

Page 1

Eee Box PC
User Manual
English
Eee Box B2 Series / EB Series
Page 2

English
E4635
First Edition V1
May 2009
Copyright © 2009 ASUSTeK COMPUTER INC. All Rights Reserved.
No part of this manual, including the products and software described in it, may
be reproduced, transmitted, transcribed, stored in a retrieval system, or translated
into any language in any form or by any means, except documentation kept by the
purchaser for backup purposes, without the express written permission of ASUSTeK
COMPUTER, INC. (“ASUS”).
Products and corporate names mentioned in this manual may or may not be
registered trademarks or copyrights of their respective companies, and are used
for identification purposes only. All trademarks are the property of their respective
owners.
Every effort has been made to ensure that the contents of this manual are correct
and up to date. However, the manufacturer makes no guarantee regarding the
accuracy of its contents, and reserves the right to make changes without prior
notice.
Page 3

Contents
Contents .......................................................................................................3
Notices .......................................................................................................... 4
Safety information ....................................................................................6
Notes for this manual ..............................................................................9
Welcome ....................................................................10
Package contents ....................................................................................10
Knowing your Eee Box PC ........................................11
Front view ..................................................................................................11
Rear view ....................................................................................................13
Using the remote control (on selected models) ..........................15
Setting up the remote control (on selected models) ................17
Positioning your Eee Box PC ....................................18
Installing the stand .................................................................................18
Installing your Eee Box PC to a monitor .........................................19
Setting up your Eee Box PC ......................................20
Connecting to a display ........................................................................20
Connecting to USB devices .................................................................20
Connecting to a network device .......................................................21
Turning on the system ..........................................................................22
English
Using your Eee Box PC ..............................................23
Configuring wireless connection ......................................................23
Configuring wired connection ...........................................................24
Using a static IP .................................................................................24
Using a dynamic IP (PPPoE connection) ..................................25
Bluetooth wireless connection (on selected models) ...............28
Configuring audio output via an HDMI device ............................30
ASUS Easy Update ..................................................................................31
Recovering your system ...........................................32
Using the recovery DVD .......................................................................32
Using the hidden partition ..................................................................33
Eee Box PC 3
Page 4

4 Eee Box PC
English
Notices
Federal Communications Commission Statement
This device complies with Part 15 of the FCC Rules. Operation is
subject to the following two conditions:
• This device may not cause harmful interference, and
• This device must accept any interference received including
interference that may cause undesired operation.
This equipment has been tested and found to comply with the limits
for a Class B digital device, pursuant to Part 15 of the FCC Rules.
These limits are designed to provide reasonable protection against
harmful interference in a residential installation. This equipment
generates, uses and can radiate radio frequency energy and, if not
installed and used in accordance with manufacturer’s instructions,
may cause harmful interference to radio communications. However,
there is no guarantee that interference will not occur in a particular
installation. If this equipment does cause harmful interference to
radio or television reception, which can be determined by turning
the equipment off and on, the user is encouraged to try to correct
the interference by one or more of the following measures:
• Reorient or relocate the receiving antenna.
• Increase the separation between the equipment and receiver.
• Connect the equipment to an outlet on a circuit different from
that to which the receiver is connected.
• Consult the dealer or an experienced radio/TV technician for
help.
The use of shielded cables for connection of the monitor to
the graphics card is required to assure compliance with FCC
regulations. Changes or modifications to this unit not expressly
approved by the party responsible for compliance could void the
user’s authority to operate this equipment.
Page 5

Eee Box PC 5
English
Canadian Department of Communications Statement
This digital apparatus does not exceed the Class B limits for
radio noise emissions from digital apparatus set out in the
Radio Interference Regulations of the Canadian Department of
Communications.
This class B digital apparatus complies with Canadian ICES-003.
Macrovision Corporation Product Notice
This product incorporates copyright protection technology that
is protected by method claims of certain U.S. patents and other
intellectual property rights owned by Macrovision Corporation and
other rights owners. Use of this copyright protection technology
must be authorized by Macrovision Corporation, and is intended
for home and other limited viewing uses only unless otherwise
authorized by Macrovision Corporation. Reverse engineering or
disassembly is prohibited.
REACH
Complying with the REACH (Registration, Evaluation, Authorization,
and Restriction of Chemicals) regulatory framework, we publish
the chemical substances in our products at ASUS REACH website at
http://green.asus.com/english/REACH.htm.
Page 6

6 Eee Box PC
English
Safety information
Your Eee Box PC is designed and tested to meet the latest standards
of safety for information technology equipment. However, to
ensure your safety, it is important that you read the following safety
instructions.
Setting up your system
• Read and follow all instructions in the documentation before you
operate your system.
• Do not use this product near water or a heated source such as a
radiator.
• Set up the system on a stable surface with the provided stand.
Never use the system alone without the stand.
• Openings on the chassis are for ventilation. Do not block or cover
these openings. Make sure you leave plenty of space around the
system for ventilation. Never insert objects of any kind into the
ventilation openings.
• Use this product in environments with ambient temperatures
between 0˚C and 35˚C.
• If you use an extension cord, make sure that the total ampere
rating of the devices plugged into the extension cord does not
exceed its ampere rating.
Care during use
• Do not walk on the power cord or allow anything to rest on it.
• Do not spill water or any other liquids on your system.
• When the system is turned off, a small amount of electrical
current still flows. Always unplug all power, modem, and network
cables from the power outlets before cleaning the system.
• If you encounter the following technical problems with the
product, unplug the power cord and contact a qualified service
technician or your retailer.
• The power cord or plug is damaged.
Page 7
Eee Box PC 7
English
• Liquid has been spilled into the system.
• The system does not function properly even if you follow
the operating instructions.
• The system was dropped or the cabinet is damaged.
• The system performance changes.
Lithium-Ion Battery Warning
CAUTION: Danger of explosion if battery is incorrectly
replaced. Replace only with the same or equivalent type
recommended by the manufacturer. Dispose of used batteries
according to the manufacturer’s instructions.
LASER PRODUCT WARNING
CLASS 1 LASER PRODUCT
NO DISASSEMBLY
The warranty does not apply to the products that
have been disassembled by users
DO NOT throw the Eee Box PC in municipal waste. This product has
been designed to enable proper reuse of parts and recycling. This
symbol of the crossed out wheeled bin indicates that the product
(electrical, electronic equipment, and mercury-containing button
cell battery) should not be placed in municipal waste. Check local
technical support services for product recycling.
DO NOT throw the battery in municipal waste. This symbol of the
crossed out wheeled bin indicates that the battery should not be
placed in municipal waste. Check local technical support services
for battery replacement.
Page 8

8 Eee Box PC
English
European Union Eco-label
This Eee Box PC has been awarded the EU Flower label, which means
that this product has the following characteristics:
1. Decreased energy consumption during use and stand-by
modes.
2. Limited use of toxic heavy metals.
3. Limited use of substances harmful to the environment and
health.
4. Reduction of the use of natural resources by encouraging
recycling.
5. Extended product lifetime through the availability of spare
parts.
6. Reduced solid waste through takeback policy.
For more information on the EU Flower label, please visit the
European Union Eco-label website at http://europa.eu.int/ecolabel.
Takeback and Recycling
Old computers, notebook computers, and other electronic equipment
contain hazardous chemicals that are harmful to the environment
when disposed in a landfill with trash. By recycling the metals, plastics,
and components found in an old computer will be broken down and
reused to make new products. And, the environment is protected from
any uncontrolled release of harmful chemicals.
ASUS works with recycling vendors with the highest standards for
protecting our environment, ensuring worker safety, and complying
with global environmental laws. Our commitment to recycling our
old equipment grows out of our work to protect the environment in
many ways.
For further information about ASUS product recycling and contacts,
please visit GreenASUS Takeback and Recycling page (http://green.
asus.com/english/takeback.htm)
Page 9
Eee Box PC 9
English
Notes for this manual
To make sure that you perform certain tasks properly, take note of
the following symbols used throughout this manual.
WARNING: Vital information that you MUST follow to prevent
injury to yourself.
IMPORTANT: Instructions that you MUST follow to complete a
task.
TIP: Tips and useful information that help you complete a task.
NOTE: Additional information for special situations.
Page 10
10 Eee Box PC
English
Welcome
User Manual
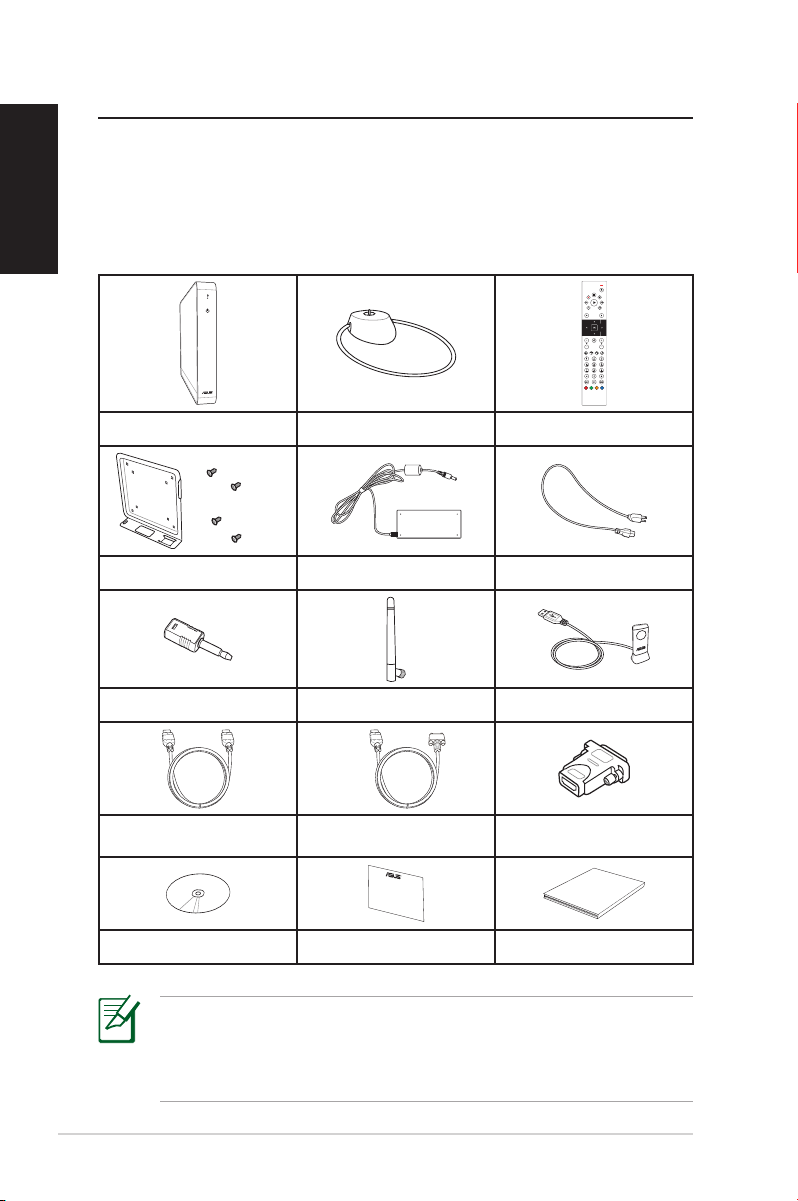
Congratulations on your purchase of the Eee Box PC. The following
illustration displays the package contents of your new Eee Box PC. If
any of the below items is damaged or missing, contact your retailer.
Package contents
Eee Box PC Stand Remote control (optional)
VESA mount and Screw pack AC adapter Power cord
Mini jack to S/PDIF adapter Wireless antenna IR receiver (optional)
HDMI cable (optional)
Recovery/Support DVD(s) Warranty card User manual
HDMI to DVI cable
(optional)
HDMI-DVI adapter
(optional)
If the device or its components fail or malfunction during normal
and proper use within the warranty period, bring the warranty
card to the ASUS Service Center for replacement of the defective
components.
Page 11
Eee Box PC 11
English
Knowing your Eee Box PC
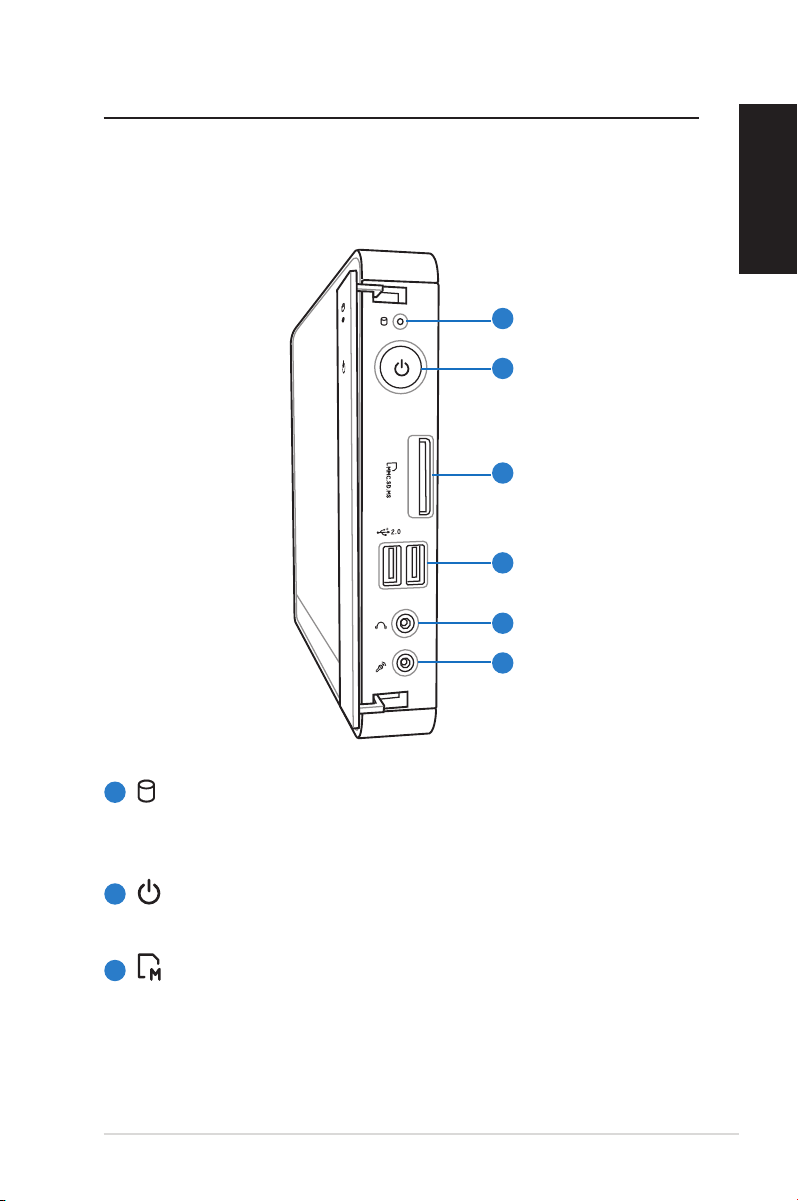
Front view
Refer to the diagram below to identify the components on this side
of the system.
1
2
3
4
5
6
1
Hard disk LED
The hard disk LED blinks when data is being written into or
read from the hard disk drive.
2
Power switch
The power switch allows powering ON and OFF the system.
3
Memory card slot
The built-in memory card reader reads MMC/SD/SDHC/
MS/MS Pro cards used in devices like digital cameras, MP3
players, mobile phones, and PDAs.
Page 12

12 Eee Box PC
English
4
USB port
The USB (Universal Serial Bus) port is compatible with
USB devices such as keyboards, mouse devices, cameras,
and hard disk drives. USB allows many devices to run
simultaneously on a single computer, with some peripheral
acting as additional plug-in sites or hubs.
5
Headphone/Audio Out jack
The stereo headphone jack (3.5mm) is used to connect
the system’s audio out signal to amplified speakers or
headphones.
6
Microphone jack
The microphone jack is designed to connect the
microphone used for video conferencing, voice narrations,
or simple audio recordings.
Page 13
Eee Box PC 13
English
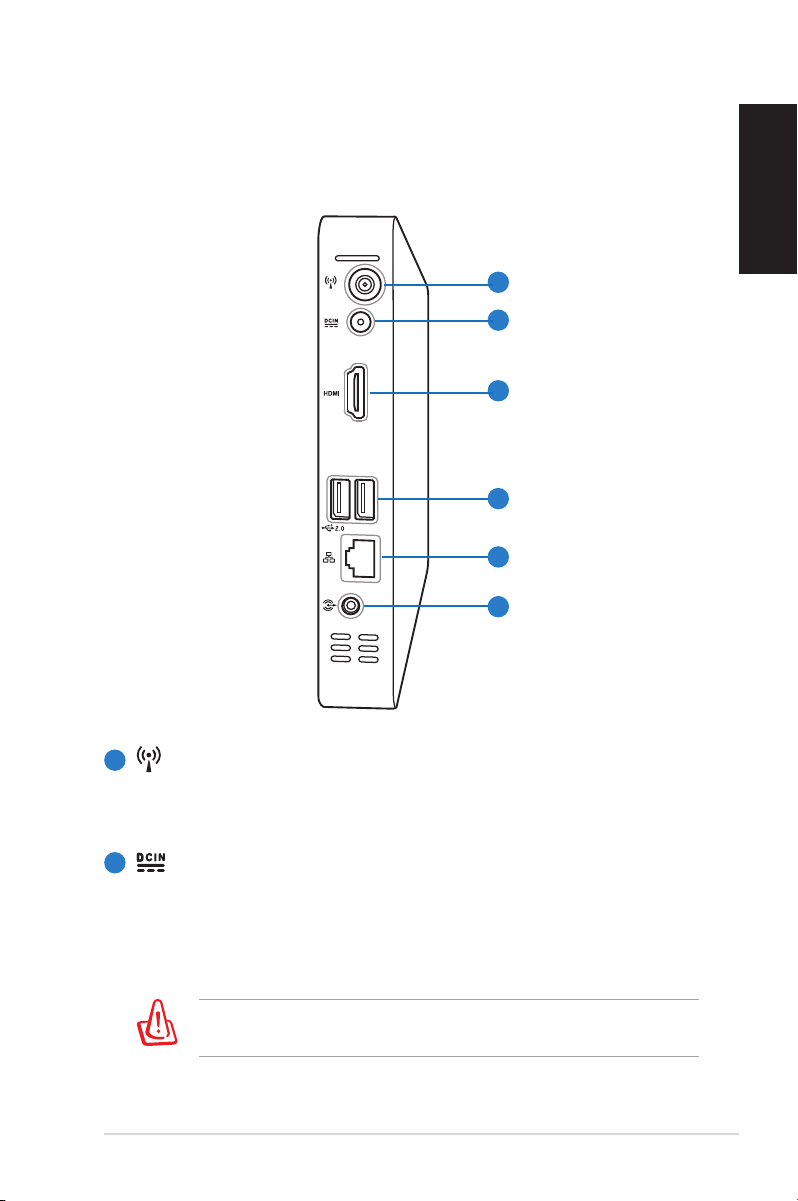
Rear view
Refer to the diagram below to identify the components on this side
of the system.
1
2
3
4
5
6
1
Wireless antenna jack
The jack is used to connect the supplied wireless antenna to
enhance wireless signal reception.
2
Power input (DC 12V)
The supplied power adapter converts AC power to DC
power for use with this jack. Power supplied through this
jack supplies power to the PC. To prevent damage to the PC,
always use the supplied power adapter.
The power adapter may become warm to hot when in use. Do
not cover the adapter and keep it away from your body.
Page 14
14 Eee Box PC
English
3
HDMI port
The HDMI (High Definition Multimedia Interface) port
supports a Full-HD device such as an LCD TV or monitor to
allow viewing on a larger external display.
4
USB port
The USB (Universal Serial Bus) port is compatible with
USB devices such as keyboards, mouse devices, cameras,
and hard disk drives. USB allows many devices to run
simultaneously on a single computer, with some peripheral
acting as additional plug-in sites or hubs.
5
LAN port
The eight-pin RJ-45 LAN port supports a standard Ethernet
cable for connection to a local network.
6
Audio Out (S/PDIF Out) jack
Plug an 3.5mm mini-jack audio cable into this jack for
analog or digital audio transfer.
For S/PDIF Out function, use the supplied mini jack
to S/PDIF adapter to connect to your amplifier.
Page 15
Eee Box PC 15
English
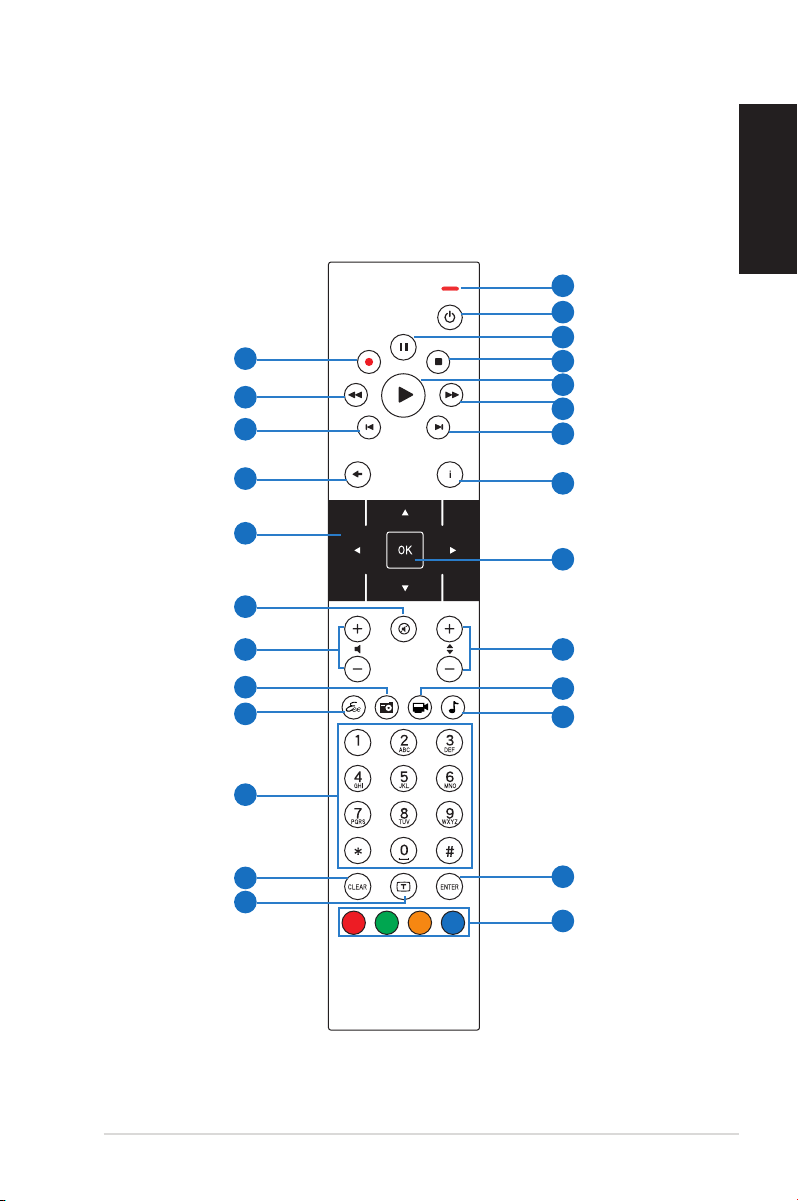
Using the remote control (on selected
models)
Use the remote to launch the Eee Cinema program to play media
files. Refer to the next page to familiarize yourself with the functions
of the remote control buttons.
1
2
3
26
25
24
4
5
6
7
23
22
21
20
19
18
17
16
15
8
9
10
11
12
13
14
Page 16
16 Eee Box PC
English
1
LED indicator: Lights up red when you press a button.
2
Power: Press to toggle between on and standby mode.
3
Pause: Press to pause a playback.
4
Stop: Press to stop playing a media file.
5
Play: Press to play a media file.
6
Fast-foward: Press to fast-forward a media file.
7
Next track: Press to go to the next track.
8
Information: Press to display program information under Eee
Cinema or other menu options.
9
OK: Press to confirm an action.
10
Channel up/down: Press to change TV channels.*
11
Video: Press to launch the Videos menu in Eee Cinema.
12
Music: Press to launch the Music menu in Eee Cinema.
13
Enter: Press to confirm a selection.
14
Color buttons: Press to access menu options in Eee Cinema or
in Teletext mode. (The button functions may vary with areas.)
15
Teletext on/off: Press to turn on/off Teletext mode. (This
function is available in certain areas only.)
16
Clear: Press to clear input information.
17
Numeric buttons: Press to enter numbers or select a channel.*
18
Eee Cinema: Press to launch Eee Cinema.
19
Photos: Press to launch the Photos menu in Eee Cinema.
20
Volume up/down: Press to increase/decrease volume.
21
Mute: Press to disable audio output.
22
Four-way navigation buttons: Press to scroll through menu
options.
23
Return: Press to return to the previous page.
Page 17
Eee Box PC 17
English
24
Previous track: Press to go back to the previous track.
25
Rewind: Press to rewind a media file.
26
Record: Press to start recording TV.*
*The TV function is available in certain areas only.
Setting up the remote control (on
selected models)
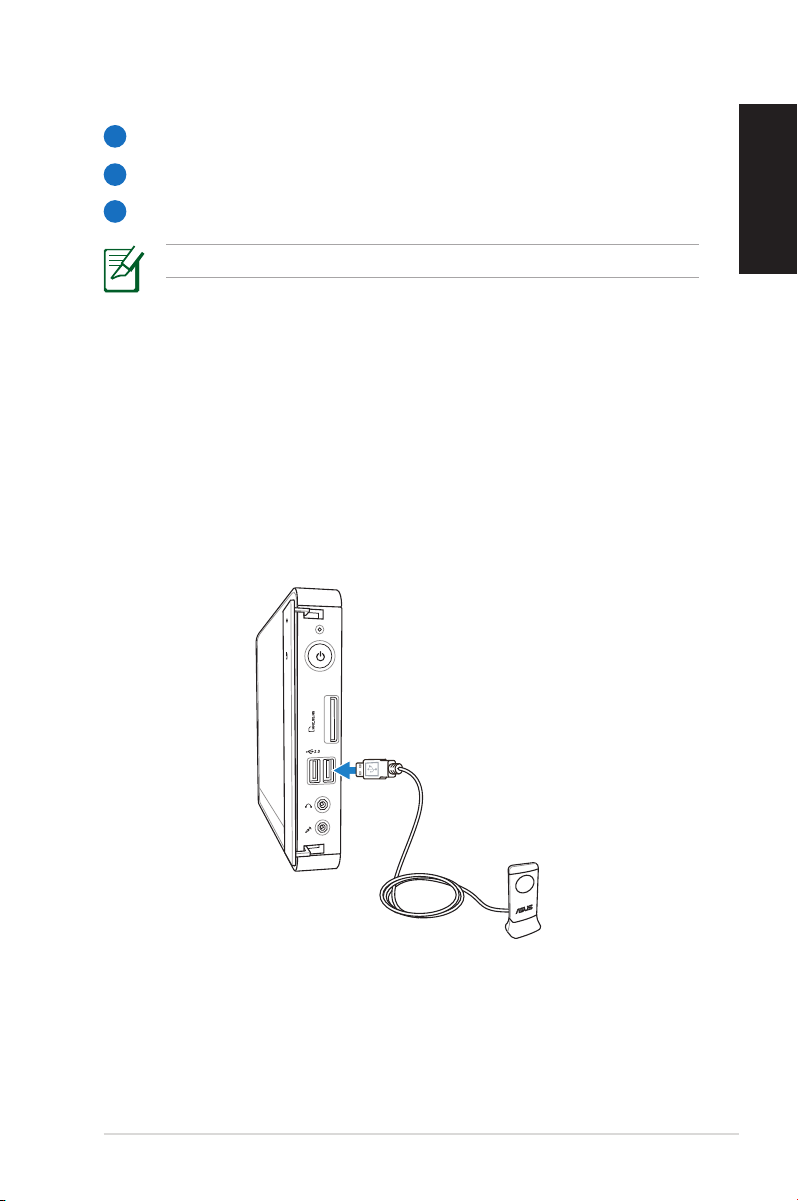
1. Plug the IR receiver into any of the USB ports on your Eee Box
PC.
2. Place the IR receiver on a stable surface.
3. Aim the remote control at the receiver when using the remote.
Page 18
18 Eee Box PC
English
Positioning your Eee Box PC
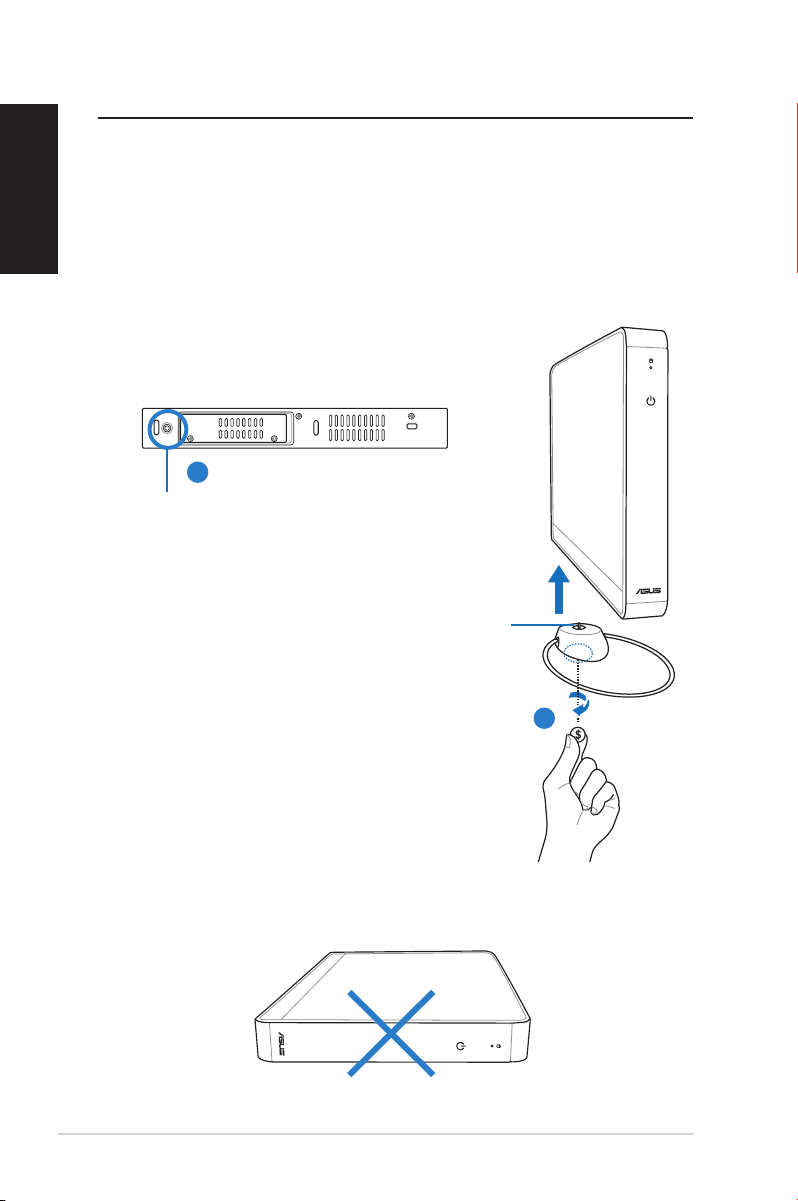
Installing the stand
Erect your Eee Box PC with the supplied stand. To do so:
1. Locate the screw hole on the bottom of the Eee Box PC.
2. Align the stand screw to the PC screw hole, and then secure the
stand to the PC with a coin.
Eee Box PC bottom view
1
Screw hole
Stand screw
2
Do not place your Eee Box PC on the desktop without the stand.
Page 19
Eee Box PC 19
English
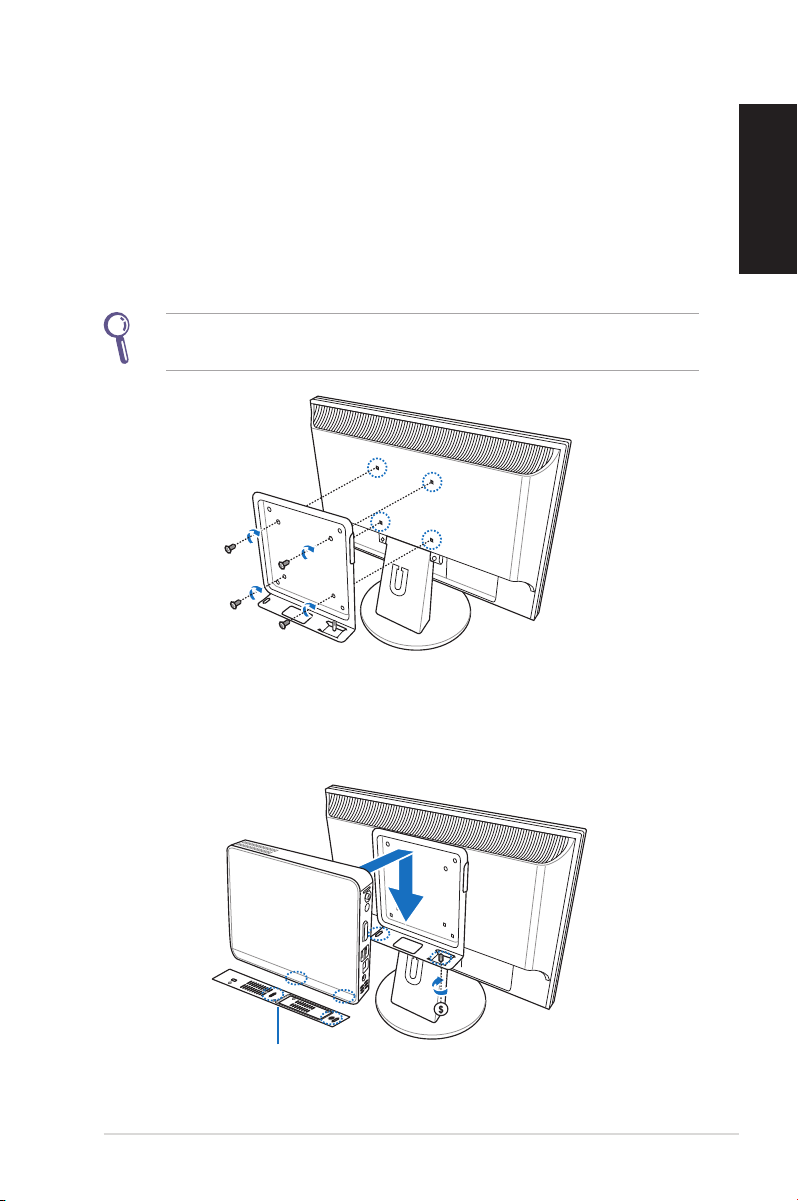
Installing your Eee Box PC to a
monitor
You can also install your Eee Box PC to the back of a monitor. To do
so:
1. Secure the VESA mount to your monitor with four screws (HNM/
M4 x 8).
To fasten the VESA mount, your monitor must comply with VESA75
or VESA100 standard.
2. Place your Eee Box PC on the VESA mount noting the correct
alignment, and then secure the PC to the VESA mount with a
coin.
Eee Box PC bottom view
Page 20
20 Eee Box PC
English
Setting up your Eee Box PC
You need to connect peripherals before using your Eee Box PC.
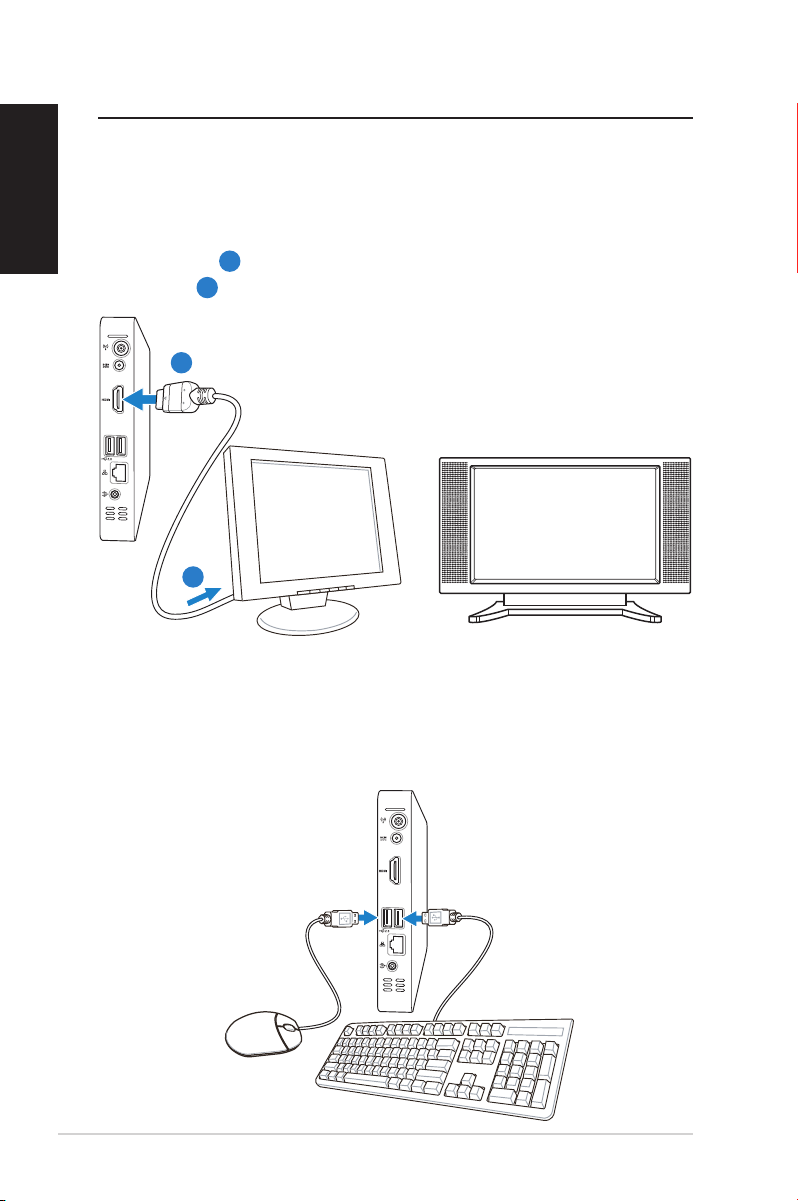
Connecting to a display
Connect one end of the supplied HDMI/DVI cable to an LCD TV or an
LCD monitor (1) and the other end to the HDMI port on the system
rear panel (2).
2
LCD monitor LCD TV
–or–
1
Connecting to USB devices
Connect USB devices like wired/wireless keyboards (varying with
areas), mouse devices, and printers to the USB ports on the system
rear panel.
Page 21
Eee Box PC 21
English
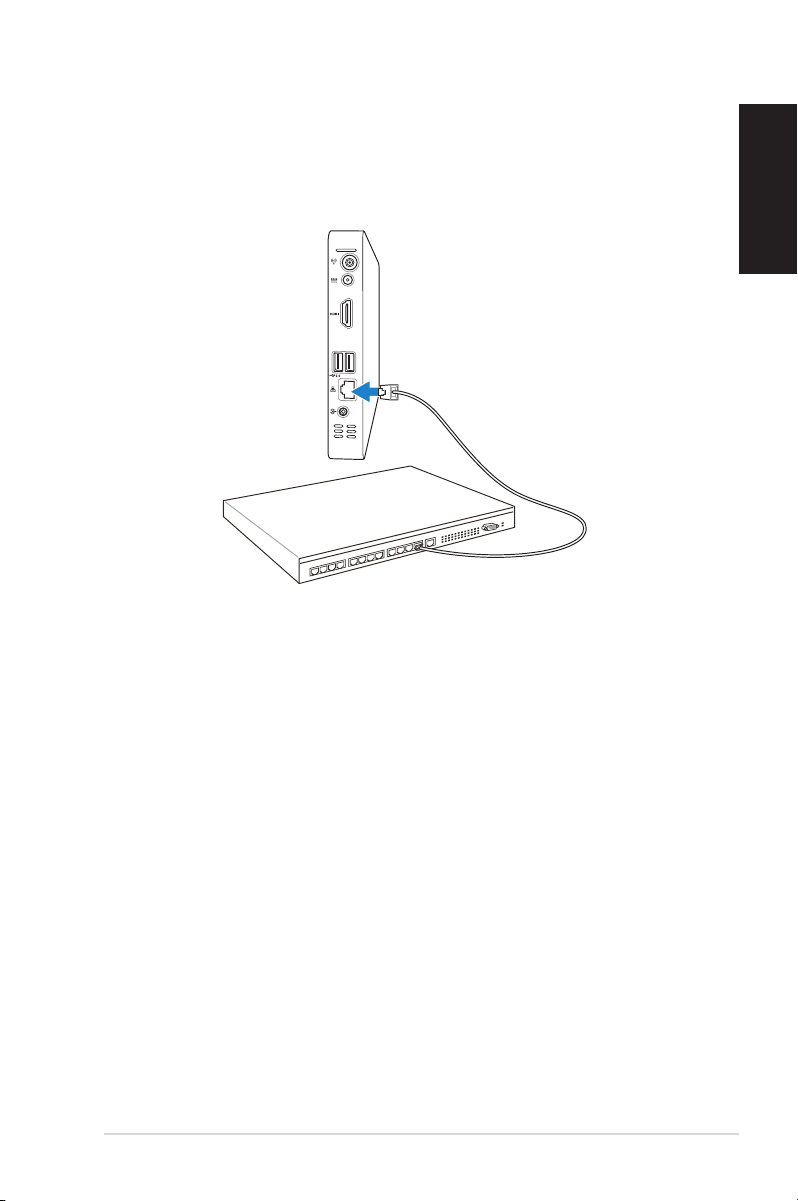
Connecting to a network device
Connect one end of a network cable to the LAN port on the system
rear panel and the other end to a hub or switch.
Network cable with RJ-45 connectors
Network hub or switch
Page 22
22 Eee Box PC
English
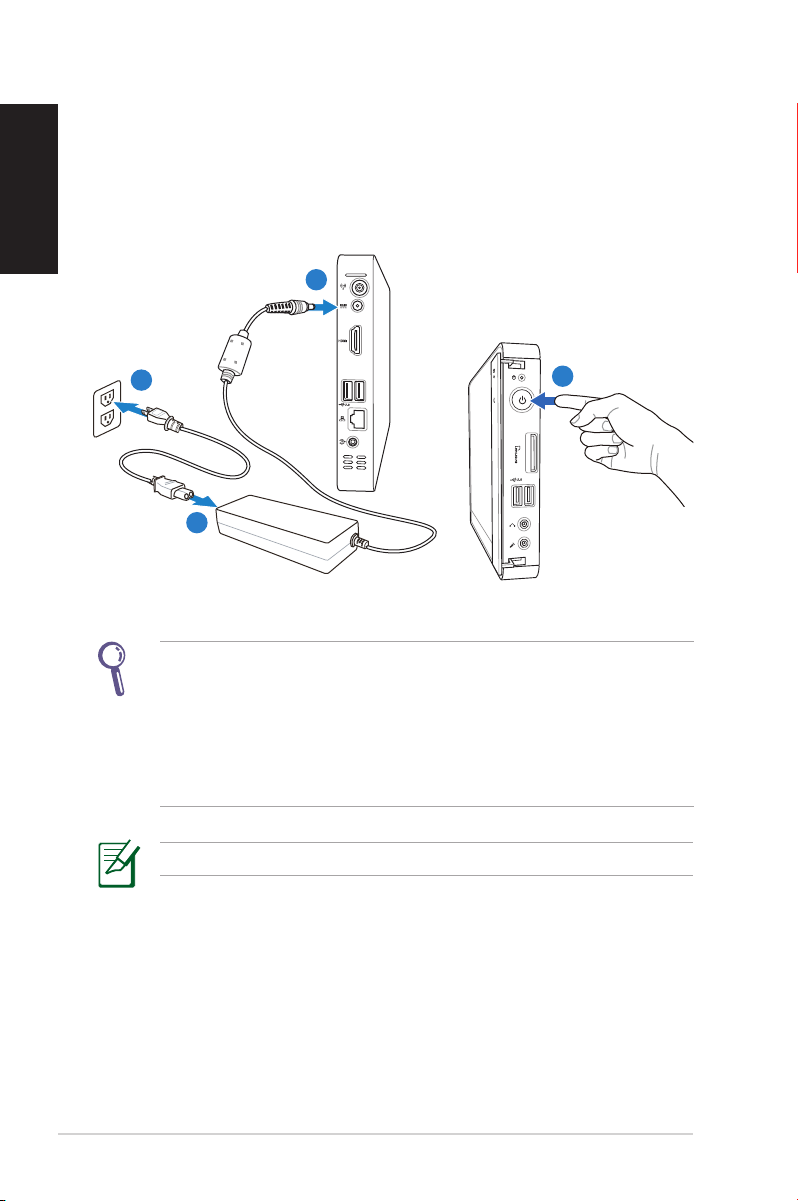
Turning on the system
Connect the supplied AC adapter to the DC IN jack on the system
rear panel, and then press the power switch on the front panel to
turn on the system.
3
2
1
• When your Eee Box PC is not in use, unplug the power adapter
or switch off the AC outlet to save on power consumption.
• Adjust the power management settings in the Window®
Control Panel. This is to ensure that your Eee Box PC is set to a
low power consumption mode and is fully operational at the
same time.
To enter the BIOS setup, press <F2> repeatedly during bootup.
4
Page 23

Eee Box PC 23
English
Using your Eee Box PC
Conguring wireless connection
To connect to a wireless network, follow the instructions below:
Connect the supplied wireless antenna to your Eee Box PC to
enhance wireless signal reception.
For security concerns, DO NOT connect to an unsecured network.
Otherwise, the transmitted information without encryption might
be visible to others.
The screenshots shown in this section are for Windows® XP
operating system.
1. Double-click the crossed wireless network icon on the
notification area.
2. Select the wireless network
you want to connect to from
the list and click Connect.
Enter the network security
key if necessary.
3. After connection was
established, you will see
Connected.
Page 24
24 Eee Box PC
English
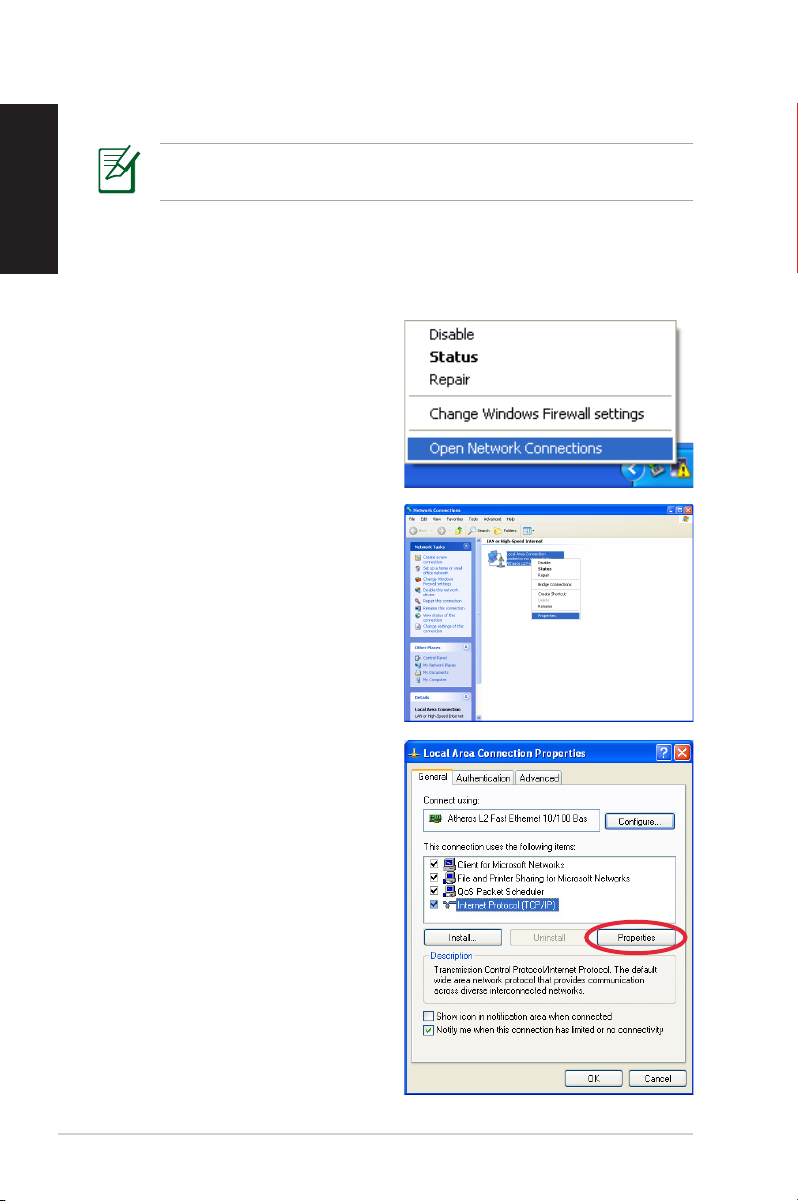
Conguring wired connection
The screenshots shown in this section are for Windows® XP
operating system.
To establish a wired network, follow the instructions below:
Using a static IP
1. Right-click the network icon
on the notification area
and select Open Network
Connections.
2. Right-click Local Area
Connection and select
Properties.
3. Hightlight Internet
Protocol (TCP/IP) and click
Properties.
Page 25
Eee Box PC 25
English
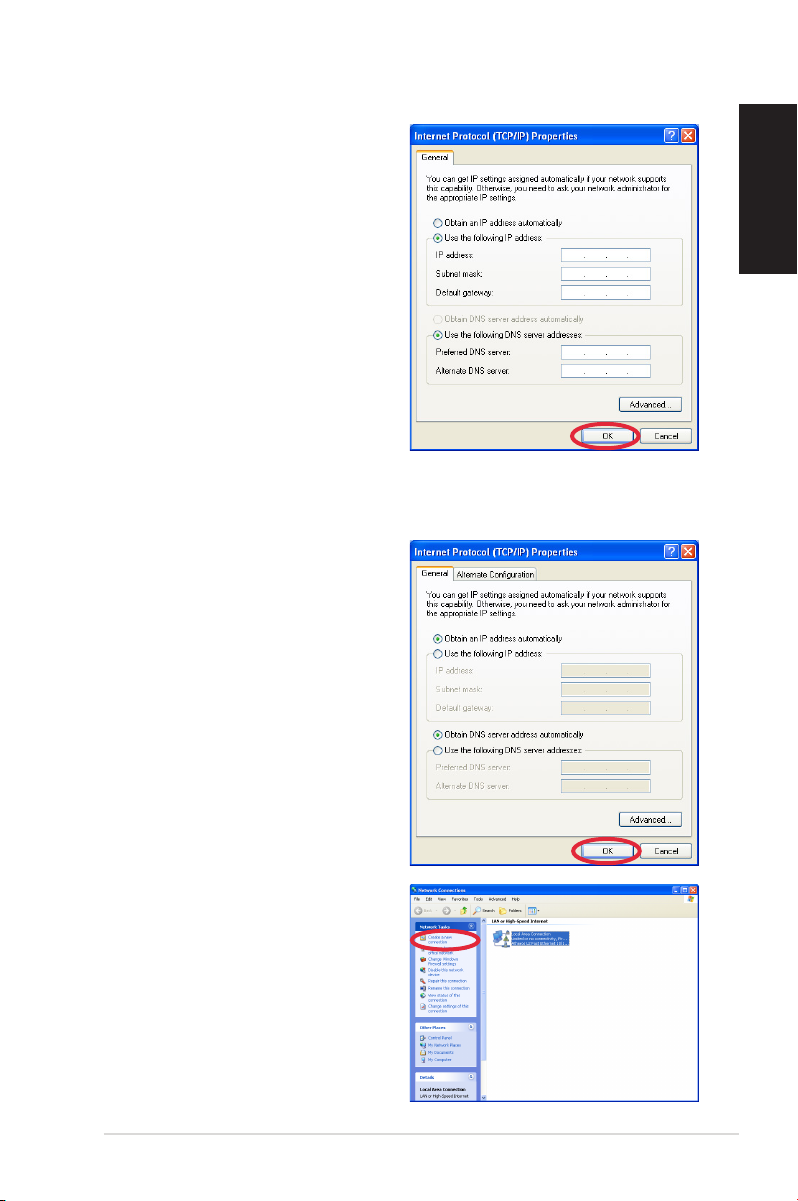
4. Select Use the following IP
address.
5. Enter your IP address,
Subnet mask and Default
gateway.
6. If needed, enter the
Preferred DNS server
address.
7. After entering all of the
related values, click OK to
finish the configuration.
Using a dynamic IP (PPPoE connection)
1. Repeat Step 1–3 in the
previous section.
2 Select Obtain an IP address
automatically and click OK.
3. Click Create a new
connection to start the New
Connection Wizard.
Page 26
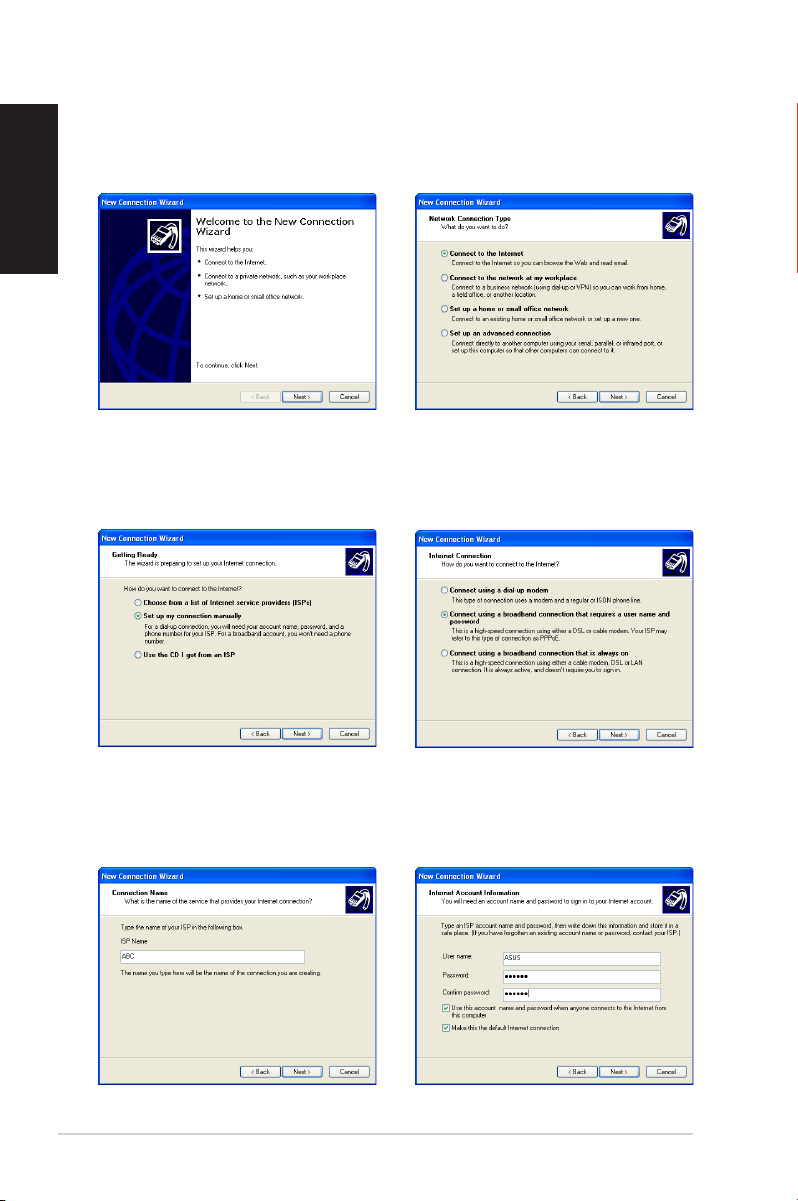
26 Eee Box PC
English
4. Click Next. 5. Select Connect to the
Internet and click Next.
6. Select Set up my
connection manually.
8. Enter your ISP Name and
click Next.
7. Select your connection
type and click Next.
9. Enter your User name and
Password. Click Next.
Page 27
Eee Box PC 27
English
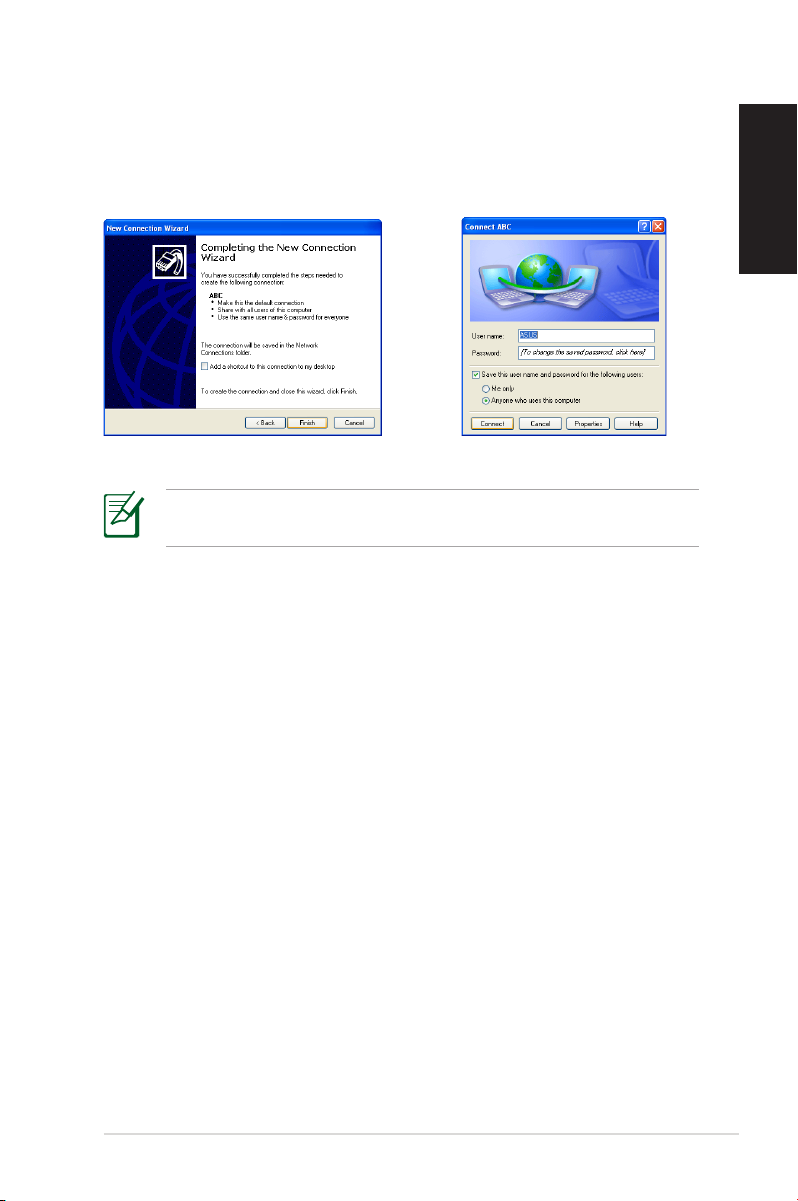
10. Click Finish to finish the
configuration.
Contact your Internet Service Provider (ISP) if you have problems
connecting to the network.
11. Enter your user name and
password. Click Connect to
connect to the Internet.
Page 28
28 Eee Box PC
English
Bluetooth wireless connection (on
selected models)
Follow the instructions below to build Bluetooth wireless
connection.
The screenshots shown in this section are for Windows® XP
operating system.
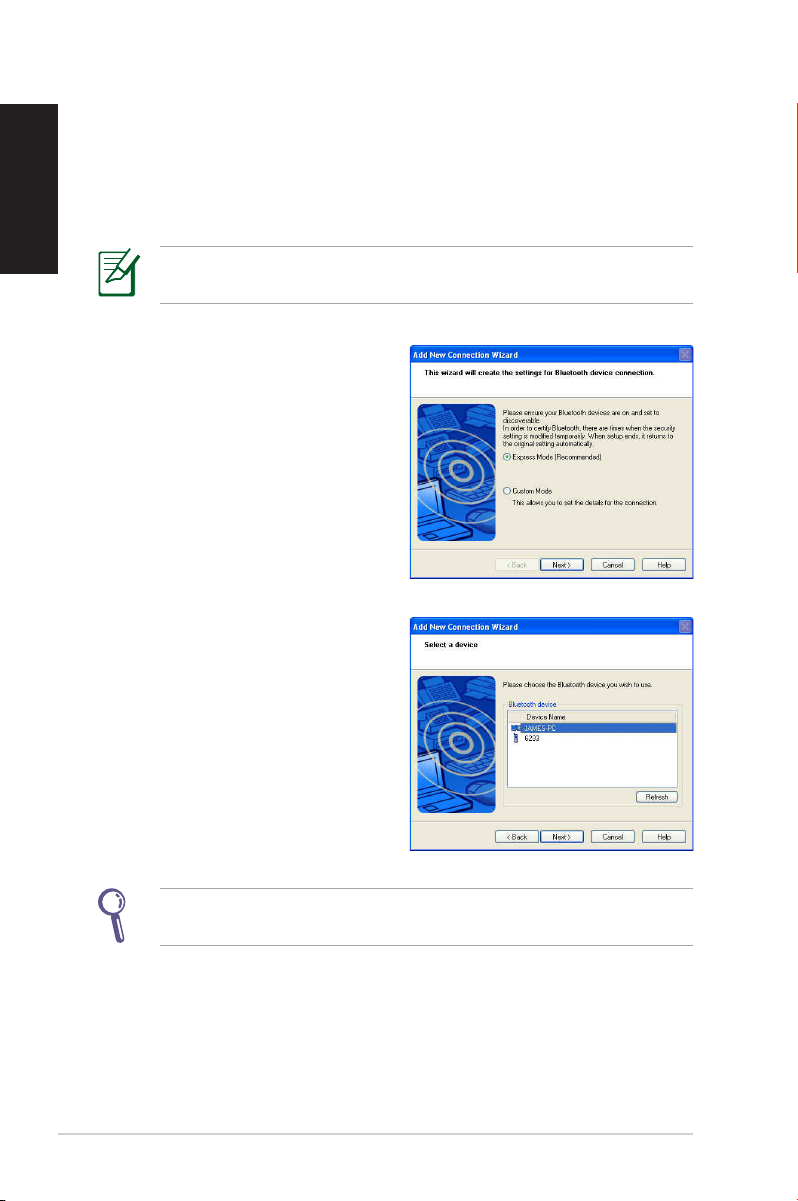
1. Double-click the Bluetooth
icon on the Windows®
notification area to start the
connection wizard.
2. Select the Bluetooth device
you want to connect to from
the list and click Next to
continue.
If you do not see the device you want to connect on the Bluetooth
device list, click Refresh to search for the Bluetooth devices again.
Page 29
Eee Box PC 29
English
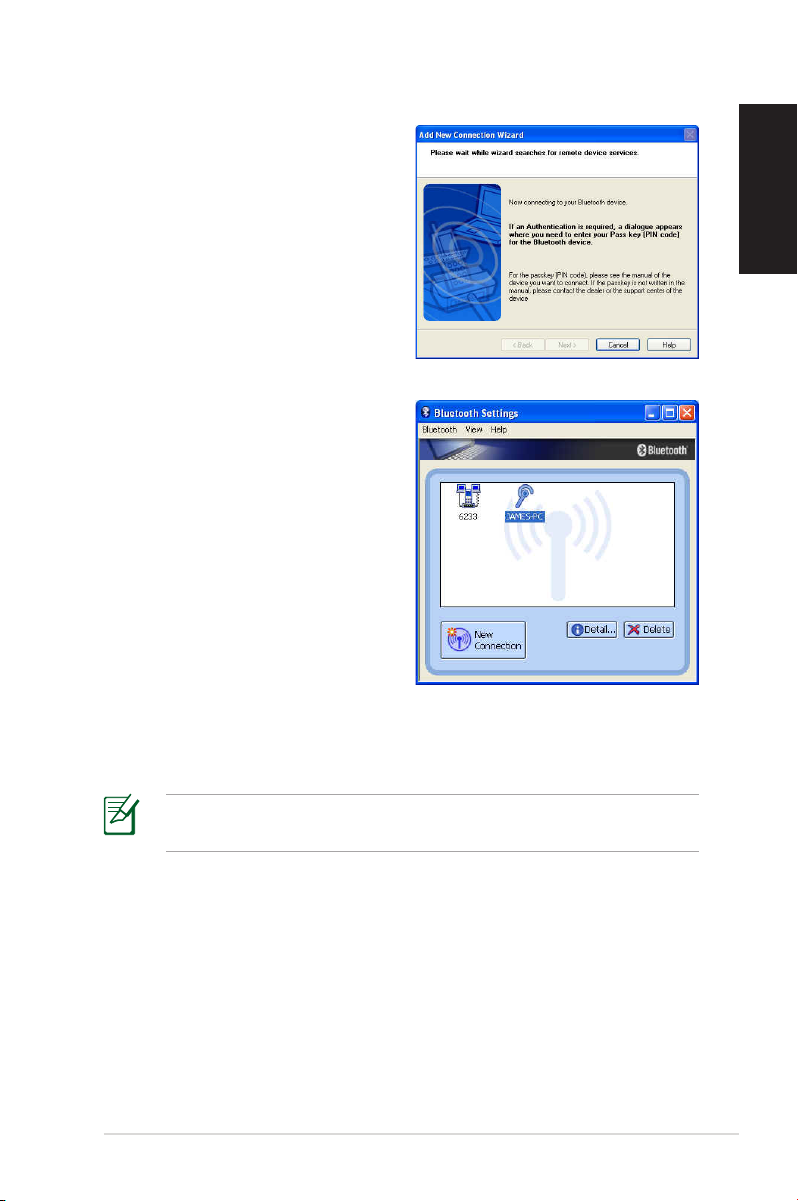
3. You may need to enter
the password if the device
requires authentication.
4. The device you connect to
will be shown after the setup
completes
5. Click the New Connection button and follow the previous
instructions to add more Bluetooth devices.
Your Eee Box PC can connect multiple devices at a time via
Bluetooth.
Page 30
30 Eee Box PC
English
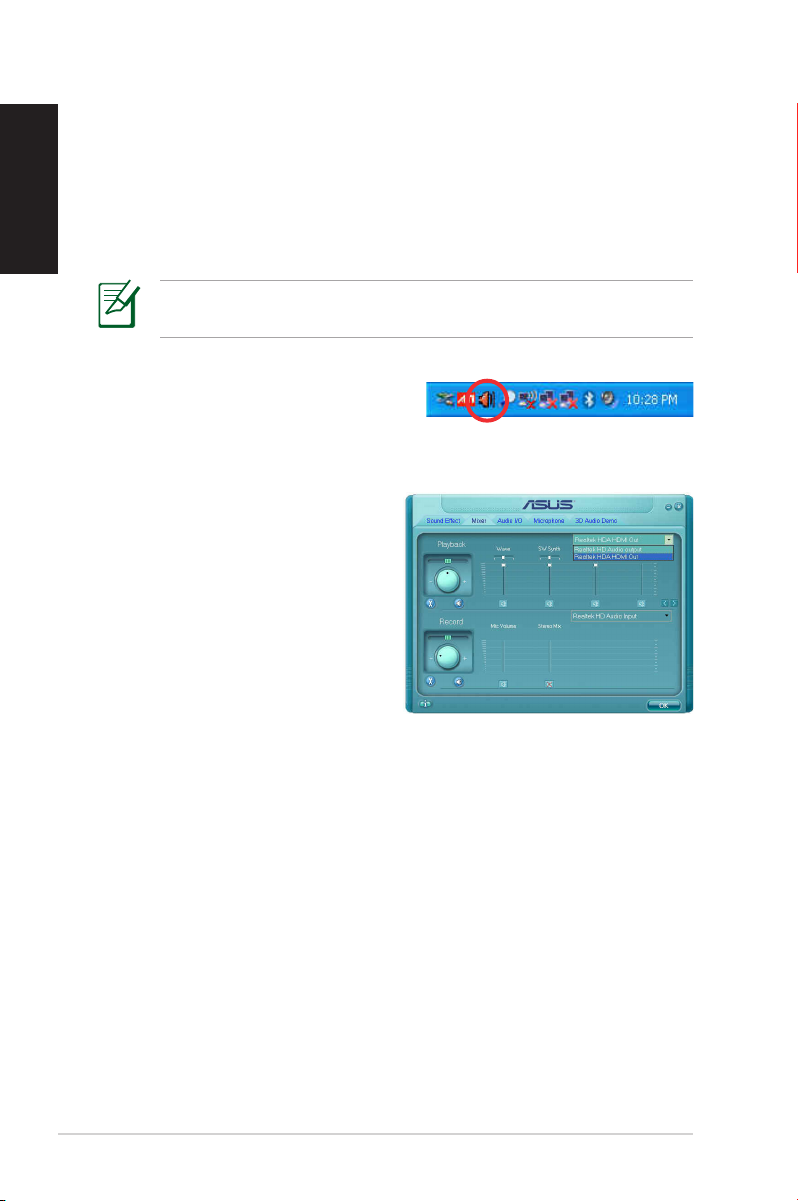
Conguring audio output via an HDMI
device
If you use your TV with an HDMI connector as an audio output
device, connect it to the Home Theater PC and follow the steps
below to configure audio settings:
The screenshots shown in this section are for Windows® XP
operating system.
1. Double-click the audio icon on
the Windows® notification area.
2. Under the Mixer window,
select Realtek HDA HDMI
Out.
3. Click OK to exit the setup.
Page 31

Eee Box PC 31
English
ASUS Easy Update
ASUS Easy Update is a software tool that automatically detects and
downloads the latest BIOS, drivers, and applications for your
Eee Box PC.
1. From the Windows® notification
area, right-click the ASUS Easy
Update icon.
2. Select Schedule to set how
often you want to update your
system.
3. Select Update to activate the
update.
4. Click OK to display the items
you can download.
5. Check the item(s) you want to
download, and then click OK.
Page 32

32 Eee Box PC
English
Recovering your system
Using the recovery DVD
The recovery DVD includes an image of the operating system
installed on your system at the factory. The recovery DVD provides a
comprehensive recovery solution that quickly restores your system
to its original working state, provided that your hard disk drive is in
good working order. Before using the recovery DVD, copy your data
files (such as Outlook PST files) to a USB device or to a network drive
and make note of any customized configuration settings (such as
network settings).
You must connect an external USB DVD-ROM to your computer
before inserting the recovery DVD.
1. Turn on your computer and press <F8> to enter the Please
select boot device menu.
2. Insert the recovery DVD into the optical drive and select
the optical drive (“DVDROM: XXX”) as the boot device. Press
<Enter> and then press any key to continue.
3. The ASUS Recovery DVD window appears. Select where to
install a new system (min. 20GB space is required). Options are:
Recover system to a partition
This option will recover only the partition you select from below,
allowing you to keep the other partitions. Select a partition and
click NEXT.
Recover system to entire HD
This option will delete all partitions from your hard disk drive
and restore factory settings. Select and click Yes.
4. Follow the on-screen instructions to complete the recovery
process.
You will lose all your data during the system recovery. Make sure
that you make a backup of it before recovering the system.
Page 33

Eee Box PC 33
English
5. After the system recovery is completed, restart the computer.
6. Set up your language, time zone, keyboard, computer name, and
user name to enter the Windows® OS.
This recovery DVD is for Eee Box PC only. DO NOT use it on other
computers. Visit the ASUS website www.asus.com for any updates.
Using the hidden partition
The recovery partition includes an image of the operating system,
drivers, and utilities installed on your system at the factory. The
recovery partition provides a comprehensive recovery solution that
quickly restores your system’s software to its original working state,
provided that your hard disk drive is in good working order. Before
using the recovery partition, copy your data files (such as Outlook
PST files) to a USB device or to a network drive and make note of any
customized configuration settings (such as network settings).
DO NOT delete the partition named “RECOVERY.” The recovery
partition is created at the factory and cannot be restored by the
user if deleted. Take your system to an authorized ASUS service
center if you have problems with the recovery process.
1. Press <F9> during bootup (requires a recovery partition).
2. The ASUS Recovery System window appears. Select Recover
system to a partition.
3. Select a partition with min. 20GB space and click Next.
4. Follow the on-screen instructions to complete the recovery
process.
5. Restart the computer after the system recovery is completed.
6. Set up your language, time zone, keyboard, computer name, and
user name to enter the Windows® OS.
Page 34

English
34 Eee Box PC
Page 35

Eee Box PC
Manuel d’utilisation
Français
Eee Box Séries B2 et EB
Page 36

Français
F4635
Première édition V1
Avril 2009
Copyright © 2009 ASUSTeK COMPUTER INC. Tous droits réservés.
Aucun extrait de ce manuel, incluant les produits et logiciels qui y sont décrits, ne
peut être reproduit, transmis, transcrit, stocké dans un système de restitution, ou
traduit dans quelque langue que ce soit sous quelque forme ou quelque moyen
que ce soit, à l’exception de la documentation conservée par l’acheteur dans un
but de sauvegarde, sans la permission écrite expresse de ASUSTeK COMPUTER, INC.
(“ASUS”).
Les produits et noms de sociétés qui apparaissent dans ce manuel ne sont utilisés
que dans un but d’identification ou d’explication dans l’intérêt du propriétaire, sans
intention de contrefaçon. Toutes les marques mentionnées dans ce manuel sont la
propriété de leur propriétaires respectifs.
Des efforts particuliers ont été faits pour garantir que le contenu de ce manuel soit
correct et à jour. Cependant, le fabricant n’offre aucune garantie sur l’exactitude
de son contenu et se réserve le droit d’effectuer tout changement, et ce, à tout
moment et sans avertissement.
Page 37

Table des matières
Table des matières .................................................................................... 3
Notes ............................................................................................................. 4
Consignes de sécurité .............................................................................6
Notes pour ce manuel .............................................................................9
Bienvenue .................................................................10
Contenu de la boîte ...............................................................................10
Faire connaissance avec votre Eee Box PC ..............11
Vue avant ...................................................................................................11
Vue arrière .................................................................................................13
Utiliser la télécommande (sur une sélection de modèles) ......15
Configurer la télécommande (sur une sélection de modèles) 17
Positionner votre Eee Box PC...................................18
Installer le socle .......................................................................................18
Installer votre Eee Box PC sur un moniteur ...................................19
Configurer votre Eee Box PC ....................................20
Connexion d'un écran ...........................................................................20
Connexion de périphériques USB .....................................................20
Connexion réseau ...................................................................................21
Allumer le système .................................................................................22
Français
Utiliser votre Eee Box PC ..........................................23
Configurer une connexion sans fil ....................................................23
Configurer une connexion filaire ......................................................24
Utiliser une IP statique ...................................................................24
Utiliser une IP dynamique (connexion PPPoE) ......................25
Connexion Bluetooth (sur une sélection de modèles) .............28
Configuration audio via un périphérique HDMI ..........................30
ASUS Easy Update ..................................................................................31
Restaurer le système ................................................32
Utiliser le DVD de restauration ...........................................................32
Utiliser la partition cachée ...................................................................33
Eee Box PC 3
Page 38

4 Eee Box PC
Français
Notes
Rapport de la Commission Fédérale des Communications
Ce dispositif est conforme à l’alinéa 15 des règles établies par la FCC.
L'opération est sujette aux 2 conditions suivantes:
• Ce dispositif ne peut causer d'interférence nuisible, et
• Ce dispositif se doit d'accepter toute interférence reçue, incluant
toute interférence pouvant causer des résultats indésirés.
Cet équipement a été testé et s'est avéré être conforme aux limites
établies pour un dispositif numérique de classe B, conformément
à l'alinéa 15 des règles de la FCC. Ces limites sont conçues pour
assurer une protection raisonnable contre l’interférence nuisible
à une installation réseau. Cet équipement génère, utilise et peut
irradier de l'énergie à fréquence radio et, si non installé et utilisé
selon les instructions du fabricant, peut causer une interférence
nocive aux communications radio. Cependant, il n'est pas exclu
qu'une interférence se produise lors d'une installation particulière.
Si cet équipement cause une interférence nuisible au signal radio ou
télévisé, ce qui peut-être déterminé par l'arrêt puis le réamorçage de
celui-ci, l'utilisateur est encouragé à essayer de corriger l'interférence
en s'aidant d'une ou plusieurs des mesures suivantes:
• Réorientez ou replacez l'antenne de réception.
• Augmentez l'espace de séparation entre l'équipement et le
récepteur.
• Reliez l’équipement à une sortie sur un circuit différent de celui
auquel le récepteur est relié.
• Consultez le revendeur ou un technicien expérimenté radio/TV
pour de l’aide.
L’utilisation de câbles protégés pour le raccordement du moniteur
à la carte de graphique est exigée pour assurer la conformité
aux règlements de la FCC. Les changements ou les modifications
apportés à cette unité n'étant pas expressément approuvés par la
partie responsable de la conformité pourraient annuler l’autorité de
l’utilisateur à manipuler cet équipement.
Page 39

Eee Box PC 5
Français
Rapport du Département Canadien des Communications
Cet appareil numérique ne dépasse pas les limites de classe B en
terme d'émissions de nuisances sonore, par radio, par des appareils
numériques, et ce conformément aux régulations d’interférence par
radio établies par le département canadien des communications.
(Cet appareil numérique de la classe B est conforme à la norme ICES003 du Canada.)
Note relative aux produits de Macrovision Corporation
Ce produit comprend une technologie de protection de copyright
protégée par certains brevets déposés aux U.S.A. et autres droits de
propriété intellectuelle appartenant à Macrovision Corporation et
autres détenteurs de droits. L’usage de cette technologie doit être
autorisé par Macrovision Corporation, et n’est destiné qu’à un usage
familial ou autres usages limités de même sorte à moins d’une
autorisation par Macrovision Corporation. Rétro-ingénierie et
démontage sont interdits.
REACH
Conforme avec le Règlement REACH (Enregistrement, Évaluation,
Autorisation et Restriction des produits chimiques), nous avons
publié la liste des substances chimiques utilisées dans nos produits
sur le site Web ASUS REACH à l’adresse http://green.asus.com/
english/REACH.htm.
Page 40

6 Eee Box PC
Français
Consignes de sécurité
Votre Eee Box PC a été conçu et testé pour satisfaire aux standards
de sécurité les plus récents en matière d’équipements informatiques.
Toutefois, afin de garantir une utilisation sans risque de ce produit,
il est important que vous respectiez les consignes de sécurité
présentées dans ce manuel.
Configurer votre système
• Avant d’utiliser votre système, lisez et suivez les instructions de la
documentation.
• N’utilisez pas ce produit à proximité de liquides ou d’une source
de chaleur, tel qu’un radiateur.
• Positionnez le système sur une surface stable à l’aide du socle.
N’utilisez pas le système sans son socle.
• Les ouvertures situées sur le boîtier de l’ordinateur sont destinées
à la ventilation. Veillez à ne pas les bloquer ou les recouvrir.
N’insérez jamais d’objet dans les ouvertures de ventilation.
• Utilisez ce produit dans un environnement avec une température
ambiante comprise entre 0˚C et 35˚C.
• Sivous utilisez une rallonge,vérifiez quelasomme desintensitésSi vous utilisez une rallonge,vérifiez quelasomme desintensités, vérifiezque la somme des intensitésvérifiez que la somme des intensités
nominales des équipements connectés à la rallonge ne dépasse pas
celle supportée par cette dernière.
Précautions à suivre lors de l’utilisation
• Ne pas marcher sur le cordon d’alimentation, et ne rien poser
dessus.
• Ne pas renverser d’eau ou tout autre liquide sur votre système.
• Lorsque le système est éteint, une certaine quantité de courant
résiduel continue à circuler dans le système. Débranchez
systématiquement tous les câbles d’alimentation, de modems et
de réseau, des prises murales avant de nettoyer le système.
• Déconnecter le système du secteur, et demander conseil à votre
revendeur ou à un technicien qualifié si :
Page 41

Eee Box PC 7
Français
• La prise ou le câble d’alimentation est endommagé.
• Du liquide a été renversé sur le système.
• Le système ne fonctionne pas correctement alors que les
consignes ont été respectées.
• Le système est tombé ou le boîtier est endommagé.
• Les performances système s’altèrent.
Avertissement sur les batteries Lithium-Ion
MISE EN GARDE: Danger d’explosion si la batterie n’est pas
remplacée correctement. Remplacer uniquement avec une
batterie de type semblable ou équivalent, recommandée
par le fabricant. Mettez au rebut les batteries usagées
conformément aux instructions du fabricant.
Avertissement de sécurité relatif aux lasers
PRODUIT LASER DE CLASSE 1
PAS DE DÉMONTAGE
La garantie ne couvre pas les appareils ayant été
désassemblés par les utilisateurs
NE PAS jeter le Eee Box dans une benne à ordures municipale.
Ce produit a été conçu de sorte à pouvoir réutiliser ou recycler
certains composants. Le symbole de la benne à roue barrée
indique que ce produit (équipement électrique ou électronique)
ne doit pas être placé dans une décharge publique. Vérifiez auprès
de votre municipalité les dispositions locales en matière de mise
au rebut des déchets électroniques.
NE PAS jeter la batterie dans une benne à ordures municipale. Le
symbole de la benne à roue barrée indique que la pile ne doit pas
être placée dans une décharge publique.
Page 42

8 Eee Box PC
Français
Label écologique de l’Union Européenne
Ce Eee Box PC a reçu le label Flower de l’Union Européenne couvrant
les critères suivants :
1. Consommation d’énergie diminuée en opération et en veille
2. Utilisation limitée de métaux lourds toxiques
3. Utilisation limitée de substances nocives pour l’environnement
ou la santé
4. Réduction de l’utilisation des ressources naturelles en
encourageant le recyclage*
5. Durée de vie du produit étendue grâce à des mises à niveau
simple et une disponibilité des pièces de rechange sur une
durée plus longue
6. Réduction des déchets solides grâce à la politique de reprise
des appareils usagés.
Pour plus d’informations sur le label Flower de l’UE, visitez la page
label Eco de l’Union Européenne : http://europa.eu.int/ecolabel.
Reprise et Recyclage
Les ordinateurs, ordinateurs portables et autres équipements
électroniques contiennent des substances chimiques pouvant
nuire à l’environnement s’ils sont jetés avec les ordures ménagères.
En recyclant, les parties métalliques, plastiques, et les composants
des ordinateurs usagés sont réutilisés pour fabriquer de nouveaux
produits et l’environnement est protégé d’une diffusion incontrôlée
de substances chimiques.
ASUS travaille en collaboration avec des centres de recyclage
respectant des procédures exigeantes dans le but de protéger
l’environnement, d’assurer la sécurité des utilisateurs, et de respecter
les lois internationales sur la protection de l’environnement. Notre
engagement dans le recyclage de nos produits usagés résulte de
notre politique de protection de l’environnement qui prend en
compte de multiples aspects.
Pour plus d’informations sur le recyclage des produits ASUS et
obtenir des conctacts utiles, visitez le site de reprise et de recyclage
GreenASUS (http://green.asus.com/english/takeback.htm).
Page 43

Eee Box PC 9
Français
Notes pour ce manuel
Pour être certains que vous effectuiez certaines tâches correctement,
veuillez prendre notes des symboles suivants. Ces symboles
possèdent différents degrés d’importance :
AVERTISSEMENT : Instructions que vous DEVEZ suivre pour éviter Instructions que vous DEVEZ suivre pour éviterInstructions que vous DEVEZ suivre pour éviter
de vous blesser lors de la réalisation d’une tâche.
IMPORTANT : Instructions que vous DEVEZ suivre pour mener uneInstructions que vous DEVEZ suivre pour mener une
tâche à bien.
ASTUCE : Trucs et informations additionnelles pour vous aider àTrucs et informations additionnelles pour vous aider à
mener une tâche à bien.
NOTE : Informations additionnelles destinées à certaines situationsInformations additionnelles destinées à certaines situations
spécifiques..
Page 44

10 Eee Box PC
Français
User Manual
Bienvenue
Félicitations pour l’achat du Eee Box PC. Les illustrations suivantesLes illustrations suivantes
font état du contenu de la boîte de votre Eee Box PC. Si l’un des Eee Box PC. Si l’un desSi l’un des
éléments ci-dessous était manquant ou endommagé, contactez
votre revendeur.
Contenu de la boîte
Eee Box PC Socle Télécommande (optionnel)
Kit VESA et sachet de vis Adaptateur secteur Cordon d’alimentation
Adaptateur Mini jack
Câble HDMI (optionnel)
DVD de restauration/
- S/PDIF
support
Antenne sans fil
Câble HDMI vers DVI
(optionnel)
Carte de garantie
Récepteur infrarouge
(optionnel)
Adaptateur HDMI-DVI
(optionnel)
Manuel d’utilisation
Si l’appareil ou l’un de ses composants est défaillant lors d’une
utilisation normale et durant la période de garantie, visitez un
centre après-ventre ASUS muni de la carte de garantie pour tout
remplacement des composants défectueux.
Page 45

Eee Box PC 11
Français
Faire connaissance avec
votre Eee Box PC
Vue avant
Référez-vous au diagramme ci-dessous pour identifier les
composants localisés en façade de l'appareil.
1
2
3
4
5
6
1
LED d’activité du disque durLED d’activité du disque dur
La LED du disque dur clignote lorsque des données sont
lues ou inscrites sur le disque dur.
2
Bouton d’alimentationBouton d’alimentation
L’interrupteur d’alimentation permet de mettre l’appareil
sous/hors tension.
3
Slot pour cartes mémoireSlot pour cartes mémoire
Le lecteur de cartes mémoire embarqué supporte les cartes
MMC/SD/SDHC/MS/MS Pro utilisées pour les caméscopes
numériques, lecteurs MP3, téléphones mobiles et PDA.
Page 46

12 Eee Box PC
Français
4
Port USB
Le port USB (Universal Serial Bus) est compatible avec les
périphériques USB tels que les claviers, les périphériques de
pointage, les appareils-photos et les disques durs. La norme
USB permet à plusieurs périphériques de fonctionner
simultanément sur un ordinateur.
5
Port casque/sortie audioPort casque/sortie audio/sortie audio
Le port casque stéréo deLe port casque stéréo de 1/8” (3.5mm) est utilisé pour la
connexion d’un casque ou de haut-parleurs externes.
6
Port microphonePort microphone
Le port microphone est destiné à la connexion d’unLe port microphone est destiné à la connexion d’un
microphone utilisé généralement pour les visioconférences
ou de simples enregistrements audio.
Page 47

Eee Box PC 13
Français
Vue arrière
Référez-vous au diagramme ci-dessous pour identifier les
composants localisés à l'arrière de l'appareil.
1
2
3
4
5
6
1
Connecteur pour antenne sans filConnecteur pour antenne sans fil
Ce connecteur est utilisé pour la connexion de l’antenne
sans fil fournie afin d’accroître la réception du signal sans fil.
2
Port d’alimentation (CC 12V)Port d’alimentation (CC 12V)
L’adaptateur d’alimentation inclus convertit le courant
alternatif en courant continu pour alimenter le système.
Pour éviter d’endommager le PC, utilisez toujours
l’adaptateur d’alimentation fourni.
L’adaptateur d’alimentation peut devenir chaud ou brûlant
lors de son utilisation. ne pas couvrir l’adaptateur et le garder a
distance de votre corps.
Page 48

14 Eee Box PC
Français
3
Port HDMIPort HDMIHDMI
Le port HDMI (High Definition Multimedia Interface)
supporte les périphériques d'affichage Full-HD tel qu”un
téléviseur ou un moniteur LCD afin de permettre l'affichage
sur un écran externe.
4
Port USBPort USB
Le port USB (Universal Serial Bus) est compatible avec les
périphériques USB tels que les claviers, les périphériques de
pointage, les appareils-photos et les disques durs. La norme
USB permet à plusieurs périphériques de fonctionner
simultanément sur un ordinateur.
5
Port réseauPort réseau
Le port LAN RJ-45 de 8 broches supporte un câble Ethernet
standard pour la connexion à un réseau local.
6
Port de sortie audio (port S/PDIF out)Port de sortie audio (port S/PDIF out)
Connectez un câble audio stéréo de 3.5mm sur ce port pour
des transferts audio numériques.
Pour une sortie S/PDIF, connectez l’adaptateur mini
jack audio vers S/PDIF fourni à votre amplificateur.
Page 49

Eee Box PC 15
Français
Utiliser la télécommande (sur une
sélection de modèles)
Utilisez la télécommande pour lancer le programme Eee Cinema et Eee Cinema et
visionner vos fichiers multimédia. Référez-vous à la page suivanteRéférez-vous à la page suivante
pour vous familiariser avec les boutons de la télécommande.
1
2
3
26
25
24
4
5
6
7
23
22
21
20
19
18
17
16
15
8
9
10
11
12
13
14
Page 50

16 Eee Box PC
Français
1
Indicateur LED : s’allume lorsque vous appuyez sur un bouton.
2
Alimentation : pressez pour basculer ou sortir du mode veille.
3
Pause : pressez pour mettre en pause la lecture d’un fichier.
4
Arrêt : pressez pour arrêter la lecture d’un fichier multimédia.
5
Lecture : pressez pour lancer la lecture d’un fichier multimédia.
6
Avance rapide : pressez pour effectuer une avance rapide dans
la lecture d’un fichier multimédia.
7
Piste suivante : pressez pour aller à la piste suivante.
8
Informations : pressez pour afficher les informations des
programmes.sous Eee Cinema ou d’autres menus d’options.
9
OK : pressez pour confirmer une action.
10
Chaîne suiv/préc : pressez pour changer de chaîne.*
11
Vidéo : pressez pour lancer le menu Videos de Eee Cinema.
12
Musique : pressez pour lancer le menu Music de Eee Cinema.
13
Entrée : pressez pour confirmer une sélection.
14
Boutons colorés : pressez pour accéder aux options des menus
de Eee Cinema ou en mode Télétexte. (Les fonctions de ces
boutons peuvent varier selon les régions.)
15
Télétexte : pressez pour activer/désactiver le mode télétexte.
(Cette fonction n’est disponible que dans certaines régions.)
16
Effacer : pressez pour effacer la saisie.
17
Boutons numériques : pressez pour entrer des chiffres ou
sélectionner une chaîne.*
18
Eee Cinema : pressez pour démarrer Eee Cinema.
19
Photos : pressez pour lancer le menu Photos de Eee Cinema.
20
Aug/dim le volume : pressez pour augmenter ou diminuer le
volume.
21
Muet : pressez pour désactiver le son.
Page 51

Eee Box PC 17
Français
22
Boutons quadri-directionnels : pressez pour naviguer dans les
menus à l’écran.
23
Retour : pressez pour retourner à la page précédente.
24
Piste précédente : pressez pour revenir à la piste précédente.
25
Retour rapide : pressez pour rembobiner un fichier multimédia.
26
Enregistrer : pressez pour commencer l’enregistrement d’un
programme TV.*
*La fonction TV n’est disponible que dans certaines régions
Congurer la télécommande (sur une
sélection de modèles)
1. Branchez le récepteur infrarouge sur l’un des ports USB de votre
Eee Box PC.
2. Placez le récepteur infrarouge sur une surface stable.
3. Pointez la télécommande vers le récepteur lors de son
utilisation.
Page 52

18 Eee Box PC
Français
Positionner votre Eee Box PC
Installer le socle
Placez le Eee Box PC sur son socle. Pour ce faire :
1. Localisez le pas de vis sous le Eee Box PC.
2. Alignez la vis du socle au pas de vis du PC, puis sécurisez le socle
au PC à l’aide d’une pièce de monnaie.
Dessous du Eee Box PC
1
Pas de vis
Vis du socle
Ne placez pas votre Eee Box PC sur un bureau sans son socle.
2
Page 53

Eee Box PC 19
Français
Installer votre Eee Box PC sur un
moniteur
Vous pouvez aussi installer votre Eee Box PC à l’arrière d’un
moniteur. Pour ce faire :
1. Sécurisez la tablette VESA à votre moniteur à l’aide de quatre vis
(HNM/M4 x 8)..
Pour sécuriser la tablette VESA, votre moniteur doit être
compatible avec le standard VESA75 ou VESA100.
2. Placez votre Eee Box PC sur la tablette VESA comme illustré cidessous. Ensuite, sécurisez le PC à la tablette VESA à l’aide d’une
pièce de monnaie.
Dessous du Eee Box PC
Page 54

20 Eee Box PC
Français
Congurer votre Eee Box PC
Il est nécessaire de connecter certains périphériques avant de
pouvoir utiliser votre Eee Box PC.
Connexion d'un écran
Connectez une extrémité d’un câble HDMI/DVI à un téléviseur ou
moniteur LCD (1) et l’autre extrémité au portet l’autre extrémité au port HDMI localisé à
l'arrière du système (2).
2
Moniteur LCD TV LCD
–ou–
1
Connexion de périphériques USB
Connectez des périphériques USB tels qu’un clavier avec ou sans fil
(varient selon les régions), une souris ou une imprimante aux ports ou une imprimante aux ports
USB du système
Page 55

Eee Box PC 21
Français
Connexion réseau
Connectez une extrémité du câble réseau au port LAN localisé à
l’arrière du système et l’autre extrémité à un hub ou switch.
Câble réseau RJ-45
Hub réseau ou switch
Page 56

22 Eee Box PC
Français
Allumer le système
Connectez l’adaptateur secteur au port DC IN localisé à l’arrière du
système, puis appuyez sur le bouton d’alimentation situé en façade
de l’appareil.
3
2
1
• Lorsque vous n’utilisez pas votre Eee Box PC, débranchez
l’adaptateur secteur pour économiser de l’énergie.
• Ajustez les paramètres de consommation électrique à partir
du Panneau de configuration de Window®. Ceci permet à
votre Eee Box PC d’être pleinement opérationnel tout en
économisant de l’énergie.
4
Pour entrer dans l’utilitaire de configuration du BIOS, appuyez de
manière répétée sur F2 au démarrage du système.
Page 57

Eee Box PC 23
Français
Utiliser votre Eee Box PC
Congurer une connexion sans l
Pour établir une connexion réseau sans fil, suivez les instructions
suivantes :
Connectez l’antenne sans fil fournie à votre Eee Box PC pour
améliorer la réception du signal sans fil.
Pour des raisons de sécurité, Ne vous connectez PAS à un réseau
non sécurisé. Le faire peut rendre les données transmises visibles
par d’autres personnes.
Les captures d’écran de cette section ont été prises sous Windows®
XP.
1. Faites un clic droit sur
l’icône réseau sans fil de
la zone de notification de
Windows® et sélectionnez
Afficher les réseaux sans
fil disponibles.
2. Sélectionnez le réseau sans
fil auquel vous souhaitez
vous connecter et cliquez
sur Connecter.
Entrez si nécessaire la clé
de sécurité réseau.
3. Une fois la connexion
établie, le statut de
la connexion sans fil
basculera sur Connecté.
Page 58

24 Eee Box PC
Français
Congurer une connexion laire
Les captures d’écran de cette section ont été prises sous Windows®
XP.
Pour établir une connexion réseau filaire, suivez les instructions
suivantes:
Utiliser une IP statique
1. Faites un clic droit surFaites un clic droit sur
l’icône réseau de la zone de
notification de Windows®
et sélectionnez Ouvrir les
connexions réseau.
2. Faites un clic droit surFaites un clic droit sur
Connexion à un réseau
local et sélectionnez
Propriétés.
3. Sélectionnez Internet
Protocol (TCP/IP) et cliquez
sur Propriétés.
Page 59

Eee Box PC 25
Français
4. Sélectionnez Utiliser
l’adresse IP suivante.
5. Entrez votre Adresse IP, le
Masque de sous-réseau et la
Passerelle par défaut.
6. Si nécessaire, entez votre
adresse de Serveur DNS
préféré .
7. Une fois terminé, cliquez
sur OK pour terminer la
configuration.
Utiliser une IP dynamique (connexion PPPoE)
1. Répétez les étapes 1 à 3 de la
section précédente.
2 Sélectionnez Obtenir
une adresse IP
automatiquement et cliquez
sur OK.
3. Cliquez sur Créer une
nouvelle connexion pour
lancer l’Assistant de nouvelle
connexion.
Page 60

26 Eee Box PC
Français
4. Cliquez sur Suivant. 5. Sélectionnez Etablir une
connexion à Internet et
cliquez sur Suivant.
6. Sélectionnez Configurer
ma connexion
manuellement.
8. Entrez le nom de votre FAI
et cliquez sur Suivant.
7. Sélectionnez votre type de
connexion et cliquez sur
Suivant.
9. Entrez votre Nom
d’utilisateur et Mot de
passe. Cliquez sur Suivant.
Page 61

Eee Box PC 27
Français
10. Cliquez sur Terminer pour
compléter la configuration.
Contactez votre Fournisseur d’Accès à Internet (FAI) si vous
rencontrez des problèmes lors de la connexion au réseau.
11. Entrez votre Nom d’utilisateur
et Mot de passe. Cliquez sur
Se connecter pour vous
connecter à Internet.
Page 62

28 Eee Box PC
Français
Connexion Bluetooth (sur une
sélection de modèles)
Suivez les instructions ci-dessous pour créer une connexion sans fil
Bluetooth.
Les captures d’écran de cette section ont été prises sous Windows®
XP.
1. Double-cliquez sur l'icône
Bluetooth de la barre
des tâches de Windows
pour lancer l'assistant de
connexion.
2. Sélectionnez le périphérique
Bluetooth auquel vous
souhaitez vous connecter
et cliquez sur Suivant pour
continuer.
Si le périphérique auquel vous souhaitez vous connecter n'apparaît
pas, cliquez sur Actualiser pour lancer une nouvelle recherche.
Page 63

Eee Box PC 29
Français
3. La saisie d'un mot de passe
peut être nécessaire si le
périphérique nécessite une
authentification.
4. Le périphérique auquel vousLe périphérique auquel vous
êtes connecté apparaît à
l'écran.
6. Cliquez sur le bouton Nouvelle connexion et suivez les
instructions apparaissant à l’écran pour ajouter d'autres
périphériques Bluetooth.
Votre Eee Box PC peut se connecter à plusieurs périphériques
Bluetooth. à la fois.
Page 64

30 Eee Box PC
Français
Conguration audio via un
périphérique HDMI
Si vous utilisez un poste TV pourvu d’une prise HDMI, connectez-le à
votre Eee Box PC et suivez les étapes ci-dessous pour configurer les et suivez les étapes ci-dessous pour configurer leset suivez les étapes ci-dessous pour configurer les
paramètres audio :
Les captures d’écran de cette section ont été prises sous Windows®
XP.
1. Dans la zone de notificationDans la zone de notification
de Windows®, double-cliquez
sur l’icône de Volume.
2. Depuis l’ongletDepuis l’onglet Mixer,
sélectionnez Realtek HDA
HDMI Out.
3. Cliquez sur OK pour quitter.
Page 65

Eee Box PC 31
Français
ASUS Easy Update
ASUS Easy Update est un outil logiciel qui détecte et télécharge
automatiquement les dernières version de BIOS, pilotes et
applications pour votre Eee Box PC.
1. Dans la zone de notification de
Windows®, faites un clic droit sur
l’icône ASUS Easy Update.
2. Sélectionnez Schedule
(Programmer) pour
déterminer à quelle fréquence
vous souhaitez que le système
soit mis à jour.
3. Sélectionnez Mise à jour pour
activer la mise à jour.
4. Cliquez sur OK pour afficher
les éléments que vous
souhaitez télécharger.
5. Cochez le(s) élément(s) que
vous souhaitez télécharger,
puis cliquez sur OK.
Page 66

32 Eee Box PC
Français
Restaurer le système
Utiliser le DVD de restauration
Le DVD de restauration contient une image du système d'exploitation
installé sur votre système en usine. Le DVD de restauration, en plus
du DVD de support, offre une solution de restauration complète
permettant de restaurer rapidement votre système dans son état de
fonctionnement d'origine, à condition que votre disque dur soit en
bon état. Avant d'utiliser le DVD de restauration, copiez vos données
un périphérique de stockage USB ou un lecteur réseau et prenez
note de tous vos paramètres de configuration personnalisés (tels que
vos paramètres réseau).
Vous devrez d’abord connecter un lecteur de DVD-ROM
USB externe à votre système pour pouvoir utiliser le DVD de
restauration.
1. Allumez votre ordinateur et appuyez sur <F8> pour accéder au
menu de sélection du périphérique de démarrage.
2. Insérez le DVD de restauration dans le lecteur optique
et sélectionnez le lecteur optique (normalement identifié
“DVDROM:XXXX”) comme périphérique de boot primaire.
Appuyez sur <Entrée> puis appuyez sur une touche quelconque
pour continuer:
3. La fenêtre ASUS Recovery DVD apparaît. Sélectionnez un
emplacement d’installation (un minimum de 20Go d’espace
libre est nécessaire. Options de partitionnage:
Recover system to a partition.
(Restaurer le système sur une partition)
Cette option ne supprimera que la partition sélectionnée, vous
permettant ainsi de conserver d’autres partitions et de créer une
nouvelle partition système. Sélectionnez une partition et cliquez
sur NEXT.
Recover system to entire HD.
(Restaurer Windows sur la totalité du disque dur)
Cette option supprimera toutes les partitions de votre disque dur
pour créer une nouvelle partition système. Sélectionnez et cliquez
sur Yes.
Page 67

Eee Box PC 33
Français
4. Suivez les instructions apparaissant à l’écran pour terminer le
processus de restauration.
Toutes vos données seront perdues lors du processus de
restauration. Assurez-vous d'avoir fait une copie de sauvegarde de
vos données avant de restaurer le système.
5. Une fois la restauration du système terminée, redémarrez
l’ordinateur.
6. Configurez les paramètres de langue, de fuseau horaire,
de clavier et nom d’utilisateur pour accéder au système
d’exploitation Windows®.
Le DVD de restauration est réservé au Eee Box PC. Ne l’utilisez pas
sur d’autres ordinateurs. Visitez le site Web d’ASUS (www.asus.com)
pour toute mise à jour.
Utiliser la partition cachée
La partition de restauration contient une image du système
d'exploitation, des pilotes et des utilitaires installés sur votre
système en usine. La partition de restauration offre une solution
de restauration complète permettant de restaurer rapidement la
partie logicielle de votre système dans son état de fonctionnement
d'origine, à condition que votre disque dur soit en bon état. Avant
d'utiliser la partition de restauration, copiez vos données sur un
périphérique de stockage USB ou un lecteur réseau et prenez note
de tous vos paramètres de configuration personnalisés (tels que vos
paramètres réseau).
NE PAS supprimer la partition nommée “RECOVERY.” La partition
de restauration est créée en usine et ne pourra être restaurée par
l'utilisateur si celle-ci est supprimée. Amenez votre système à l'un
des centres de service agréés par ASUS si vous rencontrez des
problèmes lors du processus de restauration.
1. Appuyez sur <F9> lors du démarrage (nécessite une partition
de restauration).
2. La fenêtre ASUS Recovery System apparaît. Sélectionnez
Page 68

Français
Recover system to a partition.
3. Sélectionnez une partition avec un 20 Go d’espace libre etSélectionnez une partition avec un 20 Go d’espace libre et
cliquez sur Next. :
4. Suivez les instructions apparaissant à l’écran pour terminer le
processus de restauration.
5. Redémarrez le système une fois le processus de restauration
terminé.
6. Configurez les paramètres de langue, de fuseau horaire, de
clavier et nom d’utilisateur avant d’accéder au système
d’exploitation Windows®.
34 Eee Box PC
Page 69

Eee Box-PC
Benutzerhandbuch
Deutsch
Eee Box B2-Serie/EB-Serie
Page 70

Deutsch
G4635
Erste Ausgabe V1
Mai 2009
Copyright © 2009 ASUSTeK COMPUTER INC. Alle Rechte vorbehalten.
Kein Teil dieses Handbuchs, einschließlich der darin beschriebenen Produkte
und Software, darf ohne ausdrückliche, schriftliche Genehmigung von ASUSTeK
COMPUTER INC. (“ASUS”) in irgendeiner Form, ganz gleich auf welche Weise,
vervielfältigt, übertragen, abgeschrieben, in einem Wiedergewinnungssystem
gespeichert oder in eine andere Sprache übersetzt werden.
In diesem Handbuch angegebene Produkt- und Firmennamen können u.U.
eingetragene Warenzeichen oder Urheberrechte der entsprechenden Firmen sein
und dienen nur der Identifizierung oder Erklärung zu Gunsten des Eigentümers,
ohne Rechte verletzen zu wollen.
Es wurden keine Mühen gescheut, den Inhalt dieses Handbuchs korrekt und
aktuell zu gestalten. Dennoch kann für die Richtigkeit des Inhalts keine Haftbarkeit
übernommen werden. Der Hersteller behält sich das Recht vor, jederzeit ohne
Vorankündigung Änderungen am Handbuch vorzunehmen.
Page 71

Inhalt
Inhalt .............................................................................................................3
Erklärungen.................................................................................................4
Sicherheitsinformationen ...................................................................... 6
Hinweise für dieses Handbuch ............................................................ 9
Willkommen ..............................................................10
Paketinhalt ................................................................................................10
Kennenlernen Ihres
Vorderseite ................................................................................................11
Rückseite ....................................................................................................13
Benutzen der Fernbedienung (nur an bestimmten Modellen) 15
Fernbedienung einrichten (nur an bestimmten Modellen) ....17
Eee Box-PC .................................11
Eee Box-PC aufstellen ...............................................18
Ständer installieren ................................................................................18
Eee Box PC an einem Bildschirm befestigen .................................19
Eee Box-PC vorbereiten ...........................................20
Bildschirm anschließen .........................................................................20
USB-Geräte anschließen .......................................................................20
An ein Netzwerkgerät anschließen ..................................................21
System einschalten ................................................................................22
Eee Box PC benutzen ................................................23
Wireless-Verbindung konfigurieren .................................................23
Kabelverbindung konfigurieren ........................................................24
Statische IP benutzen .....................................................................24
Dynamische IP benutzen (PPPoE-Verbindung) .....................25
Bluetooth-Wireless-Verbindung (nur an bestimmten Modellen) 28
Konfigurieren des Audio-Ausgangs via eines HDMI-Gerätes .30
ASUS Easy Update ..................................................................................31
Deutsch
Systemwiederherstellung ........................................32
Verwenden der Wiederherstellungs-DVD .....................................32
Verwenden der versteckten Partition ..............................................33
Eee Box-PC 3
Page 72

4 Eee Box-PC
Deutsch
Erklärungen
Erklärung der Federal Communications Commission
Dieses Gerät entspricht den FCC-Vorschriften, Teil 15. Sein Betrieb
unterliegt den folgenden zwei Bedingungen:
• Dieses Gerät darf keine schädigenden Interferenzen erzeugen,
und
• Dieses Gerät muss alle empfangenen Interferenzen aufnehmen,
einschließlich derjenigen, die einen unerwünschten Betrieb
erzeugen.
Dieses Gerät ist auf Grund von Tests für Übereinstimmung mit den
Einschränkungen eines Digitalgeräts der Klasse B, gemäß Teil 15
der FCC-Vorschriften, zugelassen. Diese Einschränkungen sollen bei
Installation des Geräts in einer Wohnumgebung auf angemessene
Weise gegen schädigende Interferenzen schützen. Dieses Gerät
erzeugt und verwendet Hochfrequenzenergie und kann, wenn
es nicht gemäß den Anweisungen des Herstellers installiert und
bedient wird, den Radio- und Fernsehempfang empfindlich
stören. Es wird jedoch nicht garantiert, dass bei einer bestimmten
Installation keine Interferenzen auftreten. Wenn das Gerät den
Radio- oder Fernsehempfang empfindlich stört, was sich durch
Aus- und Einschalten des Geräts feststellen lässt, ist der Benutzer
ersucht, die Interferenzen mittels einer oder mehrerer der folgenden
Maßnahmen zu beheben:
• Empfangsantenne neu ausrichten oder an einem anderen Ort
aufstellen.
• Den Abstand zwischen dem Gerät und dem Empfänger
vergrößern.
• Das Gerät an die Steckdose eines Stromkreises anschließen, an
die nicht auch der Empfänger angeschlossen ist.
• Den Händler oder einen erfahrenen Radio-/Fernsehtechniker um
Hilfe bitten.
Um Übereinstimmung mit den FCC-Vorschriften zu gewährleisten,
müssen abgeschirmte Kabel für den Anschluss des Monitors an die
Grafikkarte verwendet werden. Änderungen oder Modifizierungen
dieses Geräts, die nicht ausdrücklich von der für Übereinstimmung
verantwortlichen Partei genehmigt sind, können das Recht des
Benutzers, dieses Gerät zu betreiben, annullieren.
Page 73

Eee Box-PC 5
Deutsch
Erklärung des kanadischen Ministeriums für
Telekommunikation
Dieses Digitalgerät überschreitet keine Grenzwerte für
Funkrauschemissionen der Klasse B, die vom kanadischen
Ministeriums für Telekommunikation in den Funkstörvorschriften
festgelegt sind.
Dieses Digitalgerät der Klasse B stimmt mit dem kanadischen
ICES-003 überein.
Macrovision Corporation-Produktanmerkung
Dieses Produkt verfügt über Kopierschutztechnologie, die durch
methodische Anforderungen bestimmter U.S.A.-Patente und
anderer geistiger Eigentumsrechte der Macrovision Corporation
und anderer Parteien geschützt sind. Die Verwendung dieser
Kopierschutztechnologie muss von Macrovision Corporation
genehmigt werden und ist, wenn nicht anderweitig von der
Macrovision Corporation genehmigt, nur für private oder
eingeschränkte Vorführungszwecke vorgesehen. ReverseEngineering oder Demontage ist verboten.
REACH
Die rechtlichen Rahmenbedingungen für REACH (Registration,
Evaluation, Authorization, and Restriction of Chemicals) erfüllend,
veröffentlichen wir die chemischen Substanzen in unseren
Produkten auf unserer ASUS REACH-Wbseite unter
http://green.asus.com/english/REACH.htm.
Page 74

6 Eee Box-PC
Deutsch
Sicherheitsinformationen
Ihr ASUS Eee Box PC wurde auf die neuesten Sicherheitsstandards
für Informationstechnologie geprüft und für gut befunden. Um
allerdings die sichere Handhabung des Produkts zu gewährleisten,
sollten Sie den Anweisungen in diesem Dokument unbedingt Folge
leisten.
Einstellen des Systems
• Lesen und befolgen Sie alle Anweisungen des Handbuchs, bevor
Sie das Gerät in Betrieb nehmen.
• Benutzen Sie das Gerät nicht in der Nähe von Wasser oder
Hitzequellen, z.B. Heizungen.
• Platzieren Sie das System auf einer stabilen Oberfläche.
• Die Öffnungen am Computergehäuse dienen der Belüftung
und sollten keinesfalls versperrt oder abgedeckt werden.
Vergewissern Sie sich, dass rund um den Computer genügend
Abstand (mind. 15 cm) zur optimalen Belüftung vorhanden ist.
Stecken Sie keine Gegenstände in die Luftschlitze.
• Benutzen Sie dieses Gerät in einer Umgebung, deren Temperatur
zwischen 0˚C und 35˚C liegt.
• Wenn Sie ein Verlängerungskabel mit mehreren Steckdosen für
das Gerät verwenden, vergewissern Sie sich, dass die zulässige
Stromstärke insgesamt nicht überschritten wird.
Vorsicht bei der Benutzung
• Treten Sie nicht auf das Stromkabel und stellen Sie nichts darauf ab.
• Halten Sie das Gerät von Wasser und anderen Flüssigkeiten fern.
• Wenn das System ausgeschaltet ist, fließen immer noch geringe
Mengen an Strom. Ziehen Sie immer alle Stecker von Strom- und
Modemkabeln ab, bevor Sie das System reinigen.
• Ziehen Sie den Stromstecker ab und geben Sie das Gerät zur
Reparatur an qualifiziertes Personal, wenn:
• das Stromkabel oder der Stromstecker beschädigt wurden
• Flüssigkeit im System verschüttet wurde
Page 75

Eee Box-PC 7
Deutsch
• das System nicht ordnungsgemäß funktioniert, auch
wenn alle Betriebsanleitungen befolgt werden
• das Gerät fallen gelassen wurde oder das Gehäuse
beschädigt ist
• sich die Systemleistung drastisch verändert
Lithium-Ionen-Akku-Warnung
AUCHTUNG: Bei unsachgemäßem Austausch kann der Akku
explodieren. Verwenden Sie als Ersatz nur vom Hersteller
empfohlene oder ähnliche Modelle. Entsorgen Sie die Akkus
entsprechend den Anweisungen des Herstellers.
LASER-PRODUKTWARNUNG
LASER-PRODUKT DER KLASSE 1
ttthbfkjhskjhgdfkjhgsdkjhfkjsdhfgkjhs
NICHT AUSEINANDERNEHMEN
Die Garantie verfällt, wenn das Produkt vom Benutzer
auseinandergenommen wurde
Werfen Sie den Eee Box PC NICHT in den normalen Hausmüll.
Dieses Produkt wurde entwickelt, um ordnungsgemäß
wiederverwertet werden zu können. Dieses Symbol der
durchgestrichenen Mülltonne zeigt an, dass dieses Produkt
(elektrisches und elektronisches Zubehör, quecksilberhaltige
Knopfzellen) nicht im normalen Hausmüll entsorgt werden
darf. Erkundigen Sie sich bei Ihren örtlichen Behörden nach der
ordnungsgemäßen Geräteentsorgung.
Das durchgestrichene Symbol der Mülltonne zeigt an, dass der
Akku nicht im normalen Hausmüll entsorgt werden darf. Bitte
erkundigen Sie sich nach lokalen Regelungen zur Entsorgung von
Batterien und Akkus.
Page 76

8 Eee Box-PC
Deutsch
European Union Eco-Label
Diesen Eee Box PC wurde das EU Flower-Label zuerkannt, was
bedeutet, dass dieses Produkt dir folgenden Charakteristika erfüllt:
1. Verringerter Energieverbrauch während der Benutzung und im
Standby-Status.
2. Begrenzte Verwendung von giftigen Schwermetallen.
3. Begrenzte Verwendung von gesundheits- und
umweltschädlichen Substanzen.
4. Reduzierte Verwendung von natürlichen Ressourcen durch vie
versprechende Wiederverwertung.
5. Verlängerte Produktlebensdauer durch verfügbare Ersatzteile.
6. Reduzierter Festmüll durch Rücknahmeregelung.
Für mehr Informationen über den EU Flower-Aufkleber besuchen Sie
bitte die European Union Eco-Label-Webseite unter
http://europa.eu.int/ecolabel.
Rücknahme und Wiederverwertung
Alte Computer, Notebook-Computer und andere elektronische
Ausrüstung enthalten für die Gesundheit und die Umwelt schädliche
Chemikalien, wenn diese auf einer normalen Mülldeponie entsorgt
werden. Bei der Wiederverwertung der Metalle, Plastik und
Komponenten aus alten Computern werden diese aufgebrochen,
sortiert und für die herstellung neuer Produkte wider verwendet.
Dadurch wird die Umwelt durch die unkontrollierte Freisetzung
schädlicher Chemikalien geschützt.
ASUS arbeitet mit Recycling-Firmen zusammen, die die höchsten
Standards für den Schutz der Umwelt, der Arbeitssicherheit und
den weltweiten Umweltgesetzen erfüllen. Unsere Verpflichtung
zur Wiederverwertung unserer alten Komponenten entstand aus
unserer Arbeit zum Schutz der Umwelt auf mehreren Wegen.
Für weitere Informationen über die ASUS-Produktwiederverwertung
und die Kontaktdaten besuchen Sie bitte die GreenASUS Takeback and
Recycling-Webseite (http://green.asus.com/english/takeback.htm)
Page 77

Eee Box-PC 9
Deutsch
Hinweise für dieses Handbuch
Um sicherzustellen, dass Sie bestimmte Aufgaben richtig ausführen,
beachten Sie bitte die folgenden Symbole, die in diesem Handbuch
verwendet werden.
GEFAHR/WARNUNG: Informationen zum Vermeiden von
Verletzungen beim Ausführen einer Aufgabe.
WICHTIG: Anweisungen, die Sie beim Ausführen einer Aufgabe
befolgen müssen.
TIPP: Tipps und nützliche Informationen zur Durchführung einer
Aufgabe.
ANMERKUNG: Tipps und nützliche Informationen für besondere
Umstände.
Page 78

10 Eee Box-PC
Deutsch
User Manual
Willkommen
Herzlichen Glückwunsch zu Ihrem Kauf eines Eee Box-PCs. Der Inhalt
des Produktpakets wird im Folgenden aufgeführt. Sollten folgende
Artikel beschädigt oder nicht vorhanden sein, wenden Sie sich bitte
an Ihren Händler.
Paketinhalt
Eee Box PC Ständer
Fernbedienung
(optional)
VESA-Halterung +Schrauben Netzteil Netzkabel
Mini-Buchse-S/PDIF-Adapter Wireless-Antenne
HDMI-Kabel (optional)
Wiederherstellungs-/Support DVDs Garantiekarte Benutzerhandbuch
HDMI auf DVI Kabel
(optional)
IR-Empfänger
(optional)
HDMI-DVI-Adapter
(optional)
Wenn das Gerät oder seine Komponenten während normaler Benutzung
innerhalb der Garantiezeit nicht funktionieren oder fehlerhaft arbeiten
bringen Sie es zusammen mit der Garantiekarte zur Reparatur oder zum
Austausch der Komponenten zu Ihren ASUS-Kundendienst.
Page 79

Eee Box-PC 11
Deutsch
Kennenlernen Ihres
Eee Box-PC
Vorderseite
Die nachstehende Abbildung zeigt die Komponenten auf dieser
Seite des Systems.
1
2
3
4
5
6
1
Festplatten-LED
Diese LED blinkt, wenn Daten auf der Festplatte gelesen
oder auf ihr geschrieben werden..
2
Netzschalter
Dieser Schalter schaltet das System EIN und AUS.
3
Speicherkartensteckplatz
Der integrierte Kartenleser liest MMC/SD/SDHC/MS/MS Pro-
Karten aus Geräten wie z.B. Digitalkameras, MP3-Playern,
Handys und PDAs.
Page 80

12 Eee Box-PC
Deutsch
4
USB-Anschluss
Der USB (Universal Serial Bus)-Anschluss ist kompatibel
mit USB-Geräten wie z.B. Tastaturen, USB-Mäuse, Kameras
und externe Laufwerke. USB macht es möglich, mehrere
Geräte gleichzeitig an einem Computer zu nutzen. Einige
Peripherigeräte können dabei als zusätzliche SteckMöglichkeiten oder Hubs genutzt werden.
Kopfhörer-/Audio-Ausgang
5
Die Stereo-Kopfhörerbuchse (3,5mm) dient zum Verbinden
des Audioausgangssignals des Systems mit verstärkten
Lautsprechern oder einem Kopfhörer.
Mikrofonbuchse
6
An den Mikrofonanschluss können Sie ein Mikrofon
anschließen, das Sie für Skype, Sprachanwendungen und
einfache Tonaufnahmen einsetzen können.
Page 81

Eee Box-PC 13
Deutsch
Rückseite
Die nachstehende Abbildung zeigt die Komponenten auf dieser
Seite des Systems.
1
2
3
4
5
6
1
Wireless-Antennenbuchse
Diese Buchse verbindet mit der mitgelieferten Wireless-
Antenne, um den Signalempfang zu verbessern.
2
Netzteileingang (12V Gleichspannung)
Hier schließen Sie das mitgelieferte Netzteil an,
das Wechselspannung zum Betrieb Ihres Eee PC in
Gleichspannung umwandelt. Wenn das Netzteil mit diesem
Anschluss verbunden wird, versorgt es Ihren Eee PC mit
Strom. Damit es nicht zu Schäden am Eee PC kommt,
benutzen Sie ausschließlich das mitgelieferte Netzteil.
Das Netzteil kann sich im Betrieb erhitzen. Decken Sie es nicht
ab und halten Sie es vom Körper fern.
Page 82

14 Eee Box-PC
Deutsch
3
HDMI-Anschluss
Der HDMI (High Definition Multimedia Interface) -Anschluss
unterstützt voll HD-fähige Geräte wie z.B. LCD-TV oder einen
Monitor für die Anzeige auf einen größeren externen Gerät.
4
USB-Anschluss
Der USB (Universal Serial Bus)-Anschluss ist kompatibel
mit USB-Geräten wie z.B. Tastaturen, USB-Mäuse, Kameras
und externe Laufwerke. USB macht es möglich, mehrere
Geräte gleichzeitig an einem Computer zu nutzen. Einige
Peripherigeräte können dabei als zusätzliche SteckMöglichkeiten oder Hubs genutzt werden.
5
LAN-Anschluss
Der 8-polige RJ-45 LAN-Anschluss unterstützt ein Standard
Ethernet-Kabel zum Anschluss an ein lokales Netzwerk.
Audio-Ausgangsbuchse (S/PDIF-Ausgang)
6
Stecken Sie ein 3,5mm Mini-Buchsenaudiokabel an diesen
Anschluss, um analoges oder digitales Audio zu übertragen.
Verbinden Sie das mitgelieferte Mini-Buchsen-zu
S/PDIF-Adapter mit Ihrem Verstärker, um die S/PDIFAusgangsfunktion zu nutzen.
Page 83

Eee Box-PC 15
Deutsch
Benutzen der Fernbedienung (nur an
bestimmten Modellen)
Sie können die Fernbedienung benutzen, um das Programm
Eee Cinema zum Abspielen von Mediendateien zu starten. Die
nächsten Seiten machen Sie mit den Funktionen und den Tasten der
Fernbedienung vertraut.
1
2
3
26
25
24
4
5
6
7
23
22
21
20
19
18
17
16
15
8
9
10
11
12
13
14
Page 84

16 Eee Box-PC
Deutsch
1
LED-Anzeige: Leuchtet rot, wenn Sie eine Taste drücken.
2
Betrieb: Schaltet zwischen Standby und Eingeschaltet um.
3
Pause: Wiedergabe anhalten.
4
Stopp: Widergabe der Mediendatei stoppen.
5
Wiedergabe: Mediendatei abspielen.
6
Schneller Vorlauf: Mediendatei vorspulen.
7
Nächste Spur: Zur nächsten Spur springen.
8
Information: Programminformationen unter Eee Cinema oder
andere Menüoptionen anzeigen.
9
OK: Eine Aktion bestätigen.
10
Kanal auf/ab: TV-Kanäle umschalten.*
11
Video: Videomenü in Eee Cinema öffnen.
12
Musik: Musikmenü in Eee Cinema öffnen.
13
Enter: Auswahl bestätigen.
14
Farbige Tasten: Auf Menüoptionen in Eee Cinema oder im
Teletext-Modus zugreifen. (Tastenfunktionen sind von der
Region abhängig.)
15
Teletext ein/aus: Teletextmodus ein-/ausschalten. (Diese
Funktion ist nur in einigen Gebieten verfügbar.)
16
Löschen: Eingabeinformation löschen.
17
Zifferntasten: Zahleneingabe oder Kanalaswahl.*
18
Eee Cinema: Eee Cinema starten.
19
Fotos: Fotomenü in Eee Cinema aufrufen.
20
Lautstärke auf/ab: Lautstärke erhöhen/senken.
21
Ton aus: Ton ausschalten.
22
4-Wege Navigationstasten: Navigation durch Menüoptionen.
23
Zurück: Zurück zur vorherigen Seite.
Page 85

Eee Box-PC 17
Deutsch
24
Vorherige Spur: Zur vorherigen Spur springen.
25
Zurück spulen: Mediendatei zurück spulen.
26
Augfnahme: TV-Sendung aufnehmen.*
*Die TV-Funktionen sind nur in bestimmten Gebieten verfügbar.
Fernbedienung einrichten (nur an bestimmten Modellen)
1. Stecken Sie den IR-Empfänger in einen USB-Anschluss an Ihren
Eee Box PC.
2. Stellen Sie den Empfänger auf eine stabile Oberfläche.
3. Richten Sie die Fernbedienung auf den Empfänger, wenn Sie sie
benutzen.
Page 86

18 Eee Box-PC
Deutsch
Eee Box-PC aufstellen
Ständer installieren
Stellen Sie den Eee Box-PC mit dem mitgelieferten Ständer
folgendermaßen auf:
1. Suchen Sie die Schraubenlöcher auf der Unterseite des Eee BoxPCs.
2. Richten Sie die Ständerschrauben auf die Löcher aus, und
befestigen Sie dann den Ständer mit Hilfe einer Münze am PC.
Eee Box-PC Unterseite
1
Schraubenloch
Ständerschraube
Stellen Sie den Eee Box-PC auf keinen Fall ohne Ständer auf.
2
Page 87

Eee Box-PC 19
Deutsch
Eee Box PC an einem Bildschirm
befestigen
Sie können Ihren Eee Box-PC auch an der Rückseite eines
Bildschirms befestigen. Gehen Sie dazu folgendermaßen vor:
1. Befestigen Sie die VESA-Halterung mit vier (HNM/M4 x 8)
Schrauben.
Um die VESA-Halterung befestigen zu können, muss Ihr Bildschirm
dem Standard VESA75 oder VESA100 entsprechen.
2
2. Stellen Sie den Eee Box-PC auf die VESA-Halterung. Achten Sie
auf die korrekte Ausrichtung. Befestigen Sie den PC mit Hilfe
einer Münze an der VESA-Halterung.
Eee Box-PC Unterseite
Page 88

20 Eee Box-PC
Deutsch
Eee Box-PC vorbereiten
Bevor Sie Ihrem Eee Box-PC nutzen können, müssen Sie einige
Peripheriegeräte anschließen.
Bildschirm anschließen
Verbinden Sie ein Ende des DVI-Kabels mit dem Bildschirm (1) und
das andere Ende mit dem HDMI-Anschluss auf der Rückseite des
Systems (2).
2
LCD-Monitor LCD TV
–or–
1
USB-Geräte anschließen
Verbinden Sie USB-Geräte wie Tastatur, Maus oder Drucker mit den
USB -Anschlüssen auf der Rückseite des Systems.
Page 89

Eee Box-PC 21
Deutsch
An ein Netzwerkgerät anschließen
Verbinden Sie ein Ende des Netzwerkkabels mit dem LAN-Anschluss
auf der Rückseite des Systems und das andere mit einem Hub oder
Switch.
Netzwerkkabel mit RJ-45-Anschluss
Netzwerk-Hub oder Switch
Page 90

22 Eee Box-PC
Deutsch
System einschalten
Verbinden Sie das Netzteil mit dem Anschluss DC IN auf der
Rückseite des Systems und drücken Sie dann den Netzschalter auf
der Vorderseite, um das System einzuschalten.
2
1
• Wenn Ihr Eee Box PC nicht benutzt wird, ziehen Sie bitte den
Stecker des Netzteils aus der Steckdose oder schalten den
Stromverteiler aus, um Energie zu sparen.
• Regeln Sie die Energiespareinstellungen in der Window®.
Systemsteuerung. Damit stellen Sie sicher, dass Ihr Eee Box PC
auf einen niedrigen Stromverbrauchsmodus gesetzt wurde
aber trotzdem voll funktionsfähig bleibt.
Um zum BISO zu gelangen, drücken Sie während des
Startvorgangs wiederholt die Taste <F2>
4
Page 91

Eee Box-PC 23
Deutsch
Eee Box PC benutzen
Wireless-Verbindung kongurieren
Um sich mit einem Wireless-Netzwerk zu verbinden, gehen Sie
folgendermaßen vor:
Verbinden Sie die mitgelieferte Wireless-Antenne mit Ihrem Eee
Box-PC, um den Signalempfang zu verbessern.
Verbinden Sie sich aus Sicherheitsgründen NICHT mit einen
ungesicherten Netzwerk, da sonst die Möglichkeit besteht, dass
durch die fehlende Verschlüsselung Ihre Daten von anderen
gesehen werden..
Die Abbildungen in diesen Abschnitt basieren auf einen
Windows® XP-Betriebssystem.
1. Rechtsklicken Sie in der Windows®-Tastkleiste auf das Wireless-
Netzwerk-Symbol und wählen Sie Verfügbare WirelessNetzwerke anzeigen
2. Wählen Sie das gewünschte
Netzwerk aus der Liste
aus und klicken Sie auf
Verbinden.
Geben Sie bei Bedarf
den NetzwerkSicherheitsschlüssel ein.
3. Nachdem die Verbindung
hergestellt wurde, wird
Verbunden angezeigt.
Page 92

24 Eee Box-PC
Deutsch
Kabelverbindung kongurieren
Die Abbildungen in diesen Abschnitt basieren auf einen
Windows® XP-Betriebssystem.
So stellen Sie eine Kabelnetzwerkverbindung her:
Statische IP benutzen
1. Rechtsklicken Sie im
Benachrichtigungsbereich
auf das Netzwerksymbol
und wählen Sie
Netzwerkverbindungen
öffnen.
2. Rechtsklicken Sie auf LANVerbindung und wählen Sie
Eigenschaften.
3. Markieren Sie Internet
Protocol (TCP/IP)
und klicken Sie auf
Eigenschaften.
Page 93

Eee Box-PC 25
Deutsch
4. Wählen Sie Folgende IPAdresse verwenden.
5. Geben Sie Ihre IP-Adresse,
Subnetzmaske und
Standardgateway ein.
6. Wenn nötig, geben Sie
die Adresse für den
Bevorzugten DNS-Server
ein.
7. Nach der Eingabe aller
erforderlichen Daten,
klicken Sie auf OK, um die
Konfiguration zu beenden.
Dynamische IP benutzen (PPPoE-Verbindung)
1. Wiederholen Sie die
Schritte 1–3 des vorherigen
Abschnittes.
2 Wählen Sie IP-Adresse
automatisch beziehen und
klicken Sie auf OK.
3. Klicken Sie auf Neue
Verbindung erstellen, um
den Verbindungsassistenten
zu starten.
Page 94

26 Eee Box-PC
Deutsch
4. Klicken Sie auf Weiter. 5. Wählen Sie Verbindung
mit dem Internet
herstellen und klicken Sie
auf Weiter.
6. Wählen Sie Verbindung
manuell einrichten.
8. Geben Sie Ihren ISP-
Namen ein und klicken Sie
auf Weiter.
7. Wählen Sie die
Verbindungsart und
klicken Sie auf Weiter.
9. Geben Sie Ihren
Benutzernamen und das
Passwort ein. Klicken Sie
auf Weiter.
Page 95

Eee Box-PC 27
Deutsch
10. Klicken Sie auf Fertig stellen, um die Konfiguration
zu beenden.
Setzen Sie sich mit Ihrem Internet Service Provider (ISP) in
Verbindung, wenn Sie bei der Verbindung zum Netzwerk Probleme
haben.
11. Geben Sie Ihren Benutzernamen und das Passwort
ein. Klicken Sie auf Ver-
binden, um sich mit dem
Internet zu verbinden.
Page 96

28 Eee Box-PC
Deutsch
Bluetooth-Wireless-Verbindung (nur
an bestimmten Modellen)
Folgen Sie den Anweisungen, um eine Bluetooth-Verbindung herzustellen.
Die Abbildungen in diesen Abschnitt basieren auf einen
Windows® XP-Betriebssystem.
1. Doppelklicken Sie auf das
Bluetooth-Symbol in der
Windwos-Startleiste, um den
Verbindungsassistenten zu
starten.
2. Wählen Sie das Bluetooth-Gerät, mit dem Sie sich verbinden wollen, aus der Liste aus
und klicken Sie auf Weiter,
um fortzufahren.
Wenn Sie das gewünschte Gerät nicht sehen können, klicken Sie
auf Actualisieren, um erneut nach Bluetooth-Geräten zu suchen.
Page 97

Eee Box-PC 29
Deutsch
3. Sie müssen möglicherweise
ein Passwort eingeben,
wenn das Gerät eine
Authentifikation erfordert.
4. Das verbundene Gerät wird
nach dem Beenden der
Einrichtung angezeigt.
5. Klicken Sie auf Neue Verbindung und folgen Sie den vorhe-
rigen Anweisungen, um mehr Bluetooth-Geräte hinzuzufügen.
Ihr Eee Box PC kann via Bluetooth gleichzeitig mit mehreren
Geräten verbunden sein.
Page 98

30 Eee Box-PC
Deutsch
Kongurieren des Audio-Ausgangs via
eines HDMI-Gerätes
Wenn Sie als Audio-Ausgabegerät Ihr TV-Gerät mit HDMI-Anschluss
benutzen, verbinden Sie es mit dem Eee Box PC und folgen Sie den
nächsten Schritten, um die Audio-Einstellungen zu konfigurieren:
Die Abbildungen in diesen Abschnitt basieren auf einen
Windows® XP-Betriebssystem.
1. Rechtsklicken Sie in der
Windows®-Taskleiste auf das
Lautsprechersymbol.
2. Wählen Sie im MixerFenster Realtek HDA HDMI
Out.
4. Klicken Sie auf OK, um die
Einstellung zu beenden.
Page 99

Eee Box-PC 31
Deutsch
ASUS Easy Update
ASUS Easy Update ist eine Hilfs-Software, welche automatisch die
neuesten BIOS-Versionen, Treiber und Anwendungen für Ihren Eee
Box-PC erkennt und herunterlädt.
1. Rechtsklicken Sie in der
Windows®-Taskleiste auf das
Symbol ASUS Easy Update.
2. Wählen Sie Zeitplan, um
einzustellen, wie oft Sie Ihr
System aktualisieren wollen.
3. Wählen Sie Aktualisieren, um
die Aktualisierungsfunktion zu
aktivieren.
4. Klicken Sie auf OK, um die
Elemente anzuzeigen, die Sie
herunterladen können.
5. Markieren Sie die Elemente,
die Sie herunterladen wollen
und klicken Sie dann auf OK.
Page 100

32 Eee Box-PC
Deutsch
Systemwiederherstellung
Verwenden der Wiederherstellungs-DVD
Die Wiederherstellungs-DVD beinhaltet ein Image (Abbild) des
Betriebssystems, wie es vom Hersteller auf Ihrem Eee PC installiert
wurde. Die Wiederherstellungs-DVD bietet eine umfangreiche
Wiederherstellungslösung, die Ihr System schnell in den
Originalzustand zurück versetzt, vorausgesetzt, Ihre Festplatte
arbeitet ordnungsgemäß. Bevor Sie die Wiederherstellungs-DVD
verwenden, kopieren Sie alle persönlichen Daten (z.B. Outlook PSTDateien) auf einen externen Datenträger und notieren Sie sich alle
vorgenommenen Einstellungen (z.B. Netzwerkeinstellungen).
Sie müssen ein externes USB-DVD-ROM-Laufwerk an Ihren
Computer anschließen, bevor Sie die Wiederherstellungs-DVD und
Support-CD nutzen können.
1. Schalten Sie den Computer ein und drücken Sie <F8>, um das
Menü Bootgerät auswählen anzuzeigen.
2. Legen Sie die Wiederherstellungs-DVD in das optische Laufwerk
und wählen Sie das optische Laufwerk (“DVDROM: XXX”) als
Boot-Laufwerk. Drücken Sie <Eingabetaste> und dann eine
beliebige Taste, um fortzufahren.
3. Der ASUS Recovery DVD-Bildschirm wird angezeigt. Wählen
Sie, wo das neue System installiert werden soll (dazu werden
mind. 20GB freier Speicherplatz benötigt). Zur Auswahl stehen:
Recover Windows to a partition
Diese Option löscht nur die Partition, die sie ausgewählt haben
und belässt die anderen Partitionen in deren Zustand und
erstellt eine neue Systempartition als Laufwerk “C”. Wählen Sie
einen Partition und klicken Sie NEXT.
Recover Windows to entire HD
Diese Option löscht alle Partitionen auf Ihrer Festplatte und
erstellt eine neue Systempartion als Laufwerk “C” . Wählen Sie
diese Option und klicken Sie Yes.
4. Befolgen Sie die Bildschirmanweisungen, um den
Wiederherstellungsvorgang abzuschließen.
Bei der Wiederherstellung gehen alle Daten verloren. Sichern Sie
daher wichtige Daten, bevor Sie das System wiederherstellen.
5. Starten Sie den Computer neu, wenn die Wiederherstellung
abgeschlossen ist.
 Loading...