

Page 1
AiGuru S2
Wireless Skype Phone
Page 2

E2944
First Edition V1
March 2007
Copyright © 2007 ASUSTeK COMPUTER INC. All Rights Reserved.
No part of this manual, including the products and software described in it, may
be reproduced, transmitted, transcribed, stored in a retrieval system, or translated
into any language in any form or by any means, except documentation kept by the
purchaser for backup purposes, without the express written permission of ASUSTeK
COMPUTER INC. (“ASUS”).
Product warranty or service will not be extended if: (1) the product is repaired,
modied or altered, unless such repair, modication of alteration is authorized in
writing by ASUS; or (2) the serial number of the product is defaced or missing.
ASUS PROVIDES THIS MANUAL “AS IS” WITHOUT WARRANTY OF ANY
KIND, EITHER EXPRESS OR IMPLIED, INCLUDING BUT NOT LIMITED TO
THE IMPLIED WARRANTIES OR CONDITIONS OF MERCHANTABILITY OR
FITNESS FOR A PARTICULAR PURPOSE. IN NO EVENT SHALL ASUS, ITS
DIRECTORS, OFFICERS, EMPLOYEES OR AGENTS BE LIABLE FOR ANY
INDIRECT, SPECIAL, INCIDENTAL, OR CONSEQUENTIAL DAMAGES (INCLUDING
DAMAGES FOR LOSS OF PROFITS, LOSS OF BUSINESS, LOSS OF USE OR
DATA, INTERRUPTION OF BUSINESS AND THE LIKE), EVEN IF ASUS HAS
BEEN ADVISED OF THE POSSIBILITY OF SUCH DAMAGES ARISING FROM ANY
DEFECT OR ERROR IN THIS MANUAL OR PRODUCT.
SPECIFICATIONS AND INFORMATION CONTAINED IN THIS MANUAL ARE
FURNISHED FOR INFORMATIONAL USE ONLY, AND ARE SUBJECT TO CHANGE
AT ANY TIME WITHOUT NOTICE, AND SHOULD NOT BE CONSTRUED AS A
COMMITMENT BY ASUS. ASUS ASSUMES NO RESPONSIBILITY OR LIABILITY
FOR ANY ERRORS OR INACCURACIES THAT MAY APPEAR IN THIS MANUAL,
INCLUDING THE PRODUCTS AND SOFTWARE DESCRIBED IN IT.
Products and corporate names appearing in this manual may or may not be
registered trademarks or copyrights of their respective companies, and are used only
for identication or explanation and to the owners’ benet, without intent to infringe.
ii
Page 3
Safety precautions
For your safety and to keep your phone in good operating condition, read the following
tips and reminders carefully before using your phone.
Always keep the phone dry and free from dust.
Make sure that the phone is switched off before removing/
replacing the battery.
Refer phone servicing only to qualied personnel.
Use only approved accessories. Do not connect incompatible
products or devices.
Use the phone following the instructions in this user guide.
Refer to the Appendix for detailed safety notices.
iii
Page 4

Table of contents
Safety precautions ........................................................................................iii
Table of contents ...........................................................................................iv
About this guide ............................................................................................vii
Package contents ..........................................................................................xi
System requirements ....................................................................................xii
Specications ................................................................................................xii
Chapter 1: Basic information
1.1 Phone layout ..................................................................................1-2
1.2 Battery information .......................................................................1-4
1.2.1 Battery power levels .............................................................1-4
1.2.2 Removing and installing the battery ..................................... 1-4
1.2.3 Charging the battery ............................................................1-6
1.2.4 Turning the phone on or off ..................................................1-7
1.2.5 Display layout .......................................................................1-7
Chapter 2: Installing and using the AiGuru S2 Utility
2.1 Installing the AiGuru S2 Utility .....................................................2-2
2.2 Optimizing the AiGuru S2 Utility settings ...................................2-10
2.2.1 Status ................................................................................... 2-11
2.2.2 WiFi Music Settings .............................................................2-14
2.2.3 Handset Mode Switch and WiFi Congure ..........................2-16
Chapter 3: Getting to know the phone menu and
using the Skype™ features
3.1 Skype .............................................................................................. 3-2
3.1.1 Making a call ........................................................................3-2
3.1.2 Hang up a call ......................................................................3-5
3.1.3 Conference call ....................................................................3-5
iv
Page 5

Table of contents
3.1.4 Presence .............................................................................. 3-7
3.1.5 Skype Voicemail ...................................................................3-8
3.1.6 Chat Alert .............................................................................3-10
3.2 Call List...........................................................................................3-11
3.3 MyProle .......................................................................................3-14
3.4 WiFi Music ......................................................................................3-15
3.4.1 Play mode ............................................................................3-15
3.4.2 Sound mode .........................................................................3-16
3.5 Settings ..........................................................................................3-17
3.5.1 Language .............................................................................3-17
3.5.2 Display .................................................................................3-18
3.5.3 System info. .........................................................................3-20
3.5.4 Load Default .........................................................................3-22
Chapter 4: Windows®Vista™Conguratonand
Windows® SideShow™
4.1 Installing AiGiuru S2 utility ...........................................................4-2
4.2 Changing Skype Privilege Level ..................................................4-8
4.3 Setting up Wireless Music ............................................................ 4-9
4.4 Using Windows SideShow function ............................................4-10
4.4.1 Windows Mail ....................................................................... 4-10
4.4.2 RSS ......................................................................................4-12
Appendix: Reference information
A.1 Setting PC-cillin™ .........................................................................A-2
PC-cillin™ 2007 ...............................................................................A-5
A.2 Setting the Windows Firewall .......................................................A-8
A.2.1 Windows XP .........................................................................A-8
A.2.2 Windows Vista .....................................................................A-9
v
Page 6

Table of contents
A.3 Subscribing RSS feeds ................................................................. A-11
A.4 Notices............................................................................................A-15
A.5 Safety statements ..........................................................................A-16
A.6 Troubleshooting ............................................................................A-23
A.7 FAQ ................................................................................................. A-24
ASUS contact information ............................................................................A-28
vi
Page 7

About this guide
This user guide contains the information you need to use your AiGuru S2 phone.
How this guide is organized
This user guide contains the following parts:
Chapter 1: Basic information
This chapter describes the phone layout, provides information about the
battery including how to charge it, and basic functions such as turning the
phone on/off. This chapter also describes the different layout displays of the
phone.
Chapter 2: Installing and using the AiGuru S2 Utility
This chapter provides instructions on how to install the AiGuru S2 Utility and
the required device drivers. This chapter also shows you how to use the
AiGuru S2 utility.
Chapter 3: Getting to know the phone menu and using the Skype™ features
This chapter shows you how to use the phone and navigate through the Phone
Menu and the Skype™ Menu.
Chapter 4: Windows® Vista™CongurationandWindows® SideShow™
This chapter shows you how to install, congure and use the AiGuru S2 utility
under Windows® Vista™ operating system and how to use the Windows®
SideShow™ features via your AiGuru S2 handset.
Appendix: Reference information
This chapter describes PC-cillin rewall settings, RSS feeds and provides
safety notices, an FAQ section, as well as ASUS’ contact information.
vii
Page 8
Conventions used in this guide
To make sure that you peform certain tasks properly, take note of the following
conventions used throughout this user guide.
NOTE: Tips and information to aid in completing a task.
IMPORTANT: Instructions that you MUST follow to complete a task.
CAUTION: Information to prevent injury to yourself when trying to
complete a task.
WARNING: Information to prevent injury to the unit when trying to
complete a task.
NETWORK DEPENDENT/SUBSCRIBED FEATURE: The phone
feature is network dependent or subscribed.
viii
Page 9

Welcome
Thank you for choosing the ASUS AiGuru S2 Wireless Skype Phone Kit. It will
allow you to make phone using your broadband connection. This Phone is specially
designed to facilitate the manipulation of the service and features provided by SkypeTM.
What is SkypeTM
SkypeTM is free and simple software that enables you to make free calls anywhere in
the world in minutes. If you are tired of paying outrageous fees for telephony, Skype
is for you!
SkypeTM is quick and easy to install. Just download it, register, and within minutes
you can use the ASUS AiGuru S2 Wireless Skype Phone to call your friends on
SkypeTM. SkypeTM calls have excellent sound quality and are highly secure with end-toend encryption. SkypeTM is a registered trademark of Skype Technologies S.A. and all
rights related to it are reserved. It is not in any way connected to ASUSTek Computer,
Inc. To create an account, download the SkypeTM program, and know more about this
program, visit www.skype.com.
Skype™ is a registered trademark of Skype™ Technologies S.A. and
is not in any way connected to ASUSTek Computer, Inc. To create an
account, download the Skype™ program, and know more about this
program, visit www.skype.com.
“Get AiGuru S2 Phone convenience when you use SkypeTM!
Now you do not have to sit in front of your computer when you want to talk to your
friends. With the Skype application running on your PC, the handset can read and
display your contact list on its built-in illuminated display. Just choose who you want to
talk to from the menu, press a button, and get ready to talk.
TM
ix
Page 10

Of course, the handset supports SkypeOutTM dialing as well as your Skype contact list.
The handset rings when you have a SkypeTM or SkypeInTM call coming in, and shows
the caller’s ID on the screen. You can hit the Mute button for privacy, or use the loud-
speaker function to let everyone join in. You can put an existing call on hold and allow
callers to leave a message on the answer machine, and retrieve voice mail with ease.
In short, the ASUS AiGuru S2 Wireless Skype Phone Kit gives you all the
functionality of a regular phone, through SkypeTM. You get the convenience of a
wireless phone and all its features, plus the high-quality voice reception that you get
from SkypeTM on your PC, without being tied to your computer
x
Page 11
Package contents
Check your phone package for the following items:
AiGuru S2 phone Quick Start Guide Support CD
Wireless Link USB
dongle extension
USB cable
Battery
Wireless Link USB
dongle
xi
Page 12
System requirements
• PC running Microsoft® Windows® XP (SP2) / 2000 (SP4) / 32-bit Editions of
Windows Vista / Home Premium / Ultimate / Business / Enterprise
• At least 1 GHz processor
• At least 256 MB RAM
• At least 40 MB free hard disk drive space
• Internet connection: Dial-up, broadband, or cable modem (at least 33.6 Kbps)
We recommend a broadband connection. Voice quality may vary
depending on the connection speed.
• Skype™ version 3.0.0.198 recommended (bundled in the support CD)
Specications
Dimension 116(L) x 47(W) x 12.3(H) mm
Weight 100 g
Wireless standard IEEE 802.11 b+g @11/54 Mbps, 2.4 GHz, with
I/O 128 x 128 Dot matrix color STNLCD
Keypad Alphanumeric keys
auto-fallback and auto-channel selection
0.5 W Speaker
Receiver
Mini USB port
2.5 mm 2-channel Earphone jack
End key
Call key
Navigation keys
Right soft key
Left soft key
Asterisk key
(Continued on the next page)
xii
Page 13

Specications
Features Skype™, SkypeIn™, SkypeOut™, Skype™ Conference
Operating distance Indoors: 30 m*
Power duration Li-ion 3.7 V 750 mAH, 25 hours standby, 2.5 talk hours
Charging 3 hours USB full charging
Wireless receiver Wireless Link dongle (UI) mounted on the PC or
Sofware to install AiGuru S2 Utility
Accessories Support CD
* According to free space test. The operating distance may be shorter
or interfered if there are walls, barriers, or interferences in the home
layout or operating environment.
support
Contacts list, call list Search
Call rejecting, call receiving, call redial, hold
Hands-free speaker out
Caller ID display
Outdoors: 100 m*
notebook
Wireless Link dongle driver
Quick Start Guide
Battery
USB cable
Wireless Link dongle
Wireless Link dongle 3D 360º USB extension
xiii
Page 14

xiv
Page 15

Chapter 1
Basic information
This chapter describes the phone layout, provides information about
the battery including how to charge it, and basic functions such as
turning the phone on/off. This chapter also describes the different
layout displays of the phone.
Page 16
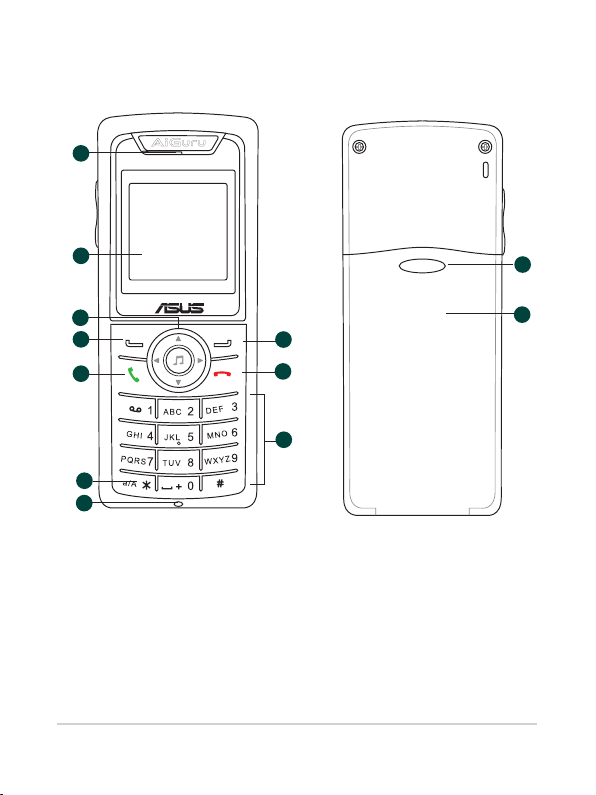
1.1 Phone layout
Front view
1
2
3
4
5
6
7
1. Earpiece/Speaker
2. LCD screen. Displays information such as time, battery status, signal strength,
and menus.
3. Navigation keys. Allows you to navigate menu lists and functions as a
shortcut.
Up: Skype Presence
Down: Skype Contacts
Left: Skype Menu
Right: Missed Call list
Middle: WiFi Music
1-2
8
9
10
Back view
11
12
Chapter 1: Basic information
Page 17
4. Left soft key. Allows you to perform the function indicated on the bottom left
corner of the screen.
5. Call key. Initiates a call.
6. Asterisk key. Holds to chage the input modes. Toggles between numeric and
alpha modes.
7. Microphone
8. Right soft key. Allows you to perform the function indicated on the bottom right
corner of the screen.
9. End key. Terminates a call.
10. Alphanumeric keypad. Allows you to enter numbers, letters, and symbols.
11. Battery latch. Secures the battery cover to the phone.
12. Battery cover. Covers the battery.
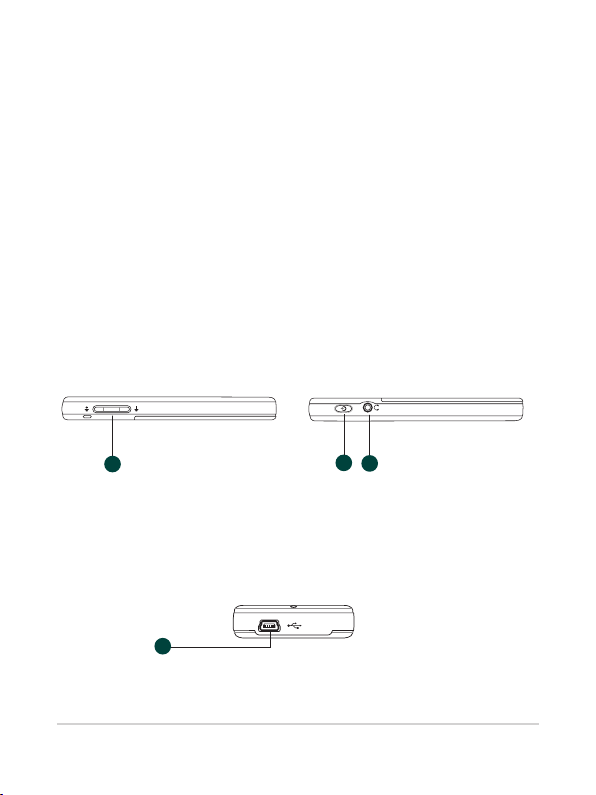
Side view (left) Side view (right)
14
13
13. Volume adjustment buttons. Adjusts the phone volume.
14. Power button. Turns the phone on or off.
15. Earphone jack. Connects an earphone.
15
Bottom view
16
16. USB B type connector. Connects a USB B series plug to charge the phone
battery and congure the phone.
AiGuru S2 Wireless Skype Phone
1-3
Page 18

1.2 Battery information
A rechargeable battery powers the AiGuru S2 Wireless Skype Phone. Make sure that
the battery is fully charged to prevent interrupted communications due to power loss.
Fully charge the lithium ion battery before rst use and whenever it is
depleted to prolong battery life.
1.2.1 Battery power levels
The battery icon on the LCD screen helps you keep track of the remaining battery
power so you will know when you need to charge the battery. Note the battery icon
indicating the battery power levels.
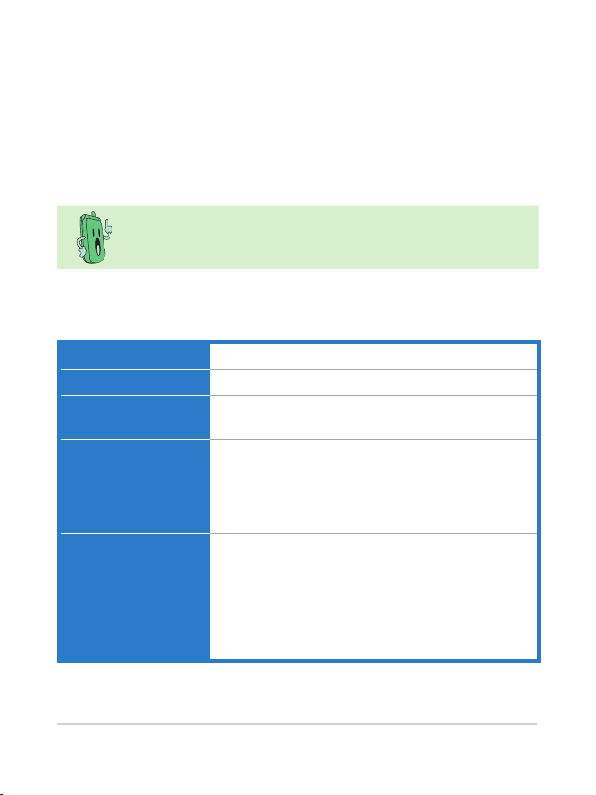
Icon Indication
Battery is 55% to 100% full.
Battery is 25% to 55% full.
Battery is 10% to 25% full.
Turning red. Battery has no power.
Charging is required.
1.2.2 Removing and installing the battery
The rechargeable battery comes installed in the AiGuru S2. In the future, you may
need to replace the current battery. Follow the instructions in this section to remove
and install the battery if needed.
Before removing or installing the battery, make sure the phone is
turned off and not connected to a USB cable.
1-4
Chapter 1: Basic information
Page 19
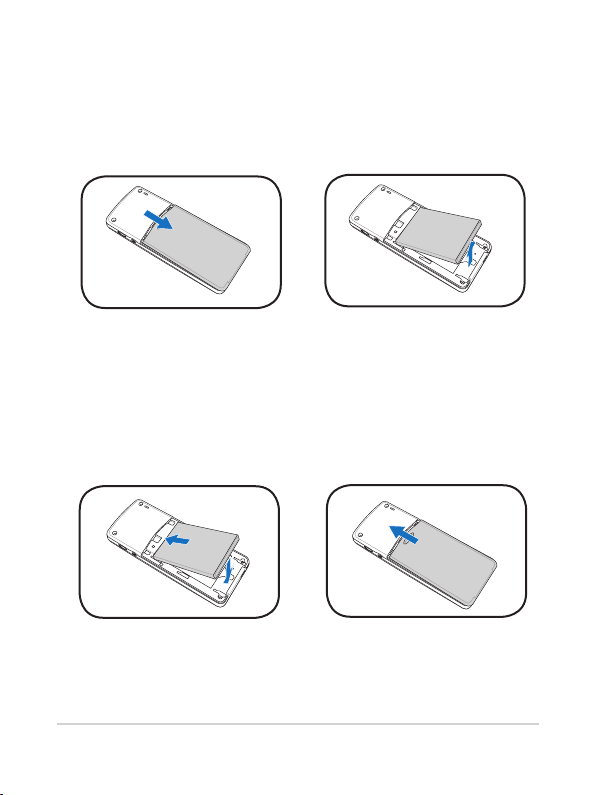
To remove the battery:
1. Push the battery cover latch in
the direction of the arrow until the
battery cover disengages from the
phone. Lift the cover then set it
aside.
To install the battery:
1. Place the battery into the battery
compartment noting the correct
polarity.
2. Upwardly lift the battery and set it
aside.
2. Slide the battery cover in the
direction of the arrow until the latch
snaps in place.
AiGuru S2 Wireless Skype Phone
1-5
Page 20
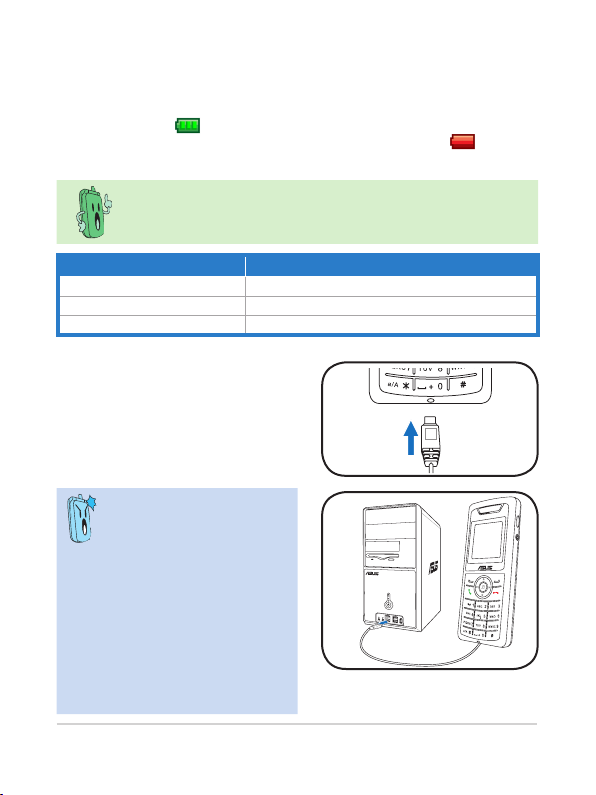
1.2.3 Charging the battery
Low battery indicator
The battery indicator (green) on the upper left corner of the screen indicates how
much charge remains in the battery. When the battery indicator shows (red), you
need to recharge the battery. Charge the battery through the USB cable.
To know the charging status of the phone, note the LED color on the
upper left corner of the handset. Refer to the table below.
Color Indication
Orange (blinking) Battery charging
Green (blinking slowly) Idle mode (backlight is off)
No color (LED off) Phone in use
USB direct charging
1. Connect the USB Series B plug
(with the squarish end) to the port
at the bottom of the phone.
2. Connect the USB Series A plug
(with the at rectangular end) to a
USB 2.0 port on your computer.
Make sure your computer
is turned on. For the best
battery performance, make the
battery charge and discharge
completely the rst few times
you use it.
For some PC, USB ports may
fail to deliver enough power to
the devices connected to them.
When using S2, connecting
your S2 and the dongle to
neighboring USB ports is not
suggested.
1-6
Chapter 1: Basic information
Page 21
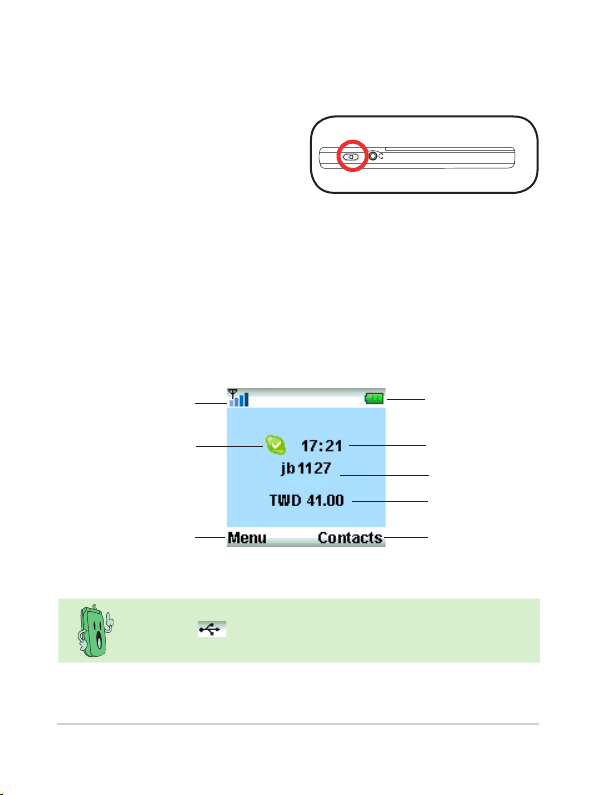
1.2.4 Turning the phone on or off
To turn the phone on or off:
1. Locate the power button on the
right side of the phone.
2. Press the power button for a few
seconds until the display turns on
or off.
1.2.5 Display layout
Idle mode
The phone is in idle mode when it is ready for use and you have not performed any
action.
WiFi Signal strength
indicator
Skype status
Main menu
selection
When you switch to USB Mode, the WiFi Signal strength indicator will
change to . Refer to 2.2.3 for detailed information on handset
mode switch.
AiGuru S2 Wireless Skype Phone
Battery indicator
Clock
Account name
Skype credit
Skype Contacts list
1-7
Page 22
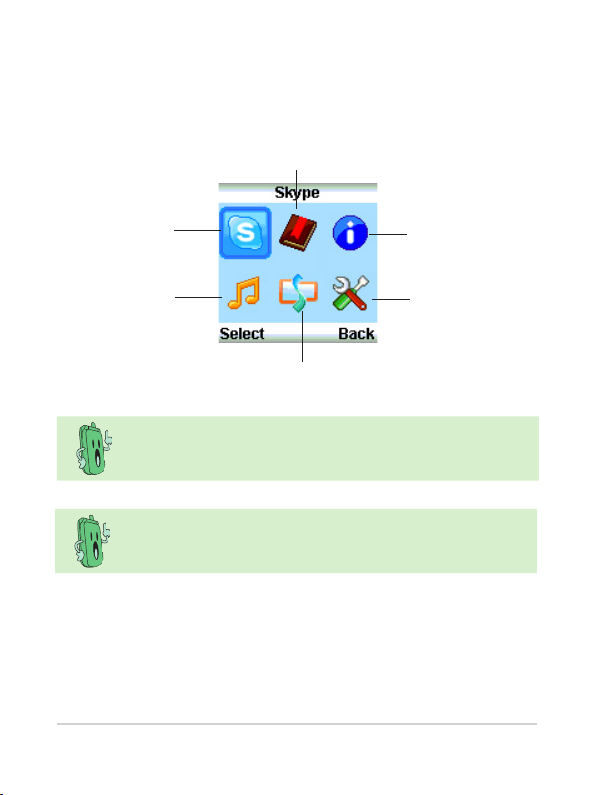
Main menu
After you press the left soft key, the main menu appears. You can navigate to Skype,
Call List, MyProle, Settings, SideShow, WiFi Music to use all the functions or
congure the settings.
Call List
1-8
Skype
WiFi Music
SideShow
When you log off Skype, switch to USB Mode, or disconnect the
connection, some icons in the main menu will be grayed out.
The SideShow icon is only available under Windows Vista system and
the functions available will vary depending on the Windows Vista. If
your operating system is Windows XP, this item will be unavailable.
My Prole
Settings
Chapter 1: Basic information
Page 23

Chapter 2
Installing and using
the AiGuru S2 Utility
This chapter provides instructions on how to install the AiGuru S2
Utility and the required device drivers. This chapter also shows you
how to congure the phone and Wireless Link USB dongle.
Page 24

2.1 Installing the AiGuru S2 Utility
Before using your AiGuru S2 Wireless Skype Phone, you need to install the AiGuru S2
Utility. This utility allows you to take full advantage of your phone’s features.
Requirements for installing the AiGuru S2 utility:
1. Windows® XP (SP2) / 2000 (SP4) / 32-bit Editions of Windows Vista / Home
Premium / Ultimate / Business / Enterprise
2. At least 1 GHz processor
3. At least 256 MB RAM
4. At least 40 MB free hard disk drive space
5. Internet connection: Dial-up, broadband, or cable modem (at least 33.6 Kbps)
6. Skype™ account
7. Microsoft® DirectX 9.0c
8. Wireless Link USB dongle
9. AiGuru S2 support CD
Consult the Internet Service Provider(ISP) for detailed information
about network setting.
2-2
Chapter 2: Installing and using the AiGuru S2 Utility
Page 25
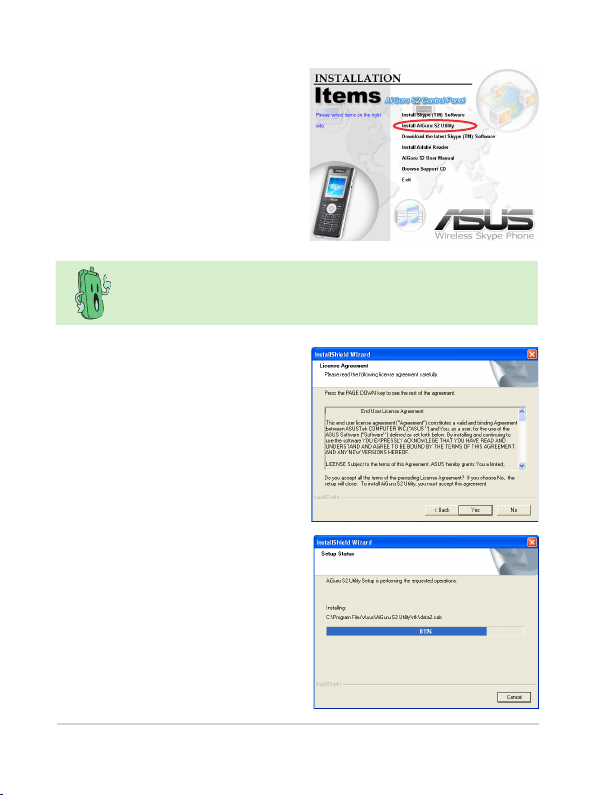
To install the AiGuru S2 Utility:
1. Place the AiGuru S2 support CD in
the optical drive.
The AiGuru S2 Control Panel
appears. Click Install AiGuru S2
Utility.
If the AiGuru S2 Utility installation does not run automatically, click
Browse Support CD, then double click Setup.exe to run the
installation or readme for help.
2. Click Yes to start installation
when the InstallShield Wizard
appears.
3. When the installation begins, the
Setup Status window indicates
the progress of installation.
AiGuru S2 Wireless Skype Phone
2-3
Page 26
4. This screen appears when
W
i
r
e
l
e
s
s
L
i
n
k
Wirel
installation is completed. Refer
to the following description to
connect the Wireless Link USB
dongle to your PC.
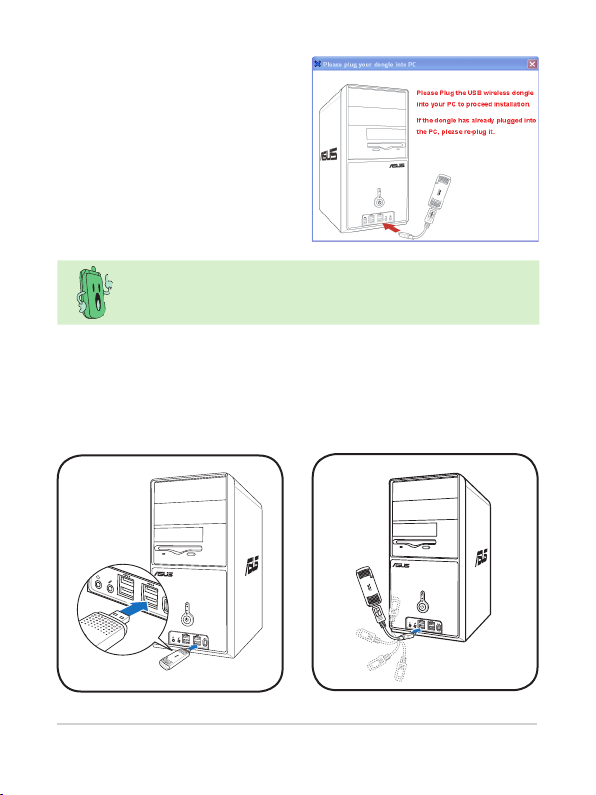
Installation can not proceed if the Wireless Link USB dongle is not
connected to your PC.
To connect the Wireless Link USB dongle:
You may plug the Wireless Link USB dongle to your PC directly or connect it to your
PC with the Wireless Link USB dongle extension. See the pictures below:
Method 1: Method 2:
2-4
Chapter 2: Installing and using the AiGuru S2 Utility
Page 27
The Wireless Link USB dongle extension comes with the handset. You
can adjust it up to 360º to get better signal.
The Wireless Link USB dongle is a thumb-sized device that creates
a wireless network using the IEEE 802.11g wireless standards. The
device allows wireless communication between your computer and
your phone using USB 2.0 connectivity, giving you the convenient
access to the Skype™ program and control of the AiGuru S2 Utility.
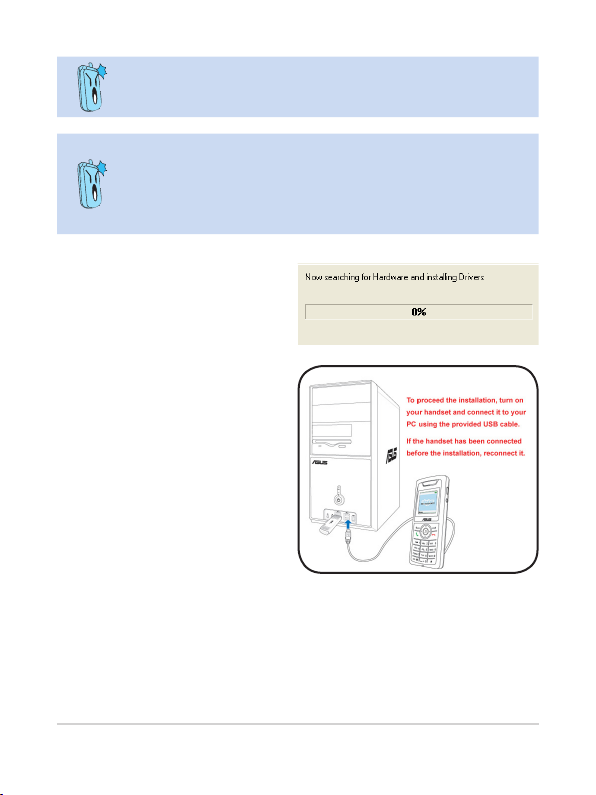
1. Installation proceeds when you
connect the Wireless Link USB
dongle to your PC.
2. This screen appears when
installation is completed. Turn
on your handset and connect it
to your PC using the provided
USB cable.
AiGuru S2 Wireless Skype Phone
2-5
Page 28
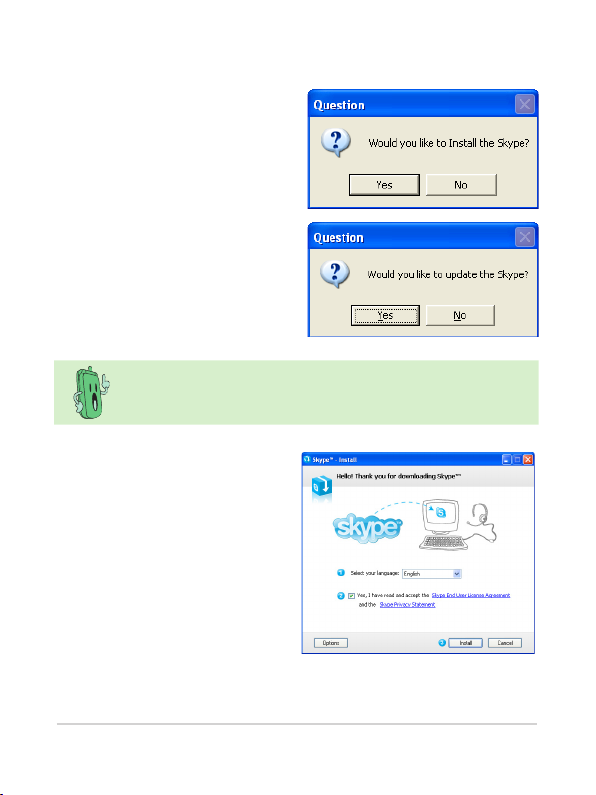
To install Skype™:
1. A dialogue box opens, asking if
you would like to install or update
the Skype™ program. Click Yes
to install the program.
We recommand you install the program in the Support CD or the
programs suggested in ASUS website.
2. The Skype™ Setup Wizard
appears and leads you to nish
the installation. Select the
language to use rst.
3. Read the License Agreement and
then click the box, then click the
Install button to install.
2-6
Chapter 2: Installing and using the AiGuru S2 Utility
Page 29
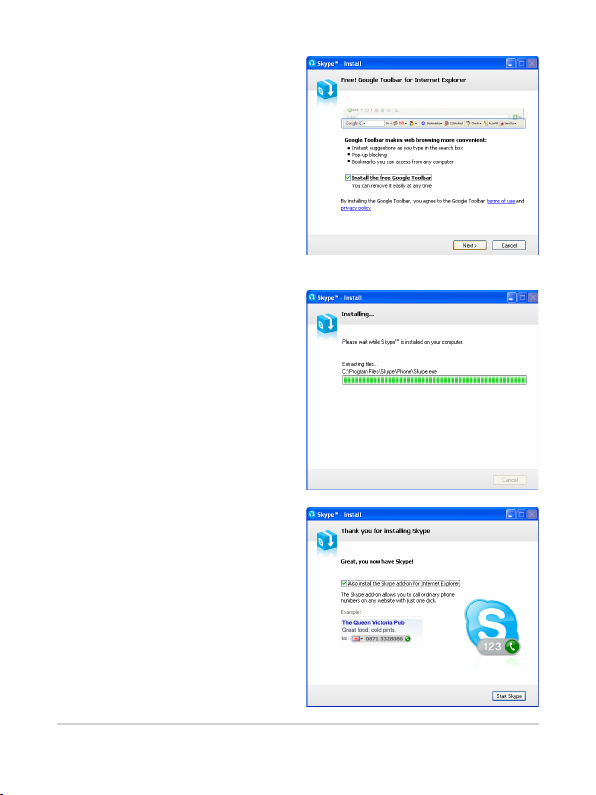
4. If you want to install the free
Google Toolbar please click
the box before Install the free
Google Toolbar, then click the
Next button.
5. Installation proceeds.
6. This screen appears when
installation is completed. Click
the Start Skype.
AiGuru S2 Wireless Skype Phone
2-7
Page 30
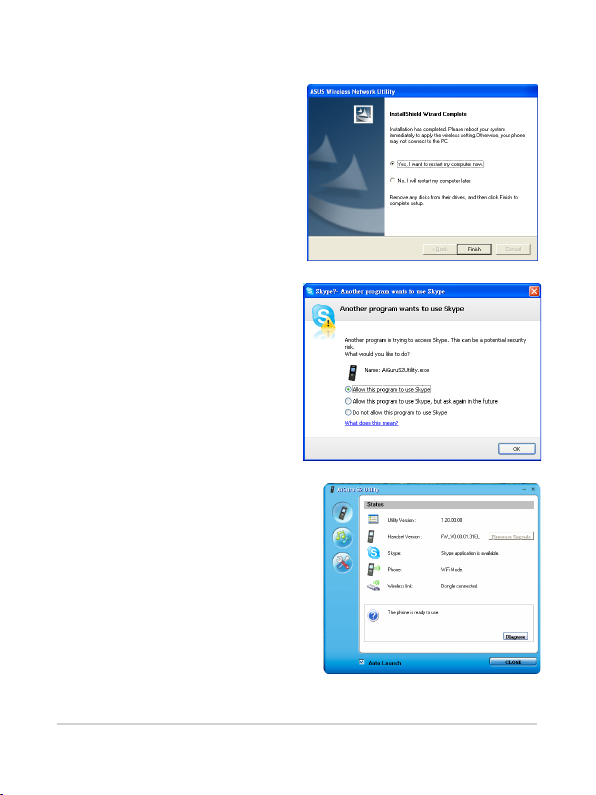
To continue AiGuru S2 Utility installation
1. InstallShield Wizard appears
after you nish Skype installation.
Select Yes, I want to restart my
computer now and click Finish.
2. After restarting the computer,
when you log in to skype, a
prompt appears. Select Allow
this program to use Skype and
click OK. The AiGuru S2 utility
will be ready to use.
3. The warning message appears
on the utility screen, if the phone
and the Wireless Link USB
dongle are not connected to your
PC, or the Skype application
is not initiated. The warning
messages disappear when
everything is ready.
2-8
Chapter 2: Installing and using the AiGuru S2 Utility
Page 31

4. Click the third button on the left
to check if the WiFi congure is
correct.
5. When the conguration succeeds,
the handset displays the
information as the right picture,
and is ready to use.
If the
connection
USB dongle and try again.
jb1127
according to the user.
AiGuru S2 Wireless Skype Phone
fails, place the handset close to the Wireless Link
on the phone display is the skype account name and it varies
2-9
Page 32

2.2 Optimizing the AiGuru S2
Utility settings
After installing the AiGuru S2 Utility and Wireless Link USB dongle device driver, it is
time to customize the settings to optimize the features of your phone.
To launch the AiGuru S2 Utility:
1. Turn on your phone.
2. Connect the Wireless Link USB dongle to your computer.
3. Start your computer.
4. Launch the Skype application and log in to your skype account.
5. Launch the AiGuru S2 Utility by double-clicking the AiGuru S2 Utility icon (with
the image of this phone on your desktop or the taskbar.
6. The AiGuru S2 Utility main screen appears. Refer to the following section for
details on how to customize the AiGuru S2 Utility.
2-10
Chapter 2: Installing and using the AiGuru S2 Utility
Page 33

2.2.1 Status
Click the button on the left to display the phone status.
AiGuru S2 utility will auto-detect the
phone status, as shown in the picture
on the right.
Item Message
Utility Version Displays the utility version you are using.
Handset
Version
Skype
Wireless Link Dongle (not) connected
Phone Displays the mode you are in, WiFi Mode or USB Mode. Aslo it
Displays the handset version. You can update the handset
rmware by connecting the handset to the computer and click the
Firmware Upgrade button.
Skype application is (not) available.
tells the handset is connected through the USB cable or not.
is a warning message, indicating the
Skype application is not initiated or the
phone or the Wireless Link USB dongle
is not detected. If icon appears,
click the Diagnose button to nd out the
problem.
AiGuru S2 Wireless Skype Phone
2-11
Page 34

Wi-Fi Disconnect
If the triangle warning icon appears before Phone on the left pane of the control
panel, there is a Wi-Fi connection failure. Follow the instructions below to solve the
connection problem.
To rebuild Wi-Fi connection:
1. Make sure your Skype application
has been initiated and the
wireless link donlge is connected.
(No warning icons before both
items)
2. Move the mouse cursor to the
AiGuru S2 icon on the Windows
OS taskbar and it pops out the
same message shown on the
control panel.
3. Press the alphanumeric keypad
for Wi-Fi reconnection directly
or click the Diagnose button on
the control panel to identify the
problem.
2-12
Chapter 2: Installing and using the AiGuru S2 Utility
Page 35

Firmware upgrade
Follow the instructions below for rmware
updating.
1. Connect your handset to your PC through the providing USB cable and click
the Firmware Upgrade button to apply the latest rmware for your handset.
2. The warning message appears Do not power off.
3. After the process is complete, follow the instruction to reboot the handset.
During the rmware updating, turning the handset off or removing the
USB cable will seriously damage the handset.
Update the rmware to obtain the best performance and stablity.
AiGuru S2 Wireless Skype Phone
2-13
Page 36

2.2.2 WiFi Music Settings
Click the button on the left to open the WiFi Music Settings screen and to
select the playlist you would like to listen to on your phone.
1
2
3
1. Media Player: Allows you to choose the media player you want from the dropdown menu. AiGuru S2 Utility supports Windows Media Player and iTunes.
iTunes has compatible problem with Windows Vista operating system.
If you are using Windows Vista operating system, the iTunes will be
unavailable in the drop-down menu.
2-14
Chapter 2: Installing and using the AiGuru S2 Utility
Page 37

2. Playlist: Allows you to create a new playlist, import an existed playlist that
created from the AiGuru S2 utility, or delete an unwanted playlist.
Create new playlist: Click the button New,
and enter the new playlist name in the
dialogue box.
Import a playlist: Click the button
Import, and the Import a playlist screen
appears.Locate the playlist you created
earlier or the playlist you want to import
and click Open.
Delete a playlist: Click the button Delete,
and a dialogue box appears, asking for
conrmation. Click OK to delete the playlist
in the disk.
3. Playlist content: Allows you to easily drag and drop songs onto the list. You
can also use the button below to add and remove a song from the list or clear
the whole playlist at a time. Click the button Save to save your customized
setup.
AiGuru S2 Wireless Skype Phone
2-15
Page 38

2.2.3 HandsetModeSwitchandWiFiCongure
Click the button on the left to open the Handset Mode Switch and WiFi
Conguration screen.
Handset Mode Switch
You can switch between WiFi Mode and USB Mode. The function of WiFi Music will be
disabled when you are in USB mode.
When you switch between WiFi Mode and USB Mode, please don’t
unplug the handset until the conguration completed.
2-16
Chapter 2: Installing and using the AiGuru S2 Utility
Page 39

WiFiCongure
After the installation of AiGuru S2 utility and the Skype application, the handset should
be ready to use. The system will automatically detect your phone setting if you restart
your computer or replug the Wireless Link USB dongle.
You need to click the AirCong button to reset the phone if you connect the phone to
another computer or the IP address of your computer changes. You have to congure
your phone and the AiGuru S2 utility. Make sure you’ve connected the dongle to your
computer and the handset is turned on. Click the button Air Cong and hold the Call
Key of the handset simutaneously. If the AirCong fails, refer to 2.2.1 Status to
diagnose the problem.
AiGuru S2 Wireless Skype Phone
2-17
Page 40

2-18
Chapter 2: Installing and using the AiGuru S2 Utility
Page 41

Chapter 3
Getting to know
the phone menu and
using the Skype™ features
This chapter shows you how to use the phone and
navigate through the Phone Menu and the Skype™ Menu.
Page 42

3.1 Skype
Your AiGuru S2 phone allows you to receive or make skype phone calls while you are
away from your computer, within the operating range of the WLAN module
3.1.1 Making a call
Before using your AiGuru S2 Wireless Skype Phone, make sure
you have installed the AiGuru S2 Utility and congured the required
settings. Do not quit the utility while you are signed in to Skype™.
Refer to Chapter 2 for details.
Using an entry in the Contact List:
To make a call to a mobile phone or land line using SkypeOut™, you
need to purchase credits. Visit the Skype™ website at www.skype.com
for details.
1. From the idle screen, press
the left soft key to display the
main menu. and select Skype
> Contacts. Or, press the right
soft key to display the contacts
directly.
The phone book on your phone only displays the contacts saved in
your Skype account.
Chapter 3: Getting to know the phone menu and using the Skype™ features
3-2
2. The contact list appears, sorted
by SkypeOut number and Skype
contacts.
Page 43

3. For SkypeOut number:
1. Scroll up/down to choose the
SkypeOut number you want to
call, and then press the Call Key
to make the connection directly.
For Skype contact:
1. Scroll up/down to choose the
contact you want to call, and then
press the Call Key to make the
connection directly.
3. Also, you can SkypeOut your
contact’s other phone numbers
in the ViewProle menu. Scroll
up/down to select the wanted
number and press the left soft
key (SkypeOut) or press the Call
Key directly.
2. Or press the left soft key
(Options) to SkypeOut Call.
2. To do it otherwise, press the left
soft key (Options) to Call.
AiGuru S2 Wireless Skype Phone
3-3
Page 44

Searching a contact in the Contact List:
When making a call, you can search a wanted contact in the contact list with the
keypad. It is faster and saves your time to make a skype phone call.
Search a contact by phone numbers:
1. Key in the phone number with the
keypad. The screen will display
the suggested contacts with each
keystroke.
3. Follow the instructions on the previous pages to initiate the call.
Search a contact by names:
1. Key in the contact’s name with the
keypad. The screen will display
the suggested contacts with each
keystroke.
2. Scroll up and down through the
possible contacts and select the
contact you want.
2. Scroll up and down through the
possible contacts and select the
contact you want.
3. Follow the instructions on the previous pages to initiate the call.
Chapter 3: Getting to know the phone menu and using the Skype™ features
3-4
Page 45

Using the numeric keypad:
To make a call using the numeric keypad:
1. From the idle screen, press the “0”
key twice to input “+” sign and dial the
telephone number you want to connect.
2. Press the left soft key (Save) to save the
number; otherwise, press the right soft
key (Delete) to delete the entry one by
one.
3. Press End Key to delete all entries and
return to the idle screen. Or, press the
Call Key to make the connection.
3.1.2 Hang up a call
When you are done with the phone conversation, press End Key to terminate the call.
3.1.3 Conference call
1. From the idle screen, press
the left soft key to display the
main menu, and select Skype >
Conference call.
2. From the Conference Call
screen, press the left soft key to
select the conference participant.
A check mark appears before the
contact’s name or the SkypeOut
number. Press twice to unselect
the participant.
AiGuru S2 Wireless Skype Phone
3-5
Page 46

3. Repeat the previous steps to add
more conference participants.
A conference call can include maximum one host and four participants.
You have to unselect a participant before you add another new one if
the participant number exceeds the limit.
5. When you are done with the phone
conversation, press End Key to
terminate the call.
During the call, you can switch between Loudspeaker mode and
Handset mode for Handsfree function, or Mute the mircrophone so
that others cannot hear you.
During a call, you can press Hold to hold the call and Unhold to
continue. If there is another incoming call, press Switch call to
swtich between two calls. However, the function of holding a call is
unavailable in a conference call.
4. Press Call Key to start the
connection.
Chapter 3: Getting to know the phone menu and using the Skype™ features
3-6
Page 47

3.1.4 Presence
You can change your Skype status through the handset remotely.
1. From the idle screen, press
the left soft key to display the
main menu and select Skype >
Presence.
2. Scroll up/down to choose the
Skype status you want, and press
the left soft key (Select) too make
a conrmation, Ofine, Online,
Skype Me, Away, Not available,
Do not disturb or Invisible.
3. After the selection, the idle
screen displays as shown.
When you switch your status to Ofine, some Skype functions will be
disabled, such as making calls.
AiGuru S2 Wireless Skype Phone
3-7
Page 48

3.1.5 Skype Voicemail
You can download and listen to your Voicemail, or delete the Voicemail in a few steps.
Play a Voicemail:
1. From the idle screen, press the
left soft key to display the main
menu and select Skype > Skype
Voicemail.
2. Use the navigation keys to nd
the Voicemail you want from the
list
3. Press the left soft key (Options)
and select Play.
Chapter 3: Getting to know the phone menu and using the Skype™ features
3-8
Page 49

Delete a/all Voicemail(s):
1. From the idle screen, press the left soft key to display the main menu and
select Skype > Skype Voicemail.
2. Use the navigation keys to locate the Voicemail you want to delete from the list.
3. Press the left soft key (Options)
and select Delete.
4. A message appears, asking for
conrmation. Press the left soft
key (OK) to delete the selected
Voicemail.
5. To delete all Voicemails, repeat the previous instructions and select Delete All
to clear all Voicemails.
AiGuru S2 Wireless Skype Phone
3-9
Page 50

3.1.6 Chat Alert
After activating Chat Alert function, an icon will appear on your handset display to
remind you of an incoming text message on your PC with a beep when you are away
chatting via AiGuru S2.
To activate or inactivate Chat Alert:
1. From the idle screen, press the left
soft key to display the main menu
and select Skype > Chat Alert.
2. Use the navigation keys and the left
soft key to select On to start Chat
Alert or Off to stop this function.
After the text message is read, the icon on your handset display will
disappear.
When this function is disabled, there will be no reminder icon and
alerting beep if a text message is coming to your PC.
Chapter 3: Getting to know the phone menu and using the Skype™ features
3-10
Page 51

3.2 Call List
Displaying the Missed Call, Incoming Call, and Outgoing Call, the Call List menu is
convenient for you to trace the history of all kinds of calls.
1. From the idle screen, press the left soft key to display the main menu and
select Call List.
2. Use the navigation keys to highlight
the type of call history you want to
browse and press the left soft key
to Enter.
3. Select a Missed/Incoming/Outgoing
call entry and press the left soft key
to call back.
4. Or hightlight Details and press left
soft key to check the call details.
AiGuru S2 Wireless Skype Phone
3-11
Page 52

5. The information about the call will
be displayed as shown.
6. Or hightlight ViewProle and press
left soft key to view the caller or the
recipient’s prole.
7. The prole of the caller or the
recipient will be displayed as
shown.
Chapter 3: Getting to know the phone menu and using the Skype™ features
3-12
Page 53

Missed call alert
When there is a missed call, the handset display will alert you with a missed call
message.
To clear the alert message:
1. From the idle screen, press the
left soft key to display the main
menu, and select Call List >
Missed Call.
2. The screen will display the
callers.
3. Follow the instructions on previous pages to call back, check the call details or
view the caller’s prole.
4. After you return back to the idle screen, the missed call alert message is
removed.
When you checked the missed call, the call in the Missed Call will be
moved to Incoming Call.
AiGuru S2 Wireless Skype Phone
3-13
Page 54

3.3 MyProle
My Prole menu lists detailed prole of your Skype account.
1. From the idle screen, press the left
soft key to display the main menu
and select MyProle.
2. Scroll up and down using the
navigation keys to view the prole.
3. Press the left soft key to SkypeOut to the phone number in your prole.
You are not allowed to make a Skype call to yourself. While browsing
this menu, you can only SkypeOut to your home number, ofce
number, or your mobile phone number.
Chapter 3: Getting to know the phone menu and using the Skype™ features
3-14
Page 55

3.4 WiFi Music
Your AiGuru S2 phone can function as a Windows Media Player or iTunes remote
controller, allowing you to play audio les while you are away from your computer,
within the operating range of the WLAN module.
1. From the idle screen, press the
left soft key to display the main
menu and select WiFi Music or
press key to enter WiFi Music
directly.
3.4.1 Play mode
You are able to switch the play mode to Repeat and Random.
1. From the playback screen, press
the left soft key (Mode).
2. The handset screen will display the
song list you select in your AiGuru
S2 PC utility. Press the left soft key
to start enjoying the music.
2. From the Mode menu, highlight
Play Mode and press the left soft
key (Select) to conrm.
AiGuru S2 Wireless Skype Phone
3-15
Page 56

3. From the Play Mode menu, select
Repeat to repeat the whole playlist
or Random to shufe the play
order. You can activate these two
mode together.
4. After the repeat or the random mode is selected, the repeat icon or the
random icon or both of them will appear on the playback screen.
3.4.2 Sound mode
The WiFi Music function of AiGuru S2 provides different sound modes for the music
playing. You can change the mode to suit the music genre or your mood.
1. From the playback screen, press the left soft key (Mode).
2. From the Mode menu, highlight
Sound Mode and press the left
soft key (Select) to conrm.
4. After the selection, the sound mode will appear on the playback screen.
3. From the Sound Mode menu,
highlight a mode and press the left
soft key (Select) to conrm.
The WiFi Music functions only in the WiFi mode.
Chapter 3: Getting to know the phone menu and using the Skype™ features
3-16
Page 57

3.5 Settings
In the Settings menu, you can congure settings of AiGuru S2 wireless skype phone,
including language, display, keypad lock, or you can restore to the default setting.
3.5.1 Language
1. From the idle screen, press the left
soft key to display the main menu
and select Settings.
2. From the Settings screen, select
Language and press the left soft
key to Enter.
3. The Language screen opens, and
you can highlight the language you
want to use. Press the left soft key
(Select) to conrm.
AiGuru S2 Wireless Skype Phone
3-17
Page 58

3.5.2 Display
Backlingt Time
1. From the idle screen, press the left soft key to display the main menu and
select Settings.
2. From the Settings screen, select
Display and press the left soft key to
Enter.
2. Highlight Backlight Time and press
the left soft key to Select.
3. From the Backlight Time menu,
you can select a screen backlight
time and press the left soft key to
Select.
Unless you set the backlight time to Always On, the handset display
darkens when the backlight time is up and blackens after 30-second
idle to minimize battery energy consumption. Press any key to light up
the display.
Chapter 3: Getting to know the phone menu and using the Skype™ features
3-18
Page 59

The display will not blacken under three conditions: (1) the handset is
connected to the PC and charging, (2) during a call, and (3) the WiFi
Music is functioning.
Brightness
1. From the idle screen, press the left soft key to display the main menu and
select Settings.
2. From the Settings screen, select Display and press the left soft key to Enter.
3. Highlight Brightness and press the
left soft key to Select.
4. Use the navigation keys to adjust
the value. Scroll right to increase
the brightness and left to decrease
the brightness.
The conguration value of brightness is between -2 to 2.
AiGuru S2 Wireless Skype Phone
3-19
Page 60

3.5.3 System info.
The System Info. menu offers the information such as WiFi status, Mac address, and
rmware version.
WiFi Status
1. From the idle screen, press the left
soft key to display the main menu
and select
screen, select
Settings
and press the left soft key to
Info.
.
Enter
Settings
. From the
System
2. From the
3. The
3-20
System Info.
select
WiFi Status
left soft key to
WiFi Status
Chapter 3: Getting to know the phone menu and using the Skype™ features
screen,
and press the
.
Enter
screen opens.
Page 61

MAC Address
1. From the
System Info.
select
MAC Address
the left soft key to
screen,
and press
Enter
2. The
.
MAC Address
screen opens.
Both
WiFi Status
list when in the USB mode.
Info.
and
Firmware Version
1. From the
AiGuru S2 Wireless Skype Phone
System Info.
select
Firmware Version
the left soft key to
Enter
screen,
and press
.
MAC Address
2. The
opens.
will not appear on the
Firmware Version
screen
System
3-21
Page 62

3.5.4 Load Default
To load the default settings:
1. From the idle screen, press the left
soft key to display the main menu
and select
2. From the
Load Default
key to
Enter
3. A message appears, asking for
conrmation.
4. Press the left soft key (
conrm or the right soft key (No) to
stop the default loading.
5. After the the loading completes, the
screen shows
.
Settings
screen, select
Settings
and press the left soft
.
) to
Yes
Default set
.
Chapter 3: Getting to know the phone menu and using the Skype™ features
3-22
Page 63

Chapter 4
Windows® Vista™ Conguraton
and Windows® SideShow™
This chapter shows you how to install, congure and use
the AiGuru S2 utility under Windows® Vista™ operating system
and how to use the Windows® SideShow™ features via your AiGuru S2 handset.
Page 64

4.1 Installing AiGiuru S2 utility
If you are using Windows Vista OS, follow the instructions below to install AiGuru S2
utility.
To install the AiGuru S2 Utility:
1. Place the AiGuru S2 support CD in
the optical drive.
The AiGuru S2 Control Panel
appears. Click Install AiGuru S2
Utility.
2. Click Yes to start installation
when the InstallShield Wizard
appears.
3. When the installation begins, the
Setup Status window indicates
the progress of installation.
4-2
Chapter 4: Windows® Vista™ Conguration and Windows® SideShow™
Page 65

4. The Windows Security warning
message pops out and click
Install this driver software
anyway to continue.
5. Then, the system will continue
to install the ASUS WLAN card
driver.
6. The Windows Security warning
message pops out again for
conrmation. Click Install this
driver software anyway to
continue.
AiGuru S2 Wireless Skype Phone
4-3
Page 66

7. This screen appears when
installation is completed. Refer
to section 2.1.3 to connect the
Wireless Link USB dongle to your
PC.
Installation can not proceed if the Wireless Link USB dongle is not
connected to your PC.
8. This screen appears after the
dongle is connected. Turn on
your handset and connect it to
your PC using the provided USB
cable.
9. A dialogue box opens, asking if
you would like to install or update
the Skype™ program. Click Yes
to install the program or No if
your Skype™ program version is
more updated.
4-4
Chapter 4: Windows® Vista™ Conguration and Windows® SideShow™
Page 67

Refer to the section
Skype™ program.
10. To install Feed Viewer for
Windows SideShow, link to the
Microsoft website to download
Feed Viewer.
AiGuru S2 supports Windows® SideShow™ functions, and this function
will be unavailable without Feed Viewer.
11. The Restarting Windows screen
appears. Toggle No, I will restart
my computer later and click OK
to continue install Feed Viewer.
OR
Click OK directly to restart the
computer if you don’t want to
install Feed Viewer.
12. From the Windows Live Gallery
web page, click the Download
button to download the Feed
Viewer.
2.1 Installing the AiGuru S2 Utility
to install
AiGuru S2 Wireless Skype Phone
4-5
Page 68

13. Click Install to continue.
14. Click Run to run the Feed Viewer.
15. To use Feed Viewer for Windows
SideShow, check the box before
License Agreement and click
Install to proceed the setup.
4-6
Chapter 4: Windows® Vista™ Conguration and Windows® SideShow™
Page 69

16. When the installation begins,
the status window indicates the
progress of installation.
17. When the installation completes,
click the Finish button to exit the
Setup Wizard.
18. Restart your computer to complete the installation.
Refer to the section
the installation of AiGuru S2 utility.
AiGuru S2 Wireless Skype Phone
2.1 Installing the AiGuru S2 Utility
to complete
4-7
Page 70

4.2 Changing Skype Privilege Level
After you complete the AiGuru S2 utility installation, two shortcuts are added to the
desktop, and both of the program icons are with the security shield overlay, indicating
that the applications are intended for administrators only. Before using, you need to
change the privilege level.
To change the privilege level:
1. Right-click the Skype icon on the
desktop and select Property.
2. Click the Compatibility tab
on the top and check the box
before Run this program as
an administrator. Click the OK
button to complete the setup.
3. Initiate Skype. When the warning
message pops out, click Allow to
proceed.
4-8
Chapter 4: Windows® Vista™ Conguration and Windows® SideShow™
Page 71

4.3 Setting up Wireless Music
Before enjoy wireless music under Windows Vista operating system, you nedd to
ocngure the playback device rst. Refer to section 2.2.3 for more information about
wireless music.
To set up wireless music:
1. Right-click the speaker icon on the
OS taskbar and select Playback
Devices.
2. Click the Playback tab on the top
and highlight Line3. Click the OK
button to complete the setup.
It is a one-time setup. If you want to enjoy your music through the PC
speakers, you have to manually recongure the playback device.
AiGuru S2 Wireless Skype Phone
4-9
Page 72

4.4 Using Windows SideShow function
AiGuru S2 supports Windows® SideShow™ functions, allowing you to read your
emails and your subscribed RSS information away from your PC.
Visit Microsoft website (www.microsoft.com) to learn more about
Windows® SideShow™ features.
Windows® SideShow™ features are only available under Windows
Vista OS.
4.4.1 Windows Mail
1. From the idle screen, press the
left soft key and slect Windows®
SideShow™.
2. Highlight Window Mail and press
the left soft key to Enter.
4-10
Chapter 4: Windows® Vista™ Conguration and Windows® SideShow™
Page 73

3. Scroll up and down for the unread
mails in your Windows Mail in Vista.
The list will display senders and the
partial subject. Highlight one entry
and press the left soft key to read
more.
4. The subject of the selected mail will
be displayed as shown.
This function enables you to read your Windows Mail in Vista only.
Microsoft Outlook 2007 is not supported.
You can only konw the mail senders and the subjects. Complete mails
are not available.
AiGuru S2 Wireless Skype Phone
4-11
Page 74

4.4.2 RSS
1. From the Windows Sideshow
menu, highlight RSS and press the
left soft key to Enter.
2. From your subscribed RSS list,
scroll up and down to select an
RSS feed, then press the left soft
key to Enter.
4-12
Refer to the
an RSS feed from your favorite website.
Chapter 4: Windows® Vista™ Conguration and Windows® SideShow™
A.3 Subscribing RSS feeds
for instructions to subscribe
Page 75

3. From the RSS list, select an entry,
and press the left soft key (Detail)
to read more.
4. The content and the date will be
displayed as shown. Scroll down to
read more.
The date and the RSS content are offered by your subscribed website,
and they vary with the websites.
AiGuru S2 Wireless Skype Phone
4-13
Page 76

4-14
Chapter 4: Windows® Vista™ Conguration and Windows® SideShow™
Page 77

Appendix
Reference information
This chapter describes PC-cillin rewall settings, RSS feeds and provides safety notices, an
FAQ section as well as ASUS’ contact information.
Page 78

A.1 Setting PC-cillin™
If you installed PC-cillin™ Internet Security software in your computer, make the
following settings before installing AiGuru S2 Utility.
1. Open Trend Micro PC-cillin
Internet Security, click Network
Security tab, then click Personal
Firewall.
2. On Personal Firewall screen,
click Add.
A-2
Appendix: Reference information
Page 79

3. Key in ASUS in Prolename
eld, then click OK.
4. Select Exception List tab, and
click Add.
AiGuru S2 Wireless Skype Phone
A-3
Page 80

5. Add AiGuruIn
a. Description: AiGuruIn
b. Target: Select Speciedapplication
and point to the location where the
application is saved.
c. Connection: Incoming
d. Action: Allow
e. Protocol: TCP/UDP
d. Port(s): All ports
f. IP Setting: All IP Addresses
6. Add AiGuruOut
a. Description: AiGuruOut
b. Target: Select Speciedapplication
and point to the location where the
application is saved.
c. Connection: Outgoing
d. Action: Allow
e. Protocol: TCP/UDP
d. Port(s): All ports
f. IP Setting: All IP Addresses
A-4
Appendix: Reference information
Page 81

7. Back to the Personal Firewall
screen, select ASUS in Choose
prole eld, then click Apply.
PC-cillin™ 2007
If you installed PC-cillin™ Internet Security 2007 software in your computer, make the
following settings before installing AiGuru S2 Utility.
1. Open Trend Micro PC-cillin
Internet Security, click Personal
Network Firewall Controls tab
on the left, and click Personal
Firewall, then press the Settings
button.
AiGuru S2 Wireless Skype Phone
A-5
Page 82

2. On Personal Firewall screen,
click Add.
3. Key in ASUS in Prolename
eld, then click OK.
4. Click the Program Control tab
on the top, and click Add.
A-6
Appendix: Reference information
Page 83

5. Add AiGuru
a. Key in AiGuru in the Name
of program control rule
eld.
b. In the Target section,
toggle Specied
application and locate
the executable le of the
application.
c. In the Setting section,
toggle Simple Mode and
Allow
d. Click the OK button to
leave.
6. On Personal Firewall screen,
click ASUS and press the OK
button to complete the setup.
7. When you run the AiGuru S2
utility, PC-cillin warning message
pops out shown and click Allow
to continue.
AiGuru S2 Wireless Skype Phone
A-7
Page 84

A.2 Setting the Windows Firewall
A.2.1 Windows XP
1. From the Control Panel, select
Windows Firewall.
2. Toggle Off and press the OK
button to complete the setup.
A-8
Appendix: Reference information
Page 85

A.2.2 Windows Vista
1. From the Control Panel, select
Security Center.
2. Click Firewall.
3. Select Change Settings.
AiGuru S2 Wireless Skype Phone
A-9
Page 86

4. Toggle Off and press the OK
button to complete the setup.
A-10
Appendix: Reference information
Page 87

A.3 Subscribing RSS feeds
If you want to use the Windows® SideShow™ function, you need to subscribe RSS feeds
rst. Follow the instructions below to subscribe RSS feeds.
To subscribe RSS feeds using IE7.0:
1. Visit the websites you are
interested in. The website
supports RSS if the web page is
marked with or .
2. Click the feed you would like to
subscribe.
AiGuru S2 Wireless Skype Phone
A-11
Page 88

3. Click Subscribe to this feed.
4. You can rename the feed and
retrieve it in the folder you want,
then click Subscribe.
5. The web page shows that You’ve
successfully subscribed to this
feed!
A-12
Appendix: Reference information
Page 89

6. After the subscription, you can
see it in your Feeds list.
7. From the Control Panel, select
Windows SideShow and doubleclick Feed Headlines on the
Gadgets list.
AiGuru S2 Wireless Skype Phone
A-13
Page 90

8. The feeds you’ve subscribed will
be displayed as shown.Click the
checkboxes add as a gadget.To
remove the feed, just unselect the
checkbox. Press the OK button
to complete the Feed Headlines
settings.
8. The gadgets you’ve selected will
show on your AiGuru S2.
A-14
Appendix: Reference information
Page 91

A.4 Notices
FEDERAL COMMUNICATIONS COMMISSION INTERFERENCE
STATEMENT
This equipment has been tested and found to comply with the limits for a Class B
digital device, pursuant to Part 15 of the FCC Rules. These limits are designed to
provide reasonable protection against harmful interference in a residential installation.
This equipment generates, uses and can radiate radio frequency energy and, if not
installed and used in accordance with the instructions, may cause harmful interference
to radio communications. However, there is no guarantee that interference will not
occur in a particular installation. If this equipment does cause harmful interference to
radio or television reception, which can be determined by turning the equipment off
and on, the user is encouraged to try to correct the interference by one or more of the
following measures:
– Reorient or relocate the receiving antenna.
– Increase the separation between the equipment and receiver.
– Connect the equipment into an outlet on a circuit different from that to which the
receiver is connected.
– Consult the dealer or an experienced radio/TV technician for help.
CAUTION:
Any changes or modications not expressly approved by the party responsible for
compliance could void the user’s authority to operate the equipment.
This device complies with Part 15 of the FCC Rules. Operation is subject to the
following two conditions:
(1)This device may not cause harmful interference and
(2)This device must accept any interference received, including interference that may
cause undesired operation.
AiGuru S2 Wireless Skype Phone
A-15
Page 92

A.5 Safety statements
Regulatory Information/Disclaimers
Installation and use of this Wireless LAN device must be in strict accordance with
the instructions included in the user documentation provided with the product. Any
changes or modications (including the antennas) made to this device that are not
expressly approved by the manufacturer may void the user’s authority to operate
the equipment. The manufacturer is not responsible for any radio or television
interference caused by unauthorized modication of this device, or the substitution
of the connecting cables and equipment other than manufacturer specied. It is the
responsibility of the user to correct any interference caused by such unauthorized
modication, substitution or attachment. Manufacturer and its authorized resellers
or distributors will assume no liability for any damage or violation of government
regulations arising from failing to comply with these guidelines.
To maintain compliance with FCC’s RF exposure guidelines, this
equipment should be installed and operated with minimum distance
[20cm] between the radiator and your body. Use on the supplied
antenna. Unauthorized antenna, modication, or attachments could
damage the transmitter and may violate FCC regulations.
Safety Information
In order to maintain compliance with the FCC RF exposure guidelines, this equipment
should be installed and operated with minimum distance [20 cm] between the radiator
and your body. Use only with supplied antenna. Unauthorized antenna, modication,
or attachments could damage the transmitter and may violate FCC regulations.
Any changes or modications not expressly approved in this manual
could void your authorization to use this device.
A-16
Appendix: Reference information
Page 93

FCC RF Radiation Exposure Statement
This equipment complies with FCC RF radiation exposure limits set forth for
an uncontrolled environment.
This equipment must not be co-located or operating in conjunction with any
other antenna or transmitter.
Maximum SAR Measurement (1g)
Head: 802.11b=0.815 W/kg, 802.11g=0.466 W/kg
Body: 802.11b=0.352 W/kg, 802.11g=0.225 W/kg
Radio waves may affect electronic equipment or medical devices (e.g.,
pacemakers), which may cause malfunctions and possible injuries.If you
use a pacemaker or other medical device, consult your physician or the
manufacturer of the medical device before using the wireless networking
feature.
Industry Canada regulatory information
Operation is subject to the following two conditions:
(1) This device may not cause harmful interference and
(2) This device must accept any interference received, including
interference that may cause undesired operation.
Declaration of Conformity
This product complies with the Radio & Telecommunication Terminal
Equipment Directive (1995/5/EC), the Electromagnetic Compatibility
Directive (89/336/EEC), and Low Voltage Directive (73/23/EEC).
Compliance with these directives implies conformity to the following
European Standards:
EN 55022, EN55024, EN 300 328, EN 301 489-1 & 17, EN 60950, EN
50360, EN 50361
EU RF Exposure Statement
This equipment complies with EU RF radiation exposure limits of 2 W/kg.
802.11b=0.439 W/kg, 802.11g=0.25 W/kg
AiGuru S2 Wireless Skype Phone
A-17
Page 94

Wireless Operation Channel for Different Domains
North America 2.412-2.462 GHz Ch01 through Ch11
Japan 2.412-2.462 GHz Ch01 through Ch11
Europe ETSI 2.412-2.462 GHz Ch01 through Ch11
France Restricted Wireless Frequency Bands
Some areas of France have a restricted frequency band. The worst case maximum
authorized power indoors are:
• 10 mW for the entire 2.4 GHz band (2400 MHz–2483.5 MHz)
• 100 mW for frequencies between 2446.5 MHz and 2483.5 MHz
Channels 10 through 13 inclusively operate in the band
2446.6 MHz to 2483.5 MHz.
There are few possibilities for outdoor use: On private property or on the private
property of public persons, use is subject to a preliminary authorization procedure by
the Ministry of Defense, with maximum authorized power of 100mW in the 2446.5–
2483.5 MHz band. Use outdoors on public property is not permitted.
In the departments listed below, for the entire 2.4 GHz band:
• Maximum authorized power indoors is 100 mW
• Maximum authorized power outdoors is 10 mW
Departments in which the use of the 2400–2483.5 MHz band is permitted with an
EIRP of less than 100mW indoors and less than 10mW outdoors:
01 Ain Orientales 02 Aisne 03 Allier 05 Hautes Alpes
08 Ardennes 09 Ariège 11 Aude 12 Aveyron
16 Charente 24 Dordogne 25 Doubs 26 Drôme
32 Gers 36 Indre 37 Indre et Loire 41 Loir et Cher
45 Loiret 50 Manche 55 Meuse 58 Nièvre
59 Nord 60 Oise 61 Orne 63 Puy du Dôme
64 Pyrénées Atlantique 66 Pyrénées 67 Bas Rhin 68 Haut Rhin
70 Haute Saône 71 Saône et Loire 75 Paris 82 Tarn et Garonne
84 Vaucluse 88 Vosges 89 Yonne 90 Territoire de Belfort
94 Val de Marne
A-18
Appendix: Reference information
Page 95

This requirement is likely to change over time, allowing you to use your wireless LAN
card in more areas within France. Please check with ART for the latest information
(www.art-telecom.fr)
Your WLAN Card transmits less than 100 mW, but more than 10 mW.
UL Safety Notices
Required for UL 1459 covering telecommunications (telephone) equipment intended
to be electrically connected to a telecommunication network that has an operating
voltage to ground that does not exceed 200V peak, 300V peak-to-peak, and 105V
rms, and installed or used in accordance with the National Electrical Code (NFPA 70).
When using the device, basic safety precautions should always be followed to reduce
the risk of re, electric shock, and injury to persons, including the following:
• Do not use the device near water, for example, near a bath tub, wash bowl,
kitchen sink or laundry tub, in a wet basement or near a swimming pool.
• Do not use the device during an electrical storm. There may be a remote risk of
electric shock from lightning.
• Do not use the device in the vicinity of a gas leak.
Required for UL 1642 covering primary (nonrechargeable) and secondary
(rechargeable) lithium batteries for use as power sources in products. These batteries
contain metallic lithium, or a lithium alloy, or a lithium ion, and may consist of a single
electrochemical cell or two or more cells connected in series, parallel, or both, that
convert chemical energy into electrical energy by an irreversible or reversible chemical
reaction.
• Do not dispose the device battery pack in a re, as they may explode. Check
with local codes for possible special disposal instructions to reduce the risk of
injury to persons due to re or explosion.
• Do not use power adapters or batteries from other devices to reduce the risk of
injury to persons due to re or explosion. Use only UL certied power adapters or
batteries supplied by the manufacturer or authorized retailers.
AiGuru S2 Wireless Skype Phone
A-19
Page 96

Power Safety Requirement
Products with electrical current ratings up to 6 A and weighing more than 3 Kg must
use approved power cords greater than or equal to: H05VV-F, 3G, 0.75 mm2 or
H05VV-F, 2G, 0.75 mm2.
Nordic Cautions
A-20
Appendix: Reference information
Page 97

Proper Disposal
The symbol of the crossed out bin indicates that the product (electrical and electronic
equipment) should not be placed in municipal waste. Check local regulations for
disposal of electronic products.
AiGuru S2 Wireless Skype Phone
A-21
Page 98

Safety Warnings
Read the following safety warnings carefully before using your cell phone.
• This equipment is intended for use with power supplied from supplied battery
charger(s) and/or power supply unit(s). Other usage will invalidate any
certication given to this apparatus and may be dangerous.
• Switch off your phone when in an aircraft. The use of wireless phones in an
aircraft may be dangerous to the operation of the aircraft, disrupt cellular
networks, and may be illegal. Failure to observe this instruction may lead to
suspension or denial of phone services to the offender, legal action or both.
• Do not use the phone or phone equipment when at a refueling point.
• Observe restrictions on the use of radio equipment in fuel depots, chemical
plants, or where blasting operations are in progress.
• The use of the Alert device to operate a vehicle’s lights or horn on public roads is
not permitted.
You MUST exercise proper control of your vehicle at all times. Observe the following
safety precautions when driving:
• Do not use a hand-held telephone or microphone while you are driving.
• When driving, nd a safe place to stop the vehicle before using the phone.
• Do not speak into a hands-free microphone if it will distract you from driving.
• You MUST NOT stop on the hard shoulder of a motorway to answer or make a
call, except in an emergency.
• The radio equipment should be connected to the antenna via a non-radiating
cable (e.g. coaxial cable). The antenna must be mounted in a position such that
no part of the human body will normally rest close to any part of the antenna
unless there is an intervening metallic screen, such as a metallic roof.
NOTES:
• You can connect the USB charger or USB data cable to the device in only one
orientation. Incorrect insertion of the cable connector may cause short circuiting
and may damage the device.
A-22
Appendix: Reference information
Page 99

A.6 Troubleshooting
When the phone and wireless settings are congured
properly, the main display should show the following.
This means that the phone is ready to use.
Following are some situations you might encounter, indicating that there is a problem
with the connection, and the possible actions you can take.
Message displayed Problem description Action to take
WiFi Disconnected 1. The phone was not
congured properly.
2. Communication
between the phone
and the Wireless Link
USB dongle is not
established.
No Service 1. The communication
between the phone and
the Wireless Link USB
dongle is established.
2. The AiGuru S2 Utility
has not been launched.
Recongure the
phone settings.
See section “2.2.3
Handset Mode
Switch and WiFi
Congure”
See section “2.2
Optimizing the
AiGuru S2 Utility
settings” to launch
the AiGuru S2 Utility.
Skype™ Logged Off 1. Skype™ is not launched
on your PC or logged in
with personal account.
2. There is no Internet
access.
Different from Ofine (Presence), the message Skype Logged Off
denotes some possible problems of the Skype utility or the lack of
internet access.
AiGuru S2 Wireless Skype Phone
Make sure that you
have Internet access
and that you have
launched and logged
into Skype™
A-23
Page 100

A.7 FAQ
This section provides solutions to problems that may occur or questions commonly
encountered during the installation and operation of the ASUS AiGuru S2 Wireless
Skype Phone. Read the description below to solve your problems. If you cannot nd
an answer here, check the ASUS contact information at the end of the user manual.
Q1. Why is there no dial tone when I press the Talk & Recall button?
A1. Either the Wireless Link USB dongle is not properly connected to the PC, the
handset is too far from the Wireless Link USB dongle, or the battery is low (low
battery icon is displayed).
• Check the connections.
• Move closer to the Wireless Link USB Dongle unit.
• Charge the battery.
• If there is something wrong with Skype Program itself, please restart Skype.
Q2. Why does the screen show “WiFi Disconnect”?
A2. When the phone is out of the Wireless Link USB dongle’s operating range, the
phone will keep accessing its signal source for 30 seconds. If detecting the
signal fails, the screen shows the message “WiFi Disconnect” and the goes
into sleep mode.
To regain wireless access, move the handset closer to the Wireless Link USB
dongle and press any key on the handset for access retrieval.
Q3. Why is the battery icon “empty” although the handset has been charged
for 24 hours?
A3. The handset might not be connected to the PC correctly. It is also possible that
the handset’s battery is defective.
• Contact your dealer to purchase a new rechargeable battery.
• Make sure the battery icon is scrolling. If it is not, the battery is not charging.
Q4. Why is there no symbol on the display?
A4. This could mean that the battery is not charged or the Phone Kit is not properly
connected.
• Verify that you have set up the Phone Kit properly.
A-24
Appendix: Reference information
 Loading...