

Page 1
ASUS Ai Booster
The ASUS Ai Booster is an innovative application that allows overclocking
of system components in Windows® environment. This utility lets you
overclock the CPU either manually or automatically without the hassle of
entering the BIOS Setup.
NOTE. Ai Booster supports Windows® 2000/XP/2003 operating system.
Installing Ai Booster
The Ai Booster application is included in the support CD that came with
your motherboard package.
To install the Ai Booster:
1. Place the support CD into the optical drive. The Drivers installation
window appears if your computer has an enabled Autorun feature.
2. Click the Utilities tab, then click Ai Booster.
3. Follow the screen instructions to install.
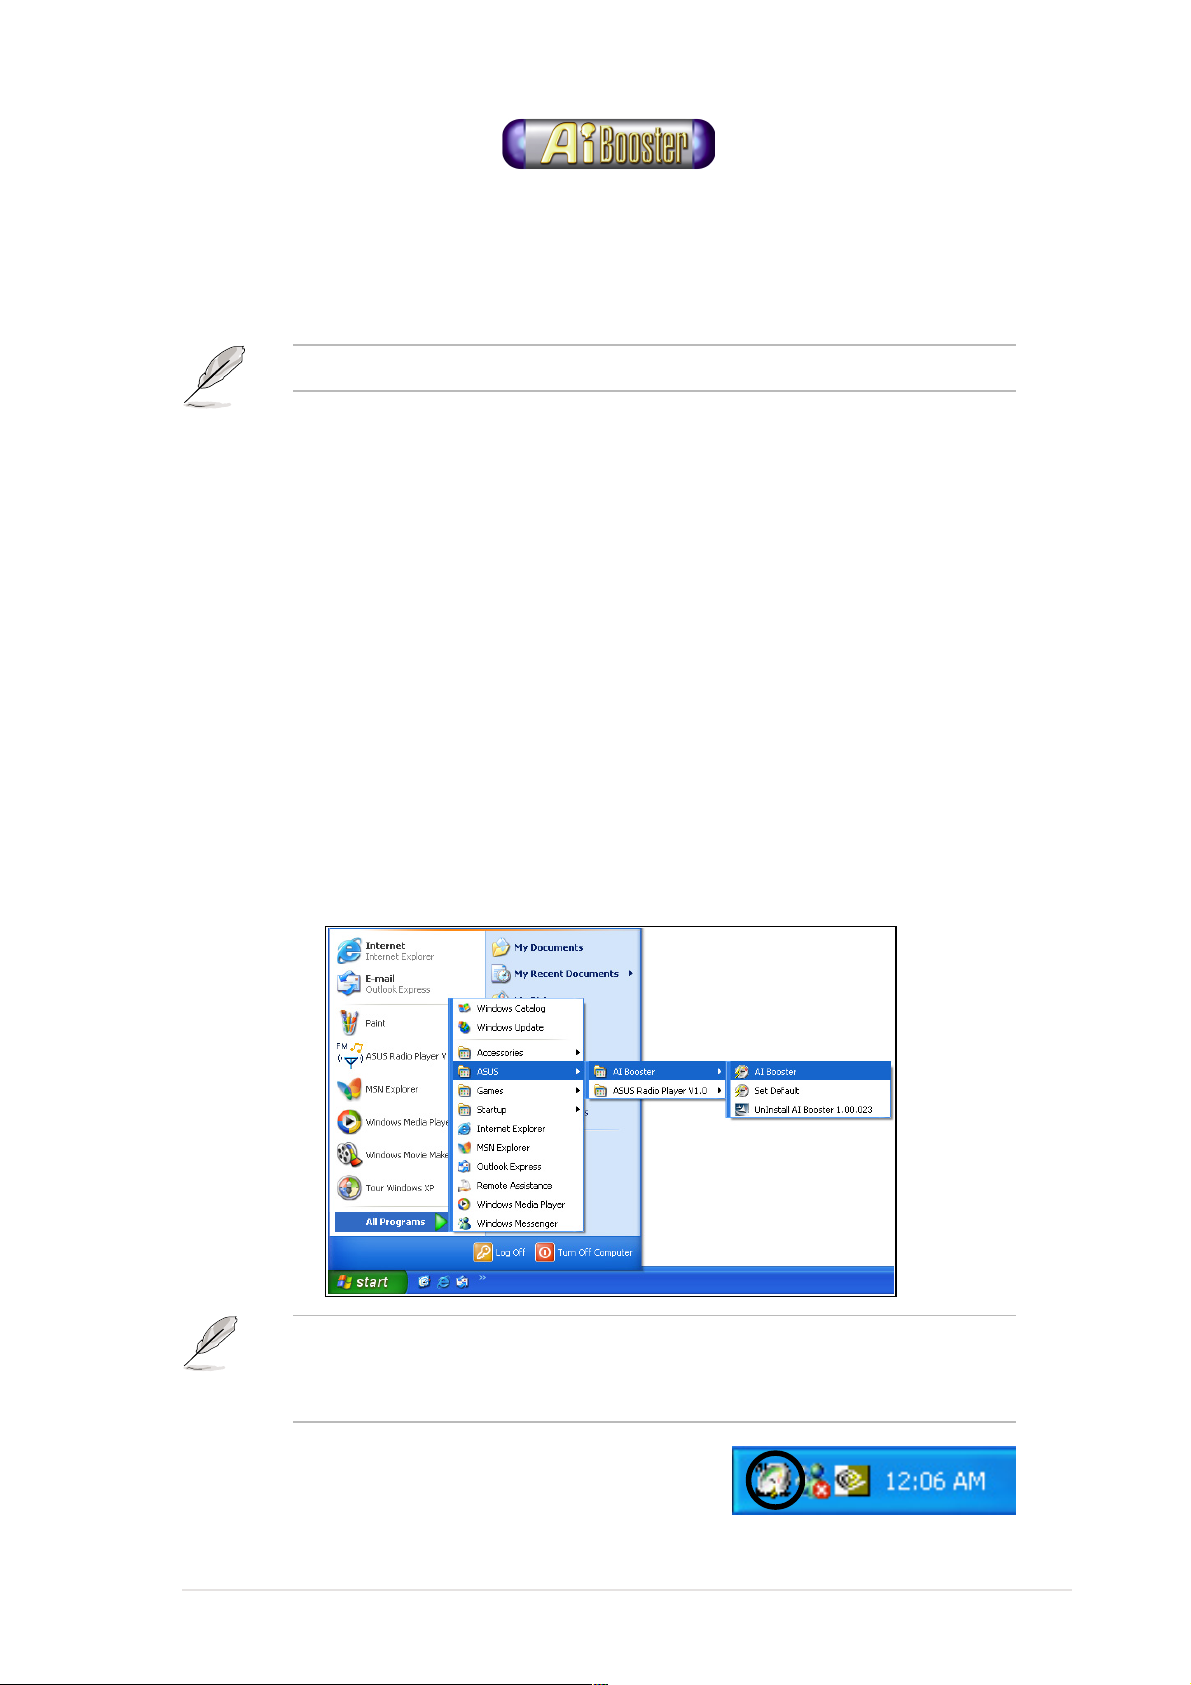
Launching Ai Booster
To launch Ai Booster, click Start > All Programs > ASUS > AI Booster >
AI Booster. The Ai Booster interface appears.
If Autorun is NOT enabled in your computer, browse the contents of
the support CD to locate the file AIBooster.exe from the Utilities folder.
Double-click the AIBooster.exe to start installation.
After launching the application, the Ai Booster
icon appears in the Windows® taskbar.
Right-click this icon to close or restore the Ai
Booster interface.
User guide
1
Page 2
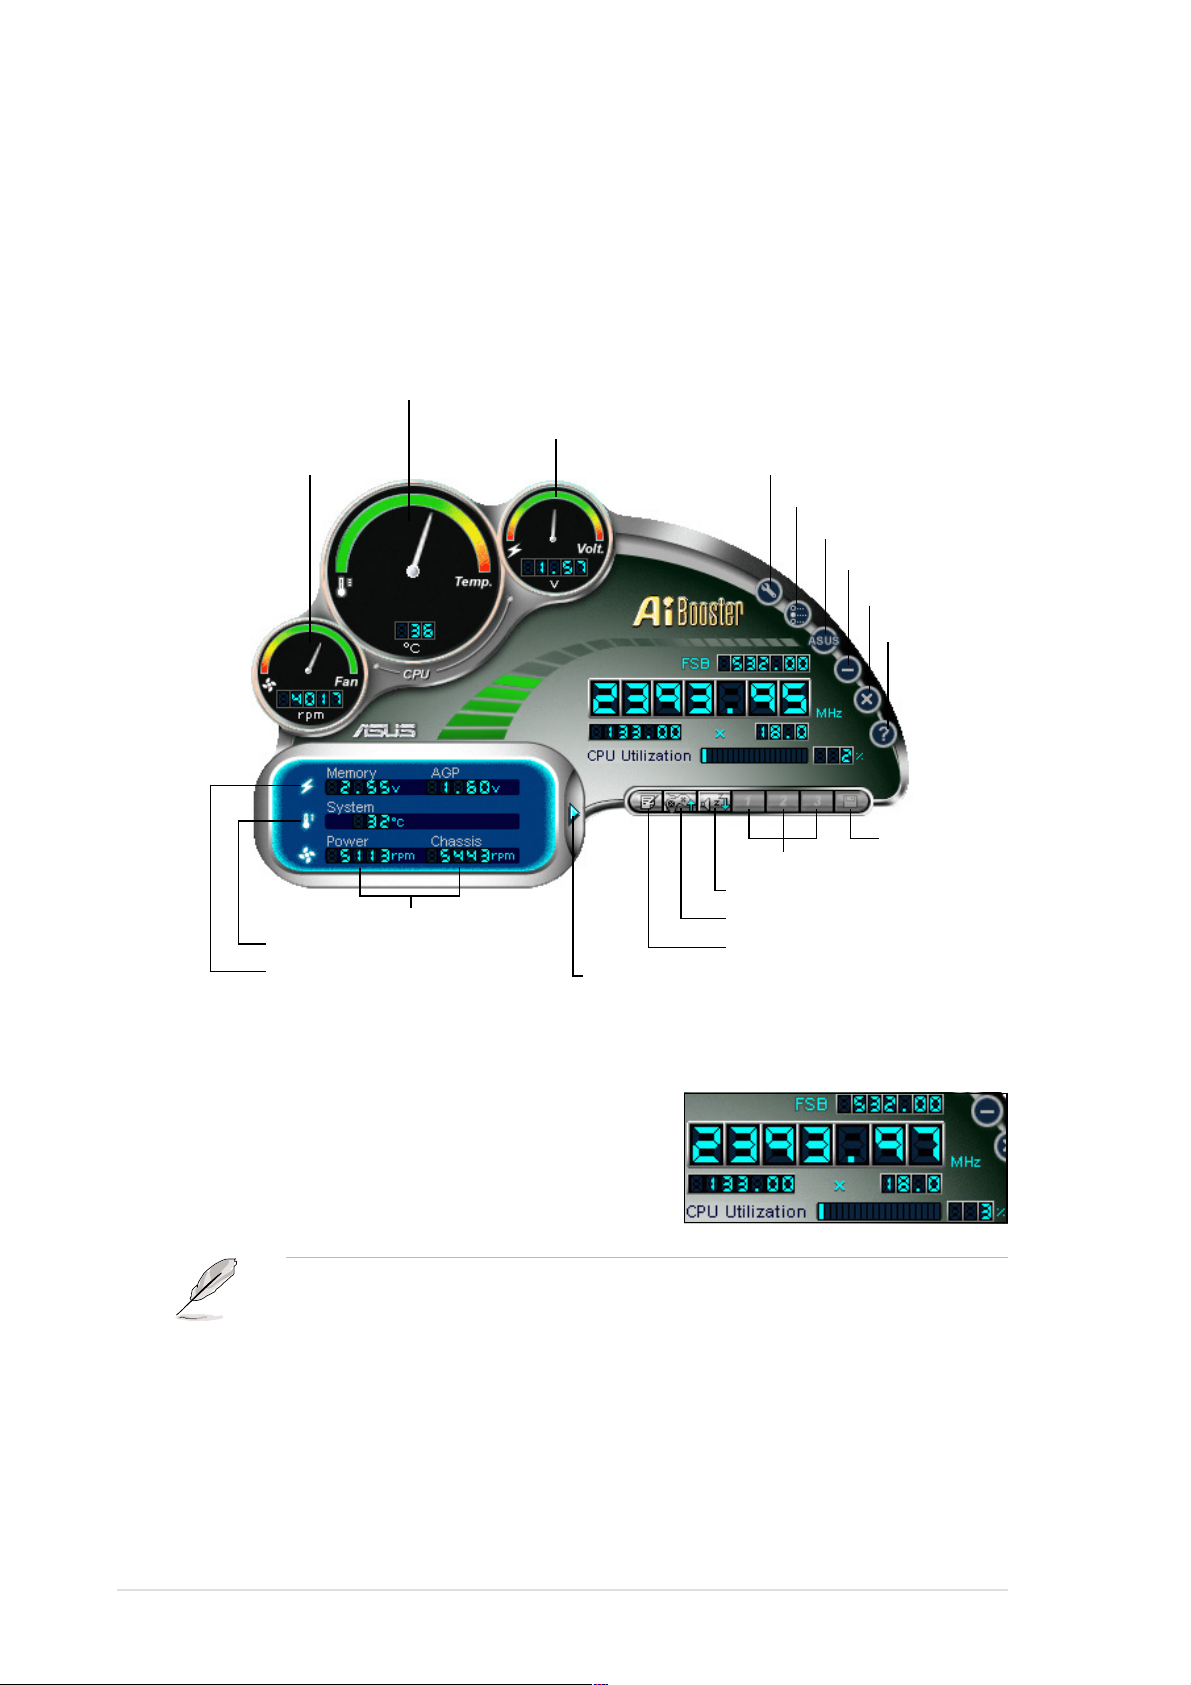
Ai Booster interface
The Ai Booster features a user-friendly interface similar to a car
dashboard. The interface displays various auto-detected system
component information allowing you to quickly assess, and if desired,
change the overclock settings.
CPU temperature
CPU voltage
CPU fan speed
Power and chassis fan speeds
System temperature
Memory and AGP voltages
Display Tuning panel
Preferences
ASUS website
Minimize
Close
Help
Save
User presets
Silent mode
Performance mode
Restore defaults
Display Tuning panel
CPU monitoring panel
This panel displays the auto-detected CPU
front side bus (FSB), core and external
frequencies (in MHz), and multiplier and
CPU utilitization information.
NOTE. A second utilization bar appears below the CPU utilization bar if
the installed CPU supports the Intel® Hyper-Threading feature. You
must enable Hyper-Threading in the BIOS Setup before Ai Booster
2
ASUS Ai Booster
Page 3
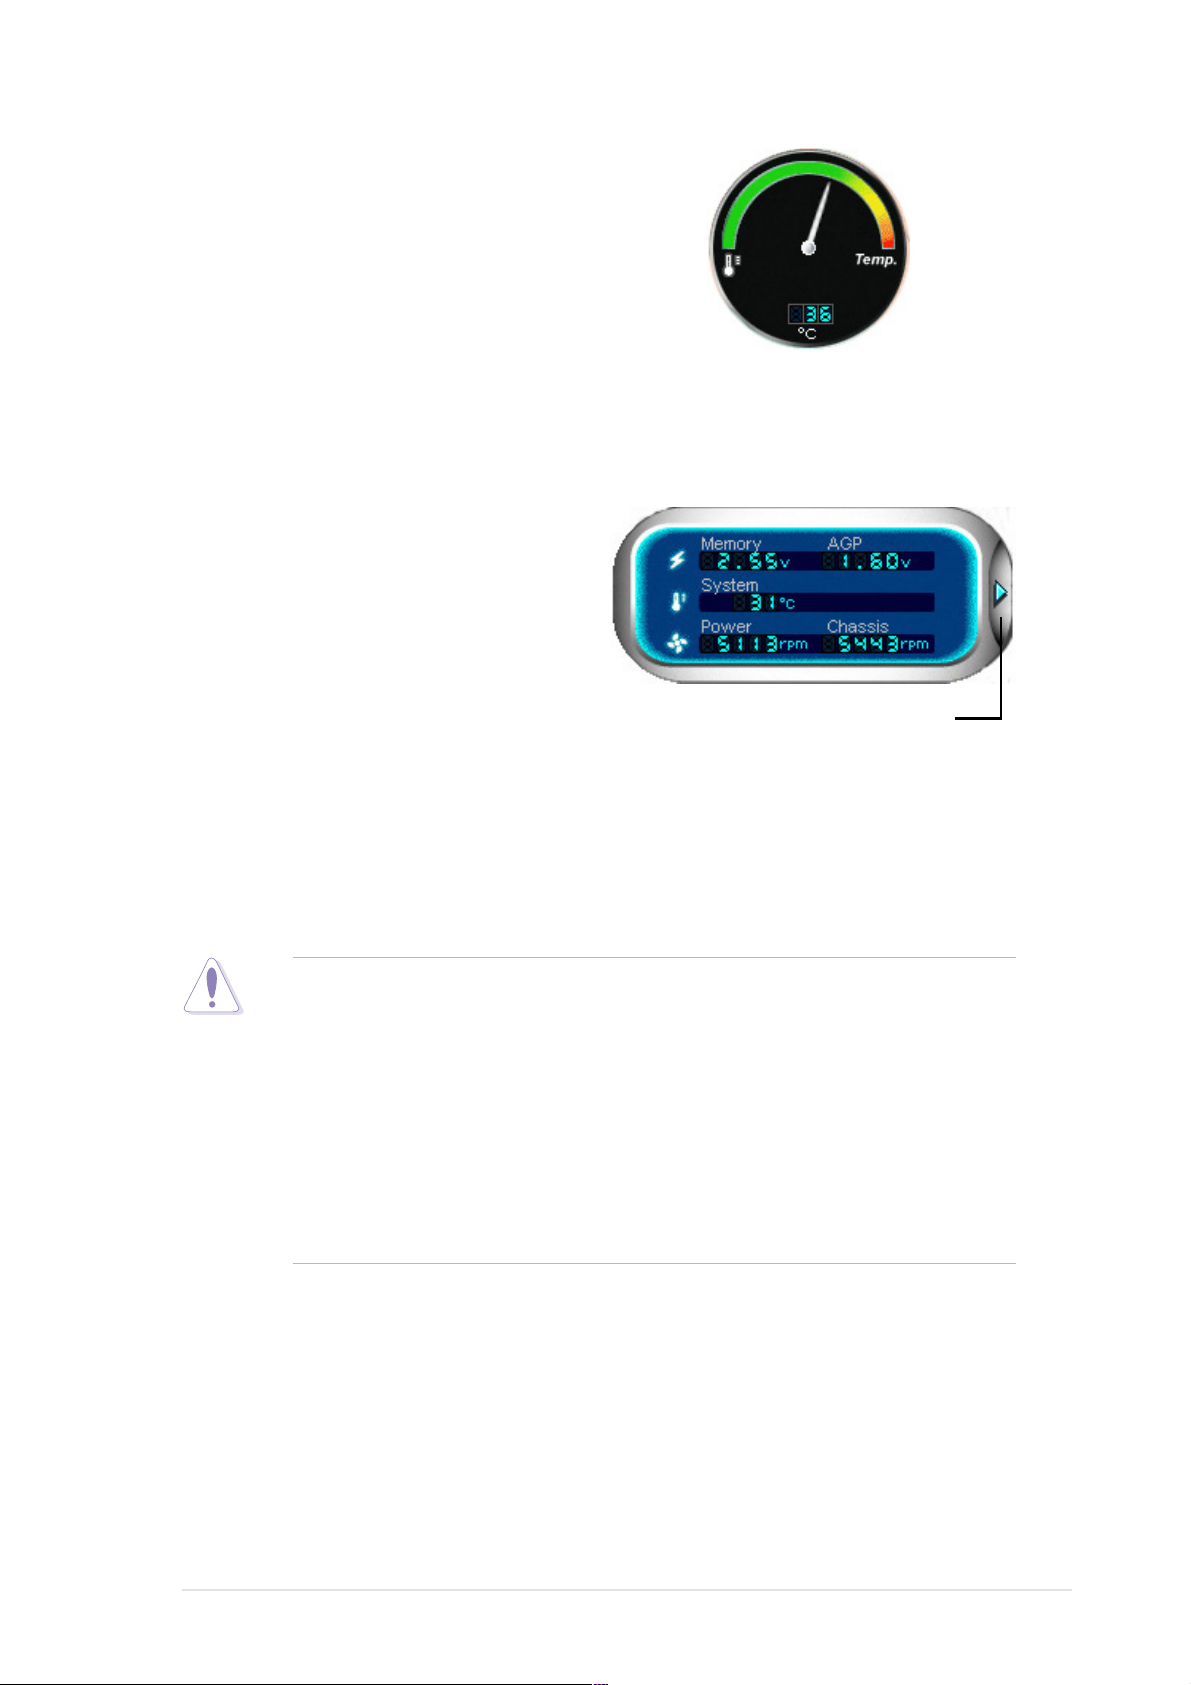
CPU monitoring dials
The CPU monitoring dials display the
CPU temperature (ºC), voltage, and
CPU fan speeds. The color indicator
(green turning red) shows the
minimum to maximum temperature,
voltage, and RPM values.
System monitoring panel
The Ai Booster also monitors and
displays the memory and AGP
voltages, system temperature, and
power supply and chassis fan
speeds. Use this display as reference
when overclocking the CPU or other
system components.
Click to open the Tuning panel
Before you overclock
Take note of the following precautions before you overclock the CPU, and
other system components.
CAUTION!
• Overclocking/underclocking may damage your system! These
procedures must be performed by experienced PC users only.
• You may either use the Ai Booster or the BIOS Setup to overclock
your system. DO NOT use both utilities at the same time do
overclocking.
• Make sure you have an efficient cooling system before you
overclock the CPU or other system components.
User guide
3
Page 4

Manual overclocking
The Ai Booster allows you overclock system components manually using
the Tuning panel. You may overclock either the CPU external frequency or
the multiplier.
To overclock the CPU manually:
1. Click the
Close the Tuning panel
or the button to display the T uning panel.
Apply changes
Increase value
Decrease value
Preset selection
Launch test
application
Browse and select test
application
2. Select a CPU item, external frequency or multiplier .
NOTE. Most CPUs have locked multipliers.
The multiplier item is grayed out if the
installed CPU has a locked multiplier.
3. Increase or decrease the CPU external
frequency/multiplier by clicking the or
button.
You may also click the
button to display a
frequency/multiplier preset values. Select your
desired frequency/multiplier, then click OK.
NOTE. Click the button anytime if you
wish to restore the default settings.
4
ASUS Ai Booster
Page 5

4. Select the CPU voltage, then click the or
button to increase or decrease the voltage. Do the
same with the AGP and memory voltages if you
also wish to adjust their values.
You may also click the button to display the
preset voltage values. Select the desired voltage,
then click OK.
CAUTION! Incorrect voltage settings may
cause system crash and/or damage the CPU,
and other system components.
5. Set the CPU Fan Control to Auto or Manual. Click the or button
to increase or decrease the fan speed threshold temperature and level.
IMPORTANT!
• We recommend that you keep the default setting Auto to allow
Ai Booster to efficiently control the CPU fan.
• Setting a very low CPU fan speed may stop the fan and damage
the CPU.
6. Click the Apply button to effect
your settings.
IMPORTANT!
• You lose your overclock settings when you restart the computer.
Always save your overclock configuration using the Save button.
Refer to the Saving overclock configuration section for details.
• When the computer hangs or crashes after applying your
overclocked settings, restore the default settings by following the
instructions in the “Restoring defaults” section.
NOTE. In some instances, Ai Booster automatically adjusts the BIOS
settings after you applied overclocking.
User guide
5
Page 6

Saving overclock configuration
The Ai Booster allows you to save up to three customized overclocking
configurations.
To save a customized configuration:
1. Configure your overclock settings,
then click Apply.
2. Click the button. A Save folder
appears.
3. Select a user preset number, then
type a name for your configuration.
4. Click OK when done.
Automatic overclocking
The Performance Mode and Silent Mode presets allow you to
automatically overclock or underclock your CPU.
CAUTION! The preset Performance and Silent Modes are not
guaranteed to work on your system.
Performance Mode (PM)
To overclock your CPU using the PM presets:
1. Click the
preset selection appears.
2. Select from the available PM
presets. Selecting PM +3%
overclocks your CPU by 3%,
PM +5% by 5%, and so on.
3. Click OK when done.
button. The PM
NOTE. The available PM
presets vary according to
installed system
components.
6
ASUS Ai Booster
Page 7

4. Click the OK when this confirmation
window appears.
5. Ai Booster prompts you to restart
your system. Click Y es to restart,
No to directly apply overclocking, or
Cancel to cancel overclocking.
IMPORTANT!
• Direct overclocking may crash or hang your system. We
recommend that you restart your computer after applying the
overclock settings.
• When the computer hangs or crashes after overclocking, restore
the default settings by following the instructions in the “Restoring
defaults” section.
Silent Mode (SM)
To underclock your CPU and reduce the CPU fan speed using the SM
presets:
1. Click the button. The SM
preset selection appears.
2. Select from the available SM
presets. Selecting SM -3%
underclocks your CPU by 3%,
SM -5% by 5%, and so on.
NOTE. Underclocking the
CPU reduces the CPU fan
speed.
3. Click OK when this confirmation
window appears.
User guide
7
Page 8

Testing system stability
You may test and observe the stability of your overclocked system by
running a PC game, multimedia, or other memory-intensive computer
applications.
To test system stability:
1. Click the Browse button at the bottom of the Tuning panel.
2. Locate the executable (.exe) file of the application you wish to set as test
program, then click Open.
3. Click the Run button from the Tuning panel.
4. Observe if the overclock settings affect the system performance. Adjust
your overclock settings if necessary.
Setting preferences
Ai Booster comes with a customizable monitoring feature that allows you to
set the intervals of system monitors displayed in the Ai Booster interface.
To set the monitor intervals:
1. Click the button. The monitor
interval window appears.
2. Adjust the monitor interval
(in seconds) using the up/down arrow button.
3. Check the Sound Effect box. When enabled, each monitor event
generates a sound.
4. Click OK when done.
8
ASUS Ai Booster
Page 9

Restoring defaults
Follow these instructions to restore the default values when your system
hangs or crashes after overclocking.
1. Restart your computer.
2. Press any key when this window
appears.
3. Ai Booster restores the default
values.
®
You may also restore the default values Windows
instructions.
1. Restart your computer.
®
2. Run Windows
in Safe Mode by pressing <F8> during the Power On
Self Test (POST).
3. Click Start > All Programs > ASUS > Ai Booster > Set Default from
®
the Windows
desktop to restore the default values.
by following these
User guide
9
 Loading...