

Page 1

User Manual
Page 2

Version 1.0
Published May 2013
Copyright©2013 ASRock INC. All rights reserved.
Copyright Notice:
No part of this documentation may be reproduced, transcribed, transmitted, or
translated in any language, in any form or by any means, except duplication of
documentation by the purchaser for backup purpose, without written consent of
ASRock Inc.
Products and corporate names appearing in this documentation may or may not
be registered trademarks or copyrights of their respective companies, and are used
only for identication or explanation and to the owners’ benet, without intent to
infringe.
Disclaimer:
Specications and information contained in this documentation are furnished for
informational use only and subject to change without notice, and should not be
constructed as a commitment by ASRock. ASRock assumes no responsibility for
any errors or omissions that may appear in this documentation.
With respect to the contents of this documentation, ASRock does not provide
warranty of any kind, either expressed or implied, including but not limited to
the implied warranties or conditions of merchantability or tness for a particular
purpose.
In no event shall ASRock, its directors, ocers, employees, or agents be liable for
any indirect, special, incidental, or consequential damages (including damages for
loss of prots, loss of business, loss of data, interruption of business and the like),
even if ASRock has been advised of the possibility of such damages arising from any
defect or error in the documentation or product.
e terms HDMI™ and HDMI High-Denition Multimedia Interface, and the HDMI
logo are trademarks or registered trademarks of HDMI Licensing LLC in the United
States and other countries.
is device complies with Part 15 of the FCC Rules. Operation is subject to the following
two conditions:
(1) this device may not cause harmful interference, and
(2) this device must accept any interference received, including interference that
may cause undesired operation.
CALIFORNIA, USA ONLY
e Lithium battery adopted on this motherboard contains Perchlorate, a toxic substance
controlled in Perchlorate Best Management Practices (BMP) regulations passed by the
California Legislature. When you discard the Lithium battery in California, USA, please
follow the related regulations in advance.
“Perchlorate Material-special handling may apply, see ww w.dtsc.ca.gov/hazardouswaste/
perchlorate”
ASRock Website: http://www.asrock.com
Page 3

Contents
Chapter 1 Introduction 1
1.1 Package Contents 1
1.2 Specications 2
1.3 Unique Features 6
1.4 Motherboard Layout 9
1.5 I/O Panel 11
Chapter 2 Installation 13
2.1 Installing the CPU 14
2.2 Installing the CPU Fan and Heatsink 17
2.3 Installing Memory Modules (DIMM) 18
2.4 Expansion Slots (PCI and PCI Express Slots) 20
2.5 Jumpers Setup 21
2.6 Onboard Headers and Connectors 22
Chapter 3 Software and Utilities Operation 27
3.1 Installing Drivers 27
3.2 A-Tuning 28
3.3 Intel® Rapid Start Technology 32
3.4 Intel® Smart Connect Technology 37
3.5 Intel® Remote Wake Technology 42
3.5.1 Conguring and Using MeshCentral 42
3.5.2 Conguring and Using Splashtop 47
3.6 Start8 50
3.7 Intel® vPro Conguration and Management 53
Page 4

Chapter 4 UEFI SETUP UTILITY 54
4.1 Introduction 54
4.1.1 UEFI Menu Bar 54
4.1.2 Navigation Keys 55
4.2 Main Screen 56
4.3 OC Tweaker Screen 57
4.4 Advanced Screen 65
4.4.1 CPU Conguration 66
4.4.2 Chipset Conguration 68
4.4.3 Storage Conguration 70
4.4.4 Intel® Rapid Start Technology 72
4.4.5 Intel® Smart Connect Technology 73
4.4.6 AMT Conguration 74
4.4.7 Super IO Conguration 76
4.4.8 ACPI Conguration 77
4.4.9 USB Conguration 79
4.4.10 Trusted Computing 80
4.4.11 Serial Port Console Redirection 81
4.5 Tools 82
4.6 Hardware Health Event Monitoring Screen 84
4.7 Boot Screen 85
4.8 Security Screen 88
4.9 Exit Screen 89
Page 5
Chapter 1 Introduction
ank you for purchasing ASRock Q87M vPro motherboard, a reliable motherboard
produced under ASRock ’s consistently stringent quality control. It delivers excellent
performance with robust design conforming to ASRock ’s commitment to quality
and endurance.
In this manual, Chapter 1 and 2 contains the introduction of the motherboard
and step-by-step installation guides. Chapter 3 contains the operation guide of the
soware and utilities. Chapter 4 contains the conguration guide of the BIOS setup.
Becau se the motherboard specications and the BIOS soware might be updated, the
content of this documentation will be subject to change without notice. In case any modications of this manual occur, the updated version w ill be available on ASRock ’s website
without further notice. If you require technical suppor t related to this motherboard, pl ease
visit our website for specic information about the model you are using. You may nd the
latest VGA cards and CPU support list on ASRock ’s website a s well. ASRock website htt p://
www.asrock.com.
1.1 Package Contents
ASRock Q87M vPro Motherboard (Micro ATX Form Factor)
•
ASRock Q87M vPro Quick Installation Guide
•
ASRock Q87M vPro Support CD
•
2 x Serial ATA (SATA) Data Cables (Optional)
•
1 x I/O Panel Shield
•
Q87M vPro
English
Page 6

1.2 Specications
Platform
A-Style
CPU
Chipset
Memory
•
•
•
•
•
•
•
•
•
•
* Intel® Small Business Advantage, Intel® vProTM Technology
and Intel® Active Management Technology 9.0 can be supported
only with Intel® CoreTM vProTM processor family
•
•
•
•
•
Micro ATX Form Factor
All Solid Capacitor design
Home Cloud
Supports 4th Generation Intel® CoreTM i7 / i5 / i3 / Xeon® /
Pentium® / Celeron® in LGA1150 Package
4 Power Phase Design
Supports Intel® Turbo Boost 2.0 Technology
Intel® Q87
Supports Intel® vProTM Technology
Supports Intel® Active Management Technology 9.0
Supports Intel® Small Business Advantage 2.0
Dual Channel DDR3 memory technolog y
4 x DDR3 DIMM slots
Supports DDR3 1600/1333/1066 non-ECC, un-buered
memory
Max. capacity of system memory: 32GB
Supports Intel® Extreme Memory Prole (XMP) 1.3 / 1.2
1 x PCI Express 3.0 x16 slot
Expansion
Slot
Graphics
English
•
2 x PCI Express 2.0 x1 slots
•
1 x PCI slot
•
Intel® HD Graphics Built-in Visuals and the VGA outputs can
•
be supported only with processors which are GPU integrated.
Supports Intel® HD Graphics Built-in Visuals : Intel® Quick
•
Sync Video with AVC, MVC (S3D) and MPEG-2 Full HW
Encode1,
Intel® InTruTM 3D, Intel® Clear Video HD Technology, Intel®
•
InsiderTM, Intel® HD Graphics 4400/4600
Pixel Shader 5.0, DirectX 11.1
•
2 3
Page 7

Graphics
Max. shared memory 1792MB
•
Four VGA Output options: D-Sub, DVI-D, HDMI and
•
DisplayPort
Supports Triple Monitors
•
Supports HDMI Technology with max. resolution up to
•
1920x1200 @ 60Hz
Supports DVI-D with ma x. resolution up to 1920x1200 @
•
60Hz
Supports D-Sub with max. resolution up to 1920x1200 @
•
60Hz
Supports DisplayPort with ma x. resolution up to 3840x2160 @
•
60Hz
Supports Auto Lip Sync, Deep Color (12bpc), xvYCC and
•
HBR (High Bit Rate Audio) with HDMI (Compliant HDMI
monitor is required)
Supports HDCP function with DVI-D, HDMI and
•
DisplayPort ports
Supports Full HD 1080p Blu-ray (BD) playback with DVI-D,
•
HDMI and DisplayPort ports
Q87M vPro
Audio
LAN
5.1 CH HD Audio (Realtek ALC662 Audio Codec)
•
Gigabit LAN 10/100/10 00 Mb/s
•
Giga PHY Intel® I217LM
•
Supports Intel® Remote Wake and iSCSI Remote Boot Tech-
•
nology
Supports Wake-On-LAN
•
Supports Energy Ecient Ethernet 802.3az
•
Supports PXE
•
English
Page 8

Rear Panel
I/O
Storage
Connector
1 x PS/2 Mouse Port
•
1 x PS/2 Keyboard Port
•
1 x D-Sub Port
•
1 x DVI-D Port
•
1 x HDMI Port
•
1 x DisplayPort
•
2 x USB 2.0 Ports
•
4 x USB 3.0 Ports
•
1 x RJ-45 LAN Ports with LED (ACT/LINK LED and SPEED
•
LED)
HD Audio Jack: Line in / Front Speaker / Microphone
•
6 x SATA3 6.0 Gb/s connectors, support RAID (RAID 0,
•
RAID 1, RAID 5, RAID 10, Intel Rapid Storage Technology
12 and Intel
Smart Response Technology), NCQ, AHCI and “Hot Plug”
•
functions
1 x Print Port header
•
1 x COM port headers
•
1 x Power LED header
•
1 x Chassis Intrusion header
•
1 x TPM header
•
2 x CPU Fan connectors (1 x 4-pin, 1 x 3-pin)
•
2 x Chassis Fan connectors (1 x 4-pin, 1 x 3-pin)
•
1 x Power Fan connector (3-pin)
•
1 x 24 pin ATX power connector
•
1 x 8 pin 12V power connector
•
1 x Front panel audio connector
•
2 x USB 2.0 headers (support 4 USB 2.0 ports)
•
1 x USB 3.0 header (support 2 USB 3.0 ports)
•
64Mb AMI UEFI Legal BIOS with Multilingual GUI support
BIOS
Feature
English
•
ACPI 1.1 Compliance Wake Up Events
•
SMBIOS 2.3.1 Support
•
CPU, DRAM, PCH 1.05V, PCH 1.5V Voltage Multi-adjust-
•
ment
4 5
Page 9
Support
CD
Hardware
Monitor
OS
Certications
Drivers, Utilities, AntiVirus Soware (Tria l Version), Cyber-
•
Link MediaEspresso 6.5 Trial, Google Chrome Browser and
Toolbar, Start8, MeshCentral, Splashtop Streamer
CPU/Chassis Temperature Sensing
•
CPU/Chassis/Power Fan Tachometer
•
CPU/Chassis Quiet Fan (Allow Chassis Fan Speed Auto-
•
Adjust by CPU Temperature)
CPU/Chassis Fan Multi-Speed Control
•
CASE OPEN detection
•
Voltage Monitoring: +12V, +5V, +3.3V, CPU Vcore
•
Microso® Windows® 8 / 8 64-bit / 7 / 7 64-bit compliant
•
FCC, CE, WHQL
•
ErP/EuP Ready (ErP/EuP ready power supply is required)
•
Q87M vPro
* For detailed product information, please visit our website: http://www.asrock.com
Please realiz e that the re is a certain r isk involved with o verclocking, including adjusting
the setting in the BIOS, applying Untied Overclocking Technolog y, or using third-party
overclocking to ols. O verclocking may aect your system’s stability, or even c ause damage to
the components and devices of your system. It should be don e at your ow n risk and expense.
We are not responsibl e for possible damage caused by overclo cking.
Due to limitation , the actual memory size may be less than 4GB for the re servation for system usage under Windows® 32-bit ope rating systems. Windows® 64-bit operating systems
do not have s uch limitation s. You can use ASRock XFast R AM to utilize the memory that
Windows® cannot use.
English
Page 10
1.3 Unique Features
ASRock A-Tuning
A-Tuning is ASRock’s multi purpose soware suite with a new interface, more new
features and improved utilities, including XFast R AM, Dehumidier, Good Night
LED, FAN-Tastic Tuning, OC Tweaker and a whole lot more.
ASRock Instant Flash
ASRock Instant Flash is a BIOS ash utility embedded in Flash ROM. is conve-
nient BIOS update tool allows you to update the system BIOS in a few clicks without
preparing an additional oppy diskette or other complicated ash utility. Just save
the new BIOS le to your USB storage and launch this tool by pressing <F6> or
<F2> during POST to enter the BIOS setup menu to access ASRock Instant Flash.
Please be noted that the USB ash drive or hard drive must use FAT32/16/12 le
system.
ASRock APP Charger
Simply by installing the ASRock APP Charger makes your iPhone/iPad/iPod Touch
charge up to 40% faster than before on your computer. ASRock APP Charger allows
you to quickly charge many Apple devices simultaneously and even supports
continuous charging when your PC enters into Standby mode (S1), Suspend to RAM
(S3), hibernation mode (S4) or power o (S5).
ASRock XFast USB
ASRock XFast USB can boost the performance of your USB storage devices. e
performance may depend on the properties of the device.
ASRock XFast LAN
ASRock XFast LAN provides faster internet access, which includes the benets
listed below. LAN Application Prioritization: You can congure your application’s
priority ideally and add new programs to the list. Lower Latency in Game: Aer
setting online game’s priority higher, it can lower the latency in games. Trac
Shaping: You can watch Youtube HD videos and download simultaneously. Real-
Time Analysis of Your Data: With the status window, you can easily recognize
which data streams you are currently transferring.
English
6 7
Page 11
ASRock XFast RAM
ASRock XFast RAM is included in A-Tuning. It fully utilizes the memory space
that cannot be used under Windows® 32-bit operating systems. ASRock XFast RAM
shortens the loading time of previously visited websites, making web surng faster
than ever. And it also boosts the speed of Adobe Photoshop 5 times faster. Another
advantage of ASRock XFast RAM is that it reduces the frequency of accessing your
SSDs or HDDs in order to extend their lifespan.
ASRock Crashless BIOS
ASRock Crashless BIOS allows users to update their BIOS without fear of failing. If
power loss occurs during the BIOS updating process, ASRock Crashless BIOS will
automatically nish the BIOS update procedure aer regaining power. Please note
that BIOS les need to be placed in the root director y of your USB disk. Only USB 2.0
ports support this feature.
ASRock OMG (Online Management Guard)
Administrators are able to establish an internet curfew or restrict internet access
at specied times via OMG. You may schedule the starting and ending hours of
internet access granted to other users. In order to prevent users from bypassing
OMG, guest accounts without permission to modify the system time are required.
Q87M vPro
ASRock Internet Flash
ASRock Internet Flash downloads and updates the latest UEFI rmware version
from our servers for you without entering Windows® OS. Please setup network
conguration before using Internet Flash.
ASRock System Browser
ASRock System Browser shows the overview of your current PC and the devices
connected.
ASRock Dehumidier Function
Users may prevent motherboard damages due to dampness by enabling
“Dehumidier Function”. When enabling Dehumidier Function, the computer
will power on automatically to dehumidify the system aer entering S4/S5 state.
English
Page 12
ASRock Fast Boot
With ASRock’s exclusive Fast Boot technology, it takes less than 1.5 seconds to
logon to Windows 8 from a cold boot. No more waiting! e speedy boot will
completely change your user experience and behavior.
ASRock Restart to UEFI
Windows® 8 brings the ultimate boot up experience. e lightning boot up speed
makes it hard to access the UEFI setup. ASRock Restart to UEFI allows users to
enter the UEFI automatically when turning on the PC. By enabling this function,
the PC will enter the UEFI directly aer you restart.
ASRock Good Night LED
ASRock Good Night LED technology oers you a better sleeping environment by
extinguishing the unessential LEDs. By enabling Good Night LED in the BIOS, the
Power/HDD LEDs will be switched o when the system is powered on. Good Night
LED will automatically switch o the Power and Keyboard LEDs when the system
enters into Standby/Hibernation mode as well.
ASRock USB Key
In a world where time is money, why waste precious time everyday typing
usernames to log in to Windows? Why should we even bother memorizing those
foot long passwords? Just plug in the USB Key and let your computer log in to
windows automatically!
ASRock Home Cloud
is motherboard supports remote wake with the onboard Intel LAN, so you
can connect with your PC from anywhere in the world. You will be able to power
your PC on or turn it o, monitor and take control of it remotely with another
smartphone, tablet or computer.
ASRock FAN-Tastic Tuning
ASRock FAN-Tastic Tuning is included in A-Tuning. Congure up to ve dierent
fan speeds using the graph. e fans will automatically shi to the next speed level
when the assigned temperature is met.
English
8 9
Page 13
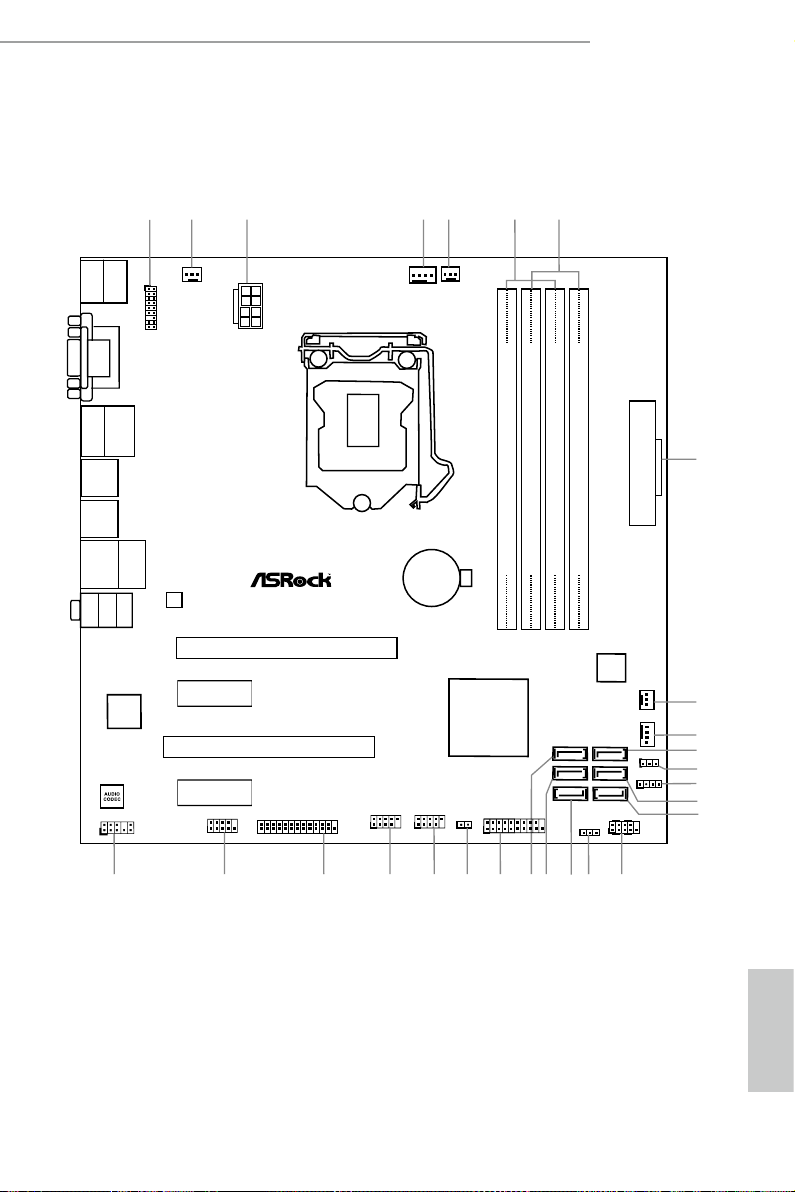
1.4 Motherboard Layout
DDR 3_A1 (6 4 bit, 24 0-pin m odule )
DDR 3_A2 (6 4 bit, 24 0-pin m odule )
DDR 3_B1 (6 4 bit, 24 0-pin m odule )
DDR 3_B2 (6 4 bit, 24 0-pin m odule )
64Mb
BIOS
Intel
Q87
PCIE1
PCI1
Sup er
I/O
HD_AUDIO1
1
COM1
1
CLRCMOS1
1
HDLED RESET
PLED PWRBTN
PANEL1
1
PLED1
1
CHA_FAN2
CPU_FAN1
CPU_FAN2
PWR_FAN1
CHA_FAN1
1
SPEAKER1
LAN
USB4_5
1
SATA
_1
SATA
_5
Q87M vPro
PCI Express 3.0
RoHS
LPT1
2
HDMI 1
HDMI _DP_1
TPMS1
1
1
3 4
5 6 7
8
9
10
11
12
13
SATA
_3
SATA
_0
SATA
_4
SATA
_2
14
15
18
1920
16
17
1
USB3_4_5
21
1
CI1
2223
USB6_7
1
24252627
CMOS
Battery
PCIE2
PCIE3
Keyb oard
Mous e
PS2
PS2
Q87M vPro
DVI1
VGA
USB 2.0
T: USB2
B: USB3
USB 3.0
T: USB2
B: USB3
USB 3.0
T: USB0
B: USB1
Bott om:
Cent er:
Mic In
Fron t
Top:
RJ-45
Line I n
Top:
ATX12V1
ATXPWR1
English
Page 14

No. Description
1 TPM Header (TPMS1)
2 Power Fan Connector (PWR_FAN1)
3 ATX 12V Power Connector (ATX12V1)
4 CPU Fan Connector (CPU_FAN1)
5 CPU Fan Connector (CPU_FAN2)
6 2 x 240-pin DDR3 DIMM Slots (DDR3_A1, DDR3_B1)
7 2 x 240-pin DDR3 DIMM Slots (DDR3_A2, DDR3_B2)
8 ATX Power Connector (ATXPWR1)
9 Chassis Fan Connector (CHA_FAN2)
10 Chassis Fan Connector (CHA_FAN1)
11 SATA3 Con ne ctors (SATA_ 4)
12 Clear CMOS Jumper (CLRCMOS1)
13 Chassis Speaker Header (SPEAKER1)
14 SATA3 Connectors (SATA_2)
15 SATA3 Connectors (SATA_0)
16 System Panel Header (PANEL1)
17 Power LED Header (PLED1)
18 SATA3 Connectors (SATA_1)
19 SATA3 Connectors (SATA_3)
20 SATA3 Connectors (SATA_5)
21 USB 3.0 Header (USB3_4_5)
22 Chassis Intrusion Header (CI1)
23 USB 2.0 Header (USB4_5)
24 USB 2.0 Header (USB6 _7)
25 Print Port Header (LPT1)
26 COM Port Header (COM1)
27 Front Panel Audio Header (HD_AUDIO1)
English
10 11
Page 15
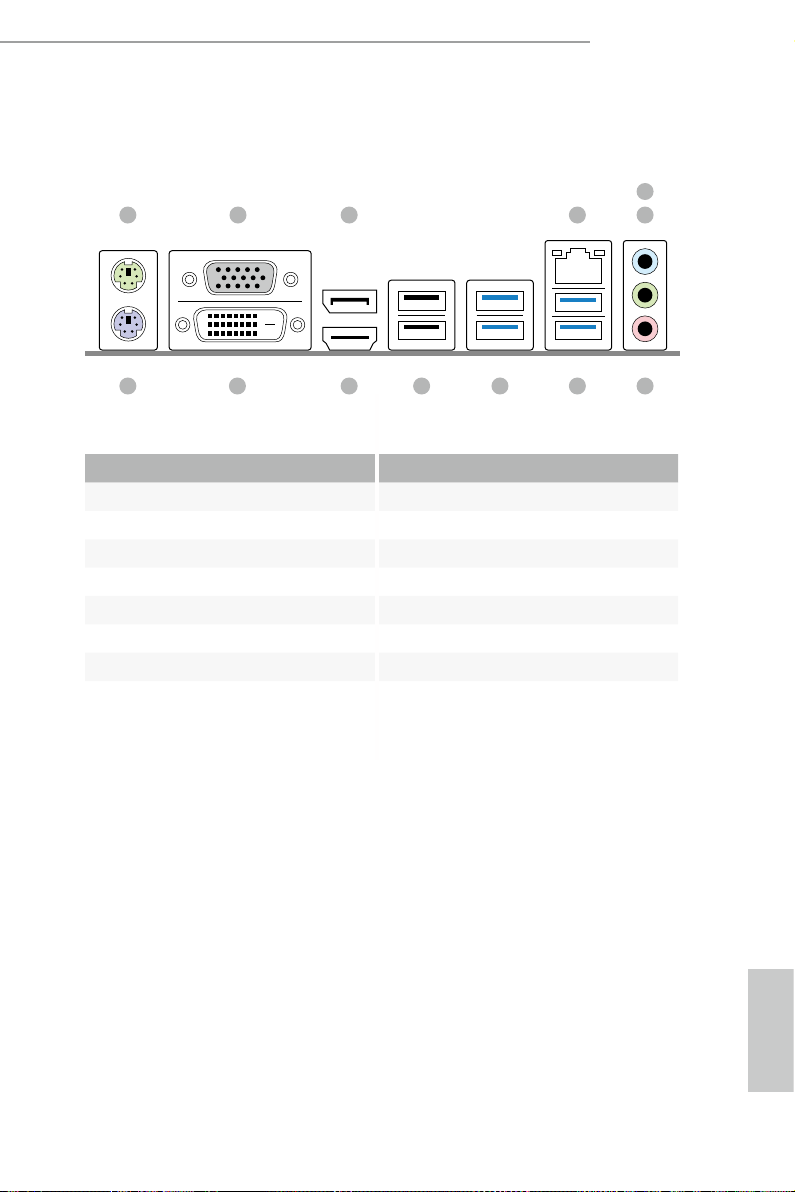
1.5 I/O Panel
1 2 43 6
No. Description No. Description
1 PS/2 Mouse Port 8 USB 3.0 Ports (LAN_USB3_01)
2 D-Sub Port 9 USB 3.0 Ports (USB3_23)
3 Display Port 10 USB 2.0 Ports (USB23)
4 LAN RJ-45 Port 11 HDMI Port
5 Line In (Light Blue) 12 DVI-D Port
6 Front Speaker (Lime)** 13 PS/2 Keyboard Port
7 Microphone (Pink)
Q87M vPro
5
78910111213
English
Page 16
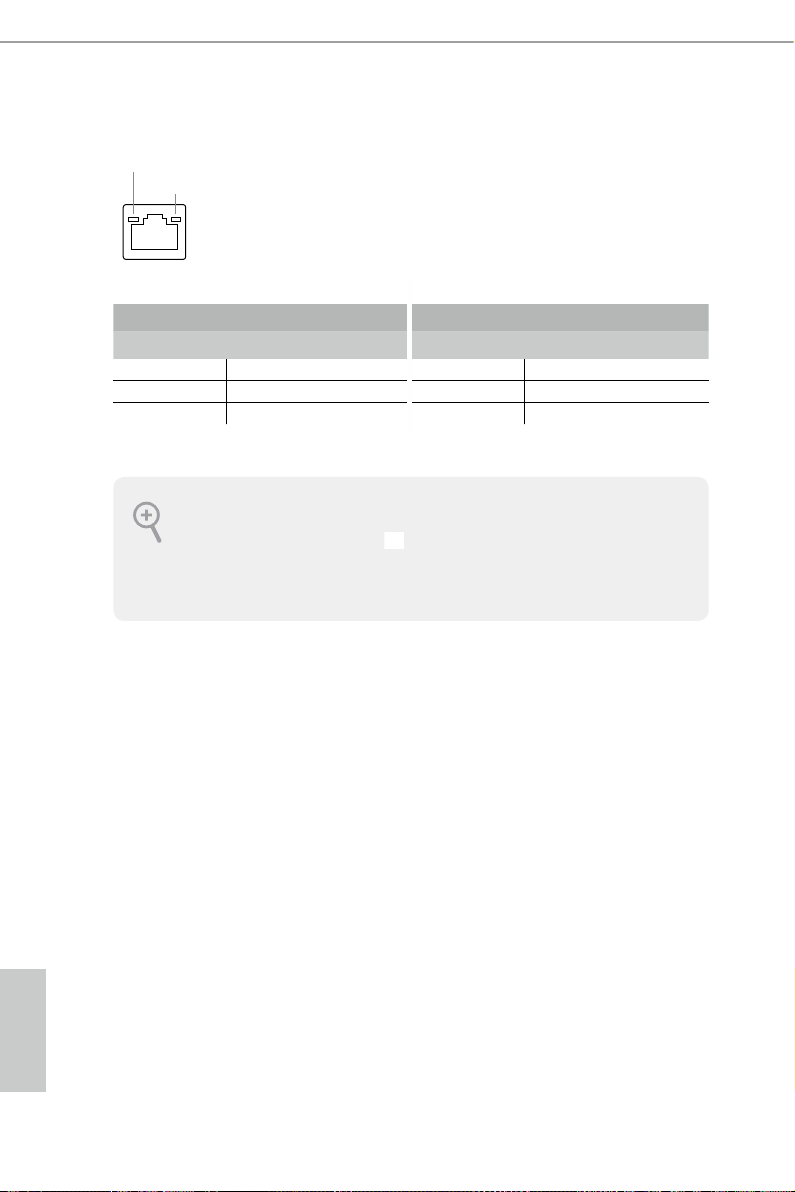
* ere are two LEDs on each LAN port. Please refer to the table below for the LAN port LED indications.
ACT/LINK LED
SPEED LED
LAN Por t
Activity / Link LED Speed LED
Status Description Status Description
O No Link O 10Mbps connection
Blinking Data Activity Orange 100Mbps connection
On Link Green 1Gbps connection
To enable Multi-Streaming, you need to connect a front panel audio cable to the front
panel au dio header. Aer re starting your computer, you will nd the “Mixe r” tool on your
system. Plea se sele ct “Mixe r ToolBox” , click “Enable playback multi-streaming”, and
click “ok”. Choose “2CH”, “4CH”, “6CH”, or “8CH” and then you are a llowed to select
“Realtek HDA Primary output” to u se the Rear Speaker, Central/Ba ss, and Front Speaker,
or select “Realtek HDA Audio 2nd output” to use the front panel audio.
English
12 13
Page 17

Chapter 2 Installation
is is a Micro ATX form factor motherboard. Before you install the motherboard,
study the conguration of your chassis to ensure that the motherboard ts into it.
Pre-installation Precautions
Take note of the following precautions before you install motherboard components
or change any motherboard settings.
Make sure to unplug the power cord before installing or removing the motherboard.
•
Failure to do so may cause physical injuries to you and damages to motherboard
components.
In order to avoid damage from static electricity to the motherboard’s components,
•
NEVER place your motherboard directly on a carpet. Also remember to use a grounded
wrist strap or touch a safety grounded object before you handle the components.
Hold components by the edges and do not touch the ICs.
•
Whenever you uninstall any components, place them on a grounded anti-static pad or
•
in the bag that comes with the components.
When placing screws to secure the motherboard to the chassis, please do not over-
•
tighten the screws! Doing so may damage the motherboard.
Page 18
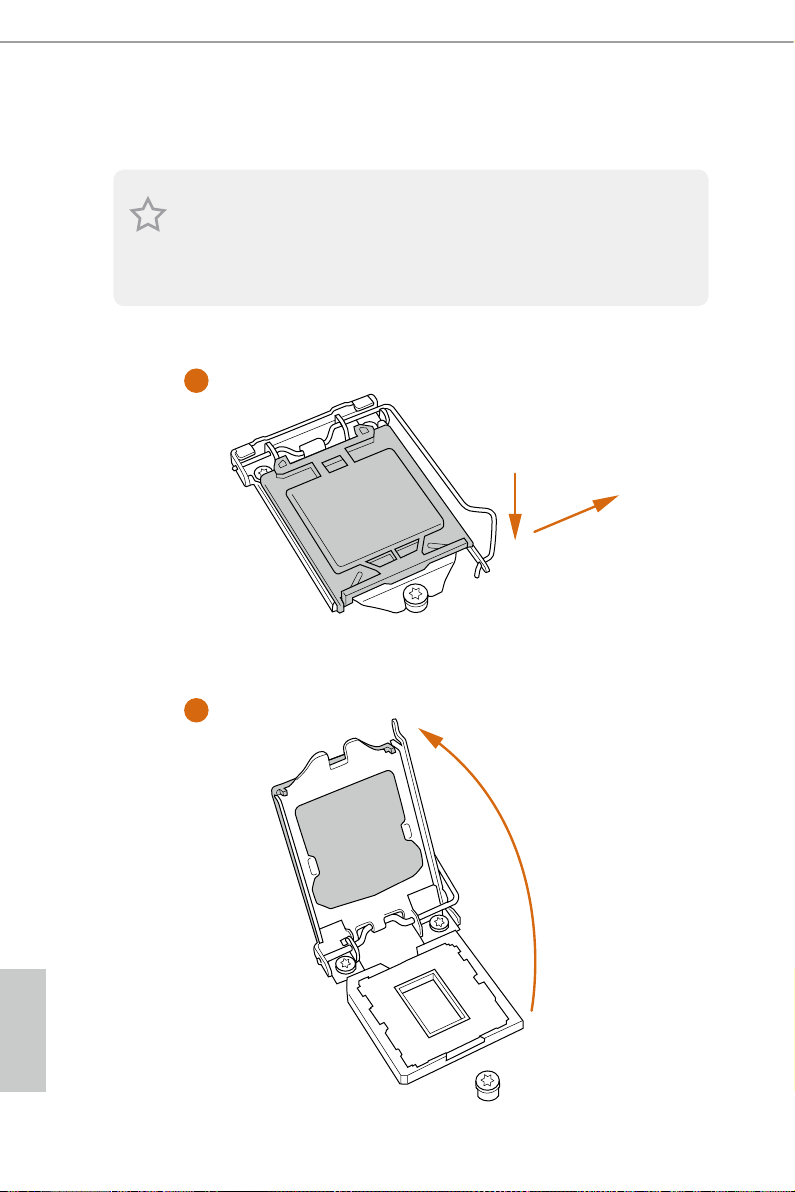
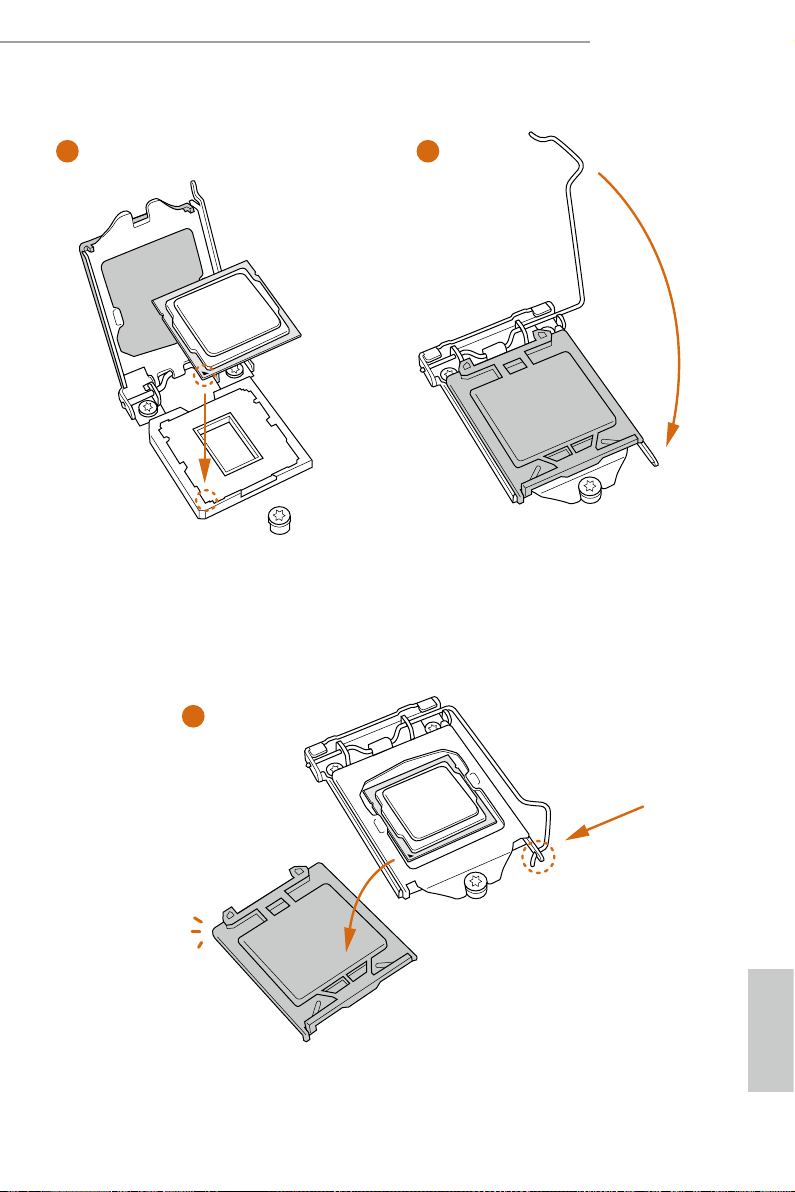
2.1 Installing the CPU
1. Before you insert the 1150-Pin CPU into the sock et, please check if the P nP cap is on the
socket, if the CPU surface is unclean, or if there are any bent pins in the sock et. Do not
force to in sert the CPU into the socket if above situation is found . Otherwise, the CPU
will be seriously damaged.
2. Unplug all power c ables before in stalling the CPU.
1
A
B
2
English
14 15
Page 19
Q87M vPro
3
5
4
English
Page 20

Please save and replace the cover if the processor i s removed. e cover must be placed if
you wish to return the motherboard for aer service.
English
16 17
Page 21
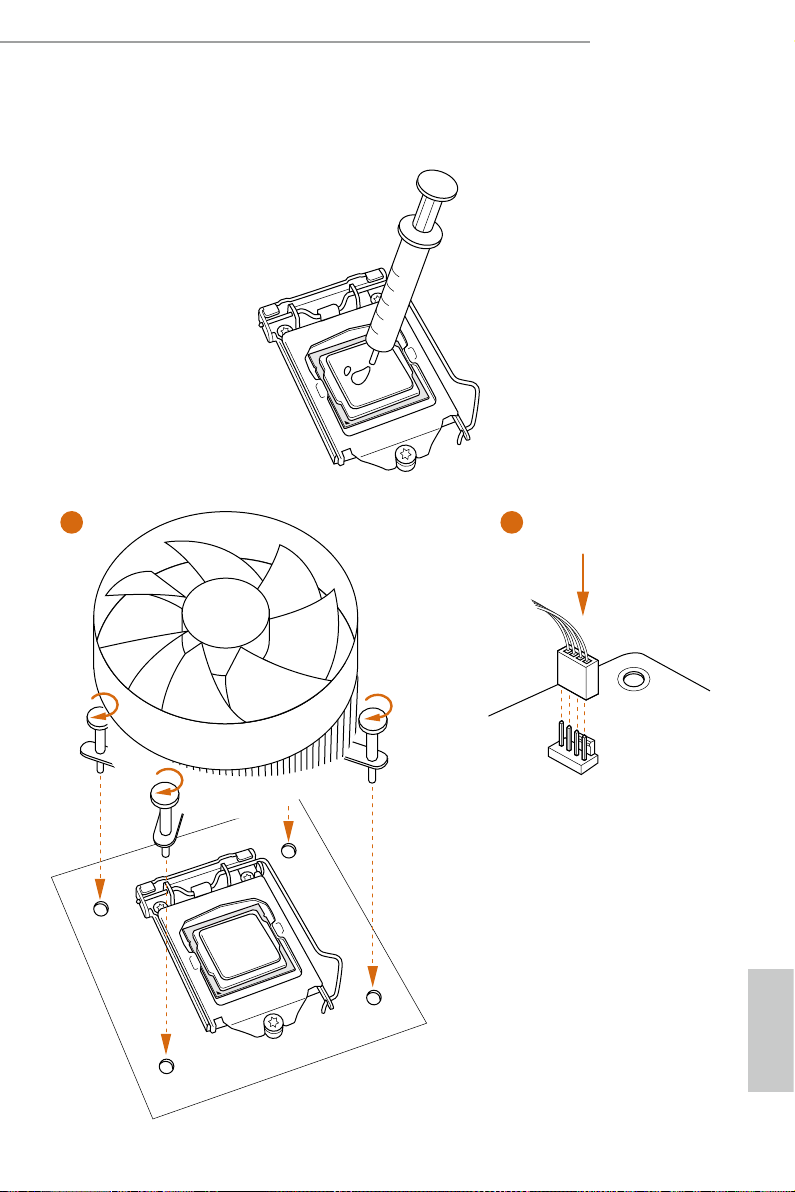
2.2 Installing the CPU Fan and Heatsink
1 2
Q87M vPro
FAN
CPU_
English
Page 22
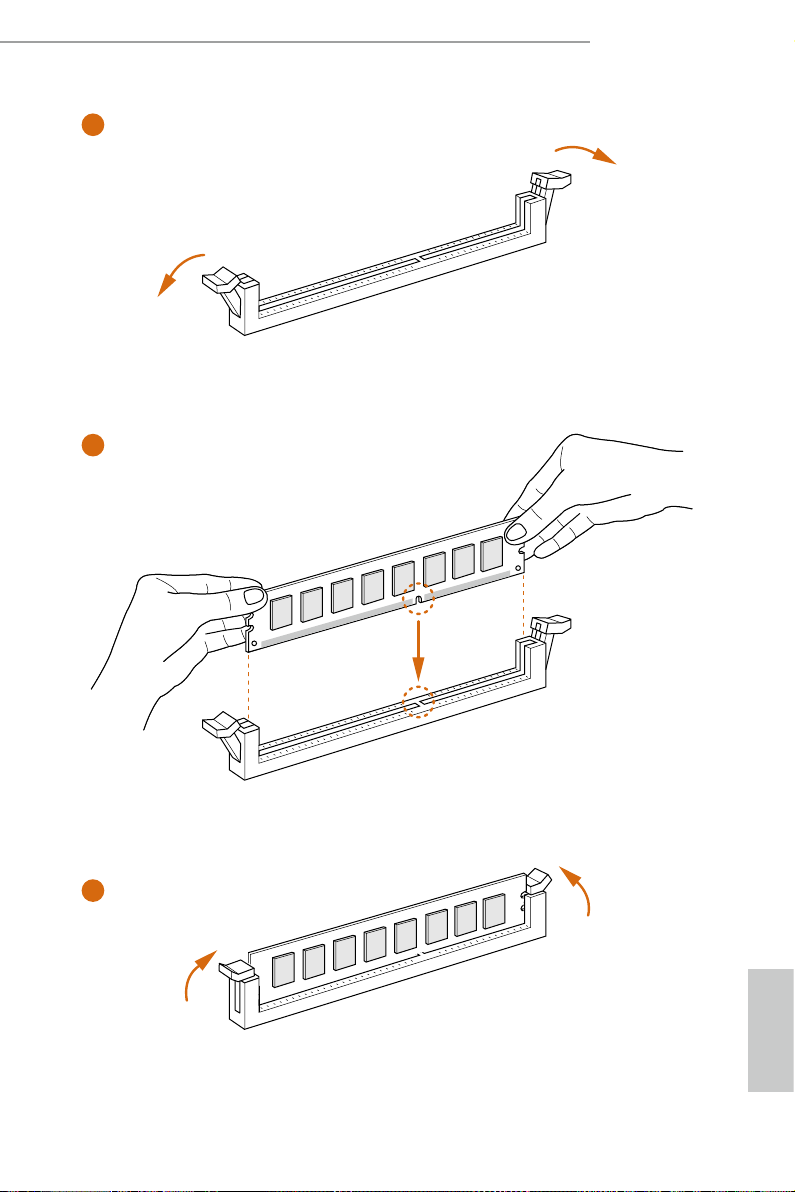
2.3 Installing Memory Modules (DIMM)
is motherboard provides two 240-pin DDR3 (Double Data Rate 3) DIMM slots,
and supports Dual Channel Memory Technology.
1. For dual channel cong uration , you always need to in stall identical (the same b rand,
speed , size and chip-type) DDR3 DI MM pairs.
2. It is unable to activate Du al Channel Memory Technology with only one memory module
installed.
3. It is not allowed to install a DDR or DDR2 memory module into a DDR3 slot; other wise,
this motherboard and DIMM may be damaged.
e DIMM only ts in one correct orie ntation. It will cause permanent dam age to the
motherboard and the DIMM if you force the DIMM into the slot at incorrect orientation.
English
18 19
Page 23
Q87M vPro
1
2
3
English
Page 24
2.4 Expansion Slots (PCI and PCI Express Slots)
ere is 3 PCI Express slots and 1 PCI slot on this motherboard.
Before installing an ex pansion card, please make sure that the power supply is switched o
or the power cord is unplug ged. Pl ease re ad the documentation of the expansion card and
make necessary hardware settings for the card before you start the installation.
PCI slot:
e PCI1 is used to install expansion cards that have 32-bit PCI interface.
PCIe slots:
PCIE1 (PCIe 3.0 x16 slot) is used for PCI Express x16 lane width graphics cards.
PCIE2 and 3 (PCIe 2.0 x1 slot) are used for PCI Express x1 lane width cards.
English
20 21
Page 25
2.5 Jumpers Setup
e illustration shows how jumpers are setup. When the jumper cap is placed on
the pins, the jumper is “Short”. If no jumper cap is placed on the pins, the jumper
is “Open”. e illustration shows a 3-pin jumper whose pin1 and pin2 are “Short”
when a jumper cap is placed on these 2 pins.
Clear CMOS Jumper
(CLRCMO S1)
(see p.9, No. 12)
CLRCMOS1 allows you to clear the data in CMOS. To clear and reset the system
parameters to default setup, please turn o the computer and unplug the power
cord from the power supply. Aer waiting for 15 seconds, use a jumper cap to
short pin2 and pin3 on CLRCMOS1 for 5 seconds. However, please do not clear
the CMOS right aer you update the BIOS. If you need to clear the CMOS when
you just nish updating the BIOS, you must boot up the system rst, and then shut
it down before you do the clear-CMOS action. Please be noted that the password,
date, time, and user default prole will be cleared only if the CMOS battery is
removed.
Clear CMOSDefault
Q87M vPro
If you clear the CMOS, the case open may be detected. Pl ease adjust the BIOS option “Clear
Status” to clear th e record of previous chassis intrusion status.
English
Page 26
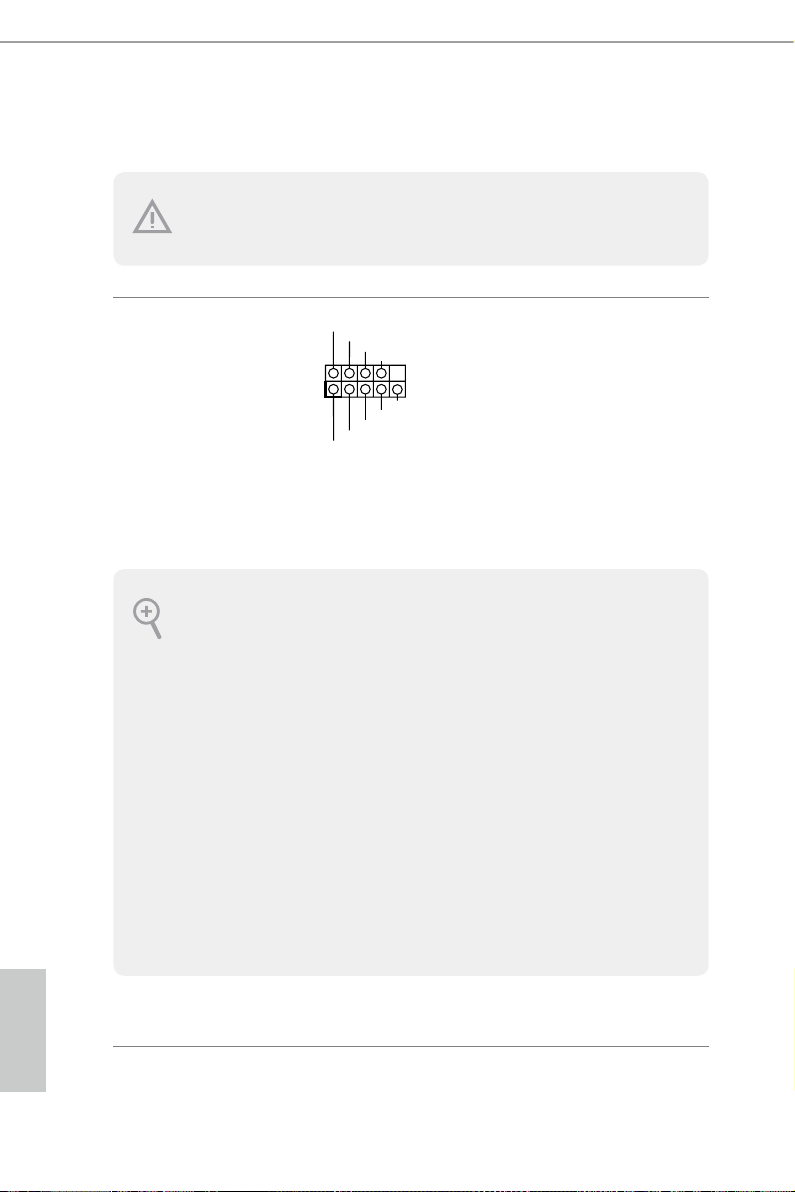
2.6 Onboard Headers and Connectors
1
Onboard headers and connectors are NOT jump ers. Do NOT place jumper caps over these
heade rs and connectors. Placing jumper caps over the headers and connectors will cause
permanent damage to the motherboard.
System Panel Header
(9-pi n PANEL1)
(see p.9, No. 16)
PWRBTN (Power Switch):
Connec t to the power switch on the ch assi s front panel. You may congure the way to tur n
o your system using the power switch.
RESET (Reset Switch):
Connec t to the reset switch on the chassi s front panel. Press the reset sw itch to restart the
computer if the computer f reezes and fails to per form a normal restar t.
PLED (Syste m Power LED):
Connec t to the power status indicator on the chas sis front panel. e LED i s on when the
system is operating. e LED keeps blinking when the system is in S1/S3 sleep state. e
LED is o when the system is in S4 slee p state or powered o (S5).
HDLED (Ha rd Drive Activity LED):
Connec t to the hard drive ac tivity LED on the chassis front panel. e LED is on when the
hard drive is reading or wr iting data.
e front panel de sign may dier by chassis. A front panel module mainly consists of powe r
switch, reset switch , power LED, hard dr ive activity LED, speaker and etc. When connecting your ch assi s front panel module to thi s header, make sure the wire a ssignments and the
pin assignments are matched correctly.
PLED+
PLED-
HDLED-
HDLED+
PWRBTN#
GND
RESET#
GND
GND
Connect the power
switch, reset switch and
system status indicator on
the chassis to this header
according to the pin
assignments below. Note
the positive and negative
pins before connecting
the cables.
English
22 23
Page 27
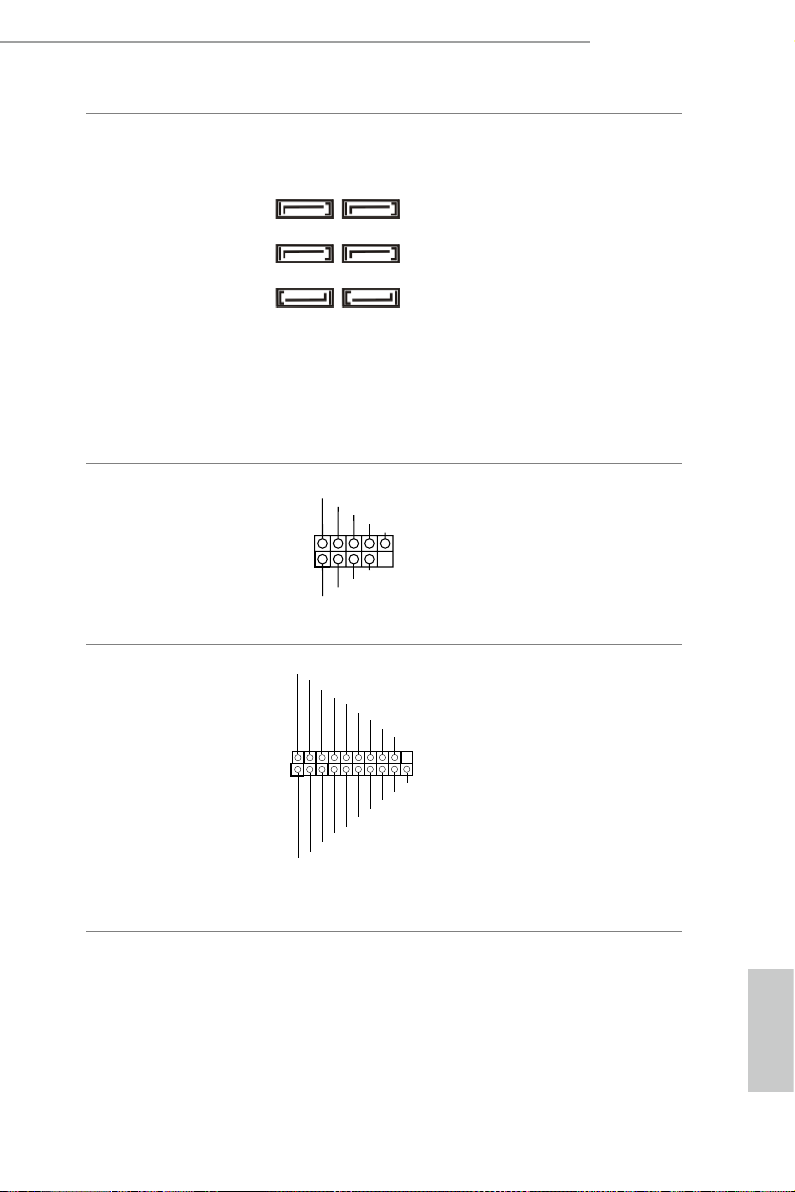
Q87M vPro
DUMMY
GND
GND
P+
P-
USB_PWR
P+
P-
USB_PWR
1
1
ID
IntA_P_D+
Serial ATA3 Connectors
(SATA_0:
see p.9, No. 15)
(SATA_1:
see p.9, No. 18)
(SATA_2:
see p.9, No. 14)
(SATA_3:
see p.9, No. 19)
(SATA_4 :
see p.9, No. 11)
(SATA_5:
see p.9, No. 20)
USB 2.0 Headers
(9-pin USB_4_5)
(see p.9, No. 23)
(9-pin USB_6_7)
(see p.9, No. 24)
USB 3.0 Headers
(19-pin USB3_4_ 5)
(see p.9, No. 21)
SATA_5
SATA_3
SATA_1
IntA_P_D-
IntA_P_D+
GND
IntA_P_SSTX+
GND
IntA_P_D-
SATA_4
SATA_2
SATA_0
IntA_P_SSTX-
GND
IntA_P_SSRX+
GND
IntA_P_SSTX-
IntA_P_SSTX+
IntA_P_SSRX-
Vbus
Vbus
IntA_P_SSRX-
IntA_P_SSRX+
ese six SATA3
connectors support SATA
data cables for internal
storage devices with up to
6.0 Gb/s data transfer rate.
Besides two USB 2.0 ports
on the I/O panel, there
are two headers on this
motherboard. Each USB
2.0 header can support
two ports.
Besides four USB 3.0 ports
on the I/O panel, there
are one header on this
motherboard. Each USB
3.0 header can support
two ports.
English
Page 28
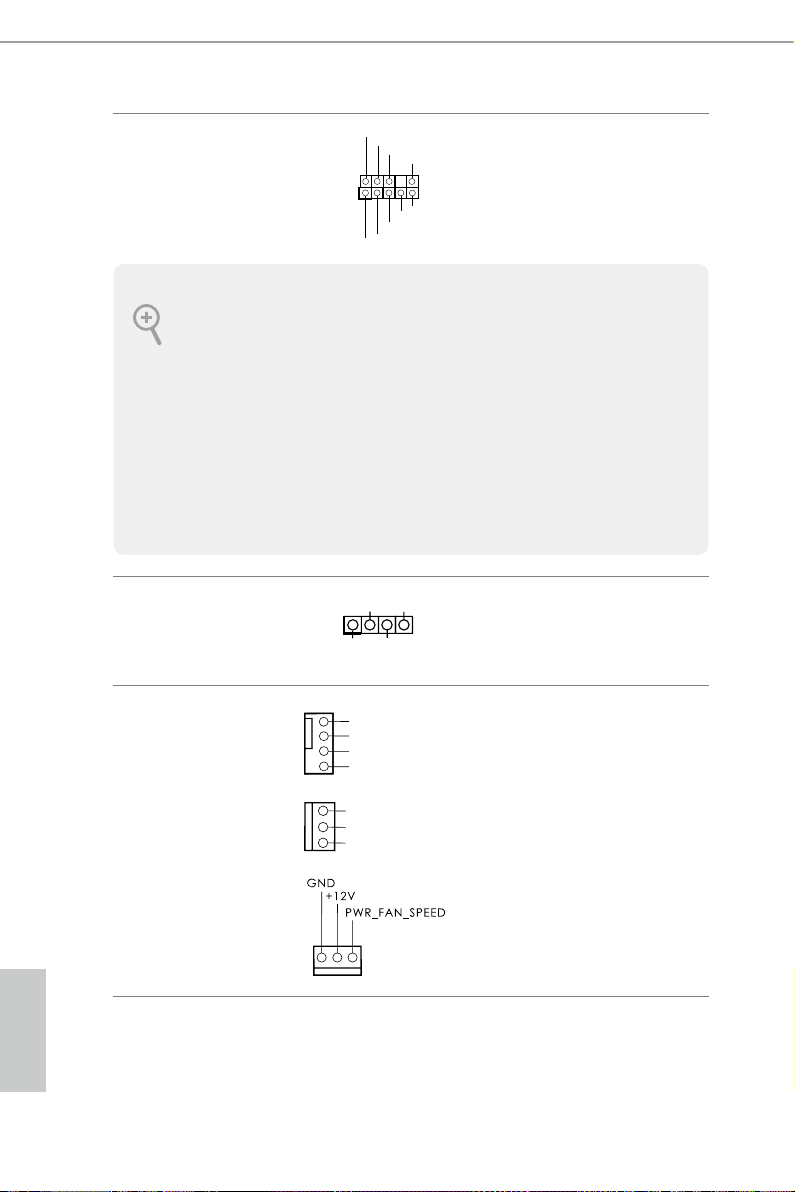
Front Panel Audio Header
1
DUMMY
SPEAKER
J_SENSE
OUT2_L
1
MIC_RET
PRESENCE#
GND
OUT2_R
MIC2_R
MIC2_L
OUT_RET
GND
N_SPEED
(9-pin HD_ AUDIO1)
(see p.9, No. 27)
is header is for
connecting audio devices
to the front audio panel.
1. High Denition Audio support s Jack Sensing, but the panel wire on the chassis must sup port HDA to function correctly. Ple ase fol low the instructions in our manual and chassis
manual to install your system.
2. If you use an AC’97 audio panel , please install it to th e front panel audio header by the
steps below:
A. Connect Mic_IN (MIC) to MIC2_ L.
B. Conne ct Audio_R (RIN) to OUT2_R and Audio_ L (LIN) to OUT2_ L.
C. Connect Ground (GND) to Ground (GND).
D. MIC_ RET and OUT_RET are for the HD audio panel only. You don’t ne ed to connect
them for the AC’97 audio panel .
E. To activate the front mic, go to the “FrontMic” Tab in the Realtek Control panel and
adjust “Recording Volume”.
Chassis Speaker Header
(4-p i n SPEAKER1)
(see p.9, No. 13)
Chassis and Power Fan
Connectors
(4-pin CHA_FAN1)
(see p.9, No. 10)
(4-pin CHA_FAN2)
(see p.9, No. 9)
DUMMY
+5V
+12V
CHA_FAN_SPEED
FAN_SPEED_CONTROL
GND
+ 12V
CHA_ FA
Please connect the chassis
speaker to this header.
Please connect fan cables
to the fan connectors and
match the black wire to
the ground pin.
(3-p in PW R_ FA N1)
(see p.9, No. 2)
English
24 25
Page 29
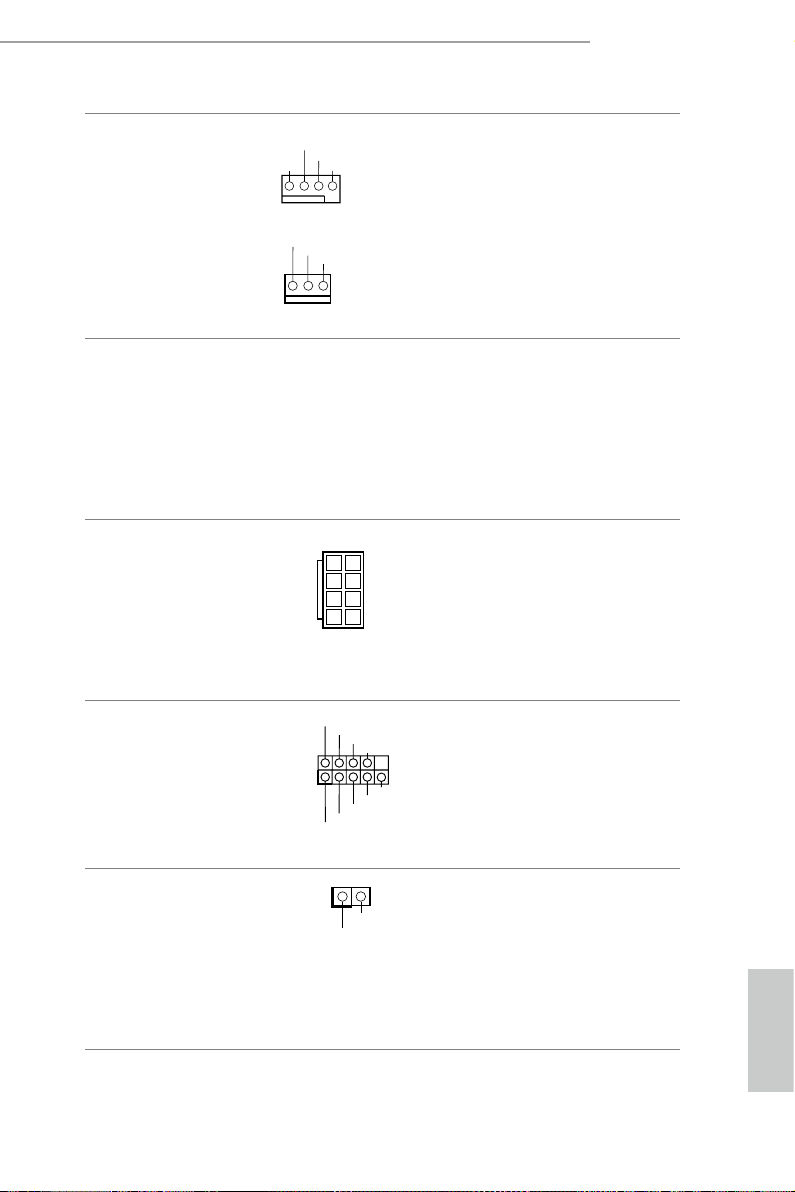
Q87M vPro
+12V
N_SPEED_CONTROL
5
8
Signal
GND
N_SPEED
1
CPU Fan Connectors
(4-pin CPU_FAN1)
(see p.9, No. 4)
(4-pin CPU_FAN2)
(see p.9, No. 5)
ATX Power Connector
(24-p i n ATX PWR1)
(see p.9, No. 8)
ATX 12V Power
Connector
(8-pin ATX12V1)
(see p.9, No. 3)
Serial Port Header
(9-p in CO M1)
(see p.9, No. 26)
CPU_FAN_SPEED
GND
+12V
12
1
FA
CPU_FA
RRXD1
DDTR#1
TTXD1
DDCD#1
24
13
1
4
DDSR#1
CCTS#1
RRTS#1
GND
RRI#1
is motherboard pro-
vides a 4-Pin CPU fan
(Quiet Fan) connector.
If you plan to connect a
3-Pin CPU fan, please
connect it to Pin 1-3.
is motherboard pro-
vides a 24-pin ATX power
connector. To use a 20-pin
ATX power supply, please
plug it along Pin 1 and Pin
13.
is motherboard pro-
vides an 8-pin ATX 12V
power connector. To use a
4-pin ATX power supply,
please plug it along Pin 1
and Pin 5.
is COM1 header
supports a serial port
module.
Chassis Intrusion Header
(2-p in CI1)
(see p.9, No. 22)
1
GND
is motherboard supports
CASE OPEN de tec tion feat ure
that detects if the cha ssis cover
has been removed. This feature
requires a chassis w ith chas sis
intrusion detection design.
English
Page 30
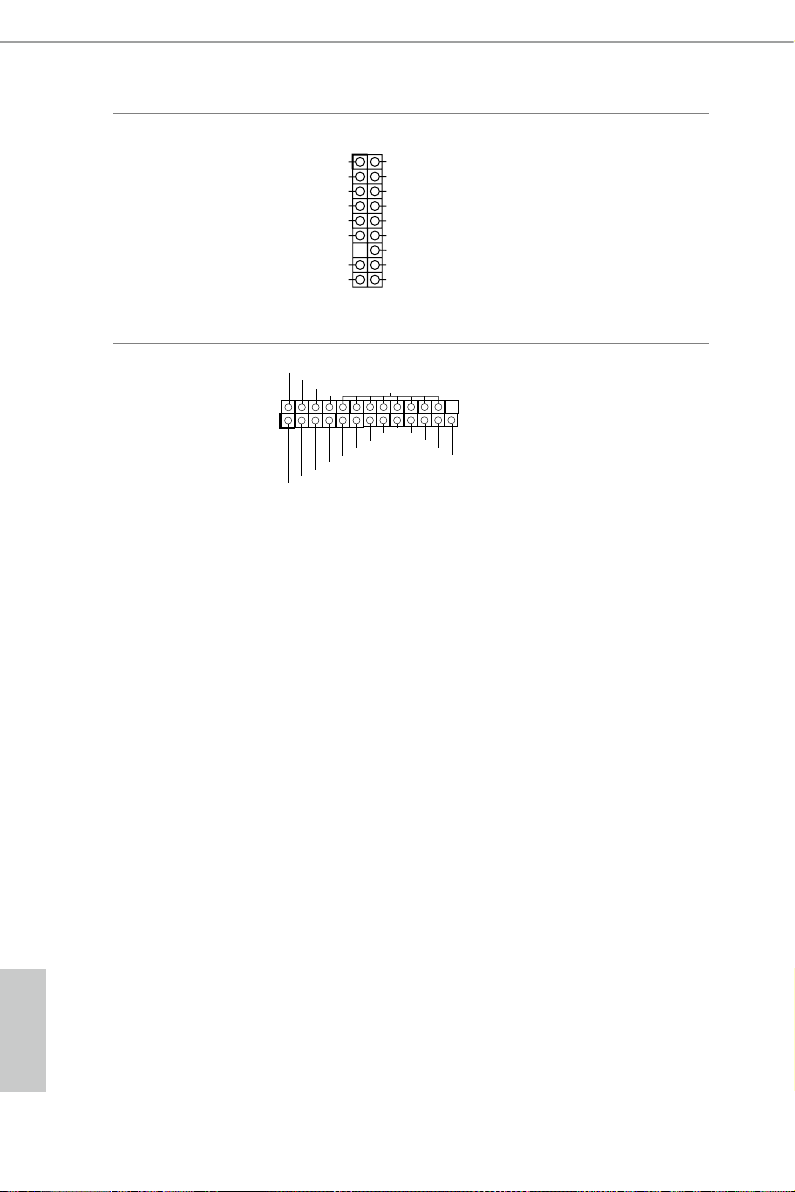
TPM Header
CK_33M_TPM
N
AFD#
STB#
(17-pi n TP MS1)
(see p.9, No. 1)
1
LFRAME#_L
T
PM_RST#
LAD3_L
+3V
LAD0_L
+3VSB
GNDF_CLKRUN#
GND
SMB_CLK_MAIN
SMB_DATA_MAI
LAD2_L
LAD1_L
GND
S_PWRDWN#
SERIRQ#
is connector supports Trusted
Platform Module (TPM) system,
which can securely store keys,
digital certicates, passwords,
and data. A TPM system also
helps enhance network security,
protects digital identities, and
ensures platform integrity.
Print Port Header
(25-pin LPT1)
(see p.9, No. 25)
ERROR#
PINIT#
1
SPD1
SPD0
SLIN#
SPD2
SPD3
SPD4
SPD5
SPD6
GND
SPD7
ACK#
BUSY
is is an interface for print port
cable that allows convenient
connection of printer devices.
PE
SLCT
English
26 PB
Page 31
Chapter 3 Software and Utilities Operation
3.1 Installing Drivers
e Support CD that comes with the motherboard contains necessary drivers and
useful utilities that enhance the motherboard’s features.
Running The Support CD
To begin using the support CD, insert the CD into your CD-ROM drive. e CD
automatically displays the Main Menu if “AUTORUN” is enabled in your computer.
If the Main Menu does not appear automatically, locate and double click on the le
“ASRSETUP.EXE” in the Support CD to display the menu.
Drivers Menu
e drivers compatible to your system will be auto-detected and listed on the
support CD driver page. Please click Install All or follow the order from top to
bottom to install those required drivers. erefore, the drivers you install can work
properly.
Utilities Menu
e Utilities Menu shows the application soware that the motherboard supports.
Click on a specic item then follow the installation wizard to install it.
Q87M vPro
To improve Windows 7 compatibility, please download and install the following hot x
provided by Microso.
“KB2720599”: http://support.microso.com/kb/2720599/en-us
English
Page 32

3.2 A-Tuning
A-Tuning is ASRock’s multi purpose soware suite with a new interface, more new
features and improved utilities, including XFast R AM, Dehumidier, Good Night
LED, FAN-Tastic Tuning, OC Tweaker and a whole lot more.
3.2.1 Installing A-Tuning
When you install the all-in-one driver to your system from ASRock’s support CD,
A-Tu ni n g will be auto-installed as well. Aer the installation, you will nd the icon
“A-Tu ni n g“ on your desktop. Double-click the “A-Tuning“ icon, A-Tu ni ng
main menu will pop up.
3.2.2 Using A-Tuning
ere are ve sections in A-Tu ni ng main menu: Operation Mode, Tools, OC
Tweaker, System Info and Tech Service.
Operation Mode
Choose an operation mode for your computer.
English
28 29
Page 33

Tool s
Various tools and utilities.
XFast RAM
Boost the system’s performance and extend the HDD’s or SDD’s lifespan! Create a
hidden partition, then assign which les should be stored in the RAM drive.
Q87M vPro
Fast Boot
Fast Boot minimizes your computer's boot time. Please note that Ultra Fast mode
is only supported by Windows 8 and the VBIOS must support UEFI GOP if you are
using an external graphics card.
OMG
Schedule the starting and ending hours of Internet access granted to other users.
Place X marks on the time table to disable the Internet.
Good Night LED
Switch o the Power/HDD/LAN LEDs when the system is on, and automatically
switch o the Power and Keyboard LEDs when the system enters into Standby/
Hibernation mode.
FAN-Tastic Tuning
Congure up to ve dierent fan speeds using the graph. e fans will automatically
shi to the next speed level when the assigned temperature is met.
English
Page 34

Dehumidier
Prevent motherboard damages due to dampness. Enable this function and
congure the period of time until the computer powers on, and the duration of the
dehumidifying process.
HDMI-IN
Connect two dierent devices to one monitor and toggle between the primary and
secondary screen without replugging the connectors every time. Please set a hotkey
for switching between the two devices.
OC Tw eaker
Congurations for overclocking the system.
System Info
View information about the system.
System Browser
System Browser shows the overview of your current PC and the devices connected.
English
30 31
Page 35

Tech Ser vice
Contact Tech Service.
Q87M vPro
English
Page 36
3.3 Intel® Rapid Start Technology
Intel® Rapid Start Technolog y enables your system to wake up faster from deep
sleep, saving time and power consumption. Feel secure to know that your system
will resume to working condition even if an unexpected power loss happens while
the PC is in sleep mode.
3.3.1 System Requirements
• Conrm whether your motherboard supports this feature.
• Operating system: Microso Windows 8/7 (32- or 64-bit edition)
• Set the SATA mode to AHCI. If Windows 8/7 is already installed under IDE
mode, directly changing the SATA mode to AHCI may cause Windows 8/7
to crash while booting. If your system is not in AHCI mode, please follow the
instructions below.
ere are certain risks. Please back up any importa nt data before operating to avoid loss.
1. Press Win + R simultaneously in Windows 8/7, type "Regedit" into the word
box then click OK.
2. Enter into HKEY_LOCAL _MACHINE\SYSTEM\CurrentControlSet\services\
msahci in Windows Registry Editor. Double click on the value Start and
change the value from 3 into 0. Click on OK.
English
32 33
Page 37

3. Exit the Registry Editor window and restart the computer.
4. Press F2 to enter BIOS, then go to Advanced ‐> Storage Conguration and
change SATA Mode to AHCI. Press F10 to save changes and exit.
5. Enter Windows 8/7. Windows will discover the new device and install AHCI
drivers automatically.
Q87M vPro
3.3.2 Setup Guide
Conguring Rapid Start
Step 1
Run ASRock Rapid Start utility from Start -> All Programs -> ASRock Utilit y.
Step 2
If you have more than one hard drives in your system, you must select one, then
choose the Partition Size desired for your hidden partition and click on Create. e
system will automatically create a hidden partition according to your settings. If
there are SSD’s installed into your system, it is recommended to create the partition
on the SSD.
English
Page 38

English
Step 3
When prompted to restart aer the setup, click Ye s to reboot.
Step 4
Double-click the Intel® Rapid Start Technology Manager icon in the Windows
sy stem tray.
34 35
Page 39

Step 5
Make sure Rapid Start is on. Drag the slider to congure the time. For example, if
the timer value is set to ten minutes, the system will enable Rapid Start mode aer
entering sleep state for ten minutes. If the timer is set to 0 minutes, Windows will
immediately enable Rapid Start mode as it enters sleep state.
Q87M vPro
Using Rapid Start
1. You may shut down the computer without terminating the applications or les
you are executing currently. Click on Windows Start ‐> the arrow next to Shut
down, and click on Sleep.
2. Windows system will enter sleep state.
3. According to your settings in Rapid Start Technology Manager, the system
will automatically wake up and enable Rapid Start mode aer entering sleep
English
Page 40

state for a period of time. e power of the computer in Rapid Start mode can
be cut o, it will not cause data loss of the programs or les you were executing
before entering sleep state.
4. When you wish to continue to use the computer just hit the power button, the
system will rapidly return to Windows, the programs and les which you were
using before entering sleep state will be accessible immediately.
English
36 37
Page 41
3.4 Intel® Smart Connect Technology
Intel® Smart Connect Technology is a feature that periodically wakes your computer
from Windows® sleep state to refresh email or social networking applications. It
saves your waiting time and keeps the content always up-to-date.
3.4.1 System Requirements
• Conrm whether your motherboard supports this feature.
• Operating system: Microso Windows 8/7 (32- or 64-bit edition)
• Set the SATA mode to AHCI. If Windows 8/7 is already installed under IDE
mode, directly changing the SATA mode to AHCI may cause Windows 8/7
to crash while booting. If your system is not in AHCI mode, please follow the
instructions below.
ere are certain risks. Please back up any importa nt data before operating to avoid loss.
1. Press Win + R simultaneously in Windows 8/7, type "Regedit" into the word
box then click OK.
Q87M vPro
2. Enter into HKEY_LOCAL _MACHINE\SYSTEM\CurrentControlSet\services\
msahci in Windows Registry Editor. Double click on the value Start and
change the value from 3 into 0. Click on OK.
English
Page 42

3.4.2 Setup Guide
Installing ASRock Smart Connect Utility
Step 1
Install ASRock Smart Connect Utility, which is located in the folder at the following
path of the Support CD: \ ASRock Utility > Smart Connect.
Step 2
Once installed, run ASRock Smart Connect from your desktop or go to Windows
Start -> All Programs -> ASRock Utility.
English
38 39
Page 43

Step 3
Click the Add button. Take Foxmail as an example, add Foxmail to the Application
list.
Step 4
Select Foxmail from the Application List, then click the arrow pointing right to add
this application to the Smart Connect List.
Q87M vPro
Step 5
Click Apply to enable Smart Connect.
English
Page 44

Step 6
Double-click the Intel® Smart Connect Technology Manager icon in the
Windows system tray.
Step 7
Drag the slider to congure how oen the system will connect to the network to
download updates. Shorter durations will provide more frequent updates, but may
cause more power consumption.
Using Smart Connect
1. Keep the applications which you wish to connect to the internet and receive
updates while the system is in sleep state running. Foxmail for instance, keep
Foxmail running.
2. Click on Windows Start -> the arrow next to Shut down, and click on Sleep.
English
3. Windows system will enter sleep state.
40 41
Page 45

4. e system will wake up from sleep state periodica lly, and then start to update
Foxmail. e screen will not display anything so the computer can maintain
minimum power usage. Aerwards, the system will automatically return to
sleep state again.
5. Upon waking up the system, you will nd the new mail that were sent to you
during sleep state are already updated and ready to be read in Foxmail.
Q87M vPro
English
Page 46

3.5 Intel® Remote Wake Technology
Intel® Remote Wake Technolog y allows you to use programs or services over the
Internet to wake up your home computer from energy ecient sleep mode.
Before conguring this feature, verify the following.
• Remote Wake has been enabled in "Intel® Smart Connect Technolog y
Manager".
• Make sure that the "PCI Device Power On" is enabled in UEFI SETUP
UTILITY > Advanced > ACPI Conguration.
3.5.1 Conguring and Using MeshCentral
MeshCentral allows you to remotely wake up a PC from any network using a single
web site. Just download and install the mesh agent on your computers and your
computers will show up in the "My Devices" section of MeshCentral.com.
Creating a Mesh
Step 1
Login to Meshcentral.com.
If you have not created a MeshCentral acount, go to MeshCentra l.com and create a
new account.
English
Step 2
Click the "My Account" tab. en click on "New" to create a new mesh.
42 43
Page 47

Step 3
A new mesh window will pop up. Enter a mesh name and password.
Step 4
Select all the checkboxes and click Create Mesh.
Q87M vPro
Downloading and Installing Mesh Agent
Step 1
Click Install on the My Account page.
Step 2
Select the mesh and download both les. Make sure both les are in the same
di rec to ry.
Step 3
Right-click on MeshAgent.exe and select Run as administrator.
English
Page 48

Step 4
Click Install / Update.
Step 5
Wait a minute for the New Machine to appear in "My Device".
English
44 45
Page 49

Step 6
Check whether "Intel Remote Wake" appeared or not.
Waking up Your PC using PC
Step 1
On the "My Devices" page, click on Power Actions.
Step 2
Click on Wa ke or Sleep.
Q87M vPro
English
Page 50
Waking up Your PC Using Mobile Device
Before waking up your home computer using a mobile dev ice, please l og out of MeshCentral
on other previously used computers or devices.
Step 1
Login to meshcentral.com/m.
Step 2
Select a Machine.
Step 3
Click on Wa ke or Sleep.
English
Tutorial Video
46 47
Page 51
3.5.2 Conguring and Using Splashtop
Splashtop is a remote desktop access soware that lets you remotely access your
home computer from your mobile device.
Before conguring this feature, verify that "Remote Wake" has been enabled in
"Intel® Smart Connect Technology Manager".
Setup Guide
Step 1
Download and install the Streamer on your home computer, which is located in
the folder at the following path of the Support CD: \ ASRock Utilit y > Splashtop
Streamer. en enter your Splashtop Account. If you have not created a Splashtop
acount, create one.
Step 2
Download and install “Splashtop 2” on your mobile device and log into the app.
Using Remote Wakeup
Step 1
In "Splashtop 2”, tap the edit button next to an oine machine from the list.
Q87M vPro
Step 2
Tap "Wake up this computer".
English
Page 52
Using Remote Control
Step 1
In "Splashtop 2”, tap an online machine from the list to connect to your home
computer.
Step 2
Start remotely accessing your home computer.
e func tionality and price of the Splashtop APP a nd subscription fee is subject to
change . Please check www.splashtop.com for for details.
English
48 49
Page 53

Accessing Data
Q87M vPro
Playing Video
English
Page 54

3.6 Start8
For those Windows 8 users who miss the Start Menu, Start8 is an ideal solution that
brings back the familiar Start Menu along with added customizations for greater
eciency.
3.6.1 Installing Start8
Install Start8, which is located in the folder at the following path of the Support CD:
\ ASRock Uti lity > Start8.
3.6.2 Conguring Start8
Style
Select between the Windows 7 style and Windows 8 style Start Menu. en select
the theme of the Start Menu and customize the style of the Start icon.
English
50 51
Page 55

Congure
Congure provides conguration options, including icon sizes, which shortcuts you
want Start Menu to display, quick access to recently used apps, the functionality of
the power button, and more.
Q87M vPro
Control
English
Page 56

Control lets you congure what a click on the start button or a press on the
Windows key does.
Desktop
Desktop a llows you to disable the hot corners when you are working on the desktop.
It also lets you choose whether or not the system boots directly into desktop mode
and bypass the Metro user interface.
About
Displays information about Start8.
English
52 53
Page 57

3.7 Intel® vPro Conguration and Management
If you would like to congure and manage Intel vPro Technolog y, please install
"Intel Open Manageability Developer Tool Kit", which is located in the folder at the
following path of the Support CD: ..\Utilities\ManageabilityToolKit\(v1.21)\Man-
ageabilityDeveloperToolKit.msi. You can download the latest version of the tool kit
from http://opentools.homeip.net/open-manageability.
Q87M vPro
English
Page 58
Chapter 4 UEFI SETUP UTILITY
4.1 Introduction
ASRock Interactive UEFI is a blend of system conguration tools, cool sound eects
and stunning visuals. Not only will it make BIOS setup less dicult but also a lot
more amusing. is section explains how to use the UEFI SETUP UTILITY to
congure your system. You may run the UEFI SETUP UTILITY by pressing <F2>
or <Del> right aer you power on the computer, otherwise, the Power-On-Self-Test
(POST) will continue with its test routines. If you wish to enter the UEFI SETUP
UTILITY aer POST, restart the system by pressing <Ctl> + <Alt> + <Delete>, or
by pressing the reset button on the system chassis. You may also restart by turning
the system o and then back on.
Becau se the UEFI soware is constantly being upd ated, the following UEFI setup screens
and descriptions are for reference pur pose only, and they may not exactly match what you
see on your screen.
4.1.1 UEFI Menu Bar
e top of the screen has a menu bar with the following selections:
Main
OC Tweaker
Advanced
Tool
H/W Monitor
Boot
For setting system time/date information
For overclocking congurations
For advanced system congurations
Useful tools
Displays current hardware status
For conguring boot settings and boot priority
English
Security
Exit
54 55
For security settings
Exit the current screen or the UEFI Setup Utility
Page 59

4.1.2 Navigation Keys
Use < > key or < > key to choose among the selections on the menu bar, and
use < > key or < > key to move the cursor up or down to select items, then
press <Enter> to get into the sub screen. You can also use the mouse to click your
required item.
Please check the following table for the descriptions of each navigation key.
Navigation Key(s) Description
Q87M vPro
+ / -
<Tab>
<PGUP>
<PGDN>
<HOME>
<END>
<F1>
<F7>
<F9>
<F10>
<F12>
<ESC>
To change option for the selected items
Switch to next function
Go to the previous page
Go to the next page
Go to the top of the screen
Go to the bottom of the screen
To display the General Help Screen
Discard changes and exit the SETUP UTILITY
Load optimal default values for all the settings
Save changes and exit the SETUP UTILITY
Print screen
Jump to the Exit Screen or exit the current screen
English
Page 60

4.2 Main Screen
When you enter the UEFI SETUP UTILITY, the Main screen will appear and
display the system overview.
English
56 57
Page 61
4.3 OC Tweaker Screen
In the OC Tweaker screen, you can set up overclocking features.
Q87M vPro
Becau se the UEFI soware is constantly being upd ated, the following UEFI setup screens
and descriptions are for reference pur pose only, and they may not exactly match what you
see on your screen.
CPU Ratio
e CPU speed is determined by the CPU Ratio multiplied with the BCLK.
Increasing the CPU Ratio will increase the internal CPU clock speed without
aecting the clock speed of other components.
Intel SpeedStep Technology
Intel SpeedStep technology allows processors to switch between multiple frequen-
cies and voltage points for better power saving and heat dissipation.
Intel Turbo Boost Technology
Intel Turbo Boost Technolog y enables the processor to run above its base operating
frequency when the operating system requests the highest performance state.
English
Page 62

Long Duration Power Limit
Congure Package Power Limit 1 in watts. When the limit is exceeded, the CPU
ratio will be lowered aer a period of time. A lower limit can protect the CPU and
save power, while a higher limit may improve performance.
Long Duration Maintained
Congure the period of time until the CPU ratio is lowered when the Long
Duration Power Limit is exceeded.
Short Duration Power Limit
Congure Package Power Limit 2 in watts. When the limit is exceeded, the CPU
ratio will be lowered immediately. A lower limit can protect the CPU and save
power, while a higher limit may improve performance.
Primary Plane Current Limit
Congure the current limit of the CPU under Turbo Mode in ampere. A lower
limit can protect the CPU and save power, while a higher limit may improve
performance.
GT Frequency
Congure the frequency of the integrated GPU.
GT Voltage Mode
Auto: For optimized settings.
Adaptive: Add voltage to the integrated GPU when the system is under heavy load.
Override: e voltage is xed.
GT Adaptive Voltage
Congure the xed voltage added to the integrated GPU.
GT Voltage Oset
Congure the voltage added to the integrated GPU when the system is under heavy load.
English
58 59
Page 63

DRAM Timing Conguration
DRAM Frequency
If [Auto] is selected, the motherboard will detect the memory module(s) inserted
and assign the appropriate frequency automatically.
DRAM Conguration
Q87M vPro
CAS# Latency (tCL)
e time between sending a column address to the memory and the beginning of the data
in response.
RAS# to CAS# Delay (tRCD)
e number of clock cycles required between the opening of a row of memory and
accessing columns within it.
Row Precharge Time (tRP)
e number of clock cycles required between the issuing of the precharge command
and opening the next row.
RAS# Active Time (tRAS)
e number of clock cycles required between a bank active command and issuing the
precharge command.
English
Page 64

Command Rate (CR)
e delay between when a memor y chip is selected and when the rst active command can
be issued.
Write Recovery Time (tWR)
e amount of delay that must elapse aer the completion of a valid write operation,
before an active bank can be precharged.
Refresh Cycle Time (tRFC)
e number of clocks from a Refresh command until the rst Activate command to
the same rank.
RAS to RAS Delay (tRRD)
e number of clocks between two rows activated in dierent banks of the same
rank.
Write to Read Delay (tWTR)
e number of clocks between the last valid write operation and the next read
command to the same internal bank.
Read to Precharge (tRTP)
e number of clocks that are inserted between a read command to a row pre-
charge command to the same rank.
Four Activate Window (tFAW)
e time window in which four activates are allowed the same rank.
CAS Write Latency (tCWL)
Congure CAS Write Latency.
tREFI
Congure refresh cycles at an average periodic interval.
tCKE
Congure the period of time the DDR3 initiates a minimum of one refresh
English
command internally once it enters Self-Refresh mode.
tRDRD
Congure between module read to read delay.
60 61
Page 65

tRDRDDR
Congure between module read to read delay from dierent ranks.
tRDRDDD
Use this to change DRAM tRWSR Auto/Manual settings. e default is [Auto].
tWRRD
Congure between module write to read delay.
tWRRDDR
Congure between module write to read delay from dierent ranks.
tWRRDDD
Use this to change DRAM tRRSR Auto/Manual settings. e default is [Auto].
Congure between module write to read delay from dierent DIMMs.
tWRWR
Congure between module write to write delay.
tWRWRDR
Congure between module write to write delay from dierent ranks.
Q87M vPro
tWRWRDD
Congure between module write to write delay from dierent DIMMs.
tRDWR
Congure between module read to write delay.
tRDWRDR
Congure between module read to write delay from dierent ranks.
tRDWRDD
Congure between module read to write delay from dierent DIMMs.
RTL (CHA)
Congure round trip latency for channel A.
RTL (CHB)
Congure round trip latency for channel B.
English
Page 66

IO-L (CHA)
Congure IO latency for channel A.
IO-L (CHB)
Congure IO latency for channel B.
ODT WR (CHA)
Congure the memory on die termination resistors' WR for channel A.
ODT WR (CHB)
Congure the memory on die termination resistors' WR for channel B.
ODT NOM (CHA)
Use this to change ODT (CHA) Auto/Manual settings. e default is [Auto].
ODT NOM (CHB)
Use this to change ODT (CHB) Auto/Manual settings. e default is [Auto].
Command Tri State
Enable for DRAM power saving.
MRC Fast Boot
Enable Memory Fast Boot to skip DRAM memory training for booting faster.
DIMM Exit Mode
Use this to congure DIMM Exit Mode. e default is [Fast Exit].
English
62 63
Page 67

FIVR Conguration
FIVR Switch Frequency Signature
Select whether to boost or lower the FIVR Switch Frequency.
FIVR Switch Frequency Oset
Congure the percentage of frequency boost or deduction.
CPU Voltage Mode
Auto: For optimized settings.
Adaptive: Add voltage to the CPU when the system is under heavy load.
Override: e voltage is xed.
CPU Adaptive Voltage
Congure the voltage added to the CPU when the system is under heavy load.
CPU Voltage Oset
Congure the dynamic CPU voltage added to the CPU.
CPU Cache Voltage Mode
Auto: For optimized settings.
Q87M vPro
Adaptive: Add voltage to the CPU Cache when the system is under heavy load.
Override: e voltage is xed.
CPU Cache Adaptive Voltage
Congure the voltage added to the CPU Cache when the system is under heavy
load.
CPU Cache Voltage Oset
Congure the voltage for the CPU Cache. Setting the voltage higher may increase
system stability when overclocking.
System Agent Voltage Oset
Congure the voltage for the System Agent. Setting the voltage higher may increase
system stability when overclocking.
English
Page 68

CPU Analog IO Voltage Oset
CPU I/O Analog Voltage.
CPU Digital IO Voltage Oset
CPU I/O Digital Voltage.
CPU Integrated VR Faults
Disable FIVR Faults to raise the threshold to trigger CPU over current protection
and over voltage protection for better overclocking capabilities.
CPU Integrated VR Eciency Mode
Enable FIVR Eciency Management for power saving. Disable for better performance and
overclocking capabilities.
Voltage Conguration
DRAM Voltage
Use this to congure DRAM Voltage. e default value is [Auto].
PCH 1.05V Voltage
Chipset 1.05V Voltage. Use default settings for best performance.
PCH 1.5V Voltage
I/O 1.5V Voltage. Use default settings for best performance.
English
64 65
Page 69
Q87M vPro
4.4 Advanced Screen
In this section, you may set the congurations for the following items: CPU Conguration,
Chipset Conguration, Storage Conguration, Intel® Rapid Start Technology, Intel® Smart
Connect Technology, AMT Conguration, Super IO Conguration, ACPI Conguration,
USB Conguration , Trusted Computing and Serial Port Console Redirection.
Setting wrong values in this sec tion may cause the system to malfunction.
English
Page 70

4.4.1 CPU Conguration
Intel TXT(LT) Support
Use this option to enable or disable Intel(R) TXT(LT) support. e default value is
[Disabled].
Intel Hyper Threading Technology
Intel Hyper reading Technology allows multiple threads to run on each core, so
that the overall performance on threaded soware is improved.
Active Processor Cores
Select the number of cores to enable in each processor package.
CPU C States Support
Enable CPU C States Support for power saving. It is recommended to keep C3, C6
and C7 all enabled for better power saving.
Enhanced Halt State (C1E)
Enable Enhanced Halt State (C1E) for lower power consumption.
English
CPU C3 State Support
Enable C3 sleep state for lower power consumption.
66 67
Page 71

CPU C6 State Support
Enable C6 deep sleep state for lower power consumption.
CPU C7 State Support
Enable C7 deep sleep state for lower power consumption.
Package C State Support
Enable CPU, PCIe, Memor y, Graphics C State Support for power saving.
CPU Thermal Throttling
Enable CPU internal thermal control mechanisms to keep the CPU from overheat-
ing.
No-Execute Memory Protection
Processors with No-Execution Memory Protection Technology may prevent certain
classes of malicious buer overow attacks.
Intel Virtualization Technology
Intel Virtualization Technology allows a platform to run multiple operating systems
and applications in independent partitions, so that one computer system can
function as multiple virtual systems.
Q87M vPro
Hardware Prefetcher
Automatically prefetch data and code for the processor. Enable for better
performance.
Adjacent Cache Line Prefetch
Automatically prefetch the subsequent cache line while retrieving the currently
requested cache line. Enable for better performance.
English
Page 72

4.4.2 Chipset Conguration
VT-d
Intel® Virtualization Technology for Directed I/O helps your virtual machine
monitor better utilize hardware by improving application compatibility and
reliability, and providing additional levels of manageability, security, isolation, and
I/O performance.
Primary Graphics Adapter
Select a primary VGA.
PCIE1 Link Speed
Select the link speed for PCIE1.
Share Memory
Congure the size of memory that is allocated to the integrated graphics processor
when the system boots up.
IGPU Multi-Monitor
English
Select disable to disable the integrated graphics when an external graphics card is
installed. Select enable to keep the integrated graphics enabled at all times.
68 69
Page 73

Render Standby
Power down the render unit when the GPU is idle for lower power consumption.
Onboard HD Audio
Enable/disable onboard HD audio. Set to Auto to enable onboard HD audio and
automatically disable it when a sound card is installed.
Front Panel
Enable/disable front panel HD audio.
Onboard HDMI HD Audio
Enable audio for the onboard digital outputs.
Deep Sleep
Congure deep sleep mode for power saving when the computer is shut down.
Restore on AC/Power Loss
Select the power state aer a power failure. If [Power O] is selected, the power will
remain o when the power recovers. If [Power On] is selected, the system will start
to boot up when the power recovers.
Q87M vPro
Good Night LED
By enabling Good Night LED, the Power/HDD LEDs will be switched o when the
system is on. It will also automatically switch o the Power and Keyboard LEDs
when the system enters into Standby/Hibernation mode.
English
Page 74

4.4.3 Storage Conguration
SATA Controller(s)
Enable/disable the SATA controllers.
SATA Mode Selection
IDE: For better compatibility.
AHCI: Supports new features that improve performance.
RAID: Combine multiple disk drives into a logical unit.
AHCI (Advanc ed Host Controll er Inter face) support s NCQ and other new features that
will improve SATA disk performance but IDE mod e does not have these advantages.
SATA Aggressive Link Power Management
SATA Aggressive Link Power Management allows SATA devices to enter a low
power state during periods of inactivity to save power. It is only supported by AHCI
English
mode.
Dynamic Storage Accelerator
Keep this option enabled for higher HDD and SDD I/O performance, lower latency
and increased system responsiveness.
70 71
Page 75

Hard Disk S.M.A.R.T.
S.M.A.R.T stands for Self-Monitoring, Analysis, and Reporting Technology. It is a
monitoring system for computer hard disk drives to detect and report on various
indicators of reliability.
Q87M vPro
English
Page 76

4.4.4 Intel® Rapid Start Technology
Intel® Rapid Start Technology
Intel® Rapid Start Technolog y is a new zero power hibernation mode which allows
users to resume in just 5-6 seconds.
English
72 73
Page 77

4.4.5 Intel® Smart Connect Technology
Intel® Smart Connect Technology
Intel® Smart Connect Technology automatically updates your email and social
networks, such as Twitter, Facebook, etc. while the computer is in sleep mode.
Q87M vPro
English
Page 78

4.4.6 AMT Conguration
Intel AMT
Use this item to enable/disable Intel(R) Active Management Technology BIOS
Extension.
BIOS Hotkey Pressed
Use this item to enable/disable BIOS hotkey press.
MEBx Selection Screen
Use this item to enable/disable MEBx selection screen.
Hide Un-Congure ME Conrmation Prompt
Use this item to enable/disable hide un-congure ME without password
conrmation prompt.
MEBx Debug Message Output
Use this item to enable/disable MEBx debug message output.
English
Un-Congure ME
Use this item to enable/disable un-congure ME without password.
74 75
Page 79

Amt Wait Timer
Set timer to wait before sending ASF_GET_BOOT_OPTIONS.
Disable ME
Use this item to enable/disable set ME to so temporary.
ASF
Use this item to enable/disable Alert Specication Format.
Activate Remote Assistance Process
Use this item to enable/disable trigger CIR A boot.
USB Congure
Use this item to enable/disable USB congure function.
PET Progress
Use this item to enable/disable PET Events progress to recieve PET events or not.
WatchDog
Use this item to enable/disable WatchDog Timer
Q87M vPro
English
Page 80

4.4.7 Super IO Conguration
Serial Port1
Enable or disable the Serial port.
Serial Port Address1
Select the address of the Serial port.
Parallel Port
Use this item to enable or disable the onboard parallel port.
Change Settings
Use this item to select an optional setting for Super IO device.
Device Mode
Use this item to change the Printer Port mode.
English
76 77
Page 81

4.4.8 ACPI Conguration
Suspend to RAM
Select disable for ACPI suspend type S1. It is recommended to select auto for ACPI
S3 power saving.
Q87M vPro
Check Ready Bit
Enable to enter the operating system aer S3 only when the hard disk is ready, this
is recommended for better system stability.
ACPI HPET Table
Enable the High Precision Event Timer for better performance and to pass WHQL
tests.
PS/2 Keyboard Power On
Allow the system to be waked up by a PS/2 Keyboard.
PCI Devices Power On
Allow the system to be waked up by a PCI device and enable wake on LAN.
Wake From Onboard LAN
Allow the system to be waked up by the Onboard Intel I217V LAN.
English
Page 82

Ring-In Power On
Allow the system to be waked up by onboard COM port modem Ring-In signals.
RTC Alarm Power On
Allow the system to be waked up by the real time clock alarm. Set it to By OS to let
it be handled by your operating system.
USB Keyboard/Remote Power On
Allow the system to be waked up by an USB keyboard or remote controller.
USB Mouse Power On
Allow the system to be waked up by an USB mouse.
English
78 79
Page 83

4.4.9 USB Conguration
USB Controller
Enable or disable all the USB ports.
Q87M vPro
USB 3.0 Controller
Enable or disable all the USB 3.0 ports.
Legacy USB Support
Enable or disable Legacy OS Support for USB 2.0 devices. If you encounter USB
compatibility issues it is recommended to disable legacy USB support. Select UEFI
Setup Only to support USB devices under the UEFI setup and Windows/Linux
operating systems only.
Legacy USB 3.0 Support
Enable or disable Legacy OS Support for USB 3.0 devices.
English
Page 84

4.4.10 Trusted Computing
Security Device Support
Enable or disable BIOS support for security device.
English
80 81
Page 85

4.4.11 Serial Port Console Redirection
Console Redirection
Use this option to enable or disable Console Redirection.
Q87M vPro
Console Redirection Settings
Use this option to congure Console Redirection Settings.
English
Page 86

4.5 Tools
Instant Flash
Save UEFI les in your USB storage device and run Instant Flash to update your
UEFI.
Internet Flash
ASRock Internet Flash downloads and updates the latest UEFI rmware version
from our servers for you. Please setup network conguration before using Internet
Flash.
*For BIOS backup and recovery purpose, it is recommended to plug in your USB
pen drive before using this function.
English
82 83
Page 87

Network Conguration
Use this to congure internet connection settings for Internet Flash.
Internet Setting
Enable or disable sound eects in the setup utility.
Q87M vPro
UEFI Download Server
Select a server to download the UEFI rmware.
English
Page 88

4.6 Hardware Health Event Monitoring Screen
is section allows you to monitor the status of the hardware on your system,
including the parameters of the CPU temperature, motherboard temperature, fan
speed and voltage.
CPU Fan 1&2 Setting
Select a fan mode for CPU Fans 1&2, or choose Customize to set 5 CPU
temperatures and assign a respective fan speed for each temperature.
Chassis Fan 1&2 Setting
Select a fan mode for Chassis Fan 1&2, or choose Customize to set 5 CPU
temperatures and assign a respective fan speed for each temperature.
Case Open Feature
Enable or disable Case Open Feature to detect whether the chassis cover has been
removed.
English
84 85
Page 89

4.7 Boot Screen
is section displays the available devices on your system for you to congure the
boot settings and the boot priority.
Fast Boot
Fast Boot minimizes your computer's boot time. In fast mode you may not boot
from an USB storage device. Ultra Fast mode is only supported by Windows 8 and
the VBIOS must support UEFI GOP if you are using an external graphics card.
Please notice that Ultra Fast mode will boot so fast that the only way to enter this
UEFI Setup Utility is to Clear CMOS or run the Restart to UEFI utility in Windows.
Q87M vPro
Boot From Onboard LAN
Allow the system to be waked up by the onboard LAN.
Setup Prompt Timeout
Congure the number of seconds to wait for the setup hot key.
Bootup Num-Lock
Select whether Num Lock should be turned on or o when the system boots up.
Boot Beep
Select whether the Boot Beep should be turned on or o when the system boots up. Please
note that a buzzer is needed.
English
Page 90

Full Screen Logo
Enable to display the boot logo or disable to show normal POST messages.
AddOn ROM Display
Enable AddOn ROM Display to see the AddOn ROM messages or congure the
AddOn ROM if you've enabled Full Screen Logo. Disable for faster boot speed.
Boot Failure Guard
If the computer fails to boot for a number of times the system automatically restores
the default settings.
Boot Failure Guard Count
Congure the number of attempts to boot until the system automatically restores
the default settings.
CSM (Compatibility Support Module)
CSM
Enable to launch the Compatibility Support Module. Please do not disable unless
you’re running a WHCK test. If you are using Windows 8 64-bit and all of your
English
devices support UEFI, you may also disable CSM for faster boot speed.
Launch PXE OpROM Policy
Select UEFI only to run those that support UEFI option ROM only. Select Legacy
only to run those that support legacy option ROM only. Do not launch?
86 87
Page 91

Launch Storage OpROM Policy
Select UEFI only to run those that support UEFI option ROM only. Select Legacy
only to run those that support legacy option ROM only. Do not launch?
Launch Video OpROM Policy
Select UEFI only to run those that support UEFI option ROM only. Select Legacy
only to run those that support legacy option ROM only. Do not launch?
Q87M vPro
English
Page 92

4.8 Security Screen
In this section you may set or change the supervisor/user password for the system.
You may also clear the user password.
Supervisor Password
Set or change the password for the administrator account. Only the administrator
has authority to change the settings in the UEFI Setup Utility. Leave it blank and
press enter to remove the password.
User Password
Set or change the password for the user account. Users are unable to change the
settings in the UEFI Setup Utility. Leave it blank and press enter to remove the
password.
Secure Boot
Enable to support Windows 8 Secure Boot.
English
88 89
Page 93

4.9 Exit Screen
Save Changes and Exit
When you select this option the following message, “Save conguration changes
and exit setup?” will pop out. Select [OK] to save changes and exit the UEFI SETUP
UTILITY.
Q87M vPro
Discard Changes and Exit
When you select this option the following message, “Discard changes and exit
setup?” will pop out. Select [OK] to exit the UEFI SETUP UTILITY without saving
any changes.
Discard Changes
When you select this option the following message, “Discard changes?” will pop
out. Select [OK] to discard all changes.
Load UEFI Defaults
Load UEFI default values for a ll options. e F9 key can be used for this operation.
Launch EFI Shell from lesystem device
Copy shellx64.e to the root directory to launch EFI Shell.
English
Page 94

Contact Information
If you need to contact ASRock or want to know more about ASRock, you’re welcome
to visit ASRock’s website at http://ww w.asrock.com; or you may contact your dealer
for further information. For technical questions, please submit a support request
form at http://www.asrock.com/support/tsd.asp
ASRock Incorporation
2F., No.37, Sec. 2, Jhongyang S. Rd., Beitou District,
Taipei City 112, Taiwan (R.O.C.)
ASRock EUROPE B.V.
Bijsterhuizen 3151
6604 LV Wijchen
e Netherlands
Phone: +31-24-345-44-33
Fax: +31-24-345-44-38
ASRock America, Inc.
13848 Magnolia Ave, Chino, CA91710
U.S.A.
Phone: +1-909-590-8308
Fax: +1-909-590-1026
English
90 PB
 Loading...