

Asko WM75.1 User Manual
INSTRUCTIONS FOR USE
Washing machine
WM75.1
Carefully read the instructions for use before using the washing machine.
W40864C/1

Dear Customer,
We thank you for purchasing this quality ASKO product.
We hope it meets all your expectations. Scandinavian design combines pure lines, everyday functionality,
and high quality. These are the key characteristics of all our products, and the reason why they are highly
appreciated across the globe.
We kindly recommend you to read these instructions before using the appliance for the fi rst time. The
instruction manual also includes information on how you can help protect the environment.
TABLE OF CONTENTS
Safety precautions 3
Washing machine description 6
Detergent compartment 6
Before using the appliance for the fi rst time 7
Installation and connection 9
Tips before washing 16
Washing process, step by step (1 – 8) 18
System settings 30
Errors – what to do? 37
Service 42
Technical information 43
Program table 45
Table: washing mode/temperature 48
Table options 49
Disposal 50
Quick guide 51
Cleaning and maintenance 33
The following symbols are used throughout the manual and they have the following meanings:
Information, advice, tip, or recommendation Warning – danger of hot surface
Warning – general danger Warning – danger of fire
Warning – danger of electric shock
Original instructions
2
See Quick guide on the last page.

SAFETY PRECAUTIONS
GENERAL
Please read the instruction manual and save it for future reference.
• Please do not use the washing machine if you have not read and
understood these instructions or use fi rst.
• Failure to observe the instructions for use or inappropriate use of the
washing machine may result in damage to the laundry or machine, or injury
to the user. Keep the instruction manual handy, near the washing machine.
• Instructions for use are available on our website at www.asko.com.
• Your washing machine is intended solely for household use.
• The appliance has to be connected to the water and power supply by a
trained expert.
• Any repair and maintenance pertaining to safety or performance should be
done by trained experts.
• To avoid hazard, damaged power cord may only be replaced by the
manufacturer, authorized service technician, or other authorized person.
• After installation, the washing machine should stand still for two hours before
it is connected to the power mains.
• The washing machine may not be connected to the power mains using an
extension cord.
• Do not connect the washing machine to an electrical outlet intended for an
electric shaver or hair dryer.
• To connect the washing machine to water supply, make sure to use the
supplied water supply hose and gaskets. Water pressure has to be between
0.1 and 1 MPa (approximately 1–10 kp/cm
• Always use a new water supply hose to connect the appliance to water
supply; do not reuse an old water supply hose.
• After the washing cycle, close the water tap and pull out the washing
machine plug from the power socket.
• Only use the washing machine for washing laundry, as described in the
instruction manual. The machine is not intended for dry cleaning.
• In case of incorrect appliance connection, incorrect use, or servicing by an
unauthorized person, the user shall bear the cost of any damage.
• Only use detergents intended for the washing machine!
• Only use agents for machine washing and care of laundry. We shall not be
responsible for any damages or discolouration of gaskets and plastic parts
resulting from incorrect use of bleaching or colouring agents.
2
, 1-10 bar, 10–100 N/cm2).
3

• Bleaches that contain chlorine can be replaced with oxygen-based bleaches.
Otherwise, a neutralization cycle should be performed by running the Cotton
program at the highest temperature. For best results, use hydrogen peroxide
or oxygen-based detergents.
• Do not use colourants (dyes) or bleaching substances (substances
for discolouration or removal of colourants) as they contain sulphuric
compounds that could cause corrosion.
• Excessive use of products containing chlorine compounds increases the
risk of premature failure of appliance components. This depends on the
concentration of chlorine, exposure time, and temperature.
• Do not use detergents that contain solvents as this could lead to release
of poisonous gases, damage to the machine, and risk of fi re and explosion.
• Before using the appliance for the fi rst time, remove the transport bolts and
all other transport protection devices. See chapter "BEFORE FIRST USE /
Transport protection".
• The machine is not intended for use by persons (including children) with
physical or mental impairments, or persons with lacking experience and
knowledge. These persons should be instructed about the use of the
appliance by a person responsible for their safety.
• Emergency door opening tool is located on the back side of the dispenser.
• Maximum washing capacity in kg (for the label program Standard cotton) is
indicated on the rating plate (or in the PROGRAM TABLE).
CHILD SAFETY
• Do not allow small children to play with the washing machine.
• Before closing the washing machine door and running the program, make
sure there is nothing except laundry in the drum (e.g. if a child climbed into
the washing machine drum and closed the door from the inside).
• Keep the detergent and conditioner out of reach of children.
• Activate the child lock. See chapter "SYSTEM SETTINGS, section Child
Lock".
• Do not let children younger than three years to come near the
appliance, unless they are under constant supervision.
• The washing machine is made in compliance with all relevant safety
standards. This washing machine may be used by children aged 8 years and
above and by persons with reduced physical, sensory or mental capabilities
or lack of experience and knowledge, but only if they are supervised during
the use of the appliance, if they have been provided relevant instructions
regarding safe use of the washing machine, and if they understand the
4

hazards of inappropriate use. Make sure children do not play with the
appliance. Make sure the children do not clean the washing machine or
perform any maintenance tasks without supervision.
DANGER OF HOT SURFACE
• At higher washing temperatures, the door glass will heat up. Be careful to
avoid burns. Make sure children do not play near the door glass.
WATER OVERFLOW PROTECTION
• If the water level in the appliance rises above the normal level, then the
excessive water level protection will be activated. It will shut off the water
supply and start pumping out the water. If the water level does not decrease
in 60 seconds, the program will be interrupted (see chapter "ERRORS –
WHAT TO DO?").
TRANSPORTING / STORAGE DURING THE WINTER
If you transport or store the appliance in vehicles or rooms that are not heated
and where the temperature could drop to below freezing point, please do the
following:
• Clean the drain pump fi lter. See chapter "CLEANING AND MAINTENANCE".
• Close the water supply to the washing machine, undo the water supply hose
from the water supply tap, and wait until the water fl ows out of the tap and the
hose.
• After the drain pump fi lter is emptied, there can still be a small amount of
water in the machine. This, however, does not aff ect the quality and will not
damage the appliance.
• If the washing machine is to be transported, transport protection has
to be re-installed before transport (See chapter "BEFORE USING THE
APPLIANCE FOR THE FIRST TIME").
SAVE THESE INSTRUCTIONS FOR FUTURE REFERENCE!
5
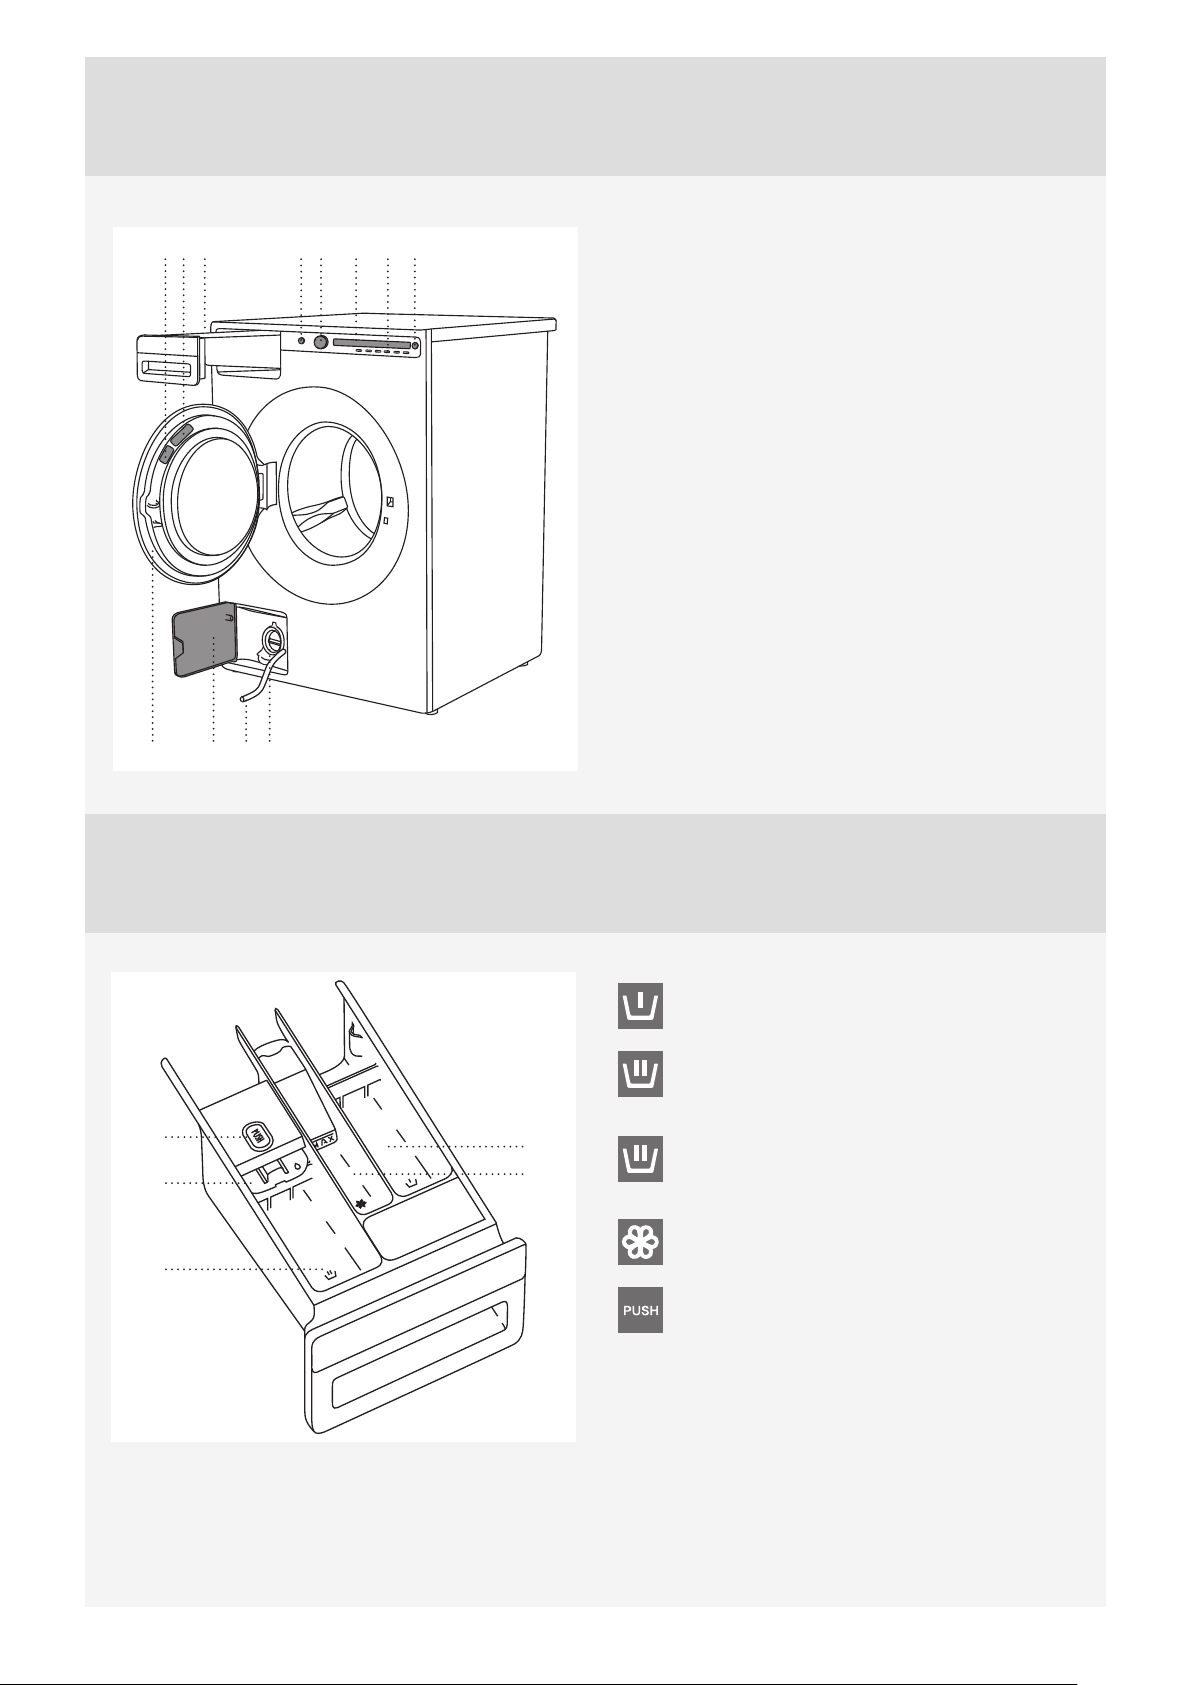
WASHING MACHINE DESCRIPTION
910
15
267834
1211
1. Main switch (ON/OFF)
2. Program selector knob
3. Display unit
4. Program settings buttons
5. Button (start/pause)
6. Detergent compartment
7. QR and AUID code (on the inside of the washing
machine door)
8. Rating plate with information about the washing
machine (on the inside of the washing machine
door)
9. Washing machine door
10. Drain fi lter cover
11. Water release hose
12. Drain fi lter pump (installed behind the drain
pump fi lter)
DETERGENT COMPARTMENT
5
3
2
1. Prewash compartment
2. Compartment for main wash liquid
detergent.
Use the foldable barrier (3).
1
4
2. Compartment for main wash powder
detergent.
Do not use the foldable barrier (3).
4. Softener / conditioner compartment
5. Tab for detergent compartment removal
6
BEFORE USING THE APPLIANCE FOR THE FIRST TIME
PACKAGING
Remove all packaging.
Please sort the materials in compliance with local recommendations (see chapter ”DISPOSAL”).
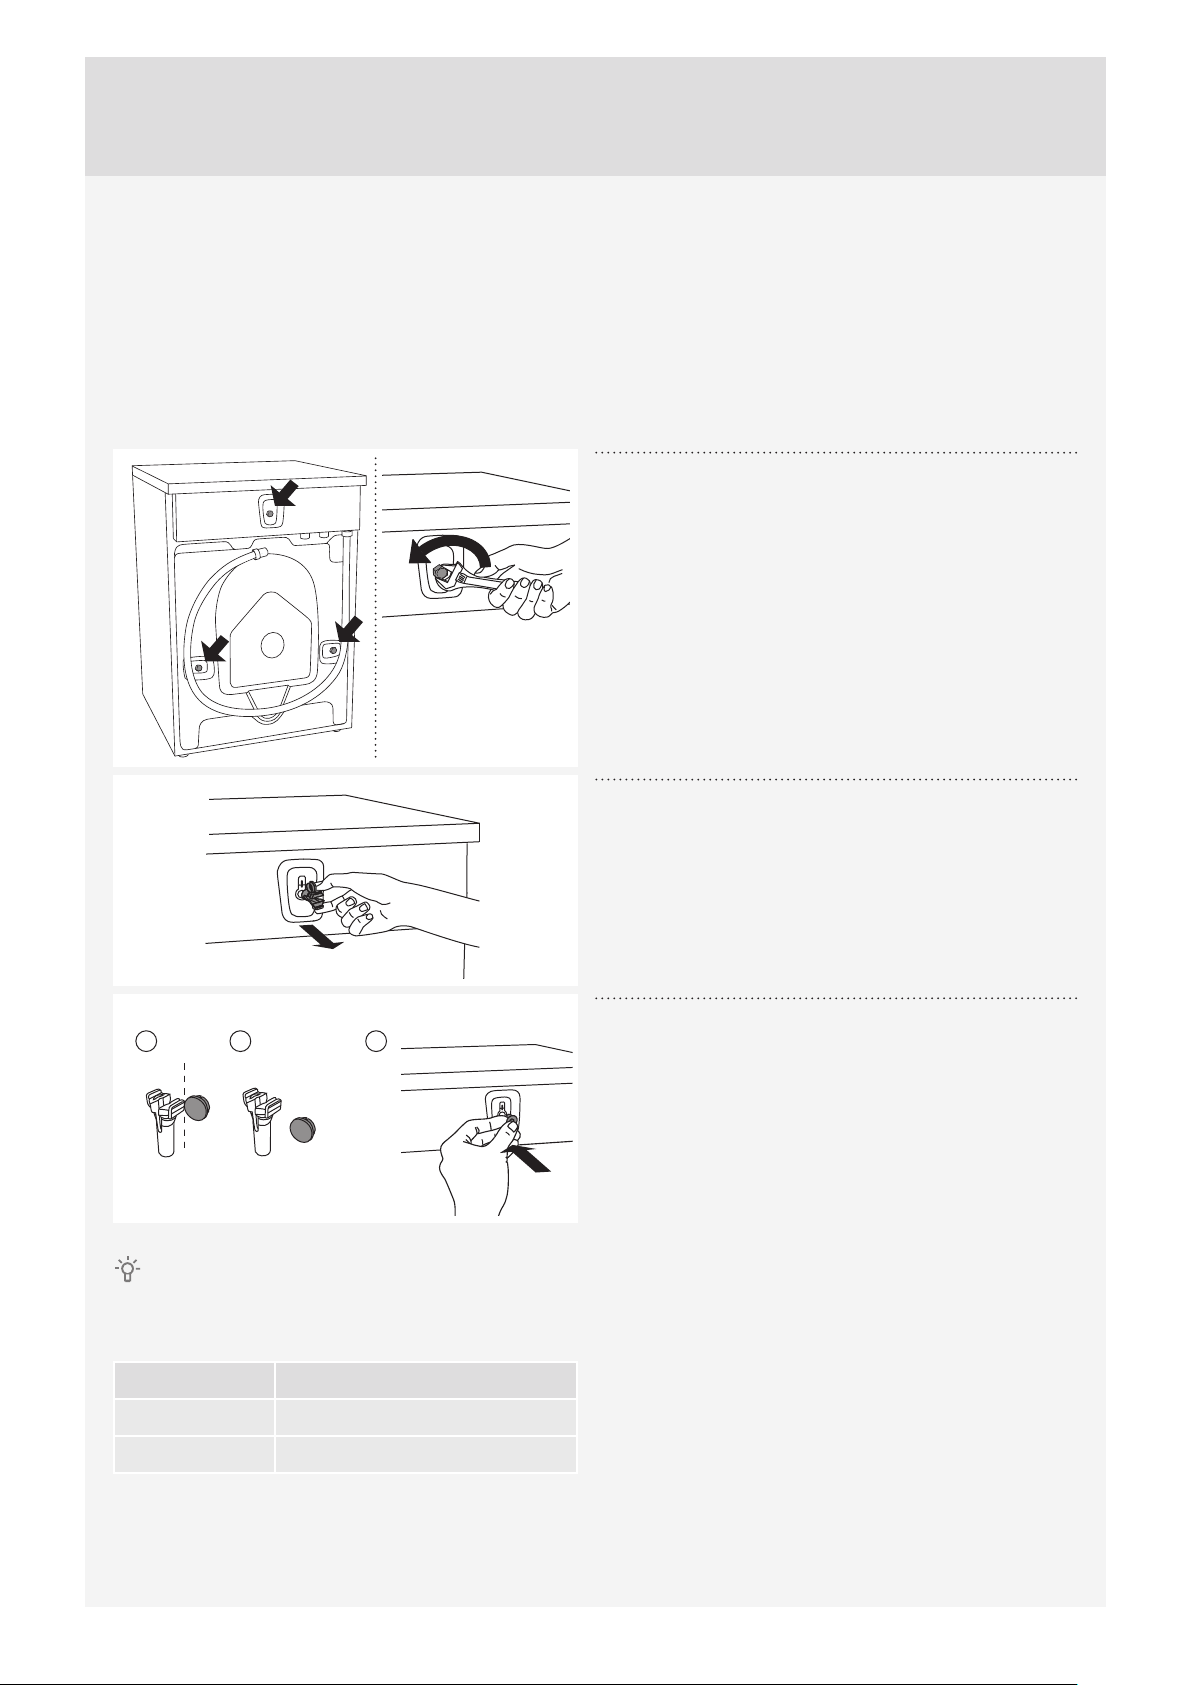
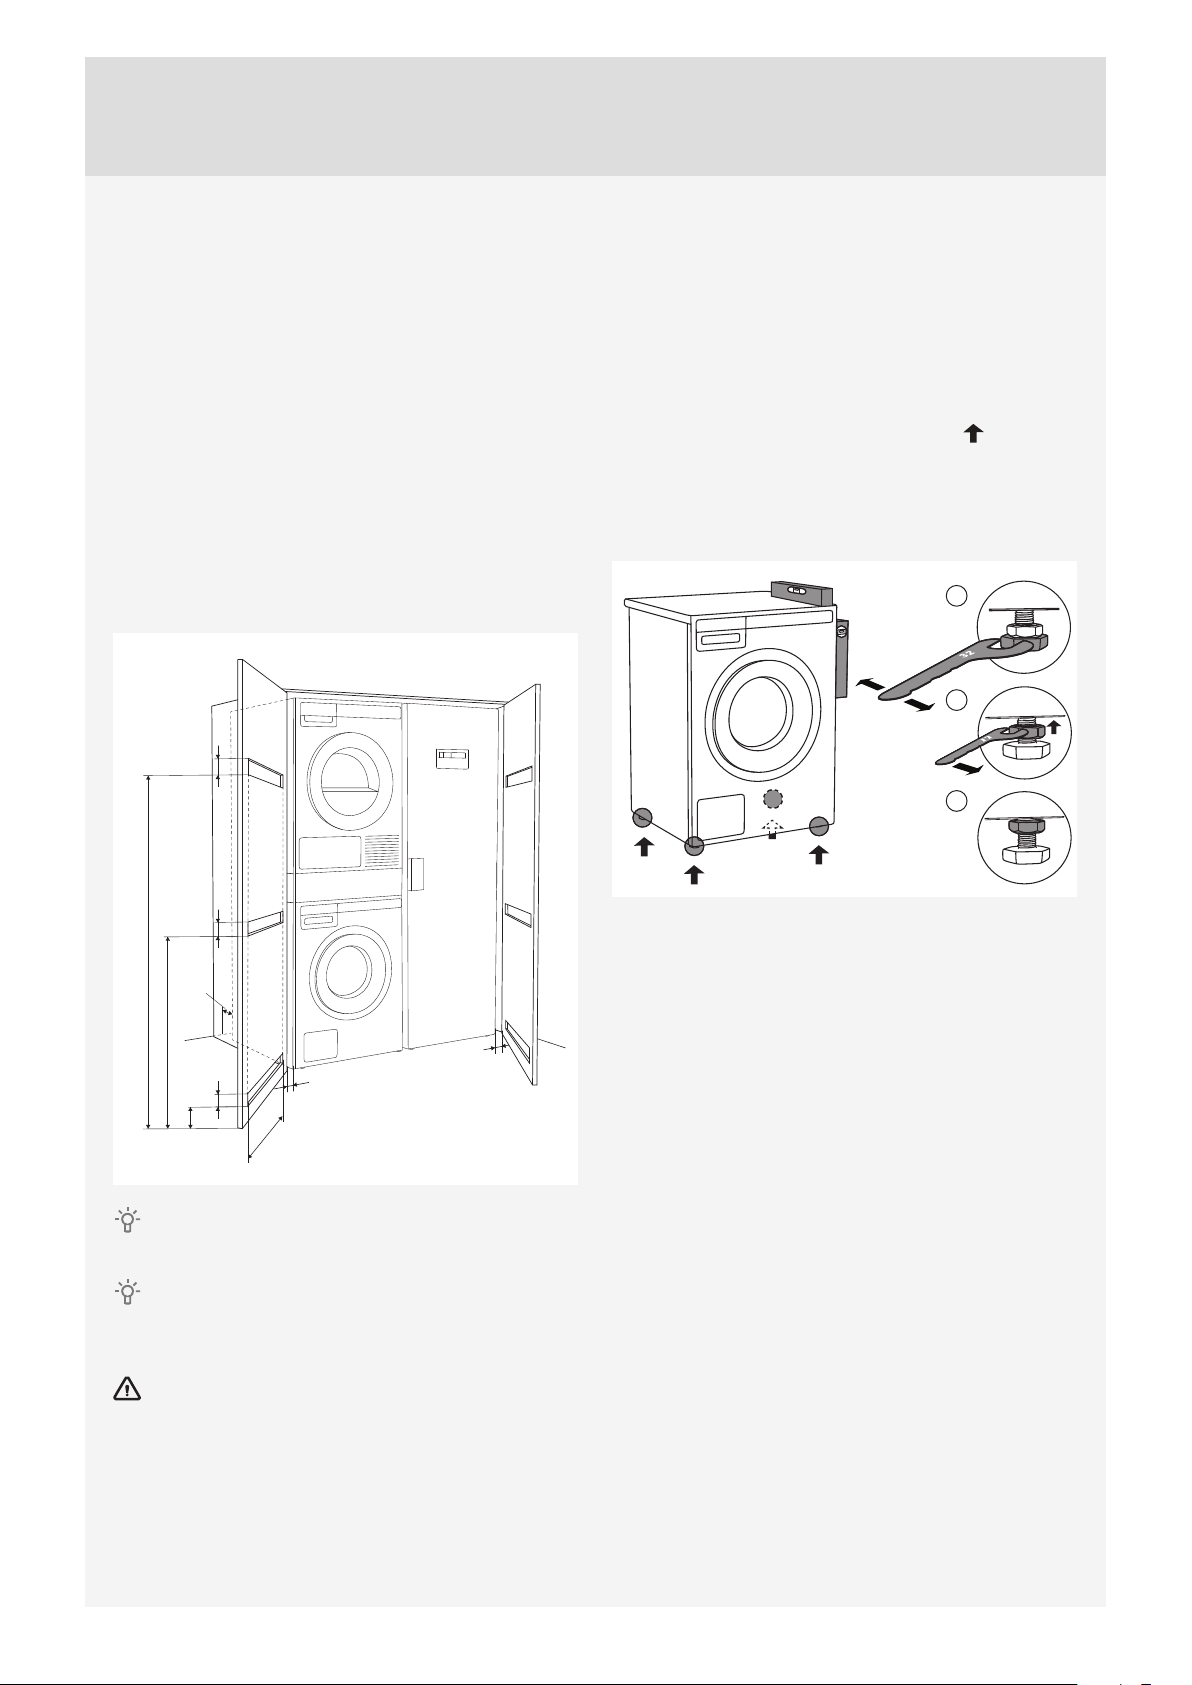
TRANSPORT PROTECTION
Before using the appliance, remove the three transport bolts and plastic plugs which protect the appliance
during transport.
Release and remove the bolts as shown in the
1
fi gures.
To remove the plastic plugs holding the bolts,
2
squeeze them and then pull them out.
12 3
If you wish to transport the washing machine, reinstall the bolts and plastic caps to lock the machine. This
will prevent any damage to the machine due to vibrations during transport. If you have lost the transport bolts
or plastic caps, replacements can be ordered at your dealer.
Art. No. ID:
Remove the caps from the plastic plugs. Push the
3
caps over the three holes in which the plastic plugs
were inserted. Save the bolts and plastic plugs if you
have to transport your washing machine in the future.
270698 Bolt
551188 Plastic cap (transport lock)
Please order three pieces of each item!
7

CLEANING
Disconnect the washing machine from the power mains and open the door. Clean the washing machine drum
with a damp cloth and a mild detergent.
Connect the washing machine to the power mains and run the dedicated drum cleaning program. See
chapter "WASHING PROCESS; STEP BY STEP (1–8)" /STEP 5: CHOOSE THE PROGRAM.
No program can be started while the door is open.
SETTINGS BEFORE FIRST USE
After connecting the washing machine and power it for the fi rst time, you will be asked to do following
settings:
Language selection
Press the button 2 or the program selector knob to scroll the list of languages. Confi rm your selection by
pressing the OK button.
The amount of detergent depends on the hardness of water. For details, see the detergent packaging.
Please contact your local water supply company to check the water hardness in your area.
Before it dispatched from the factory, every appliance is tested.
As a result, there may be some residual water left in the drain pump fi lter. This, however, does not aff ect the
quality and will not damage the appliance.
8
INSTALLATION AND CONNECTION
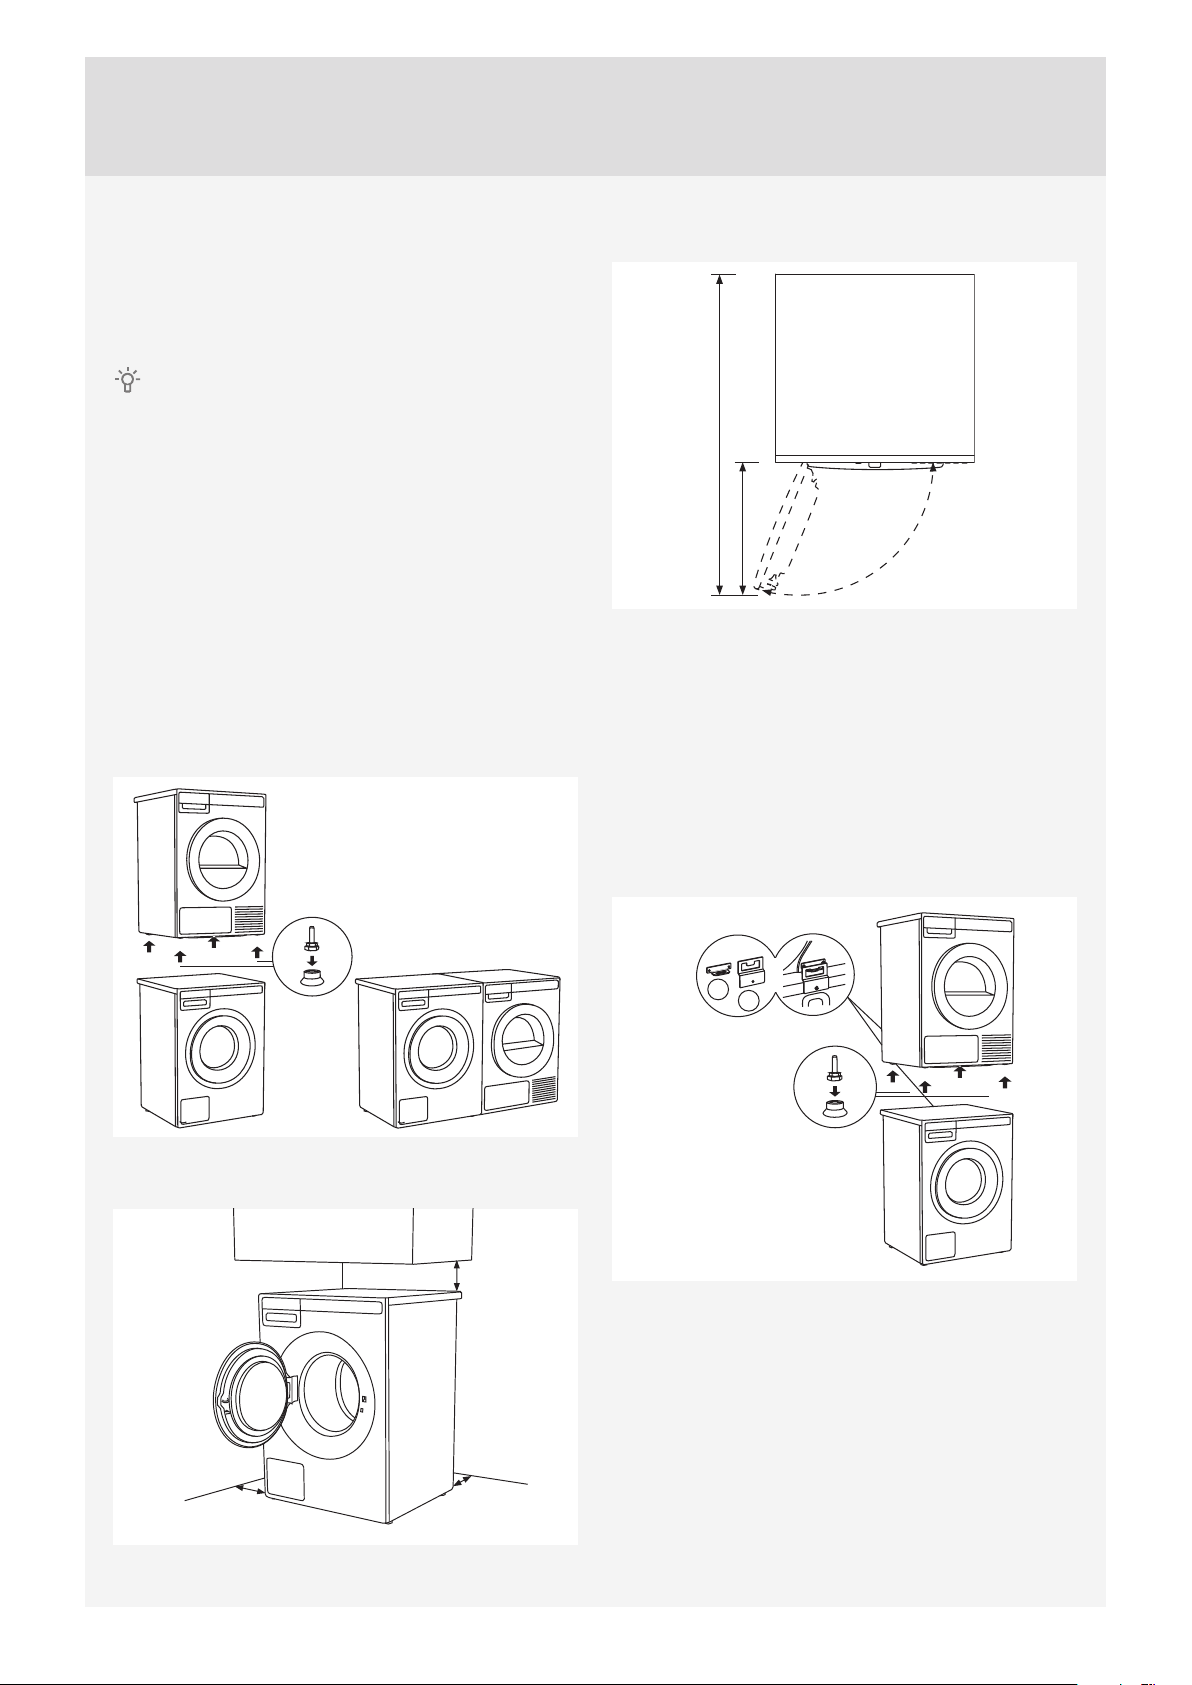
POSITIONING THE WASHING MACHINE
The washing machine can be installed as a builtin (integrated) or a free-standing unit. Place the
machine on a level surface so that the power outlet
on the wall is accessible.
Before connecting the washing machine to the
power mains, wait for at least 2 hours until it reaches
room temperature.
Built-in washing machine
The washing machine can be integrated under a
worktop with a height of 900–950 mm. Leave 5 cm
of room around the entire of the appliance, including
between the back edge of the upper cover and the
wall behind it.
Free-standing appliance
If you have a dryer of suitable dimensions (by
another dryer manufacturer), use the vacuum feet
to stack it on top of the washing machine, or place it
next to it.
Opening the washing machine door (top view)
942 mm
376 mm
110°
Stacking an ASKO dryer on top of an ASKO
washing machine
To stack an ASKO dryer on top of a washing
machine, use the extra vacuum feet and the tipping
guard (A+B), supplied in the cardboard box in the
ASKO dryer drum. If the washing machine and
dryer are not of matching dimensions or if you
have installed a hidden helper between the two
appliances, then binding plates are available as
optional accessories at the service unit.
Clearances around the washing machine
min. 50 mm
min. 50 mm
min. 50 mm
A
B
9
Ventilation Requirements of ASKO laundry
concept or closet installation
ASKO's front panel controls make it possible to
install the washers and dryers in a cabinet or closet.
Make sure there is clearance between appliances
and cabinet or wall and 25 mm minimum clearance
between the rear edge of the appliance top panel
and the cabinet or wall.
When closet or cabinet is closed by the door, we
recommend louvered doors, to ensure proper
ventilation.
Otherwise there must be ventilation openings on
the door. See illustration of dimension for ventilation
openings below:
65 mm
ADJUSTING THE FEET
Place the washing machine so that it is stable.
1. Level the washing machine in longitudinal and
traverse direction by rotating the adjustable feet
(using a No. 32 spanner).
The feet allow levelling by +/- 1 cm.
2. When the appropriate height of feet is set, use the
wrench No. 17 to fi rmly fasten the counter-nuts
towards the bottom of the appliance .
3. Tighten the jam nuts (counter nuts) to the end
position.
This will reduce washing machine noise, vibration,
movement etc. to minimum.
1
2
3
50 mm
1550 mm
25 mm
635 mm
65 mm
35 mm
12 mm
465 mm
12 mm
Ensure the dryer door can be opened without
hindrance after installation.
The cool air intake panel at the front of the dryer
must not be blocked or covered. Doing so could
cause a fault.
Disregarding of instructions infl uences on
appliance performance and may also result in failure
of the appliance.
10
MOVING THE WASHING MACHINE AND
TRANSPORT AFTER INSTALLATION
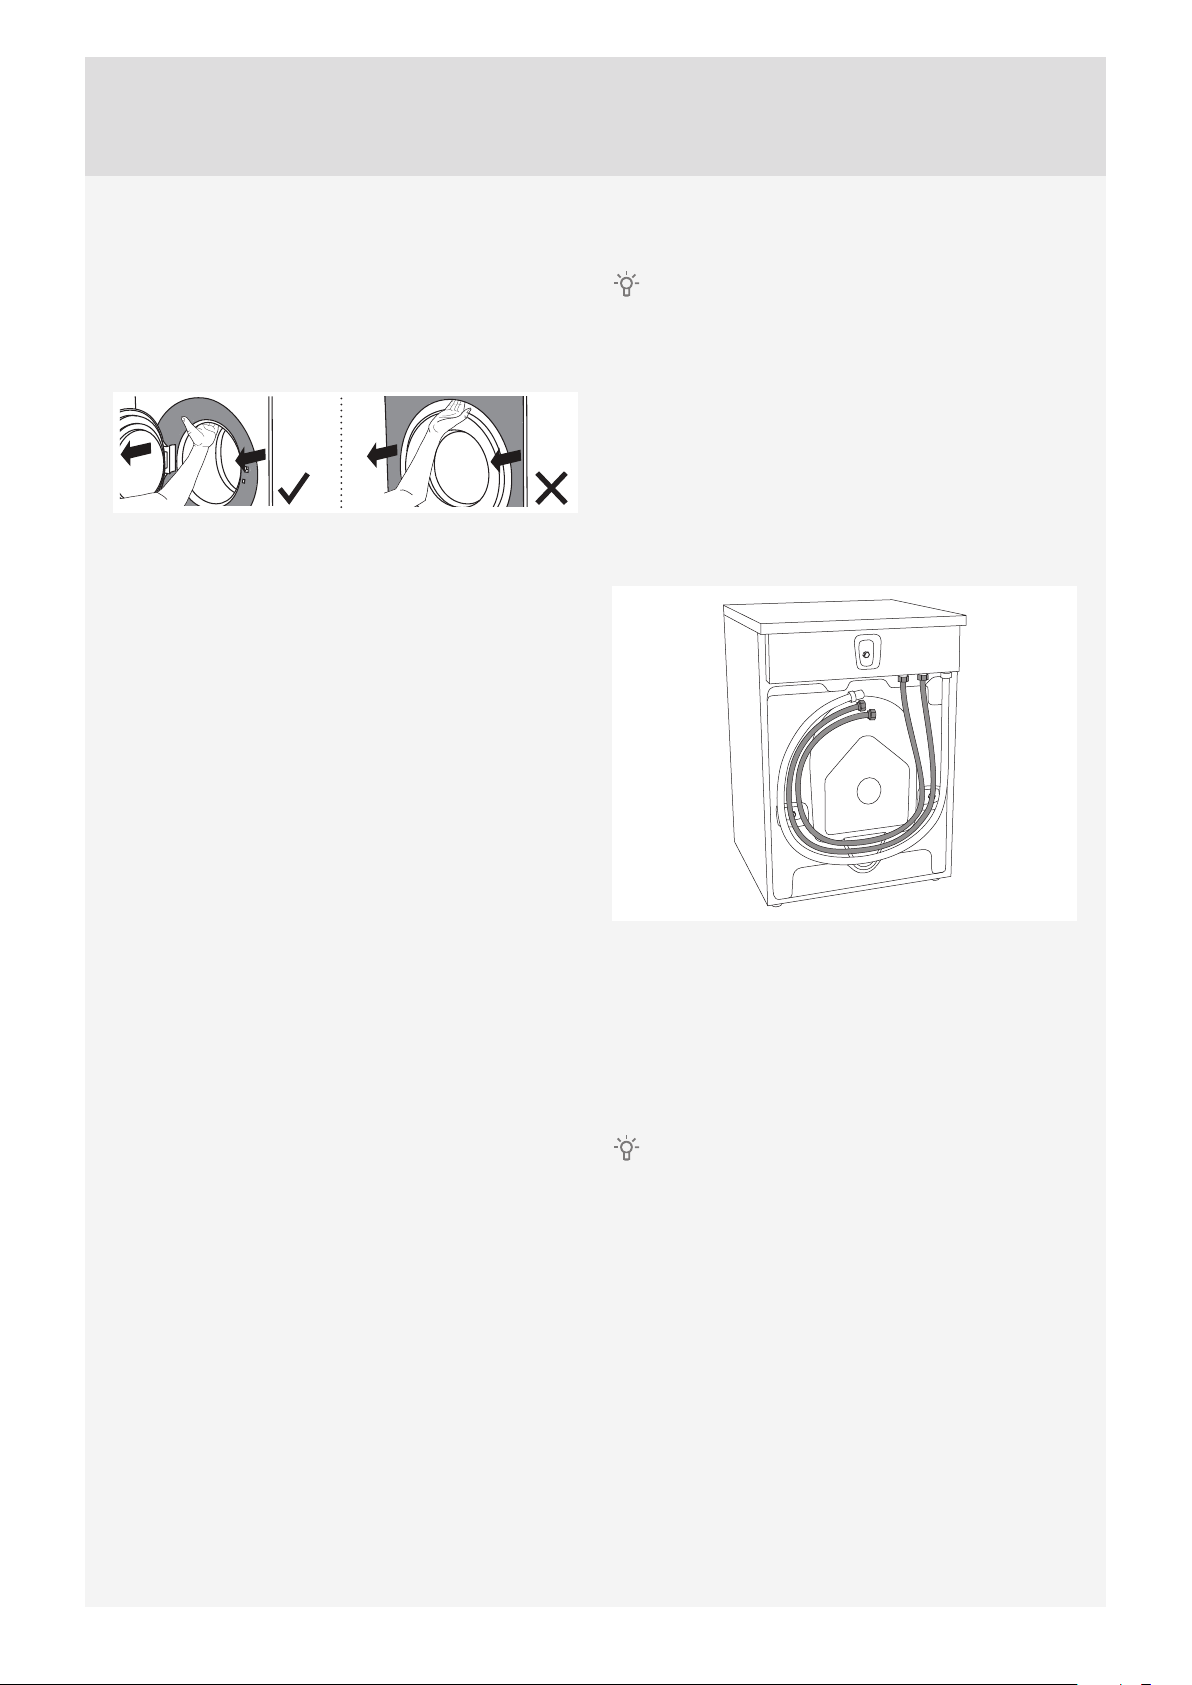
If you are moving the washing machine without
packaging, open the washing machine door and pull
the appliance by holding the washing assembly, as
indicated in the fi gure.
For any further moving of the appliance, use the
transport rods (the washing machine drum has to be
blocked).
(See chapter TRANSPORT PROTECTION.)
CONNECTING TO WATER SUPPLY
The machine has to be connected to water
supply by an adequately trained person.
Use the water supply hose to connect the appliance.
Water pressure has to be between 0.1 and 1 MPa
(approximately 1–10 kp/cm2 , 1-10 bar, 10–100 N/
cm2).
If the hoses are newly installed, we recommend
rinsing them to remove any impurities. Otherwise,
these impurities could clog the fi lter in the water
connection on the washing machine and thus cut off
the water supply.
The water intake hose has to be fastened fi rmly
enough for the hose to have a good seal.
After connecting the hose, the seal must be checked
for any leaks.
Only use the water supply hose supplied with the
appliance. Do not use any used or other hoses.
If the connection on the supply hose is of
diff erent dimensions than the water tap (e.g. 3/4” →
1/2”), use an adapter.
11
CONNECTING TO HOT/COLD WATER
SUPPLY
(Only available in some models)
If your appliance has connections for both hot
and cold water, then connect one hose to the cold
water connection and the other hose to the hot
water connection, as indicated on the back of the
appliance:
COLD = cold and HOT = hot.
Hot water is supplied for programs operating at 40
°C or more.
Connecting to both hot and cold water will save
time and electric energy when washing.
If your washing machine model has connections
for both hot and cold water, and you only wish to
connect cold water, then the protective cap has to be
(or remain) attached to the hot water connection.
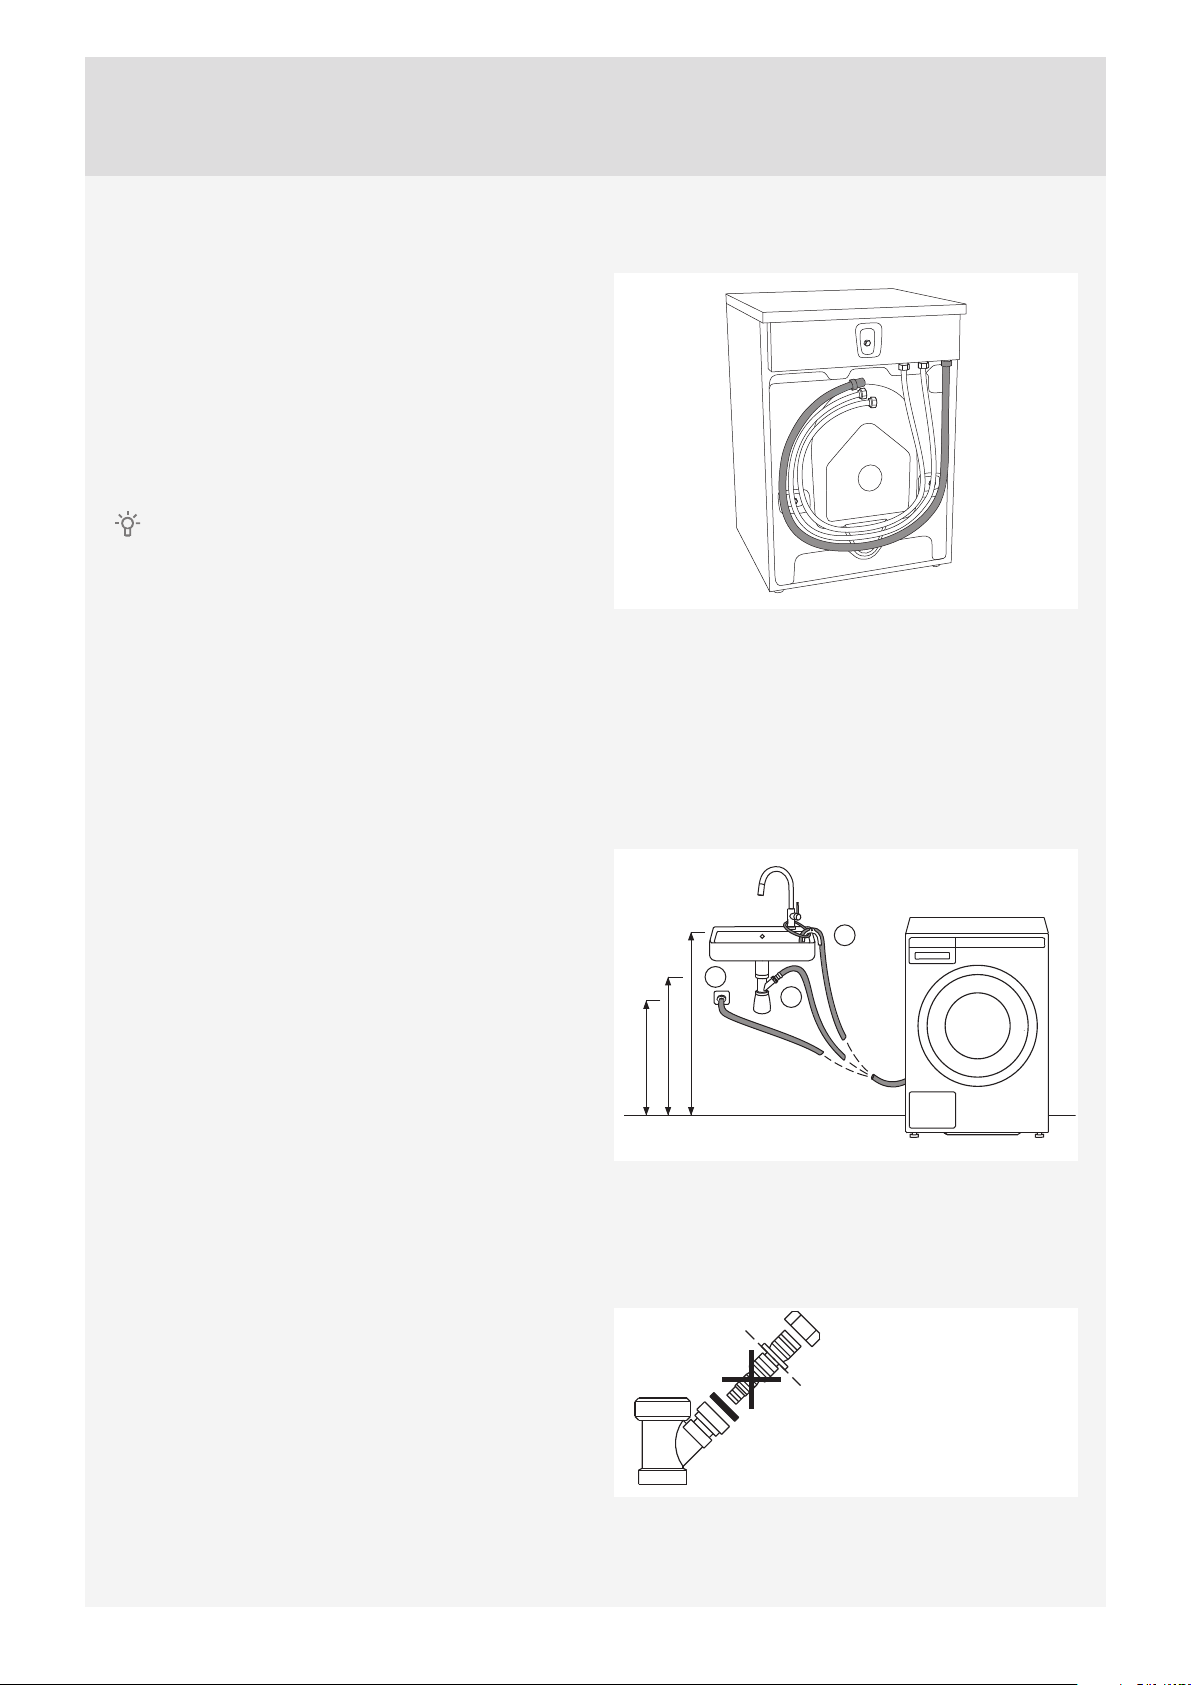
INSTALLING THE DRAIN HOSE
Upon delivery, the appliance has a drain hose
attached. This drain hose must be connected to
a drain. Drain hose can also be attached to a wall
drain with a trap; such trap should be properly
installed to allow cleaning. The height of the drain
should be 600–900 mm above the fl oor. The lower
position (600 mm) is always recommended. Make
sure the drain hose is not clipped or bent.
A
C
B
600 - 900 mm
600 - 900 mm
600 - 900 mm
Drain hose can also be connected directly to the
washbasin drain via a siphon. In this case, the hose,
should be 600–900 mm above the fl oor. Internal
hose diameter should be at least 18 mm.
See fi gure.
At least 18 mm
12
CONNECTING TO THE POWER MAINS
After installation, the washing machine should
stand still for two hours before it is connected to the
power mains.
Connect the appliance to an earthed power outlet.
After installation, the wall outlet should be freely
accessible. The outlet should be fi tted with an earth
contact (in compliance with the relevant regulations).
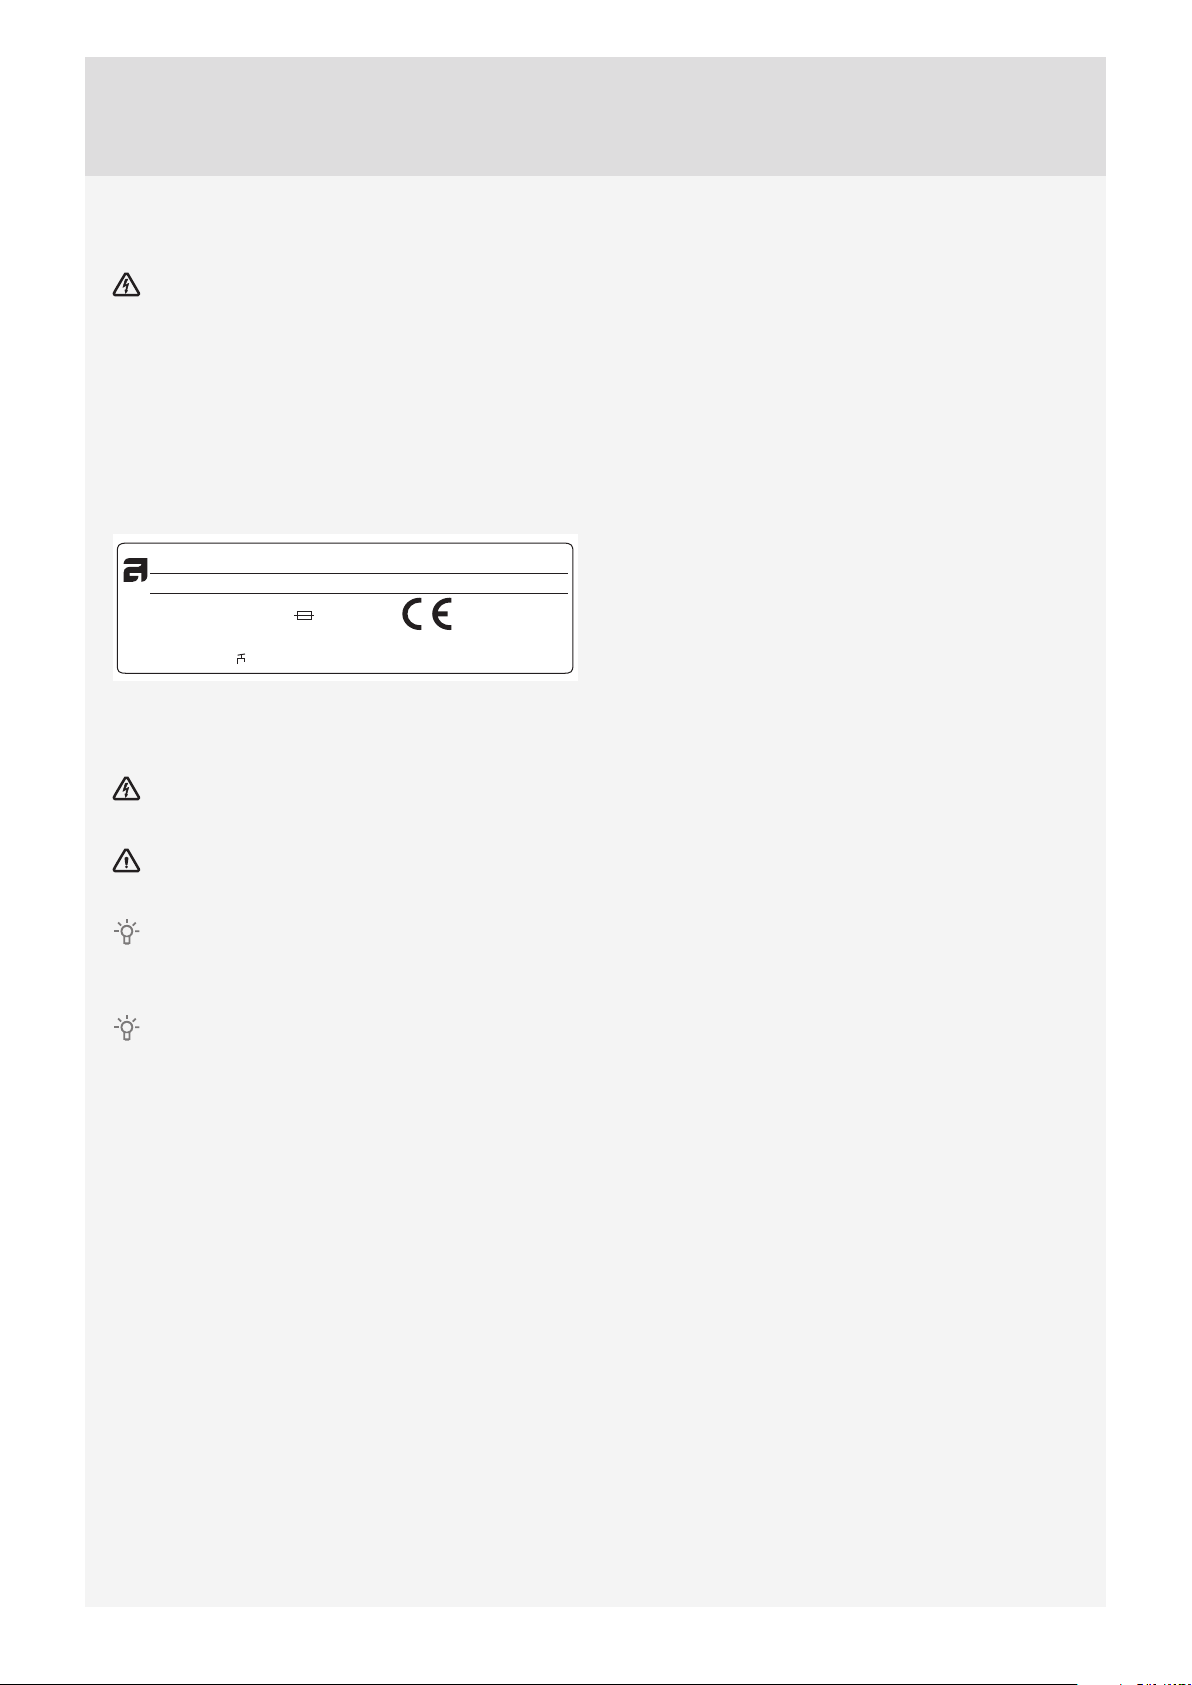
Connection upon delivery
TYPE: WMXX.XXXXX
Art.No.: XXXXXX/XX Ser.No.: XXXXXXXX
XX Hz
XXXX W
XX-X MPa
XXX-XXX V ~
IPX4
MODEL: XXXXXX.X
XXA
X kg
Information about your washing machine is indicated
on the rating (type) plate.
Use the type A diff erential current protection switch.
We recommend using over-voltage protection to
protect the appliance in case of a lightning strike.
The washing machine may not be connected to
the power mains using an extension cord.
Do not connect the washing machine to an
electrical outlet intended for an electric shaver or
hair dryer.
Any repair and maintenance pertaining to safety
or performance should be done by trained experts.
13

ASKO LAUNDRY CARE - HIDDEN HELPERS*
Laundry care ironing board
The ironing board is a clever solution. It is always
handy when you need to iron your clothes, and it can
be easily, safely and invisibly stored away when not in
use.
It can be installed between your washer and dryer, or
on top of one of them.
Laundry care double
A wire basket and pull-out shelf. It can be used as an
additional surface for folding clothes, sorting socks
and for storage. The basket is useful for removing and
carrying laundry to the wardrobe or workbench for
ironing and folding.
It can be installed between your washer and dryer, or
on top of one of them.
Laundry care single
Pull-out shelf. It can be used as an additional surface
when folding clothes and sorting socks or for storage.
It also makes loading and unloading your laundry
much easier.
It can be installed between your washer and dryer.
Laundry care basket
A large pull-out basket that is easily accessible via a
push-pull door opening. Useful for removing laundry
and carrying it to the wardrobe or workbench for
ironing and folding.
It can be installed between your washer and dryer, or
on top of one of them.
Pedestal drawer with shelf
A useful storage drawer with a height of 30 cm. Ideal
for storing your detergent, softener, coat hangers,
pegs, user manuals and other useful items in the
laundry area. The drawer also comes with a shelf for
easy loading and unloading of your laundry.
14
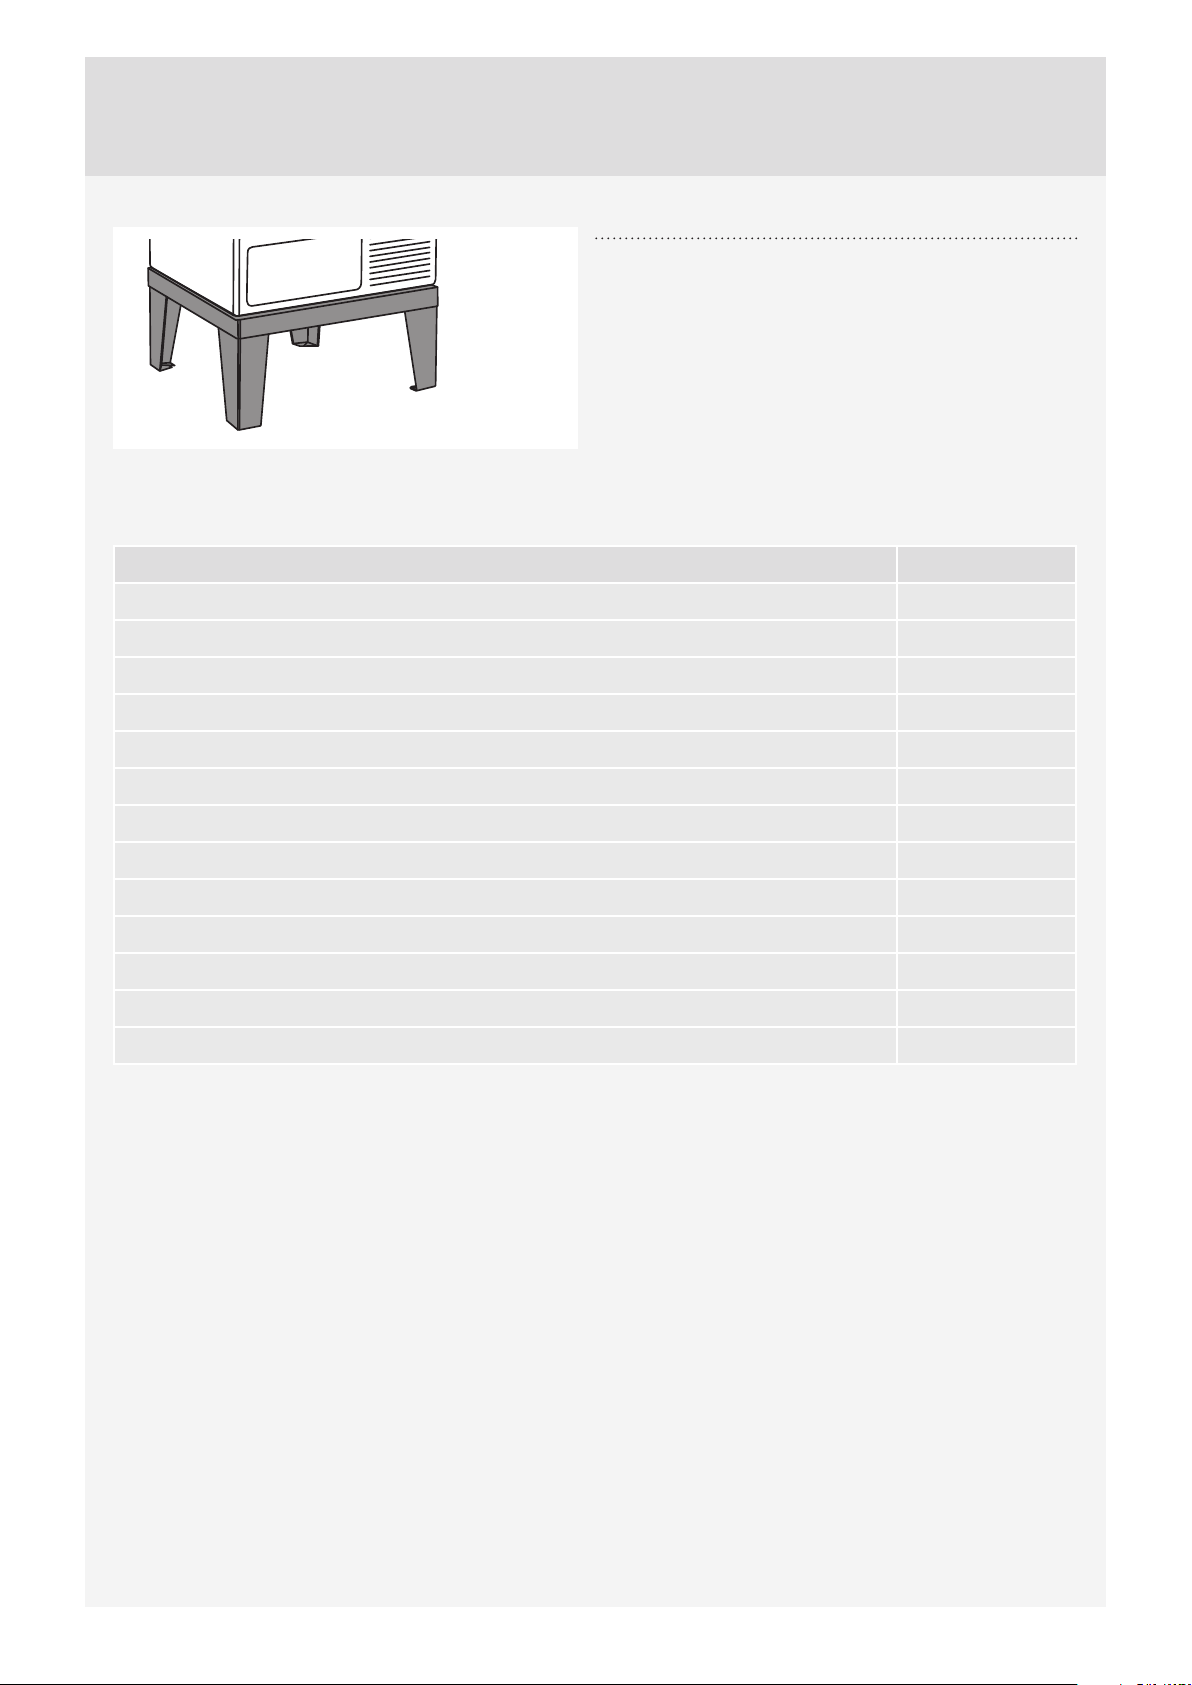
Laundry care plinth
Thanks to the stainless steel plinth, your appliance
will be raised by 30 cm, which makes loading and
unloading of laundry easier.
*AVAILABILITY DEPENDING ON MARKET
DENOMINATION ART. No.
IRONING BOARD HI1153 White 576552
IRONING BOARD HI1153 Stainless steel 732756
IRONING BOARD HI1153 Titanium 576553
LAUNDRY CARE DOUBLE HDB1153 White 576554
LAUNDRY CARE DOUBLE HDB1153 Stainless steel 732757
LAUNDRY CARE DOUBLE HDB1153 Titanium 576555
LAUNDRY CARE SINGLE HSS1053 White 576730
LAUNDRY CARE SINGLE HSS1053 Titanium 576732
LAUNDRY CARE HB1153 White 576733
PEDESTAL DRAWER W. SHELF HPS5323 White (only 8 kg or 9 kg models) 576735
PEDESTAL DRAWER W. SHELF HPS5323 Stainless steel (only 8 kg or 9 kg models) 576737
STAINLESS STEEL PLINTH HPL530S for 8 kg and 9 kg models 441663
STAINLESS STEEL PLINTH HPL830S for 11 kg and 12 kg models 445501
15
TIPS BEFORE WASHING
This chapter includes several tips on how to prepare
the laundry for washing.
LAUNDRY SORTING
Sort the laundry according to:
• how soiled it is,
• colour,
• material.
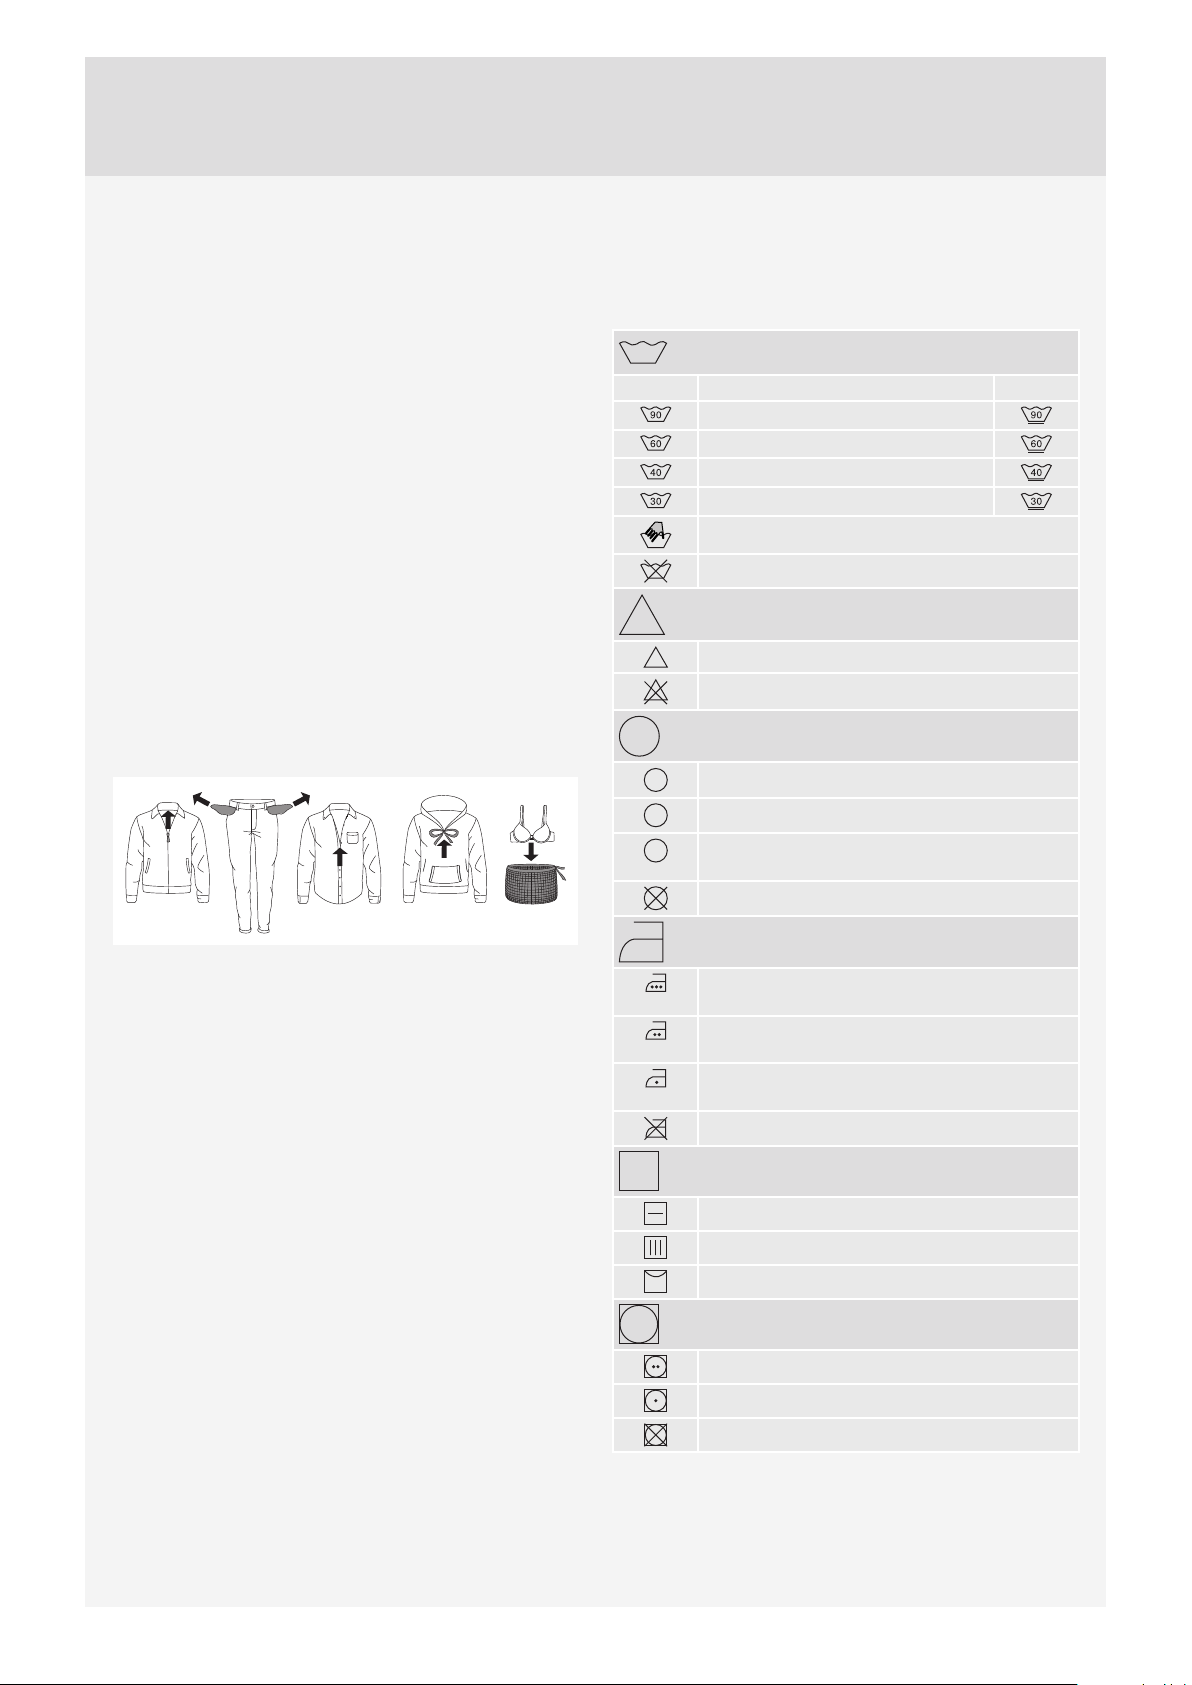
CLOTHING
1. Close the zips and hook-and-loop fasteners so
that they do not damage the fabric.
2. New dyed items may contain excess dye;
therefore, they have to be washed separately
several times.
3. Turn delicate items inside out. This will decrease
the risk of tear and colour fading.
4. Place very sensitive clothes and small items in a
special-purpose laundry washing bag.
5. Empty the pockets and turn them inside out.
LAUNDRY SYMBOLS
Observe the laundry symbols.
Textile maintenance symbols:
Washing
Normal Delicate
Max. washing temperature 90 °C
Max. washing temperature 60 °C
Max. washing temperature 40 °C
Max. washing temperature 30 °C
Hand wash only
Do not wash
Bleaching
Bleaching in cool water
c1
Bleaching not allowed
Dry cleaning
A
Dry cleaning with all agents
P
Perchloroethylene R11, R113, petroleum
Dry cleaning in kerosene, pure alcohol,
F
and R113
Dry cleaning not allowed
Ironing
Ironing with a hot iron with a maximum
temperature of 200 °C
Ironing with a hot iron with a maximum
temperature of 150°C
Ironing with a warm iron with a maximum
temperature of 110°C
Ironing not allowed
Natural drying
Drying on a flat surface
Drying without prior spinning
Drying on a clothes line or a hanger
Tumble drying
Drying at high temperatures
Drying at low temperatures
Tumble drying not allowed
16
 Loading...