

Page 1
INSTALLATION INSTRUCTIONS
Washing machine
WM85
Carefully read the instructions for use before using the washing machine.
DOMESTIC
Page 2

Dear Customer,
Read these instructions carefully and completely before you install the machine. The installation should
be carried out by a qualifi ed person who is familiar with all local codes and ordinances for electrical and
plumbing connections. See also the general Safety Instructions in the Use & Care Guide.
Cosmetic damage must be reported to the ASKO dealer within fi ve days from the date of purchase. As soon
as you unpack the machine, thoroughly check it for cosmetic damage.
2
Customer Care Center, 1-800-898-1879, www.askousa.com
Page 3
INSTALLATION
Read these instructions carefully and completely
before you install the machine. The installation
should be carried out by a qualifi ed person who
is familiar with all local codes and ordinances for
electrical and plumbing connections.
Cosmetic damage must be reported to your dealer
within fi ve days from the date of purchase. After
unpacking the washer, thoroughly check the unit for
cosmetic damage.
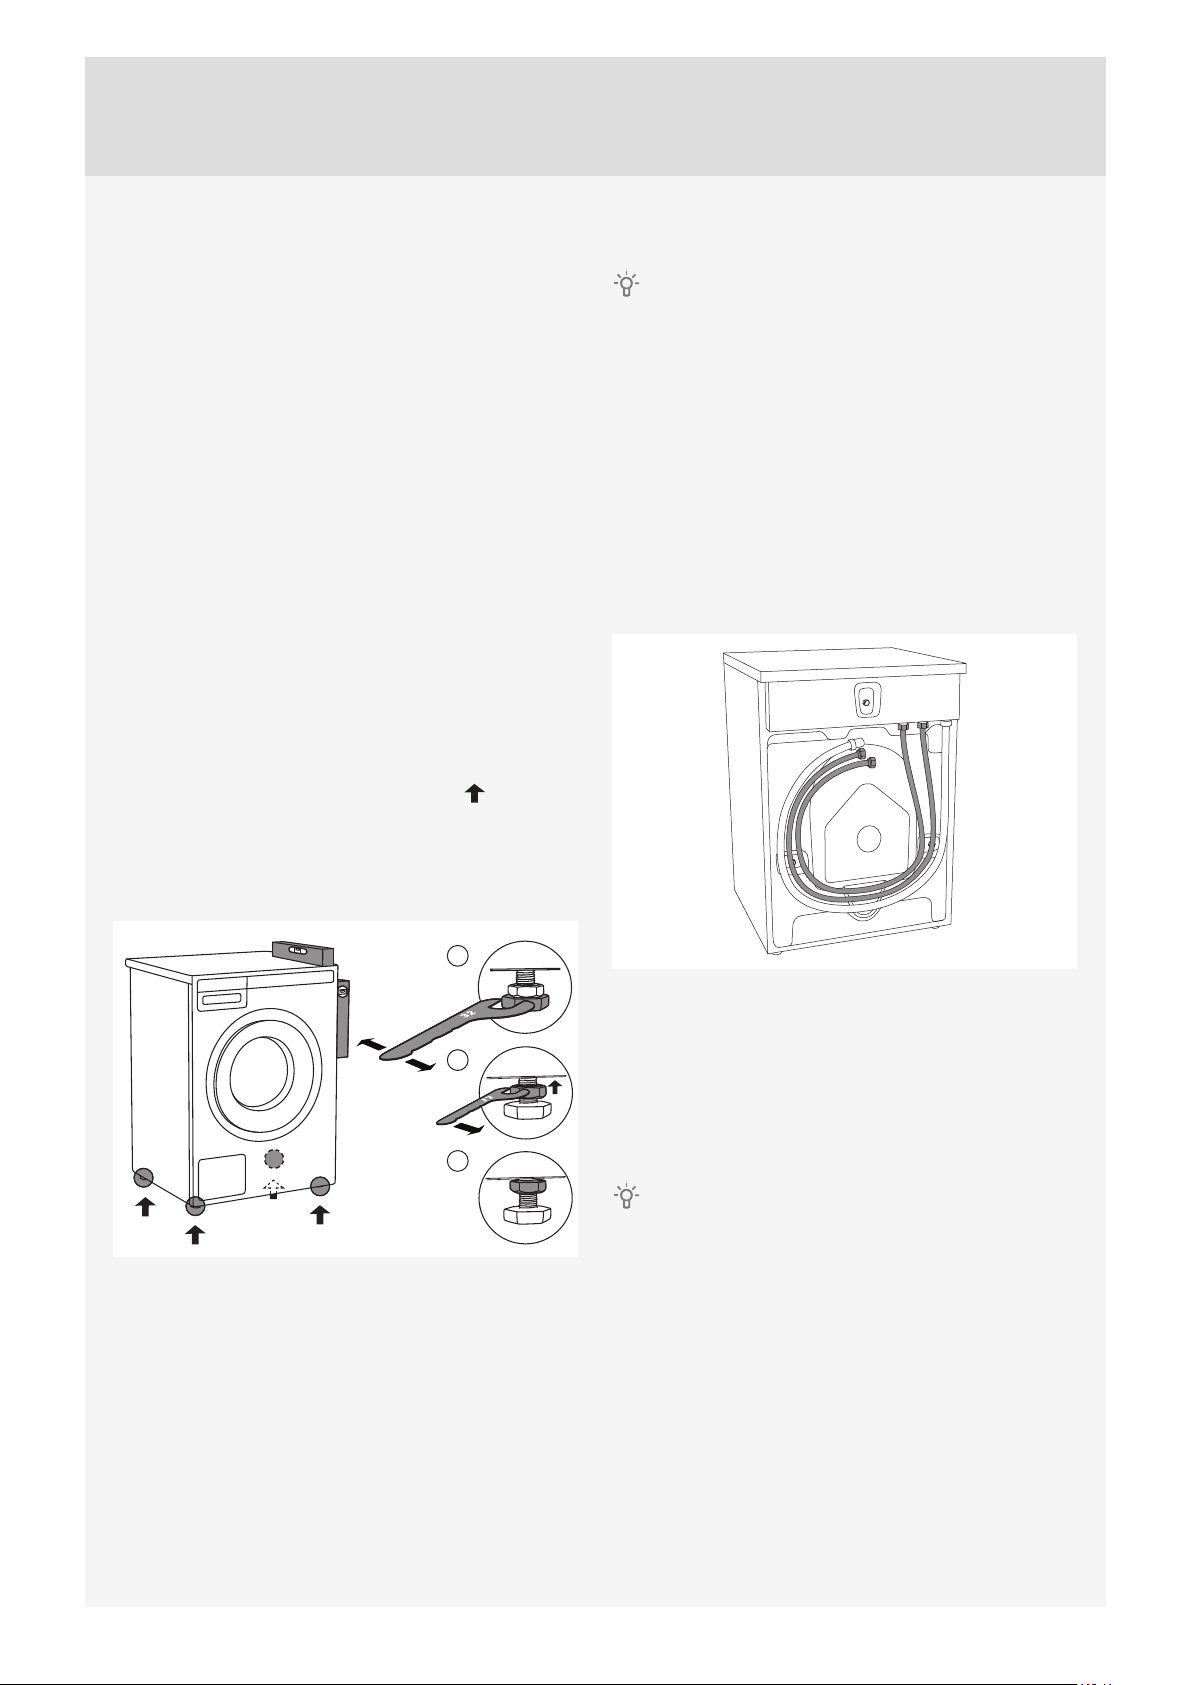
ADJUSTING THE FEET
Place the washing machine so that it is stable.
It is important that the machine is level to prevent
excessive vibrations during spin cycles. Each foot
of the washer is adjustable, so you can level the
washer on any surface. Once it is level, securely
tighten the lock nuts on the feet to prevent excessive
vibration during spin cycles.
1. Level the washing machine in longitudinal and
traverse direction by rotating the adjustable feet.
The feet allow levelling by +/- 1 cm.
2. When the appropriate height of feet is set, use the
wrench No. 17 to fi rmly fasten the counter-nuts
towards the bottom of the appliance
3. Tighten the jam nuts (counter nuts) to the end
position.
This will reduce washing machine noise to
minimum.
.
CONNECTING TO WATER SUPPLY
The machine has to be connected to water
supply by an adequately trained person.
Since ASKO washers have a built-in heating
element, you only need a cold water inlet. The
connection should be made by someone who is
sufficiently skilled. Use the hose supplied with
the washer. (The inlet hose is marked for correct
connection.) The water pressure must be in the
range 15–146 PSI. A valve should be fitted on
the water supply pipe. If a new supply pipe has
been installed for the washer, it should be flushed
thoroughly to remove any foreign particles that might
clog the filter in the fill valve.
1
The water intake hose has to be fastened fi rmly
enough for the hose to have a good seal.
2
3
After connecting the hose, the seal must be checked
for any leaks.
Only use the water supply hose supplied with the
appliance. Do not use any used or other hoses.
If the unit is installed on a second storey, follow
local building codes. We recommend installing a
drip pan.
Hot water connection
(depending on model)
A few seconds after you start a program, the
washing machine will begin to fi ll with water from
the hot and cold supplies. If for some reason no hot
water is available, the machine waits for one minute
and then fi lls with cold water only. The wash drum
does not start to rotate until it begins to fi ll with water.
However, if you choose to connect your ECOmachine to cold water only, it is important that you
shut off the hot water connection.
Customer Care Center, 1-800-898-1879, www.askousa.com
3
Page 4

See the "Settings" chapter for information on how to
switch between "Hot water On" and "Hot water Off ".
INSTALLING THE DRAIN HOSE
The machine is supplied with the outlet hose already
attached. The hose should be extended over a
suitable sink edge or drain pipe at a height of 24"
to 36" (610 mm to 914 mm) above the bottom of the
unit. (The lower height is preferable.) Make sure the
hose is not kinked.
Drain hose can also be connected directly to the
washbasin drain via a siphon. In this case, the hose,
too, should be 24" to 36" mm above the fl oor. Internal
hose diameter should be at least 18 mm.
See fi gure.
At least 18 mm
If the hose is extended, the internal diameter of
the coupling must not be less than ½".
Do not extend the drain hose higher than 36”
(914 mm) from the bottom of the unit.
24" to 36"
24" to 36"
A
C
B
24" to 36"
4
Customer Care Center, 1-800-898-1879, www.askousa.com
Page 5

ELECTRICAL CONNECTIONS
The machine is delivered ready-fi tted with a plug
and is intended for connection to an ASKO Dryer,
which is equipped with a matching receptacle. The
plug supplied with the washer can only be used with
an ASKO Dryer. If the washer is used separately or
with another dryer, it must be on a separate 208-240
V single-phase circuit.
If the machine is to be used in a wet area, the supply
must be protected by a residual current device.
As supplied: 208-240 V, 60 Hz, 2000 W heating
element, 15 A fuse required.
Repairs and maintenance relating to safety or
performance must be carried out by a qualifed
professional.
Connection to a permanently wired supply point
must be made only by a qualifi ed electrician.
Grounding instructions
This appliance must be grounded. In the event of
malfunction or breakdown, grounding will reduce
the risk of electric shock by providing a path of
least resistance for electric current. This appliance
is equipped with a cord having an equipmentgrounding conductor and a grounding plug. The plug
must be plugged into an appropriate outlet that is
properly installed and grounded in accordance with
all local codes and ordinances.
Freestanding installation
The washer can be placed next to the dryer. It
is essential that the machine is leveled and the
locknuts are tightened to prevent excessive vibration
during spin cycles. Also be sure to leave a minimum
of ½" of space between the washer and the dryer.
The height adjustment for the washer is 35½" to
37½" (900 mm to 950 mm). Do not raise it higher
than 34½" (876 mm).
Improper connection of the equipmentgrounding conductor can result in a risk of electric
shock. Check with a qualifi ed electrician or
serviceman if you are in doubt as to whether the
appliance is properly grounded.
Do not modify the plug provided with the appliance.
If it will not fi t the outlet, have a proper outlet installed
by a qualifi ed electrician.
Customer Care Center, 1-800-898-1879, www.askousa.com
5
Page 6

Clearances around the washing machine
min. 50 mm
min. 50 mm
min. 50 mm
Opening the washing machine door (top view)
Built-in installation
ASKO washers can be installed beneath a cabinet
or worktop with a height of 34” to 35” (900 to 950
mm) or in a closet. There must be a gap of about ½”
(12 mm) all around the machine, including between
the rear edge of the machine’s top panel and the
back wall. The opening width must be at least
24½” (622 mm). Space must also be available for
the fi ll and drain hoses. See the illustration below
for measurements and positions. If the washer is
installed in a closet the door must be left open while
the washer is running.
412 mm
1093,5 mm
110°
Stacked installation
ASKO washers should never be stacked on a
counter or a dryer. You can, however, stack an ASKO
dryer on an ASKO washer. Refer to your Dryer Use
and Care Guide for instructions on how to do this.
622 mm
If the drain outlet is higher than 24"(610 mm), the
connections will need to be recessed.
6
Customer Care Center, 1-800-898-1879, www.askousa.com
Page 7

NOTES
Customer Care Center, 1-800-898-1879, www.askousa.com
7
Page 8

We reserve the right to modifi cations.
WM85 DOM US/CA
www.askousa.com
en (09-17)
 Loading...