

Page 1
INSTRUCTIONS FOR USE
Washing machine
WM75.B
Carefully read the instructions for use before using the dryer.
W2084.W.U
Page 2

Dear Customer,
We thank you for purchasing this quality ASKO product.
We hope it meets all your expectations. Scandinavian design combines pure lines, everyday functionality,
and high quality. These are the key characteristics of all our products, and the reason why they are highly
appreciated across the globe.
We kindly recommend you to read these instructions before using the appliance for the fi rst time. The
instruction manual also includes information on how you can help protect the environment.
TABLE OF CONTENTS
Important safety instructions 3
Washing machine description 7
Dispenser tray 7
Before using the appliance for the fi rst time 8
Installation and connection 10
Tips before washing 15
Washing process, step by step (1 – 8) 18
Cleaning and maintenance 33
Errors – what to do? 37
Service 42
Technical information 45
Program table 46
Disposal 48
Quick guide 51
System settings 30
The following symbols are used throughout the manual and they have the following meanings:
Information, advice, tip, or recommendation Warning – danger of hot surface
Warning – general danger Warning – danger of fire
Warning – danger of electric shock
Original instructions
2
Customer Care Center, 1-800-898-1879, www.askousa.com
See Quick guide on the last page.
Page 3

IMPORTANT SAFETY INSTRUCTIONS
GENERAL
SAVE THESE INSTRUCTIONS FOR FUTURE REFERENCE!
To reduce the risk of fi re, electric shock, or injury to persons when using
your appliance, follow basic precautions, including the following:
• Read all instructions before using the appliance.
• Do not run appliance while you are out of the home.
• The appliance is intended exclusively for use in households.
Do not wash or dry articles that have been previously cleaned in, washed
•
in, soaked in, or spotted with gasoline, dry-cleaning solvents, cooking oils, or
other fl ammable or explosive substances because they give off vapors that
could ignite or explode.
• Use only detergents and softeners for machine wash. Manufacturer may not
assume responsibility for any damage and eventual discolouring of gaskets
and plastic components as a consequence of incorrect use of bleach and/or
colouring agents.
•
Never use detergents containing solvents, since there is a danger of
creating toxic gasses which may damage the machine and result in ignition
or explosion.
• Do not allow children to play on or in the appliance. Close supervision of
children is necessary when the appliance is used near children.
• Before the appliance is removed from service or discarded, remove the door
to the washing compartment.
• Do not reach into the appliance if the drum is moving.
• Do not install or store this appliance where it will be exposed to the weather.
• Do not tamper with controls.
• Do not repair or replace any part of the appliance or attempt any servicing
unless specifi cally recommended in the user-repair instructions or in
published user-repair instructions that you understand and have the skills to
carry out.
• Do not add gasoline, dry-cleaning solvents, or other fl ammable or explosive
substances to the wash water. These substances give off vapors that could
ignite or explode.
• Under certain conditions, hydrogen gas may be produced in a hot water
system that has not been used for 2 weeks or more. HYDROGEN GAS IS
EXPLOSIVE. If the hot water system has not been used for such a period,
before using a washing machine or combination washer-dryer, turn on all
water faucets and let the water fl ow from each for several minutes. This will
release any accumulated hydrogen gas. As the gas is fl ammable, do not
smoke or use an open fl ame during this time.
Customer Care Center, 1-800-898-1879, www.askousa.com
3
Page 4

This appliance must be properly grounded. This manual does not cover
every possible condition and situation that may occur. Use common sense and
caution when installing, operating, and maintaining any appliance.
GROUNDING INSTRUCTIONS
A) Grounding instructions for a grounded, cord-connected appliance:
In the event of malfunction or breakdown, grounding will reduce the risk of
electric shock by providing a path of least resistance for electric current. This
appliance is equipped with a cord having an equipment-grounding conductor
and a grounding plug. The plug must be plugged into an appropriate outlet
that is properly installed and grounded in accordance with all local codes and
ordinances.
Improper connection of the equipment-grounding conductor can result
in a risk of electric shock. Check with a qualifi ed electrician or service
representative or personnel if you are in doubt as to whether the appliance is
properly grounded.
Do not modify the plug provided with the appliance.
If it will not fi t the outlet, have a proper outlet installed by a qualifi ed
electrician.
B) Grounding instructions for a permanently connected appliance:
This appliance must be connected to a grounded metal, permanent wiring
system, or an equipment-grounding conductor must be run with the circuit
conductors and connected to the equipment-grounding terminal or lead on the
appliance.
This manual does not cover every possible condition and situation that
may occur. Use common sense and caution when installing, operating, and
maintaining any appliance.
4
Customer Care Center, 1-800-898-1879, www.askousa.com
Page 5

KIDSAFE™ CHILD SAFETY
Keep an eye on children!
Laundry detergents are corrosive, so always keep them out of reach of
•
children.
•
Should a child swallow detergent, give plenty to drink immediately, i.e.,
one or two glasses of milk or water. Do not try to induce vomiting. Seek
medical advice immediately: The National Poison center phone number is
1-800-222-1222.
• Always close the door and start the appliance as soon as you put in the
detergent.
Always turn the power off to the machine when it is not in use.
•
•
Always keep small children away from the machine when it is open.
There may be some detergent residue left inside the machine.
• If laundry detergent gets in someone’s eyes, rinse them with plenty of
water for at least 15 minutes.
• Do not allow small children to play with the washing machine.
• Before closing the washing machine door and running the program, make
sure there is nothing except laundry in the drum (e.g. if a child climbed into
the washing machine drum and closed the door from the inside).
• Keep the detergent and conditioner out of reach of children.
• Activate the child lock. See chapter "SYSTEM SETTINGS, section Child
Lock".
• Do not let children younger than three years to come near the
appliance, unless they are under constant supervision.
• The washing machine is made in compliance with all relevant safety
standards. This washing machine may be used by children aged 8 years and
above and by persons with reduced physical, sensory or mental capabilities
or lack of experience and knowledge, but only if they are supervised during
the use of the appliance, if they have been provided relevant instructions
regarding safe use of the washing machine, and if they understand the
hazards of inappropriate use. Make sure children do not play with the
appliance. Make sure the children do not clean the washing machine or
perform any maintenance tasks without supervision.
DANGER OF HOT SURFACE
• At higher washing temperatures, the door glass will heat up. Be careful to
avoid burns. Make sure children do not play near the door glass.
Customer Care Center, 1-800-898-1879, www.askousa.com
5
Page 6

WATER OVERFLOW PROTECTION
• If the water level in the appliance rises above the normal level, then the
excessive water level protection will be activated. It will shut off the water
supply and start pumping out the water. If the water level does not decrease
in 60 seconds, the program will be interrupted (see chapter "ERRORS –
WHAT TO DO?").
TRANSPORTING / STORAGE DURING THE WINTER
If you transport or store the appliance in vehicles or rooms that are not heated
and where the temperature could drop to below freezing point, please do the
following:
• Clean the drain pump fi lter. See chapter "CLEANING AND MAINTENANCE".
• Close the water supply to the washing machine, undo the water supply hose
from the water supply tap, and wait until the water fl ows out of the tap and the
hose.
• After the drain pump fi lter is emptied, there can still be a small amount of
water in the machine. This, however, does not aff ect the quality and will not
damage the appliance.
• If the washing machine is to be transported, transport protection has to be
re-installed before transport (See chapter BEFORE USING THE APPLIANCE
FOR THE FIRST TIME).
SAVE THESE INSTRUCTIONS FOR FUTURE REFERENCE!
6
Customer Care Center, 1-800-898-1879, www.askousa.com
Page 7

WASHING MACHINE DESCRIPTION
910
15
267834
1211
1. Main switch (ON/OFF)
2. Program selector knob
3. Display unit
4. Program settings buttons
5. Button (start/pause/stop)
6. Dispenser tray
7. Rating plate with information about the washing
machine (on the inside of the washing machine
door)
8. QR and AUID code (on the inside of the washing
machine door)
9. Washing machine door
10. Drain fi lter cover
11. Water release hose
12. Drain fi lter pump (installed behind the drain
pump fi lter)
DISPENSER TRAY
1. Prewash compartment
2. Compartment for main wash liquid
5
3
2
The detergent drawer automatically dispenses the detergent and fabric softener at the appropriate times.
Simply pour the measured amounts of detergent and softener into the proper compartments (as illustrated)
and close the drawer.
1
4
detergent.
Use the barrier (3).
2. Compartment for main wash powder
detergent.
Do not use the barrier (3).
4. Softener / conditioner compartment
5. Tab for dispenser tray removal
To avoid oversudsing, do not put detergent in the prewash compartment unless you are using one of the
Heavy wash programs which has a prewash cycle.
Customer Care Center, 1-800-898-1879, www.askousa.com
7
Page 8

BEFORE USING THE APPLIANCE FOR THE FIRST TIME
PACKAGING
Remove all packaging.
Please sort the materials in compliance with local recommendations (see chapter ”DISPOSAL”).
TRANSPORT PROTECTION
Before using the appliance, remove the three transport bolts and plastic plugs which protect the appliance
during transport.
Release and remove the bolts as shown in the
1
fi gures.
To remove the plastic plugs holding the bolts,
2
squeeze them and then pull them out.
12 3
If you wish to transport the washing machine, reinstall the bolts and plastic caps to lock the machine. This
will prevent any damage to the machine due to vibrations during transport. If you have lost the transport bolts
or plastic caps, replacements can be ordered at your dealer.
Art. No. ID:
Remove the caps from the plastic plugs. Push
3
the caps over the three holes in which the plastic
plugs were inserted. Save the plastic plugs if you have
to transport your washing machine in the future.
270698 Bolt
551188 Plastic cap (transport lock)
Please order three pieces of each item!
8
Customer Care Center, 1-800-898-1879, www.askousa.com
Page 9

CLEANING
Disconnect the washing machine from the power mains and open the door. Clean the washing machine drum
with a damp cloth and a mild detergent.
No program can be started while the door is open.
SETTINGS BEFORE FIRST USE
After connecting the washing machine and running it for the fi rst time, choose the following:
Language selection
Press the button 2 or the program selector knob to scroll the list of languages. Confi rm your selection by
pressing the OK button.
The amount of detergent depends on the hardness of water. For details, see the detergent packaging.
Please contact your local water supply company to check the water hardness in your area.
Before it dispatched from the factory, every appliance is tested.
As a result, there may be some residual water left in the drain pump fi lter. This, however, does not aff ect the
quality and will not damage the appliance.
Customer Care Center, 1-800-898-1879, www.askousa.com
9
Page 10
INSTALLATION AND CONNECTION
POSITIONING THE WASHING MACHINE
Read these instructions carefully and completely
before you install the machine. The installation
should be carried out by a qualifi ed person who
is familiar with all local codes and ordinances for
electrical and plumbing connections.
Cosmetic damage must be reported to your dealer
within fi ve days from the date of purchase. After
unpacking the washer, thoroughly check the unit for
cosmetic damage.
The washing machine can be installed as a builtin (integrated) or a free-standing unit. Place the
machine on a level surface so that the power outlet
on the wall is accessible.
Before connecting the washing machine to the
power mains, wait for at least 2 hours until it reaches
room temperature.
Grounding instructions
This appliance must be grounded. In the event of
malfunction or breakdown, grounding will reduce
the risk of electric shock by providing a path of
least resistance for electric current. This appliance
is equipped with a cord having an equipmentgrounding conductor and a grounding plug. The plug
must be plugged into an appropriate outlet that is
properly installed and grounded in accordance with
all local codes and ordinances.
Improper connection of the equipment-
grounding conductor can result in a risk of electric
shock. Check with a qualifi ed electrician or
serviceman if you are in doubt as to whether the
appliance is properly grounded.
Do not modify the plug provided with the appliance.
If it will not fi t the outlet, have a proper outlet installed
by a qualifi ed electrician.
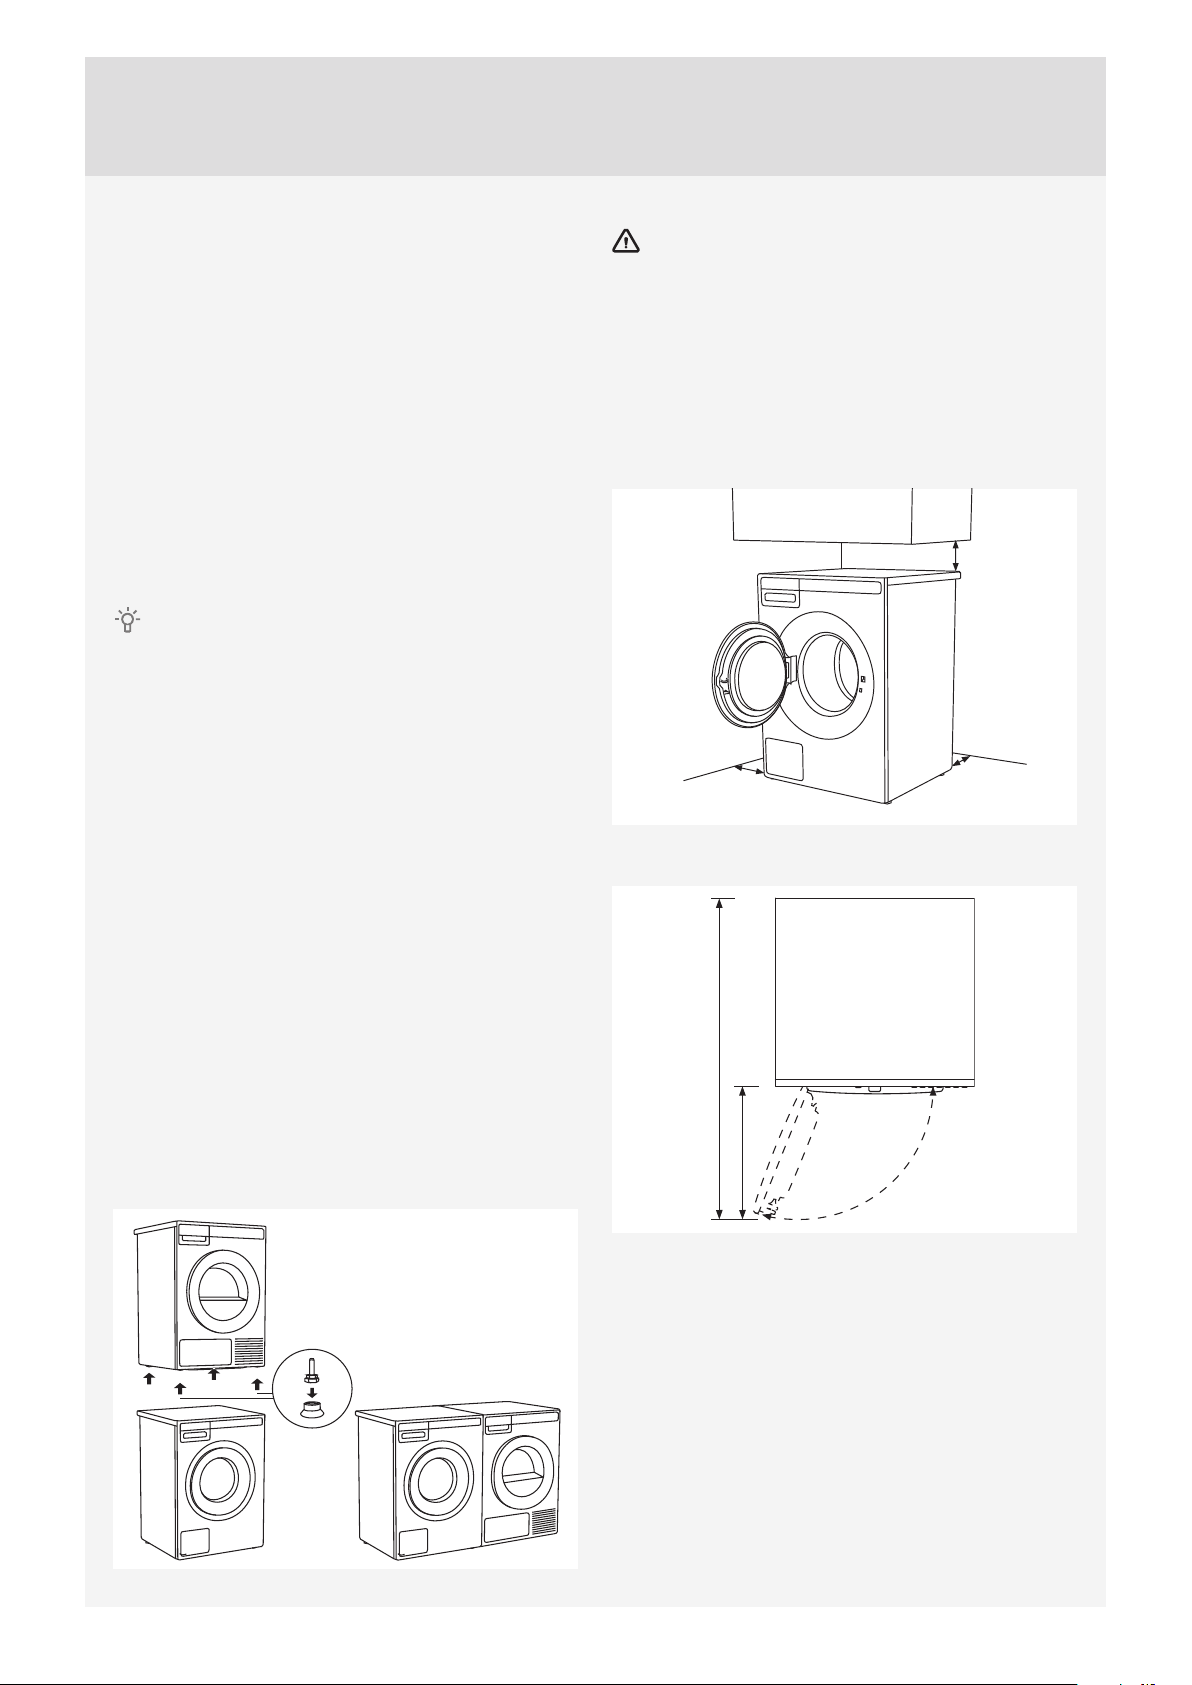
Clearances around the washing machine
min. 50 mm
min. 50 mm
min. 50 mm
Opening the washing machine door (top view)
Freestanding installation
The washer can be placed next to the dryer. It
is essential that the machine is leveled and the
locknuts are tightened to prevent excessive vibration
during spin cycles. Also be sure to leave a minimum
of ½" of space between the washer and the dryer.
The height adjustment for the washer is 35½" to
37½" (900 mm to 950 mm). Do not raise it higher
than 34½" (876 mm).
480 mm
978 mm
110°
Stacked installation
ASKO washers should never be stacked on a
counter or a dryer. You can, however, stack an ASKO
dryer on an ASKO washer. Refer to your Dryer Use
and Care Guide for instructions on how to do this.
Stacking an ASKO dryer on top of an ASKO
washing machine
To stack an ASKO dryer on top of a washing
machine, use the extra vacuum feet and the tipping
guard (A+B), supplied in the cardboard box in the
ASKO dryer drum. If the washing machine and
dryer are not of matching dimensions or if you
10
Customer Care Center, 1-800-898-1879, www.askousa.com
Page 11

have installed a hidden helper between the two
appliances, then binding plates are available as
optional accessories at the service unit.
A
B
ADJUSTING THE FEET
Place the washing machine so that it is stable.
It is important that the machine is level to prevent
excessive vibrations during spin cycles. Each foot
of the washer is adjustable, so you can level the
washer on any surface. Once it is level, securely
tighten the lock nuts on the feet to prevent excessive
vibration during spin cycles.
1. Level the washing machine in longitudinal and
traverse direction by rotating the adjustable feet.
The feet allow levelling by +/- 1 cm.
2. When the appropriate height of feet is set, use the
wrench No. 17 to fi rmly fasten the counter-nuts
towards the bottom of the appliance .
3. Tighten the jam nuts (counter nuts) to the end
position.
This will reduce washing machine noise to
minimum.
Built-in installation
ASKO washers can be installed beneath a cabinet
or worktop with a height of 34” to 35” (863 to 889
mm) or in a closet. There must be a gap of about ½”
(12 mm) all around the machine, including between
the rear edge of the machine’s top panel and the
back wall. The opening width must be at least
24½” (622 mm). Space must also be available for
the fi ll and drain hoses. See the illustration below
for measurements and positions. If the washer is
installed in a closet the door must be left open while
the washer is running.
1
2
3
622 mm
If the drain outlet is higher than 24"(610 mm), the
connections will need to be recessed.
Customer Care Center, 1-800-898-1879, www.askousa.com
11
Page 12

CONNECTING TO WATER SUPPLY
The machine has to be connected to water
supply by an adequately trained person.
Since ASKO washers have a built-in heating
element, you only need a cold water inlet. The
connection should be made by someone who is
sufficiently skilled. Use the hose supplied with
the washer. (The inlet hose is marked for correct
connection.) The water pressure must be in the
range 15–146 PSI. A valve should be fitted on
the water supply pipe. If a new supply pipe has
been installed for the washer, it should be flushed
thoroughly to remove any foreign particles that might
clog the filter in the fill valve.
The water intake hose has to be fastened fi rmly
enough for the hose to have a good seal.
After connecting the hose, the seal must be checked
for any leaks.
Only use the water supply hose supplied with the
appliance. Do not use any used or other hoses.
CONNECTING TO HOT/COLD WATER
SUPPLY
(Only in some models)
If your appliance has connections for both hot
and cold water, then connect one hose to the cold
water connection and the other hose to the hot
water connection, as indicated on the back of the
appliance:
COLD = cold and HOT = hot.
Hot water is supplied for programs operating at
WARM or more.
Connecting to both hot and cold water will save
time and electric energy when washing.
If your washing machine model has connections
for both hot and cold water, and you only wish to
connect cold water, then the protective cap has to be
(or remain) attached to toe hot water connection.
Hot water connection
(Depending on model)
A few seconds after you start a program, the
washing machine will begin to fi ll with water from
the hot and cold supplies. If for some reason no hot
water is available, the machine waits for one minute
and then fi lls with cold water only. The wash drum
does not start to rotate until it begins to fi ll with water.
Read these instructions carefully and completely
before you install the machine. The installation
should be carried out by a qualifi ed person who
is familiar with all local codes and ordinances for
electrical and plumbing connections.
Cosmetic damage must be reported to your dealer
within fi ve days from the date of purchase. After
unpacking the washer, thoroughly check the unit for
cosmetic damage.
12
If the unit is installed on a second storey, follow
local building codes. We recommend installing a
drip pan.
Customer Care Center, 1-800-898-1879, www.askousa.com
Page 13

INSTALLING THE DRAIN HOSE
The machine is supplied with the outlet hose already
attached. The hose should be extended over a
suitable sink edge or drain pipe at a height of 24"
to 36" (610 mm to 914 mm) above the bottom of the
unit. (The lower height is preferable.) Make sure the
hose is not kinked.
Drain hose can also be connected directly to the
washbasin drain via a siphon. In this case, the hose,
too, should be 24" to 36" mm above the fl oor. Internal
hose diameter should be at least 18 mm.
See fi gure.
At least 18 mm
If the hose is extended, the internal diameter of
the coupling must not be less than ½".
Do not extend the drain hose higher than 36”
(914 mm) from the bottom of the unit.
24" to 36"
24" to 36"
A
C
B
24" to 36"
Customer Care Center, 1-800-898-1879, www.askousa.com
13
Page 14

CONNECTING TO THE POWER MAINS
Connection upon delivery
After installation, the washing machine should
stand still for two hours before it is connected to the
power mains.
Connect the appliance to an earthed power outlet.
After installation, the wall outlet should be freely
accessible. The outlet should be fi tted with an earth
contact (in compliance with the relevant regulations).
Electrical Connections
The machine is delivered ready-fi tted with a plug
and is intended for connection to an ASKO Dryer,
which is equipped with a matching receptacle. The
plug supplied with the washer can only be used with
an ASKO Dryer. If the washer is used separately or
with another dryer, it must be on a separate 208-240
V single-phase circuit.
If the machine is to be used in a wet area, the supply
must be protected by a residual current device.
As supplied: 208-240 V, 60 Hz, 2000W heating
element, 15A fuse required.
Connection to a permanently wired supply point
must be made only by a qualifi ed electrician.
TYPE: WMXX.XXXXX
Art.No.: XXXXXX/XX Ser.No.: XXXXXXXX
XX Hz
XXXX W
XX-X MPa
XXX-XXX V ~
IPX4
MODEL: XXXXXX.X
XXA
X kg
Information about your washing machine is indicated
on the rating (type) plate.
Use the type A diff erential current protection switch.
We recommend using over-voltage protection to
protect the appliance in case of a lightning strike.
The washing machine may not be connected to
the power mains using an extension cord.
Do not connect the washing machine to an
electrical outlet intended for an electric shaver or
hair dryer.
Any repair and maintenance pertaining to safety
or performance should be done by trained experts.
To reduce the risk of fire, electric shock, or
injury to persons, read the chapter "IMPORTANT
SAFETY INSTRUCTIONS" before operating this
appliance.
14
Customer Care Center, 1-800-898-1879, www.askousa.com
Page 15

TIPS BEFORE WASHING
This chapter includes several tips on how to prepare
the laundry for washing.
LAUNDRY SORTING
Sort the laundry according to:
• how soiled it is,
• color,
• material.
CLOTHING
1. Close the zips and hook-and-loop fasteners so
that they do not damage the fabric.
2. New dyed items may contain excess dye;
therefore, they have to be washed separately
several times.
3. Turn delicate items inside out. This will decrease
the risk of tear and color fading.
4. Place very sensitive clothes and small items in a
special-purpose laundry washing bag.
(The special purpose laundry bag is available as
an optional accessory.)
5. Empty the pockets and turn them inside out.
Customer Care Center, 1-800-898-1879, www.askousa.com
15
Page 16
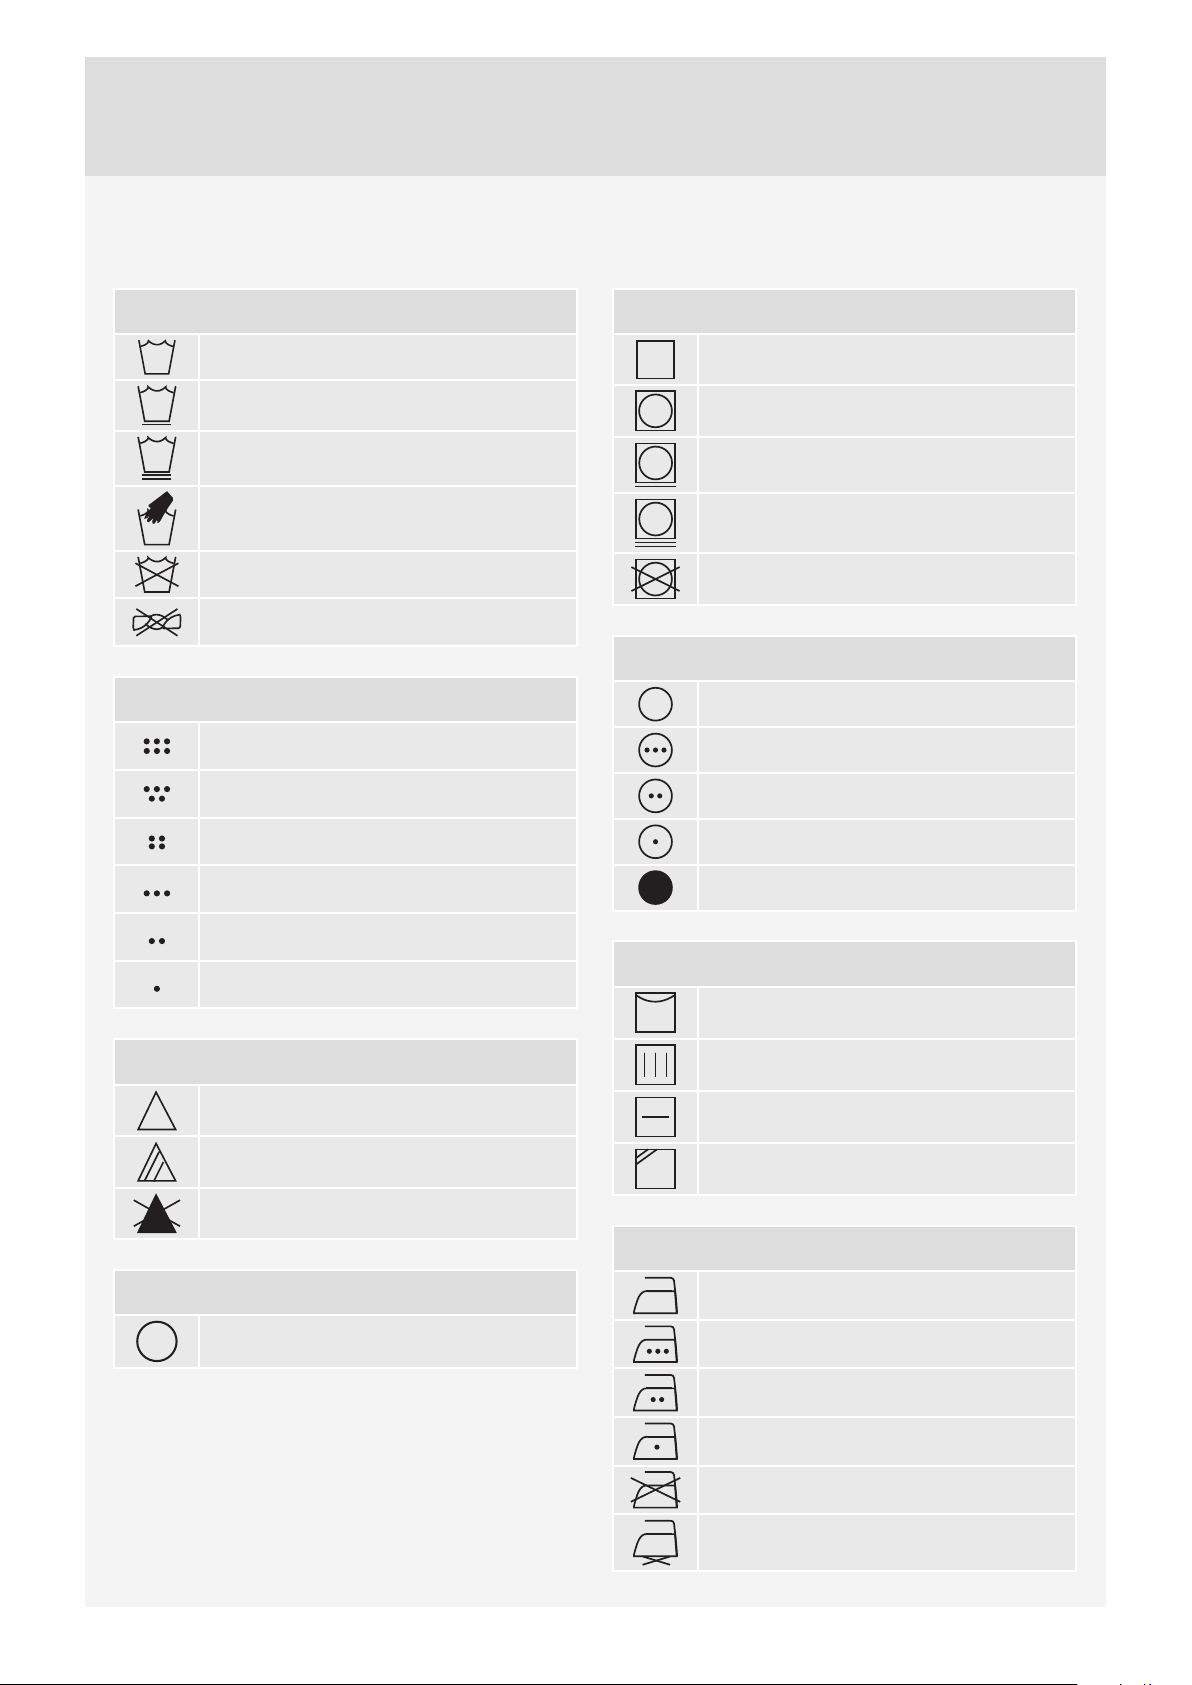
LAUNDRY SYMBOLS
Observe the laundry symbols.
Wash cycle
Normal wash cycle
Permanent Press or Wrinkle
Resistant setting
Gentle/Delicate setting
Hand wash only
Do not wash
Do not wring. Hang dry,
drip dry, or dry flat
Wash water temperature
Maximum water temp
205° F/95° C (EXTRA HOT)
Maximum water temp
160° F/70° C (EXTRA HOT)
Maximum water temp
140° F/60° C (HOT)
Maximum water temp
120° F/50° C (HOT)
Maximum water temp
105° F/40° C (WARM)
Maximum water temp
85° F/30° C (WARM)
Tumble dry cycle
Machine dry
Normal setting
Permanent Press or Wrinkle
Resistant setting
Gentle or Delicate setting
Do not tumble dry
Tumble dry heat setting
Any heat
High heat
Medium heat
Low heat
No heat/Air fluff
Special drying instructions
Line dry or hang to dry
16
Bleach instructions
Any bleach when needed
Only non-chlorine bleach
Do not bleach
Dry clean symbol
Dry clean only
Drip dry (do not spin or wring)
Dry flat
Dry in shade
Ironing instructions
Ironing is necessary
High temperature setting
Medium temperature setting
Low temperature setting
Do not iron or press with heat
Iron without steam
Customer Care Center, 1-800-898-1879, www.askousa.com
Page 17

COLOURED COTTON
Colored cotton items labeled (140 °F / 60 °C) (HOT)
should be washed at HOT the fi rst time in order to
remove any excess dye. If you do not do so, there is
a risk that the color will run. Use detergent without
bleach in order to preserve the color of the fabric.
UNBLEACHED LINEN
Unbleached linen fabrics should be washed at HOT,
using detergent containing no bleach or optical
whiteners. Heavily-soiled linen can occasionally be
washed at higher temperatures, but not too often as
the heat can destroy the linen’s sheen and strength.
WOOL
These fabrics are intended for either machine or
hand wash. The Wool/Hand Wash program is
equally gentle or even gentler than an actual hand
wash.
Wool in particular is sensitive to washing and similar
procedures.
If you do not wish to spin your clothes, select a
setting without spinning (see "STEP 6: Choose
the program settings /button 3"). However, most
garments are suitable for at least a short spinning
cycle. Top spinning speed available is MAX.
VISCOSE AND SYNTHETIC FIBRES
Materials made of viscose and some synthetic fi bres
are highly sensitive, and require a lot of space in
order not to crease. When washing, only fi ll the
drum to a half and choose a program with spinning
speed MAX.
Viscose and acetates are fragile when wet.
REDUCING ALLERGIC REACTIONS
(Only in some models)
The options include washing with the Allergy
Program Cotton and Allergy Program Synthetics,
using the Allergy Mode program setting, or using an
extra rinse (Super Rinse). These programs, program
settings, and functions can be used for people
with sensitive skin, such as those suff ering from
allergies, or small children.
SAVING TIME AND ENERGY
To save time and energy, use the Everyday Wash.
This program has shorter main wash cycle than
Standard Cotton and often suffi ces for less soiled
laundry.
ECONOMY AND EFFICIENCY
You can save a lot of energy by not using the
programs operating at higher temperatures.
Choose the Quick program if you wish to only
refresh the laundry; or use the Time program. This
will save water and power.
Selecting the maximum spinning speed will reduce
power consumption if you dry the clothes in a
dryer or a drying cabinet.
When using the programs Heavy, Everyday Wash
and Standard Cotton, we recommend washing a full
load.
Avoid prewash. Modern washing machines and
detergents are effi cient without the prewash as well.
Prewash is only necessary for heavily soiled
laundry. Use the additional function Prewash (see
"STEP 6: Program Settings Menu – choosing extra
functions / button 5").
DETERGENTS
Detergents carrying the environment protection label
are less harmful to the environment.
Only add the detergents in compliance with the
recommendations by detergent manufacturers.
Recommended amount of washing detergent
at certain loads and water hardness levels are
specifi ed on the detergent packaging.
STAINS
If your clothes are soiled with stubborn stains
(blood, eggs, coff ee, grass etc.), they should be
appropriately treated before the wash. Then, wash
your laundry using the special programs (if your
washing machine has them).
Do not use any chemical substances or agents;
only use the stain removing detergents.
DYEING FABRICS
If you wish to dye fabrics in the washing machine,
choose the Everyday Wash program with the Super
Rinse extra function. Choose the temperature
according to the dye manufacturer's
recommendations. If you dye mixed fabrics, such
as polyester/cotton, choose a low spinning speed.
Add the dye directly into the drum, rather than
in the detergent compartment. After dyeing use
the Drum Cleaning program (self-cleaning program).
Use the standard amount of detergent.
When using bleaches or stain removal agents,
there is danger of corrosion and discolouration.
To protect the environment, we recommend you
avoid using powerful chemicals.
Customer Care Center, 1-800-898-1879, www.askousa.com
17
Page 18

WASHING PROCESS, STEP BY STEP (1 – 8)
STEP 1: SORT THE LAUNDRY
See chapter "TIPS BEFORE WASHING"
Use a washing net for underwire bras. Empty the pockets. Coins, nails etc. could damage the machine
and the fabric.
STEP 2: TURN ON THE MAIN SWITCH.
Turning on
Press the on/off button.
Turning off
Press the on/off button.
If the machine does not accept the on/off command correctly, wait for at least 8 seconds before pressing any
other button.
STEP 3: OPEN THE WASHING MACHINE DOOR AND INSERT THE LAUNDRY.
Open the washing machine door by pulling the handle towards you.
1
2 3
18
Place the laundry into the washing machine drum.
Before doing so, make sure the drum is empty.
Do not overload the drum!
If the washing machine drum is too full, the laundry will not be washed as thoroughly.
Customer Care Center, 1-800-898-1879, www.askousa.com
Page 19

STEP 4: ADD THE DETERGENT AND THE CONDITIONER.
Recommended amount of detergent is usually specifi ed on the detergent packaging. When washing a
smaller amount of laundry, the amount of detergent used can be decreased.
Observe manufacturers' recommendations regarding the type of detergent suitable for certain temperatures,
load size, and water hardness.
Liquid detergents
We don’t recommend liquid detergents because they tend to produce more suds than powder detergents
when used in water temperatures of (150 F°) HOT or higher.
If you should try a liquid detergent, start with a very small amount, such as 1 to 2 tablespoons. Also, liquid
detergent can be used for all programs without prewash, so add it into the main wash compartment.
Detergents
Laundry detergents are available in low-,
normal- and high-sudsing formulas. A detergent´s ability to clean is not relative to the amount of suds
it produces. Excess suds in a front-loading washer actually interfere with the cleaning because they
cushion the tumbling action. Also, high-sudsing detergents are more diffi cult to completely rinse out. The
use of anything other than a low-sudsing detergent can cause severe oversudsing, which could cause
suds to backup through the detergent compartment and run down the front of the washer onto the fl oor. If
oversudsing occurs, run the wash through one or more rinse programs until all items are thoroughly rinsed.
Remove the laundry then run the washer through a Normal wash program to get rid of any remaining
detergent.
We recommend that you don’t use bleach in your ASKO washer. The tumbling wash action, temperature
control options, extended wash times and proper amount of detergent are suffi cient to remove most stains.
Recommended powder detergents
ASKO washers use 50% to 75% less detergent than most other washers. This is because of their low water
consumption and the fact that all the wash water is repeatedly circulated through the laundry, ensuring that
all the detergent is fully utilized. We recommend that you use powder detergents made specifi cally for front-
loading washers. These are sometimes called HE (High-Effi ciency) detergents. Please visit our homepage
www.askona.com to see the powder detergents we recommend for ASKO washers.
We recommend that you do not use any powder detergent that doesn’t wash completely out of the detergent
drawer.
We recommend adding the powder detergent immediately before the washing cycle. Otherwise, make
sure the detergent compartment in the dispenser tray is completely dry before adding the powder detergent,
as otherwise, the powder detergent may cake before the start of the washing process.
Detergent Amounts Based on Water Hardness
The amount of detergent needed can vary due to diff erences in water hardness. To determine the water
hardness in your area, contact your local water utility or area water softening company. The harder the water,
the more detergent you may need. Refer to the chart below for the recommended detergent amounts based
on water hardness. Remember, you should adjust the amount of detergent you use by small amounts until
you fi nd the correct amount.
Note that 12 grains and higher is extremely hard water and detergent alone may not be enough. You may
need to use a water softener to maximize the performance of your washer. Also, in areas with hard water (9+)
you may need to wash at lower temperatures to prevent hard water deposits from forming in the tank and
wash system.
Amount of detergent to use
The amount of detergent needed varies among the diff erent brands, but for most detergents, you need only
one or two tablespoons. Using too much detergent can result in detergent residue being left in your clothes,
which can cause them to appear gray or dingy. You should start with a small amount of detergent and
increase it only if the cleaning results are unsatisfactory.
Customer Care Center, 1-800-898-1879, www.askousa.com
19
Page 20

Additionally, you should never put detergent in the prewash compartment unless you are using a wash
program that has a prewash cycle. This could cause excess foaming, which could damage the machine.
The amount of detergent needed can also depend on the hardness of the water in your area. See the
“Detergent Amounts Based on Water Hardness” section on the next page for more details.
Recommended detergent amounts based on water hardness
Detergent amounts
Water hardness Pre Wash Main Wash
Soft (0-3 grains per gal.) 1 teaspoon 1 to 1-1/2 tablespoons
Medium (4-8 grains per gal.) 1 teaspoon 1 to 2 tablespoons
Hard (9+ grains per gal.) 1 teaspoon 2 to 3 tablespoons
Laundry ball or washing bag
If you are using a laundry ball or a washing bag, place it directly into the drum and choose a program without
any prewash.
An excessive amount of detergent will not improve washing results. Rather, it will lead to foaming and
increase the environmental impact. We recommend using less detergent. Only increase the dosage if you are
not satisfi ed with the washing results.
Fabric softener
Pour the conditioner into the dispenser tray, into the compartment with the symbol . Observe the
recommendation on the conditioner packaging.
Do not fill the conditioner compartment over the max. indication (maximum indicated level). Otherwise, the
conditioner will be added to the laundry too soon, leading to poorer washing effect.
20
Customer Care Center, 1-800-898-1879, www.askousa.com
Page 21

STEP 5: CHOOSE THE PROGRAM.
Choose the program by rotating the Program selector knob in either direction.
The Program selector knob can be used when arrows appear on the display.
Choose the program depending on the type of laundry and how heavily soiled it is (see chapter "TIPS
BEFORE WASHING").
Estimated program duration will appear on the display.
Extra program settings can also be selected for each program.
See STEP 6.
Choose between the following programs:
Program Description
1. EVERYDAY WASH Program for lightly to moderately dirty laundry. The temperature can be set
separately; therefore, observe the instructions indicated on the clothing.
Wash the clothes worn directly on the skin at HOT. Less heavily soiled
laundry will be thoroughly cleaned at WARM. Spinning speed can also be
freely selected. Default setting is maximum spinning speed.
Program duration and amount of water will be adjusted to the amount of
laundry.
2. STANDARD COTTON Program for normally or heavily soiled laundry, white or coloured. The
temperature can be set separately; therefore, observe the instructions
indicated on the clothing worn directly on the skin. Choose WARM if the
laundry is only lightly dirty. Spinning speed can be set to your preference.
Default setting is maximum spinning speed.
Program duration and amount of water will be adjusted to the amount of
laundry.
3. MIX/SYNTHETICS Program for delicate clothing made of synthetic and mixed fibres or viscose,
and for simple care of cotton. The highest available temperature is HOT.
Observe the instructions indicated on the clothing. Most synthetic fabrics
will be washed at WARM. Clothing worn directly on the skin should be
washed at HOT. Maximum spinning can be decreased if necessary.
4. WOOL/HAND WASH Gentle program for washing wool, silk, and clothes that require manual
washing. Maximum temperature is WARM. This program has a short
spinning cycle. Top spinning speed available is MAX.
5. DARK WASH This program is used for washing dark laundry using special-purpose
detergents for black laundry. The program washes at low temperatures, with
gentle tumbling and lower spin speed.
6. TIME PROGRAM Use this program when you wish to wash the laundry for a specific amount
of time. Duration can be set from 20 minutes to 3 hours (in 15-minute steps).
In this program, select the corresponding washing time and temperature
according to the type of laundry being washed.
Customer Care Center, 1-800-898-1879, www.askousa.com
21
Page 22

Program Description
7. AUTO PROGRAM
(Auto)
This program automatically adjusts the duration of the main wash and
number of rinses depending on the amount of laundry in the machine.
No extra program settings are possible.
8. QUICK PROGRAM
(Quick)
Program for normally soiled cotton and/or linen clothes for daily use up to
a full load. You can select "Cold" (incoming water temperature), WARM,
HOT or EXTRA HOT. The lower the selected temperature, the shorter the
program time. Garments worn next to the skin should be washed at EXTRA
HOT.
9. HEAVY Program for heavily soiled laundry. Use the prewash option. The
temperature can be set separately; therefore, observe the instructions
indicated on the clothing. Maximum available temperature is EXTRA HOT. It
is suitable for very heavily soiled laundry.
Spinning speed can be set to your preference.
Program duration and amount of water will be adjusted to the amount of
laundry.
10. RINSE This program includes one cold rinse and a short spinning cycle. The
program is suitable for laundry that only needs rinsing, and for cleaning
cloths or mops.
11. SPINNING
Use the program when you only wish to spin the laundry.
(Spin)
12. DRAIN If you only wish to pump out the water from the washing machine, choose
the Drain program.
13. EASY CARE Program for delicate clothing made of synthetic and mixed fibres, and
for simple care of cotton. It may also be used for pillows, quilted jackets
and similar items, as it uses a lot of water for the wash. Carefully read
the washing instructions. If the outer layer has a membrane, do not use
a conditioner. Washing temperature can be set up to HOT, and spinning
speed can be set up to MAX rpm.
14. DRUM CLEANING This program is used to clean the drum and to remove detergent residues
and bacteria. The drum has to be empty. Only add a small amount
of powder detergent. You may also add a small amount of vinegar
(approximately 2 dcl). Run this program at least once a month.
15. QUICK PROFESSIONAL
PROGRAM
(Quick Pro)
Program for smaller amounts of lightly soiled laundry. The program washes
with gentle tumbling and lower spin speed.
(4 kg, WARM, 59 min)
16. SYSTEM SETTINGS Use the program selector knob to choose System Settings and confirm with
ENTER (button "2").
Use the Program selector knob to scroll through the settings.
The following options are available:
– Child Lock,
– Language (language selection),
– Programs (set of programs),
– Display (display unit: contrast & logo),
– Sounds (acoustic signals),
– Reset.
See chapter "SYSTEM SETTINGS".
22
Customer Care Center, 1-800-898-1879, www.askousa.com
Page 23

STEP 6: CHOOSING THE PROGRAM SETTINGS
Using the program settings, the washing programs can be further adjusted to your wishes.
Some program settings may not be available for your selected program.
Selected program settings will remain stored after the end of the washing cycle and may be changed
subsequently (except for delayed start which is not stored after the wash is complete).
123456
1. Washing mode
2. Temperature
3. Spin speed
Choose the program settings before pressing the START button.
Program settings cannot be changed during the progress of a program.
Press the button under the program setting to display the information (INFO) about the each program
setting.
Following are the program settings that may be selected using the buttons 1 to 6:
4. Super Rinse
5. Additional program option (choosing extra
functions)
6. Start delay
1. Washing mode
By pressing the button 1, you can choose between washing modes:
• Normal mode
(Basic setting)
• Green mode
(Wash that saves energy; longer washing time, lower water consumption).
• Intense Mode
(Wash that improves cleaning performance, with extra water and extended washing time).
2. Temperature
By consecutively pressing the button 2, you can set the temperature for the selected program, choosing from
the following available values:
Cold / Warm / Hot / Extra Hot
The actual available temperature options will depend on the selected program.
Customer Care Center, 1-800-898-1879, www.askousa.com
23
Page 24

3. Spin speed
By consecutively pressing the button 3, you can set the spin speed, choosing from the following available
values:
No D / No S / Min / Max. (rpm) (max rpm = depends on the model)
Default setting is MAX; it depends on the selected program (spin rate can be changed – reduced or increased
(only in some models)).
The actual available spin speed will depend on the selected washing program.
With the NO d (no drain) option, the program will not include a spin cycle, and the water from the last rinse
will remain in the washing machine. The laundry will stay in the water from the last rinse, which will prevent
creasing. If you have selected the No d (No Drain) option, you have to select the Drain or Spinning program
after the end of the washing program to pump the water out from the machine before you open the washing
machine door.
4. Super Rinse (extra rinses)
By pressing the button 4, you can switch the Super Rinse option on or off (OFF).
To increase the number of rinse cycles (+2), select the Super Rinse setting. This is recommended for persons
with highly sensitive skin and/or in areas with very soft water.
Availability of this setting will depend on the selected washing program.
5. Choosing extra functions (Additional program option)
Press the button 5 to confi rm the extra functions. Then, use the Program selector knob to scroll the list of
functions or options. Confi rm the function you wish to select by pressing the button 1.
The following extra functions are available:
* Prewash
To use a prewash before the main wash, choose the Prewash option. Use of this function is recommended
for heavily soiled laundry or for laundry with stubborn surface stains. Confi rm the selection by pressing the
button 1 (On / Off ). To return to the main menu, press the button 6.
Add the prewash detergent into the prewash compartment and the main wash detergent into the main
wash compartment of the dispenser tray (see chapter "DISPENSER TRAY").
* High water level
For a larger amount of water after the wash and spinning cycle, select the High Water Level option. Confi rm
the selection by pressing the button 1 (On / Off ). To return to the main menu, press the button 6.
* Anti-crease
If you do not want your laundry to crease during the wash or to be tumbled gently, choose the Anti-Crease
option. This function is recommended for delicate laundry. Confi rm the selection by pressing the button 1 (On
/ Off ). To return to the main menu, press the button 6.
Some functions may not be available on all programs.
24
Customer Care Center, 1-800-898-1879, www.askousa.com
Page 25

6. Start delay
Press the button 6 to choose the delayed start when you wish the washing program to start after a certain
period of time (30´ to 24 hours after you press the Start button).
Everyday wash OKOffWarm MinAllergy
2:11
The estimated time remaining until the
end of the washing program will be
indicated above the button 6.
Press the button 6 for the arrows to
appear.
65
Use the Program selector knob or the
button 6 to set the delay from 30´ to 6
hours in 30-minute steps, and then from
6 hours to 24 hours in 1-hour steps.
Press the button 5 (OK) to confi rm your
selection.
Press the Start button to start.
When the countdown reaches zero,
the selected washing program will start
automatically.
To cancel the delay and start the
washing process immediately, press the
Delayed start paused
03:50
button 5 .
To change the start delay time, press
5
the Start/Stop button and hold it for 3
seconds. Then, use the button 6 or the
Program selector knob to set a new start
delay time. After selecting the new delay
time, press the Start button again.
If you have set the delayed start function, and you are using liquid detergent, we recommend setting a
program without a pre-wash.
Customer Care Center, 1-800-898-1879, www.askousa.com
25
Page 26

STEP 7: START THE WASH
Close the washing machine door and press the Start/Pause/Stop button.
Start (short press of the button – start/resume)
Pause (short press of the button – pause)
Stop (press and hold for 3 seconds – stop or cancel)
Starting
2:20
Remaining time
Depending on the selected program, anticipated washing time will be displayed in hours and minutes.
Actual washing time will depend on the selected program, load, type of laundry, spin speed etc.
Actual washing time may be longer or shorter than initially displayed.
Remaining time will be updated during the program duration, depending on the actual amount of laundry
and amount of water pumped into the machine. The last remaining time update takes place before the fi nal
spinning cycle.
In case of uneven distribution of laundry, the time on the display will fl ash and it will not count down.
Once the laundry is evenly redistributed, the washing time will continue and it will stop fl ashing
Washing
2:20
Adding or removing laundry after the start of the program
PausedStop program Add clothes
5
The door may be opened when the water is pumped from the machine. Then, add or remove the laundry.
Close the door and continue the program. Press the Start/Pause/Stop button.
The program will resume from the point at which it was interrupted.
To add or remove laundry during the
progress of a washing program, use the
Start/Pause/Stop button to pause the
program. Then, press the button 5 to
select "Add clothes".
26
Door can not be opened due to high temperature - please restart.
The result will not be satisfying adding clothes this late - please start.
Customer Care Center, 1-800-898-1879, www.askousa.com
If the door cannot be opened, it is
possible that the temperature in the
machine is too high.
Also, if the door cannot be opened, it
is possible that the program has been
running for too long and any laundry
added at that point would not be
effi ciently washed.
Page 27

Pausing, stopping or changing the program
PausedStop program Add clothes
1
To change or stop the washing program, press the Start/Pause/Stop button and hold it for 3 seconds.
Use the button 1 to choose "Stop program". The program is canceled and the water is pumped out of the
machine if necessary. Only then will you be able to open the washing machine door. Use the Program
selector knob to select a new program. If necessary, add detergent, and then press the Start/Pause/Stop
button.
A washing program can be paused by pressing the ON/OFF button.
The washing machine will switch off .
After the washing machine is switched on, press the Start button to resume the program.
Do not open the detergent dispenser tray while the appliance is operating.
To pause the program, shortly press the
Start/Pause/Stop button.
To resume a program, press the Start/
Pause/Stop button again.
Customer Care Center, 1-800-898-1879, www.askousa.com
27
Page 28

STEP 8: END OF PROGRAM
Cycle completed succsessfully
Start
new
5
Add
fav
After the end of the washing program,
the display will indicate that the program
has been successfully completed
("Cycle completed successfully").
Anti
creasing
Cycle completed succsessfully
Stop Anti
creasing
If you have selected the Anti-Crease
extra function, gentle tumbling will
continue after the end of the washing
program in order to prevent creasing.
6
Open the door towards you and remove the laundry from the washing machine.
Make sure the washing machine drum is empty.
If you do not take any action within 5 minutes after the end of the program, the display will switch off to
standby mode in order to save power.
The display will light up again if you press the ON/OFF button or open the washing machine door.
After the washing cycle, close the water intake and pull out the washing machine plug from the power
socket.
Favourite programs
Cycle completed succsessfully
Start
new
Add
fav
After the end of the program, you can
use the button 6 to store the program,
including all extra settings, as your
favourite program.
6
28
Make your list of four own favourite programs.
Confirm BackFav. list position: Favourite
Up to 4 favourite programs can be
stored.
Choose the favourite program position
(number) using the button 2; the most
recently used program, including all
settings, will be off ered.
42
To store a program, confi rm with the
button 4.
If you do not wish to store the program after the wash, rotate the Program selector knob and you will return to
the program selection; or, simply open the washing machine door.
Customer Care Center, 1-800-898-1879, www.askousa.com
Page 29

Changing a favourite program
If you wish to store a program after the end of the washing cycle, but there is no more room for another
favourite program (only 4 favourite program slots are available), then one of the existing stored favourite
programs can be substituted with a new one.
1. Favourite Confirm BackFav. list position:
Use the button 2 to scroll through the
list of Favourite programs.
Press the button 4 to confi rm the
program to be replaced.
42
NoYes1. Fav Auto will be replaced
Confi rm the replacement by pressing
the button 5.
65
The list of favourite programs will appear when you switch on the washing machine.
If you do not take any action for 5 minutes, the display will switch to standby mode.
To activate the display, press the ON/OFF button or open the washing machine door.
Customer Care Center, 1-800-898-1879, www.askousa.com
29
Page 30

SYSTEM SETTINGS
System settings
Enter
In the main menu, use the Program
selector knob to select System Settings.
Confi rm the selection by pressing the
button 2.
2
Then, use the Program selector knob to scroll the list of the following settings that you can adjust:
• Child Lock,
• Language (language selection),
• Programs (set of programs),
• Display (display unit: contrast & logo),
• Sounds (acoustic signals),
• Reset.
Use the button 6 (BACK) to return to System Settings or to the main menu.
Press the INFO button to display brief information about the setting.
CHILD LOCK
Child lock BackInfo
Child lock can be activated by pressing
the button 1 . This will prevent
children from switching on the machine.
1
Child lock BackInfo
1
Child lock
Locks user interface to any interactions.
Hold for to deactivate.
3 sec
14
Press the button 1 to deactivate the
child lock.
When the child lock is activated, no
other function can be selected.
To temporarily (for 3 minutes) switch off
the child lock, press the 1 and 4 buttons
simultaneously and keep them pressed
for 3 seconds.
30
Customer Care Center, 1-800-898-1879, www.askousa.com
Page 31

LANGUAGE
Language OK
Russian
You can choose between 25 languages.
Press the button 3 for the arrows
to appear. Use the Program selector
knob or the button 3 to scroll the list of
languages.
63
Use the button 6 to confi rm the selected
language.
Language Back
Russian
Use the button 6 to return to System
Settings.
63
PROGRAMS
The main menu includes the entire set of programs that you can choose using the Program selector knob.
This setting allows only displaying the selected program in the main menu.
Sports wearPrograms BackInfo
Press the button 1 for the arrows to
appear. Use the Program selector knob
or the button 1 to select a program.
Use the button 3 to set whether this
13 6
program is to be displayed or not:
On / Off .
Use the button 6 to return to System
Settings.
DISPLAY UNIT
Display
Contrast Logotype
Back
Set the contrast and logo display.
13
1 2
3
4
5
BackContrast
1
BackLogotype
1 6
Customer Care Center, 1-800-898-1879, www.askousa.com
Use the buttons 1 to 5 to set the
contrast.
Use the button 1 to toggle logo display
on or off .
If you choose on , the logo will be
displayed on the display unit when the
washing machine is turned on.
Use the button 6 to return to System
Settings.
31
Page 32

SOUNDS
Choose whether audible signals are switched on or off .
InfoMidSounds Back
Use the button 1 to switch acoustic
signal on or off .
Use the button 4 to choose between the
following settings: low, mid, and high. As
1 64
you scroll through the options, a sample
audible signal will be sounded.
Use the button 6 to return to System
Settings.
RESET
This means that all settings will return to the default settings and your own settings will be deleted.
Reset InfoYes
Back
Confi rm the selection by pressing the
button 3 (YES).
Use the button 6 to return to System
Settings.
63
32
Customer Care Center, 1-800-898-1879, www.askousa.com
Page 33

CLEANING AND MAINTENANCE
CLEANING THE FILTER
The washing machine has a fi lter that will retain smaller objects such as coins, buttons, hair etc.
Before cleaning, drain the water from the washing
1
machine using the Drain program, and disconnect
the washing machine from the power mains.
Open the pump fi lter cover using appropriate tools
(emergency door opening tool is located on the back
side of the dispenser).
Release the water drain hose from the holder.
2
Before cleaning the fi lter, drain the water from the
washing machine by placing the end of the water drain
hose over a large shallow container and opening the
cap on the water drain hose.
Gradually rotate the fi lter in the counter-clockwise
3
direction and pull it out.
Clean the fi lter thoroughly under running water.
4
Remove all objects and impurities from the fi lter
5
housing and the impeller.
Replace the fi lter as shown in the fi gure and
6
fasten it by rotating in the clockwise direction. For
a good seal, the fi lter seal surface should be clean.
Also re-install the drain hose.
Customer Care Center, 1-800-898-1879, www.askousa.com
33
Page 34

CLEANING THE DISPENSER TRAY AND DOOR RUBBER GASKET
Press the tab to completely remove the dispenser
1
tray from its housing.
A B
Rinse and thoroughly clean the tray. You may also
2
remove the cap from the plug in the conditioner
compartment (A). Clean any residue from the cap and
tube.
Clean the dispenser tray (B) interior.
Replace the cap on the plug.
Use a brush to clean the nozzles on the upper
3
side of the dispenser tray housing.
After a washing program, nozzles that clean the
interior of the dispenser are automatically switched on
(only with some models).
Replace the detergent dispenser into its housing.
4
Close the dispenser tank!
Do not wash the dispenser tank in the dishwasher!
34
After every wash, wipe the rubber door seal to
5
extend its useful life.
Customer Care Center, 1-800-898-1879, www.askousa.com
Page 35

CLEANING THE APPLIANCE EXTERIOR
Wipe the washing machine exterior and the display unit using a soft damp cotton cloth and mild detergent.
Do not use any solvents or cleaning agents that could damage the washing machine (please observe
the recommendations and warnings provided by the manufacturers of the cleaning agents).
Do not clean the washing machine with a jet of water!
Always disconnect the washing machine from the power mains before cleaning.
CLEANING THE WASHING MACHINE INTERIOR AGAINST ODOURS
Modern detergents often allow washing clothes at low temperatures. This means that residue may
accumulate in the washing machine, which in turn could cause odours.
To avoid such odorous, we recommend running the self-cleaning program (Drum-cleaning) once per month.
Use a small amount of powder detergent and do not put any laundry in the drum.
Customer Care Center, 1-800-898-1879, www.askousa.com
35
Page 36

CLEANING THE RINSING HOLES (UNDER THE AGITATOR IN THE DRUM)
If you believe that objects like nails or paper clips fell into the washing machine drum, check the area
underneath the rib. Such objects may rust (corrode) and cause stains on your clothes. Nails and other sharp
objects can also cause holes in the fabric.
Proceed as follows:
Insert a screwdriver or a similar tool into the slot in
1
the rib and carefully push it to the left.
Hold the rib with the other hand and pull it towards
you.
2
Lift the drum rib.
3
Remove any objects.
4
Place the rib into the installation slot indicated with
5
"F" towards you. Make sure all ribs are fi rmly in
place in their respective slots in the drum. Push the rib
inwards (as indicated by the arrow in the fi gure) until it
snaps.
If you are using hard water
If you are washing with hard water (causing limescale build-up), a greyish-white fi lm may appear on the
washing machine drum. To remove this fi lm, add vinegar into the washing machine drum and select any
program with a temperature of EXTRA HOT, or the Drum Cleaning program. See STEP 5: Choose the
program.
Repeat the process as necessary.
36
Customer Care Center, 1-800-898-1879, www.askousa.com
Page 37

ERRORS – WHAT TO DO?
Disturbances from the environment (e.g. the power grid) may result in various error reports (see
Troubleshooting table). In such case:
• Switch off the appliance, wait for 1 minute, switch the appliance back on, and repeat the washing program.
• If the error persists, call an authorized service unit.
• You will be able to solve most of the problems in appliance operation by yourself (see Troubleshooting table
below).
• Repairs may only be carried out by an adequately trained person.
• Repair or any warranty claim resulting from incorrect connection or use of the washing machine shall not be
covered by the warranty. In such cases, the costs of repair shall be charged to the user.
The warranty does not cover the errors or failures resulting from disturbances from the environment
(lightning strike, power grid failures, natural disasters etc.).
Problem/error Cause What to do?
Washing machine
door does not open.
The machine will
not start.
Washing program is
not in progress.
Washing time
is longer than
anticipated (the
time is regularly
updated on the
display unit).
• Water level too high. • Drain the water using the Drain or Spinning
program. See "Step 5: Choose the program".
• Water temperature in the
washing machine is too high.
• Power supply failure. • Press the Start/Pause/Stop button to resume the
• Washing machine door is not
properly closed.
• There is no voltage in the
power outlet.
• Delayed start function has
been selected.
• Low inlet water temperature. • Program duration can be up to 60% longer than
• UKS* (*unbalance system)
stability system engaged due
to unevenly distributed laundry.
• Low mains voltage. • Washing machine needs more time because the
• Wait for the water temperature to drop and pump
out the water. If you still cannot open the door, use
the emergency door opening tool (see chapter
"ERRORS – WHAT TO DO? / Manual opening of
washing machine door").
program.
• Firmly press on the washing machine door until
you hear two clicks when it is closed.
• Check if the plug is connected to the power outlet
and whether there is electric current (or voltage) in
the outlet.
• To cancel the delayed start function, press the
Start/Pause/Stop button and hold it for three
seconds.
initially anticipated in the normal progress.
• Program time is extended due to the need to
redistribute the laundry in the drum.
power mains voltage is too low.
Display does not
light up.
The wording on the
display unit is not
in your language.
• Power supply failure. • Program time is extended by the duration of the
power supply failure.
• There is no voltage in the
appliance.
• You have not selected your
preferred language yet.
Customer Care Center, 1-800-898-1879, www.askousa.com
• Check if the plug is connected to the power outlet
and whether there is electric current (or voltage) in
the outlet.
• Choose the preferred language (see "STEP 5 /
System Settings / Choosing the language").
37
Page 38

Problem/error Cause What to do?
Wet laundry • A small amount of laundry will
often be unevenly distributed.
There are traces
• The laundry was very greasy. • Wash the laundry again. When your laundry is this
of grease (or
grease rolls) on the
clothes.
There are still
stains on the
laundry.
• You used bleach-free liquid
detergent or powder detergent
for coloured laundry.
• You selected an unsuitable
program.
There are white
residues of
washing powder on
the laundry.
• This is not due to poor rinsing
by your washing machine,
but rather due to phosphatefree detergents which contain
ingredients (zeolites) for water
softening. These ingredients
may be deposited on the
laundry.
• Loosen and redistribute the laundry and select the
Drain or Spinning program.
• Increase the amount of laundry in the washing
machine and restart the program (see "STEP 7:
Start the wash / Adding or removing laundry after
the start of the program").
heavily soiled, add more washing powder or use a
liquid detergent.
• Use a detergent that contains bleach.
• Use special stain removers.
• Immediately rinse the laundry again.
• Use liquid detergents that do not contain zeolites.
• Try removing any residues with a brush.
There is powder
detergent left in
the main wash
compartment
of the detergent
dispenser tray.
There is
conditioner left in
the conditioner
compartment of the
dispenser tray.
Odour in the
washing machine
drum.
Machine is moving
during operation.
Machine is moving
during spinning.
• Water pressure not high
• Clean the net on the water supply hose.
enough.
• Some washing powders may
stick strongly to the dispenser
tray if it is empty.
• Choose higher water level or extra rinse (see
"Step 6 / Choose program settings").
• Wipe the dispenser tray before adding the powder
detergent.
• Plug cap is not positioned
correctly or it is
clogged.
• Make sure the plug cap in the conditioner
compartment of the dispenser tray is positioned
correctly.
• Clean the plug cap (see chapter "CLEANING AND
MAINTENANCE / Cleaning the dispenser tray").
• Residues of fabric, washing
• Check if the filter is clean.
detergent, and conditioner in
the filter.
• Development of germs and
bacteria.
• Choose a self-cleaning (Drum Cleaning) program
(see "STEP 5: Choose the program").
• Feet not adjusted correctly. • Level the feet (see chapter "INSTALLATION AND
CONNECTION / Adjusting the feet").
• Transport bolts not removed. • Remove the transport bolts (see chapter
"BEFORE USING THE APPLIANCE FOR THE
FIRST TIME / Transport protection").
• Unevenly distributed laundry
or not enough laundry.
• The washing machine will automatically decrease
the spin speed if vibration is too strong.
• Increase the amount of laundry in the washing
machine and restart the program (see "STEP 7:
Start the wash / Adding or removing laundry after
the start of the program").
38
Customer Care Center, 1-800-898-1879, www.askousa.com
Page 39

Manual opening of washing machine door
Washing machine door may be opened manually if the appliance is not connected to the power mains
and if the water has been pumped out of the machine.
A Choose the Spinning or Drain program to pump the water from the machine. If this does not work, water has
to be drained from the washing machine drum manually. See chapter "Cleaning the trap and drain pump" in
the chapter "CLEANING AND MAINTENANCE".
B Make sure the main switch is off and that the plug is disconnected from the power outlet.
C Take the emergency door opening tool (found at the back of the dispenser) and insert it into the upper part
of the slot on the right-hand side of the washing machine door latch.
D Press the key (key=the emergency door opening tool) downwards (all the way, until you hear a click) to
unlock the washing machine door. When the door is unlocked, open it by pulling towards you.
1
2
If the washing machine door still cannot be opened, call a service technician.
Customer Care Center, 1-800-898-1879, www.askousa.com
39
Page 40

FAILURE DISPLAY
In case of a failure while a program is in progress, the relevant Error X is indicated on the display unit.
Info EXITError 3
5
Errors indicated on the display unit may include the following:
Error Error indication on the display unit What to do?
Press the INFO button to display the
error description.
Switch off the appliance and turn it back
on.
E1 THERMISTOR ERROR
Temperature sensor error.
• Inlet water too cold. Repeat the washing program.
• If the appliance reports this error again, call a service
technician.
E2 DOOR LOCK ERROR Restart the program. If the error reoccurs, call a
service technician.
E3 WATER FILLING ERROR Check the following:
• is the water inlet valve open,
• is the filter on the water inlet hose clean,
• is the water supply hose deformed (clipped, clogged
etc.).
Then, press the START button to resume the program.
If the error reoccurs, call a service technician.
E6 HEATING ERROR
Water heating error.
E7 DRAINING ERROR
Water draining error.
Restart the program. If the error reoccurs, call a
service technician.
Check the following:
• is the pump filter clean,
• is the drain hose clogged,
• is the drain clogged,
• is the drain hose fitted at the right height (see chapter
on drain hose installation in the instruction manual).
Then, press the Start button again. If the error
reoccurs, call a service technician.
E7.1 DRAIN SYSTEM ALERT
Water drain system alert.
Alert about reduced water flow in the pumping stage.
Check the following:
• is the pump filter clean,
• is the drain hose clogged,
• is the drain clogged,
• is the drain hose fitted at the right height (see chapter
on drain hose installation).
40
E10 WATER LEVEL SENSOR ERROR Restart the program. If the error reoccurs, call a
service technician.
E11 OVERFLOW
Water overflowing.
Restart the program. If the error reoccurs, call a
service technician.
E12 MOTOR ERROR Restart the program. If the error reoccurs, call a
service technician.
E22 DOOR LOCK ERROR
Error while locking the door.
Door is closed, but it cannot be locked. Close the door
again. Turn the washing machine off, then restart the
washing program. If the error reoccurs, call a service
technician.
Customer Care Center, 1-800-898-1879, www.askousa.com
Page 41

Error Error indication on the display unit What to do?
E23 DOOR UNLOCK ERROR
Error while unlocking the door.
Door is closed, but it cannot be unlocked. Turn off
the washing machine, then turn it back on. If the error
reoccurs, call a service technician. See instructions for
opening the door – chapter on manual door opening.
E36 COMMUNICATION UI AND PMCU
Error in UI and PMCU communication.
UNBALANCE
Unevenly distributed laundry.
STERIL TUB ALERT
Warning – Self-cleaning program
Turn off the appliance and turn it back on. If the error
reoccurs, call a service technician.
Manually distribute the laundry and run the spinning
program.
Use the self-cleaning program (DRUM CLEANING);
see STEP 5.
Unevenly distributed laundry or lumps of laundry in the washing machine drum may cause problems such
as vibration and noisy operation. The washing machine will sense this and activate the UKS* (*unbalance
system).
Smaller loads (e.g. one towel, one sweater, one bathrobe etc.) or clothes made of materials with special
geometrical properties are virtually impossible to distribute evenly across the washing machine drum
(slippers, large items etc.). This results in several attempts to redistribute the laundry, which in turn leads to
longer program duration. In extreme cases of unfavourable conditions, the program can be completed without
the spinning cycle.
UKS* (*unbalance system) allows stable operation and extends the useful life of the appliance.
Customer Care Center, 1-800-898-1879, www.askousa.com
41
Page 42

SERVICE
LIMITED WARRANTY – RESIDENTIAL
APPLIANCES
ASKO Appliance Inc., a Delaware corporation
(hereinafter “ASKO”) warrants the original purchaser
(the “ASKO Customer”) of the ASKO product (the
“ASKO Product”), who purchased the appliance from
a distributor, dealer, manufactures representative
or other seller who has been authorized by ASKO
(“Authorized ASKO Dealer”), that this ASKO Product
is free of defects in material and workmanship,
subject to the terms and conditions set forth herein.
The limited warranty covers parts and labor, except
as set forth in this Limited Warranty. Service must be
provided by an ASKO designated service company.
YOUR SOLE AND EXCLUSIVE REMEDY UNDER
THIS LIMITED WARRANTY SHALL BE PRODUCT
REPAIR AS PROVIDED HEREIN. The limited
warranty is valid only in the United States or Canada
and applies only when the appliance is used in the
country in which it was purchased. Proof of original
purchase date is required to obtain service under
this limited warranty.
Residential ASKO Products Used
Exclusively for Household/Personal
Purposes:
Two (2) Years limited Warranty – Any warranty
service claims for residential ASKO Products must
be fi led with ASKO within two (2) years from date of
purchase.
Residential ASKO Products Not Used
Exclusively for House Hold Purposes, used
Commercially or Use in marine, Mobile or
Aeronautical Applications:
One (1) Year limited Warranty – Any warranty service
claims for ASKO Products not used exclusively for
household and personal use, used commercially or
used in marine, mobile, or aeronautical application
must be fi led with ASKO within One (1) year from
date of purchase.
ITEMS EXCLUDED FROM WARRANTY
This limited warranty does not cover:
1. Replacement parts or repair labor if this appliance
is used in a manner that is inconsistent to
published user or operator instructions and or/or
installation instructions.
2. Service calls to correct the installation of your
appliance, to instruct you on how to use your
appliance, to replace or repair house fuses, or to
correct house wiring or plumbing.
3. Consumable parts are excluded from warranty
coverage.
4. Damage resulting from accident, alteration,
misuse, abuse, fi re, fl ood, acts of God, improper
installation, installation not in accordance with
electrical or plumbing codes, or use of products
not approved by ASKO.
5. Cosmetic damage, including scratches, dents,
chips or other damage to the fi nish of your
appliance, unless such damage results from
defects in material or workmanship and is
reported to ASKO within 5 days from date of
purchase.
6. Pickup and delivery. This appliance is intended to
be repaired in your home.
7. Repairs to parts or systems resulting from
unauthorized modifi cations made to the
appliance.
8. Expenses for travel and transportation for product
service if your appliance is located in a remote
area where service by an authorized ASKO
servicer is not available.
9. The removal and reinstallation of your appliance
if it is installed in an inaccessible location or is not
installed in accordance with ASKO’s published
installation instructions.
10.Replacement parts or repair labor on appliances
with original model/serial numbers that have been
removed, altered or cannot be easily determined.
42
Customer Care Center, 1-800-898-1879, www.askousa.com
Page 43

DISLCAIMER OF IMPLIED WARRANTIES
YOUR SOLE AND EXCLUSIVE REMEDY
UNDER THIS LIMITED WARRANTY SHALL BE
PRODUCT REPAIR AS PROVIDED HEREIN. ASKO
SHALL NOT BE LIABLE FOR INCIDENTIAL OR
CONSEQUENTIAL DAMAGES. Some states and
provinces do not allow the exclusion or limitation
of incidental or consequential damages, so these
limitations and exclusion may not apply to you. This
warranty gives you specifi c legal rights, and you
also may have other rights that vary from state to
state or province to province.
If you think you need repair service, fi rst see the
“Trouble Shooting” section of the Use & Care Guide.
If you are unable to resolve after checking “Trouble
Shooting” additional help can be found by calling
ASKO Consumer Care at 1-800-898-1879
Customer Care Center, 1-800-898-1879, www.askousa.com
43
Page 44

When you contact a service centre, please state
the model (1), type (2), and serial number (3) of your
washing machine.
Model, type, and serial number are indicated on the
rating (type) plate located on the washing machine
door casing.
In case of a failure, only use approved spare
parts by authorized manufacturers.
Repair or any warranty claim resulting from
incorrect connection or use of the washing machine
shall not be covered by the warranty. In such cases,
the costs of repair shall be charged to the user.
1, 2, 3
213
TYPE: WMXX.XXXXX
Art.No.: XXXXXX/XX Ser.No.: XXXXXXXX
XX Hz
XXXX W
XX-X MPa
XXX-XXX V ~
IPX4
MODEL: XXXXXX.X
XXA
X kg
Should you need further assistance, you can write to
ASKO Appliances with any questions or concerns at
the address below:
ASKO Appliances Inc.
Customer Care Center
PO Box 940609
Plano, Texas 75094-0609
44
Customer Care Center, 1-800-898-1879, www.askousa.com
Page 45

TECHNICAL INFORMATION
TECHNICAL INFORMATION
Height 850 mm
Width 595 mm
Depth 580 mm
Weight 76 kg
Drum volume 57,2 l (2,02 cu.ft.)
Rated power See rating plate
Heater power See rating plate
Water pressure 0,1–1 MPa
1–10 kp/cm
10–100 N/cm
2
2
Material for the drum and dispenser Stainless steel
Housing material Hot-dip galvanized and powder coated sheet metal, or
stainless steel sheet (depending on model)
Water connection 1.5 m pex hose
Drain hose 1.6 m polypropylene hose
Customer Care Center, 1-800-898-1879, www.askousa.com
45
Page 46

PROGRAM TABLE
Program
Prewash
Temp.
Super rinse
Agitation level*
Spinning speed
(rpm)
Residual moisture [%]
Maximum load
(kg)
Water consumption
(approximately, in litres)
Power consumption
(approximately, kWh)
Program duration
(approximately, in hours
1. Everyday wash X HOT X I MAX 8 68 1,60 2:19
2. Standard cotton X WARM X N MAX 8 68 1,30 2:12
3. Mix/Synthetics X WARM X S MAX 3,5 50 0,35 1:39
4. Wool/Hand wash WARM H MAX 2 58 0,28 0:45
5. Dark wash WARM X E MAX 3 40 0,53 1:28
6. Time program X WARM E MAX 2 - - -
7. Auto program WARM N MAX 8 - - -
1)
8. Quick program
COLD X N MIN 40 0,50 0:47
9. Heavy X HOT X I MAX 8 95 2,00 3:06
10. Rinse N MAX 30 0,06 0:29
11. Spin - MAX - 0,05 0:17
12. Drain - - 0,01 0:01
13. Easy care WARM X E MAX 3,5 50 0,45 1:42
14. Drum cleaning N - - -
15. Quick Pro WARM N MAX 4 40 0,50 0:59
and minutes)
46
*Agitation level (I = Intensive rhythm, N = Normal rhythm, E = Extra sensitive rhythm, S = Sensitive rhythm, H = Hand wash rhythm)
1)
Test program for energy performance, water consumption and capacity of household clothes washers according to the standard CAN/CSA - C 360-13.
The above table includes several examples of the use of energy, water, and time for several diff erent program settings. Actual consumption or duration
may vary depending on the water pressure, water hardness, water inlet temperature, room temperature, weight and type of load, changes in power
supply, and selected options or set tings. In the examples specifi ed here, the draining is set to Normal and no additional options are selected.
Customer Care Center, 1-800-898-1879, www.askousa.com
Page 47

Adjustment of the displayed washing time
Advanced technology allows the appliance to sense the amount of laundry and add the required amount of
water during the washing process. Depending on the washing load, washing time can be longer or shorter
and the time displayed will be adjusted accordingly.
Moreover, displayed washing time may change due to diff erences in inlet water temperature. At low inlet
water temperatures, washing time can be longer; at higher temperatures, it can be shorter.
Unevenly distributed laundry or lumps of laundry in the washing machine drum can cause problems such as
vibration and noisy operation. The appliance can sense such lumps and will try to redistribute the laundry.
Smaller loads (e.g. one towel, one sweater, one bathrobe etc.) or clothes made of materials with special
geometrical properties are virtually impossible to distribute evenly across the washing machine drum
(slippers, large items etc.). This results in several attempts to redistribute the laundry, which in turn leads to
longer program duration.
Customer Care Center, 1-800-898-1879, www.askousa.com
47
Page 48

DISPOSAL
Disposal / recycling of packaging
Our product packaging is made of environmentally friendly materials that can be recycled, disposed
of, or destroyed without any hazard to the environment. To this end, packaging materials are labelled
appropriately.
The symbol on the product or its packaging indicates that the product should not be treated as
normal household waste. The product should be taken to an authorized collection centre for waste electric and
electronic equipment processing.
When disposing of an appliance at the end of its useful life, remove all power cords and destroy the door latch
and switch to prevent the door from locking or latching (child safety).
Correct disposal of the product will help prevent any negative eff ects on the environment and health of people
which could occur in case of incorrect product removal. For detailed information on removal and processing of
the product, please contact the relevant authority in charge of waste management, your waste disposal
service, or the store where you bought the product.
48
Customer Care Center, 1-800-898-1879, www.askousa.com
Page 49

NOTES
Customer Care Center, 1-800-898-1879, www.askousa.com
49
Page 50

NOTES
50
Customer Care Center, 1-800-898-1879, www.askousa.com
Page 51

QUICK GUIDE
1.
2.
3.
SORT THE LAUNDRY.
Close the zip fasteners.
Check the laundry care symbols.
Sort the laundry based on how heavily soiled it is, by color, and by
material.
SWITCH ON THE MAIN ON/OFF SWITCH (ON/OFF)
OPEN THE WASHING MACHINE DOOR AND INSERT
THE LAUNDRY.
Before doing so, make sure the drum is empty.
4.
5.
6.
7.
ADD THE DETERGENT AND THE CONDITIONER.
Recommended detergent amount is usually indicated on the
packaging.
For smaller wash loads, use a smaller amount of detergent.
CHOOSE THE WASHING PROGRAM.
Turn the program selector knob to the desired washing program.
Selected program will be indicated on the display unit.
CHOOSE THE PROGRAM SETTING.
Choose the settings by pressing the relevant buttons.
CLOSE THE WASHING MACHINE DOOR AND PRESS
THE ”START” BUTTON.
Anticipated washing time, in hours and minutes, will be indicated on
the display.
END OF PROGRAM
Open the door and remove the laundry from the washing machine.
Close the door.
8.
Customer Care Center, 1-800-898-1879, www.askousa.com
Switch off the main on/off switch.
Close the water tap and remove the power plug from the power socket.
We reserve the right to modifi cations.
51
Page 52

www.askousa.com
WM75.B US/CA
en (09-17)
 Loading...