

Page 1
Dear customer!
Thank you for choosing this quality product from ASKO. We hope it will
meet your expectations and fulfi l your needs for many years to come.
Scandinavian design combines clean lines, everyday functionality and
high quality. These are key characteristics of all our products and the
reason they are greatly appreciated throughout the world.
Operating instructions
BO6PY4T1-42 OP8676S
Page 2

We thank you for your trust and the
purchase of our appliance.
This detailed instruction manual is supplied to make the
use of this product easier. The instructions should allow
you to learn about your new appliance as quickly as
possible.
Make sure you have received an undamaged appliance.
If you do fi nd transport damage, please contact the
seller from which you purchased the appliance, or the
regional warehouse from which it was supplied. The
telephone number can be found on the invoice or on the
delivery note.
Instructions for installation and connection are supplied
on a separate sheet.
Instructions for use are also available at our website:
www.asko.com / < http://www.asko.com />
Important information
Tip, note
2
Page 3

CONTENTS
THE ELECTRIC PYROLYTIC OVEN 4
TECHNICAL SPECIFICATIONS 4
CONTROL UNIT 6
IMPORTANT SAFETY INSTRUCTIONS 7
BEFORE CONNECTING THE OVEN: 8
BEFORE USING THE APPLIANCE FOR
THE FIRST TIME 9
STEPS OF THE COOKING
PROCESS (1–6) 10
STEP 1: SWITCHING ON THE APPLIANCE
FOR THE FIRST TIME 10
STEP 2: CHOOSING THE BASIC COOKING
MENUS AND SETTINGS 11
STEP 3: STARTING THE COOKING PROCESS 18
STEP 4: END OF COOKING AND SWITCHING
OFF THE OVEN 18
STEP 5: SELECTING ADDITIONAL FUNCTIONS/
EXTRAS 19
STEP 6: CHOOSING THE GENERAL SETTINGS 21
DESCRIPTIONS OF SYSTEMS (COOKING
MODES) AND COOKING TABLES 22
MAINTENANCE & CLEANING 36
CONVENTIONAL OVEN CLEANING 36
AUTOMATIC OVEN CLEANING – PYROLYSIS 37
REMOVING AND CLEANING THE WIRE GUIDES 39
CLEANING THE OVEN CAVITY CEILING 40
REMOVING AND INSERTING THE OVEN DOOR 41
DOOR LOCK (depending on the model) 42
REMOVING AND INSERTING THE OVEN DOOR
GLASS PANE 43
REPLACING THE BULB 44
TROUBLESHOOTING TABLE 45
DISPOSAL 46
3
Page 4
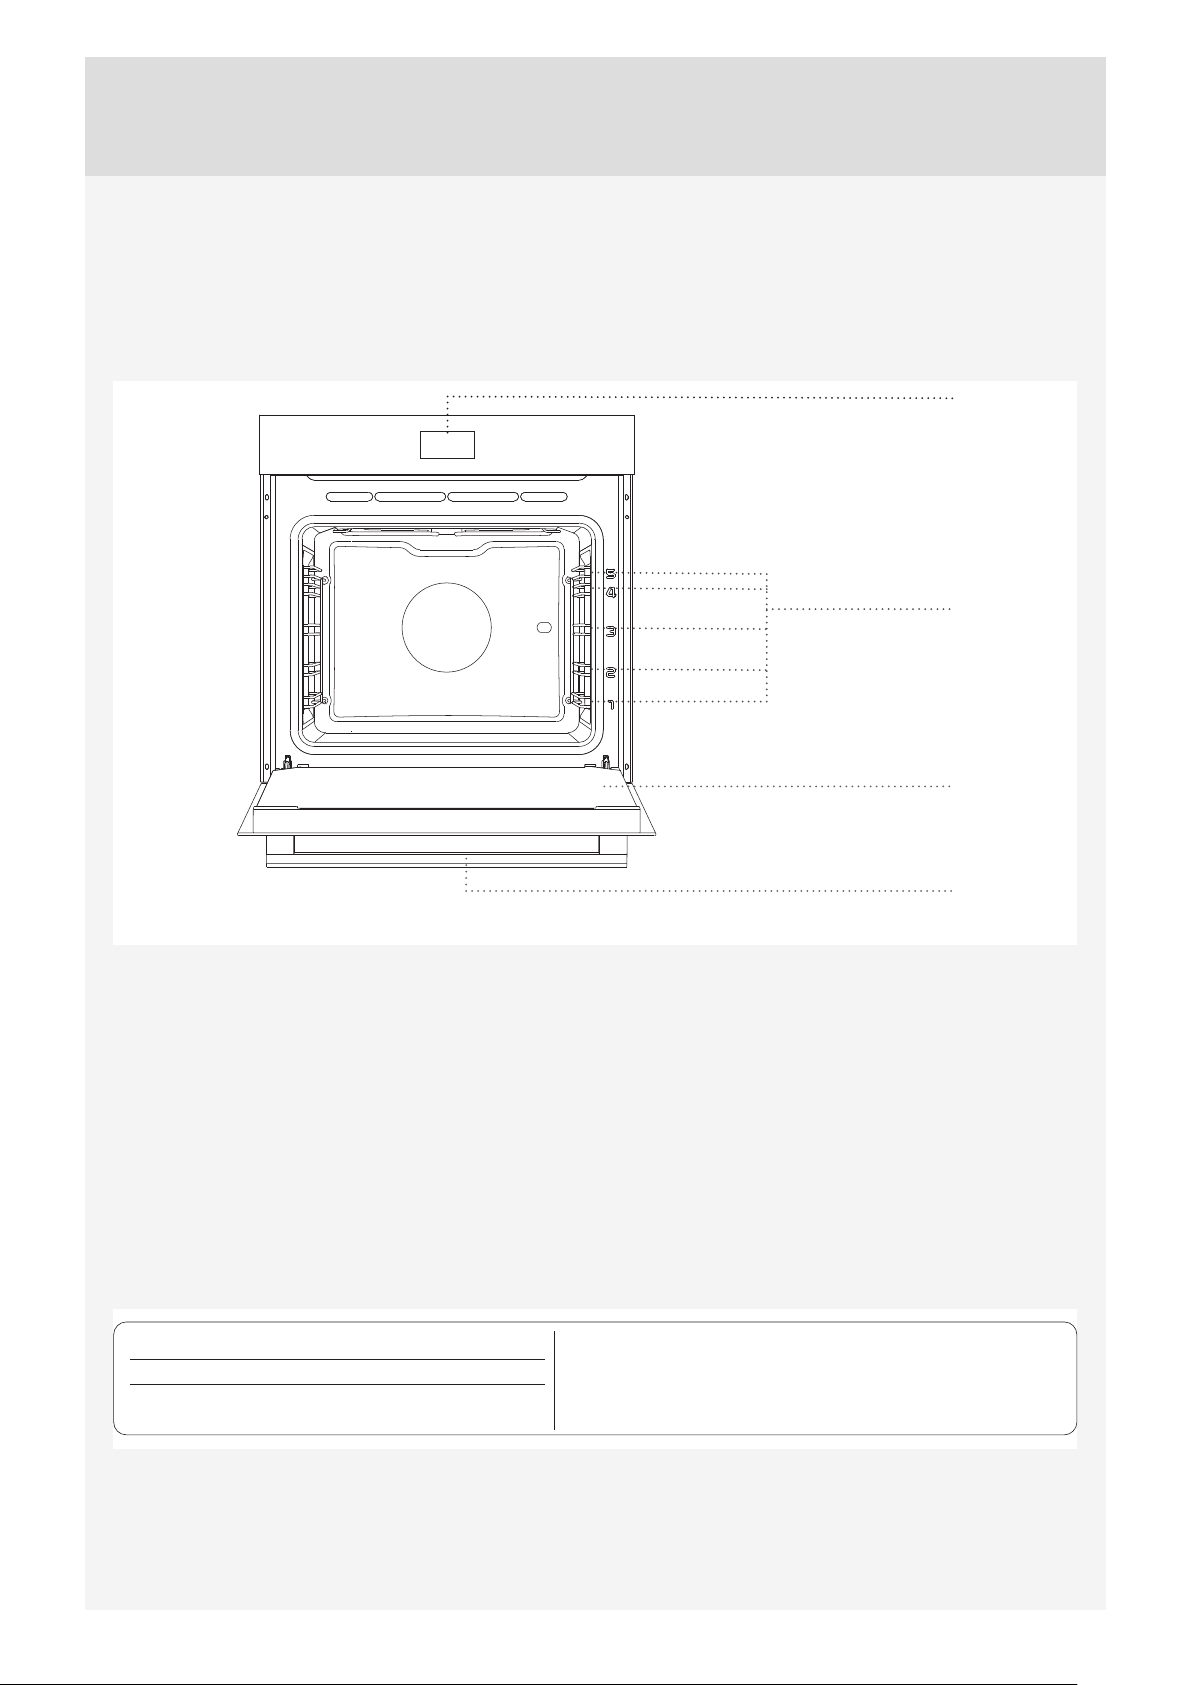
THE ELECTRIC PYROLYTIC OVEN
(DESCRIPTION OF THE OVEN AND EQUIPMENT – DEPENDING ON THE MODEL)
The fi gure represents one of the built-in appliance models. Since the appliances for which these instructions were drawn
up may have diff erent equipment, some functions or equipment may be described in the manual that may not be present
in your appliances.
Control unit
5
4
3
- Cooking levels
2
1
Guides
TECHNICAL SPECIFICATIONS
(DEPENDING ON THE MODEL)
XXXXXX
TYPE:
XXXXXX
ART. Nr:
SER. Nr: XXXXXX
220-240V ~
220V-240V, 50/60Hz
Oven door
Oven handle
Pn :
max
3.5 kW
TN XXXXX
The rating plate indicating the basic information about
the appliance is located at the edge of the oven and it is
visible when the oven door is opened.
4
Page 5
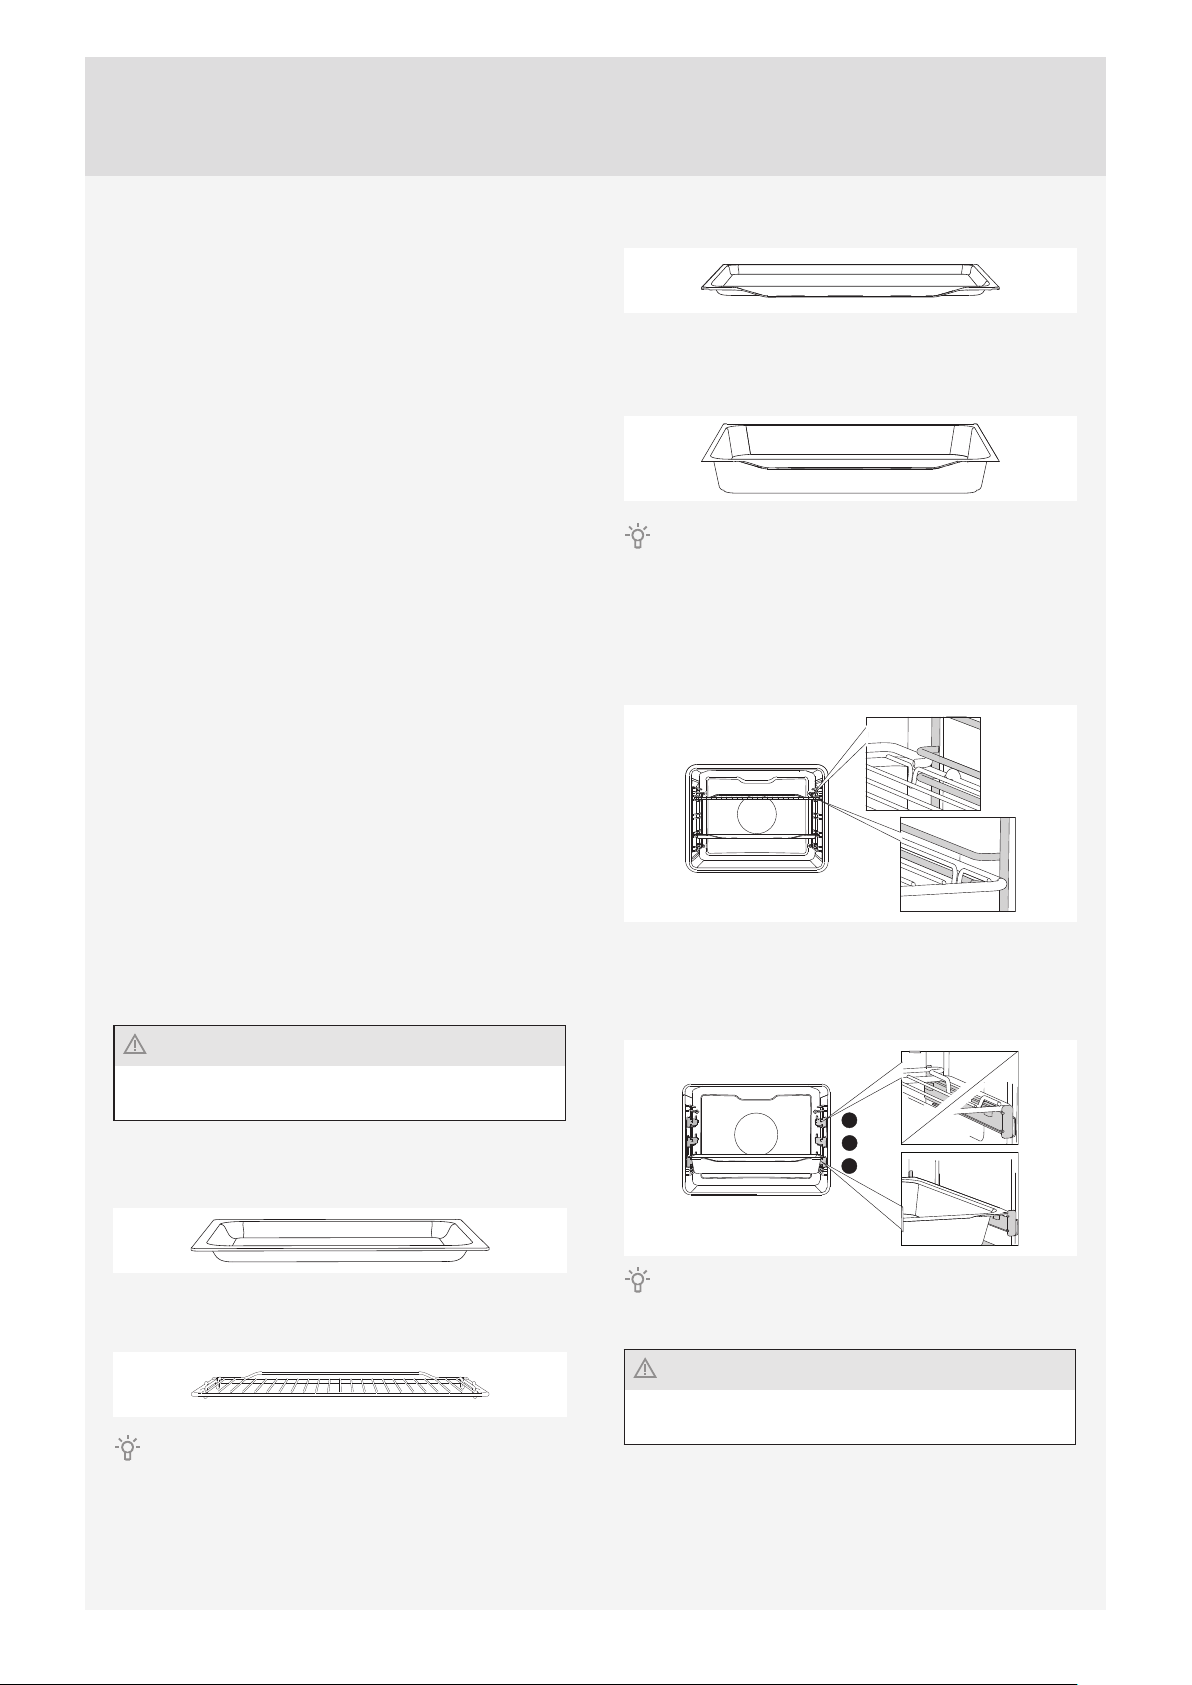
WIRE GUIDES
The wire guides allow preparation of the food on 5 levels
(please note that the levels/guides are counted from the
bottom up).
Guides 4 and 5 are intended for grilling.
pastry and cakes.
TELESCOPIC GUIDES
Telescopic pull-out guides may be fi tted for the 2nd, 3rd,
and 4th level. There are several diff erent designs of the
pull-out guides (depending on the model): three partially
extendible, one fully and two partially extendible, and
three fully extendible guides.
OVEN DOOR SWITCH
The switches deactivate oven heating and the fan when
the oven door is opened during the cooking process.
When the door is closed, the switches turn the heaters
back on.
COOLING FAN
The appliance is fi tted with a cooling fan that cools the
housing and the appliance control panel.
EXTENDED OPERATION OF THE COOLING FAN
After the oven is switched off , the cooling fan continues
to operate for a short while in order to cool the oven. (Extended cooling fan operation depends on the temperature
in the center of the oven).
OVEN EQUIPMENT AND ACCESSORIES
Before pyrolytic cleaning, remove all accessories,
from the oven!
GLASS BAKING DISH is used for cooking with all oven
systems. It can also be used as a serving tray.
The DEEP BAKING TRAY is used for roasting meat and
baking moist pastry. It can also be used as a drip tray.
Never place the deep baking tray in the fi rst guide during
the cooking process, except when grilling food or using the
roasting spit and you are only using the deep tray as a drip
tray.
The grid or the tray should always be inserted into the
groove between the two wire profi les.
With telescopic extendible guides, fi rst pull out the
guides of one level and place the grid or the baking tray
onto them. Then, push them in with your hand as far as
they will go.
4
3
2
The GRID is used for grilling or as support for a pan,
baking tray or baking dish with the food.
There is a safety latch on the grid. Therefore, lift the grid
slightly at the front when pulling it out from the oven.
The SHALLOW BAKING SHEET is used for baking
Close the oven door when the telescopic guides are
retracted all the way into the oven.
The appliance and some of the accessible parts tend
to heat up during cooking. Use oven mitts.
5
Page 6
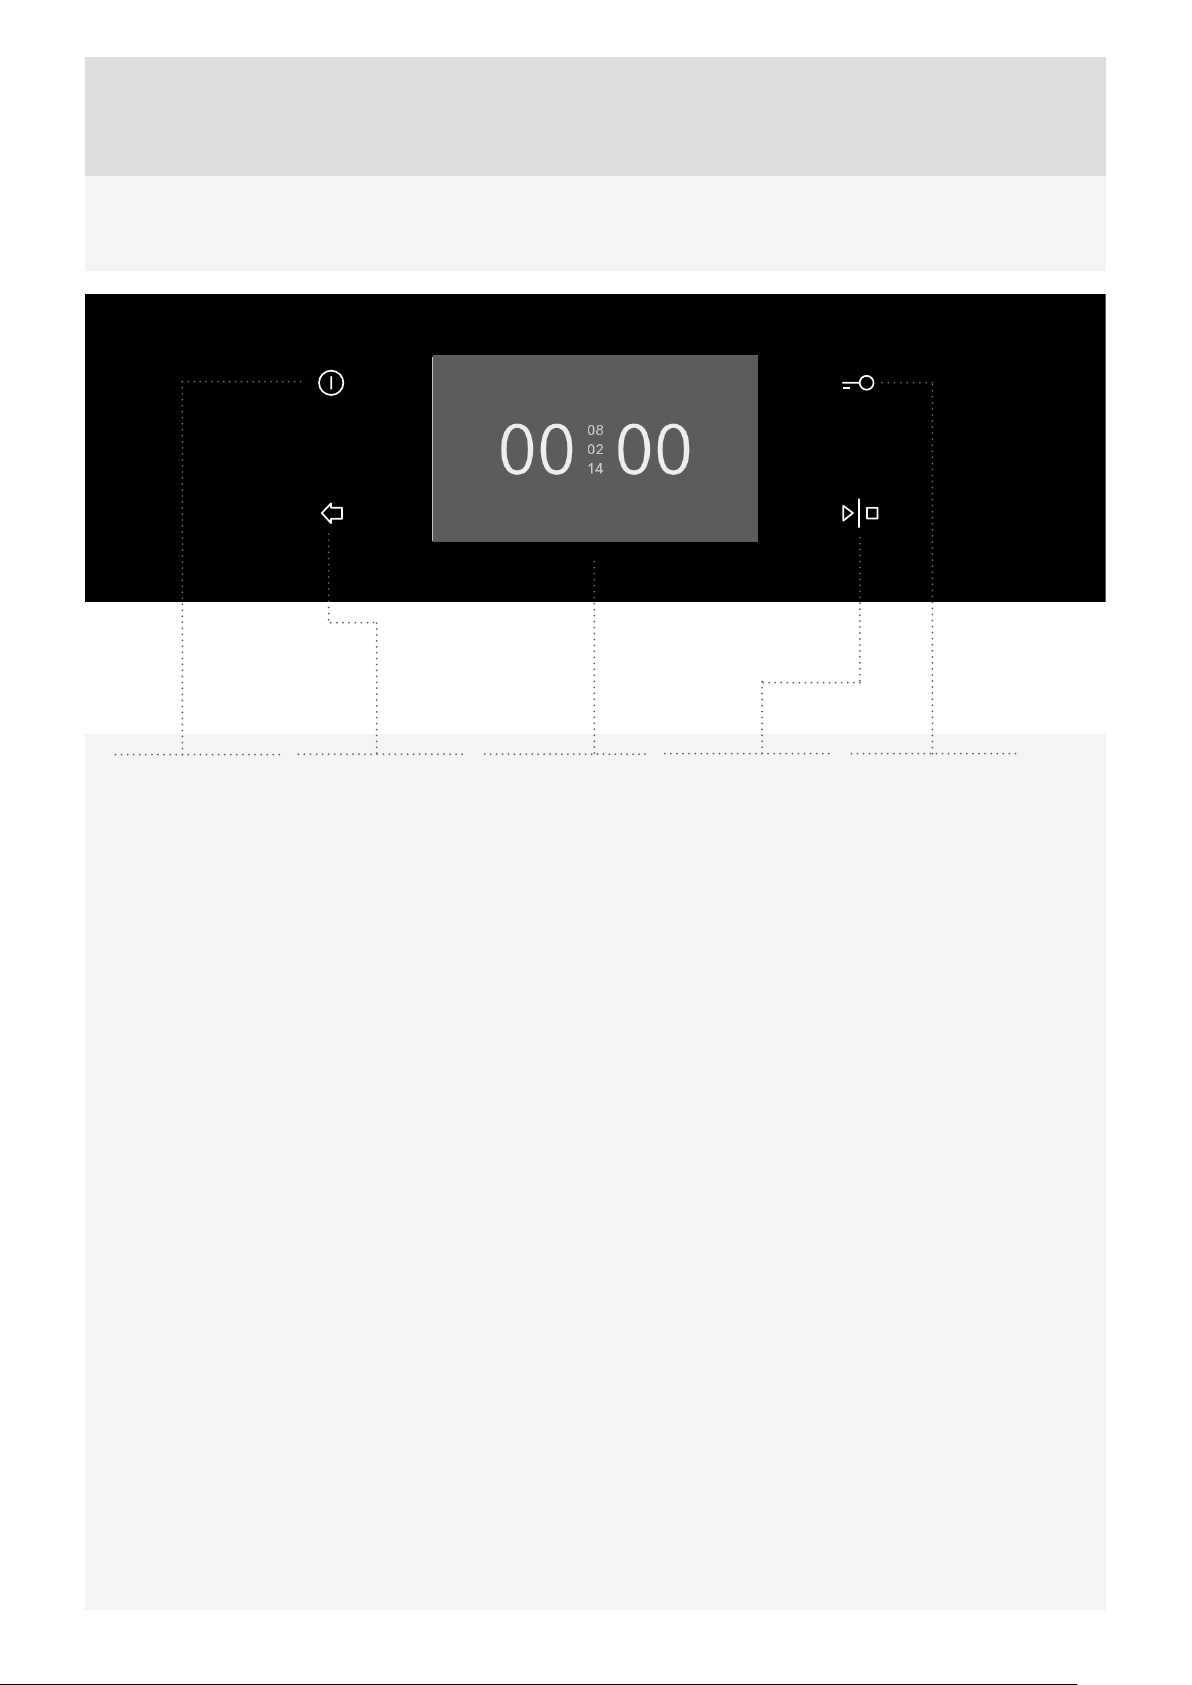
CONTROL UNIT
ON/OFF KEY
1
NOTE:
The keys will respond better if you touch them with a larger area of your fi ngertip. Each time you press a key, this will be
acknowledged by a short acoustic signal.
Navigate the menu by sliding your fi nger up and down or left and right. Confi rm your selection with a touch.
BACK KEY
2
Touc h b riefl y to
return to previous
menu.
Touch and hold
to return to main
menu.
DISPLAY – For
selection and
3
display of settings
START/STOP
KEY
4
CHILD LOCK
KEY
5
6
Page 7

IMPORTANT SAFETY INSTRUCTIONS
CAREFULLY READ THE INSTRUCTIONS AND SAVE THEM FOR FUTURE REFERENCE.
This appliance may only be used by children aged 8 years and above and persons with
reduced physical, sensory or mental capabilities or lack of experience and knowledge
if supervision or instructions are provided to them concerning use of the appliance in a
safe way and if they understand the hazards involved. Do not let the children play with
the appliance. Cleaning and user maintenance shall not be made by children without
supervision.
WARNING: The appliance and some of its accessible parts may become very hot during
use. Be careful not to touch the heaters. Children younger than 8 years should be constantly
supervised.
The appliance becomes very hot during use. Be careful not to touch the oven heaters.
WARNING: The accessible parts of the appliance may become hot during use. Children
should be kept away from the oven.
Only use the temperature probe recommended for use in this oven.
WARNING: Before replacing the light bulb, make sure the appliance has been disconnected
from the power mains, in order to prevent the hazard of an electric shock.
Do not use abrasive cleaners or sharp metal scrapers to clean the oven as they may damage the
fi nish or the protective enamel coating. Such damages may lead to cracking of the glass.
Do not use steam cleaners or high pressure cleaners to clean the appliance as this may result in an
electric shock.
The appliance is not intended to be controlled with external timers or special control systems.
The appliance is intended for household use. Do
not use it for any other purpose, such as room heating,
drying of pets or other animals, paper, fabrics, herbs etc.
as this may lead to injury or fi re hazard.
The appliance may only be connected to the power
mains by an authorized service technician or expert.
Tampering with the appliance or non-professional repair
thereof may result in risk of severe injury or damage to
the product.
If the power cords of other appliances located near
this appliance are caught in the oven door, they may
be damaged, which may in turn result in a short circuit.
Therefore, keep the power cords of other appliances at a
safe distance.
Oven door become very hot during operation. A
third glass is installed for extra protection, reducing
the temperature of the outside surface (only with some
models).
Oven door hinges may be damaged when under
excessive load. Do not place heavy pans on open oven
door and do not lean against open oven door when
cleaning the oven cavity. Never stand on the open oven
door and do not let children to sit on it.
Make sure the vents are never covered or obstructed in
any other way.
If the power cord is damaged, it should be replaced by
the manufacturer or an authorized service technician, in
order to avoid hazard.
Do not line the oven walls with aluminium foil and do
not place baking trays or other cookware on the oven
bottom. Aluminium foil would prevent air circulation
in the oven, hinder the cooking process, and ruin the
enamel coating.
7
Page 8

Safe use of the oven during pyrolytic cleaning
Before activating the automatic cleaning process, remove the grid, the spit roasting kit, glass baking
trays, meat probe, and any other cookware that is not a part of oven equipment.
During the automatic cleaning process, the oven gets very hot from the outside. Risk of burns! Keep
children away from the oven.
The appliance is intended for household use. Do not use
it for any other purpose, such as room heating, drying of
pets or other animals, paper, fabrics, herbs etc. as this
may lead to injury or fi re hazard.
If the power cords of other appliances located near
this appliance are caught in the oven door, they may
be damaged, which may in turn result in a short circuit.
Therefore, keep the power cords of other appliances at a
safe distance.
If the power cord is damaged, it should be replaced by
the manufacturer or an authorized service technician, in
order to avoid hazard.
Do not line the oven walls with aluminium foil and do
not place baking trays or other cookware on the oven
bottom. Aluminium foil would prevent air circulation
in the oven, hinder the cooking process, and ruin the
enamel coating.
Oven door become very hot during operation. A third
glass is installed for extra protection, reducing the
temperature of the outside surface (only with some
models).
Oven door hinges may be damaged when under
excessive load. Do not place heavy pans on open oven
door and do not lean against open oven door when
cleaning the oven cavity. Never stand on the open oven
door and do not let children to sit on it.
Make sure the vents are never covered or obstructed in
any other way.
BEFORE CONNECTING THE OVEN:
Carefully read the instructions for use before
connecting the appliance. Repair or any warranty
claim resulting from incorrect connection or use of the
appliance shall not be covered by the warranty.
8
Page 9

BEFORE USING THE APPLIANCE FOR THE FIRST TIME
Upon receiving the appliance, remove all parts, including
any transport equipment, from the oven.
Clean all accessories and utensils with warm water and
regular detergent. Do not use any abrasive cleaners.
When the oven heats up for the fi rst time, the
characteristic smell of a new appliance will be emitted.
Ventilate the room thoroughly during the fi rst use.
9
Page 10
STEPS OF THE COOKING PROCESS (1–6)
STEP 1: SWITCHING ON THE APPLIANCE FOR THE FIRST TIME
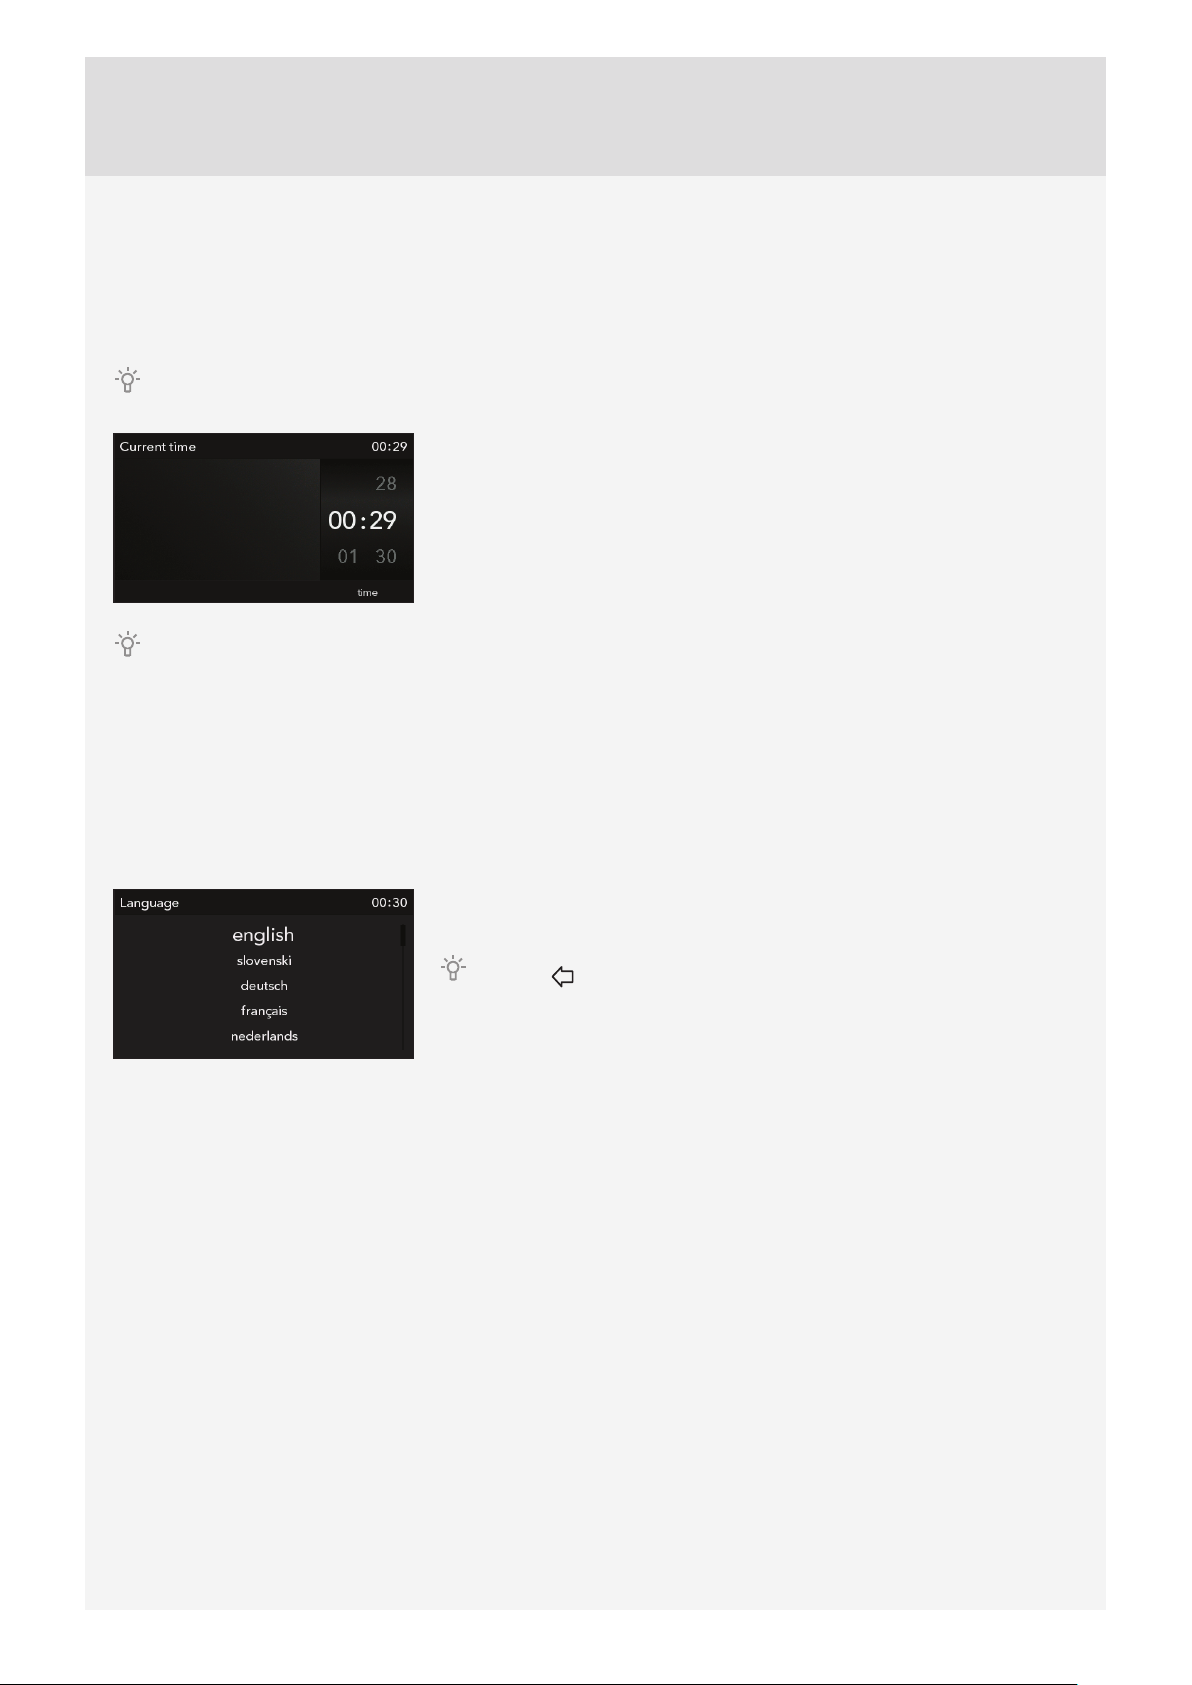
SETTING THE CLOCK
After connecting your appliance to the power mains or after an extended power outage, CLOCK settings will appear on
the display.
Navigate the menu by sliding your fi nger up and down.
Set the CLOCK by touching the display. Confi rm the setting with the START/
STOP key.
The oven will also work if the clock is not set. However, timer functions are not available in this case (see chapter
SETTING THE TIMER FUNCTIONS). After a few minutes of idling, the appliance will switch to standby mode.
CHANGING THE CLOCK SETTING
Clock settings may be changed when no timer function is activated (see chapter CHOOSING THE GENERAL
SETTINGS).
SELECTING THE LANGUAGE
If you are not happy with the language in which the messages on the display are presented, select another one. English
is the preset language.
When you touch the line with the desired language, the size of the letters in
that line will increase.
Press the key to return to MAIN MENU.
10
Page 11
STEP 2: CHOOSING THE BASIC COOKING MENUS AND SETTINGS
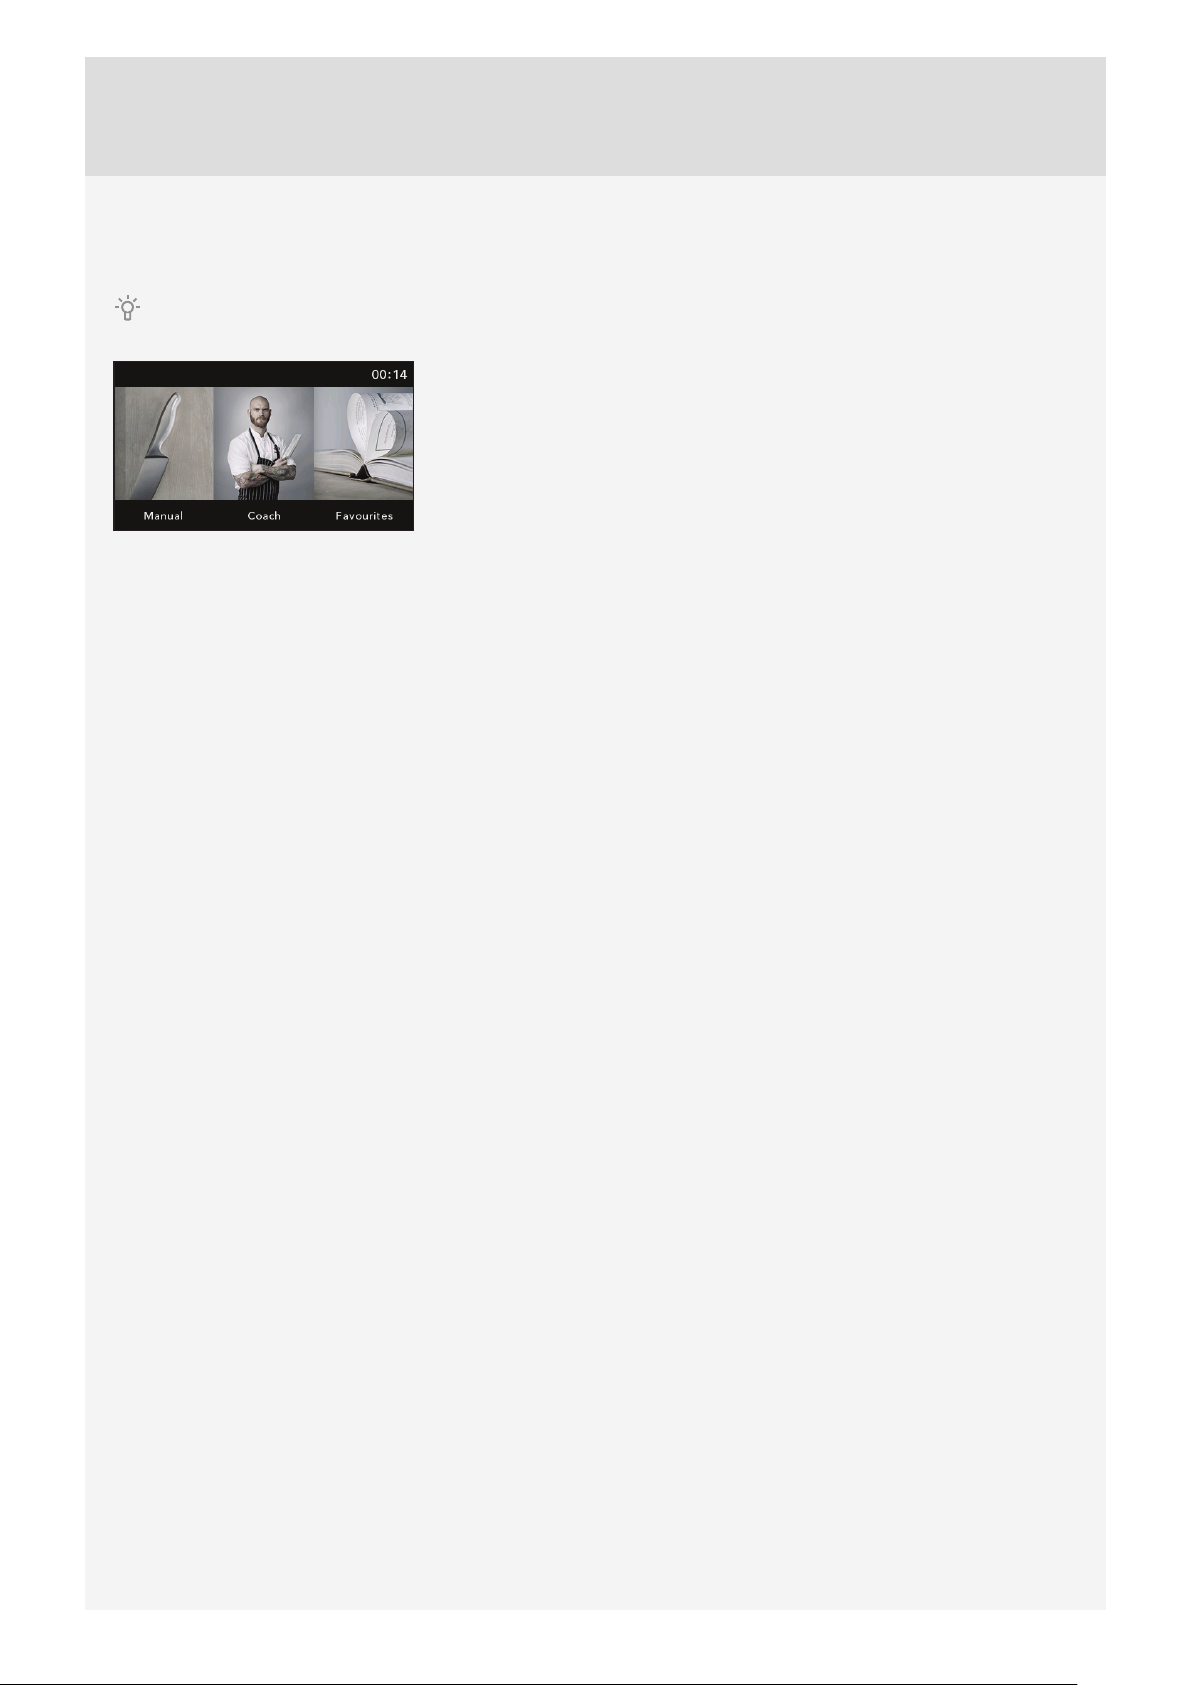
The process of preparing food in your oven can be controlled in several ways:
Navigate the menu by sliding your fi nger left and right.
Select the desired mode by touching the corresponding image. The name of
the selected menu will appear at the top.
Professional mode
Use this mode when you wish to prepare any type and amount of food. All settings are selected by the user.
Automatic mode
In this mode, fi rst select the type of food. This is followed by automatic setting of the quantity, level of doneness, and
cooking end time.The program off ers a broad choice of preset recipes reviewed by professional chefs and nutrition
experts.
My recipes
This mode allows you to prepare your food the way you like it, with the same steps and settings each time. Save your
favourite recipes to oven memory and retrieve them the next time you need them.
11
Page 12
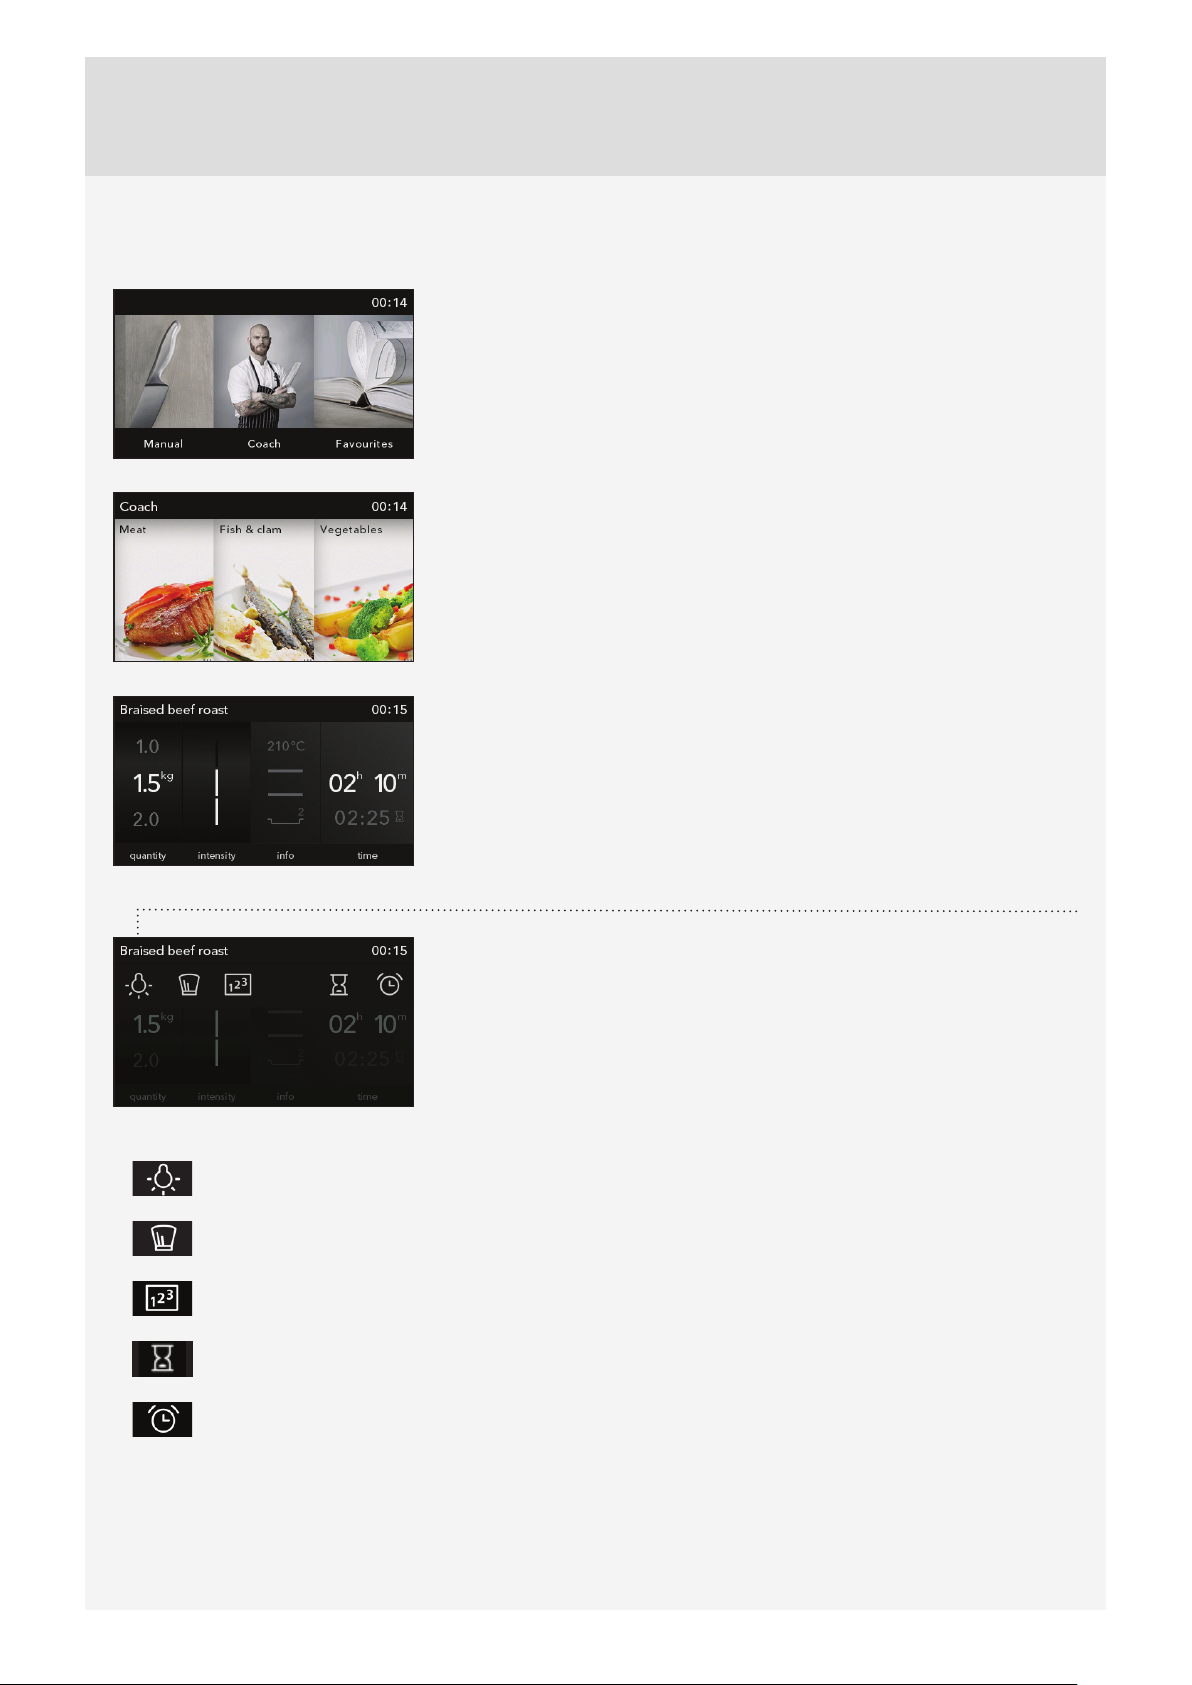
A) COOKING BY SELECTING THE TYPE OF FOOD (Auto mode)
Choose the Auto mode.
Select the type of food and the dish.
Preset values will be displayed:
- amount,
- doneness level (intensity),
- cooking time (cooking end time is displayed in grey).
Amount and doneness level can be adjusted. Selected values will appear in
red.
EXTRA SETTINGS (EXTRAS)Choose them by touching the upper strip or the
corresponding sign.
- oven lighting
- method and ingredients for the selected recipe
- step mode (see chapter STEP COOKING)
- cooking end time setting (see chapter TIMER FUNCTIONS)
12
- minute minder (see chapter EXTRA SETTINGS/EXTRAS)
Page 13

PREHEAT
Some dishes in the Auto mode also include the preheat function
When you select the food, the following note will appear: »Selected program includes preheating.« Preheating
started. Do not insert the food yet. The symbol °C will fl ash on the display.
When the selected temperature is reached, the preheating process stops and an acoustic signal is emitted.
The following note will appear on the display: »Preheating complete«. Please insert the food. Open the door or confi rm
by pressing the KNOB. The program then resumes the cooking process with selected settings.
When the preheat function is set, delayed start function cannot be used.
.
13
Page 14
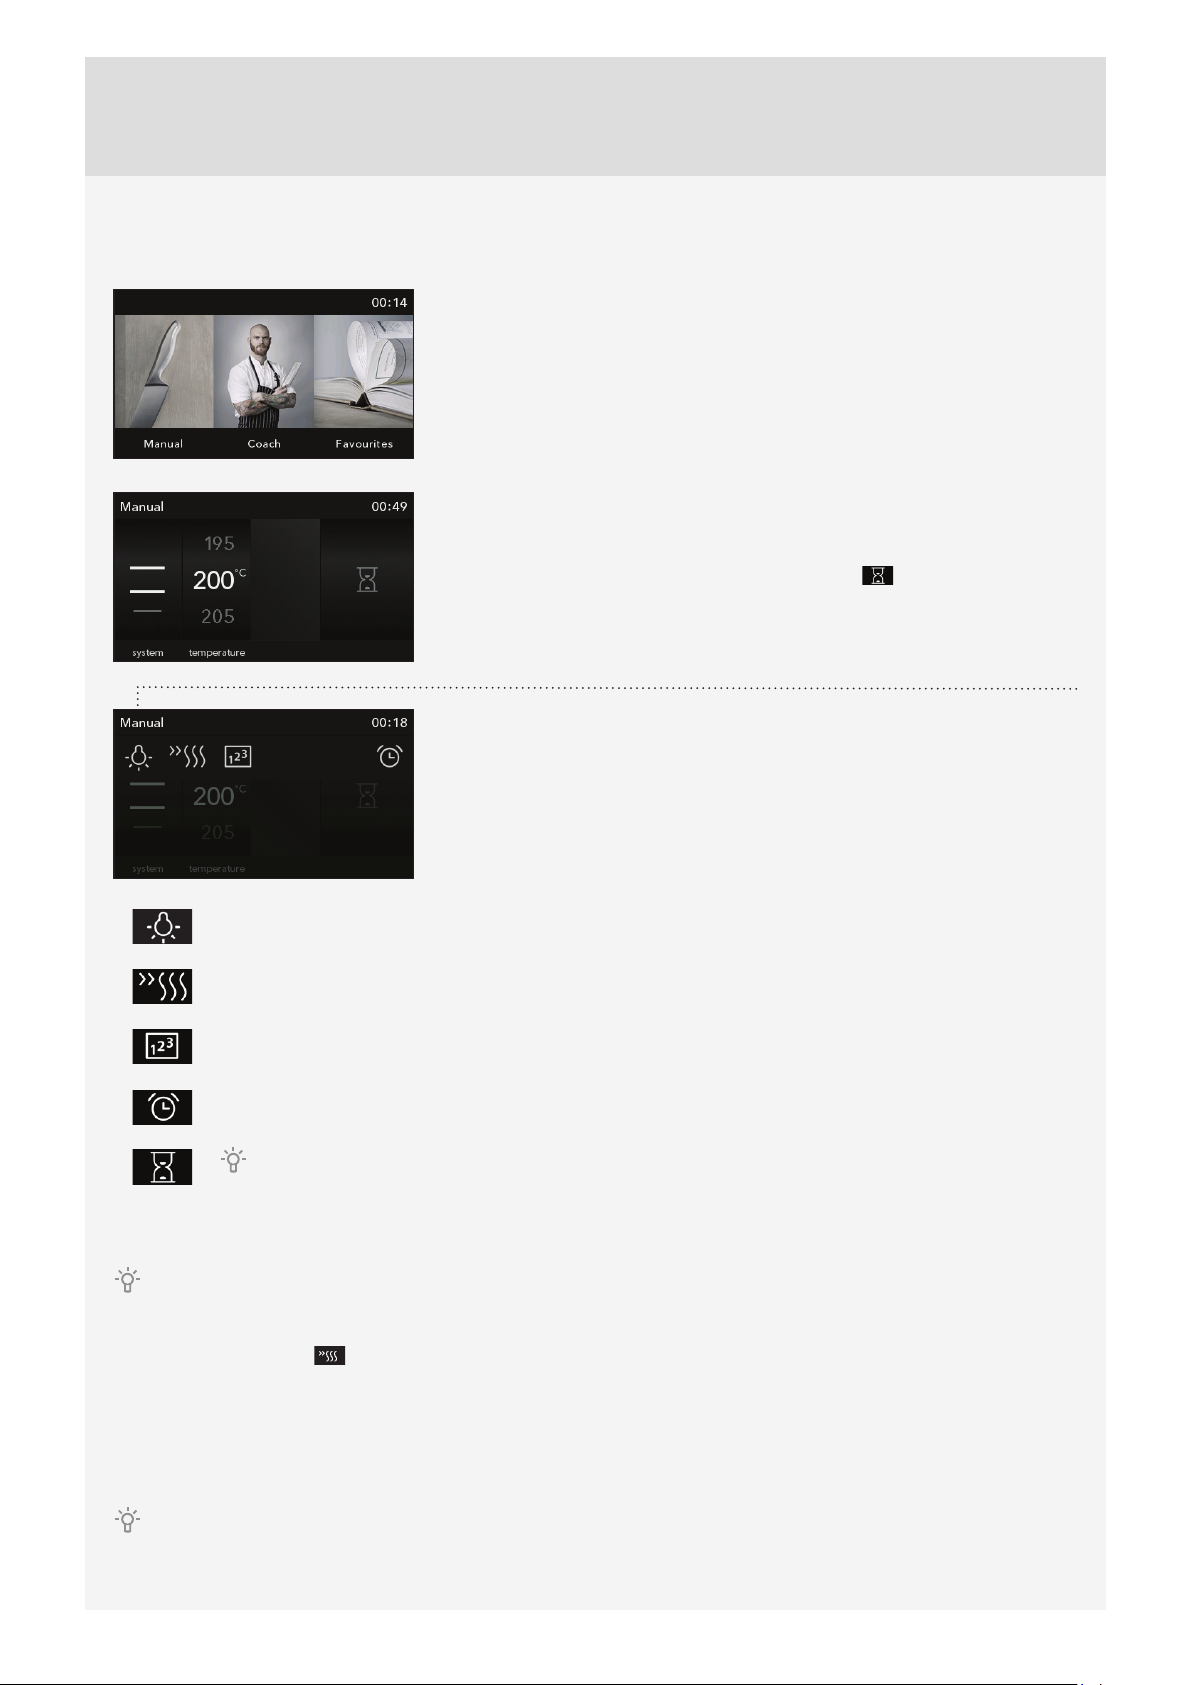
B) COOKING BY SELECTING THE OPERATING MODE (Professional mode)
Choose Professional (Pro) mode.
Choose your own default settings:
- system
- oven temperature
Selected values will appear in red. Touch the symbol
time.
- cooking time (cooking end time is displayed in grey).
EXTRA SETTINGS (EXTRAS):Choose them by touching the upper strip or the
corresponding sign.
to select the cooking
- oven lighting
- preheating
- step mode (see chapter STEP COOKING)
- minute minder (see chapter EXTRA SETTINGS/EXTRAS)
If you select Duration, extra settings will allow you to select delayed start (see chapter TIMER
FUNCTIONS)
Touch the START key.
Rising oven temperature and elapsed cooking time will be displayed.
PREHEAT
Use the preheat function if you wish to heat the oven to the desired temperature as quickly as possible. When this
symbol is selected, the preheat function will be switched on and a warning will appear. »Preheating started.« Do not
insert the food yet. The symbol °C will fl ash on the display.
When the selected temperature is reached, the preheating process stops and an acoustic signal is emitted. The
following note will appear on the display: »Preheating complete«. Please insert the food. Open the door or confi rm by
pressing the KNOB. The program then resumes the cooking process with selected settings.
14
When the preheat function is set, delayed start function cannot be used.
Page 15
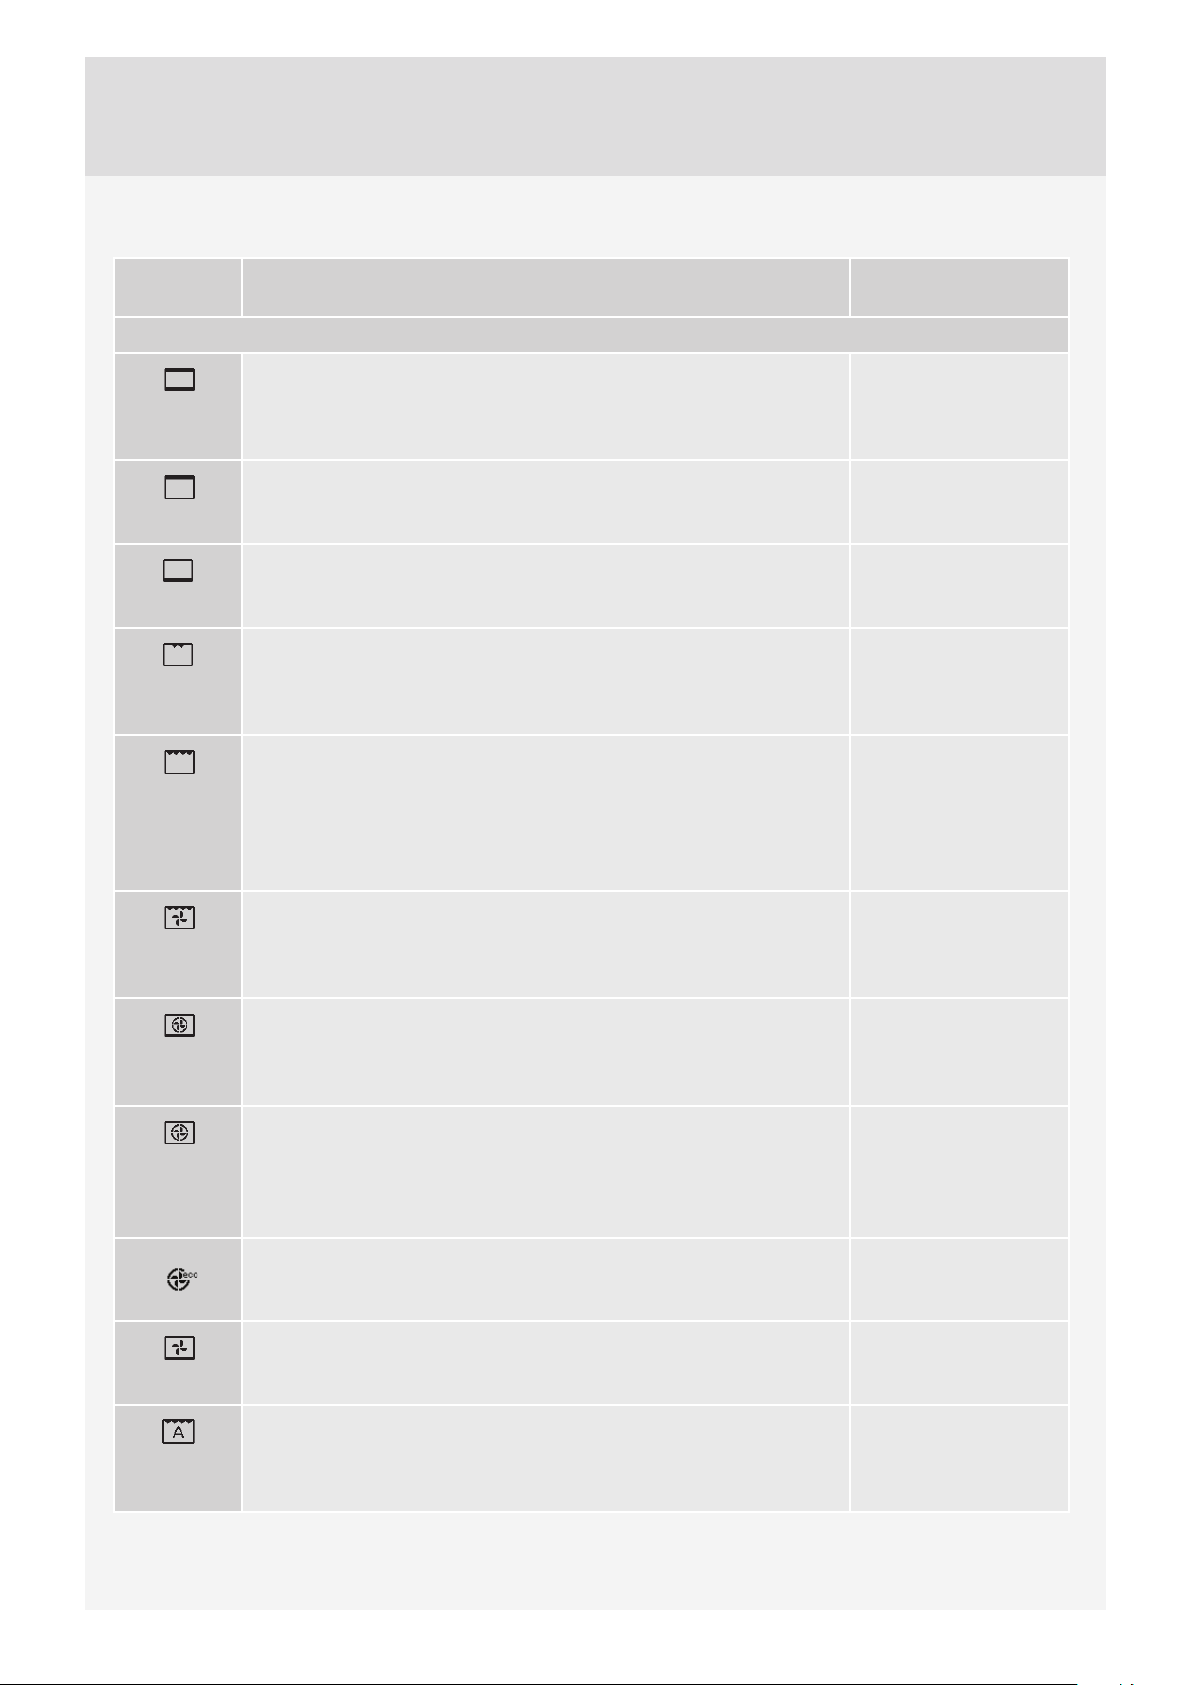
COOKING SYSTEMS (depending on the model)
SYSTEM DESCRIPTION
COOKING SYSTEMS
PRESET TEMPERATURE
(°C)
UPPER AND BOTTOM HEATER
The heaters in the bottom and in the ceiling of the oven cavity will radiate
heat evenly into the oven interior. Pastry or meat can only be baked/
roasted at a single height level.
UPPER HEATER
Only the heater on the oven cavity ceiling will radiate heat. Use this heater
to brown the upper side of the dish.
BOTTOM HEATER
Only the heater on the bottom of the oven cavity will radiate heat. Use this
heater to brown the lower side of the dish.
GRILL
Only grill heater, a part of the large grill set, will operate.
Use this heater to grill a few open sandwiches or beer sausages, or for
toasting bread.
LARGE GRILL
The upper heater and the grill heater will operate. The heat is radiated
directly by the grill heater installed in the oven ceiling. To boost the heating
eff ect, the upper heater is activated as well. This system is used for grilling
a smaller amount of open sandwiches or beer sausages, and for toasting
bread.
GRILL WITH FAN
Grill heater and the fan will operate. This combination is used to grill meat
and to roast larger chunks of meat or poultry at a single height level. It is
also appropriate for dishes au gratin and for browning to a crispy crust.
200
150
160
240
240
170
HOT AIR AND BOTTOM HEATER
200
Bottom heater, round heater, and the fan will operate. This is used to bake
pizza, moist pastry, fruitcakes, leavened dough and shortcrust on several
levels simultaneously.
360 HOT AIR
180
Round heater and the fan will operate. The fan installed in the back wall
of the oven cavity makes sure the hot air constantly circulates around the
roast or pastry. This mode is used for roasting meat and baking pastry at
several levels simultaneously.
ECO COOKING
1)
180
In this mode, power consumption during the cooking process is optimized.
This mode is used for roasting meat and baking pastry.
BOTTOM HEATER AND FAN
180
This is used for baking leavened but low-rising pastry and for preserving
fruit and vegetables.
AUTOMATIC COOKING OF MEAT – AUTO ROAST MODE
180
In the Auto Roast mode/system, the upper heater will operate in
combination with the grill heater and the round heater. It is used for
roasting all types of meat.
1)
It is used for determining the energy effi ciency class pursuant to the EN 60350-1 standard.
In this mode, the actual temperature in the oven is not displayed due to a special appliance operation algorithm and use of
residual heat.
15
Page 16
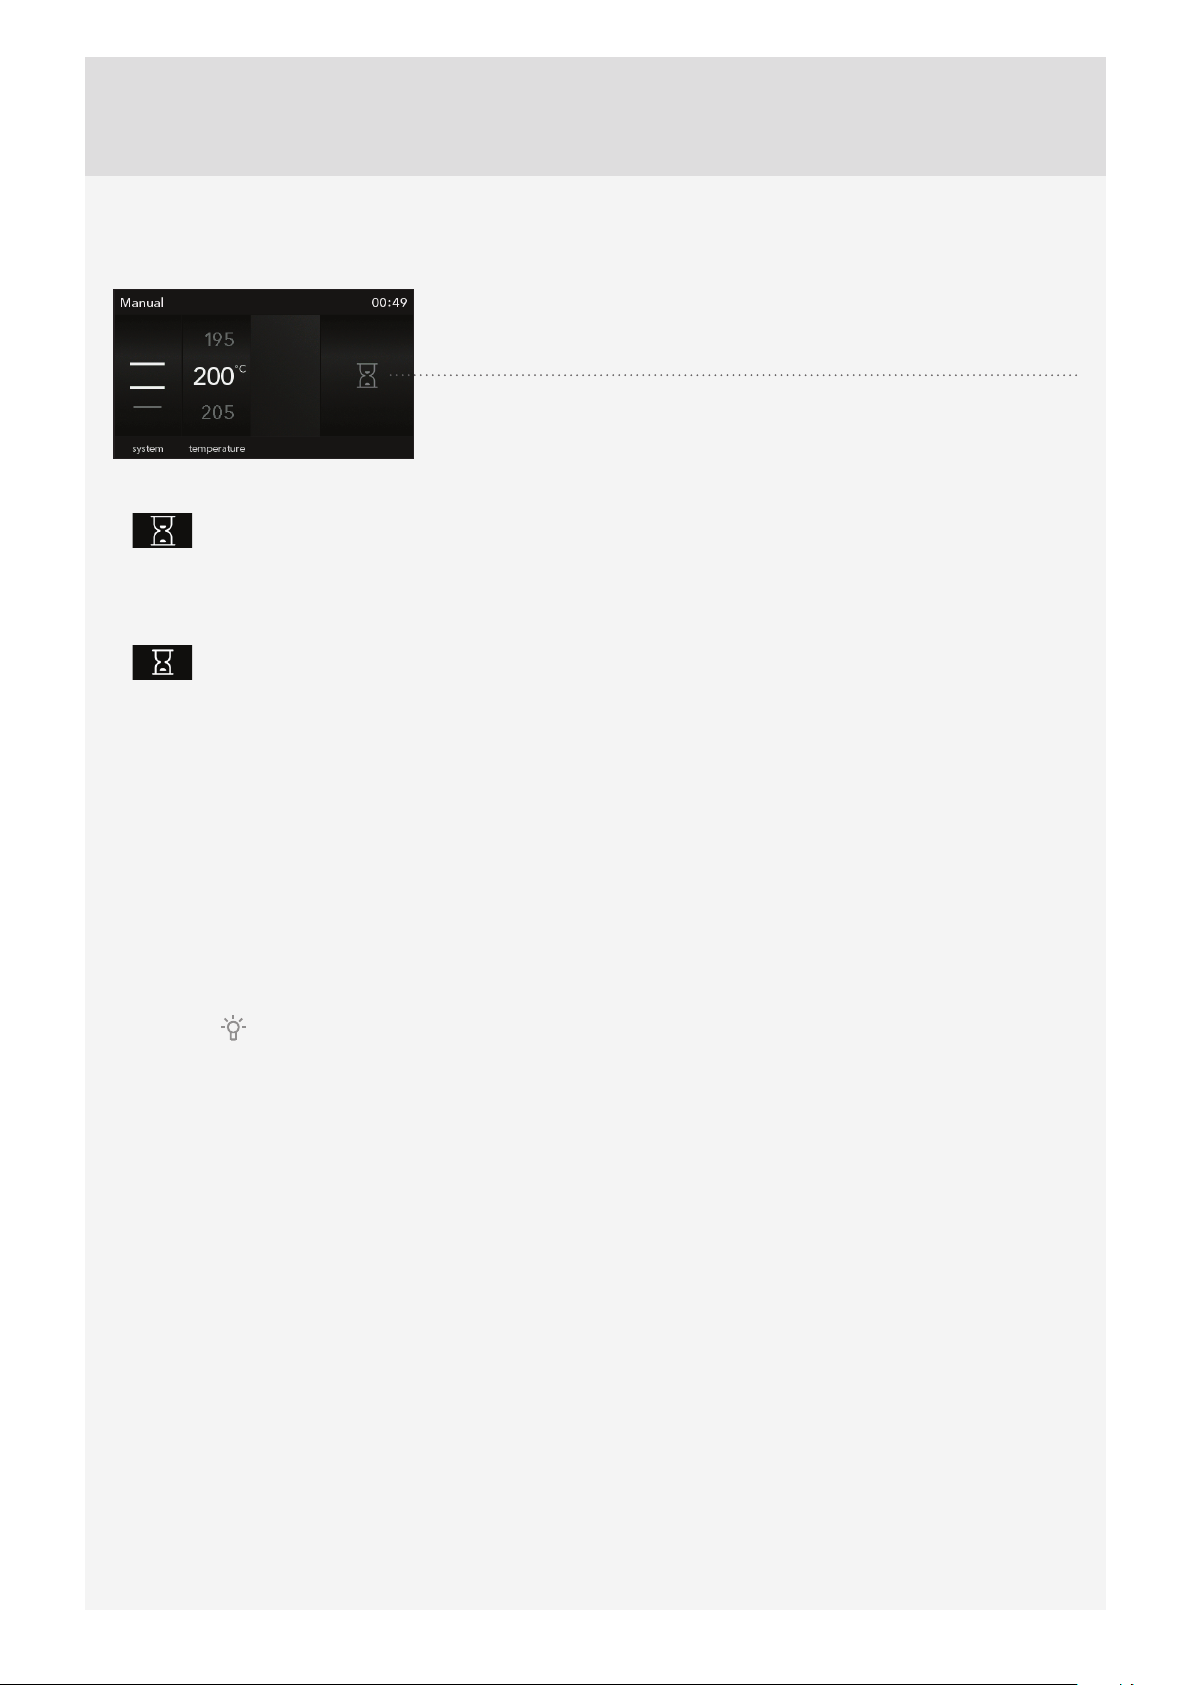
TIMER FUNCTIONS – DURATION
Timer functions can be selected in the basic Professional (Pro) mode and in
the Auto mode by choosing the corresponding symbol.
Setting the cooking time
In this mode, you can defi ne the duration of oven operation (cooking time). Set the desired cooking time
and confi rm the setting. Cooking end time is adjusted accordingly.Press START to start the cooking
process. All selected settings are indicated on the display.All timer functions can be cancelled by setting
the time to ”0”.
Setting the delayed start
In this mode, you may specify the duration of the cooking process (cooking time) and the time when you
wish the cooking process to stop (end time). Make sure the clock is accurately set to current time.
Example:
Current time: noon
Cooking time: 2 hours
End of cooking: 6 pm
First, set the cooking time (cooking duration), i.e. 2 hours. The sum of the current time and cooking time is
automatically displayed (2 pm).
How, set the COOKING END TIME and set the time (6 PM). Press START to start the cooking process.
The timer will wait for the start of the cooking process. The following note will appear on the display: ”Your
program is delayed. It will start at 4 pm.”
After the set time expires, the oven will automatically stop operating (end of cooking). An acoustic
signal will be heard. After one minute, the acoustic signal will be switched off automatically.
After a few minutes of idling, the appliance will switch to standby mode. The time of day will appear.
16
Page 17
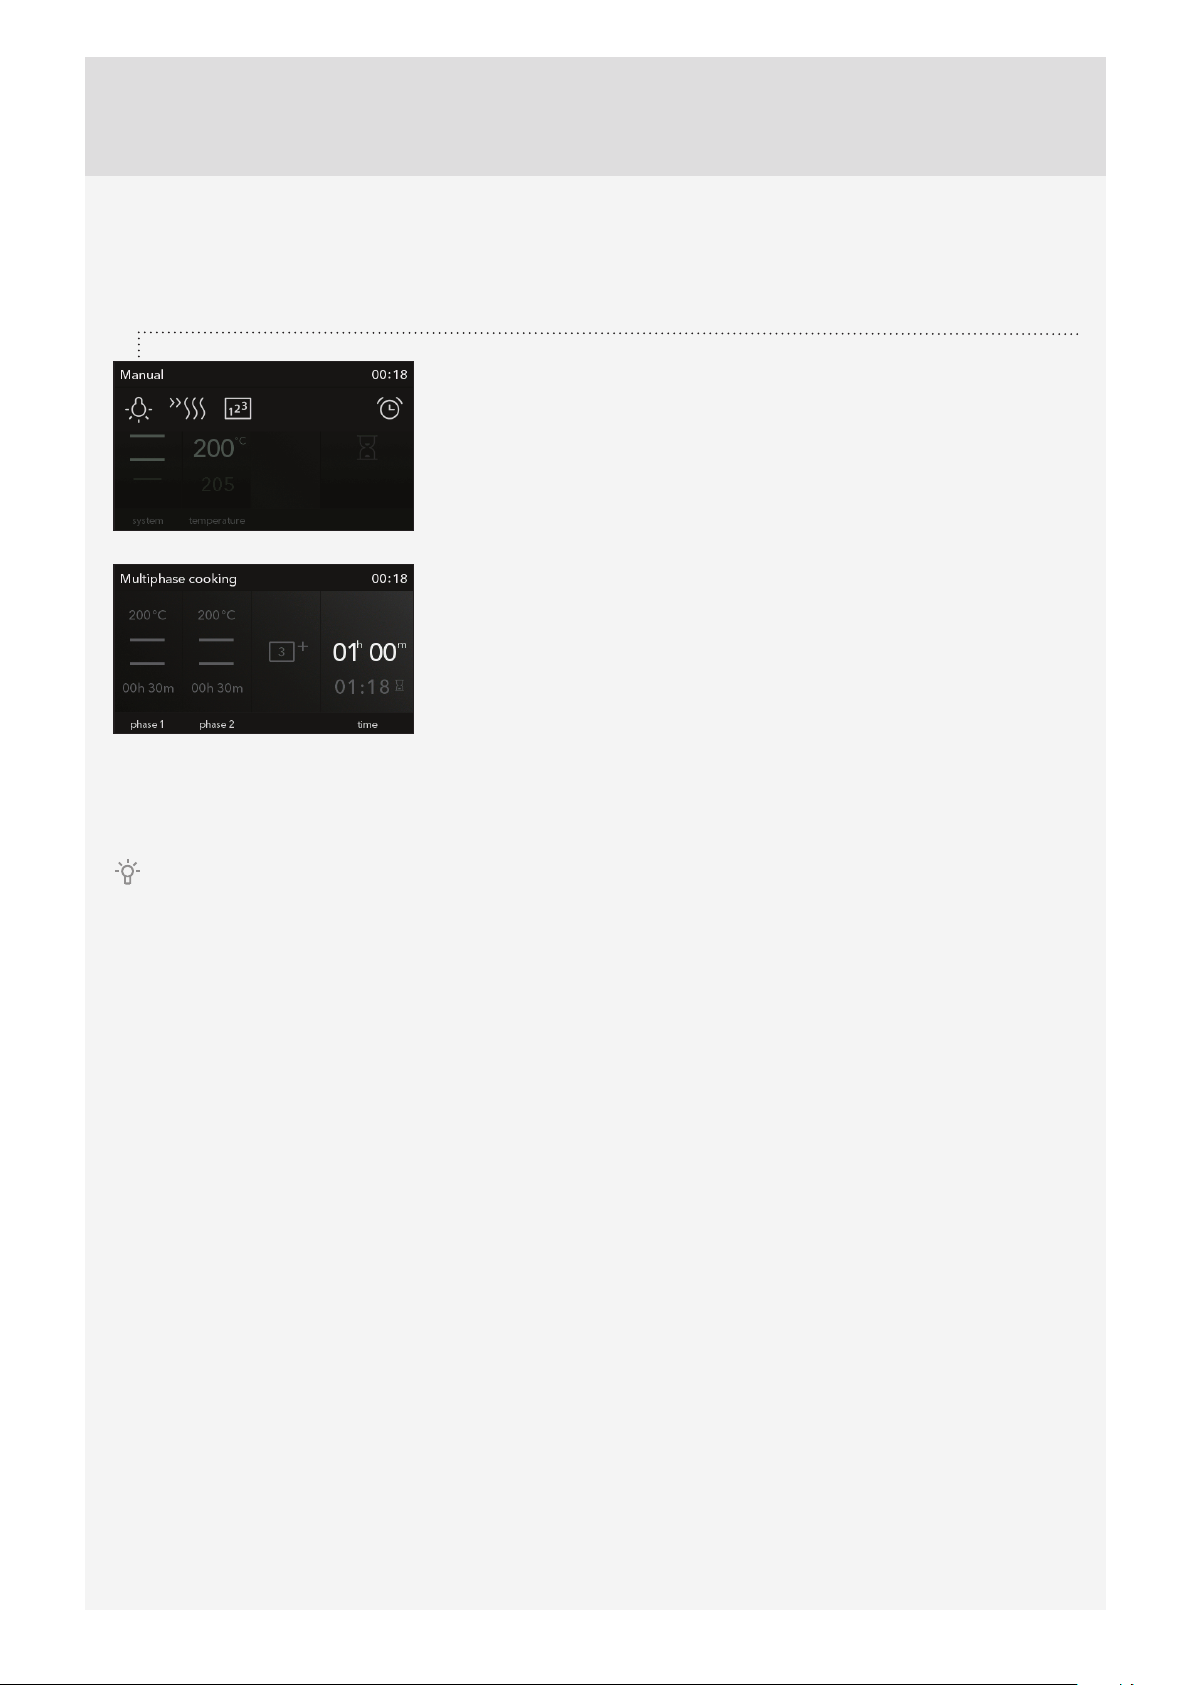
STEP COOKING
This mode allows you to combine three diff erent settings successively in a single cooking process.
Choose diff erent settings or cooking end time to cook your food just the way you want it.
Touch the corresponding sign to select the Step Cooking symbol in EXTRA
SETTINGS (EXTRAS).
Touch the display twice to select Step 2 and Step 3.Touch the corresponding
sign (step name) to confi rm or delete a step.
Touch the START symbol to turn on the oven. The oven starts operating immediately, with the settings defi ned in Step
1. (Selected step will be highlighted in red.)After the set cooking time elapses, Step 2 and then Step 3 are activated, if
specifi ed.
To delete a step during operation, select the step and select the cross symbol by touching its name. This can only be
done with steps that have not started yet.
17
Page 18
STEP 3: STARTING THE COOKING PROCESS
The START/STOP key will fl ash before the start of the cooking process.
Start the cooking process by touching the START key.
Some settings can be changed during operation by touching the display unit (temperature, cooking duration, and step
mode/program).
Press the START/STOP key to change other settings or to fi nish the cooking process. The following warning will appear:
”Program paused. Do you wish to cancel it?”
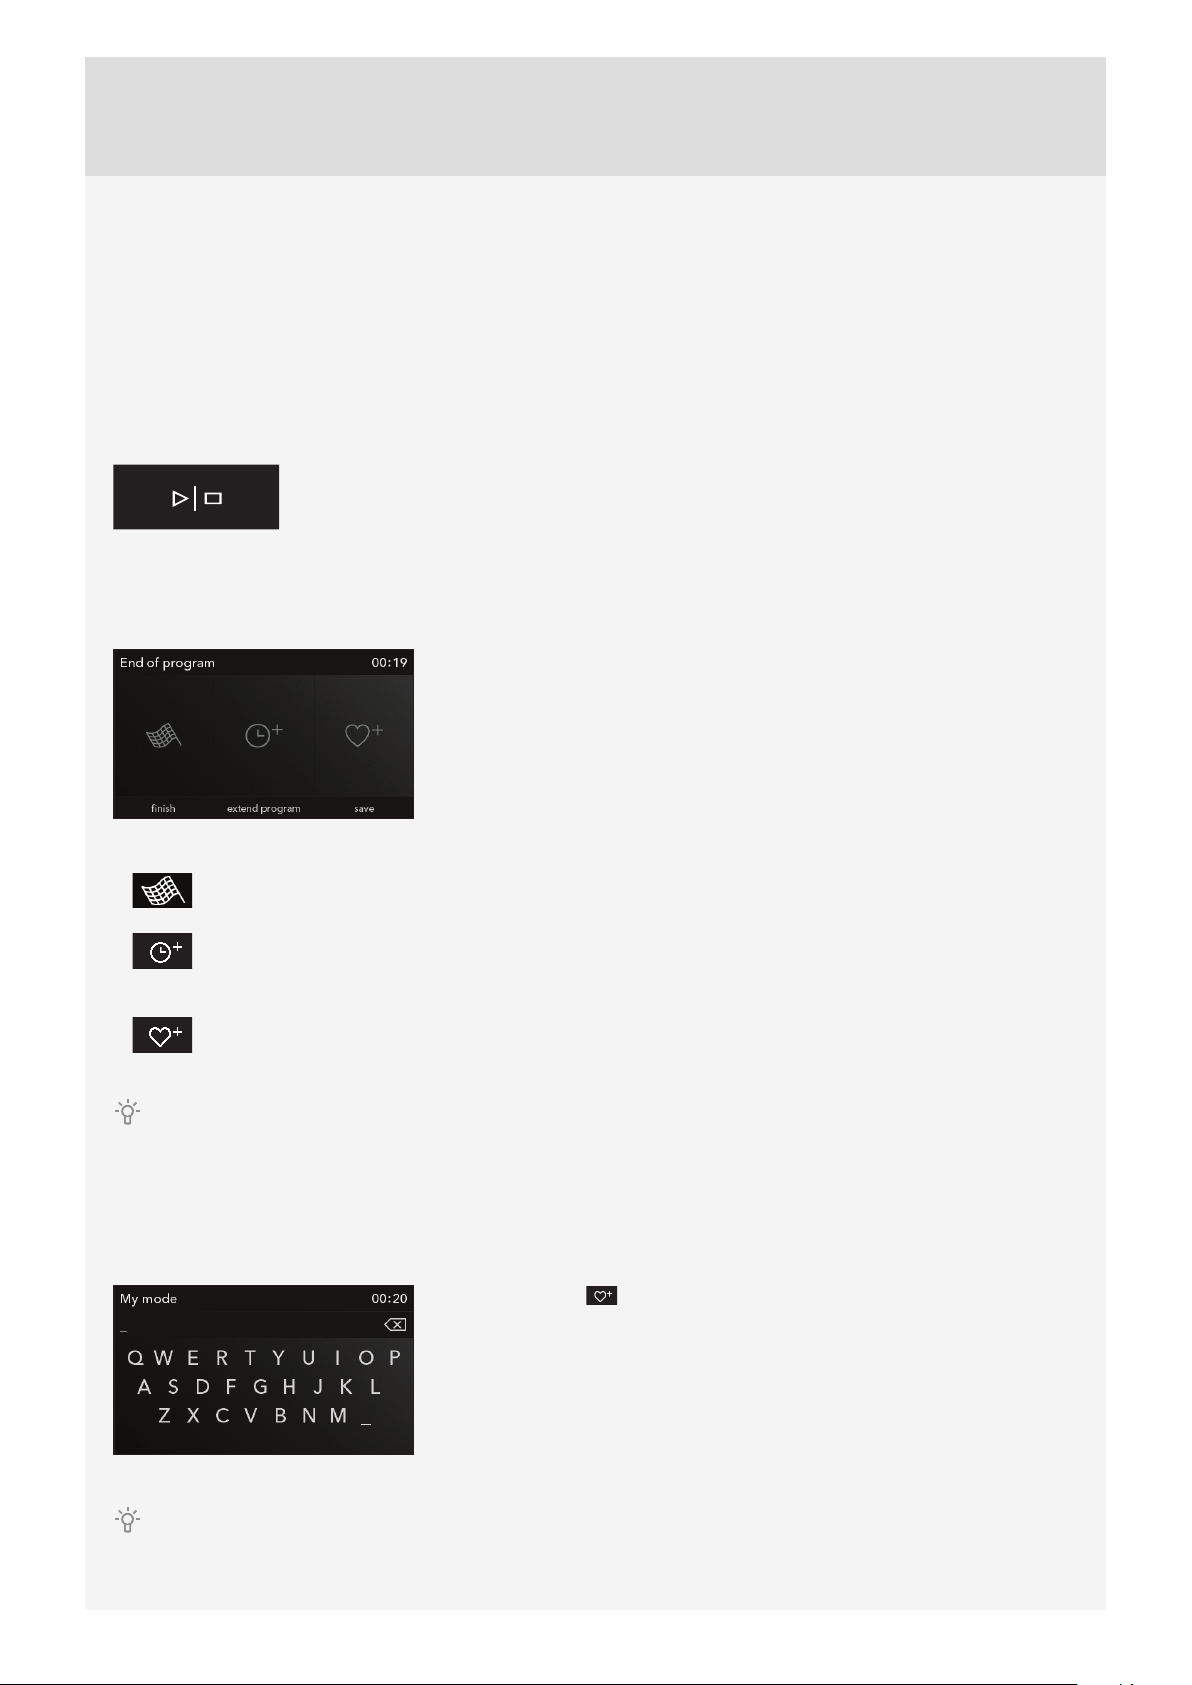
STEP 4: END OF COOKING AND SWITCHING OFF THE OVEN
After the cooking process, menu with symbols will appear.
End!
Select the symbol and end the cooking process. Main menu will appear on the display.
Extend the cooking time
Cooking time can be extended by selecting the symbol. New cooking end time can be selected (see
chapter TIMER FUNCTIONS).
Add to my recipes – save
This mode allows you to save the selected settings into the oven memory and use them again at a later
time.
After cooking in the oven, the cooling fan will stop operating. If you leave your food in the oven, moisture can be
released from it and cause condensation on the oven front panel and door. To prevent condensation, set the selector
switch knob to light. Thus, the cooling fan will continue to operate and cool the oven, thus preventing condensation.
SAVING USER-DEFINED PROGRAMS (MY RECIPES)
Select the symbol and specify the name by touching the corresponding
letters. If required, delete a character using the arrow.
18
Touch the START/STOP key to save the settings.
Your favourite recipes that you have previously stored in the memory can be retrieved and used at any time. Choose
the process and the settings in the My Recipes main menu.
Page 19
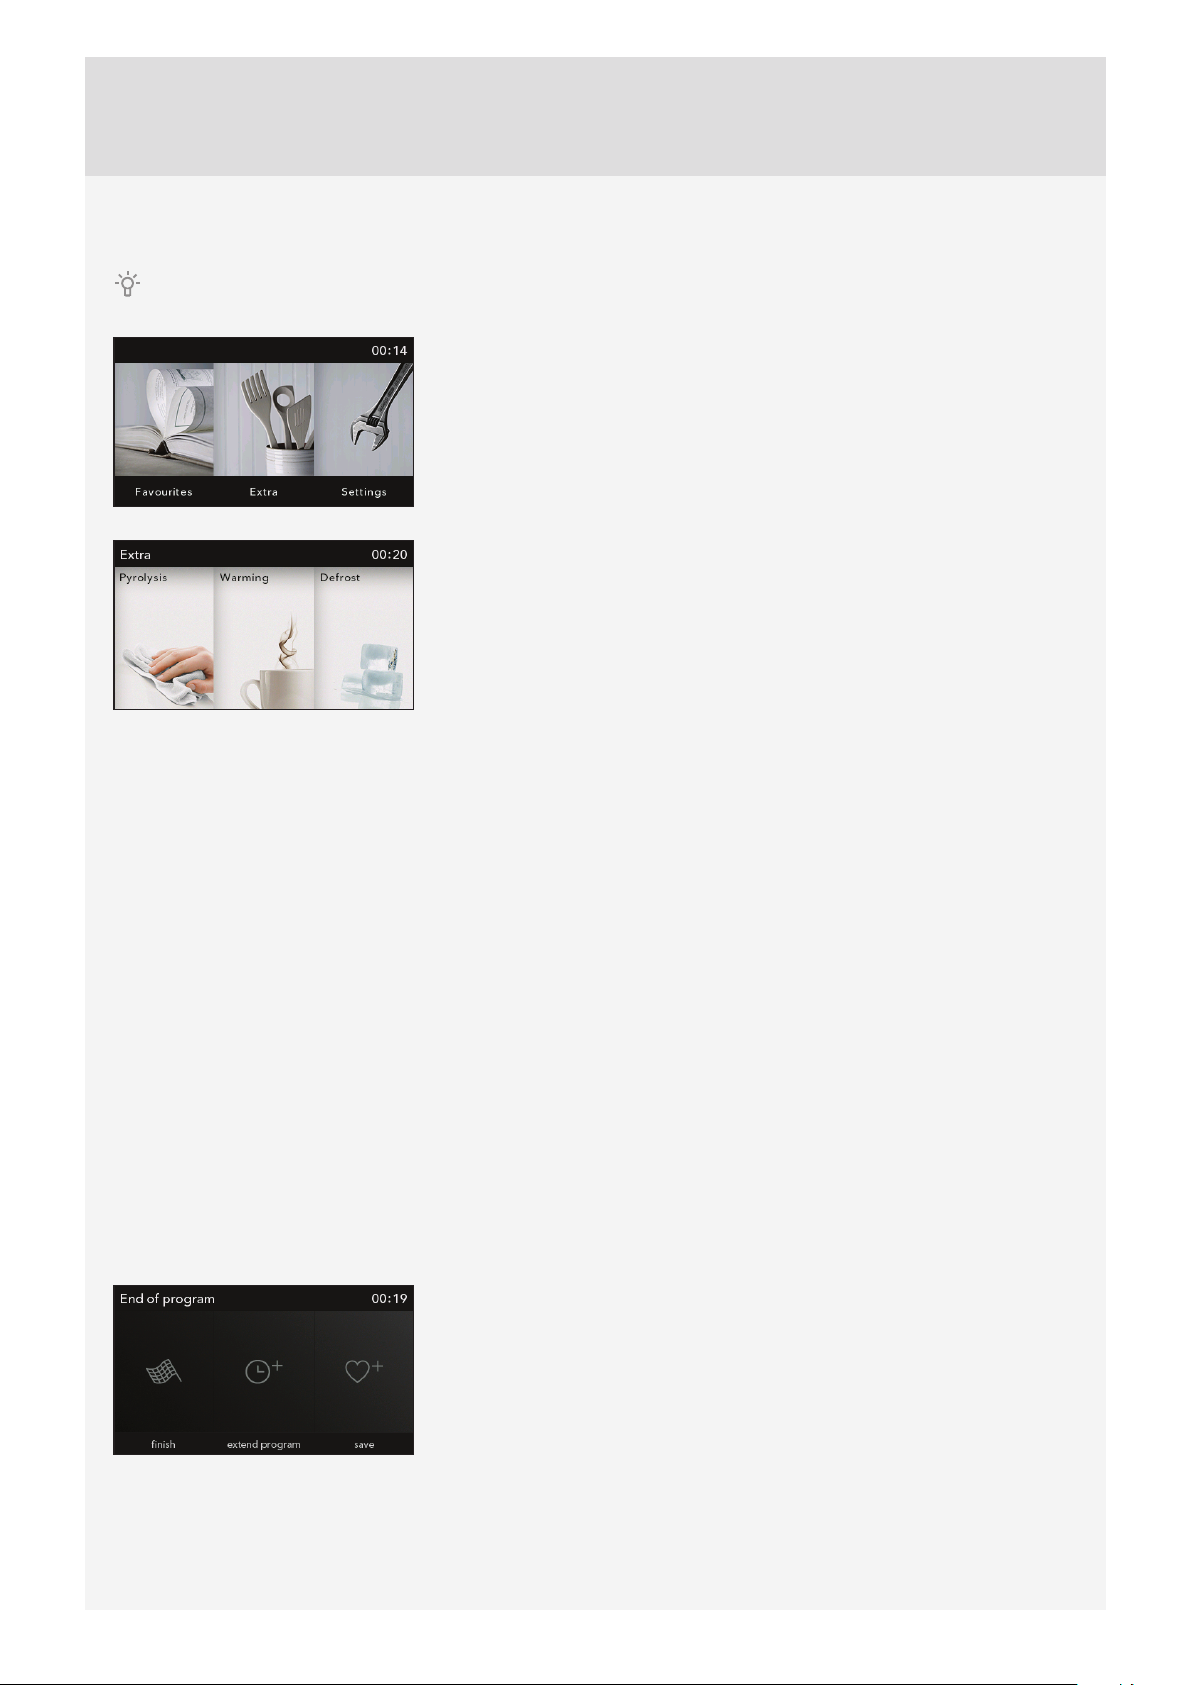
STEP 5: SELECTING ADDITIONAL FUNCTIONS/EXTRAS
Navigate the menu by sliding your fi nger left and right.
Select the EXTRAS menu by touching it. EXTRAS menu will appear
Pyrolysis
This function allows automatic cleaning of the oven cavity/interior using high temperature (approx. 460 °C), which incinerates the
fat residues and other impurities, reducing them to ashes. When the automatic cleaning program is completed and the oven has
cooled down, you only need to wipe the oven cavity clean with a damp cloth (see chapter CLEANING AND MAINTENANCE).
Defrosting
In this mode, the air will circulate without any heaters operating. Only the fan will be activated. Use this function to slowly defrost
frozen food (cakes, pastry, bread, rolls, and deep-frozen fruit).By selecting the relevant symbol you may specify the type of food,
weight, or defrosting start and end time.Halfway through the defrost time, the pieces should be turned over, stirred and separated
if they were frozen together.
Quick preheat
Use the preheat function if you wish to heat the oven to the desired temperature as quickly as possible. This mode is not
appropriate for cooking. When the oven heats up to the selected temperature, the preheat process is completed and the oven is
ready for cooking with the selected cooking mode.
Reheating
Reheating can be used to keep the food that is already cooked warm. Select the symbol to set the temperature, and reheating
start and end time.
Plate heating
Use this function to reheat your dinnerware (plates, cups) before serving food in it to keep the food warm longer. Select the
symbol to set the temperature, and reheating start and end time.
Select the symbol and end the cooking process. Main menu will appear on the
display.
19
Page 20

CHILD LOCK
Activate it by touching the LOCK key (key symbol). The following message will appear on the display:
»Child lock activated.« Touch the key again to deactivate the child lock.
If the child lock is activated with no timer function engaged (only clock is displayed), then the oven
will not operate.If the child lock is activated after a timer function has been set, then the oven will operate
normally; however, it will not be possible to change the settings.When the child lock is activated, systems
(cooking modes) or additional functions cannot be changed. Only the cooking/baking/roasting process
can be stopped or switched off . Child lock remains active after the oven is switched off . To select a new
system, the child lock must fi rst be deactivated.
OVEN LIGHTING
Oven lighting is switched on automatically when the door is opened or when the oven is switched on.After
the end of the cooking process, the light will remain on for another minute.
SETTING THE MINUTE MINDER
The minute minder can be used independently of the oven operation. The longest possible setting is 10
hours. When the time expires, an acoustic signal will be heard which you may turn off by touching any key.
After one minute, the acoustic signal will be switched off automatically.
Lighting and minute minder can be selected at any time by touching the upper strip.
20
Page 21
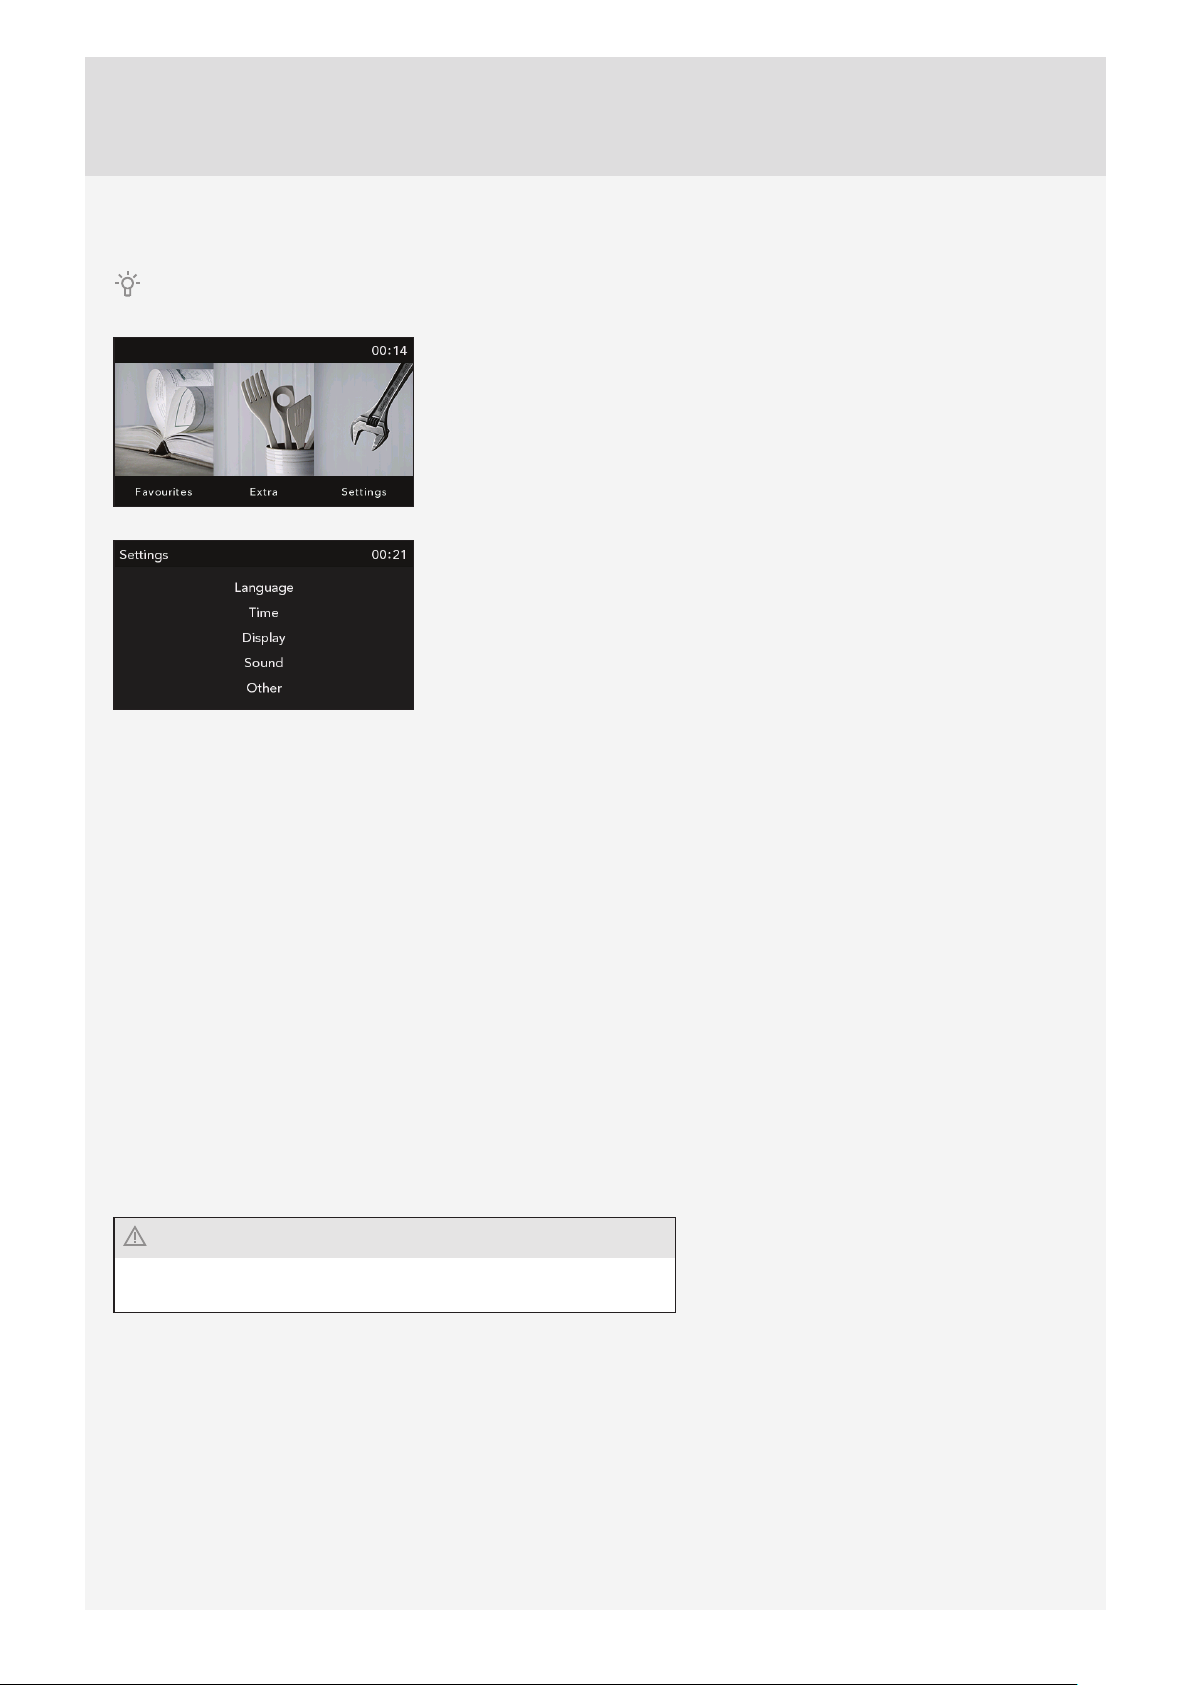
STEP 6: CHOOSING THE GENERAL SETTINGS
Navigate the menu by sliding your fi nger left and right.
Select the Settings menu by touching it.
When you touch the line with the desired setting, the size of the letters in that
line will increase.
Language
Select the language for the text on the display.
Time
Set the time of day after the appliance is connected to the power mains for the fi rst time or after being disconnected
from the power mains for a longer period of time (more than one week). Set the CLOCK – time. Then, clock display
mode can be selected in the ”TIME” fi eld: digital or analogue.
Sound
Loudness of the acoustic signal can be set when no timer function is activated (only the time of day is displayed). In this
menu, you choose between the following two options: sound loudness and duration of alarm.
Display
In this menu, you can set the following:
Display brightness/dimmer
Night mode - specify the time until which you wish the display to be off .
Other settings
Switch off oven lighting
Reset to factory defaults
After a power outage or after switching off the appliance, all extra
user settings are restored.
21
Page 22

DESCRIPTIONS OF SYSTEMS (COOKING MODES) AND COOKING
TABLES
If your desired food cannot be found in the cooking
table, fi nd information for similar food. The information
displayed applies to cooking in a single level.
An interval of suggested temperature is indicated. Start
with a lower temperature setting and increase it if you
fi nd the food is not browned suffi ciently.
Cooking times are rough estimates and may vary subject
to some conditions.
The symbol * means that the oven should be preheated
using the selected cooking system.
Only preheat the oven if required by the recipe of in the
tables in this instruction manual. Heating an empty oven
consumes a lot of energy. Hence, baking several types
of pastry or several pizzas successively will save a lot of
energy as the oven will already have been preheated.
Use dark, black silicon-layered or enamel-coated baking
sheets and trays as they conduct the heat very well.
When using parchment paper, make sure it is resistant to
high temperatures.
When cooking larger chunks of meat or pastry, a lot
of steam will be generated inside the oven, which in
turn may condense on the oven door. This is a normal
phenomenon which will not aff ect the operation of the
appliance. After the cooking process, wipe the door and
the door glass dry.
Switch off the oven approximately 10 minutes before
the end of the cooking process to save energy by
making use of the accumulated heat.
Do not cool the food in a closed oven to prevent
condensation (dew).
22
Page 23
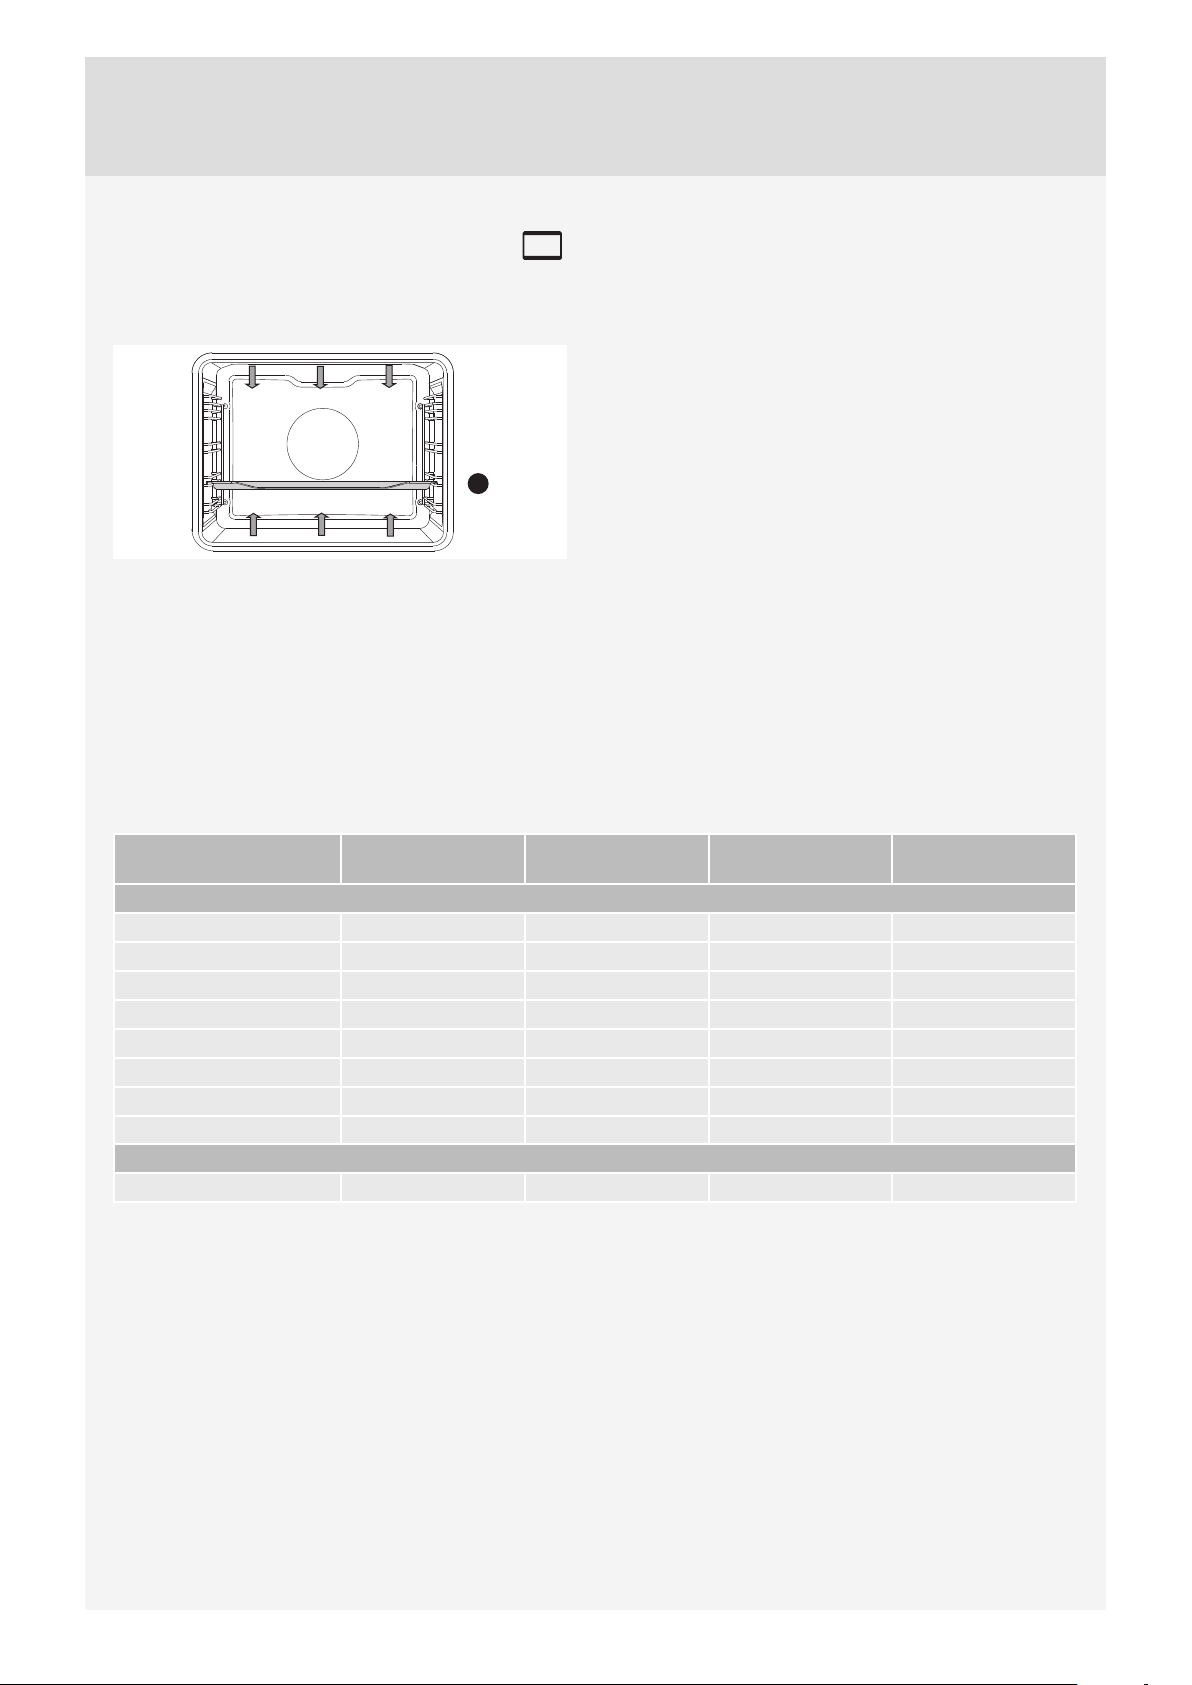
UPPER AND BOTTOM HEATER
The heaters in the bottom and in the ceiling of the oven
cavity will radiate heat evenly into the oven interior.
2
Roasting meat:
Use enamel coated, tempered glass, clay, or cast iron
pan or tray. Stainless steel trays are not suitable as they
strongly refl ect the heat.
Use enamel coated, tempered glass, clay, or cast iron
pan or tray. Stainless steel trays are not suitable as they
strongly refl ect the heat.
Type of food Weight
(g)
MEAT
Pork roast 1500 2 180-200 90-120
Pork shoulder 1500 2 180-200 110-140
Pork roulade 1500 2 180-200 90-110
Roast beef 1500 2 170-190 120-150
Veal roulade 1500 2 180-200 80-100
Lamb sirloin 1500 2 180-200 60-80
Rabbit loin 1000 2 180-200 50-70
Deer shank 1500 2 180-200 90-120
FISH
Braised fish, 1 kg 200 g/piece 2 190-210 40-50
Guide
(from the bottom)
Temperature
(°C)
Cooking time
(min)
23
Page 24

Baking pastry
Only use one level and dark baking sheets or trays. In
light-coloured baking sheets or trays, the browning of
the pastry will be poorer, as such equipment will refl ect
the heat.Always place the baking trays on the grid. If you
are using the supplied baking sheet, remove the grid.
Cooking time will be shorter if the oven is preheated.
Type of food Guide
(from the bottom)
PAST RY
Vegetable soufflé 2 190-210 35-45
Sweet soufflé 2 170-190 40-50
Bread rolls * 3 190-210 20-30
White bread, 1 kg * 3
Buckwheat bread, 1 kg * 3 180-190 50-60
Whole grain bread, 1 kg * 3 180-190 50-60
Rye bread, 1 kg * 3 180-190 50-60
Spelt bread, 1 kg * 3 180-190 50-60
Walnut cake 2 170-180 50-60
Sponge cake * 2 160-170 30-40
Small pastries made with
yeast dough
Cabbage pirozhki * 3 190-200 25-35
Fruitcake 2 130-150 80-100
Meringue cookies 3 80-90 110-130
Jelly-filled rolls (Buchtel) 3 170-180 30-40
3 200-210 20-30
Temperature
(°C)
220 10-15
180-190 30-40
Cooking time
(min)
24
Tip Use
Is the cake done? • Pierce the cake at the top with a wooden toothpick or skewer. If there are no traces on the
Did the cake collapse? • Check the recipe.
The cake is too light at the
bottom?
Cake with moist stuffing is
underdone?
Do not insert the deep baking tray into the fi rst guide.
pick or the skewer when pulled out, the cake is done.
• Next time, use less liquid.
• Note the mixing time when using small mixers, blenders etc.
• Use a dark-coloured baking sheet or tray.
• Place the baking sheet one guide lower and switch on the lower heater towards the end of
the cooking progress.
• Increase temperature and extend baking time.
Page 25
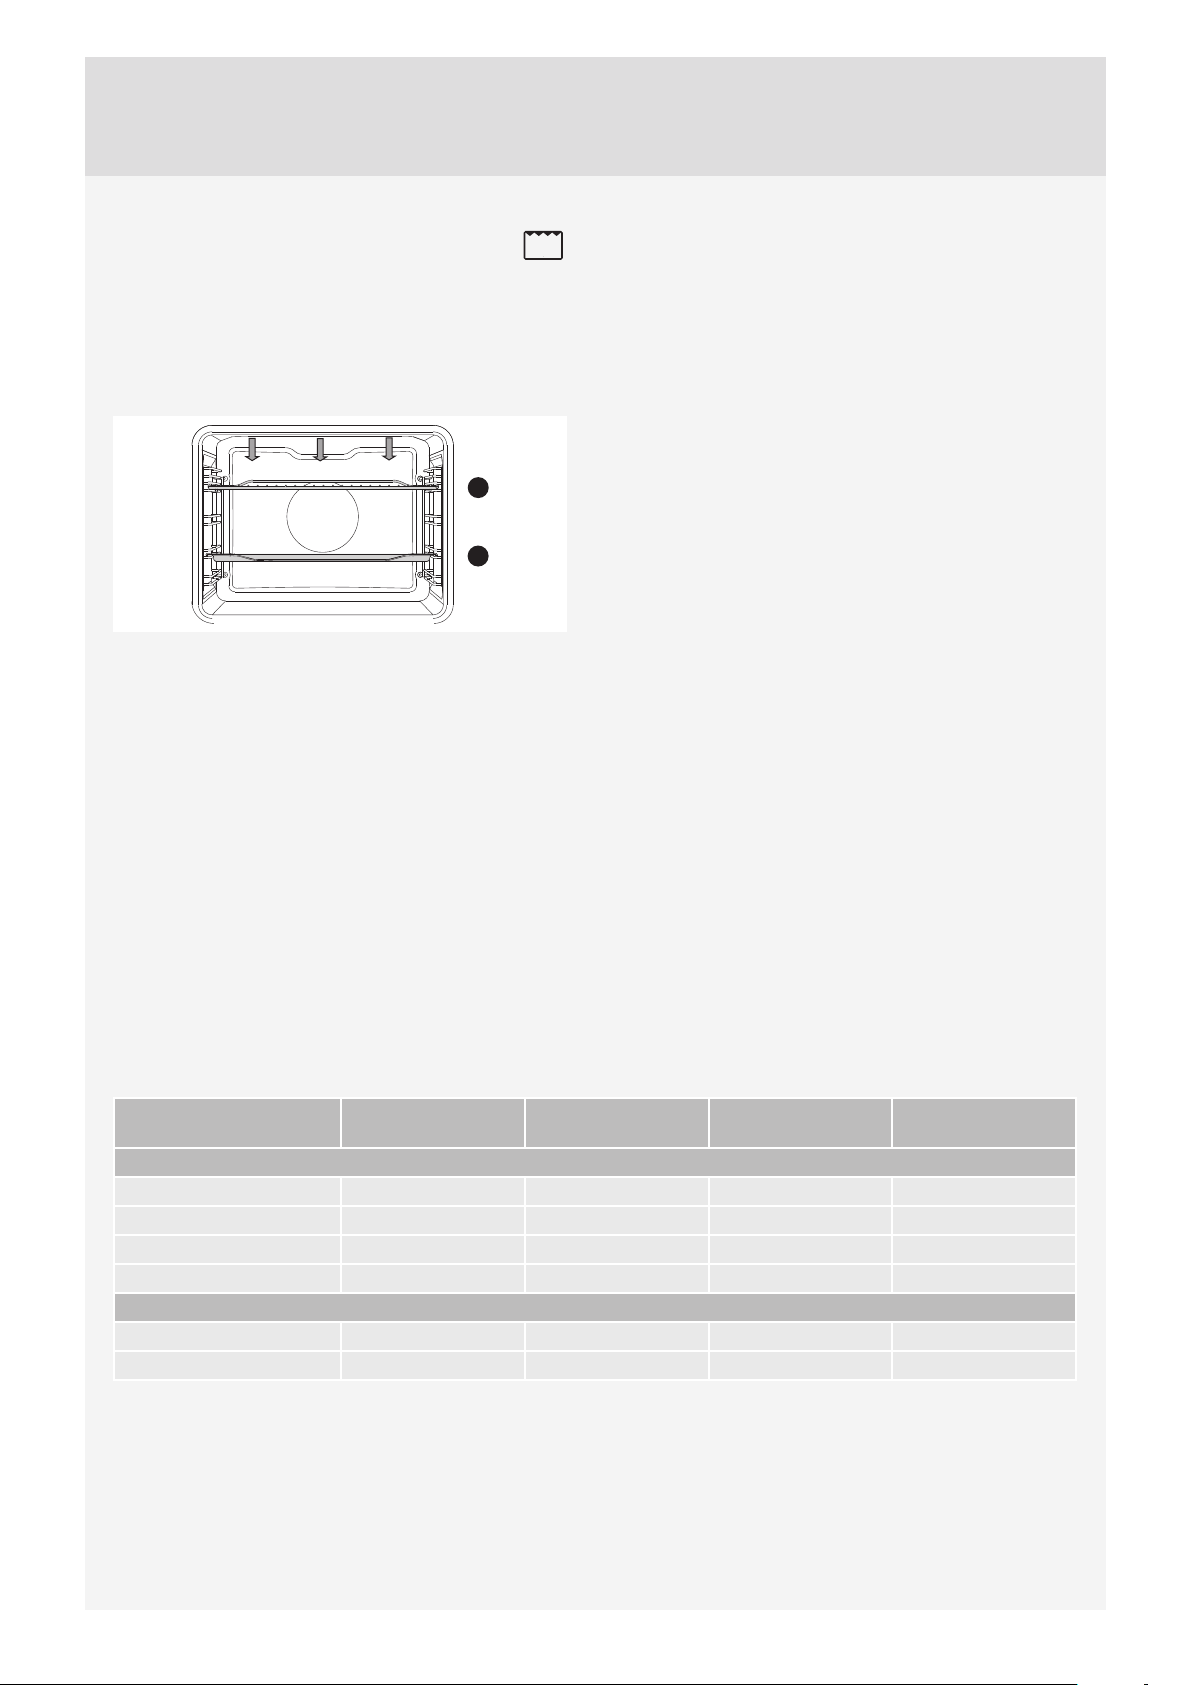
LARGE GRILL, GRILL
When grilling food with the large grill, the upper heater
and the grill heater fi tted on the ceiling of the oven cavity
will operate.
When grilling with normal (not large) grill, only grill
heater, a part of the large grill set, will operate.
4
2
Preheat the infrared (grill) heater for fi ve minutes.
Supervise the cooking process at all times. The meat
may burn quickly due to high temperature.Roasting with
the grill heater is suitable for crispy and low-fat cooking
of bratwurst, cuts of meat and fi sh (steaks, escalopes,
salmon steaks or fi llets etc.) or toasted bread.
When grilling directly on the grid, smear it with oil to
prevent the meat from sticking onto it and insert it into
the 4th guide. Insert the drip tray in to the 1st or 2nd
guide. When grilling in a baking tray, make sure there
is enough liquid in the tray to prevent burning. Turn the
meat during cooking.
After grilling, clean the oven, the accessories, and the
utensils.
Grilling table – small grill
Type of food Weight
(g)
Guide
(from the bottom)
Temperature
(°C)
Cooking time
(min)
MEAT
Beefsteak, rare 180 g/piece 4 240 20-25
Pork neck fillet 150 g/piece 4 240 25-30
Cutlets/chops 280 g/piece 4 240 30-35
Grill sausages 70 g/piece 4 240 20-25
TOASTED BREAD
Toast / 4 240 5-10
Open sandwiches / 4 240 5-10
25
Page 26
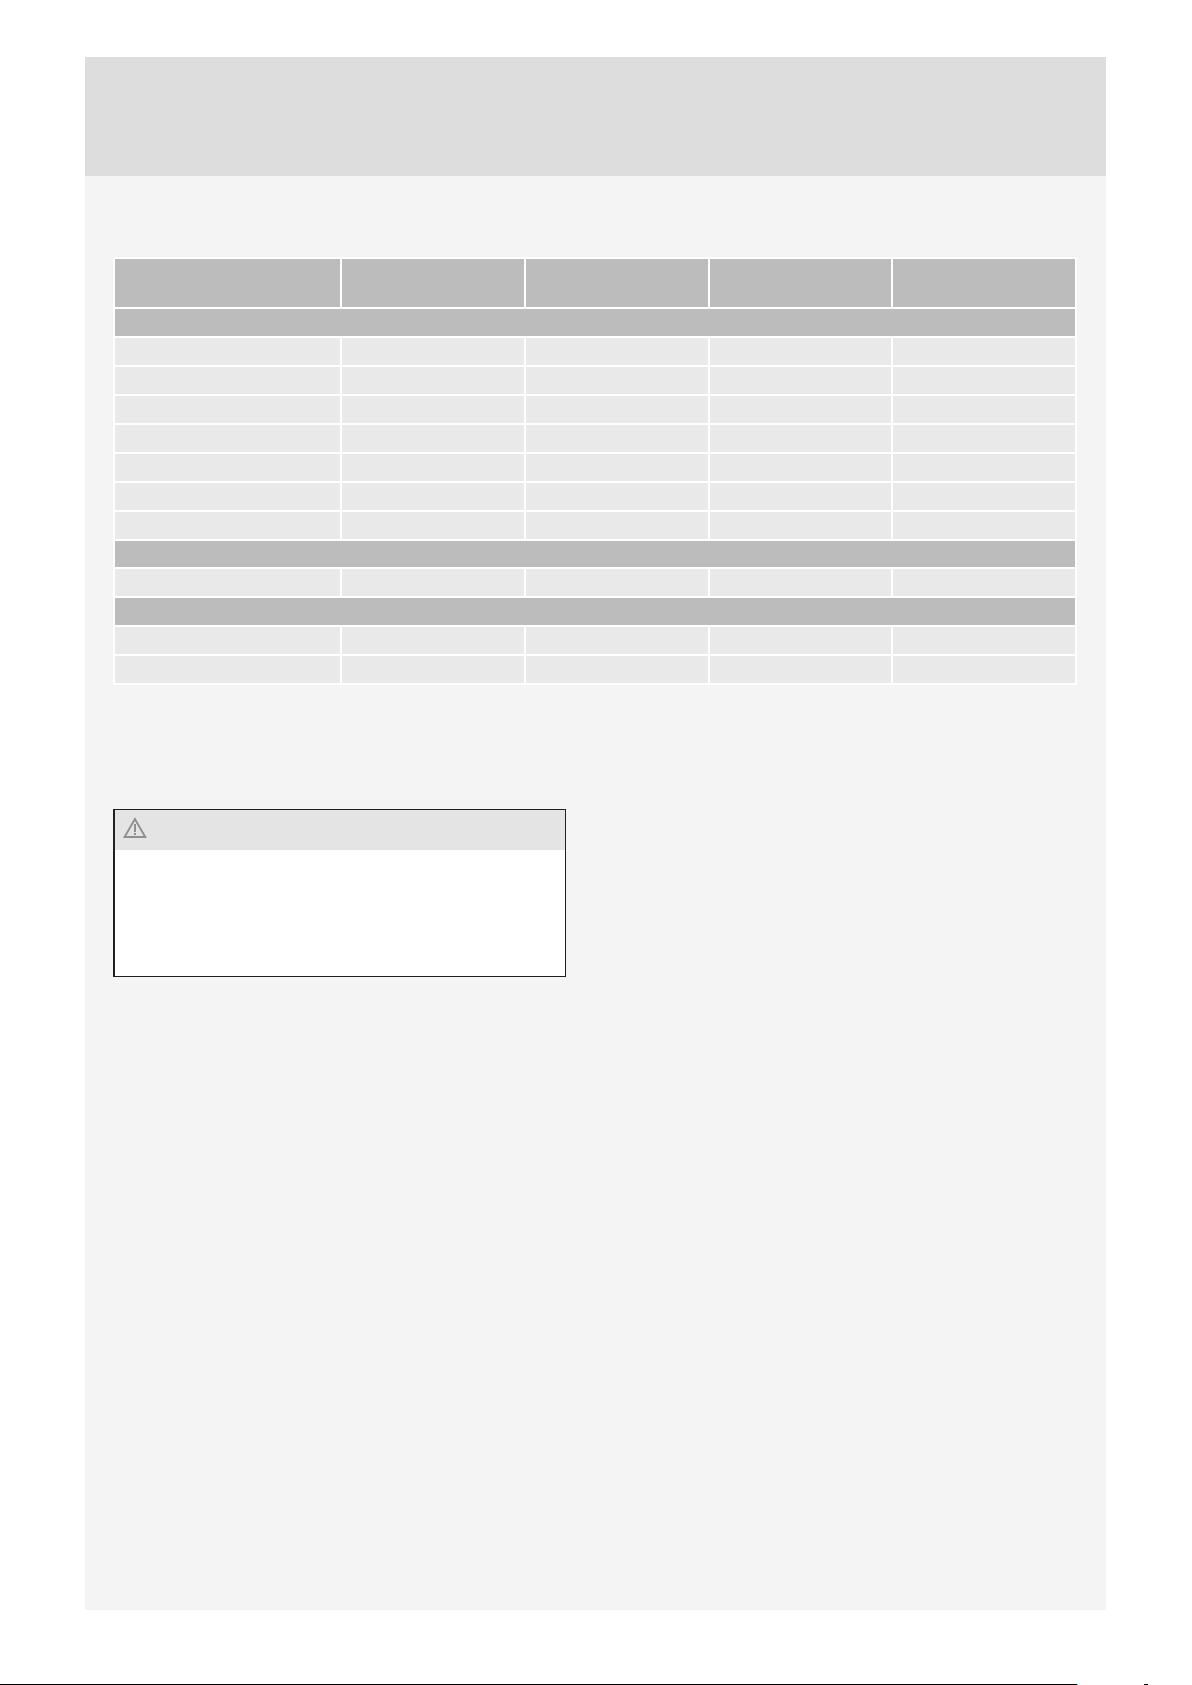
Grilling table – large grill
Type of food Weight
(g)
MEAT
Beefsteak, rare 180 g/piece 4 240 10-15
Beefsteak, well done 180 g/piece 4 240 15-20
Pork neck fillet 150 g/piece 4 240 15-20
Cutlets/chops 280 g/piece 4 240 20-25
Veal escalope 140 g/piece 4 240 15-20
Grill sausages 70 g/piece 4 240 10-20
Spam (Leberkäse) 150 g/piece 4 240 15-20
FISH
Salmon steaks/fillets 200 g/piece 4 240 15-20
TOASTED BREAD
6 slices of bread / 4 240 1-4
Open sandwiches / 4 240 2-5
Always keep the oven door closed when using the grill (infrared) heater.
Grill heater, grid, and other oven accessories get very hot during grilling. Therefore, use oven mitts and meat tongs.
Guide
(from the bottom)
Temperature
(°C)
Cooking time
(min)
Always keep the oven door closed when using the grill
(infrared) heater.
Grill heater, grid, and other oven accessories get very
hot during grilling. Therefore, use oven mitts and meat
tongs.
26
Page 27
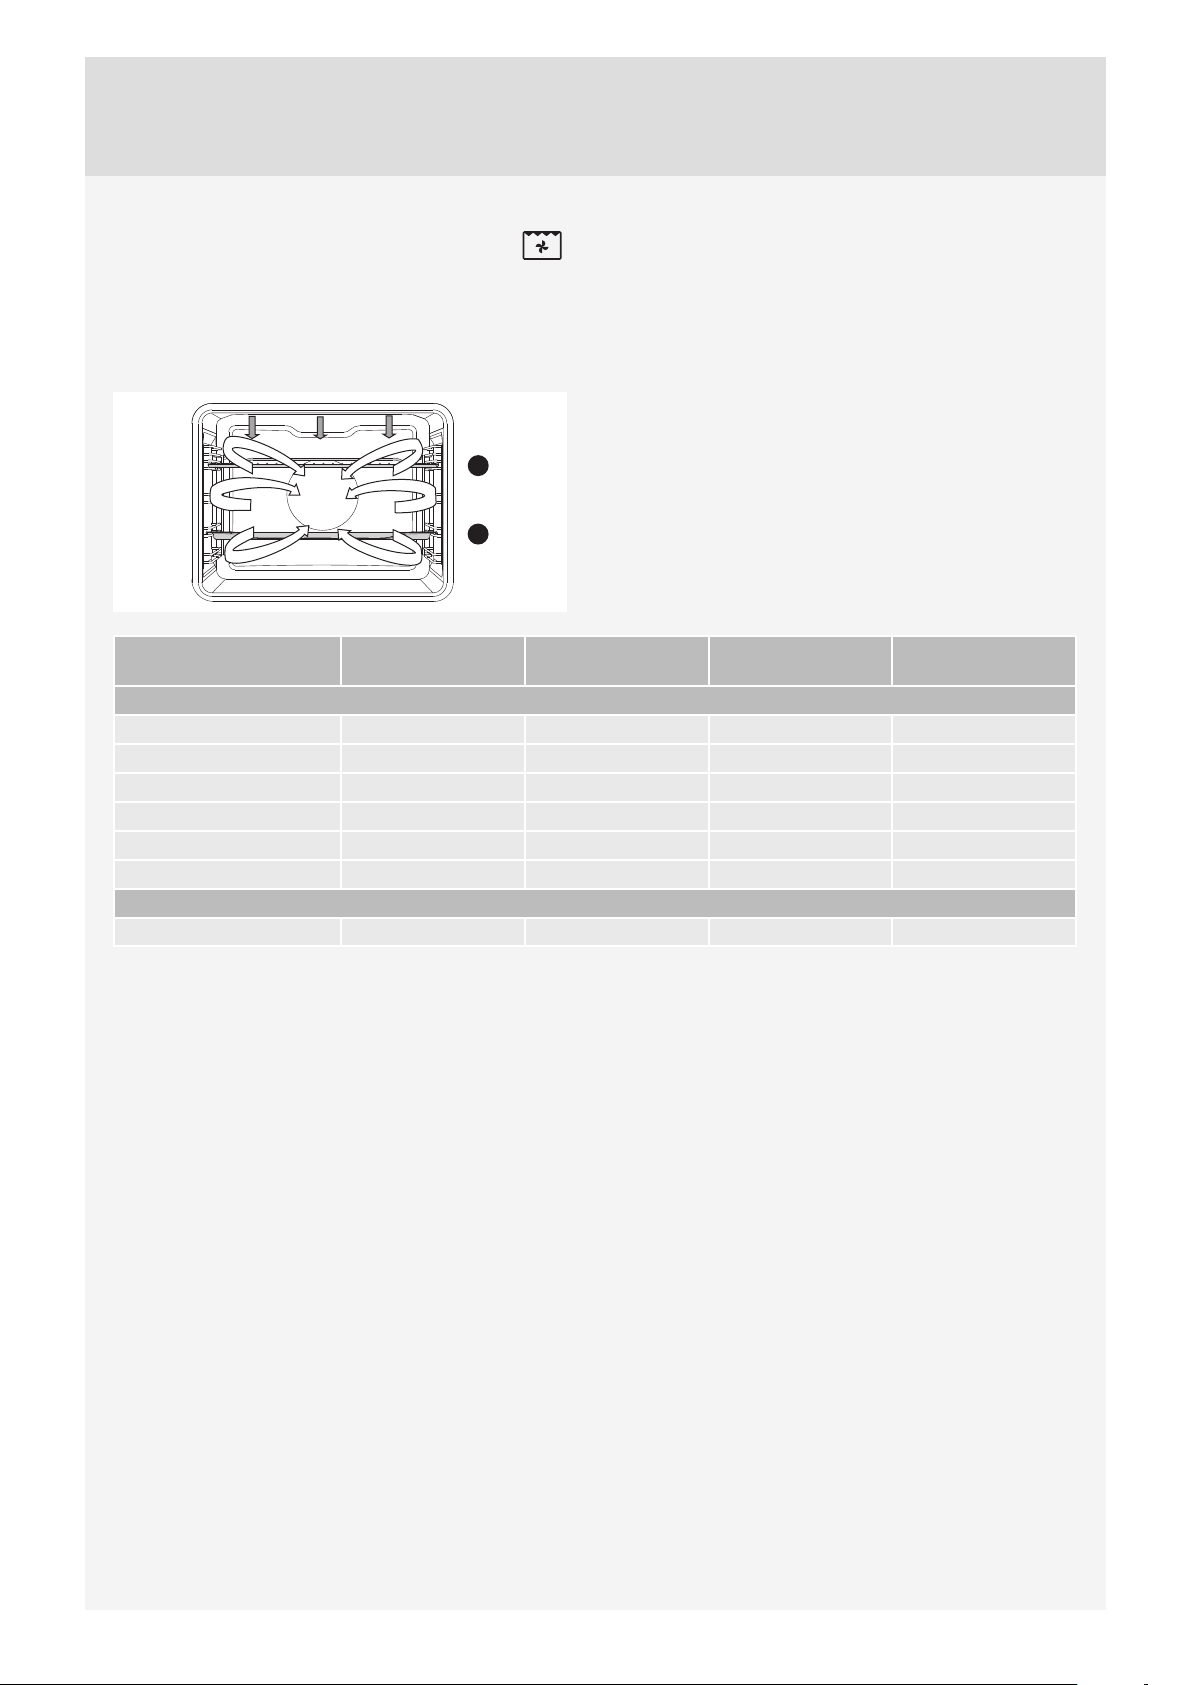
GRILL WITH FAN
In this operating mode, the grill heater and the fan
operate simultaneously. Suitable for grilling meat, fi sh,
and vegetables.
(See descriptions and tips for GRILL.)
4
2
Type of food Weight
(g)
Guide
(from the bottom)
Temperature
(°C)
Cooking time
(min)
MEAT
Duck 2000 2 180-200 90-110
Pork roast 1500 2 170-190 90-120
Pork shoulder 1500 2 160-180 100-130
Half of chicken 700 2 190-210 50-60
Chicken, 1.5 kg 1500 2 200-220 60-80
Meat loaf 1500 2 160-180 70-90
FISH
Trout 200 g/piece 2 200-220 20-30
27
Page 28
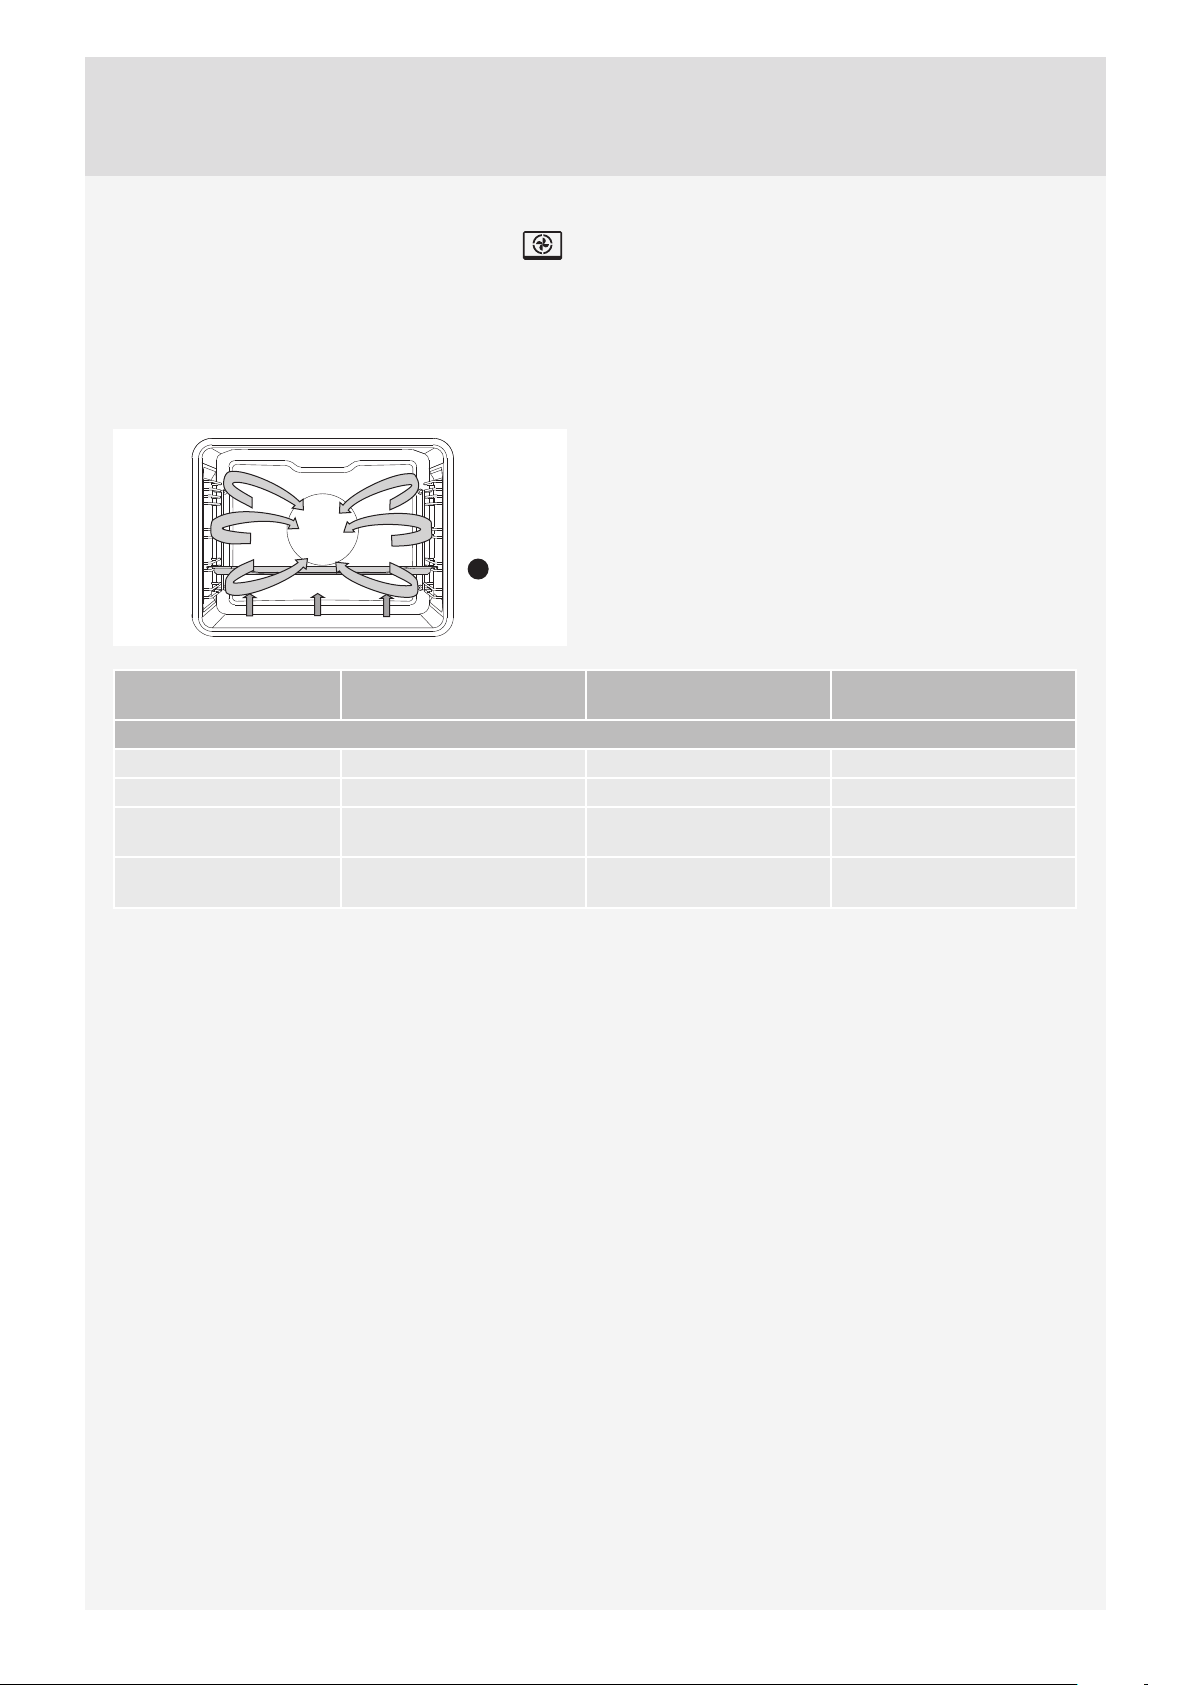
HOT AIR AND BOTTOM HEATER
The bottom heater, the round heater, and the hot air fan
will operate. Suitable for baking pizzas, apple pies, and
fruitcakes.
(See descriptions and tips for UPPER and BOTTOM
HEATER.)
2
Type of food Guide
(from the bottom)
PAST RY
Cheesecake, short crust 2 150-160 60-70
Pizza * 3 210-220 10-15
Quiche Lorraine,
shortcrust
Apple strudel, phyllo
dough
2 190-200 50-60
2 170-180 50-60
Temperature
(°C)
Cooking time
(min)
28
Page 29
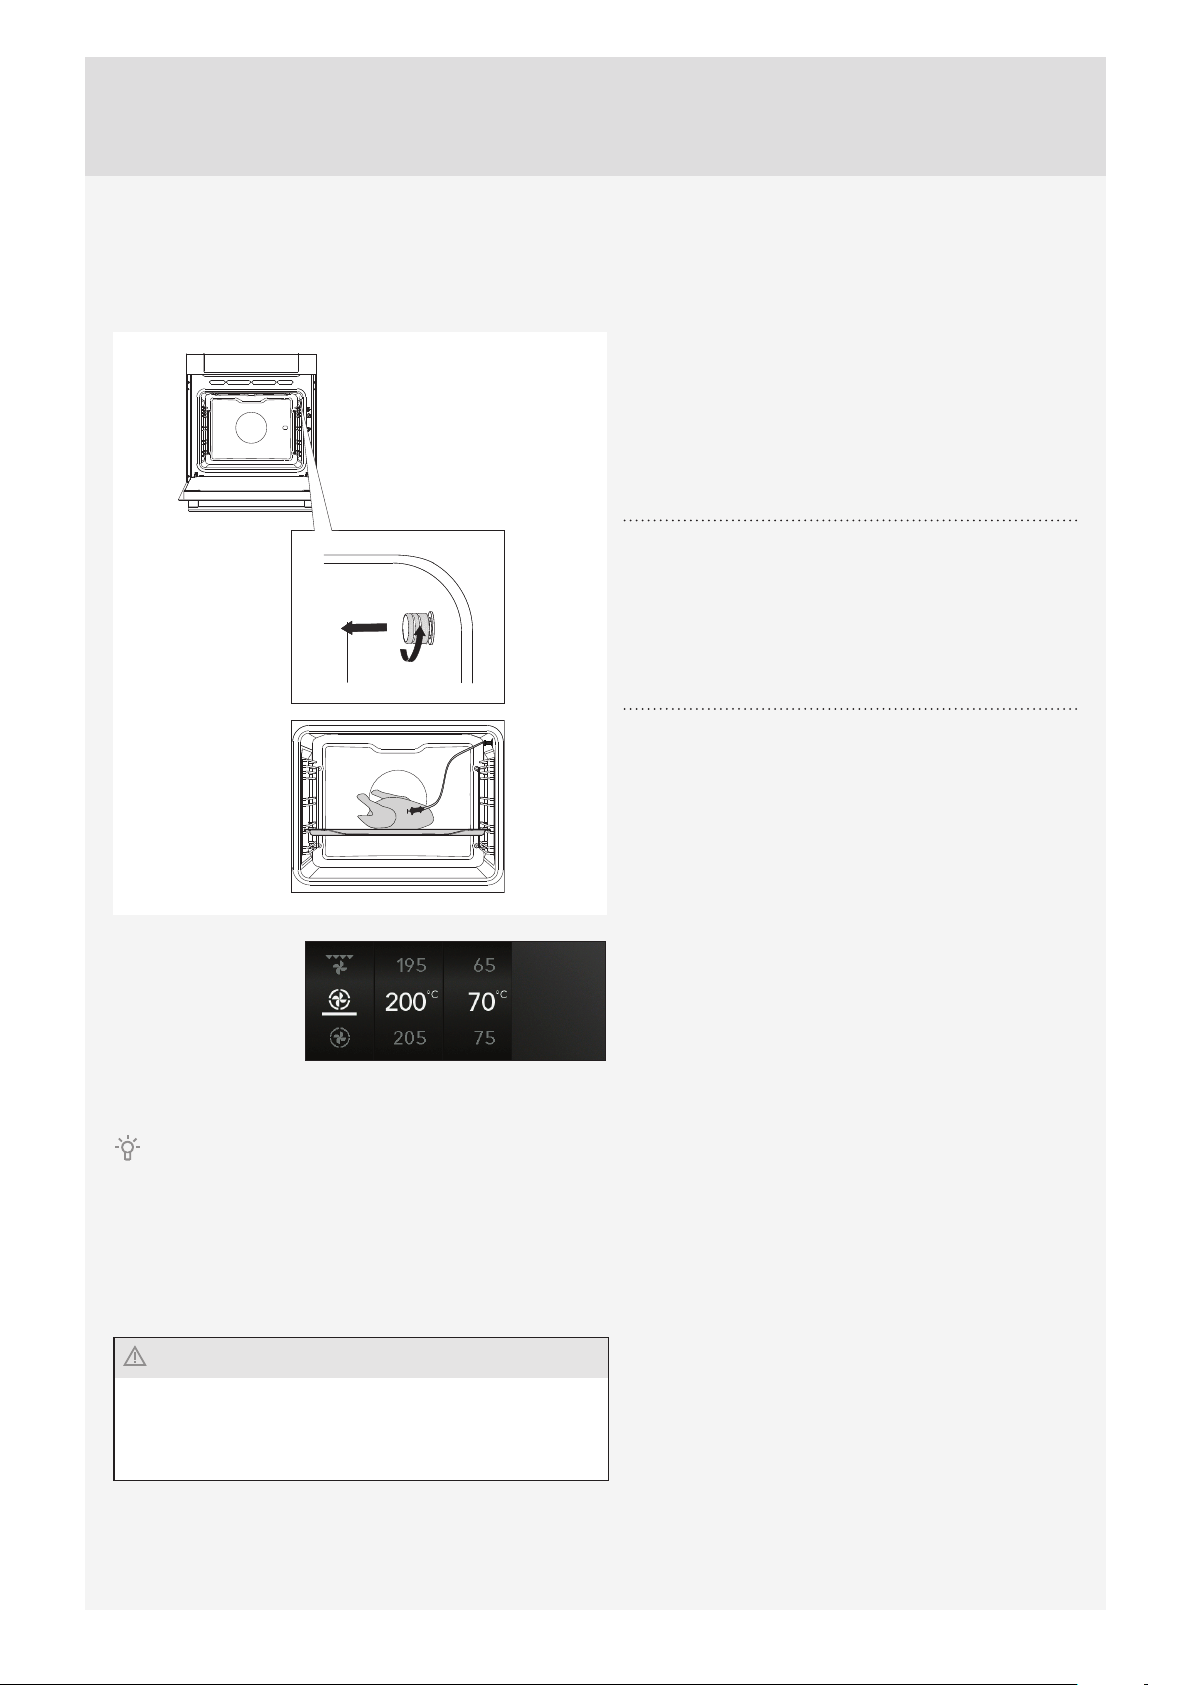
Roasting with a meat probe (depending on the model)
In this mode, set the desired temperature of the food core. The oven operates until the food core reaches the set
temperature. Temperature core is measured by the temperature probe.
Remove the metal cap (the socket is in the front
upper corner of the oven right wall).
1
Connect the meat probe plug to the socket and stick
the probe into the food. (If any timer settings were
2
activated, they will be cancelled.)
Choose the system (lower heater and fan).
3
Preset temperature and probe temperature will be displayed. Touch the START key.
During cooking, the rising temperature of the core will be displayed (the desired core temperature may be adjusted
during the cooking process).
When the set core temperature is reached, the cooking process will stop.
An acoustic signal will be heard which you may turn off by touching any key. After one minute, the acoustic signal will be
switched off automatically. Clock will appear on the display.
A
fter the cooking process, replace the metal cap of the meat probe socket.
Only use the probe intended for use with your oven.Make
sure the probe does not touch the heater during cooking.
After the cooking process, the probe will be very hot. Take
care to prevent burning.
29
Page 30

Degrees of doneness for meat
TYPE OF MEAT
BEEF
Raw 40-45
Rare 55-60
Medium 65-70
Well done 75-80
VEAL
Well done 75-85
PORK
Medium 65-70
Well done 75-85
LAMB
Well done 79
MUTTON
Raw 45
Rare 55-60
Medium 65-70
Well done 80
GOAT MEAT
Medium 70
Well done 82
POULTRY
Well done 82
FISH
Well done 65-70
Core temperature
(°C)
30
Page 31
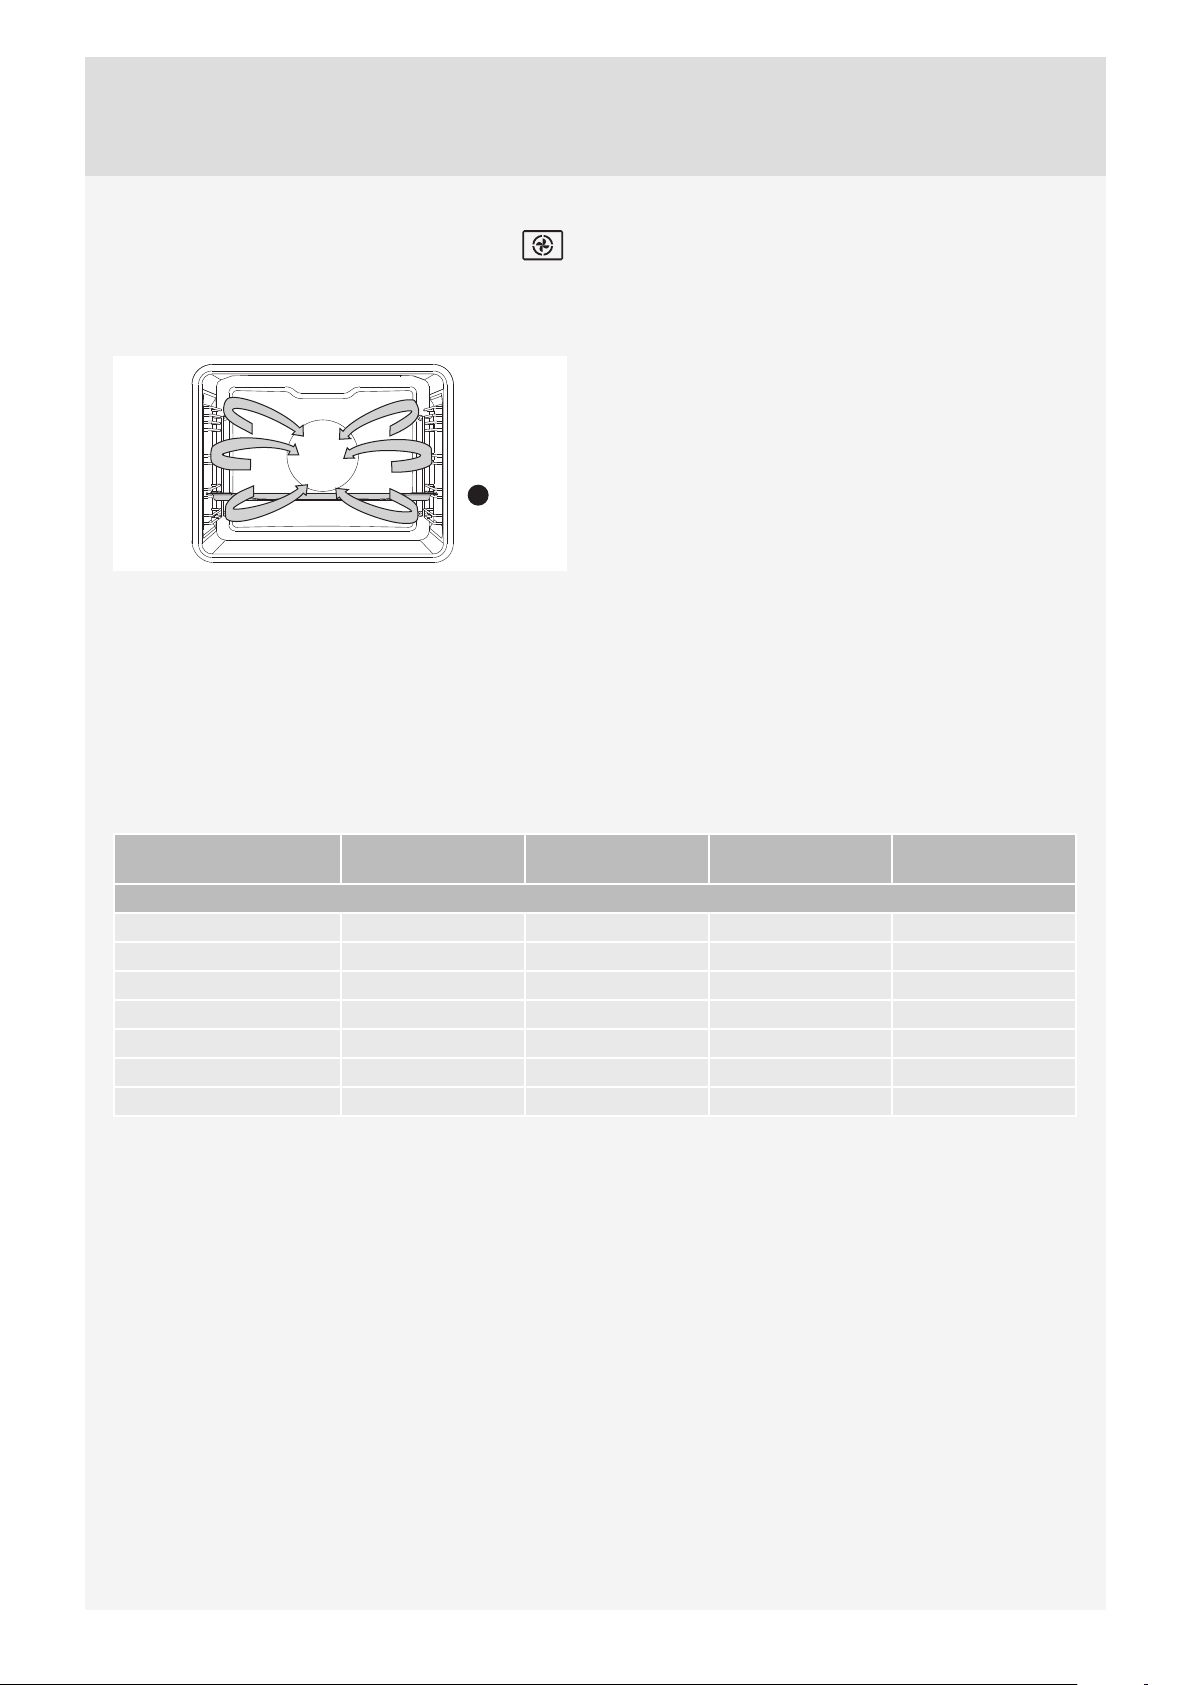
360 HOT AIR
Round heater and the fan will operate. The fan installed
in the back wall of the oven cavity makes sure the hot air
constantly circulates around the roast or pastry.
2
Roasting meat:
Use enamel coated, tempered glass, clay, or cast iron
pan or tray. Stainless steel trays are not suitable as they
strongly refl ect the heat.
Provide enough liquid during the cooking process to
prevent the meat from burning. Turn the meat during
roasting. The roast will remain juicier if you cover it.
Type of food Weight
(g)
MEAT
Pork roast, including skin 1500 2 160-180 90-120
Chicken, whole 1500 2 170-190 70-90
Duck 2000 2 160-180 120-150
Goose 4000 2 150-170 170-200
Turkey 5000 2 150-170 180-210
Chicken breast 1000 3 180-200 50-60
Stuffed chicken 1500 2 180-200 110-130
Guide
(from the bottom)
Temperature
(°C)
Cooking time
(min)
31
Page 32

Baking pastry
Preheating is recommended.
Biscuits and cookies can be baked in shallow baking sheets on several levels simultaneously (2nd and 3rd).
Note that baking time can diff er even with if the baking sheets used are the same. The biscuits in the upper baking sheet
may be ready sooner than those in the lower one.
Always place the baking trays on the grid. If you are using the supplied baking sheet, remove the grid.
For even browning, make sure the biscuits are of the same thickness.
Type of food Guide
(from the bottom)
PAST RY
Sponge cake 2 150-160 30-40
Crumble cake 3 160-170 25-35
Plum cake 2 150-160 30-40
Sponge roll * 3 160-170 15-25
Fruit cake, short crust 2 160-170 50-70
Challah (braided yeast
bun)
Apple strudel 3 170-180 50-60
Pizza * 3 200-210 15-20
Biscuits, short crust * 3 150-160 15-25
Biscuits, pressed * 3 140-150 20-30
Small cakes * 3 140-150 20-30
Cookies, leavened 3 170-180 20-35
Cookies, phyllo dough 3 170-180 20-30
Cream-filled pastry 3 180-190 25-45
FROZEN PRODUCTS
Apple and cottage cheese
strudel
Pizza 3 180-190 20-35
Fried potatoes, oven-
ready
Croquettes, oven-baked 3 200-210 20-35
2 160-170 35-50
3 170-180 55-70
3 200-210 25-40
Temperature
(°C)
Cooking time
(min)
32
Do not insert the deep baking tray into the fi rst guide.
Page 33
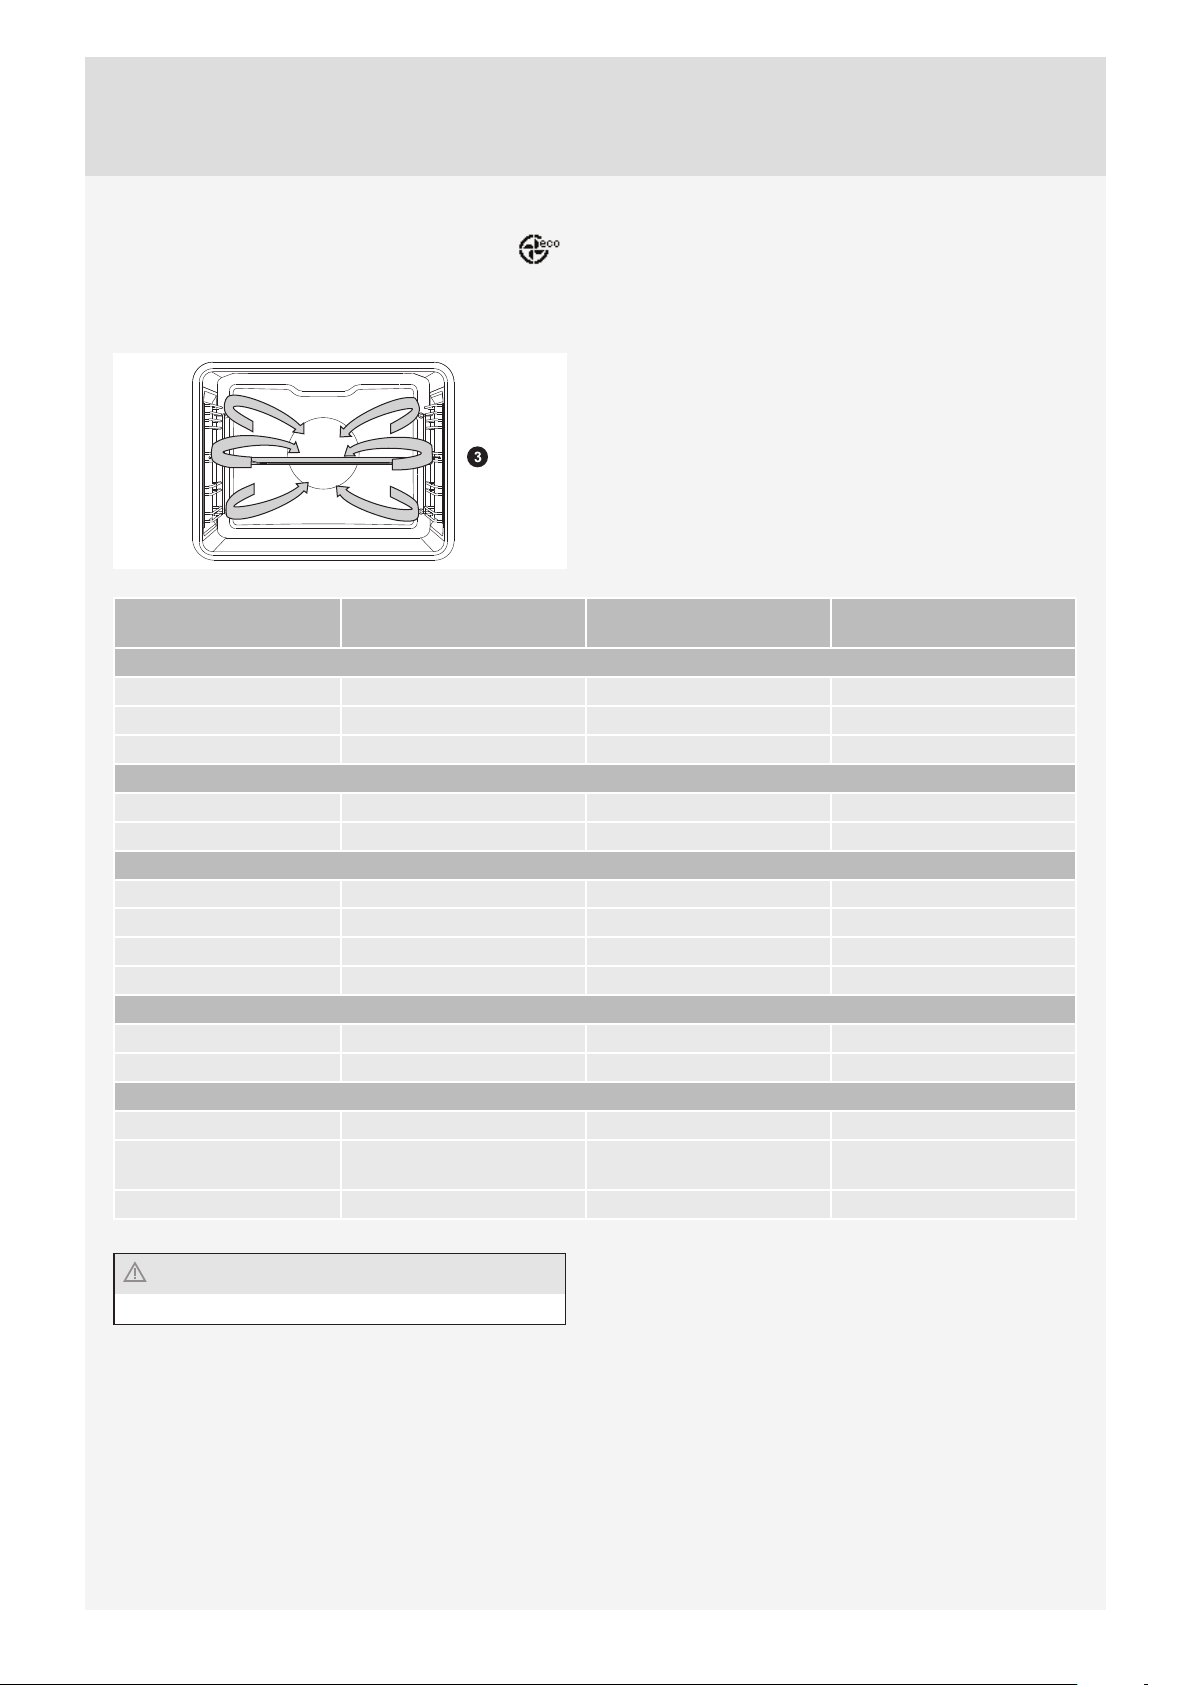
ECO COOKING
Round heater and the fan will operate. The fan installed
in the back wall of the oven cavity makes sure the hot air
constantly circulates around the roast or pastry.
Type of food Guide
(from the bottom)
MEAT
Pork roast, 1 kg 2 190-200 110-130
Pork roast, 2 kg 2 190-200 130-150
Beef roast, 1 kg 2 200-210 100-120
FISH
Whole fish, 200 g/piece 3 190-200 40-50
Fish fillet, 100 g/piece 3 200-210 25-35
PAST RY
Pressed cookies 3 170-180 15-25
Small cupcakes 3 180-190 30-35
Sponge roll 3 190-200 15-25
Fruit cake, short crust 2 180-190 55-65
DISHES AU GRATIN
Potatoes au gratin 2 180-190 40-50
Lasagne 2 190-200 45-55
FROZEN PRODUCTS
Pommes frites, 1 kg 3 220-230 35-45
Chicken medallions, 0.7
kg
Fish sticks, 0.6 kg 3 210-220 30-40
3 210-220 30-40
Temperature
(°C)
Cooking time
(min)
Do not insert the deep baking tray into the fi rst guide.
33
Page 34
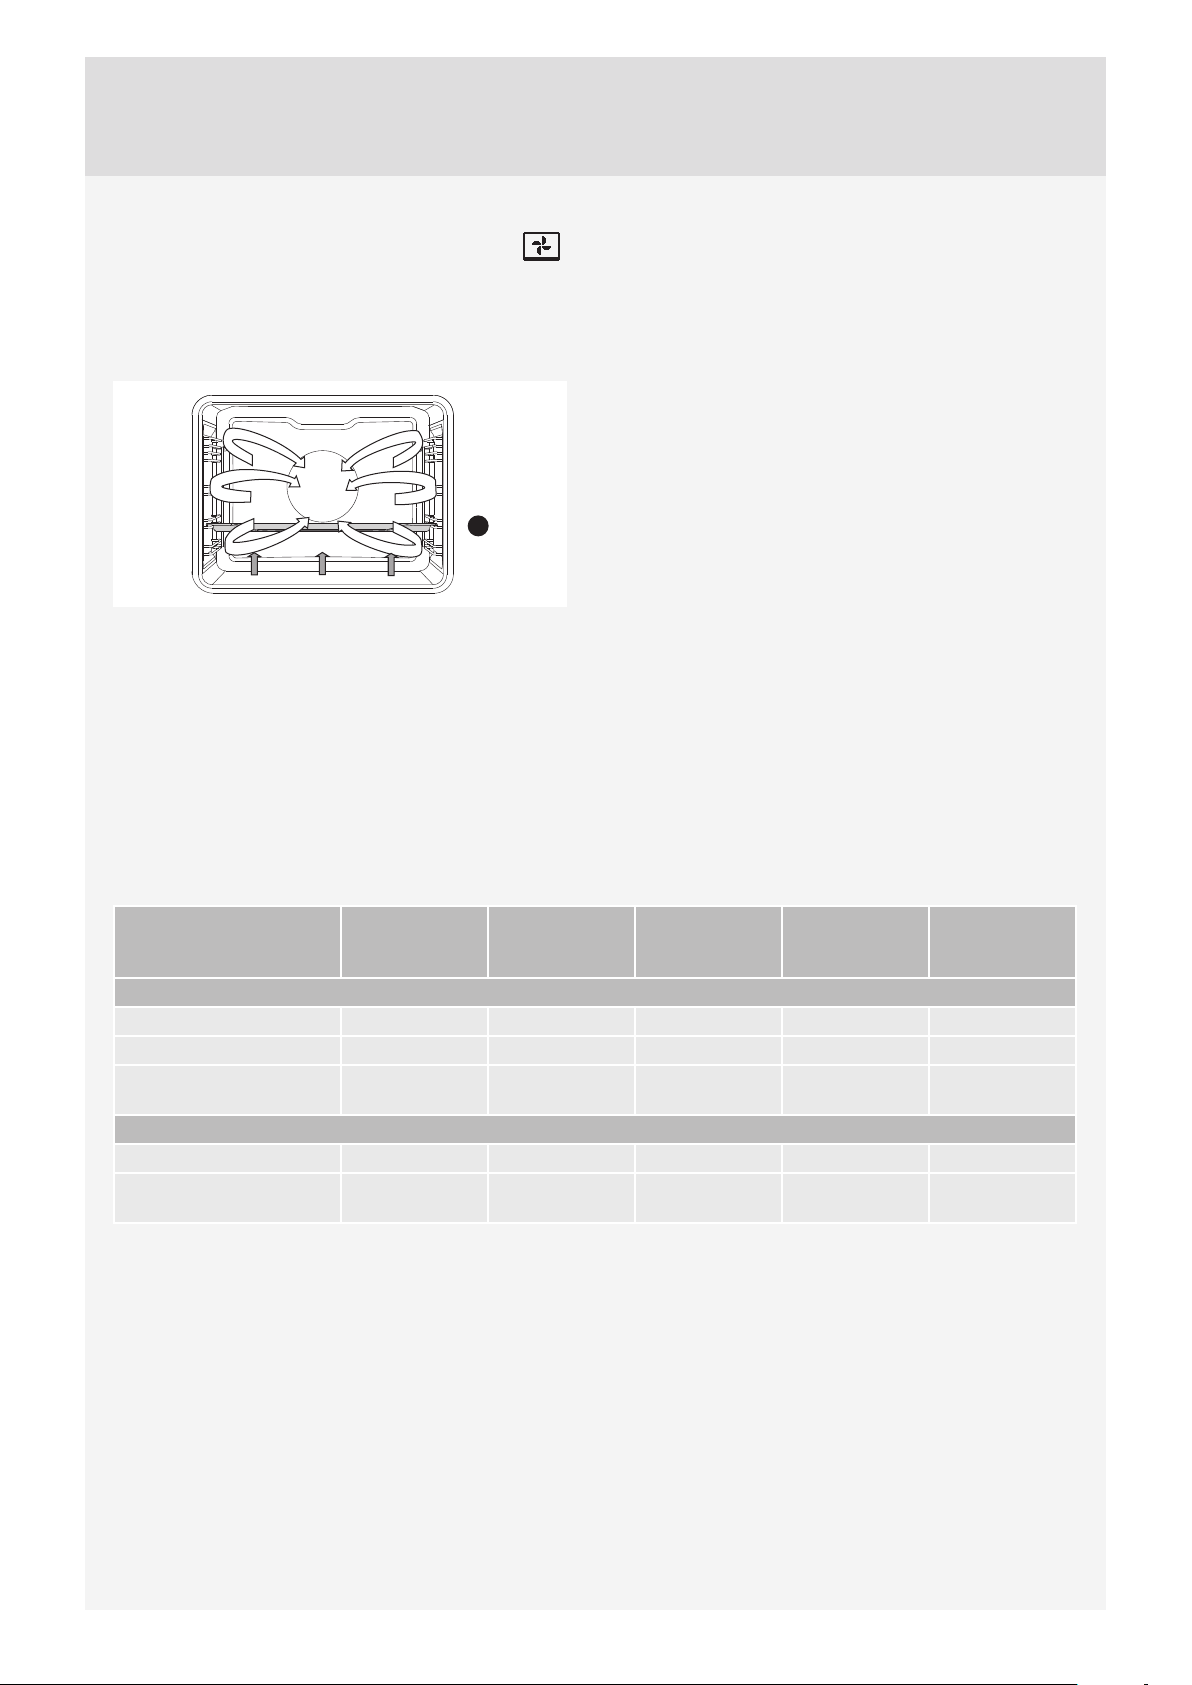
BOTTOM HEATER AND FAN
This is used for baking leavened but low-rising pastry and
for preserving fruit and vegetables. Use the second guide
from the bottom and a rather shallow baking tray to allow
the hot air to circulate across the upper side of the dish.
2
PRESERVATION
Prepare the food to be preserved and jars as usual. Use jars with a rubber sealing ring and a glass cover. Do not use jars
with threaded or metal caps or metal tins. Make sure the jars are of equal size, fi lled with the same contents, and tightly
sealed.
Pour 1 litre of hot water into the deep tray (approx. 70°C) and place 6 1-litre jars into the tray. Place the tray into the oven
on the second guide.
During preservation, observe the food and cook until the liquid in the jars starts to simmer – when bubbles appear in the
fi rst jar.
Type of food Guide
(from the bot-
tom)
FRUIT
Strawberries (6×1 l) 2 180 40-60 switch off 20-30
Stone fruits (6×1 l) 2 180 40-60 switch off 20-30
Fruit mush
(6×1 l)
VEGETABLE
Pickled gherkins (6×1 l) 2 180 40-60 switch off 20-30
Beans/carrots (6×1 l) 2 180 40-60
2 180 40-60 switch off 20-30
Temperature
(°C)
Cooking time
(min)
Temperature
at the start of
simmering
120 °C,
60 min
Resting time in
the oven
(min)
20-30
34
Page 35
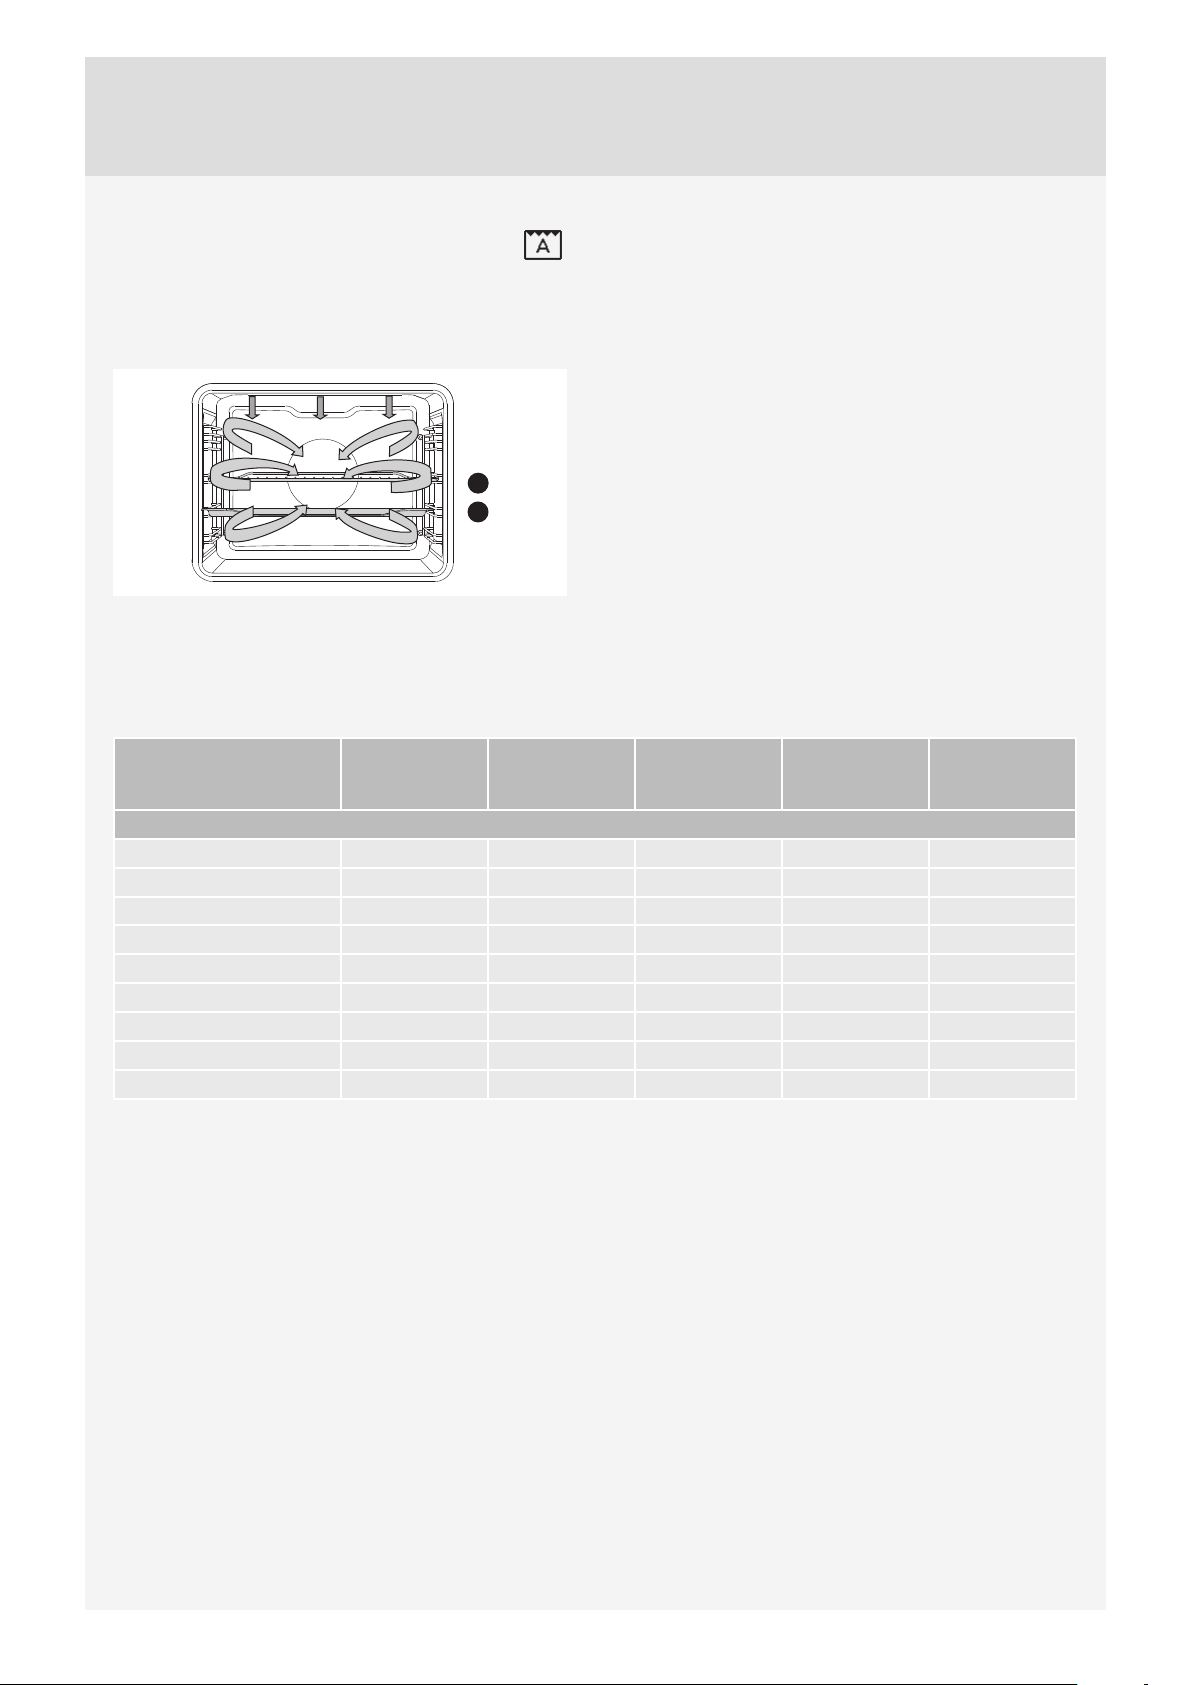
AUTOMATIC COOKING OF MEAT –
AUTO ROAST MODE
In the Auto Roast mode, the upper heater will operate in
combination with the grill heater and the round heater. It is
used for roasting all types of meat.
3
2
In the Auto Roast mode, the upper heater will operate in combination with the grill heater and the round heater. It is used
for roasting all types of meat.
When grilling directly on the grid, smear it with oil to prevent the meat from sticking onto it and insert it into the 3rd guide.
Insert a drip tray into the 2nd guide. When roasting meat in a baking tray, insert it into the 2nd guide.
Type of food Weight
(g)
Guide
(from the
bottom)
Temperature
(°C)
Cooking time
(min)
Core
temperatur
(°C)
MEAT
Beef tenderloin 1000 2 160-180 60-80 55-75*
Chicken, whole 1500 2 170-190 65-85 85-90
Turkey 4000 2 160-180 150-180 85-90
Pork roast 1500 2 160-180 100-120 70-85
Meat loaf 1000 2 160-180 50-65 80-85
Veal 1000 2 160-180 70-90 75-85
Lamb 1000 2 170-190 50-70 75-85
Venison 1000 2 170-190 60-90 75-85
Whole fish 1000 3 160-180 40-50 75-85
35
Page 36

MAINTENANCE & CLEANING
Be sure to unplug the appliance from the power supply
and wait for the appliance to cool down.
Children should not clean the appliance or perform
maintenance tasks without proper supervision.
Aluminium fi nish
Clean the aluminium fi nish with non-abrasive liquid
cleaners intended for such surfaces. Apply the cleaner
onto a wet cloth and clean the surface. Then, rinse the
surface with water. Do not apply the cleaner directly onto
the aluminium fi nish.
Do not use abrasive cleaners or sponges.
Note: The surface should not come into contact with
oven cleaning sprays as this may result in visible and
permanent damage.
Stainless steel sheet front side of the
housing
(depending on the model)
Clean this surface only with a mild detergent (soapsuds)
and a soft sponge that will not scratch the fi nish. Do not
use abrasive cleaners or cleaners containing solvents as
they may damage the housing fi nish.
CONVENTIONAL OVEN CLEANING
You may use the standard cleaning procedure to clean
stubborn dirt in the oven (using cleaners or an oven
spray). After such cleaning, rinse the cleaner residues
thoroughly.
Clean the oven and the accessories after each use
to prevent the dirt from burning into the surface. The
easiest way to remove fat is by using warm soapsuds
while the oven is still warm.
With stubborn dirt and grime, use conventional oven
cleaners. Rinse the oven thoroughly with clean water to
remove all cleaner residue.
Never use aggressive cleaners, abrasive cleaners,
abrasive sponges, stain and rust removers etc.
Clean the accessories (baking sheets and trays, grids
etc.) with hot water and detergent.
The oven, the oven cavity and the baking trays are lined
with a special enamel coating for a smooth and resistant
surface. This special coating makes cleaning at room
temperature easier.
Lacquer-coated surfaces and plastic parts
(depending on the model)
Do not clean the knobs and buttons, door handles,
stickers, and rating/type plates with abrasive cleaners or
abrasive cleaning materials, alcohol-based cleaners, or
with alcohol.
Immediately remove any stains with a soft non-abrasive
cloth and some water, in order to avoid damaging the
surface.
You may also use cleaners and cleaning materials
intended for such surfaces as instructed by their
respective manufacturers.
The aluminium-coated surfaces should not come
into contact with oven cleaning sprays as this may result
in visible and permanent damage.
36
Page 37
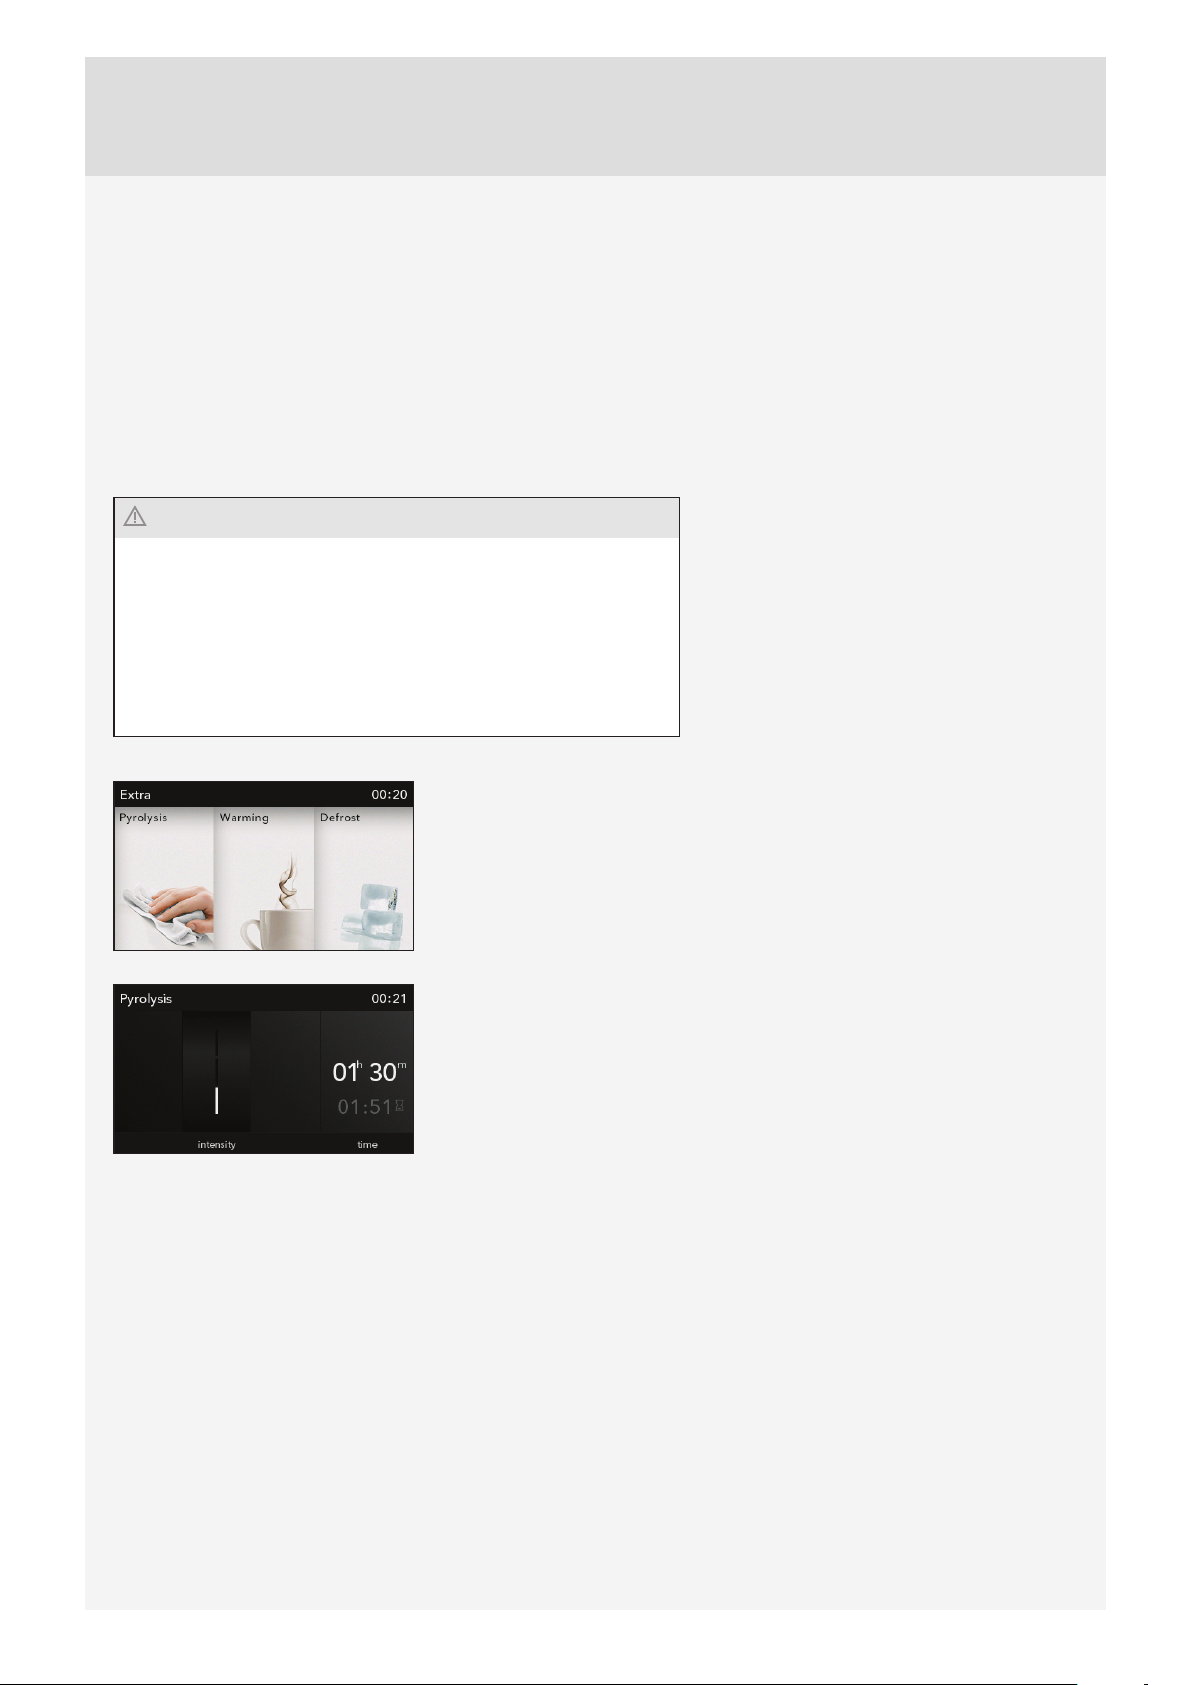
AUTOMATIC OVEN CLEANING – PYROLYSIS
For average use of the oven, we recommend running the pyrolytic cleaning program once per month to keep the oven
cavity clean and free from old grease and dirt.
After the pyrolytic cleaning process, minor discoloration may occur around the door. This can easily be removed with a
little soap and a sponge.
Wipe the oven and the accessories to be cleaned in the oven with a damp cloth!
Chunks of food and fat may ignite during the pyrolytic cleaning process. Danger of fi re!
Before pyrolytic cleaning wait for the oven to cool down and remove
all equipment and accessories from it, including the extendible
guides.
* Depending on the model
If special-purpose wire guides are supplied with the appliance,
mount them in place of the extendible guides before starting the
pyrolytic cleaning process.
Select Pyrolysis in the Extra menu.
Choose the desired cleaning intensity.
Basic: approx. 90min
Medium: approx. 120min
High: approx. 150min
After a certain period of time, oven door will be automatically locked for your safety (when the temperature reaches 250
°C).Unpleasant smell may be emitted from the oven during the cleaning process.
After the cleaning process, the display will read: ”The door is locked. The appliance is cooling down.”
After pyrolytic cleaning, there will be some ashes on the bottom of the oven cavity and stain residues on the edges.
When the oven cools down, clean all residues with a damp cloth and a non-abrasive sponge. Wipe the oven door and the
adjacent surfaces in the gasket area. Do not rub the gasket.
37
Page 38

Do not attempt to open the oven door while the automatic cleaning
program is in progress. The program may be terminated. Risk of
burns!
CLEANING THE PYROLYTIC ACCESSORIES IN THE OVEN (depending on the model)
The pyrolysis program can also be used to occasionally clean the pyrolytic baking sheets and trays supplied (see Oven
accessories). After use, clean them with hot water and detergent, then wipe them with a cloth and place them into the
2nd or 3rd guide. Do not place a baking sheet or tray into the 1st guide.
During pyrolytic cleaning, the baking sheets and trays and the oven cavity may partly discolour and loose some shine.
If you also clean baking pans with the pyrolytic cleaning process, then the bottom of the oven may not be entirely cleaned
at the end of the process.
38
Page 39
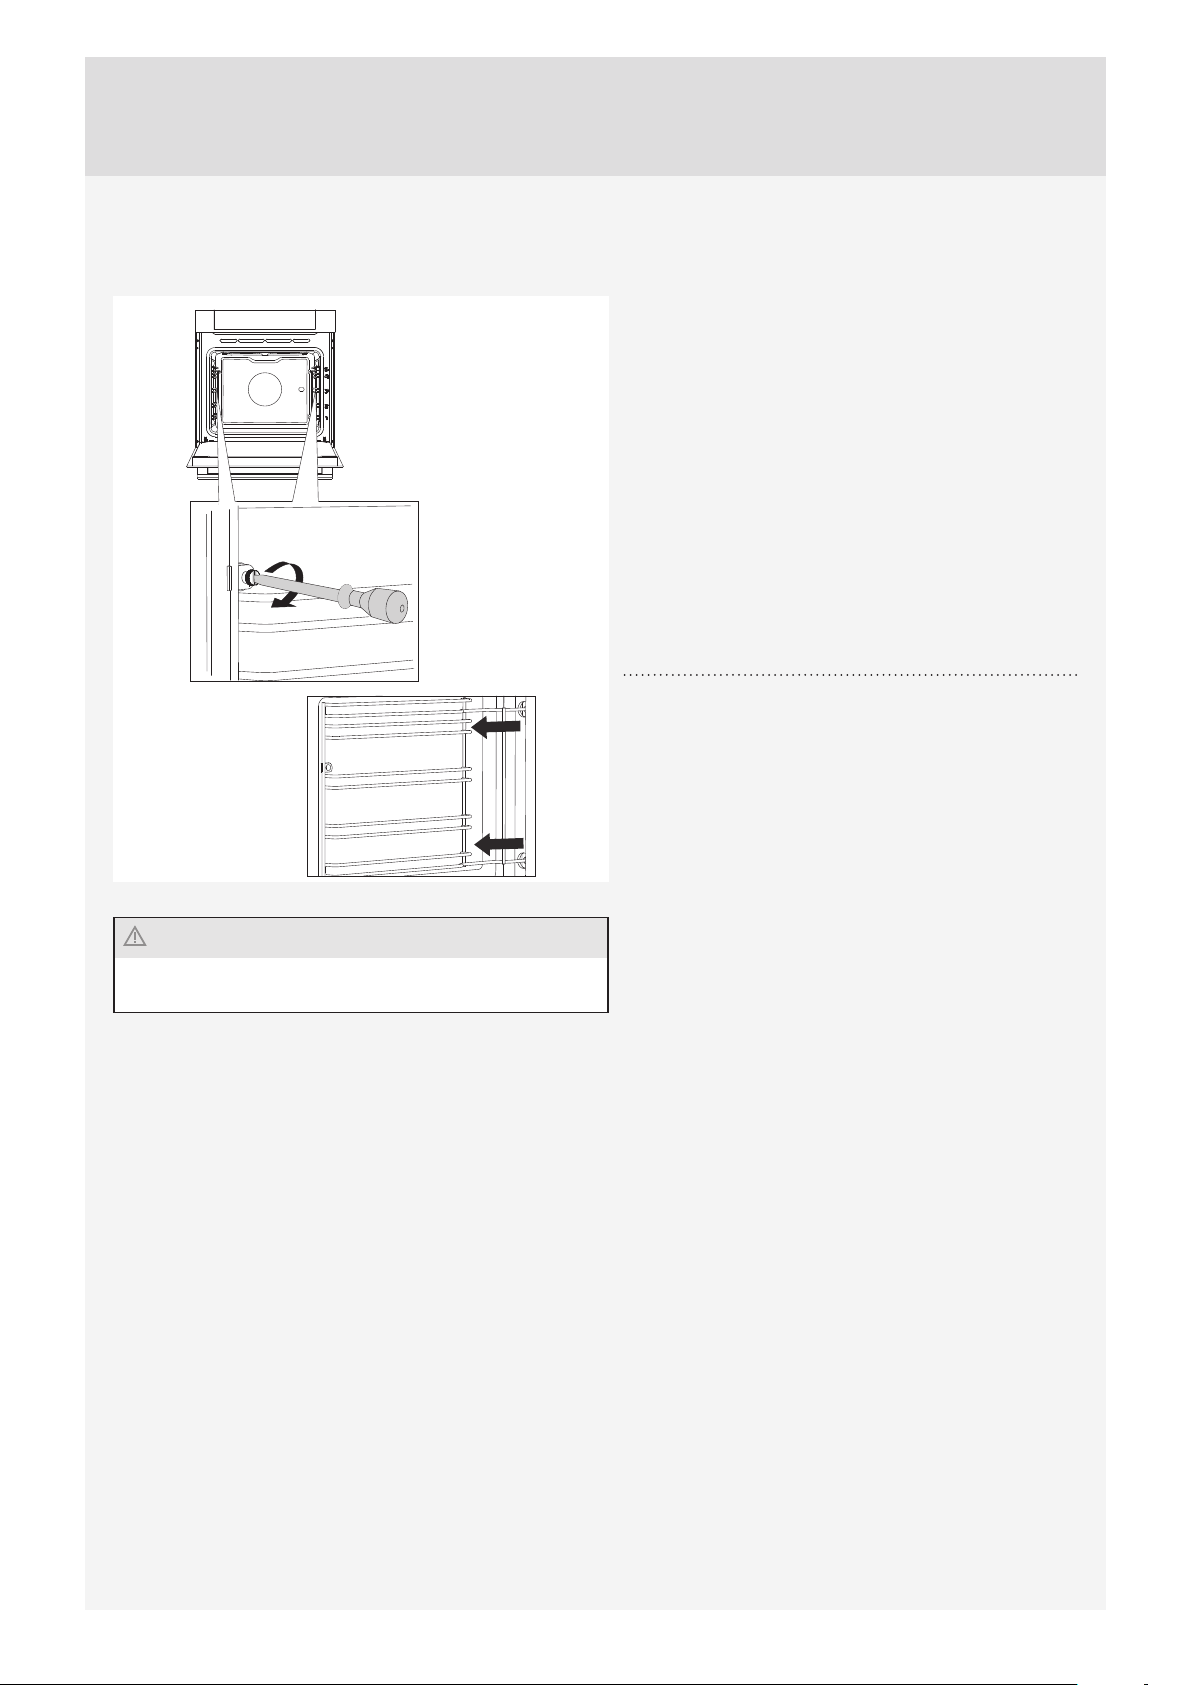
REMOVING AND CLEANING THE WIRE GUIDES
Only use conventional cleaners to clean the guides.
Undo the screw.
1
Remove the guides from the holes in the back wall.
2
After cleaning, re-tighten the screws on the guides with a
screwdriver.
39
Page 40
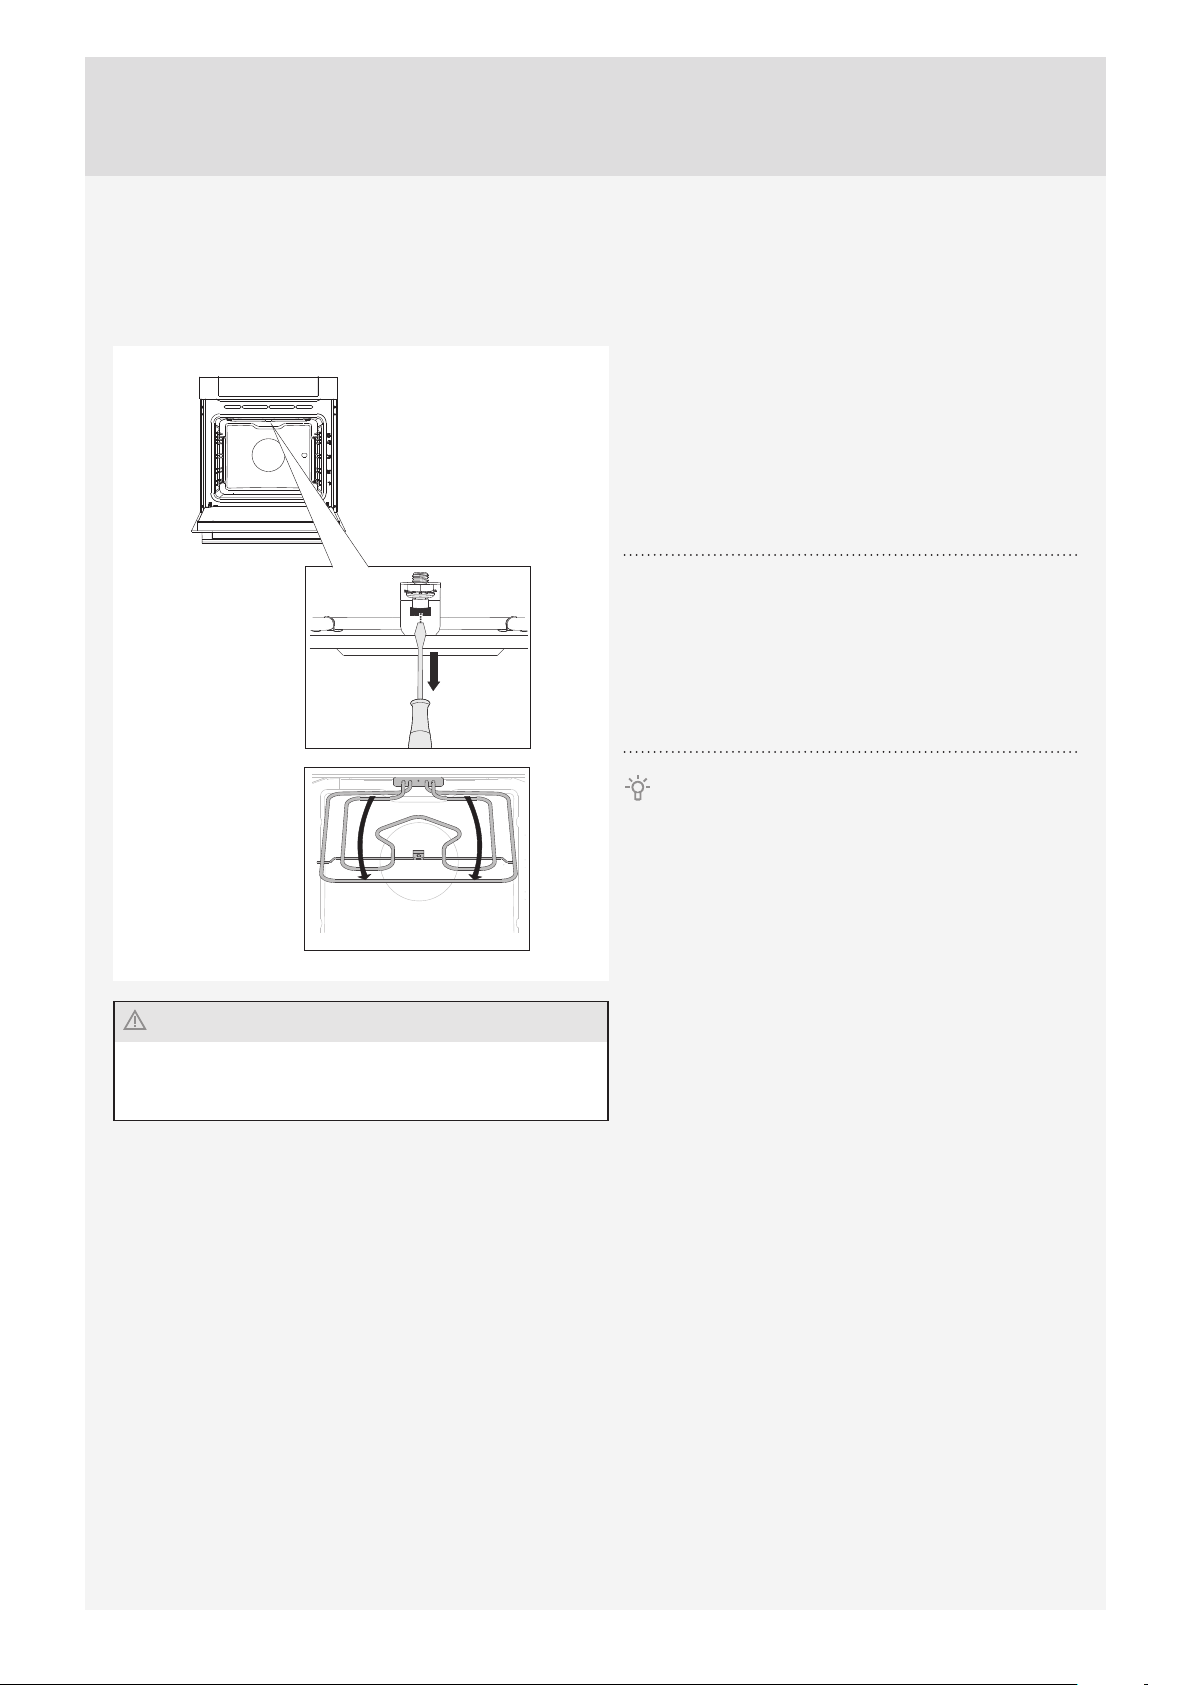
CLEANING THE OVEN CAVITY CEILING
Upper grill heater is foldable to allow easier cleaning of the oven cavity ceiling. Before cleaning the oven, remove the
trays, the grid, and the guides.
To remove the heater, undo the screw located at the
front of the oven cavity ceiling.
1
Never use the heater when folded/lowered.
Disconnect the appliance from the power mains.
The heater must be cool; otherwise, there is danger of
burns.
40
Page 41
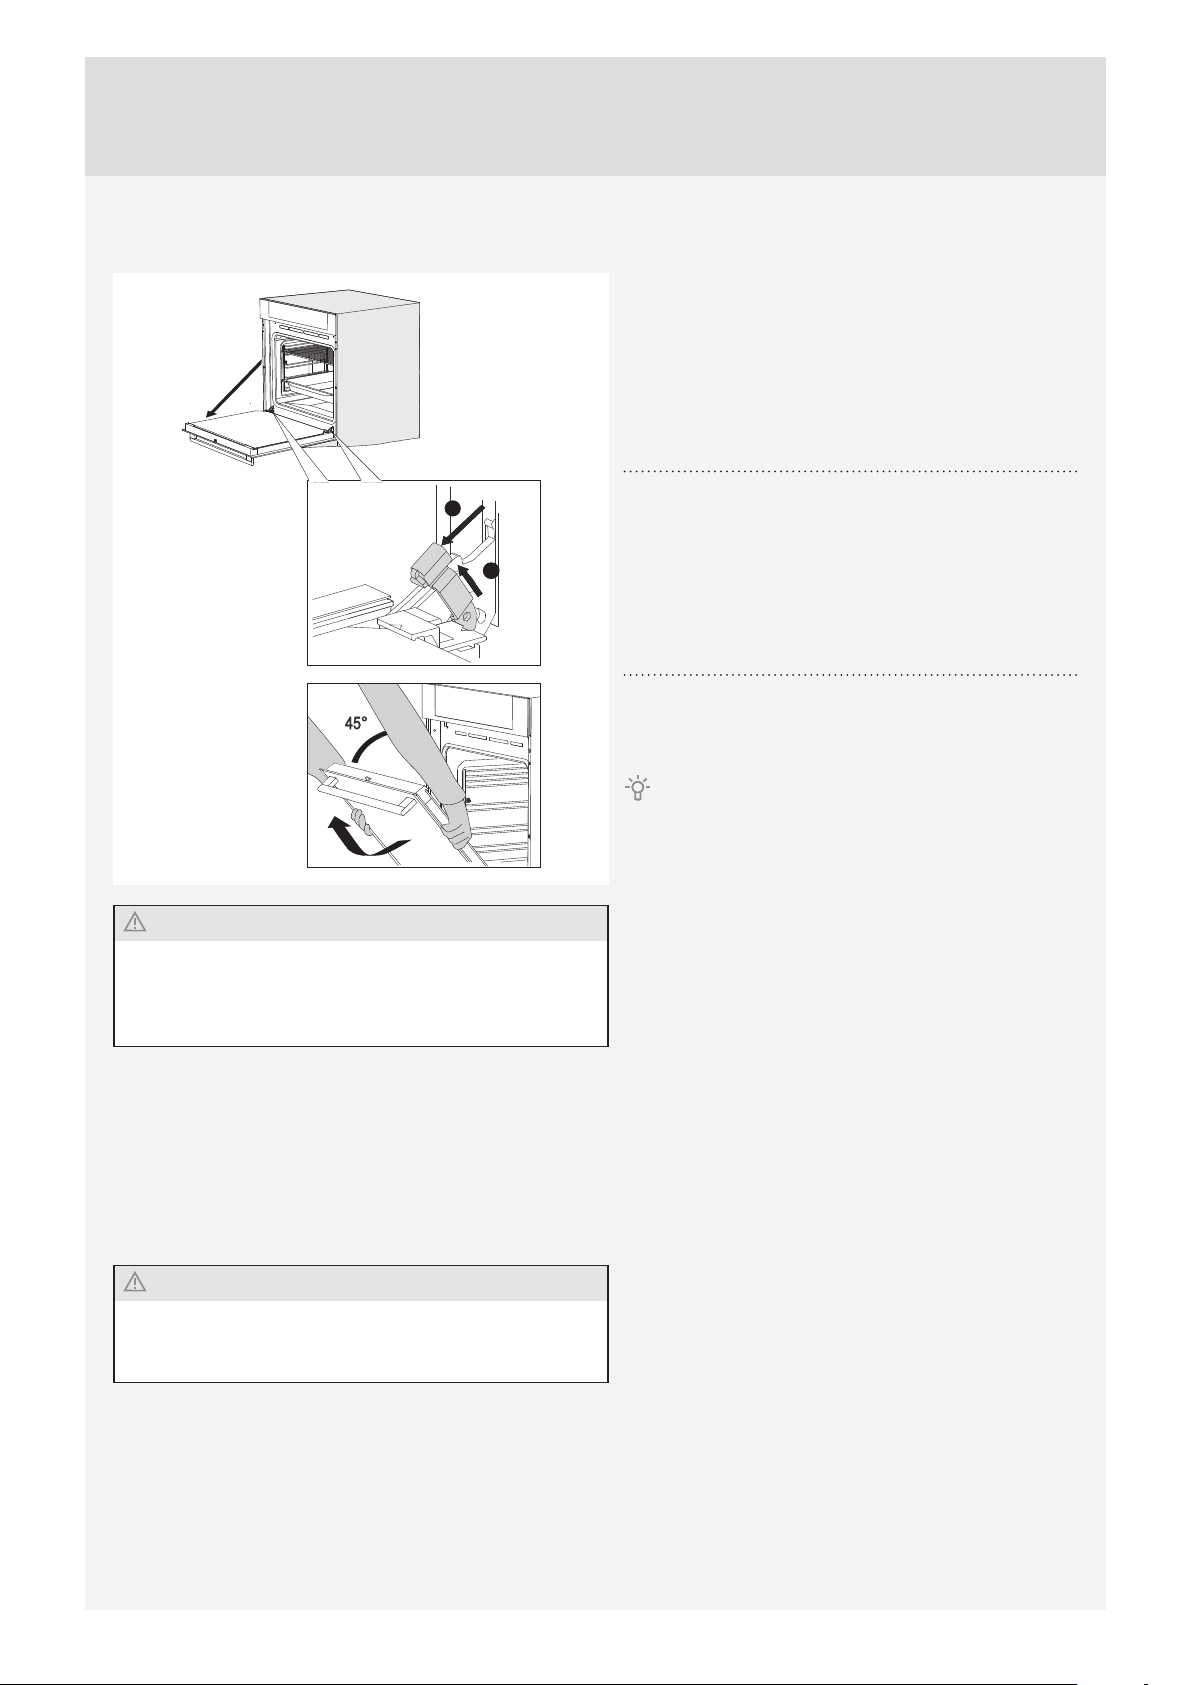
REMOVING AND INSERTING THE OVEN DOOR
First, fully open the door (as far as it will go).
1
B
Slightly lift the hinge retainers and pull the door
towards you.
2
A
Slowly close the door to a 45-degree angle (relative
to the position of the fully closed door); then, lift the
3
door and pull it out.
To replace the door, observe the reverse order. If
the door does not open or close properly, make sure the
notches on the hinges are aligned with the hinge beds.
When replacing the door, always make sure the hinge retainers
are correctly placed in the hinge beds to prevent sudden
closing of the main hinge which is connected to a strong main
spring. If the main spring is engaged, there is a risk of injury.
SOFT DOOR CLOSING (depending on the model)
Oven door is fi tted with a system that dampens the door opening force, starting at the 75-degree angle.
SOFT DOOR CLOSING (depending on the model)
Oven door is fi tted with a system that dampens the door closing force, starting at the 75-degree angle. It allows simple, quiet, and
smooth closing of the door. A gentle push (to a 15-degree angle relative to the closed door position) is enough for the door to close
automatically and softly.
If the force applied to close the door is too strong, the eff ect
of the system is reduced or the system will be bypassed for
safety.
41
Page 42
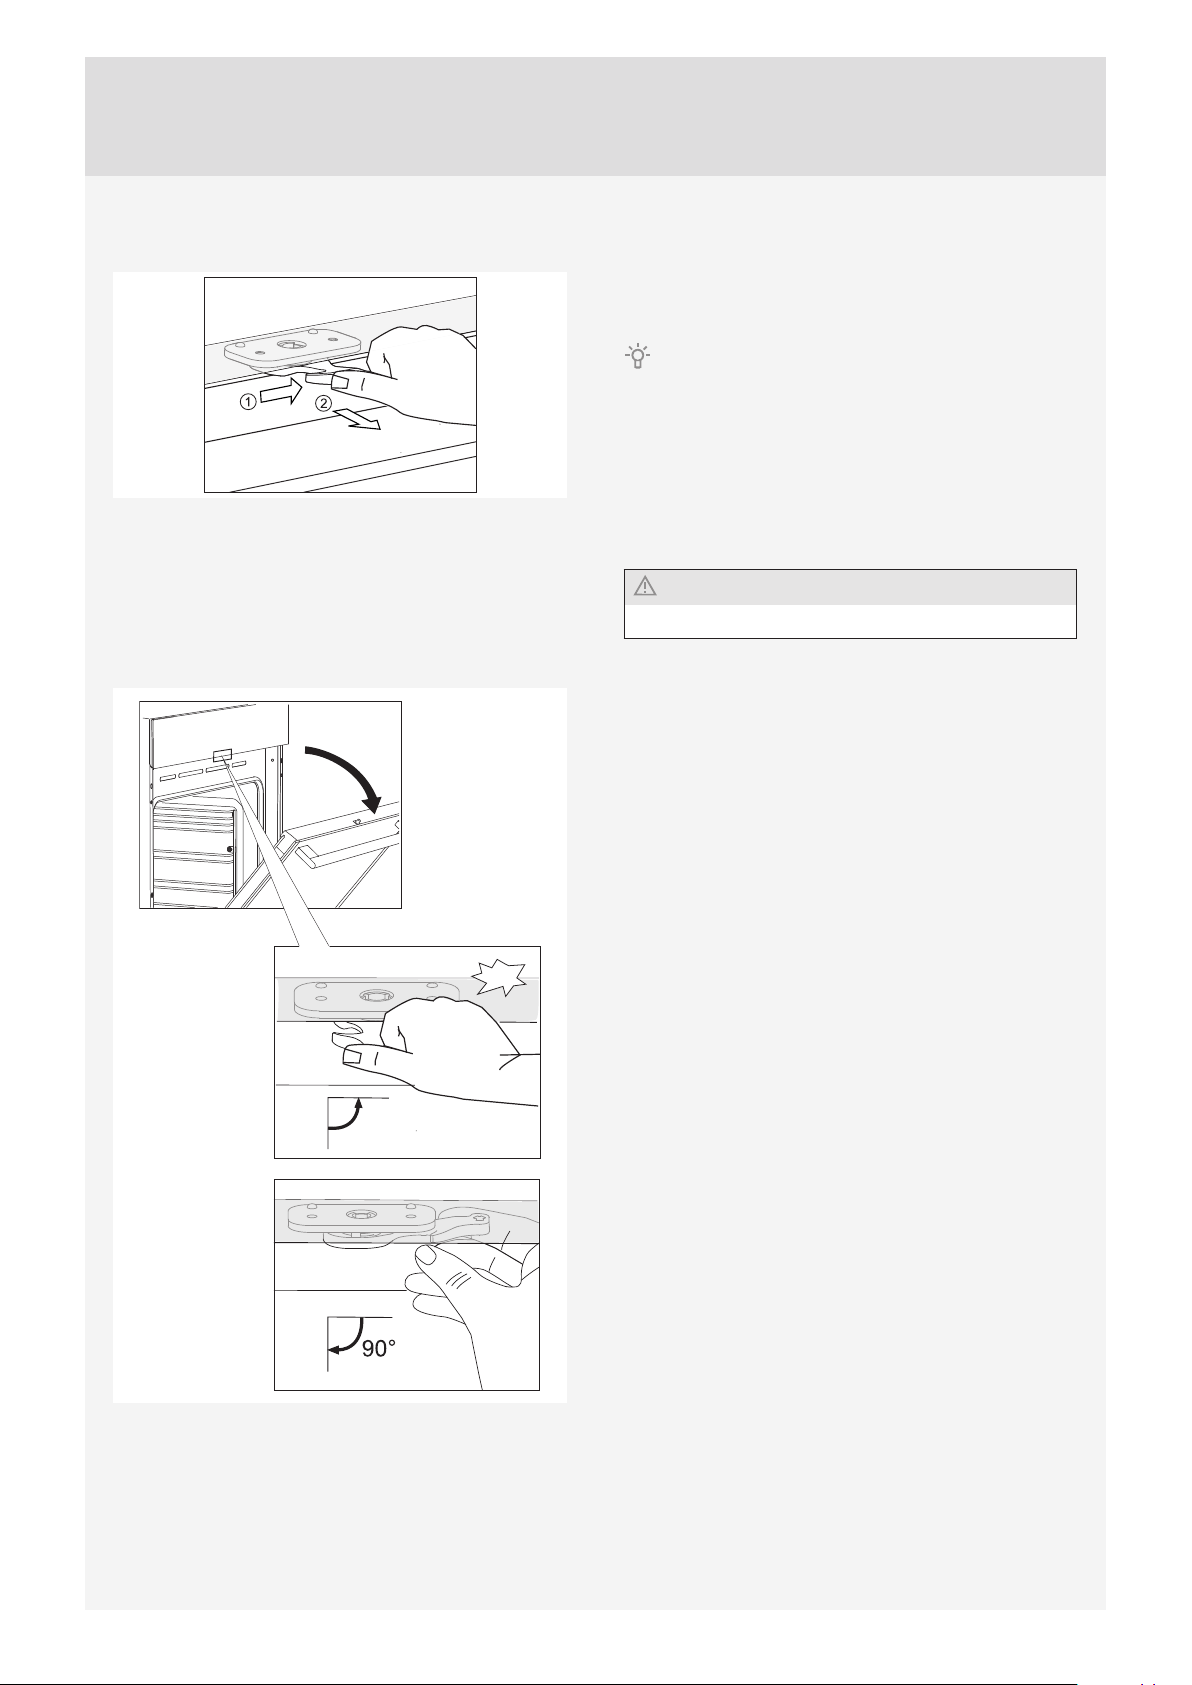
DOOR LOCK (depending on the model)
To open it, gently push it to the right with your thumb and
pull the door outwards at the same time.
When the oven door is closed, the door lock
automatically returns to the initial position.
DEACTIVATING AND ACTIVATING THE DOOR LOCK
The oven should be cooled down completely.
First, open the oven door.
90°
klik
Push the door lock to the right by 90° with your thumb
until you feel a click. The door lock is not deactivated.
To reactivate the door lock, open the oven door and use
your right-hand index fi nger to pull the lever towards you.
42
Page 43
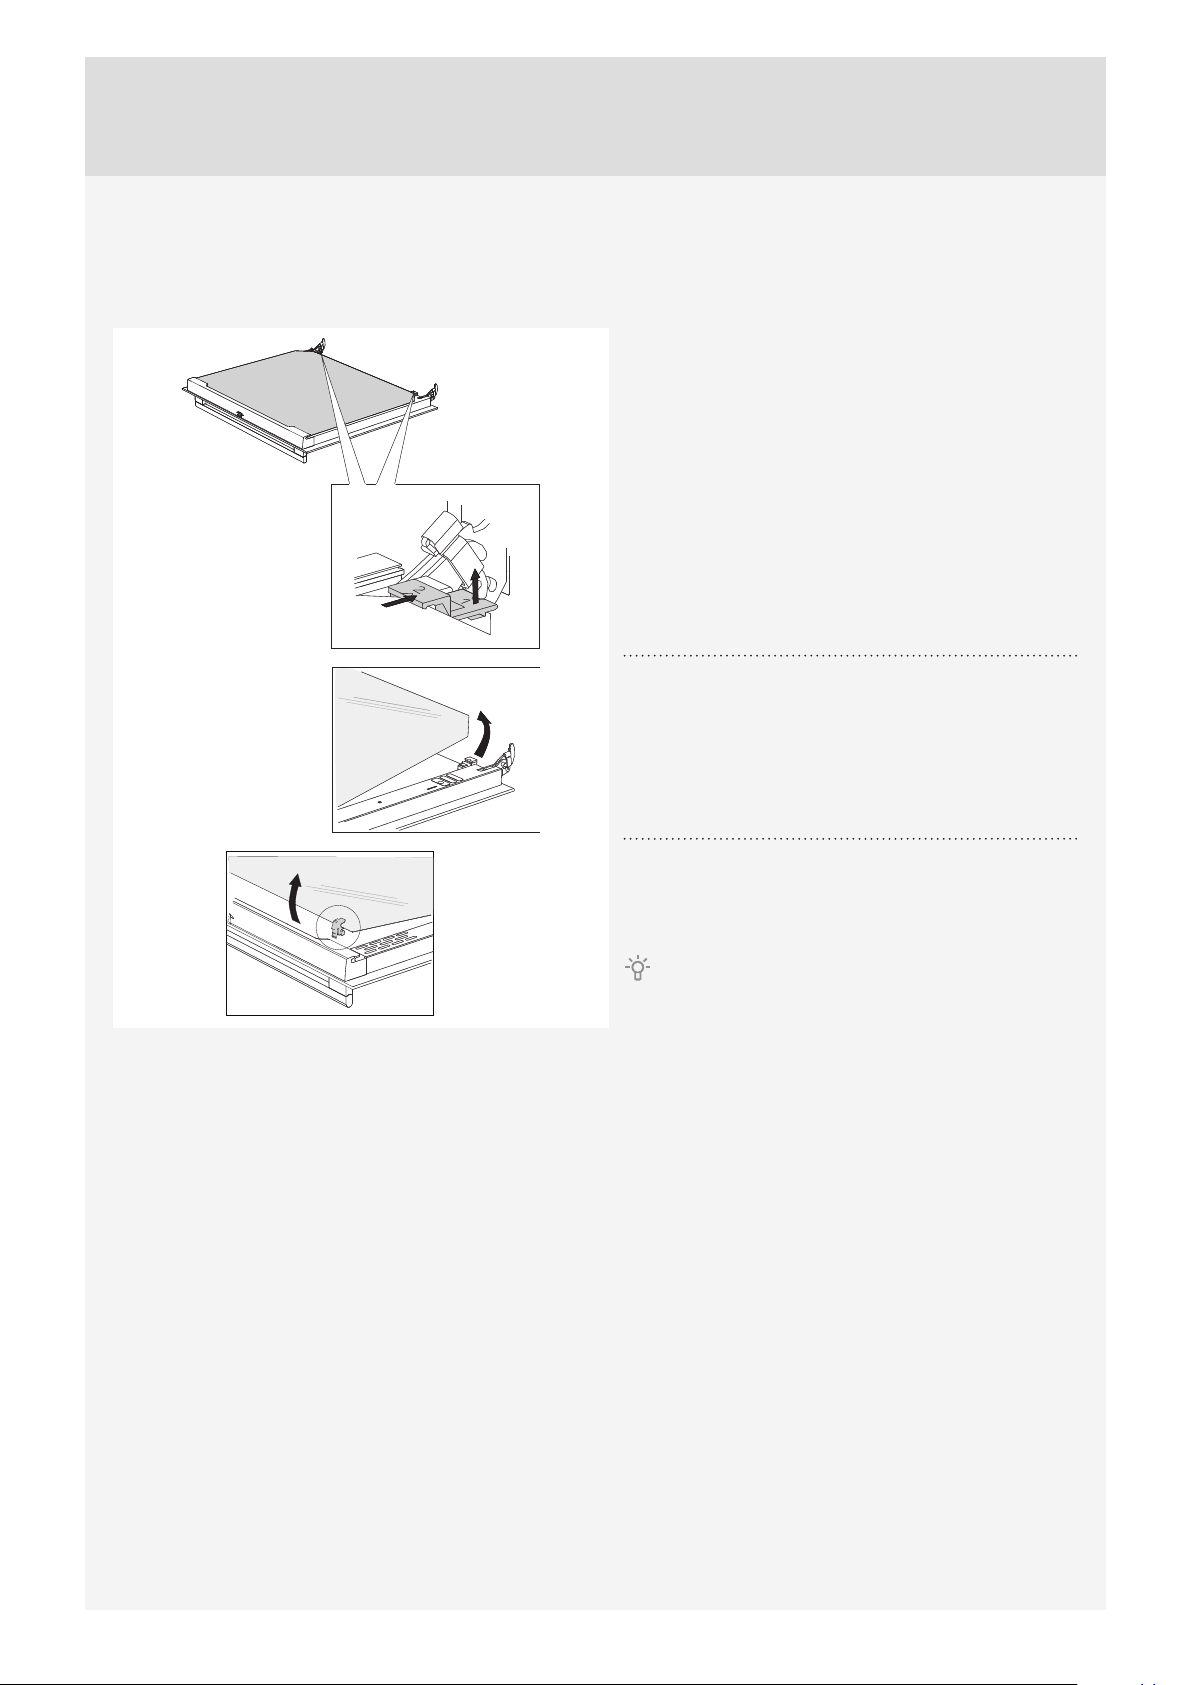
REMOVING AND INSERTING THE OVEN DOOR GLASS PANE
Oven door glass pane can be cleaned from the inside, but it has to be removed fi rst. Remove the oven door (see chapter
”Removing and replacing the oven door”).
Slightly lift the supports on the left and right side of
the door (marking 1 on the support) and pull them
1
away from the glass pane (marking 2 on the support).
Hold the door glass pane by the lower edge; slightly
lift it so that it is no longer attached to the support;
2
and remove it.
To remove the third glass pane (only with some
models), lift and remove it. Also remove the rubber
3
seals on the glass pane.
To replace the glass pane, observe the reverse
order. The markings (semicircle) on the door and the
glass pane should overlap.
43
Page 44
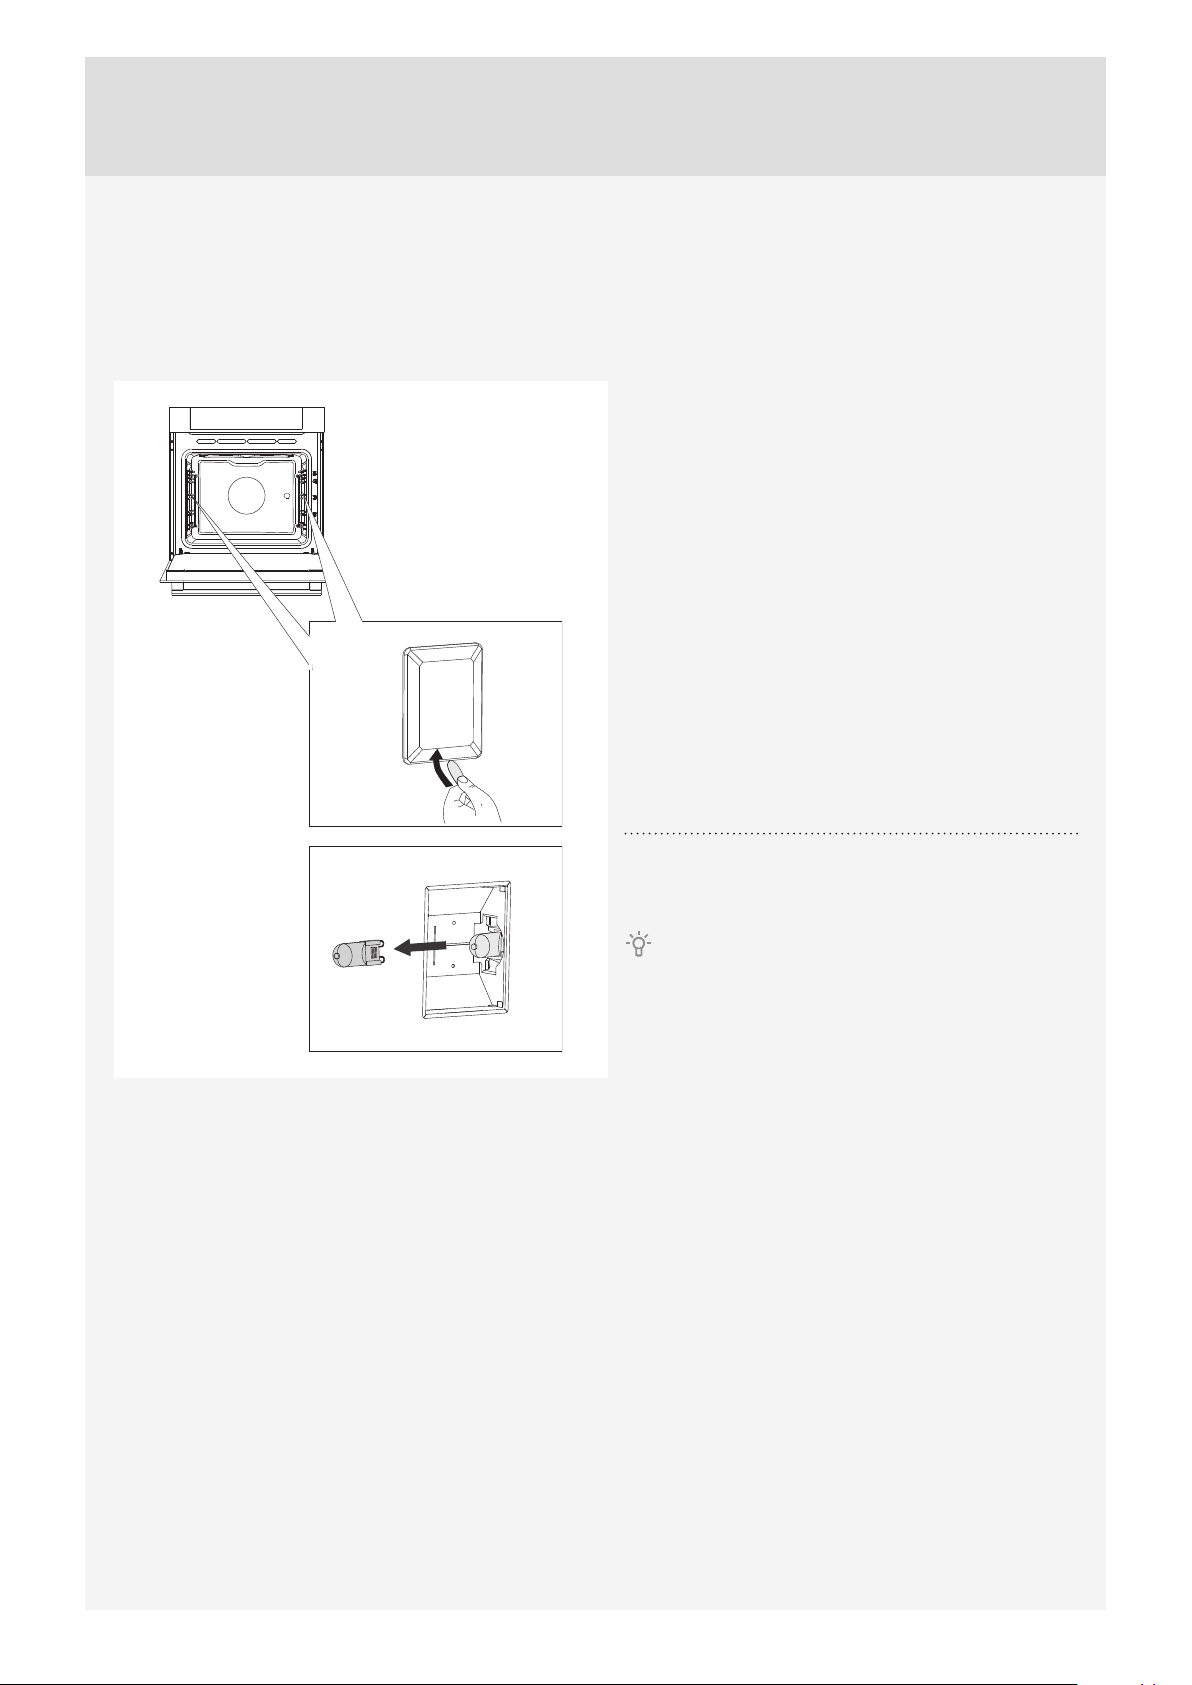
REPLACING THE BULB
The bulb is a consumable and therefore not covered by warranty. Before changing the bulb, remove the trays, the grid,
and the guides.
Use a Phillips (cross) screwdriver.
(Halogen lamp: G9, 230 V, 25 W)
Undo the four screws on the cover. Remove the cover
and the glass.
1
Remove the halogen light bulb and replace it with a
new one.
2
Use protection to avoid burs.
44
Page 45
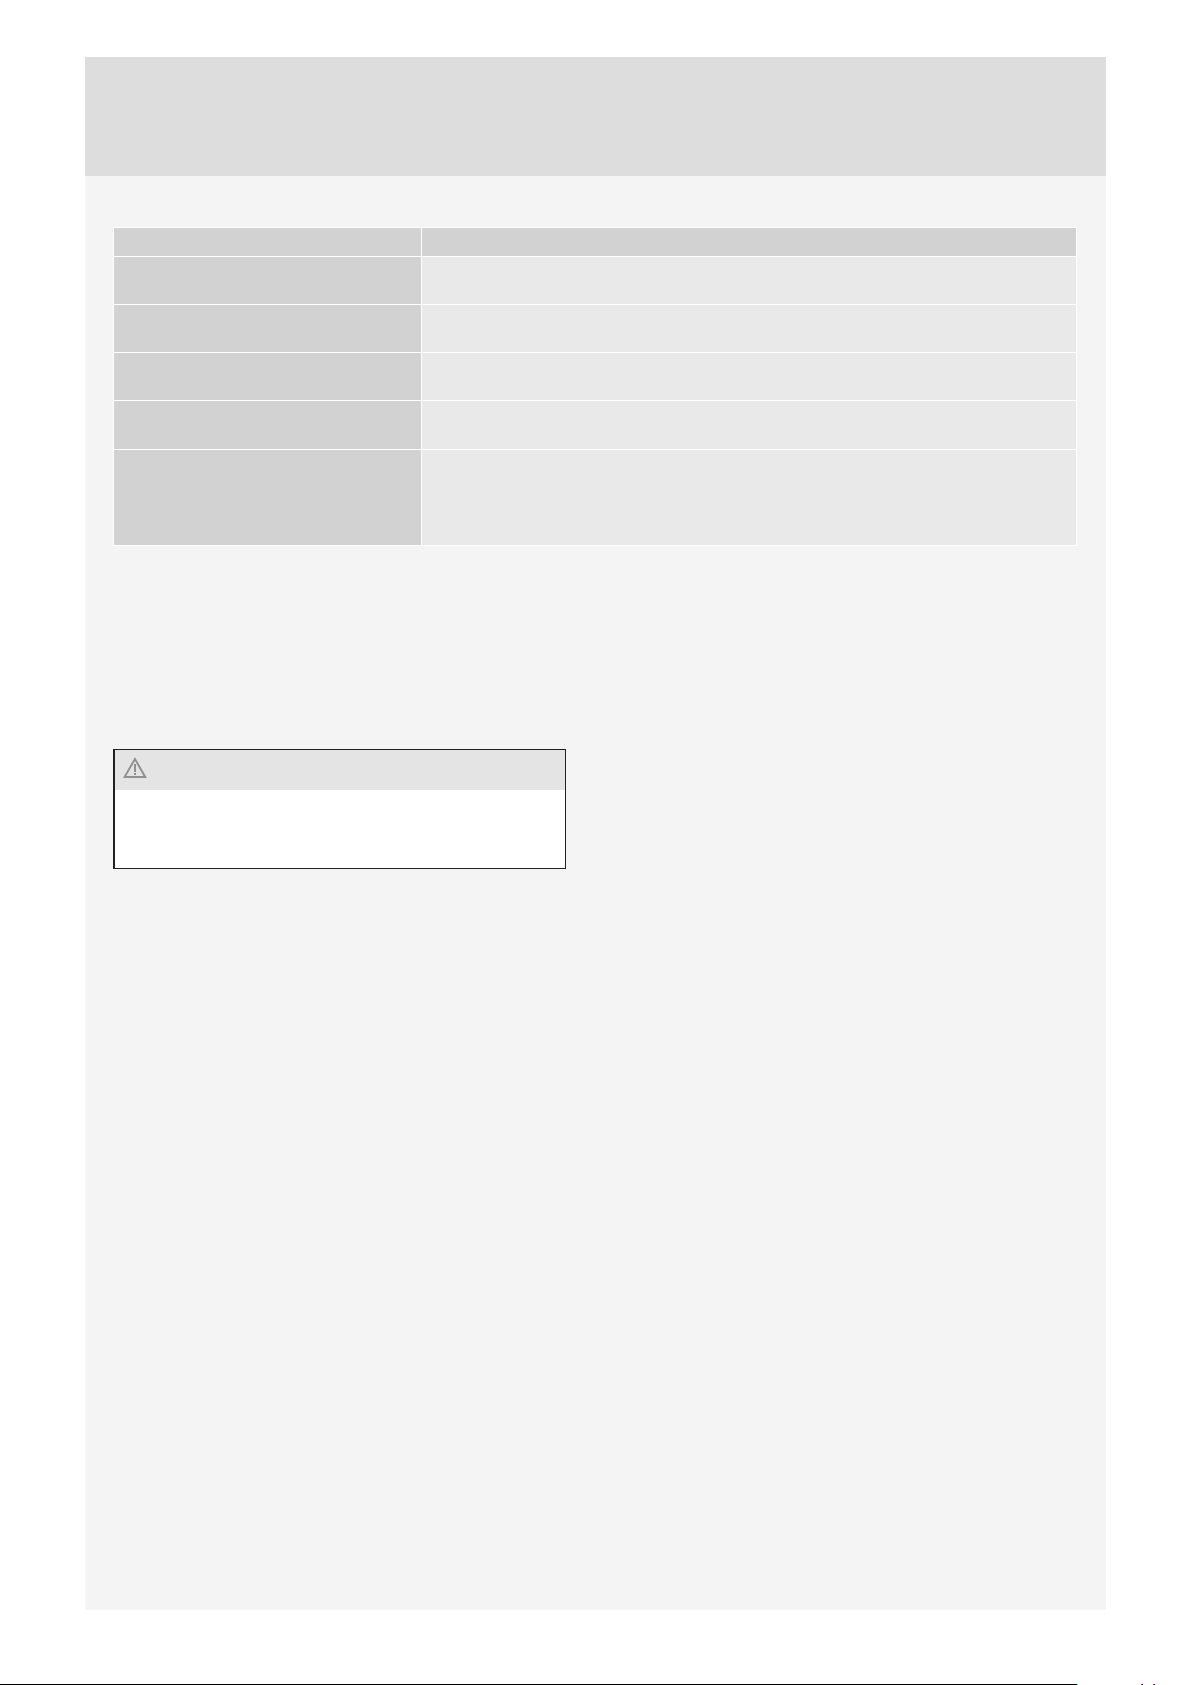
TROUBLESHOOTING TABLE
Problem/error Cause
There is no response of the
sensors; the display is frozen.
The main fuse in your home trips
often.
The oven lighting does not work. The process of changing the light bulb is described in the chapter.
The pastry is underdone. Did you choose the right temperature and heating system?
Error code is displayed: ERRXX ...
* XX denotes the number/code of
the error.
If the problems persist despite observing the advice
above, call an authorized service technician. Repair or
any warranty claim resulting from incorrect connection
or use of the appliance shall not be covered by the
warranty. In this case, the user will cover the cost of
repair.
Disconnect the appliance from the power mains for a few minutes (undo the fuse
or switch off the main switch); then, reconnect the appliance and switch it on.
Call a service technician.
Cleaning and Maintenance.
Is the oven door closed?
There is an error in the electronic module operation. Disconnect the appliance
from the power mains for a few minutes. Then, reconnect it and set the time of
day.
If the error is still indicated, call a service technician.
Before the repair, disconnect the appliance from the
power mains (by removing the fuse or by removing the
plug from the wall outlet).
45
Page 46

DISPOSAL
Packaging is made of environmentally
friendly materials that can be recycled,
disposed of, or destroyed without any
hazard to the environment. To this end,
packaging materials are labelled appropriately.
The symbol on the product or its packaging indicates
that the product should not be treated as normal
household waste. The product should be taken to an
authorized collection center for waste electric and
electronic equipment processing.
Correct disposal of the product will help prevent any
negative eff ects on the environment and health of people
which could occur in case of incorrect product removal.
For detailed information on removal and processing of
the product, please contact the relevant municipal body
in charge of waste management, your waste disposal
service, or the store where you bought the product.
46
We reserve the right to any changes and errors in the instructions for use.
Page 47

Page 48

MULIT_PIROLIZA_TFT_60
en (02-18)
 Loading...