

Page 1
OPERATING INSTRUCTIONS
Dishwasher
EN
DBI675IXXLS.U
DBI675THXXLS.U
DBI675PHXXLS.U
Page 2

Contents
3Your dishwasher ........................................
If the dishwasher is turned off due to a power
3Welcome to our growing ASKO family! .......
failure ...........................................................
4Important safety instructions ...................
4General ........................................................
5Child safety ..................................................
5Activate child lock (Kid Safe™) ...................
5Installation ....................................................
5Winter storage/Transport .............................
5Overflow guard function ..............................
5Packing material ..........................................
5Disposal .......................................................
7Before washing for the first time ..............
71. Water hardness ........................................
72. Basic settings ..........................................
9Greener dishwashing ................................
9The dishwasher saves energy and water .....
10Loading the dishwasher ............................
10Fragile dishes ..............................................
10Loading affects the results ..........................
10The baskets .................................................
11Upper basket ...............................................
12Middle basket ..............................................
Adjust the height and slide the dishwasher
12Lower basket ...............................................
into place .....................................................
13Cutlery basket ..............................................
14Typical load .................................................
16Using the dishwasher ................................
16Add detergent ..............................................
17The main power switch ................................
17Select program ............................................
18Select program mode ..................................
18Select option ................................................
19Starting the dishwasher ...............................
19Time remaining ............................................
19Status light™ ................................................
20Stopping or changing a program ................
20If you want to load more dishes ...................
20
20Once the program has finished ...................
20How to get the best drying results ...............
20Unloading the dishwasher ...........................
22Program chart ..............................................
23Settings .......................................................
23Open the dishwasher's Settings menu ........
25Care and maintenance instructions .........
25Add rinse aid ...............................................
25Cleaning the filters .......................................
26Cleaning the spray arms and spray pipes ...
27Clean the dishwasher inside and out ..........
28Remove blockages ......................................
29Troubleshooting .........................................
35Installation instructions ............................
35Important safety instructions ........................
36Transport protection for the door .................
36Trim kit .........................................................
36Placing the dishwasher ................................
37Fit the protective film ....................................
37
38Drain connection ..........................................
39Connection to water supply .........................
40Electrical connection ...................................
41Screwing the dishwasher into place ............
42Dishwasher toe kick .....................................
43Service ........................................................
43Limited Warranty – Residential Appliances ..
43Items excluded from warranty .....................
43Disclaimer ....................................................
44ASKO Customer Care ..................................
44Service after expiration of limited warranty ...
45Technical information ................................
45Technical data .............................................
Page 3
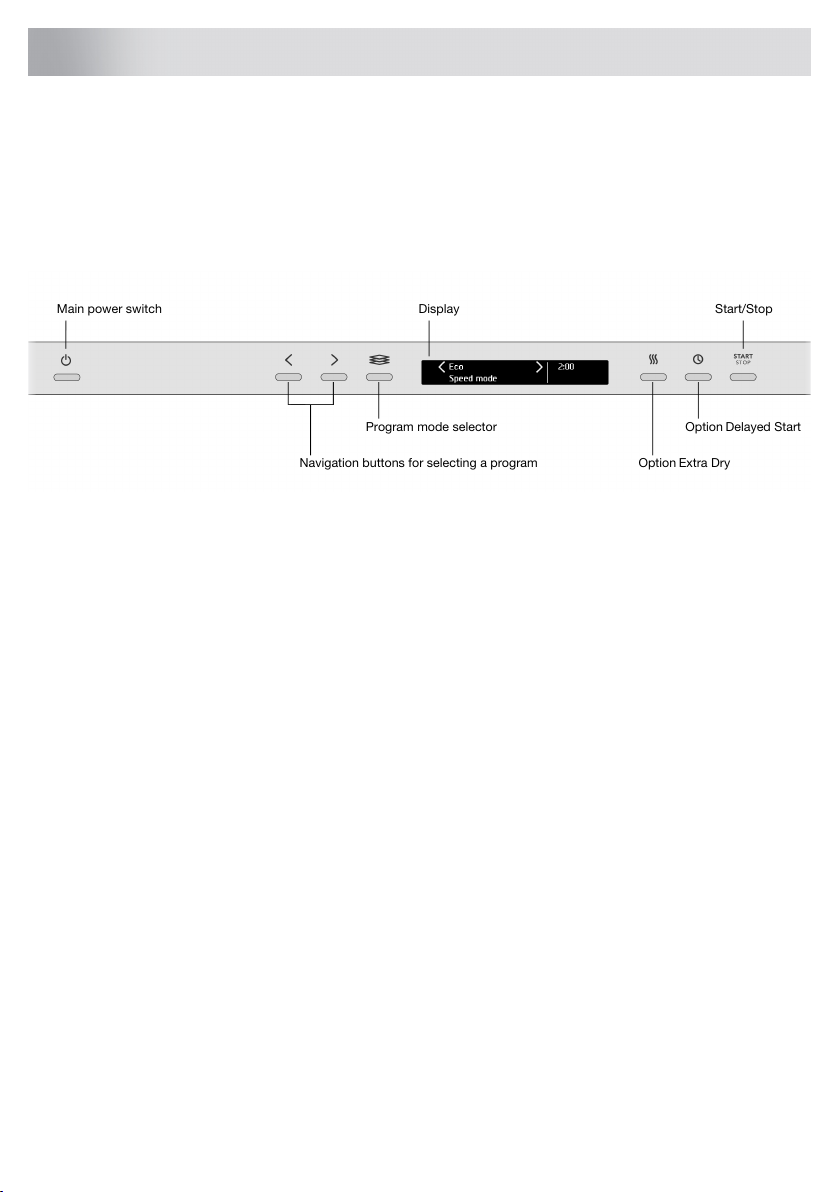
Display Start/Stop
Program mode selector
Navigation buttons for selecting a program
Option Delayed Start
Option Extra Dry
Main power switch
Your dishwasher
Welcome to our growing ASKO family!
We are proud of our appliances. We want them to help make the world a better place – improving
the quality of life for you and your loved ones. We hope that this appliance will be an appreciated
and dependable device for many years to come.
Please read the operating instructions before use. They include general tips, information about the
settings and adjustments you can make, and how best to care for your appliance.
Install the dishwasher, see the chapter Installation instructions. Following this, open the door and
press the main power switch to start using the machine.
"Welcome to your new ASKO. This is a first time set up." is shown on the display the first time
the dishwasher is switched on. It is important that you choose the right settings to ensure good
dishwashing results. See page 7.
3
Page 4
Important safety instructions
SAVE THESE INSTRUCTIONS FOR FUTURE REFERENCE
WARNING!
When using your dishwasher, follow basic precautions, including the following:
• Read all instructions before using the dishwasher.
• Use the dishwasher only for its intended function.
• Use only detergents or wetting agents recommended for use in a dishwasher and keep them
out of the reach of children.
• When loading items to be washed:
– locate sharp items so that they are not likely to damage the door seal, and
– load sharp knives with the handles up to reduce the risk of cut-type injuries.
• Do not wash plastic items unless they are marked “dishwasher safe” or the equivalent. For
plastic items not so marked, check the manufacturer’s recommendations.
• Do not operate the dishwasher unless all enclosure panels are properly in place.
• Do not tamper with controls.
• Do not abuse, sit on, or stand on the door or dish rack of the dishwasher.
• To reduce the risk of injury, do not allow children to play in or on a dishwasher.
• Under certain conditions, hydrogen gas may be produced in a hot water system that has not
been used for two weeks or more. HYDROGEN GAS IS EXPLOSIVE. If the hot water system
has not been used for two weeks, before using the dishwasher turn on all hot water faucets
and let the water flow from each for several minutes. This will release any accumulated hydrogen gas. As the gas is flammable, do not smoke or use an open flame during this time.
• Remove the door to the washing compartment when removing an old dishwasher from service
or discarding it.
• Read the grounding instructions in the installation instructions.
General
• Do not run the dishwasher while you are out of the home.
• Do not store or use combustible materials, gasoline, or other flammable vapors and liquids in
the vicinity of this or any other appliance.
• Disconnect electrical power to dishwasher before servicing.
• Repairs should be done by a qualified technician.
WARNING!
PROPOSITION 65 FOR CALIFORNIA RESIDENTS
Cancer and Reproductive Harm – www.P65Warnings.ca.gov
4
Page 5
Important safety instructions
Child safety
• Always keep small children away from the machine when it is open. There may be some detergent
residue left inside the machine.
• Always close the door and start the dishwasher as soon as you put in the detergent.
• If dishwasher detergent gets in someone’s eyes, rinse them with plenty of water for at least 15
minutes.
• Should a child swallow dishwasher detergent or rinse aid, give plenty to drink immediately, i.e.,
one or two glasses of milk or water. Do not try to induce vomiting. Seek medical advice immediately: Call the National Capital Poison Center at 1-800-222-1222.
WARNING!
Dishwasher detergents and rinse aids are corrosive, so always keep them out of reach of children.
Activate child lock (Kid Safe™)
You can activate the child lock (button lock) to prevent children from starting the dishwasher. See
the chapter Settings.
Installation
See the chapter Installation instructions.
Winter storage/Transport
Store the dishwasher above freezing and avoid long transport distances in very cold weather.
Transport the dishwasher upright or laying on its back.
Overflow guard function
The overflow protection starts pumping out the machine and turns off the water supply if the water
level in the dishwasher exceeds the normal level. If the overflow protection is triggered, Overfilling
water appears on the display. Turn off the water supply and contact your nearest service center.
Packing material
The outer packaging protects the product during transport. The packaging material is recyclable.
Separate the different packaging materials to help reduce raw material use and waste. Your dealer
can take the packaging for recycling or direct you to the nearest recycling center. The packaging
is comprised of:
• Corrugated cardboard made from up to 100% recycled material.
• Expanded polystyrene (EPS) with no added chlorine or fluorine.
• Supports made from untreated wood.
• Protective plastic made from polyethylene (PE).
Disposal
The dishwasher is manufactured and labeled for recycling.
When the machine has reached the end of its service life and is to be disposed of, it should immediately be made unusable. Pull out the power cable and cut it as short as possible.
5
Page 6

Important safety instructions
Contact your municipality for information about where and how your dishwasher can be recycled
correctly.
6
Page 7
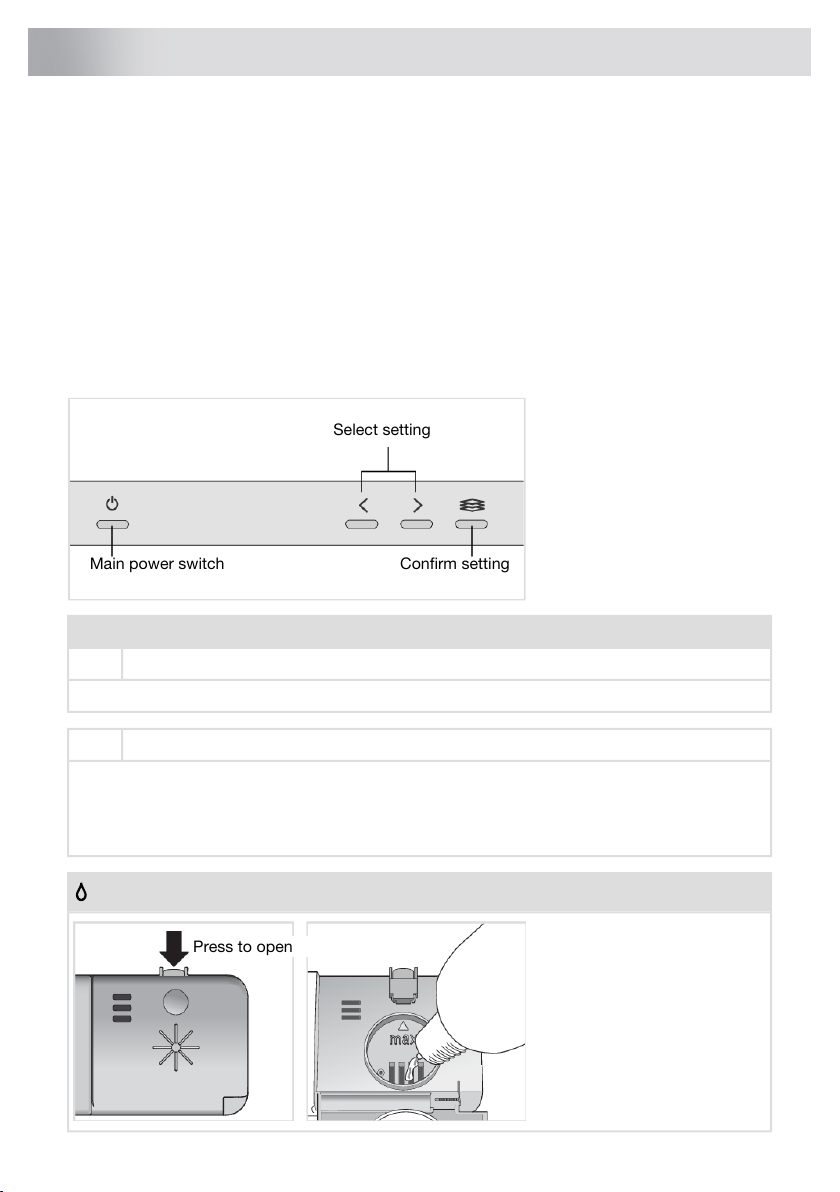
Confirm setting
Select setting
Main power switch
Press to open
Before washing for the first time
1. Water hardness
In order to achieve good dishwashing results, the dishwasher needs soft water (water with low mineral content). Hard water leaves a white coating on dishes and the dishwasher.
Contact the local water utility to check the water hardness in your area. This is important to determine
how much detergent and rinse aid to use.
In general, more rinse aid and detergent are needed for hard water.
2. Basic settings
Open the door and press the main power switch.
"Welcome to your new ASKO. This is a first time set up." is shown on the display. It is important
that you choose the right settings to ensure good dishwashing results.
Settings
Language1.
Select the language to be shown on the display.
Rinse aid 0/1/2/3/4/52.
Use rinse aid to improve wash and dry times. Also use rinse aid to achieve clear and spotless results.
Select rinse aid dosage. The rinse aid dispenser can be adjusted between 0 (Off) and 5 (High
dosage).
Pre-selected at factory: 5
Add rinse aid
7
Page 8

Before washing for the first time
Add rinse aid
1. Open the rinse aid compartment lid.
2. Carefully top up with rinse aid to the level marked max.
3. Wipe up any spilled rinse aid around the compartment.
4. Close the lid firmly.
To change the chosen setting, see the chapter Settings.
8
Page 9

Greener dishwashing
The dishwasher saves energy and water
When using a dishwasher in a residential setting, less energy and water are generally used compared
to washing the dishes by hand.
Do not rinse under running water
Do not rinse the dishes under running water as this will lead to increased energy and water consumption. Simply scrape off large food particles before loading the dishwasher.
Choose a green detergent
Read the environmental declaration on the packaging!
Too much detergent and rinse aid can result in less effective dishwashing and lead to a greater
environmental impact.
Run a fully loaded dishwasher
Save energy and water by waiting until the dishwasher is full before running a program. Use the
Rinse and hold program to rinse the dishes if there are any unpleasant odors.
Run programs at a lower temperature
If the dishes are only lightly soiled, you can select a program with a low temperature.
Select dishwashing program – Eco
This program is the most effective in terms of energy consumption.
Select program mode – Green mode
The dishwasher has different program modes. To save energy and water, use Green mode. (Available
with: Normal , Light)
Open the door a little once the program has finished
Better drying results are achieved if you open the door a little once the program has ended. (If the
dishwasher is built-in, the surrounding furnishings must be resistant to any condensation from the
dishwasher.)
Connect to cold water
Connect the dishwasher to the cold water supply if the building is heated using oil, electricity, or
gas.
Connection to hot water supply
Connect the dishwasher to the hot water supply (max. 160 °F (70 °C)) if the building is heated using
an energy-efficient means such as district heating, solar power, or geothermal power. Choosing a
hot water connection cuts dishwashing times and reduces the dishwasher's energy consumption.
NOTE!
Do not exceed the permitted water supply temperature. Certain materials used in some cookware
cannot withstand strong heat.
9
Page 10

Loading the dishwasher
Fragile dishes
Some cookware is not dishwasher safe. This can be for several reasons. Some materials cannot
withstand high temperatures, others can be damaged by dishwasher detergent.
Use caution with, for example, handmade items, fragile decoration, crystal/glassware, silver, copper,
tin, aluminum, wood, and plastic. Look for the "Dishwasher safe" marking.
Fragile decoration
Porcelain with decoration on top of the glazing (the items feel rough) should not be washed in a
dishwasher.
Crystal/Glass
Wash fragile items made of crystal/glass, such as crystal glass from Orrefors, using the gentle
dishwashing program Crystal . Remember to use a small amount of detergent and to place items
so that they do not touch each other during the wash.
Use rinse aid to improve wash and dry times. Also use rinse aid to achieve clear and spotless results.
Hand-painted glassware, as well as antique and very fragile items, should not be washed in a
dishwasher.
Silver
Silver and stainless steel items should not come into contact, as the silver can become discolored.
Aluminum
Aluminum can lose its shine if washed in a dishwasher. However, good quality aluminum pans can
be washed in a dishwasher, even if some of the shine will be lost.
Cutlery with glued handles
Some types of glue are not dishwasher safe. In such cases, the handles may loosen.
Loading affects the results
Load the dishes carefully to ensure the best washing and drying results with the lowest possible
energy and water consumption. Give your dishwasher the best chance to reach and clean all surfaces,
as well as to dry the dishes as thoroughly as possible.
• All dirty surfaces should face in and down!
• Dishes should not be placed in or on each other.
• Angle dishes with hollows, such as cups, so that the rinse water will run off. This is also important
for plastic items.
• Place the upper basket in its highest position when dishwashing very large plates.
• Make sure small items cannot fall through the dishwasher basket; place them in the cutlery
basket.
NOTE!
Check that the spray arms can rotate freely.
The baskets
The dishwasher includes an upper, a lower, and a cutlery basket.
The basket appearance may differ depending on the configuration.
10
Page 11
Loading the dishwasher
Upper basket
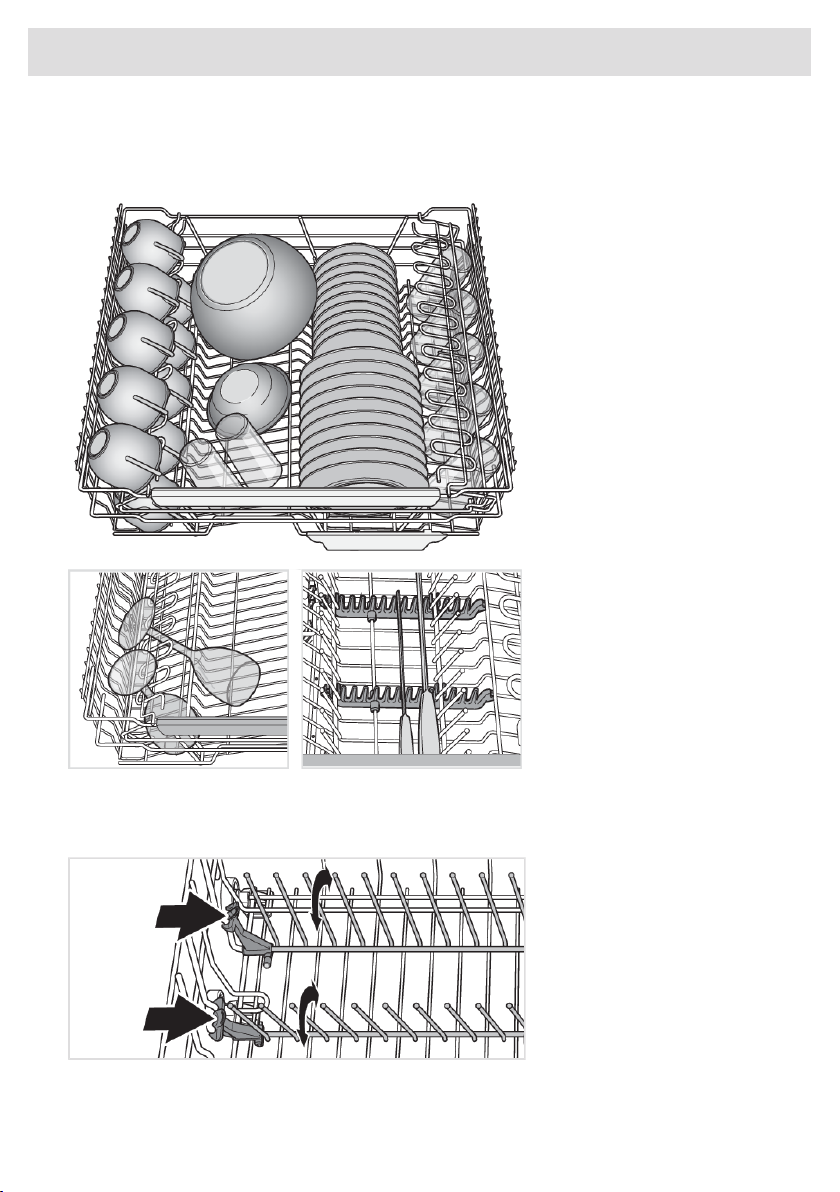
Place glasses, cups, bowls, side plates, and saucers in the upper basket. Place all soiled surfaces
down! Place wine glasses on the wine glass shelf. Place knives in the knife stand on the right.
Foldable tines
The foldable tines can be folded up or down to make it easier to load pots, bowls, and glasses. Release the foldable tines by pressing the catch inward before adjusting their position.
Raising the upper basket
1. Pull out the upper basket.
2. Grab the sides of the upper basket with both hands and lift it up.
11
Page 12
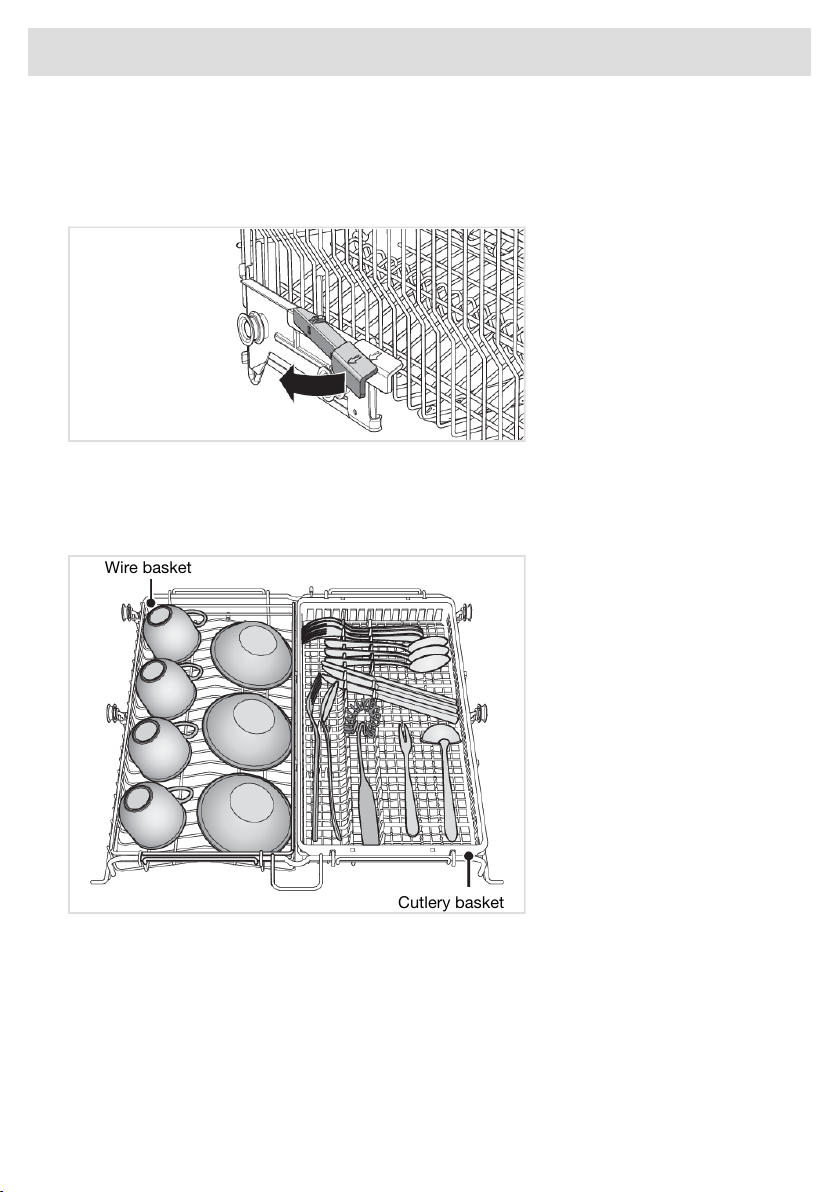
Wire basket
Cutlery basket
Loading the dishwasher
Lowering the upper basket
1. Pull out the upper basket.
2. While holding the basket, pull out the two locking handles on either side to lower the upper
basket.
Middle basket
The middle basket with the spray pipe is suitable for low items.
The middle basket's utensils basket has space for ladles, whisks, serving cutlery and similar items.
Washing larger items
The two baskets in the middle basket can be removed, or the entire middle basket can be removed,
to create more space between the upper and lower baskets if larger items are being washed.
Lower basket
Place plates, side plates, serving dishes, pots, and cutlery (in the cutlery basket) in the lower basket.
Place pots and pans in the right rear of the lower basket for the best cleaning results from the two
rear spray nozzles (WideSpray™), which are intended for these types of dishes.
12
Page 13
Loading the dishwasher
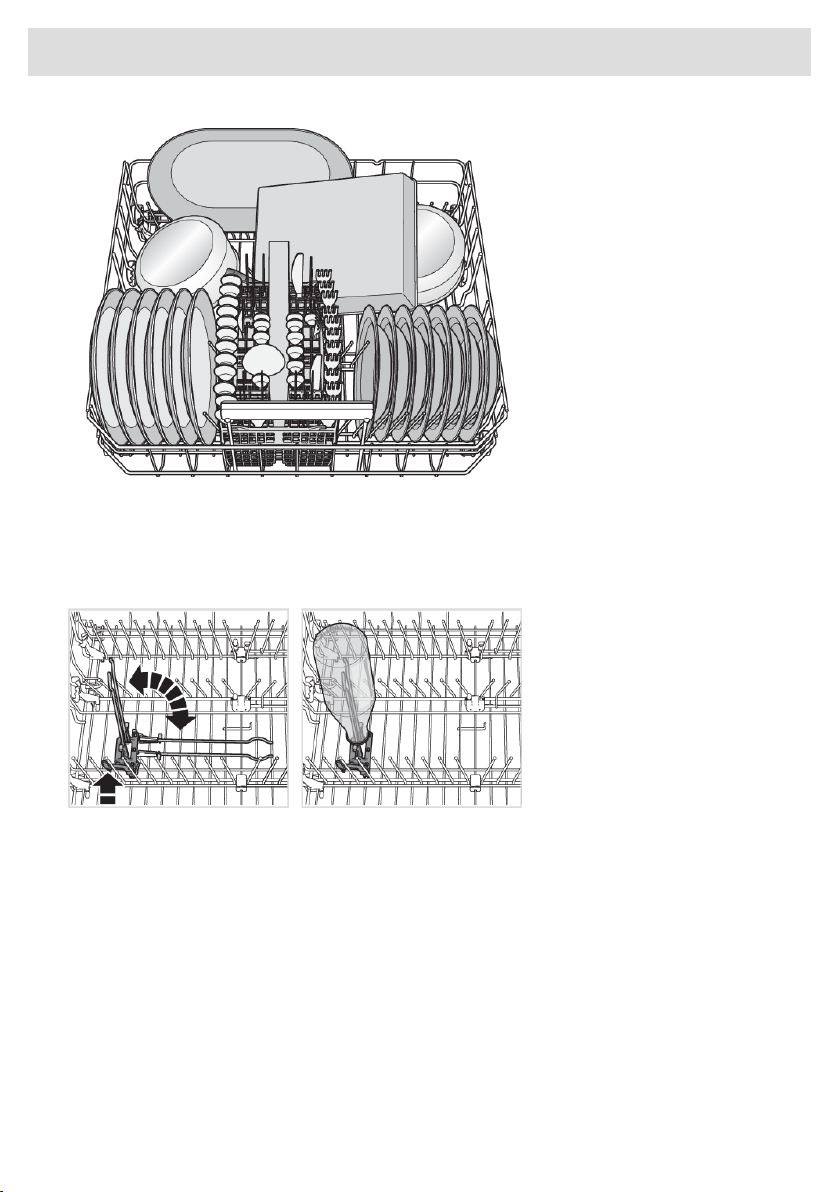
Foldable tines
Lower the foldable tines when washing large pots. Release the foldable tines by pressing the catch
inward before adjusting their position. In the rear right part of the lower basket, half of the foldable
tines can be folded when washing, for example, stoneware or a large pan.
Vase and bottle holder
Washing large plates
Move adjustable tines and their mounts to widen the distance between the tine rows to adapt the
lower basket to plates with a diameter greater than 9 3/4" (25 cm).
Cutlery basket
Place cutlery with the handles facing down, except for knives, and spread them out as much as
possible. Ensure that spoons do not stack inside each other.
The cutlery basket is best placed in the middle at the front of the lower basket to best utilize dishwashing performance from the unique spray nozzle (Power Zone Cutlery™), which is intended for
the cutlery basket.
13
Page 14
Loading the dishwasher
WARNING!
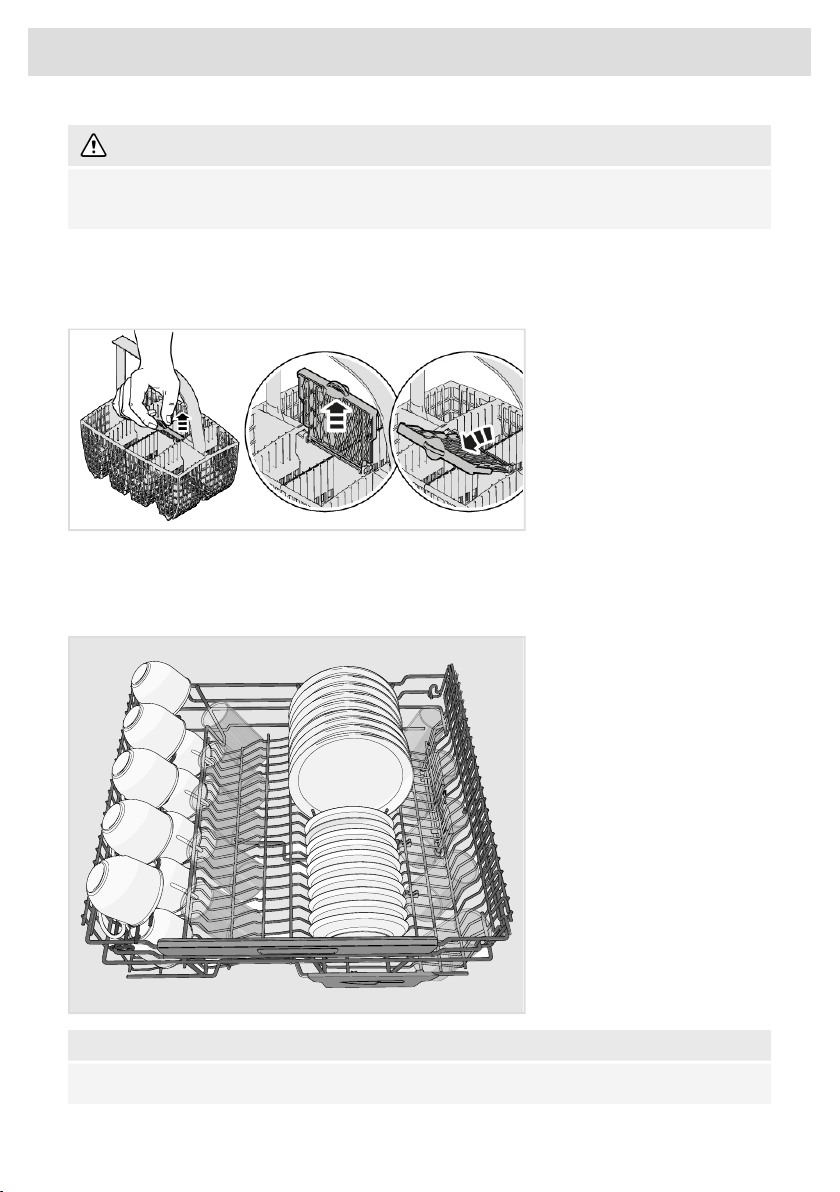
Knives and other pointed items must be placed with the points down in the cutlery basket or
horizontally in other baskets.
Fold-down section for small items
The cutlery basket has a fold-down section in the middle for small items, or small shafts, such as
electric whisk attachments.
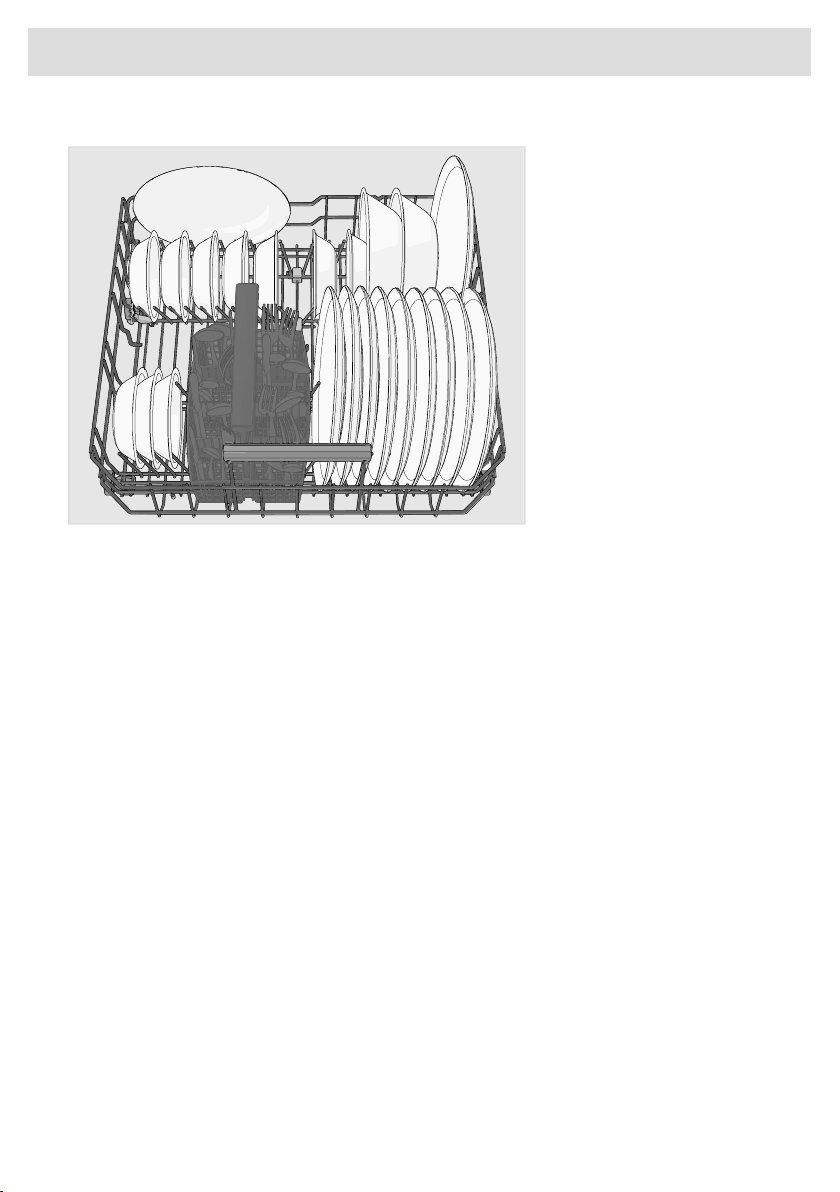
Typical load
Recommended for daily, regular, or typical use.
Upper basket
NOTE!
Ensure the upper basket is set to its lowest position.
14
Page 15
Lower basket
Loading the dishwasher
15
Page 16
Press to open
Using the dishwasher
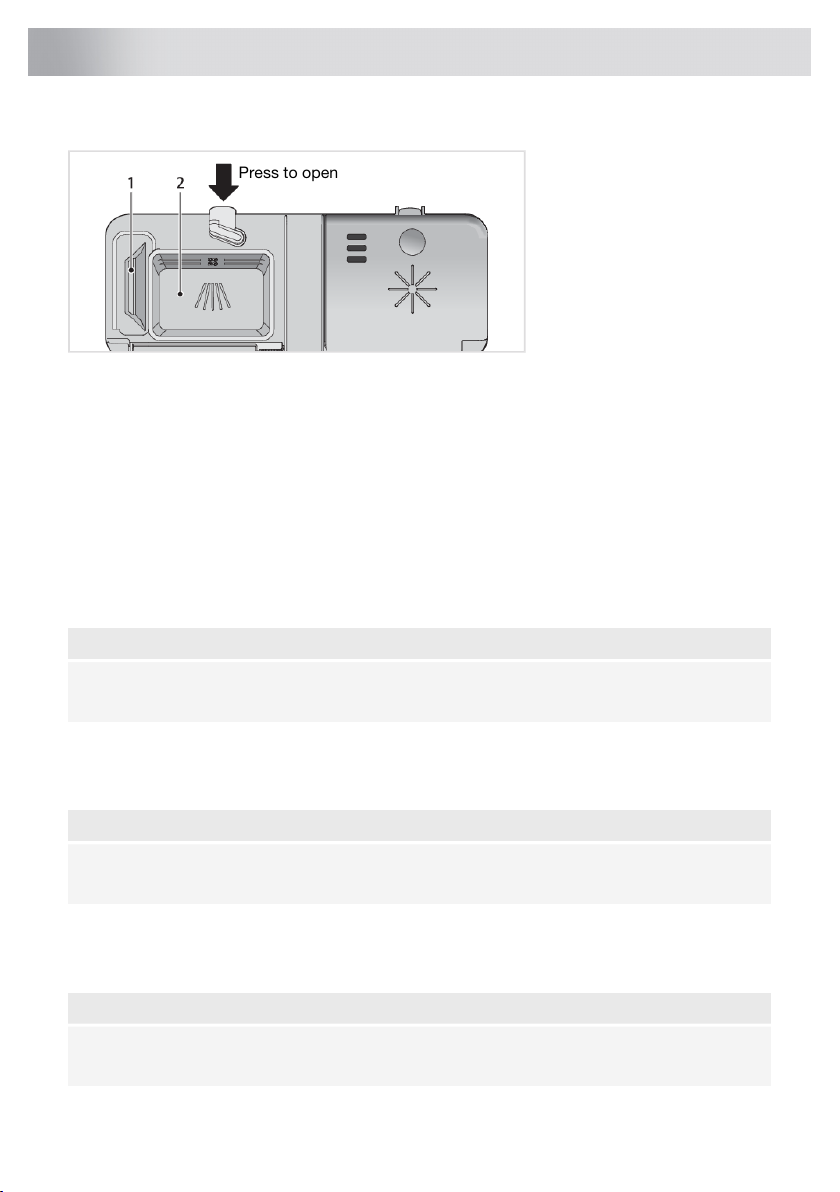
Add detergent
1. Prewash detergent compartment
2. Main wash detergent compartment
Detergent is added according to water hardness.
Follow the instructions on the detergent packaging.
Too much detergent can result in less effective dishwashing and also entails greater environmental
impact.
The detergent compartment must be dry when adding detergent. There is one compartment for the
prewash and one for the main wash. If powder or liquid dishwasher detergent is used, add a small
amount of the detergent to the prewash compartment. Contact the detergent manufacturer if you
have questions about the detergent.
NOTE!
Use only dishwasher detergent! Liquid hand-washing detergent must not be used as the foam
that forms prevents the dishwasher from operating effectively.
Dishwasher tablets
Halve the tablet if it is difficult to close the dispenser lid. There is a risk that the detergent will not be
released properly if the lid is tight and cannot open correctly.
NOTE!
Dishwasher tablets are not recommended for short programs (less than 75 minutes). Use powder
or liquid dishwasher detergent instead.
All-in-one detergent
There are many types of all-in-one detergents on the market. Read through the directions for these
products carefully.
NOTE!
Optimal washing and drying results are achieved by using normal dishwasher detergent together
with separately dispensed rinse aid.
16
Page 17
Select program mode Select any options
Open the door and press the main power switch.
Select program
Starting the dishwasher
Using the dishwasher
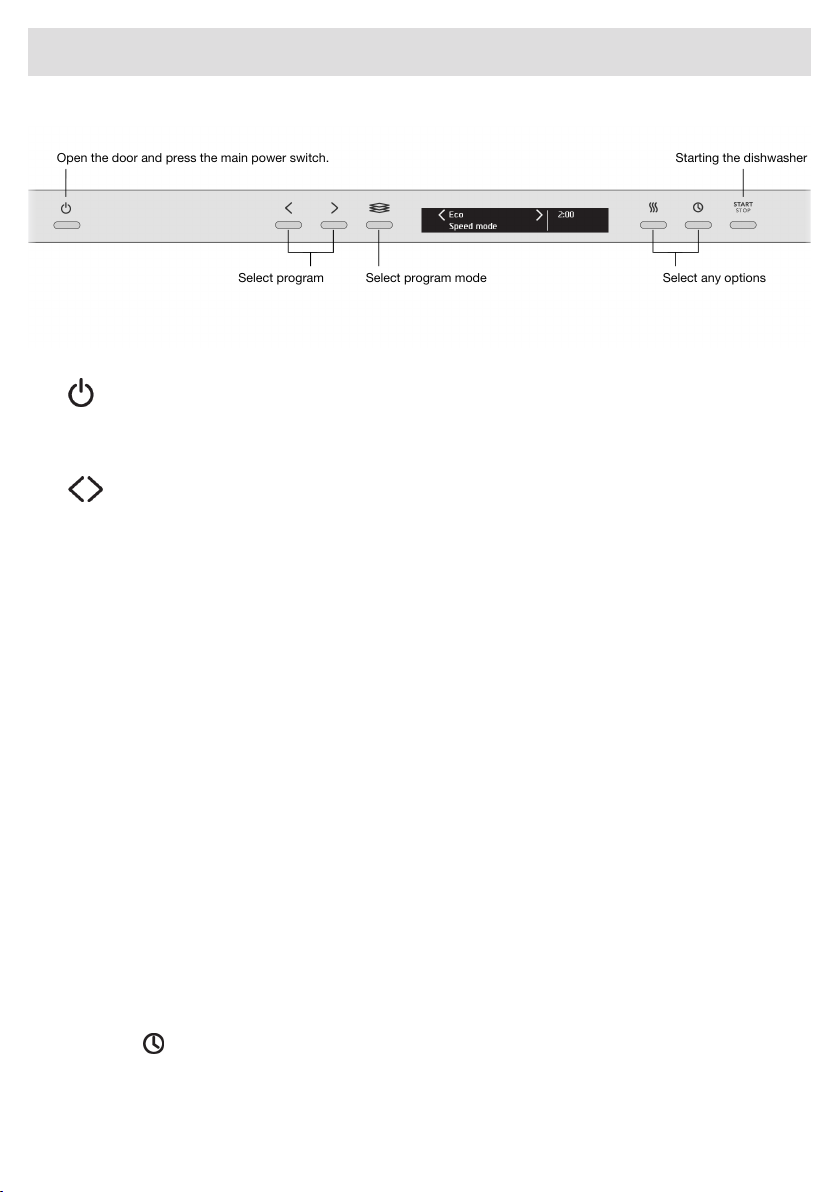
The main power switch
Open the door and press the main power switch. Also turn on the water supply valve if it is turned
off.
Select program
Select a program to suit the type of dishes and how dirty they are.
Normal
This program is recommended for daily, regular, or typical use to completely wash a full load of
normally soiled dishes, such as plates, serving dishes, cups, and glasses.
Eco
This program is the most effective in terms of energy consumption.
You can read more about greener dishwashing in the chapter Greener dishwashing.
Auto
The dishwasher can measure how dirty the dishes are and adjust water consumption and temperature
accordingly. When newly installed, the program needs to be run five times before it is fully adapted
and can provide the best results.
Light
An effective program for slightly dried leftovers. (This program is not intended for burnt food, such
as on oven dishes.)
Time
The program adapts to the specified running time or finish time. With this program, it is important to
choose a time suited to how dirty the dishes are.
Lightly soiled dishes0:15-0:45
Normally soiled dishes1:00-1:30
Press the option button to set the desired program time.
Rinse and hold
Use to rinse dishes while you wait for the dishwasher to become fully loaded.
Heavily soiled dishes2:00-2:30
17
Page 18
Using the dishwasher
Plastic
A program intended for washing plastic items that are dishwasher safe. This program has an extra
long drying cycle. Porcelain and glasses can also be washed.
Sanitize
This program is recommended for baby bottles and cutting boards when additional sanitation is required. The temperature is high in the main wash and in the final rinse.
Crystal
A gentle dishwashing program with a low temperature for washing fragile items made of crystal/glass,
such as crystal glass from Orrefors. Remember to use a small amount of detergent and to place
items so that they do not touch each other during the wash. See also Fragile dishes in the chapter
Loading the dishwasher. Porcelain that has just been used without dried leftovers can also be washed
using this program.
Self-cleaning
Self-cleaning program for sanitizing the dishwasher tub, spray arms, and spray pipes.
This program should be run (with no dishes in the machine) using regular dishwasher detergent or
citric acid. Special dishwasher cleaners are also available in stores. For the removal of limescale
deposits, see Dishwasher tub in the chapter Care and maintenance instructions.
Upper half
You can use this program if you only have cups and glasses that need washing in the upper basket.
Lightly soiled dishes can also be placed in the lower basket.
Lower half
You can use this program when you only want to wash plates and cutlery in the lower basket.
Lightly soiled dishes can also be placed in the upper basket.
Select program mode
To select a program mode, press the program mode selector until the desired mode is shown on
the display. The available program modes vary between programs.
Green mode
The dishwasher uses less energy and water. The program time is extended.
Speed mode
The program time is shortened, but the dishwasher uses more energy.
Night mode
Lower noise level during the dishwashing program. The program time is extended.
Intensive mode (Heat Boost)
The higher temperature dissolves grease on very dirty dishes, but the dishwasher consumes more
energy and water. The program time is extended.
Select option
To select an option, press the option button until the desired option is shown on the display. The
available options vary between programs.
Extra Dry (Heated drying option)
The Extra Dry option improves the drying results by using a longer drying cycle and a higher temperature in the final rinse. Energy consumption is slightly increased.
18
Page 19
Status light
Using the dishwasher
The Extra Dry option is pre-selected for some programs. You can deactivate this option to save time
and energy.
Delayed Start
When you select Delayed Start, the dishwasher will start 1-24 hours after you have pressed the
button Start/Stop and closed the door.
1. Press the button once to activate Delayed Start. Press the button several times – or hold it in –
to set the desired number of hours.
2. Press Start/Stop and close the door. The timer counts down and the dishwasher starts after the
selected delay.
If you want to cancel the Delayed Start option, open the door then press and hold Start/Stop for three
seconds.
Starting the dishwasher
Press Start/Stop until the display shows "Program started, close door in 4 sec". This indicates that
the dishwasher is ready to start. Close the door properly within four seconds, otherwise the dishwasher
will not start.
If the dishwasher is not started or the door is not closed within 2 minutes of the last button press,
the machine switches off.
Time remaining
Once you have chosen a program, program mode, and options, the time the program took when
last used is displayed.
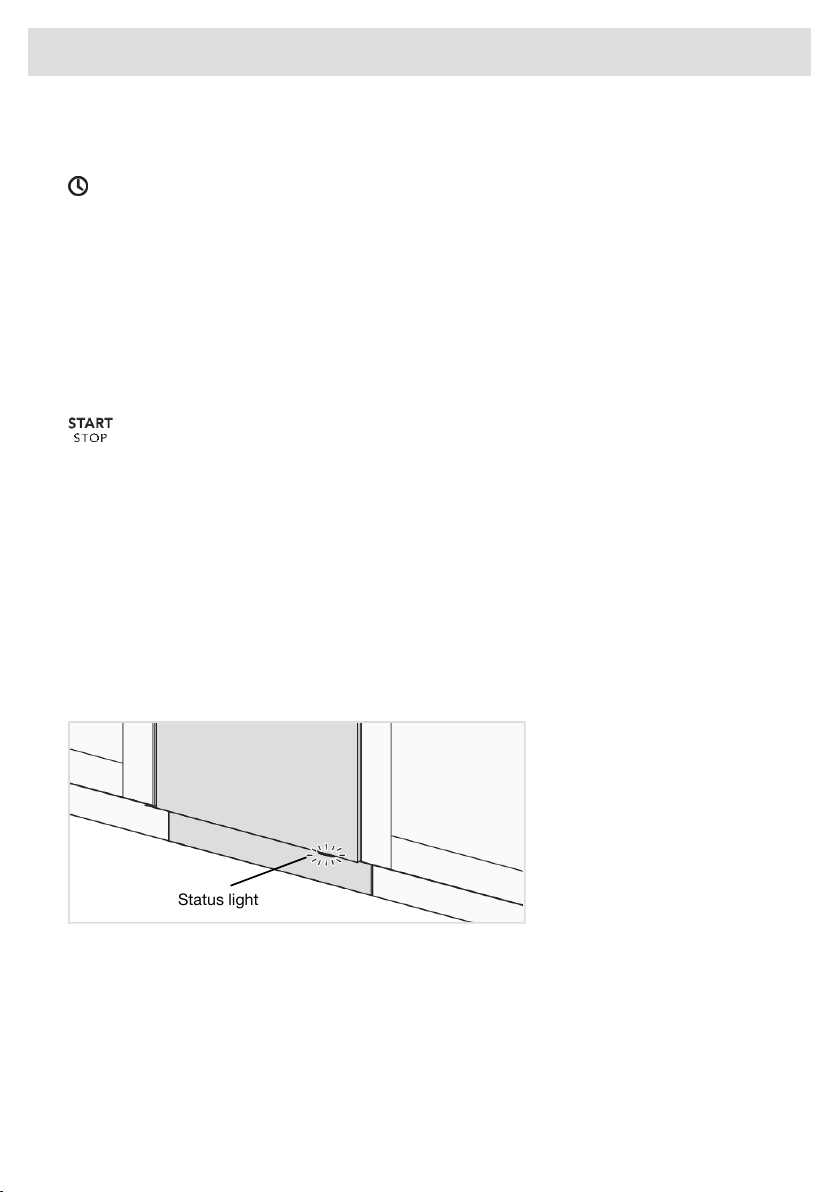
Status light™
The status light at the bottom on the dishwasher provides information by means of 3 different colors.
Blue - Load more
The program has started, but you can still load more dishes.
Red - Do not load
You should not load more dishes (can result in poor dishwashing).
A flashing light indicates that the door has been opened while a program is in progress. If it flashes
when the door is closed, an error has occurred. See the chapter Troubleshooting.
Green - Unload
The dishwashing program is finished. The status light stays on for 15 minutes.
19
Page 20
Using the dishwasher
Stopping or changing a program
If you want to change the program after starting the dishwasher, open the door then press and hold
Start/Stop for three seconds. Add more detergent if the lid of the detergent dispenser has opened.
Then choose a new program, press Start/Stop, and close the door within four seconds.
If you want to load more dishes
Open the door. The dishwasher stops automatically. Add the dishes. Press Start/Stop and close the
door within four seconds.
WARNING!
If the door is open, "Program paused" is shown on the display. If you want the dishwashing program
to continue, press Start/Stop and close the door immediately. If you want to cancel the dishwashing
program, press and hold Start/Stop for three seconds.
If the dishwasher is turned off due to a power failure
If the program was not finished, the interrupted program resumes when power is restored.
NOTE!
During drying, the program is interrupted if the power is cut or the door is open for more than
2 minutes.
Once the program has finished
The end of the program is indicated by one short signal from the buzzer. The chapter Settings describes how to change this function.
Moreover, the end of the program is indicated by the status light turning green.
The dishwasher switches off automatically after the program ends.
To minimize the risk of leaks, we recommend that you turn off the water supply valve if away from
home for an extended period of time.
How to get the best drying results
• Fully load the dishwasher.
• Angle dishes with hollows, such as cups, so that the rinse water will run off. This is also important
for plastic items.
• Top up with rinse aid or increase the rinse aid dosage level.
• Activate the Extra Dry option.
• Open the door a little once the program has finished.
• Allow the dishes to cool before unloading the dishwasher.
Unloading the dishwasher
Hot porcelain is more fragile. Leave the dishes to cool in the dishwasher before unloading them.
20
Page 21

Using the dishwasher
Unload the lower basket first to avoid any water drops from the upper basket falling onto the dishes
in the lower basket.
21
Page 22

Using the dishwasher
Water cons.
1)
Consumption values
(gallon)
3)
Energy
(approx.
Hot water
Dishwashing
time
2)
Energy
(approx.
Cold water
Dishwashing
time
kWh)
(approx.
hrs:min)
kWh)
(approx.
hrs:min)
3.20.51:501.02:10
3.30.42:500.83:10
3.7-5.30.6-1.22:20-3:001.0-1.62:40-3:20
3.80.82:001.22:20
2.4- 4.60.4-1.00:15-2:300.5-1.40:15-2:30
0.90.010:070.010:07
3.00.72:501.13:10
2.60.91:101.31:30
2.30.41:300.71:50
2.40.61:051.01:25
3.20.62:051.02:25
3.20.62:051.02:25
Final rinseNumber
of rinses
Main washPrewashesProgram
mode / Op-
tion
Detergent,
compartment
2
Program
Program chart
22
(ml)
55 °C
53 °C
4)
Normal
131 °F2
50 °C
122 °F3
65 °C
149 °F2-3
65 °C
149 °F2
<65 °C
<149 °F2-3
--- °C
--- °F1Rinse and hold
68 °C
154 °F2
68 °C
154 °F2
50 °C
122 °F2
70 °C
158 °F2
60 °C
140 °F2
60 °C
140 °F2
127 °F225
50 °C
122 °F225Eco
50-65 °C
122-149 °F2-325Auto
60 °C
140 °F225Light
<65 °C
<149 °F0-225Time
55 °C
131 °F125Plastic
70 °C
158 °F25Sanitize
45 °C
113 °F20Crystal
70 °C
158 °FSelf-cleaning
65 °C
149 °F120Upper half
65 °C
149 °F120Lower half
Consumption values vary depending on the temperature of the incoming water, room temperature, load size, selected additional functions, and more.2)Connection to cold water, approx. 50 °F (10 °C). (A cold water supply is recommended.)
Connection to hot water, approx. 120 °F (50 °C).4)The energy label performance figures are based on this program. This program is recommended for daily, regular, or typical use to completely wash a full load of normally soiled dishes,
1)
such as plates, serving dishes, cups and glasses.
3)
Page 23
Mode selector to confirm current setting
Setting Current setting
Navigation buttons for choosing setting
Settings
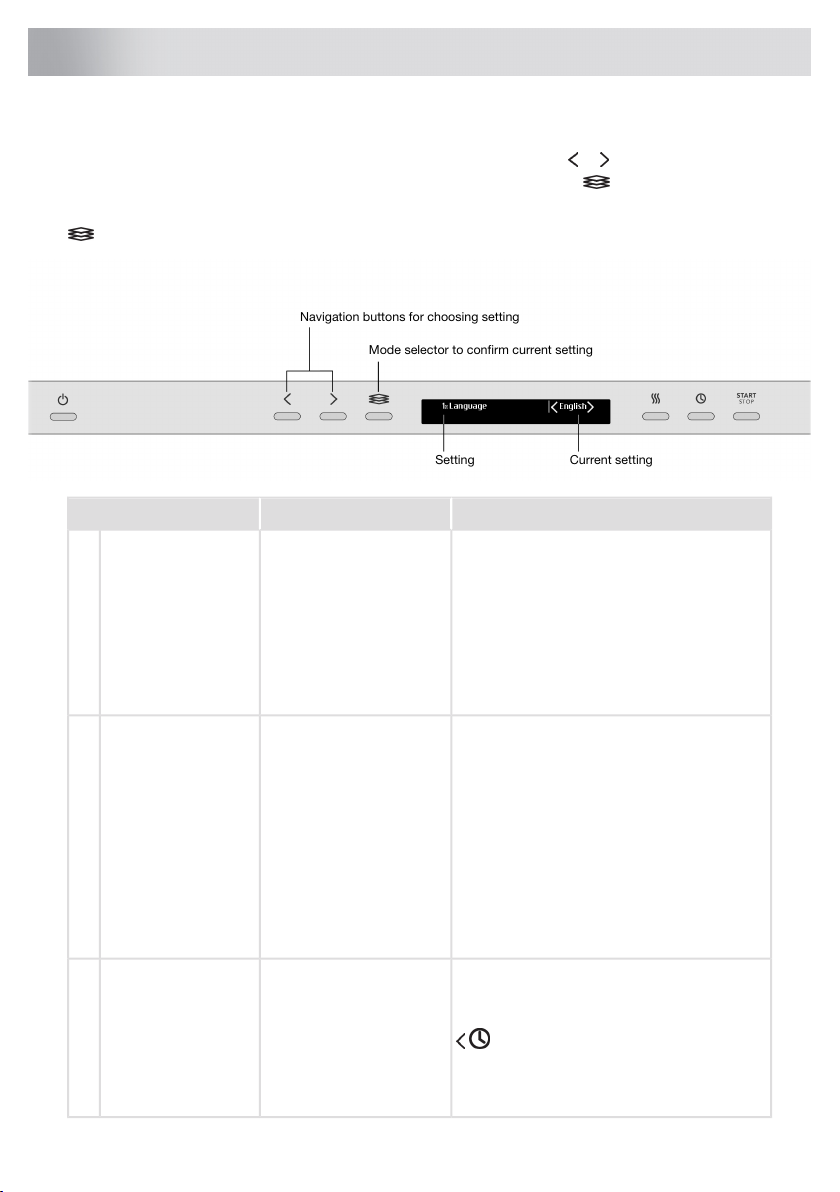
Open the dishwasher's Settings menu
To open the dishwasher's Settings menu, press the Navigation button or until Settings menu is
shown on the display and confirm your selection with the mode selector .
To exit the dishwasher's Settings menu, select Exit and confirm your selection with the mode selector
.
AlternativesSettings
Language1.
Select programs2.
English US/Svenska/
Dansk/Norsk/Suomi/
Nederlands/Français/
Deutsch/Italiano/
Español/Português/
Sloven./Eesti/Latviešu/
Lietuvių/Hrvatski/Polish/
简体中文 / 繁體中文 /
日本語
Normal On/Off
Eco On/Off
Auto On/Off
Light On/Off
Time On/Off
Rinse and hold On/Off
Plastic On/Off
Sanitize On/Off
Crystal On/Off
Self-cleaning On/Off
Upper half On/Off
Lower half On/Off
On/OffChild lock3.
Русский
You can choose the language used for the
display.
/
Programs can be shown or hidden in the
menu. Choose between On and Off.
(Eco cannot be hidden in the menu.)
You can activate the child lock (button lock)
to prevent children from starting the dishwasher.
To temporarily deactivate and activate
the child lock, press and hold the left Navigation button and the option button Delayed
Start for 3 seconds.
23
Page 24
Settings
Display settings4.
AlternativesSettings
play1/2/3/4
Logo in top display On/Off
0/1/2/3Feedback sound5.
0/1/2/3Buzzer volume6.
0/1/2/3/4/5Rinse aid7.
For adjusting the contrast of the display.Contrast top dis-
Setting to hide the logo shown on the display.
This sound is used to confirm each button
press.
The buzzer indicates when a dishwashing
program has ended.
Error messages are always indicated by a
loud buzzer.
Setting for rinse aid dosage. The rinse aid
dispenser can be adjusted between 0 (Off)
and 5 (High dosage).
Increase the rinse aid dosage:
• If the dishes have water marks.
Reduce the rinse aid dosage:
• If the dishes have a sticky white/blue
film.
• If the dishes are streaked.
• Heavy foaming. If you have very soft
water, the rinse aid can be diluted 50:50
with water.
Super rinse adds two extra rinses.On/OffSuper rinse8.
Activated in the following programs:
Normal
Eco
Light
Plastic
Upper half
Lower half
9.
er off
Exit
24
On/OffInterior light at pow-
Select whether the interior light is to be
switched on when the dishwasher is turned
off and the door is opened. (If the main
power switch is turned on, the interior light
is always switched on when the door is
opened.)
To exit the dishwasher's Settings menu, select Exit and confirm your selection with the
mode selector .
Page 25
Press to open
Coarse filter
Care and maintenance instructions
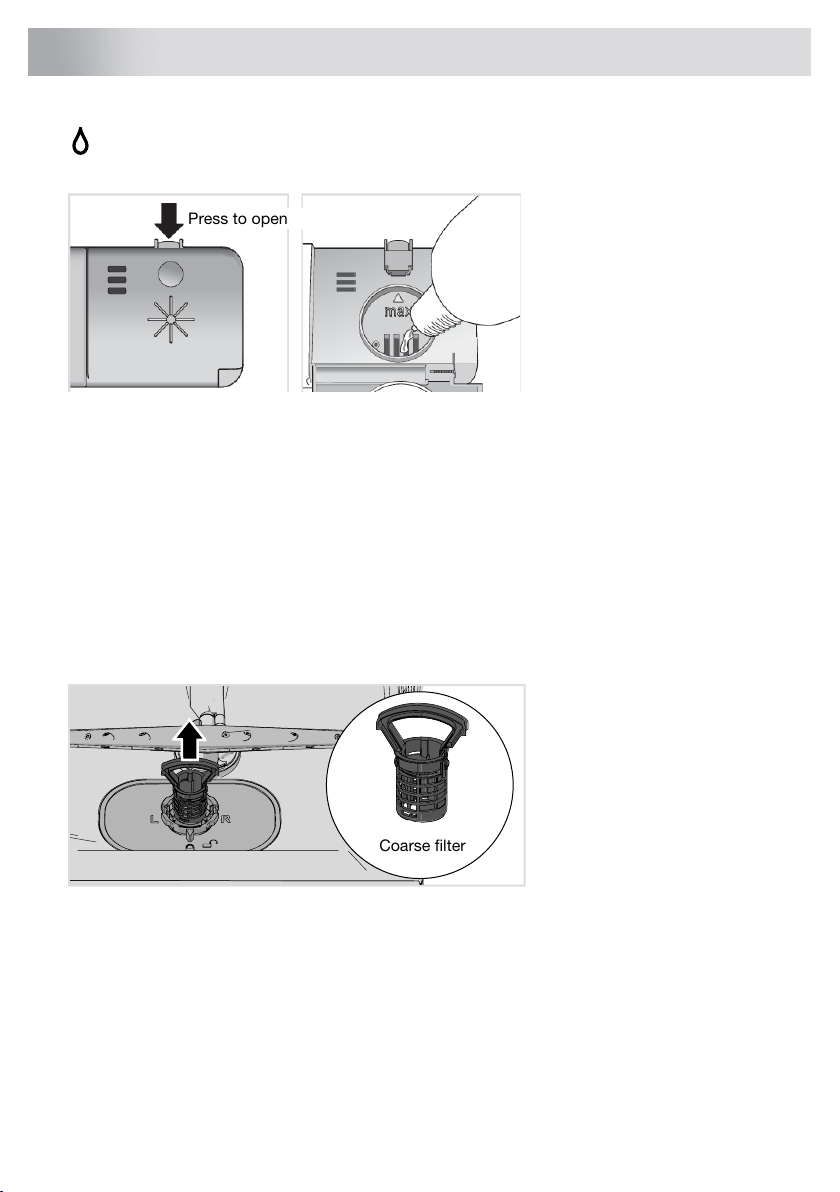
Add rinse aid
When the rinse aid needs topping up, the above symbol lights on the display.
1. Open the rinse aid compartment lid.
2. Carefully top up with rinse aid to the level marked max.
3. Wipe up any spilled rinse aid around the compartment.
4. Close the lid firmly.
After topping up, it may take a while before the symbol goes out.
Cleaning the filters
Coarse filter
The coarse filter traps larger food particles, which cannot get past the drain pump. Empty the coarse
filter when necessary. It should be cleaned at regular intervals depending on how often the dishwasher
is used.
1. Lift the coarse filter by the handle.
2. Empty the coarse filter.
3. Refit the coarse filter. Press it down until it clicks into place.
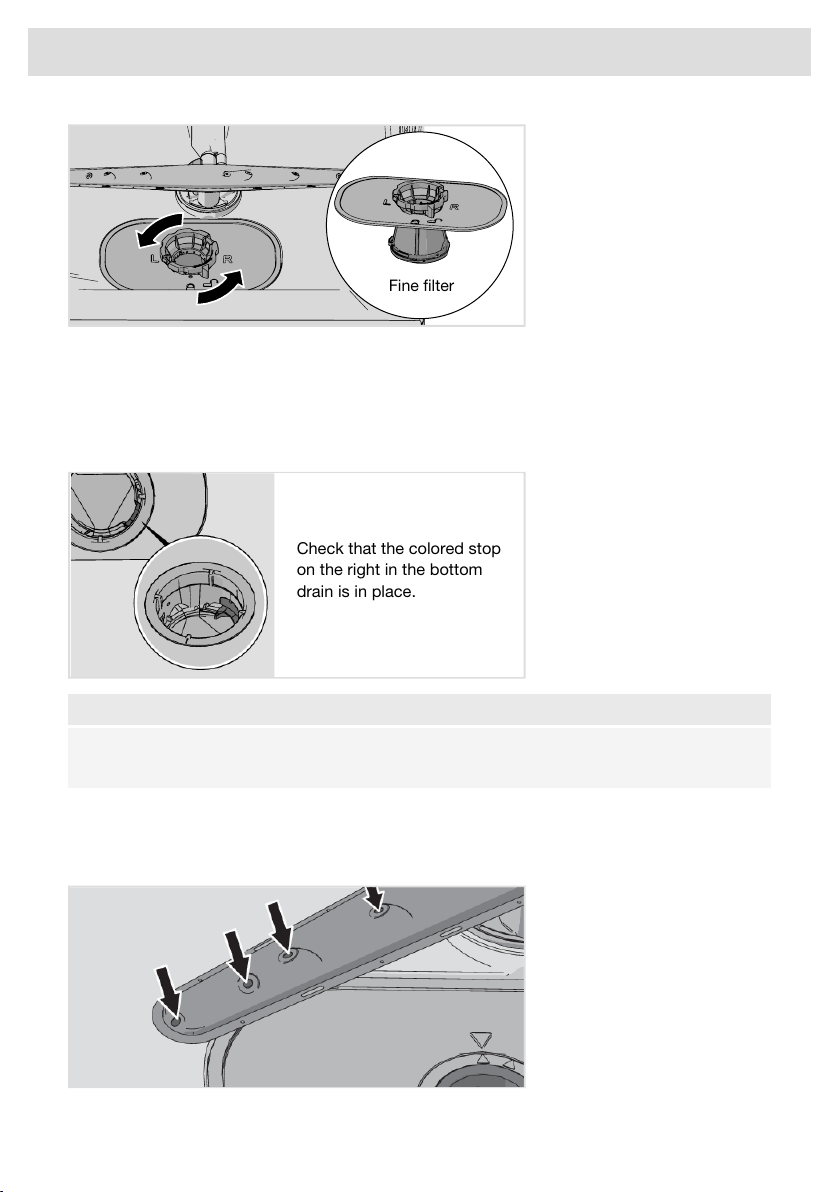
Fine filter
Debris that collects on the fine filter is automatically rinsed away during each wash. Clean the fine
filter when necessary. It should be cleaned at regular intervals depending on how often the dishwasher
is used.
25
Page 26
Fine filter
Check that the colored stop
on the right in the bottom
drain is in place.
Care and maintenance instructions
1. Turn the locking ring counterclockwise and lift the fine filter straight up.
2. Clean the fine filter.
3. Refit the fine filter and turn the locking ring clockwise to its stop position. Check that the edges
seal properly.
Remember to refit the coarse filter!
NOTE!
Dishwashing results may be affected if the coarse and fine filters are incorrectly fitted. The dishwasher must not be used without the filters in place!
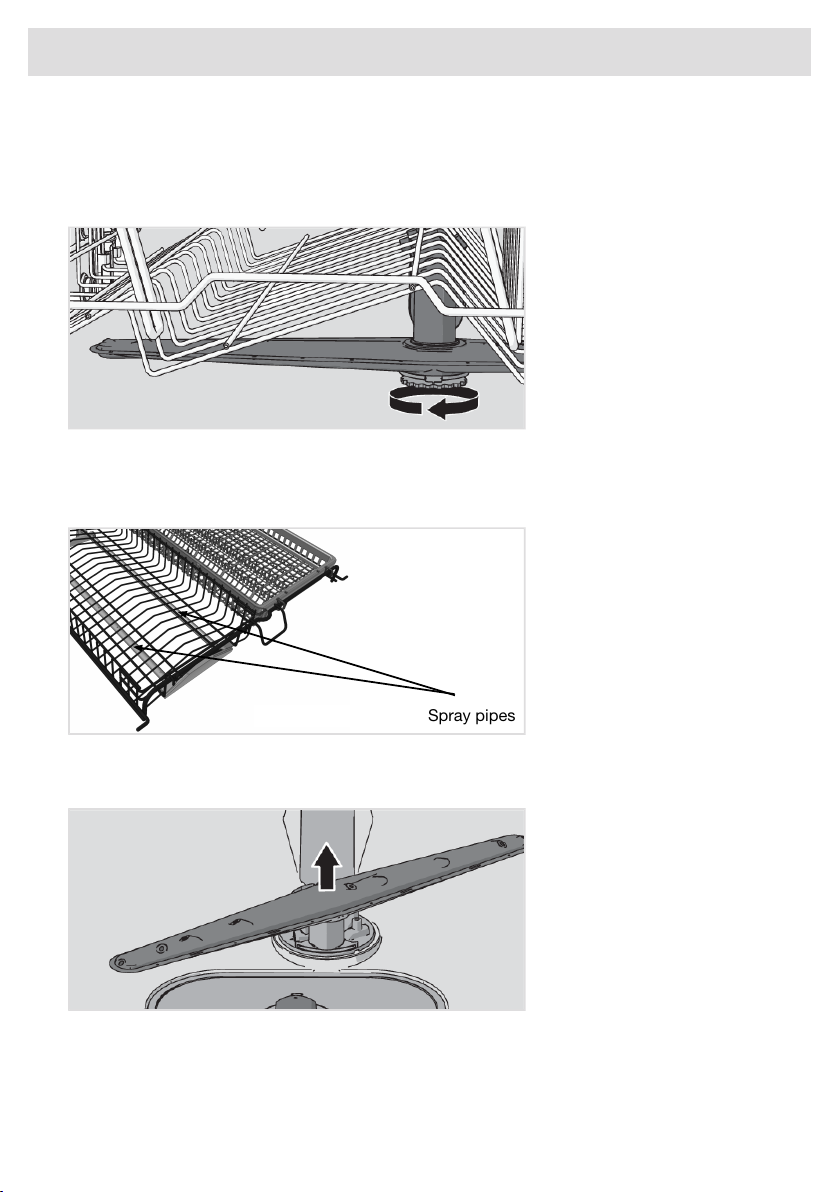
Cleaning the spray arms and spray pipes
Holes and bearings can become blocked. Remove debris using a needle or similar item. The spray
arms have holes on the bottom.
Spray arms can be removed for cleaning. Remember to fit them firmly back into place afterward.
26
Page 27
Spray pipes
Care and maintenance instructions
Upper spray arm
1. Pull out the upper basket.
2. Unscrew the spray arm bearings counterclockwise to remove the spray arm from the upper
basket.
The middle spray pipes
• Pull out the middle basket.
• Check the holes in the spray pipes.
Lower spray arm
• Pull the lower spray arm straight up to release it.
Clean the dishwasher inside and out
Door and door seal
Open the door. Clean the sides of the door and the door seal regularly with a slightly damp cloth.
Clean the door seal at the lower front edge of the dishwasher with a washing-up brush.
27
Page 28
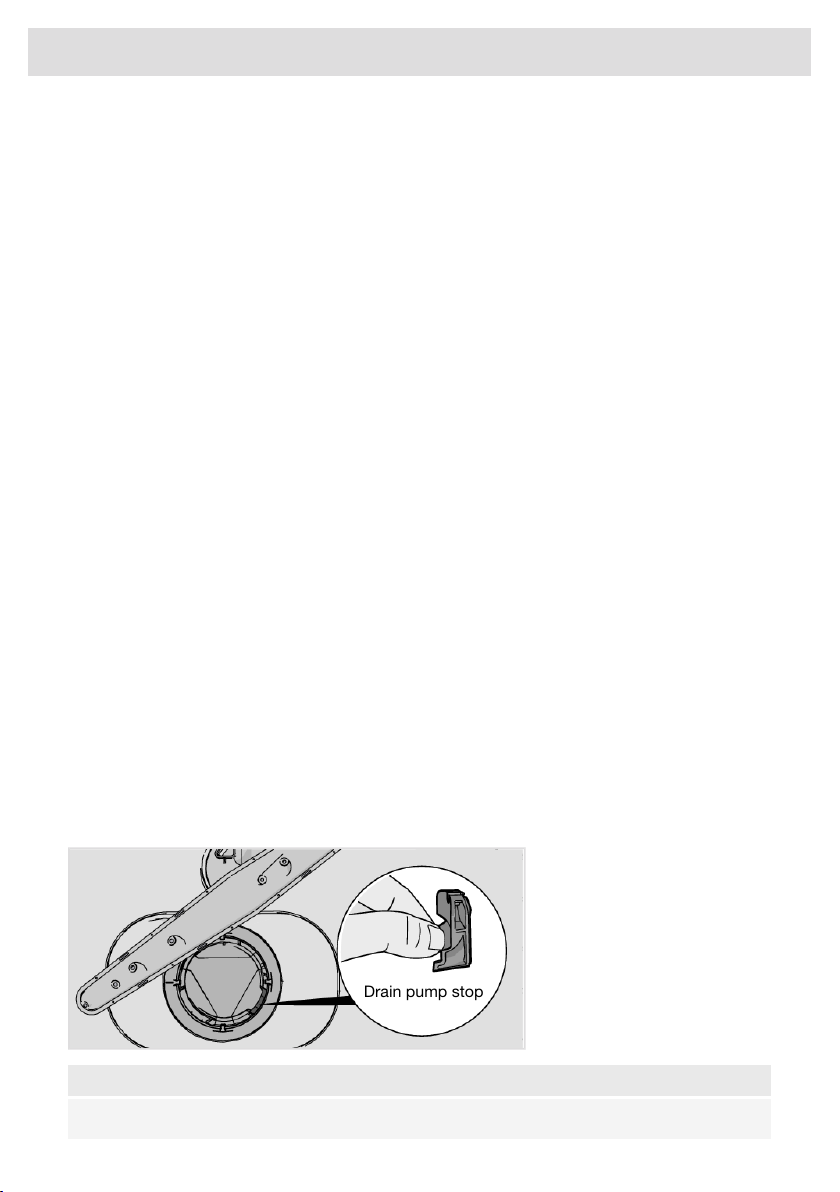
Drain pump stop
Care and maintenance instructions
Display and buttons
Keep the display and the buttons clean. If necessary, wipe them with a dry or slightly damp cloth.
Never use cleaning products – they may scratch the surface.
Use the main power switch to switch off the dishwasher when cleaning the buttons to avoid activating
them inadvertently.
Dishwasher tub
The dishwasher tub is made of stainless steel and is kept clean through normal use (when used
regularly).
If you have hard water, limescale deposits may build up in the dishwasher. If this happens, run the
Self-cleaning program with two tablespoons of citric acid in the detergent compartment (with no
dishes in the machine). Special dishwasher cleaners are also available in stores.
Never use anti-freeze, Draino®, CLR®, or other chemical cleaners.
Remove blockages
Unblocking the drain pump
If the dishwasher still contains water after the program has finished, something may be blocking the
drainage pump. Such blockages are easily removed.
1. Turn off the machine using the main power switch and unplug it from the power outlet.
2. Remove the coarse filter and the fine filter.
3. Scoop out the water from the dishwasher tub.
4. In order to inspect the drain pump, remove the colored stop on the right in the bottom drain.
5. Turn the pump wheel located behind the drain pump stop by hand. Carefully remove any items.
6. Reinstall the drain pump stop along with the fine and coarse filters.
7. Plug the machine in again.
If the dishwasher still does not start and a whirring sound is heard, the overflow protection has
been triggered.
• Shut off the water.
• Unplug the unit from the power outlet.
• Call the Customer Care Center.
NOTE!
Do not forget to reinstall the drain pump stop.
28
Page 29
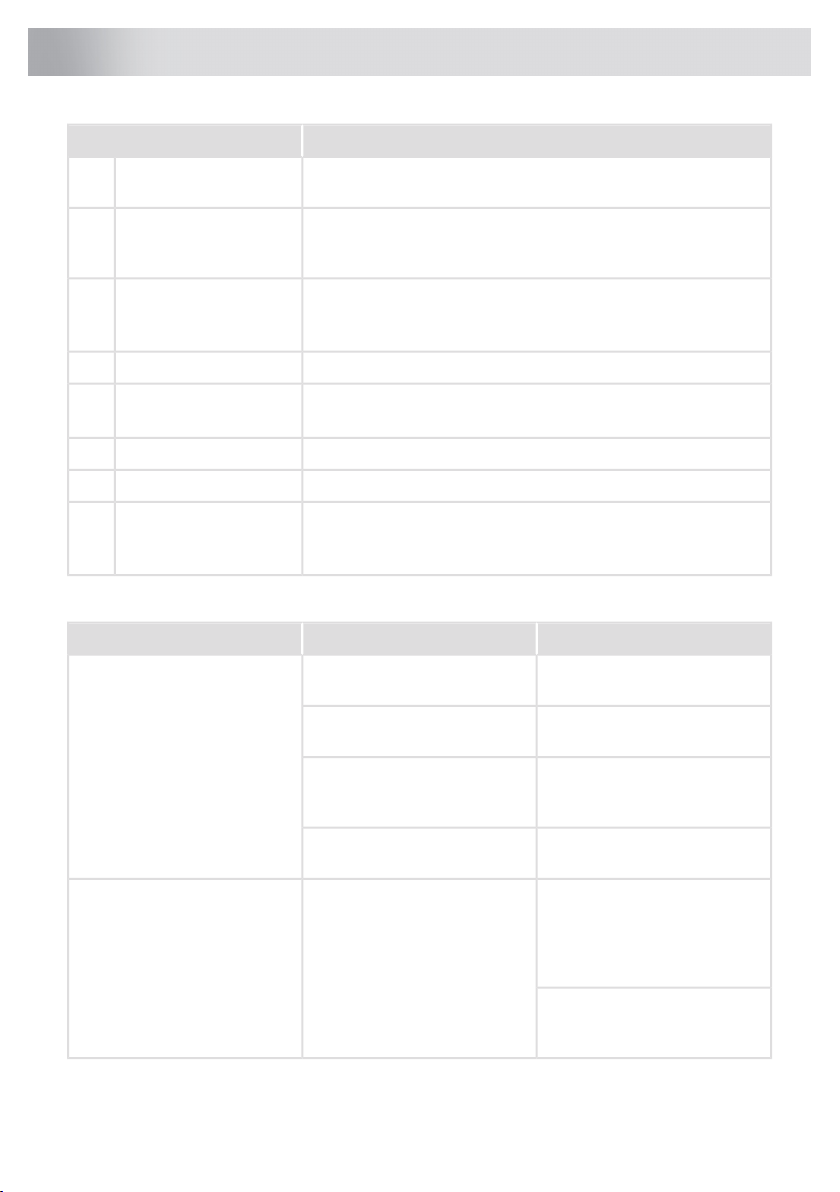
Overfilling water 1F10
Water outlet faultF11
Water inlet faultF12
Clean the filters
F52
(Water level fault)
Water inlet faultF67
Press any button to clear the error message.
The buttons do not react when
pressed.
Cannot close door.
Troubleshooting
ActionType of fault on the display
Clear the drain pump. See the chapter Care and maintenance
instructions. If the problem persists, call the Customer Care Center.
See “Water remains in the dishwasher above the filters” in the table
“Problem” below. If the problem persists, call the Customer Care
Center.
Check that the water supply valve is on. If the problem persists,
call the Customer Care Center.
The water pressure should be 4.2-140 psi.
Turn off the water supply valve and call the Customer Care Center.Inlet valve leakageF40
Clean the coarse and fine filters. If the problem persists, call the
Customer Care Center.
Turn off the water supply valve and call the Customer Care Center.Overfilling water 2F54
Call the Customer Care Center.Circ. pump faultF56
Check that the water supply valve is on. If the problem persists,
call the Customer Care Center.
The water pressure should be 4.2-140 psi.
ActionPossible causesProblem
too soon after opening the door.
ed.
The door is closed.
The buttons are dirty.
The baskets are not correctly
positioned.
Wait a moment then try again.You have pressed the buttons
See the chapter Settings.Child lock (button lock) activat-
Open the door. The buttons only
react to use when the door is
open.
Clean with a dry or slightly damp
cloth.
Check that the baskets are correctly positioned horizontally,
and that the middle basket's
water connector is in line with its
spray pipe.
Check that the dishes are not
blocking the baskets from sliding properly into place.
29
Page 30

Troubleshooting
The dishwasher does not start.
The Start/Stop start button has
been pressed for too short a
time.
The door is not closed properly
or was not closed immediately
after pressing the Start/Stop
button.
You have opened the dishwasher to add more dishes while a
program is in progress.
tripped.
power outlet.
off.
A whirring sound (the drain
pump) is heard from the dishwasher and does not stop when
the main power switch is turned
off.
Check that the Delayed Start
option has not been selected.
ActionPossible causesProblem
Press and hold Start/Stop until
the display shows "Program
started, close door in 4 sec".
Close the door within four seconds, otherwise the dishwasher
will not start.
If you want the dishwashing
program to continue, press
Start/Stop and close the door
within four seconds.
Check.A fuse/circuit breaker has been
Check.The plug is not plugged into the
Check.The water supply valve is turned
Check.Overflow/leaks.
Turn off the water supply valve.
Pull out the plug and call the
Customer Care Center.
Press and hold Start/Stop for
three seconds if you want to
cancel the Delayed Start option.
30
Page 31

Spots on stainless steel or silver.
The spray arms do not rotate.The dishes are not clean.
Spray arm holes or bearings
blocked.
Unsuitable dishwashing program.
Incorrect detergent dosage.
is a perishable product.
Dishes loaded incorrectly.
over during the program.
The filters are not fitted correctly.
Drain pump stop missing.
Some types of food, such as
mustard, mayonnaise, lemon,
vinegar, salt, and dressings, can
cause spots on stainless steel if
left for too long.
All stainless steel can cause
spots on silver if they come into
contact during dishwashing.
Aluminum can also cause spots
on dishes.
Troubleshooting
ActionPossible causesProblem
Check that the dishes are not
blocking the spray arms.
Clean the spray arms and the
middle basket's spray pipe. See
the chapter Care and mainte-
nance instructions.
Select a program with Intensive
mode (Heat Boost). The program will use a higher temperature to dissolve grease on very
dirty dishes.
Dose according to water hardness. Far too much or far too little detergent can result in poor
dishwashing results.
Avoid large packages.Detergent is too old. Detergent
Do not cover dishes with large
bowls or lids. Avoid placing very
tall glasses in the corners of the
baskets.
Load the dishes securely.Glasses and cups have toppled
Check that the filter handle is
locked in the stop position.
Check that the colored stop on
the right in the bottom drain is in
place. See the chapter Care and
maintenance instructions.
Rinse off these types of food if
not starting the dishwasher immediately. Use the Rinse and
hold program.
In order to avoid marks and tarnishing, separate dishes made
from different metals, such as
silver, stainless steel, and aluminum.
31
Page 32

Troubleshooting
Spots or films on the dishes.
The dishes have a sticky
white/blue film.
Spots left after washing.
Detergent residue in the detergent compartment after dishwashing.
Rattling sound when dishwashing.
"Program paused" is shown on
the display.
ting.
Too high temperature and/or too
much detergent can cause
etching on crystal. Unfortunately, this cannot be repaired, only
prevented.
Rinse aid dosage setting too
high.
Lipstick and tea can be difficult
to wash off.
The detergent compartment was
damp when adding detergent.
The detergent compartment has
been blocked.
The dishes are not correctly
placed or the spray arms are not
rotating.
The dishwasher door has been
opened while a program is in
progress.
ActionPossible causesProblem
See the chapter Settings.Incorrect rinse aid dosage set-
Wash crystal at a low temperature and with a conservative
amount of detergent. Contact
the detergent manufacturer.
Reduce the dosage. See the
chapter Settings. If you have
very soft water, you may want to
dilute the rinse aid 50:50 with
water.
Use a detergent with a bleaching agent.
The detergent compartment
must be dry when adding detergent.
Check that the dishes are not
preventing the detergent compartment from opening.
Check that the dishes are
placed securely. Spin the spray
arms to make sure they can rotate.
If you want the dishwashing
program to continue, press
Start/Stop and close the door
within four seconds.
If you want to cancel the dishwashing program, press and
hold Start/Stop for three seconds.
32
Page 33

above the filters.
Bad odor in dishwasher.
Grease deposits in the dishwasher.
The filters are not fitted correctly.
Debris in the drain pump.
Drain pump stop missing.
Kink in drain hose.
Blocked drain hose.
Dirt around the seals and in
corners.
Low temperature programs have
been selected for a prolonged
period.
The dishwasher is connected to
a garbage disposer.
Low temperature programs have
been selected for a prolonged
period.
Troubleshooting
ActionPossible causesProblem
Clean the coarse and fine filters.The filters are clogged.Water remains in the dishwasher
Check that the filter handle is
locked in the stop position.
Clean the drain pump. See the
chapter Care and maintenance
instructions.
Check that the colored stop on
the right in the bottom drain is in
place. See the chapter Care and
maintenance instructions.
Check that the hose is free from
kinks and sharp bends.
Loosen the drain hose from
where it terminates. Check that
no debris has clogged the hose.
Is the cone-shaped part of the
drain boot cut to the maximum
size of the fitting where it attaches?
Clean with dish brush and low
foaming cleaner.
Run a program with a high temperature once or twice a month.
Or run a self-cleaning program.
See Self-cleaning in the chapter
Using the dishwasher.
Cleaning the garbage disposer
connected to the dishwasher
can eliminate odors. Follow the
disposer manufacturer's cleaning instructions.
Select a program with Intensive
mode (Heat Boost). The program will use a higher temperature to dissolve grease on very
dirty dishes. Or run a self-cleaning program once or twice a
month. See Self-cleaning in the
chapter Using the dishwasher.
33
Page 34
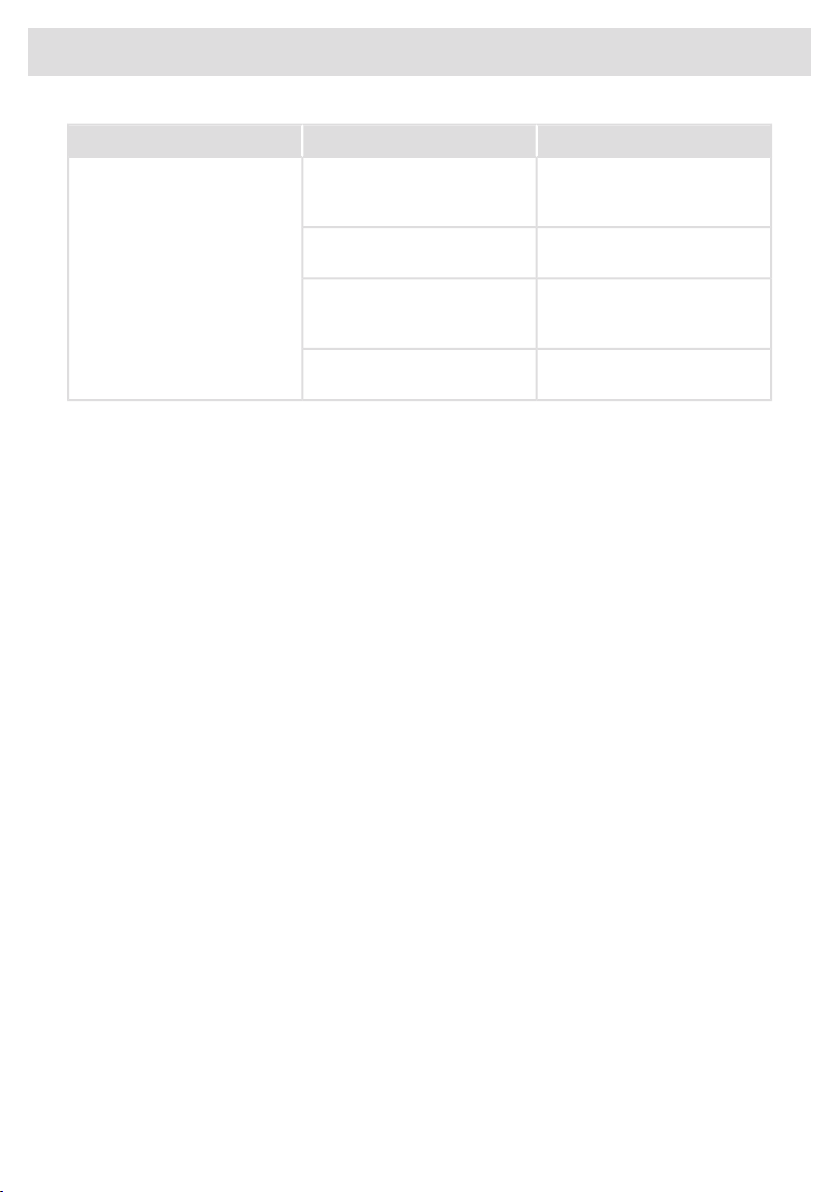
Troubleshooting
The dishes are not dry enough.
gram's drying cycle may be insufficient.
ed.
Rinse aid needs topping up or
dosage is set too low.
ActionPossible causesProblem
Activate the Extra Dry option.Depending on the load, the pro-
Fully load the dishwasher.The dishwasher is not fully load-
Top up with rinse aid or increase
the rinse aid dosage level. See
the chapter Settings.
Open the door a little once the
program has finished.
34
Page 35
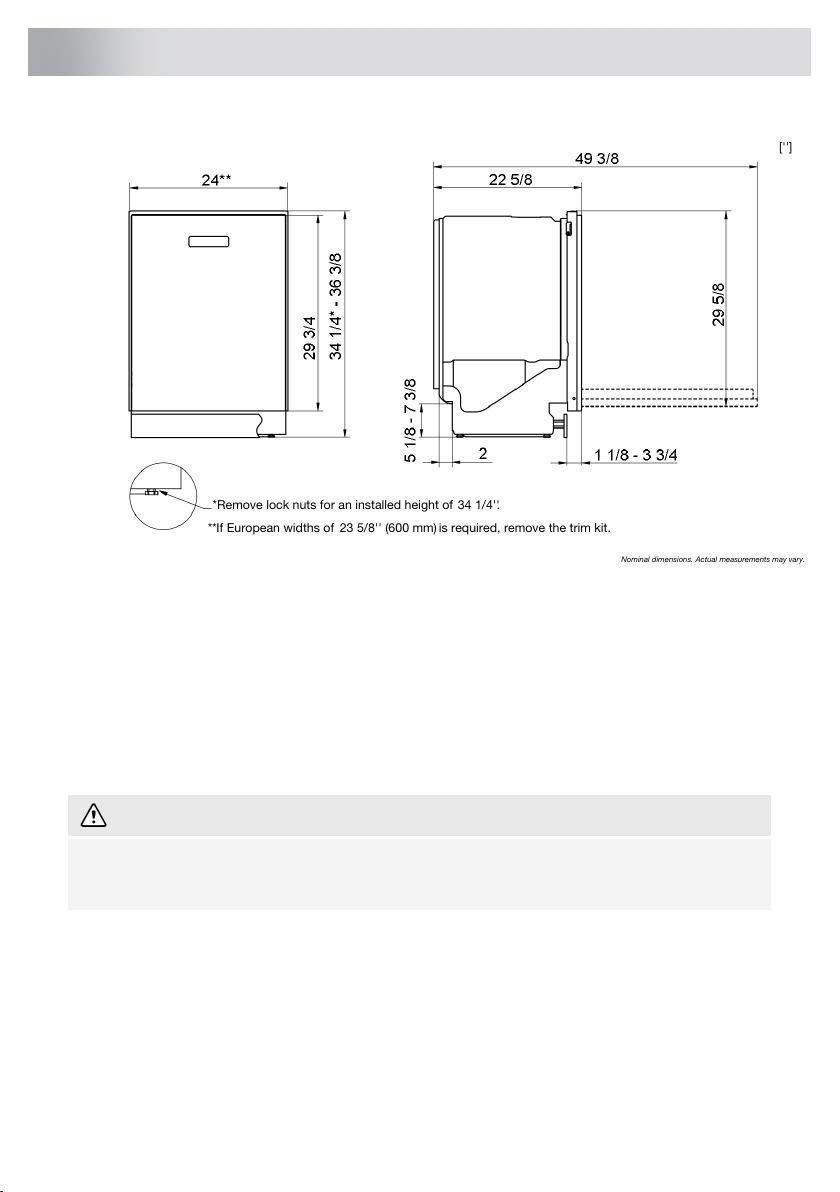
['']
Nominal dimensions. Actual measurementsmay vary.
**If European widths of 23 5/8'' (600 mm) is required, remove the trim kit.
*Remove lock nuts for an installed height of 34 1/4''.
Installation instructions
Important safety instructions
• Connections to electricity, water, and drainage must be performed by a qualified professional.
• Always follow applicable regulations for water, drainage, and electricity.
• Take care during installation! Wear protective gloves! There must always be two people!
• Place a drip tray on the floor beneath the dishwasher to prevent damage from any water leaks.
• Before screwing the dishwasher into place, test the dishwasher by running the Rinse and hold
program. Check that the dishwasher fills with water and drains. Also check that none of the
connections leak.
WARNING!
Turn off the water supply when installing the dishwasher!
The plug must be disconnected or power to the outlet turned off while installing the dishwasher!
35
Page 36
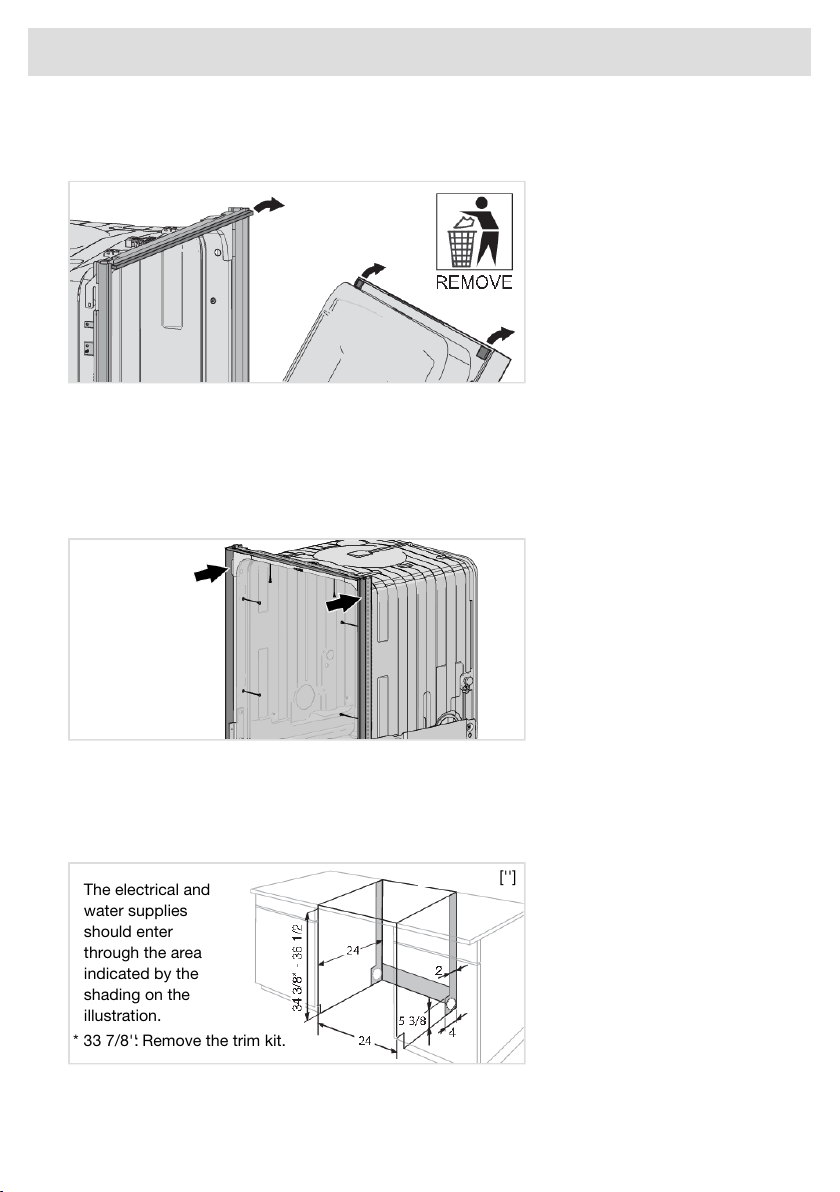
['']
The electrical and
water supplies
should enter
through the area
indicated by the
shading on the
illustration.
* 33 7/8'':
Remove the trim kit.
Installation instructions
Transport protection for the door
Do not forget to remove the transport protection for the door when unpacking the dishwasher.
Trim kit
The dishwasher is equipped with a trim kit to fit the 24'' cutout standard. If a European width of 23
5/8'' (600 mm) is required, remove the trim kit.
Adjust the trim kit
The trim kit can be adjusted backward to level the dishwasher tub.
Placing the dishwasher
The dishwasher is intended to be built in under a countertop. The built-in measurements are shown
in the illustration. Make sure that the cord and hose hole's edges are even and will not damage the
drain and inlet hoses or the power cord.
36
Page 37
Frameless
cabinetry
Filler
Framed
cabinetry
Installation instructions
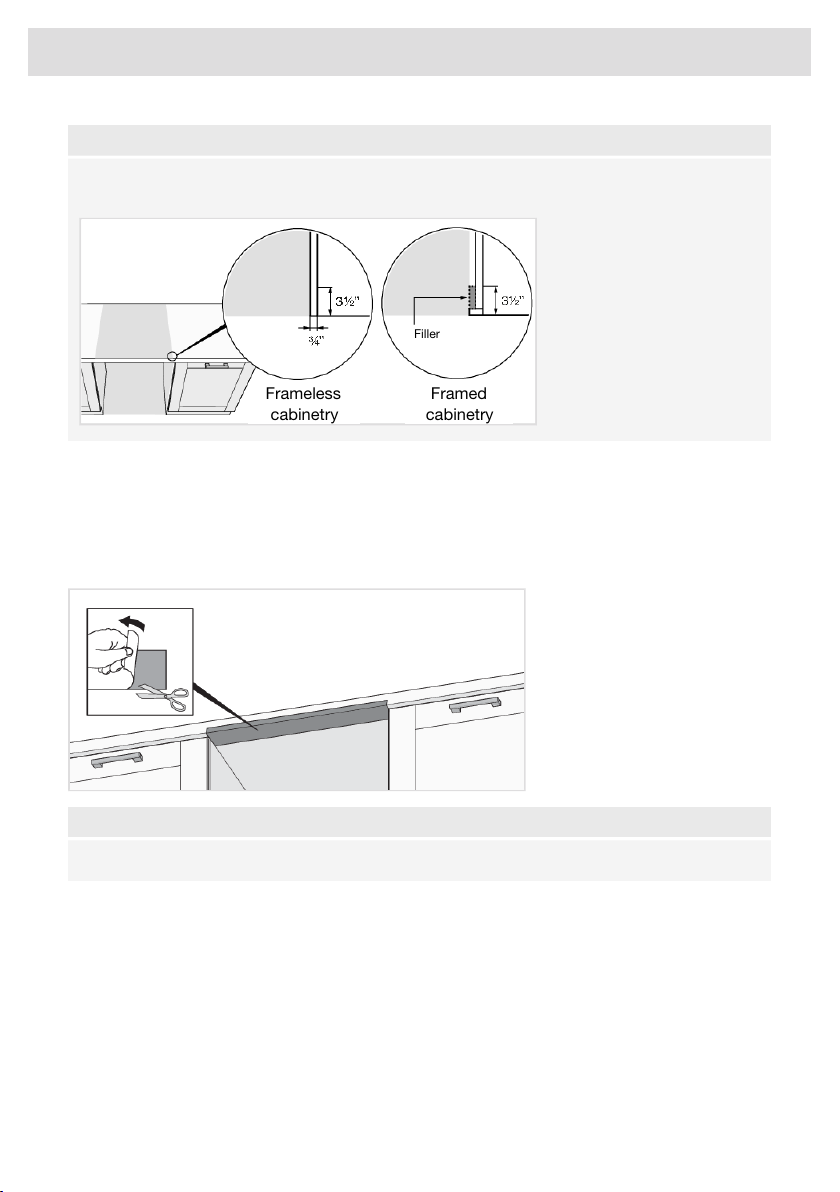
NOTE!
Framed cabinets require additional finished filler material behind the face frame for a proper installation. A minimum 3½” (89 mm) finished return is required on all sides of the opening.
If the dishwasher is built-in, the surrounding furnishings must be resistant to any condensation from
the dishwasher.
Fit the protective film
Affix the protective film (packed in the document bag). The protective film is to protect the countertop
from moisture.
NOTE!
The surface to which the protective film is fitted must be clean and dry.
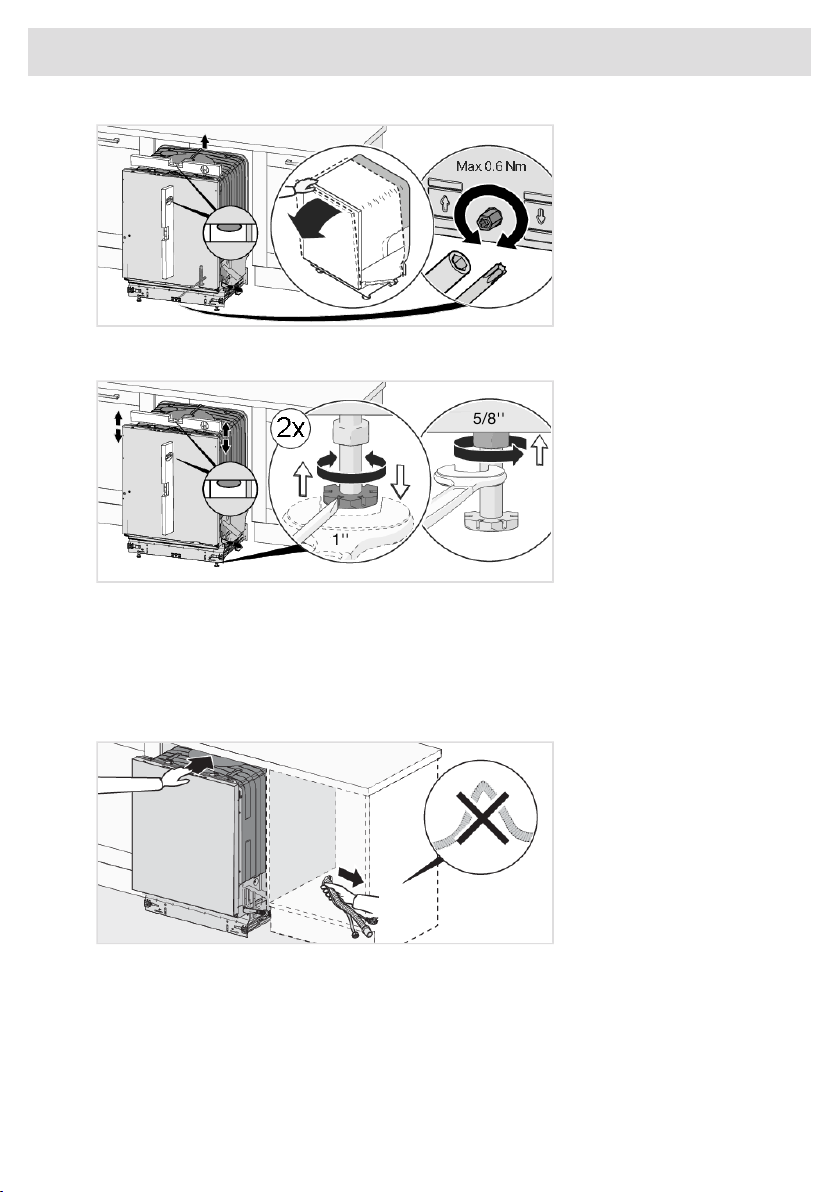
Adjust the height and slide the dishwasher into place
1. Start by measuring the height from the floor to the bottom edge of the countertop.
2. Measure the height from the floor to the top edge of the dishwasher.
3. Lean the dishwasher forward a little and adjust the rear foot with the screw at the front of the
dishwasher. Turn clockwise to lower or counterclockwise to raise.
37
Page 38
1''
5/8''
Installation instructions
4. Adjust the front feet by turning them clockwise to raise and counterclockwise to lower the dishwasher.
5. Verify there is an air gap of at least 1/8'' between the underside of the countertop and the top
edge of the dishwasher.
6. Slide the dishwasher into place.
• Pull the supply and drainage hoses when sliding the dishwasher into place.
• Check that the hoses have no kinks or sharp bends, and check that there is nothing that
can damage the hoses.
7. Make any final adjustments to the feet (the dishwasher may lean no more than 1/4'') and tighten
the lock nuts on the front feet.
Drain connection
This dishwasher is suitable for installing in a raised recess (to attain an ergonomic working height).
This means that the dishwasher can be placed so that the drain hose runs to a lower level than the
bottom of the dishwasher, such as by routing it directly to a floor drain. The dishwasher is fitted with
an integrated anti-siphon device to prevent the machine from being emptied of water during the
wash cycle.
38
Page 39
min.
0.6" (14
mm)
Max. 373/8''
Installation instructions
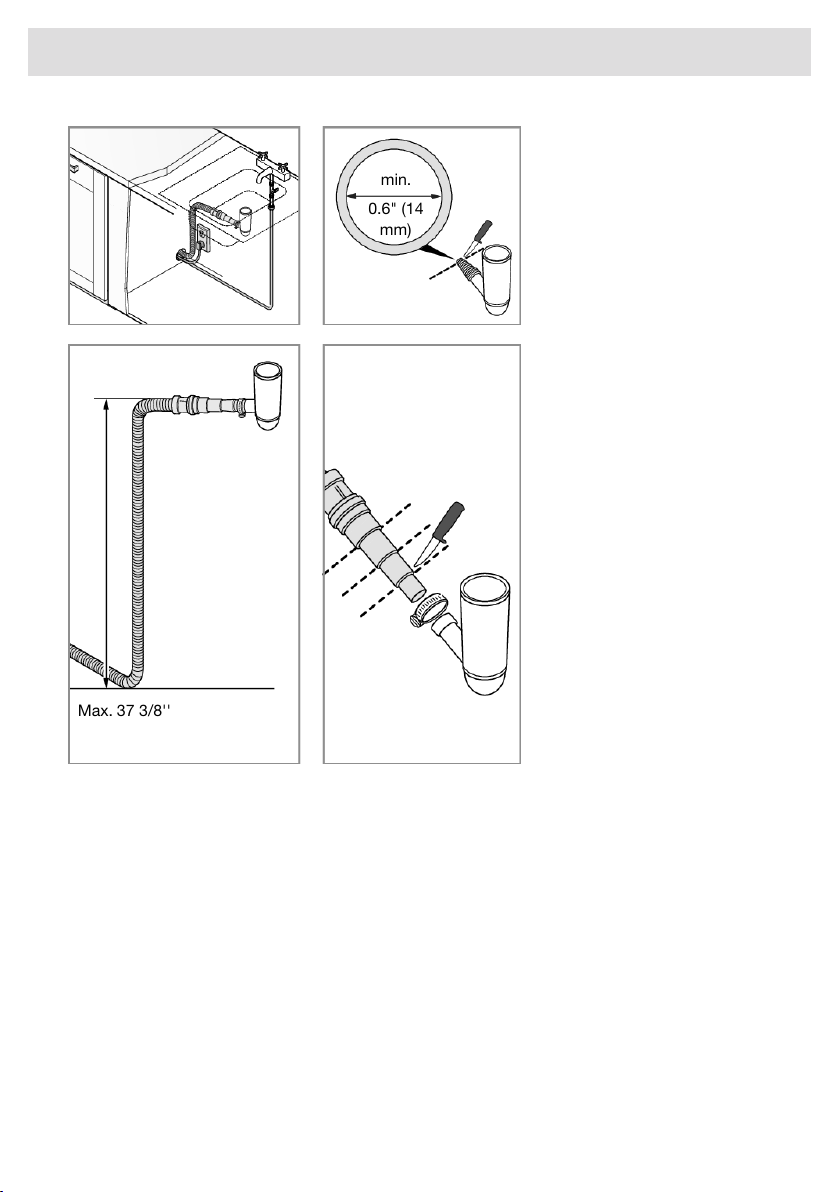
The drain hose can also be connected to a connection nipple on the sink unit's water trap. The
connection nipple must have an internal diameter of at least 1/2''.
The drain hose may be extended by a maximum of 87" (2.2 m) (the total length of the drain hose
must not exceed 177" (4.5 m)). Any joins and connecting pipes must have an internal diameter of
at least 1/2''. However, the drain hose should ideally be replaced with a new hose without joins.
No part of the drain hose may be more than 37 3/8'' above the bottom of the dishwasher.
Attach the drain hose with a hose clamp. Ensure that the drain hose has no kinks.
Connection to water supply
Use only the inlet hose supplied with the dishwasher. Do not re-use old or other spare hoses.
The supply pipe must be fitted with a water supply valve. The water supply valve must be easily
accessible, so that the water can be shut off if the dishwasher has to be moved.
Once the installation is complete, turn on the water supply valve and allow the pressure to settle for
a while. Check that all connections are watertight.
39
Page 40
Installation instructions
Water supply
The machine can be connected to either a cold or a hot (max. 160 °F (70 °C)) water supply. The
water pressure should be 4.2-140 psi (0.03-1.0 MPa).
Connection to cold water supply
Connect the dishwasher to the cold water supply if the building is heated using oil, electricity, or
gas.
Connection to hot water supply
Connect the dishwasher to the hot water supply (max. 160 °F (70 °C)) if the building is heated using
an energy-efficient means such as district heating, solar power, or geothermal power. Choosing a
hot water connection cuts dishwashing times and reduces the dishwasher's energy consumption.
NOTE!
Do not exceed the permitted water supply temperature. Certain materials used in some cookware
cannot withstand strong heat. See Fragile dishes in the chapter Loading the dishwasher.
Electrical connection
Information about the electrical connection can be found on the serial number plate. This specification
must match the electricity supply.
The power outlet for the appliance shall be installed in a cabinet or on a wall adjacent to the undercounter space in which the appliance is to be installed. Do not use an extension cord for this appliance.
The access hole for the electrical supplie must be round and smooth and no bigger than 1 1/2'' in
diameter. If the partition is metal, it needs to be covered with an edge protector.
Use caution when the appliance is installed or removed to reduce the likelihood of damage to the
power cord.
Grounding instructions
This appliance must be grounded. In the event of a malfunction or breakdown, grounding will reduce
the risk of electric shock by providing a path of least resistance for electric current. This appliance
is equipped with a power cord fitted with an equipment grounding conductor and a grounding plug.
The plug must be plugged into an appropriate power outlet that is installed and grounded in accordance with all local codes and ordinances.
WARNING!
Improper connection of the equipment grounding conductor can result in a risk of electric shock.
Check with a qualified electrician or service representative if you are in doubt as to whether the
appliance is properly grounded. Do not modify the plug provided with the appliance. If it does
not fit the power outlet, have an appropriate power outlet installed by a qualified electrician.
40
Page 41
Installation instructions
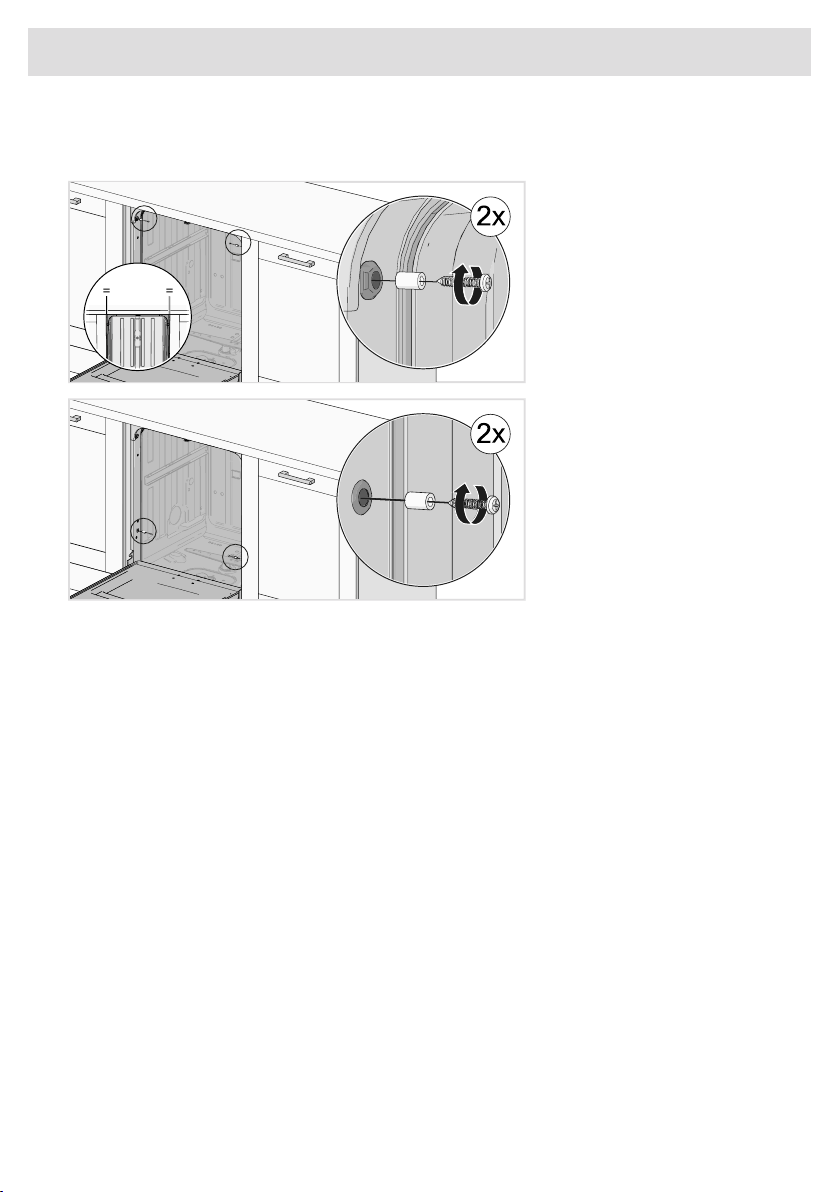
Screwing the dishwasher into place
(Applicable only to built-in dishwashers.)
After fastening the machine, check that the front feet still touch the floor.
41
Page 42
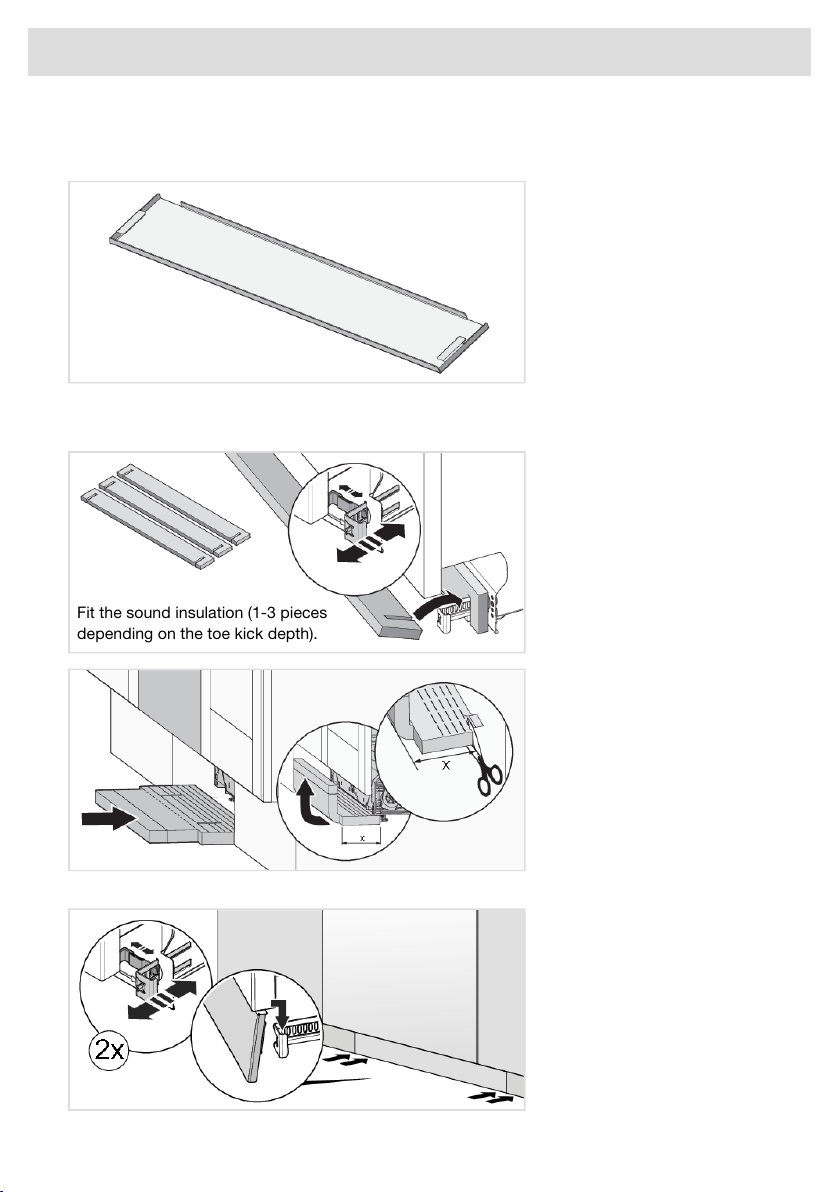
Fit the sound insulation (1-3 pieces
depending on the toe kick depth).
Installation instructions
Dishwasher toe kick
The dishwasher is supplied with a toe kick.
Fit the sound insulation
(only certain models)
Fit the toe kick
42
Page 43

Service
Limited Warranty – Residential Appliances
This Limited Warranty covers parts and labor, except as set forth in this Limited Warranty. Service
must be provided by an authorized ASKO service company. YOUR SOLE AND EXCLUSIVE REMEDY
UNDER THIS LIMITED WARRANTY SHALL BE PRODUCT REPAIR AS PROVIDED HEREIN. This
Limited Warranty is valid only when the ASKO Product is used in the country in which it was purchased. Proof of original purchase date is required to obtain service under this Limited Warranty.
Residential ASKO Products Used Exclusively for Household/Personal Purposes:
Two (2) Years limited Warranty – Any warranty service claims for residential ASKO Products must
be filed with ASKO within two (2) years from date of purchase. Service will be provided during normal
business hours.
Residential ASKO Products Not Used Exclusively for Household/Personal Purposes or used Commercially or used in Marine, Mobile or Aeronautical Applications:
One (1) Year limited Warranty – Any warranty service claims for ASKO Products not used exclusively
for household and personal use, or used commercially or used in marine, mobile, or aeronautical
applications must be filed with ASKO within one (1) year from date of purchase. Service will be
provided during normal business hours.
Items excluded from warranty
This limited warranty does not cover:
1. Replacement parts or repair labor if the ASKO Product is used in a manner that is inconsistent
with published user or operator instructions and/or installation instructions.
2. Service calls to correct the installation of the ASKO Product, to instruct you on how to use the
ASKO Product, to replace or repair house fuses, or to correct house wiring or plumbing.
3. Consumable items and parts, such as filters.
4. Damage resulting from accident, alteration, misuse, abuse, negligence, fire, flood, natural disasters, improper use, improper installation, installation not in accordance with electrical or plumbing
codes, or use of products not approved by ASKO, as well as any attempted repair by other than
authorized ASKO service companies.
5. Cosmetic damage, including scratches, dents, chips or other damage to the finish of the ASKO
Product, unless such damage results from defects in materials or workmanship and is reported
to ASKO within 5 days from date of purchase.
6. Pickup and delivery. The ASKO Product is intended to be repaired in your home.
7. Repairs to parts or systems resulting from unauthorized modifications made to the ASKO Product.
8. Expenses for travel and transportation for product service if the ASKO Product is located in a
remote area where service by an authorized ASKO service company is not available.
9. The removal and reinstallation of the ASKO Product if it is installed in an inaccessible location
or is not installed in accordance with ASKO’s published installation instructions.
10. Replacement parts or repair labor on ASKO Products with original model/serial numbers that
have been removed, altered or cannot be easily determined.
Disclaimer
YOUR SOLE AND EXCLUSIVE REMEDY UNDER THIS LIMITED WARRANTY SHALL BE PRODUCT
REPAIR AS PROVIDED HEREIN. EXPRESSLY DISCLAIMED ARE ALL OTHER EXPRESS AND IMPLIED
WARRANTIES, INCLUDING ANY IMPLIED WARRANTIES OF MERCHANTABILITY AND FITNESS
FOR A PARTICULAR PURPOSE. Some jurisdictions do not allow exclusion or limitations regarding
warranty rights. This Limited Warranty gives you specific legal rights and you may have other rights
43
Page 44
Service
that vary from jurisdiction to jurisdiction. Attempted repair by any person other than an authorized
ASKO service company will void this Limited Warranty.
Limitation of liability
IN NO EVENT SHALL ASKO OR THE MANUFACTURER AND THEIR RESPECTIVE PARENTS, SUBSIDIARIES AND AFFILIATES BE LIABLE FOR CONSEQUENTIAL, INCIDENTAL, EXEMPLARY,
PUNITIVE OR SPECIAL DAMAGES. IN NO EVENT SHALL ASKO OR THE MANUFACTURER AND
THEIR RESPECTIVE PARENTS, SUBSIDIARIES AND AFFILIATES BE LIABLE FOR DAMAGES
OTHER THAN ACTUAL DAMAGES AND IN NO EVENT FOR DAMAGES IN EXCESS OF THE PRICE
PAID FOR THE ASKO PRODUCT AS TO WHICH A CLAIM IS MADE. Some jurisdictions do not allow
the exclusion or limitation of incidental, consequential or other damages, so these limitations and
exclusions may not apply to you. This Limited Warranty gives you specific legal rights. You also may
have other rights that vary from jurisdiction to jurisdiction.
ASKO Customer Care
Read the chapter Troubleshooting before contacting the Customer Care Center. If you have encountered a problem that you cannot resolve, please contact your nearest dealer.
us.asko.com, +1-800-898-1879USA
ca.asko.com, +1-800-361-0799, [email protected]CANADA
asko.com/mx, +52-800-400-4372, [email protected]MEXICO
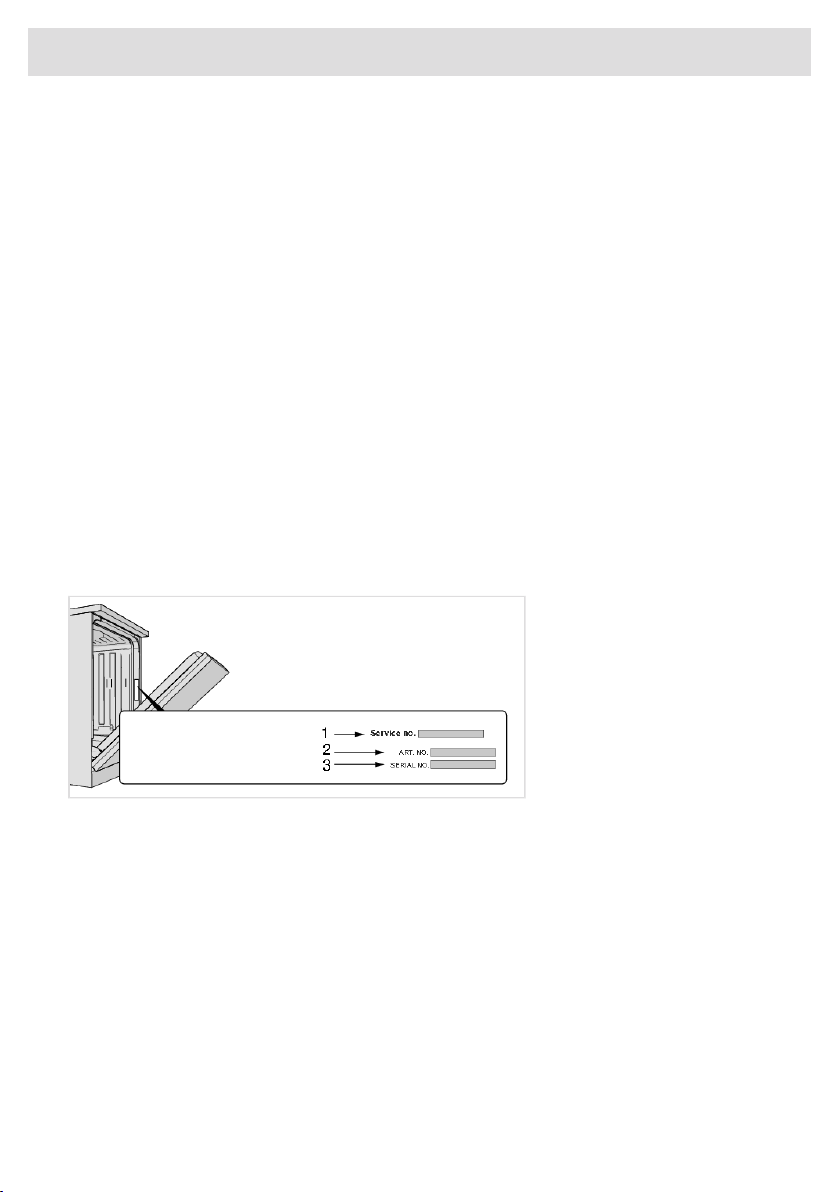
When making contact, provide the details on the serial number plate. Include the service number
(1), the article number (2), and the serial number (3).
Service after expiration of limited warranty
For information about obtaining parts and labor after expiration of this Limited Warranty or arising
outside the scope of this Limited Warranty, please contact ASKO Customer Care.
To verify the ASKO warranty – please visit our local web page.
44
Page 45

Technical information
Technical data
34 1/4 - 36 3/8"Height:
24"Width:
22 5/8"Depth:
Weight:
1)
Weight can vary due to different specifications.
110 lb (50 kg)
4.2-140 psi (0.03-1.0 MPa)Water pressure:
See serial number plateElectrical connection:
See serial number plateRated power:
1)
45
Page 46
US.ASKO.COM • CA.ASKO.COM • ASKO.COM/MX
We reserve the right to make changes.
843099
-a5
 Loading...