


AO654XP

AO654XP
OPERATION MANUAL
APPLIANCES
FOR LIVING

Congratulations, you are now the proud owner of an ARTUSI cooking appliance. Thank you for purchasing ARTUSI
and welcome to the ARTUSI Family.
This instruction manual has been specially created to inform you of the full range of features your ARTUSI appliance
has to offer and serves as an introduction to getting the very best out of your ARTUSI appliance.
We present detailed information on each of the features your ARTUSI appliance consists of. Once you have read
this section you will be able to choose the most appropriate settings for your appliance when cooking different
types of food.
We ask you to read the instructions in this booklet very carefully as this will allow you to get the best results from
using your appliance. KEEP THE DOCUMENTATION OF THIS PRODUCT FOR FUTURE REFERENCE.
TO REGISTER YOUR PRODUCT WITH ARTUSI, PLEASE FILL OUT THE WARRANTY CARD AT THE END OF
THIS BOOKLET AND POST IT TO:
REPLY PAID 83617
LEICHHARDT NSW 2040
GB
1
TABLE OF CONTENTS
SAFETY INSTRUCTIONS............................................................................... 2
INSTALLATION OF THE OVEN...................................................................... 3
Electricals........................................................................................................ 3
Connection to the electrical power mains........................................................ 5
INSTRUCTIONS FOR USE............................................................................. 6
Oven Racks..................................................................................................... 6
Oven extendable racks (if present).................................................................. 7
Cooking functions............................................................................................ 8
Electronic control............................................................................................. 10
DOOR LOCKING SYSTEM............................................................................. 17
Automatic door locking during pyrolytic cycle.................................................. 17
Oven lights....................................................................................................... 17
CLEANING AND MAINTENANCE................................................................... 18
Self-cleaning cycle (pyrolytic cycles)............................................................... 18
Oven door removal.......................................................................................... 19
Removing the “FULL GLASS” panoramic door............................................... 20
How to remove the inner glass of the “FULL GLASS” panoramic door.......... 21
Replacement of the oven light......................................................................... 22
GUIDANCE TEMPERATURE AN TIME SCHEDULE FOR COOKING........... 23
At the end of the product life cycle, the products equipped with
electronics, which have not gone through a selection process, are
potentially dangerous for the environment and for human health due
to the presence of dangerous materials. This appliance cannot be
thrown in the domestic waste at the end of its life cycle. Therefore it
must be delivered to an authorised waste collecting center tomake
it safe and to recycle its parts in order to respect the environment.
GB
2
SAFETY INSTRUCTIONS
- Do not disassemble any parts prior to having disconnected the oven from the
mains.
- Do not use the appliance if any part is broken (for example a glass). Disconnect
it from the mains and call service.
- Before using the oven, it is recommended to make it operate at noload at the maximum
temperature for an hour to eliminate the insulating material odour.
- In all models, leave the door closed when the grill is used.
- The cooling fan may remain in operation so long as the oven is hot, even after it has
been switched off.
- During the use the appliance becomes very hot; don’t touch the heating elements
inside the oven.
- During the oven operation, the front is heated as well; consequently keep children
clear of the oven, especially during self-cleaning.
- Parents and adults should pay particular attention when using the product in presence
of children.
- Children should be overseen so as to ensure that they don’t play with the equipment.
- Keep children under age 8 away, unless constantly supervised.
- This appliance is not intended for use by persons (including children over age 8) with
reduced physical sensory or mental capabilities, or lack of experience and knowledge,
unless they have been given supervision or instruction concerning use of the appliance
by a person responsable for their safety.
- Children may not perform cleaning and maintenance unsupervised.
- In order to avoid damage to the oven enamel coat, do not cover the oven muffle sole
with any item (e.g. aluminum foil, pans and the likes).
- Do not use harsh abrasive cleaners or sharp metal scrapers to clean the oven door
glass since they can scratch the surface, which may result in shattering of the glass.
- Abrasive detergents and steam cleaning equipment should not be used for cleaning.
- Before performing self-cleaning, take out all accessories (grills, dishes, pans) to avoid
damaging them, remove large cooking residues and then close the door, ensuring that
it is closed properly.
- The oven is cool and power to the oven has been turned off before removing the door.
Failure to do so could result in electrical shock or burns.
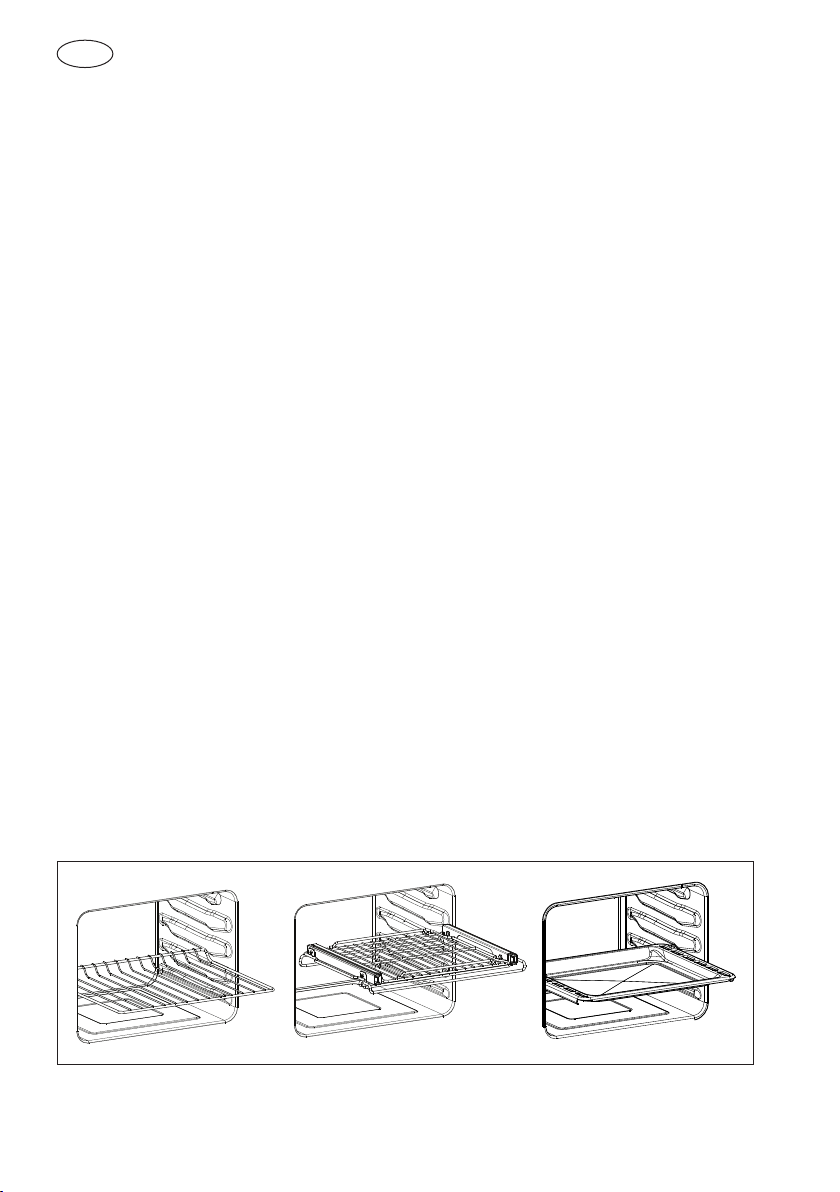
Refer to the figures below for the correct placement of the grills

GB
3
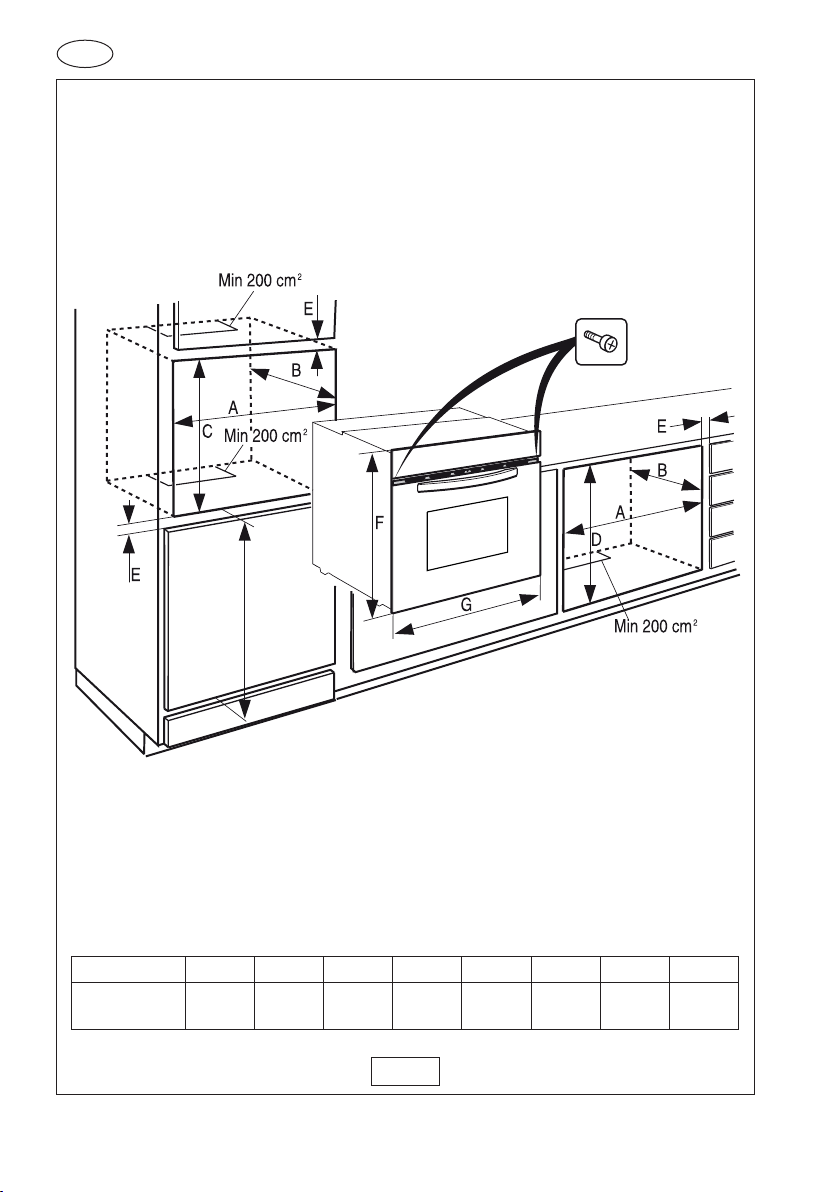
INSTALLATION OF THE OVEN
To install the oven into the kitchen a cutout should be made in accordance with the
dimensions shown in Fig. 1.
The apparatus is to be fastened to the top by means of the two screws provided in the kit
through the holes made on the oven uprights.
The cabinet in which the apparatus is installed shall be open on the back side to ensure
a sufficient air circulation and prevent overheating.
Leave a gap of at least 200 cm2 (see Fig. 1) for air circulation if the oven is installed in a
column; this is not necessary if the oven is installed under the work top.
WARNING
As the apparatus is to be fitted in your kitchen furniture, make
sure that all surfaces in contact with the oven can resist a
temperature of approx 90°C.
Electricals
- Absorbed power:
oven top element:............................................. 2000+1000W 230V - 2000+1000W 240V
oven bottom element: ...................................... 1200+400W 230V - 1200+400W 240V
round element (hot air): ................................... 2500W 240V (on some models)
roasting jack motor: ......................................... 4 W (on some models)
lamp: ................................................................ 25 W
hot air fan motor:............................................... 25 W
cooling fan motor:............................................. 25 W
- Maximum absorbed power: (see data plate).
- Supply voltage: (see data plate).
NOTE
This appliance is in compliance with following European directives:
2006/95/CE (LVD), 2004/108/CE (EMC), 2011/65/CE (RoHS),
2012/19/UE (WEEE), 2002/40/CE.
GB
4
H
Appliances A B C D E F G H
Single oven
56 55 58,5 59,5
Min
1,3
58,9 59,5 86,5
Dimensions are in centimeters
Fig. 1

GB
5
Connection to the electrical power mains
WARNING
This apparatus must be earthed.
The oven is only for domestic use.
The feed voltage and the absorbed power are as indicated on the data plate attached to
the left-hand side upright, which can be seen when the oven door is open.
Connecting must be carried out by qualified personnel and in accordance with the
regulations currently in force.
The manufacturer can not be held responsible for any damages to persons or objects
caused by failure to observe these instructions.
If the supply cord is damaged, it must be replaced by the manufacturer, its service agent
or similarly qualified persons in order to avoid a hazard.
The oven must be connected to the mains through a multipole circuit breaker with
a contact-to-contact gap of at least 3 mm, making sure that the earth wire is not
disconnected. For connecting use a flexible cable of the H05V2V2-F 3x1,5 mm
2
type
remembering to make it long enough to allow the oven to be removed from its housing
unit when maintenance work is required.
To connect the cable to the oven
proceed as follows (see Fig. 2):
- Remove the lid (1) by unfastening the
three screws (2). Unfasten the two
screws (3) for the cable holder and
feed the cable through the opening
immediately below the cover.
- Remove about 12 cm of the outside
insulation from the cable and
shorten the two active wires (live and
neutral) to 6 cm, leaving long the one
to be connected to the main earth
terminal on the terminal box; remove
about 1 cm of the main insulation
from the three wires and connect
them correctly to the terminal box,
remembering to respect the polarities.
- Tighten the two screws (3) of the cable holder and put the lid (1) back on with the three
screws (2).
Fig. 2
GB
6
INSTRUCTIONS FOR USE
Oven Racks
WARNING
Never use aluminum foil to cover the oven racks or to line the
oven. It can cause damage to the oven liner if heat is trapped
under the foil.
WARNING
Make sure you do not force it to avoid damage to the enamel.
The oven has rack guides at four levels.
Rack positions are numbered from the
bottom rack guide (#1) to the top (#4).
Check cooking charts for best rack
positions to use when cooking.
Each level guide consists of paired
supports formed in the walls on each side of the oven cavity.
Always be sure to position the oven racks before turning on the oven. Make sure that the
racks are level once they are in position.
The racks are designed to stop when pulled forward to their limit.
To remove oven rack from the oven
(see Fig. 4):
1 Pull rack forward.
2 Lift rack up at front and then remove it.
To replace an oven rack (see Fig. 5):
1 Place rear of rack between rack level
guides.
2 While lifting front of rack, slide rack in all
the way while lowering the front.
1
2
1
2
Fig. 4
Fig. 5
Fig. 3

GB
7
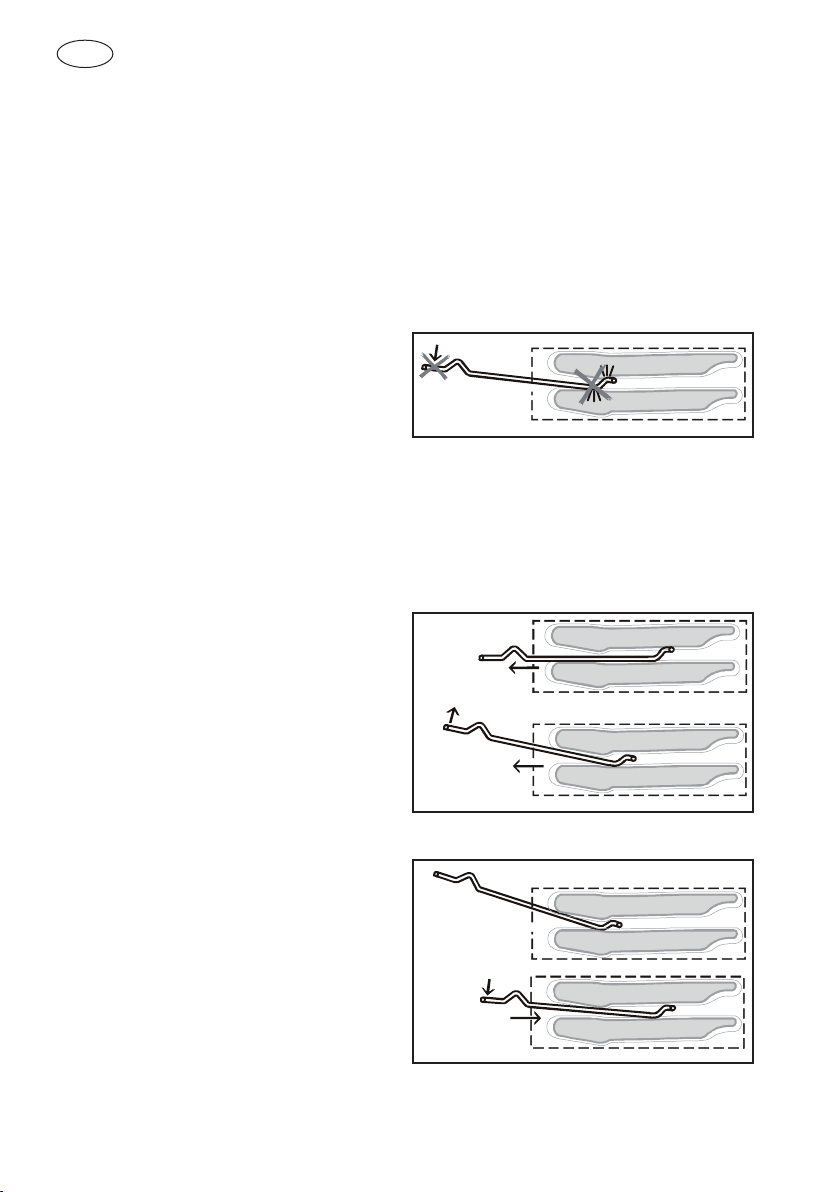
Oven extendable racks (if present)
The extendable rack allows for easier access to cooking foods. It extends beyond the
standard flat rack bringing he food closer to the user.
WARNING
Make sute that:
• When the rack is outside of the oven, slide arms do not
lock. They could unexpectedly extend if the rack is carried
incorrectly. Extending slide arms could cause injury. Rack
should only be held or carried by grasping the sides.
• To avoid burns, pull rack all the way out and lift pan above
handle when transferring food to and from oven.
NOTE
Always remove the extendable rack before self-cleaning the oven.
To remove extendable rack from the oven
(see Fig. 6):
1 Lift of rack slightly and push it until the stop
release.
2 Raise back of rack until frame and stop clear
rack guide.
3 Pull rack down and out.
To replace an extendable rack (see Fig. 7):
1 Grasp rack firmly on both sides. Place rack
(including frame) above desired rack guide.
2 Push all the way in until the back of the rack
drops into place.
3 Pull both sections forward until stops
activates. Rack should be straight and flat,
not crooked.
1
2
3
1
2
3
Fig. 6
Fig. 7
 Loading...