


APPLIANCES FOR LIVING
AFG910
AFG900X
OPERATION MANUAL

Congratulations, you are now the proud owner of an ARTUSI cooking appliance. Thank you for purchasing ARTUSI and welcome to the ARTUSI Family.
This instruction manual has been specially created to inform you of the full range of features your ARTUSI appliance has to offer and serves as an introduction to getting the very best out of your ARTUSI appliance.
We present detailed information on each of the features your ARTUSI appliance consists of. Once you have read this section you will be able to choose the most appropriate settings for your appliance when cooking different types of food.
We ask you to read the instructions in this booklet very carefully as this will allow you to get the best results from using your appliance. KEEP THE DOCUMENTATION OF THIS PRODUCT FOR FUTURE REFERENCE.
TO REGISTER YOUR PRODUCT WITH ARTUSI, PLEASE FILL OUT THE WARRANTY CARD AT THE END OF THIS BOOKLET AND POST IT TO:
Dear Artusi Customer, please read this user manual carefully before using the product and, keep it permanently at your disposal.
Note: This user manual is prepared for more than one model. Some of the features specified in this Manual may not be available on your appliance.
All our appliances are only for domestic use, not for commercial use. Products marked with (*) are optional.
“THIS APPLIANCE SHALL BE INSTALLED IN ACCORDANCE WITH THE REGULA TIONS FORCE AND ONLY USED IN A WELL VENTILATED SPACE. READ THE INSTRUCTIONS BEFORE INSTALLING OR USING THIS APPLIANCE”
“Conforms with the WEEE Regulations.”
The appliance was designed and made in accordance with the European standards listed below: => EN 30-1-1, EN 30-2-1 and EN 437 plus subsequent amendments (gas)
=> EN 60 335-1 and EN 60 335-2-6 (electrical) plus relative amendments
The appliance complies with the prescriptions of the European Directives as below: => 2006/95 EC concerning electrical safety (BT).
=> 2004/108 EC concerning electromagnetic compatibility (EMC) => 2009/142 EC concerning gas safety.
THIS APPLIANCE IS ALSO DESIGNED TO COMPLY WITH AUSTRALIAN STANDARDS.
Oven accessories that could come into contact with foodstuffs are made with materials that comply with the provisions of the 89/109 EC directive dated 21/12/88.
This product complies with EU Directive 2002/96/EC. The crossed-out dustbin symbol reported on the appliance indicates that the appliance must be disposed of separately from other domestic refuse at the
end of its useful life. It must therefore be delivered to a waste recycling centre specifcally for electric and electronic equipment or returned to the
retailer at the moment of purchase of a new equivalent appliance.
The user is responsible for delivering the appliance to the appropriate collection centre at the end of its useful life, Failure to do so may result in a fne, as provided for by laws governing waste disposal.
Differential collection of waste products for eventual recycling, treatment and environmentally friendly disposal helps reduce possible negative effects on the environment and health, and also enables the materials making up the product to be recycled.
For more detailed information on the available refuse collection systems, refer to the local Municipal Solid Waste disposal centre or the shop where the product was purchased.
Producers and importers are responsible for fulflling their obligations as regards recycling, treatment and environmentally friendly disposal by directly or indirectly participating in the collection system.
2
ASSISTANCE AND SPARE PARTS
Before this appliance left the factory it was tested and fne-tuned by specialised expert personnel in order to guarantee its best functioning results.
Any subsequent repairs or adjustments that may be necessary must be done with the maximum of care and attention by qualifed personnel.
For this reason we recommend you always contact our Service Centre specifying the brand, the model, its serial number and type of problem you are facing with it. All data related to your appliance are printed on the data label affxed on the appliance as well as on its original packaging.
A duplicate data label is contained in this booklet also. Please attach this label on the handbook or to an accessible surface near by the appliance for easy reference.
This information enables the technical assistant to come and visit you with the correct spares and guarantee a prompt and suitable service.
You will only fnd original spare parts at our Service Centre and authorised dealers.
CONTENTS
ASSISTANCE AND SPARE PARTS |
3 |
IMPORTANT NOTES AND PRECAUTIONS FOR USE |
4-6 |
DESCRIPTION OF THE APPLIANCE |
7-9 |
INSTRUCTIONS FOR THE USER |
10-16 |
INSTRUCTIONS FOR THE INSTALLER |
17-25 |
TROUBLESHOOTING |
26 |
TECHNICAL FEATURES |
26-28 |
461308302_000 12/2013
3

IMPORTANT NOTES AND PRECAUTIONS FOR USE
You have purchased one of our |
|||||
products for which we thank you. We |
|||||
are confdent that this new appliance, |
|||||
modern, functional and practical, made |
|||||
with top quality materials, will meet all |
|||||
your demands. This new appliance |
|||||
is easy to use but before installing |
|||||
and using it, it is important to read |
|||||
this handbook through |
carefully. |
||||
It provides information for a safe |
|||||
installation, use and maintenance. Keep |
|||||
this handbook in a safe place for future |
|||||
reference. |
|
|
|
|
|
The manufacturer reserves the right |
|||||
to make all the modifcations to its |
|||||
products that it deems necessary |
|||||
or useful, also in your interests, |
|||||
without |
prejudicing |
its |
essential |
||
functional and safety characteristics. |
|||||
The manufacturer cannot be held |
|||||
responsible for any inaccuracies due to |
|||||
printing or transcription errors that may |
|||||
be found in this handbook. |
|
|
|||
N.B.: the pictures shown in the fgures in |
|||||
this handbook are purely indicative. |
|||||
• The |
installation, |
adjustments, |
|||
conversions |
and |
maintenance |
|||
operations |
listed |
in |
|
section |
|
«INSTRUCTIONS |
FOR |
THE |
|||
INSTALLER» must only be carried out |
|||||
by authorised personnel . |
|
|
|||
• The installation of all-gas and combi |
|||||
appliances must comply with the |
|||||
standards in force. |
|
|
|
||
• The appliance must only be used for |
|||||
its original purpose, that is, cooking |
|||||
for domestic use. Any other use is |
|||||
considered improper and, as such, |
|||||
dangerous. |
|
|
|
|
|
• The manufacturer cannot be held |
|||||
responsible for any damage to persons |
|||||
or property resulting from an incorrect |
|||||
installation, maintenance or use of the |
|||||
appliance. |
packaging |
has |
been |
||
• Once |
the |
||||
|
removed from the outer surfaces and |
||||||
|
the various inner parts, thoroughly |
||||||
|
check that the appliance is in perfect |
||||||
|
condition. If you have any doubts do |
||||||
|
not use the appliance and call in an |
||||||
|
authorised person. |
|
materials |
used |
|||
• The |
packaging |
|
|||||
|
(cardboard, plastic bags, polystyrene |
||||||
|
foam, |
nails, |
etc.) |
must |
not be |
||
|
left within easy reach of children |
||||||
|
because they are a potential hazard |
||||||
|
source. All packaging materials used |
||||||
|
are environmentally-friendly and |
||||||
|
recyclable. |
|
|
|
|
|
|
• The electrical safety of this appliance |
|||||||
|
is only guaranteed if it is correctly |
||||||
|
connected to a suitable earth system, |
||||||
|
as prescribed by the electrical safety |
||||||
|
standards.Themanufacturerdisclaims |
||||||
|
all responsibility if these instructions |
||||||
|
are not followed. Should you have |
||||||
|
any doubts, seek the assistance of an |
||||||
|
authorised person. |
|
the |
appliance |
|||
• Before |
connecting |
||||||
|
ensure that the rating plate data |
||||||
|
corresponds |
to |
that of |
the |
gas |
||
|
and electricity supply (see section |
||||||
• |
«TECHNICAL FEATURES»). |
|
|||||
NOT FOR USE IN MARINE CRAFT, |
|||||||
|
CARAVANS |
OR |
MOBILE |
HOMES |
|||
UNLESS EACH BURNER IS FITTED WITH A FLAME SAFEGUARD.
• DO NOT MODIFY THIS APPLIANCE
• DOMESTIC USE ONLY
WARNING - The appliance and its accessible parts become hot during use. Care should be taken to avoid touching heating element. Children less than 8 years of age shall be kept away unless continuosly supervised.
HOT SURFACE
4

IMPORTANT NOTES AND PRECAUTIONS FOR USE
•The oven door glass and the accessible parts will become hot when in use. To avoid burns and scalds young children should be kept away.
•Do not use this appliance as a space heater.
•Do not touch any electrical appliance if hands or feet are wet or damp.
•Do not use the appliance bare footed.
•Do not pull the power lead to take the plug out of the socket.
•Do not leave the appliance outside under the sun, rain, etc.
•Young children should be supervised to ensure that they not play with the appliance.
•This appliance is not intended for use by persons (including children) with reduced physical, sensory or mental capabilities, or lack of experience and knowledge, unless they have been given supervision or instruction concerning use of the appliance by a person responsible for their safety.Children shall not play with the appliance. Cleaning and user maintenance shall not be made by children with out supervision.
•WARNING - In order to prevent the accidental tipping of the appliance, for example by a child climbing on the open oven door, or where users put extreme weight on the door when in open position, the stabilising means must be installed by the installer. Failure to ft the stabilising brackets properly may cause personal burn injuries and damage to the gas pipe.
•Before cooking for the frst time, ensure the oven is empty and its door closed, heat the oven at maximum temperature for two hours. This
will allow the protective coating on the interior of the oven to be burnt off and dissipate the associated smells. Ensure adequate ventilation in the kitchen whilst burning off and don’t be alarmed by a little bit of smoke during this process.
• When you insert the oven shelf, be sure that the rear stopper of the oven rack must be positioned upwards.
• Unattended cooking on a hob with fat or oil can be dangerous and may result in fre.
• Never try to extinguish a fre with water, but switch of the appliance and then cover fame e.g. with a lide or a fre blanket .
• Danger of fre: Do not store items on the cooking surfaces
• Do not use harsh abrasive cleaners or sharp metal scrapers to clean the oven glass door since they can scratch the surface, which may result in shattering of the glass.
• NEVER use sponges or abrasive products, and solvents to remove stains or adhesives on the painted or stainless steel surfaces.
• Switch off the oven before removing the fan guard for cleaning. Replace the guard after cleaning in accordance with the instructions.
• The oven can be equipped with temperature probe. Only use the temperature probe recommended for this oven by our Service Centre.
• Remove any spillage from the lid before opening.
Warning: If the surface is cracked, switch off the appliance to avoid the possibility of electric shock, for hob surfaces of glass-ceramic or similar material which protect live parts)
461308302_000 12/2013
5

IMPORTANT NOTES AND PRECAUTIONS FOR USE
•The appliance is not intended to be operated by means of an external timer or separate remote-control system
•Ensure that the appliance is switched off before replacing the lamp to avoid the possibility of electric shock..
•The cookers can be equipped with a small compartment under the oven that can be used for storing things Remember that the surfaces become hot, it is strictly forbidden to place infammable materials inside.
•Do not use a steam cleaner to clean a hob, oven or range.
•The appliance is to be placed directly on the foor and shall not be mounted on a base.
•If the appliance is ftted with a glass lid, this can shatter when heated. Turn off all the burners or disconnect all the plates, and allow them to cool before closing the lid
•Not suitable for installation or operation with aftermarket lids or covers
•Avoid using the oven as a larder or as a saucepan cupboard when you are not using it for cooking: if the oven is turned on accidentally it could cause damage and accidents.
•If you are using an electrical socket near the appliance, make sure that the cables are not touching the cooker and are far enough away from all hot parts.
•When you have fnished using the appliance check that all the controls are in the off or closed position, checking that the “0” of the knob corresponds to the “•” symbol serigraphed on the front panel.
•Switch off the electrical supply before you start cleaning or servicing the appliance.
•In the case of a failure or malfunction, turn the appliance off and switch off the electrical supply and do not tamper with it. All repairs or adjustments must be carried out with maximum care and the proper attention of an authorised person.
•For this reason we recommend you call our Service Centre.
6

DESCRIPTION OF THE APPLIANCE
GENERAL
The cooker is ftted with a gas hob with the electric oven .
Each knob on the front panel has a diagram printed above it showing to which burner it refers.
The combination of the different sized burners offers the possibility of various types of cooking.
The oven walls of the two cavity, are ftted with various guide bars (fg. 1) on which the following accessories can be placed (fg. 2):
•Oven shelf Ensure shelf is located with dish and tray stop pointing upwards and at rear of oven.
•Drip tray and Drip tray grid
•handle
1
5

 4
4
 3
3

2 1
1
3 |
2 |
1 |
2 |
12/2013 |
|
461308302_000
7
DESCRIPTION OF THE APPLIANCE
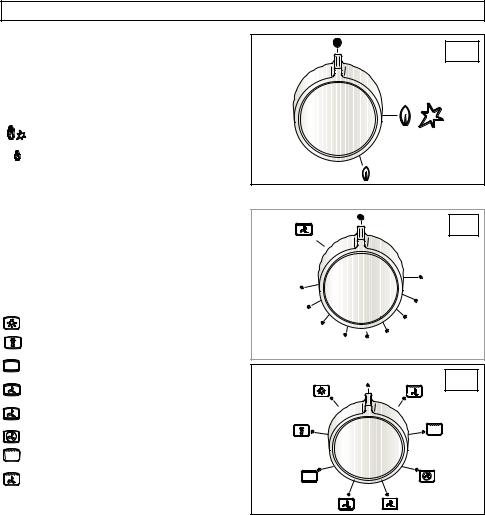
DESCRIPTION OF THE CONTROLS
HOB GAS BURNER KNOB (A)
By turning the knob counterclockwise, the following symbols appear:
•= Closed position
= “Full on” position
= “Reduced rate” position
OVEN THERMOSTAT KNOB (B)
By turning the oven knob clockwise you will fnd the different oven temperature values (from 50°C to Maxi).
OVEN MULTIFUNCTION SELECTOR KNOB (C)
By turning the knob to the right or to the left you will fnd the following symbols:
0= Oven off
= Oven light on, which stays on for all functions
= Fan on
= Top and bottom heating elements on
= Top and bottom heating elements and fan on
=Bottom heating element and fan on
=Rear heating element and fan on
= Grill + spit heating element on = Grill heating element and fan on
A
B
50 |
Max |
|
225 |
||
75 |
||
200 |
||
100 |
||
175 |
||
125 150 |
0C
8

DESCRIPTION OF THE APPLIANCE
ELECTRONIC PROGRAMMER
The programmer can select the following functions:
- |
Clock |
(set by keys 2 and 3) |
- |
Minute counter |
(set by key 1) |
- |
Cooking time |
(set by key 2) |
- |
End of cooking |
(set by key 3) |
- |
Manual operation mode |
(set by key 4) |
- |
Setting time backwards |
(set by key 5) |
- |
Setting time forward |
(set by key 6) |
The digital display (N) always shows the time and can display cooking and end of cooking time or the minute counter time by pressing the corresponding push button.
N.B.: At the end of each setting session (except for the minute counter) the programmer turns the oven off. Check when next using the oven, if the programmer is not going to be used, that the latter is set on manual operation (see the instructions given further on).
Setting the time (from 0.01 to 24.00 = hh,mm)
After connecting to the electricity mains or subsequent to a power cut, AUTO and “0.00” will both fash simultaneously on the display.
Press push buttons 2 and 3 simultaneously and start setting the current time by pressing push button 5 or 6. Once set the AUTO symbol will turn off and the  symbol, for manual operation, will turn on.
Minute counter (from 0.01 to 0.59 = hh,mm)
Press push button 1 and select cooking time with push
button 5 or 6. The |
symbol turns on. At the end of |
|
the set time the buzzer will go off and the |
symbol |
|
turns off. |
|
|
Semi-automatic operation
(with cooking time from 0.01 to 23.59 = hh,mm)
By pressing push button 2 and setting the length of cooking time with push button 5 or 6, the AUTO and symbols will light up and stay on all the time. At the end of the set time the symbol will turn off, the AUTO symbol will fash and the buzzer will go off.
Semi-automatic operation
(with end of cooking time from 0.01 to 23.59 = hh,mm)
By pressing push button 3 and setting the end of cooking time with push button 6, the AUTO and symbols will turn on and stay on all the time. At the end of the set time the  symbol will turn off, the AUTO symbol will fash and the buzzer will go off.
M |
N |
A |
|
U |
|
T |
|
O |
|
|
|
|
|
|
|
|
|
|
1 2 3 4 5 |
6 |
|
|
|||||
Automatic operation |
|
|
|
|||||
(with the start of cooking time delayed) |
|
|||||||
First programme cooking time (both the AUTO |
|
|||||||
and |
symbol will turn on) and then the end of |
|
||||||
cooking time (the |
symbol will turn off) as described |
|
||||||
previously. The |
symbol will turn on again when |
|
||||||
baking in the oven starts. At the end of cooking time |
|
|||||||
the |
symbol will turn off, the AUTO symbol will fash |
|
||||||
and the buzzer will go off. |
|
|
|
|||||
Manual operation |
|
|
|
|
|
|
||
Manual operation is only possible when the automatic |
|
|||||||
programming has fnished or after having cancelled it by |
|
|||||||
pressing push button 4. The AUTO symbol disappears |
|
|||||||
and the |
symbol turns on. |
|
|
|
||||
Buzzer |
|
|
|
|
|
|
|
|
The buzzer will go off at the end of a programme or at |
|
|||||||
the end of the minute counter function and lasts about 7 |
|
|||||||
minutes. The buzzer can be stopped by pressing one of |
|
|||||||
the function push buttons. |
|
|
|
|||||
Programme start and control |
|
|
|
|||||
The programme starts after setting. The programme |
|
|||||||
set can be controlled at any time by pressing the |
|
|||||||
corresponding push button. |
|
|
|
|||||
Correcting/cancelling the programme setting |
|
|||||||
An automatic function programming error will occur if the |
|
|||||||
time shown on the clock is between the cooking start |
|
|||||||
time and cooking end time. This error will be signalled |
12/2013 |
|||||||
duration or end of cooking time. Any programme that has |
||||||||
immediately by a buzzer and the AUTO symbol will |
|
|||||||
fash. A setting error can be corrected by altering the |
|
|||||||
been set can be corrected at any time by pressing the |
|
|||||||
corresponding programming key and then key 5 or 6. To |
000 |
|||||||
cancel a programme, correct the time set bringing it to a |
||||||||
_ |
||||||||
value of “0.00”. If functioning time is cancelled the end of |
||||||||
461308302 |
||||||||
time cannot be corrected when the automatic operation |
||||||||
functioning is cancelled too and vice versa. The oven turns off automatically and the AUTO symbol fashes. Press key 4 to set the programmer on manual operation. The right
programme is working.
9
 Loading...