

Page 1

AINT119
OPERATION MANUAL
APPLIANCES
FOR LIVING
Page 2

Congratulations, you are now the proud owner of an ARTUSI cooking appliance. Thank you for purchasing ARTUSI
and welcome to the ARTUSI Family.
This instruction manual has been specially created to inform you of the full range of features your ARTUSI appliance
has to offer and serves as an introduction to getting the very best out of your ARTUSI appliance.
We present detailed information on each of the features your ARTUSI appliance consists of. Once you have read
this section you will be able to choose the most appropriate settings for your appliance when cooking different
types of food.
We ask you to read the instructions in this booklet very carefully as this will allow you to get the best results from
using your appliance. KEEP THE DOCUMENTATION OF THIS PRODUCT FOR FUTURE REFERENCE.
TO REGISTER YOUR PRODUCT WITH ARTUSI, PLEASE FILL OUT THE WARRANTY CARD AT THE END OF
THIS BOOKLET AND POST IT TO: REPLY PAID 83617
LEICHHARDT NSW 2040
Dear Artusi Customer, please read this user manual carefully before using the product and, keep it permanently at
your disposal.
Note: This user manual is prepared for more than one model. Some of the features specified in this Manual may not
be available on your appliance.
All our appliances are only for domestic use, not for commercial use. Products marked with (*) are optional.
“THIS APPLIANCE SHALL BE INSTALLED IN ACCORDANCE WITH THE REGULA TIONS FORCE AND ONLY USED
IN A WELL VENTILATED SPACE. READ THE INSTRUCTIONS BEFORE INSTALLING OR USING THIS APPLIANCE”
“Conforms with the WEEE Regulations.”
Page 3

13
be stored, it is possible that it will
deteriorate or an uncontrolled reaction
may occur that can cause risks.
• Before performing any operation,
unplug the power cord from the power
socket.
• On delivery, check to make sure that
the product is not damaged and that
all the parts and accessories are in
perfect condition.
• If in the refrigeration system a leak is
noted, do not touch the wall outlet and
do not use open flames. Open the
window and let air into the room. Then
call a service center to ask for repair.
• Do not use extension cords or
adapters.
• Do not excessively pull or fold the
power cord or touch the plug with wet
hands.
• Do not damage the plug and/or the
power cord; this could cause electrical
shocks or fires.
• If the supply cord is damaged, it must
be replaced by the manufacturer, its
service agent or similarly qualified
person in order to avoid a hazard.
• Do not place or store inflammable and
highly volatile materials such as ether,
petrol, LPG, propane gas, aerosol spray
cans, adhesives, pure alcohol, etc.
These materials may cause an
explosion.
• Do not use or store inflammable
sprays, such as spray paint, near the
Wine Coolers. It could cause an
explosion or fire.
• Do not place objects and/or containers
filled with water on the top of the
appliance.
• We do not recommend the use of
extension leads and multi-way
adapters.
• Do not dispose of the appliance on a
fire. Take care not to damage, the
cooling circuit/pipes of the appliance in
transportation and in use. In case of
damage do not expose the appliance to
fire, potential ignition source and
immediately ventilate the room where
the appliance is situated.
• The refrigeration system positioned
behind and inside the Wine Coolers
contains refrigerant. Therefore, avoid
damaging the tubes.
• Do not use electrical appliances inside
the food storage compartments of the
appliance, unless they are of the type
recommended by the manufacturer.
• Do not damage the refrigerant circuit.
• Do not use mechanical devices or other
means to accelerate the defrosting
process, other than those
recommended by the manufacturer.
• Do not use electrical appliances inside
the food storage compartments, unless
they are of the type recommended by
the manufacturer.
• Do not touch internal cooling
elements, especially with wet hands, to
avoid cracks or injuries.
• Maintain the ventilation openings in
the appliance enclosure or in the builtin structure, free of obstruction.
• Do not use pointed or sharp-edged
objects such as knives or forks to
remove the frost.
• Never use hairdryers, electrical heaters
or other such electrical appliances for
defrosting.
• Do not scrape with a knife or sharp
object to remove frost or ice that
occurs. With these, the refrigerant
circuit can be damaged, the spill from
which can cause a fire or damage your
eyes.
• Do not use mechanical devices or other
equipment to hasten the defrosting
process.
• Absolutely avoid the use of open flame
or electrical equipment, such as
heaters, steam cleaners, candles, oil
Page 4

14
lamps and the like in order to speed up
the defrosting phase.
• Never use water wash the compressor
position, wipe it with a dry cloth
thoroughly after cleaning to prevent
rust.
• It is recommended to keep the plug
clean, any excessive dust residues on
the plug can be the cause fire.
• The product is designed and built for
domestic household use only.
• The guarantee will be void if the
product is installed or used in
commercial or non-residential
domestic household premises.
• The product must be correctly
installed, located and operated in
accordance with the instructions
contained in the User Instructions
Booklet provided.
• The guarantee is applicable only to
new products and is not transferable if
the product is resold.
• Our company disclaims any liability for
incidental or consequential damages.
• The guarantee does not in any way
diminish your statutory or legal rights.
• Do not perform repairs on this Wine
Coolers. All interventions must be
performed solely by qualified
personnel.
SAFETY CHILDREN!
• If you are discarding an old product
with a lock or latch fitted to the door,
ensure that it is left in a safe condition
to prevent the entrapment of children.
• This appliance can be used by children
aged from 8 years and above and by
persons with reduced physical, sensory
or mental capabilities or with a lack of
experience and knowledge; provided
that they have been given adequate
supervision or instruction concerning
how to use the appliance in a safe way
and understand the hazards involved.
• Children should not play with the
appliance. Cleaning and user
maintenance should not be made by
children without supervision.
Page 5
15
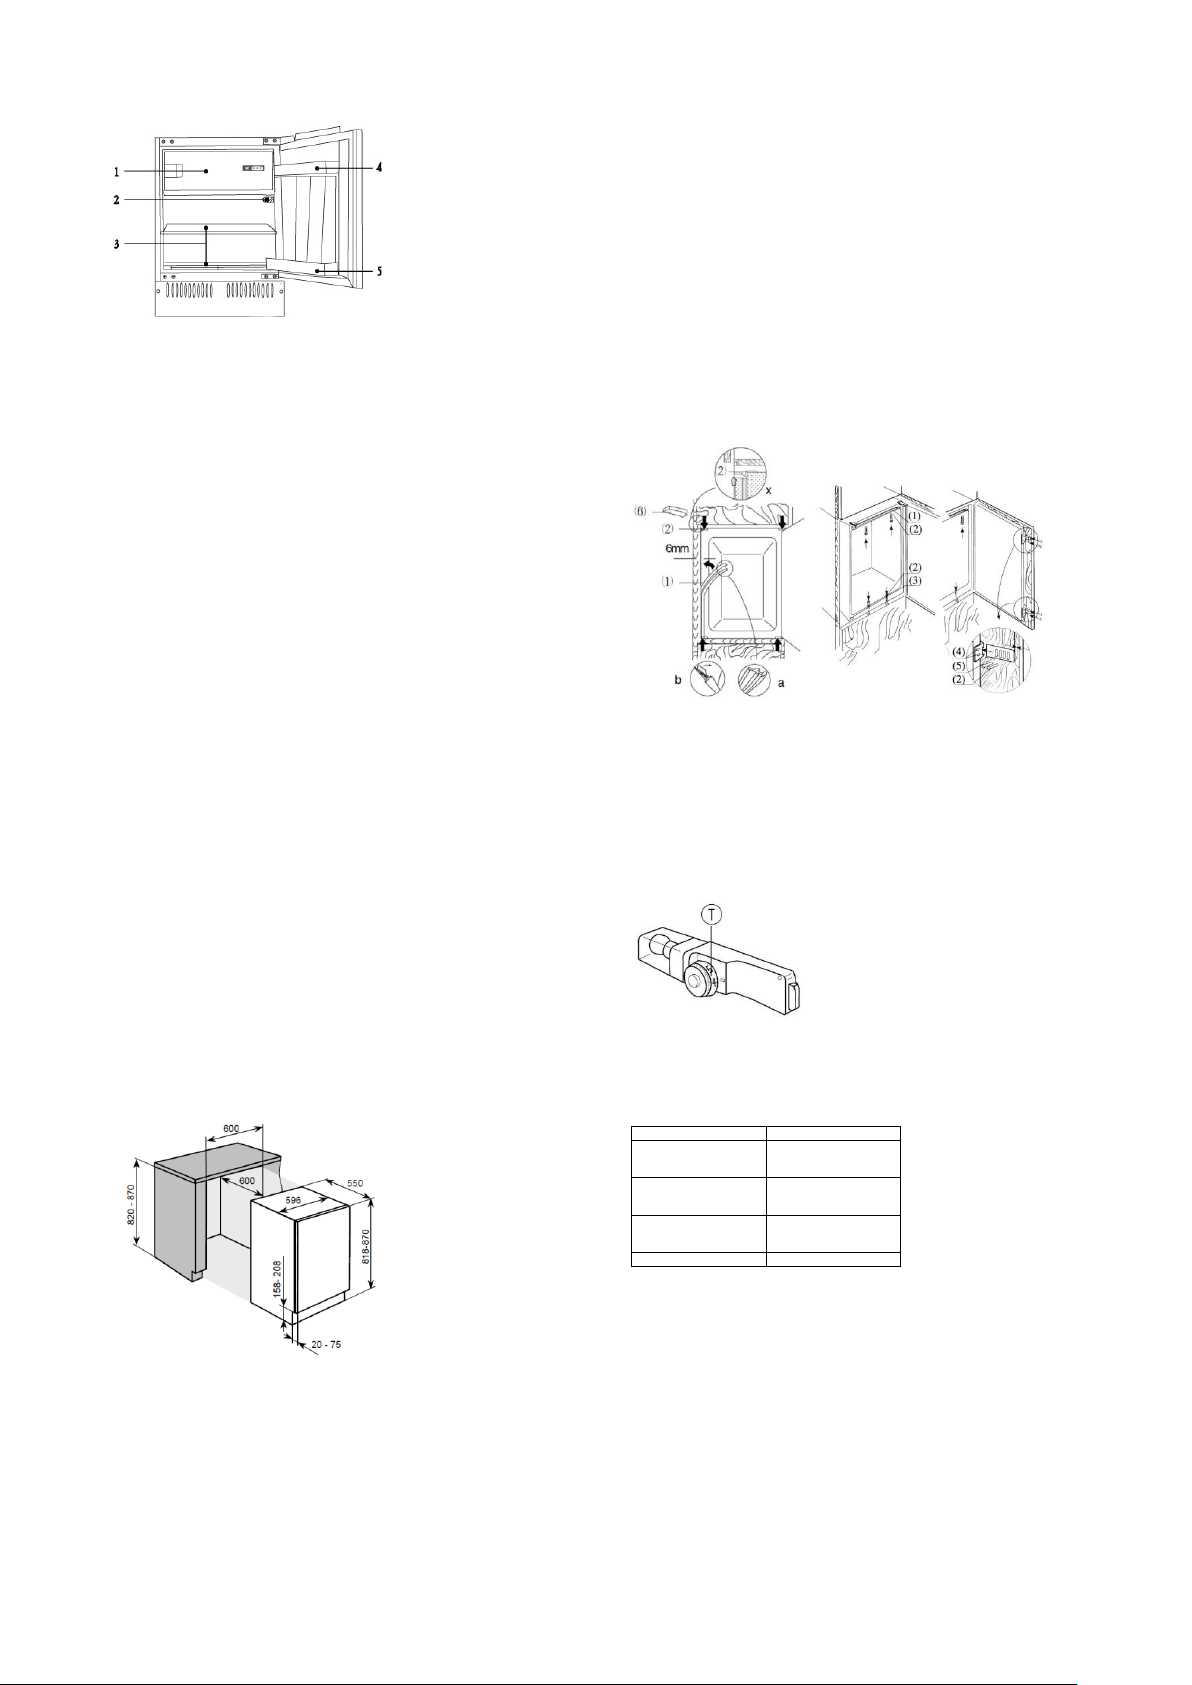
REFRIGERATOR DIAGRAM
1.Freezing compartment
2.Temperature Controller
3.Shelves
4. Egg tray/door rack
5. Bottle rack
This diagram may vary slightly with the layout of the refrigerator you have
just purchased due to technical improvements.
PREPARATION
Unpacking
Remove all packaging materials.
Check attachments and materials
Please check that your appliance comes with all quoted accessories and that
all components are in good condition.
Ensure proper location of the refrigerator
Clean the refrigerator before fist use.
Ensure the appliance is located out of direct sunlight and away from other
heat producing appliances.
See also ventilation requirements (below).
Idle time
After the refrigerator has been sited and cleaned, let it stand for more than 30
minutes before connecting the power source.
Ventilation
* Level the appliance with a spirit level and a try square. The appliance has
adjustable feet.
* A minimum gap of 38mm must be maintained at the back of the appliance
for ventilation.
* Do not cover the air inlet at the front of the appliance and allow for 200cm²
air flow through plinth.
* Check the position of the power socket for usability and check the AC
voltage is compatible with the data shown on the rating plate which can be
found left inside wall of the appliance next to the salad crisper drawer(s). The
power supply must be suitably earthed.
Built-under Installation (Figure 2)
1. Check that the kitchen unit door is in the correct operating position.
2. Run the mains cable through the unit aperture so that it can be connected
to the power supply after installing the appliance. Remove the cover (6)
only if space is restricted.
3. Place the refrigerator into the kitchen unit. Fix the mountings (1) with
screws (2) onto the upper frame when two third of the refrigerator has
been pushed in. Then push the refrigerator in completely, ensuring that the
gib clamp of the mountings stuck on the horizontal frame of the kitchen
unit. Adjust the position of the refrigerator making a 6mm space between
inside wall of the kitchen unit and external sides of the refrigerators. Fix the
mountings to the horizontal frame of the kitchen unit with screws.
4. Insert the seal in the aperture (approx. 10mm) between the lower front
frame and bottom board of the kitchen. Fix lower mountings (3) to the
lower front frame with screws (2). Fix the lower mountings to the bottom
board of the kitchen unit with screws (2).
5. Properly insert seals in the apertures on the left, upper and right sides of
the refrigerator.
6. Fix the door to the holders (4) (each upper and lower pos ition has one) with
screws (2). Press close the doors of the refrigerator and of the kitchen unit,
and then completely open the doors, and then place the connecting plate
(5)to the corresponding holder and fix it to the door of the kitchen unit
(space between the connecting plate and the edge of the kitchen unit "t"
equals to the thickness of the external board of the kitchen unit, about
20mm).Adjust the connecting element so that the handle side of the
kitchen unit door does not make contact with the unit body when closed.
(Approximately 1mm gap for large appliances), mount the second door
connecting element where appropriate.
7. Plug the open hole in the appliance door.
(Figure 2)
OPERATION
Starting the refrigerator
After connecting to the power supply, turn the temperature controller
clockwise from position 0 to any position between 1 and 7 to start the
refrigerator. The refrigerator compressor will stop when the temperature
controller is at position 0.
Adjusting the temperature:
The temperature inside the refrigerator is adjusted by turning the
temperature controller. Positions 1 to 7 represent different temperatures
from the lowest to the highest.
Position
Conditions
1-2
Summer or ambient
temperature between 2535 °C
3-4
Spring, autumn or ambient
temperature between 1525 °C
4-5
Winter, or ambient
temperature between 5-15
°C
6-7
Quick freeze
Caution: Some time will be required for the refrigerator to reach the set
level when temperature adjustments are made. The length of this period is
determined by difference in the existing and set temperatures, the ambient
temperature, the frequency with which the door is opened and closed and
the amount of food in storage.
Loading the refrigerator with food
When the refrigerator is switched on, do not load food until 1~2 hours have
passed. Usually, food for cold storage or deep freezing can be loaded when
the temperature inside the compartment reaches the set point.
Page 6
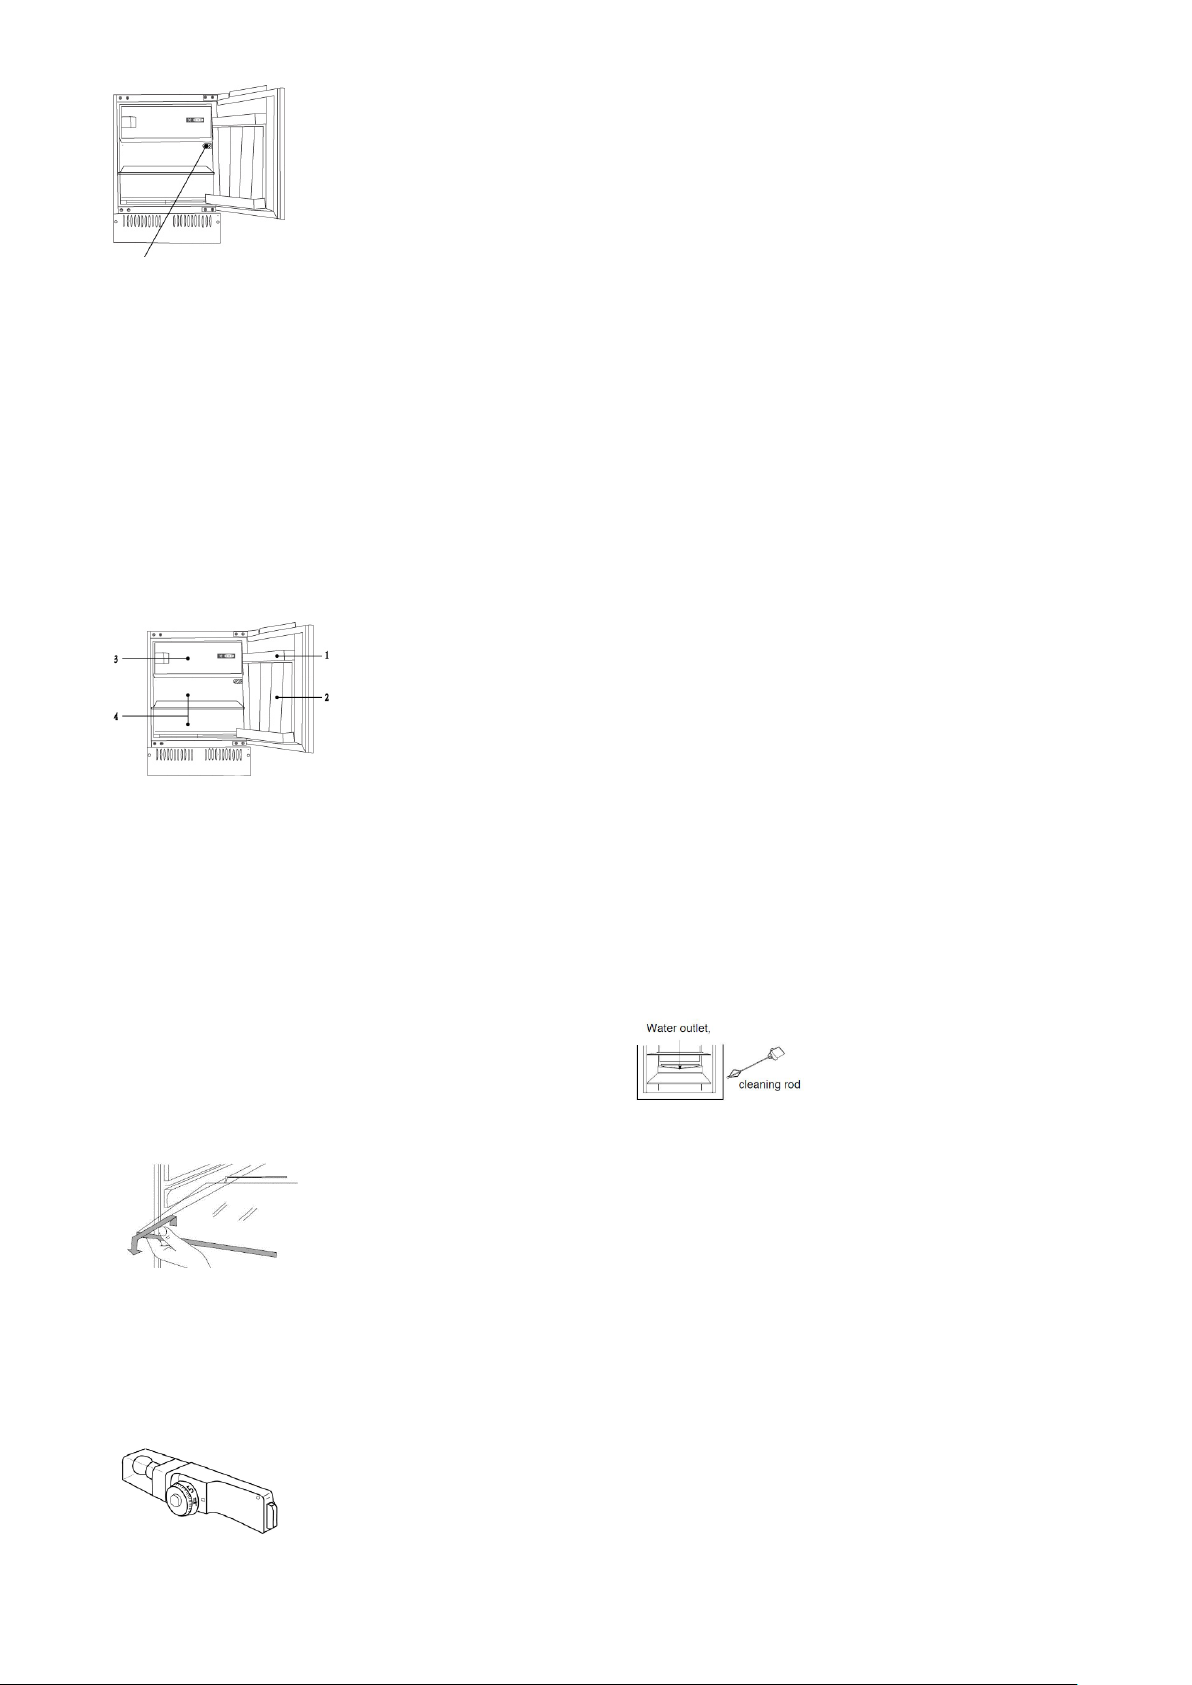
16
Thermostat
INSTRUCTIONS
Cold storage is for short-term food
Storage or for daily consumption.
Although the temperature in most parts of the cold storage compartment can
be regulated between 0 and 10 degrees Centigrade, extended periods of food
storage is not recommended. Cold storage should only be used for short-term
storage.
Cold storage compartment
1. Eggs and butter
2. Beverages and bottled drink
3. Food to be frozen
4. General food, meat, vegitables, etc.
Cautions for cold storage
* Hot food must be cooled to room temperature before storing in the
refrigerator
* Dry any water droplets on the food before placing it in the refrigerator.
* It is recommended that food be sealed in suitable storage bags before being
placed in the refrigerator; this will prevent moisture in the food from
evaporating and prevent vegetables and fruit from withering or altering in
flavor.
* Do not store excess quantities or weights of food; food should be stored
with spaces in between for better storage results. Never overload shelves, as
the may collapse under excessive loads.
* Food to be stored should be sorted according to consumer requirements.
Food consumed daily should be placed in the most convenient area, this will
minimize opening periods for the door. Do not place food to close to the
internal walls.
Food holder cleaning
* Food holders can be taken out for cleaning
Lamp & Replacement:
Lamp: 240V, 10W
Lamp holder: E14 (lamps exceeding 15W
must not be used)
* For replacement, unplug to disconnect the
Power
* Remove the lamp by turning anti-clockwise
Instructions for food storage
* Storage period will be extended if vegetables are placed with their roots
towards the cold source.
*Leaves of carrots of turnips should be removed before storage
* Put a wad of tissue on the bottle holder before placing bottles on it so that
later cleaning is easier
* Frozen food can be placed in the cold compartment before serving, as this
will conserve energy.
* Onions, garlic, ginger, water chestnuts and other root vegetables should not
be stored in the refrigerator, as these foods are suitable for long-term storage
at normal temperatures.
* Ripe squash, melon, papaw, bananas and pineapples should not be stored in
the refrigerator. Freezing will accelerate the ripening process.
Long-term storage of food
As the freezer storage temperature is very low, fresh food can be stored in
the freezer compartment for a long time. Food requiring long-term can be
stored in the frozen food compartment. Attention should be paid to the
storage information printed on the food packing.
Frozen food storage
* The recommend weight of fresh food is less than 2 kg.
* Hot food should not be stored in the refrigerator until it has cooled down to
room temperature.
* The outside of any food packing should dried before storage in the freezer,
and any packing materials should be odor-free, airtight, non-poisonous and
nontoxic.
* Only remove the required amount of food from the refrigerator. Defrosted
food cannot be re-stored in the freezer unless it is first cooked.
* Food cut into small portions will freeze faster and be easier to defrost and
cook. The recommended weight for each portion is less than 1.5 kg.
* Do not put in bottled beer or drinks.
* Do not touch frozen food wet-handed.
Making water-Ice
* Pour water into the water ice mould up to three-quarters of the mould
volume, and then place the mould in the freezing compartment.
* Do not a use knife or other metal tools to take the ice out of the mould.
* The ice can be easily removed by hand after the mould has been placed in
warm water for a short time.
DEFROSTING CLEANING DE COMMISSIONING
Defrosting the cold storage compartment
The cold storage compartment is designed for automatic defrosting. Frost
formed on the back wall will melt and flow via the drainpipe to the
evaporating container over the compressor on the back of the refrigerator,
where the heat generated by the compressor will evaporate the water.
Caution: Always keep the drain over the vegetable and fruit tray clear to
ensure the normal flow of defrosted water. Use the rod provided to clear
any blockages.
Defrosting the freezer
After a period of operation, a layer of frost will form on the surface of the
freezer. Additional electricity will be consumed if this layer becomes too thick.
The defrosting process must be carried out when a thick layer of frost has
been formed.
To defrost the freezer, first disconnect the power by unplugging the
refrigerator, and then remove any food from the refrigerator and place it in a
cool place. Use a plastic defrosting tool.
After ice and frost are melted, wipe up the inside of the freezer compartment.
Caution: Never use a metal tool or electrical heater for defrosting.
After the defrosting is completed, plug in the refrigerator and it starts
operation again.
Power failure
Even in summer, food can be stored in the refrigerator for a few hours after a
power failure.
Page 7

17
* Don’t put additional food into the refrigerator during a power failure.
* Avoid opening the door during power failures
* If prior notice of a power failure is given, make some ice a nd put it in a
container in the top of the cold storage compartment.
Caution: temperature in the refrigerator will rise during a power failure or in
the event of technical problems, and the storage period will be reduced.
Cleaning
The refrigerator should be cleaned regularly to prevent the formation of bad
odors.
* Disconnect the power before cleaning the refrigerator.
* Do not use a hard brush, steel brush, detergent, gasoline or other solvents,
hot water, acid or alkali for cleaning.
* Wipe water drops on the surface of the refrigerator with a soft cloth.
(1) Do not use excessive amounts of water for cleaning the refrigerator
(2) Use a dry cloth to clean the switch, the lamp and the temperature
controller
* Always keep the rubber door seal clean
* Clean the back and sides of the refrigerator regularly.
Cessation of Operation
If the power failure lasts for an extended period, unplug the refrigerator and
clean the refrigerator as previously described.
Keep the door of refrigerator open when the power is turned off to prevent
any food remaining in the compartment from producing bad odors.
Caution: It is recommended that the refrigerator is not turned off
During Vacations
* Remove any food from refrigerator is the vacation is short. Turn the
temperature selection knob to the proper position, and make sure that the
door of the refrigerator is properly closed.
* If the vacation is long, take out the food from the refrigerator and
disconnect the power. When the frost inside melts, clean and dry the
compartment.
Discarding
* Remove the door of the refrigerator when you get rid of it, in case children
may get trapped in.
Moving the refrigerator
* Unplug the refrigerator
* Remove any food
* Tightly close the door with tape
QUESTIONS AND ANSWERS
Events below are the problems:
* The temperature of the refrigerator and the compressor will rise and the
compressor will run for comparatively longer periods when the refrigerator is
first started.
* Wipe water drops on the external surface of the refrigerator with a soft
cloth.
* When the refrigerator is opened frequently or stay open too long in humid
seasons, the cavity will be dampened.
* A slight sound will be heard when the liquid refrigerant circulates or when
the compressor switched on and off.
* A slight sound will be heard when defrosted water drops into the
evaporating dish.
* The compressor will operate for comparatively longer periods if excessive
quantities of food are stored or the ambient temperature is high.
* The evaporator will produce odors if the compartment is not cleaned.
Caution: The refrigerator should never be restarted until a period of at least
five minutes has elapsed.
Please determine the cause od the problem before making any repairs.
Phenomena
Causes
Refrigerator will
not start
* Bad connection to power source (plug, socket
and fuse)
* The temperature knob is at the 0 position
* Low voltage
The lamp does not
blink
*Bulb failure
* Power supply not connected
* The temperature knob is at the 0 position
Excessive noise
*Uneven placement
*Contact between the refrigerator and a wall or
other article
Compressor
operates for a long
period or
temperature does
not reach set point
* First time of operation
* Excessive food stored
* Frequent opening of the refrigerator door due
to hot weather
* The temperature controller is not set properly
* Refrigerator is in direct sunlight, or close to a
heat source
* Poor ventilation, or dirt on the condenser
Food dry
* Food not properly covered or sealed
Thick frost on
frozen food
* Door is not properly closed
* Frequent opening of the refrigerator door
* Frost inside food bags is normal
Strange odor
* Failure to seal food properly
* Rotting food inside refrigerator
* Refrigerator should be cleaned. See “Cleaning”
DOOR REVERSAL
1. Unplug the appliance before reversing the door opening direction.
2. Remove food from the appliance.
3. Remove caps on the front of the refrigerator body (Fig. 1, Fig 2).
4. Remove the two screws, which attach the upper hinge to the appliance
door (Fig. 3). Take special care and hold the appliance door vertically.
5. Holding the door, swing the upper door hinge away from the door using the
other hand (Fig. 4).
Be especially careful during this step, as the hinge may close and cause
injury.
6. Remove the two screws, which attach the lower hinge to the appliance
door (Fig. 5). Take special care and hold the appliance door with the other
hand.
7. Holding the door, swing the lower door hinge away from the door using the
other hand, then detach the door from the appliance body (Fig. 6).
8. Remove the two screws , which attach the upper hinge to the body and the
two screws holding the lower hinge to the appliance body (Fig. 7).
9. Screw the upper and lower hinge on the opposite side of the appliance
body using suitable screws (Fig. 8). Upper hinge should be mounted on the
other side of the appliance as the lower hinge. The lower hinge should be
mounted on the other side of the appliance as the upper hinge.
With the hinges open, hold the door parallel to the appliance body and screw
the hinges to the door using suitable screws while taking proper care.
10. Make sure that the door is properly aligned with the appliance body (Fig.
9).
INSTALLATION OF THE APPLIANCE
Installation of the appliance should be performed by a qualified installer. The
appliance should be placed in furniture case (Fig. 10). Once the appliance is
placed correctly, adjust the height of the appliance by turning the 4 adjustable
feet as appropriate. If necessary, adjacent Amica appliances should be braced
with a bracket fixed by screws and fitted in furniture (Fig. 11). There is a
special strip at the top of the appliance. Attach it to the underside of the
cabinet with appropriate screws supplied with the assembly kit (Fig. 16).
Decorative strip
must not block the vents located in the bottom casing unit, the strip must be
cut to size (Fig. 17). The depth of the bottom casing unit can be adjusted by
moving it forwards or backwards. Once properly adjusted, tighten the
mounting screws (located in the openings on both sides of the casing unit)
with a cross-head screwdriver.
This will permanently attach the casing unit (Fig. 18).
FITTING FURNITURE BOARD TO APPLIANCE DOOR
Place the mounting bracket on furniture board and position it accordingly (Fig.
12). The distance between the furniture board and the underside of the
worktop should be 5 mm (Fig. 13). Attach the mounting bracket using suitable
screws supplied in the installation kit. Pull out the mounting bracket cover
and screw in the two special screws (2) in the appliance doors (Fig. 14). Attach
furniture board with the fixed mounting bracket to the appliance door. Secure
the furniture board with suitable nuts (item 3, Figure 14). Make sure the
furniture board assembly is positioned correctly relative to the appliance (Fig.
15). Using the supplied screws, attach the furniture board assembly to the
bottom of the appliance door (Fig. 15). Replace the mounting bracket cover in
its original location.
Page 8

18
Page 9

19
SCRAPPING OLD APPLIANCES
This appliance is marked according to the European directive 2012/19/EU on
Waste Electrical and Electronic Equipment (WEEE).
WEEE contains both polluting substances (which can cause negative
consequences for the environment) and basic components (which can be reused). It is important to have WEEE subjected to specific treatments, in order
to remove and dispose properly all pollutants, and recover and recycle all
materials.
Individuals can play an important role in ensuring that WEEE does not become
an environmental issue; it is essential to follow some basic rules:
WEEE should not be treated as household waste.
WEEE should be handed over to the relevant collection points managed by
the municipality or by registered companies. In many countries, for large
WEEE, home collection could be present.
In many countries, when you buy a new appliance, the old one may be
returned to the retailer who has to collect it free of charge on a one-to-one
basis, as long as the equipment is of equivalent type and has the same
functions as the supplied equipment.
Conformity
By placing the mark on this product, we are confirming compliance to all
relevant European safety, health and environmental requirements which are
applicable in legislation for this product.
Page 10

Warranty Card
Worldwide Appliances Pty Limited
A.B.N. 45868077422
Oce:
48-50 Moore Street, Leichhardt N.S.W 2040
Post:
Locked Bag 3000, Annandale, N.S.W 2038
P: 1300 694 583
WARRANTY REGISTRATION
Your ongoing satisfaction with your artusi
product is important to us. We ask that you
complete the enclosed Warranty Registration
Card and return it to us so that we have a record
of the artusi product purchased by you.
PRIVACY
Worldwide Appliances respects your
privacy and is committed to handling your
personal information in accordance with the
National Privacy Principles and the Privacy
Act 1988 (Cth). A copy of the Worldwide
Appliances Privacy Policy is available at
www.artusi.com.au. Worldwide Appliances will
not disclose any personal information set out
in the Warranty Registration Card (“Personal
Information”) without your consent unless
required by:
1. law;
2. any Worldwide Appliances related company;
3. any service provider which provide services
to artusi or assist artusi in providing services
(including repair and warranty services) to
customers. Our purpose in collecting the
Personal Information is
to keep a record of the artusi product purchased
by you, in order to provide a better warranty
service to you in the unlikely event that there is
a problem with your artusi product. Worldwide
Appliances may contact you at any one or more
of the address, email address or telephone
numbers set out in the Warranty Registration
Card. Please contact artusi on 1300 694
583 should you not wish to be contacted by
Worldwide Appliances.
WARRANTY
1. Warranty
Worldwide Appliances warrants that each artusi
product will remain, for a period of either 12
months or 24 months of warranty. All Warranties
are valid from the original date of purchase, And
warranty claims must be accompanied by the
proof of purchase.
24 months warranty products:
All Built-in Appliances – Limited to Ovens,
Gas, Induction and Electric Cooktops, and All
Rangehoods
Freestanding Cookers - Gas and Electric Models
(900mm Width)
artusi.com.au
Dishwashers - Freestanding, Fully Integrated,
Semi Integrated and built-in
12 months warranty products:
Freestanding Cookers - Gas and Electric Models
in 50cm, 54cm and 60cm Widths
Portable Appliances* – Benchtop Models and
Portable Gas Models
2. What is not Covered by the Warranty.
The Warranty does not apply if an artusi product
is defective by a factor other than a defect arising
in the manufacture of the artusi product, including
but not limited to:
(a) damage through misuse (including failure
to maintain, service or use with proper care),
neglect, accident or ordinary wear and tear
(including deterioration of parts and accessories
and glass breakage);
(b) use for purpose for which the artusi product
was not sold or designed;
(c) use or installation which is not in accordance
with any specied instructions for use or
installation;
(d) use or operation after a defect has occurred or
been discovered;
(e) damage through freight, transportation or
handling in transit (other than when Worldwide
Appliances is responsible);
(f) damage through exposure to chemicals, dusts,
residues, excessive voltage, heat, atmospheric
conditions or other forces or environmental
factors outside the control or Worldwide
Appliances;
(g) repair, modication or tampering by the
purchaser or any person other than Worldwide
Appliances, an employee of Worldwide
Appliances or an authorised artusi service
contractor*;
(h) use of parts, components or accessories
which have not been supplied or specically
approved by artusi.
(i) damage to surface coatings caused by cleaning
or maintenance using products not recommended
in the artusi product handbook provided to the
purchaser upon purchase of the artusi product;
(j) damage to the base of an electric oven due to
items having been placed on the base of the oven
cavity or covering the base, such as aluminium
foil (this impedes the transfer of heat from the
element to the oven cavity and can result in
irreparable damage); or
(k) damages, dents or other cosmetic
imperfections not aecting the performance of the
artusi in respect of an artusi product purchased
as a “factory second” or from display
The Warranty does not extend to light globes
used in artusi products.
3. Domestic Use
Each artusi product is made for domestic use.
This Warranty may not extend to artusi products
used for commercial purposes.
Continued over...
Page 11

Warranty Card continued
artusi.com.au
4. Time for Claim under the Warranty
You must make any claim under this Warranty
within twenty eight (28) days after the occurrence
of an event which gives rise to a claim pursuant
to the Warranty, by booking a service call on the
telephone number below.
5. Proof of Purchase
Customers must retain proof of purchase in order
to be eligible to make a warranty claim in respect
of an artusi product.
6. Claiming under the Warranty
Customers will bear the cost of claiming under
this Warranty unless Worldwide Appliances
determines the expenses are reasonable, in which
case the customer must claim those expenses
by providing written evidence of each expense
to Worldwide Appliances at the address on the
Warranty Registration Card.
7. Statutory Rights
(a) These terms and conditions do not aect your
statutory rights.
(b) The limitations on the Warranty set out in this
document do not exclude or limit the application
of the consumer guarantees set out in the Act or
any other equivalent or corresponding legislation
in the relevant jurisdiction where to do so would:
(i) contravene the law of the relevant jurisdiction;
or
(ii) cause any part of the Warranty to be void.
(c) Worldwide Appliances excludes indirect or
consequential loss of any kind (including, without
limitation, loss of use of the artusi product) and
(other than expressly provided for in these terms
and conditions) subject to all terms,
conditions and warranties implied by custom, the
general law, the Act or other statute.
(d) The liability of Worldwide Appliances to you
Warranty Card tear off
for a breach of any express or non-excludable
implied term, condition or warranty is limited at
the option of Worldwide Appliances to:
(i) replacing or repairing the defective part of the
artusi product;
(ii) paying the cost of replacing or repairing the
defective part of the artusi product;
(iii) replacing the artusi product; or
(iv) paying the cost of replacing the artusi
product.
(e) Our goods come with guarantees that cannot
be excluded under the Australian Consumer
Law. You are entitled to a replacement or refund
for a major failure and for compensation for any
other reasonably foreseeable loss or damage.
You are also entitled to have the goods repaired
or replaced if the goods fail to be of acceptable
quality and the failure does not amount to a
major failure.
8. Defects
Any part of an artusi product deemed to be
defective and replaced by Worldwide Appliances
is the property of Worldwide Appliances.
Worldwide Appliances reserves the right to
inspect and test artusi products in order to
determine the extent of any defect and the
validity of a claim under the Warranty.
*To locate your closest artusi authorised service
agent please contact us on 1300 652 100 or visit
www.artusi.com.au
ALL SERVICE CALLS MUST BE BOOKED
THROUGH AN AUTHORISED DEALER OR
WARRANTY DEPARTMENT ON 1300 652 100
OR stokesaps.com.au/artusi-service
01032014
WARRANTY REGISTRATION CARD
01052013
Last Name: First Name:
Address:
State: Postcode: Email:
Home Phone: Mobile:
Purchase Date: / / (Please attach proof of purchase to validate warranty)
MODEL NUMBER
1
2
3
4
Please complete and send to ARTUSI at: REPLY PAID 83617
LEICHHARDT NSW 2040
SERIAL NUMBER
(if you cannot locate the serial number please call ARTUSI on 1300 694 583)
01032014
4
Page 12

Page 13

DISCLAIMER
Worldwide Appliances PTY LTD, trading as ARTUSI, is continually seeking ways to improve the design specifications, aesthetics and production
techniques of its products. As a result alterations to our products and designs take place continually. Whilst every effort is made to produce
information and literature that is up to date, this brochure should not be regarded as an infallible guide to the current specifications, nor does it
constitute an offer for the sale of any particular product. Product dimensions indicated in our literature is indicative only. Actual product only
should be used to define dimension cutouts. Distributors, and retailers are not agents of ARTUSI and are not authorised to bind ARTUSI by any
express or implied undertaking or representation.
ARTUSI OFFICES ARE OPEN DAILY FROM 9AM–5PM AND SATURDAYS 10AM–4PM
NSW & ACT (HEAD OFFICE)
48-50 MOORE STREET
LEICHHARDT
F 02 8569 4699
P: 13 00 6 49 5 83
VIC, TAS & SA
1211 TOORAK ROAD
CAMBERWELL
F 03 9809 2155
QLD
1/42 CAVENDISH ROAD
COORPAROO
F 07 3397 0850
WA & NT
UNIT 10/55 HOWE STREET
OSBORNE PARK
F 08 9201 9188
NZ
PO BOX 11.160
SOCKBURN CHRISTCHURCH
F 03 344 5906
ARTUSI.COM.AU
 Loading...