

Artusi AGH92XFFD User Manual for AGH92XFFD

AGH92XFFD
OPERATION MANUAL
APPLIANCES
FOR LIVING

Congratulations, you are now the proud owner of an ARTUSI cooking appliance. Thank you for purchasing ARTUSI
and welcome to the ARTUSI Family.
This instruction manual has been specially created to inform you of the full range of features your ARTUSI appliance
has to offer and serves as an introduction to getting the very best out of your ARTUSI appliance.
We present detailed information on each of the features your ARTUSI appliance consists of. Once you have read
this section you will be able to choose the most appropriate settings for your appliance when cooking different
types of food.
We ask you to read the instructions in this booklet very carefully as this will allow you to get the best results from
using your appliance. KEEP THE DOCUMENTATION OF THIS PRODUCT FOR FUTURE REFERENCE.
TO REGISTER YOUR PRODUCT WITH ARTUSI, PLEASE FILL OUT THE WARRANTY CARD AT THE END OF
THIS BOOKLET AND POST IT TO: REPLY PAID 83617
LEICHHARDT NSW 2040
Dear Artusi Customer, please read this user manual carefully before using the product and, keep it permanently at
your disposal.
Note: This user manual is prepared for more than one model. Some of the features specified in this Manual may not
be available on your appliance.
All our appliances are only for domestic use, not for commercial use. Products marked with (*) are optional.
“THIS APPLIANCE SHALL BE INSTALLED IN ACCORDANCE WITH THE REGULA TIONS FORCE AND ONLY USED
IN A WELL VENTILATED SPACE. READ THE INSTRUCTIONS BEFORE INSTALLING OR USING THIS APPLIANCE”
“Conforms with the WEEE Regulations.”

Instructions for use
Installation
All the operations concerned with
EN
the installation (electrical and gas
connections, adaptation to type of gas,
necessary adjustments, etc.) must be
carried out by qualied technicians, in
terms with the standards in force.
For specic instructions, kindly read
the part reserved for the installation
technician.
Use
Gas burners (Fig. 1-3).
The ignition of the gas burner is carried
out by putting a small ame to the upper
part holes of the burner, pressing and
rotating the corresponding knob in an
anti-clockwise manner, until the maxi-
mum position has coincided with the
marker. When the gas burner has been
turned on, adjust the ame according to
need. The minimum position is found at
the end of the anti- clockwise rotation
direction.
In models with automatic ignition,
operate the knob as described above,
pressing simultaneously, the cor-
responding push-button. For models
with automatic/ simultaneous (with
one hand) ignition, it is sucient to
proceed as described above using
the corresponding knob. The electric
spark between the ignition plug and
the burner provides the ignition of the
burner itself. After ignition, immediately
release the push-button and adjust the
ame according to need.
For models with a thermoelectric safety
system, the burner is ignited as in
the various cases described above,
keeping the knob fully pressed on the
maximum position for approximately
3/5 seconds. After releasing the knob,
make sure the burner is actually lit.
N.B. - we recommend the use of pots
and pans with a diameter matching that
of the burner, thus preventing the ame
from escaping from the bottom part and
surrounding the pot
• do not leave any empty pots or pans
on the re
• do not use any tools for grill-cooking
on Crystal hobs.
When cooking is nished, it is also a
good norm to close the main gas pipe
tap and/ or cylinder.
Models with Dual Wok burner
Some models have a Dual Wok
burner. The centre ame (F1) can be
lit by pressing the knob and turning it
clockwise or the entire burner (F2) can
be lit as shown the gure below.
16

Important
• use of the appliance produces heat
and moisture in the room where it is
installed. Make sure the kitchen is
suciently ventilated; keep natural
ventilation holes open or install
mechanical ventilation devices (such
as a hood).
• Prolonged use of the appliance may
require additional ventilation, such as
opening a window.
• on oors with thermoelectric
protection do not keep the ignite
button pushed for more than 15
seconds. If the burner has not ignited
after 15 seconds, open the door of
the room and wait at least one minute
before making a further attempt.
• on oors without protection, should
the burner ame go out close the
corresponding gas cock and wait at
least on minute before making any
attempt to ignite it.
recommend at bottom recipients with
a diameter equal or slightly larger than
that of the plate itself.
• avoid liquid overow. Therefore, after
boiling or heating liquids, reduce the
heat output;
• do not leave the electrical plates on
with empty pots and pans;
• when cooking is nished, rotate
the knob back into closing and/or
disconnected position.
In the event of even a slight fracture
on the cooking vitroceramic surface,
disconnect the electric power supply
immediately.
DO NOT STARE AT THE HALOGEN
LAMP.
GAS
EN
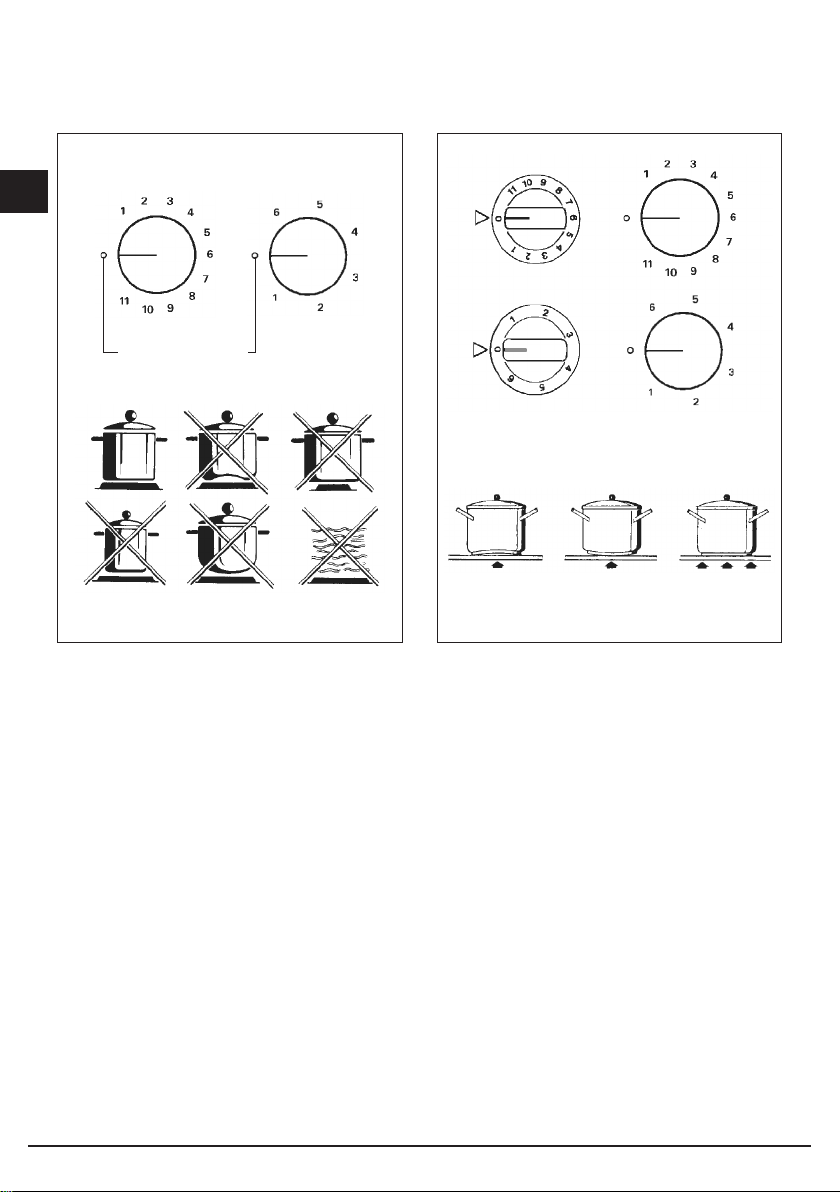
Electrical plates / Vitroceramic
heating element
(Fig. 2-2a-3). Rotate the knob towards
the position required for cooking
and bear in mind that the higher the
number, the higher the heat output.
See table “use of electrical plates”/
heatin elements vitroceramic. The pilot
light signals that the plate is “on”.
Some types of pilot lights will
maintain some slight luminescence
even after disconnection. That is
quite normal.
N.B.: When using electrical plates/
heating elements vitroceramic, we
17
sh 20x32
wok Ø 20-32
fast Ø 20-26
semifast Ø 14-20
auxiliary * Ø 10-14
*with reduction grid
Fig. 1
EN
ELECTRICAL PLATES
SWITCHED
OFF
Fig. 2
VITROCERAMIC HEATING
ELEMENTS
no no yes
Fig. 2a
18

USE OF ELECTRICAL PLATES/
VITROCERAMIC HEATING ELEMENTS
Commutator
Energy regulator Heat intensity Cooking methods
1 1-2 slight
2 3-4 mild
3 5-6 slow
4 7 - 8 medium
5 9 - 10 high
6 10 - 11 burning heat
EN
melting of fats etc.; heat
small quantities of liquid
heating of medium quantities
of liquid; puddings, long-
cooking sauces
defreezing - heat large
quantities of liquid; cooking
below boiling temperature
tender roasts; cooking at
boiling temperature
roasts - boiled food; pan-
frying of meats
bring large quantities of liquid
to boil; fry
19
 Loading...