

Page 1
ARTDio
IInntteelllliiggeennccee CCoommmmuunniiccaattiioon
n
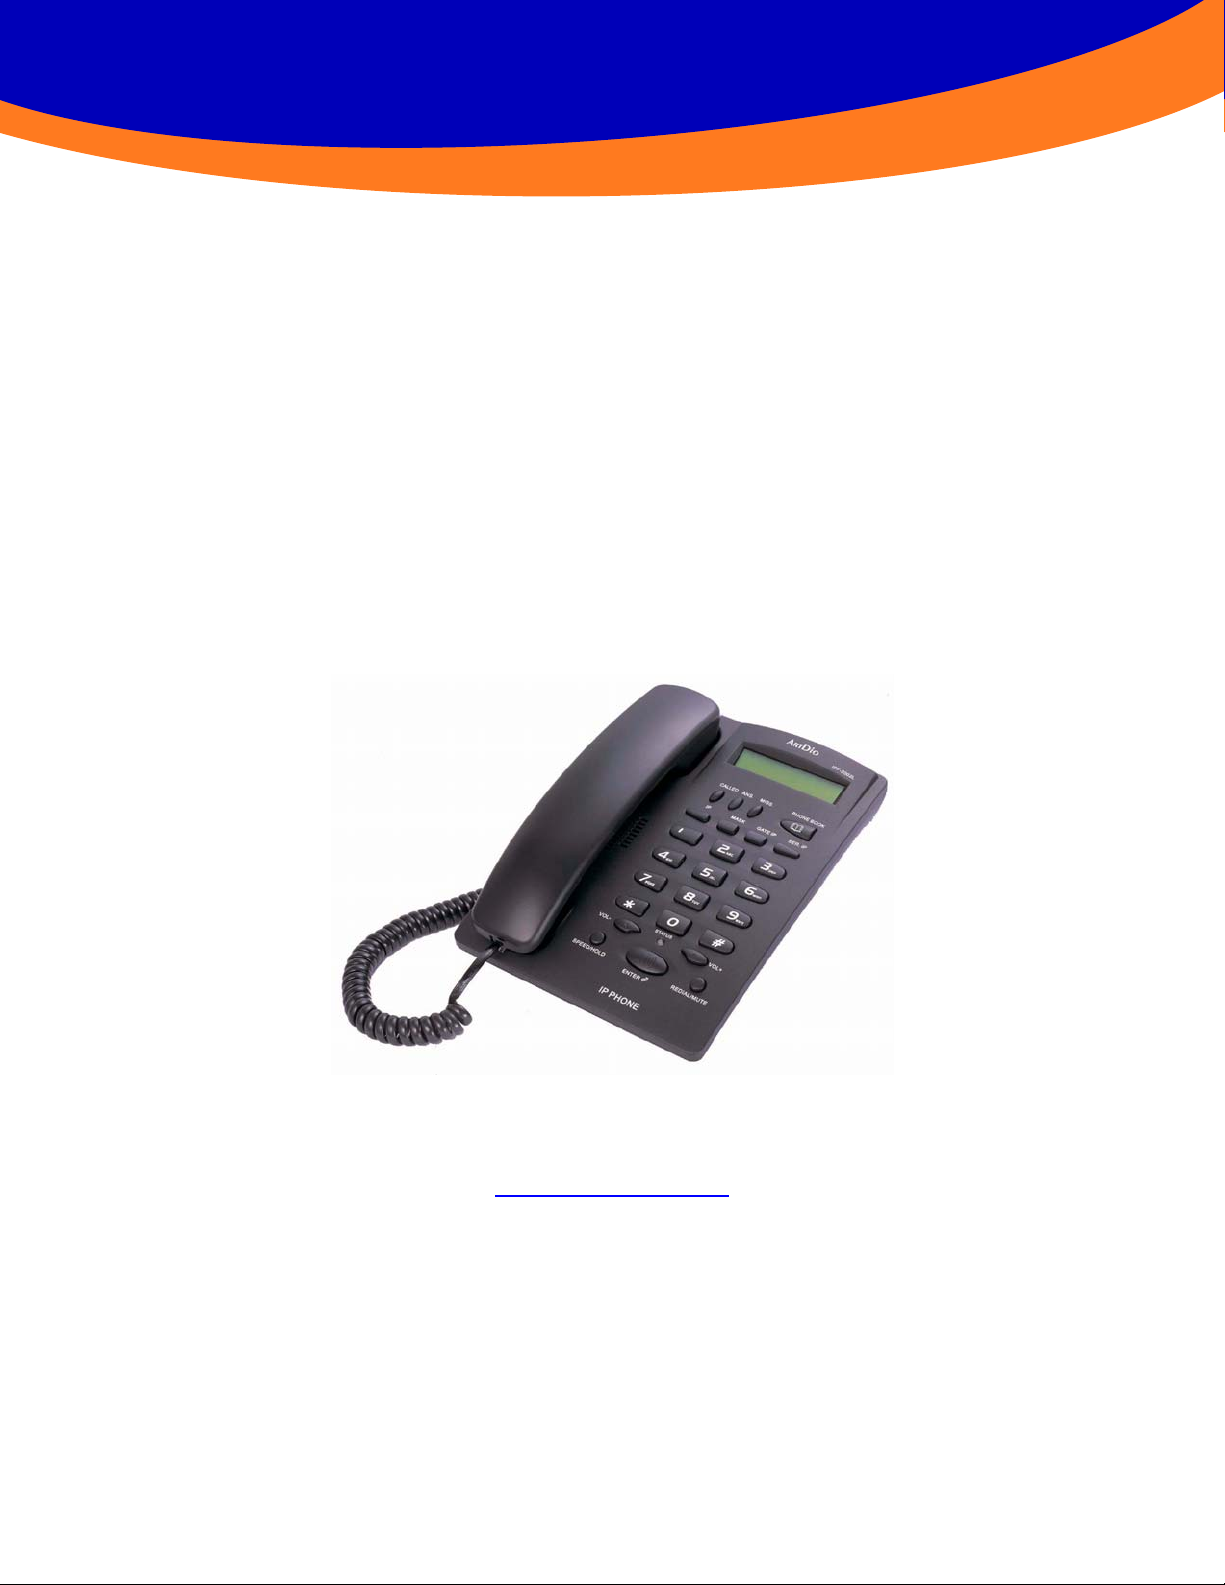
IPF-2002L User Manual
V1.0
www.artdioinc.com
ArtDio Company, Inc.
Page 2

IPF-2002L User Manual
Safety Instructions
• Do not attempt to service the product yourself. Any servicing of this product should be
referred to qualified service personal.
• To avoid electric shock, do not put your finger, pin, wire, or any other metal objects into vent s
and gaps.
• To avoid accidental fire or electric shock, do not twist power cord or place it under heavy
objects.
• The product should be connected to a power supply of the type described in the operating
instructions or as marked on the product.
• To avoid hazard to children, dispose of the product’s plastic packaging carefully.
• Please read all the instructions before using this product.
2
Page 3

IPF-2002L User Manual
Contents
1. PRODUCT SPECIFICATION..................................................................................................5
2. PACKAGE CONTENTS .........................................................................................................6
3. IPF-2002L FUNCTIONS.........................................................................................................7
3.1 Front Panel.........................................................................................................................................................................7
3.2 Rear and Back Panel.......................................................................................................................................................8
3.3 Function Keys...................................................................................................................................................................9
3.4 Status Indicators...............................................................................................................................................................9
4. HARDWARE INSTALLATION:.............................................................................................10
4.1 Connection with a Router ............................................................................................................................................10
4.2 Connection without a Router......................................................................................................................................11
5. CONFIGURE THE IPF-2002L USING KEYPAD ..................................................................12
5.1 Network Settings:...........................................................................................................................................................12
5.1.1 PPPoE Setting...................................................................................................................................................................12
5.1.2 Static IP Setting................................................................................................................................................................. 13
5.1.3 DHCP Setting....................................................................................................................................................................13
5.2 Protocol Settings............................................................................................................................................................13
5.3 Audio Settings: ...............................................................................................................................................................14
5.4 Other Settings:................................................................................................................................................................15
5.5 Speed Dial Settings:......................................................................................................................................................15
5.6 Default Settings:.............................................................................................................................................................15
5.7 Save Settings:.................................................................................................................................................................15
5.8 Exit Settings:...................................................................................................................................................................16
6. WEB CONFIGURATION:..................................................................................................17
6.1 Network Settings:...........................................................................................................................................................17
6.2 Protocol Settings:..........................................................................................................................................................18
6.3 Phone Settings:..............................................................................................................................................................21
3
Page 4

IPF-2002L User Manual
6.4 Audio Settings: ...............................................................................................................................................................22
6.5 Other Settings:................................................................................................................................................................23
6.6 Update...............................................................................................................................................................................23
6.7 Phone Book .....................................................................................................................................................................23
7. PASSING THROUGH THE NAT/FIREWALL:......................................................................25
7.1 SIP with STUN................................................................................................................................................................. 25
7.2 SIP with Outbound Proxy.............................................................................................................................................25
7.3 Others................................................................................................................................................................................25
8. REGISTRATION MESSAGE................................................................................................27
9. USING IPF-2002L ................................................................................................................27
9.1 Pickup the Phone...........................................................................................................................................................27
9.2 Making Phone Calls.......................................................................................................................................................27
9.3 Check the IPF-2002L Call Records............................................................................................................................28
9.4 Speed Dial........................................................................................................................................................................28
9.5 Mute...................................................................................................................................................................................28
9.6 Hold....................................................................................................................................................................................28
10. APPENDIX .........................................................................................................................29
10.1 IPF-2002L Keypad and Symbols Mapping Table:.................................................................................................29
10.2 H.323 Web Configuration Exsample........................................................................................................................29
10.3 MGCP Web Configuration Exsample......................................................................................................................30
10.4 How to Add a Prefix in Front of the Number.........................................................................................................31
10.5 Some Troubleshooting ...............................................................................................................................................31
10.6 IPF-2002L Keypad Selection Tree ............................................................................................................................32
(Using administrator password).......................................................................................................................................32
4
Page 5
IPF-2002L User Manual
A
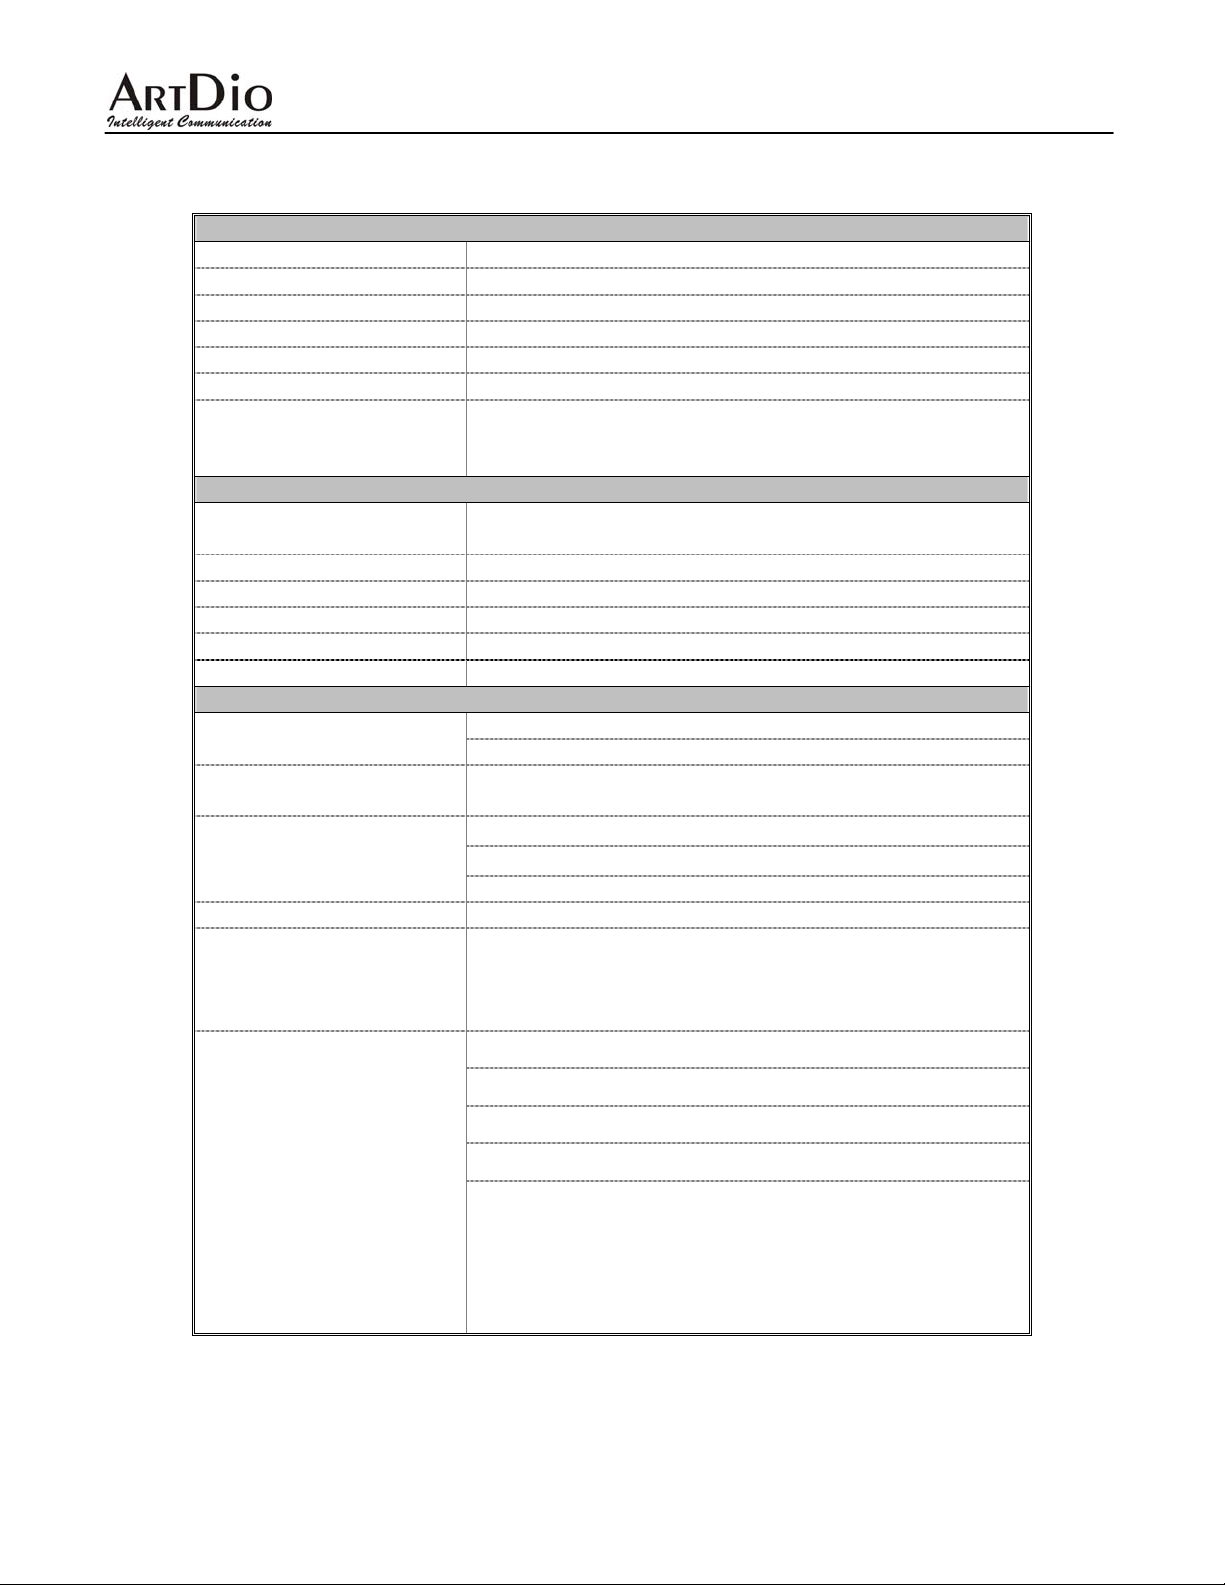
1. Product Specification
Voice Interface
Call control protocol SIP(RFC-3261) or H.323 V4 or MGCP
Voice compression G.711 A/µ -Law, G.723.1, G.729A/B/AB
Echo cancellation G.165/G.167 16ms
Voice Process Differential input/Differential output
Delayed (End to End) < 100ms
Flow of the average 14K(G.723.1) ~ 51K(G.729) BPS
Silence Suppression, VAD, CNG, Acoustic Echo
Other Support
LAN Interface
Interfaces
Connectors RJ-45 connector
Management Web browser, Keypad on the Phone, LCD screen,
IP address PPPoE, DHCP client, Static IP
Firmware Upgrade FTP/TFTP
Transport Protocol RTP/RTCP, UDP/TCP
General Information
Power
Power consumption
Working environment
Certification CE, FCC
Feature Keys
Other information
Cancellation, Jitter Buffering, DTMF tone detection,
E.164 Dial plan
Two 10/100 Base-T Auto-Negotiation, MDI/MDI-X
Ethernet Port
100 ~ 240VAC, 50 ~ 60Hz
5VDC, 1A
5W
Operation Temperature : 0 ~ 40℃ (32° ~ 104°F)
Storage Temperature : -30 ~ 65℃ (-22° ~ 149°F)
Relative Humidity : 10 ~ 95% Non Condensing
Called, Answered, Miss Call, Phone (Phone book/This
Phone Number), Network-Setting (IP/Subnet Mask/
Gateway/Server IP) Speedy Dial, Call Hold, Redial, Mute,
Volume Up/Down, Hand-free.
100 Entries Phone Book
IVR (English)
Earphone/Microphone Connector
NAT Pass-through (SIP with STUN)
Call Hold, Call Mute, Call Status, Caller ID, Headset,
Networking Status, Volume Adjustment, No
Forward, Busy Call Forward, Always Call Forward, Miss
Call, Dialed Call, Answered Call, Last Number Redial,
Speedy Dial, Web configuration, LCD Display, LED
indicators...etc.
nswer Call
5
Page 6

IPF-2002L User Manual
2. Package Contents
The IPF-2002L Series VoIP phone package contains:
• One IPF-2002L VoIP phone
• One power adaptor
• One RJ-45 Ethernet cable
• Quick Installation Guide
• Installation CD
6
Page 7
IPF-2002L User Manual
3. IPF-2002L Functions
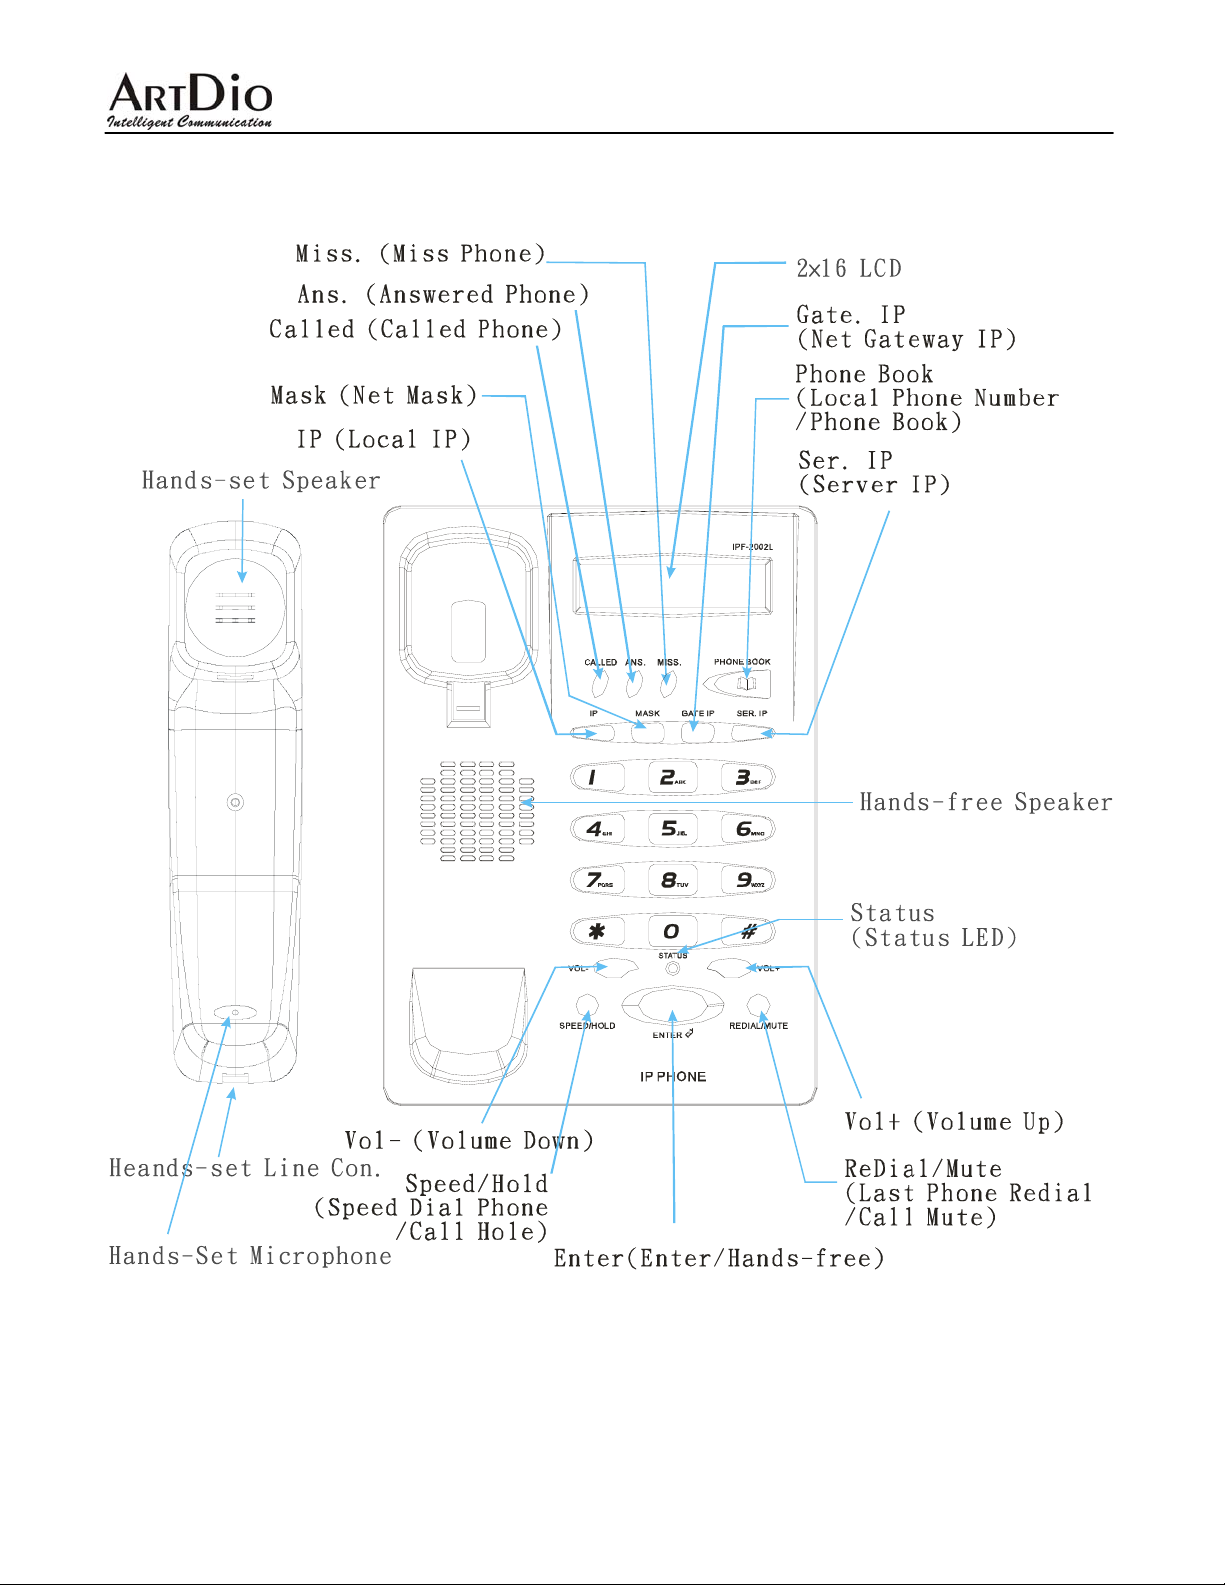
3.1 Front Panel
7
Page 8
IPF-2002L User Manual
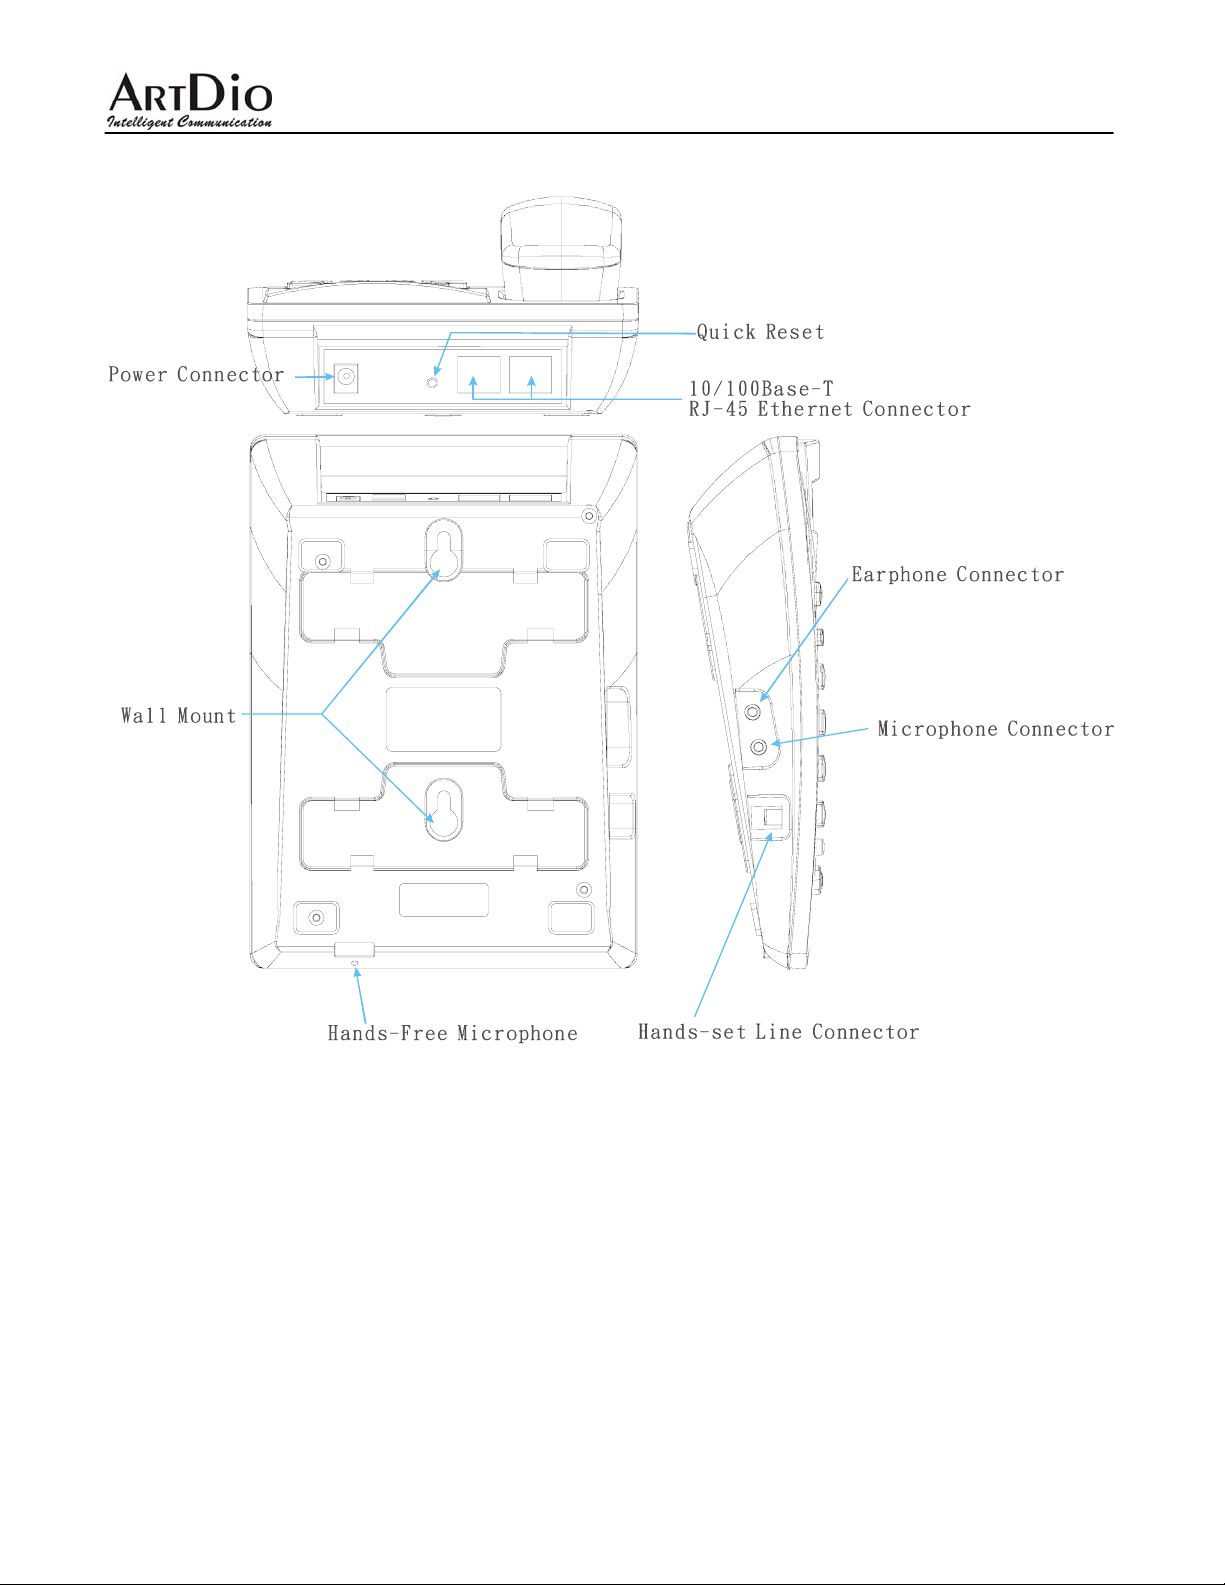
3.2 Rear and Back Panel
8
Page 9
IPF-2002L User Manual
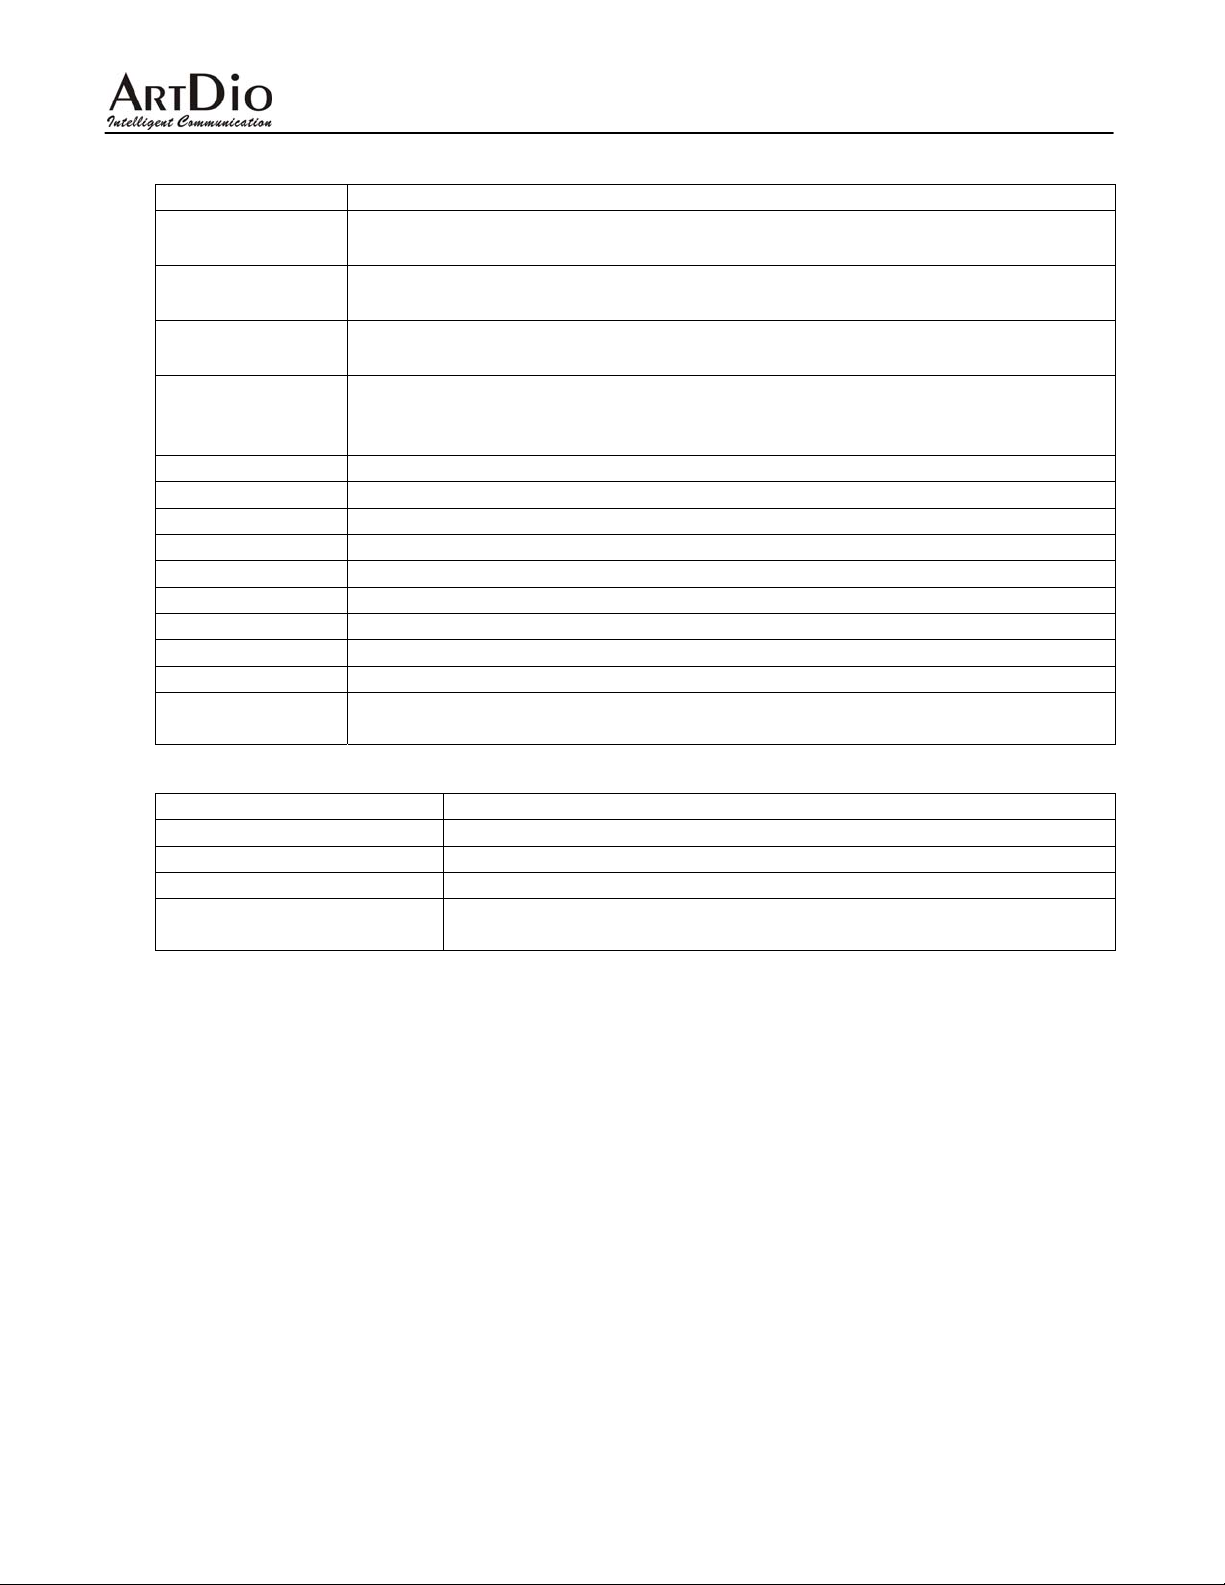
3.3 Function Keys
Keys Function
Called
Ans.
Miss
Phone
IP
Mask
GATE IP
SER .IP
Hand Free
SPD / HOLD
REDIAL / MUTE
VOLVOL +
ENTER
With handset hung, press this button to display the phone number of the last
call placed. In addition, press【#】to dial this number .
With handset hung, press this button to display the phone number of an
incoming call. In addition, press【#】to dial this number.
With handset hung, press this button to display the missed call number. In
addition, press【#】to dial this number.
With handset hung, press this button to get the phone number of the phone.
Press again will show the data in the phone book. In addition, press【#】to dial
this number.
With handset hung, press this button to get local IP address of the phone.
With handset hung, press this button to get the subnet mask of the IPF-2000.
With handset hung, press this button to get the gateway IP address in LAN.
With handset hung, press this button to get the service server IP address.
Press this button to turn on the speaker phone.
Speed Dial; Hold
Redial; Mute
Decreases the volume of the handset or speaker; turns to the left hand side.
Increases the volume of the handset or speaker; turns to the right hand side.
With handset hung, press this button to allow you talk with hands-free; the
“Confirm” button while configuration.
3.4 Status Indicators
Light Description
Fast blinking green light
Slow blinking green light
Yellow light blink once
Red light blinking
IPF-2002L is receiving a call.
IPF-2002L is on phone.
Booting IPF-2002L.
IPF-2002L is not connected to the internet, disconnected, or fails to
register to the server.
9
Page 10
IPF-2002L User Manual
4. Hardware Installation:
Prepare your Internet information, and then follow the steps below to install your IPF-2002L.
※ For the Cable ISP subscriber:
Cable ISPs usually provide DHCP to its subscribers, and each time they only allow one user
to logon. Therefore, most ISPs require their subscribers report the MAC address of their
internet device to allow them to use the service. If you want to apply another account for
IPF-2002L, just simply report the MAC address of your IPF-2002L to your ISP provider.
If you want to use multiple internet devices in the same time, you need a router to connect to the
ISP, and connect your internet devices to the router. Then replace the original MAC address to
your router’s MAC address.
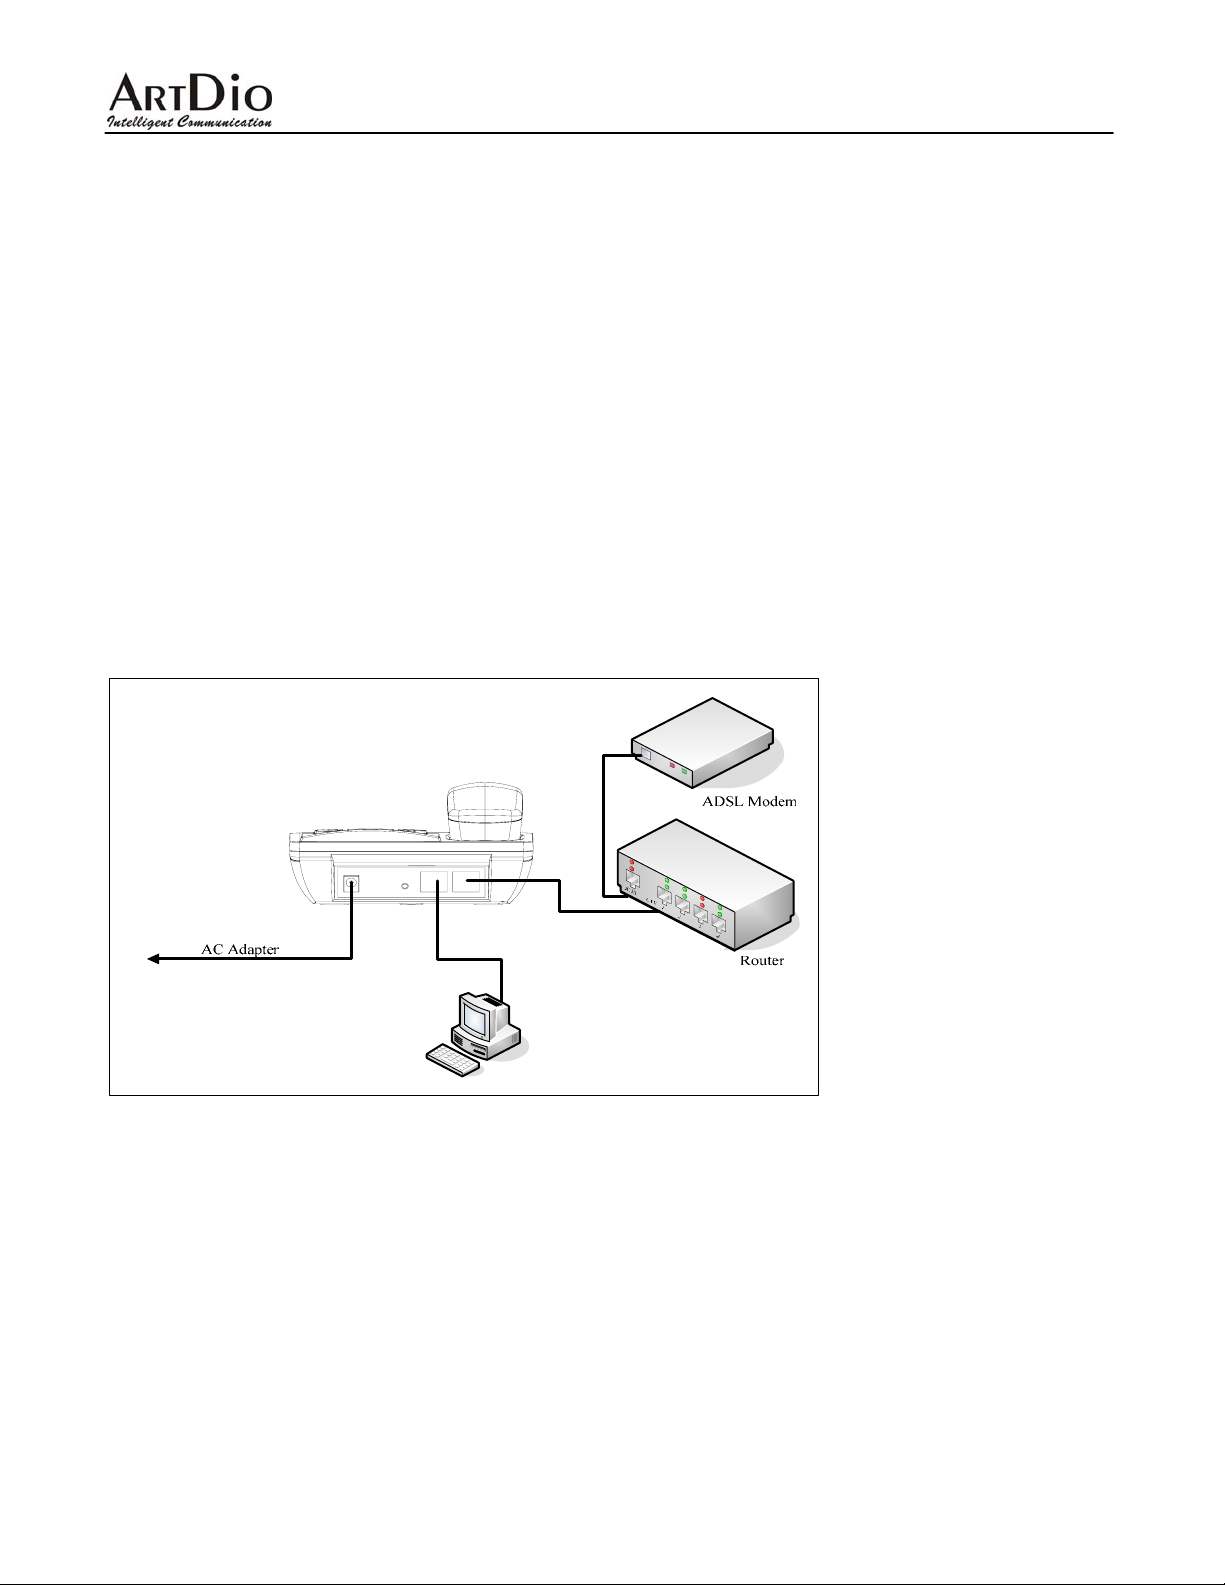
4.1 Connection with a Router
Plug one end of the RJ-45 cable to one of the LAN port on the IPF-2002L, and plug another end
to one of the LAN port of your router. Once “Ready for call” is shown on the screen, the
hardware installation is completed. There is another LAN port available for you to connect to
another internet device or to your PC.
10
Page 11
IPF-2002L User Manual
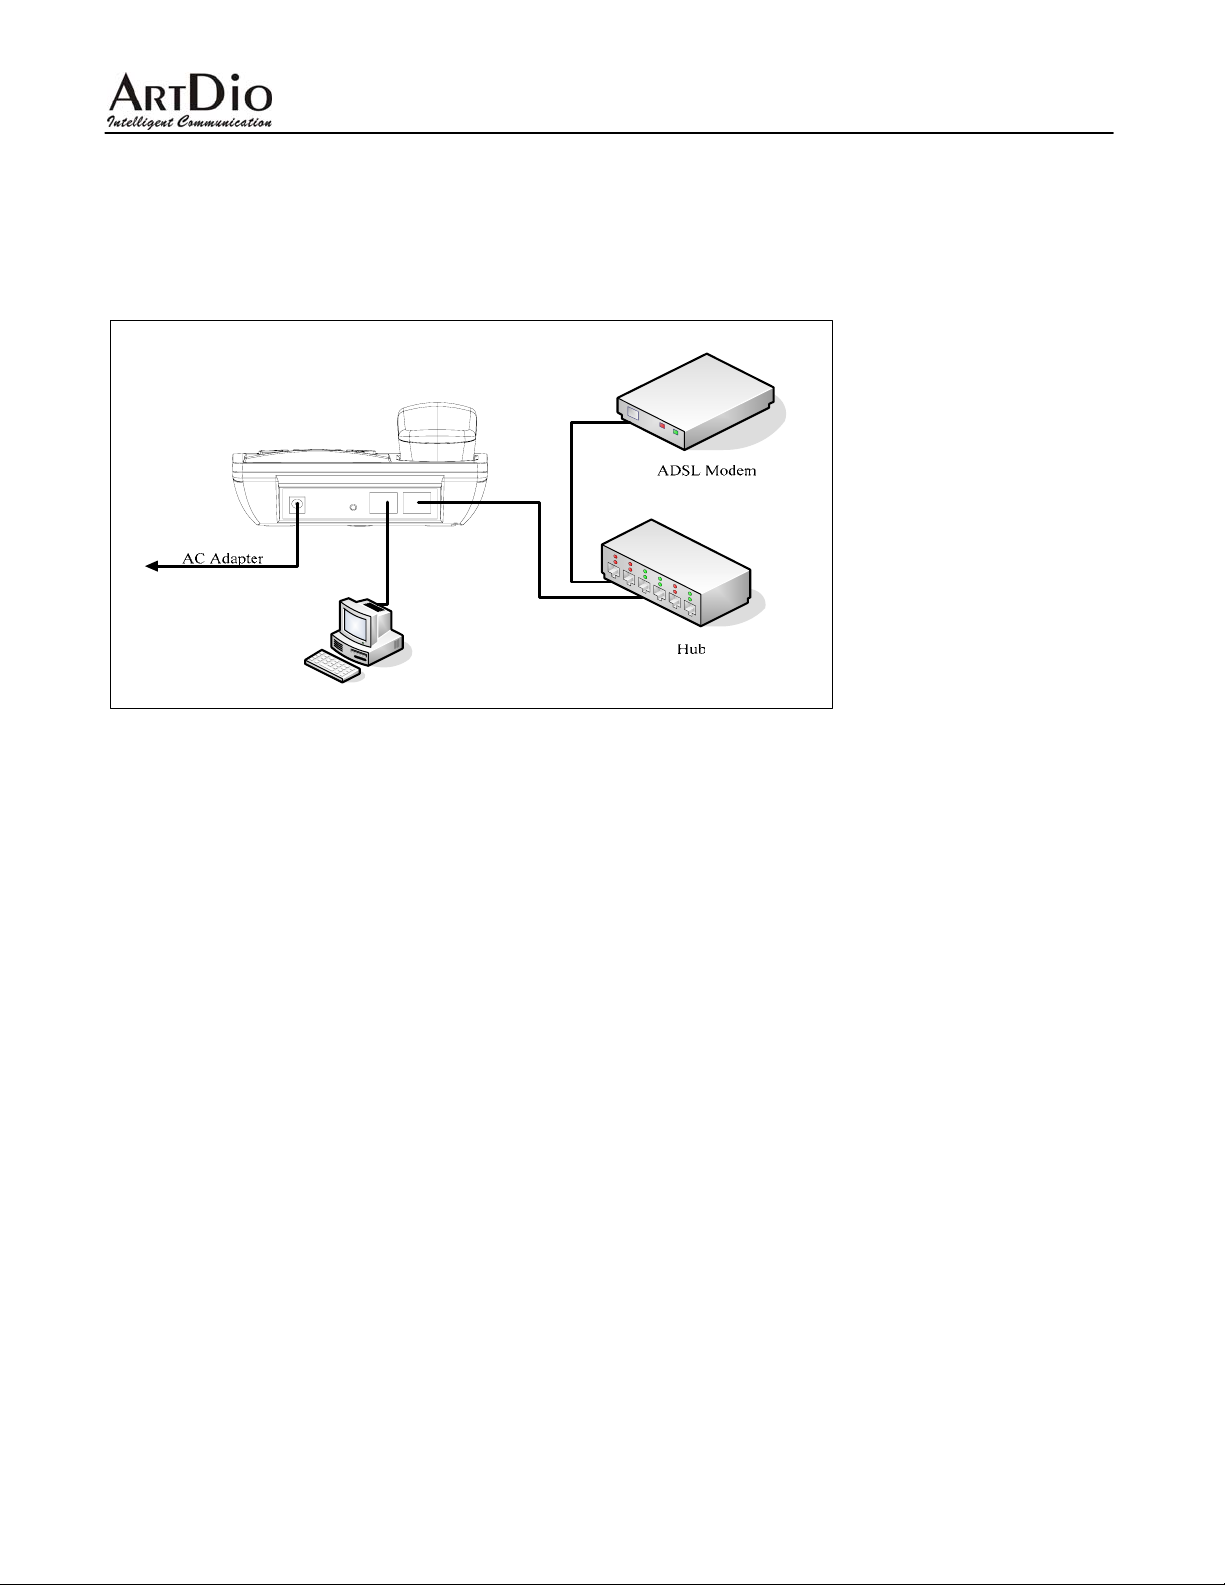
4.2 Connection without a Router
Plug one end of the RJ-45 cable to one of the LAN port on IPF-2002L, and plug another end to
one of the LAN port of your HUB. Once “Ready for call” is shown on the screen, the hardware
installation is completed. There is another LAN port available for you to connect to another
internet device or to your PC.
11
Page 12
IPF-2002L User Manual
5. Configure the IPF-2002L Using Keypad
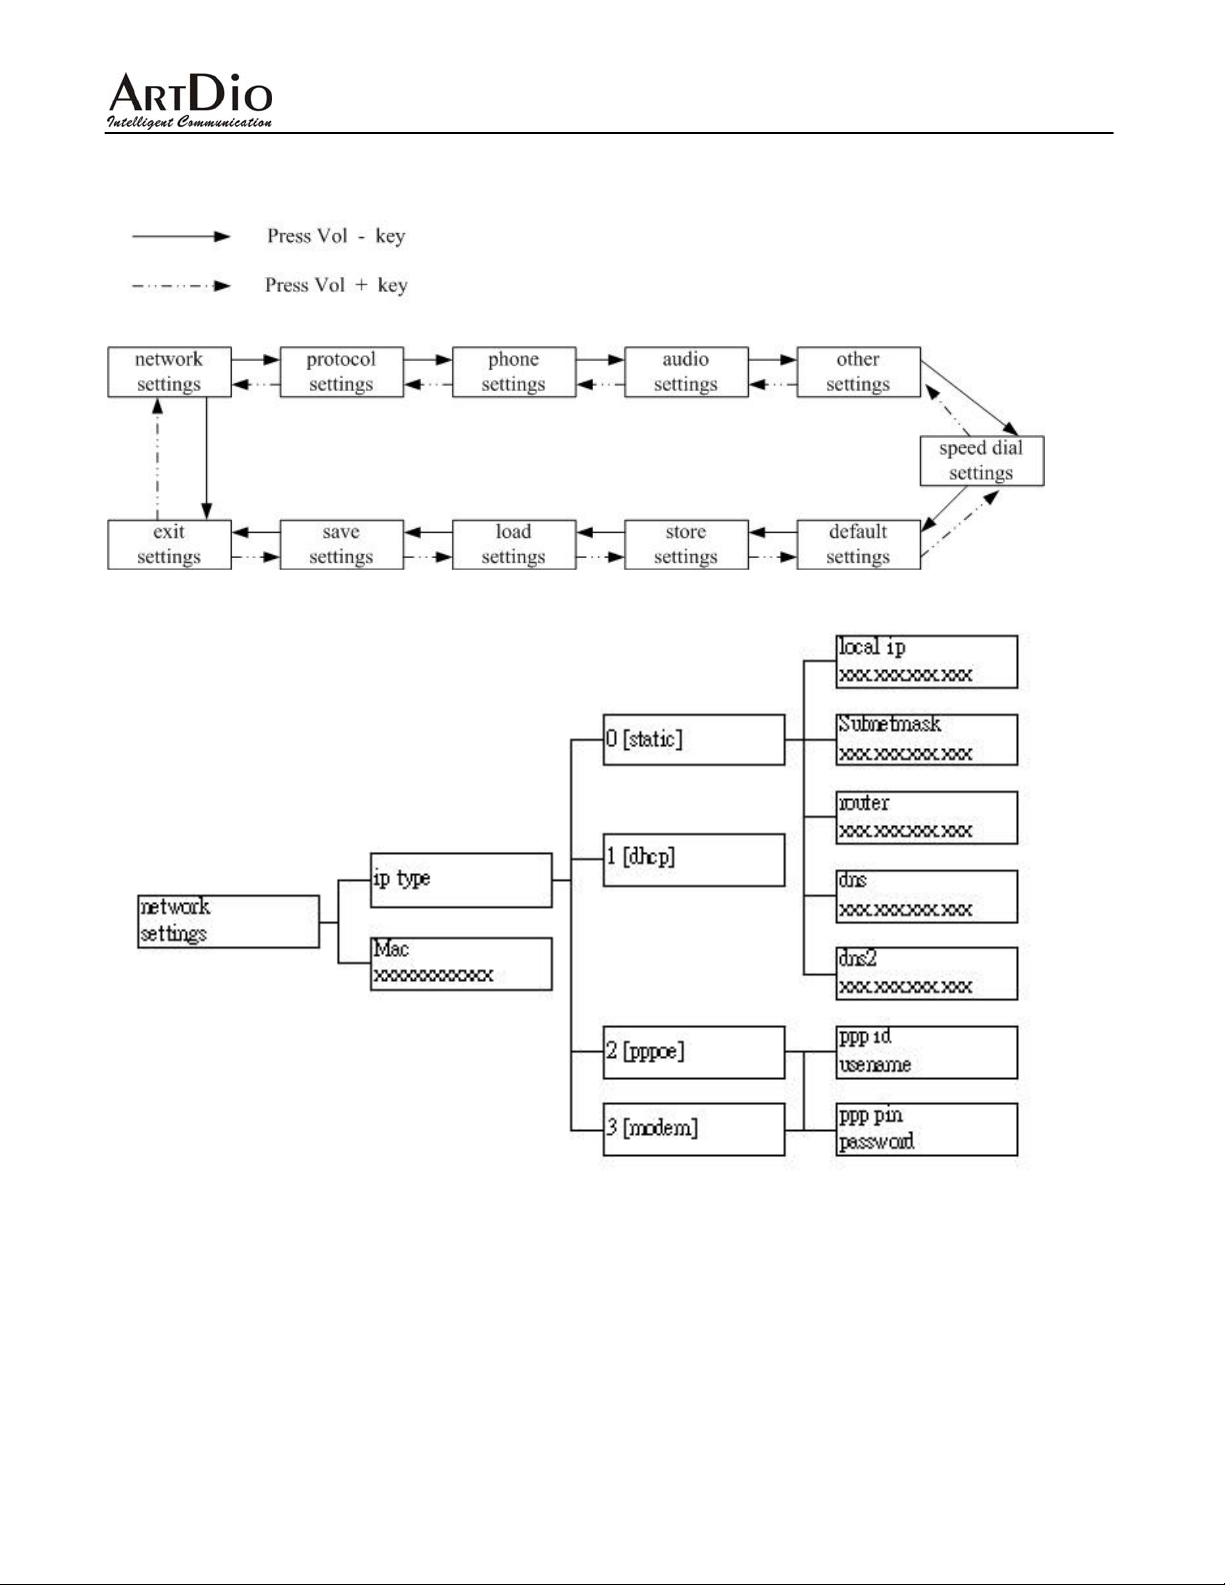
IPF-2002L can be configured with its keypad or on a web page. The following table below
illustrates the configuration function keys when using the keypad:
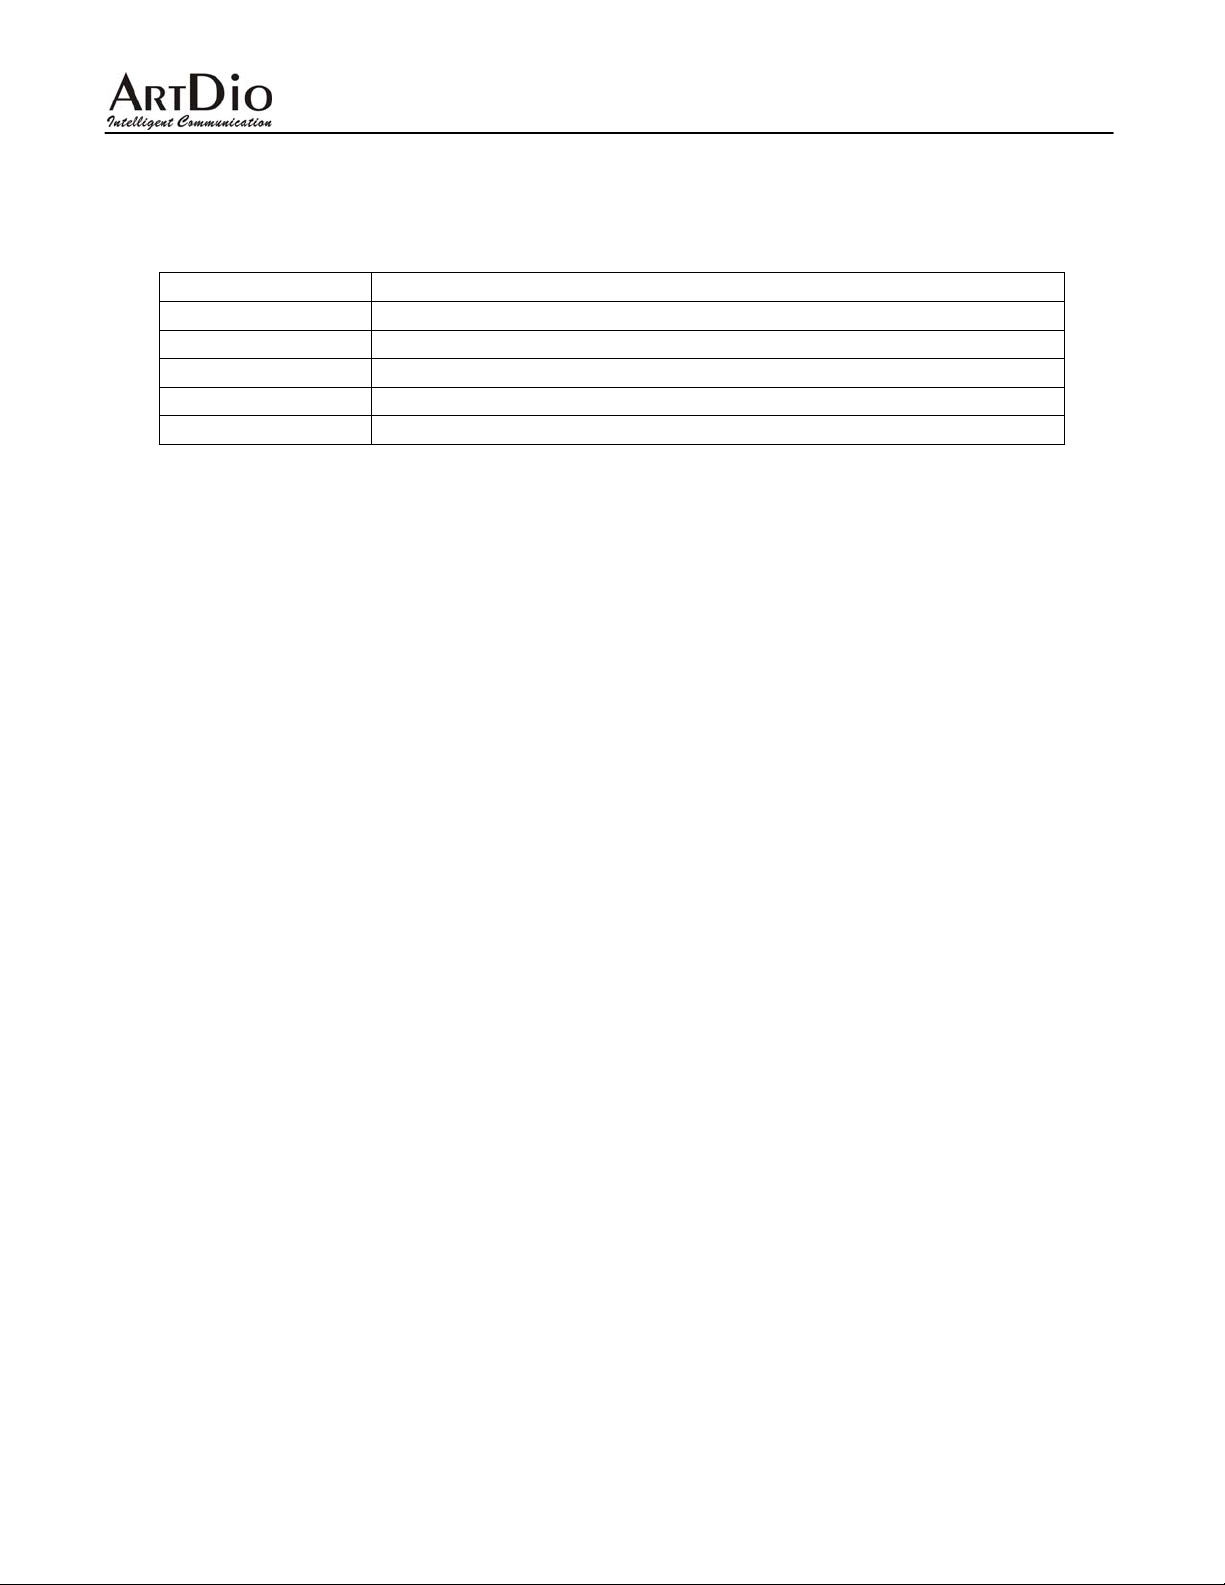
Keys Function
SPD / HOLD To change settings when using the keypad configuration
REDIAL / MUTE To main menu options when using the keypad configuration
VOL - To the next page when using the keypad configuration
VOL + To the previous page when using the keypad configuration
Enter To confirm the setting when using the keypad configuration
5.1 Network Settings:
The default network setting for IPF-2002L is DHCP. Therefore, if you connect your IPF-2002L to
a DHCP network, it will direct connect to the Internet without any network setting.
If the network environment is PPPoE or Static IP, please change the network setting on your
phone to PPPoE or Static IP. You can use the keypad to change your phone network setting. If
you don’t know what kind of network environment you are at, please contact your Internet
Service Provider.
Use the keypad configuration and choose the【network settings】. Please configure your phone
to DHCP, Static, or PPPoE according to your network environment.
5.1.1 PPPoE Setting
1. Connect the PPPoE network to the RJ-45 port of the IPF-2002L, and then plug in the
power.
2. Press 1234# (Hold the “#” key) Æ LCD shows【password】Æ Press 1234 and then press
ENTER Æ LCD shows 【network settings】.
3. Press ENTER Æ LCD shows 【iptype】Æ press SPD/HOLD Æ Blinking cursor Æ Press 2
and then press ENTER. (2 sets your networking settings the PPPoE mode)
4. Press ENTER Æ LCD shows 【pppid】Æ Press SPD/HOLD Æ Input PPPoE account
number and then press ENTER.
5. Press ENTER Æ LCD shows【pppin】Æ Press SPD/HOLD Æ Input PPPoE password and
then press ENTER Æ Press ENTER again to complete the configuration.
If you want to input symbols or characters such as @, A, a, B, b, C, c, please refer to
the
keypad mapping table in Appendix 10.1.
12
Page 13

IPF-2002L User Manual
5.1.2 Static IP Setting
Please input the Static IP comes from your ISP, or the Private IP address, Subnet Mask, and
Default Gateway IP address in your company.
1. Connect the RJ-45 Ethernet Cable to the LAN port on the IPF-2002L, and then plug in the
power.
2. Press 1234# (Hold the “#” key) Æ LCD shows【password】Æ Press 1234 and then press
ENTER Æ LCD shows【network settings】.
3. Press ENTER Æ LCD shows【iptype】Æ press SPD/HOLD Æ Blinking cursorÆ Press 0
and then press ENTER. (0 sets your networking settings to the Static IP mode)
4. Press ENTER Æ LCD shows【ip】Æ Press SPD/HOLD Æ Blinking cursor Æ Input IP
address (XXX*XXX*XXX*XXX) and then press ENTER.
5. Press ENTER Æ LCD shows 【subnet mask】Æ Press SPD/HOLD Æ Blinking cursor Æ
Input Subnet Mask information (XXX*XXX*XXX*XXX) and then press ENTER.
6. Press ENTER Æ LCD shows【router】Æ Press
default gateway information (XXX*XXX*XXX*XXX, where X is any number or character)
and then press ENTER.
SPD/HOLD Æ Blinking cursor Æ Input
5.1.3 DHCP Setting
1. Connect the RJ-45 cable to the LAN port on the IPF-2002L, and then plug in the power.
2. Press 1234# (Hold the # key) Æ LCD shows 【password】Æ Press 1234 and then press
ENTER Æ LCD shows【network settings】.
3. Press ENTER Æ LCD shows【iptype】Æ Press SPD/HOLD Æ Blinking cursor Æ Press 1
and then press ENTER (1 sets your networking settings to the DHCP mode).
5.2 Protocol Settings
1. Press 1234# (Hold the “#” key) Æ LCD shows【password】Æ Press 1234 and then press
ENTER Æ LCD shows【network settings】 Æ Press VOL - Æ LCD shows【protocol
settings】.
2. Configure if IPF-2002L needs to login to the server.
【protocol settings】Æ Press ENTER several times Æ LCD shows【service】.
• If the IPF-2002L is not going to register on the server, press SPD/HOLD Æ Press 0 (Not
register to the server) and then press ENTER.
• If the IPF-2002L is going to register on the server, press SPD/HOLD Æ Press 1
(Register to the server) and then press ENTER.
3. Configure the server IP address on the IPF-2002L:
【protocol settings】Æ Press ENTER several times Æ LCD shows【service address】Æ
press SPD/HOLD Æ Input server IP address (XXX*XXX*XXX*XXX, where X is any number
or character) and then press ENTER.
13
Page 14

IPF-2002L User Manual
4. Enable the STUN service to penetrate the NAT network when using SIP protocol.
【protocol settings】Æ Press ENTER several times Æ LCD shows【nat traversal】Æ
Press SPD/HOLDÆ Press 4 (Enable STUN) and then press ENTER Æ Press ENTER Æ
LCD shows【nat addr】Æ Input STUN server IP address (XXX*XXX*XXX*XXX, where X is
any number or character) and then press ENTER.
5. Configure the IPF-2002L register type
【protocol settings】Æ Press ENTER several times Æ Press VOL+ several timesÆ LCD
shows【local type】Æ Press SPD/HOLD.
• Press 0 (Input the phone number as E.164 to register to the server) and then press
ENTER.
• Press 1 (Input the account number) and then press ENTER. If this option is used,
please also configure step 7 and 8.
6. Configure IPF-2002L register account.
【 protocol settings 】 Æ Press ENTER several timesÆ LCD shows 【 account 】 Æ
Press SPD/HOLD Æ Input register account (XXX) and then press ENTER.
7. Configure IPF-2002L account password.
【 protocol settings】 Æ Press ENTER several timesÆ LCD shows【 pin】Æ Press
SPD/HOLD Æ Input account password (XXX) and then press ENTER.
8. Configure IPF-2002L register port.
【protocol settings】Æ Press ENTER several timesÆ LCD shows【register port】Æ Press
SPD/HOLD Æ Input register port (XXX) and then press ENTER.
5.3 Audio Settings:
1. Press 1234# (Hold the “#” key) Æ LCD shows【password】Æ Press 1234 and then press
ENTER Æ LCD shows【network settings】Æ Press VOL – several times Æ LCD shows
【audio settings】.
2. Configure the codec type for IPF-2002L.
【audio settings】Æ Press ENTER Æ LCD shows【audio type】Æ Press SPD/HOLD.
• Press 0 (configure the codec as G.729) and then press ENTER.
• Press 1 (configure the codec as G.723.1) and then press ENTER.
• Press 2 (configure the codec as G.711u) and then press ENTER.
• Press 3 (configure the codec as G.711a1) and then press ENTER.
• Press 4 (configure the codec as auto) and then press ENTER.
3. Configure the volume of the phone handset and speaker.
【 audio settings】 Æ Press ENTER several times Æ LCD shows【 handset in】Æ
Press SPD/HOLD Æ Input the volume of the phone handset and speaker (Default is 7,
Max is 15) and then press ENTER.
14
Page 15

IPF-2002L User Manual
5.4 Other Settings:
1. Press 1234# (Hold the “#” key) Æ LCD shows【password】Æ Press 1234 and then press
ENTER Æ LCD shows【network settings】Æ Press VOL – several times Æ LCD shows
【other settings】.
2. Configure user password:
【other settings】Æ Press ENTER Æ LCD shows【password】Æ Press SPD/HOLD Æ
Input the new user password and then press ENTER.
3. Configure administrator password:
【other settings】Æ Press ENTER several timesÆ LCD shows【super password】Æ
Press SPD/HOLD Æ Input the new administrator password and then press ENTER.
5.5 Speed Dial Settings:
1. Press 1234# (Hold the “#” key) Æ LCD shows【password】Æ Press 1234 and then press
ENTER Æ LCD shows【network settings】Æ Press VOL – several times Æ LCD shows
【speed dial settings】.
2. Configure speed dial code and phone number:
【speed dial settings】Æ Press ENTER Æ LCD shows【memory 1】Æ Press SPD/HOLD
and input first speed dial code (can be any number or character) Æ Press ENTER Æ LCD
shows【number 1】Æ Press SPD/HOLD and input first speed dial number (can only be any
number) and then press ENTER.
Repeat the step 2 for more speed dial numbers. IPF-2002L has up to 100 entries speed
dial numbers.
5.6 Default Settings:
Press 1234# (Hold the “#” key) Æ LCD shows 【password】Æ Press 1234 and then press
ENTER Æ LCD shows【network settings】Æ Press VOL – several times Æ LCD shows【default
settings】and then press ENTER Æ LCD shows【Are You Sure?】.
• If choose Yes, LCD shows【Default ok】then shows【Undo default setting】. Press
REDIAL/MUTE several times until the LCD shows 【save settings】, save the setting and
reboot the IPF-2002L
• If choose No, IPF-2002L will not load the factory default settings.
5.7 Save Settings:
After all the configuration is done and correct, press REDIAL/MUTE several times until the LCD
shows 【save settings】Æ Press ENTER Æ LCD shows【Are Y ou Sure?】.
• Press ENTER as Yes, IPF-2002L will reboot and load the new settings.
• Press REDIAL/MUTE as No, IPF-2002L will back to phone keypad configuration mode.
15
Page 16

IPF-2002L User Manual
5.8 Exit Settings:
If you want to exit the keypad configure mode without saving any changes, press
REDIAL/MUTE several times until the LCD shows【Are Y ou Sure?】.
• Press ENTER as Yes, IPF-2002L will reboot.
• Press REDIAL/MUTE as No, IPF-2002L will back to phone keypad configuration mode.
16
Page 17
IPF-2002L User Manual
6. WEB Configuration:
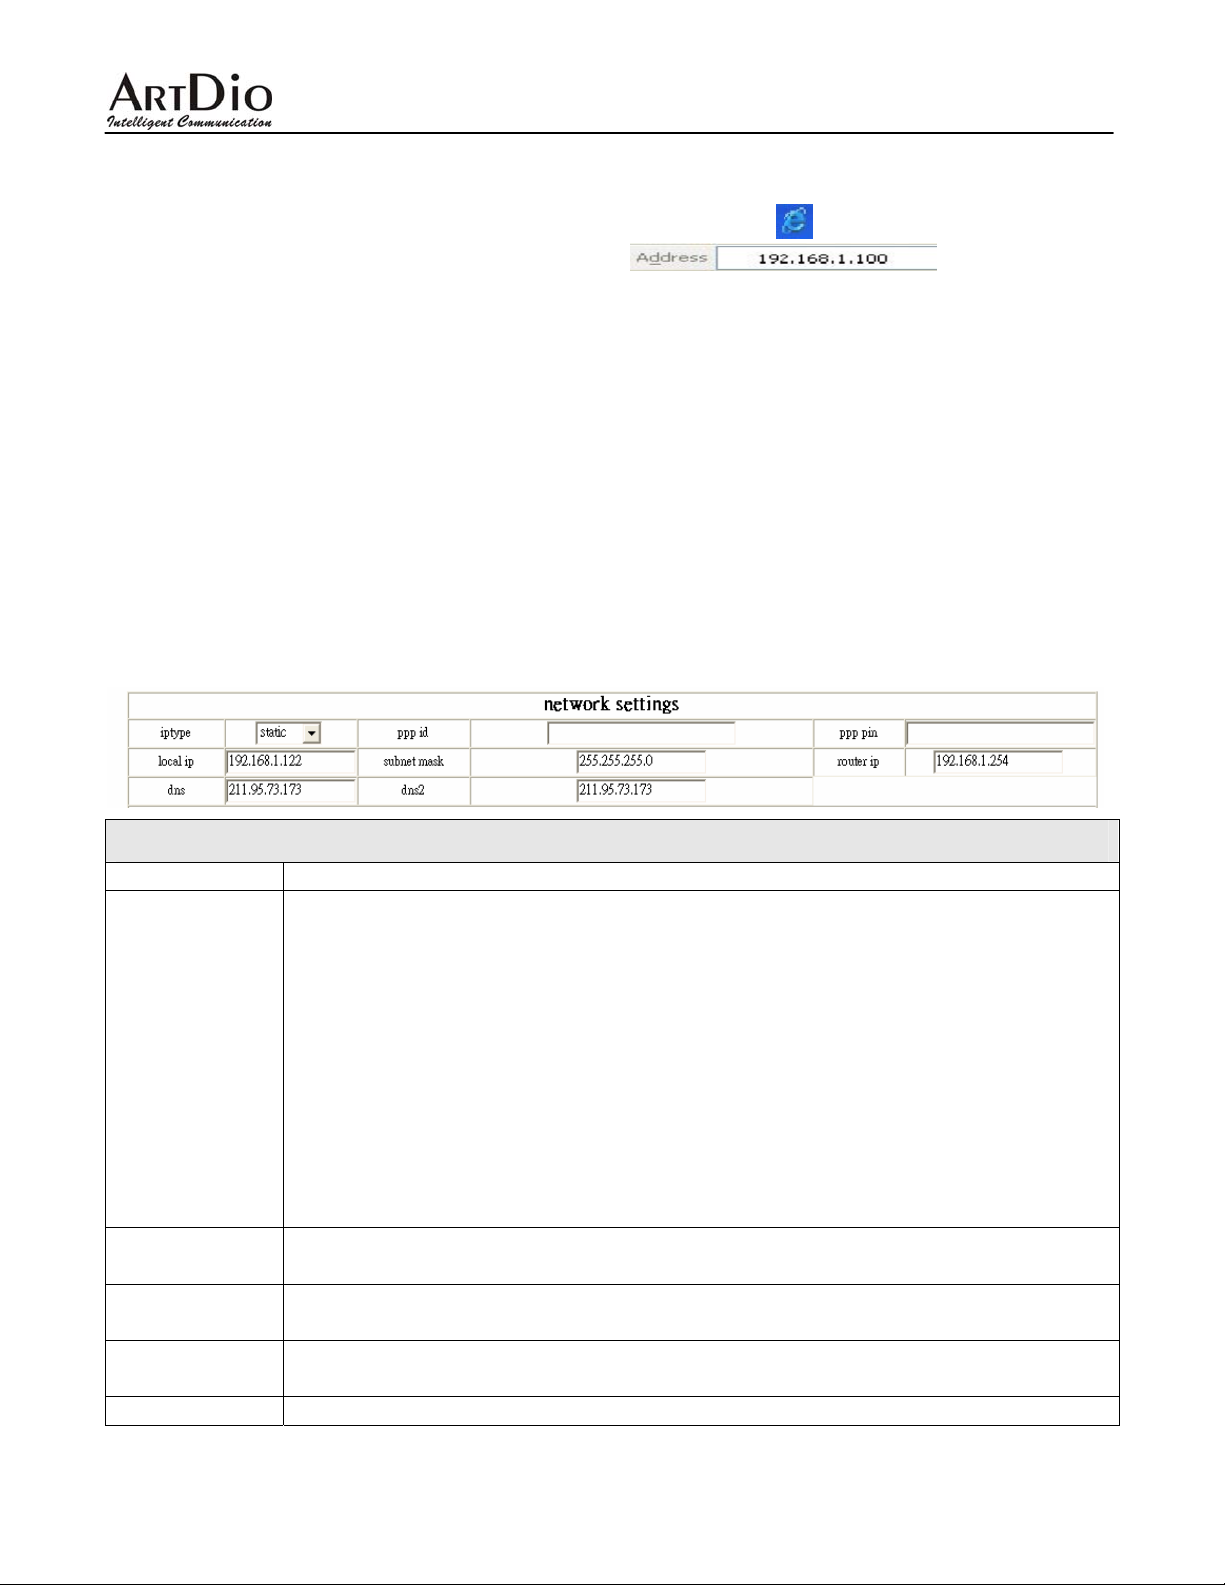
St art a W eb browser, such as Microsoft’s Internet Explorer (IE) , and enter the IPF-2000’s IP
address on the web browser. Address window . The IPF-2002L
Web configuration page is accessed by entering an assigned URL, or by pressing the IP button
from on the IPF-2002L front panel to display the IP address.
The IPF-2002L login screen is displayed:
The IPF-2002L web configuration password comes with two categories: User password and
Administrator password.
• The default User Password is 1234.
• The default Administrator Password is 12345678.
Enter one of the passwords and click the “Submit” button.
The following are the definitions for all the configuration parameters in the Web Configuration
Page:
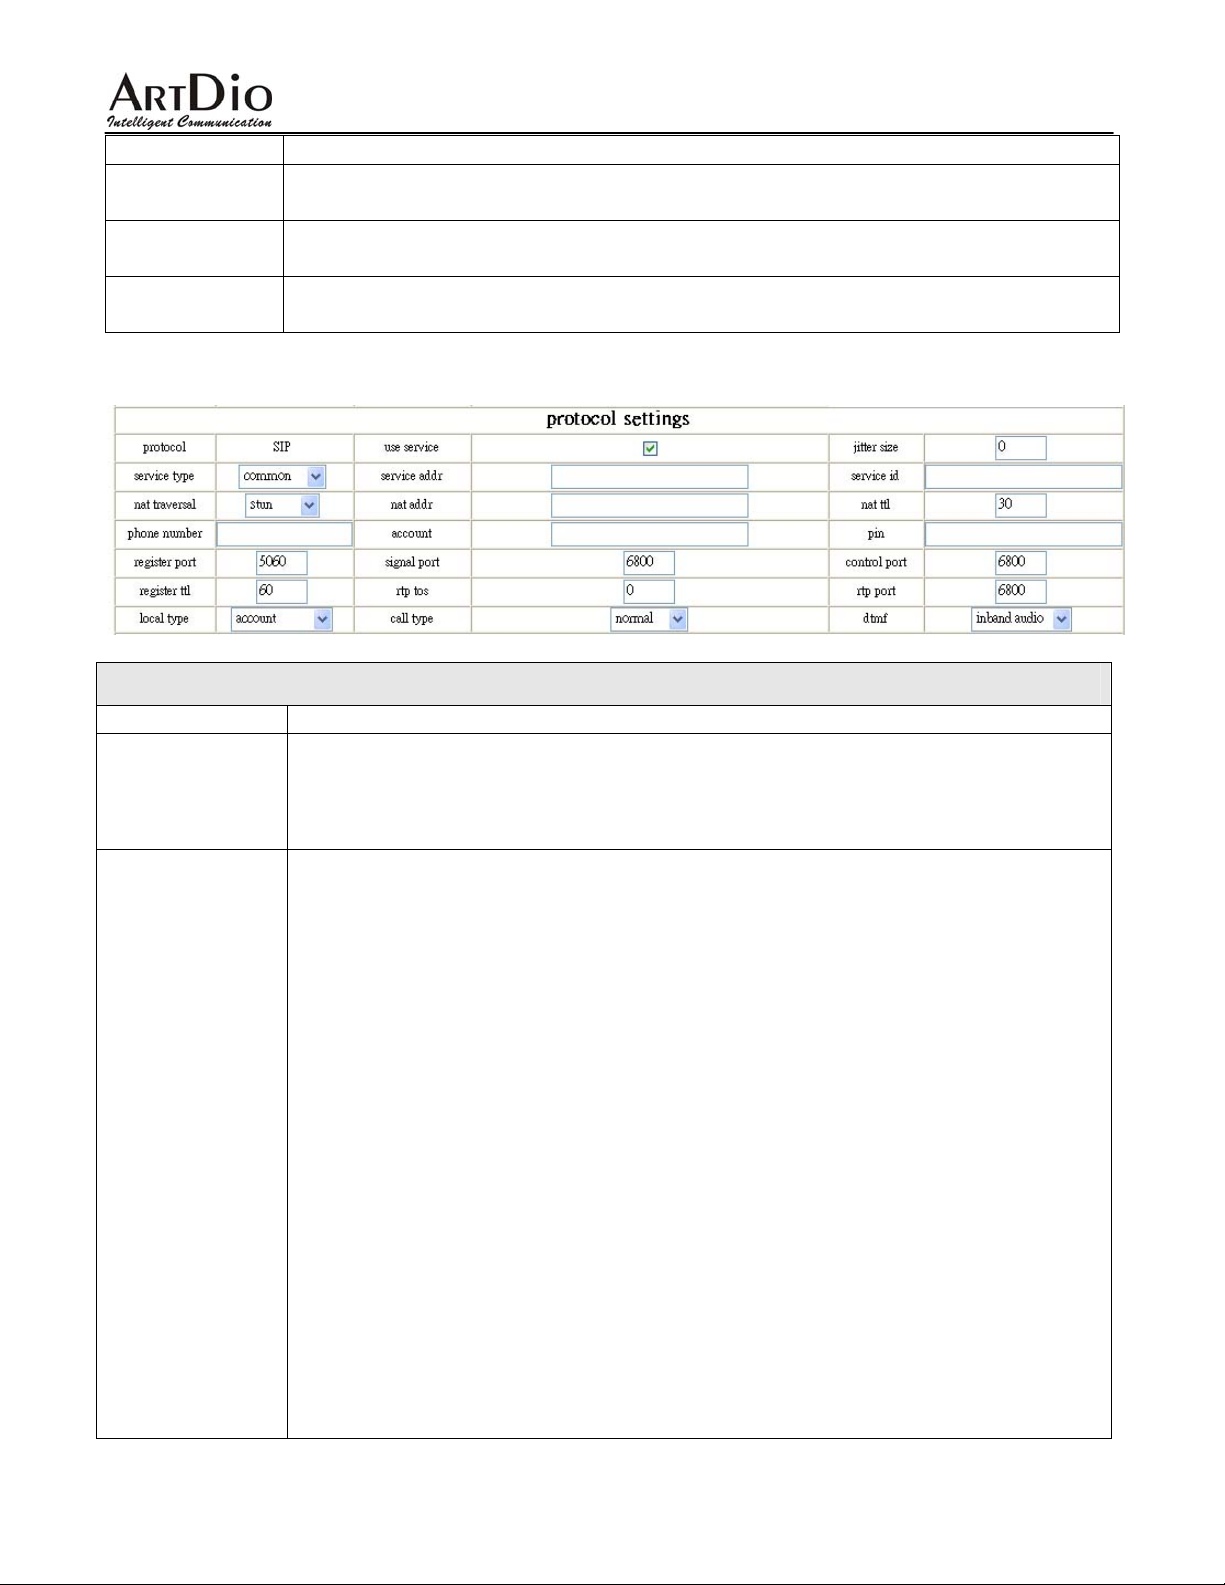
6.1 Network Settings:
Networking Parameter Values
Fields Description
Set how IPF-2002L gets relevant network parameters by selecting
corresponding item from drop down list.
• static
Select this option to authorize users to configure IP address, subnet
mask and router IP address of IPF-2002L.
iptype
ppp id
ppp pin
local ip
subnet mask
• dhcp
Select this option to enable DHCP server automatically assign all the
required network parameters to IPF-2002L
• pppoe
Select this option and then fill up the ppp id and ppp pin with PPPoE
account and password to enable the PPPoE connection. The ISP will
automatically assign all the required IP parameters to IPF-2002L.
With PPPoE selected in iptype drop down list, please enter the user name in
this field.
With PPPoE selected in iptype drop down list, please enter the password in
this field.
With Static selected in iptype drop down list, please enter the IP address of
the IPF-2000 in this field.
With Static selected in iptype drop down list, please enter the Subnet Mask
17
Page 18
IPF-2002L User Manual
address of the IPF-2002L in this field.
router ip
dns
dns2
With Static selected in iptype drop down list, please enter the router IP
address of the IPF-2002L in this field.
With Static selected in iptype drop down list, please enter the IP address of
the DNS server in this field.
With Static selected in iptype drop down list, please enter the IP address of
the backup DNS server in this field.
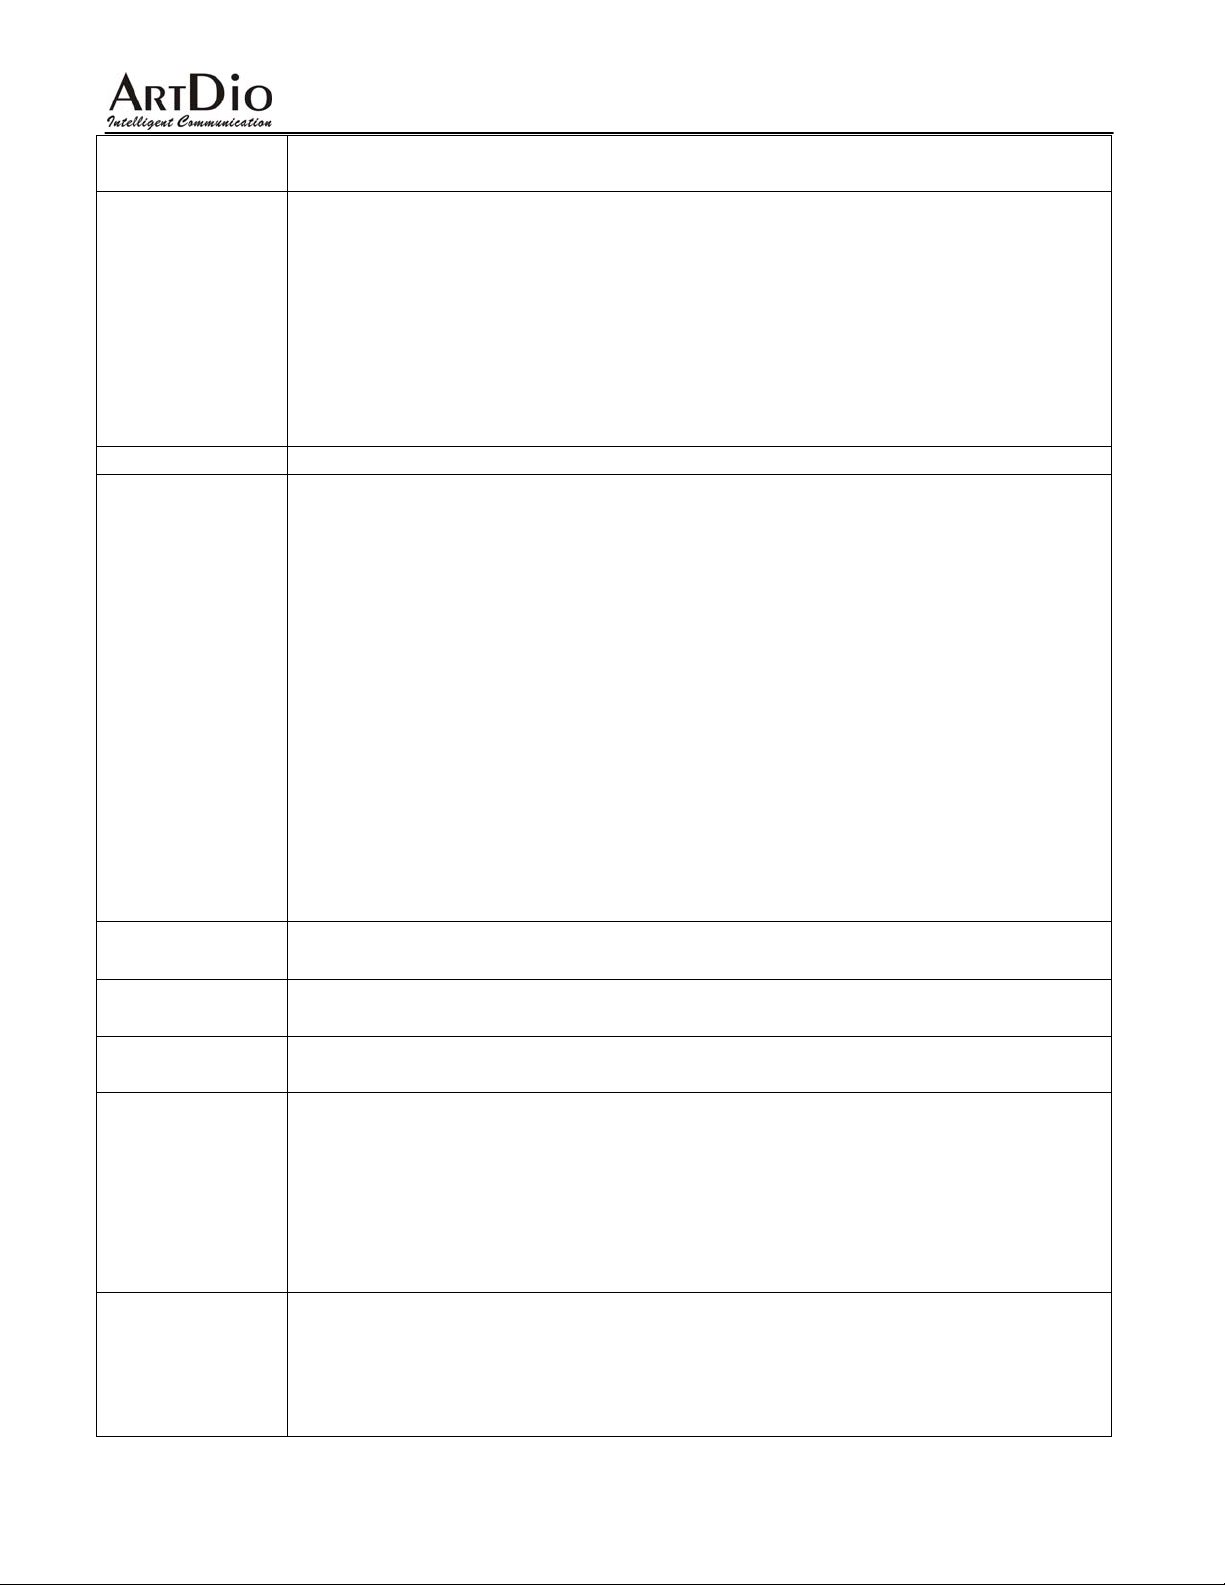
6.2 Protocol Settings:
Protocol Parameter Values
Field Description
The IPF-2002L supports H.323, SIP and MGCP protocols.
protocol
use service
• If you are using a H.323 firmware, this field will be H.323.
• If you are using a SIP firmware, this field will be SIP.
• If you are using a MGCP firmware, this field will be MGCP.
Check this box if you will register to the server. Services response to
different protocols as follows:
• For the SIP protocol: Check this box if you will register to the server.
Then, fill in the SIP proxy server IP address or domain name in the
service addr field.
• For the H.323 protocol: Enter the Gatekeeper IP address.
To allow the IPF-2002L calls each other by E.164 number:
Please check this option and then fill the IP address or domain
name of corresponding gatekeeper into the Service Addr. field.
To make point to point calls to another voice gateway: Please do
not check this option and fill up the voice gateway’s IP address
in the Service Addr. field.
To make calls by dialing IP address of other IP Phone or H.323
devices (such as Netmeeting) at the same network segment, do
not check this option and leave the Service Addr. field blank.
※ If the gatekeeper is not to be used, please configure the Service
Port as 1720. Detailed information please refers to the Service Port
configuration.
• With MGCP protocol used, the protocol service refers to Call Agent.
Please check this box according to system, and then fill Service
Address field with the IP address or domain name of the Call Agen t.
18
Page 19
service type
service addr
service id
nat traversal
nat addr
nat ttl
phone number
account
pin
IPF-2002L User Manual
The default service type is common. For other requests, please find the
service type in the drop down list.
• Use H.323 protocol
If the Use Service option is checked, please fill up the IP address or
the domain name of the gatekeeper.
If the Use Service opt ion is unchecked, please fill up the IP address
or the domain name of the voice gateway.
• USE MGCP protocol: Please fill up the IP address or domain name of
the Call Agent.
• Use SIP protocol: If the Use Service option is checked, please fill up the
IP address or domain name of the SIP Proxy Server in this field.
Set service ID according to requirement of system.
When using a private IP to traverse the NAT, select one of the conditions:
• disable
When IPF-2002L is using a public IP, choose disable.
When IPF-2002L is using SIP protocol, and is using the Outbound
Proxy, choose disable
• enable
Automatically check the public IP of the NAT router. When IPF-2002L is
using the private IP, please choose enable. After choosing enable, the
nat addr will automatically activate. Without special request, please fill
up 00.0.0.0 in the nat addr field and properly configure the port on the
NAT router.
• stun
Use the STUN protocol. STUN enables a device to find out its public IP
address and the type of NAT service its sitting behind. It helps the SIP
traverse the NAT. If this option is selected, please also fill up the IP
address of the STUN server in the nat addr field.
• When stun or enable is enabled in the nat traversal field, enter the NAT
Proxy’s IP address. Otherwise, keep this field as 0.0.0.0.
This defines how many seconds a NAT traversal message is will be sent to
the NAT server. The default setting is 30 seconds.
With H.323/MGCP/SIP protocol used, enter the phone number of the
IPF-2002L.
• When using the H.323 protocol to logon gatekeeper, please fill up the
H.323 ID or H.235 account.
• When choose the prefix in dialplan field, please fill up the number
provided by ISR, card number and “#”. For example 14589653185#
• With MGCP protocol used, please enter the Local name of the
EndpointID into this field.
• With SIP protocol used, fill up the SIP Proxy account.
• When H.323 protocol is used to logon the gatekeeper, fill up the
password or H.235 authentication password.
• When SIP protocol is used to logon SIP Proxy Server, please fill up the
password into this field.
• When choose the prefix in the us e dialplan drop-down menu, please fill
19
Page 20
register port
signal port
control port
register ttl
rtp tos
rtp port
local type
call type
dtmf
IPF-2002L User Manual
up the password provided by ISR, card number, and “#”. For example
3185#.
• With MGCP protocol used, enter the domain name of the EndpointID
into this field.
※ With MGCP protocol is used, as requested by some system, please
add the bracket with the domain name. For example, [voiptest.com].
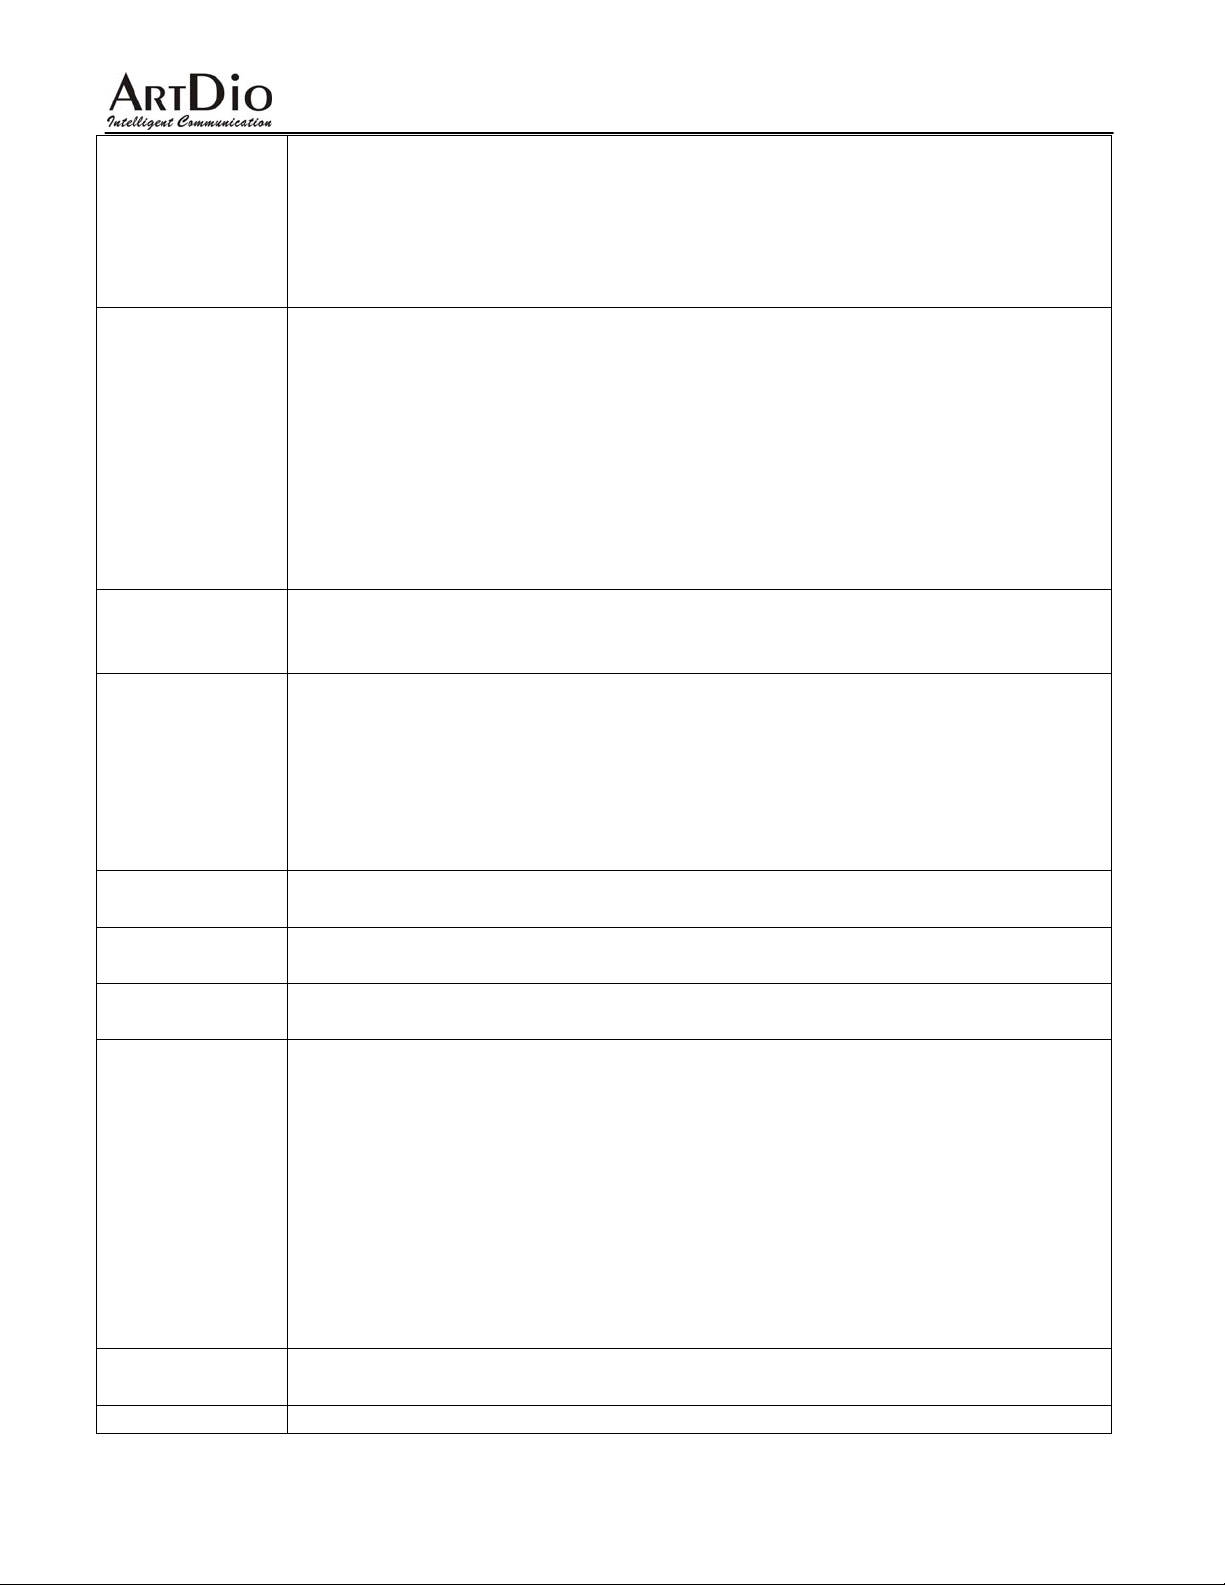
According to used protocol, set as follows:
• With H.323 protocol used,
If the gatekeeper is used, the register port works as the
gatekeeper’s monitor port. The default value is 1719.
If the gatekeeper is not used, the register port works as the end
point device or the gatekeeper’s monitor port. The default value is
1720.
• With MGCP protocol used, this port is the Call Agent’s receive port. The
default value is 2727.
• With SIP protocol used, the default setting is 5060.
With H.323 protocol used, this port is mapped to the Q.931 port. For H.323,
the Q.931 call usually uses TCP protocol. The value can be set between
1024 and 65535.
z With H.323 protocol used, this port is H.245 port using TCP protocol.
H.245 protocol defines call control signal, and uses TCP protocol. The
value can be set between 1024 and 65535.
z With MGCP and SIP used, there is no specific request for this port. You
can enter any number.
※ If there are many IPF-2002L traversing the NAT at the same time,
each IPF-2002L should be assigned with different port number.
This defines how many seconds a register message will be sent to the
server. The default setting is 60 second.
Fill TOS segment of IP header in RTP digital follow here. Detailed
information please refer to IP protocol information.
RTP port is the port transferring and receiving voice flow using UDP
protocol. Please fill an even number between 1024 and 65535 into this field.
This parameter refers to how IPF-2002L log in gatekeeper or SIP Proxy
server. The meaning of each item is as follow:
• Phone number:
Use phone number as E.164 and H.323 ID to login the gatekeeper.
• Account
Use account authentication to login. Please also fill up the account name
and password into the account and pin fields.
• H.235 account
With H.323 protocol used, if the gatekeeper supports H.235 protocol,
please choose this option. Please also fill up the account name and
password into the account and pin fields.
Set call type by selecting the items in drop down list. There are three
options: normal, faststart, advanced. The recommended way is advanced.
Set DTMF signal sending way by selecting control string, inband audio,
20
Page 21
IPF-2002L User Manual
signal keypad or RFC 28933 from drop down menu.
If you can not dial the extensions, please set the dtmf as inband audio.
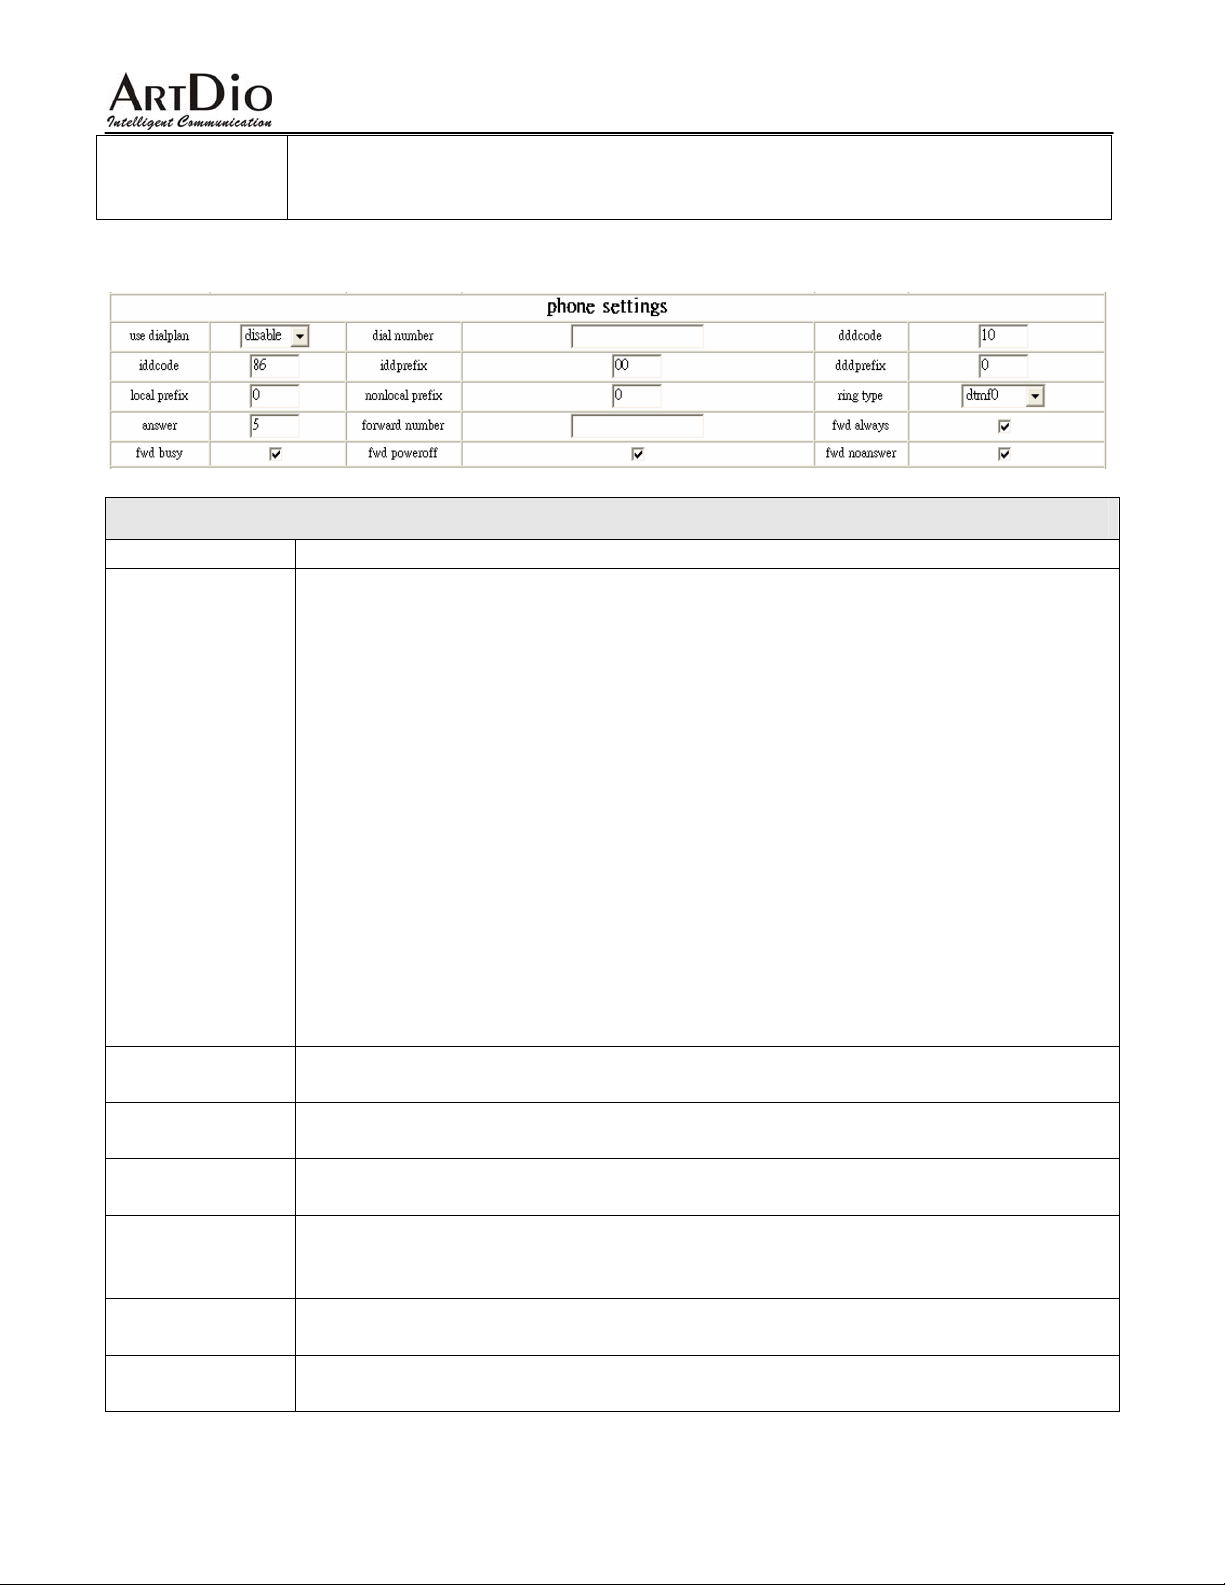
6.3 Phone Settings:
Phone Parameter Values
Fields Description
Set whether use dial plan or use dial number by selecting the corresponding
item in drop down list.
• disable
Do not use dial plan or dial number by selecting this option.
• enable
Enable the dialing plan. This dialing plan should combine with the
Regional Code and Area Code. Please follow the E.164 rule to setup the
country code, area code and long distance code.
use dialplan
dial number
dddcode
iddcode
iddprefix
dddprefix
local prefix
• dialnum
Use dial number by selecting this option. With this option selected,
please enter the dial prefix into dial number field.
• prefix
• hotline
This option enables the hotline function. When you pick up the handset
or press ENTER, IPF-2002L will automatically dial the numbers
configured in the dial number field. Please also fill up the number in the
dial number field.
With dialnum selected in use dialplan drop down list, please enter the fial
prefix into this field according to requirement of log in server.
With enable or dialnum selected in use dialplan drop down list, set area
code according to E.164 dial rule. For example, LA 626.
With enable or dialnum selected in the drop down list, set country code
according to E.164 dial rule. For example, U.S.A. 1; Taiwan 886; China 86.
With enable or dialnum selected in the drop down list, set international call
prefix according to E.164 dial rule. For example, U.S.A. 011; Taiwan 002;
China 00.
With enable or dialnum selected in the drop down list, set long distance call
prefix according to E.164 dial rule. For example, U.S.A. 1; Taiwan 0.
With enable selected in innerline drop down list, please fill the prefix number
for a backup setting 1, such as 56.
21
Page 22
nonlocal
prefix
answer
ring type
forward
number
fwd poweroff
fwd noanswer
fwd always
fwd busy
IPF-2002L User Manual
p down list, please fill the prefix number With enable selected in innerline dro
for a backup setting 2, such as 57.
Enter a number from 0 through 60 to set the entries of the seconds before
the phone answer the call auto or forwar
function, please set this parameter as 0.
et ring type by selecting corresponding option from the drop down menu.
S
• dtmf 0-9: Set ring as ordinary rings in di
• not disturb: Sets the phone do no
• pcmring: Sets the ring to music.
• user define: Sets to music saved by user by selection this
Enter receiving forwarded calls phone number into this field.
forwarded calls phone number into forward number field.
Forward calls without replying by checking this box. Please enter receiving
forwarded calls phone num
period in the answer field.
se enter receiving forwarded calls phone number into Forward all calls. Plea
forward number field.
Forward calls if busy. Please enter receiving forwarded calls phone num
into forward number field, and enter the ring period in the answer field.
ber into fwd number field, and enter the ring
d the call. To disable auto answer
fferent frequency.
ring.
option.
e enter receiving Forward calls if power off by checking this box. Pleas
ber
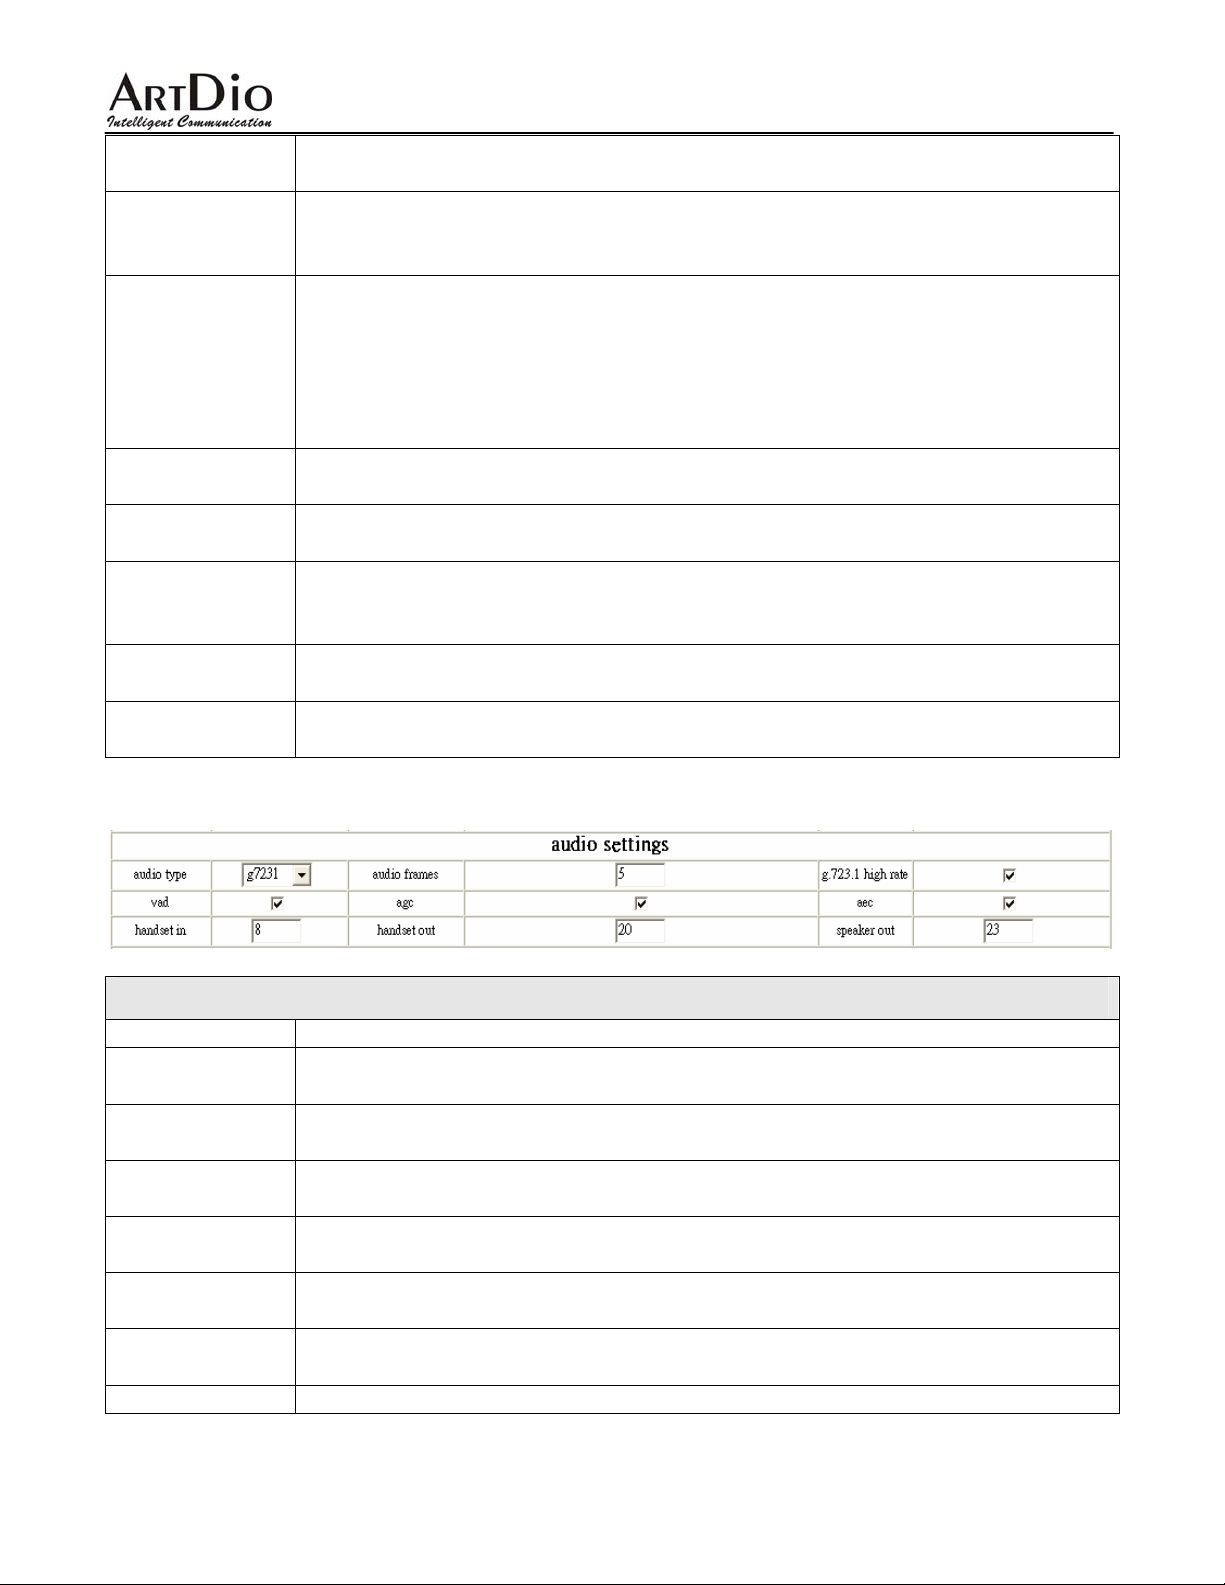
6.4 Audio Settings:
Audio Para lues meter Va
Fields Description
audio type
audio frames
g.723 high rate
vad
agc
aec
handset in
options are g.711u, g.711a, g.723.1, g.729, g.729a, g.729b and auto.
Sets audio frames in RTP package. With G.723 audio codec used, set it as
1; with G729 audio codec used, set it as 2. The recommendation value is 2.
high rate (6.3K) by checking/unchecking this option.
le/disable VAD (voice activity detection) by checking/unchecking this Enab
box.
le/disable AGC (automatic gain control) by checking/unchecking this Enab
box.
Enable/disable AEC (Acoustic echo canceller) by checking/unchecking this
box.
Set the volume of handset input. The range is 1 to 15.
. The Set audio type of the phone by selecting item from drop down list
nable/disable g.723.1 With g.723.1 selected in audio type drop down list, e
22
Page 23
IPF-2002L User Manual
handset out
speaker out
Set the volume of handset output. The range is 1 to 26.
Set the volume of speaker. The range is 1 to 26.
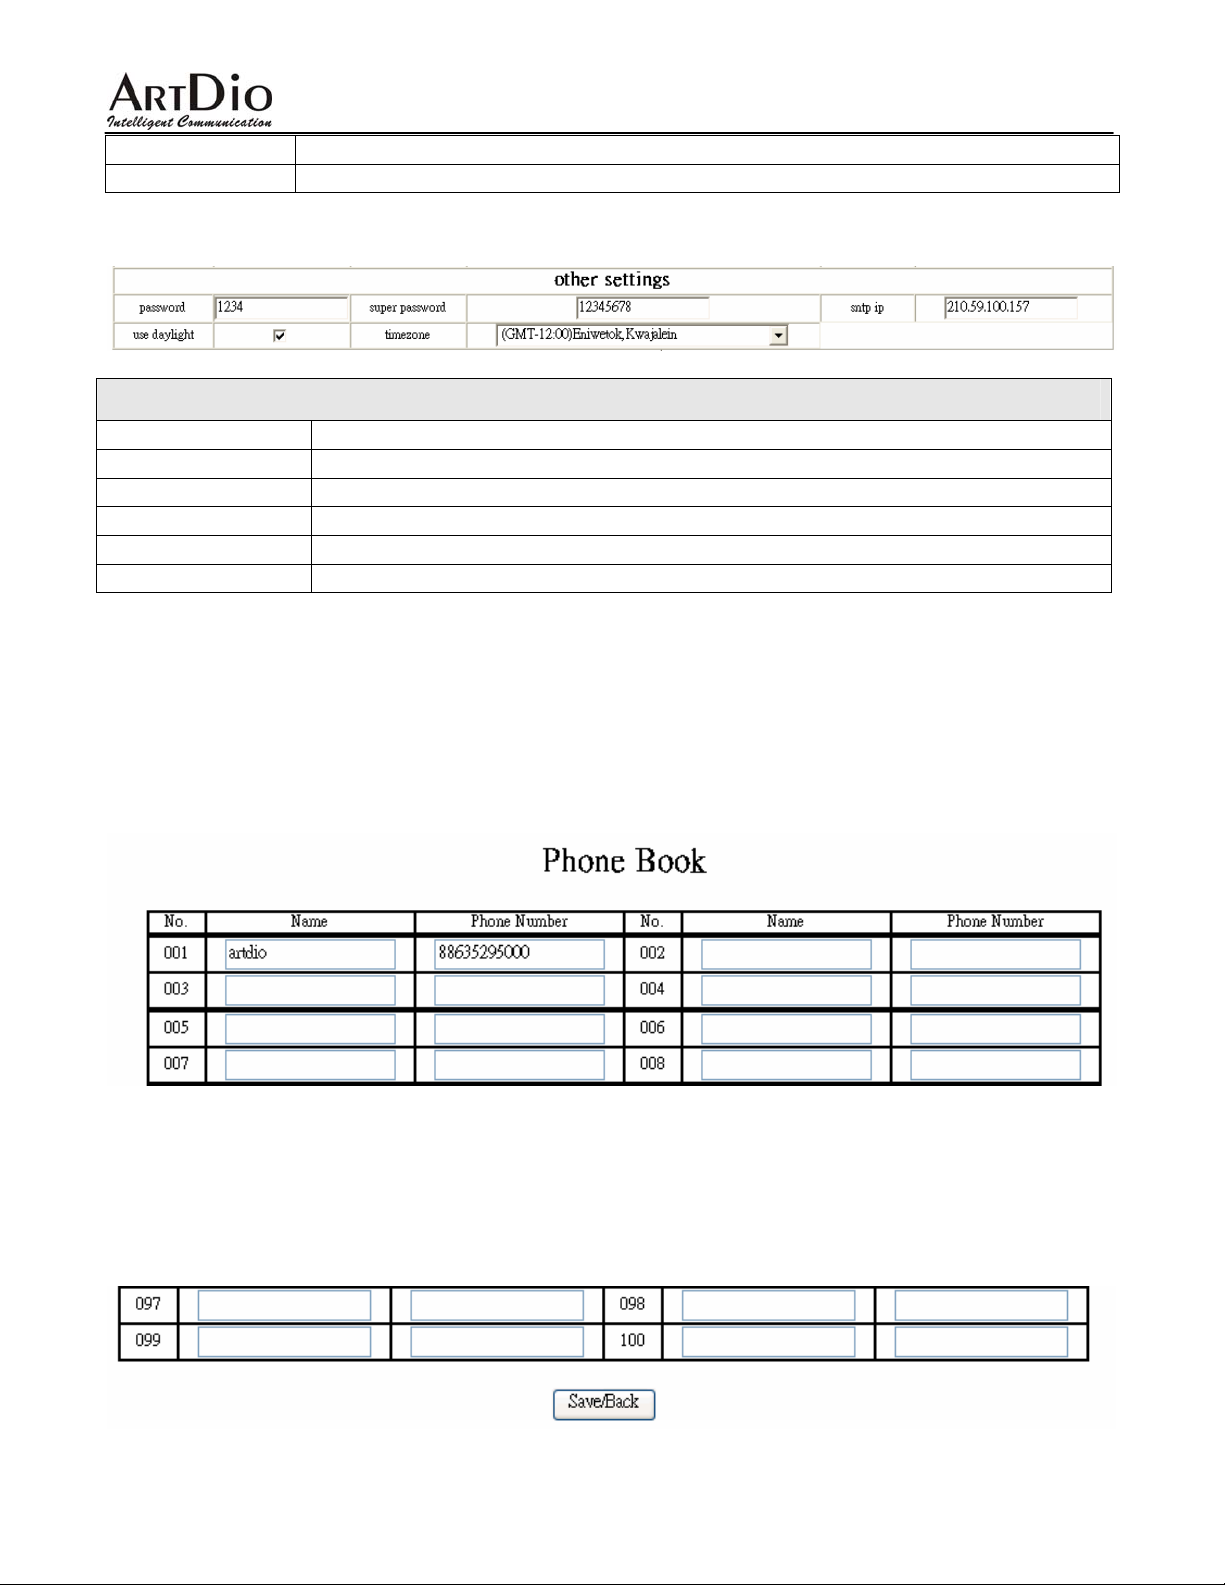
6.5 Other Settings:
Other Param es eter Valu
Field Description
password
super password
sntp ip
use daylight
timezone
6.6 Update
After configuration, please click Save/Reboot. IPF-2002L will save the setting and reboot. If the
webpage goes back to login page, please login and configure again.
Set the user’s password. Should be no longer than 16 digits.
ld be no longer than 16 digits. Set the administrator’s password. Shou
Fill IP address of the time server here.
ng this option. Enable/Disable daylight by checking/unchecki
Select correct time zone in drop down menu.
6.7 Phone Book
Click on Phone Book to access IPF-2002L phone book page.
You may create a phone book entry by input the necessary information in their corresponding
spaces. For example, if you want to add a new contact artdio with phone number 88635295000
to your No. 1 phone book entry, enter artdio in the Name field and enter 88635295000 in the
Phone Number field.
After configure the phone book
call by using SPD/HOLD key.
, click Save/Back to save the setting. Normally you can make a
23
Page 24

IPF-2002L User Manual
※ With H.323 protocol used without using the gatekeeper or voice gateway, you can enter the
IP address of another IPF-2002L in the phone number field (use “*” instead of “.”). For example,
enter 192*168*1*21 for IP address 192.168.1.21.
24
Page 25
IPF-2002L User Manual
7. Passing through the NAT/Firewall:
When IPF-2002L works with NAT/Firewall, some of the following cases might happen:
1. With a valid account, IPF-2002L can not successfully register to the server.
2. IPF-2002L itself can make calls but is not able to receive calls.
3. One-way talk. One end can not hear any sound.
It might be the NAT/F irewall issues in these cases. IPF-2002L supports two methods to allow
SIP passing through the NAT/Firewall by deploying STUN or Outbound Proxy.
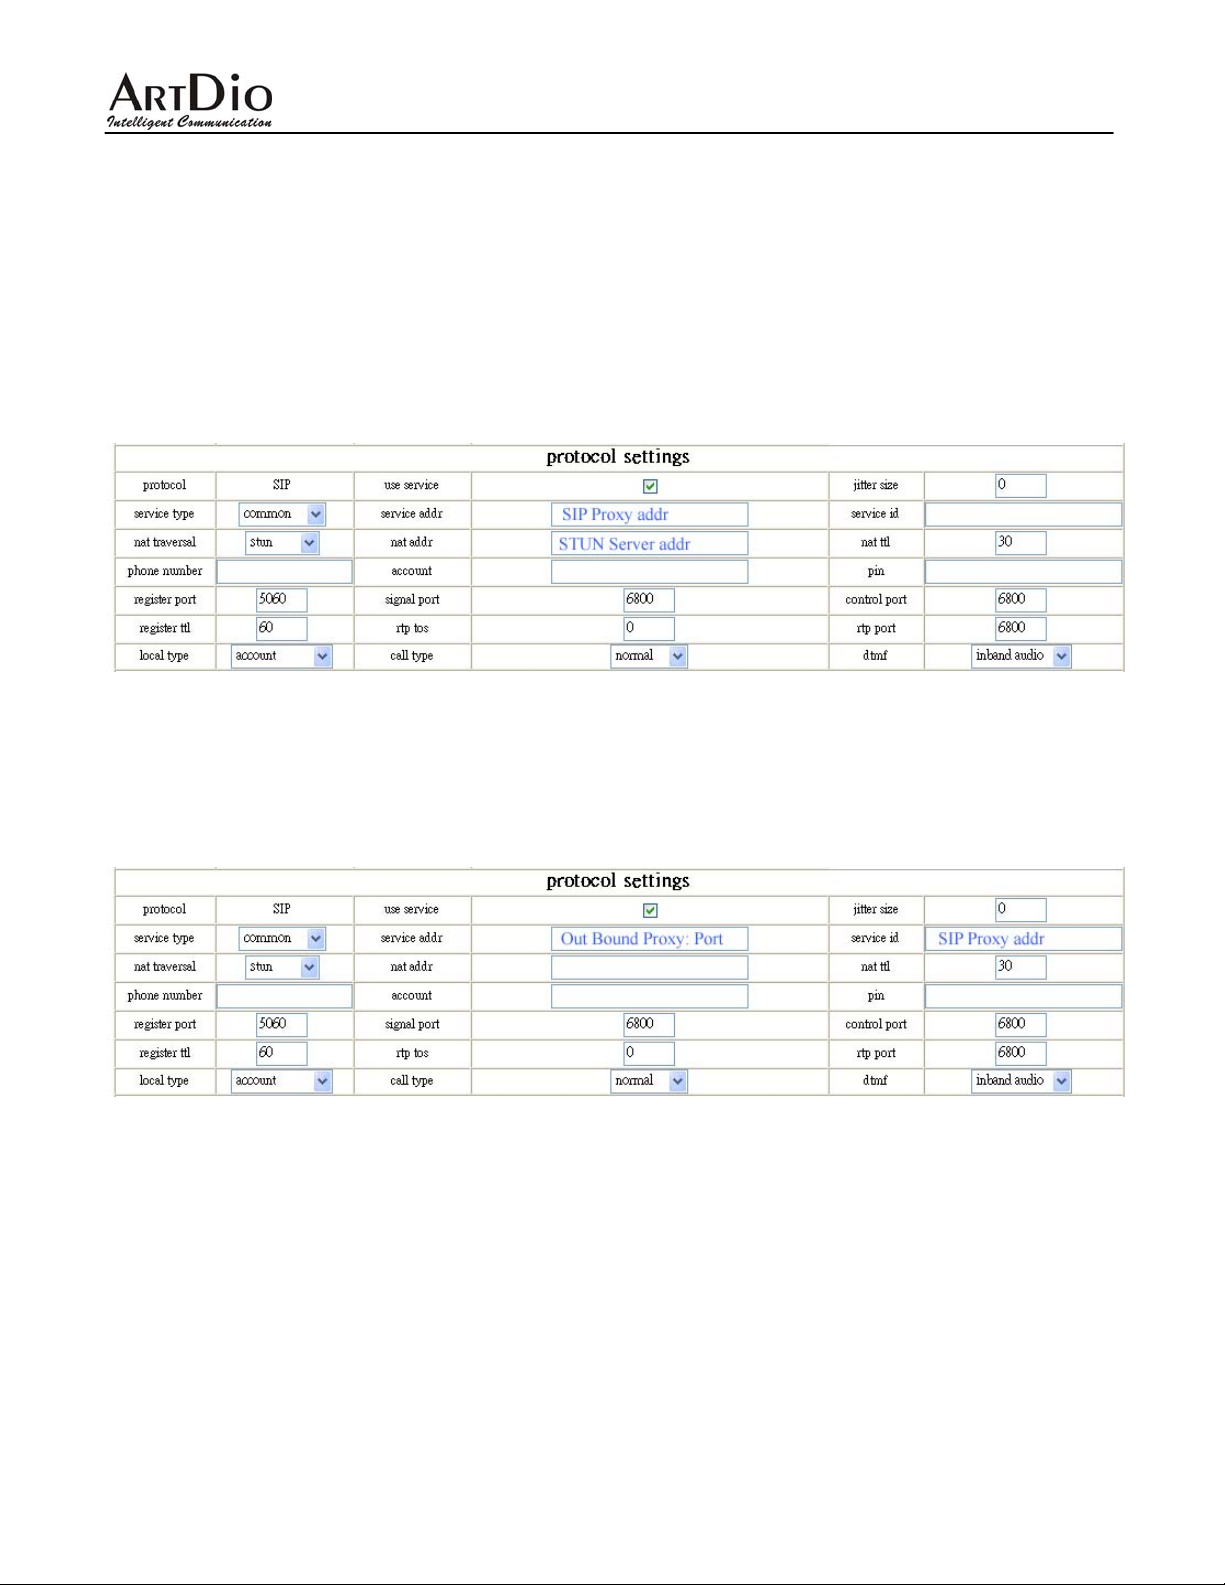
7.1 SIP with STUN
• service address: fill up the IP address or domain name of the SIP Proxy server.
• nat traversal: select STUN from the drop down list.
• nat addr: fill up the IP address and domain name of the STUN server.
7.2 SIP with Outbound Proxy
• service address: fill up the IP address or domain name of the Outbound Proxy server. If
the port of the Outbound Proxy is not 5060, please add “:” and the port number right after
the IP address.
• service id: fill up the IP address or domain name of the SIP Proxy server.
• nat traversal: select disable.
7.3 Others
When H.323 and MGCP protocol used, please refer to the appendix H.323 and MGCP
configuration examples. If IPF-2002L can not work this way, open the corresponding ports on
the NAT/Firewall device.
25
Page 26
IPF-2002L User Manual
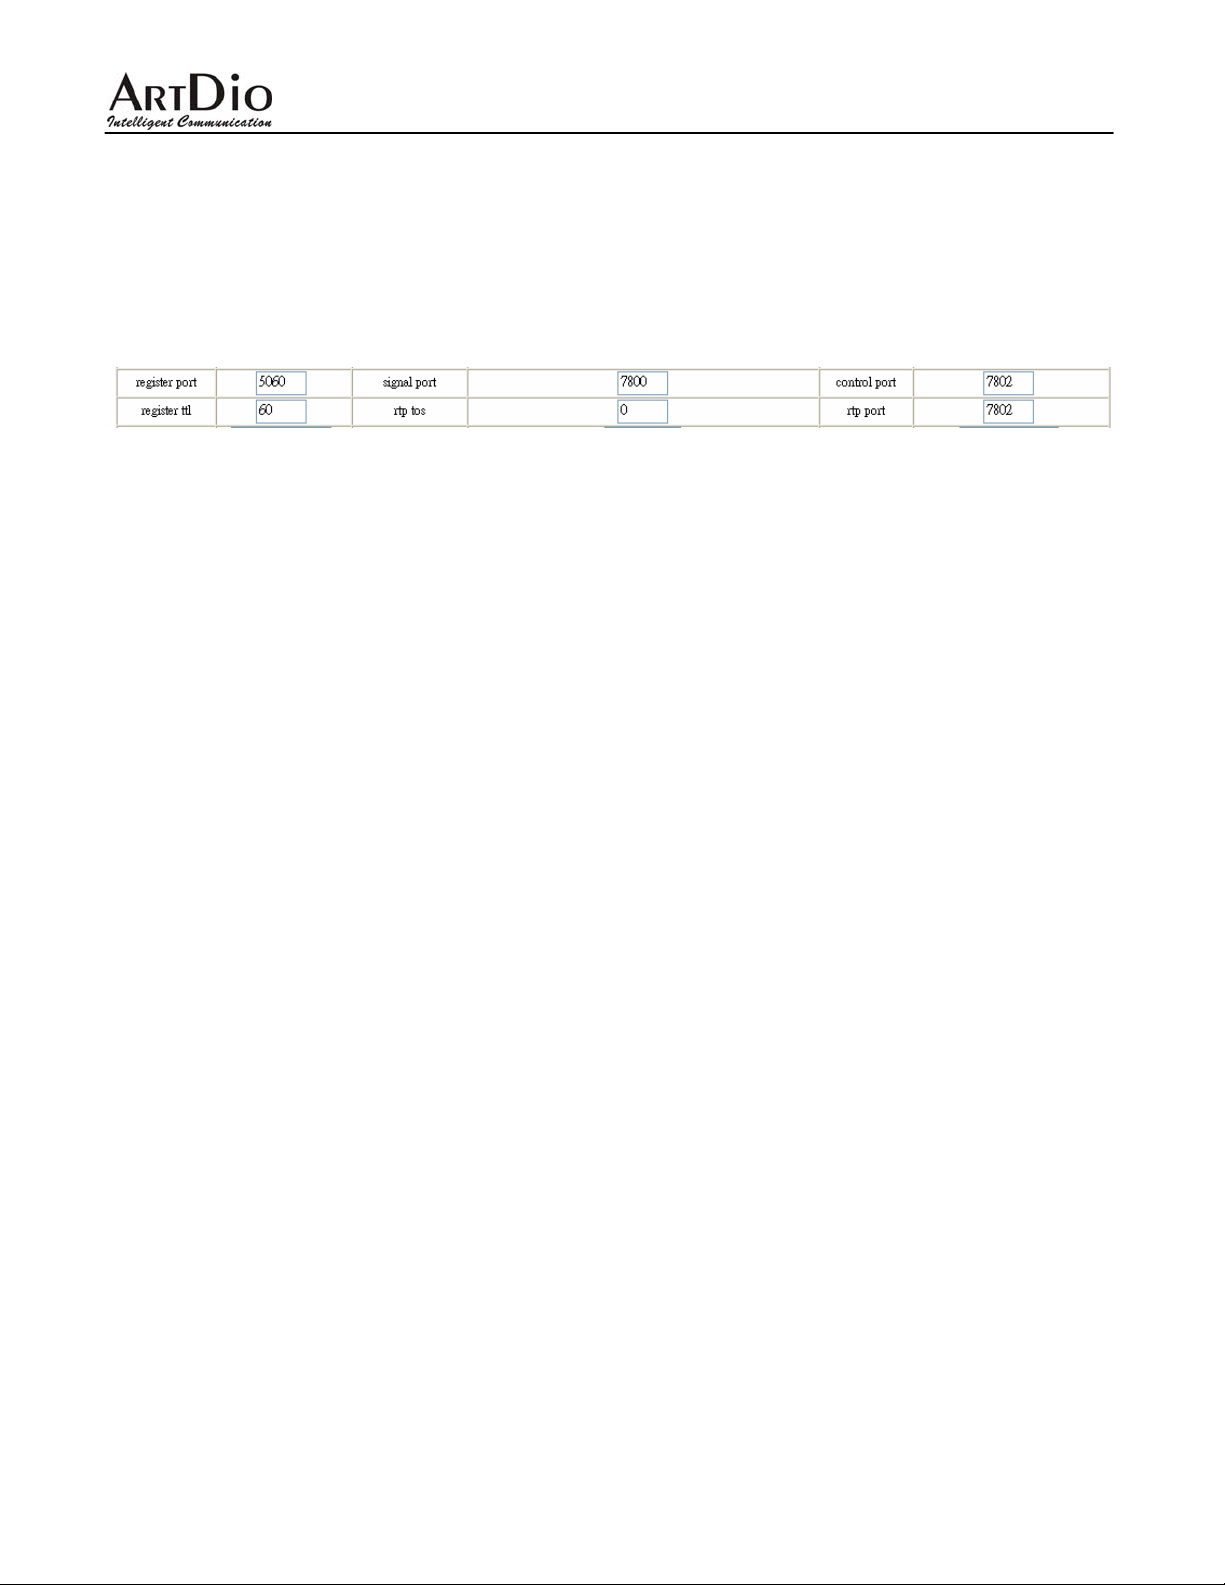
Figure below shows the possible usage ports for the IPF-2002L. Please contact to the network
administrator or MIS person to open these ports on the NAT/Firewall device:
• register port: for TCP/UDP protocol
• signal port: for TCP/UDP protocol
• control port: for TCP/UDP protocol
• rtp port: for UDP protocol
26
Page 27

IPF-2002L User Manual
8. Registration Message
Once the account is successfully registered on the IPF-2002L,【Ready for call】will shows on the
screen, so does the time and date. If the registration is not successful, the LCD will display
【Logon Fail】or【Wait Logon …】. The possible reasons of the registration failure would be:
• Internet connection is fail. (Fail to acquire the IP address under the DHCP and PPPoE
mode, or some IP configurations are wrong under the Static IP mode),
• Registration is fail. (Fail to register to the VoIP server)
9. Using IPF-2002L
9.1 Pickup the Phone
When there is an incoming phone call, the IPF-2002L will ring. There are three ways you can
pick up the call:
• Use handset:
When the phone rings, pick up the handset to talk to the other end. When the call is end,
hand up the handset.
• From handset to speaker:
If you are using the handset, press ENTER to transfer the call to speaker. Press Enter
again to hand up the call.
• Use earphone:
Have your earphone plug into the earphone jack. When the phone rings, pick up the
handset and place it aside the phone, then you can use the earphone to pick the phone.
• Use speaker:
When the phone rings, press ENTER button to pick up the call. Press Enter again to
hand up the call.
• From speaker to handset:
If you are using the speaker, pick up the handset then you are able to pick up the call.
Press Enter again to hand up the call.
9.2 Making Phone Calls
• Use handset:
Pickup the phone, after hearing the ring tone, you can dial the number . Enter # right after
the number. Once you hear the “Du Du” tone from the phone, the phone on another side
is ringing.
• Use earphone:
Have your earphone plug into the earphone jack. Pick up the handset and place it aside
the phone, then you can use the earphone to pick the phone.
27
Page 28

IPF-2002L User Manual
• Use speaker:
When the phone rings, press ENTER button to pick up the call. Press Enter again to
hand up the call.
If you hear a busy tone after you dial, the other end is using the phone. Please hang up and
make the call later. You can reach this number by pressing the REDIAL button on the phone.
9.3 Check the IPF-2002L Call Records
9.3.1 Check missed calls
Press the MISS button to review any missed call. You can return a missed call by simply press #.
Press VOL+ to view the next entry and press VOL- to view the previous entry.
9.3.2 Check received calls
Press the ANS button to review any answered call. You can return an answered call by simply
press #. Press VOL+ to view the next entry and press VOL- to view the previous entry.
9.3.1 Check dialed calls
Press the CALLED button to review any dialed call. You can return a dialed call by simply press
#.
※ IPF-2002L is able to store a total of 80 Missed, Received, and Dialed call entries. When
entries exceed its capacity, IPF-2002L will delete the oldest entry automatically. Records
will be lost during power outage and reboot.
9.4 Speed Dial
Speed Dial feature can only used when entries are stored in the speed dial setting or in the
phone book on web configuration.
The operating instructions are as follows:
1. If you want to dial the 10
SPD/HOLD.
2. Press the PHONE button on the phone twice Æ LCD shows the phone number on the
phone book Æ Press VOL+ to view the next entry or press VOL- to view the previous
entry Æ press # to dial this phone number.
th
speed dial number Æ press 10 on the IPF-2002L Æ press
9.5 Mute
Press REDIAL/MUTE button during a conversation to initiate this feature. LCD will show 【Mute
On】.
9.6 Hold
Press SPD/HOLD button during a conversation to hold a call. LCD on both side will show 【Call
Hold】.
28
Page 29
IPF-2002L User Manual
10. Appendix
10.1 IPF-2002L Keypad and Symbols Mapping Table:
Number key Press once Press twice Press 3 times Press 4 times Press 5 times
1 1 . , ? ⁄/!
2 2
3 3
4 4
5 5
6 6
7 7
8 8
9 9
* .
0 0
#
Switch to upper/lower case
A/a B/b C/c
D/d E/e F/ f
G/g H/h I/i
J/j K/k L/l
M/m N/n O/o
P/p Q/q R/r S/s
T/t U/u V/v
W/w X/x Y/y Z/z
Space
:⁄@ ;⁄- ’⁄&
【
】
*
#
10.2 H.323 Web Configuration Exsample
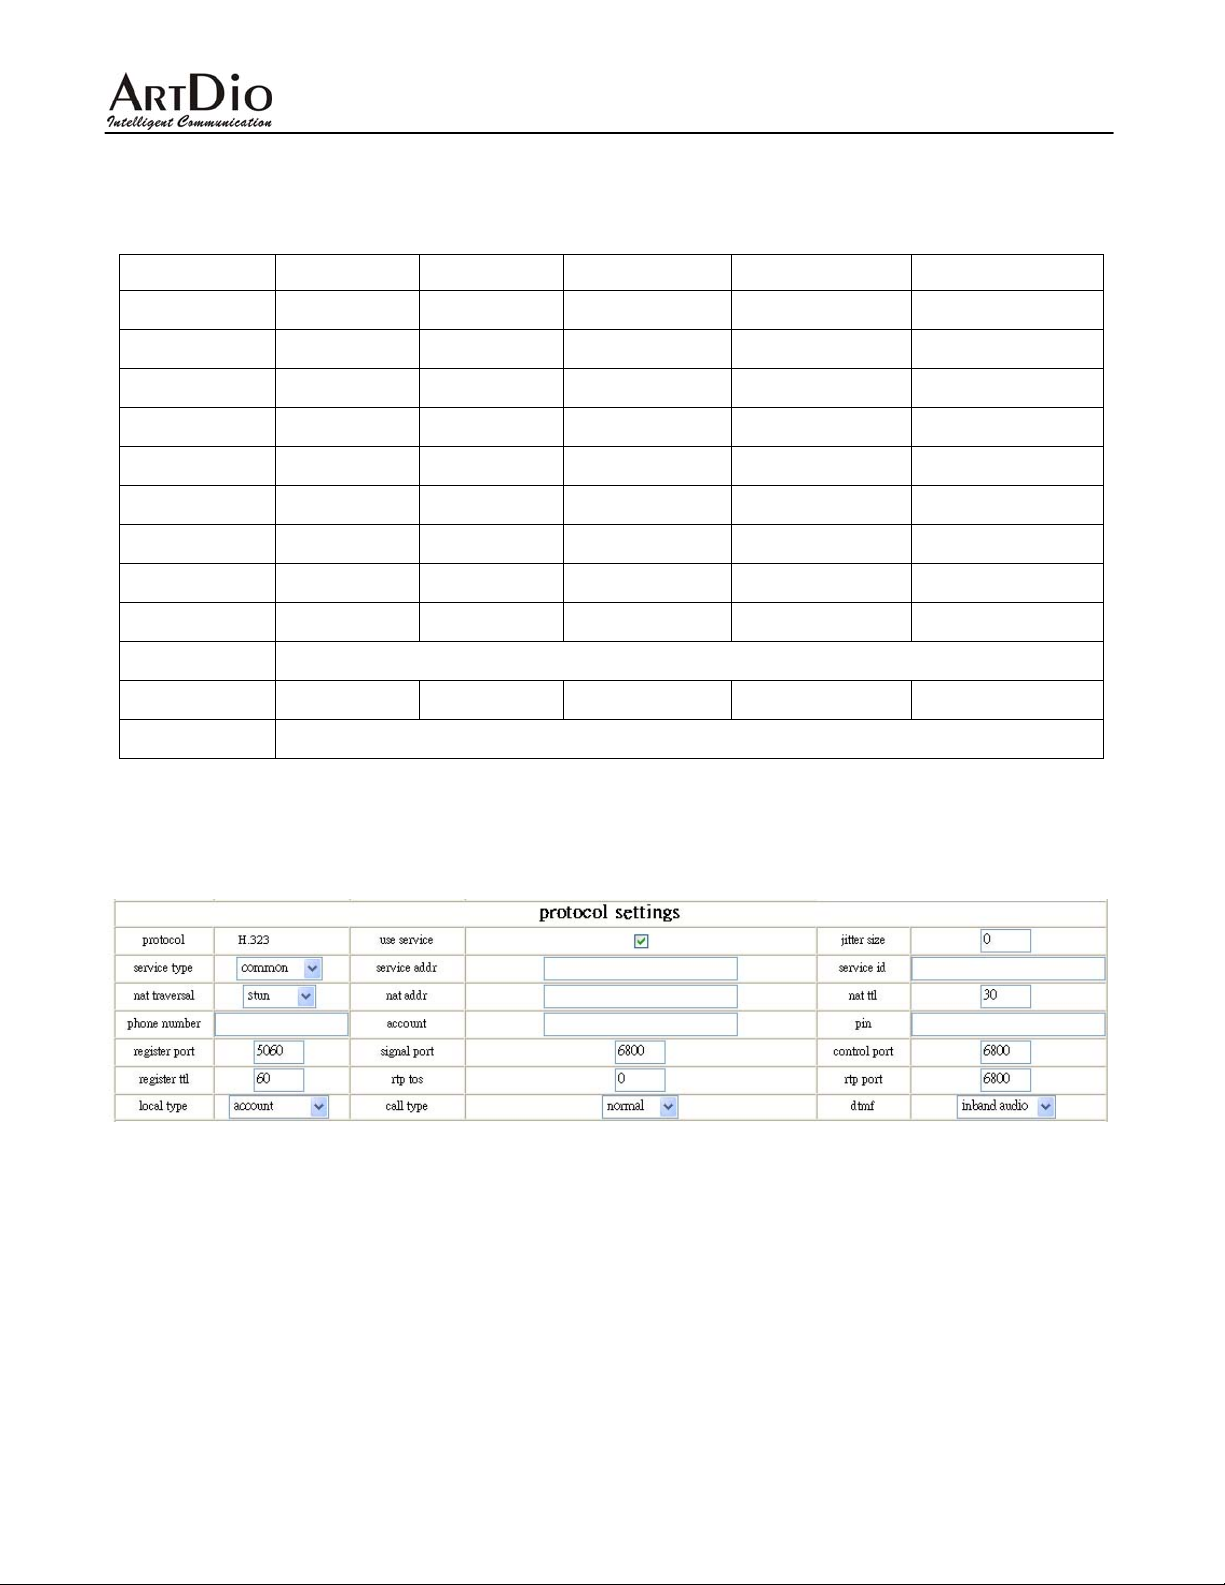
With H.323 protocol used, please change the following parameters and leave the other setting
as default.
• use service: Check
• service type: Choose common if not specified by the VoIP service provider.
• service addr: Enter the IP address or domain name of the Gatekeeper of your VoIP
service provider.
• nat traversal: Choose citron if not specified by the VoIP service provider.
• phone number: Enter the phone number provided from your VoIP service provider.
• account: Enter the account (H.323 ID) provided from you VoIP service provider.
• pin: Enter the account password provided from you VoIP service provider.
29
Page 30
IPF-2002L User Manual
• register port: Normally will be 1719.
• signal port: Normally will be 1720.
• control port: Normally will be 1722.
• RTP port: Normally will be 1722.
• local type: Choose account if not specified by the VoIP service provider.
10.3 MGCP Web Configuration Exsample
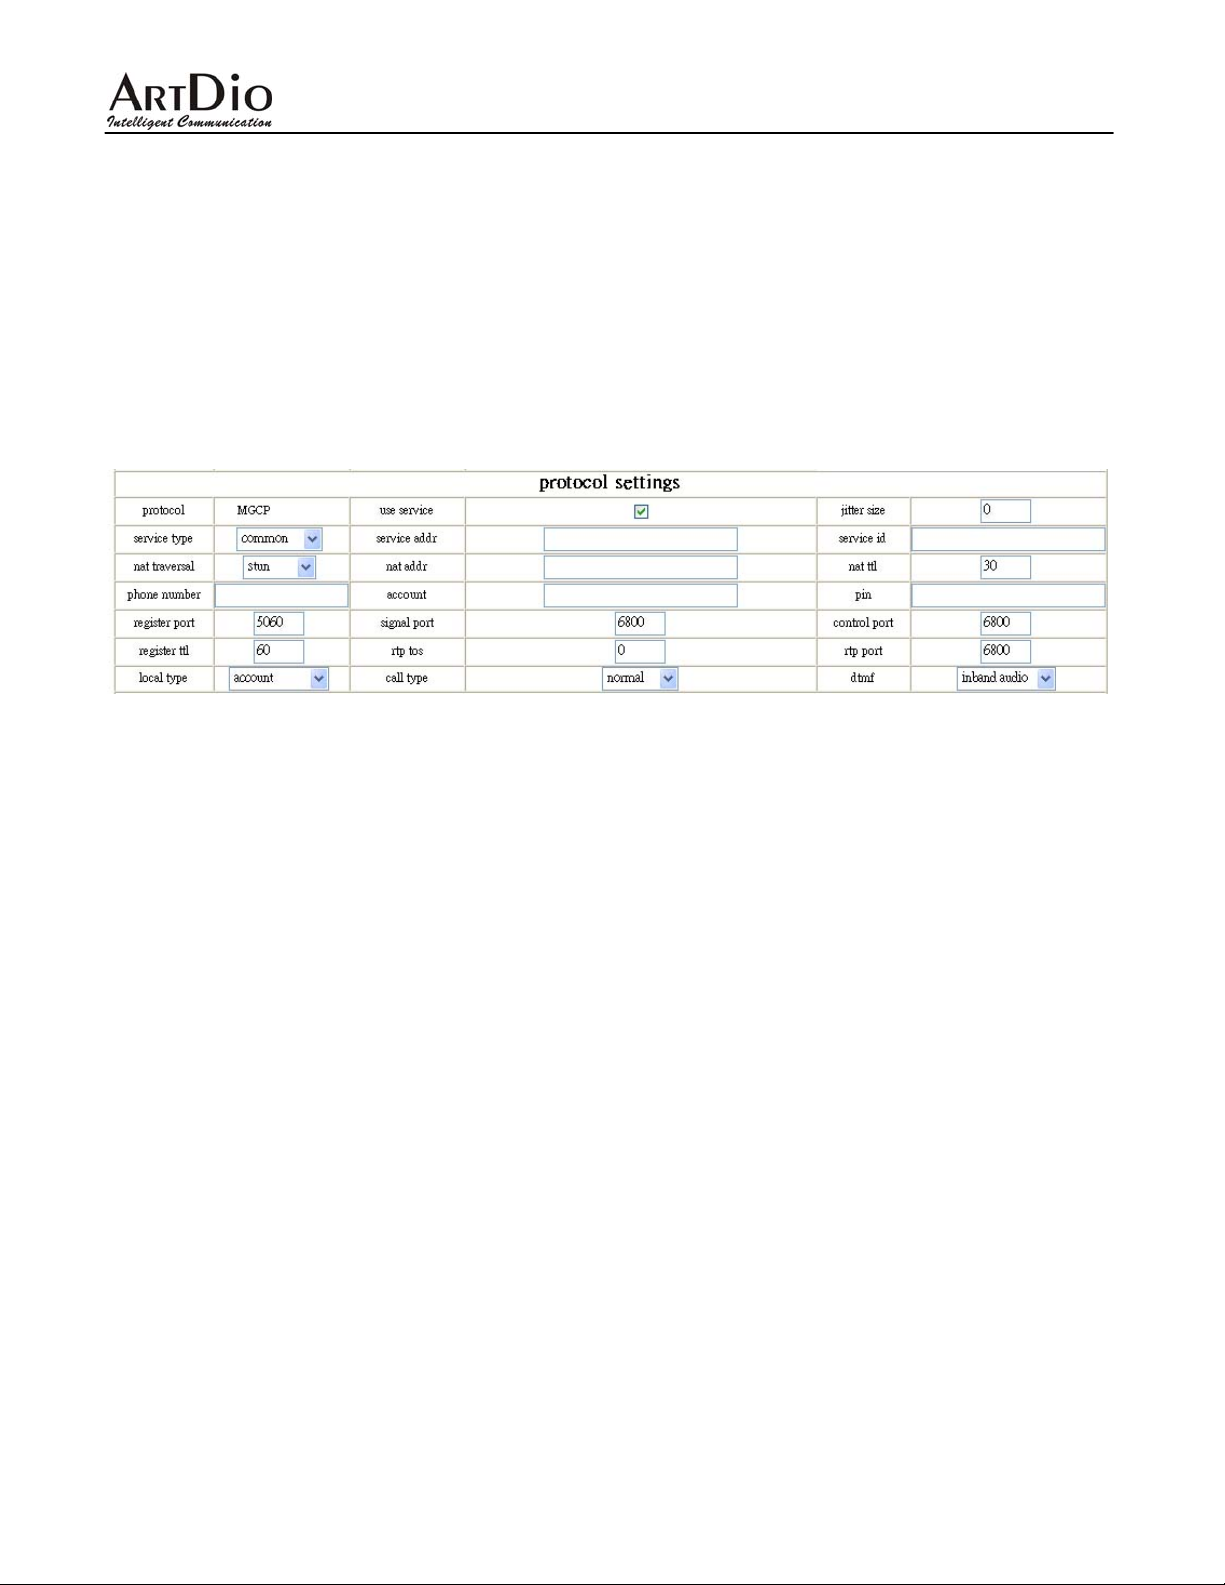
With H.323 protocol used, please change the following parameters and leave the other setting
as default.
• use service: Check
• service type: Choose common if not specified by the VoIP service provider.
• service addr: Enter the IP address or domain name of the Gatekeeper of your VoIP
service provider.
• nat traversal: Choose stun.
• nat addr: Enter the IP address or domain name of the NAT server of your VoIP service
provider.
• phone Number: enter the phone number provided from your VoIP service provider.
• account: Normally will be aaln/0 if not specified by the VoIP service provider.
• pin: Enter the account password provided from you VoIP service provider.
• register port: Normally will be 2427.
• signal port: Normally will be 6800.
• control port: Normally will be 6800.
• RTP port: Normally will be 6800.
• local type: Choose phone number if not specified by the VoIP service provider.
• call type: Normally will be advanced.
30
Page 31
IPF-2002L User Manual
10.4 How to Add a Prefix in Front of the Number
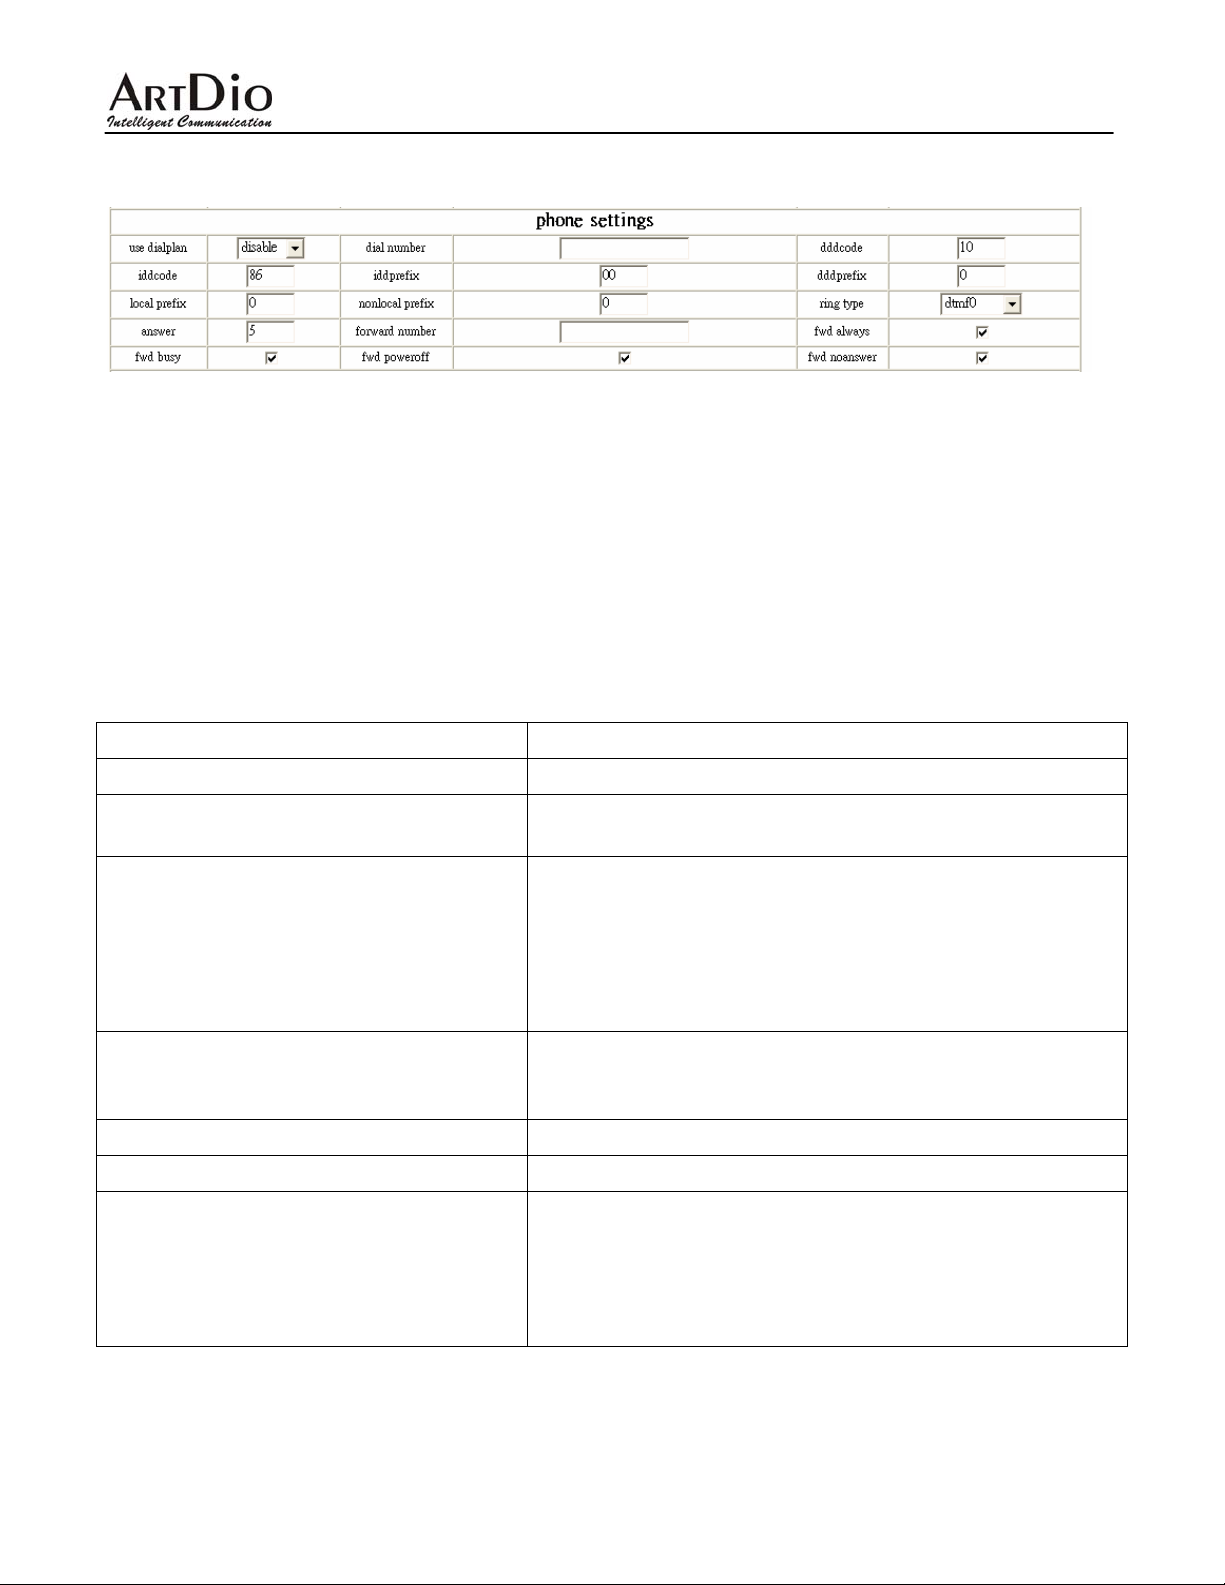
• use dialplan: Select dialnum.
• dial number: Enter the prefix you want to add. For example: 666.
• dddcode: Blank.
• iddcode: Blank.
• dddprefix: Blank.
• local prefix: Blank.
• nonlocal prefix: Blank.
10.5 Some Troubleshooting
Problem: Troubleshooting:
LCD display down or disorder Unplug the power Æ Wait for 5 seconds Æ Plug the power back.
LCD shows 【Please dial】, but the phone is
unable to dial or hang up.
LCD shows 【Wait Logon …】, 【Log On】, or
【Log On Failed】
LCD shows 【Ready for call】. However, when
dialing the phone number, the LCD shows
【Please Hangup】
Hear echo during the conversation Please press VOL – to the proper volume.
Noise Please check the connection and see if the connection is loose.
Reset to the factory default
Unplug the power Æ Wait f or 5 seconds Æ Plug the power back.
1. Please check the Internet connection of the RJ-45 is ok.
2. Please check if the IPF-2002L is able to acquire an IP
address. If not, please check the Network Setting and
see if the configuration is correct.
3. Please verify that the account is valid. Please contact you
VoIP service provider for the account information.
Please verify that the account is valid. Please contact your VoIP
service provider for the account information.
1. Press and hold the keypad * Æ Unplug the power Æ Plug
the power Æ the IPF-2002L will reboot.
2. LCD shows 【*】 Æ Release the keypad * Æ Press #5*5
Æ the IPF-2002L will reboot.
31
3. After rebooting, the phone set to be the factory default.
Page 32
IPF-2002L User Manual
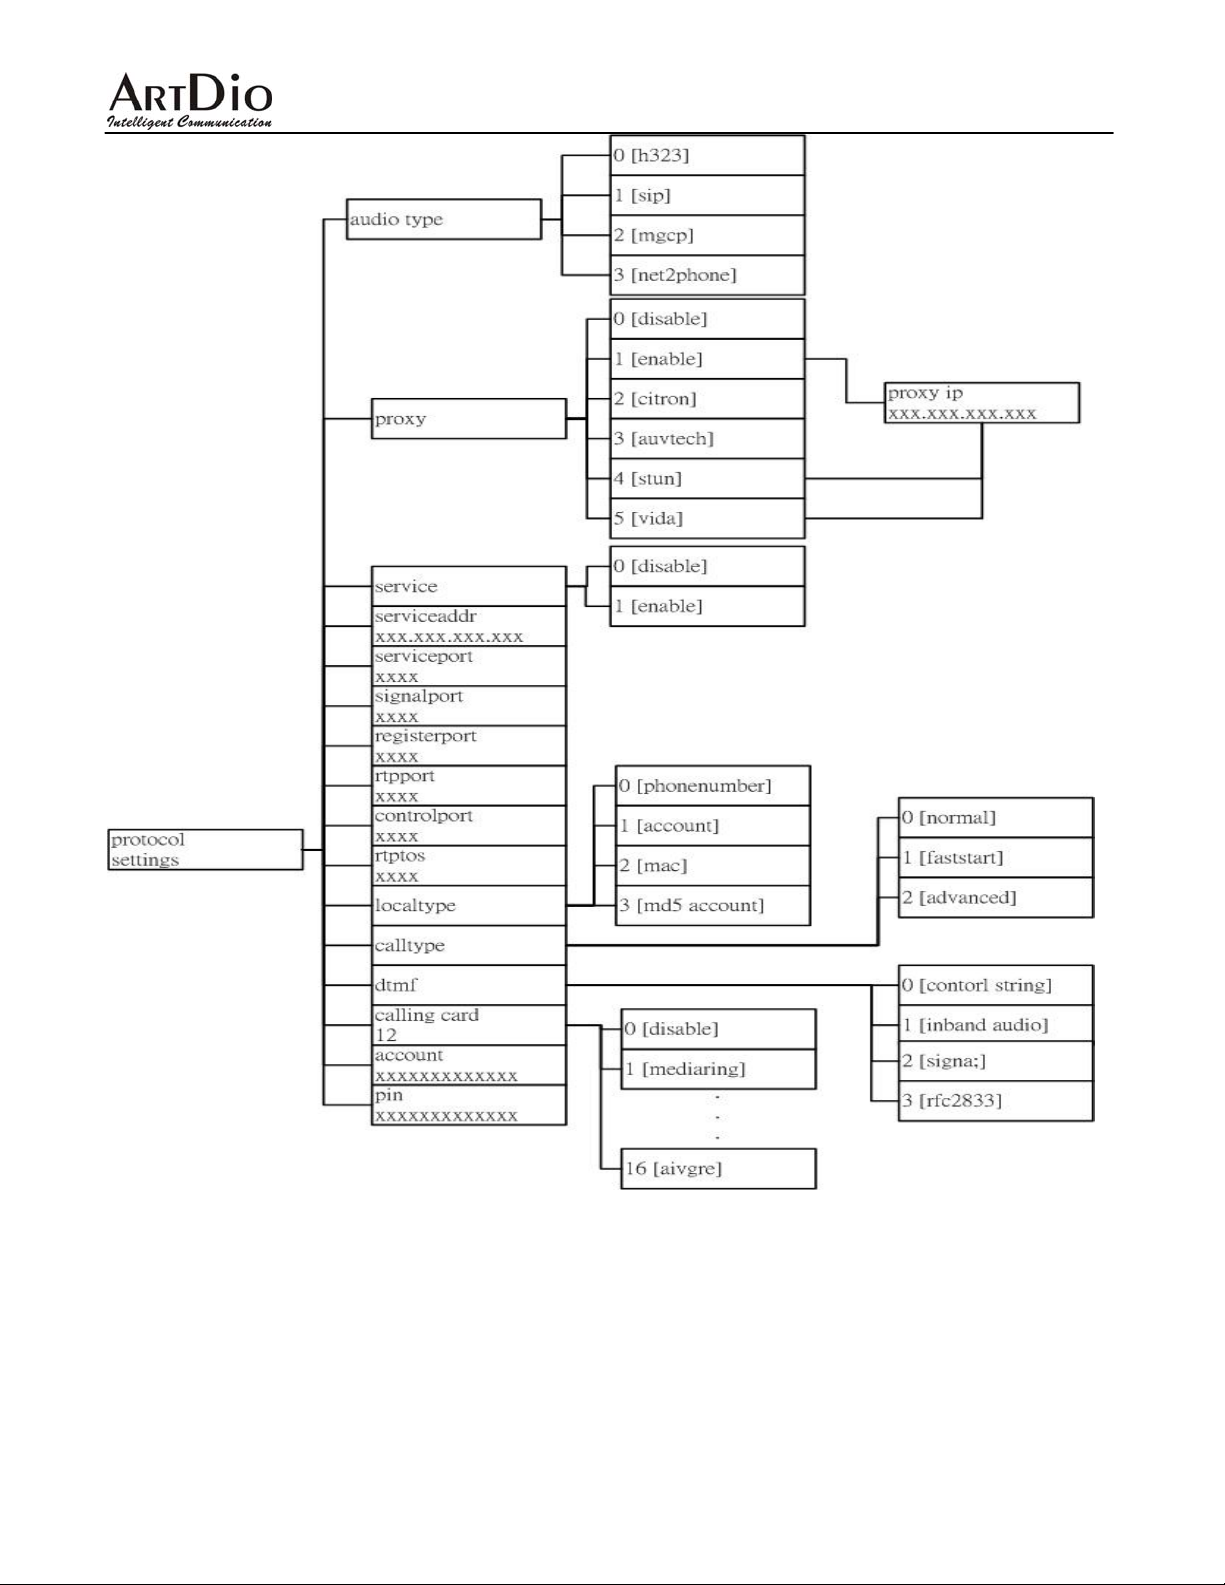
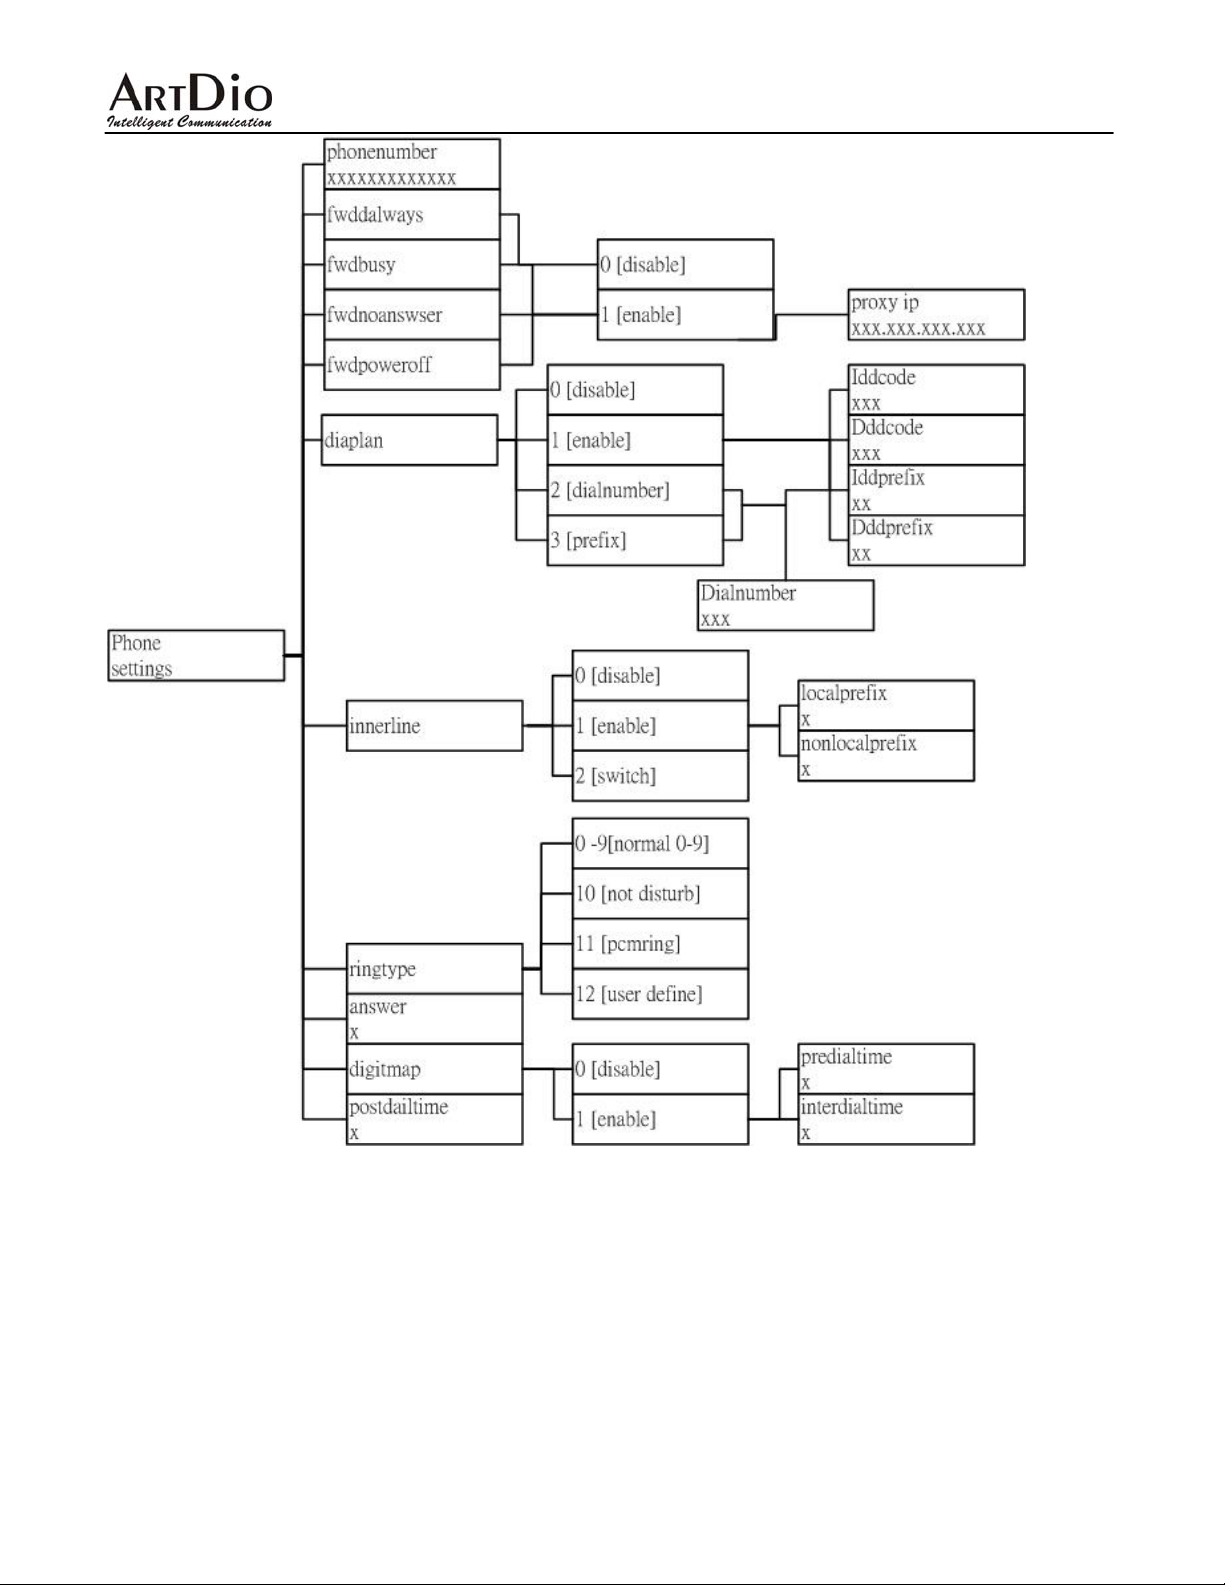
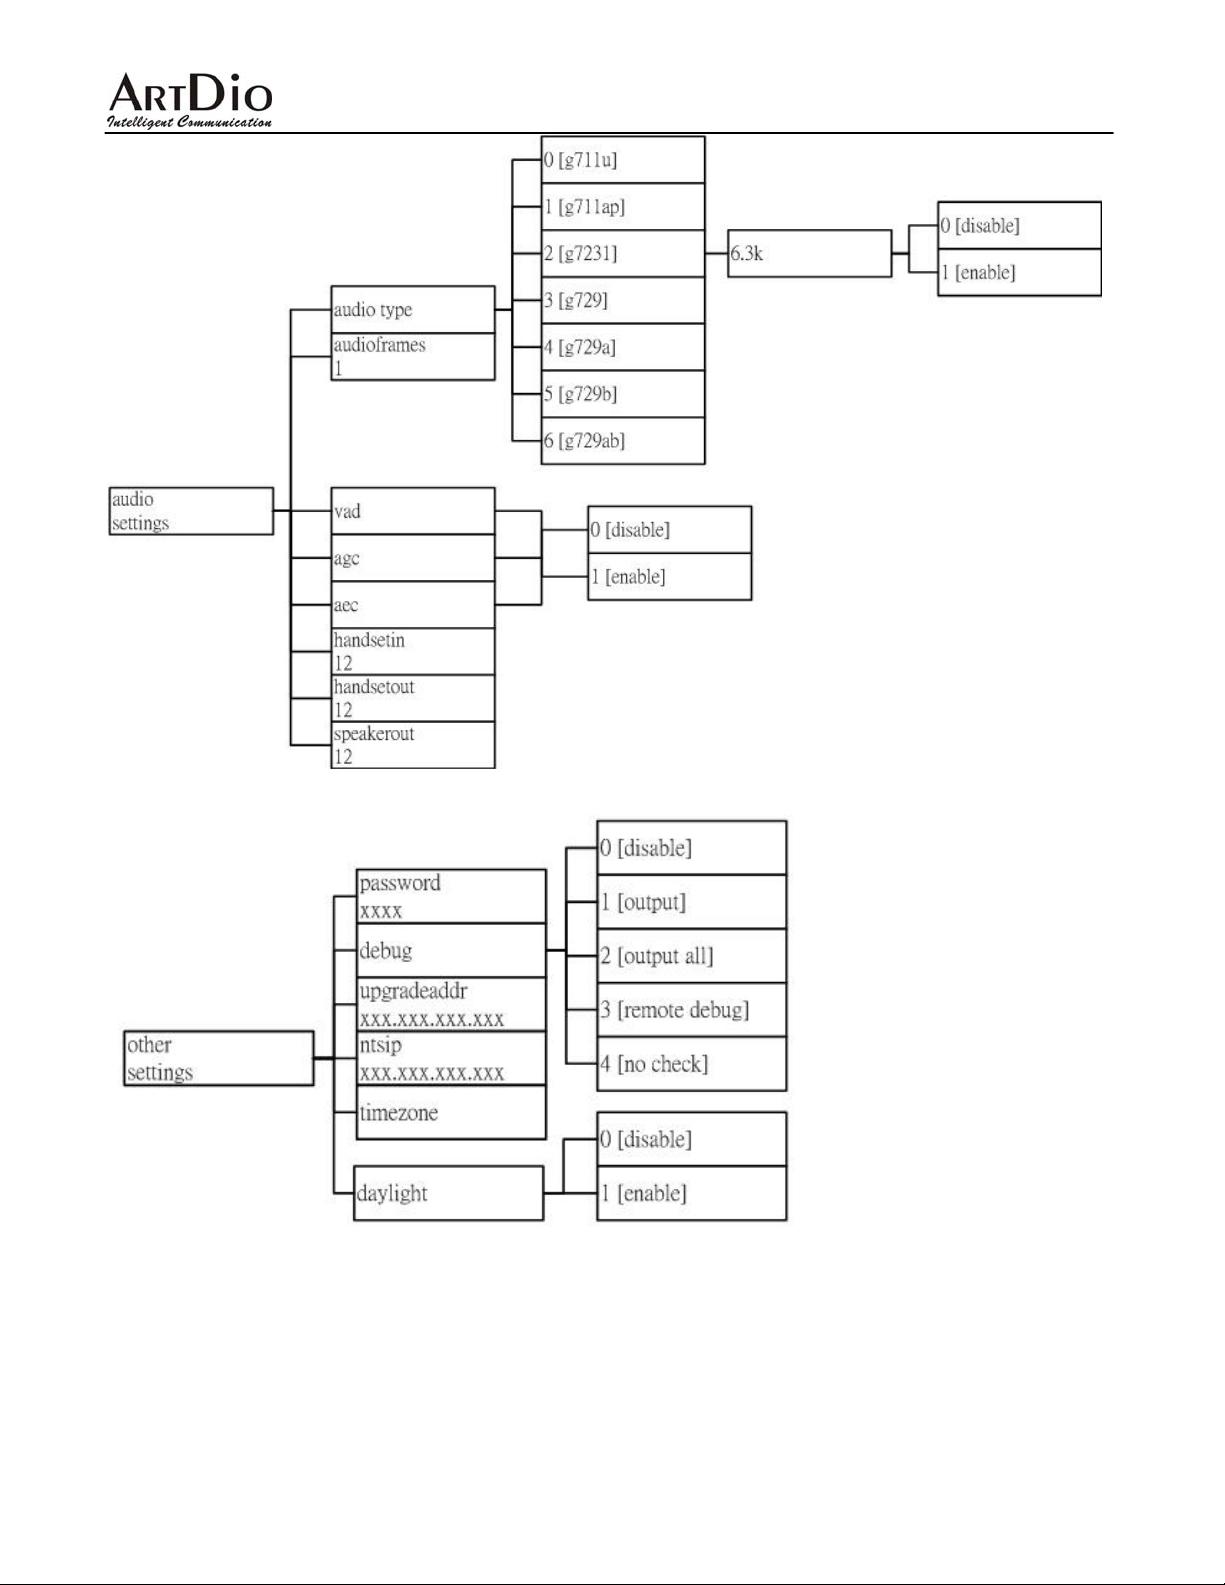
10.6 IPF-2002L Keypad Selection Tree (Using administrator password)
32
Page 33
IPF-2002L User Manual
33
Page 34
IPF-2002L User Manual
34
Page 35
IPF-2002L User Manual
35
Page 36

IPF-2002L User Manual
Los Angeles Office, U.S.A.
Address:14235 Lomitas Ave. La Puente, CA 91746
TEL:+1-626-336-0369
FAX:+1-626-961-9114
Email:[email protected]
Taiwan Headquarter
Add:7th FL.., No.476, Min-Hu RD., Hsin-Chu, Taiwan 300
TEL:+886-3-5295000
FAX:+886-3-5295005
E-Mail:[email protected]
Shanghai Office, China
Add:No.8 775 Nong, Hang Dong RD., Shanghai China
TEL:+86-21-64216757
FAX:+86-21-64206680
E-Mail:shsales@ artdio.com.tw
36
 Loading...