


ALEXA XT

ALEXA Family of Cameras
Software Update Packet 10.0 (ALEXA XT/XR)
Software Update Packet 10.0 (ALEXA Classic)
Date: 22
nd
September 2014
USER MANUAL

All rights reserved.
This document is provided under a license agreement containing
restrictions on use and disclosure and is also protected by copyright
law.
Due to continued product development this information may change
without notice. The information and intellectual property contained
herein is confidential between ARRI and the client and remains the
exclusive property of ARRI. If you find any problems in the
documentation, please report them to us in writing. ARRI does not
warrant that this document is error-free.
Arnold & Richter Cine Technik
Tuerkenstr. 89
D-80799 Munich
Germany
mailto: service@arri.com
http://www.arri.com

III
Contents
1 Disclaimer 8
1.1 About This Manual ................................................................. 11
2 Scope 12
3 Introduction to the ALEXA 14
4 Layout of the ALEXA 22
5 Safety Guidelines 26
5.1 Explanation of Warning Signs and Indications ................... 26
5.2 General Safety Guidelines ..................................................... 26
5.3 Specific Safety Instructions ................................................... 27
6 General Precautions 29
6.1 Storage and Transport ........................................................... 29
6.2 Electromagnetic Interference ................................................ 29
6.3 Condensation .......................................................................... 29
7 Power Supply 31
7.1 Power Management ............................................................... 31
7.2 BAT Connector ....................................................................... 31
7.3 Mains Unit NG 12/26 R........................................................... 32
7.4 Cine-Style Batteries ................................................................ 32
7.5 Onboard Batteries .................................................................. 33
7.5.1 V-Lock Batteries ...................................................................... 33
7.5.2 Gold Mount Batteries ............................................................. 34
7.6 Power Outputs ........................................................................ 36
7.6.1 Powering 12 V Accessories ................................................... 36
7.6.2 Powering 24 V Accessories ................................................... 36
8 Camera Support 37
8.1 Minimum Equipment Recommended For Operation ......... 37
8.2 Tripod and Remote Heads ..................................................... 37
8.3 Electronic Viewfinder EVF-1 .................................................. 38
8.3.1 Viewfinder Cables .................................................................. 39
8.3.2 Viewfinder Mounting Bracket ............................................... 40

IV Contents
8.4 Center Camera Handle CCH-1 ............................................... 42
8.5 Side Camera Handle SCH-1 ................................................... 43
8.6 Bridge Plates BP-12/BP-13 ..................................................... 44
8.7 Bridge Plate adapter BPA-1 ................................................... 45
8.8 Wedge Adapter WA-1 and Quick-Release Plate QR-HD-1 .. 46
8.9 Leveling Block LB-1 ................................................................ 46
8.10 Shoulder Pad SP-3 ................................................................. 47
9 Connectors 48
9.1 BAT .......................................................................................... 50
9.2 REC OUT 1 + 2 ........................................................................ 51
9.3 RET/SYNC IN ........................................................................... 51
9.4 MON OUT ............................................................................... 51
9.5 EXT .......................................................................................... 51
9.6 ETHERNET .............................................................................. 52
9.7 EVF ........................................................................................... 52
9.8 AUDIO IN ................................................................................. 52
9.9 RS ............................................................................................. 53
9.10 12 V .......................................................................................... 53
9.11 TC ............................................................................................. 53
9.12 AUDIO OUT ............................................................................. 53
9.13 SD Card ................................................................................... 54
9.14 SxS Slots ................................................................................. 55
9.15 XR (Xtended Recording) Module .......................................... 57
10 Lens Mounting 61
10.1 Lens Adapter PL Mount LA-PL-1 (no LDS) ........................... 61
10.2 Lens Support .......................................................................... 62
11 Camera Controls 64
11.1 Main Controls ......................................................................... 65
11.1.1 Display ..................................................................................... 65
11.1.2 Screen Buttons ....................................................................... 65
11.1.3 HOME screen .......................................................................... 66
11.1.3.1 Lists and User Lists ................................................................ 69
11.1.3.2 FPS ........................................................................................... 71
11.1.3.3 AUDIO...................................................................................... 76
11.1.3.4 SHUTTER ................................................................................ 79
11.1.3.5 EI .............................................................................................. 80
11.1.3.6 COLOR ..................................................................................... 81

Contents V
11.1.3.7 WB ........................................................................................... 86
11.1.4 Function Buttons .................................................................... 88
11.1.4.1 TC ............................................................................................. 90
11.1.4.2 INFO ......................................................................................... 92
11.1.4.3 USER........................................................................................ 96
11.1.4.4 PLAY ........................................................................................ 99
11.1.5 Menu...................................................................................... 102
11.1.5.1 Recording .............................................................................. 103
11.1.5.2 Monitoring ............................................................................ 112
11.1.5.3 Project.................................................................................... 119
11.1.5.4 System................................................................................... 121
11.1.5.5 Frame grabs .......................................................................... 131
11.1.5.6 User Setups .......................................................................... 133
11.2 Operator controls ................................................................. 135
11.3 EVF-1 Controls ...................................................................... 136
11.3.1 Viewfinder EVF menu .......................................................... 136
11.3.2 Viewfinder CAM menu......................................................... 138
12 Operation of the Camera 139
12.1 Recording .............................................................................. 139
12.1.1 Internal recording ................................................................. 139
12.1.1.1 SxS Module .......................................................................... 139
12.1.1.2 XR Module ............................................................................ 140
12.1.1.3 Internal Recording Formats ................................................. 140
12.1.2 External recording ................................................................ 150
12.1.3 Parallel recording ................................................................. 152
12.1.4 High Speed recording .......................................................... 153
12.2 Monitoring ............................................................................ 153
12.2.1 Frame Lines .......................................................................... 154
12.2.2 Status Info Overlays ............................................................. 154
12.3 Using Timecode ................................................................... 156
12.4 Syncing the Sensors of Two Cameras ............................... 158
12.5 Syncing the Settings of Two Cameras ............................... 159
12.6 Sensor modes 16:9 and 4:3 ................................................. 161
13 ALEXA Plus 164
13.1 Lens Adapter PL-Mount LA-PL-2 (with LDS) ...................... 165
13.2 Radio System ........................................................................ 166
13.3 Wireless Remote System..................................................... 167
13.3.1 Lens Motors .......................................................................... 167
13.3.2 Hand Units ............................................................................ 169

VI
Contents
13.4 Lens Data Display LDD-FP ................................................... 170
13.5 Plus Camera Controls .......................................................... 171
14 ALEXA Plus 4:3 177
15 ALEXA Studio 180
15.1 ALEXA Studio Images .......................................................... 181
15.2 Optics..................................................................................... 185
15.2.1 Electronic Mirror Shutter ..................................................... 186
15.2.2 Lens Adapter PL Mount LA-PL-2 (with LDS) ...................... 186
15.2.3 Optical Viewfinder ................................................................ 188
15.2.4 ND Filter ................................................................................ 196
15.3 Studio Camera Controls ...................................................... 197
15.4 4:3 Mode ............................................................................... 200
15.5 Licensed Features ................................................................. 202
16 ALEXA M 203
16.1 ALEXA M Images ................................................................. 204
16.2 ALEXA M Camera Head ....................................................... 209
16.2.1 CCH-2 ..................................................................................... 210
16.3 ALEXA M Camera Body ....................................................... 210
16.4 Fibre Connection .................................................................. 211
16.5 4:3 Mode ............................................................................... 213
16.6 Licensed Features ................................................................. 215
16.7 Lens Data System ................................................................. 215
17 ALEXA XT Cameras 216
17.1 In-Camera Filter Module IFM-1 ........................................... 217
17.1.1 Safety instructions for in-camera filtration ........................ 219
17.1.1.1 Maximum lens mounting depth ......................................... 219
17.1.1.2 Basic precautions ................................................................. 220
17.1.1.3 Required shimming and maximum lens mounting depth 221
17.1.1.4 Available IFM-1 and FSND Filter Sets ................................ 221
17.1.2 Preparing Internal Filtration ................................................ 221
17.1.2.1 FSND Filter Set (Basic) for ALEXA XT ................................ 222
17.1.2.2 IFM-1 Set for ALEXA Classic ............................................... 223
17.1.3 Shimming the lens mount ................................................... 226
17.1.4 Mounting in-camera filters .................................................. 233
17.1.5 Filter cleaning ....................................................................... 237
17.1.6 FSND Filter Set (Completion) .............................................. 238
17.1.7 FSND Filter Set (Full) for ALEXA XT ................................... 239

Contents VII
17.2 Open Gate sensor mode ...................................................... 240
18 ALEXA Fiber Remote Option 241
19 Remote Control Unit RCU-4 242
20 Index 243
Appendix 247
A.1 Appendix ............................................................................... 248
A.2 Connector Pin Outs .............................................................. 253
A.3 False Color Display ............................................................... 259
A.4 Warning and Error Messages ............................................. 261
A.5 Dimensions, Weights and Menu Structure Trees ............. 270

8 Disclaimer
1 Disclaimer
Before using the products described in this manual be sure to read and
understand all respective instruction.
The ARRI ALEXA is only available to commercial customers. The
customer grants by utilization that the ARRI ALEXA or other
components of the system are deployed for commercial use. Otherwise
the customer has the obligation to contact ARRI preceding the
utilization.
While ARRI endeavors to enhance the quality, reliability and safety of
their products, customers agree and acknowledge that the possibility of
defects thereof cannot be eliminated entirely. To minimize risk of
damage to property or injury (including death) to persons arising from
defects in the products, customers must incorporate sufficient safety
measures in their work with the system and have to heed the stated
canonic use.
ARRI or its subsidiaries do not assume any responsibility for incurred
losses due to improper handling or configuration of the camera or
other system components, due to sensor contamination, occurrence of
dead or defective pixels, defective signal connections or
incompatibilities with third party recording devices.
ARRI assumes no responsibility for any errors that may appear in this
document. The information is subject to change without notice.
For product specification changes since this manual was published,
refer to the latest publications of ARRI data sheets or data books, etc.,
for the most up-to-date specifications. Not all products and/or types are
available in every country. Please check with an ARRI sales
representative for availability and additional information.
Neither ARRI nor its subsidiaries assume any liability for infringement
of patents, copyrights or other intellectual property rights of third
parties by or arising from the use of ARRI products or any other liability
arising from the use of such products. No license, express, implied or
otherwise, is granted under any patents, copyrights or other intellectual
property right of ARRI or others.
ARRI or its subsidiaries expressly exclude any liability, warranty,
demand or other obligation for any claim, representation, or cause, or
action, or whatsoever, express or implied, whether in contract or tort,
including negligence, or incorporated in terms and conditions, whether
by statue, law or otherwise. In no event shall ARRI or its subsidiaries be
liable for or have a remedy for recovery of any special, direct, indirect,
incidental, or consequential damages, including, but not limited to lost
profits, lost savings, lost revenues or economic loss of any kind or for
any claim by third party, downtime, good-will, damage to or
replacement of equipment or property, any cost or recovering of any
material or goods associated with the assembly or use of our products,
or any other damages or injury of the persons and so on or under any
other legal theory.
In the case one or all of the foregoing clauses are not allowed by
applicable law, the fullest extent permissible clauses by applicable law
are validated.

About This Manual 9
ARRI is a registered trademark of Arnold & Richter Cine Technik GmbH
& Co Betriebs KG.
Note: This product and the accessories recommended by the manufacturer
fulfill the specifications of the European Directive 2004/108/EC (15th December
2004).
The ALEXA viewfinder EVF-1 contains proprietary technology owned by
Fourth Dimension Displays Limited and licensed by ARRI.
This product contains licensed technology from Linotype.
Quicktime and Quicktime logo are trademarks or registered trademarks
of Apple Computer, Inc., used under license therefrom.
Apple ProRes 422 Proxy, Apple ProRes 422 LT, Apple ProRes 422, Apple
ProRes 422 HQ, Apple ProRes 4444, Apple ProRes 444 XQ, and the
ProRes logo are trademarks or registered trademarks of Apple
Computer, Inc., used under license therefrom.
SxS and
are trademarks of SONY corporation.
mkdosfs
Portions © 1998, Robert Nordier. All Rights Reserved.
© 1998, Robert Nordier. All rights reserved.
Redistribution and use in source and binary forms, with or without
modification, are permitted provided that the following conditions are
met:
Redistributions of source code must retain the above copyright notice,
this list of conditions and the following disclaimer.
Redistributions in binary form must reproduce the above copyright
notice, this list of conditions and the following disclaimer in the
documentation and/or other materials provided with the distribution.
THIS SOFTWARE IS PROVIDED BY THE AUTHOR(S) “AS IS” AND ANY
EXPRESS OR IMPLIED WARRANTIES, INCLUDING, BUT NOT LIMITED
TO, THE IMPLIED WARRANTIES OF MERCHANTABILITY AND FITNESS
FOR A PARTICULAR PURPOSE ARE DISCLAIMED. IN NO EVENT SHALL
THE AUTHOR(S) BE LIABLE FOR ANY DIRECT, INDIRECT, INCIDENTAL,
SPECIAL, EXEMPLARY, OR CONSEQUENTIAL DAMAGES (INCLUDING,
BUT NOT LIMITED TO, PROCUREMENT OF SUBSTITUTE GOODS OR
SERVICES; LOSS OF USE, DATA, OR PROFITS; OR BUSINESS
INTERRUPTION) HOWEVER CAUSED AND ON ANY THEORY OF
LIABILITY, WHETHER IN CONTRACT, STRICT LIABILITY, OR TORT
(INCLUDING NEGLIGENCE OR OTHERWISE) ARISING IN ANY WAY
OUT OF THE USE OF THIS SOFTWARE, EVEN IF ADVISED OF THE
POSSIBILITY OF SUCH DAMAGE.
This product meets CE regulations.

10 Disclaimer

About This Manual 11
1.1 About This Manual
ARRI recommends that all users of the ALEXA read the manual in its
entirety prior to use. For experienced users, the manual's structure also
provides quick access for reference.
In this manual:
• Layout of the ALEXA
• Safety Guidelines
• General Precautions
• Power Supply
• Camera Support
• Connectors
• Lens Mounting
• User Interface
• Operation of the ALEXA
How to Use This Manual
All directions are given from a camera operator's point of view. For
example, camera-right side refers to the right side of the camera when
standing behind the camera and operating it in a normal fashion.
Connectors are written in all capital letters, for example, REC OUT.
Menus and screens on the Main Camera Controls are written in all
capital letters, for example, RECORDING menu and HOME screen.
Buttons are written in bold typeface capital letters, for example, PLAY
button.
The appendix at the back of the manual contains useful reference
material including ALEXA specifications, connector pin-out diagrams, a
false color display explanation, error and warning message
explanations, ALEXA dimensional drawings and a menu structure tree.

12 Scope
2 Scope
This instruction manual applies to the following hardware, software
and firmware versions:
ALEXA, ALEXA Plus, ALEXA Plus 4:3, ALEXA M: with Electronic
Viewfinder EVF-1;
ALEXA XT, ALEXA XT Plus, ALEXA XT M: with Electronic Viewfinder
EVF-1;
ALEXA Studio, ALEXA XT Studio: with optical viewfinder or with
Electronic Viewfinder EVF-1;
• Camera Software Update Packet (SUP) for ALEXA
XT cameras and ALEXA Classic cameras with XR
module upgrade:
10.0
• Camera Software Update Packet (SUP) for ALEXA
Classic cameras with SxS module:
10.0
Please note that ALEXA HD and ALEXA HD Plus cameras are limited to
SUP 7.0 and thus the SUP 7.0 manual should be used for those
cameras.
Document revision history
S
UP ID drawing release/
revision
date
2.1 K5.72550.0 2031-00-00-00-99 FG5445 29th Nov 2010
3.0 K5.72550.0 2031-00-00-00-99 K7741 11th Feb 2011
3.1 K5.72550.0 2031-00-00-00-99-B K7776 04th Apr 2011
3.1 K5.72550.0 2031-00-00-00-99-C K7781 07th Apr 2011
4.0 K5.72550.0 2031-00-00-00-99-D K7817 05th Jul 2011
4.0.1 K5.72550.0 2031-00-00-00-99-E K7845 24th Aug 2011
5.0 K5.72550.0 2031-00-00-00-99-F K7874 16th Nov 2011
5.0 +
5.1
K5.72550.0 2031-00-00-00-99-G K7890 19th Dec 2011
5.0 +
5.1
K5.72550.0 2031-00-00-00-99-H K8005 26th Jan 2011
5.1 +
6.0
K5.72550.0 2031-00-00-00-99-I K8021 12th Feb 2012

About This Manual 13
SUP ID drawing release/
revision
date
6.1 K5.72550.0 2031-00-00-00-99-J K8071 14th May 2012
7.0 K5.72550.0 2031-00-00-00-99-K K8128 5th Nov 2012
7.0.1 K5.72550.0 2031-00-00-00-99-L K8169 14th Jan 2013
7.1 K5.72550.0 2031-00-00-00-99-M K8189 30th Jan 2013
8.0 K5.72550.0 2031-00-00-00-99-N K8223 22nd April 2013
8.0 K5.72550.0 2031-00-00-00-99-O K8257 18th June 2013
8.0 +
8.1
10000073 V01 K08304 17th July 2013
9.0
10000073 V02 K08340 25th Nov 2013
10.0
10000073 V03 K08576 22nd Sep 2014

14 Introduction to the ALEXA
3 Introduction to the ALEXA
ARRI ALEXA is an extraordinary 35mm format digital camera system
designed for motion pictures and television, consisting of eleven
cameras and an extensive range of primes, zooms, accessories and
recording solutions. Combining innovative digital technology with 95
years of ARRI history and experience has created a camera system that
makes it easy to create great looking images.
• The ALEXA and ALEXA XT provide the most affordable entry
with full ALEXA image quality.
• ALEXA Plus adds support for the ARRI Wireless Remote System
(WRS), cmotion cvolution lens control, ARRI Lens Data System,
an additional HD-SDI and RS output and expanded metadata.
• ALEXA Plus 4:3 and ALEXA XT Plus share the same features as
the ALEXA Plus but with a taller usable sensor area (4:3) for
plug-and-play use with anamorphic lenses. Providing unmatched
versatility, the ALEXA Plus, ALEXA Plus 4:3 and ALEXA XT Plus
have become the workhorses of the industry.
• ALEXA M and ALEXA XT M are specialists; a modular system
with a separate camera head and body for action oriented
cinematography, aerial mounts and 3D.
• The flagships of the range, the ALEXA Studio and ALEXA XT
Studio, are the only digital motion picture cameras with an
optical viewfinder and a rotating mirror shutter.
• The ALEXA HD and ALEXA HD Plus form the basis of the ALEXA
Fiber Remote and ALEXA Fiber Remote camera sets. Since they
are designed for HD-only use, they do not include and cannot be
upgraded to ARRIRAW, ProRes 2K, DNxHD 444, 4:3, 3D sync or
the XR Module.
All ALEXA cameras offer exceptional image quality with the organic look
and feel of film; their unequalled exposure latitude, high sensitivity and
unique ARRI color processing provide sharp and natural images with a
cinematic look of breathtaking richness and detail.
Making them the perfect tools for a wide range of workflow and budget
requirements, ALEXA cameras allow for the most efficient and versatile
workflows. They can simultaneously output a number of formats, all
with audio and metadata. Their ability to record Apple ProRes (in HD or
2K*) or Avid DNxHD images to in-camera media offers file-based
workflows of unparalleled efficiency for immediate time and cost
savings. ARRIRAW* (in-camera with XT cameras and ALEXA Classic
cameras upgraded with the XR Module) delivers the pinnacle in image
quality, postproduction flexibility and archiving peace of mind, while
the HD-SDI outputs integrate seamlessly into existing HD
infrastructures.

About This Manual 15
ALEXAs are true ARRI cameras: simple and safe to operate, ergonomic in
design and reliable in even the most extreme environments. ALEXA
cameras are designed around the way you work and, like all other ARRI
products, are backed by the global ARRI service network.
To provide more choices to the filmmaker, the ALEXA system is based
on an open architecture with many industry-standard interfaces and
compatibility with third party products. This, in combination with a
number of components on the camera that can be upgraded and long
product cycles make the system future-proof and ensures a safe return
on investment.
More than just hardware, ALEXA cameras represent an entire image
pipeline that stands alone as the most complete and powerful digital
production system ever built.
Exceptional Image Performance
• Film-like, organic look
• Wide exposure latitude
− 14+ stops over the entire EI range as measured with the ARRI
Dynamic Range Test Chart
− Extended, clean highlights
− Extremely low noise floor
− Future proof for High Dynamic Range (HDR) displays
• High sensitivity
− True base sensitivity of EI 800
− Adjustable from EI 160 to EI 3200
• ARRI color science
− Natural color reproduction, especially for skin tones
− Excellent color separation
− Holds up extremely well when over or underexposed
• Sharp, natural images for HD, 2K, UHD or 4K deliverables

16 Introduction to the ALEXA
All ALEXA cameras provide the best looking digital image with the least
amount of fuss. This is made possible by a unique imaging chain
consisting of a high end optical low pass filter, a custom made CMOS
sensor with Dual Gain Architecture (DGA) and custom electronics and
processing software. These components are carefully crafted by ARRI
so that together they produce images with the organic look and feel of
film. The sensor provides unequalled exposure latitude of over 14 stops
over the entire EI range, with special consideration given to a gentle
highlight treatment. Creating a good looking roll-off in the highlights is
probably one of the most difficult tasks for any camera designer and we
have spent enormous resources at insuring ALEXA's outstanding
performance in the critical area between almost overexposed and fully
overexposed. ALEXA's high sensitivity and its ability to hold up very
well even when extremely under- or overexposed speed up work on
any real-world set. ALEXA's color processing was developed by our
own color scientists (who are the same people that have been working
on the ARRILASER and ARRISCAN, so are intimately familiar with both
film and digital color science), and creates clean and natural colors,
especially noticeable in ALEXA's great looking skin tones. The low
noise floor and great color separation helps greatly in color correction
and compositing. Our goal is creating the best looking images, and
when assessing imaging technologies, we always ask if it improves the
image, disregarding the marketing hype. With ALEXA we have, as the
visual effects supervisor of The Avengers put it, created "better pixels".
Efficient and Versatile Workflows
• Multiple in-camera recording options
− ARRIRAW
1,2
, ProRes or DNxHD
− Log C or Rec 709 gamma
− Optional ARRI Look Files for custom looks
− Embedded metadata in all file formats
• ARRIRAW
1
− Uncompressed, unencrypted raw sensor data
− 16:9 or 4:3 resolutions
− Greatest image quality from ALEXA
− Greatest flexibility in post
− Best option for future-proof archiving
• Apple ProRes
− ProRes 422, 422 HQ, 4444 and 4444 XQ
2
− HD or 2K resolutions, 16:9 or 4:3 aspect ratios
1
− Pre-recording
1
− Native Final Cut Pro X support
• DNxHD
− DNxHD 145, DNxHD 220x and DNxHD 444
1
− MXF wrapped files (SMPTE standard compliant)
− Native Avid Media Composer support
• Two independent HD-SDI outputs
− Optional ARRI Look Files for custom looks
− Streaming metadata
− 180º image rotation for fast Steadicam low mode

About This Manual 17
• Online tools and downloadable apps
1
ALEXA HD and HD Plus do not include and cannot be upgraded to
ARRIRAW, ProRes 2K, DNxHD 444, 4:3 sensor mode, 3D sync, pre-
recording or the XR Module.
2
Only ALEXA XT cameras and ALEXA Classic cameras with the XR
Module upgrade.
ALEXAs easily fit into many different types of projects because of the
versatility of their multiple outputs. ALEXAs can record and play back
Apple ProRes (in HD or 2K* resolution and 16:9 or 4:3 aspect ratio) or
DNxHD in-camera onto SxS PRO cards, CFast 2.0 cards or XR Capture
Drives, and ARRIRAW in 16:9, 4:3 or Open Gate aspect ratio onto XR
Capture Drives. Alternatively, uncompressed HD-SDI can be recorded
with an external recorder. Images can be recorded and/or output in Log
C or Rec 709, with optional ARRI Look Files for an accurate preview on
set and with a full set of rich metadata to streamline production. So
disregarding if you want to shoot a low budget TV series or Martin
Scorsese's next big Hollywood feature film, ALEXA can be easily
configured for the task at hand.
Simple and Safe Operation
• ARRI Product Quality
• Rugged and reliable
− Sealed electronics compartment
− Unique cooling system
− Stable lens mount/sensor holder
− Continuous file closing to protect footage
− Self-healing metadata
• Intuitive, easy to use controls
− Same interface on all ALEXA models
• High quality electronic viewfinder
• Powerful assistive displays, including
− Surround view
− False color exposure check
− Smooth mode for better motion portrayal
− Peaking focus check
− Compare stored image with live image
− RETURN IN video
• Well balanced, ergonomic body design
• Global ARRI service network

18 Introduction to the ALEXA
ALEXA cameras are part of a long heritage of cameras from ARRI, and
we are very familiar with the sometimes horrid things done to our
cameras in the field. We just have to go into our own service
department to see the carnage! So ALEXAs are built rugged and
reliable with a sealed electronics compartment, a unique cooling
system and the most stable lens/sensor mount German engineering
could devise. All ALEXAs are backed by ARRI's global service network,
providing a friendly ARRI service technician accessible 24/5.
We know what it is like to try to change fps and shutter angle at 4:00 am
in the morning in the rain after a long night shoot. Professional
cameras need to be very simple to operate, and they need to make sure
that a good looking image is recorded, no matter what. With ALEXA we
have developed an intuitive user interface that is easy to learn and
quick to operate. The same interface is used on all models of ALEXA,
with the same menu, buttons, etc., so there is no learning curve when
using another model ALEXA.
Critically important to camera operators is the viewfinder. Based on our
experience with optical viewfinders, ALEXA's electronic viewfinder
provides an exceptionally clear image with natural skin tones and
smooth motion portrayal that is easy on the eye. For those who
appreciate the advantages of optical viewfinders, the ALEXA Studio can
be operated with an optical or electronic viewfinder. The electronic
viewfinder includes powerful assistive displays like surround view, false
color exposure check or anamorphic de-squeeze.
The hardware of the camera is designed for the best and most
ergonomic use on the set, including the built-in shoulder cut-out, many
attachment points on the camera's precision machined housing and a
large numbers of accessories like the low mode set, the Remote Control
Unit RCU-4 or the Wireless Compact Unit WCU-4. With meticulous
attention to detail we have added many small but helpful design
refinements, including built-in supports for 15 mm lightweight rods or
differently shaped extrusions (eyebrows) above some buttons so the
operator can feel the button's position even from the other side of the
camera or shooting in low light. The same care has been taken to
ensure compatibility with the extensive range of exiting accessories.
ALEXAs are well balanced and can be quickly switched from shoulder
use to tripod, crane or Steadicam. They accept a wide range of power
input from 10.5 to 34 V DC. Multiple power sources can be
simultaneously connected (with hot plug capability) and a smart circuit
will automatically switch to the one with the highest voltage.
Open, Future Proof Architecture
• Compatibility with industry standards
− PL mount lenses
− Apple ProRes, Avid DNxHD, HD-SDI, S
xS PRO cards and
CFast 2.0 cards
− Gold mount or V-lock on-board batteries
− 12 or 24 V power inputs and outputs

About This Manual 19
− Support for ARRI and cmotion cvolution wireless lens control
systems
− ARRIRAW* support for third parties through ARRI Partner
Program and ARRIRAW SDK
• Numerous upgrade options
− Upgradable in-camera recording module (XR Module)
− Upgradable electronics interface module (Plus side panel)
− Exchangeable Lens Mount (ELM)
− Easy and powerful free Software Update Packets (SUPs)
− New features through purchase of license
• Long product cycles
We are open to equipment and standards from other manufacturers, be
that PL mount lenses, Apple ProRes, the HD-SDI standard, Gold or V-
mount on-board batteries, cmotion lens control systems or both 12 and
24V accessory power outputs. We want to make sure that you can put
together the right ALEXA package with the accessories you want.
To ensure a smooth post production workflow, we are sharing our color
science with post production equipment manufacturers through the
ARRI Partner Program. Our ARRIRAW Software Development Kit (SDK)
allows them to integrate the ARRI debayering algorithm or create their
own, depending on what works best for them.
In addition, ALEXAs can be upgraded, as we have shown with the Plus
upgrade, the Fiber Remote Option, the XR Module upgrade and as we
are continuously showing with our free Software Upgrade Packets that
provide new and exciting features like ProRes 2K, ProRes 4:3, ProRes
4444 XQ, ARRIRAW Open Gate or 180º image rotation. Further features
like high speed or anamorphic de-squeeze are included in some
cameras and can be purchased through software licenses for the
others. All this, combined with our long product cycles, create a
sustainable business model for all owners of ARRI cameras.
ALEXA XT CAMERAS
Second generation ALEXAs are called ALEXA XT cameras (Xtended
Technology). They were released in 2013 and, in addition to all the
features of the ALEXA Classic camera, they are equipped with the XR
Module (Xtended Recording), internal ND filtration, a 4:3 Super 35
sensor, built-in CDL server and an LDS PL mount. In addition, they have
a new viewfinder mounting bracket, include anamorphic de-squeeze
and high speed licenses as well as a new, super silent fan. ALEXA XT
cameras are the ALEXA XT, ALEXA XT M, ALEXA XT Plus and ALEXA
XT Studio. The XR Module is on the left side of the camera. It has one
slot for either an XR Capture Drive, the SxS Adapter for use with SxS
PRO cards or the CFast 2.0 Adapter for use with CFast 2.0 cards.
• Faster, lighter and more affordable ARRIRAW recordin
g
− In-camera ARRIRAW recording up to 120 fps onto XR Capture
Drives
− Proven, efficient and versatile Codex ARRIRAW workfl
ow

20 Introduction to the ALEXA
• Faster and longer ProRes/DNxHD in-camera recording
− ProRes or DNxHD onto SxS PRO cards with SxS Adapter or
CFast 2.0 cards with CFast 2.0 Adapter
− ProRes or DNxHD high speed onto XR Capture Drives or CFast
2.0 cards
− Proven, efficient and versatile ProRes/DNxHD workflow
• 4:3 Super 35 sensor
− Ideal for anamorphic lenses
− Increased post flexibility for spherical lenses
• Open Gate sensor mode
− Records full sensor area in ARRIRAW
− For image repositioning, resizing, rotating or stabilizing
− For VFX work or upscale to 4K
• Built-in ND filter option
3
− Neutral color balance at all densities
− Anti-reflective multi-coating maintains high contrast
− Precision polishing preserves image sharpness
− Internal filter holder reduces weight, reflections and hassle
− 8 full-spectrum neutral density (FSND) filters available from
ND 0.3 to ND 2.4
• Built-in Lens Data System (LDS)
− More efficient workflow on-set and in post
− Lens Data Archive (LDA) for use with non-LDS lenses
• Integrated CDL capture
− Stores ASC Color Decision List (CDL) in ARRIRAW metadata
• Included anamorphic de-squeeze and high speed licenses
• Viewfinder Mounting Bracket VMB-3
− Improved operating comfort and flexibility
− Strong and rigid construction
− Special hard, low friction anodizing on all moving parts
− 15 mm lightweight rods hold viewfinder mount
− Built-in bubble level
• Super silent ALEXA XT fan
• Quick switch BNC connectors
− Can be exchanged without camera disassembly
3
Only for ALEXA XT, ALEXA XT M and ALEXA XT Plus. ALEXA XT
Studio has its own motorized ND filter solution.
ALEXA Classic Cameras with the XR Module Upgrade
The ALEXA XR Module (XR = Xtended Recording), which is built into all
ALEXA XT cameras, is also available as an affordable upgrade for all
ALEXA Classic cameras. The ALEXA XR Module is a new side panel
with exciting in-camera recording options, replacing the current SxS
Module. It allows ALEXA Classic camera owners to embrace the latest
advances in recording technologies without having to purchase a new
camera, exemplifying the concept of modular upgradeability that was
built into the ALEXA design from the very beginning.

About This Manual 21
Please note that most other features of the XT cameras can also be
installed in ALEXA Classic cameras as individual upgrades, like the
built-in ND filter option, the Viewfinder Mounting Bracket VMB-3 or the
super silent XT fan. However, only true ALEXA XT cameras are capable
of ARRIRAW Open Gate mode, and ALEXA Classic cameras will retain
their native aspect ratio when upgraded. So a 16:9 ALEXA Classic will
remain a 16:9 camera after the XR Module upgrade.
* ProRes 2K/16:9 and ARRIRAW output are not available on ALEXA HD and
ALEXA HD Plus
22 Layout of the ALEXA
4 Layout of the ALEXA
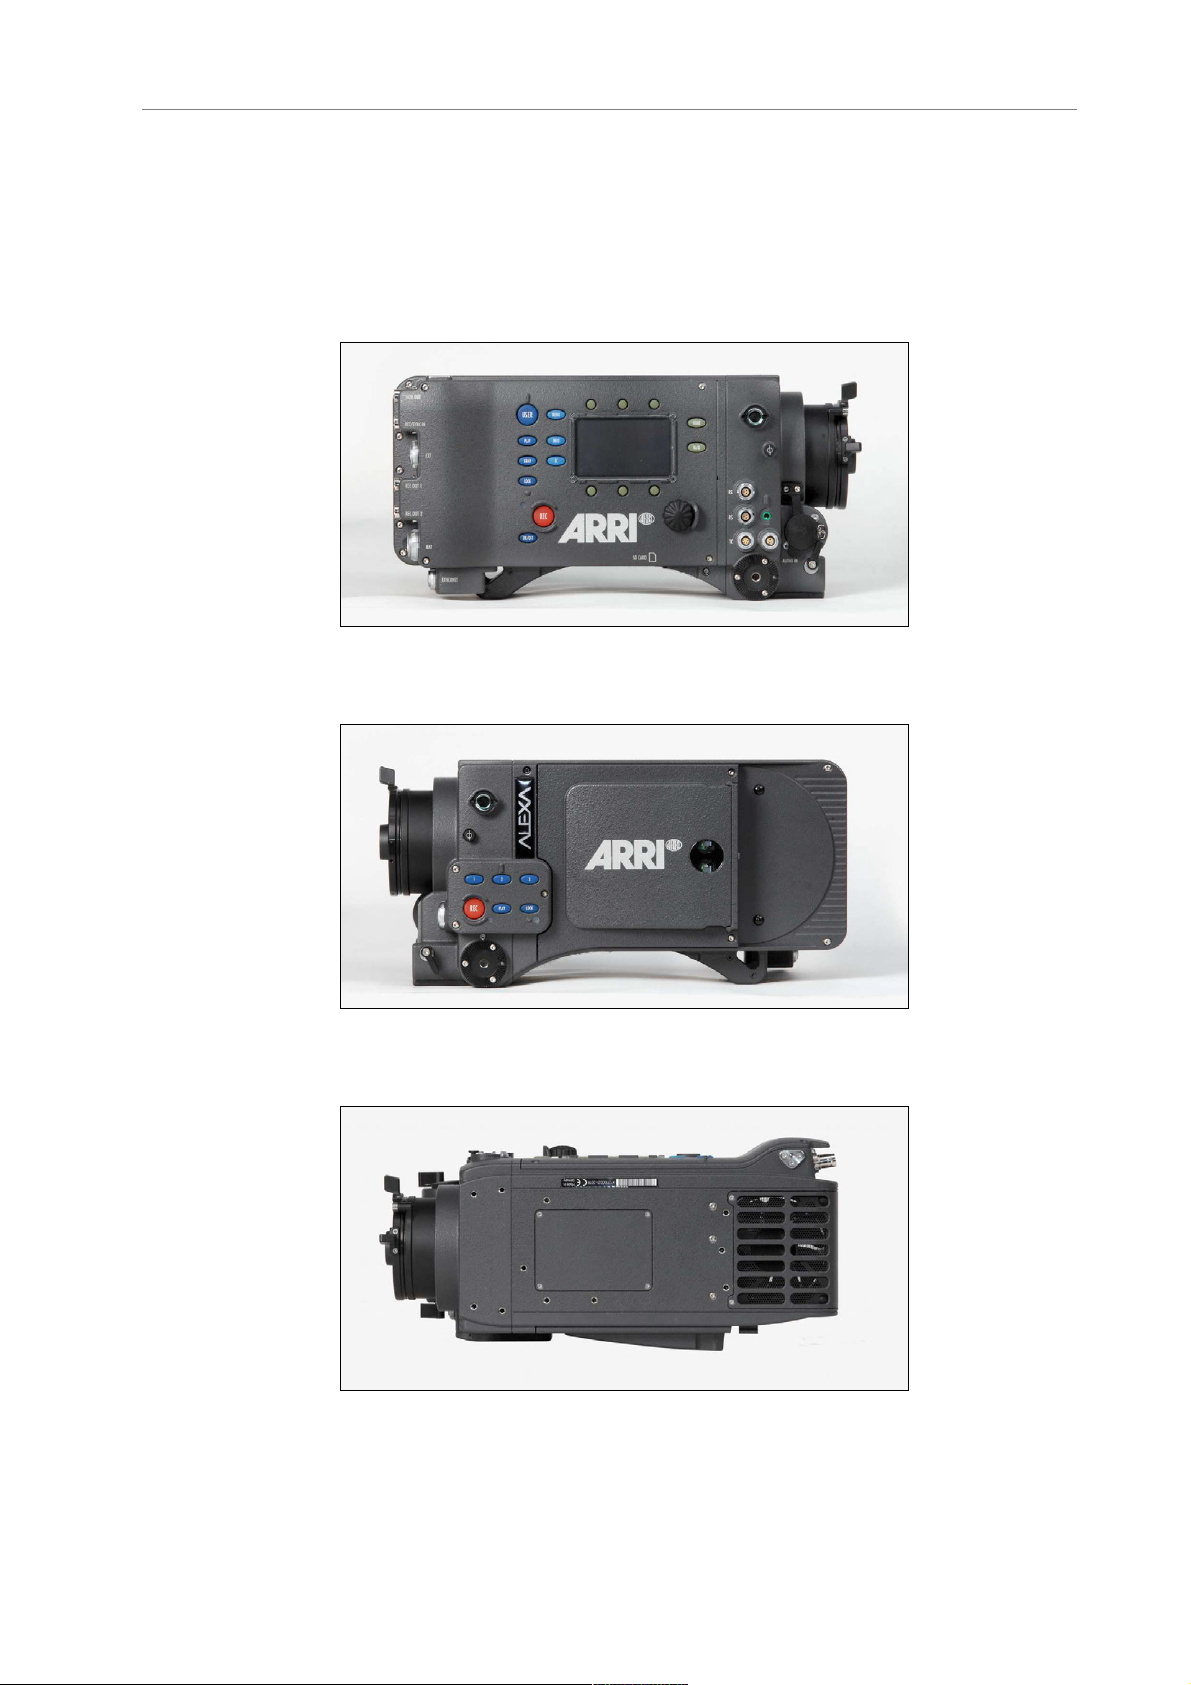
The following images show the ALEXA Classic with SxS module:
Figure 1: ALEXA right
Figure 2: ALEXA left
Figure 3: ALEXA top
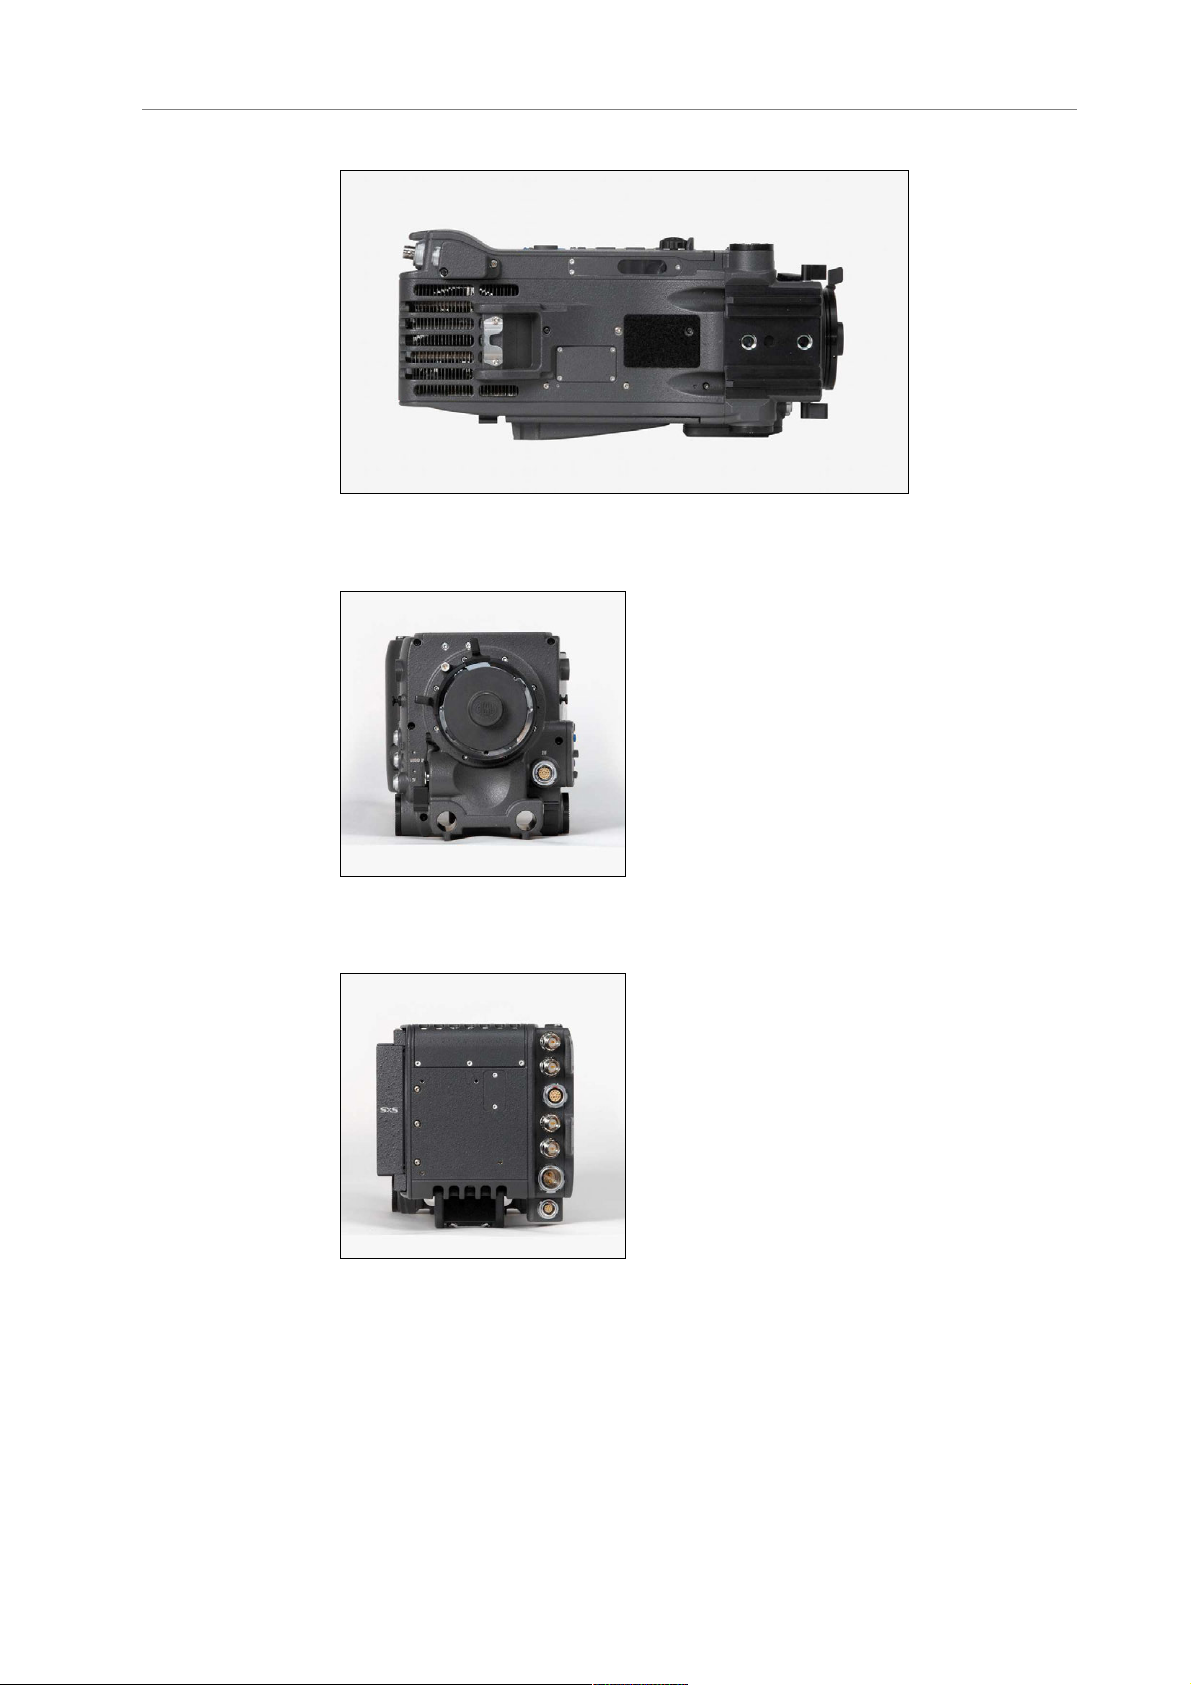
About This Manual 23
Figure 4: ALEXA bottom
Figure 5: ALEXA front
Figure 6: ALEXA back
24 Layout of the ALEXA
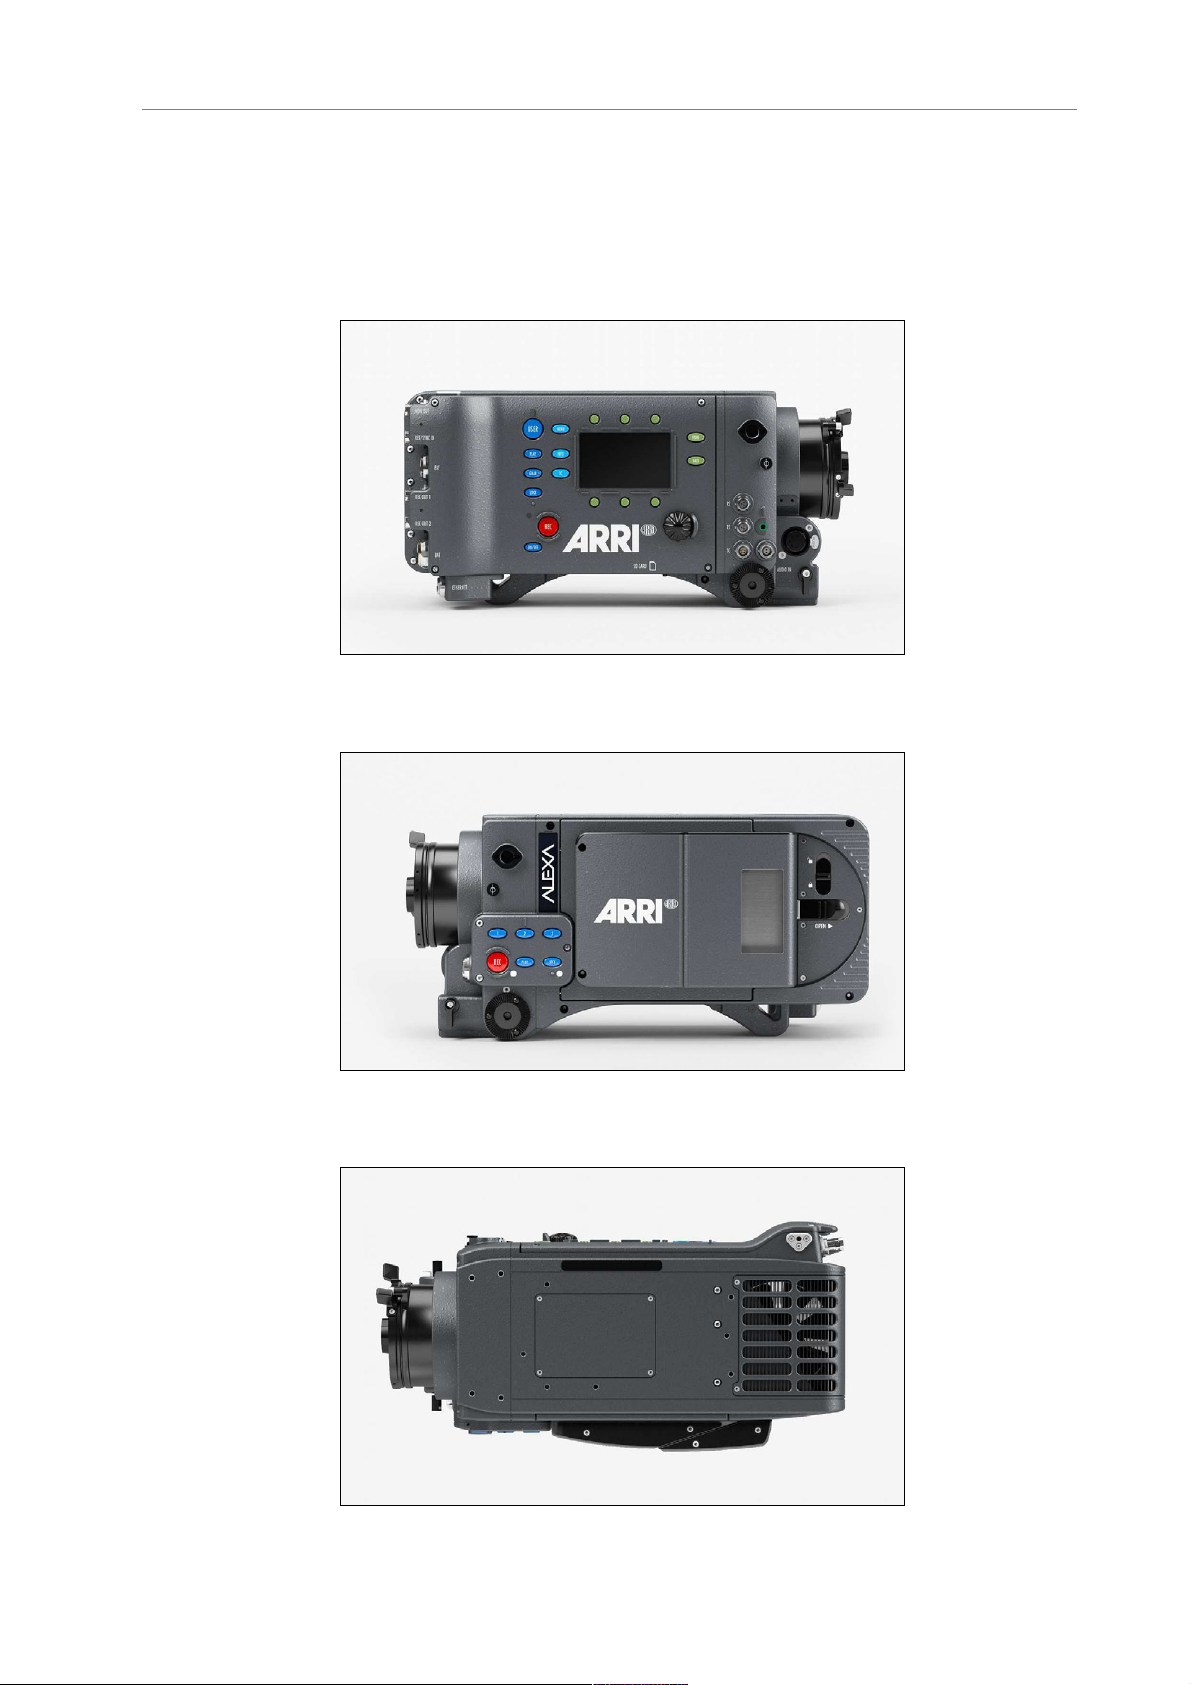
The following images show the ALEXA Classic upgraded with the XR
module:
Figure 7: ALEXA right
Figure 8: ALEXA left
About This Manual 25
Figure 9: ALEXA top
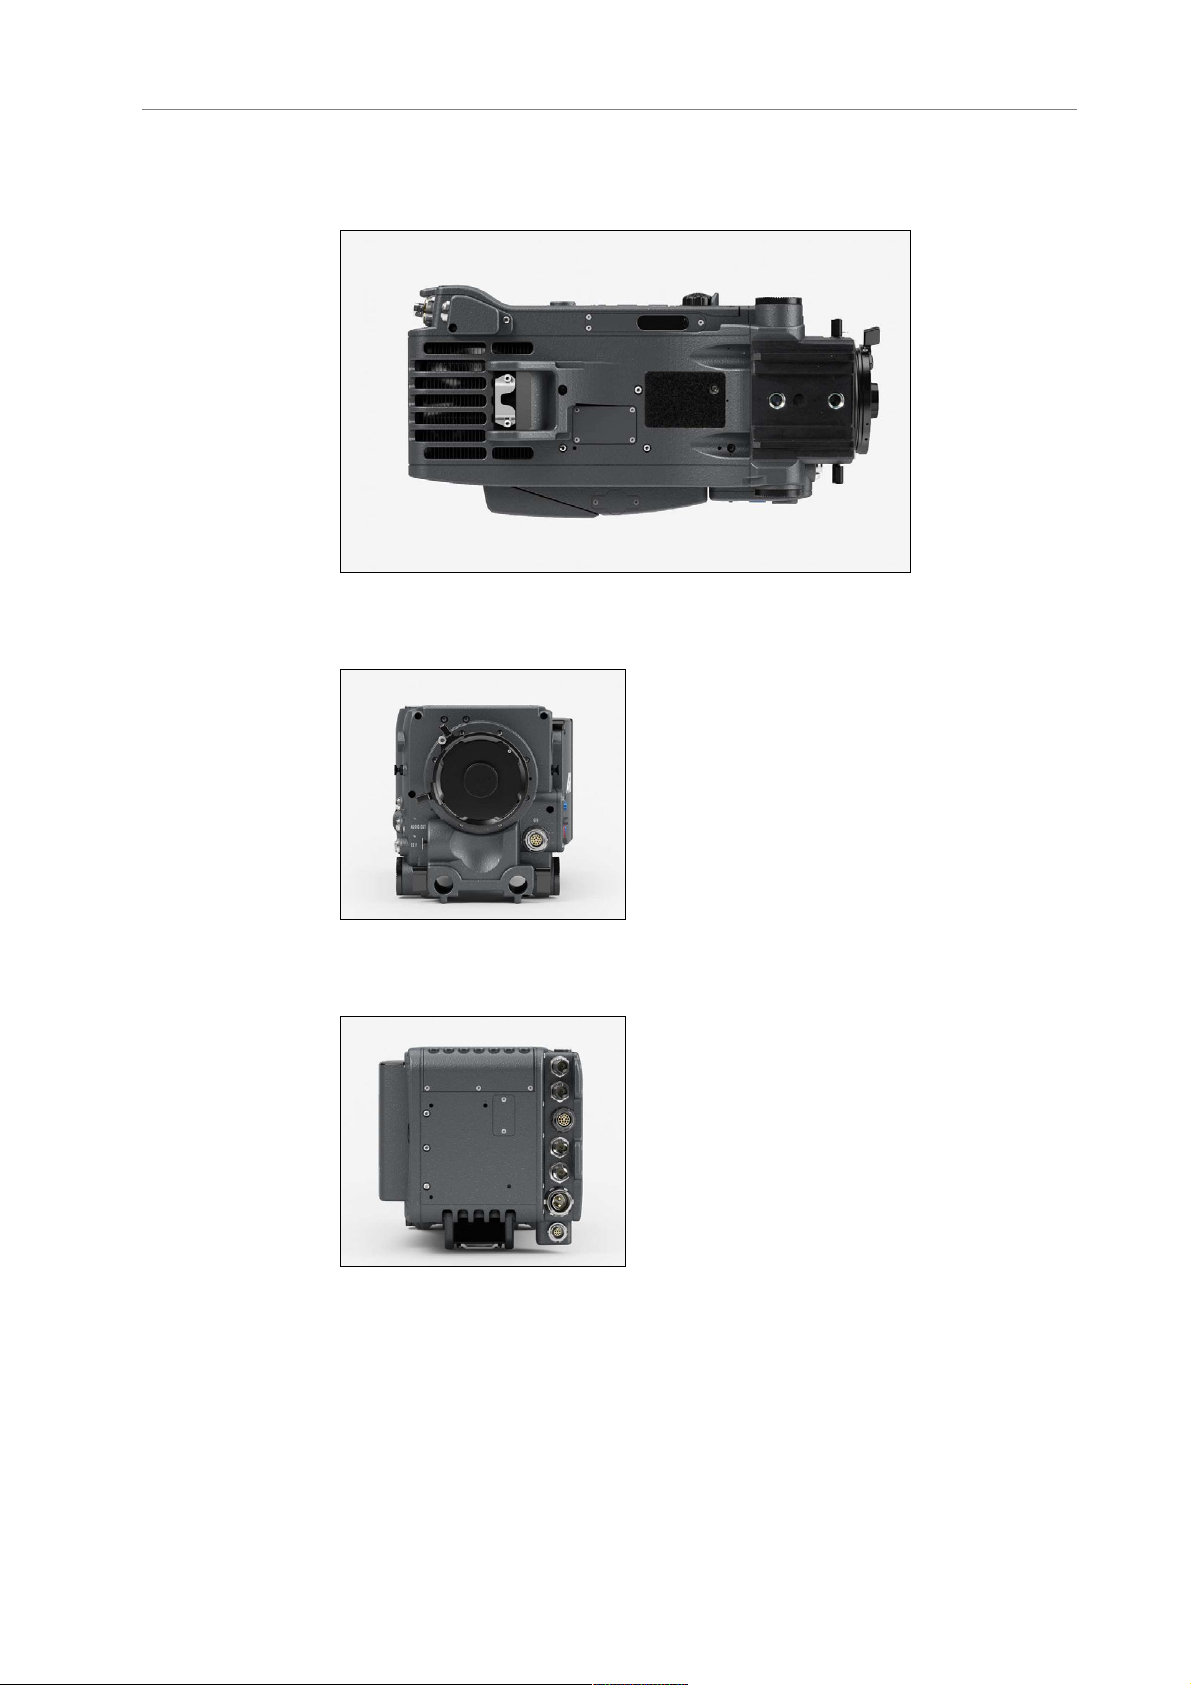
Figure 10: ALEXA bottom
Figure 11: ALEXA front
Figure 12: ALEXA back

26 Safety Guidelines
5 Safety Guidelines
Any violation of these safety instructions or non-observance of
personal care could cause serious injuries (including death) to users
and affiliates and damage to the equipment or other objects.
5.1 Explanation of Warning Signs and
Indications
Indicates a possible risk of injury or damage to the equipment
Indicates the risk of electric shock or fire danger that could
result in injury or damage to the equipment.
Note: Indicates further information or information from other instruction
manuals
5.2 General Safety Guidelines
• Always follow these guidelines to ensure against injury to
yourself or others and damage to the system or other objects.
• This safety information is in addition to the product specific
operating instructions in general and must be strictly observed
for safety reasons.
• Read and understand all safety and operating instructions before
you operate or install the system!
• Retain all safety and operating instructions for future reference.
• Heed all warnings on the system and in the safety and operating
instructions before you operate or install the system. Follow all
installation and operating instructions.
• Do not use accessories or attachments that are not
recommended by ARRI, as they may cause hazards and
invalidate the warranty!
• Do not attempt to repair any part of the system! Repairs must
only be carried out by authorized ARRI Service Centers.

Specific Safety Instructions 27
5.3 Specific Safety Instructions
• Do not remove any safety measures from the system!
• Do not operate the system in areas with humidity above
operating levels or expose it to water or moisture!
• Do not cover the fan openings at the camera back top and
bottom!
• Do not subject the system to severe shocks!
• Do not place the system on an unstable trolley/hand truck, stand,
tripod, bracket, table or any other unstable support device! The
system may fall, causing serious personal injury and damage to
the system or other objects.
• Operate the system using only the type of power sour
ce
indicated in the manual! Unplug the power cable by gripping the
power plug, not the cable!
• Never insert objects of any kind into any part of the system if not
clearly qualified for the task in the manual, as objects may touch
dangerous voltage points or short out parts! This could cause
fire or electrical shock.
• Unplug the system from the power outlet before opening any
part of the system or before making any changes to the system,
especially the attaching or removing of cables!
• Do not use solvents to clean!
• Do not remove any stickers or paint marked screws!
• Always place a lens or a protective cap in the lens mount
receptacle!
• Never run a camera with a mirror shutter without a lens or a
protective cap in the lens mount receptable!
• Changing camera lenses should be done in a dry and dust-free
environment. If this is not possible, take extra care that no dust
enters the camera while the lens is off!
• When no lens is attached to the camera, immediately place the
protective on the lens mount to avoid contamination of the
sensor cover glass!
• After changing lenses, always perform a dust check to make sure
no dust has settled on the sensor cover glass!
• Clean optical lens surfaces only with a lens brush or a clean lens
cloth. in cases of solid dirt or grease, moisten a lens cloth with
pure alcohol. Discard contaminated lens cloth after use! Never
attempt to clean a lens brush with your fingers!
• NEVER USE CANS WITH COMPRESSED AIR OR GAS TO BLOW
OFF THE DUST! This can severely damage optical elements.

28 Safety Guidelines
• If the sensor cover glass has been contaminated by solid dirt or
grease, special optical cleaning kits should be used for dirt
removal under very high care! If the contamination cannot be
removed, the camera should be taken to an ARRI service center
for cleaning.
• THE USE OF METHANOL TO CLEAN OPTICAL SURFACES IS
NOT RECOMMENDED!
• NEVER USE ACETONE TO CLEAN OPTICAL SURFACES!
• NEVER TRY TO REMOVE THE SENSOR COVER GLASS!
• DO NOT POINT THE CAMERA INTO DIRECT SUNLIGHT, VERY
BRIGHT LIGHT SOURCES, OR HIGH-ENERGY LIGHT SOURCES
(e.g. laser beams)! This may cause permanent damage to the
camera image sensor.
• DO NOT POINT THE VIEWFINDER INTO DIRECT SUNLIGHT,
VERY BRIGHT LIGHT SOURCES, OR HIGH-ENERGY LIGHT
SOURCES (e.g. laser beams)! This may cause permanent
damage to the viewfinder display and optical elements.

Storage and Transport 29
6 General Precautions
6.1 Storage and Transport
• Use a lens port cap to prevent damage to the sensor cover glass
and sensor whenever there is no lens attached.
• Unplug all cables when transporting the ALEXA in a camera
case.
• Do not store the camera in places where it may be subject to
temperature extremes, direct sunlight, high humidity, severe
vibration, or strong magnetic fields.
6.2 Electromagnetic Interference
ALEXA meets EC regulations by fulfilling the specifications of the
European Directive 2004/108/EC (15th December 2004).
This equipment has been tested and found to comply with the limits for
a Class A digital device, pursuant to part 15 of the FCC Rules. These
limits are designed to provide reasonable protection against harmful
interference when the equipment is operated in a commercial
environment. This equipment generates, uses, and can radiate radio
frequency energy and, if not installed and used in accordance with the
instruction manual, may cause harmful interference to radio
communications. Operation of this equipment in a residential area is
likely to cause harmful interference in which case the user will be
required to correct the interference at his own expense.
Changes or modifications not expressly approved by the party
responsible for compliance could void the user's authority to operate
the equipment.
Complies with the canadian ICES-003 Class A specifications. Cet
appareil numérique de la Classe A est conformé à la norme NMB-003
du Canada.
This device complies with RSS 210 of Industry Canada. This Class A
device meets all the requirements of the Canadian interference-causing
equipment regulation. Cet appareil numérique de la Class A respecte
toutes les exigences du Réglement sur le matérial brouilleur du Canada.
6.3 Condensation

30 General Precautions
When moving the camera from a cool to a warm location or when the
camera is used in a damp environment, condensation may form inside
the lens port, on the sensor cover glass, between the sensor and the
sensor cover glass, and on internal or external electrical connections.
• Operating the camera while condensation is present may result
in personal injury or damage to the equipment.
Condensation on the optical components may have a visible effect on
the output images. To reduce the risk of condensation:
• Find a warmer storage location.
• Attach the ARRI air-drying cartridge (silica bottle) to the PL-
Mount of the camera during storage
• Note: Do NOT leave the air-drying cartridge attached to the PL-
Mount during transportation of the camera!
• If camera needs to be stored in a place that is considerably
cooler than the location where it will be used, consider keeping
the camera powered from a mains unit in addition to using the
air-drying cartridge.
• In ambient temperatures above 30°C/86°F and/or humidity above
60%, always attach the air-drying cartridge to the PL-Mount of
the camera when not in use. This not only applies to storage, but
also to shooting breaks and situations when the camera remains
without an attached lens for an extended time.
• MAKE SURE THE SILICA BOTTLE IS SECURELY FASTENED.
UNDER NO CIRCUMSTANCES SPILL SILICA INTO THE LENS
PORT!
 Loading...