

Page 1

Page 2
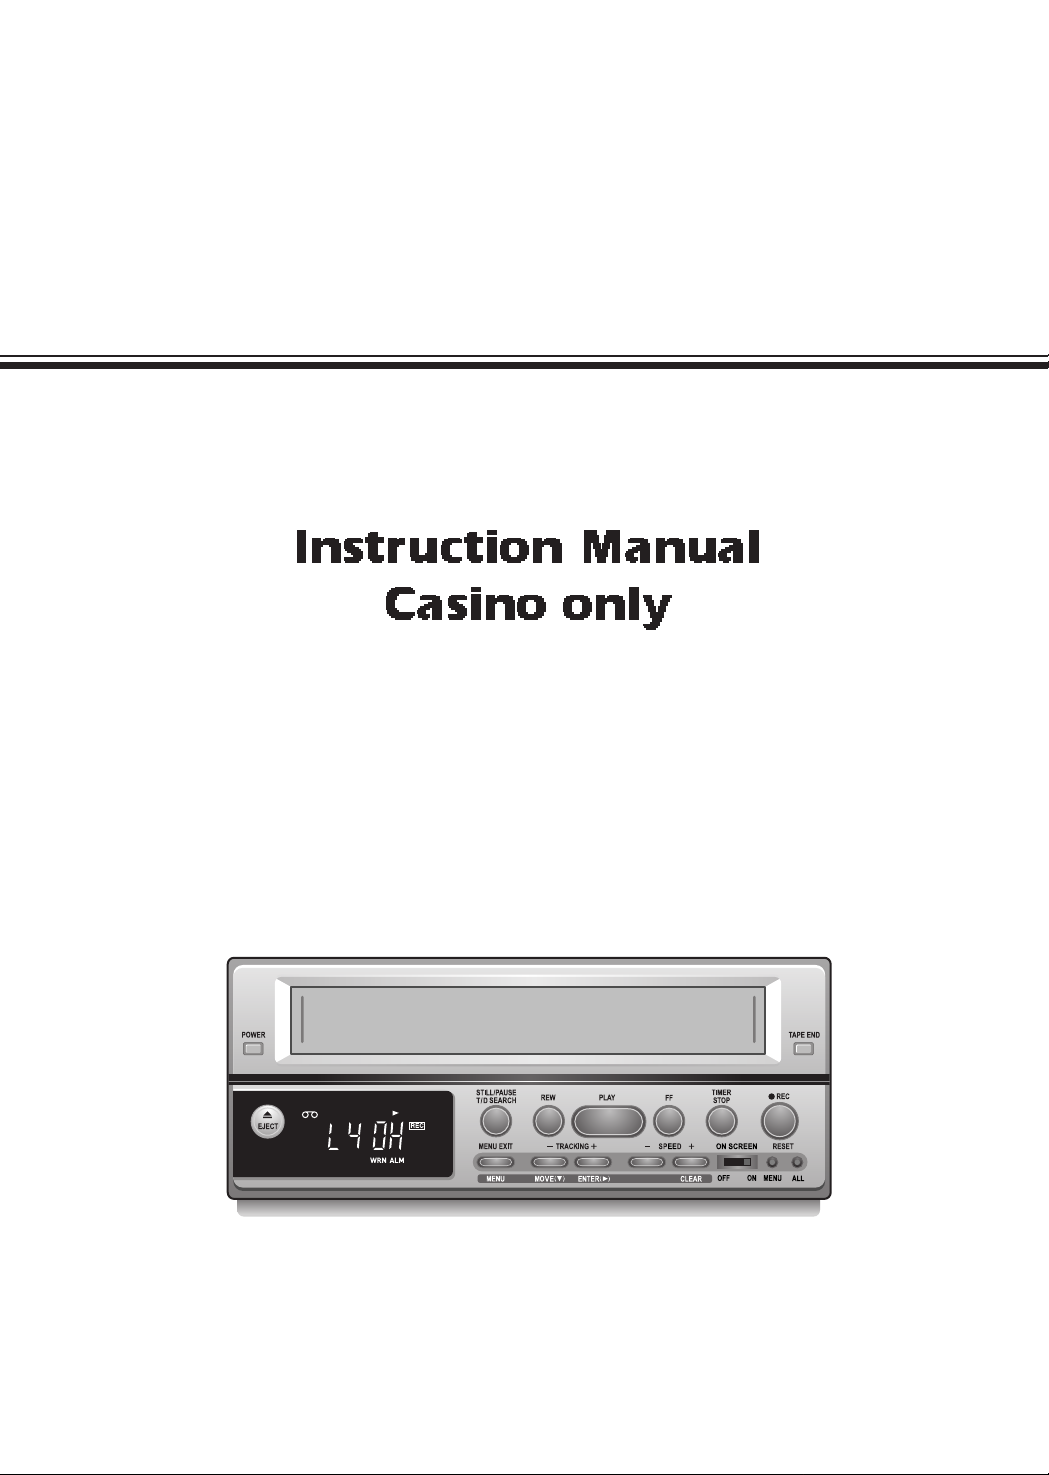
TIME LAPSE VCR
TIME LAPSE VCR
Instruction Manual
Casino only
Page 3
IMPORTANT SAFEGUARDS
English-3
Safety Precautions
This label may appear on the bottom of the unit due to space limitations.
The lightning flash with arrow point symbol, within an equilateral triangle, is
intended to alert the user to the presence of uninsulated "dangerous voltage"
within the product's enclosure that may be of sufficient magnitude to
constitute a risk of electric shock to persons.
The exclamation point within an equilateral triangle is intended to alert the
user to the presence of important operating and maintenance (servicing)
instructions in the literature accompanying the appliance.
Power disconnect : Units with or without ON-OFF switches have power
supplied to the unit whenever the power cord is inserted into the main source;
however, the unit is operational only when the ON-OFF switch is in the ON
position. To disconnect it from the main source, you have to disconnect the
power cord.
FCC COMPLIANCE STATEMENT
Warning
To reduce the risk of fire or electric shock, Do not expose this product to rain or moisture.
Do not insert any metallic object through ventilation grills.
CAUTION
RISK OF ELECTRIC SHOCK DO NOT OPEN
CAUTION
: TO REDUCE THE RISK OF ELECTRIC SHOCK, DO NOT REMOVE COVER (OR BACK). NO
USER-SERVICEABLE PARTS INSIDE. REFER SERVICING TO QUALIFIED SERVICE
PERSONNEL.
FCC INFORMATION
:This equipment has been tested and found to comply with the limits for a Class B
digital device, pursuant to Part 15 of the FCC Rules. These limits are designed to provide reasonable
protection against harmful interference when the equipment is operated in a commercial environment.
This equipment generates, uses and can radiate radio frequency energy and, if not installed and used in
accordance with the instruction manual, may cause harmful interference to radio communications.
Operation of this equipment in a residential area is likely to cause harmful interference in which case the
user will be required to correct the interference at his own expense.
CAUTION
: CHANGES OR MODIFICATIONS NOT EXPRESSLY APPROVED BY THE PARTY RESPONSIBLE
FOR COMPLIANCE COULD VOID THE USER’S AUTHORITY TO OPERATE THE EQUIPMENT.
CAUTION
: To prevent electric shock, match wide blade of plug to wide slot, fully insert.
NOTE TO CATV SYSTEM INSTALLER :
This reminder is provided to call the catv system installer’s attention to article 820-40 of the NEC that
provides guidelines for proper grounding and, in particular, specifies that the cable ground shall be
connected to the grounding system of the building, as close to the point of cable entry as practical.
Page 4

T ABLE OF CONTENTS
English-4
Congratulations on your choice of this Real Time Recorder. You have selected a high-quality,
precision engineered instrument designed to give you years of enjoyment.
To get the best performance from your new Time Lapse Recorder, it is important that you
carefully read and follow the operating instructions in this manual in the sequence in which
they are presented.
Should you experience a problem, please follow the "Before Calling For Service"
Important Safeguards ............................................................................................................... 3
Table of Contents ..................................................................................................................... 4
Features .................................................................................................................................... 5
Features and functions ............................................................................................................. 6
Remote controller (option) ........................................................................................................ 8
Rear panel ................................................................................................................................ 9
Connecting with other equipment .......................................................................................... 11
Setting the Clock (Initial clock setting), Setting the menus .................................................... 12
Loading and unloading the cassette tape ................................................................................ 14
Manual Recording .................................................................................................................... 15
Alarm recording ........................................................................................................................ 17
Repeat / Series recording ........................................................................................................ 20
Timer recording ........................................................................................................................ 21
Playback .................................................................................................................................... 22
Special playback ...................................................................................................................... 23
Additional features ................................................................................................................... 24
Special effects .......................................................................................................................... 26
Adjustment ............................................................................................................................... 27
Before calling for service ......................................................................................................... 28
Service Guide ........................................................................................................................... 29
Specifications ........................................................................................................................... 30
Page 5

English-5
FEA TURES
✤ Field counter on screen
✤ Real time 40H REC/PB(NTSC, PAL); Use the T160(E-240) Tape
✤ Linear Audio (up to 40H)
✤ Wireless remote control (Option)
✤ Camera switching pulse (VEXT out)
✤ 30 days battery back-up
✤ Universal power
- The VCR has wide range of power input that requires no manual switching : AC 90-240V, 50/60Hz
✤ Flexible timer recording
✤ Multiple OSD Languages (English /French / Spanish /Germany /Italian)
✤ Alarm Record
✤ Repeat Record
✤ Series Record
✤ Go to Zero
✤ Alarm Recall
✤ Alarm Scan
✤ Time / Date Search
✤ Power fail recall
✤ Low energy consumption (approx. 17w)
✤ Self Diagnostics
This unit is designed for continuous operation. Switching it off does not
disconnect it from the mains (STAND-BY). To disconnect it from the mains,
you have to unplug mains.
Page 6
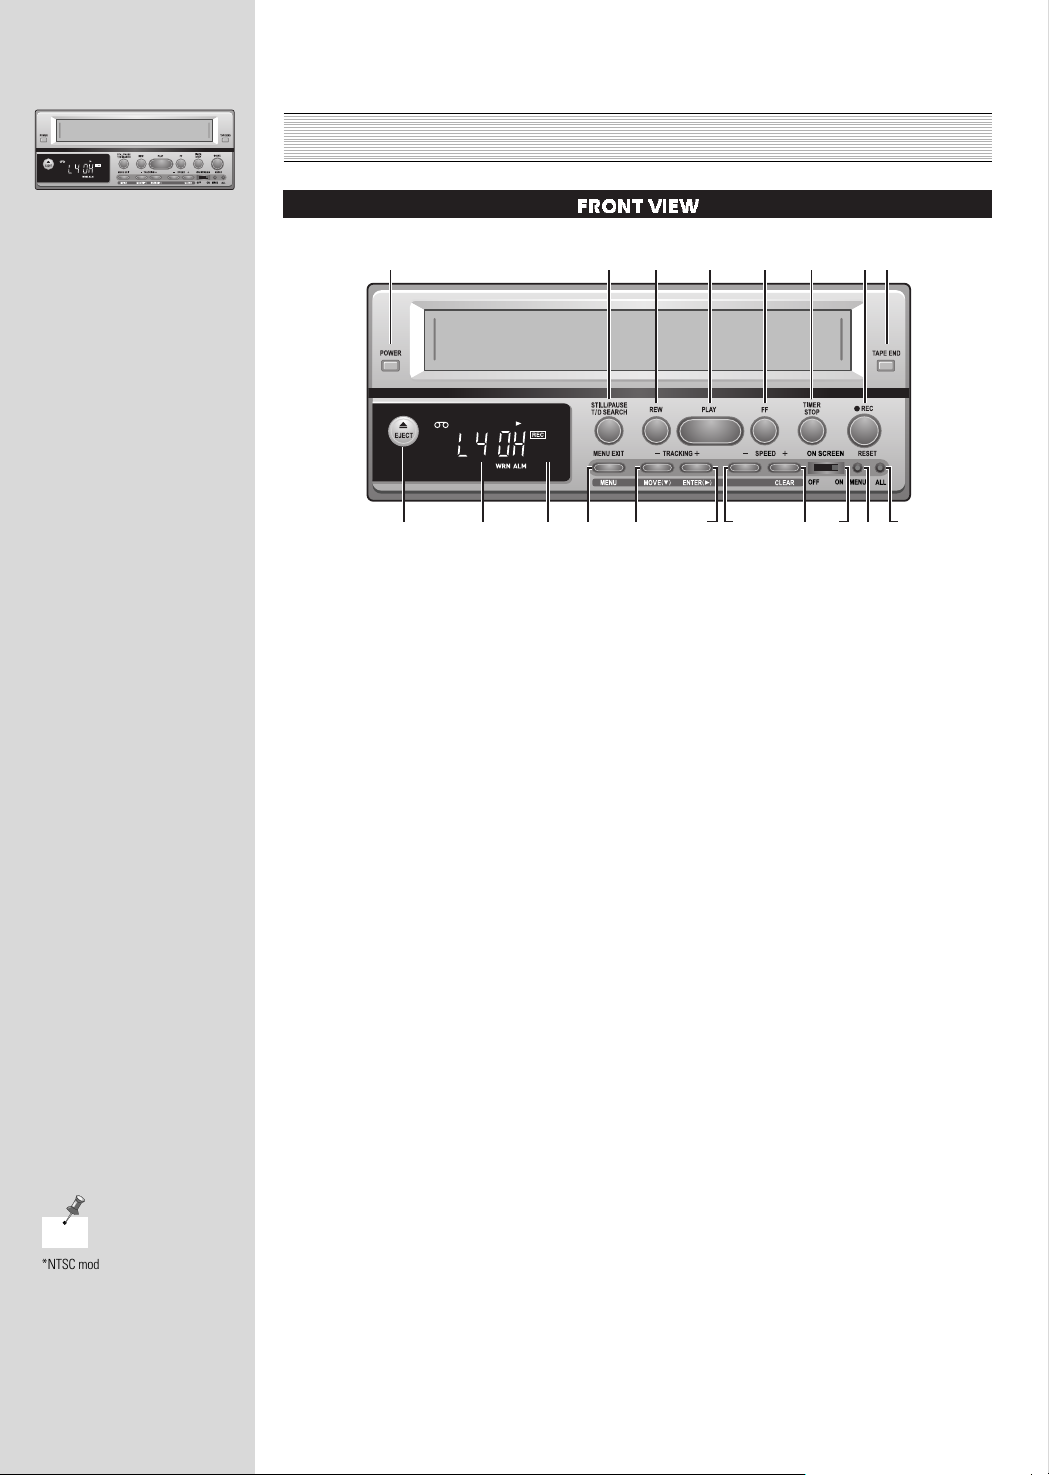
FEA TURES AND FUNCTIONS
English-6
1. POWER LED
When Power ON, LED Light
2. EJECT button
Press to remove the cassette.
3. PAUSE/STILL SEARCH button
When pressed during recording, tape
movement stops temporarily. Press REC
button to continue the recording.
When pressed during playback, tape
movement stops.
Press again to advance by still picture.
Press to TIMER/DATE SEARCH in stop
Mode.
4. REW button
Press to Rewind in stop Mode.
5. PLAY/REC CHECK button
Press to playback a previously recorded
tape. Press this button during recording to
confirm the recording operation.
It playbacks the recording on screen for
seconds and returns to recording mode.
6. FF button
Press to Fast Forward wind in stop Mode,
to Fast Forward view in playback.
7. STOP button
Press to discontinue all tape related
functions. After finished TIMER Record
SET up, press button 2 Seconds more
than to activate TIMER program.
8. REC(RECORD) button
Press to begin recording.
9. TAPE END LED
When tape Remain Less than 6minite on
the 8H Mode, LED light.
10. LED Display
11. MENU/MENU EXIT button
Press to display current state on Monitor
screen, You can change its contents.
Press to undisplay Menu screen.
12. MOVE(
▼
)/TRACKING(-) button
Press to move the cursor down on menu
screen or to operate tracking during
playback / slow. To move the location of
time OSD
13. ENTER(
▶
)/TRACKING(+) button
Press to select the cursor to change the
value to set or to operate tracking(+)
during playback / slow.
14. SPEED(-) button
Press to select in good order like *L40H,
L24H, L8H during playback and stop mode
15. CLEAR/Speed(+) button
Press to delete the information stored on
screen display as Alarm recall, Power fail
and Timer program. Press to select in
good order like *L8H, L24H, L40H during
recording / playback and stop mode
16. OSD ON/OFF switch
Move to Display on / off.
17. MENU Reset
Press to OSD data initialize.
18. All Reset
Press to system initialize.
FRONT VIEW
*NTSC model: L40H, L24H, L8H...
PAL model: L27H, L15H, L3H...
NOTE
13 14
2
4101112
13456789
15
16
17
18
Page 7
FEA TURES AND FUNCTIONS ( CONTINUED )
English-7
INDICATOR PANEL
1. CLOCK/COUNTER/SPEED/REMAIN
/ERROR display
2. CASSETTE Indicator
3. COUNTER Indicator
4. REMAIN Indicator
5. TIME/DATE SEARCH Indicator
6. REPEAT Indicator
7. SERIES Indicator
8. WARNING Indicator
9. ALARM Indicator
(ALARM REC ON Indicator)
10. SECURITY LOCK Indicator
11. TIMER Recording Indicator
12. RECORD Indicator
VCR FUNCTION Indication
PLAYBACK INDICATION RECORDING INDICATION
PLAYBACK
PAUSE/STILL
FAST FORWARD
REWIND
FORWARD SLOW PICTURE/
FORWARD FIELD ADVANCE
REVERSE SLOW PICTURE/
REVERSE FIELD ADVANCE
CUE
REVIEW
RECORDING
TIMER RECORDING
ALARM INDEX
ALARM RECORDING
SERIES RECORDING
2
12
11
10
3
1
4
6789
5
Page 8
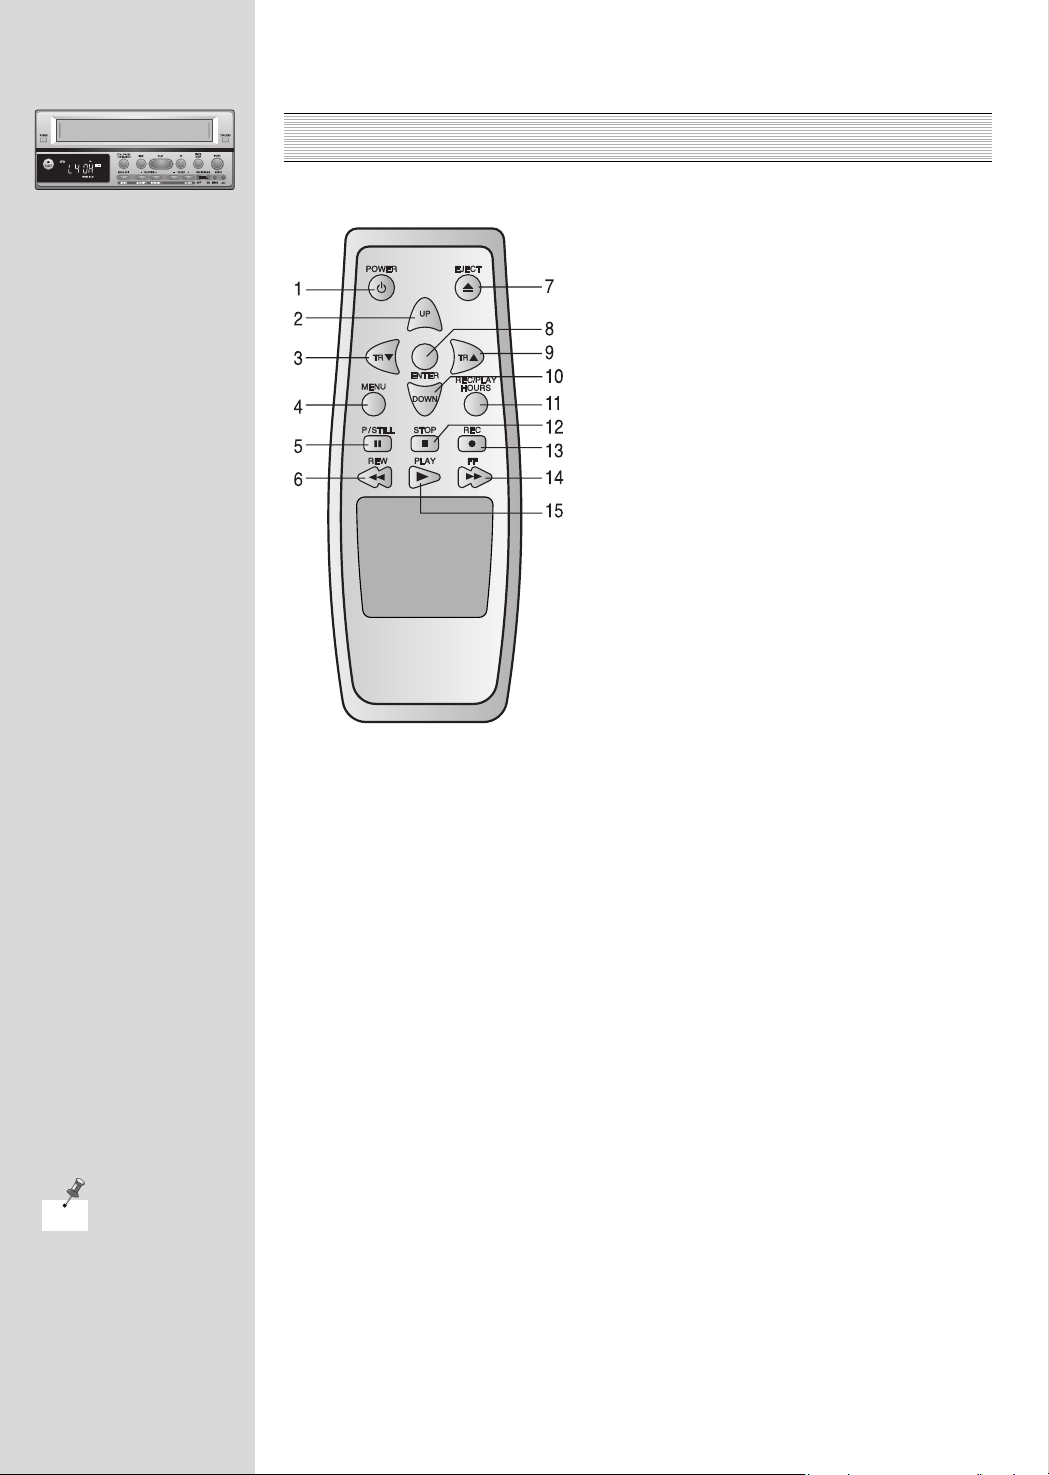
REMOTE CONTROLLER ( OPTION )
English-8
*NTSC model: L8H, L24H, L40H...
NOTE
1. POWER button
(press again off; press again for off)
The POWER LED light when the VCR is switch
on. Press to select the timer program - on or off.
By setting power off, a timer program is set to
work.
2. UP button
Press to set speed in ascending order *8H, 24H,
40H.... during recording pause or playback.
3. TR
†
(MOVE) button
To operate tracking during playback or slow. If a
still picture vibrates vertically, stabilize it by
pressing the TR
†
button. Move to time/date
location pressing this button in stop Mode.
4. MENU button
Press to display current status on monitor
screen. You can change its contents.
5. P/STILL button
When pressed during recording, tape movement
stops temporarily.
Press REC button to continue the recording.
When pressed during playback, tape movement
stops. Press again to advance by still frame.
It can also be used to search TIME/DATE
SEARCH by pressing this button in stop mode.
6. REW (Rewind)
To rewind the tape during the STOP mode or for fast reverse picture search during
playback.
7. EJECT
Press to eject the cassette in the VCR.
8. ENTER (SELECT) button
Press to change the value or to operate tracking during playback or slow.
9. TR
…
(MOVE) button
Press to change the value or to operate tracking during playback or slow. If a still picture
vibrates vertically, stabilize it by pressing the TR
…
button.
10. DOWN button
Press to set speed in descending order *40H, 24H, 8H.... during recording pause or playback.
11. REC/PLAY HOURS button
Press to set speed in ascending order *8H, 24H, 40H.... during recording PAUSE or
playback.
12. STOP
Press to discontinue all tape related functions.
13. REC (RECORD) button
Press to begin recording.
14. FF (Fast Forward)
To advance the tape during the STOP mode or for fast forward picture search.
15. PLAY (PLAY/REC CHECK) button
Press to playback, to confirm the recording operation during record.
Page 9
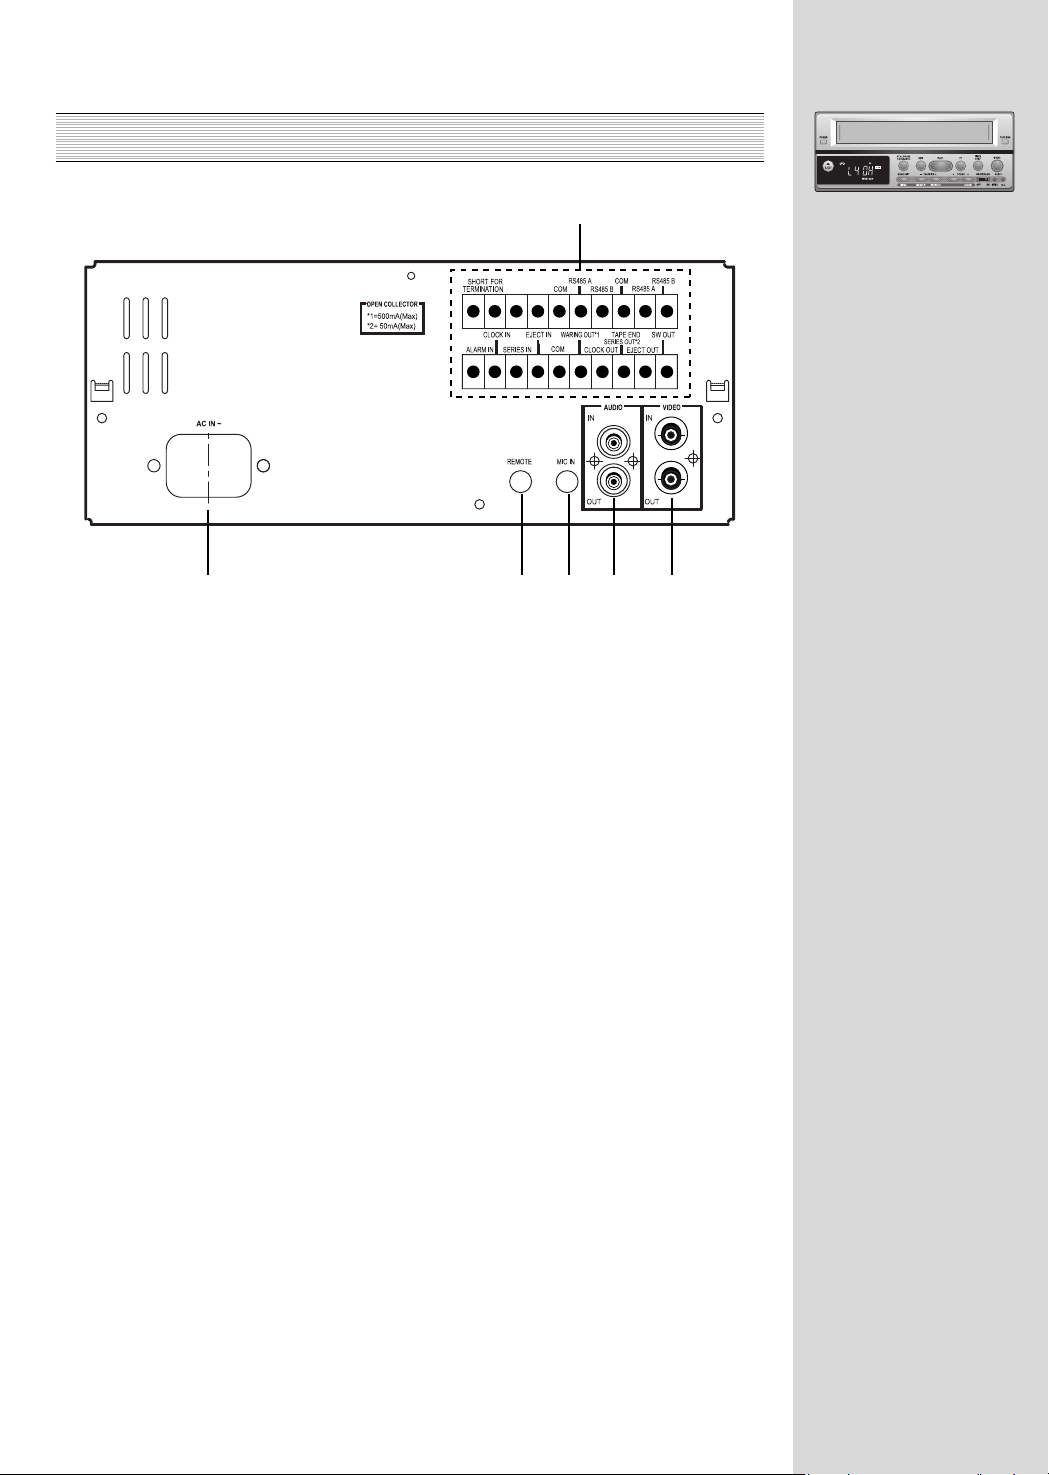
REAR P ANEL
English-9
1. POWER CORD
Connect only to an AC 100-240V, 50/60Hz
outlet.
2. REMOTE
Connect the wired Remote controller.
3. Mic IN
Connect the Mic
4. AUDIO IN/OUT JACK
Connect the audio input and output
terminal.
5. VIDEO IN/OUT JACK
Connect the video input and output
terminal.
6. 10-Pin TERMINAL BLOCK
Connect external signals.
1 263 4 5
Page 10
REAR P ANEL ( CONTINUED )
English-10
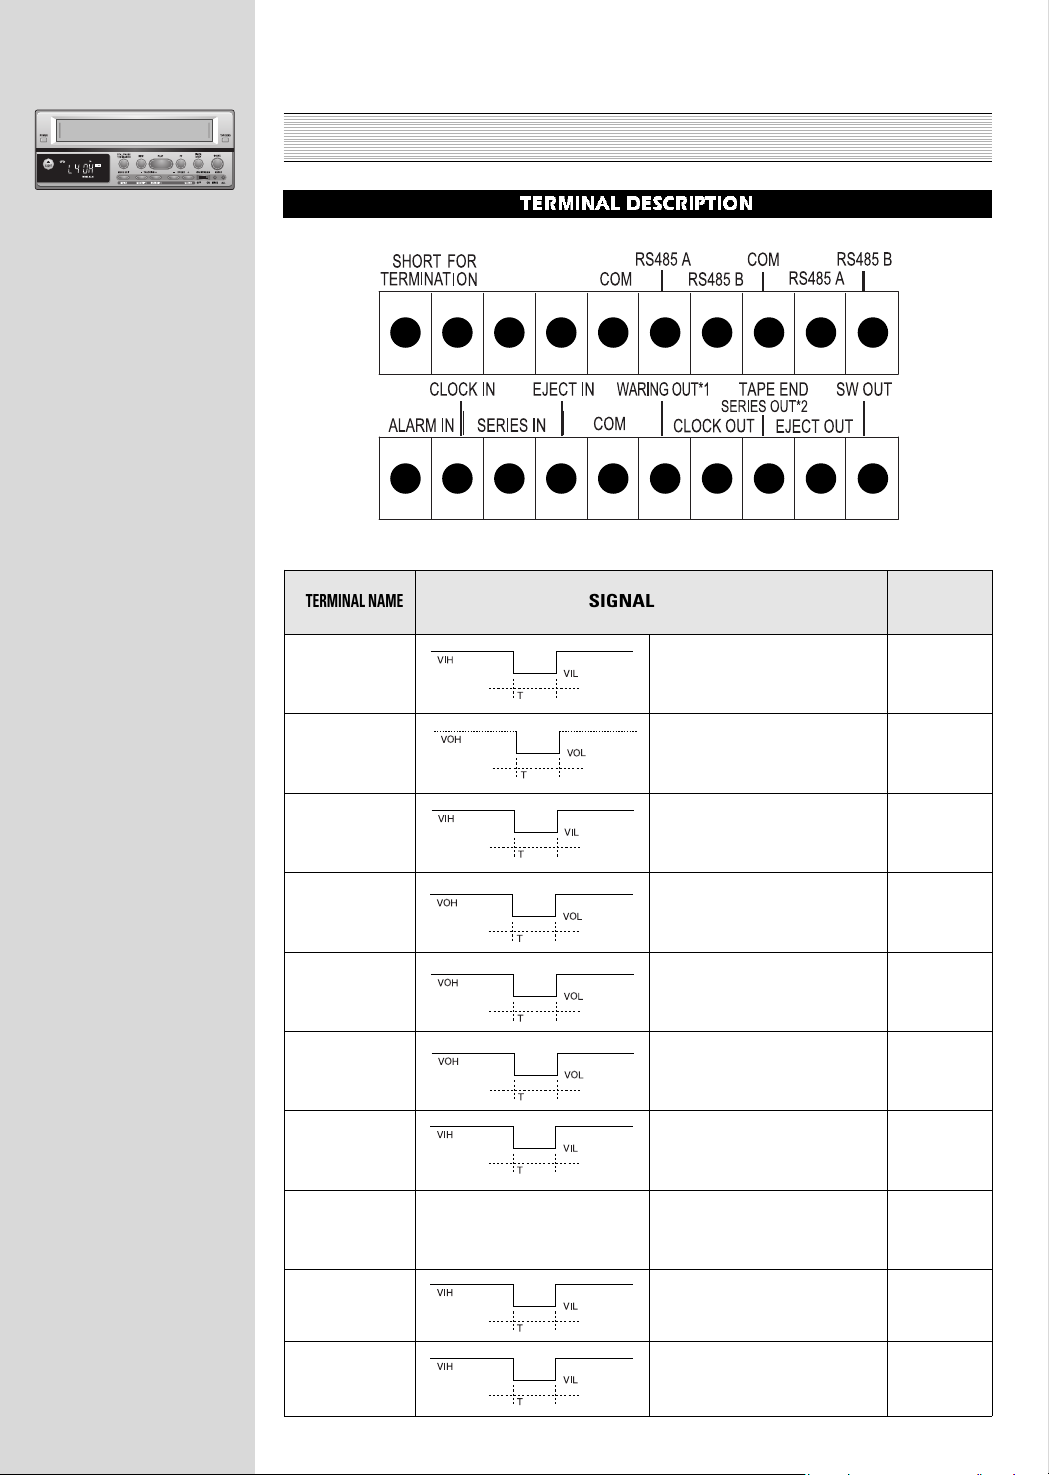
TERMINAL DESCRIPTION
TERMINAL NAME
SIGNAL LEVEL TYPE
INPUT
OUTPUT
INPUT
OUTPUT
OUTPUT
OUTPUT
INPUT
GND
INPUT
OUTPUT
ALARM IN
WARNING OUT
SERIES IN
SERIES OUT
TAPE END OUT
SW OUT
EJECT OUT
COM
EJECT IN
EJECT OUT
_ _ _
_ _ _
VIH : 4 ~ 5V
VIL : 0 ~ 0.6V
T : About 0.5 second
VOH : open colloctor
VOL : 0 ~ 0.6V
T : Alarm Recording
VIH : 4 ~ 5V
VIL : 0 ~ 0.6V
T : More than 0.5 second
VOH : 4 ~ 5V
VOL : 0 ~ 0.6V
T : More than 1 second
VOH : 4 ~ 5V
VOL : 0 ~ 0.6V
T : 2sec
VOH : 4 ~ 5V
VOL : 0 ~ 0.6V
T : About 0.02 second
VIH : 4 ~ 5V
VIL : 0 ~ 0.6V
T : above 250msec
VIH : 4 ~ 5V
VIL : 0 ~ 0.6V
T : inputted time
VIH : 4 ~ 5V
VIL : 0 ~ 0.6V
T:
More than 0.02 second
Page 11
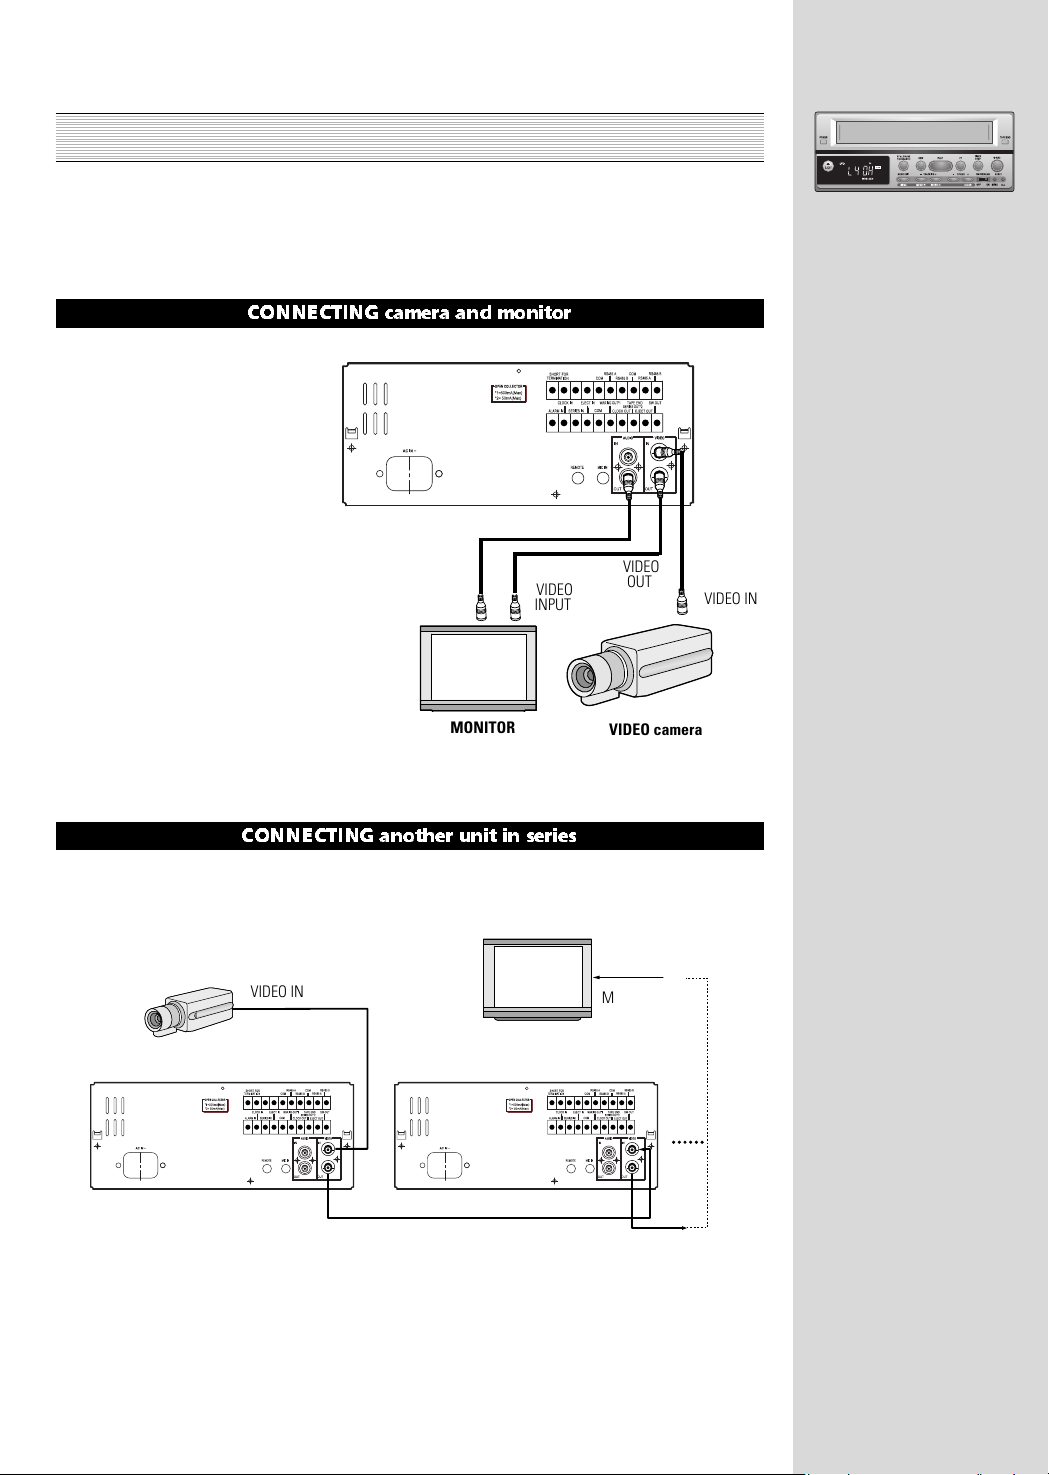
CONNECTING WITH OTHER EQUIPMENT
English-11
1. Disconnect the power before connection
2. Do the connections shown as below
3. Plug in the power cord into the outlet.
4. Turn on the power.
CONNECTING camera and monitor
CONNECTING another unit in series
VIDEO IN
VIDEO
OUT
VIDEO
INPUT
MONITOR
VIDEO camera
VIDEO IN
MONITOR
VIDEO OUT
AUDIO OUT
VIDEO IN
GND
VIDEO OUT
With the following connections you
can monitor the pictures and
sound.
AUDIO
INPUT
Page 12

SETTING THE CLOCK ( INITIAL CLOCK SETTING )
English-12
setting the menus
MENU OPERATION
1. Press MENU button.
2. Press MOVE to shift the cursor ( ) downward.
3. Press ENTER to select or adjust the default value, and when having a following
informative page, it enters into the next mode.
4. Press SPEED(-) or SPEED(+) to adjust the cursor value.
5. Press MENU to exit the OSD mode.
When the VCR is turned on for the first time or after exhaustion of the battery, initial clock set
up is needed. Without inputting the clock data, the time to be recorded on the recorded
pictures will not match with the time of the incidents. Therefore make sure that you fill out
correctly before exiting menu.
By pressing ENTER key, date format change like following order.
MM/DD/YY DD/MM/YY
DATE FORMAT
*You can amend the data by using
speed -/+ keys when the above menu
appears and the record and playback
speed will not be changed at that time.
NOTE
[ CLOCK SET UP ]
▶ DATE FORMAT MMDDYY
DATE MM/DD/YY DAY
TIME HH:MM:SS
DAY LIGHT OFF
IN 03/2nd-SUN 02:00
OUT 11/1st-SUN 02:00
DISPLAY LOWER-R
[ ▼ ] [ ▶ ] [MENU] END
Page 13

SETTING THE MENUS ( CONTINUED )
English-13
[ MENU ]
▶ LANGUAGE ENGLISH
CLOCK SET UP
RECORD MODE SET UP
SYSTEM SET UP
TIMER RECORD SET UP
SEARCH SET UP
OTHERS
[ ▼ ] [ ▶ ] [MENU] END
INITIAL MENU
[ CLOCK SET UP ]
▶ DATE FORMAT MMDDYY
DATE MM/DD/YY DAY
TIME HH:MM:SS
DAY LIGHT OFF
IN 03/2nd-SUN 02:00
OUT 11/1st-SUN 02:00
DISPLAY LOWER-R
[ ▼ ] [ ▶ ] [MENU] END
SECOND MENU GROUP
[ RECORD MODE SET UP ]
▶ ALARM REC MODE L8H
ALARM REC TIME 30SEC
1SHOT REC 1SEC
VEXT OUT 1FIELD
SERIES REC OFF
REPEAT : OFF
REWIND/STOP
[ ▼ ] [ ▶ ] [MENU] END
[ SYSTEM SET UP ]
▶ SECURITY LOCK OFF
VIDEO AUTO
TAPE SELECT T-120
V-SYNC ON
LED DISPLAY CLOCK
CLOCK ADJUST 00:00
[ ▼ ] [ ▶ ] [MENU] END
[ ALARM REVIEW ]
1
––/––/–– ––:––:––
2
––/––/–– ––:––:––
3
––/––/–– ––:––:––
4
––/––/–– ––:––:––
5
––/––/–– ––:––:––
6
––/––/–– ––:––:––
7
––/––/–– ––:––:––
8
––/––/–– ––:––:––
[CLEAR] CLEAR [MENU] END
THIRD MENU GROUP
[ POWER FAIL REVIEW ]
1 OFF
––/––/–– ––:––:––
ON
––/––/–– ––:––:––
2 OFF
––/––/–– ––:––:––
ON
––/––/–– ––:––:––
3 OFF
––/––/–– ––:––:––
ON
––/––/–– ––:––:––
4 OFF
––/––/–– ––:––:––
ON
––/––/–– ––:––:––
[CLEAR] CLEAR [MENU] END
[ WARNING/BUZZER ]
▶ ALARM ON
ERROR MODE ON
VIDEO LOSS ON
CROG DETECT ON
[BUZZER SELECT]
TAPE END ON
BUTTONS ON
[ ▼ ] [ ▶ ] [MENU] END
SET START END DAY SPD
▶ OFF
––:–– ––:–– ––– –––
OFF
––:–– ––:–– ––– –––
OFF
––:–– ––:–– ––– –––
OFF
––:–– ––:–– ––– –––
OFF
––:–– ––:–– ––– –––
OFF
––:–– ––:–– ––– –––
OFF
––:–– ––:–– ––– –––
OFF
––:–– ––:–– ––– –––
[ ▼ ] [ ▶ ] [CLEAR] [MENU] END
[ SEARCH SET UP ]
▶ COUNTER RESET 0000
GO TO ZERO
TIME/DATE SEARCH
ALARM SCAN REVERSE
ALARM SCAN FORWARD
[ ▼ ] [ ▶ ] [ ] [ ][MENU] END
[ TIME/DATE SEARCH ]
CURRENT
––:–– ––:–
TARGET
––:––
[ ▼ ] [ ▶ ] [MENU] END
[ OTHERS ]
ALARM REVIEW
POWER FAIL REVIEW
▶ WARNING/BUZZER
ELAPSED TIME : 00000HR
[ ▼ ] [ ▶ ] [MENU] END
EXPLANATION OF EACH KEY FUNCTION
• MOVE: Shift down of the
[] cursor ( )
• ENTER: !Mode selection and
[] data input
@ Shift right
• –, + : Up and down of data
• CLEAR:Remove data in a line or whole
page
• MENU: Go back to MAIN MENU or EXIT
NOTE
Page 14

LOADING AND UNLOADING THE CASSETTE TAPE
English-14
1. To position the cassette properly before inserting it
in the cassette slot, hold the cassette so that the
long narrow edge with the contents label faces
towards you. The other long narrow edge is hinged
and should face towards the VCR.The clear plastic
window that shows the video tape should face
upward.
2. Gently insert the video tape into the cassette slot
to a point where the VCR automatically retracts the
cassette.
* When you insert the videotape, be sure to orient it squarely to the slot.
1. Press the EJECT button on the front of the VCR.
2. Remove the cassette.
Your VCR will eject a video cassette even if it is in Standby mode. When the EJECT button is
pressed, the VCR will automatically eject the tape.
It is not possible to eject a tape while recording without first pressing the stop button. A tape
cannot be ejected when the VCR is locked.
Video cassettes come with an erasure prevention tab which,
when removed, prevents the tape’s contents from being
erased, or recorded over.
If the cassette you insert in your VCR has the erasure
prevention tab removed, your VCR will automatically eject it if
you attempt to record on it.
*Your new VCR has protection circuit
which will eject the tape if it is loaded
improperly. If the VCR ejects the tape
you are trying to load, remove it
completely and check that the long
narrow edge with the contents label is
facing towards you and that the clear
plastic window that shows the video
tape is facing upwards. Then try again.
Video cassette tapes can be loaded into your new VCR as long as the VCR is plugged into a
power source. Even if the VCR power switch is turned off, loading a cassette will
automatically cause it to turn on. Use only standard video cassette tapes.
Use only standard grade cassette tapes for reliable video recording. Please do not use : Pro,
Hi-Fi and High Grade tapes as damage to the video heads may occur.
FF
➝
Rewind before you use a new tape. If you use the same tape many times its magnet is
peeled, causing noise or poor quality picture. The tape may droop and cause troubles. Dusty
tape causes troubles. Unevenly wound tape may be damaged. Wind such tape evenly by
FF
➝
Rewind before using.
UNLOADING
TO PREVENT ACCIDENTAL ERASURE
LOADING
NOTE
*when the Video cassette tape loaded
into VCR. That have a erasure
prevention TaB, the VCR will rewind
the tape, and wind some of the tape to
check for the presence of Tape
Management data.
NOTE
*We recommend that any torn or broken
cassette tape requiring repair be taken
to professionals who specialize in such
procedures. The adhesives on many
common types of tape could damage
the head of your VCR.
NOTE
Page 15

MANUAL RECORDING
English-15
Load a cassette with the erasure prevention tab intact.
1
1
Press the PB/REC SPEED (-) or (+) buttons to select the desired recording mode.
2
Press the REC button to begin recording.
Set the SECURITY LOCK to ON in a System Set up to prevent the recording condition
from being operated by fault.
3
3-1
Press the STOP button to stop recording. If the Security Lock was set to ON, set it to
OFF before you press the eject button to stop recording and eject.
4
* Select the “System SET UP” Menu is set
to VIDEO setting according to the type of
image to be recorded, VIDEO(AUTO),
VIDEO(COLOR) or VIDEO(B/W)
* Do not connect color and black & white
cameras together.
NOTE
* Press the PAUSE/STILL button to
momentarily stop recording. Press rec
button again to resume recording.
* To protect the tape, the pause mode is
automatically released after 5 minutes.
* The REC button will not function unless
the tape is in the stop or pause mode.
* If the cassette inserted in your VCR has
the erasure prevention tab removed, your
VCR will automatically eject it if you
attempt to record on it.
* 6H(NTSC), 3H(PAL) tapes are compatible
with other VCR’s. Time Lapse recordings
can be played correctly by other Time
Lapse Recorders when the recording
interval and head type matches the
recording.
* In case of first recording of Time Lapse
mode after inserting cassete tape, for
the stable recoding, it is recorded by
8H mode for several seconds.
NOTE
Page 16

MANUAL RECORDING(CONTINUED)
English-16
*It is recommended T-160(E240) tape is
not used in 72H or longer for tape
safety reason. (960H Model)
*The recording mode of this VCR
indicates the recording time with T120(E180) cassette.
*The gray marked parts is available
for 24H model.
*And it is not compatible with those of
other companies.
NOTE
* Normal sound is played back only
when a tape recorded in linear mode,
is played in their respective mode.
* The longer the recording time mode,
the worse the sound quality becomes.
NOTE
When the REC button is pressed, the recording mode is switched in the order of below table.
During recording, press the PLAY button. The tape will rewind a little and then play the
recording just made. When the tape reaches the position where the REC CHECK button was
pressed, the VCR returns to record mode. While REC CHECK is executed telerecording is not
carried out.
REC/PLAY
Actual rec/Play hours
Recording Interval Number of Rec fields
Audio
MODE T-120 T-160
recording/PLAY BACK
L8H 6H 8H 0.017s/f 60 f/s yes
L24H 18H 24H 0.05 s/f 20 f/s yes
L40H 30H 40H 0.083 s/f 12 f/s yes
64H 54H 72H 0.15 s/f 6.67 f/s no
96H 78H 104H 0.22 s/f 4.62 f/s no
160H 126H 168H 0.35 s/f 2.86 f/s no
224H 174H 232H 0.483 s/f 2.07 f/s no
320H 246H 328H 0.683 s/f 1.46 f/s no
640H 486H 648H 1.35 s/f 0.74 f/s no
1280H 966H 1288H 2.683 s/f 0.37 f/s no
RECORDING MODE
RECORDING CHECK FUNCTION
• Apply the specified line input signal to the AUDIO IN connector.
• Available recording hours are shown above.
AUDIO RECORDING / PLAYBACK
When the LOCK is set to on, the eject buttons will not operate and the VCR is kept in the
current mode . To release the lock mode, the LOCK is set to off in a system set up Menu.
SECURITY LOCK MODE
NTSC
PAL
•Linear REC mode : L6H,L18H, L30H
•Linear REC mode : L3H, L15H, L27H
REC/PLAY
Actual rec/ Play hours
Recording Interval
Number of Rec fields
Audio
MODE E-180 E-240
recording/PLAY BACK
L4H 3H 4H 0.02 s/f 50 f/s yes
L20H 15H 20H 0.1 s/f 10 f/s yes
L36H 27H 36H 0.18 s/f 5.56 f/s yes
64H 51H 68H 0.34 s/f 2.94 f/s no
96H 75H 100H 0.5 s/f 2 f/s no
160H 123H 164H 0.82 s/f 1.22 f/s no
224H 171H 228H 1.14 s/f 0.88 f/s no
320H 243H 320H 1.62 s/f 0.62 f/s no
640H 483H 644H 3.22 s/f 0.31 f/s no
1280H 963H 1284H 6.42 s/f 0.16 f/s no
Page 17

ALARM RECORDING
English-17
It is possible to switch from all recording modes to linear recording mode by applying an
alarm signal to the SET terminal on the rear panel.
* Set the alarm recording mode and alarm recording period with alarm set up of menu.
* The index signal is automatically recorded when an alarm recording begins.
Buzzer is activated while alarm recording when the alarm signal is input, if the buzzer is set
ON on the picture of WARNING / BUZZER.
* In case when another alarm signal is input into ALARM IN TERMINAL while the index
signal is recorded,
-Input within 30 sec. : Recording is newly started without indicating alarm listing any more.
-Input after 30 sec. : Recording is newly started with new starting time indicated on the
alarm listing.
* When an alarm signal is input during alarm video tape recording it is executed based on the
last input alarm signal.
* It is possible to switch the alarm
recording by applying the set
signal from the alarm sensor
during recording in all time
mode.
ALARM RECORDING CONNECTION
* The alarm can be confirmed
from a distance. Because buzzer
sounds when external alarm
signal is input.
Page 18

ALARM RECORDING ( CONTINUED )
English-18
You must set the alarm recording mode in the RECORD MODE SET UP menu before executing
alarm recording.
When you finish ALARM RECORDING SETUP by following 1~3 steps above, try inputting the
alarm signal. Then recording will start with buzzer. If you set the DURATION to T-END,
recording will be done to the end of the tape. If you set it to 30 SEC(or 1, 5, 10 MIN), recording
will be done within the indicated time.
LEVEL setup - The recording continues for 30 SEC. in case of within 30 SEC.
- The recording continues for the time that ALARM IN signal is input in case of
above 30 SEC.
During alarm recording, the alarm recording mark (’A’) will automatically be displayed on
screen.
* The alarm in indicator(ALM) blinks during alarm recording and on when the alarm
recording is finished.
* When the alarm recording is finished, the VCR resumes recording in the same record
modes as before the alarm recording.
Press the MENU button to display MENU on the monitor.
Then Select RECORD MODE SET UP using MOVE button.
1
Set Speed NTSC : (L8H, L24H, L40H)
Set Speed PAL : (L3H, L15H, L27H)
2
* If a set signal is applied during alarm
recording, a new alarm recording will
start with the new set signal.
* Alarm recording will continue for the
duration of time which has been set in
ALARM REC DURATION menu, even if
a timer recording has reached its end
time.
* Alarm recording stops when the end of
the tape is reached.
* Alarm recording can start recording
when an alarm is triggered even if the
VCR is stopped or is set for timer
recording.
NOTE
[ MENU ]
LANGUAGE ENGLISH
CLOCK SET UP
▶ RECORD MODE SET UP
SYSTEM SET UP
TIMER RECORD SET UP
SEARCH SET UP
OTHERS
[ ▼ ] [ ▶ ] [MENU] END
[ RECORD MODE SET UP ]
▶ ALARM REC MODE L8H
ALARM REC TIME 30SEC
1SHOT REC 1SEC
VEXT OUT 1FIELD
SERIES REC OFF
REPEAT : OFF
REWIND/STOP
[ ▼ ] [ ▶ ] [MENU] END
Set 30Sec(1/3/5 MIN/T-END/LEVEL)
3
Page 19

ALARM RECORDING ( CONTINUED )
English-19
When alarm recordings begin, the start times are stored in the
memory so it is possible to confirm when they have occurred.
Select the ALARM REVIEW in the OTHERS menu and the alarm list
display will appear on the screen.
* Up to 8 alarm recording start times can be stored in memory.
Therefore, the latest 8 alarmed times will be displayed.
* The alarm recording list is reset by the following procedure.
• Select the CLEAR button in the ALARM REVIEW of OTHERS
menu.
This machine automatically inserts an index signal at the beginning of each ALARM
RECORDING allowing the start of each alarm to be located with Alarm Scan.
ALARM SCAN
* In SEARCH menu, select ALARM SCAN REVERSE or ALARM SCAN FORWARD. Then it
fast searches forward or backward to the previous (or next) alarm position and starts
playback.
It is automatically repeated to the end of tape.
* At the alarm position you want,press PLAY
ALARM RECORD TIME DISPLAY
LOCATING THE START OF ALARM RECORDINGS
stop and then playback
* The index signal may be difficult to locate in some poorly recorded conditions.
[ ALARM REVIEW ]
1
––/––/–– ––:––:––
2
––/––/–– ––:––:––
3
––/––/–– ––:––:––
4
––/––/–– ––:––:––
5
––/––/–– ––:––:––
6
––/––/–– ––:––:––
7
––/––/–– ––:––:––
8
––/––/–– ––:––:––
[CLEAR] CLEAR [MENU] END
Page 20

REPEA T RECORDING / SERIES RECORDING
English-20
REPEAT RECORDING
SERIES RECORDING
When the “REPEAT REC” of the “RECORD MODE SET UP” menu is set to ON (the repeat
indicator is illuminated), the tape will automatically be rewound to the start when the tape
end is reached. Then recording will start again.
Continue the repeated video recording to the tape end after recording the alarm, when the
alarm signal is input when the video recording is repeated, and stand by at stop after
rewinding.
* If it happens more than one alarm recording, the repeat recording will not be operated.
1. Set SERIES REC to ON on RECORD MODE SET UP screen.
2. Connect SERIES OUT terminal in rear panel to SERIES IN of another set.
* Refer to page 9 (connecting another units in series)
* SERIES recording may have a short
pause ( ≈ 5 seconds) when going from
recorder A to recorder B.
* When set in above configuration and
the first VCR reaches the end of the
tape, the second VCR automatically
begins recording.
* series recording will not function
during timer recording.
NOTE
Page 21

TIMER RECORDING
English-21
* “DLY” (in “Day of the week”) is used for the same
time recording everyday.
* A 24-hour display is used. 00 : 00 indicates
midnight ; 12 : 00 midday and 15 : 00 3 o’clock in
the afternoon.
* If the recording
times of two
programs overlap,
the later program
is given a priority, which means some of A
program will be lost.
* In Linear REC mode, sound is also recorded.
* DAY mode covers MON, TUE . . . . . SAT, SUN, M-
F (MON-FRI) and DLY (Daily).
If an error is encountered when the TIMER button is pressed, refer to the following table.
• Check if a tape is not inserted. • Insert a recordable tape that
has safety tab on it.
• Check if the tape lost safety tab. • Replace with a tape with safety
tab on it. •Attach the safety tap.
• Check if timer programs are • Input any timer programs to
not input in timer program. record in timer program.
Symptom Check points Things to do
No display of .
Press the MENU button to display the main menu on the monitor.
1
Press the MOVE button continuously until comes to CLOCK/SET UP position.
SET the time and date. See the page12
2
Press MOVE button continuously until comes to TIMER RECORD SET UP position.
Then press ENETR button.
3
When TIMER PROGRAM CHART appears on the monitor, press the ENETR button again.
ON(or OFF)will blink.
To disregard the timer program, set OFF.
4
Record the desired timer program by pressing (+) or (-) button.
To move to the next position, press ENETR button.
5
When you finished above process, press the MENU button to exit from TIMER
PROGRAM. Then press STOP button to activate TIMER PROGRAM. The power will be off
and will be displayed.
6
HOW TO AVOID MISTAKES WHEN USING THE TIMER
* DAY : Day of the week
* START : Recording start time
* END : Recording end time
* SPD : Recording mode display
NOTE
[ SET START END DAY SPD ]
▶ OFF
––:–– ––:–– ––– –––
OFF
––:–– ––:–– ––– –––
OFF
––:–– ––:–– ––– –––
OFF
––:–– ––:–– ––– –––
OFF
––:–– ––:–– ––– –––
OFF
––:–– ––:–– ––– –––
OFF
––:–– ––:–– ––– –––
OFF
––:–– ––:–– ––– –––
[ ▼ ] [ ▶ ] [MENU] END
Page 22

PLAYBACK
English-22
PLAYBACK MODE L8H L24H L40H 48 H 72 H 120 H 168 H 240H 480H 960 H
Audio playback Available Available Available Not Available Not Available Not Not Not Not Not
PLAYBACK MODE L3H L15H L27H 48 H 72 H 120H 168 H 240H 480H 960 H
Audio playback Available Available Available Not Available Not Available Not Not Not Not Not
Load a pre-recorded tape.
AUTO PLAY :If a cassette with the erasure prevention tab removed is loaded, the unit
automatically begins playback.
1
Press the PB / REC SPEED (+) or(–) buttons to select the desired playback mode.
2
Press the PLAY button to start playback.
3
Press the STOP button to stop playback.
4
AUDIO PLAYBACK
The modes with the letter “L” (i.e. L8H, L24H, L40H) are for audio recording and playback on
the linear track.
• NTSC
* Select the VIDEO setting on “SYSTEM
SET UP” menu to COLOR or B/W
according to the playback video signal
type.
* If too much noise appears in B/W
playback mode of B/W monitor, convert
to color mode. Then you can view more
clear picture.
NOTE
* When the picture shakes up and down
when above 24H, 40H of PLAYBACK, the
shaking can decrease by the control of
V. LOCK.(Refer to V. LOCK on page 27).
* There is normal sound playback only
when a tape recorded in theLinear REC
modes is played back in its respective
mode.
* If a recording is played back in a higher
REC/PB mode than it was recorded, the
picture will be played back in slow
motion, and if a recording is played back
in a lower mode than it was recorded,
the picture will be played back in fast
motion.
* The picture may move up / down or
noise may occur when the tape is played
back in time lapse modes, such as
L24H, L40H or longer.
NOTE
• PAL
1
Page 23

English-23
SPECIAL PLAYBACK
STILL/SLOW PICTURE
If you press the PAUSE / STILL button during playback, slow and picture search (CUE/REV),
you will obtain a still picture.
Press the PAUSE/STILL button again, then one picture shifts forward, which is called field
advance or frame advancde.
* A few noise bars or vertical movement
may appear during frame by frame and
field by field playback.
* If noise appears in top or botton side in
Still mode, adjust the tracking in slow
mode (Field, Frame) until noise
disappears. Then confirm the picture in
still mode.
* In case of double speed reproduction
picture may tremble at its upper and
lower part due to signal character.
NOTE
PAUSE / STILL BUTTON
Page 24

ADDITIONAL FEA TURES
English-24
SELF DIAGNOSTICS
Any defects are indicated on the front indicating window after VCR checks itself for
malfunction.
1. When the self-Diagnostics finds problem, check and do it by yourself.
1) In case of TAPE LOADING PROBLEM( ).
• Press the “Power” button for erasing the problem indicationg use a Remote controller.
• Remove the video tape and check the condition of the tape. If the video tape has
something damaged, change it please
• In case of that the problem message is occured frequently, please call for service
technician.
2) In case of CAPSTAN, DRUM, REEL PROBLEM(cA, dr, rEEL)
• Remove the videotape and check the condition of the tape. If the videotape has
something damaged, change it please.
• Using the cleaning tape, please clean the deck mechanism.
• In case of that the problem message is occured frequently, please call for service
technician.
TAPE COUNTER
A four digit counter indicates the relative position of the tape. The counter will increase or
decrease during playback, FF/REW or search mode.
* “-- : --” illuminates when the VCR lost clock data.
COUNTER RESET
In SEARCH menu, select counter reset to reset the counter to “0000”
The counter value reset to “0000” when the tape is loaded after the same tape was ejected.
DIGITRON ERROR PARTS
LOADING ERROR
CAPSTAN ERROR
DRUM ERROR
REEL ERROR
Page 25

English-25
ADDITIONAL FEA TURES
MEMORY BACK-UP IN CASE OF POWER FAILURE
This VCR includes a built-in memory back-up so the presets of present time and date, alarm
list, power loss list will remain in memory. If there is a power failure or if the power code is
disconnected from the AC outlet, the presets will remain in memory for a maximum of 30 days
provided that the VCR has been connected to AC power for at least 40 hours per week.
Connection to AC power charges the backup battery.
* Check the present time if there has been a power failure or if the power cord has been
disconnected from AC power for a prolonged time.
RECORDING AFTER A POWER FAILURE
If there is a power failure during recording and the power comes back on, the VCR will resume
recording in the same record mode as before the power failure. After the power comes back
on, an PF will be displayed on the display. If a power failure occurs during playback, the VCR
will be in the stop mode when the power comes back on.
POWER FAILURE DISPLAY
The power failure start time and recover time are stored in the memory so it is possible to
confirm power failure history on screen.
1. Press the MENU button to display the MAIN MENU.
2. Move dowen to OTHERS.
3. Press ENTER to enter.
4. Move to POWER FAIL REVIEW, press ENTER.
5. The list of power failure history is shown on screen.
6. Press CLEAR to remove all data.
* Few seconds of power failure may not be listed.
* The latest four are updated for notice.
[ POWER FAIL REVIEW ]
1 OFF
––/––/–– ––:––:––
ON
––/––/–– ––:––:––
2 OFF
––/––/–– ––:––:––
ON
––/––/–– ––:––:––
3 OFF
––/––/–– ––:––:––
ON
––/––/–– ––:––:––
4 OFF
––/––/–– ––:––:––
ON
––/––/–– ––:––:––
[CLEAR] CLEAR [MENU] END
Page 26

English-26
KEY BUZZER
If Buttons is “ON” at OTHERS on the menu, Buzzer is activated when Buttons is in operation,
and Buzzer is not activated when the Buttons of the mode that is not in operation.
NO VIDEO SIGNAL BUZZER
* Buzzer is activated for 3 sec. when the video signal is not input on the state of POWER ON.
* Buzzer is activated when the video signal is not input on the recording mode, and the state
continues until the video signal is input.
* When the stop of buzzer activation is wanted, push any key for stopping it.
POWER ON/OFF, STOP/EJECT. REC KEYS performs their functions at the moment BUZZER
stops the function of activation.
TAPE END BUZZER
* Buzzer is activated when TAPE reached the end point(6 min. remains based on 8H), and
“END” blinks on the front PANEL.
* Rewind starts and buzzer is activated at the same time when tape reached the end point
completely, and buzzer keeps activating after the completion.
* When the stop of buzzer activation is wanted, push any key for stopping it.
STOP/EJECT. REC KEYS performs their functions at the moment BUZZER stops the function
of activation.
TIME / DATE SEARCH
This searches for specified day/time for images to be played back.
1) Press the P/STILL button during stop mode.
* TIME / DATE SEARCH
CURRENT
TARGET will be displayed on screen.
2) Press the ENTER( ) and (+), (-) to set the desired day, hour, minutes.
3) Press the FF( or REW)button
* The desired day / time is searched and a image of the recording will be playback.
SPECIAL EFFECTS
Page 27

English-27
ADJUSTMENT
TRACKING ADJUSTMENT
If noise appears in the picture during playback, slow playback, adjust the TRACKING buttons
to achieve the best picture.
When the tape is ejected the tracking is set to the initial setting.
VERTICAL ADJUSTMENT (Correcting picture vibration at the top and bottom)
When watching still playback, the picture may vibrate. In this case, press the V.LOCK œ or √
button to reduce or eliminate the picture vibration.
1. Capture a still picture by pressing the PAUSE / STILL button in playback or special
playback.
2. Press the V.LOCK
œ or √ button to reduce or eliminate the picture vibration.
* Noise bars will move through the
picture each time the TRACKING
button is pressed
NOTE
* Horizontal vibration cannot be
corrected with V.LOCK
œ or √
buttons.
NOTE
TRACKING -, + BUTTON
TRACKING -, + BUTTON
Page 28

English-28
BEFORE CALLING FOR SERVICE
Symptom
VCR does not operate.
The VCR POWER is ON, but unit does not
operate.
No operation when any tape operation button
is pressed.
Recording does not work.
Recording cannot be stopped by pressing the
STOP button.
Timer recording does not operate.
No operation when the PLAY button is pressed.
Noise bars in the picture during playback.
The picture vibrates at the top and bottom
when in still picture mode.
Clear camera pictures during recording but
during playback the picture is not clear.
The picture is not clear on the monitor.
The present time is not correct even though the
VCR is used everyday.
The power cord has been disconnected for less
than 31 days but the present time has been
reset.
Repeat recording does not work.
Alarm recording does not work.
Playback speed is fast or slow.
During the playback, the picture is waving
intermittently from side to side.
* Cleaning Tape
Using the cleaning Tape on REAL TIME
VCR, in case of the tape contains
pictures; there can be picture noise on
the screen because of different recording
method between cleaning tape and REAL
TIME VCR. In spite of the picture noise,
cleaning is working properly. Please just
let it be 10 to 15 seconds more. If
cleaning is imperfect, please repeat it
1~2 times more.
NOTE
Check & Remedy
• Is the indicator illuminating?
• Has the Power Cord been disconnected from the AC outlet?
• Is the indicator illuminating?
• Is the indicator illuminating?
• Safety devices are operating. Press the RESET button on the
panel using a suitable implement.
• Is the indicator illuminating?
• Press the Rec Lock button on the front of the video recorder.
• Is a cassette inserted?
• Has the cassette’s erasure prevention tab been broken off?
• Has the tape run out?
• Is the indicator illuminating?
• Has the present time and recording time been set accurately?
• Is the indicator illuminating?
• Has the tape run out?
• Is a cassette inserted?
• Has the TRACKING control been adjusted?
• Has the V.LOCK control been adjusted?
• This symptom may occur when the recorder has been used for
a long period of time. During this time, a deposit of oxide has
built up on the video heads which must now be cleaned.
Cleaning of the heads requires expertise. Please contact your
dealer.
• Is the camera correctly focused?
• Make sure the VCR has main power supplied continuously for
least 40 hours per week.
• Make sure the VCR has main power supplied continuously for
least 40 hours per week.
• The contents stored in the memory may be erased before the
30 days depending on the charge time of the power failure
compensation circuit. Set the present time again.
• Is the repeat recording indicator illuminating?
• In case alarm telerecording is executed more than once on a
tape repetitive telerecording is not executed to protect the
alarm information
• Is the external switch correctly connected?
• Is the playback mode set to the desired mode with PB/REC
SPEED button?
• Please confirm the camera setting to INTERNAL SYNC mode.
Page 29

English-29
SERVICE GUIDE
1000Hr 2000Hr 3000Hr 4000Hr 5000Hr 6000Hr 7000Hr 8000Hr 9000Hr 10000Hr
●●●●●●●◆●●
▲▲ ▲◆▲▲
◆
◆
● ● ● ●●●●●●●
● ● ● ●●●●●●●
◆
◆
◆
◆
◆
NO DESCRIPTION
1 VIDEO HEAD
2 ARM ASS’Y CLEANER
3 MOTOR CAPSTAN
4 BELT CAPSTAN
5 BASE ASS’Y A/C
6 HEAD F/E
7 ARM ASS’Y IDLER
8 HOLDER ASS’Y PINCH
9 BAND ASS’Y TENSION & REEL(S)
10 ARM ASS’Y F/L
11 CLUTCH ASS’Y
* Please, regularly check the used time
and clean or replace according to
guided instruction of above.
NOTE
◆ : changing, ● : cleaning, ▲ : checking
✓Refer servicing to qualified service personnel.
Page 30

English-30
SPECIFICA TIONS
Tape format VHS
Television System EIA Standard (525 lines, 60F/S), NTSC Color Signal
CCIR Standard (625 lines, 50F/S), PAL Color Signal
Video Recording System 4 Rotary Heads, Azimuth Helical Scanning System
Luminance Signal FM Recording
Color Signal Color Subcarrier Phase Shift Recording
REC/PB Mode NTSC : L8, L24, L40
PAL : L3,L15,L27
Horizontal Resolution More than 350 lines (B/W) More than300 lines (Color)
Signal to Noise Ratio Video 43dB Audio 42dB
Video Input 1.0Vp/p, 75 Ω, BNC-F jack
Video Output 1.0Vp/p, 75 Ω, BNC-F jack
Audio Tracks 1 Track
Audio Frequency 100Hz~7KHz (NTSC: L8H, PAL: L3H Mode)
Audio Input -8dBm, 47K Ω, RCA Pin jack
Audio Output -6dBm, 1K Ω, RCA Pin jack
Audio Mode NTSC : L8, L24, L40
PAL : L3, L15, L27
Alarm Recording Time 30 sec, 1/3/5 mins, T.END. LEVEL
FF/REW Time Approx. 100secs with T-120 (E-180)
Elapsed Use Time To 9,999 hours max
Timer Programs 8 Programs
Battery Backup 30 days
Remote in Wired/Wireless (opt.)
Power Source AC 90-240V 50/60Hz
Power Consumption Approx. 17Watts
Operating Temperature 41˚F - 104˚F (5˚C - 40˚C)
Relative Humidity Max. 80%
Dimensions ( W X H X D ) 360 X 94 X 270mm
Weight (Net) about 3.5Kg
* Design and specifications are subject to
change without prior notice.
NOTE
Page 31

MEMO
Page 32

MEMO
Page 33

MEMO
Page 34

MEMO
 Loading...