

Essential Video Doorbell
Wire-Free
User Manual

Contents
1. Get to Know Your Doorbell 5
If you choose to wire your doorbell ................................................................................................. 6
Get the Arlo app ................................................................................................................................... 6
Do more with Arlo ................................................................................................................................ 7
2. Get Started 8
Charge the battery before installation ............................................................................................. 8
Use the Arlo app for installation and setup .................................................................................... 9
Tips for optimal WiFi performance .................................................................................................. 9
Connect your mobile device to a 2.4 GHz WiFi network during setup .................................... 10
Doorbell LED ....................................................................................................................................... 11
Choose a good spot to mount your doorbell .............................................................................. 12
Mount your doorbell wire-free ........................................................................................................ 13
Test motion detection ...................................................................................................................... 14
Customize your doorbell settings ................................................................................................... 14
Recharge the battery aer installation .......................................................................................... 15
Chime options for your doorbell .................................................................................................... 16
3. Arlo Chime 2 18
Meet your Chime 2 ............................................................................................................................. 18
Do more with your Chime 2 ............................................................................................................. 19
Find a good location for your Chime 2 .......................................................................................... 19
Set up your Chime 2 .......................................................................................................................... 19
Chime 2 LED ........................................................................................................................................ 20
Select a melody for your Chime 2 .................................................................................................. 20
Use silent mode to stop the Chime 2 from ringing ..................................................................... 21
4. Optional: Connect a wired chime 22
Voltage requirements ........................................................................................................................ 22
Check the voltage level printed on the doorbell transformer ................................................. 23
Change from wire-free to wired installation .................................................................................24
Hardwire your wire-free Essential Video Doorbell ...................................................................... 24
Battery charging with a hardwired doorbell ................................................................................ 26
2

Essential Video Doorbell Wire-Free
5. Use Your Doorbell 27
Answer your doorbell from your smartphone ............................................................................. 27
Accept a call from your doorbell..................................................................................................... 27
Respond to a visitor with a Quick Reply ........................................................................................ 28
Play a message from a visitor .......................................................................................................... 29
Use silent mode for the doorbell .................................................................................................... 29
Control the doorbell LED ................................................................................................................. 30
Change the call settings ...................................................................................................................30
6. View and Record Videos 32
View your doorbell’s camera feed .................................................................................................. 33
Record clips from live video.............................................................................................................33
Take a snapshot from live video ..................................................................................................... 34
2-Way Audio ........................................................................................................................................ 34
Change the order of the camera feeds .......................................................................................... 34
Motion detection activity zones ...................................................................................................... 35
View recordings and snapshots ...................................................................................................... 36
Download recordings........................................................................................................................37
7. Change Your Settings 39
Two-step verication ........................................................................................................................ 39
Use face or ngerprint authentication .......................................................................................... 41
Customize your prole ..................................................................................................................... 42
Change your Arlo password .............................................................................................................43
Reset a forgotten password ............................................................................................................. 43
Grant access to friends ..................................................................................................................... 44
Change the time zone ....................................................................................................................... 45
Doorbell settings ................................................................................................................................ 46
Adjust the icker setting ................................................................................................................... 49
View device information ................................................................................................................... 49
Remove a device from your account ............................................................................................. 49
Restart the doorbell from the Arlo app ......................................................................................... 50
8. Modes, Rules, and Alerts 51
Arm or disarm all your Arlo devices ............................................................................................... 51
Modes ................................................................................................................................................... 51
3Contents User Manual

Essential Video Doorbell Wire-Free
Select a mode ..................................................................................................................................... 52
Mute Notications ............................................................................................................................. 52
Rules for modes ................................................................................................................................. 53
Trigger a Chime 2 when the doorbell is pressed ......................................................................... 53
Change motion sensitivity ............................................................................................................... 54
Automatically stop recording when motion stops ...................................................................... 54
Manage alerts ..................................................................................................................................... 55
Schedule when your doorbell camera is armed ......................................................................... 55
Geofencing with multiple mobile devices .................................................................................... 58
Use your doorbell to trigger another camera to record ............................................................. 60
9. Arlo Connect 62
Use Arlo with Amazon Alexa ............................................................................................................ 62
Add your doorbell to the Google Assistant app .......................................................................... 64
Use Arlo with IFTTT ........................................................................................................................... 64
10. Troubleshooting 65
Scan the QR code during doorbell setup ......................................................................................65
Arlo doesn’t discover your doorbell during setup ......................................................................66
Remove the doorbell from its mount ............................................................................................ 67
Reset the Video Doorbell .................................................................................................................. 67
Optimize your doorbell battery life ................................................................................................ 68
Scan the QR code during Chime 2 setup ...................................................................................... 69
Arlo doesn’t discover your Chime 2 during setup ....................................................................... 70
Your Chime 2 doesn’t ring when the Arlo doorbell is pressed .................................................. 70
Reset the Chime 2 .............................................................................................................................. 71
Can’t see video streams in a browser ............................................................................................ 72
Not receiving push notications ..................................................................................................... 73
I can’t log in to my Arlo account ..................................................................................................... 74
Troubleshoot Arlo Geofencing ........................................................................................................ 75
4Contents User Manual
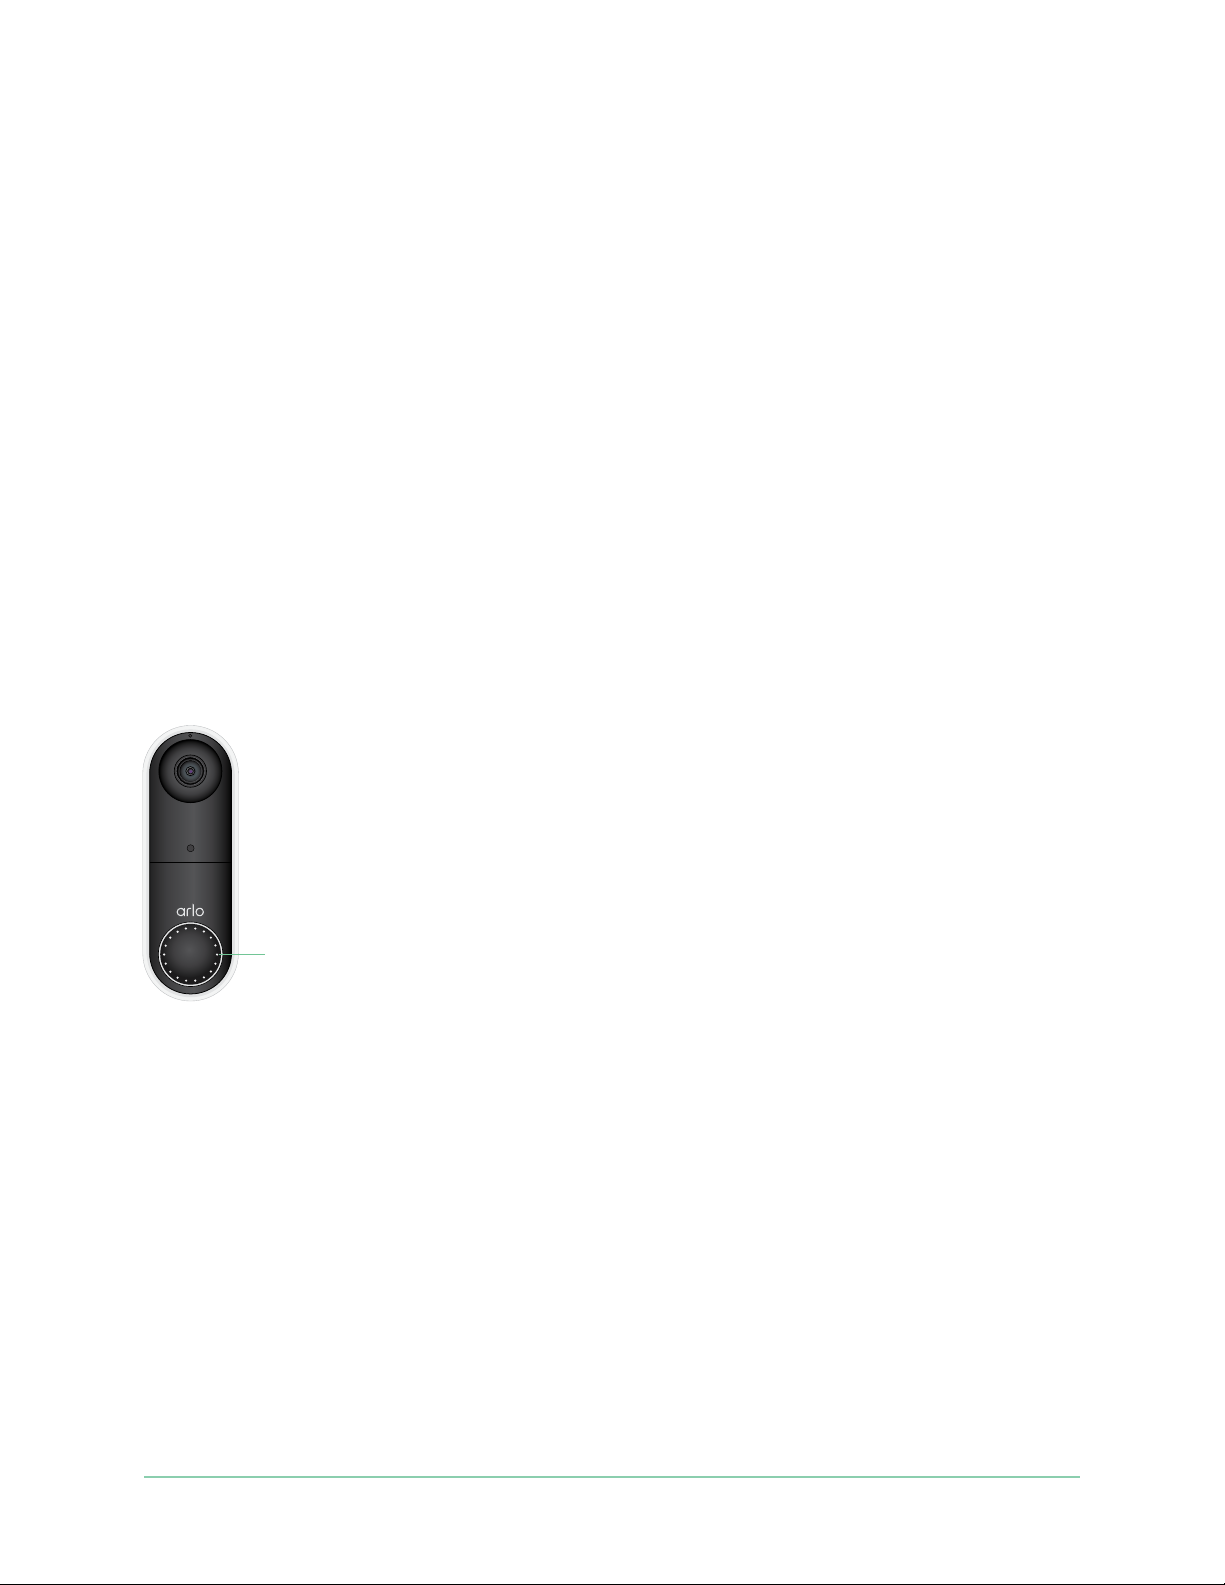
1. Get to Know Your Doorbell
A better way to see the complete picture at your door. Your Arlo Essential Video Doorbell
Wire-Free can be powered by a rechargeable battery or hardwired. Connect directly to WiFi for
easy setup. When motion is detected, receive notications and view live video from your
phone. See what’s at the door, from head to toe or a package on the ground during the day or
in low light with night vision, without opening your door. Speak to visitors with two-way
audio or use pre-recorded quick reply messages when you’re busy.
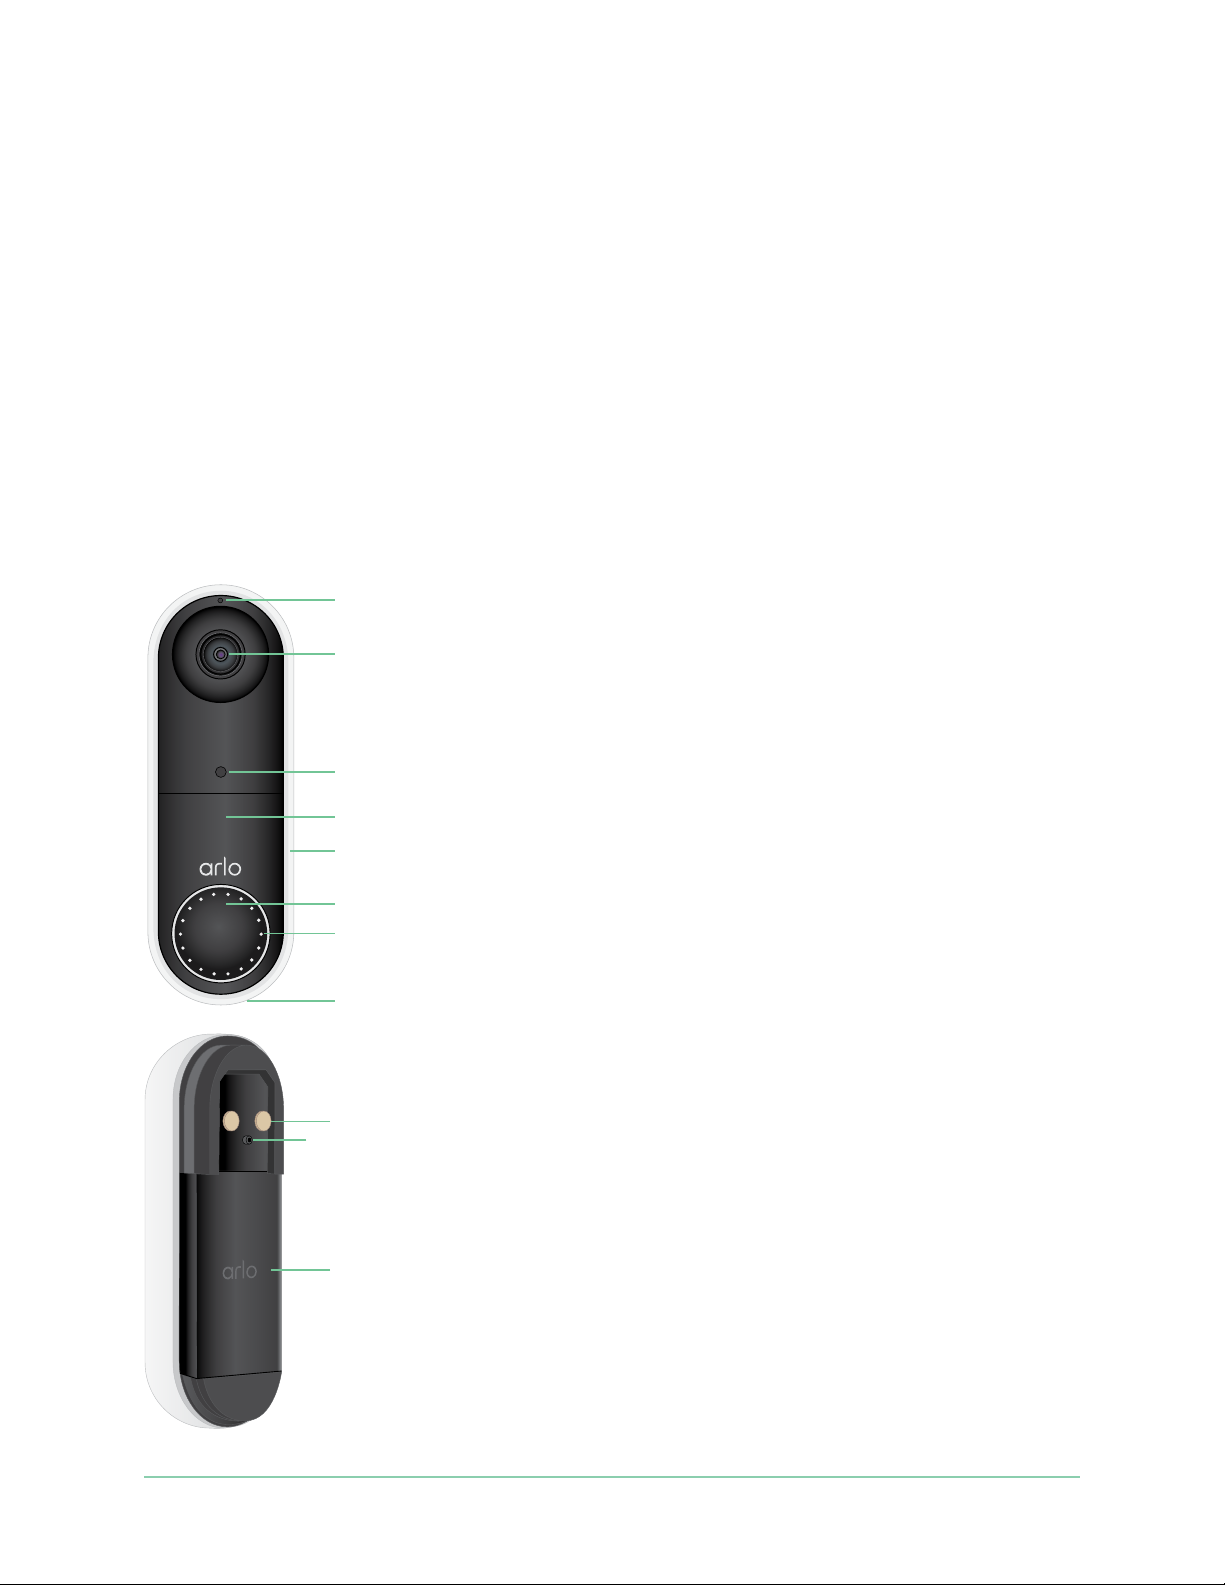
Microphone
Lens with 180-degree
eld of view
Ambient light sensor
IR LED for night vision
Weather-resistant casing
Doorbell button
Status LEDs
Speaker
Wiring terminals (optional)
Reset button (pinhole)
Rechargeable battery
5
Essential Video Doorbell Wire-Free
If you choose to wire your doorbell
The wire-free Arlo Essential Doorbell comes with a rechargeable battery, which provides
power to the doorbell. Wiring is not required for installation. If you want to hardwire your
wire-free Essential Video Doorbell, you can.
The voltage must be 8 – 24VAC. If you want to install or upgrade a transformer, contact a
licensed electrician or visit arlo.com for information about installation services. For more
information about optional wiring, see 3. Optional: Connect a wired chime on page 22.
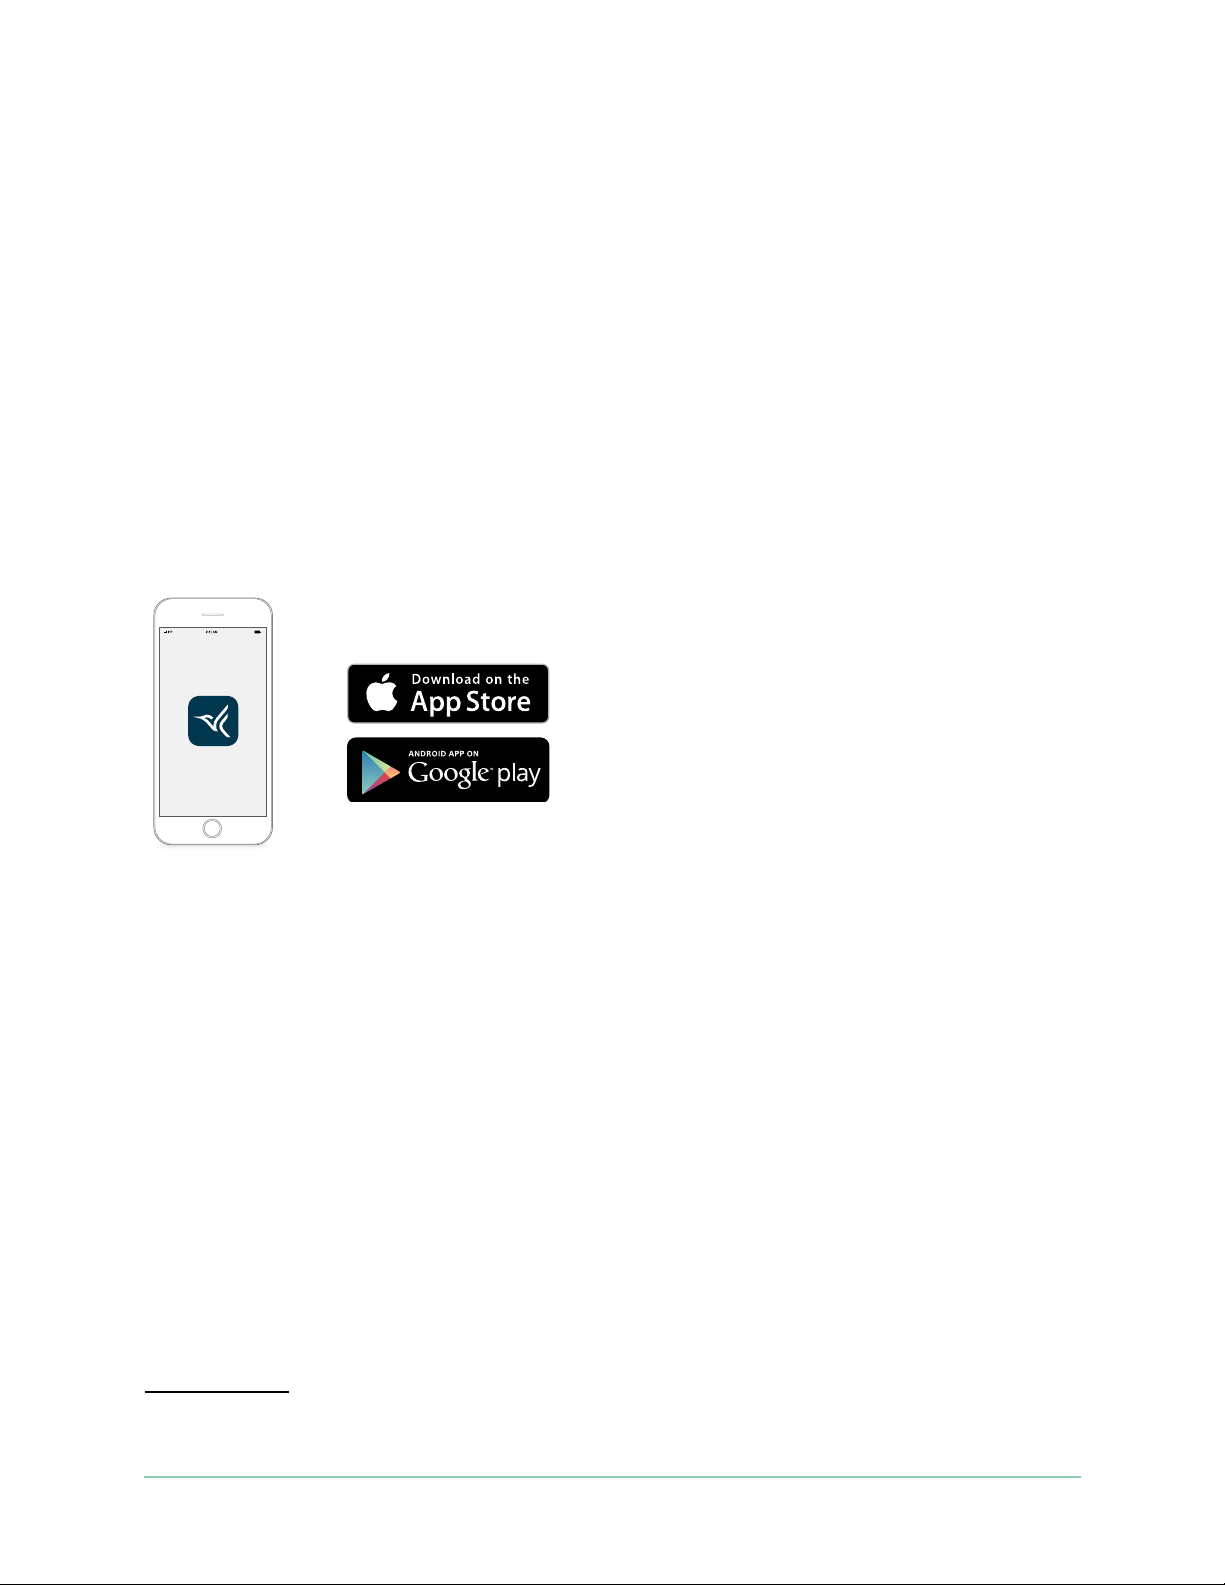
Get the Arlo app
Download the Arlo app. The Arlo app lets you create an Arlo account in the cloud and set up
and manage all your Arlo devices.
Note: If you already use the Arlo app, make
sure that you’re using the latest version. To
nd out if an update is available, go to the
app store and search for Arlo.
Features
• See more at your front door. See a person from head to toe or a package on the ground
with a 180 degree diagonal viewing angle optimized for the front door.
• Security in the palm of your hand. Receive notications when motion is detected and
watch live streaming video from your smartphone or tablet.
• More ways to answer. See and speak to visitors with clear two-way audio, or respond
with pre-recorded quick reply messages when you’re busy. Receive a video call when your
doorbell is pressed and never miss a visitor.
• Night Vision. See who’s at your door at night, even without a light on.
• Multiple powering options. Install without wires using the rechargeable battery, or
hardwire to existing wiring for continuous charging.
• Notications that matter. Get alerts when your Video Doorbell spots people, vehicles,
animals or a package with Arlo Smart
1 Arlo Smart service is not available in certain countries. See www.arlo.com/ArloSmart for details.
1
.
6Get to Know Your Doorbell
User Manual

Essential Video Doorbell Wire-Free
• Built-in smart siren. Trigger your siren automatically, or manually from the Arlo app.
• Visitor messaging. Guests can leave you a voice message if you’re unable to answer the
door, and you can listen remotely at your convenience.
• Direct to WiFi. Connects directly to WiFi for simple setup.
Do more with Arlo
You can add these options:
• Arlo Chime 2. The Arlo Chime 2 may be included with your Essential Video Doorbell WireFree, or sold separately. Your Chime 2 lets you receive instant alerts from your wire-free
Essential Video Doorbell and your Arlo cameras. For more information, see Chapter 3. Arlo
Chime 2 on page 18.
• Add more Arlo cameras and devices. Cover more areas in and around your home by
adding cameras, security lights, and more.
• Upgrade your Arlo subscription. For more information,visit What are the available Arlo
subscription plans and how much cloud recording is available?.
7Get to Know Your Doorbell
User Manual
2. Get Started
Charge the battery before installation
Your wire-free Essential Video Doorbell comes with a rechargeable battery. We recommend
that you charge the battery to 100% before you install the doorbell. For help with recharging
the battery aer installation, see Replace battery/umounting on page 15.
Warning: Do not leave the doorbell outdoors without the battery installed. Doing so can
result in water intrusion into the doorbell.
To charge the battery before installation:
1. Connect the rechargeable battery to the USB charging cable that came in the package.
The charging cable works with most power adapters.
LED
2. Charge the battery to 100%.
The battery LED lights red during charging, then turns green when the battery is fully
charged.
Note: If you haven’t installed your doorbell yet, we recommend that you wait to insert the
battery into the doorbell until you are ready to follow the steps in the Arlo app to install
and set up your doorbell.
8

Essential Video Doorbell Wire-Free
Use the Arlo app for installation and setup
You must use the Arlo app to install and set up your wire-free Essential Video Doorbell. The
Arlo app guides you through installation and setup:
1. Create your Arlo account.
You use the same account to manage all your Arlo devices.
2. Follow the instructions in the Arlo app to install and set up your wire-free Arlo Essential
Video Doorbell.
Once you set up your Arlo account, you can access it by using the Arlo app on a smartphone
or tablet, or from a computer using a web browser. If you’re using a computer, enter https://
my.arlo.com/#/login in the address bar of the browser.
Tips for optimal WiFi performance
The distance between WiFi devices can aect the WiFi signal:
• Maximum recommended distance. Place your WiFi router within range of your doorbell.
The maximum line-of-sight range of your WiFi router is reduced by each wall, ceiling, or
other major obstruction between the doorbell and the router.
• Minimum recommended distance. To reduce WiFi interference, allow at least 6½ feet (2
meters) between your doorbell and any Arlo cameras that you install.
These materials can reduce WiFi signal strength if they are located between WiFi devices:
• Unusually thick walls and ceilings
• Brick
• Concrete
• Stone
• Ceramic
• Glass, especially mirrors
• Metal
• Large quantities of water, such as the water in a sh tank or water heater
9Get Started
User Manual

Essential Video Doorbell Wire-Free
Connect your mobile device to a 2.4 GHz WiFi network during setup
If you’re connecting your wire-free Essential Video Doorbell directly to your router’s WiFi
network, it’s important to understand that your mobile device must connect to the same WiFi
network as the doorbell during setup.
Your doorbell can only connect to a 2.4 GHz WiFi network. Many routers broadcast WiFi
networks in both 2.4 GHz and 5 GHz bands, so your phone might connect to the 5 GHz WiFi
band. During setup, connect your phone to your 2.4 GHz WiFi network, then connect your
Video Doorbell to that same 2.4 GHz WiFi network.
Find your 2.4 GHz WiFi network name and password
Your phone might connect to your 5 GHz WiFi network most of the time. If you’re not sure
about how to nd the 2.4 GHz WiFi network:
• Look on your WiFi router label.
Many routers have a label that shows the WiFi network name, which is also called an SSID.
Your 2.4 GHz network name might have a 2, 2.4, or 2G at the end. Your 5 GHz network
name might have a 5 or 5G at the end. If you changed your WiFi settings, then check the
place where you saved your custom settings.
• If your WiFi network name or SSID doesn’t indicate whether it’s 2.4 GHz or 5 GHz, ask your
Internet service provider (ISP) or the person who set up your WiFi router.
• If you have a mesh WiFi network, it uses only one WiFi network name for both WiFi bands.
The doorbell nds and connects to the 2.4 GHz WiFi band. As long as you connect your
phone to the same mesh network, Arlo can discover the doorbell.
Connect your iOS (Apple) device to a 2.4 GHz network
1. Unlock your device and tap Settings.
2. Tap Wi-Fi, near the top of the list of Settings options.
3. Turn on WiFi by tapping the switch next to Wi-Fi at the top.
Note: WiFi is activated when the switch is green.
4. Select a 2.4 GHz WiFi network.
This is commonly indicated by a 2, 2.4, or 2G at the end of the network name.
5. If prompted, enter the password for the network.
When you’re connected to the WiFi network, a blue check mark appears to the le of the
network name.
10Get Started
User Manual
Essential Video Doorbell Wire-Free
Connect your Android device to a 2.4 GHz network
1. Unlock your device and tap Settings.
2. Tap Network & Internet > Wi-Fi.
3. Turn on WiFi by tapping Use WiFi at the top.
4. Select a 2.4 GHz WiFi network.
This is commonly indicated by a 2, 2.4, or 2G at the end of the network name.
5. If prompted, enter the password for the network.
When you’re connected to the WiFi network, the word Connected appears under the
network name.
Doorbell LED
The LED is on the outside of your doorbell and indicates how the doorbell is operating.
This section describes how the LED works if you didn’t change the default LED settings. For
information about changing the LED behavior, see Control the LED on page 30.
LED
The LED behaviors on your doorbell vary, depending on whether you have set it up.
LED behavior during setup
• O. The battery is not in the doorbell, or the battery isn’t charged. For more information,
see Charge the battery on page 8.
• Single white ash. The battery is correctly inserted in the doorbell.
• Flashing white. The doorbell is ready to connect to your WiFi router. Aer you scan the QR
code in the Arlo app, one of the following two behaviors happens:
• Rapid ashing white. The Arlo app discovered your doorbell.
• Flashing amber. The Arlo app did not discover your doorbell. Make sure that both your
doorbell and your mobile device are connected to the same 2.4 GHz WiFi network.
11Get Started
User Manual
Essential Video Doorbell Wire-Free
3 (.9m)
0 (0m)6 (1.8m)9 (3.6m)
LED behavior aer setup
• Slow breathing pattern white. The doorbell detected motion.
• Solid white. The doorbell is connected to a call.
• Fading white. The call from the doorbell ended.
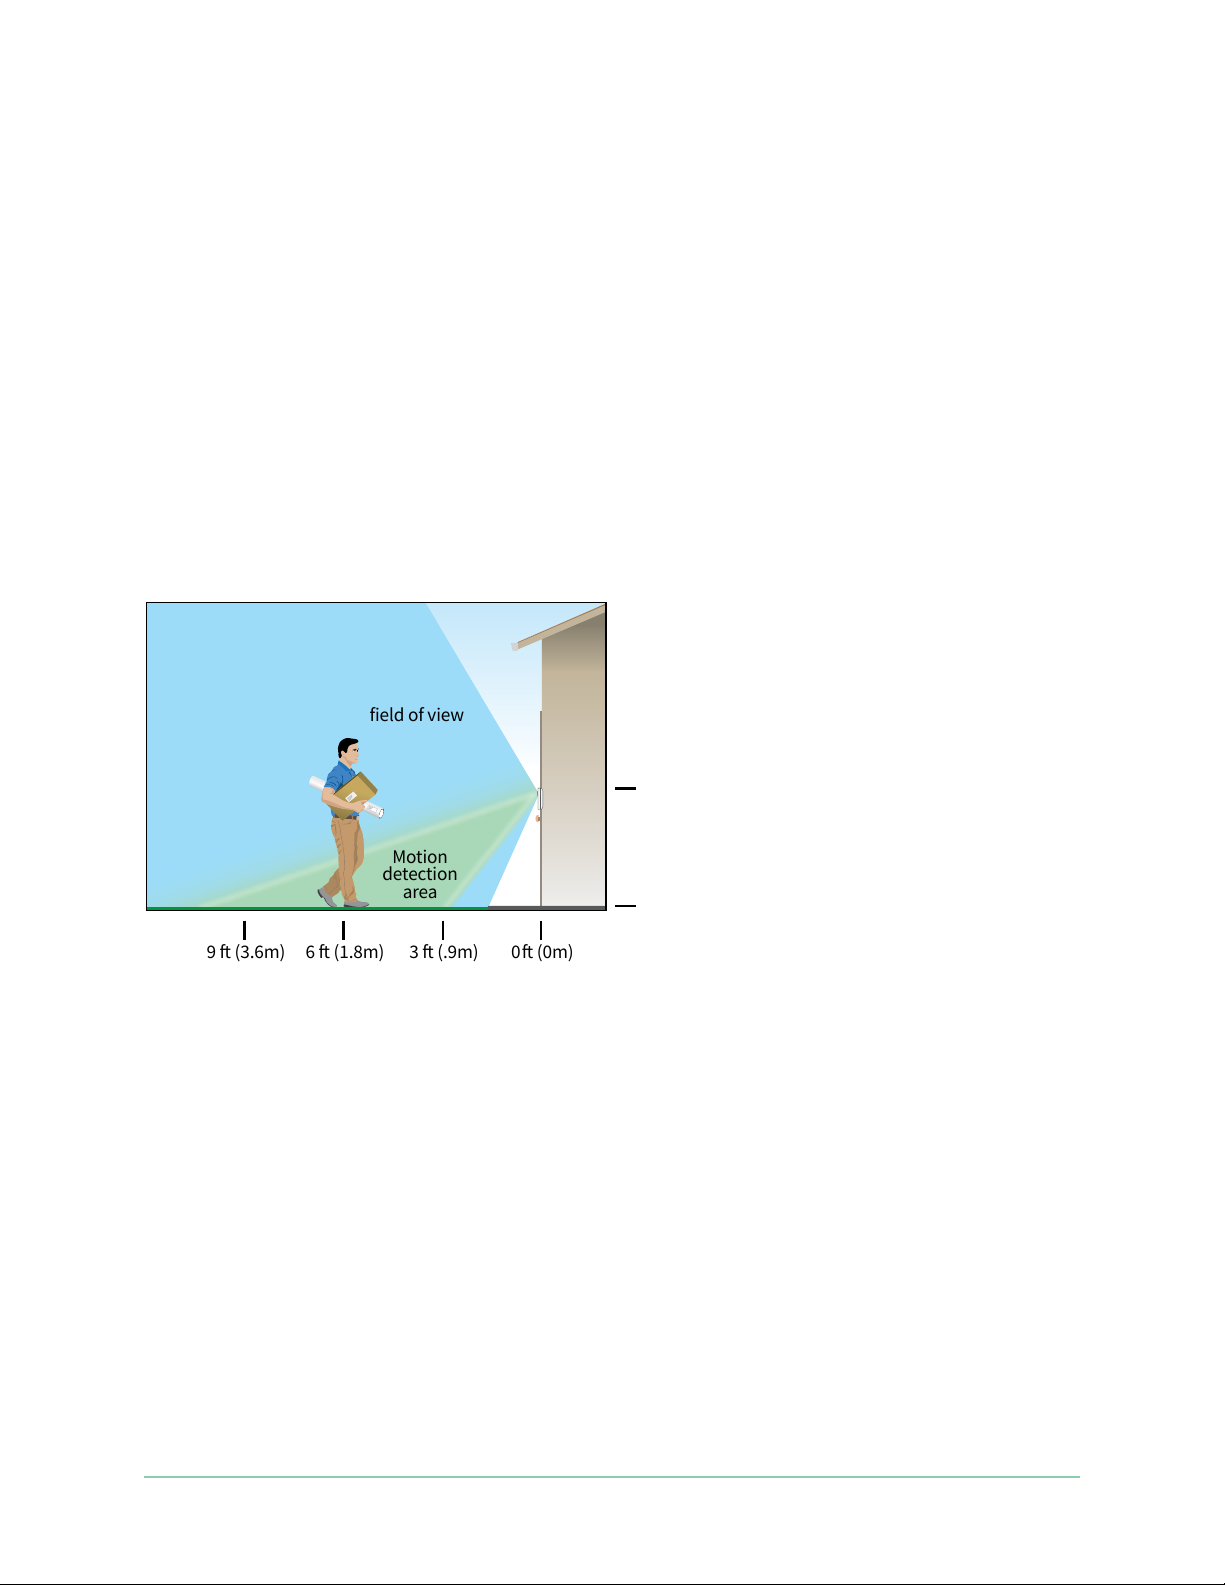
Choose a good spot to mount your doorbell
The best location for your doorbell varies by household and outdoor environment.
Place your doorbell with the fullest view of the area leading up to the front entry. This
provides the best opportunity to capture motion detection events and video clips that include
a person approaching the door. You can use the included angled mounting wedge to optimize
the angle of your doorbell.
Doorbell
field of view
Doorbell
height
Motion
detection
area
4 (1.2 m)
When mounting your doorbell:
• Place the doorbell about 4 feet (1.2 m) above the ground.
• Make sure that nearby walls and other objects do not obstruct the view of your doorbell.
• The lower half of the camera’s eld of view is the motion-sensitive part of the image. The
doorbell begins recording when it detects motion in this area.
12Get Started
User Manual
Essential Video Doorbell Wire-Free
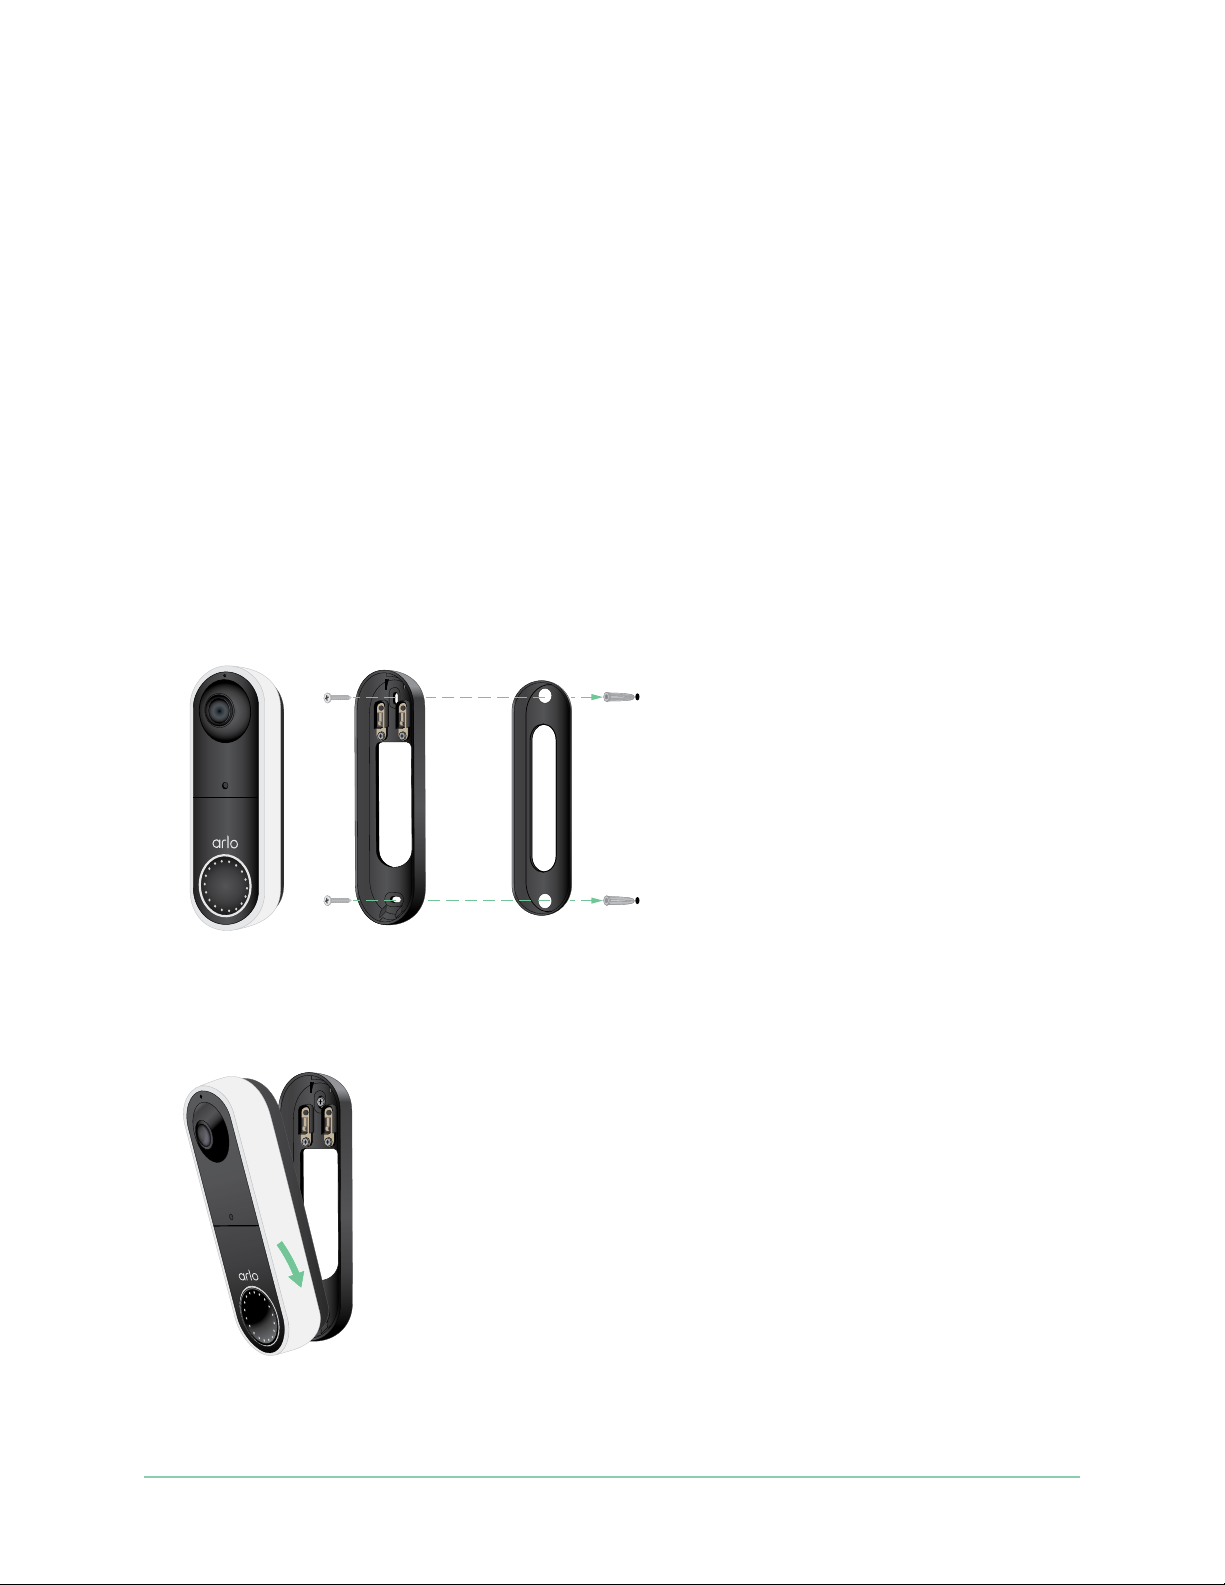
Mount your doorbell wire-free
Note: If you want to hardwire your doorbell, which is optional, see Hardwire your wire-free
Essential Video Doorbell on page 24.
1. Place the mounting plate on the wall where you want to mount your doorbell, and mark
the locations for the two screw holes.
2. Decide whether to use the angled mounting plate to adjust the area your doorbell faces.
3. Use a 6 mm (15/64 inch) drill bit to drill two holes.
4. Align the mounting plate with the two holes in the wall.
5. While holding the mounting plate over the two holes (and the angled mounting plate, if
you’re using it), use a screwdriver to put a screw into each of the holes.
If you’re mounting the doorbell on drywall, we recommend that you use
the provided wall anchors.
Mounting plate
6. Place the doorbell on the mounting plate in a down-and-in motion.
When the doorbell is secured, there is a click sound.
Optional mounting wedge
13Get Started
User Manual

Essential Video Doorbell Wire-Free
Test motion detection
You can use the motion detection test to nd the right motion sensitivity setting for your
doorbell.
1. Open the Arlo app.
2. Tap the gear icon next to the Essential Video Doorbell Wire-Free.
3. Tap Device Utilities > Motion Detection Test.
4. Move in front of the camera.
During this test, the camera LED blinks white when motion is detected.
5. Move the slider to adjust the motion sensitivity level as needed.
Note: This motion sensitivity setting is only for use during the motion detection test so
that you can identify the setting you want to use.
6. Aer you nd a setting that works well, edit the mode rule to change the sensitivity level
to your preferred setting so that it takes eect.
For more information about how to edit a mode rule, see Change motion sensitivity on
page 54.
Customize your doorbell settings
You control the rules your doorbell uses to record and alert you by selecting a mode. You can
also arm or disarm all your Arlo devices.
The Arlo app comes with four modes:
• Armed
• Disarmed
• Schedule
• Geofencing
You can customize each mode and you can also create custom modes. For information, see
Chapter 6. Modes, Rules, and Alerts on page 51.
14Get Started
User Manual
Essential Video Doorbell Wire-Free
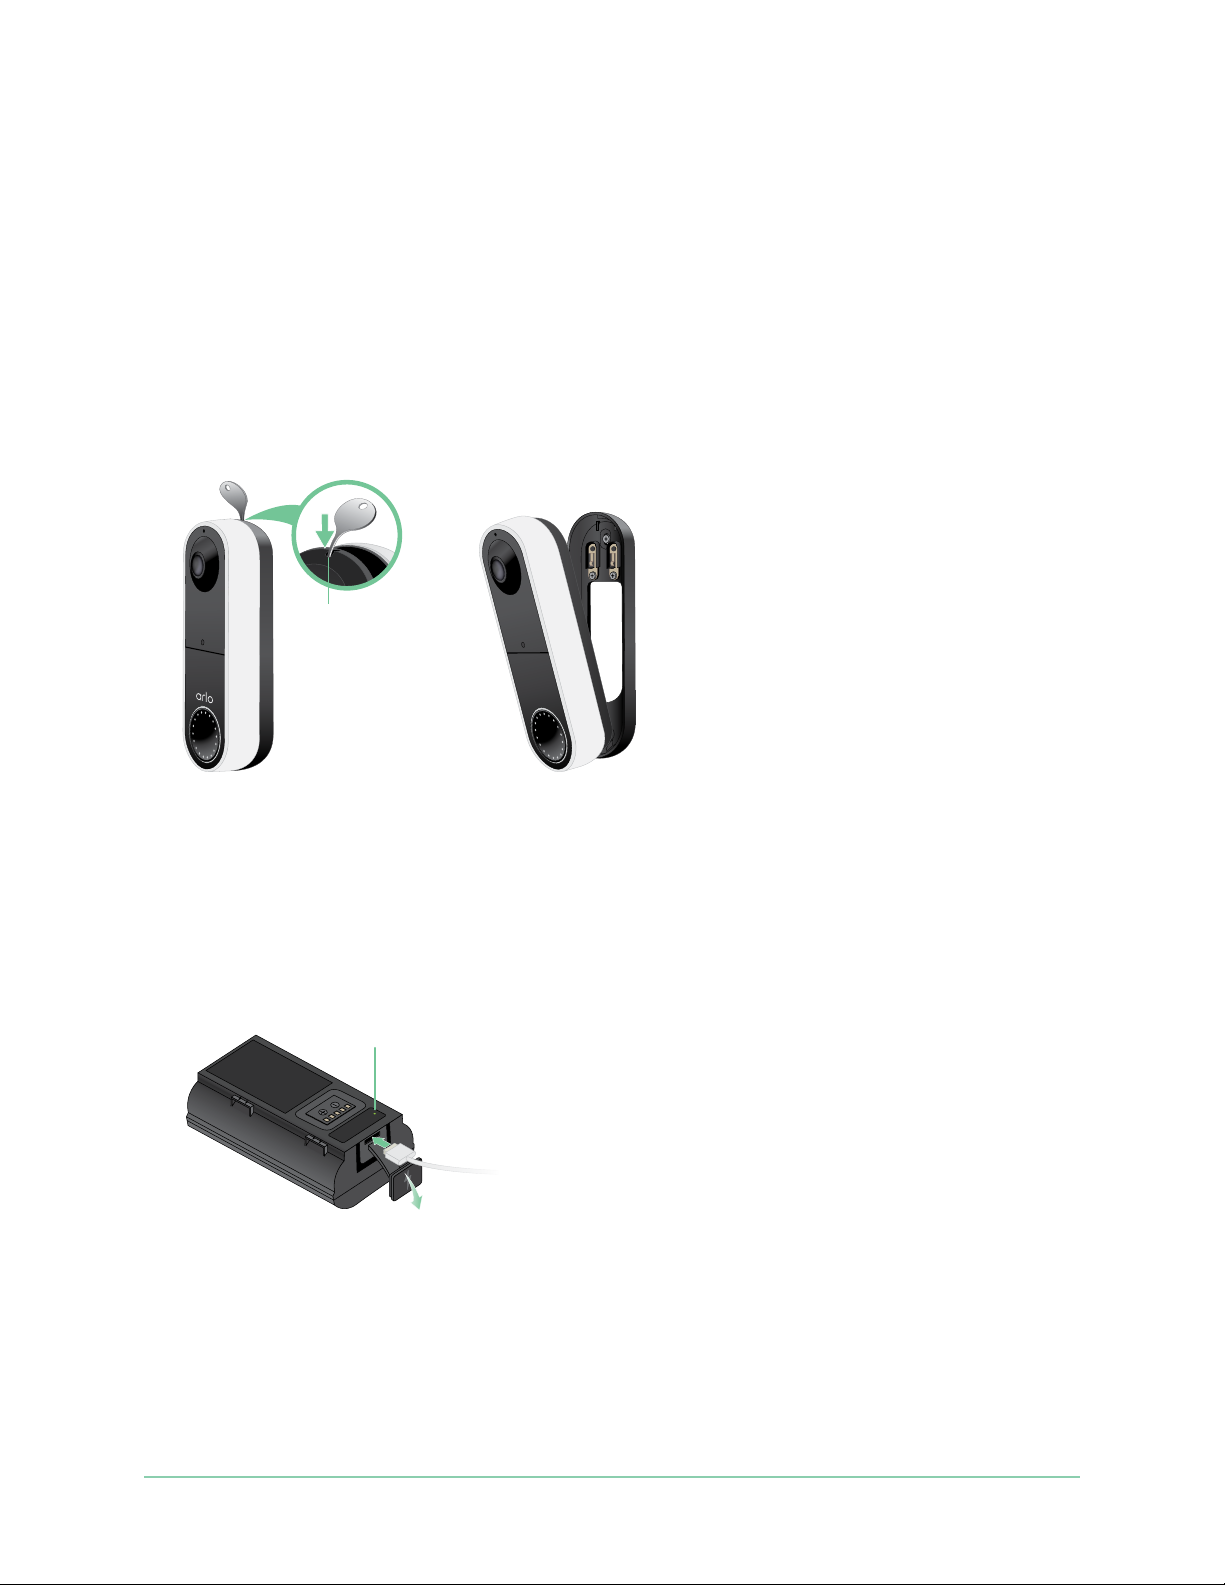
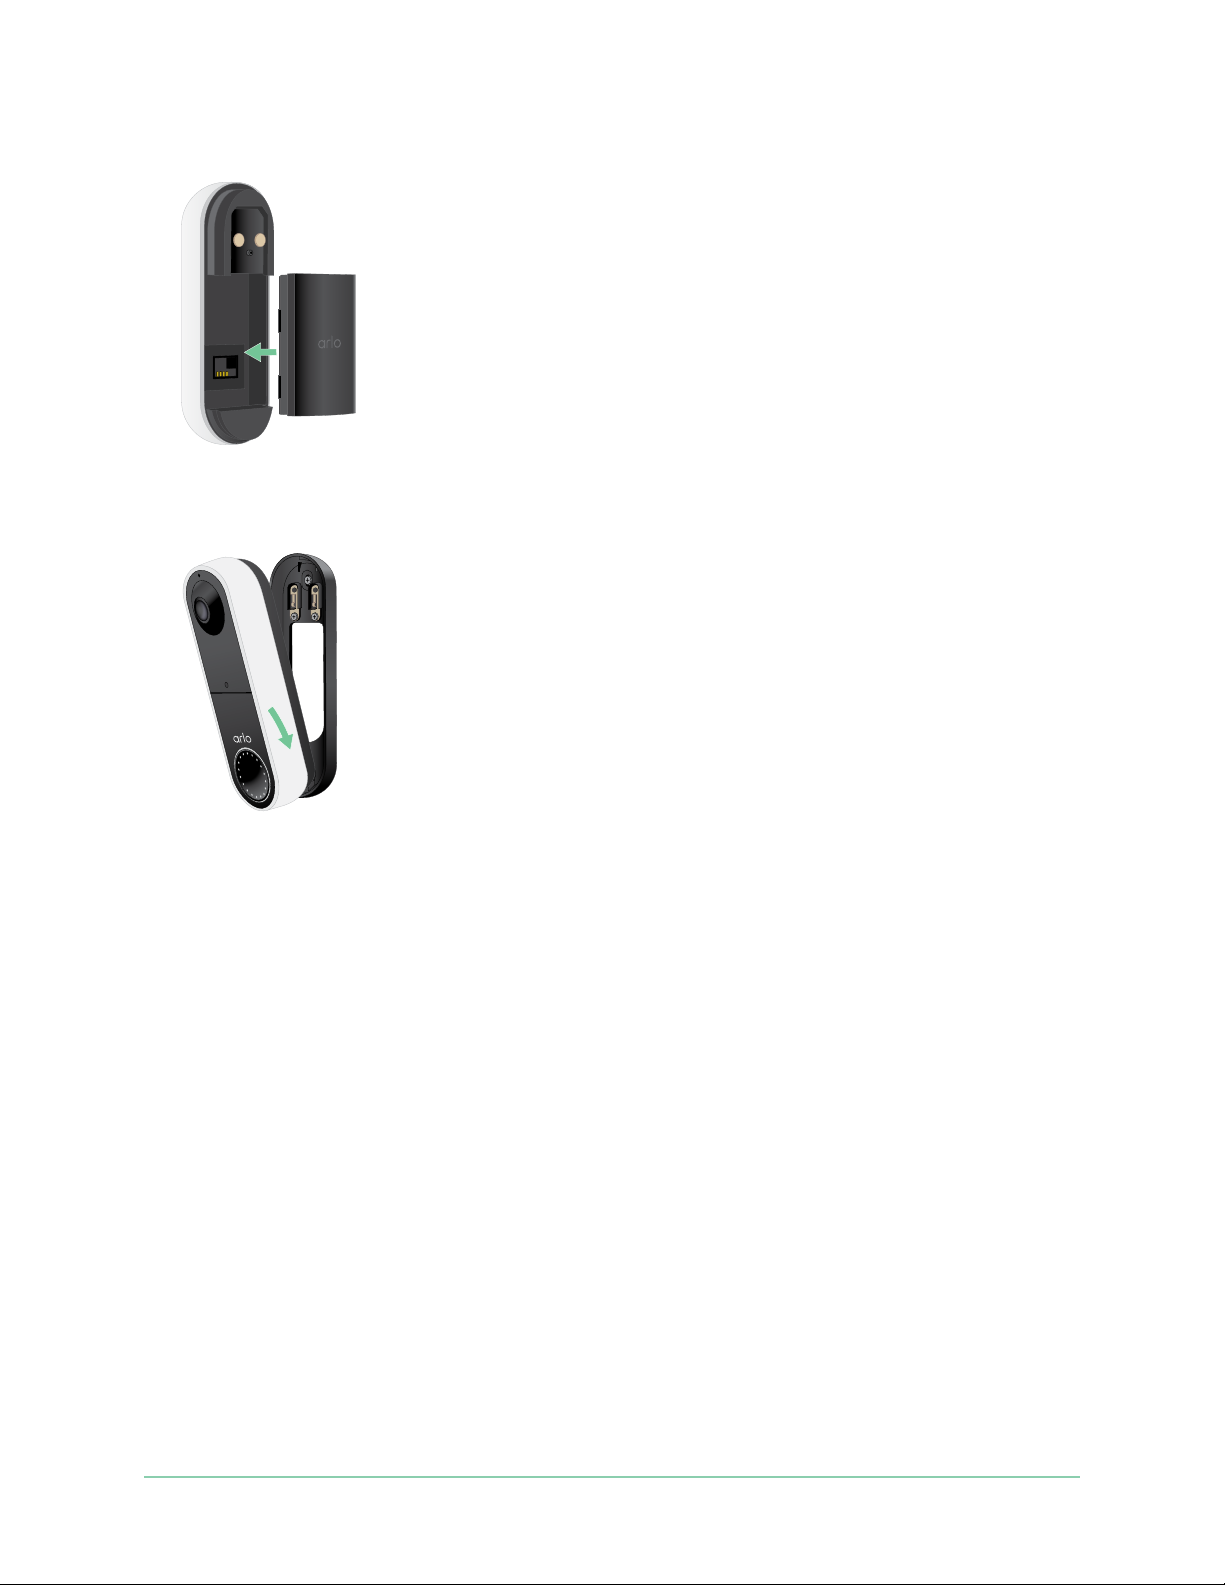
Recharge the battery aer installation
Warning: Do not leave the doorbell outdoors without the battery installed. Doing so can
result in water intrusion into the doorbell.
1. Locate the release pin that came with your wire-free Arlo Essential Video Doorbell.
Alternatively, you can use a paperclip or a similar object.
2. Insert the release pin into the release pinhole at the top of the doorbell mount.
A click occurs, and the doorbell is released from the mount.
Rear Access
3. Pull the doorbell o the mount in an up-and-out motion.
4. Bring the doorbell indoors.
5. Remove the battery from the doorbell.
6. Connect the battery to the USB charging cable that came in the package.
The charging cable works with most power adapters.
LED
7. Charge the battery to 100%.
The battery LED lights red during charging, then turns green when the battery is fully
charged.
15Get Started
User Manual
Essential Video Doorbell Wire-Free
8. Place the battery back into the doorbell.
9. Place the doorbell on the mounting plate in a down-and-in motion.
When the doorbell is secured, there is a click sound.
Chime options for your doorbell
The wire-free Arlo Essential Video Doorbell oers several chime options. To hear a ring when
someone presses your doorbell, you can connect the doorbell to an Arlo Chime 2, your home’s
traditional chime, a smart home voice assistant system, your mobile device (for SIP video
call), or an Arlo Chime with a compatible Arlo SmartHub or base station.
Wire-free chime solutions
You can take advantage of a variety of wire-free options to hear a ring and receive notications
when someone presses your Arlo doorbell.
• Doorbell video phone call.
Your doorbell is connected to the mobile device you used to set up the doorbell in the
Arlo app. Your phone rings when someone presses your doorbell, and you can answer the
phone to speak with the person who rang the doorbell. If you have an iOS device, you can
assign a contact name and ringtone to the doorbell. For more information, see Answer
your doorbell from your smartphone on page 27.
16Get Started
User Manual

Essential Video Doorbell Wire-Free
• Arlo Chime 2.
The Arlo Chime 2 may be included with your Essential Video Doorbell Wire-Free, or sold
separately. Your Chime 2 lets you receive instant alerts from your wire-free Essential Video
Doorbell and your Arlo cameras. For more information, see Chapter 3. Arlo Chime 2 on page
18.
• Smart home voice assistant systems.
You can use a home voice assistant system—like Amazon Alexa or Google Assistant—to
make an announcement when someone presses your wire-free Arlo Essential Video
Doorbell. Your doorbell is also compatible with Samsung SmartThings and IFTTT. For
more information, see Chapter 9. Arlo Connect on page 62.
• Arlo Chime, sold separately.
If you have an Arlo SmartHub or base station, you can use it to add an Arlo Chime to
your Arlo account. When an Arlo chime is on your account, you can pair it with your Arlo
doorbell. See Connect an optional Arlo Chime (sold separately).
Traditional chime solution
Your Arlo doorbell is fully wire-free, but you can connect it to your existing doorbell wiring (if
applicable) to ring your household chime and to continuously charge the doorbell. For more
information, see Chapter 3. Optional: Connect a wired chime on page 22.
Connect an Arlo Chime (sold separately)
You can connect your wire-free Arlo Essential Video Doorbell to an Arlo Chime. When a chime
is connected, a ring plays when someone presses your video doorbell. This is a useful wire-
free solution if you don’t already have a mechanical or digital chime to connect to your
doorbell.
Note: The Arlo Chime requires connection to an Arlo SmartHub or base station.
To connect an Arlo Chime to your doorbell:
1. Open the Arlo app.
2. Tap Settings > My Devices.
3. Select your Arlo Essential Video Doorbell.
4. Scroll to the bottom of Device Settings, and tap Add Chime.
5. Follow the Arlo app to connect your Arlo Chime.
When your Arlo Chime is connected to your Arlo Essential Video Doorbell, the chime
appears under PAIRED DEVICES on the Device Settings page.
17Get Started
User Manual
3. Arlo Chime 2
The Arlo Chime 2 is optional. Depending on the product you purchase, the Arlo Chime 2 may
be included with your Arlo Essential Video Doorbell Wire-Free, or sold separately. The Arlo
Chime 2 lets you receive instant alerts from your Arlo doorbell and your Arlo cameras.
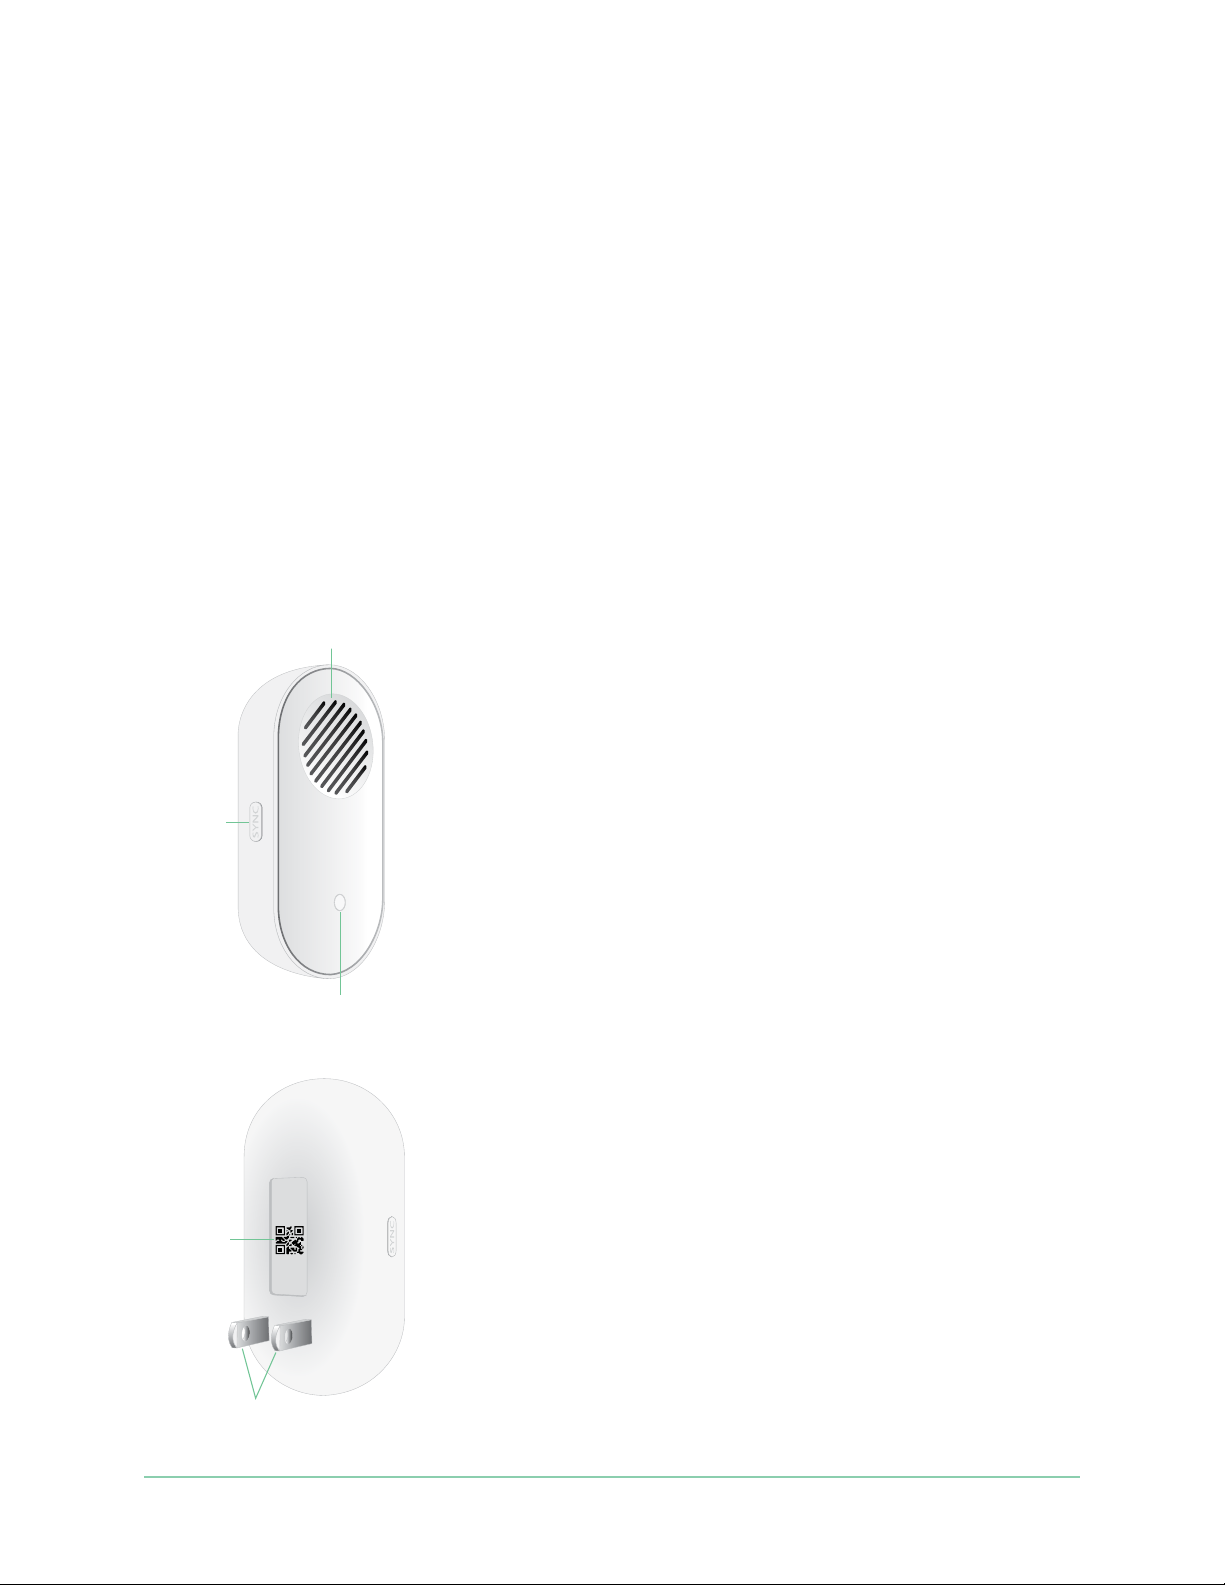
Meet your Chime 2
Speaker
Front view, integrated items and features:
• Speaker: The speaker rings or plays a melody
when someone presses your doorbell. You can
Sync
button
also set up audio alerts or a siren sound to alert
you when motion or audio is detected on an Arlo
camera.
• Sync button: Use the sync button to help set up
your Arlo Chime 2, or to factory reset the chime.
QR code
• Status LED: The LED indicates the status of your
Arlo Chime 2.
Status
LED
Rear view, integrated items and features:
• QR code: Use the QR code to set up your Arlo
Chime 2.
• Power prongs: Plug your Arlo Chime 2 into a
wall outlet.
Power
prongs
18

Essential Video Doorbell Wire-Free
Do more with your Chime 2
You can add an unlimited number of Arlo Chime 2 devices to your Arlo account. These devices
do not count toward the device limit of an Arlo Smart subscription.
You can pair more than one Arlo doorbell with your Chime 2. For example, if you have two Arlo
Essential Video Doorbells (Wired or Wire-Free), you can set both to trigger your Arlo Chime.
You can also customize your Arlo doorbell’s melody, so you know which doorbell rang.
Find a good location for your Chime 2
When placing your Arlo Chime 2:
• Place your chime in a central area in your home. This helps to ensure that you hear the
chime from multiple areas of your home.
• Place your chime in a room where you are most oen present. If you need to select one of
many rooms in your home to place your chime, place the chime wherever you are most
likely to be when someone presses your doorbell.
• If possible, use a raised wall outlet. A higher position for your Arlo Chime 2 improves audio
and WiFi connectivity.
• Use a vertical wall outlet. Place your chime into an outlet that is vertical along a wall,
rather than horizontal like a power strip.
• Use multiple chimes throughout your home. If you have a large home, you might benet
from placing a separate Arlo Chime 2 on each oor or wing of your home.
Set up your Chime 2
Set up your Essential Video Doorbell Wire-Free rst, and then set up your Chime 2 to pair with
your doorbell.
1. Open the Arlo app.
2. Tap Add New Device.
3. Follow the instructions in the Arlo app to install and set up your Chime 2.
When your Arlo Chime 2 is connected to your Arlo Essential Video Doorbell, the chime
appears under PAIRED DEVICES on the Device Settings page in the Arlo app.
19Arlo Chime 2
User Manual
Essential Video Doorbell Wire-Free
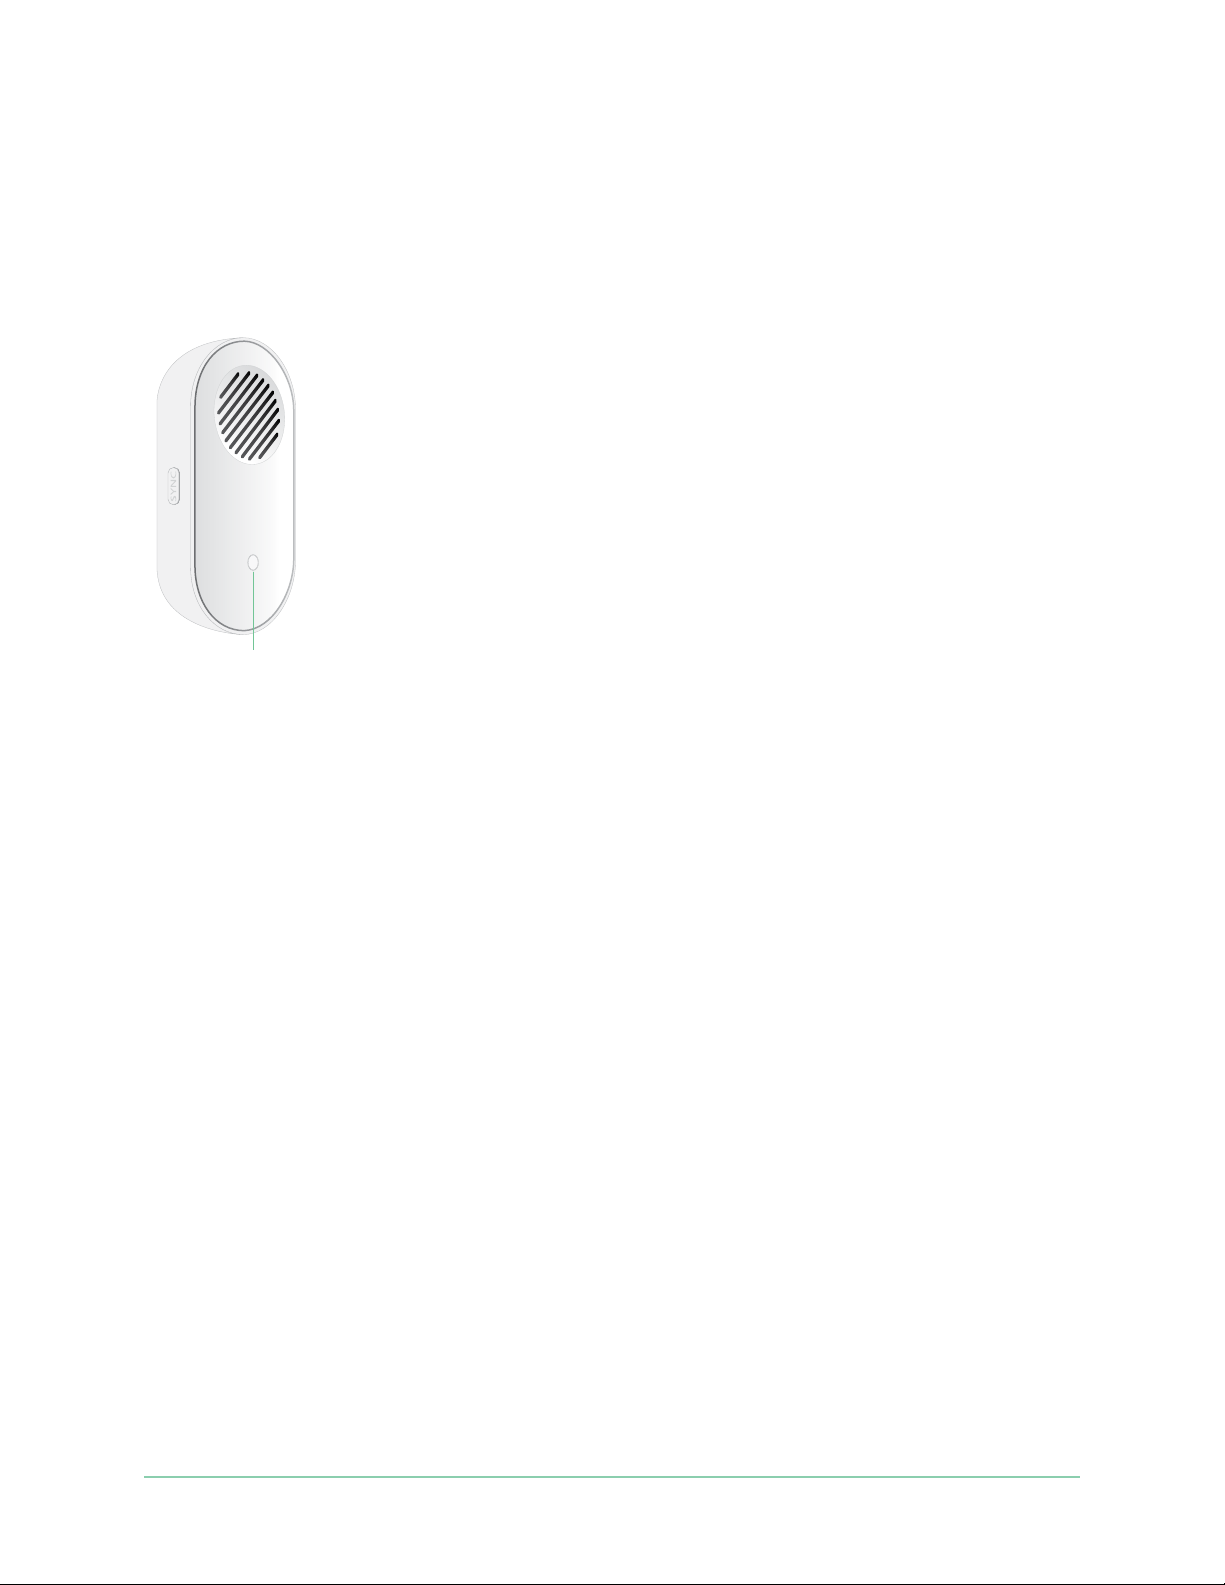
Chime 2 LED
The Arlo Chime 2 LED indicates the chime status and activity. When the chime rst powers
on, the LED lights solid white for a brief period. During regular operation, the LED is o except
when the Chime 2 is making a sound.
Status
LED
LED behaviors during setup
• Fading white. The chime is in pairing mode, and is ready to be set up.
• Fast blinking white. The chime connected to your WiFi network and your Arlo account.
• Slow blinking amber. A setup error occurred. See Arlo doesn’t discover your Chime 2
during setup on page 70.
LED behaviors aer setup
• Alternating ashing white and amber. A rmware update is in progress. Do not remove,
reset, or unplug the chime.
• Fast blinking white. The chime completed a factory reset. For information about resetting,
your chime, see Reset the Chime 2 on page 71.
• Slow blinking white. The chime is ringing or playing audio.
• Slow blinking amber. The chime is oline.
Select a melody for your Chime 2
You can select one of seven melodies to play when someone presses your Arlo doorbell and
triggers your Arlo Chime 2. If you have multiple Arlo doorbells associated with one chime, you
can set a dierent melody for each doorbell so that you know which doorbell was pressed.
20Arlo Chime 2
User Manual

Essential Video Doorbell Wire-Free
To select a melody for your Arlo Chime 2:
1. Open the Arlo app.
2. Tap Settings > My Devices.
3. Select an Arlo doorbell that is paired with your Arlo Chime 2.
4. Tap Melody > Chime Melody.
5. Select a melody.
Your settings are saved.
Use silent mode to stop the Chime 2 from ringing
The Chime 2 rings when it’s paired to your Essential Video Doorbell and someone presses the
doorbell button. To stop the Chime 2 from ringing, select silent mode for the doorbell.
To turn silent mode features on and o:
1. Open the Arlo app.
2. Tap the gear icon next to the doorbell.
3. Tap Silent Mode.
4. Adjust the settings.
For more detailed information, see Turn Silent mode on and o on page 29.
21Arlo Chime 2
User Manual
4. Optional: Connect a wired chime
The wire-free Arlo Essential Doorbell comes with a rechargeable battery, which provides
power to the doorbell. Wiring is not required for installation. If you want to hardwire your
wire-free Essential Video Doorbell, you can. Hardwiring your doorbell lets you connect it to
your home’s existing chime and allows the doorbell to trickle charge when it’s not in use.
Voltage requirements
If you choose to wire your wire-free Essential Video Doorbell, the voltage must be 8 – 24 VAC
and a transformer is required.
If your voltage doesn’t meet the power requirements, and you need to install or upgrade a
transformer, contact a licensed electrician or visit arlo.com for information about installation
services.
We recommend that you check the voltage on the transformer that powers your existing
doorbell before installing your wire-free Essential Video Doorbell. If the transformer’s voltage
isn’t 8 – 24 VAC, you must upgrade your transformer before you use the doorbell.
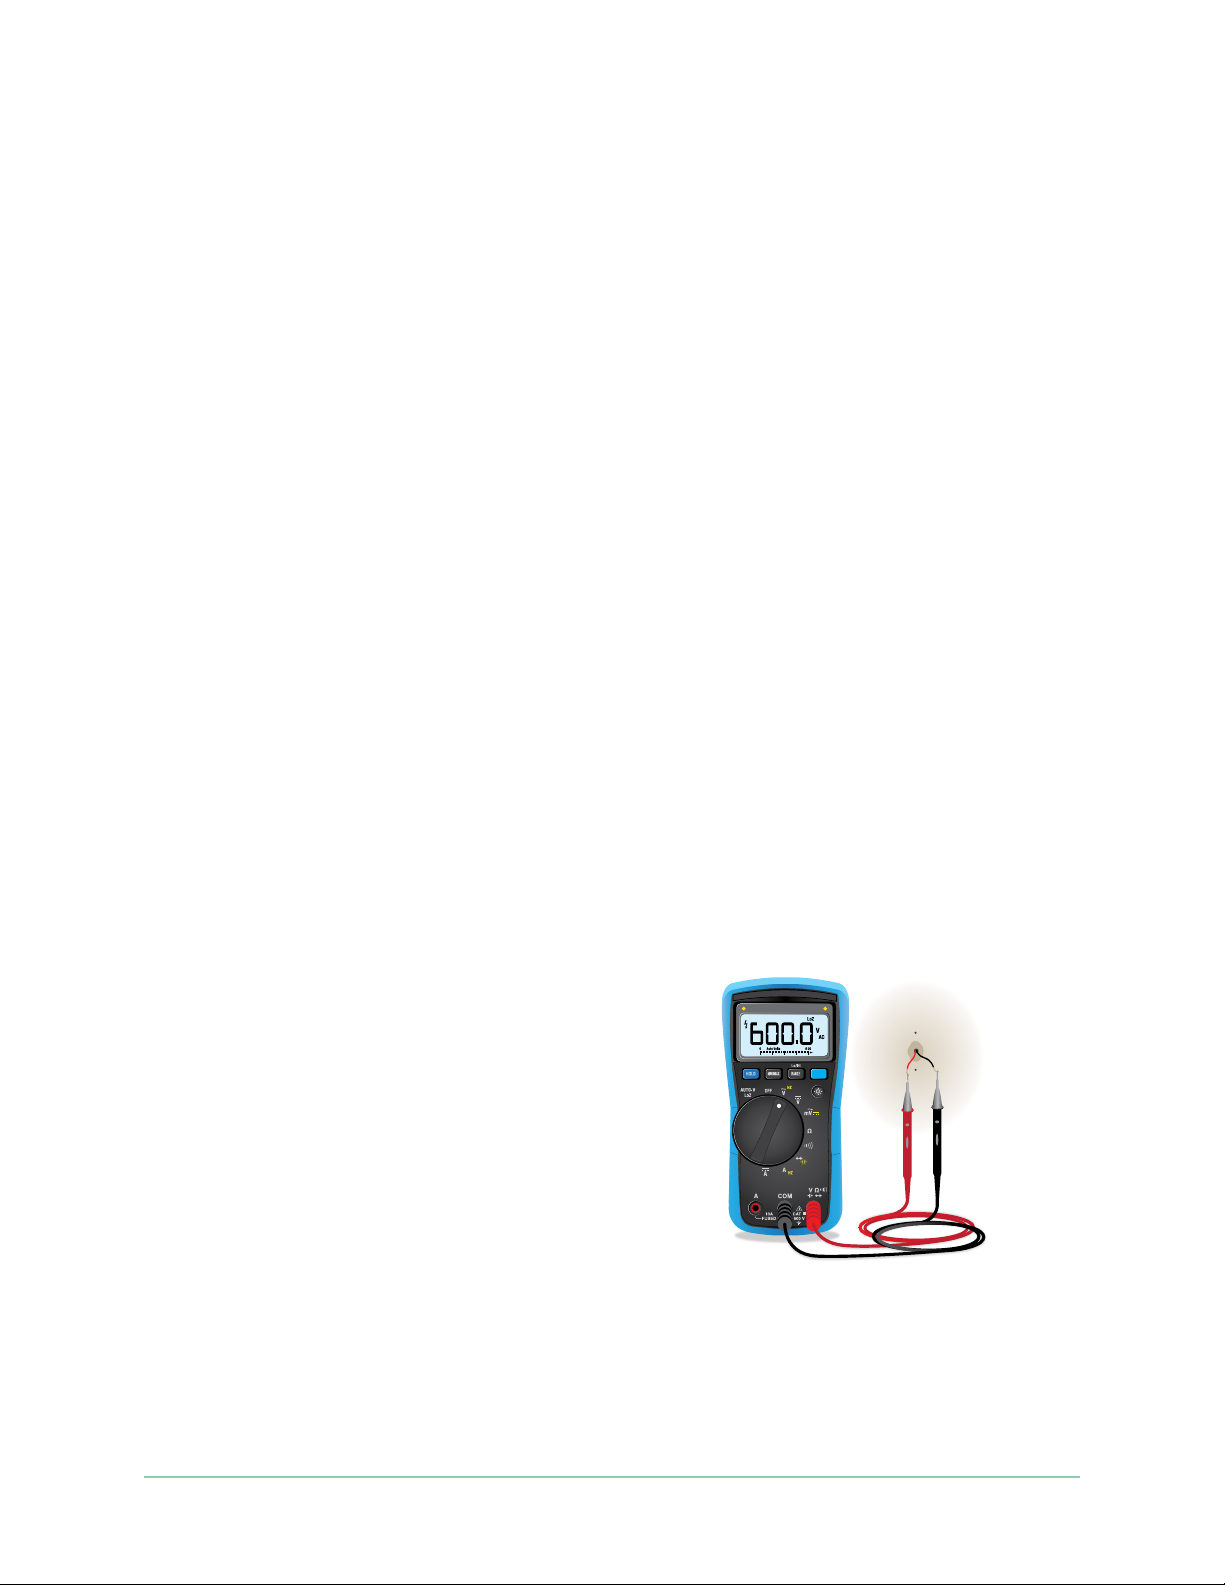
You can check the voltage level of your doorbell transformer by one of these methods:
• Use a multimeter to test the voltage.
A multimeter is an electronic tool that measures
the precise voltage level of your existing doorbell
wiring. Using a multimeter gives you the most
accurate estimate of your transformer’s voltage,
and it can be done without nding the
transformer. We recommend that you measure
at the existing doorbell wiring or at your chime.
• Check if the voltage is printed on the
transformer that provides power to your
existing doorbell.
The estimated voltage is commonly printed on transformers. This is typically accurate, but
it isn’t as precise as using a multimeter.
22
Essential Video Doorbell Wire-Free
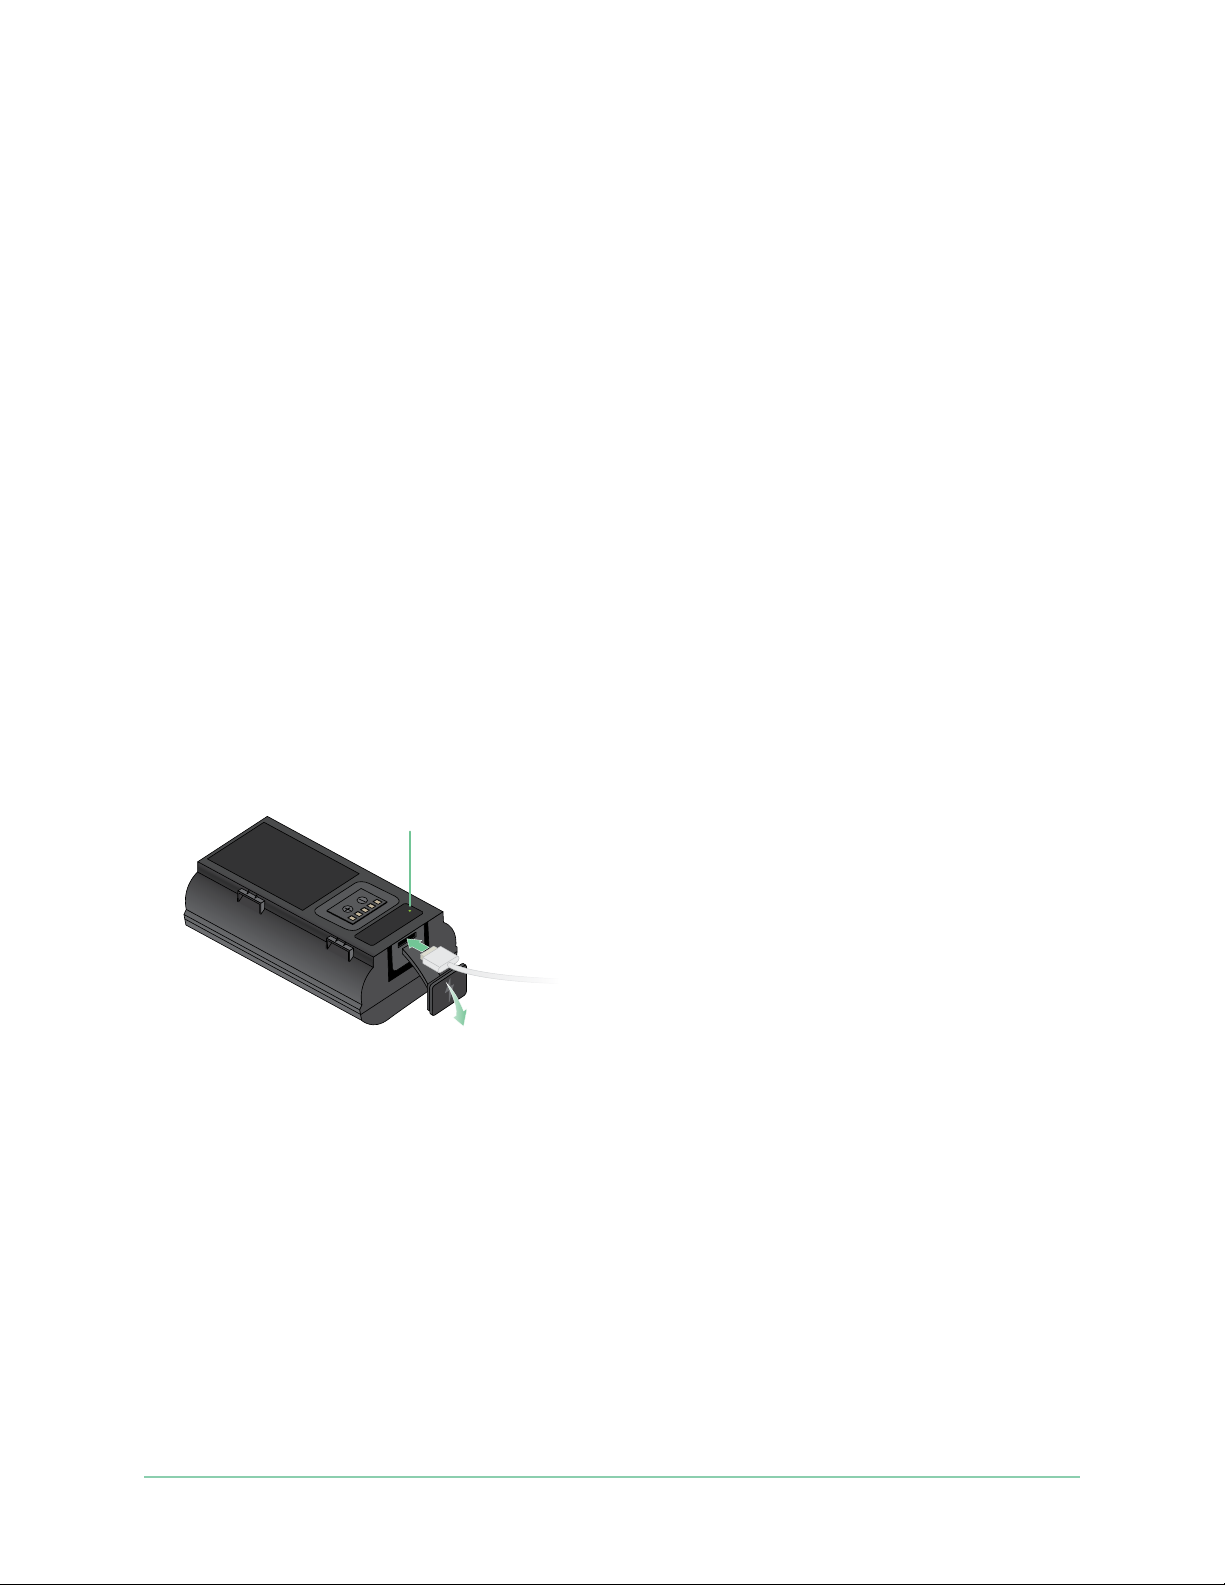
Use a multimeter to check the voltage of a transformer
1. Disconnect your existing doorbell.
To do this, unmount or unscrew your existing doorbell to expose the wiring or AC
terminals on the back.
2. Set your multimeter to AC (the V with a wavy line on top or next to it).
3. Connect the two probes from the multimeter to the wires from your doorbell.
4. Read the voltage level on your multimeter’s display to make sure iti’s between 8-24 VAC
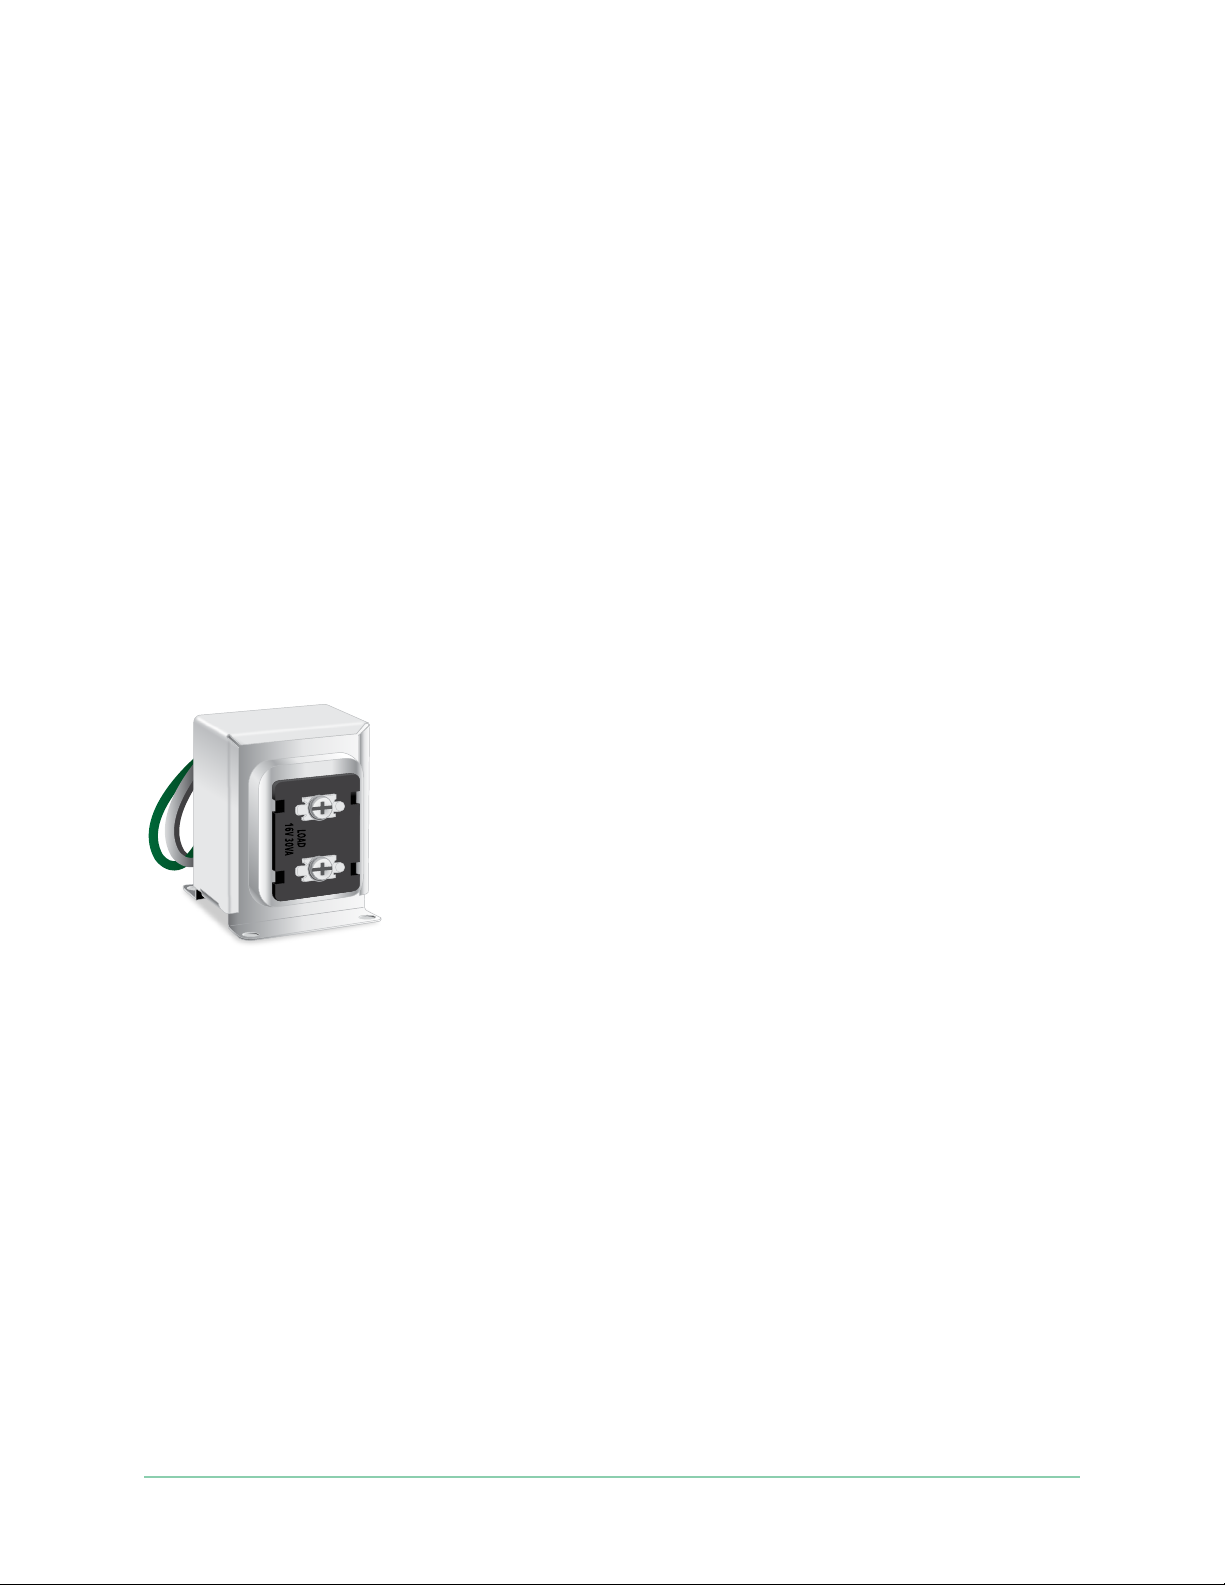
Check the voltage level printed on the doorbell transformer
A doorbell transformer is a device that steps down your household AC voltage to a lower
voltage suitable for powering an electric doorbell.
Sample doorbell transformer
The transformer is typically found:
• In the front closet near your existing doorbell
• Near your house’s circuit breaker
• In the basement or attic
• In the garage
• Near your house’s furnace
• In the crawl space under your house
23Optional: Connect a wired chime
User Manual
Essential Video Doorbell Wire-Free
Wire Extensions (Optional)
Wires are not
Change from wire-free to wired installation
If you already set up your doorbell wire-free, and now want to hardwire it, you must rst
remove the doorbell from your Arlo account, then re-add it in the Arlo app and follow the
instructions for a wired doorbell.
1. Open the Arlo app.
2. Tap Settings > My Devices.
3. Scroll to the bottom, and tap Remove Device.
4. Tap the Devices tab.
5. At the bottom of the Devices tab, tap Add New Device.
6. Select your Arlo Essential Video Doorbell Wire-Free.
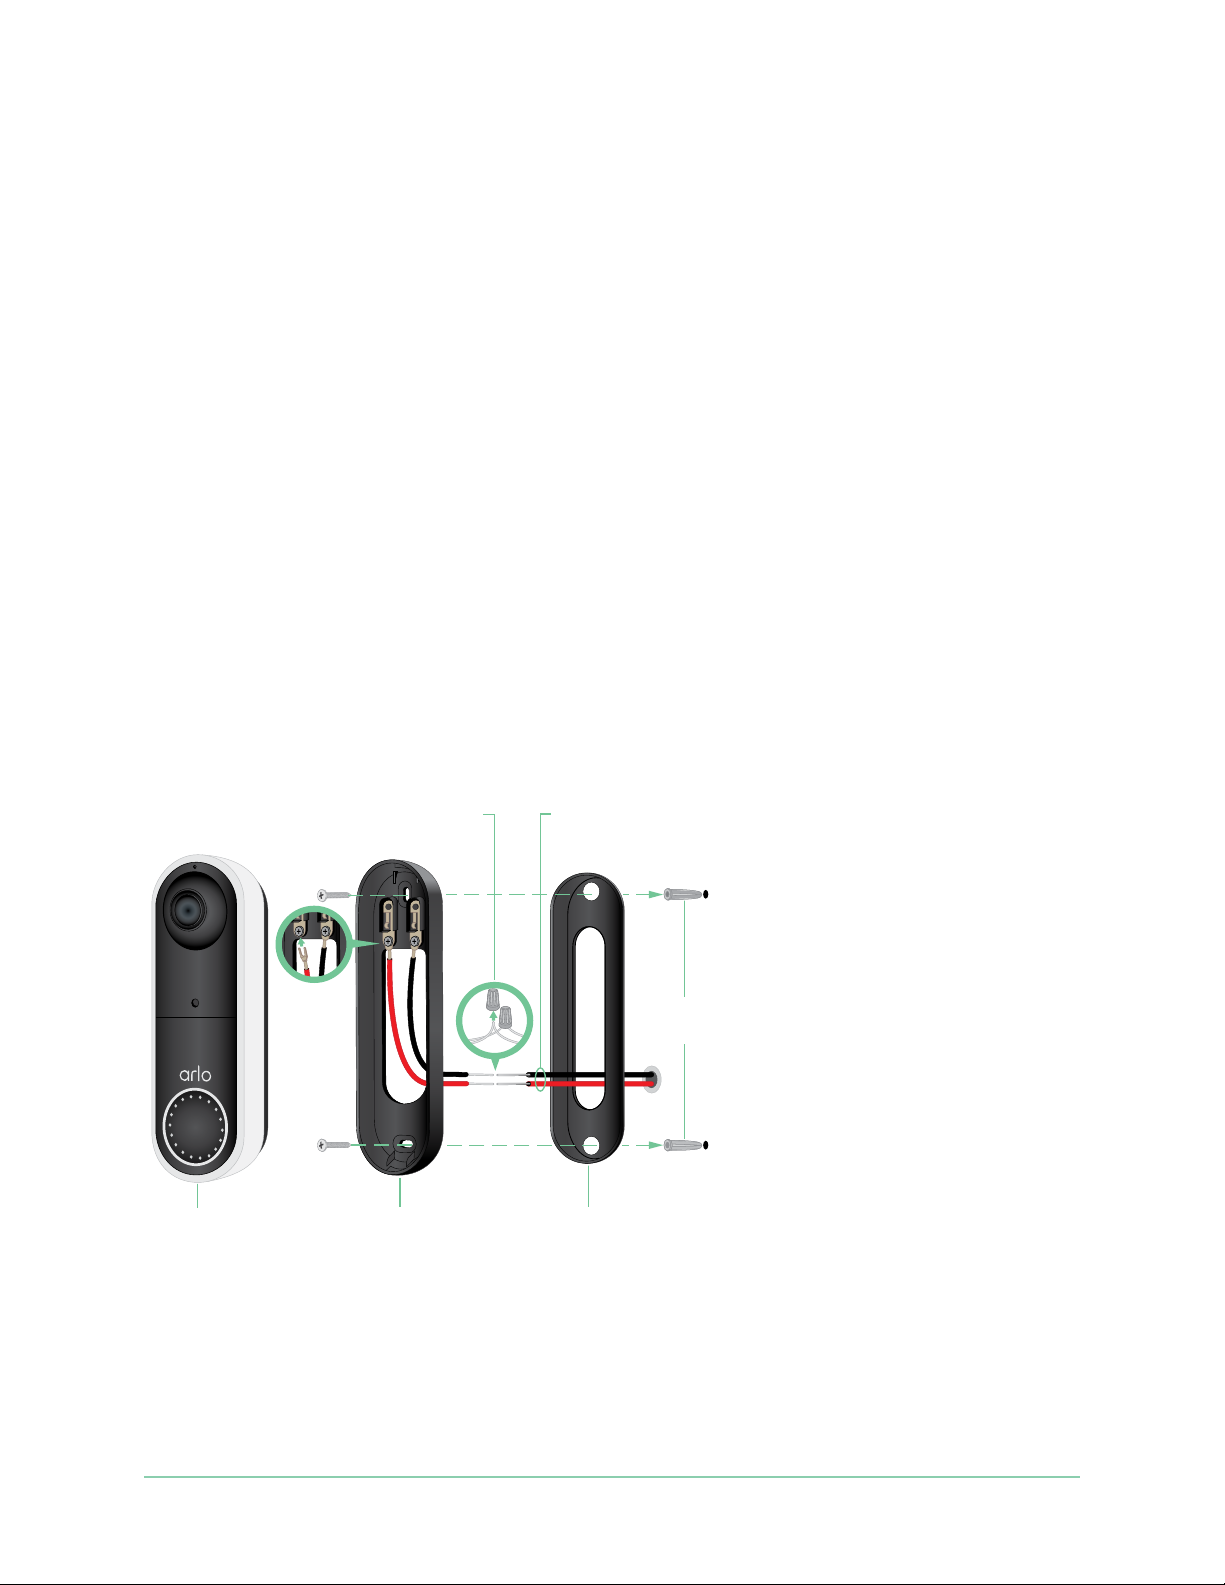
Hardwire your wire-free Essential Video Doorbell
This process is optional. The wire-free Essential Video Doorbell is battery operated, but you
can hardwire it if you like. Hardwiring your doorbell lets you connect it to your home’s existing
chime and allows the doorbell to trickle charge when it’s not in use.
and Wire Nuts (Optional)
Video
Doorbell
Mounting
Plate
required for the
wire-free configuration
Wall Anchors
(Optional)
Angled
Mounting Wedge
(Optional)
Tools
• A Phillips screwdriver is required to install the doorbell (not provided).
• You might also benet from having a drill, a level, and a ladder (to reach the chime).
24Optional: Connect a wired chime
User Manual

Essential Video Doorbell Wire-Free
Installation overview
You must use the Arlo app for installation and setup. The Arlo app guides you through
hardwired installation in this order:
1. Turn o your power at the breaker.
Warning: Failure to turn o your power might result in serious injury.
2. Follow the instructions in the Arlo app to connect the wires and install your doorbell.
3. Turn on power at the breaker.
4. Check the LED on your doorbell. See LED during setup on page 19.
5. Connect your doorbell to your home network’s 2.4 GHz WiFi.
6. Determine whether to use the at mounting plate on its own, or combine it with the
angled mounting plate to adjust the eld of view for your doorbell.
Installing with an angled mounting plate depends on the position of the doorbell and the
walkway to your home. The angled mounting plate lets you install your doorbell so that it
is angled toward the le or angled toward the right.
Use the optional wire extensions
Two identical wire extensions and fasteners come in the package with yourwire-free Essential
Video Doorbell.
Wire extension
If the existing wires for your doorbell are too short to connect your wire-free Essential Video
Doorbell, you can use the wire extensions and fasteners to lengthen the wires.
To connect wire extensions to your wire-free Essential Video Doorbell:
1. Remove the rubber ends from the wire extensions.
Fastener
2. Attach a wire extension to one of your existing doorbell wires.
To do this, connect the wire end of the wire extension (not the prong end) to your existing
doorbell wire and twist the wires together securely.
3. Attach the second wire extension to the other doorbell wire.
25Optional: Connect a wired chime
User Manual

Essential Video Doorbell Wire-Free
4. Place the fasteners on top of the connected wire ends, and twist the fasteners.
The fasteners funnel and secure the wires together.
5. Attach the extended wires to the mounting plate.
6. Tuck the wire extensions and the fasteners into the wiring cavity in the wall, behind your
doorbell.
You can use the optional mounting plate to get a better vantage point for the doorbell if it
isn’t facing straight out at the desired entryway.
7. Place your doorbell onto the mounting plate.
Ensure that the mounting screws are completely screwed in and ush with the mounting
plate so that the wire-free Essential Video Doorbell clips securely into the mounting plate.
You are ready to use the Arlo app to continue the setup process to hardwire your doorbell.
Battery charging with a hardwired doorbell
The wire-free Arlo Essential Doorbell comes with a rechargeable battery, which provides
power to the doorbell. Wiring is not required for installation.
If you choose to hardwire your doorbell to an 8-24VAC transformer, your doorbell draws a
small current through the wiring to trickle charge the battery and reduce the need to take it
out for recharging. This means that your doorbell always consumes battery power while it is
active, and gradually recharges while it is asleep.
For safety and long-term reliability, the doorbell battery starts trickle charging when the
battery level drops below 65 percent, then stops charging when it reaches 80 percent. The
rate of charging and overall battery level is dependent on usage and weather conditions.
Additionally, frequent use of the doorbell can result in complete battery drain because the
doorbell battery only charges when not in use. You can use the Arlo app to verify changes in
the battery percentage, but you will not see a charging icon when the doorbell is hardwired.
Frequent use of the doorbell can result in complete battery drain because the doorbell battery
only charges when not in use. You can choose to bring the battery indoors and charge using
the microUSB cable to 100%, if desired.
26Optional: Connect a wired chime
User Manual

5. Use Your Doorbell
Answer your doorbell from your smartphone
When a visitor presses your wire-free Essential Video Doorbell, your mobile device receives a
video call through an Internet connection. You must install the Arlo app on your smartphone
and you must be logged in to the Arlo app. The caller displays as the name you gave to your
wire-free Essential Video Doorbell. You can accept or decline the call the same way you do for
other calls that you receive on your smartphone.
When your smartphone rings, you can do the following:
• Accept the call and speak to your visitor.
• Answer the call with a Quick Reply. Select a recorded message for the doorbell to play for
the visitor.
• Decline the call. If a visitor presses your doorbell and you decline the call or don’t answer
your smartphone aer 20 seconds, your doorbell prompts the visitor to leave a message. If
the visitor leaves a message, it is saved as a Doorbell recording in your Arlo library.
If you want to receive the call on a dierent phone, you can log out of the Arlo app on the rst
smartphone and log into the Arlo app on another smartphone or tablet.
To receive the call on multiple phones, you can create a grant access account (add doorbell
to the grant access account) and log in to the Arlo app using the grant account on the other
smartphone. (See Grant access to friends on page 44.)
Accept a call from your doorbell
To accept a call on your smartphone from your wire-free Essential Video Doorbell:
1. When you receive a call from the wire-free Essential Video Doorbell, tap Accept.
2. If you are prompted to allow Arlo to access the camera, tap OK.
The incoming call page displays.
3. To talk to the visitor, speak into your phone as you normally do.
27

Essential Video Doorbell Wire-Free
You can also tap a button to toggle between hands-free and earpiece mode, play a quick
reply message for the visitor, or mute your sound.
4. To toggle between hands-free and earpiece mode, tap the speaker button.
5. To play a quick reply message, tap the message icon and select a message from the list.
6. To mute yourself so that the visitor doesn’t hear sound, tap the microphone button.
7. When you’re nished, tap End.
Respond to a visitor with a Quick Reply
1. When you receive a call from the wire-free Essential Video Doorbell, tap Accept.
2. If you’re prompted to allow Arlo to access the camera, tap OK.
The incoming call page displays.
3. To play a quick reply message, tap the message icon and select a message from the list.
The messages are:
• We will be right there.
• Leave the package outside.
• Sorry, I’m not interested.
• Can I help you?
• I’m busy right now.
Change the language for Quick Reply messages
1. Open the Arlo app.
2. Tap the gear icon next to the wire-free Essential Video Doorbell.
3. Scroll down and tap Language.
4. Select a language.
28Use Your Doorbell
User Manual

Essential Video Doorbell Wire-Free
Play a message from a visitor
If a visitor leaves a message aer pressing your doorbell, the message is saved in your Arlo
library.
1. Open the Arlo app.
2. Tap Library.
3. Tap the doorbell recording.
Use silent mode for the doorbell
Silent mode allows you to temporarily disable incoming calls and/or chime rings on your
doorbell.
To turn Silent mode features on and o:
1. Open the Arlo app.
2. Tap the gear icon next to the doorbell.
3. Tap Silent Mode.
4. Move the Silent Mode slider to enable or disable silent mode.
When Silent Mode is enabled, all the doorbell-press notications are disabled by default. If
you want your chime to ring or receive a phone call when someone presses your doorbell,
you can move the individual sliders to enable each feature. When the toggle is green, the
feature is enabled.
5. Depending on your settings and whether you use an optional chime, select which of the
following you want to be silent:
• Incoming Call. Your mobile device receives a call when someone presses your Arlo
doorbell.
• Arlo Chime 2 or Arlo Chime. If you have an optional Arlo Chime 2 or Chime (sold
separately), you can select it.
• Traditional Chime. The chime that you wired your Arlo doorbell to rings when
someone presses your Arlo doorbell.
Note: When Silent Mode is enabled, third-party smart home assistants—such as Amazon
Alexa and Google Assistant—are disabled for your doorbell.
29Use Your Doorbell
User Manual

Essential Video Doorbell Wire-Free
Control the doorbell LED
The LED on your Video Doorbell indicates how the doorbell is operating. By default, the
doorbell lights white in a slow breathing pattern when motion is detected and lights solid
white when a video call is accepted and active. You can toggle these LED patterns on and o.
To change the settings for the Status LEDs:
1. Open the Arlo app.
2. Tap the gear icon next to the wire-free Essential Video Doorbell.
3. Tap Doorbell LED.
4. Tap Breathe LED on Motion Detection to enable or disable this setting.
When Breathe LED is enabled, the LED lights in a slow breathing pattern when motion is
detected. When this setting is disabled, the LED remains o when motion is detected.
5. Tap LED on Call Accepted to enable or disable this setting.
When this setting is enabled, the LED lights solid white when a video call is accepted and
active. When this setting is disabled, the LED remains o when a call is accepted.
Change the call settings
1. Open the Arlo app.
2. Tap the gear icon next to the wire-free Essential Video Doorbell.
3. Scroll down and tap Call Settings.
4. To turn the speaker on your mobile phone on and o, tap Speaker.
5. To mute the audio on your mobile phone, tap Mute.
6. To allow a visitor to leave a video message if you don’t accept a doorbell call aer 20
seconds, or if you decline the call, tap Leave your message.
Turn the doorbell siren on and o
Your doorbell includes a siren that you can turn on to discourage tampering by an unwanted
visitor. With an Arlo Smart plan, you can activate the siren from the push notication sent on
motion detection.
1. Open the Arlo app.
2. Tap Siren
on the upper right.
30Use Your Doorbell
User Manual

Essential Video Doorbell Wire-Free
3. Tap Activate Siren.
If you have multiple Arlo devices with sirens, you’re prompted to select a device.
4. Swipe the Siren icon to the right.
The siren remains active for ve minutes or until you turn it o.
5. To turn o the siren, tap the slider at the top of the Devices page.
31Use Your Doorbell
User Manual

6. View and Record Videos
When you open the Arlo app, the Devices page displays your doorbell’s camera feed.
Tap to turn the siren
Live camera feed
from the doorbell
on and o
Tap Play
the camera feed
Motion detection is on
Tap a button to go
to Devices, Library,
Modes, or Settings
Camera
icon
Located below each camera
feed
Battery charge
WiFi connection Mute the audio
Motion detection is on 2-way Audio
Silent mode Record video manually
to stream
Camera
feed icon
Number of new recordings
Tap to view device settings
for the doorbell
Tap the camera feed to display
these icons
Play/Stop
View or change the settings Take a snapshot
32

Essential Video Doorbell Wire-Free
View your doorbell’s camera feed
1. Open the Arlo app.
2. Tap Play
The camera feed updates and camera feed icons display.
3. To stop viewing the live feed, tap Stop
on the camera feed.
.
Pan and zoom video
You can pan and zoom to focus in on the high-denition details of any live or recorded video.
Just pinch and drag any image as you do with photos on your smartphone. You can also
pinch and zoom in live feed, or use pinch and zoom to adjust your eld of view from the Video
Settings.
1. Open the Arlo app.
2. Tap Library.
3. Tap any live video or prerecorded video from your Arlo library.
A full screen view displays.
4. To pan and zoom using a mobile device:
• Pinch to zoom in and out of the video.
• Touch and drag to move around the zoomed-in frame.
5. To pan and zoom using a computer:
• Click the Zoom icon.
• Use your mouse to move around the frame.
Record clips from live video
This feature requires an Arlo Smart subscription.
1. Open the Arlo app.
2. Tap the camera feed image.
3. Tap Record
This icon turns red to indicate that you’re recording the live feed.
4. To stop recording, tap Record
to begin recording.
again.
33View and Record Videos
User Manual

Essential Video Doorbell Wire-Free
Take a snapshot from live video
This feature requires an Arlo Smart subscription.
1. Open the Arlo app.
2. Tap the camera feed image.
3. Tap Snapshot
The snapshot is saved in your library.
.
2-Way Audio
The doorbell includes a microphone that supports 2-Way Audio.
1. Open the Arlo app.
2. Tap the camera feed image.
3. Tap the microphone icon
4. The rst time you use 2-Way Audio, allow Arlo to use your phone’s microphone.
5. Tap the microphone button.
Two-way audio automatically opens, allowing you to use 2-Way Audio.
.
Change the order of the camera feeds
If you use more than one camera, you can change the order in which the camera feeds display
on the Devices page.
1. Open the Arlo app.
2. Tap Settings.
3. Under SYSTEM, tap Device Order.
4. If you’re using a smartphone or tablet, tap Edit at the top of the page.
A list icon displays.
5. Tap and hold the list icon and drag each device to the correct position on the list.
6. Tap Save.
34View and Record Videos
User Manual

Essential Video Doorbell Wire-Free
Motion detection activity zones
With an Arlo Smart subscription, you can designate zones within the doorbell camera view
where you want the camera to detect and record motion.
Add an activity zone
1. Open the Arlo app.
2. Tap Settings > My Devices.
3. Select the wire-free Essential Video Doorbell.
4. Under VIDEO, tap Activity Zones.
5. Tap +.
An activity zone box displays in the camera feed image.
6. Move the zone to the desired position in the camera feed image.
7. To reposition the zone, tap and hold the zone and move it.
8. To customize the zone name, tap Edit
If you’re using a web browser, click > next to the zone name.
9. Tap Save.
and enter a name.
Change an activity zone
1. Open the Arlo app.
2. Tap Settings > My Devices.
3. Select the wire-free Essential Video Doorbell.
4. Under VIDEO, tap Activity Zones.
5. Tap a zone to select it.
6. Move the zone to the desired position in the camera feed image.
7. To reposition the zone, tap and hold the zone and move it.
8. To customize the zone name, tap Edit
If you’re using a web browser, click > next to the zone name.
9. Tap Save.
and enter a name.
35View and Record Videos
User Manual

Essential Video Doorbell Wire-Free
Delete an activity zone
1. Open the Arlo app.
2. Tap Settings > My Devices.
3. Select the wire-free Essential Video Doorbell.
4. Under VIDEO, tap Activity Zones.
5. Tap a zone to select it.
6. Delete the device.
On an iOS device, slide the motion detection zone to the le and tap Delete.
On an Android device, slide the motion detection zone to the le.
View recordings and snapshots
With an Arlo Smart plan, your recordings and snapshots are stored in your Arlo library. You can
use the lter and the calender to nd and view specic recordings.
Access cloud recordings
Your wire-free Essential Video Doorbell records when it is in an armed mode and detects
motion. Your Arlo recordings are sent to your Arlo account in the cloud and stored in your
library. Recordings are encrypted with your user name and password.
You can access your recordings from the Arlo app on your mobile device or by using a web
browser to visit https://my.arlo.com/#/login. You can download recordings from the cloud and
save them.
Use the Library
You can use the library to nd and view recordings based on the date.
1. Open the Arlo app.
2. Tap Library.
A green circle indicates the selected day. A green dot below the date indicates each day on
which a video clip was recorded.
3. Tap a highlighted date.
Recordings from that date display below the calendar.
36View and Record Videos
User Manual

Essential Video Doorbell Wire-Free
Use the lter
You can use the lter to nd and view recordings based on criteria that you select.
1. Open the Arlo app.
2. Tap Library.
3. Tap Filter in the upper le corner of the page.
4. Tap the ltering criteria that you want to use.
5. Tap Done.
Turn o the lter
1. Open the Arlo app.
2. Tap Library.
3. Tap Filter in the upper le corner of the page.
4. Tap Reset.
5. Tap Done.
Download recordings
1. Open the Arlo app.
2. Tap Library.
3. Tap a recording.
4. Tap Download.
5. Tap OK to conrm.
Make a recording a favorite
1. Open the Arlo app.
2. Tap Library.
3. Tap a recording.
4. Tap Favorite.
37View and Record Videos
User Manual

Essential Video Doorbell Wire-Free
Share recordings
1. Open the Arlo app.
2. Tap Library.
3. Tap a recording.
4. Tap Share.
5. Share the le.
Donate recordings for research
You can donate video or snapshot les to Arlo to use for research and development of Arlo
products.
1. Open the Arlo app.
2. Tap Library.
3. Tap a recording.
4. Tap Donate.
5. Tap OK to conrm.
Delete recordings
1. Open the Arlo app.
2. Tap Library.
3. Tap a recording.
4. Tap Delete.
5. Tap OK to conrm.
38View and Record Videos
User Manual

7. Change Your Settings
Once you set up your Arlo account, you can access it by using the Arlo app on a smartphone
or tablet, or from a computer using a web browser. If you’re using a computer, enter https://
my.arlo.com/#/login in the address bar of the browser.
Two-step verication
Two-step verication helps protect your account by adding another layer of security when you
log in to your Arlo account. Arlo will verify your identity anytime you sign in with a new device.
You can have up to ve dierent two-step verication methods, in addition to the email
address associated with your Arlo account.
You must enable two-step verication enabled to access your Arlo account. This is to protect
your data and add an extra layer of security to your Arlo account. Before you set up two-step
verication, make sure that you can log in to the email address associated with your Arlo
account. Your account email is always used as a backup option to log in to your account.
Note: If you’re a Friend on someone’s Arlo account, and the account owner sets up two-step
verication, you don’t have to use two-step verication to log in. Likewise, if you set up twostep verication as a Friend on an Arlo account, the account owner isn’t aected.
How two-step verication works
To sign in with two-step verication, you must rst enter your email address and password.
Then, you must verify your identity with a security code (delivered by SMS text message or
email) or conrmation from an already trusted device. Requiring two pieces of information
helps to prevent any unwanted log in, even if someone has your Arlo account password.
• Trusted device. You can trust a device on your Arlo account so that you never have to
verify your log in with a push notication or text message. The device shows up under the
list of trusted devices in Settings > Prole > Login Settings > Two-Step Verication.
• Push notication. When someone attempts to log in to your Arlo account on a new device,
Arlo sends a push notication to a previously trusted (and currently logged in) iOS or
Android device. Tap the push notication on the trusted device to approve or deny the log
in.
39

Essential Video Doorbell Wire-Free
• SMS text message. When someone attempts to log in to your Arlo account, Arlo sends a
text message to the phone number that you veried for two-step verication. Enter the
security code from the text message to complete the log in.
• Email. If you can’t access a trusted device with push notications, or if you can’t receive
SMS text messages, you can request a security code to be sent to the email associated
with your Arlo account.
Set up two-step verication from the Arlo app
Before you set up two-step verication, make sure you can log in to the email that you’re
using for your Arlo account. Email is your backup two-step verication option.
To enable two-step verication from your mobile device:
1. Open the Arlo app.
2. Tap Settings.
3. In the ACCOUNT section, select Prole > Login Settings > Two-Step Verication.
4. Tap the switch next to Enable.
5. Select Push Notication and/or SMS Text Message as your verication method.
Note: Your Arlo account email is an automatic back-up option.
6. Follow the instructions in the app to complete your two-step verication setup.
Two-step verication is enabled for your account.
Set up two-step verication from a computer
To enable two-step verication from your desktop:
1. Log in to my.arlo.com.
2. Click Settings > Prole > Two-Step Verication.
3. Click the switch next to Enable.
4. Click Add SMS Verication as your verication method.
Note: Note: Your Arlo account email is an automatic back-up option.
5. Follow the instructions to complete your two-step verication setup.
Two-step verication is enabled for your account.
Note: Push notication verication cannot be enabled on my.arlo.com. You must use the Arlo
app to enable push notication verication.
40Change Your Settings
User Manual

Essential Video Doorbell Wire-Free
Add a phone number or device to two-step verication
1. Open the Arlo app.
2. Tap Settings.
3. In the ACCOUNT section, select Prole > Login Settings > Two-Step Verication.
4. To add a phone number, tap Add SMS Verication and enter the phone number.
5. To add a trusted device, tap Add Trusted Device.
Remove a phone number or device from two-step verication
1. Open the Arlo app.
2. Tap Settings.
3. In the ACCOUNT section, select Prole > Login Settings > Two-Step Verication.
4. Tap the trashcan icon next to a phone number or trusted device.
Use face or ngerprint authentication
You can use Touch ID® or Face ID® with a compatible Apple device. With a compatible Android
device, you can use ngerprint authentication.
Your device must meet the following minimum requirements:
• Apple devices:
iOS version 10.3 or higher
A Touch ID compatible device (iPhone 5s, iPad Air 2, or newer)
A Face ID compatible device (iPhone X, iPad Pro 2018, or newer)
• Android devices:
Android OS version 6.0 or higher
A compatible Android device with ngerprint authentication
Turn ngerprint authentication on and o for the Arlo app
1. Enable ngerprint authentication on your iPhone or Android device.
2. Open the Arlo app.
3. Tap Settings.
41Change Your Settings
User Manual

Essential Video Doorbell Wire-Free
4. In the ACCOUNT section, select Prole > Login Settings.
5. Slide the toggle for ngerprint or Touch ID to the right (on) or le (o).
Turn face authentication on and o for the Arlo app
1. Enable Face ID authentication on your iPhone.
2. Open the Arlo app.
3. Tap Settings.
4. In the ACCOUNT section, select Prole > Login Settings.
5. Slide the toggle Face ID to the right (on) or le (o).
Customize your prole
You can enter your name, add a prole photo and home address, and opt-in or opt-out of Arlo
news and support updates.
Add a prole picture
1. Open the Arlo app.
2. Tap Settings.
3. In the ACCOUNT section, select Prole > Edit Prole.
4. Tap the prole picture at the top of the page.
5. Select Take Photo or Choose from Library.
Note: If you already have a prole picture, you can also select Remove Current Photo.
6. Upload your preferred prole picture.
7. Tap Save at the bottom of the page.
Edit prole settings
You can enter your name, add a prole photo and home address, and opt-in or opt-out of Arlo
news and support updates.
1. Open the Arlo app.
2. Tap Settings.
42Change Your Settings
User Manual

Essential Video Doorbell Wire-Free
3. In the ACCOUNT section, select Prole > Edit Prole.
4. Enter your prole settings.
5. Tap Save at the bottom of the page.
Change your Arlo password
You can change your password in the Arlo app or by logging in to my.arlo.com.
1. Open the Arlo app.
2. Tap Settings.
3. In the ACCOUNT section, select Prole > Login Settings.
4. Enter your old password.
5. Enter a new password and then conrm it.
6. Tap Change Password.
Your new password is saved.
Reset a forgotten password
If you forgot your Arlo password, you can reset it with a veried email address.
1. Open the Arlo app.
2. Tap Forgot Password?.
3. Enter your email address.
4. Tap Send Email.
An email is sent from alerts@arlo.com to your veried email address.
5. Tap the link provided in that email.
6. Enter a new password.
7. Tap Submit.
Your password is reset.
43Change Your Settings
User Manual

Essential Video Doorbell Wire-Free
Grant access to friends
You can add friends to your Arlo account. Friends can view live streams from your cameras;
record video clips; view, share, mark as favorite, and delete clips from your library; and take
snapshots. Friends are granted limited access to some of the settings and features of your
Arlo account. You can select which cameras friends can see and what administrative rights are
available to them.
Friends without access rights can:
• Play and view library content.
• View live footage.
• Zoom and drag video footage.
• Control brightness.
• Enter full-screen view.
Friends who are granted access rights can also:
• Play and pause video footage.
• Record video footage.
• Mute the speaker.
• Access and change modes.
• View motion detection statuses.
• Manually record.
• Take snapshots.
• Mark as a favorite, share, download, and delete video footage.
• Use a camera’s microphone.
Add a friend
1. Open the Arlo app.
2. Tap Settings.
3. Under ACCOUNT, tap Grant Access.
4. Tap Add or +.
5. Enter your friend’s rst name, last name, and email address.
6. Tap the Arlo devices that you want your friend to access.
44Change Your Settings
User Manual

Essential Video Doorbell Wire-Free
7. To grant access rights to your friend, tap Allow Access Rights.
Selecting Allow Access Rights allows this friend to change your account and camera
settings.
8. Tap Send Invite.
An email message is sent inviting your friend to create an Arlo account. This friend’s name
is displayed with the status Pending. When the friend accepts your invitation, the status
changes to Accepted.
Edit a friend’s access privileges
1. Open the Arlo app.
2. Tap Settings.
3. Under ACCOUNT, tap Grant Access.
A list of your friends displays with the status of their accounts.
4. Tap the friend, and tap Edit
5. Tap cameras to select or deselect them.
6. Tap Allow Access Rights.
Selecting Allow Access Rights allows this friend to change your account and camera
settings.
7. Tap Done.
.
Delete a friend
1. Open the Arlo app.
2. Tap Settings.
3. Under ACCOUNT, tap Grant Access.
4. Select the friend, and tap Edit
5. Tap Delete Friend.
.
6. Tap Yes.
Change the time zone
1. Open the Arlo app.
2. Tap Settings > My Devices.
45Change Your Settings
User Manual

Essential Video Doorbell Wire-Free
3. Tap the wire-free Essential Video Doorbell.
4. Tap Time Zone.
5. Tap a time zone.
If you’re using a mobile device, your settings are saved.
6. If you’re using a computer, click Save.
Doorbell settings
You can view or change the settings for your doorbell using either of these methods:
• Tap Settings > My Devices and select the doorbell.
• Tap the gear icon
below the doorbell’s camera feed.
Change the doorbell name
1. Open the Arlo app.
2. Tap the gear icon next to the wire-free Essential Video Doorbell.
3. Tap Edit
4. Enter a new name.
Names are limited to 32 characters.
5. Tap Save.
next to the doorbell name.
Change the type of traditional chime the doorbell triggers
You can set your wire-free Essential Video Doorbell to trigger a mechanical, digital, or no
chime when someone presses the doorbell button.
Note: If you already added your doorbell in the Arlo app and you selected battery (not wired),
then you’ll need to remove your doorbell from the Arlo app and re-add it selecting wired in
order to change the chime setting.
To change the type of chime that your doorbell triggers when the doorbell is setup as wired:
1. Open the Arlo app.
2. Tap the gear icon next to the wire-free Essential Video Doorbell.
3. Tap Traditional Chime.
46Change Your Settings
User Manual

Essential Video Doorbell Wire-Free
4. Select Mechanical, Digital, or None.
• Mechanical. Mechanical chimes make a traditional ding-dong sound when rung.
• Digital. Digital or electronic chimes have a speaker and can play a melody or ding-dong
when rung.
• None. Use this setting if you’re bypassing the doorbell chime or are installing to a
transformer, without any chime connected. For more information, see Use Bypass
mode for the Power Kit on page 67.
Change the brightness of the video
This change takes eect on the next video stream or motion recording.
1. Open the Arlo app.
2. Tap the gear icon next to the wire-free Essential Video Doorbell.
3. Tap Video Settings.
4. Move the slider to increase or decrease the video brightness.
Change the video quality
This change takes eect on the next video stream or motion recording.
1. Open the Arlo app.
2. Tap the gear icon next to the wire-free Essential Video Doorbell.
3. Tap Video Settings > Video Quality.
4. Tap to select 1536sq, 1080sq, or 720sq.
Turn night vision on and o
When night vision is enabled, the camera automatically turns on the infrared (IR) LED to
record in low-light conditions. We recommend that you turn o night vision if the camera is
facing reective surfaces, such as windows. This change takes eect on the next video stream
or motion recording.
1. Open the Arlo app.
2. Tap the gear icon next to the wire-free Essential Video Doorbell.
3. Tap Video Settings.
4. Tap Night Vision.
5. If you’re using an Android device, tap the slider.
47Change Your Settings
User Manual

Essential Video Doorbell Wire-Free
Turn Auto HDR on and o
High Dynamic Range (HDR) is a soware method of adjusting high-contrast video or photo
images that include areas of bright highlight and deep shadow. Without HDR, some images
with bright areas can appear washed out, while dark areas can appear black, without detail.
HDR makes it possible to see detail in both the highlights and shadows.
Your doorbell comes with an Auto HDR feature that is enabled by default. When your
doorbell’s camera detects an image that would benet from HDR, it automatically applies
HDR unless you use the Arlo app to disable Auto HDR.
With Auto HDR
To turn Auto HDR on or o:
1. Open the Arlo app.
2. Tap the gear icon next to your doorbell.
3. Tap Video Settings.
4. Tap Auto HDR.
If you’re using an Android device, tap the slider.
Without Auto HDR
Change the audio settings
You can adjust the settings to turn the microphone on and o and adjust the speaker. These
settings take eect whether or not the microphone and speaker are enabled for live-streaming
and motion recording.
Note: Controls for the speaker and microphone settings of your mobile phone during a
doorbell video call are set up within Call Settings. See Change the call settings on page 30.
To change the audio settings:
1. Open the Arlo app.
48Change Your Settings
User Manual

Essential Video Doorbell Wire-Free
2. Tap the gear icon next to the doorbell.
3. If you’re using a mobile device, tap Audio Settings.
4. Adjust the settings:
• Microphone toggle turns the microphone o and on.
• Speaker toggle and volume. To turn the speaker on and o, tap Speaker. To change
the speaker volume, move the Speaker Volume slider.
Adjust the icker setting
The combination of certain articial light sources and the Video Doorbell’s camera shutter
speed might cause ickering or dark lines in recorded video. The default setting is Auto (60
Hz), but you can change this setting to 50 Hz.
1. Open the Arlo app.
2. Tap the gear icon next to the wire-free Essential Video Doorbell.
3. Tap Flicker Adjustment.
4. Tap a setting.
View device information
You can view the rmware version, hardware version, and the serial number.
1. Open the Arlo app.
2. Tap Settings > My Devices.
3. Tap the device.
4. Tap Device Info.
Remove a device from your account
1. Open the Arlo app.
2. Tap Settings > My Devices.
3. Tap the device.
4. Scroll down and tap Remove Device.
49Change Your Settings
User Manual

Essential Video Doorbell Wire-Free
Restart the doorbell from the Arlo app
1. Open the Arlo app.
2. Tap Settings > My Devices.
3. Tap the doorbell.
4. Scroll down to the bottom of the page and tap Restart.
50Change Your Settings
User Manual

8. Modes, Rules, and Alerts
You can arm or disarm Arlo devices that detect motion or audio, either individually or all at
the same time. You can also can set up a schedule to automatically arm each device. Your
doorbell always detects motion. When it is armed, it alerts you when motion is detected, and
can be set up to ring a chime.
Arm or disarm all your Arlo devices
Arming or disarming all devices deactivates other modes, such as Schedule, Geofencing, and
Custom modes. To return a device to another mode, select the device and then select a mode.
To arm or disarm all your Arlo devices:
1. Open the Arlo app.
2. Tap Modes.
3. Tap Arm All Devices or Disarm All Devices.
Modes
Arlo modes give you control over how your doorbell responds with recordings and alerts
when it detects motion. Modes let you tell your doorbell and other Arlo devices to respond
dierently at dierent times.
You can create your own modes, but the Arlo app comes with these modes:
Armed. The doorbell records and sends alerts, and can trigger a chime to ring when
triggered, depending on your rule settings.
Disarmed. Pressing the doorbell button still works as usual, but the doorbell camera
doesn’t record or send alerts when motion is detected.
Schedule. Manage recordings and alerts based on a schedule.
Geofencing. Arm, disarm, or resume a schedule mode when you arrive at or leave
a given location based on your mobile device location.
51

Essential Video Doorbell Wire-Free
You can customize the Armed and Schedule modes and you can add new modes. When you’re
sleeping, you might want the doorbell to record, but not send you alerts. Then during the
daytime, the doorbell could both record and notify you when motion is detected. You can
create dierent modes for the same doorbell or camera, but each Arlo device can only use one
mode at a time.
Select a mode
You can select a mode or set modes to activate according to a schedule.
1. Open the Arlo app.
2. Tap Mode.
3. Tap the wire-free Essential Video Doorbell.
A list of modes displays.
4. Tap a mode to activate it.
The mode that you selected turns on immediately. The mode stays active until you change
it.
Mute Notications
Mute Notications temporarily silences push notications to your mobile device, while videos
continue to be recorded. This is great for a party when you don’t want to be disturbed. You
can mute notications from the Arlo app. If you use Arlo Smart, you can also activate Mute
Notications directly from push notications.
To mute notications:
1. Open the Arlo app.
2. Tap Settings > Mute Notications.
3. Select the length of time to mute notications.
A message displays conrming that you’re muting notications. The Mute Notication
status shows the amount of remaining time until notications resume.
To unmute notications
1. Open the Arlo app.
2. Tap Settings > Mute Notications > Unmute.
The Mute Notications status changes to O.
52Modes, Rules, and Alerts
User Manual

Essential Video Doorbell Wire-Free
Rules for modes
Each mode uses one or more rules. You can set these options.
• Trigger device. If your doorbell is your only Arlo device, it is the trigger device that detects
motion. If you use additional Arlo cameras or devices, you can create rules where one Arlo
device triggers another. For example, if the someone presses the doorbell at night, an Arlo
Security Light turns on. In this example, the doorbell is the trigger device.
• Action device. If your doorbell is your only Arlo device, it’s the action device. The action
device performs an action in response to the trigger device. For example, you might want
your driveway camera to trigger your doorbell camera to start recording video. Or you
might want your Chime 2 to alert you when your Arlo Security Light detects motion. You
decide what action each camera takes.
• Notications. When a trigger is detected, the Arlo app can send you push notications,
email alerts, or both. You can also send email alerts to friends, family members, pet sitters,
or anyone who might need to respond when your Arlo doorbell or camera is triggered.
Trigger a Chime 2 when the doorbell is pressed
Depending on the product you purchase, the Arlo Chime 2 may be included with your Arlo
Essential Video Doorbell Wire-Free, or sold separately. The Arlo Chime 2 lets you receive
instant alerts from your Arlo doorbell and your Arlo cameras.
During setup, you pair your Chime 2 with your Essential Video Doorbell. This means your
Chime 2 will ring when someone presses your doorbell button. (You don’t have to set up a
mode for that.) You can view the paired devices on the Device Settings page for the Chime 2
(Pair Doorbell) or the Device Settings page for the Doorbell (Pair Chime).
Mode rules are only used when setting up the Chime 2 as an action device to play a sound or
siren in response to a trigger, such as motion or audio from a doorbell or camera.
Set up a rule to use the Chime 2 as a siren
1. Open the Arlo app.
2. Tap Mode.
3. Select your doorbell or the Arlo device that you want to use to trigger a siren.
A list of modes displays.
4. Tap Edit next to the mode that you want to edit.
5. Tap Edit next to the rule.
53Modes, Rules, and Alerts
User Manual

Essential Video Doorbell Wire-Free
6. Tap Add Device.
7. Select your Chime 2 on the Action Device page, and tap Save.
8. Select Activate Siren.
Change motion sensitivity
You can edit a rule to change the motion sensitivity level for your cameras.
1. Open the Arlo app.
2. Tap Mode.
3. Tap the wire-free Essential Video Doorbell.
4. Tap Edit
5. Tap Edit next to the rule.
6. Under If the following, tap Edit next to Motion is detected.
7. Move the slider to adjust the sensitivity level for motion detection for this camera.
If you used a mobile device to specify the settings, your settings are saved.
8. If you used a browser to specify the settings, click Save.
next to the mode.
Automatically stop recording when motion stops
1. Open the Arlo app.
2. Tap Mode.
3. Tap the wire-free Essential Video Doorbell.
4. Tap Edit next to the mode.
5. Under Then do the following, tap Edit next to Record video.
6. Select Record until activity stops (up to 300 sec).
54Modes, Rules, and Alerts
User Manual

Essential Video Doorbell Wire-Free
Manage alerts
Arlo can push notications to your smartphone, send you email alerts, or do both. To receive
Arlo notications on your phone, you must install the Arlo app on your phone.
Note: If you log out of the Arlo app on your smartphone or mobile device, you will stop
receiving push notications.
1. Open the Arlo app.
2. Tap Mode.
3. Tap the wire-free Essential Video Doorbell.
4. Tap Edit
Note: The Disarmed mode doesn’t send alerts.
5. Under Alert, tap Push Notication to turn alerts on and o for your mobile device.
6. Under Alert, tap Email Alerts to turn email notications on and o.
7. To specify an email address, tap Edit
next to the mode.
next to Email Alerts and enter the email address.
Schedule when your doorbell camera is armed
You can set a schedule to specify the days and times during the week when your doorbell’s
camera records in response to motion triggers. Schedules recur weekly. For example, the
schedule for Tuesday repeats every Tuesday as long as the schedule is turned on.
To schedule when your camera responds to motion triggers:
1. Open the Arlo app.
2. Tap Mode.
3. Select your doorbell.
A list of modes displays.
4. Tap Schedule
5. Tap Edit next to Schedule.
6. Tap Add or +.
7. Set the days and times for your new schedule.
.
55Modes, Rules, and Alerts
User Manual

Essential Video Doorbell Wire-Free
Note: To add an overnight schedule such as 8:00 p.m. to 6:00 a.m., you need to add two
separate schedules. First, add 8:00 p.m. to 11:59 p.m., then add 12:00 a.m. to 6:00 a.m.
8. Tap Done.
Edit a schedule
1. Open the Arlo app.
2. Tap Mode.
3. Select your doorbell.
A list of modes displays.
4. Tap Schedule .
5. Tap Edit next to Schedule.
6. Tap a green box.
7. Change the start and stop times and tap Save.
Set up Arlo Geofencing
Geofencing is a virtual fence around a location called a zone. You can use Arlo Geofencing to
arm, disarm, or resume schedule modes when your mobile device is in zone or out of zone.
To set up geofencing, you must use your mobile device and allow the Arlo app to use your
location.
Geofencing accuracy
For accuracy, geofencing uses a combination of GPS, cellular data, and WiFi data. The local
environment aects geofencing:
• In urban environments, where the cell towers and WiFi routers are more dense, geofencing
accuracy can reach 100–200 meters.
Note: If you live in a skyscraper, geofencing might not work reliably due to GPS
inaccuracies. Using the Large radius setting might help.
• In rural areas, where cell towers and WiFi routers are sparse, geofencing accuracy can
reach several hundred meters.
To improve geofencing accuracy, make sure that your mobile device meets these conditions:
• WiFi is turned on.
• GPS or location services are turned on.
56Modes, Rules, and Alerts
User Manual

Essential Video Doorbell Wire-Free
Prepare your mobile device for geofencing
1. Enable GPS or location services so that Arlo can locate your device.
2. Enable WiFi.
3. Download the Arlo app and log in on each mobile device that you plan to enable for
geofencing.
For Arlo Geofencing to work on your device, you must adjust the settings on your Android or
iOS mobile device as follows:
Android devices
• Location permission = On
• Location services = On
• Battery saver = O
• Data limit = O
• Airplane mode = O
iOS (Apple) devices
• Share my location = On
• Location services = Always
• Airplane mode = O
Set up geofencing for the rst time and set up modes
1. Open the Arlo app.
2. Tap Mode.
3. Tap the wire-free Essential Video Doorbell.
4. Tap Geofencing
5. Allow the Arlo app to use your mobile device’s location.
Geofencing works only if Arlo can locate your mobile device. The Location Address page
displays your current address.
.
6. To change the radius setting, tap Radius and select a radius size.
Radius sizes are Small, Medium, and Large (approximately 150 meters, 250 meters, and
500 meters, respectively).
7. Tap Device Location and enter a name for your location.
57Modes, Rules, and Alerts
User Manual

Essential Video Doorbell Wire-Free
8. Tap Away Mode and select a mode.
Your camera uses the Away mode when your mobile device is outside the radius of your
camera’s location. Most people select Armed, Schedule, or Custom Mode so that the
camera detects motion while they’re gone.
9. Tap Home Mode and select a mode.
Your camera uses this mode when your mobile device is within the radius of your camera’s
location. Most people select Disarmed while they’re home.
If you use more than one enabled mobile device, you might be asked to select an Arlo
device to connect it to.
10. To select the preferred mobile device, tap the device and then tap Next.
11. Tap Save.
For troubleshooting tips, see Troubleshoot Arlo Geofencing on page 75.
Geofencing with multiple mobile devices
Arlo Geofencing works with multiple mobile devices.
Arlo uses the rst-in, last-out principal to manage households where more than one person
uses geofencing. If everyone leaves home with their mobile devices, this triggers an away
state. Since no one is inside the geofence, your cameras are armed. When the rst person
comes home (rst in), their mobile device is now inside the geofence, triggering the home
state and your cameras are disarmed. If one person leaves, but another is still home, the
cameras stay disarmed in the home state until the last person leaves (last out).
We recommend that you enable geofencing only for the mobile device that each person
carries every day. For example, if you use a smartphone and a tablet, and you take your phone
when you leave, set your phone as an enabled device in your Geofencing settings. Don’t set
your tablet as an enabled device, because Away mode won’t be triggered when you go out
and leave your tablet home.
The Geofencing mode only changes from Home to Away when all enabled mobile devices are
outside the Device Location in your Geofencing settings.
To review which mobile devices participate in geofencing, open the Arlo app and check the
Enabled Devices page in Geofencing settings (in the Modes section of the Arlo app). Remove
any devices that you don’t want to trigger Home/Away mode changes.
Make sure that these conditions are met:
• Your Arlo devices are online.
• Geofencing is enabled.
58Modes, Rules, and Alerts
User Manual

Essential Video Doorbell Wire-Free
• Your friends’ and family’s mobile devices are added to your account.
For information about adding devices, see Enable or disable geofencing for friends’ mobile
devices on page 59.
• (Required when your friend wants to participate in geofencing) Your friend is logged in to
the Arlo app on his or her mobile device and the GPS or location service is enabled on your
friend’s mobile device.
Enable or disable geofencing for friends’ mobile devices
1. Open the Arlo app.
2. Tap Mode.
3. Tap the wire-free Essential Video Doorbell.
4. Tap Edit next to Geofencing.
5. Tap Enabled Devices.
A list of mobile devices displays. A check mark appears next to the device name when
geofencing is enabled.
6. Tap one or more mobile devices.
The device location displays as either In Zone, Out of Zone, or Unavailable (if there’s an
issue contacting that device).
7. To disable geofencing, tap the mobile device again.
The check mark disappears when geofencing is disabled.
For more information, see Set up Arlo Geofencing on page 56.
Custom modes
You can add modes in addition to the modes that come with the Arlo app and give the new
modes custom names, such as Vacation. You can create one rule for each mode.
You can create multiple rules within the same mode so that each camera performs dierent
actions and sends dierent alerts. You can also use Schedule mode to activate modes
automatically at dierent times of the day or week. (See Schedule your rules on page 43.)
59Modes, Rules, and Alerts
User Manual

Essential Video Doorbell Wire-Free
Add a mode
1. Open the Arlo app.
2. Tap Mode.
3. Tap the wire-free Essential Video Doorbell.
4. Tap Add a Mode.
5. Enter the mode name and tap Next.
6. Select the trigger device and tap Next.
This is the doorbell that detects motion.
7. Enter the trigger device settings for the When motion is detected and tap Next.
8. Use the slider to set the motion sensitivity for the trigger device and tap Next.
Higher motion sensitivity settings usually trigger your camera to capture videos more
frequently.
9. Set the audio sensitivity for the trigger device and tap Next.
10. Select an action device and tap Next.
This is the Arlo device that performs an action when the trigger device detects motion
or sound. You can select the same Arlo device you’re using as a trigger or a dierent Arlo
device.
11. Select an action and tap Next.
You can select Record video,or Do nothing.
If you’re using a computer web browser, you can also specify the recording time setting.
12. Select the notications for Arlo to send when motion or audio is detected and then tap
Next.
13. Review your settings and tap Save.
Use your doorbell to trigger another camera to record
You can set up a rule so that your Video Doorbell triggers an Arlo camera to start recording
when the doorbell detects motion. For example, you can trigger an Arlo wire-free camera
overlooking your front entry to record, even if the camera doesn’t detect motion. You can
trigger an indoor Arlo camera to record, to ensure no one enters your home.
1. Open the Arlo app.
60Modes, Rules, and Alerts
User Manual

Essential Video Doorbell Wire-Free
2. Tap the wire-free Essential Video Doorbell.
3. Tap the menu on the upper-right corner of the page to open it.
4. Tap Motion settings.
5. To receive alerts when your doorbell detects motion, tap Motion Triggered Alerts.
6. Tap Add Device.
7. Tap Camera and then tap Next.
8. Tap Record video and then tap Next.
For the recording settings, you can choose one of these options:
• Record until activity stops (up to 300 sec)
• Record for a xed length of time (then use the slider to select the number of seconds
from 10 to 120.)
9. Tap Next
The Motion Settings page shows your settings in Then do the following.
10. Tap Done.
61Modes, Rules, and Alerts
User Manual

9. Arlo Connect
Some partner devices require that the wire-free Essential Video Doorbell be set to 1080p/720p
resolution to see video stream on assistant devices with a screen as they do not support the
default wire-free Essential Video Doorbell resolution, which is 1536 x 1536. For information
about setting the video quality for the wire-free Essential Video Doorbell, see Change the
video quality on page 47.
Use Arlo with Amazon Alexa
With the Arlo Skill and Alexa, you can access your Arlo devices using voice commands and
view a live camera feed on your Echo Show, Fire TV, or Fire tablet. Alexa can also notify you
when motion is detected by your Arlo cameras.
To use the Arlo Skill, you need a connected wire-free Essential Video Doorbell and one of
these Amazon devices:
• Echo Show
• Echo Spot
• Echo Dot
• Echo, Echo Plus
• Fire tablets (7th generation or newer)
• Fire TV (all generations)
• Fire TV stick (second generation only)
• Fire TV Edition smart TVs
Note: Some Alexa devices require that your wire-free Essential Video Doorbell be set to
1080p/720p resolution to see video stream as they do not support the default wire-free
Essential Video Doorbell resolution, which is 1536 x 1536. For information about setting the
video quality, see Change the video quality on page 47.
62

Essential Video Doorbell Wire-Free
Enable the Arlo Skill
Make sure that your wire-free Essential Video Doorbell is powered on and connected to the
cloud.
Enable the Arlo skill in one of these ways:
• Ask Amazon Alexa “Alexa, enable Arlo skill” to receive instructions in your Alexa app to link
your Arlo account with your Alexa account.
• In the Alexa app, search for the Arlo Skill and select Enable Skill to link your Arlo account
with your Alexa account.
Use the Arlo Skill
Aer you enable the Arlo Alexa Skill, you can try using these commands:
• “Alexa, show me <camera name>.” Start streaming a camera live.
• “Alexa, stop.” Stop an activity and return to your device’s home screen.
• “Alexa, hide <camera name>.” Stop streaming from a camera and return to your device’s
home screen.
• “Alexa, go home.” Return to your device’s home screen.
• “Alexa, show the last motion detected by my <camera name>.”
To use this command, your Arlo subscription must include viewing past video clips for
your camera.
Set up Alexa to notify you when your doorbell detects motion
You can use either of these methods:
• In the Smart Home section of the Alexa app, turn on Announcements for your Arlo camera.
• Create an Alexa Routine from the Alexa app main menu.
63Arlo Connect
User Manual

Essential Video Doorbell Wire-Free
Add your doorbell to the Google Assistant app
To use your doorbell with Google Assistant, you need:
• A Google Home Hub, a Chromecast device, a TV with Chromecast, or a media player with
Chromecast
• The Google Assistant app on your mobile device. This app is included with most Android
devices, but you can also download it from the Apple App Store on iOS devices.
• Some Google devices require that your wire-free Essential Video Doorbell be set to
1080p/720p resolution as they do not support the default video resolution, which is 1536
x 1536. For information about setting the video quality, see Change the video quality on
page 47.
To connect your Arlo cameras to the Google Assistant app:
1. If you plan to use a voice-enabled speaker with the Google Assistant, set up that device.
2. Open the Google Assistant app to the home page.
3. Tap the + icon.
4. Tap Set up Device > Have something already set up?.
5. Select the Arlo icon from the list of device options.
You can search for Arlo or scroll down to nd Arlo on the list of devices.
6. Sign in with your Arlo account.
Your camera is added to Google Assistant.
7. To test your camera, say “Hey Google, show [name of room where camera is placed] on
[name of Google device].”
8. To end the stream, say “Hey Google, stop [name of Chromecast device].”
For more information, see Google Assistant Help: Control smart home devices.
Use Arlo with IFTTT
You can use the Arlo app with IFTTT (If This Then That), a free cloud-based service that
connects smart home devices and applications.
To add Arlo to your IFTTT app, visit itt.com/arlo.
To learn more about Arlo and IFTTT, visit arlo.com/community.
64Arlo Connect
User Manual

10. Troubleshooting
Scan the QR code during doorbell setup
During setup, your doorbell’s camera must scan a QR code from the Arlo app when you’re
adding the doorbell to your 2.4 GHz WiFi network. If your doorbell doesn’t emit a chime sound
aer scanning the QR code, then the QR code was not successfully scanned.
If your doorbell didn’t scan the QR code:
• Scan the QR code in an evenly lit area.
Avoid scanning the QR code in a low light area.
• Move your phone closer to the doorbell’s camera lens.
Position your phone about four inches (10 cm) from the doorbell lens and slowly move it
closer. You can also try dierent angles.
• Increase the brightness on your phone.
Turn up the brightness on your phone to the highest level. On an iPhone, also select Light
(not Dark) under Settings > Display & Brightness.
• If your phone is small, consider using the Arlo app on a tablet to set up your doorbell.
• If the infrared (IR) LED on the doorbell is lit red while you are scanning the QR code, cover
the LED with your thumb. The IR LED can interfere with scanning the QR code.
IR LED location
• Clean the doorbell’s camera lens.
Use a lint-free cloth to remove any smudges.
65

Essential Video Doorbell Wire-Free
Arlo doesn’t discover your doorbell during setup
Aer your doorbell scans the QR code in the Arlo app during setup, the Arlo app attempts to
discover your wire-free Essential Video Doorbell on the same WiFi network that your phone
is connected to. Since the doorbell connects to 2.4 GHz WiFi networks, during setup you must
connect your phone to the same 2.4 GHz WiFi network.
If the Arlo app doesn’t discover your doorbell during the setup process:
1. Check the doorbell LED to see what went wrong.
If the doorbell LED ashes amber for 10 seconds, the doorbell can’t connect to the
WiFi network. Make sure that you enter the correct WiFi settings for your 2.4 GHz WiFi
network. The WiFi network name (SSID) and WiFi password are both case sensitive.
MyWiFiPassword is not the same as mywipassword.
2. Check your phone’s WiFi connection.
During setup, your phone must connect to the same 2.4 GHz WiFi network as your
doorbell.
Many WiFi routers broadcast in both the 2.4 GHz and 5 GHz WiFi bands. Your home
network might include two WiFi networks, or even three if you have a guest network.
• In your phone’s WiFi settings, look for your WiFi network name that ends in 2, 2.4, or 2G
and connect to that network. For more information, see Connect your mobile device to
a 2.4 GHz WiFi network on page 67.
• Your phone might automatically connect to cellular data. To keep this from happening,
make sure that Wi-Fi Assist and Adaptive Wi-Fi features are o on your mobile device.
These features allow mobile phones to automatically switch between WiFi and cellular
network Internet access.
• If you use a VPN or WiFi extender, disconnect it during the WiFi setup process.
3. Check your WiFi router’s Internet connection.
Aer your doorbell connect to the same WiFi network as your phone, the Arlo app needs
to access your Arlo account in the cloud in order to add your doorbell to your Arlo account.
If the Arlo app still can’t discover your doorbell, visit Arlo Support www.arlo.com/en-us/
support/.
66Troubleshooting
User Manual

Essential Video Doorbell Wire-Free
Remove the doorbell from its mount
1. Locate the release pin that came with your wire-free Arlo Essential Video Doorbell.
Alternatively, you can use a paperclip or a similar object.
2. Insert the release pin into the release pinhole at the top of the doorbell mount.
A click occurs, and the doorbell is released from the mount.
Rear Access
3. Pull the doorbell o the mount in an up-and-out motion.
Reset the Video Doorbell
Resetting your Video Doorbell returns it to default settings. Your doorbell is also removed
from your Arlo account when you reset it. This means that you must use the Arlo app to add
and set up your Video Doorbell aer a reset.
1. Locate the release pin that came with your wire-free Arlo Essential Video Doorbell.
Alternatively, you can use a paperclip or a similar object.
2. Insert the release pin into the release pinhole at the top of the doorbell mount.
A click occurs, and the doorbell is released from the mount.
Rear Access
3. Pull the doorbell o the mount in an up-and-out motion.
67Troubleshooting
User Manual

Essential Video Doorbell Wire-Free
4. Use a paperclip or the release pin to press and hold the reset button on the back of the
doorbell for about 10 seconds.
When the doorbell resets, the LED on the front of the doorbell ashes white.
5. To add the doorbell to your Arlo account and set it up, open the Arlo app and tap Add New
Device.
Optimize your doorbell battery life
Your Essential Video Doorbell battery life is aected by frequent video recordings and its local
environment. Follow these tips and guidelines to improve your doorbell’s battery life.
• Charge the doorbell to 100% before the rst use. See Charge the battery before
installation on page 8.
• Place the doorbell in an area with good WiFi coverage. In the Arlo app, you can check the
WiFi Signal Strength icon
page 9.
• Don’t focus your doorbell on an area with high traic. To avoid unwanted notications,
keep your doorbell’s eld of view (FOV) away from areas where you don’t want to detect
motion, such as a busy street. You can use the included angled mounting wedge to adjust
the orientation of your doorbell. For more information, see Choose a good spot to mount
your doorbell on page 12.
Note: Activity zones help lter out notications and recordings for motion events
that occur outside of your zone(s). They do not reduce your camera’s battery power
consumption, since your camera still continuously monitors for motion events within your
activity zone(s). For more information, visit What are activity zones and how do I create
them?.
• Hardwire your doorbell. You can hardwire your doorbell, which continuously trickle
charges the battery when the doorbell isn’t in use. See 4. Optional: Connect a wired chime
on page 22.
for your doorbell. See Tips for optimal WiFi performance on
68Troubleshooting
User Manual

Essential Video Doorbell Wire-Free
The following factors reduce your doorbell battery life:
• Frequent motion and audio recordings. When your doorbell is armed, every time it
detects motion or audio, it uses battery power to record the event. If you want fewer
motion alerts and recordings, reduce the doorbell’s motion sensitivity. For more
information, see Change motion sensitivity on page 54. You can also set a schedule
for your doorbell so that it only records video at certain times of the day. For more
information, see Schedule when your doorbell camera is armed on page 55.
• Long livestreams and motion or audio recordings. Your Arlo Essential Video Doorbell
Wire-Free uses battery power while it is recording or streaming video. If possible, try to
avoid frequent and lengthy livestreams of your doorbell. Additionally, you can reduce the
length of each motion and audio recording. For more information, visit How do I adjust
Arlo video recording length?.
• Connection to a WiFi extender or mesh WiFi network. Some WiFi extenders or mesh
satellites might cause more power consumption on your doorbell.
If you are using a WiFi router with an extender, try to connect your doorbell to the router’s
WiFi network. For help reconguring your network connection, see the instructions for
your WiFi router or your WiFi extender.
If you are using a mesh WiFi network with a WiFi router and one or more satellites, try
moving your WiFi router closer to your doorbell, so that the doorbell connects to the
router instead of a satellite. For help reconguring your network, see the instructions for
your WiFi router.
Scan the QR code during Chime 2 setup
The Arlo Chime 2 is optional. Depending on the product you purchase, an Arlo Chime 2 may
be included with your Arlo Essential Video Doorbell Wire-Free, or sold separately.
When you use the Arlo app to set up your Chime 2, you’re prompted to use your mobile device
to scan the QR code located on the chime. If the Arlo app doesn’t read this QR code, try the
following:
• Move your mobile device closer or further from the QR code.
Your mobile device might need to be a certain distance from the QR code to properly
focus.
• Slowly move the phone camera closer to and farther away from the QR code to enable
the camera to focus better. Some smartphones might not be able to auto-focus.
• Try scanning the QR code at a dierent angle.
• Scan the QR code in an evenly lit area.
Avoid scanning the QR code in the dark or directly under a bright light. Bright lighting can
cause reect o the Arlo device and inhibit your mobile device camera from seeing the
entire QR code.
69Troubleshooting
User Manual

Essential Video Doorbell Wire-Free
• Try setting up your Arlo device with a dierent mobile device.
For example, if you tried using a tablet to set up your Arlo device, try using a smartphone
instead.
• Take a picture of the QR code, and scan the picture of the QR code.
If a dierent smartphone or tablet doesn’t work, take a clear picture of the QR code, and
enlarge the picture on your screen. Then scan the picture with the device that you are
using to set up the device.
• Clean the camera lens on your mobile device.
The camera lens might have debris or a smudge on it, hindering its ability to scan the QR
code. Try using a lint-free cloth to remove anything that might prevent the camera from
scanning the QR code.
• If your QR code is scratched, damaged, or unreadable, contact Arlo Support.
Once your account and product are veried, Arlo Support experts can send an email to
provide an undamaged version of the damaged QR code on your chime.
Arlo doesn’t discover your Chime 2 during setup
If the Arlo app cannot discover your Chime 2, check the following:
1. An internet connection is available. Check the status of the internet on your WiFi router. If
your router isn’t connected to the internet, contact your internet service provider (ISP) or
router manufacturer.
2. You are typing the correct WiFi network SSID (network name) and password. The network
SSID and password are case-sensitive and must be EXACTLY correct. You can tap the
password eye icon to view your password before submitting.
3. Your mobile device and Chime 2 are not too far away from your WiFi router. We
recommend placing your Chime 2 about 10-15 feet (3-4.5 meters) away from your WiFi
router during the setup process. When your Chime 2 is set up and connected, you can
move it to an indoor location within range of your WiFi router.
Your Chime 2 doesn’t ring when the Arlo doorbell is pressed
Your Chime 2 might not ring because your Essential Video Doorbell is in silent mode, the
Chime 2 isn’t paired with your doorbell, or due to internet connection issues or power
problems.
If your Arlo Chime 2 isn’t ringing, check the following:
• Is your doorbell in silent mode?
To view or change the silent mode setting for your doorbell, tap the gear icon next to the
70Troubleshooting
User Manual

Essential Video Doorbell Wire-Free
doorbell and then tap Silent Mode.
• Is your Chime 2 paired to your Essential Video Doorbell ?
To check, open the Arlo app and tap the gear icon next to your Chime 2. On the Device
Settings page, see if your doorbell appears under PAIRED DEVICES.
• Are your Arlo Chime 2 and the Essential Video Doorbell connected to internet?
To check, open the Arlo app and tap the Settings icon next to your Arlo device. The app
indicates whether the device is oline.
• Is your Arlo Chime 2 receiving power?
The Chime 2 must be plugged in to an indoor power outlet that supplies continuous power
AC power.
If your Arlo Chime 2 still doesn’t ring, reset it and add it back to your Arlo account. For more
information, see the following section, Reset the Chime 2.
If you are still unable to get Arlo Chime 2 to ring, visit www.arlo.com/en-us/support/ for
assistance.
Reset the Chime 2
Your Arlo Chime 2 must be plugged in to a wall outlet during the reset process . Resetting your
Chime 2 returns it to its factory default settings and disables the device. This means that you
must use the Arlo app to set up your Chime 2 again aer a reset.
1. Plug your Chime 2 into a wall outlet.
2. Press and hold the Sync button on the side of your Chime 2
for 10 seconds, until the LED starts ashing.
The LED ashes white when the reset process begins.
3. Let go of the Sync button when the LED starts ashing.
71Troubleshooting
User Manual

Essential Video Doorbell Wire-Free
4. Open the Arlo app and remove the Chime 2:
a. Tap the settings icon next to your Chime 2.
b. Scroll to the bottom of the Device Settings page, and tap Remove Device.
c. Close the Device Settings page.
5. Tap Add New Device on the Devices page.
6. Follow the instructions in the Arlo app to set up your Chime 2.
When your Chime 2 is connected to your Arlo Essential Video Doorbell, the chime appears
under PAIRED DEVICES on the Device Settings page in the Arlo app.
Can’t see video streams in a browser
The Arlo web client uses the Adobe Flash plug-in to display your camera streams in a browser.
Make sure that your browser isn’t blocking the plug-in and that you’re using the latest version
of Adobe Flash.
Your router might be blocking the ports to which Arlo sends data. To make sure that Arlo can
stay connected, you must keep ports 443 and 80 open on your router. Also see the following
sections WiFi signal interference and Out of range.
WiFi signal interference
Environments with multiple WiFi networks, WiFi devices, or frequencies can cause signal
interference with your Arlo system. Minimize the number of networks, WiFi devices, and
transmitted frequencies in the area where you place your WiFi router and cameras.
We recommend that you allow at least 6½ feet (2 meters) between your wire-free Essential
Video Doorbell and any Arlo cameras that you install to prevent WiFi signals between the
devices from interfering with each other.
Out of range
Make sure that your doorbell is within range of your WiFi router. The range might be reduced
if metal objects or thick walls and ceilings are between your router and the wire-free Essential
Video Doorbell.
72Troubleshooting
User Manual

Essential Video Doorbell Wire-Free
Not receiving push notications
You must be logged in to the Arlo app to receive Arlo alerts on your smartphone or mobile
device. Arlo registers your device for push notication when you log in. If you used the logout
option instead of simply exiting the app, you must log back in to the app. You receive Arlo
alerts even if your device is sleeping.
Check the rules for armed modes
Check the rules in your modes. Make sure that push notication is enabled in the Armed mode
or in a custom mode if you created one.
1. Open the Arlo app.
2. Tap the Mode button.
3. Select the wire-free Essential Video Doorbell.
A list of modes displays.
4. Tap Edit
5. Tap Edit next to the rule.
6. Under Alert, make sure that the Push Notication check box is selected.
7. If you made changes, tap Save.
next to Armed.
Check the Arlo app notication settings on an iOS device
Make sure that you allow the Arlo app to receive push notications. The Arlo app push
notications might be disabled on your iOS device.
1. Tap the Settings icon for your iOS device.
2. Tap Notications > Arlo.
3. Make sure that Allow Notication is selected.
Check the Arlo app notication settings on an Android device
Make sure that you allow the Arlo app to receive push notications. The Arlo app push
notications might be disabled on your Android device.
1. Tap the Settings icon for your Android device.
2. Tap Application Manager > Arlo.
3. Make sure that the Show Notications setting is selected.
73Troubleshooting
User Manual

Essential Video Doorbell Wire-Free
If you said no to push notications at installation
When you install the Arlo app for the rst time, to receive alerts, you must select Allow when
asked if you want Arlo to send you push notications. For iOS apps, aer you respond to this
alert, it isn’t presented again unless the device is restored to factory settings or the app is
uninstalled for at least a day.
If you said no on an iOS device, uninstall the app, wait for a day, and then reinstall it, and
allow notications. If you don’t want to wait a day before you reinstall the app, you can use
the system clock on your device to simulate a day. Set the system clock forward a day or
more, turn your device o, and then turn the device back on. Aer you reinstall the app, return
the system clock to the correct setting.
I can’t log in to my Arlo account
If you can’t sign in to your Arlo account in the Arlo app or Arlo web portal, select the scenario
that applies to you. Follow the instructions to regain access to your account and/or Arlo
cameras.
• Forgot your password? You can use the email address associated with your Arlo account
to reset your Arlo account password. See Reset a forgotten password on page 43.
• Forgot the email address for your Arlo account? You’ll have to create a new Arlo account,
reset your Arlo cameras, then set up the cameras on the new account.
• Can’t access your trusted device or phone number? If you can’t access your trusted
device to verify a log in, or if you can’t receive SMS text messages, you can request to have
a security code sent to the email associated with your Arlo account. The email associated
with your Arlo account is always available as a backup login option,
• Lost access to ALL two-step verication options and can’t verify your account log in?
You’ll have to create a new Arlo account, reset your Arlo cameras, then set up the cameras
on the new account.
Note: The email associated with your Arlo account is always used as a backup option to
recover your account. Make sure that you have access to your email account, and that the
email account is safe and secure.
74Troubleshooting
User Manual

Essential Video Doorbell Wire-Free
Troubleshoot Arlo Geofencing
Note: Selecting Modes > Arm All Devices or Disarm All Devices deactivates Geofencing mode.
To activate Geofencing mode, tap Modes, select your Arlo device, and then select Geofencing.
Each Arlo user has a unique setup environment. These are the most common geofencing
issues:
• Your mobile device isn’t sharing its location information with Arlo. See Prepare your mobile
device for geofencing on page 57.
• Away mode isn’t triggered when you leave because an extra mobile device that’s enabled
for geofencing is still in the Device Location. See Geofencing with multiple mobile devices
on page 58.
• Geofencing stopped working because the location sharing settings for a mobile device
changed. See Prepare your mobile device for geofencing on page 57.
• A task-killing app is interfering with Arlo Geofencing. A task-killing app, such as Shutapp or
Doze, can disable Arlo Geofencing. To use Arlo Geofencing, disable any apps that suppress
the Arlo app.
• Geofencing for your mobile device on your friend’s Arlo account isn’t working.
If you’re a friend on someone else’s Arlo account, your mobile device can only change
Home/Away modes if the Arlo account owner does the following:
• Turn on the Allow Access Rights setting. See Grant access to friends on page 44.
• Set your device as an Enabled Device in Geofencing settings. See Enable or disable
geofencing for friends’ mobile devices on page 59.
Still experiencing issues with geofencing? Contact Arlo Customer Support.
75Troubleshooting
User Manual

Essential Video Doorbell Wire-Free
Support
For product updates and web support, visit http://www.arlo.com/en-us/support/.
Arlo Technologies, Inc.
2200 Faraday Ave. Suite 150
Carlsbad, CA 92008 USA
Document publication date: April 2021
PN 202-50027-02
Trademarks
© Arlo Technologies, Inc. Arlo, Arlo logo, and Every Angle Covered are trademarks of Arlo
Technologies, Inc. App Store is a service mark of Apple Inc. Google Play and the Google Play
logo are trademarks of Google LLC. Amazon and all related logos are trademarks of Amazon.
com, Inc. or its affiliates. Any other trademarks are for reference purposes.
Compliance
The regulatory marking is located at the bottom of the unit.
For regulatory compliance information including the EU Declaration of Conformity, visit www.
arlo.com/about/regulatory/.
See the regulatory compliance document before connecting the power supply.
FCC ID: 2APLE18300411
IC: 23815-18300411
CAN ICES-3 (B) / NMB-3 (B)
Federal Communication Commission Interference Statement:
This equipment has been tested and found to comply with the limits for a Class B digital
device, pursuant to part 15 of the FCC Rules. These limits are designed to provide reasonable
protection against harmful interference in a residential installation. This equipment
generates, uses, and can radiate radio frequency energy and, if not installed and used in
accordance with the instructions, may cause harmful interference to radio communications.
However, there is no guarantee that interference will not occur in a particular installation. If
this equipment does cause harmful interference to radio or television reception, which can be
determined by turning the equipment o and on, the user is encouraged to try to correct the
interference by one or more of the following measures:
• Reorient or relocate the receiving antenna.
• Increase the separation between the equipment and receiver.
76
User Manual

Essential Video Doorbell Wire-Free
• Connect the equipment into an outlet on a circuit dierent from that to which the receiver
is connected.
• Consult the dealer or an experienced radio/TV technician for help.
This device complies with part 15 of the FCC Rules. Operation is subject to the following
two conditions: (1) This device may not cause harmful interference, and (2) this device must
accept any interference received, including interference that may cause undesired operation.
Any changes or modifications not expressly approved by the party responsible for compliance
could void your authority to operate the equipment.
RF exposure statements
This Transmitter must not be colocated or operating in conjunction with any other antenna or
transmitter.
This equipment complies with FCC RF radiation exposure limits set forth for an uncontrolled
environment. This equipment should be installed and operated with a minimum distance of
20 centimeters between the radiator and your body or nearby persons.
Industry Canada statement:
This device complies with Industry Canada license-exempt RSSs. Operation is subject to the
following two conditions:
1) This device may not cause interference, and
2) This device must accept any interference, including interference that may cause undesired
operation of the device.
Le présent appareil est conforme aux CNR d’Industrie Canada applicables aux appareils radio
exempts de licence. L’exploitation est autorisée aux deux conditions suivantes :
1) l’appareil ne doit pas produire de brouillage;
2) l’utilisateur de l’appareil doit accepter tout brouillage radioélectrique subi, meme si le
brouillage est susceptible d’en compromettre le fonctionnement.
Innovation, Science and Economic Development Canada Statement:
This digital apparatus complies with CAN ICES-3 (B) / NMB-3 (B).
Énoncé d’Innovation, Sciences et Développement économique Canada
Ce périphérique numérique est conforme à la norme CAN ICES-3(B)/NMB-3 (B).
77
User Manual

Essential Video Doorbell Wire-Free
Radiation Exposure Statement:
This equipment complies with IC radiation exposure limits set forth for an uncontrolled
environment. This equipment should be installed and operated with minimum distance 20 cm
between the radiator and your body.
Déclaration d’exposition aux radiations:
Cet équipement est conforme aux limites d’exposition aux rayonnements IC établies pour un
environnement non contrôlé. Cet équipement doit être installé et utilisé avec un minimum de
20 cm de distance entre la source de rayonnement et votre corps.
78
User Manual
 Loading...