


Wired Video Doorbell
User Manual

Contents |
|
1. Get to Know Your Arlo Video Doorbell |
5 |
Video Doorbell front view.............................................................................................. |
5 |
Video Doorbell rear view............................................................................................... |
6 |
Installation requirements................................................................................................ |
6 |
Get the Arlo app.............................................................................................................. |
6 |
Do more with Arlo........................................................................................................... |
7 |
FAQs.................................................................................................................................. |
7 |
2. Get Started |
8 |
Use the Arlo app for installation and setup............................................................... |
10 |
Install the Power Kit in your chime box...................................................................... |
10 |
Install your Video Doorbell.......................................................................................... |
11 |
Use the optional wire extensions................................................................................ |
12 |
Video Doorbell LED...................................................................................................... |
14 |
Tips for optimal WiFi performance............................................................................. |
15 |
Test motion detection................................................................................................... |
15 |
Control when your doorbell detects motion............................................................ |
16 |
3. Use Your Video Doorbell |
17 |
Answer your Video Doorbell from your smartphone.............................................. |
17 |
Accept a call from your Video Doorbell.................................................................... |
17 |
Respond to a visitor with a Quick Reply..................................................................... |
18 |
Play a message from a visitor...................................................................................... |
19 |
Turn Silent mode on and off........................................................................................ |
19 |
Turn the Video Doorbell off and on........................................................................... |
19 |
Control the LED............................................................................................................. |
19 |
Change the call settings............................................................................................... |
20 |
4. View and Record Videos |
21 |
View your Video Doorbell’s camera feed.................................................................. |
22 |
Record clips from live video........................................................................................ |
22 |
Take a snapshot from live video.................................................................................. |
23 |
Talk and Listen............................................................................................................... |
23 |
2

|
Video Doorbell |
|
|
Change the order of the camera feeds..................................................................... |
23 |
|
Motion detection activity zones.................................................................................. |
24 |
|
View recordings and snapshots.................................................................................. |
25 |
|
Download recordings................................................................................................... |
26 |
5. |
Change Your Settings |
28 |
|
Two-step verification..................................................................................................... |
28 |
|
Use face or fingerprint authentication....................................................................... |
30 |
|
Customize your profile................................................................................................. |
31 |
|
Change your Arlo password........................................................................................ |
31 |
|
Reset a forgotten password......................................................................................... |
32 |
|
Grant access to friends................................................................................................. |
32 |
|
Change the time zone.................................................................................................. |
34 |
|
Video Doorbell settings............................................................................................... |
34 |
|
Adjust the flicker setting............................................................................................... |
37 |
|
View device information............................................................................................... |
37 |
|
Remove a device from your account.......................................................................... |
38 |
|
Restart the Video Doorbell from the Arlo app.......................................................... |
38 |
6. Modes, Rules, and Alerts |
39 |
|
|
Modes............................................................................................................................. |
39 |
|
Select a mode................................................................................................................ |
40 |
|
Mute Notifications......................................................................................................... |
40 |
|
Rules for modes............................................................................................................. |
41 |
|
Change motion sensitivity........................................................................................... |
41 |
|
Automatically stop recording when motion stops................................................... |
41 |
|
Manage alerts................................................................................................................ |
42 |
|
Schedule your rules...................................................................................................... |
42 |
|
Set up Arlo Geofencing................................................................................................ |
43 |
|
Geofencing with multiple mobile devices................................................................ |
45 |
|
Use your Video Doorbell to trigger a camera to record |
48 |
7. |
Troubleshooting |
50 |
|
Video Doorbell doesn’t scan the QR code in the Arlo app during setup |
50 |
|
The Arlo app doesn’t find the doorbell during setup............................................. |
51 |
|
Connect your mobile device to a 2.4 GHz WiFi network during setup |
52 |
Contents |
3 |
User Manual |

Video Doorbell |
|
Use Bypass mode for the Power Kit............................................................................ |
53 |
The chime doesn’t ring when I press the doorbell.................................................. |
54 |
Video Doorbell LED doesn’t light............................................................................... |
54 |
Power interruption notification.................................................................................... |
55 |
Remove the Video Doorbell from its mount............................................................. |
55 |
Reset the Video Doorbell............................................................................................. |
56 |
Can’t see video streams in a browser......................................................................... |
57 |
WiFi signal interference................................................................................................ |
57 |
Not receiving push notifications................................................................................. |
57 |
Troubleshoot Arlo Geofencing................................................................................... |
59 |
Contents |
4 |
User Manual |

1.Get to Know Your Arlo Video Doorbell
The Arlo Video Doorbell lets you get notifications when motion is detected and view live video on your phone. Get the bigger picture of what’s at your door, from head to toe or a package on the ground. Even see clearly in low light with night vision. Speak to visitors with two-way audio or use pre-recorded quick reply messages when you’re busy. Arlo Video Doorbell uses your existing doorbell wiring for continuous power.
Features:
•HD Video. See a clear picture in every detail through your doorbell’s high performance lens.
•Motion Detection and Alerts. Receive alerts when motion is detected.
•Video Call. Calls your phone directly so you never miss a visitor
•Night vision. See who’s at your door at night, even without a light on.
•180° Viewing Angle. See a person from head to toe or a package on the ground.
Video Doorbell front view
Microphone
Lens with 180-degree field of view
Light sensor
Weather-resistant casing
Status LEDs
Doorbell button
Speaker
5
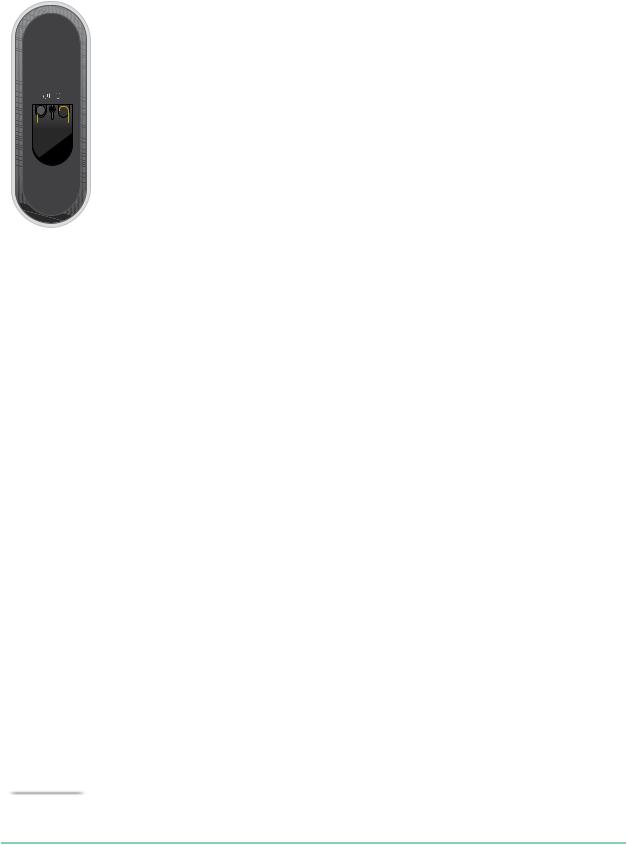
Video Doorbell
Video Doorbell rear view
Reset button (pinhole)
Wiring screws
Installation requirements
To install your Arlo Video Doorbell, you need:
•A wired doorbell and chime with existing electrical wiring
•Voltage between 16V AC and 24V AC, and a 10VA transformer
Follow the instructions in the Arlo app to connect the Arlo Video Doorbell to your home’s existing doorbell wiring. If you need further help, contact a local electrician or professional to assist you.Arlo has also partnered with HelloTech to provide nationwide professional installation services for the Arlo Video Doorbell.Visit www.Hellotech.com/arlo to learn more.
Get the Arlo app
Download the Arlo app.The Arlo app lets you create an Arlo account in the cloud and set up and manage all your Arlo devices.
Note: If you already use the Arlo app, make sure that you’re using the latest version.To find out if an update is available, go to the app store and search for Arlo.
Get to Know Your Arlo Video Doorbell |
6 |
User Manual |

Video Doorbell
Do more with Arlo
You can add these options, which are sold separately:
•Add more Arlo cameras and devices. Cover more areas in and around your home by adding cameras, security lights, and more.
•Upgrade your Arlo subscription. For more information,visit What are the available Arlo subscription plans and how much cloud recording is available?.
FAQs
•Does the Arlo Video Doorbell require a SmartHub or base station?
No.You can connect your Arlo Video Doorbell directly to your home’s 2.4 GHz WiFi network.
•Is leaving a message on the Arlo Video Doorbell the same as leaving a message on the Arlo Audio Doorbell?
Yes. If no action has been taken 20 seconds after a doorbell press, the visitor is prompted to leave a voicemail.This also happens when you decline a doorbell call.You must have an Arlo Smart plan for users to access voicemail prompts. (You can enable the voicemail feature through Leave your message under Call Settings.)
•Is the Arlo Video Doorbell compatible with my existing Arlo system?
Yes.The Arlo Video Doorbell doesn’t require a base station or SmartHub but it can still be configured to trigger recordings on other cameras or vice versa.
•Can I pair the Arlo Video Doorbell with other Arlo cameras?
No.The Arlo Video Doorbell has its own integrated camera. However, you can set up cross-triggering so that other Arlo cameras record when the Video Doorbell detects motion.
Get to Know Your Arlo Video Doorbell |
7 |
User Manual |

2. Get Started
You can install the Arlo Video Doorbell yourself, or contact a local electrician or professional to assist you. Arlo has partnered with HelloTech in the US to provide nationwide professional installation services for the Arlo Video Doorbell. For more information, visit www.HelloTech.com/arlo.
Note: In some regions, a transformer is included in the package with the Arlo Video Doorbell. It is recommended that the transformer be installed by a professional electrician.
Voltage requirements
The Arlo Video Doorbell requires a wired doorbell and chime with voltage between 16V AC and 24V AC, and a 10VA transformer.
We recommend that you check the voltage on the transformer that powers your existing doorbell before installing your Arlo Video Doorbell. If the transformer’s voltage isn’t 16-24 VAC, you must upgrade your transformer before you use the doorbell.
You can check the voltage level of your doorbell transformer by one of these methods:
•Use a multimeter to test the voltage.
A multimeter is an electronic tool that
measures the precise voltage level of your existing doorbell wiring. Using a multimeter gives you the most accurate estimate of your transformer’s voltage, and it can be done without finding the transformer. We recommend that you measure at the
existing doorbell wiring or at your chime.
• Check if the voltage is printed on the transformer that provides power to your
existing doorbell.
The estimated voltage is commonly printed on transformers. This is typically accurate, but it isn’t as precise as using a multimeter.
8

Video Doorbell
Use a multimeter to check the voltage of a transformer
1.Disconnect your existing doorbell.
To do this, unmount or unscrew your existing doorbell to expose the wiring or AC terminals on the back.
2.Set your multimeter to AC (the V with a wavy line on top or next to it).
3.Connect the two probes from the multimeter to the wires from your doorbell.
4.Read the voltage level on your multimeter’s display.
If the voltage level is between 16-24 VAC, you can use the Arlo Video Doorbell with your current doorbell transformer.
If the voltage level is lower than 16VAC or the transformer is underpowered (less than 10VA) then consider having the transformer replaced by an electrician or a professional service provider.
Check the voltage level printed on the doorbell transformer
A doorbell transformer is a device that steps down your household AC voltage to a lower voltage suitable for powering an electric doorbell.
Sample doorbell transformer
The transformer is typically found:
•In the front closet near your existing doorbell
•Near your house’s circuit breaker
•In the basement or attic
•In the garage
•Near your house’s furnace
Get Started |
9 |
User Manual |
Video Doorbell
•In the crawl space under your house
Use the Arlo app for installation and setup
You must use the Arlo app to install and set up your Arlo Video Doorbell. The Arlo app guides you through installation and setup:
1. Create your Arlo account.
You use the same account to manage all your Arlo devices.
2.Follow the instructions in the Arlo app to install and set up your Arlo Video Doorbell.
Once you set up your Arlo account, you can access it by using the Arlo app on a smartphone or tablet, or from a computer using a web browser. If you’re using a computer, enter https://my.arlo.com/#/login in the address bar of the browser.
Install the Power Kit in your chime box
The Power Kit ensures that your Arlo Video Doorbell receives consistent power. The Power Kit is required for the Video Doorbell to function reliably and prevents your chime from ringing when the Arlo Video Doorbell is recording or live-streaming.
Power Kit
Note: If your chime box uses only batteries, it is not compatible with the Arlo Video Doorbell. Before you install the Arlo Video Doorbell, consult an electrician to replace your chime box with a wired doorbell and chime, with voltage between 16-24 VAC.
The Arlo app guides you through the process of installing the Power Kit in the chime box for your existing doorbell. These are the main steps:
1.Turn off your power at the breaker.
Warning: Failure to turn off your power might result in serious injury.
2.Remove the cover of your chime box.
Get Started |
10 |
User Manual |
Video Doorbell
3.Follow the specific instructions in the Arlo app for how to connect the Power Kit wires to your chime.
If your chime is more complex than two or three wires, then you might need to consult a professional electrician.
4.Place your Power Kit in the chime box.
Make sure to place the Power Kit in a safe spot in the chime box that won’t interfere with the operation of the chime. See the suggested placements and areas to avoid, as illustrated in the Arlo app.
Install your Video Doorbell
You need:
•The items that came in the Arlo Video Doorbell box
•Phillips screwdriver
•(Optional) power drill
After installing the Power Kit in your chime box, follow the steps in the Arlo app to install your doorbell.
The Arlo app guides you through installation in this order:
1.Turn off your power at the breaker.
Warning: Failure to turn off your power might result in serious injury.
2.Remove and disconnect your existing doorbell.
3.Determine whether to use the flat mounting plate on its own, or combine it with the angled mounting plate to adjust the field of view for your doorbell.
Angled mounting plate
Get Started |
11 |
User Manual |

Video Doorbell
Installing with an angled mounting plate depends on the position of the doorbell and the walkway to your home. The angled mounting plate lets you install your doorbell so that it is angled toward the left or angled toward the right.
4.Follow the instructions in the Arlo app to connect the wires and install your doorbell.
Arlo Video |
Mounting |
Angled |
Doorbell |
plate |
mounting wedge |
|
|
(optional) |
5.Turn on power at the breaker.
6.Check the LED on the front of your Arlo Video Doorbell. See LED during setup on page 14.
7.Connect your Arlo Video Doorbell to your home network’s 2.4 GHz WiFi.
Use the optional wire extensions
Two identical wire extensions and fasteners come in the package with your Arlo Video Doorbell.
|
|
|
|
Wire extension |
Fastener |
||
If the existing wires for your doorbell are too short to connect your Arlo Video Doorbell, you can use the wire extensions and fasteners to lengthen the wires.
Get Started |
12 |
User Manual |

Video Doorbell
To connect wire extensions to your Arlo Video Doorbell:
1.Remove the rubber ends from the wire extensions.
2.Attach a wire extension to one of your existing doorbell wires.
To do this, connect the wire end of the wire extension (not the prong end) to your existing doorbell wire and twist the wires together securely.
3.Attach the second wire extension to the other doorbell wire.
4.Place the fasteners on top of the connected wire ends, and twist the fasteners. The fasteners funnel and secure the wires together.
5.Attach the extended wires to your Arlo Video Doorbell.
6.Tuck the wire extensions and the fasteners into the wiring cavity in the wall, behind your doorbell.
If there isn’t sufficient space, you may need to use the angled mounting plate to create additional space behind the Arlo Video Doorbell.
7.Place your Arlo Video Doorbell onto the mounting plate in an up-and-in motion.
Ensure that the mounting screws are completely screwed in and flush with the mounting plate so that the Video Doorbell clips securely into the mounting plate.
You are ready to use the Arlo app to continue the setup process for your Video Doorbell.
Get Started |
13 |
User Manual |

Video Doorbell
Video Doorbell LED
The LED is on the outside of your doorbell and indicates how the doorbell is operating. The following sections describe how the LED works if you didn’t change the default LED settings.
Note: For information about changing the LED behavior, see Control the LED on page 19.
LED during setup
•Off. The doorbell is not receiving power. Check that the power at the breaker is on. Check that the wiring to the doorbell is secured.
•Solid white. The doorbell is powered on and ready for setup.
•Solid amber. The doorbell isn’t receiving enough power.
You might need to activate bypass mode. For more information, see Use Bypass mode for the Power Kit on page 53.
You can also consult an electrician or replace your transformer and chime with one that offers 16-24 VAC, with 10VA minimum.
•Flashing amber. Your Video Doorbell didn’t connect to your WiFi network. During setup, make sure that your phone and doorbell connect to your 2.4 GHz WiFi network.
•Flashing white. Your Video Doorbell is scanning for a QR code, attempting to connect to WiFi, or attempting to connect to the Arlo network. If your doorbell
LED continues to flash white for more than a few minutes, change the WiFi settings in your phone to connect to the same 2.4 GHz WiFi network as the doorbell. Also confirm that your WiFi router has an Internet connection..
•Alternating amber and white. The operating temperature or voltage is too low. Wait up to 13 minutes for the doorbell to warm up or for its internal battery to charge.
LED after setup
•Slow breathing pattern white. The doorbell detected motion.
•Solid white. The doorbell was pressed and is calling you or the doorbell is connected to a call.
•Fading white. The call from the doorbell ended.
Get Started |
14 |
User Manual |

Video Doorbell
Tips for optimal WiFi performance
The distance between WiFi devices can affect the WiFi signal:
•Maximum recommended distance. We recommend that you place your WiFi router within 300 feet (90 meters) from the Arlo Video Doorbell. The maximum line-of-sight range of 300 feet is reduced by each wall, ceiling, or other major obstruction between the doorbell and the router.
•Minimum recommended distance. To reduce WiFi interference, allow at least 6½ feet (2 meters) between your Arlo Video Doorbell and any Arlo cameras that you install.
These materials can reduce WiFi signal strength if they are located between WiFi devices:
•Unusually thick walls and ceilings
•Brick
•Concrete
•Stone
•Ceramic
•Glass, especially mirrors
•Metal
•Large quantities of water, such as the water in a fish tank or water heater
Test motion detection
You can use the motion detection test to find the right motion sensitivity setting for your doorbell.
1.Open the Arlo app.
2.Tap the gear icon next to the Arlo Video Doorbell.
3.Tap Device Utilities > Motion Detection Test.
4.Move in front of the camera.
During this test, the camera LED blinks white when motion is detected.
5.Move the slider to adjust the motion sensitivity level as needed.
6.Edit the ruler to enter the motion sensitivity level that you want to use. See Change motion sensitivity on page 41.
Get Started |
15 |
User Manual |

Video Doorbell
Control when your doorbell detects motion
You control when your Arlo Video Doorbell detects motion and the rules it uses to record and alert you by selecting a mode. The Arlo app comes with four modes:
•Armed
•Disarmed
•Schedule
•Geofencing
You can customize each mode and you can also create custom modes. For information, see Chapter 6. Modes, Rules, and Alerts on page 39.
Get Started |
16 |
User Manual |

3. Use Your Video Doorbell
Answer your Video Doorbell from your smartphone
When a visitor presses your Arlo Video Doorbell, your mobile device receives a video call through an Internet connection. You must install the Arlo app on your smartphone and you must be logged in to the Arlo app. The caller displays as the name you gave to your Arlo Video Doorbell. You can accept or decline the call the same way you do for other calls that you receive on your smartphone.
When your smartphone rings, you can do the following:
•Accept the call and speak to your visitor.
•Answer the call with a Quick Reply. Select a recorded message for the doorbell to play for the visitor.
•Decline the call. If a visitor presses your Arlo Video Doorbell and you don’t answer your smartphone after five rings, your doorbell prompts the visitor to leave a message. If the visitor leaves a message, it is saved as a Doorbell recording in your Arlo library.
If you want to receive the call on a different phone, you can log out of the Arlo app on the first smartphone and log into the Arlo app on another smartphone or tablet.
To receive the call on multiple phones, you can create a grant access account (add doorbell to the grant access account) and log in to the Arlo app using the grant account on the other smartphone. (See Grant access to friends on page 32.)
Accept a call from your Video Doorbell
To accept a call on your smartphone from your Arlo Video Doorbell:
1.When you receive a call from the Arlo Video Doorbell, tap Accept.
2.If you are prompted to allow Arlo to access the camera, tap OK. The incoming call page displays.
17

Video Doorbell
3.To talk to the visitor, speak into your phone as you normally do.
You can also tap a button to toggle between hands-free and earpiece mode, play a quick reply message for the visitor, or mute your sound.
4.To toggle between hands-free and earpiece mode, tap the speaker button.
5.To play a quick reply message, tap the message icon and select a message from the list.
6.To mute yourself so that the visitor doesn’t hear sound, tap the microphone button.
7.When you’re finished, tap End.
Respond to a visitor with a Quick Reply
1.When you receive a call from the Arlo Video Doorbell, tap Accept.
2.If you’re prompted to allow Arlo to access the camera, tap OK. The incoming call page displays.
3.To play a quick reply message, tap the message icon and select a message from the list.
The messages are:
•We will be right there.
•Leave the package outside.
•Sorry, I’m not interested.
•Can I help you?
•I’m busy right now.
Change the language for Quick Reply messages
1.Open the Arlo app.
2.Tap the gear icon next to the Arlo Video Doorbell.
3.Scroll down and tap Language.
4.Select a language.
Use Your Video Doorbell |
18 |
User Manual |
 Loading...