

Page 1

Page 2

BCS 313 V
Fridge/freezer combined 1
GB
Instructions for installation and use
Комбинированный холодильник-морозильник
CSI
Инструкции по установке и использованию
11
To maintain the EFFICIENCY and SAFETY of this appliance, we recommend:
- call only the Service Centers authorized by the manufacturer
- always use original Spare Parts
Производитель оставляет за собой право без предупреждения вносить
изменения в конструкцию, не ухудшающие эффективность работы
оборудования.
- Некоторые параметры, приведенные в этой инструкции, являются приблизительными.
- Производитель не несет ответственности за незначительные отклонения от указанных величин.
Page 3

Safety - a good habit to get into.
ATTENTION
Read your manual carefully since it contains instructions
which will ensure safe installation, use and maintenance of
your appliance.
Your Refrigerator is built to International safety standards
(EN60) and has been awarded the European approval mark
(IMQ) for compliance with UK electrical safety requirements.
It also meets the EC standards on the prevention and elimination of radio interference (EC directive 87/308 - 02.06.89).
1. This appliance must not be installed outdoors - not even in
an area protected by a roof. It is extremely danger ous to leave
it exposed to rain or storms.
2. It must only be used by adults and exclusively to refrigerate
and freeze foodstuffs, following the instructions for use contained in this manual.
3. Do not ever touch or handle the appliance with bare feet or
with wet hands or feet.
4. It is highly recommended that you do not use extension
cords or multiple socket adapters. If the refrigerator is installed
between cabinets, make sure that the cord is not bent or dangerously pinched or compressed.
5. Never pull on the cord or the refrigerator to remove the
plug from the wall socket - this is very dangerous.
6. Never touch the cooling components within the appliance,
especially with wet hands because this could result in injury.
Never put ice cubes just removed from the freezer into your
mouth because they could stick to your mouth and cause burns.
7. Never clean or perform maintenance on the appliance
without first removing the plug from the socket; in fact,
turning the knob for adjusting the temperature to the "0"·
setting is not sufficient to eliminate all electrical contact with
the mains.
8. Before having your old refrigerator picked up for disposal,
remove or make inoperable any locking devices to prevent children who might play in or around the appliance from being
locked inside.
9. Before calling for service/assistance in the case of malfunction, consult the chapter entitled “Is There a Problem? to determine whether it is possible to eliminate the problem. do not
try to repair the problem by trying to access the internal components of the appliance.
10. If damaged, the power supply cord on this appliance
must necessarily be replaced by our service centre because
special tools are required for replacement.
11. Do not use electric appliances inside the compartment for
food storage, if these are not those recommended by the
manufacturer.
12. At the end of the functional life of your appliance –
containing cyclopentane gas in the insulation foam and perhaps
gas R600a (isobutane) in the refrigeration circuit – the latter
should made safe before being sent to the dump.
For this operation, please contact your dealer or the Local
Organisation in charge of waste disposal.
Installation
To ensure that the appliance operates properly and to
reduce energy consumption, it is important that the
appliance is installed correctly .
V entilation
The compressor and condenser generate heat and, therefore, need to be ventilated properly. Rooms with less than
perfect ventilation are not very suited for installation of the
appliance. Therefore, it should be installed in a room with
an opening (window or French window) that provide the
appropriate amount of air re-circulation. It is also important
that the room not be too humid.
Away from Heat
This appliance should not be positioned in a place where it is
directly exposed to sunlight or directly next to an iven/hob.
Electrical Connection and Earthing
Before proceeding with the electrical connection, make sure
that the voltage indicated on the rating plate, located at the
bottom left near the vegetable crisper, corresponds to the
mains voltage in your home and that the socket is fitted
with a standard earthing wire in accordance with safety
standards for 46/90 systems. If the socket is not fitted with
an earthing wire, the manufacturer will not be held liability
for any damages and or injuries arising out of the use of the
appliance. Do not use multiple sockets or adapters.
Position the appliance in such a way that you can access
the socket where it is plugged in.
Insufficient power?
The electrical socket must be able to handle the maximum
power load of the appliance, which is indicated on the rating plate located at the bottom left next to the vegetable
crisper.
Before making the electrical connection ...
After the appliance has been delivered, place it in the vertical upright position and wait at least 3 hours before inserting the plug into the socket in order to ensure that it functions properly .
1
GB
Page 4
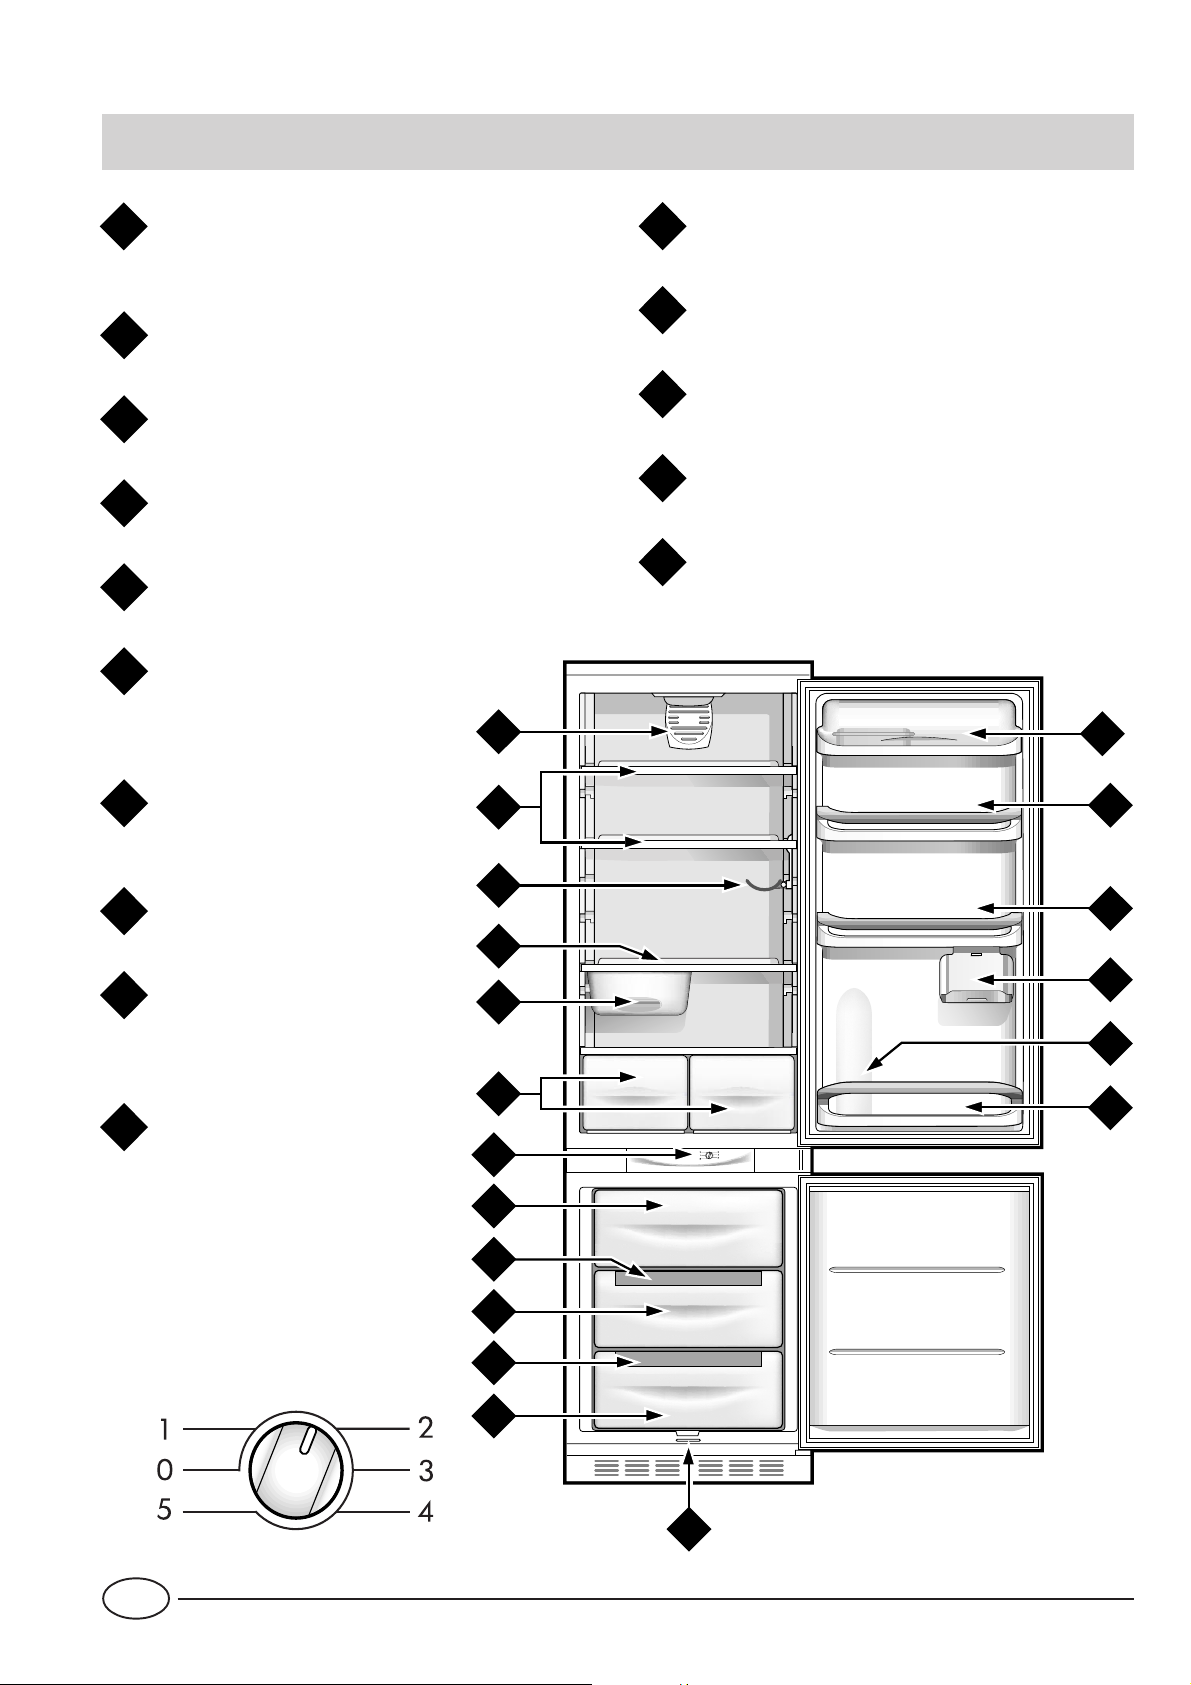
Close-up view
M
D
E
O
N
L
M
F
K
A
B
C
B
J
G
H
G
I
H
Removable door shelves with lid, with egg tray
A
and lidded butter dish
Removable miscellaneous shelf
B
Hinged shelf
C
Compartment for a 2 litre bottle
D
Removable door shelf for bottles
E
Drain system for drawing off
F
defrost water from freezer
compartment
Compartment for storing
G
Fruit and Vegetable Crispers
K
Meat/cheese storage box
L
Removable/Adjustable Shelves
M
Hinged bottle rack
N
"A.I.R. System"
O
(Ariston Integrated Refrigeration)
frozen foods
Ice tray "ESY ICE"
H
Compartment for freezing
I
fresh foods and storing frozen
foods
Compartment for freezing
J
fresh foods and storing frozen
foods
This knob is used to regulate the
temperature in the two compartments with the following settings:
0 The refrigerator is off;
1 less cold;
5 colder
GB
2
Page 5

How to Start the Appliance
NOTICE
After the appliance has been delivered, stand it in the
upright position and wait approximately 3 hours before connecting it to the electrical outlet to guarantee
that it operates properly.
Before placing foodstuffs in the refrigerator or fr eezer , clean
the interior well with warm water and baking soda.
After having plugged the appliance into the socket, make
sure that the refrigerator light has turned on. Then turn the
thermostat knob “J” to setting “3”. After a few hours have
passed, you can place fresh food in the refrigerator compartment and frozen foods into the freezer.
How to use the refrigerator compartment...
The thermostat automatically regulates the temperature inside the appliance
1 = less cold 5 = colder
It is recommended that a medium setting be used.
To increase the amount of space, optimize arrangement and
improve appearance, this appliance has a “cooling area” located within the back panel of the refrigerator compartment.
When the appliance is operating, this panel may be covered
with frost or droplets of water depending on whether the compressor is operating or not at a given time. Do not be concerned about this! The refrigerator is operating normally.
If the thermostat knob is positioned on higher settings while
the refrigerator is heavily filled and the ambient temperature
high, the appliance may run continuously , resulting in the for mation of frost on the back cooling area. This will lead to an
increase in energy consumption.
To avoid this situation, just turn the thermostat knob to a
lower setting so that the appliance defrosts automatically .
The refrigerator compartment of your appliance is equipped with
A.I.R. System (Ariston Integrated Refrigeration) which allows
an optimal food storage while simplifying the use of the refrigerator
thanks to the following features:
- Fast temperature reset: after the doors heve been opened,
the internal temperatures return to optimal values faster,
improving food storage.
- More uniform temperature distribution: this makes it possible
to place any type of food on any shelf.
- Higher humidity level: this allows you to store food longer.
B
A
3
GB
Page 6
How to use the freezer compartment...
- For the preparation of food to be frozen, please consult a specialized manual.
- Food that has been thawed, even partially , must not be refrozen: you must cook it in order to consume it (within 24
hours) or to freeze it once again.
- Fresh foods that you intend to freeze must not be placed
in contact with those that are already frozen or those that
have been fast-frozen. Rather, they must be placed on the
grid in the freezer compartment, in contact with the walls
of the compartment (back or side) if possible. Please keep in
mind that proper conservation of frozen foods depends on
the speed with which they are frozen.
- During the freezing process, avoid opening the door of the
freezer .
- The maximum daily quantity of food that can be frozen is
indicated on the rating plate located to the left of the vegetable crisper.
- In order to freeze and then thaw foods optimally, it is recommended that you divide food into small portions so that
they freeze quickly and uniformly. The packages should be
clearly marked with the content and the date they were
frozen.
- Do not open the freezer door in the event of a power
failure or malfunction. This precaution will slow the rise in
temperature within the compartment. If the door is not
opened, frozen and fast-frozen foods will remain in their
current state for approximately 9-14 hours.
- Do not place full bottles in the freezer: they could easily
burst because all liquids increase in volume when they freeze.
- If the ambient temperature remains below 14°C for an
extended period of time, the temperature needed for extended storage of food in the freezer will not be reached,
resulting in reduced storage life of the food.
Ice trays
This new concept of ice trays is an exclusive Merloni patent.
The fact that they are situated on the top part of the freezer
drawers ensures greater ergonomics and cleanliness and
leaves more room free inside the drawers : the ice no longer
comes into contact with the food placed inside the freezer
compartment; furthermore, the dripping of the water during
filling is avoided (a lid to cover up the hole after filling with
water is also provided).
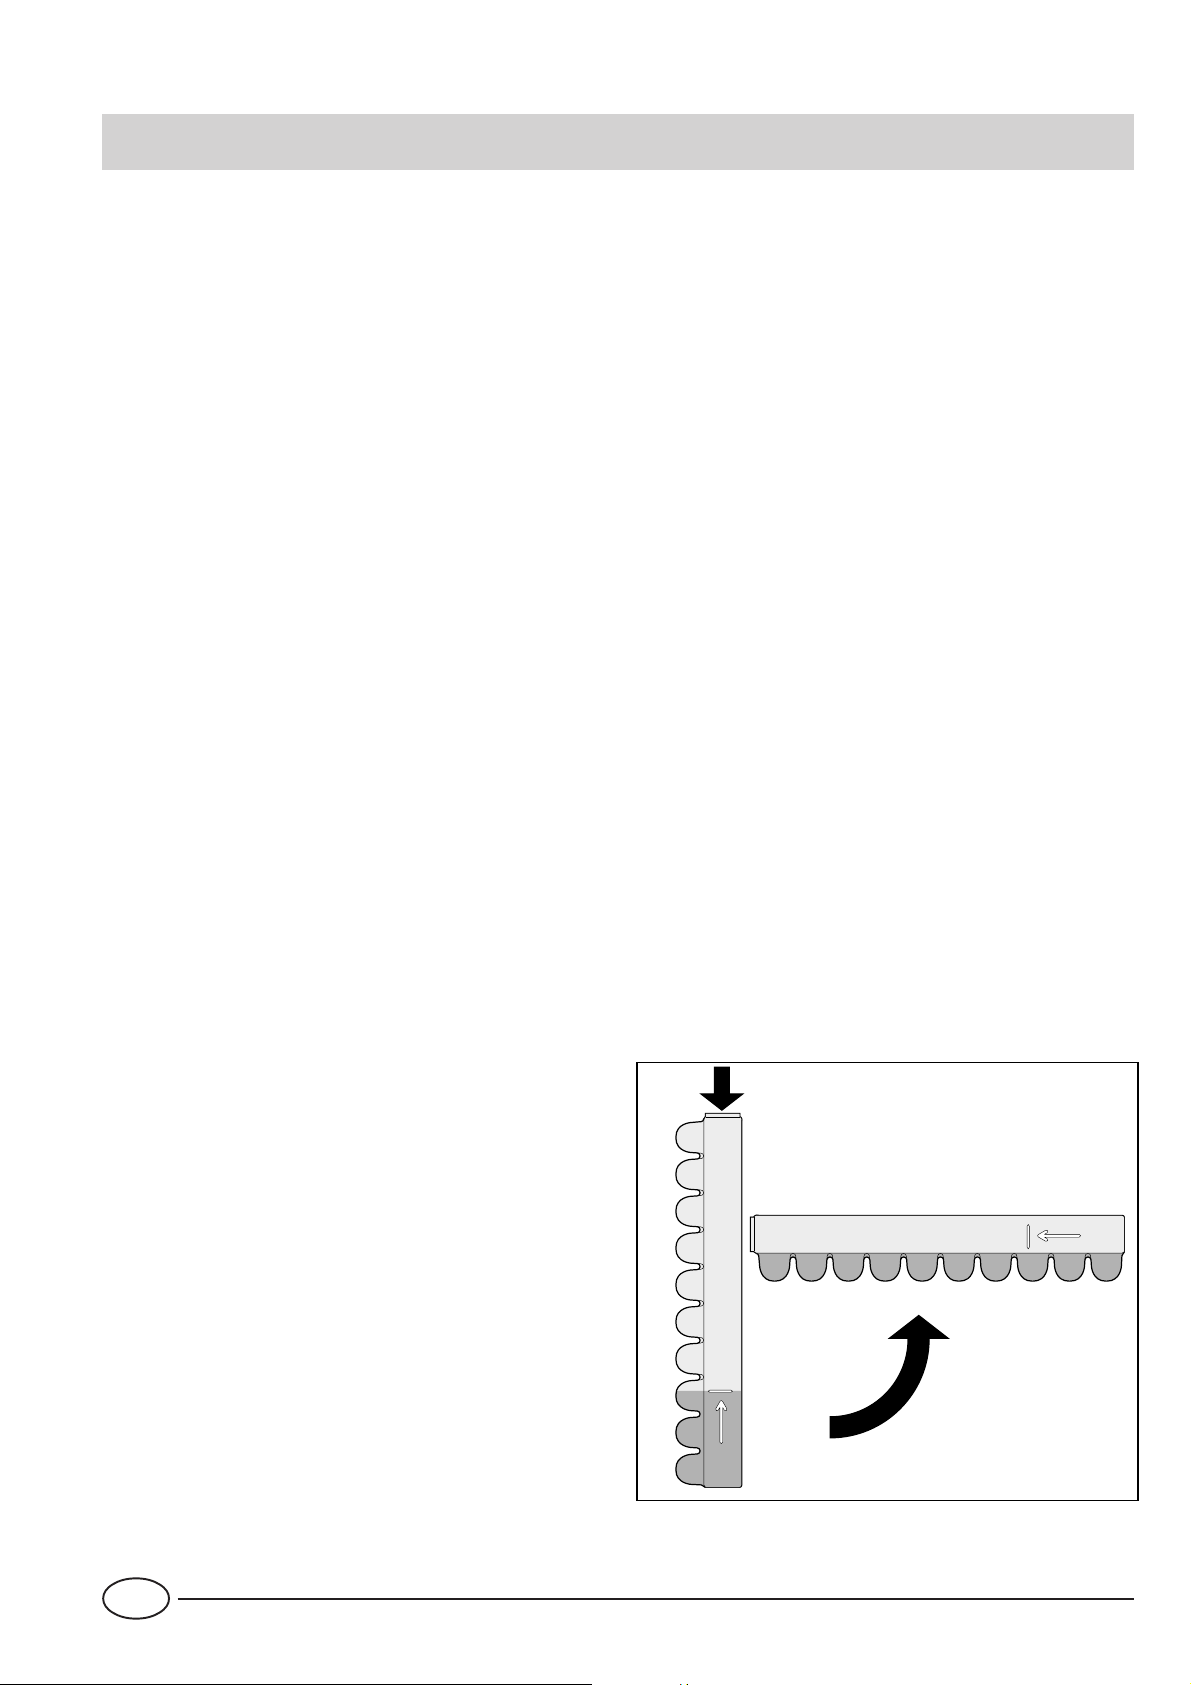
Instructions for use (Fig. 5)
Fill up the tray with water via the special hole up to the level
indicated (MAX WATER LEVEL), taking care not to exceed
it: inserting more water than is necessary will lead to the
formation of ice which could obstruct the exit of the ice
cubes.
If you have used an excessive amount of water, you will
have to wait until the ice has melted, empty out the tray
and re-fill it with water.
Once you have filled the ice tray up with water through the
hole indicated, turn it by 90 °. Thanks to the connected
compartments, the water fills up the special shapes, after
which you can cover the hole up with the special cap and
place the ice tray in the inner door of the freezer
compartment.
Once the ice has formed, all you need to do is to knock the
tray against a hard surface so that the ice cubes come away
from their housing and come out of the same hole used to
fill the tray with water . T o make it easier for the ice cubes to
come out, wet the outside of the tray.
WARNING: every time you fill up the ice tray with water ,
make sure that the same is completely empty and that there
are no traces of ice left inside it.
The minimum time required for ice to form well is
approximately 8 hours.
GB
MAX
WATER LEVEL
MAX
WATER LEVEL
Fig. 5
4
Page 7
Guide to Using the Freezer
Meat and Fish
Food Wrapping
Beef Roast Tinfoil 2 / 3 9 / 10 Not required.
Lamb Tinfoil 1 / 2 6 Not required.
Pork Roast Tinfoil 1 6 Not required.
Veal Roast Tinfoil 1 8 Not required.
Veal/Pork Chops
Veal/Lamb Cutlets
Minced Meat
Heart and Liver Plastic Baggies 3 Not required.
Each piece wrapped in cling wrap and
then in tinfoil (4 to 6 slices)
Each piece wrapped in cling wrap and
then in tinfoil (4 to 6 slices)
In aluminium containers covered with cling
wrap.
Tenderising
(days)
Freshly
minced
Storage
(months)
6 Not required.
6 Not required.
2 Slowly in refrigerator.
Thawing Time
Sausages Cling Wrap or Tinfoil 2 As necessary.
Chicken and Turkey Tinfoil 1 / 3 9 Very slowly in refrigerator.
Duck and Goose Tinfoil 1 / 4 6 Very slowly in refrigerator.
Pheasant, Partrige and
Wild Duck
Hare and Rabbit Tinfoil 3 / 4 6 Very slowly in refrigerator.
Venison Tinfoil or Cling Wrap 5 / 6 9 Very slowly in refrigerator.
Large Fish Ti nfoil or Cling Wrap 4 / 6 Very slowly in refrigerator.
Small Fish Plastic Baggies 2 / 3 Not required.
Crustaceans Plastic Baggies 3 / 6 Not required.
Shellfish
Tinfoil 1 / 3 9 Very slowly in refrigerator.
Store in salted water in aluminium
containers or plastic containers.
3 Very slowly in refrigerator.
Boiled Fish Tinfoil or Cling Wrap 12 In hot water.
Fried Fish Plastic Baggies 4 / 6 Directly in pan.
5
GB
Page 8
Fruits and Vegetables
Food Preparation
Apples and Pears Peel and cut into slices. 2’
Apricots, Peaches,
Cherries and Plums
Strawb erries
Blackberries and
Raspberries
Cooked Fruit Cut, cook and strain.
Fruit Juice Wash, cut and crush.
Cauliflower
Cabbage and
Brussel Sprouts
Peas Shell and wash. 2’ Plastic Baggies 12 Not required.
Peel and pit. 1’ / 2’
Rinse and fry.
Remove leaves, cut head
into small pieces and blanch
in wate r and a little lem on
juice .
Wash a nd c ut into sm all
pieces.
Blanching
Time
2’ Plastic Baggies 12 Not required.
1’ / 2’ Plastic Baggies 10 / 12 At room temperature.
Wrapping
In Containers (cover
with syrup)
In Containers (cover
with syrup)
In Containers (cover
with sugar)
In Containers (add
10% sugar)
In Containers (sugar
to taste)
Storage
(months)
12
12
10 / 12
12
10 / 12
Thawing Time
In refrigerator very
slowly.
In refrigerator very
slowly.
In refrigerator very
slowly.
In refrigerator very
slowly.
In refrigerator very
slowly.
French Beans Wash and slice if required. 2 Plastic Baggies 10 / 12 Not required.
Carrots, Peppers
and Turnips
Mush rooms a nd
Asparagus
Spinach Wash and mince. 2’ Plastic Baggies 12 At room temperature.
Vegetable for Soups
Various Foods Preparation
Bread Plastic Baggies 4
Cakes Plastic Baggies 6
Cream Plastic Containers 6
Butter
Peel, w a sh an d slice if
necessary.
Wash, peel and cut up. 3’ / 4’
Wash and cut up in small
pieces.
3’ / 4’ Plastic Baggies 12 Not required.
3’
Blanching
Time
Plastic Baggies or
Containers
Plastic Baggies or
Containers
Wrapping
In original wrapping
or tinfoil
6 At room temperature.
6 / 7 Not required.
Storage
(months)
6 In refrigerato r.
Thawing time
At room temperature
and in the oven.
About 10 minutes at
room temperature,
cook at 100/200°C.
At room temperature or
in refrigerator.
Boiled Food or
Vegetable Soup
Eggs
GB
Plastic or Glass
Containers
Freeze without shells
in sm a ll co nta ine rs
6
3 / 6
10
At room temperature or
in hot water.
At room temperature or
in refrigerator.
Page 9

Tips on Saving Energy
- Install the Appliance Properly
In other words, away from sources of heat and direct sunlight, in a well ventilated room complying with the minimum distances indicated in the paragraph entitled, “ Installation/Ventilation.”.
THE ACTUAL ENERGY CONSUMPTION OF THE
APPLIANCE DEPENDS ON THE WAY THE SAME IS USED
AND ON ITS LOCATION.
The consumption tests were performed in 560mm deep
column units, the most common installation setting for this
appliance.
- Use the Right Temperature Setting
A setting which is too cold increases energy consumption.
- Do not Overfill
To conserve food properly, the cold air must circulate freely
within the refrigerator . If it is overfilled, this will prevent pr oper
air circulation, forcing the compressor to work continuously.
- Close the Doors
Open your refrigerator as little as possible because each time
you do so you loose much of the cold air. To raise the temperature to the proper level again, the motor must work for
a long time, consuming energy.
- Keep an Eye on the Seals
Keep the seals clean and make sure that they adhere well to
the door. This alone will ensure that no cold air escapes.
- No Hot Foods
A hot pot or pan placed in the refrigerator immediately raises
the temperature several degrees. Let hot cookwar e and food
cool to ambient temperature before placing them in the refrigerator .
- Defrost the Freezer
Check the thickness of the frost on the walls of the freezer
and immediately defrost it if the layer of frost is too thick.
(see the section entitled, “Keeping your Appliance in Shape”).
Keeping Your Appliance in Shape
Before doing any cleaning, disconnect the appliance
from the electricity (by pulling out the plug or turning
off the general switch in your home).
Defrosting
WARNING: do not damage the refrigeration cir cuit.
Do not use mechanical devices or other tools to speed
up the defrosting process, unless they have been recommended by the manufacturer.
How to Defrost the Refrigerator
This appliance defrosts automatically and the water is
channeled to the back toward the drain installed for this
purpose (fig. 6). Here, the heat produced by the compr essor
will make it evaporate. The only thing you must do is to
periodically check and clean the hole of the drain, which is
located behind the vegetable crispers, so that the water
drains properly.
How to Defrost the Freezer
- Every so often, remove the frost with the scraper provided
with the appliance (do not use knives or metal objects).
- If the frost is more than 15 mm thick, the freezer must be
defrosted.
Proceed as follows: turn the thermostat knob (H) to the ·
setting "0" (Fig. 7). Then wrap all the frozen and fast-fr ozen
food in newspaper, placing it either in the refrigerator or in
a cool place. Leave the freezer door open so that the frost
thaws completely . Y ou can speed this process by placing containers of warm water in the compartment.
The unit is provided with a system which allows the defrost
water to be collected in a container to be placed beneath
the unit (proceed as illustrated in fig 8).
Fig. 6
7
Fig. 7
Fig. 8
GB
Page 10

Cleaning and Special Maintenance
Before cleaning the refrigerator , disconnect it from the
electrical mains (by removing the plug from the socket
or by turning off the main electricity switch for the
apartment or house).
- The materials used to build your appliance are hygienic
and do not transmit odors. However , to preserve this quality
of your appliance, the food stored in it must be well closed
and covered to prevent spills which could stain it and cause
unpleasant odors.
- Only water and baking soda. T o clean both the interior and
exterior, use a sponge with warm water and baking soda,
which is, among other things, a good disinfectant. If you do
not have any in the house, you can use a neutral soap.
- What not to use. Never use abrasives, bleach or ammonia.
Solvents and similar products are strictly prohibited.
- All the removable part should be taken out and allowed to
soak in hot water and dishwashing soap. Rinse and dry them
well before putting them back in the refrigerator.
- When the appliance is not used for a long time. If you
decide not to use the appliance (during the summer), it must
cleaned and the doors left open to prevent the formation of
mold and unpleasant odors.
- Replacing the light bulb.
When replacing the light of the refrigerator compartment
unplug the unit from the power supply and chang the used
lamp with another one of not more than 15 W.
For access ti lamp "A", remove the centre screw "B" at the
back of the lamp cover, as indicated in fig. 9.
Fig. 9
A
B
GB
8
Page 11

Is There a Problem?
The refrigerator does not function.
Have you checked whether:
• The main switch for the electricity to the apartment or
home has been turned off;
• The plug is properly inserted in the outlet;
• The outlet is adequate; try inserting the plug into another
outlet in the room.
The refrigerator and the freezer do not cool
properly.
Have you checked whether:
• The doors do not close well or the seals are faulty;
• The doors are left open too long;
• The thermostat knob is not on the proper setting;
• The refrigerator or freezer is overfilled.
The food in the refrigerator becomes too cold.
Have you checked whether:
• The thermostat knob is on the proper setting;
• The food is in contact with the back wall - which is the
coldest part.
If after all the checks, the appliance still does not operate or
the problem persists, call the nearest Service Centre and
inform them of: the type of problem, the abbreviation of
the model name (Mod.) and the relative numbers (S/N) written on the rating plate located at the bottom left next to
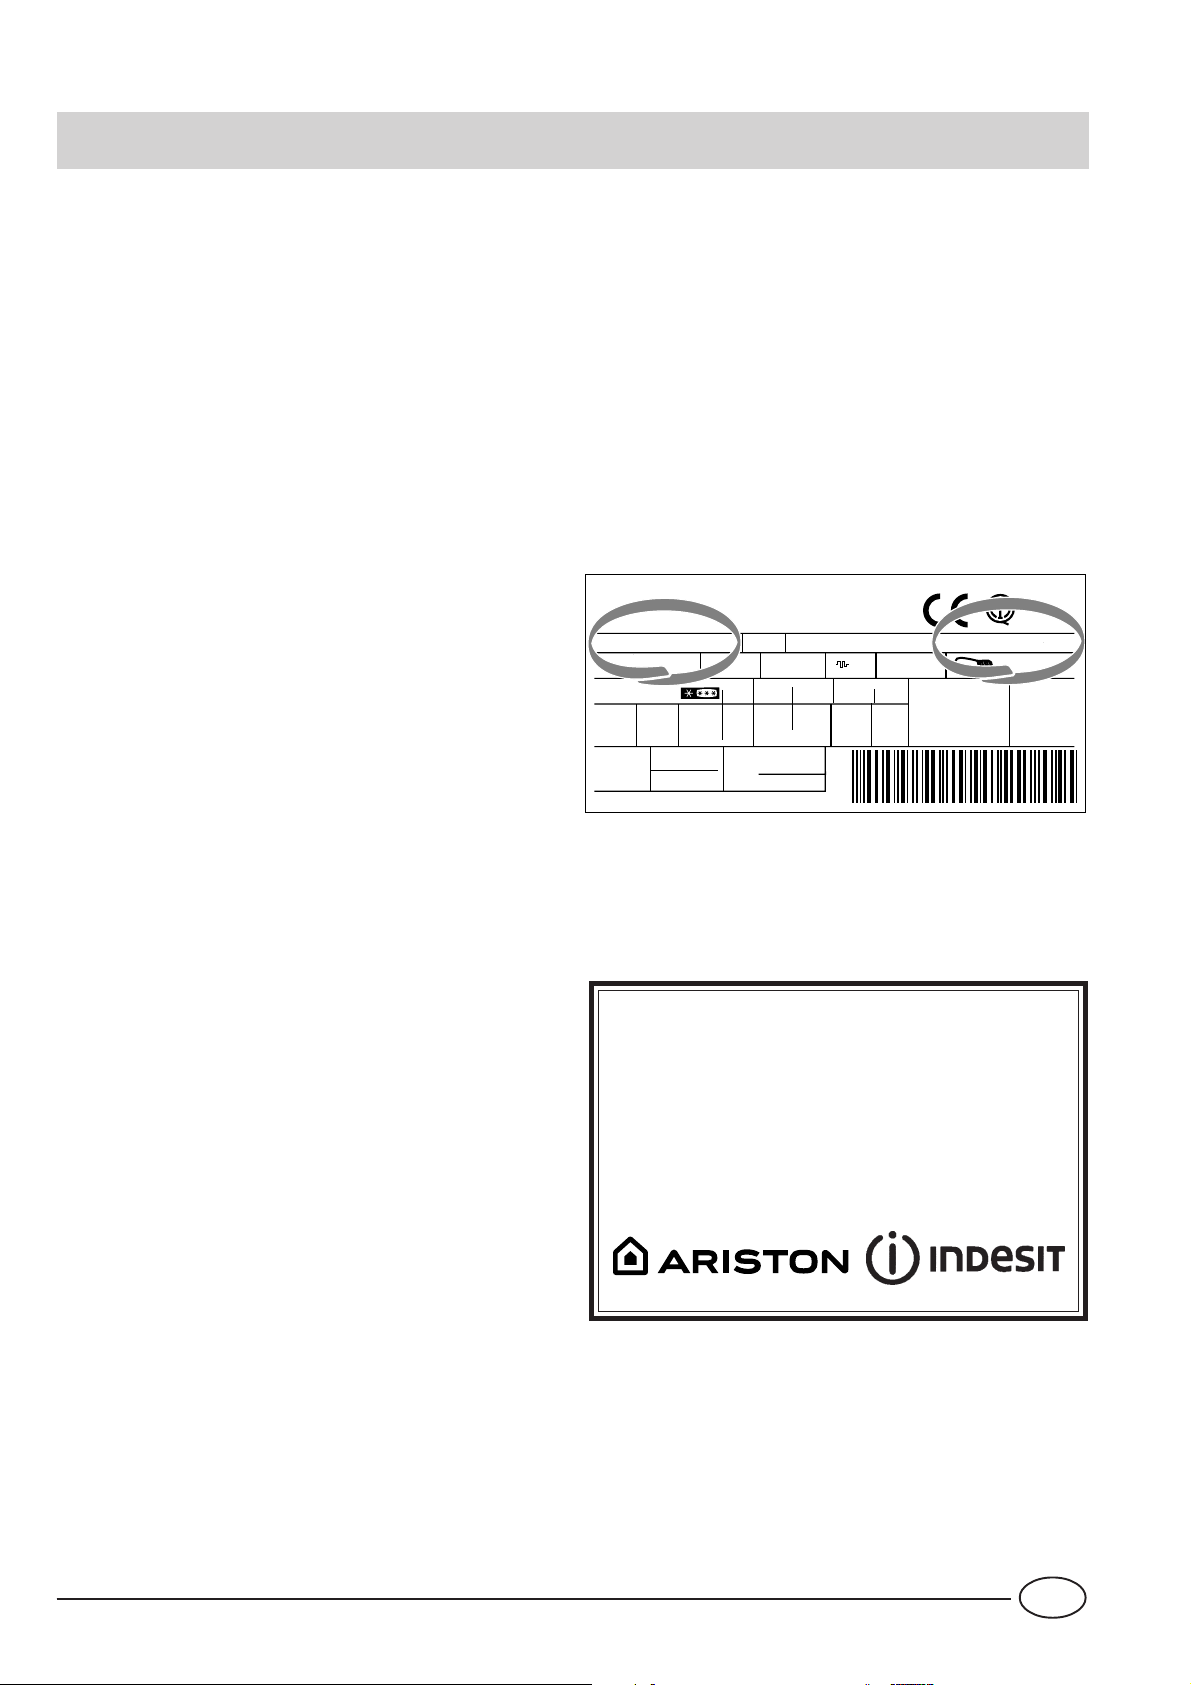
the vegetable crisper (see examples in the figures below).
75
Test
P.S-I.
TI
Net
Util
Utile
Pressure
HIGH-235
LOW 140
RG 2330
Mod.
220 - 240 V- 50 Hz 150 W
340
Total
Gross
Bruto
Brut
Compr.
Syst.
Kompr.
Made in Italy 13918
Gross
Bruto
Brut
R 134 a
kg 0,090
93139180000 S/N 704211801
Cod.
Gross
Bruto
Brut
W
Fuse
A
Freez. Capac
Poder de Cong
4,0
kg/24 h
Max 15 w
Class
Clase
N
Classe
Never call on unauthorized technicians and always
refuse spare parts which are not originals.
The motor runs continuously.
Have you checked whether
• The doors are not closed well or have remained open too
long;
• The ambient temperature is too high;
• The thermostat knob is not on the proper setting.
The appliance makes too much noise.
The gas refrigerant produces a slight noise even when the
compressor is not running (this is not a defect).
Have you checked whether:
• The refrigerator is level.
• The appliance was installed between cabinets or objects
that vibrate and make noise.
There is water on the bottom of the refrigerator.
Have you checked whether:
• The hole for draining the water from the frost is clogged
(see fig. 6).
9
GB
Page 12

GB
10
Page 13

Безопасность хорошая привычка
´нŁматеºьно прочŁтаШте данное руŒоводжтво: оно поможет
´ам ознаŒомŁтьжя ж возможножтямŁ ıоºодŁºьнŁŒа, правŁºамŁ
еªо монтажа, ŁжпоºьзованŁя Ł оЖжºужŁванŁя.
´аł ıоºодŁºьнŁŒ Łзªотовºен в жоответжтвŁŁ ж международнЯмŁ жтандартамŁ ЖезопажножтŁ (EN 60). ˙а удовºетворенŁе треЖованŁШ эºеŒтроЖезопажножтŁ ´еºŁŒоЖрŁтанŁŁ
ıоºодŁºьнŁŒ ЖЯº отмечен марŒоШ жоответжтвŁя (IMQ). ˛ЖорудованŁе отвечает треЖованŁям ¯С (дŁреŒтŁва ¯С 87/308
от 02.06.89) о предотврашенŁŁ Ł ужтраненŁŁ радŁопомеı.
1. ХоºодŁºьнŁŒ разраЖотан дºя ŁжпоºьзованŁя внутрŁ помешенŁШ. ˝Ł прŁ ŒаŒŁı оЖжтоятеºьжтваı не ŁжпоºьзуШте оЖорудованŁе на уºŁце.
2. ХоºодŁºьнŁŒ доºжен Łжпоºьзоватьжя в домаłнŁı ужºовŁяı
дºя заморажŁванŁя жвежŁı продуŒтов Ł ıраненŁя замороженнЯı продуŒтов в жоответжтвŁŁ ж ŁнжтруŒцŁямŁ данноªо
руŒоводжтва.
3. ˝е ŒажаШтежь оЖорудованŁя моŒрЯмŁ ŁºŁ жЯрЯмŁ руŒамŁ.
˝е поºьзуШтежь ıоºодŁºьнŁŒом ЖожŁŒом.
4. ˝е ŁжпоºьзуШте дºя подŒºюченŁя ıоºодŁºьнŁŒа удºŁнŁтеºŁ Ł троШнŁŒŁ. ¯жºŁ ıоºодŁºьнŁŒ ужтановºен между
предметамŁ меЖеºŁ, уЖедŁтежь, что провод не переŒручен Ł
не прŁжат.
5. ˝ŁŒоªда не тянŁте за провод ŁºŁ за жам ıоºодŁºьнŁŒ, чтоЖЯ
отжоедŁнŁть еªо от розетŒŁ. Это очень опажно.
6. ˝е ŒажаШтежь внутреннŁı оıºаждаюшŁı эºементов ıоºодŁºьнŁŒа, ожоЖенно вºажнЯмŁ руŒамŁ, чтоЖЯ не поºучŁть
межтное оЖмороженŁе. ˝е ЖерŁте жразу в рот ŒуЖŁŒŁ ºьда,
вЯнутЯе Łз морозŁºьноªо отдеºенŁя ´Я можете оЖжечьжя.
7. ˇеред вЯпоºненŁем ºюЖЯı раЖот по моШŒе ŁºŁ оЖжºужŁванŁю отжоедŁнŁте ıоºодŁºьнŁŒ от жетŁ, вЯнув вŁºŒу Łз
розетŒŁ. ¨меШте в вŁду, что ужтановŒŁ терможтата в поºоженŁе "0" недожтаточно дºя поºноªо отŒºюченŁя эºеŒтропŁтанŁя ıоºодŁºьнŁŒа.
8. ˇрежде чем ŁзЖавŁтьжя от жтароªо ıоºодŁºьнŁŒа неоЖıодŁмо жºомать ŁºŁ жнять ж неªо запŁраюшŁе прŁжпожоЖºенŁя, чтоЖЯ оЖезопажŁть детеШ, ŒоторЯе моªут заŒрЯть жеЖя
внутрŁ во время ŁªрЯ.
9. ˇрŁ вознŁŒновенŁŁ нежтандартноШ жŁтуацŁŁ отŒºючŁте
ıоºодŁºьнŁŒ от жетŁ Ł позвонŁте в жервŁжнЯШ центр, теºефон Œотороªо напечатан в ªарантŁШном доŒументе (жервŁжном жертŁфŁŒате, жервŁжноШ ŒнŁжŒе). ˇеред звонŒом в
жервŁжнЯШ центр прочŁтаШте раздеº «УжтраненŁе неŁжправножтеШ». ´озможно ´Я жамŁ реłŁте вознŁŒłую проЖºему.
˝е пЯтаШтежь жаможтоятеºьно чŁнŁть ıоºодŁºьнŁŒ, ежºŁ
треЖуетжя вмеłатеºьжтво в еªо внутреннŁе ŒомпонентЯ.
10. ¯жºŁ неоЖıодŁмо заменŁть пŁтаюшŁШ ŒаЖеºь, оЖратŁтежь в жервŁжнЯШ центр (в ºюЖом жºучае прŁ поджоедŁненŁŁ
ŒаЖеºя доºжнЯ Łжпоºьзоватьжя жпецŁаºьнЯе ŒонтаŒтЯ Ł
ŁнжтрументЯ).
˙апрешаетжя ŁзмененŁе ŒонжтруŒцŁŁ ıоºодŁºьнŁŒа Ł вмеłатеºьжтво ºŁц, не упоºномоченнЯı проŁзводŁтеºем на
ªарантŁШнЯШ ремонт.
11. ˝е ŁжпоºьзуШте эºеŒтропрŁЖорЯ, предназначеннЯе дºя
прŁªотовºенŁя пŁшŁ, дºя ее ıраненŁя в ıоºодŁºьнŁŒе, ежºŁ
это не реŒомендовано проŁзводŁтеºем.
12. ¯жºŁ ´Я реłŁºŁ Жоºьłе не Łжпоºьзовать ´аł ıоºодŁºьнŁŒ, перед тем ŒаŒ вЯЖрожŁть, позаЖотьтежь оЖ еªо
утŁºŁзацŁŁ. ´аł ıоºодŁºьнŁŒ жодержŁт цŁŒºопентановЯШ ªаз
в ŁзоºяцŁонноШ пене Ł, возможно, ŁзоЖутан (R600) в
оıºаждаюшем Œонтуре в пожºеднем жºучае ´ам неоЖıодŁмо жвязатьжя ж межтноШ орªанŁзацŁеШ, ответжтвенноШ за
утŁºŁзацŁю.
Установка
Правильная установка необходима для обеспечения
надежной и наиболее эффективной работы холодильника.
Вентиляция
˚омпрежжор Ł Œонденжатор ıоºодŁºьнŁŒа в процежже раЖотЯ наªреваютжя, поэтому неоЖıодŁмо оЖежпечŁть дожтаточную вентŁºяцŁю. ХоºодŁºьнŁŒ доºжен ЖЯть
ужтановºен в ıороłо проветрŁваемом помешенŁŁ ж
нормаºьноШ вºажножтью. ˙апрешено ужтанавºŁвать
ıоºодŁºьнŁŒŁ в помешенŁяı ж повЯłенноШ вºажножтью,
напрŁмер, ваннЯı Œомнатаı, подваºаı.
Не располагайте вблизи источников тепла
˝е жºедует ужтанавºŁвать ıоºодŁºьнŁŒ таŒ, чтоЖЯ он наıодŁºжя под воздеШжтвŁем прямЯı жоºнечнЯı ºучеШ ŁºŁ
рядом ж ŁжточнŁŒамŁ тепºа (ŒуıоннЯмŁ пºŁтамŁ, дуıовŒамŁ Ł т.п.).
Подключение к электросети
ˇеред подŒºюченŁем Œ эºеŒтрожетŁ уЖедŁтежь, что напряженŁе жетŁ жоответжтвует даннЯм, уŒазаннЯм в таЖºŁце, Œоторая наıодŁтжя на ºевоШ жтороне ıоºодŁºьноªо
отдеºенŁя рядом ж яшŁŒамŁ дºя ıраненŁя овошеШ Ł фруŒтов; розетŒа заземºена в жоответжтвŁŁ ж нормамŁ
ЖезопажножтŁ.
˙апрешено ŁжпоºьзованŁе переıоднŁŒов Ł удºŁнŁтеºеШ,
таŒ ŒаŒ онŁ жоздают опажножть возªоранŁя.
˛ЖорудованŁе, подŒºюченное ж наруłенŁем треЖованŁШ
ЖезопажножтŁ ЖЯтовЯı прŁЖоров ЖоºьłоШ мошножтŁ, ŁзºоженнЯı в данноШ ŁнжтруŒцŁŁ, явºяетжя потенцŁаºьно
опажнЯм. ˇроŁзводŁтеºь не нежет ответжтвенножтŁ за
ушерЖ здоровью Ł жоЖжтвенножтŁ, ежºŁ он вЯзван нежоЖºюденŁем уŒазаннЯı норм ужтановŒŁ.
Холодильник должен быть установлен таким образом, чтобы Вы всегда имели доступ к розетке.
Розетка
—озетŒа доºжна вЯдержŁвать поºную эºеŒтрŁчежŒую наªрузŒу ıоºодŁºьнŁŒа, Œоторая уŒазана в таЖºŁчŒе ıараŒтерŁжтŁŒ оЖорудованŁя.
Перед подключением к электросети
УжтановŁте ıоºодŁºьнŁŒ вертŁŒаºьно Ł подождŁте прŁмерно 3 чажа перед подŒºюченŁем еªо Œ эºеŒтрожетŁ
это неоЖıодŁмо дºя правŁºьноШ раЖотЯ ıоºодŁºьнŁŒа.
1111
CSI
Page 14

Описание
Съемная полка с лотком для яиц и
A
масленкой
Съемная полка для разных продуктов
B
Полка с крышкой
C
Гнездо для одной бутылки ¸мкостью 2
D
литра
Съемная дверная полка для бутылок
E
Дренажная система для отвода
F
оттаявшей воды
Отделение для хранения
G
Ящики для овощей и фруктов
K
Скользящий контейнер для мяса и сыра
L
Съемные, регулируемые по высоте полки
M
Откидная полка для бутылок
N
O
замороженных продуктов
Лоток для льда "EASW ICE"
H
Отделение для
I
замораживания свежих
продуктов и хранения
замороженных продуктов
Рукоятка термостата
J
ıоºодŁºьноªо отдеºенŁя
—уŒоятŒа терможтата
позвоºяет реªуºŁровать температуру в ıоºодŁºьном Ł морозŁºьном отдеºенŁяı.
´озможнЯ жºедуюшŁе
ужтановŒŁ:
0 ıîºîäŁºüíŁŒ âߌºþ÷åí;
1 мŁнŁмаºьное оıºажденŁе;
5 маŒжŁмаºьное оıºажденŁе.
O
M
N
M
L
K
J
I
H
A
B
B
C
D
E
CSI
G
H
G
F
12
Page 15

Включение холодильника
ВНИМАНИЕ
После установки подождите примерно три часа
перед тем, как подключить холодильник к
электросети, чтобы быть уверенными, что
хладагент после транспортировки распределился должным образом это необходимо для правильной работы холодильника.
˜о помешенŁя продуŒтов в ıоºодŁºьнŁŒ неоЖıодŁмо
вЯмЯть внуòðåííŁå поверıножтŁ ıоºодŁºьноШ Ł морозŁºьноШ Œàìåð ðажтвором пŁшевоШ жодЯ.
ˇожºе тоªо ŒàŒ ´ß ïî䌺þ÷ŁºŁ ıîºîäŁºüíŁŒ Œ ýºåŒòðŁ÷åæŒîØ æåòŁ, уЖедŁтежь, что ºампочŒа в
ıоºодŁºьнŁŒå çàªореºажь, ужтановŁте руŒоятŒу
терможтата J â æреднее поºоженŁе (3), через
нежŒоºьŒо ÷àæîâ ´Я можете помежтŁть продуŒтЯ в
ıоºодŁºьноå îòäåºåíŁå.
Использование холодильного îòäеления
Температура внутрŁ ıоºодŁºьноªо отдеºенŁя автоматŁчежŒŁ реªуºŁруетжя в жоответжтвŁŁ ж позŁцŁеШ,
ужтановºенноШ руŒоятŒоШ терможтата.
1 наŁменее ıоºоднЯШ режŁм
5 наŁЖоºее ıоºоднЯШ режŁм
МЯ реŒомендуем ужтанавºŁвать терможтат на
жреднюю позŁцŁю.
˜ºя тоªо, чтоЖЯ увеºŁчŁть прожтранжтво,
оптŁмŁзŁровать ражпоºоженŁе продуŒтов Ł
уºучłŁть вŁдŁможть внутрŁ отдеºенŁя, ŁжпарŁтеºь
ражпоºожен на заднеШ панеºŁ ıоºодŁºьноªо
отдеºенŁя. ´о время раЖотЯ ıоºодŁºьнŁŒа панеºь
может поŒрЯватьжя Łнеем ŁºŁ ŒапºямŁ водЯ в завŁжŁможтŁ от тоªо, раЖотает Œомпрежжор в даннЯШ
момент ŁºŁ нет. ˝е ЖежпоŒоШтежь, это жоверłеíно
нормаºьно.
¯жºŁ терможтат ужтановºен на маŒжŁмаºьнуþ
ïîçŁöŁþ (íàïðŁìåð, ıîºîäŁºüíŁŒ æŁºüíî çàïîºíåí
продуŒтамŁ ŁºŁ температура в помешенŁŁ о÷åíü
вЯжоŒая), то Œомпрежжор может раЖотать
ЖежпрерЯвно, в резуºьтате чеªо на ïàíåºŁ
ŁжпарŁтеºя оЖразуетжя жºоШ Łнея. Это ïðŁâîäŁò Œ
повЯłенному потреЖºенŁю эºеŒтроэíåðªŁŁ. ´î
ŁзЖежанŁе подоЖноШ жŁтуацŁŁ прожто ужтановŁте
руŒоятŒу терможтата À íà ìåíüłóþ ïîçŁöŁþ, òàŒ
чтоЖЯ ıоºодŁºьнŁŒ разморозŁºжя автоматŁчежŒŁ.
ÕîºîäŁºüíîå îòäåºåíŁå ´àłåªî ıîºодŁºьнŁŒа ожнашено
жŁжтемоШ оıºажденŁя воздуıа "A.I.R. System", Œоторая
позвоºяет дожтŁªать оптŁмаºьноªо режŁма ıраненŁя продуŒтов Ł, в то же время, упрошает процежж ŁжпоºьзованŁя
ıоºодŁºьнŁŒа Жºаªодаря жºеäóþøŁì ôóíŒöŁÿì:
- Быстрое восстановление температуры: ïîæºå îòŒðßâà-
нŁя дверцЯ внутренняя температура возврашаетжя Œ
оптŁмаºьному значенŁю ЖЯжтрее, уºучłая режŁм ıраненŁя продуŒтов.
- Ровное распределение температуðû: позвоºяет помешать ºюЖЯе продóŒòß íà ºþÆßå ïŁ.
- Высокий уровень влажности: óâåºŁ÷Łâàåò æðîŒ ıðàíå-
нŁя продуŒтов.
A
A -вЯдуваемЯШ воздуı, оıºаждаюшŁШжя
прŁ жопрŁŒожновенŁŁ ж ıоºодноШ панеºью;
B - втяªŁваемЯШ наªретЯШ воздуı.
СºедуШте ŁнжтруŒцŁŁ по ıраненŁю: прŁ неправŁºьном
ıраненŁŁ даже жамЯе жвежŁе продуŒтЯ ЖЯжтро
Łжпортятжя.
´îïðåŒŁ îÆøåŁçвежтному мненŁю помнŁте, что прŁªотовºеннЯе продуŒтЯ можно ıранŁть меньłее время, чем
æâåæŁå.
ÕîºîäŁºüíîå отдеºенŁе оЖорудовано праŒтŁчнЯмŁ жœемíßìŁ ïàмŁ (—Łж. 1), вЯжота ŒоторЯı может реªуºŁроватьжя, это позвоºяет размешать ŒрупнЯе упаŒовŒŁ Ł
ÆîºüłŁе емŒожтŁ. ˇоºŒŁ моªут ЖЯть наŒºоненЯ дºя ıраíåíŁÿ îòŒðßòßı ÆóòߺîŒ.
˜àØòе пŁше ожтЯть, перед тем ŒаŒ помешать ее в ıоºоäŁºьнŁŒ. Это позвоºŁт ŁзЖежать повЯłенŁя температурЯ
в ıоºодŁºьнŁŒе, а жºедоватеºьно, допоºнŁтеºьноШ наªрузŒŁ на Œомпрежжор Ł допоºнŁтеºьноªо ражıода эºеŒтроэнерªŁŁ.
˝е жтавьте в ıоºодŁºьнŁŒ жŁдŒожтŁ в отŒрЯтЯı емŒожтяı,
это увеºŁчŁт вºажножть Ł прŁведет Œ формŁрованŁю Łнея
на жтенŒаı.
B
B
A
1
2
1313
—Łæ. 1
CSI
Page 16

˚онтеШнер дºя ıраненŁя жЯра/мяжа (L) - жœемнЯШ. ˜ºя
оптŁмŁзацŁŁ жвоЖодноªо межта ŒонтеШнер можно
ждвŁнуть попереŒ (—Łж. 2).
`оŒовая отŒŁдная поºŒа дºя ЖутЯºоŒ (N) может Łжпоºьзоватьжя дºя ªорŁзонтаºьноªо ıраненŁя ºюЖоШ ЖутЯºŒŁ
(—Łж. 3) ŁºŁ нежŒоºьŒŁı (2-4-ı) ŒонжервнЯı ЖаноŒ (—Łж.
4). ¯жºŁ поºŒа не Łжпоºьзуетжя, ее можно заŒрЯть, ожвоЖодŁв межто в ıоºодŁºьнŁŒе.
CSI
14
Page 17

Лотки для льда
Этот новЯШ тŁп формочеŒ дºя ºедянЯı ŒуЖŁŒов
запатентован фŁрмоШ Merloni. ¨ı ражпоºоженŁе в
верıнеШ чажтŁ яшŁŒов морозŁºьноШ ŒамерЯ
оЖежпечŁвает Жоºьłую эрªономŁŒу Ł чŁжтоту: ºед
не жопрŁŒажаетжя ж продуŒтамŁ, помешеннЯмŁ в
морозŁºьное отдеºенŁе. `оºее тоªо, ŁжŒºючаетжя
проºŁв водЯ во время запоºненŁя (пожºе запоºненŁя заŒроШте прŁºаªаемоШ ŒрЯłŒоШ).
Инструкции по использованию (—Łж. 5)
˙апоºнŁте ºотоŒ водоШ через жпецŁаºьное отвержтŁе до
уŒазанноªо уровня (МАХ WATER LEVEL маŒжŁмаºьнЯШ
уровень водЯ), превЯłенŁе уровня может прŁвежтŁ Œ
тому, что ŁзвºеченŁе ºьда Łз формЯ Жудет затруднено.
¯жºŁ ´Я вже-таŒŁ превЯжŁºŁ маŒжŁмаºьно допужтŁмЯШ
уровень, подождŁте поŒа ºед ражтает, опорожнŁте форму
Ł запоºнŁте еше раз.
ˇожºе тоªо, ŒаŒ ´Я запоºнŁºŁ форму до уŒазанноªо уровня, повернŁте ее на 90 ªрадужов. ˇо прŁнцŁпу
жооЖшаюшŁıжя жожудов вода запоºняет формочŒŁ, пожºе
чеªо отвержтŁе заŒрЯваетжя проЖŒоШ, Ł формочŒŁ
помешаютжя в жпецŁаºьное ªнездо в яшŁŒе.
˚оªда ºед Жудет ªотов, пожтучŁте формоШ о твердую поверıножть, чтоЖЯ ŒуЖŁŒŁ ºьда вЯłºŁ Łз формовочнЯı
ªнезд, затем вЯтряжŁте Łı через заºŁвное отвержтŁе. ˆотовЯе ŒуЖŁŒŁ ºьда Жудет ºеªче вЯтряıнуть, ежºŁ вЯ намочŁте внеłнюю поверıножть формЯ.
ˇ—¯˜Уˇ—¯˘˜¯˝¨¯: ŒаждЯШ раз перед ŁжпоºьзованŁем
формЯ уЖедŁтежь, что она жоверłенно пужта Ł в неШ не
ожтаºŁжь ŒужочŒŁ ºьда.
МŁнŁмаºьное время, неоЖıодŁмое дºя прŁªотовºенŁя
ºьда прŁмерно 8 чажов.
—Łæ. 5
1515
CSI
Page 18

2-3 9-10
1-2 6
16
18
3
2
1-3 9
1-4 6
1-3 9
3-4 6
5-6 9
6
6
2
4-6
2-3
3-6
12
4-6
CSI
16
3
Page 19

1 -2
2
(
(
(
12
12
10-12
12
10-12
1717
CSI
Page 20

Обслуживание и уход
Перед выполнением любых операций по мойке
и обслуживанию отсоедините холодильник от
электросети.
Размораживание
Внимание: не ŁжпоºьзуШте дºя ужŒоренŁя процежжа
разморажŁванŁя предметЯ, ŒоторЯе моªут
поцарапать жтенŒŁ ıоºодŁºьнŁŒа ŁºŁ наруłŁть
ªерметŁчножть ıоºодŁºьноШ ŒамерЯ.
Размораживание холодильного отделения
ХоºодŁºьное отдеºенŁе
разморажŁваетжя автоматŁчежŒŁ;
оЖразуюшаяжя вода пожтупает в дренажную жŁжтему (ðèñ.6), затем Łжпаряетжя тепºом Œомпрежжора. ¯дŁнжтвенное,
что ´ам неоЖıодŁмо
деºать дºя оЖжºужŁванŁя ıоºодŁºьноªо отдеºенŁя жºедŁть, чтоЖЯ
дренажное отвержтŁе, Œоторое наıодŁтжя за яшŁŒом
дºя овошеШ Ł фруŒтов, не ЖЯºо зажорено.
Pèñ. 7
Размораживание морозильного отделения
Со временем на внутреннŁı жтенŒаı морозŁºьноªо
отдеºенŁя наражтает ŁнеШ, ŒоторЯШ жºедует удаºять
жпецŁаºьнЯм пºажтмажжовЯм жŒреЖŒом,
пожтавºяемЯм вмежте ж ıоºодŁºьнŁŒом.
ˇрŁ тоºшŁне Łнея Жоºее 5 мм жºедует разморозŁть
морозŁºьное отдеºенŁе. ˇожтавьте руŒоятŒу
терможтата J â ïîºîæåíŁå «0» (ðèñ.7).
˝а время разморажŁванŁя завернŁте
замороженнЯе продуŒтЯ в нежŒоºьŒо жºоев ªазет Ł
помежтŁте Łı, по возможножтŁ, в ıоºодное межто.
˛жтавьте дверь отŒрЯтоШ дºя тоªо, чтоЖЯ ŁнеШ
ражтаяº ЖЯжтрее, дºя ужŒоренŁя разморажŁванŁя
помежтŁте в морозŁºьнŁŒ Œажтрюºю ж тепºоШ водоШ.
ХоºодŁºьнŁŒ Łмеет дренажную жŁжтему, пожтавьте
подıодяшую емŒожть, ŒаŒ поŒазано на ðèñ. 8.
´ЯмоШте Ł тшатеºьно вЯжуłŁте ŒамерЯ перед повторнЯм вŒºюченŁем.
Обслуживание и уход
• ´аł ıоºодŁºьнŁŒ Łзªотовºен Łз не паıнушŁı ªŁªŁенŁчежŒŁı матерŁаºов. ˜ºя жоıраненŁя этŁı
ıараŒтерŁжтŁŒ, вжеªда ıранŁте жŁºьно паıнушŁе
продуŒтЯ в пºотно заŒрЯваюшŁıжя ŒонтеШнераı
чтоЖЯ ŁзЖежать оЖразованŁя запаıов, ŒоторЯе
потом Жудет жºожно удаºŁть.
• ´нутреннŁе Ł внеłнŁе поверıножтŁ ıоºодŁºьнŁŒа
моШте ªуЖŒоШ ŁºŁ мяªŒоШ тŒанью, жмоченноШ в
ражтворе пŁшевоШ жодЯ в тепºоШ воде (жода таŒже
явºяетжя ıороłŁм дезŁнфеŒтором). ˇрŁ отжутжтвŁŁ
пŁшевоШ жодЯ ŁжпоºьзуШте неШтраºьное моюшее
жреджтво.
• ˝ŁŒоªда не ŁжпоºьзуШте орªанŁчежŒŁе ражтворŁтеºŁ, аЖразŁвнЯе, ıºоро- Ł аммŁаŒожодержашŁе
вешежтва.
• ´же жœемнЯе чажтŁ можно мЯть в ражтвором мЯºа
ŁºŁ моюшеªо жреджтва в воде. ТаŒже Łı можно мЯть
в пожудомоечноШ маłŁне. ˇомнŁте, что вже жœемнЯе
чажтŁ неоЖıодŁмо тшатеºьно вЯжуłŁть перед тем,
ŒаŒ пожтавŁть Łı оЖратно в ıоºодŁºьнŁŒ.
• ˇЯºь может жŒапºŁватьжя на заднеШ панеºŁ ıоºодŁºьнŁŒа Ł препятжтвовать еªо нормаºьноШ раЖоте.
ˇропЯºежожьте заднюю жтенŒу ıоºодŁºьнŁŒа
ожторожно, Łжпоºьзуя подıодяшŁе нажадŒŁ.
• ¯жºŁ вЯ не жоЖŁраетежь Łжпоºьзовать ıоºодŁºьнŁŒ
продоºжŁтеºьное время, вЯмоШте еªо ŁзнутрŁ,
вЯжуłŁте Ł ожтавьте дверь прŁотŒрЯтоШ, чтоЖЯ
ŁзЖежать оЖразованŁя непрŁятноªо запаıа Ł
пºеженŁ.
Замена лампы освещения
(данная процедура не является гарантийным ремонтом).
˛тŒºючŁте ıоºодŁºьнŁŒ от жетŁ, вЯнув вŁºŒу Łз розетŒŁ.
´ЯвернŁте ºампу Ł заменŁте ее анаºоªŁчноШ (мошножтью не Жоºее 15 ´т). ˜ºя дожтупа Œ ºампе "À", отвернŁте
центраºьнЯШ вŁнт "Â" на заднеШ чажтŁ пºафона, ŒаŒ поŒазано на —Łж. 9.
A
Ðèñ. 7
CSI
B
—Łæ. 9
Ðèñ. 8
18
Page 21
Устранение неисправностей
´ жºучае неудовºетворŁтеºьноШ раЖотЯ
ıоºодŁºьнŁŒа ŁºŁ вознŁŒновенŁя неŁжправножтеШ
прочŁтаШте этот раздеº, прежде чем вЯзЯвать
теıнŁŒов. ´ ЖоºьłŁнжтве жºучае ´Я можете реłŁть
вознŁŒłŁе проЖºемЯ жамŁ.
Холодильник не работает
Проверьте:
• в доме не отŒºючено эºеŒтрŁчежтво;
• вŁºŒа надежно вжтавºена в розетŒу;
• розетŒа Łжправна; дºя проверŒŁ подŒºючŁте ужтроШжтво, в ŁжправножтŁ Œотороªо ´Я уверенЯ;
• попроЖуШте подŒºючŁтьжя Œ друªоШ розетŒе.
Температура в отделениях
холодильника слишком высокая
Проверьте:
• дверцЯ отдеºенŁШ заŒрЯтЯ пºотно, упºотненŁя на
дверцаı не поврежденЯ;
• терможтат наıодŁтжя в правŁºьном поºоженŁŁ;
• отдеºенŁя не перепоºненЯ продуŒтамŁ;
• дверь отдеºенŁя не отŒрЯваºŁ чажто.
В холодильном отделении
скапливается вода
Проверьте
• ˜ренажное отвержтŁе не зажорено (жм. ðèñ. 6.
¯жºŁ пожºе проверŒŁ ıоºодŁºьнŁŒ не раЖотает, ŁºŁ про-
ЖºемЯ ожтаютжя, жвяжŁтежь ж жервŁжнЯм центром Ł прŁ
звонŒе жооЖшŁте жºедуюшую ŁнформацŁю: номер ªарантŁШноªо доŒумента (жервŁжноШ ŒнŁжŒŁ, жервŁжноªо жертŁфŁŒата Ł т.п.), неŁжправножть, модеºь (Mod.),
жерŁШнЯШ номер (S/N), оЖозначеннЯе на
ŁнформацŁонноШ таЖºŁчŒе, ражпоºоженноШ жºева за
яшŁŒом дºя овошеШ Ł фруŒтов (жм. прŁмерЯ на ðèñ.
íŁæå).
75
Test
P.S-I.
TI
Net
Util
Utile
Pressure
HIGH-235
LOW 140
RG 2330
Mod.
220 - 240 V- 50 Hz 150 W
340
Total
Gross
Bruto
Brut
Compr.
Syst.
Kompr.
Made in Italy 13918
Gross
Bruto
Brut
R 134 a
kg 0,090
93139180000 S/N 704211801
Cod.
Gross
Bruto
Brut
W
Fuse
A
Freez. Capac
Poder de Cong
4,0
kg/24 h
Max 15 w
Class
Clase
N
Classe
Продукты в холодильном отделении
переохлаждаются
Проверьте:
• терможтат наıодŁтжя в правŁºьном поºоженŁŁ;
• продуŒтЯ не Œажаютжя заднеШ чажтŁ ıоºодŁºьнŁŒа
она очень ıоºодная.
Постоянно работает компрессор
Проверьте:
• дверцЯ ıоºодŁºьнŁŒа пºотно заŒрЯваютжя Ł отŒрЯваютжя не жºŁłŒом чажто;
• температура в помешенŁŁ не жºŁłŒом вЯжоŒая;
• терможтат наıодŁтжя в правŁºьном поºоженŁŁ.
Холодильник слишком шумит при
работе
Проверьте:
Хºадаªент, цŁрŒуºŁруюшŁШ внутрŁ жŁжтемЯ
оıºажденŁя, может неªромŒо ЖуºьŒать, даже ежºŁ
Œомпрежжор не раЖотает. ˝е ЖежпоŒоШтежь, это
жоверłенно нормаºьно.
• ХоºодŁºьнŁŒ вЯровнен.
• ХоºодŁºьнŁŒ не Œажаетжя пожтоянно вŁЖрŁруюшŁı пожтороннŁı предметов (напрŁмер, оŒружаюшеШ меЖеºŁ).
· Не пользуйтесь услугами лиц, не
уполномоченных производителем.
· При ремонте требуйте использования оригинальных запасных частей.
Merloni Elettrodomestici spa
Срок службы
10 ëåò
со дня изготовления
Производитель оставляет за собой право без предупреждения вносить изменения в конструкцию и комплектацию, не
ухудшающие эффективность работы оборудования.
Некоторые параметры, приведенные в этой инструкции,
являются приблизительными. Производитель не несет
ответственности за незначительные отклонения от указанных величин.
1919
CSI
Page 22

CSI
20
Page 23

Page 24

Via Aristide Merloni, 47
60044 Fabriano (AN) Italj
tel. +39 0732 6611
www.merloni,com
05/2003 - 195038733.00 - Xerox Business Services DocuTech
 Loading...