

Page 1

Instructions for
installation and use
Contents
Installation, 2-3
EN
English,1
I
Italiano,17
TR
Türkçe,49
AQUALTIS
AQLF8F 292 U
CIS
Русский,33
Unpacking and levelling
Connecting the electricity and water supplies
Technical data
Description of the machine, 4-5
Control panel
Auto Dose System, 6-7
Running a wash cycle, 8
Wash cycles and options, 9
Table of wash cycles
Wash options
Detergents and laundry, 10
Detergent
Preparing the laundry
Washing recommendations
Load balancing system
Precautions and advice, 11
General safety
Disposal
Opening the porthole door manually
WASHING MACHINE
EN
Care and maintenance, 12
Cutting off the water and electricity supplies
Cleaning the machine
Cleaning the detergent dispenser drawer
Caring for your appliance drum
Cleaning the pump
Checking the water inlet hose
Trouble shooting, 13-14
Assistance, 15
1
Page 2

Installation
EN
This instruction manual should be kept in a safe place
for future reference. If the washing machine is sold,
given away or moved, please ensure the manual is kept
with the machine, so that the new owner may benefit
from the advice contained within it.
Read these instructions carefully: they contain vital
information relating to the safe installation and operation
of the appliance.
Inside the pack containing this manual, you will also
find the guarantee and all the details necessary for
installation.
Unpacking and levelling
Unpacking
1. Once you have removed all the packaging from the
washing machine, make sure it has not been damaged
during transportation.
If it has been damaged, contact the retailer and do not
proceed any further with the installation process.
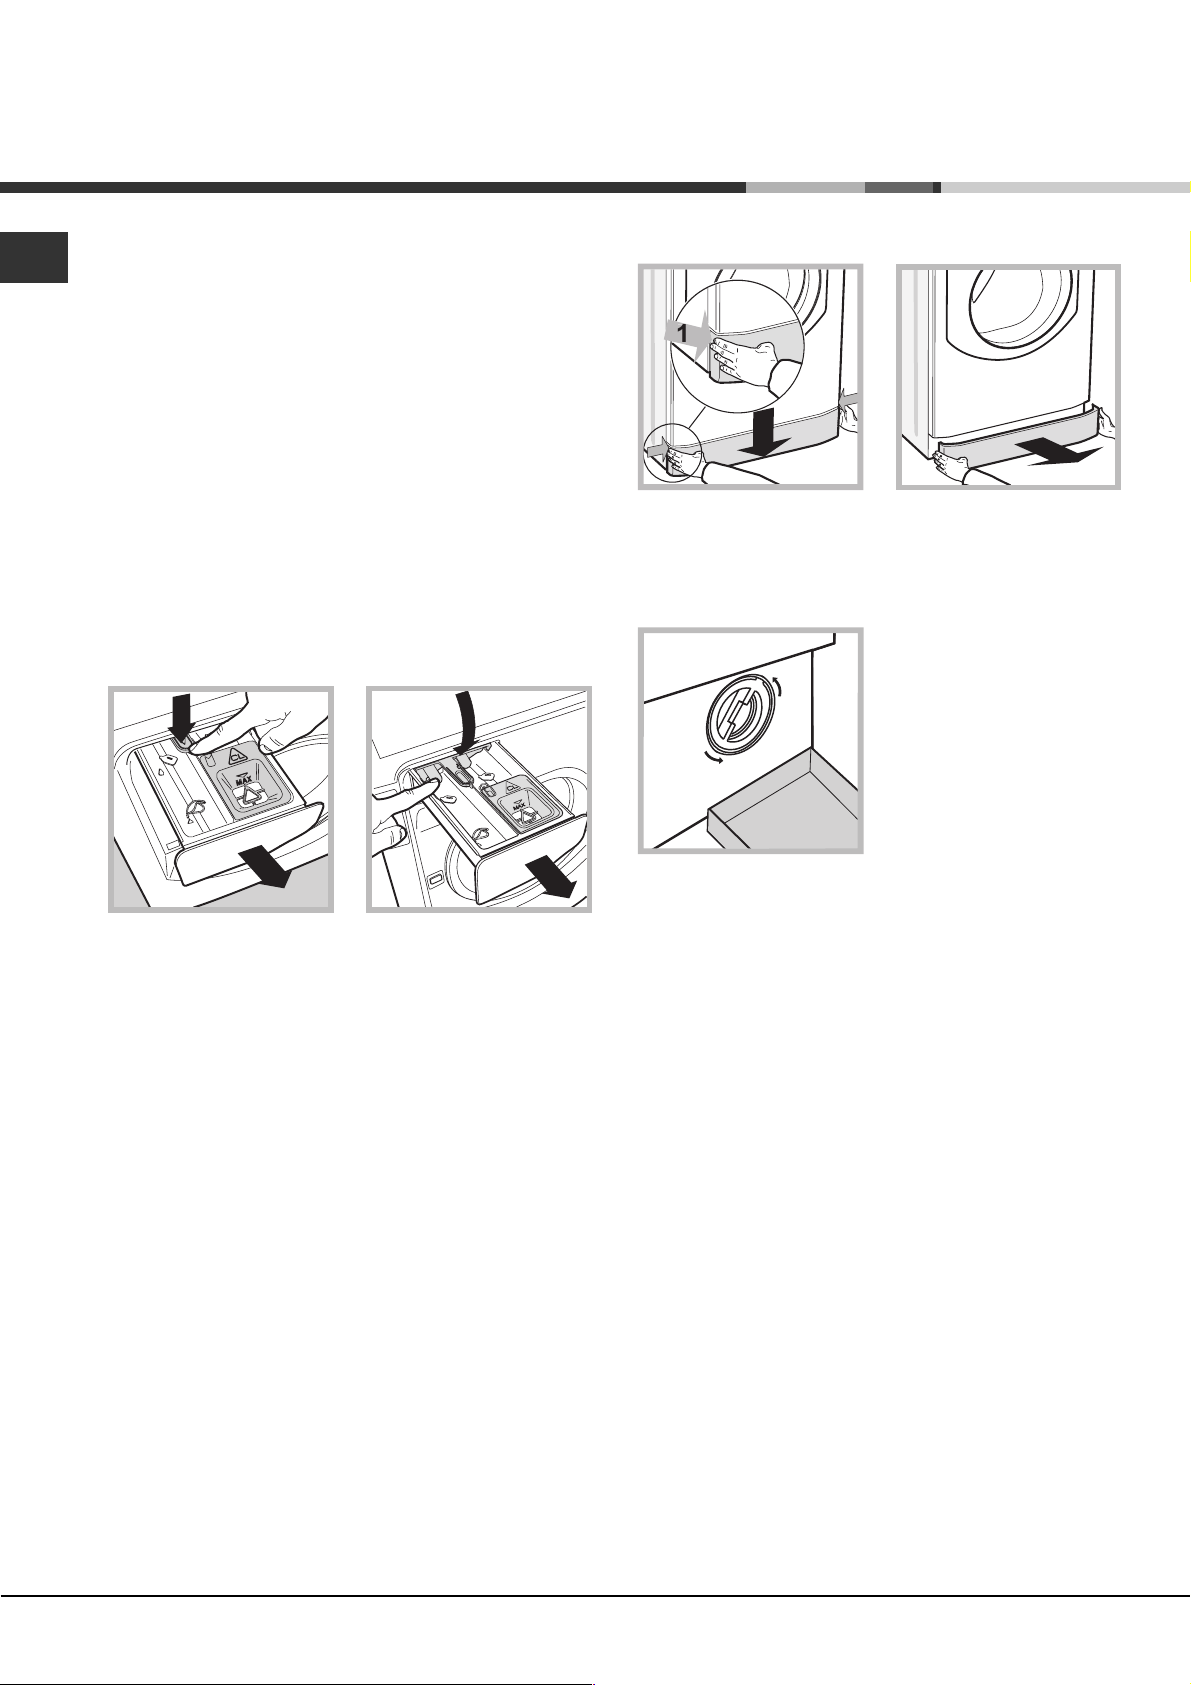
2. Remove the 4
protective screws (used
during transportation) and
the corresponding spacer,
located on the rear part of
the appliance (see figure).
If the appliance is levelled correctly, it will be more
stable and much less likely to cause vibrations and noise
while it is operating, particularly during the spin cycle.
If it is placed on carpet or a rug, adjust the feet in such
a way as to allow a sufficient ventilation space
underneath the washing machine.
Connecting the electricity and water
supplies
Connecting the water inlet hose
Before connecting the inlet hose to the water supply,
run the water until it is perfectly clear.
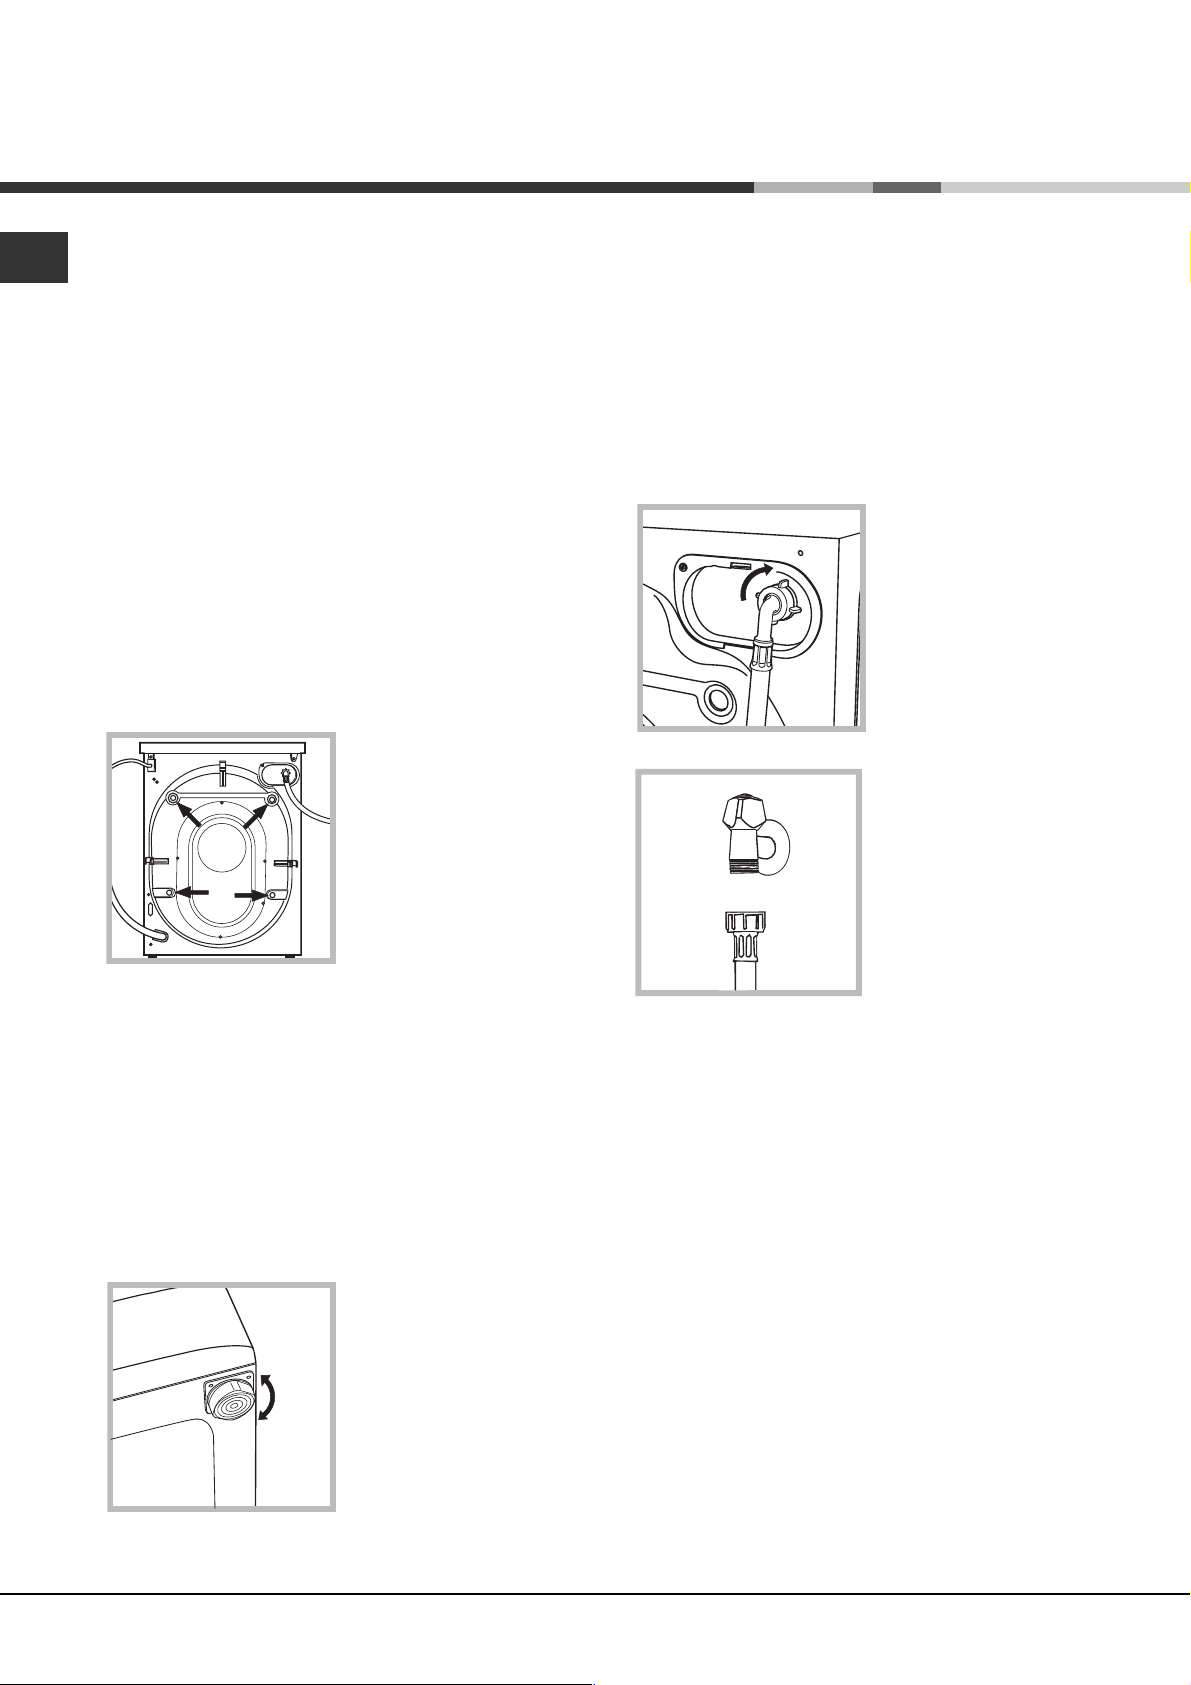
1. Connect the inlet hose
to the machine by
screwing it onto the cold
water inlet of the
appliance, which is
situated on the top righthand side of the rear part
of the appliance (see
figure).
2. Connect the inlet hose
by screwing it to a cold
water tab using a 3/4 gas
threaded connection (see
figure).
3. Close off the holes using the plastic plugs supplied in
the pack.
4. Keep all the parts in a safe place; they will be
needed again if the washing machine is moved to
another location, to prevent the inside of the
appliance being damaged.
Packaging materials should not be used as toys for
children.
Levelling
1. Place the washing machine on a flat sturdy floor,
without resting it up against walls or cabinets.
2. If the floor is uneven,
the front feet of the
machine may be adjusted
until it reaches a horizontal
position (the angle of
inclination must not
exceed 2 degrees).
3. Make sure that the hose is not folded over or bent.
The water pressure at the tap must fall within the
values indicated in the Technical data table (see next
page).
If the inlet hose is not long enough, contact a
specialised shop or an authorised technician.
Never use second-hand or old inlet hoses; use the
products supplied with the machine.
2
Page 3
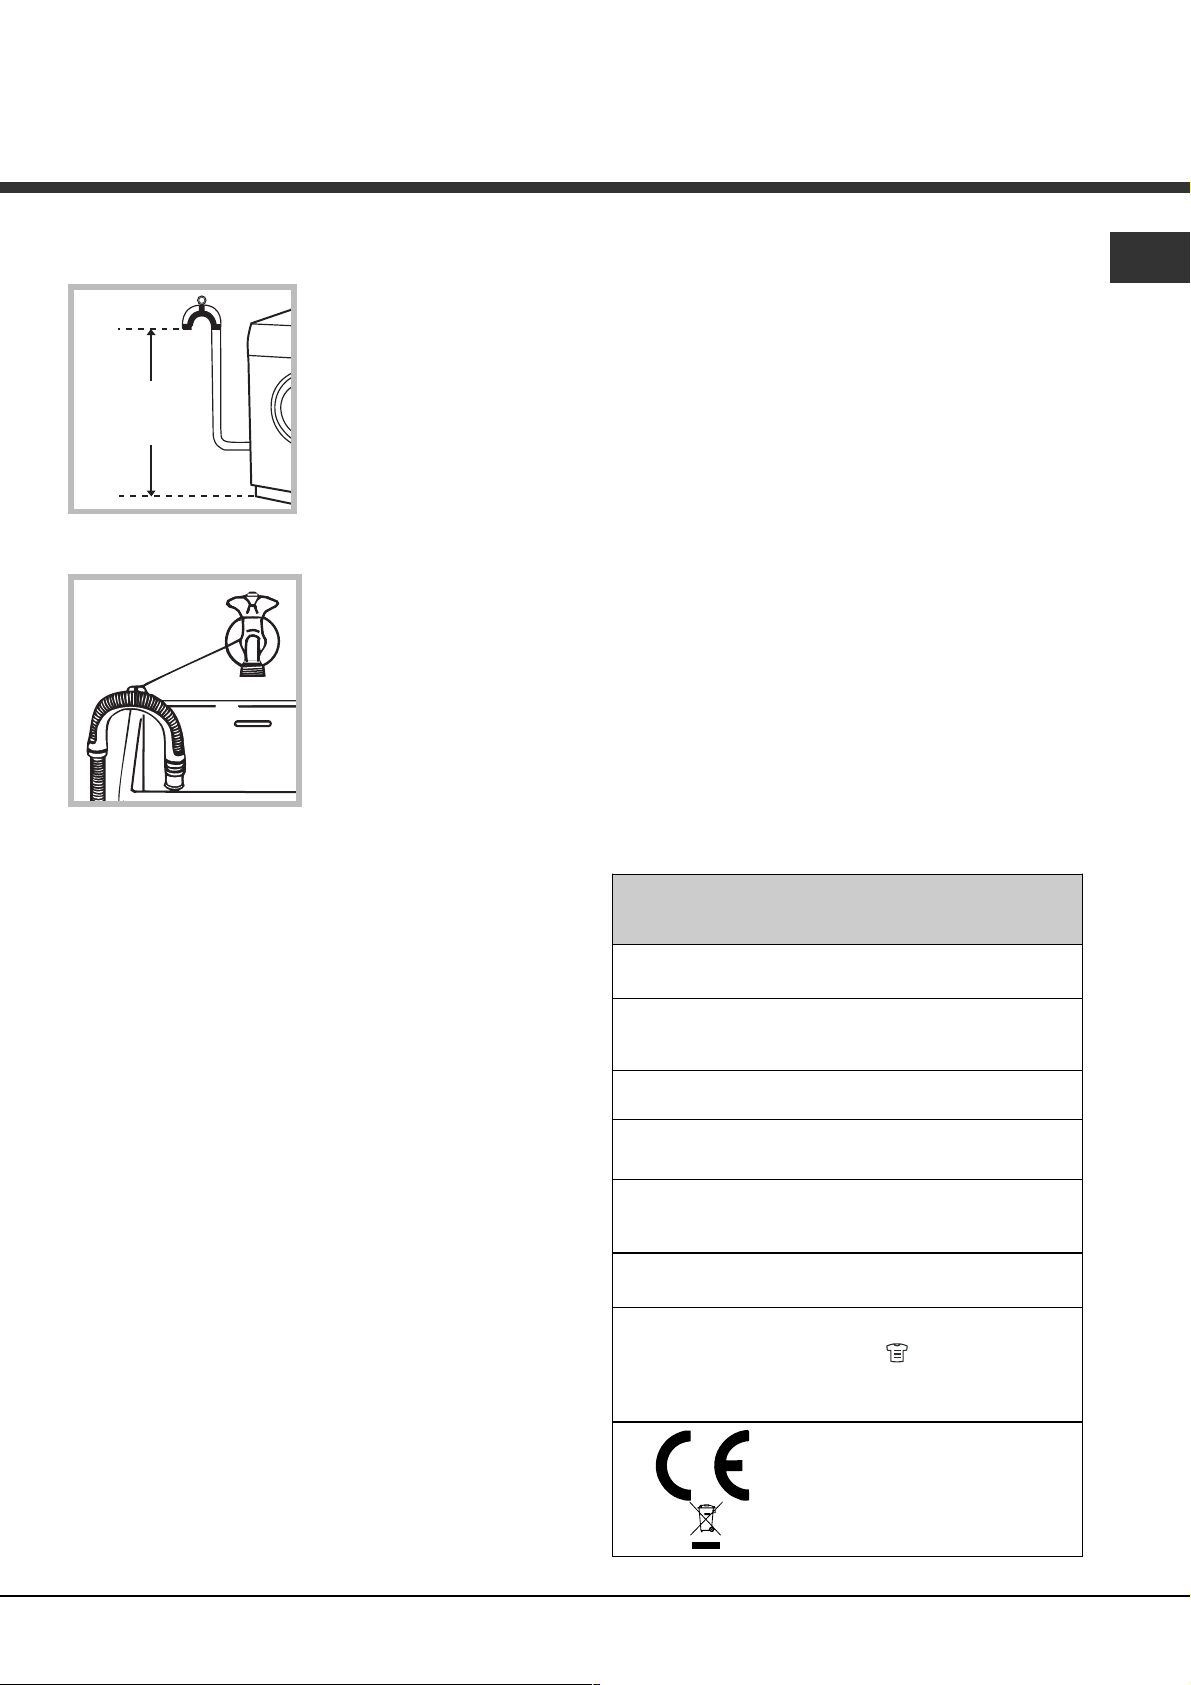
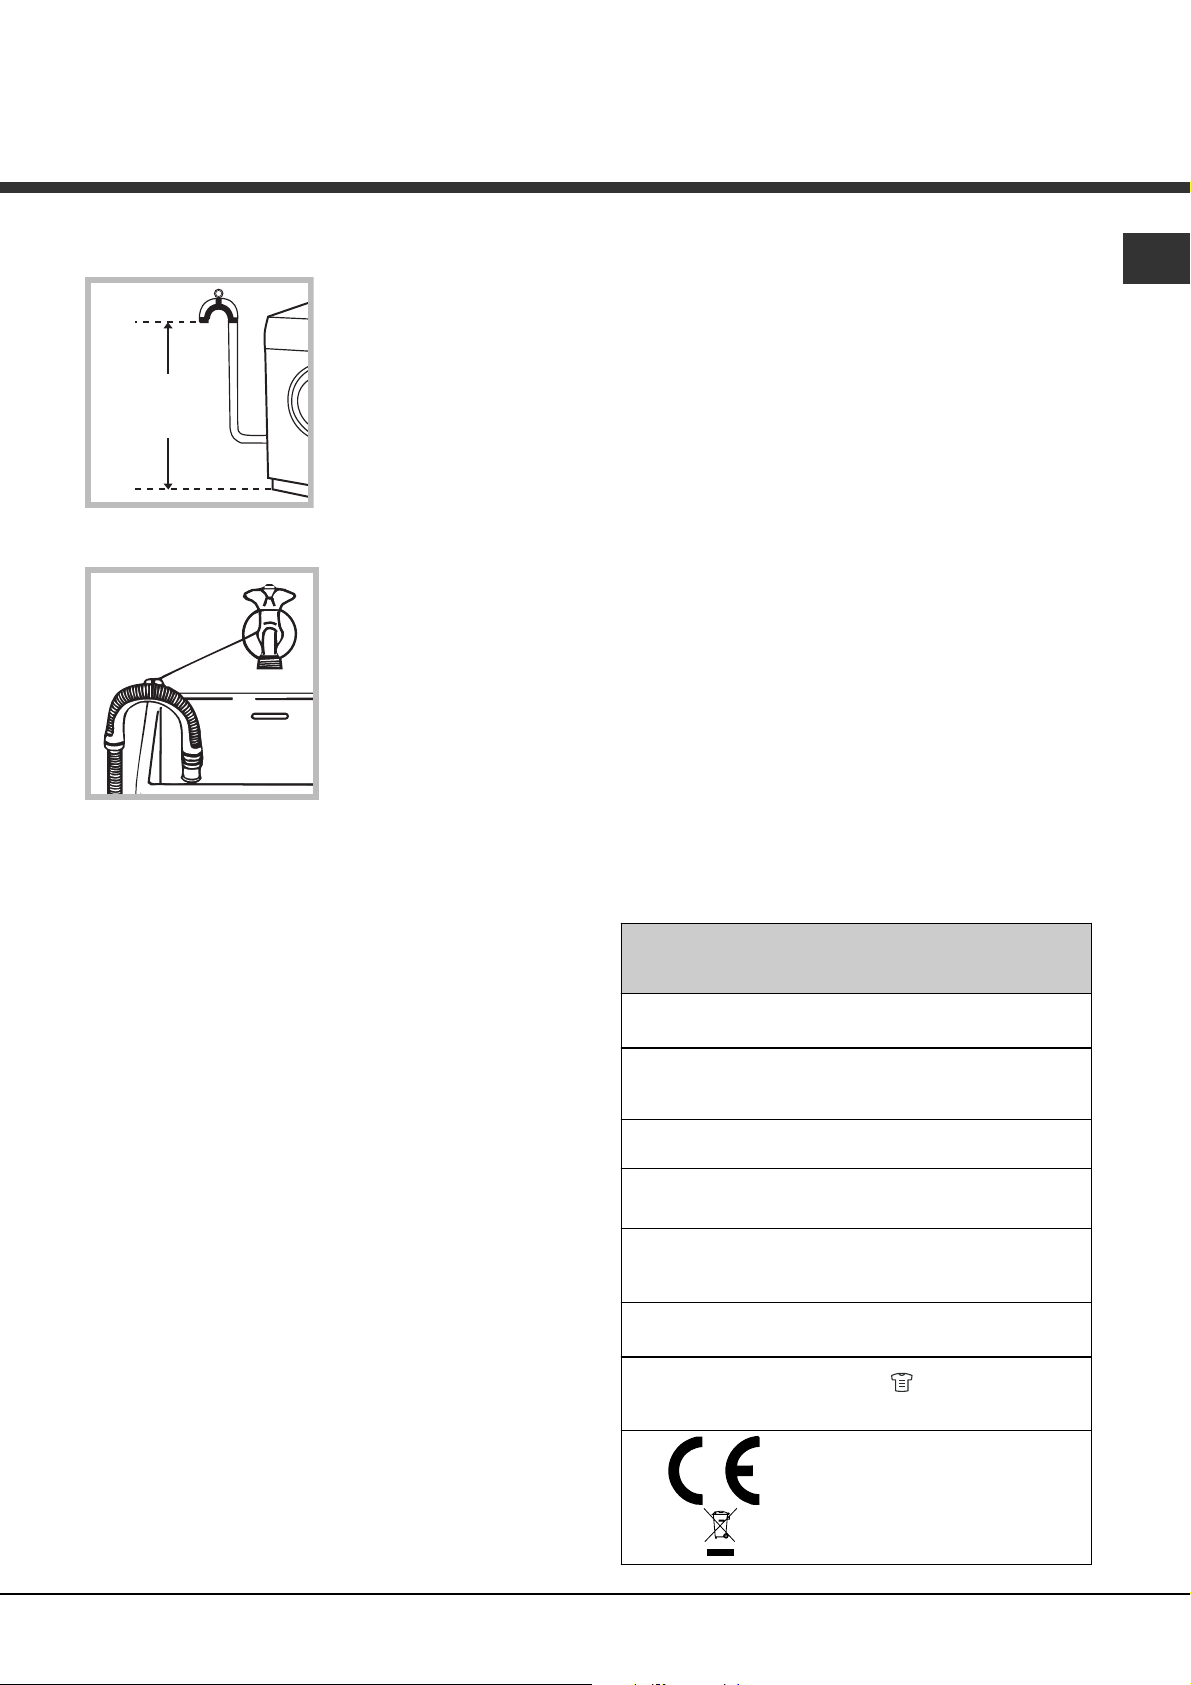
Connecting the drain hose
65 - 100 cm
Connect the drain hose to
drain duct piping or a wall
drain located between 65
and 100 cm above the
floor, making sure it is not
bent at all.
Alternatively, rest the drain
hose on the side of a
washbasin or bathtub,
fastening the duct
supplied to the tap (see
figure).
The free end of the hose
should not be underwater.
Do not use extension cords or multiple sockets.
EN
The cable should not be bent or compressed.
The power supply cable and plug must only be
replaced by authorised technicians.
Warning! The company shall not be held responsible in
the event that these regulations are not respected.
We advise against the use of hose extensions; if it is
absolutely necessary, the extension must have the same
diameter as the original hose and must not exceed 150
cm in length.
Electrical connections
Before plugging the appliance into the electricity socket,
make sure that:
the socket is earthed and complies with all applicable
laws;
the socket is able to withstand the maximum power
load of the appliance as indicated in the Technical
data table (see opposite);
the power supply voltage falls within the values
indicated in the Technical data table (see opposite);
the socket is compatible with the plug of the
appliance. If this is not the case, have the socket or
the plug replaced.
The machine must not be installed outdoors, even in
covered areas. It is extremely dangerous to leave the
appliance exposed to rain, storms and other weather
conditions.
The mains socket must remain within easy reach after
the washing machine has been installed.
Technical data
Model
Dimensions
Capacity
Electrical
connections
Water connections
Spin speed
Energy rated
programmes
according to
regulation
EN 60456
AQLF8F 292 U
width 59.5 cm
height 85 cm
depth 64,5 cm
from 1 to 8 kg
please refer to the technical data
plate fixed to the machine
maximum pressu re 1 MPa (10 bar)
minimum pressure 0.05 MPa (0.5 bar)
drum capacity 62 litres
up to 1200 rotations per minute
programme ; temperature 60°C;
using a load of 8 kg.
This appliance conforms to the
following EC Directives:
- 2004/108/EC (Electromagnetic
Compatibility)
- 2006/95/EC (Low Voltage)
- 2002/96/EC
3
Page 4
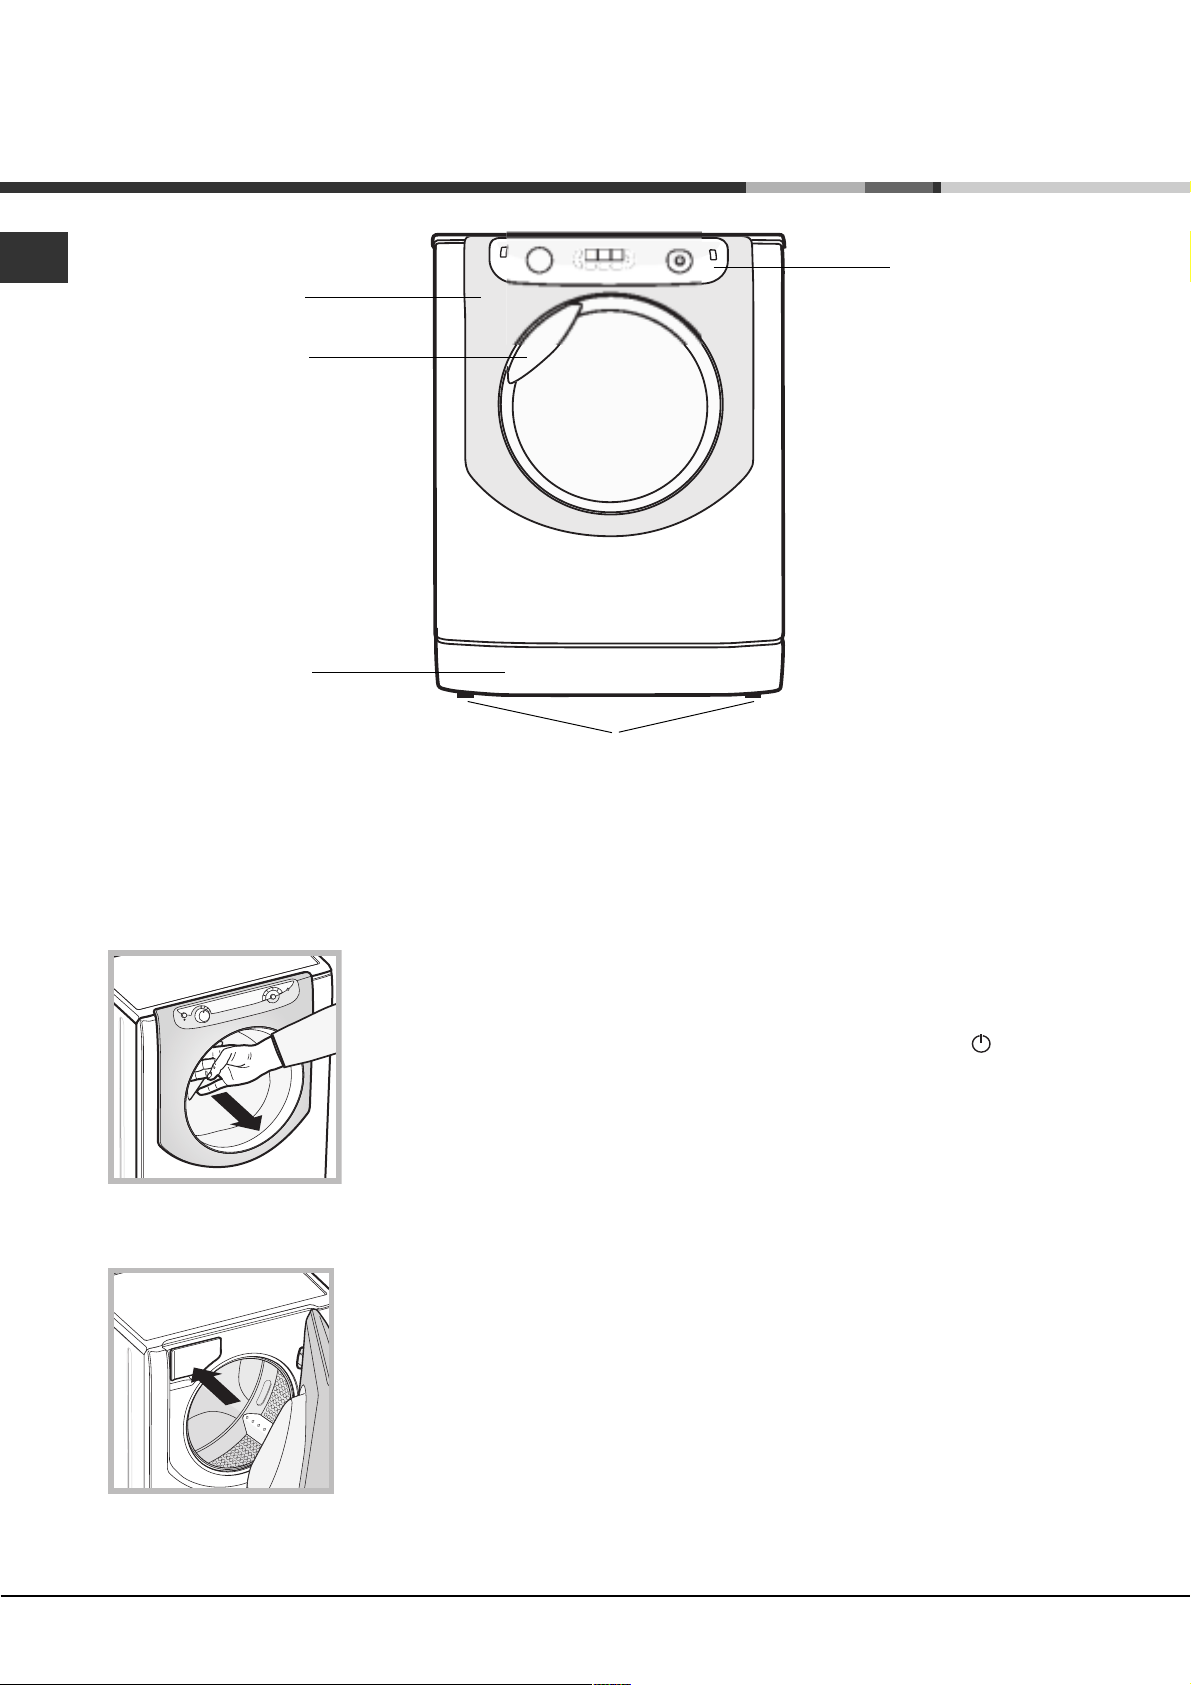
Description of the machine
EN
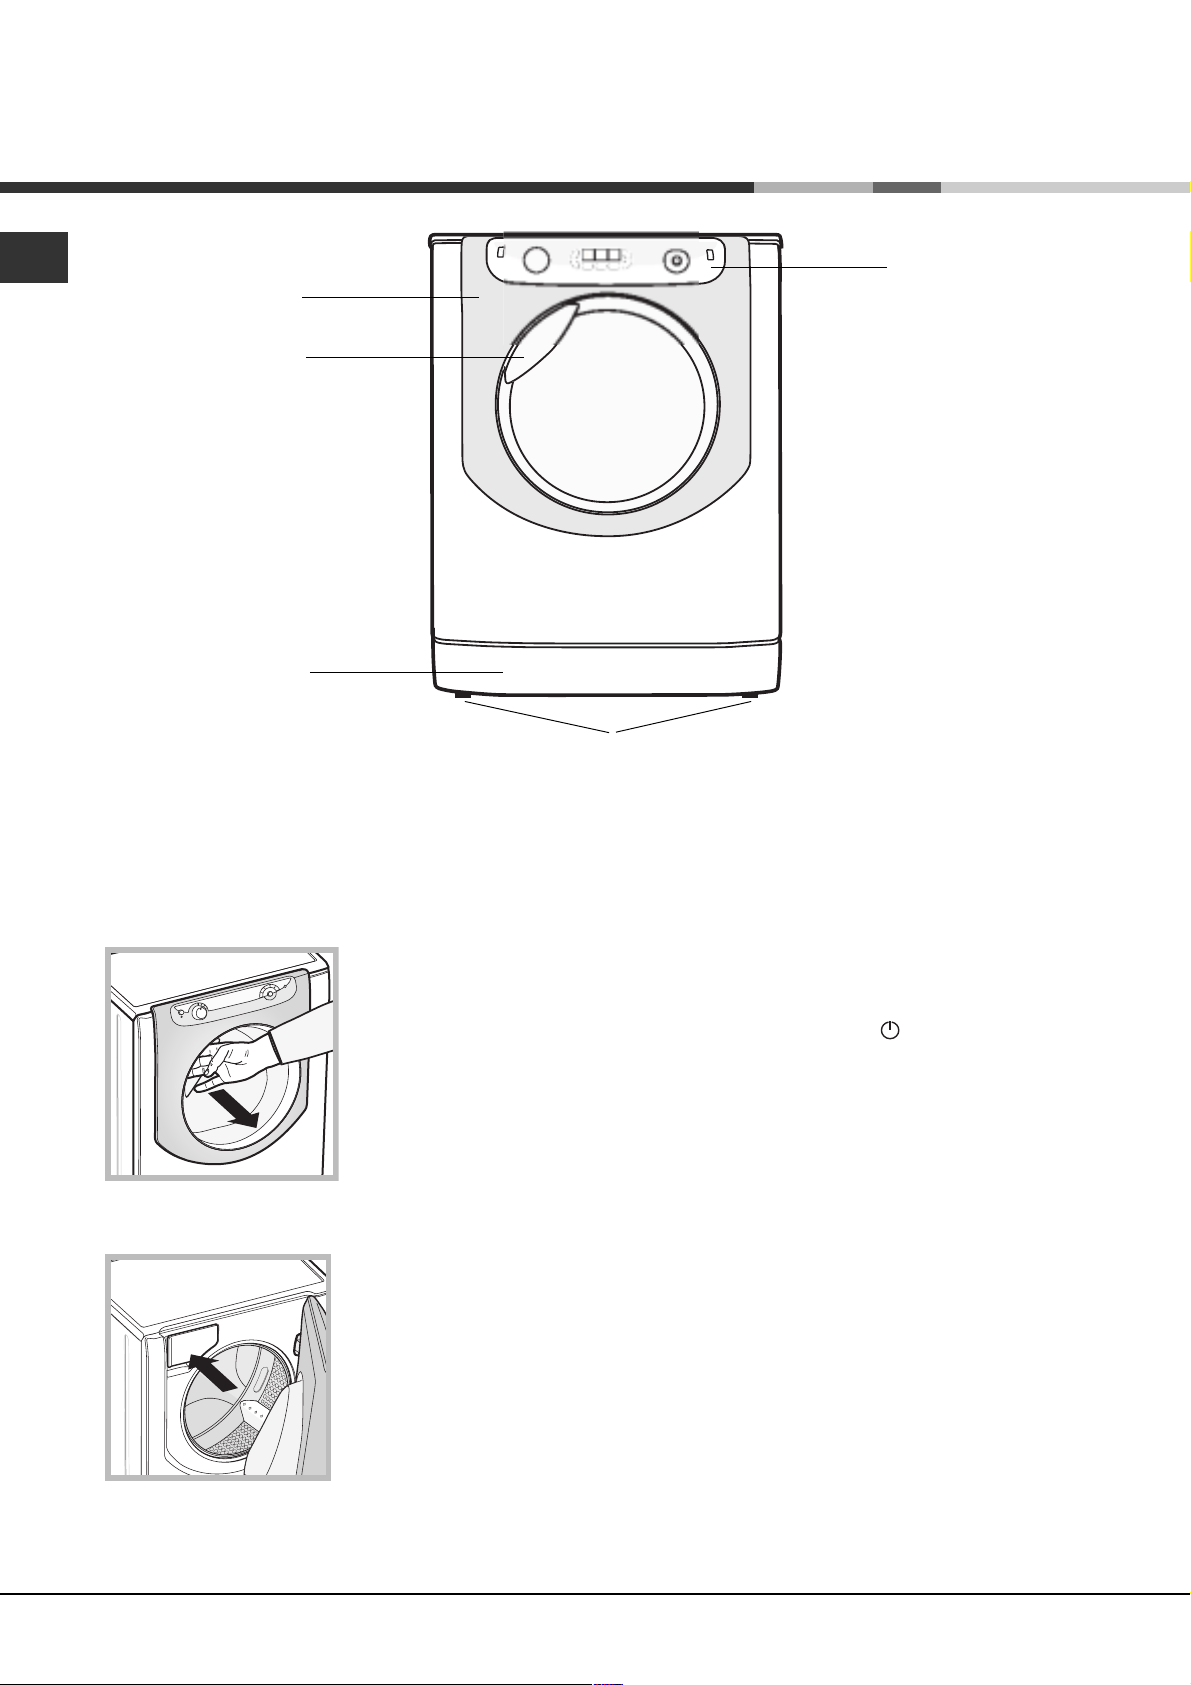
PORTHOLE DOOR
PORTHOLE DOOR
HANDLE
KICK STRIP
CONTROL
PANEL
ADJUSTABLE FEET
PORTHOLE DOOR
Always use the handle to
open the porthole door (see
figure).
DETERGENT DISPENSER DRAWER
The detergent dispenser
drawer is located inside the
machine and can be
accessed by opening the
door.
Refer to the chapter "Auto
Dose System" for information
on operation.
Note: stick the label showing
the wash cycle descriptions
and options on the front of
the detergent dispenser drawer. You will find the sticker
in the pack containing this manual.
Standby mode
This washing machine, in compliance with new energy
saving regulations, is fitted with an automatic standby
system which is enabled after about 30 minutes if no
activity is detected. Press the ON-OFF
and wait for the machine to start up again.
button briefly
4
Page 5

Control panel
WASH CYCLE
SELECTOR knob
DETERGENT
DILUTION
button
TEMPERATURE/
DETERGENT
DETERGENT
button
display
SPINdisplay
DELAY TIMER/SOFTENER /
CYCLE DURATIONdisplay
SOFTENER
button
OPTION button
with indicator light
ECO indicator light
START/PAUSE
button with indicator
light
EN
WASH
CYCLE
PHASE
icons
ON/OFF button with
indicator light
TEMPERATURE button
Button with ON/OFF indicator light: press this briefly
to switch the machine on or off. The green indicator light
indicates that the machine is switched on. To switch off
the washing machine during the wash cycle, press and
hold the button for approximately 3 seconds; if the
button is pressed briefly or accidentally the machine will
not switch off. If the machine is switched off during a
wash cycle, this wash cycle will be cancelled.
WASH CYCLE SELECTOR knob: may be turned in
either direction. To select the most suitable wash cycle,
please refer to the Table of wash cycles.
The knob will not move during the wash cycle.
TEMPERATURE
button: press to modify or exclude
the temperature setting; the value selected will appear
on the display above (see Running a wash cycle).
SPIN SPEED CYCLE
button: press to modify or
exclude the spin cycle; the value selected will appear on
the display above (see Running a wash cycle).
DELAY TIMER
button: press to set a DELAY TIMER
for the selected wash cycle; the set delay time will appear
on the display above (see Running a wash cycle).
DETERGENT and SOFTENER buttons: refer to
"Modifying pre-set parameters" in the chapter "Auto Dose
System".
DETERGENT DILUTION button: refer to "Filling the
tanks" in the chapter "Auto Dose System".
OPTION button with indicator light: press to select the
available options. The indicator light corresponding to the
selected option will remain lit (see Running a wash cycle).
SPIN SPEED
button
WASH CYCLE PHASE icons: these illuminate to
indicate the progress of the wash cycle (Wash
Rinse
The text
START/PAUSE button with indicator light: when the
green indicator light flashes slowly, press the button to
start a wash cycle. Once the cycle has begun the
indicator light will remain lit in a fixed manner. To pause
the wash cycle, press the button again; the indicator
light will flash in an orange colour. If the Door locked
opened. To start the wash cycle from the point at which
it was interrupted, press the button again.
DOOR LOCKED
porthole door is locked. To open the door, pause the
wash cycle (see Running a wash cycle).
CHILD LOCK
or deactivate the CHILD LOCK, press and hold the
button for approximately 2 seconds. when the indicator
light is illuminated, the control panel is locked. This
means it is possible to prevent wash cycles from being
modified accidentally, especially where there are children
in the home.
ECO indicator light: the
altering the washing parameters, an energy saving of at
least 10% is made. Furthermore, before the machine
enters Standby mode, the icon will light up for a few
seconds; when the machine is switched off the
estimated energy saving will be around the 80% mark.
DELAY
TIMER
button
DOOR LOCKED
indicator light
CHILD LOCK button
with indicator light
Spin Drain ).
lights up when the cycle is complete.
indicator light is switched off, the door may be
indicator light: indicates that the
button with indicator light: to activate
icon lights up when, after
5
Page 6

Auto Dose System
EN
Introduction
This washing machine is
equipped with two tanks: one
for liquid detergent (either
concentrated or diluted) with
a capacity of approx. 5.5 l
and another for liquid fabric
softener (either concentrated
or diluted) with a capacity of
approx. 3.5 l (see picture).
Check the detergent/fabric
softener box to verify whether
it is diluted or concentrated
detergent. The automatic
dosing system intakes the
correct amount of detergent and fabric softener from the
tanks for each type of load and at the right time,
guaranteeing optimal washing results without wastage.
The amount of detergent/fabric softener can be modified
manually by pressing the DETERGENT and FABRIC
SOFTENER buttons (refer to "Modifying pre-set
parameters"). If you prefer, the washing machine can
also be used in the "traditional" mode, i.e. by adding the
detergent in the dispenser; the machine will automatically
detect the detergent and will not use the tanks.
Detergent dispenser
"Traditional" mode.
Pull out the detergent dispenser drawer up to the first
stop point to add the detergent (either liquid or powder
detergent), bleach or other additives (e.g. whiteners) and
the pre-wash detergent for washing in the "traditional"
mode (refer to "Traditional mode).
"Auto Dose System mode.
A
moving the dispenser drawer during filling operations.
Once the tanks have been filled (refer to "Filling the tanks"),
the machine can run up to 40 cycles before the detergent
finishes (*).
First-time use
Turn the washing machine on by pressing the ON/OFF
button. The first wash cycle must be carried out without
laundry and by adding detergent in the detergent
dispenser (refer to "Traditional mode); set the
programme "
without filling the tanks.
(*) with an average load of 4 kg, 40°C Cotton programme, "medium" water
hardness level and dirt level set to 3.
" (Cotton 90°) without pre-wash and
In order to fill the detergent
and fabric softener tanks,
the detergent dispenser
drawer must be fully
extracted: open the dispenser
drawer up to the first stop
point then press the lever (A)
and open up to the second
stop point, making sure that
it is fully extracted. Avoid
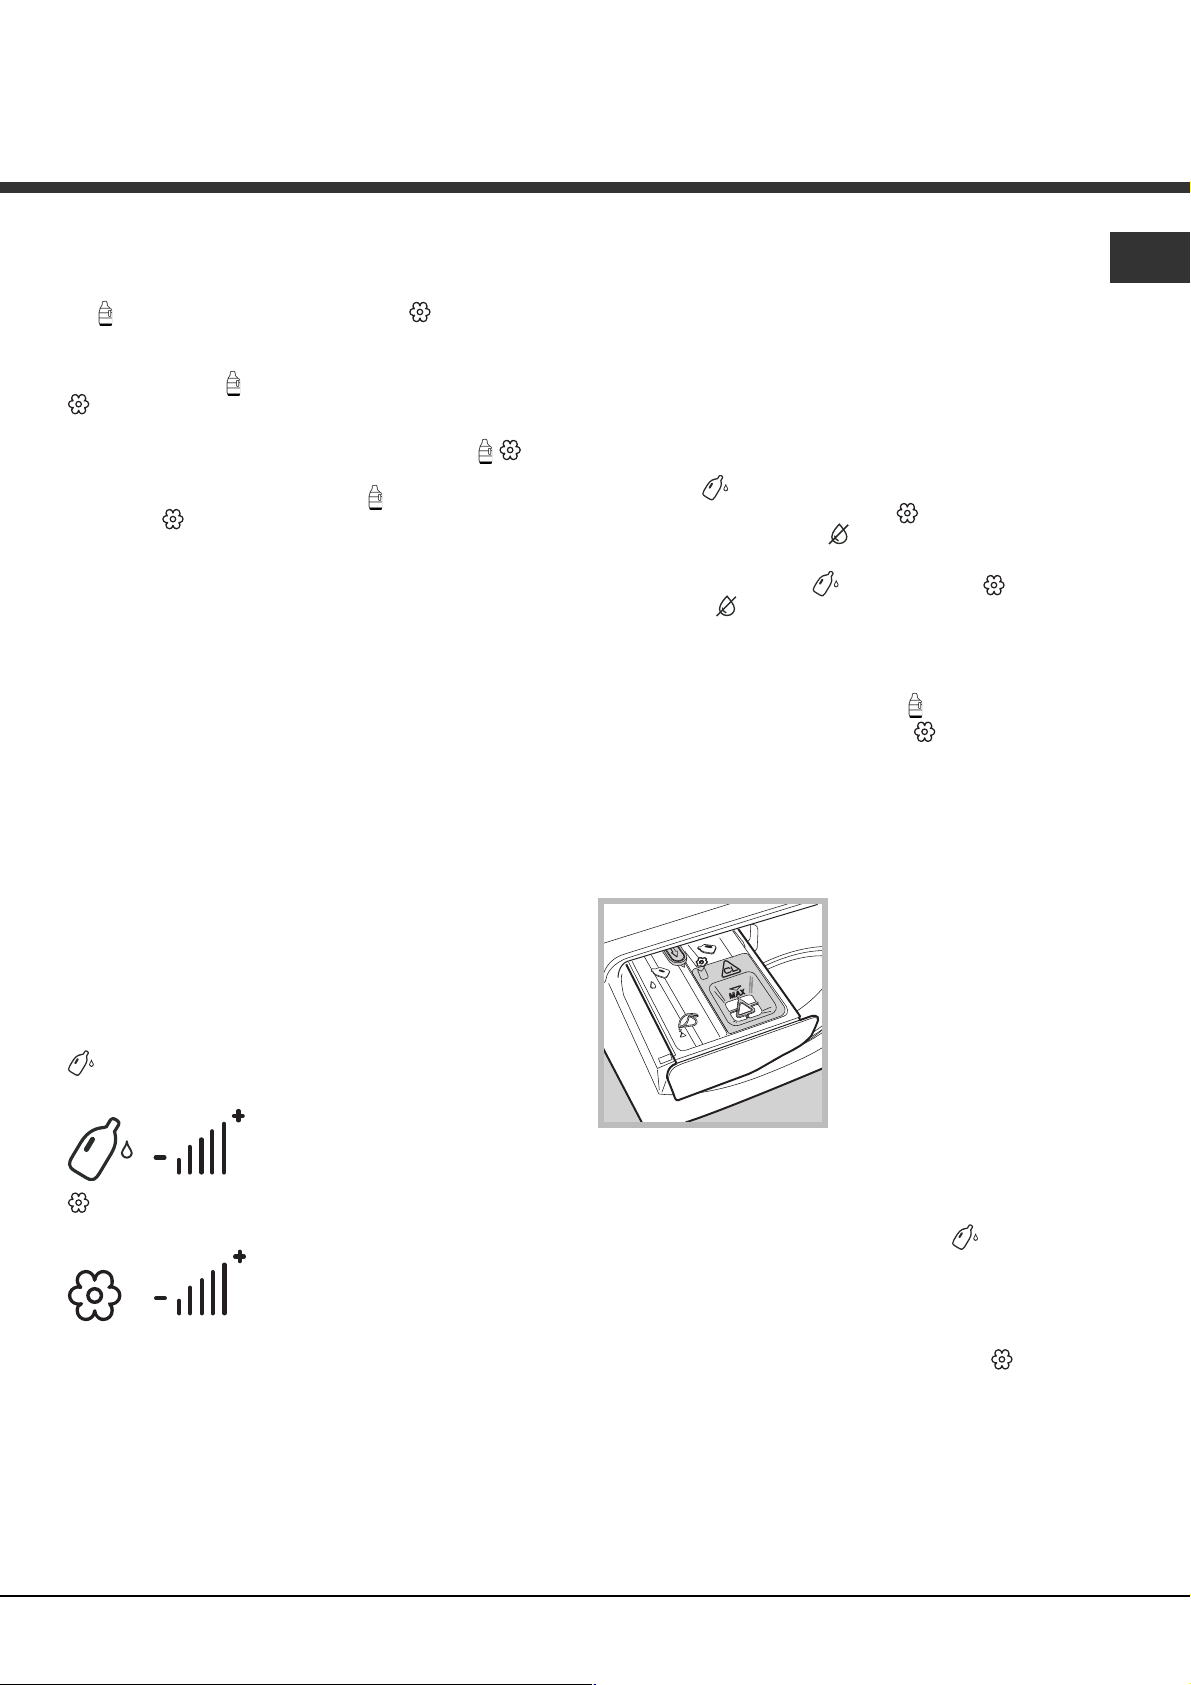
Filling the tanks:
Open the detergent dispenser drawer in the "Auto Dose
System" mode (refer to "Detergent dispenser").
Slowly pour the detergent (B) and fabric softener (C)
until the tanks are completely filled (see picture).
C
B
To avoid exceeding the maximum capacity, a buzzer
(beep) will sound with growing intensity to signal the level
and 3 long beeps will sound once the tank is completely
full.
Start the wash cycle immediately after filling the tanks to
ensure that the dispenser is properly cleaned.The
respective icons
fabric softener) will light up gradually to signal the level.
The filling time depends on the density of the product.
Very dense products will take longer to fill.
Close the detergent dispenser drawer only once the
compartments are completely empty.
Select the density of the detergent added (either
concentrated or liquid) by pressing the appropriate
button
The machine will store the selection.
If no option is selected, the detergent intake option will
be pre-set to "diluted".
Use button
will be automatically extracted by the machine:
1) If concentrated softener is used, we recommend
selecting the first level (
necessary, stepping up by a single position (
bars) to increase detergent intake.
2) If diluted softener is used, we recommend setting level
3 (
the amount of fabric softener to be extracted.
3) To exclude the use of fabric softener, press
the bars disappear (also refer to "Modifying pre-set
parameters").
.
with 3 bars) and to then either increase/decrease
(for the detergent) and (for the
to set the amount of fabric softener that
with one bar) and, if
with 2
until
6
Page 7
Signals for successive refilling:
When the level of detergent/fabric softener falls below the
required level, at the end of the cycle, the first segment of
the
detergent symbol or the petal of the fabric softener
symbol in the bottom left section, will flash slowly on the
display. Once the detergent/fabric softener is finished, the
first segment of the
fabric softener symbol in the lower left section will flash
fast to signal that the detergent or fabric softener tank is
empty. While the cycle runs, with empty tanks, the
symbols will disappear; at the end of the cycle or during the
pause mode, the first segment of the symbol and the
petal of the
If the tanks are not filled, the successive wash cycles in
Auto Dose System will be carried out without any intake of
detergent.
We suggest adding detergent and fabric softener ONLY
after the machine's signal.
NEVER mix two different detergents; always clean out
the tank before adding a new type of detergent (refer to
"Cleaning cycle set by the user").
Using the "Auto Dose System"
If the compartments have been filled with detergent and
fabric softener, you may start using the machine (refer to
"Running a wash cycle").
Powder detergents for pre-washing and powder additives
may only be used in the traditional mode or using the "Auto
Dose System", by placing the additives directly inside the
drum, preferably in conjunction with the "laundry ball".
Modifying pre-set parameters:
The machine automatically intakes detergent on the
basis of the selected programme, wash load and water
hardness. However, the amount of detergent/fabric
softener used may be modified.
button: press to increase, decrease and to exclude
detergent intake.
detergent symbol or the petal of the
symbol in the lower left section will flash fast.
Automatic cleaning:
The washing machine carries out an automatic cleaning
cycle during the rinse cycle if the level of detergent that
remains is insufficient for carrying out a
successive wash cycle.
Cleaning cycle set by the user:
Run the cleaning cycle (with empty drum) if you require
adding a different product to the previous one or if the tanks
have been incorrectly filled (e.g. fabric softener has been
erroneously poured into the detergent tank or vice-versa).
Press button
cleaning of the detergent tank, button
fabric softener tank or button
Once the buzzers with growing intensity are followed by 2
long buzzers and the icons
fabric softener,
for the selected container will start.
The cleaning cycle lasts about 40' if the tanks are initially
empty; if not, the cycle will last longer.
During the tank cleaning cycle, the
gradually from bottom to top and the
gradually petal by petal.
"Traditional" mode
Pull out the detergent dispenser drawer up to the first
stop point (see picture) then pour the amount of
detergent and other additives (e.g. bleach) required for a
single wash cycle directly into the dispenser.
3. ! Do not pour anything in this compartment.
and hold for approximately 8 sec. to activate
for cleaning the
for cleaning both tanks.
for the detergent, for the
for both tanks appear, the cleaning cycle
symbol will fill
symbol will fill
1. pre-wash compartment:
use powder detergent only.
1
2
3
2. main wash
compartment: use powder
or liquid detergent. If the
latter is used, we
recommend pouring it into
the dispenser immediately
before starting the washing
machine and without
running a pre-wash cycle.
EN
button: press to increase, decrease and to exclude
fabric softener intake.
The level of detergent/fabric softener suggested by the
machine is indicated by 3 bars.
Less than 3 bars indicates a lower level of detergent/
fabric softener compared to that suggested by the
machine, while more than 3 bars indicates a higher level
of detergent/fabric softener.
Cleaning the tanks:
Tank cleaning cycles can either be automatic or pre-set
by the user.
Tablet detergent or the relative "laundry ball" must be
added directly inside the drum. In this event, deactivate
the "Auto Dose System" (by pressing the
the relative vertical bars disappear from the display).
Do not pour any fabric softener as the appropriate
quantity required for each wash cycle will be
automatically extracted.
To deactivate fabric softener intake, press the
until the vertical bars disappear from the display.
For wool and silk garments, we recommend using a
special detergent which must be poured directly into the
detergent dispenser (compartment 2).
Running the wash cycle:
Select the programme and the compatible options on
the basis of the required need and type of load.
button until
button
7
Page 8

Running a wash cycle
EN
WARNING: before you use the washing machine for
the first time, run a wash cycle with detergent and no
laundry, using the 90° cottons cycle without pre-wash.
1. SWITCH THE MACHINE ON. Press the
All the indicator lights will illuminate for 1 second; the
indicator light corresponding to the
remain lit in a fixed manner and the START/PAUSE
indicator light will flash slowly.
2. LOAD THE LAUNDRY. Open the porthole door.
Load the laundry, making sure you do not exceed the
maximum load value indicated in the table of wash
cycles on the following page.
3. MEASURE OUT THE DETERGENT. There is no
need to add detergent when the "Auto Dose System"
mode is used, as the machine automatically intakes
detergent on the basis of the selected programme,
type of load and water hardness. Refer to the
paragraph "Traditional mode for implementing the
traditional operation mode.
4. CLOSE THE PORTHOLE DOOR.
5. SELECT THE PROGRAMME. Turn the WASH
CYCLE SELECTOR KNOB right or left, until you have
selected the desired wash cycle. A temperature and
spin speed is set for each wash cycle; these may be
adjusted.
6. CUSTOMISE THE WASH CYCLE. Use the
relevant buttons on the control panel:
Modify the temperature and/or spin
speed.
The machine automatically displays the maximum
temperature and spin speed values set for the
selected cycle, or the most recently-used settings if
they are compatible with the selected cycle. The
temperature can be decreased by pressing the
button, until the cold wash ( ) setting is reached.
The spin speed may be progressively reduced by
pressing the
). If these buttons are pressed again, the
(
maximum values are restored.
Exception: if the Cotton programme is selected,
the temperature can be increased up to a value of
90°C.
Set a DELAY TIMER.
Press the button until you have reached the desired
delay time. During the setting process, the delay time
is shown on the display and the
After selecting a DELAY TIMER time, the fixed
symbol and the cycle duration will appear on the
display. Press the button once to display the selected
delay time. To remove the DELAY TIMER option,
button, until it is completely excluded
button will then
symbol flashes.
button.
press the button until the display shows the text OFF;
symbol will disappear.
the
Once the START/PAUSE button has been pressed,
the time delay may only be decreased.
Modify the cycle settings.
Press the OPTION button to customise the wash
cycle in accordance with your own requirements.
Press the button to activate the option; the
corresponding indicator light will switch on.
Press the button again to disable the option; the
indicator light will switch off.
If the selected option is not compatible with the
selected wash cycle, this incompatibility will be
signalled by the flashing of the indicator light and a
sound alert (3 beeps); the option will not be activated.
7. START THE PROGRAMME. Press the START/
PAUSE button. The corresponding indicator light
remains lit in a fixed manner and the porthole door
locks (the
illuminates). The icons corresponding to the wash
cycle phases will light up during the cycle to indicate
which phase is currently in progress. To change a
wash cycle once it has already started, pause the
washing machine by pressing the START/PAUSE
button; then select the desired cycle and press the
START/PAUSE button again. To open the door during
a wash cycle, press the START/PAUSE button; if the
DOOR LOCKED
may open the door. Press the START/PAUSE button
again to restart the wash cycle from the point at
which it was interrupted.
8. THE END OF THE WASH CYCLE. This is indicated
by the illuminated text END. The porthole door may
be opened immediately. If the START/PAUSE indicator
light is flashing, press the button to end the cycle.
Open the door, unload the laundry and switch off the
machine.
If you wish to cancel a cycle which has already begun,
press and hold the
the machine switches off.
Bag for quilts, curtains and delicate garments
The Aqualtis washing machine makes it easier for you to
wash even the most valuable and delicate garments in
complete confidence thanks to the special bag which
protects the laundry (this is supplied with the machine).
We recommend that the bag is used every time you
wash quilts and padded items with an outer layer made
using synthetic material.
DOOR LOCKED indicator light
indicator light is switched off you
button until the cycle stops and
8
Page 9
Wash cycles and options
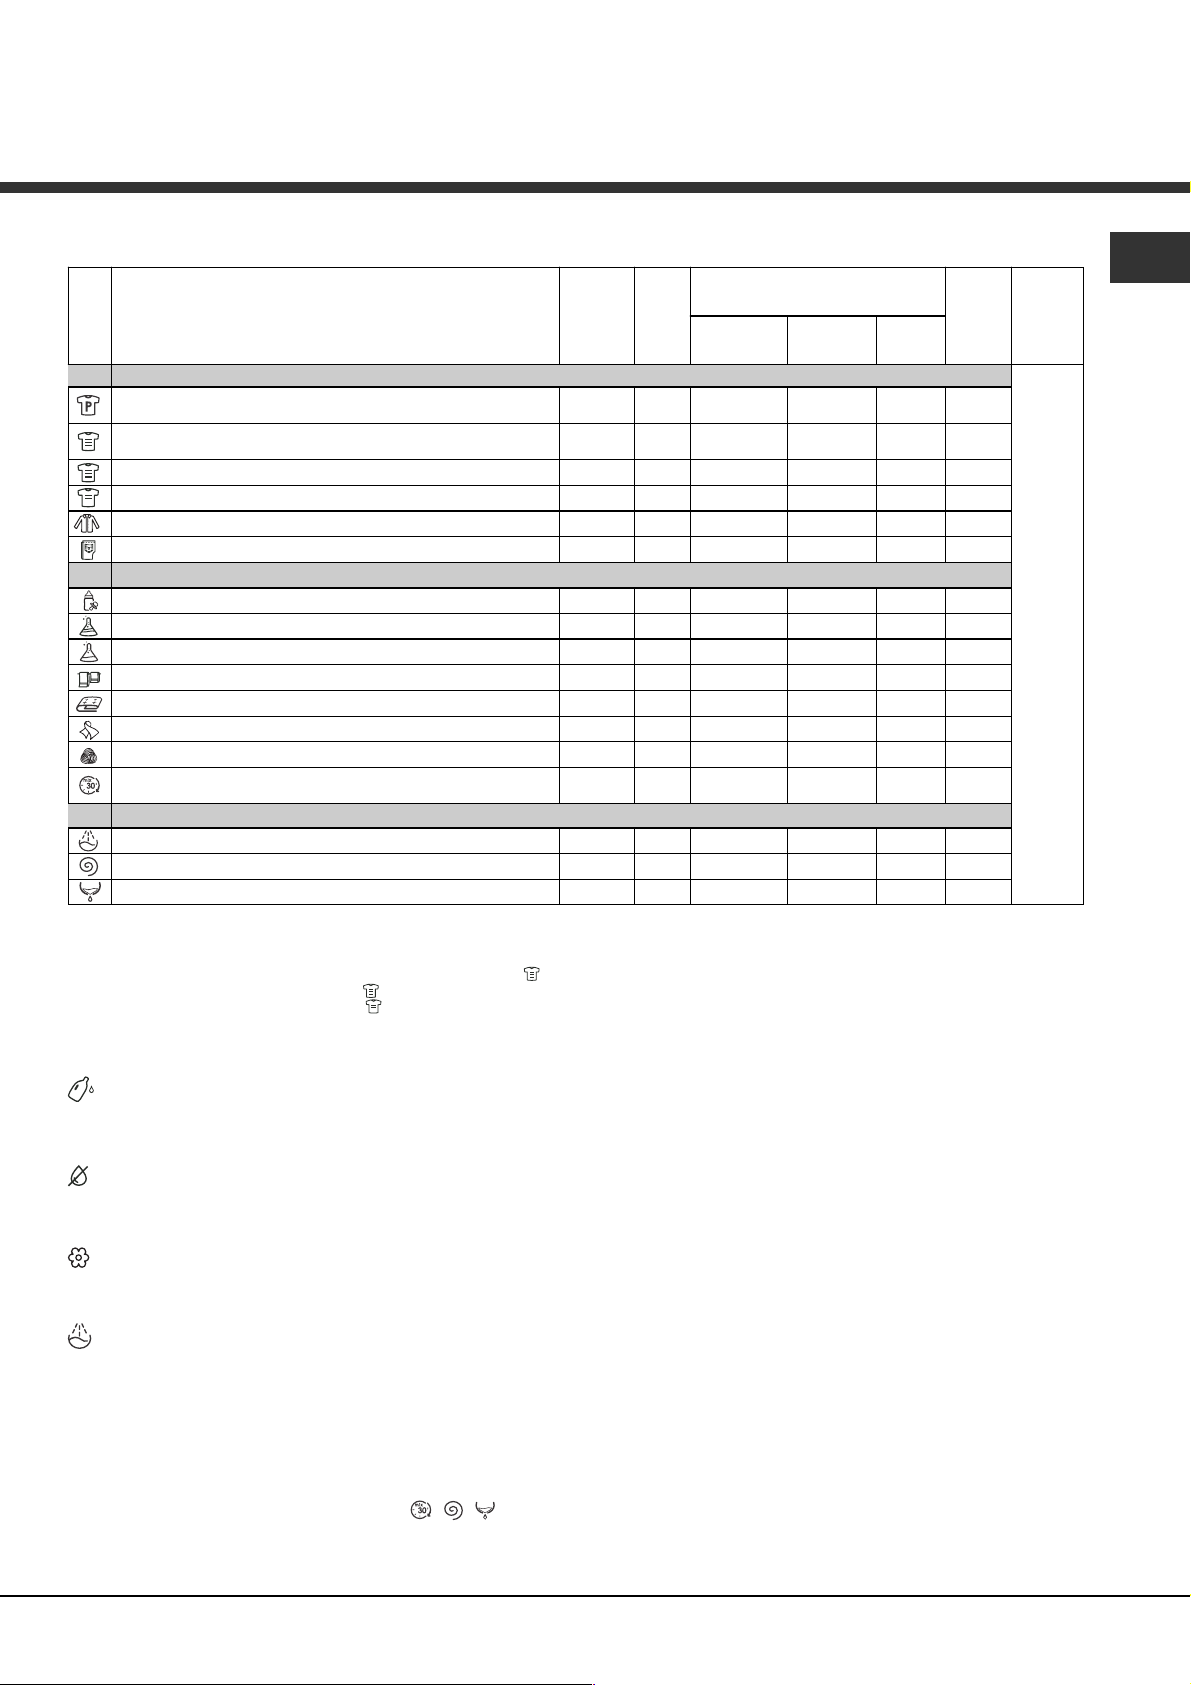
Table of wash cycles
Icon Description of the wash cycle
Cottons wash cycles
Cotton with pre-wash
(Add detergent to the relevant compartment).
Cotton (1): heavily soiled whites and resistant colours.
Cotton (2): heavily soiled whites and delicate colours.
Coloured Cotton (3) 40° 1200 -
Shir ts
Jeans
Special programmes
Baby: heavily soiled delicate colours
Durable Synthetics 60° 800 -
Synthetics
Delicate
"Bed & Bath" for bedlinen and towels.
Duvets:
Silk: for garments in silk and viscose, lingerie.
Mix 30': to refresh lightly soiled garments quickly (not s uitable
Partials wash cycles
Rinse - 1200 - -
Spin - 1200 - - - 8
Drain - 0 - - - 8
(*) Note: 10 minutes after the START, the machine will recalculate the time remaining until the end of the wash cycle on the basis of the load inside it; this
value will then be shown on the display.
For all Test Institutes:
1) Test wash cycle in compliance with regulation EN 60456: set wash cycle
2) Long wash cycle for cottons: set wash cycle
3) Short wash cycle for cottons: set wash cycle
for down-stuffed garments.
Wool: for wool, cashmere, etc.
for wool, silk and clothes which require washing by hand)
with a temperature of 40°C.
with a temperature of 40°C.
Max.
temp.
(°C)
(Max. 90°)
40° 1200 -
40° 600 -
40° 800 -
40° 800 -
40° 800 -
40° 600 -
with a temperature of 60°C.
Max.
speed
(rpm)
90° 1200
60°
1200 -
60° 1200 -
30° 1000 -
30° 0 -
30° 800 -
Detergent and additives
Detergent
for prewash
lll
Detergent
for wash
ll
ll
ll
ll
ll
ll
ll
ll
ll
ll
ll
ll
ll
Fabric
softener
Max.
load
(kg)
Cycle
duration
8
8
8
8
2
4
on the display.
4
4
4
8
3,5
2
2
3,5
l
8
EN
(*) The duration of the wash cycles can be checked
Options
Detergent dosage
To dose the amount of detergent (refer to the chapter
"Auto Dose System").
Concentrated Detergent
To modify the degree of detergent density (refer to the
chapter "Auto Dose System").
Fabric softener dosage
To dose the amount of fabric softener (refer to the
chapter "Auto Dose System").
Extra rinse
By selecting this option, the efficiency of the rinse is
increased and optimal residual detergent removal is
guaranteed. It is particularly useful for skin which is
sensitive to detergents. We recommend this option is
used with a full load of washing, or when a large amount
of detergent is required.
It cannot be used in conjunction with
, , .
9
Page 10

Detergents and laundry
EN
Detergent
The type and quantity of detergent required depend on
the type of fabric you are washing (cotton, wool, silk,
etc.), as well as its colour, the washing temperature, the
level of soiling and the hardness of the water in the area.
Whenever the detergent and fabric softener Auto Dose
System is activated, this washing machine helps to
prevent wastage and to protect the environment,
besides guaranteeing optimal washing performance.
We recommend the following:
Use powder detergent for carrying out a pre-wash
and pour in the "traditional" mode.
Use liquid detergents for delicate cotton garments and
for all low-temperature wash cycles.
When activating the "Auto Dose System" mode, use
liquid detergent and fabric softeners only. Never add
ultra-concentrated detergents (e.g. "Gel" type
detergents or similar).
Use gentle liquid detergents for wool and silk
garments and pour in the "traditional" mode.
Never mix two different detergents; always clean out
the tank before adding a new type of detergent.
The detergent should be poured into the relevant
compartment - or the dispenser placed directly inside the
drum - before the wash cycle begins. In the latter case, it will
not be possible to select the Cottons with pre-wash cycle.
Do not use hand washing detergents because these
create too much foam.
and optimising the effect of special disinfecting additives
added to the detergent. At the end of the wash cycle,
the machine will slowly rotate the drum; to end the cycle
press the START/PAUSE button.
Silk: use the special Silk
garments. We recommend the use of special detergent
which has been designed to wash delicate clothes.
Curtains: use the Silk
be folded and placed inside the bag provided.
Wool: is the only washing machine brand to have been
awarded the prestigious Woolmark Platinum Care
endorsement (M.0508) by the Woolmark Company,
which means that all woollen garments may be washed
in the washing machine, even those which state hand
wash only
be used to wash all woollen garments in the washing
machine while guaranteeing optimum performance.
Duvets: to wash double or single duvets (the weight of
which should not exceed 3,5 kg), cushions or clothes
padded with goose down such as puffa jackets, use the
special Duvets
duvets are placed in the drum with their edges folded
inwards (see figure) and that no more than ¾ of the total
volume of the drum is used.
on the label. The Wool wash cycle can
wash cycle. We recommend that
wash cycle to wash all silk
wash cycle. These should
Preparing the laundry
Shake out the garments before loading them into the
machine.
Divide the laundry according fabric type (symbol on the
washing instruction label) and colour, making sure you
separate the coloured garments from the white ones;
Empty all pockets and check the buttons;
Do not exceed the values listed in the Table of wash
cycles, which refer to the weight of the laundry when dry.
How much does your laundry weigh?
1 sheet 400-500 g
1 pillowcase 150-200 g
1 tablecloth 400-500 g
1 bathrobe 900-1200 g
1 towel 150-250 g
1 pair of jeans 400-500 g
1 shirt 150-200 g
Washing recommendations
Shirts: use the special Shirts wash cycle to wash
shirts in different fabrics and colours to guarantee they
receive the best possible care.
Jeans: use the special Jeans
denim garments; turn inside out before washing and use
a liquid detergent.
Baby: use the special Baby
the remove the soiling typically caused by babies, while
removing all traces of detergent from nappies in order to
prevent the delicate skin of babies from suffering allergic
reactions. The cycle has been designed to reduce the
amount of bacteria by using a greater quantity of water
wash cycle for all
wash cycle to remove
Quilts: to wash quilts with a synthetic outer layer, use
the bag provided and set the wash cycle to Duvets
Bedlinen and towels: use the Bed & Bath
to wash laundry from all over the house; this optimises
fabric softener performance and helps you save time and
energy. We recommend the use of powder detergent.
Stubborn stains: it is wise to treat stubborn stains with
solid soap before washing, and to use the Cottons with
pre-wash cycle.
cycle
Load balancing system
Before every spin cycle, to avoid excessive vibrations
before every spin and to distribute the load in a uniform
manner, the drum rotates continuously at a speed which
is slightly greater than the washing rotation speed. If,
after several attempts, the load is not balanced
correctly, the machine spins at a reduced spin speed. If
the load is excessively unbalanced, the washing
machine performs the distribution process instead of
spinning. To encourage improved load distribution and
balance, we recommend small and large garments are
mixed in the load.
.
10
Page 11

Precautions and tips
The machine was designed and constructed in
accordance with international safety regulations. The
following information is provided for safety reasons and
must therefore be read carefully.
General safety
This appliance is not intended for use by persons
(including children) with reduced physical, sensory or
mental capabilities, or lack of experience and
knowledge, unless they have been given supervision
or instruction concerning use of the appliance by a
person responsible for their safety. Children should be
supervised to ensure that they do not play with the
appliance.
This appliance was designed for domestic use only.
Do not touch the machine when barefoot or with wet
or damp hands or feet.
Do not pull on the power supply cable when
unplugging the appliance from the electricity socket.
Hold the plug and pull.
Do not touch the drained water as it may reach
extremely high temperatures.
Never force the porthole door. This could damage the
safety lock mechanism designed to prevent
accidental opening.
If the appliance breaks down, do not under any
circumstances access the internal mechanisms in an
attempt to repair it yourself.
Always keep children well away from the appliance
while it is operating.
For more information relating to the correct disposal of
household appliances, owners should contact their
local authorities or appliance dealer.
Opening the porthole door manually
In the event that it is not possible to open the porthole
door due to a powercut, and if you wish to remove the
laundry, proceed as follows:
1. remove the plug from the
electrical socket.
2. make sure the water level
inside the machine is lower
than the door opening; if it is
not, remove excess water
using the drain hose,
collecting it in a bucket as
indicated in the figure.
3. remove the cover panel on the lower front part of the
washing machine (see overleaf).
4. pull outwards using the
tab as indicated in the figure,
until the plastic tie-rod is
freed from its stop position;
pull downwards until you
hear a click, which
indicates that the door is
now unlocked.
EN
If it must be moved, proceed with the help of two or
three people and handle it with the utmost care.
Never try to do this alone, because the appliance is
very heavy.
Before loading laundry into the washing machine,
make sure the drum is empty.
Disposal
Disposing of the packaging materials: observe local
regulations so that the packaging may be re-used.
The European Directive 2002/96/EC relating to Waste
Electrical and Electronic Equipment (WEEE) states
that household appliances should not be disposed of
using the normal solid urban waste cycle. Exhausted
appliances should be collected separately in order to
optimise the cost of re-using and recycling the
materials inside the machine, while preventing
potential damage to the atmosphere and to public
health. The crossed-out dustbin is marked on all
products to remind the owner of their obligations
regarding separated waste collection.
5. open the door; if this is
still not possible repeat the
procedure.
6. reposition the panel, making sure the hooks are
securely in place before you push it onto the appliance.
11
Page 12
Care and maintenance
EN
Cutting off the water and electricity
supplies
Turn off the water tap after every wash cycle. This will
limit wear on the hydraulic system in the machine and
help to prevent leaks.
Unplug the appliance when cleaning it and during all
maintenance work.
Cleaning the machine
The outer parts and rubber components of the appliance
can be cleaned using a soft cloth soaked in lukewarm
soapy water. Do not use solvents or abrasives.
Cleaning the detergent dispenser drawer
A
D
To access the pre-chamber:
2
1. take off the cover panel on the front of the machine
by first pressing it in the centre and then pushing
downwards on both sides until you can remove it (see
figures);
2. position a container so
that it will collect the water
which flows out
(approximately 1.5 l) (see
figure);
3. unscrew the lid by
rotating it in an anticlockwise direction (see
figure);
To pull out the dispenser drawer, open until the first stop
point then press lever A to open completely; finally, press
one of the levers D and pull the drawer outwards (see
picture).
Wash it under running water; this procedure should be
effected regularly. Be careful to remove any detergent
residues from the dispenser drawer socket on the
machine.
Keep the drawer to the left hand side when replacing it
to ensure that it centres the guides and to prevent it
from jamming.
Caring for your appliance drum
Always leave the door ajar to prevent unpleasant
odours from forming.
Cleaning the pump
The washing machine is fitted with a self-cleaning pump
which does not require any maintenance. Sometimes,
small items (such as coins or buttons) may fall into the
protective pre-chamber at the base of the pump.
4. clean the inside thoroughly;
5. screw the lid back on;
6. reposition the panel, making sure the hooks are
securely in place before you push it onto the appliance.
Checking the water inlet hose
Check the inlet hose at least once a year. If there are
any cracks, it should be replaced immediately: during
the wash cycles, water pressure is very strong and a
cracked hose could easily split open.
Make sure the wash cycle has finished and unplug the
appliance.
12
Page 13

Trouble shooting
Your washing machine could occasionally fail to work. Before contacting the Technical Assistance Centre
(see Assistance), make sure that the problem cannot be not solved easily using the following list.
Problem:
The washing machine does not
switch on.
The wash cycle does not start.
The washing machine does not fill
with water.
The machine continuously fills
with water and drains.
The washing machine does not
drain or spin.
The machine vibrates a lot during
the spin cycle.
The washing machine leaks.
The icons corresponding to the
Phase in progress flash rapidly
at the same time as the ON/OFF
indicator light.
Possible causes / Solutions:
The appliance is not plugged into the socket fully, or not enough to make
contact.
There is no power in the house.
The door is not closed properly.
The START/PAUSE button has not been pressed.
The water tap has not been opened.
A DELAY TIMER has been set.
The water inlet hose is not connected to the tap.
The hose is bent.
The water tap has not been opened.
There is no water supply in the house.
The pressure is too low.
The START/PAUSE button has not been pressed.
The drain hose is not fitted at a height between 65 and 100 cm from the
floor (see Installation).
The free end of the hose is under water (see Installation).
If the dwelling is on one of the upper floors of a building, there may be
problems relating to water drainage, causing the washing machine to fill
with water and drain continuously. Special anti-draining valves are available
in shops and help to prevent this inconvenience.
The wall drainage system is not fitted with a breather pipe.
The wash cycle does not include draining: Some wash cycles require the
drain phase to be started manually (see Wash cycles and options).
The drain hose is bent (see Installation).
The drainage duct is clogged.
The drum was not unlocked correctly during installation (see Installation).
The machine is not level (see Installation ).
The machine is trapped between cabinets and walls (see Installation).
The load is unbalanced (see Detergents and laundry).
The water inlet hose is not screwed on properly (see Installation).
The detergent dispenser is blocked (to clean it, see Care and
maintenance).
The drain hose is not fixed in place properly (see Installation).
Switch off the machine and unplug it, wait for approximately 1 minute and
then switch it back on again. If the problem persists, contact the Technical
Assistance Service.
EN
There is too much foam.
The washing machine door
remains locked.
The detergent is not suitable for machine washing (it should display the text
for washing machines or hand and machine wash, or the like).
Too much detergent was used.
Perform the manual unlocking procedure (see Precautions and tips).
13
Page 14

EN
Troubleshooting:
Possible causes / Solutions:
The machine's washing
performance is unsatisfactory.
What happens if the tanks are
loaded even if they are already full?
What happens if the dispenser is
used in the traditional mode while
the tanks are still full?
Can the tanks also be used for
powder detergent?
Can powder detergent fall into the
tanks?
What happens if the dispenser is
not opened properly when filling the
tanks?
The tanks have not been loaded correctly (e.g. fabric softener has been
added instead of detergent or vice-versa)
Two different types of detergent/fabric softener have mixed.
NEVER mix two different detergents; always clean out the tanks before adding
a new type of detergent.
The "Auto Dose System is blocked due to prolonged lack of use: carry
out a tank cleaning cycle (refer to "Cleaning cycle pre-set by user").
Buzzers (Beep) and visual signals (icons appearing on the display) indicate
that the tank is full. If further detergent/fabric softener is added, the excess
quantity will fall into the drum and will be washed away with the next cycle.
The machine will automatically track whether powder or liquid detergent
has been loaded in the traditional mode and will not intake any amount of
detergent from the tank. Fabric softener can only be used in the "Auto
Dose System mode.
No, powder detergent can only be used in the traditional mode.
No, there is a barrier to prevent powder detergent from falling into one of
the tanks even if the dispenser is open in the "Auto Dose System" position
(i.e. completely open).
If the dispenser is not completely open, the detergent or fabric softener
that has been added will fall into the drum and will be washed away with
the next cycle.
What happens if detergent and
fabric softener are erroneously
inverted?
What happens if different
detergents are mixed before the
tanks are empty?
The washing machine will wash with unsatisfactory results, the tanks will
have to be emptied and subjected to a manual cleaning cycle.
The machine will wash normally although we recommend only refilling the
tanks after the signal emitted by the machine; do not mix different
detergents/fabric softeners.
Note: To exit Demo mode, press and hold the two ON/OFF and START/PAUSE buttons simultaneously for 3 seconds.
14
Page 15

Assistance
Before calling for Assistance:
Check whether you can solve the problem by yourself (see Trouble shooting);
Restart the wash cycle to check whether the problem has been solved;
If it has not, contact the Authorised Technical Assistance Service.
If the washing machine has been installed or used incorrectly, you will have to pay for the call-out service.
Always request the assistance of authorised technicians.
Please have the following information to hand:
the type of problem;
the appliance model (Mod.);
the serial number (S/N).
The above information can be found on the data plate located on the appliance itself.
EN
15
Page 16

EN
16
Page 17

Istruzioni per
linstallazione e luso
Sommario
Installazione, 18-19
I
Italiano
AQUALTIS
AQLF8F 292 U
Disimballo e livellamento
Collegamenti idraulici ed elettrici
Dati tecnici
Descrizione della macchina, 20-21
Pannello comandi
Auto Dose System, 22-23
Come effettuare un ciclo di lavaggio, 24
Programmi e opzioni, 25
Tabella Programmi
Le opzioni di lavaggio
Detersivi e biancheria, 26
Detersivo
Preparare la biancheria
Consigli di lavaggio
Sistema bilanciamento del carico
LAVABIANCHERIA
I
Precauzioni e consigli, 27
Sicurezza generale
Smaltimento
Apertura manuale della porta oblò
Manutenzione e cura, 28
Escludere acqua e corrente elettrica
Pulire la macchina
Pulire il cassetto dei detersivi
Curare il cestello
Pulire la pompa
Controllare il tubo di alimentazione dellacqua
Anomalie e rimedi, 29
Assistenza, 30
Assistenza Attiva 7 giorni su 7
17
Page 18
Installazione
E importante conservare questo libretto per poterlo
I
consultare in ogni momento. In caso di vendita, di
cessione o di trasloco, assicurarsi che resti insieme
alla lavabiancheria.
Leggere attentamente le istruzioni: ci sono importanti
informazioni sullinstallazione, sulluso e sulla
sicurezza.
Nella busta contenente questo libretto troverete,
oltre alla garanzia, dei particolari che serviranno per
linstallazione.
Disimballo e livellamento
Disimballo
1. Una volta disimballata la lavabiancheria, controllare
che non abbia subito danni durante il trasporto.
Se fosse danneggiata non collegarla e contattare
il rivenditore.
2. Rimuovere le 4 viti di
protezione per il
trasporto ed il relativo
distanziale posti nella
parte posteriore (vedi
figura).
In caso sia posizionata su moquette o tappeti,
regolare i piedini in modo da conservare sotto la
lavabiancheria lo spazio necessario per la ventilazione.
Collegamenti idraulici ed elettrici
Collegamento del tubo di alimentazione dellacqua
Prima di collegare il tubo di alimentazione alla rete
idrica, far scorrere l'acqua finché non sia limpida.
1. Collegare il tubo di
alimentazione alla
macchina avvitandolo
all'apposita presa
d'acqua, nella parte
posteriore in alto a
destra (vedi figura).
2. Collegare il tubo di
alimentazione
avvitandolo a un
rubinetto d'acqua fredda
con bocca filettata da
3/4 gas (vedi figura).
3. Chiudere i fori con i tappi di plastica contenuti nella
busta.
4. Conservare tutti i pezzi; qualora la lavabiancheria
dovesse essere trasportata, dovranno essere
rimontati per evitare danneggiamenti interni.
Gli imballaggi non sono giocattoli per bambini.
Livellamento
1. Posizionare la lavabiancheria su un pavimento
piano e rigido, senza appoggiarla a muri o mobili.
2. Compensare le
irregolarità svitando o
avvitando i piedini finchè
la macchina non sia
orizzontale (non deve
essere inclinata più di 2
gradi).
Un accurato livellamento dà stabilità ed evita vibrazioni
e rumorosità soprattutto nella fase di centrifuga.
3. Fare attenzione che nel tubo non ci siano né pieghe
né strozzature.
La pressione idrica del rubinetto deve essere
compresa nei valori della tabella Dati tecnici
(vedi pagina a fianco).
Se la lunghezza del tubo di alimentazione non fosse
sufficiente, rivolgersi a un negozio specializzato o a un
tecnico autorizzato.
Non utilizzare mai tubi di carico usati o vecchi, ma
quelli in dotazione alla macchina.
18
Page 19
Collegamento del tubo di scarico
Collegare il tubo di
scarico a una conduttura
di scarico o a uno
scarico a muro posti tra
65 e 100 cm da terra
65 - 100 cm
evitando assolutamente
di piegarlo.
In alternativa,
appoggiare il tubo di
scarico al bordo di un
lavandino o di una
vasca, legando la guida
in dotazione al rubinetto
(vedi figura).
L'estremità libera del
tubo di scarico non
deve rimanere immersa
nell'acqua.
Non usare prolunghe e multiple.
I
Il cavo non deve subire piegature o compressioni.
Il cavo di alimentazione e la spina devono essere
sostituiti solo da tecnici autorizzati.
Attenzione! Lazienda declina ogni responsabilità
qualora queste norme non vengano rispettate.
È sconsigliato usare tubi di prolunga; se
indispensabile, la prolunga deve avere lo stesso
diametro del tubo originale e non superare i 150 cm.
Collegamento elettrico
Prima di inserire la spina nella presa della corrente,
accertarsi che:
la presa abbia la messa a terra e sia a norma
di legge;
la presa sia in grado di sopportare il carico
massimo di potenza della macchina, indicato
nella targhetta caratteristiche;
la tensione di alimentazione sia compresa nei
valori indicati nella targhetta caratteristiche;
la presa sia compatibile con la spina della
macchina. In caso contrario far sostituire la presa o
la spina.
La macchina non va installata all'aperto, nemmeno
se lo spazio è riparato, perché è molto pericoloso
lasciarla esposta a pioggia e temporali.
A macchina installata, la presa della corrente deve
essere facilmente raggiungibile.
Dati tecnici
Modello
Dimensioni
Capacità
Collegamenti
elettrici
Collegamenti
idrici
Velo ci tà di
centrifuga
Programmi di
controllo secondo
la norma EN 60456
AQLF8F 292 U
larghezza cm 59,5
altezza cm 85
profondità cm 64,5
da 1 a 8 kg
vedi la targhetta caratteristiche
tecniche applicata sulla macchina
pressione massima 1 MPa (10 bar)
pressione minima 0,05 MPa (0,5 bar)
capacità del cesto 62 litri
sino a 1200 giri al minuto
programma ; temperatura 60°C;
effettuato con 8 kg di carico.
Questa apparecchiatura è conforme
alle seguenti Direttive Comunitarie:
- 2004/108/CE (Compatibilità
Elettromagnetica)
- 2002/96/CE
- 2006/95/CE (Bassa Tensione)
19
Page 20
Descrizione della macchina
I
PORTA OBLÒ
MANIGLIA
PORTA
OBLÒ
ZOCCOLO
PIEDINI REGOLABILI
PANNELLO
COMANDI
PORTA OBLO
Per aprire la porta oblò
utilizzare sempre lapposita
maniglia
CASSETTO DETERSIVI
Il cassetto detersivi si
trova allinterno della
macchina e vi si accede
aprendo la porta.
Per lutilizzo vedi il capitolo
Auto Dose System.
Per il dosaggio dei detersivi vedi il capitolo Detersivi
e biancheria.
Nota: attaccare sul
cassetto detersivi ladesivo con le descrizioni dei
programmi e opzioni. Ladesivo si trova nella busta
contenente questo libretto.
(vedi figura).
Modalità di stand by
Questa lavatrice, in conformità alle nuove normative
legate al risparmio energetico, è dotata di un sistema
di autospegnimento (stand by) che entra in funzione
dopo circa 30 minuti nel caso di non utilizzo. Premere
brevemente il tasto ON-OFF
macchina si riattivi.
e attendere che la
20
Page 21

Pannello comandi
Manopola
PROGRAMMI
TEMPERATURA/
Pulsante
DETERGENTE
Pulsante
DILUIZIONE
DETERGENTE
Display
DETERGENTE
Display
CENTRIFUGA
Display
PARTENZA RITARDATA/
AMMORBIDENTE/DURATA
CICLO
Pulsante
AMMORBIDENTE
Pulsante e Spia
OPZIONE
Spia
ECO
Pulsante con spia
AVVIO/
PAUSA
I
Icone
FASI DI
LAVAGGIO
Pulsante con spia
ON/OFF
TEMPERATURA
Pulsante
CENTRIFUGA
Pulsante con spia ON/OFF: premere brevemente il
pulsante per accendere o spegnere la macchina. La
spia verde indica che la macchina è accesa. Per
spegnere la lavabiancheria durante il lavaggio è
necessario tenere premuto il pulsante più a lungo,
circa 3 sec.; una pressione breve o accidentale non
permetterà lo spegnimento della macchina.
Lo spegnimento della macchina durante un lavaggio in
corso annulla il lavaggio stesso.
Manopola PROGRAMMI: può essere ruotata in
entrambe le direzioni. Per impostare il programma più
adatto vedi la Tabella programmi. Durante il lavaggio
la manopola resta ferma.
Pulsante
TEMPERATURA: premere per modificare
o escludere la temperatura; il valore scelto viene indicato
dal display soprastante (vedi Come effettuare un ciclo
di lavaggio).
Pulsante
CENTRIFUGA: premere per modificare o
escludere la centrifuga; il valore scelto viene indicato dal
display soprastante (vedi Come effettuare un ciclo di
lavaggio).
Pulsante
PARTENZA RITARDATA: premere per
impostare una partenza ritardata del programma prescelto;
il valore del ritardo impostato viene indicato dal display
soprastante (vedi Come effettuare un ciclo di lavaggio).
Pulsanti DETERGENTE e AMMORBIDENTE:
vedi "Modificare i parametri pre-impostati" nel capitolo
"Auto Dose System" .
Pulsante
"Riempire i Serbatoi" nel capitolo "Auto Dose System".
DILUIZIONE DETERGENTE: vedi
Pulsante con SpiaOPZIONE: premere per selezionare
lopzione disponibile. La spia relativa allopzione rimarrà
accesa (vedi Come effettuare un ciclo di lavaggio).
Pulsante
Pulsante
PARTENZA
RITARDATA
Spia
BLOCCO
Pulsante con spia
BLOCCO
TASTI
PORTA
Icone FASI DI LAVAGGIO: si illuminano ad indicare
l'avanzamento del ciclo (Lavaggio
- Risciacquo
- Centrifuga - Scarico finale ). La scritta si
illumina quando il ciclo è terminato.
Pulsante con spia AVVIO/PAUSA: quando la spia
verde lampeggia lentamente, premere il pulsante per
avviare un lavaggio. A ciclo avviato la spia diventa
fissa. Per mettere in pausa il lavaggio, premere
nuovamente il pulsante; la spia lampeggerà con colore
arancione. Se la spia Blocco porta
è spenta, si
potrà aprire la porta oblò. Per far ripartire il lavaggio
dal punto in cui è stato interrotto, premere
nuovamente il pulsante.
Spia
BLOCCO PORTA: indica che la porta oblò è
bloccata. Per aprire la porta è necessario mettere il
ciclo in pausa (vedi Come effettuare un ciclo di
lavaggio).
Pulsante con spia
BLOCCO TASTI: per attivare o
disattivare il blocco del pannello comandi, tenere
premuto il pulsante per circa 2 secondi. La spia accesa
indica che il pannello comandi è bloccato. In questo
modo si impediscono modifiche accidentali dei
programmi, soprattutto se in casa ci sono dei bambini.
Spia ECO: licona
si accenderà quando,
modificando i parametri di lavaggio, si otterrà un
risparmio di energia di almeno il 10%.
Inoltre prima che la macchina entri nella modalità di
Stand by licona
si accenderà per pochi secondi;
a macchina spenta il recupero energetico stimato sarà
dell80% circa.
21
Page 22

Auto Dose System
Introduzione
I
la quantità ideale di detersivo e ammorbidente per ogni tipo
di carico e nel momento più indicato, garantendo risultati di
lavaggio ottimali e senza sprechi. E' possibile modificare la
quantità di detersivo e di ammorbidente manualmente
agendo sui pulsanti DETERGENTE e AMMORBIDENTE (vedi
"Modificare i parametri pre-impostati"). Se si desidera è
possibile utilizzare la lavabiancheria nel modo tradizionale,
caricando il detersivo nel cassetto; la macchina ne rileva
automaticamente la presenza e non utilizza i serbatoi.
Cassetto detersivi
Modalità Tradizionale.
Estrarre il cassetto detersivi fino al primo fermo per
caricare il detersivo (liquido o in polvere), la candeggina o
altri additivi (es. sbiancanti) e il detersivo per il
prelavaggio per l'uso in modo tradizionale (vedi "Utilizzo
tradizionale").
Modalità Auto Dose.
A
circa 40 cicli per il detergente.
Primo utilizzo
Accendere la lavabiancheria premendo il pulsante ON/OFF.
Il primo lavaggio deve essere effettuato senza biancheria
ma con detersivo versato direttamente nel cassetto
detergenti (vedi modalità Tradizionale) impostando il
programma
caricare i serbatoi.
Riempire i serbatoi:
Aprire il cassetto dei detersivi in modalità Auto Dose
(vedi Cassetto Detersivi).
Versare lentamente il detersivo (B) e lammorbidente (C)
in modo da riempire completamente i serbatoi (vedi
figure).
(*) con carico medio di 4 kg, programma Cotone 40°C, durezza dell'acqua
"media" e livello di sporco impostato su 3.
(Cotone 90°) senza prelavaggio e senza
Questa lavabiancheria è
provvista di due serbatoi: uno
per il detersivo liquido
(concentrato o diluito) della
capacità di circa 5,5 lt e
l'altro per l'ammorbidente
liquido (concentrato o diluito)
della capacità di circa 3,5 lt
(vedi figura).
Controlla sul contenitore del
detersivo/ammorbidente se è
diluito o concentrato.
Il sistema di dosaggio
automatico preleva dai serbatoi
Per riempire i serbatoi di
detergente e ammorbidente
aprire il cassetto detersivi
fino al primo fermo, quindi
premere la levetta (A) ed
estrarlo fino al secondo
fermo accertandosi che
arrivi a battuta.
Una volta riempiti i serbatoi
(vedi "Riempire i serbatoi"), la
macchina avrà autonomia di
C
B
Per non superare la quantità massima, un segnale
acustico (beep) con l'intensità crescente avviserà del
livello raggiunto fino al completo riempimento del
serbatoio indicato da 3 beep lunghi.
Iniziare subito il lavaggio dopo aver riempito i serbatoi
per garantire la pulizia del cassetto.
Sul display le rispettive icone
(per ammorbidente) si illumineranno gradualmente per
indicare la quantità raggiunta.
Il tempo di caricamento dipende dalla densità del
prodotto. Con prodotti molto densi i tempi di
caricamento saranno più lunghi.
Chiudere il cassetto detersivi solo quando le vaschette
si saranno completamente svuotate.
Selezionare la densità del detersivo versato (concentrato
o diluito) premendo l'apposito pulsante
La macchina memorizzerà la scelta.
Non effettuando la selezione, il prelievo del detersivo
sarà impostato su "diluito".
Utilizzare il pulsante
ammorbidente che verrà prelevato automaticamente
dalla macchina:
1) Se l'ammorbidente è concentrato, si consiglia di
selezionare il primo livello (
aumentare eventualmente di una sola posizione (
con 2 barrette) per incrementarne il prelievo.
2) Se l'ammorbidente è diluito, si consiglia di
impostare il 3 livello (
diminuire da qui la quantità di ammorbidente da
prelevare.
3) Per escludere l'utilizzo dell'ammorbidente premere
il pulsante
anche Modificare i parametri pre-impostati).
Segnalazione per riempimenti successivi:
Quando il livello residuo del detersivo/ammorbidente
scenderà sotto la quantità necessaria, alla fine del
ciclo, sul display lampeggerà lentamente il primo
fino a far scomparire le barrette (vedi
per impostare la quantità di
con 3 barrette) e aumentare/
(per detersivo) e
.
con 1 barretta) ed
22
Page 23

segmento del simbolo per il detersivo, oppure il petalo
in basso a sinistra del simbolo
Quando il detersivo/ammorbidente sarà esaurito, il vuoto
del serbatoio detersivo o del serbatoio ammorbidente
verrà rispettivamente visualizzato con il lampeggio veloce
del primo segmento del simbolo
a sinistra del simbolo
Durante il ciclo, con serbatoi vuoti, i simboli
scompariranno; invece a fine ciclo ed in pausa il primo
segmento del simbolo
simbolo
vengono caricati i serbatoi, i lavaggi successivi in modalità
Auto Dose saranno effettuati senza prelevare il detersivo.
Si consiglia di ricaricare il detergente e l'ammorbidente
SOLO dopo l'indicazione della macchina.
Non mescolare MAI due detersivi differenti; effettuare
sempre la pulizia del serbatoio prima di inserirne uno nuovo
(vedi Pulizia impostata dall'utente).
Utilizzo Auto Dose System
Se i serbatoi sono stati riempiti con detersivo ed ammorbidente procedere allutilizzo della macchina (vedi Come
effettuare un ciclo di lavaggio).
Il detersivo per il prelavaggio in polvere e gli additivi in
polvere posso essere usati solo in modalità tradizionale
o in modalità Auto Dose System inserendo gli additivi
direttamente nel cestello, preferibilmente con lausilio
della pallina.
Modificare i parametri pre-impostati:
La macchina preleva automaticamente la quantità di
detersivo in base al programma scelto, la quantità del
carico inserito e la durezza dell'acqua. Tuttavia, si puo'
modificare la quantità del detersivo/ammorbidente.
Pulsante
escludere il prelievo del detergente.
Pulsante
escludere lil prelievo dell'ammorbidente.
Il livello di detergente /ammorbidente suggerito dalla
macchina è indicato con 3 barrette.
I livelli minori di 3 barrette indicano meno detersivo/
ammorbidente rispetto al livello suggerito dalla
macchina, mentre i livelli superiori di 3 indicano
l'aumento della quantità del detersivo/ammorbidente.
Pulizia serbatoi:
Sono previsti cicli di pulizia automatica dei serbatoi,
oppure su richiesta dell'utente.
Pulizia automatica:
La lavabiancheria effettua un ciclo di pulizia automatico
durante i risciacqui, quando la quantità di detersivo
residua è insufficiente ad un successivo ciclo di lavaggio.
lampeggeranno velocemente. Se non
: premere per aumentare, diminuire e
: premere per aumentare, diminuire e
.
e il petalo in basso a sinistra del
per lammorbidente.
o del petalo in basso
Pulizia impostata dall'utente:
Effettuare il ciclo di pulizia (con il cestello vuoto) se si
vuole caricare un prodotto differente da quello
precedentemente utilizzato o se i serbatoi sono stati
riempiti in modo errato (l'ammorbidente è stato versato
nello scompartimento del detergente o viceversa). 4.
Tenere premuto per circa 8 sec. il pulsante
l'attivazione della pulizia del serbatoio del detersivo, il
pulsante
pulsante per entrambi i serbatoi. Dopo i "beep" con
l'intensità crescente seguito da 2 "beep" lunghi e
l'animazione delle icone
l'ammorbidente,
ciclo di pulizia per il contenitore selezionato. Il ciclo di
pulizia dura circa 40 se i serbatoi sono inizialmente
vuoti, in caso contrario la durata del ciclo sarà
maggiore.
Durante il ciclo pulizia dei serbatoi, simbolo
riempie ripetutamente dal basso verso lalto e il
simbolo
petalo.
Utilizzo tradizionale
Estrarre il cassetto detersivi fino al primo fermo (vedi
figura), versare direttamente nel cassetto il detersivo e
altri additivi (es. candeggina) necessari per un solo
lavaggio.
effetture il prelavaggio.
3. Non utilizzare questa vaschetta.
Il detersivo in pastiglie o lapposita pallina devono
essere inseriti direttamente allinterno del cestello. In
questo caso escludere la modalità Auto Dose
System (premere il pulsante
le relative barrette verticali su display).
Non versare l'ammorbidente perché verrà prelevato in
automatico nella quantità richiesta per ogni lavaggio.
Per escludere il prelievo dellammorbidente premere il
pulsante
su display.
Per capi in lana e seta si consiglia di utilizzare il
detergente dedicato versandolo direttamente nel
cassetto detersivi (vaschetta 2).
Effettuare il lavaggio:
Scegliere il programma e le opzioni compatibili in base
alle necessità e tipo di carico.
per quello dell'ammorbidente oppure il
per il detergente, per
per entrambi i serbatoi, inizierà il
si riempie ripetutamente petalo dopo
1. vaschetta per il
prelavaggio: usare esclusi-
1
2
3
fino a far scomparire le barrette verticali
vamente detersivo in
polvere.
2. vaschetta per il lavaggio:
usare detersivo in polvere o
liquido. In questultimo caso
si raccomanda di versarlo
immediatamente prima
dellavvio della
lavabiancheria e senza
fino a far scomparire
per
si
23
Page 24

Come effettuare un ciclo di
lavaggio
NOTA: la prima volta che si utilizza la lavabiancheria,
I
effettuare un ciclo di lavaggio senza biancheria ma
con detersivo impostando il programma cotone 90°
senza prelavaggio.
1. ACCENDERE LA MACCHINA. Premere il
pulsante
secondo dopo il quale rimarrà accesa fissa la spia
del pulsante
lentamente.
2. CARICARE LA BIANCHERIA. Aprire la porta
oblò. Caricare la biancheria facendo attenzione a
non superare la quantità di carico indicata nella
tabella programmi della pagina successiva.
3. DOSARE IL DETERSIVO. Per l'utilizzo in modalità
Auto Dose non è necessario dosare il detersivo, la
macchina lo preleva automaticamente in base al
programma selezionato, al tipo di carico e alla
durezza dell'acqua. Per l'utilizzo in modalità
tradizionale vedi "Utilizzo tradizionale".
4. CHIUDERE LA PORTA OBLO.
5. SCEGLIERE IL PROGRAMMA. Ruotare la
MANOPOLA PROGRAMMI verso destra o verso
sinistra fino a selezionare il programma desiderato;
viene associata una temperatura e una velocità di
centrifuga che possono essere modificati.
6. PERSONALIZZARE IL CICLO DI LAVAGGIO.
Agire sugli appositi pulsanti del pannello comandi:
Modificare la temperatura e/o la
centrifuga.
La macchina visualizza automaticamente la
temperatura e la centrifuga massime previste per il
programma impostato o le ultime selezionate se
compatibili con il programma scelto. Premendo il
pulsante
temperatura sino al lavaggio a freddo (
Premendo il pulsante
la centrifuga sino alla sua esclusione (
Unulteriore pressione dei pulsanti riporterà i valori a
quelli massimi previsti.
. Tutte le spie si accenderanno per 1
, la spia AVVIO/PAUSA lampeggerà
si riduce progressivamente la
si riduce progressivamente
Eccezione: selezionando il programma Cotone
Bianchi la temperatura può essere portata sino a 90°.
Impostare la partenza ritardata.
Premere il pulsante relativo fino a raggiungere il
tempo del ritardo desiderato. Durante
limpostazione viene visualizzato il tempo del ritardo
insieme al simbolo
dopo qualche secondo dalla scelta del ritardo il
display visualizzerà il simbolo
del ciclo. Premendo il pulsante una volta viene
visualizzato il tempo di ritardo impostato.
Per rimuovere la partenza ritardata premere il
pulsante fino a che sul display compare la scritta
OFF; il simbolo
che lampeggia;
fisso e la durata
si spegnerà.
Una volta premuto il pulsante AVVIO/PAUSA il
valore del ritardo potrà essere modificato solo
diminuendolo.
Modificare le caratteristiche del ciclo.
Premere il pulsante OPZIONE per personalizzare il
lavaggio secondo le proprie esigenze.
Premere il pulsante per attivare lopzione; si
accenderà la spia relativa.
Premere nuovamente il pulsante per disattivare
lopzione; la spia si spegnerà.
Se lopzione selezionata non è compatibile con il
programma impostato, lincompatibilità verrà
segnalata con il lampeggio della spia ed un segnale
acustico (3 beep) e lopzione non verrà attivata.
7. AVVIARE IL PROGRAMMA. Premere il tasto
AVVIO/PAUSA. La spia relativa si fisserà e la porta
oblò si bloccherà (spia BLOCCO PORTA
accesa). Le icone relative alle fasi di lavaggio si
illumineranno durante il ciclo ad indicare la fase in
corso.
Per cambiare un programma mentre un ciclo è in
corso, mettere la lavabiancheria in pausa
premendo il pulsante AVVIO/PAUSA; selezionare
quindi il ciclo desiderato e premere nuovamente il
pulsante AVVIO/PAUSA. Per aprire la porta mentre
un ciclo è in corso premere il pulsante AVVIO/
PAUSA; se la spia PORTA BLOCCATA è spenta
sarà possibile aprire la porta. Premere nuovamente
sul pulsante AVVIO/PAUSA per far ripartire il
programma dal punto in cui era stato interrotto.
8. FINE DEL PROGRAMMA. Viene indicata dalla
scritta END accesa. La porta oblò si potrà aprire
immediatamente. Se la spia AVVIO/PAUSA lampeggia,
premere il pulsante per terminare il ciclo. Aprire la
porta, scaricare la biancheria e spegnere la macchina.
Se si desidera annullare un ciclo già avviato, tenere
premuto il pulsante
).
).
interrotto e la macchina si spegnerà.
Sacchetto per trapunte, tende e capi delicati
Grazie allo speciale sacchetto fornito in dotazione, la
lavabiancheria Aqualtis ti consente di lavare anche i
capi più preziosi e delicati garantendo loro la massima
protezione. Si raccomanda di utilizzare in ogni caso il
sacchetto per il lavaggio di trapunte e piumini con
fodera esterna realizzata in materiale sintetico.
finché il ciclo non verrà
24
Page 25

Programmi e opzioni
Tabella programmi
Icona Descrizione del Programma
Pr ogra mmi Cotone
Cotone bianchi
Cotone bianchi (1): bianchi e colorati resistenti molto sporchi.
Cotone bianchi (2):
Cotone color ati (3 )
Camicie
Jeans
Programmi speciali
Baby: colori delicati molto sporchi.
Sintetici resistenti
Sintetici delicati
Biancheria "7 giorni": per biancheria da letto e da bagno.
Piumini: per capi imbottiti in piuma d'oca.
Seta: per capi in seta, viscosa, lingerie.
Lana: per lana, cachemire, ecc.
Mix 30': per rinfrescare rapidamente capi poco sporchi (non
indicato per lana, seta e capi da lavare a mano).
Programmi parziali
Risciacquo - 1200 - Centrifuga - 1200 - - - 8
Scarico - 0 - - - 8
prelavaggio
con
bianchi e colorati delicati molto sporchi.
Te m p .
max.
(Max. 90°)
Velocità
max.
(°C)
90° 1200
60°
40° 1200 40° 1200 40° 600 40° 800 -
40° 800 -
60° 800 -
40° 800 -
60° 1200 30° 1000 30° 0 -
40° 600 -
30° 800 -
(giri al
minuto)
1200 -
Detersivi e additivi
Detersivo
prelavaggio
lll
Detersivo
Lavaggio
ll
ll
ll
ll
ll
ll
ll
ll
ll
ll
ll
ll
ll
Ammor-
bidente
l
Carico
max.
(Kg)
8
8
8
8
2
4
4
4
4
8
3,5
2
2
3,5
8
Durata
ciclo
(*) E' possibile controllare la durata dei programmi di
lavaggio sul display.
(*) Nota: dopo circa 10 minuti dallo START, la macchina in base al carico effettuato, ricalcolerà e visualizzera il tempo residuo alla fine del programma.
Per tutti Test Institutes:
1) Programma di controllo secondo la norma EN 60456: impostare il programma
2) Programma cotone lungo: impostare il programma
3) Programma cotone corto: impostare il programma
con una temperatura di 40°C.
con una temperatura di 40°C.
con una temperaura di 60°C.
Opzioni
Dosaggio detersivo
Per dosare la quantità di detersivo (vedi capitolo Auto
Dose System).
Densità detersivo
Per modificare il grado di densità del detersivo (vedi
capitolo Auto Dose System).
Dosaggio ammorbidente
Per dosare la quantità di ammorbidente (vedi capitolo Auto
Dose System).
Extra Risciacquo
Selezionando questa opzione si aumenta lefficacia del
risciacquo e si assicura la massima rimozione dei residui
del detersivo. E utile per pelli particolarmente sensibili ai
detersivi. Si consiglia lutilizzo di questa opzione con la
lavabiancheria a pieno carico o con lutilizzo di elevate
dosi di detersivo.
Non è attivabile sui programmi , , .
25
Page 26

Detersivi e biancheria
Detersivo
I
La scelta e la quantità del detersivo dipendono dal tipo
di tessuto (cotone, lana, seta...), dal colore, dalla
temperatura di lavaggio, dal grado di sporco e dalla
durezza dellacqua.
Questa lavabiancheria con il sistema di auto-dosaggio
del detergente e ammorbidente, aiuta ad evitare gli
sprechi e proteggere l'ambiente oltre a garantire le
performance di lavaggio ottimali.
Si consiglia di:
usare il detersivo in polvere se si effettua un
prelavaggio caricandolo in maniera Tradizionale.
usare detersivi liquidi per capi delicati in cotone e per
tutti i programmi a bassa temperatura.
per lutilizzo in modalita Auto Dose System usare
solo detersivo e ammorbidente liquido. Non caricare
detergenti superconcentrati, Gel e simili.
usare detersivi liquidi delicati per lana e seta
caricandoli in maniera Tradizionale.
Non mescolare MAI due detersivi differenti; effettuare
sempre la pulizia del serbatoio prima di inserirne uno
nuovo.
Il detersivo deve essere versato prima dellinizio del
lavaggio nellapposita vaschetta, oppure nel dosatore da
porre direttamente nel cestello. In questo caso non si
può selezionare il ciclo Cotone con prelavaggio.
Non usare detersivi per il lavaggio a mano perché
formano troppa schiuma.
Preparare la biancheria
Aprire bene i capi prima di caricarli.
Suddividere la biancheria secondo il tipo di tessuto
(simbolo sulletichetta del capo) ed il colore facendo
attenzione a separare i capi colorati da quelli bianchi;
Svuotare le tasche e controllare i bottoni;
Non superare i valori indicati nella Tabella
Programmi riferiti al peso della biancheria asciutta.
Quanto pesa la biancheria?
1 lenzuolo 400-500 gr.
1 federa 150-200 gr.
1 tovaglia 400-500 gr.
1 accappatoio 900-1200 gr.
1 asciugamano 150-250 gr.
1 jeans 400-500 gr.
1 camicia 150-200 gr.
Consigli di lavaggio
Camicie: utilizzare lapposito programma Camicie
per lavare camicie di diversi tipi di tessuto e colore per
garantirne la massima cura.
Jeans: utilizzare lapposito programma Jeans
tutti i capi in tessuto Denim; rovesciare i capi prima del
lavaggio ed utilizzare un detersivo liquido.
Baby: utilizzare lapposito programma Baby
asportare lo sporco tipico dei bambini e rimuovere il
detersivo dai panni onde evitare reazioni allergiche alla
pelle delicata dei bambini. Questo ciclo è stato studiato
per ridurre la carica batterica utilizzando una maggior
quantità di acqua e ottimizzando l'effetto di additivi
specifici igenizzanti aggiunti al detersivo.
per
per
Al temine del lavaggio la macchina effettuerà delle lente
rotazioni del cestello; per terminare il ciclo premere il
pulsante AVVIO/PAUSA.
Seta: utilizzare lapposito programma Seta
lavare tutti i capi in seta. Si consiglia lutilizzo di un
detersivo specifico per capi delicati.
Tende: utilizzare il programma Seta
piegarle e inserirle nel sacchetto fornito in dotazione.
Lana: è lunica lavabiancheria ad aver ottenuto il
prestigioso riconoscimento Woolmark Platinum Care
(M.0508) da parte di The Woolmark Company, che
certifica il lavaggio in lavatrice di tutti i capi in lana, anche
quelli recanti letichetta solo lavaggio a mano
il programma Lana si possono lavare in lavatrice tutti i
capi in lana con la garanzia delle migliori performance.
Piumini: per lavare capi con imbottiture in piuma doca
quali piumoni matrimoniali o singoli (non eccedenti i 3,5
kg. di peso), cuscini, giacche a vento utilizzare lapposito
programma Piumini
piumini nel cestello ripiegandone i lembi verso linterno
(vedi figure) e di non superare i ¾ di volume del cestello
stesso.
Trapunte: per lavare trapunte con fodera sintetica,
utilizzare l'apposito sacchetto fornito in dotazione e
impostare il programma "Piumini"
Biancheria da bagno e da letto: per lavare la biancheria
di tutta la casa in un unico ciclo utilizzare il programma
Biancheria 7 giorni
ammorbidente e ti consente di risparmiare tempo ed energia.
Si consiglia lutilizzo di detersivo in polvere.
Macchie ostinate: è bene trattare le macchie ostinate
con sapone solido prima del lavaggio e di utilizzare il
programma Cotone con prelavaggio.
. Si raccomanda di caricare i
che ottimizza lutilizzo di
. Si raccomanda di
.
per
. Con
Sistema bilanciamento del carico
Prima di ogni centrifuga, per evitare vibrazioni eccessive e per
distribuire il carico in modo uniforme, il cestello effettua delle
rotazioni ad una velocità leggermente superiore a quella del
lavaggio. Se al termine di ripetuti tentativi il carico non fosse
ancora correttamente bilanciato la macchina effettua la
centrifuga ad una velocità inferiore a quella prevista. In
presenza di eccessivo sbilanciamento la lavabiancheria
effettua la distribuzione anzichè la centrifuga. Per favorire
una migliore distribuzione del carico e il suo corretto
bilanciamento si consiglia di mescolare capi grandi e
piccoli.
26
Page 27

Precauzioni e consigli
La macchina è stata progettata e costruita in
conformità alle norme internazionali di sicurezza. Queste
avvertenze sono fornite per ragioni di
sicurezza e devono essere lette attentamente.
Sicurezza generale
Questo apparecchio è stato concepito esclusivamente
per un uso di tipo domestico.
L'apparecchio non deve essere utilizzato da persone
(bambini compresi) con capacità fisiche, sensoriali o
mentali ridotte e con esperienze e conoscenze
insufficienti, a meno che tale utilizzo non avvenga
sotto la supervisione o le istruzioni di una persona
responsabile della loro sicurezza.
I bambini devono essere sorvegliati per garantire che
non giochino con l'apparecchio.
La macchina deve essere usata solo da persone
adulte e secondo le istruzioni riportate in questo
libretto.
Non toccare la macchina a piedi nudi o con le mani o i
piedi bagnati o umidi.
Non staccare la spina dalla presa della corrente
tirando il cavo, bensì afferrando la spina.
Non toccare lacqua di scarico, che può raggiungere
temperature elevate.
Non forzare in nessun caso la porta loblò: potrebbe
danneggiarsi il meccanismo di sicurezza che
protegge da aperture accidentali.
In caso di guasto, in nessun caso accedere ai
meccanismi interni per tentare una riparazione.
Controllare sempre che i bambini non si avvicinino
alla macchina in funzione.
Se deve essere spostata, lavorare in due o tre persone
con la massima attenzione. Mai da soli perché la
macchina è molto pesante.
Prima di introdurre la biancheria controllare che il
cestello sia vuoto.
Smaltimento
cestino barrato è riportato su tutti i prodotti per ricordare
gli obblighi di raccolta separata.
Per ulteriori informazioni, sulla corretta dismissione
degli elettrodomestici, i detentori potranno rivolgersi al
servizio pubblico preposto o ai rivenditori.
Apertura manuale della porta oblò
Nel caso non sia possibile aprire la porta oblò a causa
della mancanza di energia elettrica e volete stendere il
bucato, procedere come segue:
1. togliere la spina dalla
presa di corrente.
2. verificate che il livello
dellacqua allinterno della
macchina sia inferiore
rispetto allapertura delloblò;
in caso contrario togliere
lacqua in eccedenza
attraverso il tubo di scarico
raccogliendola in un secchio
come indicato in figura.
3. rimuovere il pannello di copertura sul lato anteriore
della lavabiancheria (vedi pagina seguente).
4. utilizzando la linguetta
indicata in figura tirare
verso lesterno fino a
liberare il tirante in plastica
dal fermo; tirarlo
successivamente verso il
basso fino a sentire un
click che indica che la
porta è sbloccata.
5. aprite la porta; nel caso
non sia ancora possibile
ripetete loperazione.
Smaltimento del materiale di imballaggio: attenersi alle
norme locali, così gli imballaggi potranno essere
riutilizzati.
La direttiva Europea 2002/96/CE sui rifiuti di
apparecchiature elettriche ed elettroniche, prevede che
gli elettrodomestici non debbano essere smaltiti nel
normale flusso dei rifiuti solidi urbani. Gli
apparecchi dismessi devono essere raccolti
separatamente per ottimizzare il tasso di recupero e
riciclaggio dei materiali che li compongono ed impedire
potenziali danni per la salute e l'ambiente. Il simbolo del
27
6. rimontare il pannello assicurandosi, prima di
spingerlo verso la macchina, di aver inserito i ganci
nelle apposite asole.
Page 28

Manutenzione e cura
Escludere acqua e corrente elettrica
I
Chiudere il rubinetto dellacqua dopo ogni
lavaggio. Si limita così lusura dellimpianto
idraulico della macchina e si elimina il pericolo di
perdite.
Staccare la spina della corrente quando si pulisce la
macchina e durante i lavori di manutenzione.
Pulire la macchina
La parte esterna e le parti in gomma possono essere
puliti con un panno imbevuto di acqua tiepida e
sapone. Non usare solventi o abrasivi.
Pulire il cassetto dei detersivi
A
D
Per accedere alla precamera:
2
1. rimuovere il pannello di copertura sul lato anteriore
della macchina premendo verso il centro, quindi spingere
verso il basso da entrambe i lati ed estrarlo (vedi figure);
2. posizionare un contenitore
per raccogliere lacqua che
uscirà (circa 1,5 lt) (vedi
figura);
3. svitare il coperchio
ruotandolo in senso
antiorario (vedi figura);
Per estrarre il cassetto, aprirlo fino al primo fermo, poi
premere la leva A aprendolo completamente, infine
premere una delle levette D e tirarlo verso l'esterno
(vedi figure).
Lavarlo sotto lacqua corrente; questa pulizia va
effettuata frequentemente. Avere cura di rimuovere
anche eventuali residui di detergente dalla sede del
cassetto sulla macchina.
Per rimontarlo occorre tenerlo accostato tutto a
sinistra, facendo attenzione a centrare la guida di
scorrimento per evitare che si incastri.
Curare il cestello
Lasciare sempre socchiusa la porta oblò per evitare
che si formino cattivi odori.
Pulire la pompa
La macchina è dotata di una pompa autopulente che
non ha bisogno di manutenzione. Può però succedere
che piccoli oggetti (monete, bottoni) cadano nella
precamera che protegge la pompa, situata nella parte
inferiore di essa.
4. pulire accuratamente linterno;
5. riavvitare il coperchio;
6. rimontare il pannello assicurandosi, prima di spingerlo
verso la macchina, di aver inserito i ganci nelle apposite
asole.
Controllare il tubo di alimentazione
dellacqua
Controllare il tubo di alimentazione almeno una volta
allanno. Se presenta screpolature e fessure va sostituito:
durante i lavaggi le forti pressioni potrebbero provocare
improvvise spaccature.
Assicurarsi che il ciclo di lavaggio sia terminato e
staccare la spina.
28
Page 29

Anomalie e rimedi
Può accadere che la macchina non funzioni. Prima di telefonare allAssistenza (vedi Assistenza), controllare che non si
tratti di un problema facilmente risolvibile aiutandosi con il seguente elenco.
Anomalie:
La macchina
non si accende.
Il ciclo di lavaggio
non inizia.
La macchina non carica acqua.
La macchina carica e scarica
acqua di continuo.
La macchina non scarica
o non centrifuga.
La macchina vibra
molto durante la centrifuga.
La macchina perde acqua.
Le icone relative alla Fase in
corso lampeggiano velocemente
contemporaneamente alla spia
ON/OFF.
Si forma troppa schiuma.
La porta della macchina rimane
bloccata.
Possibili cause / Soluzione:
La spina non è inserita nella presa della corrente, o non abbastanza
da fare contatto.
In casa non cè corrente.
La porta oblò non è ben chiusa.
Il pulsante AVVIO/PAUSA non è stato premuto.
Il rubinetto dellacqua non è aperto.
Si è impostato un ritardo sullora di avvio (vedi Come effettuare un ciclo di lavaggio).
Il tubo di alimentazione dellacqua non è collegato al rubinetto.
Il tubo è piegato.
Il rubinetto dellacqua non è aperto.
In casa manca lacqua.
Non cè sufficiente pressione.
Il pulsante AVVIO/PAUSA non è stato premuto.
Il tubo di scarico non è installato fra 65 e 100 cm da terra (vedi Installazione).
Lestremità del tubo di scarico è immersa nellacqua (vedi Installazione).
Se labitazione si trova agli ultimi piani di un edificio, è possibile che si
verifichino fenomeni di sifonaggio, per cui la macchina carica e scarica
acqua di continuo. Per eliminare linconveniente sono disponibili in commercio apposite valvole anti-sifonaggio.
Lo scarico a muro non ha lo sfiato daria.
Il programma non prevede lo scarico: con alcuni programmi occorre
avviarlo manualmente (vedi Programmi e opzioni).
Il tubo di scarico è piegato (vedi Installazione).
La conduttura di scarico è ostruita.
Il filtro della pompa di scarico è intasato.
Il cestello, al momento dellinstallazione, non è stato sbloccato
correttamente (vedi Installazione).
La macchina non è in piano (vedi Installazione).
La macchina è stretta tra mobili e muro (vedi Installazione).
Il carico è sbilanciato (vedi Detersivi e biancheria).
Il tubo di alimentazione dellacqua non è ben avvitato (vedi Installazione).
Il cassetto dei detersivi è intasato (per pulirlo vedi Manutenzione e cura).
Il tubo di scarico non è fissato bene (vedi Installazione).
Spegnere la macchina e togliere la spina dalla presa, attendere circa 1
minuto quindi riaccenderla.
Se lanomalia persiste, chiamare lAssistenza.
Il detersivo non è specifico per lavabiancheria (deve esserci la
dicitura per lavatrice, a mano e in lavatrice, o simili).
Il dosaggio è stato eccessivo.
Eseguire la procedura di sblocco manuale (vedi "Precauzioni e consigli").
I
29
Page 30

Anomalie:
I
Possibili cause / Soluzione:
La macchina non dà buone
performance di lavaggio.
Cosa succede se i serbatoi sono
pieni e li carico?
Cosa succede se uso il cassetto
in modo tradizionale mentre i
serbatoi sono ancora pieni?
I serbatoi sono anche per detersivo in polvere?
Il detersivo in polvere può andare nei serbatoi?
Cosa succede se non apro il
cassetto correttamente per il
riempimento dei serbatoi?
I serbatoi non sono stati caricati correttamente (ammorbidente al posto
del detersivo o viceversa).
Si sono mescolati due detersivi/ammorbidenti differenti.
Non mescolare MAI due detersivi/ammorbidenti differenti; effettuare sempre
la pulizia dei serbatoi prima di inserirne altri.
Sistema Auto Dose System intasato perché non utilizzato per un lungo
periodo: eseguire una pulizia dei serbatoi (vedi Pulizia impostata dal
lutente).
Segnali sonori (Beep) e visivi (icone sul display) indicano che il serbatoio è
pieno. Se si continua a caricare il detersivo/ammorbidente, la quantità in
eccesso andrà nel cestello e sarà lavata via al ciclo successivo.
La macchina riconoscerà automaticamente se è stato caricato detersivo
in polvere o detergente liquido nel modo tradizionale e non preleverà nulla
dal serbatoio. L'ammorbidente può essere utilizzato solo in modalità Auto
dose.
No, il detersivo in polvere può essere utilizzato solo in modo tradizionale.
No, c'è una parete che evita che il detersivo in polvere possa cadere in
uno dei serbatoi anche se il cassetto è aperto in posizione Auto Dose
System (completamente aperto).
Se il cassetto non è completamento aperto il detergente o ammorbidente
caricato cadrà nel cestello e sarà lavato via al prossimo ciclo.
Cosa succede se inverto il
detersivo con l'ammorbidente?
Cosa succede se non aspetto
che i serbatoi siano vuoti e
mischio detergenti diversi?
La macchina laverà con scarsi risultati e sarà necessario svuotare i
serbatoi applicando il ciclo di pulizia manuale.
La macchina laverà normalmente ma si raccomanda di ricaricare solo i
serbatoi dopo il segnale comunicato dalla macchina e non mischiare
detersivi/ammorbidenti diversi.
Nota: per uscire dal Demo Mode premere contemporanemanete per 3 sec. i due pulsanti ON/OFF e AVVIO/PAUSA .
30
Page 31

Assistenza
Prima di contattare lAssistenza:
Verificare se lanomalia può essere risolta autonomamente (vedi Anomalie e Rimedi);
Riavviare il programma per controllare se linconveniente è stato ovviato;
In caso negativo, contattare il Servizio Assistenza Tecnico Autorizzato.
In caso di errata installazione o uso non corretto della lavabiancheria lintervento di assistenza sarà a pagamento.
Non ricorrere mai a tecnici non autorizzati.
Comunicare:
il tipo di anomalia;
il modello della macchina (Mod.);
il numero di serie (S/N).
Queste ultime informazioni si trovano sulla targhetta caratteristiche posta sullapparecchio.
Assistenza Attiva 7 giorni su 7
*
In caso di necessità dintervento chiamare il Numero Unico Nazionale 199.199.199*.
Un operatore sarà a completa disposizione per fissare un appuntamento con il Centro Assistenza Tecnico
Autorizzato più vicino al luogo da cui si chiama.
È attivo 7 giorni su 7, sabato e domenica compresi, e non lascia mai inascoltata una richiesta.
* Al costo di 14,25 centesimi di Euro al minuto (iva inclusa) dal Lun. al Ven. dalle 08:00 alle 18:30, il Sab. dalle 08:00 alle 13:00 e di 5,58
centesimi di Euro al minuto (iva inclusa) dal Lun. al Ven. dalle 18:30 alle 08:00, il Sab. dalle 13:00 alle 08:00 e i giorni festivi, per chi
chiama da telefono fisso.
Per chi chiama da radiomobile le tariffe sono legate al piano tariffario delloperatore telefonico utilizzato.
Le suddette tariffe potrebbero essere soggette a variazione da parte delloperatore telefonico; per maggiori informazioni consultare il sito
www.hotpoint-ariston.eu.
31
Page 32

I
32
Page 33

Руководство по установке и
эксплуатации
CIS
Русский
AQUALTIS
AQLF8F 292 U
СТИРАЛЬНАЯ МАШИНА
Содержание
Установка, 34-35
Распаковка и нивелировка
Водопроводное и электрическое подсоединения
Технические характеристики
Описание стиральной машины, 36-37
Панель управления
Auto Dose System, 38-39
Порядок выполнения цикла стирки, 40
Программы и дополнительные функции, 41
Таблица программ
Дополнительные функции стирки
Стиральные вещества и типы белья, 42
Стиральное вещество
Подготовка белья
Рекомендации по стирке
Система балансировки белья
CIS
Предосторожности и рекомендации, 43
Общие требования по безопасности
Утилизация
Открывание люка вручную
Техническое обслуживание и уход, 44
Отключение воды и электрического тока
Чистка машины
Чистка ячейки стиральных веществ
Уход за барабаном
Порядок чистки насоса
Проверка водопроводного шланга
Неисправности и методы их устранения, 45-46
Сервисное обслуживание, 47
33
Page 34

Установка
CIS
! Важно сохранить данное руководство для его
последующих консультаций. В случае продажи,
передачи или переезда проверьте, чтобы данное
руководство сопровождало стиральную машину.
! Внимательно прочитайте инструкции: в них
содержатся важные сведения об установке
изделия, его эксплуатации и безопасности.
! В пакете с техническим руководством вы найдете,
помимо гарантийного таллона, детали, необходимые
для установки машины.
Распаковка и нивелировка
Снятие упаковки
1. После снятия упаковки со стиральной машины
проверьте, чтобы на ней не было повреждений,
вызванных при перевозке.
В случае обнаружения повреждений немедленно
обратитесь к поставщику, не подключая машину.
2. Снимите 4 винта,
предохраняющие
машину в процессе
перевозки, и распорки,
расположенные в задней
части машины (ñì.
схему).
! В случае установки машины на ковер или
ковровое покрытие отрегулируйте ножки таким
образом, чтобы под стиральной машиной оставался
достаточный зазор для вентиляции.
Водопроводное и электрическое
подсоединения
Порядок подсоединения шланга подачи воды
! Перед подсоединением водопроводного шланга к
водопроводу дайте стечь воде до тех пор, пока
она не станет прозрачной.
1. Подсоедините шланг к
машине, привинтив его к
специальному крану,
расположенному в
задней верхней части
справа (см. схему).
2. Прикрутите шланг
подачи к
водопроводному крану
холодной воды с
резьбовым отверстием
3/4 газ, (см. схему).
3. Закройте отверстия резиновыми заглушками,
которые вы найдете в пакете.
4. Сохраните все детали. В случае последующей
перевозки стиральной машины, они должны быть
установлены во избежание ее повреждения.
! Не разрешайте детям играть с упаковочными
материалами.
Нивелировка
1. Установите стиральную машину на плоском и
прочном полу, не прислоняя ее к стенам или к
мебели.
2. Выровняйте машину
при помощи
регулируемых ножек до
полного выравнивания
(наклон не должен
превышать 2-х
градусов).
! Тщательная нивелировка гарантирует стабильность
и устраняет вибрации и шум, в особенности в
процессе отжима.
3. Проверьте, чтобы водопроводный шланг не был
заломлен или сжат.
! Водопроводное давление в кране должно быть в
пределах значений, указанных в таблице
Технические данные (см. страницу рядом).
! Если длина водопроводного шланга будет
недостаточной, следует обратиться в
специализированный магазин или к
уполномоченному сантехнику.
! Никогда не используйте б/у или старые шланги для
подачи воды, а только прилагающиеся к машине.
34
Page 35

Подсоединение сливного шланга
Подсоедините сливной
шланг, не сгибая его, к
сливному трубопроводу
или к сливному патрубку
в стене,
65 - 100 cm
расположенному на
высоте 65 100 см от
пола.
В качестве
альтернативы поместите
конец сливного шланга
в раковину или в ванну,
прикрепив
прилагающуюся
направляющую к крану
(см. схему).
Свободный конец
сливного шланга не
должен быть погружен в
воду.
! Не рекомендуется использовать удлинительные
шланги. При необходимости удлинение должно
иметь такой же диаметр, что и оригинальный шланг,
и его длина не должна превышать 150 см.
Электрическое подключение
! Замена сетевого кабеля может осуществляться
только уполномоченными техниками.
Внимание! Производитель снимает с себя всякую
ответственность в случае несоблюдения указанных
норм установки и подключения оборудования.
Технические характеристики
Ìîäå ëü
Стр ана-изг отовите ль
Габаритные
размеры
Вместимос ть
Номинальное значение
напряжения
электропитания или
диапазон напр яжения
Условное обозначение
рода электрического тока
или номинальная частота
переменного тока
Kлас с зашиты от
поражения
электрическим током
Гидравлические
параметры
AQLF8F 292 U
Италия
ши р и н а 5 9 , 5 с м
высота 85 см
глубина 64,5 см
1 - 8 êã
220-240 V ~
50 Hz
Kласс защиты I
max давление 1 Мпа (10 бар)
min давление 0,05 Мпа (0,5 бар)
объем барабана 62 л
+15
Перед подсоединением штепсельной вилки изделия
к сетевой розетке необходимо проверить
следующее:
сетевая розетка должна быть заземлена и
соответствовать нормативам;
сетевая розетка должна быть расчитана на
максимальную мощность стиральной машины,
указанную в таблице Технические данные (ñì.
таблицу сбоку);
напряжение электропитания должно
соответствовать значениям, указанным в таблице
Технические данные (см. таблицу сбоку);
сетевая розетка должна быть совместима
штепсельной вилкой машины. В противном
случае необходимо заменить розетку или вилку.
! Запрещается устанавливать стиральную машину
на улице, даже под навесом, так как является
чрезвычайно опасным подвергать ее воздействию
дождя и грозы.
! Стиральная машина должна быть установлена так,
чтобы доступ к сетевой розетке оставался
свободным.
! Не используйте удлинители и тройники.
! Сетевой кабель изделия не должен быть согнут
или сжат.
Скорость отжима
Kонтрольные программы
согласно нормативу
EN 60456
В случае необходимости получения информации по сертификатам
соотв етствия или получения копий сертификатов с оответствия на
данную технику, Вы можете отправить запрос по электронному
адресу cert.rus@indesit.com.
Дату производств а
данной техники можно
получить из серийного
номера, расположенного
под штрих-кодом (S/N
XXXXXXXXX), следующим
образом
Степень защиты от попадания тв ердых частиц и влаги,
обеспечиваемая защитной оболочкой, за исключением
низковольтного оборудования, не имеющего защиты от влаги
IPX04
Kлас с
энергопотребления
äî 1200 îá/ìèí
программа ;
температура 60° С; при загрузке
до 8 кг.
Данное изделие соответствует
следующим Директивам
Европейского Сообщества:
- 2004/ 108/СЕ (Электромагнитная
совместимость);
- 2006/ 95/CE (Низкое апряжение)
- 2002 /96/CE
- 1-ая цифра в S/N соответствует
последней цифре года,
- 2-ая и 3-я цифры в S/N порядковому номеру месяца г ода,
- 4-ая и 5-ая цифры в S/N - день
A++
:
!#
Page 36

Описание стиральной машины
CIS
ËÞÊ
РУЧКА ЛЮКА
ПЛИНТУС
ПАНЕЛЬ
УПРАВЛЕНИЯ
РЕГУЛИРУЕМЫЕ
НОЖКИ
ËÞÊ
Для открывания люка
всегда используйте
специальную ручку (ñì.
схему).
ДОЗАТОР СТИРАЛЬНОГО ВЕЩЕСТВА
Дозатор находится внутри
машины и доступен через
люк. Порядок
использования смотрите в
разделе Auto Dose
System.
Примечание: наклейте
на дозатор стирального
вещества наклейку с
перечнем программ и
дополнительных
функций. Наклейка находится в пакете вместе с
настоящим техническим руководством.
Режим ожидания
Настоящая стиральная машина отвечает требованиям
новых нормативов по экономии электроэнергии,
укомплектована системой автоматического
отключения (режим сохранения энергии),
включающейся через 30 минут простоя машины.
Нажмите один раз кнопку ON/OFF
пока машина вновь включится.
и подождите,
36
Page 37

Панель управления
Кнопки
концентрированное
моющее средство
Ручка выбора
программ
СТИРАЛЬНОЕ ВЕЩЕСТВО
Дисплей
ТЕМПЕРАТУРЫ/
Кнопка
СТИРАЛЬНОЕ
ВЕЩЕСТВО
Дисплей
ОТЖИМА
Дисплей ОТЛОЖЕННЫЙ ЗАПУСК/
ОПОЛАСКИВАТЕЛЬ/ПРОДОЛЖИТЕЛЬНОСТИ
ЦИКЛА
Кнопка
ОПОЛАСКИВАТЕЛЬ
Кнопка è
индикаторы
ДОПОЛНИТЕЛЬНЫЕ
ФУНКЦИИ
Индикатор
ECO
Кнопка с
индикатором
ПУСК/ПАУЗА
Символы
ФАЗЫ
СТИРКИ
+15
Кнопка с
индикатором
ON/OFF
Кнопка ТЕМПЕРАТУРЫ
Кнопка ОТЖИМ
Кнопка с индикатором ON/OFF: нажмите кнопку один
раз для включения или выключения машины. Зеленый
индикатор показывает, что машина включена. Для
выключения стиральной машины в процессе стирки
необходимо держать нажатой кнопку, примерно 3
секунды. Короткое или случайное нажатие не приведет
к отключению машины. В случае выключения машины в
процессе стирки текущий цикл отменяется.
Рукоятка ПРОГРАММЫ: может вращаться в обе
стороны. Для выбора нужной программы смотрите
«Таблица программ».
В процессе стирки рукоятка не вращается.
Кнопка
или исключения нагрева. Заданное значение
показывается на дисплее сверху (см. Порядок
выполнения цикла стирки).
Кнопка
исключения отжима. Заданное значение показывается на
дисплее сверху (см. Порядок выполнения цикла стирки).
Кнопка
программирования задержки пуска выбранной
программы. Заданное значение задержки
показывается на дисплее сверху (см. Порядок
выполнения цикла стирки).
Кнопки
смотрите «Изменение параметров, заданных на
фабрике» в разделе "Auto Dose System".
Кнопка
смотрите «Наполнение емкостей» в разделе "Auto
Dose System".
Кнопка с индикаторы ДОПОЛНИТЕЛЬНЫЕ ФУНКЦИИ:
нажмите для выбора имеющихся дополнительных
функций. Индикатор выбранной дополнительной
функции загорается (см. Порядок выполнения цикла
стирки).
ТЕМПЕРАТУРЫ: нажмите для изменения
ОТЖИМ: нажмите для изменения или
ОТЛОЖЕННЫЙ ЗАПУСК: нажмите для
МОЮЩEE СРEДСТВО и ОПОЛАСКИВАТЕЛЬ:
концентрированное моющее средство:
Кнопка с
индикатором
ЗАЩИТА ОТ
Кнопка
ОТЛОЖЕННЫЙ
ЗАПУСК
Символы ФАЗЫ СТИРКИ: загораются для
визуализации последовательности выполнения цикла
(Стирка
Окончательный слив ).
Надпись
Кнопка с индикатором ПУСК/ПАУЗА: когда зеленый
индикатор редко мигает, нажмите кнопку для пуска
цикла стирки. После пуска цикла индикатор перестает
мигать. Для прерывания стирки вновь нажмите кнопку,
индикатор замигает оранжевым цветом. Если
индикатор «Блокировка люка»
открыть люк.
Для возобновления стирки с момента, когда она была
прервана, вновь нажмите эту кнопку.
Индикатор
люк заблокирован. Для открывания люка необходимо
прервать цикл (см «Порядок выполнения цикла
стирки»).
Кнопка с индикатором
включения или отключения блокировки консоли
управления держите кнопку нажатой примерно 2
секунды. Включенный индикатор означает, что консоль
управления заблокирована. Таким образом
программа не может быть случайно изменена,
особенно если в доме дети.
Индикатор
параметров стирки получается экономия
электроэнергии не менее чем на 10%. Кроме того перед
тем как машина переключится в режим сохранения
энергии, символ загорится на несколько секунд. При
выключенной машине примерная экономия
электроэнергии составляет примерно 80%.
Ïoëockaíèe - Отжим -
загорается по завершении цикла.
БЛОКИРОВКА ЛЮКА: показывает, что
загорается, когда при изменении
Индикатор
БЛОКИРОВКА ЛЮКА
погас, можно
ЗАЩИТА ОТ ЛЕТЕЙ: для
ЛЕТЕЙ
!%
Page 38

Auto Dose System
CIS
Вступление
Данная стиральная
машина укомплектована
двумя емкостями: одна для
жидкого стирального
вещества
(концентрированного или
разбавленного) емкостью
примерно 5,5 литров и
другая для жидкого
ополаскивателя
(концентрированного или
разбавленного) емкостью
примерно 3,5 литров (ñì.
схему).
! Проверьте по упаковке
стирального вещества/
ополаскивателя, является ли оно разбавленным или
концентрированным.
! система автоматической дозировки забирает из
емкостей оптимальное количество стирального
вещества и ополаскивателя для каждого типа загрузки
и в оптимальный момент, обеспечивая идеальный
результат экономной стирки. Дозу стирального
вещества и ополаскивателя можно изменить вручную
при помощи кнопок МОЮЩEE СРEДСТВО и
ОПОЛАСКИВАТЕЛЬ (см. «Изменение параметров,
заданных на фабрике»). При необходимости можно
использовать стиральную машину в традиционном
режиме, поместив стиральное вещество в ячейку.
Машина автоматически определит его наличие и не
будет использовать емкости.
Ячейка стирального вещества
Традиционный режим:
Вытащите ячейку стирального вещества до первого
упора для загрузки стирального вещества (жидкого или
порошка), отбеливатель или другие добавки (напр.,
отбеливатели) и стиральное вещество для
предварительной стирки для традиционного режима
(см. «Традиционный режим).
Режим Auto Dose.
A
наполнения емкостей (см. «Наполнение емкостей»)
машина сможет автономно выполнить примерно 40 циклов
с имеющимся стиральным веществом (*).
Первое включение
Включите машину при помощи кнопки ON/OFF.
Первый цикл стирки выполняется без белья, но со
стиральным веществом, помещаемым
непосредственно в ячейки стирального вещества (ñì.
Традиционный режим), выбрав программу «
(Хлопок 90°) без предварительной стирки и без
загрузки емкостей.
Для наполнения емкостей
для стирального вещества и
ополаскивателя полностью
выдвинуть ячейку с
дозатором: открыть ячейку до
первого упора, затем нажать
на рычажок (À) и выдвинуть
ячейку до второго упора,
проверив, чтобы она была
видвинута полностью. Не
двигать ячейку в процессе
наполнения. После
»
Наполнение емкостей:
Откройте ячейку стирального вещества в режиме «Auto
Dose» (см. «Ячейка стирального вещества»). Постепенно
загрузите стиральное вещество (B) и ополаскиватель (C) äî
полного наполнения емкостей (см. схемы).
C
B
Во избежание превышения максимального уровня звуковой
сигнал (бип) с нарастающей громкостью извещает об
уровне наполнения емкостей вплоть до полного
наполнения, отмечающегося 3 длинными сигналами.
Сразу же после наполнения емкостей произведите
цикл мойки для чистки ячейки.
На дисплее последовательно загорятся символы
(стиральное вещество) и (ополаскиватель),
показывающие достигнутый уровень.
Время наполнения зависит от вязкости вещества. При
сильно вязких веществах время наполнения
увеличивается. Закройте ячейку стирального вещества,
только когда дозаторы будут совершенно пустыми.
Выберите степень вязкости загружаемого стирального
вещества (концентрированного или разбавленного)
при помощи специальной кнопки
Машина сохранит эти данные в памяти.
Если Вы не зададите степень вязкости дозировка
стирального вещества из емкости автоматически
задается на разбавленное.
При помощи кнопки
ополаскивателя, автоматически забираемого машиной
в процессе цикла.
1) Если ополаскиватель концентрированный,
рекомендуется выбрать первый уровень
с 1 линией) и при необходимости увеличить только
(
на 1 линию (
2) Если ополаскиватель разбавлен, рекомендуется задать
3-ий уровень (
дозу ополаскивателя на каждый цикл с этого уровня.
3) Для исключения ополаскивателя нажмите кнопку
до тех пор, пока все линии не исчезнут (см. также
«Изменение параметров, заданных на фабрике»).
(*) при средней загруженности, 4 кг, программа Хлопок 40°C,
«средней» жесткости воды и уровне загрязнения белья 3.
с 2 линиями) для увеличения дозы.
с 3 линиями) и увеличивать/уменьшать
задайте количество
.
38
Page 39

Сигнализация последующих наполнений:
Когда остаточный уровень стирального вещества/
ополаскивателя сократится ниже необходимого
объема, в конце цикла на дисплее будет редко мигать
первый сектор символа
или сектор в левой нижней части символа
ополаскивателя. Когда стиральное вещество/
ополаскиватель закончатся, это состояние емкости
стирального вещества или емкости ополаскивателя
будет соответственно показано частым миганием
первого сектора символа
нижней части символа
В процессе выполнения цикла при пустых емкостях
символы
время паузы первый сегмент символа
левой нижней части символа
Если емкости не наполняются, последующие циклы
стирки в режиме Auto Dose производятся без
стирального вещества.
! Рекомендуется дозаправить стиральное
вещество и ополаскиватель ТОЛЬКО после
соответствующей сигнализации машины.
! НИКОГДА не смешивайте два разных типа
стирального вещества; всегда промывайте
емкость перед заправкой в него нового стирального
вещества (см. Промывка по команде пользователя).
Auto Dose System
Если емкости уже наполнены стиральным веществом
и ополаскивателем, можно приступить к эксплуатации
машины (см. «Порядок выполнения цикла стирки»).
Стиральный порошок для предварительной стирки
и добавки в порошке можно использовать в
традиционном режиме или в режиме
автоматической дозировки «Auto Dose System»,
поместив добавки непосредственно в барабан,
предпочтительно в специальной сфере.
Изменение параметров, заданных на фабрике:
Машина автоматически дозирует нужное количество
стирального вещества в зависимости от выбранной
программы, от веса загруженного белья и от степени
жесткости воды. Тем не менее дозу стирального
вещества/ополаскивателя можно изменить.
Кнопка
уменьшения и для исключения дозировки стирального вещества.
Кнопка
уменьшения и для исключения дозировки ополаскивателя.
Уровень стирального вещества / ополаскивателя,
рекомендуемый для данной стиральной машины,
показан 3 линиями.
Уровни, меньше 3-х линий, означают меньшую дозу
стирального вещества / ополаскивателя по
сравнению с дозой, рекомендованной для данной
машины. Уровни, выше 3-х линий, означают
увеличение дозы стирального вещества /
ополаскивателя.
Промывка емкостей:
Предусмотрены циклы промывки емкостей, выполняемые
автоматически или по команде пользователя.
исчезнут; по окончании цикла и во
кратковременно: нажать для увеличения,
кратковременно: нажать для увеличения,
для стирального вещества
äëÿ
или сектора в левой
.
или сектора в
будут часто мигать.
Автоматическая промывка:
Стиральная машина производит цикл автоматической
промывки в процессе ополаскивания, когда остаточный
уровень стирального вещества недостаточен для
следующего цикла стирки.
Промывка по команде пользователя:
Произвести цикл промывки (без белья в барабане),
если Вы хотите залить стиральное вещество, отличное
от ранее используемого, или если емкости были
наполнены неправильно (ополаскиватель был залит в
отделение для стирального вещества и наоборот).
Держать нажатой 8 сек. кнопку
промывки емкости стирального вещества, кнопку
для емкости ополаскивателя, или же кнопку для
обеих емкостей. После звукового сигнала с
возрастающей громкостью, после 2 других длительных
звуковых сигналов и включения символов
стирального вещества,
обеих емкостей начинается цикл промывки выбранной
емкости. Цикл промывки длится 40 минут если емкости
изначально пустые, в противном случае
продолжительность цикла будет больше.
В процессе цикла промывки емкостей символ
постоянно загорается снизу вверх, а символ
постоянно загорается сегмент за сегментом.
Традиционный режим
Выдвиньте ячейку стирального вещества до первого
упора (см. схему), поместите стиральное вещество и
другие добавки (например, отбеливатель) в
соответствующие дозаторы только на один цикл стирки.
для ополаскивателя, для
1
2
пуском программы стирки, без предварительной стирки.
3. ячейка для отбеливателя: использовать при
необходимости отбеливания .
Стиральное вещество в таблетках или
специальная сфера помещаются непосредственно
внутрь барабана. В этом случае исключите «Auto
Dose System» (нажмите кнопку
исчезновения соответствующих вертикальных
линий на дисплее).
Не заливайте ополаскиватель, так как он
дозируется автоматически в нужном количестве
для каждого цикла стирки.
Для исключения дозировки ополаскивателя нажмите
кнопку
дисплее не исчезнут.
Для шерстяных и шелковых вещей используйте
деликатное стиральное вещество, которое
заливается непосредственно в ячейку стирального
вещества (дозатор 2).
Порядок выполнения стирки:
Выберите программу и совместимые с ней дополнительные
функции в зависимости от Ваших нужд и типа белья.
до тех пор, пока вертикальные линии на
3
для включения
äëÿ
1. ячейка для
предварительной стирки:
используйте только
стиральный порошок.
2. ячейка для основной
стирки: используйте
стиральный порошок или
жидкое стиральное
вещество. В последнем
случае рекомендуется
залить его
непосредстввенно перед
вплоть до
CIS
39
Page 40

Порядок выполнения цикла
стирки
CIS
ПРИМЕЧАНИЕ: при первом использовании
стиральной машины выполните один цикл стирки
без белья, но со стиральным веществом, выбрав
программу хлопок 90° без предварительной стирки.
1. ПОРЯДОК ВКЛЮЧЕНИЯ МАШИНЫНажмите
кнопку
затем останется включенным индикатор кнопки
индикатор ПУСК/ПАУЗА будет редко мигать.
2. ПОРЯДОК ЗАГРУЗКИ БЕЛЬЯ Откройте люк
машины. Загрузите в барабан белье, не
превышая максимальный допустимый вес,
указанный в таблице программ на следующей
странице.
3. ДОЗИРОВКА СТИРАЛЬНОГО ВЕЩЕСТВА. Для
использования в режиме «Auto Dose System» не
нужно дозировать стиральное вещество. Машина
автоматически дозирует его в зависимости от
выбранной программы, от типа белья и от степени
жесткости воды. Порядок использования в
традиционном режиме смотрите в «Традиционный
режим».
4. ЗАКРОЙТЕ ЛЮК.
5. ВЫБОР ПРОГРАММЫ Поверните РУКОЯТКУ
ПРОГРАММ вправо или влево на нужную вам
программу. При этом автоматически
устанавливаются значения температуры и
скорости отжима, которые могут быть изменены.
6. ПЕРСОНАЛИЗИРОВАННЫЕ ЦИКЛЫ СТИРКИ.
Нажмите специальные кнопки на консоли управления:
скорости отжима.
Машина автоматически показывает на дисплее
максимальные температуру и скорость отжима,
предусмотренные для выбранной программы, или
последние выбранные значения, если они
совместимы с выбранной программой. При
помощи кнопки
температуру вплоть до стирки в холодной воде
(
уменьшить скорость отжима вплоть до его
исключения (
кнопок вернутся максимальные допустимые
значения.
. Все индикаторы загорятся на 1 секунду,
Порядок изменения температуры и/или
можно постепенно уменьшить
). При помощи кнопки можно постепенно
). При еще одном нажатии этих
Исключение: при выборе программы ХЛОПОK
температура может быть увеличена до 90°.
Программирование пуска с задержкой.
Нажимайте соответствующую кнопку вплоть до
получения нужного времени задержки. В
процессе программирования показывается время
задержки вместе с мигающим символом
После программирования запуска с задержкой на
дисплее загорается символ
продолжительность цикла. При однократном
нажиме кнопки показывается заданное время
задержки.
и показывается
.
Для отмены пуска с задержкой нажмите кнопку
несколько раз до тех пор, пока на дисплее не
появится надпись OFF; символ
! После нажатия кнопки ПУСК/ПАУЗА значение
задержки может быть изменено только по
убыванию.
,
Изменение параметров цикла.
Нажмите кнопки ДОПОЛНИТЕЛЬНЫЕ ФУНКЦИИ
для персонализации цикла согласно вашим
нуждам.
Нажмите кнопку для включения дополнительной
функции, загорится соответствующий индикатор.
Вновь нажмите кнопку для отключения функции,
индикатор погаснет.
! Если выбранная дополнительная функция
несовместима с выбранной программой, замигает
соответствующий индикатор и включится
звуковой сигнал (3 раза), функция не будет
включена.
7. ПУСК ПРОГРАММЫ. Нажмите кнопку ПУСК/
ПАУЗА. Соответствующий индикатор загорится, и
люк машины заблокируется (загорится индикатор
ЛЮК ЗАБЛОКИРОВАН
загораются по мере выполнения программы для
визуализации текущей фазы стирки.
Для изменения текущей программы, прервите
цикл, нажав кнопку ПУСК/ПАУЗА, затем выберите
нужный цикл и вновь нажмите кнопку ПУСК/
ПАУЗА. Чтобы открыть люк в процессе
выполнения цикла нажмите кнопку ПУСК/ПАУЗА;
если индикатор БЛОКИРОВКА ЛЮКА
погаснет, можно открывать люк. Вновь нажмите
кнопку ПУСК/ПАУЗА для возобновления
программы с момента, когда она была прервана.
8. ЗАВЕРШЕНИЕ ПРОГРАММЫ.Сигнализируется
включением надписи END. Люк можно открыть
сразу же. Если индикатор ПУСК/ПАУЗА мигает,
нажмите кнопку для завершения цикла. Откройте
люк, выгрузьте белье и выключите машину.
). Символы фаз стирки
погаснет.
Для отмены текущего цикла держите нажатой
кнопку до тех пор, пока цикл не прервется и
машина выключится.
Мешок для стеганных одеял, занавесок и
деликатного белья
Благодаря специальному мешку, прилагающемуся
к машине, стиральная машина Aqualtis дает
возможность стирать также самые деликатные и
ценные вещи с гарантией их полной сохранности.
Рекомендуется использовать мешок каждый раз
для стирки стеганных и пуховых вещей на
синтетической подкладке.
40
Page 41

Программы и
дополнительные функции
Таблица программ
Ñèì-
Описание программы
âîë
Программы для х/б белья
ХЛОПОK: с предварител ьной стиркой (Добавить
стиральное вещество в специальную ячейку).
ХЛОПОK (1): очень грязное белое и прочное цветное белье.
ХЛОПОK (2): очень гря зное белое и деликатное цветное белье.
ХЛОПОK (3)
Рубашки
Jeans
Специальные программы
Baby: очень грязное деликатное цветное белье.
Ñèíòeòèka с интетические изделия
Ñèíòeòèka деликатные вещи
Bed & Bath: постельное белье и полотенца.
Ïóx/Ïep o: изделия , набитые утиным пухом.
Øe ë k : изделия из шелка, вискозы и нижнее белье.
Øe ð c ò ü : шерсть, кашемир и т.д.
Ìèkc 30: быстрое освежение малогрязного белья (не для
шерсти, шелка и изде лий, требующих ручной стирки).
Частичные программы
Ïoë ockaíè e
Отжим
Ñëèâ
Ìàêñ .
òåìï.
(°C)
90° 1200
60°
(Max. 90° )
40° 12 00 -
40° 12 00 -
40° 600 -
40° 800 -
40° 800 -
60° 800 -
40° 800 -
60° 1200 -
30° 1000 -
30° 0 -
40° 600 -
30° 800 -
-1200--
-1200-- - 8
-0---8
Макс .
Скорость
(обор ото
â ìèíó òó )
1200 -
Стиральные вещества
Ïð åä-
варит-
ельная
стирка
Ñòèð êà
ll l
Опола-
скиват-
åëü
ll
ll
ll
ll
ll
ll
ll
ll
ll
ll
ll
ll
ll
l
Ìàêñ .
çàãð ó çêà
(êã)
3,5
3,5
8
8
8
8
2
4
4
4
4
8
2
2
8
CIS
Продол-
житть
цикла
продолжительность программы стирки
отображается на дисплее.
(*) Примечание: примерно через 10 минут после ЗАПУСКА цикла в зависимости от веса загруженного белья, машина расчитает и покажет на дисплее
время, остающееся до завершения программы.
Для всех институтов тестирования:
1) Программы управления в соответствии с Директивой EN 60456: задайте программу с температурой 60°C.
2) Длинная программа для х/б белья: задайте программу с температурой 40°C.
3) Короткая программа для х/б белья: задайте программу с температурой 40°C.
Дополнительные функции стирки
Дозировка стирального вещества
Порядок дозировки стирального вещества (ñì.
раздел «Auto Dose System»).
Вязкость стирального вещества
Порядок изменения степени вязкости стирального
вещества (см. раздел «Auto Dose System»).
Дозировка ополаскивателя
Порядок дозировки ополаскивателя (см. раздел
«Auto Dose System»).
Доп. Полоскание
При выборе этой функции повышается
эффективность ополаскивания, обеспечивая
максимальное удаление остатков стирального
вещества. Эта функция особенно удобна для людей
с кожей, чувствительной к стиральным веществам.
Рекомендуется использовать эту функцию в случае
полной загрузки машины или в случае
использования большой дозы стирального вещества.
! Функция несовместима с программами
, , .
41
Page 42

Стиральные вещества и типы
белья
CIS
Стиральное вещество
Выбор и доза стирального вещества зависят от типа белья
(х/б, шерсть, шелк...), от цвета белья, от температуры
стирки, от степени загрязнения и от жесткости воды.
Данная стиральная машина с системой
автоматической дозировки стирального вещества и
ополаскивателя помогает избежать излишнего
расхода и сохраняет окружающую среду, а также
обеспечивает отличные результаты стирки.
Рекомендуется:
использовать стиральный порошок, если
производится предварительная стирка, загрузив его
традиционным способом.
использовать жидкие стиральные вещества для деликатных
х/б вещей и для всех программ с низкой температурой.
для использования в режиме «Auto Dose System»
используйте только жидкое стиральное вещество и
ополаскиватель. Не загружайте суперконцентрированные
стиральные вещества, гель и подобные.
используйте деликатные жидкие стиральные
вещества для стирки шелковых и шерстяных вещей в
традиционном режиме.
! НИКОГДА не смешивайте два разных типа стирального
вещества; всегда промывайте емкости перед заправкой в
них нового типа стирального вещества.
Стиральное вещество помещается перед началом
стирки в специальную ячейку или в дозатор, который
помещается непосредственно в барабан. В этом
случае нельзя выбрать цикл Хлопок с
предварительной стиркой.
! Не используйте стиральные вещества для ручной
стирки так как они образуют слишком много пены.
Подготовка белья
Тщательно расправьте белье перед его загрузкой в
барабан.
Разделите белье по типу ткани (см. символ на
этикетке) и по цвету, обращая внимание на
разделение цветных и белых вещей.
Выньте из карманов все предметы и проверьте
пуговицы;
Не превышайте значения, указанные в «Таблице
программ», указывающие вес сухого белья:
Сколько весит белье?
1 простыня 400-500 г
1 наволочка 150-200 г
1 скатерть 400-500 г
1 банный халат 900-1200 г
1 полотенце 150-250 г
1 пара джинс 400-500 г
1 рубашка 150-200 ã
Рекомендации по стирке
Ðóáaøkè: используйте специальную программу
Ðóáaøkè для стирки рубашек из разных типов
ткани и цвета для их максимальной сохранности.
Jeans: используйте специальную программу Jeans
для всех вещей из ткани Denim; перед стиркой
выверните вещи наизнанку и используйте жидкое
моющее вещество.
Baby: используйте специальную программу Baby
для удаления типичных детских загрязнений и полного
удаления стирального вещества во избежание
аллергической реакции деликатной детской кожи.
Данный цикл расчитан на сокращение
микробиологической обсемен¸нности благодаря
использованию большего объема воды и оптимизации
воздействия специальных дезинфицирующих добавок
стирального вещества. По завершении стирки машина
продолжит медленно вращать барабан. Для остановки
цикла нажмите кнопку START/PAUSE.
Øeëk: используйте специальную программу «Шелк»
для стирки всех шелковых вещей. Рекомендуется
использовать специальное стиральное вещество для
деликатных тканей.
Занавески: Используйте программу «Шелк»
Рекомендуется свернуть занавески и поместить в
прилагающийся мешок.
Шерсть: Машина марки единственная получила
престижный знак Woolmark Platinum Care (M.0508) от
Компании The Woolmark Company, который
сертифицирует машинную стирку всех шерстяных изделий,
даже тех, на этикетках которых указано «только ручная
стирка»
эффективно стирать любые шерстяные изделия.
Ïóx/Ïepo: для стирки вещей, набитых утиным пухом, таких
как двойные или одинарные пуховые одеяла (весом не
более 3,5 кг), подушки, куртки используйте специальную
программу Пуx/Пepo
пуховики в барабан машины, сложив края внутрь (см. схему)
и не превышать ¾ объема барабана.
Стеганные вещи: для стирки стеганных вещей на
синтетической подкладке используйте специальный
прилагающийся мешок и выберите программу Пуx/Пepo
Постельное белье и полотенца: данная стиральная
машина позволяет стирать белье для всей семьи по
единой программе Bed & Bath
использование ополаскивателя и позволяющей
сэкономить время и электроэнергию. Рекомендуется
использовать стиральный порошок.
Трудновыводимые пятна: трудновыводимые пятна
перед стиркой в машине следует обработать твердым
мылом и стирать по программе Х/б белье с
предварительной стиркой.
. По программе «Шерсть» можно надежно и
. Рекомендуется загрузить
, оптимизирующей
.
Система балансировки белья
Перед каждым отжимом во избежание чрезмерных
вибраций и для равномерного распределения белья в
барабане машина производит вращения со скоростью,
слегка превышающей скорость стирки. Если после
нескольких попыток белье не будет правильно
сбалансировано, машина произведет отжим на меньшей
скорости по сравнению с предусмотренной. В случае
чрезмерной разбалансировки машина выполнит
распределение белья вместо отжима. Для оптимизации
распределения белья и его правильной балансировки
рекомендуется перемешать мелкое белье с крупным.
.
42
Page 43

Предосторожности и
рекомендации
! Стиральная машина спроектирована и изготовлена
в соответствии с международными нормативами по
безопасности. Необходимо внимательно прочитать
настоящие предупреждения, составленные в целях
вашей безопасности.
Общие требования к безопасности
Не разрешайте пользоваться машиной лицам
(включая детей) с ограниченными физическими,
сенсорными, умственными способностями и не
обладающих достаточными знаниями и опытом,
если только они не пользуются машиной под
наблюдением и после инструктажа со стороны
лиц, ответственных за их безопасность.Не
разрешайте детям играть с машиной.
Данное изделие предназначено исключительно
для домашнего использования.
Не прикасайтесь к изделию влажными руками,
босиком или с мокрыми ногами.
Не тяните за сетевой кабель для отсоединения
штепсельной вилки изделия из сетевой розетки,
возьмитесь за вилку рукой.
Не прикасайтесь к сливаемой воде, так как она
может быть очень горячей.
Категорически запрещается пытаться открыть
люк силой: это может привести к повреждению
защитного механизма, предохраняющего от
случайного открывания машины.
В случае неисправности категорически
запрещается открывать внутренние механизмы
изделия с целью их самостоятельного ремонта.
Следите, чтобы дети не приближались к
работающей стиральной машине.
Перемещать машину следует осторожно, вдвоем
или втроем. Никогда не перемещайте машину в
одиночку, так как машина очень тяжелая.
Перед помещением в стиральную машину белья
проверьте, чтобы барабан был пуст.
Утилизация
Уничтожение упаковочных материалов:
соблюдайте местные нормативы с целью
вторичного использования упаковочных
материалов.
Согласно Европейской Директиве 2002/96/СЕ
касательно утилизации электронных и
электрических электроприборов электроприборы
не должны выбрасываться вместе с обычным
городским мусором. Выведенные из строя
приборы должны собираться отдельно для
оптимизации их утилизации и рекуперации
составляющих их материалов, а также для
безопасности окружающей среды и здоровья.
Символ «зачеркнутая мусорная корзина»,
имеющийся на всех приборах, служит
напоминанием об их отдельной утилизации.
За более подробной информацией о правильной
утилизации бытовых электроприборов
пользователи могут обратиться в специальную
государственную организацию или в магазин.
Открывание люка вручную
Если по причине отключения электроэнергии
невозможно открыть люк машины, чтобы выгрузить
чистое белье, действуйте следующим образом:
1. выньте штепсельную
вилку машины из сетевой
розетки.
2. проверьте, чтобы
уровень воды в машине
был ниже отверстия люка.
В противном случае
слейте излишек воды
через сливную трубу в
ведро, как показано на
рисунке.
3. снимите переднюю панель стиральной машины
(см. схему ниже).
4. потяните наружу
язычок, показанный на
схеме, вплоть до
освобождения
пластикового
блокировочного винта.
Затем потяните его вниз,
пока не услышите
щелчок, что означает
разблокировку люка.
5. откройте люк. Если это
все еще невозможно,
повторите
вышеописанную
операцию.
6. установите на место переднюю панель, проверив
перед ее прикреплением к машине, чтобы крюки
вошли в соответствующие петли.
CIS
43
Page 44

Техническое обслуживание и уход
CIS
Отключение воды и электрического тока
Перекрывайте водопроводный кран после каждой
стирки. Таким образом сокращается износ
водопроводной системы машины и сокращается
риск утечек.
Выньте штепсельную вилку машины из сетевой
розетки перед началом чистки и технического
обслуживания стиральной машины.
Чистка машины
Для чистки наружных и резиновых частей
стиральной машины использовать тряпку,
смоченную теплой водой с мылом. Не используйте
растворители или абразивные чистящие средства.
Чистка ячейки стиральных веществ
A
D
Для доступа к кожуху:
2
1. снимите переднюю панель стиральной машины,
нажав в центре, затем потяните ее вниз за края и
снимите ее (см. схемы).
2. подставьте емкость для
слива воды (примерно 1,5
литра) (ñì. рисунок).
3. отвинтите крышку,
повернув ее против
часовой стрелки (ñì.
схему);
Для съема ячейки-дозатора откройте его до первого
упора, затем нажмите на язычок À, выдвигая ячейку
полностью, затем нажмите на язычки D и потяните
ячейку наружу (см. схемы).
Промойте ячейку под струей воды. Эту операции
необхдимо выполнять регулярно. Тщательно удалите
остатки стирального вещества также из ниши ячейки
внутри машины.
Для установки ячейки-дозатора на место держите его
левее и вставьте в направляющую, избегая перекоса.
Уход за барабаном
После использования стиральной машины всегда
следует оставлять люк полуоткрытым во
избежание образования неприятных запахов в
барабане.
Порядок чистки насоса
Стиральная машина оснащена самочистящимся
насосом, не нуждающимся в техническом
обслуживании. Тем не менее мелкие предметы
(монеты, пуговицы) могут упасть за кожух,
предохраняющий насос, расположенный в его
нижней части.
4. тщательно прочистите кожух внутри;
5. завинтите крышку на место;
6. установите на место переднюю панель, проверив
перед ее прикреплением к машине, чтобы крюки
вошли в соответствующие петли.
Проверка водопроводного шланга
Проверяйте шланг подачи воды не реже одного
раза в год. При обнаружении трещин или разрывов
шланга замените его: в процессе стирки сильное
водопроводное давление может привести к
внезапному отсоединению шланга.
! Проверьте, чтобы цикл стирки завершился, и
выньте штепсельную вилку из сетевой розетки.
44
Page 45

Неисправности и методы
их устранения
Если ваша стиральная машина не работает. Прежде чем обратиться в Центр Сервисного обслуживания (см.
Сервисное обслуживание), проверьте, можно ли устранить неисправность, следуя рекомендациям,
приведенным в следующем перечне.
Неисправности:
Стиральная машина не
включается.
Цикл стирки не запускается.
Стиральная машина не заливает
воду.
Стиральная машина непрерывно
заливает и сливает воду.
Возможные причины / Методы устранения:
Штепсельная вилка не соединена с сетевой розеткой или отходит и не
обеспечивает контакта.
В доме отключено электричество.
Люк плохо закрыт.
Не была нажата кнопка ПУСК/ПАУЗА.
Перекрыт водопроводный кран.
Был запрограммирован запуск с задержкой.
Водопроводный шланг не подсоединен к крану.
Шланг согнут.
Перекрыт водопроводный кран.
В доме нет воды.
Недостаточное водопроводное давление.
Не была нажата кнопка ПУСК/ПАУЗА.
Сливной шланг не находится на высоте 65 100 см. от пола (ñì.
«Установка»).
Конец сливного шланга погружен в воду (см. «Установка»).
Если ваша квартира находится на последних этажах здания, может
наблюдаться «сифонный эффект», поэтому стиральная машина
производит непрерывный залив и слив воды. Для устранения этой
аномалии в продаже имеются специальные клапаны «антисифоны».
Настенное сливное отверстие не оснащено вантузом для выпуска воздуха.
CIS
Машина не сливает воду или не
отжимает белье.
Стиральная машина сильно
вибрирует в процессе отжима.
Утечки воды из стиральной
машины.
Символы «текущей фазы» часто
мигают одновременно с индикатором
ON/OFF.
В процессе стирки образуется
слишком обильная пена.
Люк машины остается
заблокированным.
Выбранная программа не предусматривает слив воды: для некоторых
программ необходимо включить слив вручную (см. «Программы и
дополнительные функции»).
Сливной шланг перегнулся (см. «Установка»).
Засорен сливной трубопровод.
В момент установки стиральной машины барабан был разблокирован
неправильно (см. «Установка»).
Стиральная машина установлена неровно (см. «Установка»).
Машина касается к стены или мебели (см. «Установка»).
Белье в барабане несбалансировано (см. «Стиральные вещества и
типы белья»).
Плохо привинчен водопроводный шланг (см. «Установка»).
Засорен дозатор стирального вещества (порядок его чистки см.
«Техническое обслуживание и уход»).
Сливной шланг непрочно закреплен (см. Установка).
Выключите машину и выньте штепсельную вилку из сетевой розетки,
подождите 1 минуту и вновь включите машину. Если неисправность
не устраняется, обратитесь в Центр Сервисного обслуживания.
Стиральное вещество непригодно для стирки в стиральной машине
(на упаковке должно быть указано «для стирки в стиральной
машине», «для ручной и машинной стирки» или подобное).
В дозатор было помещено чрезмерное количество стирального вещества.
Выполните разблокировку вручную (см. «Предосторожности и
рекомендации».)
45
Page 46

CIS
Неисправности:
Плохое качество стирки.
Возможные причины / Методы устранения:
Емкости были наполнены неправильно (ополаскиватель вместо
стирального вещества и наоборот).
Были смешаны два разных типа стирального вещества /
ополаскивателя.
! НИКОГДА не смешивайте два разных типа стирального
вещества / ополаскивателя; всегда промывайте емкости
перед заправкой в них нового типа стирального вещества /
ополаскивателя.
Система автоматической дозировки «Auto Dose System» засорена
из-за длительного простоя: выполнить один цикл промывки
емкостей (см. «Промывка по команде пользователя»).
Что произойдет, если дозаправить
уже полные емкости?
Что произойдет при использовании
ячейки-дозатора в традиционном
режиме при еще полных емкостях?
Можно ли засыпать в емкости
стиральный порошок?
Можно ли засыпать в емкости
стиральный порошок?
Что произойдет, если неправильно
открыть ячейку-дозатор для
дозаправки емкостей?
Что произойдет, если спутать
стиральное вещество с
ополаскивателем?
Звуковые сигналы (Бип) и визуальные (символы на дисплее)
показывают, что емкость полная. Если Вы продолжите заливать
стиральное вещество / ополаскиватель, излишек этих веществ
попадет в барабан и вымоется с последующим циклом стирки.
Машина автоматически распознает, какой тип стирального
вещества был загружен: жидкое или порошок в традиционном
режиме и не использует емкости. Ополаскиватель можно
использовать только в режиме автоматической дозировки Auto
dose.
Нет, стиральный порошок можно использовать только в
традиционном режиме.
Нет, имеется перегородка, предотвращающая попаданию
стирального порошка в одну из емкостей, даже если ячейка
открыта в положении «Auto Dose System» (полностью выдвинута).
Если ячейка выдвинута неполностью, стиральное вещество или
ополаскиватель попадут в барабан и вымоются с последующим
циклом стирки.
Качество стирки будет плохим, потребуется опорожнить емкости
посредством цикла ручной промывки.
Что произойдет, если я не знаю,
пусты ли емкости, и смешаю
разные типы стирального
вещества?
! Примечание: для выхода из режима «Демо» нажмите одновременно на 3 сек. две кнопки «ON/OFF»
ПАУЗА» .
46
Машина произведет нормальный цикл стирки, но рекомендуем
дозаправлять емкости после сигнала, подаваемого машиной и не
смешивать разные типы стирального вещества / ополаскивателя.
è «ÏÓÑÊ/
Page 47

Сервисное
обслуживание
Перед тем, как обратиться в Авторизованный Сервисный Центр:
Проверьте, можно ли устранить неисправность самостоятельно (см. «Неисправности и методы их
устранения);
Вновь запустите программу для проверки исправности машины;
В противном случае обратитесь в уполномоченный Центр Сервисного обслуживания.
! В случае неправильной установки машины или ее неправильного использования вызов специалиста из
Сервиса должен быть оплачен;
! Не пользуйтесь услугами лиц, не уполномоченных производителем.
При обращении в Авторизованный Сервисный Центр необходимо сообщить:
тип неисправности;
модель изделия (Мод.);
серийный номер (S/N).
Эти данные вы найдете на паспортной табличке, расположенной на изделии.
CIS
47
Page 48

CIS
48
Page 49

Montaj ve kullaným
talimatlarý
ÇAMAÞIR MAKÝNESÝ
TR
Türkçe
AQUALTIS
AQLF8F 292 U
Ýçindekiler
TR
Montaj, 50-51
Ambalajdan çýkarma ve tesviye
Elektrik ve su baðlantýlarýnýn yapýlmasý
Teknik bilgiler
Makinenin tanýtýmý, 52-53
Kumanda paneli
Auto Dose System, 54-55
Bir programýn çalýþtýrýlmasý, 56
Programlar ve seçenekleri, 57
Program tablosu
Seçenekleri
Deterjan ve çamaþýr, 58
Deterjan
Çamaþýrýn hazýrlanmasý
Yýkama önerileri
Yük dengeleme sistemi
Önlem ve öneriler, 59
Genel güvenlik
Atma
Yan kapaðýn manüel olarak açýlmasý
Bakým ve onarým, 60
Su ve elektrik baðlantýlarýnýn kesilmesi
Makinenin temizlenmesi
Deterjan daðýtma çekmecesinin temizlenmesi
Cihaz tamburuna bakým yapýlmasý
Pompanýn temizlenmesi
Su giriþ hortumunun kontrol edilmesi
Sorun giderme, 61-62
Teknik Servis, 63
49
Page 50

Montaj
TR
Bu montaj kýlavuzunu gelecekte referans olarak
kullanmak için güvenli bir yerde tutun. Çamaþýr makinesi
satýlýr, baþkasýna verilir veya taþýnýrsa, lütfen yeni
sahibinin içerisinde bulunan önerilerden faydalanabilmesi
için kýlavuzu makine ile birlikte muhafaza edin.
Aþaðýdaki talimatlarý dikkatli bir þekilde okuyun:
cihazýn güvenli þekilde montajý ve kullanýlmasý ile ilgili
hayati bilgileri içermektedir.
Bu kýlavuzu içeren pakette, garanti belgesini ve
montaj için gerekli ayrýntýlý bilgileri bulacaksýnýz.
Ambalajdan çýkarma ve tesviye
Ambalajdan çýkarma
1. Bütün ambalaj malzemelerini çamaþýr makinesinden
çýkarýr çýkarmaz, nakliye sýrasýnda hasar görüp
görmediðini kontrol edin.
Hasar görmüþse, satýcýnýzla temas kurun ve montaj
iþlemi ile ilgili herhangi bir faaliyette bulunmayýn.
2. Koruyucu 4 vidayý
(nakliye sýrasýnda
kullanýlýr) ve cihazýn arka
kýsmýna yerleþtirilen ilgili
ara parçayý çýkarýn (þekle
bakýnýz).
Cihaz düzgün þekilde dengelenirse, daha dengeli olacak
ve çalýþýrken özellikle sýkma sýrasýnda muhtemelen daha
az titreþim ve gürültüye sebep olacaktýr.
Bir halý veya kilim üzerine yerleþtirilirse, ayaklarý
çamaþýr makinesinin altýnda yeterli havalandýrma alaný
býrakacak þekilde ayarlayýn.
Elektrik ve su baðlantýlarýnýn yapýlmasý
Su giriþ hortumunun baðlanmasý
Giriþ hortumunu su þebekesine baðlamadan önce,
iyice temizlenene kadar suyun akmasýna izin verin.
1. Cihazýn arka
bölümünün sað üst
tarafýndan yer alan soðuk
su giriþine takarak giriþ
hortumunu baðlayýn
(þekle bakýnýz).
2. Giriþ hortumunu 3/4 gaz
vidalý baðlantý kullanarak
bir soðuk su musluðuna
baðlayýn (þekle bakýnýz).
3. Paket içerisinde bulunan plastik týpalarý kullanarak
delikleri kapatýn.
4. Bütün parçalarý güvenli bir yerde muhafaza edin;
çamaþýr makinesi baþka bir yere taþýnýrsa cihazýn
iç bölümünün hasar görmesini önlemek için bu
parçalara tekrar ihtiyaç duyulacaktýr.
Ambalaj malzemeleri çocuklar için oyuncak olarak
kullanýlmamalýdýr.
Tesviye
1. Çamaþýr makinesini duvar veya dolaplara
dayamadan düz dayanýklý bir zemine yerleþtirin.
2. Zemin düz deðilse,
makinenin ön ayaklarý
yatay konuma ulaþana
kadar ayarlanabilir (eðim
açýsý 2 dereceyi
aþmamalýdýr).
3. Hortumun katlanýp bükülmediðine emin olun.
Musluktaki su basýncýnýn teknik veri tablosunda
gösterilen deðerlere uygun olmasý gerekir(sonraki
sayfaya bakýnýz).
Giriþ hortumu yeterli uzunlukta deðilse, bayinize
veya yetkili teknik servise danýþýn.
Ýkinci el veya eski giriþ hortumunu kesinlikle
kullanmayýn, makine ile birlikte verilen ürünleri kullanýn.
50
Page 51
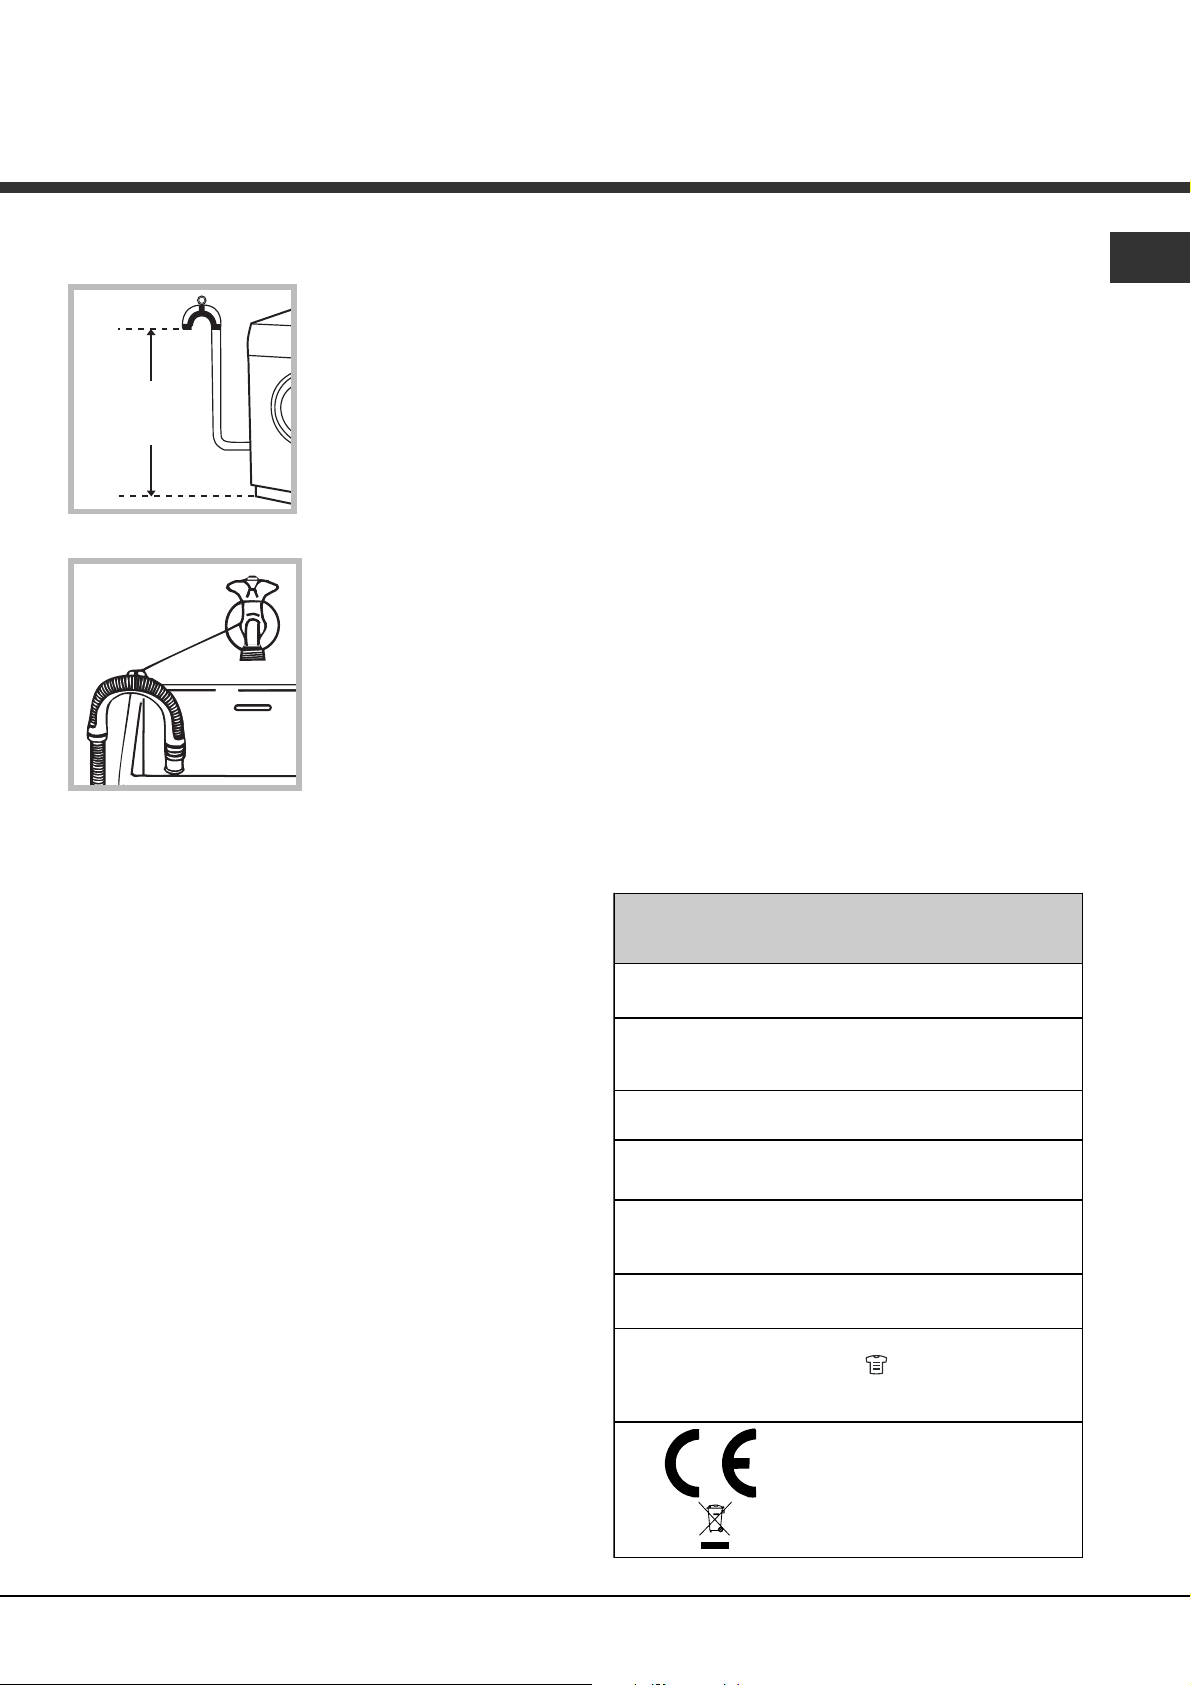
Tahliye hortumunun baðlanmasý
Tahliye hortumunu,
katlanmamasýna dikkat
ederek zeminden veya
yerden 65 cm ile 100 cm
arasýndaki bir
65 - 100 cm
yükseklikten duvar
tahliyesine takýnýz.
veya, ambalaj
torbasýndaki hortum
dirseðiyle, düþmeyecek
þekilde sabitleyerek
boþaltma hortumunu
lavabo ya da küvete
asýnýz (bkz. þekil).
Tahliye hortumunun
serbest ucunun suya
girmemesi gerekir.
Kablonun ezilmemesi ve katlanmamasý gerekir.
Beslenme kablosu ve priz yalnýzca yetkili servis
tarafýndan deðiþtirilmelidir.
Dikkat! Bu þartlara uyulmamasý halinde firma tüm
sorumluluklardan muaftýr.
TR
Tahliye hortumunun ek yapýlarak uzatýlmamasý
tavsiye edilir; baþka seçenek yoksa, uzatma
hortumunun çapýnýn da ayný olmasý ve 150 cm'yi. den
uzun olmamasý gerekir.
Elektirik baðlantýsý
Makinenin fiþini bir elektrik prizine takmadan önce
aþaðýdakileri kontrol ediniz:
tesisat topraklý prize sahip ve yürürlükteki
normlara uygun olmalýdýr;
elektrik prizi, Teknik Veriler tablosunda belirtilen
makinenin maksimum güç yükünü taþýyabilmelidir
(bkz. yan taraf);
besleme gerilimi Teknik Veriler tablosunda
belirtilen deðer sýnýrý kapsamýnda olmalýdýr
(bkz. yan taraf);
priz ve makinenin fiþi birbiriyle uyumlu olmalýdýr.
Aksi takdirde ya prizi, yada fiþi deðiþtiriniz.
Makine, üzeri kapalý bile olsa açýk alanlara monte
edilmez, zira yaðmur ve fýrtýnaya maruz kalmasý son
derece tehlikelidir.
Makine monte edildikten sonra priz kolayca eriþilebilir
durumda olmalýdýr.
Uzatma kablosu ve çoklu prizler kullanmayýnýz.
Teknik bilgiler
Model
Ölçüler
Kapasite
Elektrik baðlantýlarý
Su baðlantýlarý
Sýkma hýzý
EN 60456
standartlarý
uyarýnca kontrol
programlarý
AQLF8F 292 U
geniþlik 59,5 cm
yükseklik 85 cm
derinlik 64,5 cm
1 - 8 kg
makine üstünde takýlý olan teknik
veriler plakasýna bakýnýz.
max. su basýncý 1 MPa (10 bar)
min. su basýncý 0,05 MPa (0,5 bar)
tambur kapasitesi 62 litre
maksimum dakikada 1200 devire
kadar
program ; 60°C sýcaklýkta;
8 kg çamaþýrla.
Bu makina aþaðýda belirtilen AB
normlarýna uygundur:
- 2004/108/CE (Elektromanyetik
Uyum)
- 2002/96/CE
- 2006/95/CE (Alçak gerilim)
51
Page 52

Makinenin tanýtýmý
TR
KAPAK
KAPAK
TUTMA YERÝ
AYAK
ÇARPMASINDAN
KORUYUCU PANEL
Kumanda
paneli
AYARLANABÝLÝR
AYAKLAR
KAPAK
DETERJAN ÇEKMECESÝ
Kapaðý açmak için her
zaman tutma yerini
kullanýn (þekle bakýnýz).
Deterjan çekmecesi
makinenin içerisinde
bulunmaktadýr, kapak
açýlarak eriþilebilir.
Kullaným için Auto Dose
System bölümüne bakýnýz.
Not: Yikama programlarini
açiklayan ve seçeneklerini
gösteren etiketi deterjan
çekmecesinin önüne
yapistirin.
Bekleme modu
Yeni enerji tasarrufu düzenlemeleri ile uyumlu bu
çamaþýr makinesine herhangi bir faaliyet
algýlanmadýðýnda 30 dakika içinde devreye sokulan
otomatik bekleme sistemi yerleþtirilmiþtir ON/OFF
düðmesine bir süre basýn ve makinenin tekrar
çalýþmasýný bekleyin.
52
Page 53

Kumanda paneli
düðmesi
KONSANTRE
DETERJAN
PROGRAM SEÇÝCÝ
döner düðme
SICAKLIK/
DETERJAN/
düðmesi
DETERJAN
ekraný
DEVIR
AYARÝ
ekraný
GECÝKMELÝ ÇALIÞTIRMA/
düðmesi
YUMUÞATICI
Gösterge lambalarý
bulunan
SEÇÝM düðmesi
YUMUÞATICI/
ECO gösterge
lambasý
Gösterge lambasý
bulunan
BAÞLAT/
DURDUR
ekraný
64
PROGRAM
AÞAMA
simgeleri
ON/OFF gösterge
lambasý bulunan düðme
SICAKLIK AYARÝ
düðmesi
DEVIR AYARÝ
ON/OFF gösterge lambasý bulunan düðme:
Makineyi açýp, kapamak için bu düðmeye bir süre
basýn. Yeþil gösterge lambasý makinenin açýk olduðunu
gösterir. Program sýrasýnda, çamaþýr makinesini
kapatmak için, yaklaþýk 3 saniye düðmeyi basýlý tutun,
düðmeye bir süre veya istemeden basýlýrsa, makine
kapanmayacaktýr.
Program sýrasýnda makine kapatýlýrsa, bu program iptal
edilecektir.
PROGRAM SEÇÝCÝ döner düðme: her iki yöne de
döndürülebilir. En uygun programý seçmek için, lütfen
Programlar Tablosuna bakýnýz. Program sýrasýnda
döner düðme hareket etmeyecektir.
SICAKLIK AYARÝ
düðmesi: sýcaklýk ayarýnda
deðiþiklik yapmak veya devre dýþý býrakmak için basýn,
seçilen deðer üstteki ekranda görüntüye gelecektir (Bir
programýn çalýþtýrýlmasýna bakýnýz).
DEVIR AYARÝ
düðmesi: sýcaklýk ayarýnda deðiþiklik
yapmak veya devre dýþý býrakmak için basýn, seçilen
deðer üstteki ekranda görüntüye gelecektir (Bir
programýn çalýþtýrýlmasýna bakýnýz).
YÝKAMA ZAMANÝ ERTELEME
düðmesi: seçilen
program için gecikmeli çalýþmayý ayarlamak amacýyla
basýn; ayarlanan gecikmeli çalýþtýrma süresi üstteki
ekranda görüntüye gelecektir (Bir programýn
çalýþtýrýlmasýna bakýnýz).
DETERJAN ve YUMUÞATICI düðmesi : bakýnýz Auto
Dose System bölümündeki Önceden ayarlanan
parametrelerin deðiþtirilmesi.
KONSANTRE DETERJAN düðmesi : bakýnýz Auto Dose
System bölümündeki Haznelerin doldurulmasý.
düðmesi
YÝKAMA ZAMANÝ
ERTELEME
düðmesi
KAPI KÝLÝTLÝ
gösterge lambasý
Gösterge lambasý bulunan
ÇOCUK KÝLÝDÝ düðmesi
Gösterge lambalarý bulunan SEÇÝM düðmesi: mevcut
seçenekleri seçmek için basýn. Seçilen seçeneðe
karþýlýk gelen gösterge lambasý yanacaktýr (Bir
programýn çalýþtýrýlmasýna bakýnýz).
PROGRAM AÞAMA simgeleri: bu simgeler program
sürecini göstermek için aydýnlanýr (Yýkama
Durulama
Sýkma Boþatlma ). yazýsý
program bitiminde yanar.
Gösterge lambasý bulunan BAÞLAT/DURDUR düðmesi:
yeþil gösterge lambasý yavaþ yavaþ yanýp söner, bir
program baþlatmak için düðmeye basýn. Program baþlar
baþlamaz, gösterge lambasý sürekli yanacaktýr.
Programý duraklatmak için, düðmeye tekrar basýn,
gösterge lambasý turuncu renkte yanýp sönecektir.
Kapak kilitli
gösterge lambasý kapanýrsa, kapak
açýlmayabilir. Programý yarýda kesildiði noktadan
baþlatmak için, düðmeye tekrar basýn.
KAPI KÝLÝTLÝ
gösterge lambasý: kapaðýn kilitli
olduðunu gösterir. Kapaðý açmak için, programý
duraklatýn (Bir programýn çalýþtýrýlmasýna bakýnýz).
Gösterge lambasý bulunan ÇOCUK KÝLÝDÝ
düðmesi: kontrol panelini devreye sokmak veya
devreden çýkarmak için, düðmeyi yaklaþýk 2 saniye
basýlý tutun. Gösterge lambasý aydýnlatýldýðýnda,
kumanda paneli kilitlenir. Bu, özellikle çocuklar evde
olduðu sýrada, programda kazayla deðiþiklik
yapýlmasýný önlemenin mümkün olduðu anlamýna gelir.
ECO gösterge lambasý:
simgesi yandýðýnda,
Yýkama parametreleri deðiþtirildikten sonra, en az
%10 enerji tasarrufu saðlanýr. Ayrýca, makine
Bekleme moduna girmeden önce, simge birkaç
saniye yanacak; makine kapandýðýnda hesaplanana
enerji tasarrufu %80 iþareti etrafýnda olacaktýr.
#!
Page 54

Auto Dose System
TR
Giriþ
Bu çamaþýr makinesi, iki
hazneden meydana
gelmektedir: biri yaklaþýk
5,5 lt kapasiteye sahip sývý
deterjan (konsantre veya
sulandýrýlmýþ) için ve diðeri
yaklaþýk 3,5 lt kapasiteye
sahip sývý yumuþatýcý
(konsantre veya
sulandýrýlmýþ) için (þekle
bakýnýz).
Sulandýrýlmýþ mý yoksa
konsantre mi olduðunu
deterjan/yumuþatýcý gözü
üzerinde kontrol ediniz.
! otomatik dozaj sistemi, her tip yük için ve en uygun
yýkama neticesi saðlayarak ve kayýpsýz olarak belirtilen
süre içinde uygun deterjan ve yumuþatýcý miktarýný
haznelerden alýr. DETERJAN ve YUMUÞATICI
düðmeleri üzerinde hareket ederek manuel olarak
deterjan ve yumuþatýcý miktarýný deðiþtirmek
mümkündür (bakýnýz Önceden ayarlanan
parametrelerin deðiþtirilmesi). Eðer arzu edilirse,
deterjaný göze koyarak geleneksel þekilde çamaþýr
makinesini kullanmak mümkündür; makine deterjanýn
varlýðýný otomatik olarak algýlar ve hazneleri kullanmaz.
Deterjan gözü
Geleneksel yöntem.
Deterjaný (sývý veya toz), beyazlatýcýyý veya diðer katký
maddelerini (örn. beyazlatýcý maddeler) ve geleneksel
þekilde kullaným amaçlý önyýkama için deterjaný
doldurmak amacýyla ilk kilide kadar deterjan gözünü
çekiniz (bakýnýz Geleneksel kullaným).
Auto Dose Yöntemi.
A
Hazneler dolunca (bakýnýz Haznelerin doldurulmasý),
makine deterjan için yaklaþýk 40 devirlik otonoma
sahip olacaktýr (*).
Ýlk kullaným
ON/OFF tuþuna basarak çamaþýr makinasýný çalýþtýrýnýz.
Ýlk yýkama iþlemi,
(önyýkamasýz ve hazneleri doldurmadan Koton 90°)
(bakýnýz Geleneksel yöntem) deterjan gözüne
doðrudan dökülen deterjan ile beyazlatýcý olmadan
gerçekleþtirilmelidir.
Deterjan ve yumuþatýcý
gözlerini doldurmak için,
deterjan çekmecesini
tamamen çekiniz:
çekmeceyi ilk kilide kadar
açýnýz, kola (A) basýnýz ve
sonuna geldiðinden emin
olunca ikinci kilide kadar
çekiniz. Çekmeceyi
yükleme sýrasýnda
hareket ettirmeyiniz.
programýný ayarlayarak
Haznelerin doldurulmasý:
Auto Dose þeklinde deterjan gözünü açýnýz(bakýnýz
Deterjan Gözü).
Deterjaný (B) ve yumuþatýcýyý (C) hazneleri tamamen
dolduracak þekilde yavaþça dökünüz (þekillere bakýnýz).
C
B
Maksimum miktarý aþmamak için, artan yoðunluða
sahip akustik bir sinyal (bip) 3 uzun bip sesi ile
belirtilen haznenin tamamen doldurulmasýna kadar
ulaþýlan seviyeyi bildirecektir.
Gözün temizliðini saðlamak için hazneleri doldurduktan
sonra yýkama iþlemini hemen baþlatýnýz.
Ekran üzerinde ayrý ayrý
(yumuþatýcý için) ikonlarý ulaþýlan miktarý göstermek
için derece derece yanacaktýr.
Yükleme süresi, ürünün yoðunluðuna baðlýdýr. Çok
yoðun olan ürünler ile yükleme süresi daha uzun
olacaktýr.
Deterjan gözünü sadece hazneler tamamen boþalacaðý
zaman kapatýnýz.
Özel
yoðunluðunu (konsantre veya sulandýrýlmýþ) seçiniz.
Makine, seçimi hafýzaya alacaktýr.
Seçim yapmayýnca, deterjanýn alýmý sulandýrýlmýþ
seçimi üzerinde ayarlanacaktýr.
Makine tarafýndan otomatik olarak alýnacak olan yumuþatýcý
miktarýný ayarlamak için
1) Eðer yumuþatýcý konsantre ise, ilk seviyeyi (1 çubuklu
olmasý halinde (2 çubuklu
2) Eðer yumuþatýcý sulandýrýlmýþ ise, seviye 3'ü
(3 çubuklu
miktarýný buradan arttýrmanýz/azaltmanýz tavsiye edilir.
3) Yumuþatýcýnýn kullanýmýný engellemek için, çubuklar
kaybolana kadar
parametrelerin deðiþtirilmesi bölümüne de bakýnýz).
düðmesine basarak, dökülen deterjanýn
) seçmeniz ve alýmýný arttýrmak için tek pozisyon
) ayarlamanýz ve alýnacak yumuþatýcý
düðmesine basýnýz (Önceden ayarlanan
(deterjan için) ve
düðmesini kullanýnýz.
) arttýrmanýz tavsiye edilir.
(*) 4 kg.lýk ortalama yük, Pamuklu 40°C programda, suyun sertlik
derecesi orta ve ayarlanan kirlilik seviyesi 3 üzerinde iken.
54
Page 55

Sonraki doldurma iþlemleri için sinyalizasyon:
Deterjanýn/yumuþatýcýnýn kalan seviyesi gereken
miktarýn altýna indiði zaman, devir sonunda, ekran
üzerinde deterjan için
yumuþatýcý için sembolünün sol altta yer alan
yapraðý yavaþ bir þekilde yanýp sönecektir. Deterjan/
yumuþatýcý bittiði zaman, deterjan haznesinin veya
yumuþatýcý haznesinin boþ olma durumu ayrý ayrý
sembolünün ilk bölümünün veya sembolünün sol
altta yer alan yapraðýnýn hýzlý yanýp sönmesi ile
görüntülenecektir.
Devir sýrasýnda, hazneler boþken,
kaybolacaktýr; devir sonunda ve duraklama halinde ise
sembolünün ilk bölümü ve sembolünün sol altta
yer alan yapraðý hýzlý bir þekilde yanýp sönecektir.
Eðer hazneler yüklenmemiþ ise, Auto Dose þeklindeki
sonraki yýkamalar deterjaný almadan gerçekleþecektir.
Deterjaný ve yumuþatýcýyý SADECE makinenin
iþaretinden sonra yeniden doldurmanýz tavsiye edilir.
HÝÇBÝR ZAMAN iki farklý deterjaný karýþtýrmayýnýz;
haznenin temizliðini her zaman yenisini koymadan
önce gerçekleþtiriniz (bakýnýz Kullanýcý tarafýndan
yapýlan temizlik).
Auto Dose System kullanýmý
Haznelerin deterjan ve yumuþatýcý ile doldurulmuþ
olmasý halinde makine kullanýmýný gerçekleþtireblirsiniz
(bakýnýz Bir programýn çalýþtýrýlmasý).
Ön yýkama için olan deterjan ve toz katký maddeleri
yalnýzca geleneksel þekilde ya da Auto Dose System
yolu ile, katký maddelerini direkt olarak içerisine
koyunuz, tercihen top yardýmýyla koyunuz.
Önceden ayarlanan parametrelerin
deðiþtirilmesi:
Makine seçilen programa, koyulan yük miktarýna ve
suyun sertliðine göre deterjan miktarýný otomatik olarak
alýr. Bununla beraber, deterjan/yumuþatýcý miktarý
deðiþtirilebilmektedir.
düðmesi: deterjan alýmýný arttýrmak, azaltmak ve
engellemek için basýnýz.
sembolünün ilk bölümü veya
sembolleri
Otomatik temizlik:
Çamaþýr makinesi, kalan deterjan miktarý bir sonraki
yýkama devresi için yetersiz olduðu zaman, durulama
iþlemi sýrasýnda otomatik bir devir gerçekleþtirmektedir.
Kullanýcý tarafýndan yapýlan temizlik:
Eðer önceden kullanýlan üründen farklý bir ürün
doldurmak istenirse veya hazneler hatalý þekilde
doldurulmuþsa (yumuþatýcý, deterjan bölmesine veya
tam tersi dökülmüþtür), temizlik devresini
gerçekleþtiriniz (boþ kazan ile). Deterjan gözünün
temizlik iþleminin devreye girmesi için yaklaþýk 8 san.
düðmesine basýlý tutunuz, düðmesine
yumuþatýcý gözünün temizlik iþleminin devreye girmesi
için veya
Gittikçe artan beep seslerini 2 uzun beep sesi takip
edecek ve deterjan için
ikonu, her iki göz için de ikonu yanacaktýr ve
seçilen hazne için temizlik devresi baþlayacaktýr.
Eðer hazneler ilk olarak boþaltýlmýþ ise temizlik devresi
yaklaþýk 40 sürer, aksi taktirde devrenin süresi daha
uzun olacaktýr.
Haznelerin temizlik devresi sýrasýnda,
aþaðýdan yukarýya doðru tekrar tekrar dolar ve
sembolü tekrar tekrar yaprak yaprak dolar.
Geleneksel kullaným
Deterjan gözünü ilk kilide kadar çekiniz (þekle
bakýnýz), tek bir yýkama için gerekli olan deterjaný ve
diðer katký maddelerini (örn. beyazlatýcý) doðrudan
deterjan gözüne dökünüz.
konulmasý tavsiye edilir.
3. beyazlatýcý haznesi:
düðmesine her iki göz için basýlý tutunuz.
ikonu, yumuþatýcý için
sembolü
1. ön yýkama haznesi:
sadece toz deterjan
1
2
3
kullanýnýz.
2. yýkama haznesi: toz
veya sývý deterjan
kullanýnýz. Bu son
durumda; deterjanýn
çamaþýr makinesi
çalýþtýrýlmadan hemen önce
ve ön yýkama
gerçekleþtirilmeden
TR
düðmesi: yumuþatýcý alýmýný arttýrmak, azaltmak ve
engellemek için basýnýz.
Makine tarafýndan gösterilen deterjan/yumuþatýcý
seviyesi, 3 çubuk ile belirtilir.
3 çubuklu en yüksek seviyeler deterjan/yumuþatýcý
miktarýnýn artmasýný belirtirken, 3 çubuklu en düþük
seviyeler makine tarafýndan gösterilen seviyeye göre
daha az deterjan/yumuþatýcý belirtirler.
Haznelerin temizliði:
Haznelerin otomatik veya kullanýcýnýn talebi üzerine
temizlik devirleri öngörülür.
Tablet deterjan veya özel top doðrudan kazanýn içine
konulmalýdýr. Bu durumda Auto Dose System þeklini
hariç tutunuz (ekran üzerinde dikey iliþkin çubuklar
kaybolana kadar
Yumuþatýcýyý dökmeyiniz çünkü her yýkama için
gereken miktarda otomatik olarak alýnacaktýr.
Yumuþatýcý alýmýný engellemek için, ekran üzerinde
dikey çubuklar kaybolana kadar
Yün ve ipek giysiler için deterjan gözüne (hazne 2 )
doðrudan dökerek özel deterjaný kullanmanýz tavsiye
edilir.
Yýkama iþleminin gerçekleþtirilmesi:
Programý ve ihtiyaçlara ve yük tipine göre uygun
opsiyonlarý seçiniz.
tuþuna basýnýz).
tuþuna basýnýz.
55
Page 56

Bir programýn çalýþtýrýlmasý
TR
UYARI: Çamaþýr makinasýnýn ilk kullanýmýndan önce,
ön yýkamasýz 90 pamuklu programýný kullanarak
deterjanla çamaþýrsýz bir yýkama yapýn
1. MAKÝNEYÝ AÇ.
lambalarý 1 saniyeliðine yanacaktýr,
gösterge lambasý sürekli yanýk kalacak ve BAÞLAT/
DURDUR gösterge lambasý hýzlý bir þekilde yanýp
sönecektir.
2. ÇAMAÞIRI YERLEÞTÝRÝN. Kapaðý açýn. Bir sonraki
sayfadaki programlar tablosunda gösterilen
maksimum yük deðerini aþmamaya dikkat ederek
çamaþýrý yerleþtirin.
3. DETERJANI ÖLÇÜP AYIRIN. Auto Dose System
yönteminde kullanýmiçin deterjanýn miktarýný
ayarlamak gerekmez, makine seçilen programa, yük
tipine ve suyun sertliðine göre deterjaný otomatik
olarak alýr. Geleneksel yöntemde kullaným için
bakýnýz Geleneksel kullaným.
4. KAPAÐI KAPATIN.
5. PROGRAMI SEÇÝN. Ýstediðiniz programý seçene
kadar PROGRAM SEÇÝCÝ DÖNER DÜÐMEyi saða
veya sola çevirin. Sýcaklýk ve dönüþ hýzý her program
için ayrý ayrý ayarlýdýr, bunlarda deðiþiklik yapýlabilir.
6. PROGRAMI ÖZELLEÞTÝRÝN. Kumanda panelindeki
ilgili düðmeleri kullanýn:
Sýcaklýk ve/veya dönüþ hýzýný deðiþtirin.
Makine, seçilen programla uyumlu ise maksimum
sýcaklýðý, seçilen program için ayarlý dönüþ hýzý
deðerlerini veya en son kullanýlan ayarlarý otomatik
olarak görüntüler. Soðuk yýkama (
ulaþana kadar sýcaklýk düðmesine basýlarak
düþürülebilir. Devir hýzý, tamamen devre dýþý
býrakýlana kadar (
kademe kademe azaltýlabilir. Bu düðmelere tekrar
basýlýrsa, maksimum deðerler sýfýrlanýr.
düðmesine basýn. Bütün gösterge
düðmesine ait
) ayarýna
) düðmesine basýlarak
Ýstisna: Pamuklu programý seçildiðinde sýcaklýk
derecesi 90°C ye kadar yükseltilebilir.
Yýkama Zamaný Erteleme ayarla.
Ýstediðiniz gecikme süresine ulaþana kadar
düðmeye basýn. Ayarlama iþlemi sýrasýnda, gecikme
süresi ekranda gösterilir ve
Gecikmeli çalýþtýrma süresi seçildikten sonra, sabit
sembolü ve çevrim süresi ekranda belirecektir.
Seçilen gecikme süresini görüntülemek için
düðmeye bir kez basýn.
Gecikmeli çalýþtýrma seçeneðini iptal etmek için,
ekran OFF yazýsýný gösterene kadar düðmeye basýn,
sembolü ekrandan kaybolacaktýr.
START/PAUSE düðmesine basýlýr basýlmaz,
gecikme süresi düþürülecektir.
sembolü yanýp söner.
Program ayarlarini deðiþtirin. Ýhtiyacýnýza uygun
olarak programý özelleþtirmek için SEÇÝM
düðmelerine basýn.
Seçimi etkinleþtirmek için düðmeye basýn, ilgili
gösterge lambasý yanacaktýr.
Seçimi devre dýþý býrakmak için düðmeye tekrar
basýn, gösterge lambasý kapanacaktýr.
Seçim, seçilen yýkama çevrimi ile uyumlu deðilse,
bu uyumsuzluk gösterge lambasýnýn hýzlý bir þekilde
yanýp sönmesi ve bir alarm sesi (3 bip) ile
bildirilecektir, seçim devreye sokulmayacaktýr.
7. PROGRAMI BAÞLATIN. BAÞLAT/DURDUR
düðmesine basýn. Ýlgili gösterge lambasý sürekli
yanar ve kapak kilitlenir (
gösterge lambasý yanar). Program sýrasýnda
aþamanýn yürütülmekte olduðunu göstermek için
program aþamalarýna ait simgeler yanacaktýr.
Bir kez baþlamýþ olan programý deðiþtirmek için,
BAÞLAT/DURDUR düðmesine basarak çamaþýr
makinesini duraklatýn, daha sonra istenilen programý
seçin ve tekrar BAÞLAT/DURDUR düðmesine basýn.
Program sýrasýnda kapaðý açmak için, BAÞLAT/
DURDUR düðmesine basýn, KAPAK KÝLÝTLÝ
gösterge lambasý kapalýysa, kapaðý açabilirsiniz.
Programý yarýda kesildiði noktadan baþlatmak için,
BAÞLAT/DURDUR düðmesine tekrar basýn.
8. PROGRAM BÝTTÝ. Bu durum aydýnlatýlan END yazýsý
ile gösterilir. Kapak hemen açýlmayabilir. BAÞLAT/
DURDUR gösterge lambasý yanýyorsa, programý
sona erdirmek için düðmeye basýn. Kapaðý açýn,
çamaþýrý boþaltýn ve makineyi kapatýn.
Baþlamýþ olan bir programý iptal etmek istiyorsanýz,
program durana ve makine kapanan kadar
düðmesini basýlý tutun.
KAPAK KÝLÝTLÝ
Örtü, perde ve hassas giysiler için çanta
Aqualtis çamaþýr makinesi, çamaþýrý koruyan özel
çanta sayesinde en deðerli ve hassas çamaþýrlarý bile
güven içerisinde yýkamanýzý saðlar (bu çanta makine ile
birlikte verilmektedir). Sentetik malzeme kullanýlarak
yapýlan bir dýþ tabakaya sahip örtüleri ve pamuklu
eþyalarý her yýkadýðýnýzda çantayý kullanmanýzý öneririz.
56
Page 57

Programlar ve seçenekleri
Program çevrimi tablosu
Maks.
Simge Program açýklamasý
Pamuklu programlarý
Ön yýkamalý beyaz Pamuklu
(Ýlgili hazneye deterjan koyunuz).
Pamuklu (1): Çok kirli beyazlar ve dayanýklý renkliler.
Pamuklu (2): Çok kirli beyazlar ve hassas renkliler.
Renkli Pamuklu (3)
Gömlek
Blucin
Özel programlar
Bebek: Çok kirli hassas renkler.
Sentetik Dayanýklý
Sentetik Hassas
Nevresim ve havlular için haftalýk yýkama
Yorgan: Doldurulmuþ giysiler için
Ýpek: ipek ve sentetik giysiler, iç çamaþýrlarý için.
Yünlü: Yün, kaþmir vs.
30':
Karýþýk
yýkamayý gerektiren yün, ipek ve elbiseler için uygun deðildir).
Kýsmi programlar
Durulama
Sýkma
Boþaltma
(*) Not: BAÞLAT iþleminden 10 dakika sonra, makine içerisindeki yükü temel alarak programýn sonuna kadar kalan süreyi tekrar hesaplayacaktýr.
Tüm Test Enstitüleri için:
1) EN60456 standartlarý uyarýnca kontrol programlarý 60°C ye ve . programa ayarlayýnýz.
2) Pamuklu uzun programý;
3) Pamuklu kýsa programý;
Az kirlenmiþ giysileri hemen temizlemek için (elle
programda 40°Cye ayarlayýnýz.
programda 40°Cye ayarlayýnýz.
Sýcak
(Max. 90°)
Maks. Hýz
(°C)
(dev/d ak.)
90° 1200
60°
40° 1200
40° 1200
40° 600
40° 800
40° 800
60° 800
40° 800
60° 1200
30° 1000
30° 0
40° 600
30° 800
- 1200 -
- 1200 - - - 8
- 0 - - - 8
1200
Deterjan ve katký maddeleri
Çamaþýr
deterjaný
Yumuþa-
ll
lll
lll
lll
lll
ll
lll
lll
lll
lll
ll
ll
ll
ll
Çamaþýr
týcý
ll
suyu
- 8
- 4
- 3,5
- 2
- 2
- 3,5
Maks.
yük
(kg)
8
8
8
2
4
4
4
8
8
Program
süresi
edilemez.
TR
(*) Yýkama çevrimlerinin süresi ekrandan kontrol
Seçenekleri
Deterjan miktarýnýn ayarlanmasý
Deterjan miktarýný ayarlamak için (Auto Dose System
bölümüne bakýnýz).
Deterjan yoðunluðu
Deterjanýn yoðunluk derecesini deðiþtirmek için (Auto
Dose System bölümüne bakýnýz).
Yumuþatýcý miktarýnýn ayarlanmasý
Yumuþatýcý miktarýný ayarlamak için (Auto Dose
System bölümüne bakýnýz).
Ekstra Durulama
Bu seçeneði seçenerek, durulamanýn verimliliði arttýrýlýr
ve kalan deterjanýn iyice çýkarýlmasý saðlanýr. Özellikle
deterjanlar için hassas olan ipek için kullanýþlýdýr. Bu
seçeneðin tam yüklü yýkamada ve çok fazla miktarda
deterjan gerekli olduðunda kullanýlmasý önerilir.
Bu programlarda uygulanamaz:
, , .
57
Page 58

Deterjan ve çamaþýr
TR
Deterjan
Gerekli deterjan miktarý, renk, yýkama sýcaklýðý,
kirlenme seviyesi ve bölgedeki suyun sertliðinin yaný
sýra yýkamakta olduðunuz kumaþ türüne (pamuk, yün,
ipek vs.) baðlýdýr.
dozajlanma sistemine sahip olan bu çamaþýr makinesi,
kayýplarýn önlenmesine ve optimal yýkama performansý
saðlamasýnýn dýþýnda çevreyi korumaya yardým eder.
Tavsiyeler:
eðer Geleneksel þekilde deterjaný yükleyerek bir ön
yýkama iþlemi gerçekleþtiriliyorsa, toz deterjan
kullanýnýz.
pamuklu narin dokumalar ve alçak ýsý derecesi ile
çalýþan tüm programlar için sývý deterjan kullanýlmasý.
Auto Dose System yönteminde kullaným için
sadece sývý deterjan ve yumuþatýcý kullanýnýz.
Superkonsantre, Gel ve benzeri deterjanlarý
doldurmayýnýz.
Geleneksel yöntemde doldurarakyünlü ve ipekliler
için narin sývý deterjanlar kullanýnýz.
Ýki farklý deterjaný HÝÇBÝR ZAMAN karýþtýrmayýnýz;
yenisini koymadan önce haznenin temizliðini her
zaman yapýnýz.
Program baþlamadan önce, deterjan ilgili bölmeye veya
doðrudan tamburun içerisine yerleþtirilen daðýtýcýya
dökülmelidir. Son durumda, ön yýkama programlý
Pamuklularýn seçilmesi mümkün olmayacaktýr.
Çok fazla köpük yapacaðýndan çitileme deterjaný
kullanmayýn.
Deterjan ve yumuþatýcýnýn otomatik
Çamaþýrýn hazýrlanmasý
Makinenin içerisine yerleþtirmeden önce giysileri silkin.
Renkli giysileri beyaz olanlardan ayýrmaya dikkat
ederek, çamaþýrý kumaþ türüne (yýkama talimatý
etiketindeki sembol) ve rengine göre ayýrýn;
Bütün cepleri boþaltýn ve düðmeleri kontrol edin,
Kurulama sýrasýnda çamaþýrýn aðýrlýðýný gösteren
Programlar Tablosudaki deðerleri aþmayýn.
Çamaþýrýnýz aðýrlýðý ne kadardýr ?
1 çarþaf 400-500 gr
1 yastýk kýlýfý 150-200 gr
1 masa örtüsü 400-500 gr
1 bornoz 900-1200 gr
1 havlu 150-250 gr
1kot pantolon 400-500 gr
1 gömlek 150-200 gr
Yýkama önerileri
Gömlek: Mümkün olan en iyi þekilde korunmalarýný
saðlamak için farklý kumaþ tipindeki ve renkteki
gömlekleri yýkamak için özel Gömlek
programýný kullanýn.
Blucin: Kot kumaþýndan yapýlan tüm giysiler için özel
Blucin
dýþa çevirin ve sývý deterjan kullanýn.
Bebek: Bir yandan bebeklerin hassas ciltlerini acý verici
hassas alerjik tepkilerden korumak için çocuk
bezlerindeki deterjan kalýntýlarýný temizlerken bebeklerin
neden olduðu tipik lekeleri gidermek için özel Bebek
programýný kullanýn, yýkamadan önce içlerini
yýkama
programýný kullanýn. Program, büyük miktarda su
kullanarak ve deterjana katýlan özel dezenfekte
maddelerinin etkisini ideal bir þekilde kullanarak bakteri
miktarýný azaltmak üzere tasarlanmýþtýr program sonunda,
makine tamburu yavaþça döndürecektir, programý sona
erdirmek için START/PAUSE düðmesine basýn.
Ýpek: Bütün ipek giysileri yýkamak için özel Ýpek
programýný kullanýn. Hassas elbiseleri yýkamak için
tasarlanan özel deterjanýn kullanýlmasýný tavsiye ederiz.
Perdeler: Ýpek
ve birlikte verilen çantanýn içerisine yerleþtirilmelidir.
Yünlü: Woolmark Company tarafýndan verilen,
etiketinde sadece elde yýkayýn
yünlü giysilerin bu çamaþýr makinesinde yýkanabileceði
anlamýna gelen saygýn Woolmark Platinum Care
onayýný (M.0508) alan tek çamaþýr makinesi markasýdýr.
Yünlü programý en ideal performansý elde ederek
çamaþýr makinesinde tüm yünlü giysileri yýkamak için
kullanýlabilir.
Yorgan: Çift katlý veya tekli yorganlarý (aðýrlýðý 3,5 kgý
aþmayan), yastýklarý, puf mont gibi içerisine kaz tüyü
yerleþtirilmiþ giysileri yýkamak için, özel Yorgan
programýný kullanýn. Yorganlarý kenarlarýný içeri doðru
katlayarak tambura yerleþtirmenizi (þekile bakýnýz) ve
tamburun toplam hacminin
kullanmamanýzý tavsiye ederiz.
Örtü: Sentetik dýþ yüzeye sahip örtüleri yýkamak için,
makine ile birlikte verilen çantayý kullanýn ve programý
Yorgan
Yatak çarþafý ve havlular: Evdeki tüm çamaþýrý yýkamak
için Nevresim
performansýný ideal hale getirir ve zaman ve enerjiden
tasarruf etmenizi saðlar. Toz deterjan kullanmanýzý öneririz.
Ýnatçý lekeler: Ýnatçý lekelerin yýkamadan önce
sabunla elden geçirilmesi ve Ön-yýkamalý Pamuklular
programýnýn kullanýlmasý akýllýca olacaktýr.
programýný kullanýn. Bunlar katlanmalý
yazanlar dahil tüm
¾ ünden fazlasýný
a ayarlayýn.
programýný kullanýn, bu yumuþatýcý
Yük dengeleme sistemi
Her sýkma aþamasýndan önce aþýrý titreþimi önlemek ve
yükü tek bir yönde daðýtmak için, tambur yýkama
dönüþ hýzýndan biraz daha fazla olan bir hýzda sürekli
döner. Birkaç denemeden sonra, yük doðru þekilde
dengelenmezse, makine düþük bir dönüþ hýzýnda
döner. Yük çok dengesizse, çamaþýr makinesi
döndürme yerine daðýtma iþlemini uygular. Geliþmiþ
yük daðýlýmý ve dengeyi desteklemek için, küçük ve
büyük giysilerin yük içerisinde karýþtýrýlmasýný öneririz.
58
Page 59

Önlem ve öneriler
Makine uluslararasý güvenlik düzenlemelerine uygun
olacak þekilde tasarlanmýþ ve imal edilmiþtir.
Aþaðýdaki bilgiler güvenlik amacýyla verilmiþtir ve bu
nedenle dikkatli bir þekilde okunmasý gerekmektedir.
Genel güvenlik
Bu cihaz sadece ev kullanýmý için tasarlanmýþtýr.
Kullaným güvenliklerinden sorumlu bir kiþinin
komutlarý ve denetimi altýnda gerçekleþmediði
sürece, cihaz, fiziksel kapasitesi yetersiz (çocuklar
dahil), iþitsel veya zihinsel olarak yeterli olamayan
kiþiler ile yetersiz bilgi ve deneyime sahip olan
kiþiler tarafýndan kullanýlmamalýdýr. Cihazla
oynamamalarýný garanti etmek için çocuklarýn
kontrol altýnda olmalarý gerekmektedir.
Makineye yalýnayak veya el ya da ayaklar ýslakken
dokunmayýn.
Cihazý elektrik prizinden çekerken güç kablosundan
çekmeyin. Fiþi tutup, çekin.
Yüksek sýcaklýða ulaþabileceði için boþaltýlan suya
dokunmayýn.
Kapaðý asla zorlamayýn. Bu kazayla açýlmasýný
önlemek için tasarlanan güvenlik kilidi
mekanizmasýna hasar verebilir.
Cihaz arýzalanýrsa, ne olursa olsun kendi kendinize
tamir etmeyi denemek için iç mekanizmaya
dokunmayýn.
Çocuklarý daima çalýþýr durumdayken cihazdan uzak
tutun.
Taþýnmasý gerekirse, iki veya üç kiþinin yardýmý
hareket ettirin ve azami dikkatle taþýyýn. Cihaz çok
aðýr olduðundan dolayý, kesinlikle bunu tek baþýnýza
yapmayý denemeyin.
Çamaþýrý, çamaþýr makinesinin içine yerleþtirirken,
tamburun boþ olduðundan emin olun.
Kapaðýn manüel olarak açýlmasý
TR
Elektrik kesintisinden dolayý kapaðýn açýlmasý mümkün
olmadýðýnda ve çamaþýrý çýkarmak istiyorsanýz:
1. Fiþi elektrik prizinden
çekin.
2. Makine içerisindeki
suyun kapak açýlýþýndan
daha düþük seviyede
olmasýna dikkat edin, bu
durumda deðilse, fazla suyu
þekilde gösterildiði gibi
tahliye hortumunu
kullanarak bir kovanýn
içerisine boþaltýn.
3. çamaþýr makinesinin ön alt tarafýndaki kapak
panelini çýkarýn (arka sayfaya bakýnýz).
4. Þekilde gösterildiði gibi
plastik baðlama çubuðu
durma konumundan serbest
kalana kadar týrnaðý
kullanarak çekip çýkarýn,
kapak kilidinin açýldýðýný
gösteren çýt sesini duyana
kadar aþaðý doðru çekin.
5. kapaðý açýn, kapak
açýlmazsa, iþlemi tekrar
yapýn.
Atma
Ambalaj malzemelerinin atýlmasý: Ambalaj
malmzelerinin tekrar kullanýlabilmesi için yerel
düzenlemelere uyun.
Atýk Elektrikli ve Elektronik Cihazlarla ilgili Avrupa
Birliði Yönergesi 2002/96/EC evde kullanýlan
cihazlarýn normal katý kentsel atýk dönüþümünü
kullananlarla birlikte atýlmamasý gerektiðini ifade
etmektedir. Hurda cihazlar, atmosfere ve halk
saðlýðýna yönelik potansiyel tehlikeyi önlemenin
yanýsýra makine içerisindeki malzemelerin tekrar
kullaným ve geri dönüþüm maliyetini en uygun hale
getirmek için ayrý ayrý toplanmalýdýr. Ayrýlmýþ atýk
toplama ile ilgili yükümlülüklerini cihaz sahiplerine
hatýrlatmak için tüm ürünler çarpý konulmuþ çöp
kutusu ile iþaretlenmiþtir.
Eve ait cihazlarýn doðru þekilde atýlmasý ile ilgili
daha fazla bilgi almak için, cihaz sahipleri yerel
makamlarla ve cihaz satýcýlarý ile temas kurmalýdýr.
6. cihazýn üstüne itmeden önce kancalarýn güvenli bir
þekilde yerine takýldýðýndan emin olarak, paneli yerine
yerleþtirin.
59
Page 60

Bakým ve onarým
TR
Su ve elektrik baðlantýlarýnýn kesilmesi
Her programdan sonra musluðu kapatýn. Bu makine
içerisindeki hidrolik sistemin aþýnmasýný sýnýrlayacak
ve sýzýntýlarýn önlenmesine yardýmcý olacaktýr.
Temizlik ve tüm bakým iþleri sýrasýnda cihazý fiþten
çekin.
Makinenin temizlenmesi
Cihazýn dýþ parçalarý ve kauçuk parçalarý soðuk
sabunlu suya batýrýlmýþ yumuþak bir bez kullanýlarak
temizlenebilir. Çözücü veya aþýndýrýcý kullanmayýn.
Deterjan çekmecesinin temizlenmesi
A
D
Ön hazneye eriþmek için:
2
1. Çýkarana kadar ilk önce ortaya doðru bastýrarak ve
her iki yanýndan iterek makinenin önündeki kapak
panelini çýkarýn(þekile bakýnýz);
2. Akan suyu toplamak için
bir kap yerleþtirin (yaklaþýk
1.5 l) (þekile bakýnýz);
3. saat yönünde çevirerek
kapaðý yerinden çýkarýn
(þekile bakýnýz);
Gözü çýkarmak için, ilk kilide kadar gözü açýnýz, daha
sonra tamamen açarak A koluna basýnýz, son olarak D
kollarýndan birine basýnýz ve gözü dýþarý doðru çekiniz
(þekillere bakýnýz).
Akar su altýnda gözü yýkayýnýz, bu temizlik iþlemi sýk
sýk yapýlmalýdýr. Makine üzerindeki çekmecenin
yerinden muhtemel deterjan artýklarýný da kaldýrmaya
özen gösteriniz.
Gözü yeniden monte etmek için, kýzaðý ortalamaya ve
sýkýþmasýndan kaçýnmaya dikkat ederek, sola yaklaþýk
tutmak gerekir.
Cihaz tamburuna bakým yapýlmasý
Ýstenmeyen kokularýn oluþmasýný önlemek için
kapaðý daima aralýk býrakýn.
Pompanýn temizlenmesi
Çamaþýr makinesine, bakým gerektirmeyen kendini
temizleyen bir pompa takýlmýþtýr. Bazen, küçük
cisimler (madeni para veya düðme gibi) pompanýn alt
bölümündeki koruyucu ön hazneye düþebilir.
Programýn bittiðinden ve cihazýn fiþten çekili
olduðundan emin olun.
4. içerisini iyice temizleyin;
5. kapaðý geri takýn;
6. cihazýn üstüne itmeden önce kancalarýn güvenli bir
þekilde yerine takýldýðýndan emin olarak, paneli yerine
yerleþtirin.
Su giriþ hortumunun kontrol edilmesi
Giriþ hortumunu yýlda bir kez kontrol edin. Herhangi bir
çatlak varsa, hemen deðiþtirilmesi gerekmektedir:
program sýrasýnda su basýncý çok güçlüdür, çatlak bir
hortum kolayca yarýlabilir.
60
Page 61

Sorun giderme
Çamaþýr makineniz bazen çalýþmayabilir. Teknik Destek Merkezi ile temas kurmadan önce (Teknik Servis e
bakýnýz), aþaðýdaki listeyi kullanarak sorunun kolayca çözülüp çözülemeyeceðinden emin olunuz.
Sorun:
Çamaþýr makinesi çalýþmýyor.
Program baþlamadý.
Çamaþýr makinesi su almýyor.
Makine süreki su alýp, tahliye ediyor.
Çamaþýr makinesi tahliye veya
dönüþ yapmýyor.
Sýkma sýrasýnda makine
çok titriyor.
Çamaþýr makinesi su sýzdýrýyor.
Yürütülmekte olan aþama ile
ilgili simgeler ON/OFF gösterge
lambasý ile ayný anda hýzlý bir
þekilde yanýp sönüyor.
Olasý nedenleri / Çözümler:
Cihazýn fiþi prize düzgün bir þekilde takýlmamýþtýr veya yeterli temas yoktur.
Evde elektrik yoktur.
Kapak düzgün þekilde kapatýlmamýþtýr.
BAÞLAT/DURDUR düðmesine basýlmamýþtýr.
Su musluðu açýk deðildir.
Gecikmeli bir çalýþtýrma ayarlanmýþtýr.
Su giriþ hortumu musluða baðlanmamýþtýr.
Hortum bükülmüþtür.
Su musluðu açýk deðildir.
Evde su yoktur.
Basýnç çok düþüktür.
BAÞLAT/DURDUR düðmesine basýlmamýþtýr.
Tahliye hortumu yerden 65 ila 100 cm arasýndaki bir yüksekliðe
yerleþtirilmemiþtir (Montaja bakýnýz).
Hortumun boþta kalan ucu suyun altýndadýr (Montaja bakýnýz).
Ev binanýn üst katlarýndan birindeyse, çamaþýr makinesinin sürekli su alýp
tahliye etmesine neden olan su drenajý ile ilgili bir sorun vardýr. Bu
güçlüðün giderilmesine yardýmcý olacak özel tahliye önleyici valfler
maðazalarda satýlmaktadýr.
Duvar tahliye sistemine havalandýrma borusu takýlmamýþtýr.
Program tahliyeyi içermemektedir: Bazý programlar tahliye aþamasýnýn
manüel olarak çalýþtýrýlmasýný gerektirir (Programlar ve seçeneklerine
bakýnýz).
Tahliye hortumu bükülmüþtür (Montaja bakýnýz).
Pis su borusu týkanmýþtýr.
Tamburun montaj sýrasýnda doðru þekilde kilidi açýlmamýþtýr (Montaja bakýnýz).
Makine dengeli deðildir (Montaja bakýnýz).
Makine dolap ve duvar arasýnda sýkýþmýþtýr (Montaja bakýnýz).
Yük dengesizdir (see Deterjan ve çamaþýr na bakýnýz).
Su giriþ hortumu düzgün þekilde takýlmamýþtýr(Montaja bakýnýz).
Deterjan daðýtýcýsý týkalýdýr (temizlemek için, Bakým ve onarýma bakýnýz).
Tahliye hortumu yerine düzgün þekilde yerleþtirilmemiþtir (Montaja bakýnýz).
Makineyi kapatýp, fiþini çekin, yaklaþýk 1 dakika bekleyin ve daha sonra
tekrar açýn. Sorun devam ederse, Teknik Destek Servisi ile temas kurun.
TR
Çok fazla köpük var.
Çamaþýr makinesi kilitli kalýyor.
Deterjan çamaþýr makinesi için uygun deðildir (çamaþýr makineleri için veya
Elde ve makinede yýkama ya da benzeri bir yazýnýn ekrana gelmesi gerekir).
Çok fazla deterjan kullanýlmýþtýr.
Manüel kilitleme iþlemi uygulayýn (Önlemler ve ip uçlarýna bakýnýz).
61
Page 62

TR
Sorun:
Olasý nedenleri / Çözümler:
Makine iyi yykama performansy
vermiyor.
Eðer hazneler dolu iken onlara
yükleme yaparsam ne olur?
Hazneler dolu iken geleneksel
þekilde gözü kullanyrsam ne olur?
Hazneler toz deterjan için de
kullanylyr my?
Toz deterjan haznelere gidebilir
mi?
Haznelerin doldurulmasy için gözü
doðru bir þekilde açmazsam ne
olur?
Hazneler, doðru bir þekilde yüklenmemiþ (yumuþatycy deterjanyn
yerine veya tam tersi).
Yki farkly deterjan/yumuþatycy karyþtyrylmyþ.
HYÇBYR ZAMAN farkly iki deterjany/yumuþatycyyy karyþtyrmayynyz;
baþkalaryny koymadan önce haznelerin temizliðini her zaman
gerçekleþtiriniz.
Auto Dose System sistemi tykaly çünkü uzun süre kullanylmamyþ:
haznelerin temizliðini yapynyz (bakynyz Kullanýcý tarafýndan yapýlan
temizlik).
Sesli (bip) ve görsel (ekran üzerinde ikon) sinyaller, haznenin dolu
olduðunu belirtir. Eðer deterjan/yumuþatycy koymaya devam edilirse,
fazla olan miktar kazana gidecek ve bir sonraki devirde yykanacaktyr.
Makine, geleneksel þekilde toz mu yoksa syvy deterjan my konduðunu
otomatik olarak algylayacak ve hazneden hiçbir þey almayacaktyr.
Yumuþatycy, sadece Auto Dose yönteminde kullanylabilmektedir.
Hayyr, toz deterjan sadece geleneksel þekilde kullanylabilmektedir.
Hayyr, göz Auto Dose System pozisyonunda açylsa bile (tamamen
açyk) haznelerden birine toz deterjanyn dökülmesini önleyen bir bariyer
vardyr.
Eðer göz tamamen açyk deðilse, yüklenen deterjan veya yumuþatycy
kazana dökülecek ve bir sonraki devirde yykanacaktyr.
Deterjany yumuþatycy ile yer
deðiþtirirsem ne olur?
Haznelerin boþalmasyny
beklemezsem ve farkly deterjanlary
karyþtyryrsam ne olur?
Makine zayyf sonuçlarla yykayacak ve manuel temizlik devresini
uygulayarak hazneleri boþaltmak gerekecektir.
Makine, normal bir þekilde yykayacaktyr fakat makineden gelen
sinyalden sonra sadece hazneleri yeniden yüklemeniz ve farkly
deterjanlary/yumuþatycylary karyþtyrmamanyz tavsiye edilir.
Not: Demo modundan çýkmak için, ON/OFF ve BAÞLAT/DURDUR düðmelerinin her ikisine de ayný anda 3
saniye kadar basýn.
62
Page 63

Teknik Servis
Destek bölümünü aramadan önce:
Sorunu kendi kendinize çözüp çözemeyeceðinizi kontrol edin (Sorun Gidermeye bakýnýz);
Sorunun çözülüp çözülmediðini kontrol etmek için programý yeniden baþlatýn;
Çözülmediyse, yetkili Teknik Servisi ile temas kurun.
Çamaþýr makinesi hatalý bir þekilde monte edilmiþ veya kullanýlmamýþsa, servis çaðýrma için ücret ödemeniz
gerekecektir.
Her zaman yetkili servis yardýmý talep edin.
Lütfen aþaðýdaki bilgileri hazýr durumda bulundurun:
Sorunun türü;
cihaz modeli (Mod.);
seri numarasý (S/N).
Yukarýdaki bilgiler cihazýn üzerine yerleþtirilen künye levhasýndan alýnabilir.
Cihazýn ömrü 10 yýldýr.
Tüm Türkiye'de; Yetkili Teknik Servis, Orijinal Yedek Parça, Bakim Ürünlerimiz ve Garanti ile ilgili
bilgi için:
0 212 444 50 10
64
$!
Page 64

64
195086362.01
11/2010 - Xerox Fabriano
$"
 Loading...