

Page 1

Instructions for
installation and use
Contents
Installation, 2-3
EN
English,1
CIS
Русский,13
AQUALTIS
AQ9D 49 X
UK
Укра¿нська,25
Unpacking and levelling
Connecting the electricity and water supplies
Technical data
Description of the machine, 4-5
Touch control panel
Running a wash cycle, 6
Wash cycles and options, 7
Table of wash cycles
Wash options
Detergents and laundry, 8
Detergent
Preparing the laundry
Washing recommendations
Precautions and advice, 9
General safety
Load balancing system
Disposal
Opening the porthole door manually
WASHING MACHINE
EN
Care and maintenance, 10
Cutting off the water and electricity supplies
Cleaning the machine
Cleaning the detergent dispenser drawer
Caring for your appliance drum
Cleaning the pump
Checking the water inlet hose
Trouble shooting, 11
Assistance, 12
1
Page 2
Installation
EN
This instruction manual should be kept in a safe place
for future reference. If the washing machine is sold,
given away or moved, please ensure the manual is kept
with the machine, so that the new owner may benefit
from the advice contained within it.
Read these instructions carefully: they contain vital
information relating to the safe installation and operation
of the appliance.
Inside the pack containing this manual, you will also
find the guarantee and all the details necessary for
installation.
Unpacking and levelling
Unpacking
1. Once you have removed all the packaging from the
washing machine, make sure it has not been damaged
during transportation.
If it has been damaged, contact the retailer and do not
proceed any further with the installation process.
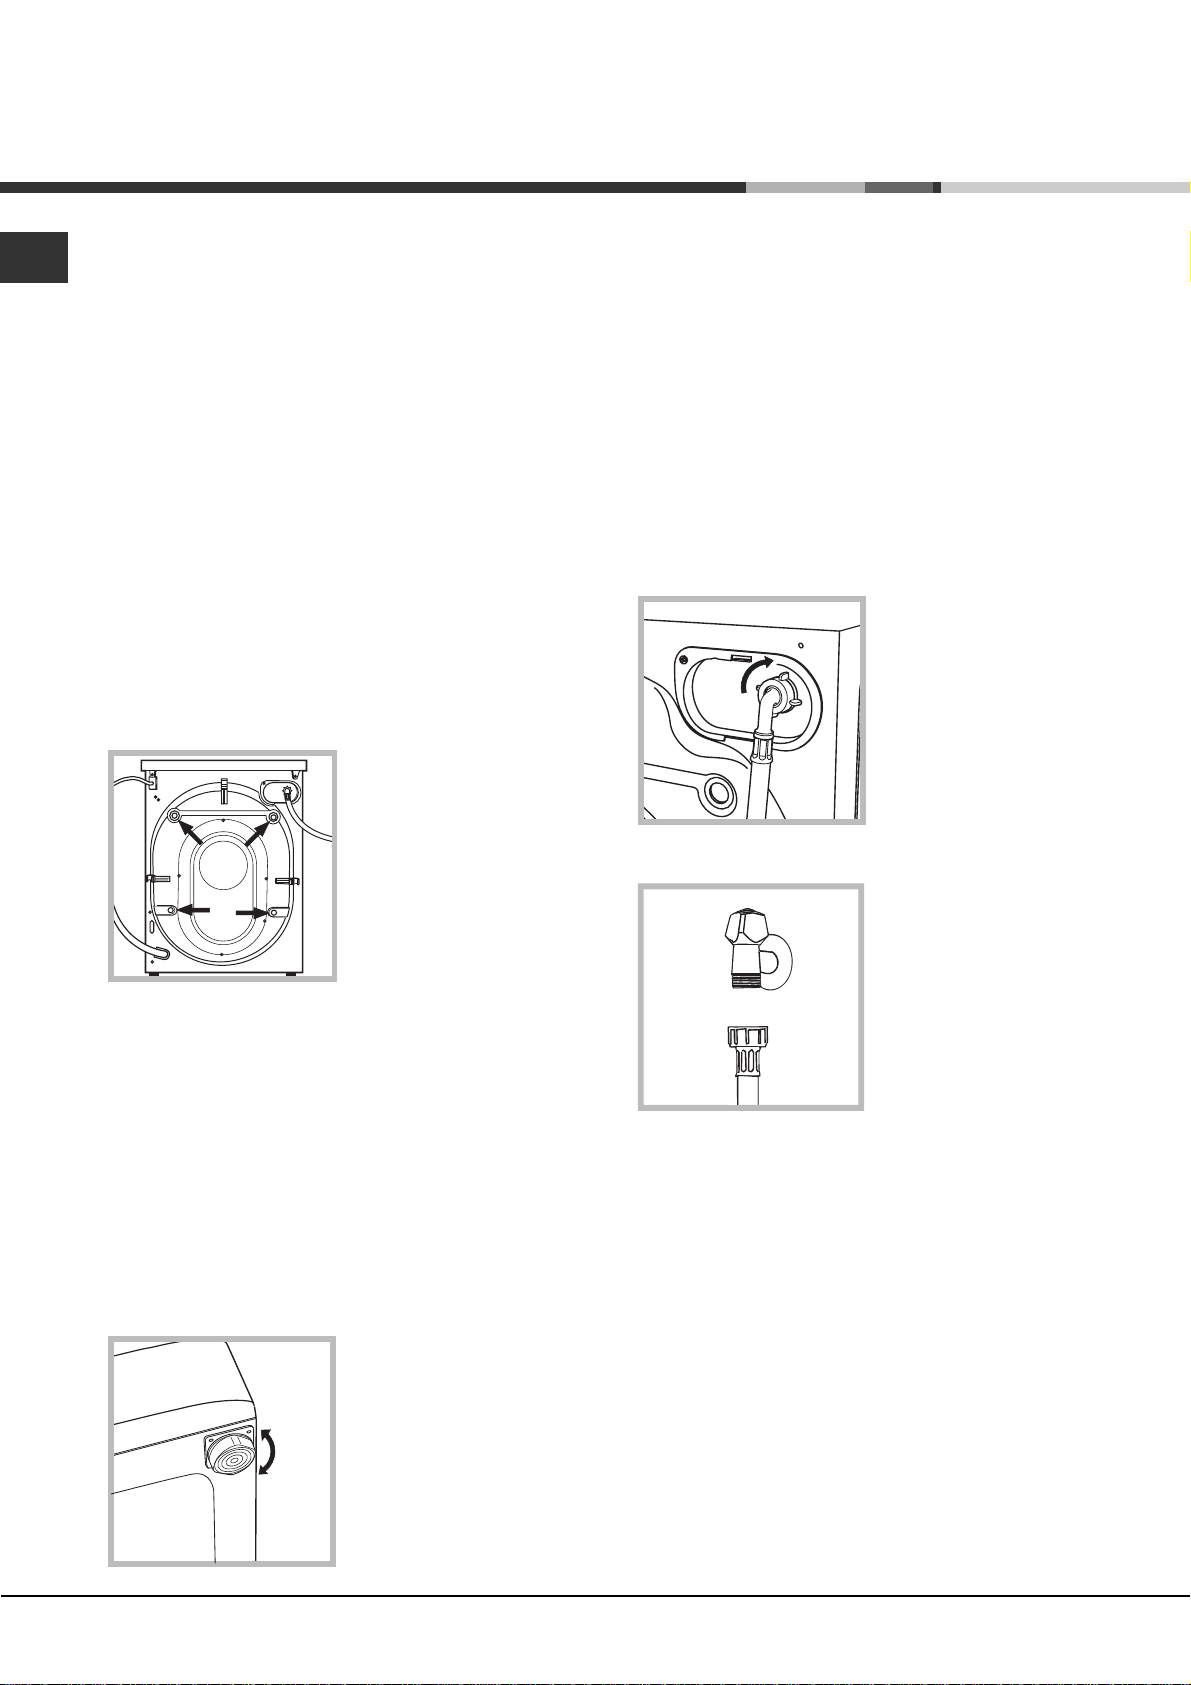
2. Remove the 4
protective screws (used
during transportation) and
the corresponding spacer,
located on the rear part of
the appliance (see figure).
If the appliance is levelled correctly, it will be more
stable and much less likely to cause vibrations and noise
while it is operating, particularly during the spin cycle.
If it is placed on carpet or a rug, adjust the feet in such
a way as to allow a sufficient ventilation space
underneath the washing machine.
Connecting the electricity and water
supplies
Connecting the water inlet hose
Before connecting the inlet hose to the water supply,
run the water until it is perfectly clear.
1. Connect the inlet hose
to the machine by
screwing it onto the cold
water inlet of the
appliance, which is
situated on the top righthand side of the rear part
of the appliance (see
figure).
2. Connect the inlet hose
by screwing it to a cold
water tab using a 3/4 gas
threaded connection (see
figure).
3. Close off the holes using the plastic plugs supplied in
the pack.
4. Keep all the parts in a safe place; they will be needed
again if the washing machine is moved to another
location, to prevent the inside of the appliance being
damaged.
Packaging materials should not be used as toys for
children.
Levelling
1. Place the washing machine on a flat sturdy floor,
without resting it up against walls or cabinets.
2. If the floor is uneven,
the front feet of the
machine may be adjusted
until it reaches a horizontal
position (the angle of
inclination must not
exceed 2 degrees).
3. Make sure that the hose is not folded over or bent.
The water pressure at the tap must fall within the
values indicated in the Technical data table (see next
page).
If the inlet hose is not long enough, contact a
specialised shop or an authorised technician.
Never use second-hand or old inlet hoses; use the
products supplied with the machine.
2
Page 3

Connecting the drain hose
65 - 100 cm
Connect the drain hose to
drain duct piping or a wall
drain located between 65
and 100 cm above the
floor, making sure it is not
bent at all.
Alternatively, rest the drain
hose on the side of a
washbasin or bathtub,
fastening the duct
supplied to the tap (see
figure).
The free end of the hose
should not be underwater.
Do not use extension cords or multiple sockets.
EN
The cable should not be bent or compressed.
The power supply cable and plug must only be
replaced by authorised technicians.
Warning! The company shall not be held responsible in
the event that these regulations are not respected.
We advise against the use of hose extensions; if it is
absolutely necessary, the extension must have the same
diameter as the original hose and must not exceed 150
cm in length.
Electrical connections
Before plugging the appliance into the electricity socket,
make sure that:
the socket is earthed and complies with all applicable
laws;
the socket is able to withstand the maximum power
load of the appliance as indicated in the Technical
data table (see opposite);
the power supply voltage falls within the values
indicated in the Technical data table (see opposite);
the socket is compatible with the plug of the
appliance. If this is not the case, have the socket or
the plug replaced.
The machine must not be installed outdoors, even in
covered areas. It is extremely dangerous to leave the
appliance exposed to rain, storms and other weather
conditions.
The mains socket must remain within easy reach after
the washing machine has been installed.
Technical data
Model
Dimensions
Capacity
Electrical
connections
Water connections
Spin speed
Energy rated
programmes
according to
regulation
EN 60456
AQ9D 49 X
width 59,5 cm
height 85 cm
depth 64,5 cm
from 1 to 9 kg
please refer to the technical data
plate fixed to the machine
maximum pressu re 1 MPa (10 bar)
minimum pressure 0.05 MPa (0.5 bar)
drum capacity 62 litres
up to 1400 rotations per minute
programme ; temperature 60°C;
using a load of 9 kg.
This appliance conforms to the
following EC Directives:
- 89/336/EEC dated 03/05/89
(Electromagnetic Compatibility) and
subsequent modification s
- 2006/95/EC (Low Voltage)
- 2002/96/EC
3
Page 4
Description of the machine
EN
PORTHOLE DOOR
PORTHOLE DOOR
HANDLE
KICK STRIP
ADJUSTABLE FEET
PORTHOLE DOOR
Always use the handle to
open the porthole door (see
figure).
DETERGENT DISPENSER DRAWER
The detergent dispenser
drawer is located inside the
machine and can be
accessed by opening the
door.
For more information on
detergent measures, please
refer to the chapter entitled
Detergents and laundry.
Note: stick the label showing
the wash cycle descriptions and options on the front of
the detergent dispenser drawer. You will find the sticker
in the pack containing this manual.
CONTROL
PANEL
1. pre-wash compartment:
use powder detergent.
2. main wash compartment:
1
2
washing additives compartment: for fabric softener or
liquid additives. We recommend that the maximum level
indicated by the grille is not exceeded, and that
concentrated fabric softeners are diluted.
TOUCH CONTROL PANEL
use powder or liquid
detergent. If using the latter
type of detergent, we
recommend it is poured into
the drawer immediately
before you start the washing
machine.
To adjust the settings, gently
press the icon inside the
sensitive (touch control) area
as illustrated in the figure.
Standby mode
This washing machine, in compliance with new energy
saving regulations, is fitted with an automatic standby
system which is enabled after a few minutes if no activity
is detected. Press the ON-OFF
for the machine to start up again.
4
button briefly and wait
Page 5

Touch control panel
WASH CYCLE
SELECTOR knob
M2
M1
TEMPERATURE
DISPLAY
SPIN
button
button
START/PAUSEbutton
with indicator light
ECO
indicator light
EN
WASH
CYCLE
PHASE
icons
Button withON/OFF
indicator light
Button with ON/OFF indicator light: press this briefly to switch
the machine on or off. The green indicator light indicates that the
machine is switched on. To switch off the washing machine during
the wash cycle, press and hold the button for approximately 3
seconds; if the button is pressed briefly or accidentally the machine
will not switch off. If the machine is switched off during a wash
cycle, this wash cycle will be cancelled.
WASH CYCLE SELECTOR knob: may be turned in either
direction. To select the most suitable wash cycle, please refer
to the Table of wash cycles.
The knob will not move during the wash cycle.
M1-M2-M3 buttons: press and hold one of the buttons to
store a cycle with your own set preferences in the memory of
the machine. To recall a previously-stored cycle, press the
corresponding button.
TEMPERATURE
temperature setting; the value selected will appear on the
display above (see Running a wash cycle).
SPIN CYCLE
cycle; the value selected will appear on the display above (see
Running a wash cycle).
DELAYED START
for the selected wash cycle; the set delay time will appear on
the display above (see Running a wash cycle).
OPTION buttons: press to select the available options. The
indicator light corresponding to the selected option will remain
lit (see Running a wash cycle).
WASH CYCLE PHASE icons: these illuminate to indicate the
progress of the wash cycle (Wash
Drain
START/PAUSE button with indicator light: when the green
indicator light flashes slowly, press the button to start a wash
cycle. Once the cycle has begun the indicator light will remain
lit in a fixed manner. To pause the wash cycle, press the button
again; the indicator light will flash in an orange colour. If the
). The text lights up when the cycle is complete.
button: press to modify or exclude the
button: press to modify or exclude the spin
button: press to set a delayed start
M3
Rinse Spin
OPTION
buttons
CONTROL PANEL
DELAYED START
button
LOCK button with
indicator light
DOOR LOCKED indicator light
Door locked
be opened. To start the wash cycle from the point at which it
was interrupted, press the button again.
DOOR LOCKED
porthole door is locked. To open the door, pause the wash
cycle (see Running a wash cycle).
CONTROL PANEL LOCK
activate or deactivate the control panel lock, press and hold
the button for approximately 2 seconds. when the indicator
light is illuminated, the control panel is locked. This means it is
possible to prevent wash cycles from being modified
accidentally, especially where there are children in the home.
ECO indicator light: the icon lights up when, after altering the
washing parameters, an energy saving of at least 10% is made.
Furthermore, before the machine enters Standby mode, the
icon will light up for a few seconds; when the machine is switched
off the estimated energy saving will be around the 80% mark.
CHANGE LANGUAGE
The first time the machine is switched on, the first language
will flash on the display. The "
appear on the display, in line with the 3 buttons on the righthand side. The languages change automatically every 3";
alternatively, they can be changed by pressing the buttons next
to the " " and "V" symbols. Use the "OK" button to confirm the
language, which will be set after 2". If no buttons are pressed,
the automatic language change will begin again after 30".
The language may only be changed while the machine is
switched off.
Press and hold the temperature
buttons for 5''; a short beep sounds and the set language
flashes on the display. Press the buttons next to the "
"V" symbols to change the language. Use the button next to
the "OK" symbol to confirm the language, which will be set
after 2". If no buttons are pressed, the language set previously
will be displayed after 30". Switch on the machine.
indicator light is switched off, the door may
indicator light: indicates that the
button with indicator light: to
", "OK" and "V" symbols will
+spin +delayed start
" and
5
Page 6

Running a wash cycle
EN
WARNING: before you use the washing machine for
the first time, run a wash cycle with detergent and no
laundry, using the 90° cottons cycle without pre-wash.
1. SWITCH THE MACHINE ON. Press the
All the indicator lights will illuminate for 1 second and
the text AQUALTIS will appear on the display; the
indicator light corresponding to the
remain lit in a constant manner and the START/
PAUSE indicator light will flash.
2. SELECT THE PROGRAMME. Turn the
PROGRAMME KNOB left or right, until the required
programme has been selected; the name of the
programme will appear on the display. A temperature
and spin speed is set for each programme; these may
be adjusted. The cycle duration will also appear on
the display.
3. LOAD THE LAUNDRY. Open the porthole door.
Load the laundry, making sure you do not exceed the
maximum load value indicated in the table of wash
cycles on the following page.
4. MEASURE OUT THE DETERGENT. Pull out the
detergent dispenser drawer and pour the detergent
into the relevant compartments as described in
Description of the machine.
5. CLOSE THE PORTHOLE DOOR.
6. CUSTOMISE THE WASH CYCLE. Use the
relevant buttons on the control panel:
Modify the temperature and/or spin speed.
The machine automatically displays the maximum
temperature and spin speed values set for the
selected cycle, or the most recently-used settings if
they are compatible with the selected cycle. The
temperature can be decreased by pressing the
button, until the cold wash OFF setting is reached.
The spin speed may be progressively reduced by
pressing the
OFF. If these buttons are pressed again, the
maximum values are restored.
Exception: if the Cottons programme is selected,
the temperature can be increased up to a value of
90°C.
Setting a delayed start.
To set a delayed start for the selected cycle, press
the corresponding button repeatedly until the required
delay period has been reached. During the setting
procedure, the delay period and the text "Starts in:"
will be displayed, along with the flashing
After the delayed start has been set, the
will remain fixed on the display, which will also indicate
the duration of the selected cycle with the text "Ends
in:" and the cycle duration. Press the DELAYED
START button just once to display the delay time set
previously.
button, until it is completely excluded
button will then
button.
symbol.
symbol
After the countdown has begun, the display will show
the text "Starts in:" and the delay period. Once the
set delay time has elapsed, the machine will begin its
cycle and the display will show "Ends in:" and the
time remaining until the end of the cycle.
To remove the delayed start option, press the button
until the display shows the text OFF; the
will disappear.
Modify the cycle settings.
Press the button to activate the option; the name
of the option will then appear on the display and
the corresponding indicator light will illuminate.
Press the button again to deactivate the option;
the name of the option will then appear on the
display followed by the text OFF, and the
corresponding indicator light will switch off.
If the selected option is not compatible with the
selected wash cycle, this incompatibility will be
signalled by the flashing of the indicator light and a
sound alert (3 beeps); the option will not be activated.
If the selected option is not compatible with another
option that has been selected previously, the indicator
light corresponding to the first option selected will flash
and only the second option will be activated; the
indicator light corresponding to the button will remain
lit in a constant manner.
The options may affect the recommended load value
and/or the duration of the cycle.
7. START THE PROGRAMME. Press the START/
PAUSE button. The corresponding indicator light
remains lit in a fixed manner and the porthole door
locks (the
illuminates). The icons corresponding to the wash
cycle phases will light up during the cycle to indicate
which phase is currently in progress.
To change a wash cycle once it has already started,
pause the washing machine by pressing the START/
PAUSE button; then select the desired cycle and
press the START/PAUSE button again.
To open the door during a wash cycle, press the
START/PAUSE button; if the DOOR LOCKED
indicator light is switched off you may open the door.
Press the START/PAUSE button again to restart the
wash cycle from the point at which it was interrupted.
8. THE END OF THE WASH CYCLE. This is indicated
by the illuminated text END. The porthole door may
be opened immediately. If the START/PAUSE indicator
light is flashing, press the button to end the cycle.
Open the door, unload the laundry and switch off the
machine.
If you wish to cancel a cycle which has already begun,
press and hold the
the machine switches off.
DOOR LOCKED indicator light
button until the cycle stops and
symbol
6
Page 7

Wash cycles and options
Table of wash cycles
Icon Description of the wash cycle
Cottons wash cycles
Cotton with pre-wash
(Add detergent to the relevant compartment).
Cotton (1):
Cotton (2): heavily soiled whites and delicate colours.
Coloured Cotton (3) 40° 1400 -
Shirts
Jeans
Special programmes
Baby: heavily soiled delicate colours
Durable Synthetics 60° 800 -
* Steam Refresh (see next page)
"Bed & Bath" for bedlinen and towels.
Duvets: for down-stuffed garments.
Silk: for garments in silk and viscose, lingerie.
Wool: for wool, cashmere, etc.
Mix 30':
for wool, silk and clothes which require washing by hand)
Partials wash cycles
Rinse - 1400 - -
Spin - 1400 - - - 9
Drain - 0 - - - 9
(*) Note: 10 minutes after the START, the machine will recalculate the time remaining until the end of the wash cycle on the basis of the load inside it; this
value will then be shown on the display.
heavily soiled whites and resistant colours.
to refresh lightly soiled garments quickly (not s uitable
Max.
temp.
(°C)
90° 1400
60°
(Max. 90°)
40° 1400 -
40° 600 -
40° 800 -
40° 800 -
60° 1400 -
30° 1200 -
30° 0 -
40° 600 -
30° 800 -
Max.
speed
(rpm)
1400 -
- - - - - 1,5
Detergent and additives
Detergent
for prewash
lll
Detergent
for wash
ll
ll
ll
ll
ll
ll
ll
ll
ll
ll
ll
ll
Fabric
softener
Max.
load
l
(kg)
9
9
9
9
2
4
4
4
9
3,5
2
2
3,5
9
Cycle
duration
on the display.
EN
(*) The duration of the wash cycles can be checked
For all Test Institutes:
1) Test wash cycle in compliance with regulation EN 60456: set wash cycle
2) Long wash cycle for cottons: set wash cycle
3) Short wash cycle for cottons: set wash cycle
with a temperature of 40°C.
with a temperature of 40°C.
Wash options
Steam Hygiene
This option enhances washing performance by
generating steam during the wash cycle that eliminates
any bacteria from fibres while treating them at the same
time. Place the laundry in the drum, choose a
compatible programme and select option "
The steam generated during washing machine
operation may cause the porthole door to become hazy.
It cannot be used in conjunction with
, , , , , , , , .
Easy Iron
By selecting this option, the wash and spin cycles will be
modified in order to reduce the formation of creases.
At the end of the cycle the washing machine
drum will rotate slowly; the Easy Iron and START/
PAUSE indicator lights will flash. To end the cycle press
the START/PAUSE button or the Easy Iron button.
For the Silk
wash cycle, the machine will end the
cycle while the laundry is soaking and the Easy
".
, (90°C), ,
with a temperature of 60°C.
Iron indicator light will flash. To drain the water so that
the laundry may be removed, press the START/PAUSE
button or the Easy Iron button.
It cannot be used in conjunction with
, , , , ,
.
Time Saver
If you select this option, the wash cycle duration will be
reduced by 30%-50%, depending on the selected cycle,
thereby guaranteeing simultaneous water and energy
saving. Use this cycle for lightly soiled garments.
It cannot be used in conjunction with
, , , , , .
Extra rinse
By selecting this option, the efficiency of the rinse is
increased and optimal residual detergent removal is
guaranteed. It is particularly useful for skin which is
sensitive to detergents. We recommend this option is
used with a full load of washing, or when a large amount
of detergent is required.
It cannot be used in conjunction with
, , , ,
, , , .
7
Page 8

Detergents and laundry
EN
Detergent
The type and quantity of detergent required depend on the
type of fabric you are washing (cotton, wool, silk, etc.), as well
as its colour, the washing temperature, the level of soiling and
the hardness of the water in the area. Measuring out the
detergent carefully will avoid wastage and help to protect the
environment: although they are biodegradable, detergents still
contain ingredients which alter the balance of nature.
We recommend the following:
use powder detergents for white cotton garments and
pre-washing.
use liquid detergents for delicate cotton garments and
for all low-temperature wash cycles.
use gentle liquid detergents for wool and silk garments.
The detergent should be poured into the relevant
compartment - or the dispenser placed directly inside
the drum - before the wash cycle begins. In the latter
case, it will not be possible to select the Cottons with
pre-wash cycle.
Do not use hand washing detergents because these
create too much foam.
Preparing the laundry
Shake out the garments before loading them into the
machine.
Divide the laundry according fabric type (symbol on the
washing instruction label) and colour, making sure you
separate the coloured garments from the white ones;
Empty all pockets and check the buttons;
Do not exceed the values listed in the Table of wash
cycles, which refer to the weight of the laundry when dry.
How much does your laundry weigh?
1 sheet 400-500 g
1 pillowcase 150-200 g
1 tablecloth 400-500 g
1 bathrobe 900-1200 g
1 towel 150-250 g
1 pair of jeans 400-500 g
1 shirt 150-200 g
Washing recommendations
Shirts: use the special Shirts
shirts in different fabrics and colours to guarantee they
receive the best possible care.
Jeans: use the special Jeans
denim garments; turn inside out before washing and use
a liquid detergent.
Baby: use the special Baby
the remove the soiling typically caused by babies, while
removing all traces of detergent from nappies in order to
prevent the delicate skin of babies from suffering allergic
reactions. The cycle has been designed to reduce the
amount of bacteria by using a greater quantity of water
and optimising the effect of special disinfecting additives
added to the detergent. At the end of the wash cycle,
the machine will slowly rotate the drum; to end the cycle
press the START/PAUSE button.
Silk: use the special Silk
garments. We recommend the use of special detergent
which has been designed to wash delicate clothes.
Curtains: use the Silk
be folded and placed inside the bag provided.
Wool: Hotpoint/Ariston is the only washing machine
brand to have been awarded the prestigious Woolmark
Platinum Care endorsement (M.0508) by the Woolmark
Company, which means that all woollen garments may
be washed in the washing machine, even those which
state hand wash only
wash cycle can be used to wash all woollen garments in
the washing machine while guaranteeing optimum
performance.
Duvets: to wash double or single duvets (the weight of
which should not exceed 3,5 kg), cushions or clothes
padded with goose down such as puffa jackets, use the
special Duvets
duvets are placed in the drum with their edges folded
inwards (see figure) and that no more than ¾ of the total
volume of the drum is used. To achieve the best results,
we recommend that a liquid detergent is used and
placed inside the detergent dispenser drawer.
wash cycle. We recommend that
wash cycle. These should
on the label. The Wool
wash cycle to wash
wash cycle for all
wash cycle to remove
wash cycle to wash all silk
* Steam Refresh
This programme refreshes garments by removing bad
odours and relaxing the fibres (1.5 kg, roughly 3 items).
Insert dry items only (that are not dirty) and select
programme "
cycle is completed, so we recommend hanging them to
dry. The "
Moreover, with the "Steam Perfume" laundry balls, your
favourite perfume can be added to your laundry. Place a
few drops of perfume on the sponge contained inside
the laundry ball, close it and insert it into the drum
together with the laundry. Then launch the specific
programme "
be relaxed and fragrant.
Not recommended for wool or silk garments.
Do not add too much perfume to the sponge in order
to avoid it dripping.
Do not add softeners or detergents.
8
". The garments will be damp once the
" programme makes ironing easier.
". At the end of the cycle, garments will
Quilts: to wash quilts with a synthetic outer layer, use
the bag provided and set the wash cycle to Duvets
Bedlinen and towels: use the Bed & Bath cycle
to wash laundry from all over the house; this optimises
fabric softener performance and helps you save time and
energy. We recommend the use of powder detergent.
Stubborn stains: it is wise to treat stubborn stains with
solid soap before washing, and to use the Cottons with
pre-wash cycle.
.
Page 9

Precautions and tips
The machine was designed and constructed in
accordance with international safety regulations. The
following information is provided for safety reasons and
must therefore be read carefully.
General safety
This appliance was designed for domestic use only.
This appliance is not intended for use by persons
(including children) with reduced physical, sensory or
mental capabilities, or lack of experience and
knowledge, unless they have been given supervision
or instruction concerning use of the appliance by a
person responsible for their safety. Children should be
supervised to ensure that they do not play with the
appliance.
Do not touch the machine when barefoot or with wet
or damp hands or feet.
Do not pull on the power supply cable when
unplugging the appliance from the electricity socket.
Hold the plug and pull.
Do not touch the drained water as it may reach
extremely high temperatures.
Never force the porthole door. This could damage the
safety lock mechanism designed to prevent
accidental opening.
If the appliance breaks down, do not under any
circumstances access the internal mechanisms in an
attempt to repair it yourself.
Always keep children well away from the appliance
while it is operating.
If it must be moved, proceed with the help of two or
three people and handle it with the utmost care.
Never try to do this alone, because the appliance is
very heavy.
Before loading laundry into the washing machine,
make sure the drum is empty.
Load balancing system
Before every spin cycle, to avoid excessive vibrations
before every spin and to distribute the load in a uniform
manner, the drum rotates continuously at a speed which
is slightly greater than the washing rotation speed. If, after
several attempts, the load is not balanced correctly, the
machine spins at a reduced spin speed. If the load is
excessively unbalanced, the washing machine performs
the distribution process instead of spinning. To encourage
improved load distribution and balance, we recommend
small and large garments are mixed in the load.
Bag for quilts, curtains and delicate garments
The Aqualtis washing machine makes it easier for you to
wash even the most valuable and delicate garments in
complete confidence thanks to the special bag which
protects the laundry (this is supplied with the machine).
We recommend that the bag is used every time you
wash quilts and padded items with an outer layer made
using synthetic material.
Disposal
Disposing of the packaging materials: observe local
regulations so that the packaging may be re-used.
The European Directive 2002/96/EC relating to Waste
Electrical and Electronic Equipment (WEEE) states
that household appliances should not be disposed of
using the normal solid urban waste cycle. Exhausted
appliances should be collected separately in order to
optimise the cost of re-using and recycling the
materials inside the machine, while preventing
potential damage to the atmosphere and to public
health. The crossed-out dustbin is marked on all
products to remind the owner of their obligations
regarding separated waste collection.
For more information relating to the correct disposal of
household appliances, owners should contact their
local authorities or appliance dealer.
Opening the porthole door manually
In the event that it is not possible to open the porthole
door due to a powercut, and if you wish to remove the
laundry, proceed as follows:
1. remove the plug from the
electrical socket.
2. make sure the water level
inside the machine is lower
than the door opening; if it is
not, remove excess water
using the drain hose,
collecting it in a bucket as
indicated in the figure.
3. remove the cover panel
on the lower front part of the
washing machine (see
overleaf).
4. pull outwards using the
tab as indicated in the figure,
until the plastic tie-rod is
freed from its stop position;
pull downwards until you
hear a click, which
indicates that the door is
now unlocked.
5. open the door; if this is
still not possible repeat the
procedure.
6. reposition the panel,
making sure the hooks are
securely in place before you
push it onto the appliance.
EN
9
Page 10

Care and maintenance
EN
Cutting off the water and electricity
supplies
Turn off the water tap after every wash cycle. This will
limit wear on the hydraulic system in the machine and
help to prevent leaks.
Unplug the appliance when cleaning it and during all
maintenance work.
Cleaning the machine
The outer parts and rubber components of the appliance
can be cleaned using a soft cloth soaked in lukewarm
soapy water. Do not use solvents or abrasives.
Cleaning the detergent dispenser
drawer
To remove the drawer, press
lever (1) and pull the drawer
outwards (2) (see figure).
Wash it under running
water; this procedure should
be repeated frequently.
To access the pre-chamber:
2
1. take off the cover panel on the front of the machine
by first pressing it in the centre and then pushing
downwards on both sides until you can remove it (see
figures);
2. position a container so
that it will collect the water
which flows out
(approximately 1.5 l) (see
figure);
3. unscrew the lid by
rotating it in an anticlockwise direction (see
figure);
Caring for your appliance drum
Always leave the door ajar to prevent unpleasant
odours from forming.
Cleaning the pump
The washing machine is fitted with a self-cleaning pump
which does not require any maintenance. Sometimes,
small items (such as coins or buttons) may fall into the
protective pre-chamber at the base of the pump.
Make sure the wash cycle has finished and unplug the
appliance.
4. clean the inside thoroughly;
5. screw the lid back on;
6. reposition the panel, making sure the hooks are
securely in place before you push it onto the appliance.
Checking the water inlet hose
Check the inlet hose at least once a year. If there are
any cracks, it should be replaced immediately: during
the wash cycles, water pressure is very strong and a
cracked hose could easily split open.
10
Page 11
Trouble shooting
Your washing machine could occasionally fail to work. Before contacting the Technical Assistance Centre
(see Assistance), make sure that the problem cannot be not solved easily using the following list.
Problem:
The washing machine does not
switch on.
The wash cycle does not start.
The washing machine does not fill
with water.
The washing machine door
remains locked.
The machine continuously fills
with water and drains.
The washing machine does not
drain or spin.
The machine vibrates a lot during
the spin cycle.
The washing machine leaks.
The icons corresponding to the
Phase in progress flash rapidly
at the same time as the ON/OFF
Possible causes / Solutions:
The appliance is not plugged into the socket fully, or not enough to make
contact.
There is no power in the house.
The door is not closed properly.
The START/PAUSE button has not been pressed.
The water tap has not been opened.
A delayed start has been set.
The water inlet hose is not connected to the tap.
The hose is bent.
The water tap has not been opened.
There is no water supply in the house.
The pressure is too low.
The START/PAUSE button has not been pressed.
If you have selected the Baby
the wash cycle has finished the machine will slowly rotate the drum; to end
the cycle press the START/PAUSE button or the Easy iron
you have selected the Silk
while the laundry is soaking; to drain the water so that the laundry may be
removed, press the START/PAUSE button or the Easy iron
The drain hose is not fitted at a height between 65 and 100 cm from the
floor (see Installation).
The free end of the hose is under water (see Installation).
If the dwelling is on one of the upper floors of a building, there may be
problems relating to water drainage, causing the washing machine to fill
with water and drain continuously. Special anti-draining valves are available
in shops and help to prevent this inconvenience.
The wall drainage system is not fitted with a breather pipe.
The wash cycle does not include draining: Some wash cycles require the
drain phase to be started manually (see Wash cycles and options).
The Easy iron option is enabled: to complete the wash cycle, press the
START/PAUSE button (Wash cycles and options).
The drain hose is bent (see Installation).
The drainage duct is clogged.
The drum was not unlocked correctly during installation (see Installation).
The machine is not level (see Installation ).
The machine is trapped between cabinets and walls (see Installation).
The load is unbalanced (see Detergents and laundry).
The water inlet hose is not screwed on properly (see Installation).
The detergent dispenser is blocked (to clean it, see Care and
maintenance).
The drain hose is not fixed in place properly (see Installation).
Switch off the machine and unplug it, wait for approximately 1 minute and
then switch it back on again. If the problem persists, contact the Technical
Assistance Service.
cycle or the Easy iron option, when
wash cycle, the machine will end the cycle
indicator light.
There is too much foam.
The washing machine door
The detergent is not suitable for machine washing (it should display the text
for washing machines or hand and machine wash, or the like).
Too much detergent was used.
Perform the manual unlocking procedure (see Precautions and tips).
remains locked.
EN
button. If
button.
Note: To exit Demo mode, press and hold the two ON/OFF and START/PAUSE buttons simultaneously for 3 seconds.
11
Page 12

Assistance
EN
Before calling for Assistance:
Check whether you can solve the problem by yourself (see Trouble shooting);
Restart the wash cycle to check whether the problem has been solved;
If it has not, contact the Authorised Technical Assistance Service.
If the washing machine has been installed or used incorrectly, you will have to pay for the call-out service.
Always request the assistance of authorised technicians.
Please have the following information to hand:
the type of problem;
the appliance model (Mod.);
the serial number (S/N).
The above information can be found on the data plate located on the appliance itself.
12
Page 13

Руководство по установке и
эксплуатации
+15
Русский
AQUALTIS
СТИРАЛЬНАЯ МАШИНА
Содержание
Установка, 14-15
Распаковка и нивелировка
Водопроводное и электрическое подсоединения
Технические характеристики
Описание стиральной машины, 16-17
Консоль управления сенсорное управление
Порядок выполнения цикла стирки, 18
Программы и дополнительные функции, 19
Таблица программ
Дополнительные функции стирки
Стиральные вещества и типы белья, 20
Стиральное вещество
Подготовка белья
Рекомендации по стирке
+15
AQ9D 49 X
Предосторожности и рекомендации, 21
Общие требования по безопасности
Система балансировки белья
Утилизация
Открывание люка вручную
Техническое обслуживание и уход, 22
Отключение воды и электрического тока
Чистка машины
Чистка ячейки стиральных веществ
Уход за барабаном
Порядок чистки насоса
Проверка водопроводного шланга
Неисправности и методы их устранения, 23
Сервисное обслуживание, 24
!
Page 14

Установка
+15
Важно сохранить данное руководство для его
последующих консультаций. В случае продажи,
передачи или переезда проверьте, чтобы данное
руководство сопровождало стиральную машину.
Внимательно прочитайте инструкции: в них
содержатся важные сведения об установке
изделия, его эксплуатации и безопасности.
В пакете с техническим руководством вы найдете,
помимо гарантийного таллона, детали, необходимые
для установки машины.
Распаковка и нивелировка
Снятие упаковки
1. После снятия упаковки со стиральной машины
проверьте, чтобы на ней не было повреждений,
вызванных при перевозке.
В случае обнаружения повреждений немедленно
обратитесь к поставщику, не подключая машину.
2. Снимите 4 винта,
предохраняющие
машину в процессе
перевозки, и распорки,
расположенные в задней
части машины (ñì.
схему).
В случае установки машины на ковер или
ковровое покрытие отрегулируйте ножки таким
образом, чтобы под стиральной машиной оставался
достаточный зазор для вентиляции.
Водопроводное и электрическое
подсоединения
Порядок подсоединения шланга подачи воды
Перед подсоединением водопроводного шланга к
водопроводу дайте стечь воде до тех пор, пока
она не станет прозрачной.
1. Подсоедините шланг к
машине, привинтив его к
специальному крану,
расположенному в
задней верхней части
справа (см. схему).
2. Прикрутите шланг
подачи к
водопроводному крану
холодной воды с
резьбовым отверстием
3/4 газ, (см. схему).
3. Закройте отверстия резиновыми заглушками,
которые вы найдете в пакете.
4. Сохраните все детали. В случае последующей
перевозки стиральной машины, они должны быть
установлены во избежание ее повреждения.
Не разрешайте детям играть с упаковочными
материалами.
Нивелировка
1. Установите стиральную машину на плоском и
прочном полу, не прислоняя ее к стенам или к
мебели.
2. Выровняйте машину
при помощи
регулируемых ножек до
полного выравнивания
(наклон не должен
превышать 2-х
градусов).
Тщательная нивелировка гарантирует стабильность
и устраняет вибрации и шум, в особенности в
процессе отжима.
3. Проверьте, чтобы водопроводный шланг не был
заломлен или сжат.
Водопроводное давление в кране должно быть в
пределах значений, указанных в таблице
Технические данные (см. страницу рядом).
Если длина водопроводного шланга будет
недостаточной, следует обратиться в
специализированный магазин или к
уполномоченному сантехнику.
Никогда не используйте б/у или старые шланги для
подачи воды, а только прилагающиеся к машине.
"
Page 15

Подсоединение сливного шланга
Подсоедините сливной
шланг, не сгибая его, к
сливному трубопроводу
или к сливному патрубку
в стене,
65 - 100 cm
расположенному на
высоте 65 100 см от
пола.
В качестве
альтернативы поместите
конец сливного шланга
в раковину или в ванну,
прикрепив
прилагающуюся
направляющую к крану
(см. схему).
Свободный конец
сливного шланга не
должен быть погружен
в воду.
Не рекомендуется использовать удлинительные
шланги. При необходимости удлинение должно
иметь такой же диаметр, что и оригинальный шланг,
и его длина не должна превышать 150 см.
Электрическое подключение
Перед подсоединением штепсельной вилки изделия
к сетевой розетке необходимо проверить
следующее:
сетевая розетка должна быть заземлена и
соответствовать нормативам;
сетевая розетка должна быть расчитана на
максимальную мощность стиральной машины,
указанную в таблице Технические данные (ñì.
таблицу сбоку);
напряжение электропитания должно
соответствовать значениям, указанным в таблице
Технические данные (см. таблицу сбоку);
сетевая розетка должна быть совместима
штепсельной вилкой машины. В противном
случае необходимо заменить розетку или вилку.
Запрещается устанавливать стиральную машину
на улице, даже под навесом, так как является
чрезвычайно опасным подвергать ее воздействию
дождя и грозы.
Стиральная машина должна быть установлена так,
чтобы доступ к сетевой розетке оставался
свободным.
Не используйте удлинители и тройники.
Сетевой кабель изделия не должен быть согнут
èëè ñæàò.
Замена сетевого кабеля может осуществляться
только уполномоченными техниками.
Внимание! Производитель снимает с себя всякую
ответственность в случае несоблюдения указанных
норм установки и подключения оборудования.
Технические характеристики
Ìîäå ëü
Стр ана-изг отовите ль
Габаритные
размеры
Вместимос ть
Номинальное значение
напряжения
электропитания или
диапазон напр яжения
Условное обозначение
рода электрического тока
или номинальная частота
переменного тока
Kлас с зашиты от
поражения
электрическим током
Гидравлические
параметры
Скорость отжима
Kонтрольные программы
согласно нормативу
EN 60456
В случае необходимости получения информации по сертификатам
соотв етствия или получения копий сертификатов с оответствия на
данную технику, Вы можете отправить запрос по электронному
адресу cert.rus@indesit.com.
Дату производств а
данной техники можно
получить из серийного
номера, расположенного
под штрих-кодом (S/N
XXXXXXXXX), следующим
образом
Степень защиты от попадания тв ердых частиц и влаги,
обеспечиваемая защитной оболочкой, за исключением
низковольтного оборудования, не имеющего защиты от влаги
IPX04
Kлас с
энергопотребления
AQ9D 49 X
Италия
ши р и н а 5 9 , 5 с м
высота 85 см
глубина 64,5 см
1 - 9 êã
220-240 V ~
50 Hz
Kласс защиты I
max давление 1 Мпа (10 бар)
min давление 0,05 Мпа (0,5 бар)
объем барабана 62 л
äî 1400 îá/ìèí
программа ;
температура 60° С; при загрузке
до 9 кг.
Данное изделие соответствует
следующим Директивам
Европейского Сообщества:
- 2004/108/СЕ (Электромагнитная
совместимость);
- 2006/95/CE (Низкое апряжение)
- 2002/96/CE
- 1-ая цифра в S/N соответствует
последней цифре года,
- 2-ая и 3-я цифры в S/ N порядковому номеру месяца г ода,
- 4-àÿ è 5-àÿ öèô ðû â S/ N - äå íü
:
)
+15
#
Page 16

Описание стиральной машины
+15
РУЧКА ЛЮКА
ПЛИНТУС
ËÞÊ
ËÞÊ
РЕГУЛИРУЕМЫЕ НОЖКИ
Для открывания люка
всегда используйте
специальную ручку (ñì.
схему).
ПАНЕЛЬ
УПРАВЛЕНИЯ
1. ячейка
предварительной стирки:
используйте стиральный
1
2
непосредстввенно перед пуском программы стирки.
ячейка для добавок: для ополаскивателя или
жидких добавок. Рекомендуется никогда не
превышать максимальный уровень, указанный на
решетке дозатора и разбавлять концентрированные
ополаскиватели.
порошок.
2. ячейка для основной
стирки: используйте
стиральный порошок или
жидкое стиральное
вещество. В последнем
случае рекомендуется
залить его
ДОЗАТОР СТИРАЛЬНОГО ВЕЩЕСТВА
Дозатор находится внутри
машины и доступен через
люк.
Описание дозировки
стиральных веществ
смотрите в разделе
Стиральные вещества
и белье.
Примечание: наклейте
на дозатор стирального
вещества наклейку с
перечнем программ и дополнительных функций.
Наклейка находится в пакете вместе с
настоящим техническим руководством.
$
Консоль управления сенсорное управление
Для изменения настроек
слегка дотроньтесь до
символа в сенсорной зоне
(сенсорное управление),
как показано на схеме.
Режим ожидания
Настоящая стиральная машина отвечает требованиям
новых нормативов по экономии электроэнергии,
укомплектована системой автоматического
отключения (режим сохранения энергии),
включающейся через несколько минут простоя
машины. Нажмите один раз кнопку ON/OFF
подождите, пока машина вновь включится.
è
Page 17

Консоль управления сенсорное
управление
Ручка выбора
программ
M2
M1
Кнопка ОТЖИМ
Кнопка ТЕМПЕРАТУРЫ
Дисплей
Кнопка с индикатором
START/PAUSE
Индикатор
ECO
+15
Символы
ФАЗЫ
СТИРКИ
Кнопка с
индикатором
ON/OFF
Кнопка с индикатором ON/OFF: нажмите кнопку один
раз для включения или выключения машины. Зеленый
индикатор показывает, что машина включена. Для
выключения стиральной машины в процессе стирки
необходимо держать нажатой кнопку, примерно 3
секунды. Короткое или случайное нажатие не приведет
к отключению машины. В случае выключения машины в
процессе стирки текущий цикл отменяется.
Рукоятка ПРОГРАММЫ: может вращаться в обе стороны.
Для выбора нужной программы смотрите «Таблица
программ». В процессе стирки рукоятка не вращается.
Кнопки M1-M2-M3: держите нажатой одну из этих кнопок
для ввода в память цикла и персонализированных вами
программ. Для включения цикла, ранее введенного в
память, нажмите соответствующую кнопку.
Кнопка
или исключения нагрева. Заданное значение
показывается на дисплее сверху (см. Порядок
выполнения цикла стирки).
Кнопка
исключения отжима. Заданное значение показывается на
дисплее сверху (см. Порядок выполнения цикла стирки).
Кнопка
программирования задержки пуска выбранной программы.
Заданное значение задержки показывается на дисплее
сверху (см. Порядок выполнения цикла стирки).
Кнопки ДОПОЛНИТЕЛЬНЫЕ ФУНКЦИИ: нажмите для
выбора имеющихся дополнительных функций. Индикатор
выбранной дополнительной функции загорается (ñì.
Порядок выполнения цикла стирки).
Символы ФАЗЫ СТИРКИ: загораются для
визуализации последовательности выполнения цикла
(Стирка
Окончательный слив ).
Надпись
Кнопка с индикатором START/PAUSE: когда зеленый
индикатор редко мигает, нажмите кнопку для пуска
цикла стирки. После пуска цикла индикатор перестает
ТЕМПЕРАТУРЫ: нажмите для изменения
ОТЖИМ: нажмите для изменения или
ОТЛОЖЕННЫЙ ЗАПУСК: нажмите для
Ïoëockaíèe - Отжим -
загорается по завершении цикла.
M3
ДОПОЛНИТЕЛЬНЫЕ
Кнопки
ФУНКЦИИ
Кнопка
ОТЛОЖЕННЫЙ
ЗАПУСК
Индикатор
БЛОКИРОВКА ЛЮКА
мигать. Для прерывания стирки вновь нажмите кнопку,
индикатор замигает оранжевым цветом. Если
индикатор «Блокировка люка»
открыть люк. Для возобновления стирки с момента,
когда она была прервана, вновь нажмите эту кнопку.
Индикатор
заблокирован. Для открывания люка необходимо
прервать цикл (см «Порядок выполнения цикла стирки»).
Кнопка с индикатором
включения или отключения блокировки консоли
управления держите кнопку нажатой примерно 2 секунды.
Включенный индикатор означает, что консоль управления
заблокирована. Таким образом программа не может быть
случайно изменена, особенно если в доме дети.
Индикатор
стирки получается экономия электроэнергии не менее чем
на 10%. Кроме того перед тем как машина переключится в
режим сохранения энергии, символ загорится на несколько
секунд. При выключенной машине примерная экономия
электроэнергии составляет примерно 80%.
ВЫБОР ЯЗЫКА
При первом включении машины на дисплее мигает
первый язык. Напротив 3 кнопок справа на дисплее
показываются символы «
автоматически каждые 3 секунды или при помощи кнопок
рядом с символами
подтвердите выбранный язык через 2 секунды. Если Вы не
нажмете никаких кнопок, через 30 секунд возобновиться
автоматическая смена языков.
Смена языка возможна только при выключенной машине.
При одновременном нажатии кнопок температуры
отжим + запуск с задержкой на 5 секунд кроме
короткого звукового сигнала на дисплее мигает выбранный
язык. При помощи кнопок рядом с символами
производится смена языка. При помощи кнопки рядом с
символом «ÎÊ» подтвердите выбранный язык через 2
секунды. Если Вы не нажмете никаких кнопок, через 30
секунд на дисплее показывается выбранный ранее язык.
БЛОКИРОВКА ЛЮКА: показывает, что люк
ЗАЩИТА ОТ ЛЕТЕЙ: для
загорается, когда при изменении параметров
», «ÎÊ» è «V». Языки сменяются
è V. При помощи кнопки «ОК»
погас, можно
Кнопка с
индикатором
ЗАЩИТА ОТ
ЛЕТЕЙ
+
è V
%
Page 18

Порядок выполнения цикла
стирки
+15
ПРИМЕЧАНИЕ: при первом использовании
стиральной машины выполните один цикл стирки
без белья, но со стиральным веществом, выбрав
программу хлопок 90° без предварительной стирки.
1. AПОРЯДОК ВКЛЮЧЕНИЯ МАШИНЫ. Нажмите
кнопку
секунду, и на дисплее появится надпись
AQUALTIS. Затем останется включенным
индикатор кнопки
START/PAUSE.
2. ВЫБОР ПРОГРАММЫ. Поверните РУКОЯТКУ
ПРОГРАММЫ вправо или влево вплоть до выбора
нужной программы. Название программы появится на
дисплее. Вместе с программой будет показана
температура и скорость отжима, которые могут быть
изменены. На дисплее показывается
продолжительность данного цикла.
3. ПОРЯДОК ЗАГРУЗКИ БЕЛЬЯ. Откройте люк машины.
Загрузите в барабан белье, не превышая
максимальный допустимый вес, указанный в таблице
программ на следующей странице.
4. ДОЗИРОВКА СТИРАЛЬНОГО ВЕЩЕСТВА. Выньте
дозатор и поместите стиральное вещество в
специальные ячейки, как описано в «Описание
стиральной машины».
5. ЗАКРОЙТЕ ЛЮК.
6. ПЕРСОНАЛИЗИРОВАННЫЕ ЦИКЛЫ СТИРКИ.
Нажмите специальные кнопки на консоли управления:
скорости отжима.
Машина автоматически показывает на дисплее
максимальные температуру и скорость отжима,
предусмотренные для выбранной программы, или
последние выбранные значения, если они
совместимы с выбранной программой. При помощи
кнопки
температуру вплоть до стирки в холодной воде
OFF. При помощи кнопки
уменьшить скорость отжима вплоть до его
исключения OFF. При еще одном нажатии этих
кнопок вернутся максимальные допустимые
значения.
Исключение: при выборе программы ХЛОПОK
температура может быть увеличена до 90°.
Программирование пуска с задержкой.
Для программирования задержки пуска
выбранной программы нажмите соответствующую
кнопку вплоть до получения нужного значения
задержки. В процессе настройки показывается
время задержки и сообщение «Haч через:» и
мигает символ
задержкой на дисплее показывается символ
после чего на дисплее вновь будет показана
продолжительность выбранной программы с
сообщением «окончaние:» и продолжительность
цикла. При однократном нажатии кнопки ЗАПУСК
С ЗАДЕРЖКОЙ на дисплее показывается ранее
заданное время задержки.
. Все индикаторы загорятся на 1
, и будет мигать индикатор
Порядок изменения температуры и/или
можно постепенно уменьшить
можно постепенно
. После настройки запуска с
После запуска на дисплее показывается
сообщение «Haч через:» и время задержки. По
истечении заданного времени задержки машина
запускает цикл, и на дисплее показывается
сообщение «окончaние:» и время, остающееся
до завершения цикла.
Для отмены пуска с задержкой нажмите кнопку
несколько раз до тех пор, пока на дисплее не
появится надпись OFF; символ
Изменение параметров цикла.
Нажмите кнопку для включения дополнительной
функции. На дисплее появится название функции, и
загорится индикатор соответствующей кнопки.
Вновь нажмите кнопку для отмены
дополнительной функции. На дисплее появится
название функции и надпись OFF, индикатор
погаснет.
Если выбранная дополнительная функция
несовместима с выбранной программой, замигает
соответствующий индикатор и включится
звуковой сигнал (3 раза), функция не будет
включена.
Если выбранная функция является несовместимой с
другой, ранее заданной дополнительной функцией,
будет мигать индикатор первой выбранной функции, и
будет включена только вторая дополнительная
функция, индикатор включенной функции будет
гореть, не мигая.
Дополнительные функции могут изменить
рекомендуемую загрузку машины и/или
продолжительность цикла.
7. ПУСК ПРОГРАММЫ. Нажмите кнопку START/PAUSE.
Соответствующий индикатор загорится, и люк машины
заблокируется (загорится индикатор ЛЮК
ЗАБЛОКИРОВАН
по мере выполнения программы для визуализации
текущей фазы стирки. Для изменения текущей
программы, прервите цикл, нажав кнопку START/
PAUSE, затем выберите нужный цикл и вновь нажмите
кнопку START/PAUSE. Чтобы открыть люк в процессе
выполнения цикла нажмите кнопку START/PAUSE;
если индикатор БЛОКИРОВКА ЛЮКА
можно открывать люк. Вновь нажмите кнопку START/
PAUSE для возобновления программы с момента,
когда она была прервана.
8. ЗАВЕРШЕНИЕ ПРОГРАММЫ. Сигнализируется
включением надписи END. Люк можно открыть
сразу же. Если индикатор START/PAUSE мигает,
нажмите кнопку для завершения цикла. Откройте
люк, выгрузьте белье и выключите машину.
Для отмены текущего цикла держите нажатой кнопку
до тех пор, пока цикл не прервется и машина
,
выключится.
). Символы фаз стирки загораются
погаснет.
погаснет,
&
Page 19

Программы и
дополнительные функции
Таблица программ
Ñèì-
Îïèñ àíèå ïð îãð àììû
âîë
Пр огр ам мы д ля х /б бел ья
ХЛОПОK: с предварительной стиркой (Добав ить
стиральное вещество в специальную ячейку).
ХЛОПОK (1): очень грязное белое и прочное цветное белье.
ХЛОПОK (2): очень грязное белое и деликатное цветное белье.
ХЛОПОK цветные ткaни ( 3)
Рубашки
ДЖИНСЫ
Специальные программы
Детское Белье: очень грязное деликатное цветное белье.
Ñèíò eòèka синтетические изделия
* Осве жающая пар овая обр аботка
Постельное Белье постельное белье и полотенца.
Ïóx /Ïe po : изделия , набитые утиным пухом.
Øe ë k : изделия из шелка, вискозы и нижнее белье.
Øe ð c ò ü : шерсть, кашемир и т.д.
Ìèkc 30: быстрое осв ежение малогрязного белья (не для
шерсти, шелка и изделий, требующих ручной стирки).
Частичные прогр аммы
Ïoë ock aíèe
Отжим
Ñëèâ
(*) Примечание: примерно через 10 минут после ЗАПУСКА цикла в зависимости от веса загруженного белья, машина расчитает и покажет на дисплее
время, остающееся до завершения программы.
Для всех институтов тестирования:
1) Программы управления в соответствии с Директивой EN 60456: задайте программу
2) Длинная программа для х/б белья: задайте программу
3) Короткая программа для х/б белья: задайте программу
(см. страницу ря дом).
с температурой 40°C.
с температурой 40°C.
Ìàêñ .
òåìï.
(°C)
90° 1400
60°
(Max. 90° )
40° 1400 -
40° 1400 -
40° 600 -
40° 800 -
40° 800 -
60° 800 -
60° 1400 -
30° 1200 -
30° 0 -
40° 600 -
30° 800 -
Макс .
Скорость
(обор ото
в минуту)
1400 -
---- -1,5
-1400- -
-1400- - - 9
-0-- - 9
Стир альные в ещества
Предв ар-
ительная
стирка
с температурой 60°C.
Ñòèð êà
ll l
ll
ll
ll
ll
ll
ll
ll
ll
ll
ll
ll
ll
Îïîë àñêè-
ватель
l
Ìàêñ .
çàãð óçêà
(êã)
9
9
9
9
2
4
4
4
9
3,5
2
2
3,5
9
Продолж-
èòòü
цикла
отображается на дисплее.
продолжительность программы стирки
Дополнительные функции стирки
Дезинфицирующая паровая обработка
При выборе этой функции повышается
эффективность стирки за счет выделения пара,
который в процессе цикла удаляет также возможные
бактерии из тканей, в то же время стирая их.
Загрузите белье в корзину, выберите совместимую
программу и выберите функцию
.
! В процессе работы стиральной машины люк может
запотеть из-за парообразования.
! Функция несовместима с программами
,
(90°C), , , , , , , , , , .
Легкая Глажка
При выборе этой функции стирки и отжим
изменяются таким образом, чтобы сократить
образование складок. По завершении цикла
стиральная машина выполняет медленное
вращение барабана, индикаторы Легкая Глажка и
START/PAUSE мигают. Для завершения цикла
нажмите кнопку START/PAUSE или кнопку Легкая
Глажка. В программе Шелк
машина завершает
цикл без слива воды, и индикатор Легкая Глажка
мигает. Для слива воды и выгрузки белья
необходимо нажать кнопку START/PAUSE или
кнопку Легкая Глажка.
Функция несовместима с программами
, , ,
, , .
Быстрая Cтирка
При выборе этой функции продолжительность
программы сокращается на 30%-50% в зависимости
от выбранной программы, обеспечивая в то же
время экономию воды и электроэнергии.
Используйте эту программу для несильно
загрязненного белья.
Функция несовместима с программами
, , ,
, , , , , , .
Доп. Полоскание
При выборе этой функции повышается
эффективность ополаскивания, обеспечивая
максимальное удаление остатков стирального
вещества. Эта функция особенно удобна для людей
с кожей, чувствительной к стиральным веществам.
Рекомендуется использовать эту функцию в
случае полной загрузки машины или в случае
использования большой дозы стирального
вещества.
Функция несовместима с программами
, , ,
.
+15
'
Page 20

Стиральные вещества и типы
белья
+15
Стиральное вещество
Выбор и доза стирального вещества зависят от типа белья
(х/б, шерсть, шелк...), от цвета белья, от температуры
стирки, от степени загрязнения и от жесткости воды.
Правильная дозировка стирального вещества это
экономия и охрана окружающей среды: хотя
стиральные вещества и являются биоразлагаемыми,
они содержат вещества, пагубно влияющие на природу.
Рекомендуется:
использовать стиральные порошки для белых х/б
вещей и для предварительной стирки.
использовать жидкие стиральные вещества для
деликатных х/б вещей и для всех программ с
низкой температурой.
использовать деликатные жидкие стиральные
вещества для стирки шелковых и шерстяных вещей.
Стиральное вещество помещается перед началом
стирки в специальную ячейку или в дозатор,
который помещается непосредственно в барабан. В
этом случае нельзя выбрать цикл Хлопок с
предварительной стиркой.
Не используйте стиральные вещества для ручной
стирки так как они образуют слишком много пены.
Подготовка белья
Тщательно расправьте белье перед его загрузкой
в барабан.
Разделите белье по типу ткани (см. символ на
этикетке) и по цвету, обращая внимание на
разделение цветных и белых вещей.
Выньте из карманов все предметы и проверьте
пуговицы;
Не превышайте значения, указанные в «Таблице
программ», указывающие вес сухого белья:
Сколько весит белье?
1 простыня 400-500 ã
1 наволочка 150-200 ã
1 скатерть 400-500 ã
1 банный халат 900-1200 г
1 полотенце 150-250 ã
1 пара джинс 400-500 ã
1 рубашка 150-200 ã
ДЖИНСЫ: используйте специальную программу
ДЖИНСЫ
перед стиркой выверните вещи наизнанку и
используйте жидкое моющее вещество.
Baby: используйте специальную программу Baby
для удаления типичных детских загрязнений и
полного удаления стирального вещества во
избежание аллергической реакции деликатной детской
кожи. Данный цикл расчитан на сокращение
микробиологической обсемен¸нности благодаря
использованию большего объема воды и оптимизации
воздействия специальных дезинфицирующих добавок
стирального вещества. По завершении стирки машина
продолжит медленно вращать барабан. Для остановки
цикла нажмите кнопку START/PAUSE.
Øeëk: используйте специальную программу «Шелк»
для стирки всех шелковых вещей.
Рекомендуется использовать специальное
стиральное вещество для деликатных тканей.
Занавески: Используйте программу «Шелк»
Рекомендуется свернуть занавески и поместить в
прилагающийся мешок.
Шерсть: Машина марки Hotpoint/Ariston
единственная получила престижный знак Woolmark
Platinum Care (M.0508) от Компании The Woolmark
Company, который сертифицирует машинную стирку
всех шерстяных изделий, даже тех, на этикетках
которых указано «только ручная стирка»
программе «Шерсть» можно надежно и эффективно
стирать любые шерстяные изделия.
Ïóx/Ïepo: для стирки вещей, набитых утиным пухом,
таких как двойные или одинарные пуховые одеяла
(весом не более 3,5 кг), подушки, куртки используйте
специальную программу Пуx/Пepo
загрузить пуховики в барабан машины, сложив края
внутрь (см. схему) и не превышать ¾ объема барабана.
Для оптимальной стирки рекомендуется использовать
жидкое стиральное вещество, заливаемое в дозатор
стиральных веществ.
для всех вещей из ткани Denim;
.
. Ïî
. екомендуется
Рекомендации по стирке
* Освежающая паровая обработка: Данная
программа освежает вещи, удаляя неприятные запахи и
делая ткани более мягкими (1,5 кг, примерно 3 вещи).
Загрузите только сухие вещи (не грязные) и выберите
программу «
слегка влажным. Рекомендуется повесить его
досушиваться. Программа «
Кроме добавив профумированные шарики «Steam
Profumo, можно придать вещам Ваш любимый аромат.
Поместите несколько капель духов на губку внутри
шарика, закройте его, поместите его в барабан вместе с
вещами и запустите соответствующую программу
«
». По завершении цикла вещи будут мягкими и
душистыми.
Не рекомендуется для шерстяных или шелковых вещей.
Не мочите губку излишним количеством духов во
избежание их утечки.
Не добавляйте ополаскиватель или стиральное вещество.
Ðóáaøkè: используйте специальную программу
Рубaшkи
ткани и цвета для их максимальной сохранности.
». По завершении цикла белье остается
» облегчает глажку.
для стирки рубашек из разных типов
Стеганные вещи: для стирки стеганных вещей на
синтетической подкладке используйте специальный
прилагающийся мешок и выберите программу Пуx/
Пepo
Постельное белье и полотенца: данная
стиральная машина позволяет стирать белье для
всей семьи по единой программе Bed & Bath
оптимизирующей использование ополаскивателя и
позволяющей сэкономить время и электроэнергию.
Рекомендуется использовать стиральный порошок.
Трудновыводимые пятна: трудновыводимые
пятна перед стиркой в машине следует обработать
твердым мылом и стирать по программе Х/б белье с
предварительной стиркой.
.
,
Page 21

Предосторожности и
рекомендации
Стиральная машина спроектирована и изготовлена в
соответствии с международными нормативами по
безопасности. Необходимо внимательно прочитать
настоящие предупреждения, составленные в целях
вашей безопасности.
Общие требования к безопасности
Данное изделие предназначено исключительно для
домашнего использования.
Не разрешайте пользоваться машиной лицам
(включая детей) с ограниченными физическими,
сенсорными, умственными способностями и не
обладающих достаточными знаниями и опытом,
если только они не пользуются машиной под
наблюдением и после инструктажа со стороны лиц,
ответственных за их безопасность. Не разрешайте
детям играть с машиной.
Не прикасайтесь к изделию влажными руками,
босиком или с мокрыми ногами.
Не тяните за сетевой кабель для отсоединения
штепсельной вилки изделия из сетевой розетки,
возьмитесь за вилку рукой.
Не прикасайтесь к сливаемой воде, так как она
может быть очень горячей.
Категорически запрещается пытаться открыть люк
силой: это может привести к повреждению
защитного механизма, предохраняющего от
случайного открывания машины.
В случае неисправности категорически запрещается
открывать внутренние механизмы изделия с целью
их самостоятельного ремонта.
Следите, чтобы дети не приближались к
работающей стиральной машине.
Перемещать машину следует осторожно, вдвоем
или втроем. Никогда не перемещайте машину в
одиночку, так как машина очень тяжелая.
Перед помещением в стиральную машину белья
проверьте, чтобы барабан был пуст.
Система балансировки белья
Перед каждым отжимом во избежание чрезмерных
вибраций и для равномерного распределения белья в
барабане машина производит вращения со скоростью,
слегка превышающей скорость стирки. Если после
нескольких попыток белье не будет правильно
сбалансировано, машина произведет отжим на
меньшей скорости по сравнению с предусмотренной. В
случае чрезмерной разбалансировки машина
выполнит распределение белья вместо отжима. Для
оптимизации распределения белья и его правильной
балансировки рекомендуется перемешать мелкое
белье с крупным.
Мешок для стеганных одеял, занавесок и
деликатного белья
Благодаря специальному мешку, прилагающемуся к
машине, стиральная машина Aqualtis дает возможность
стирать также самые деликатные и ценные вещи с
гарантией их полной сохранности. Рекомендуется
использовать мешок каждый раз для стирки стеганных и
пуховых вещей на синтетической подкладке.
Утилизация
Уничтожение упаковочных материалов: соблюдайте
местные нормативы с целью вторичного
использования упаковочных материалов.
Согласно Европейской Директиве 2002/96/СЕ
касательно утилизации электронных и
электрических электроприборов электроприборы не
должны выбрасываться вместе с обычным
городским мусором. Выведенные из строя приборы
должны собираться отдельно для оптимизации их
утилизации и рекуперации составляющих их
материалов, а также для безопасности окружающей
среды и здоровья. Символ «зачеркнутая мусорная
корзина», имеющийся на всех приборах, служит
напоминанием об их отдельной утилизации.
За более подробной информацией о правильной
утилизации бытовых электроприборов пользователи
могут обратиться в специальную государственную
организацию или в магазин.
Открывание люка вручную
Если по причине отключения электроэнергии
невозможно открыть люк машины, чтобы выгрузить
чистое белье, действуйте следующим образом:
1. выньте штепсельную
вилку машины из сетевой
розетки.
2. проверьте, чтобы
уровень воды в машине
был ниже отверстия люка.
В противном случае
слейте излишек воды
через сливную трубу в
ведро, как показано на
рисунке.
3. снимите переднюю
панель стиральной
машины (см. схему ниже).
4. потяните наружу
язычок, показанный на
схеме, вплоть до
освобождения
пластикового
блокировочного винта.
Затем потяните его вниз,
пока не услышите
щелчок, что означает
разблокировку люка.
5. откройте люк. Если это
все еще невозможно,
повторите
вышеописанную
операцию.
6. установите на место
переднюю панель,
проверив перед ее
прикреплением к машине, чтобы крюки вошли в
соответствующие петли.
+15
Page 22

Техническое обслуживание и уход
+15
Отключение воды и электрического
тока
Перекрывайте водопроводный кран после каждой
стирки. Таким образом сокращается износ
водопроводной системы машины и сокращается
риск утечек.
Выньте штепсельную вилку машины из сетевой
розетки перед началом чистки и технического
обслуживания стиральной машины.
Чистка машины
Для чистки наружных и резиновых частей
стиральной машины использовать тряпку,
смоченную теплой водой с мылом. Не используйте
растворители или абразивные чистящие средства.
Чистка ячейки стиральных веществ
Чтобы вынуть дозатор,
нажмите на язычок (1) и
вытащите дозатор (2) (ñì.
рисунок).
Промойте ячейку под
струей воды. Эта
операция должна
выполняться регулярно.
Для доступа к кожуху:
2
1. снимите переднюю панель стиральной машины,
нажав в центре, затем потяните ее вниз за края и
снимите ее (см. схемы).
2. подставьте емкость для
слива воды (примерно 1,5
литра) (ñì. рисунок).
3. отвинтите крышку,
повернув ее против
часовой стрелки (ñì.
схему);
4. тщательно прочистите кожух внутри;
5. завинтите крышку на место;
6. установите на место переднюю панель, проверив
перед ее прикреплением к машине, чтобы крюки
вошли в соответствующие петли.
Уход за барабаном
После использования стиральной машины всегда
следует оставлять люк полуоткрытым во
избежание образования неприятных запахов в
барабане.
Порядок чистки насоса
Стиральная машина оснащена самочистящимся
насосом, не нуждающимся в техническом
обслуживании. Тем не менее мелкие предметы
(монеты, пуговицы) могут упасть за кожух,
предохраняющий насос, расположенный в его
нижней части.
Проверьте, чтобы цикл стирки завершился, и
выньте штепсельную вилку из сетевой розетки.
Проверка водопроводного шланга
Проверяйте шланг подачи воды не реже одного
раза в год. При обнаружении трещин или разрывов
шланга замените его: в процессе стирки сильное
водопроводное давление может привести к
внезапному отсоединению шланга.
Page 23

Неисправности и методы
их устранения
Если ваша стиральная машина не работает. Прежде чем обратиться в Центр Сервисного обслуживания
(см. Сервисное обслуживание), проверьте, можно ли устранить неисправность, следуя рекомендациям,
приведенным в следующем перечне.
Неисправности:
Стиральная машина не
включается.
Цикл стирки не запускается.
Стиральная машина не заливает
воду.
Люк машины остается
заблокированным.
Стиральная машина непрерывно
заливает и сливает воду.
Машина не сливает воду или не
отжимает белье.
Возможные причины / Методы устранения:
Штепсельная вилка не соединена с сетевой розеткой или отходит и не
обеспечивает контакта.
В доме отключено электричество.
Люк плохо закрыт.
Не была нажата кнопка START/PAUSE.
Перекрыт водопроводный кран.
Был запрограммирован запуск с задержкой.
Водопроводный шланг не подсоединен к крану.
Шланг согнут.
Перекрыт водопроводный кран.
В доме нет воды.
Недостаточное водопроводное давление.
Не была нажата кнопка START/PAUSE.
При выборе цикла Baby
Глажка
медленное вращение барабана; для завершения цикла нажмите
кнопку START/PAUSE или кнопку Легкая Глажка
программы Шeлk
барабана. Для слива воды и выгрузки белья необходимо нажать
кнопку START/PAUSE или кнопку Легкая Глажка
Сливной шланг не находится на высоте 65 100 см. от пола (ñì.
«Установка»).
Конец сливного шланга погружен в воду (см. «Установка»).
Если ваша квартира находится на последних этажах здания, может
наблюдаться «сифонный эффект», поэтому стиральная машина
производит непрерывный залив и слив воды. Для устранения этой
аномалии в продаже имеются специальные клапаны «антисифоны».
Настенное сливное отверстие не оснащено вантузом для выпуска воздуха.
Выбранная программа не предусматривает слив воды: для некоторых
программ необходимо включить слив вручную (см. «Программы и
дополнительные функции»).
Включена дополнительная функция «Легкая Глажка»: для
завершения программы нажмите кнопку START/PAUSE
(см. «Программы и дополнительные функции»).
Сливной шланг перегнулся (см. «Установка»).
Засорен сливной трубопровод.
по завершении цикла стиральная машина производит
или дополнительной функции Легкая
. При выборе
машина завершает цикл, не сливая воду из
.
+15
Стиральная машина сильно
вибрирует в процессе отжима.
Утечки воды из стиральной
машины.
Символы «текущей фазы» часто
мигают одновременно с индикатором
ON/OFF.
В процессе стирки образуется
слишком обильная пена.
Люк машины остается
заблокированным.
Примечание: для выхода из режима «Демо» нажмите одновременно на 3 сек. две кнопки «ON/OFF» è «START/
PAUSE»
.
В момент установки стиральной машины барабан был разблокирован
неправильно (см. «Установка»).
Стиральная машина установлена неровно (см. «Установка»).
Машина касается к стены или мебели (см. «Установка»).
Белье в барабане несбалансировано (см. «Стиральные вещества и типы белья»).
Плохо привинчен водопроводный шланг (см. «Установка»).
Засорен дозатор стирального вещества (порядок его чистки см.
«Техническое обслуживание и уход»).
Сливной шланг непрочно закреплен (см. Установка).
Выключите машину и выньте штепсельную вилку из сетевой розетки,
подождите 1 минуту и вновь включите машину. Если неисправность
не устраняется, обратитесь в Центр Сервисного обслуживания.
Стиральное вещество непригодно для стирки в стиральной машине
(на упаковке должно быть указано «для стирки в стиральной
машине», «для ручной и машинной стирки» или подобное).
В дозатор было помещено чрезмерное количество стирального вещества.
Выполните разблокировку вручную (см. «Предосторожности и
рекомендации»).
!
Page 24

Сервисное
обслуживание
+15
Перед тем, как обратиться в Авторизованный Сервисный Центр:
Проверьте, можно ли устранить неисправность самостоятельно (см. «Неисправности и методы их
устранения);
Вновь запустите программу для проверки исправности машины;
В противном случае обратитесь в уполномоченный Центр Сервисного обслуживания.
В случае неправильной установки машины или ее неправильного использования вызов специалиста из
Сервиса должен быть оплачен;
Не пользуйтесь услугами лиц, не уполномоченных производителем.
При обращении в Авторизованный Сервисный Центр необходимо сообщить:
тип неисправности;
модель изделия (Мод.);
серийный номер (S/N).
Эти данные вы найдете на паспортной табличке, расположенной на изделии.
Производитель: Indesit Company
Виале А. Мерлони 47, 60044, Фабриано (АН), Италия
Импортер: ООО “Индезит ÐÓÑ”
С вопросами (в России) до 01.01.2011: Россия, 129223, Москва, Проспект Мира, ВВЦ, пав. 46
обращаться по адресу: ñ 01.01.2011: Россия, 127018, Москва, ул. Двинцев, дом 12, корп. 1
"
Page 25

²нструкц³я з монтажу та
експлуатац³¿
UK
Укра¿нська
AQUALTIS
AQ9D 49 X
ПРАЛЬНА МАШИНА
Çì³ñò
UK
Встановлення, 26-27
Розпакування ³ вир³внювання
П³дключення води й електроенерг³¿
Технiчнi данi
Опис машини, 28-29
Панель команд з сенсорним керуванням
Як зд³йснювати цикл прання, 30
Програми й опц³¿, 31
Таблиця програм
Опц³¿ прання
Пральн³ засоби ³ б³лизна, 32
Зас³б для прання
П³дготовка б³лизни
Поради з прання
Запоб³жн³ заходи та поради, 33
Загальна безпека
Система балансування завантаження
Утил³зац³я
Ручне в³дкривання дверцят люку
Техн³чне обслуговування та догляд, 34
В³дключення води й електричного живлення
Миття машини
Чистка касети для миючих засоб³в
Догляд за барабаном для б³лизни
Чищення насосу
Стеження за шлангом для подач³ води
Несправност³ та засоби ¿х усунення, 35
Допомога, 36
25
Page 26

Встановлення
UK
Необх³дно збер³гати дану брошуру, щоб мати
можлив³сть проконсультуватися з нею у будь-який
момент. У випадку продажу, передач³ або пере¿зду,
переконайтеся у тому, що вона залишаºться разом
³з пральною машиною
Уважно вивч³ть ³нструкц³ю: в н³й м³ститься важлива
³нформац³я про встановлення, використання та
безпеку.
У пакет³ з ³нструкц³ºю ви знайдете, окр³м гарант³¿,
докладну ³нформац³ю для встановлення.
Розпакування ³ вир³внювання
Розпакування
1. Розпакувавши пральну машину, перев³рте ¿¿ на
наявн³сть пошкоджень п³д час транспортування.
Якщо так³ º, не виконуйте нiяких пiдключень та
негайно зверн³ться до постачальника.
2. Видал³ть 4 запоб³жних
гвинти для
транспортування ³
в³дпов³дну розп³рну
деталь, розташовану
ззаду ( див. малюнок).
У випадку встановлення машини на килимовому
покритт³ або килимах, н³жки необх³дно
в³дрегулювати таким чином, щоб гарантувати п³д
пральною машиною необх³дний прост³р для
вентиляц³¿.
П³дключення води й електроенерг³¿
Контроль шланга для подач³ води
До п³дключення шланга подач³ води до
водопроводу, злийте деяку к³льк³сть води, доки
вона не йтиме чистою.
1. П³дключ³ть шланг
подач³ води до машини,
п³дºднавши його до
виходу на задньому боц³
угор³ праворуч (äèâ.
малюнок).
3. Закрийте отв³р пробками з пластмаси, що
м³стяться у пакет³.
4. Збер³гайте вс³ детал³; якщо пральна машина маº
перевозиться, вони знову можуть бути потр³бними,
щоб уникнути внутр³шн³х пошкоджень.
Забороняйте дiтям гратися з упаковками.
Вир³внювання
1. Встанов³ть пральну машину на плоск³й та тверд³й
п³длоз³, не притуляючи ¿¿ до ст³н або мебл³в.
2. Компенсуйте
нер³вност³, в³дкручуючи
або вкручуючи н³жки,
доки машина не стане
горизонтально (вона не
повинна в³дхилятися
б³льш н³ж на 2 градуси).
2. П³дключ³ть трубу для
подач³ води,
прикрутивши ¿¿ до крану
холодно¿ води з р³зьбою
¾ (див. малюнок)
3. Зверн³ть увагу, щоб шланг не мав згин³в та
утиск³в.
Тиск води в кран³ маº в³дпов³дати значенням у
таблиц³ Техн³чних даних (див. стор³нку поруч).
Якщо довжини шланга для води не вистачаº,
зверн³ться у спец³ал³зовану крамницю або до
уповноваженого фах³вця.
Н³коли не використовуйте уживан³ або стар³ шланги
для роботи п³д тиском, а т³льки шланги, що
поставляються разом ³з машиною.
Правильне вир³внювання надасть стаб³льн³сть й
усуне в³брац³ю, а також знизить р³вень шуму,
особливо п³д час роботи центрифуги.
26
Page 27

П³дключення шланга для зливу води
П³дключ³ть зливний
шланг до канал³зац³¿ або
до зливного отвору у
ст³н³ на висот³ в³д 65 до
100 см в³д п³длоги, не
65 - 100 cm
допускаючи його
згинання.
Або ж встанов³ть вих³д
зливного шланга на
край рукомийника або
ванни, використавши
дугу, що спрямовуº
к³нець шланга (äèâ.
малюнок).
Не залишайте в³льний
к³нець зливного шланга
зануреним у воду.
Коли машина вже встановлена, маº
забезпечуватися в³льний доступ до ¿¿ розетки.
Не використовуйте подовжувач³ й тр³йники.
Кабель не повинен мати згин³в або утиск³в.
Зам³на кабелю живлення й вилки мають
виконуватися т³льки фах³вцями.
Увага! П³дприºмство зн³маº з себе в³дпов³дальн³сть,
якщо вказан³ норми не дотримуватимуться.
UK
Використання подовжувача шланга не
рекомендоване. В разi необхiдностi використання
подовжувача шланга, переконайтеся у тому, що в³н
маº той самий д³аметр та його довжина не
перевищуº 150 см.
Електричн³ п³дключення
Перш нiж увiмкнути вилку в електричну розетку,
переконайтеся, що:
розетка маº заземлення у в³дпов³дност³ до
встановлених норм;
розетка розрахована на максимальне
навантаження у межах потужност³ машини,
зазначене у таблиц³ Техн³чних даних (äèâ.
малюнок поруч);
напруга живлення перебуваº у межах,
зазначених у таблиц³ Техн³чних даних (äèâ.
малюнок поруч);
розетка п³дходить до вилки машини. В ³ншому
випадку зам³н³ть розетку або вилку.
Машину не можна встановлювати поза
прим³щенням, нав³ть, п³д час його ремонту, тому що
дуже небезпечно п³ддавати ¿¿ впливу дощу ³ грози.
Òåõí³÷í³ Äàí³
Ìîäå ëü
Ðîçì³ðè
Завантаження
Електр ичн³
п³дключення
П³дключення
води
Шв и д к ³ с т ь
центрифуги
Прогр ами
управл³ння
зг³дн о н орм и
EN 60456
AQ9D 49 X
Ширина 59,5 см
Висота 85 см
Глибина 64,5 см
1 - 9 êã
див. табличку з технiчними даними на
машинi
Максимальний тиск 1 МПА (10 бар)
М³н³мал ьн ий тиск 0. 05 МПА (0. 5 бар)
М³стк³с ть бака 62 л³три
äî 1400 îá/õâ
Програма для ; Температура
60°C ; зд³йс нена з 9 кг заван таження.
Дане обладнання в³дпов³даº таким
загальноºвропейс ьким Директивам:
- 89/336/CEE вiд 03/05/89
(Електромагн³тна Сум³сн³сть) й
наступн³ зм³ни
- 2002/96/CE
- 2 006/9 5/CE (Низька Напруга)
27
Page 28

Опис машини
UK
ДВЕРЦЯТА
ЛЮКУ
РУЧКА
ДВЕРЦЯТ
ЛЮКУ
ДЕКОРАТИВНА
НИЖНЯ ПАНЕЛЬ
ДВЕРЦЯТА ЛЮКУ
Для в³дкриття дверцят
люку завжди
використовуйте
спец³альну ручку (äèâ.
малюнок).
КАСЕТА ДЛЯ ПРАЛЬНИХ ЗАСОБIВ
Н²ЖКИ, ЩО РЕГУЛЮЮТЬСЯ
2
запуском прально¿ машини
ванночка для додаткових засоб³в: для
помякшувач³в або додаткових р³дин.
Рекомендуºться н³коли не перевищувати
максимальний р³вень, в³дм³чений с³ткою, ³
розбавляти концентрован³ помякшувач³.
ПАНЕЛЬ
КОМАНД
1. ванночка для
попереднього прання:
використовуйте миючий
1
зас³б у порошку.
2. ванночка для прання:
використовуйте миючий
зас³б у порошку або
р³дкий. У цьому
останньому випадку
рекомендуºться наливати
його безпосередньо перед
Касета для пральних
засобiв знаходиться
всередин³ машини; щоб ¿¿
дiстатися, в³дкрийте
дверцята.
Про дозування пральних
засоб³в йдеться у розд³л³
Пральн³ засоби ³ б³лизна.
Ïðèìiòêà: приклейте на
касету с пральними
засобами клейку стрiчку з
описом програм та опцiй. Клейка стрiчка
знаходиться в пакетi з брошюрою.
28
Панель команд з сенсорним керуванням
Для змiни параметрiв
злегка натиснiть на значок
на сенсорному екранi
(touch control), як вказано
на малюнку.
Режим очiкування
Вiдповiдно до норм, повязаних з заощадження
енергi¿, цю пральну машину оснащено системою
автовимкнення (stand by), яка активуºться через
декiлька секунд вiдсутностi роботи з боку машини.
Швидко натиснiть кнопку ON/OFF
вiдновлення роботи машини.
та зачекайте
Page 29

Панель команд з сенсорним керуванням
Ручка
ПРОГРАМИ
M2
M1
ДИСПЛЕЙ
Кнопка
²ÄÆÈÌ
Кнопка
ТЕМПЕРАТУРА
Кнопка з ³ндикаторною
лампою START/PAUSE
²ндикаторна
лампа EÊO
П³ктограми
UK
ФАЗИ
ПРАННЯ
Кнопка з ³ндикаторною
лампою ON/OFF
Кнопка з ³ндикаторною лампою ON/OFF: швидко
натисн³ть ³ в³дпуст³ть кнопку для вмикання або вимикання
машини. Зелена ³ндикаторна лампа означаº, що машина
вв³мкнена. Для вимикання прально¿ машини п³д час
прання необх³дно утримувати кнопку натиснутою
приблизно б³льш н³ж 3 сек.; короткочасне або випадкове
натискання не дозволить вимкнути машину. Вимикання
машини п³д час циклу прання вiдмiнюº це прання.
Ручка ПРОГРАМИ: може обертатися в обох напрямках. Щоб
встановити найб³льш придатну програму див. Таблицю
програм. П³д час прання ручка залишаºться нерухомою.
Кнопки M1-M2-M3:тримайте натиснутою одну з кнопок,
щоб запамятати цикл ³ в³дпов³дн³ персонал³зован³
опц³¿. Для виклику попередньо внесеного у память
циклу натисн³ть в³дпов³дну кнопку.
Кнопка
або виключення температури; значення
в³дображаºться на диспле¿, який знаходиться вище
(див. Як зд³йснювати цикл прання).
Кнопка
виключення центрифуги; значення в³дображаºться на диспле¿,
який знаходиться вище (див. Як зд³йснювати цикл прання).
Кнопка
використання машини в режим³ в³дкладеного прання;
значення часу затримки в³дображаºться на диспле¿, який
знаходиться вище (див. Як зд³йснювати цикл прання).
Кнопки ÎÏÖ²¯: натиснiть для вибору наявних опц³й. Горить
³ндикаторна лампа, що в³дноситься до вибрано¿ опц³¿ прання
(див. Як зд³йснювати цикл прання).
П³ктограми ФАЗИ ПРАННЯ: загораються при
проходженн³ в³дпов³дних фаз циклу (Прання
Полоскання
Надпис
Кнопка з ³ндикаторною лампою START/PAUSE: коли зелена
³ндикаторна лампа блимаº з пов³льними ³нтервалами,
натисн³ть на кнопку для запуску прання. Якщо цикл розпочався,
³ндикаторна лампа горить пост³йно. Щоб в³йти в режим паузи
ТЕМПЕРАТУРА: натисн³ть для внесення зм³н
ВIДЖИМУ: натисн³ть для внесення зм³н або
ВIДКЛАДЕНЕ ПРАННЯ: натиснiть для
- ³äæèì Çëèâ ).
спалахуº п³сля зак³нчення циклу.
M3
Кнопка з ³ндикаторною лампою
БЛОКУВАННЯ КОМАНД
Iндикаторна лампа ДВЕРЦЯТА
Кнопки
ÎÏÖ²¯
Кнопка
ВIДКЛАДЕНЕ
ПРАННЯ
ЛЮКУ ЗАБЛОКОВАНI
п³д час прання, знову натисн³ть на кнопку; ³ндикаторна лампа
почне гор³ти оранжевим кольором. Якщо ³ндикаторна лампа
Дверцята люку заблокованi
для завантаження б³лизни. Щоб продовжити прання з м³сця, де
воно було перервано, знову натисн³ть на кнопку.
Iндикаторна лампа
показуº, що люк для завантаження заблокований. Щоб
вiдкрити дверцята, встановiть цикл у режим паузи (див.
Як зд³йснювати цикл прання).
Кнопка з ³ндикаторною лампою
КОМАНД: щоб активувати або дезактивувати блок панел³
команд, натисн³ть ³ утримуйте кнопку приблизно 2 секунди.
Ув³мкнена ³ндикаторна лампа вказуº, що панелькоманд
заблоковано. У цей спос³б перешкоджають випадков³й
зм³н³ програм, передус³м, якщо у дом³ º д³ти.
²ндикаторна лампа ÅÊÎ: Пiктограма
час змiни параметрiв миття, вiдбуваºться заожадження
енергi¿ не менше за 10%. Крiм того, перш нiж машина
увiйде у режим очiкування Stand by, позначка спалахне на
декiлька секунд; у вимкненiй машинi оцiнюване
енергозбереження складатиме приблизно 80%.
ЗМIНА МОВИ
При першому увiмкненнi машини на екранi почне блимати
перша мова. Навпроти 3 кнопок праворуч екрану
зявляться позначки
вiдбуваºться автоматично кожнi 3 секунди. Або ж можна
натиснути кнопки поруз з позначками
секунди можна обрати мову та пiдтвердити ¿¿ за допомогою
кнопки OK . Якщо не натиснути нi на яку кнопку, через 30
секунд мови знову розпочнуть змiнюватися автоматично.
Змiнювати мову можна лише при вимкненiй машинi.
-
При одночасному 5-секундному натисканнi на кнопки
температури
буде подано короткий звуковий сигнал та на екранi почне
блимати задана мова. При натисканнi на кнопки поруч з
позначками
секунди можна обрати мову та пiдтвердити ¿¿ за допомогою
кнопки поруч з OK. Якщо не натиснути нi на яку кнопку,
через 30 секунд зявиться остання задана мова.
ДВЕРЦЯТА ЛЮКУ ЗАБЛОКОВАНI:
+вiджиму +вiдстроченого прання
òà V вiдбуваºться змiна мови. Через 2
погасне, можна в³дкривати люк
БЛОКУВАННЯ
спалахуº, якщо пiд
, OK òà V. Çìiíà ìîâ
òà V. Через 2
29
Page 30

Як зд³йснювати цикл прання
UK
ÏÐÈ̲ÒÊÀ: при першому використанн³ прально¿
машини, зд³йсн³ть цикл прання без б³лизни, але з
миючим засобом, в режим³ прання бавовняних
вироб³в при температур³ 90 градус³в без
попереднього прання.
1. УВ²МКНЕННЯ МАШИНИ. Натисн³ть кнопку
³ндикаторн³ лампи загоряться на 1 секунду ³ на
диспле¿ зявиться напис AQUALTIS; залишиться
гор³ти ³ндикаторна лампа кнопки
лампа START/PAUSE блиматиме.
2. ВИБ²Р ПРОГРАМИ. Обертайте РУЧКУ ПРОГРАМ
л³воруч або праворуч, щоб вибрати бажану
програму; назва програми в³добразиться на
диспле¿; кожна програма маº в³дпов³дну
температуру та швидк³сть в³джиму, як³ можуть бути
зм³нен³. На диспле¿ зявиться тривалiсть циклу.
3. ЗАВАНТАЖЕННЯ Б²ЛИЗНИ. В³дкрийте дверцята
люку. Завантажте б³лизну, звертаючи увагу, щоб
не перевищити к³льк³сть б³лизни, зазначену в
таблиц³ програм на наступн³й стор³нц³ або вказану
на екранi.
4. додавання засобу для прання. Витягн³ть
касету ³ додайте миючий зас³б у в³дпов³дн³
ванночки як вказано в Опис³ машини.
5. ЗАКРИЙТЕ ЛЮК.
6. ПЕРСОНАЛИЗАЦ²Я ЦИКЛУ ПРАННЯ.
Використовуйте спец³альн³ кнопки на панел³
команд:
Зм³на температури та/або швидкостi
в³джиму.
На диспле¿ автоматично вiдображаºться
максимальна температура i швидкiсть
центрифуги, передбаченi для задано¿ програми.
Або останнi заданi параметри, якщо вони º
сумiсними з вибраною програмою. Натискаючи на
кнопку
прання у холодн³й вод³ OFF. Натискаючи на
кнопку
в³джиму, аж до його в³дключення взагалi OFF.
Наступне натискання на кнопки призводить до
повернення у верхню позиц³ю до максимальних
значень.
Виключення: при вибор³ програми Бiла
бавовна, температура може зб³льшитися до 90
градус³в.
Задати вiдстрочене прання.
Для встановлення вiдстроченого прання обрано¿
програми натискайте на вiдповiдну кнопку, доки
не зявиться необхiдний час вiдстрочення. Пiд
час встановлення зявляºться час вiдстрочення
разом з написом Початок через: та блимаючою
позначкою
прання позначка
свiтлом та зявиться тривалiсть заданного циклу з
написом Завершення через:. Ïðè
, зменшують температуру прання до
, поступово зменшують швидк³сть
. Пiсля встановлення вiдстроченого
на диспле¿ горiтиме постiйним
, а ³ндикаторна
. Âñ³
одноразовому натисканнi на кнопку
ВIДСТРОЧЕНОГО ПРАННЯ зявиться попередньо
заданий час вiдстрочення.
Пiсля пуску на диспле¿ зявиться напис Початок
через: та час вiдстрочення. Пiсля вичерпання
заданого часу вiдстрочення машина розпочне
роботу, та на диспле¿ зявиться напис
Завершення через: та час, якого бракуº до
кiнця циклу. Щоб скасувати вiдстрочене прання,
натискайте на кнопку, доки на диспле¿ не
зявиться напис OFF; позначка
Модифiкацiя характеристик циклу.
Натисн³ть кнопку, щоб активувати опц³ю; на
диспле¿ в³добразиться назва опц³¿ ³ загориться
³ндикаторна лампа, що в³дпов³даº кнопц³.
Знову натисн³ть на кнопку, щоб дезактивувати
дану опц³ю; на диспле¿ зявиться назва опц³¿
плюс OFF, а ³ндикаторна лампа згасне.
Якщо вибрано опцiю, несумiсною з заданою
програмою, надаºться сигнализацiя через
блимання iндикаторно¿ лампи та звуковий сигнал
(тричi); опцiя не активуºться.
Якщо вибрана опц³я несум³сна з ³ншою ран³ше
вибраною, ³ндикаторна лампа, що в³дпов³даº
первинн³й опц³¿ почне блимати, при цьому буде
активована т³льки друга опц³я, ³ндикаторна лампа
кнопки гор³тиме пост³йно.
За допомогою опцiй можна змiнювати
рекомендоване завантаження та/або тривалiсть
циклу.
7. ЗАПУСК ПРОГРАМИ. Натисн³ть кнопку START/
PAUSE. Загориться в³дпов³дна ³ндикаторна
лампа, ³ люк заблокуºться (вв³мкнена ³ндикаторна
лампа ДВЕРЦЯТА ЛЮКУ ЗАБЛОКОВАНI
П³ктограми, що в³дносяться до фаз прання,
загоряться п³д час циклу, показуючи зм³ну фаз.
Для зм³ни програми, п³д час виконання циклу,
перевед³ть пральну машину в режим паузи,
натиснувши на кнопку START/PAUSE; вибер³ть
бажаний цикл ³ знову натисн³ть кнопку START/
PAUSE. Щоб вiдкрити дверцята пiд час циклу,
натиснiть кнопку START/PAUSE; згасла
iндикаторна лампа
ДВЕРЦЯТА ЛЮКУ ЗАБЛОКОВАНI
вiдкрити люк. Знову натисн³ть на кнопку START/
PAUSE, щоб запустити програму з того моменту,
на якому вона була перервана.
8. ЗАВЕРШЕННЯ ПРОГРАМИ. В³дображаºться
вмиканням надпису END. Дверцята люку можна
в³дкрити в³дразу. Якщо ³ндикаторна лампа START/
PAUSE блимаº, натисн³ть на кнопку, щоб
завершити цикл. В³дкрийте дверцята люку,
витягн³ть б³лизну й вимкнiть машину.
Для вiдмiни вже працюючого циклу натиснiть
кнопку, утримуючи ¿¿, й цикл буде перервано,
пiсля чого машина вимкнеться.
згасне.
).
дозволяº
30
Page 31

Програми й опц³¿
Таблиця програм
Пiктограма Опис програми
Програми Бавовна
Бiла бавовна
Бiла бавовн а
Бiла бавовна
Kольорова бавовнa
Ñîð î÷êè
Джинси
Особливi програми
Дитина:
Синтетичнi мiцнi тканини
Осв ³жаюча Пара
*
Бiлизна 7 днiв:
Пухо-пiря нi вироби:
Øî â ê :
Âîâ íà:
Mix 30':
(не рекомендоване для вовняних, шовкових речей або для
речей для ручного прання)
Частковi програми
Полоскання
Âiäæèì
Çëèâ
(*) Примiтка: приблизно за 10 хвилин пiсля пуску (START) машина розрахуº та вiдобразить час, який залишився до завершення програми, який
залежитиме вiд завантаження.
Для всiх Установ з проведення випробувань:
1) Програма керування згiдно до норми EN 60456: встановiть програму
2) Довга програма бавовна: встановiть програму
3) Коротка програма бавовна: встановiть програму
з попереднiм пранням
:
дуже забрудненi стiйкi кольоровi та бтканини.
(1 )
:
дуже забрудненi делiкатнi кольоровi та бтканини.
(2)
(3 )
дуже забрудненi кольоровi делiкатнi тканини.
(äèâ. ñòîð³íêó ïî ðó÷ ).
для пост³льно¿ б³лизни ³ банного приладдя.
для пухо-пiря них вироб.
для речей з шовку, вiскози, нижньо¿ бiлизни.
для речей з вовни, кашемiру, тощо.
для швидого освiження злегка забруднених речей
.
з температурою 40°C.
з температурою 40°C.
Ìàêñ.
òåìï.
(ºC)
90° 1400
60°
(Max. 90° )
40° 1400 -
40° 1400 -
40° 600 -
40° 800 -
40° 800 -
60° 800 -
- ----1,5
60° 1400 -
30° 1200 -
30° 0 -
40° 600 -
30° 800 -
-1400- -
-1400---9
- 0---9
з температурою 60°C.
Ìàêñ .
øâ è ä êi ñ ò ü
(обертiв за
хвилин у)
1400 -
Пральнi засо би та до датко вi
Ïîïå ð-
åäíº
прання
зас оби
Пральний
зас iб дл я
миття
lll
Ïîìÿê-
øó â à÷
ll
ll
ll
ll
ll
ll
ll
ll
ll
ll
ll
ll
l
Ìàêñ.
çàâ àíò à-
ження
(êã)
9
9
9
9
2
4
4
4
9
3,5
2
2
3,5
9
UK
Тривалiсть
циклу
(*) Тривалiсть програм вiдображаºться на диспле¿.
Опц³¿ прання
Чистяча пара
При вибор³ ц³º¿ опц³¿ п³двищуºться ефективн³сть
прання завдяки виробленню пари, яка п³д час циклу
прання, окрiм всього, знищуº наявн³ у волокнах
бактер³¿, разом ³з дел³катною обробкою само¿
тканини. Вставте б³лизну у барабан, вибер³ть
потр³бну програму та вибер³ть опц³ю
П³д час роботи машини люк може стати майже
непрозорим через утворення пари всередин³.
Цикл неможливо активувати на програмах
(90°C), , , , , , , , , , .
Полегшене прасування
При вибор³ дано¿ опц³¿, режими прання ³ в³джиму
будуть в³дпов³дно зм³нен³ для зменшення утворення
складок. П³сля зак³нчення циклу пральна машина
почне виконувати пов³льне обертання барабана;
³ндикаторн³ лампи Полегшене прасування ³ START/
PAUSE блимають. Щоб зак³нчити цикл, натисн³ть на
кнопку START/PAUSE або кнопку Подовжений цикл.
У програм³ Шовк
машина зак³нчить цикл ³з
замоченою б³лизною й вв³мкне ³ндикаторну лампу
.
,
Полегшене прасування . Щоб злити воду й отримати
можлив³сть витягнути б³лизну, натисн³ть на кнопку
START/PAUSE або кнопку Полегшене прасування .
Цикл неможливо активувати на програмах
, ,
, , , .
Заощадження часу
Завдяки цiº¿ опцi¿ тривалiсть програми зменшуºться
на 30%-50% залежно вiд вибраного циклу,
заощаджуючи воду та електричну енергiю. Цей
цикл призначений для не дуже забруднених речей.
Не активуºться у програмах
, , , , , , , ,
, .
Додаткове полоскання
При вибор³ дано¿ опц³¿ зб³льшуºться ефективн³сть
полоскання й гарантуºться максимальне
видаленняпральногозасобу. В³н зручний для людей з³
шк³рою, особливо чутливою до миючих засоб³в.
Рекомендуºться ¿¿ використання ³з пральною машиною при
повному завантаженн³ або з використанням п³двищених
доз пральних засоб³в.
Не працюº з програмами
, , , .
31
Page 32

Миюч³ засоби ³ б³лизна
UK
Зас³б для прання
Виб³р ³ к³льк³сть миючого засобу залежать в³д типу
тканини (бавовна, вовна, шовк...), кольор³в,
температури прання, ступеню забруднення ³ жорсткост³
води.
Правильне дозування миючих засоб³в дозволяº
уникнути зайвих витрат й захищаº довк³лля: миюч³
засоби, як³ здатн³ б³олог³чно руйнуватися, м³стять
елементи, що зм³нюють р³вновагу навкiлля.
Рекомендуºться:
використовувати миюч³ засоби в порошку для б³лизни
з б³ло¿ бавовни ³ для попереднього прання.
використовувати р³дк³ миюч³ засоби для тонких
речей з бавовни ³ для вс³х програм при низьк³й
температур³.
використовувати р³дк³ дел³катн³ миюч³ засоби для
вовни ³ шовку.
Миючий зас³б необх³дно додати ще до початку прання у
спец³альну ванночку, або у дозатор, який потр³бно
покласти прямо у бак. У цьому випадку не можна
вибирати цикл Бавовна з попередн³м пранням.
Не використовуйте миюч³ засоби для ручного прання,
тому що вони утворюють надто багато п³ни.
П³дготовка б³лизни
Перш нiж завантажувати речi, добре розкрийте ¿х.
Розсортуйте б³лизну зг³дно типу тканини (символ на
етикетц³) ³ кольору, звернувши увагу на розд³лення
б³ло¿ ³ кольорово¿ б³лизни;
Перев³рте кишен³ й ´удзики;
Не перевищуйте значення, вказан³ у Таблиц³
програм , що в³дносяться до ваги сухо¿ б³лизни.
Ск³льки важить б³лизна?
1 простирадло 400-500 ãð.
1 наволочка 150-200 ãð.
1 скатертина 400-500 ãð.
1 халат 900-1200 ãð.
1 рушник 150-250 ãð.
1 джинси 400-500 ãð.
1 сорочка 150-200 ãð.
Поради з прання
Джинси: використовуйте спецiальну програму Джинси
для речей з тканини Denim; перед пранням виверн³ть
реч³ назовн³ та вживайте р³дкий пральний зас³б.
Дитина: використовуйте спецiальну програму Дитина
для видалення забруднень, типових для дiтей, а
також для видалення прального засобу з речей з
метою запобiгання алергiчним реакцiям тендiтно¿
шкiри малюкiв. Цикл розраховано для зменшення
бактерiологiчного потенцiалу, за допомогою бiльшо¿
кiлькостi води та оптимiзуючи ефект спецiальних
гiгiºнiзуючих присадок у миючому засобi.
Наприкiнцi циклу прання машина виконаº повiльнi
обертання барабану; для завершення циклу натиснiть
на кнопку START/PAUSE.
Øîâê: використовуйте спец³альну програму для прання
речей з шовку Шовк
спец³ального миючого засобу для дел³катних вироб³в.
Штори: Використовуйте програму Шовк .
Рекомендуºться скласти та вкласти у м³шечок, що
входить до комплекту постачання.
Вовна: Hotpoint/Ariston - ºдина пральна машина, що
отримала престижний знак Woolmark Platinum Care
(M. 0508) в³д компан³¿ The Woolmark Company, що
посв³дчуº як³сть прання у пральн³й машин³ ус³х вироб³в
з вовни, а також вироб³в т³льки для ручного прання
. З програмою Вовна таким чином можна
абсолютно спок³йно прати у пральн³й машин³ вс³
вовнян³ реч³ з гарант³ºю високо¿ ефективност³.
Пухо-пiрянi вироби: для прання вироб³в ³з
наповненням гусячим пухом, таких як подв³ин³ и
одинарн³ ковдри (як³ не перевищують за вагою 3,5 кг),
подушки, куртки, використовуите спец³альну програму
Пухово-пiрянi вироби
завантажити у барабан у згорнутому вигляд³ з краями,
загорнутими досередини (див. малюнок), при цьому не
перевищуите ¾ обºму самого барабану.
Для оптимального прання рекомендуºться
використовувати р³дкий миючий зас³б, який необх³дно
налити у касету для миючих засоб³в.
. Рекомендуºться використання
. Так³ вироби рекомендуºться
* Осв³жаюча Пара: Ця програма дозволяº осв³жати
окрем³ вироби, видаляючи неприºмн³ запахи та
помякшуючи волокна (1,5 кг, приблизно 3 реч³). Вставте
т³льки сух³ вироби (не брудн³) та вибер³ть програму
. Наприк³нц³ циклу реч³ залишаються вологими,
рекомендуºться розв³сити ¿х.
Програма полегшуº процес прасування.
Кр³м того, за допомогою кулькових ароматизатор³в
Steam Profumo, можна надати додаткового аромату
б³лизн³. Нанес³ть дек³лька крапель ароматизатора на
губку, яка м³ститься усередин³ кульки, знов закрийте ¿¿,
поклад³ть у барабан разом ³з б³лизною та запуст³ть
потр³бну програму
буде помякшеною та ароматизованою.
Не рекомендуºться для вовняних та бавовняних речей.
Не нанос³ть на губку надм³рну к³льк³сть
ароматизатора, щоб не допустити крапання.
Не додавайте помякшувач або пральний порошок.
Сорочки: для забезпечення максимального догляду
використовуйте спецiальну програму Сорочки
прання сорочок з рiзноманiтних тканин та рiзних
кольорiв.
32
. По зак³нченн³ циклу б³лизна
äëÿ
Стьобанi ковдри: щоб випрати стьобан³ ковдри з
синтетичною п³дкладкою, використовуйте спец³альний
м³шечок, що входить у комплект постачання та
програму Пухо-пiр`янi вироби
Б³лизна для ванно¿ ³ пост³льна б³лизна: ця пральна
машина дозволяº випрати б³лизну з усього дому за один
ºдиний цикл Б³лизна за 7 дн³в
використання помякшувача й заощаджуº час ³ енерг³ю.
Рекомендуºться використання миючих засоб³в у порошку.
Ст³йки плями: рекомендуºться обробити ст³йки плями за
допомогою твердого мила ще до прання й використати
програму Бавовна з попередн³м пранням.
.
, що оптим³зуº
Page 33

Запоб³жн³ заходи та
поради
Машина була спроектована ³ вироблена у
в³дпов³дност³ з м³жнародними нормами безпеки. Дан³
попередження складен³ для забезпечення безпеки ³
тому ¿х треба уважно прочитати.
Загальна безпека
Дане обладнання було розроблене виключно для
побутового використання.
Цей апарат не маº використовуватися д³тьми або
особами з обмеженими ф³зичними, сенсорними чи
розумовими можливостями, або якщо ¿м бракуº
досв³ду та необх³дних знань. Винятки складають
ситуац³¿, коли користування в³дбуваºться п³д
наглядом або за вказ³вками ос³б, в³дпов³дальних за
¿хню безпеку. Доросл³ мають стежити, щоб д³ти не
гралися з апаратом.
Не торкайтеся до машини голими ногами або
мокрими чи вологими руками й ногами.
Не виймайте штепсель з електрично¿ розетки,
витягуючи його за пров³д, тримайтеся т³льки за
самий штепсель.
Будьте обережн³: вода, що зливаºться, може мати
високу температуру.
У жодному випадку не застосовуйте силу до дверцят
люку: це може ушкодити запобiжний механiзм проти
випадкових вiдкривань.
Якщо машина не працюº у разi поломки, у жодному
випадку не намагайтеся дiстатися внутрiшнiх
механiзмiв з метою самост³йного ремонту.
Слiдкуйте, щоб дiти не наближалися до працюючо¿
машини.
Якщо необх³дно перенести машину, так³ д³¿ мають
виконуватися двома або трьома вантажниками (а не
одним!) за умови максимально¿ уваги, Нi в якому
разi - однiºю особою, тому що машина дуже важка.
Перш н³ж завантажити б³лизну, перев³рте, щоб
барабан був порожн³й.
Система балансування завантаження
Перед кожним в³джимом, для запоб³гання надм³рн³й
в³брац³¿ ³ для р³вном³рного розпод³лу навантаження,
барабан зд³йснюº оберти на дещо б³льш³й швидкост³,
н³ж швидк³сть прання. Якщо по зак³нченн³ дек³лькох
спроб завантажен³ реч³ ще не були правильно
в³дбалансован³, машина зд³йснюº в³джим на швидкост³,
нижч³й в³д передбачено¿. У випадку надм³рно¿
незбалансованост³ пральна машина зд³йснюº розпод³л
зам³сть в³джиму. З метою оптимального розпод³лу
завантаження та його правильного балансування
рекомендуºться одночасне прання великих ³ малих
речей.
Мiшечок для стьобаних ковдр, штор та делiкатних
речей
Завдяки спец³альному м³шечку, що входить у комплект
постачання, Aqualtis дозволяº Вам також прати дорог³
та дел³катн³ реч³, гарантуючи ³х максимальнии захист.
Ми рекомендуºмо використовувати кожного разу
м³шечок для прання стьобаних ковдр та пухово-пiряних
виробiв ³з зовн³шньою п³дкладкою ³з синтетичного
матер³алу.
Óòèë³çàö³ÿ
Утил³зац³я пакувального матер³алу: додержуйтесь
м³сцевих норм, так як пакування може бути
використане повторно.
ªвропейська директива 2002/96/CE з в³дход³в в³д
електрично¿ й електронно¿ апаратури передбачаº,
що побутов³ електроприлади не можуть
перероблятися у звичайному порядку для твердих
м³ських в³дход³в. Знят³ з експлуатац³¿ побутов³
прилади мають бути з³бран³ окремо для оптим³зац³¿
ступеню в³дновлення й рециклу матер³ал³в, що
входять до ¿хнього складу, та з метою усунення
потенц³йно¿ шкоди для здоровя та довк³лля. Символ
закреслено¿ корзини, зображений на вс³х виробах,
нагадуº про необх³дн³сть окремо¿ утил³зац³¿.
Щодо подальшо¿ iнформацi¿ стосовно правильно¿
утилiзацi¿ електропобутових приладiв, власники
можуть звернутися до вiдповiдних мiських служб або
до продавцiв.
Ручне в³дкривання дверцят люку
У випадку, якщо неможливо в³дкрити дверцята люку ³зза в³дсутност³ електроенерг³¿ ³ ви хот³ли б в³дкласти
прання, треба д³яти таким чином:
1. витягн³ть штепсель з
електрично¿ розетки.
2. Перев³рте, щоб р³вень
води усередин³ машини був
нижче р³вня дверцят люку;
якщо це не так, злиите
надлишок води через
зливнии шланг, збираючи ³³
у в³др³, як показано на
малюнку.
3. знiмiть з прально¿
машини передню захисну
панель (див.наступну
ñòîðiíêó).
4. Потягн³ть за язичок,
показаний на малюнку,
назовн³ до зв³льнення
пластмасово¿ тяги з³
стопора; тягн³ть посл³довно
вниз доки не в³дчуºте що
усередин³ клацнуло, це
означаº, що дверцята
розблоковано.
5. в³дкрийте дверцята; у
випадку, якщо це дос³ ще
неможливо повтор³ть
процедуру.
6. встанов³ть панель на
м³сце, пересв³дч³ться у тому,
що крюки були вставлен³ у
спец³альн³ петл³, пiсля чого притиснiть ¿¿ до машини.
UK
33
Page 34

Техн³чне обслуговування та
догляд
UK
В³дключення води й електричного
живлення
Закривайте водопров³дний кран п³сля кожного
прання. У такий спос³б зменшуºться знос
г³дравл³чно¿ частини машини й усуваºться
небезпека витоку.
Виймайте штепсель з розетки п³д час миття
машини ³ п³д час роб³т з техн³чного
обслуговування.
Миття машини
Зовн³шня частина ³ гумов³ детал³ можуть бути
вимит³ тканиною, змоченою у тепл³й вод³ й мил³. Не
використовуйте розчинники або абразиви.
Чистка касети для миючих засоб³в
Щоб витягти касету,
натисн³ть на важ³ль (1) ³
потягн³ть касету назовн³
(2) ( див. малюнок).
Промийте п³д проточною
водою; ця процедура маº
проводитися регулярно.
Щоб потрапити до форкамери:
2
1. знiмiть захисну панель з передньо¿ частини
машини шляхом натискання у центрi, потiм
натиснiть униз з обох бокiв та витягнiть ¿¿
(див.малюнки).
2. встанов³ть контеинер,
щоб з³брати воду, яка
виходить (приблизно 1.5 л)
(äèâ. малюнок).
3. в³дкрут³ть кришку,
обертаючи ³³ проти
годинниково³ стр³лки (äèâ.
малюнок);
4. акуратно очист³ть внутр³шню частину;
5. накрут³ть кришку;
6. встанов³ть панель на м³сце, пересв³дч³ться у
тому, що крюки були вставлен³ у спец³альн³ петл³,
пiсля чого притиснiть ¿¿ до машини.
Догляд за барабаном для б³лизни
Завжди залишайте в³дкритими дверцята люку,
тод³ не утворюватимуться неприºмн³ запахи.
Чищення насосу
Машина обладнана насосом з автоматичною
чисткою, що не вимагаº техн³чного обслуговування.
Може трапитися так, що мал³ предмети (монети,
´удзики) потраплять до форкамери, що захищаº
насос, розташований у ¿¿ нижн³й частин³.
Переконайтеся у тому, що цикл прання зак³нчено, ³
витягн³ть штепсель з розетки.
34
Стеження за шлангом для подач³ води
Перев³ряйте шланг для подач³ води не менше
одного разу на р³к. Якщо на ньому º тр³щини, в³н
п³длягаº зам³н³: п³д час прання високий тиск може
призвести до роз³рвання.
Page 35

Несправност³ та засоби ¿х
л³кв³дац³¿
Може трапитися так, що машина не буде працювати. До того як зателефонувати у Сервiсний центр (див. Допомога),
перев³рте, чи не º дана несправн³сть проблемою, що легко вир³шуºться, звернувшись до списку нижче.
UK
Несправност³:
Пральна машина не вмикаºться.
Цикл прання не розпочинаºться.
У машину не надходить вода.
Дверцята люку машини
залишаються заблокованими.
Машина безперервно заливаº ³
зливаº воду.
Пральна машина не зливаº воду
чи не вiджимаº.
Пральна машина дуже вiбруº пiд
час вiджиму.
Машина пропускаº воду.
П³ктограми, що в³дносяться до
Поточно¿ фази швидко блимають
одночасно з ³ндикаторною лампою
ON/OFF.
Можлив³ причини/Р³шення:
Штепсель не вставлений в електричну розетку або вставлений не до кiнця.
У будинку немаº електроенерг³¿.
Дверцята люку погано закрит³.
Кнопка START/PAUSE не була натиснута.
Водопров³дний кран закритий.
Якщо вiдстрочення задане на час запуску.
Шланг подач³ води не п³дключено до водопровiдного крану.
Перегин у шлангу.
Водопров³дний кран закритий.
У водопровод³ немаº води.
Недостатн³й тиск.
Кнопка START/PAUSE не була натиснута.
При виборi циклу Дитина
наприкiнцi циклу пральна машина здiйснить повiльни оберти
барабану; для завершення циклу натиснiть кнопку START/PAUSE або
кнопку Полегшене прасування
машина завершить цикл, залишивши бiлизну у водi, тобто не
зливаючи ¿¿; щоб злити воду та витягти бiлизну слiд натиснути кнопку
START/PAUSE або кнопку Полегшене прасування
Зливний шланг не знаходиться на в³дстан³ в³д 65 до 100 см в³д
п³длоги (див. див. Встановлення).
К³нець зливного шланга занурений у воду (див. див. Встановлення).
Якщо квартира знаходиться на верхн³х поверхах будинку, можливо,
в³дбуваºться сифонний ефект, при якому машина безперервно
заливаº й зливаº воду. Щоб його л³кв³дувати, ³снують спец³альн³
антисифонн³ клапани, як³ можна придбати у торговельн³й мереж³.
Стiнний каналiзацiйний злив не маº в³ддушини для виходу повiтря.
Програма не передбачаº зливання: у деяких програмах його потр³бно
вмикати вручну (див. Програми ³ опц³¿).
Активована опц³я Полегшене прасування: для завершення
програми, натисн³ть кнопку START/PAUSE (див. Програми ³ опц³¿).
Перегин зливного шланга (див. див. Встановлення).
Засм³тився зливний шланг.
Барабан, у момент встановлення, не був правильно розблокований
(див. Встановлення).
Машина сто¿ть не на плоск³й поверхн³ (див. Встановлення).
Машина затиснута м³ж меблями ³ ст³ною (див. див. Встановлення).
Дисбаланс завантаження (див. Миюч³ засоби ³ б³лизна).
Погано пригвинчений шланг подач³ води (див. Встановлення).
Забруднена касета для миючих засоб³в (як вимитидив. Техн³чне
обслуговування ³ догляд).
Погано закр³плений зливний шланг (див. Встановлення).
Вимкн³ть машину й витягн³ть штепсель з розетки, зачекайте близько 1
хвилини й ув³мкн³ть ¿¿ повторно. Якщо несправн³сть не усунено,
зателефонуйте у Сервiсний центр.
або опцi¿ Полегшене прасування ,
. При виборi циклу Шовк
.
Утворюºться занадто багато п³ни.
Дверцята люку машини
залишаються заблокованими.
Ïðèìiòêà: для виходу з Режим демо натискайте одночасно протягом 3 секунд кнопки ON/OFF òà START/PAUSE .
Миючий зас³б не п³дходить для прально¿ машини (маº бути напис для
машинного прання, для ручного й машинного прання, або под³бний).
Перевищена доза миючого засобу.
Виконайте процедуру ручного розблокування (див. Запоб³жн³ заходи
й поради).
35
Page 36

Допомога
195076138.03
11/2010 - Xerox Fabriano
UK
Перш н³ж телефонувати у Сервiсний центр:
Перев³рте, чи можна самост³йно вир³шити проблему (див. Несправност³ ³ засоби ¿х усунення);
Запуст³ть програму повторно, щоб перев³рити чи усунено несправн³сть;
При негативному результат³, зверн³ться у Авторизований сервiсний центр.
В разi помилкового встановлення обо неправильного використання прально¿ машини операцi¿, якi
проводитимуть фахiвцi Сервiсного центру, будуть платними.
Звертайтеся виключно до уповноважених фах³вц³в.
Пов³домити:
тип несправност³;
модель машини (Мод.);
сер³йний номер (С/Н).
Ц³ дан³ знаходяться на ³нформац³йн³й пластин³ на сам³й машин³.
36
 Loading...