

Page 1

Instructions for
installation and use
WASHING MACHINE
EN
English,1
ΕΛΛΗΝΙΚΑ, 17
UK
Українська,49
AQUALTIS
ADS93D 69
TRGR
Türkçe,33
Contents
Installation, 2-3
Unpacking and levelling
Connecting the electricity and water supplies
Technical data
Care and maintenance, 4
Cutting off the water and electricity supplies
Cleaning the machine
Cleaning the detergent dispenser drawer
Caring for your appliance drum
Cleaning the pump
Checking the water inlet hose
Precautions and advice, 5
General safety
Load balancing system
Disposal
Opening the porthole door manually
Description of the machine, 6-7
Touch control panel
Auto Dose System, 8-9
EN
Running a wash cycle, 10
Wash cycles and options, 11
Table of wash cycles
Wash options
Detergents and laundry, 12
Detergent
Preparing the laundry
Washing recommendations
Trouble shooting, 13-14
Assistance, 15
1
Page 2
Installation
EN
! This instruction manual should be kept in a
safe place for future reference. If the washing
machine is sold, given away or moved, please
ensure the manual is kept with the machine,
so that the new owner may benefit from the
advice contained within it.
! Read these instructions carefully: they
contain vital information relating to the safe
installation and operation of the appliance.
! Inside the pack containing this manual, you
will also find the guarantee and all the details
necessary for installation.
Unpacking and levelling
Unpacking
1. Once you have removed all the packaging
from the washing machine, make sure it has not
been damaged during transportation. If it has
been damaged, contact the retailer and do not
proceed any further with the installation process.
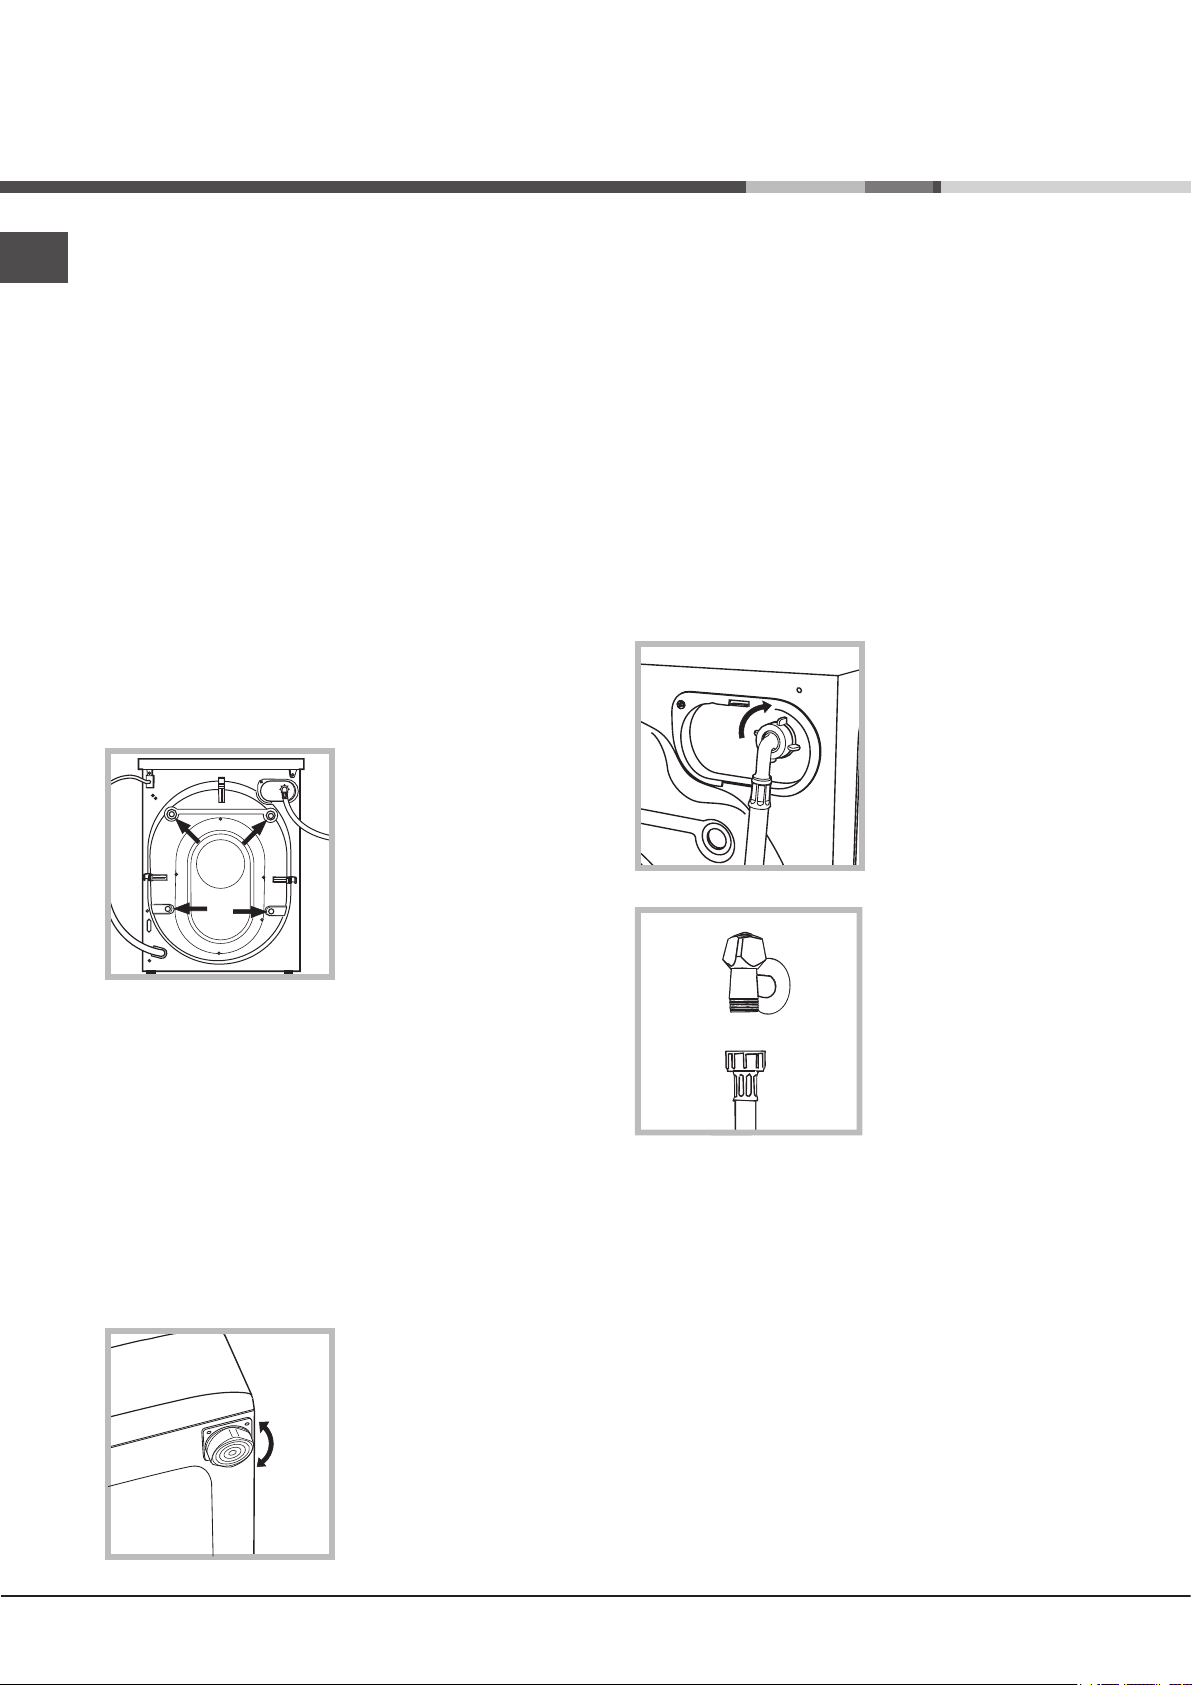
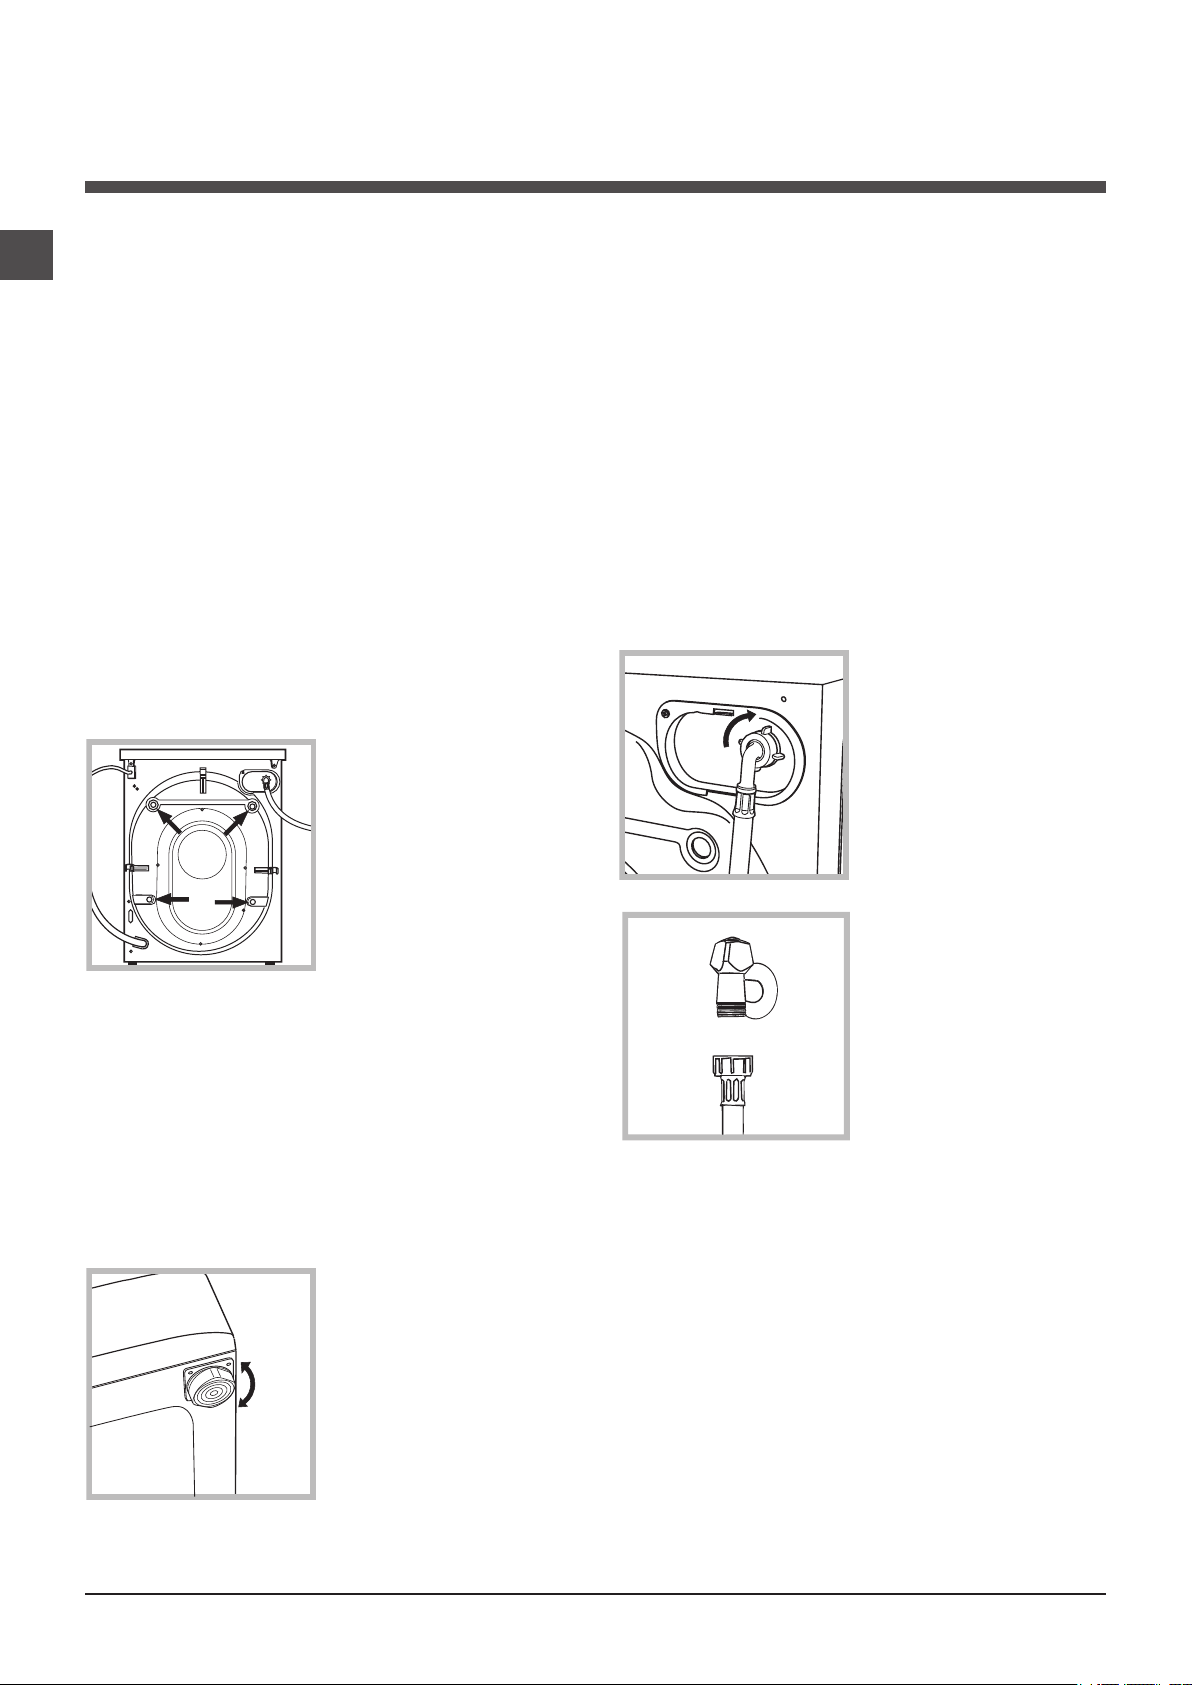
2. Remove the 4
protective screws
(used during
transportation) and
the corresponding
spacer, located on
the rear part of the
appliance (see figure).
3. Close off the holes using the plastic plugs
supplied in the pack.
4. Keep all the parts in a safe place; they will
be needed again if the washing machine is
moved to another location, to prevent the
inside of the appliance being damaged.
! Packaging materials should not be used as
toys for children.
Levelling
1. Place the washing machine on a flat sturdy
floor, without resting it up against walls or
cabinets.
2. If the floor is
uneven, the front feet
of the machine may
be adjusted until it
reaches a horizontal
position (the angle of
inclination must not
exceed 2 degrees).
! If the appliance is levelled correctly, it will
be more stable and much less likely to cause
vibrations and noise while it is operating,
particularly during the spin cycle.
! If it is placed on carpet or a rug, adjust the
feet in such a way as to allow a sufficient
ventilation space underneath the washing
machine.
Connecting the electricity and
water supplies
Connecting the water inlet hose
! Before connecting the inlet hose to the water
supply, run the water until it is perfectly clear.
1. Connect the inlet
hose to the machine
by screwing it onto
the cold water inlet of
the appliance, which
is situated on the top
right-hand side of
the rear part of the
appliance (see figure).
2. Connect the inlet
hose by screwing it to
a cold water tap using
a 3/4 gas threaded
connection (see
figure).
3. Make sure that the hose is not folded over
or bent.
! The water pressure at the tap must fall within
the values indicated in the Technical data table
(see next page).
! If the inlet hose is not long enough, contact a
specialised shop or an authorised technician.
! Never use second-hand or old inlet hoses;
use the products supplied with the machine.
2
Page 3

Connecting the drain hose
65 - 100 cm
Connect the drain
hose to drain duct
piping or a wall drain
located between 65
and 100 cm above
the floor, making sure
it is not bent at all.
Alternatively, rest the
drain hose on the
side of a washbasin
or bathtub, fastening
the duct supplied to
the tap (see figure).
The free end of the
hose should not be
underwater.
! We advise against the use of hose extensions;
if it is absolutely necessary, the extension must
have the same diameter as the original hose
and must not exceed 150 cm in length.
Electrical connections
Before plugging the appliance into the
electricity socket, make sure that:
• the socket is earthed and complies with all
applicable laws;
• the socket is able to withstand the maximum
power load of the appliance as indicated in
the Technical data table (see opposite);
• the power supply voltage falls within the
values indicated in the Technical data table
(see opposite);
• the socket is compatible with the plug of the
appliance. If this is not the case, have the
socket or the plug replaced.
! Do not use extension cords or multiple
sockets.
! The cable should not be bent or compressed.
! The power supply cable and plug must only
be replaced by authorised technicians.
Warning! The company shall not be held
responsible in the event that these regulations
are not respected.
Technical data
Model
Dimensions
Capacity
Electrical
connections
Water connections
Spin speed
Test wash
cycles in
accordance with
directives
1061/2010
and
1015/2010
ADS93D 69
width 59.5 cm
height 85 cm
depth 64,5 cm
from 1 to 9 kg
please refer to the technical
data plate fixed to the machine
maximum pressure
1 MPa (10 bar)
minimum pressure
0.05 MPa (0.5 bar)
drum capacity 62 litres
up to 1600 rotations per
minute
programme
;
Cotton standard 60°C.
programme ;
Cotton standard 40°C.
EN
! The machine must not be installed outdoors,
even in covered areas. It is extremely
dangerous to leave the appliance exposed to
rain, storms and other weather conditions.
! The mains socket must remain within easy reach
after the washing machine has been installed.
This appliance conforms to
the following EC Directives:
- 2004/108/EC (Electromagnetic Compatibility)
- 2006/95/EC (Low Voltage)
- 2002/96/EC
3
Page 4

2
Care and maintenance
A
D
EN
Cutting off the water and
electricity supplies
• Turn off the water tap after every wash cycle.
This will limit wear on the hydraulic system in
the machine and help to prevent leaks.
• Unplug the appliance when cleaning it and
during all maintenance work.
Cleaning the machine
The outer parts and rubber components of the
appliance can be cleaned using a soft cloth
soaked in lukewarm soapy water. Do not use
solvents or abrasives.
Cleaning the detergent dispenser
drawer
! Make sure the wash cycle has finished and
unplug the appliance.
To access the pre-chamber:
1. take off the cover panel on the front of the
machine by first pressing it in the centre and
then pushing downwards on both sides until
you can remove it (see figures);
2. position a container
so that it will collect the
water which flows out
(approximately 1.5 l)
(see figure);
3. unscrew the lid by
rotating it in an anticlockwise direction (see
figure);
4. clean the inside thoroughly;
To pull out the dispenser drawer, open until
the first stop point then press lever A to open
completely; finally, press one of the levers D and
pull the drawer outwards (see picture).
Wash it under running water; this procedure
should be effected regularly. Be careful to remove
any detergent residues from the dispenser
drawer socket on the machine.
Keep the drawer to the left hand side when
replacing it to ensure that it centres the guides
and to prevent it from jamming.
Caring for your appliance drum
• Always leave the door ajar to prevent
unpleasant odours from forming.
5. screw the lid back on;
6. reposition the panel, making sure the hooks
are securely in place before you push it onto
the appliance.
Checking the water inlet hose
Check the inlet hose at least once a year. If
there are any cracks, it should be replaced
immediately: during the wash cycles, water
pressure is very strong and a cracked hose
could easily split open.
Cleaning the pump
The washing machine is fitted with a selfcleaning pump which does not require any
maintenance. Sometimes, small items (such
as coins or buttons) may fall into the protective
pre-chamber at the base of the pump.
4
Page 5

Precautions and tips
! The machine was designed and constructed in
accordance with international safety regulations. The
following information is provided for safety reasons and
must therefore be read carefully.
General safety
• This appliance was designed for domestic use only.
• This appliance can be used by children
aged from 8 years and above and
persons with reduced physical, sensory or
mental capabilities or lack of experience
and knowledge if they have been given
supervision or instruction concerning use of
the appliance in a safe way and understand
the hazards involved. Children shall not
play with the appliance. Cleaning and user
maintenance shall not be made by children
without supervision.
• Do not touch the machine when barefoot or with wet or
damp hands or feet.
• Do not pull on the power supply cable when unplugging
the appliance from the electricity socket. Hold the plug
and pull.
• Do not touch the drained water as it may reach
extremely high temperatures.
• Never force the porthole door. This could damage the
safety lock mechanism designed to prevent accidental
opening.
• If the appliance breaks down, do not under any
circumstances access the internal mechanisms in an
attempt to repair it yourself.
• Always keep children well away from the appliance while
it is operating.
• If it must be moved, proceed with the help of two or
three people and handle it with the utmost care. Never
try to do this alone, because the appliance is very heavy.
• Before loading laundry into the washing machine, make
sure the drum is empty.
inside the machine, while preventing potential damage
to the atmosphere and to public health.
The crossed-out dustbin is marked on all products
to remind the owner of their obligations regarding
separated waste collection.
For more information relating to the correct disposal of
household appliances, owners should contact their local
authorities or appliance dealer.
Opening the porthole door manually
In the event that it is not possible to open the porthole door
due to a powercut, and if you wish to remove the laundry,
proceed as follows:
1. remove the plug from the
electrical socket.
2. make sure the water level
inside the machine is lower
than the door opening; if
it is not, remove excess
water using the drain hose,
collecting it in a bucket as
indicated in the figure.
3. remove the cover panel on the lower front part of the
washing machine (see overleaf).
4. pull outwards using the
tab as indicated in the figure,
until the plastic tie-rod is freed
from its stop position; pull
downwards until you hear a
“click”, which indicates that
the door is now unlocked.
EN
Load balancing system
Before every spin cycle, to avoid excessive vibrations
before every spin and to distribute the load in a uniform
manner, the drum rotates continuously at a speed which
is slightly greater than the washing rotation speed. If,
after several attempts, the load is not balanced correctly,
the machine spins at a reduced spin speed. If the load is
excessively unbalanced, the washing machine performs
the distribution process instead of spinning. To encourage
improved load distribution and balance, we recommend
small and large garments are mixed in the load.
Disposal
• Disposing of the packaging materials: observe local
regulations so that the packaging may be re-used.
• The European Directive 2002/96/EC relating to Waste
Electrical and Electronic Equipment (WEEE) states
that household appliances should not be disposed of
using the normal solid urban waste cycle. Exhausted
appliances should be collected separately in order to
optimise the cost of re-using and recycling the materials
5. open the door; if this is
still not possible repeat the
procedure.
6. reposition the panel, making sure the hooks are securely
in place before you push it onto the appliance.
5
Page 6

Description of the machine
EN
PORTHOLE DOOR
PORTHOLE DOOR
HANDLE
KICK STRIP
CONTROL
PANEL
ADJUSTABLE FEET
PORTHOLE DOOR
Always use the handle to
open the porthole door (see
figure).
DETERGENT DISPENSER DRAWER
The detergent dispenser
drawer is located inside
the machine and can be
accessed by opening the
door.
Refer to the chapter “Auto
Dose System” for information
on operation.
TOUCH CONTROL PANEL
To adjust the settings, gently
press the icon inside the
sensitive (touch control) area
as illustrated in the figure.
Standby mode
This washing machine, in compliance with new energy
saving regulations, is fitted with an automatic standby
system which is enabled after about 30 minutes if no
activity is detected. Press the ON-OFF button briefly and
wait for the machine to start up again.
Consumption in off-mode: 0,5 W
Consumption in Left-on: 0,5 W
6
Page 7
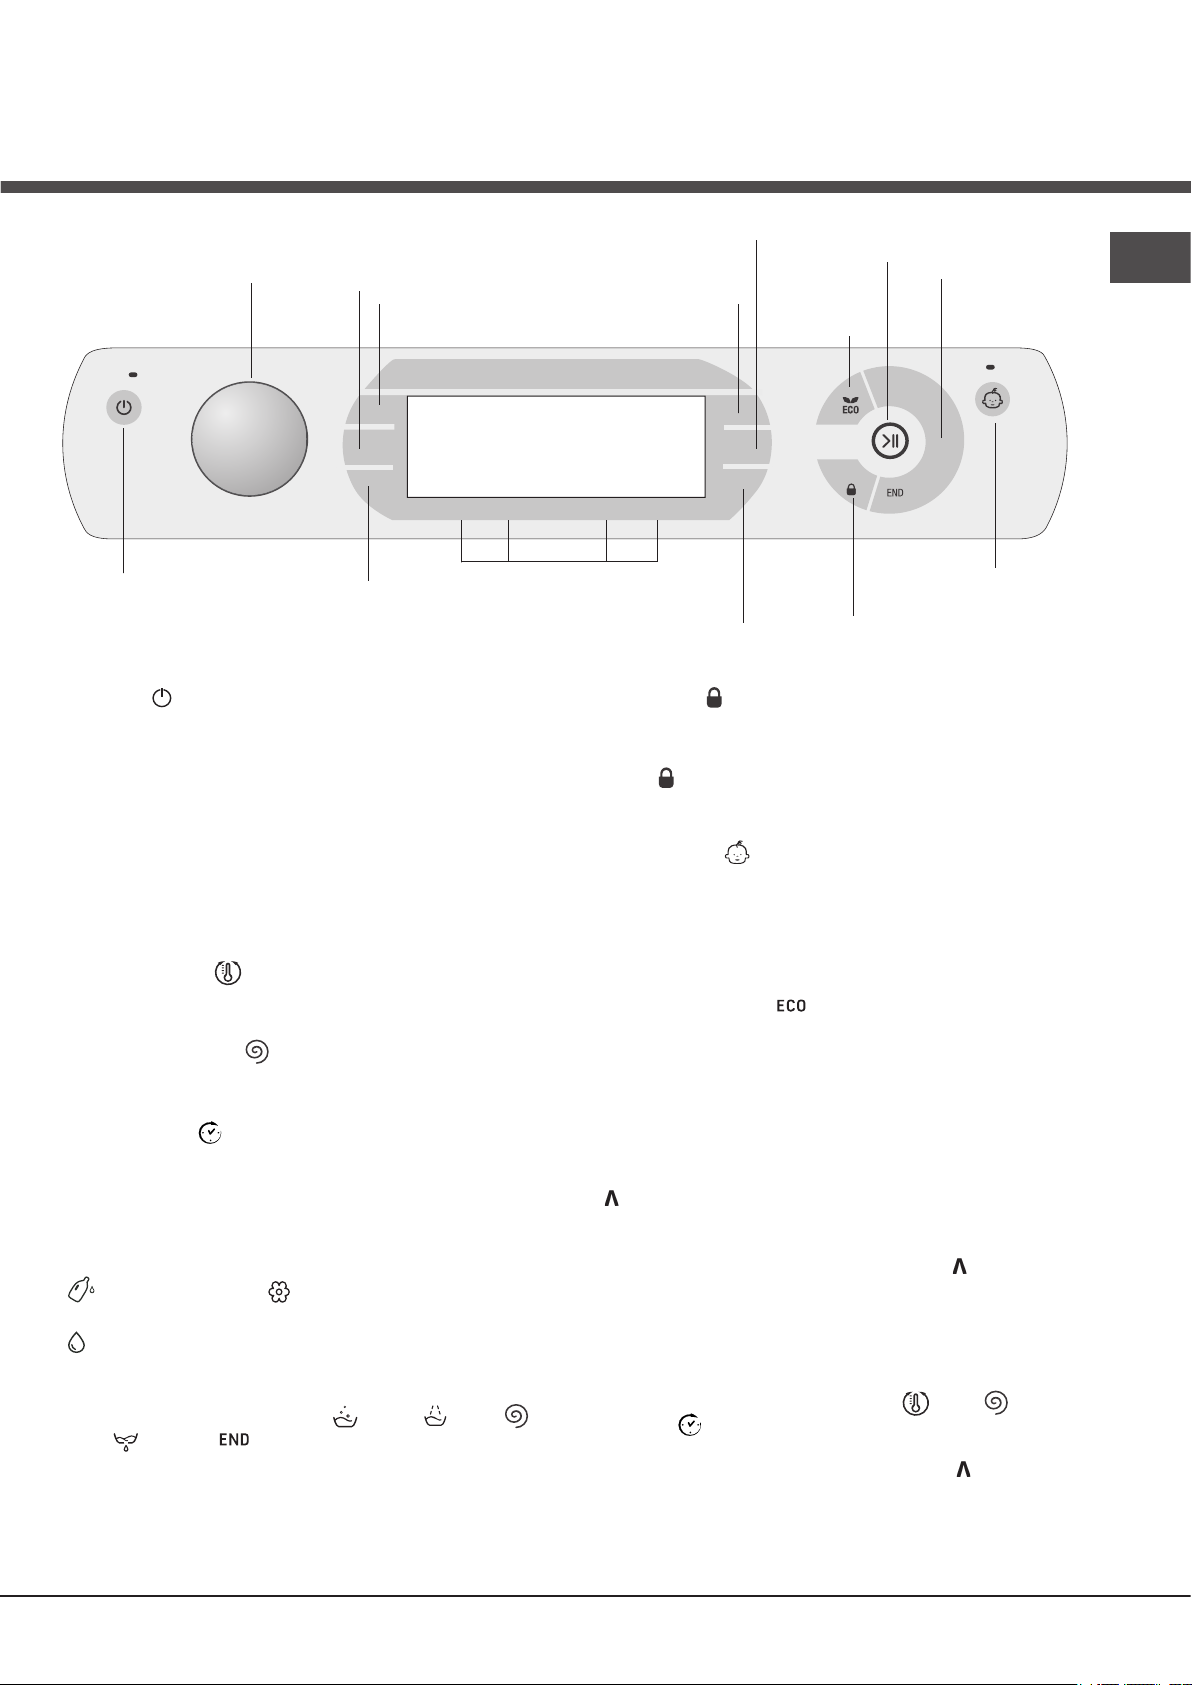
Touch control panel
WASH CYCLE
SELECTOR knob
SOFTENER
button
DETERGENT
button
TEMPERATURE
DISPLAY
SPIN SPEED
button
button
START/PAUSE button
with indicator light
ECO
indicator light
WASH CYCLE
PHASE icons
EN
Button with ON/OFF
indicator light
Button with ON/OFF indicator light: press this briefly to switch
the machine on or off. The green indicator light indicates that the
machine is switched on. To switch off the washing machine during
the wash cycle, press and hold the button for approximately
3 seconds; if the button is pressed briefly or accidentally the
machine will not switch off. If the machine is switched off during
a wash cycle, this wash cycle will be cancelled.
WASH CYCLE SELECTOR knob: may be turned in either
direction. To select the most suitable wash cycle, please refer
to the “Table of wash cycles”.
The knob will not move during the wash cycle.
TEMPERATURE button: press to modify or exclude the
temperature setting; the value selected will appear on the display
above (see “Running a wash cycle”).
SPIN SPEED CYCLE button: press to modify or exclude the
spin cycle; the value selected will appear on the display above
(see “Running a wash cycle”).
DELAY TIMER button: press to set a delayed start for the
selected wash cycle; the set delay time will appear on the display
above (see “Running a wash cycle”).
OPTION buttons with indicator lights: press to select the available
options. The indicator light corresponding to the selected option
will remain lit (see “Running a wash cycle”).
DETERGENT and SOFTENER buttons : refer to
“Modifying pre-set parameters” in the chapter “Auto Dose System”.
DETERGENT DILUTION button: refer to “Filling the tanks”
in the chapter “Auto Dose System”.
WASH CYCLE PHASE icons: these illuminate to indicate the
progress of the wash cycle (Wash – Rinse – Spin –
Drain ). The text lights up when the cycle is complete.
START/PAUSE button with indicator light: when the green
indicator light flashes slowly, press the button to start a wash
cycle. Once the cycle has begun the indicator light will remain
lit in a fixed manner. To pause the wash cycle, press the button
again; the indicator light will flash in an orange colour.
DETERGENT
DILUTION
button
OPTION
buttons
DELAY
TIMER button
If the “LOCK” indicator light is switched off, the door may be
opened. To start the wash cycle from the point at which it was
interrupted, press the button again.
LOCK indicator light: indicates that the porthole door is
locked. To open the door, pause the wash cycle (see “Running
a wash cycle”).
CHILD LOCK button with indicator light: to activate or
deactivate the control panel lock, press and hold the button for
approximately 2 seconds. when the indicator light is illuminated,
the control panel is locked (apart from the ON/OFF button). This
means it is possible to prevent wash cycles from being modified
accidentally, especially where there are children in the home.
ECO indicator light: the icon lights up when, after altering the
washing parameters, an energy saving of at least 10% is made.
Furthermore, before the machine enters “Standby” mode, the
icon will light up for a few seconds; when the machine is switched
off the estimated energy saving will be around the 80% mark.
CHANGE LANGUAGE
The first time the machine is switched on, the first language
will flash on the display. The
“ “, “OK” and “V” symbols will appear on the display, in line
with the 3 buttons on the right-hand side. The languages
change automatically every 3”; alternatively, they can be
changed by pressing the buttons next to the “ “ and “V”
symbols. Use the “OK” button to confirm the language, which
will be set after 2”. If no buttons are pressed, the automatic
language change will begin again after 30”.
LOCK
indicator light
CHILD LOCK button
with indicator light
To change the language, switch the machine on and off
again; in the 30” time period after it has been switched
off, press and hold the temperature +spin
+delayed start buttons simultaneously for 5’’. A short
sound alert will be emitted and the set language will flash
on the display. Press the buttons next to the “ “ and “V”
symbols to change the language. Use the button next to the
“OK” symbol to confirm the language, which will be set after
2”. If no buttons are pressed, the language set previously will
be displayed after 30”. Switch on the machine.
7
7
Page 8
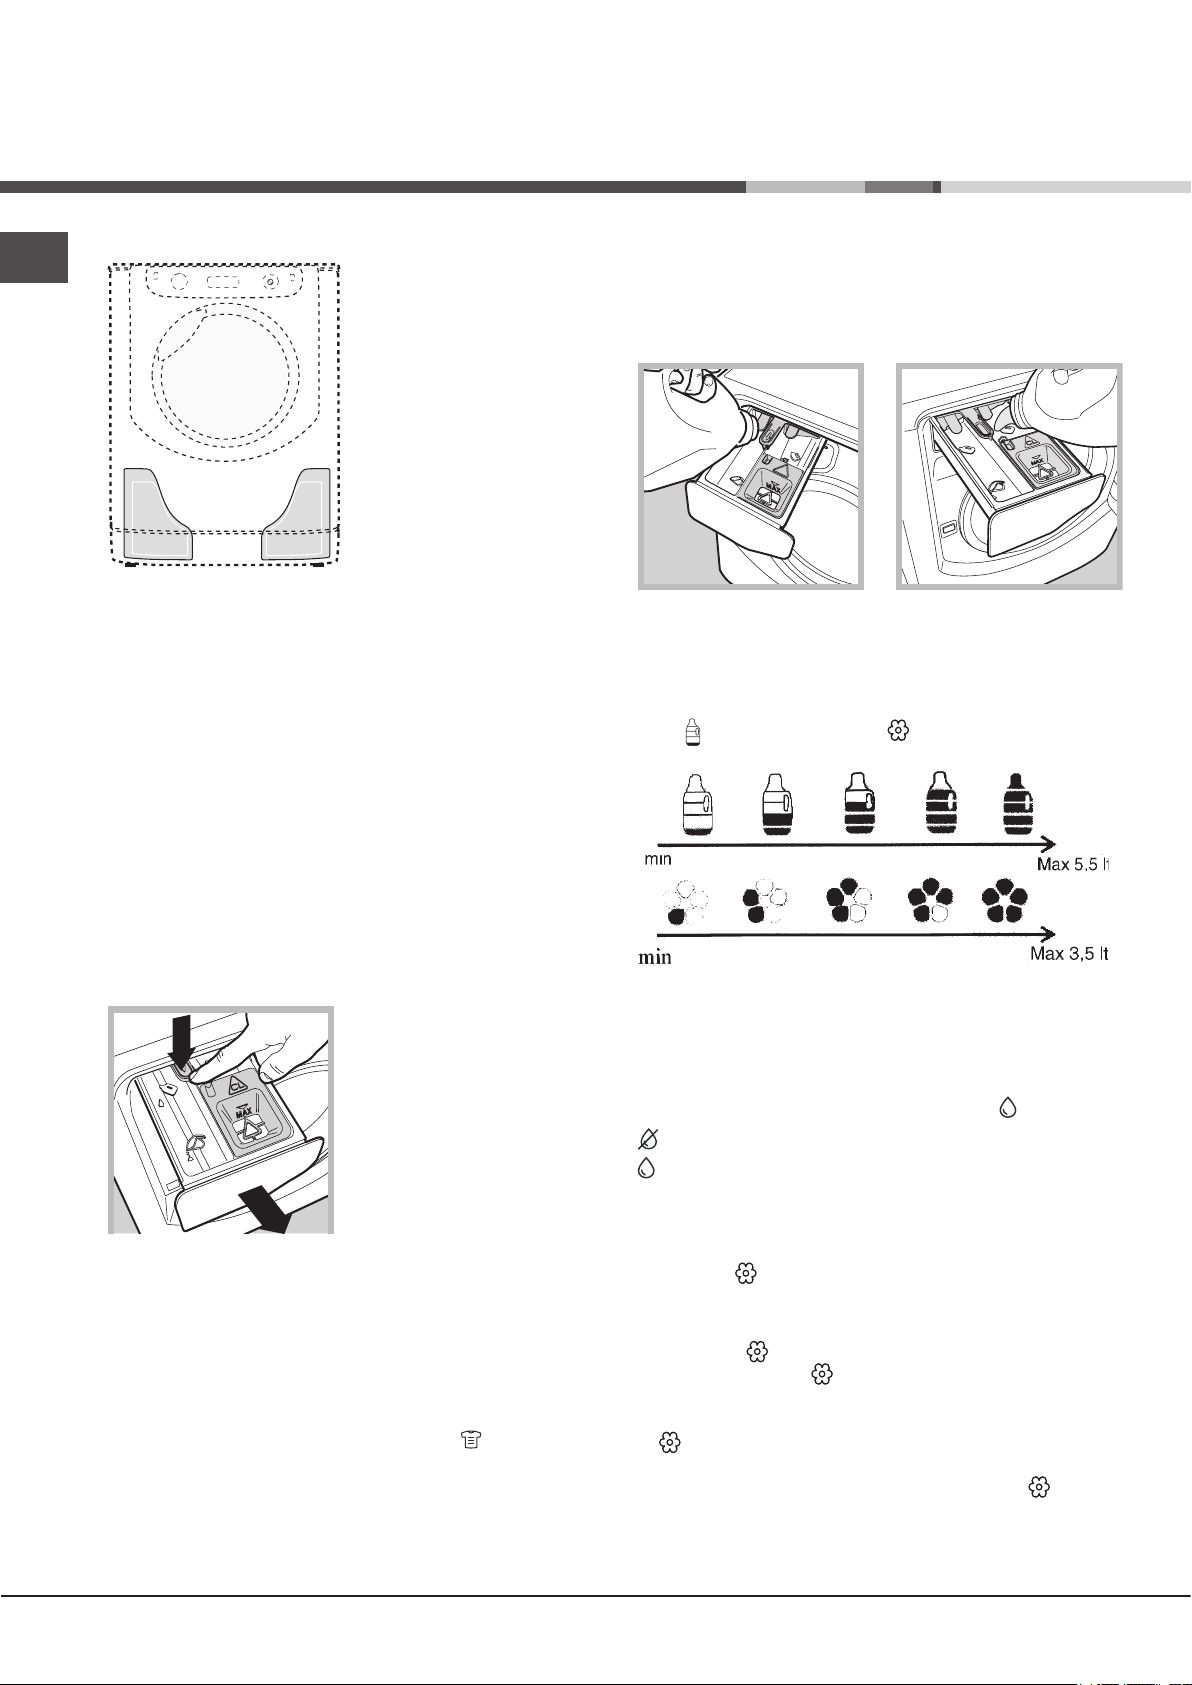
Auto Dose System
B
C
A
EN
Introduction
Thi s wash i ng m a c hi n e is
equipped with two tanks: one
fo r liqu id det ergent (eith er
concentrated or diluted) with
a capacity of approx. 5.5 l
and another for liquid fabric
softener (either concentrated
or diluted) with a capacity of
approx. 3.5 l (see picture).
! Check the detergent/fabric
softener box to verify whether
it is diluted or concentrated
deterge n t . Th e autom a t i c
dosing syst em intakes the
correct amount of detergent and fabric softener from the
tanks for each type of load and at the right time, guaranteeing
optimal washing results without wastage. The amount of
detergent/fabric softener can be modified manually by
pressing the DETERGENT and FABRIC SOFTENER buttons
(refer to “Modifying pre-set parameters”). If you prefer, the
washing machine can also be used in the “traditional” mode,
i.e. by adding the detergent in the dispenser; the machine will
automatically detect the detergent and will not use the tanks.
Detergent dispenser
“Traditional” mode.
Pull out the detergent dispenser drawer up to the first stop
point to add the detergent (either liquid or powder detergent),
bleach or other additives (e.g. whiteners) and the pre-wash
detergent for washing in the “traditional” mode (refer to
“Traditional” mode).
“Auto Dose System” mode.
In order to fill the detergent
and fabric softener tanks, the
detergent dispenser drawer
must be fu l l y extracted :
open the dispenser drawer
up to the first stop point then
press the lever (A) and open
up to the second stop point,
making sure that it is fully
ex t r a c t e d . Avoid moving
the dispenser drawer during
filling operations. Once the tanks have been filled (refer to
“Filling the tanks”), the machine can run up to 40 cycles before
the detergent finishes (*).
First-time use
Turn the washing machine on by pressing the ON/OFF button.
The first wash cycle must be carried out without laundry
and by adding detergent in the detergent dispenser (refer
to “Traditional” mode); set the programme “ “ (Cotton 90°)
without pre-wash and without filling the tanks.
Filling the tanks:
Open the detergent dispenser drawer in the “Auto Dose
System” mode (refer to “Detergent dispenser”).
Slowly pour the detergent (B) and fabric softener (C)
until th e tan k s are co m p l etely fi lled (see pi c t ure).
To avoid exceeding the maximum capacity, a buzzer (beep)
will sound with growing intensity to signal the level and 3 long
beeps will sound once the tank is completely full.
Start the wash cycle immediately after filling the tanks to
ensure that the dispenser is properly cleaned.The respective
icons (for the detergent) and (for the fabric softener) will
light up gradually to signal the level.
The filling time depends on the density of the product. Very
dense products will take longer to fill.
Close the detergent dispenser drawer only once the
compartments are completely empty.
Select the density of the detergent added (either concentrated
or liquid) by pressing the appropriate button .
Concentrated
Diluted
The machine will store the selection.
If no option is selected, the detergent intake option will be
pre-set to “diluted”.
Use button to set the amount of fabric softener that will
be automatically extracted by the machine:
1) If concentrated softener is used, we recommend selecting
the first level ( with one bar) and, if necessary, stepping up
by a single position ( with 2 bars) to increase detergent
intake.
2) If diluted softener is used, we recommend setting level
3 ( with 3 bars) and to then either increase/decrease the
amount of fabric softener to be extracted.
3) To exclude the use of fabric softener, press until the
bars disappear (also refer to “Modifying pre-set parameters”).
(*) with an average load of 4 kg, 40°C Cotton programme, “medium” water hardness
level and dirt level set to 3.
8
Page 9
Signals for successive refilling:
3
1
2
Once, at the end of a cycle, the level of detergent/fabric
softener falls below the level required for a successive
wash cycle, the display will visualise the relative messages
“At end of cycle refill detergent” or “At end of cycle refill
softener” or “At end of cycle refill tanks”. If the tanks are
not filled, the successive wash cycles in Auto Dose System
will be carried out without any intake of detergent.
! We suggest adding detergent and fabric softener ONLY
after the machine’s signal.
! NEVER mix two different detergents; always clean out
the tank before adding a new type of detergent (refer to
“Cleaning cycle set by the user”).
Using the “Auto Dose System”
If the compartments have been filled with detergent and
fabric softener, you may start using the machine (refer to
“Running a wash cycle”).
Powder detergents for pre-washing and powder
additives may only be used in the traditional mode or
using the “Auto Dose System”, by placing the additives
directly inside the drum, preferably in conjunction with the
“laundry ball”.
Whenever bleaching is required, pour the bleach in the
relative compartment (refer to the option “Super Wash”).
Modifying pre-set parameters:
The machine automatically intakes detergent on the
basis of the selected programme, wash load and water
hardness. However, the amount of detergent/fabric
softener used may be modified.
button: press to increase, decrease and to exclude
detergent intake.
Automatic cleaning:
The washing machine carries out an automatic cleaning
cycle during the rinse cycle if the level of detergent that
remains is insufficient for carrying out a
successive wash cycle.
Cleaning cycle set by the user:
Run the cleaning cycle (with empty drum) if you require
adding a different product to the previous one or if the tanks
have been incorrectly filled (e.g. fabric softener has been
erroneously poured into the detergent tank or vice-versa).
Press button and hold for 5 sec. to activate cleaning of
the detergent tank, button for cleaning the fabric softener
tank or button for cleaning both tanks. Keep pressing for
a further 3 sec. (the countdown “4-3-2-1” will appear in the
top right corner) until “CLEAN-GO” pops up.
The cleaning cycle lasts about 40’ if the tanks are initially
empty; if not, the cycle will last longer. The icons indicating
that the tanks are empty will appear on the display.
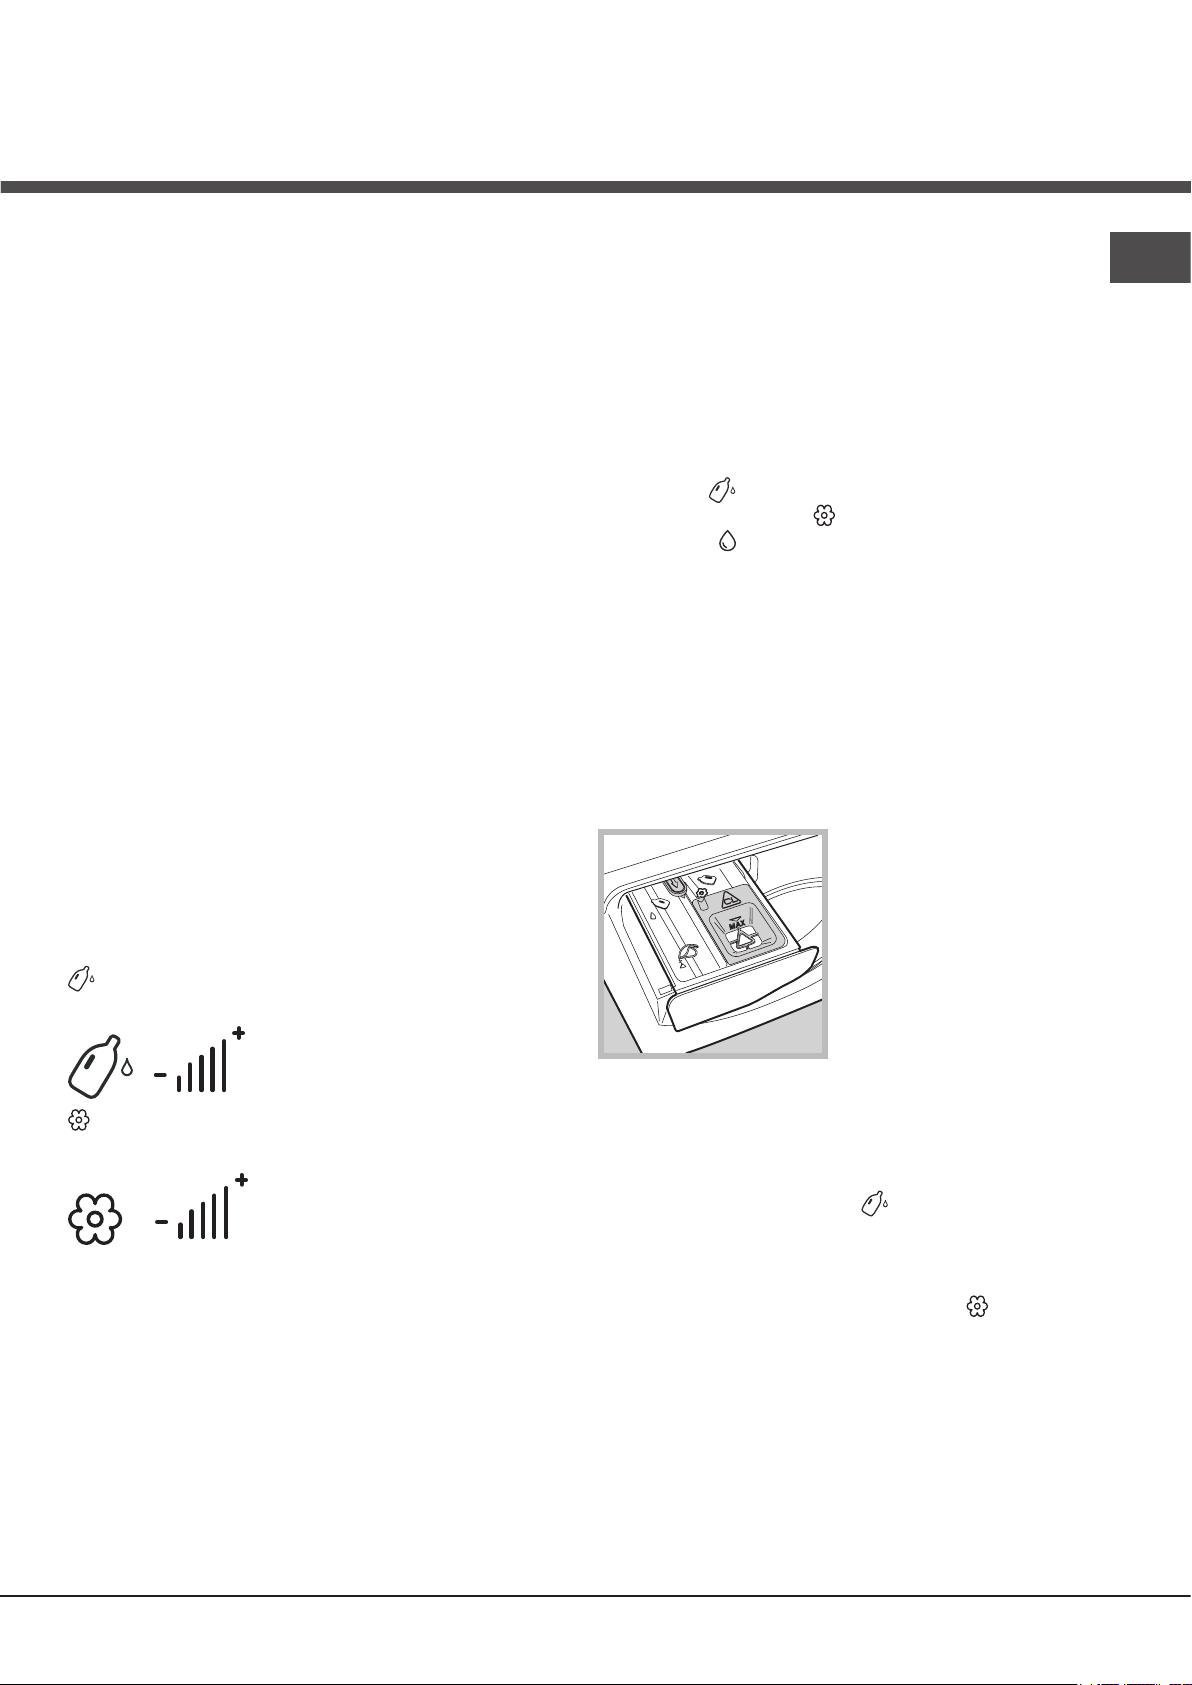
“Traditional” mode
Pull out the detergent dispenser drawer up to the first stop
point (see picture) then pour the amount of detergent and
other additives (e.g. bleach) required for a single wash cycle
directly into the dispenser.
1. pre-wash compartment: use
powder detergent only.
2. main wash compartment:
use powder or liquid detergent.
If t h e l a tt e r i s u se d , w e
recommend pouring it into the
dispenser immediately before
starting the washing machine
and without running a prewash cycle.
EN
button: press to increase, decrease and to exclude
fabric softener intake.
The level of detergent/fabric softener suggested by the
machine is indicated by 3 bars.
Less than 3 bars indicates a lower level of detergent/
fabric softener compared to that suggested by the
machine, while more than 3 bars indicates a higher level of
detergent/fabric softener.
Cleaning the tanks:
Tank cleaning cycles can either be automatic or pre-set by
the user.
3. bleach compartment: to be used whenever bleaching is
required (refer to “Super Wash” option).
Tablet detergent or the relative “laundry ball” must be added
directly inside the drum. In this event, deactivate the “Auto
Dose System” (by pressing the button until the relative
vertical bars disappear from the display).
Do not pour any fabric softener as the appropriate quantity
required for each wash cycle will be automatically extracted.
To deactivate fabric softener intake, press the button until
the vertical bars disappear from the display.
For wool and silk garments, we recommend using a special
detergent which must be poured directly into the detergent
dispenser (compartment 2).
Running the wash cycle:
Select the programme and the compatible options on the
basis of the required need and type of load.
9
9
Page 10
Running a wash cycle
EN
WARNING: before you use the washing machine for the first
time, run a wash cycle with detergent and no laundry, using
the 90° cottons cycle without pre-wash.
1. SWITCH THE MACHINE ON. Press the button. All
the indicator lights will illuminate for 1 second and the text
AQUALTIS will appear on the display; the indicator light
corresponding to the button will then remain lit in a constant
manner and the START/PAUSE indicator light will flash.
2. SELECT THE PROGRAMME. Turn the PROGRAMME
KNOB left or right, until the required programme has been
selected; the name of the programme will appear on the
display. A temperature and spin speed is set for each
programme; these may be adjusted. The cycle duration
will also appear on the display.
3. LOAD THE LAUNDRY. Open the porthole door. Load the
laundry, making sure you do not exceed the maximum load
value indicated in the table of wash cycles on the following
page.
4. MEASURE OUT THE DETERGENT. There is no need
to add detergent when the “Auto Dose System” mode is
used, as the machine automatically intakes detergent on the
basis of the selected programme, type of load and water
hardness. Refer to the paragraph “Traditional” mode for
implementing the traditional operation mode.
5. CLOSE THE PORTHOLE DOOR.
6. CUSTOMISE THE WASH CYCLE. Use the relevant
buttons on the control panel:
Modify the temperature and/or spin speed.
The mac hine a utoma ticall y disp lays the maximum
temperature and spin speed values set for the selected
cycle, or the most recently-used settings if they are
compatible with the selected cycle. The temperature
can be decreased by pressing the button, until the
cold wash “OFF” setting is reached. The spin speed may
be progressively reduced by pressing the button,
until it is completely excluded “OFF”. If these buttons
are pressed again, the maximum values are restored.
! Exception: if the
temperature can be increased up to a value of 90°C.
Set a DELAY TIMER
To set a delayed start for the selected cycle, press the
corresponding button repeatedly until the required delay
period has been reached. During the setting procedure, the
delay period and the text “Starts in:” will be displayed, along
with the flashing symbol. After the delayed start has been
set, the symbol will remain fixed on the display, which will
also indicate the duration of the selected cycle with the text
“Ends in:” and the cycle duration. Press the DELAY TIMER
button just once to display the delay time set previously. After
the countdown has begun, the display will show the text
“Starts in:” and the delay period.
Once the set delay time has elapsed, the machine will begin
its cycle and the display will show “Ends in:” and the time
remaining until the end of the cycle. To remove the delayed
start option, press the button until the display shows the text
OFF; the symbol will disappear.
programme is selected, the
Modify the cycle settings.
• Press the button to activate the option; the name of the
option will then appear on the display and the corresponding
indicator light will illuminate.
• Press the button again to deactivate the option; the name
of the option will then appear on the display followed by
the text OFF, and the corresponding indicator light will
switch off.
! If the selected option is not compatible with the selected
wash cycle, this incompatibility will be signalled by the
flashing of the indicator light and a sound alert (3 beeps);
the option will not be activated.
! If the selected option is not compatible with another option
that has been selected previously, the indicator light
corresponding to the first option selected will flash and
only the second option will be activated; the indicator light
corresponding to the button will remain lit in a constant
manner.
! The options may affect the recommended load value and/or
the duration of the cycle.
7. START THE PROGRAMME. Press the START/PAUSE
button. The corresponding indicator light remains lit in a
fixed manner and the porthole door locks (the LOCK
indicator light illuminates). The icons corresponding to
the wash cycle phases will light up during the cycle to
indicate which phase is currently in progress. To change a
wash cycle once it has already started, pause the washing
machine by pressing the START/PAUSE button; then select
the desired cycle and press the START/PAUSE button
again. To open the door during a wash cycle, press the
START/PAUSE button; if the LOCK indicator light is
switched off you may open the door. Press the START/
PAUSE button again to restart the wash cycle from the
point at which it was interrupted.
8. THE END OF THE WASH CYCLE. This is indicated by
the illuminated text END. The porthole door may be opened
immediately. If the START/PAUSE indicator light is flashing,
press the button to end the cycle. Open the door, unload
the laundry and switch off the machine.
! If you wish to cancel a cycle which has already begun, press
and hold the button until the cycle stops and the machine
switches off.
Bag for quilts, curtains and delicate garments
The Aqualtis washing machine makes it easier for you to wash
even the most valuable and delicate garments in complete
confidence thanks to the special bag which protects the
laundry (this is supplied with the machine). We recommend
that the bag is used every time you wash quilts and
padded items with an outer layer made using synthetic
material.
10
Page 11

Wash cycles and options
3
1
2
Table of wash cycles
Detergent and additives
Description of the wash cycle
Icon
Synthetics Resistant 60° 800
Synthetics Resistant (4) 40° 800
Whites
Coloureds
Darks
Shirts
Duvets: for down-stuffed garments. 30° 1200 -
Bed&Bath for bedlinen and towels. 60° 1600
Rinse
Spin and Pump out - 1600 - - - - 9 - - - 16’
Anti Allergy
Ultradelicates
Wool: for wool, cashmere, etc. 40° 800 -
Mix 30': to refresh lightly soiled garments quickly (not suitable for
wool, silk and clothes which require washing by hand).
Cotton Standard 60°C (1): heavily soiled whites and resistant colours.
Cotton Standard 40°C (2): lightly soiled whites and delicate colours. 40° 1600 -
Cotton Standard 20°C: lightly soiled whites and delicate colours. 20° 1600 -
The length of cycle shown on the display or in this booklet is an estimation only and is calculated assuming standard working conditions. The actual duration can vary according to factors such as water temperature and pressure, the amount of detergent used, the amount and type of load inserted, load balancing and any wash options selected.
Note: 10 minutes after the START, the machine will recalculate the time remaining until the end of the wash cycle on the basis of the load inside it; this value
will then be shown on the display.
1) Test wash cycle in compliance with directive 1061/2010: set wash cycle with a temperature of 60°C.
This cycle is designed for cotton loads with a normal soil level and is the most efficient in terms of both electricity and water consumption; it should be used for
garments which can be washed at 60°C. The actual washing temperature may differ from the indicated value.
2) Test wash cycle in compliance with directive 1061/2010: set wash cycle with a temperature of 40°C.
This cycle is designed for cotton loads with a normal soil level and is the most efficient in terms of both electricity and water consumption; it should be used for
garments which can be washed at 40°C. The actual washing temperature may differ from the indicated value.
3) At 60 °C the “Prewash” function cannot be selected.
For all Test Institutes:
2) Long wash cycle for cottons: set wash cycle with a temperature of 40°C.
4) Long wash cycle for synthetics: set wash cycle with a temperature of 40°C.
Max.
temp.
(°C)
60° 1600
40° 1600
30° 800 -
40° 600 -
60° 1600 -
30° 0 -
30° 800 -
60°
(Max. 90°)
Max.
speed
(rpm)
Prewash
- 1600 - -
(3)
1600
Wash
Bleach
-
-
-
-
-
-
-
Fabric
softener
Residual
Energy con-
dampness %
Max. load (kg)
5 46 1,03 60 115’
5 46 0,56 60 100’
5 - - - 180’
5 44 0,83 63 100’
5 - - - 80’
2 - - - 70’
3,5 - - - 120’
9 - - - 140’
9 - - - 36’
5 - - - 195’
1 - - - 80’
2 - - - 90’
3,5 71 0,20 38 30’
9 44 1,36 76 190’
9 44 1,09 92 185’
9 - - - 175’
Total water lt
sumption kWh
Cycle dura-
EN
tion
Wash options
Super Wash
Th i s option o ffers a h ighpe rforman ce wash due to
the greater quantity of water
used in the initial phase of
th e cycl e, and due to the
increased wash cycle duration,
is particularly useful for the
removal of stubborn stains. It
can be used with or without
bleach. If you desire bleaching,
use t he c o mp a rtm e nt 3 .
When dos i n g the bl e a c h ,
be careful not to exceed the “max” level (see figure).
To bleach laundry without carrying out a full wash cycle,
pour the bleach into the compartment 3, select the “Rinse”
cycle and activate the “Super Wash” option .
! It cannot be used in conjunction with , , , , ,
, , .
Extra rinse
By selecting this option, the efficiency of the rinse is increased
and optimal residual detergent removal is guaranteed. It is
particularly useful for skin which is sensitive to detergents. We
recommend this option is used with a full load of washing, or
when a large amount of detergent is required.
! It cannot be used in conjunction with , , , , .
Easy Iron
By selecting this option, the wash and spin cycles will be
modified in order to reduce the formation of creases.
At the end of the cycle the washing machine drum will
rotate slowly; the “Easy Iron” and START/PAUSE indicator
lights will flash. To end the cycle press the START/PAUSE
button or the “Easy Iron” button.
! It cannot be used in conjunction with , , , , , .
Prewash
If this function is selected, the pre-wash cycle will run; this is
useful for removing stubborn stains.
N.B.: put the detergent in the relevant compartment.
! It cannot be used in conjunction with , , , , ,
, , , , (60°), , .
11
11
Page 12

Detergents and laundry
EN
Detergent
The type and quantity of detergent required depend on the
type of fabric you are washing (cotton, wool, silk, etc.), as
well as its colour, the washing temperature, the level of soiling
and the hardness of the water in the area.
Whenever the detergent and fabric softener “Auto Dose
System” is activated, this washing machine helps to
prevent wastage and to protect the environment, besides
guaranteeing optimal washing performance.
We recommend the following:
• Use powder detergent for carrying out a pre-wash and
pour in the “traditional” mode.
• Use liquid detergents for delicate cotton garments and for
all low-temperature wash cycles.
• When activating the “Auto Dose System” mode, use liquid
detergent and fabric softeners only. Never add ultra-
concentrated detergents (e.g. “Gel” type detergents
or similar).
• Use gentle liquid detergents for wool and silk garments
and pour in the “traditional” mode.
! Never mix two different detergents; always clean out the
tank before adding a new type of detergent.
The detergent should be poured into the relevant compartment
- or the dispenser placed directly inside the drum - before the
wash cycle begins. In the latter case, it will not be possible
to select the Cottons with pre-wash cycle.
! Use powder detergent for white cotton garments, for
pre-washing, and for washing at temperatures over 60°C
! Follow the instructions given on the detergent packaging.
! Do not use hand washing detergents because these
create too much foam.
Preparing the laundry
• Shake out the garments before loading them into the
machine.
• Divide the laundry according fabric type (symbol on the
washing instruction label) and colour, making sure you
separate the coloured garments from the white ones;
• Empty all pockets and check the buttons;
• Do not exceed the values listed in the “Table of wash
cycles”, which refer to the weight of the laundry when dry.
How much does your laundry weigh?
1 sheet 400-500 g
1 pillowcase 150-200 g
1 tablecloth 400-500 g
1 bathrobe 900-1200 g
1 towel 150-250 g
1 pair of jeans 400-500 g
1 shirt 150-200 g
Washing recommendations
Whites: use this cycle to wash white clothes. The
programme is designed to maintain the brightness of
white clothes over time.
Coloureds: use this cycle to wash bright coloured
clothes. The programme is designed to maintain bright
colours over time.
Darks: Use cycle to wash dark-coloured garments.
This programme is designed to maintain dark colours
over time. We recommend using a liquid detergent for the
best results when washing dark-coloured garments.
Shirts: use the special wash cycle to wash shirts in
different fabrics and colours to guarantee they receive the
best possible care.
Duvets: to wash double or single duvets (the weight of
which should not exceed 3,5 kg), cushions or clothes
padded with goose down such as puffa jackets, use the
special wash cycle. We recommend that duvets are
placed in the drum with their edges folded inwards (see
figure) and that no more than ¾ of the total volume of the
drum is used. To achieve the best results, we recommend
that a liquid detergent is used and placed inside the
detergent dispenser drawer.
Quilts: to wash quilts with a synthetic outer layer, use the
bag provided and set the wash cycle to .
Bedlinen and towels: Use programme to wash bed
linen and towels in one single cycle: it optimises softener
performance and helps you save time and energy. We
recommend the use of powder detergent
Anti Allergy: use programme to remove major allergens
such as pollen, mites, cat’s and dog’s hair.
Ultradelicates: use programme to wash very delicate
garments having strasses or sequins.
We recommend turning the garments inside out before
washing and placing small items into the special bag
for washing delicates. Use liquid detergent on delicate
garments for best results.
To wash Silk garments and Curtains (these should be folded
and placed inside the bag provided), select cycle and then
option (in this case it will also be possible to enable the
“Extra Rinse” option); the machine will end the cycle while
the laundry is soaking and the indicator light will flash.
To drain the water so that the laundry may be removed,
press the START/PAUSE button or the button.
Wool: the wool wash cycle on this Hotpoint-Ariston
machine has been tested and approved by The
Woolmark Company for washing wool garments labelled
as hand washable provided that the garments are
washed according to the instructions on the garment
label and those issued by the manufacturer of this
washing machine. Hotpoint-Ariston is the first washing
machine brand to be approved by The Woolmark
Company for Apparel Care- Platinum for its washing
performance and consumption of energy and water.
(M1127)
In UK, Eire, Hong Kong and India the Woolmark trade mark
is a Certification trade mark.
Cotton Standard 20°C: ideal for heavily soiled cotton
loads. The effective performance levels achieved at cold
temperatures, which are comparable to washing at 40°,
are guaranteed by a mechanical action which operates at
varying speed, with repeated and frequent peaks.
12
Page 13

Trouble shooting
Your washing machine could occasionally fail to work. Before contacting the Technical Assistance Centre (see “Assistance”),
make sure that the problem cannot be solved easily using the following list.
Problem:
The washing machine does not
switch on.
The wash cycle does not start.
The washing machine does not fill
with water.
The washing machine door
remains locked.
The machine continuously fills
with water and drains.
The washing machine does not
drain or spin.
The machine vibrates a lot during
the spin cycle.
The washing machine leaks.
The icons corresponding to the
“Phase in progress” flash rapidly
at the same time as the ON/OFF
Possible causes / Solutions:
• The appliance is not plugged into the socket fully, or not enough to make
contact.
• There is no power in the house.
• The door is not closed properly.
• The START/PAUSE button has not been pressed.
• The water tap has not been opened.
• A delayed start has been set.
• The water inlet hose is not connected to the tap.
• The hose is bent.
• The water tap has not been opened.
• There is no water supply in the house.
• The pressure is too low.
• The START/PAUSE button has not been pressed.
• If you have selected the function, at the end of the cycle the washing
machine drum will rotate slowly; to end the cycle press the START/PAUSE
button or the button.
• The drain hose is not fitted at a height between 65 and 100 cm from the floor
(see “Installation”).
• The free end of the hose is under water (see “Installation”).
• If the dwelling is on one of the upper floors of a building, there may be
problems relating to water drainage, causing the washing machine to fill with
water and drain continuously. Special anti-draining valves are available in shops
and help to prevent this inconvenience.
• The wall drainage system is not fitted with a breather pipe.
• The wash cycle does not include draining: Some wash cycles require the drain
phase to be started manually (see “Wash cycles and options”).
• The “Easy iron” option is enabled: to complete the wash cycle, press the
START/PAUSE button (“Wash cycles and options”).
• The drain hose is bent (see Installation).
• The drainage duct is clogged.
• The drum was not unlocked correctly during installation (see “Installation”).
• The machine is not level (see “Installation” ).
• The machine is trapped between cabinets and walls (see “Installation”).
• The load is unbalanced (see “Detergents and laundry”).
• The water inlet hose is not screwed on properly (see “Installation”).
• The detergent dispenser is blocked (to clean it, see “Care and maintenance”).
• The drain hose is not fixed in place properly (see “Installation”).
• Switch off the machine and unplug it, wait for approximately 1 minute and
then switch it back on again. If the problem persists, contact the Technical
Assistance Service.
indicator light.
There is too much foam.
The washing machine door
• The detergent is not suitable for machine washing (it should display the text
“for washing machines” or “hand and machine wash”, or the like).
• Too much detergent was used.
• Perform the manual unlocking procedure (see “Precautions and tips”).
remains locked.
EN
“AutoDose disabled, use the
dispenser drawer” appears on the
display.
• Indicates malfunctioning of the AutoDose system. Use the machine traditionally,
by pouring the detergent and fabric softener required for a wash cycle into
the drawer, and contact the Assistance service to establish the cause(s) of the
malfunction.
13
Page 14

EN
Troubleshooting:
Possible causes / Solutions:
The machine’s washing performance
is unsatisfactory.
What happens if the tanks are loaded
even if they are already full?
What happens if the dispenser is used
in the traditional mode while the tanks
are still full?
Can the tanks also be used for
powder detergent?
Can powder detergent fall into the
tanks?
What happens if the dispenser is
not opened properly when filling the
tanks?
• The tanks have not been loaded correctly (e.g. fabric softener has been
added instead of detergent or vice-versa)
• Two different types of detergent/fabric softener have mixed.
! NEVER mix two different detergents; always clean out the tanks before adding
a new type of detergent.
• The “Auto Dose System” is blocked due to prolonged lack of use: carry out
a tank cleaning cycle (refer to “Cleaning cycle set by the user”).
• Buzzers (Beep) and visual signals (icons appearing on the display) indicate
that the tank is full. If further detergent/fabric softener is added, the excess
quantity will fall into the drum and will be washed away with the next cycle.
• The machine will automatically track whether powder or liquid detergent
has been loaded in the traditional mode and will not intake any amount of
detergent from the tank. Fabric softener can only be used in the “Auto Dose
System” mode.
• No, powder detergent can only be used in the traditional mode.
• No, there is a barrier to prevent powder detergent from falling into one of
the tanks even if the dispenser is open in the “Auto Dose System” position
(i.e. completely open).
• If the dispenser is not completely open, the detergent or fabric softener that
has been added will fall into the drum and will be washed away with the
next cycle.
What happens if detergent and fabric
softener are erroneously inverted?
What happens if different detergents
are mixed before the tanks are
empty?
! Note: to exit “Demo mode”, switch machine off, press and hold the two “START/PAUSE” and “ON/OFF” buttons
simultaneously for 3 seconds.
• The washing machine will wash with unsatisfactory results, the tanks will
have to be emptied and subjected to a manual cleaning cycle.
• The machine will wash normally although we recommend only refilling
the tanks after the signal emitted by the machine; do not mix different
detergents/fabric softeners.
14
Page 15

Assistance
Before calling for Assistance:
• Check whether you can solve the problem by yourself (see “Trouble shooting”);
• Restart the wash cycle to check whether the problem has been solved;
• If it has not, contact the Authorised Technical Assistance Service.
! If the washing machine has been installed or used incorrectly, you will have to pay for the call-out service.
! Always request the assistance of authorised technicians.
Please have the following information to hand:
• the type of problem;
• the appliance model (Mod.);
• the serial number (S/N).
The above information can be found on the data plate located on the appliance itself.
EN
15
Page 16

EN
16
Page 17

Οδηγίες για την
εγκατάσταση και τη χρήση
Περιεχόμενα
Εγκατάσταση, 18-19
GR
Ελληνικά
AQUALTIS
Αποσυσκευασία και οριζοντίωση
Υδραυλικές και ηλεκτρικές συνδέσεις
Τεχνικά στοιχεία
Συντήρηση και φροντίδα, 20
Αποκλεισμός νερού και ηλεκτρικού ρεύματος
Καθαρισμός της μηχανής
Καθαρισμός του συρταριού απορρυπαντικών
Φροντίδα του κάδου
Καθαρισμός της αντλίας
Έλεγχος του σωλήνα τροφοδοσίας του νερού
Προφυλάξεις και συμβουλές, 21
Γενική ασφάλεια
Σύστημα ισοστάθμισης του φορτίου
Διάθεση
Χειρονακτικό άνοιγμα της πόρτας
ΠΛΥΝΤΗΡΙΟ
GR
ADS93D 69
Περιγραφή της μηχανής, 22-23
Πίνακας χειριστηρίων touch control
Auto Dose System, 24-25
Πως διενεργείται ένας κύκλος πλυσίματος, 26
Προγράμματα και δυνατότητες, 27
Πίνακας Προγραμμάτων
Οι δυνατότητες πλυσίματος
Απορρυπαντικά και μπουγάδα, 28
Απορρυπαντικό
Προετοιμασία της μπουγάδας
Συμβουλές πλυσίματος
Ανωμαλίες και λύσεις, 29-30
Υποστήριξη, 31
17
Page 18
Εγκατάσταση
GR
! Είναι σημαντικό να διατηρήσετε το
εγχειρίδιο αυτό για να μπορείτε να το
συμβουλεύεστε οποιαδήποτε στιγμή. Σε
περίπτωση πώλησης, παραχώρησης ή
μετακόμισης, βεβαιωθείτε ότι παραμένει μαζί
με το πλυντήριο.
! Διαβάστε προσεκτικά τις οδηγίες:
υπάρχουν σημαντικές πληροφορίες για την
εγκατάσταση, τη χρήση και την ασφάλεια.
! Στη σακουλίτσα που περιέχει το εγχειρίδιο
αυτό θα βρείτε, εκτός της εγγύησης, υλικά
που χρησιμεύουν για την εγκατάσταση.
Αποσυσκευασία και οριζοντίωση
Αποσυσκευασία
1. Αφού αποσυσκευαστεί το πλυντήριο,
ελέγξτε αν έχει υποστεί ζημιές κατά τη
μεταφορά.
Αν έχει υποστεί ζημιές μην το συνδέετε και
επικοινωνήστε με τον μεταπωλητή.
2. Αφαιρέστε τις 4
προστατευτικές βίδες
για τη μεταφορά και
τον σχετικό αποστάτη
που βρίσκονται στο
πίσω μέρος (βλέπε
εικόνα).
3. Κλείστε τις οπές με τα πλαστικά πώματα
που περιέχονται στη σακουλίτσα.
4. Φυλάξτε όλα τα κομμάτια. Αν το
πλυντήριο χρειαστεί να μεταφερθεί, θα
πρέπει να ξαναμονταριστούν για την
αποφυγή εσωτερικών βλαβών.
! Οι συσκευασίες δεν είναι παιχνίδια για μικρά
παιδιά!
Αλφάδιασμα
1. Τοποθετήστε το
πλυντήριο σε ένα
δάπεδο επίπεδο και
ανθεκτικό, χωρίς να
το ακουμπήσετε σε
τοίχους ή έπιπλα.
2. Αντισταθμίστε
τις ανωμαλίες
ξεβιδώνοντας ή
βιδώνοντας τα
ποδαράκια έως ότου η μηχανή αλφαδιαστεί
(δεν πρέπει να κλίνει περισσότερο από 2
μοίρες).
! Ένα επιμελές αλφάδιασμα δίνει
σταθερότητα και αποσοβεί δονήσεις και
θορυβότητα κυρίως στη φάση στυψίματος.
! Σε περίπτωση μοκέτας ή τάπητα, ρυθμίστε
τα ποδαράκια έτσι ώστε να υφίσταται κάτω
από το πλυντήριο αρκετός χώρος για τον
αερισμό.
Υδραυλικές και ηλεκτρικές
συνδέσεις
Σύνδεση του σωλήνα τροφοδοσίας του
νερού
! Πριν συνδέσετε το σωλήνα τροφοδοσίας στο
δίκτυο ύδρευσης, αφήστε να τρέξει το νερό
μέχρι να βγει διαυγές.
1. Συνδέστε το
σωλήνα τροφοδοσίας
στο πλυντήριο
βιδώνοντάς τον στην
αντίστοιχη είσοδο
νερού, στο πίσω
μέρος επάνω δεξιά
(βλέπε εικόνα).
2. Συνδέστε το
σωλήνα τροφοδοσίας
βιδώνοντάς τον σε
ένα κρουνό κρύου
νερού με στόμιο
σπειρώματος 3/4 gas
(βλέπε εικόνα).
3. Προσέξτε ώστε στο σωλήνα να μην
υπάρχουν ούτε πτυχώσεις, ούτε στενώσεις.
! Η πίεση νερού του κρουνού πρέπει να
κυμαίνεται μεταξύ των τιμών του πίνακα
Τεχνικά στοιχεία (βλέπε σελίδα δίπλα).
! Αν το μήκος του σωλήνα τροφοδοσίας δεν
επαρκεί, απευθυνθείτε σε ένα ειδικευμένο
κατάστημα ή σε εξουσιοδοτημένο τεχνικό.
! Μη χρησιμοποιείτε ποτέ χρησιμοποιημένους
ή παλιούς σωλήνες τροφοδοσίας, αλλά
εκείνους που παρέχονται με τη μηχανή.
18
Page 19

чщсзфйкьфзфб фпх кЬдпх 62 лЯфсб
- 2006/95/CE (ЧбмзлЮ ФЬуз)
Σύνδεση του σωλήνα αποστράγγισης
65 - 100 cm
Συνδέστε το σωλήνα
αδειάσματος σε
μια σωλήνωση
αδειάσματος ή
σε μια επιτοίχια
παροχέτευση σε
ύψος από το έδαφος
μεταξύ 65 και 100 cm
και αποφεύγοντας
ρητά να τον
διπλώσετε.
Εναλλακτικά,
στηρίξτε το σωλήνα
αδειάσματος στο
χείλος ενός νιπτήρα
ή μιας λεκάνης,
δένοντας τον οδηγό
που σας παρέχεται
στον κρουνό (βλέπε
εικόνα). Το ελεύθερο
άκρο του σωλήνα
αδειάσματος δεν
πρέπει να παραμένει βυθισμένο στο νερό.
! Το καλώδιο δεν πρέπει να φέρει πτυχές ή
να είναι συμπιεσμένο.
! Το καλώδιο τροφοδοσίας και το βύσμα
πρέπει να αντικαθίστανται μόνο από
εξουσιοδοτημένους τεχνικούς.
Προσοχή! Η επιχείρηση αποποιείται κάθε
ευθύνης σε περίπτωση που δεν τηρούνται
αυτοί οι κανόνες.
ФечнйкЬ уфпйчеЯб
МпнфЭлп ADS93D 69
рлЬфпт cm 59,5
ДйбуфЬуейт
Чщсзфйкьфзфб áðü 1 Ýùò 9 kg
ЗлекфсйкЭт
ухндЭуейт
эшпт cm 85
вЬипт cm 64,5
ВлЭре фзн рйнбкЯдб
чбсбкфзсйуфйкюн ерЯ фзт
мзчбнЮт
GR
! Δεν συνιστάται η χρήση προεκτάσεων
σωλήνων. Αν απαιτείται, η προέκταση πρέπει
να έχει την ίδια διάμετρο του αρχικού σωλήνα
και να μην ξεπερνάει τα 150 cm.
Ηλεκτρική σύνδεση
Πριν εισάγετε το βύσμα στην ηλεκτρική πρίζα,
βεβαιωθείτε ότι:
• η πρίζα διαθέτει γείωση και τηρεί τις εκ του
νόμου προδιαγραφές.
• Η πρίζα να είναι σε θέση να υποφέρει
το μέγιστο φορτίο ισχύος της μηχανής,
που αναφέρεται στον πίνακα Τεχνικών
στοιχείων (βλέπε δίπλα).
• Η τάση τροφοδοσίας να κυμαίνεται μεταξύ
των τιμών που αναφέρονται στον πίνακα
Τεχνικών στοιχείων (βλέπε δίπλα).
• Η πρίζα να είναι συμβατή με το βύσμα
της μηχανής. Σε αντίθετη περίπτωση,
αντικαταστήστε την πρίζα ή το βύσμα.
! Το πλυντήριο δεν εγκαθίσταται σε
ανοιχτό χώρο, ακόμη και αν ο χώρος είναι
καλυμμένος, διότι είναι πολύ επικίνδυνο να το
αφήνετε εκτεθειμένο σε βροχή και κακοκαιρία.
! Με την εγκατάσταση του πλυντηρίου, η πρίζα
ρεύματος πρέπει να είναι εύκολα προσβάσιμη.
! Μη χρησιμοποιείτε προεκτάσεις και
πολύπριζα.
УхндЭуейт
неспэ
Фбчэфзфб
уфхшЯмбфпт
Προγράμματα
ελέγχου
σύμφωνα με
τις οδηγίες
1061/2010
και
1015/2010
θόρυβος
(dB(A) re
1 pW)
мЭгйуфз рЯеуз
1 MPa (10 bar)
ЕлЬчйуфз рЯеуз
0,05 MPa (0,5 bar)
мЭчсй 1600 уфспцЭт фп
лерфь
рсьгсбммб
;
ΒΑΜΒΑΚΕΡΑ ΚΑΝΟΝΙΚΌ
60°C.
рсьгсбммб ;
ΒΑΜΒΑΚΕΡΑ ΚΑΝΟΝΙΚΌ
40°C.
З ухукехЮ бхфЮ
еЯнбй уэмцщнз ме фйт
бкьлпхиет КпйнпфйкЭт
ПдзгЯет:
- 2004/108/CE
(ЗлекфспмбгнзфйкЮ
Ухмвбфьфзфб)
- 2002/96/CE
Πλύσιμο: 51
Στύψιμο: 79
19
Page 20

2
A
D
Συντήρηση και φροντίδα
GR
Αποκλεισμός νερού και ηλεκτρικού
ρεύματος
• Κλείστε τον κρουνό του νερού μετά από
κάθε
πλύσιμο. Έτσι περιορίζεται η φθορά της
υδραυλικής εγκατάστασης της μηχανής και
αποσοβείται ο κίνδυνος απωλειών.
• Να βγάζετε το βύσμα από το ρεύμα όταν
καθαρίζετε το μηχάνημα και κατά τις
εργασίες συντήρησης.
Καθαρισμός της μηχανής
Το εξωτερικό μέρος και τα λαστιχένια μέρη
μπορούν να καθαρίζονται με ένα πανί
βρεγμένο με χλιαρό νερό και σαπούνι. Μη
χρησιμοποιείτε διαλύτες ή αποξυστικά.
Καθαρισμός του συρταριού
απορρυπαντικών
Για να βγάλετε το συρτάρι, ανοίξτε το μέχρι
το πρώτο στοπ, μετά πατήστε το μοχλό A
ανοίγοντάς τον τελείως, τέλος πατήστε έναν
από τους μοχλούς D και τραβήξτε τον προς
τα έξω (βλέπε εικόνες).
αντικείμενα (κέρματα, κουμπιά) στον
προθάλαμο που προστατεύει την αντλία, που
βρίσκεται στο κάτω μέρος αυτής.
! Βεβαιωθείτε ότι ο κύκλος πλυσίματος έχει
τελειώσει και βγάλτε το βύσμα.
Για να έχετε πρόσβαση στον προθάλαμο:
1. αφαιρέστε το πάνελ κάλυψης στο πρόσθιο
πλευρό της μηχανής προς το κέντρο, κατόπιν
ωθήστε προς τα κάτω αμφότερα τα πλευρά
και βγάλτε το (βλέπε εικόνες).
2. τοποθετήστε ένα
δοχείο για τη συλλογή
του νερού που θα βγει
(περίπου 1,5 lt) (βλέπε
εικόνα).
3. Ξεβιδώστε το
καπάκι στρέφοντάς
το αριστερόστροφα
(βλέπε εικόνα).
Πλένετέ το κάτω από τρεχούμενο νερό.
Ο καθαρισμός αυτός διενεργείται συχνά.
Μεριμνήστε να απομακρύνετε και ενδεχόμενα
υπολείμματα απορρυπαντικών από την έδρα
του συρταριού στη μηχανή.
Για να το ξαναμοντάρετε πρέπει να το
κρατάτε πλευρισμένο τελείως αριστερά,
προσέχοντας να κεντράρετε τον οδηγό
ολίσθησης και να αποτρέψετε την εμπλοκή.
Φροντίδα του κάδου
• Να αφήνετε πάντα μισόκλειστη την πόρτα
για να μην παράγονται δυσοσμίες.
Καθαρισμός της αντλίας
Το πλυντήριο διαθέτει μια αυτοκαθαριζόμενη
αντλία που δεν χρειάζεται συντήρηση.
Μπορεί, όμως, να τύχει να πέσουν μικρά
20
4. καθαρίστε επιμελώς το εσωτερικό;
5. ξαναβιδώστε το καπάκι
6. ξαναμοντάρετε το πάνελ όντας σίγουροι,
πριν το σπρώξετε προς τη μηχανή, ότι έχετε
εισάγει τα γαντζάκια στις αντίστοιχες εσοχές.
Έλεγχος του σωλήνα τροφοδοσίας
του νερού
Ελέγχετε το σωλήνα τροφοδοσίας
τουλάχιστον μια φορά ετησίως. Αν
παρουσιάζει σκασίματα και σχισμές
αντικαθίσταται: κατά τα πλυσίματα οι ισχυρές
πιέσεις θα μπορούσαν να προκαλέσουν
αναπάντεχα σπασίματα.
Page 21

Προφυλάξεις και συμβουλές
! Το πλυντήριο σχεδιάστηκε και κατασκευάστηκε
σύμφωνα με τους διεθνείς κανόνες ασφαλείας. Αυτές οι
προειδοποιήσεις παρέχονται για λόγους ασφαλείας και
πρέπει να διαβάζονται προσεκτικά.
Γενική ασφάλεια
• Η συσκευή αυτή σχεδιάστηκε αποκλειστικά για οικιακή
χρήση.
• Η συσκευή αυτή μπορεί να χρησιμοποιηθεί
από παιδιά άνω των 8 ετών και από άτομα με
μειωμένες φυσικές, αισθητηριακές ή νοητικές
ικανότητες ή με εμπειρία και γνώσεις ανεπαρκείς,
αν επιτηρούνται ή αν έχουν δεχτεί κατάλληλη
εκπαίδευση σχετικά με τη χρήση της συσκευής με
τρόπο ασφαλή και κατανοώντας τους σχετικούς
κινδύνους. Τα παιδιά δεν πρέπει να παίζουν με τη
συσκευή. Συντήρηση και καθαρισμός δεν πρέπει
να διενεργούνται από παιδιά χωρίς επιτήρηση.
• Η μηχανή πρέπει να χρησιμοποιείται μόνο από ενήλικα
άτομα και σύμφωνα με τις οδηγίες του παρόντος
εγχειριδίου.
• Μην αγγίζετε το μηχάνημα με γυμνά πόδια ή χέρια ή τα
πόδια βρεγμένα.
• Μην βγάζετε το βύσμα από την ηλεκτρική πρίζα
τραβώντας το καλώδιο, αλλά να πιάνετε την πρίζα.
• Μην αγγίζετε το νερό αδειάσματος, αφού μπορεί να
φτάσει σε υψηλές θερμοκρασίες.
• Μην ζορίζετε σε καμία περίπτωση την πόρτα: θα
μπορούσε να χαλάσει ο μηχανισμός ασφαλείας που
προστατεύει από τυχαία ανοίγματα.
• Σε περίπτωση βλάβης, σε καμία περίπτωση να
μην επεμβαίνετε στους εσωτερικούς μηχανισμούς
προσπαθώντας να επισκευάσετε.
• Να ελέγχετε πάντα τα παιδιά να μην πλησιάζουν στο
μηχάνημα σε λειτουργία.
• Αν πρέπει να μετατοπιστεί, συνεργαστείτε δύο ή τρία
άτομα με τη μέγιστη προσοχή. Ποτέ μόνοι σας γιατί το
μηχάνημα είναι πολύ βαρύ.
• Πριν εισάγετε τη μπουγάδα ελέγξτε αν ο κάδος είναι
άδειος.
Σύστημα ισοστάθμισης του φορτίου
Πριν από κάθε στύψιμο, για να αποφύγετε δονήσεις
υπερβολικές και για να κατανείμετε ομοιόμορφα το
φορτίο, ο κάδος διενεργεί περιστροφές σε μια ταχύτητα
ελαφρά ανώτερη εκείνης του πλυσίματος. Αν στο τέλος
των διαδοχικών προσπαθειών το φορτίο δεν έχει ακόμη
εξισορροπηθεί σωστά η μηχανή διενεργεί το στύψιμο σε
μια ταχύτητα χαμηλότερη της προβλεπόμενης. Παρουσία
υπερβολικής αστάθειας, το πλυντήριο διενεργεί την
κατανομή αντί του στυψίματος. Για να ευνοηθεί καλύτερη
κατανομή του φορτίου και της σωστής εξισορρόπησης
συνιστάται η ανάμιξη ρούχων μεγάλων και μικρών
διαστάσεων.
Διάθεση
• Διάθεση του υλικού συσκευασίας: τηρείτε τους
τοπικούς κανονισμούς, ώστε οι συσκευασίες να
μπορούν να επαναχρησιμοποιηθούν.
• Η Ευρωπαϊκή Οδηγία 2002/96/CE για τα απορρίμματα
ηλεκτρικών και ηλεκτρονικών συσκευών, προβλέπει
ότι οι οικιακές ηλεκτρικές συσκευές δεν πρέπει να
διατίθενται στην κανονική ροή των στερεών αστικών
απορριμμάτων. Οι απορριπτόμενες συσκευές πρέπει
να συλλέγονται χωριστά για να βελτιστοποιείται το
ποσοστό ανάκτησης και ανακύκλωσης των υλικών
που τις αποτελούν και να αποφεύγονται δυνητικές
ζημιές για την υγεία και το περιβάλλον. Το σύμβολο του
διαγραμμένου καλαθιού υπάρχει σε όλα τα προϊόντα
για να θυμίζει τις υποχρεώσεις χωριστής συλλογής.
Για περαιτέρω πληροφορίες, για τη σωστή
απομάκρυνση των οικιακών ηλεκτρικών συσκευών, οι
κάτοχοι θα μπορούν να απευθύνονται στην αρμόδια
δημόσια υπηρεσία ή στους μεταπωλητές.
Χειρονακτικό άνοιγμα της πόρτας
Στην περίπτωση αδυναμίας ανοίγματος της πόρτας εξ
αιτίας απουσίας ηλεκτρικής ενέργειας ενώ θέλετε να
απλώσετε την μπουγάδα, προχωρήστε ως ακολούθως:
1. βγάλτε το βύσμα από την
ηλεκτρική πρίζα.
2. βεβαιωθείτε ότι η στάθμη
του νερού στο εσωτερικό της
μηχανής είναι χαμηλότερη
σε σχέση με το άνοιγμα
της πόρτας. Σε αντίθετη
περίπτωση αφαιρέστε το
σε περίσσεια νερό μέσω
του σωλήνα αδειάσματος
συλλέγοντάς το σε ένα
κουβά όπως φαίνεται
στηνεικόνα.
3. αφαιρέστε το ταμπλό
κάλυψης στο πρόσθιο
πλευρό του πλυντηρίου
(βλέπε επόμενη σελίδα).
4. χρησιμοποιώντας τη
γλωσσίτσα που φαίνεται
στην εικόνα τραβήξτε
προς τά έξω μέχρι να
ελευθερώσετε το πλαστικό
από το στοπ. Τραβήξτε το
ακολούθως προς τα κάτω
μέχρι να ακούσετε το “κλικ”
που δείχνει ότι η πόρτα είναι
απασφαλισμένη.
5. Ανοίξτε την πόρτα. Στην
περίπτωση που ακόμη δεν
είναι δυνατόν επαναλάβετε τη
διεργασία.
6. ξαναμοντάρετε το πάνελ
όντας σίγουροι, πριν το σπρώξετε προς τη μηχανή, ότι
έχετε εισάγει τα γαντζάκια στις αντίστοιχες εσοχές.
GR
21
Page 22

Περιγραφή της μηχανής
GR
ΠΟΡΤΑ
ΛΑΒΗ
ΠΟΡΤΑΣ
ΒΑΣΗ
ΠΊΝΑΚΑΣ ΧΕΙΡΙΣΤΗΡΊΩΝ
TOUCH CONTROL
ΡΥΘΜΙΖΌΜΕΝΑ ΠΟΔΑΡΆΚΙΑ
ΠΟΡΤΑ
Θήκη απορρυπαντικώí
Για να ανοίξετε την πόρτα
χρησιμοποιείτε πάντα
τη σχετική λαβή (βλέπε
εικόνα).
Βρίσκεται στο εσωτερικό
της μηχανής και έχετε
πρόσβαση ανοίγοντας την
πόρτα.
Για τη χρήση βλέπε το
κεφάλαιο “Auto Dose Sy-
stem”.
ΠΊΝΑΚΑΣ ΧΕΙΡΙΣΤΗΡΊΩΝ TOUCH CONTROL
Για να αλλάξετε τις ρυθμίσεις
πιέστε ελαφρά στο
εικονίδιο στο εσωτερικό της
ευαίσθητης περιοχής (touch
control) όπως υποδεικνύεται
στην εικόνα.
Τρόπος stand by
Το πλυντήριο αυτό, σύμφωνα με τις νέες ρυθμίσεις
σχετικές με την εξοικονόμηση ενέργειας, διαθέτει
ένα σύστημα αυτόματου σβησίματος (stand by) που
τίθεται σε λειτουργία μετά από περίπου 30 λεπτά στην
περίπτωση μη χρήσης. Πατήστε σύντομα το κουμπί
ON-OFF και περιμένετε η μηχανή να ενεργοποιηθεί εκ
νέου.
Κατανάλωση σε off-mode: 0,5 W
Κατανάλωση σε Left-on: 0,5 W
22
Page 23

ΠΊΝΑΚΑΣ ΧΕΙΡΙΣΤΗΡΊΩΝ TOUCH CONTROL
Επιλογέας
ΠΡΟΓΡΑΜΜΑΤΩΝ
Κουμπί ΜΑΛΑΚΤΙΚΟΥ
Κουμπί
ΑΠΟΡΡΥΠΑΝΤΙΚΟΥ
ΟΘΌΝΗ
Κουμπί
ΣΤΥΨΙΜΑΤΟΣ
Πλήκτρο
ΘΕΡΜΟΚΡΑΣΙΑ
START/PAUSE
Ενδεικτικό
φωτάκι
ECO
GR
Εικονίδια
ΦΑΣΕΙΣ
ΠΛΥΣΙΜΑΤΟΣ
ON/OFF
Κουμπί ΑΡΑΙΩΣΗΣ
Κουμπιά
ΔΥΝΑΤΟΤΗΤΩΝ
ΑΠΟΡΡΥΠΑΝΤΙΚΟΥ
ON/OFF : πιέστε σύντομα το κουμπί για να ανάψετε ή να
σβήσετε τη μηχανή. Το πράσινο ενδεικτικό φωτάκι δείχνει
ότι η μηχανή είναι αναμμένη. Για να σβήσετε το πλυντήριο
κατά το πλύσιμο πρέπει να κρατάτε πατημένο το κουμπί
πιο πολύ, περίπου 3 sec. Στιγμιαίο ή τυχαίο πάτημα δεν
επιτρέπει το σβήσιμο της μηχανής. Το σβήσιμο της μηχανής
κατά το πλύσιμο σε εξέλιξη ακυρώνει το ίδιο το πλύσιμο.
Επιλογέας ΠΡΟΓΡΑΜΜΑΤΩΝ μπορεί να στραφεί σε
αμφότερες τις κατευθύνσεις. Για να θέσετε το πλέον
σωστό πρόγραμμα βλέπε τον “Πίνακα προγραμμάτων”.
Κατά το πλύσιμο ο επιλογέας παραμένει ακίνητος.
Πλήκτρο ΘΕΡΜΟΚΡΑΣΙΑ: πατήστε για να αλλάξετε ή
να αποκλείσετε τη θερμοκρασία. Η τιμή που επιλέγεται
φαίνεται στην οθόνη (βλέπε “Πως διενεργείται ένας κύκλος
πλυσίματος”).
Κουμπί ΣΤΥΨΙΜΑΤΟΣ: πατήστε για να αλλάξετε ή να
αποκλείσετε το στύψιμο. Η τιμή που επιλέγεται φαίνεται
στην οθόνη (βλέπε “Πως διενεργείται ένας κύκλος
πλυσίματος”).
Κουμπί ΕΚΚΙΝΗΣΗ ΜΕ ΧΡΟΝΙΚΗ ΥΣΤΕΡΗΣΗ:
πατήστε για να θέσετε μια εκκίνηση με υστέρηση του
προεπιλεγμένου προγράμματος. Η τεθείσα τιμή της
υστέρησης φαίνεται στην οθόνη (βλέπε “Πως διενεργείται
ένας κύκλος πλυσίματος”).
Κουμπιά ΔΥΝΑΤΟΤΗΤΩΝ: πατώντας το κουμπί, στην
οθόνη θα εμφανιστεί το όνομα της δυνατότητας. Το άναμμα
της σχετικής ενδεικτικής λυχνίας δείχνει ότι η δυνατότητα
έχει επιλεγεί.
Κουμπιά ΑΠΟΡΡΥΠΑΝΤΙΚΟΥ και ΜΑΛΑΚΤΙΚΟΥ:
βλέπε “Τροποποίηση των προκαθορισμένων παραμέτρων
“ στο κεφάλαιο “Auto Dose System”.
Κουμπί ΑΡΑΙΩΣΗΣ ΑΠΟΡΡΥΠΑΝΤΙΚΟΥ: βλέπε
“Πλήρωση των Ρεζερβουάρ” στο κεφάλαιο “Auto Dose
System”.
Εικονίδια ΦΑΣΕΙΣ ΠΛΥΣΙΜΑΤΟΣ: φωτίζονται δείχνοντας
την προώθηση του κύκλου (Πλύσιμο - Ξέβγαλμα Στύψιμο - Άντληση ). Η ένδειξη φωτίζεται όταν
ο κύκλος τελειώσει.
START/PAUSE: όταν το πράσινο ενδεικτικό φωτάκι
αναβοσβήνει αργά, πιέστε το κουμπί για την εκκίνηση
ενός πλυσίματος. Με την εκκίνηση του κύκλου το
ενδεικτικό φωτάκι σταθεροποιείται. Για να θέσετε σε
Κουμπί
ΕΚΚΙΝΗΣΗ
ΜΕ ΧΡΟΝΙΚΗ
Ενδεικτικό φωτάκι
LOCK
ΑΣΦΆΛΙΣΗ
ΚΟΥΜΠΙΏΝ
ΥΣΤΕΡΗΣΗ
παύση το πλύσιμο, πατήστε εκ νέου το κουμπί. Το
ενδεικτικό φωτάκι θα αναβοσβήνει με πορτοκαλί χρώμα.
Αν το ενδεικτικό φωτάκι “LOCK” είναι σβηστό, μπορείτε
να ανοίξετε την πόρτα. Για να ξεκινήσει πάλι το πλύσιμο
από το σημείο διακοπής, πατήστε εκ νέου το κουμπί.
Ενδεικτικό φωτάκι LOCK: δείχνει ότι η πόρτα είναι
μπλοκαρισμένη. Για να ανοίξετε την πόρτα θέστε τον
κύκλο σε παύση (βλέπε “Πως διενεργείται ένα κύκλος
πλυσίματος”).
ΑΣΦΆΛΙΣΗ ΚΟΥΜΠΙΏΝ: για την ενεργοποίηση ή
απενεργοποίηση του μπλοκ του πίνακα χειριστηρίων,
κρατήστε πατημένο το κουμπί για περίπου 2 δευτερόλεπτα.
Το αναμμένο φωτάκι δείχνει ότι ο πίνακας χειριστηρίων
είναι ασφαλισμένος (πλην του κουμπιού ON/OFF). Με τον
τρόπο αυτόν παρεμποδίζονται τυχαίες τροποποιήσεις των
προγραμμάτων, κυρίως αν στο σπίτι υπάρχουν παιδιά.
Ενδεικτικό φωτάκι ECO: το εικονίδιο θα ανάψει
όταν, τροποποιώντας τις παραμέτρους πλυσίματος, θα
εξοικονομηθεί ενέργεια τουλάχιστον 10%. Ακόμη, πριν
η μηχανή τεθεί σε τρόπο “Stand by” το εικονίδιο θα
ανάψει για λίγα δευτερόλεπτα. Με τη μηχανή σβηστή η
ενεργειακή ανάκτηση εκτιμάται στο 80% περίπου.
ΑΛΛΑΓΗ ΓΛΩΣΣΑΣ
Στο πρώτο άναμμα της μηχανής εμφανίζεται στην οθόνη
η πρώτη γλώσσα να αναβοσβήνει. Απέναντι από τα 3
κουμπιά δεξιά της οθόνης εμφανίζονται τα σύμβολα “
”, “OK” και “V”. Οι γλώσσες αλλάζουν αυτόματα κάθε
3’’ ή πιέζοντας τα κουμπιά δίπλα από τα σύμβολα “
“ και “V”. Με το κουμπί “OK” επιβεβαιώνεται η γλώσσα
που σταθεροποιείται μετά από 2’’. Αν δεν πατηθεί κανένα
κουμπί, με το πέρας των 30’’ η αυτόματη αλλαγή των
γλωσσών ξαναρχίζει.
Για την αλλαγή της γλώσσας χρειάζεται να ανάψετε και
να σβήσετε τη μηχανή, στα 30” μετά το σβήσιμο πατήστε
ταυτόχρονα τα κουμπιά θερμοκρασίας +στυψίματος
+εκκίνηση με καθυστέρηση για 5’’ και εκτός από ένα
σύντομο ακουστικό σήμα εμφανίζεται στην οθόνη η τεθείσα
γλώσσα να αναβοσβήνει. Πιέζοντας τα κουμπιά δίπλα στα
σύμβολα “ “ και “V” αλλάζει η γλώσσα. Με το κουμπί
δίπλα στο σύμβολο «OK» επιβεβαιώνεται η γλώσσα που
σταθεροποιείται μετά από 2’’. Αν δεν πατηθεί κανένα κουμπί,
με το πέρας των 30’’ θα απεικονιστεί η προηγουμένως τεθείσα
γλώσσα.
23
Page 24

A
B
C
Auto Dose System
GR
Εισαγωγή
Το πλυντήριο αυτό διαθέτει
δύο ρεζερβουάρ: ένα για
το υγρό απορρυπαντικό
(συμπυκνωμένο ή αραιωμένο)
χωρητικότητας περίπου 5,5
lt και το άλλο για το υγρό
μαλακτικό (συμπυκνωμένο ή
αραιωμένο) χωρητικότητας
περίπου 3,5 lt (βλέπε εικόνα).
! Έλεγξε στο δοχείο του
απορρυπαντικού/μαλακτικού
αν είναι αραιωμένο ή
συμπυκνωμένο.
Το σύστημα αυτόματης
δοσιμέτρησης παραλαμβάνει
από τα ρεζερβουάρ την ιδανική
ποσότητα απορρυπαντικού και μαλακτικού για κάθε τύπο
φορτίου και την πλέον κατάλληλη στιγμή, εξασφαλίζοντας
βέλτιστα αποτελέσματα και χωρίς απώλειες. Μπορείτε να
τροποποιήσετε την ποσότητα απορρυπαντικού και μαλακτικού
χειρονακτικά ενεργώντας στα κουμπιά ΑΠΟΡΡΥΠΑΝΤΙΚΟΥ
και ΜΑΛΑΚΤΙΚΟΥ (βλέπε “Τροποποίηση των παραμέτρων
που έχουν προ-καθοριστεί”). Αν επιθυμείτε μπορείτε να
χρησιμοποιήσετε το πλυντήριο με τον “παραδοσιακό”,
τρόπο, φορτώνοντας το απορρυπαντικό στο συρτάρι. Η
μηχανή καταγράφει αυτόματα την παρουσία του και δεν
χρησιμοποιεί τα ρεζερβουάρ.
Θήκη απορρυπαντικών
Τρόπος “Παραδοσιακός”.
Βγάλτε τη θήκη απορρυπαντικών μέχρι το πρώτο στοπ για
να φορτώσετε το απορρυπαντικό (υγρό ή σε σκόνη),
τη χλωρίνη ή άλλα πρόσθετα (π.χ. λευκαντικά) και
το απορρυπαντικό για την πρόπλυση με χρήση
παραδοσιακού τρόπου (βλέπε “Παραδοσιακή
χρησιμοποίηση”).
Τρόπος “Auto Dose”.
Για να γεμίσετε
τα ρεζερβουάρ
απορρυπαντικού και
μαλακτικού βγάλτε
τελείως το συρτάρι
απορρυπαντικών: ανοίξτε
το συρτάρι μέχρι το πρώτο
στοπ, κατόπιν πατήστε το
μοχλό (A) και βγάλτε το
μέχρι το δεύτερο στοπ
αφού βεβαιωθείτε ότι
φτάνει στο τέλος διαδρομής. Μην κινείτε το συρτάρι
κατά την τροφοδοσία.
Αφού γεμίσουν τα ρεζερβουάρ (βλέπε “Πλήρωση των
ρεζερβουάρ”), η μηχανή θα έχει αυτονομία μέχρι 40
κύκλους για το απορρυπαντικό (*).
Πρώτη χρησιμοποίηση
Ανάβει το πλυντήριο πιέζοντας το κουμπί ON/OFF.
Το πρώτο πλύσιμο θα πρέπει να διενεργηθεί χωρίς
μπουγάδα αλλά με απορρυπαντικό που το χύνετε απ’
ευθείας στη θήκη απορρυπαντικών (βλέπε Παραδοσιακό
τρόπο) θέτοντας το πρόγραμμα “ ” (Βαμβακερά 90°)
χωρίς πρόπλυση και χωρίς τροφοδοσία των ρεζερβουάρ.
Πλήρωση των ρεζερβουάρ:
Ανοίξτε τη θήκη απορρυπαντικών σε τρόπο “Auto Dose”
(βλέπε “Θήκη Απορρυπαντικών”).
Χύστε αργά το απορρυπαντικό (B) και το μαλακτικό (C) έτσι
που να γεμίσουν τελείως τα ρεζερβουάρ (βλέπε εικόνες).
Για να μην ξεπεράσετε τη μέγιστη ποσότητα, ένα ακουστικό
σήμα (μπιπ) με αυξανόμενη ένταση ειδοποιεί για την
επίτευξη της στάθμης μέχρι την πλήρη πλήρωση του
ρεζερβουάρ που επισημαίνεται με 3 μακρόσυρτα μπιπ.
Αρχίστε αμέσως το πλύσιμο αφού έχετε γεμίσει τα
ρεζερβουάρ για να εξασφαλιστεί ο καθαρισμός της θήκης.
Στην οθόνη τα αντίστοιχα εικονίδια (για
απορρυπαντικό) και (για μαλακτικό) θα φωτιστούν
βαθμιαία δείχνοντας την επιτευχθείσα ποσότητα.
Ο χρόνος τροφοδοσίας εξαρτάται από την πυκνότητα
του προϊόντος. Με προϊόντα πολύ πυκνά οι χρόνοι
τροφοδοσίας θα είναι μεγαλύτεροι.
Κλείστε τη θήκη απορρυπαντικών μόνο όταν οι
λεκανίτσες θα έχουν τελείως αδειάσει.
Επιλέξτε την πυκνότητα του απορρυπαντικού που χύνετε
(πυκνό ή αραιωμένο) πατώντας το σχετικό κουμπί .
Συμπυκνωμένο
Αραιωμένο
Το μηχάνημα θα αποθηκεύσει την επιλογή.
Αν δεν γίνει η επιλογή, η παραλαβή του απορρυπαντικού
θα τεθεί στο “αραιωμένο”.
Χρησιμοποιήστε το κουμπί για να θέσετε την
ποσότητα απορρυπαντικού που θα ληφθεί αυτόματα
από τη μηχανή:
1) Αν το μαλακτικό είναι συμπυκνωμένο, συστήνεται
η επιλογή της πρώτης στάθμης ( με 1 ραβδάκι)
και ενδεχομένως η αύξηση μιας μόνο θέσης ( με 2
ραβδάκια) για την αύξηση της λήψης.
2) Αν το μαλακτικό είναι αραιωμένο, συστήνεται να θέσετε
το επίπεδο 3 ( με 3 ραβδάκια) και να αυξήσετε/μειώσετε
από εδώ την ποσότητα απορρυπαντικού προς λήψη.
3) Για να αποκλείσετε τη χρησιμοποίηση του
απορρυπαντικού πατήστε το κουμπί μέχρι να
εξαφανιστούν τα ραβδάκια (βλέπε επίσης “Τροποποίηση
των προκαθορισμένων παραμέτρων”).
24
(*) με μεσαίο φορτίο 4kg, πρόγραμμα Βαμβακερών 40°C, σκληρότητα νερού μέτρια
και επίπεδο βρωμιάς τεθέν στο 3.
Page 25

Επισήμανση για διαδοχικές πληρώσεις:
3
1
2
Όταν, στο τέλος ενός κύκλου, η υπολειπόμενη στάθμη
του απορρυπαντικού/μαλακτικού κατέβει κάτω από την
αναγκαία ποσότητα για ένα επόμενο πλύσιμο, στην οθόνη
θα εμφανιστούν τα σχετικά μηνύματα “Στο τέλος του
κύκλου επανατροφοδοσίας απορρυπαντικού” ή “Στο
τέλος του κύκλου επανατροφοδοσίας μαλακτικού”
ή “Στο τέλος του κύκλου επανατροφοδοσίας
ρεζερβουάρ” (για αμφότερα). Αν τροφοδοτηθούν τα
ρεζερβουάρ, τα επόμενα πλυσίματα σε τρόπο Auto Dose
θα διενεργηθούν χωρίς λήψη του απορρυπαντικού.
! Συστήνεται να επανατροφοδοτήσετε με απορρυπαντικό
και μαλακτικό ΜΟΝΟ μετά την υπόδειξη της μηχανής.
! Μην αναμιγνύετε ΠΟΤΕ δύο διαφορετικά
απορρυπαντικά. Να διενεργείτε πάντα τον καθαρισμό
ρτου ρεζερβουάρ πριν εισάγετε ένα νέο (βλέπε
“Καθαρισμός τεθείς από το χρήστη”).
Χρήση “Auto Dose System”
Αν τα ρεζερβουάρ γέμισαν με απορρυπαντικό και
μαλακτικό προχωρήστε στη χρησιμοποίηση της μηχανής
(βλέπε “Πώς διενεργείται ένας κύκλος πλυσίματος”).
Το απορρυπαντικό για την πρόπλυση σε σκόνη και τα
πρόσθετα σε σκόνη μπορούν να χρησιμοποιηθούν
μόνο σε τρόπο παραδοσιακό ή σε τρόπο “Auto Dose
System” εισάγοντας τα πρόσθετα απ’ ευθείας στον κάδο,
κατά προτίμηση με τη βοήθεια της “μπαλίτσας”.
Αν θέλετε να λευκάνετε χύστε το λευκαντικό στο σχετικό
διαμέρισμα (βλέπε δυνατότητα “Super Wash”).
Τροποποίηση των προκαθορισμένων παραμέτρων:
Η μηχανή παραλαμβάνει αυτόματα την ποσότητα
απορρυπαντικού με βάση το επιλεγμένο πρόγραμμα, την
ποσότητα του εισαχθέντος φορτίου και την σκληρότητα του
νερού. Ωστόσο, μπορείτε να τροποποιήσετε την ποσότητα
του απορρυπαντικού/μαλακτικού.
Κουμπί : πατήστε για να αυξήσετε, να μειώσετε και να
αποκλείσετε την παραλαβή του απορρυπαντικού.
Κουμπί : πατήστε για να αυξήσετε, να μειώσετε και να
αποκλείσετε την παραλαβή του μαλακτικού.
Η στάθμη του απορρυπαντικού/μαλακτικού που
προτείνεται από τη μηχανή υποδεικνύεται με 3 ραβδάκια.
Οι στάθμες οι μικρότερες κατά 3 ραβδάκια δείχνουν
λιγότερο απορρυπαντικό/μαλακτικό σε σχέση με την
προτεινόμενη στάθμη από τη μηχανή, ενώ οι στάθμες
ανώτερες του 3 δείχνουν την αύξηση της ποσότητας του
απορρυπαντικού/μαλακτικού.
Καθαρισμός ρεζερβουάρ:
Προβλέπονται κύκλοι αυτόματου καθαρισμού των
ρεζερβουάρ ή κατά παραγγελία του χρήστη.
Αυτόματος καθαρισμός:
Το πλυντήριο διενεργεί έναν αυτόματο κύκλο καθαρισμού
κατά τα ξεβγάλματα, όταν η ποσότητα εναπομείναντος
απορρυπαντικού είναι ανεπαρκής για έναν επόμενο
κύκλο πλυσίματος.
Καθαρισμός οριζόμενος από το χρήστη:
Διενεργήστε τον κύκλο καθαρισμού (με τον κάδο κενό) αν
θέλετε να φορτώσετε ένα προϊόν διαφορετικό από εκείνο
που χρησιμοποιήθηκε προηγουμένως ή αν τα ρεζερβουάρ
γέμισαν με τρόπο εσφαλμένο (το μαλακτικό χύθηκε στο
διαμέρισμα του απορρυπαντικού ή αντίστροφα). Κρατήστε
πατημένο για 5 sec. το κουμπί για την ενεργοποίηση
του καθαρισμού του ρεζερβουάρ του απορρυπαντικού, το
κουμπί για το μαλακτικό ή το κουμπί για αμφότερα
τα ρεζερβουάρ. Συνεχίστε να το κρατάτε πατημένο για
άλλα 3 sec. (ψηλά δεξιά θα εμφανιστεί η αντίστροφη
μέτρηση “4-3-2-1”) μέχρι να εμφανιστεί το pop-up:
“Καθαρισμός ON”.
Ο κύκλος καθαρισμού διαρκεί περίπου 40’ αν τα
ρεζερβουάρ είναι αρχικά κενά, σε αντίθετη περίπτωση η
διάρκεια του κύκλου θα είναι μεγαλύτερη. Στην οθόνη θα
εμφανιστούν τα εικονίδια δείχνοντας ότι τα ρεζερβουάρ
είναι άδεια.
Χρησιμοποίηση “παραδοσιακή”
Βγάλτε το συρτάρι απορρυπαντικών μέχρι το πρώτο
στοπ (βλέπε εικόνα), χύστε απ’ ευθείας στο συρτάρι το
απορρυπαντικό και άλλα πρόσθετα (π.χ. λευκαντικό)
αναγκαία για ένα μόνο πλύσιμο.
1. λεκανίτσα για την
πρόπλυση: χρησιμοποιήστε
αποκλειστικά
απορρυπαντικό σε σκόνη.
2. λεκανίτσα για το
πλύσιμο: χρησιμοποιείτε
απορρυπαντικό σε σκόνη
ή υγρό Στην τελευταία
περίπτωση προτείνεται να
το χύνετε αμέσως πριν την
εκκίνηση του πλυντηρίου
και χωρίς να κάνετε την
πρόπλυση.
3. λεκανίτσα για το λευκαντικό: χρησιμοποιήστε αν θέλετε
να λευκάνετε (βλέπε δυνατότητα “Σούπερ Γουός”).
Το απορρυπαντικό σε παστίλιες ή η σχετική “μπαλίτσα”
πρέπει να εισάγονται απ’ ευθείας εντός του κάδου.
Στην περίπτωση αυτή ο τρόπος “Auto Dose System”
(πατήστε το κουμπί μέχρι να εξαφανιστούν τα σχετικά
κατακόρυφα ραβδάκια στην οθόνη).
Μη χύνετε απορρυπαντικό γιατί θα παραληφθεί αυτόματα
στην απαιτούμενη ποσότητα για κάθε πλύσιμο.
Για να αποκλείσετε την λήψη του μαλακτικού πατήστε το
κουμπί μέχρι να εξαφανιστούν τα σχετικά κατακόρυφα
ραβδάκια στην οθόνη.
Για ρούχα μάλλινα συστήνεται η χρήση του ειδικού
απορρυπαντικού χύνοντάς το απ’ ευθείας στη θήκη
απορρυπαντικών (λεκανίτσα 2).
GR
Διενέργεια του πλυσίματος:
Επιλέξτε το πρόγραμμα και τις συμβατές δυνατότητες με
βάση τις ανάγκες και τον τύπο φορτίου.
25
Page 26

Πως διενεργείται ένας κύκλος
πλυσίματος
GR
ΣΗΜΕΙΩΣΗ: την πρώτη φορά που χρησιμοποιείτε το
πλυντήριο, διενεργήστε ένα κύκλο πλυσίματος χωρίς
ρούχα αλλά με απορρυπαντικό, θέτοντας το πρόγραμμα
βαμβακερών 90° χωρίς πρόπλυση.
1. ΑΝΑΨΤΕ ΤΟ ΜΗΧΑΝΗΜΑ. Πατήστε το κουμπί . Όλα
τα ενδεικτικά φωτάκια θα ανάψουν για 1 δευτερόλεπτο
και στην οθόνη θα εμφανιστεί η ένδειξη AQUALTIS; Μετά
θα παραμείνει αναμμένο σταθερά το ενδεικτικό φωτάκι
του κουμπιού και το ενδεικτικό φωτάκι START/PAUSE
θα αναβοσβήνει.
2. ΕΠΙΛΕΞΤΕ ΤΟ ΠΡΟΓΡΑΜΜΑ. Στρέψτε τον ΕΠΙΛΟΓΕΑ
ΠΡΟΓΡΑΜΜΑΤΩΝ προς τα δεξιά ή προς τα αριστερά
μέχρι να επιλέξετε το επιθυμητό πρόγραμμα. Το όνομα
του προγράμματος θα εμφανιστεί στην οθόνη και σε
αυτό αντιστοιχίζεται μια θερμοκρασία και μια ταχύτητα
στυψίματος που μπορούν να τροποποιηθούν. Στην οθόνη
θα εμφανιστεί η διάρκεια του κύκλου.
3. ΦΟΡΤΩΣΤΕ ΤΗΝ ΜΠΟΥΓΑΔΑ. Ανοίξτε την πόρτα.
Φορτώστε τα ρούχα, προσέχοντας να μην ξεπεράσετε
την ποσότητα φορτίου που υποδεικνύεται στον πίνακα
προγραμμάτων της επόμενης σελίδας.
4. ΔΟΣΟΛΟΓΙΑ ΤΟΥ ΑΠΟΡΡΥΠΑΝΤΙΚΟΥ. Για τη
χρησιμοποίηση σε τρόπο Auto Dose δεν χρειάζεται
να δοσολογήσετε το απορρυπαντικό, η μηχανή το
παραλαμβάνει αυτόματα με βάση το επιλεγμένο
πρόγραμμα, τον τύπο φορτίου και τη σκληρότητα του
νερού. Για τη χρησ ιμοποίηση σε παραδοσιακό τρόπο
βλέπε “Χχρησιμοποίηση παραδοσιακή”.
5. ΚΛΕΙΣΙΜΟ ΤΗΣ ΠΟΡΤΑΣ.
! Για να ανοίξετε την πόρτα ενώ είναι σε εξέλιξη ένας
κύκλος πιέστε το κουμπί START/PAUSE. Αν το ενδεικτικό
φωτάκι LOCK είναι σβηστό θα μπορείτε να ανοίξετε
την πόρτα. Πατήστε εκ νέου το κουμπί START/PAUSE για
να ξεκινήσει πάλι το πρόγραμμα από το σημείο διακοπής.
6. ΕΞΑΤΟΜΙΚΕΥΣΗ ΤΟΥ ΚΥΚΛΟΥ ΠΛΥΣΙΜΑΤΟΣ.
Ενεργήστε στα σχετικά κουμπιά του πίνακα χειριστηρίων:
Τροποποίηση της θερμοκρασίας ή/και του
στυψίματος. Η μηχανή απεικονίζει αυτόματα τη μέγιστη
θερμοκρασία και στύψιμο που προβλέπονται για το τεθέν
πρόγραμμα ή τις τελευταίες επιλεγείσες αν είναι συμβατές
με το επιλεγμένο πρόγραμμα. Πατώντας το κουμπί
μειώνεται προοδευτικά η θερμοκρασία μέχρι το πλύσιμο
σε κρύο νερό “OFF”. Πατώντας το κουμπί μειώνεται
προοδευτικά το στύψιμο μέχρι τον αποκλεισμό του
“OFF”. Περαιτέρω πάτημα των κουμπιών επαναφέρει τις
τιμές στις μέγιστες προβλεπόμενες.
! Εξαίρεση: επιλέγοντας το πρόγραμμα η
θερμοκρασία μπορεί να αυξηθεί μέχρι 90°.
Θέστε μια εκκίνηση με υστέρηση.
Για να θέσετε την εκκίνηση με υστέρηση του
προεπιλεγμένου προγράμματος, πατήστε το σχετικό
κουμπί μέχρι να επιτευχθεί ο χρόνος της επιθυμητής
υστέρησης. Κατά τη ρύθμιση απεικονίζεται ο χρόνος
υστέρησης μαζί με την ένδειξη “Ξεκινάει σε:” και το
σύμβολο αναβοσβήνει. Αφού θέσετε την εκκίνηση
με υστέρηση η Οθόνη θα απεικονίσει το σύμβολο
σταθερό και η οθόνη θα επιστρέψει στην απεικόνιση της
διάρκειας του τεθέντος κύκλου με τις ενδείξεις “Τελειώνει
σε:” η διάρκεια του κύκλου. Πιέζοντας το κουμπί
ΕΚΚΙΝΗΣΗ ΜΕ ΥΣΤΕΡΗΣΗ μια μόνο φορά απεικονίζεται
ο προηγουμένως τεθείς χρόνος υστέρησης.
Μετά την εκκίνηση η οθόνη θα απεικονίσει την ένδειξη
“Ξεκινάει σε:” και ο χρόνος καθυστέρησης. Αφού
παρέλθει ο τεθείς χρόνος καθυστέρησης, η μηχανή θα
ξεκινήσει και η οθόνη θα απεικονίσει “Τελειώνει σε:” και
ο υπολειπόμενος χρόνος για το τέλος κύκλου.
Για να απαλείψετε την εκκίνηση με υστέρηση πατήστε το
κουμπί μέχρις ότου εμφανιστεί στην οθόνη η ένδειξη OFF.
Το σύμβολο θα σβήσει.
Τροποποίηση των χαρακτηριστικών
του κύκλου.
• Πατήστε το κουμπί για να ενεργοποιήσετε τη δυνατότητα.
Στην οθόνη θα εμφανιστεί το όνομα της δυνατότητας και
το φωτάκι του αντίστοιχου κουμπιού θα ανάψει.
• Πατήστε εκ νέου το κουμπί για να απενεργοποιήσετε
μια δυνατότητα. Στην οθόνη θα εμφανιστεί το όνομα
της δυνατότητας και το OFF και το φωτάκι θα σβήσει.
! Αν η επιλεγμένη δυνατότητα δεν είναι συμβατή με το
τεθέν πρόγραμμα, η ασυμβατότητα θα επισημανθεί με
την αναλαμπή της ενδεικτικής λυχνίας και ένα ηχητικό
σήμα (3 μπιπ) και η δυνατότητα δεν θα ενεργοποιηθεί.
! Αν η δυνατότητα που επελέγη δεν είναι συμβατή με
μια άλλη προηγουμένως τεθείσα, το ενδεικτικό φωτάκι
σχετικό με την πρώτη δυνατότητα που επελέγη θα
αναβοσβήνει και θα ενεργοποιηθεί μόνο η δεύτερη, το
ενδεικτικό φωτάκι τηςενεργήςδυνατότητας θα φωτιστεί.
! Οι δυνατότητες μπορούν να αλλάξουν το προτεινόμενο
φορτίο ή/και τη διάρκεια του κύκλου.
7. ΕΚΚΙΝΗΣΗ ΤΟΥ ΠΡΟΓΡΑΜΜΑΤΟΣ. Πιέστε το κουμπί
v. Το σχετικό ενδεικτικό φωτάκι θα σταθεροποιηθεί
και η πόρτα θα ασφαλιστεί (ενδεικτικό φωτάκι LOCK
αναμμένο). Τα εικονίδια τα σχετικά με τις φάσεις
πλυσίματος θα φωτιστούν κατά τον κύκλο δείχνοντας
την σε εξέλιξη φάση. Για να αλλάξετε ένα πρόγραμμα
ενώ είναι σε εξέλιξη ένας κύκλος, θέστε το πλυντήριο
σε παύση πιέζοντας το κουμπί START/PAUSE. Κατόπιν
επιλέξτε τον επιθυμητό κύκλο και πατήστε εκ νέου το
κουμπί START/PAUSE. Για να ανοίξετε την πόρτα ενώ
είναι σε εξέλιξη ένας κύκλος πατήστε το κουμπί START/
PAUSE. Αν το ενδεικτικό φωτάκι; LOCK είναι σβηστό
θα μπορείτε να ανοίξετε την πόρτα. Πατήστε εκ νέου
το κουμπί START/PAUSE για να ξεκινήσει πάλι το
πρόγραμμα από το σημείο διακοπής.
8. ΤΕΛΟΣ ΤΟΥ ΠΡΟΓΡΑΜΜΑΤΟΣ. Υποδεικνύεται από
την ένδειξη END αναμμένη. Η πόρτα θα μπορεί να
ανοίξει αμέσως. Αν το ενδεικτικό φωτάκι START/PAUSE αναβοσβήνει, πατήστε το κουμπί για να τελειώσει ο
κύκλος. Ανοίξτε την πόρτα, αδειάστε τα ρούχα και σβήστε
τη μηχανή.
! Αν επιθυμείτε να ακυρώσετε ένα κύκλο που ήδη ξεκίνησε,
πατήστε επί μακρόν το κουμπί . Ο κύκλος θα διακοπεί και
η μηχανή θα σβήσει.
Σακίδιο για παπλώματα, κουρτίνες και ευαίσθητα ρούχα
Χάρη στο ειδικό παρεχόμενο σακίδιο, το Hotpoint/Ariston σου
επιτρέπει να πλένεις ακόμη και τα πλέον πολύτιμα και ευαίσθητα
ρούχα σου εξασφαλίζοντάς τους τη μέγιστη προστασία.
Συστήνεται να χρησιμοποιείτε σε κάθε περίπτωση το σακίδιο
για το πλύσιμο παπλωμάτων και παπλωμάτων με
φόδρα εξωτερική από συνθετικό υλικό.
26
Page 27

3
1
2
Προγράμματα και δυνατότητες
Μέγιστο Φορτίο.
Πίνακας Προγραμμάτων
Απορρυπαντικά
Περιγραφή του προγράμματος
Προγράμματα
ΣΥΝΘΕΤΙΚΑ ανθεκτικά
ΣΥΝΘΕΤΙΚΑ ανθεκτικά (4)
ΛΕΥΚΆ
ΧΡΩΜΑΤΙΣΤΆ
ΣΚΟΥΡΑ
ΠΟΥΚΑΜΙΣΑ
ΠΑΠΛΩΜΑΤΑ: Για ρούχα με εσωτερική επένδυση πούπουλων χήνας.
ΑΣΠΡΟΡΟΥΧΑ: Για ασπρόρουχα κρεβατιού και μπάνιου.
ΞΕΒΓΑΛΜΑ
ΣΤΥΨΙΜΟ + ΑΝΤΛΗΣΗ
ΥΠΟ-ΑΛΛΕΡΓΙΚΑ
ΥΠΕΡ ΕΥΑΙΣΘΗΤΑ
ΜΑΛΛΙΝΑ: Για μάλλινα, cachemire, κλπ.
ΜΕΙΚΤΑ 30’: Για το γρήγορο φρεσκάρισμα ρούχων ελαφρά λερωμένων
(δεν ενδείκνυται για μάλλινα, μεταξωτά και ρούχα που πλένονται στο χέρι).
ΒΑΜΒΑΚΕΡΑ ΚΑΝΟΝΙΚΌ 60°C (1): Λευκά και χρωματιστά
ανθεκτικά, πολύ λερωμένα.
ΒΑΜΒΑΚΕΡΑ ΚΑΝΟΝΙΚΌ 40°C (2): Λευκά λίγο λερωμένα και
ευαίσθητα χρώματα.
ΒΑΜΒΑΚΕΡΑ ΚΑΝΟΝΙΚΌ 20°C: Λευκά λίγο λερωμένα και ευαίσθητα
χρώματα.
Η διάρκεια του κύκλου που φαίνεται στην οθόνη ή στο εγχειρίδιο αποτελεί μια εκτίμηση υπολογισμένη με βάση τις στάνταρ συνθήκες. Ο πραγματικός χρόνος μπορεί να ποικίλει με βάση πολυάριθμους παράγοντες
όπως θερμοκρασία και πίεση του εισερχόμενου νερού, θερμοκρασία περιβάλλοντος, ποσότητα απορρυπαντικού, ποσότητα και τύπος φορτίου, ισοστάθμιση του φορτίου, πρόσθετες επιλεγμένες δυνατότητες.
Σημείωση: μετά από περίπου 10 λεπτά από το START, η μηχανή με βάση το πραγματοποιηθέν φορτίο, θα επανυπολογίσει και θα απεικονίσει τον υπολειπόμενο χρόνο για το τέλος του προγράμματος.
1) Πρόγραμμα ελέγχου σύμφωνα με την προδιαγραφή 1061/2010: θέστε το πρόγραμμα σε μια θερμοκρασία 60°C.
Ο κύκλος αυτός είναι κατάλληλος για τον καθαρισμό φορτίου βαμβακερών με συνηθισμένη βρωμιά και είναι ο πλέον αποτελεσματικός σε όρους κατανάλωσης
ενέργειας και νερού, προς χρήση σε ρούχα πλενόμενα στους 60 °C. Η πραγματική θερμοκρασία πλυσίματος μπορεί να διαφέρει από την υποδεικνυόμενη.
2) Πρόγραμμα ελέγχου σύμφωνα με την προδιαγραφή 1061/2010: θέστε το πρόγραμμα σε μια θερμοκρασία 40°C.
Ο κύκλος αυτός είναι κατάλληλος για τον καθαρισμό φορτίου βαμβακερών με συνηθισμένη βρωμιά και είναι ο πλέον αποτελεσματικός σε όρους κατανάλωσης
ενέργειας και νερού, προς χρήση σε ρούχα πλενόμενα στους 40 °C. Η πραγματική θερμοκρασία πλυσίματος μπορεί να διαφέρει από την υποδεικνυόμενη.
3) Στη θερμοκρασία των 60 °C η λειτουργία “Πρόπλυση” δεν μπορεί να είναι ενεργή.
Για όλα τα Test Institutes:
2) Πρόγραμμα βαμβακερών μακρύ: θέστε το πρόγραμμα σε μια θερμοκρασία 40°C.
4) Πρόγραμμα συνθετικών μεγάλης διάρκειας: θέστε το πρόγραμμα σε μια θερμοκρασία 40°C.
Μέγιστη
θερμοκρ.
(°C)
(Max. 90°)
Μέγιστη
ταχύτητα
(στροφές
ανά
λεπτό)
60° 800
40° 800
60° 1600
40° 1600
30° 800 -
40° 600 30° 1200 60° 1600
- 1600 - -
- 1600 - - - - 9 - - - 16’
60° 1600 -
30° 0 -
40° 800 -
30° 800 -
60°
40° 1600 -
20° 1600 -
1600
και πρόσθετα
Πλύσιμο
Πρόπλυση
(3)
Лехкбнфйкь
-
-
-
-
-
-
-
(Kg)
Μαλακτικό
5 46 1,03 60 115’
5 46 0,56 60 100’
5 - - - 180’
5 44 0,83 63 100’
5 - - - 80’
2 - - - 70’
3,5 - - - 120’
9 - - - 140’
9 - - - 36’
5 - - - 195’
1 - - - 80’
2 - - - 90’
3,5 71 0,20 38 30’
9 44 1,36 76 190’
9 44 1,09 92 185’
9 - - - 175’
υγρασία %
Υπολειπόμενη
νερό lt
Συνολικό
Κατανάλωση
ενέργειας kWh
Διάρκεια
GR
κύκλου
Δυνατότητες πλυσίματος
Σούπερ Γουός
Η δυνατότητα αυτή εξασφαλίζει ένα πλύσιμο υψηλών
επιδόσεων χάρη στη χρήση
μεγαλύτερης ποσότητας
νερού στην αρχική φάση του
κύκλου και στη μεγαλύτερη
διάρκεια του προγράμματος.
Μπορεί να χρησιμοποιείται
με ή χωρίς λευκαντικό. Αν
επιθυμείτε μόνο λεύκανση
χωρίς πλήρες πλύσιμο, χύστε
το λευκαντικό στην πρόσθετη
λεκανίτσα 3, θέστε το
πρόγραμμα “Ξέβγαλμα” και
ενεργοποιήστε τη δυνατότητα “Σούπερ Γουός” .
! Δεν ενεργοποιείται στα προγράμματα , , , , ,
, , .
Εξτρα ξέβγαλμα
Επιλέγοντας τη δυνατότητα αυτή αυξάνεται η
αποτελεσματικότητα του ξεβγάλματος και εξασφαλίζεται η
μέγιστη απομάκρυνση του απορρυπαντικού. Είναι χρήσιμο
για επιδερμίδες ιδιαίτερα ευαίσθητες στα απορρυπαντικά.
Συνιστάται η χρήση της δυνατότητας αυτής με το πλυντήριο
σε πλήρες φορτίο ή με τη χρήση υψηλών δόσεων
απορρυπαντικού.
! Δεν είναι διαθέσιμο στα προγράμματα , , , , .
Εύκολο Σιδέρωμα
Επιλέγοντας τη δυνατότητα αυτή, το πλύσιμο και το στύψιμο
θα τροποποιηθούν κατάλληλα για τη μείωση σχηματισμού
τσαλακωμάτων. Στο τέλος του κύκλου το πλυντήριο θα
διενεργεί αργές περιστροφές του κάδου. Τα ενδεικτικά φωτάκια
“Εύκολο Σιδέρωμα” και START/PAUSE θα αναβοσβήνουν.
Για το πέρας του κύκλου πατήστε το κουμπί START/PAUSE
ή το κουμπί “Εύκολο Σιδέρωμα”.
! Δεν είναι διαθέσιμο στα προγράμματα , , , , , .
Πρόπλυση
Επιλέγοντας τη λειτουργία αυτή διενεργείται η πρόπλυση,
χρήσιμη για την απομάκρυνση δύσκολων λεκέδων.
ΠΑΡΑΤΗΡΗΣΗ: Προσθέστε το απορρυπαντικό στο
αντίστοιχο διαμέρισμα.
! Δεν είναι διαθέσιμη στα προγράμματα , , , ,
, , , , , (60°), , .
27
Page 28

Απορρυπαντικά και μπουγάδα
GR
Απορρυπαντικό
Η επιλογή και η ποσότητα του απορρυπαντικού εξαρτώνται
από τον τύπο υφάσματος (βαμβακερά, μάλλινα, μεταξωτά...),
από το χρώμα, από τη θερμοκρασία πλυσίματος, από το βαθμό
βρωμιάς και από την σκληρότητα του νερού.
Το πλυντήριο αυτό με το σύστημα αυτόματης δοσολόγησης
του απορρυπαντικού και του μαλακτικού, βοηθάει στην
αποφυγή σπατάλης και προστατεύει το περιβάλλον εκτός του
ότι διασφαλίζει τις βέλτιστες επιδόσεις πλυσίματος.
Συνιστάται:
• να χρησιμοποιείτε το απορρυπαντικό σε σκόνη αν διενεργείτε
μια πρόπλυση φορτώνοντάς το με τρόπο “Παραδοσιακό”.
• να χρησιμοποιείτε υγρά απορρυπαντικά για ευαίσθητα
ρούχα βαμβακερά και για όλα τα προγράμματα σε χαμηλή
θερμοκρασία.
• γ τη χρησιμοποίηση σε τρόπο “Auto Dose System”
χρησιμοποιείτε μόνο υγρό απορρυπαντικό και μαλακτικό.
Μη φορτώνετε απορρυπαντικά υπερ-συμπυκνωμένα,
“Gel” και παρόμοια.
• χρησιμοποιείτε υγρά απορρυπαντικά ειδικά για μάλλινα και
μεταξωτά φορτώνοντάς τα σε τρόπο “Παραδοσιακό”.
! Μην αναμιγνύετε ΠΟΤΕ δύο διαφορετικά απορρυπαντικά.
Να διενεργείτε πάντα τον καθαρισμό του ρεζερβουάρ πριν
εισάγετε ένα νέο.
Το απορρυπαντικό πρέπει να χύνεται πριν την έναρξη
του πλυσίματος στην αντίστοιχη λεκανίτσα ή να το βάζετε
απ’ευθείας στον κάδο. Στην περίπτωση αυτή δεν μπορείτε
να επιλέξετε τον κύ κ λ ο Βαμβακερών με πρ όπ λυση.
! Μη χρησιμοποιείτε απορρυπαντικά για το πλύσιμο στο χέρι,
διότι παράγουν πολύ αφρό.
! Να χρησιμοποιείτε απορρυπαντικά σε σκόνη για ρούχα
λευκά βαμβακερά και για την πρόπλυση και για πλυσίματα σε
θερμοκρασία μεγαλύτερη των 60°C.
! Ακολ ουθήσ τε τις υποδ ε ίξεις που αναγρά φ οντα ι στη
συσκευασία του απορρυπαντικού.
Προετοιμασία της μπουγάδας
• Ανοίξτε καλά τα ρούχα πριν τα τοποθετήσετε.
• Χωρίστε την μπουγάδα ανάλοογα με τον τύπο του υφάσματος
(σύμβολο στην ετικέτα του ρούχου) και το χρώμα προσέχοντας
να χωρίσετε τα χρωματιστά ρούχα από τα λευκά.
• Εκκενώστε τις τσέπες και ελέγξτε τα κουμπιά.
• Μην ξεπερνάτε τις υποδεικνυόμενες τιμές στον “Πίνακα
Προγραμμάτων” σε σχέση με το βάρος της στεγνής
μπουγάδας.
Πόσο ζυγίζει η μπουγάδα;
1 σεντόνι 400-500 gr.
1 μαξιλαροθήκη 150-200 gr.
1 τραπεζομάντιλο 400-500 gr.
1 μπουρνούζι 900-1200 gr.
1 πετσέτα 150-250 gr.
1 jean 400-500 gr.
1 πουκάμισο 150-200 gr.
Συμβουλές πλυσίματος
ΛΕΥΚΆ: χρησιμοποιήστε τον κύκλο για το πλύσιμο των
λευκών ρούχων. Το πρόγραμμα μελετήθηκε για τη διατήρηση της
λαμπρότητας του λευκού στο χρόνο. Για καλύτερα αποτελέσματα
συστήνεται η χρήση απορρυπαντικού σε σκόνη.
ΧΡΩΜΑΤΙΣΤΆ: χρησιμοποιήστε τον κύκλο για το πλύσιμο
ανοιχτόχρωμων ρούχων. Το πρόγραμμα μελετήθηκε για τη
διατήρηση της ζωντάνιας των χρωμάτων στο χρόνο.
ΣΚΟΥΡΑ: χρησιμοποιήστε το πρόγραμμα για το πλύσιμο
σκουρόχρωμων ρούχων. Το πρόγραμμα μελετήθηκε για τη
διατήρηση των σκούρων χρωμάτων στο χρόνο. Για καλύτερα
αποτελέσματα συνιστάται η χρήση υγρού απορρυπαντικού,
κατά προτίμηση για το πλύσιμο σκουρόχρωμων ρούχων.
ΠΟΥΚΑΜΙΣΑ: χρησιμοποιήστε το αντίστοιχο πρόγραμμα
για να πλύνετε πουκάμισα διαφόρων ειδών υφάσματος και
χρώματος για τη μέγιστη φροντίδα.
ΠΑΠΛΩΜΑΤΑ: για να πλύνετε ρούχα με γέμιση από πούπουλα
χήνας όπως παπλώματα «διπλά» ή μονά (που δεν υπερβαίνουν
τα 3,5 kg βάρους), μαξιλάρια, μπουφάν, χρησιμοποιήστε το
συγκεκριμένο πρόγραμμα . Συστήνεται να βάζετε τα πουπουλένια
στον κάδο διπλώνοντάς τις άκρες προς τα μέσα (βλέπε εικόνες) και να
μην ξεπερνάτε τα 3/4 του όγκου του ίδιου του κάδου. Για ένα βέλτιστο
πλύσιμο συστήνεται να χρησιμοποιείτε υγρό απορρυπαντικό που
θα το δοσολογείτε στη θήκη απορρυπαντικού.
Παπλώματα: για να πλύνετε παπλώματα με συνθετική
επένδυση, χρησιμοποιήστε το παρεχόμενο σακίδιο και θέστε
το πρόγραμμα .
ΑΣΠΡΟΡΟΥΧΑ: για να πλύνετε τα ασπρόρουχα μπάνιου και
ύπνου σε ένα μοναδικό κύκλο, χρησιμοποιήστε το πρόγραμμα
που βελτιστοποιεί τη χρήση του μαλακτικού και επιτρέπει
εξοικονόμηση χρόνου και ενέργειας. Συνιστάται η χρήση
απορρυπαντικού σε σκόνη.
ΥΠΟ-ΑΛΛΕΡΓΙΚΑ: χρησιμοποιήστε το πρόγραμμα για την
απομάκρυνση των κυριότερων αλλεργιογόνων όπως γύρη,
άκαρι, τρίχες γάτας και σκύλου.
ΥΠΕΡ ΕΥΑΙΣΘΗΤΑ: χρησιμοποιήστε το πρόγραμμα για το
πλύσιμο ρούχων πολύ ευαίσθητων που φέρουν πρόσθετα όπως
στρας ή παγέτες. Συνιστάται να γυρίζετε από την ανάποδη τα
ρούχα πριν το πλύσιμο και να βάζετε τα μικρά ρούχα στο ειδικό
σακίδιο για το πλύσιμο των ευαίσθητων ρούχων.
Για καλύτερα αποτελέσματα συνιστάται η χρήση υγρού
απορρυπαντικού για ευαίσθητα ρούχα.
Για το πλύσιμο μεταξωτών ρούχων και κουρτινών (Προτείνεται
να τις διπλώνετε και να τις βάζετε στο παρεχόμενο σακίδιο),
επιλέξτε τον κύκλο και ενεργοποιήστε τη δυνατότητα
(Στην περίπτωση αυτή μπορείτε να ενεργοποιήσετε και τη
δυνατότητα “Επιπλέον Ξέβγαλμα”); η μηχανή θα τελειώσει
τον κύκλο με την μπουγάδα σε μούλιασμα και το ενδεικτικό
φωτάκι θα αναβοσβήνει. Για να αδειάσετε το νερό και να
μπορείτε να βγάλετε την μπουγάδα πρέπει να πατήσετε το
κουμπί START/PAUSE ή το κουμπί .
Μά λλινα : ο κύκλος πλυ σίματος “Μάλλιν α” αυτού του
πλυντηρίου Hotpoint-Ariston δοκιμάστηκε και εγκρίθηκε από
την Woolmark Company για το πλύσιμο ρούχων μάλλινων που
ταξινομούνται ως “πλενόμενα στο χέρι”, αρκεί το πλύσιμο να
εκτελείται σύμφωνα με τις οδηγίες της ετικέτας του ενδύματος
και τις υποδείξεις του κατασκευαστή της οικιακής ηλεκτρικής
συσκευής. Η Hotpoint-Ariston είναι η πρώτη μάρκα που
απέκτησε από την Woolmark Company την πιστοποίηση Woolmark Apparel Care - Platinum για τις επιδόσεις της στο
πλύσιμο και τη χαμηλή κατανάλωση νερού και ενέργειας.
(M1127)
βαμβακερά kανονικό 20°C: ιδανικό για φορτία λερωμένων
βαμβακερών. Οι καλές επιδόσεις και σε χαμηλή θερμοκρασία,
συγκρίσιμες με ένα πλύσιμο στους 40°, εξασφαλίζονται από
μια μηχανική δράση που λειτουργεί με μεταβολή ταχύτητας σε
επαναλαμβανόμενες και κοντινές αυξομειώσεις.
28
Page 29

Ανωμαλίες και λύσεις
Μπορεί να συμβεί το μηχάνημα να μη λειτουργεί. Πριν τηλεφωνήσετε στην Υποστήριξη( βλέπε “Υποστήριξη ”), ελέγξτε αν
δεν πρόκειται για πρόβλημα που επιλύεται εύκολα με τη βοήθεια του ακόλουθου καταλόγου.
Ανωμαλίες:
Το μηχάνημα δεν ανάβει.
Ο κύκλος πλυσίματος δεν ξεκινάει.
Το πλυντήριο δεν γεμίζει νερό.
Η πόρτα της μηχανής παραμένει
ασφαλισμένη.
Το πλυντήριο φορτώνει και αδειάζει
νερό συνεχώς.
Το μηχάνημα δεν φορτώνει ή δεν
στύβει.
Το μηχάνημα δονείται πολύ κατά το
στύψιμο.
Το μηχάνημα χάνει νερό.
Τα εικονίδια τα σχετικά με τη “Φάση
σε εξέλιξη” αναβοσβήνουν γρήγορα
ταυτόχρονα στο ενδεικτικό φωτάκι
ON/OFF.
Σχηματίζεται πολύς αφρός.
Η πόρτα της μηχανής παραμένει
ασφαλισμένη.
Δυνατά αίτια / Λύση:
• Το βύσμα δεν έχει εισαχθεί στην ηλεκτρική πρίζα ή όχι αρκετά για να κάνει επαφή.
• Στο σπίτι δεν υπάρχει ρεύμα.
• Η πόρτα δεν είναι καλά κλεισμένη.
• Το κουμπί START/PAUSE δεν πατήθηκε.
• Η βρύση του νερού δεν είναι ανοιχτή.
• Τέθηκε μια καθυστέρηση στην ώρα εκκίνησης.
• Ο σωλήνας τροφοδοσίας του νερού δεν είναι συνδεδεμένος στον κρουνό.
• Ο σωλήνας είναι διπλωμένος.
• Η βρύση του νερού δεν είναι ανοιχτή.
• Στο σπίτι λείπει το νερό.
• Δεν υπάρχει αρκετή πίεση.
• Το κουμπί START/PAUSE δεν πατήθηκε.
• Στο τέλος του κύκλου, επιλέγοντας τη δυνατότητα , το πλυντήριο θα διενεργεί
αργές περιστροφές του κάδου. Για να τελειώσει ο κύκλος πιέστε το κουμπί
START/PAUSE ή το κουμπί ”.
• Ο σωλήνας αδειάσματος δεν έχει εγκατασταθεί μεταξύ 65 και 100 cm από το
έδαφος ( βλέπε «Εγκατάσταση»).
• Το άκρο του σωλήνα αδειάσματος είναι βυθισμένο στο νερό (βλέπε
«Εγκατάσταση»).
• Αν η κατοικία βρίσκεται στους τελευταίους ορόφους ενός κτιρίου, μπορεί να
διαπιστωθούν φαινόμενα σιφωνισμού, οπότε το πλυντήριο φορτώνει και αδειάζει
νερό συνεχώς. Για την αντιμετώπιση του προβλήματος διατίθενται στο εμπόριο
κατάλληλες βαλβίδες αντι-σιφωνισμού.
• Το επιτοίχιο άδειασμα δεν έχει απαέρωση.
• Το πρόγραμμα δεν προβλέπει το άδειασμα: με ορισμένα προγράμματα πρέπει να το
εκκινήσετε χειρονακτικά (βλέπε “Προγράμματα και δυνατότητες”).
• Είναι ενεργή η δυνατότητα : για να ολοκληρώσετε το πρόγραμμα, πατήστε το
πλήκτρο START/PAUSE (βλέπε «Προγράμματα και δυνατότητες»).
• Ο σωλήνας αδειάσματος είναι διπλωμένος (βλέπε «Εγκατάσταση»).
• Η σωλήνωση αδειάσματος είναι βουλωμένη.
• Ο κάδος, τη στιγμή της εγκατάστασης, δεν ξεμπλόκαρε σωστά (βλέπε
“Εγκατάσταση”).
• Η μηχανή δεν είναι επιπεδωμένη (βλέπε “Εγκατάσταση”).
• Το μηχάνημα ασφυκτιά μεταξύ επίπλων και τοίχου (βλέπε “Εγκατάσταση”).
• Το φορτίο είναι ανισόρροπο (βλέπε “Απορρυπαντικά και μπουγάδα”).
• Ο σωλήνας τροφοδοσίας του νερού δεν είναι καλά βιδωμένος (βλέπε “Εγκατάσταση”).
• Η θήκη των απορρυπαντικών είναι βουλωμένη (για να την καθαρίσετε βλέπε
“Συντήρηση και φροντίδα”).
• Ο σωλήνας αδειάσματος δεν είναι σωστά στερεωμένος (βλέπε “Εγκατάσταση”).
• Σβήστε τη μηχανή και βγάλτε το βύσμα από την πρίζα, περιμένετε περίπου 1 λεπτό
μετά ξανανάψτε τη. Αν η ανωμαλία επιμένει, καλέστε την Υποστήριξη.
• Το απορρυπαντικό δεν είναι ειδικό για πλυντήριο (πρέπει να υπάρχει η ένδειξη “για
πλυντήριο”, “για πλύσιμο στο χέρι και στο πλυντήριο”, ή παρόμοια).
• Η δοσολογία υπήρξε υπερβολική.
• Εκτελέστε τη διαδικασία χειρονακτικής απασφάλισης (βλέπε «Προφυλάξεις και
συμβουλές»).
GR
Η οθόνη δείχνει “Αυτόμ.δοσ.ανενεργή,
χρησιμοποιήστε το συρτάρι”.
• Υποδεικνύει μια δυσλειτουργία του συστήματος αυτόματης δοσομέτρησης.
Χρησιμοποιήστε το μηχάνημα με τον παραδοσιακό τρόπο, εισάγοντας
απορρυπαντικό και μαλακτικό, στην αναγκαία ποσότητα για ένα πλύσιμο, στο
συρταράκι και επικοινωνήστε με την Τεχνική Υποστήριξη για την εξακρίβωση των
αιτιών της δυσλειτουργίας.
29
Page 30

GR
Ανωμαλίες:
Δυνατά αίτια / Λύση:
Η μηχανή δεν δίνει καλές επιδόσεις
πλυσίματος.
Τι συμβαίνει αν τα ρεζερβουάρ είναι
γεμάτα και τα φορτώνω;
Τι συμβαίνει αν χρησιμοποιήσω
το συρτάρι παραδοσιακά ενώ τα
ρεζερβουάρ είναι ακόμη γεμάτα;
Τα ρεζερβουάρ είναι και για
απορρυπαντικό σε σκόνη;
Το απορρυπαντικό σε σκόνη μπορεί να
πάει και στα ρεζερβουάρ;
Τι συμβαίνει αν δεν ανοίγω σωστά
το συρτάρι για την πλήρωση των
ρεζερβουάρ;
• Τα ρεζερβουάρ δεν φορτώθηκαν σωστά (μαλακτικό στη θέση του
απορρυπαντικού ή αντίστροφα).
• Αναμίχθηκαν δύο διαφορετικά απορρυπαντικά/μαλακτικά.
! Μην αναμιγνύετε ΠΟΤΕ δύο απορρυπαντικά/μαλακτικά. Να διενεργείτε πάντα
τον καθαρισμό πριν εισάγετε άλλα.
• Σύστημα “Auto Dose System” βουλωμένο γιατί δεν χρησιμοποιήθηκε επί
μακρόν: κάνετε έναν καθαρισμό των ρεζερβουάρ (βλέπε “Καθαρισμός τεθείς από
το χρήστη”).
• Ηχητικά σήματα (Μπιπ) και οπτικά (εικονίδια στην οθόνη) δείχνουν ότι το
ρεζερβουάρ είναι γεμάτο. Αν συνεχίσετε να φορτώνετε το απορρυπαντικό/
μαλακτικό, η ποσότητα που περισσεύει θα πάει στον κάδο και θα απομακρυνθεί
στον επόμενο κύκλο.
• Η μηχανή θα αναγνωρίσει αυτόματα αν φορτώθηκε απορρυπαντικό σε σκόνη ή
υγρό απορρυπαντικό με τον παραδοσιακό τρόπο και δεν θα παραλάβει τίποτα
από το ρεζερβουάρ. Το μαλακτικό μπορεί να χρησιμοποιείται μόνο με τον τρόπο
Auto dose.
• Όχι, το απορρυπαντικό σε σκόνη μπορεί να χρησιμοποιηθεί μόνο με τρόπο
παραδοσιακό.
• Όχι, υπάρχει ένα τοίχωμα που αποτρέπει το απορρυπαντικό σε σκόνη να πέσει
σε ένα από τα ρεζερβουάρ ακόμη κι αν το συρτάρι είναι ανοιχτό σε θέση “Auto
Dose System” (τελείως ανοιχτό).
• Αν το συρτάρι δεν είναι τελείως ανοιχτό το απορρυπαντικό ή το μαλακτικό θα
πέσει στον κάδο και να απομακρυνθεί στον επόμενο κύκλο.
Τι συμβαίνει αν στη θέση του
απορρυπαντικού βάλω το μαλακτικό;
Τι συμβαίνει αν δεν περιμένω
να αδειάσουν τα ρεζερβουάρ
και ανακατέψω διαφορετικά
απορρυπαντικά;
• Η μηχανή θα πλύνει με ανεπαρκή αποτελέσματα και θα χρειαστεί να αδειάσετε
τα ρεζερβουάρ εφαρμόζοντας τον κύκλο χειρονακτικού καθαρισμού.
• Η μηχανή θα πλύνει κανονικά αλλά προτείνεται να επαναφορτώσετε τα
ρεζερβουάρ μόνο μετά το σήμα που δίνει η μηχανή και να μην αναμίξετε
διαφορετικά απορρυπαντικά/μαλακτικά.
! Σημείωση: για να βγείτε από το “Demo Mode”, απενεργοποιήσετε το πλυντήριο, πιέστε ταυτόχρονα για 3 sec. τα δύο κουμπιά και .
30
Page 31

Υποστήριξη
Πριν επικοινωνήσετε με την Υποστήριξη:
• Ελέγξτε αν η ανωμαλία μπορεί να αντιμετωπιστεί αυτόνομα (βλέπε «Ανωμαλίες και Λύσεις»);
• Επανεκκινήστε το πρόγραμμα για να ελέγξετε αν το πρόβλημα αντιμετωπίστηκε;
• Σε αρνητική περίπτωση, επικοινωνήστε με την Εξουσιοδοτημένη Υπηρεσία Τεχνικής Υποστήριξης.
! Σε περίπτωση εσφαλμένης εγκατάστασης ή μη σωστής χρήσης του πλυντηρίου η επέμβαση του σέρβις θα είναι επ’ αμοιβή.
! Μην καταφεύγετε ποτέ σε μη εξουσιοδοτημένους τεχνικούς.
Γνωστοποιήστε:
• το είδος της ανωμαλίας;
• το μοντέλο της μηχανής (Mod.);
• τον αριθμό σειράς (S/N).
Αυτές οι τελευταίες πληροφορίες βρίσκονται στην πινακίδα χαρακτηριστικών επί της συσκευής.
GR
31
Page 32

GR
32
Page 33

Montaj ve kullanım
talimatları
ÇAMAŞIR MAKİNESİ
TR
Türkçe
AQUALTIS
ADS93D 69
İçindekiler
Montaj, 34-35
Ambalajdan çıkarma ve tesviye
Elektrik ve su bağlantılarının yapılması
Teknik bilgiler
Bakım ve onarım, 36
Su ve elektrik bağlantılarının kesilmesi
Makinenin temizlenmesi
Deterjan dağıtma çekmecesinin temizlenmesi
Cihaz tamburuna bakım yapılması
Pompanın temizlenmesi
Su giriş hortumunun kontrol edilmesi
Önlem ve öneriler, 37
Genel güvenlik
Yük dengeleme sistemi
Atma
Yan kapağın manüel olarak açılması
Makinenin tanıtımı, 38-39
“Dokunmatik kumanda” paneli
Auto Dose System, 40-41
TR
Bir programın çalıştırılması, 42
Programlar ve seçenekleri, 43
Program tablosu
Yıkama seçenekleri
Deterjan ve çamaşır, 44
Deterjan
Çamaşırın hazırlanması
Yıkama önerileri
Sorun giderme, 45-46
Teknik Servis, 47
33
Page 34

Montaj
TR
! Bu kullanma kılavuzunun saklanması daha
sonradan da okunup faydalı olabilmesi
açısından önemlidir. Çamaşır makinesinin
satılması, devri veya nakli durumlarında da,
bu kılavuzun çamaşır makinesi ile birlikte
kalmasını sağlayınız.
! Talimatları dikkatlice okuyunuz: montaj,
kullanım ve güvenliğe ilişkin önemli bilgiler
içermektedir.
! Bu kılavuzu içeren torbanın içinde garanti
dahil montaj için gereken detaylar mevcuttur.
Ambalaj malzemesinin kaldırılması
ve makinenin seviye ayarının
yapılması
Ambalaj malzemesinin kaldırılması
1. Ambalajı açıldıktan sonra çamaşır
makinesinin taşıma esnasında hasar
görmemiş olduğunu kontrol ediniz.
Hasar görmüş ise monte etmeden satıcıya
başvurunuz.
2. Arkada bulunan 4
adet nakliye emniyet
vidalarını ve ilgili ara
parçasını çıkartınız
(bkz. şekil).
3. Nakliye
emniyetlerinin
boşaltığı deliklere
ambalaj torbasındaki
plastik tıpaları takınız.
4. Tüm parçaları saklayınız; iç hasar
görmesini önlemek için herhangi bir
nakliye sırasında çamaşır makinenisini yine
nakliye emniyetleri takılı olarak taşıyınız.
! Ambalajlar çocuk oyuncağı değildir.
Tesviye
! Makinenin seviyesinin dikkatlice
ayarlanması makinenin titremesini, özellikle
sıkma programı çalışırken ses çıkarmasını ve
yerinden oynamasını engeller.
! Zeminde moket veya halı olması halinde,
ayakları makinenin altında havalandırma
sağlanacak şekilde ayarlayınız.
Elektrik ve su bağlantıları
Su besleme hortumunun bağlanması
! Su besleme hortumunu su şebekesine
bağlamadan önce berrak su gelene kadar
suyu akıtınız.
1. Su besleme
hortumunu arka
kısımının üst sağ
köşesinde bulunan su
girişine vidalayarak
makineye bağlayınız
(bkz. şekil).
2. Giris hortumunu
3/4 gaz vidalı baglantı
kullanarak bir soguk
su musluguna
baglayın (sekle
bakınız).
Baglantıyı yapmadan
önce, iyice temiz
olana kadar suyun
akmasına izin verin.
3. Hortumun katlanmamasına ve
ezilmemesine dikkat ediniz.
1. Çamaşır makinesini düz ve sert bir
zemine yerleştiriniz, duvar veya mobilyalara
dayamayınız.
2. Ayarlanabilir
ayakları gevşeterek
ya da sıkarak
makinenin zemine
tamamen oturmasını
sağlayınız (en fazla 2
derece eğilebilir).
34
! Musluğun su basıncının Teknik Veriler
tablosunda belirtildiği gibi olması gerekir (bkz.
yan sayfa).
! Besleme hortumunun boyu yetersiz ise
yetkili bir satış mağazasına veya teknik
servise başvurunuz.
! Eski veya kullanılmış hortumları asla
kullanmayınız. Makine ile birlikte verilmiş
olanları kullanınız.
Page 35

Tahliye hortumunun bağlanması
65 - 100 cm
Tahliye hortumunu,
katlanmamasına
dikkat ederek
zeminden veya
yerden 65 cm ile 100
cm arasındaki bir
yükseklikten duvar
tahliyesine takınız.
! Makine monte edildikten sonra priz kolayca
erişilebilir durumda olmalıdır.
! Uzatma kablosu ve çoklu prizler
kullanmayınız.
! Kablonun ezilmemesi ve katlanmaması
gerekir.
! Beslenme kablosu ve priz yalnızca yetkili
servis tarafından değiştirilmelidir.
TR
veya, ambalaj
torbasındaki
hortum dirseğiyle,
düşmeyecek
şekilde sabitleyerek
boşaltma hortumunu
lavabo ya da küvete
asınız (bkz. şekil).
Tahliye hortumunun
serbest ucunun suya
girmemesi gerekir.
! Tahliye hortumunun ek yapılarak
uzatılmaması tavsiye edilir; başka seçenek
yoksa, uzatma hortumunun çapının da aynı
olması ve 150 cm’yi. den uzun olmaması
gerekir.
Elektirik bağlantısı
Makinenin şini bir elektrik prizine takmadan
önce aşağıdakileri kontrol ediniz:
• tesisat topraklı prize sahip ve yürürlükteki
normlara uygun olmalıdır;
• elektrik prizi, Teknik Veriler tablosunda
belirtilen makinenin maksimum güç yükünü
taşıyabilmelidir (bkz. yan taraf);
• besleme gerilimi Teknik Veriler tablosunda
belirtilen değer sınırı kapsamında olmalıdır
(bkz. yan taraf);
Dikkat! Bu şartlara uyulmaması halinde rma
tüm sorumluluklardan muaftır.
Teknik bilgiler
Model ADS93D 69
geniþlik 59,5 cm
Ölçüler
Kapasite 1 - 9 kg
Elektrik baðlantýlarý
Su baðlantýlarý
Sýkma hýzý
1061/2010
ve 1015/2010
sayýlý direktiflere
göre kontrol
programlarý
yükseklik 85 cm
derinlik 64,5 cm
makine üstünde takýlý olan
teknik veriler plakasýna
bakýnýz.
max. su basýncý
1 MPa (10 bar)
min. su basýncý
0,05 MPa (0,5 bar)
tambur kapasitesi 62 litre
maksimum dakikada 1600
devire kadar
program
;
Pamuklu Standart 60°C.
program
;
Pamuklu Standart 40°C.
• priz ve makinenin şi birbiriyle uyumlu
olmalıdır. Aksi takdirde ya prizi, yada şi
değiştiriniz.
! Makine, üzeri kapalı bile olsa açık alanlara
monte edilmez, zira yağmur ve fırtınaya
maruz kalması son derece tehlikelidir.
Bu makina aþaðýda belirtilen
AB normlarýna uygundur:
- 2004/108/CE (Elektromanyetik Uyum)
- 2002/96/CE
- 2006/95/CE (Alçak gerilim)
35
Page 36

2
Bakım ve onarım
A
D
TR
Su ve elektrik bağlantılarının
kesilmesi
• Her programdan sonra musluğu kapatın.
Bu makine içerisindeki hidrolik sistemin
aşınmasını sınırlayacak ve sızıntıların
önlenmesine yardımcı olacaktır.
• Temizlik ve tüm bakım işleri sırasında
cihazı şten çekin.
Makinenin temizlenmesi
Cihazın dış parçaları ve kauçuk parçaları
soğuk sabunlu suya batırılmış yumuşak bir
bez kullanılarak temizlenebilir. Çözücü veya
aşındırıcı kullanmayın.
Deterjan çekmecesinin
temizlenmesi
Gözü çıkarmak için, ilk kilide kadar gözü
açınız, daha sonra tamamen açarak A
koluna basınız, son olarak D kollarından
birine basınız ve gözü dışarı doğru çekiniz
(şekillere bakınız).
! Programın bittiğinden ve cihazın şten çekili
olduğundan emin olun.
Ön hazneye erişmek için:
1. Çıkarana kadar ilk önce ortaya doğru
bastırarak ve her iki yanından iterek
makinenin önündeki kapak panelini
çıkarın(şekile bakınız);
2. Akan suyu toplamak
için bir kap yerleştirin
(yaklaşık 1.5 l) (şekile
bakınız);
3. saat yönünde
çevirerek kapağı
yerinden çıkarın
(şekile bakınız);
4. içerisini iyice temizleyin;
5. kapağı geri takın;
6. cihazın üstüne itmeden önce kancaların
güvenli bir şekilde yerine takıldığından emin
Akar su altında gözü yıkayınız, bu temizlik
işlemi sık sık yapılmalıdır. Makine üzerindeki
çekmecenin yerinden muhtemel deterjan
artıklarını da kaldırmaya özen gösteriniz.
Gözü yeniden monte etmek için, kızağı
ortalamaya ve sıkışmasından kaçınmaya
dikkat ederek, sola yaklaşık tutmak gerekir.
Cihaz tamburuna bakım yapılması
• İstenmeyen kokuların oluşmasını önlemek
için kapağı daima aralık bırakın.
olarak, paneli yerine yerleştirin.
Su giriş hortumunun kontrol
edilmesi
Giriş hortumunu yılda bir kez kontrol
edin. Herhangi bir çatlak varsa, hemen
değiştirilmesi gerekmektedir: program
sırasında su basıncı çok güçlüdür, çatlak bir
hortum kolayca yarılabilir.
Pompanın temizlenmesi
Çamaşır makinesine, bakım gerektirmeyen
kendini temizleyen bir pompa takılmıştır.
Bazen, küçük cisimler (madeni para veya
düğme gibi) pompanın alt bölümündeki
koruyucu ön hazneye düşebilir.
36
Page 37

Önlem ve öneriler
! Makine uluslararası güvenlik düzenlemelerine uygun
olacak şekilde tasarlanmış ve imal edilmiştir. Aşağıdaki
bilgiler güvenlik amacıyla verilmiştir ve bu nedenle dikkatli
bir şekilde okunması gerekmektedir.
Genel güvenlik
• Bu cihaz sadece ev kullanımı için tasarlanmıştır.
• Bu cihaz, eğer gözetim altında bulunuyorlar
ise veya güvenli şekilde ve ilişkin tehlikeler
göz önünde bulundurularak, cihazın kullanımı
hakkında uygun eğitim almışlar ise, 8 yaşından
büyük çocuklar ve ziksel, duyusal veya mental
kapasitelerden yoksun veya yetersiz tecrübe
ve bilgiye sahip kişiler tarafından kullanılabilir.
Çocuklar, cihaz ile oynamamalıdır. Bakım
ve temizlik işlemleri, denetimsiz çocuklar
tarafından gerçekleştirilmemelidir.
• Makineye yalınayak veya el ya da ayaklar ıslakken
dokunmayın.
• Cihazı elektrik prizinden çekerken güç kablosundan
çekmeyin. Fişi tutup, çekin.
• Yüksek sıcaklığa ulaşabileceği için boşaltılan suya
dokunmayın.
• Kapağı asla zorlamayın. Bu kazayla açılmasını
önlemek için tasarlanan güvenlik kilidi mekanizmasına
hasar verebilir.
• Cihaz arızalanırsa, ne olursa olsun kendi kendinize
tamir etmeyi denemek için iç mekanizmaya
dokunmayın.
• Çocukları daima çalışır durumdayken cihazdan uzak
tutun.
• Taşınması gerekirse, iki veya üç kişinin yardımı
hareket ettirin ve azami dikkatle taşıyın. Cihaz çok
ağır olduğundan dolayı, kesinlikle bunu tek başınıza
yapmayı denemeyin.
• Çamaşırı, çamaşır makinesinin içine yerleştirirken,
tamburun boş olduğundan emin olun.
Yük dengeleme sistemi
Her sıkma aşamasından önce aşırı titreşimi önlemek
ve yükü tek bir yönde dağıtmak için, tambur yıkama
dönüş hızından biraz daha fazla olan bir hızda sürekli
döner. Birkaç denemeden sonra, yük doğru şekilde
dengelenmezse, makine düşük bir dönüş hızında döner.
Yük çok dengesizse, çamaşır makinesi döndürme yerine
dağıtma işlemini uygular. Gelişmiş yük dağılımı ve
dengeyi desteklemek için, küçük ve büyük giysilerin yük
içerisinde karıştırılmasını öneririz.
normal katı kentsel atık dönüşümünü kullananlarla
birlikte atılmaması gerektiğini ifade etmektedir.
Hurda cihazlar, atmosfere ve halk sağlığına yönelik
potansiyel tehlikeyi önlemenin yanısıra makine
içerisindeki malzemelerin tekrar kullanım ve geri
dönüşüm maliyetini en uygun hale getirmek için
ayrı ayrı toplanmalıdır. Ayrılmış atık toplama ile ilgili
yükümlülüklerini cihaz sahiplerine hatırlatmak için tüm
ürünler çarpı konulmuş çöp kutusu ile işaretlenmiştir.
Eve ait cihazların doğru şekilde atılması ile ilgili daha
fazla bilgi almak için, cihaz sahipleri yerel makamlarla
ve cihaz satıcıları ile temas kurmalıdır.
Kapağın manüel olarak açılması
Elektrik kesintisinden dolayı kapağın açılması mümkün
olmadığında ve çamaşırı çıkarmak istiyorsanız:
1. Fişi elektrik prizinden
çekin.
2. Makine içerisindeki suyun
kapak açılışından daha
düşük seviyede olmasına
dikkat edin, bu durumda
değilse, fazla suyu şekilde
gösterildiği gibi tahliye
hortumunu kullanarak bir
kovanın içerisine boşaltın.
3. çamaşır makinesinin ön alt tarafındaki kapak panelini
çıkarın (arka sayfaya bakınız).
4. Şekilde gösterildiği gibi
plastik bağlama çubuğu
durma konumundan
serbest kalana kadar tırnağı
kullanarak çekip çıkarın,
kapak kilidinin açıldığını
gösteren “çıt” sesini duyana
kadar aşağı doğru çekin.
5. kapağı açın, kapak
açılmazsa, işlemi tekrar
yapın.
TR
Atma
• Ambalaj malzemelerinin atılması: Ambalaj
malmzelerinin tekrar kullanılabilmesi için yerel
düzenlemelere uyun.
• Atık Elektrikli ve Elektronik Cihazlarla ilgili Avrupa
Birliği Yönergesi 2002/96/EC evde kullanılan cihazların
6. cihazın üstüne itmeden önce kancaların güvenli bir
şekilde yerine takıldığından emin olarak, paneli yerine
yerleştirin.
37
Page 38

Makinenin tanıtımı
TR
KAPAK
KAPAK
TUTMA YERİ
AYAK
ÇARPMASINDAN
KORUYUCU PANEL
Kumanda
paneli
AYARLANABİLİR
AYAKLAR
KAPAK
DETERJAN ÇEKMECESİ
Kapağı açmak için her
zaman tutma yerini kullanın
(şekle bakınız).
Deterjan çekmecesi
makinenin içerisinde
bulunmaktadır, kapak
açılarak erişilebilir.
Kullanım için “Auto Dose
System” bölümüne bakınız.
“Dokunmatik kumanda” paneli
Ayarlamaları yapmak
için şekilde gösterildiği
gibi hassas (dokunmatik
kumanda) alanın içinde
bulunan simgeye hafçe
basın.
Bekleme modu
Yeni enerji tasarrufu düzenlemeleri ile uyumlu bu çamaşır
makinesine herhangi bir faaliyet algılanmadığında 30
dakika içinde devreye sokulan otomatik bekleme sistemi
yerleştirilmiştir ON/OFF düğmesine bir süre basın ve
makinenin tekrar çalışmasını bekleyin.
Off-mode’da tüketim: 0,5 W
Left-on’da tüketim: 0,5 W
38
Page 39

“Dokunmatik kumanda” paneli
düğmesi
PROGRAM SEÇİCİ
döner düğme
YUMUŞATICI
düğmesi
DETERJAN
SICAKLIK AYARİ
Ekranı
DEVIR AYARİ
düğmesi
düğmesi
Gösterge lambası bulunan
START/PAUSE
ECO
gösterge
lambası
PROGRAM
AŞAMA simgeleri
TR
ON/OFF gösterge
lambası bulunan düğme
ON/OFF gösterge lambası bulunan düğme: Makineyi
açıp, kapamak için bu düğmeye bir süre basın. Yeşil
gösterge lambası makinenin açık olduğunu gösterir. Program
sırasında, çamaşır makinesini kapatmak için, yaklaşık
3 saniye düğmeyi basılı tutun, düğmeye bir süre veya
istemeden basılırsa, makine kapanmayacaktır. Program
sırasında makine kapatılırsa, bu program iptal edilecektir.
PROGRAM SEÇİCİ döner düğme: her iki yöne de
döndürülebilir. En uygun programı seçmek için, lütfen
“Programlar Tablosu”’na bakınız. Program sırasında döner
düğme hareket etmeyecektir.
SICAKLIK AYARİ düğmesi: sıcaklık ayarında değişiklik
yapmak veya devre dışı bırakmak için basın, seçilen
değer üstteki ekranda görüntüye gelecektir (“Bir programın
çalıştırılması”’na bakınız).
DEVIR AYARİ düğmesi: sıcaklık ayarında değişiklik
yapmak veya devre dışı bırakmak için basın, seçilen
değer üstteki ekranda görüntüye gelecektir (“Bir programın
çalıştırılması”’na bakınız).
YİKAMA ZAMANİ ERTELEME düğmesi: seçilen
program için gecikmeli çalışmayı ayarlamak amacıyla
basın; ayarlanan gecikmeli çalıştırma süresi üstteki ekranda
görüntüye gelecektir (“Bir programın çalıştırılması”’na
bakınız).
Gösterge lambaları bulunan SEÇİM düğmesi: mevcut
seçenekleri seçmek için basın. Seçilen seçeneğe karşılık
gelen gösterge lambası yanacaktır (“Bir programın
çalıştırılması”’na bakınız).
DETERJAN ve YUMUŞATICI düğmesi : bakınız
“ Auto Dose System” bölümündeki “Önceden ayarlanan
parametrelerin değiştirilmesi”.
DETERJAN SULANDIRMA düğmesi : bakınız “Auto
Dose System” bölümündeki “Haznelerin doldurulması”.
PROGRAM AŞAMA simgeleri: bu simgeler program
sürecini göstermek için aydınlanır (Yıkama – Durulama
–Sıkma – Boşatlma ). yazısı program
bitiminde yanar.
Gösterge lambası bulunan START/PAUSE düğmesi: yeşil
gösterge lambası yavaş yavaş yanıp söner, bir program
düğmesi
DETERJAN
SULANDIRMA
SEÇİM düğmesi
YİKAMA ZAMANİ
ERTELEME
düğmesi
başlatmak için düğmeye basın. Program başlar başlamaz,
gösterge lambası sürekli yanacaktır. program duraklatmak
için, düğmeye tekrar basın, gösterge lambası turuncu renkte
yanıp sönecektir. “LOCK” gösterge lambası kapanırsa,
kapak açılmayabilir. Programı yarıda kesildiği noktadan
başlatmak için, düğmeye tekrar basın.
LOCK gösterge lambası: kapağın kilitli olduğunu gösterir.
Kapağı açmak için, programı duraklatın (“Bir programın
çalıştırılması”’na bakınız).
Gösterge lambası bulunan ÇOCUK KİLİDİ düğmesi: kontrol
panelini devreye sokmak veya devreden çıkarmak için,
düğmeyi yaklaşık 2 saniye basılı tutun. Gösterge lambası
aydınlatıldığında, kumanda paneli kilitlenir (ON/OFF tuşu
LOCK gösterge
lambası
Gösterge lambası bulunan
ÇOCUK KİLİDİ düğmesi
hariç). Bu, özellikle çocuklar evde olduğu sırada, programda
kazayla değişiklik yapılmasını önlemenin mümkün olduğu
anlamına gelir.
ECO gösterge lambası: simgesi yandığında, Yıkama
parametreleri değiştirildikten sonra, en az %10 enerji
tasarrufu sağlanır. Ayrıca, makine “Bekleme” moduna
girmeden önce, simge birkaç saniye yanacak; makine
kapandığında hesaplanana enerji tasarrufu %80 işareti
etrafında olacaktır.
DİLİ DEĞİŞTİR
Makine ilk defa açıldığında ekran üzerinde ilk olarak dil
öğesi yanıp sönecektir. “ ”, “OK” ve “V” simgeleri ekranda
görüntülenecek ve sağ tarafta bulunan 3 adet düğme
ile aynı hizada bulunacaktır. Diller her 3”’de bir otomatik
olarak değişecektir ya da buna alternatif olarak “ ” ve
“V” sembollerinin yanında bulunan düğmelere basarak
değiştirilebilirler. 2”’nin ardından ayarlanacak olan dili
onaylamak için “OK” tuşunu kullanın. Düğmelere basılmazsa
otomatik dil, 30” sonra değişmeye başlayacaktır.
Dili değiştirmek için, makineyi açıp kapatmak gerekir,
makine kapandıktan 30’’ sonra aynı anda sıcaklık derecesi
+Sıkma +5” gecikmeli başlatma butonlarına
basınız ve kısa sesli bir sinyal dışında ekranda yanıp
sönen ayarlanan dil görünür. Dili değiştirmek için “ ” ve “V”
sembollerinin yanındaki düğmelere basın. 2”’nin ardından
ayarlanacak olan dili onaylamak için “OK” sembolünün
yanındaki tuşu kullanın. Düğmelere basılmazsa ayarlanan
dil, 30” sonra ekranda görüntülenmeye başlayacaktır.
Makine kapatıldı.
39
Page 40

Auto Dose System
A
B
C
TR
Giriş
Bu çamaşır makinesi,
iki hazneden meydana
gelmektedir: biri yaklaşık
5,5 lt kapasiteye sahip
sıvı deterjan (konsantre
veya sulandırılmış) için
ve diğeri yaklaşık 3,5
lt kapasiteye sahip sıvı
yumuşatıcı (konsantre veya
sulandırılmış) için (şekle
bakınız).
! Sulandırılmış mı yoksa
konsantre mi olduğunu
deterjan/yumuşatıcı gözü
üzerinde kontrol ediniz.
! otomatik dozaj sistemi, her tip yük için ve en uygun
yıkama neticesi sağlayarak ve kayıpsız olarak belirtilen
süre içinde uygun deterjan ve yumuşatıcı miktarını
haznelerden alır. DETERJAN ve YUMUŞATICI düğmeleri
üzerinde hareket ederek manuel olarak deterjan ve
yumuşatıcı miktarını değiştirmek mümkündür (bakınız
“Önceden ayarlanan parametrelerin değiştirilmesi”). Eğer
arzu edilirse, deterjanı göze koyarak “geleneksel” şekilde
çamaşır makinesini kullanmak mümkündür; makine
deterjanın varlığını otomatik olarak algılar ve hazneleri
kullanmaz.
Deterjan gözü
“Geleneksel” yöntem.
Deterjanı (sıvı veya toz), beyazlatıcıyı veya diğer katkı
maddelerini (örn. beyazlatıcı maddeler) ve geleneksel
şekilde kullanım amaçlı önyıkama için deterjanı
doldurmak amacıyla ilk kilide kadar deterjan gözünü
çekiniz (bakınız “Geleneksel kullanım”).
“Auto Dose” Yöntemi.
Deterjan ve yumuşatıcı
gözlerini doldurmak için,
deterjan çekmecesini
tamamen çekiniz:
çekmeceyi ilk kilide kadar
açınız, kola (A) basınız
ve sonuna geldiğinden
emin olunca ikinci kilide
kadar çekiniz. Çekmeceyi
yükleme sırasında hareket
ettirmeyiniz.
Hazneler dolunca (bakınız “Haznelerin doldurulması”),
makine deterjan için yaklaşık 40 devirlik otonoma sahip
olacaktır (*).
İlk kullanım
ON/OFF tuşuna basarak çamaşır makinasını çalıştırınız.
İlk yıkama işlemi, “ ” programını ayarlayarak
(önyıkamasız ve hazneleri doldurmadan Koton
90°) (bakınız Geleneksel yöntem) deterjan gözüne
doğrudan dökülen deterjan ile beyazlatıcı olmadan
gerçekleştirilmelidir.
Haznelerin doldurulması:
“Auto Dose” şeklinde deterjan gözünü açınız(bakınız
“Deterjan Gözü”).
Deterjanı (B) ve yumuşatıcıyı (C) hazneleri tamamen
dolduracak şekilde yavaşça dökünüz (şekillere bakınız).
Maksimum miktarı aşmamak için, artan yoğunluğa
sahip akustik bir sinyal (bip) 3 uzun bip sesi ile belirtilen
haznenin tamamen doldurulmasına kadar ulaşılan
seviyeyi bildirecektir.
Gözün temizliğini sağlamak için hazneleri doldurduktan
sonra yıkama işlemini hemen başlatınız.
Ekran üzerinde ayrı ayrı (deterjan için) ve
(yumuşatıcı için) ikonları ulaşılan miktarı göstermek için
derece derece yanacaktır.
Yükleme süresi, ürünün yoğunluğuna bağlıdır. Çok yoğun
olan ürünler ile yükleme süresi daha uzun olacaktır.
Deterjan gözünü sadece hazneler tamamen boşalacağı
zaman kapatınız.
Özel düğmesine basarak, dökülen deterjanın
yoğunluğunu (konsantre veya sulandırılmış) seçiniz.
Konsantre
Sıvı
Makine, seçimi hafızaya alacaktır.
Seçim yapmayınca, deterjanın alımı “sulandırılmış”
seçimi üzerinde ayarlanacaktır.
Makine tarafından otomatik olarak alınacak olan yumuşatıcı
miktarını ayarlamak için düğmesini kullanınız.
1) Eğer yumuşatıcı konsantre ise, ilk seviyeyi (1 çubuklu
) seçmeniz ve alımını arttırmak için tek pozisyon
olması halinde (2 çubuklu ) arttırmanız tavsiye edilir.
2) Eğer yumuşatıcı sulandırılmış ise, seviye 3’ü
(3 çubuklu ) ayarlamanız ve alınacak yumuşatıcı
miktarını buradan arttırmanız/azaltmanız tavsiye edilir.
3) Yumuşatıcının kullanımını engellemek için, çubuklar
kaybolana kadar düğmesine basınız (“Önceden ayarlanan
parametrelerin değiştirilmesi” bölümüne de bakınız).
40
(*) 4 kg.’lık ortalama yük, Pamuklu 40°C programda, suyun sertlik derecesi “orta” ve
ayarlanan kirlilik seviyesi 3 üzerinde iken.
Page 41

Sonraki doldurma işlemleri için sinyalizasyon:
3
1
2
Bir devir bitiminde, deterjanın/yumuşatıcının kalan seviyesi
bir sonraki yıkama için gerekli olan miktar altına indiği
zaman, ekran üzerinde ilişkin “Program sonunda,
deterjan haznesini doldurunuz” veya “Program
sonunda, yumuşatıcı haznesini doldurunuz” veya
“Program sonunda, hazneleri doldurunuz” (her ikisi
için) mesajları görünecektir. Eğer hazneler yüklenmemiş
ise, “Auto Dose” şeklindeki sonraki yıkamalar deterjanı
almadan gerçekleşecektir.
! Deterjanı ve yumuşatıcıyı SADECE makinenin
işaretinden sonra yeniden doldurmanız tavsiye edilir.
! HİÇBİR ZAMAN iki farklı deterjanı karıştırmayınız;
haznenin temizliğini her zaman yenisini koymadan önce
gerçekleştiriniz (bakınız “Kullanıcı tarafından yapılan
temizlik”).
“Auto Dose System” kullanımı
Haznelerin deterjan ve yumuşatıcı ile doldurulmuş olması
halinde makine kullanımını gerçekleştireblirsiniz (bakınız
“Bir programın çalıştırılması”).
Ön yıkama için olan deterjan ve toz katkı maddeleri
yalnızca geleneksel şekilde ya da “Auto Dose System”
yolu ile, katkı maddelerini direkt olarak içerisine koyunuz,
tercihen “top” yardımıyla koyunuz.
Eğer beyazlatmak istenirse, özel bölmeye beyazlatıcıyı
dökünüz (bakınız “Süper Beyaz” seçeneği).
Önceden ayarlanan parametrelerin değiştirilmesi:
Makine seçilen programa, koyulan yük miktarına ve
suyun sertliğine göre deterjan miktarını otomatik olarak
alır. Bununla beraber, deterjan/yumuşatıcı miktarı
değiştirilebilmektedir.
düğmesi: deterjan alımını arttırmak, azaltmak ve
engellemek için basınız.
düğmesi: yumuşatıcı alımını arttırmak, azaltmak ve
engellemek için basınız.
Makine tarafından gösterilen deterjan/yumuşatıcı
seviyesi, 3 çubuk ile belirtilir.
3 çubuklu en yüksek seviyeler deterjan/yumuşatıcı
miktarının artmasını belirtirken, 3 çubuklu en düşük
seviyeler makine tarafından gösterilen seviyeye göre
daha az deterjan/yumuşatıcı belirtirler.
Haznelerin temizliği:
Haznelerin otomatik veya kullanıcının talebi üzerine
temizlik devirleri öngörülür.
Otomatik temizlik:
Çamaşır makinesi, kalan deterjan miktarı bir sonraki
yıkama devresi için yetersiz olduğu zaman, durulama
işlemi sırasında otomatik bir devir gerçekleştirmektedir.
Kullanıcı tarafından yapılan temizlik:
Eğer önceden kullanılan üründen farklı bir ürün
doldurmak istenirse veya hazneler hatalı şekilde
doldurulmuşsa (yumuşatıcı, deterjan bölmesine veya
tam tersi dökülmüştür), temizlik devresini gerçekleştiriniz
(boş kazan ile). Deterjan gözünün temizlik işleminin
devreye girmesi için 5 san. düğmesine basılı tutunuz,
düğmesine yumuşatıcı gözünün temizlik işleminin
devreye girmesi için veya düğmesine her iki göz için
basılı tutunuz. 3 san. daha açılan mesaj kaybolana kadar
basılı tutmaya devam ediniz (yukarıda sağda geri sayım
“4-3-2-1” görünecektir): “Hazne temiz”.
Eğer hazneler ilk olarak boşaltılmış ise temizlik devresi
yaklaşık 40’ sürer, aksi taktirde devrenin süresi daha
uzun olacaktır. Ekran üzerinde haznelerin boş olduğunu
belirten ikonlar belirecektir.
“Geleneksel” kullanım
Deterjan gözünü ilk kilide kadar çekiniz (şekle bakınız),
tek bir yıkama için gerekli olan deterjanı ve diğer katkı
maddelerini (örn. beyazlatıcı) doğrudan deterjan gözüne
dökünüz.
1. ön yıkama haznesi:
sadece toz deterjan
kullanınız.
2. yıkama haznesi:
toz veya sıvı deterjan
kullanınız. Bu son durumda;
deterjanın çamaşır
makinesi çalıştırılmadan
hemen önce ve ön yıkama
gerçekleştirilmeden
konulması tavsiye edilir.
3. beyazlatıcı haznesi: beyazlatmak istenirse kullanınız
(“Süper Yıkama” seçeneğine bakınız).
Tablet deterjan veya özel “top” doğrudan kazanın içine
konulmalıdır. Bu durumda “Auto Dose System” şeklini
hariç tutunuz (ekran üzerinde dikey ilişkin çubuklar
kaybolana kadar tuşuna basınız).
Yumuşatıcıyı dökmeyiniz çünkü her yıkama için gereken
miktarda otomatik olarak alınacaktır.
Yumuşatıcı alımını engellemek için, ekran üzerinde dikey
çubuklar kaybolana kadar tuşuna basınız.
Yün ve ipek giysiler için deterjan gözüne (hazne 2 )
doğrudan dökerek özel deterjanı kullanmanız tavsiye
edilir.
Yıkama işleminin gerçekleştirilmesi:
Programı ve ihtiyaçlara ve yük tipine göre uygun
opsiyonları seçiniz.
TR
41
Page 42

Bir programın çalıştırılması
TR
UYARI: Çamaşır makinasının ilk kullanımından önce, ön
yıkamasız 90 pamuklu programını kullanarak deterjanla
çamaşırsız bir yıkama yapın.
1. MAKİNENİN ÇALIŞTIRILMASI. tuşa basınız. Tüm
uyarı lambaları 1 saniye için yanıp sönecek, ekranda
AQUALTIS yazısı görüntülenecektir ve START/PAUSE
uyarı lambası yanıp sönecektir.
2. PROGRAMIN SEÇİLMESİ. PROGRAMI SEÇİCİ
DÖNER DÜĞME istenilen program seçilinceye kadar
sağa ya da sola döndürünüz. Programın ismi ekranda
görüntülenecektir, secilen programa bağlı hafızadaki
sıcalık derecesi ve sıkma devir hızı yükseltilemez.
Devir süresi ekranda gösterilecektir.
3. ÇAMAŞIRI YERLEŞTİRİN.Yan kapağı açın. Bir
sonraki sayfadaki yıkama çevrimleri tablosunda
gösterilen maksimum yük değerini (veya ekranda
gösterilen ağırlık seviyesini) aşmamaya dikkat ederek
çamaşırı yerleştirin.
4. DETERJANI ÖLÇÜP AYIRIN. “Auto Dose System”
yönteminde kullanımiçin deterjanın miktarını
ayarlamak gerekmez, makine seçilen programa, yük
tipine ve suyun sertliğine göre deterjanı otomatik
olarak alır. Geleneksel yöntemde kullanım için bakınız
“Geleneksel kullanım”.
5. YAN KAPAĞI KAPATIN.
6. PROGRAMI ÖZELLEŞTİRİN. Kumanda panelindeki
ilgili düğmeleri kullanın:
Sıcaklık ve/veya dönüş hızını değiştirin.
Makine, seçilen programla uyumlu ise maksimum
sıcaklığı, seçilen program için ayarlı dönüş hızı
değerlerini veya en son kullanılan ayarları otomatik
olarak görüntüler. Soğuk yıkama (OFF) ayarına ulaşana
kadar sıcaklık düğmesine basılarak düşürülebilir.
Devir hızı, tamamen devre dışı bırakılana kadar (OFF)
düğmesine basılarak kademe kademe azaltılabilir. Bu
düğmelere tekrar basılırsa, maksimum değerler sıfırlanır.
! İstisna: programı seçildiğinde sıcaklık derecesi
90°C ye kadar yükseltilebilir.
Yıkama Zamanı Erteleme ayarla.
Seçilen çevrim için gecikmeli başlatmayı ayarlamak
amacıyla, gerekli gecikme süresine ulaşana kadar
ilgili düğmeye tekrar tekrar basın. Ayarlama prosedürü
boyunca gecikme süresi ve “Başlar”: öğesi
görüntülenecek ve sembolü yanıp sönecektir.
Gecikmeli başlatma ayarlandıktan sonra sembolü
ekranda sabit kalır ve aynı zamanda “Biter”: metni
ile seçilen devrin süresini de gösterir. ve devir süresi.
Önceki gecikmeli başlatma ayarını görüntülemek için
YİKAMA ZAMANİ ERTELEME düğmesine basın.
Geri sayım başladıktan sonra ekranda “Başlar”:
ibaresi ve gecikme süresi Görüntülenecektir. Ayarlanan
gecikme süresinin tamamlanmasının ardından makine
devrine başlayacaktır ve ekranda “Biter”: ibaresi
görüntülenecektir. Bunun yanı sıra devrin bitişine ne
kadar kaldığı da görüntülenecektir.
Gecikmeli başlamayı iptal etmek için ekranda “OFF”
yazısı görüntüleninceye kadar tuşa basınız.
sembolünün yanıp sönmesi sonra erecektir.
Program ayarlarini değiştirin.
• Fonksiyonu etkinleştirmek için düğmeye basınız;
ekranda fonksiyon ismi görüntülenecek ve tuşla
ilgili sembol yanacaktır.
• Fonksiyonu iptal etmek için aynı düğmeye tekrar
basınız; ekranda fonksiyonun ismi ile “OFF” yazısı
görüntülenecek ve tuşla ilgili sembol sönecektir.
! Seçim, seçilen yıkama çevrimi ile uyumlu değilse, bu
uyumsuzluk gösterge lambasının hızlı bir şekilde yanıp
sönmesi ve bir alarm sesi (3 bip) ile bildirilecektir,
seçim devreye sokulmayacaktır.
! Seçim önceden seçilmiş başka bir seçim ile uyumlu
değilse, seçilen ilk seçime ait gösterge lambası yanıp
sönecek ve sadece ikinci seçim devreye sokulacaktır,
düğmeye ait gösterge lambası sürekli yanacaktır.
! Yapılan seçimler önerilen yükleme değerini ve/veya
devrin süresini etkileyebilir.
7. PROGRAMI BAŞLATIN. START/PAUSE düğmesine
basın. İlgili gösterge lambası sürekli yanar ve kapak
kilitlenir ( LOCK gösterge lambası yanar). Program
sırasında aşamanın yürütülmekte olduğunu göstermek
için program aşamalarına ait simgeler yanacaktır.
Bir kez başlamış olan programı değiştirmek için,
START/PAUSE düğmesine basarak çamaşır
makinesini duraklatın, daha sonra istenilen çevrimi
seçin ve tekrar START/PAUSE düğmesine basın.
Yıkama çevrimi sırasında kapağı açmak için, START/
PAUSE düğmesine basın, LOCK gösterge lambası
kapalıysa, kapağı açabilirsiniz. programı yarıda
kesildiği noktadan başlatmak için, START/PAUSE
düğmesine tekrar basın.
8. PROGRAM BİTTİ. Bu durum aydınlatılan END yazısı
ile gösterilir. Kapak hemen açılmayabilir. START/
PAUSE gösterge lambası yanıyorsa, programı sona
erdirmek için düğmeye basın. Kapağı açın, çamaşırı
boşaltın ve makineyi kapatın.
! Başlamış olan bir programı iptal etmek istiyorsanız,
program durana ve makine kapanan kadar düğmesini
basılı tutun.
Örtü, perde ve hassas giysiler için çanta
Aqualtis çamaşır makinesi, çamaşırı koruyan özel çanta
sayesinde en değerli ve hassas çamaşırları bile güven
içerisinde yıkamanızı sağlar (bu çanta makine ile birlikte
verilmektedir). Sentetik malzeme kullanılarak yapılan
bir dış tabakaya sahip örtüleri ve pamuklu eşyaları
her yıkadığınızda çantayı kullanmanızı öneririz.
42
Page 43

Programlar ve seçenekleri
3
1
2
Deterjan ve katký
Program tablosu
Yýkama çevrimi açýklamasý
Simge
Sentetikler Dayanýklý
Sentetikler Dayanýklý (4)
Beyazlar
Renkliler
Koyu Renkliler
Gömlekler
Yorganlar: Doldurulmuþ giysiler için
Nevresimler ve havlular için haftalýk yýkama
Durulama
Sýkma ve Boþaltma
Anti alerji
Ultra narýnler
Yünlü: Yün, kaþmir vs.
Karýþýk 30’: Az kirlenmiþ giysileri hemen temizlemek için (elle
yýkamayý gerektiren yün, ipek ve elbiseler için uygun deðildir).
Pamuklu Standart 60°C (1): çok kirli dayanıklı beyaz ve renkliler.
Pamuklu Standart 40°C (2): çok kirli beyazlar ve hassas renkliler.
Pamuklu Standart 20°C: çok kirli beyazlar ve hassas renkliler.
Ekran veya kitapçık üzerinde gösterilen devre süresi, standart şartlara göre hesaplanmış tahmini bir süredir. Geçerli olan süre, girişteki sıcaklık derecesi ve suyun basıncı, ortam sıcaklığı,
deterjan miktarı, yük miktarı ve tipi, yükün dengesi, seçilen ilave seçenekler gibi sayısız faktörlere göre değişiklik gösterebilmektedir.
Not: BAŞLAT işleminden 10 dakika sonra, makine içerisindeki yükü temel alarak programın sonuna kadar kalan süreyi tekrar hesaplayacaktır.
1) 1061/2010 direktine göre deneme programları: programını 60°C’ye ayarlayınız.
Bu devre, orta kirlilikteki pamuklu çamaşırları temizlemek için uygundur ve 60 °C’de yıkanabilir çamaşırlar üzerinde kullanılacak, kombine enerji ve su
tüketimi açısından en etkili devredir. Geçerli olan yıkama sıcaklık derecesi, belirtilen sıcaklık derecesinden farklı olabilir.
2) 1061/2010 direktine göre deneme programları: programını 40°C’ye ayarlayınız.
Bu devre, orta kirlilikteki pamuklu çamaşırları temizlemek için uygundur ve 40 °C’de yıkanabilir çamaşırlar üzerinde kullanılacak, kombine enerji ve su
tüketimi açısından en etkili devredir. Geçerli olan yıkama sıcaklık derecesi, belirtilen sıcaklık derecesinden farklı olabilir.
3) 60 °C sıcaklıkta “Ön yıkama” fonksiyonu etkinleştirilemez.
Tüm Test Enstitüleri için:
2) Pamuklu uzun programı; programda 40°C’ye ayarlayınız.
4) Sentetik için uzun yıkama çevrimi; programda 40°C’ye ayarlayınız.
Maks.
Sýcak
(°C)
60° 800
40° 800
60° 1600
40° 1600
30° 800 -
40° 600 30° 1200 60° 1600
60° 1600 -
30° 0 -
40° 800 -
30° 800 -
60°
(Max. 90°)
40° 1600 -
20° 1600 -
Maks.
Hýz (dev/
dak.)
- 1600 - -
- 1600 - - - - 9 - - - 16’
1600
maddeleri
Ön
yýkamalý
(3)
Çamaþýr
Çamaþýr
deterjaný
-
-
-
-
-
-
-
suyu
(kg)
týcý
Maks. yük
Yumuþa-
5 46 1,03 60 115’
5 46 0,56 60 100’
5 - - - 180’
5 44 0,83 63 100’
5 - - - 80’
2 - - - 70’
3,5 - - - 120’
9 - - - 140’
9 - - - 36’
5 - - - 195’
1 - - - 80’
2 - - - 90’
3,5 71 0,20 38 30’
9 44 1,36 76 190’
9 44 1,09 92 185’
9 - - - 175’
Enerji tüketi-
Kalan nem %
mi kWh
Toplam su lt
süresi
Çevrim
TR
Yıkama seçenekleri
Süper Yıkama
Bu seçenek, programın
ilk aşamasında büyük
miktarda su kullandığından
ve arttırılmış program
süresinden dolayı yüksek
performanslı bir yıkama
sağlar.
Bu fonksiyon özellikle
inatçı lekelerin çıkarılması
için kullanışlıdır. Çamaşır
suyu ile veya çamaşır suyu
olmadan kullanılabilir.
Eğer beyazlatma da
yapılmak istenirse, hazne 3’e beyazlatıcı ekleyiniz.
Çamaşır suyu miktarını ayarlarken, ”max” seviyeyi
aşmayınız (şekile bakınız). Tam yıkama işlemi olmadan
çamaşırı ağartmak için, çamaşır suyunu ilave bölme
3’e dökün, “Durulama” programını ’i seçin ve “Süper
Yıkama” seçeneği ’i devreye sokun.
! Bu programlarda uygulanamaz: , , , , , ,
, .
Ekstra Durulama
Bu seçeneği seçenerek, durulamanın verimliliği arttırılır
ve kalan deterjanın iyice çıkarılması sağlanır. Özellikle
deterjanlar için hassas olan ipek için kullanışlıdır. Bu
seçeneğin tam yüklü yıkamada ve çok fazla miktarda
deterjan gerekli olduğunda kullanılması önerilir.
! Bu programlarda uygulanamaz: , , , , .
Kolay Ütüleme
Bu seçeneğin seçilmesi, yıkama ve sıkma programlarında
iz oluşumunun azaltılması için değişiklik yapacaktır.
Program sonunda, çamaşır makinesi tamburu yavaş bir
şekilde dönecek, “Kolay Ütüleme” ve START/PAUSE
gösterge lambaları yanıp sönecektir. Programı sona
erdirmek için, START/PAUSE düğmesine veya “Kolay
Ütü” düğmesine basın.
! Bu programlarda uygulanamaz: , , , , , .
Ön yıkama
Bu işlev seçildiğinde en dayanıklı lekeleri çıkarmak için
kullanılan ön yıkama gerçekleştirilir.
Not: Mevcut olan hazneye deterjan koyunuz.
! Bu programlarda uygulanamaz: , , , , ,
, , , , (60°), , .
43
Page 44

Deterjan ve çamaşır
TR
Deterjan
Gerekli deterjan miktarı, renk, yıkama sıcaklığı, kirlenme seviyesi
ve bölgedeki suyun sertliğinin yanı sıra yıkamakta olduğunuz
kumaş türüne (pamuk, yün, ipek vs.) bağlıdır. Deterjan ve
yumuşatıcının otomatik dozajlanma sistemine sahip olan bu
çamaşır makinesi, kayıpların önlenmesine ve optimal yıkama
performansı sağlamasının dışında çevreyi korumaya yardım eder.
Tavsiyeler:
• eğer “Geleneksel” şekilde deterjanı yükleyerek bir ön
yıkama işlemi gerçekleştiriliyorsa, toz deterjan kullanınız.
• pamuklu narin dokumalar ve alçak ısı derecesi ile çalışan
tüm programlar için sıvı deterjan kullanılması.
• “Auto Dose System” yönteminde kullanım için sadece
sıvı deterjan ve yumuşatıcı kullanınız. Superkonsantre,
“Gel” ve benzeri deterjanları doldurmayınız.
• “Geleneksel” yöntemde doldurarakyünlü ve ipekliler için
narin sıvı deterjanlar kullanınız.
! İki farklı deterjanı HİÇBİR ZAMAN karıştırmayınız; yenisini
koymadan önce haznenin temizliğini her zaman yapınız.
Program başlamadan önce, deterjan ilgili bölmeye –
veya doğrudan tamburun içerisine yerleştirilen dağıtıcıya
dökülmelidir. Son durumda, ön yıkama programlı Pamukluların
seçilmesi mümkün olmayacaktır.
! Çok fazla köpük yapacağından çitileme deterjanı
kullanmayın.
! Beyaz pamuklu çamaşırlar, ön yıkama ve 60°C’den yüksek
sıcaklık derecesi ile yıkamalar için toz deterjan kullanınız.
! Deterjan ambalajı üzerinde aktarılan bilgileri takip ediniz.
Çamaşırın hazırlanması
• Makinenin içerisine yerleştirmeden önce giysileri silkin.
• Renkli giysileri beyaz olanlardan ayırmaya dikkat ederek,
çamaşırı kumaş türüne (yıkama talimatı etiketindeki
sembol) ve rengine göre ayırın;
• Bütün cepleri boşaltın ve düğmeleri kontrol edin,
• Kurulama sırasında çamaşırın ağırlığını gösteren
“Programlar Tablosu”’’daki değerleri aşmayın.
Çamaşırınız ağırlığı ne kadardır ?
1 çarşaf 400-500 gr
1 yastık kılıfı 150-200 gr
1 masa örtüsü 400-500 gr
1 bornoz 900-1200 gr
1 havlu 150-250 gr
1kot pantolon 400-500 gr
1 gömlek 150-200 gr
Yıkama önerileri
Beyazlar: beyaz çamaşırları yıkama devresini kullanınız.
Program , zaman içinde beyaz parlaklığının korunması
için düşünülmüştür. Daha iyi sonuçlar için, toz deterjanın
kullanılması tavsiye edilir.
Renkliler: açık renk çamaşırları yıkama devresini
kullanınız. Program, zaman içinde renklerin canlılığının
korunması için düşünülmüştür.
Koyu Renkliler: Koyu renk çamaşırların yıkanması için
programını kullanınız. Program, koyu renklerin uzun
süre korunması için düşünülmüştür. En iyi sonuçlar elde
etmek için koyu renk çamaşırları yıkarken sıvı deterjan
kullanılması önerilir.
Gömlekler: Mümkün olan en iyi şekilde korunmalarını
sağlamak için farklı kumaş tipindeki ve renkteki gömlekleri
yıkamak için özel yıkama programını kullanın.
Yorganlar: Çift katlı veya tekli yorganları (ağırlığı 3,5
kg’ı aşmayan), yastıkları, puf mont gibi içerisine kaz tüyü
yerleştirilmiş giysileri yıkamak için, özel programını
kullanın. Yorganları kenarlarını içeri doğru katlayarak
tambura yerleştirmenizi (şekile bakınız) ve tamburun toplam
hacminin ¾’ ünden fazlasını kullanmamanızı tavsiye ederiz.
En iyi sonucu almak için, sıvı detarjan kullanmanızı ve
deterjan çekmecesine yerleştirmenizi tavsiye ederiz.
Örtü: Sentetik dış yüzeye sahip örtüleri yıkamak için,
makine ile birlikte verilen çantayı kullanın ve programı
’a ayarlayın.
Yatak çarşafı ve havlular: Tek yıkama performansıyla
havlu ve yatak çarşaflarını yıkamak için yumuşatıcı
kullanımını en uygun hale getiren, zaman ve enerji tasarrufu
yapmanızı sağlayan programını kullanınız. Toz deterjan
kullanılması önerilir.
Anti alerji: Polen, mayt, kedi ve köpek tüyü gibi temel
alerjenleri ortadan kaldırmak için programını kullanınız.
Ultra narınler: Taşlı veya pullu giysiler gibi çok hassas
çamaşırları yıkamak için programını kullanınız.
Çamaşırları yıkamadan önce ters çevirmeniz ve küçük
parçaları hassas çamaşırların yıkanması için kullanılan özel
torba içerisine koymanız önerilir.
Daha iyi sonuçlar elde etmek için hassas çamaşırlara özel
sıvı deterjanın kullanılması önerilir.
İpekli kumaşların ve perdelerin (bunlar katlanmalı
ve birlikte verilen çantanın içerisine yerleştirilmelidir)
yıkanması için programını seçiniz ve opsiyonunu
devreye sokunuz (Bu durumda, “Ekstra Durulama”
seçeneğini de etkinleştirmek mümkün olacaktır);
makine çamaşır ıslatılırken programı sona erdirecek
ve gösterge lambası yanıp sönecektirtir. Çamaşır
çıkarılmadan önce suyu tahliye etmek için, START/
PAUSE düğmesine veya düğmesine basın.
Yünlü: Bu Hotpoint-Ariston çamaşır makinesinin “Yünlüler”
yıkama devresi, yıkama işlemi giysilerin etiketi üzerinde
aktarılan talimatlara ve elektrikli ev aletinin üretici rması
tarafından verilen talimatlara riayet ederek gerçekleştirildiği
sürece, “elde yıkanabilir” olarak sınıandırılan yünlü
çamaşırların yıkanması için Woolmark Company
tarafından test edilmiş ve onaylanmıştır. Hotpoint-Ariston,
yıkama performans-larından ve su ve elektrik tüketiminden
dolayı Woolmark Company tarafından Woolmark Apparel
Care - Platinum sertikasını elde eden ilk çamaşır
makinesi markasıdır. (M1127) .
Pamuklu Standart 20°C: kirli pamuklu çamaşırlar için
idealdir. 40°’de bir yıkama ile mukayese edilebilen,
soğuk suda da etkili olan performanslar, yinelenen ve
karşılaştırılan en yüksek hız varyasyonu ile çalışan
mekanik bir hareket ile sağlanır.
44
Page 45

Sorun giderme
Çamaşır makineniz bazen çalışmayabilir. Teknik Destek Merkezi ile temas kurmadan önce (“Teknik Servis” ’e bakınız),
aşağıdaki listeyi kullanarak sorunun kolayca çözülüp çözülemeyeceğinden emin olunuz.
Sorun:
Çamaşır makinesi çalışmıyor.
Program başlamadı.
Çamaşır makinesi su almıyor.
Çamaşır makinesi kilitli kalıyor.
Makine süreki su alıp, tahliye
ediyor.
Çamaşır makinesi tahliye veya
dönüş yapmıyor.
Sıkma sırasında makine
çok titriyor.
Çamaşır makinesi su sızdırıyor.
“Yürütülmekte olan aşama” ile
ilgili simgeler ON/OFF gösterge
Olası nedenleri / Çözümler:
• Cihazın şi prize düzgün bir şekilde takılmamıştır veya yeterli temas yoktur.
• Evde elektrik yoktur.
• Kapak düzgün şekilde kapatılmamıştır.
• START/PAUSE düğmesine basılmamıştır.
• Su musluğu açık değildir.
• Gecikmeli bir çalıştırma ayarlanmıştır.
• Su giriş hortumu musluğa bağlanmamıştır.
• Hortum bükülmüştür.
• Su musluğu açık değildir.
• Evde su yoktur.
• Basınç çok düşüktür.
• START/PAUSE düğmesine basılmamıştır.
• opsiyonunu seçince, devre sonunda çamaşır makinesi tamburun
yavaş dönmesini sağlayacaktır, programı durdurmak için, “START/PAUSE”
düğmesine veya düğmesine basın.
• Tahliye hortumu yerden 65 ila 100 cm arasındaki bir yüksekliğe
yerleştirilmemiştir (“Montaj”’a bakınız).
• Hortumun boşta kalan ucu suyun altındadır (“Montaj”’a bakınız).
• Ev binanın üst katlarından birindeyse, çamaşır makinesinin sürekli su alıp
tahliye etmesine neden olan su drenajı ile ilgili bir sorun vardır. Bu güçlüğün
giderilmesine yardımcı olacak özel tahliye önleyici valer mağazalarda
satılmaktadır.
• Duvar tahliye sistemine havalandırma borusu takılmamıştır.
• Program tahliyeyi içermemektedir: Bazı programlar tahliye aşamasının
manüel olarak çalıştırılmasını gerektirir (“Programlar ve seçenekleri”’ne
bakınız).
• seçeneği devre dışı bırakılır: programı tamamlamak için, START/PAUSE
düğmesine basın (“Programlar ve seçenekleri”).
• Tahliye hortumu bükülmüştür (Montaj’a bakınız).
• Pis su borusu tıkanmıştır.
• Tamburun montaj sırasında doğru şekilde kilidi açılmamıştır (“Montaj”’a bakınız).
• Makine dengeli değildir (“Montaj”’a bakınız).
• Makine dolap ve duvar arasında sıkışmıştır (“Montaj”’a bakınız).
• Yük dengesizdir (see “Deterjan ve çamaşır”’ na bakınız).
• Su giriş hortumu düzgün şekilde takılmamıştır(“Montaj”’a bakınız).
• Deterjan dağıtıcısı tıkalıdır (temizlemek için, “Bakım ve onarım”’a bakınız).
• Tahliye hortumu yerine düzgün şekilde yerleştirilmemiştir (“Montaj”’a bakınız).
• Makineyi kapatıp, şini çekin, yaklaşık 1 dakika bekleyin ve daha sonra
tekrar açın. Sorun devam ederse, Teknik Destek Servis’i ile temas kurun.
lambası ile aynı anda hızlı bir
şekilde yanıp sönüyor.
TR
Çok fazla köpük var.
Çamaşır makinesi kilitli kalıyor.
Ekran, “AutoDose engellenmiştir,
hazneyi kullanınız” gösteriyor.
• Deterjan çamaşır makinesi için uygun değildir (“çamaşır makineleri için” veya
“Elde ve makinede yıkama” ya da benzeri bir yazının ekrana gelmesi gerekir).
• Çok fazla deterjan kullanılmıştır.
• Manüel kilitleme işlemi uygulayın (“Önlemler ve ip uçları”’na bakınız).
• Otomatik dozajlama sisteminin hatalı bir işleyişini bildiriyor. Makineyi, bir
yıkama için gereken miktarda, deterjan gözüne deterjan ve yumuşatıcı
koyarak klasik yöntemde kullanınız ve hatalı işleyiş nedenlerini doğrulamak
için Teknik Destek ile irtibata geçiniz.
45
Page 46

TR
Sorun:
Olası nedenleri / Çözümler:
Makine iyi yykama performansy
vermiyor.
Eğer hazneler dolu iken onlara yükleme
yaparsam ne olur?
Hazneler dolu iken geleneksel şekilde
gözü kullanyrsam ne olur?
Hazneler toz deterjan için de kullanylyr
my?
Toz deterjan haznelere gidebilir mi?
Haznelerin doldurulmasy için gözü
doğru bir şekilde açmazsam ne olur?
Deterjany yumuşatycy ile yer
değiştirirsem ne olur?
• Hazneler, doğru bir şekilde yüklenmemiş (yumuşatycy deterjanyn yerine
veya tam tersi).
• Yki farkly deterjan/yumuşatycy karyştyrylmyş.
! HYÇBYR ZAMAN farkly iki deterjany/yumuşatycyyy karyştyrmayynyz;
başkalaryny koymadan önce haznelerin temizliğini her zaman
gerçekleştiriniz.
• “Auto Dose System” sistemi tykaly çünkü uzun süre kullanylmamyş:
haznelerin temizliğini yapynyz (bakynyz “Kullanıcı tarafından yapılan
temizlik”).
• Sesli (bip) ve görsel (ekran üzerinde ikon) sinyaller, haznenin dolu
olduğunu belirtir. Eğer deterjan/yumuşatycy koymaya devam edilirse, fazla
olan miktar kazana gidecek ve bir sonraki devirde yykanacaktyr.
• Makine, geleneksel şekilde toz mu yoksa syvy deterjan my konduğunu
otomatik olarak algylayacak ve hazneden hiçbir şey almayacaktyr.
Yumuşatycy, sadece Auto Dose yönteminde kullanylabilmektedir.
• Hayyr, toz deterjan sadece geleneksel şekilde kullanylabilmektedir.
• Hayyr, göz “Auto Dose System” pozisyonunda açylsa bile (tamamen açyk)
haznelerden birine toz deterjanyn dökülmesini önleyen bir bariyer vardyr.
• Eğer göz tamamen açyk değilse, yüklenen deterjan veya yumuşatycy
kazana dökülecek ve bir sonraki devirde yykanacaktyr.
• Makine zayyf sonuçlarla yykayacak ve manuel temizlik devresini
uygulayarak hazneleri boşaltmak gerekecektir.
Haznelerin boşalmasyny beklemezsem
ve farkly deterjanlary karyştyryrsam ne
olur?
• Makine, normal bir şekilde yykayacaktyr fakat makineden gelen sinyalden
sonra sadece hazneleri yeniden yüklemeniz ve farkly deterjanlary/
yumuşatycylary karyştyrmamanyz tavsiye edilir.
! Not: “Demo mod”’undan çıkmak için, çamaşır makinesi kapatmak, ve düğmelerinin her ikisine de aynı anda 3 saniye
kadar basın.
46
Page 47

Teknik Servis
Destek bölümünü aramadan önce:
• Sorunu kendi kendinize çözüp çözemeyeceğinizi kontrol edin (“Sorun Giderme”’ye bakınız);
• Sorunun çözülüp çözülmediğini kontrol etmek için programı yeniden başlatın;
• Çözülmediyse, yetkili Teknik Servisi ile temas kurun.
! Çamaşır makinesi hatalı bir şekilde monte edilmiş veya kullanılmamışsa, servis çağırma için ücret ödemeniz
gerekecektir.
! Her zaman yetkili servis yardımı talep edin.
Lütfen aşağıdaki bilgileri hazır durumda bulundurun:
• Sorunun türü;
• cihaz modeli (Mod.);
• seri numarası (S/N).
Yukarıdaki bilgiler cihazın üzerine yerleştirilen künye levhasından alınabilir.
Cihazın ömrü 10 yıldır.
Tüm Türkiye’de; Yetkili Teknik Servis, Orijinal Yedek Parça, Bakım Ürünlerimiz ve Garanti ile ilgili bilgi için:
0 212 444 50 10
TR
47
Page 48

TR
48
Page 49

Iнструкцiя з встановлення
і використання
UK
Українська
AQUALTIS
ADS93D 69
ПРАЛЬНА МАШИНА
Зміст
Встановлення, 50-51
Розпакування й вирівнювання
Підключення води й електроенергії
Технiчнi данi
Опис машини, 52-53
Сенсорна панель керування
Система автоматичного дозування, 54-55
Як здійснювати цикл прання, 56
Програми й опції, 57
Таблиця програм
Опції прання
Пральні засоби і білизна, 58
Пральний засіб
Як підготовити білизну
Поради з прання
UK
Запобіжні заходи та поради, 59
Загальна безпека
Система балансування завантаження
Утилiзацiя
Відкриття люку вручну
Технічне обслуговування та догляд, 60
Виключення води й електричного живлення
Як очистити машину
Очищення касети для пральних засобів
Догляд за барабаном для білизни
Миття насосу
Контроль труби для подачі води
Несправності та засоби їх усунення, 61-62
Допомога, 63
49
Page 50

Встановлення
UK
! Зберігайте цей довідник, щоб мати нагоду звернутися до
нього у будь-який момент. У випадку продажу, передачі
або переїзду, переконайтеся у тому, що він залишається
разом із пральною машиною.
! Уважно вивчіть інструкцію: в ній міститься важлива
інформація щодо встановлення, використання і безпеки.
! У пакеті з інструкцією ви знайдете, окрім гарантії,
докладну інформацію для встановлення.
Розпакування й вирівнювання
Розпакування
1. Розпакувавши пральну машину, перевірте її на
наявність пошкоджень внаслідок перевезення.
Якщо такі є, не виконуйте нiяких пiдключень та негайно
зверніться до постачальника.
2. Ви да лі ть з зад н ьо ї
частини 4 запобіжних гвинти,
застосованих з захисною
метою для транспортування,
і відповідну розпірну деталь
( див. малюнок).
! Правильне вирівнювання надасть стабільність й
усуне вібрацію, а також знизить рівень шуму, особливо
під час роботи центрифуги.
! У випадку встановлення машини на килимовому
покритті або килимах, ніжки необхідно відрегулювати
таким чином, щоб гарантувати під пральною машиною
необхідний простір для вентиляції.
Підключення води й електроенергії
Контроль труби для подачі води
! До підключення шланга подачі води до водопроводу
злийте деяку кількість води, доки вона не йтиме
чистою.
1. Під'єдн а йте шланг
подачі води до машини,
а саме до виходу на
за дн ьо м у бо ці уго рі
праворуч ( див. малюнок).
3. Закрийте отвори пластиковими пробками, що містяться
у пакеті.
4. Зберігайте всі деталі; якщо пральна машина має
перевозиться, вони знову можуть знадобитися, щоб
уникнути внутрішніх пошкоджень.
! Забороняйте дiтям гратися з упаковками.
Вирiвнювання
1. Встановіть пральну машину на плоскій та твердій
підлозі, не притуляючи її до стін або меблів.
2. Компенсуйте нерівності,
відкручуючи або вкручуючи
ніжки, до к и машина не
стане горизонтально (вона
не повинна відхилятися
більш, ніж на 2 градуси).
2. П ід' єдн айте тру бу
подачi, прикрутивши її
до крану холодної води
за допомогою штуцеру
з газовою різьбою 3/4
(див. схему).
3. Перевірте, щоб труба не мала згинів та утисків.
! Тиск води в крані має відповідати значенням у таблиці
Технічних даних
(див.сторінку поруч).
! Якщо довжини шланга для води не вистачає,
зверніться у спеціалізовану крамницю або до
уповноваженого фахівця.
! Ніколи не використовуйте уживані або старі труби
подачі, а тільки такі, що постачаються разом із
машиною.
50
Page 51

Пiд’єднання шлангу злива води
65 - 100 cm
Пі д к л юч і ть зл и в ни й
шланг до ка н аліза ц ії
або до зливного отвору
у стіні на висоті від 65
до 100 см від підлоги,
не д оп ус к аю чи й ог о
згинання.
Або ж встановіть вихід
зливного шланга на край
рукомийника або ванни,
поєднавши напрямну,
як а постачається, до
крану (див. малюнок).
Не залишайте вільний
кінець зливного шланга
зануреним у воду.
! Не використовуйте подовжувачі й трійники.
! Шнур не повинен мати згинів або утисків.
! Заміна шнуру живлення й вилки мають виконуватися
тільки фахівцями.
Увага! Компанія знімає з себе відповідальність у разі
недотримання вказаних норм.
UK
! Використання подовжувача шланга не рекомендоване.
В разi необхiдностi використання подовжувача шланга,
переконайтеся у тому, що він має той самий діаметр
та його довжина не перевищує 150 см.
Підключення до електричної мережі
Перш нiж вставити вилку в електричну розетку,
переконайтеся, що:
• розетка має заземлення у відповідності до чинного
законодавства;
• розетка розрахована на максимальне навантаження
у межах потужності приладу, зазначене у табличці з
характеристиками;
• напруга живлення знаходиться в межах значень,
вказаних на табличці з характеристиками;
• розетка підходить до вилки машини. В іншому
випадку замініть розетку або вилку.
! Машину не можна встановлювати поза приміщенням,
навіть в захищених мiсцях, тому що дуже небезпечно
піддавати її впливу дощу і грози.
! Коли машина вже встановлена, має забезпечуватися
вільний доступ до її розетки.
Технiчнi данi
Модель ADS93D 69
ширина 59,5 см
Розмiри
Кiлькiсть бiлизни вiд 1 до 9 кг
Електричні
підключення
Водопровднi
пiдключення
Швидкiсть
центрифуги
Програма
випробувань
відповідно до
Директиви
EN 60456
висота 85 см
глибина 64,5 см
див. шильдік з технiчними даними на
машинi
максимальний тиск 1 мПа (10 бар)
мiнiмальний тиск 0,05 мПа (0,5 бар)
об’єм баку – 62 лiтри
до 1400 обертiв на хвилину
програма
виконується з завантаженням 9 кг.
Цей прилад вiдповiдає таким
європейським директивам:
- 2004/108/CE (Електромагнітна
сумiснiсть)
- 2002/96/CE
- 2006/95/CE (Низька напруга)
; температура 60°C;
51
Page 52

Опис машини
UK
ДВЕРЦЯТА ЛЮКУ
РУЧКА
ДВЕРЦЯТ
ЛЮКУ
ДЕКОРАТИВНИЙ
ЦОКОЛЬ
СЕНСОРНА
ПАНЕЛЬ
КЕРУВАННЯ
РЕГУЛЬОВАНІ НІЖКИ
ДВЕРЦЯТА ЛЮКУ
Для відкриття дверцят люку
завжди використовуйте
спеціальну ручку
(див. малюнок).
КАСЕТА ДЛЯ ПРАЛЬНИХ ЗАСОБІВ
Знаходиться всередині
машини біля дверцят люку.
Використання описане
в розділі “Система
автоматичного дозування”.
СЕНСОРНА ПАНЕЛЬ КЕРУВАННЯ
Для змiни параметрiв
злегка натиснiть на
піктограму на сенсорному
екранi, як вказано на
малюнку.
Режим очiкування
Вiдповiдно до норм, пов’язаних з заощадження
енергiї, цю пральну машину оснащено системою
автовимкнення (stand by), яка активується через
30 хвилин вiдсутностi будь-яких дій з машиною.
Натиснiть і відразу ж відпустіть кнопку ON-OFF та
зачекайте вiдновлення роботи машини.
52
Page 53

Сенсорна панель керування
Регулятор
ПРОГРАМ
Кнопка
ПОМ'ЯКШУВАЧ
Кнопка
ПРАЛЬНИЙ ЗАСІБ
ДИСПЛЕЙ
Кнопка ВІДЖИМ
Кнопка
ТЕМПЕРАТУРА
START/PAUSE
Індикатор
ECO
Пiктограми
ФАЗИ
ПРАННЯ
UK
ON/OFF
Кнопка
Кнопки ОПЦІЇ
РОЗБАВЛЕННЯ
ПРАЛЬНОГО
ЗАСОБУ
ON/OFF : швидко натисніть і відпустіть кнопку
дл я вмикання або вимикання машини. Зелена
індикаторна лампа означає, що машина ввімкнена. Для
вимикання пральної машини під час прання необхідно
утримувати кнопку натиснутою приблизно більше 3 сек.;
короткочасне або випадкове натискання не дозволить
вимкнути машину. Вимикання машини під час циклу
прання скасовує поточне прання.
Регулятор ПРОГРАМИ: може обертатися в обох
напрямках. Щоб встановити найбільш придатну
програму див. “ Таблицю програм”. Під час прання
регулятор залишається нерухомим.
Кнопка ТЕМПЕРАТУРА: натисніть для внесення змін
або виключення температури; значення відображається
на дисплеї (див. “Як здійснювати цикл прання”).
Кнопка ВІДЖИМ: натисніть для внесення змін або
виключення віджиму; значення відображається на
дисплеї (див. “Як здійснювати цикл прання”).
Кнопка ВІДКЛАДЕНЕ ПРАННЯ: натиснiть для
використання машини в режимі відкладеного прання;
значення часу затримки відображається на дисплеї
(див. “Як здійснювати цикл прання”).
Кнопки ОПЦІЇ: натисканням на кнопку на дисплей
викликається назва опції. Увімкнення відповідного
індикатору свідчить про те, що ця опція задіяна.
Кнопки ПРАЛЬНИЙ ЗАСІБ і ПОМ'ЯКШУВАЧ:
див. “Як змінити попередньо задані параметри” у розділі
“Система автоматичного дозування” .
Кнопка РОЗБАВЛЕННЯ ПРАЛЬНОГО ЗАСОБУ:
див. “Як заповнити контейнери” у розділі “Система
автоматичного дозування” .
Пікто грами ФАЗ И ПРАННЯ : загорают ь ся при
проходженні відповідних фаз циклу (Прання Полоскання - Віджим – Злив ). Надпис
спалахує після закінчення циклу.
START/PAUSE: коли зелена індикаторна лампа блимає
з повільними інтервалами, натисніть на кнопку для
запуску прання. Якщо цикл розпочався, індикаторна
лампа горить постійним світлом. Щоб увійти в
Кнопка
ВIДКЛАДЕНЕ
ПРАННЯ
Індикатор
LOCK
LOCK
КНОПОК
режим паузи під час прання, знову натисніть на кнопку;
індикаторна лампа почне горіти оранжевим кольором.
Якщо індикатор "LOCK" згасне, можна відкривати люк
для завантаження білизни. Щоб продовжити прання з
місця, де воно було перерване, знову натисніть на кнопку.
Індикатор LOCK: показує, що люк для завантаження
заблокований. Щоб вiдкрити дверцята, встановiть цикл у
режим паузи (vedi “Як здійснювати цикл прання”).
LOCK КНОПОК: щоб активувати або дезактивувати
блок панелі команд, натисніть і утрим уйте кнопку
приблизно 2 секунди. Увімкнена індикаторна лампа вказує,
що панелькоманд заблоковано (за винятком кнопки
ON/OFF). У цей спосіб перешкоджають випадковій зміні
програм, передусім, якщо у домі є діти.
Індикатор ЕКО: Піктограма загориться, якщо, змінюючи
параметри прання, користувач отримає заощадження
електричної енергії, принаймні на 10%. Крiм того, перш нiж
машина увiйде у режим очiкування “Stand by”, позначка
спалахне на декiлька секунд; у вимкненiй машинi оцiнюване
повторне використання енергії складатиме приблизно 80% .
ВИБІР МОВИ
При першому увiмкненнi машини на екранi почне
блимати перша наявна мова. Навпроти 3 кнопок праворуч
екрану з’являться позначки “ “ , “OK” і “V”. Змiна мов
вiдбувається автоматично кожнi 3 секунди. Або ж можна
натиснути кнопки поруч з позначками “ “ і “V”. Через 2
секунди можна підтвердити мову за допомогою кнопки
“OK”. Якщо не натиснути нi на яку кнопку, через 30 секунд
мови знову розпочнуть змiнюватися автоматично.
Щоб змінити мову, необхідно увімкнути і вимкнути
машину, потім протягом 30 секунд після вимкнення
машини одночасно натиснути на кнопки температури
+віджиму +відстроченого прання і утримати
їх 5 секунд. На дисплеї почне блимати нова обрана
мова, про що сповіщає короткочасний звуковий сигнал.
При натисканнi на кнопки поруч з позначками “ “ і “V”
вiдбувається змiна мови. Через 2 секунди можна обрати
мову та пiдтвердити її за допомогою кнопки поруч з “OK”.
Якщо не натиснути нi на яку кнопку, через 30 секунд
з’явиться остання задана мова. Знову увімкніть машину.
53
53
Page 54

Система автоматичного дозування
A
B
C
UK
Вступ
Ця пральна машина оснащена
двома контейнерами: один
для рідкого прального
засобу (концентрованого або
розбавленого) місткістю 5,5 л і
інший для рідкого пом'якшувача
(концентрованого або
розбавленого) місткістю
приблизно 3,5 л (див.малюнок).
! Перевірте на упаковці
прального засобу/
пом'якшувача, йдеться
про концентровану або
розбавлену рідину.
Система автоматичного
дозування відмірює з баків
ідеальну кількість прального засобу і пом'якшувача для
кожного типу завантаження і в найбільш придатний
момент, забезпечуючи оптимальні результати прання без
зайвих витрат. Можна змінити кількість прального засобу
і пом'якшувача уручну за допомогою кнопок ПРАЛЬНИЙ
ЗАСІБ і ПОМ'ЯКШУВАЧ (див. “Як змінити попередньо
задані параметри”). За бажанням можна використовувати
пральну машину у “традиційному” режимі, заповнюючи
пральний засіб у касету; машина автоматично визначає
його наявність і не використовує контейнери.
Касета для пральних засобів
“Традиційний” режим.
Вийміть касету для пральних засобів до першого
стопору , щоб завантажити пральний засіб (рідкий або
порошковий), відбілювач або інші додаткові засоби (напр.,
для відбілення) і пральний засіб для попереднього прання
за традиційним способом (див. “Традиційний спосіб
використання”).
Режим “Автоматичного дозування”.
Щоб заповнити ємності
пральним засобом і
пом'якшувачем, повністю
вийміть касету для
прального засобу:
відкрийте касету до першого
стопору, потім натисніть
на важіль (A) і вийміть
її до другого стопору ,
переконавшись до вона
дійшла до упору. Не
пересувайте касету під час
завантаження засобів.
Після заповнення ємностей (див. “Як заповнити
ємності”) машина автономно працюватиме упродовж
40 циклів із пральним засобом (*).
Перше використання
Ввімкніть пральну машину, натиснувши кнопку ON/OFF.
Перше прання слід виконувати без білизни, з
пральним засобом, завантаженим безпосередньо
у касету для пральних засобів (див. Традиційний
режим), встановивши програму “ ” (Бавовна 90°) без
попереднього прання і не завантажуючи контейнери.
Як заповнити контейнери:
Відкрити касету для пральних засобів в режимі “Автоматичного
дозування” (див.“Касета для пральних засобів”).
Завантажте повільно пральний засіб (B) і пом'якшувач
(C), щоб цілком заповнити контейнери (див.малюнки).
Щоб не перевищ увати максимальну кількість,
передбачено звуковий сигналізатор, який по наростальній
сповіщає по досягнутий рівень (одним сигналом), а
наприкінці після заповнення контейнеру пролунають три
тривалих звукових сигнали.
Щоб забезпечити чистоту касети, розпочинайте прання
відразу ж після заповнення контейнерів. На дисплеї
поступово спалахують піктограми (для прального засобу)
і (для пом'якшувача), які вказують на досягнутий рівень.
Час заповнення залежить від концентрації продукту.
Концентровані продукти вимагають більш тривалого
часу заповнення.
Закрийте касету для пральних засобів тільки після
повного спорожнення контейнерів.
Виберіть концентрацію прального засобу
(концентрований або розбавлений) за допомогою
відповідної кнопки .
Концентрований
Розбавлений
Машина вносить цей вибір у пам'ять.
Якщо не зробити вибір, пральний засіб буде
заповнюватися у “розбавленому” стані.
За допомогою кнопки запрограмуйте кількість
пом'якшувача, який автоматично відбиратиметься
машиною:
1) Якщо пом'якшувач має концентрований стан,
рекомендується обрати перший рівень ( з 1 рискою)
і перейти при необхідності лише на одну позицію ( з
2 рисками), щоб збільшити відбирану кількість.
2) Якщо пом'якшувач розбавлений, рекомендується
запрограмувати 3 рівень ( з 3 рисками) і відносно до
нього збільшувати/зменшувати кількість відбираного
пом'якшувача.
3) Щоб не використовувати пом'якшувач, натискайте
на кнопку до зникнення рисок (див.також “Як
зімнити попередньо задані параметри”).
(*) приблизно для 4 кг речей, з програмою Cotone (Бавовна) 40°C,
середньою жорсткостю води і рівнем забруднення, встановленим на 3.
54
Page 55

Сигналізація для наступних операцій з заповнення:
3
1
2
Коли наприкінці циклу остаточний рівень прального засобу/
пом'якшувача зменшиться і не досягятиме кількості,
необхідної для наступного прання, на дисплеї з'являться
відповідні повідомлення “At end of cycle refill detergent"
або “At end of cycle refill softener” або “At end of cycle
refill tanks” (для обох). Якщо не завантажити контейнери,
наступні цикли прання в режимі Автоматичного дозування
виконуватимуться без відбору прального засобу.
! Рекомендується завантажувати пральний засіб і
пом'якшувач ТІЛЬКИ після вказівок з боку машини.
! НІ В ЯКОМУ РАЗІ не змішуйте два різні пральні засоби;
обов'язково очищайте контейнер перед заповненням новим
засобом (див. “Чищення, запрограмоване користувачем”).
Система автоматичного дозування “Auto Dose System”
Якщо контейнери заповнені пральним засобом і
пом'якшувачем, можно розпочинати прання (див. “Як
здійснити цикл прання”).
Порошковий пральний засіб для попереднього
прання і додаткові порошкові засоби можна
використовувати у традиційному режимі або у
режимі автоматичного дозування “Auto Dose System”,
завантажуючи додаткові засоби безпосередньо у бак,
бажано з використанням “кульки”.
Для вибілення слід заповнити відбілювачем відповідне
відділення (див.опцію “Super Wash” (Суперпрання)).
Як змінити попередньо задані параметри:
Машина автоматично відбирає кількість прального засобу
залежно від обраної програми, завантаженої білизни
і жорсткості води. Однак за бажанням можна змінити
кількість прального засобу/пом'якшувача.
Кнопка : натисніть для збільшення, зменшення або
виключення взагалі відбору прального засобу.
Кнопка : натисніть для збільшення, зменшення або
виключення взагалі відбору пом'якшувача.
Рекомендований машиною рівень прального засобу /
пом'якшувача вказується за допомогою 3 рисок.
Рівні менш, ніж з 3 рисками, вказують на меншу
кількість прального засобу/пом'якшувача відносно до
рекомендованого машиною рівня. Рівні більше, ніж з 3
рисками, вказують на збільшену кількість прального
засобу/пом'якшувача.
Очищення контейнерів:
Пе р едбач е н і ци к ли автоматичного або заданого
користувачем очищення контейнерів.
Автоматичне очищення:
Пральна машина виконує цикл автоматичного очищення
під час ополіскування, коли кількість остаточного прального
засобу є недостатньою для наступного прання.
Очищення, задане користувачем:
Виконуйте цикл очищення (з пустим баком), якщо
необхідно завантажити речі, відмінні від попередньо
використованих, або якщо баки завантажені некоректно
(пом'якшувач заповнений у відділення для прального
засобу, або навпаки). Натисніть і притримайте на 5
сек. кнопку для активації очищення контейнера для
прального засобу, кнопку - для пом'якшувача або
кнопку - для обох контейнерів. Притримайте кнопку
ще на 3 сек. (вгорі праворуч розпочнеться зворотній
відлік “4-3-2-1”) до появи вікна: “CLEAN-GO”.
Цикл очищення триває приблизно 40’ з порожнімі
контейнерами, в протилежному випадку цикл
збільшується за часом. На дисплеї з'являться
піктограми, які вказують на порожній стан контейнерів.
“Традиційний" режим використання
Вийміть касету з пральним засобом до першого
стопору (див.малюнок), завантажте безпосередньо у
касету пральний засіб і інші додаткові засоби (напр.,
відбілювач), які необхідні лише для одного прання.
1 . в а н н о ч к а д л я
попер ед н ь ого пр а ння:
використовуйте тільки
порош кови й пр альн ий
засіб.
2. ванночка для прання:
в и к о р и с т о в у й т е
порошковий або рідкий
пральний засіб. У цьому
о с т а н н ь о м у в и п а д к у
рекомендується наливати
його безпосередньо перед запуском пральної машини,
не виконуючи попереднє прання.
3. ванночка для відбілювача: використовуйте її
для операцій з вибілення (див. опцію “Super Wash”
(Суперпрання)).
Пральний засіб у таблетках або у вигляді "кульки"
необхідно вставляти безпосередньо всередині баку.
В цьому випадку слід виключити з роботи режим
для автоматичного дозування - “Auto Dose System”
(натискайте на кнопку до зникнення з дисплею
відповідних вертикальних рисок).
Н е з а в а н т а ж у й т е п о м ' я к ш у в а ч , т о му
щ о в і н в і д б и р а є т ь с я а в т о м а т и ч н о у
не о б х і д н і й кі л ь к о с т і дл я кож н о г о пр а н н я .
Щоб не зас т о с ову в а т и ві д бір по м'якш у в ач а,
натискайте на кнопку до зникнення з дисплею
вертикальних рисок.
Для вовняних і шовкових речей рекомендується
ви к ористо вува ти відпо в ідний пральний засіб,
завантажуючи його безпосередньо у касету для
пральних засобів (ванночка 2).
Як виконувати прання:
Виберіть програму і сумісні з нею опції залежно від
потреб і типу завантаженої білизни.
UK
55
Page 56

Як здійснювати цикл прання
UK
Зауваження: при першому використанні пральної
машини здійсніть цикл прання без білизни, але з
пральним засобом, в режимі прання бавовняних
виробів при температурі 90 градусів (програма cotone
90°) без попереднього прання.
1. УВІМКНУТИ МАШИНУ. Натисніть на кнопку . Всі
індикатори спалахнуть на 1 секунду і на дисплеї
з'явиться напис AQUALTIS; деякий час індикатор кнопки
залишається горіти і індикатор START/PAUSE блимає.
2. ВИБРАТИ ПРОГРАМУ. Обертайте РЕГУЛЯТОР
ПРОГРАМ праворуч або ліворуч для вибору бажаної
програми; на дисплеї з'явиться назва програми; кожна
програма має відповідну температуру прання та
швидкість віджиму, ці параметри можуть бути змінені.
На дисплеї з’явиться тривалiсть циклу.
3. ЗАВАНТАЖИТИ БІЛИЗНУ. Відкрийте люк. Завантажте
білизну, звертаючи увагу, щоб не перевищити кількість,
зазначену в таблиці програм на наступній сторінці.
4. ВІДМІРЯТИ ПРАЛЬНИЙ ЗАСІБ. Для використання
режиму автоматичного дозування - Auto Dose немає
необхідності в дозуванні прального засобу, тому
що машина відбирає його автоматично відповідно
до обраної програми, типу завантаженої білизни і
жорсткості води. Для використання традиційного
режиму див. “Традиційний режим використання”.
5. ЗАКРИТИ ЛЮК.
!Щоб відкрити дверцята люку під час циклу, натисніть
кнопку START/PAUSE; якщо індикатор LOCK ЛЮКУ
згасла, це означає, що можна відкрити дверцята
люку. Знову натисніть на кнопку START/PAUSE , щоб
продовжити програму з того мiсця, де її було перервано.
6. ПЕРСОНАЛИЗАЦІЯ ЦИКЛУ ПРАННЯ. Використовуйте
спеціальні кнопки на панелі команд:
Як змінити температуру та/або швидкість віджиму.
На дисплеї автоматично вiдображається максимальна
температура i швидкiсть віджиму, передбаченi для
заданої програми. Або останнi заданi параметри, якщо
вони є сумiсними з вибраною програмою. Натискаючи
на кнопку , зменшують температуру прання до
прання у холодній воді “OFF”. Натискаючи на кнопку
, поступово зменшують швидкість віджиму, аж до його
відключення “OFF”. Наступне натискання на кнопки
призводить до повернення у верхню позицію – до
максимальних значень.
! Виключення: при виборі програми , температура
може збільшитися до 90 градусів.
Як запрограмувати відстрочене прання.
Для встановлення вiдстроченого прання обраної програми
натискайте на вiдповiдну кнопку, доки не з’явиться
необхiдний час вiдстрочення. Пiд час встановлення
з’являється час вiдстрочення разом з написом “Starts
in:” та блимаючою позначкою . Пiсля встановлення
вiдстроченого прання позначка на дисплеї горiтиме
постiйним свiтлом та з’явиться тривалiсть заданного циклу
з написами “Ends in:” . При одноразовому натисканнi на
кнопку ВIДСТРОЧЕНОГО ПРАННЯ з’явиться попередньо
заданий час вiдстрочення.
Пiсля пуску на дисплеї з’явиться напис “Starts in:” та
час вiдстрочення. Пiсля завершення заданного часу
вiдстрочення машина розпочне роботу, та на дисплеї
з’явиться напис “Ends in:” та час, який залишився до
кiнця циклу.
Щоб скасувати вiдстрочене прання, натискайте на
кнопку, доки на дисплеї не з’явиться напис OFF ;
позначка згасне.
Як змінити характеристики циклу.
• Натисніть на кнопку для активації опції; на дисплеї
з'явиться назва опції і спалахне відповідний індикатор.
• При повторному натисненні на кнопку опцію буде
вимкнено; на дисплеї з'явиться назва опції і OFF,
згасне відповідний індикатор.
! Якщо вибрано опцiю, несумiсну з заданою програмою,
надається сигнализацiя через блимання iндикатору
та звуковий сигнал (тричi); опцiя не активується.
! Якщо вибрана опція несумісна з іншою раніше
обраною, індикатор, що відповідає первинній опції,
почне блимати, при цьому буде активована тільки
друга опція, індикатор котрої горітиме постійно.
! За допомогою опцiй можна змiнювати рекомендоване
завантаження та/або тривалiсть циклу.
7. ЗАПУСК ПРОГРАМИ. Натисніть кнопку START/
PAUSE. Загориться відповідна індикаторна лампа,
і люк заблокується (ввімкнена індикаторна лампа
LOCK ). Піктограми, що відносяться до фаз прання,
загоряться під час циклу, показуючи зміну фаз. Для
зміни програми, під час виконання циклу, переведіть
пральну машину в режим паузи, натиснувши на
кнопку START/PAUSE; виберіть бажаний цикл і
знову натисніть кнопку START/PAUSE. Щоб вiдкрити
дверцята пiд час циклу, натиснiть кнопку START/
PAUSE; згасла iндикаторна лампа LOCK дозволяє
вiдкрити люк. Знову натисніть на кнопку START/
PAUSE, щоб запустити програму з того моменту, на
якому вона була перервана.
8. ЗАВЕРШ Е ННЯ ПРОГРАМ И . На завершення
програми вказує напис END, який загоряється.
Дверцята люку можна відкрити відразу. Якщо
індикатор START/PAUSE блимає, натисніть на
кнопку, щоб завершити цикл. Відкрийте дверцята
люку, витягніть білизну й вимкнiть машину.
! Якщо необхідно скасувати вже розпочатий цикл,
натисніть на кнопку і притримайте її відносно тривалий
час. Цикл буде перерваний, і машина вимкнеться.
Мішечок для стьобаних ковдр, штор та делiкатних речей
Завдяки спеціально м у мішечку, що входить у
комплект постачання, Hotpoint/Ariston дозволяє Вам
також прати найбільш коштовні та делікатні речі,
гарантуючи їх максимальний захист. Ми рекомендуємо
використовувати кожного разу мішечок для прання
стьобаних ковдр та пухово-пiр’яних виробiв із
зовнішньою підкладкою із синтетичного матеріалу.
56
Page 57

Програми й опції
3
1
2
Таблиця програм
Макс.
Опис програми
Програми
Синтетичнi
Білі речі
Кольорові речі
Темні речі
Сорочки
Пухо-пiр`янi вироби: для пухо-пiр`яних вироб.
Бiлизна “7 днiв”: для постільної білизни і банного
приладдя.
Полоскання
Вiджим і Злив
Протиалергійне прання
Делікатне
Вовна: для речей з вовни, кашемiру, тощо.
Mix 30’: Для швидого освiження злегка забруднених речей
(не рекомендоване для вовняних, шовкових речей або
речей для ручного прання)
Стандартний Бавовна 60° (1): дуже забрудненi стiйкi бiлi
та кольоровi тканини.
Стандартний Бавовна 40°: дуже забрудненi делiкатнi бiлi
та кольоровi тканини.
Стандартний Бавовна 20°: дуже забрудненi делiкатнi бiлi
та кольоровi тканини.
Тривалість циклу, вказана на дисплеї або в керівництві, разрахована на основі стандартних умов роботи. Фактичний час може залежати від чисельних факторів, таких як температура і
тиск подаваної води, температура у приміщенні, кількість миючого засобу, кількість і тип завантаженої білизни, зрівноваження завантаженої білизни, додаткові обрані опції.
(*) Примiтка: приблизно за 10 хвилин пiсля пуску (START) машина розрахує та вiдобразить час, який залишився до завершення програми, який залежитиме вiд завантаження.
Для всiх Установ з проведення випробувань:
1) Програма керування згiдно до норми EN 60456: встановiть програму з температурою 60°C
2) При температурі 60 °C функцію “Попереднє прання” не можна буде активувати.
темп.
(°C)
60° 800
60° 1600
40° 1600
30° 800 -
40° 600 -
30° 1200 -
60° 1600
- 1600 - -
- 1600 - - - - 9
60° 1600 -
30° 0 -
40° 800 -
30° 800 -
60°
(Max. 90°C)
40° 1600 -
20° 1600 -
Макс.
швидкiсть
(обертiв
хвилину)
1600
Пральнi засоби та додатковi засоби
Попереднiм
за
пранням
.
Прання
(2)
Відбіл-
ювач
-
-
-
-
-
-
-
Пом’
якшувач
Макс.
завантаження
(кг)
5
5
5
5
2
3,5
9
9
5
1
2
3,5
9
9
9
Трива-
лiсть
циклу
(*) Тривалiсть програм вiдображується на дисплеї.
UK
Опції прання
Super Wash
Завдяки використанню
більшої кількості води на
початку циклу та бiльшiй
тривалостi програми,
така опція гарантує
високоякісне прання.
Може використовуватися
з або без відбілювача.
При необхiдностi
виконати також
відбілювання вставте
додаткову ванночку 3, що входить до комплекту
постачання, у ванночку 1. Пiд час дозування
вiдбiлювача не перевищуйте максимальний рiвень
“max” на центральному стрижнi (див.малюнок). Якщо
ви бажаєте тільки відбілювати без виконання
повного прання, заповнiть вiдбiлювачем додаткову
ванночку 3, задайте програму “Полоскання” та
активуйте опцiю “Super Wash” .
! Не активується на програмах , , , , , ,
, .
Додаткове полоскання
При виборі даної опції збільшується ефективність
полоскання й гарантується максимальне
видаленняпральногозасобу. Він зручний для людей
зі шкірою, особливо чутливою до миючих засобів.
Рекомендується її використання із пральною машиною
при повному завантаженні або з використанням
підвищених доз пральних засобів.
! Не працює з програмами , , , , .
Полегшене прасування
При виборі даної опції, режими прання і віджиму будуть
відповідно змінені для зменшення утворення складок.
Після закінчення циклу пральна машина почне виконувати
повільне обертання барабана; індикаторні лампи “
Полегшене прасування” і START/PAUSE блимають. Щоб
закінчити цикл, натисніть на кнопку START/PAUSE або
кнопку “Подовжений цикл”.
! Цикл неможливо активувати на програмах , , ,
, , .
Попереднє прання
Вибiр цiєї функцiї вмикає попереднє прання, яке є
корисним для видалення стiйких плям.
Увага: Додайте миючий засiб у вiдповiдне вiддiлення.
! Не активується у програмах , , , , , , ,
, , (60°), , .
57
Page 58

Пральні засоби і білизна
UK
Пральний засіб
Вибір і кількість прального засобу залежать від типу тканини
(бавовна, вовна, шовк...), кольорів, температури прання,
ступеню забруднення і жорсткості води.
Ця пральна машина з системою автоматичного дозування
прального засобу і пом'якшувача дозволяє уникнути зайвим
витратам і зробити власний внесок у зазист довкілля, а також
гарантує оптимальні показники прання.
Рекомендується:
• використовувати порошковий пральний засіб, якщо
передбачений цикл попереднього прання, завантажуючи
його у “Традиційному” режимі.
• використовувати рідкі пральні засоби для делікатних речей
з бавовни і для всіх програм з низькою температурою.
• для використання в режимі автоматичного дозування
“Auto Dose System” придатні лише рідкі пральний засіб
і пом'якшувач. Не застосовуйте пральні засоби з
високою концентрацією, “гелі”, тощо.
• використовуйте рідкі делікатні пральні засоби для вовни і
шовку, завантажуючи їх в “Традиційному” режимі.
! НІ В ЯКОМУ РАЗІ не змішуйте два різні пральні засоби; обов'язково
очищайте контейнер перед заповненням новим засобом.
Пральний засіб необхідно додати ще до початку прання у
спеціальну ванночку або у дозатор, який потрібно покласти
прямо у барабан. У цьому випадку не можна обирати цикл
Cotone con prelavaggio (Бавовна з попереднім пранням).
! Не використовуйте пральні засоби для ручного
прання, тому що вони утворюють надто багато піни.
Як підготовити білизну
• Перш нiж завантажувати речi, добре розкрийте їх.
• Розсортуйте білизну згідно типу тканини (символ на етикетці) і
кольору, звернувши увагу на розділення білих і кольорових речей;
• Перевірте кишені й ґудзики;
• Не перевищуйте значення, вказані у “Таблиці програм” ,
що відносяться до ваги сухої білизни.
Скільки важить білизна?
1 простирадло 400-500 гр.
1 наволочка 150-200 гр.
1 скатертина 400-500 гр.
1 банний халат 900-1200 гр.
1 рушник 150-250 гр.
1 джинси 400-500 гр.
1 сорочка 150-200 гр.
Поради з прання
Білі речі: цей цикл використовується для прання білих
речей. Завдяки цій програмі забезпечується тривале зберігання
сяючого білого кольору. Кращі результати отримуються при
використанні порошкового прального засобу.
Кольорові речі: цей цикл використовується для
прання світлих речей. Завдяки цій програмі забезпечується
тривале зберігання насичених кольорів.
Темні речі: цей цикл використовується для прання
темних речей. Завдяки цій програмі забезпечується
тривале зберігання живих темних кольорів. Для кращих
результатів рекомендується використовувати рідкий
пральний засіб, бажано спеціальний для темних речей.
Сорочки: з метою дбайливого ставлення використовуйте
спеціальний цикл для прання сорочок з рiзноманiтних
тканин та рiзних кольорiв.
Пухо-пiр`янi вироби: для прання виробів із
наповненням з гусячого пуху, таких як подвійні й
одинарні ковдри (які не перевищують за вагою 3,5 кг),
подушки, куртки, використовуйте спеціальну програму
. Такі вироби рекомендується завантажити у
барабан у згорнутому вигляді з краями, загорнутими
досередини (див. малюнок), при цьому не перевищувати
¾ об’єму самого барабану. Для оптимального прання
рекомендується використовувати рідкий миючий засіб,
який необхідно налити у касету для пральних засобів.
Стьобанi ковдри: щоб випрати стьобані ковдри з
синтетичною підкладкою, використовуйте спеціальний
мішечок, що входить у комплект постачання, та програму .
Банна і постільна білизна: щоб випрати банну
і постільну білизну в єдиному циклі, передбачена
програма , яка оптимізує використання пом'якшувача і
забезпечує заощадження часу й енергії. Рекомендується
використання порошкових пральних засобів.
Протиалергійне прання: використовуйте програму
для видалення основних алергенів: пилку, кліщів, кошачої
та собачої шерсті .
Делікатне: ця програма використовується для
прання надзвичайно делікатних речей, які оздоблені
стразами або блискітками.
Рекомендується вивернути речі навиворіт і розмістити
дрібні речі у спеціальний мішечок для прання делікатних
речей. Кращі результати отримуються при використанні
рідкого прального засобу для делікатних речей.
Для прання шовкових речей або портьєр
(pекомендується скласти та вкласти у мішечок, що
входить до комплекту постачання) виберіть цикл
і активуйте опцію (В цьому випадку можна буде
активувати також опцію “Додаткове полоскання”);
машина закінчить цикл із замоченою білизною й
блиманням відповідної індикаторної лампи . Щоб
злити воду й отримати можливість витягнути білизну,
натисніть на кнопку START/PAUSE або кнопку .
Вовна: Цикл прання “Вовна” цієї пральної машини
Hotpoint-Ariston протестований і затверджений
компанією Woolmark у відношенні до прання
вовняних речей, класифікованих як для “ручного
прання”, за умови виконання прання згідно до
інструкцій, наведених на етикетці виробу, і вказівок
виробника електропобутового приладу. HotpointAriston - перша марка пральних машин, яка
отримала від компанії Woolmark сертифікацію Woolmark Apparel Care - Platinum за власні показники
прання і витрати води й електроенергії. (M1127)
Стандартний Бавовна 20°: ідеальна для бавовняних
забруднених речей. Добре прання, в тому числі у
холодній воді, яке можна порівняти з пранням при 40°,
гарантується механічною роботою, яка здійснюється на
змінній швидкості із частими повторюваними піками.
58
Page 59

Запобіжні заходи та поради
! Машина спроектована і вироблена у відповідності з
міжнародними стандартами безпеки. Це попередження
надаються задля вашої безпеки: уважно ознайомтеся з ними.
Загальна безпека
• Цей електропобутовий прилад не має використовуватися
дітьми або особами з обмеженими фізичними, сенсорними
чи розумовими можливостями, або якщо їм бракує досвіду
та необхідних знань. Винятки складають ситуації, коли
користування відбувається під наглядом або за вказівками
осіб, відповідальних за їхню безпеку. Дорослі мають
стежити, щоб діти не гралися з електропобутовим приладом.
• Дане обладнання було розроблене виключно для
побутового використання.
• Не торкайтеся приладу голими ногами або мокрими чи
вологими руками й ногами.
• Не виймайте вилку з розетки, потягнувши за кабель,
тримайтеся тільки за саму вилку.
• Будьте обережні: вода, що зливається, може бути дуже
гарячою.
• У жодному випадку не застосовуйте силу до дверцят
люку: це може ушкодити запобiжний механiзм проти
випадкових вiдкривань.
• Якщо прилад не працює через несправностi, у жодному
випадку не робіть спроб самостійно виконати ремонт
внутрішніх механізмів.
• Слiдкуйте, щоб дiти не наближалися до працюючої
машини.
• Якщо необхідно перенести машину, такі дії мають
виконуватися двома або трьома вантажниками (а не
одним!) за умови максимальної уваги. Нi в якому разi
- однiєю особою, тому що машина дуже важка.
• Перш ніж завантажити білизну, перевірте, щоб барабан
був порожній.
Система балансування завантаження
Перед кожним віджимом, для запобігання надмірній
вібрації і для рівномірного розподілу навантаження,
барабан здійснює оберти на дещо більшій швидкості, ніж
швидкість прання. Якщо по закінченні декількох спроб
завантажені речі ще не були правильно відбалансовані,
машина здійснює віджим на швидкості, нижчій від
передбаченої. У випадку надмірної незбалансованості
пральна машина здійснює розподіл замість віджиму. З
метою оптимального розподілу завантаження та його
правильного балансування рекомендується одночасне
прання великих і малих речей.
Зняті з експлуатації побутові прилади мають
бути зібрані окремо для оптимізації ступеню
відновлення й повторного застосування матеріалів,
що входять до їхнього складу, та з метою усунення
потенційної шкоди для здоров’я та довкілля. Символ
закресленого сміттєвого баку, зображений на всіх
виробах, нагадує про необхідність окремої утилізації.
Дл я подальшої інформації щодо правильної
утилізації побутової техніки, їхні власники можуть
звернутися до вiдповiдних мiських служб або до
постачальника.
Відкриття люку вручну
У випадку, якщо неможливо відкрити дверцята люку
із-за відсутності електроенергії і ви хотіли б відкласти
прання, треба діяти таким чином:
1. в и т я г н і т ь ви л к у з
електричної розетки.
2. Перевірте, щоб рівень
води усередині машини був
нижче рівня дверцят люку;
якщо це не так, злийте
над лиш ок води че рез
зливний шланг, збираючи
її у відрі, як показано на
малюнку.
3. знiмiть з пральної машини передню захисну панель
(див.наступну сторiнку).
4. Потягніть за язичок,
пок азаний на малюнку,
назовн і до звіл ь ненн я
пл а ст м а с о в ої тя ги зі
стопора; тягніть послідовно
вниз доки не відчуєте що
усередині клацнуло, це
означа є, що две рцята
розблоковано.
5. відкрийте дверцята; у
випадку, якщо це досі ще
неможливо – повторіть
процедуру.
UK
Утилiзацiя
• Утилізація пакувального матеріалу: дотримуватись
м і с ц е в и х но р м , т о м у щ о уп а к ов к а мо ж е
використовуватися повторно.
• Європейська директива 2002/96/CE з відходів від
електричної й електронної апаратури передбачає, що
побутові електроприлади не можуть перероблятися
у звичайному порядку для твердих міських відходів.
6. встановіть панель на місце, пересвідчіться у тому,
що крюки були вставлені у спеціальні петлі, пiсля чого
притиснiть її до машини.
59
Page 60

Технічне обслуговування та
2
A
D
догляд
UK
Виключення води й електричного живлення
• Закривайте водопровідний кран після кожного прання.
У такий спосіб зменшується знос гідравлічної частини
машини й усувається небезпека витоку.
• Виймайте вилку з розетки під час очищення машини і
під час робіт з технічного обслуговування.
Як очистити машину
Зовнішня частина і гумові деталі можуть бути вимиті
ганчіркою, зволож е ною у теплій воді й милі. Не
використовуйте розчинники або абразивнi засоби.
Очищення касети для пральних засобів
Щоб потрапити до форкамери:
1. знiмiть захисну панель з передньої частини машини
шляхом натискання у центрi, потiм натиснiть униз з
обох бокiв та витягнiть її (див.малюнки).
2. встано віть ємн ість,
що б зі брати воду, яка
витікатиме (приблизно
1,5 л) (див. малюнок).
3. ві д кр ут і ть кр и шк у,
о б е р т а ю ч и її п р о т и
годинникової стрілки (див.
малюнок);
Щоб вийняти касету, відкрийте її до першого стопору,
потім натисніть на важіль A, відчиняючи її повністю,
потім натисніть на один з важелів D і потягніть її назовні
(див.малюнки).
Промийте касету під проточною водою; ця процедура
має проводитися регулярно. Очищайте від залишків
пральних засобів також гніздо для касети у машині.
Щоб повернути на місце касету, розташуйте її ліворуч і
вставте рівно на напрямну.
Догляд за барабаном для білизни
• Завжди залишайте відкритими дверцята люку, тоді не
утворюватимуться неприємні запахи.
Миття насосу
Машина обладнана насосом з автоматичним очищенням,
що не вимагає технічного обслуговування. Може трапитися
так, що малі предмети (монети, ґудзики) потраплять до
форкамери, що захищає насос, розташований у її нижній
частині.
! Переконайтеся у тому, що цикл прання закінчено, і
витягніть вилку з розетки.
4. ретельно очистіть всерединi;
5. знову закрутіть кришку;
6. встановіть панель на місце, пересвідчіться у тому,
що крюки вставлені у спеціальні петлі, пiсля чого
притиснiть її до машини.
Контроль труби для подачі води
Перевіряйте трубу для подачі води не менше одного
разу на рік. Якщо на ній є тріщини, вона підлягає
заміні: під час прання високий тиск може призвести
до розірвання.
60
Page 61

Несправності та засоби їх усунення
Може трапитися так, що машина не буде працювати. Перш нiж зателефонувати у Сервiсний центр (див. “Допомога”),
перевірте, чи не є дана несправність проблемою, що легко вирішується за допомогою наведеного нижче списка.
Несправності:
Пральна машина
не вмикається.
Цикл прання
не розпочинається.
У машину не надходить вода.
Дверцята люку машини
залишаються заблокованими.
Машина безперервно заливає і
зливає воду.
Пральна машина не зливає воду
чи не вiджимає.
Пральна машина дуже вiбрує пiд
час вiджиму.
Машина пропускає воду.
Можливі причини / Засоби усунення:
• Вилка не вставлена в електричну розетку або вставлена не до кiнця.
• У будинку немає електроенергії.
• Дверцята люку погано закриті.
• Кнопку START/PAUSE не було натиснуто.
• Водопровідний кран закритий.
• Якщо вiдстрочення задане на час запуску.
• Трубу подачі води не під'єднано до водопровiдного крану.
• Перегин у шлангу.
• Водопровідний кран закритий.
• У водопроводі немає води.
• Недостатній тиск.
• Кнопку START/PAUSE не було натиснуто.
• Якщо обрано опцію , наприкінці циклу пральна машина виконує
повільні обертання барабану; щоб завершити цикл, натисніть на
кнопкуSTART/PAUSE або на кнопку .
• Зливний шланг не знаходиться на відстані від 65 до 100 см від підлоги
(див. “Встановлення”).
• Кінець зливного шланга занурений у воду ( див. “Встановлення”).
• Якщо квартира знаходиться на верхніх поверхах будинку, можливо,
відбувається сифонний ефект, при якому машина безперервно
заливає й зливає воду. Щоб його ліквідувати, існують спеціальні
антисифонні клапани, які можна придбати у торговельній мережі.
• Стiнний каналiзацiйний злив не має віддушини для виходу повiтря.
• Програма не передбачає зливання: у деяких програмах його потрібно
вмикати вручну( див. “Програми і опції”).
• Активовано опцію : для завершення програми, натисніть кнопку
START/PAUSE (див. "Програми і опції").
• Перегин зливного шланга ( див. “Встановлення”).
• Засмітився зливний шланг.
• Барабан, у момент встановлення, не був правильно розблокований
(див. “Встановлення”).
• Машина стоїть не на плоскій поверхні ( див. “Встановлення”).
• Машина затиснута між меблями і стіною ( див. “Встановлення”).
• Дисбаланс завантаження ( див. "Пральні засоби і білизна").
• Погано пригвинчено трубу подачі води ( див. “Встановлення”).
• Забруднена касета для пральних засобів (як вимитидив. “Технічне
обслуговування і догляд”).
• Погано закріплений зливний шланг (див. “Встановлення”).
UK
Піктограми, що відносяться до
"Поточної фази" швидко блимають
одночасно з індикатором ON/OFF.
Утворюється занадто багато піни.
Дверцята люку машини
залишаються заблокованими.
Режим автоматичного дозування
не активований, використовуйте
касету з пральним засобом.
• Вимкніть машину й витягніть вилку з розетки, зачекайте близько 1
хвилини й увімкніть її повторно.
Якщо несправність не усунено, зателефонуйте у Сервiсний центр.
• Пральний засіб не підходить для пральної машини (має бути напис
"для машинного прання", "для ручного і машинного прання", або
подібний).
• Перевищена доза прального засобу.
• Виконайте процедуру ручного розблокування (див. "Запобіжні заходи й поради").
• Вказує на неполадку в системі автоматичного дозування. Використовуйте
машину в традиційному режимі, завантажуючи необхідну кількість
прального засобу або пом'якшувача касету, і зверніться до Сервісного
центру, щоб знайти і усунути причини неполадки.
61
Page 62

UK
Несправності:
Можливі причини / Засоби усунення:
Показники прання не є
оптимальними.
Що трапиться, якщо контейнери
заповнені і ще завантажити їх?
Що трапиться, якщо я
використовую касету у
традиційному режимі в той час, як
контейнери ще заповнені?
Контейнери призначені також
і для порошкового прального
засобу?
Порошковий пральний засіб
придатний для контейнерів?
• Контейнери некоректно завантажені (пом'якшувач у відділенні для
прального засобу, або навпаки).
• Змішані два різних пральних засоба/пом'якшувача.
! НІ В ЯКОМУ РАЗІ не змішуйте два різні пральні засоби; обов'язково
очищайте контейнер перед заповненням новим засобом.
• Система автоматичного дозування “Auto Dose System” засмічена,
тому що не використовується тривалий час: виконайте очищення
контейнерів (див. “Очищення, задане користувачем”).
• Звукові сигнали(зумер) і візуальні сигнали (піктограми на дисплеї)
вказують на те, що контейнер заповнений. Якщо продовжити
завантаження прального засобу/пом'якшувача, зайва кількість
потрапить у барабан і вимита у наступному циклі.
• Машина автоматично розпізнає, якщо завантажений порошковий
або рідкий пральний засіб у традиційному режимі, і тому не відбирає
нічого з контейнеру. Пом'якшувач може використовуватися лише у
режимі автоматичного дозування Auto dose.
• Ні, порошковий пральний засіб може використовуватися лише у
традиційному способі.
• Ні, передбачена стінка, яка перешкоджає падінню порошкового
прального засобу в один з контейнерів навіть, якщо касета відкрита у
положенні “Auto Dose System” (повністю відкрита).
Що трапиться, якщо не відчинити
коректно касету для заповнення
контейнерів?
Що трапиться, якщо поміняти
місцями пральний засіб з
пом'якшувачем?
Що трапиться, якщо я не
дочекаюсь, коли контейнери
будуть спорожнені і змішаю різні
пральні засоби?
• Якщо касета відкрита не повністю, завантажений пральний засіб або
пом'якшувач потрапить у барабан і буде вимитий при наступному пранні.
• Машина виконає прання з незадовільними результатами і тому
необхідно спорожнити контейнери, застосувавши цикл ручного
очищення.
• Машина виконає задовільне прання, але рекомендується завантажити
контейнери тільки після сигналу від машини і ні в якому разі не
змішувати різні пральні засоби/пом'якшувачі.
! Зауваження: щоб вийти з “демонстраційного режиму”, вимкніть машину, потім натисніть одночасно впродовж 3 сек. дві кнопки
“START/PAUSE” і “ON/OFF” .
62
Page 63

Допомога
Перш ніж звернутися у Сервісний центр:
• Перевірте, чи можна самостійно вирішити проблему ( див. “Несправності і засоби їх усунення”);
• Запустіть програму повторно, щоб перевірити чи усунено несправність;
• При негативному результаті зверніться в уповноважений сервiсний центр.
! У випадку неправильного встановлення або неправильного використання з вас може бути стягнута плата за
проведення операції.
! Звертайтеся виключно до уповноважених фахівців.
Слід повідомити:
• тип несправності;
• модель машини (Mod.);
• Серійний номер (S/N).
Ці дані знаходяться на табличці на самій машині.
UK
63
Page 64

UK
195106319.00
07/2012 - Xerox Fabriano
64
 Loading...