

Page 1

SERIES
Installation and
Servicing
Instructions
Type C Boilers
G.C.N: 47-116-34
G.C.N: 47-116-35
G.C.N: 47-116-09
G.C.N: 47-116-10
LEAVE THESE
INSTRUCTIONS WITH THE
END-USER
Country of destination: GB/IE
Page 2

TABLE OF CONTENTS
1. GENERAL INFORMATION
1.1. GENERAL INFORMATION
1.2. TECHNICAL INFORMATION
1.3. OVERALL VIEW
2. INSTALLATION
2.1. REFERENCE STANDARDS
2.2. SITING
2.3. OVERALL DIMENSIONS
2.4. MINIMUM CLEARANCES
2.5. MOUNTING
2.6. ELECTRICAL CONNECTION
2.7. GAS CONNECTION
2.8. WA
2.9.
LUE CONNECTIONS
F
2.10. ACCESSORY CONNECTION
2.11.
LECTRICAL
E
2.12. WATER CIRCUIT DIAGRAM
COMMISSIONING
3.
3.1. INITIAL PREPARATION
3.2. REMOVING THE CASING
3.3. CONTROL PANEL
3.4. INITIAL STA RT-UP
3.5. DISPLAY:MESSA
NORMAL OPERA
3.6. OPERATING PARAMETERS
3.6.1. REGULATION MENU TABLE
3.6.2. SETTINGS DISPLA
3.6.3. GAS REGULATION CHECK
3.6.4. IGNITION DELAY ADJUSTMENT
3.6.5. ADJUSTING THE MAXIMUM HEATING POWER
3.6.6. SOFT LIGHT ADJUSTMENT
3.7. CHANGING THE TYPE OF GAS
3.8. BOILER SAFETY SYSTEMS
3.9. COMBUSTION ANALYSIS
3.10. COMPLETION
3.11. DRAINING
THE
CONNECTIONS
TER
APPLIANCE
THE
DIAGRAM
APPLIANCE
SHOWNDURING
GES
TION
Y
6. SERVICING INSTRUCTIONS
6.1. REPLA
CEMENT OF
6.2. TO GAIN GENERAL ACCESS
6.3. ACCESS TO THE COMBUSTION CHAMBER
6.3.1. REMOVING THE FAN
6.3.2.
6.3.3.
6.3.4.
6.3.5. REMO
6.3.6. REMO
6.3.7. R
6.4. ACCESS
6.4.1. REMO
6.4.2. REMO
6.5. ACCESS
6.5.1.
EMOVING THE AIR PRESSURE SWITCH
R
EMOVING THE BURNER
R
EMOVING THE ELECTRODES
R
VING THE
VING THE
EMO
VING THE
TO THE
VING THE
VING THESPARK
TO THEWATER
R
VING THE
EMO
(S
ECOND
ARY
6.5.2. REMOVING THE SAFETY VALVE
6.5.3. REMOVING THE AUTOMATIC AIR VENT
6.5.4. REMOVING THE DIVERTER VALVE ACTUATOR
6.5.5. REMOVING THE DHW FLOW SWITCH
(MFFI ONLY)
R
6.5.6.
EMO
VING
6.5.7. REMOVING THE PRESSURE GAUGE
6.5.8. REMO
6.5.9. REMO
6.5.10. R
VING THE
VING THE
PR
(N.T.C. - MFFI ONLY)
OBE
EMOVING THE C.H. FLOW TEMPERATURE
PROBE (N.T.C.)
6.5.11. R
EMO
VING THE
PROBE (N.T.C.)
6.6. A
CCESS TO THE CONTROL SYSTEM
6.6.1. CHECKING THE FUSES
6.6.2. REMOVING THE PRINTED CIRCUIT BOARDS
6.6.3. REMOVING THE TIME CLOCK
PAR
TS
HEATEXCHANGER
CONDENSATETRAP (TUBE)
CONDENSATETRAP
GAS VAL
GAS VAL
GENERA
.H.W.
D
) EXCHANGER
THE PUMP
EXP
ANSION
D.H.W. TEMPERA
C.H. RETURN TEMPERA
7. FAULT FINDING
7.1 FAULT FINDING GUIDE (FLOW-CHARTS)
VE
VE
TOR
CIRCUIT
VESSEL
TURE
TURE
4. ZONE VALVES
5. MAINTENANCE
5.1.
5.2. CLEANING THE PRIMARY EXCHANGER
5.3. CLEANING THE CONDENSATE TRAP
5.4.
G
ENERAL REMARKS
O
TIONAL
PERA
TEST
8. SHORT SPARES PARTS LIST
8.1. ACO 27 MFFI
2
Page 3

1. GENERAL INFORMATION
1.1. GENERAL INFORMATION
This man
should be kept with the appliance so that it can be consulted by
the user and our author
Please carefully read the instructions and notices about the unit
contained in this manual, as they provide important information
regarding the safe installation, use and maintenance of the
product.
For operating instructions please consult the separate Users
Manual.
ual is an integral and essential part of the product. It
ised personnel.
Read the instructions and recommendations in these Installation
and Ser
use and maintenance of the appliance.
Keep this manual in a safe place. You may need it for your own
reference while Servicing Technicians or your installer may
need to consult it in the future.
This is a combined appliance for the production of central
heating (C.H.) and domestic hot water (D.H.W.).
This appliance
designed.
The manufacturer declines all liability for damage caused by
improper or negligent use.
No asbestos or other hazardous mater
the fabrication of this product.
Before connecting the appliance, check that the information
shown on the data plate and the table in section 7 comply with
the electric, water and gas mains of the property.You will find the
data plate on the reverse of the control panel.
The gas with which this appliance operates is also shown on the
label at the bottom of the boiler.
Do not install this appliance in a damp environment or close to
equipment which spray water or other liquids.
Do not place objects on the appliance.
Do not allow children or inexperienced persons to use the
appliance without supervision.
If you smell gas in the room,
switches, use the telephone or any other object which might
cause sparks.
Open doors and windows immediately to ventilate the room.
Shut the gas mains tap (at or adjacent to the gas meter) or the
valve of the gas cylinder and call your Gas Supplier immediately.
If you are going away for a long period of time, remember to shut
the mains gas tap or the gas cylinder valve.
Always disconnect the appliance either by unplugging it from
the mains or turning off the mains switch before cleaning the
appliance or carrying out maintenance.
In the case of faults or failure, s
turn off the gas tap. Do not tamper with the appliance.
F
request the use of or
contact MTS (GB) Limited.
vicing Instructions carefully to ensure proper installation,
must be used only for the purpose for which it is
ials have been used in
do not turn on or off light
witch off the appliance and
or repairs
, call y
our local A
iginal spare par
uthorised Servicing Agent and
ts. For in-guarantee repairs
3
Page 4

1.2. TECHNICAL INFORMATION
Name
CE Cer
tification
Flue Type
General Info
Heat Input max/min (Central Heating) kW
Heat Input max (Domestic Hot Water) kW
Heat Output max/min kW
Efficiency of Nominal Heat Input (60/80
Efficiency of Nominal Heat Input (30/50°C) %
Efficiency at 30% of Nominal Heat Input (47°C) %
Efficiency at 30% of Nominal Heat Input (30°C) %
Efficiency at Minum Input %
Efficiency (Dir. 92/42/EEC)**
SEDBUK Rating Band
Energy Performance
Heat Loss to the Casing (∆T=50°C) %
Flue Heat Loss with Burner Operating %
Flue Heat Loss with Burner Off %
Max Discharge of Products of Combustion (G20) Kg/h
Residual Discharge Head mbar
Temp. of exhaust fumes at nominal capacity °C
2 Content %
CO
O2 Content %
Emissions
CO Content ppm
Nox Class
°C) %
CO 27 MFFI
A
0085BP0229
C13-C33-C43-C53-C83-B23-B33
25,5 / 8,9
27,0
22,5 / 7,7
88,2
88,2
92,9
92,9
86,7
A
0,5
2,6
0,4
35,3
0,61
72
9,1
4,3
109
5
CO 27 RFFI SYSTEM
A
0085BP0229
C13-C33-C43-C53-C83-B23-B33
25,5 / 8,9
-----
22,5 / 7,7
88,2
88,2
92,9
92,9
86,7
A
0,5
2,6
0,4
35,3
0,61
72
9,1
4,3
109
5
Head Loss on Water Side (max) (T=20°C) mbar
Residual Head of System bar
Expansion Vessel Pre-load Pressure bar
Maximum Heating Pressure bar
Expansion Vessel Capacity l
Maximum Water Content of System l
Heating Temperature max/min (High temperature) °C
Central Heating
Heating Temperature max/min (Low Temperature) °C
Domestic Hot
ater
W
Specific Flow Rate (10 minutes/DT 30°C) l/min
.H.W. Flow Rate ∆T=25°C l/min
D
.
.H.W
D
Water Temperature (approx) max/min °C
w Rate ∆T=35°C l/min
Flo
D.H.W. Minimum Flow Rate l/min
Pressure of Domestic Hot Water max/min bar
Domestic Hot
Condensate produced l/h
Max.
PH of condensate W
Nominal Pressure Natural Gas (G20) mbar
Consumption at Nominal Capacity(G20) m3/h
Gas
Gas Consumption after 10 Minutes* m
Electrical Supply V/Hz
er Consumption W
w
o
P
ature
emper
Minim
um Ambient
T
Protection Grade of Electrical System IP
nal Fuse Rating
Inter
Elettrical Data
200
0,2
0,7
3
7
130
82 / 42
75 / 20
200
0,2
0,7
3
7
130
82 / 42
75 / 20
56 / 36
12,6
15,2
10,8
2,5
6 / 0,2
1,5
4
20
2,43
3
0,85
230/50
118
C
°
+5
24D
1,5
4
20
2,43
0,85
230/50
118
+5
24D
eight
W
Dimensions (W/D/H)
G.C. Number
* Calculated at 70% maximum output
** Calculated on Upper calorific value
4
Kg
mm
40
280/450/750
47-116-34
40
280/450/750
47-116-09
Page 5

Name
CE Cer
tification
Flue Type
General Info
Heat Input max/min (Central Heating) kW
Heat Input max (Domestic Hot
Heat Output max/min kW
Efficiency of Nominal Heat Input (60/80°C) %
Efficiency of Nominal Heat Input (30/50°C) %
Efficiency at 30% of Nominal Heat Input (47°C) %
Efficiency at 30% of Nominal Heat Input (30°C) %
Efficiency at Minum Input %
Efficiency (Dir. 92/42/EEC)**
SEDBUK Rating Band
Energy Performance
Heat Loss to the Casing (∆T=50°C) %
Flue Heat Loss with Burner Operating %
Flue Heat Loss with Burner Off %
Water) kW
ACO 32 MFFI
0085BP0229
C13-C33-C43-C53-C83-B23-B33
31,6 /10,5
32,0
28 / 9,5
97,3
88,5
91,2
97,1
89,7
A
0,5
2,7
0,4
ACO 32 RFFI SYSTEM
0085BP0229
C13-C33-C43-C53-C83-B23-B33
31,6 /10,5
----------28 / 9,5
97,3
88,5
91,2
97,1
89,7
A
0,5
2,7
0,4
Max Discharge of Products of Combustion (G20) Kg/h
Residual Discharge Head mbar
Temp. of exhaust fumes at nominal capacity °C
CO2 Content %
O
2 Content
Emissions
CO Content ppm
Nox Class
Head Loss on Water Side (max) (T=20°C) mbar
Residual Head of System bar
Expansion Vessel Pre-load Pressure bar
Maximum Heating Pressure bar
Expansion Vessel Capacity l
Maximum Water Content of System l
Heating Temperature max/min (High temperature) °C
Central Heating
Heating Temperature max/min (Low Temperature) °C
Domestic Hot Water Temperature (approx) max/min °C
Specific Flow Rate (10 minutes/DT 30°C) l/min
w Rate ∆T=25°C l/min
Flo
.
.H.W
D
D.H.W. Flow Rate ∆T=35°C l/min
D.H.W. Minimum Flow Rate l/min
ater max/min
Pressure of Domestic Hot
Domestic Hot Water
W
Max. Condensate produced l/h
PH of condensate W
%
bar
45,7
1
76,4
8,7
5
71
5
200
0,2
0,7
3
7
130
82 / 42
75 / 20
56 / 36
15,3
18,3
13,1
2,5
6 / 0,2
1,8
4
45,7
1
76,4
8,7
5
71
5
200
0,2
0,7
3
7
130
82 / 42
75 / 20
1,8
4
Nominal Pressure Natural Gas (G20) mbar
Consumption at Nominal Capacity(G20) m3/h
Gas
Gas Consumption after 10 Minutes* m
Electrical Supply V/Hz
Power Consumption W
Minimum Ambient Temperature °C
Protection Grade of Electrical System IP
Internal Fuse Rating
Elettrical Data
eight
W
Dimensions (W/D/H) mm
Number
G.C.
* Calculated at 70% maxim
** Calculated on Upper calorific value
um output
Kg
20
3,01
3
0,35
230/50
118
+5
24D
42
280/450/750
47-116-35
20
3,01
0,35
230/50
118
+5
24D
40
280/450/750
47-116-10
5
Page 6

1.2. OVERALL VIEW
9
8
1
3
5
7
12 13 14 15 16
19
21
24
25
6
4
26
20
17
18
23
2
22
9
9
8
8
1
1
3
3
5
5
7
7
10
12 14 15 16
19
24
25
6
6
4
4
26
20
17
18
23
2
2
22
27/32 MFFI
27/32 RFFI SYSTEM
FIG. 1.0
LEGEND:
1. Flue connector
2. Mixer
an
F
3.
4. Spark generator
5. Burner
Ignition and detection electrode
6.
7. Air release valve
Main heat e
8.
9. Central Heating flow temperature probe
10. Automatic by-pass
11. Domestic Hot Water temperature probe
ety v
Saf
12.
13. Secondary heat exchanger
14. Gas valve
Condensate discharge
15.
16. Condensate trap inspection cap
ain valve
Dr
17.
18. Domestic Hot Water flow switch
19. Circulation pump with automatic air release valve
20. Condensate trap
er
Div
21.
22. Condensate trap (tube)
23. Central Heating return temperature probe
24. Expansion vessel
25. Air pressure switch
Combustion analysis test point
26.
xchanger (aluminium)
e (3 bar)
alv
alve
ter v
6
Page 7

2. INSTALLATION
2.1. REFERENCE ST
The technical information and instructions provided herein below
are intended for the installer / Servicing Technician so that the
unit may be installed and serviced correctly and safely.
In the United Kingdom the installation and initial start up of the
boiler must be by a CORGI Registered Installer in accordance
with the installation standards currently in effect, as well as with
any and all local health and safety standards i.e. CORGI.
In the Republic of Ireland the installation and initial start up of
the appliance must be carried out by a Competent Person in
accordance with the current edition of I.S.813 “Domestic Gas
Installations”, the current Building Regulations, reference should
also be made to the current ETCI rules for electrical installation.
This appliance must be installed by a competent installer in
accordance with current Gas Safety (installation & use)
Regulations.
The installation of this appliance must be in accordance with the
relevant requirements of the Local Building Regulations, the
current I.E.E. Wiring Regulations, the bylaws of the local water
authority, in Scotland, in accordance with the Building Standards
(Scotland) Regulation and Health and Safety document No. 635
“Electricity at work regulations 1989” and in the Republic of
Ireland with the current edition of I.S. 813, the Local Building
Regulations (IE).
ANDARDS
2.2. SITING THE APPLIANCE
The appliance may be installed in any room or indoor area,
although particular attention is drawn to the requirements of the
current I.E.E. Wiring Regulations, and in Scotland, the electrical
provisions of the Building Regulations applicable in Scotland,
with respect to the installation of the combined appliance in a
room containing a bath or sho
room containing a bath or shower should only be considered if
there is no alter
Where a room-sealed appliance is installed in a room
containing a bath or shower the appliance and any
electrical s
electricity should be situated so that it cannot be touched
by a person using the bath or shower, specifically in
accordance with current IEE Wiring Regulations.
The location must permit adequate space for servicing and air
circulation around the appliance as indicated in Section 2.4.
The location must permit the provision of an adequate flue and
termination.
For unusual locations special procedures may be necessary.
BS 6798-1987 gives detailed guidance on this aspect.
A compartment used to enclose the appliance must be designed
specifically for this purpose. No specific ventilation requirements
are needed for the installation within a cupboard.
This appliance is not suitable for outdoor installation.
The type C appliances (in which the combustion circuit, air
vent intake and combustion chamber are air-tight with
respect to the room in which the appliance is installed) can
be installed in any type of room.
native.
witch or appliance control, utilising mains
wer, the location of the boiler in a
C.O.S.H.H.
Materials used in the manufacture of this appliance are nonhazardous and no special precautions are required when
servicing.
Installation should also comply with the following British
Standard Codes of Practice:
BS 7593:1992
BS 5546:1990
BS 5440-1:2000 Flues
BS 5440-2:2000 Air supply
BS 5449:1990
BS 6798:1987
BS 6891:1989 Installation of low pressure gas pipe up to
BS 7671:2001
BS 4814:1990 Specification for expansion vessels
BS 5482:1994 Installation of L.P.G.
and in the Repub
Codes of Pr
Treatment of water in domestic hot water
central heating systems
Installation of hot water supplies f
domestic purposes
culation hot water systems
ced cir
For
Installation of gas fired hot water boiler
of rated input not exceeding 60kW
28mm
IEE wiring regulations
lic of Ireland in accordance with the f
actice:
or
ollo
s
wing
Secondary ventilation is not required with this boiler. The boiler
must be installed on a solid, non-combustible, permanent wall to
prevent access from the rear.
813
I.S.
The appliance may be installed in any room or indoor area,
although particular attention is drawn to the requirements of the
current I.E.E. Wiring Regulations, and in Scotland, the electrical
visions of the Building Regulations applicab
pro
Domestic Gas Installations
le in Scotland,
7
Page 8

2.3. OVERALL DIMENSIONS
93 65
450 143
118
123
750
5
45
50
35
67 67 65 93
acqua
gas
280
225 225
130 130
F
785
280
450
300
300
450
20
20
93
450
143
118
123
750
5
45
50
35
132132 93
acqua
gas
280
225 225
130 130
F
27/32 RFFI SYSTEM
FIG. 2.1
FIG. 2.0
LEGEND:
A = Central Heating Flow (3/4”)
B = Domestic Hot Water Outlet (1/2”)
C = Gas Inlet (3/4”)
D = Domestic Cold Water Inlet (1/2”)
E = Central Heating Return (3/4”)
F = Condensate discharge
27/32 MFFI
2.4. MINIMUM CLEARANCES
In order to allow access to the interior of the boiler for maintenance
purposes, the boiler must be installed in compliance with the
clearance requirements indicated in the diagram below.
27/32 MFFI
8
IG. 2.1
F
FIG. 2.2
Page 9

85 mm
220 mm
300
27/32 RFFI SYSTEM
2.6. ELECTRICAL CONNECTION
The boiler oper
technical data table (Section 1.2), where the maximum absorbed
wer is also indicated. Make sure that the connections for the
po
neutral and live wires correspond to the indications in the
ram. The appliance electrical connections are situated on
diag
the reverse of the control panel (see the Servicing Instructions
for further information Section 6).
IMPOR
TANT
In the event that the power supply cable must be changed,
replace it with one with the same specifications. Make the
connections to the terminal board located within the control
panel, as follows:
- The yellow-green wire should be connected to the terminal
ked with the earth symbol; make sure to re-use the ferrule
mar
mounted on the other supply cable;
- The blue wire should be connected to the terminal marked “N”;
- The brown wire should be connected to the terminal marked “L”.
ates with alternating current, as indicated in the
!
FIG. 2.2
2.5. MOUNTING THE APPLIANCE
Fasten the boiler in place using the template and anchors
supplied with the unit. It is highly recommended that a spirit level
be used to position the boiler so that it is perfectly level.
For additional information, please consult the instructions
contained in the connection kit and the flue kit.
For safety purposes, have a competent person carefully check
the electrical system in the property, as the manufacturer will not
be held liable for damage caused by the failure to earth the
appliance properly or by anomalies in the supply of power. Make
sure that the residential electrical system is adequate for the
maximum power absorbed by the unit, which is indicated on the
rating plate. In addition, check that the section of cabling is
appropriate for the power absorbed by the boiler.
FIG. 2.3
Note: The diagrams for the electrical system are indicated in
section 2.11.
Warning, this appliance must be earthed.
External wiring to the appliance must be carried out by a
competent person and be in accordance with the current I.E.E.
Regulations and applicable local regulations.
The appliance is supplied with a fly-lead already connected, this
must be connected to a 240v supply fused at 3A and must
facilitate complete electrical isolation of the appliance, by the
use of a fused double pole isolator having a contact separation
means of a 3
ely, by
of at least 3 mm in all poles or alter
fused three pin plug and unswitched shuttered socket outlet
both complying with BS 1363.
The point of connection to the Electricity supply must be readily
accessible and adjacent to the appliance unless the appliance is
installed in a bathroom when this must be sited outside the
bathroom (see section 2.2).
Should external controls be required, the design of the external
electrical circuits should be undertaken by a competent person,
see Section 2.10 for further information.
nativ
2.7. GAS CONNECTION
The local gas region contr
service pipe.
If the gas supply f
that an adequate supply is a
other appliances when the
Pipe work must be of an adequate size. Pipes of a smaller size
than the boiler inlet connection should not be used.
or the boiler ser
actor connects the gas meter to the
es other appliances ensure
v
le both to the boiler and the
ailab
v
y are in use at the same time.
A
9
Page 10

2.8. WATER CONNECTIONS
FIG. 2.4
VIEW
OF THE
BOILER CONNECTIONS
27/32 MFFI
I
A
CB
H
27/32 RFFI SYSTEM
I
A
C E
H
D
end:
Leg
A = Central Heating Flow
B = Domestic Hot Water Outlet
C = Gas Inlet
D = Domestic Cold Water Inlet
E = Central Heating Return
= Condensate discharge
H
I = Safety valve discharge
= Drain valve
J
E
J
Central Heating
Detailed recommendations are giv
5449-1:1990, the f
PIPE WORK:
Copper tubing to BS EN 1057:1996 is recommended for
water pipes. Jointing should be either with capillary soldered
or compression fittings.
Where possible pipes should have a gradient to ensure air is
carried naturally to air release points and water flows
naturally to drain taps.
The appliance has a built-in automatic air release valve, however
it should be ensured as far as possible that the appliance heat
exchanger is not a natural collecting point for air.
Except where providing useful heat, pipes should be
insulated to prevent heat loss and avoid freezing.
Particular attention should be paid to pipes passing through
ventilated spaces in roofs and under floors.
BY-PASS:
J
The appliance includes an automatic by-pass valve, which
protects the main heat exchanger in case of reduced or
interrupted water circulation through the heating system, due
to the closing of thermostatic valves or cock-type valves
within the system.
SYSTEM DESIGN:
This boiler is suitable only for sealed systems.
DRAIN COCKS:
These must be located in accessible positions to permit the
dr
aining of the whole system. The taps must be at least
15mm nominal siz
2870:1980.
SAFETY VALVEDISCHARGE:
The discharge should terminate facing downwards on the
ior of the b
xter
e
ly boiling w
(possib
uisance
n
damage to electrical components and wiring.
The discharge must not be over an entrance or a window or
y other type of pub
an
CONDENSATEDISCHARGE:
The condensate discharge hose from the boiler must have a
continuous fall of 2.5° and must be inserted by at least 50 mm
into a suitab
overflow pipe. The condensate discharge pipe must have a
continuous fall and preferably be installed and terminated
within the building to prevent freezing.
The discharge pipe must be terminated in a suitable position:
Connecting in to an internal soil stack (at least 450 mm
i)
above the invert of the stack). A trap giving a water seal of
at least 75 mm must be incorporated into the pipe run,
there also must be an air break upstream of the trap.
ollowing notes are given for general guidance.
e and man
uilding in a position where discharging
ater & steam) will not create danger or
, but in an easily visible position, and not cause
lic access
le acid resistant pipe - e
en in BS 6798:1987 and BS
actured in accordance with BS
uf
.
plastic w
.g.
aste or
10
Page 11

ii) Connecting into the waste system of the building such as
0
100
200
300
400
500
0 200 400 600 800 1000 1200
(mbar)
(l/h)
a washing machine or sink trap. The connection must be
upstream of the washing machine/sink (If the connection
is down stream of the waste trap then an additional trap
giving a minimum water seal of 75 mm and an air break
must be incorporated in the pipe run, as above.
iii) Terminating into a gully, below the grid level but above the
water level.
Into a soakway.
iv)
O
: If any condensate pipe work is to be installed
N
TE
xternally, then it should be kept to a minimum and be
e
insulated with a waterproof insulation and have a continuous
all.
f
AIR RELEASE POINTS:
These m
ust be fitted at all high points where air naturally
collects and must be sited to facilitate complete filling of the
system.
The appliance has an integral sealed expansion vessel to
accommodate the increase of water value when the system is
heated.
It can accept up to 7 l (1.5 gal) of expansion water. If the
heating circuit has an unusually high water content, calculate
the total expansion and add an additional sealed expansion
vessel with adequate capacity.
MAINS WA
FEED - CENTRAL HEA
TER
TING
:
There must be no direct connection to the mains water supply
even through a non-return valve, without the approval of the
Local Water Authority.
FILLING:
A method for initially filling the heating system is supplied with
the connection kit. The filling loop is connected between the
cold water inlet and the central heating flow connections, and
incorporates a non-return valve. To operate the filling loop, it
is necessary to open both quarter turn handles, once the
required pressure has been achieved, close both handles and
disconnect the hose in accordance with water byelaws. N
The installer should ensure that there are no leaks as
frequent filling of the heating system can lead to premature
scaling of the main exchanger and failure of hydraulic
components.
OTE:
DOMESTIC WA
TER
The domestic water must be in accordance with the relevant
recommendation of BS 5546:1990. Copper tubing to BS EN
1057:1996 is recommended for water carrying pipe work and
must be used for pipe work carrying drinking water, a scale
reducer should also be used to reduce the risk of scale
forming in the domestic side of the heat exchanger.
UNDER FLOOR HEATING SYSTEMS:
In the e
vent of an under floor heating system, fit a safety
thermostat on the boiler flow (see Section 2.10). This
mostat should be positioned at a safe distance from the
ther
boiler to ensure the correct operation of the same. If the
mostat is positioned too close to the boiler, the water
ther
remaining in the boiler after domestic hot water has been
awn will flow into the central heating system and may cause
dr
the thermostat contact to open without there being any real
danger of the system being damaged, this would lead to a
boiler shutdown both in D.H.W. mode and C.H. mode, and the
error code
automatically when the ther
“E08” would be displayed; boiler operation resumes
mostat contact closes on cooling.
Should the thermostat fail to be installed as recommended, the
under floor heating system can be protected by installing a
thermostatic valve upstream from the thermostat in order to
prevent the flow of excessively hot water towards the system.
27/32 MFFI
RESIDUAL HEAD OF THE BOILER
FIG. 2.5
27/32 RFFI SYSTEM
11
Page 12

WA
The boiler is equipped with an aluminium allo
exchanger.
The detailed recommendations f
BS 7593:1992 (Treatment of water in domestic hot water central
heating systems); the following notes are given for general
guidance:
- If the boiler is installed in an existing system, any
- Under no circumstances should the boiler be fired before
- Any treatment of water by additives in the system for frost
- If anti-freeze substances are to be used in the system, check
- In under-floor systems, the use of plastic pipes without
TREA
TER
unsuitableadditives must be removed;
thesystem has been thoroughly flushed; the flushing
procedure m
We highly recommend the use of a flushing detergent
appropriate for the metals used in the aluminium alloy circuit.
These include (Fernox Superfloc, BetzDearborn Sentinel
X300 or X400 or Salamander System Cleanser), whose
function is to dissolve any foreign matter that may be in the
system;
In hard w
the system the treatment of the water to prevent premature
scaling of the main heat exchanger is necessary.
The formation of scale strongly compromises the efficiency of
the thermic exchange because small areas of scale cause a
high increase of the temperature of the metallic walls and
therefore add to the thermal stress of the heat exchanger.
Demineralized water is more aggressive so in this situation it
is necessary to treat the water with an appropriate corrosion
inhibitor.
protection or for corrosion inhibition has to be absolutely
suitable for all the metals used in the circuit including the
aluminium alloys.
The use of a corrosion inhibitor in the system such as Fernox
MB-1, BetzDeaborn Sentinel X100 or Copal Salamander
System Inhibitor is recommended to prevent corrosion
(sludge) damaging the boiler and systems;
carefully that they are compatible with the aluminium.
In particular, DO NOT USE ordinary ETHYLENE GLYCOL,
since it is corrosive in relation to aluminium and its alloy, as
well being toxic.
MTS suggests the use of suitable anti-freeze products such
as F
taking place.
Periodically check the pH of the water/anti-freeze mixture of
the boiler circuit and replace it when the amount measured is
out of the r
DO NOT MIX DIFFERENT TYPES OF ANTI-FREEZE
protection against penetration of oxygen through the walls
can cause corrosion of the system’s metal parts ( metal
piping, boiler, etc), through the formation of oxides and
bacterial agents.
To prevent this problem, it is necessary to use pipes with an
“oxygen-proof barrier”, in accordance with standards DIN
4726/4729. If pipes of this kind are not used, keep the
system separate byinstalling heat exchanger
with a specific system water treatment.
TMENT
y main heat
or water treatment are given in
ust be in line with BS7593:1992.
ater areas or where large quantities of water are in
ernox ALPHI 11, which will prevent rust and incrustation
ange stipulated by the manufacturer ( 7 < pH < 8).
s of those
12
IMPORTANT
Failure to carry out the water treatment procedure
may invalidate the appliance warranty
Page 13
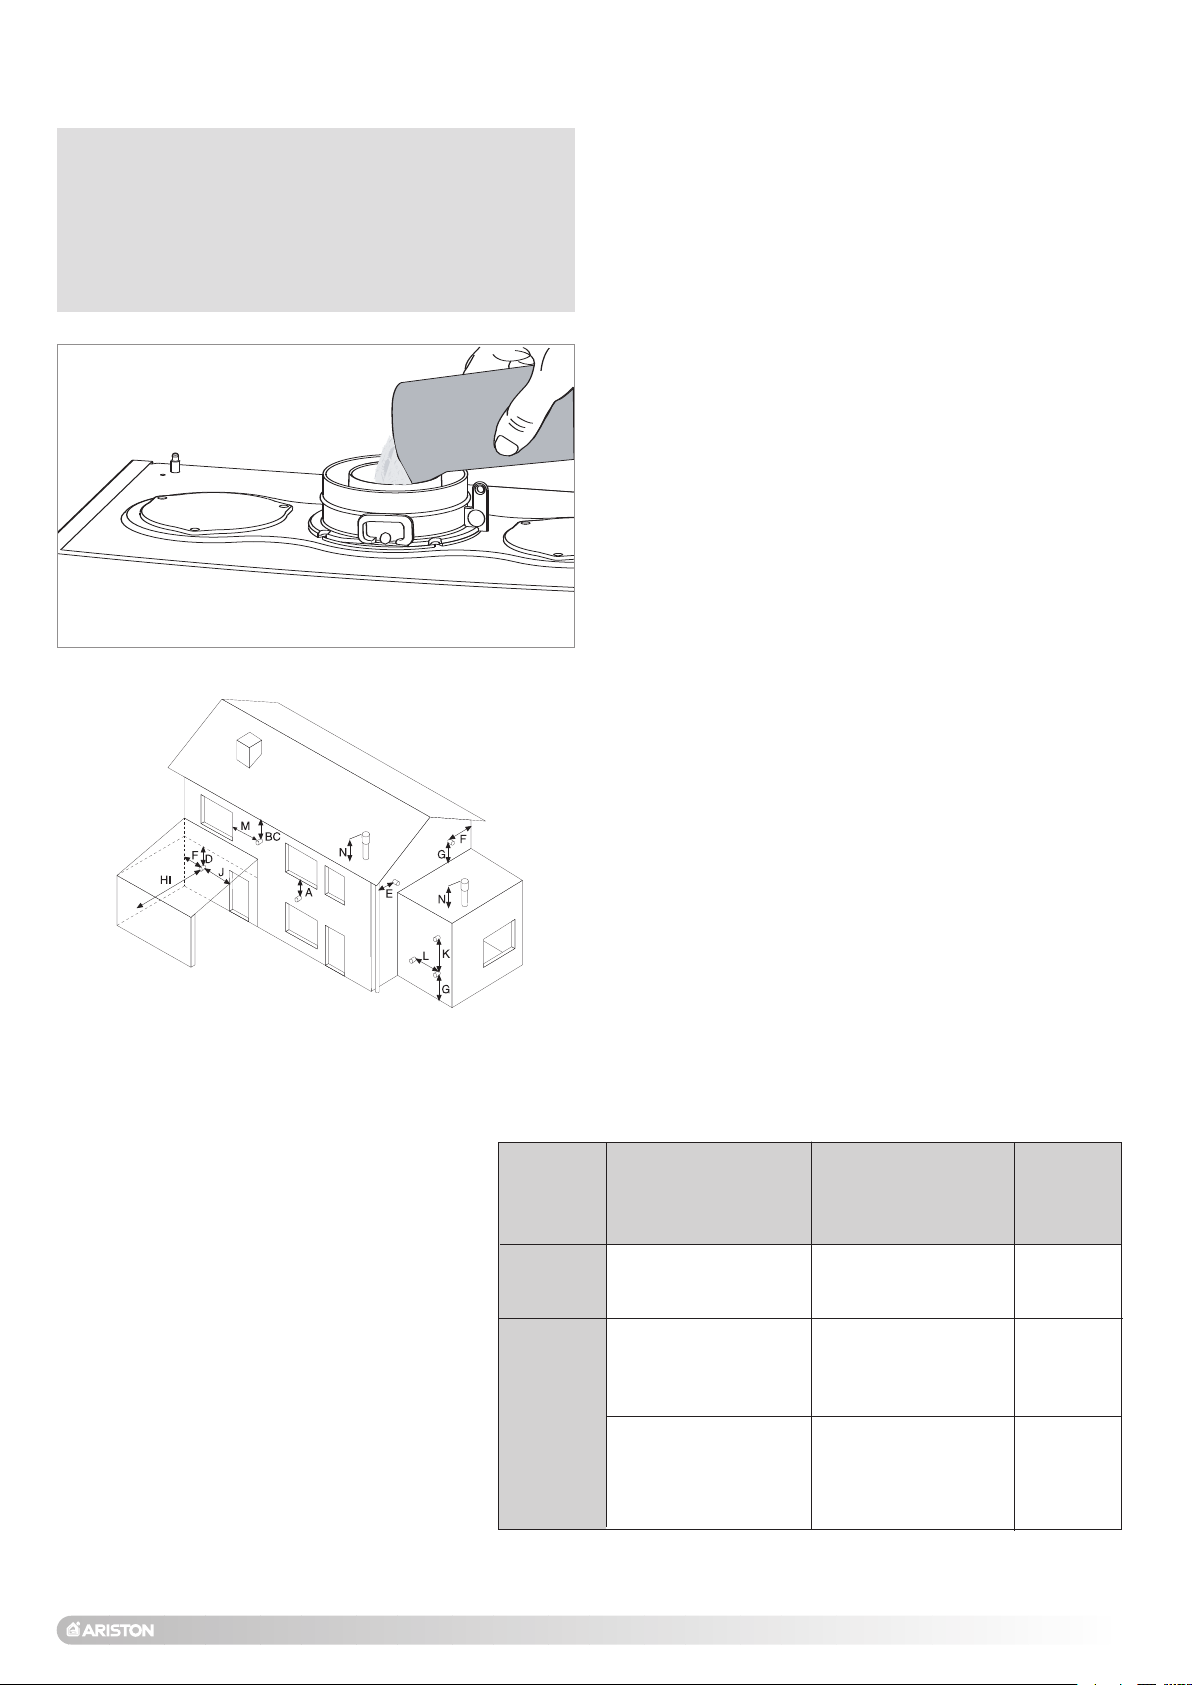
2.9. FLUE CONNECTIONS
IMPORTANT!!
BEFORE CONNECTING THE FLUE, ENSURE THAT 1 LITRE OF
WATER HAS BEEN POURED INTO THE EXHAUST CONNECTION TO
FILL THE CONDENSATE TRAP
EMPTY
THERE IS A RISK OF FLUE GASSES ESCAPING INTO THE
ROOM.
(FIG.2.6). SHOULD THE TRAP BE
FIG. 2.6
FLUE SYSTEM
The provision for satisfactory flue termination must be made as
descr
ibed in BS 5440-1.
The appliance must be installed so that the flue terminal is exposed to
outdoor air.
The terminal must not discharge into another room or space such as
an outhouse or lean-to.
It is important that the position of the terminal allows a free passage
of air across it at all times.
The ter
minal should be located with due regard for the damage or
discolouration that might occur on buildings in the vicinity.
In cold or humid weather water vapour may condense on leaving the
flue terminal.
The effect of such “steaming” must be considered.
If the terminal is less than 2 metres above a balcony, above ground
or above a flat roof to which people have access, then a suitable
terminal guard must be fitted. When ordering a terminal guard,
quote the appliance model number.
A suitable terminal guard is available from:
TOWER FLUE COMPONENTS
Morley Road
Tonbridge
Kent TN9 1RA
The minimum acceptable spacing from the terminal to obstructions
and ventilation openings are specified in Fig. 2.7.
FIG. 2.7
27 MFFI
Coaxial
Systems
TERMINAL POSITION mm
A - Directly below an open window or other opening 300
B - Below gutters, solid pipes or drain pipes 75
C - Below eaves 200
D - Below balconies or car-port roof 200
E - From vertical drain pipes and soil pipes 75
F - From internal or external corners 300
G - Above ground or below balcony level 300
H - From a surface facing a terminal 600
I - From a terminal facing a terminal 1200
J - From an opening in the car port
(e.g. door, window) into dwelling 1200
K - Vertically from a terminal in the same wall 1500
L - Horizontally from a terminal in the same wall 300
M -
Horizontally from an opening window 300
N - Fixed by vertical flue terminal
ype
Exhaust
T
Maximum Extension
Exhaust/Air
(m)
13
C
4
Diameter
of Pipes
(mm)
Ø 60/100
win Pipe
T
Systems
C13, C33, C
53,C83
C
43
20 (S1=S2)
1+39 (S1+S2)
Ø 80/80
Ø 80/80
13
Page 14
32 MFFI
Exhaust Type
Maximum Extension
Exhaust/Air
(m)
Diameter
of Pipes
(mm)
FIG. 2.8
Coaxial
Systems
Twin Pipe
Systems
13
C
C13, C33, C
C
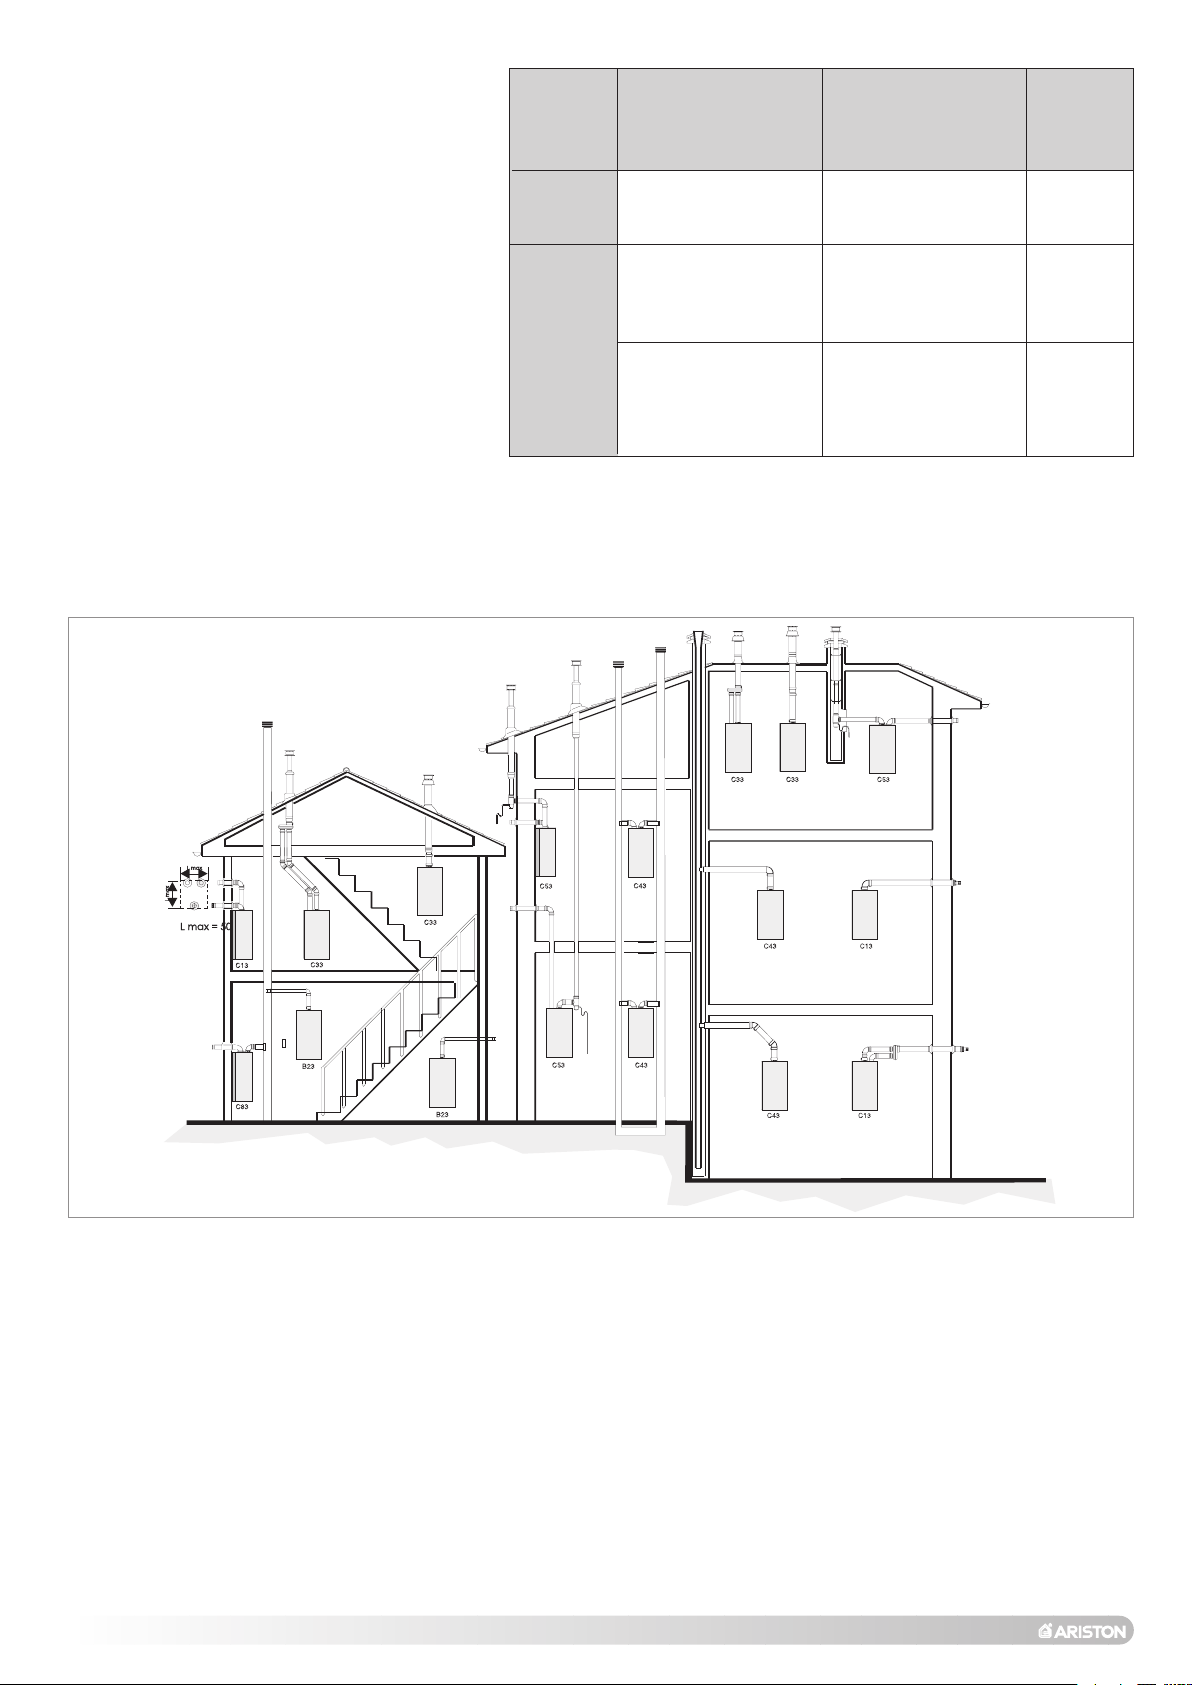
In FIG. 2.8 (PAG E 11), several different types of flue systems are
shown.
For additional information regarding the flue accessories, please
consult the Flue Pipe Accessories manual.
43
53,C83
4
24 (S1=S2)
1+48 (S1+S2)
Ø 60/100
Ø 80/80
Ø 80/80
14
Page 15

2.10. ACCESSORY CONNECTION
CN6
CR SE
US
FIG. 2.9
IMPORTANT!!
Before carrying out any repairs to the appliance always
ensure that the e
The boiler will remain live even when the ON/OFF knob is
“O”(off) position.
in the
xternal power supply has been isolated.
SP
TA
FIG. 2.10
IMPORTANT!!
Only remove the links from SP and TA if they are to be
connected to external controls.
In order to gain access to the e
first necessary to remove the casing (as shown in Section 3.2)
then proceed as follows:
1. Remove the cover of the main PCB box
2. Access can now be gained to the following connector (see
Section 2.11):
CN10 - Saf
CN 9 - Room Thermostat
CN
CN 6 - Interface PCB
CONNECTION OF ROOM THERMOSTAT OR EXTERNAL
TIME CLOCK
- Insert the thermostat cable through the cable grommet and
a.
fasten it by means of the cable-clamp provided.
b.- Connect the thermostat wires to the terminal block
c.- If a remote time clock is to be fitted, disconnect the
d. - Using a volt-free switching time clock, connect the
e. - If using an external time clock and room thermostat,
ety thermostat for underfoor heating
11 - Time clock
(Fig. 2.12 - Diagram A).
CN9
integral time clock from the P.C.B. CN11
switching wires from the time clock following points 1-4
(Fig. 2.12 - Diagram B).
above
these must be connected in series as points 1-7 above
(Fig. 2.12 - Diagram C).
xternal control connections, it is
(FIG 2.9).
FIG.
2.11
CONNECTION OF INTERFACE PCB (optional)
The Interface PCB allows for the connection of:
REMOTE CONTROL - Clima Manager
External sensor
Secondaty outlet (*)
(*) = The secondary outlet can be used for the connection of the
following accessories:
- Zone valve
- LPG valve
- Secondar
When connecting one of the abo
necessar
Menu (see Section 3.6.1)
y Pump
y to modify the
E
E
ameter on the P
par
e accessor
v
ies it is
arameter
FIG. 2.12
15
Page 16

2.11. ELECTRICAL DIAGRAM
P
r
o
g
.
h
m
Day
7
8 9
10 1112
1
1
CN7
CN12
CN8
CN11
CN9
CN10
1
1
FLOOR
ROOM
TIMER
FUSE
FUSE
N
N
L
L
1
CN16
CN4
2
1 2 1
1
2
3 4
2
123456789
1011
12
1
MV
Az
Bl
Mr
Rs
R/N
Mr
Mr
Nr
Nr
Nr
Bn
Bn
Gr
Gr
Gr
Gr
Gr
Gr
Bn
Bn
Bl
Bl
Bl
Bl
Rs
Bn
Mr
Nr
CN1 CN12CN5
7
8 9
10 1112
FS PA
TA TS
NTC1
NTC2
NTC3
CN8 CN11
123456789
101112
12345
6
CN6
CN9 CN10
CN5
CN1
CN2
CN3
CN6
CI
AC WFS
VG
O
P
C
L
K
E
F
A
B
H
I
CR
SE
US
N
D
N
M
The P.C.B. is fitted with 2 fuses, on the live and the
al.
neutr
The fuse holder contains:
- 5 x 20mm
“3.15A Slow” glass fuses
FIG. 2.13
16
Page 17

Legend:
A-ON/OFF button
B-Multifunction display
C-RESET b
D-Green led (indicates burner on)
E-Comfort function yellow LED
-
F
Red LED
G-COMFORT button
H-Programming key +
-
I
Prog
J-Menù button
K-Central Heating temperature adjustment
-
L
Domestic Hot
M-Eepron
N-Interface PCB (optional)
FS - Domestic hot water flow switch
NTC1 - Central Heating flow temperature probe
NTC2 - Central Heating return temperature probe
NTC3 - Domestic Hot Water temperature probe
- Connection for boiler thermostat
OP - Time clock
VG - Gas valve
M - Diverter valve (mod. 27/32 MFFI)
- Connection for external diverter valve
CI - Circulation pump with automatic air release valve
MV - Fan
AC - Spark generator
PA-Air pressure switch
TA - Room Thermostat (optional)
TS - Underfloor Heating Safety Thermostat (optional)
CR - Remote Control (optional)
SE - External sensor (optional)
US - Secondary outlet (optional)
utton
(indicates lockout)
ramming key -
Water temperature adjustment
(mod. 27/32 MFFI)
(mod. 27/32 RFFI SYSTEM)
(mod. 27/32 RFFI SYSTEM)
CN1 = FAN
1: Start of coil (black)
2: End of coil (brown)
3: “Hall” sensor power supply 12V (red)
4: “Hall” sensor input (white)
5: “Hall” sensor neutral (blue)
6: Not used
CN2 = FLAME SENSOR
CN3 = Earth
CN4 =
1: Live (brown)
2: Neutral (blue)
CN5 = EQUIPMENT
WER SUPPLY
PO
CONNECTIONS
1: Gas valve neutral (blue)
2: Gas valve live (brown)
3: Not used
4: Pump (V1) live (red)
Pump (V2) live (black)
5:
Pump (ON/OFF) live (brown)
6:
7:
Pump neutral (blue)
8: 3-way valve (D. H.W.) (brown)
9: 3-way valve (C. H.)(red/black)
10:
3-way valve Neutral (blue)
11: Spark generator Neutral (blue)
12: Spark generator live (black)
CN6 = INTERFACE PCB
(OPTIONAL - see paragraph 2.10)
Accessories:
External sensor
Remote Control CLIMA MANAGER
Secondary outlet (see Section. 2.10)
CN7 = DISPLAY
1: Power 5V
2: Display return
3: Display transmission
4: Earth
CN8 = SENSOR CONNECTOR
1: Central Heating flow sensor (white)
2: Central Heating return sensor (white)
3: Not used
y)
witch (g
DHW flo
4:
DHW sensor (g
5:
Not used
6:
7: Not used
DHW flo
8:
DHW sensor
9:
C
10:
11: C.H. return sensor earth (white)
12: Not used
CN9 = ROOM THERMOSTAT
(OPTIONAL - see paragraph 2.10)
CN10 =
CN11 = TIME CLOCK
w s
witch
w s
.H. flow sensor earth (white)
UNDERFLOOR HEA
SAFETY
(OPTIONAL - see paragraph 2.10)
see para
re
y)
re
rey)
th (g
ear
y)
re
th (g
ear
THERMOSTAT
graph 2.10
TING
17
Page 18

2.12. WATER CIRCUIT DIAGRAM
AB C DE
2
3
5
6
7
8
9
10
11
12
13
14
15
16
17
18
19
4
1
20
27/32 MFFI
FIG. 2.14
LEGEND:
1- Fan
ner
Bur
-
2
Ignition/detection electrode
-
3
4 - Air release valve
5 - Main heat exchanger
al heating flo
Centr
-
6
Condensate
-
7
- Gas valve
8
9 - Pressure gauge
alv
ety v
Saf
-
10
Secondar
-
11
- Domestic hot water temperature probe
12
13 - Drain valve
y heat exchanger
w temper
Tr ap
e
ature probe
14 - Domestic hot water flow switch
-
15
-
16
17 - Circulation pump with automatic
-
18
-
19
- Air pressure switch
20
e
alv
ised v
Motor
Automatic By-pass
air release valve
Expansion v
Centr
essel
al heating return temperature probe
18
Page 19

C
2
3
5
6
7
8
9
10
17
16
18
19
20
4
1
21
A
B
D
E
15
11
12
13
14
27/32 RFFI SYSTEM
2.14
FIG.
LEGEND:
1- Fan
2
3
ner
Bur
Ignition/detection electrode
-
4 - Air release valve
5 - Main heat exchanger
-
6
-
7
- Gas valve
8
al heating flo
Centr
Condensate
Tr ap
w temper
ature probe
15 - Expansion relief valve
e
alv
ain v
Dr
-
16
Automatic By-pass
-
17
18 - Circulation pump with automatic
air release valve
Expansion v
-
19
Centr
-
20
- Air pressure switch
21
essel
al heating return temperature probe
9 - Pressure gauge
e
alv
ety v
Saf
-
10
.H.W. priority valve (Optional extra)
D
-
11
- Non-return valve (integral to Jig Kit)
12
13 - Filling loop (integral to Jig Kit)
14 - Indirect cylinder expansion vessel
19
Page 20

3. COMMISSIONING
3.1. INITIAL PREPARATION
MTS (GB) Limited suppor
information pack you will find a copy of the Log Book.
It is important that this is completed in the presence of your
customer, they are shown how to use it, and it is signed by them.
Please instr
engineer or us
Preliminary electrical system checks to ensure electrical safety
ust be carried out by a competent person i.e. polarity, earth
m
continuity, resistance to earth and short circuit.
FILLING THE HEATING SYSTEM:
Remove the panels of the case and lower the control panel
(see section 3.2. for further information).
Open the central heating flow and return cocks supplied with
the connection kit.
Unscrew the cap on the automatic air release valve one full
turn and leave open permanently.
Close all air release valves on the central heating system.
Gradually open valve(s) at the filling point (filling-loop)
connection to the central heating system until water is heard to
flow, do not open fully.
Open each air release tap starting with the lowest point and
close it only when clear water, free of air, is visible.
Purge the air from the pump by unscrewing the pump plug
and also manually rotate the pump shaft in the direction
indicated by the pump label to ensure the pump is free.
Close the pump plug.
Continue filling the system until at least 1 bar registers on the
pressure gauge.
Inspect the system for water soundness and remedy any leaks
discovered.
uct your customer that they must have their
Log Book with them whenever they contact a service
.
t the initiative. Within the
FILLING OF THE D.H.W. SYSTEM:
Close all hot water draw-off taps.
Open the cold water inlet cock supplied with the connection kit.
Open slowly each draw-off tap and close it only when clear
water, free of bubbles, is visible
GAS SUPPLY:
or
Inspect the entire installation including the gas meter
soundness and purge, all as described in BS 6891:1988.
Open the gas coc
appliance and chec
.
leaks
k (supplied with the connection kit) to the
k the gas connector on the appliance f
, test f
or
Water Treatment
The boiler is equipped with an aluminium alloy main heat
exchanger.
The detailed recommendations for water treatment are given in
BS 7593:1992 (Treatment of water in domestic hot water central
heating systems); the following notes are given for general
guidance:
If the boiler is installed in an e
unsuitableadditives must be removed;
- Under no circumstances should the boiler be fired before
thesystem has been thoroughly flushed;
procedure m
We highly recommend the use of a flushing detergent
appropriate for the metals used in the aluminium alloy circuit.
These include (F
X300 or X400 or Salamander System Cleanser), whose
function is to dissolv
system;
In hard w
ust be in line with BS7593:1992.
x Superfloc
no
er
e any foreign matter that may be in the
ater areas or where large quantities of w
xisting system, an
the flushing
, BetzDearbor
n Sentinel
ater are in
y
20
Page 21

the system the treatment of the water to prevent premature
scaling of the main heat exchanger is necessary.
The formation of scale strongly compromises the efficiency of
the thermic exchange because small areas of scale cause a
high increase of the temperature of the metallic walls and
therefore add to the thermal stress of the heat exchanger.
Demineralized water is more aggressive so in this situation it
is necessar
inhibitor.
Any treatment of water by additives in the system for frost
protection or for corrosion inhibition has to be absolutely
suitab
aluminium alloys.
The use of a corrosion inhibitor in the system such as F
MB-1, BetzDeaborn Sentinel X100 or Copal Salamander
System Inhibitor is recommended to prevent corrosion
(sludge) damaging the boiler and systems;
- If anti-freeze substances are to be used in the system, check
carefully that the
In particular, DO NOT USE ordinary ETHYLENE GLYCOL,
since it is corrosive in relation to aluminium and its alloy, as
well being toxic.
MTS suggests the use of suitable anti-freeze products such
as Fernox ALPHI 11, which will prevent rust and incrustation
taking place.
Periodically check the pH of the water/anti-freeze mixture of
the boiler circuit and replace it when the amount measured is
out of the range stipulated by the manufacturer ( 7 < pH < 8).
DO NOT MIX DIFFERENT TYPES OF ANTI-FREEZE
- In under-floor systems, the use of plastic pipes without
protection against penetration of oxygen through the walls
can cause corrosion of the system’s metal parts ( metal
piping, boiler, etc), through the formation of oxides and
bacterial agents.
To prevent this problem, it is necessary to use pipes with an
“oxygen-proof barrier”, in accordance with standards DIN
4726/4729. If pipes of this kind are not used, keep the
system separate byinstalling heat exchanger
with a specific system water treatment.
y to treat the water with an appropriate corrosion
le for all the metals used in the circuit including the
ernox
y are compatible with the aluminium.
s of those
IMPORTANT
Failure to carry out the water treatment procedure
y invalidate the appliance warranty
ma
When the installation and filling are completed turn on the
central heating system (Section 3.4) and run it until the
.
ature has reached the boiler oper
temper
The system m
The flushing procedure must be in line with BS 7593:1992 Code
of practice for treatment of water in domestic hot water central
heating systems.
ing this oper
Dur
heating flushing detergent (Fernox Superfloc or equivalent),
whose function is to dissolve any foreign matter that may be in
the system.
Substances diff
problems to the pump or other components.
The use of an inhibitor in the system such as Fernox MB-1 or
equivalent is strongly recommended to prevent corrosion
(sludge) damaging the boiler and system.
Failure to carry out this procedure may invalidate the
appliance warranty.
ust then be immediately flushed through.
ation, we highly recommend the use of a central
erent fr
om these could create serious
ating temper
ature
21
Page 22

3.2. REMOVING THE CASING
To remove the front casing panel, follow these steps:
1. Remove the screws “A” (FIG 3.1);
2. Remove the four screws from case hooks (two at the top
and two at the bottom) and rotate anti-clockwise (FIG 3.2);
3. Lift and unhook the case panel (FIG 3.3).
A
A
FIG. 3.2
F
IG. 3.1
IG. 3.3
F
22
Page 23

3.3. CONTROL PANEL
A
B
C
27/32 MFFI
I
H
G
F
E
FIG. 3.4
Button Description
ON/OFF Switch
“COMFORT” Function Push-button
Reset Button/
Flue Test**/ scroll through Functions Menu
Menu Switch
Programming “+” key
Programming “-” key
A
B
C
D
E
F
D
Description
Green LED
(illuminated = burner on)
Time cloc
Selector knob f
Central Heating Temperature Adjustment Knob
Control Panel Cover
Domestic Hot Water Temperature Adjustment Knob
Heating System Pressure Gauge
k
or Summer/Winter
ANT!!
** IMPOR
The Flue Test function will cause the boiler to run continuously on
maximum power. This function must only be activated by an
authorised engineer
T
.
G
H
“COMFORT” Function L.E.D
Red LED
out)
(illuminated = boiler loc
I
Multi-function Display
k
23
Page 24

A
B
C
27/32 RFFI SYSTEM
I
H
G
F
FIG. 3.4
Button Description
ON/OFF Switch
Heating only
Reset Button/
Flue Test**/ scroll through Functions Menu
u Switch
Men
Programming “+” key
ramming “-” key
Prog
A
B
C
D
F
G
Description
Green LED
ner on)
(illuminated = b
Time clock
Selector knob for Summer/Winter
Central Heating Temperature Adjustment Knob
Control Panel Cover
Heating System Pressure Gauge
Heating only L.E.D
ur
D
24
TANT!!
um po
This function m
.
wer
ust onl
y be activ
ated by an
** IMPOR
The Flue Test function will cause the boiler to run continuously on
maxim
authorised engineer.
H
Red LED
(illuminated = boiler lockout)
I
Multi-function Display
Page 25

3.4. INITIAL START-UP
C
FIG. 3.6
1. Make sure that:
- the cap of the automatic air release valve is loosened;
- the system pressure is at least 1 bar on the
pressure gauge
- the gas cock is closed (Fig. 3.5);
-
the electrical connection has been carried
out in the correct manner.
To allow the air to escape from the system,
proceed as follows:
- push the On/off button and turn the
knob “C” (Fig. 3.6) to the “winter” position. The boiler pump will
start up and three consecutive attempts will be made to ignite
H
the burner. After the third attempt, the electronic system will
shutdown the boiler, because the supply of gas has been cut off.
The message “
“H” will illuminate;
- let the pump operate until all the air has escaped from the
system;
- repeat the procedure for bleeding the radiators of air;
- draw hot water for a short while;
- check the system pressure and, if it has gone down, fill it with
water until it returns to 1 bar.
2. Fill the boiler condensate trap with water, by pouring 1/2 a
litre of water into the exhaust flue connector (see fig. 3.7).
N.B. In the event of a prolonged period of system shutdown,
the condensate trap should be filled bef
use. A shortage of water in the trap is dangerous because it
could possib
“F” (Fig. 3.4);
FIG. 3.5
A01” will appear on the display and the red LED
ore any renewed
ly lead to a leakage of fumes into the air.
FIG. 3.7
3,
Ensure that the flue is filled correctly.
4. Turn on the gas cock(fig. 3.8) and check the
seals on the connections, including the one
for the burner, making sure that the meter
does not signal the passage of gas. Check
the connections with a soap solution and
eliminate any leaks.
5. Press the reset button , the boiler will attempt to light.
If the burner does not light the first time, repeat the procedure.
Note: Should the boiler fail to ignite check that no air is present in
the gas pipe.
The boiler is configured in the factory for the gas type in
question. To check the air/gas ratio, please refer to section
3.6.4.
6. Complete the Benchmark log book.
Fig. 3.8
25
Page 26

3.5. DISPLAY:MESSAGES SHOWN DURING
NORMAL OPERATION
During operation of the boiler, while it is carrying out its normal
operations, the left-hand display shows a series of characters that
ref
er to the operations indicated below:
--
Diagnostics phase (precedes the other operations)
0
0
No request for heat
C
C
Heating
c
c
Pump overrun for heating
d
d
Domestic hot water
h
h
Pump o
verrun for domestic hot water
b
b
Storage cylinder(SYSTEM version)
The r
ight-hand display (two-digit) shows:
- in CENTRAL HEATING mode: temperature of the Central Heating
system flo
- in DOMESTIC HOT WATER mode: temperature of the Domestic Hot
Water (MFFI only).
w;
LEFT RIGHT
FIG. 3.9
26
Page 27

3.6. OPERATING PARAMETERS
The boiler has been designed to allow easy intervention with regard
to the operating parameters.
3.6.1 REGULATION MENU TABLE
Summary of the functions accessed when the RESET button
and the menu button are pushed at the same time for
5 seconds
On the display will appear the parameters indicated on table 3A.
To modify the parameters push the programming
keys and .
TAB.3A
.
left display right display function factory setting
6600
11
22
from
from
00 to999
00 to999
9
Soft light
9
as % of maximun Heating Power
Maximun Heating Power (%)
(ACO 27 MFFI - RFFI SYSTEM)
4433
(ACO 32 MFFI - RFFI SYSTEM)
5555
(ACO 27 MFFI - RFFI SYSTEM)
5522
(ACO 32 MFFI - RFFI SYSTEM)
Fig.
3.10
33
44
55
66
tt
FF
ee
from
SS00 toSS1
from
OO00 to002
from
0000 to003
from
00 to7
7
Ignition delay (minutes)
Central heating maximun temperature
Central heating minimum temperature
pm (Check of the temperature
P∆T r
erence betw
diff
sensors for twelve seconds on initial
start-up)
1
2
3
T USED
NO
Boiler types
Secondary outlet function
een the flo
w and return
0000
0022
- ACO 27/32 RFFI SYSTEM
0022
8822
4422
4455
SS00
- ACO 27 /32 MFFI
0000
pp
cc
pp
0011 to1155 orCCO
from
0000 to001
from
UU00 toUU1
from
O
Pump o
1
Comf
Pump speed adjustment (modulating or
1
single speed)
err
v
t function
or
un (Centr
al Heating)
(only model MFFI)
0022
0011
UU11
27
Page 28

left-hand display right-hand display Function factory setting
rr
pp
pp66
PP55
tt
AA
bb00
0000 to001
from
9900 to991
from
--2200 to++220
from
00__33 to33__0
from
8811
selects low temperature systems
1
or std systems
emperature regulation controlled by
1
T
external sensor
0
Correction of heat curve translation
0
Curve incline
Test Function
Bus Address (Do not modify)
Set-point second heating zone
0011
9900
bb11
bb
bb
bb
bb
bb
bb
2200
30
4400
5500
6600
7700
GSM value
NOT USED
NOT USED
NOT USED
NOT USED
NOT USED
T USED
NO
28
Important!!
The parameters P5, P6 and P9 are only enabled when
the outdoor sensor is connected.
To return to the normal display, press the menu button .
Page 29

FIG. 3.11
0
5
10
15
20
25
kW
%
Soft light adjustment
The soft light can be adjusted betw
(shown on the display as “00”, i.e. 100%) and the minimum
wer (shown on the display as “01”, i.e. 1%). The boiler is
po
factory set to a value which is suitable for the ignition with any
type of gas (appro
The value set expressed as a percentage, can be displayed and
adjusted as indicated in Section 3.6.1 (parameter 1)
x. 33%).
11
een the maximum power
FIG. 3.12
Heat input
Maximun Heating Power adjustment
The maximum heating power can be adjusted to between the
maximum power allowed by the boiler (24kW) and the minimum
power (8kW). The value is factory set to 70% of the maximum
power.
The value set (expressed as a percentage) canbe displayed and
modified as illustrated in Section 3.6.1 (parameter 2).
The display shows the value between 100% ("00" on the display)
and 1% ("01") of this inter
val.
22
3.13
FIG.
FIG. 3.14
FIG.
3.15
Display
Ignition Delay adjustment
The ignition delay can be adjusted to between 0 and 7
minutes. The delay is factory set to 2 minutes.
alue set can be displayed and modified as illustrated in
The v
Section 3.6.1 (parameter 3)
33
Maximun Central Heating temperature
This parameter allows the setting of the maximum temperature for
the central heating circuit. The value is factory set at 82°C and
can be adjusted as illustr
ated in Section 3.6.1 (par
Minimum Central Heating temperature
This parameter allows the setting of the minimum temperature for
the central heating circuit. The value is factory set at 42°C and
can be adjusted as illustrated in Section 3.6.1 (parameter 5).
44
ameter 4).
55
29
Page 30

Boiler types
actory setting:
F
FF
00 - ACO 27 / 32 MFFI (C.H. + D.H.W.)
CO 27 / 32 RFFI SYSTEM(C.H. only)
02 - A
THIS
PARAMETER MUST NEVER BE ADJUSTED
.
FIG. 3.16
FIG. 3.17
Secondary outlet Function
EE
(This parameter can be modified only with the
interface PCB connected)
With the interfa ce PCB connected, it is possible to set the boiler
to operate with one of the following accessories, (see Section
2.10 for further information). The setting can be varied by
pushing the and keys, the following options are available:
0
000
1
001
2
002
3
003
PUMP OVERRUN
The pump overrun may be varied (after the burner has been turned
off) by pressing the programming keys and ..
The following modes are available:
001
1
003
3
006
6
009
9
112
2
115
5
CCO
O
zone valve - factory setting
LPG valve
seconday pump
NOT USED
PP
ute of pump overrun
1 min
3 minutes of pump overrun - factoy setting
6 minutes of pump overrun
9 minutes of pump overrun
12 minutes of pump overrun
15 minutes of pump overrun
Continuous pump overrun
FIG. 3.18
Comfort Function (MFFI model)
The boiler allows the convenience level to be increased in the output
of domestic hot water by means of the “COMFORT” function. This
function keeps the secondary exchanger warm during the periods in
which the boiler is inactive, thereby allowing the initial water drawn to
be at a higher temperature.
The function may be activated by pressing the
y on the control panel (see section 3.3.). When the function is
e
k
w light
ello
, a y
e
activ
K
D
panel.
t function can be activ
The comf
or
the and keys
0
000
Comfort function deactvated
1
001
Comfort function active for 30 minutes - factory setting.
It is possib
le to deactiv
“K” comes on, again located on the control
ate the comf
CC
COMFORT button
ated or deactivated by pressing
ort function by pressing the
button .
The yellow LED
NOTE: Dur
function, if selected, is temporarily deactivated. The L.E.D. light
remains on to indicate that the boiler will return to the “COMFORT”
mode once the pump overrun has finished.
Pump Speed Adjustment
By pressing the and k
ation of the pump
oper
“K” will go out.
ing the overrun period of the pump, the “COMFORT”
PP
ys it is possib
e
, the two options are as follows:
le to adust the
FIG. 3.19
30
0
UU0
- Single Speed Pump
1
UU1
- Modulating Pump - f
actor
y setting
Page 31

+20
20
-20
6
60
100
-20
+20
-20 +20
to in
crea
se
the
cu
rve
in
pa
ral
lel
to
decrea
se
the
cu
rve
in
pa
ral
lel
FIG. 3.20
FIG. 3.21
FIG. 3.25
r
SETTING THE TEMPERATURE FIELD
Using the programming keys and it is possible to make the
ollowing adjustments:
f
000
0
“
” signifies that the flow temperature (which may be set by
means of the knob on the front control panel) may be
regulated from 20 to 75°C.
001
1
“
” signifies that the flo
means of the knob on the front control panel) may be
regulated from 42 to 82 °C.
w temperature (which also may be set by
r
TEMPERATURE REGULATION CONTROLLED BY THE
P
EXTERNAL SENSOR
(Onl
y enabled when the outdoor sensor is installed)
By pressing the and
adjustments:
990
0
“
” T
emperature regulation controlled by the external sensor is
inactive (not installed).
991
1
“
” Temperature regulation controlled by the external sensor is
active (installed).
Adapting the heat curve “
(Only enabled when an outdoor sensor is installed)
o adapt the heat curve to the system requirements, set
T
parameter “P 6” in order to shift the curve in parallel, so that
the flow temperature calculated is changed, along with the
ambient temperature.
When “
P 6” appears on the left-hand display, use the
heating control knob to shift the curve in parallel as
illustrated in the figure below. The shift value can be read
on the right-hand display, from -20 to +20.
P
it is possible to make the following
PP 6
6
”
FIG. 3.26
Flow temperature (°C)
Exter
nal temper
ature (
C)
°
31
Page 32

100
80
3
2,5
2
1,5
1,2
1
0,5
0,3
60
40
20
20 16
temp. esterna [°C]
temp. di mandata della caldaia [°C]
12 8 4 0 -4 --8 --12 --16
FIG. 3.22
3.23
FIG.
WARNING
(*) - If curve 0_3 or 0_5 is set, a system
safety thermostat must be connected to
the main terminal board (see paragraph
2.10)
PP 5
SETTING THE CURVE INCLINE
(Only enabled when an outdoor sensor is installed)
When using an outdoor sensor, the microprocessor-controlled P.C.B.
calculates the most suitable flow temperature, taking into account
the e
xternal temperature and the type of system. The
microprocessor is capable of doing this because it is possible to
establish a link between the external temperature and the flow
temperature of the Central Heating system water. This link translates
into a "thermal curve".
The type of curve should be chosen in correspondence with the
planned temperature of the system and the nature of the heat loss
present in the building.
5
3.24
Fig.
With parameter P 5 it is posslbe to adjust the heat curve
setting to those shown in fig. 4.16). Using programming keys
and , the curve setting may be changed. The possibility of
setting curves varies according to parameter r:
r = 00 (low temperature range) from curve 0_3 to 0_5
systems only)
r = 01 (high temperature range) from curve 1_0 to 3_0.
max power Central Heating
max power DHW
minimum power
32
(underfloor
3.27
FIG.
FIG. 3.28
FIG. 3.29
Flow temperature (°C)
External temperature (°C)
Test Function
The P.C.B. allows the boiler to be forced to the maximum or
minimum power. Enable the test function and
ight-hand displa
the r
To select operation at maximum power, press the programming
y , tw
e
k
y (see Fig.
displa
This function is disab
adjustments menu.
o select oper
T
y , two dashes will appear at the bottom of the right-hand
e
k
display (see Fig. 3.10). This function is disabled when you press
reset key
Note: The boiler can be forced to the maximum and minimum
power even without enabling the test function via the
adjustments men
a - b
b - by pressing the key, the boiler is forced to operate at
“H” to quit the adjustments menu.
y pressing the Reset k
automatically forced to test mode and t-- will be displayed,
the boiler is now in the test mode for the maximum heating
po
wer, to force the boiler to maximum output for hot water it
is necessary to press the and keys together, two
dashes appear at the top of the right-hand display (see Fig.
3.9). This function is disabled by pressing the reset key .
um po
minim
ight-hand displa
r
pressing the reset k
tt
OO will appear on
y (see Fig.
o dashes will appear at the top of the r
3.9).
led when y
ation at minim
u:
, tw
er
w
y (Fig.
e
3.8).
ou press reset key to quit the
wer, press the programming
um po
ey for 5 seconds, the boiler is
o dashes appear at the bottom of the
This function is disab
3.10).
.
y
ight-hand
led b
y
Page 33

3.6.2 SETTINGS DISPLAY
The boiler is designed to monitor some operating variables and
settings by means of the display on the front control panel. Keeping,
at the same time, the reset and the menu key pressed for over 10
seconds will allo
system variables. By pressing the reset button repeatedly after that,
it is possib
Indication on the
left-hand display
UU//1
UU//2
UU//3
UU//4
UU//5
UU//6
E
E
A
To return to the normal display, press the menu key.
The boiler will automatically retun to the normal display after no
b
uttons have been pressed for 2 minutes.
NOTE 1: U/1 means that “
NOTE2: the value 100% appears as “
* = Only displated when an external sensor is fitted.
w access to the “readout” function of the main
le to read the following information in sequence:
V
alue read on right-hand display
1
2
3
4
5
6
Flow temperature of the Central Heating circuit (°C)
Return temperature of the Central Heating circuit (°C)
Domestic Hot Water output temperature (°C)
Outdoor temperature (°C)*
Exaust Fume temperature
Fan speed (% rpm)
Last safety shut-off (see section 3.7.)
Last shutdown (see section 3.7.)
U
U
1
1
” and “
” blink alternately on the display
000
0
” on the display
33
Page 34

1 3
2
4
2
4
3
1
3.6.3 GAS REGULATION CHECK
Supply pressure check
1. Loosen screw “1” (Fig. 3.31) and conect the pressure gauge
connection pipe into the test point.
2. Turn the boiler on at maximum power, enabling the “flue
sweep” function (press the RESET key for 5 seconds and
press the programming keys + and - together). The supply
pressure should correspond to that shown for the type of gas
the boiler is designed for methane gas G20.
and make sure it is
When the check is over, tighten screw “
3.
1”
securely in place.
Disable the test mode by pressing the reset key.
4.
FIG. 3.30
SUPPLY PRESSURE
G20 methane 17-25 mbar
AIR/GAS RATIO SETTING
Calibration v
CO
2 at maximum power % vol 8,7 ±0.2
alues c
after 4 minutes of operation
methane G20
hec
AIR/GAS RATIO CHECK
Air/gas ratio at minimum power
To check the air/gas ratio at minimum power, proceed as follows:
1. Connect the combustion analyser to the analysis point (Fig.
3.30) after removing the cover plate.
2. Turn the boiler on at minimum power via the test function
(see paragraph 3.6.1) or by pressing RESET key for 5
seconds and the programming key - on the control panel.
Ensure the CO
value indicated in table 4D. If this is not the case, adjust
screw
“2” (Fig.3.31) with a screwdriver, after removing the
cap, until you obtain the correct CO
reading to become stable for at least 4 minutes.
3. When the check is over, replace the cap on screw “
3.31).
4. Disable operation at minimum power by pressing the RESET
key.
Air/gas ratio at maximum power
To check the air/gas ratio at maximum power, proceed as
follows:
1. With the combustion analyser already connected to the
FIG. 3.31
analysis point, set the boiler to maximum power via the test
function (see paragraph 3.6.1) or enabling the “flue sweep
function” by pressing the RESET key for 5 seconds and the
programming keys + and -.
Ensure the CO
value indicated in table 4D. If this is not the case, adjust
4” with a screwdriver (Fig. 3.31), until you obtain the
screw “
correct CO
at least 4 minutes.
2. Disable the test mode by pressing the RESET key.
The test mode is automatically disabled after 5 minutes.
3.
Repeat the air/gas ratio at minimum power check (see
above).
k
4. Disconnect the analyser, remount the cover plate and check
it is securely in place.
value on the analyser corresponds with the
2
reading. Allow the
2
2 value on the analyser corresponds with the
2 reading.
Allow the reading to become stable for
2” (Fig.
AIR/GAS
Calibration v
CO
2 at minim
after 4 min
methane G20
34
RATIO SETTING
k
um po
hec
wer
alues c
utes of operation
ol 9,2 ±0.2
% v
Page 35

3.6.4 IGNITION DELAY ADJUSTMENT
The ignition delay can be adjusted to between 0 and 7 minutes.
The delay is factory set to 2 minutes.
The value set can be displayed and modified as illustrated in
paragraph 3.6.1 (parameter 3).
3.6.5 ADJUSTING THE MAXIMUM HEATING POWER
3.6.6 SOFT LIGHT ADJUSTMENT
3.7 CHANGING THE TYPE OF GAS
The maximum heating power can be adjusted to between the
maximum power allowed by the boiler (24 kW) and the minimum
one (8 kW). The value is factory set to 70% of the maximum
wer.
po
The value set (expressed as a percentage) can be displayed
and modified as illustrated in paragraph 3.6.1(parameter 2).
The soft light can be adjusted between the maximum power
(shown on the display as "00", i.e. 100%) and minimum power
(shown on the display as "01", i.e. 1%). The boiler is factory set
to a value which is suitable for ignition with any type of gas
(approx. 33%).
The value set (expressed as a percentage) can be displayed
and modified as illustrated in paragraph 3.6.1 (parameter 1).
Initially the ACO boiler is only available for use with
methane Gas (G20).
35
Page 36

3.8. BOILER SAFETY SYSTEMS
The boiler is protected from malfunctioning by means of internal
checks by the P.C.B., which brings the boiler to a stop if
necessary.
In the event of the boiler being shut off in this manner, a code
appears on the display which refers to the type of shut-off and
the reason behind it.
There are two types of shut-off:
There follows a list of the shutdown modes and the respective
codes shown on the display.
A
A
Shutdown (“
reset the boiler using the appropriate key. If this shutdown
occurs frequently, your local Service Agent should be contacted.
DISPLAY CAUSE
AA0011
AA0022
AA0033
AA0077
AA3333
AA9977
AA9988
” type): if such a situation occurs, it is necessary to
Too many attempts to ignite on starting up
No water or no water circulation in central
heating system
The heating flow temperature exceeds 105°C
during operation
Too many failures to flame in one period
during operation
Problem with the fan
Problem with the electronic monitoring
Problem with the electronic monitoring
SAFETY SHUTDO
-
(characterised on the display by the letter “
is automatically remo
resolved.
As soon as the origin of the shutdown disappears, the boiler
starts up again and returns to its normal operation.
SHUTDOWN: (characterised on the display by the letter
-
A
A
“
”), is not removed unless a manual intervention is made.
The boiler may return to operation only if reset by pressing
the RESET button located at the centre of the display.
Safety shutdown: In the event that a safety shutdown occurs, it is
necessary to contact an Authorised Service Centre.
DISPLAY CAUSE
EE 0044
EE 0055
EE 0066
EE 0077
EE 0088
EE 0099
EE 1100
WN:for this group of errors
E
E
”) the situation
ved as soon as the cause behind it is
Domestic hot water temperature probe
in open circuit
Domestic hot water temperature probe
in short circuit
Heating flow temperature probe in open circuit
Heating flow temperature probe in short-circuit
Heating return temperature probe
in open circuit
Heating return temperature probe
in short-circuit
Under floor heating temperature probe
in open circuit
lem with the electronic monitor
AA9999
NOTE: When there is no ignition, check that the gas cock is open.
36
Prob
ing
EE 2200
EE 3300
EE 3311
EE 3333
EE 3344
EE 8800
EE 9944
EE 9955
EE 9999
e closed
Flame detected with gas v
Outdoor sensor open circuit
Outdoor sensor in shor
ation sensed with no demand f
an oper
F
central heating or domestic hot water
Fan operation but air pressure switch
does not close
Remote Control CLIMA MANAGER room
sensor in open circuit or short circuit
Problem within the electronic system
Error reading flo
Problem within the electronic system
w or retur
alv
t circuit
n temper
ature probe
or
Page 37

DAILYTEST.
In order to prevent the shutdown of the components, the
boiler carries out a self-diagnosing test every 21 hours: the
pump turns on for 15 seconds and the diverter valve moves.
ANTI-FR
The anti-frost function acts on the central heating flow
temperature probe, independently from other regulations, when
the board is turned ON.
If the pr
for 2 minutes.
After the tw
the following:
a) if the centr
stops;
b) if the centr
the pump will run for another two minutes;
c) if the central heating flow temperature is < 3°C, the burner will
fire (heating position) at minimum power until the temperature
reaches 33°C, the burner will go out and the pump will continue
un for two minutes.
to r
DEVICE.
OST
imary circuit temperature falls below 8°C the pump will
o minutes of circulation (fixed) the boiler will check
al heating flow temperature is > 8°C, the pump
al heating flow temperature is between 3 and 8°C,
If the flow temperature remains between 3-8°C the pump will
continue to run for two minutes for a maximum of 10 times
unless a temperature above 8°C is detected in the central
heating flow, after this the the burner will fire.
If lockout is caused by overheat the burner is kept OFF.
NOTE: In all cases, the circulation takes place in the central
heating system.
The anti-frost device activates only when (with the boiler
ating correctly):
oper
- the system pressure is correct;
- the boiler is electr
- there is a supply of gas.
ANTI-SCALE DEVICE.
When producing domestic hot water, the burner shuts off
ver the output temperature of the hot water exceeds
whene
61°C or the flow temperature of the primary circuit exceeds
78°C. It will not turn on if the temperature of the primary
circuit is greater than 78°C.
ically powered;
3.9. COMBUSTION ANALYSIS
3.10 COMPLETION
3.11 DRAINING
The boiler is designed to allow for easy analysis of the products
of combustion.
Using the flue analysis points, it is possible to detect the
temperature of the burnt gas, the combustion air, the
concentrations of O
To access these points, unscrew the front screw and
remove the metal plate and seal.
The best test conditions, with the maximum heating
power, are achieved when the FLUE SWEEP FUNCTION
is enabled (press the RESET KEY for 5 seconds and the
programming keys + and -). The boiler will return to
normal operating conditions automatically after 5 minutes,
or if you press the reset key. When you have finished,
reposition the metal plate correctly and make sure the
seal fits perfectly.
For the Republic of Ireland it is necessary to complete a
“Declaration of Conformity” to indicate compliance to I.S. 813.
An example of this is given in the current edtion of I.S. 813. In
addition it is necessar
The draining of the heating system must be carried out as
ws:
ollo
f
urn off the boiler and the bipolar switch;
T
-
- Loosen the automatic air release valve;
- Open the system's discharge valve and gather the water
that comes out in a container
Empty out from the lo
provided).
If the system is to be left active in areas where the room
temperature may go below 0°C during winter, it is recommended
that anti-freez
system in order to avoid the need for repeated draining.
2, CO2, etc.
y to complete the Log Book.
;
west points of the system (where
e liquid be added to the w
ater in the heating
Draining the domestic hot water system
y time that there is a danger of freezing, the domestic hot
er
Ev
water system must be drained as follows:
- close the water mains stop-cock;
- open all the hot and cold water outlets;
empty out from the lowest points (where provided).
-
37
Page 38

4. ZONE VALVES
The boiler is capable of managing a heating system that uses zone
valves. The electrical connection of these valves is carried out by
means of the appropriate terminal board (indicated in the
“
LECTRICAL CONNECTION” section).
E
By way of example, two possible types of systems would be:
1. System with 2 v
(day and night).
2. System with 1 valve (regulation of the night zone subordinated
to that of the day).
A possible set-up for the first type of system is as follows:
alves with independent regulation of the zones
CR = remote control
VZ1,2 = zone valve 1 and 2
TA = room thermostat or timer-thermostat
= radiators
F,N = electrical connection (live and neutral)
RL = relay
A possible set-up for the system with a single zone valve is as
follows:
This set-up is simpler and more economical because it does not
involve the use of the special relay. The night zone, however, may
only be heated during the time periods in which the remote control
timer gives consent to the heating of the day zone. Example:
• day zone programming (remote control): 8:00 - 22:00
• night zone programming (timer-thermostat): 20:00 - 22:00
38
Page 39

5. MAINTENANCE
5.1. GENERAL REMARKS
IMPORTANT!!
Every time that the combustion chamber cover or the
primary heat exchanger is removed from the boiler, the
combustion chamber seal must be replaced (code:
65102217).
gasket must be spread around the area the gasket fits
to ensure an airtight seal.
Only the grease provided must be used, however,
should more grease be needed it must have a
temperature range of between –40 deg C and +200
deg C”
The silicone grease provided with the
It is recommended that the following inspections be carried out
on the boiler at least once a year:
1. Check the seals in the water group and, if necessary, replace the
gaskets and restore the seal to perfect working order.
2. Check the seals in the gas group and, if necessary, replace
the gaskets and restore the seal to perfect working order.
3. Visually check the overall state of the boiler.
4. Visually check the combustion and, if necessary,
disassemb
5. Following inspection 3, disassemble and clean the
comb
6. Following inspection 4, disassemble and clean the injector, if
necessar
7. Clean the primary heat exchanger (see section 6.2)
8. Regulate the correct r
ignition, partially loaded and at maximum load.
9. Check the correct functioning of the heating safety devices:
- temperature limit safety device.
10. Check the correct functioning of the gas group safety
vices:
de
- absence of gas or flame safety device (Ionisation).
11. Check that the electrical connections are correct (in
conformity with the instructions manual).
12. Check the efficiency of the production of domestic hot water
(test the rate of flow and temperature).
13. Carry out a general inspection of the functioning of the boiler.
14. Check the characteristics for expulsion of the products of
combustion.
15. Remove the oxide from the detection electrode by means of
an emery cloth.
le and clean the burner.
ustion chamber, if necessary.
y.
ate of flow of the gas: rate of flow on
5.2. CLEANING THE PRIMARY EXCHANGER
IMPORTANT!!
Every time that the combustion chamber cover or the
primary heat exchanger is removed from the boiler, the
combustion chamber seal must be replaced (code:
65102217). The silicone grease provided with the
gasket must be spread around the area the gasket fits
to ensure an airtight seal.
Only the grease provided must be used, however,
should more grease be needed it must have a
temperature range of between –40 deg C and +200
deg C”
5.3. CLEANING THE CONDENSATE TRAP
NB: if the boiler is not to be used for a prolonged period, the
condensate trap should be filled before igniting it again. A
shor
isk of e
r
tage of w
ater in the tr
xhaust fumes escaping into the air
ap is dangerous because there is the
.
CLEANING THE EXHAUST SIDE
Remove the combustion chamber inspection hatch (see section
6.3.5). Check that the exhaust passages between the blades of
the block are free; if there are deposits present, wash the blades
with compressed air, water or a vinegar-based detergent.
NOTE: it is possible to use a brush in order to mechanically
remove the residues.
Use of detergents:
- soak the blades well
- allow the detergent to act for about 20 minutes
- rinse with a strong jet of water to remove the deposits (the
control panel must be kept closed)
- make sure that there are no traces of detergents in the
exchanger.
CLEANING THE WATER SIDE
Use detergents that dissolve CaCO3. Leave to act for a short
time (in order not to damage the alumin
e sure that the detergent does not remain inside the
Mak
exchanger.
t of the condensate tr
er par
Unscre
Lastly
w the lo
, fill it with w
w
ater and replace the stopper.
um) and then r
ap and clean it.
inse
.
5.4. OPERATIONAL TEST
, fill the
After ha
heating circuit to a pressure of appro
air from the system. Also fill the domestic hot water system.
-
-
-
- Check the seal and the correct functioning of the system for
- Check that the boiler ignites properly and carry out a visual
ving carr
Place the boiler in oper
If necessar
Check the settings and the correct functioning of all the
control, regulation and monitoring parts.
xpelling fumes/dr
e
check on the burner flame.
ied out the maintenance oper
x. 1.5 bar and release the
ation.
, release the air again from the heating system.
y
wing of comb
a
ustion air.
ations
39
Page 40

TABLE
I and II
YES
YES
YESYES
YESYES
NONO
NONO
IS THE
DISPLAY ON?
DOES AN ERROR CODE
APPEAR ON THE DISPLAY?
1. Check the fuses
2. Check the power supply to
the control panel
3. Check/replace the
ON/OFF button
4.
Check the connection between
the main and displa
y P.C.B.s
5. Check/replace the
main and display P.C.B.s
NO
NO
PRESS THE ON/OFF BUTTON
TO THE ON POSITION
MAKE SURE THAT:
1. There is sufficient water in the system
2. The gas is turned on
3. The electrical supply is turned on
SUMMERSUMMER
WINTERWINTER
COMFORT
SELECTOR ON/OFF:
yellow L.E.D
. on
YES:
COMFORT ONYES: COMFORT ON
YES: COMFORT ONYES: COMFORT ON
Flow
temperature
<36C
COMFORT
SELECTOR ON/OFF:
yellow L.E.D
. on
Flow
temperature
>42C
Flow
temperature
<36C
Flow
temperature
>42C
NO: NO:
COMFOR
T OFFCOMFORT OFF
NO: NO:
COMFOR
T OFFCOMFORT OFF
YESYES
NONO
YESYES
NONO
NONO
YESYES
NONO
YESYES
YESYES
YESYES
D.H.W.
IS BEING
DRAWN?
D.H.W.
IS BEING
DRAWN?
YESYES
NONO
IS THE
THE TIME CLOCK
AND/OR ROOM THERMOSTAT
BE ACTIVATED?
NONO
NONO
BUILT-IN
ELECTRONIC
ANTI-FROST DEVICE:
Is there a condition for it to be active?
(flow temp between 3C & 8C)
- PC0 continuous pump
operation selected on
menu
THERE IS NO CALL FOR PUMP OPERATION
THERE IS NO CALL FOR PUMP OPERATION
A
NO
BUILT-IN
ELECTRONIC
ANTI-FROST DEVICE:
Is there a condition for it to be active?
(flow temp between 3C & 8C)
- PC0 continuous pump
operation selected on
menu
7. FAULT FINDING
7.1. FA
ULT
FINDING GUIDE
(FLOW-CHARTS)
Model 27/32 MFFI
It is possib
le to detect and correct any defect by using the standard fault
finding diagrams described in this chapter.
55
Page 41

TABLE
I and II
YES
YES
YESYES
YESYES
NONO
NONO
IS THE
DISPLAY ON?
DOES AN ERROR CODE
APPEAR ON THE DISPLAY?
1. Check the fuses
2. Check the power supply to
the control panel
3. Check/replace the
ON/OFF button
4.
Check the connection between
the main and display P.C.B.s
5. Check/replace the
main and displa
y P.C.B.s
NONO
PRESS THE ON/OFF BUTTON
TO THE ON POSITION
MAKE SURE THAT:
1. There is sufficient water in the system
2. The gas is turned on
3.
The electrical supply is turned on
SUMMERSUMMER
WINTERWINTER
COMFORT
SELECTOR ON/OFF:
yellow L.E.D
. on
YES: COMFORT ONYES: COMFORT ON
YES: COMFORT ONYES: COMFORT ON
Flow
temperature
<36C
COMFOR
T
SELECTOR ON/OFF:
yellow L.E.D
. on
Flow
temperature
>42C
Flow
temperature
<36C
Flow
temperature
>42C
NO: NO:
COMFORT OFFCOMFORT OFF
NO: NO:
COMFORT OFFCOMFORT OFF
YESYES
NONO
YESYES
NO
NO
NO
NO
YES
YES
NONO
YESYES
YESYES
YESYES
D.H.W.
IS BEING
DRAWN?
D.H.W.
IS BEING
DRAWN?
YESYES
NONO
IS THE
THE TIME CLOCK
AND/OR ROOM THERMOSTAT
BE ACTIVATED?
NONO
NONO
BUILT-IN
ELECTRONIC
ANTI-FROST DEVICE:
Is there a condition for it to be active?
(flow temp between 3C & 8C)
- PC0 continuous pump
operation selected on
menu
THERE IS NO CALL FOR PUMP OPERATION
THERE IS NO CALL FOR PUMP OPERATION
A
NO
BUILT-IN
ELECTRONIC
ANTI-FROST DEVICE:
Is there a condition for it to be active?
(flow temp between 3C & 8C)
- PC0 continuous pump
operation selected on
menu
Model 27/32 RFFI SYSTEM
56
Page 42

YESYES
YESYES
NONO
NONO
YESYES
IS THE
PUMP RUNNING?
WAS THE
PL
AUSIBILITY TEST
OK? (
E95: test failed
)
1. Check the pump cable
2. Check/replace the pump
3. Check/replace the NTC
probes
4. Replace the main P.C.B.
P
OWER TO
THE PUMP?
NONO
A
B
Release/Replace pump
1. Check/replace pump cable
57
Page 43

1. Check the fan cable
2.
Replace the fan
3. Replace the main P.C.B.
1. Check/replace ignition
electrode
2. Check ignition cable
3. Check/replace the main P.C.B.
Replace
the main P
.C.B.
IS THE F
AN
RUNNING?
DOES CODE
A33 APPEAR?
ARE IGNITION
SPARKS GENERATED
REGULARLY?
DOES THE
AIR PRESSURE SWITCH
CLOSE? (E33)
YES
YES
YESYES
NONO
NONO
NONO
YESYES
YESYES
NONO
1. Check the power supply
of the gas valve.
2. Check for an air
pressure signal
3. Check the gas pressure
on the burner
4. Check the soft-light
adjustment
5. Replace the gas valve
6. Check/replace the
main P.C.B.
1. Table II
2. Press RESET
1. Table III
IS THE BURNER
ALIGHT?
BOILER HAS
SHUTDOWN?
YESYES
YESYES
NONO
WAS
THE FLOW TEST
SUCCESSFULL?
(A02 TEST FAILED)
YESYES
NONO
NONO
IS
THERE STILL
A PROBLEM?
NORMAL
OPERATION
NONO
YESYES
B
1. Check pump cable
2. Check/replace the pump
3. Check NTC probes cables
4. Check/replace NTC probes
5. Check/replace main P.C.B.
1. Check the exhaust flue duct
2. Check the APS cable
3. Check if there is condensate in the silicone pipes
4.
Check/Replace the APS
5. Check/Replace the main P.C.B.
58
Page 44

8. SHORT SPARE PART LIST
49
15
16
17
64
63
137
31
87
26
85
47
48
83
84
3427 302925
19
3736 38 41 423935
43
44
45
46
82
104
98
103
97
102
98
100
99
36
101
97
96
11
77
76
78
74
RESET
CONFORT
ON/OFF
68
79
82
51
50
47
48
89
88
92
90
91
61 60
22
23
24
20
19
21
86
28
94
95
93
110
32 33 40
72
70
69
73
80
71
81
14
13
7
6
1
12
8
7
8
6
9
10
62
4
3
5
58 575
63
6
64
4
2
54 5253
111
109
112
113
88
134
122
128
136
126
121
121
124
133
107
108
108
106
105
88
91
90
118
117
67
66
65
123
122
119
120
130
132
131
129
135
59
59
56 55
125
125
116
115
114
18
88
127
75
6
205
ON/
OFF
CON
FOR
T
RE
S
ET
M
208
207
210
215
216
202
201
205
204
203
212
213
214
206
211
209
cod. 65102191
27/32 MFFI
59
Page 45

Key
no.
G.C. part
no.
Description
ON
ARIST
Part. No.
1 Flue restrictor 65102197
10 Spark generator 65102177
14 Main P.C.B. 65102236
18 Secondary heat exchanger 990685
21 Temperature probe (DHW) 998458
22 Manifold (CH Return) 990384
29 Safety valve (3bar) 997088
31 Pressure gauge 65102220
32 Gas valve 65102247
35 Flow switch (DHW) 995948
37 Motor (3-way valve) 997147
42 Pump 65102253
46 Automatic air vent 995865
54 Expansion vessel 995940
55 Air pressure switch 65102232
75 Hose clip 990632
90 Retaining clip (NTC CH) 65101007
91 NTC (CH) 990405
101 Repair kit (3-way valve) 65101288
107 Main exchanger (27 KW) 65102233
107 Main exchanger (32 KW) 65102260
126 Ignition electrode 65102198
130 Detection electrode 65102199
132 Fan 65102248
136 Burner (27kW) 65102181
136 Burner (32kW) 65102180
203 Cable (Time Clock) 65102188
204 Time Clock 999599
215 Display P.C.B. 65102235
216 Cable (Display P.C.B.) 65102185
60
Page 46

47
16
17
18
62
61
123
28
83
23
81
45
46
79
80
24 272622 36 39 4037
41
42
43
44
34
90
33
11
75
74
76
73
RES
ET
ON/
OFF
66
77
48
45
46
84
85
86
59 58
19
20
21
82
25
87
88
96
31 38
70
68
67
71
78
69
14
13
7
6
1
12
8
7
8
6
9
10
60
4
3
5
56 555
61
6
62
4
2
52 5051
97
95
98
99
29
120
108
114
122
112
107
107
110
119
93
94
94
92
91
29
86
85
104
103
65
64
63
109
108
105
106
116
118
117
115
121
57
57
54 53
111
111
102
101
100
29
113
72
6
353433
89
3029 32
15
49
205
ON/
OFF
RE
S
ET
M
208
207
211
216
217
202
201
205
204
203
213
214
215
206
212
210
code 65102299
209
27/32 RFFI SYSTEM
61
Page 47

Key
no.
G.C. part
no.
Description
ARISTON
art. No.
P
1 Flue restrictor 65102196
10 Spark generator 65102177
14 Main P.C.B. 65102236
42 Manifold (CH Return) 65102305
26 Safety valve (3bar) 997088
28 Pressure gauge 65102220
31 Gas valve 65102247
40 Pump 65102253
44 Automatic air vent 995865
52 Expansion vessel 995940
53 Air pressure switch 65102232
75 Hose clip 990632
85 Retaining clip (NTC CH) 65101007
86 NTC (CH) 990405
93 Main exchanger (27 KW) 65102233
93 Main exchanger (32 KW) 65102260
112 Ignition electrode 65102198
116 Detection electrode 65102199
118 Fan 65102248
122 Burner (27kW) 65102181
122 Burner (32kW) 65102180
203 Cable (Time Clock) 65102188
204 Time Clock 999599
216 Display P.C.B. 65102235
217 Cable (Display P.C.B.) 65102185
62
Page 48

63
Page 49

Manufacturer: Merloni TermoSanitari SpA - Italy
Commercial subsidiaries: MTS (GB) LIMITED MTS Heating Limited
MTS Building Damastown Industrial Park
Hughenden Avenue Damastown Avenue
ycombe
W
High
Bucks HP13 5FT Dublin 15
elephone:
T
ax:
F
Internet: www.mtsgroup.com/uk Internet: www.mtsgroup.com/ie
E-mail:
Technical Advice: 0870 241 8180 Technical Advice: (01) 437 0121
Customer Ser
(01494) 755600
(01494) 459775 Fax: (01) 810 3727
.com
o@uk.mtsg
inf
roup
0870 600 9888
vice:
Mulhuddart
elephone:
T
E-mail:inf
Customer Ser
(01) 810 3723
o@ie.mtsgroup.com
vice:
(01)
437 0121
099841832211
 Loading...