

Page 1

MALIBU 2 SEAT SWING
Assembly Instructions - Please keep for future reference 6503501
Dimensions
Width - 153cm
Depth - 120cm
Height - 162cm
Important - Read these instructions fully before starting assembly
If you need help or have damaged or missing parts, call the Customer Helpline: 03456400800
For further assistance please visit http://www.argos-support.co.uk/
Issue 1 - 24/10/16
Page 2

!
Safety and Care Advice
Important - Please read these instructions fully before starting assembly
Check you have all the
components and tools listed on
pages 2 & 3.
Remove all fittings from the
plastic bags and separate them
into their groups.
Keep children and animals away
from the work area, small parts
could choke if swallowed.
Make sure you have enough
space to layout the parts before
starting.
Do not stand or put weight on
the parts during assembly, this
could cause damage.
Assemble on a soft level
surface to avoid damaging the
unit or your floor.
Parts of the assembly will be
easier with 2 people.
Dispose of all packaging
carefully and responsibly.
The user of this swing should
always inspect it before each
use.
Check the tightness of all nuts
and bolts on a regular basis.
Always remove the canopy in
heavy wind conditions, otherwise
the canopy may tip over and
cause damage to its parts.
Oil all of the metal parts that
move during usage season.
The manufacturer will not
accept responsibility for
unauthorized repairs or
modifications to the swing or its
parts.
Weight limit is 227 kgs.
Warning: The unit weighs
approximately 21.4 kgs.
Please lift with care.
Care and maintenance
Wash frame parts with mild
soap and water, rinse thoroughly,
and dry frame completely. Do not
use bleach, acid, or other
solvents on the frame parts.
The canopy may be surface
washed with mild soap and
water if necessary. Commercial
foaming upholstery cleaner may
also be used. Rinse well and
hang to dry. Do not machine
wash or dry.
We recommend the use of
furniture covers to protect your
swing when not in use.
Please inspect and tighten all
bolts or fasteners on a regular
basis to ensure proper
performance and safety of your
swing.
In order to prolong the life and
beauty of your swing, we
recommend that it be stored in a
dry and protected area when not in
use.
1
Page 3

Components - Fittings
Please check you have all the fittings listed below
Note: The quantities below are the correct amount to complete the assembly.
A
M8 x 75mm Bolt x 4 M6 x 50mm Bolt x 10
D
ST4.2 x 16mm Screw x 4
G H I
D12 Spring Washer x 4
J
B C
D17 Washer x 8
D10 Spring Washer x 10
M6 x 45mm Bolt x 8
FE
D16 Washer x 28
M8 x P1.25mm Plastic Nut x 4
LK
M6 x P1.0mm Plastic Nut x 10
M N
Canopy/Frame Connector x 2
Leg Cap x 4
Plastic Screw x 2
Tools required
6mm Hex Key 13 & 17mm Nut Wrench
4mm Hex Key
Ruler - Use this ruler to help correctly identify the screws
Suspension Spring x 2
Screwdriver (Not provided)
45
2
Page 4

Components - Parts
Please check you have all the parts listed below
1
Top Cross Beam x 1
Hole
Hole
Hole
2
Front Upright Support x 2
3
Rear Upright Support x 2
4
Rear Cross Brace x 1
Hole
Hole
5
Lateral Cross Brace x 2
3
Page 5

Components - Parts
Please check you have all the parts listed below
6
Right Seat Arm x 1
7
Left Seat Arm x 1
9
Swing Arm Tube x 4
10
Front/Rear Canopy Brace x 2
8
Seat Assembly x 2
Hole
11
Side Canopy Brace x 2
Hole
12
Support Brace x 2
13
Canopy x 1
Hole
4
Page 6

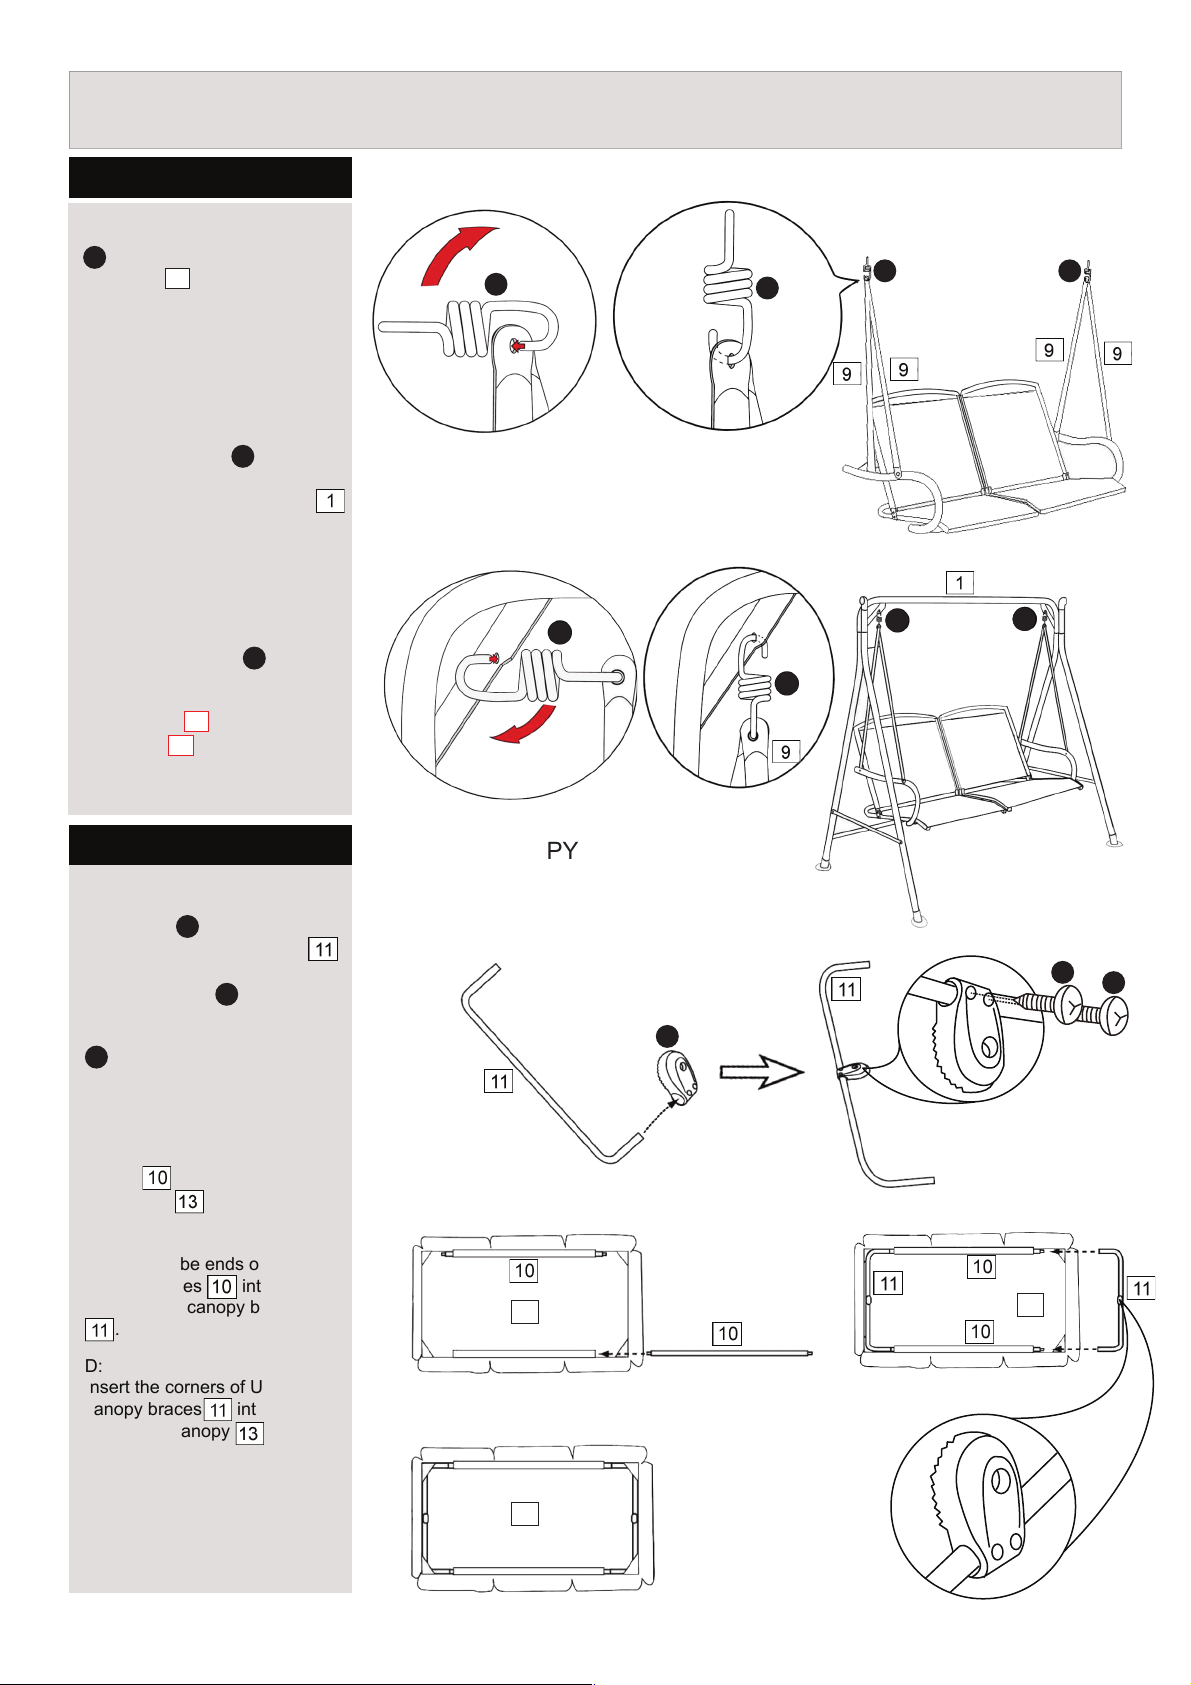
Assembly Instructions
Step 1
Note: When fastening with bolts
and nuts, always use washer
, , or the tube and
FE
G
H
the bolt or the tube and the
plastic nuts.
A:
Fasten the front and rear
upright supports and at
the top by using two sets of
bolts , washers ,
A
spring washers and
plastic nuts . Complete the
same procedure for both sides.
Do not completely tighten the
plastic nuts and bolts.
B:
Attach the top cross beam at
each end of the upright support
and . Fasten the bolts and
2 3
plastic nuts on top of the upright
support.
2 3
E
G
I
1
FRAME ASSEMBLY
A:
3
2
A
E
A E
Do not tighten bolts after a.
Fasten all bolts after Step 1.
2 3
B:
E
E
I
G
J
J
I
G
C:
Attach the lateral cross braces
to the upright supports
and by using bolts ,
washers , spring washers
and plastic nuts .
D:
Fasten the rear cross brace
to the rear upright supports
by using bolts , washers
, spring washers and
F
plastic nuts .
F H
J
B
J
B
H
C:
D:
3
B
F
F
H
J
E:
5
3
4
J
H
F
F
B
E:
Insert the leg caps into the
base of the feet. Completely
tighten all of the plastic nuts and
bolts.
K
5
K
K
K
K
Page 7

Assembly Instructions
Step 2
Connect right seat arm and
left seat arm together by
using support braces . See
Figure for correct position of
support braces .
NOTE:
The labels marked “L” and “R” on
the seat arms and should
coincide with Figure to ensure
proper assembly.
7
12
6 7
6
12
Step 3
Align the holes of the support
braces , seat arms and
12
, and seat assembly .
7
Fasten them together by using
bolts , washers .
C
6
8
F
SEAT ASSEMBLY
L
R
Step 4
Attach the swing arm tubes
to the front of the seat arms
and by using bolts ,
7
washers , spring washers
and plastic nuts . Fasten the
remaining swing arm tubes
to the back of the seat arms
and by using bolts ,
washers , spring washers
and plastic nuts .
F
J
7
F
J
9
6
B
H
9
6
B
F
C
J
H
F
F
B
F
H
J
H
B
F
6
Page 8
Assembly Instructions
Step 5
A:
Hook the suspension springs
into the top of both swing
L
arm tubes . Repeat both sides.
B:
Hang the opposite ends of the
suspension spring into the
holes located on the angled
braces of the top cross beam .
Repeat both sides.
Warning:
Make sure that both ends of the
suspension springs go
completely through the holes
on the angled braces of the top
cross beam and the swing
arm tubes .
9
L
L
1
9
A:
B:
L
L
L
L
L L
L
L
Step 6
A:
Slide the canopy frame
connectors onto the Ushaped side canopy braces
and fasten them into position
by using screws .
Please make sure that the teeth
on the canopy frame connectors
M
are facing towards the inside
of the swing.
B:
Insert the front/rear canopy
braces into the sleeves of
the canopy .
C:
Insert the tube ends of front/rear
canopy braces into the Ushaped side canopy braces
.
D:
Insert the corners of U-shaped
canopy braces into the
pockets of canopy .
M
D
ATTACH CANOPY
A:
B:
13
D:
D
D
D
M
C:
13
13
7
Page 9

Assembly Instructions
Step 7
Attach the canopy/frame
connectors onto the
canopy assembly to the
adjustable teeth on the top
cross beam by using
plastic screws . Repeat
both sides.
Re-check and re-tighten all nuts
and bolts to assure stability.
Warning:
To avoid danger of suffocation,
please always keep plastic
bags or small parts away from
babies and children.
M
N
N
M
M
N
Assembly is completed.
If you need help or have damaged or missing parts, call the Customer Helpline: 03456400800
For further assistance please visit http://www.argos-support.co.uk/
Retailer: Argos
Address: 489-499 Avebury Boulevard Saxon Gate West, Central Milton Keynes Bucks, MK9, 2NW
8
 Loading...