

Page 1
O B
171 / 8274
157 / 3213
171 / 8274
If you need help or have damaged or missing parts, call the Customer Helpline on
01992 450 333
157 / 3213
Page 2
Keep children and animals away
from work area, as small parts
could cause a choking hazzard
if swallowed
Keep children and animals away
from work area, as small parts
could cause a choking hazzard
if swallowed
Page 3
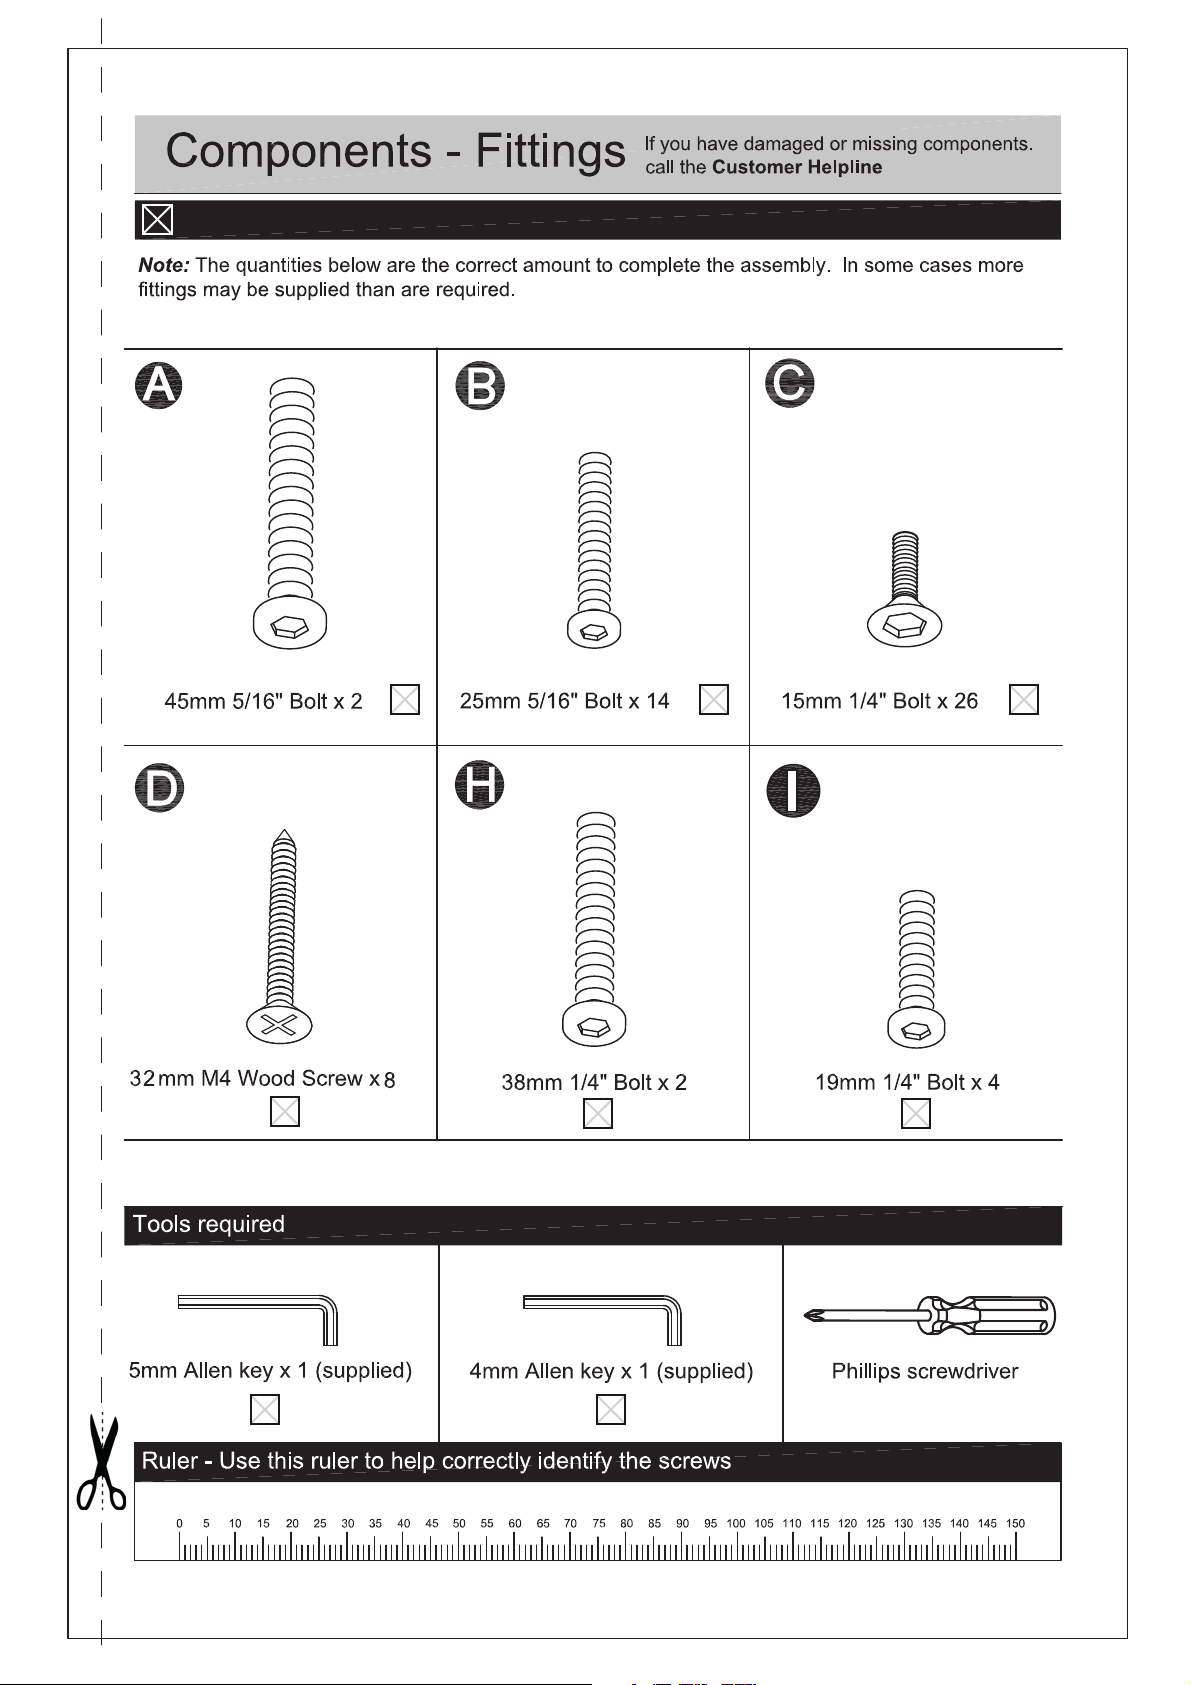
Tick boxes provided to check the components.
on 01992 450 333.
(Cannot compress by hand
alone. It must be attached
to the frame with a mattress
on top for it to compress).
Long support leg x2
9
Slats
x 28 (4ft6)
x 30 ( 5ft )
Page 4
Tick boxes provided to check the components.
on 01992 450 333.
Metal Support Block x 4
20
(These clips are very small, please
keep them in a safe place until
required in assembly.)
Metal Clip x 4
E
Plastic Cap x2
J
5/16” Washer x 8
F
1/4” Washer x 4
K
Frame Support x 1
Plastic Foot Adjuster x 2
G
3
Page 5
Tick boxes provided to check the components
on 01992 450 333.
(not supplied)
4
Page 6

Step 1
Assemble footboard
A)
Attach the frame support
to the footboard
22 4
using bolts and
washers as shown.
B)
Attach the metal support
blocks to the leg
board & headboard
as shown using m4
3
screws .
A
F
16
4
D
22
16
16
16
16
5
Page 7

B
B
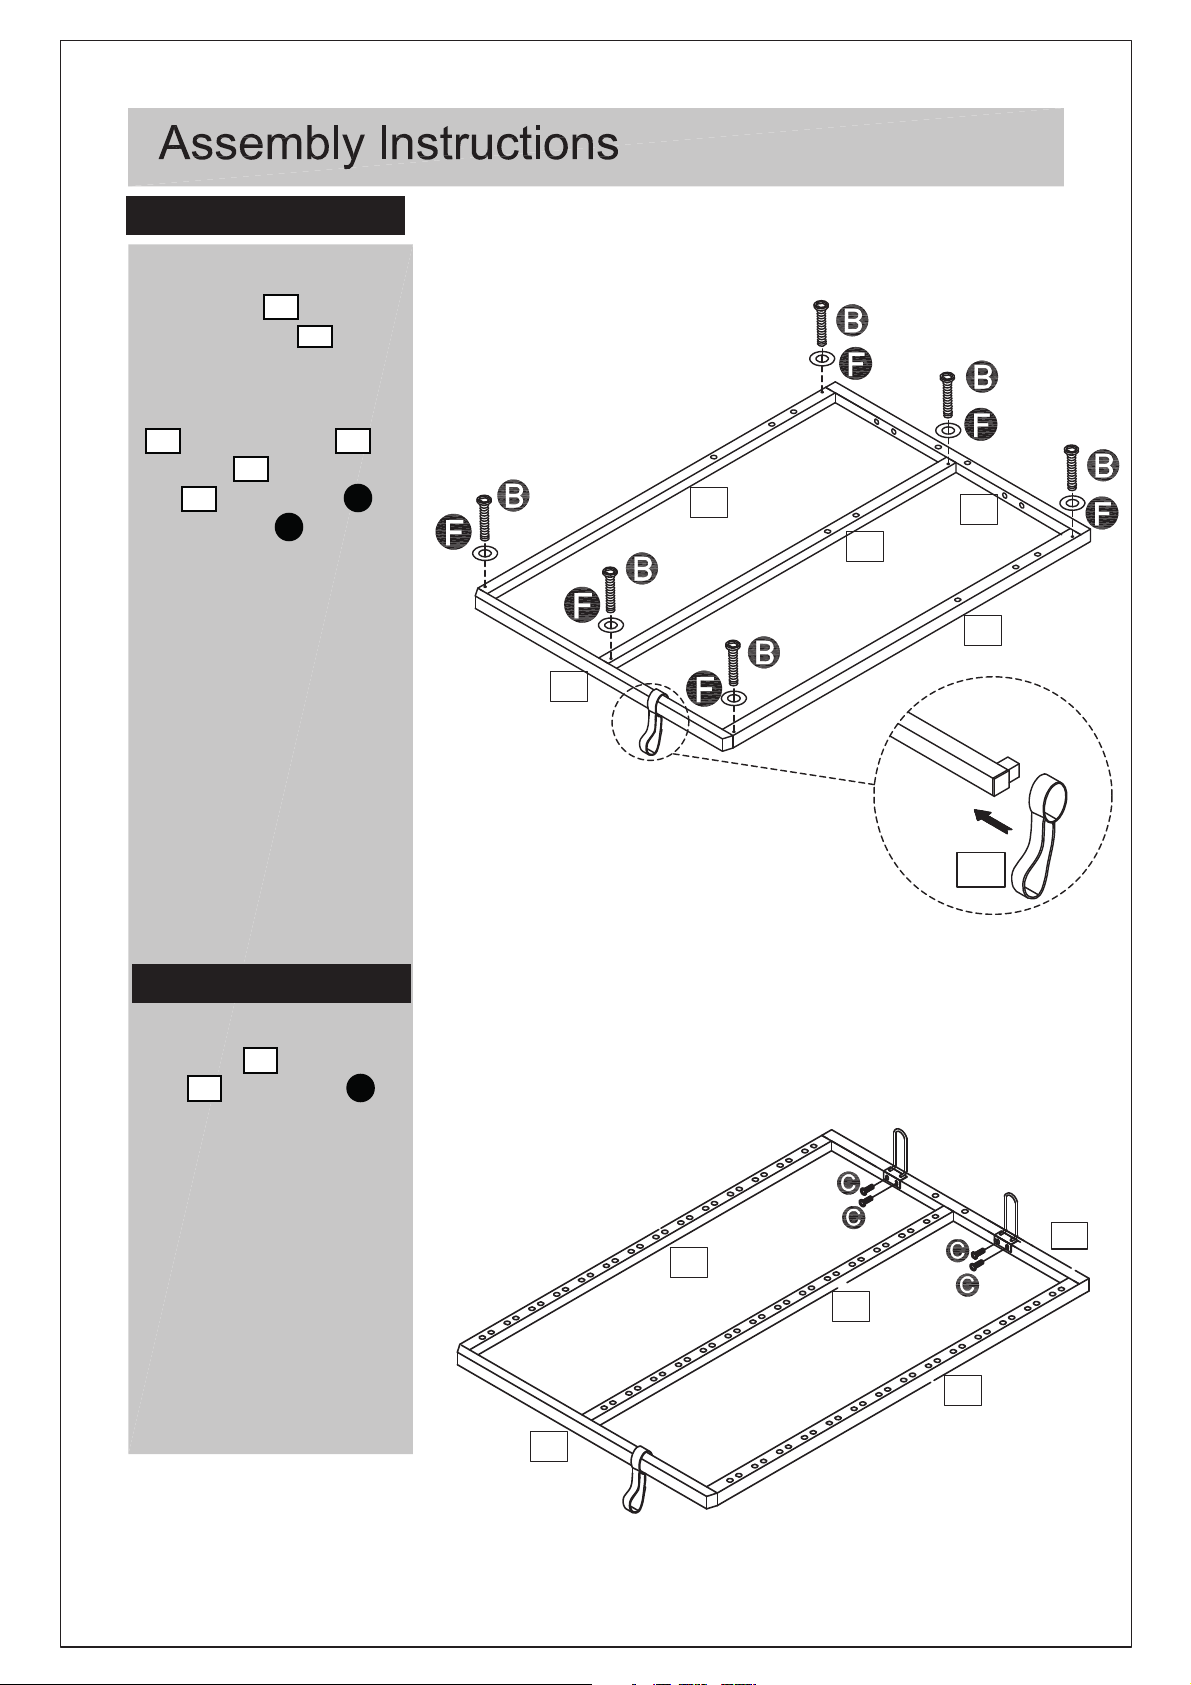
Step 2
B
B
Attaching side rails
Loosely attach the bolts
to the headboard
B
B
and footboard then
hook on the side rails
2
& . Securely tighten
the bolts .
Do not over tighten.
B
4
3
1
B
2
Footboard Headboard
B
G
B
3
6
Page 8

Step 3
Assemble base
a: Attach the short
support legs to the
underside of the bottom
central rail using
bolt .
H
18
15
15
18
Insert cap .
J
b: Attach the bottom
centre rail to the
headboard and footboard using
washers & bolts
as shown.
I
15
3
4
K
15
C
17
c: Attach the support rails
17 1
to the side rails
2
& using bolts
C
as shown.
Place bolts in to
the countersunk
side of the
support rails.
17
17
7
Page 9

Step 4
8
Page 10

C
Step 5
Attaching hinges
a: Attach the hinges
to the side rails &
using 4x bolts as
shown with the Allen key
provided.
1
C
IMPORTANT: The gas struts will not compress by hand alone.
The gas struts will only compress once the frame is assembled
with the weight of the mattress on top.
5
Make sure the open end of the hinge is facing the footboard
2
as shown.
a:
5
b: Attach the gas struts
6
with the thinner
tube facing up away
from the bed base.
Secure in place with
metal clips .
E
C
b:
C
P
C
6
TIP: Use pliers to slightly squeeze
the clip to ensure a snug t on to
E
each end of the gas strut.
9
Page 11
Step 6
Frame assembly
Identify the rails then lay them down on the oor to
secure together.
Attach belt to the
front frame rail before
xing the rails together.
Connect the side rails
12 10
back frame rail ,
front rail , and centre
13
rail using bolts
and washers as shown.
21
11
11
B
F
11
12
10
13
12
21
Step 7
Connect the mattress
supports to the back
rail using bolts
as shown.
10
8
C
Turn the frame over to attach the mattress supports.
10
12
13
12
11
10
Page 12

Step 8
Support legs assembly
Attach the long support
legs to the underside
9
of the frame using bolts
as shown.
C
Insert the plastic
foot adjusters .
G
Note: Be careful not to block or damage the support legs
with any items stored underneath the frame. Ensure there
is enough space for the legs when the frame is lowered.
9
Adjust the feet so they are not in
direct contact with the at base
9
below it. There should be a 10mm
gap. To adjust, rotate the lower
section until at desired height.
10mm
10mm
11
Page 13

Step 9
Attach frame
Attach the assembled
frame to the hinges
as shown, by inserting
bolts through the
C
upper arm of the hinge
5
and into the side
12
rails .
5
12
5
C
C
C
12
5
C
C
C
The weight of the mattress will help lower the frame.
Mattress weight limit is 50kg.
12
Page 14
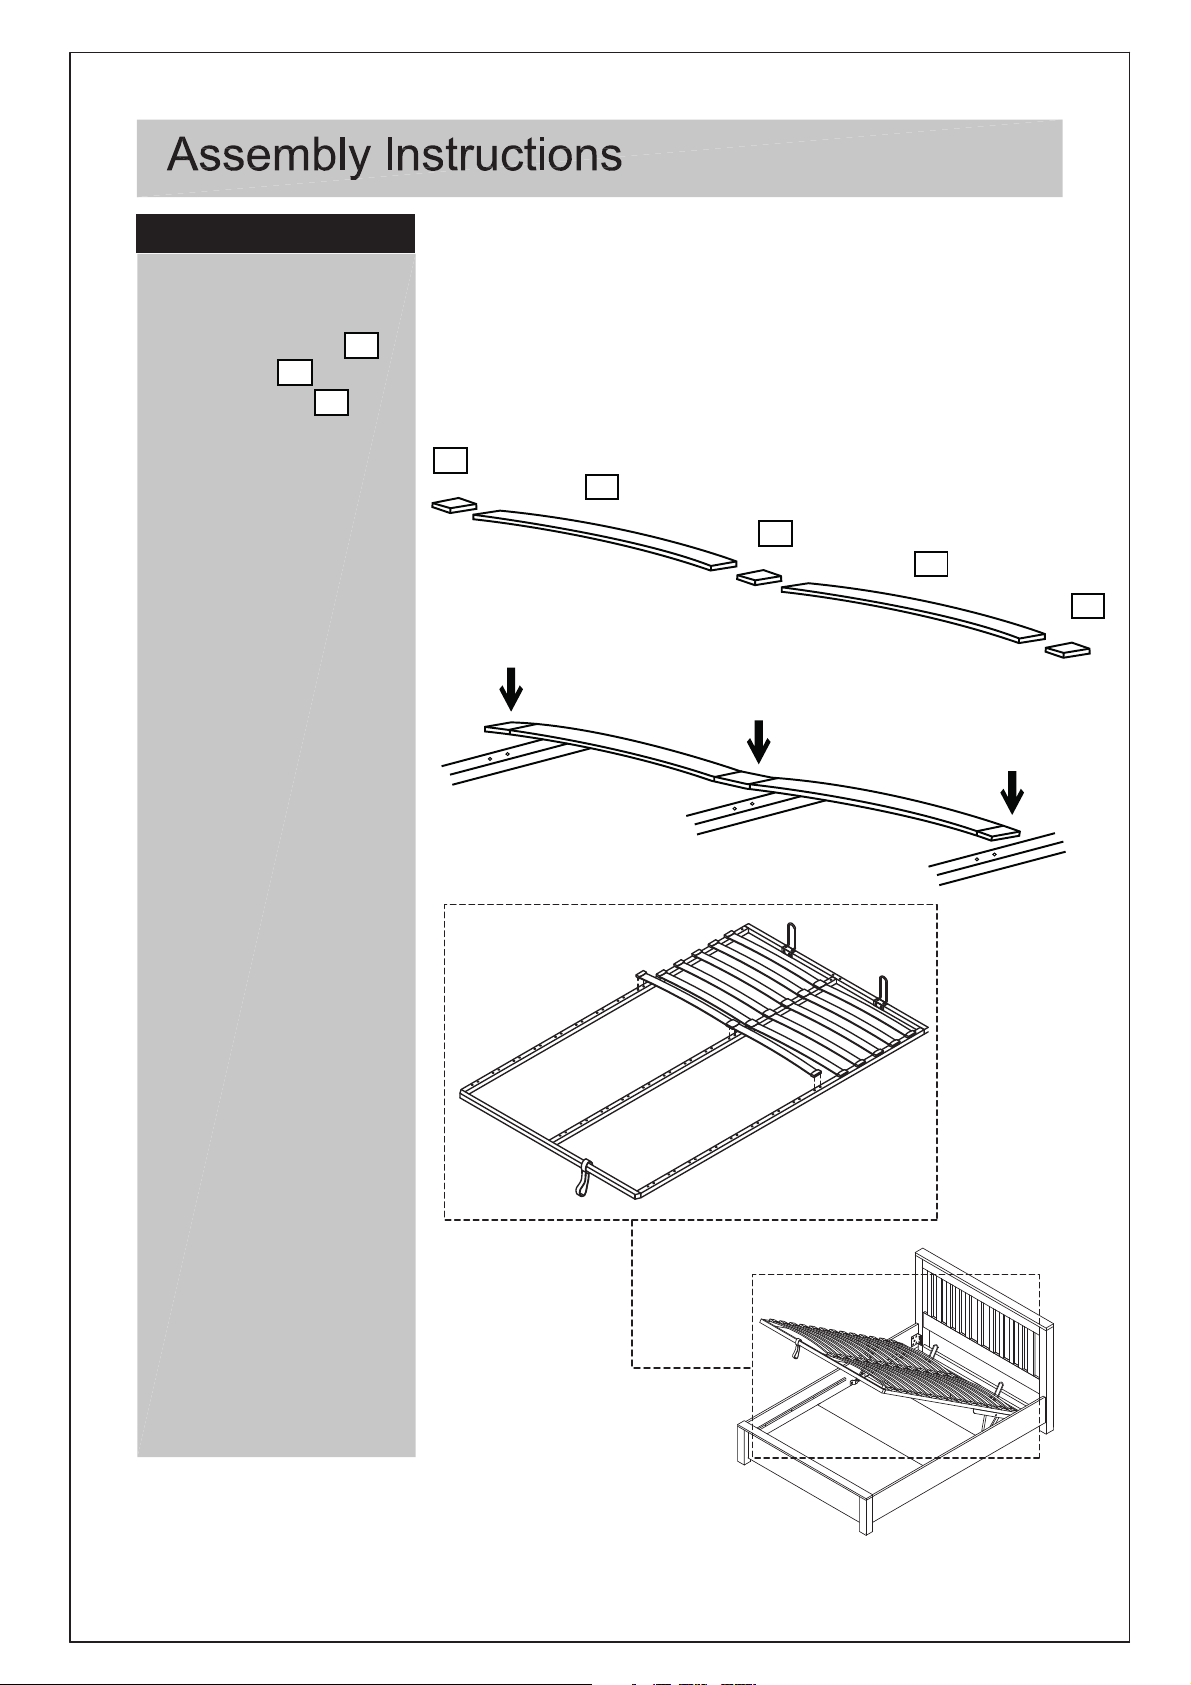
Step 10
Place Slats
a: Slot the bed slats
into the end and
central slat caps as
shown.
20
14
19
Contact customer service if you have any damaged slats or
are missing slats or caps on 01992 450 333.
Note: The frame may not push down until the mattress has
been placed on top. If so, attach the slats rst whilst frame is in
the upright position, place mattress on top of frame and pull
down hard using the strap provided.
20
14
19
14
b: With the slats tted
into the slat caps, rmly
push the end caps into
the slat frame rst, then
push down the middle
slat cap into place on the
centre rail.
20
Step 1
Step 3
Step 2
Assembly is now complete
13
 Loading...