

Page 1
MADE IN
BRITAIN
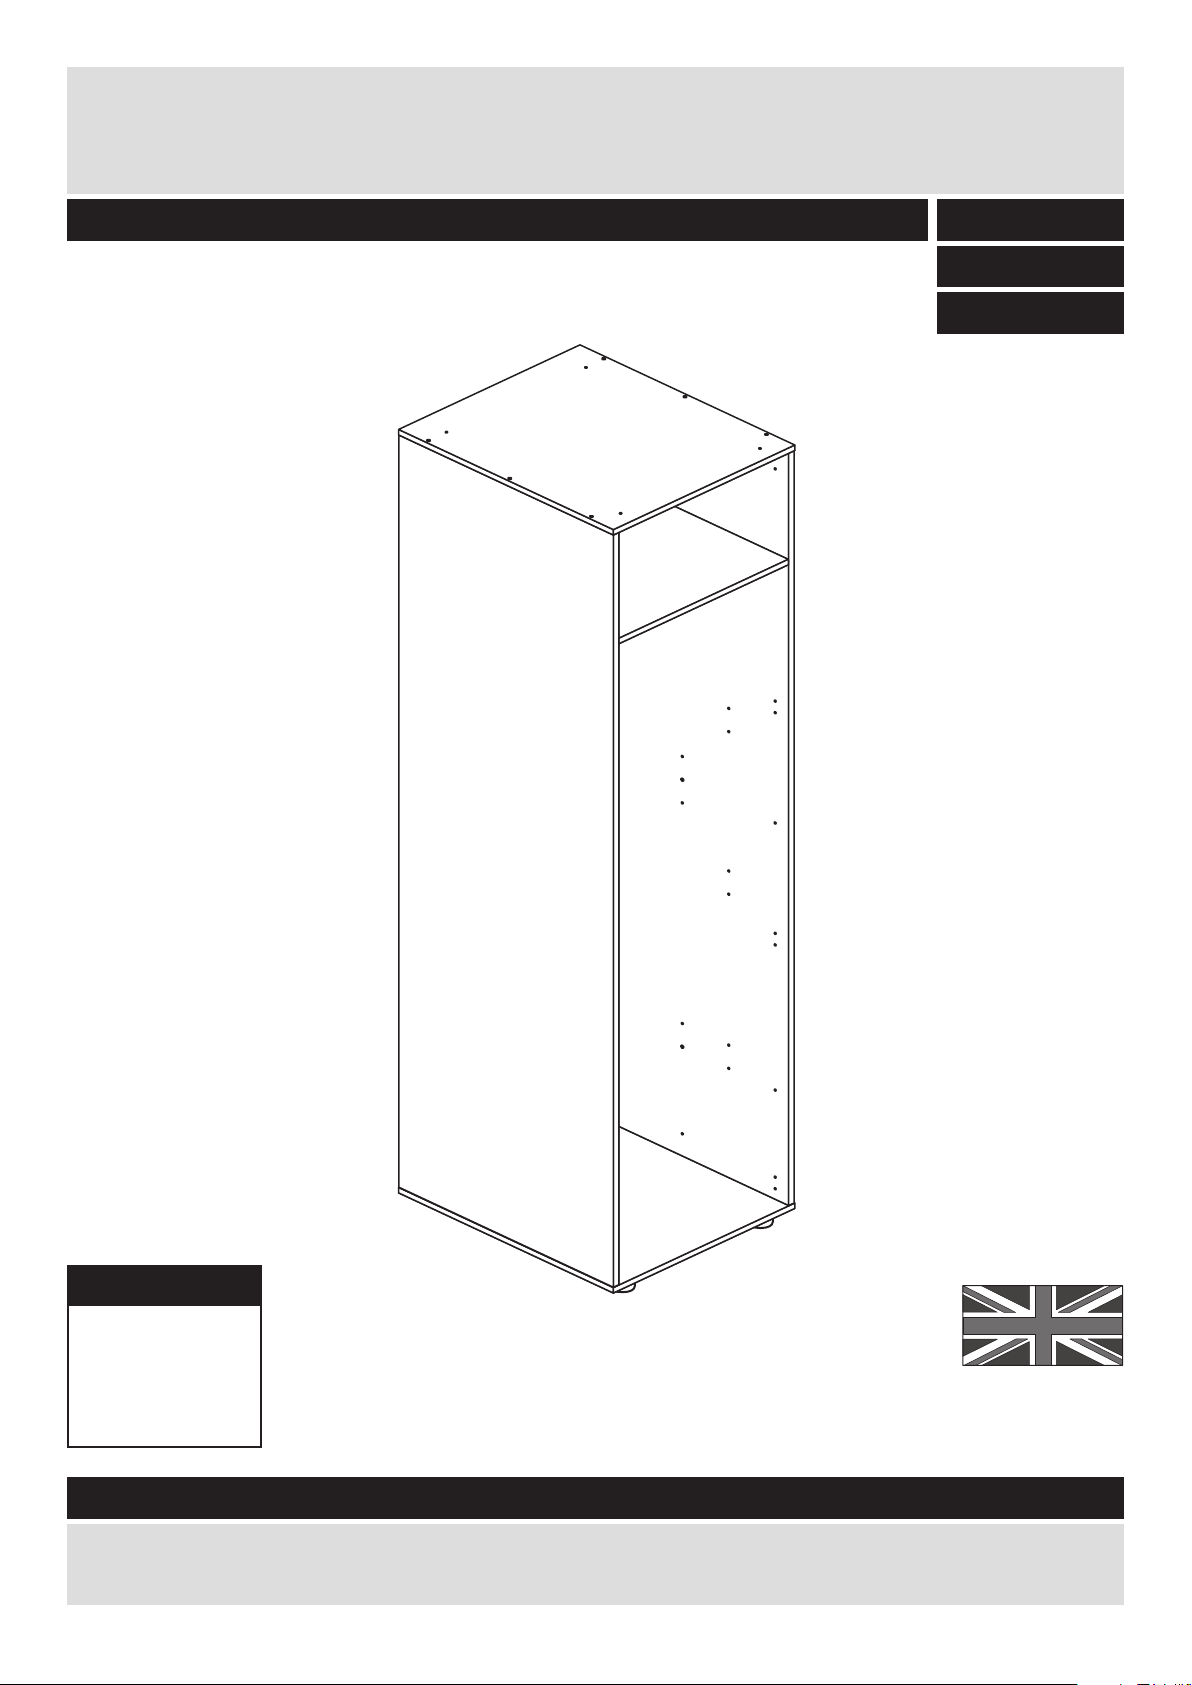
Dimensions
Width - 50cm
Depth - 59.5cm
Height - 212.5cm
Atlas - Single Robe Carcass
Assembly Instructions - Please keep for future reference
If you need help or have damaged or missing parts, call the Customer Helpline: 08456 400800
Issue 2 - 05/02/14
Important - Please read these instructions fully before starting assembly
152/9432
157/9107
157/2537
Page 2
Safety and Care Advice
Important - Please read these instructions fully before starting assembly
• Warning: This unit weighs
approximately 34kgs.
Please lift with care.
• Check you have all the
components and tools listed on
pages 2 and 3.
• Remove all fittings from the
plastic bags and separate them
into their groups.
• Keep children and animals
away from the work area, small
parts could choke if swallowed.
• Parts of the assembly will be
easier with 2 people.
• Make sure you have enough
space to layout the parts before
starting.
• Do not stand or put weight on
the product, this could cause
damage.
• Assemble the item as close to
its final position (in the same
room) as possible.
• Assemble on a soft level
surface to avoid damaging the
unit or your floor (use opened
out unit carton).
1
Care and maintenance
• Only clean using a damp cloth
and mild detergent, do no use
bleach or abrasive cleaners.
• From time to time check that
there are no loose screws on
this unit.
• This product should not be
discarded with household
waste. Take to your local
authority waste disposal centre.
Note: If required the next page
can be cut out and used as
reference throughout the
assembly. Keep this page with
these instructions for future
reference.
• We do not
recommend the
use of power
drill/drivers for
inserting screws,
as this could damage the unit.
Only use hand screwdrivers.
• Safety note: It is
recommended that this unit is
secured to a wall using the
bracket supplied.
• Dispose of all packaging
carefully and responsibly.
Page 3
Components - Panels
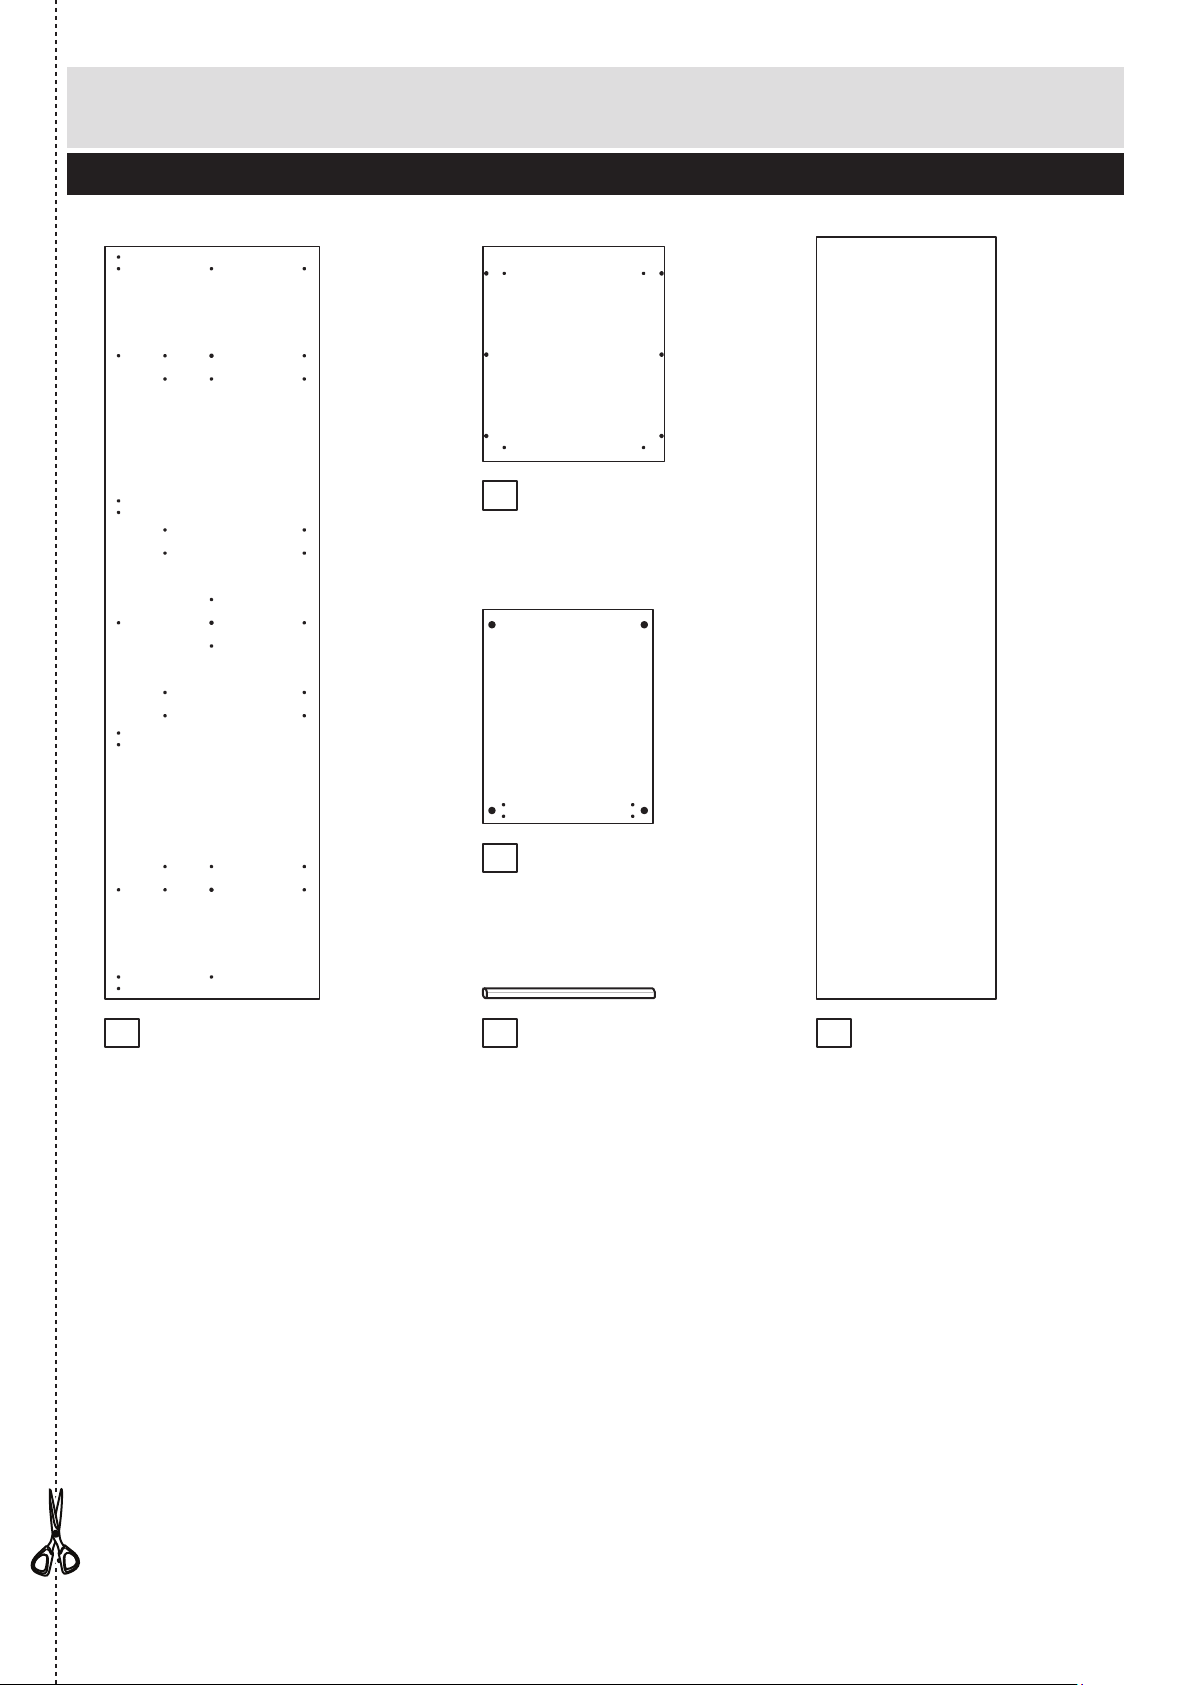
Please check you have all the panels listed below
2
1
If you have damaged or missing components, call the
Customer Helpline: 08456 400800 quoting the reference
numbers below
Universal End (D2396A)
(2074 x 591mm) x 2
Top/Base (D2399A)
(500 x 592mm) x 2
Fixed Shelf (D2401A)
(468 x 590mm)
Back (X2100-494)
(2100 x 494mm)
2
3
Hanging Rail (FHR460)
(460mm long) x 2
4 5
Page 4
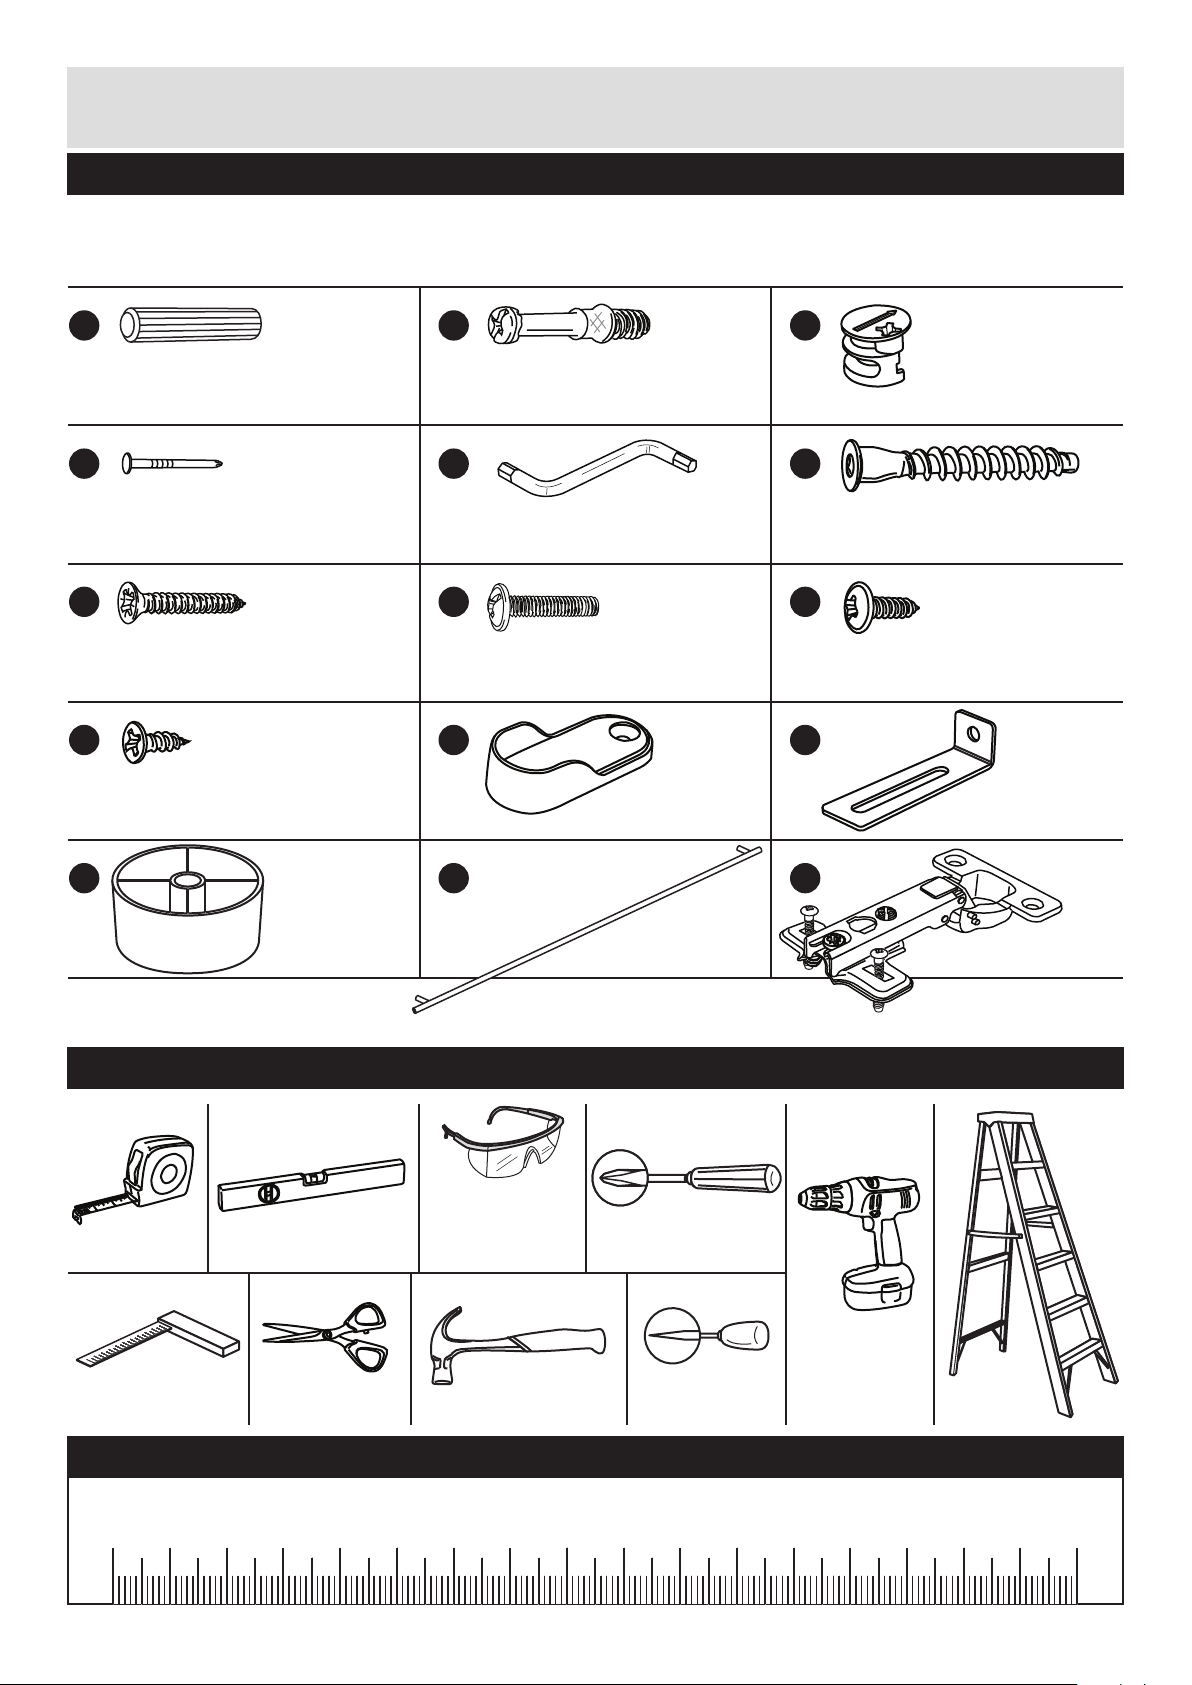
Please check you have all the fittings listed below
3
Components - Fittings
If you have damaged or missing components, call the
Customer Helpline: 08456 400800 quoting the reference
numbers below
Note: The quantities below are the correct amount to complete the assembly. In some cases
more fittings may be supplied than are required.
A
Wooden dowel (F22) x 2
B
Metal dowel (F901) x 4
C
D E
Large locking
nut (F900) x 4
F
G H I
L
Nail (F51) x 33
Ruler - Use this ruler to help correctly identify the screws
mm 10 20 30 40 50 60 70 80 90 100 110 120 130 140 150 160 170
J
M
K
Rail Holder
(F891) x 4
Allen Key (F36) x 1
50mm Screw (F49) x 12
19mm Screw (F461) x 2
25mm Screw (F50) x 4
13mm Screw (F63) x 16
13mm Screw (F79) x 1
Bracket (F327) x 1
Feet (F854) x 4
Tools required
Rule
Scissors
Spirit
level
Hammer Bradawl
Eye protection
(when using a
hammer or drill)
Cross-head
screwdriver
Step
ladder
Electric drill
(only use
when drilling
into walls)
Square
mm
10
20
30
40
50
60
70
80
90
100
mm
10
20
30
40
50
60
70
80
90
100
ON
Handle (F323) x 1 Hinge (F328) x 4
Page 5
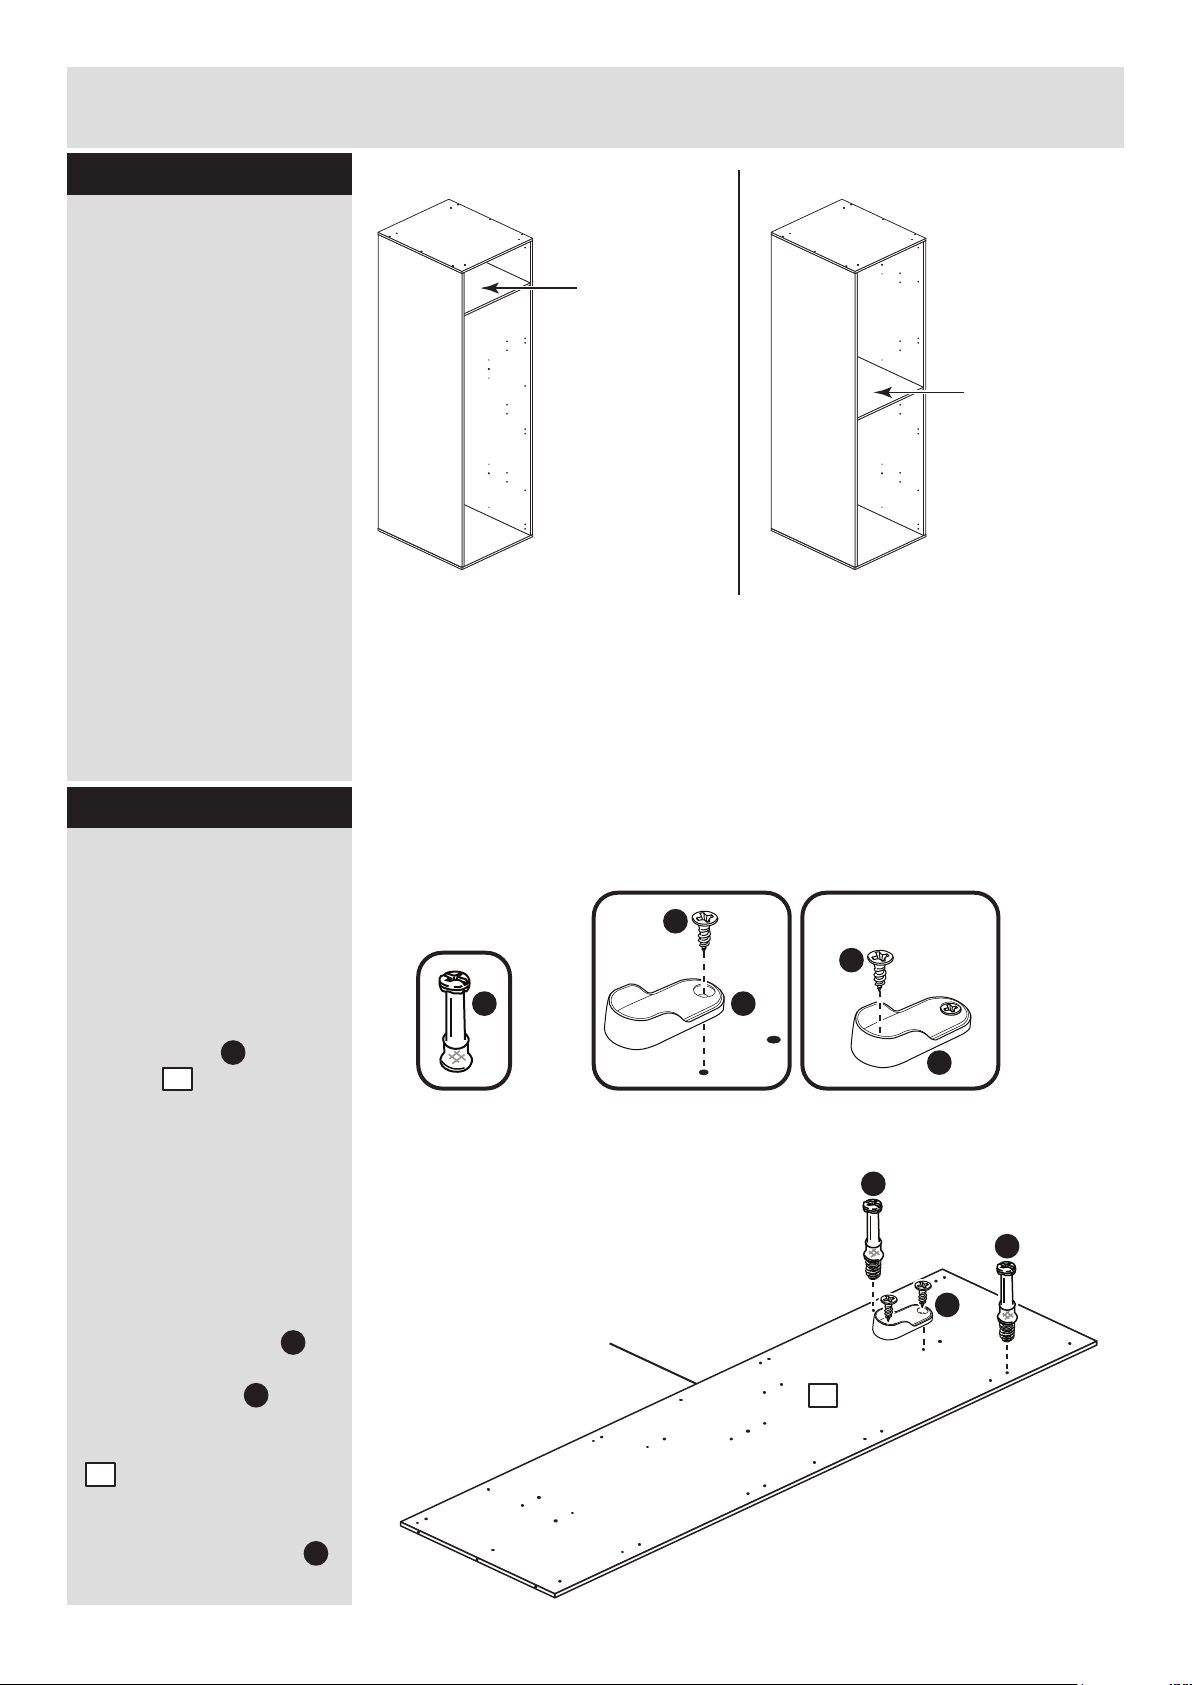
Finished
front edge
Prepare the left end
Refer to step 1 and, if
you have chosen to fit 1
hanging rail or, an
internal chest or, a
shelf pack, screw 2
metal dowels into the
left end .
Note: Tighten the metal
dowels up fully against
the panels.
Note: If you have
purchased a shelf pack,
do not fit the rail holder.
To fit the rail holder ,
screw through its top
hole with screw and
into the shallow mark
hole drilled in the left end
. . Make sure that it is
fitted straight, in line with
the panel edges and
then fit another screw
Assembly Instructions
4
If you have damaged or missing components, call the
Customer Helpline: 08456 400800 quoting the reference
numbers below
Are you fitting 1 or 2
Hanging Rails or, an
Internal Chest or, a
Shelf Pack?
Step 1
Step 2
The fixed shelf will
need to go here if
you are fitting the
following:-
Only 1 Hanging Rail
or
An Internal Chest
or
A Shelf Pack
Follow Steps
2 and 3.
Only follow Steps 2 and 3 if you are only fitting
1 hanging rail or, an internal chest or, a shelf pack.
If you are fitting 2 hanging rails, follow Step 4 and 5.
The fixed shelf
will need to go
here if you are
fitting the
following:-
2 Hanging Rails
Follow Steps
4 and 5.
J
K
J
K
B
K
J
B
B
1
1
B
K
1
J
Note: If you have purchased a shelf pack,
do not fit the rail holder.
Page 6
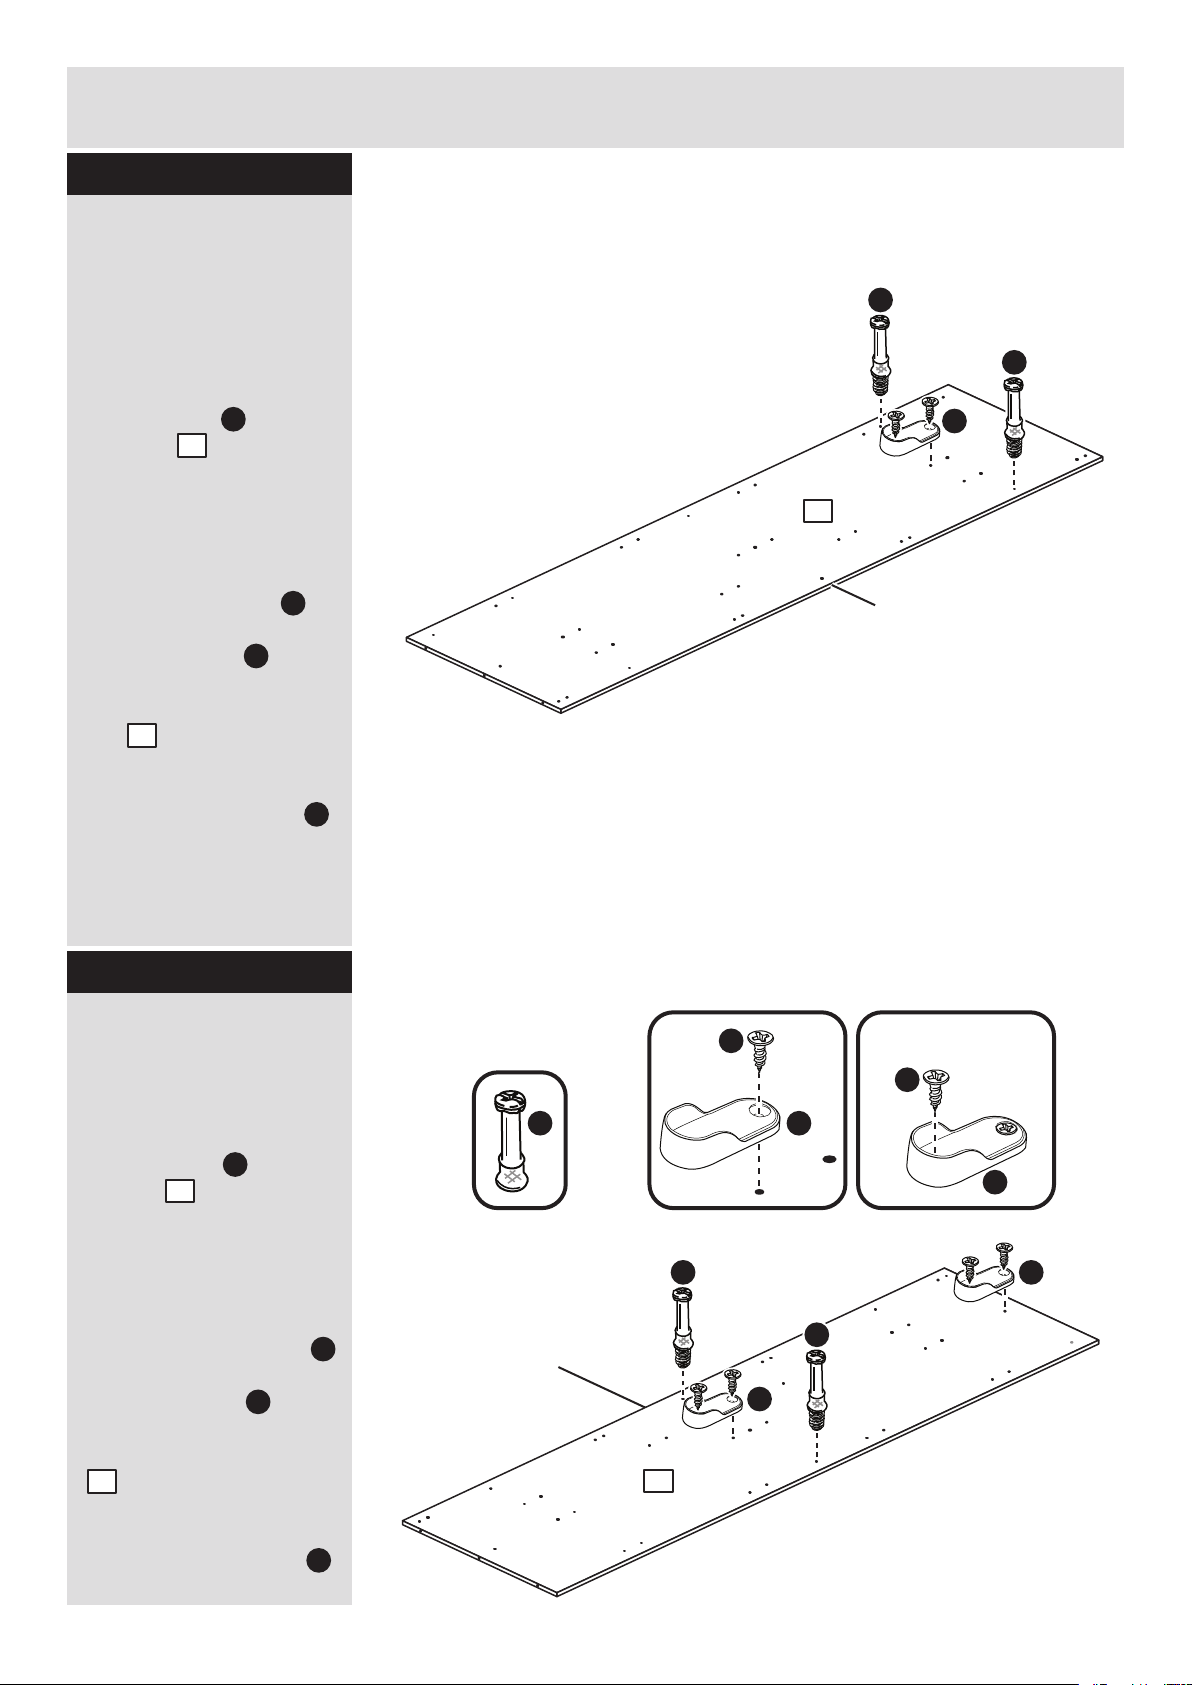
Assembly Instructions
5
Step 3
Step 4
Prepare the right end
Refer to step 1 and, if
you have chosen to fit 1
hanging rail or, an
internal chest or, a
shelf pack, screw 2
metal dowels into the
right end .
Note: Tighten the metal
dowels up fully against
the panels.
To fit the rail holder ,
screw through its top
hole with screw and
into the shallow mark
hole drilled in the right
end . Make sure that
it is fitted straight, in line
with the panel edges and
then fit another screw
using the lower hole.
B
K
J
J
1
1
B
B
K
1
Finished
front edge
Finished
front edge
Prepare the left end
Refer to step 1 and, if
you have chosen to fit 2
hanging rails, screw 2
metal dowels into the
left end .
Note: Tighten the metal
dowels up fully against
the panels.
To fit the 2 rail holders
screw through the top
hole with screw and
into the shallow mark
hole drilled in the left end
. . Make sure that they
are fitted straight, in line
with the panel edges and
then fit another screw
using the lower hole.
B
K
J
J
B
B
1
1
J
K
J
K
B
K
1
K
Only follow Steps 4 and 5 if you are fitting 2 hanging rails.
If you are just fitting 1 rail, follow Step 2 and 3.
Note: If you have purchased a shelf pack,
do not fit the rail holder.
Only follow Steps 2 and 3 if you are only fitting
1 hanging rail or, an internal chest or, a shelf pack.
If you are fitting 2 hanging rails, follow Step 4 and 5.
Page 7
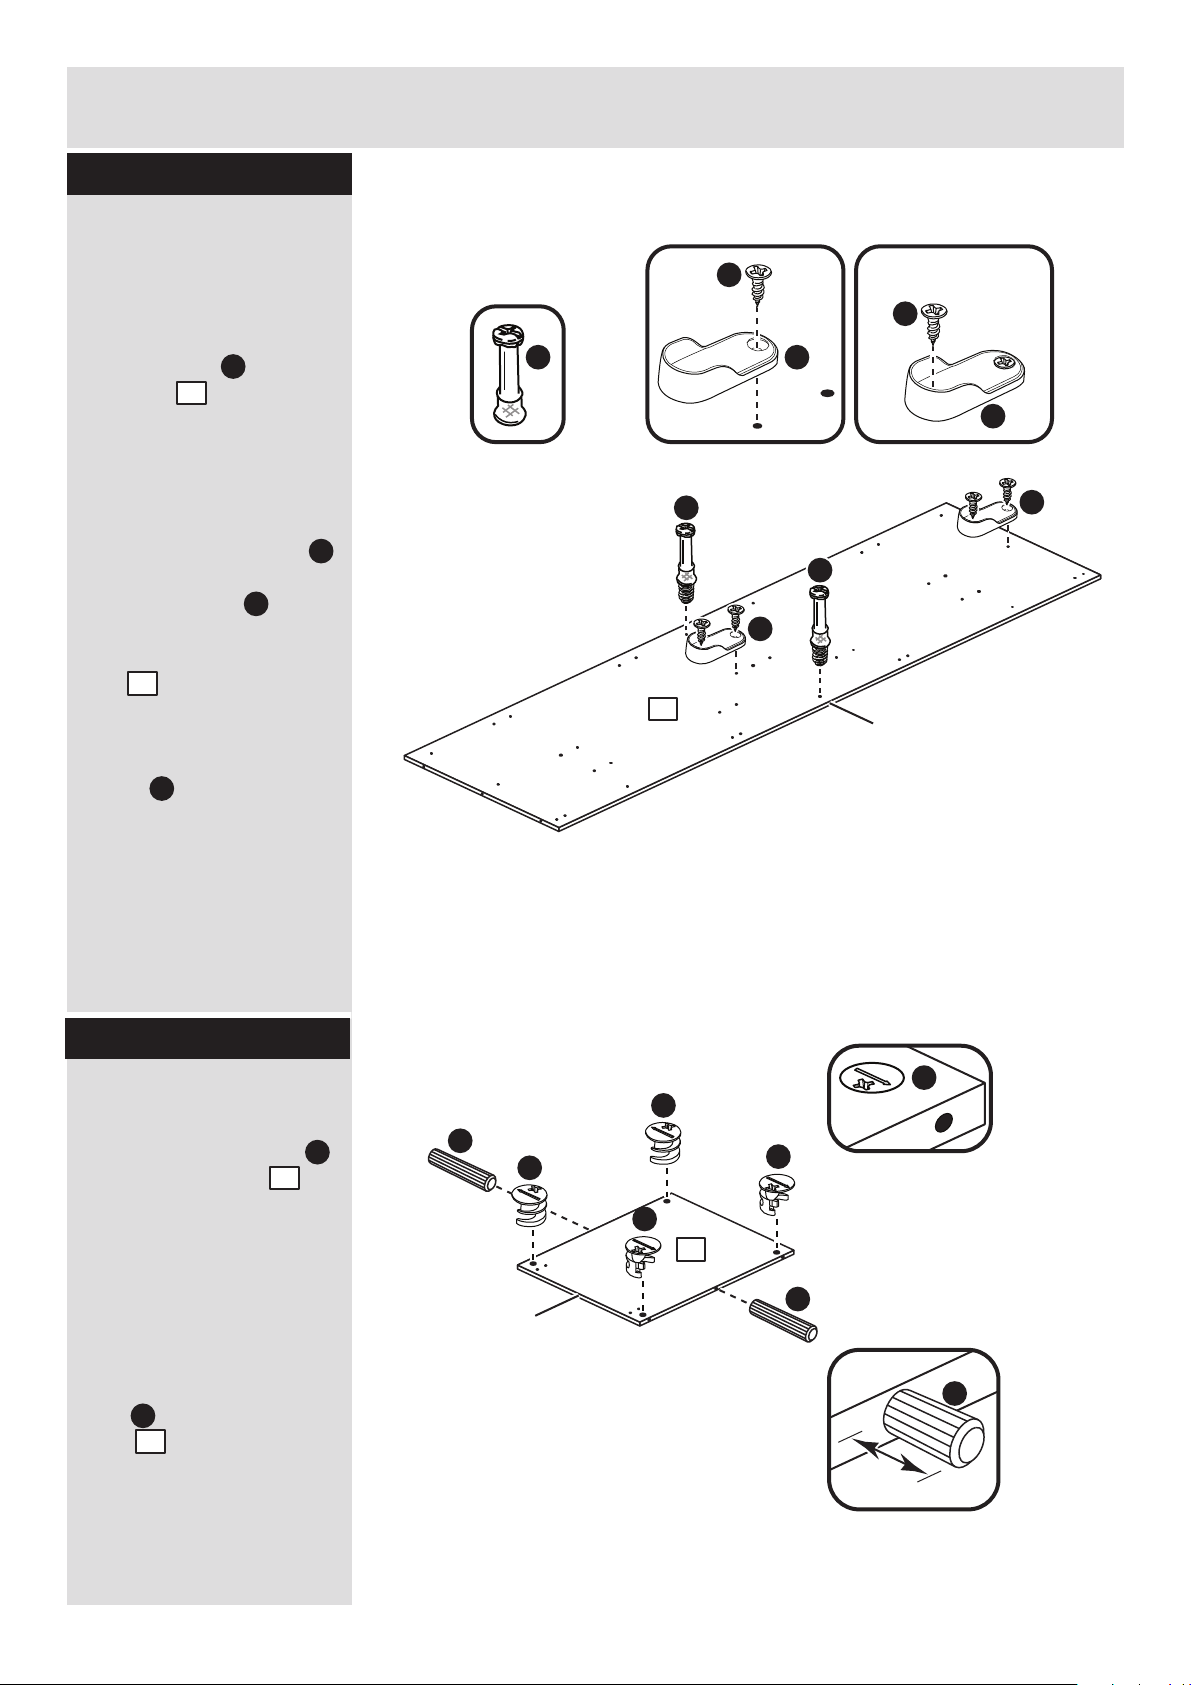
A
Assembly Instructions
6
Step 5
Only follow Steps 4 and 5 if you are fitting 2 hanging rails.
If you are just fitting 1 rail, follow Step 2 and 3.
B
B
K
1
Finished
front edge
Prepare the right end
Refer to step 1 and, if
you have chosen to fit 2
hanging rails, screw 2
metal dowels into the
right end .
Note: Tighten the metal
dowels up fully against
the panels.
To fit the 2 rail holders
screw through the top
hole with screw and
into the shallow mark
hole drilled in the right
end . Make sure that
they are fitted straight, in
line with the panel edges
and then fit another
screw using the lower
hole.
B
K
J
J
1
1
J
K
J
K
B
K
Step 6
Prepare the fixed shelf
Tap 2 wooden dowels
into the fixed shelf .
Note: Wooden dowels
must not stick out from
the edge by more than
10mm or they may
damage other panels.
Insert 4 large locking
nuts into the fixed
shelf .
Note: The arrow on the
locking nut must point
towards the hole in the
edge of the panel.
A
C
3
3
C
C
C
C
C
3
Finished
front edge
A
10mm
A
Page 8
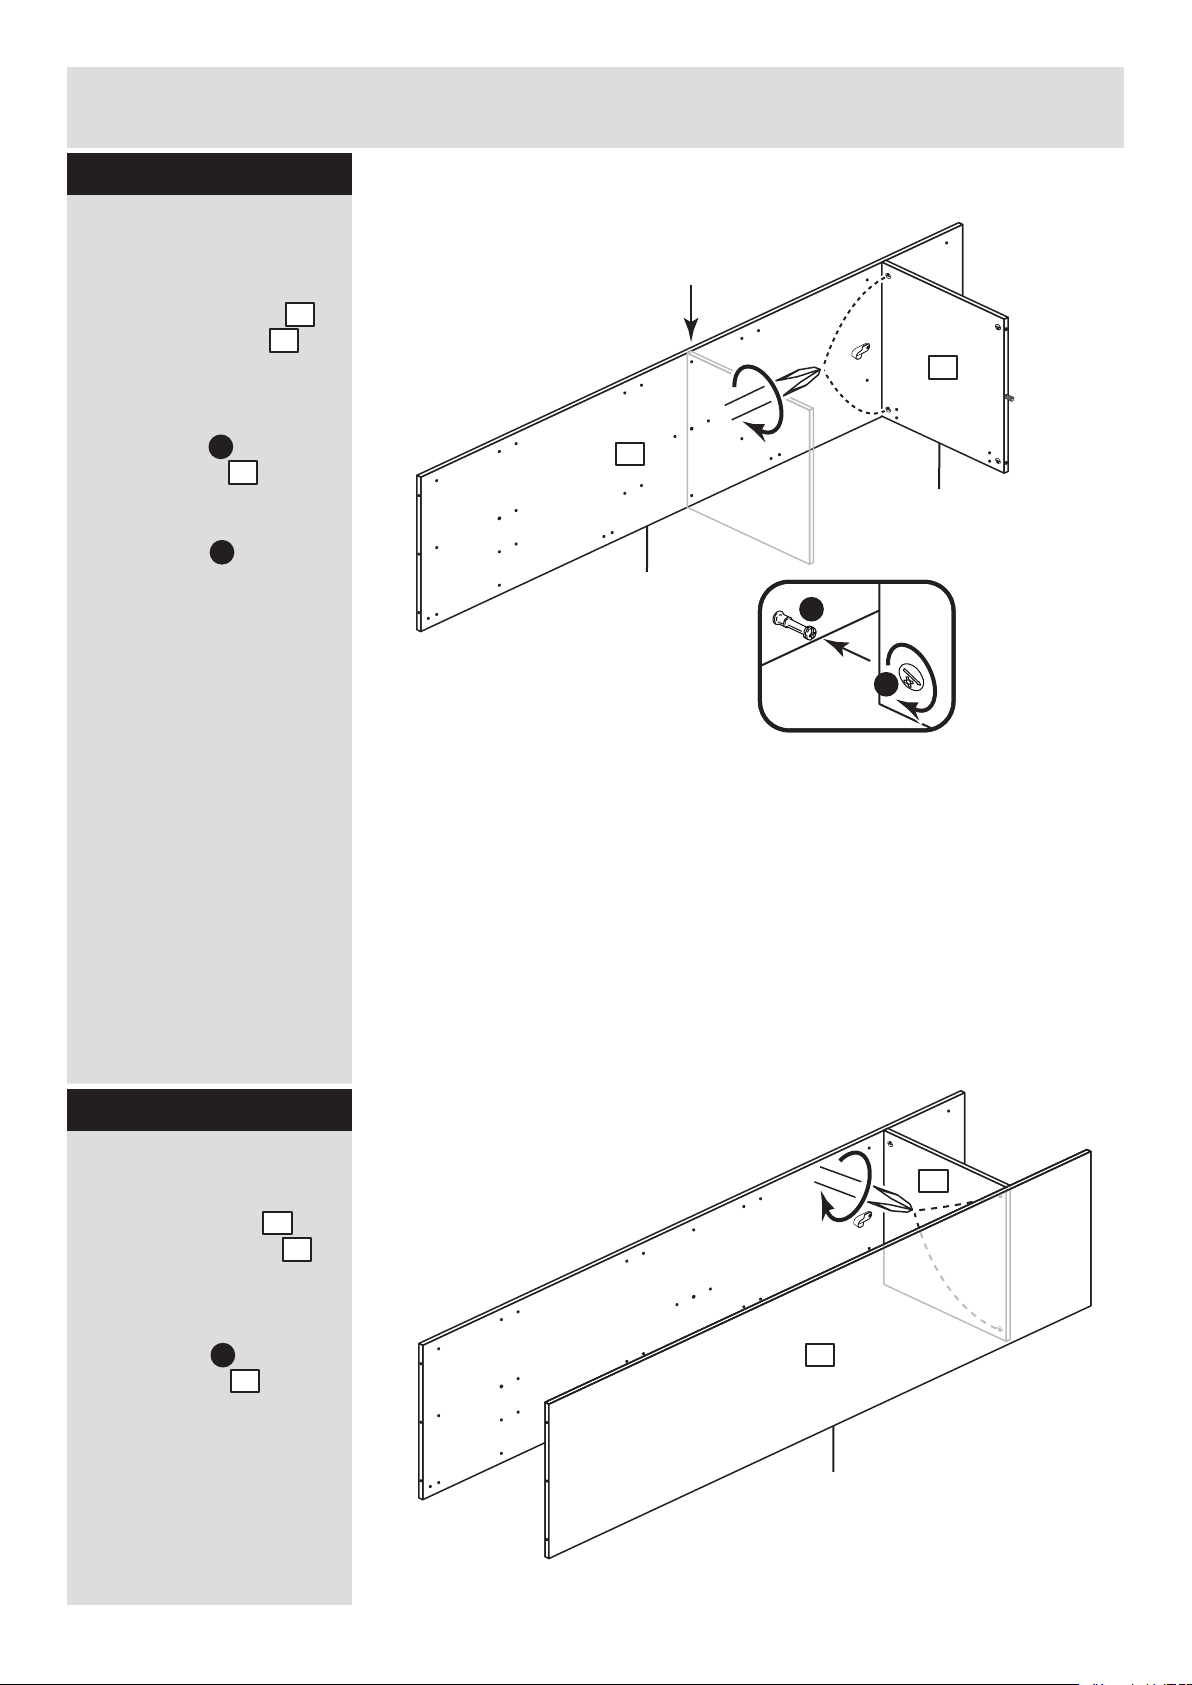
Finished
front edge
Finished
front edge
Finished
front edge
Assembly Instructions
7
Step 7
Step 8
Join the fixed shelf to
the right side
Push the fixed shelf
onto the right side .
Use a screwdriver to
tighten the 2 large
locking nuts fitted to
the fixed shelf .
Note: Turn the large
locking nuts as far as
they will go - more than
1/2 a turn.
If you have fitted the
2 metal dowels in this
position, the fixed
shelf will go here.
The following diagrams will show the fixed
shelf at the top end of the unit.
You may have fitted it in the middle of the unit.
B
C
3
1
1
3
C
C
3
3
1
Fit the left side
Push the left side
onto the fixed shelf .
Use a screwdriver to
tighten the 2 large
locking nuts fitted to
the fixed shelf .
1
3
C
3
Page 9
E
F
F
F
F
F
Finished
front edge
Finished
front edge
E
F
Assembly Instructions
8
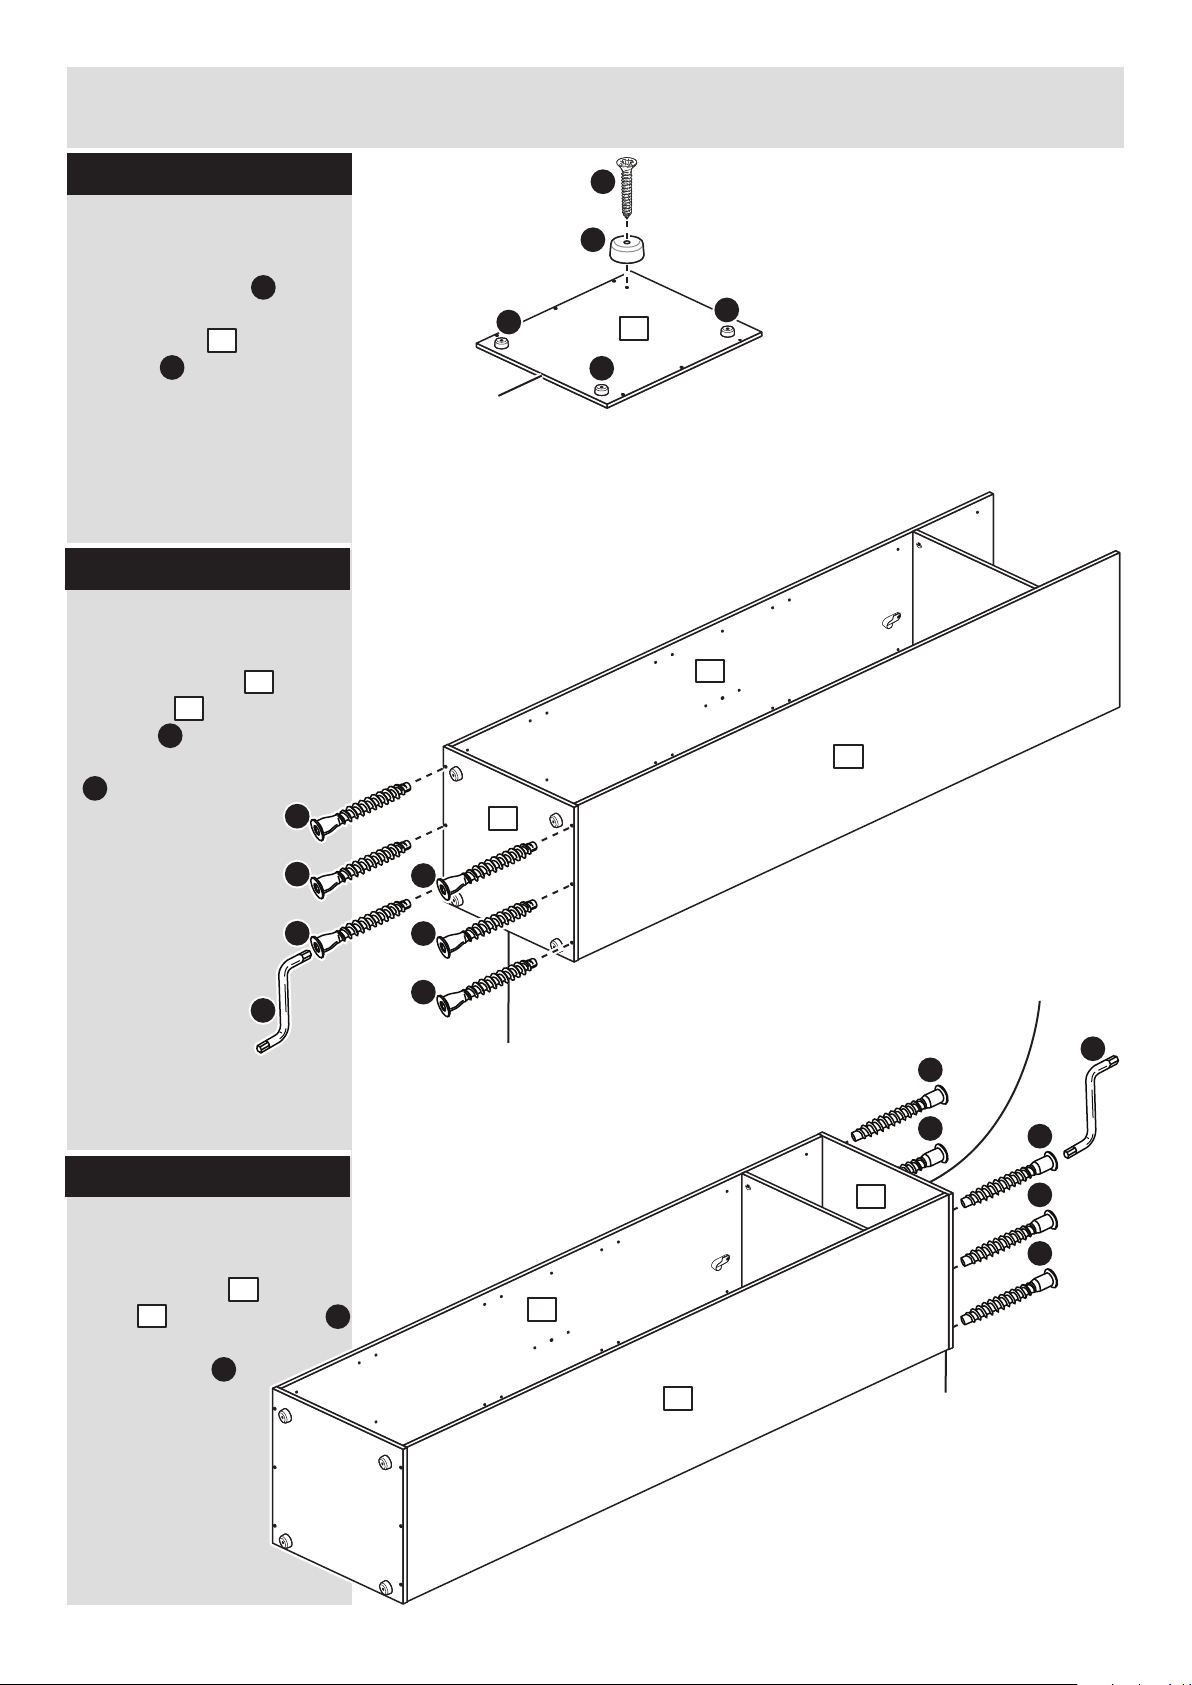
Step 9
Step 10
Fit the base
Attach the base to
the ends using 6
screws and tighten
them using the allen key
. .
G
M
M
M
M
Finished
front edge
Prepare the base
Screw the 4 feet into
the shallow mark holes
on the base using
screws .
Note: Use the shallow
mark holes to fit the feet.
M
2
G
2
1
F
F
F
F
2
2
1
F
E
Step 11
Fit the top
Attach the top to the
ends using 6 screws
and tighten them using
the allen key .
2
1
F
E
1
2
1
1
Unit colour on
the top surface
F
Page 10
Assembly Instructions
9
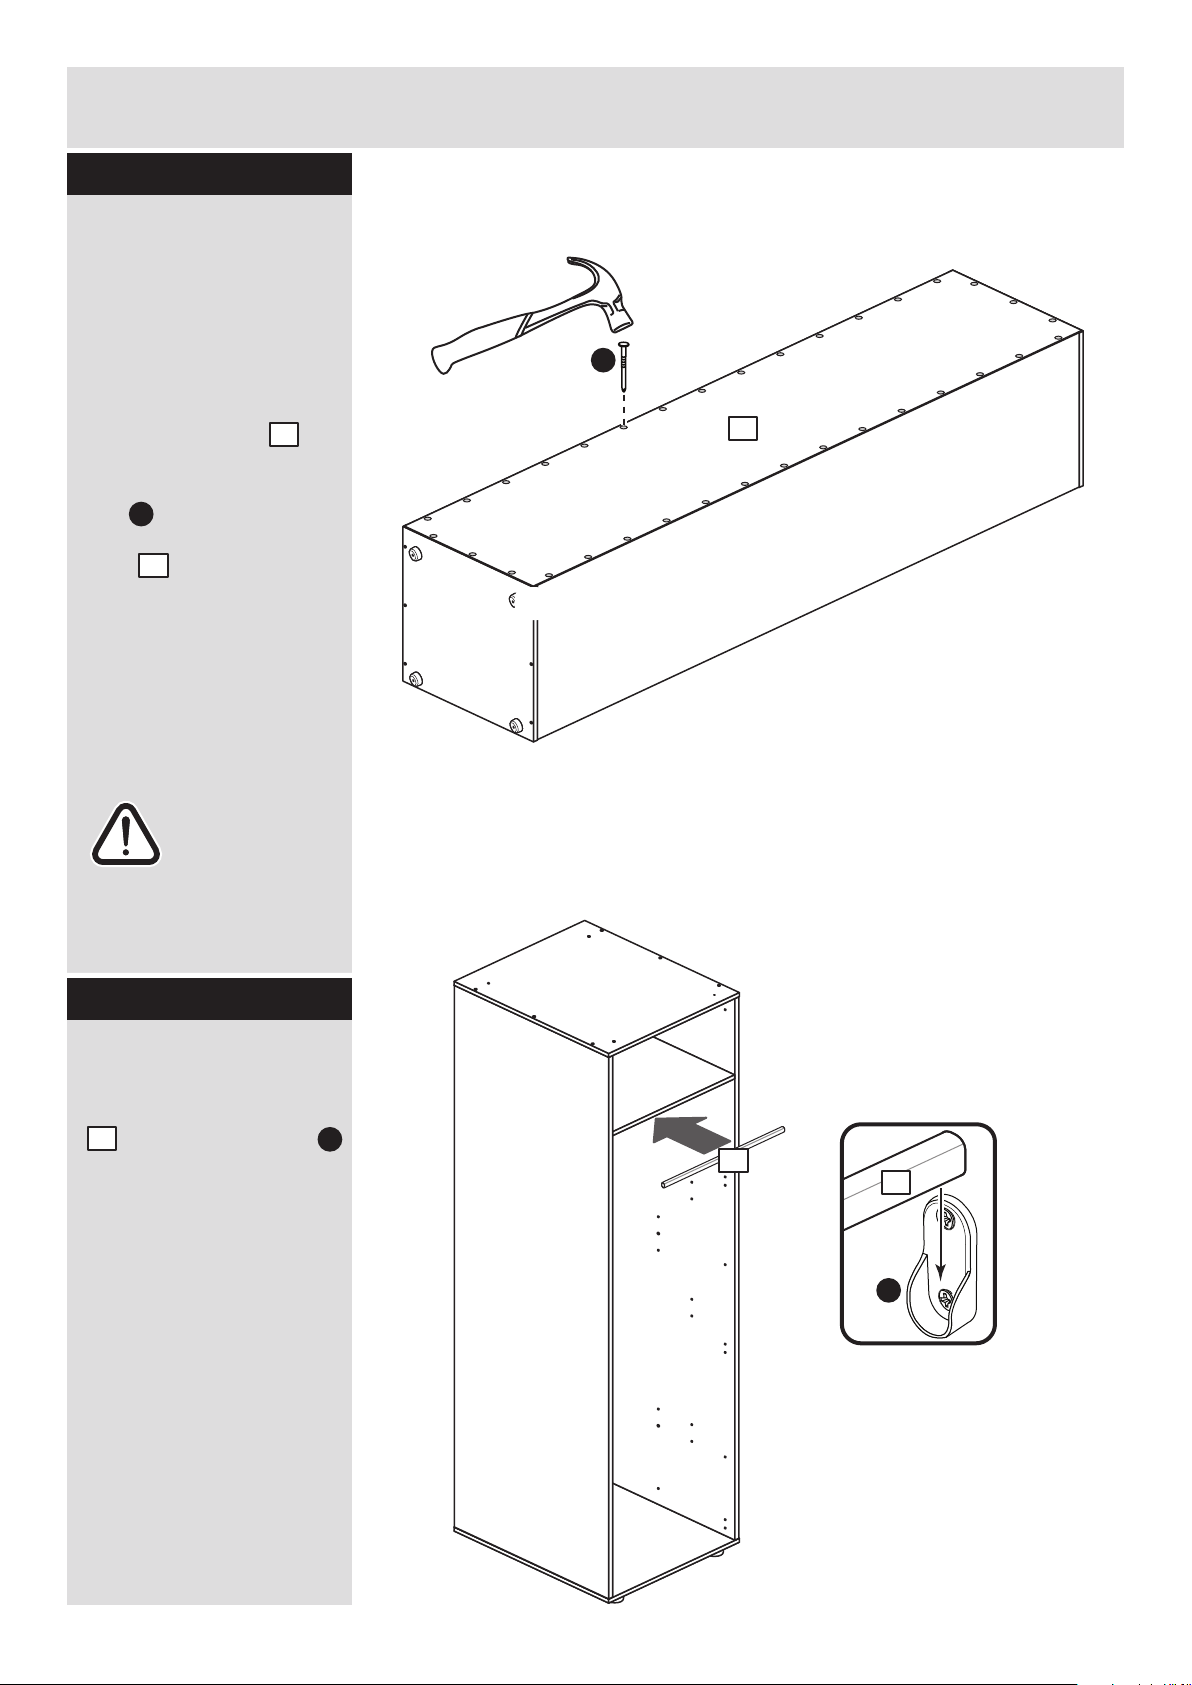
Step 12
Step 13
y
y
x
x
b:
Fit the back
a: Square up the unit by
making sure that
measurement x to x
equals y to y.
b: Place the back
onto the unit.
Nail around the
outside edges of the
back .
Note: Nails should be
spaced about 150mm
apart.
Stand the unit up for
the next step.
5
D
The measurement from top corner X to bottom corner X must be
equal to the measurement from top corner Y to bottom corner Y
a:
5
D
5
4
4
K
Fit the hanging rail(s)
Push the hanging rail(s)
. into the rail holders
fitted to the side panels.
4
K
Warning: The
unit is heavy.
Lift with care.
Note: Do not fit the hanging rail(s)
if you are fitting the shelf pack.
Page 11
Assembly Instructions
10
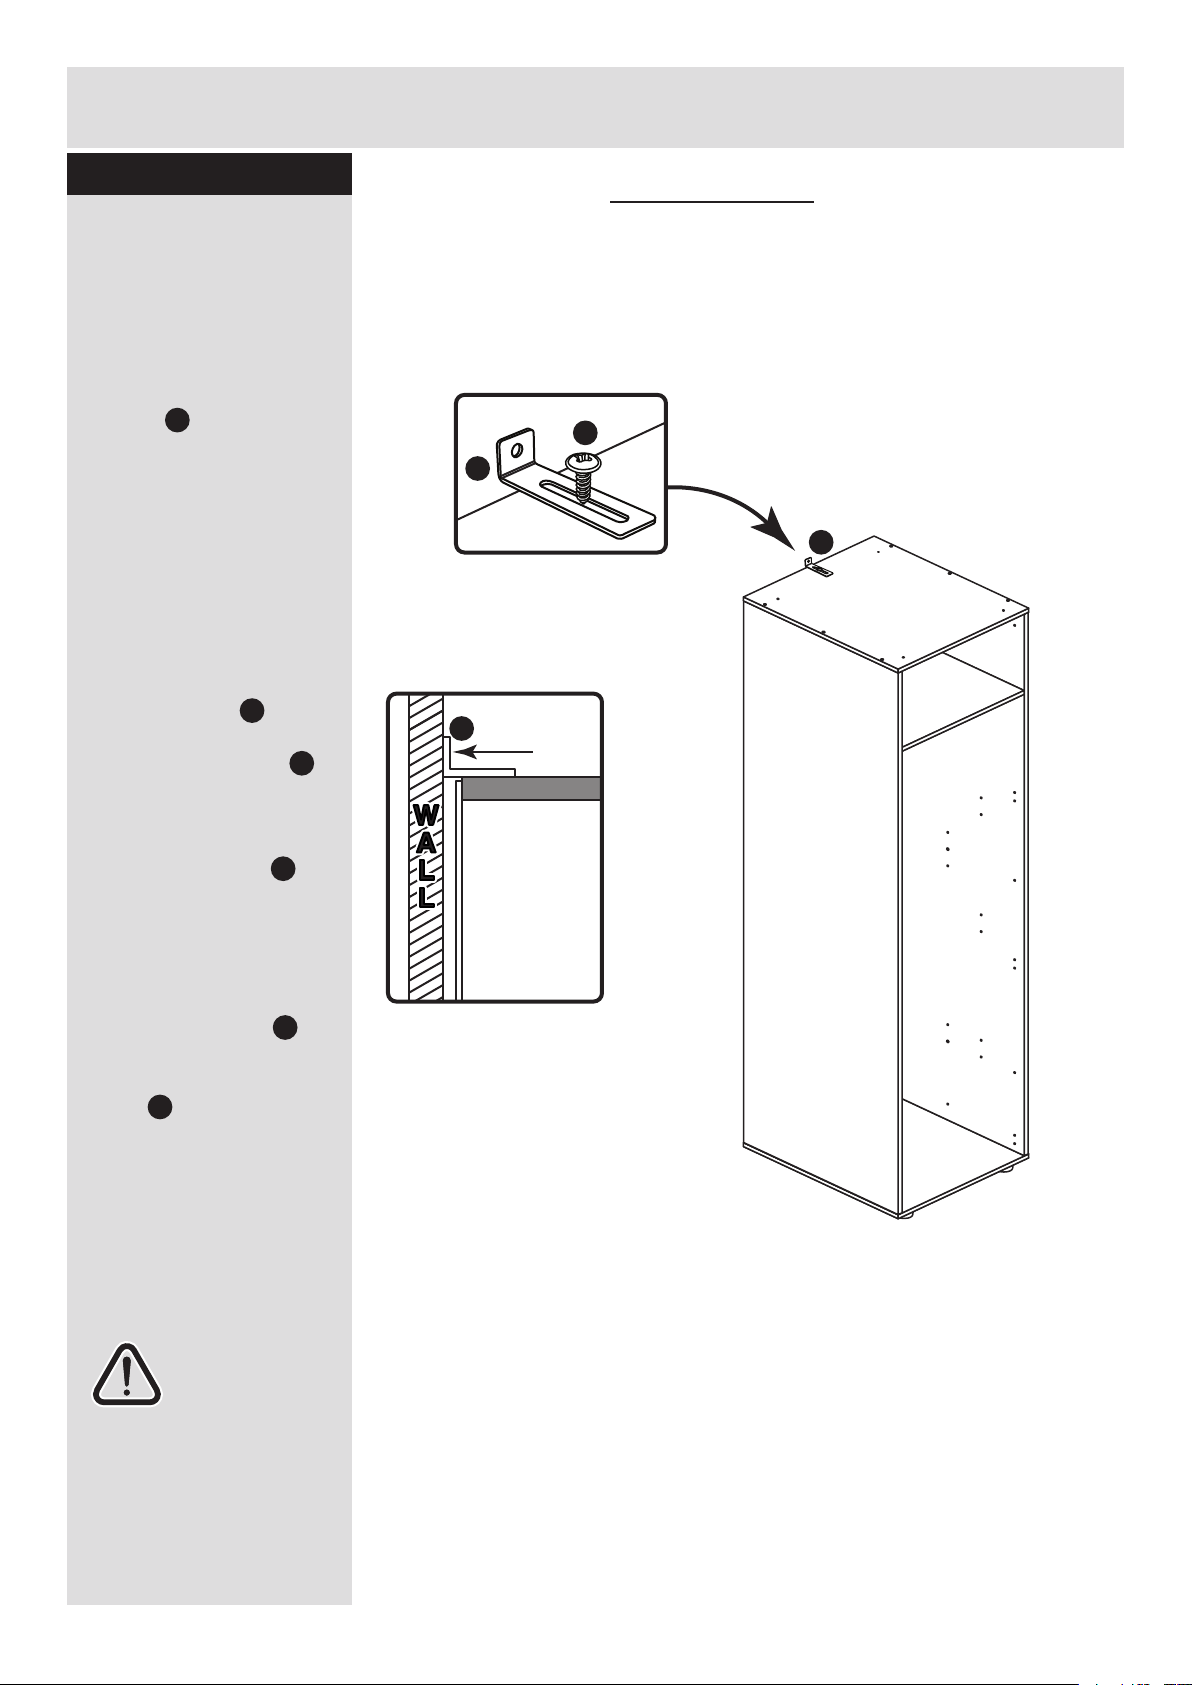
Step 14
Top of Unit
WALL
WALL
Back of Unit
Fit the bracket
To prevent possible
overbalancing, we
recommend that this unit
is secured to a suitable
wall by use of the
bracket fitted to the
top of the unit.
Fixings are not supplied,
as they will need to suit
the wall type and the
length of screw will
depend on the distance
from the back of the unit
to the wall.
Fix the bracket
loosely onto the top of
the unit using screw
and mark the wall for the
wall fixing.
Swivel the bracket
away from the wall and
drill a hole in the wall
using a suitable drill bit
and fit your wall fixing.
Swivel the bracket
back and fix the bracket
to the wall, then tighten
screw .
Note: Take care when
drilling the wall that you
do not drill into any
pipes, wires etc.
If in doubt, consult an
expert.
Warning: The
unit is heavy.
Lift with care.
L
L
I
L
L
I
L
I
L
L
IMPORTANT
The unused fittings from this assembly are used to fit the door.
Please refer to the instructions packed with the door.
IMPORTANT
The unit MUST be fixed to a wall
using the bracket supplied.
The unit must be level and square
before fitting the bracket.
Page 12
Assembly Instructions
11
If you need help or have damaged or missing parts, call the Customer Helpline: 08456 400800
and quote the reference numbers on the component pages.
Argos Ltd, 489-499 Avebury Boulevard, Central Milton Keynes, MK9 2NW
ALR2954
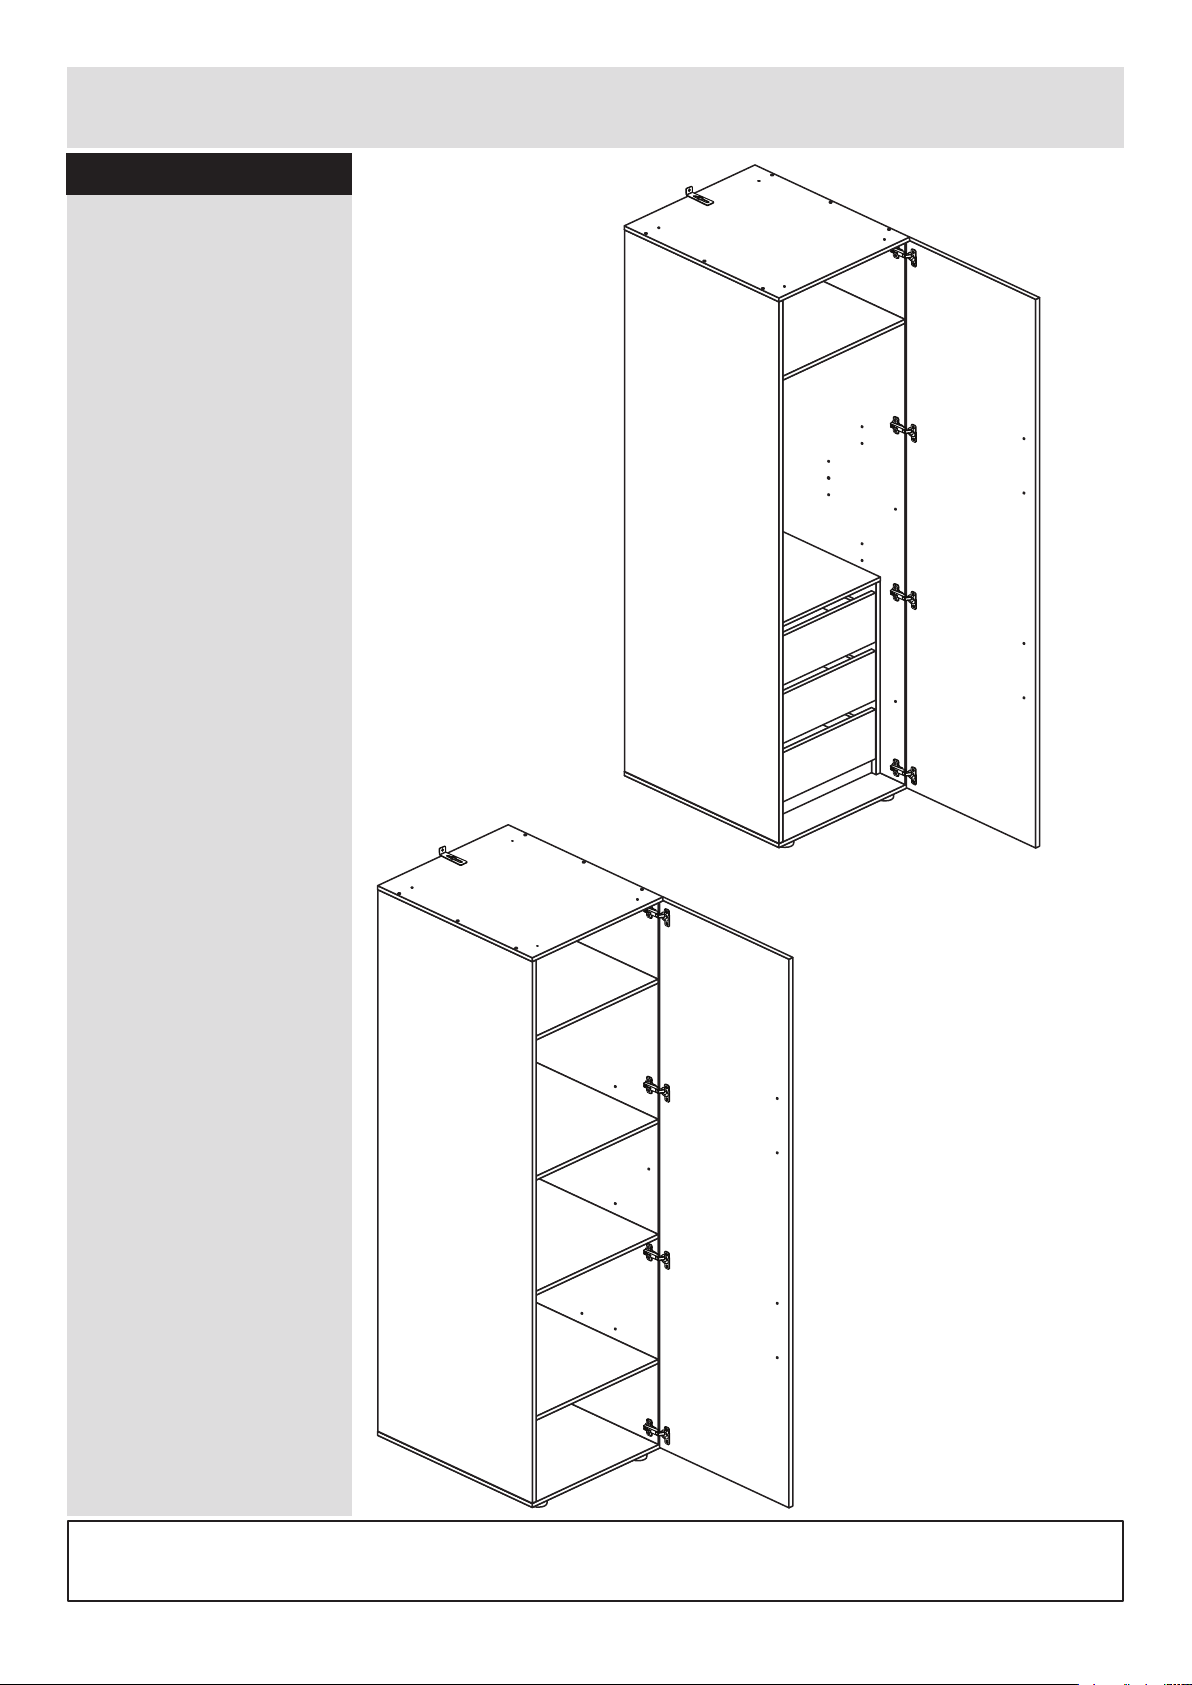
Step 15
Fit the door and, if
required, the shelf
pack and internal
chest
Please refer to the
instructions packed with
the door, shelf pack or
chest.
Door
Chest
Shelf
Shelf
Shelf
Door
 Loading...