

Page 1

made for you.
Page 2

Page 3

Page 4

Page 5

ITALIANO
3
Gentile Cliente,
La ringraziamo per aver scelto un nostro prodotto.
La preghiamo di leggere attentamente le istruzioni per l’uso prima dell’allacciamento e dell’utilizzo della macchina. La conoscenza dei principi di funzionamento garantirà un corretto e sicuro
sfruttamento dell’apparecchio. Le istruzioni per l’uso contengono molte indicazioni utili circa il
funzionamento, oltre ai particolari tecnici della macchina che La aiuteranno ad ottimizzare l’utilizzo
di questa macchina.
In caso di vendita, oppure di cessione dell’asciugatore, bisogna ricordarsi di consegnare al nuovo
utilizzatore anche il libretto delle istruzioni per l’uso.
INDICE
NOTE E CONSIGLI PER L’UTILIZZATORE 3-4
• Dati tecnici 3
DESCRIZIONE DELLA MACCHINA 5
• Accessori optional 5
INSTALLAZIONE DELLA MACCHINA 5-7
• Installazione 5
• Messa in piano del’asciugatore 6
• Collegamento all’impianto elettrico 6
• Regolazione dello scarico dell’acqua di condensa verso l’esterno 6
• Modifi ca rotazione porta 7
UTILIZZO DELLA MACCHINA 7-9
• Precauzioni per tessuti 7
• Tabella programmi 7
• Descrizione del pannello di controllo 8
• Raccomandazioni prima dell’asciugatura 9
• Come asciugare 9
MANUTENZIONE 9-11
• Illuminazione interna 9
• Scarico serbatoio dell’acqua di condensa 10
• Pulizia e manutenzione 10-11
• Individuazione guasti 11
• Soluzione dei problemi 11
NOTE E CONSIGLI PER L’UTILIZZATORE
DATI TECNICI
Larghezza cm.:
Dimensioni:
MODELLO:
NUMERO DI FABBRICAZIONE:
DATA D’ACQUISTO:
SM2165
Altezza cm.:
Profondità cm.:
Capacità massima
Potenza Nominale
Tensione di alimentazione
...........................................................................................................................................................................................................
........................................................................................................................................................
......................................................................................................................................................................................
7,0 kg. Asciutti
vedere targhetta dati
vedere targhetta dati
59.5
85.0
60.4
IT
Page 6

4
NOTE E CONSIGLI PER L’UTILIZZATORE
▼ L’uso di questo apparecchio dovrà essere quello
di asciugatore per uso domestico ogni altro
utilizzo è da considerarsi improprio e quindi
pericoloso.
▼ Conservare il presente manuale d’uso sempre
vicino all’asciugatrice in modo da poterlo consultare rapidamente se necessario.
▼ Qualsiasi modifi ca o tentativo di manomissione
dell’apparecchio può essere pericolosa per
l’utilizzatore e provocare danni al prodotto.
▼ Alla consegna dell’elettrodomestico, verifi care
che risulti indenne da eventuali danneggiamenti dovuti al trasporto. Se si rilevassero
danneggiamenti, rivolgersi immediatamente
al rivenditore.
▼ Non coprire l’asciugatrice con biancheria o altro.
▼ Nel posizionare l’apparecchio assicurarsi che
il cavo di alimentazione non subisca piegature
ne compressioni e sia accessibile, per eventuali
interventi.
▼ Chiudere sempre la porta dopo l’utilizzo del-
l’elettrodomestico.
In tal modo si impedirà che i bambini si appoggi-
no alla porta facendo ribaltare l’asciugatrice.
▼ E’ vietato l’uso della macchina ai bambini, se
non sorvegliati.
▼ Non asciugiugare indumenti sporchi nell’asciu-
gatore.
▼ Non far mai asciugare indumenti che sono
stati sporcati con sostanze come oli di cucina,
petrolio, acetone, alcol, benzina, kerosene,
smacchiatori, trementina, cere.
▼ Rimuovere queste sostanze con un lavaggio a
caldo e una quantità addizionale di detersivo
prima di essere caricati nell’asciugatore.
▼ Non far asciugare articoli come gomma piuma,
lattice di gomma, impermeabili, tessuti a tenuta
d’acqua, tappeti in gomma articoli e vestiti o
cuscini preformati con blocchi di gomma piuma
in quanto potrebbero sciogliersi e danneggiare
altri capi di biancheria o addirittura l’elettrodomestico stesso.
▼ Ammorbidenti per tessuti, o prodotti simili,
devono essere usati rispettando le istruzioni
d’uso inserite nella confezione
▼ Se l’elettrodomestico viene venduto o regalato, si
ricordi di consegnare anche il presente manuale
che consentirà al successivo proprietario di utilizzare l’asciugatrice in modo corretto e sicuro.
▼ Non si può tentare di riparare da soli i guasti del-
l’apparecchio perché le riparazioni effettuate da
non professionisti possono provocare seri danni
e tolgono il diritto alle riparazioni di garanzia.
▼ Le riparazioni dell’apparecchio possono essere
effettuate esclusivamente da personale autoriz-
▼ Centrifugare o strizzare bene la biancheria pri-
▼ Pulire bene il fi ltro ogni volta che si utilizza
▼ Non attaccare oppure staccare la spina dalla
▼ La macchina deve essere collegata ad una
▼ E’ vietato collegare la macchina alla presa elet-
▼ Non esporre l’apparecchio ad agenti atmosferici.
▼ Eseguendo le revisioni o le pulizie ricordarsi
Nel caso si voglia staccare la macchina dalla
▼ Questo apparecchio è contrassegnato in
Il simbolo sul prodotto o sulla docu-
IT
zato dei centri di assistenza. Per le riparazioni
devono essere usate solo parti di ricambio
originali.
ma di caricarla nell’asciugatore. La biancheria
ben centrifugata si asciugherà più in fretta.
l’asciugatrice, in modo da garantire una perfetta circolazione dell’aria.
presa della corrente elettrica con le mani
bagnate.
presa di corrente elettrica provvista di messa a
terra e conforme alle esigenze di sicurezza.
trica utilizzando prolunghe o spine multiple.
di staccare l’apparecchio dalla presa della
corrente elettrica.
presa della corrente non tirare il cavo elettrico
ma la spina.
conformità alla Direttiva Europea 2002/96/EC,
Waste Electrical and Electronic Equipment
(WEEE). Assicurandosi che questo prodotto
sia smaltito in modo corretto, l’utente contribuisce a prevenire le potenziali conseguenze
negative per l’ambiente e la salute.
mentazione di accompagnamento indica che
questo prodotto non deve essere trattato come
rifi uto domestico ma deve essere consegnato
presso l’idoneo punto di raccolta per il riciclaggio di apparecchiature elettriche ed elettroniche.
Disfarsene seguendo le normative locali per lo
smaltimento dei rifi uti. Per ulteriori informazioni
sul trattamento, recupero e riciclaggio di questo
prodotto, contattare l’idoneo uffi cio locale, il servizio di raccolta dei rifi uti domestici o il negozio
presso il quale il prodotto è stato acquistato.
ATTENZIONE!!! Le superfi ci in cui
appare questo simbolo durante il
funzionamento possono riscaldarsi.
LA DITTA PRODUTTRICE DECLINA QUALSIASI RESPONSABILITÀ PER EVENTUALI
INCIDENTI PROVOCATI DALLA NON OSSERVANZA DELLE NORME DI SICUREZZA
NONCHÉ DELLE ISTRUZIONI D’USO
SM2165
Page 7

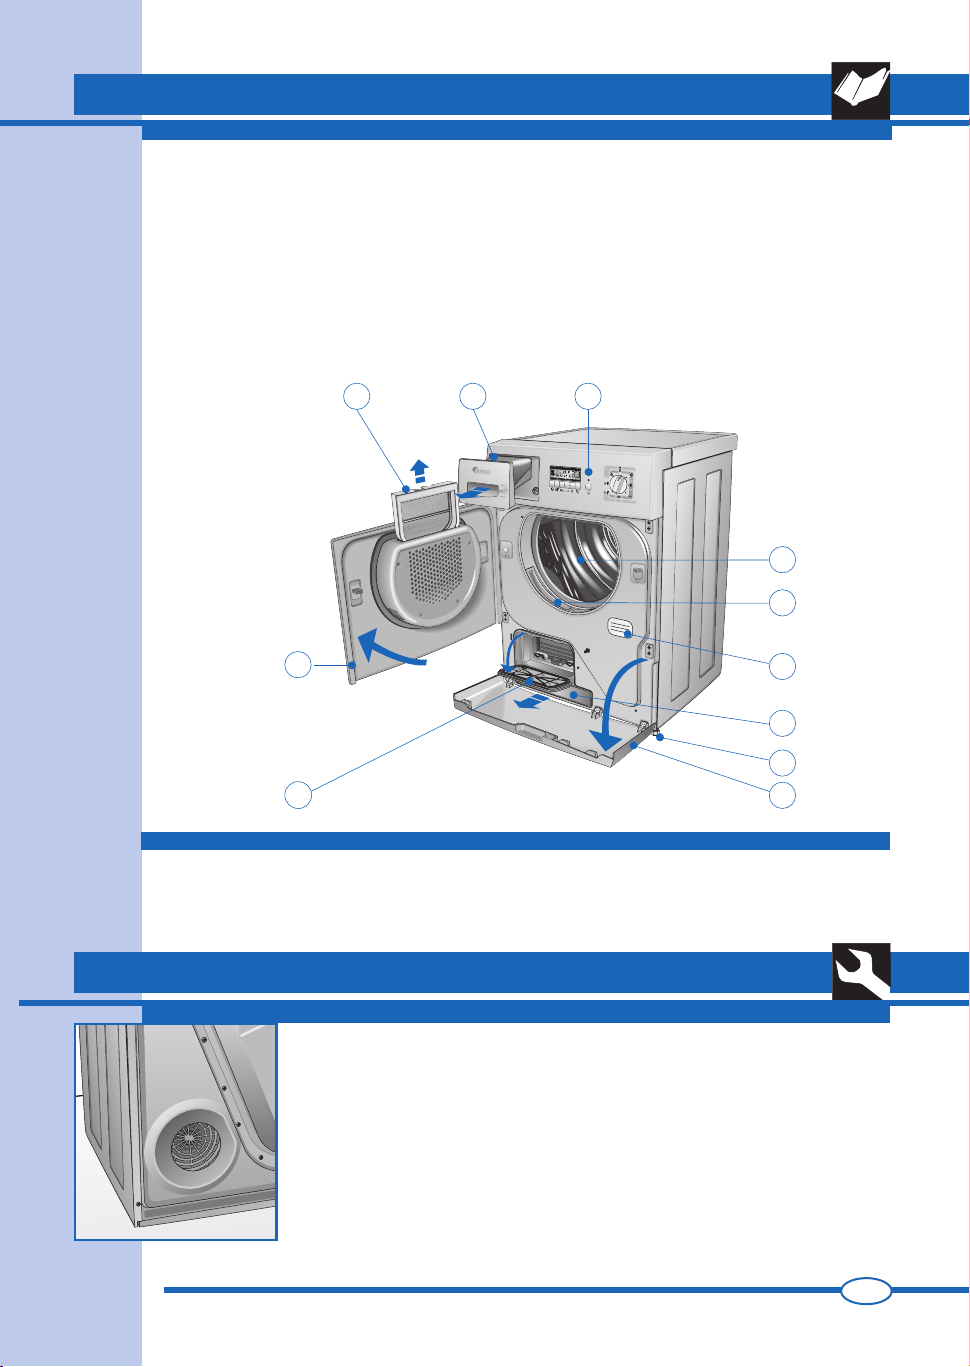
DESCRIZIONE DELLA MACCHINA
DESCRIZIONE DELLA MACCHINA
1 Porta cestello.
2 Filtro porta cestello.
3 Serbatoio dell’acqua di condensa superiore*
(Nel caso in cui il tubo di scarico dell’acqua di
condensa non sia collegato direttamente allo
scarico, la condensa si raccoglie in questo
serbatoio).
4 Pannello di controllo.
5 Cestello asciugatore.
*
3
L
5
6 Filtro bocca cestello.
7 Targhetta caratteristiche tecniche.
8 Serbatoio condensa inferiore*.
9 Piedini regolabili.
10 Portello condensatore.
11 Portello inferiore.
* presente secondo il modello
42
5
6
1
7
*
8
9
1
È disponibile presso il vostro venditore l’accessorio per completare la diversa installazione che
vi permetterà di fi ssare la vostra asciugatrice sopra una lavabiancheria carica frontale per poter
economizzare lo spazio. Il modello di macchina che vi permetterà di fare questo montaggio vi sarà
consigliato dal vostro installatore.
10
11
ACCESSORI OPTIONAL
INSTALLAZIONE DELLA MACCHINA
INSTALLAZIONE
▼ L’installazione deve essere effettuata da personale professionalmente qualifi -
cato, secondo le istruzioni del costruttore, perché una errata installazione può
causare danni a persone e cose.
▼ Non tenere l’asciugatrice in locali dove potrebbe gelare. Il gelo potrebbe com-
promettere l’elettronica.
▼ Posizionare l’asciugatrice in un locale provvisto di ventilazione.
▼ Non coprire il foro di ventilazione sul lato posteriore (fi g. 2) e non posizionare
2
SM2165
la macchina su moquette spessa.
▼ Pulire l’interno del cestello di asciugatura con un panno umido per togliere
l’eventuale polvere che vi si deposita.
IT
Page 8

6
Piedini regolabili. Mettere l’asciugatrice in posizione verticale in modo che appoggi
saldamente su tutti e quattro i piedini. Livellare la macchina registrando i piedini
come di seguito descritto
▼ Sollevare leggermente la macchina.
▼ Regolare i piedini all’altezza giusta (fi g. 3).
▼ Abbassare la macchina.
N:B: Una macchina mal livellata può danneggiare i cuscinetti ed usurarsi
prematuramente. Questo asciugatore non necessita di fi ssaggio al suolo.
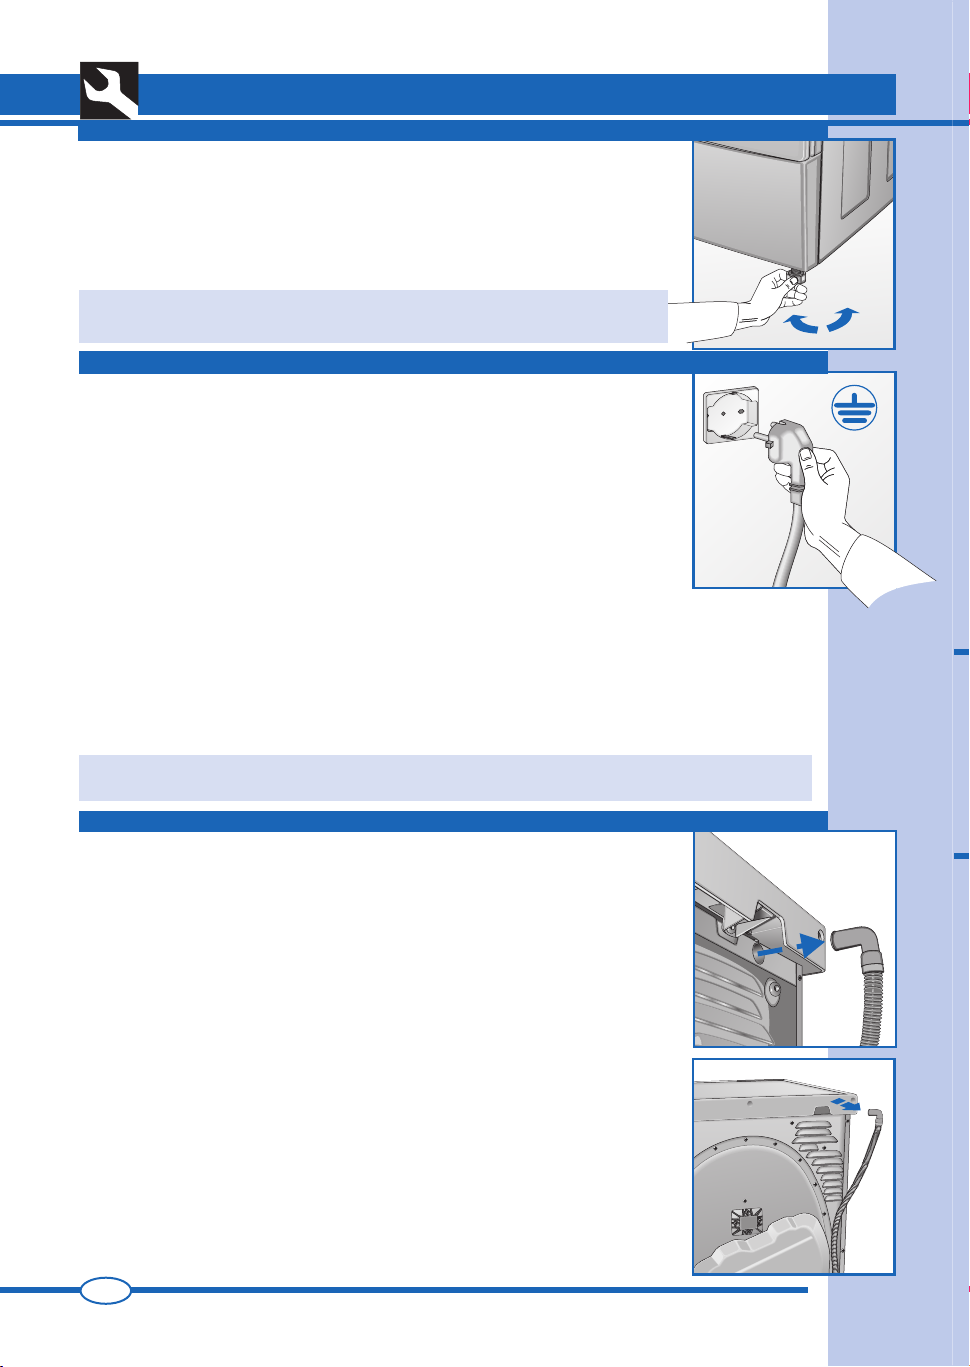
▼ Accertarsi che la tensione elettrica indicata nei dati tecnici della targhetta posta
sul retro dell’apparecchio, corrisponda a quella della rete elettrica.
▼ Salvavita, cavi elettrici e presa della rete devono avere parametri tali da per-
mettere di sopportare il carico massimo indicato sulla targhetta stessa.
▼ A seguito dell'installazione, l'accesso all'alimentazione di rete deve essere
garantito da un interruttore onnipolare.
▼ La presa di corrente alla quale viene allacciata la macchina deve essere munita
di messa a terra. In caso contrario, il produttore declina qualsiasi responsabilità
per eventuali incidenti (fi g. 4).
▼ Se il cavo d’alimentazione è danneggiato in qualche modo, contattare il centro
di assistenza tecnica specializzato.
▼ E’ vietato allacciare l’asciugatore alla rete attraverso elementi indiretti come
prolunghe e prese multiple.
▼ Posizionare l’apparecchio in modo che il cavo alimentazione sia facilmente
accessibile in modo da poterlo disconnettere in caso di necessità.
Importante: Alla fi ne del ciclo di asciugatura, scollegare l’asciugatrice dalla rete per impedire
che un bambino possa eventualmente metterla in funzione.
INSTALLAZIONE DELLA MACCHINA
MESSA IN PIANO DELL’ASCIUGATORE
COLLEGAMENTO ALL’IMPIANTO ELETTRICO
3
4
REGOLAZIONE DELLO SCARICO DELL’ACQUA DI CONDENSA VERSO L’ESTERNO
È possibile raccogliere l’acqua di condensa nel serbatoio (fi g. 10), ma è anche
possibile collegare il tubo direttamente allo scarico.
In tal caso l’acqua viene eliminata mediante pompa.
Nel caso in cui si volesse collegare il tubo dell’acqua di condensa direttamente allo
scarico, procedere come segue:
▼ Prima di iniziare qualsiasi operazione, togliere la spina dalla presa di corrente.
▼ Tirare il tubo posto nella parte posteriore della macchina per sfi larlo dalla sede
(fi g. 5/6) e infi larlo nello scarico.
IT
5
6
SM2165
Page 9

7
8
INSTALLAZIONE DELLA MACCHINA
APERTURA E MODIFICA ROTAZIONE PORTA
▼ Premere la porta sulla destra (fi g. 7) (la porta si apre). Se la porta è stata rove-
sciata premere sulla sinistra.
▼ È possibile modifi care il senso di rotazione della porta cestello secondo le proprie
necessità (fi g. 8).
N.B.: Questa operazione deve essere eseguita esclusivamente da personale
specializzato.
Contattare il servizio assistenza tecnica.
UTILIZZO DELLA MACCHINA
PRECAUZIONI PER TESSUTI
In caso di dubbi sul tipo di tessuto, controllare l’etichetta sul capo stesso.
Quasi tutti i capi che possono essere asciugati indicano specifi camente che sono idonei per asciugatura
a macchina.
Per evitare l’elettricità statica sui capi, durante i cicli di risciacquo della lavatrice usare un ammorbi-
dente.
Togliere subito dal cestello i capi sintetici per evitare che sgualciscano.
7
RACCOMANDAZIONI PRIMA DELL’ASCIUGATURA
SUDDIVISIONE DELLA BIANCHERIA
Prima di asciugare la biancheria, bisogna
centrifugarla con il numero di giri adatto al tipo
di biancheria. Centrifugando con il numero di
giri massimo consentito, si risparmia fino a
35% di tempo di energia. Più è alta la velocità
di centrifuga, migliore è l’asciugatura ottenuta.
L’uso dell’ammorbidente nel lavaggio permette di
ottenere una migliore asciugatura e un risparmio
di tempo. Prima di asciugare la biancheria
nell’elettrodomestico, controllare se è adatta ad
asciugatura meccanica. Consultare perciò i simboli
riportati sulle etichette di lavaggio.
Se non si trova il simbolo dell’asciugatura
sull’etichetta, attenersi alle regole seguenti:
▼ Biancheria bianca/colorata e biancheria antipiega
si asciugano a temperatura normale con il pro-
SM2165
gramma di asciugatura scelto appositamente.
▼ Asciugare la biancheria delicata, per esempio
gli acrilici, sempre a temperature basse.
Consigli generali:
Jersey si restringe spesso non soltanto con il
lavaggio ma anche con l’asciugatura.
Puro lino.
▼ Asciugare soltanto se indicato dal fabbricante
sull’etichetta di lavaggio.
Altrimenti il tessuto potrebbe diventare
ruvido.
▼ Non asciugare biancheria colorata scura in-
sieme con biancheria colorata chiara; questo
per evitare che stinga.
IT
Page 10

8
UTILIZZO DELLA MACCHINA
DESCRIZIONE PANNELLO DI CONTROLLO
CT
LS
Ih. Ia. Iv. Ic.
L
CR
LR
P
R
9
P. Manopola programmi serve a selezionare i programmi desiderati socondo il tipo di tessuto e alle
proprie necessità, la posizione di STOP oltre che
spegnere il dislpay ha anche la funzione di resettare
la macchina. Se si decidesse per qualsiasi motivo
cambiare programma o aggiungere della biancheria,
basta semplicemente posizionare la manopola sullo
STOP, quindi selezionare il nuovo programma e
premere il tasto START.
NB.Attenzione!! si consiglia di utilizzare questa
funzione solo se strettamente necessario e
soltanto se il programma da resettare è iniziato
da non più di 3 minuti.
N.B. In alcuni modelli con il programma Delay
impostato, o alla fi ne del ciclo, la retro illuminazione del display dopo alcuni minuti si spegne.
E suffi cente azionare un qualsiasi tasto perchè
questa si riaccenda.
S. Tasto Start premendo questo tasto l’asciugatore
inizia il ciclo d’asciugatura impostato.
LS.
LED Start spento indica la posizione di “STOP”;
Acceso fi sso indica programma in corso; Lampeggio
veloce indica programma selezionato da avviare;
Lampeggio lento indica la fi ne del programma.
U. Tasto selettore d’asciugatura serve a selezionare il
grado d’umidità desiderato nei programmi a controllo
elettronico, e il tempo nei programmi manuali.
Non tutte le selezioni sono possibili in tutti i
programmi.(vedi: “TABELLA PROGRAMMI”)
LR.
Le icone del programma asciugatura con controllo
elettronicosono 4, quella selezionata
lampeggia mentre le altre 3 restano fi sse.
A ciclo avviato rimane accesa solo quella scelta.
CT.
Contatore asciugatura visualizza il tempo impostato con passi di 20 minuti fi no ad un massimo di 2
ore e 40 minuti per il programma cotone e di 2 ore
per i sintetici.
C. Tasto esclusione cicalino esclude la funzione del
IT
HA VCU
cicalino altrimenti sempre attivo, la scelta rimane
memorizzata anche in caso di spegnimentoI.
Le segnalazioni sono:
1 beep lungo (ciclo avviato)
4 beep lunghi (ciclo terminato)
4 beep brevi (rotazione cestello per funzione antipiega)
V. Tasto ripristino allarme vaschetta serve a riavviare
il ciclo di asciugatura dopo lo svuotamento della
vaschetta dell’acqua di condenza (fi g. 11)
LV.
Icona allarme vaschetta piena il lampeggio indica
che la vaschetta è piena ed è necessario svuotarla
(il ciclo si ferma); accesa fi ssa, dopo aver rinserito
la vaschetta indica che la funzione si stà riattivando ;
spenta indica sicurezza ripristinata (il ciclo riparte).
A. Tasto antipiega attiva la funzione che al termine del
ciclo di asciugatura la biancheria all’interno del’asciugatore continua a girare in un senso e nell’altro per altri
sessanta minuti riducendone la sgualcitura. Ogni ruotazione viene segnalata dal cicalino con brevi beep.
H. Pulsante antipiega ritardo asciugatura serve a far
ruotare la biancheria nel cestello durante l’attesa per
diminuirne la sgualcitura.
lh. la. lc.
Le icone cicalino, antipiega e ritado partenza
visualizzate nel display indicano la che la funzione
è attiva.
R. Tasto ritardo partenza permette di ritardare
l’asciugatura fi no ad un massimo di 16 ore. Ad
ogni pressione la partenza verrà ritardata di un’ora.
Premendo il tasto START il ritardatore attivato viene
indicato sul display con il simbolo h lampeggiante,
da quel momento la macchina dopo aver atteso il
numero delle ore impostato, inizierà automaticamente il ciclo d’asciugatura.
Nel caso di interruzione dell’alimentazione durante
il ritardo, l’impostazione viene annullata e premendo
lo START il ciclo parte immediatamente.
CR. Contatore ritardo di partenza visualizza il tempo impostato con passi di un’ora fi no ad un massimo di 16 ore.
S
SM2165
Page 11

TESSUTO
COTONE
UTILIZZO DELLA MACCHINA
TABELLA PROGRAMMI
PROGRAMMI A CONTROLLO ELETTRONICO DELL'UMIDITA'
MAX. CARICO
BIANCHERIA
7.0 kg.
EXTRA
SECCO
SECCO DA
RIPORRE
UMIDO DA
STIRO
9
MOLTO
UMIDO
SINTETICI
DELICATI
LANA
COTONE
SINTETICI
RAFFREDDAMENTO
1) Caricare la biancheria nel cestello e chiudere
la porta.
2) Con le mani asciutte inserire la spina del-
l’asciugatore nella rete.
3) Posizionare la manopola del programmatore
sullo Stop per resettare eventuali programmi
precedenti, quindi ruotarla sul programma più
idoneo per il tipo di tessuto.
4) Con il tasto selettore d’asciugatura selezionare
il grado d’umidità desiderato (vedi Tabella
Programmi).
5) Selezionare le opzioni desiderate con qli
appositi tasti.
3.5 kg.
3.5 kg.
1.5 kg.
7.0 kg.
3.5 kg.
PROGRAMMI A TEMPO
160-140 min 140-120 min 120-100 min 100-80 min
120-100 min 80-60 min 60-40 min 40-20 min
COME ASCIUGARE
20 min
6) Premere il tasto START per iniziare l’asciu-
gatura.
7) Finita l’asciugatura segnalata dal lampeggio
del led start, dal cicalino e dalla scritta END
sul display riportare il selettore nella posizione
di STOP
8) Aprire la porta del cestello ed estrarre la
biancheria.
9) Richiudere la porta.
10) Con le mani asciutte staccare la spina del-
l’asciugatore dalla rete.
10
SM2165
MANUTENZIONE
ILLUMINAZIONE INTERNA
L’illuminazione è all’interno.
Per sostituire una lampadina, procedere nel modo seguente:
▼ Togliere la spina dalla presa di corrente o agendo sull’interruttore generale;
▼ Rimuovere la calotta della lampadina;
▼ Estrarre la lampadina (fi g. 10);
▼ Attenzione: non usare lampadine da più di 15 W.!
▼ Rimontare di nuovo la calotta della lampadina.
IT
Page 12

10
SCARICO DEL SERBATOIO DELL’ACQUA DI CONDENSA
Se non e stata collegata direttamente allo scarico, l’acqua di condensa viene
raccolta nel serbatoio (fi g. 11). Il serbatoio deve essere svuotato dopo ogni ciclo di
asciugatura.
Per svuotare il serbatoio procedere come segue:
▼ Estrarre il serbatoio dell’fasciugatrice (fi g. 11);
▼ Svuotare il serbatoio; l’apertura di scarico si trova sul lato superiore destro (fi g.
12);
▼ Dopo averlo svuotato riposizionare fi no in fondo;
▼ Quando si dimentica di svuotare il serbatoio o quando si riempie durante
l’asciugatura, il led d’allarme della vaschetta dell’acqua condensa lampeggia e
l’asciugatrice si arrestera. In seguito procedere come descritto sopra.
▼ Per proseguire il programma interrotto, premere il tasto (V) ripristino allarme
vaschetta (fi g. 9).
Togliere la tensione dell’apparecchio prima di iniziare a pulire. E’ importante pulire
l’apparecchio dopo ogni lavaggio, per far risparmiare tempo all’asciugatura e quindi
energia.
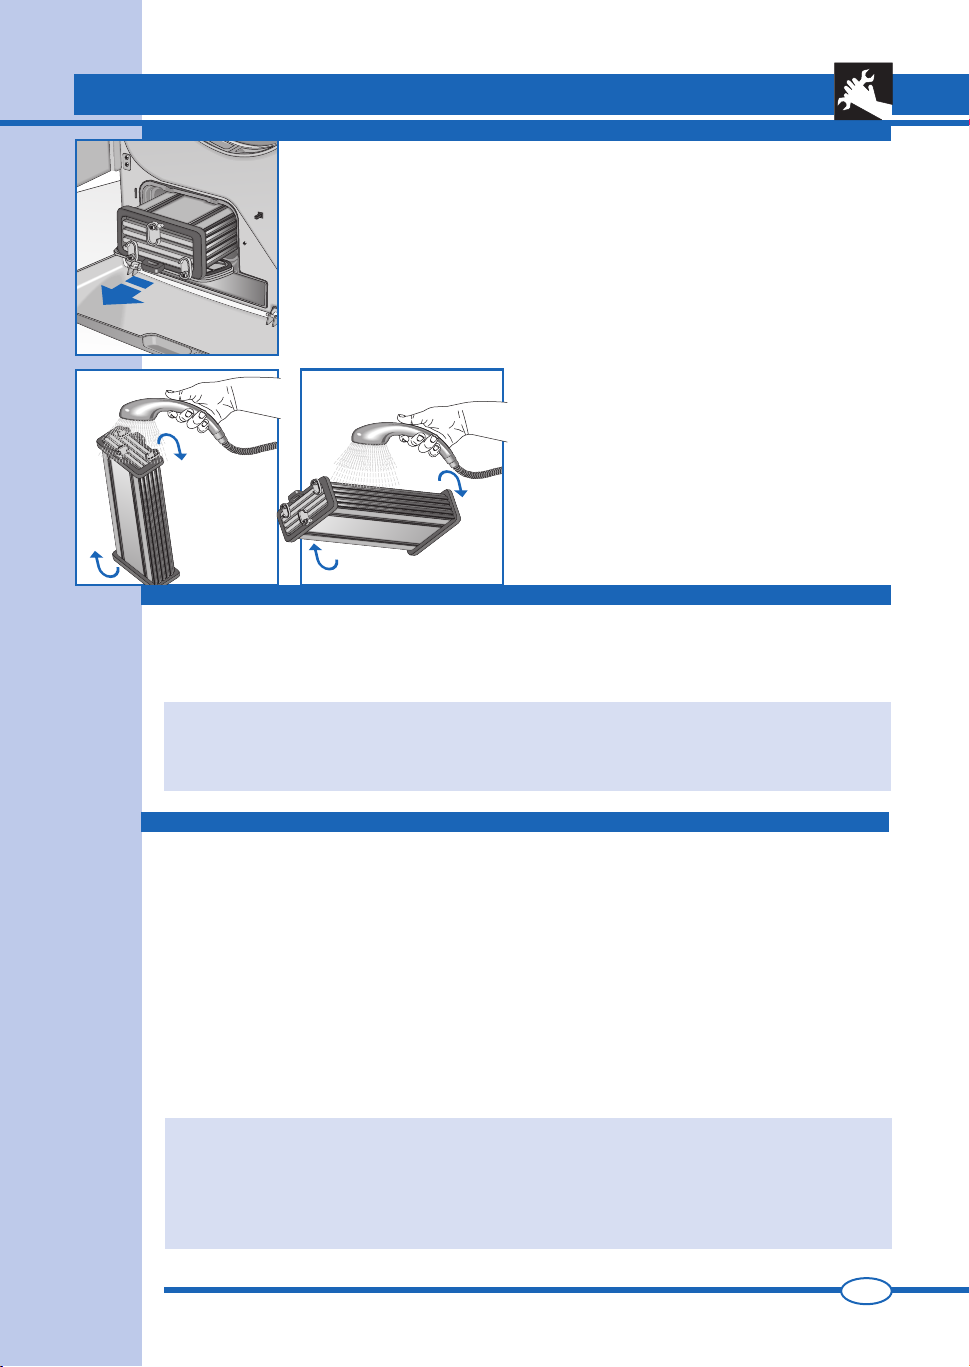
1. Filtro per fi lacci nello sportello (fi g. 13).
2. Filtro per fi lacci nel l’apertura di carico (fi g. 14).
3. Condensatore (fi g. 15).
▼ Rimuovere il fi ltro tirandolo verso l’alto e pulirlo (fi g. 13).
MANUTENZIONE
PULIZIA E MANUTENZIONE
11
12
13
▼ Inoltre è possibile rimuovere i due fi ltri fi lacci dall’apertura di carico e pulirli (fi g.
14).
NB. La presenza di fi bre nel fi ltro non dipende dall’asciugatura. I fi lacci
provengono dalle fi bre dei tessuti rotti o sfi lacciati durante il lavaggio e
soprattutto per usura del capo d’abbigliamento.
La pulizia è più semplice facendoci scorrere sopra l’acqua calda.
▼ Si raccomanda di pulire il condensatore due o tre volte all’anno (fi g. 15/18).
▼ Aprire la porta ruotare la levetta in posizione verticale e rimuovere il coperchio
(fi g. 15).
IT
14
15
SM2165
Page 13
16
MANUTENZIONE
PULIZIA E MANUTENZIONE
▼ Ruotare le 3 levette in posizione verticale ed estrarre il condensatore (fi g. 16).
11
17
18
INDIVIDUAZIONE GUASTI
Tutte le apparecchiature elettriche sono soggette a guasti.
Si ricordi che in questi casi si dovrà chiamare un tecnico qualifi cato. Potrete comunque risolvere voi
stessi molti dei problemi che si verifi cano.
Importante: In caso di cattivo funzionamento, si ricordi di scollegare immediamente la
macchina dalla rete d’alimentazione.
Prima di chiamare il nostro Centro Assistenza,verifi care i punti di seguito indicati.
SOLUZIONE DEI PROBLEMI
Se la macchina non parte
• assicurarsi che:
1) Verifi care di aver effettuato il collegamento
all’alimentazione di rete.
2) Verifi care che la presa sia effi ciente:
2a) è saltato il fusibile? (Il controllo è facile,
basta collegare un’altra apparecchiatura come una lampada da tavolo).
2b) Sono state seguite tutte le istruzioni del
manuale d’istruzioni?
▼ Lavare il condensatore anteriormente e poste-
riormente e sui lati orientando il getto d’acqua
come indicato (fi g.17/18).
Per ottenere uno sgocciolamento perfetto del
condensatore, appoggiarlo su un lato sopra un
asciugamano.
▼ Quando è ben asciutto, rimontare il condensatore
rifacendo le operazioni in ordine contrario.
Se la macchina non parte
• assicurarsi che:
1) La porta sia stata chiusa correttamente.
2) Sia stato premuto il tasto start.
La biancheria non si asciuga
• assicurarsi che:
1) È possibile che il foro scarico aria sia ostruito.
2) È possibile che il fi ltro sia intasato. (Si ricordi
che quando si apre l’oblò, le parti interne
dell’asciugatrice e la biancheria possono
essere molto calde).
Se dopo l’esecuzione delle funzioni descritte, l’apparecchio continua a non funzionare
correttamente segnalare il difetto al centro assistenza tecnica autorizzato più vicino. Si
prega cortesemente di comunicare il modello, il numero di fabbricazione ed il tipo di guasto.
Queste informazioni permettono all’operatore dell’assistenza tecnica di procurarsi le parti
di ricambio necessarie e, quindi, garantiscono una veloce ed effi cace esecuzione della
riparazione.
SM2165
IT
Page 14

1212
................................................................................................................................................................
................................................................................................................................................................
................................................................................................................................................................
................................................................................................................................................................
................................................................................................................................................................
................................................................................................................................................................
................................................................................................................................................................
................................................................................................................................................................
................................................................................................................................................................
................................................................................................................................................................
................................................................................................................................................................
................................................................................................................................................................
................................................................................................................................................................
................................................................................................................................................................
................................................................................................................................................................
................................................................................................................................................................
................................................................................................................................................................
................................................................................................................................................................
................................................................................................................................................................
................................................................................................................................................................
................................................................................................................................................................
................................................................................................................................................................
................................................................................................................................................................
................................................................................................................................................................
................................................................................................................................................................
................................................................................................................................................................
................................................................................................................................................................
................................................................................................................................................................
................................................................................................................................................................
................................................................................................................................................................
...................................................................................................................................................................
...................................................................................................................................................................
...................................................................................................................................................................
...................................................................................................................................................................
...................................................................................................................................................................
...................................................................................................................................................................
..................................................................................................................................................................
.................................................................................................................................................................
NOTE
SM2165
Page 15

ENGLISH
Dear Customer,
Thank you for choosing our product.
Please read these instructions carefully before connecting and using the appliance.
Knowledge of the operating principles will help guarantee correct and safe use of the appliance.
This instruction booklet contains the technical characteristics of the drier and is full of useful infor-
mation regarding its operation, all designed to help you get the best out of your appliance.
If the appliance is sold or handed over for use by others, remember to give the new user the
instruction booklet.
CONTENTS
NOTES AND ADVICE FOR THE USER 13-14
• Technical information 13
DESCRIPTION OF THE APPLIANCE 15
• Optional accessories 15
INSTALLING THE APPLIANCE 15-17
• Installation 15
• Levelling the drier 16
• Connecting to the mains supply 16
• Connecting the condensation drain to the drainage system. 16
• Changing the door opening direction 17
USING THE DRIER
• Precautions for fabrics 17
• Recommendations prior to drying 17
• Description of the control panel 18
• Programme 19
• How to dry 19
17-19
13
MAINTENANCE 19-21
• Internal light 19
• Draining the condensation reservoir 20
• Cleaning and maintenance 20-21
• Troubleshooting 21
• Resolving problems 21
NOTES AND ADVICE FOR THE USER
TECHNICAL DATA
Width cm.:
Dimensions:
MODEL:
...................................................................................................................................................................................................................
Height cm.:
Depth cm.:
SERIAL NUMBER:
DATE OF PURCHASE:
SM2165
Max. capacity
Power rating
Voltage
.........................................................................................................................................................................................
................................................................................................................................................................................
59.5
85.0
60.4
7 kg dry
see characteristics plate
see characteristics plate
GB
Page 16

14
NOTES AND ADVICE FOR THE USER
▼ This appliance has been designed for use as a
domestic drier. Any other use is considered as
improper and therefore dangerous.
▼ Keep this instruction book near to the appliance
always, so that it can be easily consulted when
necessary.
▼ Any modifi cations or attempts to interfere with
the appliance can be dangerous for the user and
may damage the product.
▼ On delivery of the appliance, check that it has
not been damaged during transport. If any
damage is discovered, report the matter to the
retailer immediately.
▼ Do not cover the drier with washing or any other
items.
▼ When positioning the appliance, ensure that the
power supply cable is not kinked or squashed
and is accessible.
▼ Always close the door after using the drier.
This will prevent children from leaning on the
door and possibly overturning the drier.
▼ The appliance must not be used by children
unless supervised.
▼ Do not use the drier for drying dirty clothes.
▼ Never dry items that have been soiled with
substances such as cooking oil, petroleum,
acetone, alcohol, petrol, kerosene, stain
removers, turpentine, wax.
▼ Remove these substances in a hot wash using
an additional quantity of detergent prior to
loading the items in the drier.
▼ Do not dry items such as foam rubber, latex,
raincoats, waterproof fabrics, rubber mats,
preformed items, clothes or cushions with foam
rubber inserts, as these may melt and damage
other items in the washing or even the appliance
itself.
▼ Fabric softeners, or similar products, must be
used respecting the manufacturer's instructions
on the packaging.
▼ If the appliance is sold or given away, remember
to hand over this instruction book with it. This will
help the new owner use the drier both correctly
and safely.
▼ Do not attempt to repair any appliance faults
alone, in that repairs carried out by a non-
professional may cause serious damage
and will invalidate any rights to repairs under
guarantee.
▼ Repairs to the appliance can only be carried
out by personnel authorised by the customer
service centres. All repairs must make use of
original spare parts only.
▼ Spin dry or wring the washing well before
GB
loading it into the drier. Spun dry washing will
dry quicker.
▼ Clean the filter thoroughly each time the
drier is used in order to guarantee perfect air
circulation.
▼ Never insert or remove the plug from the mains
socket with wet hands.
▼ The drier must be connected to a mains socket
fi tted with an effi cient earth complying with
current safety standards.
▼ Do not use extension leads or multiple plug
adapters to connect the appliance to the mains
supply.
▼ Do not expose the appliance to atmospheric
agents.
▼ When servicing or cleaning the appliance,
remember to disconnect it from the mains
supply.
▼ Do not pull the power supply cable to unplug
the appliance from the mains supply. Pull the
plug only.
▼ This appliance is marked as complying
with European Directive 2002/96/EC, Waste
Electrical and Electronic Equipment (WEEE).
Make sure that the product is disposed of in a
correct manner. The user is obliged to contribute
towards preventing any negative consequences
for health and the environment.
The symbol affi xed to the product or
accompanying documents signifi es that the
product must not be treated as normal domestic
refuse, but must be delivered to an authorised
collection centre to enable the electric and
electronic equipment to be recycled.
When disposing of the appliance, comply with
local waste disposal regulations.
For further information on the treatment,
recovery and recycling of this product, refer to
the appropriate offi ces, local domestic waste
collection service or the retailer from where the
appliance was purchased.
Warning!!! Surfaces on which
this symbol appears may heat up
during normal operation.
THE MANUFACTURER WILL NOT BE HELD
RESPONSIBLE FOR ANY INCIDENTS
RESULTING FROM NON-COMPLIANCE WITH
SAFETY STANDARDS OR THE REQUIREMENTS
OF THIS INSTRUCTION BOOK.
SM2165
Page 17

DESCRIPTION OF THE APPLIANCE
DESCRIPTION OF THE APPLIANCE
1 Drum door.
2 Drum door fi lter.
3 Upper condensation water reservoir*.
(The condensation is collected in this reservoir
when the condensation drain hose is not
connected directly to the drainage system).
4 Control panel.
5 Drier drum.
*
3
15
6 Drum mouth fi lter.
7 Rating plate.
8 Lower condensation water reservoir*.
9 Adjustable feet
10 Condenser door.
11 Lower door.
* according to model
42
L
5
6
1
7
*
8
9
1
The retailer can provide an accessory to enable the drier to be mounted on top of a front - loading washing
machine, thus saving space. The installer will inform you of the appliance model for which this option is
possible.
10
11
OPTIONAL ACCESSORIES
INSTALLING THE APPLIANCE
INSTALLATION
▼ Installation must be carried out by qualifi ed personnel in line with the instructions
supplied by the manufacturer. Incorrect installation may result in damage and/or
injury.
▼ Do not install the drier in rooms subject to freezing temperatures. Freezing
temperatures could damage the electronics.
▼ Position the drier in a well-ventilated room.
▼ Do not cover the ventilation hole on the back (fi g. 2) and do not place the drier on
2
SM2165
thick carpet.
▼ Clean the inside of the drying drum using a damp cloth to remove any dust
deposits.
GB
Page 18
16
Adjustable feet. Place the drier upright so that it rests fi rmly on all four feet.
Level the drier by adjusting the feet as follows:
▼ Lift the drier slightly.
▼ Adjust the feet to the correct height (fi g. 3).
▼ Lower the drier.
NB. A badly levelled appliance may cause damage to the bearings and lead to
their premature wear. This drier does not need to be anchored to the fl oor.
▼ Make sure that the voltage indicated on the identifi cation plate attached to the
back of the appliance corresponds to that of the mains supply.
▼ All cut-outs, electric wiring and mains sockets must have a rating such that enables
them to support the maximum load indicated on the identifi cation plate.
▼ Once the appliance has been installed, it must be connected to the mains supply
through a single-pole switch.
▼ The mains supply to which the appliance is connected must be fi tted with an
earthing system. If this is not the case, the manufacturer will not be held liable for
any incidents that may occur (fi g. 4).
▼ If the power supply cable is damaged in any way, contact the appropriate
specialised customer technical service centre.
▼ The drier must not be connected to the mains supply using indirect methods such
as extension leads or multiple adapters.
▼ Position the appliance so that the power supply cable is easily accessible for
disconnection when the need arises.
Important: On completion of the drying cycle, disconnect the appliance from the mains supply
to prevent young children from operating the drier.
CONNECTING THE CONDENSATION DRAIN TO THE DRAINAGE SYSTEM.
INSTALLING THE APPLIANCE
LEVELLING THE DRIER
CONNECTING TO THE MAINS SUPPLY
3
4
The condensation can be collected in the reservoir (fi g. 10) or, alternatively, the hose
can be connected directly to the drainage system.
In this case, the collected water is pumped out.
To connect the condensation hose directly to the drainage system, proceed as
follows:
▼ Before starting any operations, unplug the appliance from the mains socket.
▼ Extract the hose on the back of the appliance by pulling it from its housing, (fi g.
5/6) and insert it in the waste water pipe.
GB
5
6
SM2165
Page 19

7
8
INSTALLING THE APPLIANCE
OPENING THE DOOR AND CHANGING THE OPENING DIRECTION
▼ Press the right side of the door (fi g. 7) to open it. If the door has been reversed,
press the left side.
▼ The direction of the drum door opening can be modifi ed according to needs (fi g.
8).
- N.B.: This operation must only be carried out by a qualifi ed technician.
Contact the customer service centre.
USING THE DRIER
PRECAUTIONS FOR FABRIC TYPES
In the case of doubt as to the type of fabric, read the label on the item itself.
Almost all items that can be machine dried have this information specifi ed on the label.
To avoid static electricity being generated in the items, add a conditioner to the rinse cycle of the washing
machine.
Remove synthetic materials from the drum immediately to prevent them from creasing.
17
RECOMMENDATIONS PRIOR TO DRYING
SORTING THE WASHING
Before drying the washing, spin it at the recommended
rpm for the type of load. Spinning at maximum rpm
will result in up to a 35% saving in energy. The
higher the spin speed, the better the drying result.
Using a softener in the wash cycle will improve
drying and save time. Before drying the washing in
the drier, check the items to make sure they can be
machine dried. Refer to the clothing care symbols
on the labels.
If the label has no drying symbol, proceed as
follows:
▼ White/coloured washing and crease-proof
washing can be dried at normal temperature
using the appropriate drying programme.
▼ Delicate washing, acrylics for example, must
always be dried at low temperature.
SM2165
General advice:
Jersey often shrinks, not only in the wash but also
during drying.
Pure linen.
▼ Only dry garments with specific drying
instructions on label, otherwise, the fabric could
roughen.
▼ In order to avoid staining, never dry dark
coloured washing together with light coloured
washing.
GB
Page 20

18
USING THE DRIER
DESCRIPTION OF THE CONTROL PANEL.
CT
LS
Ih. Ia. Iv. Ic.
L
CR
LR
P
HA VCU
R
9
P. Programmer Knob. Used to select the required programmes according to the type of fabric and drying needs.
In addition to switching off the display, the STOP button also
resets the appliance. If, for any reason, you want to change
the programme or add more washing to the load during
the drying cycle, simply place the programmer knob in the
“STOP” position. Then re-position the knob on the required
programme and press the “START” button.
NB. Warning!! Only use this function if strictly
necessary and then only if the program to reset
has been running for less than 3 minutes.
N.B. On some models fi tted with a Delay function,
when the function is enabled or at the end of the
cycle, the backlit display will switch off after a
few minutes. Pressing any button will switch the
display light on again.
S. Start Button. Press this button to start the programmed
drying cycle.
L
S
. Start LED. Off indicates the “STOP” position. On fi xed
indicates the programme is running. Fast fl ashing indicates
the set programme is ready to start. Slow fl ashing indicates
the end of the drying programme.
U. Drying selector button. This is used to select the degree
of dampness on electronically controlled programmes and
the time on manual programmes.
Not all the options are available for all programmes.(see:
“PROGRAMME TABLE”)
R
. There are 4 icons for the electronically controlled drying
L
programme. The selected icon will fl ash while the other 3
remain lit. When the cycle starts, only the selected icon
remains lit.
T
. Drier timer. Displays the set time in steps of 20 minutes,
C
up to a maximum of 2 hours and 40 minutes for the cotton
programme and 2 hours for the synthetics programme.
C. Beep silencer button. Disables the beep function,
which would otherwise be permanently enabled. The
S
selection remains memorised even when the appliance
is switched off.
The beeps signal as follows:
1 long beep (cycle started)
4 long beeps (cycle completed)
4 short beeps (drum rotating for anti-crease function)
V. Water reservoir alarm reset button. Used to restart the
cycle after the condensation water reservoir has been
emptied (fi g. 11)
L
V
. Reservoir full alarm icon. A fl ashing icon indicates that
the reservoir is full and needs to be emptied (the drying
cycle stops). After the container has been replaced, a
fi xed lit icon indicates that the function is restarting. Icon
off indicates that the alarm has been reset (the cycle
restarts).
A. Anti-crease button. Activates a function that, at the
end of the drying cycle, rotates the drum and the washing
loaded in it in one direction then in the other for a further
sixty minutes to reduce creasing. Each rotation is signalled
by a short beep .
H. Drying delay anti-crease button. This rotates the
washing in the drum during the delayed start in order to
reduce creasing.
lh. la. lc. The beeper, anti-crease and delayed start icons
appearing on the display indicate that the functions are
active.
R. Delayed start button. Used to delay drier start-up for
up to a maximum of 16 hours. Each time the button is
pressed, the start is delayed for one hour. When the
START button is pressed, the letter h will fl ash on the
display signalling that the function has been activated. The
machine will wait for the number of hours set to elapse and
then start the drying cycle automatically. If the power supply is interrupted while the delayed start function is active,
the function itself will be annulled. Pressing the START
button will start the drying cycle immediately.
C
R
. Delayed start counter. Displays the delay time set in
steps of one hour up to a maximum of 16 hours.
GB
SM2165
Page 21

FABRIC
COTTON
USING THE DRIER
PROGRAMME TABLE
ELECTRONIC DAMPNESS CONTROL PROGRAMMES
MAX. WASHING
LOAD
7.0 kg.
EXTRA
DRY
WARDROBE
DRY
IRON
DAMP
19
VERY
DAMP
SYNTHETICS
DELICATES
WOOL
COTTON
SYNTHETICS
3.5 kg.
3.5 kg.
1.5 kg.
7.0 kg.
3.5 kg.
TIMED PROGRAMMES
160-140 min 140-120 min 120-100 min 100-80 min
120-100 min 80-60 min 60-40 min 40-20 min
COOLING
HOW TO DRY
1) Load the washing in the drum and close the
door.
2) With dry hands, insert the plug in the mains
socket.
3) Position the programmer knob on Stop to reset
any previously set programmes. Then rotate the
knob to the most suitable programme for the
type of fabric loaded.
4) Use the drying selector to select the degree of
dampness required (see Programme Table).
5) Select the required options by pressing the
appropriate buttons.
20 min
6) Press the START button to start the drying
cycle.
7) The end of the drying cycle is signalled by the
fl ashing start led, the beeper and the word END
appearing on the display. At this point, return
the selector to the STOP position.
8) Open the drum door and remove the wash-
ing.
9) Re-close the door.
10) With dry hands, remove the plug from the mains
socket.
10
SM2165
MAINTENANCE
INTERNAL LIGHT (AVAILABLE ACCORDING TO MODEL)
The drier is fi tted with an internal light.
To replace the bulb, proceed as follows:
▼ Remove the plug from the mains socket or switch off the main power supply;
▼ Remove the lamp cover.
▼ Remove the bulb (fi g. 10).
▼ Warning: Do not use bulbs of rating higher than 15 W!
▼ Replace the lamp cover.
GB
Page 22

20
DRAINING THE CONDENSATION WATER RESERVOIR
If the condensation drain hose is not connected directly to the drainage system, the
condensation is collected in the reservoir (fi g. 11). The reservoir must be emptied after
each drying cycle.
To empty the reservoir, proceed as follows:
▼ Remove the reservoir from the drier (Fig. 11).
▼ Empty the reservoir. The drain hole is located on the top right (fi g. 12).
▼ After emptying, replace the container in its housing making sure it is properly
seated.
▼ If the reservoir is not emptied or it fi lls up excessively during a drying cycle, the
condensation reservoir warning light will fl ash and the drier will stop. If this happens,
proceed as described above.
▼ To restart the programme, press the reservoir alarm reset button (V) (fi g. 9).
CLEANING AND MAINTENANCE
Disconnect the drier from the mains supply before cleaning. It is important to clean
the drier after each drying cycle in order to save in drying time and consequently save
energy.
1. Door fl uff fi lter (fi g. 13).
2. Fluff fi lter in the loading aperture (fi g. 14).
3. Condenser (fi g. 15).
▼ Remove the fi lter by pulling upwards and then clean it (fi g. 13).
MAINTENANCE
11
12
13
▼ It is also possible to remove the two fl uff fi lters from the door opening and clean
them (fi g. 14).
NB. The presence of fl uff in the fi lter is not the result of the drying procedure.
The fl uff comes from the fi bres of fabrics damaged or unthreaded during
the wash and, above all, as a result of wear.
The fi lters can be cleaned by simply placing them under hot running water.
▼ The condenser should be cleaned two or three times a year (fi g. 15/18).
▼ Open the door, rotate the lever to the vertical position and remove the cover (fi g.
15).
GB
14
15
SM2165
Page 23

16
MAINTENANCE
CLEANING AND MAINTENANCE
▼ Rotate the 3 levers to the vertical position and remove the condenser (fi g. 16).
21
17
18
TROUBLESHOOTING
All electric appliances may break-down at some time.
Remember to call a qualifi ed technician in these cases. However, many problems can be resolved without
the need for external intervention.
Important: If a fault occurs, disconnect the appliance from the mains supply immediately.
Before calling the customer service centre, check the points listed below.
RESOLVING PROBLEMS
If the drier doesn't start
• Check that:
1)
The appliance is plugged into the mains
supply.
2) The mains socket is working correctly:
2a) The fuse has not blown. (Check by
plugging in another appliance such as a table
lamp and see if that works)
2b) All the instructions in the manual have been
followed.
▼ Wash the front, back and sides of the condenser,
aiming the jet of water as shown (fi g.17/18).
To dry the condenser thoroughly, place it on its
side on a towel.
▼ When the condenser is dry, replace it following
the same procedure in reverse order.
If the drier doesn't start
• Check that:
1) The door is closed properly
2) The start button has been pressed.
The washing does not dry
• Check that:
1) The air exhaust aperture is not blocked.
The fi lter is not blocked. (Remember that
2)
when the door is opened, the internal
parts of the drier and the washing may
be very hot).
If, after all these checks have been carried out, the appliance still does not work, inform the
nearest customer service centre. When contacting the service centre, inform them of the
appliance model, serial number and type of fault. This information will help the service centre
operator in procuring the necessary spare parts, thus guaranteeing a speedy and effi cient
repair.
SM2165
GB
Page 24

2222
................................................................................................................................................................
................................................................................................................................................................
................................................................................................................................................................
................................................................................................................................................................
................................................................................................................................................................
................................................................................................................................................................
................................................................................................................................................................
................................................................................................................................................................
................................................................................................................................................................
................................................................................................................................................................
................................................................................................................................................................
................................................................................................................................................................
................................................................................................................................................................
................................................................................................................................................................
................................................................................................................................................................
................................................................................................................................................................
................................................................................................................................................................
................................................................................................................................................................
................................................................................................................................................................
................................................................................................................................................................
................................................................................................................................................................
................................................................................................................................................................
................................................................................................................................................................
................................................................................................................................................................
................................................................................................................................................................
................................................................................................................................................................
................................................................................................................................................................
................................................................................................................................................................
................................................................................................................................................................
................................................................................................................................................................
...................................................................................................................................................................
...................................................................................................................................................................
...................................................................................................................................................................
...................................................................................................................................................................
...................................................................................................................................................................
...................................................................................................................................................................
..................................................................................................................................................................
.................................................................................................................................................................
NOTES
SM2165
Page 25

DEUTSCH
Verehrter Kunde,
Wir gratulieren Ihnen zur Wahl unseres Trockners.
Bitte lesen Sie diese Gebrauchsanweisung genau durch, bevor Sie die Maschine anschließen und gebrauchen.
Die gute Kenntnis der Funktionsprinzipien wird Ihnen die korrekte und sichere Nutzung des Gerätes ermög-
lichen.
Die Gebrauchsanweisung enthält neben den technischen Merkmalen des Trockners viele nützliche Tipps, die
Ihnen helfen werden, das Gerät optimal zu gebrauchen.
Falls Sie den Trockner weiterverkaufen oder abgeben, muss dem neuen Benutzer auch die Gebrauchsanwei-
sung ausgehändigt werden.
INHALT
HINWEISE UND RATSCHLÄGE FÜR DEN BENUTZER 23-24
• Technische Daten 23
BESCHREIBUNG DER MASCHINE 25
• Optionales Zubehör 25
INSTALLATION DER MASCHINE 25-27
• Installation 25
• Gerades Ausrichten des Trockners 26
• Anschluss an das Stromnetz 26
• Ableitung des Kondensats nach Außen 26
• Ändern der Türanschlagsrichtung 27
GEBRAUCH DER MASCHINE 27-29
• Vorbereiten der Wäsche 27
• Hinweise zum Trocknen 27
• Beschreibung der Bedienblende 28
• Programmtabelle 29
• Trocknen 29
23
WARTUNG 29-31
• Innenbeleuchtung 29
• Entleeren des Kondensatbehälters 30
• Reinigung und Wartung 30-31
• Störungssuche 31
• Problemlösungen 31
HINWEISE UND RATSCHLÄGE FÜR DEN BENUTZER
TECHNISCHE DATEN
Breite cm:
Abmessungen:
MODELL:
SERIENNUMMER:
Höhe cm:
Tiefe cm:
Max. Fassungsvermögen
Nennleistung
Versorgungsspannung
...............................................................................................................................................................................................................
.........................................................................................................................................................................................
DATUM DES ERWERBS:
SM2165
..........................................................................................................................................................................
59.5
85.0
60.4
7 kg Tockenwäsche
Siehe Typenschild
Siehe Typenschild
DE
Page 26

24
HINWEISE UND RATSCHLÄGE FÜR DEN BENUTZER
▼ Das Gerät dient zum Wäschetrocknen im Haushalt.
Jede andere Verwendung ist unsachgemäß und
folglich gefährlich.
▼ Bewahren Sie dieses Handbuch stets in der Nähe
des Trockners auf, damit es im Bedarfsfall problemlos
konsultiert werden kann.
▼ Jede Veränderung oder sonstige Manipulierung des
Geräts kann den Benutzer gefährden und Schäden
am Trockner verursachen.
▼ Bei Lieferung des Haushaltsgeräts dieses umgehend
auf eventuelle Transportschäden untersuchen. Falls
solche festgestellt werden, ist umgehend der Händler
zu benachrichtigen.
▼ Den Trockner nicht mit Wäsche oder anderen Gegen-
ständen bedecken.
▼ Beim Aufstellen des Trockners darauf achten, dass
das Stromkabel nicht verdreht oder gequetscht wird
und für etwaige Eingriffe problemlos zugänglich ist.
▼ Nach dem Gebrauch des Haushaltsgeräts stets die
Tür verschließen.
▼ Auf diese Weise wird verhindert, dass sich Kinder
an die Tür anlehnen und so das Gerät umkippen
können.
▼ Kinder dürfen sich nicht unbeaufsichtigt in der Nähe
der Maschine aufhalten.
Keine schmutzigen Wäschestücke im Trockner trock-
nen.
▼ Auf keinen Fall Wäschestücke trocknen, die mit
Speiseöl, Erdöl, Azeton, Alkohol, Benzin, Kerosin,
Fleckenmittel, Terpentin oder Wachsen verschmutzt
sind.
▼ Derlei Wäschestücke müssen heiß und mit reichlich
Waschmittel gewaschen werden, bevor sie in den
Trockner eingefüllt werden.
▼ Auf keinen Fall Kleidungsstücke mit Schaumgummi,
Latex, impermeable und wasserdichte Gewebe,
Gummimatten, Gegenstände und Kleidungsstücke
oder vorgeformte Kissen mit Schaumgummieinlagen
in den Trockner geben, weil diese schmelzen und
andere Wäschestücke oder sogar das Haushaltsgerät
selbst beschädigen könnten.
▼ Weichspüler oder ähnliche Mittel müssen laut beige-
legter Gebrauchsanweisung angewandt werden.
▼ Falls das Haushaltsgerät weiterverkauft oder ver-
schenkt wird, ist auch die Gebrauchsanweisung auszuhändigen, damit der neue Benutzer es auf korrekte
und sichere Weise benutzen kann.
▼ Bei Betriebsstörungen auf keinen Fall versuchen, das
Gerät selbst zu reparieren, weil dies schwerwiegende
Schäden verursachen könnte und außerdem den
Gewährleistungsanspruch verfallen lässt.
▼ Das Gerät darf ausschließlich von autorisiertem
Personal der Kundendienstzentren repariert werden.
DE
Für Reparaturen dürfen nur Original-Ersatzteile
verwendet werden.
▼ Die Wäsche vor dem Einfüllen in den Trockner gut
auswringen oder schleudern. Je besser die Wäsche
geschleudert ist, umso schneller wird sie trocknen.
▼ Das Flusensieb vor jedem Gebrauch des Geräts
sorgfältig reinigen, damit die Luft immer ungehindert
zirkulieren kann.
▼ Den Stecker nicht mit nassen Händen aus- oder
einstecken.
▼ Das Gerät muss an eine vorschriftsmäßig geerdete
Steckdose angeschlossen werden.
▼ Die Verwendung von Verlängerungskabeln oder
Mehrfachsteckern ist verboten.
▼ Das Gerät darf nicht den Witterungseinfl üssen ausge-
setzt werden.
▼ Vor irgendwelchen Arbeiten am Gerät oder dessen
Reinigung, den Trockner unbedingt spannungslos
machen.
▼ Beim Ausstecken des Kabels aus der Steckdose nie
am Kabel selbst, sondern ausschließlich am Stecker
ziehen.
▼ Dieses Gerät entspricht den Europäischen Richt-
linien 2002/96/EC, Waste Electrical and Electronic Equipment (WEEE). Die vorschriftsmäßige
Entsorgung des ausrangierten Geräts stellt einen
wertvollen Beitrag zum Schutz der Umwelt und der
Gesundheit dar.
Das Symbol am Gerät oder in den Begleitpapieren weist darauf hin, dass dieses Produkt
nicht als Hausmüll behandelt werden darf, sondern
als Sondermüll einer Sammelstelle für elektrische
und elektronische Altgeräte zu übergeben ist.
Gemäß den lokalen Vorschriften zur Abfallbeseiti-
gung entsorgen.
Für weitere Informationen zu Behandlung, Abbau
und Recycling dieses Produkts die zuständige
Behörde, das Abfallbeseitigungsunternehmen oder
den Händler, bei dem das Gerät erworben wurde,
kontaktieren.
ACHTUNG: MIT DIESEM SYMBOL BEZEICHNETE OBERFLÄCHEN KÖNNEN WÄHREND
DES BETRIEBS HEISS WERDEN.
DER HERSTELLER HAFTET NICHT FÜR
EVENTUELLE SCHÄDEN, WELCHE
INFOLGE DER NICHTBEACHTUNG DER
SICHERHEITSVORSCHRIFTEN UND DER
GEBRAUCHSANWEISUNG ENTSTEHEN
KÖNNEN
SM2165
Page 27
BESCHREIBUNG DER MASCHINE
BESCHREIBUNG DER MASCHINE
1 Trommeltür.
2 Flusensieb an der Trommeltür.
3 Oberer Kondensatbehälter*
(Falls der Kondensatschlauch nicht direkt mit
dem Abfl uss verbunden ist, wird die Flüssigkeit
in diesem Behälter gesammelt).
4 Bedienblende.
5 Trocknertrommel.
*
3
L
25
6 Flusensieb an der Trommelöffnung.
7 Typenschild.
8 Unterer Kondensatbehälter*.
9 Verstellbare Füße.
10 Kondensatorklappe.
11 Untere Klappe.
* je nach Modell
42
5
6
1
7
*
8
9
1
Bei Ihrem Händler erhalten Sie das Zubehör zur Realisierung andersartiger Installationen, mit dem Sie
Ihren Trockner auf einer Frontladerwaschmaschine aufstellen und so Platz sparen können. Fragen Sie
Ihren Installateur, welches Modell eine derartige Kombination möglich macht.
10
11
OPTIONALES ZUBEHÖR
INSTALLATION DER MASCHINE
INSTALLATION
▼ Der Trockner muss von Fachpersonal und gemäß den Anweisungen des
Herstellers installiert werden, da eine fehlerhafte Installation Personen– und
Sachschäden verursachen kann.
▼ Den Trockner nicht in frostgefährdeten Räumen aufstellen. Frost kann die Elek-
tronik beschädigen.
▼ Den Trockner in einem gut belüfteten Raum aufstellen.
▼ Das Belüftungsgitter an der Rückseite des Gerätes (Abb. 2) nicht abdecken und
2
SM2165
den Trockner nicht auf dickem Teppichboden aufstellen.
▼ Das Innere der Trocknertrommel mit einem feuchten Tuch von eventuellem Staub
befreien.
DE
Page 28

26
Verstellbare Füße. Den Trockner so aufstellen, dass er mit allen vier Füßen fest
auf dem Boden steht. Nun die Maschine gerade ausrichten, indem die Füße wie
nachstehend beschrieben verstellt werden.
▼ Das Gerät leicht anheben.
▼ Die Füße auf die richtige Höhe einstellen (Abb. 3).
▼ Das Gerät wieder hinstellen.
NB: Wenn der Trockner nicht gerade ausgerichtet ist, können die Lager vorzeitig
verschleißen. Dieser Trockner muss nicht am Boden verankert werden.
▼ Sicherstellen, dass der am Typenschild an der Geräterückseite angegebene
Spannungswert dem Wert Ihres Netzes entspricht.
▼ Schutzschalter, Stromkabel und Netzsteckdose müssen so ausgelegt sein, dass
sie die am Typenschild angegebene Höchstlast aushalten können.
▼ Nach erfolgter Installation soll das Gerät über einen allpoligen Schalter an die
Netzversorgung angeschlossen werden können.
▼ Die für den Geräteanschluss vorgesehene Steckdose muss vorschriftsmäßig
geerdet sein. Andernfalls haftet der Hersteller nicht für eventuelle Schäden (Abb.
4).
▼ Im Falle eines schadhaften Stromkabels ein technisches Kundendienstzentrum
kontaktieren.
▼ Die Verwendung von Verlängerungskabeln und Mehrfachsteckdosen für den
Anschluss des Trockners ist verboten.
▼ Den Trockner so aufstellen, dass das Stromkabel problemlos erreichbar ist und
im Bedarfsfall ausgesteckt werden kann.
Wichtig: Den Trockner nach jedem Gebrauch stets vom Netz trennen, damit niemand ihn
ungewollt in Betrieb setzen kann.
INSTALLATION DER MASCHINE
GERADES AUSRICHTEN DES TROCKNERS
ANSCHLUSS AN DAS STROMNETZ
3
4
ABLEITUNG DES KONDENSATS NACH AUSSEN
Das Kondensat kann in dem speziellen Behälter (Abb. 10) gesammelt, oder aber
nach außen geleitet werden, indem der Schlauch direkt mit dem Abfl uss verbunden
wird.
In diesem Fall wird das Kondensat abgepumpt.
Um den Kondensatschlauch direkt an den Abfl uss anzuschließen, wie folgt vorge-
hen:
▼ Vor jedem Eingriff stets den Stecker aus der Steckdose nehmen.
▼ Den Schlauch aus seinem Sitz an der Geräterückseite nehmen (Abb. 5/6) und
in den Abfl uss stecken.
DE
5
6
SM2165
Page 29

7
8
INSTALLATION DER MASCHINE
ÖFFNEN DER TÜR UND ÄNDERN DER ANSCHLAGRICHTUNG
▼ Auf den rechten Teil der Tür drücken (Abb. 7), die Tür geht auf. Wurde die An-
schlagrichtung geändert, ist auf den linken Teil der Tür zu drücken.
▼ Die Anschlagrichtung der Trommeltür kann je nach den individuellen Anforde-
rungen verändert werden (Abb. 8).
NB: Dieser Vorgang muss Fachpersonal überlassen werden.
Wenden Sie sich dazu an den technischen Kundendienst.
GEBRAUCH DER MASCHINE
VORBEREITUNG DER WÄSCHE
Falls Zweifel über die Beschaffenheit eines Wäschestücks bestehen, die Angaben auf dem Pfl egeetikett
kontrollieren.
Fast bei allen für den Trockner geeigneten Kleidungsstücken ist diese Besonderheit auf dem Etikett
vermerkt.
Um statische Elektrizität der Wäschestücke zu vermeiden, sollten Sie beim Spülen der Wäsche einen
Weichspüler verwenden.
Synthetische Wäschestücke immer gleich aus der Trommel nehmen, damit sie nicht knittern.
27
HNWEISE ZUM TROCKNEN
SORTIEREN DER WÄSCHE
Vor dem Trocknen die Wäsche mit der geeigneten
Schleuderdrehzahl schleudern. Wenn Sie bei der
maximal zulässigen Schleuderdrehzahl schleudern,
sparen Sie bis zu 35% des Stromverbrauchs. Je
höher die Schleuderdrehzahl, umso besser das
Trockenergebnis. Die Verwendung eines Weichspülers beim Spülen der Wäsche verbessert die
Trocknung und spart Zeit. Bevor Sie die Wäsche
in den Trockner geben, sollten Sie sicherstellen,
dass sie für mechanisches Trocknen geeignet ist.
Beachten Sie zu diesem Zweck immer die Symbole
am Pfl egeetikett.
Hat das Wäschestück kein Trocknersymbol, halten Sie sich an die folgenden Regeln:
▼ Weiß- und Buntwäsche, sowie knitterarme
Wäsche werden bei normaler Temperatur mit
dem entsprechenden Programm getrocknet.
SM2165
▼ Empfi ndliche Wäsche, wie zum Beispiel
Artikel aus Acryl, stets bei niedrigen
Temperaturen trocknen.
Allgemeine Ratschläge:
Jersey kann nicht nur beim Waschen, sondern
auch beim Trocknen einlaufen.
Reines Leinen
▼ Nur trocknen, wenn vom Hersteller am Pfl e-
geetikett angegeben.
Andernfalls könnte der Stoff aufrauen.
▼ Dunkle Buntwäsche nicht zusammen mit
hellen Wäschestücken trocknen, weil diese
sonst verfärben könnten.
DE
Page 30

28
GEBRAUCH DER MASCHINE
BESCHREIBUNG DER BEDIENBLENDE
CT
LS
Ih. Ia. Iv. Ic.
L
CR
LR
P
HA VCU
R
9
P. Programmwähler Dieser dient zum Einstellen der
gewünschten Programme, je nach Gewebeart und den
jeweiligen Anforderungen. Die Position STOPP lässt das
Display verlöschen und setzt die Maschine zurück. Soll
eine Einstellung verändert oder zusätzliche Wäsche in den
Trockner eingelegt werden, den Programmwähler zunächst
auf „STOPP“ und dann auf das neue Programm stellen.
Zuletzt die Taste „START“ drücken.
NB: Achtung: Dieser Vorgang sollte nur wenn
unbedingt notwendig durchgeführt werden, und
nur wenn das betreffende Programm seit nicht
mehr als 3 Minuten begonnen hat.
NB: Bei einigen Modellen verlöscht die Hintergrundbeleuchtung des Displays nach einigen
Minuten, wenn das Programm Delay eingestellt
ist, oder am Ende des Waschgangs. Sie schaltet
sich einfach durch Drücken einer beliebigen
Taste wieder ein.
S. Taste für Start Nach dem Drücken dieser Taste beginnt
der eingestellte Trockenvorgang.
S
. LED für Start Die ausgeschaltete LED steht für
L
“STOPP”; die bleibend eingeschaltete LED steht für den
laufenden Trockenvorgang; die schnell blinkende LED
bedeutet, dass das gewählte Programm gestartet werden
muss; die langsam blinkende LED zeigt das Ende des
Programms an.
U. Wahltaste für den gewünschten Feuchtigkeitsgrad bei
den elektronisch gesteuerten Programmen, und für die
Dauer bei manuellen Programmen. Nicht alle Optionen
sind in allen Programmen verfügbar (siehe: “PROGRAMMTABELLEN”).
R
. Es gibt 4 Ikonen des elektronisch gesteuerten Trok-
L
kenprogramms. Die selektierte Ikone blinkt, während die
anderen 3 bleibend eingeschaltet bleiben. Nachdem der
Trockengang angelaufen ist, bleibt nur die selektierte Ikone
eingeschaltet.
T
. Trockengangzähler für die Anzeige der eingestellten
C
Zeit in Schritten von 20 Minuten, bis maximal 2 Stunden
und 40 Minuten für Baumwolle, und 2 Stunden für Synthetikgewebe.
DE
S
C. Taste für den Ausschluss des Summers, der ansonsten
immer aktiv ist. Die Einstellung bleibt auch nach dem
Ausschalten gespeichert.
Die Signalisierungen sind:
1 langer Beep (Trockengang angelaufen)
4 lange Beeps (Trockengang beendet)
4 kurze Beeps (Trommeldrehung als Knitterschutz)
V. Taste für Alarm-Reset, mit der der Trockengang nach dem Entleeren des Kondensatbehälters wieder gestartet wird (Abb. 11)
L
V
. Alarm-Ikone für vollen Behälter, der anzeigt, dass der Be-
hälter voll ist und entleert werden muss (der Trockengang hält
an); ist sie nach Wiedereinsetzen des Behälters bleibend eingeschaltet, zeigt dies an, dass die Funktion wieder aktiviert
wird; ist sie ausgeschaltet, zeigt sie an, dass die Sicherung
zurückgesetzt ist (der Trockengang läuft wieder an).
A. Knitterschutztaste, welche die Funktion aktiviert, die am
Ende des Trockengangs dafür sorgt, dass die Wäsche für
weitere 60 Minuten im Trockner hin und her bewegt wird,
damit sie nicht zerknittert. Jede Drehung wird von dem
Summer durch einen kurzen Beep angesagt.
H. Taste für Knitterschutz im Falle der verzögerten Trocknung, dient dazu, die Wäsche während der Wartezeit
weiter in der Trommel zu bewegen, um deren Knittern
zu verhindern.
lh. la. lc. Die am Display erscheinenden Ikonen für Summer, Knitterschutz und Startverzögerung zeigen an, dass
die jeweilige Funktion aktiv ist.
R. Taste für Startverzögerung ermöglicht den Trockenvorgang um bis maximal 16 Stunden zu verzögern. Bei
jedem Drücken wird der Start um eine Stunde verzögert.
Bei Drücken der Taste für START wird die aktive Verzögerung am Display durch das blinkende Symbol H angezeigt;
danach beginnt die Maschine nach Ablauf der eingegebenen Stunde automatisch mit dem Trockengang. Im Falle
eines Stromausfalls während der Verzögerungszeit wird
die Einstellung genullt und der Trockengang beginnt sofort
durch Drücken der Start-Taste.
C
R
. Der Zähler für Startverzögerung zeigt die eingestellte
Zeit mit Schritten von einer Stunden, bis zu max. 16
Stunden an.
SM2165
Page 31

GEBRAUCH DER MASCHINE
PROGRAMMTABELLE
PROGRAMME MIT ELEKTRONISCHER FEUCHTIGKEITSKONTROLLE
GEWEBE
max.
WÄSCHEFÜLL
EXTRATROC
KEN
SCHRANKFE
RTIG
BÜGELFEUC
HT
29
SEHR
FEUCHT
BAUMWOLLE
SYNTHETIKGEWEBE
FEINWÄSCHE
WOLLE
BAUMWOLLE
SYNTHETIKGEWEBE
ABKÜHLUNG
1) Die Wäsche in die Trommel einlegen und die
Tür schließen.
2) Mit trockenen Händen den Gerätestecker in
die Steckdose stecken.
3) Den Programmwähler auf Stopp stellen, um
eventuelle frühere Programme zurückzusetzen,
und dann auf das für die Art des Gewebes
geeignete Programm verstellen.
4) Mit dem Wahlschalter für Trocknen den ge-
wünschten Feuchtigkeitsgrad wählen (siehe
Programmtabelle).
5) Mit den speziellen Tasten die gewünschten
Optionen programmieren.
7.0 kg.
3.5 kg.
3.5 kg.
1.5 kg.
7.0 kg.
3.5 kg.
ZEITPROGRAMME
160-140 min 140-120 min 120-100 min 100-80 min
120-100 min 80-60 min 60-40 min 40-20 min
TROCKNEN
20 min
6) Die Taste für START drücken, um den Trok-
kengang zu beginnen.
7) Nach dem Trocknen, dessen Ende durch den
Summer und die Aufschrift END am Display
angezeigt wird, den Programmwähler wieder
auf die Position STOPP stellen.
8) Die Trommeltür öffnen und die Wäsche her-
ausnehmen.
9) Die Tür wieder verschließen.
10) Mit trockenen Händen den Gerätestecker aus
der Steckdose nehmen.
10
SM2165
WARTUNG
INNENBELEUCHTUNG (JE NACH MODELL)
Die Beleuchtung befi ndet sich im Geräteinnern.
Zum Auswechseln der Lampe wie folgt vorgehen:
▼ Das Gerät spannungslos machen, indem der Stecker ausgesteckt oder der
Hauptschalter ausgeschaltet wird.
▼ Die Lampenabdeckung abnehmen.
▼ Die Lampe herausnehmen (Abb. 10);
▼ Achtung: Die neue Lampe darf höchstens eine 15W-Lampe sein!
▼ Die neue Lampe einsetzen und die Lampenabdeckung wieder anbringen.
DE
Page 32

30
ENTLEEREN DES KONDENSATBEHÄLTERS
Wenn der Kondensatschlauch nicht direkt mit dem Abfl uss verbunden ist, wird die
Flüssigkeit im speziellen Behälter gesammelt (Abb. 11). Dieser Behälter muss nach
jedem Trockengang entleert werden.
Zum Entleeren des Kondensatbehälters wie folgt vorgehen:
▼ Den Behälter aus dem Trockner nehmen (Abb. 11);
▼ Den Behälter entleeren; die Entleeröffnung befi ndet sich oben rechts (Abb. 12);
▼ Nachdem der Behälter entleert wurde, wird er bis zum Anschlag wieder einge-
setzt.
▼ Wenn vergessen wurde, den Behälter zu entleeren, oder wenn dieser während
eines Trockengangs volläuft, beginnt die LED des Kondensatbehälteralarms zu
blinken und der Trockner schaltet sich aus. Danach wie folgt vorgehen:
▼ Um das unterbrochene Programm fortzusetzen, die Taste (V) für Reset des
Kondensatbehälteralarms drücken (Abb. 9).
REINIGUNG UND WARTUNG
Vor dem Reinigen das Gerät spannungslos machen. Es ist wichtig, dass das Gerät
nach jedem Trocknen gesäubert wird, den so wird Trockenzeit und folglich Energie
eingespart.
1. Flusensieb an der Tür (Abb. 13).
2. Flusensieb an der Einfüllöffnung (Abb. 14).
3. Kondensator (Abb. 15).
▼ Das Flusensieb nach oben herausziehen und reinigen (Abb. 13).
WARTUNG
11
12
13
▼ Daneben können die beiden Flusensiebe an der Einfüllöffnung herausgenommen
und gesäubert werden (Abb. 14).
NB: Die Flusen im Sieb entstehen nicht durch den Trockenvorgang.
Sie stammen vielmehr aus schadhaften oder zerschlissenen Fasern des
Gewebes, vor allem auf Grund von Verschleiß des Kleidungsstückes.
Zum Reinigen die Siebe am besten unter einen Strahl warmen Wassers aus-
spülen.
▼ Der Kondensator sollte zwei- bis dreimal jährlich gereinigt werden (Abb.
15/18).
▼ Die Tür öffnen, den Hebel senkrecht stellen und den Deckel abnehmen (Abb.
15).
DE
14
15
SM2165
Page 33

16
WARTUNG
REINIGUNG UND WARTUNG
▼ Die drei Hebel senkrecht stellen und den Kondensator herausziehen (Abb.
16).
31
17
18
STÖRUNGSSUCHE
Alle Elektrogeräte können manchmal Störungen aufweisen.
Wenden Sie sich in einem solchen Fall unbedingt an einen Fachmann. Kleinere Probleme können Sie
jedoch selbst beseitigen.
Wichtig: Im Falle einer Funktionsstörung das Gerät zu allererst spannungslos machen.
Bevor Sie unseren Kundendienst hinzuziehen, sollten Sie die folgenden Punkte überprüfen.
PROBLEMLÖSUNG
Das Gerät läuft nicht an
• Die folgenden Kontrollen durchführen:
1) Ob das Gerät korrekt an das Netz angeschlossen ist.
2) Ob die Steckdose in Ordnung ist:
2a) Wurde die Schmelzsicherung aus-
gelöst? (Um dies zu prüfen, einfach
ein anderes Gerät, zum Beispiel eine
Tischlampe, an die fragliche Steckdose
anschließen).
2b) Wurden alle Anleitungen der Ge-
brauchsanweisung befolgt?
▼ Den Kondensator von allen Seiten mit einem
Wasserstrahl ausspülen, wie in den Abbildungen
gezeigt (Abb.17/18).
Dann den Kondensator seitlich auf ein Handtuch
legen und vollkommen abtropfen lassen.
▼ Wenn er ganz trocken ist, wird er wieder einge-
baut, wozu in umgekehrter Reihenfolge vorgegangen wird.
Das Gerät läuft nicht an
• Die folgenden Kontrollen durchführen:
1) Ob die Tür richtig verschlossen ist.
2) Ob die Start-Taste gedrückt wurde.
Die Wäsche wird nicht getrocknet
• Die folgenden Kontrollen durchführen:
1) Ob die Entlüftungsöffnung verstopft ist.
2) Ob das Flusensieb verstopft ist. (Bedenken
Sie, wenn Sie die Einfülltür aufmachen,
dass die inneren Teile des Trockners und
die Wäsche sehr heiß sein können).
Wenn das Gerät nach diesen Kontrollen weiterhin nicht korrekt funktioniert, wenden Sie sich
bitte an das nächstgelegene Kundendienstzentrum. Geben Sie dabei das Modell und die
Seriennummer an und beschreiben Sie die Art der Störung. Mit diesen Informationen wird
der Kundendiensttechniker in die Lage versetzt, die erforderlichen Ersatzteile zu besorgen
und die Reparatur folglich schnell und effi zient durchzuführen.
SM2165
DE
Page 34

3232
................................................................................................................................................................
................................................................................................................................................................
................................................................................................................................................................
................................................................................................................................................................
................................................................................................................................................................
................................................................................................................................................................
................................................................................................................................................................
................................................................................................................................................................
................................................................................................................................................................
................................................................................................................................................................
................................................................................................................................................................
................................................................................................................................................................
................................................................................................................................................................
................................................................................................................................................................
................................................................................................................................................................
................................................................................................................................................................
................................................................................................................................................................
................................................................................................................................................................
................................................................................................................................................................
................................................................................................................................................................
................................................................................................................................................................
................................................................................................................................................................
................................................................................................................................................................
................................................................................................................................................................
................................................................................................................................................................
................................................................................................................................................................
................................................................................................................................................................
................................................................................................................................................................
................................................................................................................................................................
................................................................................................................................................................
...................................................................................................................................................................
...................................................................................................................................................................
...................................................................................................................................................................
...................................................................................................................................................................
...................................................................................................................................................................
...................................................................................................................................................................
..................................................................................................................................................................
.................................................................................................................................................................
ANMERKUNGEN
SM2165
Page 35

FRANÇAIS
Cher client,
Nous vous remercions d’avoir choisi l’un de nos produits.
Nous vous invitons à lire attentivement les instructions d’utilisation avant de brancher et de mettre en service
la machine. La connaissance des principes de fonctionnement vous permettra d’utiliser l’appareil correctement
et en toute sécurité.
Les instructions d’utilisation contiennent non seulement les caractéristiques techniques de l’appareil mais
aussi de nombreuses indications sur le fonctionnement qui vous aideront à utiliser la machine de manière
optimale.
En cas de vente optimale ou de cession du sèche-linge, il ne faut pas oublier de remettre au nouvel utilisateur
la notice d’emploi.
33
TABLE DES MATIÈRES
NOTES ET CONSEILS POUR L’UTILISATEUR 33-34
• Données techniques 33
DESCRIPTION DE LA MACHINE 35
• Accessoires en option 35
INSTALLATION DE LA MACHINE 35-37
• Installation 35
• Mise à niveau du sèche-linge 36
• Branchement à l’installation électrique 36
• Réglage pour l’évacuation de l’eau de condensation vers l’extérieur 36
• Modifi cation du sens d’ouverture de la porte 37
UTILISATION DE LA MACHINE 37-39
• Précautions pour les tissus 37
• Conseils avant le séchage 37
• Description du tableau des commandes 38
• Tableau des programmes 38
• Comment sécher 39
ENTRETIEN 39-41
• Éclairage interne 39
• Vidange du bac de récupération de l’eau de condensation 40
• Nettoyage et entretien 40-41
• Diagnostic de pannes 41
• Résolution des problèmes 41
NOTES ET CONSEILS POUR L’UTILISATEUR
INFORMATIONS TECHNIQUES
Largeur cm.:
Dimensions:
MODÈLE:
NUMÉRO DE FABRICATION:
DATE D’ACHAT:
SM2165
Hauteur cm.:
Profondeur cm.:
Capacité maximum
Puissance Nominale
Tension électrique
...........................................................................................................................................................................................................
...........................................................................................................................................................
...........................................................................................................................................................................................
7 kg. linge sec
Voir plaque d’identification
Voir plaque d’identification
59.5
85.0
60.4
FR
Page 36

34
NOTES ET CONSEILS POUR L’UTILISATEUR
▼ Cet appareil doit être utilisé comme un sèche-linge à
usage domestique. Tout autre utilisation est impropre
et donc dangereuse.
▼ Toujours conserver cette notice d’emploi à proximité
du sèche-linge afi n de pouvoir le consulter rapidement en cas de besoin.
▼ Toute modifi cation ou tentative de transformation de
l’appareil peut être dangereuse pour l’utilisateur et
causer des dommages à la machine.
▼ A la réception de l’appareil, vérifi er qu’il n’a subi aucun
dommage durant le transport. En cas de dommages,
s’adresser immédiatement au revendeur.
▼ Ne pas couvrir le sèche-linge avec du linge ni quoique
ce soit d’autre.
▼ Lors du positionnement de l’appareil, s’assurer que
le câble d’alimentation n’est ni plié ni écrasé et qu’il
est accessible pour toute intervention.
▼ Toujours fermer la porte après l’utilisation de l’appareil.
Cela permet d’éviter que les enfants ne s’appuient
sur la porte et ne fassent basculer le sèche-linge.
▼ Il est interdit de laisser les enfants utiliser la machine
sans surveillance.
▼ Ne pas sécher de linge sale dans le sèche-linge.
▼ Ne jamais faire sécher du linge souillé par des substan-
ces telles que : huile de cuisine, pétrole, acétone, alcool,
essence, kérosène, détachant, térébenthine ou cire.
▼ Éliminer ces substances en effectuant un cycle
de lavage à chaud avec une dose de détergent
supplémentaire avant de charger le linge dans le
sèche-linge.
▼ Ne pas faire sécher d’articles tels que : mousse de
caoutchouc, latex de caoutchouc, imperméables,
tissus hydrofuges, tapis en caoutchouc, articles et
vêtements ou coussins préformés avec des blocs
de mousse de caoutchouc, car ils pourraient fondre
et abîmer le reste du linge ou même détériorer l’ap-
pareil.
▼ Les assouplissants pour le linge ou produits similaires
doivent être utilisés selon les instructions fournies sur
l’emballage.
▼ Si l’appareil est vendu ou offert, ne pas oublier de re-
mettre cette notice avec la machine ; ce qui permettra
au nouveau propriétaire d’utiliser le sèche-linge de
manière correcte et sûre.
▼ Il est interdit de réparer soi-même les pannes de
l’appareil car les réparations effectuées par des
personnes non professionnelles peuvent causer de
graves dommages et entraînent l’annulation de la
garantie.
▼ Les réparations de l’appareil doivent être confi ées
exclusivement au personnel des centres de service
après-vente. Pour les réparations, seules les pièces
détachées d’origine doivent être utilisées.
▼ Essorer ou bien tordre le linge avant de le charger
▼ Bien nettoyer le fi ltre après chaque utilisation du
▼ Ne pas brancher ou débrancher la fi che de la prise
▼ La machine doit être branchée à une prise de cou-
▼ Il est interdit de brancher la machine à la prise
▼ Ne pas exposer l’appareil aux agents atmosphéri-
▼ Lors des opérations de révision ou de nettoyage, ne
▼ Pour débrancher la machine de la prise électrique,
▼ Cet appareil porte le symbole du recyclage confor-
Il faut donc s’en défaire selon les normes locales
Pour toute autre information relative au traitement, à la
FR
dans le sèche-linge. Le linge bien essoré sèchera
plus rapidement.
sèche-linge afi n de garantir une circulation optimale
de l’air.
électrique avec les mains mouillées.
rant avec mise à la terre conforme aux exigences
de sécurité.
électrique en utilisant des rallonges ou des fi ches
multiples.
ques.
pas oublier de débrancher l’appareil de la prise de
courant.
ne pas tirer sur le câble électrique mais sur la
fi che.
mément à la directive européenne 2002/96/CE
relative aux déchets d’équipements électriques et
électroniques (DEEE). En procédant correctement
à la mise au rebut de cet appareil, l’utilisateur
contribue à éviter toute conséquence néfaste pour
l’environnement et la santé de l’homme.
Le symbole présent sur l’appareil ou sur la
documentation qui l’accompagne indique que ce
produit ne peut en aucun cas être traité comme
déchet ménager et doit donc être remis à un centre
de collecte des déchets chargé du recyclage des
équipements électriques et électroniques.
relatives au traitement des déchets.
récupération et au recyclage de ce produit, contacter
le service local concerné, le service de collecte des
déchets ménagers ou le magasin où le produit a été
acheté.
ATTENTION ! Les surfaces portant
ce symbole peuvent être chaudes
durant le fonctionnement.
LE PRODUCTEUR DECLINE TOUTE
RESPONSABILITE EN CAS D’ACCIDENTS
PROVOQUES PAR LE NON-RESPECT
DES NORMES DE SECURITE ET DES
INSTRUCTIONS D’UTILISATION.
SM2165
Page 37

DESCRIPTION DE LA MACHINE
DESCRIPTION DE LA MACHINE
1 Porte du tambour
2 Filtre de la porte du tambour
3 Bac de récupération de l’eau de condensation
supérieur*
(Si le tuyau de vidange de l’eau de condensation
n’est pas directement raccordé au tuyau d’évacuation, la condensation est recueillie dans ce bac).
4 Tableau des commandes
5 Tambour de séchage
*
3
L
35
6 Filtre sur l’ouverture du tambour
7 Plaquette des caractéristiques techniques
8 Bac de l’eau de condensation inférieur*
9 Pieds réglables
10 Portillon du condenseur
11 Portillon inférieur
* présent selon le modèle
42
5
6
1
7
*
8
9
1
Pour gagner de la place, il est possible de superposer votre sèche-linge sur une machine à laver à
chargement frontal grâce à l’accessoire ad hoc disponible chez votre revendeur. Le modèle d’appareil
qui vous permettra de réaliser cette installation vous sera conseillé par votre installateur.
10
11
ACCESSOIRES EN OPTION
INSTALLATION DE LA MACHINE
INSTALLATION
▼ L’installation doit être effectuée par un technicien qualifi é, conformément aux
instructions fournies par le constructeur car une installation incorrecte peut
causer des dommages aux personnes et aux choses.
▼ Ne pas installer le sèche-linge dans un local où il ne serait pas à l’abri du gel.
Le gel pourrait en effet détériorer les parties électroniques.
▼ Positionner le sèche-linge dans une pièce ventilée.
▼ Ne pas couvrir l’orifi ce de ventilation situé à l’arrière (fi g. 2) et ne pas poser la
2
SM2165
machine sur une moquette épaisse.
▼ Nettoyer l’intérieur du tambour de séchage avec un chiffon humide afi n d’éliminer
la poussière qui a pu s’y déposer.
FR
Page 38

36
Pieds réglables. Mettre le sèche-linge à la verticale de sorte qu’il soit parfaitement
posé sur les quatre pieds. Mettre la machine à niveau en réglant les pieds comme
cela est décrit ci-dessous :
▼ Soulever légèrement la machine.
▼ Régler les pieds à la bonne hauteur (fi g.3).
▼ Reposer l’appareil.
N. B. : En cas de mise à niveau incorrecte de la machine, les roulements peuvent
être endommagés et s’user prématurément. Il n’est pas nécessaire de fi xer ce
sèche-linge au sol.
BRANCHEMENT À L’INSTALLATION ÉLECTRIQUE
▼ S’assurer que la tension électrique indiquée dans les données techniques de
la plaquette placée sur le panneau arrière de l’appareil correspond à la tension
du secteur.
▼ Le disjoncteur différentiel, les câbles électriques et la prise de courant doivent
être en mesure de supporter la charge maximale indiquée sur la plaquette.
▼ Après l’installation, l’accès à l’alimentation du secteur doit être garanti par un
interrupteur omnipolaire.
▼ La machine doit être branchée à une prise de courant avec mise à la terre. Dans
le cas contraire, le producteur décline toute responsabilité quant aux éventuels
accidents (fi g. 4).
▼ Si le câble d’alimentation présente la moindre détérioration, contacter le centre
de service après-vente spécialisé.
▼ Il est interdit de brancher le sèche-linge au secteur en interposant des raccor-
dements indirects, tels que des rallonges ou des prises multiples.
▼ Positionner l’appareil de sorte que le câble d’alimentation soit facilement acces-
sible pour pouvoir le débrancher en cas de besoin.
Important : À la fi n du cycle de séchage, débrancher le sèche-linge du secteur afi n d’éviter
qu’un enfant puisse le mettre en marche accidentellement.
INSTALLATION DE LA MACHINE
MISE À NIVEAU DU SÈCHE-LINGE
3
4
REGLAGE POUR L’EVACUATION DE L’EAU DE CONDENSATION VERS L’EXTERIEUR
Il est possible de récupérer l’eau de condensation dans le bac (fi g. 10) mais aussi
de raccorder le tuyau de vidange directement au tuyau d’évacuation.
Dans ce cas, l’eau est éliminée au moyen d’une pompe.
Pour raccorder le tuyau de l’eau de condensation directement au raccord d’évacua-
tion, agir comme suit:
▼ Avant de commencer une quelconque opération, débrancher la fi che de la prise
de courant.
▼ Tirer le tuyau placé à l’arrière de la machine pour l’extraire de son logement
(fi g. 5/6) et l’enfi ler dans le raccord d’évacuation.
FR
SM2165
5
6
Page 39

7
8
INSTALLATION DE LA MACHINE
OUVERTURE ET MODIFICATION DU SENS D’OUVERTURE DE LA PORTE
▼ Appuyer sur la droite de la porte (fi g. 7) (la porte s’ouvre). Si la porte a été
inversée, appuyer sur la gauche.
▼ Le sens d’ouverture de la porte du tambour peut être modifi é selon les exigences
de l’utilisateur (fi g. 8).
N.B. : Cette opération doit être exclusivement effectuée par du personnel
spécialisé.
Contacter le service après-vente.
37
UTILISATION DE LA MACHINE
PRÉCAUTIONS POUR LES TISSUS
En cas de doutes sur le type de tissu, contrôler l’étiquette cousue sur le vêtement.
Sur presque tous les tissus qui peuvent être séchés, il est spécifi quement indiqué qu’ils sont adaptés
au séchage en machine.
Pour éviter la présence d’électricité statique sur les vêtements, il est conseillé d’utiliser un assouplissant
durant les cycles de rinçage de la machine à laver.
Retirer aussitôt le linge synthétique du tambour pour éviter qu’il ne se froisse.
CONSEILS AVANT LE SÉCHAGE
TRI DU LINGE
Avant de sécher le linge, il faut l’essorer en sélectionnant un nombre de tours adapté au type de linge.
Un essorage effectué à la vitesse maximale admise
permet d’économiser jusqu’à 35 % d’énergie. La
qualité du séchage obtenu est proportionnelle à
la vitesse d’essorage. L’utilisation d’assouplissant
durant le lavage améliore le séchage et garantit
un gain de temps. Avant de sécher le linge dans
l’appareil, contrôler qu’il est adapté au séchage
mécanique. Pour ce faire, consulter les symboles
reportés sur les étiquettes d’entretien.
Si le symbole du séchage est absent de
l’étiquette, respecter les règles suivantes :
▼ Le linge blanc/couleur et le linge infroissable
se sèchent à température normale avec le programme de séchage sélectionné à cet effet.
SM2165
▼ Toujours sécher le linge délicat, par exemple
les tissus acryliques, à basse température.
Conseils généraux :
Jersey : Rétrécit souvent, non seulement au
lavage mais aussi au séchage.
Pur lin.
▼ Sécher uniquement si le séchage en machine
est indiqué par le fabricant sur l’étiquette
d’entretien.
Sinon, le tissu pourrait devenir rêche.
▼ Ne pas faire sécher du linge de couleur som-
bre avec du linge clair afi n d’éviter qu’il ne
déteigne.
FR
Page 40

38
UTILISATION DE LA MACHINE
DESCRIPTION DU TABLEAU DES COMMANDES
CT
LS
Ih. Ia. Iv. Ic.
L
CR
LR
P
HA VCU
R
9
P. Manette de sélection des programmes, sert à sélectionner les programmes désirés selon le type de tissu et
les besoins de l’utilisateur ; en plus d’éteindre l’affi cheur,
la position « ARRÊT » sert également à remettre la machine à zéro. Si, pour une quelconque raison, on décide
de changer de programme ou d’ajouter du linge, il suffi t
de mettre la manette sur la position « ARRÊT », puis de
sélectionner le nouveau programme et d’appuyer sur la
touche « DÉPART ».
N.B. Attention!! Il est vivement conseillé de n’utiliser cette fonction qu’en cas de réelle nécessité et
seulement si le programme à remettre à zéro n’est
pas commencé depuis plus de 3 minutes.
N.B. Sur certains modèles, quand on active la
fonction “Retard”, ou en fi n de cycle de séchage,
l’éclairage sur le fond de l’affi cheur s’éteint
après quelques minutes. Il suffi t d’appuyer sur
n’importe quelle touche pour qu’il se rallume.
S. Touche « Départ » : appuyer sur cette touche pour que
le sèche-linge débute le cycle de séchage sélectionné.
LS. Voyant « Dépar t » : éteint, il indique que le sèche-linge
est arrêté ; allumé fi xement, qu’un cycle est en cours ; le
clignotement rapide signale qu’un programme sélectionné
doit être mis en route, alors que le clignotement lent indique
la fi n du programme.
U. Touche de sélection du séchage, sert à sélectionner le
degré d’humidité désiré pour les programmes à contrôle
électronique, et la durée du séchage pour les programmes manuels. Tous les programmes ne permettent pas
d’activer toutes les fonctions. (voir : “TABLEAUX DES
PROGRAMMES”)
R
. Il y a quatre icônes du programme de séchage avec
L
contrôle électronique, l’icône sélectionnée clignote alors
que les 3 autres restent allumées fi xement. Quand le
séchage commence, seule l’icône sélectionnée reste
allumée.
C
T
. Compteur de séchage ; sert à visualiser le temps
programmé par pas de 20 minutes jusqu’à un maximum
de 2 heures et 40 minutes pour le programme coton et 2
heures pour les synthétiques.
C. Touche exclusion avertisseur sonore, exclut la fonction de l’avertisseur sonore qui, par défaut, est toujours
FR
S
activée ; le choix est mémorisé en cas de coupure de
courant.
Les signaux acoustiques sont les suivants:
1 bip long (cycle commencé)
4 bips longs (cycle terminé)
4 bips courts (rotation du tambour pour la fonction
antifroissage)
V. Touche de remise à zéro de l’alarme du bac : permet de
faire redémarrer le cycle de séchage après avoir vidé le
bac de récupération de l’eau de condensation (fi g. 11).
V
. Icône de l’alarme du bac plein : il clignote quand le
L
bac de récupération de l’eau de condensation est plein et
doit être vidé (le cycle s’interrompt) ; il est allumé fi xement
quand le bac a été repositionné et que la fonction est en
phase de réactivation ; il s’éteint quand la sécurité est
rétablie (le cycle repart).
A. Touche antifroissage : active la fonction ; à la fi n du
cycle de séchage, le tambour continue à tourner dans un
sens et dans l’autre pendant encore soixante minutes de
sorte que le linge présent dans le sèche-linge se froisse
le moins possible. Chaque rotation est signalée par des
bips courts émis par l’avertisseur sonore.
H. Touche antifroissage séchage différé : permet de faire
tourner le linge dans le tambour pendant l’attente pour
en diminuer le froissage.
lh. la. lc. Les icônes avertisseur sonore, antifroissage
et départ différé s’affi chent pour indiquer que la fonction
est activée.
R. Touche de départ différé : permet de différer le séchage jusqu’à 16 heures au maximum. Chaque fois que
l’on appuie sur la touche, le départ est différé d’une
heure. Appuyer alors sur la touche « Départ » : le voyant
sélectionné clignote, ce qui indique que la fonction a
été activée ; dès lors, une fois que le temps d’attente
programmé se sera écoulé, la machine démarrera automatiquement le cycle de séchage. En cas de coupure de
courant durant le temps d’attente, la programmation est
annulée et il faut appuyer sur « Départ » pour que le cycle
démarre immédiatement.
R
. Compteur de départ différé : visualise le temps
C
programmé par pas d’une heure jusqu’à un maximum
de 16 heures.
SM2165
Page 41

UTILISATION DE LA MACHINE
TABLEAU DES PROGRAMMES
ROGRAMMES AVEC CONTRÔLE ÉLECTRONIQUE DE L’HUMIDITÉ
TISSU
COTON
MAX CHARGE
DE LINGE
7.0 kg.
EXTRA
SEC
PRÊT À
RANGER
PRÊT À
REPASSER
39
TRÈS
HUMIDE
SYNTHÉTIQUES
DÉLICATS
LAINE
COTON
SYNTHÉTIQUES
REFROIDISSEMENT
1) Charger le linge dans le tambour et fermer la
porte.
2) Avec les mains sèches, brancher la fi che du
sèche-linge au secteur.
3) Positionner la manette de sélection des
programmes sur « Arrêt » pour annuler les
éventuels programmes précédents puis sélectionner le programme le mieux adapté au
type de tissu.
4) A l’aide de la touche de sélection du séchage,
sélectionner le degré d’humidité désiré (voir
Tableau des Programmes).
5) Sélectionner les options souhaitées avec les
3.5 kg.
3.5 kg.
1.5 kg.
PROGRAMMES AVEC MINUTERIE
7.0 kg.
3.5 kg.
160-140 min 140-120 min 120-100 min 100-80 min
120-100 min 80-60 min 60-40 min 40-20 min
COMMENT SÉCHER
20 min
touches correspondantes.
6) Appuyer sur la touche « Départ » pour faire
démarrer le séchage.
7) La fi n du séchage est signalé par le voyant
« Départ », qui se met à clignoter, et par le
mot END (fi n) qui s’affi che ; il faut alors repositionner le sélecteur sur « Arrêt »
8) Ouvrir la porte du tambour et sortir le linge.
9) Refermer la porte.
10) Avec les mains sèches, débrancher la fi che
du sèche-linge du secteur.
10
SM2165
ENTRETIEN
ÉCLAIRAGE INTERNE (DISPONIBLE SELON LE MODELE)
L’éclairage est placé à l’intérieur.
Pour remplacer l’ampoule, agir comme suit :
▼ Mettre l’appareil hors tension en débranchant la fi che de la prise de courant ou
en actionnant l’interrupteur général ;
▼ Enlever le cache de l’ampoule ;
▼ Retirer l’ampoule (fi g. 10) ;
▼ Attention : ne pas utiliser d’ampoules de plus de 15 W !
▼ Remonter le cache de l’ampoule.
FR
Page 42

40
VIDANGE DU BAC DE RÉCUPÉRATION DE L’EAU DE CONDENSATION
Si le tuyau de vidange n’a pas été directement raccordé au tuyau d’évacuation,
l’eau de condensation est recueillie dans le bac (fi g. 11). Le bac doit être vidé après
chaque cycle de séchage.
Pour vider le bac, agir comme suit :
▼ Extraire le bac du sèche-linge (fi g. 11) ;
▼ Vider le bac ; l’orifi ce de vidange se trouve sur le côté supérieur droit (fi g. 12) ;
▼ Après l’avoir vidé, le repositionner en poussant jusqu’au fond ;
▼ Si l’on oublie de vider le bac de récupération de l’eau de condensation ou s’il se
remplit durant le séchage, le voyant d’alarme clignote et le sèche-linge s’arrête.
Ensuite, agir comme ci-dessus.
▼ Pour poursuivre un programme interrompu, appuyer sur la touche (V) de remise
à zéro de l’alarme du bac (fi g. 9).
NETTOYAGE ET ENTRETIEN
Mettre l’appareil hors tension avant de commencer le nettoyage. Il est important de
nettoyer l’appareil après chaque utilisation pour économiser du temps de séchage
et donc de l’énergie.
1. Filtre à peluches dans la porte (fi g. 13) ;
2. Filtre à peluches dans l’ouverture de chargement (fi g. 14) ;
3. Condenseur (fi g. 15) ;
▼ Enlever le fi ltre en le tirant vers le haut et le nettoyer (fi g. 13).
ENTRETIEN
11
13
12
▼ Il est également possible d’extraire les deux fi ltres à peluches de l’ouverture de
chargement et de les nettoyer (fi g. 14).
N.B. La présence de fi bres dans le fi ltre ne dépend pas du séchage.
Les peluches proviennent des fi bres des tissus qui se sont déchirés ou
effi lochés durant le lavage ou, essentiellement, à cause de l’usure du
vêtement.
Pour faciliter le nettoyage, faire couler de l’eau chaude sur le fi ltre.
▼ Il est recommandé de nettoyer le condenseur deux ou trois fois par an (fi g.
15/18).
▼ Ouvrir le portillon, tourner la manette à la verticale et enlever le couvercle (fi g.
15).
FR
14
15
SM2165
Page 43

16
ENTRETIEN
NETTOYAGE ET ENTRETIEN
▼ Tourner les 3 manettes à la verticale et extraire le condenseur (fi g. 16).
41
17
18
DIAGNOSTIC DE PANNES
Tous les appareils électriques sont sujets aux pannes.
Rappelons qu’il est nécessaire, dans ce cas, de faire appel à un technicien qualifi é. Vous pouvez toutefois
résoudre vous-mêmes la plupart des problèmes qui se produisent.
Important : En cas de fonctionnement défectueux, il est impératif de débrancher aussitôt la
machine du secteur.
Avant d’appeler notre Centre d’Assistance, vérifi er les points indiqués ci-dessous.
RÉSOLUTION DES PROBLÈMES
Si la machine ne démarre pas :
• Vérifi er les points suivants :
1) La machine est correctement branchée au
réseau électrique.
2) La prise fonctionne :
2a) Le fusible a-t-il sauté ? (il est facile
de contrôler : il suffi t de brancher un
autre appareil, comme une lampe de
bureau)
2b) Toutes les instructions de la noticed’em-
ploi ont-elles été suivies ?
▼ Laver le condenseur devant et derrière puis sur
les côtés en orientant le jet d’eau comme indiqué
sur les fi gures 17 et 18.
Pour que le condenseur s’égoutte parfaitement,
le poser sur un côté, sur un essuie-mains.
▼ Quand il est bien sec, remonter le condenseur
en effectuant les mêmes opérations en sens
inverse.
Si la machine ne démarre pas :
• Vérifi er les points suivants :
1) La porte a été correctement fermée ;
2) La touche « Départ » a bien été enfoncée.
Le linge ne sèche pas :
• Vérifi er les points suivants :
1) Il est possible que l’orifi ce d’évacuation de
l’air soit bouché ;
2) Il est possible que le fi ltre soit obstrué. (faire
attention lors de l’ouverture de la porte : les
parties internes du sèche-linge et le linge
peuvent être très chauds).
Si, après vérifi cation des points ci-dessus, l’appareil ne fonctionne toujours pas correctement, signaler le défaut au centre de service après-vente agréé le plus proche. Merci de bien
vouloir communiquer le modèle, le numéro de fabrication et le type de panne. Ces informations permettent à l’opérateur du service après-vente de se procurer les pièces de rechange
nécessaires et garantissent donc une exécution rapide et effi cace de la réparation.
SM2165
FR
Page 44

4242
................................................................................................................................................................
................................................................................................................................................................
................................................................................................................................................................
................................................................................................................................................................
................................................................................................................................................................
................................................................................................................................................................
................................................................................................................................................................
................................................................................................................................................................
................................................................................................................................................................
................................................................................................................................................................
................................................................................................................................................................
................................................................................................................................................................
................................................................................................................................................................
................................................................................................................................................................
................................................................................................................................................................
................................................................................................................................................................
................................................................................................................................................................
................................................................................................................................................................
................................................................................................................................................................
................................................................................................................................................................
................................................................................................................................................................
................................................................................................................................................................
................................................................................................................................................................
................................................................................................................................................................
................................................................................................................................................................
................................................................................................................................................................
................................................................................................................................................................
................................................................................................................................................................
................................................................................................................................................................
................................................................................................................................................................
...................................................................................................................................................................
...................................................................................................................................................................
...................................................................................................................................................................
...................................................................................................................................................................
...................................................................................................................................................................
...................................................................................................................................................................
..................................................................................................................................................................
.................................................................................................................................................................
NOTES
SM2165
Page 45

ESPAÑOL
Estimado Cliente
Nuestra enhorabuena por haber elegido un producto nuestro.
Le rogamos leer atentamente las instrucciones para el uso antes de la conexión y el uso de la máquina.
El conocimiento de los principios de funcionamiento garantizará un correcto y seguro aprovechamiento del
aparato.
Las instrucciones para el uso contienen muchas indicaciones útiles sobre el funcionamiento, además de los
detalles técnicos de la máquina que la ayudarán a optimizar el uso de esta máquina.
En caso de venta, o bien de cesión de la secadora, hay que acordarse de entregar también al nuevo usuario el
manual de instrucciones para el uso.
43
ÍNDICE
NOTAS Y CONSEJOS PARA EL USUARIO 43-44
• Datos Técnicos 43
DESCRIPCIÓN DE LA MÁQUINA 45
• Accesorios opcionales 45
INSTALACIÓN DE LA MÁQUINA 45-47
• Instalación 45
• Puesta en plano de la secadora 46
• Conexión a la instalación eléctrica 46
• Regulación de la descarga del agua de condensación hacia el exterior 46
• Modifi cación rotación puerta 47
USO DE LA MÁQUINA 47-49
• Precauciones para los tejidos 47
• Recomendaciones antes del secado 47
• Descripción del tablero de control 48
• Tabla de programas 49
• Cómo secar 49
MANTENIMIENTO 49-51
• Iluminación interna 49
• Descarga del estanque del agua de condensación 50
• Limpieza y mantenimiento 50-51
• Identifi cación de averías 51
• Solución de los problemas 51
NOTAS Y CONSEJOS PARA EL USUARIO
DATOS TÉCNICOS
Ancho cm.:
Dimensiones:
MODELO:
NUMERO DE FABRICACIÓN:
FECHA DE COMPRA:
SM2165
Alto cm.:
Profundidad cm.:
Capacidad Máxima
Potencia Nominal
Tensión De Alimentación
...........................................................................................................................................................................................................
............................................................................................................................................................
..............................................................................................................................................................................
7 kg. secado
ver placa de datos
ver placa de datos
59.5
85.0
60.4
ES
Page 46

44
NOTAS Y CONSEJOS PARA EL USUARIO
▼ El uso de este aparato debe ser el de una seca-
dora para uso doméstico cualquier otro uso debe
considerarse impropio y por lo tanto peligroso.
▼ Conservar el presente manual de uso siempre
cerca de la secadora para poderlo consultar
rápidamente si es necesario.
▼ Cualquier modifi cación o intento de modifi cación
del aparato puede ser peligrosa para el usuario y
provocar daños al producto.
▼ A la entrega del electrodoméstico, verifi car que
no presente daños debidos al transporte. Si se
detectan daños dirigirse inmediatamente al revendedor.
▼ No cubrir la secadora con ropa u otros objetos.
▼ Al posicionar el aparato controlar que el cable de
alimentación no sufra dobleces ni compresiones
y quede accesible , para eventuales intervenciones.
▼ Cerrar siempre la puerta después del uso del
electrodoméstico.
▼ De este modo se impide que los niños se apoyen
a la puerta haciendo volcar la secadora.
▼ Está prohibido el uso de la máquina a los niños,
sin vigilancia.
▼ No secar ropa sucia en la secadora.
▼ No secar nunca prendas que se han ensuciado
con sustancias como aceites de cocina, petróleo,
acetona, alcohol, bencina, keroseno, desmanchadores, trementina, ceras.
▼ Eliminar estas sustancias con un lavado en caliente
y una cantidad adicional de detergente antes de
cargarlas en la secadora.
▼ No hacer secar artículos de espuma de goma,
impermeables, tejidos estancos al agua, tapices de
goma artículos y vestidos o cojines preformados
con bloques de espuma de goma en cuanto pueden
derretirse y dañar otras prendas de ropa o incluso
el mismo electrodoméstico.
▼ Los suavizantes para tejidos, o productos similares
deben usarse respetando las instrucciones de uso
indicadas en la confección.
▼ Si el electrodoméstico es vendido o regalado,
recuerde entregar también el presente manual que
permitirá al propietario sucesivo utilizar la secadora
de manera correcta y segura.
▼ No se puede intentar reparar por si solos las averías
del aparato porque las reparaciones efectuadas por
no profesionales pueden provocar serios daños y
quitan el derecho a las reparaciones en garantía.
▼ Las reparaciones del aparato pueden ser efectua-
das sólo por personal autorizado de los los centros
de asistencia. Para las reparaciones deben usarse
sólo piezas de recambio originales.
ES
▼ Centrifugar o estrujar bien la ropa antes de car-
garla en la secadora. La ropa bien centrifugada
se secará más rápidamente.
▼ Limpiar bien el fi ltro cada vez que se usa para
garantizar una perfecta circulación del aire.
▼ No conectar o bien desconectar el enchufe de
la toma de la corriente eléctrica con las manos
mojadas.
▼ La máquina debe conectarse a una toma de
corriente eléctrica provista de puesta a tierra y
conforme a las exigencias de seguridad.
▼ Está prohibido conectar la máquina a la toma eléc-
trica usando extensiones o enchufes múltiples.
▼ No exponer el aparato a los agentes
atmosféricos.
▼ Al ejecutar las revisiones o las limpiezas recuerde
desconectar el aparato de la toma de la corriente
eléctrica.
▼ En el caso se desee desconectar la máquina de
la toma de la corriente eléctrica no tirar del cable
eléctrico sino el enchufe.
▼ Este aparato está marcado conforme a la Directiva
Europea 2002/96/EC, Waste Electrical and Electronic Equipment (WEEE). Comprobando que este
producto se elimine de manera correcta, el usuario
ayuda a prevenir las potenciales consecuencias
negativas para el ambiente y la salud.
El símbolo en el producto o en los do-
cumentos de acompañamiento indica que este
producto no debe ser tratado como desecho doméstico, sino que debe ser entregado al punto de
recolección adecuado para el reciclaje de equipos
eléctricos y electrónicos.
Eliminarla siguiendo las normas locales para la
eliminación de los desechos.
Para mayores informaciones sobre el tratamiento,
la recuperación y el reciclaje de este producto,
dirigirse a la ofi cina local de recolección de los
desechos domésticos adecuada o al negocio
donde se ha comprado el aparato.
¡¡¡ATENCIÓN!!! Las superfi cies en que
aparece este símbolo durante el funcionamiento pueden calentarse.
LA EMPRESA PRODUCTORA RECHAZA CUALQUIER RESPONSABILIDAD POR EVENTUALES
INCIDENTES PROVOCADOS POR NO OBSERVAR LAS NORMAS DE SEGURIDAD ADEMÁS
DE LAS INSTRUCCIONES DE USO
SM2165
Page 47

DESCRIPCIÓN DE LA MÁQUINA
DESCRIPCIÓN DE LA MÁQUINA
1 Puerta tambor
2 Filtro puerta tambor
3 Estanque del agua de condensación superior*
(En el caso que el tubo de descarga del agua de
condensación no esté conectado directamente a
la descarga, la condensación se recoge en este
estanque).
4 Tablero de control.
5 Tambor secadora
*
3
45
6 Filtro boca tambor
7 Placa de características técnicas.
8 Estanque de condensación inferior*.
9 Pies regulables.
10 Puerta condensador.
11 Puerta inferior.
* presente según el modelo
42
L
5
6
1
7
*
8
9
1
Está disponible donde su revendedor el accesorio para completar la instalación diferente que le permitirá
fi jar su secadora sobre una lavadora con carga frontal para poder economizar el espacio. El modelo de
máquina que le permitirá hacer este montaje se lo aconsejará su instalador.
10
11
ACCESORIOS OPCIONALES
INSTALACIÓN DE LA MÁQUINA
INSTALACIÓN
▼ La instalación debe ser efectuada por personal profesionalmente califi cado, según
las instrucciones del constructor, porque una instalación errada puede causar
daños a personas y cosas
▼ No instalar la secadora en locales donde se puede congelar. El hielo puede afectar
a la electrónica.
▼ Posicionar la secadora en un local provisto de ventilación.
▼ No cubrir el orifi cio de ventilación en el lado posterior (fi g. 2) y no posicionar la
2
SM2165
máquina sobre una moqueta gruesa.
▼ Limpiar el interior del tambor de secado con un paño húmedo para eliminar los
depósitos de polvo.
ES
Page 48

46
PUESTA EN PLANO DE LA SECADORA
Pies regulables. Poner la secadora en posición vertical de manera que se apoye
sólidamente en los cuatro pies. Nivelar la máquina registrando los pies como se
describe a continuación
▼ Levantar ligeramente la secadora.
▼ Regular los pies a la altura correcta (fi g. 3).
▼ Bajar la máquina.
N.B.: Una máquina nivelada no correctamente puede dañar los cojinetes y
acelera su desgaste. Esta secadora no necesita fi jación en el suelo.
CONEXIÓN A LA INSTALACIÓN ELÉCTRICA
▼ Comprobar que la tensión eléctrica indicada en los datos técnicos de la placa si-
tuada en la parte posterior del aparato, corresponda aquélla de la red eléctrica.
▼ Salvavida, cables eléctricos y toma de la red deben tener parámetros tales que
permitan soportar la carga máxima indicada en la misma placa.
▼ Luego de la instalación, el acceso a la alimentación de red debe estar garantizado
por un interruptor unipolar.
▼ La toma de corriente a la cual se conecta la máquina debe estar dotada de una
puesta a tierra. En caso contrario, el productor rechaza cualquier responsabilidad
por eventuales incidentes. (fi g. 4).
▼ Si el cable de alimentación está dañado en algún modo, ponerse en contacto con
un centro de asistencia técnica especializado.
▼ Está prohibido conectar la secadora a la red a través de elementos indirectos
como extensiones y tomas múltiples.
▼ Posicionar el aparato de manera que el cable de alimentación quede fácilmente
accesible para desconectarlo en caso de necesidad.
Importante: Al fi nal del ciclo de secado, desconectar la secadora de la red para impedir que
un niño pueda eventualmente ponerla en función.
MÁQUINA
3
4
REGULACIÓN DE LA DESCARGA DEL AGUA DE CONDENSACIÓN HACIA EL EXTERIOR
Es posible recoger el agua de condensación en el estanque (fi g. 10), pero también es
posible conectar el tubo directamente a la descarga.
En este caso el agua es alimentada mediante bomba.
Si se desea conectar el tubo del agua de condensación directamente a la descarga,
proceder de la siguiente manera:
▼ Antes de iniciar cualquier operación, quitar el enchufe de la toma de la corrien-
te.
▼ Tirar el tubo situado en la parte posterior de la máquina para extraerlo del asiento
(fi g. 5/6) e introducirlo en la descarga.
ES
SM2165
5
6
Page 49

7
8
INSTALACIÓN DE LA MÁQUINA
APERTURA Y MODIFICACIÓN DE LA ROTACIÓN DE LA PUERTA
▼ Presionar la puerta en la derecha (fi g. 7) (la puerta se abre). Si la puerta ha sido
volcada presionar en la izquierda.
▼ Es posible modifi car el sentido de rotación de la puerta del tambor según sus
propias necesidades (fi g. 8).
N.B.: Esta operación debe ser ejecutada exclusivamente por personal especializado. Ponerse en contacto con el servicio de asistencia técnica.
USO DE LA MÁQUINA
PRECAUCIONES PARA LOS TEJIDOS
En caso de dudas sobre el tipo de tejido, leer la tarjeta aplicada en la prenda.
Casi todas las prendas que pueden secarse en máquina tienen la indicación específi ca que son
adecuadas para el secado en máquina.
Para evitar la electricidad estática en las prendas, durante los ciclos de aclarado de la lavadora usar un
suavizante.
Quitar inmediatamente del tambor las prendas sintéticas para evitar ue se estropeen.
47
RECOMENDACIONES ANTES DEL SECADO
DIVISIÓN DE LA ROPA
Antes de secar la ropa, hay que centrifugarla con el
número de revoluciones adecuado al tipo de ropa.
Centrifugando con el número máximo de revoluciones admitido, se ahorra hasta el 35% de tiempo
de energía. Mientras más alta es la velocidad de
centrífuga, mejor es el secado obtenido. El uso de
suavizante en el lavado permite obtener un secado
mejor y un ahorro de tiempo. Antes de secar la ropa
en el electrodoméstico, controlar si es adecuada
para el secado mecánico. Consultar por lo tanto los
símbolos indicados en las etiquetas de lavado.
Si no encuentra el símbolo del secado en la
etiqueta, aténgase a las siguientes reglas:
▼ La ropa blanca/de color y ropa inderformable se
seca a temperatura normal con el programa de
secado escogido específi camente.
SM2165
▼ Secar la ropa delicada, por ejemplo los acríli-
cos, siempre a temperaturas bajas.
Consejos generales:
El Jersey se restringe a menudo no sólo con el
lavado sino que además con el secado.
Puro lino.
▼ Secar solamente si está indicado por el fabri-
cante en la etiqueta de lavado.
De otro modo el tejido podría ponerse áspero.
▼ No secar la ropa de color oscura junto con
la ropa de color clara; esto para evitar que
destiña.
ES
Page 50

48
USO DE LA MÁQUINA
DESCRIPCIÓN DEL TABLERO DE CONTROL
CT
LS
Ih. Ia. Iv. Ic.
L
CR
LR
P
HA VCU
R
9
P. La perilla de programas sirve para seleccionar los
programas deseados según el tipo de tejido y las propias
necesidades, la posición de STOP además de apagar
el display tiene la función de reconfi gurar la máquina.
Si se decide por cualquier motivo cambiar el programa
o añadir ropa, basta posicionar la perilla en el STOP,
luego seleccionar el nuevo programa y presionar la
tecla START.
NB: ¡¡Atención!! Se aconseja utilizar esta función
sólo si estrictamente necesario y solamente si
el programa a reconfi gurar ha iniciado hace no
más de 3 minutos.
N.B. En algunos modelos con el programa Delay
implementado, o al fi nal del ciclo, la iluminación
de fondo del display después de algunos minutos
se apaga. Es sufi ciente accionar cualquier tecla
para que ésta se vuelva a encender.
S. Tecla Start si se presiona esta tecla la secadora inicia
el ciclo de secado implementado.
L
S
. LED Start apagado indica la posición de “STOP”; En-
cendido fi jo indica ciclo en curso; Parpadeo veloz indica
programa implementado a poner en marcha; Parpadeo
lento indica el fi n del programa.
U. Tecla selector de secado sirve para seleccionar el
grado de humedad deseado en los programas con control
electrónico, y el tiempo en los programas manuales. No
todas las selecciones son posibles en todos los programas (ver: “TABLA DE PROGRAMAS”)
LR. Los iconos del programa de secado con control
electrónico son 4 , el seleccionado parpadea mientras
los otros 3 permanecen fi jos. Una vez que el ciclo ha
sido puesto en marcha permanece encendido sólo el
seleccionado.
T
. Contador de secado visualiza el tiempo implementado
C
con pasos de 20 minutos hasta un máximo de 2 horas
y 40 minutos para el programa algodón y 2 horas para
los sintéticos.
C. Tecla de exclusión zumbador excluye la función del
zumbador que de otro modo está siempre activo, la
selección permanece memorizada incluso en caso de
ES
S
apagado.
Las señalaciones son:
1 beep largo (ciclo activado)
4 beep largos (ciclo terminado)
4 beep breves (rotación tambor para función
antiarruga)
V. Tecla de restablecimiento alarma cubeta sirve para
poner nuevamente en marcha el ciclo de secado después del vaciado de la cubeta del agua de condensación
(fi g. 11)
L
V
. Icono alarma cubeta llena, el parpadeo indica que
la cubeta está llena y es necesario vaciarla (el ciclo se
detiene); encendido fi jo, después de haber reintroducido
la cubeta indica que la función se está reactivando;
apagado indica seguridad restablecida (el ciclo vuelve
a partir).
A. Tecla antiarrugas activa la función que permite que
al fi nal del ciclo de secado la ropa al interior de la secadora siga girando en un sentido o en el otro por otros
sesenta minutos reduciendo las arrugas. Cada rotación
es señalada por el zumbador con breves beep.
H. Pulsador antiarrugas retraso secado sirve para
hacer girar la ropa en el tambor durante la espera para
disminuir las arrugas.
lh. la. lc. Los iconos zumbador, antiarrugas y retraso
partida visualizados en el display indican que la función
está activa.
R. Tecla retraso de partida permite retrasar el secado
hasta un máximo de 16 horas. A cada presión la partida
se retrasa una hora. Al presionar la tecla START, el retrasador activado es indicado en el display con el símbolo
h intermitente; desde ese momento la máquina después
de haber esperado el número de horas implementado,
inicia automáticamente el ciclo de secado. En el caso
de interrupción de la alimentación durante el retraso, la
implementación se anula y al presionar el START el ciclo
vuelve a partir inmediatamente.
C
R
. Contador de retraso de partida visualiza el tiempo
implementado con pasos de una hora hasta un máximo
de 16 horas.
SM2165
Page 51

USO DE LA MÁQUINA
TABLA DE PROGRAMAS
PROGRAMAS CON CONTROL ELECTRÓNICO DE LA HUMEDAD
TEJIDO
ALGODÓN
MÁX. CARGA
ROPA
7.0 kg.
EXTRA
SECO
SECO PARA
GUARDAR
HÚMEDO PARA
PLANCHAR
49
MUY
HÚMEDO
SINTÉTICOS
DELICADOS
LANA
ALGODÓN
SINTÉTICOS
3.5 kg.
3.5 kg.
1.5 kg.
7.0 kg.
3.5 kg.
PROGRAMAS A TIEMPO
160-140 min 140-120 min 120-100 min 100-80 min
120-100 min 80-60 min 60-40 min 40-20 min
ENFRIAMIENTO
CÓMO SECAR
1) Cargar la ropa en el tambor y cerrar la puer-
ta.
2) Con las manos secas introducir el enchufe de
la secadora en la red.
3) Posicionar la perilla del programador en el
Stop para reconfi gurar eventuales programas
precedentes, luego colocarla en el programa
más adecuado para el tipo de tejido.
4) Con la tecla selector de secado seleccionar
el grado de humedad deseado ( ver Tabla de
Programas).
5) Seleccionar las opciones deseadas con las
teclas correspondientes.
20 min
6) Presionar la tecla START para iniciar el seca-
do.
7) Una vez terminado el secado señalado por
el parpadeo del led start y por el zumbador y
por la leyenda END colocar el selector en la
posición de STOP.
8) Abrir la puerta del tambor y extraer la ropa.
9) Cerrar la puerta.
10) Con las manos secas desconectar el enchufe
de la secadora de la red.
10
SM2165
MANTENIMIENTO
ILUMINACIÓN INTERNA (disponible SEGÚN EL MODELO)
La iluminación está en el interior.
Para sustituir un bombillo, proceder de la manera siguiente:
▼ Quitar el enchufe de la toma de corriente u operando en el interruptor general;
▼ Quitar el casco del bombillo;
▼ Extraer el bombillo (fi g. 10);
▼ Atención: no usar bombillos de más de 15 W.!
▼ Montar nuevamente el casco del bombillo.
ES
Page 52

50
DESCARGA DEL ESTANQUE DEL AGUA DE CONDENSACIÓN
Si no ha sido conectada a la descarga, el agua de condensación es recogida en el
estanque (fi g. 11). El estanque debe vaciarse después de cada ciclo de secado.
Para vaciar el estanque proceder de la siguiente manera:
▼ Extraer el estanque de la secadora (fi g. 11);
▼ Vaciar el estanque; la apertura de descarga se encuentra en el lado superior
derecho (fi g. 12);
▼ Después de haber vaciado volver a posicionar en el fondo;
▼ Cuando se olvida de vaciar el estanque o cuando se llena durante el secado, el
led de alarma de la cubeta del agua de condensación parpadea y la secadora se
detiene. A continuación proceder como se indica arriba:
▼ Para seguir el programa interrumpido, presionar la tecla (V) recuperación alarma
cubeta (fi g. 9).
LIMPIEZA Y MANTENIMIENTO
Quitar la tensión del aparato antes de iniciar a limpiar. Es importante limpiar el aparato
después de cada lavado, para ahorrar tiempo en el secado y por lo tanto energía.
1. Filtro para hilachas en la puerta (fi g. 13).
2. Filtro para hilachas en la apertura de carga (fi g. 14).
3. Condensador (fi g. 15).
MANTENIMIENTO
11
12
13
▼ Quitar el fi ltro tirándolo hacia lo alto y limpiarlo (fi g. 13).
▼ Además es posible quitar los dos fi ltros para hilachas desde la apertura de carga
y limpiarlos (fi g. 14).
NB: La presencia de fi bras en el fi ltro no depende del secado.
Las hilachas proceden de las fi bras de los tejidos rotos o deshilachados
durante el lavado y sobre todo por desgaste de la prenda de ropa.
La limpieza se simplifi ca haciendo correr sobre el fi ltro agua caliente.
▼ Se recomienda limpiar el condensador dos o tres veces al año (fi g. 15/18).
▼ Abrir la puerta girar la leva colocándola en posición vertical y quitar la tapa (fi g.
15).
ES
14
15
SM2165
Page 53

16
MANTENIMIENTO
LIMPIEZA Y MANTENIMIENTO
▼ Colocar las 3 levas en posición vertical y extraer el condensador (fi g. 16).
51
17
18
INVESTIGACIÓN DE AVERÍAS
Todos los equipos eléctricos están sujetos a averías.
Recuerde que en estos casos debe llamar a un técnico califi cado. Puede en todo caso resolver Ud. Mismo
muchos de los problemas que se verifi can.
Importante: En caso de mal funcionamiento, recuerde desconectar inmediatamente la máquina
de la red de alimentación.
Antes de llamar nuestro Centro de Asistencia, verifi car los puntos que se indican a continuación.
SOLUCIÓN DE LOS PROBLEMAS
La máquina no parte
• Comprobar que:
1) Verifi car si se ha efectuado la conexión a la
alimentación de red.
2) Verifi car que la toma esté efi ciente;
2a) ¿Ha saltado un fusible? (El control es fácil,
basta conectar otro aparato como una lámpara de mesa)
2b) ¿Se han ejecutado todas las instrucciones
del manual de instrucciones?
▼ Lavar el condensador en la parte anterior y pos-
terior y en los lados orientando el chorro de agua
como se indica (fi g.17/18).
Para obtener un goteo perfecto del condensador,
apoyarlo de lado sobre una toalla.
▼ Cuando está bien seco, montar nuevamente el
condensador realizando las operaciones en orden
contrario.
Si la máquina no parte
• Comprobar que:
1) La puerta esté cerrada correctamente.
2) Se haya presionado la tecla start.
La ropa no se seca
• Comprobar que:
1) Es posible que el orifi cio de descarga esté
obstruido.
2) Es posible que el fi ltro esté atascado. (Recuerde que cuando se abre la puerta con
vidrio, as partes internas de la secadora y
la ropa pueden estar muy calientes)
Si después de la ejecución de las funciones descritas, el aparato sigue no funcionando
correctamente señalar el defecto al centro de asistencia técnica autorizado más cercano. Se
ruega cortésmente comunicar el modelo, el número de fabricación y el tipo de avería. Estas
informaciones permiten al operador de la asistencia técnica obtener las piezas de recambio
necesarias y, por lo tanto, garantizan una ejecución veloz y efi caz de la reparación.
SM2165
ES
Page 54

5252
................................................................................................................................................................
................................................................................................................................................................
................................................................................................................................................................
................................................................................................................................................................
................................................................................................................................................................
................................................................................................................................................................
................................................................................................................................................................
................................................................................................................................................................
................................................................................................................................................................
................................................................................................................................................................
................................................................................................................................................................
................................................................................................................................................................
................................................................................................................................................................
................................................................................................................................................................
................................................................................................................................................................
................................................................................................................................................................
................................................................................................................................................................
................................................................................................................................................................
................................................................................................................................................................
................................................................................................................................................................
................................................................................................................................................................
................................................................................................................................................................
................................................................................................................................................................
................................................................................................................................................................
................................................................................................................................................................
................................................................................................................................................................
................................................................................................................................................................
................................................................................................................................................................
................................................................................................................................................................
................................................................................................................................................................
...................................................................................................................................................................
...................................................................................................................................................................
...................................................................................................................................................................
...................................................................................................................................................................
...................................................................................................................................................................
...................................................................................................................................................................
..................................................................................................................................................................
.................................................................................................................................................................
NOTAS
SM2165
Page 55

PORTUGUÊS
Estimado Cliente,
Agradecemos-lhe a preferência por um produto nosso.
Leia com atenção as instruções de utilização, antes de efectuar as ligações e de utilizar a máquina. O conhecimento dos princípios de funcionamento é um factor fundamental para lhe permitir tirar o máximo proveito
do seu aparelho, em condições de segurança, e para garantir um funcionamento correcto. As instruções para
utilização, além das particularidades técnicas, contêm muitas indicações úteis sobre o funcionamento da
máquina, que o ajudarão a tirar o máximo proveito deste seu electrodoméstico.
Em caso de venda ou de transferência de propriedade do secador de roupa, é importante que não se esqueça
de entregar o livro de instruções de utilização ao novo utilizador.
53
ÍNDICE
NOTAS E CONSELHOS ÚTEIS PARA O UTILIZADOR 53-54
• Dados técnicos 53
DESCRIÇÃO DA MÁQUINA 55
• Acessórios de opção 55
INSTALAÇÃO DA MÁQUINA 55-57
• Instalação 55
• Nivelação do secador de roupa 56
• Ligação à instalação eléctrica 56
• Ajuste da descarga de água de condensação para o exterior 56
• Alteração do sentido de rotação da porta 57
UTILIZAÇÃO DA MÁQUINA 57-59
• Cuidados a ter com os tecidos 57
• Cuidados a ter antes da secagem 57
• Descrição do painel de comando 58
• Tabela de programas 59
• Como secar 59
MANUTENÇÃO 59-61
• Iluminação interior 59
• Como esvaziar o reservatório da água de condensação 60
• Limpeza e manutenção 60-61
• Detecção de avarias 61
• Guia para resolução de problemas 61
NOTAS E CONSELHOS ÚTEIS PARA O UTILIZADOR
DADOS TÉCNICOS
Largura cm.:
Dimensões:
MODELO:
NÚMERO DE FABRICO:
DATA DE COMPRA:
SM2165
Altura cm.:
Profundidade cm:
Capacidade máxima
Potência Nominal
Tensão de alimentação
...........................................................................................................................................................................................................
........................................................................................................................................................................
..................................................................................................................................................................................
7 kg de roupa seca
ver placa de dados
ver placa de dados
59.5
85.0
60.4
PT
Page 56

54
NOTAS E CONSELHOS ÚTEIS PARA O UTILIZADOR
▼ Este aparelho deve ser utilizado exclusivamente
como secador de roupa, para uso doméstico. Quaisquer outras utilizações são consideradas indevidas
e, portanto, perigosas.
▼ Conserve este manual de instruções sempre próximo
do secador de roupa, de maneira a poder consultá-lo
rapidamente, em caso de necessidade.
▼ Qualquer alteração ou tentativa de modifi cação do
aparelho podem ser perigosas para o utilizador e
provocar danos no electrodoméstico.
▼ Na altura em que receber o electrodoméstico, veri-
fi que se está perfeitamente intacto, assegurando-se
de que não tem danos provocados pelo transporte.
No caso de detectar qualquer dano, contacte imediatamente o revendedor.
▼ Não cubra o secador com roupa ou outros objectos.
▼ Ao colocar o aparelho no local de instalação, certifi que-
se de que o cabo de alimentação energética não fi ca
dobrado nem sujeito a compressões, e de que fi ca
acessível para eventuais intervenções necessárias.
▼ No fi m de utilizar o electrodoméstico, feche sempre
a porta.
Deste modo, evitará que as crianças se apoiem na
porta e façam cair o secador de roupa.
▼ É proibida a utilização da máquina por crianças, sem
vigilância.
▼ Não seque roupa suja no secador.
▼ Nunca seque roupa que se tenha sujado com óleo
de cozinha, petróleo, acetona. álcool, gasolina,
querosene, tira-nódoas, terebintina, cera.
▼ Remova estas substâncias previamente, fazendo
uma lavagem a quente com uma quantidade de
detergente adicional, antes de introduzir a roupa no
secador.
▼ Não ponha a secar artigos como espuma de
borracha, látex, tecidos impermeáveis, tapetes de
borracha, artigos e fatos ou almofadas pré-formados
com blocos de espuma de borracha, porque podem
derreter e estragar a outra roupa, ou mesmo o electrodoméstico.
▼ Os amaciadores para tecidos, ou produtos análogos,
devem ser utilizados respeitando as instruções de
utilização incluídas na respectiva embalagem
▼ Se o electrodoméstico for vendido ou cedido a
terceiros, não se esqueça de entregar este livro de
instruções que permitirá ao novo proprietário utilizar
correctamente o secador de roupa e em condições
de segurança.
▼ Não pode tentar reparar as avarias do aparelho,
porque as reparações feitas por não profi ssionais
podem provocar danos graves e anulam o direito às
reparações cobertas por garantia.
▼ As reparações do aparelho só podem ser feitas por
▼ Centrifugue ou torça bem a roupa antes de a intro-
▼ Sempre que utilizar o secador de roupa, limpe bem
▼ Não ligue ou desligue a fi cha na/da tomada de
▼ A máquina deve ser ligada a uma tomada de corren-
▼ É proibido ligar a máquina à tomada eléctrica utili-
▼ Não exponha o aparelho aos efeitos deletérios do
▼ Quando fi zer revisões ou limpezas na máquina,
▼ No caso de desejar desligar a máquina da tomada
▼
Elimine-o de acordo com as indicações das normas
Para mais informações sobre o tratamento, recupe-
PT
pessoal autorizado dos centros de assistência. Para
as reparações deverão ser usadas unicamente
peças originais.
duzir no secador. A roupa centrifugada seca mais
rapidamente!
o fi ltro, para garantir uma perfeita circulação de ar.
corrente eléctrica com as mãos molhadas.
te eléctrica provida de ligação à terra que cumpra
os requisitos de segurança.
zando extensões ou fi chas múltiplas
tempo.
lembre-se sempre de desligar, previamente, o
aparelho da tomada de corrente eléctrica.
de corrente, não puxe pelo fi o eléctrico. Agarre a
fi cha e puxe.
Este aparelho está classifi cado de acordo com a
Directiva Europeia 2002/96/EC sobre Resíduos de
Equipamento Eléctrico e Electrónico (REEE). Ao
garantir a eliminação apropriada deste produto, está
a ajudar a evitar potenciais consequências negativas
para o ambiente e saúde pública.
O símbolo aplicado no produto ou nos
documentos que o acompanham, indica que
este aparelho não pode ser tratado como lixo
doméstico. Terá de ser entregue num centro de
recolha próprio para reciclagem de equipamentos eléctricos e electrónicos.
locais sobre eliminação de desperdícios.
ração e reciclagem deste produto, contacte o serviço
local de recolha de desperdícios domésticos ou a loja
onde adquiriu o aparelho.
Atenção!!! As superfícies com este
símbolo correm risco de aquecer, durante o funcionamento do aparelho.
A EMPRESA FABRICANTE DECLINA TODA E
QUALQUER RESPONSABILIDADE POR EVENTUAIS ACIDENTES PROVOCADOS PELA NÃO
OBSERVÂNCIA DAS NORMAS DE SEGURANÇA
E INSTRUÇÕES DE UTILIZAÇÃO
SM2165
Page 57

DESCRIÇÃO DA MÁQUINA
DESCRIÇÃO DA MÁQUINA
1 Porta do tambor.
2 Filtro da porta do tambor.
3 Depósito de água de condensação superior*
(Se o tubo de descarga de água de conden-
sação não estiver ligado directamente ao
esgoto, a condensação será recolhida neste
reservatório).
4 Painel de comando.
5 Tambor do secador.
*
3
L
55
6 Filtro da boca do tambor.
7 Placa de características técnicas.
8 Depósito de condensação inferior*.
9 Pés reguláveis.
10 Porta do condensador.
11 Porta inferior.
* presente em alguns modelos
42
5
6
1
7
*
8
9
1
Encontrará disponível no seu vendedor de confi ança o acessório que lhe permite completar a instalação
que serve para fi xar o seu secador sobre a máquina de lavar roupa (se esta se carregar pela frente)
proporcionando, assim, grande economia de espaço. O modelo de máquina que lhe poderá permitir
fazer este tipo de montagem ser-lhe-á indicado pelo seu instalador.
10
11
ACESSÓRIOS DE OPÇÃO
INSTALAÇÃO DA MÁQUINA
INSTALAÇÃO
▼ A instalação da máquina deve ser feita por pessoal profi ssionalmente qualifi cado
e de acordo com as instruções do fabricante. Uma instalação mal feita pode
provocar lesões nas pessoas e danos nos objectos.
▼ Não coloque o secador de roupa em locais onde haja perigo de congelação. O
gelo pode comprometer a electrónica do aparelho.
▼ Coloque o secador de roupa num local bem ventilado.
▼ Não cubra o orifício de ventilação no lado posterior da máquina (fi g. 2) e não
2
SM2165
coloque a máquina em locais com chão de alcatifa alta.
▼ Limpe o interior do tambor de secagem com um pano húmido, para eliminar o
pó eventualmente depositado.
PT
Page 58

56
Pés reguláveis. Coloque o secador de roupa em posição vertical, de maneira a
fi car bem apoiado nos quatro pés. Nivele a máquina, regulando os pés conforme
descrevemos a seguir
▼ Levante ligeiramente a máquina.
▼ Regule os pés com a altura certa (fi g. 3).
▼ Baixe a máquina.
As máquinas mal niveladas podem danifi car os rolamentos e fi cam sujeitas a desgaste
prematuro. Este secador de roupa não precisa de ser fi xado no pavimento.
▼ Verifi que se a tensão eléctrica indicada nos dados técnicos da chapa de carac-
terísticas da máquina, colocada na traseira do aparelho, corresponde à tensão
de rede da instalação eléctrica de sua casa.
▼ O interruptor diferencial, os cabos eléctricos e a tomada de rede devem ter capa-
cidade para aguentar a carga máxima indicada na chapa de características.
▼ Após instalação, o fornecimento de corrente de rede deve ser garantido por um
interruptor omnipolar.
▼ A tomada de corrente onde a máquina vai ser ligada deve ter ligação à terra. Caso
contrário, o fabricante declina toda e qualquer responsabilidade por eventuais
acidentes (fi g. 4).
▼ Se o fi o eléctrico de alimentação estiver danifi cado, contacte o centro de assis-
tência técnica especializado.
▼ É proibido ligar o secador de roupa à rede mediante utilização de elementos
indirectos, tais como extensões e tomadas múltiplas.
▼ Coloque o aparelho de modo a deixar o cabo de alimentação facilmente acessível
para poder desligá-lo sempre que for necessário.
INSTALAÇÃO DA MÁQUINA
NIVELAÇÃO DO SECADOR DE ROUPA
LIGAÇÃO À INSTALAÇÃO ELÉCTRICA
3
4
Importante: No fi m do ciclo de secagem, desligue o secador de roupa da rede para impedir
que as crianças, inadvertidamente, o ponham a funcionar.
AJUSTE DA DESCARGA DE ÁGUA DE CONDENSAÇÃO PARA O EXTERIOR
A água de condensação pode ser recolhida no reservatório próprio (fi g. 10), mas
também pode ser recolhida ligando o tubo directamente ao esgoto.
Neste caso, a água é eliminada por meio de uma bomba.
No caso de desejar ligar o tubo de água de condensação directamente ao esgoto,
proceda do seguinte modo:
▼ Antes de começar qualquer operação, desligue a fi cha da tomada de corrente.
▼ Puxe o tubo situado na parte posterior da máquina, para o retirar da sede (fi g.
5/6) e enfi ar no esgoto.
PT
5
6
SM2165
Page 59

7
8
INSTALAÇÃO DA MÁQUINA
ABERTURA E ALTERAÇÃO DA ROTAÇÃO DA PORTA
▼ Carregue na porta, do lado direito (fi g. 7) (a porta abre). Se a porta tiver sido
invertida, carregue do lado esquerdo.
▼ É possível mudar o sentido de rotação da porta do tambor segundo as neces-
sidades individuais (fi g. 8).
Nota: Esta operação deve ser feita, exclusivamente, por pessoal especializado. Contacte o serviço de assistência técnica.
57
UTILIZAÇÃO DA MÁQUINA
CUIDADOS A TER COM OS TECIDOS
Em caso de dúvida sobre o tipo de tecido, verifi que a etiqueta cosida na própria peça de roupa.
Quase todas as peças de roupa que podem ser secas no secador de roupa têm uma indicação es-
pecífi ca própria na etiqueta.
Para evitar electricidade estática na roupa, use amaciador nos ciclos de enxaguamento da máquina
de lavar.
Tire a roupa de fi bra sintética do tambor imediatamente após a conclusão do ciclo, para evitar que se
formem vincos.
CUIDADOS A TER ANTES DA SECAGEM
SEPARAÇÃO DA ROUPA
Antes de secar a roupa, é necessário centrifugá-la
com o número de rotações adequado ao tipo de
roupa. Centrifugando com o número máximo de
rotações permitido, consegue-se poupar até 35%
de tempo de energia. Quanto maior for a velocidade
de centrifugação melhor será a secagem obtida. A
utilização de amaciador durante a lavagem permite
obter uma melhor secagem e uma economia de
tempo. Antes de secar a roupa no electrodoméstico,
verifi que se ela é indicada para secagem mecânica. Para isso, consulte os símbolos indicados nas
etiquetas de lavagem da própria roupa.
Se não encontrar o símbolo de secagem na
etiqueta, siga as indicações seguintes:
▼ Roupa branca/de cor e roupa anti-rugas secam a
temperatura normal com o programa de secagem
seleccionado especifi camente.
SM2165
▼ Seque sempre a roupa delicada, acrílicos por
Conselhos gerais:
O jersey encolhe com frequência, não só na
lavagem, mas também na secagem.
Linho puro.
▼ Seque, apenas, se indicado na etiqueta de
Caso contrário o tecido pode tornar-se áspero.
▼ Não seque roupa de cor escura juntamente
exemplo, a baixa temperatura.
lavagem do fabricante.
com roupa de cor clara, para evitar que tinja.
PT
Page 60

58
UTILIZAÇÃO DA MÁQUINA
DESCRIÇÃO DO PAINEL DE COMANDO
CT
LS
Ih. Ia. Iv. Ic.
L
CR
LR
P
HA VCU
R
9
P. Botão dos programas - serve para seleccionar os programas desejados de acordo com o tipo de tecido e as
necessidades próprias. A posição STOP, além de desligar
o display, tem a função de fazer o reset da máquina.
Se por qualquer motivo se desejar alterar o programa
de lavagem ou adicionar posteriormente outra roupa na
máquina, é sufi ciente colocar o botão na posição STOP,
seleccionar o novo programa desejado e premir o botão
START.
NOTA: Atenção!! Aconselha-se utilizar esta
função apenas em casos excepcionais, de verdadeira necessidade, e somente se o programa que
se deseja substituir tiver iniciado há não mais de
3 minutos, no máximo.
Nota: Em alguns modelos, com o programa Delay
programado ou no fi m do ciclo, a retroiluminação
do display apaga-se ao fi m de alguns minutos.
Basta accionar uma tecla qualquer, para ela voltar
a acender-se.
S. Botão Start - premindo este botão, o secador de roupa
dá início ao ciclo de secagem programado.
LS. LED Start - apagado indica a posição “STOP”; aceso
fi xo indica que o programa está a decorrer; a piscar rapidamente indica que há um programa seleccionado a iniciar;
a piscar lentamente indica o fi m do programa.
U. Botão selector de secagem - nos programas com controlo electrónico serve para seleccionar o grau de humidade e,
nos programas manuais, serve para seleccionar o tempo.
Nem todas as selecções estão disponíveis em todos os
programas.(ver: “TABELA DE PROGRAMAS”)
LR. Os ícones do programa de secagem com controlo electrónico são 4. O que estiver seleccionado pisca, enquanto
os outros 3 estão acesos com luz fi xa. Com o ciclo iniciado
só fi ca aceso o ícone seleccionado.
T
. Contador de secagem - mostra o tempo defi nido, com
C
passos de 20 minutos, até um máximo de 2 horas e 40
minutos para o programa dos algodões e de 2 horas para
o dos sintéticos.
C. Botão de exclusão do sinal sonoro - exclui a função
do sinal sonoro, senão estaria sempre activo. A selecção
mantém-se memorizada mesmo quando a máquina se
desliga.
PT
S
Os sinais sonoros são:
1 bip longo (ciclo iniciado)
4 bips longos (ciclo concluído)
4 bips curtos (rotação do tambor para a função antirugas)
V. Botão para reset do alarme do recipiente - serve para
reiniciar o ciclo de secagem, após esvaziamento do
recipiente de água de condensação (fi g. 11)
LV. Ícone de alarme por recipiente cheio - a piscar indicaque o recipiente está cheio e que é necessário esvaziá-lo
(o ciclo pára); aceso fi xo após reposição do recipiente no
respectivo lugar, indica que a função se está a reactivar;
apagado indica que a segurança está restabelecida (o
ciclo reinicia).
A. Botão anti-rugas - activa a função homónima; através
desta a função a máquina, no fi m do ciclo de secagem
continuará a fazer rodar o tambor em ambos os sentidos,
durante mais sessenta minutos, diminuindo as gelhas da
roupa. Cada rotação é sinalizada pela emissão de um
sinal sonoro que emite bips de curta duração .
H. Botão anti-rugas, início diferido - serve para pôr a
roupa a rodar no tambor durante a espera, para diminuir
a formação de gelhas.
lh. la. lc. A presença no display dos ícones do sinal
sonoro, anti-rugas e início diferido, indicam que a função
está activada.
R. Botão de início diferido - permite diferir o início do
programa de secagem, o mais tardar até 16 horas.
Por cada pressão no botão, o início da lavagem será
diferido de 1 hora.
Premindo o botão START, o diferimento activado aparece
indicado no display através do símbolo h intermitente; a partir
dessa altura a máquina, após aguardar o número de horas
defi nido, dará automaticamente início ao ciclo de secagem.
Em caso de interrupção da corrente de rede durante o período
de diferimento, a programação será cancelada e, premindo o
botão start, o ciclo iniciará imediatamente.
C
R
. Contador do início diferido - mostra o tempo de
diferimento defi nido, com passos de uma hora, até um
máximo de 16 horas.
SM2165
Page 61

UTILIZAÇÃO DA MÁQUINA
TABELA DE PROGRAMAS
PROGRAMAS COM CONTROLO ELECTRÓNICO DA HUMIDADE
TECIDO
ALGODÃO
MÁX. PESO DE
ROUPA
7.0 kg.
EXTRA
SECO
SECO PARA
GUARDAR
DIRECTAMENTE NO
ARMÁRIO
HÚMIDO PARA O
FERRO
59
MUITO
HÚMIDO
SINTÉTICOS
DELICADOS
ALGODÃO
SINTÉTICO
ARREFECIMENTO
1) Meter a roupa no tambor e fechar a porta.
2) Com as mãos secas, ligar a fi cha do secador
na tomada de rede.
3) Colocar o botão programador na posição Stop,
para fazer o reset de eventuais programas anteriores. A seguir, rodar o botão para a posição
corrrespondente ao programa mais indicado
ao tipo de tecido desejado.
4) Com o botão selector de secagem, seleccione
o grau de humidade desejado (ver Tabela de
Programas).
5) Seleccionar as opções desejadas, utilizando
os botões próprios.
LÃ
3.5 kg.
3.5 kg.
1.5 kg.
7.0 kg.
3.5 kg.
PROGRAMAS POR TEMPO
160-140 min 140-120 min 120-100 min 100-80 min
120-100 min 80-60 min 60-40 min 40-20 min
COMO SECAR
20 min
6) Premir o botão START , para dar início à
secagem.
7) Concluída a secagem, acontecimento sinali-
zado pelo piscar do led start, pelo disparar do
sinal sonoro e pelo aparecimento da palavra
END no display, colocar de novo o selector na
posição STOP
8) Abrir a porta do tambor e tirar a roupa.
9) Fechar de novo a porta.
10) Com as mãos secas, desligar a ficha do
secador da tomada de rede.
10
SM2165
MANUTENÇÃO
ILUMINAÇÃO INTERIOR (DISPONÍVEL CONSOANTE O MODELO)
A iluminação está dentro do aparelho.
Para substituir uma lâmpada fundida, proceda do modo seguinte:
▼ Desligue a fi cha da tomada de corrente ou desactive o interruptor geral;
▼ Desmonte a calote da lâmpada;
▼ Retire a lâmpada (fi g. 10);
▼ Atenção! Não use lâmpadas com mais de 15 W.!
▼ Monte de novo a calote da lâmpada.
PT
Page 62

60
ESVAZIAMENTO DO RESERVATÓRIO DA ÁGUA DE CONDENSAÇÃO
Se não tiver sido ligada directamente ao esgoto, a água de condensação é recolhida
no reservatório (fi g. 11). O reservatório deve ser sempre esvaziado no fi m do ciclo
de secagem.
Para esvaziar o reservatório, proceda do modo seguinte:
▼ Tire o reservatório do secador de roupa (fi g. 11);
▼ Despeje o reservatório; a abertura para esvaziamento está no lado superior
direito (fi g. 12);
▼ Depois de o ter esvaziado, coloque-o de novo no lugar, empurrando-o até ao
fundo;
▼ Quando se esquecer de esvaziar o reservatório, ou no caso dele se encher du-
rante o ciclo de secagem, o led de alarme do recipiente da água de condensação
começa a piscar e o secador de roupa pára. A seguir, proceda como descrito
acima.
▼ Para continuar o programa interrompido, prima o botão (V) de reset do alarme
do recipiente da água de condensação (fi g. 9).
LIMPEZA E MANUTENÇÃO
Desligue o aparelho da rede eléctrica antes de o começar a limpar. É importante
limpar o aparelho a seguir a cada lavagem, para gastar menos tempo na secagem
e, implicitamente, poupar energia.
1. Filtro para cotão na porta (fi g. 13).
2. Filtro para cotão na abertura de introdução da roupa (fi g. 14).
3. Condensador (fi g. 15).
▼ Remova o fi ltro, puxando-o para cima, e limpe-o (fi g. 13).
MANUTENÇÃO
11
12
13
▼ Além disso, é possível remover os dois fi ltros de cotão da abertura de introdução
de roupa e limpá-los (fi g. 14).
NOTA: A presença de fi bras no fi ltro não depende da secagem.
O cotão sai das fi bras de tecidos rasgados ou desfi ados durante a lavagem
e, sobretudo, é provocado pelo desgaste da própria peça de roupa.
A limpeza é mais fácil se deixar correr água quente em cima deles.
▼ Aconselhamos limpar o condensador duas ou três vezes por ano (fi g. 15/18).
▼ Abra a porta, rode a alavanca para a posição vertical e remova a tampa (fi g.
15).
PT
14
15
SM2165
Page 63

16
MANUTENÇÃO
LIMPEZA E MANUTENÇÃO
▼ Rode as 3 alavancas para a posição vertical e tire o condensador para fora (fi g.
16).
61
17
18
DETECÇÃO DE AVARIAS
Todos os aparelhos eléctricos estão sujeitos a avarias.
Lembre-se que neste caso é necessário chamar um técnico qualifi cado. De qualquer modo, vai poder
resolver sozinho muitos dos problemas que se verifi carem.
Importante: Em caso de mau funcionamento, lembre-se de desligar imediatamente a máquina
da rede de alimentação.
Antes de chamar o nosso Centro de Assistência, faça as verifi cações indicadas a seguir.
GUIA PARA A RESOLUÇÃO DE PROBLEMAS
Se a máquina não funcionar
• Certifi que-se de que:
1) A máquina está ligada à alimentação de
rede.
2) Verifi que se a tomada é efi ciente:
2a) O fusível saltou? (A verifi cação é fácil!
Experimente ligar outro aparelho à mesma
tomada, um candeeiro por exemplo).
2b) As indicações do livro de instruções foram
respeitadas integralmente?
▼ Lave o condensador à frente, atrás e dos lados,
orientando o jacto de água como indicado
(fi g.17/18).
Para o escorrimento perfeito do condensador,
apoie-o sobre um dos lados, em cima de uma
toalha de mãos.
▼ Quando estiver bem seco, monte de novo o
condensador, repetindo as operações de desmontagem pela ordem de sucessão inversa.
Se a máquina não funcionar
• Certifi que-se de que:
1) A porta está devidamente fechada.
2) O botão start está premido.
A roupa não seca
• Certifi que-se de que:
1) O orifício de escape de ar não está obstruído.
2) O fi ltro não está entupido. (Ao abrir a porta
da máquina, lembre-se de que a parte de
dentro do secador e a roupa podem estar
muito quentes).
Se após verifi cação dos itens descritos o aparelho continuar a não funcionar devidamente,
assinale o defeito ao centro de assistência técnico autorizado, mais próximo. Agradecemos
que comunique o modelo, o número de fabrico e o tipo de avaria. Estas informações permitem
ao operador da assistência técnica procurar de antemão as peças sobresselentes necessárias,
garantindo assim uma reparação rápida e efi caz.
SM2165
PT
Page 64

6262
................................................................................................................................................................
................................................................................................................................................................
................................................................................................................................................................
................................................................................................................................................................
................................................................................................................................................................
................................................................................................................................................................
................................................................................................................................................................
................................................................................................................................................................
................................................................................................................................................................
................................................................................................................................................................
................................................................................................................................................................
................................................................................................................................................................
................................................................................................................................................................
................................................................................................................................................................
................................................................................................................................................................
................................................................................................................................................................
................................................................................................................................................................
................................................................................................................................................................
................................................................................................................................................................
................................................................................................................................................................
................................................................................................................................................................
................................................................................................................................................................
................................................................................................................................................................
................................................................................................................................................................
................................................................................................................................................................
................................................................................................................................................................
................................................................................................................................................................
................................................................................................................................................................
................................................................................................................................................................
................................................................................................................................................................
...................................................................................................................................................................
...................................................................................................................................................................
...................................................................................................................................................................
...................................................................................................................................................................
...................................................................................................................................................................
...................................................................................................................................................................
..................................................................................................................................................................
.................................................................................................................................................................
OBSERVAÇÕES
SM2165
Page 65

NEDERLANDS
63
Geachte klant,
Wij danken u voor uw keuze voor ons product.
Wij verzoeken u de gebruiksaanwijzingen aandachtig te lezen alvorens het apparaat aan te sluiten
en te gebruiken.
De kennis van de werkingsprincipes garandeert een correct en veilig gebruik van het apparaat.
De gebruiksaanwijzing bevat vele nuttige wenken over de werking en de technische details van de
machine die u helpen om het gebruik van dit apparaat te optimaliseren.
Denk er bij verkoop of overdracht van de wasdroger aan dat u ook de gebruikshandleiding aan de
nieuwe eigenaar overhandigt.
INHOUD
OPMERKINGEN EN ADVIEZEN VOOR DE GEBRUIKER 63-64
• Technische gegevens 63
BESCHRIJVING VAN HET APPARAAT 65
• Optionele accessoires 65
INSTALLATIE VAN DE MACHINE 65-67
• Installatie 65
• Waterpas zetten van de wasdroger 66
• Aansluiten op het elektriciteitsnet 66
• Regelen van de afvoer van het condenswater naar buiten 66
• Omkeren van de deur 67
GEBRUIK VAN DE MACHINE 67-69
• Voorzorgsmaatregelen voor textiel 67
• Voorafgaande adviezen 67
• Beschrijving van het bedieningspaneel 68
• Programmatabel 69
• Drogen 69
ONDERHOUD 69-71
• Binnenverlichting 69
• Legen van het condensreservoir 70
• Reiniging en onderhoud 70-71
• Opsporen van storingen 71
• Oplossen van problemen 71
OPMERKINGEN EN ADVIEZEN VOOR DE GEBRUIKER
TECHNISCHE GEGEVENS
Breedte cm:
Afmetingen:
MODEL:
Hoogte cm:
Diepte cm:
Maximale inhoud
Nominaal Vermogen
Voedingsspanning
................................................................................................................................................................................................................
PRODUCTIENUMMER:
AANKOOPDATUM:
SM2165
............................................................................................................................................................................
......................................................................................................................................................................................
59.5
85.0
60.4
7kg Droog
Zie het typeplaatje
Zie het typeplaatje
NL
Page 66

64
OPMERKINGEN EN ADVIEZEN VOOR DE GEBRUIKER
▼ Dit apparaat moet gebruikt worden als een wasdro-
ger voor huishoudelijk gebruik; elk ander gebruik is
oneigenlijk en dus gevaarlijk.
▼ Bewaar deze gebruikshandleiding altijd in de buurt
van de wasdroger, zodat u deze indien nodig snel
kunt raadplegen.
▼ Elke wijziging of poging om het apparaat onklaar te
maken kan een gevaar voor de gebruiker opleveren
en schade aan het product tot gevolg hebben.
▼ Controleer het apparaat bij ontvangst op eventuele
transportschade. Wend u bij schade onmiddellijk tot
de verkoper.
▼ Bedek de wasdroger niet met wasgoed of andere
voorwerpen.
▼ Zorg er bij het plaatsen van het apparaat voor dat
het snoer niet geknikt of beklemd raakt en dat het
toegankelijk is voor eventuele interventies.
▼ Sluit de deur altijd na het gebruik van het apparaat.
▼ Op deze manier voorkomt u dat kinderen op de deur
gaan leunen en dat het apparaat gaat kantelen.
▼ Het gebruik van het apparaat door kinderen is ver-
boden, tenzij onder toezicht.
▼ Droog geen vuil wasgoed in de wasdroger.
▼ Droog nooit kledingstukken die zijn bevuild met
stoffen als keukenolie, petroleum, aceton, alcohol,
benzine, kerosine, vlekkenmiddelen, terpentijn,
was.
▼ Verwijder deze substanties door de kledingstukken
warm te wassen met een extra hoeveelheid wasmiddel, voordat u ze in de wasdroger laadt.
▼ Droog geen artikelen zoals schuimrubber, latex, wa-
terafstotende stoffen, waterdichte stoffen, rubberen
matten, met schuimrubber voorgevormde artikelen,
kleding of kussens, omdat deze kunnen smelten en
andere kledingstukken of zelfs het apparaat kunnen
beschadigen.
▼ Wasverzachters of soortgelijke producten moeten
worden gebruikt volgens de gebruiksaanwijzingen
op de verpakking.
▼ Als het apparaat wordt verkocht of afgegeven, moet
deze handleiding erbij geleverd worden, zodat de
volgende eigenaar de wasdroger op correcte en
veilige wijze kan gebruiken.
▼ Het is niet toegestaan het apparaat zelf te repare-
ren, omdat reparaties door ondeskundige personen
ernstige schade kunnen veroorzaken en het recht op
garantiereparaties doen vervallen.
▼ De reparaties van het apparaat mogen uitsluitend
door bevoegd personeel van de servicecentra worden
uitgevoerd. Voor de reparaties mogen alleen originele
reserveonderdelen worden gebruikt.
▼ Het wasgoed moet goed gecentrifugeerd of uitge-
wrongen worden, alvorens het in de wasdroger te
laden. Goed gecentrifugeerd wasgoed droogt sneller.
▼ Reinig het fi lter bij elk gebruik van de wasdroger,
zodat een perfecte luchtcirculatie wordt gegarandeerd.
▼ Verwijder of steek de stekker nooit uit of in het
stopcontact met natte handen.
▼ De machine moet op een geaard stopcontact worden
aangesloten dat aan de veiligheidseisen voldoet.
▼ Het is verboden de machine met verlengsnoeren
of meervoudige stekkers op het stopcontact aan te
sluiten.
▼ Stel het apparaat niet bloot aan weersinvloeden.
▼ Haal de stekker uit het stopcontact voordat u revisie-
of reinigingswerkzaamheden uitvoert.
▼ Trek niet aan het snoer, maar aan de stekker als u de
machine van het elektriciteitsnet wilt loskoppelen.
▼ Dit apparaat is voorzien van het merkteken volgens
de Europese richtlijn 2002/96/EG, Afgedankte elektrische en elektronische apparaten (AEEA). Door
ervoor te zorgen dat dit product op de juiste manier
als afval wordt verwerkt, helpt u mogelijk negatieve
consequenties voor het milieu en de gezondheid te
voorkomen.
Het symbool op het product of op de bijbehorende documentatie geeft aan dat dit product
niet als huishoudelijk afval mag worden behandeld.
In plaats daarvan moet het worden afgegeven bij
een verzamelpunt voor recycling van elektrische en
elektronische apparaten.
Volg de plaatselijke voorschriften voor afvalverwer-
king op wanneer u het apparaat afdankt.
Voor meer informatie over de behandeling, terug-
winning en recycling van dit product kunt u contact
opnemen met het stadskantoor in uw woonplaats,
uw afvalophaaldienst of de winkel waar u het product
hebt aangeschaft.
LET OP!!! De oppervlakken met
dit symbool kunnen tijdens de
werking warm worden.
DE FABRIKANT KAN NIET AANSPRAKELIJK
WORDEN GESTELD VOOR EVENTUELE ONGEVALLEN ALS GEVOLG VAN HET NIET IN ACHT
NEMEN VAN DE VEILIGHEIDSVOORSCHRIFTEN
EN DE GEBRUIKSAANWIJZINGEN
NL
SM2165
Page 67

BESCHRIJVING VAN HET APPARAAT
BESCHRIJVING VAN HET APPARAAT
1 Deur trommel.
2 Deurfi lter trommel.
3 Bovenste condensreservoir*
(Als de afvoerleiding van het condenswater niet
rechtstreeks op de afvoer is aangesloten, wordt
de condens in dit reservoir opgevangen).
4 Bedieningspaneel.
5 Trommel wasdroger.
3
6 Filter opening trommel.
7 Typeplaatje.
8 Onderste condensreservoir*.
9 Stelvoetjes.
10 Klep condensor.
11 Onderste klep.
* afhankelijk van het model
*
L
42
65
5
6
1
7
*
8
9
1
Het accessoire waarmee u uw wasdroger op een voorlader wasmachine kunt installeren om ruimte te
besparen is verkrijgbaar bij uw verkoper. Uw installateur kan u adviseren welk machinemodel geschikt
is voor deze montage.
10
11
OPTIONELE ACCESSOIRES
INSTALLATIE VAN DE MACHINE
INSTALLATIE
▼ De installatie moet door gekwalifi ceerd beroepspersoneel worden uitgevoerd
volgens de aanwijzingen van de fabrikant, omdat een onjuiste installatie letsel
of schade kan veroorzaken.
▼ Plaats de wasdroger niet in vorstgevoelige ruimten. Temperaturen onder het
vriespunt kunnen een negatief effect op de elektronica hebben.
▼ Plaats de droger in een goed geventileerde ruimte.
▼ Bedek de ventilatieopening op de achterkant (afb. 2) niet en plaats de machine
2
SM2165
niet op een dik tapijt.
▼ Reinig de binnenkant van de droogtrommel met een vochtige doek om eventueel
stof te verwijderen.
NL
Page 68

66
Stelvoetjes. Zet de wasdroger verticaal, zodat hij stevig op alle vier de voetjes staat.
Zet de machine waterpas door de stelvoetjes als volgt af te stellen
▼ Til de machine iets op.
▼ Stel de voetjes op de juiste hoogte af (afb. 3).
▼ Zet de machine neer.
Belangrijk: een machine die niet goed waterpas is gezet kan de lagers
beschadigen en vroegtijdig slijten.
Deze wasdroger hoeft niet aan de vloer te worden bevestigd.
▼ Controleer of de voedingsspanning op het technische gegevensplaatje aan de
achterzijde van het apparaat overeenstemt met die van het elektriciteitsnet.
▼ De parameters van de herstelzekering, de elektrische kabels en het stopcontact
moeten voldoen aan de maximale belasting op het plaatje.
▼ Na de installatie moet de toegang tot de netvoeding gegarandeerd worden door
een meerpolige schakelaar.
▼ Het stopcontact waarop de machine wordt aangesloten moet geaard zijn. Indien
dit niet het geval is, wijst de fabrikant iedere vorm van aansprakelijkheid voor
eventuele ongevallen van de hand (afb. 4).
▼ Als de voedingskabel op enige wijze beschadigd is, dient u contact op te nemen
met het gespecialiseerde technische servicecentrum.
▼ Het is verboden de wasdroger op het elektriciteitsnet aan te sluiten met behulp
van indirecte elementen, zoals verlengsnoeren en meervoudige stopcontacten.
▼ Plaats het apparaat zodanig dat de voedingskabel gemakkelijk toegankelijk is,
zodat het zo nodig kan worden losgekoppeld.
Belangrijk: koppel de wasdroger na de droogcyclus los van het elektriciteitsnet om te voorkomen dat kinderen hem eventueel in werking kunnen zetten.
INSTALLATIE VAN DE MACHINE
WATERPAS ZETTEN VAN DE WASDROGER
AANSLUITEN OP HET ELEKTRICITEITSNET
3
4
REGELEN VAN DE AFVOER VAN HET CONDENSWATER NAAR BUITEN
Het condenswater kan in het reservoir (afb. 10) worden opgevangen, maar het is
ook mogelijk de leiding rechtstreeks op de afvoer aan te sluiten.
In dat geval wordt het water met behulp van een pomp verwijderd.
Ga als volgt te werk als u de condensleiding rechtstreeks op de afvoer wilt aan-
sluiten:
▼ haal de stekker uit het stopcontact voordat u enige werkzaamheid uitvoert.
▼ Trek de leiding aan de achterkant van de machine uit zijn behuizing (afb. 5/6)
en steek hem in de afvoer.
NL
SM2165
5
6
Page 69

7
8
INSTALLATIE VAN DE MACHINE
OPENEN EN OMKEREN VAN DE DEUR
▼ Druk op de rechterzijde van de deur (afb. 7) (de deur gaat open). Druk op de
linkerzijde als de deur is omgekeerd.
▼ De draairichting van de deur van de trommel kan naar wens worden omgekeerd
(afb. 8).
NB.: deze handeling mag uitsluitend door gespecialiseerd personeel worden
uitgevoerd.
Neem contact op met de technische servicedienst.
GEBRUIK VAN DE MACHINE
VOORZORGSMAATREGELEN VOOR TEXTIEL
Kijk bij twijfels over het type textiel op het kledingsetiket.
Bijna alle kledingstukken die kunnen worden gedroogd geven specifi ek aan dat ze geschikt zijn voor
het drogen in de machine.
Gebruik tijdens de spoelcyclus van de wasmachine een wasverzachter om te voorkomen dat de kleding
statisch geladen wordt.
Neem synthetische kleding meteen uit de trommel om te voorkomen dat ze kreuken.
67
VOORAFGAANDE ADVIEZEN
SORTEREN VAN HET WASGOED
Vóór het drogen moet het wasgoed worden gecentrifugeerd met een voor het type wasgoed geschikt
toerental. Door met het maximaal toelaatbare
toerental te centrifugeren bespaart u tot 35% tijd
en energie. Hoe hoger het centrifugetoerental, hoe
beter het droogresultaat. Het gebruik van wasverzachter tijdens het wassen verbetert het droogresultaat en bespaart tijd. Controleer of het wasgoed
geschikt is voor een mechanische droogcyclus
alvorens het met dit apparaat te drogen. Raadpleeg
hiervoor de symbolen op het wasetiket.
Houd u aan de volgende regels als u het niet op
het etiket vindt:
▼ Witte/bonte was en kreukherstellende was
drogen bij een normale temperatuur met het
speciaal gekozen droogprogramma.
SM2165
▼ Fijne was, bijvoorbeeld acryl, moet altijd op
een lage temperatuur worden gedroogd.
Algemene adviezen:
Jersey krimpt vaak niet alleen tijdens het wassen
maar ook tijdens het drogen.
Zuiver linnen.
▼ Alleen drogen als dit door de fabrikant op het
wasetiket is aangegeven.
Anders kan het weefsel ruw worden.
▼ Droog donker gekleurd wasgoed nooit samen
met licht gekleurd wasgoed om te voorkomen
dat het verkleurt.
NL
Page 70

68
GEBRUIK VAN DE MACHINE
BESCHRIJVING VAN HET BEDIENINGSPANEEL
CT
LS
Ih. Ia. Iv. Ic.
L
CR
LR
P
HA VCU
9
R
P. Programmaknop voor het selecteren van de gewenste
programma’s volgens textielsoort en naar uw behoeften.
De STOP-stand heeft, naast het uitschakelen van het
display, ook de functie om de machine te resetten.
Als u om welke reden dan ook het programma wilt wijzigen of wasgoed wilt toevoegen zet u de programmaknop
eenvoudig in de STOP-stand , kies daarna het nieuwe
programma en druk op de START-knop.
NB. Let op!! Het is raadzaam om deze functie alleen te gebruiken wanneer dit strikt noodzakelijk
is en alleen als het te resetten programma minder
dan 3 minuten begonnen is.
NB Als het programma Delay is ingesteld of aan
het einde van de cyclus, gaat bij enkele modellen de achtergrondverlichting van het display na
enkele minuten uit. Een druk op een willekeurige
toets is voldoende om de verlichting weer in te
schakelen.
S. Starttoets, door op deze toets te drukken begint de
wasdroger de ingestelde droogcyclus.
S
. LED Start uit geeft de ‘STOP’-stand aan, voortdurend
L
brandend betekent dat het programma bezig is; snel
knipperend betekent dat het geselecteerde programma
gestart moet worden; langzaam knipperend geeft het
einde van het programma aan.
U. Droogtoets die er bij de elektronisch gestuurde
programma’s voor dient om de gewenste drooggraad
te selecteren en bij de handmatige programma’s om de
tijd te selecteren.
Niet alle selecties zijn bij alle programma’s mogelijk (zie:
‘PROGRAMMATABEL’)
R
. Er zijn 4 pictogrammen van het droogprogramma met
L
elektronische besturing. Het geselecteerde pictogram knippert, terwijl de andere 3 voortdurend blijven branden.
Als de cyclus is gestart, blijft alleen het gekozen pictogram branden.
CT. Teller droogcyclus, geeft de ingestelde tijd met stappen van 20 minuten weer tot een maximum van 2 uur en
40 minuten voor het katoenprogramma en tot 2 uur voor
synthetisch wasgoed.
NL
S
C. Uitschakeltoets van de zoemer voor het uitzetten van
de functie van de, anders altijd actieve, zoemer. De keuze
blijft ook bij uitschakeling in het geheugen opgeslagen.
De signaleringen zijn de volgende:
1 lange pieptoon (cyclus gestart)
4 lange pieptonen (cyclus beëindigd)
4 korte pieptonen (rotatie trommel voor antikreukfunctie)
V. Hersteltoets alarm condensreservoir voor het opnieuw
starten van de droogcyclus na het leegmaken van het
reservoir met het condenswater (afb. 11)
L
V
. Pictogram alarm en vol condensreservoir, als dit
knippert, betekent het dat het reservoir vol is en geleegd
moet worden (de cyclus stopt); voortdurend brandend,
nadat het reservoir is teruggeplaatst, geeft aan dat de
functie opnieuw wordt geactiveerd; uit betekent dat de
veiligheid hersteld is (de cyclus start opnieuw).
A. Antikreuk-toets activeert de functie die aan het einde
van de droogcyclus het wasgoed gedurende zestig minuten in beide richtingen ronddraait waardoor er minder
kreuken in het wasgoed komen. Elke rotatie wordt met
korte pieptonen door de zoemer gesignaleerd.
H. Antikreuk-knop vertraging droogcyclus om het wasgoed tijdens het wachten in de trommel te laten draaien
om de kreuken te verminderen.
lh. la. lc. De pictogrammen zoemer, antikreuk en uitgestelde start op het display geven aan dat de desbetreffende functie actief is.
R. Toets uitgestelde start waarmee de droogcyclus tot
maximaal 16 uur kan worden uitgesteld.
Bij elke druk op de knop wordt de start met een uur
uitgesteld.Door op de START-toets te drukken wordt de
vertrager knipperend op het display weergegeven met
het symbool h; vanaf dat moment begint de machine na
het aantal ingestelde uren automatisch met de droogcyclus. Als de spanning tijdens de uitgestelde start uitvalt,
wordt de instelling geannuleerd. Door op START te
drukken start de cyclus onmiddellijk.
C
R
. Teller uitgestelde start, geeft de ingestelde tijd
met stappen van een uur weer tot een maximum van
16 uur.
SM2165
Page 71

GEBRUIK VAN DE MACHINE
PROGRAMMATABEL
PROGRAMMA’S MET ELEKTRONISCHE CONTROLE VAN DE VOCHTIGHEID
TEXTIEL
MAX. LADING
WASGOED
EXTRA
DROOG
KASTDROOG
STRIJK
DROOG
ZEER
VOCHTIG
69
KATOEN
SYNTHETISCH
FIJN
WOL
KATOEN
SYNTHETISCH
KOELING
1) Laad het wasgoed in de trommel en sluit de
deur.
2) Steek de stekker van de wasdroger met droge
handen in het stopcontact.
3) Zet de programma’s op stop om eventuele
vorige programma/s te resetten en draai de
knop daarna op het programma dat het meest
geschikt is voor de textielsoort.
4) Selecteer met de droogtoets de gewenste
drooggraad (zie de Programmatabel).
5) Selecteer de gewenste opties met de desbe-
treffende toetsen.
7.0 kg.
3.5 kg.
3.5 kg.
1.5 kg.
7.0 kg.
3.5 kg.
TIJDPROGRAMMA’S
160-140 min 140-120 min 120-100 min 100-80 min
120-100 min 80-60 min 60-40 min 40-20 min
DROGEN
20 min
6) Druk op de START-toets om de droogcyclus
te starten.
7) Zet de knop weer in de STOP-stand als het
einde van de droogcyclus wordt aangegeven
door het knipperen van de led start, door
de zoemer en door de melding END op het
display.
8) Open de deur van de trommel en neem het
wasgoed eruit.
9) Sluit de deur.
10) Haal de stekker van de wasdroger met droge
handen uit het stopcontact.
10
ONDERHOUD
BINNENVERLICHTING (VERKRIJGBAAR AFHANKELIJK VAN HET MODEL)
De verlichting bevindt zich in de trommel.
Ga als volgt te werk om een lampje te vervangen:
▼ Haal de stekker uit het stopcontact of schakel de hoofdschakelaar uit.
▼ Verwijder het lampenkapje;
▼ Neem het lampje weg (afb. 10);
▼ Let op: gebruik geen lampjes van meer dan 15W!
▼ Monteer het lampenkapje weer.
SM2165
NL
Page 72

70
LEGEN VAN HET CONDENSRESERVOIR
Als de machine niet rechtstreeks op de afvoer is aangesloten wordt het condenswater in het reservoir opgevangen (afb. 11). Het reservoir moet na elke droogcyclus
worden geleegd.
Ga als volgt te werk om het reservoir leeg te maken:
▼ Haal het reservoir uit de droger (afb. 11);
▼ Maak het reservoir leeg; de afvoeropening bevindt zich rechts boven (afb. 12);
▼ Plaats het reservoir na het legen terug;
▼ Als u vergeet om het reservoir leeg te maken of als het tijdens het drogen te vol
raakt, gaat het alarm van het condensreservoir knipperen en stopt de droger.
Ga hierna te werk zoals hierboven is beschreven.
▼ Druk op de toets (V) ‘herstel alarm condensreservoir’ om het onderbroken pro-
gramma te hervatten (afb. 9).
REINIGING EN ONDERHOUD
Schakel de stroomtoevoer naar het apparaat uit alvorens de reinigingswerkzaamheden te beginnen. Het is erg belangrijk dat het apparaat na elk gebruik wordt
schoongemaakt om tijd en dus energie te besparen.
1. Pluizenfi lter in de deur (afb. 13).
2. Pluizenfi lter in de vulopening (afb. 14).
3. Condensor (afb. 15).
▼ Verwijder het fi lter door het omhoog te trekken en maak het schoon (afb. 13).
ONDERHOUD
11
12
13
▼ Bovendien kunnen de twee pluizenfi lters uit de laadopening worden verwijderd.
Maak ze schoon (afb. 14).
NB. De aanwezigheid van vezels in het fi lter is niet afhankelijk van de
droogcyclus. De pluizen zijn afkomstig van de vezels van textiel dat tijdens
het wassen beschadigd of gerafeld is en vooral van versleten kledingstukken.
De reiniging is gemakkelijker als u het fi lter onder stromend warm water
houdt.
▼ Het is aanbevolen de condensor twee of drie maal per jaar schoon te maken
(afb. 15/18).
▼ Open de deur, draai het hendeltje in een verticale positie en verwijder het deksel
(afb. 15).
NL
14
15
SM2165
Page 73

16
ONDERHOUD
REINIGING EN ONDERHOUD
▼ Draai de 3 hendeltjes in een verticale positie en neem de condensor weg (afb.
16).
71
17
18
OPSPOREN VAN STORINGEN
Alle elektrische apparaten zijn onderhevig aan storingen.
Neem in dat geval contact op met een gekwalifi ceerd technicus. Maar u kunt zelf ook veel problemen
oplossen.
Belangrijk: koppel de machine bij een slechte werking onmiddellijk los van het elektriciteitsnet.
Controleer de volgende punten alvorens contact op te nemen met ons servicecentrum.
OPLOSSEN VAN PROBLEMEN
Als de machine niet start
• Controleer of:
1) het apparaat op het elektriciteitsnet is aangesloten.
2) het stopcontact goed werkt:
2a) is de zekering gesprongen? (De
controle is eenvoudig, sluit een ander
apparaat aan, bijvoorbeeld een tafellamp).
2b) hebt u alle instructies in de handleiding
opgevolgd?
▼ Reinig de condensor aan de voor- en achterkant
en aan de zijkanten door de waterstraal zo te
richten als is aangegeven (afb. 17/18).
Zet de condensor op een handdoek om hem
goed af te laten druipen.
▼ Monteer de condensor weer als hij goed droog
is en herhaal de handelingen in omgekeerde
volgorde.
Als de machine niet start
• Controleer of:
1) de deur correct gesloten is.
2) op de starttoets is gedrukt.
Het wasgoed droogt niet
• Controleer of:
1) de luchtafvoeropening verstopt is.
2) het fi lter verstopt is. (Bedenk dat wanneer
u de deur opent, de binnenkant van de
wasdroger en het wasgoed erg heet kunnen
zijn).
Als het apparaat na het uitvoeren van de beschreven functies nog niet correct werkt, dient u
het defect aan het dichtstbijzijnde bevoegde servicecentrum te melden. Wij vragen u om het
model, het fabrieksnummer en het defect te vermelden. Deze informatie maakt het voor de
monteur van de technische servicedienst mogelijk om de noodzakelijke reserveonderdelen
mee te nemen en dus een snelle en effi ciënte reparatie te garanderen.
SM2165
NL
Page 74

7272
................................................................................................................................................................
................................................................................................................................................................
................................................................................................................................................................
................................................................................................................................................................
................................................................................................................................................................
................................................................................................................................................................
................................................................................................................................................................
................................................................................................................................................................
................................................................................................................................................................
................................................................................................................................................................
................................................................................................................................................................
................................................................................................................................................................
................................................................................................................................................................
................................................................................................................................................................
................................................................................................................................................................
................................................................................................................................................................
................................................................................................................................................................
................................................................................................................................................................
................................................................................................................................................................
................................................................................................................................................................
................................................................................................................................................................
................................................................................................................................................................
................................................................................................................................................................
................................................................................................................................................................
................................................................................................................................................................
................................................................................................................................................................
................................................................................................................................................................
................................................................................................................................................................
................................................................................................................................................................
................................................................................................................................................................
...................................................................................................................................................................
...................................................................................................................................................................
...................................................................................................................................................................
...................................................................................................................................................................
...................................................................................................................................................................
...................................................................................................................................................................
..................................................................................................................................................................
.................................................................................................................................................................
OPMERKINGEN
SM2165
Page 75

POLSKI
Szanowny kliencie,
Dziękujemy za wybór naszego produktu.
Przed uruchomieniem i przystąpieniem do użytkowania urządzenia prosimy uważnie przeczytać
instrukcję obsługi.
Znajomość zasad działania gwarantuje właściwą i bezpieczną obsługę urządzenia.
Instrukcja obsługi zawiera wiele pomocnych w trakcie obsługi urządzenia wskazówek dotyczących
szczegółów technicznych, a także pomocnych dla uzyskania optymalnych rezultatów. W razie
sprzedaży lub przekazania suszarki należy przekazać nowemu użytkownikowi także instrukcję
obsługi urządzenia.
73
SPIS TREŚCI
UWAGI ORAZ WSKAZÓWKI DLA UŻYTKOWNIKA 73-74
• Dane techniczne 73
OPIS MASZYNY 75
• Akcesoria opcjonalne 75
INSTALACJA MASZYNY 75-77
• Instalacja 75
• Poziomowanie suszarki 76
• Podłączenie do instalacji elektrycznej 76
• Regulacja wylotu na zewnątrz skroplonej wody 76
• Zmiana otwierania drzwiczek 77
UŻYTKOWANIE MASZYNY 77-79
• Uwagi dotyczące tkanin 77
• Zalecenia przed rozpoczęciem suszenia 77
• Opis panelu sterowania 78
• Tabela programów 79
• Jak suszyć 79
KONSERWACJA 79-81
• Oświetlenie wewnętrzne 79
• Opróżnianie zbiornika na skroploną wodę 80
• Czyszczenie i konserwacja 80-81
• Wyszukiwanie usterek 81
• Rozwiązywanie problemów 81
UWAGI ORAZ WSKAZÓWKI DLA UŻYTKOWNIKA
DANE TECHNICZNE
MODEL:
NUMER PRODUKCYJNY:
DATA ZAKUPU:
SM2165
...................................................................................................................................................................................................................
.........................................................................................................................................................................
..................................................................................................................................................................................................
PL
Page 76

74
UWAGI ORAZ WSKAZÓWKI DLA UŻYTKOWNIKA
▼ Urządzenie przeznaczone jest do suszenia
prania, do użytku domowego, każde inne zastosowanie jest niewłaściwe i niebezpieczne.
▼ Niniejszą instrukcję obsługi należy prze-
chowywać zawsze w pobliżu suszarki tak,
aby w razie konieczności szybko zasięgnąć
informacji.
▼ Wszelkie modyfikacje lub próby dokonywa-
nia zmian działania urządzenia mogą być
niebezpieczne dla użytkownika oraz mogą
powodować postanie usterek w urządzeniu.
▼ Przy dostawie urządzenia sprawdzić wszel-
kie usterki, które mogły powstać podczas
transportu. W przypadku wykrycia uszkodzeń
powstałych podczas transportu należy od
razu zwrócić się do sprzedawcy.
▼ Nie przykrywać suszarki bielizną ani innymi
przedmiotami.
▼ Podczas ustawiania urządzenia upewnić się,
że kabel zasilania nie jest przygnieciony i nic
nie utrudnia korzystania z niego.
▼ Zawsze po zakończeniu użytkowania za-
mknąć drzwiczki suszarki.
▼ Dzięki temu dzieci nie będą mogły wieszać
się na drzwiczkach i wywrócić urządzenia.
▼ Dzieci bez opieki nie mogą obsługiwać suszarki.
▼ W suszarce nie wolno suszyć zabrudzonej
odzieży.
▼ Nigdy nie wolno suszyć rzeczy, które zostały
zabrudzone przez substancje takie jak: olej spożywczy, ropa, aceton, alkohol, benzyna, nafta,
wywabiacz do plam, terpentyna, cerezyna itp.
▼ Przed suszeniem należy rzeczy wyprać w
ciepłej wodzie z odpowiednią ilością detergentu.
▼ Nie wolno suszyć materiałów takich jak: guma,
pianka, lateks, materiały nieprzemakalne,
uszczelki, podkładki gumowe, artykuły, ubrania lub pościel z elementami pianki gumowej,
gdyż mogą się one roztopić i zniszczyć inne
elementy danej rzeczy lub samo urządzenie.
▼ Zmiękczaczy do tkanin lub produktów podob-
nych należy używać zgodnie z zaleceniami
podanymi na opakowaniu.
▼ Jeżeli urządzenie zostanie sprzedane lub
podarowane, należy również pamiętać o przekazaniu następnemu użytkownikowi niniejszej
instrukcji obsługi suszarki.
▼ Nie wolno próbować samemu naprawiać uste-
rek suszarki, nieprofesjonalne naprawy mogą
spowodować kolejne usterki oraz skutkują
utratą gwarancji.
▼ Naprawy urządzenia mogą być wykonywane wy-
łącznie przez osoby z autoryzowanych centrów
serwisowych. Do napraw mogą być używane
wyłącznie oryginalne części zamienne.
▼ Przed włożeniem prania do suszarki należy
je dobrze odwirować lub wykręcić. Pranie
dobrze odwirowane wysuszy się szybciej.
▼ Aby zapewnić dobrą cyrkulację powietrza,
należy dokładnie oczyścić filtr przed każdym
użyciem suszarki.
▼ Nie wolno wkładać lub wyjmować wtyczki z
gniazdka mokrymi rękami.
▼ Urządzenie musi być podłączone do gniazd-
ka z uziemieniem zgodnie z normami bezpieczeństwa.
▼ Nie wolno podłączać urządzenia do gniazdka
elektrycznego przy pomocy przedłużaczy lub
rozdzielaczy.
▼ Nie wystawiać urządzenia na działanie
czynników atmosferycznych.
▼ Podczas wykonywania kontroli urządzenia
lub czyszczenia należy wyjąć wtyczkę z
gniazdka elektrycznego.
▼ Przy odłączaniu wtyczki z gniazdka należy
ciągnąć za wtyczkę – nigdy za kabel.
Niniejsze urządzenie jest oznaczone jako
▼
zgodne z dyrektywą 2002/96/EC, Odpady
elektryczne i elektroniczne (WEEE). Należy
upewnić się, że urządzenie zostanie zlikwidowane w odpowiedni sposób, użytkownik
ma także wpływ na potencjalny negatywny
wpływ na środowisko i zdrowie.
▼ Symbol na produkcie lub w dołączo-
nej dokumentacji oznacza, że produktu tego
nie można traktować jak zwykłych odpadów,
ale należy go zawieźć do punktu zajmującego się likwidacją urządzeń elektrycznych i
elektronicznych.
W razie utylizacji urządzenia należy także
przestrzegać odpowiednich lokalnych norm
i przepisów. Szczegółowe informacje na temat postępowania z urządzeniem oraz jego
recyclingu uzyskasz w urzędzie miasta/gminy, lokalnych instytucjach zajmujących się
likwidacja odpadów lub w sklepie, w którym
kupiłeś produkt.
UWAGA!!! Powierzchnie oznaczone
tym symbolem mogą być gorące w
trakcie działania urządzenia.
PRODUCENT ZRZEKA SIĘ JAKIEJKOLWIEK ODPOWIEDZIALNOŚCI ZA WYPADKI SPOWODOWANE PRZEZ NIEPRZESTRZEGANIE NORM BEZPIECZEŃSTWA
ORAZ INSTRUKCJI OBSŁUGI
PL
SM2165
Page 77

OPIS MASZYNY
OPIS MASZYNY
1 Drzwiczki.
2 Filtr drzwiczek
3 Górny zbiornik na skroploną wodę
(Jeśli rurka odpływu skroplonej wody nie jest
podłączona bezpośrednio do odpływu, woda
zbiera się w tym zbiorniczku).
4 Panel sterowania.
5 Koszyk suszarki.
*
3
L
75
6 Filtr otworu koszyka.
7 Tabliczka znamionowa.
8 Dolny zbiornik na skroploną wodę*.
9 Nóżki regulowane.
10 Pokrywa skraplacza.
11 Pokrywa dolna.
* w zależności od modelu
42
5
6
1
7
*
8
9
1
U sprzedawców dostępne są akcesoria pozwalające na zainstalowanie suszarki nad pralką z załadunkiem
z przodu. Instalator doradzi.
Państwu, jaki model urządzenia jest przystosowany do instalacji tego rodzaju.
10
11
AKCESORIA OPCJONALNE
INSTALACJA MASZYNY
INSTALACJA
▼ Instalacja powinna być wykonana przez osobę wykwalifikowaną oraz zgodnie
ze wskazówkami producenta, nieprawidłowa instalacja może spowodować
wypadek lub uszkodzenie sprzętu.
▼ Nie wolno trzymać suszarki w miejscach, gdzie temperatura spada poniżej
zera. Mróz może uszkodzić elementy elektroniczne.
▼ Suszarkę należy umieścić w odpowiednio wentylowanym pomieszczeniu.
▼ Nie wolno zakrywać otworu wentylacyjnego znajdującego się z tyłu (rys. 2) ani
2
SM2165
ustawiać maszyny na grubej wykładzinie
▼ Wnętrze kosza suszenia należy czyścić przy pomocy wilgotnej ściereczki, aby
usunąć ewentualne nagromadzone zanieczyszczenia.
PL
Page 78

76
Nóżki regulowane. Ustawić suszarkę w pozycji pionowej tak, aby oparła się stabilnie
na wszystkich czterech nóżkach.
Wypoziomować maszynę przy pomocy nóżek w następujący sposób:
▼ Podnieść nieznacznie urządzenie.
▼ Dokonać regulacji nóżek na odpowiednią wysokość (rys. 3).
▼ Opuścić urządzenie.
Uwaga: Jeżeli maszyna będzie źle wypoziomowana, może dojść do uszkodzenia łożysk oraz wcześniejszego zużycia się. Nie ma konieczności podłączania
tej suszarki do uziemienia.
PODŁĄCZENIE DO INSTALACJI ELEKTRYCZNEJ
▼ Upewnić się, że napięcie elektryczne podane na tabliczce znamionowej znaj-
dującej się z tyłu urządzenia odpowiada napięciu sieci zasilającej.
▼ Zabezpieczenie różnicowo-prądowe, kable elektryczne oraz gniazdko sieci
muszą mieć parametry odpowiednie dla maksymalnego obciążenia podanego
na tabliczce znamionowej.
▼ W czasie instalacji dostęp do zasilania sieci musi być zagwarantowany przez
przełącznik jednobiegunowy.
▼ Gniazdko, z którego będzie zasilane urządzenie, musi być wyposażone w uzie-
mienie. W przeciwnym razie producent zrzeka się wszelkiej odpowiedzialności
za ewentualne wypadki (rys. 4).
▼ Jeżeli kabel zasilania jest w jakikolwiek sposób uszkodzony, należy skontak-
tować się z centrum serwisowym.
▼ Zabronione jest podłączanie suszarki do sieci poprzez np. przedłużacze lub
rozdzielacze.
▼ Urządzenie należy ustawić w taki sposób, aby kabel zasilania był łatwo dostępny
w razie konieczności odłączenia.
INSTALACJA MASZYNY
POZIOMOWANIE SUSZARKI
3
4
Ważne: Na końcu cyklu suszenia, należy odłączyć urządzenie od zasilania, aby uniknąć przypadkowego włączenia przez dzieci.
REGULACJA WYLOTU NA ZEWNĄTRZ SKROPLONEJ WODY
Skroplona woda może zbierać się w zbiorniczku (rys. 10) lub też można podłączyć
rurkę bezpośrednio do odpływu.
W takim wypadku woda będzie usuwana przy pomocy pompy.
Aby podłączyć rurkę odpływu wody bezpośrednio do odpływu, należy:
▼ Przed wykonaniem jakiejkolwiek czynności odłączyć wtyczkę z gniazdka elek-
trycznego.
▼ Przeciągnąć rurkę do tylnej części urządzenia i przymocować ją do gniazda
(rys. 5/6), natomiast drugi jej koniec do odpływu.
PL
5
6
SM2165
Page 79

7
8
INSTALACJA MASZYNY
ZMIANA KIERUNKU OTWIERANIA DRZWICZEK
▼ Nacisnąć drzwiczki z prawej strony (rys. 7) (drzwiczki otwierają się). Jeżeli
drzwiczki były odwrócone, nacisnąć z lewej strony.
▼ W razie potrzeby można zmienić kierunek obrotu drzwiczek (rys. 8).
UWAGA: Operacja ta może być wykonywana wyłącznie przez osobę wykwalifikowaną.
Proszę skontaktować się z centrum serwisowym.
UŻYTKOWANIE MASZYNY
UWAGI DOTYCZĄCE TKANIN
W razie wątpliwości co do typu tkaniny należy sprawdzić jej etykietę.
Prawie wszystkie etykiety podają dokładnie, czy dana tkanina jest przystosowana do suszenia
maszynowego.
Aby uniknąć nagromadzenia się elektryczności statycznej na tkaninach podczas suszenia, należy
używać zmiękczaczy.
Aby uniknąć pomięcia należy wyjąć z kosza tkaniny syntetyczne.
ZALECENIA PRZED ROZPOCZĘCIEM SUSZENIA
PODZIAŁ RZECZY
Przed przystąpieniem do suszenia należy odwirować
pranie z prędkością odpowiednią do typu tkaniny.
Jeżeli pranie zostanie odwirowane z maksymalną
dopuszczalną prędkością, oszczędza się do 35%
czasu suszenia. Im wyższa prędkość wirowania,
tym lepsze efekty suszenia. Użycie zmiękczacza
podczas prania pozwala na uzyskanie lepszych
efektów suszenia oraz oszczędność czasu.
Przed przystąpieniem do suszenia sprawdzić,
czy dana rzecz jest przystosowana do suszenia
mechanicznego. Sprawdzić symbole dotyczące
prania podane na etykiecie danej rzeczy.
Jeżeli nie ma symbolu suszenia na etykiecie,
należy przestrzegać poniższych zasad:
▼ Rzeczy białe/kolorowe oraz niemnące suszy
się w zwykłych temperaturach z odpowiednio dobranym programem suszenia.
▼ Rzeczy delikatne, na przykład akrylowe,
należy suszyć zawsze w niższych temperaturach.
Uwagi ogólne:
Jersey ulega skurczeniu nie tylko w praniu, ale
również podczas suszenia.
Czysty len.
▼ Suszyć pod warunkiem, że na etykiecie jest
odpowiedni symbol.
W przeciwnym razie tkanina może stać się
szorstka.
▼ Aby uniknąć odbarwień, nie wolno suszyć rze-
czy w ciemnych kolorach razem z jasnymi.
77
SM2165
PL
Page 80

78
UŻYTKOWANIE MASZYNY
OPIS PANELU STEROWANIA
CT
LS
Ih. Ia. Iv. Ic.
L
CR
LR
P
HA VCU
R
9
P. Pokrętło programów służy do wyboru programu odpowiedniego do typu tkaniny oraz według potrzeb, pozycja
STOP służy do wyłączenia wyświetlacza, a także do
ponownego uruchomienia urządzenia.
Jeżeli z jakiegoś powodu zdecydujesz się zmienić program lub dodać rzeczy, wystarczy ustawić pokrętło w
pozycji STOP, następnie należy wybrać nowy program
lub nacisnąć przycisk START.
UWAGA!! Zaleca się korzystanie z tej funkcji tylko
wtedy, gdy jest to konieczne, a program nie trwał
dłużej niż 3 minuty.
UWAGA: W niektórych modelach przy uruchomionym programie opóźnienia (Delay) oraz na
końcu cyklu wyświetlacz po kilku minutach
gaśnie. Wystarczy nacisnąć dowolny przycisk,
aby go aktywować.
S. Po naciśnięciu przycisku Start rozpoczyna się wybrany
cykl suszenia.
L
S
. Zgaszona kontrolka Start oznacza pozycję “STOP”;
zapalona oznacza, że program jest w trakcie; szybkie
miganie oznacza, że został wybrany program do uruchomienia; wolne miganie oznacza koniec programu.
U. Przycisk wybierania poziomu wysuszenia służy do
wyboru stopnia wilgotności dla programów sterowanych
elektronicznie oraz czasów dla programów ręcznych.
Nie wszystkie ustawienia są możliwe dla wszystkich
programów. (patrz: „TABELA PROGRAMÓW”)
R
. Są 4 ikony programów suszenia ze sterowaniem
L
elektronicznym, wybrana miga, a pozostałe 3 zostają
zapalone.
Po uruchomieniu cyklu pozostaje zapalona tylko ta
wybrana.
C
T
. Licznik suszenia podaje wprowadzony czas, w prze-
działach co 20 minut, maksymalnie do 2 godzin 40 minut
dla programu bawełna oraz 2 godziny dla syntetyków.
C. Przycisk wyłączania dźwięku powoduje jego wyłączenie, w przeciwnym razie dźwięk jest zawsze włączony,
wybór pozostaje w pamięci także w razie wyłączenia
urządzenia.
PL
S
Sygnały dźwiękowe:
1 długi dźwięk (cykl uruchomiony)
4 długie dźwięki (cykl przerwany)
4 krótkie dźwięki (obrót bębna dla funkcji zapobiegania
zagnieceniom)
V. Przycisk przywrócenia alarmu zbiorniczka służy do
ponownego uruchomiania cyklu suszenia po opróżnieniu
zbiorniczka na skroploną wodę (rys. 11)
V
. Migająca ikona alarmu pełnego zbiorniczka oznacza,
L
że zbiorniczek jest pełny i należy go opróżnić (cykl
zatrzymuje się); zapalona oznacza, że po założeniu
zbiorniczka program uruchamia się ponownie; zgaszona oznacza, że wszystko jest w porządku (cykl
trwa dalej).
A. Przycisk funkcji zapobiegania zagnieceniom uruchamia funkcję, która na końcu suszenia kontynuuje
obracanie bębna w przeciwnym kierunku przez sześćdziesiąt minut, redukując w ten sposób zagniecenia
rzeczy. Każdy obrót jest sygnalizowany przez krótki
sygnał dźwiękowy.
H. Przycisk funkcji zapobiegania zagnieceniom - opóźniania suszenie, uruchamia obracanie bębna w czasie
oczekiwania w celu zmniejszenia zagnieceń.
lh. la. lc. Ikony sygnałów dźwiękowych, funkcji zapo-
biegania zagnieceniom oraz opóźnienia uruchamiania
pojawiające się na wyświetlaczu oznaczają, która funkcja
jest uruchomiona.
R. Przycisk opóźnienia uruchomiania pozwala opóźnić
suszenie do maksymalnie 16 godzin. Przy każdym
naciśnięciu czas opóźniania jest zwiększany o jedną
godzinę.
Po przyciśnięciu przycisku START opóźnienie zostanie
podane na wyświetlaczu razem z symbolem ‘h’, po
upłynięciu wyznaczonej ilości godzin od tego momentu,
cykl suszenia uruchomi się automatycznie.
W razie przerwy w dopływie zasilania w czasie opóźnienia ustawienie zostanie skasowane, a cykl uruchomi się
zaraz po naciśnięciu przycisku START.
R
. Licznik opóźnienia rozpoczęcia podaje czas w prze-
C
działach co godzinę, aż do maksymalnie 16 godzin.
SM2165
Page 81

UŻYTKOWANIE MASZYNY
TABELA PROGRAMÓW
PROGRAMY Z ELEKTRONICZNYM STEROWANIEM WILGOTNOŚCIĄ
TKANINA
MAKS.
WKŁAD
BARDZO
SUCHE
SUCHE DO
SCHOWANIA
WILGOTNE DO
PRASOWANIA
79
BARDZO
WILGOTNE
BAWEŁNA
SYNTETYCZNE
DELIKATNE
WEŁNA
BAWEŁNA
SYNTETYCZNE
OCHŁODZENIE
1) Włożyć rzeczy do kosza i zamknąć drzwicz-
ki.
2) Suchymi rękoma włożyć wtyczkę suszarki
do gniazdka zasilania.
3) Ustawić pokrętło programatora w pozycji
Stop, aby zatrzymać ewentualne wcześniejsze programy, następnie obrócić je
do pozycji programu odpowiedniego dla
włożonych rzeczy.
4) Za pomocą przycisku suszenia wybrać
odpowiedni stopień wysuszenia/wilgotności
(patrz Tabela Programów).
5) Za pomocą odpowiednich przycisków wy-
7.0 kg.
3.5 kg.
3.5 kg.
1.5 kg.
7.0 kg.
3.5 kg.
PROGRAMY CZASOWE
160-140 min 140-120 min 120-100 min 100-80 min
120-100 min 80-60 min 60-40 min 40-20 min
JAK SUSZYĆ
20 min
brać dodatkowe funkcje.
6) Nacisnąć przycisk START, aby uruchomić
cykl suszenia.
7) Zakończenie cyklu suszenia sygnalizowane
jest przez miganie kontrolki start, sygnał
dźwiękowy oraz napis END na wyświetlaczu. Ustawić pokrętło z powrotem w pozycji
STOP
8) Otworzyć drzwiczki i wyjąć rzeczy.
9) Zamknąć drzwiczki.
10) Suchymi rękoma wyjąć wtyczkę suszarki z
gniazdka zasilania.
10
KONSERWACJA
OŚWIETLENIE WEWNĘTRZNE
Oświetlenie wewnątrz urządzenia.
Wymianę żarówki należy wykonać w następujący sposób:
▼ Wyjąć wtyczkę z gniazdka lub odłączyć prąd przy pomocy wyłącznika głównego;
▼ Zdjąć pokrywę żarówki;
▼ Wyjąć żarówkę (rys. 10);
▼ Uwaga: nie wolno używać żarówek mocniejszych niż 15 W!
▼ Założyć z powrotem osłonę żarówki.
SM2165
(DOSTĘPNE W ZALEŻNOŚCI OD MODELU)
PL
Page 82

80
OPRÓŻNIANIE ZBIORNICZKA NA SKROPLONĄ WODĘ
Jeżeli urządzenie nie zostało podłączone bezpośrednio do odpływu, skroplona woda
zbiera się w zbiorniczku (rys. 11).
Zbiorniczek należy opróżniać po zakończeniu każdego cyklu suszenia.
▼ Aby opróżnić zbiorniczek należy:
▼ Wyjąć zbiorniczek z suszarki (rys. 11);
▼ Opróżnić zbiorniczek; otwór do opróżniania znajduje się u góry po prawej stronie
(rys. 12);
▼ Po opróżnieniu założyć go na miejsce;
▼ Jeżeli zapomnisz opróżnić zbiorniczek lub napełni się on podczas trwania cyklu
suszenia, zapala się kontrolka alarmu przepełnienia wodą, a suszarka zatrzymuje się. W takim wypadku należy postępować tak, jak to opisano powyżej.
▼ Aby kontynuować przerwany program, należy nacisnąć przycisk (V) anulowania
alarmu (rys. 9).
CZYSZCZENIE I KONSERWACJA
Przed rozpoczęciem czyszczenia należy odłączyć urządzenie od zasilania
elektrycznego.
Czyszczenie urządzenia należy wykonywać po zakończeniu każdego cyklu, aby
oszczędzać czas oraz energię.
1. Filtr w koszyku (rys. 13).
2. Filtr znajdujący się w otworze załadunkowym (rys. 14).
3. Skraplacz (rys. 15).
▼ Wyjąć filtr pociągając go do góry, następnie oczyścić go (rys. 13).
KONSERWACJA
11
12
13
▼ Możliwe jest także wyjęcie dwóch filtrów znajdujących się w otworze załadun-
kowym oraz wyczyszczenie ich (rys. 14).
Uwaga Obecność włókien na filtrze nie zależy od suszenia. Włókna pochodzą z tkanin zniszczonych lub postrzępionych podczas prania, a przede
wszystkim podczas noszenia ubrania.
▼ Czyszczenie jest łatwiejsze pod ciepłą wodą.
▼ Zaleca się czyszczenie skraplacza dwa razy w roku (rys. 15/18).
▼ Otworzyć drzwiczki, obrócić dźwigienkę do pozycji pionowej i zdjąć pokrywę
(rys. 15).
PL
14
15
SM2165
Page 83

16
KONSERWACJA
CZYSZCZENIE I KONSERWACJA
▼ Obrócić 3 dźwigienki do pozycji pionowej i wyjąć skraplacz (rys. 16).
81
17
18
WYSZUKIWANIE USTEREK
Wszystkie urządzenia elektryczne mogą ulegać usterkom.
Zaleca się, aby w takim wypadku wezwać wykwalifikowanego serwisanta. Można jednak samodzielnie
rozwiązać wiele powstałych problemów.
Ważne: W razie problemów z działaniem urządzenia, zaleca się natychmiastowe odłączenie
urządzenia od sieci elektrycznej.
Przed wezwaniem serwisu należy sprawdzić poniżej podane punkty.
ROZWIĄZYWANIE PROBLEMÓW
Jeżeli maszyna nie uruchamia się
• Sprawdzić:
1) Podłączenie do sieci elektrycznej.
2) Czy w gniazdku jest zasilanie:
2a) Czy nie wyskoczył bezpiecznik? (kon-
trola jest łatwa, wystarczy podłączyć
do gniazdka inne urządzenie, takie jak
lampka stołowa).
2b) Wykonano wszystkie czynności opisane
w instrukcji obsługi?
▼ Umyć skraplacz z przodu, tyłu oraz z boków
kierując strumień wody w sposób pokazany
na rysunku (rys. 17/18).
Aby dokładnie osuszyć skraplacz, należy poło-
żyć go bokiem na ręczniku.
▼ Po dokładnym osuszeniu założyć skraplacz
wykonując opisane czynności w odwrotnej
kolejności.
Jeżeli maszyna nie uruchamia się
• Sprawdzić:
1) Czy drzwiczki zostały dokładnie zamknięte.
2) Czy naciśnięto przycisk start.
Rzeczy nie są wysuszone
• Sprawdzić:
1) Możliwe, że otwór wylotowy powietrza jest
zablokowany.
2) Możliwe, że filtr jest zapchany. (Po otwarciu
drzwiczek części wewnętrzne suszarki oraz
suszone rzeczy mogą być bardzo gorące).
Jeżeli po sprawdzeniu powyższych punków urządzenie dalej nie działa poprawnie, należy
zgłosić usterkę do najbliższego autoryzowanego centrum serwisowego.
Prosimy podać model urządzenia, numer fabryczny oraz typ usterki.
Informacje te pozwolą serwisantowi przygotować odpowiednie części zamienne oraz gwa-
rantują szybką i skuteczną naprawę.
SM2165
PL
Page 84

8282
................................................................................................................................................................
................................................................................................................................................................
................................................................................................................................................................
................................................................................................................................................................
................................................................................................................................................................
................................................................................................................................................................
................................................................................................................................................................
................................................................................................................................................................
................................................................................................................................................................
................................................................................................................................................................
................................................................................................................................................................
................................................................................................................................................................
................................................................................................................................................................
................................................................................................................................................................
................................................................................................................................................................
................................................................................................................................................................
................................................................................................................................................................
................................................................................................................................................................
................................................................................................................................................................
................................................................................................................................................................
................................................................................................................................................................
................................................................................................................................................................
................................................................................................................................................................
................................................................................................................................................................
................................................................................................................................................................
................................................................................................................................................................
................................................................................................................................................................
................................................................................................................................................................
................................................................................................................................................................
................................................................................................................................................................
...................................................................................................................................................................
...................................................................................................................................................................
...................................................................................................................................................................
...................................................................................................................................................................
...................................................................................................................................................................
...................................................................................................................................................................
..................................................................................................................................................................
.................................................................................................................................................................
NOTATKI
SM2165
Page 85

ČESKY
Vážený zákazníku
Děkujeme Vám, že jste zvolil náš výrobek.
Prosíme Vás, abyste si před připojením stroje a jeho používáním pečlivě přečetl návod k použití.
Znalost principů fungování stroje zaručí jeho správné a bezpečné využití.
Návod k použití obsahuje mnoho užitečných informací o fungování stroje a rovněž technické údaje,
které Vám pomohou jej co nejlépe využít.
V případě dalšího prodeje nebo převodu sušičky je třeba novému majiteli předat i návod k použití.
83
OBSAH
POZNÁMKY A RADY PRO UŽIVATELE 83-84
• Technická data 83
POPIS STROJE 85
• Volitelné příslušenství 85
INSTALACE STROJE 85-87
• Instalace 85
• Vyrovnání sušičky 86
• Připojení k elektrickému systémuo 86
• Seřízení odvodu kondenzované vody ven 86
• Změna otáčení dvířek 87
POUŽITÍ STROJE 87-89
• Opatření pro tkaniny 87
• Rady před sušením 87
• Popis ovládacího panelu 88
• Tabulka programů 89
• Jak sušit 89
ÚDRŽBA 89-91
• Vnitřní osvětlení 89
• Vyprázdnění nádobky na kondenzovanou vodu 89
• Čištění a údržba 89-90
• Určování závad 90
• Řešení problémů 91
POZNÁMKY A RADY PRO UŽIVATELE
MODEL:
VÝROBNÍ ČÍSLO:
DATUM PRODEJE:
SM2165
...................................................................................................................................................................................................................
TECHNICKÁ DATA
.............................................................................................................................................................................................
..........................................................................................................................................................................................
CZ
Page 86

84
POZNÁMKY A RADY PRO UŽIVATELE
▼ Tento přístroj musí být používán pouze jako
sušička k domácímu použití. Jakékoliv jiné
použití přístroje je nevhodné a proto nebezpečné.
▼ Uchovávejte tuto příručku stále v blízkosti
sušičky, aby bylo možné ji v případě potřeby
rychle použít.
▼ Jakékoliv provádění úprav či pokusy o úpravy
mohou být pro uživatele nebezpečné a mohou
výrobek poškodit.
▼ Při dodání elektrospotřebiče zkontrolujte, zda
nedošlo k jeho poškození během přepravy. V
případě, že na přístroji zjistíte závady, okamžitě se obraťte na prodejce.
▼ Nepokládejte na sušičku prádlo či jiné věci.
▼ Při umísťování přístroje zkontrolujte, zda
napájecí kabel není ohnutý nebo stlačený.
Kabel musí být přístupný pro případné zásahy.
▼ Po použití elektrospotřebiče vždy zavírejte
dveře.
▼ Tímto se zabrání dětem, aby se mohly opřít
o dvířka a sušičku převrhnout.
▼ Děti nesmí používat přístroj bez dozoru.
▼ V sušičce nesušte špinavé prádlo.
▼ Nikdy nesušte prádlo, které bylo zašpiněno lát-
kami jako kuchyňské oleje, nafta, aceton, líh,
benzín, petrolej, čistící prostředky, terpentýn,
vosky.
▼ Tyto látky odstraňte tím, že prádlo před
vložením do sušičky vyperete v teplé vodě s
větším množstvím pracího prášku.
▼ Nesušte materiály jako gumová pěna, latex,
pláštěnky, nepropustné látky, gumové koberce, předměty, oděvy nebo polštářky vyrobené
z bloků gumové pěny, neboť tyto materiály by
se mohly rozpadnout a poškodit ostatní prádlo
nebo i vlastní elektrospotřebič.
▼ Změkčovadla tkanin nebo podobné přípravky
je třeba používat podle návodu k použití přiloženého k výrobku.
▼ V případě, že elektrospotřebič prodáte nebo
darujete, nezapomeňte k němu přiložit i tuto
příručku, která umožní novému majiteli používat sušičku správně a bezpečně.
▼ Případné závady na elektrospotřebiči se
nesnažte opravovat sami, protože opravy
prováděné nekvalifikovaným personálem by
mohly přístroj poškodit a zanikl by nárok na
záruční opravy.
▼ Opravy přístroje mohou být prováděny pou-
ze autorizovaným personálem v servisních
střediscích. Při opravách musí být používány
pouze originální náhradní díly.
CZ
▼ Před naplněním sušičky prádlo dobře
odstřeďte a vyždímejte. Dobře odstředěné
prádlo se usuší rychleji.
▼ Po každém použití sušičky dobře vyčistěte
filtr, aby bylo umožněno perfektní proudění
vzduchu.
▼ Nepřipojujte a neodpojujte elektrickou zástrč-
ku ze zásuvky mokrýma rukama.
▼ Stroj musí být připojen k elektrické zásuvce
vybavené uzemněním a odpovídající bezpečnostním požadavkům.
▼ Je zakázáno připojovat stroj k elektrické
zásuvce pomocí prodlužovaček nebo kombinovaných zástrček.
▼ Nevystavujte přístroj působení atmosféric-
kých vlivů.
▼ Při provádění revizí a čištění přístroje vždy
pamatujte na to, že přístroj musí být odpojen
z elektrické zásuvky.
▼ Při odpojování stroje z elektrické zásuvky
netahejte za kabel, ale za zástrčku.
▼ Tento přístroj je označen v souladu s evrop-
skou směrnicí 2002/96/EC, Waste Electrical
and Electronic Equipment (WEEE). Zajistěte,
aby likvidace výrobku proběhla řádným
způsobem. Uživatel tím pomáhá zamezit
potenciálním negativním vlivům na životní
prostředí a zdraví.
Symbol na výrobku či v doprovodné
dokumentaci označuje, že tento výrobek
není považován za normální domácí odpad
a že je třeba jej odevzdat do příslušné sběrny
elektrických a elektronických spotřebičů.
Likvidaci spotřebiče je třeba provést v soula-
du s platnými místními předpisy pro likvidaci
odpadu.
Další informace o zpracování, dalším
použití a recyklaci tohoto spotřebiče Vám
podá příslušný místní orgán, sběrná služba
domácího odpadu nebo prodejce, u něhož
byl výrobek zakoupen.
Upozornění!!! Povrch, na němž se
při chodu stroje objeví tento symbol, se může zahřívat.
VÝROBCE SE ZŘÍKÁ JAKÉKOLIV ODPOVĚDNOSTI ZA PŘÍPADNÉ ZÁVADY ZPŮSOBENÉ NEDODRŽOVÁNÍM BEZPEČNOSTNÍCH PŘEDPISŮ A NÁVODU K POUŽITÍ
SM2165
Page 87

POPIS STROJE
POPIS STROJE
1 Dvířka bubnu
2 Filtr dvířek bubnu.
3 Horní nádobka na kondenzovanou vodu*
(V případě, že odvodní hadice kondenzované
vody není přímo připojena k odvodu, kondenzát
se shromažďuje v této nádobce).
4 Ovládací panel.
5 Sušící buben.
*
3
L
85
6 Filtr plnícího otvoru bubnu.
7 Štítek technických parametrů.
8 Dolní nádobka na kondenzovanou vodu*.
9 Seřiditelné nožičky.
10 Kryt kondenzátoru.
11 Dolní kryt.
* přítomna v závislosti na modelu
42
5
6
1
7
*
8
9
1
U Vašeho prodejce je k dispozici příslušenství k provedení odlišné instalace sušičky, což Vám umožní
připevnit sušičku nad pračku s předním naplňováním a ušetřit tak prostor. Váš instalační technik Vám
doporučí model stroje, který umožní provedení této montáže.
10
11
VOLITELNÉ PŘÍSLUŠENSTVÍ
INSTALACE STROJE
INSTALACE
▼ Instalaci stroje musí provádět kvalifikovaný personál podle instrukcí výrob-
ce, neboť chybně provedená instalace by mohla způsobit škody osobám či
věcem.
▼ Neumisťujte sušičku do místnosti, kde by mohlo mrznout. Mráz by mohl způsobit
poškození elektroniky.
▼ Sušičku umístěte do místnosti s pohybem vzduchu.
▼ Nepřikrývejte ventilační otvor na zadní straně (obr.2) a neumisťujte stroj na
2
SM2165
tlusté koberce.
▼ Případný prach, který se usazuje uvnitř sušícího bubnu, čistěte navlhčeným
hadrem.
IT
Page 88

86
Seřiditelné nožičky. Sušičku postavte do svislé polohy tak, aby pevně stála na
všech čtyřech nožičkách. Vyrovnejte stroj seřízením nožiček podle níže uvedeného
postupu.
▼ Mírně nadzvedněte stroj.
▼ Seřiďte nožičky do správné výšky (obr.3).
▼ Stroj dejte dolů.
POZN.: U špatně vyrovnaného stroje může dojít k poškození ložisek a k
předčasnému opotřebení. Tato sušička nevyžaduje připevnění k podlaze.
PŘIPOJENÍ K ELEKTRICKÉMU SYSTÉMU
▼ Zkontrolujte, zda hodnota elektrického napětí uvedená na štítku na zadní straně
přístroje odpovídá hodnotě elektrické sítě.
▼ Pojistka, elektrické kabely a zásuvka sítě musí mít takové parametry, které
umožní snést maximální zatížení uvedené na štítku.
▼ Po instalaci musí být přístup k síťovému napájení zaručen vícepólovým vypí-
načem.
▼ Zásuvka elektrického proudu, k níž je stroj připojen, musí být vybavena uzem-
něním. Není-li tomu tak, výrobce se zříká jakékoliv odpovědnosti za případné
úrazy (obr. 4).
▼ V případě jakéhokoliv poškození napájecího kabelu se obraťte na specializo-
vané servisní středisko.
▼ Je zakázáno připojovat sušičku k síti nepřímo pomocí prodlužovaček či kom-
binovaných zástrček.
▼ Umístěte přístroj tak, aby byl napájecí kabel snadno přístupný a bylo možné
jej v případě potřeby odpojit.
Důležité: Na konci cyklu sušení odpojte sušičku od sítě, aby nemohlo dojít k jejímu náhodnému
uvedení do chodu dítětem.
INSTALACE STROJE
VYROVNÁNÍ SUŠIČKY
3
4
SEŘÍZENÍ ODVODU KONDENZOVANÉ VODY VEN
Kondenzovanou vodu je možné shromažďovat do nádobky (obr. 10) nebo je možné
připojit hadici přímo k odvodu.
V tomto případě je voda odváděna pomocí čerpadla.
Budete-li chtít připojit hadici kondenzované vody přímo k odvodu, postupujte
následujícím způsobem:
▼ Před jakoukoliv operací odpojte zástrčku ze zásuvky elektrického proudu.
▼ Zatáhněte za hadici umístěnou na zadní straně stroje a vytáhněte ji z uložení
(obr. 5/6). Poté ji nasaďte na odvod.
CZ
5
6
SM2165
Page 89

7
8
INSTALACE STROJE
OTVÍRÁNÍ A ZMĚNA OTVÍRÁNÍ DVÍŘEK
▼ Zatlačte na pravou stranu dvířek (obr.7) (dvířka se otevřou). Jestliže bylo otvírání
obráceno, zatlačte na levou stranu dvířek.
▼ Směr otvírání dvířek bubnu je možné změnit podle potřeby (obr.8).
POZN.: Tuto operaci může provádět pouze kvalifikovaný personál. Kontaktujte oddělení technického servisu.
POUŽITÍ STROJE
OPATŘENÍ PRO TKANINY
V případě pochybností zkontrolujte cedulku na oděvu.
Téměř na všech oděvech, které mohou být sušeny, je uvedeno, zda jsou vhodné ke strojnímu sušení.
Aby se na oděvech nevytvářela statická elektřina, doporučujeme během cyklů máchání v pračce
používat změkčovadlo.
Prádlo ze syntetických tkanin vyndejte z bubnu co nejdříve, aby se nezmačkalo.
87
RADY PŘED SUŠENÍM
ROZTŘÍDĚNÍ PRÁDLA
Před sušením je třeba prádlo odstředit při otáčkách
vyhovujícím druhu prádla, který chcete sušit. Při
odstřeďování s maximálním povoleným počtem
otáček ušetříte až 35 % času a energie. Čím vyšší
je rychlost odstřeďování, tím lepší je výsledek
sušení. Používání změkčovače při praní umožní
lepší výsledek sušení a ušetří čas. Před sušením
prádla v elektrospotřebiči zkontrolujte, zda je prádlo
vhodné k mechanickému sušení. Za tímto účelem
zkontrolujte symboly týkající se praní uvedené na
cedulkách na oděvech.
Neobsahuje-li cedulka na oděvu symbol sušení,
postupujte podle následujících pravidel:
▼ Bílé/barevné prádlo a nemačkavé prádlo sušte
za normální teploty se zvoleným programem
SM2165
sušení.
▼ Choulostivé prádlo (např. viskózu) sušte vždy
za nízkých teplot.
Obecné rady:
Žersej se často sráží nejen při praní, ale i při
sušení.
Čistý len.
▼ Sušte pouze v případě, je-li sušení uvedeno
na cedulce o praní.
Jinak by tkanina mohla zhrubnout.
▼ Nesušte tmavé barevné prádlo spolu se
světlým barevným prádlem, aby nedošlo k
přílišnému odbarvení.
CZ
Page 90

88
POUŽITÍ STROJE
POPIS OVLÁDACÍHO PANELU
CT
LS
Ih. Ia. Iv. Ic.
L
CR
LR
P
HA VCU
R
9
P. Tlačítko programů umožňuje zvolit požadované programy
podle druhu tkaniny a podle Vašich potřeb. S tlačítkem v
poloze STOP dojde ke zhasnutí displeje a rovněž k resetu
stroje.
Chcete-li program z jakéhokoliv důvodu změnit nebo
přidat další prádlo, stačí jednoduše nastavit tlačítko do
polohy STOP, poté zvolit nový program a stisknout tlačítko
START.
POZN. Upozornění!! Doporučujeme používat tuto
funkci pouze v nezbytně nutném případě a pouze
za předpokladu, že se program, který má být resetován, spustil ne víc než před třemi minutami.
POZN. U některých modelů se zadní osvětlení
displeje při nastaveném programu Delay nebo na
konci cyklu po několika minutách zhasne. Stačí
stisknout jakékoliv tlačítko a zadní osvětlení se
znovu rozsvítí.
S. Tlačítko Start stisknutím tohoto tlačítka sušička spustí
nastavený cyklus sušení.
LS. LED Start zhasnutý označuje stav “STOP”; rozsvícený
označuje probíhání cyklu; rychlé blikání označuje, že nastavený program má být spuštěn; pomalé blikání označuje
konec programu.
U. Přepínací tlačítko sušení umožňuje zvolit požadovaný
stupeň vlhkosti u programů s elektronickým ovládáním a
čas u ručních programů.
Ne všechny volby jsou u všech programů možné (viz:
“TABULKA PROGRAMŮ”)
LR. Ikony programu sušení s elektronickým ovládáním jsou
čtyři, zvolená ikona
bliká, zatímco ostatní tři jsou stálé.
Po spuštění cyklu zůstane svítit pouze zvolená ikona.
C
T
. Počitadlo sušení zobrazuje nastavený čas ve 20 minu-
tových krocích, maximálně 2 hodiny 40 minut u programu
bavlny a 2 hodiny u syntetických tkanin.
C. Tlačítko vyloučení bzučáku vylučuje funkci bzučáku,
který je jinak stále aktivní. Volba zůstane v paměti i při
CZ
zhasnutí.
Signalizace jsou následující:
1 dlouhé pípnutí (cyklus spuštěn)
4 dlouhá pípnutí (cyklus ukončen)
4 krátká pípnutí (otáčení bubnu kvůli ochraně proti
zmačkání)
V. Tlačítko resetu alarmu vaničky slouží ke znovuspuštění
cyklu sušení po vyprázdnění vaničky kondenzované
vody (obr.11)
V
L
vanička je plná a je třeba ji vyprázdnit (cyklus se zastaví);
stále rozsvícená označuje aktivaci funkce po opětovném
umístění vaničky; zhasnutá označuje resetovanou
bezpečnost (cyklus se znovu spustí).
A. Tlačítko ochrany proti zmačkání aktivuje funkci, která
po ukončení cyklu sušení prádla v sušičce ještě dále
provádí otáčení po dobu šedesáti minut jedním nebo
druhým směrem, což snižuje zmačkání prádla. Každé
otočení je signalizováno bzučákem, který vydává krátká
pípnutí.
H. Tlačítko ochrany proti zmačkání při odloženém sušení
umožňuje otáčení prádla v bubnu při čekání, což snižuje
možnost zmačkání.
lh. la. lc. Ikony bzučáku, ochrany proti zmačkání a
odloženého startu, které se zobrazují na displeji a
označují, že funkce je aktivní.
R. Tlačítko odloženého startu umožňuje odložit sušení
maximálně až o šestnáct hodin.
Při každém stisknutí tlačítka se start sušení odloží o
hodinu.
Po stisknutí tlačítka START se aktivace odložení zobrazí
na displeji blikajícím symbolem h. Stroj počká stanovený
počet hodin a poté automaticky spustí cyklus sušení.
V případě přerušení napájení během doby odložení se
nastavení zruší a při stisknutí STARTU se cyklus spustí
okamžitě.
CR. Počitadlo odložení zobrazuje nastavený čas v hodinových krocích, maximálně 16 hodin.
S
. Ikona alarmu plné vaničky, blikající označuje, že
SM2165
Page 91

POUŽITÍ STROJE
TABULKA PROGRAMŮ
89
PROGRAMY S ELEKTRONICKÝM OVLÁDÁNÍM VLHKOSTI
TKANINA
BAVLNA
SYNTETICKÉ
TKANINY
CHOULOSTIVÉ
TKANINY
VLNA
MAX. NÁPLŇ
PRÁDLA
7.0 kg.
3.5 kg.
3.5 kg.
1.5 kg.
EXTRA
SUCHÉ
PROGRAMY S NASTAVITELNÝM ČASEM
BAVLNA
SYNTETICKÉ
TKANINY
7.0 kg.
3.5 kg.
160-140 min 140-120 min 120-100 min 100-80 min
120-100 min 80-60 min 60-40 min 40-20 min
OCHLAZOVÁNÍ
JAK SUŠIT
1) Naplňte buben prádlem a zavřete dvířka.
2) Suchýma rukama zapojte zástrčku do sítě.
3) Nastavte tlačítko programů na Stop, aby
se resetovaly předchozí programy. Poté jej
nastavte na nejvhodnější program pro druh
tkaniny, který chcete sušit.
4) Pomocí přepínacího tlačítka sušení zvolte
požadovaný stupeň vlhkosti (viz TABULKA
PROGRAMŮ).
5) Pomocí příslušných tlačítek zvolte požadované funkce.
6) Stiskněte tlačítko START, aby se spustilo
'
SUCHÉ DO
SKŘÍNĚ
20 min
sušení.
7) Po ukončení sušení signalizovaném blikáním
kontrolky led startu, bzučákem a zobrazováním nápisu END na displeji nastavte znovu
přepínač do polohy STOP.
8) Otevřete dvířka bubnu a vyndejte prádlo.
9) Znovu zavřete dvířka.
10) Suchýma rukama odpojte zástrčku ze sítě.
VLHKÉ PRO
ŽEHLENÍ
VELMI
VLHKÉ
10
SM2165
ÚDRŽBA
VNITŘNÍ OSVĚTLENÍ
Osvětlení se nachází uvnitř.
Při výměně žárovky postupujte následujícím způsobem:
▼ Odpojte zástrčku ze zásuvky elektrického proudu nebo vypněte hlavní vypínač;
▼ Odstraňte pouzdro žárovky;
▼ Vyjměte žárovku (obr. 10) ;
▼ Upozornění: nepoužívejte žárovky silnější než 15 W.!
▼ Znovu namontujte pouzdro žárovky.
(K DISPOZICI PODLE MODELU)
CZ
Page 92

90
VYPRÁZDNĚNÍ NÁDOBKY NA KONDENZOVANOU VODU
V případě, že kondenzovaná voda není připojena přímo k odvodu, shromažďuje se
v nádobce (obr. 11).
Tuto nádobku je třeba po každém cyklu sušení vyprázdnit.
▼ Při vyprazdňování nádobky postupujte následujícím způsobem:
▼ Vyjměte nádobku ze sušičky (obr. 11);
▼ Vyprázdněte nádobku, vyprazdňovací otvor se nachází na horní pravé straně
(obr. 12);
▼ Po vyprázdnění ji znovu zasuňte až dozadu;
▼ Když zapomenete nádobku vyprázdnit nebo když se tato nádobka při sušení
naplní, začne blikat led alarmu vaničky kondenzované vody a sušička se zastaví.
V tomto případě postupujte podle výše uvedeného popisu.
▼ Přerušený program bude moci pokračovat po stisknutí tlačítka (V) resetu alarmu
vaničky (obr.9).
ČIŠTĚNÍ A ÚDRŽBA
Před čištěním odpojte přístroj od přívodu napětí. Přístroj je třeba čistit po každém
praní, čímž se ušetří doba sušení a tedy i energie.
1. Filtr na vlákna ve dvířkách (obr. 13)
2. Filtr na vlákna v plnícím otvoru (obr. 14).
3. Kondenzátor (obr. 15).
▼ Filtr vytáhněte směrem nahoru a poté jej vyčistěte (obr. 13).
ÚDRŽBA
11
12
13
▼ Rovněž je možné vytáhnout a vyčistit dva filtry na vlákna z plnícího otvoru
(obr.14).
POZN. Přítomnost vláken ve filtru nezávisí na sušení. Vlákna pocházejí z
tkanin, které byly při praní poškozeny či roztřepeny nebo k jejichž poškození
došlo opotřebovaností oděvu.
▼ Čištění se provádí jednoduše, a to pod proudem tekoucí teplé vody.
▼ Doporučujeme kondenzátor čistit dvakrát až třikrát za rok (obr. 15/18).
▼ Otevřete dvířka otočením páčky do svislé polohy a odstraňte víko (obr. 15).
CZ
14
15
SM2165
Page 93

16
ÚDRŽBA
ČIŠTĚNÍ A ÚDRŽBA
▼ Otočte tři páčky do svislé polohy a vyjměte kondenzátor (obr. 16).
91
17
18
URČOVÁNÍ ZÁVAD
Na každém elektrickém spotřebiči může dojít k závadě.
Pamatujte, že v případě výskytu závady je třeba zavolat kvalifikovaného technika. Mnohé z problémů,
které se na elektrospotřebiči vyskytnou, budete moci vyřešit sami.
Důležité: Pamatujte, že v případě špatného fungování spotřebiče je třeba jej okamžitě odpojit
od napájecí sítě.
Předtím než se obrátíte na náš technický servis zkontrolujte níže uvedené body.
ŘEŠENÍ PROBLÉMŮ
Jestliže se stroj nespustí
• Zkontrolujte zda:
1) Je provedeno připojení k síťovému napáje-
ní.
2) Zkontrolovat funkčnost zásuvky:
2a) Vypověděly pojistky? (Kontrola je jedno-
duchá, stačí připojit další přístroj jako
například stolní lampu).
2b) Byly dodrženy všechny instrukce uve-
dené v příručce?
Jestliže i po provedení výše popsaných operací nebude přístroj řádně fungovat, závadu ohlaste
nejbližšímu servisnímu středisku.
Vždy uvádějte model, výrobní číslo a druh závady.
Tyto informace umožní servisnímu technikovi zajistit nutné náhradní díly, což zaručí rychlé
a účinné provedení opravy.
▼ Umyjte kondenzátor zepředu, zezadu a bočně
proudem vody, tak jak je uvedeno na obr.
17/18.
Položte kondenzátor na ručník, aby mohl řádně
odkapat.
▼ Až bude kondenzátor dobře osušen, znovu jej
namontujte opačným postupem.
Jestliže se stroj nespustí
• Zkontrolujte zda:
1) Dvířka jsou správně zavřena.
2) Bylo stisknuto tlačítko start.
Prádlo se nesuší
• Zkontrolujte zda:
1) Je možné, že otvor vypouštění vzduchu je
ucpán.
2) Je možné, že filtr je ucpán. (Pamatujte, že
při otevření dvířek mohou být vnitřní části
sušičky i prádlo velmi horké).
SM2165
CZ
Page 94

9292
................................................................................................................................................................
................................................................................................................................................................
................................................................................................................................................................
................................................................................................................................................................
................................................................................................................................................................
................................................................................................................................................................
................................................................................................................................................................
................................................................................................................................................................
................................................................................................................................................................
................................................................................................................................................................
................................................................................................................................................................
................................................................................................................................................................
................................................................................................................................................................
................................................................................................................................................................
................................................................................................................................................................
................................................................................................................................................................
................................................................................................................................................................
................................................................................................................................................................
................................................................................................................................................................
................................................................................................................................................................
................................................................................................................................................................
................................................................................................................................................................
................................................................................................................................................................
................................................................................................................................................................
................................................................................................................................................................
................................................................................................................................................................
................................................................................................................................................................
................................................................................................................................................................
................................................................................................................................................................
................................................................................................................................................................
...................................................................................................................................................................
...................................................................................................................................................................
...................................................................................................................................................................
...................................................................................................................................................................
...................................................................................................................................................................
...................................................................................................................................................................
..................................................................................................................................................................
.................................................................................................................................................................
POZNÁMKY
SM2165
Page 95

SLOVENSKY
Vážený spotrebiteľ,
ďakujeme Vám, že ste si vybrali náš výrobok.
Prosíme Vás, aby ste si návod na používanie spotrebiča pozorne prečítali ešte pred jeho zapojením
a používaním.
Ak budete poznať princípy, zaručí to správne používanie a bezpečné využívanie spotrebiča.
Návod na používanie obsahuje mnohé pokyny týkajúce sa činnosti a okrem toho aj technické podrobnosti spotrebiča, ktoré Vám pomôžu využívať ho optimálnym spôsobom.
V prípade odpredaja, alebo odovzdania sušičky inému spotrebiteľovi, nezabudnite odovzdať novému
majiteľovi aj tento návod na použitie.
93
OBSAH
POZNÁMKY A RADY PRO UŽÍVATEĽA 94-95
• Technická data 94
POPIS SPOTREBIČA 95
• Volitelné příslušenství 95
INSTALACE STROJE 95-97
• Instalace 95
• Vyrovnání sušičky 96
• Připojení k elektrickému systémuo 96
• Seřízení odvodu kondenzované vody ven 96
• Změna otáčení dvířek 97
POUŽITÍ SPOTREBIČA 97-99
• Opatření pro tkaniny 97
• Rady před sušením 97
• Popis ovládacího panelu 98
• Tabulka programů 99
• Jak sušit 99
ÚDRŽBA 99-101
• Vnitřní osvětlení 99
• Vyprázdnění nádobky na kondenzovanou vodu 100
• Čištění a údržba 100-101
• Určování závad 101
• Řešení problémů 101
POZNÁMKY A RADY PRE UŽÍVATEĽA
MODEL:
VÝROBNÉ ČÍSLO:
DÁTUM PREDAJA:
SM2165
...................................................................................................................................................................................................................
TECHNICKÉ ÚDAJE
...........................................................................................................................................................................................
..........................................................................................................................................................................................
SK
Page 96

94
POZNÁMKY A RADY PRE UŽÍVATEĽA
▼ Tento spotrebič sa používa výhradne na su-
šenie bielizne v domácnosti, každé iné jeho
použitie sa bude považovať za neprimerané a
preto nebezpečné.
▼ Tento návod na použitie uchovávajte vždy v
blízkosti sušičky, aby ste doň mohli v prípade
potreby rýchlo nahliadnuť.
▼ Akákoľvek zmena alebo pokus o manipuláciu
so spotrebičom môžu byť nebezpečné a môžu
spôsobiť poškodenie výrobku.
▼ Pri dodávke spotrebiča skontrolujte, či sa pri
preprave nepoškodil. Ak by ste zistili poškodenia, obráťte sa okamžite na predajcu.
▼ Sušičku neprikrývajte bielizňou, ani inými
materiálmi.
▼ Pri umiestňovaní spotrebiča zabezpečte, aby
napájací elektrický kábel nebol zalomený,
stlačený a aby bol v prípade nevyhnutných
zásahov prístupný.
▼ Po používaní spotrebiča vždy zatvorte dvere.
▼ Takto zamedzíte tomu, že sa deti budú opierať
o dvierka, čím by mohli spôsobiť prevrhnutie
sušičky.
▼ Je zakázané používanie spotrebiča deťmi bez
dozoru.
▼ V sušičke nesušte špinavú bielizeň.
▼ Nikdy nesušte odevy špinavé od látok ako
kuchynský olej, nafta, acetón, alkohol, benzín, kerosén, odstraňovače škvŕn, terpentín,
vosky.
▼ Odevy zašpinené uvedenými látkami pred
sušením v šušičke najprv vyperte v teplej vode
s prídavkom pracieho prostriedku.
▼ V sušičke nikdy nesušte odevy z penovej gumy,
latexu, nepriepustné odevy, gumené koberce,
ani odevy a vankúše s časťami z penovej gumy,
pretože by sa mohli rozpustiť a poškodiť iné
odevy alebo dokonca aj spotrebič.
▼ Avivážne prostriedky a podobné produkty treba
používať v súlade s pokynmi na používanie
uvedenými na ich obale
▼ Ak spotrebič predáte alebo darujete, nezabud-
nite odovzdať novému majiteľovi aj tento návod
na používanie, čo mu umožní používať sušičku
správnym a bezpečným spôsobom.
▼ Nepokúšajte sa opraviť poruchy spotrebiča,
pretože opravy vykonané inými osobami, ako
odborníkmi, môžu spôsobiť vážne poškodenia
a znamenajú stratu nároku na záručné opravy.
▼ Opravy spotrebiča môžu vykonávať výhradne
autorizovaní pracovníci v servisných strediskách. Pri opravách môžu byť použité výhradne
originálne náhradné diely.
▼ Pred vložením do sušičky bielizeň dôkladne
odstreďte alebo vyžmýkajte. Dobre odstredená bielizeň sa vysuší rýchlejšie.
▼ Pri každom použití sušičky dobre vyčistite
filter, aby sa zabezpečilo dokonalé prúdenie
vzduchu.
▼ Nezapájajte, ani nevyťahujte zástrčku elek-
trickej siete mokrými rukami.
▼ Spotrebič musí byť zapojený do elektrickej
zásuvky s uzemnením, ktorá vyhovuje bezpečnostným normám.
▼ Je zakázané zapájať spotrebič k elektrickej-
sieti prostredníctvom predlžovačiek alebo
adaptérov.
▼ Spotrebič nevystavujte atmosferickým vply-
vom.
▼ Pri vykonávaní pravidelných kontrol a pri
čistení spotrebiča ho nezabudnite odpojiť od
elektrickej siete.
▼ V prípade, že chcete spotrebič odpojiť od
elektrickej siete, neťahajte za elektrický kábel,
ale uchopte zástrčku.
▼ Tento spotrebič je označený v súlade s
európskou smernicou 2002/96/ES, Waste
Electrical and Electronic Equipment (WEEE).
Zabezpečením, že bude spotrebič zlikvidovaný správnym spôsobom, spotrebiteľ prispieva
k predchádzaniu potenciálnych negatívnych
dopadov na životné prostredie a zdravie.
Symbol na spotrebiči alebo na sprie-
vodných dokumentoch znamená, že s týmto
výrobkom sa nesmie zaobchádzať ako s
mestským odpadom, ale treba ho odovzdať
v určenom zbernom stredisku na recykláciu
elektrických a elektronických zariadení.
Zlikvidujte ho v súlade s miestnymi predpismi
na likvidáciu odpadov.
Podrobnejšie informácie o zaobchádzaní,
zbere a recyklácii tohto spotrebiča si vyžiadajte na miestnom úrade, v zbernom stredisku
domácich spotrebičov alebo v obchode, kde
ste spotrebič kúpili.
POZOR!!! Povrchy, na ktorých sa
nachádza tento symbol sa môžu
počas chodu spotrebiča zohriať.
VÝROBCA ODMIETA AKÚKOĽVEK ZODPOVEDNOSŤ ZA PRÍPADNÉ NEHODY
SPÔSOBENÉ NEDODRŽIAVANÍM BEZPEČNOSTNÝCH PREDPISOV A POKYNOV NA
POUŽÍVANIE
SK
SM2165
Page 97

POPIS SPOTREBIČA
POPIS SPOTREBIČA
1 Dvere bubna.
2 Filter na dverách bubna.
3 Vrchná nádržka na skondenzovanú vodu* (V
prípade, že odtoková rúrka na skondenzovanú vodu nie je priamo zapojená k odpadu,
skondenzovaná voda sa zachytáva v tejto
nádržke).
4 Ovládací panel
5 Bubon sušičky.
*
3
95
6 Filter ústia bubna.
7 Štítok s technickými charakteristikami.
8 Spodná nádržka na skondenzovanú vodu*
9 Nastaviteľné nožičky.
10 Dvierka kondenzátora.
11 Spodné dvierka.
* v závislosti od modelu
42
L
5
6
1
7
*
8
9
1
U vášho predajcu je k dispozícii príslušenstvo, ktorým môžete doplniť sušičku pri rôznej inštalácii, čo Vám
umožní upevniť sušičku nad práčku s predným plnením, čím lepšie využijete priestor. Model spotrebiča,
ktorý vám umožní takúto inštaláciu, vám odporučí váš servisný pracovník a predajca.
10
11
DOPLNKOVÉ PRÍSLUŠENSTVO
INŠTALÁCIA SPOTREBIČA
INŠTALÁCIA
▼ Inštaláciu musí uskutočniť kvalifikovaný pracovník servisu, v súlade s pokynmi
výrobcu, pretože nesprávna inštalácia môže spôsobiť škody na majetku a
poranenia osôb.
▼ Sušičku neumiestňujte na miestach, kde by mohla zamrznúť. Mráz by mohol
spôsobiť poruchy na elektronických zariadeniach.
▼ Sušičku umiestnite v priestore s dobrým vetraním.
▼ Ventilačný otvor na zadnej strane nezakrývajte (obr. 2) a neumiestňujte sušičku
2
SM2165
na koberci s vysokým vlasom.
▼ Vnútro bubna sušičky čistite vlhkou handrou, aby ste odstránili prach, ktorý by
sa tam mohol prípadne usadiť.
SK
Page 98

96
VYROVNANIE SUŠIČKY DO VODOROVNEJ POLOHY
Nastaviteľné nožičky. Sušičku umiestnite do vertikálnej polohy tak, aby pevne stála
na všetkých štyroch nožičkách.
Spotrebič vyrovnajte do vodorovnej polohy podľa nasledovne popísaného postupu
▼ Spotrebič mierne nadvihnite.
▼ Nastavte nožičky do správnej výšky (obr. 3).
▼ Spotrebič mierne spusťte.
Pozn.: Spotrebič, ktorý nie je dokonale vo vodorovnej polohe, môže spôsobiť predčasné poškodenie ložísk a opotrebovanie. Túto sušičku nemusíte
upevňovať k podlahe.
▼ Skontrolujte, či elektrické napätie uvedené na štítku s technickými údajmi na
zadnej strane spotrebiča zodpovedá napätiu v elektrickej sieti.
▼ Bezpečnostný vypínač, elektrické káble a sieťová zásuvka musia mať parametre,
ktoré dovolia maximálny príkon uvedený na horespomínanom štítku.
▼ Po inštalácii musí byť napájanie možné kontrolovať prostredníctvom dvojpólo-
vého vypínača.
▼ Sieťová zásuvka, do ktorej bude spotrebič zapojený, musí byť uzemnená. V
opačnom prípade výrobca odmieta akúkoľvek zodpovednosť za prípadné
nehody (obr. 4).
▼ Ak je elektrický napájací kábel akokoľvek poškodený, zavolajte špecializované
servisné stredisko.
▼ Je zakázané zapojiť sušičku k elektrickej sieti prostredníctvom predlžovačiek
a adaptérov.
▼ Spotrebič umiestnite tak, aby bol napájací kábel ľahko prístupný a aby ste ho
mohli v prípade potreby ľahko odpojiť.
Dôležité upozornenie: Po ukončení cyklu sušenia sušičku odpojte od elektrickej siete, aby ste
zabránili tomu, že by ju mohlo dieťa náhodne zapnúť.
INŠTALÁCIA SPOTREBIČA
ZAPOJENIE K ELEKTRICKEJ SIETI
3
4
REGULÁCIA ODTOKU SKONDENZOVANEJ VODY VON
Skondenzovanú vodu možno zachytávať v nádržke (obr. 10), ale môžete rúrku zapojiť
priamo k odtoku.
V takom prípade sa voda odčerpá čerpadlom.
V prípade, že chcete rúrku so skondenzovanou vodou zapojiť priamo k odtoku,
postupujte nasledovne:
▼ Pred začatím akejkoľvek operácie odpojte spotrebič od elektrickej siete.
▼ Potiahnite hadicu umiestnenú na zadnej strane spotrebiča, aby ste ju vytiahli
z jej miesta (obr. 5/6) a vsuňte ju do odpadu.
SK
5
6
SM2165
Page 99

7
8
INŠTALÁCIA SPOTREBIČA
ZMENA ROTÁCIE DVERÍ
▼ Zatlačte na dvere vpravo (obr. 7) (dvere sa otvoria). Ak boli dvere prevrátené,
zatlačte vľavo.
▼ Je možné zmeniť smer rotácie dverí bubna v závislosti od vlastných potrieb
(obr. 8).
POZN.: Túto operáciu môže vykonať výhradne špecializovaný pracovník.
Zavolajte servisné stredisko.
POUŽÍVANIE SPOTREBIČA
OCHRANNÉ OPATRENIA PRE TKANINY
V prípade, že máte pochybnosti o druhu tkaniny, skontrolujte štítok na odeve.
Na takmer všetkých odevoch, ktoré možno sušiť, je uvedené, že sú vhodné na sušenie v bubnovej
sušičke.
Aby ste predišli tvorbe statickej elektriny na odevoch, počas pláchania v práčke používajte avivážny
prostriedok.
Syntetické odevy vyberte z bubna ihneď, aby ste zabránili ich pokrčeniu.
97
ODPORÚČANIA PRED SUŠENÍM
ROZDELENIE BIELIZNE
Pred sušením bielizne ju treba odstrediť pri rýchlosti
vhodnej pre ten ktorý druh bielizne. Odstredením
bielizne pri maximálnej dovolenej rýchlosti sa ušetrí
až 35% času a energie. Čím bude rýchlejšia rýchlosť
odstreďovania, tým bude sušenie dokonalejšie.
Používanie avivážneho prostriedku umožní lepšie
usušenie a úsporu času. Pred sušením bielizne
v spotrebiči skontrolujte, či je bielizeň vhodná na
mechanické sušenie. Preto skontrolujte symboly
na etikete na odeve.
Ak na etikete symbol sušenia nie je, dodržiavajte
nasledujúce pravidlá:
▼ Biela/farebná bielizeň a bielizeň s protikrčivou
úpravou sa sušia pri normálnej teplote, pri
primerane vhodne vybranom programe.
SM2165
▼ Jemnú bielizeň, napríklad akrylové kusy,
sušte vždy pri nízkych teplotách.
Všeobecné rady:
Úplet sa často zrazí, nielen pri praní, ale aj pri
sušení.
Čistý ľan.
▼ Sušte iba vtedy, ak je to uvedené na etikete
ošetrovania bielizne.
V inom prípade by tkanina mohla zdrsnieť.
▼ Nesušte tmavú farebnú bielizeň spolu so
svetlou bielizňou; zabránite tak zapusteniu
farieb.
SK
Page 100

98
POUŽÍVANIE SPOTREBIČA
POPIS OVLÁDACIEHO PANELA
CT
LS
Ih. Ia. Iv. Ic.
L
CR
LR
P
HA VCU
R
9
P. Gombík programátora slúži na výber želaných
programov v závislosti od druhu tkaniny a osobných
potrieb, poloha STOP slúži okrem toho aj na vypnutie
displeja, ako aj na zrušenie nastavenia spotrebiča.
Ak sa rozhodnete z akéhokoľvek dôvodu zmeniť program
alebo pridať ďalšiu bielizeň, stačí jednoducho otočiť
programátor do polohy STOP, potom nastaviť nový
program a stlačiť tlačidlo ŠTART.
POZN. Pozor!! Odporúčame vám používať túto
funkciu iba v prípade nevyhnutnosti a iba ak
program, ktorý chcete zrušiť, nebol v činnosti
dlhšie ako 3 minúty.
POZN.: Na niektorých modeloch, ak je nastavený
program Delay alebo na konci cyklu, sa osvetlenie pozadia displeja po niekoľkých minútach
vypne. Aby sa znovu rozsvietilo, stačí stlačiť
ktorékoľvek tlačidlo.
S. Tlačidlo Štart stlačením tohto tlačidla začne sušička
nastavený cyklus sušenia.
L
S
. Svetelná kontrolka Štart indikuje polohu „STOP“; Ak
svieti, znamená, že prebieha cyklus sušenia; Ak bliká
rýchlo, znamená nastavený program, ktorý sa má zapnúť;
Pomalé blikanie znamená ukončenie programu.
U. Tlačidlo prepínača sušenia slúži na nastavenie
želaného stupňa vlhkosti pri programoch s elektronickým
ovládaním a na nastavenie času pri manuálnych
programoch.
Nie všetky nastavenia sú k dispozícii pri všetkých
programoch. (pozri: „TABUĽKA PROGRAMOV“)
R
. Ikony programov sušenia s elektronickým ovládaním
L
sú 4, nastavená ikona
bliká, kým ostatné 3 sú stále.
Pri zapnutí cyklu ostane svietiť iba nastavená ikona.
CT. Počítadlo sušenia zobrazuje nastavenú dobu s
krokom 20 minút, až po maximum 2 hodiny a 40 minút
pri programe pre bavlnu a 2 hodiny pre programy na
sušenie syntetiky.
C. Tlačidlo na zrušenie zvukového znamenia vylučuje
SK
S
pípanie, ktoré je ináč vždy aktívne. Nastavenie ostane
v pamäti aj po vypnutí spotrebiča.
Signalizácie:
1 dlhé pípnutie (začiatok cyklu)
4 dlhé pípnutia (ukončenie cyklu)
4 krátke pípnutia (otáčanie bubna pri funkcii proti
pokrčeniu)
V. Tlačidlo znovuzapnutia alarmu nádržky slúži na
opätovné zapnutie cyklu sušenia po vyprázdnení nádržky
na skondenzovanú vodu (obr. 11)
V
. Ak svetelná kontrolka plnej nádržky bliká, znamená
L
to, že nádržka je plná a treba ju vyprázdniť (cyklus sa
zastaví); ak svieti po vložení nádržky znamená to, že
funkcia sa znovu aktivuje; vypnutá znamená navrátenie
bezpečnej činnosti (cyklus sa znovu zapne).
A. Tlačidlo proti pokrčeniu aktivuje funkciu, ktorá po
ukončení cyklu sušenia bielizne vnútri sušičky pokračuje
v otáčaní bubna striedavo oboma smermi počas ďalších
šesťdesiatich minút, čím sa predchádza pokrčeniu.
Každá rotácia je oznámená krátkymi pípnutiami.
H. Tlačidlo funkcie proti pokrčeniu slúži na otáčanie
bielizne v bubne počas čakania na vybratie, čím sa
znižuje pokrčenie bielizne.
lh. la. lc. Ikony zvukového znamenia, funkcie proti
pokrčeniu a odloženia zapnutia zobrazené na displeji
indikujú, že funkcia je aktívna.
R. Tlačidlo odloženia spustenia do chodu umožňuje
odložiť zapnutie sušenia až o maximálne 16 hodín.
Každým jeho stlačením sa odloženie spustenia do chodu
opozdí o jednu hodinu.
Funkcia odloženia sa aktivuje stlačením tlačidl ŠTART,
na displeji sa zobrazí blikajúci symbol h, čo znamená,
že od uvedenej chvíle spotrebič začína odpočítavanie
nastavených hodín, po uplynuví ktorých sa automaticky
zapne cyklus sušenia. V prípade prerušenia dodávky
elektriny počas odloženia sa nastavenie zruší a stlačením
tlačidla ŠTART sa cyklus zapne okamžite.
R
.Počítadlo odloženia štartu zobrazuje nastavenú dobu
C
s krokom jednej hodiny, až po maximum 16 hodín.
SM2165
 Loading...