

Page 1
Table of contents
English
Package contents.................................................................................................................
Description of the phone..................................................................................................
Getting started......................................................................................................................
Mobile data & WiFi connection........................................................................................
Outlook account & Contacts.............................................................................................
Hints & tips with WindowsTM.............................................................................................
Troubleshooting....................................................................................................................
For more information, please consult the FAQs on www.archos.com. Make sure to read
them before considering any product return. As we are often updating and improving
our products, your device’s software may have a slightly dierent appearance or
modied functionality than presented in this Quick Start Guide. Consult the declaration
of conformity on:
http://www.archos.com/gb-en/support/support_tech/downloads.html
ARCHOS 50 Cesium book.indd 1 12/11/2015 11:19:00
2
3
6
10
12
14
16
1
Page 2

Package Contents
Check your product box for the following items:
- ARCHOS 50 Cesium
- Battery
- Headset
- USB cable
- Charger
- Quick start guide
- Warranty Legal & Safety notices
The items supplied with your device and available accessories may vary depending on
your region or service provider. The supplied items are designed only for your device
and may not be compatible with other devices. Unapproved accessories may cause
your device to malfunction.
2
ARCHOS 50 Cesium book.indd 2 12/11/2015 11:19:00
Page 3
3
5
4
1 2
86
7
9
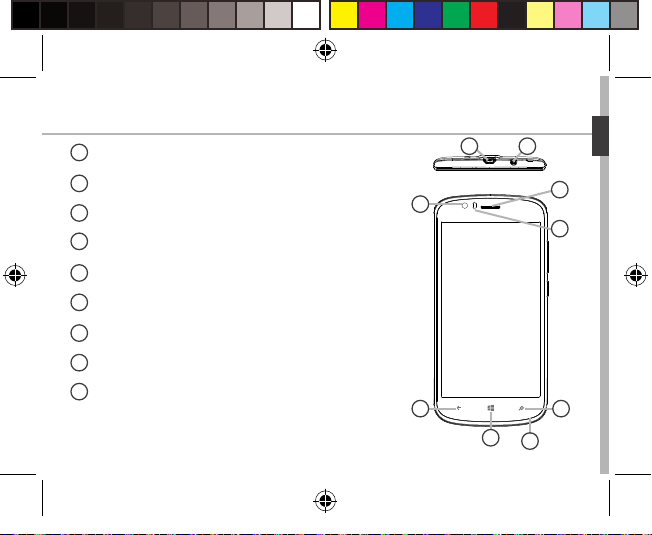
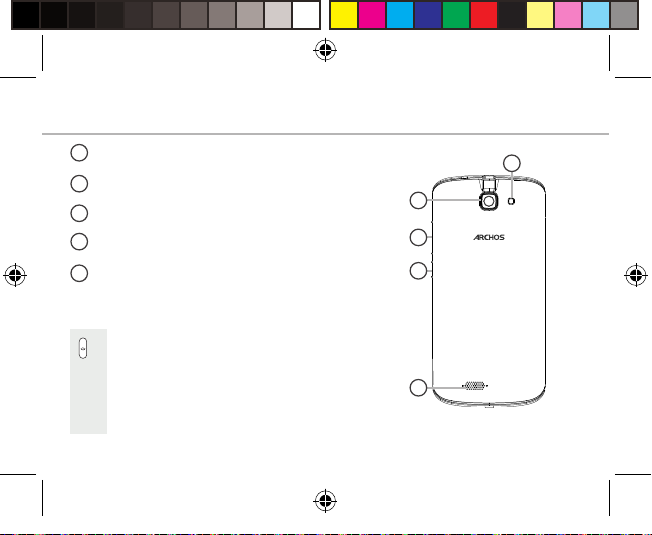
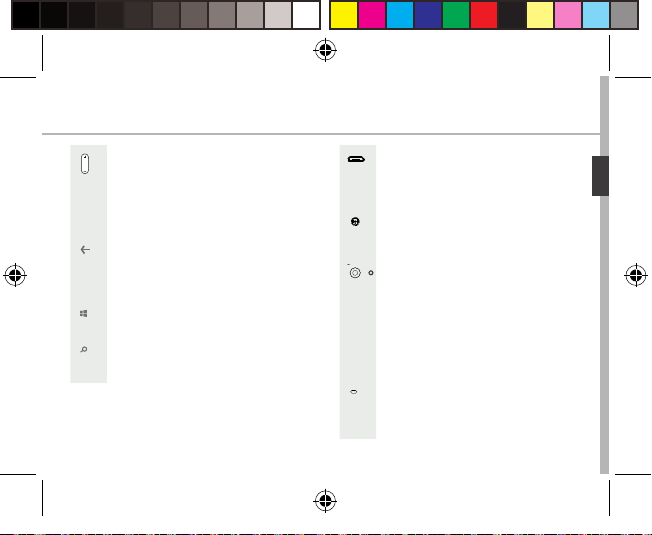
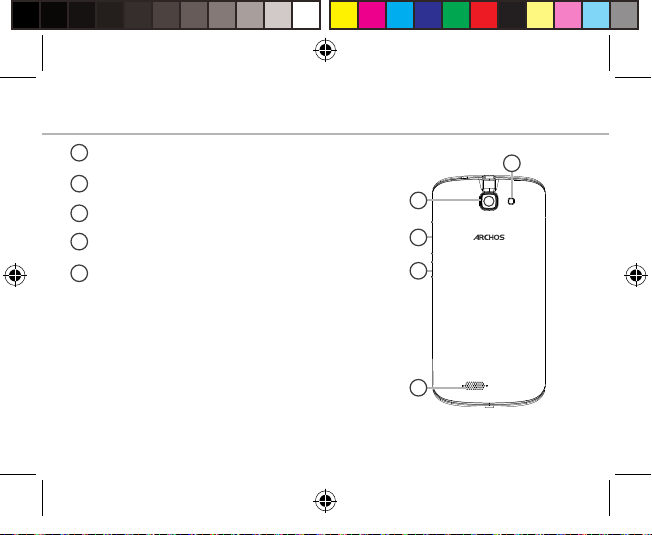
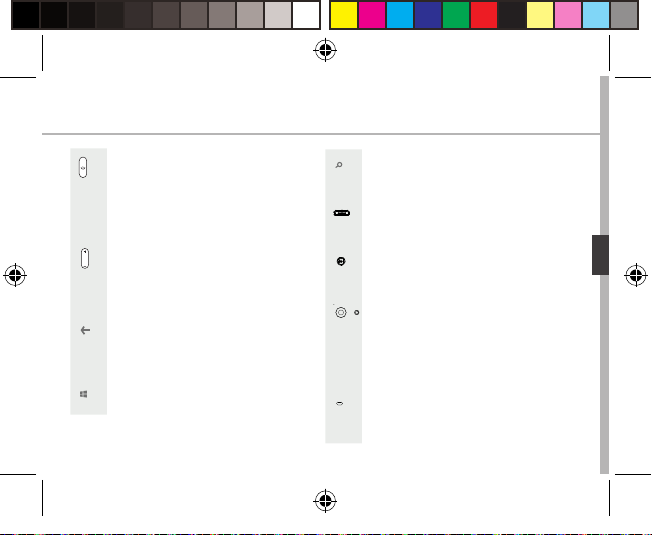
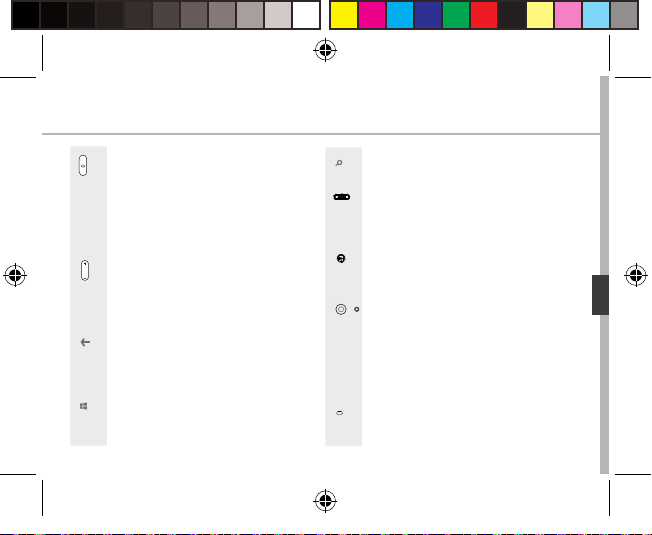
Description of the phone
1
2
3
4
5
6
7
8
9
ARCHOS 50 Cesium book.indd 3 12/11/2015 11:19:01
Micro-USB port
Headset jack
Front camera
Phone speaker
Light sensor
Back button
Start button
Search button
Microphone
English Deutsch Español Italiano Nederlands Português Pусский Polski Magyar
3
Page 4

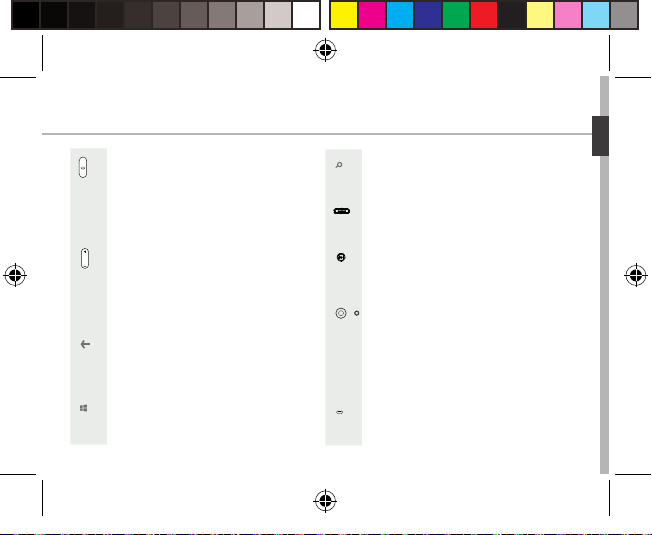
14
10
11
12
13
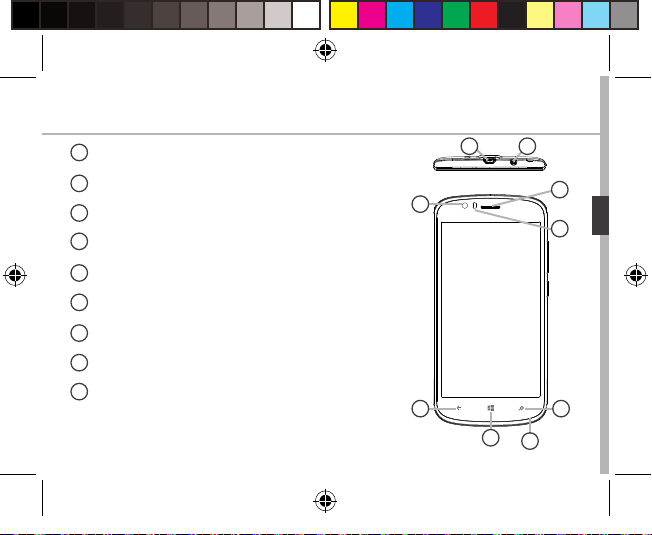
Description of the phone
Camera
10
Flash light
11
Volume buttons
12
ON/OFF button
13
Loudspeaker
14
4
ARCHOS 50 Cesium book.indd 4 12/11/2015 11:19:02
Page 5
English
ARCHOS 50 Cesium book.indd 5 12/11/2015 11:19:03
ON/OFF: when the device is off,
long press to turn on. When the
device is on, short press to turn off
the screen and long press to display
options.
Volume +/-: press +/- to adjust
the volume. When you press
the button, notication options are
displayed. You can select the most
appropriate one.
Back button: return to the previous
screen/ long press to open the list
of recent applications.
Start button: short press to return
to the Home screen.
Search button/Cortana: short press
to access Cortana/the search page.
Micro-USB port: plug the provided
cable to charge the device or to
connect it to a computer.
Headphone jack: connect the
provided earphones to make handfree calls.
Camera & Flash: take pictures or
make movies. To extend movies
duration, insert a micro-SD card.
Activate the ash option in a dark
environment and use it as a torch
through the quick settings.
Light sensor: it turns off the screen
when the device is close to your ear
during a call.
5
Page 6

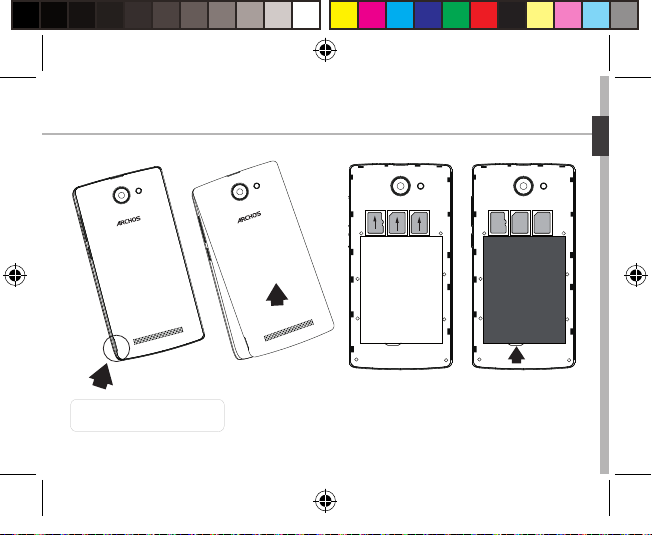
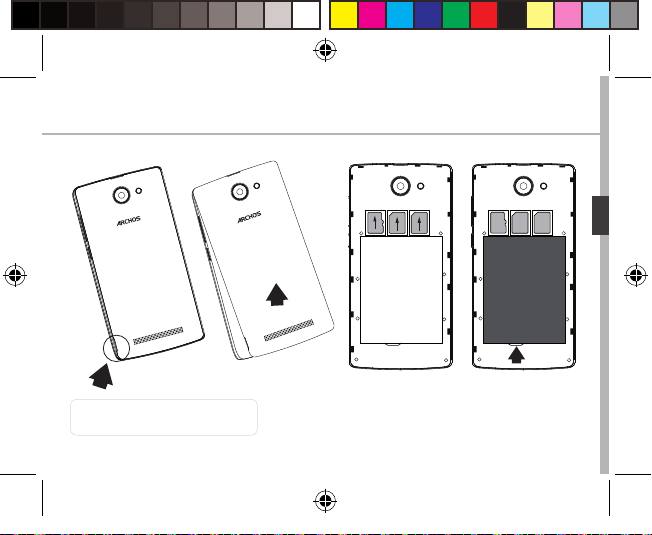
Getting started
Assembling
After you have unpacked your mobile phone box:
1. Remove the device’s back cover using the notch.
2. Insert your SIM card or Memory card in the corresponding slot.
3. Insert the device’s battery.
4. Replace the back cover.
4G/3G slot 1 When inserting your SIM card or
2G slot 2
Micro-SD card (Maximum 32 GB) slot 3
6
ARCHOS 50 Cesium book.indd 6 12/11/2015 11:19:03
micro-SD card, make sure to follow
the illustration, otherwise you may
damage the slot or the card.
Page 7

213
Lift the back cover using
ARCHOS 50 Cesium book.indd 7 12/11/2015 11:19:04
English
the notch
7
Page 8

Getting started
Turning on
1. Plug the charging cable in the Micro-USB port and connect it to its charger.
Before using your device for the rst time, charge its battery completely.
2. Press and hold the ON/OFF button to turn on the device.
The rst time you start up your ARCHOS, the installation wizard will help you
set up your device.
3. Follow the instructions.
If you have inserted a SIM card, you may need to enter a PIN code.
Beware of typing a wrong PIN code.
8
ARCHOS 50 Cesium book.indd 8 12/11/2015 11:19:04
Page 9
3
1
2
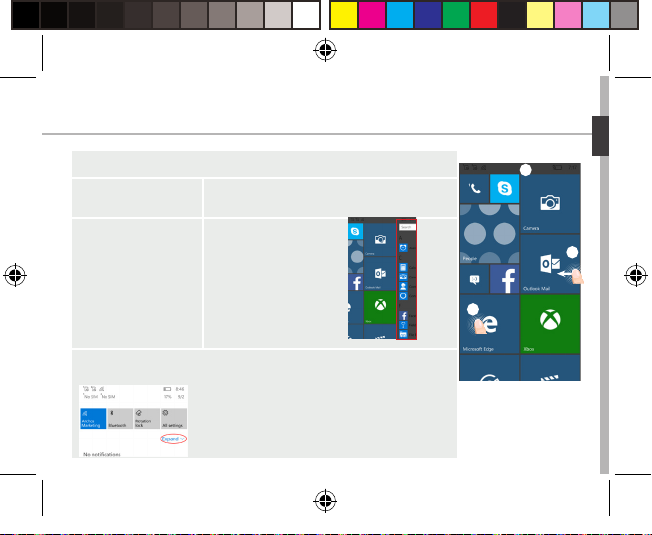
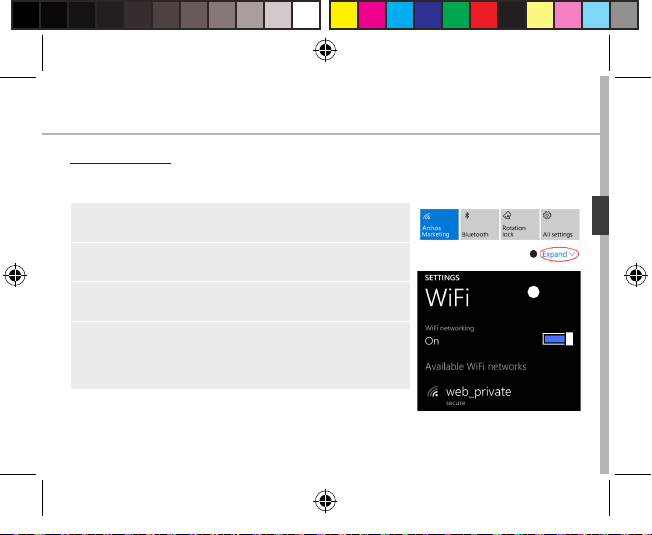
On your homescreen
1. Select a tile to open the corresponding app
2. From the right
side of the screen,
slide your nger to
the left
3. Touch and pull down the status bar to display it. Touch Expand
to reveal more quick settings.
ARCHOS 50 Cesium book.indd 9 12/11/2015 11:19:04
to access all your apps
English
9
Page 10
3
2
4
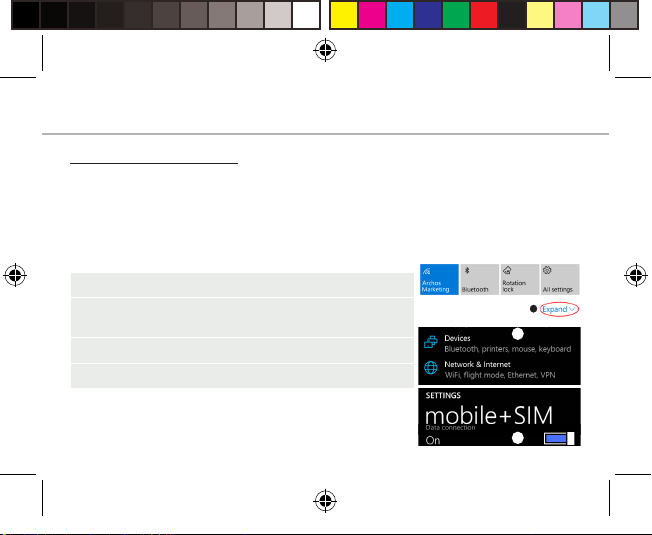
Mobile Data & WiFi connection
Mobile data connection
If your mobile phone subscription includes a mobile data option, you should
be connected to the Internet without any further setup. If you are not
connected, see below how to activate your mobile data. The ARCHOS will
only have signal if you are in an area covered by your provider’s 4G network.
Activating/Deactivating the mobile data
1. Touch and pull down the status bar to display it.
2. Touch Expand to reveal all the quick settings.
Select All Settings.
3. Select Network & Internet, then Cellular & SIM.
4. Slide the Data connection switch to turn on/off.
10
ARCHOS 50 Cesium book.indd 10 12/11/2015 11:19:05
Page 11
2
4
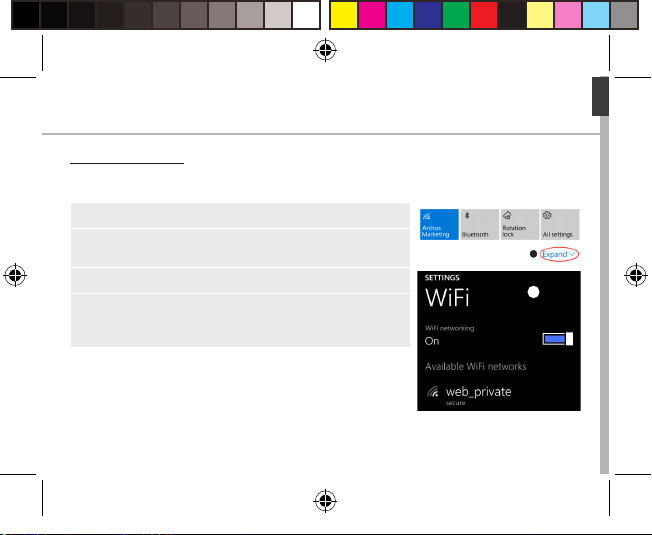
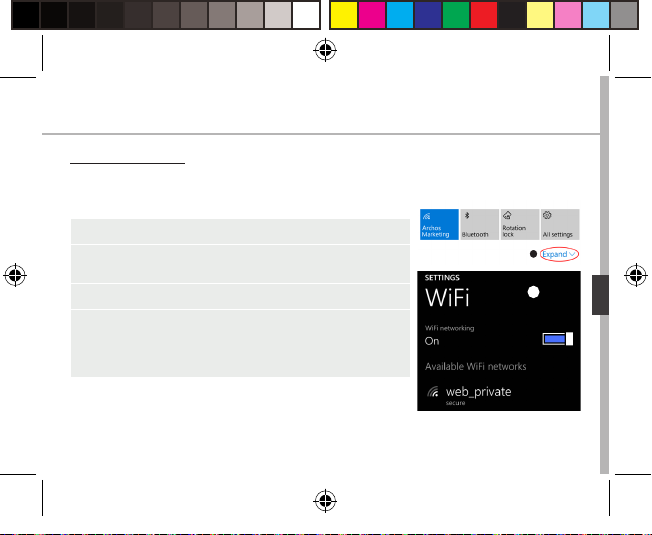
WiFi connection
WARNING: Make sure that you are in a WiFi zone. You can access the WiFi
settings quickly from the status bar.
1. Touch and pull down the status bar to display it.
2. Touch Expand to reveal all the quick settings.
Select WiFi to activate it.
3. Select WiFi a second time to display the WiFi settings.
4. Touch the name of the network you want to connect to.
Private networks will require you to enter a password.
ARCHOS 50 Cesium book.indd 11 12/11/2015 11:19:05
English
11
Page 12
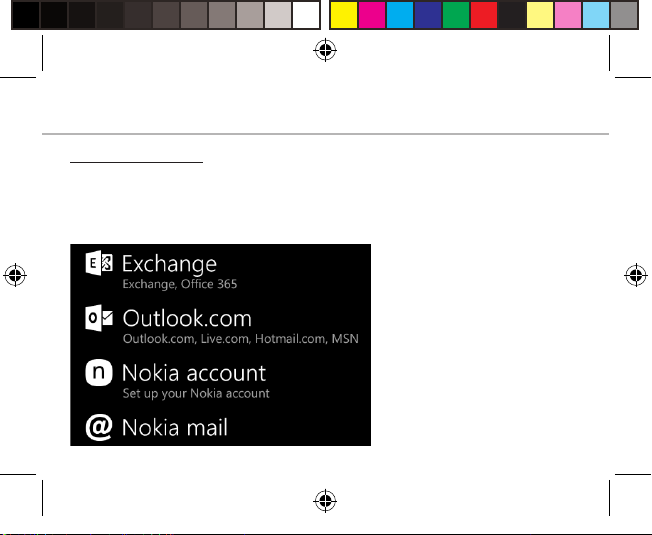
Account & Contacts
Adding an account
1. Go to ‘Settings’ > ‘Accounts’ > ‘Email & accounts’>’add an account’.
2. Select the account type to add.
3. Follow the onscreen instructions to enter information about the account.
12
ARCHOS 50 Cesium book.indd 12 12/11/2015 11:19:05
Page 13
Saving your contacts
When your contacts are saved, they are always available on the web and can
be synced to any Windows phone that’s set up with your account.
1. From Start or All Apps screen, select the People app
2. Tap and then select Settings
3. Select ‘Import from SIM card’. If you have mowre than one SIM card,
select the one you want under Import contacts from.
4. Under Save contacts to, select the account you’d like to store the contacts
in, and then tap Next.
5. To import all of the contacts on your SIM card, tap Import.
6. If you want to select contacts to import individually, tap Clear, select the
contacts you want to import, and then tap Import.
7. Your contacts are then automatically imported into the Microsoft account
set up on your phone. After saving your contacts on your Windows Phone
to a Microsoft account in the Cloud, you’ll be able to keep your contacts
synced between all the places you sign in with that account. And if you make
a change in one place, it’ll show up everywhere else.
ARCHOS 50 Cesium book.indd 13 12/11/2015 11:19:05
English
13
Page 14
Hints & tips for Windows
Making a call:
Make a call in just a few taps. On the Start screen, tap the Phone Tile,
touch the Keypad icon, enter a phone number, then tap Call . To call one
of your contacts, touch the Phone book , then tap Search to nd the
one you want. To call someone back, just tap a name or number in History.
Sending a text: Limber up those thumbs- texting is a doodle on your
Windows Phone. On Start , tap Messaging, then tap New.
Enter a phone number or contact, type your message in the text box,
then tap Send. To reply to a text, just tap the thread with the message that
you want to answer.
Shopping the store:
Browse free and paid apps and games in the Windows Phone Store. Make sure
you’ve signed in to your phone with your Microsoft account. On Start Start ,
tap Store , then do one of the following: Swipe left or right to see top apps,
browse by category and more. Tap Search to nd a specic app or game.
14
ARCHOS 50 Cesium book.indd 14 12/11/2015 11:19:05
TM
Page 15

Finding your apps and pinning them to Start:
Apps you’ve downloaded show up in the the App list. From there, you can
pin your favourites to the Start screen.
Note: You can pin apps, contacts and more to Start to keep them handy.
Locking the touchscreen:
A lock screen password can help keep your phone more secure.
Go to Settings < Lock screen and slide the Password switch to the “ON”
position and then create a password. You can decide to remove this option
at any time by sliding the Password switch to the “OFF”.
ARCHOS 50 Cesium book.indd 15 12/11/2015 11:19:05
English
15
Page 16

Troubleshooting
My phone is frozen or cannot switch on
Check the battery contacts, remove and reinstall your battery, then turn your phone on.
Check the battery power level, charge for at least 20 minutes.
My phone cannot connect to a network or “No service” is displayed
Try connecting in another location. Verify the network coverage with your operator.
Unable to make outgoing calls
Make sure your phone is connected to a network, and the network is not overloaded
or unavailable.
Unable to receive incoming calls
Make sure your phone is switched on and connected to a network (check for overloaded
or unavailable network).
SIM card PIN locked
Contact your network operator to obtain the PUK code (Personal Unblocking Key).
To configure a new 4G network:
On your device, tap Settings.
Select Wireless & networks > More... > Mobile networks.
Select Network settings. In Network operators, select your operator.
In Access Point Names, select the correct access point name and enter the exact
connection parameters provided by your 4G provider.
16
ARCHOS 50 Cesium book.indd 16 12/11/2015 11:19:05
Page 17

Table des matières
Français
Contenu de la boîte..............................................................................................................
Description du téléphone.................................................................................................
Mise en route.........................................................................................................................
Données mobiles et connexion WiFi.............................................................................
Comptes et Contacts...........................................................................................................
Trucs et astuces avec WindowsTM....................................................................................
Dépannage.............................................................................................................................
Pour plus d'informations, veuillez consulter la FAQ sur www.archos.com.
Consultez-les avant d’envisager un éventuel retour du produit. Comme nous mettons
à jour et améliorons régulièrement nos produits, le logiciel de votre appareil peut
présenter une interface ou des fonctionnalités légèrement diérentes de celles décrites
dans ce guide. Consultez la déclaration de conformité sur :
http://www.archos.com/gb-en/support/support_tech/downloads.html
ARCHOS 50 Cesium book.indd 17 12/11/2015 11:19:05
18
19
22
26
28
30
32
17
Page 18

Contenu de la boîte
Vériez que les éléments suivants sont bien dans la boîte :
- ARCHOS 50 Cesium
- Batterie
- Écouteurs
- Câble USB
- Chargeur
- Guide d’utilisation rapide
- Guide des garanties et des mentions légales
Les éléments fournis avec votre appareil de même que les accessoires peuvent varier en
fonction du pays et de votre opérateur télécom. Les éléments fournis sont conçus pour
votre téléphone et ne sont pas obligatoirement compatibles avec d'autres appareils.
Des accessoires non conformes peuvent être la source d’un mauvais fonctionnement.
18
ARCHOS 50 Cesium book.indd 18 12/11/2015 11:19:05
Page 19
3
5
4
1 2
86
7
9
Description du téléphone
1
2
3
4
5
6
7
8
9
ARCHOS 50 Cesium book.indd 19 12/11/2015 11:19:05
Port Micro-USB
Prise écouteurs
Caméra frontale
Haut-parleur du téléphone
Capteur de lumière
Bouton retour
Bouton de démarrage
Bouton de recherche
Microphone
Français
19
Page 20

14
10
11
12
13
Description du téléphone
Caméra
10
Flash
11
Boutons de volume
12
Bouton MARCHE/ARRET
13
Haut-parleur
14
20
ARCHOS 50 Cesium book.indd 20 12/11/2015 11:19:05
Page 21
Français
ARCHOS 50 Cesium book.indd 21 12/11/2015 11:19:07
MARCHE/ARRET : si l'appareil est
éteint, maintenez le bouton enfoncé
pour le démarrer. Si l'appareil est
allumé, effectuez une pression brève
pour éteindre l'écran, une longue
pour afcher les options.
Volume +/- : appuyez sur +/- pour
ajuster le volume. Quand vous
appuyez sur le bouton, les options
de notication sont afchées.
Vous pouvez choisir celle qui vous
convient le mieux.
Bouton de retour : revient à l'écran
précédent ; une pression longue
ouvre la liste des applications
récentes.
Bouton de démarrage : une pression
brève pour revenir à l'écran d'accueil.
Bouton de recherche/Cortana :
une pression brève pour accéder à
Cortana/à la page de recherche.
Port micro-USB : branchez le câble
fourni pour recharger l'appareil ou
pour le connecter à un ordinateur.
Prise écouteurs : branchez les
écouteurs fournis pour passer des
appels mains libres.
Caméra et ash : prenez des photos
et enregistrez des vidéos. Pour
augmenter la durée de vos lms,
insérez une carte micro-SD. Activez
le ash pour les ambiances sombres
et utilisez-le comme lampe torche
via les actions rapides.
Capteur de lumière : il éteint l'écran
quand votre appareil est collé à votre
oreille durant un appel.
21
Page 22
Mise en route
Montage
Une fois votre téléphone mobile déballé :
1. Retirez la coque de votre appareil au moyen de l'encoche.
2. Insérez votre carte SIM ou votre carte mémoire dans l'emplacement prévu
à cet eet.
3. Insérez la batterie de l'appareil.
4. Remettez la coque de l'appareil.
4G/3G emplacement 1 Lorsque vous insérez votre carte
2G emplacement 2
Carte micro-SD
(32 Go maximum)
22
ARCHOS 50 Cesium book.indd 22 12/11/2015 11:19:07
emplacement 3
SIM ou micro-SD, suivez bien
les indications de l'illustration
au risque d'endommager
l'emplacement ou la carte.
Page 23
213
ARCHOS 50 Cesium book.indd 23 12/11/2015 11:19:07
Retirez la coque au
moyen de l'encoche.
Français
23
Page 24

Mise en route
Allumage
1. Branchez le câble de recharge sur le port micro-USB et connectez-le au chargeur.
Avant la première utilisation de l‘appareil, rechargez complètement sa batterie.
2. Appuyez sur le bouton MARCHE/ARRÊT et maintenez-le enfoncé pour
allumer votre appareil.
Lors de la première utilisation de votre ARCHOS, l’assistant d’installation vous
aidera à congurer votre appareil.
3. Suivez les instructions.
Si vous avez inséré une carte SIM, un code PIN peut vous être demandé.
Faites attention à rentrer le bon code.
24
ARCHOS 50 Cesium book.indd 24 12/11/2015 11:19:07
Page 25
3
1
2
Sur votre écran d'accueil
1. Sélectionnez
une tuile
2. Depuis le côté
droit de l'écran,
faites glisser votre
doigt vers la gauche
pour ouvrir l'application correspondante.
pour accéder
à toutes les applications
Français
3. Touchez et tirez la barre d'état vers le bas pour l'afcher.
Touchez Développer pour afcher plus de réglages.
ARCHOS 50 Cesium book.indd 25 12/11/2015 11:19:07
25
Page 26

3
2
4
Données mobiles et connexion WiFi
Connexion données mobiles
Si votre abonnement téléphonique inclut l'option données mobiles,
vous devriez pouvoir vous connecter à Internet sans autres réglages.
Si vous n'êtes pas connecté, suivez les instructions ci-dessous pour activer
les données mobiles. L'ARCHOS ne reconnaîtra de signal que s'il est dans
une zone de couverture 4G de votre opérateur.
Activer/Désactiver les données mobiles
1. Touchez et tirez la barre d'état vers le bas pour l'afcher.
2. Touchez Expand (Développer) pour afcher toutes
les actions rapides. Sélectionnez Tous les paramètres.
3. Sélectionnez Réseau et Internet puis Réseau cellulaire
et SIM.
4. Faites glisser l'interrupteur pour activer/désactiver
la Connexion de données.
26
ARCHOS 50 Cesium book.indd 26 12/11/2015 11:19:07
Page 27

2
4
Connexion WiFi
ATTENTION: Vériez que vous êtes bien dans une zone WiFi.
Vous pouvez accéder rapidement aux paramètres WiFi depuis la barre d'état.
1. Touchez et tirez la barre d'état vers le bas pour l'afcher.
2. Touchez Expand (Développer) pour afcher toutes
les actions rapides. Sélectionnez l'option WiFi pour l'activer.
3. Sélectionnez une nouvelle fois WiFi pour afcher
les réglages possibles.
4. Touchez le réseau auquel vous souhaitez vous connecter.
Les réseaux privés nécessitent un mot de passe.
ARCHOS 50 Cesium book.indd 27 12/11/2015 11:19:07
Français
27
Page 28

Comptes et contacts
Ajouter un compte
1. Allez sur ‘Paramètres’ > ‘Comptes’ > ‘Email et compte’>’Ajouter un compte’.
2. Sélectionnez le type de compte que vous souhaitez ajouter.
3. Suivez les instructions à l'écran pour complèter les informations du compte.
28
ARCHOS 50 Cesium book.indd 28 12/11/2015 11:19:07
Enregistrez vos contacts
Une fois vos contacts
enregistrés, ils sont toujours
disponibles sur Internet et
peuvent être synchronisés
avec n'importe quel
téléphone Windows Phone
sur lequel votre compte
a été paramétré.
Page 29

1. Depuis l'écran d'accueil ou celui de la Liste d'applications,
sélectionnez l'application Contacts.
2. Touchez et sélectionnez ensuite Paramètres
3. Sélectionnez "Importer de la carte SIM". Si vous avez plusieurs cartes SIM,
sélectionnez celle que vous souhaitez utiliser sous Importer les contacts de.
4. Sous Enregistrer les contacts dans, sélectionnez le compte dans lequel
vous souhaitez stocker les contacts, puis appuyez sur Suivant.
5. Pour importer tous les contacts gurant sur votre carte SIM,
appuyez sur Importer.
6. Si vous voulez sélectionner certains contacts pour les importer
individuellement, appuyez sur Eacer, sélectionnez les contacts à importer,
puis appuyez sur Importer.
7. Vos contacts sont alors automatiquement importés dans le compte
Microsoft paramétré sur votre téléphone. Lorsque vous enregistrez les contacts
de votre Windows Phone sur un compte Microsoft dans le cloud, ils peuvent
être synchronisés sur tous les appareils sur lesquels vous vous connectez
avec ce compte. Et si vous eectuez une modication à un endroit,
elle apparaîtra partout ailleurs.
ARCHOS 50 Cesium book.indd 29 12/11/2015 11:19:07
Français
29
Page 30
Trucs et astuces avec Windows
Passer un appel :
Passez un appel en quelques gestes. Sur l'écran d'accueil, appuyez sur
la tuile Téléphone, puis sur l'icône Clavier. Entrez un numéro de téléphone
et appuyez sur Appeler . Pour appeler un de vos contacts, appuyez sur
Répertoire , puis sur Rechercher pour trouver la personne que
vous voulez. Pour rappeler quelqu'un, il vous sut d'appuyer sur son nom
ou sur son numéro dans l'Historique.
Envoyer un message :
Échauez vos pouces : la rédaction d'un SMS se fait en un clin d'œil sur votre
Windows Phone. Sur l'écran d'accueil , appuyez sur Message, puis sur Nouveau.
Entrez un numéro de téléphone ou un contact, tapez votre message,
puis appuyez sur Envoyer. Pour répondre à un message, appuyez sur
la conversation contenant le SMS que vous avez reçu.
Faire son shopping sur le Windows Phone Store :
Vous pouvez découvrir des jeux et des apps, gratuits ou payants, dans le
Windows Phone Store. Assurez-vous d'être connecté avec un compte Microsoft
30
ARCHOS 50 Cesium book.indd 30 12/11/2015 11:19:07
TM
Page 31

sur votre appareil. Sur l'écran d'accueil , appuyez sur Store et eectuez
une des actions suivantes : faites glisser l'écran vers la droite ou la gauche pour
découvrir les meilleures applications, naviguer par catégorie et bien plus encore.
Appuyez sur Rechercher pour trouver une application ou un jeu spécique.
Trouver ses applications et les épingler sur l'écran d'accueil :
Les apps que vous avez téléchargées apparaissent dans la liste d'applications.
A partir de là, vous pouvez épingler vos préférées sur l'écran d'accueil.
Remarque: Vous pouvez épingler pratiquement tout ce que vous voulez
(apps, contacts...) sur l'écran d'accueil pour plus de confort.
Verrouiller l'écran tactile :
Un mot de passe pour débloquer l'écran de verrouillage est une sécurité
supplémentaire pour votre téléphone.
Allez dans Paramètres > Écran de verrouillage, activez l'option mot de passe
en faisant glisser le curseur de l'interrupteur et créez ensuite votre mot
de passe. Vous pouvez décider à tout moment d'enlever cette sécurité
en basculant l'interrupteur sur la position inverse.
ARCHOS 50 Cesium book.indd 31 12/11/2015 11:19:07
Français
31
Page 32

Dépannage
Mon téléphone est bloqué et je ne réussis pas à l'allumer.
Vérifiez les contacts de la batterie. Sortez et replacez votre batterie et rallumez votre
téléphone. Vérifiez la charge de la batterie. Rechargez-la durant au moins 20 minutes.
Mon téléphone se connecte à aucun réseau ou le message "pas de signal" s'affiche.
Déplacez-vous et essayez de vous connecter depuis un autre endroit.
Vérifiez la couverture réseau de votre opérateur.
Impossible de passer des appels
Assurez-vous que votre téléphone soit connecté à un réseau et que ce dernier
soit disponible et pas surchargé.
Impossible de recevoir des appels
Vérifiez que votre téléphone est bien allumé et connecté à un réseau.
Assurez-vous que ce réseau est bien disponible et pas trop surchargé.
Code de la carte SIM bloqué
Contactez votre opérateur pour obtenir le code PUK (code de déblocage personnel).
Pour configurer un nouveau réseau 4G :
Sur votre appareil, appuyez sur Paramètres.
Sélectionnez Sans Fil & Réseaux > Plus... > Réseaux mobiles.
Sélectionnez Paramètres réseau Dans Opérateurs réseau, sélectionnez votre opérateur.
Dans APN (Access Point Names), sélectionnez le point d'accès de votre choix et entrez
exactement les paramètres de connexion stipulés par votre opérateur 4G.
32
ARCHOS 50 Cesium book.indd 32 12/11/2015 11:19:07
Page 33

Inhaltsverzeichnis
Verpackungsinhalt...............................................................................................................
Beschreibung des Telefons...............................................................................................
Erste Schritte..........................................................................................................................
Mobildaten & WLAN-Verbindung...................................................................................
Outlook-Konten & Kontakte.............................................................................................
Hinweise & Tipps für WindowsTM.....................................................................................
Fehlerbehebung...................................................................................................................
Weitere Informationen nden Sie in den FAQs auf www.archos.com.
Vor einer Rückgabe des Produkts diese unbedingt durchlesen. Da unsere Produkte
kontinuierlich aktualisiert und weiterentwickelt werden, kann die Software
Ihres Gerätes in Erscheinung und Funktionalität geringfügige Abweichungen
zu den Darstellungen in dieser Schnellstartanleitung aufweisen. Konsultieren Sie
die Konformitätserklärung unter:
http://www.archos.com/gb-en/support/support_tech/downloads.html
ARCHOS 50 Cesium book.indd 33 12/11/2015 11:19:07
33
34
35
38
42
44
46
48
Deutsch
Page 34

Verpackungsinhalt
In der Verpackung müssen folgende Elemente enthalten sein:
- ARCHOS 50 Cesium
- Akku
- Headset
- USB-Kabel
- Ladegerät
- Schnellbedienungsanleitung
- Garantie,- Rechts- und Sicherheitshinweise
Die mit Ihrem Gerät mitgelieferten Elemente und das verfügbare Zubehör können
je nach Region oder Dienstleister abweichen. Die mitgelieferten Elemente wurden
ausschließlich für Ihr Gerät entwickelt und sind mit anderen Geräten nicht kompatibel.
Nicht genehmigtes Zubehör kann zu einer Fehlfunktion Ihres Geräts führen.
34
ARCHOS 50 Cesium book.indd 34 12/11/2015 11:19:07
Page 35

3
5
4
1 2
86
7
9
Beschreibung des Telefons
1
2
3
4
5
6
7
8
9
ARCHOS 50 Cesium book.indd 35 12/11/2015 11:19:07
Micro-USB-Anschluss
Kopfhöreranschluss
Frontkamera
Telefonlautsprecher
Lichtsensor
Back (Zurück)-Taste
Start-Taste
Suchen-Taste
Mikrofon
Deutsch
35
Page 36
14
10
11
12
13
Beschreibung des Telefons
10
11
12
13
14
36
ARCHOS 50 Cesium book.indd 36 12/11/2015 11:19:08
Kamera
Taschenlampe
Lautstärketasten
EIN/AUS-Taste
Lautsprecher
EIN/AUS: Bei ausgeschaltetem
Gerät lang drücken, um es
einzuschalten. Bei eingeschaltetem
Gerät kurz drücken, um den
Bildschirm auszuschalten,
lang drücken, um die Optionen
anzuzeigen.
Page 37
ARCHOS 50 Cesium book.indd 37 12/11/2015 11:19:09
Drücken Sie auf Lautstärke +/-,
um die Lautstärke einzustellen.
Sobald Sie die Taste drücken,
werden die Benachrichtigungsoptionen
angezeigt. Wählen Sie die
entsprechende Option aus.
Zurück-Taste: zurück zum
vorherigen Bildschirm/lang drücken,
um die Liste der zuletzt verwendeten
Apps zu öffnen.
Start-Taste: kurz drücken, um zum
Startbildschirm zurückzukehren.
Suchen-Taste /Cortana: Kurz
drücken, um auf Cortana/die
Suchen-Seite zuzugreifen.
Micro-USB-Anschluss: Das
mitgelieferte Kabel einstecken,
um das Gerät zu laden oder um es
mit einem Computer zu verbinden.
Kopfhöreranschluss: Anschluss
des mitgelieferten Kopfhörers für
Anrufe mit Freisprechfunktion.
Kamera & Blitz: Aufnahme von
Bildern oder Filmen. Für längere
Filmaufnahmen eine micro-SDKarte einstecken. Aktivieren Sie
in einer dunklen Umgebung die
Blitzoption und verwenden Sie das
Gerät über die Schnelleinstellungen
als Taschenlampe.
Lichtsensor: Schaltet den Bildschirm
ab, sobald sich das Gerät während
eines Anrufs nahe an Ihrem Ohr
bendet.
Deutsch
37
Page 38
Erste Schritte
Montage
Nach dem Auspacken des Mobiltelefons:
1. Heben Sie die Rückabdeckung des Geräts mithilfe der Einkerbung an.
2. Stecken Sie Ihre SIM-Karte oder Speicherkarte in den entsprechenden
Steckplatz ein.
3. Legen Sie den Akku des Geräts ein.
4. Bringen Sie die Rückabdeckung wieder an.
4G/3G Steckplatz 1 Beachten Sie beim Einführen der
2G Steckplatz 2
Micro-SD-Karte
(maximal 32 GB)
38
ARCHOS 50 Cesium book.indd 38 12/11/2015 11:19:09
Steckplatz 3
SIM-Karte oder micro-SD-Karte
unbedingt die Illustration,
der Steckplatz oder die Karte
könnten sonst beschädigt werden.
Page 39

213
ARCHOS 50 Cesium book.indd 39 12/11/2015 11:19:09
Heben Sie die Rückabdeckung
mithilfe der Einkerbung an
Deutsch
39
Page 40

Erste Schritte
Einschalten
1. Stecken Sie das Ladekabel in den Micro-USB-Anschluss und verbinden Sie
es mit dem Ladegerät.
Vor der erstmaligen Verwendung des Geräts muss der Akku vollständig
aufgeladen werden.
2. Drücken und halten Sie die EIN/AUS-Taste, um das Gerät einzuschalten.
Beim ersten Einschalten des ARCHOS wird Sie der Installationsassistent bei
der Konguration Ihres Geräts unterstützen.
3. Folgen Sie den Anweisungen.
Haben Sie eine SIM-Karte eingesteckt, muss unter Umständen ein PIN-Code
eingegeben werden.
Geben Sie unbedingt die richtige PIN-Nummer ein.
40
ARCHOS 50 Cesium book.indd 40 12/11/2015 11:19:09
Page 41

3
1
2
Auf Ihrem Startbildschirm
1. Wählen Sie eine
Kachel
2. Schieben
Sie rechts im
Bildschirm Ihren
Finger nach links
um die entsprechende App zu öffnen
für den Zugriff auf Ihre Apps
Deutsch
3. Die Statusleiste berühren und nach unten ziehen,
um diese anzuzeigen. Tippen Sie auf Erweitern,
um die Schnelleinstellungen zu öffnen.
ARCHOS 50 Cesium book.indd 41 12/11/2015 11:19:10
41
Page 42

3
2
4
Mobildaten & WLAN-Verbindung
Mobildatenverbindung
Beinhaltet Ihr Mobilfunkvertrag eine Mobildatenoption, sollte ohne weitere
Einrichtung eine Verbindung zum Internet hergestellt werden. Besteht keine
Verbindung, siehe unten für die Aktivierung Ihrer Mobildaten. Beachten Sie,
dass der ARCHOS nur dann ein Signal erhält, wenn Sie sich im Bereich
des 4G-Netzwerks Ihres Anbieters benden.
Aktivierung/Deaktivierung der Mobildaten
1. Die Statusleiste berühren und nach unten ziehen,
um diese anzuzeigen.
2. Tippen Sie auf Erweitern, um die Schnelleinstellungen
zu öffnen. Wählen Sie 'Alle Einstellungen'.
3. Wählen Sie Netzwerk & Internet, dann Telefon & SIM.
4. Schieben Sie den Schalter 'Datenverbindung' auf Ein/Aus.
42
ARCHOS 50 Cesium book.indd 42 12/11/2015 11:19:10
Page 43

2
4
WLAN-Verbindung
VORSICHT! Überprüfen Sie, ob Sie sich in einer WLAN-Zone benden. Über
die Statusleiste kann schnell auf die WLAN-Einstellungen zugegrien werden.
1. Die Statusleiste berühren und nach unten ziehen,
um diese anzuzeigen.
2. Tippen Sie auf 'Erweitern', um die Schnelleinstellungen
zu öffnen. Wählen Sie WLAN zur Aktivierung.
3. Wählen Sie ein zweites Mal WLAN, um die WLANEinstellungen anzuzeigen.
4. Tippen Sie auf den Namen des Netzwerks, mit dem
eine Verbindung hergestellt werden soll. Bei privaten
Netzwerken muss ein Passwort eingegeben werden.
ARCHOS 50 Cesium book.indd 43 12/11/2015 11:19:10
Deutsch
43
Page 44

Konto & Kontakte
Konto hinzufügen
1. Gehen Sie zu ‘Settings’ > ‘Accounts’ > ‘Email & accounts’>’add an account’
('Einstellungen' > 'Konten' > 'E-Mail & Konten' > 'Konto hinzufügen').
2. Wählen Sie den hinzuzufügenden Kontotyp.
3. Folgen Sie den Anweisungen auf dem Bildschirm und geben Sie die
Informationen für das Konto ein.
44
ARCHOS 50 Cesium book.indd 44 12/11/2015 11:19:10
Speicherung Ihrer Kontakte
Ihre Kontakte sind nach der
Speicherung im Web immer
verfügbar und können mit
jedem Windows-Telefon
synchronisiert werden,
das mit dem gleichen Konto
eingerichtet ist.
1. Im Startbildschirm
oder im Bildschirm Apps
wählen Sie People app
(Kontakte-App)
Page 45

2. Tippen Sie auf und wählen Sie Settings (Einstellungen)
3. Wählen Sie ‘Import from SIM card (Von SIM-Karte importieren’.
Besitzen Sie mehr als eine SIM-Karte, wählen Sie die jeweilige Karte unter
'Import contacts from (Kontakte importieren von)' aus.
4. Unter Save contacts to (Kontakte speichern unter) wählen Sie das
Konto aus, in dem die Kontakte gespeichert werden sollen und tippen auf
Next (Weiter).
5. Um alle Kontakte auf Ihre SIM-Karte zu importieren, tippen Sie auf Import
(Importieren).
6. Sollen Kontakte einzeln importiert werden, tippen Sie auf Clear (Löschen),
wählen die zu importierenden Kontakte aus und tippen dann auf 'Import
(Importieren)'.
7. Ihre Kontakte werden dann automatisch in das auf Ihrem Telefon
eingerichtete Microsoft-Konto importiert. Nach der Speicherung Ihrer
Kontakte auf Ihrem Windows-Telefon in einem Microsoft-Konto in der Cloud
können Ihre Kontakte zwischen allen Programmen synchronisiert werden,
an denen Sie sich mit diesem Konto anmelden. Und nehmen Sie in einem
Programm Änderungen vor, werden diese auch an anderen Stellen angezeigt.
ARCHOS 50 Cesium book.indd 45 12/11/2015 11:19:10
Deutsch
45
Page 46

Hinweise & Tipps für Windows
Anrufen:
Tätigen Sie einen Anruf mit nur wenigen Handbewegungen. Tippen Sie im
Startbildschirm auf das Telefonsymbol, dann auf das Tastatursymbol,
geben Sie die Telefonnummer ein und tippen Sie dann auf Call (Anrufen)
. Um einen der Kontakte anzurufen, tippen Sie auf das Telefonbuch und
dann auf 'Search (Suchen)' , um so den gewünschten Kontakt zu suchen.
Um jemanden zurückzurufen, tippen Sie einfach auf entsprechende Namen
oder Nummern im Verlauf.
Text senden: Lockern Sie Ihre Daumen - das Senden von Textnachrichten
wird mit Ihrem Windows-Telefon zum Kinderspiel. Im Startbildschirm
tippen Sie auf Messaging (Nachrichten) und tippen dann auf New (Neu).
Geben Sie die Telefonnummer oder den Kontakt ein, tippen Sie dann die
Nachricht in das Textfeld und tippen Sie auf Send (Senden). Um auf einen
Text zu antworten, tippen Sie einfach auf die Aktivität mit der Nachricht,
die Sie beantworten möchten.
Einkaufen im Store:
Kostenlose Apps und Bezahl-Apps nden Sie im Windows Phone Store.
46
ARCHOS 50 Cesium book.indd 46 12/11/2015 11:19:10
TM
Page 47

Melden Sie sich mit Ihrem Microsoft-Konto bei Ihrem Telefon an.
Im Startbildschirm tippen Sie auf Store und haben dann folgende
Auswahlmöglichkeiten: Wischen Sie nach links oder rechts für die Anzeige
der Top-Apps, Durchsuchen nach Kategorie und vieles mehr. Tippen Sie
auf Search (Suchen), um bestimmte Apps oder Spiele zu nden.
Suchen von Apps und Verknüpfung auf dem Startbildschirm:
Von Ihnen heruntergeladene Apps werden in der App-Liste angezeigt.
Von hier aus kann eine Verknüpfung Ihrer Favoriten auf dem Startbildschirm
erstellt werden.
Hinweis: Es können Verknüpfungen von Apps, Kontakten und Anderen auf
dem Startbildschirm erstellt werden, um diese so immer gribereit zu haben.
Sperren des Touchscreens:
Durch die Erstellung eines Bildschirmpassworts kann Ihr Telefon gesichert werden.
Gehen Sie zu Settings > Lock screen (Einstellungen > Bildschirm sperren),
schieben Sie den Passwortschalter in die Position “ON (EIN)” und erstellen Sie
ein Passwort. Die Option kann durch das Schieben des Passwortschalters
auf "OFF" jederzeit entfernt werden.
ARCHOS 50 Cesium book.indd 47 12/11/2015 11:19:10
Deutsch
47
Page 48

Fehlerbehebung
Mein Telefon ist abgestürzt oder es kann nicht eingeschaltet werden
Die Akkukontakte überprüfen, den Akku herausnehmen und wieder einlegen und das Telefon
einschalten. Den Ladezustand des Akkus überprüfen und mindestens 20 Minuten aufladen.
Mein Telefon kann nicht mit einem Netzwerk verbinden oder es wird "Kein Dienst" angezeigt
Testen Sie das Gerät an einem anderen Standort. Überprüfen Sie die Netzwerkabdeckung
Ihres Anbieters.
Keine ausgehenden Anrufe möglich
Überprüfen Sie die Verbindung Telefon - Netzwerk und ob das Netzwerk überlastet oder
nicht verfügbar ist.
Eingehende Anrufe können nicht empfangen werden
Überprüfen Sie, ob das Telefon eingeschaltet und mit einem Netzwerk verbunden und
ob das Netzwerk überlastet oder nicht verfügbar ist.
PIN der SIM-Karte gesperrt
Wenden Sie sich an Ihren Netzwerkbetreiber, um den PUK-Code zu erhalten (Personal Unblocking Key).
Konfiguration eines neuen 4G-Netzwerks:
Tippen Sie im Gerät auf 'Einstellungen'.
Wählen Sie Wireless & networks > More... (Drahtlos & Netzwerke > Mehr...) > Mobilnetzwerke.
Wählen Sie 'Netzwerkeinstellungen'. Wählen Sie unter 'Netzwerkanbieter' Ihren Anbieter aus.
Unter Access Point-Namen wählen Sie den korrekten Namen des Access Points aus und geben
exakt die von Ihrem 4G-Anbieter zur Verfügung gestellten Verbindungsparameter ein.
48
ARCHOS 50 Cesium book.indd 48 12/11/2015 11:19:10
Page 49
Índice
Contenido de la caja...........................................................................................................
Descripción del teléfono...................................................................................................
Primeros pasos......................................................................................................................
Datos móviles y conexión WiFi........................................................................................
Cuenta y contactos...............................................................................................................
Trucos y consejos con WindowsTM..................................................................................
Resolución de problemas..................................................................................................
Para más información, consulte la sección de preguntas y respuestas en www.archos.com.
Examínela detenidamente antes de pensar en realizar cualquier devolución.
Al estar actualizando y mejorando constantemente nuestros productos, la apariencia
o el software de su dispositivo pueden variar ligeramente con respecto a lo descrito
en esta Guía Rápida de Inicio. Consulte la declaración de conformidad en:
http://www.archos.com/gb-en/support/support_tech/downloads.html
ARCHOS 50 Cesium book.indd 49 12/11/2015 11:19:10
49
50
51
54
58
60
62
64
Español
Page 50

Contenido de la caja
Compruebe que en la caja se incluyan los siguientes artículos:
- ARCHOS 50 Cesium
- Batería
- Auriculares
- cable USB
- Cargador
- Guía rápida de inicio
- Garantía legal y aviso de seguridad
Los artículos suministrados con el dispositivo y los accesorios disponibles pueden variar
dependiendo del país o del proveedor de servicios. Los artículos suministrados han sido
diseñados sólo para su dispositivo y pueden no ser compatibles con otros productos.
La utilización de accesorios no homologados puede provocar un funcionamiento
incorrecto del dispositivo.
50
ARCHOS 50 Cesium book.indd 50 12/11/2015 11:19:10
Page 51
3
5
4
1 2
86
7
9
Descripción del teléfono
1
2
3
4
5
6
7
8
9
ARCHOS 50 Cesium book.indd 51 12/11/2015 11:19:10
Puerto micro USB
Toma de auriculares
Cámara frontal
Altavoz del teléfono
Sensor de luz
Botón Atrás
Botón Inicio
Botón Buscar
Micrófono
Español
51
Page 52

14
10
11
12
13
Descripción del teléfono
Cámara
10
Flash
11
Botones de volumen
12
Botón encender/apagar
13
Altavoz
14
52
ARCHOS 50 Cesium book.indd 52 12/11/2015 11:19:10
Page 53

ARCHOS 50 Cesium book.indd 53 12/11/2015 11:19:12
ON/OFF: con el dispositivo
apagado, mantenga pulsado para
encenderlo. Con el dispositivo
encendido: pulse brevemente para
desactivar la pantalla y mantenga
pulsado para mostrar las opciones.
Volumen +/-: pulse +/- para ajustar
el volumen. Pulse el botón para
mostrar las opciones de noticación.
Seleccione la más apropiada.
Botón Atrás: vuelve a la pantalla
anterior/ pulsación larga para abrir
la lista de aplicaciones recientes.
Botón Inicio: pulsación corta para
volver a la pantalla principal.
Botón Buscar/Cortana: pulsación
corta para acceder a Cortana/página
de búsqueda.
Puerto micro USB: enchufe el cable
suministrado para cargar el dispositivo
o conectarlo a un ordenador.
Toma de auriculares: conecte
los auriculares suministrados para
hacer llamadas con manos libres.
Cámara y ash: para hacer fotos
o vídeos. Inserte una tarjeta micro
SD para aumentar la duración de
los vídeos. Active la opción ash en
entornos con poca luz o utilícela como
linterna a través de los ajustes rápidos.
Sensor de luz: desactiva la pantalla
cuando acerca el dispositivo a
la oreja durante una llamada.
Español
53
Page 54
Primeros pasos
Montaje
Una vez el teléfono móvil fuera de su caja:
1. Retire la cubierta posterior del dispositivo utilizando la muesca.
2. Inserte su tarjeta SIM o tarjeta de memoria en la ranura correspondiente.
3. Inserte la batería del dispositivo.
4. Vuelva a colocar la cubierta posterior.
4G/3G ranura 1 Al insertar una tarjeta SIM o
2G ranura 2
tarjeta micro-SD (máximo 32 GB) ranura 3
54
ARCHOS 50 Cesium book.indd 54 12/11/2015 11:19:12
una tarjeta micro SD, asegúrese de
hacerlo conforme a la ilustración,
de lo contrario podría dañar la ranura
o la tarjeta.
Page 55
213
Levante la cubierta posterior
ARCHOS 50 Cesium book.indd 55 12/11/2015 11:19:12
Español
utilizando la muesca
55
Page 56

Primeros pasos
Encendido
1. Enchufe el cable de carga al puerto micro USB y conéctelo al cargador.
Antes de utilizar el dispositivo por primera vez, cargue completamente la batería.
2. Mantenga pulsado el botón ON/OFF para encender el dispositivo.
La primera vez que encienda el ARCHOS, el asistente de instalación
le ayudará a congurar su dispositivo.
3. Siga las instrucciones.
Si ha introducido una tarjeta SIM, deberá teclear el código PIN.
Tenga cuidado de no introducir un código PIN incorrecto.
56
ARCHOS 50 Cesium book.indd 56 12/11/2015 11:19:12
Page 57

3
1
2
En la pantalla principal
1. Seleccione
una ventana
2. Desde el lateral
derecho de
la pantalla,
deslice un dedo
hacia la izquierda
para abrir la aplicación correspondiente
para acceder
a todas las aplicaciones
Español
3. Toque y arrastre hacia abajo la barra de estado para mostrarla.
Toque Expandir para mostrar más ajustes rápidos.
ARCHOS 50 Cesium book.indd 57 12/11/2015 11:19:12
57
Page 58

3
2
4
Datos móviles y conexión WiFi
Conexión de datos móviles
Si su contrato de telefonía móvil incluye la opción de datos móviles,
debería poder conectarse a Internet sin ninguna otra conguración
adicional. Si no está conectado, siga leyendo para saber cómo activar
los datos móviles. El ARCHOS sólo recibirá la señal si se encuentra en
un área cubierta por su proveedor de telefonía 4G.
Activación y desactivación de los datos móviles
1. Toque y arrastre hacia abajo la barra de estado
para mostrarla.
2. Toque Expandir para mostrar todos los ajustes rápidos.
Seleccione Toda la conguración
3. Seleccione Red móvil y SIM.
4. Deslice el interruptor de Conexión de datos
para activarlo o desactivarlo.
58
ARCHOS 50 Cesium book.indd 58 12/11/2015 11:19:12
Page 59
2
4
Conexión WiFi
ADVERTENCIA: Asegúrese de que se encuentra en una zona con cobertura
WiFi. Puede acceder rápidamente a los ajustes WiFi desde la barra de estado.
1. Toque y arrastre hacia abajo la barra de estado
para mostrarla.
2. Toque Expandir para mostrar todos los ajustes rápidos.
Seleccione WiFi para activarla.
3. Seleccione WiFi una segunda vez para mostrar
la conguración WiFi.
4. Toque el nombre de la red a la que se desee conectar.
Las redes privadas requieren la introducción de
una contraseña.
ARCHOS 50 Cesium book.indd 59 12/11/2015 11:19:12
Español
59
Page 60

Cuenta y contactos
Adición de una cuenta
1. Vaya a "Conguración" > "Correo y cuentas" > "Agregar una cuenta".
2. Seleccione el tipo de cuenta que desea añadir.
3. Siga las instrucciones en pantalla para introducir los datos de la cuenta.
60
ARCHOS 50 Cesium book.indd 60 12/11/2015 11:19:12
Page 61

Guardar contactos
Si tiene los contactos guardados, siempre podrá acceder a ellos en la web y
sincronizarlos con cualquier Windows phone que esté congurado en su cuenta.
1. Desde la pantalla de inicio o aplicaciones, seleccione la app Contactos
2. Toque y luego seleccione Conguración
3. Seleccione "Importar desde SIM". Si tiene más de una tarjeta SIM,
seleccione la que quiera utilizar en Importar desde.
4. En Guardar en, seleccione la cuenta en la que desee guardar los contactos,
y luego toque en Siguiente.
5. Para importar todos los contactos de su tarjeta SIM, pulse en Importar.
6. Para importar determinados contactos de forma individual, pulse en Borrar,
seleccione los contactos que desee importar y luego pulse en Importar.
7. Los contactos se importarán automáticamente a la cuenta de Microsoft
congurada en su teléfono. Tras haber guardado sus contactos de Windows
Phone en una cuenta Microsoft en la Nube, podrá mantener sus contactos
sincronizados entre todos los dispositivos a los que se conecte con esa
cuenta. De tal forma que si realiza algún cambio en un lugar, éste aparecerá
en todos los demás dispositivos.
ARCHOS 50 Cesium book.indd 61 12/11/2015 11:19:12
Español
61
Page 62

Trucos y consejos con Windows
Hacer una llamada:
Bastan unas cuantas pulsaciones para hacer una llamada. En la pantalla
de inicio, toque la ventana de teléfono, pulse el icono de teclado, introduzca
un número de teléfono y luego toque en Llamar . Para llamar a uno de
sus contactos, toque en la Agenda de teléfonos y luego pulse en Buscar
pulsar un nombre o un número en el historial de llamadas.
Enviar un mensaje de texto:
Escribir con los pulgares en un Windows Phone es un juego de niños.
En Inicio , pulse en Mensajes y luego en Nuevo.
Introduzca un número de teléfono o un contacto, teclee el mensaje en
el cuadro de texto, y luego pulse Enviar. Para responder a un mensaje de
texto, toque en el hilo del mensaje al que quiera responder.
Comprar en la tienda:
Explore las aplicaciones y juegos gratuitos y de pago de la Windows Phone Store.
Asegúrese de haber iniciado sesión en el teléfono con su cuenta de Microsoft.
62
ARCHOS 50 Cesium book.indd 62 12/11/2015 11:19:13
TM
para localizar el número deseado. Para devolver una llamada, basta con
Page 63

En Inicio , pulse en Tienda y luego realice algo de lo siguiente:
Desplace el dedo a la izqda. o dcha. para ver las principales aplicaciones,
navegar por categorías, etc. Toque en Buscar para localizar una aplicación o
un juego especíco.
Localización de apps y anclaje a la pantalla de Inicio:
Las aplicaciones descargadas aparecen en la lista de aplicaciones.. Desde ahí,
puede anclar sus favoritos a la pantalla de Inicio.
Nota: Puede anclar aplicaciones, contactos y más cosas al Inicio para tenerlos
más a mano.
Bloquear la pantalla táctil:
Una contraseña de pantalla de bloqueo puede ayudarle a que su móvil sea
más seguro.
Vaya a Conguración > Pantalla de bloqueo, deslice el control de contraseña
a su posición de activado “ON” y luego cree una contraseña. Puede desactivar
esta opción en cualquier momento deslizando el control de contraseña a
su posición de “OFF”.
ARCHOS 50 Cesium book.indd 63 12/11/2015 11:19:13
Español
63
Page 64

Resolución de problemas
Mi teléfono está colgado o no enciende
Compruebe los contactos de la batería, extraiga y vuelva a colocar la batería, y luego encienda
el teléfono. Compruebe el nivel de carga de la batería. Cárguela durante al menos 20 minutos.
Mi teléfono no puede conectarse a la red o me indica que no hay ningún servicio disponible
Pruebe a conectarse desde otro lugar. Verifique la cobertura de red con su operador.
No puedo hacer llamadas
Asegúrese de que el teléfono esté conectado a una red, y que la red no esté saturada o indisponible.
No puedo recibir llamadas
Compruebe que el teléfono esté encendido y conectado a una red (asegúrese de que la red
no esté saturada o indisponible).
PIN de tarjeta SIM bloqueado
Póngase en contacto con su operador de red para obtener el código PUK
(clave de desbloqueo personal).
Para configurar una nueva red 4G:
En su dispositivo, pulse Configuración.
Seleccione Conexiones inalámbricas y redes > Más... > Redes móviles.
En la configuración de su red móvil, seleccione su operador de telefonía.
En Nombres de puntos de acceso, seleccione el punto de acceso correcto e introduzca
los parámetros de conexión exactos proporcionados por su proveedor 4G.
64
ARCHOS 50 Cesium book.indd 64 12/11/2015 11:19:13
Page 65

Sommario
Contenuto della confezione.............................................................................................
Descrizione del telefono....................................................................................................
Introduzione...........................................................................................................................
Connessione dati e Wi-Fi....................................................................................................
Account e Contatti................................................................................................................
Consigli e suggerimenti per WindowsTM......................................................................
Risoluzione dei problemi...................................................................................................
Per ulteriori informazioni, consultare la sezione FAQ su www.archos.com.
Leggerla attentamente prima di decidere di eettuare un reso. Poiché aggiorniamo e
miglioriamo con frequenza i nostri prodotti, il software del dispositivo potrebbe avere
un aspetto leggermente dierente o funzionalità modicate rispetto a quelle mostrate
nella presente Guida rapida. Consultare la dichiarazione di conformità sul sito web:
http://www.archos.com/gb-en/support/support_tech/downloads.html
ARCHOS 50 Cesium book.indd 65 12/11/2015 11:19:13
65
66
67
70
74
76
78
80
Italiano
Page 66

Contenuto della confezione
Verica la presenza dei seguenti articoli all'interno della confezione:
- ARCHOS 50 Cesium
- Batteria
- Auricolari
- Cavo USB
- Caricabatterie
- Guida rapida
- Garanzia: Informazioni legali e sulla sicurezza
Gli articoli forniti con il dispositivo e gli accessori a disposizione possono variare in
base alla regione o al fornitore del servizio. Tali articoli sono progettati solo per questo
dispositivo e potrebbero non essere compatibili con altri dispositivi. Gli accessori non
approvati possono causare il malfunzionamento del dispositivo.
66
ARCHOS 50 Cesium book.indd 66 12/11/2015 11:19:13
Page 67

3
5
4
1 2
86
7
9
Descrizione del telefono
1
2
3
4
5
6
7
8
9
ARCHOS 50 Cesium book.indd 67 12/11/2015 11:19:13
Porta micro-USB
Jack per auricolari
Fotocamera anteriore
Altoparlante
Sensore di luminosità
Pulsante Indietro
Pulsante Start
Pulsante Cerca
Microfono
Italiano
67
Page 68
14
10
11
12
13
Descrizione del telefono
Fotocamera
10
Flash
11
Pulsanti Volume
12
Pulsante ON/OFF
13
Altoparlante
14
68
ARCHOS 50 Cesium book.indd 68 12/11/2015 11:19:13
Page 69
ARCHOS 50 Cesium book.indd 69 12/11/2015 11:19:14
ON/OFF: quando il dispositivo
è spento, premere a lungo per
accenderlo. Quando il dispositivo
è acceso, premere brevemente per
spegnere lo schermo e premere a
lungo per visualizzare le opzioni.
Volume +/-: premere +/- per
regolare il volume. Premendo il
pulsante, verranno visualizzate le
opzioni di notica e sarà possibile
selezionare la più appropriata.
Pulsante Indietro: per tornare
alla schermata precedente/premere
a lungo per aprile l'elenco
delle applicazioni recenti.
Pulsante Start: premere brevemente
per tornare alla schermata principale.
Pulsante Cerca/Cortana: premere
brevemente per accedere a Cortana/
alla pagina di ricerca.
Porta micro-USB: collegare il cavo in
dotazione per caricare il dispositivo o
per connetterlo al computer.
Jack per auricolari: collegare
gli auricolari in dotazione per
effettuare chiamate in viva voce.
Fotocamera e ash: per scattare foto
o registrare video. Per aumentare
la durata dei video, inserire una
scheda micro-SD. Attivare il ash
in ambienti bui e utilizzarlo come
torcia tramite le impostazioni rapide.
Sensore di luce: oscura lo schermo
quando il dispositivo si trova vicino
all'orecchio durante una chiamata.
Italiano
69
Page 70
Introduzione
Assemblaggio
Dopo aver tolto dalla confezione il telefono cellulare:
1. Rimuovere la copertura posteriore del dispositivo utilizzando il foro.
2. Inserire la scheda SIM o la scheda di memoria nello slot corrispondente.
3. Inserire la batteria nel dispositivo.
4. Riposizionare la copertura posteriore.
4G/3G slot 1 Quando si inserisce la scheda SIM
2G slot 2
Scheda micro-SD (massimo 32 GB) slot 3
70
ARCHOS 50 Cesium book.indd 70 12/11/2015 11:19:15
o la scheda micro-SD, attenersi
a quanto illustrato per evitare di
danneggiare lo slot o la scheda.
Page 71
213
Sollevare la copertura
ARCHOS 50 Cesium book.indd 71 12/11/2015 11:19:15
Italiano
posteriore dal foro
71
Page 72

Introduzione
Accensione
1. Inserire il cavo di ricarica nella porta micro-USB e collegarlo al caricabatterie.
Prima di utilizzare il dispositivo per la prima volta, caricare completamente
la batteria.
2. Tenere premuto il pulsante ON/OFF per accendere il dispositivo.
Alla prima accensione di ARCHOS, l'installazione guidata supporterà l'utente
nella congurazione del dispositivo.
3. Seguire le istruzioni.
Se l'utente ha inserito una scheda SIM, potrebbe essere richiesto un codice PIN.
Inserire con attenzione il codice PIN.
72
ARCHOS 50 Cesium book.indd 72 12/11/2015 11:19:15
Page 73

3
1
2
Schermata iniziale
1. Seleziona
un riquadro
2. Far scorrere il dito
dall'estremità destra
dello schermo verso
sinistra
per aprire l'app corrispondente
per accedere
a tutte le applicazioni
Italiano
3. Toccare e trascinare verso il basso la barra di stato per
visualizzarla. Toccare "Expand" [Espandi] per visualizzare altre
impostazioni rapide.
ARCHOS 50 Cesium book.indd 73 12/11/2015 11:19:15
73
Page 74

3
2
4
Connessione dati e Wi-Fi
Connessione dati
Se il piano tariario del telefono cellulare include l'opzione della
connessione dati, è possibile connettersi a Internet senza ulteriori
congurazioni. In caso contrario, vedere di seguito come attivare la propria
connessione dati. Il dispositivo ARCHOS mostrerà il segnale solo se l'utente
si trova in un'area coperta dalla rete 4G dell'operatore telefonico.
Attivazione/Disattivazione della connessione dati
1. Toccare e trascinare verso il basso la barra di stato
per visualizzarla.
2. Toccare "Expand" [Espandi] per visualizzare tutte
le impostazioni rapide. Selezionare "All Setting"
[Tutte le impostazioni].
3. Selezionare "Network & Internet" [Rete e Internet],
poi "Cellular & SIM" [Cellulare e SIM].
4. Scorrere il dito per attivare/disattivare l'opzione
"Data connection" [Connessione dati].
74
ARCHOS 50 Cesium book.indd 74 12/11/2015 11:19:15
Page 75

2
4
Connessione WiFi
AVVERTENZA: assicurarsi di essere in una zona Wi-Fi. È possibile accedere
rapidamente alle impostazioni Wi-Fi dalla barra di stato.
1. Toccare e tirare verso il basso la barra di stato
per visualizzarla.
2. Toccare "Expand" [Espandi] per visualizzare tutte
le impostazioni rapide. Selezionare "WiFi" per attivarlo.
3. Selezionare nuovamente "WiFi" per visualizzarne
le impostazioni.
4. Toccare il nome della rete a cui l'utente desidera connettersi.
Le reti private richiedono una password.
ARCHOS 50 Cesium book.indd 75 12/11/2015 11:19:15
Italiano
75
Page 76

Account e Contatti
Aggiunta di un account
1. Andare in "Settings" [Impostazioni]> "Accounts" > "Email & accounts"
[E-mail e account]> "Add an account" [Aggiungi un account].
2. Selezionare il tipo di account da aggiungere.
3. Seguire le istruzioni sullo schermo per inserire le informazioni relative
all'account.
76
ARCHOS 50 Cesium book.indd 76 12/11/2015 11:19:15
Page 77

Salvataggio dei contatti
I contatti, una volta salvati, saranno sempre disponibili sul Web e potranno essere
sincronizzati a qualsiasi telefono Windows congurato con il proprio account.
1. Dalla schermata Star t o "Tutte le app", selezionare l'app People [app Contatti].
2. Toccare e selezionare "Settings" [Impostazioni].
3. Selezionare "Import from SIM card" [Importa da scheda SIM]. Se si
possiede più di una scheda SIM, selezionare quella desiderata in "Import
contacts from" [Importa contatti da].
4. In "Save contacts to" [Salva contatti in] selezionare l'account in cui si
desidera memorizzare i contatti, quindi toccare "Next" [Avanti].
5. Per importare tutti i contatti sulla scheda SIM, toccare "Import" [Importa].
6. Se si desidera selezionare uno a uno i contatti da importare, toccare "Clear"
[Cancella], selezionare i contatti da importare, quindi "Import" [Importa].
7. I contatti verranno automaticamente importati sull'account Microsoft
congurato sul proprio telefono. Dopo aver salvato i contatti del Windows
Phone su un account Microsoft nel Cloud, sarà possibile sincronizzarli
con tutti i dispositivi collegati a quell'account. Le modiche apportate
da un dispositivo verranno visualizzate su tutti i dispositivi.
ARCHOS 50 Cesium book.indd 77 12/11/2015 11:19:15
Italiano
77
Page 78

Consigli e suggerimenti per Windows
Eettuare una chiamata:
È possibile eettuare una chiamata in pochissimi passaggi. Sulla schermata
Start, toccare il riquadro Telefono, poi l'icona del tastierino, quindi digitare
il numero di telefono e chiamare col tasto . Per chiamare uno dei propri
contatti, toccare la rubrica e il pulsante di ricerca per trovare il nome
desiderato. Per richiamare qualcuno, basta toccare un nome o un numero
nella cronologia.
Inviare un SMS:
Inviare messaggi è semplicissimo con Windows Phone. Nella schermata Start ,
toccare "Messaging" [Messaggi], quindi "New" [Nuovo].
Inserire un numero di telefono o un contatto, digitare il messaggio nella casella
di testo e toccare "Send" [Invia]. Per rispondere a un messaggio, basta toccare
la conversazione con il messaggio a cui si desidera rispondere.
Acquistare nello store:
Nel Windows Phone Store sono presenti applicazioni e giochi gratuiti e
a pagamento. Assicurarsi di aver eettuato l'accesso all'account Microsoft
78
ARCHOS 50 Cesium book.indd 78 12/11/2015 11:19:15
TM
Page 79

con il proprio telefono. Sulla schermata Start , toccare Store ,
quindi procedere con una delle seguenti azioni: Scorrere verso destra
o sinistra per vedere le applicazioni più popolari, cercare per categoria e
molto altro. Toccare "Search" [Cerca] per trovare un'app o un gioco specico.
Trovare app e aggiungerle a Start:
Le app scaricate vengono visualizzate nell'elenco delle app, da cui è possibile
aggiungere le tue preferite alla schermata Start.
Nota: è possibile aggiungere a Start applicazioni, contatti e molto altro
per averli sempre a portata di mano.
Bloccare il touchscreen:
Una password per la schermata di blocco aiuta a proteggere le informazioni
contenute nel telefono.
Andare in "Settings" [Impostazioni] > "Lock screen" [Schermata di blocco]
e attivare l'opzione della password, quindi creare una password. Si può
rimuovere questa opzione in qualsiasi momento disattivandola.
ARCHOS 50 Cesium book.indd 79 12/11/2015 11:19:15
Italiano
79
Page 80

Risoluzione dei problemi
Il telefono è bloccato o non si accende
Verificare i contatti della batteria, rimuovere e reinserire la batteria, quindi accendere il telefono.
Controllare il livello di carica della batteria, ricaricarla per almeno 20 minuti.
Il telefono non si connette alla rete o compare "No service" (Nessun servizio)
Provare a connettersi in un'altra posizione. Verificare la copertura di rete con il proprio operatore.
Impossibile effettuare chiamate
Assicurarsi che il telefono sia connesso a una rete e che la rete non sia sovraccarica o non disponibile.
Impossibile ricevere chiamate
Assicurarsi che il telefono sia acceso e connesso a una rete (controllare che la rete non sia
sovraccarica o non disponibile).
PIN della scheda SIM bloccato
Contattare il proprio operatore telefonico per ottenere il codice PUK (Personal Unblocking Key).
Per configurare una nuova rete 4G:
Sul dispositivo, toccare "Settings" [Impostazioni].
Selezionare "Wireless & networks" [Wireless e reti] > "More..." [Altro...] > "Mobile networks"
[Reti di telefonia mobile].
Selezionare "Network settings" [Impostazioni di rete]. In "Network operators" [Operatori di
rete], selezionare il proprio operatore.
In "Access Point Names" [Nomi del punto di accesso], selezionare il nome del punto di accesso
corretto e inserire i parametri esatti di connessione forniti dal provider 4G.
80
ARCHOS 50 Cesium book.indd 80 12/11/2015 11:19:15
Page 81

Inhoud
Inhoud van de verpakking...............................................................................................
Beschrijving van de telefoon...........................................................................................
Aan de slag.............................................................................................................................
Mobiele data & WiFi-verbinding.....................................................................................
Account & Contacten...........................................................................................................
Tips voor WindowsTM............................................................................................................
Probleemoplossing.............................................................................................................
Raadpleeg voor meer informatie de veelgestelde vragen (FAQ's) op www.archos.com.
Lees eerst de antwoorden op deze vragen voordat u het product terugstuurt.
Aangezien wij onze producten regelmatig updaten en verbeteren, kunnen de
afbeeldingen en/of de functies van uw apparaatsoftware afwijken van de software
in deze Verkorte handleiding. Raadpleeg de conformiteitsverklaring op:
http://www.archos.com/gb-en/support/support_tech/downloads.html
ARCHOS 50 Cesium book.indd 81 12/11/2015 11:19:15
82
83
86
90
92
94
96
Nederlands
81
Page 82

Inhoud van de verpakking
Controleer of de volgende onderdelen in de verpakking zitten:
- ARCHOS 50 Cesium
- Batterij
- Headset
- USB-kabel
- Oplader
- Verkorte handleiding
- Garantieverklaring en veiligheidsinformatie
De onderdelen die bij het apparaat zijn meegeleverd en de accessoires die verkrijgbaar zijn,
verschillen per land en per service provider. De meegeleverde onderdelen zijn uitsluitend
bestemd voor uw apparaat en zijn mogelijk niet compatibel met andere apparaten.
Niet goedgekeurde accessoires kunnen tot storingen van het apparaat leiden.
82
ARCHOS 50 Cesium book.indd 82 12/11/2015 11:19:16
Page 83

3
5
4
1 2
86
7
9
Beschrijving van de telefoon
1
2
3
4
5
6
7
8
9
ARCHOS 50 Cesium book.indd 83 12/11/2015 11:19:16
Micro-USB-poort
Aansluiting voor headset
Camera aan de voorkant
Telefoonspeaker
Lichtsensor
Vorige-knop
Startknop
Zoekknop
Microfoon
Nederlands
83
Page 84

14
10
11
12
13
Beschrijving van de telefoon
Camera
10
Flits
11
Volumeknoppen
12
AAN/UIT-knop
13
Luidspreker
14
84
ARCHOS 50 Cesium book.indd 84 12/11/2015 11:19:16
Page 85
ARCHOS 50 Cesium book.indd 85 12/11/2015 11:19:18
AAN/UIT: wanneer het apparaat
is uitgeschakeld: ingedrukt houden
om in te schakelen. Wanneer het
apparaat is ingeschakeld: kort
indrukken om het scherm uit te
schakelen en ingedrukt houden om
de opties weer te geven.
Volume +/-: druk op +/- om het
volume te regelen. Wanneer u
op de knop drukt worden de
waarschuwingsopties weergegeven.
U kunt de gewenste opties kiezen.
Terug-knop: kort indrukken om terug
te keren naar het vorige scherm.
Ingedrukt houden om het overzicht van
recente toepassingen weer te geven.
Startknop: kort indrukken om terug
te keren naar het beginscherm.
Zoekknop/Cortana: kort indrukken
voor toegang tot Cortana/de zoekpagina.
Micro-USB-poort: sluit de
meegeleverde kabel aan om het
apparaat op te laden of om het aan te
sluiten op een computer.
Hoofdtelefoonaansluiting: sluit
de meegeleverde oortjes aan om
handsfree te bellen.
Camera & its: maak foto's of
lmpjes. Om langere lmpjes op
te nemen, kunt u een micro-SDkaart plaatsen. Schakel in donkere
omgevingen de itsoptie in en
gebruik de its als zaklamp via
de snelinstellingen.
Lichtsensor: schakelt het scherm uit
wanneer het apparaat zich dicht bij uw
oor bevindt tijdens een telefoongesprek.
Nederlands
85
Page 86

Aan de slag
Montage
Na het uitpakken van de mobiele telefoon:
1. Verwijder de achterklep van het apparaat via de inkeping.
2. Plaats de SIM-kaart of geheugenkaart in de betreende sleuf.
3. Plaats de batterij van het apparaat.
4. Plaats de achterklep terug.
4G/3G sleuf 1 Controleer de afbeelding tijdens
2G sleuf 2
Micro-SD-kaart (maximaal 32 GB) sleuf 3
86
ARCHOS 50 Cesium book.indd 86 12/11/2015 11:19:18
het plaatsen van een SIM-kaart of
micro-SD-kaart. Anders beschadigt u
mogelijk de sleuf of de kaart.
Page 87

213
Breng de achterklep voorzichtig
ARCHOS 50 Cesium book.indd 87 12/11/2015 11:19:18
omhoog via de inkeping.
Nederlands
87
Page 88

Aan de slag
Inschakelen
1. Sluit de oplaadkabel aan op de Micro-SB-poort en sluit de kabel aan
op de oplader.
Voordat u het apparaat gaat gebruiken, moet u eerst de batterij helemaal opladen.
2. Houd de AAN/UIT-knop ingedrukt om het apparaat in te schakelen.
De eerste keer dat u uw ARCHOS opstart, helpt de installatiewizard u bij het
instellen van uw apparaat.
3. Volg de aanwijzingen.
Wanneer u een SIM-kaart heeft geplaatst, moet u mogelijk een PIN-code invoeren.
Voorkom de invoer van een onjuiste pincode.
88
ARCHOS 50 Cesium book.indd 88 12/11/2015 11:19:18
Page 89

3
1
2
In het beginscherm
1. Kies een tegel om de bijbehorende app te openen.
2. Schuif met uw
vinger van rechts
naar links over
het scherm
3. Trek de statusbalk omlaag om deze weer te geven.
Tik op Vergroten om meer snelinstellingen weer te geven.
ARCHOS 50 Cesium book.indd 89 12/11/2015 11:19:18
voor toegang tot alle apps
Nederlands
89
Page 90

3
2
4
Mobiele data & WiFi-verbinding
Mobiele dataverbinding
Wanneer uw mobiele telefoonabonnement een optie voor mobiele data
bevat, dan heeft u, als het goed is, meteen internetverbinding, zonder
verdere installatie. Wanneer u geen verbinding heeft, lees dan de informatie
hieronder voor het activeren van mobiele data. De ARCHOS heeft alleen
signaal in een gebied met dekking door uw 4G-netwerkaanbieder.
Mobiele data inschakelen/uitschakelen
1. Trek de statusbalk omlaag om deze weer te geven.
2. Tik op Vergroten om alle snelinstellingen weer te geven.
Kies All settings [Alle instellingen].
3. Kies Network & Internet [Netwerk & Internet],
dan Cellular & SIM [Mobiele telefoon & SIM].
4. Schuif de schakelaar voor mobiele dataverbinding
om in en uit te schakelen.
90
ARCHOS 50 Cesium book.indd 90 12/11/2015 11:19:18
Page 91
2
4
WiFi-verbinding
WAARSCHUWING: Controleer of u zich in een WiFi-zone bevindt.
Via de statusbalk heeft u snel toegang tot de WiFi-instellingen.
1. Trek de statusbalk omlaag om deze weer te geven.
2. Tik op Vergroten om alle snelinstellingen weer te geven.
Kies WiFi om in te schakelen.
3. Kies nogmaals WiFi om de WiFi-instellingen weer te geven.
4. Tik op de naam van het netwerk waarmee u verbinding
wilt maken.
Voor privénetwerken moet u een wachtwoord invoeren.
ARCHOS 50 Cesium book.indd 91 12/11/2015 11:19:18
Nederlands
91
Page 92

Account & Contacten
Een account toevoegen
1. Ga naar "Settings" [Instellingen] > "Accounts" > "Email & accounts"> "Add
an account" [Account toevoegen].
2. Selecteer het accounttype dat u wilt toevoegen.
3. Volg de aanwijzingen op het scherm om de accountgegevens in te voeren.
92
ARCHOS 50 Cesium book.indd 92 12/11/2015 11:19:18
Contacten opslaan
De contacten die u opslaat,
zijn altijd beschikbaar op
internet en kunnen worden
gesynchroniseerd met
alle Windows-telefoons
die via uw account zijn
gecongureerd.
Page 93

1. In het Startscherm of in het scherm "Alle Apps" kiest u de app People
[Contacten].
2. Tik op en kies Settings [Instellingen]
3. Kies ‘Import from SIM card’. [Importeren vanaf SIM-kaart] Wanneer u
meer dan één SIM-kaart heeft, kies dan de SIM-kaart waarvan u de contacten
wilt importeren.
4. Kies bij Save contacts to [Contacten opslaan naar] de account waarin u
de contacten wilt opslaan en tik dan op Next [Volgende].
5. Om alle contacten op uw SIM-kaart te importeren, tikt u op Import
[Importeren].
6. Om slechts een paar contacten te selecteren, tikt u op Clear [Wissen],
kiest u de contacten die u wilt importeren en tikt u op Import [Importeren].
7. Uw contacten worden dan automatisch geïmporteerd naar de Microsoft-
account die is ingesteld op uw telefoon. Nadat u de contacten op uw
Windows-telefoon heeft opgeslagen in een Microsoft-account in de Cloud,
kunt u uw contacten voortaan synchroniseren op alle plaatsen waar u inlogt
met uw account. Een wijziging die u op één plaats maakt, wordt op alle
andere plaatsen weergegeven.
ARCHOS 50 Cesium book.indd 93 12/11/2015 11:19:18
Nederlands
93
Page 94

Tips voor Windows
Telefoneren:
U kunt met slechts een paar tikken op het scherm telefoneren. Tik in het
Startscherm op de tegel van de telefoon, tik op het pictogram van het
toetsenbord, voer een telefoonnummer in en tik op Call [Bellen] . Om één
van uw contacten te bellen, tikt u op het adresboek en vervolgens tikt u op
Search [Zoeken] om het betreende contact te zoeken. Om iemand terug
te bellen, tikt u gewoon op de naam of het nummer bij History [Recent].
Tekstbericht verzenden:
Op de Windows-telefoon is sms-en met uw duimen kinderspel. Tik in het
Startscherm op Messaging [Berichten] en tik op New [Nieuw].
Voer een telefoonnummer of contact in, typ uw bericht in het tekstvak
en tik dan op Send [Versturen]. Om een tekstbericht te beantwoorden,
tikt u op het bericht waarop u wilt reageren.
Shoppen in de store:
In de Windows Phone Store kunt u zoeken naar gratis en betaalde apps en
games. Meld u eerst aan op uw telefoon met uw Microsoft-account. Tik in het
94
ARCHOS 50 Cesium book.indd 94 12/11/2015 11:19:18
TM
Page 95

Startscherm op Store en voer dan één van de volgende bewerkingen uit:
Veeg van links naar rechts over het scherm om populaire apps weer te
geven, om op categorie te zoeken en meer. Tik op Search [Zoeken] om naar
een specieke app of game te zoeken.
Apps zoeken en vastmaken aan het Startscherm:
De apps die u heeft gedownload worden weergegeven in de lijst met apps.
Vanuit deze lijst kunt u uw favoriete apps vastmaken aan het Startscherm.
Opmerking: U kunt apps, contacten en meer vastmaken aan het Startscherm
zodat u ze binnen handbereik heeft.
Touchscreen vergrendelen:
Met een wachtwoord voor schermvergrendeling kunt u uw telefoon beter
beveiligen.
Ga naar Settings > Lock screen [Instellingen > Schermslot] en schuif
de schakelaar voor het wachtwoord op "AAN". Maak vervolgens een
wachtwoord aan. U kunt deze optie te allen tijde annuleren door de
schakelaar voor het wachtwoord op "UIT" te schuiven.
ARCHOS 50 Cesium book.indd 95 12/11/2015 11:19:18
Nederlands
95
Page 96

Problemen oplossen
Mijn telefoon doet niets meer of kan niet worden ingeschakeld
Controleer de batterijcontacten, verwijder de batterij, plaats de batterij weer terug en zet dan
uw telefoon aan. Controleer uw batterijlading en laad de batterij ten minste 20 minuten lang op.
Mijn telefoon kan geen verbinding maken met een netwerk of "Geen service" wordt weergegeven
Probeer op een andere locatie verbinding te maken. Informeer bij uw beheerder naar
uw netwerkdekking.
Ik kan geen uitgaande gesprekken voeren
Controleer of uw telefoon is verbonden met een netwerk en of het netwerk overbelast of niet
beschikbaar is.
Ik kan geen inkomende gesprekken ontvangen
Controleer of uw telefoon is ingeschakeld en is verbonden met een netwerk (controleer of het
netwerk overbelast of niet beschikbaar is).
PIN-code van SIM-kaart geblokkeerd
Neem contact op met uw netwerkbeheerder voor de PUK-code (Personal Unblocking Key).
Een nieuw 4G-netwerk configureren:
Tik op Settings [Instellingen] op het apparaat. Kies Wireless & Networks [Draadloos en netwerken]
> More [Meer] > Mobile networks [Mobiele netwerken].
Kies Network settings [Netwerkinstellingen]. Bij Network operators [Netwerkbeheerders]
kiest u uw beheerder.
Bij Access Point Names [Toegangspunten] kiest u de naam van het gewenste toegangspunt en
voert u de verbindingsparameters in van uw 4G-provider.
96
ARCHOS 50 Cesium book.indd 96 12/11/2015 11:19:18
Page 97

Índice
Conteúdos do pacote.......................................................................................................
Descrição do telemóvel...................................................................................................
Introdução.............................................................................................................................
Dados móveis e ligação Wi-Fi.........................................................................................
Conta e contactos...............................................................................................................
Truques e dicas para o WindowsTM...............................................................................
Resolução de problemas..................................................................................................
Para obter mais informações, consulte as perguntas frequentes (FAQ) em www.archos.com.
Lembre-se de consultá-las antes de considerar a devolução de qualquer produto.
Como estamos constantemente a atualizar e a melhorar os nossos produtos, o software
do seu dispositivo poderá ter um aspeto ou funcionalidades ligeiramente diferentes
das apresentadas neste guia de introdução. Consulte a declaração de conformidade em:
http://www.archos.com/pt-en/support/support_tech/downloads.html
ARCHOS 50 Cesium book.indd 97 12/11/2015 11:19:18
98
99
102
106
108
110
112
Português
97
Page 98

Conteúdos do pacote
Verique a presença dos seguintes itens na embalagem do produto:
- ARCHOS 50 Cesium
- Bateria
- Auscultadores
- Cabo USB
- Carregador
- Guia de introdução
- Avisos legais de garantia e segurança
Os itens fornecidos com o seu dispositivo, bem como os acessórios disponíveis,
poderão variar mediante a sua região e/ou o fornecedor do serviço. Os itens fornecidos
foram concebidos especificamente para o seu dispositivo e poderão não ser compatíveis
com outros dispositivos. Acessórios não autorizados poderão causar uma avaria no
seu dispositivo.
98
ARCHOS 50 Cesium book.indd 98 12/11/2015 11:19:19
Page 99

3
5
4
1 2
86
7
9
Descrição do telemóvel
1
2
3
4
5
6
7
8
9
ARCHOS 50 Cesium book.indd 99 12/11/2015 11:19:19
Porta Micro USB
Entrada para auscultadores
Câmara dianteira
Altifalante do telemóvel
Sensor de luz
Botão Voltar
Botão Iniciar
Botão Pesquisar
Microfone
Português
99
Page 100

14
10
11
12
13
Descrição do telemóvel
Câmara
10
Flash
11
Botões de volume
12
Botão Ligar/Desligar
13
Altifalante
14
100
ARCHOS 50 Cesium book.indd 100 12/11/2015 11:19:19
 Loading...