

Page 1
1
Jukebox Multimedia
20, 120 & AV140
PDF User Guide
Jukebox Multimedia 20
Jukebox Multimedia 120 & AV140
ARCHOS Jukebox Multimedia 20, 120 & AV140 User Guide Version 1.1
Please visit our web site to download the most recent manual and firmware for this product
Page 2

2
Table of Contents
1 Starting up the Jukebox Multimedia................................................................................................................................ 6
1.1 Battery Saving Features................................................................................................................................................................... 6
Auto Power Off (Power Off t.)............................................................................................................................ 6
Auto Screen Off (Backlight t.)............................................................................................................................6
1.2 Charging the Batteries.....................................................................................................................................................................6
1.3 Caring for the Jukebox Multimedia................................................................................................................................................. 6
2 Ports, Connections, and Buttons....................................................................................................................................... 7
2.1 SPDIF Digital Audio....................................................................................................................................................................... 7
2.2 The Expansion Port......................................................................................................................................................................... 7
3 Playing MP3 Music............................................................................................................................................................ 8
3.1 The Display..................................................................................................................................................................................... 8
3.2 ID3 Tags.......................................................................................................................................................................................... 9
3.3 Navigation.......................................................................................................................................................................................9
3.4 Creating Directories, Deleting files, Renaming files, Viewing File Info .........................................................................................9
3.5 Entering Text................................................................................................................................................................................... 9
3.6 Creating and Playing Playlists.........................................................................................................................................................10
Creating a Playlist ............................................................................................................................................. 10
Using a Playlist from MusicMatch™.................................................................................................................. 10
Using a Playlist from iTunes™ .......................................................................................................................... 10
4 Settings..............................................................................................................................................................................12
4.1 Setting the Time of Day Clock........................................................................................................................................................ 12
4.2 Play Mode, Repeat, and Shuffle...................................................................................................................................................... 12
4.3 Sound Settings.................................................................................................................................................................................12
4.4 System Settings...............................................................................................................................................................................12
4.5 Updating the Jukebox Multimedia’s Operating System (OS)..........................................................................................................13
PC - Download the zipped file ........................................................................................................................... 13
Macintosh - Download the .ajz file..................................................................................................................... 13
Copy to Jukebox and Update ............................................................................................................................ 13
5 Recording MP3 Music ..................................................................................................................................................... 15
5.1 Recording........................................................................................................................................................................................15
Microphone ....................................................................................................................................................... 15
Line-In (Analog)................................................................................................................................................. 15
Digital SPDIF..................................................................................................................................................... 15
Incremental Recording ...................................................................................................................................... 15
5.2 Bit Rate Table & Sample Rates.......................................................................................................................................................16
6 Playing Video....................................................................................................................................................................17
7 Creating MPEG4 Video Files..........................................................................................................................................18
7.1 Installing the Software..................................................................................................................................................................... 18
DivX Codec.......................................................................................................................................................18
Virtual Dub ........................................................................................................................................................ 18
Mpeg4 Translator..............................................................................................................................................18
7.2 Using Mpeg4 Translator.................................................................................................................................................................. 19
Select Source & Destination Files ..................................................................................................................... 19
Change Settings................................................................................................................................................ 19
Target & Aspect Ratio (Jukebox 10 or 20).........................................................................................................19
Target & Priority (Jukebox 120 or AV140)......................................................................................................... 19
Start .................................................................................................................................................................. 20
MP3 Sound Track..............................................................................................................................................20
8 Viewing Photos & Reading Memory Cards...................................................................................................................21
8.1 Viewing Photos...............................................................................................................................................................................21
8.2 Transferring Photos from a Memory Card.......................................................................................................................................21
8.3 Creating a Slideshow....................................................................................................................................................................... 22
8.4 Creating Slideshows with Background Music................................................................................................................................. 22
9 Connecting / Disconnecting from your Computer.........................................................................................................23
9.1 Connecting the Jukebox Multimedia to your computer................................................................................................................... 23
Preferred Connection Order (all computers):.....................................................................................................23
Installing Drivers for Windows 98SE.................................................................................................................. 23
9.2 Disconnecting the Jukebox Multimedia from your Computer......................................................................................................... 24
10 Troubleshooting................................................................................................................................................................25
11 Using MusicMatch™ Software ....................................................................................................................................... 26
11.1 Installing MusicMatch™.................................................................................................................................................................26
Portable Device................................................................................................................................................. 26
11.2 Macintosh Users.............................................................................................................................................................................. 26
12 Optional Add-ons*...........................................................................................................................................................27
13 Technical Support............................................................................................................................................................29
Page 3

3
Warranty and Limited Liability
This product is sold with a limited warranty and specific remedies are available to the original purchaser in the event the product fails to conform to the limited
warranty. Manufacturer’s liability may be further limited in accordance with its sales contract.
In general, the manufacturer shall not be responsible for product damages caused by natural disasters, fire, static discharge, misuse, abuse, neglect, improper handling
or installation, unauthorized repair, alteration or accident. In no event shall the manufacturer be liable for loss of data stored on disk media.
MANUFACTURER SHALL NOT BE LIABLE FOR ANY SPECIAL, INCIDENTAL OR CONSEQUENTIAL DAMAGES. EVEN IF INFORMED OF
THE POSSIBILITY THEREOF IN ADVANCE.
Archos licensor(s) makes no warranties, express or implied, including, without limitation, the implied warranties of merchantability and fitness for a
particular purpose, regarding the licensed materials. Archos’s licensor(s) does not warrant, guarantee or make any representations regarding the use or the
results of the use of the licensed materials in terms of its correctness, accuracy, reliability, correctness or otherwise. The entire risk as to the results and
performance of the licensed materials is assumed by you. The exclusion of implied warranties is not permitted by some jurisdictions. The above exclusion
may not apply to you.
In no event will Archos’ licensor(s), and their directors, officers, employees or agents (collectively Archos’ licensor) be liable to you for any consequential,
incidental or indirect damages (including damages for loss of business profits, business interruption, loss of business information, and the like) arising out of the use
of inability to use the licensed materials even if Archos’ licensor has been advised of the possibility of such damages. Because some jurisdiction do not allow the
exclusion or limitation of liability for consequential or incidental damages, the above limitations may not apply to you.
Please see your sales contract for a complete statement of warranty rights, remedies and limitation of liability.
Furthermore, warranty does not apply to:
• Damages or problems resulting from misuse, abuse, accident, alteration or incorrect electrical current or voltage.
• Any product tampered-with or damaged warranty seal or serial number label.
• Any product without a warranty or serial number label.
• Batteries and any consumable items delivered with or in the equipment.
Warnings and Safety Instructions
CAUTION
To prevent risks of electric shock, this unit must only be opened by qualified service personnel.
Power off and disconnect the power supply cable before opening the unit.
WARNING
To prevent fire or shock hazard, do not expose the unit to rain or moisture.
Use of this product is for personal use only. Copying CDs or loading music, video, or picture files for sale or other business purposes is or may be a violation of
copyright law. Copyrighted materials, works of art, and/or presentations may require authorization to be fully or partially recorded. Please be aware of all such
applicable laws concerning the recording and use of such for your country and jurisdiction.
FCC Warning Statement
FCC Compliance
This equipment has been tested and found to comply with limits for a Class B digital device, pursuant to Part 15 of the FCC Rules. These limits are designed to
provide reasonable protection against harmful interference in a residential installation. This equipment generates, uses and can radiate radio frequency energy and, if
not installed and used in accordance with instructions, may cause harmful interference to radio communications. However, there is no guarantee that interference will
not occur in a particular installation. If this equipment does cause harmful interference to radio or television reception, which can be determined by turning the
equipment off and on, the user is encouraged to try to correct the interference by one or more of the following measures:
• Reorient or relocate the receiving antenna.
• Increase the separation between the equipment and receiver.
• Connect the equipment into an outlet on a circuit different from that to which the receiver is connected.
• Consult the dealer or an experienced radio/TV technician for help.
Note: During file transfer or in the PC mode, if the End User Terminal (EUT) or computer suddenly freezes or does not respond, it may be due to the electrostatic
phenomenon. Please follow the procedures below to recover the operation:
Unplug the USB cable from the End User Terminal (EUT)
Close the software application in the computer (or re-boot the computer if necessary)
Re-connect the USB cable to the End User Terminal (EUT)
CAUTION: Modifications not authorized by the manufacturer may void users authority to operate this device.
FCC Part 15 - Operation is subject to the following two conditions:
1. This device may not cause harmful interference;
2. This device must accept any interference received including interference that may cause undesired operation.
Copyright Notice
Copyright ARCHOS © 2003 All rights reserved.
This document may not, in whole or part, be copied, photocopied, reproduced, translated or reduced to any electronic medium or machine-readable form without
prior consent, in writing, from ARCHOS. All brands and products names are registered trademarks and the property of their respective owners. Specifications are
subject to change without notification. Errors and omissions accepted. Images and illustrations may not always match contents. Copyright ® ARCHOS. All rights
reserved.
Disclaimer of warranty: to the extent allowed by applicable law, representations and warranties of non-infringement of copyrights or other intellectual property
rights resulting from the use of the product under conditions other than as here above specified, are hereby excluded.
Page 4

4
Storage capacity:
Technical Specifications
Model 20: 20 GB hard drive
Series 100: depending on model number. JBM 120: 20 GB hard drive, AV140: 40GB hard drive
Interface to Computer:
Music Playback &
Recording:
Photo Viewing:
Video Playback:
Display:
Audio Input:
Audio Output:
Video Output:
Expansion Port:
Playback Autonomy:
Scalability:
Power:
Dimensions:
Weight:
Operating
Temperature:
PC System
Requirements:
Macintosh System
Requirements:
Model 20: USB 1.1 standard (optional USB 2.0 or FireWire interface cable)
Series 100: . USB 2.0 standard (optional FireWire interface cable) USB 1.1 compatible
MP3 decoding 30 to 320 kbits/s , CBR & VBR. MP3 real-time encoding 30 to 160 kbits/s VBR.
Model 20: JPEG and BMP (4, 8, 24 bit) files, any size. JPEG preview 4 images
Series 100: JPEG and BMP (4, 8, 24 bit), any size. JPEG preview 4 or 9 images (16 on television)
Model 20: up to 352x288 pixels @ 30 frames/s MPEG-4 Simple Profile compliant .AVI (DivX* 4.0 & 5.0),
MP3 stereo sound tracks, VHS picture quality
Series 100: Up to 640x304 @ 30 frames/sec (NTSC) or up to 640x368 @ 25 frames/sec (PAL) [Up to 640 x
480 resolution at lower frame rates] MPEG-4 Simple Profile compliant .AVI (DivX* 4.0 & 5.0 & XviD) MP3
stereo sound tracks, near DVD picture quality.
Built-in 1.5” LCD 237x234 pixels
Stereo analog mini jack and buit-in microphone. Digital Line-In (SPDIF) via stereo line-in (not optical SPDIF)
Stereo analog Line-OUT/earphone mini jack. Digital Line-Out (SPDIF) via stereo line-in (not optical SPDIF)
AV mini jack, audio & composite video (for television), NTSC or PAL TV standard.
Optional modules (Memory card readers, Camera, Digital Video Recorder, FM remote control, Firewire and
USB 2.0 interface cables)
MP3 playback: up to 8 hours
Video playback (on LCD): up to 3 ½ hours
downloadable firmware updates from Internet (www.archos.com).
Non replaceable internal Lithium-ion battery pack, external AC/DC Adapter.
110 x 79 x 29 mm (4.3" x 3.1' x 1.1")
290g (10.2 oz)
5 °C to 35 °C, storage temperature: -20 °C to 45 °C
Pentium 233 MHz or higher. Windows 98SE, ME, 2000, XP (Home and Professional). 64 MB RAM.
Model 20: OS 8.6 or higher. iMac, G3 or higher. USB Manager version 1.2
Series 100: MacOS 9.2 or X, iMac, G3 or higher. USB 1.1 speed only
Package Includes:
*DivX is a trademark of DivXNetworks, Inc.
Jukebox Multimedia, USB cable, AC/DC adapter, stereo headphones, combination audio/video output cable,
Scart adapter (European models), carrying pouch, MusicMatch™ software and drivers on CD, Quick Start
Guide in 6 languages.
Page 5

5
Product Introduction
Dear Customer,
This User Guide is an expansion of the Quick Start Guide that you
received with your product. This guide will show you in a more
detailed way some of the more intricate functions of the Jukebox
Multimedia. Our engineers have packed this product with many
functions and capabilities. The better you know how to use it, the more
enjoyment you will get from it. Remember, with the Jukebox
Multimedia, you can…
• Play MPEG-4 movies to a television or video projector
• View JPEG images
• Listen to MP3 files
• Use it as a voice recorder
• Record MP3 music directly from your hi-fi without a computer
• Store MP3, MP4, JPEG or any type of data file
• Create music Playlists
We hope you receive years of enjoyment from your Jukebox
Multimedia. We thank you for purchasing this product. If there is
something you thing we should improve upon, please don’t hesitate
to write to us and let us know. We are always interested in improving
our products to suite our customers needs.
Wishing you the best music listening experience,
The team at ARCHOS
PS. Don’t forget to check our website periodically for new Jukebox
multimedia add-ons as well as software updates that you can
download.
• Create JPEG slide shows with background music
• Add a variety of options such as a camera, video recorder, FM
radio/remote control, and others.
Page 6

6
1 Starting up the Jukebox Multimedia
Refer to the Quick Start Guide for basic information. Please also check the ARCHOS website to see if a more recent version of the
Operating System (OS) is available. This can be freely downloaded.
1.1 Battery Saving Features
There are two settings which can help you save battery power. These are the Auto Power Off setting and the Auto
Screen Off setting. To get to the Settings screen, Click [F1] Setup, then scroll down to [Settings] and click Play.
Then scroll down to find the two settings shown to the left. Using these functions will help to give you a longer usage
time between charges. Hard drive accessing and the LCD screen take up most of the battery energy. Note also that
when the Jukebox is connected to a computer, it will consume more energy than usual. Thus, you should always use the AC adapter when
connected.
Auto Power Off (Power Off t.)
If there are no user actions, music playing, or recording, then the Jukebox will shut itself off automatically after the specified amount of
time. The left most position corresponds to 1 minute. Each unit to the right is 1 more minute. After 9 minutes, the final position is
NEVER, which means the Jukebox will not shut off by itself.
Auto Screen Off (Backlight t.)
This timer starts counting from the moment the user last pressed a button. After the specified amount of time, the screen will shut off. The
Jukebox will continue to play or record, shutting off only the screen display. The left most position corresponds to 10 seconds. Each unit
to the right is 10 more seconds. After 110 seconds, the final position is NEVER, which means that the Jukebox will never shut off the
screen.
1.2 Charging the Batteries
Use ONLY an Archos charger/adapter that is specified for the Jukebox Multimedia. Other changers or adapters may damage the Jukebox.
The batteries will charge automatically when the AC adapter/charger is plugged in. You should charge the Jukebox for three hours
(without use) or five hours (using it while charging) to get a full charge. Once charged, you can get up to 8 hours* of MP3 music playback
time and up to 3 ½ hours* of AVI video playback time (with built-in screen). The Jukebox is made with integrated batteries which are
designed to last for the life of the Jukebox. This means that you will not have to change them. If, in the exceptional case, the batteries need
changing, this should only be done by an Archos technician.
1.3 Caring for the Jukebox Multimedia
The Jukebox Multimedia is an electronic product that needs to be treated with care.
• Do not subject it to shock
• Do not subject it to heat. Be careful that the surface it is on, is a flat clear surface. Placing the Jukebox on a pillow, blanket, or
carpet will restrict the necessary ventilation that it needs. This increase in operating temperature may cause damage to the device.
• Keep the Jukebox far away from water and excessively humid areas
• Keep the Jukebox away from high electromagnetic fields
• Keep any connected cords to the Jukebox neatly arranged. This light product could fall if a chord is accidentally pulled by a child.
• Keep it plugged into the AC adapter/charge while connected to your computer
* depending on how much manipulation the user does while the Jukebox is playing
Page 7

7
2 Ports, Connections, and Buttons
Refer to the Quick Start Guide for basic information
2.1 SPDIF Digital Audio
The SPDIF digital audio is a wire based protocol, it is not optical. To record or play via the SPDIF digital audio connection, you will use
the cable delivered with the Jukebox which has RCA type connectors (red, white, and yellow). Thus, you should locate SPDIF RCA
female type jacks on the back of your Hifi system. Place the mini-jack end of the cable in the Jukebox’s LINE-IN jack. The yellow RCA
connector works as both the IN and the OUT. You will have to swap this from the SPDIF IN and OUT on your hi-fi stereo system as
needed.
2.2 The Expansion Port
Remember that when you connect or disconnect one of the ARCHOS add-ons, such as the camera, a memory card reader, or cable
interface, you must do so while the Jukebox is off. See the end of this manual for add-on products and descriptions.
Page 8
8
3 Playing MP3 Music
song. When this song is finished playing, the Jukebox will return to the directory view.
and is in Queue mode.
Refer to the Quick Start Guide for basic information
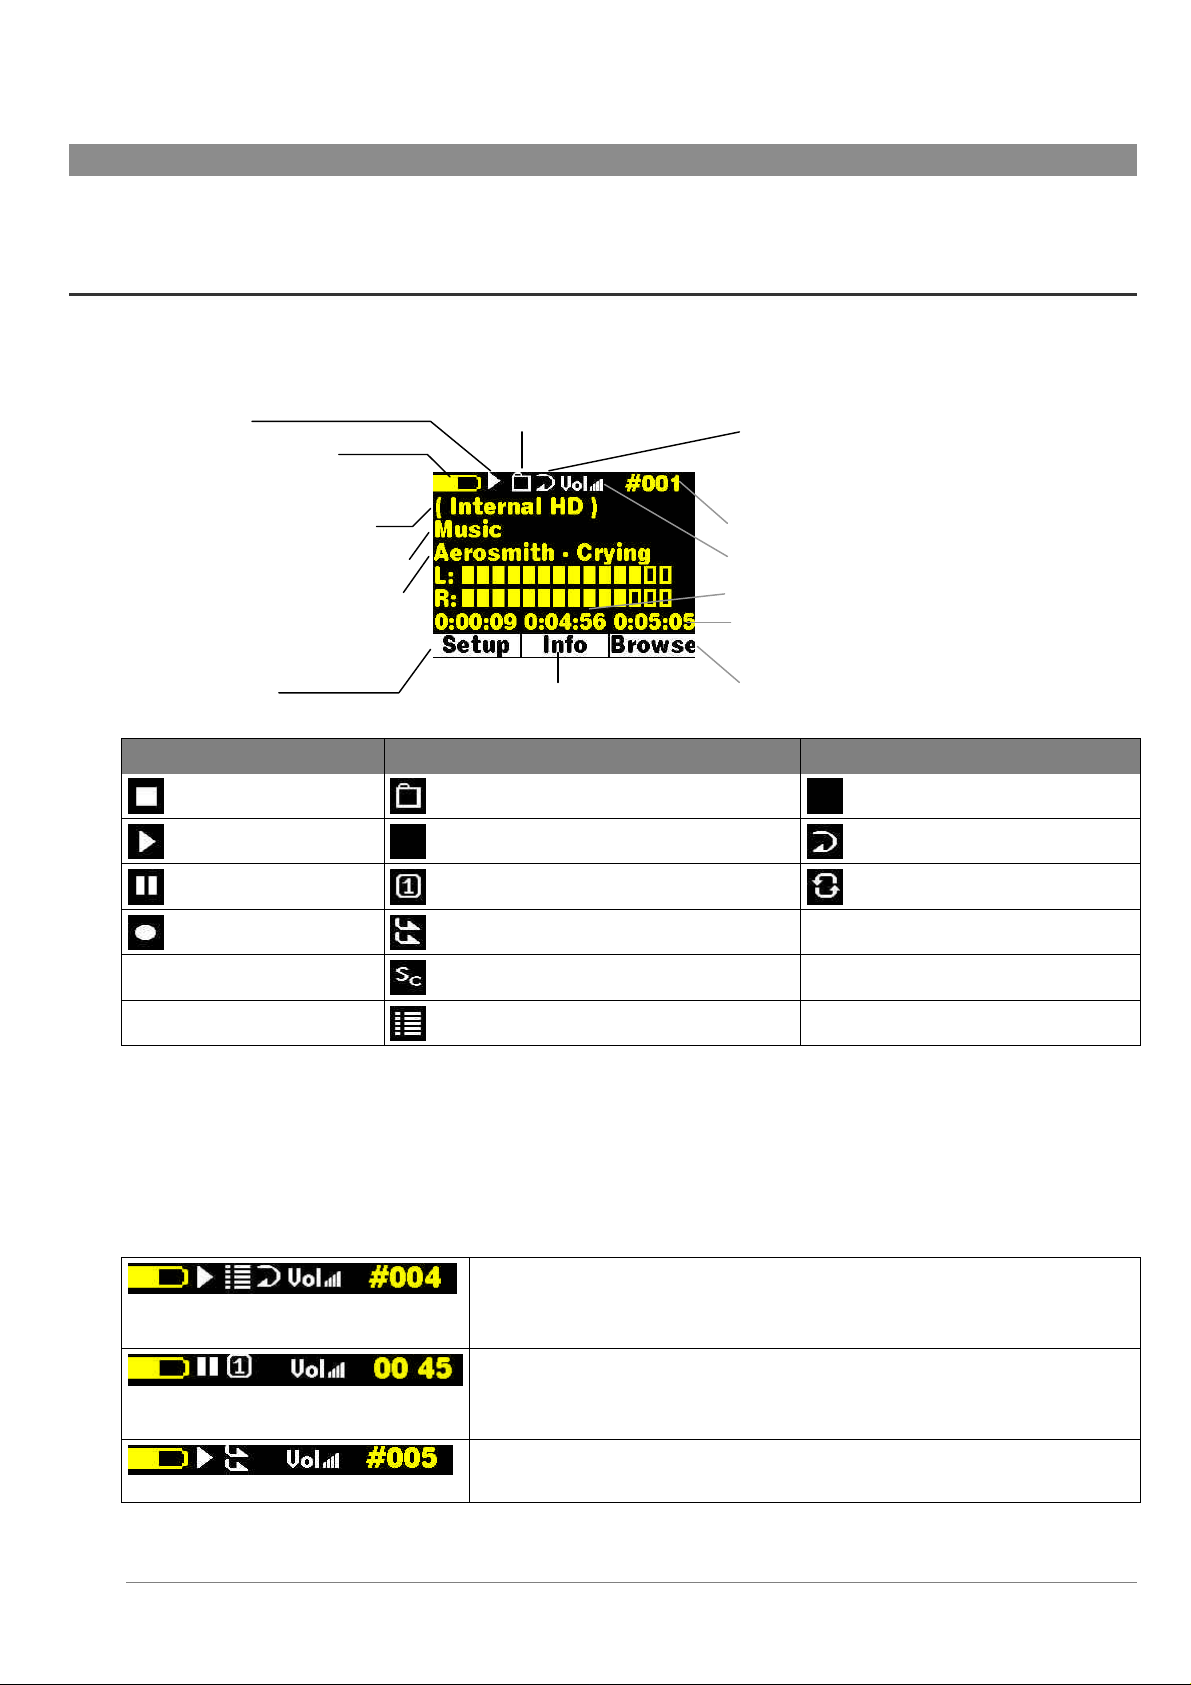
3.1 The Display
Shown below is the screen when a track (song) is being played. The top line of the Jukebox Multimedia indicates, in order, the Battery
level, Play Status, Play Mode, Repeat, Volume, and Song Number/Time.
Status: Playing
Battery level (half depleted)
Album (if ID3 tagged) folder name
Artist (if ID3 tagged) or current folder
Song title (if ID3 tagged) or file name
Song elapsed time
Go to setup options
Play Status Play Mode Repeat
Stopped Play all tracks in the current directory (no icon) Play once
Playing a track (no icon) Play all tracks on Jukebox Repeat playing
Current track is paused Play a single track then stop Shuffle (Random) track selection
Recording a track User can queue the next track to be played (1)
Play Mode: One Directory Repeat & Shuffle: Shuffle
Song number in Playlist
Volume: Almost full
Song time remaining
Song length
Show current track information
Jukebox plays first 15 seconds of each track (2)
Browse the hard drive for another track
(1) While the current song is playing, click on F3 Browse, find the next song you want to play, then click Play. This is your queued song. You can only
queue one song. See the Playlist section to prepare multiple songs to play. Once the current track is finished playing, your queued track will be played. If
you do not queue another track at this time, the Jukebox will play the next song in the directory.
(2) Each track in the directory is played for 15 seconds. This allows a quick sample of each song. If you want to play the whole song, click on the Play
button during those first 15 seconds. The Jukebox will then revert to single directory mode and play the rest of the songs in the directory without scanning.
Examples:
Jukebox is currently playing from a Playlist
Play, Playlist, Repeat – The song currently being played is from a Playlist and it is the
fourth song of that Playlist. The songs of the Playlist will repeat after the last song has
been played.
Paused, Single, Normal - The Jukebox is currently paused during the playing of a single
The time is currently 12: 45 am. The clock is a 24 hour type.
Stopped, Queue, Normal – The Jukebox is currently playing a song
The current song playing is the 5th song in it’s directory.
Page 9
9
3.2 ID3 Tags
ID3 Tags are information about the recording which is located inside of an MP3 music file. When someone creates an
MP3 music file, he or she has the option of adding information to it. This information includes, among other things,
the Album name, the name of the Artist, and the title of the song. If these data are present, the Jukebox will display
them on the screen when it plays the file. If they are not present, then the Jukebox will display in order, the name of
the parent folder, the name of the current folder, and then the name of the file. As of the writing of this manually, there are two versions of
ID3 tags that are firmly established standards, ID3 version 1 and ID3 version 2. Your Jukebox will read both sets of tags, and display the
information. If both sets of tags have information, the data from the ID3 version 2 tag will be used. Other tag information may include
composer, year, genre of music, album cover etc. This tag information is not currently used by the Jukebox multimedia. In the example
display, section 3.1 above, this file did not include any ID3 tag information. It was located in a folder called Music on the root level of the
Jukebox.
3.3 Navigation
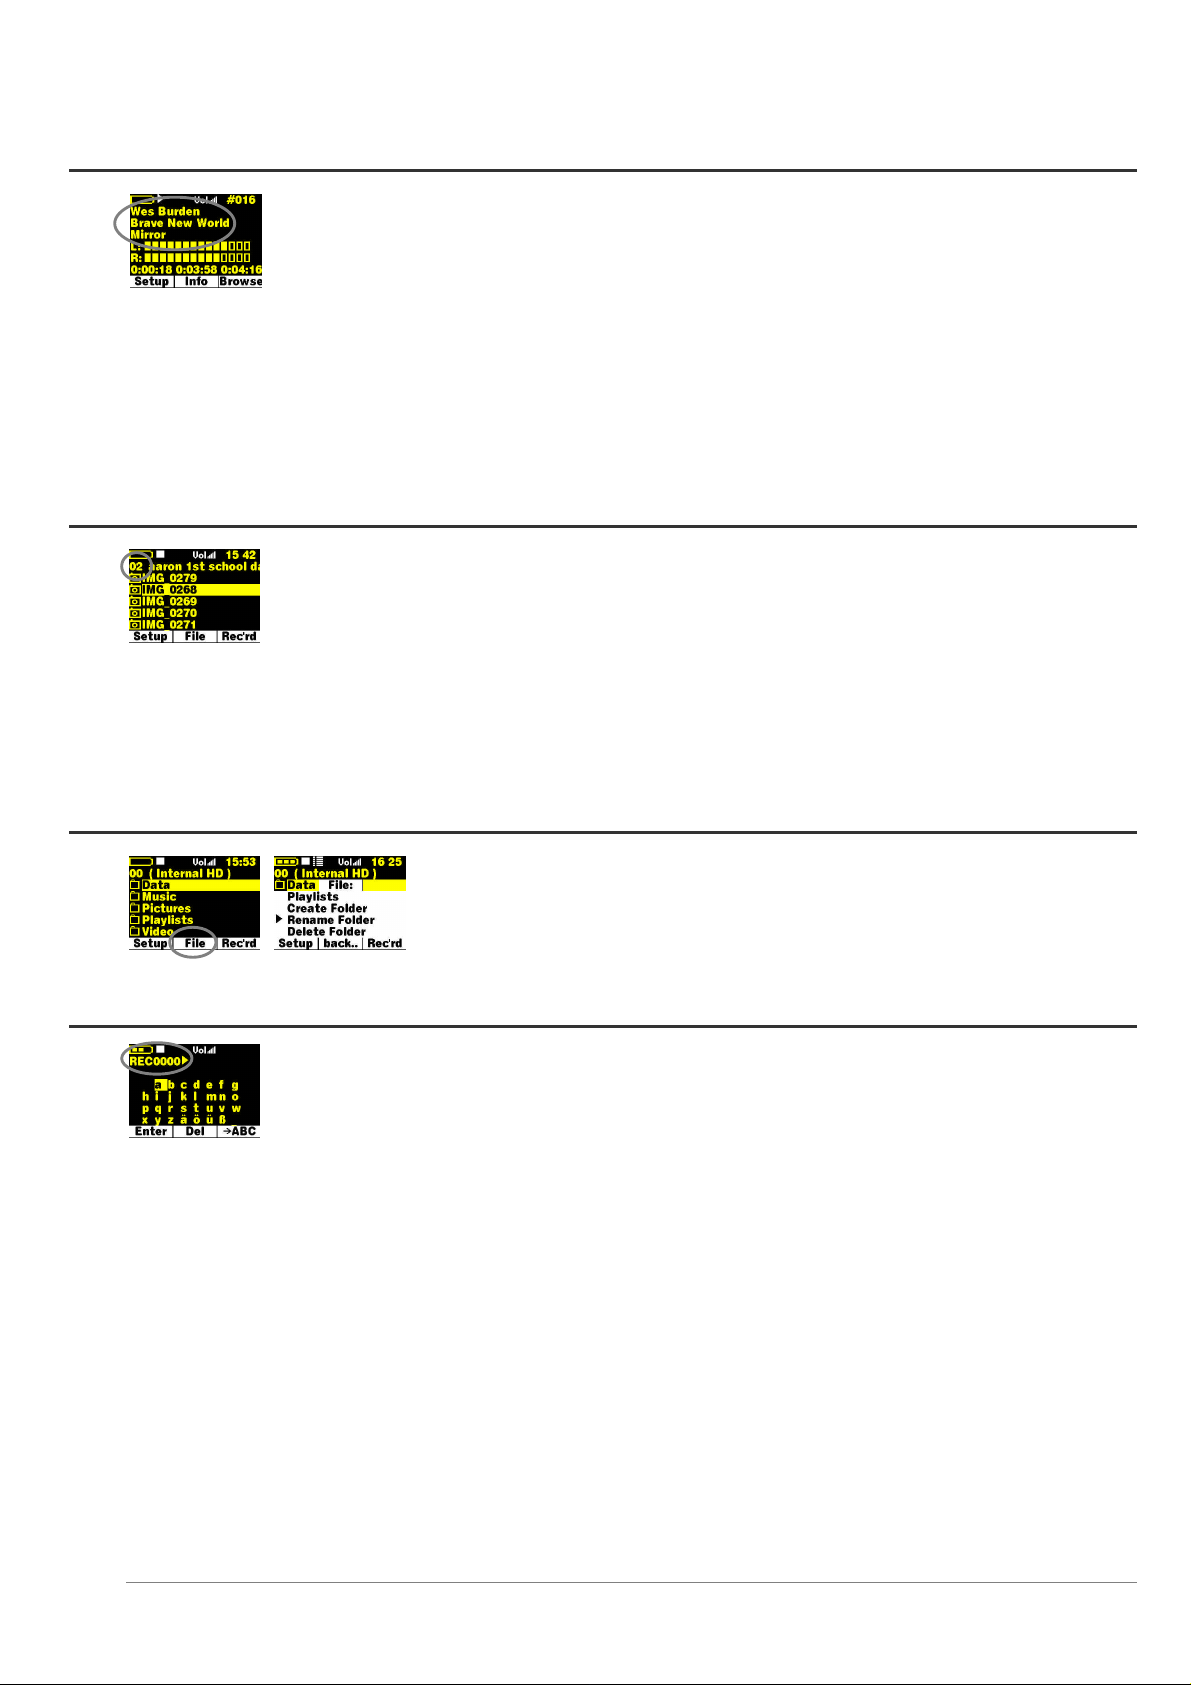
The navigation of folders (directories) is in a hierarchical format just like on your computer. As a matter of fact, the
Jukebox comes formatted as a FAT32 hard drive, just like Windows based computers. The number on the top left of
the screen, just below the battery indicator displays the depth you currently are in, in the directory structure. Level 00
is the root level which shows all of your sub folders.
To enter a folder, just highlight it with the UP and DOWN buttons, then click on the RIGHT button. You will then enter into that directory.
You will notice that the directory level indicator will increase by one. This indicates that you are one level deeper into the directory
structure. Click on LEFT to leave the current directory and go up one level to the parent directory. The OFF button can be used as a type
of “escape” like the ESC key on your computer to cancel an operation and return to the previous screen.
3.4 Creating Directories, Deleting files, Renaming files, Viewing File Info
You can most easily do these things by connecting the Jukebox to your computer and using your
file manager program. However, if you would like to do this without the aid of your computer,
click on the [F2] File button then choose which operation you would like to perform.
3.5 Entering Text
There are multiple instances where the Jukebox will ask you to enter text. For example, when renaming a file,
creating a folder, or naming a Playlist or recording. The new text (name) will appear above the grid of letters. Use the
buttons to navigate the letters then click on PLAY to accept the letter. Click on F2 to back space. Hold down on F2
to delete the entire line. There will be a default name given when you enter the text mode. In the example to the left,
the user is being asked to name a recording which has a default name of REC0000. You can keep this default name or change it. The
space character is found to the left of a and above the h. Click on F3 to get upper case characters and numbers. Click on F1 when you are
satisfied with your text entry.
Page 10

10
3.6 Creating and Playing Playlists
A Playlist is a list of songs, pictures, or a combination that the Jukebox will automatically play one after the other.
The Jukebox can load one Playlist at a time into its internal memory. You can create new Playlists, add or delete
items from a Playlist, or Save a Playlist as a file (file type .m3u) to be used another time. There is no limit to the
number of Playlists you can save on the Jukebox hard drive. Playlists are indicated by a special list icon as shown to
the left. To play a Playlist, you simply scroll to the Playlist, such as ‘Jazz Playlist’ shown to the left, and click on Play. The list of songs
will be loaded into the internal memory of the Jukebox and then will be played one by one. You can open a Playlist file
(Playlistname.m3u) on your computer with a text editor such as Notepad, and you will see that it is merely a list of files to be played. If
you delete a Playlist from your Jukebox, you are only deleting the list and not the music itself.
Creating a Playlist
To create a Playlist, you start by adding songs to the empty Playlist. When you turn on the Jukebox, the Playlist is
empty. You can verify that it is empty by taking a look at the current contents of the Playlist. Click on [F2] File, then
click Play when the cursor }}is in front of the Playlists option. You will then see the contents of your current Playlist.
To see the commands for a Playlist, click on [F2] File.
To add a song or a folder of songs to the Playlist, you simply hold down on the Play button for three seconds when
your cursor is highlighting any song or folder. In the example to the left, holding down on Play will add the song
Sailing to the Playlist. At this point, the song name will change to a different color indicating that it is in the current
Playlist. If you hold down the Play button on a folder, you will see the Jukebox add all the songs from that folder.
Each song title in that folder will now have a new font color. If you look in your Playlist now, you will see all of the songs that you have
added. The Playlist has a maximum of 5000 items that can be added. You can even add songs to your current Playlist while the Playlist is
playing. Just click on [F3] Browse while listening to your songs and add songs as normal (hold down on Play for 3 seconds on the song
name or folder). Click once on the Off button to get back to the music playing view.
Once you have added the desired songs to your Playlist, you can either immediately play your
Playlist (the first option), save your Playlist for a permanent copy, clear the contents of the
Playlist, or shuffle the Playlist into a random order. You can also click on [F3] Track which will
allow you to move, delete, or add a music track. When saving a Playlist, the Jukebox will allow
you to choose your destination folder. Locate the folder you want to save your Playlist in, and then scroll down until you highlight the
<<save here>> message. Click on Save and your Playlist will be permanently saved in that folder.
Using a Playlist from MusicMatch™
If you have used the included MusicMatch™ program to create Playlists on your computer, you may be able to
use these Playlists on your Jukebox Multimedia. If you created your Playlists from MP3 files that are on the
Jukebox, then you can simply transfer these Playlists to the Jukebox Multimedia. That is, the Jukebox must have
been connected to the computer and the files in your Playlist must be files that are on the Jukebox Multimedia’s
hard drive. If you copy a Playlist which refers to MP3 files on your computer’s hard drive, c: for example, then the Jukebox naturally
will not have that file locally on its hard drive to play. Connect your Jukebox Multimedia to your computer and then copy (or drag and
drop) the .m3u Playlist files using Explorer. You will find all your MusicMatch saved Playlists in the directory C:\Program
Files\MUSICMATCH Jukebox\Playlist\Default\. Copy the desired Playlist or Playlists to your directory of choice (we suggest the folder
“Playlists”) on the Jukebox Multimedia. Once disconnected from the computer, locate the Playlist file and click on Play.
Using a Playlist from iTunes™
For Macintosh users who would like to create iTunes™ Playlists on the Jukebox Multimedia, a special plug-in has been developed. You
will find it on the included CD-ROM in a folder called itunes plug-in. In this folder you will find a plug-in for Mac OS 9.x and another one
for Mac OS X. You will also find a .JPG image illustrating where you need to copy the plug-in to. Once this is done, iTunes will
Page 11

11
recognize the Jukebox as a Device. When you create your Playlists with iTunes, it will now save these Playlists to the root directory of
your Jukebox Multimedia. Disconnect the Jukebox from your computer and then simply click Play on the Playlist that iTunes had created
for you.
Page 12

12
4 Settings
Refer to the Quick Start Guide for basic information.
4.1 Setting the Time of Day Clock
To set the clock, click first on F1 Setup, then click on F3 (the time). You will be sent to the clock adjust screen as
shown to the left. Use the Up and Down to change a parameter’s value, and then Left and Right move to different
parameters. Click F2 when finished.
4.2 Play Mode, Repeat, and Shuffle
Depending on your preferences, you can have your MP3 music played in different ways. For example, you can have
it randomly play songs from all the songs on your Jukebox or have it repeat the songs in a given directory. Look at
the table in section 3.1 to see the different possibilities. Use the Play Mode submenu and the Repeat & Shuffle
submenu to set these options. When you find the setting you want, click on PLAY and a circle will appear in front of
the option indicating that it is the currently selected option.
The Startup Resume option, as shown in the screen to the left, is used to create a type of book mark to the place you where in the directory
structure when you last played a file. If set to On, each time you turn on your Jukebox, you will automatically be sent to the directory and
file that was last played.
4.3 Sound Settings
While listening to your music, you can adjust the sound settings to your personal preference. Click on [F1] Setup,
then with [Sound] highlighted, click on Play to enter the Sound Settings submenu. Using the UP and DOWN buttons,
highlight the parameter to change and then use the LEFT and RIGHT buttons to change it. The effect takes place
immediately. Click on F1 Back, two times to return to the screen you were originally at.
Parameter Description
Volume 32 levels of volume.
Bass 10 levels. Increases the low frequencies.
Treble 10 levels. Increases the high frequencies.
Loudness 10 levels. Increases the low mid frequencies
Balance 10 levels to the right or left
Bass Boost 10 levels. Increases the very low frequencies
Flat Readjusts all settings to a flat frequency response
Pitch 16 levels lower or higher. Changes the speed of the music.
4.4 System Settings
To enter the system settings submenu, click on [F1] Setup, scroll down to [Settings], then click Play to enter it. The
items marked with [ ] have secondary menus with a list of parameters. Highlight the parameter you want, then click
on Play to accept it.
Page 13

13
l compatible with your country’s television system.
Parameter Description
Video Internal LCD, External TV. To display via the built-in LCD screen or to view the display via
an external television. Use the included combination audio/video cable to connect the Jukebox
to a television. Holding the ON button for three seconds will also alternate between these two
options.
[TV Standard] NTSC (USA), PAL (Europe). In order to properly view images or videos on an external TV,
select one option to send the video signa
Countries other than European or American will use one of these two systems.
LCD Bright 8 brightness levels for the built-in LCD.
Video X Pos. 30 levels. To displace images or videos on the television screen to the left or right.
Video Y Pos. 30 levels. To displace images or videos on the television screen to the Up or down.
Language: The Jukebox Multimedia can be set to English (default), French, or German. Use the LEFT and
RIGHT buttons to select your language of choice.
Power Off t. Inactivity auto shutdown. See section 1.1 Battery Saving Features
Backlight t. Backlight display time. See section 1.1 Battery Saving Features
Show all files Off (default), On. Use the LEFT and RIGHT buttons to set it. If Off, the Jukebox will only
display the file names of type .MP3 (music), .m3u (Playlists), .JPG (images), .BMP (images),
and .AVI (videos) with their corresponding icons. If set to ON, the Jukebox will display the
names of ALL the files on the hard drive (using a ? icon), even if they cannot be viewed or
played, such as .txt or .pdf for example. This setting is important when the Jukebox is used
with the memory card reader add-ons. Setting it to ON will allow the Jukebox to transfer all the
files from the card media regardless of file type. If set to OFF, it will only read the above
mentioned file types which it finds on the card media.
Hard Disk Displays amount of free space on the hard drive in megabytes. Free Space / Total Space.
Firmware Version Displays the version of the current Operating System (OS).
Update Firmware Used to update the Jukebox Multimedia to a new version of the Operating System. See section
4.5 below on how to do this.
4.5 Updating the Jukebox Multimedia’s Operating System (OS)
Archos periodically updates the Operating System (OS) and makes it available for free download on the ARCHOS web site (www.archos.com).
You should check to make sure that you are running the most recent version of the OS. Each time the Jukebox Multimedia starts up, the OS
version is displayed on the screen (example: OS Version 1.1.6). Under the category Software on the Archos website, you will find the most recent
version and its version number.
PC - Download the zipped file
The file is in a zipped (compressed to allow the quickest possible download) format and should be downloaded to your computer locally.
You must then unzip the file with an unzipping utility such as WinZip™. Once unzipped, you will find two files. One is the update install
instructions & history file which explains what changes are in the new OS and the other is the OS itself, it is called AJBM.AJZ
Macintosh - Download the .ajz file
For Macintosh users, you can download the AJBM.AJZ directly without having to worry about unzipping. You can find the update history
text file of the Operating System on the Archos web site. It describes what the update has changed.
Copy to Jukebox and Update
Page 14

14
When updating your Operating System, you should keep your Jukebox powered from the AC charger/adapter so that it
will not shut down due to low batteries while you are performing the update. Connect your Jukebox to your computer
(see section 9.1), and then copy the AJBM.AJZ file to the root directory of the Jukebox. The root directory is the top
most level of the directory hierarchy. Just drag the .ajz file onto the Jukebox Hard drive in your file manager and it
will place it in the top most directory. Once this file is copied, safely disconnect the Jukebox from the computer (see section 9.2). Next,
click [F1] Setup, then click on Settings, and then scroll down to Firmware Update and click on it. The Jukebox will search for the .ajz file
and will and ask you to click [F1] Yes, to start the update. Follow the on-screen instructions. The Jukebox Multimedia will restart itself
and you will see the new OS version display on the screen as it starts up.
Page 15

15
5 Recording MP3 Music
Refer to the Quick Start Guide for basic information.
5.1 Recording
With the Jukebox Multimedia, you do not need a computer to create MP3 music and audio files. You can create MP3 files in three
different ways. You can (1) Record from the built in microphone (voice recorder) (2) Record directly from an any analog audio source
such as a stereo, portable stereo, radio, etc. via the Line-in jack or (3) Record directly from a digital stereo system that has the SPDIF
standard output (RCA type, not optical).
To start a recording press on [F3] Rec’rd. you will be sent to a pre-recording screen. If something other than <MP3>
appears above the [F1] button, click on F1 until <MP3> reappears. In this screen, you can adjust the input volume
levels so as to get the best quality recording. Increase and decrease the input sensitivity by using the Right and Left
buttons respectively. The gain control is from –3 db (far left) to +19 db (far right). Two clicks to the right for 0 db
gain. If you are listening via the headphones, this is not a good measure of the recording level since the headphones can be regulated by
the volume control on the headphone cord. If the last boxes in the Left (L) and Right (R) input level show a ! , that indicates that you have
too loud of an input signal and you should reduce the input levels. It is not possible to separately adjust the left and right input levels.
Click on [F2] Setup to enter the recording setup screen. Here you can Set the name of the song, the artist, and the
album. You can also select your recording source (Analog = line-in, Microphone, or Digital = SPDIF line-in), the
quality of the recording (0-7) and the sampling rate. You do not have to change any of these settings. The defaults
for Title, Artist, and Album respectively are REC0000, NEW ARTIST, NEW ALBUM. The REC number will be
incremented each time you make another recording in the same directory. Click on [F3] to start your recording and then again on [F3] to
stop your recording.
Microphone
The microphone is located between and slightly below the two led indicators. Make sure that you have selected Microphone as the input
source in the pre-recording Setup screen.
Line-In (Analog)
You can connect any line-level audio source to the Line-in jack on the left side of the Jukebox Multimedia. Use the included stereo cable
(Red/Right and White/Left) to connect to your Hifi system, VCR, or other audio source. To record from a source such as a portable CD
player, you will need to buy a cable with mini-jack (3.5mm) male connectors on both sides. Be careful that the source audio is supplying a
line level and not an amplified signal. An amplified signal will make for a terribly distorted recording. Make sure that you have selected
Line-In as the input source in the pre-recording Setup screen. You can also use a high quality pre-amplified microphone, such as the one
Archos sells as an option.
Digital SPDIF
The SPDIF digital audio on the Jukebox Multimedia is a wire based protocol, it is not by optical cable. To record or play via the SPDIF
digital audio connection, you will use the cable delivered with the Jukebox. Place it in the LINE-IN jack. The yellow RCA connector
works as both the IN and the OUT. You will have to swap this from the SPDIF IN and OUT on your hi-fi stereo system as needed.
Incremental Recording
While recording, you will notice the [F2] button, Next. This allows you to create incremental recordings. That is, the current recording
stops and a new recording instantly begins. The next recording has an addition number appended to its name. Thus if you multiple
incremental recordings, you might, for example, have files names of REC0002_01, REC0002_02, etc. This is good for recording old
cassettes and old vinyl records. You can click on this button during the blank space between each song. That way, each song of the record
will be one single MP3 file.
Page 16

16
5.2 Bit Rate Table & Sample Rates
Average bit rates for Recording Quality Parameter* Available Sampling Rates
Line-in (44.1 Khz Stereo Music) Microphone (22.05 Khz voice) 48 kHz
Setting 0 78 kb/s 39 kb/s 44.1 kHz
Setting 1 81 kb/s 41 kb/s 32 kHz
Setting 2
Setting 3 95 kb/s 47 kb/s** 22.05 kHz
Setting 4
Setting 5 144 kb/s** 77 kb/s
Setting 6
Setting 7
* These figures are averages because the Jukebox Multimedia uses Variable
Bit Rate (VBR) recording. Depending on the type of music or voice you record,
the actual bit rates will vary slightly.
** Suggested Settings
87 kb/s 43 kb/s 24 kHz
117 kb/s 60 kb/s 16 kHz
165 kb/s 107 kb/s
166 kb/s 131 kb/s
Page 17

17
6 Playing Video
Refer to the Quick Start Guide for basic information.
You can view video files either on the Jukebox Multimedia itself, or on a television (video projectors work nicely also). Use the included
audio/video cable to connect the Jukebox Multimedia to your television. Place the mini-jack into the EAR/AV OUT on the Jukebox and
the other connectors (Red, White, Yellow) respectively to Audio In Right, Audio In Left, and Video In on your television. If your
television only has one audio input, you will have to use either the red or the white connector.
Unfortunately, you will miss half of the stereo sound.
You must also set your television to the auxiliary video input, often called L1 just below channel 1. IN
ORDER TO SEE THE IMAGE ON TV, HOLD DOWN THE ON BUTTON FOR THREE SECONDS and
the image will switch from built-in LCD display to external TV display.
To play a video, you must have a properly encoded DivX™ or XviD video file. The Jukebox will not directly play files of type .mov,
.mpg, .mpeg, nor .avi files created with codecs other than DivX™ or Xvid. You must use the included software on the CD to re-encode
them into the proper DivX™ MP4 with an MP3 sound stream. Please see the following section on how to create MPEG 4 video files. The
Jukebox Multimedia 10 and 20 are capable of playing MP4 Simple Profile .avi files of up to size 352 x 288. The more powerful Jukebox
120 and Archos Video AV140 can play sizes up to 640x368 at 25frames/second and sizes up to 640x480 with reduced frame rates.
Button Action
Play/pause Plays and pauses the video file
Right, hold Right Advance to the next key frame, Forward fast (goes to pause state on release)
Left, hold Left Go back to the previous key frame, fast Review (goes to pause state on release)
Up Increase volume
Down Decrease volume
F1, F2, F3 Displays file elapsed time, remaining time, and total time – click again to shut off
Hold ON After 3 second hold, video signal changes from built-in LCD to AV Out and vice-versa
Off Stops playing video file
Page 18

18
7 Creating MPEG4 Video Files
Refer to the Quick Start Guide for basic information.
Please understand that video re-encoding is not always a simple one button process. Video segments that come from your digital
camcorder or which are freely available on the web are encoded in different ways. If not already in the proper MPEG4 Simple Profile
format, transforming these videos into this format readable by the Jukebox Multimedia requires special software tools. This is due to the
relatively new nature of the ISO (International Standards Organization) MPEG4 video format. Unlike its predecessors MPEG1 and
MPEG2, there are a number of levels in this format and thus not all MPEG4 video files will work on all MPEG4 players, and older
MPEG1 and MPEG2 files must be re-encoded into this format. Although you may have a bit of a learning curve in the initial re-encoding
of video files, once you have the process down, it is just a matter of letting your PC go to work and create video files for playing on your
Jukebox Multimedia.
Another, much simpler method to create MPEG4 videos, is to use the Archos DVR 20 (for the Multimedia 10
and 20) or the Archos DVR 100 (for the Multimedia 120 and AV140) optional add-on as shown to the left. It
is a device that clicks into the expansion port of the Jukebox and allows you to record a video source just like a
video cassette recorder (VCR) by connecting a cable between your video source (TV/VCR) and the Jukebox
Multimedia. This method does not require any re-encoding or that you install the below mentioned software.
ATTENTION: You should also take care to understand the copyright laws for your country and/or jurisdiction. Commercially
produced video materials typically are copyright protected and your right to copy such material may be limited or restricted.
7.1 Installing the Software
If your video file is not an MPEG4 Simple Profile .avi file at the proper size, you will need to re-encode it using the following utilities. For
the Jukebox Multimedia 10 & 20, you will need to create an AVI file that is MPEG4 Simple Profile with a resolution of 352x288 or
smaller and a sound track that is stereo MP3. For the Jukebox Multimedia 120 and the AV140, you need to create an AVI file that is
MPEG4 simple profile with a resolution can be up to 640x480 (depending on frame rate) and also a sound track in stereo MP3.
Please install the programs in the following order.
DivX Codec
This software will install the DivX™ Compression/Decompression into your PC. You should shut off any anti-virus programs when
installing this or other codec software. This is not a program that is run by itself. Rather, it installs background software which allows
your computer to do high quality video compression. This is the MPEG4 compressed video type that the Jukebox Multimedia knows how
to play. You can find this codec software, as well as an application that allows you to play DivX™ videos, at the web site www.divx.com.
There are three versions of the software found at their web site. You can choose the basic “free” version. This will give you the codec that
you will need. For Macintosh users, DivX™ re-encoding software is just in its infancy. Currently DivXnetworks has released only a
QuickTime™ decoder component, not an encoder.
Virtual Dub
A utility for transcoding one video file into another. This is a general purpose transfer and cleanup utility which has many options
allowing for even the most difficult video translations. When you install it from the CD-ROM, it will automatically unzip. It will prompt
you to save it to C:\Program Files\VirtualDub. You should use this default directory location. Otherwise you will have to instruct the
Mpeg4 translator program where to find it.
Mpeg4 Translator
This program, developed by Archos, is a “Front-end” for the Virtual Dub program. It has a simple interface which you use and it then
tells Virtual Dub how to process the video file. It sets all the parameters for Virtual Dub specifically to create a video file in the right size
Page 19

19
and format to be read by the Jukebox Multimedia 10, 20, 120 and the AV140. When you run it for the first time, the Mpeg4 Translator
will need to locate the Virtual Dub program. If you did not install the virtual dub in the default location, you will have to show the
program where Virtual Dub is.
7.2 Using Mpeg4 Translator
To the left you see the image of the main Mpeg4 Translator program. When you first run
the program, if the DivX™ codec has not been installed yet, you will be notified. You
should go and download the codec and install it on your computer. If the Virtual dub
program has not been installed, you will also be notified, and you should also install it
(either from the CD or the Virtual Dub website). If you have placed the Virtual Dub
program in a folder other than the default, it will ask you to locate the file.
Select Source & Destination Files
In the example to the left, a source file Joe.avi has been selected as the source video. You
can see on the bottom of the window its original characteristics (width 480, height 272,
frame rate 24). Next, you must then tell the program where to place (Set Destination file)
the newly recoded version of the file (it will not erase the original).
Change Settings
Following, you can change the parameters (Change Settings) of the DivX™ encoder to give adjust the level of quality of the final image.
Like MP3 music, the higher the bit rate setting is made, the higher the quality of the
music, or video in this case, that you will get. However, this will also take up more
space on your disc drive. At a horizontal size of 640 for example, a setting of 800
kbits/sec will give you a nice looking image for viewing on a television. For near DVD quality, you can set it to about 1200 kbits/second.
Target & Aspect Ratio (Jukebox 10 or 20)
Use the Target control to specify which type of Archos product you have. The program determines the best way to make it playable on the
target device (Jukebox Multimedia 10 or 20 in the case above). The highest resolution that is playable on a Jukebox 10 or 20 is 352x288.
The aspect ratio will change according to the type of output you plan on using. Choose the PAL button if you plan to connect your
Jukebox Multimedia to a European television or the NTSC button for an American television. Choose NTSC if you plan to display it on
the Jukebox only. You will notice that the width and height dimensions will change. This is normal and is required so that your image
does not look squashed or stretched.
Target & Priority (Jukebox 120 or AV140)
When you select a target of Jukebox Multimedia 120 or Archos Video AV140, you will see a Priority box appear. This control is to allow
the user to select which feature of the video to be guarded. If for example you are reencoding a video file that is 800x600 in resolution and 30 frames per second, this is
beyond the maximum resolution that the Jukebox Multimedia can play. Thus, the
Mpeg4 Translator program will have to decrease the resolution, the frame rate, or both.
If you prefer that the resolution of the image is kept to the largest maximum, then click
on the Priority control Resolution. The best possible resolution will be kept and the frame rate will be decreased in order to accommodate
that resolution. On the other hand, if you want to make sure you keep the highest possible frame rate, then click on the Priority control fps.
The highest possible frame rate will be kept and the image resolution will be decreased to accommodate keeping the higher frame rate. In
all cases, even if the original frame rate is 29 or 30 frames per second, the destination file will have a strict maximum of 25 frames per
second.
Page 20

20
Start
Click on Start and the program will call Virtual Dub to start processing the video. Depending on the power and speed of your computer,
this could take real time (a 60 minute long video re-encoded in about 60 minutes) or much longer. As
shown to the left, you will see the progress as it processes the video file. If the Start button is grayed out,
it would be for one of two reasons. 1) The source file is not a true AVI file. Even if the file name ends
with .avi, the internal file data determines if it is truly an AVI file. 2) The Virtual Dub program was not
located when Mpeg4 Translator was started up. Close the program, restart it, and make sure you locate
the Virtual Dub program.
MP3 Sound Track
Remember, in order for the Jukebox Multimedia to be able to play the video, it must have an MP3 (MPEG layer 3) stereo sound track. If
the source video file did not have an MP3 stereo sound track then your destination file will have no sound. Mpeg4 translator will signal
this error condition. Obviously, it is pretty useless to have the video file without sound. What you will need in this case is an MP3
encoder available for Virtual Dub to use. There are MP3 encoders (usually packaged together as an encoder and decoder) available on the
Web. If you choose to use the LAME codec, make sure that you have a version built with the ACM front-end. You can find other MP3
codecs on the web by using the search terms ACM, MP3 and CODEC in your favorite web search engine. Once this codec is installed into
your system, Mpeg4 Translator will be able to create final video files with MP3 sound, even if the source video file does not have an MP3
sound track.
If you are unsure what codecs (audio and/or video) your computer has, you can see the list, as shown to the
left, by going to the following location. Click on Start > Control Panel > Multimedia > Devices and then you
will see a list which includes the Video Codecs and the Audio Codecs which are installed in your system.
Decoding of MPEG 2 video files is currently not supported by Mpeg4 Translator. These are usually .mpg or
.mpeg format files, not the required AVI file. There are other tools found on the Internet that may be
downloaded in order to help you with these file types. A good starting place is the web site www.digitaldigest.com.
Page 21

1
8 Viewing Photos & Reading Memory Cards
Refer to the Quick Start Guide for basic information.
8.1 Viewing Photos
The Jukebox Multimedia is able to display pictures of type JPEG (progressive JPEG not supported) and BMP (4,8, and 24 bit depth) on its
built-in screen or on a television (Hold the ON button for 5 seconds to change between built-in screen and video out). To view a photo,
simply highlight it and click on Play. The Jukebox Multimedia will readjust the picture size to fit the screen. However, it can only resize
in certain steps. Thus your images may not always fill the entire LCD screen or television screen. To fill up the entire screen, pictures
should be in multiples of resolution 600x800 (PAL TV output), 600x384 (NTSC TV output), or 660x468 (Internal LCD). Use the Preview
mode [F1] while viewing pictures to show picture thumbnails and to go directly to the picture you want.
Button Action
Right Advance to the next picture in the current folder
Left Go back to the previous picture in the current folder
Up Rotate viewing counter-clockwise
Down Rotate viewing clockwise
F1 Setup: Adjust settings or set preview mode to view 1, 4, or 9 (with 100 series) images at a time.
F2 No Bar: Show F1 and F3 options
F3 More: Show file information and Delete file if desired
Off Go back to the browser view (view directories)
8.2 Transferring Photos from a Memory Card
Using one of the Memory Card Reader Add-ons from ARCHOS, you can read MMC*, Memory Stick®*,
SmartMedia™, and CompactFlash™ (CF) type 1 and 2 cards, as well as CompactFlash™ Microdrives. Before
connecting your Memory Card Reader to the Jukebox Multimedia, make sure the Jukebox is off. When connecting
the Memory Card Reader, make sure that it “clicks” into place with both the left and right side making a firm
connection. Once connected, turn on the Jukebox Multimedia. Now insert your memory card (face down for
Compact Flash and SmartMedia cards). The Jukebox will recognize that you have inserted a card. It will then
display the contents of the card.
With digital cameras, it is often the case that the camera stores its pictures in a subdirectory called DCIM (or even a
subdirectory within that). Once you locate the images in the Compact Flash card, click on [F3] Copy, in order to choose your copy option.
You can copy a single file or all of the files of a directory to the hard drive. Select a copy option and then click on
Play. You must now let the Jukebox know where you want to copy the image or images to. Once in the desired
folder, scroll down past all the existing subfolders and files and you will see the option <<copy here>>. Click [F3]
Copy, and your images will be copied to that folder. Once all the images are copied**, can you pull out the card from
the Memory Card Reader. The contents of the memory card will remain intact (will not be erased). You must shut off the Jukebox before
unplugging the card reader from the Jukebox.
ATTENTION: If you have file types other than .jpg and .bmp on your memory card, such as .raw or .tif, to be transferred to the Jukebox,
you must make sure that in the Setup : Settings menu, the option Show all Files is on. Scroll down toward the bottom of the list of
parameters to find it. If it is off, the Jukebox will filter the incoming files and copy only the playable types (.mp3, .m3u, .bmp, .jpg, and
.avi). It is not possible to transfer files in the other direction, that is, from the Jukebox multimedia to the memory card.
2
Page 22

22
*not available for Jukebox Multimedia 10 and 20
** If a file already exists with the same name, the Jukebox will let you either overwrite the existing file or write the new file with an index number appended
to it.
8.3 Creating a Slideshow
Picture Slideshows are created exactly like MP3 Playlists. While browsing through files, highlight the file you want and then hold down
on the play button for three seconds. The filename will change color indicating that it has been added to the Playlist. You can continue to
add JPEG images to the Playlist in this manner. The maximum number is 5000. A picture Playlist can be run, saved, cleared, or shuffled,
just like an MP3 Playlist. You will find a Picture Pause setting under [F1] Setup then under Playmode which will allow you to set the
number of seconds each image is displayed on the screen. As mentioned above, when playing the slideshow, the Jukebox Multimedia will
readjust the picture size to fit the screen.
8.4 Creating Slideshows with Background Music
Slideshows can easily be set to music making the viewing experience much more enjoyable. You can also experiment with voice narration
and create a slideshow with a running off screen voice. You simply put a combination of JPEG images and MP3 music into the Playlist
and let it run. There are a few rules you have to remember in order for the music and images to play as you wish them to.
For example, here is how you might create an interesting slideshow of a sporting event. First, put all your pictures into a single folder,
let’s call that folder parachuting for example. Next, clear the Playlist so that you are sure there is nothing in it. Search through your MP3
music and find some music to go with the mood of the pictures. Hold down the Play button for three seconds to enter that MP3 into the
Playlist as the first item. Next, go over to your parachuting folder and add it. The jukebox will load all the pictures from that folder into
the Playlist automatically. Finally, set the length of time you want each picture to be on the screen. To do this, go to Setup [F3] : Play
Mode and then scroll down to the bottom where you’ll find the Picture Pause setting. Set it to five seconds. The faster the music, the
quicker this setting should be since you will want to have a speed similar to the beat of the music. Now save your Playlist or play it
immediately. The Music will start and the pictures will display for five seconds each. The slideshow will end after the last Playlist item is
played. To create even longer slideshows, you can calculate the number of pictures a song might last for and insert a second MP3 track
further down in the list of Pictures.
If you have made a recording for each image, say a voice narration, you can enter the narrations and images alternately. The image will
stay on the screen for a minimum of what has been set in the Picture Pause setting, and a maximum of the length of the narration. For
example, say you have 12 pictures (ex: pic1.jpg – pic12.jpg) and 12 individual voice recordings (ex: voice1.mp3 – voice12.jpg) that
correspond to each picture. Put voice1.mp3 as the first item in the Playlist. Next, put pic1.jpg as the second Playlist item. Continue
creating your Playlist this way so that you have alternately, a sound, a picture, a sound, a picture, etc. Set the Picture Pause setting to 10
seconds. Now, when you play the Playlist, the first voice recording will start as the first image is being displayed. If the voice recording is
longer than 10 seconds (the Picture Pause time) the first image will continue to be displayed until the end of the current MP3 voice track.
If the voice recording is shorter than the Picture Pause time, there will be silence until the Picture Pause time is reached and then the next
MP3 track will start with the next picture being displayed.
The Jukebox Multimedia follows these rules when playing a combination of MP3s and JPEGs from a Playlist.
1. The Jukebox Multimedia plays each file in the Playlist in order. It never jumps ahead based on MP3 music length.
2. Picture Pause time is always respected (note 1). A picture will never be displayed for a shorter period of time than the setting Picture
Pause indicates (regardless if an MP3 is finished playing).
3. An MP3 file will only start AFTER a previous MP3 is finished playing (note 2).
Note 1) The last picture in a series of pictures may have a duration longer than the Picture Pause setting because the JBM hasn't yet finished playing an MP3
file.
Note 2) The MP3 may however not start immediately after the previous MP3 is finished, due to the fact that pictures may still be displaying.
Page 23

23
9 Connecting / Disconnecting from your Computer
9.1 Connecting the Jukebox Multimedia to your computer
Windows ME, 2000, XP (Home/professional) and Macintosh OS 9.2 and above do not require any special installation of software drivers.
The Jukebox Multimedia will be recognized as a Mass Storage Device and mount automatically within a few seconds of being connected.
For PCs running Windows operating systems, you will see a new drive letter, such as E: in My Computer. For Macintosh, you will see a
new Hard Drive Icon on your desktop. Note also that when the Jukebox is connected to a computer, it will use more energy than usual.
Your battery power will be consumed at a higher rate than normal. Thus, you should always use the AC adapter when connected.
Preferred Connection Order (all computers):
1) Use the power adapter to avoid that the Jukebox shuts off due to low power (battery consumption is greater when USB connected)
2) Plug USB cable into Jukebox Multimedia
3) Turn on the Jukebox Multimedia – wait until it completely boots up
4) Plug other end of cable into already running computer
Installing Drivers for Windows 98SE
When you first plug a Jukebox Multimedia into a computer running Window 98SE, it will recognize the hardware and ask to have drivers
installed. Follow the instructions below.
1. Windows 98SE has
recognized a new piece of
hardware (the Jukebox
Multimedia) and starts its
wizard. Click on Next.
4. Windows will now go and
copy from the CD to your
computer’s hard drive, all the
files it needs to make the
USB connection operational.
Click on Next to tell
Windows to install the driver.
2. Click on the button Search
for the best driver. Open up
the CD tray on your computer
and insert the included Archos
CD-ROM and then close the
5. Windows will indicate
when it has finished copying
the drivers. Click on Finish.
Do not unplug the Jukebox
from the computer.
tray. Now click on Next.
3. Uncheck the box Floppy
disk drives if it is checked,
and then check the box
Specify a location. Type in the
drive letter of your CD player
(usually D:) followed by:
/Drivers (for JBM 120 &
AV140) or /Win98SE (for
JBM 20). Click on Next and
Windows will then load the
correct drivers.
Seen here as E: on a Windows
XP machine and as F: on a
Windows98SE machine
6. Once finished, the
computer will automatically
recognize the connected
device (The Jukebox
Multimedia). It will be seen as
another drive in your file
management system.
Page 24

24
9.2 Disconnecting the Jukebox Multimedia from your Computer
WARNING: You must properly disconnect (unmount) your Jukebox from the computer before disconnecting the cable to avoid
loss of data or freezing the computer and/or the Jukebox. DO NOT SIMPLY PULL OUT THE USB CABLE AT ANY TIME.
To unmount the Jukebox Multimedia hard drive, click on the save remove icon (a green arrow) and follow the instructions. Wait until you get a
message saying that you can safely unplug the device before disconnecting the USB cable. Attention: The operating system will not allow you to
disconnect the Multimedia Jukebox if you have an open file from it in a running application. You will have to close all open Jukebox files in any
running application.
Warning: Failure to safely unmount the hard drive and disconnect the Jukebox as explained may cause the operating system or Jukebox to freeze
and/or lose data.
1. Safe remove icon next to clock
Windows XP Windows 98SE
2. Click to Eject (unmount) Jukebox Multimedia
3. Click OK, verify the message, then
unplug cable (computer or Jukebox side)
Page 25

25
10 Troubleshooting
• In case of Electrostatic Discharge, the Jukebox may lose function. Just power off and on in order to restore.
If you have troubles getting your computer to recognize (mount) the Jukebox Multimedia as an external hard drive, check the following.
• If using Windows 98SE, you must first install the drivers from the included CD-ROM.
• If using a USB hub, try connecting without using the hub (some hubs are not powered and may not work with the Jukebox)
• If using a USB port in the front of your computer, try a USB port in the back. Front USB ports are often from non-powered hubs
• Do not connect to a USB port repeated through a keyboard
• Your USB driver software may be out of date. Find your USB chipset type by going to My Computer > Properties > Device
Driver > Universal Serial Bus (USB) Controllers > Host Controller. You may have a chipset VIA, Intel, SIS or another. It is
possible that you do not have the latest software drivers for these chipsets. For VIA updates, check out www.viaarena.com. For
Intel check out www.intel.com. For SIS, cancel the driver and reinstall the Windows default USB controller drivers.
• If using a laptop computer and a docking station, try connecting without the docking station.
• If using the optional Archos USB 2.0 interface cable (JBM 10 & 20) to connect to your computer, first connect the interface
cable to the Jukebox while it is off, start up the Jukebox, then once the Jukebox has finished booting up, connect the other end of
the USB cable to a running computer. Starting up the Jukebox with it already connected via the USB 2.0 interface cable may the
Jukebox to be unrecognized by the computer.
• Shut off and reboot the computer and the Jukebox and then try connecting again in the preferred order mentioned above.
• If Macintosh OS 10.1.x says it cannot mount the volume, you can use Disk Utility to reformat the Jukebox hard drive to type MS
DOS FAT32. However, files will only be readable from a Macintosh, not a Windows machine.
• Make sure in your system BIOS the USB port is checked “ON” not “Off” Usually just on old machines.
• In Win98SE make sure in the Config.sys if there is a line “last drive = ” that it be last drive = z: Usually just on old machines.
Page 26

26
11 Using MusicMatch™ Software
11.1 Installing MusicMatch™
This software will help you to create Playlists, rename files, change ID 3 tag information (Artist, Album, Song title), and execute other
useful MP3 related functions such as transforming your personal CDs into MP3 files for playing on the Jukebox.
Installing Music Match™ software on your PC quite simple. Just slip the included CD into
your CR-ROM drive and the autorun system will present you with a list of installation options.
You can then choose Music Match™ in the language of your choice. When installing
MusicMatch™, it will ask you to enter a serial number. You will find the serial number
printed on the paper pouch that the CD was packaged in. If for some reason the autorun does
not present the menu when you place the CD into your computer, you can run the installation
via the executable program (.exe) in the folder MUSICMATCH. You will see a number of languages offered. There is an extensive help
section in MusicMatch to show you how to use it. Just click on the help button as show below once you have installed it.
Portable Device
There are some functions in MusicMatch which allow direct access to the Jukebox Multimedia. In order for the program to recognize the
Jukebox as a “Device”, it requires a plug in. The plug-in is included in version 7.2 of Music Match and already installed. In order for
MusicMatch to recognize the Jukebox Multimedia as a Portable Device, its volume name must be called “Jukebox”. If it is not, you can
rename it by right-clicking on the Jukebox hard drive in Explorer, select Properties, and then change the volume name to “Jukebox”. Now
you can export music tracks to the Jukebox Multimedia directly. Be careful as MusicMatch only places the MP3 files in the root directory.
It is preferable to use your file management system to copy files to and from your computer’s hard drive and the Jukebox Multimedia’s
hard drive.
11.2 Macintosh Users
For Macintosh users, Archos has created a plug-in for iTunes. You will find a folder on the installation CD containing the
Archos iTunes plug-in which allows the iTunes program to recognize the Jukebox Multimedia as a device. There is a JPEG
image next to the plug-in which will show you where to place the plug-in. Restart the iTunes program and you will see your Jukebox as a
device.
Page 27

27
12 Optional Add-ons*
The following add-ons and accessories for the Jukebox Multimedia can be purchase at your local retailer or through the on-line web shop
at www.archos.com.
*Verify availability
JBM Camera 100 for JBM 10, 20, 120 & AV 140
This camera turns your Jukebox Multimedia into a digital camera & camcorder. Save still images as .jpg files and
movies as MP4 .avi files. Has 1.3 Megapixel captor and 2x Digital Zoom.
JBM CompactFlash™ Reader for JBM 10, 20, 120 & AV 140
This adapter allows you to copy files from your CompactFlash™ cards onto the Jukebox Multimedia’s hard drive. To
use this adapter, simply connect it to the Jukebox when it is off, then once the Jukebox has been restarted, insert your
CompactFlash™ card (face down) and after a couple of seconds, the Jukebox will recognize it and ask you if you would
like to copy the contents or a single file. If you want to copy all file types from your CompactFlash™ memory card
(.tiff, .raw, etc.), remember to set your Jukebox hardware settings to Show all files : On.
JBM SmartMedia™ Reader for JBM 10, 20, 120 & AV 140
This adapter allows you to copy files from your SmartMedia™ cards onto the Jukebox Multimedia’s hard drive. To use
this adapter, simply connect it to the Jukebox when it is off, then once the Jukebox has been restarted, insert your
SmartMedia™ card (face down) and after a couple of seconds, the Jukebox will recognize it and ask you if you would
like to copy the contents or a single file. If you want to copy all file types from your SmartMedia™ memory card (.tiff,
.raw, etc.), remember to set your Jukebox hardware settings to Show all files : On.
JBM Memory Stick® and MultiMediaCard Reader for JBM 120 & AV 140
This adapter allows you to copy files from your MultiMediaCard and Memory Stick® cards onto the Jukebox
Multimedia’s hard drive. To use this adapter, simply connect it to the Jukebox when it is off, then once the Jukebox
has been restarted, insert your memory card and after a couple of seconds, the Jukebox will recognize it and ask you if
you would like to copy the contents or a single file. If you want to copy all file types from your MultiMediaCard or
Memory Stick® (.tiff, .raw, etc.), remember to set your Jukebox hardware settings to Show all files : On.
JBM DVR 20 Digital Video Recorder version for JBM 10 & 20
JBM DVR 100 Digital Video Recorder version for JBM 120 & AV 140
This add-on allows you to record video directly from a video source (TV, video cassette recorder, etc.) into MP4
format on the Jukebox Multimedia’s hard drive. Recordings are saved as MPEG4 .avi files. You have a choice to
encode at High or Low frame rates and a choice of bitrates from 500kb/s to 2000 kb/s. Accepts either composite video
input or S-video input. Audio is recorded via the regular line-in connection. Comes with infrared remote control and
records in European or American TV standard.
Page 28

28
JBM USB 2.0 Interface Cable for JBM 10, 20
This specialized cable with a built-in USB 2.0 circuit inside allows you to connect your Jukebox Multimedia to any
computer with a standard USB 2.0 port. USB 2.0 is a high speed connection that allows significantly faster copying of
files to and from the Jukebox Multimedia.
JBM FireWire Interface Cable for JBM 10, 20, 120 & AV 140
This specialized cable with a built-in FireWire circuit inside allows you to connect your Jukebox Multimedia to any
computer with a standard FireWire port. The FireWire standard is a high speed connection that allows significantly
faster copying of files to and from the Jukebox Multimedia. This connector is a 6 pin male connection. It will not
work with iLink 4 pin ports found on some computers.
JBM FM radio and Remote Control for JBM 10, 20, 120 & AV 140
This device is a remote control that clips onto the lapel of your jacket or shirt. Not only can you control the Jukebox
Multimedia with it, but it has a built-in FM stereo tuner and microphone allowing you to listen to and record FM
stereo music as well as record your voice like a voice recorder.
ACCESSORIES
Stereo Microphone for all ARCHOS Jukebox Products
This microphone with pre-amp is an excellent way to create high quality stereo recordings.
Traveler Case for all ARCHOS Jukebox Products
This rugged and weather-resistant case was designed specifically to carry the Jukebox Multimedia and its accessories.
Page 29

29
13 Technical Support
• Only the unit and its add-ons are under warranty, not the accessories
• If technical support determines that your product needs to be returned, please contact the place of purchase to have your product repaired or replaced
(depending on problem type).
• There is an FAQ – Frequently Asked Questions section at the ARCHOS Website www.archos.com that can help answer many of your questions.
• If you need technical help, you may contact ARCHOS directly in your own language via these phone numbers. For other countries, please use e-mail
technical support.
Telephone Support:
949-609-1400 (USA, Canada)
09-1745-6224 (Spain)
01 70 20 00 30 (France)
0207-949-0115 (UK)
02-4827-1143 (Italy)
02-050-405-10 (Netherlands)
069-6698-4714 (Germany)
E-mail Support:
technical-support@archos.com (United States and Canada customers) English
support-technique@archos.com (Europe and rest of the planet) English and French
support.de@archos.com (German Language)
To respond to your e-mails efficiently, when sending one, please indicate the product name and question type in the Subject of the e-mail.
For example:
To: technical-support@archos.com
Subject: Jukebox Multimedia 120 – USB connection to Macintosh
Worldwide Offices
United States & Canada Europe & Asia
ARCHOS Technology
3, Goodyear – Unit A
Irvine, CA 92618 USA
Phone: 1 949-609-1400
Fax: 1 949-609-1414
United Kingdom
ARCHOS (UK) Limited
Regus House
Windmill Hill Business Park
Whitehill Way
Swindon
Wiltshire SN5 6QR UK
Phone: +44 (0) 1793 44 15 10
Fax: +44 (0) 1793 44 16 10
WWW.ARCHOS.COM
ARCHOS S.A.
12, rue Ampère
91430 Igny
France
Phone: +33 (0) 169 33 169 0
Fax: +33 (0) 169 33 169 9
Germany
ARCHOS Germany GmbH
Bredelaerstrasse 63
40474 Düsseldorf
Germany
Tel: +49 211 1520 384
Fax: +49 211 1520 349
 Loading...