

Page 1

ARCAM
ARCAM tJi
OME CINEMA
PROCESSOR
CAL Ch£MA HALL TAPE LD SAT VCR AUX
OOO O OOOO
<J
PROLOGC DOLBY 3 STEREO STEREO
г^
OOO
POWER
O
r\
o
L>
O'
XETA 2 A/V PROCESSOR
HANDBOOK
Page 2

r-
WX) CO Wl« sw rowER
10 MK WCB VK
nnnnann
<B)
I
-----
22W - am
H n t»V
© @ ® @ ® (§) ®
&
o
®-
9*T HOE
OEZI
1 -VOUC«
ll=l o
ARCAM
PROBLEMS?
If your dealer is unable to answer any query regarding this or any other
Arcam product please contact Arcam Customer Services on +44 (0)1223
440964 or write to us at the address on the back cover of this handbook.
Page 3
INTRODUCTION
SYSTEM CONFIGURATION .................................................................................... Page 1
INSTALLATION ........................................................................................................ Page 3
LOCATING YOUR LOUDSPEAKERS, LOUDSPEAKER CONNECTIONS . Page 3
AUDIO & VIDEO CONNECTIONS............................................................................ Page 4,
FRONT PANEL FUNCTIONS
SWITCHING ON AND SET UP MODE
..................................................................................
....................................................................
Page 5
Page 5
USING YOUR XETA 2
REMOTE CONTROL COMMANDS
........................................................................
Page 9
GENERAL ADVICE ON USE.................................................................................. Page 10
UPGRADE PATHS.................................................................................................. Page 11
CONNECTING TO POWER AMPLIFIERS .............................................................Page 11
SOURCES OF SURROUND MATERIAL................................................................Page 11
SCART CONNECTIONS ........................................................................................ Page 11
FAULT FINDING ADVICE ...................................................................................... Page 12, 13
TECHNICAL SPECIFICATIONS ............................................................................ Inside Back
Cover
INTRODUCTION
Thank you for purchasing this Arcam product.
The Xeta 2 is a sophisticated Home Cinema Dolby Pro Logic processor which offers superb sound
and picture quahty. It must be used with an integrated amphfier or a power ampHfier to drive the
front left and right speakers.
The Xeta 2 is a httle more compHcated to cormect up than an ordinary amphfier. Please read these
instructions carefully and refer to the relevant diagrams on the following pages. Inside the front cover
are diagrams of the Xeta 2's front and rear panels. Each input/output socket, function button and
indicator is clearly numbered. The numbers correspond with those given in the instructions.
For ease of use, the Xeta 2 is suppHed with the CR40 infra-red remote control handset. Many
functions are only available via the remote control.
The Xeta 2 uses On Screen Graphics (OSG) which are displayed on your TV screen via the
composite video MONITOR OUT ® connection, to show which functions have been selected and
which system adjustments have been set.
If your TV does not have a composite video or SCv^RT input it is not possible to view the On Screen
Graphics in nomial use, but it is stiU possible to use the Xeta 2 by following the BASIC SET UP
procedure on page 8 and figure 6.
SYSTEM CONFIGURATION
You may choose from one of three basic connection configurations when using the Xeta 2. These
are discussed below and illustrated in figures 1-3.
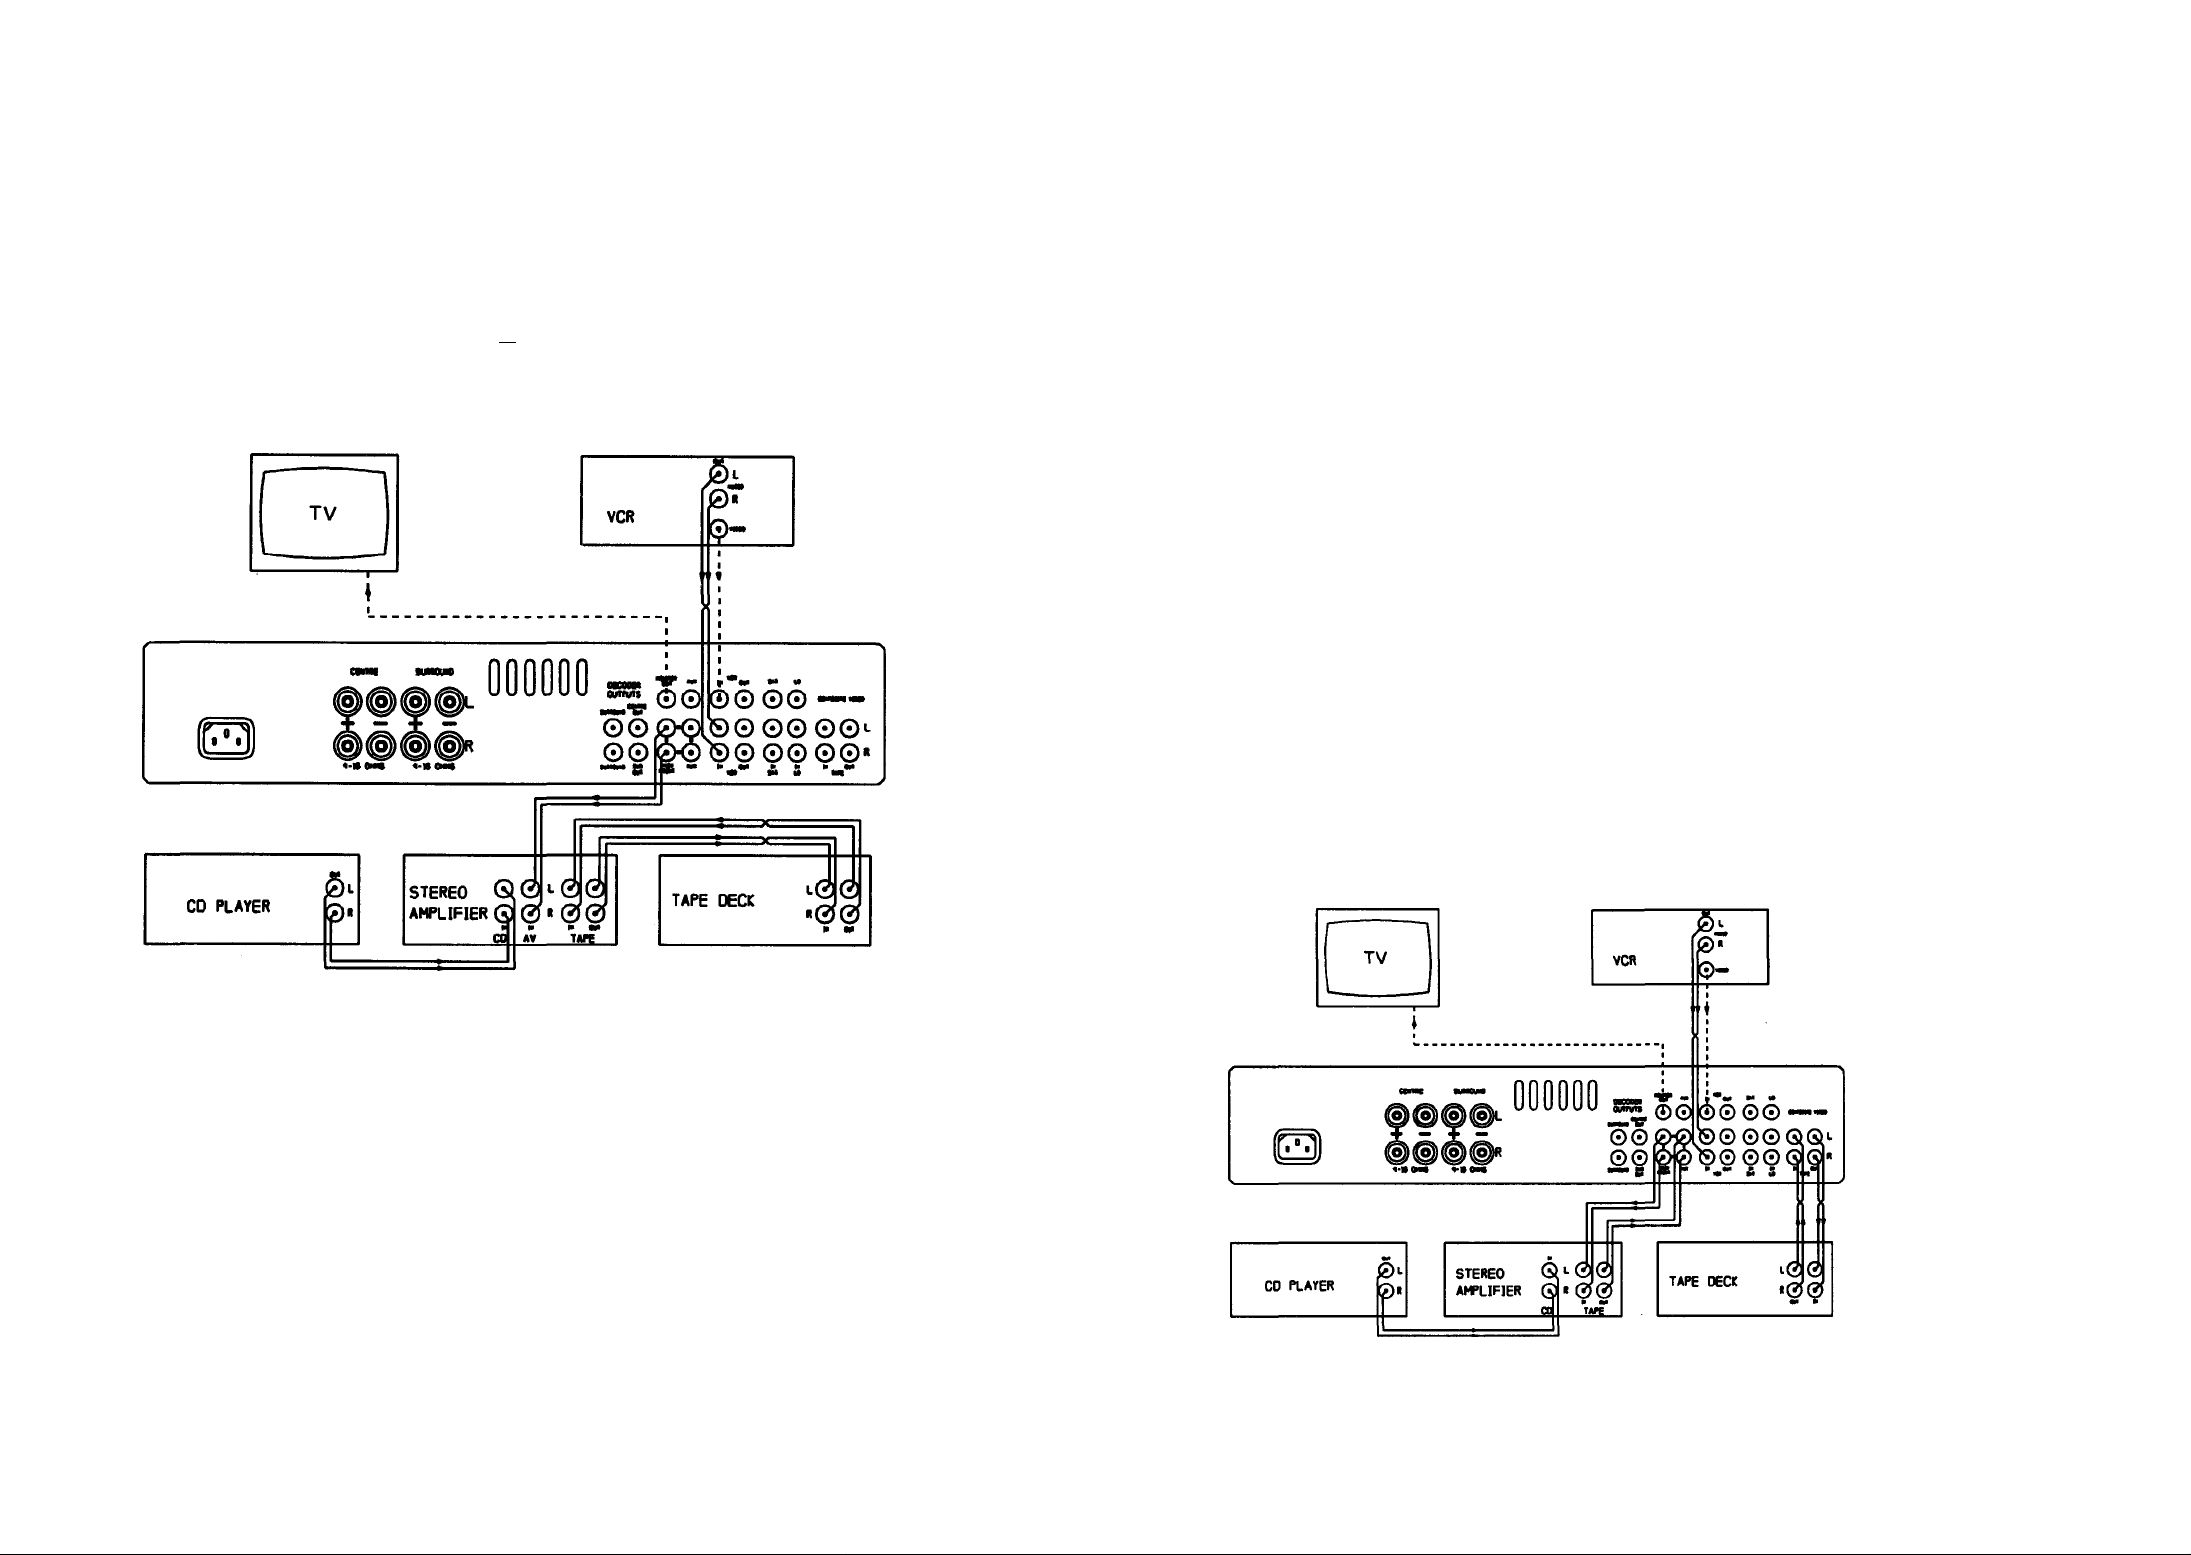
1. BASIC CONFIGURATION WITHOUT COMPOSITE VIDEO (see figure 1)
The On Screen Graphics are not visible in nomial use.The A/V source’s video signal is connected
directly to the TV either on composite video or by the remodulated (RF)connection. Dolby
decoding and processing is possible only with the A/V sources connected to the Xeta 2.
Manufactured under license from Dolby Laboratories Licensing Corporation. Additionally licensed under one or more
of the following patents: U.S. 3,632,886, 3,959,590; Canadian numbers 1,004,603 and 1,037,877.
"Dolby", Pro Logic and the double-D symbol are trademarks of Dolby Laboratories Licensing Corporation.
Figure 1
Page 4
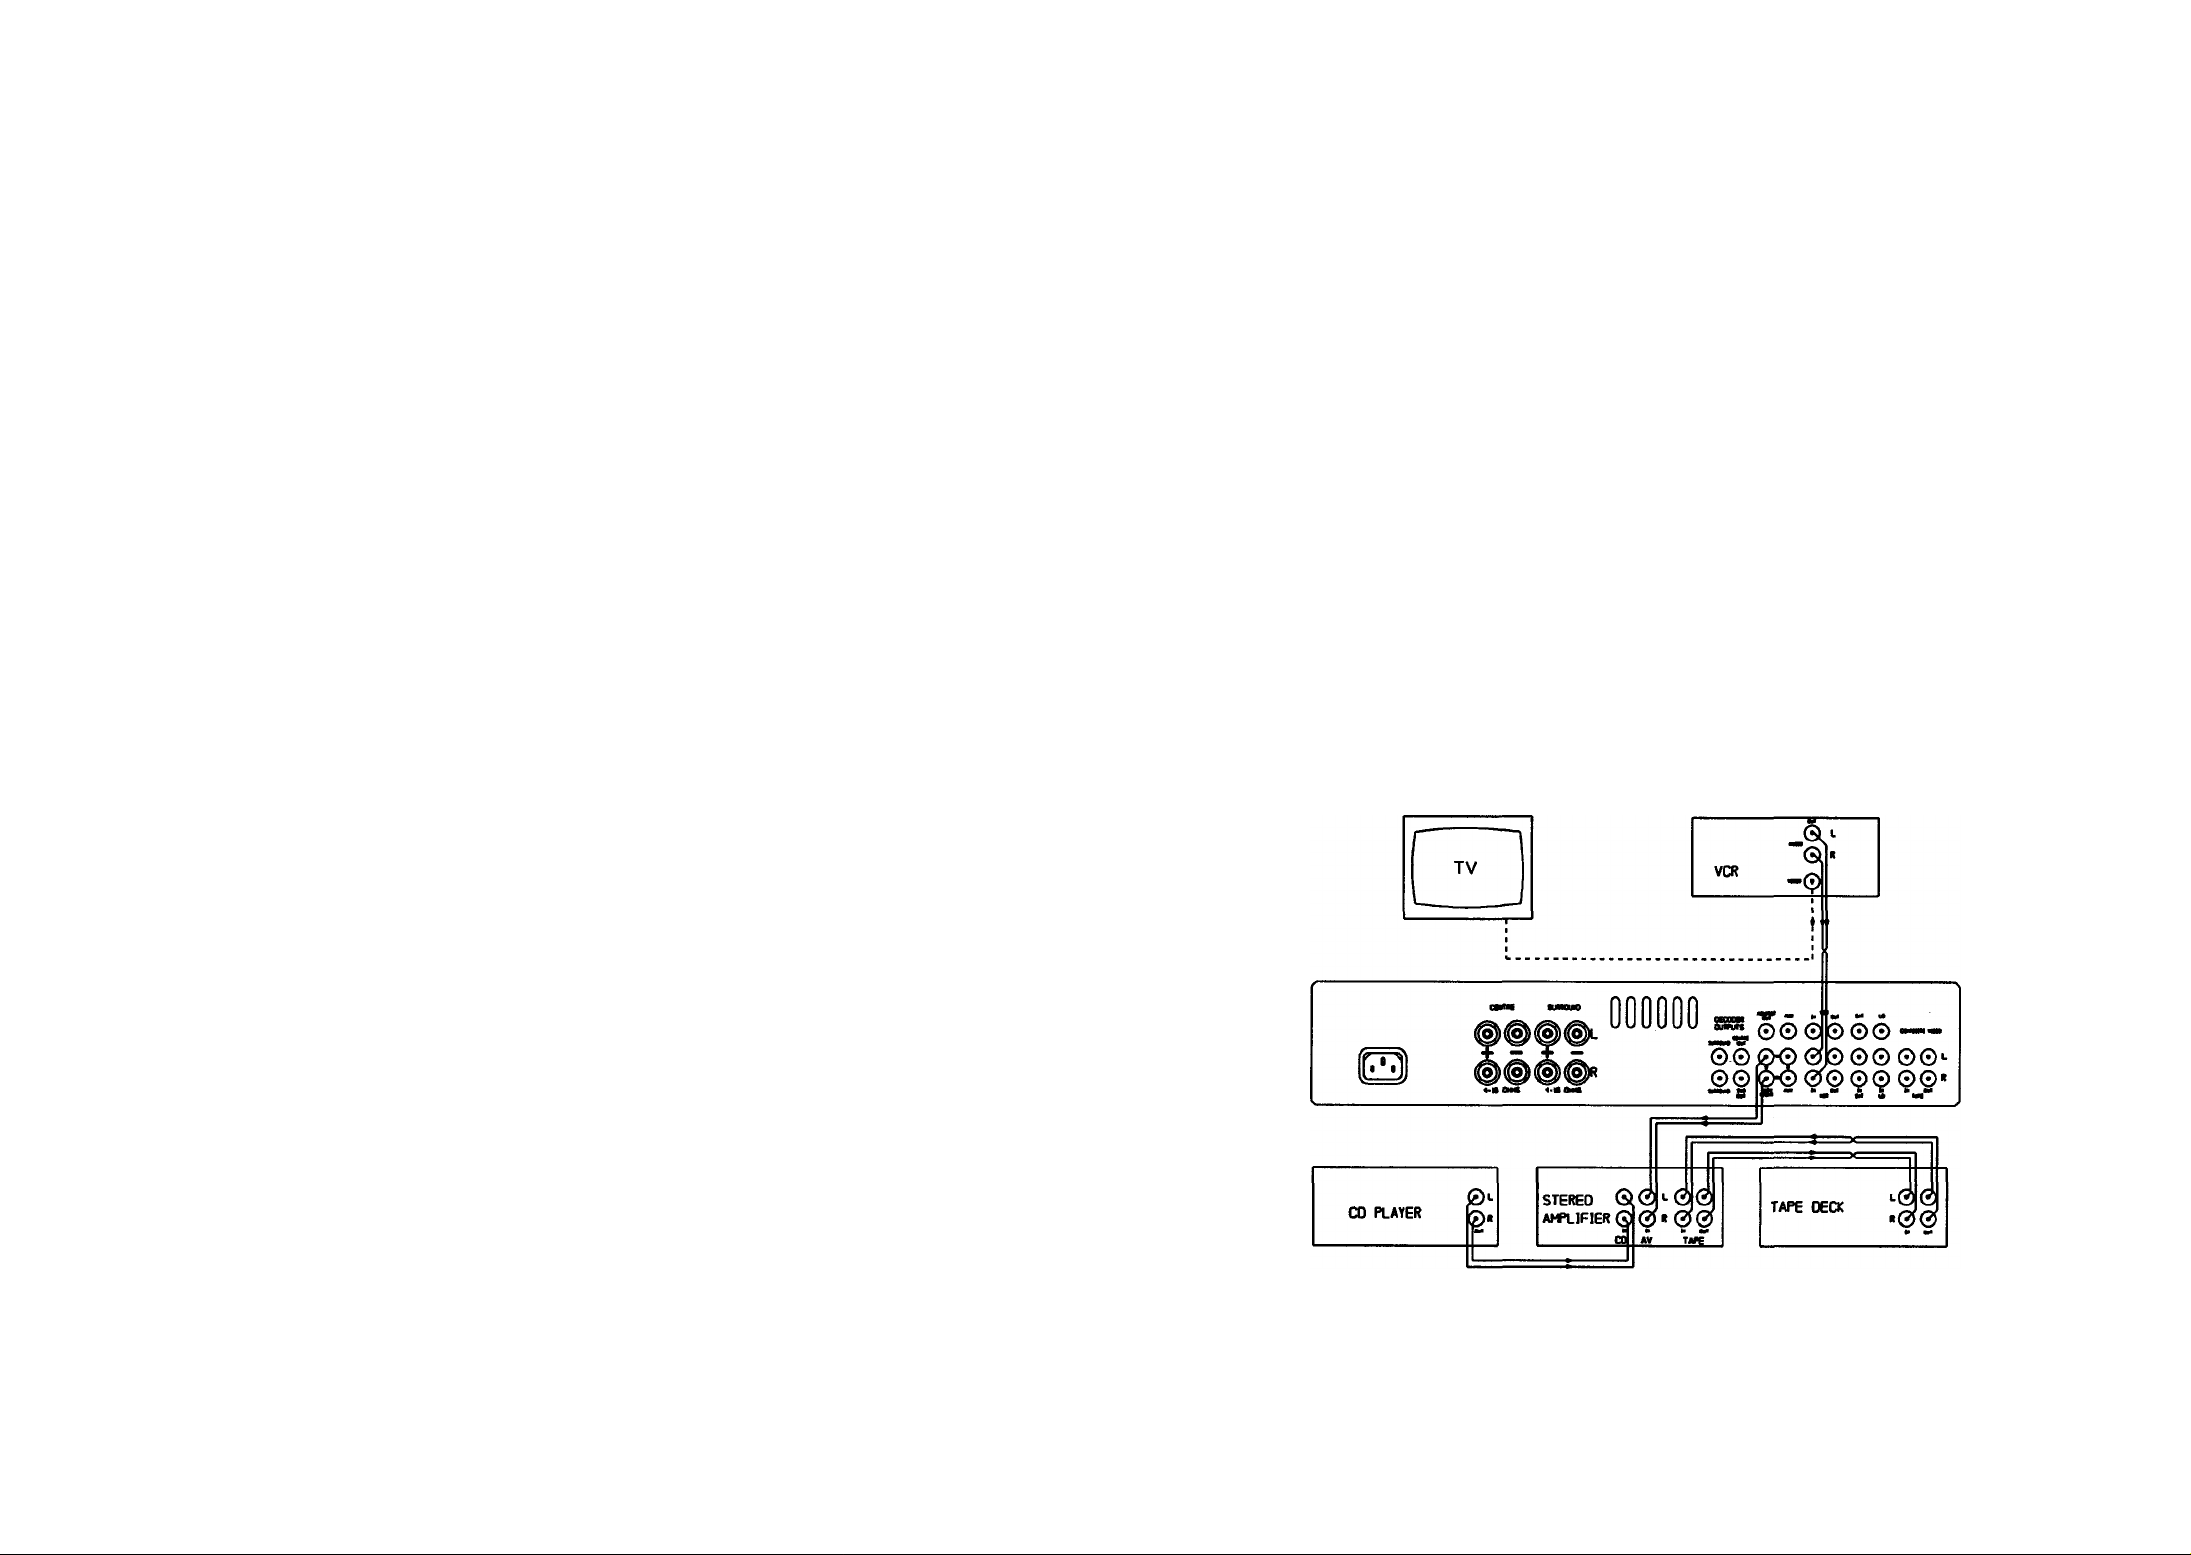
2. USING THE XETA 2 AS AN INPUT EXTENDER FOR AN SOURCES (see figure 2)
Figure 2 shows the suggested wiring for use with a power ampHfier (e.g. an Arcam Delta 290P,
Xeta 290P) Delta 290 integrated amphfiers up to serial number 9934 or any other integrated
amphfier without a spare tape monitor facihty.
Dolby decoding and processing is possible only on the audio from the A/V sources which are
connected to the Xeta 2. The video sources are routed through the Xeta 2 and the composite
video MONITOR OUT connection ® is made to the TV to enable the On Screen Graphics
to be seen.
You should also set the AV READY switch to AV READY (see your Delta 290 handbook for
details). Tbis bypasses the Delta 290's volume control when the PROCESSOR/ TAPE 2 input
is selected to allow the Xeta 2 to control the volume level of the system.
If the tape or processor loop of your amphfier has been used up by the connections to the Xeta
2, then your cassette deck should be cormected to the TAPE IN © and TAPE OUT ® of the
Xeta 2. The monitoring of the tape deck, provided it is a 3 head model, is carried out by use of
the TAPE button on the Xeta 2.
IMPORTANT NOTE: If you wish to optimise the signal path when hstening to audio only
sources you can switch the Delta 290 to the required input and release its PROCESSOR /
TAPE 2 switch. If you change the Delta 290 input via the remote handset the Xeta 2 wiU
automatically change to the AUX input. However unless you switch off the Xeta 2, or put it into
standby, it may also continue to respond to the VOLUME commands from the remote handset
which are directed at the Delta 290.
Under these conditions the volume control of the Xeta 2 can be inadvertendy set very high,
leading to very high sound levels when the Xeta 2 is switched back into the system. To minimise
this possibility you can continuously display the current volume setting of the Xeta 2 on your TV
screen by pushing the DISPLAY button on the remote handset. Additionally the Xeta 2 will
default to a factory set volume level of approximately one-third (22dB below the maximum)
when switching away from its AUX input to any video input, if the current setting is higher than
this default setting.
Figure 2
3. TAPE LOOP CONNECTION (see figure 3)
This allows Dolby Pro Logic decoding and processing of aU the sources cormected to both the
amphfier and the Xeta 2.
This is the suggested configuration if you are using an Arcam A/V Delta 290 (serial no. 9935
onwards) These units are recognisable by the PROCESSOR/ TAPE 2 button on the front panel
and a switch on the rear panel marked AV R^ADY/NORMAL. The tape out cormections of
your stereo amphfier are connected to the AUX input of the Xeta 2. This allows sources
connected to the stereo amplifier to be processed if required. The main front out connections of
the Xeta 2 are coimected to the tape in of the stereo amphfier in order to hear the left and right
front signals. The PROCESSOR/TAPE 2 button on the Delta 290 must be pushed in to enable
the signals to be processed via the Xeta 2.
Figure 3
Page 5
MAINS SUPPLY CONNECTIONS
INSTALLATION
® Check that your mains supply voltage agrees with the voltage setting indicated on the rear panel
of the unit.
■ If your mains supply voltage is different, consult your Arcam dealer.
MAINS SAFETY
■ This product is normally supphed with a moulded mains plug already fitted to the lead. If for
any reason the plug needs to be removed, it must be disposed of immediately and
securely, as it is a potential shock hazard when inserted into a mains socket.
■ If the plug is removed then the remaining lead must be wired as follows:
The blue wire must be connected to the terminal which is coloured blue or marked with the
letter N.
The brown wire must be connected to the terminal which is coloured brown or marked with
the letter L.
The green and yellow wire must be cormected to the terminal which is coloured green and
yellow, or marked with the letter E or the safety earth symbol.
■ When replacing the fuse in the supphed moulded mains plug, the integral fuse holder/cover
must always be refitted. Use a 5 amp fuse (UK models only).
■ Warning: This apparatus must be earthed.
® Insert the lEC fine socket of the mains lead fuUy into the power inlet on the rear panel.
Connect the other end to your mains supply.
NOTE: Always switch the Xeta 2 on and off using the front panel POWER switch. When you are
installing the system you are advised to disconnect or turn down the volume level on your subwoofer
(if using one) before switching the mains supply to the Xeta 2 on at the wall socket. This will avoid
any unwanted cficks or thumps through your subwoofer.
The rear surround loudspeakers should ideally be placed behind the listening position or, if this is not
possible, then to either side. The object of the rear speakers is to produce a difiiise, room filling sound.
Locate the rear loudspeakers away firom you and above your head so that they do not fire directly into
your ears. The addition of a subwoofer to enhance the bass end of your system should also be
considered. The location of a subwoofer is less critical but should foUow the manufacturer's
recommendations.
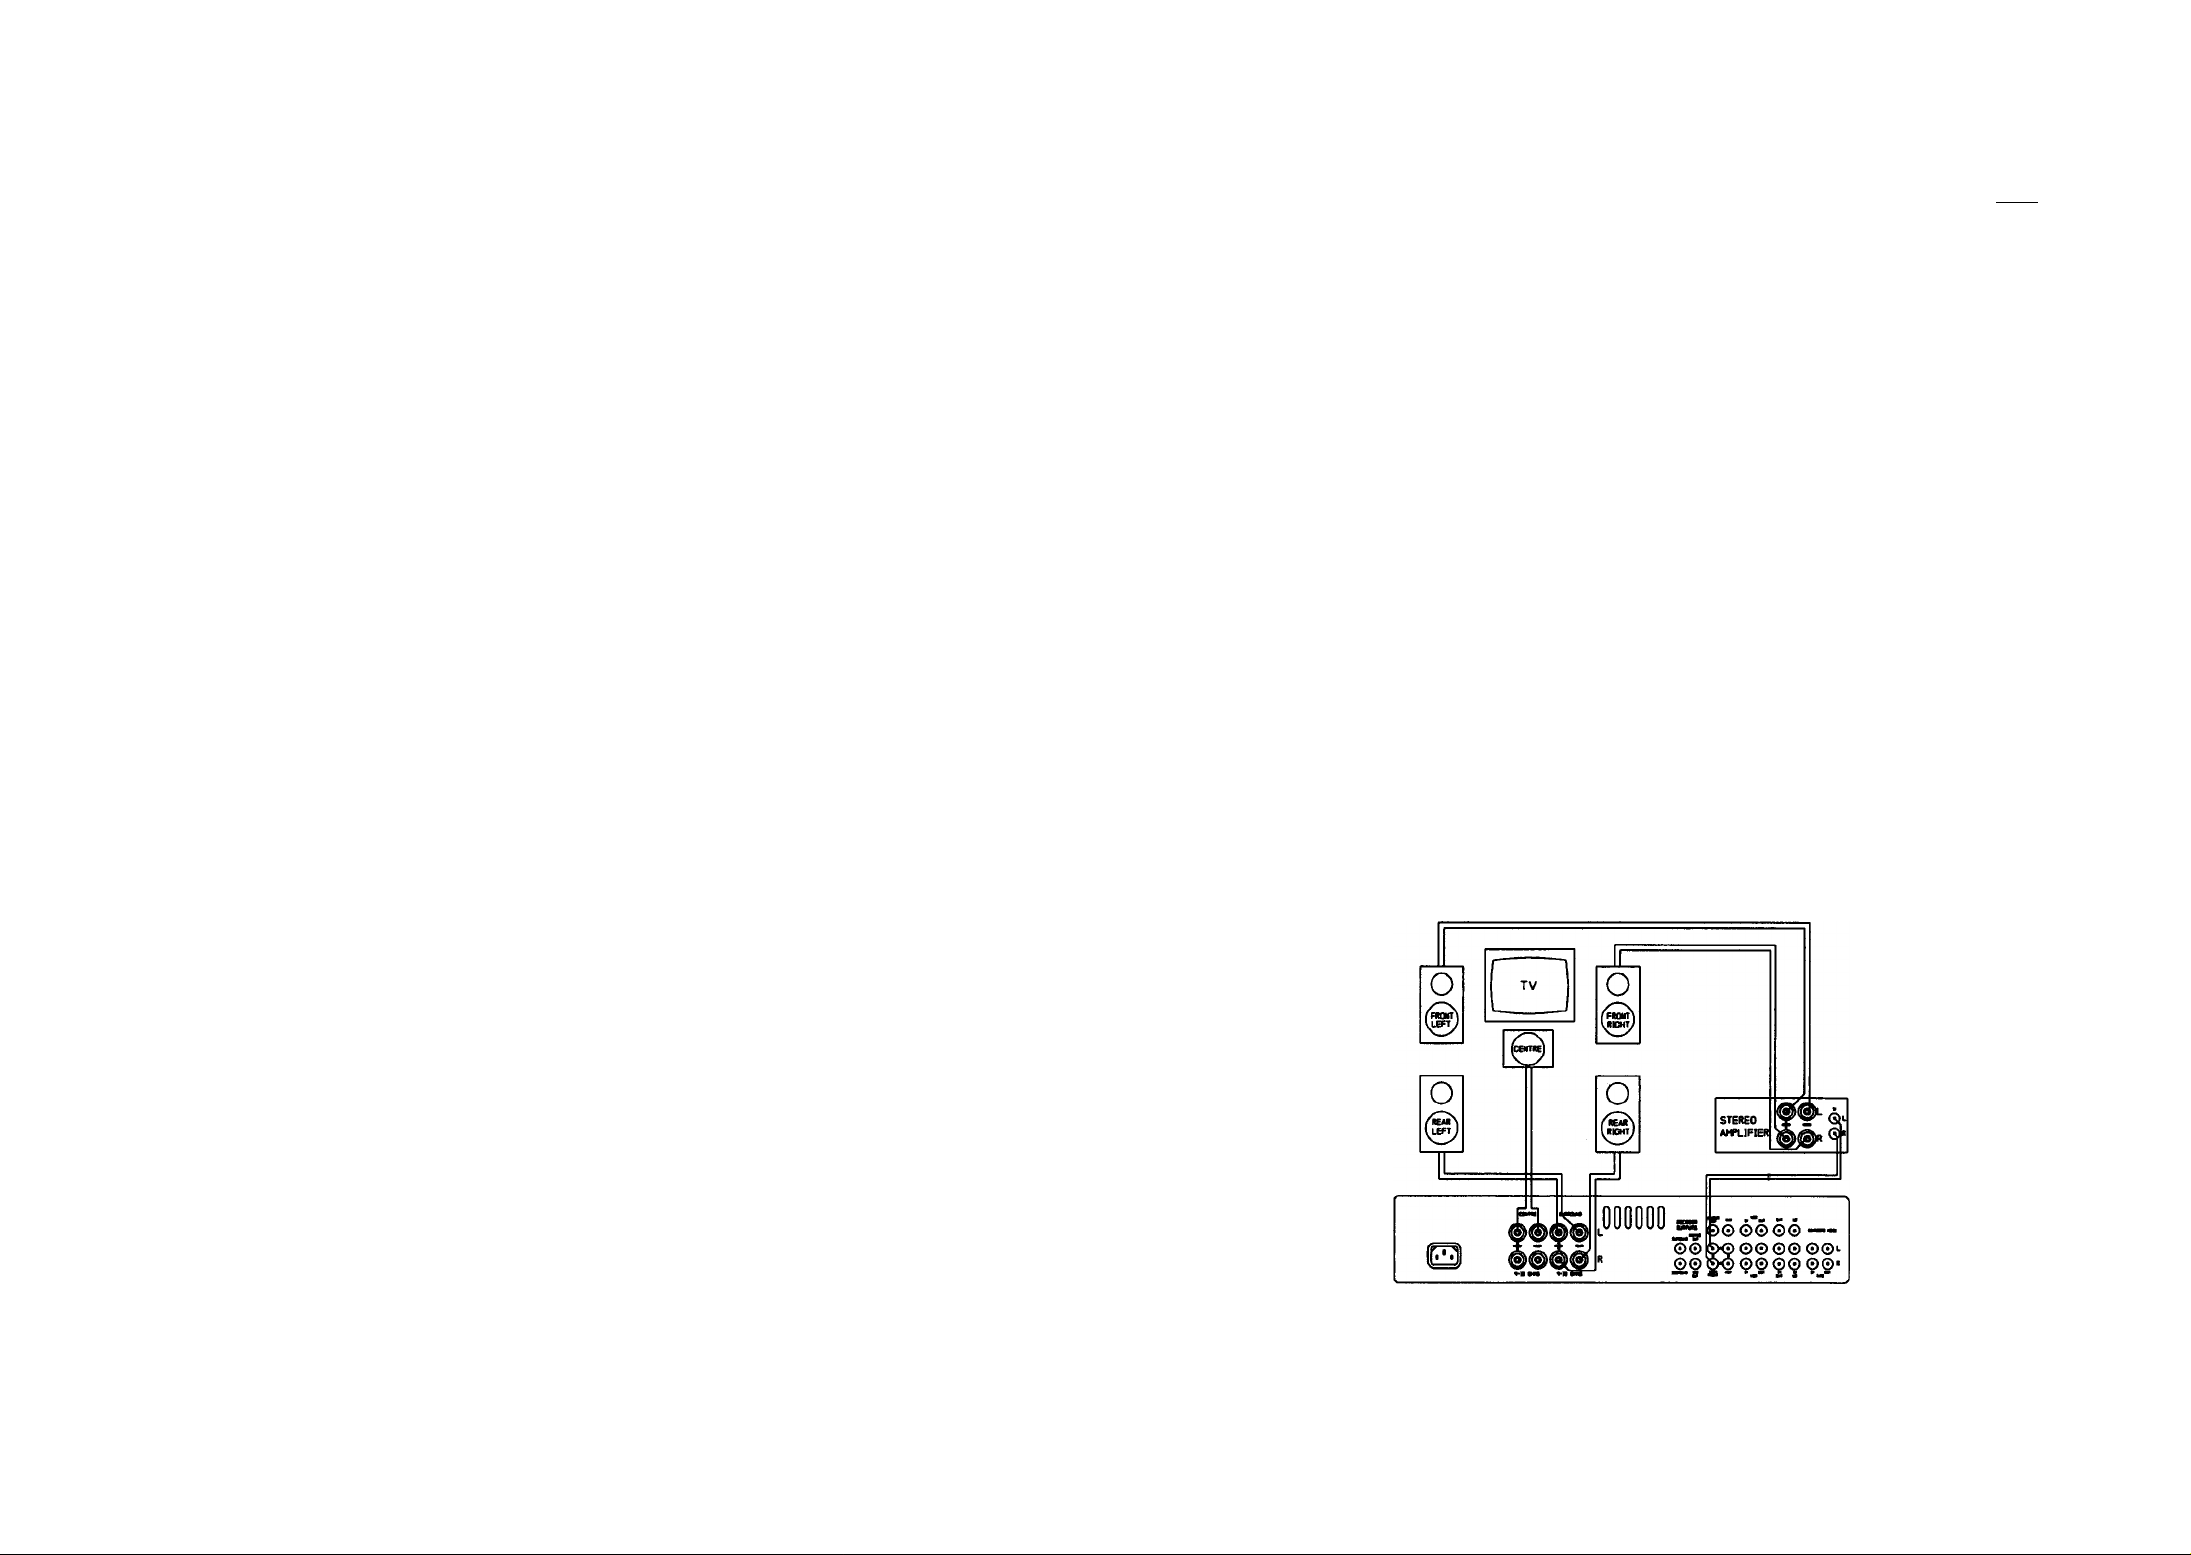
LOUDSPEAKER CONNECTIONS (See figure 4)
The Xeta 2 only contains surround and centre ampHfiers. Your firont left and right speakers should
be cormected to your stereo integrated or power ampHfier.
■ Cormect the red (positive) cable temiinations of your speaker leads to the red temunals on the
Xeta 2 and the other cable terminations to the black terminals. If your speaker cables have
appropriate bare ends, the positive conductors can usually be identified by a ridge or coloured
marking. Ensure that no stray strands are allowed to touch another cable or the
amplifier's casing. This can cause a short circuit and damage your ampHfier! The loudspeaker
terminals are marked as follows:
®,® SURROUND - Cormect your two rear surround speakers here. As the surround channel is
mono it does not matter which one is connected to left or to right.
®,® CENTRE - Cormect your centre speaker(s) here. In some systems, particirlarly where a large
screen TV is used (around 37" or larger), you may wish to use two centre speakers - one above
and one below the TV. Ensure the centre speakers(s) are magnetically shielded, or the pictures
on the TV tube coirld become pemianendy discoloured. Alternatively the two pairs of sockets
can be used to bi-wire one centre speaker if it has separate terminals for the bass and treble
drivers.
LOCATING YOUR LOUDSPEAKERS
A true Home Cinema set up confomiing to Dolby Surround requirements will need five loudspeakers
in order to recreate the surround sound experience: a firont pair, rear pair and a centre channel
loudspeaker.
If you have good quality stereo loudspeakers then you will probably wish to use these as the main
firont loudspeakers. They should be positioned roughly equidistant to, and either side of your TV and
typically 8-10 feet (2.4 - 3m) apart. The centre loudspeaker must be located close to your TV screen
so that the picture and centre sound come firom the same location. In a Home Cinema set up, the
centre speaker is very important, as much of the sound comes firom this source. Its sound balance
should be as similar as possible to the main stereo speakers.
Figure 4
Page 6

CONNECTING YOUR SOURCE COMPONENTS
COMPOSITE VIDEO CONNECTIONS (See figure 5)
■ Audio inputs: Up to five different audio sources can be connected to the Xeta 2. Four inputs
are available for simultaneous audio and video, and one for audio only. AU inputs have the
same basic sensitivity and may be used witli equipment other than that labelled, if you need to
do so.
■ Video mputs: Up to four different video sources can be comiected to the Xeta 2 - VCR, Laser
Disc (LD), Satellite (SAT) and Auxihary (AUX). Tliis allows you to select the TV picture and
sound together and is particularly useful if your TV has only one video input.
LINE LEVEL AUDIO CONNECTIONS
■ Using a suitable pair of interconnect cables to connect each component, insert the red phono
plugs into the sockets labelled 'R' and the other plugs into the sockets labelled 'L', except for
the CENTRE and SUB OUT which require only one lead.
® SURROUND OUT - Provides two identical mono outputs for an external power ampUfier
or amphfiers for the rear channel speakers, if required.
(D SUB OUT - If you have an active (amphfied) subwoofer, connect it to this
output.
® MAIN FRONT OUT - Connect to the left & right fine inputs of an integrated amphfier, e.g.
'tape in', or to the inputs of a stereo power-amplifier. You must make a connection from these
sockets to another amphfier in order to hear the front left and right signals.
In order to display the On Screen Graphics menus used in setting up and cahbratir^ the unit
you must make a cormection from the composite (base band) video MONITOR OUTPUT
@ of the Xeta 2 to your TVs composite video input. If your TV does not have a composite
video input see page 8 for a BASIC SET UP method without the use of On Screen
Graphics. Note that a remodulated (R.F.) output is not available on the Xeta 2.
You wiU need a number of 75 ohm composite video cables terminated with phono plugs
to comiect your A/V equipment to the composite video inputs and outputs of the Xeta 2.
® AUX - This is a fine level input which can be connected to the audio outputs of an additional
A/V source unit. When the Xeta 2 is connected in an ampfifier’s tape loop then the AUX
input should be connected to the TAPE OUT connections of the main amphfier.
0 VCR IN - Comiect this input to your video cassette recorders (VCR's) audio output.
® VCR OUT - Connect this output to your video cassette recorder's (VCR’s) audio input.
® SAT - Connect this input to your SateUite TV decoder's audio output.
® LD - This input is compatible with Laser Disc (LD), Compact Disc Interactive (CD-I) or a
VIDEO CD player. Connect this input to the player's audio output.
■ TAPE CONNECTIONS - Use these sockets only if you have connected the Xeta 2 into the
tape loop of your main amphfier. If not, you should leave your tape deck connected to your
main amphfier.
© TAPE IN - Connect this input to your audio cassette deck’s output (usuahy labeUed PLAY or
OUT). If you are not using the TAPE IN for your cassette deck it may be used for another line
level source such as a CD player.
® TAPE OUT - Connect this output to your cassette deck’s input (usually labelled RECOPJD
or IN).
© CENTIME OUT - Provides an output for an external amphfier for the centre speaker, if required.
Figure 5
® LD - Connect this input to your LASERDISC'S video output. This input is also compatible
with CD-I or a Video CD player.
® SAT - Connect this input to your satelhte TV decoder's composite video output.
® VCR OUT - Connect this output to your VCR's video input.
@ VCR IN - Connect this input to your VCR's video output.
® AUX - This input can be used for the video output of a camcorder, or a second VCR.
Note : Any of the above inputs can also be used to accept the video output of a TV tuner,
such as the Arcam Delta 150.
Page 7

® MONITOR OUTPUT - Connect this output to your TV’s composite video input. Most
TVs only have SCART sockets; others use a phono socket or BNC connector. You will
need a suitable lead or use an adaptor to make this connection. If in doubt consult your
dealer. Advice on SCART pin connections is given on page 11 of this handbook.
■ Note that the MONITOR OUTPUT and VCR OUT on the Xeta 2 remain active even
in standby mode, to enable unattended recordings to be made on your VCR.
FRONT PANEL FUNCTIONS
FRONT PANEL CONTROLS
(These functions are also controllable via the remote control handset.)
® INPUT INDICATORS - indicate which input is currendy selected.
® MODE INDICATORS - Indicate the current operating mode of the Xeta 2 as selected by
the mode switches.
® MUTE - Indicates that the outputs of the Xeta 2 have been muted. This will also hght on
sivitch on whilst the POWER LED is amber.
® POWER LED - Upon switching on, the POWER LED (hght emitting diode) indicator
above the POWER switch will initially glow amber. After a few seconds, it will glow green.
When the LED glows amber, the speakers are disconnected and an internal protection circuit
is activated. When the amphfier is switched into standby via the remote control, this LED
will glow amber. Switching into standby via the front panel switch will cause the LED to
glow red.
® TAPE MONITOR - Allows you to hear the input as it is being recorded on your audio tape
deck. If you have a 3 head cassette deck, switching the TAPE MONITOR in/out will
compare input with recording simultaneously. The indicator @ above the switch will glow
green when the monitor is engaged.
@ SOURCE SWITCHES - Selects the input you wish to listen to and/ or view. The indicator
above the selected input switch will glow green.
@ VOLUME - Adjusts the volume level of all the speakers simultaneously. Press a to increase
volume, press v to decrease the volmne. It is possible to MUTE the Xeta 2 by pressing and
holding both front panel volume buttons simultaneously. To unmute simply press either the
V or A key.
@ MODE SWITCHES - Enables you to choose between Stereo, Dolby 3 Stereo and Dolby
Pro Logic. The indicator above the selected switch will glow green.
@ POWER SWITCH - Switches the Xeta 2 frill on or to standby mode. In standby mode you
can make unattended VCR recordings from an AV source onto your VCR.
■ The Xeta 2 cannot be switched on via the remote control after being manually turned off".
FRONT PANEL DISPLAYS
@ P^MOTE - This is the window for the infiia-red remote control receiver. It is not a push
button! Ensure it is not obscured or conmiands from the remote control handset will not be
received.
® FUNCTION INDICATORS - Indicate that the named functions have been selected via
the remote control (see page(s) 9, 10 for more details). The CAL (calibration) frght flashes
in SET UP MODE and hghts in normal use when centre speaker is off.
® TAPE MONITOR INDICATOR - indicates that the TAPE MONITOR is selected when
illuminated.
If the POWER LED flashes amber during normal use and the speaker outputs are lost,
'SPEAKER PROTECTION ACTIVE' appears on the TV screen. It may be due to the
amplifier overheating. Check tiiat the amplifier is properly ventilated. The unit should reset
within 2-3 minutes after it has cooled down.
It may also be caused by an output overload. This may be due to using the Xeta 2 at high
volumes into low impedance loudspeakers or if there is a short circuit on the loudspeaker(s)
or speaker cables (see FAULT FINDING GUIDE on page(s) 12,13 for more details).
If the fault is due to an overload of some sort the unit will not reset unless you first
disconnect the mains supply by removing the mains lead or switching the power off at the
wall socket. If the cause of the problem is not removed before restoring the power again
the protection circuitry within the Xeta 2 will reactivate on power up. If the POWER LED
continues to flash amber after carrying out the checks in the FAULT FINDING GUIDE,
switch the unit off and contact your Arcam dealer for help,
SWITCHING ON AND SET UP
So you've wired everything up, what next?
First check all connections again to make sure there are no loose wires or plugs in wrong sockets,
check your speakers for any shorts between terminals and turn the volume control down on your
main stereo amplifier. Sv^dtch your TV on and select the relevant A/V input on the TV (i.e. the
one connected to the Xeta 2). Svdtch on the amplifier that you are using to drive your front left
and right speakers.
Switch the Xeta 2 POWER on via the front panel button. Select the source that you want to hsten
to via the Xeta 2's input selectors and ensure that the source is playing.
With a video comiection from the monitor output of the Xeta 2, your TV should display "Arcam
Xeta 2 POWER ON" for about 6 seconds if the correct video input has been selected on your TV.
Increase the volmne level of the Xeta 2 and you should hear sound from the selected source coming
from your loudspeakers. Dependent on the set up you are using you may need manually to adjust
the volume control on your main amplifier in order to hear sound from the left and right channels.
Page 8

If this is not the case, try other inputs and/or recheck your system connections. The FAULT
FINDING GUIDE on page(s) 12, 13 will also help you.
Once your system is working it is important to balance it for your components and the room
environment.
SET UP MODE : SYSTEM BALANCING
No two A/V systems are alike; levels need to be equalised for the loudspeakers you have, and each
source optimised for best performance. SET UP MODE allows you to adjust and to store these
settings. If the amplifier was installed by your dealer this should have been done as part of the
installation process. The stored settings can be recalled by pressing the red RESTORE button on
the remote control handset.
If you have a TV with a composite video input follow the set up instructions that follow.
Otherwise follow the instructions for BASIC SET UP on page 8.
If your dealer has not installed the unit or you wish to modify the stored settings then select the
SET UP MODE by pressing RESTORE followed quickly by + in the mode section of the remote
control handset (the + key also has a small red square printed above it to help you remember the
key). This wUl get you into SET UP MODE.
The cahbration LED on the fi-ont of the Xeta 2 wUl flash slowly and your TV screen should show
a menu screen something like this:
CENTRE SPEAKER (not available in stereo mode) - Do as above, selecting from the following:
Normal - For a standard centre channel loudspeaker.
Phantom - For no centre loudspeaker. This mode may be of benefit if your left and right
loudspeakers are of very high quality and you prefer a simple system without a centre speaker.
Wideband - For larger centre loudspeakers capable of working down to low frequencies (usually
50Hz or below).
NOTE: In DOLBY 3 STEREO mode you do not get the Phantom option.
N.B. When selecting centre speaker after previously selecting Stereo mode, the display will
remind you of 'NO CENTRE MODE' at the bottom of your TV screen. This also applies on Test
Tone.
TEST TONE (not available in Stereo mode) - Selecting TEST TONE will produce a sequential
burst (approx. 2-3 seconds) of noise through your speakers starting with left, centre, right and then
rear. You should adjust the CENTRE and REAR volumes via the remote control until you are
happy that all loudspeakers sound equally loud at your Hstening position. Unless you are using a
power amplifier or an A/V Delta 290 in A/V mode to drive the front left and right speakers, you
wiU have to adjust the volume level of the main ampHfier in order to hear the test tone through
these speakers. This may mean setting the volume to halfway or more on its rotation. This is an
ideal test for making sure all your speakers are connected properly. Pressing "+" on the remote
advances the sequence immediately. Pressing on the remote wiU make the sequence go
backwards. The noise sequence will stop when you press DOWN to move another menu line.
SET UP MODE - Page 1
Using the remote control handset push the UP or DOWN keys
REMOTE
CONTROL
MODE: - Use the - or + keys to select the sound mode in which you normally wish the unit to
operate for the selected source.
Choose between the following options:
Dolby Pro Logic - For füll surround sound decoding including rear channel loudspeakers.
Dolby 3 Stereo - Enhanced stereo mode using centre, left and right loudspeakers and no rear
loudspeakers.
Stereo - For stereo hi-fi use.
repeatedly to select the required line on your TV screen. This will
be highlighted on selection. Use the - or + keys to adjust the option
shown on the righthand side of your TV screen.
In Dolby 3 Stereo Mode - The display reminds you 'NO SURROUND MODE' and you get
no test tone in the rear speakers.
IIP TRIM - Sets the input sensitivity of the Xeta 2 to optimise the performance of the surround
decoding circuits (Not applicable to the TAPE input).
The TV screen will look like this:
The picture shows two peak reading bargraph level meters and an adjustable 'trim volume' setting
below.
The available range is between -16dB and OdB in IdB steps.
Page 9

Play back a recording from the source you have selected. Aim to peak just into the white bars
above the arrow during the loudest parts of music or fihn. The exact setting is not critical. You
should repeat this process for each source that you have. AH input trim settings are remembered
by the Xeta 2, so that when switching between different inputs such as SAT, Laser Disc, VCR etc.
they all phy at the same volume (assuming that's how you've set them, of course). Note that with
some low output sources it may not be possible to hit the peak area on the meter; this will not
adversely afreet the performance. Because the input trim meters are more sensitive to mid or low
frequency sound, you should try to set these levels with soundtracks which have good mid and low
frequency content. In the unlikely event that you are unable to trim dovm the input sufficiendy
from a particular source to avoid the white bars, then you may need to reduce the output level of
this source by some external means.
You can set the MODE (i.e. DOLBY PRO LOGIC etc.) for each input of the Xeta 2, except
TAPE, at this stage. Select the required input source (e.g. SAT) and then push the remote
control’s UP button three times. Now set the required MODE for that input. If required, the
HALL and CINEMA EQ settings can also be saved for the individual inputs at this stage by
selecting them via the remote control.
DELAY TIME- Surround information is delayed to the rear channels for psychoacoustic reasons.
The range is adjustable between 15 and 30 milliseconds (ms), and is commonly set at 20ms for most
installations. The optimum delay time does depend on the Hstening position. Use the charts below
and opposite to determine the delay time for your room's size and seating position. For example,
when the distance from the front speakers to the Hstening position is 3 metres and the distance from
the rear speakers to the Hstening position is 1 metre, the optimum delay time will be 20 ms.
Front Left
Rear Left
Centre
Front Right
Rear Right
(D
SZ
(0
L_
d)
(0
0)
a
0)
L_
(0
0)
l_
o
sz
4-*
E
o
0)
o
c
(0
4-*
(0
¡5
c
o
m
O
Q.
O)
c
c
(D
4-»
(0
Listening position and optimum delay time for playback
with Dolby Pro Logic surround
Distance from the front speakers to the
listening position.
SET UP MODE - Page 2
Now press DOWN on the remote control to get to the second page of the SET UP menu.
AMPLIFIER: You are given four choices for the main (front left/right) ampHfier:
OTHER - Any integrated ampHfier or preamplifier
POWER AMP- Any power ampHfier
STD D290 - Arcam Delta 290 ampHfier, s/no. less than 9935
A/V D290 - Arcam Delta 290 ampHfier, s/no. 9935 onwards.
If your ampHfier is listed above then select that one. If not choose OTHER unless your ampHfier
is remote controUable and uses RC-5 remote control codes. In this case select STD D290.
Page 10

CONNECTION:
You may choose between TAPE LOOP or LINE I/P (POWER AMP
if AMPLIFIER is set to POWER AMP).
Pressing the UP and DOWN buttons will change the mode e.g. Dolby Pro Logic etc. and the front
panel indicators will change accordingly.
Select the CONNECTION that you intend to use in your system.
The choices you make above determine how the Xeta 2 responds to commands from the Xeta 2
remote control handset. For more information see the section marked Amplifier/Connection
Choices on page 10.
POWER UP VOLUME (not available ifPOWER AMP has been selected) - Use the "+" and
buttons, not VOLUME UP/DOWN, to set this volume level. Provided you are Ustening to a
source at the time you will be able to hear the level changing as you make adjustments. Note it
is not possible to set this level to ftdl volume. The Xeta 2 will reset to this preset level if it is
switched off and on again. This is to avoid accidental high volume levels on switch on.
EXIT AND SAVE - When everything has been set to your satisfaction press the DOWN key to
highlight this line. Press "+" to exit and ’SAVED’ will flash up on the display.
The Xeta 2 has now been set to your personal settings. By pressing RESTORE on the remote
control you can recall these settings, overriding adjustments made during nomial use.
Further system tuning will be required if you have a subwoofer. You will need to adjust its level
control and tune the crossover frequency to integrate smoothly with your main loudspeakers. Try
a variety of source materials to help you make these adjustments until you are happy with the
sound. The subwoofer instmctions may also provide advice on system balancing. Do not be
concerned if the level ac^ustment on the sub-woofer needs to be set near maximum to achieve the
right balance.
If you now press the FUNC button again the 'CAL' indicator will flicker and you are able to trim
the input levels (see INPUT TRIM on page 6).
The MUTE indicator will Hght if the input level is too high. You should set the INPUT TRIM
to cause the MUTE indicator to light occasionally. This is best done on music or a soundtrack with
a high bass content.
Pressing FUNC again EXITS AND SAVES the BASIC SET UP menu.
ALTERNATIVE METHOD
It is possible to view the on screen graphics on a TV without a composite video input provided
you have a video recorder (VCR) with a composite video input.
Connect the MONITOR OUT of the Xeta 2 to the composite video input of yom VCR. Switch
your VCR to this input (see your VCR handbook) and your TV to the charmel which you use to
view your VCR. Now by pressing RESTORE quickly followed by '+' on the Xeta 2 remote
control you should be able to view the frill SET UP MENU (see page 6).
After completing the set up for all inputs you should discormect the lead from the MONITOR
OUT of the Xeta 2 and connect it to the VCR OUT of the Xeta 2 . You should now have a
connection betwen VCR OUT of the Xeta 2 and the 'Video In' input of your video recorder.
This will enable you to record other video sources, satellite, laserdisc, etc. The On Screen Graphics
win no longer be visible.
BASIC SET UP MODE
If your TV does not have a composite video input you can do a basic set up of the Xeta 2 in one
of two ways, depending on your other equipment.
To set up the Xeta 2 without being able to view the On Screen Graphics follow the instructions
below. For an alternative set up method which enables you to view the On Screen Graphics in set
up mode only refer to the next section,
To enter the BASIC SET UP mode press the FUNC button followed quickly by the ’+' button
on the remote control.
The CAL indicator will flash to indicate you are in SET UP MODE.
You will hear in noise through the speakers in sequence as you are in the TEST TONE cycle. The
noise will sequence in the following order left, centre, right, rear and can be heard for about 2-3
seconds on each one. If you want to step through the sequence quicker than this then use the '+’
or buttons.
You shoiild adjust the rear and centre volimie via the remote so that all the loudspeakers are equally
loud from your hstening position.
ALTERNATIVE METHOD, and figure 6.
Page 11

REMOTE CONTROL COMMANDS
Most functions on the remote control are straightforward and obvious to use. The On Screen
Graphics win confirm their actions on your TV screen.
The functions described below will allow you to optimise the way you use your system. Letters in
the left hand colunm refer to the remote control drawing on the inside front cover of this
handbook.
® INPUT SELECTORS: These select the required input on the Xeta 2. They may also select
inputs on the main ampHfier if it uses compatible control codes based on the Philips RC-5
standard.
® POWER: Switches the amplifier on or off firom standby. The POWER LED glows amber
if the Xeta 2 is put into 'standby' via the remote. If it is switched off manually the LED glows
red. When the Xeta 2 is in standby mode " XETA 2" is displayed on the TV screen to
remind you that the TV is stiU on.
■ The Xeta 2 cannot be switched on via the remote if it has been switched off with the
POWER button
© FUNC followed by '+' puts you into BASIC SET UP mode (see page 8). This is for use
if your TV does not have a composite video input and enables you to set some parameters
without On Screen Graphics.
® AUTOBALANCE: With AUTOBALANCE switched on, active circuitry ensures that the
surround decoder receives equal levels of left and right signal. This is most important for
proper surround decoding. With videotapes the left and right channels may be mismatched,
or may vary along the tape, therefore we recommend that AUTOBALANCE be used with
video tape sources.
■ STEREO is real stereo. For optimal hi-fi sound quality the Dolby Surround processing
circuits are actually bypassed by relays when the Xeta 2 is swatched to stereo. This prevents
the stereo signal being affected by unnecessary circuits and retains maximum fidelity. Use
STEREO for your regular hi-fi sources or for non surround encoded video material.
The + and - buttons have no function during normal operation and are used only in SET
UP MODE.
© HALL: Switches in a reverberation or HALL effect. This feature is useful to enhance non
surround encoded sources. It can be useful for recordings of five perfomiances where the
added ambience firom the rear channels can increase your involvement in the performance.
The FIALL LED on the firont panel will indicate when this is on. You can trim the amount
of HALL effect by use of the REAR +/- level buttons®.
®,® BALANCE: In SET UP MODE this function is used for manual balancing of the input
signal to optimise the surround decoding for some sources. In normal use the BALANCE
affects the left/right speaker balance.
■ To set the input balance you must be in SET UP MODE. Make sure that you are in Dolby
Pro Logic or Dolby 3 Stereo mode and switch AUTOBALANCE off. Find a surround
encoded source with plenty of speech present. Switch the centre charmel off via the remote
(the Cafibration LED will fight). The speech should almost disappear; if not, alter the balance
to the left or right by using <BAL and BAL>. Find the position that gives the minimum
speech output or "dialogue null" in the centre channel. The input balance is now optimised
and you can switch the centre speaker back on for use.
■ The input balance control operates in IdB steps which are indicated on the On Screen
Graphics. Equal levels are indicated by "L=R".
Switching AUTOBALANCE off bypasses the active circuitry for AUTOBALANCE. Signal
balancing (if required) must then be done using the BALANCE buttons on the remote
control during set up. Note that AUTOBALANCE cannot fiiUy compensate for a maximum
left or right balance setting made in normal use.
® CINEMA: Switching on Cinema EQ (Equalisation) reduces the treble output of the centre
channel. Cinema EQ can improve films recorded with excessive treble and sibilance. The
front panel CINEMA EQ LED will fight when this mode is on.
® MODE keys: The UP and DOWN buttons will cycle the Xeta 2 through the three primary
operating modes as shown below:
■ DOLBY PRO LOGIC feeds sound information through the rear speakers and the firont
speakers (L, R & C). Use this mode for surround encoded sources. Video tapes and discs
with surround encoding can be identified by looking for the Dolby Surround logo.
■ DOLBY 3 STEPÆO feeds sound information through the firont speakers (L, R & C), but
not the rear speakers. You should use either this mode or stereo mode for non surround
encoded video sources. Stereo mixes vary so that it is worth trying this and stereo mode to
see which one you prefer. If your system has no rear loudspeakers, use this mode for
surround encoded material.
@ CENTER +/-: Trims the level of the centre speaker.
® CENTRE OFF: Switches the centre channel off or on. Useful for setting the dialogue null
during manual input balancing. See BALANCE and AUTOBALANCE above for more
details. Switching the centre channel off is also useful for Karaoke and for nulling out
unwanted sports conunentators.
® DISPLAY: Pressing this switch once switches on the volume level indicator to give you an
idea of the current volume setting. This indicator is less bright than other graphics in order
to be less intmsive when watching the TV . Pressing DISPLAY a second time switches off
the On Screen Graphics. Pressing the button a third time will switch the On Screen Graphics
back on and the screen will display status information of all functions for your information.
This infomiation is displayed for about 6 seconds, and you can hold the button down to keep
the status infomiation displayed for longer. After this the normal On Screen Graphics mode
is then active. If you go into SET UP MODE with the display off, the display will come
back on in order to view the OSG. It remains active when you come out of set up.
Page 12

AMPLIFIER MODES (selected on screen in SET UP MODE)
® REAR +/-: Trims the level of the rear surround speakers.
Note: Not all films are encoded fiar surround identically. It is usefiil to trim the rear or firont levels
shghtly for some recordings.
® REAR OFF: Switches the rear channel off or on. Usefid to demonstrate the effectiveness of
the surround effect.
® RESTORE: Restores your amplifier to the condition saved in the set up mode. This is very
useful if the centre and rear levels have been adjusted after set up, as it restores them to the
saved values. The operating mode and any functions such as Cinema EQ that were saved
during set up are also restored.
Note: To enter the SET UP MODE press RESTORE quickly followed by'+' (mode), see SET
UP MODE selection on page 6 for more details.
© SHIFT: Used simultaneously with TAPE, this enables you to switch the Xeta 2's TAPE
MONITOR in and out.
Dependent on how you have set up the Xeta 2, you may need to use the SHIFT button
simultaneously with the VOLUME, MUTE, POWER or INPUT selector buttons to
control functions on the Xeta 2. It can also be used to control these functions on the Arcam
Delta Black Box 500 outboard digital to analogue converter unit.
OTHER/
POWER AMP
STD D290,
LINE
STD D290,
TAPE
Only the 4 video input buttons i.e. LD, SAT, VCR and AUX affect the Xeta 2.
The other 4 input buttons have no effect. V^en the L & R outputs of the
Xeta 2 are connected to the line input of an integrated amplifier, selecting any
non-video input on the remote (e.g. CD) will mute the Xeta 2's outputs. When
connected to a power ampHfier, all non video input commands cause the Xeta
2 to switch to "AUX".
To adjust the volume on the Xeta 2 you must hold down the SHIFT button
and press the appropriate button. Use the input selection buttons on the remote
control to select the required Delta 290 input. Pressing an A/V source input
button e.g. SAT will also change the Delta 290 input selector as below:
SAT = PHONO/AUX LD = AV VCR = TAPE 1 TAPE = TAPE 2
The AUX button has no effect. The On Screen Graphics (OSG) show which
input on the Delta 290 has been selected. Pressing volume up or down without
using the SHIFT key affects the Delta 290 volume control. SHIFT AUX
switches the Xeta 2 to the AUX input.
As above but there are no OSG for Delta 290 input selections.
® MUTE: Mutes and un-mutes the sound firom aU channels. The word ‘MUTE’ will be
displayed in the top left hand comer of the TV screen when MUTE is activated.
® VOLUME: This operates the master volume control for the Xeta 2. It may also control the
volume of some amplifiers which use the same remote control codes. Note that a VOLUME
command will automatically un-mute the Xeta 2 if MUTE is on.
If you hold either VOLUME button down, the volume will vary in steps of about 3dB. For
a finer adjustment press and quickly release the button. The volume scale on the OSG does
not have the same resolution as the actual volume control and so the pointer on the OSG
may not move every time.
AMPLIFIER/CONNECTION CHOICES
The Xeta 2 uses the Philips RC-5 remote control protocol. It responds to commands firom the
remote control handset in different ways depending on the wiring cormection (TAPE LOOP or
LINE) and the type of amplifier you have chosen firom the on screen set up menu. The handset
is the same as used in the Arcam Xeta One integrated
KPJ amplifier. This has 8 inputs so some
of the buttons may not function in the way you might at first expect. The anomoUes are set out
opposite.
A/V D290,
LINE
You must use SHIFT simultaneously with the input buttons to change Xeta 2
inputs. Use the input selection buttons without SHIFT to select inputs on the
Delta 290. If AUX on the Delta 290 is selected the OSG displays input, i.e.
'AUX' followed by 'D', to show that it is the Delta 290's AUX input you have
selected.
If you select AUX on the Xeta 2 the OSG will display AUX followed by 'X' to indicate it is
AUX on the Xeta 2 you have selected.
A/V D290, Just press the required input button and the Xeta 2 or Delta 290 will do the rest.
TAPE Selecting an input on the Delta 290 with the remote control will automatically
switch the Xeta 2 to AUX input in order to fisten to the selected source and
process the signal as required.
The A/V input cannot be selected on the Delta 290 via the remote handset,
without also changing the Xeta 2 input setting. This is because the RC-5 code
for LD and A/V are the same. The Xeta 2 switches to the LD input when you
press LD and the Delta 290 switches to the A/V input. To hsten to a source
through the Delta 290's A/V input you will then have to select AUX on the
Xeta 2, as it will not do this automatically.
10
Page 13

GENERAL ADVICE WHEN USING THE XETA 2
USING AN OUTBOARD DAC
Turn your TV volume down or mute its internal speaker, otherwise it will upset the balance of
surround sound created by the Xeta 2.
When positioning your front and centre speakers aim to get them all at the same height. Ensure that
the centre loudspeaker is magnetically shielded. Check with your dealer if in doubt.
Don't underestimate the importance of the centre speaker. Much of the soundtrack of a film is
dialogue, which is normally routed through the centre charmel loudspeaker. A poorly designed
centre speaker will result in compressed dynamics, distortion and loss of detail. Speakers used for
left, right and centre charmels should be of a similar tonal balance or come from the same
manufacturer.
For video recording, the signal path is maintained provided the Xeta 2 is connected to a Hve mains
supply. The On Screen Graphics do NOT appear on the VCR video output.
On some pre-recorded video material the On Screen Graphics may appear in a sHghtly different
position from normal. This is due to the non-standard characteristics of the video signals used by
certain suppHers of pre-recorded tapes eg. Macrovision ™. Changing over from PAL to NTSC
video sources will also cause this to occur for a few seconds until the Xeta 2 recognises and adapts
to the new signal format.
Chcking noises from inside the unit are quite normal during use. These are caused by muting relays
operating momentarily when switching modes or inputs on the amphfier.
The digital output from a Laser Disc player (which is normaUy an optical connection) may be fed
into an external digital to analogue (DAC), e.g. an Arcam Black Box 50 or 500, for improved sound
quahty.
CABLES
Cables can make or break a system. The quahty of interconnects (audio, video and digital) and
speaker cables you use will be a limiting factor on the performance of your hi-fi/home cinema
system. The better the cable the better the sound. Cables from the AudioQuest range are ideal
partners for the Xeta 2. As a rule of thumb plan to invest around 10% -15% of the value of your
equipment in cables.
SOURCES OF SURROUND ENCODED MATERIAL
The majority of films on video, laserdiscs and broadcast TV have surround sound - look for the
Dolby Surround logo.
Surround material requires a stereo source which can be any of the following:
An FM radio tuner - some plays are recorded in Dolby Surround
A stereo TV or TV tuner (NICAM)
A hi-fi stereo or NICAM video recorder
A laserdisc player
A stereo sateUite receiver or cable system
Dolby Surround encoded video games
UPGRADE PATHS AVAILABLE WITH THE XETA 2
The Xeta 2 can be used with an Arcam Delta 290P power amphfier to drive the front left and right
speakers. For even better results you can bi-amplify the front speakers using 2 x Delta 290Ps, whilst
a third Delta 290P could be added to bi-amp the centre speaker. The Xeta 290P, a version of the
Delta 290P which is an exact match for the Xeta 2's graphics, is available to order from your dealer.
CONNECTING THE XETA 2 TO EXTERNAL POWER AMPLIFIERS
The Xeta 2 can be used as the control unit with external power amplifiers being employed for higher
output power or for improving the sound quahty. Connect your additional power amplifier(s) to the
appropriate sockets as described below.
© SURROUND OUT - Provides a pair of identical mono outputs for an external power
amphfier or amphfiers for the rear channel speakers if required.
® SUB OUT - Provides a mono output for an active (powered) sub woofer. If used with a
separate power amphfier and subwoofer loudspeaker then a proper bass crossover filter should
be used.
® MAIN FRONT OUT - connect the power amplifier(s) which will be driving your front pair
of speakers to these sockets.
The Xeta 2 is compatible with aU of these.
SCART PIN CONNECTIONS
European video equipment frequently features SCART type connectors for audio and video
connections. SCART tc( phono leads are easily obtainable for intercoimection. The information
below is provided if you need to make up your own connections.
Audio
Pin
1
Audio right output
2
Audio right input
3
Audio left output
Audio screen/gjround
4
Audio left input
6
Composite Video
Pin
17 Video output screen/ground
18 Video input screen/ground
19 Video output
20 Video input
® CENTIME OUT - Provides an output for an external amphfier for the centre speaker.
11
Page 14

FAULT FINDING SECTION
INITIAL ADVICE
Please ensure that you have read the instructions and are operating the equipment accordingly.
Check aU cables to your speakers and other components for any loose or incorrect connections.
Ensure that the rest of the components making up your system are operating correctly. A fault can
occur in another component or connecting lead that might appear to be a Xeta 2 problem.
Make use of the status infomration on the On Screen Graphics by switching the Display on via the
remote handset. The infomration will tell you what modes the Xeta 2 is set to.
If any problems stiU persist you may find the following suggestions usefid.
If you still have problems after carrying out the checks Hsted then contact your Arcam dealer or use
our helpHne number shown on the inside firont cover between 9am and 5pm BST.
SYMPTOM:
THINGS TO CHECK:
NO SOUND OR FAINT SOUND
• Are the speakers cormected correctly?
• Is the source you wish to listen to cormected and operating correctly?
• Is the correct input selected?
• Is the unit switched on and the POWER fight green?
• Is the volume turned up?
• Is the MUTE srvitched ofi?
• Is the TAPE MONITOR switched out?
• Is the amplifier driving the fi"ont speakers turned on and the correct
input selected and its volume turned up?
SYMPTOM:
THINGS TO CHECK:
SYMPTOM:
THINGS TO CHECK:
ADVICE:
SYMPTOM:
ADVICE:
SOUND FROM CENTRE AND REARS ONLY
• Is the amplifier driving the front speakers switched on and the
correct input selected?
• Is the volume on this amplifier turned up?
SOUND NOT COMING OUT OF REAR SPEAKERS
• Is Dolby Pro Logic selected? The relevant LED should glow green.
• Are the rear speakers cormected properly?
• Have rear speakers been switched on (via the remote)?
• Are you replaying Dolby Surround encoded material?
• Has the rear volume been turned up?
• Is your source operating in stereo mode?
Even on Dolby Surround encoded material, sound does not come out
of the rear speakers all of the time; the amount of rear level also varies
from film to film.
SOUND COMING OUT OF REAR SPEAKERS WHEN
MATERIAL IS NOT DOLBY SURROUND ENCODED
There is nothing to check here. Sometimes on normal broadcasts
phase differences in the recordings can confuse the surround steering
circuitry allowing certain signals to be heard from the rear speaken.
You can of course switch off the rear speakers using the remote
control handset, or switch the Xeta 2 to stereo mode.
SYMPTOM:
THINGS TO CHECK:
ADVICE:
NO SOUND FROM ONE LOUDSPEAKER
• See points fisted above.
• Is the balance control set to centre position?
• Is the input balance set to L=R (via the remote)?
For the centre charmel: ensure phantom mode has not been selected
in SET UP MODE.
For the centre or rear channel: ensure these are not switched off via
the remote. Also try adjusting the channel volume.
To check a source component, swap the phono leads over (L -with R)
at the source equipment only. If the fault changes over to the other
channel, then the fault is in the source component.
SYMPTOM:
THINGS TO CHECK:
NOTE:
12
UNABLE TO MONITOR VIDEO FROM THE XETA 2 ON
YOUR TV
• Is your TV s-witched to the correct AV input?
• Have you connected the TV correctly to the video MONITOR
OUT socket on the Xeta 2?
• Have you selected the right video input via the source selector?
• Is the Xeta 2 properly switched on?.
If you can monitor the video signal but cannot display On Screen
Graphics then press DISPLAY on the remote to switch them back on.
Page 15

FAULT FINDING Continued
SYMPTOM:
THINGS TO CHECK:
SYMPTOM:
ADVICE:
XETA 2 DOES NOT RESPOND TO REMOTE CONTROL
COMMANDS
• The Xeta 2 may be set up to work using the SHIFT button
simultaneously with another button to prevent a 'clash' with the
remote control codes of other hi-fi units.
Try holding down SHIFT whilst pressing the remote control
buttons.
• Check that the unit is set up correctly (see AMPLIFIER &
CONNECTION instructions in SET UP MODE page(s) 7, 8).
• Check that the Xeta 2 is switched on and the POWER LED is
green.
• Check the remote receiver is not obscured.
• Check the batteries in the remote control are in the correct way
round or try replacing them with new ones.
XETA 2 REMOTE HANDSET OPERATES ANOTHER HI-
FI UNIT’S VOLUME, MUTE AND SOURCE SELECTION
AS WELL AS THOSE OF THE XETA 2
Change AMPLIFIER type in the SET UP menu to STD 290 (see
page 7).
You will now have to hold down the SHIFT button whilst pressing
the VOLUME, MUTE or INPUT selectors to afect the Xeta 2 only.
The problem is caused by both units responding to the standard RC-5
remote control signals used. By holding down the SHIFT button an
alternative code is used for the Xeta 2.
SYMPTOM:
THINGS TO CHECK:
SYMPTOM:
THINGS TO CHECK:
NOTE:
HIGH LEVELS OF DISTORTION AND CROSSTALK
• Check that the INPUT TRIM has been set correctly (See page 6
for more details).
It is possible to overload the audio inputs of the Xeta 2 if the input
signal is 3 volts rms or greater. As a point of reference CD players
have maximum output level of about 2 volts rms so you are unlikely
to encounter this problem. However this could happen if you are
using a preamphfier to drive the Xeta 2 and have connected the
'Preamp Outputs' to the Xeta 2 instead of the 'Tape Out'.
"SPEAKER PROTECTION ACTIVE" DISPLAYED ON TV
& THE POWER LED FLASHING AMBER
• Check that the Xeta 2 is well ventilated as the protection may have
been activated due to overheating. The unit wfil reset after 2-3
minutes when it has cooled dovm sufficiently.
The problem may also be caused by an output overload. This may be
due to using the Xeta 2 at high volumes into low impedance
loudspeaken or if there is a short circuit on the loudspeaker(s) or
speaker cables.
If you have been using the Xeta 2 at high volmnes then you may have
to reduce the volume to prevent reoccurence of the problem.
You should also have your cable and loudspeakers checked out by a
competent person before recormection to the system again.
If the fault is due to an overload of any sort the unit will not reset
unless you first disconnect the mains supply by removing the mains
lead or switching the power off at the wall socket. If the cause of the
problem is not removed before restoring the power again the
protection circuitry within the Xeta 2 will reactivate.
SYMPTOM:
THINGS TO CHECK:
XETA 2 WORKS OKAY BUT NO ON SCREEN GRAPHICS
ON TV MONITOR
• Is the DISPLAY turned ofi? Check by pressing the DISPLAY
button to turn OSG on again.
• Is the TV correcdy connected to the Xeta 2 MONITOR output?
• Is the correct input selected on the TV?
WARRANTY INFORMATION
Full details of the warranty and how to claim during the warranty period can be found in the “Safety
Instructions and Hint & Tips” booklet also supplied with this product. If you did not receive this
booklet please contact the Arcam Customer Service Department.
13
Page 16

Xeta 2 • Technical Specification
Continuous power output per channel
Centre 8Q, 20Hz - 20kHz
Rear channel.
THD, IkHz, 80% maximum output
Peak current rating, centre amplifier
Peak current rating, rear amplifiers
Line Inputs
Frequency response
Signal/noise ratio (CCIR)
Input sensitivity
Input impedance
Overload margin
Preamp Outputs
Nominal output level
Maximum output level
Output impedance
Video Section
Video signal type
Nominal input/output level
Maximum input level
Frequency response
General
Operating voltage
Maximum power consumption
Size (overall) W/D/H mm.
Weight (nett)
(packed)
4Q, 20Hz - 20kHz
8Q, IkHz
4Q, IkHz
55W
lOOW
lOOW (2x50W)
130W (2x65W)
0.05%
±18Amps
±10Amps
±0.5dB, 20Hz - 20kHz
94dB
390mV nominal
20kQ
17dB
700niV
8V
50C2
PAL and NTSC compatible
IVP-P, 75Q
2VP-P
5Hz - lOMHz, -3dB
230V ± 12%, 115V ±12%
400VA
430x300x94
6.1kg
7.4kg
Supplied Accessories
Mains lead
CR40 remote control handset
2 X AA batteries
E & OE
Page 17

Issue 0196/1
ARCAM
Pembroke Avenue, Waterbeach,
Cambridge, CBS 9PB, England.
Telephone: +44 (0)1223 440964
Fax: +44 (0)1223 863384
Part No. SH049
 Loading...