

Page 1
Handbook
Manuel
Handbuch
Handleiding
Manual
Solo iss4.id2 26/4/05, 7:56 pm1
Page 2

E2
Important safety instructions
This product is designed and manufactured to
meet strict quality and safety standards. However,
you should be aware of the following installation
and operation precautions.
1. Take heed of warnings and instructions
You should read all the safety and operating
instructions before operating this appliance. Retain
this handbook for future reference and adhere to
all warnings in the handbook or on the appliance.
2. Water and moisture
The presence of electricity near water can be
dangerous. Do not use the appliance near water –
for example next to a bathtub, washbowl, kitchen
sink, in a wet basement or near a swimming pool,
etc.
3. Object or liquid entry
Take care that objects do not fall and liquids
are not spilled into the enclosure through any
openings. Liquid-lled objects such as vases
should not be placed on the equipment.
4. Ventilation
Do not place the equipment on a bed, sofa, rug or
similar soft surface, or in an enclosed bookcase
or cabinet, since ventilation may be impeded. We
recommend a minimum distance of 50mm around
the sides and top of the appliance to provide
adequate ventilation.
5. Heat
Locate the appliance away from naked ames
or heat producing equipment such as radiators,
stoves or other appliances (including other
ampliers) that produce heat.
6. Climate
The appliance has been designed for use in
moderate climates.
7. Racks and stands
Only use a rack or stand that is recommended for
use with audio equipment. If the equipment is on
a portable rack it should be moved with great care,
to avoid overturning the combination.
8. Cleaning
Unplug the unit from the mains supply before
cleaning.
The case should normally only require a wipe
with a soft, damp, lint-free cloth. Do not use paint
thinners or other chemical solvents for cleaning.
We do not advise the use of furniture cleaning
sprays or polishes as they can cause indelible
white marks if the unit is subsequently wiped with
a damp cloth.
9. Power sources
Only connect the appliance to a power supply of
the type described in the operating instructions or
as marked on the appliance.
This is a Class 1 device and must be earthed.
The primary method of isolating Solo from the
mains supply is to use the switch on the rear of
Solo. Solo must be installed in manner that makes
disconnection possible.
10. Power-cord protection
Power supply cords should be routed so that they
are not likely to be walked on or pinched by items
placed upon or against them, paying particular
attention to cords and plugs, and the point where
they exit from the appliance.
11. Grounding
Ensure that the grounding means of the appliance
is not defeated.
12. Power lines
Locate any outdoor antenna/aerial away from
power lines.
13. Non-use periods
If the unit has a stand-by function, a small amount
of current will continue to ow into the equipment
in this mode. Unplug the power cord of the
appliance from the outlet if left unused for a long
period of time.
14. Abnormal smell
If an abnormal smell or smoke is detected from
the appliance, turn the power off immediately and
unplug the unit from the wall outlet. Contact your
dealer immediately.
15. Servicing
You should not attempt to service the appliance
beyond that described in this handbook. All other
servicing should be referred to qualied service
personnel.
16. Damage requiring service
The appliance should be serviced by qualied
service personnel when:
A. the power-supply cord or the plug has been
damaged, or
B. objects have fallen, or liquid has spilled into
the appliance, or
C. the appliance has been exposed to rain, or
D. the appliance does not appear to operate
normally or exhibits a marked change in
performance, or
E. the appliance has been dropped or the
enclosure damaged.
17. Speaker connections
Any speakers must be connected to Solo using
Class 2 wire (i.e., no connection to earth should
be made). Failure to observe this precaution may
cause Solo to be damaged.
Safety compliance
This product has been designed to meet the IEC
60065 international electrical safety standard.
RISQUE DE CHOC ELECTRIQUE
NE PAS OUVRIR
ATTENTION
CAUTION
RISK OF ELECTRIC
SHOCK DO NOT OPEN
CAUTION: To reduce the risk of electric shock, do not remove cover (or back). No user serviceable parts inside. Refer servicing to
qualified service personnel.
WARNING: To reduce the risk of fire or electric shock, do not expose this apparatus to rain or moisture.
The lightning flash with an arrowhead symbol within an equilateral triangle, is intended to alert the user to the presence of uninsulated
‘dangerous voltage’ within the product’s enclosure that may be of sufficient magnitude to constitute a risk of electric shock to persons.
The exclamation point within an equilateral triangle is intended to alert the user to the presence of important operating and maintenance
(servicing) instructions in the literature accompanying the product.
CAUTION: In Canada and the USA, to prevent electric shock, match the wide blade of the plug to the wide slot in the socket and
insert the plug fully into the socket.
safety
guidelines
Solo iss4.id2 26/4/05, 7:56 pm2
Page 3
E3
English
… and thank you for purchasing the Arcam Solo music system.
Arcam has been producing high-quality audio components for nearly thirty years.
During that time we have amassed a wealth of knowledge on both the design and
construction of audio components in order to give the best sound performance for
the price. The design of Solo is a distillation of this knowledge into an easy-to-use
package that is intended to give you years of listening enjoyment while taking just a
few minutes to learn how to use.
This handbook is intended to give you a detailed guide to using the Solo music
system. It starts by giving advice on installation, moves on to describe how to use
the product and nishes with additional information on the more advanced features.
Use the contents list shown on the right to guide you to the section of interest.
We hope that your Solo music system will give you years of trouble-free operation.
In the unlikely event of any fault, or if you simply require further information
about Arcam products, our network of dealers will be happy to help you. Further
information can be found on the Arcam web-site at www.arcam.co.uk.
The Solo development team
Contents
safety guidelines..................................................... E2
welcome…............................................................... E3
installation guidelines ............................................ E4
making music.......................................................... E8
remote control....................................................... E10
advanced features..................................................E11
technical specication .......................................... E13
product guarantee ................................................E14
welcome…
Safety
Safety guidelines are set out on page 2 of this
handbook.
Many of these items are common sense
precautions but, for your own safety and to
ensure that you do not damage the unit, we
recommend that you read them.
This product requires an earth connection.
Solo iss4.id2 26/4/05, 7:56 pm3
Page 4
E4
Interconnect cables
We recommend the use of high-quality screened
cables, since inferior-quality cables will degrade
the overall quality of your system. Use only cables
that are designed for the particular application
as other cables will have different impedance
characteristics that will degrade the performance
of your system (for example, do not use cabling
intended for video use to carry audio signals). All
cables should be kept as short as is practically
possible.
It is good practice when connecting your
equipment to make sure that the mains powersupply cabling is kept as far away as possible from
your audio cables. Failure to do so may result in
unwanted noise in the audio signals.
installation
guidelines
General guidelines
Positioning the unit
< Place Solo on a level, rm surface, avoiding
direct sunlight and sources of heat or damp.
< Do not place Solo on top of a power
ampli er or other source of heat.
< Do not place Solo in an enclosed space
such as a bookcase or closed cabinet unless
there is good provision for ventilation. Solo
is designed to run warm during normal
operation.
< Do not place any other component or item
on top of Solo as this may obstruct air ow
around the heat-sink, causing Solo to run
hot. (The unit placed on top of Solo would
become hot, too.)
< Make sure the remote-control receiver
in the centre of the front panel display is
unobstructed, otherwise this will impair the
use of the remote-control. If line-of-sight is
impractical, a remote-control repeater can
be used with the rear panel connector (see
below).
< Do not place your record deck on top of this
unit. Record decks are very sensitive to the
noise generated by mains power supplies
which will be heard as a background ‘hum’ if
the record deck is too close.
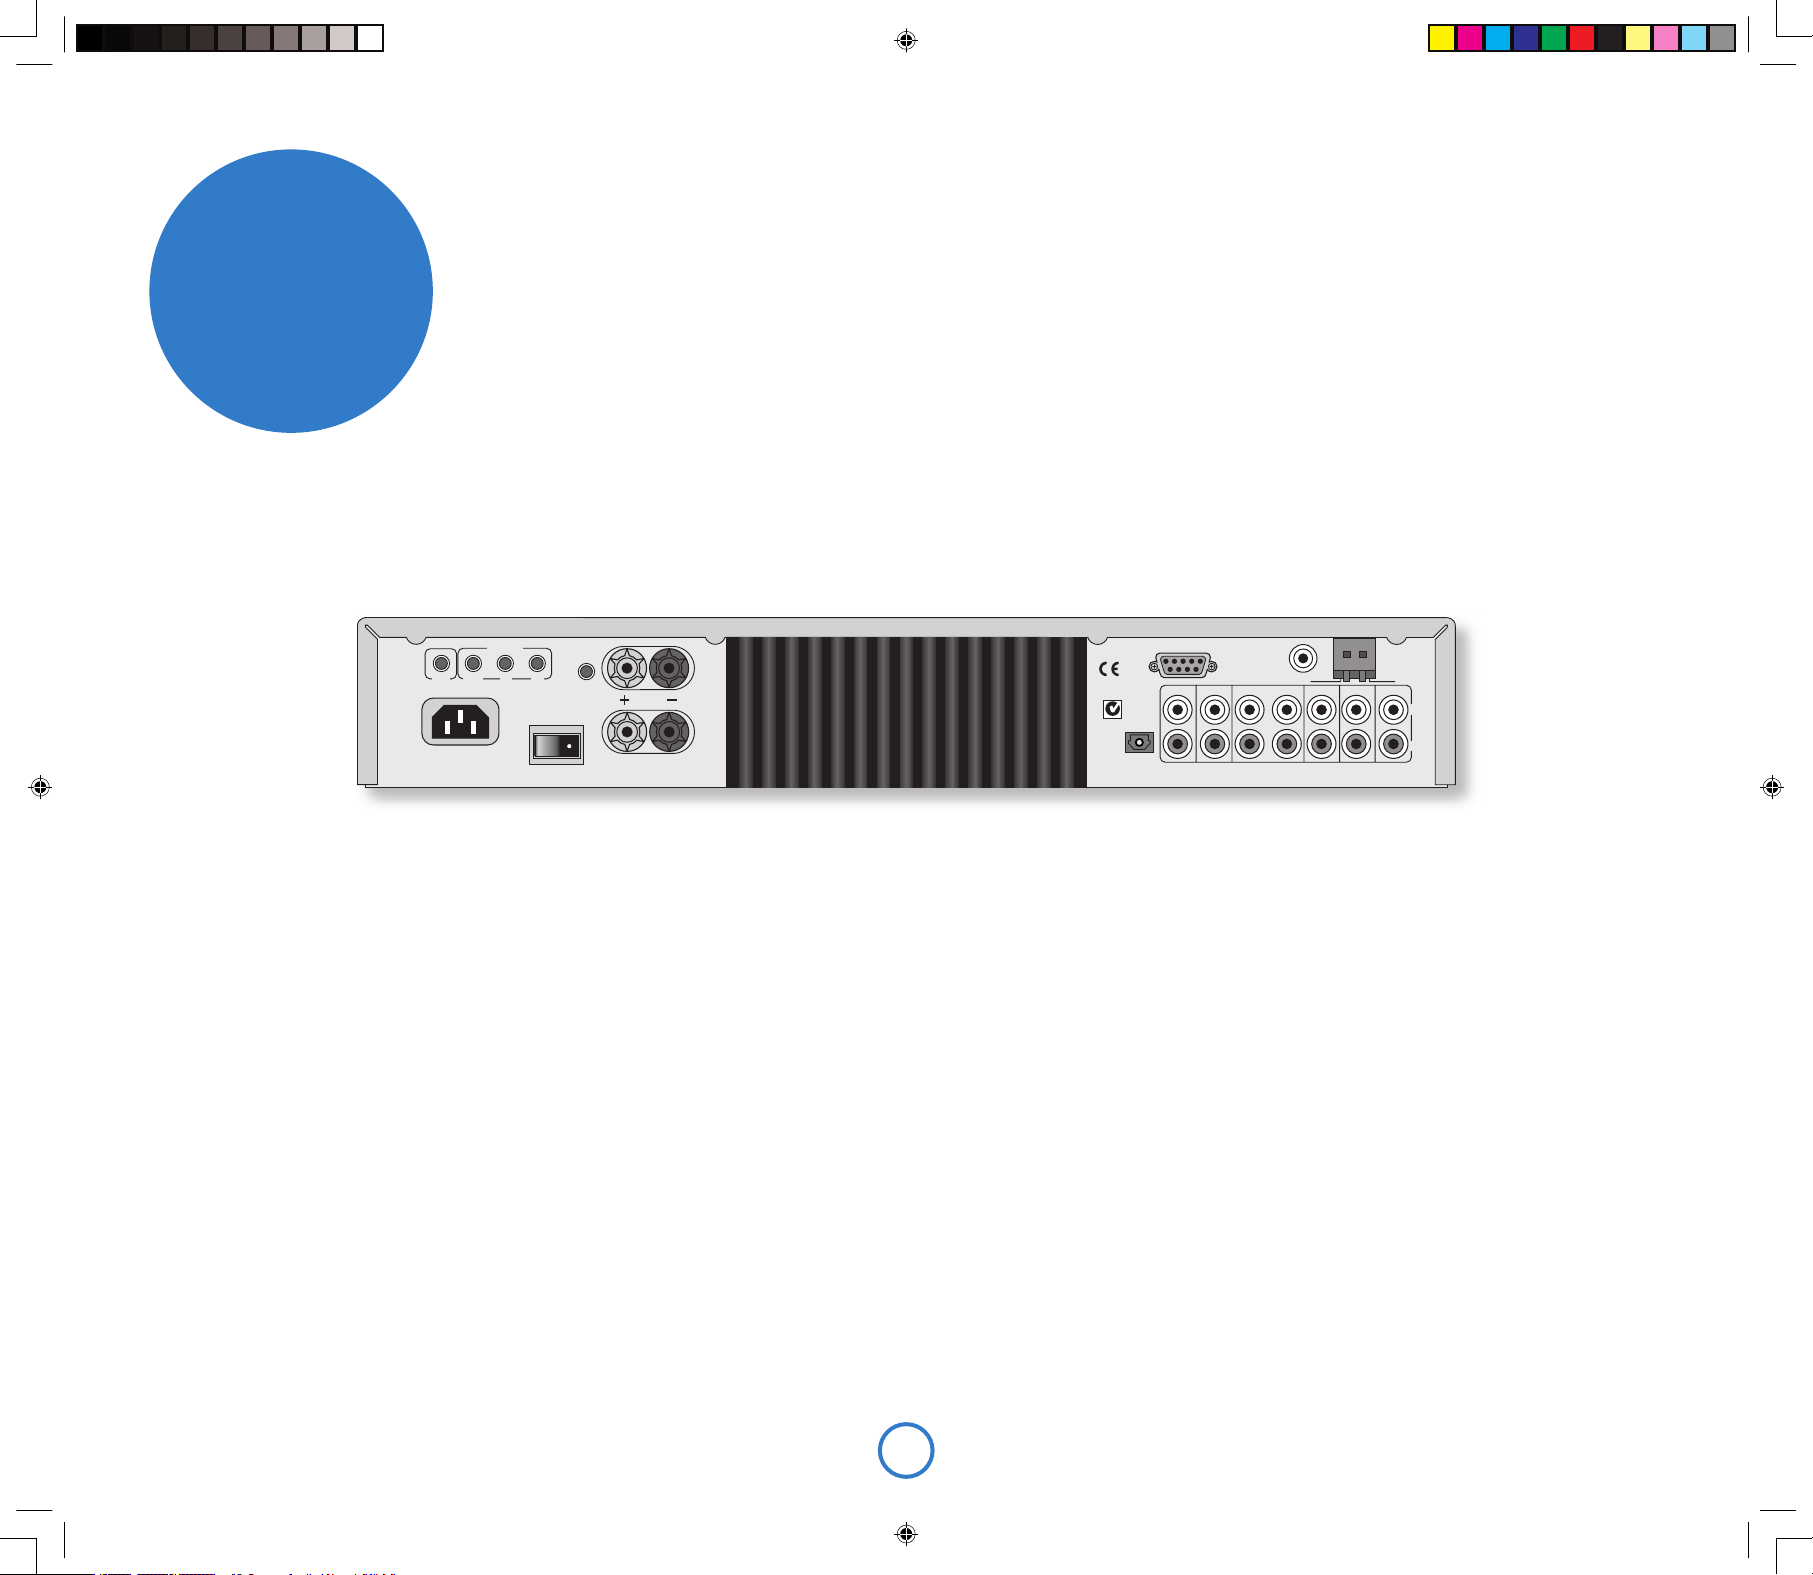
FMRS232
CD OUT
AV
IN
SERIAL NO.
GAME TVTAPE OUT TAPE INZONE 2 PRE OUT
GND
AM
230V
~
50 – 60HZ
400VA
MAX
PROGRAM
SPEAKER
OUTPUT
12V
REMOTE
IN
OUT
IN
L
R
R
L
TRIGGER
LOCAL
ZONE 2
Power
Solo is supplied with a moulded mains plug already tted to the lead.
Check that the plug supplied ts your supply – should you require a
new mains lead, please contact your Arcam dealer.
Push the IEC (kettle-style) plug end of the power cable into the
socket on the back of Solo, making sure that it is pushed in rmly.
Put the plug on the other end of the cable into your power supply
socket and, if necessary, switch the socket on.
Solo is tted with a power switch on the rear of the product, next to
the power inlet. To use Solo, make sure that this is switched on.
Solo is tted with a transformer designed to accept the mains
voltage in the region that the product was shipped to. If your
mains supply voltage does not match this speci cation (as
shown on the rear panel), you wish to take the unit to a region
with a different main voltage, or the mains plug is incorrect,
please consult your Arcam dealer.
This product must be earthed.
Radio aerial
In Europe and Canada, Solo is usually tted with a combined FM/
DAB (digital radio) receiver module; in the USA and the Far East, an
AM/FM receiver module is usually supplied. In order to use either of
these modules, you must connect an aerial to the unit – a suitable
aerial is supplied as an accessory.
The FM/DAB aerial connector is an F-type (screw) connector. The
aerial should be connected to this input by pushing the pin into the
hole in the centre of the connector, then screwing the sleeve onto
the outside. The AM aerial should be connected as described on
page 7.
To use the supplied ‘T’ shaped wire aerial, mount it as high up
as possible on a wall with the elements positioned vertically. If
accessable, try each usable wall of the room to see which gives the
best reception. Use tacks or adhesive tape to secure the aerial to the
wall, but ensure that tacks do not come into contact with the internal
wire of the aerial.
For optimal reception, the use of a roof-mounted (external) aerial is
recommended (see page 7).
Speakers
Solo is designed to drive a single pair of speakers, rated between
4 and 8 ohms, and is tted with speaker terminals that can accept
either spade terminals or bare wires.
To connect the left speaker, unscrew the terminals on the back of
Solo labelled L, insert the speaker wire (or spade) and screw the
terminals back up. Make sure that the red (positive/+) terminal
of the speaker is connected to the red terminal on Solo and the
black (negative/–) terminal of the speaker is connected to the black
terminal on Solo. Repeat the above to connect the right speaker to
the terminals labelled R.
It is important that no stray strands of wire from these connections
are allowed to touch another cable or the product casing. Failure to
ensure this can cause a short circuit, and damage to your Solo.
Do not over-tighten the loudspeaker terminals, or use a wrench,
pliers, etc., as this could cause damage to the terminals which
will not be covered under warranty.
See page 6 for tips on speaker positioning.
Solo iss4.id2 26/4/05, 7:56 pm4
Page 5
E5
English
FMRS232
AV
IN
GAME TV
TAPE OUT TAPE INZONE 2 PRE OUT
GND
AM
L
R
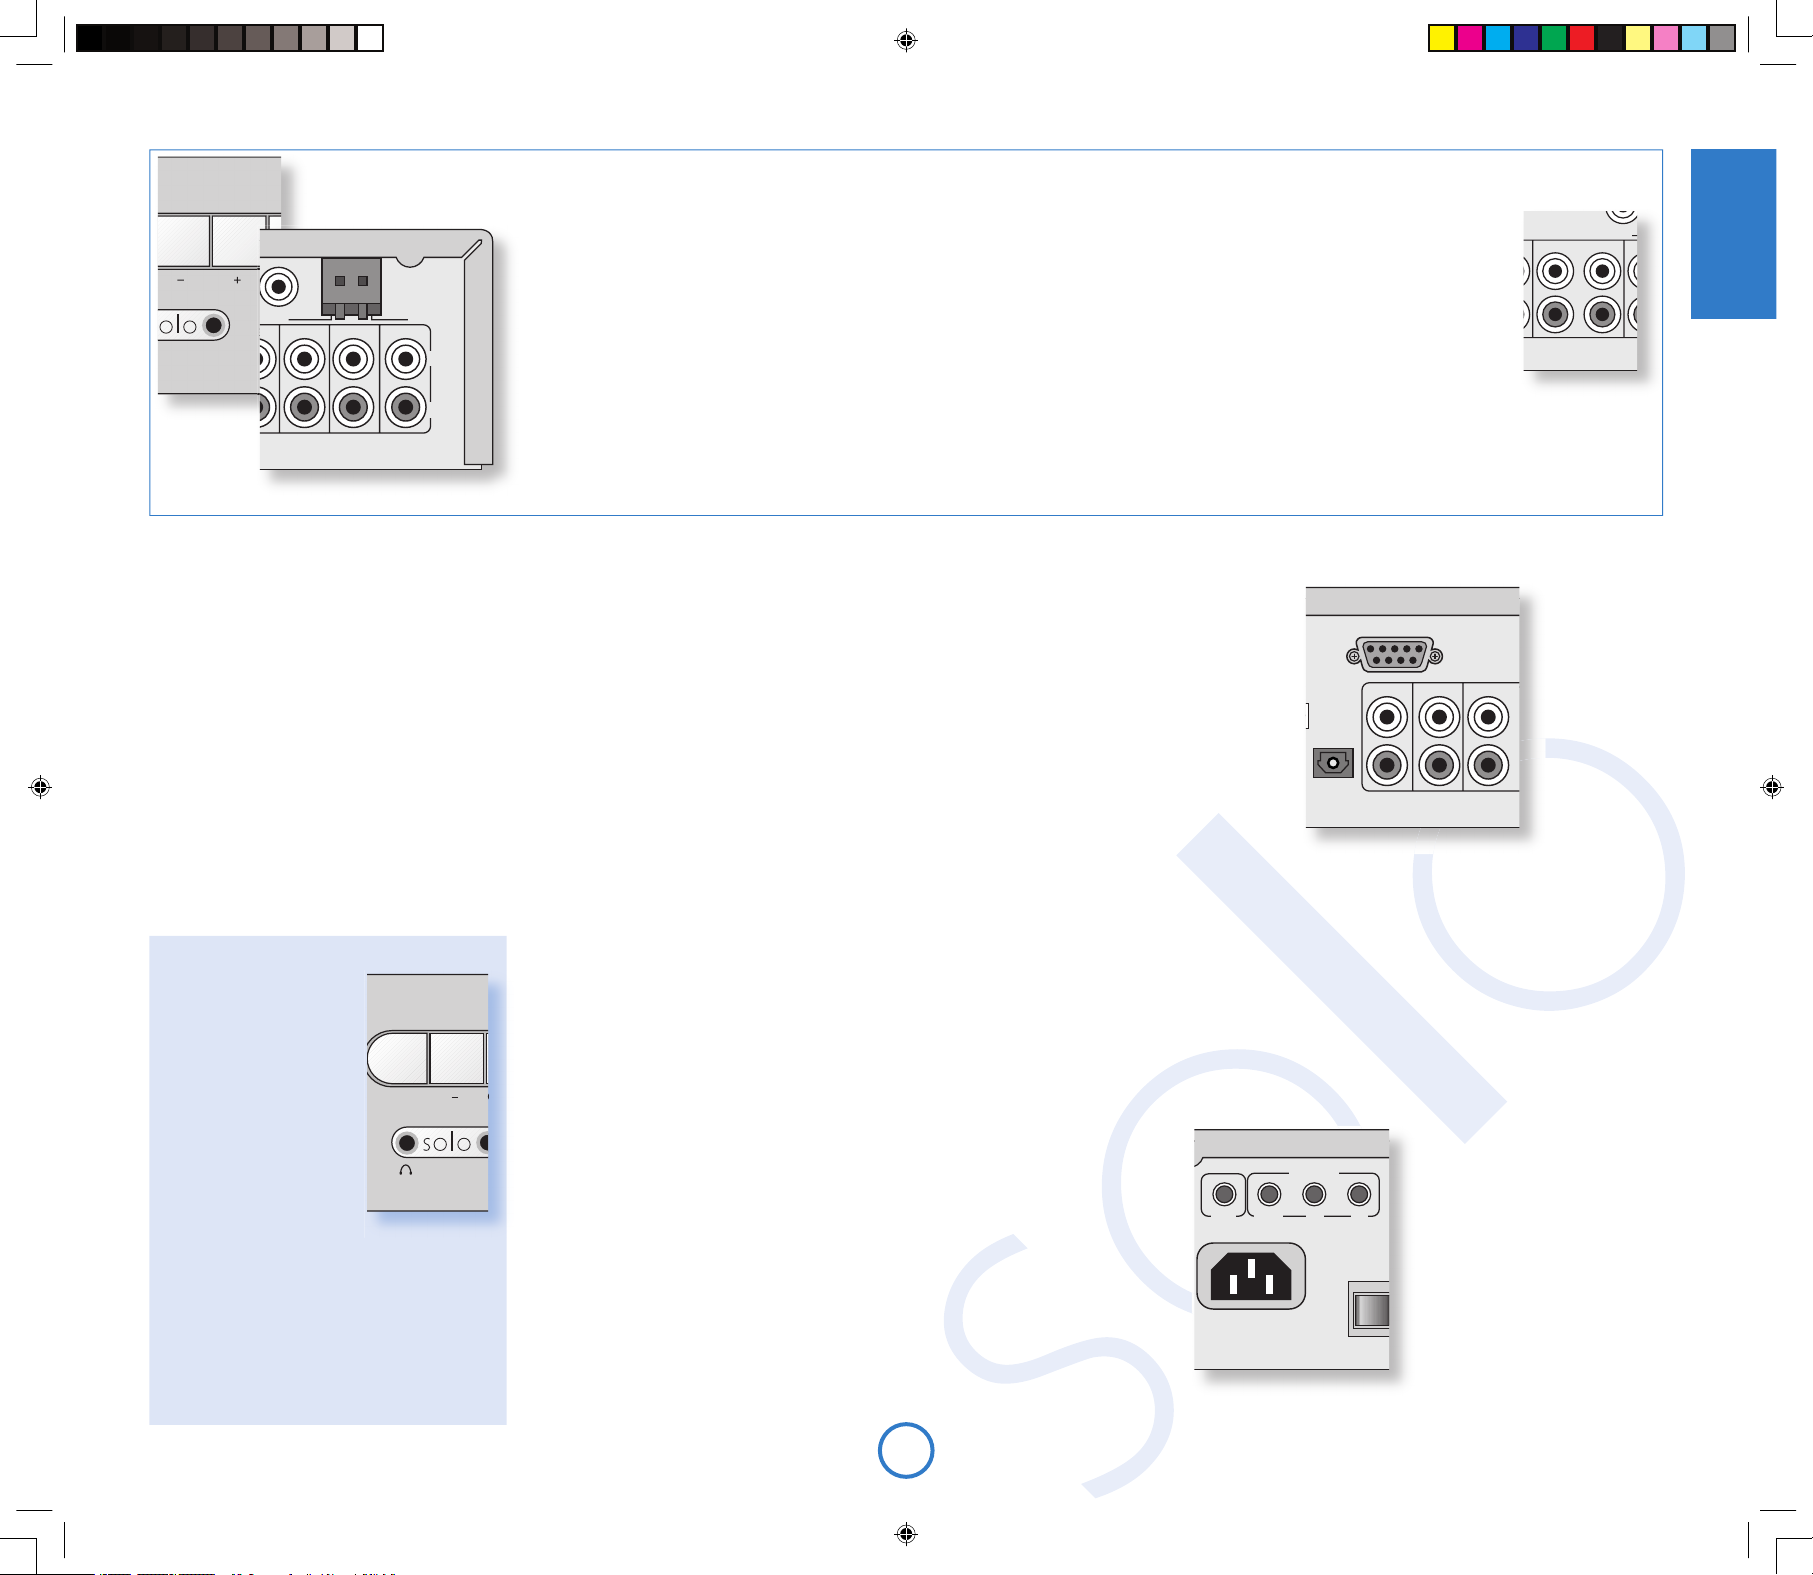
RS232 control
Solo is tted with an RS232 serial connector that
allows remote control from a PC, or similar device.
In normal use, it is unlikely that this connector
will be used. If you wish to experiment with this
remote-control method, however, full details of
the remote-control protocol can be found on the
Arcam web-site.
Listening with
headphones
The front-panel of Solo
has a socket allowing
the connection of
headphones. To use
headphones with Solo,
plug the headphones into
the socket on the left
hand side of the front
panel. When headphones
are plugged into the
headphones socket the
main speaker output and
the pre-amp. output are muted automatically
(Zone 2 output remains active).
This socket accepts headphones with an
impedance rating between 8Ω and 2kΩ,
tted with a 3.5mm stereo jack plug. The
headphone socket is always active, except
when Solo is muted.
FMRS232
CD OUT
AV
IN
SERIAL NO
.
GAME TV
TAPE OUT TAPE INZONE 2 PRE OUT
GND
AM
L
R
Audio outputs
TAPE OUT: This output is taken before the volume control, i.e., the source
being listened to is routed directly to this output. If you wish, this output
may be connected to a cassette recorder (or other recording device).
Under no circumstances should this output be connected to a
power ampli er. Note that this output is muted when the source is set
to tape, to prevent feed-back loops.
PRE OUT: To improve the sound quality still further, or if you require more
than the 50W/channel that Solo offers, an external power amp. or
subwoofer can be connected. For a subwoofer, a 2-phono to singlephono adapter cable will be required, which should be used to connect
the pre-out sockets to the input of the subwoofer. For a power ampli er,
connect these sockets to the input sockets of your power amp., then
connect your speakers to its speaker terminals.
Audio inputs
Solo provides four audio inputs and a tape loop, allowing connection of
other audio sources, (games console, TV, DVD player, etc.). Three of these
inputs, together with the tape loop, are on the rear panel, with one on
the front of Solo. The labels above the inputs give suggested uses, but all
four inputs have the same characteristics (all are line-level inputs) and any
suitable device may be connected to any input. (Note, however, that the
name of the input shown on the front-panel display cannot be changed.)
To connect a device to an input on the rear of Solo, use a stereo phono
cable of a suitable length; for connection to the front-panel, the cable must
terminate in a stereo 3.5mm jack plug. Connect the audio output of the
device to one of the inputs of Solo, making sure that the plugs are pushed
in rmly. We advise you to use high-quality interconnect cables wherever
possible to ensure the best possible sound quality.
AV
IN
GAME TV
GND
AM
L
R
Tape loop
A tape loop is provided to allow connection of an external
cassette deck to Solo.
TAPE OUT – Connect these outputs to the input sockets
of your cassette deck (usually labelled RECORD).
TAPE IN – Connect the output sockets of your cassette
deck (usually labelled PLAY) to these inputs.
Note that the TAPE OUT output is muted when Tape is
selected as the music source.
Connecting a record deck
Solo is not tted with a phono pre-ampli er. If you wish to connect a record
deck to Solo, then you will need an external pre-ampli er. Please contact your
dealer for further information and recommendations on the best option for you.
ZONE 2 OUT: This is the output to be used for a second room system. It
should be connected to the ampli er in the second room. The output
level varies with the volume control for the second room.
CD OUT: This carries the digital output from the CD and DAB (where tted)
stages of Solo, and can be used for making digital recordings using
compatible recording devices (such as MiniDisc). When a CD is being
played, this output carries a signal with a sample rate of 44.1kHz; with
DAB radio, the signal sample rate is 48kHz.
These connections are intended for use in multiroom installations. Normally there is no need to
make any connections to these sockets. If you
would like to make use of these features, however,
please download the document ‘Solo Remote
Control’ from our web-site (www.arcam.co.uk),
which includes advice on how to make these
connections.
12V TRIGGER – This output provides a 12V signal
whenever the unit is switched on (i.e., not
off or in stand-by). This signal can be used
to switch on automatically power ampli ers
(or other compatable equipment) connected
to Solo, as they will come on when Solo is
activated.
IN LOCAL – This allows remote control signals to
be received by Solo if the remote sensor
is covered (or otherwise not ‘visible’ to
the remote control). An external sensor is
used to receive the signals from the remote
control, which are then fed to Solo (into this
input) using a suitable cable.
FMRS232
CD OUT
AV
IN
SERIAL NO
.
GAME TV
TAPE OUT TAPE INZONE 2 PRE OUT
GND
AM
PROGRAM
SPEAKER
OUTPUT
12V
REMOTE
IN
OUT
IN
L
R
R
L
TRIGGER
LOCAL
ZONE 2
IN ZONE 2 – Use this connector if you are using
a second room system that has a remote
sensor. The external sensor is used to
receive the signals from the remote control,
which are then fed to Solo (into this input)
using a suitable cable.
OUT – This output carries all signals from
the front-panel remote-control receiver,
plus commands received through the
two external sensor inputs
detailed above (‘In Local’
and ‘In Zone 2’). This can be
used to route remote-control
commands to other equipment
(potentially in different
locations). For example, DVDplayer commands could be
received by Solo, then routed
to a DVD player in a remote
location using this output
connector.
Remote control inputs/outputs and the 12V trigger
Solo iss4.id2 26/4/05, 7:57 pm5
Page 6
E6
Speaker installation
The advice given here are general guidleines for speaker
installation. Refer to the documentation supplied with your
speakers for more precise positioning and installation
information.
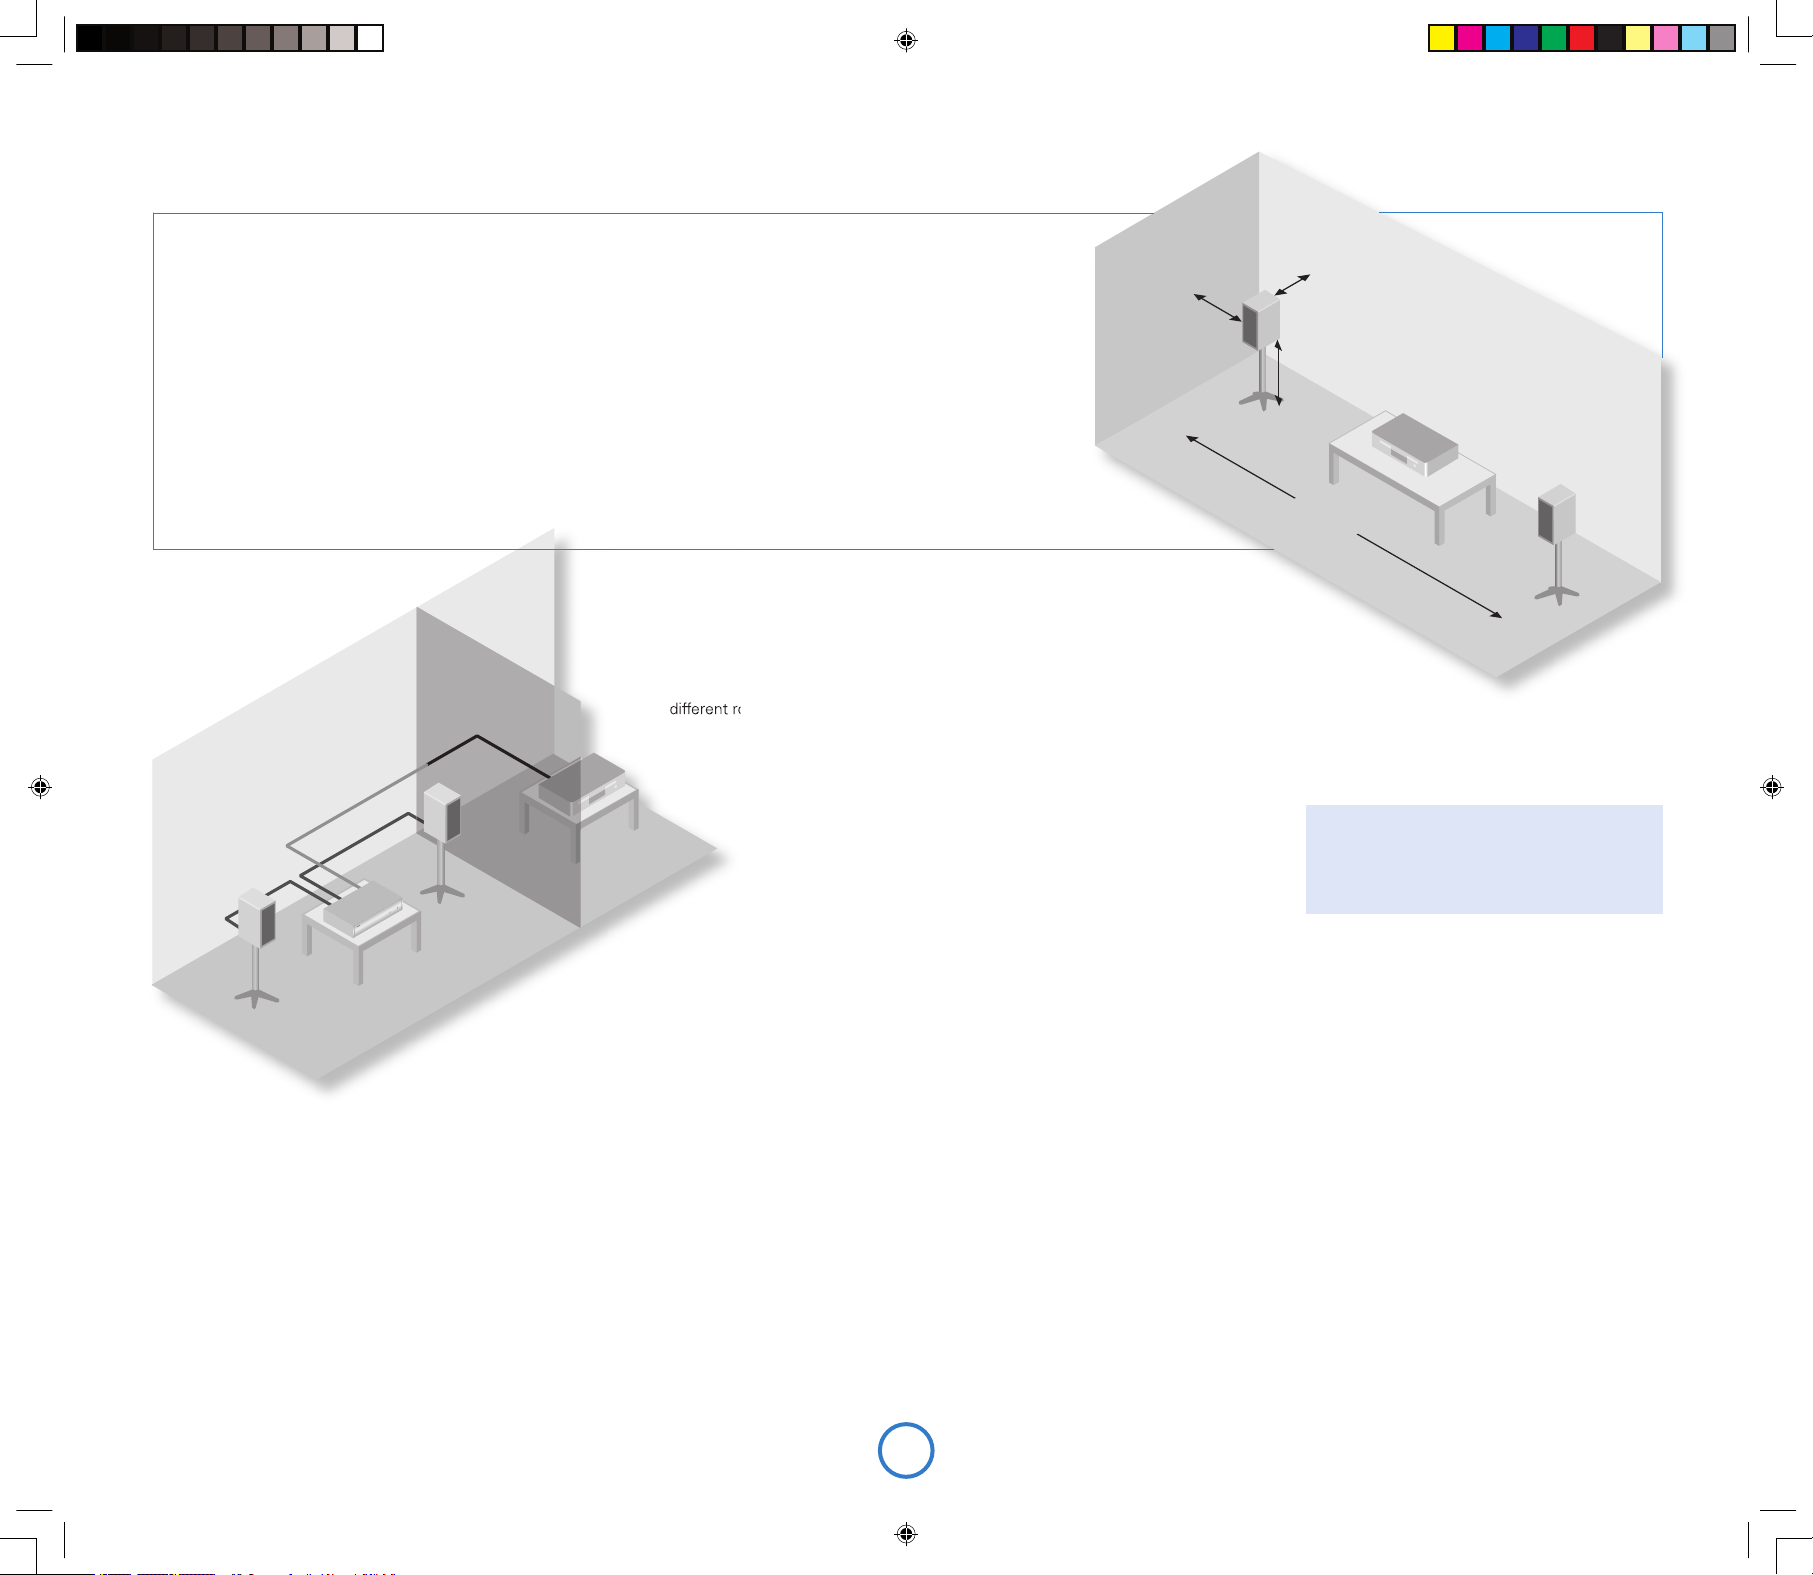
Positioning
As a rough guide, speakers should be placed on rigid stands at
about 15–40cms from the rear wall and at least 60cms from any
side wall. Speakers should never be placed on the oor (unless
they are oor-standing speakers), or in corners.
The nal sound will depend on the acoustics of the listening room
and experimentation with speaker positioning is very worthwhile.
As a starting point, we suggest that the speakers are placed
2–3m apart with their backs 15cms from the rear wall.
Listening in a second room
Solo provides two independent volume controls, offering
you the possibility of listening to the same output in two
different rooms of your house. To do this, you will require the following:
< a power ampli er (such as the Arcam P80) and speakers;
< suitable interconnect cables, such as those described above;
< a remote control receiver (optional), available from your Arcam dealer;
< a second Solo remote control (optional), available from your Arcam dealer.
Make the connections as follows:
1. Ensure that all equipment is switched off and disconnected from the mains
supply.
2. Connect the outputs of Solo labelled ‘Zone 2’ to the audio inputs of the power
ampli er using the interconnect cables.
3. Connect the speakers to the speaker terminals of the power amp. The speakers
should be connected in the same method as described in the panel on page 4,
‘Speakers’.
4. Plug the remote receiver from the second room into the connector labelled ‘In
Zone 2’ on the rear of Solo.
5. Reconnect the equipment to the mains supply and switch on. You should be able
to hear the output of Solo in through the power amp. and control the volume
using the remote control.
Note that the second room is always muted
when Solo is switched on – it must be
unmuted ‘explicitly’ when required. This is
to avoid unexpected output in the remote
location.
Speaker stands
The more rmly a speaker is held, the better it will
sound. We recommend the use of rigid metal stands
of 40–60cms height. Properly damped types that do
not ‘ring’ when tapped with a pencil (either by virtue of
construction, or because they are lled with dry silver
sand) will bring out the best in a speaker. Ensure that the
stands and/or speakers do not wobble.
>60cm
15
–
40cm
40 – 60cm
2 – 3m
Solo iss4.id2 26/4/05, 7:58 pm6
Page 7
E7
English
VHF/FM
DAB
Radio aerial
Your Solo is capable of superb radio reception, but
only if it is receiving a good quality transmission
signal.
Solo is tted with either a DAB/FM or an AM/FM
receiver module, depending on where you bought
it. Independent of which radio module is tted to
your Solo, however, a roof-mounted aerial should
be used wherever possible to obtain the best
reception.
The type of aerial you should use depends
on your listening preferences and the local
conditions. If you listen exclusively to FM
transmissions, for example, and the FM
signal strength is strong in your area, then
a simple omni-directional aerial mounted in
your loft or on your roof may be suf cient.
Listening to DAB in a weak signal area will
require a high-gain, roof-mounted aerial.
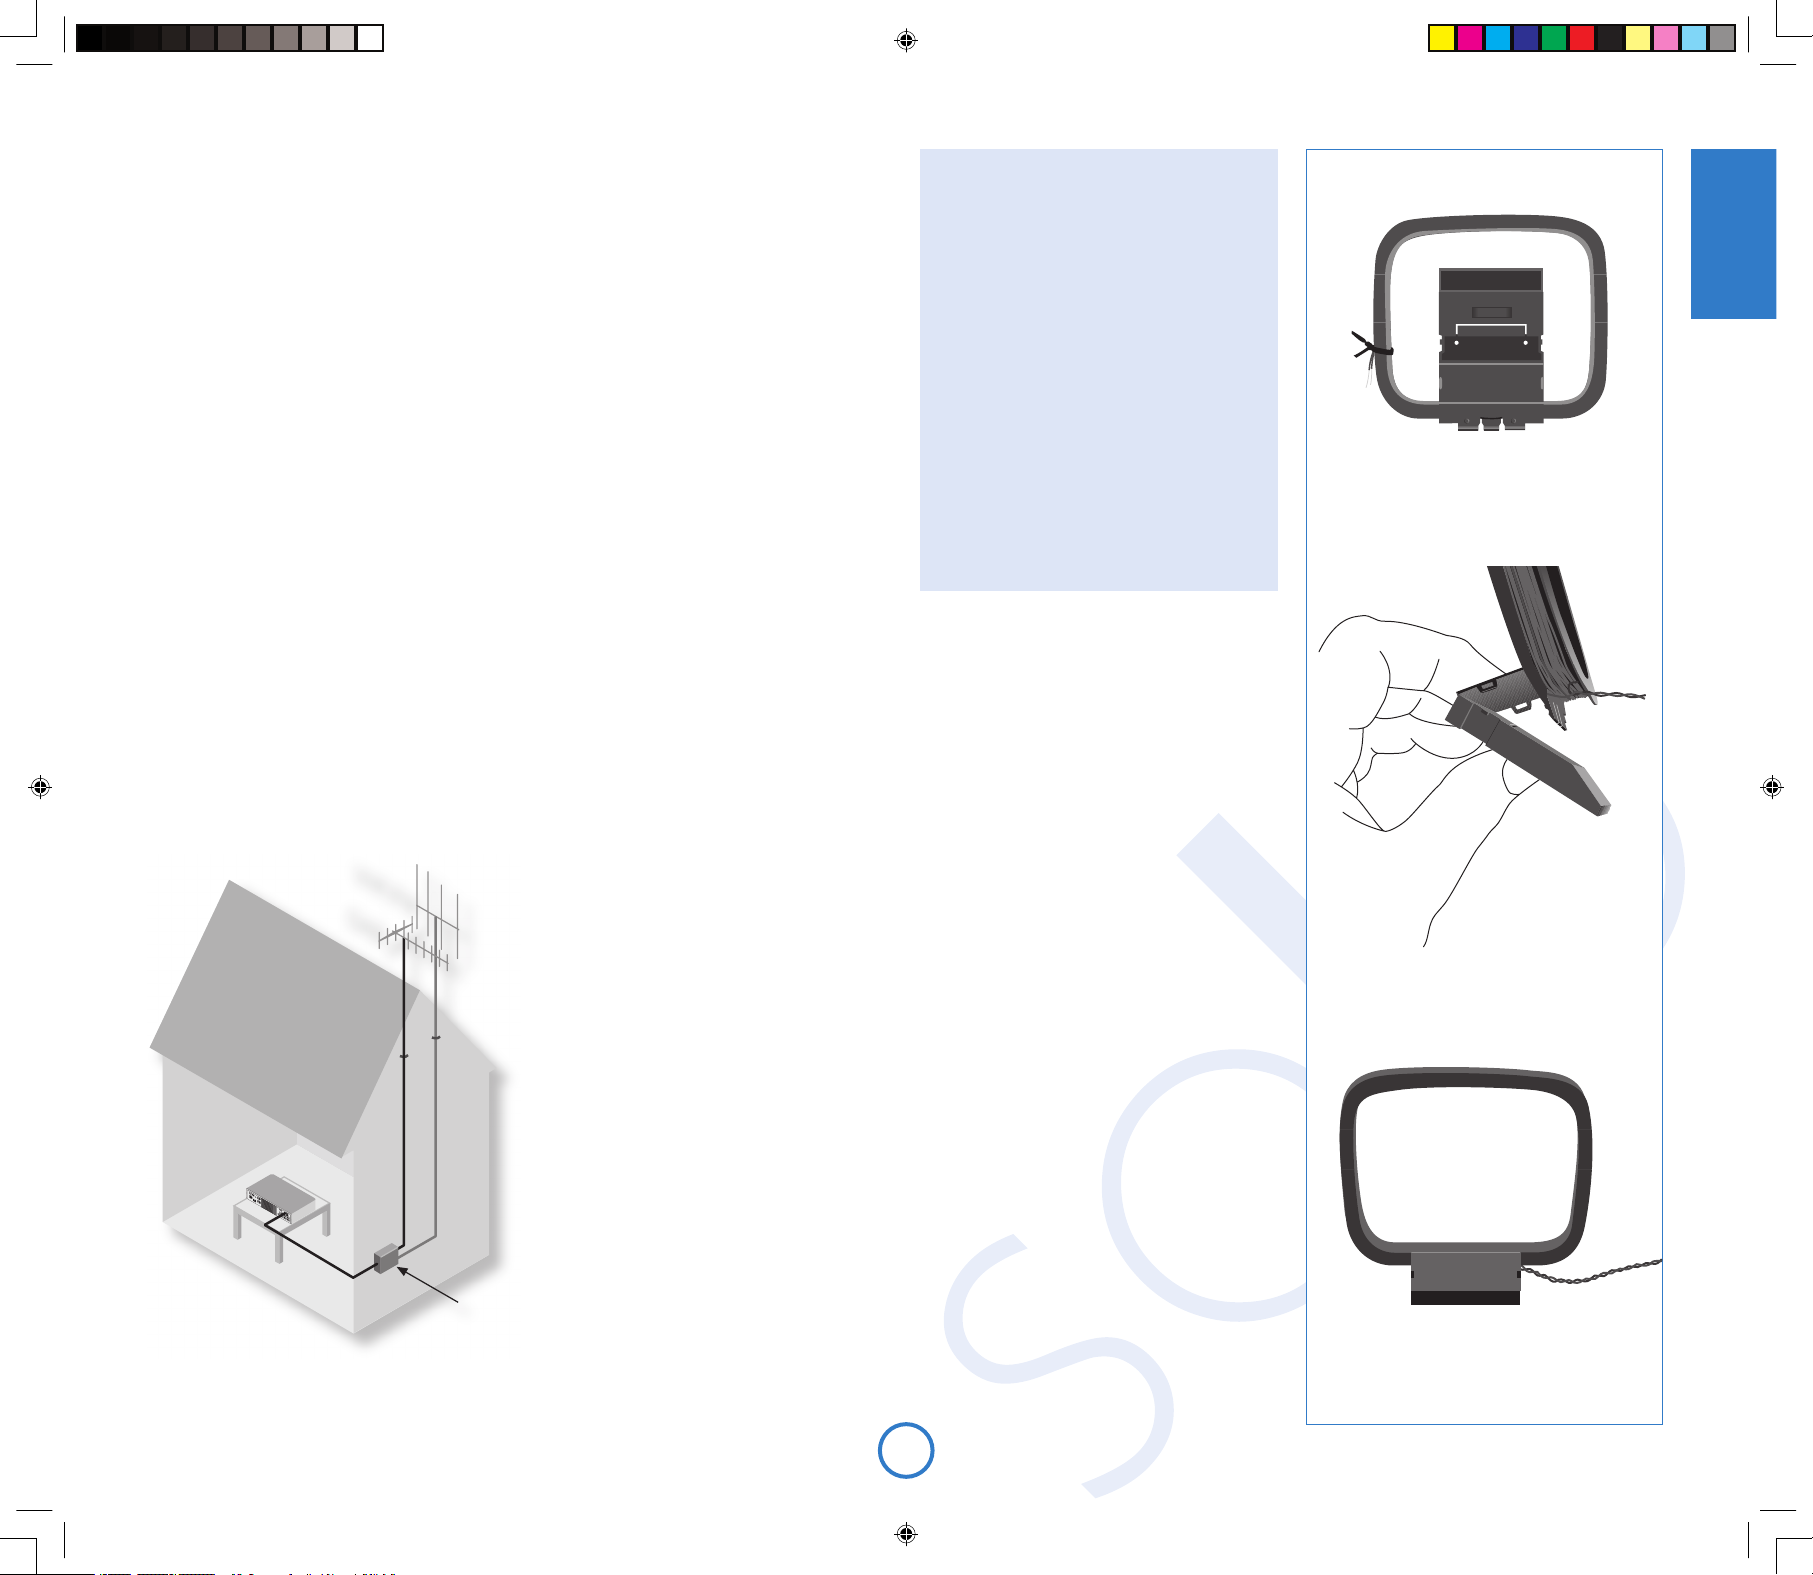
For the best reception of both DAB and
FM signals, an aerial combiner box may
be required (as shown in the diagram
opposite). This combines the signals
received by two aerials (one for DAB, the
other for FM), into one cable that then
connects to Solo. If an aerial combiner
is not used, the single aerial chosen for
both DAB and FM reception may not give
optimum performance in some regions.
For the best advice, we recommend that
you contact your local Arcam dealer or
aerial installation expert.
DAB
If the transmission signal is strong in your area
then the supplied indoor aerial may be suf cient
(it should be hung on a wall with both wires fully
stretched out vertically). In weak signal areas, an
external aerial is desirable in order to receive the
highest number of services.
DAB transmissions can be in either ‘Band III’
or the ‘L-band’ (or both). To determine the
transmission frequency in your area, contact your
dealer, or refer to www.WorldDAB.org. In Band III
transmission areas, use a multi-element Yagi aerial
if you are a long way from a transmitter, or use an
omnidirectional or folded dipole aerial if you are
close to more than one transmitter (in the U.K.,
a Band III region, this should be mounted with
the elements vertically, as the transmissions are
vertically polarised). If the DAB services in your
area are transmitted on L-band then consult your
dealer with regard to the best aerial to use.
Whether you decide to install an external aerial, or
opt to use the supplied ribbon cable, it should be
connected to the F-type (screw) connector labelled
‘FM’ on the rear of the unit.
FM/AM
An FM aerial is required to receive VHF radio signals, and an AM aerial is required to receive
AM/medium wave radio signals.
FM aerial
Although an FM ribbon aerial is supplied as an accessory to Solo, for optimal FM radio
reception a roof- or loft-mounted aerial is advised as this will give superior reception. In some
areas cable radio may be available or, in an apartment building, a distributed aerial system may
be installed. In either of these cases you should have sockets in your home marked FM or
VHF (do not use those marked TV), which should be connected to the connector labelled ‘FM’
on the rear of Solo.
If you wish to use the supplied FM ribbon cable, mount this as high up as possible on a wall
with the ‘T’-elements positioned horizontally. Try each usable wall of the room to see which
gives best reception and use tacks or adhesive tape to secure the aerial in a T shape, but note
that no tacks should come into contact with the internal wire of the aerial.
AM aerial
An AM loop aerial is supplied as an accessory to Solo. This should be attached to the AM
aerial inputs on the rear of Solo with one end connected to ‘AM’ and the other to ‘Ground’ (it
does not matter which way round this aerial is tted). Make sure that the aerial is positioned
well away from Solo itself, TVs, computers and other sources of RF ‘noise’. Rotate the aerial
to discover which position gives the best reception.
In areas of weak reception, or when Solo is in use inside a steel-framed building (such as an
apartment building), a wire between 3 and 5 metres long can be used to strengthen reception.
Mount this high up outside the building (if possible) and connect one end of this wire to the
‘AM’ part of AM aerial input, in addition to the loop aerial supplied (do not disconnect the AM
loop aerial).
Assembling the AM loop aerial
aerial combiner
2. Push the tab into the open slot in the
base of the stand. Press until the tab clicks
home.
3. Connect the leads to the AM socket at the
rear of the Solo. Rotate the aerial’s stand
until you obtain the best reception.
1. Release the tie-wrap and unwind the
twisted lead. Fold the plastic stand forward
through the loop frame.
Solo iss4.id2 26/4/05, 7:58 pm7
Page 8
E8
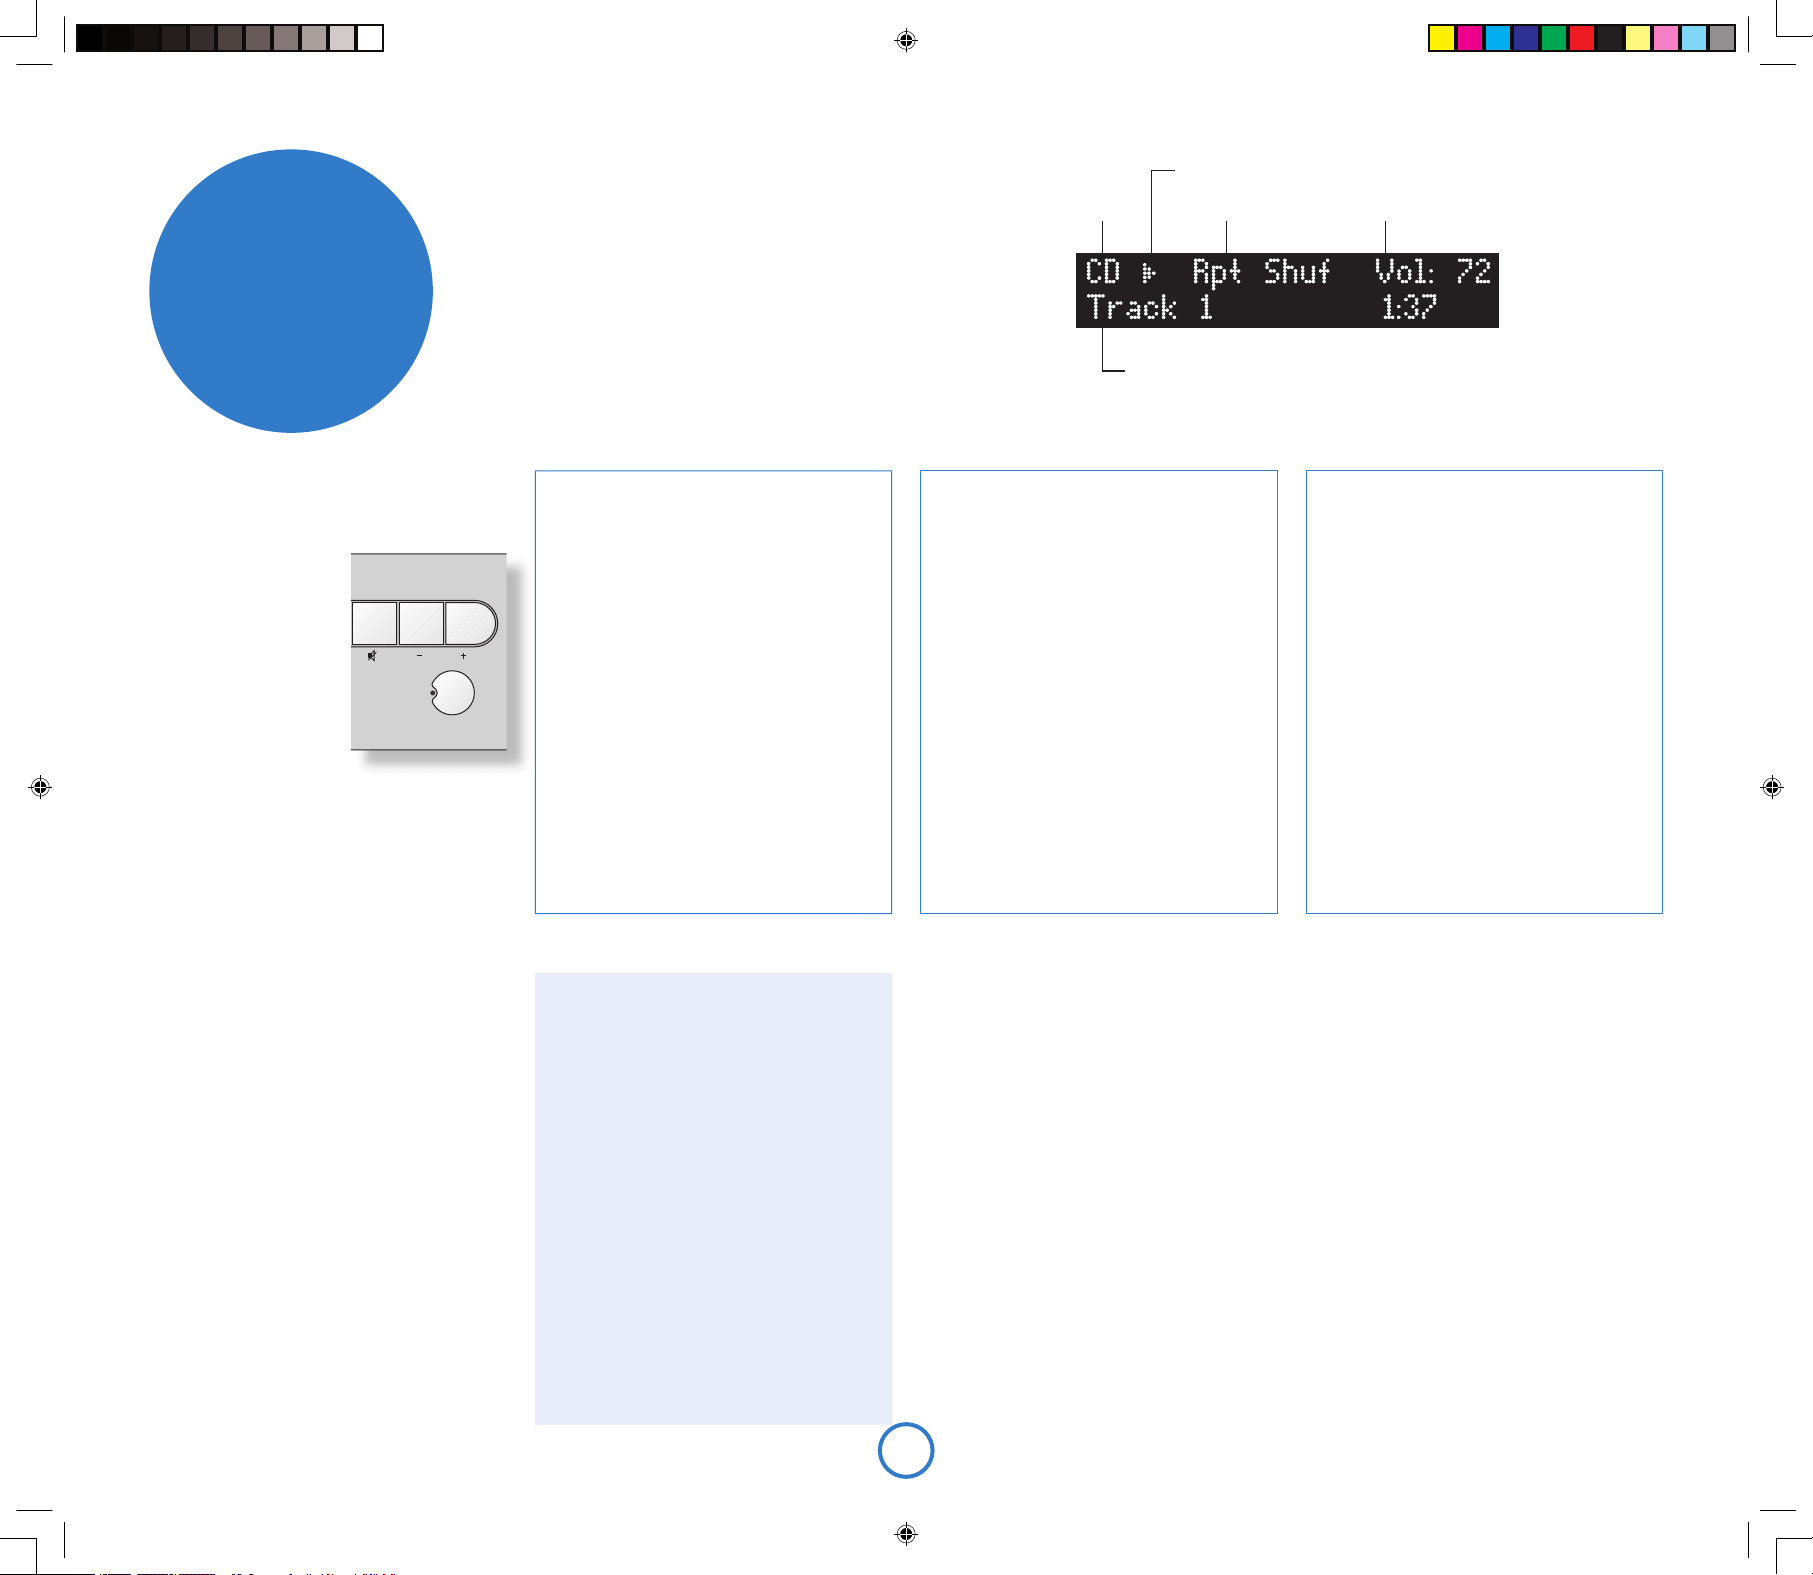
Important front panel controls
Power
Press the POWER button to
switch Solo between ‘on’
and ‘stand-by’.
When Solo is in stand-by
the light next to the power
button on the front-panel
glows red, and the frontpanel display shows the
current time. Pressing
POWER when the unit is
in stand-by will cause the
unit to switch on, when
the power button light will turn blue.
Note that the primary power-switch for Solo is
on the rear of the unit. If the power light is not
illuminated at all, please read the instructions on
page 4 ‘Power’.
Volume and Mute
Use these controls to mute, increase, or decrease
the volume. If Solo is muted, pressing the MUTE
button for a second time or changing the volume
will unmute it. The current volume is shown in the
top right corner of the display.
Source –/+
Used to change the audio source. If you wish to
listen to FM radio, for example, press SOURCE+
repeatedly until ‘FM’ is shown in the top left
corner of the display.
These buttons are also used when navigating
the Solo menu. See the section ‘Product
con guration’ (page 11) for more information.
making music
Source selection Play-back mode Current volume
Track number, song text, playback time, etc.
Play-state indicator
Skipping/scanning tracks
Press brie y the 0 and / buttons on the frontpanel or remote control to skip to the previous
or next track of a CD.
On skipping forward, play-back will start from
the beginning of the next track on the disc
(if there is one); when skipping backwards,
pressing the 0 button within the rst 3
seconds of a track will skip to the prior track (if
there is one), otherwise play-back will re-start
from the beginning of the current track. From
most positions, therefore, it is normal to have
to press 0 twice to skip to the beginning of the
previous track.
The 0 and / buttons are used also for
scanning. To scan backwards or forwards
within a track, press and hold the 0 or /
button – the track will be scanned until the
button is released.
Special play-back modes
Press MODE on the remote-control to cycle
through the repeat/shuf e modes for CD playback. The options are as follows:
1. Repeat disc: the tracks on the disc are
played in order. After the last track has
nished, play-back re-starts from the rst
track on the disc;
2. Repeat track: play-back of the current track
is repeated until cancelled;
3. Shuf e: the tracks on the disc are played in
a random order;
4. Repeat shuf e: this combines ‘repeat disc’
and ‘shuf e’. Each time that play-back is
restarted, the track order is shuf ed.
To cancel any of the shuf e/repeat modes,
press MODE repeatedly until the play-back
mode is removed from the display.
Note that the repeat/shuf e modes are
not available during programmed play-back
(described in the next panel).
Programming the play-back order
The order in which tracks on a CD are played
can be programmed. This is part of the con guration menu of Solo, which is described fully
on page 11; brief instructions are given here.
1. Press MENU to open the con guration menu;
2. Press C (SOURCE– on the front-panel), until
the top line of the display shows ‘Prog’;
3. Press OK to enter programme mode, then
use the – and + keys (front-panel: 0 and /)
to move the highlight to the next track to be
added to the play-list. Press OK to add the
track. Repeat this operation until all the tracks
you want to play have been added to the
play-list.
4. To exit programme mode, press MENU.
Press MENU again to close the con guration
menu.
To clear any programme, press < twice on the
remote-control, or eject the disc.
Display modes
Solo provides four different display modes
when listening to the CD. The mode is
changed by pressing the INFO button on either
the front-panel or the remote-control.
1. Current track time: this is the ‘conventional’
display for a CD player, showing the track
number, together with track time.
2. Remaining track time: this shows the
current track number, together with the track
time that remains to be played.
3. CD text: if available, text from the disc (CD
text) will be displayed when in this mode
(track name or artist, for example). If CD text is
unavailable, then this mode is the same as for
‘current track time’.
4. Large-character display: this mode is a
double-height display, showing just the current
track number and the volume.
CD play-back commands summary
4
(Play) – press this button to start the play-
back of a CD.
<
(Stop) – press to stop the play-back of a CD.
;
(Pause) – press to pause the play-back of
a CD. Press again (or press play) to re-start
play-back.
/
(Skip/Scan forwards) – press and release this
button of skip forwards to the beginning of
the next track. Press and hold the button to
scan forwards.
0
(Skip/Scan backwards) – press and
release this button to skip backwards
to the beginning of the current/previous
track. Press and hold the button to scan
backwards.
1
(Open/Close) – press to open the CD tray;
press again to close it.
Direct track access
Direct access may be gained to tracks on the disc
by using the numeric keys on the remote-control.
For tracks 1–9, press the number of the track that
you want to hear. To select a track greater than 9,
press and hold the rst digit of the track (e.g. 1)
until that number is shown in the bottom left
corner of the display (‘1–’), then press the second
digit.
Listening to a CD
Quick-start – to play a CD:
1. Press the
<
/1 button (load) on the front-panel
or
1
on the remote control to open the CD tray.
2. Place the CD in the centre of the tray, making sure
that the text printed on the CD is face-up. Press
the
1 or 4
(play) button to close the drawer.
3. Wait for the disc to load. If play was pressed to
close the drawer, then the disc will start playing
automatically, otherwise press 4/; (remote: A) to
start playback.
Solo iss4.id2 26/4/05, 7:58 pm8
Page 9
E9
English
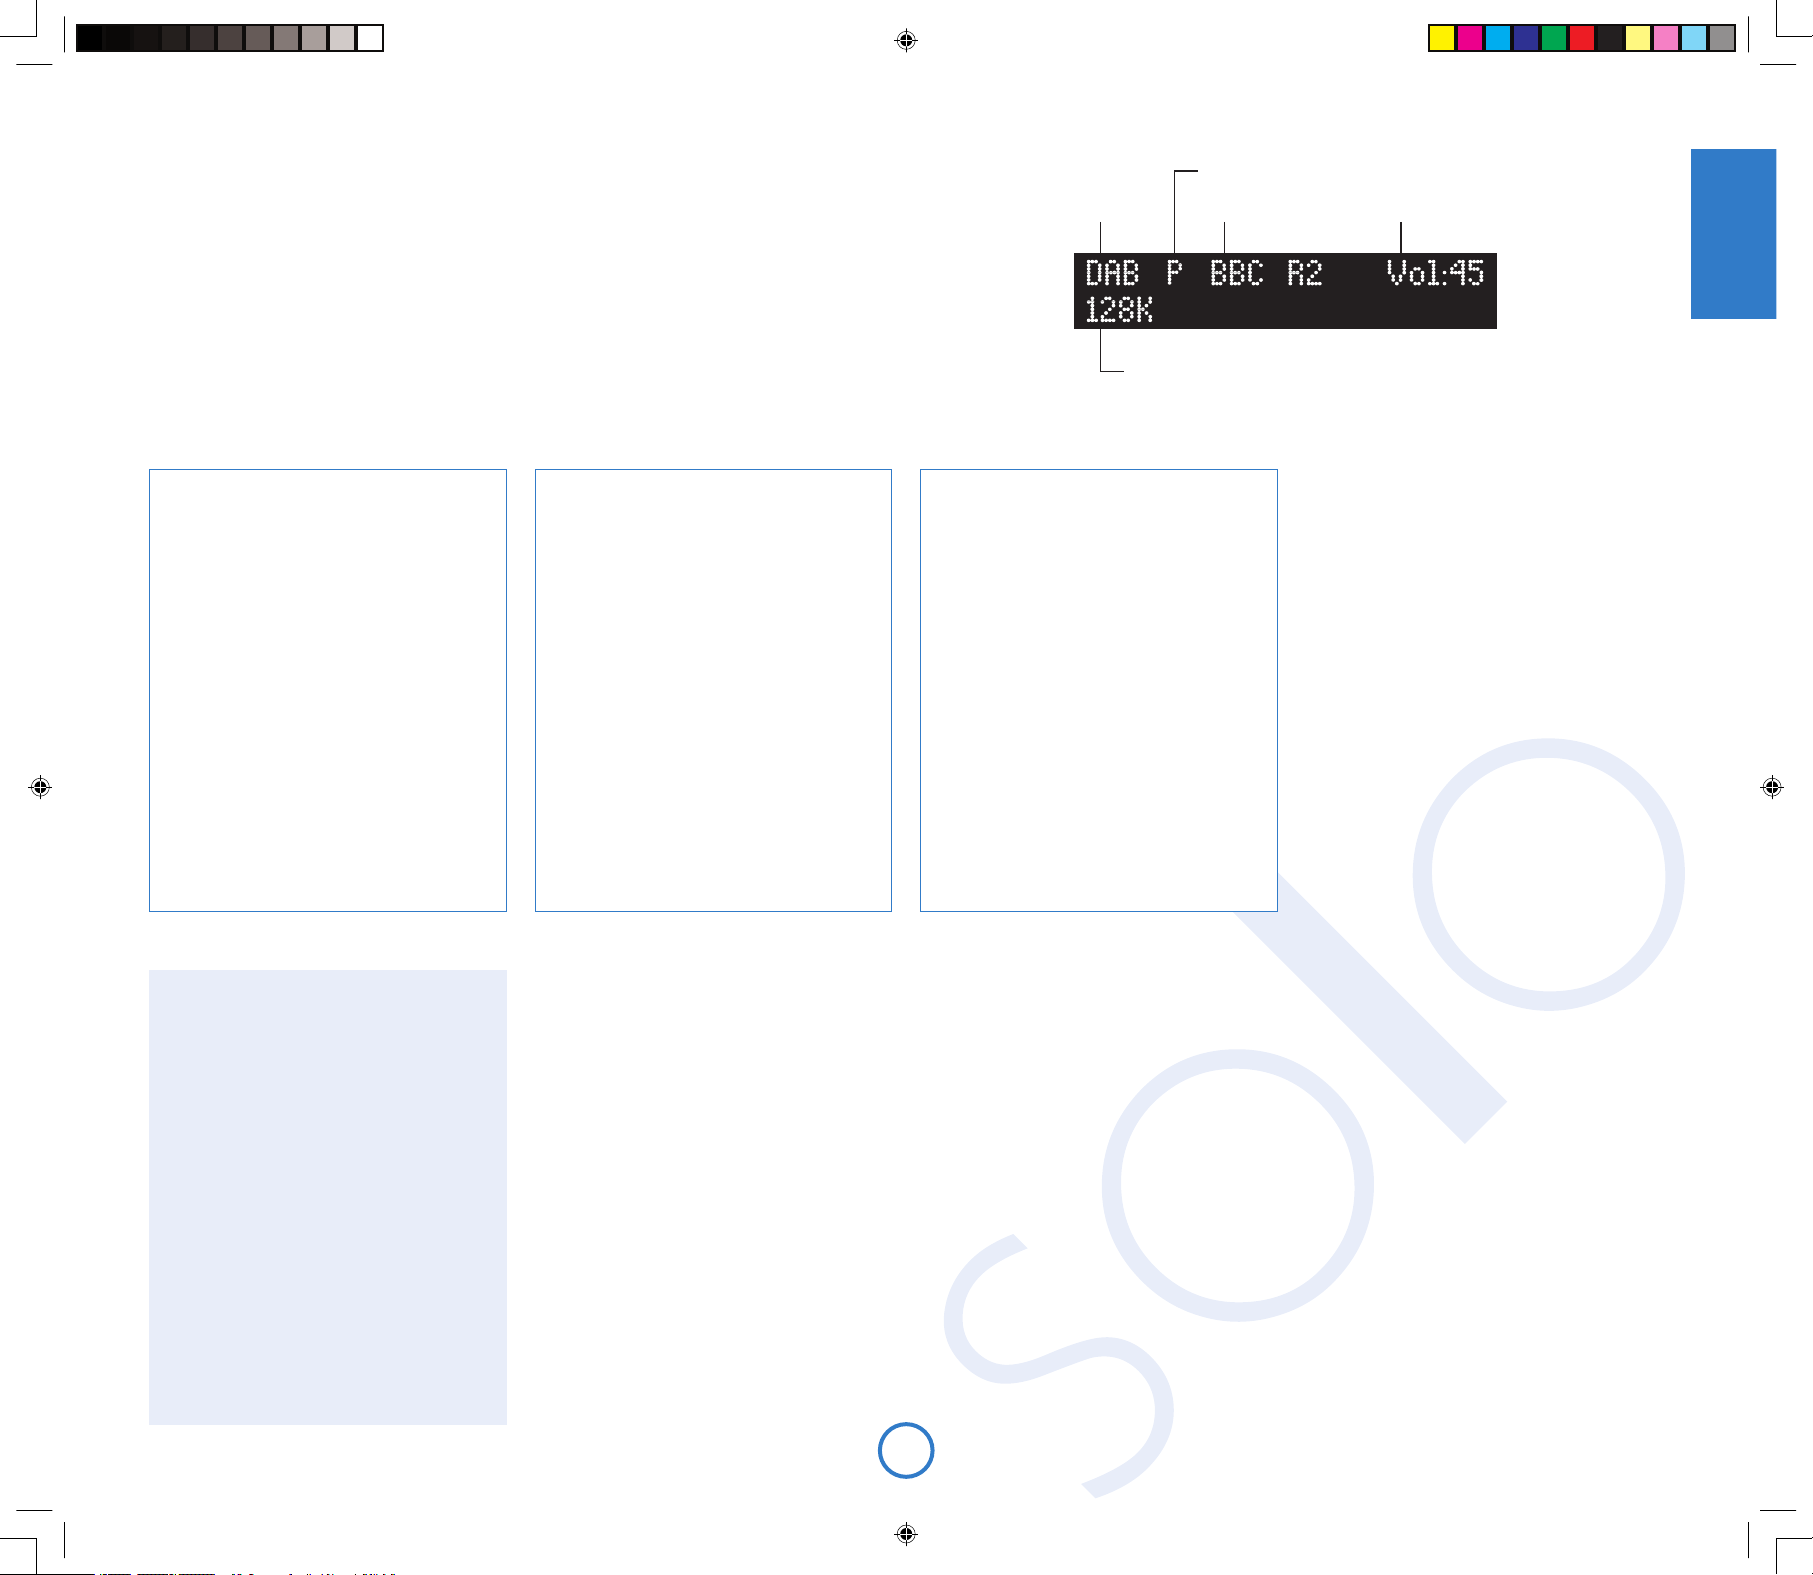
Display modes
Solo provides different display modes when
listening to the radio. The mode is changed
(cycled) by pressing the INFO button on either
the front-panel or the remote-control.
1. Programme type (DAB/FM): a short
description of the type of programme being
transmitted.
2. Transmission frequency (FM/AM): the
station name (if available) and transmission
frequency.
3. Dynamic label (DAB)/ RDS (FM): 128
characters of text used by broadcasters to
give programme-related information (e.g.,
‘phone numbers, web-addresses, etc.).
4. Data-rate (DAB): this mode shows the
data-rate of the station (in kbits/s) and the
transmission mode. A higher data-rate
indicates a higher audio quality, with the
maximum rate being 256kbits/s.
5. Signal quality: a bar-graph showing the
quality of the recieved signal.
Listening to the radio
Solo is tted with either a DAB/FM or an AM/FM receiver, depending on the part of the world that it is
shipped to.
Solo provides:
< up to 30 station presets;
< full RDS information on FM (where transmitted); programme-associated data on DAB;
< FM signal-strength and DAB data-rate meters.
Switching to the radio
Press SOURCE+ or SOURCE- until the radio type that you wish to listen to (DAB/FM/AM) is displayed on the
front panel. Alternatively, press the DAB/FM/AM button on the remote-control for direct access.
Source selection Station name
Programming station presets
You can store your favourite radio station in one of the radio ‘presets’, giving
quick access to the station in the future without the bother of having to retune. Solo provides for 30 preset radio stations, which are shared between
DAB, FM, and AM (as tted).
To store a preset, rst tune to the radio station you wish to store. To store the
station into one of presets 1–9, press and hold the appropriately numbered
button on the remote control until the ‘preset saved’ message is displayed.
An alternative method, giving access to presets 10–30, is to press MENU
to enter the Solo conguration menu (described fully on page 11), then to
navigate through the menu until ‘Store Preset’ is displayed. At this point,
using the – and + buttons on the remote control (0 or / on the front panel)
allows selection of the preset number you wish to use for the station (if a
preset is in use already, then the name or transmission frequency of the
station held in the preset is shown on the bottom line of the display; empty
presets are indicated by ‘Empty’ being shown). When the preferred preset
number is shown, press OK to store the preset. Note that saving a radio
station into a location occupied already will cause the original preset station to
be overwritten by the new one.
Your presets are retained when Solo is disconnected from the power supply.
Searching for stations
Pressing the MODE button when the radio is
selected as the music source toggles between
the two tuning modes of Solo – ‘Preset’ or
‘Tune’. The selected mode is shown briey on
the display.
When in preset mode, pressing the > or ?
buttons on the remote control (0 or / on the
front panel) selects the previous/next station
preset (if these are dened). Note that these
buttons have no effect, in preset mode, if no
presets are dened.
In tune mode, by contrast, pressing these
buttons changes the AM/FM tuning frequency
or selects the next DAB radio station from the
station list.
FM/AM
To search for new stations, ensure that Solo is
in ‘Tune’ mode, as described above.
< Manual tuning. Use the B and C
buttons (0 or / on the front panel) to
select the desired tuning frequency.
This can be used for tuning to a specic
frequency. It is also useful if you are
trying to select a station that is too weak
for automatic tuning.
< Automatic tuning. Pressing the B or
C
buttons on the remote control (0
or / on the front panel) for longer than
one second engages automatic tuning.
Solo searches for a radio station signal of
sufcient strength, then stops. To skip to
the next station, press one of the buttons
again. Automatic tuning is available for
both FM and AM.
DAB
Tuning stations in under DAB is different from
conventional FM or AM tuning, in that you do
not need to know the transmission frequency
of the station – this is handled for you by Solo.
Select DAB as the source, then press the
MENU button. Navigate through the menu
options (see page 11) until ‘DAB Setup’ is
displayed. There are two options under this
menu item – ‘Scan’ and ‘Erase settings’.
Selecting ‘Scan’ causes Solo to search for new
DAB stations. If any are found, then they will
be added automatically to the list of available
stations. Press MENU for a second time to exit
the menu.
To select a DAB radio station, press the B
or C buttons on the remote control until
the name of the station you want to listen
to is displayed. The station will be tuned
in automatically after a delay of about two
seconds.
Current volume
Transmission details, or other information
Selecting station presets
Solo must be in preset mode before preset stations can be selected (see
above).
To cycle through your preset stations, use the B or C buttons on the
remote control (0 or / on the front panel). Alternatively, presets can be
selected directly by using the numeric keypad on the remote. See page 10 for
further information on this option.
Preset mode indicator
Solo iss4.id2 26/4/05, 7:58 pm9
Page 10
E10
Inserting batteries into the
remote control
remote
control
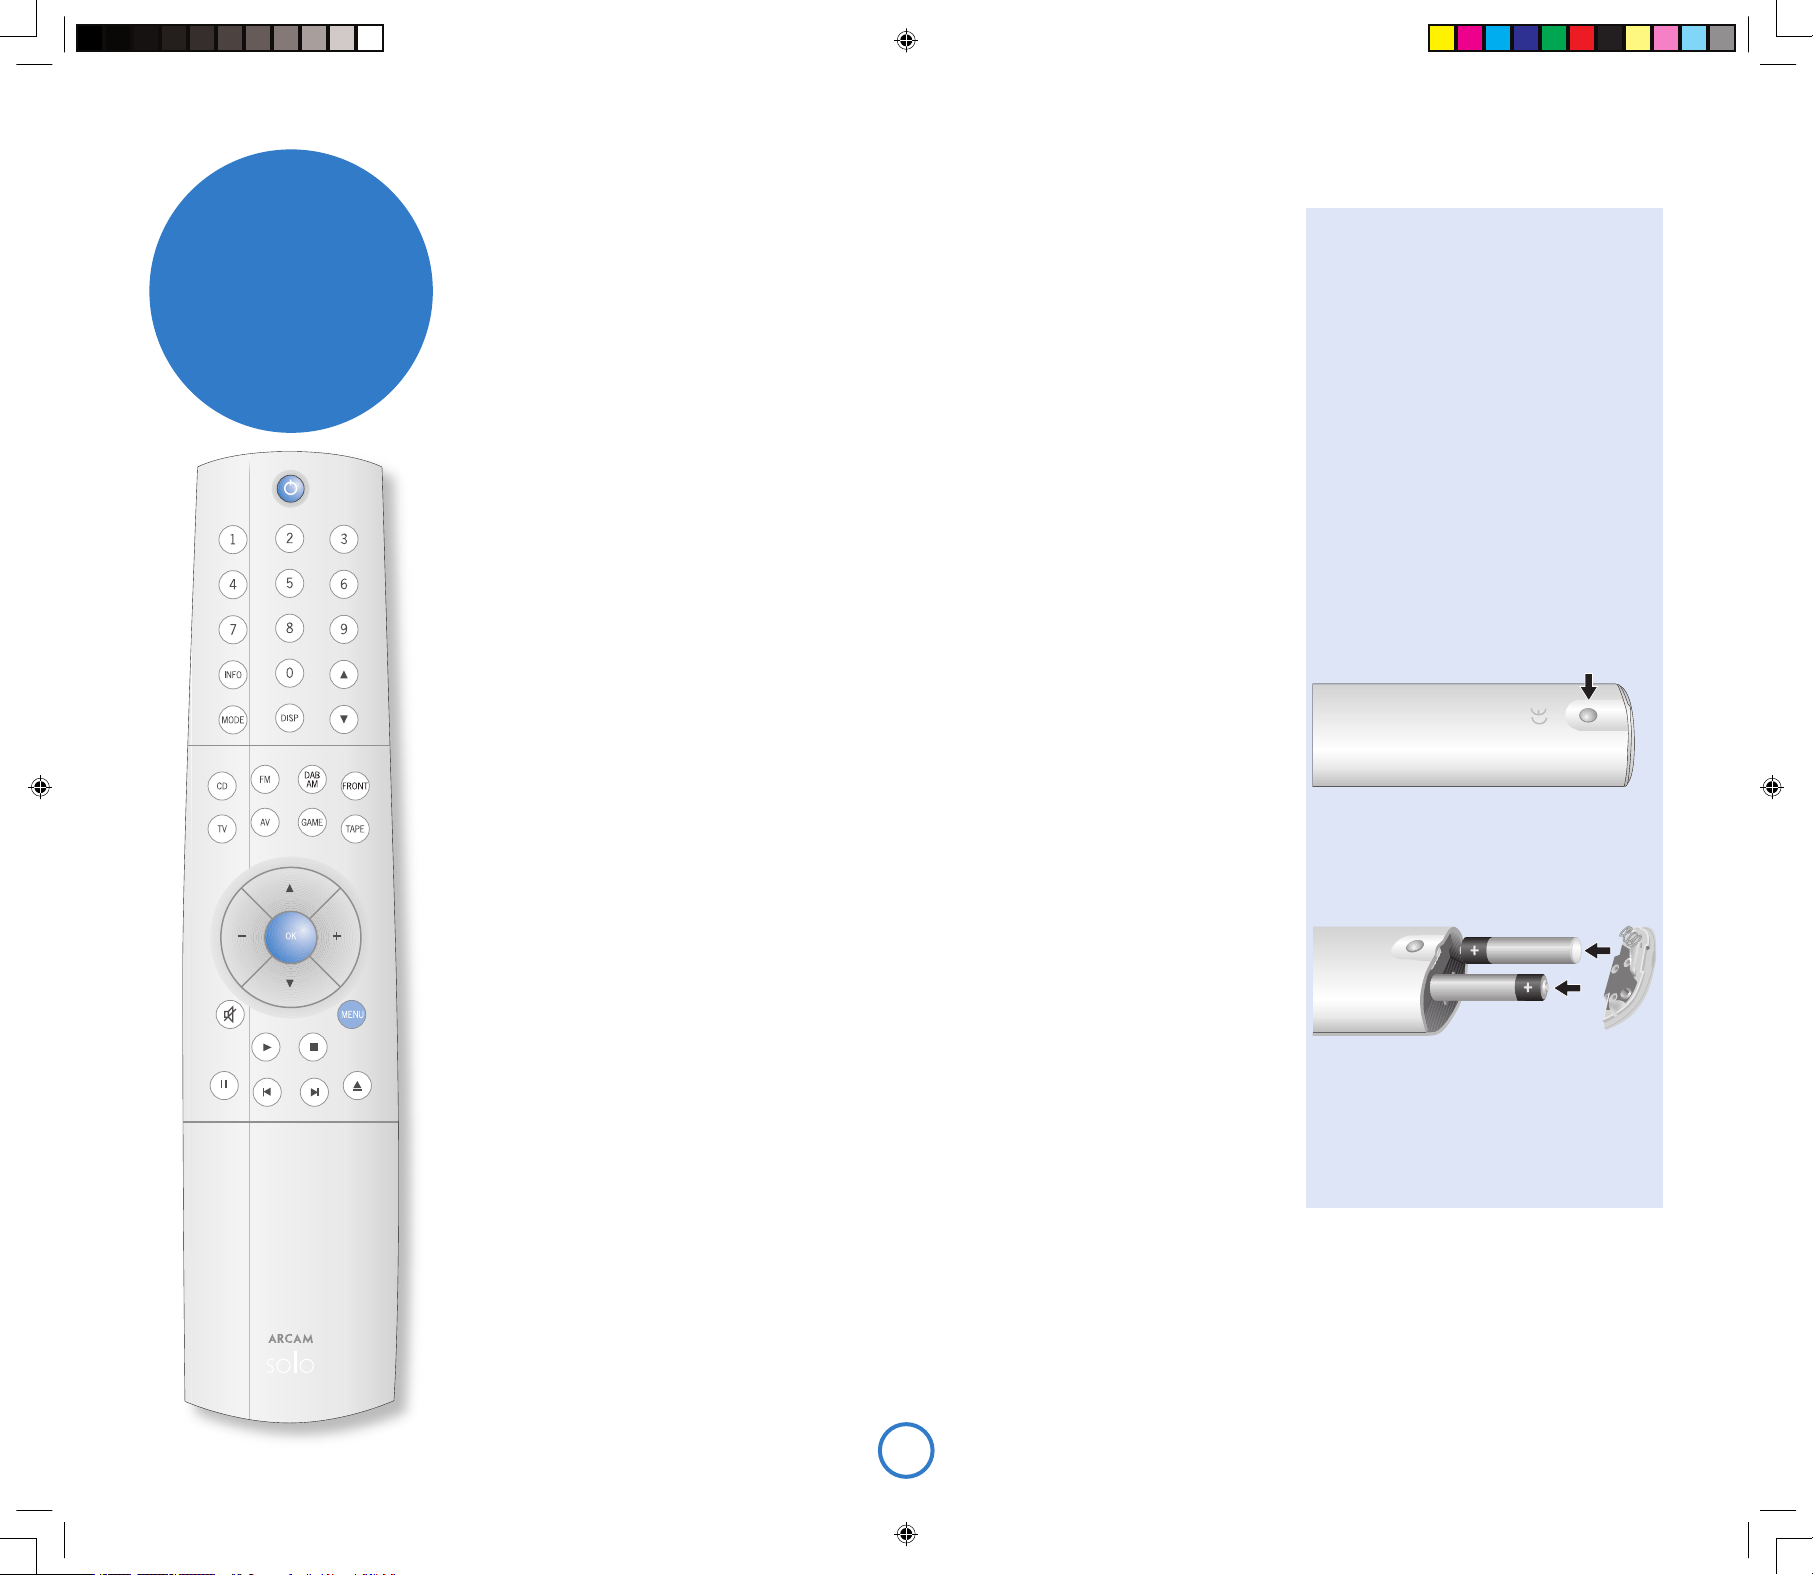
Remote control buttons
2
(Power) – Switches Solo between stand-by and on.
Track/preset selection (0–9) – Press the number of the track or preset that you want to hear. To
select a track/preset greater than 9, press and hold the rst digit of the track (e.g. 1) until the number
is shown in the bottom left corner of the display (‘1–’), then press the second digit.
>
and
?
– Used when listening to the radio to change the tuned frequency or the preset radio station.
INFO – Changes the display mode for CD or radio.
MODE – Some sources allow changes to the listening mode.
CD – Press the MODE button to cycle through the repeat/shuf e modes for CD playback.
DAB/FM/AM – Press MODE to switch between ‘tune’ and ‘preset’ mode. When in tune mode,
pressing > or ? changes the tuned frequency (FM/AM) or the selected station (DAB); in preset
mode, the preset station is changed.
DISP – Cycles the brightness of the front-panel display. There are several different brightness levels to
chose from, including switching the display off.
Source selection – Press the appropriate button to select the audio source you would like to hear.
Cursor keys and OK – When listening to music, the
B
and C keys work in the same way as the
>
and ? keys described above, with the – and + keys being used to change the volume. Together
with the OK button, these keys also nd use in navigating the con guration menu of Solo, described
on pages 11 and 12.
Mute – Press once to mute the speaker and pre-amp outputs of Solo. Press for a second time (or change
the volume) to unmute the unit.
MENU – Pressing the MENU button allows entry into the con guration menu of Solo. This is described
fully on pages 11 and 12. Press the MENU button for a second time to leave the menu.
CD play-back commands
4
(Play) – press this button to start the play-back of a CD.
<
(Stop) – press to stop the play-back of a CD.
;
(Pause) – press to pause the play-back of a CD. Press again (or press play) to re-start play-back.
/
(Skip/Scan backwards) – press and release this button to skip backwards to the beginning of the
current/previous track. Press and hold the button to scan backwards.
0
(Skip/Scan forwards) – press and release this button of skip forwards to the beginning of the next
track. Press and hold the button to scan forwards.
1
(Open/Close) – press to open the CD tray; press again to close it.
1. Open the battery compartment by
pressing the button on the back of the
remote control.
2. Insert two ‘AAA’ batteries into the battery
compartment, following the polarity
indications given inside the compartment
itself.
3. Push the battery cover back into position.
Using the remote control
Please keep in mind the following when using
the remote control:
< Ensure that there are no obstacles
between the remote control and the
remote sensor on Solo. The remote has
a range of about seven meters. (If the
remote sensor is obscured, the remote
control input jack on the rear panel is
available. Please contact your dealer for
further information.)
< Remote operation may become unreliable
if strong sunlight or uorescent light is
shining on the remote sensor of Solo.
< Replace the batteries when you notice
a reduction in the operating range of the
remote control.
Solo iss4.id2 26/4/05, 7:59 pm10
Page 11
E11
English
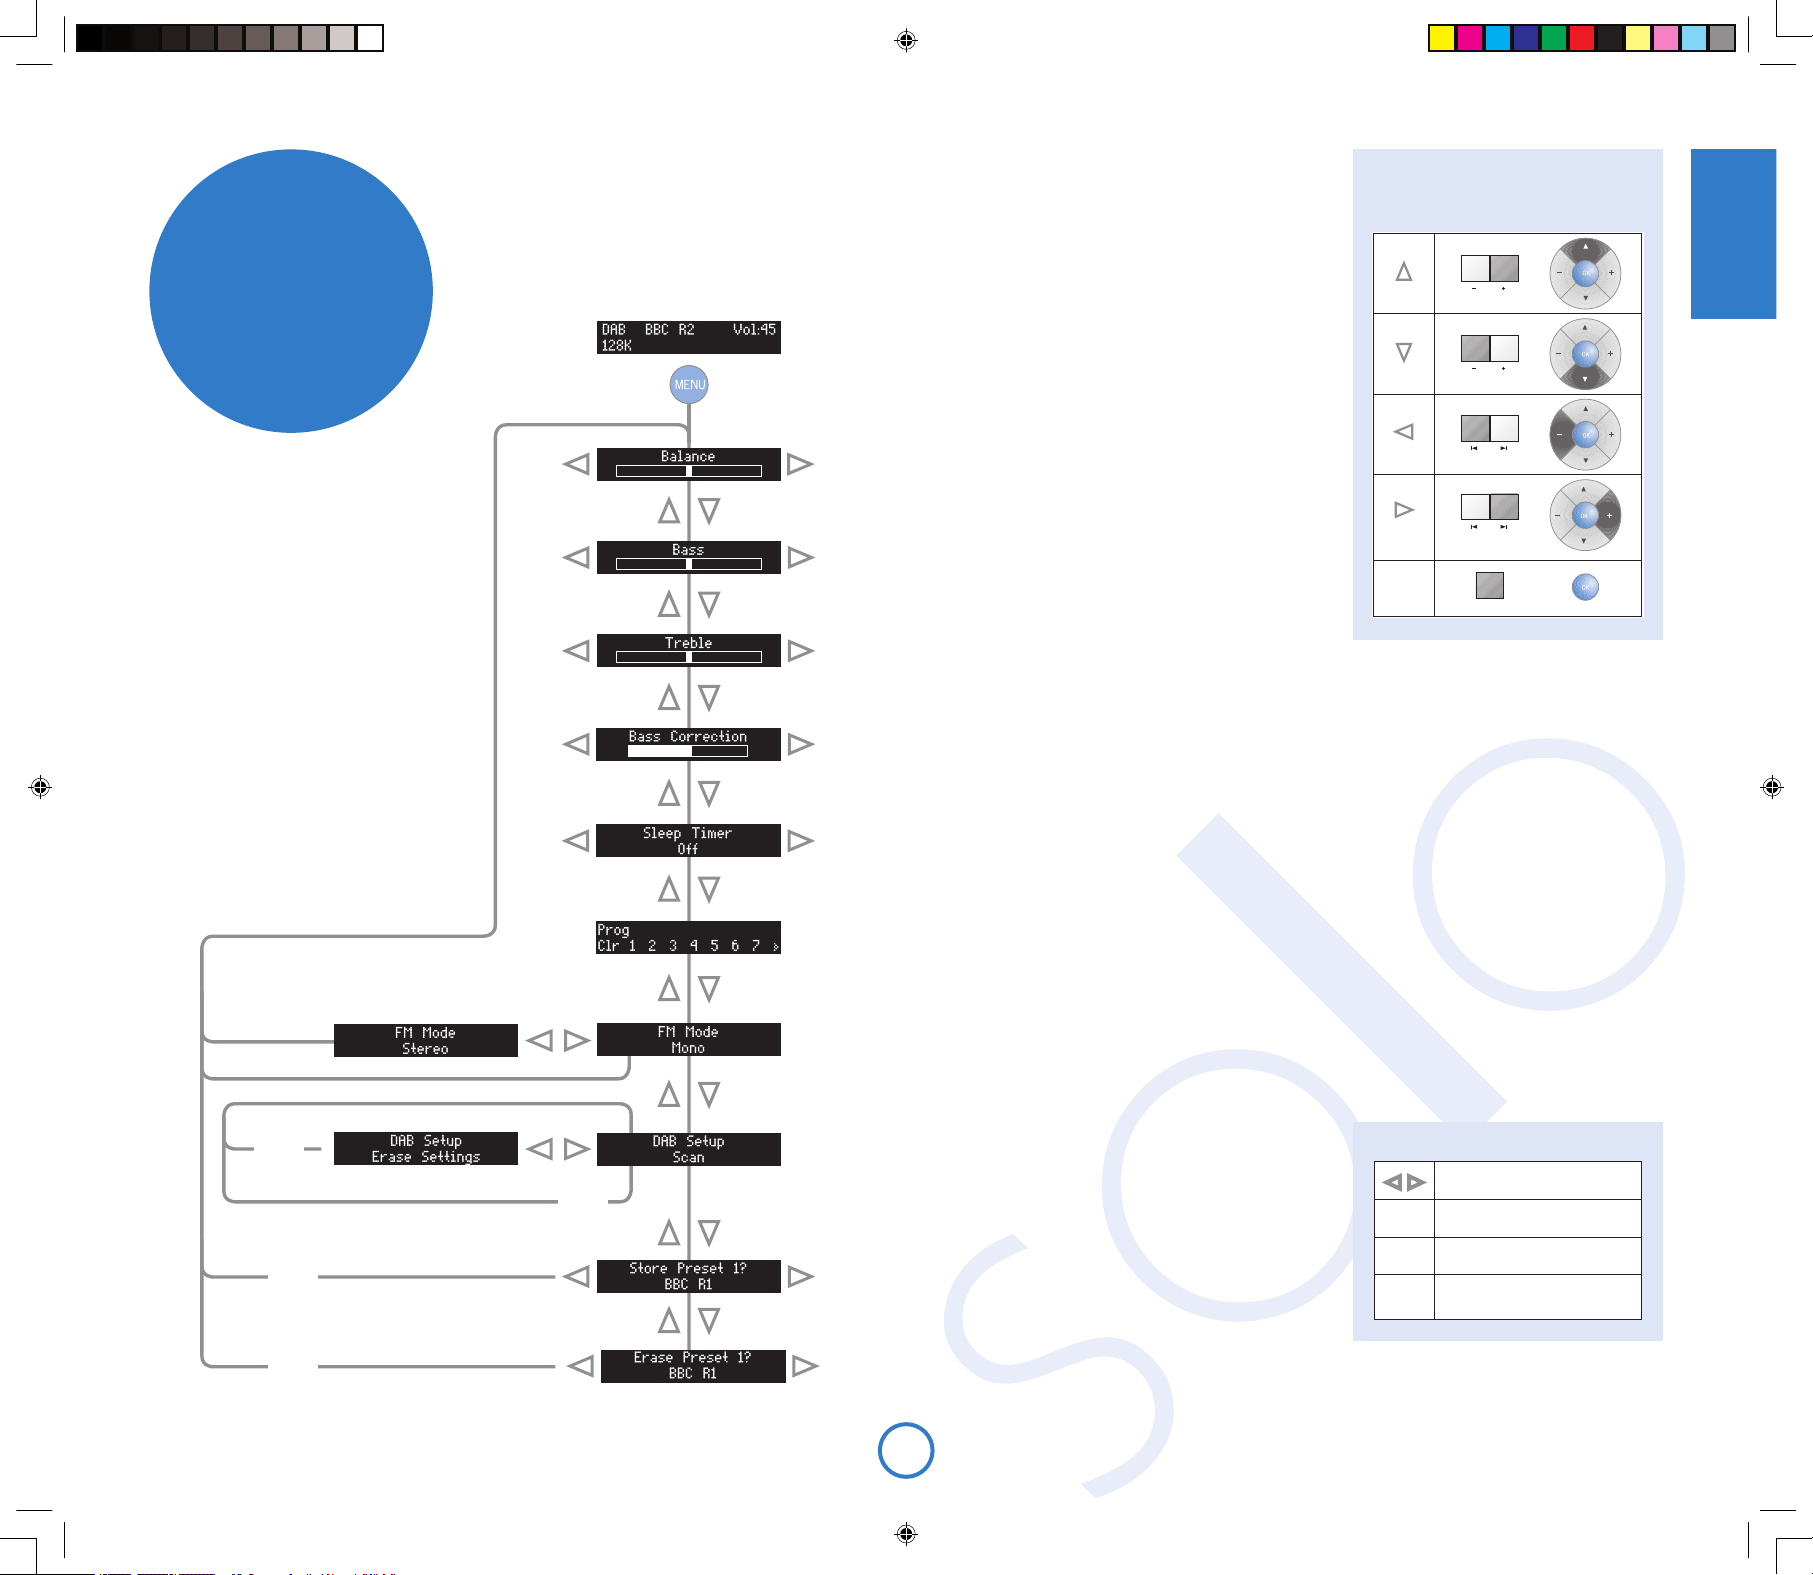
Product conguration
Solo allows you to adjust listening settings to suit your
taste, and to customise various features to t your system.
Use the diagram shown below to help you navigate through
the available settings.
Adjusting listening settings
In normal use, the display shows information on the current
volume, the source being listened to, and any sourcerelevant information (such as the play-back time on a CD).
To adjust the listening settings, press MENU on either the
front-panel or on the remote control. Use the keys as
indicated to select and adjust a particular setting.
Balance
This setting allows you to increase the volume of one
channel (left or right) relative to the other channel. It should
not normally be necessary to adjust this setting but, if
you habitually sit closer to one speaker than to the other,
altering the balance may help to restore the stereo image
for your listening position.
Bass
This setting changes the relative volume of the lower
frequency components of your music. If you feel that your
music is not ‘warm’ enough, increase this setting; if your music is ‘boomy’, decreasing this setting may
help.
See also ‘Bass correction’, below. Note that the control is inactive when headphones are connected.
Treble
This setting changes the relative volume of the higher frequency components of your music. If you feel
that percussion items in the music (for example) are being lost, increasing this setting may help. If high
frequency sounds are too dominant, decrease this setting.
Note that the bass and treble controls are inactive when headphones are connected.
Bass correction
This setting does not normally need to be used (leave on minimum).
Bass correction may be used if Solo is connected to reduced-frequency-range (‘Small’) speakers, that
cannot reproduce very low frequency sounds. Increasing this setting causes very low frequency sounds
to be progressively attenuated (since these cannot be reproduced by the speaker), while the volume of
slightly higher-frequency sounds is increased. This means that the overall bass ‘amount’ produced by the
speaker sounds the same as a full-range (‘Large’) speaker.
You cannot damage any part of your system using this setting, so we suggest that you experiment with it,
together with the bass and treble controls, until you nd the combination you prefer.
Sleep timer
This timer allows you to specify a listening period, after which Solo will switch automatically into stand-by.
The period can be set in 5-minute intervals, up to 120 minutes (2 hours).
CD programme
If you wish to program the play-back order of a CD,
press OK when this menu item is displayed. The CD
play-back order is then entered as described in the “CD
programming” panel, shown right. When you have nished
entering the programme, press MENU to leave “program
mode”. Press MENU for a second time to leave the Solo
conguration menu.
FM Mode
This menu item is shown only when the selected source is FM.
In some weak signal areas, it can be benecial to force the FM tuner to mono output, as mono requires a
much lower signal strength to produce acceptable results. If the signal strength in your area is good, leave
this set to ‘stereo’.
advanced
features
Key to the symbols used on these pages:
Symbol:
Front panel
key:
Remote control
key:
OK
‘Switch on’ state
Left Right
–dB +dB
–dB +dB
–dB +dB
Only if source
is FM
Only if source
is DAB
–Preset
Erase
settings
OK
+Preset
Scan for available stations
OK
Confirm preset
Only if source is
DAB, FM or AM
OK
Only if source
is CD
– +
–Preset +Preset
Confirm preset
OK
CD programming:
34
Highlight the track to add
OK
Add track to programme
CLR
Delete the last entry
STOP
Press STOP twice (remote only)
to clear the entire programme.
Solo iss4.id2 26/4/05, 7:59 pm11
Page 12
E12
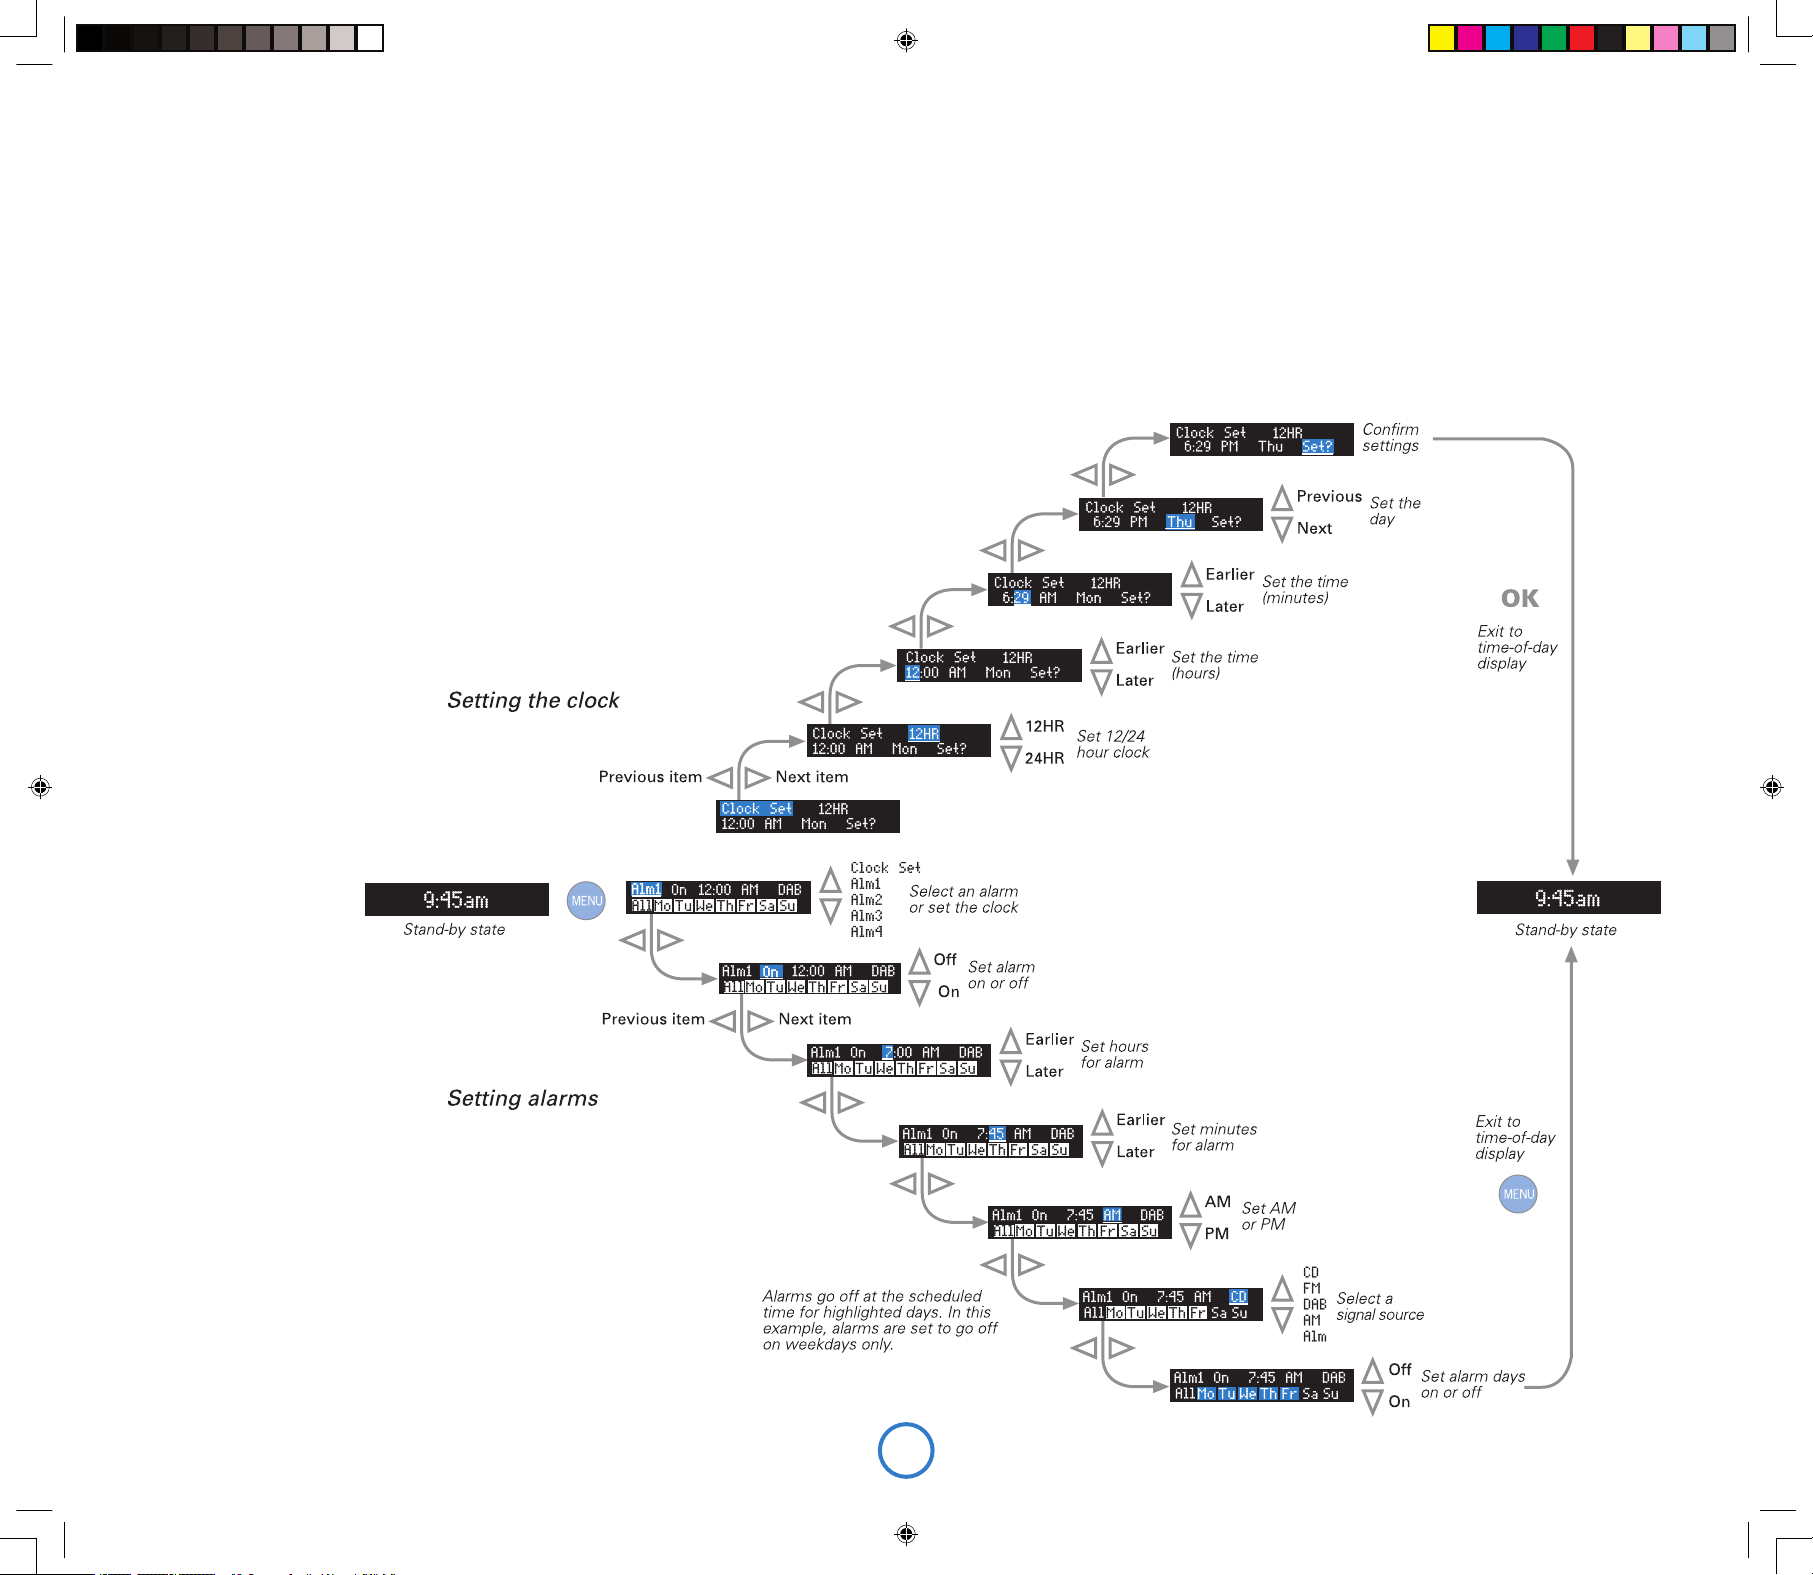
Setting the clock and alarm
When Solo is in stand-by, press MENU to set the clock or alarms.
Use the left and right buttons on the remote control to select the item to change, then use the up and
down buttons to change the value. For example, after pressing MENU to enter the clock/alarm setting
menu, pressing up and down will change between setting the clock and setting one of the alarms.
Solo allows up to four different alarms to be set.
Stopping or pausing an alarm
To stop an alarm ringing, press the power button on the front-panel or remote control. Alternatively, press
OK to enter ‘snooze’ mode; the alarm will re-sound after a 10-minute delay. To cancel snooze-mode, press
the power button.
DAB Setup
This menu item is shown only when the selected source is DAB.
There are two options under this menu item – ‘Scan’ and ‘Erase settings’. Selecting ‘Scan’ causes Solo
to search for new DAB stations. If any are found, then they will be added automatically to the list of
available stations.
Scanning for new stations does not erase old stations that are no longer transmitted – over time, or if
you change location, this may lead to you having a number of stations in your list that cannot actually be
received. In this case, select ‘Erase settings’, then perform a new scan; when the scan is complete, only
stations that are available currently in your area will be shown.
Set Preset
This menu item is shown only when the selected source is DAB, FM or AM.
See the section ‘Programming station presets’ on page 7 for more information.
Adjusting Zone 2 volume
Press and hold MENU on the front panel until ‘Z2 Vol’ is displayed, then use the volume control to
decrease/increase the Zone 2 volume. Press MENU again to exit.
Solo iss4.id2 26/4/05, 7:59 pm12
Page 13

E13
English
technical
specication
Pre-amplier
Inputs
Maximum input level 2.5Vrms
Input impedance
47kΩ
Signal/noise ratio 105dB
Co-axial outputs
Maximum output level 2.5Vrms
Output impedance
500Ω
Optical output (TOSLINK)
Sample rate 44.1kHz (with CD playback),
48kHz (with DAB receiver),
otherwise muted.
Amplier
Continuous power output, per channel, 80kHz measurement bandwidth
Both channels, 4Ω, 1kHz
75Wrms, 0.013% THD+n
Distortion, both channels 4Ω, 80% power, 1kHz
0.011% THD+n
CD play-back
DAC Wolfson 24-bit multilevel Delta-Sigma DAC
Frequency response (±0.5dB) 20Hz–20kHz
DAB receiver (where tted)
DAC AKM 96kHz 24-bit Delta-Sigma DAC
RF tuning range 174–240MHz (Band III)
1452–1490MHz (L-band)
Sensitivity (typical) –98dBm (VHF measurement to EN50248)
Input impedance
50Ω
Audio data rate (maximum)
256kbits/s MPEG layer II, protection level 3
Number stored services (maximum) 128
FM receiver
RF tuning range 87.5–108MHz
Sensitivity (typical) 2µV
Signal/noise ratio (at 200mV) 58dB
Distortion (THD at 200mV) 0.5%
AM receiver (where tted)
RF tuning range 522–1611kHz
Signal/noise ratio (at 200mV) 40dB
Distortion (THD at 30% modulation) 1.5%
General
Supply voltage* 100V, 115V or 230V AC,
depending on shipping region
Power consumption Stand-by 3.2VA;
Operational 50VA (typical), 400VA (maximum)
Size (W x D x H) W430mm x D350mm x H79mm
Weight (net) 7.75kg
Weight (packed) 10.5kg
Supplied accessories Mains lead
Wire dipole aerial (Band III)
Remote control handset and two AAA batteries
Instruction manual and registration card
* This is a Class 1 device and must be earthed. In Japan, the supply voltage is 100V, 50–60Hz.
Radio interference
Solo is an audio device containing microprocessors and other digital electronics. It has been designed to
very high standards of electromagnetic compatibility.
If Solo causes interference to radio or television reception (which can be determined by switching Solo
off and on), the following measures should be taken:
< Re-orient the receiving antenna or route the antenna cable of the effected receiver as far as
possible from Solo and its cabling.
< Relocate the receiver with respect to Solo.
< Connect the receiver and Solo to different mains outlets.
If the problem persists, please contact your Arcam dealer.
Solo iss4.id2 26/4/05, 7:59 pm13
Page 14
E14
product
guarantee
Worldwide Guarantee
This entitles you to have the unit repaired free of charge, during the rst two years after purchase, at
any authorised Arcam distributor provided that it was originally purchased from an authorised Arcam
dealer or distributor. The manufacturer can take no responsibility for defects arising from accident,
misuse, abuse, wear and tear, neglect or through unauthorised adjustment and/or repair, neither can they
accept responsibility for damage or loss occurring during transit to or from the person claiming under the
guarantee.
The warranty covers:
Parts and labour costs for two years from the purchase date. After two years you must pay for both parts
and labour costs. The warranty does not cover transportation costs at any time.
Claims under guarantee
This equipment should be packed in the original packing and returned to the dealer from whom it was
purchased, or failing this, directly to the Arcam distributor in the country of residence.
It should be sent carriage prepaid by a reputable carrier – not by post. No responsibility can be accepted
for the unit whilst in transit to the dealer or distributor and customers are therefore advised to insure the
unit against loss or damage whilst in transit.
For further details contact Arcam at:
Arcam Customer Support Department,
Pembroke Avenue, Waterbeach, CAMBRIDGE, CB5 9QR, England.
or www.arcam.co.uk.
Problems?
If your Arcam dealer is unable to answer any query regarding this or any other Arcam product please
contact Arcam Customer Support at the above address and we will do our best to help you.
Solo iss4.id2 26/4/05, 7:59 pm14
Page 15
F1
Français
Handbook
Manuel
Handbuch
Handleiding
Manual
Solo iss4.id2 26/4/05, 7:59 pm1
Page 16
F2
Instructions de sécurité
importantes
Cet appareil a été conçu et fabriqué
conformément aux normes de qualité et de
sécurité les plus strictes. Vous devez cependant
observer les précautions qui suivent lors de son
installation et de son utilisation.
1. Avertissements et consignes
Il est impératif de lire les consignes de sécurité
et d’utilisation avant de mettre cet appareil en
marche. Conservez ce manuel pour vous y référer
par la suite et respectez scrupuleusement les
avertissements gurant dans ce manuel ou sur
l’appareil lui-même.
2. Eau et humidité
L’installation d’un appareil électrique à proximité
d’une source d’eau présente de sérieux risques.
Il ne faut donc pas installer l’appareil près d’une
baignoire, d’un lavabo, d’un évier, dans un sous-sol
humide, près d’une piscine, etc.
3. Chute d’objets ou infiltration de liquides
Veillez à ne pas laisser tomber d’objets ni couler
de liquides à travers les ouvertures de l’appareil et
ne placez pas sur l’appareil d’objet contenant du
liquide, tel qu’un vase par exemple.
4. Ventilation
Évitez de placer l’appareil sur un lit, un canapé,
un tapis ou une surface similaire instable ou
dans une bibliothèque ou un meuble fermé. Ceci
risquerait de nuire à la ventilation du système.
Pour permettre une ventilation appropriée, il est
conseillé de prévoir au minimum un espace de
50 mm de chaque côté et au-dessus de l’appareil.
5. Exposition à la chaleur
Ne placez pas l’appareil à proximité d’une amme
nue ou de tout dispositif produisant de la chaleur :
radiateur, poêle ou autre, y compris d’autres
amplicateurs.
6. Conditions climatiques
L’appareil est conçu pour fonctionner dans des
climats modérés.
7. Étagères et supports
Utilisez uniquement des étagères ou des supports
pour appareils audio. Si l’appareil est monté sur un
système portatif, déplacez-le avec précaution an
d’éviter tout risque de chute.
8. Nettoyage
Mettez l’appareil hors-tension avant de le nettoyer.
Pour l’entretien du boîtier, utilisez uniquement un
chiffon doux, humide et non pelucheux. N’utilisez
pas de diluant pour peinture ni de solvant
chimique.
L’emploi d’aérosols ou de produits de nettoyage
pour meubles est déconseillé, car le passage d’un
chiffon humide risquerait de laisser des traces
blanches et indélébiles.
9. Alimentation secteur
Branchez l’appareil uniquement sur une
alimentation secteur du type mentionné dans le
manuel d’utilisation ou indiqué sur l’appareil luimême.
Cet appareil est un dispositif de classe 1 qui doit
être relié à la terre.
Utilisez principalement l’interrupteur à l’arrière
du Solo pour l’isoler de l’alimentation électrique
générale. Il doit donc être installé de manière à
pouvoir le déconnecter.
10. Protection des câbles d’alimentation
secteur
Veillez à ce que les câbles d’alimentation ne se
trouvent pas dans un lieu de passage ou bloqués
par d’autres objets. Cette règle s’applique
plus particulièrement aux prises et câbles
d’alimentation et à leurs points de sortie de
l’appareil.
11. Mise à la terre
Assurez-vous que l’appareil est correctement mis
à la terre.
12. Câbles haute tension
Évitez de monter l’antenne extérieure de l’appareil
à proximité de câbles haute tension.
13. Périodes de non-utilisation
Si l’appareil possède une fonction de mise en
veille, un courant faible continuera de circuler
lorsqu’il sera réglé sur ce mode. Débrancher le
cordon secteur de la prise murale si l’appareil doit
rester inutilisé pendant une période prolongée.
14. Odeur suspecte
Arrêtez et débranchez immédiatement l’appareil
en cas d’émission de fumée ou d’odeur anormale.
Contactez immédiatement votre revendeur.
15. Service
N’essayez jamais d’effectuer d’autres opérations
que celles mentionnées dans ce manuel. Toute
autre intervention doit être effectuée par un
personnel qualié.
16. Entretien par des techniciens qualifiés
L’appareil doit être entretenu par du personnel
qualié lorsque :
A. la prise ou le câble d’alimentation a été
endommagé,
B. des objets sont tombés ou du liquide a coulé
dans l’appareil,
C. l’appareil a été exposé à la pluie,
D. l’appareil présente des dysfonctionnements,
E. l’appareil est tombé ou le boîtier a été
endommagé.
17. Branchement des haut-parleurs
Tous les haut-parleurs doivent être connectés
au Solo avec du câble de classe 2 (aucune mise
à la terre nécessaire). Le non-respect de cette
précaution peut entraîner des dommages pour le
Solo.
Respect des consignes de
sécurité
Cet appareil a été conçu pour répondre à la norme
internationale de sécurité électrique EN60065.
RISQUE DE CHOC ELECTRIQUE
NE PAS OUVRIR
ATTENTION
CAUTION
RISK OF ELECTRIC
SHOCK DO NOT OPEN
ATTENTION : afin de réduire les risques de choc électrique, n’ouvrez pas le boîtier de l’appareil. Les pièces internes ne sont pas
réparables par l’utilisateur. Pour tout problème matériel, contactez des techniciens qualifiés.
ATTENTION : afin de réduire les risques de choc électrique et d’incendie, veillez à ne pas exposer cet appareil à la pluie ou à l’humidité.
Le triangle dans lequel figure le symbole d’un éclair alerte l’utilisateur de la présence, dans le boîtier de l’appareil, d’une tension dangereuse,
non isolée et suffisamment importante pour représenter un risque de choc électrique.
Le triangle dans lequel figure un point d’exclamation alerte l’utilisateur de la présence d’instructions de fonctionnement et de maintenance
(réparation) importantes dans la documentation accompagnant le produit.
ATTENTION : au Canada et aux États-Unis, afin de prévenir tout choc électrique, aligner la plus grosse broche de la prise à la fente la
plus large de la fiche et insérez entièrement la prise dans la fiche.
consignes de
sécurité
Solo iss4.id2 26/4/05, 7:59 pm2
Page 17

F3
Français
… et merci de faire conance au système de diffusion musicale Arcam Solo.
Arcam produit des composants audio de haute qualité depuis bientôt trente ans.
Au l des années, nous avons rassemblé tout un ensemble de connaissances en
matière de conception et de construction de composants audio pour vous offrir les
meilleures performances acoustiques au meilleur prix. Le design du Solo est un
condensé de ce savoir au cœur d’un ensemble facile à utiliser et conçu pour vous
procurer des années de plaisir d’écoute, après quelques minutes d’apprentissage
seulement.
Ce manuel est un guide détaillé pour l’utilisation du système de diffusion musicale
Solo. Il présente d’abord des conseils d’installation, décrit ensuite l’utilisation
du produit, puis se termine par des informations relatives aux fonctions les plus
avancées. Consultez la table des matières afchée à droite pour savoir à quelle
section vous reporter.
Nous espérons que votre système de diffusion musicale Solo vous procurera
des années d’écoute musicale sans problème. Si, contre toute probabilité, vous
découvriez un défaut ou si vous avez besoin d’informations supplémentaires sur
les produits Arcam, notre réseau de revendeurs se fera un plaisir de vous aider.
Vous trouverez d’autres informations sur le site Web d’Arcam à l’adresse suivante :
www.arcam.co.uk
L’équipe de dévelopement Solo
bienvenue…
consignes de sécurité............................................. F2
bienvenue… ............................................................ F3
connexions .............................................................. F4
faire de la musique................................................. F8
télé-commande......................................................F10
fonctions avancées................................................F11
spécications techniques..................................... F13
garantie du produit................................................F14
Sécurité
Les consignes de sécurité gurent à la page 2
de ce manuel.
La plupart de ces consignes découlent du bon
sens mais, pour votre propre sécurité et pour
vous assurer de ne pas endommager l’unité,
nous vous conseillons de les lire.
Ce produit doit être relié à la terre.
Table des matières
Solo iss4.id2 26/4/05, 8:00 pm3
Page 18

F4
FMRS232
CD OUT
AV
IN
SERIAL NO.
GAME TVTAPE OUT TAPE INZONE 2 PRE OUT
GND
AM
230V
~
50 – 60HZ
400VA
MAX
PROGRAM
SPEAKER
OUTPUT
12V
REMOTE
IN
OUT
IN
L
R
R
L
TRIGGER
LOCAL
ZONE 2
Alimentation
Le Solo est livré avec une prise moulée xée au câble pour
l’alimentation secteur. Véri ez que la prise fournie est compatible
avec votre système et contactez votre revendeur Arcam si vous avez
besoin d’un autre câble d’alimentation secteur.
Enfoncez la prise IEC (de type autoclave) du câble d’alimentation
dans la prise à l’arrière du Solo, en vous assurant qu’elle est bien
poussée en place. Branchez l’autre extrémité du câble d’alimentation
dans la prise d’alimentation électrique et, si nécessaire, permutez la
prise.
Le Solo est équipé d’un interrupteur sur l’arrière du boîtier, près de
l’arrivée de l’alimentation électrique. Pour utiliser le Solo, assurezvous que l’interrupteur est ouvert.
Le Solo est équipé d’un transformateur conçu pour accepter la
tension de l’alimentation électrique de la région où le produit
est expédié. Si la tension de votre alimentation électrique ne
correspond pas à cette spéci cation (af chée sur le panneau
arrière), si vous souhaitez utiliser l’unité dans une région
différente où la tension est différente, ou si la prise pour
l’alimentation électrique est inappropriée, veuillez consulter
votre revendeur Arcam.
Ce produit doit être relié à la terre.
connexions
Antenne radio
En Europe et au Canada, le Solo est généralement équipé d’un
module de réception FM/RAN (radiodiffusion audionumérique) et
d’un module de réception AM/FM aux États-Unis et en ExtrêmeOrient. Pour utiliser l’un ou l’autre de ces modules, vous devez
y connecter l’antenne appropriée qui vous est fournie comme
accessoire.
Le connecteur de l’antenne FM/RAN est un connecteur de type F (à
vis). L’antenne doit être connectée à cette entrée par enfoncement
de la broche dans le trou au centre du connecteur, puis par vissage
du manchon sur l’extérieur. L’antenne AM doit être connectée
comme indiqué à la page 9.
Pour utiliser l’antenne métallique en forme de T, installez-la aussi haut
que possible sur un mur, ses éléments positionnés verticalement.
Si possible, essayez les différents murs accessibles de la pièce
pour trouver celui qui offre la meilleure réception. Utilisez de la pâte
adhésive ou du ruban adhésif pour xer l’antenne au mur en vous
assurant que l’adhésif n’entre pas en contact avec le l métallique de
l’antenne.
Pour une réception optimale, nous vous recommandons d’utiliser
une antenne extérieure installée sur le toit (voir page 7).
Haut-parleurs
Le Solo est conçu pour une seule paire de haut-parleurs de 4 à 8
ohms et possède des bornes qui prennent en charge des cosses
embrochables ou des ls nus.
Pour connecter le haut-parleur de gauche, dévissez la borne marquée
L à l’arrière du boîtier, insérez le l du haut-parleur (ou la cosse) et
revissez la broche. Assurez-vous que la borne rouge (positif / +) du
haut-parleur est connectée à la borne rouge du Solo et la borne noire
(négatif / –) du haut-parleur connectée à la borne noire du Solo.
Répétez la même chose pour connecter le haut-parleur de droite au
connecteur marqué R.
Il est important de ne laisser aucun l vagabond autour de ces
connexions pour éviter qu’ils ne touchent d’autres câbles ou le
boîtier de l’appareil. Sans ces précautions, vous prenez le risque
qu’un court-circuit ne vienne endommager votre Solo.
Ne vissez pas à fond les bornes des haut-parleurs et n’utilisez
ni clé à vis, ni pince, etc. En effet, cela pourrait endommager les
bornes et annuler la garantie.
Reportez-vous à la page 6 pour en savoir plus sur le positionnement
des haut-parleurs.
Câbles de branchement
Il est recommandé d’utiliser des câbles blindés
et de qualité supérieure, a n de ne pas réduire la
qualité générale du système. De même, employez
uniquement des câbles conçus pour ce genre
d’application. L’utilisation de câbles inadéquats
et possédant des caractéristiques d’impédance
différentes risque de nuire aux performances
de votre système (veillez, par exemple, à ne
pas utiliser de câbles audio pour le transport de
signaux vidéo). Les câbles doivent être aussi
courts que possible.
Il est préférable lors de la connexion de
l’équipement de s’assurer que le câblage de
l’alimentation électrique principale est à bonne
distance des câbles audio a n d’éviter les bruits
indésirables dans les signaux audio et vidéo.
Recommandations générales
Installation de l’appareil
< Placez le Solo sur une surface plane et dure,
à l’abri des rayons directs du soleil et de
toute source de chaleur ou d’humidité.
< Ne posez pas l’unité au-dessus d’un
ampli cateur de puissance ou de toute autre
source de chaleur.
< Veillez à ne pas la placer dans un espace
clos, tel qu’une armoire ou un placard fermé,
sauf si la ventilation est suf sante. Lors du
fonctionnement de l’appareil, sa température
augmente.
< Ne posez aucun autre dispositif ou objet sur
le Solo. Vous risqueriez d’obstruer les fentes
de ventilation et de causer la surchauffe de
l’appareil (et par conséquent de ce dispositif
ou de cet objet).
< Véri ez que le récepteur infrarouge, situé
au centre du panneau avant de l’unité,
n’est pas obstrué. Ceci risquerait de
provoquer le dysfonctionnement du boîtier
de télécommande. Si vous ne pouvez pas
dégager une ligne directe entre le récepteur
et le boîtier de télécommande, vous pouvez
brancher un répéteur infrarouge sur le
connecteur IR du panneau arrière de l’unité
(voir ci-dessous).
< Ne posez pas votre platine sur cette
unité. Les platines sont très sensibles au
bruit généré par l’alimentation secteur,
qui risque d’être audible à la lecture sous
forme de bourdonnement si la platine
d’enregistrement est trop proche.
Solo iss4.id2 26/4/05, 8:00 pm4
Page 19

F5
Français
Contrôle RS232
Le Solo est équipé d’un connecteur de série
RS232 qui permet le contrôle à distance à partir
d’un ordinateur ou d’un dispositif similaire. Ce
connecteur est rarement employé lors d’une
utilisation courante. Cependant, si vous souhaitez
faire des essais avec cette méthode de contrôle
à distance, vus trouverez un exposé complet du
protocole de contrôle à distance sur le site Web
Arcam.
Écoute avec casque
Le panneau avant du
Solo possède une prise
pour la connexion d’un
casque. Pour utiliser un
casque avec le Solo,
branchez le casque sur
la prise située sur le
coté gauche du panneau
avant. Quand le casque
est branché dans la prise
pour casque, la sortie
haut-parleur principale
et la sortie du préampli
sont mises en sourdine
automatiquement (la
sortie de la Zone 2 reste active).
Cette prise accepte les casques dont les
valeurs d’impédance sont comprises entre
8Ω et 2kΩ, équipés d’une prise jack stéréo de
3,5 mm. La prise casque est toujours active,
sauf quand le Solo est en sourdine.
FMRS232
CD OUT
AV
IN
SERIAL NO
.
GAME TV
TAPE OUT TAPE INZONE 2 PRE OUT
GND
AM
L
R
Sorties audio
TAPE OUT (Sortie bande) : cette sortie se prend avant la commande de
volume, donc la source écoutée est routée directement à cette
sortie. Si vous le souhaitez, cette sortie peut être connectée à
une platine d’enregistrement de cassettes (ou tout autre dispositif
d’enregistrement). Cette sortie ne doit en aucun cas être connectée à
un ampli cateur de puissance.
Remarquez que cette sortie est en sourdine quand la source est dé nie
comme bande pour éviter les boucles de réaction.
PRE OUT (Sortie de préampli) : pour améliorer toujours plus la qualité audio
ou si vous voulez une puissance supérieure aux 50 W par canal offerte
par le Solo, vous pouvez connecter un ampli cateur de puissance ou un
caisson de basse. Connectez ces prises aux entrées de votre caisson
de basse ou de votre ampli cateur de puissance. Dans le cas d’un
Entrées audio
Le Solo possède quatre entrées audio et une boucle pour permettre la connexion
d’autres sources audio (console de jeu, TV, lecteur DVD, etc.). Trois de ces entrées,
et la boucle, sont situées sur le panneau arrière, une seule entrée se situant
sur le panneau avant. Les étiquettes placées au-dessus des entrées sur le Solo
suggèrent quelques utilisations, même si les quatre entrées possèdent les mêmes
caractéristiques (ce sont toutes des entrées de niveau de ligne) et tout dispositif
approprié peut être connecté à ces entrées. Remarquez, cependant, que le nom
af ché pour chaque entrée sur le panneau d’af chage avant ne peut être modi é.
Pour connecter un dispositif à une entrée sur l’arrière du Solo, utilisez un câble
stéréo phono à la bonne longueur, pour une connexion sur le panneau avant,
le câble doit être équipé d’un jack de 3,5 mm. Connectez la sortie audio de ce
dispositif à l’une des entrées audio du Solo en vous assurant que les prises sont
fermement en chées. Nous vous recommandons d’utiliser des câbles de liaison
de haute qualité à chaque fois que possible pour garantir la meilleure qualité
audio possible.
AV
IN
GAME TV
GND
AM
L
R
Tape loop ou Boucle
Une boucle est fournie pour permettre la connexion au
Solo d’une platine cassette externe.
TAPE OUT (Sortie bande) : connectez ces sorties aux
culots des entrées de votre platine cassette
(généralement appelées RECORD ou ENREG.).
TAPE IN (Entrée bande) : connectez les culots de sortie
de votre platine cassette (généralement appelées
PLAY ou LECTURE) à ces entrées.
Remarquez que la sortie TAPE OUT est mise en sourdine
quand la boucle est sélectionnée comme source musicale.
Connexion d’une platine d’enregistrement
Le Solo ne comporte pas de préampli cateur phono. Pour connecter une platine
d’enregistrement au système, vous devez disposer d’un préampli cateur
externe. Contactez votre revendeur a n d’obtenir des recommandations et
des informations plus complètes pour connaître le matériel le mieux adapté.
FMRS232
AV
IN
GAME TV
TAPE OUT TAPE INZONE 2 PRE OUT
GND
AM
L
R
ampli cateur de puissance, connectez les haut-parleurs à ses bornes de
haut-parleurs.
ZONE 2 OUT (Sortie Zone 2) : cette sortie peut être utilisée pour installer
un système dans une deuxième pièce. Elle doit être connectée à
l’ampli cateur de la deuxième pièce. Le niveau de sortie varie selon la
commande de volume de la deuxième pièce.
CD OUT (Sortie CD) : cette sortie transporte le signal de sortie numérique du
lecteur CD ou RAN (le cas échéant) du Solo et peut-être utilisée pour
les enregistrements numériques avec des dispositifs d’enregistrement
compatibles (tels que le MiniDisc). Cette sortie transporte le signal au
taux d’échantillonnage de 44,1 kHz pour la lecture d’un CD et de 48 kHz
pour la RAN.
Ces connexions sont conçues pour être utilisées
dans le cadre d’installations dans plusieurs
pièces. Lors d’une utilisation normale, ces
connexions ne sont pas employées. Si vous
souhaitez utiliser ces fonctions, téléchargez le
document intitulé « Solo Remote Control » sur le
site Web www.arcam.co.uk, où vous trouverez
également des conseils sur la con guration de ces
connexions.
12V TRIGGER (Déclencheur 12 V) : cette sortie
fournit un signal de 12 V à chaque fois que
l’unité est allumée (mais pas quand elle est
en veille ou hors tension). Ce signal peut être
utilisé pour allumer automatiquement les
ampli cateurs de puissance (ou tout autre
équipement compatible) connectés au Solo
pour qu’ils soient allumés en même temps
que le Solo.
IN LOCAL (Entrée locale) : cela permet aux
signaux de la télécommande d’être reçu par
le capteur du Solo si le capteur est masqué
(ou invisible de quelque manière que ce soit
pour la télécommande). Un capteur externe
est utilisé pour recevoir les signaux de la
télécommande et les renvoyer au Solo (dans
cette entrée) à l’aide d’un câble approprié.
FMRS232
CD OUT
AV
IN
SERIAL NO
.
GAME TV
TAPE OUT TAPE INZONE 2 PRE OUT
GND
AM
PROGRAM
SPEAKER
OUTPUT
12V
REMOTE
IN
OUT
IN
L
R
R
L
TRIGGER
LOCAL
ZONE 2
IN ZONE 2 (Entrée Zone 2) : utilisez ce connecteur
si vous utilisez un autre système équipé
d’un capteur à distance dans une deuxième
pièce. Le capteur externe est utilisé pour
recevoir les signaux de la télécommande et
les renvoyer au Solo (dans cette entrée) à
l’aide d’un câble approprié.
OUT (Sortie) : cette sortie transporte tous les
signaux du récepteur de télécommande du
panneau avant et les commandes reçues
par les deux entrées des
capteurs externes décrits
ci-dessus (Entrée locale et
Entrée Zone 2). Cela peut servir
à router les commandes de la
télécommande vers d’autres
équipements (dans d’autres
lieux éventuellement). Par
exemple, les commandes
de lecteur DVD peuvent
être reçues par le Solo, puis
routées vers un lecteur de DVD
à distance qui utiliserait ce
connecteur de sortie
Entrées et sorties de télécommande et le déclencheur 12 V
Solo iss4.id2 26/4/05, 8:01 pm5
Page 20
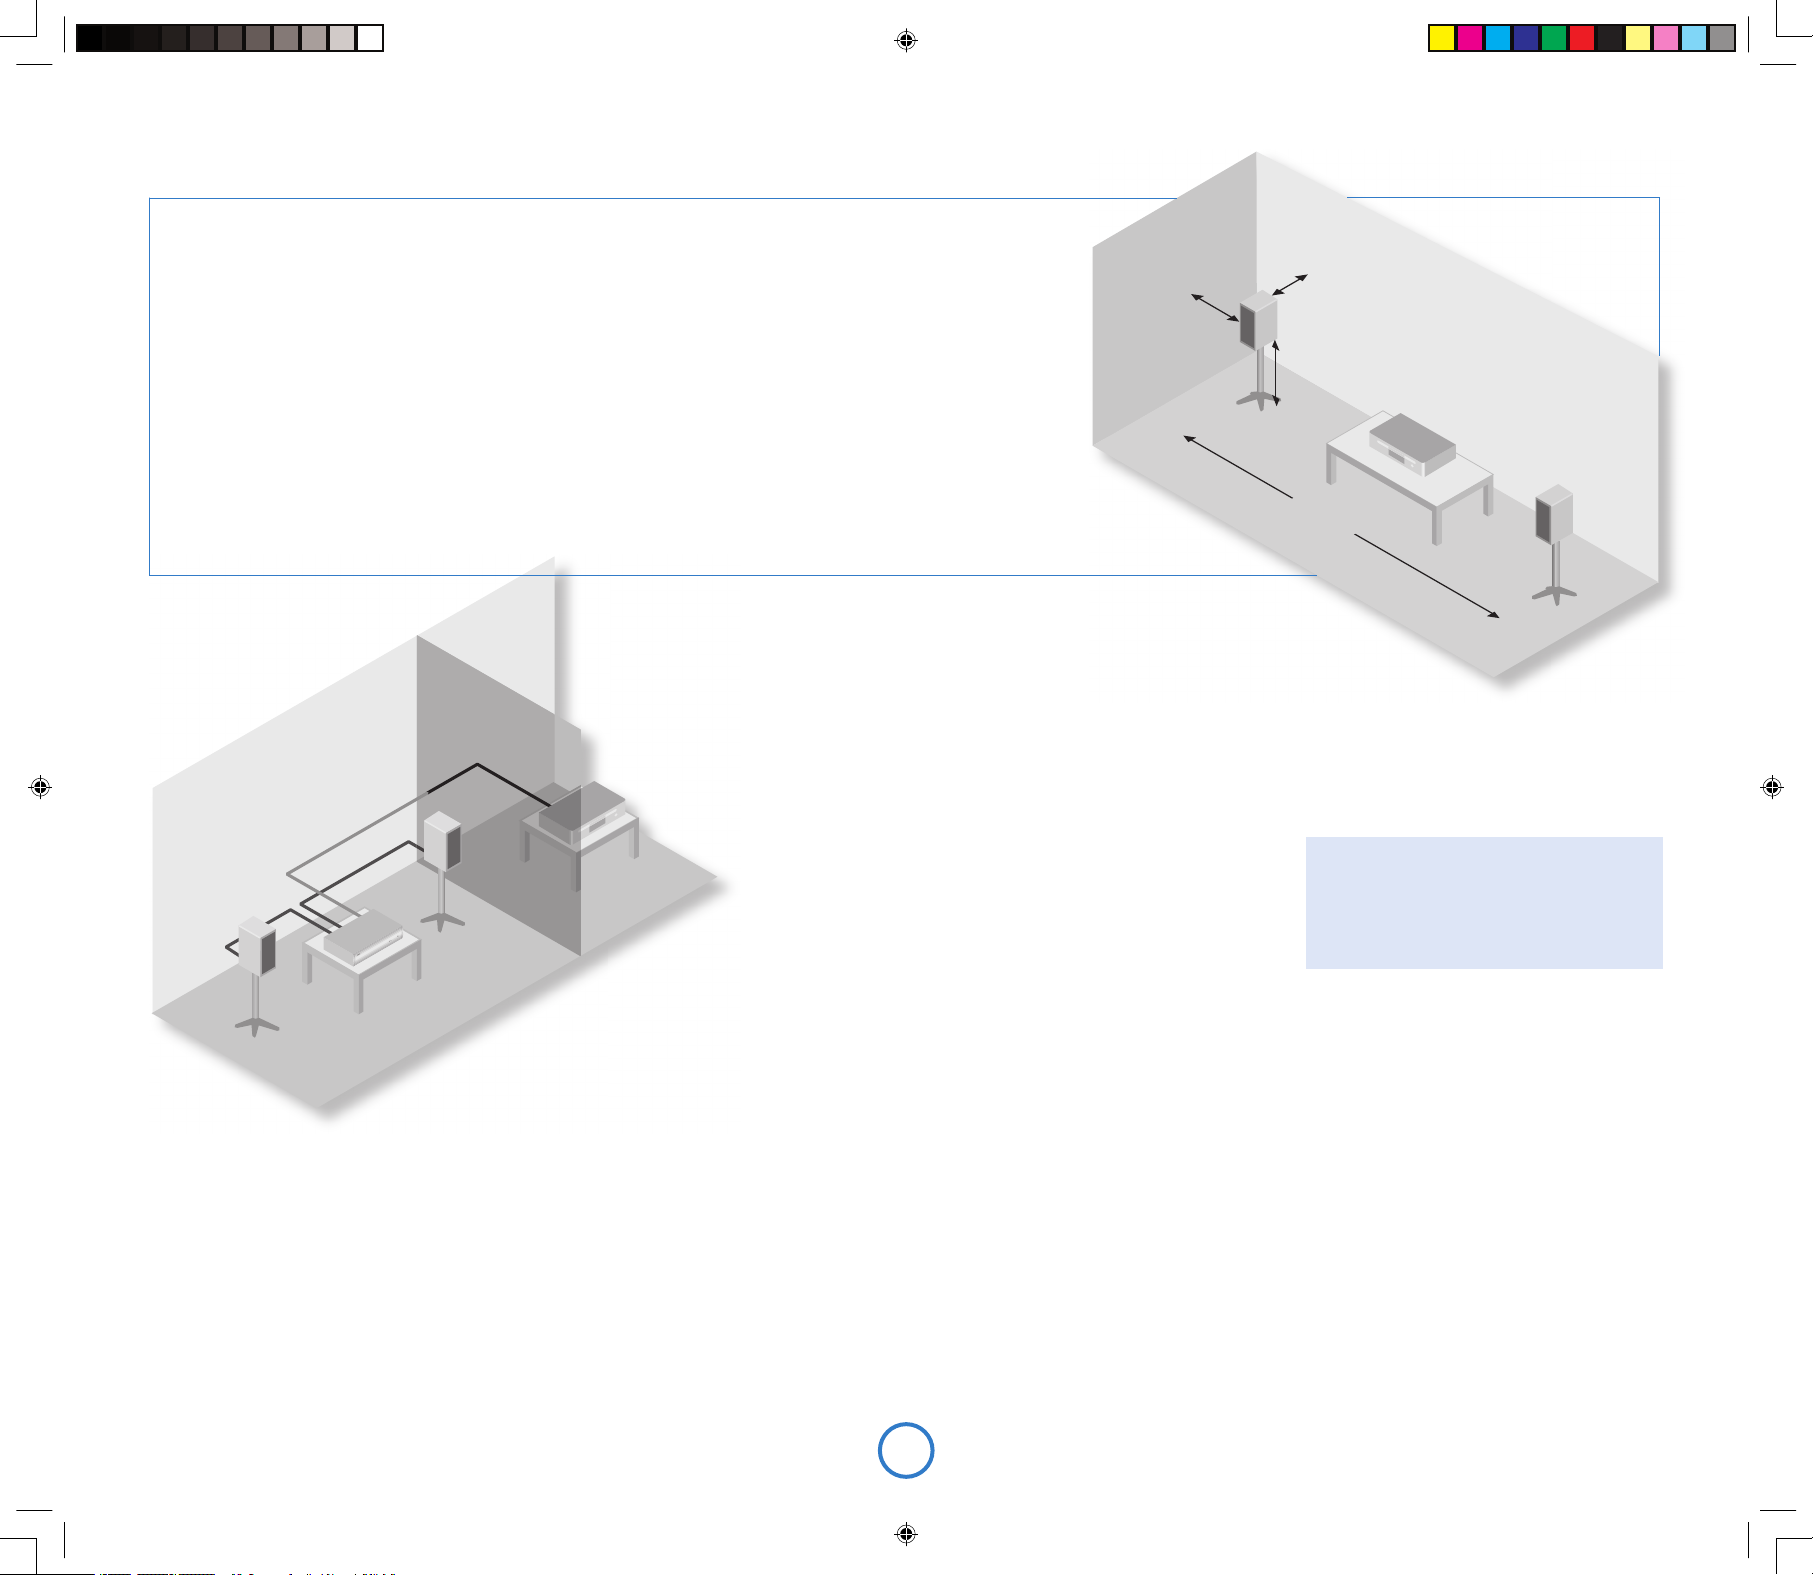
F6
>60cm
15
–
40cm
40 – 60cm
2 – 3m
Installation des haut-parleurs
Les conseils qui suivent sont des recommandations
générales pour l’installation des haut-parleurs. Reportezvous à la documentation fournie avec vos haut-parleurs
pour des informations plus précises sur le positionnement et
l’installation.
Positionnement
De manière générale, les haut-parleurs doivent être placés sur un
pied rigide à environ 15 à 40 cm du mur du fond et à 60 cm au
moins du mur de côté. Les haut-parleurs ne doivent jamais être
placés sur le sol (sauf s’ils sont prévus à cet effet) ni dans des
coins.
Le son produit dépend de l’acoustique de la pièce d’écoute et il est
recommandé de tester le positionnement des haut-parleurs. En
règle générale, nous vous suggérons de placer les haut-parleurs à
2 ou 3 m l’un de l’autre, à 15 cm du mur du fond.
Écoute dans une seconde pièce
Le Solo est fourni avec deux commandes de volume
séparées pour permettre l’écoute de la même source dans
deux pièces différentes de la maison. Pour cela, il vous faut :
< un ampli cateur de puissance (tel que l’Arcam P80, par exemple) et des haut-
parleurs,
< des câbles de connexion appropriés, tels que ceux décrits ci-dessus,
< un récepteur de télécommande (facultatif), disponible auprès de votre revendeur
Arcam,
< une deuxième télécommande Solo (facultatif), disponible auprès de votre
revendeur Arcam.
Établir les connexions comme suit :
1. Assurez-vous que tout l’équipement est hors tension et déconnecté de
l’alimentation électrique.
2. Connectez les sorties du Solo marquées Zone 2 aux entrées audio de
l’ampli cateur de puissance avec les câbles de liaison.
3. Connectez les haut-parleurs aux bornes de haut-parleur de l’ampli cateur de
puissance. Les haut-parleurs doivent être connectés de la même manière que
dans l’encadré Haut-parleurs de la page 4.
4. Branchez le récepteur à distance de la deuxième pièce dans le connecteur marqué
Zone 2 à l’arrière du Solo.
5. Rebranchez l’équipement sur l’alimentation électrique et mettez-le sous tension.
Vous devriez pouvoir entendre la sortie audio du Solo à travers l’ampli cateur de
puissance et de contrôler le volume à l’aide de la télécommande.
Remarquez que la deuxième pièce est
toujours en sourdine quand le Solo est
activé : la sourdine doit être supprimée
explicitement au besoin. Cela permet d’éviter
une sortie audio inattendue dans la seconde
pièce.
Supports de haut-parleur
Plus le haut-parleur est tenu fermement, meilleur est
le son. Nous vous recommandons d’utiliser un support
en métal rigide de 40 à 60 cm de hauteur. Les modèles
proprement amortis qui ne sonnent pas quand on les
percute avec un crayon (de par leur fabrication ou de par
leur remplissage avec du sable de silice sec) donneront
le meilleur son. Assurez-vous que le support ou le hautparleur n’oscille pas.
Solo iss4.id2 26/4/05, 8:02 pm6
Page 21
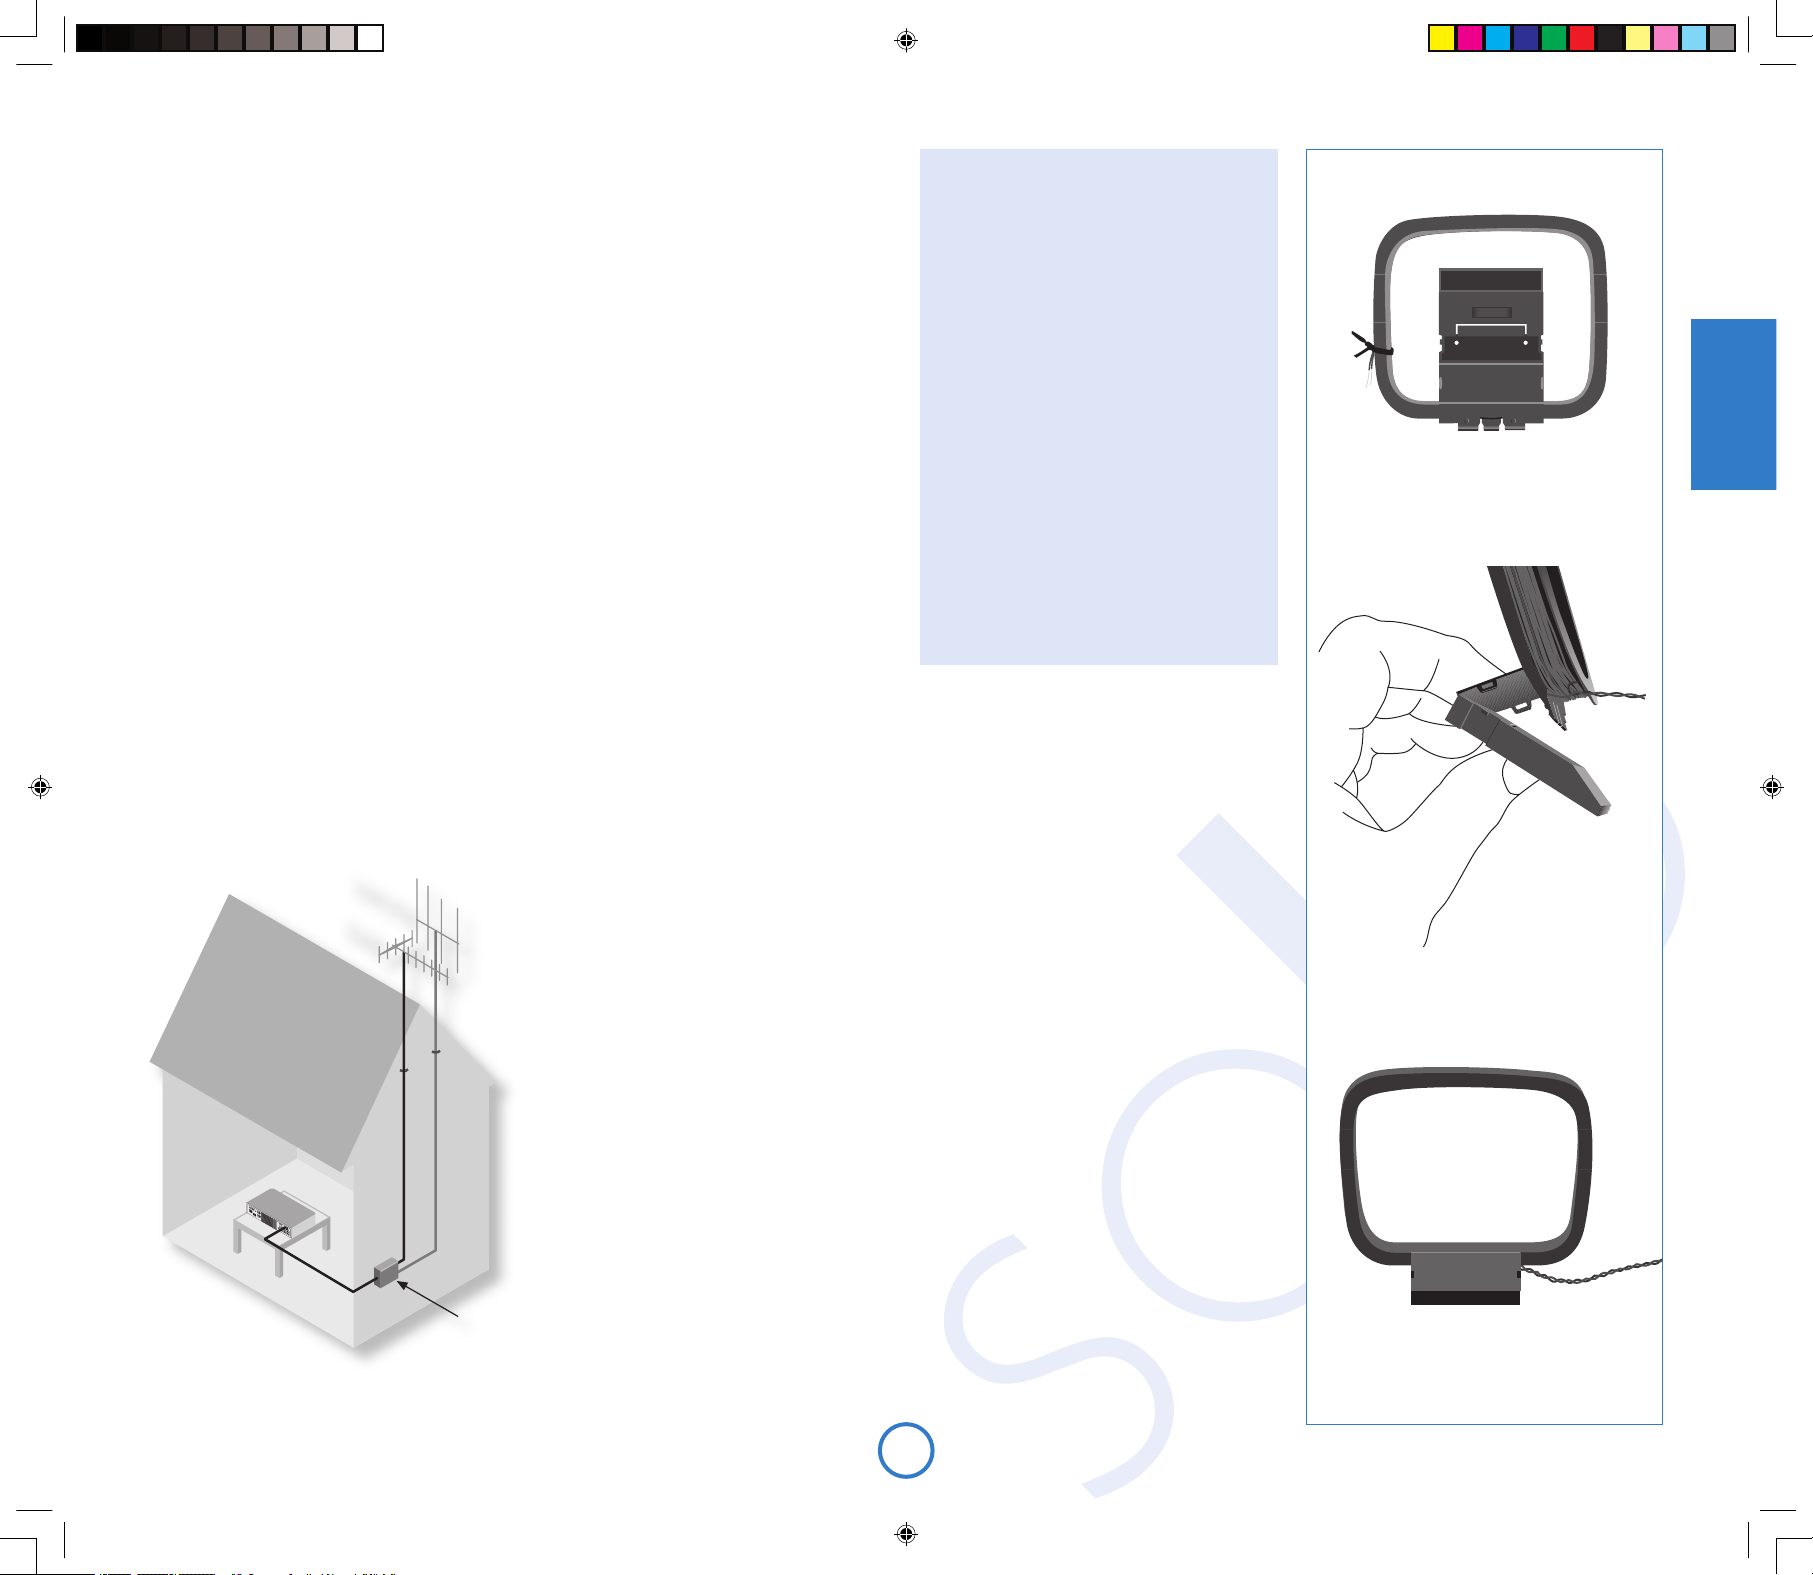
F7
Français
VHF/FM
DAB
Antenne radio
Votre Solo est tout à fait adapté à une réception
radio parfaite s’il reçoit un signal de transmission
de bonne qualité.
Le Solo est équipé d’un module de réception
RAN/FM ou AM/FM, selon la région géographique
où il est livré. Quel que soit le module installé sur
votre Solo, une antenne montée sur le toit est
toujours préférable, si possible, pour une meilleure
réception.
Le type d’antenne à utiliser dépend
de vos préférences acoustiques et des
conditions régionales. Si vous n’écoutez
que des émissions de la bande FM, par
exemple, et que le signal FM est puissant
dans votre région, une simple antenne
omnidirectionnelle fera l’affaire, installée au
grenier ou sur le toit. Pour écouter la RAN
dans une zone au signal faible, vous aurez
besoin d’une antenne à fort gain montée
sur le toit.
Pour la meilleure réception des signaux RAN
et FM, une antenne combinée peut se révéler
nécessaire (comme dans le diagramme cicontre). Elle permet de combiner les signaux
reçus par deux antennes (l’une pour la RAN,
l’autre pour la FM) en un seul câble qui
est lui connecté au Solo. Si vous n’utilisez
pas d’antenne combinée, l’antenne unique
choisie pour la RAN ou la FM peut ne pas
fournir les meilleures performances dans
certaines régions.
Nous vous recommandons de contacter
votre revendeur local Arcam ou un
spécialiste de l’installation d’antenne pour
les meilleurs conseils possibles.
RAN
Si le signal de transmission est puissant dans
votre région, l’antenne d’intérieur fournie peut
suf re (il faut la xer au mur en écartant bien
les deux ls verticalement). Dans les zones où
le signal est faible, une antenne extérieure est
préférable pour recevoir le plus grand nombre de
services possible.
Les transmissions RAN se font sur la bande III
ou la bande L ou les deux. Pour déterminer la
fréquence d’émission de votre région, contactez
votre revendeur ou rendez-vous sur le site
Web www.WorldDAB.org. Dans les zones de
transmission de bande III, utilisez une antenne
multi-élément Yagi si vous êtes éloigné d’un
émetteur ou une antenne dipôle repliée ou
omnidirectionnelle si vous êtes à proximité de
plusieurs émetteurs (au Royaume-Uni, une région
en bande III, elle doit être montée verticalement
parce que les transmissions sont polarisées
verticalement). Si les services de RAN dans votre
région sont transmis sur la bande L, consultez
votre revendeur pour savoir quelle antenne utiliser
pour la meilleure réception.
Que vous choisissiez une installation
professionnelle ou pour l’utilisation de l’antenne
fournie, celle-ci doit être branchée au connecteur
de type F marqué FM à l’arrière du récepteur.
FM et AM
Il faut une antenne FM pour recevoir les signaux radio VHF et une antenne AM pour recevoir les
signaux radio des ondes moyennes.
Antenne FM
Le Solo est livré avec une antenne FM plate. Toutefois, pour béné cier d’une réception radio FM
optimale, il est conseillé d’utiliser une antenne xée sur le toit ou dans le grenier. Dans certains
quartiers, vous pouvez béné cier de la radio par câble, et dans certains immeubles, d’un système
d’antenne distribuée. Dans ces deux cas, votre domicile est équipé d’une prise FM ou VHF
(n’utilisez pas la prise TV). Branchez-la sur l’entrée FM à l’arrière du Solo.
Si vous souhaitez utiliser l’antenne FM plate fournie, xez-la aussi haut que possible sur un mur,
en plaçant les éléments en forme de T horizontalement. Essayez tous les murs de la pièce pour
trouver celui qui assure la meilleure réception. Utilisez de la pâte adhésive ou du ruban adhésif
pour xer l’antenne en lui donnant une forme de T (veillez à ce que la pâte adhésive n’entre pas en
contact avec les câbles internes de l’antenne).
Antenne AM
Une antenne externe de boucle AM est fournie en tant qu’accessoire. Branchez-la sur les entrées
antenne AM à l’arrière du Solo : reliez une extrémité à l’entrée AM et l’autre à l’entrée GND. La
position de cette antenne est sans importance. Assurez-vous que l’antenne est placée loin du
Solo, du téléviseur, des ordinateurs et autres sources de parasites de fréquence radio. Faites-la
pivoter pour trouver la position offrant la meilleure réception.
Dans les zones de faible réception ou lorsque le Solo est utilisé dans un immeuble à armature
métallique, il est possible d’utiliser un câble de 3 à 5 mètres de long pour améliorer la réception.
Dans ce cas, il est conseillé de le monter en hauteur à l’extérieur du bâtiment, puis d’en brancher
une extrémité sur l’entrée AM et l’autre sur l’antenne cadre fournie (ne débranchez pas
l’antenne cadre AM).
Montage de la boucle de l’antenne AM
Mélangeur
2. Poussez la languette dans la fente ouverte
à la base du support. Appuyez jusqu’à ce
que la languette se place dans son logement
et fasse entendre un déclic.
3. Connectez le l à la prise AM à l’arrière du
Solo. Faites pivoter le support de l’antenne
jusqu’à ce que vous obteniez la meilleure
réception possible.
1. Dénouez l’attache et déroulez le l
torsadé. Pliez le support en plastique vers
l’avant à travers le cadre de la boucle.
Solo iss4.id2 26/4/05, 8:02 pm7
Page 22
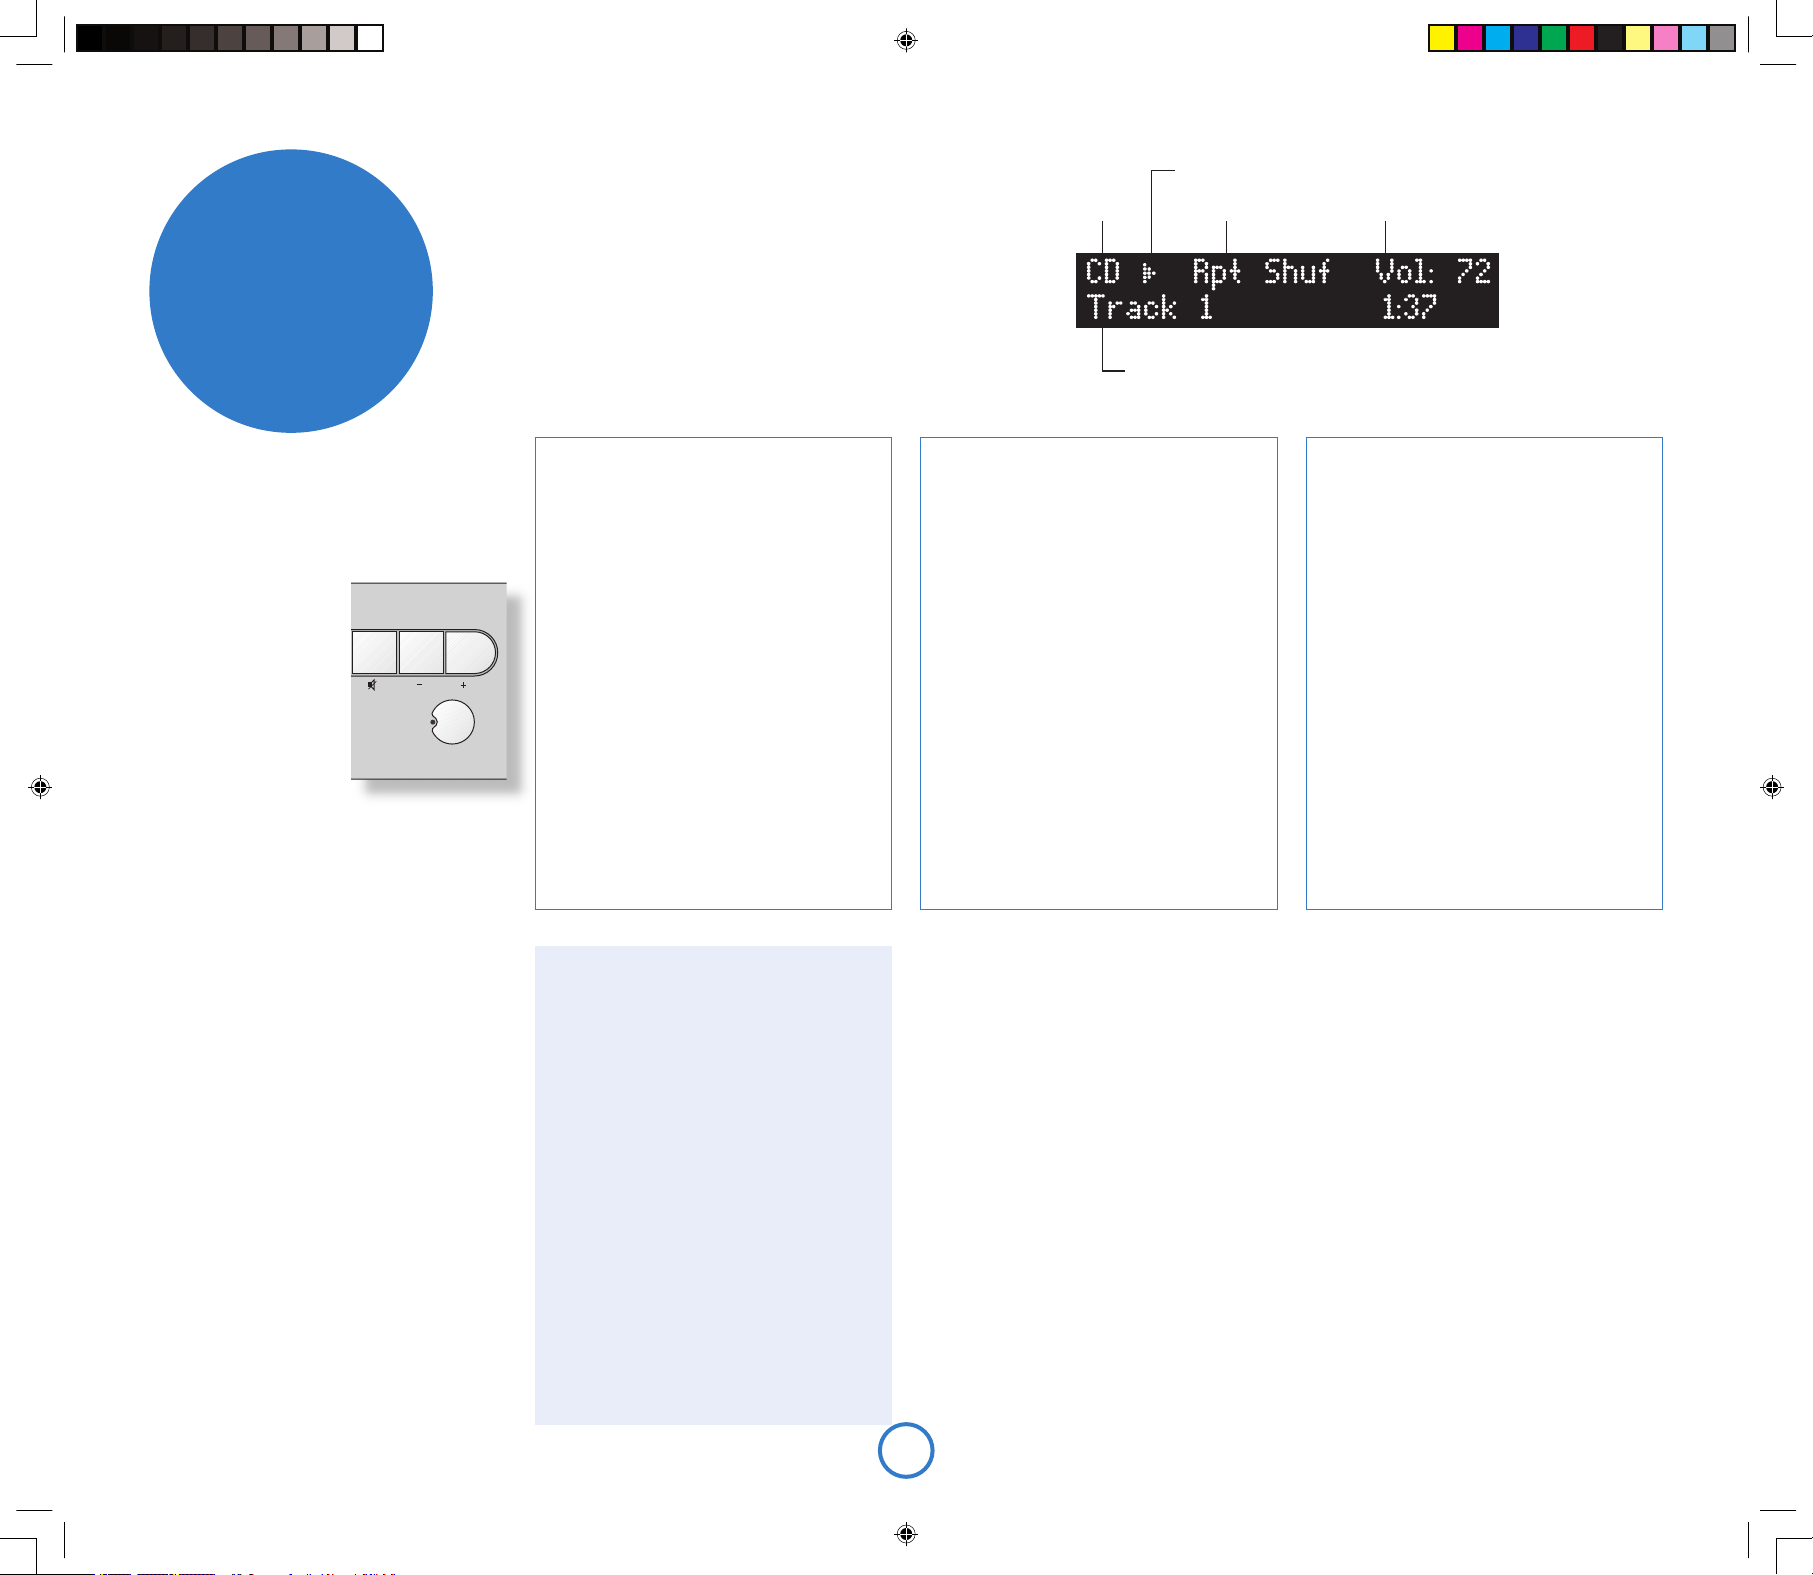
F8
Commandes importantes du
panneau avant
Alimentation
Appuyez sur le bouton
POWER pour basculer entre
la mise sous tension et la
mise en veille.
Quand le Solo est en mode
veille, le témoin lumineux
situé à côté du bouton
de mise sous tension du
panneau avant s’illumine en
rouge et le panneau avant
af che l’heure. Il suf t
d’appuyer sur ce bouton (POWER) pour quitter le
mode veille et allumer
l’appareil, le témoin lumineux
passe alors au bleu.
Notez que le commutateur d’alimentation principal
du Solo se trouve à l’arrière de l’unité. Si le
voyant d’alimentation est éteint, veuillez lire les
instructions de la section « Alimentation », page 4.
Volume et Sourdine
Utilisez ces commandes pour augmenter ou
réduire le volume ou passer en sourdine. Si le Solo
est en sourdine, il suf t d’appuyer une nouvelle
fois sur le bouton ou de modi er le niveau du
volume pour mettre n à la sourdine. Le niveau de
volume s’af che dans le coin supérieur droit de
l’écran.
Source –/+
Sert à changer de source audio. Si vous souhaitez
écouter la radio FM, par exemple, appuyez sur
SOURCE+ de manière répétée jusqu’à ce que FM
s’af che dans le coin supérieur gauche de l’écran.
Ces boutons sont également utilisés pour naviguer
dans le menu du Solo. Reportez-vous à la section
Navigation dans les menus ci-dessus pour plus
d’informations. Pour plus d’informations, consultez
la section « Con guration du produit », page 11.
faire de la
musique
Sélection de la source Mode de lecture
Volume actuel
Numéro de piste, titre des chansons, durée, etc.
Indicateur du statut de lecture
Omission/recherche de pistes
Appuyez brièvement sur les boutons 0 et /
du panneau avant ou de la télécommande pour
passer à la piste précédente ou suivante d’un CD.
Lors que l’on avance d’une piste, la lecture
commence au début de la piste suivante sur le
disque (s’il en existe une). Lorsque l’on recule
d’une piste, appuyer sur le bouton 0 pendant
les 3 premières secondes de la lecture d’une
piste permet de passer à la piste précédente
(lorsqu’elle existe) ou de revenir au début de la
piste en cours de lecture. Dans la plupart des
cas, il est donc normal de devoir appuyer deux
fois sur la touche 0 pour revenir au début de la
piste précédente.
Les boutons 0 et / permettent également
d’effectuer une recherche de pistes. Pour
effectuer une recherche arrière ou avant au
sein d’une piste, appuyez sur le bouton 0
ou / et maintenez-le enfoncé : la piste est
parcourue jusqu’à ce que vous relâchiez le
bouton.
Modes de lecture spéciaux
Appuyez sur le bouton
MODE
de la télécommande
pour parcourir les modes de répétition ou de
lecture aléatoire disponibles pour la lecture d’un
CD. Vous disposez des options suivantes :
1.
Répétition du disque : les pistes sont lues dans
l’ordre. À la n de la dernière piste, la lecture
reprend au début de la première piste du disque.
2. Répétition des pistes : la piste en cours est
lue jusqu’à ce que cette fonction soit annulée.
3. Lecture aléatoire : les pistes du disque sont
lues dans un ordre aléatoire.
4. Répétition de la lecture aléatoire :
combinaison de la répétition du disque et de
la lecture aléatoire. Chaque fois que la lecture
recommence, l’ordre des pistes est modi é.
Pour annuler un mode de lecture aléatoire ou
de répétition, appuyez sur MODE jusqu’à ce que
le mode de lecture disparaisse de l’écran.
Notez que les modes de lecture aléatoire et de
répétition ne sont pas disponibles pendant la
lecture programmée (décrite dans l’encadré suivant).
Programmation de l’ordre de lecture
L’ordre de lecture des pistes d’un CD est
programmable. Cette fonction est accessible
dans le menu de con guration du Solo, décrit
plus en détail à la page 11. Les instructions
suivantes n’en sont qu’un bref aperçu.
1. Pour ouvrir le menu de con guration,
appuyez sur MENU.
2. Appuyez sur C (ou SOURCE–) jusqu’à ce
que « Prog » s’af che sur la première ligne.
3. Appuyez sur OK pour passer en mode
programme, puis utilisez les touches – et + (0
et / sur le panneau avant) pour sélectionner
la piste suivante à ajouter à la liste de
lecture. Pour ajouter la piste, appuyez sur OK.
Répétez cette opération pour ajouter à la liste
de lecture toutes les pistes devant être lues.
4. Pour quitter le mode programme, appuyez
sur MENU. Pour fermer le menu de
con guration, appuyez de nouveau sur MENU.
Pour effacer tous les programmes, appuyez
deux fois sur la touche < de la télécommande
ou éjectez le disque.
Modes d’af chage
Lors de l’écoute du CD, le Solo propose quatre
modes d’af chage. Le bouton INFO situé sur le
panneau avant ou sur la télécommande permet
de changer de mode.
1. Durée de la piste en cours : il s’agit de
l’af chage “classique” des lecteurs de CD,
indiquant le numéro de la piste et sa durée.
2. Durée de lecture restante de la piste :
af che le numéro de la piste en cours, ainsi
que la durée de lecture restante.
3. Texte du CD : lorsqu’il existe, le texte du
disque (texte du CD) s’af che dans ce mode
(nom de la piste ou de l’artiste par exemple).
Si le CD ne comporte aucun texte, ce mode
af che alors uniquement la durée de la piste
en cours.
4. Af chage en grands caractères : ce mode
est un af chage à double hauteur où seuls le
numéro de la piste en cours et le volume sont
indiqués.
Résumé des commandes de lecture du CD
4
(Lecture) : appuyez sur ce bouton pour lancer
la lecture d’un CD.
<
(Arrêt) : appuyez sur ce bouton pour arrêter
la lecture d’un CD.
;
(Pause) : appuyez sur ce bouton pour faire
une pause dans la lecture d’un CD. Appuyez
une nouvelle fois sur le bouton pour relancer
la lecture (ou appuyez sur Lecture).
/
(Sauter/Chercher en avant) : appuyez sur ce
bouton et relâchez-le pour avancer au début
de la piste suivante. Appuyez sur ce bouton
et maintenez-le enfoncé pour chercher en
avant dans la piste.
0
(Sauter/Chercher en arrière) : appuyez sur
ce bouton et relâchez-le pour reculer d’une
piste ou revenir au début de la piste en
cours de lecture. Appuyez sur ce bouton
et maintenez-le enfoncé pour chercher en
arrière dans la piste.
1
(Ouvrir/Fermer) : appuyez sur ce bouton pour
ouvrir le tiroir du CD et appuyez une nouvelle
fois pour le fermer.
Accès direct aux pistes
Les touches numériques de la télécommande
permettent un accès direct aux pistes du disque.
Pour les pistes 1 à 9, appuyez sur le numéro de la
piste que vous voulez écouter. Pour sélectionner
tous les numéros de pistes supérieurs à 9,
appuyez sur le premier chiffre de la piste (par
example 1) et maintenez-le enfoncé jusqu’à ce
qu’il apparaisse dans le coin inférieur gauche de
l’écran (1-), puis appuyez sur le deuxième chiffre.
Écoute de CD
Démarrage rapide – Lecture d’un CD :
1. Appuyez sur le bouton </1 (Charger) du panneau avant
ou le bouton
1
de la télécommande pour ouvrir le tiroir
du CD.
2. Placez le CD au centre du plateau en vous assurant que la
face imprimée du CD soit bien sur le dessus. Appuyez sur
le bouton
1 ou 4
(Lecture) pour fermer le tiroir.
3. Attendez que le disque se charge. Si vous avez appuyé
sur lecture pour fermer le plateau, la lecture du CD se
fait automatiquement, sinon appuyez sur 4/; (A sur la
télécommande) pour lancer la lecture.
Solo iss4.id2 26/4/05, 8:03 pm8
Page 23

F9
Français
Écoute de la radio
Le Solo est équipé d’un module de réception RAM/FM ou AM/FM, selon la région géographique où il est
livré.
Équipement du Solo :
< jusqu’à 30 stations présélectionnées,
< système de radiocommunication de données complet en FM (le cas échéant), données associées
au programme en RAN,
< indicateurs de puissance de signal FM et de taux de données RAN.
Écoute de la radio
Appuyez sur SOURCE+ ou SOURCE- jusqu’à ce que le type de radio que vous souhaitez écouter
(DAB/FM/AM) s’afche sur le panneau avant. Vous pouvez également appuyer sur le bouton DAB/FM/AM
de la télécommande pour un accès direct.
Sélection de la source Nom de la station
Programmation des stations présélectionnées
Si vous le souhaitez, vous pouvez mémoriser votre station de radio préférée
dans l’une des stations de radio présélectionnées du Solo. Cela permet
d’accéder plus rapidement à la station par la suite, sans avoir à effectuer de
nouvelle syntonisation. Solo fournit 30 stations radio présélectionnées RAN/
FM ou AM/FM (selon la conguration de votre produit).
Pour mémoriser une présélection, réglez d’abord la station à mémoriser. Pour
mémoriser la station dans l’une des stations préréglées de 1 à 9, appuyez sur
le bouton de télécommande correspondant et maintenez-le enfoncé jusqu’à
conrmation de l’enregistrement de la présélection (« preset saved »).
Pour accéder aux numéros de stations présélectionnées les plus élevés,
appuyez sur le bouton MENU pour entrer dans le menu de conguration du
Solo (décrit en détail à la page 11), puis faites-le déler jusqu’à l’afchage
de la commande de mémorisation des présélections (« Store Preset »). À
l’aide des boutons – et + de la télécommande (0 ou / sur le panneau avant),
sélectionnez le numéro de présélection que vous souhaitez affecter à la
station. Si ce numéro est déjà utilisé, le nom ou la fréquence d’émission
Recherche de stations
Appuyer sur le bouton MODE quand la radio
est sélectionnée comme source de musique
permet de basculer entre les deux modes
du Solo : Preset ou Présélection et Tune ou
Syntonisation. Le mode sélectionné s’afche
brièvement.
En mode de présélection, appuyez sur les
boutons > ou ? situés sur la télécommande
(0 ou / sur le panneau de conguration) pour
sélectionner la station précédente/suivante
(si elles sont préréglées). En mode de
présélection, notez que ces boutons n’ont
aucun effet lorsque aucune station n’a été
dénie.
En mode de syntonisation, au contraire, ces
boutons permettent de changer la fréquence
AM/FM ou de sélectionner la station radio RAN
suivante dans la liste des stations.
FM et AM
Pour rechercher de nouvelles stations, vériez
que le Solo est en mode de syntonisation,
comme décrit ci-dessus.
< Syntonisation manuelle. Utilisez les
boutons B et C (0 ou / sur le
panneau avant) pour sélectionner la
fréquence désirée. Ce mode peut vous
permettre de vous accorder sur une
fréquence particulière. Cela est également
utile si vous souhaitez vous régler sur une
station trop faible pour être détectée par le
mode de recherche automatique.
< Syntonisation automatique. Appuyez
un peu plus d’une seconde sur les
boutons B ou C de la télécommande
(0 ou / sur le panneau avant) pour
lancer la syntonisation automatique. Le
Solo recherche alors un signal de station
radio sufsamment puissant avant de
s’arrêter. Appuyez de nouveau sur l’un
des deux boutons pour passer à la station
suivante. La syntonisation automatique
est disponible aussi bien pour les bandes
AM que les bandes FM.
RAN
Le réglage des stations RAN est différent du
réglage conventionnel des stations FM ou
AM, car vous n’avez pas besoin de connaître
la fréquence de transmission de la station : le
Solo gère cela pour vous.
Réglez la source sur DAB (RAN), puis appuyez
sur le bouton MENU. Faites déler les options
de menu jusqu’à l’afchage de la ‘DAB Setup’
[conguration RAN] (voir page 11). Cet élément
de menu possède deux options : ‘Scan’
[Recherche] et ‘Erase Settings’ [Effacement
des paramètres]. Sélectionner ‘Scan’ force
le Solo à chercher de nouvelles stations
RAN. S’il en trouve, elles sont ajoutées
automatiquement à la liste des stations
disponibles. Appuyez une nouvelle fois sur
MENU pour quitter ce menu.
Pour sélectionner une station de radio RAN,
appuyez sur les boutons B ou C de la
télécommande jusqu’à ce que le nom de la
station de votre choix s’afche. La station se
règle automatiquement après un délai de deux
secondes environ.
Volume actuel
Informations de transmission ou autres informations
Indicateur du mode de présélection
de la station mémorisée s’afche en bas. Les numéros de présélections
disponibles sont indiqués par « Empty ». Lorsque le numéro requis s’afche,
appuyez sur OK pour l’enregistrer. Sachez que si vous mémorisez une station
de radio sous un numéro de présélection déjà attribué, la station initiale est
remplacée par la nouvelle station.
Vos présélections sont conservées quand le Solo est déconnecté de
l’alimentation électrique
Sélection des stations présélectionnées
Pour pouvoir sélectionner les stations présélectionnées, le Solo doit être en
mode de présélection (voir ci-dessus).
Pour parcourir les stations présélectionnées, utilisez les boutons B ou C
de la télécommande (0 ou / sur le panneau avant). Vous pouvez également
sélectionner directement les présélections à l’aide du pavé numérique de la
télécommande. Pour plus d’informations sur cette option, reportez-vous à la
page 10.
Modes d’afchage
Lors de l’écoute de la radio, le Solo propose
quatre modes d’afchage. Le bouton INFO situé
sur le panneau avant ou sur la télécommande
permet de changer de mode en parcourant les
options disponibles.
1. Type de programme (DAB/FM) : brève
description du type de programme en cours
d’émission.
2. Fréquence d’émission (FM/AM) : le nom
de la station (si disponible) et la fréquence
d’émission.
3. Marquage dynamique (DAB)/ RDS (FM) :
128 caractères de texte utilisés par les stations
pour diffuser les informations relatives aux
programmes (par exemple, des numéros de
téléphone utiles, des adresses de sites Web,
etc.).
4. Taux de données (DAB) : ce mode afche
le taux de donnée de la station (en kbps) et le
mode d’émission. Un taux de données plus
élevé (taux maximal 256 kbps) indique une
qualité audio supérieure.
5. Qualité du signal : graphique à barres
représentant la qualité du signal capté.
Solo iss4.id2 26/4/05, 8:03 pm9
Page 24

F10
Insertion des piles dans la
télécommande
télé-
commande
Boutons de télécommande
2
(Alimentation) : bascule entre le mode veille et le mode actif (On).
Piste/Présélection (0 à 9) : appuyez sur le numéro de la piste ou de la présélection que vous
souhaitez écouter. Pour sélectionner une piste ou une présélection supérieure à 9, appuyez sur le
premier chiffre de la piste et maintenez-le enfoncé jusqu’à ce qu’il apparaisse dans le coin inférieur
gauche de l’écran (1-), puis appuyez sur le deuxième chiffre.
>
et
?
: utilisés lors de l’écoute de la radio. Appuyez sur > ou ? pour modi er la fréquence en mode
de syntonisation (voir MODE) ou pour modi er la station en mode de présélection.
INFO : change le mode d’af chage pour le lecteur CD ou la radio.
MODE : certaines sources permettent de modi er le mode d’écoute.
CD : appuyez sur le bouton MODE pour parcourir les modes de répétition ou de lecture aléatoire
disponibles pour la lecture d’un CD.
DAB/FM/AM : appuyez sur le bouton MODE pour basculer du mode de la syntonisation à la
présélection. En mode de syntonisation, appuyez sur > ou ? pour modi er la fréquence d’écoute
(FM/AM) ou la station sélectionnée (RAN) ; en mode de présélection, la station présélectionnée est
modi ée.
DISP : permet de modi er la luminosité de l’écran du panneau avant. Il est possible de choisir entre
différents niveaux de luminosité, y compris de désactiver l’af chage.
Sélection de la source : appuyez sur le bouton approprié pour sélectionner la source audio de votre choix.
Touches de curseur et OK : le comportement de ces touches dépend du mode du Solo. Si le menu
de con guration est ouvert (voir la page 11), alors les touches B et C servent à sélectionner
l’élément de con guration, les touches E et D servent à modi er la valeur de l’élément con guré
et la touche OK sert à con rmer une action (le cas échéant). Si le menu de con guration n’est pas
ouvert, alors les touches B et C fonctionnent de la même manière que les touches vers le haut
et vers le bas de la présélection (décrites ci-dessus) et les touches E et D servent à modi er le
volume.
Sourdine : appuyez une fois sur le bouton pour mettre en sourdine la sortie haut-parleurs et préampli du
Solo. Appuyez une nouvelle fois sur le bouton (ou modi ez le volume) pour supprimer la sourdine.
MENU : appuyez sur le bouton MENU pour entrer dans le menu de con guration du Solo. Ceci est
expliqué intégralement aux pages 11 et 12. Appuyez sur le bouton MENU une nouvelle fois pour
quitter le menu.
Commandes de lecture CD
4
(Lecture) : appuyez sur ce bouton pour lancer la lecture d’un CD.
<
(Arrêt) : appuyez sur ce bouton pour arrêter la lecture d’un CD.
;
(Pause) : appuyez sur ce bouton pour faire une pause dans la lecture d’un CD. Appuyez une
nouvelle fois sur le bouton pour relancer la lecture (ou appuyez sur Lecture).
0
(Sauter/Chercher en arrière) : appuyez sur ce bouton et relâchez-le pour reculer d’une piste ou
revenir au début de la piste en cours de lecture. Appuyez sur ce bouton et maintenez-le enfoncé
pour chercher en arrière dans la piste.
/
(Sauter/Chercher en avant) : appuyez sur ce bouton et relâchez-le pour avancer au début de la piste
suivante. Appuyez sur ce bouton et maintenez-le enfoncé pour chercher en avant dans la piste.
1
(Ouvrir/Fermer) : appuyez sur ce bouton pour ouvrir le tiroir du CD et appuyez une nouvelle fois pour
le fermer.
1. Ouvrez le couvercle du logement des
piles en appuyant sur le bouton au dos de la
télécommande.
2. Insérez deux piles AAA dans le logement
selon les indications de polarité se trouvant
à l’intérieur du logement.
3. Replacez le couvercle en position.
Utilisation de la
télécommande
Prenez en considération les points suivants lors
de l’emploi de la télécommande :
< Veillez à ce qu’il n’existe aucun obstacle
entre la télécommande et son capteur
sur le Solo. La télécommande a une
portée de sept mètres environ. Si le
capteur de la télécommande est masqué,
vous disposez d’une prise d’entrée sur
le panneau arrière. Pour de plus amples
informations à ce sujet, veuillez contacter
votre revendeur.
< La télécommande risque de mal
fonctionner si son capteur sur le Solo est
fortement soumis aux rayons du soleil ou
à une lumière uorescente.
< Remplacez les piles si vous constatez une
réduction du rayon de fonctionnement de
la télécommande.
Solo iss4.id2 26/4/05, 8:03 pm10
Page 25

F11
Français
Conguration du produit
Le Solo vous laisse régler les paramètres d’écoute selon
vos préférences et personnaliser diverses caractéristiques
de l’amplicateur pour l’adapter à votre système. Utilisez ce
diagramme pour vous aider à découvrir tous les paramètres
disponibles.
Réglage des paramètres d’écoute
Lors d’une utilisation ordinaire, l’écran afche les
informations de volume, de la source écoutée et toute
information pertinente sur la source (telle que le temps de
lecture sur un CD). Pour régler les paramètres d’écoute,
appuyez sur MENU sur le panneau avant ou sur la
télécommande. Utilisez les touches comme indiqué pour
sélectionner et congurer un paramètre particulier.
Balance [Balance]
Ce paramètre vous permet d’augmenter le volume d’un
des canaux (gauche ou droit) par rapport à l’autre. Il n’est
généralement pas nécessaire de régler ce paramètre, mais si
vous vous tenez par habitude plus près d’un des haut-parleurs
que de l’autre, la modication de la balance peut aider à
restaurer l’image stéréo pour votre emplacement dans la pièce.
Basses [Bass]
Ce paramètre modie le volume relatif des composants de basses fréquences de votre musique. Si
vous pensez que votre musique manque de « chaleur », augmentez la valeur de ce paramètre et si vous
trouvez votre musique « détonne » trop, il peut être utile de baisser la valeur de ce paramètre.
Voir également la section Correction des basses ci-dessous.
Aigus [Treble]
Ce paramètre modie le volume relatif des composants de haute fréquence de votre musique. Si vous
pensez que les éléments de percussion de la musique (par exemple) sont perdus, il peut être utile
d’augmenter la valeur de ce paramètre. Si les sons haute fréquence sont trop dominants, réduisez la
valeur de ce paramètre.
Notez que les commandes de basses et d’aigus sont inactives lorsque le casque est connecté.
Correction des basses [Bass correction]
Ce paramètre n’a généralement pas besoin d’être utilisé (laissez-le au minimum).
La correction des basses est utilisée quand le Solo est connecté à de (petits) haut-parleurs à plage de
fréquence réduite qui ne peuvent reproduire les sons à très basse fréquence. Augmenter la valeur de ce
paramètre permet d’atténuer progressivement les très basses fréquences (puisqu’elles ne peuvent pas
être reproduites par les haut-parleurs), tandis que le volume des hautes fréquences est augmenté. Cela
implique que la part générale des basses produites par les haut-parleurs reste la même que sur un hautparleur de type « Large » à bande passante complète.
Aucune partie de votre système ne risque d’être endommagée par l’utilisation de ce paramètre. Aussi,
nous vous suggérons de l’essayer, ainsi que les commandes de basses et d’aigus, jusqu’à ce que vous
trouviez la combinaison que vous préférez.
Minuterie de mise en veille [Sleep timer[
Cette minuterie vous permet de spécier une période
d’écoute après laquelle le Solo passe automatique-ment en
veille. Cette période se règle par incrément de 5 minutes
jusqu’à 120 minutes (2 heures).
Programmation de la lecture du CD
Si vous souhaitez programmer l’ordre de lecture du CD,
appuyez sur OK lorsque cette option de menu s’afche.
L’ordre de lecture du CD est ensuite entré, comme décrit
dans le panneau « Programmation de la lecture du CD »,
illustré à droite. Une fois le programme entré, appuyez sur
MENU pour quitter le mode de programmation. Appuyez
une deuxième fois sur MENU pour quitter le menu de
conguration du Solo.
fonctions
avancées
Légende des symboles utilisés dans ces pages :
Symbole:
Touche du
panneau avant :
Touche de la
télécommande :
OK
État sous tension
Gauche Droite
Seulement si
la source est FM
Seulement si
la source est RAN
–Présélection
Effacer les paramètres
Chercher les stations disponibles
Confirmer la présélection
Seulement si la source
est RAN, FM ou AM
–dB +dB
–dB +dB
–dB +dB
OK
OK
OK
Seulement si
la source est CD
OK
+Présélection
–Présélection
+Présélection
Confirmer la présélection
+–
Programmation de la lecture du CD
34
Met en surbrillance la piste pour
l’ajouter à la programmation
OK
Ajoute la piste à la programmation
CLR
Supprime la dernière entrée de la
programmation
STOP
Appuyez deux fois sur le bouton
STOP de la télécommande
pour réinitialiser la totalité de la
programmation.
Solo iss4.id2 26/4/05, 8:04 pm11
Page 26

F12
Réglage de l’horloge et de l’alarme
Quand le Solo est en mode veille, appuyez sur MENU pour régler l’horloge et les alarmes.
Utilisez les boutons vers la gauche et vers la droite de la télécommande pour sélectionner l’élément à
modier, puis les boutons vers le haut et vers le bas pour changer la valeur. Par exemple, après avoir
appuyé sur MENU pour entrer dans le menu de conguration de l’horloge et de l’alarme, une pression vers
le haut ou vers le bas permet de passer de la conguration de l’horloge à la conguration des alarmes.
Le Solo permet de congurer quatre alarmes différentes.
Arrêt ou pause d’une alarme
Pour arrêter une alarme, appuyez sur le bouton POWER du panneau avant ou de la télécommande. Vous
pouvez également appuyer sur OK pour activer le mode de répétition de l’alarme (« Snooze ») ; l’alarme se
déclenchera de nouveau après 10 minutes. Pour annuler ce mode, appuyez sur le bouton POWER.
Mode FM [FM mode]
Cet élément de menu s’afche uniquement quand la source sélectionnée est FM. Dans certaines régions
où le signal est faible, il peut être utile de forcer la sortie mono du tuner FM, puisqu’il ne requiert qu’un
signal très faible pour produire des résultats acceptables. Si la puissance du signal est bonne dans votre
région, laissez-le sur stéréo.
Conguration RAN [DAB setup]
Cet élément de menu s’afche uniquement quand la source sélectionnée est RAN.
Cet élément de menu possède deux options : « Scan » [Recherche] et « Erase Settings » [Effacement des
paramètres]. Sélectionner « Scan » force le Solo à chercher de nouvelles stations RAN. S’il en trouve, elles
sont ajoutées automatiquement à la liste des stations disponibles.
La recherche de nouvelles stations n’efface pas les anciennes stations qui ne transmettent plus : au l du
temps ou de vos déménagements, cela peut entraîner l’accumulation dans votre liste de stations que vous ne
pouvez en fait plus recevoir. Dans ce cas, sélectionnez « Erase Settings » et relancez une nouvelle recherche :
quand elle est terminée, seules les stations actuellement disponibles dans votre région s’afchent.
Conguration des présélections [Preset setup]
Cet élément de menu s’afche uniquement quand la source sélectionnée est RAN, FM ou AM.
Voir la section « Programmation des stations présélectionnées » de la page 7 pour plus d’informations.
Réglage du volume Zone 2
Appuyez sur le bouton MENU du panneau avant et maintenez-le enfoncé jusqu’à ce que le message
« Z2 Vol » s’afche. Appuyez ensuite sur les boutons de réglage du volume pour augmenter/baisser le
volume en Zone 2. Appuyez de nouveau sur le bouton MENU pour quitter.
Solo iss4.id2 26/4/05, 8:04 pm12
Page 27

F13
Français
spécications
techniques
Préamplicateur
Entrées
Niveau maximum en entrée 2,5Vrms
Impédance en entrée
47kΩ
Rapport Signal / Bruit 105dB
Sorties coaxiales
Niveau maximum en sortie 2,5Vrms
Impédance de sortie
500Ω
Sortie optique (TOSLINK)
Taux d’échantillonnage
44,1 kHz (lecture CD),
48 kHz (récepteur RAN),
Sinon, mis en sourdine.
Amplicateur
Sortie en puissance continue, par canal, 80kHz largeur de bande de mesure
Deux canaux, 4Ω, 1kHz
75Wrms, 0,013% THD+bruit
Distorsion, 4Ω, les deux canaux,
80% Puissance, 1kHz
0,011% THD+bruit
Lecture CD
DAC DAC Delta-Sigma multiniveaux 24 bits Wolfson
Réponse en fréquence (±0.5dB) 20Hz–20kHz
Récepteur audionumérique (si installé)
DAC DAC Delta-Sigma multiniveaux 24 bits 96 kHz AKM
Portée de syntonisation de fréquence radio 174–240MHz (Band III)
1452–1490MHz (L-band)
Sensibilité (ordinaire) –98dBm (mesure VHF en EN50248)
Impédance en entrée
50Ω
Taux de données audio (maximum) MPEG Layer II à 256 ko/s, protection de niveau 3
Nombre de services enregistrés (maximum) 128
Récepteur FM
Portée de syntonisation de fréquence radio 87,5–108MHz
Sensibilité (ordinaire) 2µV
Rapport signal-bruit (à 200 mV) 58dB
Distortion (THD à 200mV) 0,5%
Récepteur AM (si installé)
Portée de syntonisation de fréquence radio 522–1611kHz
Rapport signal-bruit (à 200 mV) 40dB
Distorsion (THD à 30% modulation) 1,5%
Généralités
Tension d’alimentation
100 V, 115 V ou 230 V,
selon la région d’expédition
Consommation En mode veille 3,2VA ;
En opération 50VA (ordinaire), 400VA (maximum)
Taille (L x P x H) L430mm x P350mm x H79mm
Poids (net) 7,75kg
Poids (emballé) 10,5kg
Accessoires fournis
Cordon secteur
Antenne dipôle (bande III)
Boîtier de télécommande à main et deux piles AAA
Manuel et carte d’enregistrement
Interférences radio
Le Solo est un dispositif audio contenant des microprocesseurs et d’autres composants électroniques
numériques. Il a été conçu pour répondre aux normes les plus strictes en matière de compatibilité
électromagnétique.
S’il cause des interférences lors de la réception d’émissions de radio ou de télévision (il suft, pour le
vérier, d’allumer et d’éteindre plusieurs fois l’appareil), vous devrez prendre les mesures nécessaires
pour les éliminer :
< réorienter l’antenne réceptrice ou placez le câble d’antenne du récepteur aussi loin que possible de
l’appareil et de ses câbles,
< déplacer le récepteur par rapport à l’appareil,
< brancher le récepteur et cet appareil à des prises secteur différentes.
Si le problème persiste, contactez votre revendeur Arcam.
Solo iss4.id2 26/4/05, 8:04 pm13
Page 28

F14
garantie du
produit
Garantie mondiale
Cette garantie vous autorise à faire réparer gratuitement votre appareil chez un distributeur Arcam agréé
durant les deux premières années suivant l’achat, à condition que l’appareil ait à l’origine été acheté chez
un revendeur ou un distributeur Arcam. Le fabricant ne peut engager sa responsabilité en cas de défauts
découlant d’un accident, d’une mauvaise utilisation, d’une utilisation intensive, d’une usure normale,
d’une négligence ou d’un réglage ou d’une réparation non autorisée. Il ne peut en outre engager sa
responsabilité pour tout dommage ou toute perte survenant pendant le transport du matériel sous
garantie.
La garantie couvre :
Le coût des pièces et de la main d’œuvre pendant deux ans à compter de la date d’achat. Après deux
ans, ces frais incombent au client. La garantie ne couvre jamais les frais de transport.
Réclamations au titre de la garantie
L’appareil doit être réexpédié dans son emballage d’origine et renvoyé au revendeur auprès duquel il a
été acheté, ou directement au distributeur Arcam dans le pays de résidence du client.
Il doit être envoyé en port prépayé par l’intermédiaire d’un transporteur able – jamais par la poste.
Aucune responsabilité n’est acceptée pendant le transport de l’appareil au titre de la garantie ; aussi, est-il
conseillé aux clients d’assurer l’appareil contre les pertes et les dommages subis en transit.
Pour tout renseignement complémentaire, veuillez contacter le Service client Arcam à l’adresse suivante :
Pembroke Avenue, Waterbeach, CAMBRIDGE CB5 9QR, Grande Bretagne
ou www.arcam.co.uk.
Des problèmes ?
Si votre revendeur ne peut répondre à votre demande pour ce produit Arcam ou tout autre produit Arcam,
veuillez contacter le Service client d’Arcam, à l’adresse ci-dessus, où nous ferons de notre mieux pour
vous aider.
Solo iss4.id2 26/4/05, 8:04 pm14
Page 29

D1
Deutsch
Handbook
Manuel
Handbuch
Handleiding
Manual
Solo iss4.id2 26/4/05, 8:04 pm1
Page 30

D2
Wichtige
Sicherheitsanweisungen
Dieses Gerät wurde unter Berücksichtigung
strikter Qualitäts- und Sicherheitsbestimmungen
entworfen und gefertigt. Sie sollten jedoch
bei der Installation und dem Betrieb folgende
Vorsichtsmaßnahmen treffen.
1. Beachten Sie die Warnungen und
Anweisungen
Vor der Inbetriebnahme dieses Geräts sollten
Sie die entsprechenden Sicherheits- und
Betriebsanweisungen lesen. Heben Sie dieses
Handbuch gut auf, und beachten Sie die
enthaltenen Warnungen sowie die Hinweise auf
dem Gerät.
2. Wasser und Feuchtigkeit
Das Betreiben von elektrischen Geräten in der
Nähe von Wasser kann gefährlich sein. Verwenden
Sie das Gerät nicht in einer feuchten Umgebung
(z. B. in der Nähe von Badewannen, Waschbecken,
Swimming Pools oder in einem feuchten Keller).
3. Eindringen von Flüssigkeiten oder Schmutz
Achten Sie darauf, dass keine Flüssigkeiten oder
Schmutz in das Geräteinnere gelangen. Sie sollten
keine mit Flüssigkeit gefüllten Behälter (z. B.
Blumenvasen) auf dem Gerät abstellen.
4. Belüftung
Stellen Sie das Gerät nicht auf ein Bett, ein
Sofa, einen Teppich oder eine andere weiche
Oberäche, oder in ein abgeschlossenes
Bücherregal bzw. einen Schrank, da hierdurch die
Belüftung beeinträchtigt werden könnte. Es wird
empfohlen, einen Mindestabstand von 50 mm
um die Seiten- und Oberkanten des Gerätes
freizuhalten.
5. Wärme
Stellen Sie das Gerät nicht in der Nähe von
offenem Feuer oder Wärme abgebenden
Geräten wie Heizkörpern, Herden oder anderen
Elektrogeräten (z. B. anderen Verstärkern) auf.
6. Klima
Das Gerät wurde für den Betrieb in gemäßigten
Klimazonen ausgelegt.
7. Racks und Regale
Benutzen Sie nur Racks und Regale, die für die
Verwendung mit Audiogeräten geeignet sind.
Bewegen Sie die Anlage sehr vorsichtig, wenn sie
sich auf einem fahrbaren Regal bendet, um ein
Umfallen zu vermeiden.
8. Reinigung
Ziehen Sie vor dem Reinigen des Geräts den
Netzstecker.
In den meisten Fällen reicht es aus, wenn Sie
das Gehäuse mit einem weichen, fusselfreien
und angefeuchteten Tuch abwischen. Verwenden
Sie keine Verdünner oder andere chemische
Lösungsmittel.
Von der Verwendung von Polituren oder
Möbelsprays wird abgeraten, da diese Substanzen
weiße Spuren hinterlassen können, wenn
das Gerät danach mit einem feuchten Tuch
abgewischt wird.
9. Stromversorgung
Verwenden Sie nur eine Stromquelle, die den
Hinweisen im Handbuch oder auf dem Gerät
entspricht.
Dies ist ein Gerät der Klasse 1 und muss geerdet
werden.
Zum Trennen von Solo von der
Netzstromversorgung sollte der Netzschalter auf
der Rückseite des Geräts verwendet werden. Solo
muss so aufgestellt werden, dass eine Trennung
des Geräts von der Stromversorgung möglich ist.
10. Schutz der Netzkabel
Verlegen Sie die Netzkabel nicht frei im Raum.
Achten Sie darauf, dass sie nicht geknickt oder
gedehnt werden und dass keine Gegenstände
darauf zu stehen kommen. Gehen Sie besonders
sorgfältig mit Kabelenden an Steckern und
Gerätebuchsen um.
11. Erdung
Achten Sie darauf, dass die Erdung des Geräts
nicht beeinträchtigt wird.
12. Stromleitungen
Bringen Sie Außenantennen nicht in der Nähe von
Stromleitungen an.
13. Nichtnutzung
Ist die Anlage mit einem Standby-Modus
ausgestattet, ießt in diesem Modus weiterhin ein
schwacher Strom durch das Gerät. Ziehen Sie den
Netzstecker, wenn Sie das Gerät für längere Zeit
nicht nutzen.
14. Seltsamer Geruch
Sollten Sie einen ungewöhnlichen Geruch
bemerken oder Rauch am Gerät entdecken,
schalten Sie es aus und ziehen Sie den
Netzstecker. Wenden Sie sich dann unverzüglich
an Ihren Arcam-Händler.
15. Wartung
Sie sollten nicht versuchen, das Gerät selbst zu
warten. Führen Sie nur die in diesem Handbuch
beschriebenen Maßnahmen aus. Überlassen Sie
die Wartung des Geräts einem Fachmann.
16. Zu behebende Schäden
Das Gerät sollte von einem Fachmann gewartet
werden, wenn:
A. das Netzkabel oder der Netzstecker
beschädigt wurde, oder
B. Gegenstände in das Gerät gefallen oder
Flüssigkeiten eingedrungen sind, oder
C. das Gerät Regen ausgesetzt war, oder
D. das Gerät nicht ordnungsgemäß funktioniert
oder einen erheblichen Leistungsabfall
aufweist, oder
E. das Gerät zu Boden gefallen oder das
Gehäuse beschädigt ist.
17. Lautsprecheranschlüsse
Alle Lautsprecher müssen mit Solo über ein
Klasse-2-Kabel verbunden werden (d. h. es wird
keine Erdung hergestellt). Bei Nichtbeachtung
kann dies zu Schäden am Gerät führen.
Einhaltung von
Sicherheitsbestimmungen
Dieses Gerät entspricht der internationalen
Sicherheitsnorm für Elektrogeräte IEC 60065.
RISQUE DE CHOC ELECTRIQUE
NE PAS OUVRIR
ATTENTION
CAUTION
RISK OF ELECTRIC
SHOCK DO NOT OPEN
Achtung: Um das Risiko eines Elektroschocks zu minimieren, sollten Sie die Abdeckung (Rückseite) nicht entfernen. Die Bauteile im
Gerät können vom Benutzer nicht gewartet werden. Überlassen Sie die Wartung des Geräts einem Fachmann.
Warnung: Um das Risiko von Brand oder Elektroschock zu reduzieren, sollten Sie dieses Gerät weder Regen noch Feuchtigkeit aussetzen.
Das Blitzsymbol in einem Dreieck weist den Anwender auf eine nicht isolierte „gefährliche Spannungsquelle“ im Gehäuse des Geräts hin,
die stark genug sein kann, um einen Stromschlag auszulösen.
Das Ausrufezeichen in einem gleichschenkligen Dreieck weist den Anwender auf wichtige Anweisungen zum Betrieb und zur Instandhaltung
(Wartung) in der Dokumentation hin.
Achtung: In Kanada und den USA muss zur Vorbeugung gegen elektrische Schläge der breite Teil des Steckers in die breite Öffnung
der Steckdose vorsichtig eingesteckt werden.
Sicherheits-
richtlinien
Solo iss4.id2 26/4/05, 8:05 pm2
Page 31

D3
Deutsch
… Vielen Dank, dass Sie sich für ein Arcam Solo-Musiksystem entschieden haben.
Arcam stellt seit beinahe 30 Jahren hochwertige Audiokomponenten her. Während
dieser Zeit haben wir viel Wissen und Erfahrung über das Design und den Bau von
Audiokomponenten gesammelt, auf deren Grundlage wir Ihnen beste Soundleistung
zu einem guten Preis bieten können. Das Design von Solo entstammt der
Umwandlung dieses Wissens in ein benutzerfreundliches System, das Ihnen über
Jahre hinweg viel Freude bereiten wird und dessen Bedienung in nur wenigen
Minuten zu erlernen ist.
Dieses Handbuch bietet eine detaillierte Anleitung zur Bedienung des SoloMusiksystems. Es enthält Hinweise zum Einrichten und Betrieb und stellt weitere
Informationen zu den erweiterten Funktionen des Geräts zur Verfügung. Das
Inhaltsverzeichnis bietet einen Überblick über die Abschnitte des Handbuchs.
Wir hoffen, dass Ihnen das Solo-Musiksystem viele Jahre lang Freude bereiten
wird. Im unwahrscheinlichen Fall eines Produktfehlers oder wenn Sie weitere
Informationen zu dem Produkten von Arcam wünschen, wenden Sie sich bitte an
einen unserer Händler. Weitere Informationen nden Sie auf der Arcam-Website
unter www.arcam.co.uk.
Ihr Solo Development Team
Willkommen
Sicherheits-richtlinien.............................................D2
Willkommen ............................................................D3
Anschließen von Geräten.......................................D4
Musik-wiedergabe ..................................................D8
Fern-bedienung.....................................................D10
Erweiterte Funktionen........................................... D11
Technische Daten ..................................................D13
Produkt-garantie....................................................D14
Sicherheit
Die Sicherheitsrichtlinien nden Sie auf Seite 2
dieses Handbuchs.
Vieles davon scheint zwar selbstverständlich,
Sie sollten die Hinweise aber trotzdem lesen,
damit das Gerät nicht beschädigt wird.
Dieses Produkt muss geerdet werden.
Inhalt
Solo iss4.id2 26/4/05, 8:05 pm3
Page 32

D4
FMRS232
CD OUT
AV
IN
SERIAL NO.
GAME TVTAPE OUT TAPE INZONE 2 PRE OUT
GND
AM
230V
~
50 – 60HZ
400VA
MAX
PROGRAM
SPEAKER
OUTPUT
12V
REMOTE
IN
OUT
IN
L
R
R
L
TRIGGER
LOCAL
ZONE 2
Betriebsbereitschaft
Solo wird normalerweise mit einem verschweißten Netzstecker am
Netzkabel ausgeliefert. Vergewissern Sie sich, dass der mitgelieferte
Stecker zur Steckdose passt. Sollten Sie ein anderes Netzkabel
benötigen, wenden Sie sich an Ihren Arcam-Händler.
Drücken Sie den IEC-Stecker des Netzkabels fest in die Netzbuchse
an der Geräterückseite. Stecken Sie das andere Ende des
Netzkabels in eine Netzsteckdose.
Neben dem Netzanschluss auf der Geräterückseite be ndet sich
ein Netzschalter. Dieser muss zum Betrieb des Geräts eingeschaltet
sein.
Solo ist mit einem Netzteil ausgestattet, das der Netzspannung
in dem Land entspricht, in das das Gerät ausgeliefert wurde.
Stimmt Ihre Netzspannung nicht mit der des Geräts überein
(siehe Aufkleber auf der Rückseite), möchten Sie das Gerät in
einem Land mit einer anderen Netzspannung verwenden, oder
haben Sie einen falschen Stecker erhalten, wenden Sie sich an
Ihren Arcam-Händler.
Das Gerät muss geerdet werden.
Anschließen
von Geräten
Lautsprecher
Solo ist zum Anschluss eines Lautsprecherpaars mit einer Impedanz
von 4 bis 8 Ohm ausgelegt und ist mit Lautsprecheranschlüssen
ausgestattet, an denen Flachstecker oder blanke Drähte
angeschlossen werden können.
Lösen Sie zum Anschließen des linken Lautsprechers die Anschlüsse
„L“ auf der Geräterückseite, stecken Sie das Lautsprecherkabel (bzw.
den Stecker) ein und drehen Sie die Anschlüsse wieder fest. Achten Sie
darauf, dass der rote Anschluss (Positiv/+) des Lautsprechers mit dem
roten Anschluss des Solo und der schwarze Lautsprecheranschluss
(Negativ/–) mit dem schwarzen Anschluss verbunden ist. Schließen Sie
den rechten Lautsprecher entsprechend an den Anschlüssen „R“ an.
Es ist wichtig, dass keine losen Litzen der Lautsprecherkabel andere Kabel
oder das Gerätegehäuse berühren. Es kann sonst zu einem Kurzschluss
kommen, der das Gerät beschädigen kann.
Ziehen Sie die Lautsprecheranschlüsse nicht zu fest an und
benutzen Sie keine Zangen oder ähnliche Werkzeuge, da dies
zu Schäden an den Anschlüssen führen kann, die nicht von der
Garantie abgedeckt sind.
Informationen zum Platzieren der Lautsprecher nden Sie auf Seite 6.
Radioantenne
In Europa und Kanada wird Solo üblicherweise mit einem
kombinierten Empfangsmodul für UKW und DAB (digitales Radio)
ausgerüstet. In den USA und Fernost wird das System mit einem
MW/UKW-Empfangsmodul ausgeliefert. Um dieses Modul
nutzen zu können, müssen Sie eine Antenne anschließen. Eine
entsprechende Antenne ist im Lieferumfang enthalten.
Der UKW/DAB-Antennenanschluss erfolgt über einen F-Stecker.
Verbinden Sie die Antenne mit diesem Anschluss, in dem Sie den
Stift in das Loch in der Mitte des Anschlusses stecken und dann die
Masseverbindung festdrehen. Der Anschluss der MW-Antenne wird
auf Seite 9 beschrieben.
Wenn Sie die mitgelieferte T-förmige Drahtantenne verwenden
möchten, befestigen Sie sie so hoch wie möglich an einer Wand.
Die Elemente sollten vertikal angebracht werden. Testen Sie die
Antenne an verschiedenen Wänden, bis Sie die Stelle mit dem
besten Empfang nden. Befestigen Sie die Antenne mit Klebeband
oder Reißnägeln an der Wand, aber achten Sie darauf, die Isolierung
nicht zu beschädigen.
Um einen optimalen Empfang zu gewährleisten, sollten Sie eine
Außenantenne verwenden (siehe Seite 7).
Verbindungskabel
Wir empfehlen den Einsatz hochwertiger
abgeschirmter Kabel, da minderwertige die
Wiedergabequalität des Systems beeinträchtigen.
Verwenden Sie nur Kabel, die auf das jeweilige
Einsatzgebiet ausgelegt sind, da andere Kabel
eine andere Impedanz aufweisen, was zu einer
Verminderung der Systemleistung führt. Alle Kabel
sollten so kurz wie möglich gehalten werden.
Sie sollten bei der Verkabelung der Geräte darauf
achten, dass das Netzkabel so weit wie möglich
von den Audiokabeln entfernt ist. Andernfalls
kann es zu unerwünschtem Rauschen in den
Audiosignalen kommen.
Allgemeine Hinweise
Aufstellen des Geräts
< Stellen Sie das Gerät auf einer ebenen,
festen Ober äche auf. Achten Sie darauf,
dass das Gerät keinem direkten Sonnenlicht
oder Wärme- bzw. Feuchtigkeitsquellen
ausgesetzt ist.
< Stellen Sie das Gerät nicht auf eine Endstufe
oder eine andere Wärmequelle.
< Stellen Sie das Gerät nicht in ein
geschlossenes Bücherregal oder einen
Schrank, es sei denn, es ist für ausreichende
Belüftung gesorgt. Das Gerät wird bei
Normalbetrieb warm.
< Stellen Sie kein anderes Gerät auf das Solo-
System, da dadurch die Lüftungsschlitze
verdeckt werden können, was zu einer
Überhitzung des Geräts führen kann.
Außerdem würde sich das andere Gerät
ebenfalls erwärmen.
< Vergewissern Sie sich, dass sich nichts
vor dem Empfänger der Fernbedienung in
der Mitte der Gerätevorderseite be ndet,
da dies die Funktion der Fernbedienung
beeinträchtigen würde. Wenn keine
direkte Sichtverbindung möglich ist,
können Sie am Fernbedienungsanschluss
an der Geräterückseite einen externen
Infrarotempfänger anschließen.
< Stellen Sie keinen Plattenspieler auf
dieses Gerät. Plattenspieler reagieren sehr
emp ndlich auf das von Netzteilen erzeugte
Rauschen, was als Hintergrundbrummen zu
hören ist, wenn sich der Plattenspieler zu
dicht am Gerät be ndet.
Solo iss4.id2 26/4/05, 8:05 pm4
Page 33

D5
Deutsch
RS232-Steuerung
Solo verfügt über eine serielle RS232-Schnittstelle,
über die die Fernbedienung von einem PC oder
ähnlichem Gerät möglich wird. Im Normalbetrieb
wird dieser Anschluss nicht verwendet. Wenn
Sie diese Art der Fernbedienung testen möchten,
nden Sie weitere Informationen auf der ArcamWebsite.
Kopfhörer
Auf der Vorderseite des
Solo-Systems nden
Sie einen Anschluss für
Kopfhörer. Schließen
Sie den Kopfhörer
an der Buchse auf
der linken Seite der
Gerätevorderseite an.
Wenn Sie einen Kopfhörer
anschließen, wird die
Hauptausgabe und der
Vorverstärker automatisch
stummgeschaltet, die
Ausgabe an „Zone 2“
bleibt aktiv.
Diese Buchse ist für Kopfhörer mit einer
Impedanz zwischen 8Ω und 2 kΩ geeignet,
die mit einem 3,5-mm-Stereoklinkenstecker
ausgerüstet sind. Der Kopfhörerausgang
ist immer aktiv, außer wenn Solo
stummgeschaltet ist.
FMRS232
CD OUT
AV
IN
SERIAL NO
.
GAME TV
TAPE OUT TAPE INZONE 2 PRE OUT
GND
AM
L
R
Audioausgänge
TAPE OUT: Dieser Ausgang liegt vor der Lautstärkeregelung, d. h. die
Quelle wird direkt an diesen Ausgang weitergeleitet. Sie können an
diesem Ausgang ein Kassettendeck oder ein anderes Aufnahmegerät
anschließen. In keinem Fall sollten Sie hier eine Endstufe anschließen.
Beachten Sie, dass dieser Ausgang bei Auswahl von Tape als Quelle
stummgeschaltet wird, um Rückkopplungen zu verhindern.
PRE OUT: Um die Klangqualität noch weiter zu verbessern oder wenn
Sie mehr als die von Solo zur Verfügung gestellten 50 W pro Kanal
wünschen, können Sie eine externe Endstufe oder einen Subwoofer
anschließen. Verbinden Sie diese Anschlüsse mit den Eingängen des
Subwoofers bzw. der Endstufe. Wenn Sie eine Endstufe verwenden,
schließen Sie die Lautsprecher an dieser an.
Audioeingänge
Solo verfügt über vier Audioeingänge und eine Bandschleife, über die Sie
andere Audioquellen anschließen können (Spielekonsole, TV, DVD-Player
usw.). Drei dieser Eingänge und die Bandschleife be nden sich auf der
Rückseite und einer auf der Vorderseite des Geräts. Die Beschriftungen
auf der Rückseite sind nur Vorschläge, da alle drei Eingänge dieselben
Merkmale (Hochpegel-Eingang) haben und passende Geräte mit einem
beliebigen Anschluss verbunden werden können. Bedenken Sie jedoch,
dass der Name des Eingangs auf dem Display an der Gerätevorderseite
nicht geändert werden kann.
Zum Anschließen eines Geräts an der Geräterückseite benötigen Sie
ein Cinch-Stereokabel in passender Länge und für den Eingang an der
Gerätevorderseite ein Kabel mit einem 3,5-mm-Stereoklinkenstecker.
Verbinden Sie den Audioausgang des gewünschten Geräts mit einem
der Eingänge des Solo und vergewissern Sie sich, dass die Stecker fest
eingesteckt sind. Verwenden Sie immer hochwertige Kabel, um die
bestmögliche Klangqualität zu erhalten.
AV
IN
GAME TV
GND
AM
L
R
Bandschleife
Die Bandschleife dient zum Anschluss eines externen
Kassettendecks am Solo.
TAPE OUT: Verbinden Sie diese Ausgangsbuchsen mit
den Eingangsbuchsen des Kassettendecks, die
normalerweise mit RECORD beschriftet sind.
TAPE IN: Schließen Sie hier die Ausgänge des
Kassettendecks, die normalerweise mit PLAY
beschriftet sind, an.
Beachten Sie, dass der TAPE OUT-Ausgang
stummgeschaltet ist, wenn als Musikquelle „Tape“ ausgewählt ist.
Anschließen eines Plattenspielers
Solo ist nicht mit einem Phono-Vorverstärker ausgestattet. Wenn Sie
einen Plattenspieler anschließen möchten, benötigen Sie einen externen
Vorverstärker. Bei Ihrem Händler erhalten Sie weitere Informationen und
Empfehlungen dazu.
FMRS232
AV
IN
GAME TV
TAPE OUT TAPE INZONE 2 PRE OUT
GND
AM
L
R
ZONE 2 OUT: Dieser Ausgang wird verwendet, wenn Sie ein System in einem
zweiten Raum anschließen. Schließen Sie hier den Verstärker aus dem
zweiten Raum an. Der Ausgabepegel ist von der Lautstärkeregelung des
zweiten Raums abhängig.
CD OUT: Dieser Ausgang überträgt das digitale Ausgangssignal der CD- oder
DAB-Stufe (falls installiert) von Solo und kann für digitale Aufnahmen mit
einem kompatiblen Aufnahmegerät (z. B. MiniDisc) verwendet werden.
Wird eine CD wiedergegeben, überträgt dieser Ausgang ein Signal mit
einer Sample-Rate von 44,1 kHz, bei DAB-Radio beträgt die Sample-Rate
48 kHz.
Diese Anschlüsse sind zur Verwendung bei
Installationen in mehreren Räumen gedacht.
Im normalen Betrieb benötigen Sie diese
Anschlüsse nicht. Wenn Sie diese Funktionen
jedoch verwenden möchten, erhalten Sie
weitere Informationen zum Herstellen dieser
Verbindungen im Dokument „Solo Remote
Control“, das Sie von unserer Website
(www.arcam.co.uk) herunterladen können.
12V TRIGGER: An diesem Ausgang liegt ein 12-
V-Signal an, wenn das Gerät eingeschaltet
ist (d. h. weder „Aus“ noch im Stand-byModus). Sie können damit automatisch
eine Endstufe oder andere kompatible
Komponenten, die am Solo angeschlossen
sind, einschalten, wenn Solo eingeschaltet
wird.
IN LOCAL: Dieser Anschluss ermöglicht den
Empfang des Fernbedienungssignals,
wenn der Sensor verdeckt oder für die
Fernbedienung „nicht sichtbar“ ist. Ein
externer Sensor empfängt das Signal von
der Fernbedienung und leitet es an diesen
Eingang über ein entsprechendes Kabel
weiter.
FMRS232
CD OUT
AV
IN
SERIAL NO
.
GAME TV
TAPE OUT TAPE INZONE 2 PRE OUT
GND
AM
PROGRAM
SPEAKER
OUTPUT
12V
REMOTE
IN
OUT
IN
L
R
R
L
TRIGGER
LOCAL
ZONE 2
IN ZONE 2: Verwenden Sie diesen Anschluss,
wenn Sie ein weiteren System, das über
einen Fernbedienungssensor verfügt, in
einem zweiten Raum verwenden. Der
externe Sensor empfängt das Signal von
der Fernbedienung und leitet es an diesen
Eingang über ein entsprechendes Kabel
weiter.
OUT: Dieser Ausgang überträgt alle
Signale, die über den
Fernbedienungssensor
an der Gerätevorderseite
sowie die beiden externen
Sensoreingänge („In Local“
und „In Zone 2“) eingehen.
Hiermit können Sie die
Fernbedienungsbefehle an
andere Geräte (möglicherweise
an anderen Standorten)
weiterleiten. Beispiel: Die
Befehle für einen DVD-Player
können vom Solo empfangen
und über diesen Ausgang
an den DVD-Player in einem
anderen Raum weitergeleitet werden.
Ein- und Ausgänge für Fernbedienung und der 12-V-Trigger
Solo iss4.id2 26/4/05, 8:07 pm5
Page 34

D6
Aufstellen der Lautsprecher
Die hier gegebenen Hinweise gelten allgemein für das
Aufstellen von Lautsprechern. In der Dokumentation zu den
Lautsprechern nden Sie genauere Angaben und Hinweise
zur Positionierung und Installation.
Positionierung
Lautsprecher sollten auf einem stabilen Ständer 15-40 cm vor der
hinteren Wand und mindestens 60 cm von den Seitenwänden
aufgestellt werden. Lautsprecher sollten niemals auf dem
Fußboden (es sei denn, sie sind dafür ausgelegt) oder in Ecken
aufgestellt werden.
Ihr Hörerlebnis hängt von der Akustik des Raums ab. Sie sollten
mit verschiedenen Positionen experimentieren, bis das Klangbild
Wiedergabe in einem zweiten
Raum
Solo verfügt über zwei getrennte Lautstärkeregeler, über
die Sie dieselbe Ausgabe in zwei verschiedenen Räumen
wiedergeben können. Sie benötigen dazu Folgendes:
< eine Endstufe (z. B. Arcam P80) und Lautsprecher
< entsprechende Kabel (siehe oben)
< einen Fernbedienungsempfänger (optional, erhältlich bei Ihrem Arcam-Händler)
< eine zweite Solo-Fernbedienung (optional, erhältlich bei Ihrem Arcam-Händler)
Stellen Sie folgende Verbindungen her:
1. Vergewissern Sie sich, dass alle Geräte ausgeschaltet und von der
Stromversorgung getrennt sind.
2. Verbinden Sie die Ausgänge „Zone 2” von Solo mit den Audioeingängen der
Endstufe.
3. Verbinden Sie die Lautsprecher mit den Anschlüssen der Endstufe. Beachten Sie
beim Anschluss die Hinweise unter „Lautsprecher” auf Seite 4.
4. Stecken Sie den Empfänger für die Fernbedienung des zweiten Raums in den
Anschluss „In Zone 2” auf der Rückseite von Solo.
5. Stellen Sie die Stromversorgung der Geräte wieder her und schalten Sie sie ein.
Die Ausgabe sollte über die Endstufe erfolgen. Sie können die Lautstärke über
die Fernbedienung regeln.
Beachten Sie, dass der zweite Raum
immer stummgeschaltet ist, wenn Sie
das Solo-System einschalten, und Sie die
Stummschaltung entsprechend deaktivieren
müssen. Dadurch wird vermieden, dass eine
unerwünschte Ausgabe der Musik im zweiten
Raum erfolgt.
optimal ist. Stellen Sie die Lautsprecher zuerst in einem
Abstand von 2–3 m zueinander und ca. 15 cm von der
Wand auf.
Lautsprecherständer
Je stabiler ein Lautsprecher steht, desto besser ist
sein Klang. Wir empfehlen die Verwendung stabiler
Metallständer mit einer Höhe von 40–60 cm. Mit
gedämpften Ständern, die nicht „klingen“, wenn Sie mit
einem Stift dagegen schlagen (entweder aufgrund ihrer
Bauweise oder weil sie feinem Sand gefüllt sind) erzielen
Sie das beste Ergebnis. Stellen Sie sicher, dass die
Ständer und/oder Lautsprecher nicht wackeln.
>60cm
15
–
40cm
40 – 60cm
2 – 3m
Solo iss4.id2 26/4/05, 8:08 pm6
Page 35

D7
Deutsch
VHF/FM
DAB
Radioantenne
Solo hat einen sehr guten Radioempfang, aber nur,
wenn das empfangene Signal gut ist.
Solo ist entweder mit einem DAB/FM- oder AM/
FM-Empfangsmodul ausgestattet, je nachdem,
wo Sie es gekauft haben. Unabhängig davon,
welches Modul installiert ist, sollten Sie jedoch
immer eine Außenantenne verwenden, um den
besten Empfang zu erhalten.
Die Art der Antenne, die Sie verwenden
sollten hängt von Ihren bevorzugten
Sendern und den lokalen Bedingungen
ab. Wenn Sie z. B. ausschließlich UKWSender hören und in Ihrem Gebiet eine
gute UKW-Signalstärke besteht, dann ist
eine einfache Antenne (innen oder außen)
meistens ausreichend. In einem Gebiet mit
schwachen Signalen ist zum Empfang von
DAB-Sendern eine Außenantenne mit guter
Verstärkung erforderlich.
Für den besten Empfang von DAB- und
UKW-Sendern ist evtl. eine Antennenweiche
erforderlich (siehe gegenüber liegende
Abbildung). Diese kombiniert die beiden
empfangenen Signale der Antennen
(DAB und UKW) und leitet sie in einem
Antennenkabel an das Gerät. Wenn keine
Antennenweiche verwendet wird, erhalten
Sie von der Antenne, die Sie für DAB und
UKW gewählt haben, evtl. keinen optimalen
Empfang.
Lassen Sie sich von Ihrem Arcam-Händler
oder einem Antennenfachmann in Ihrer
Umgebung beraten.
DAB
Wenn das Sendersignal in Ihrem Gebiet sehr stark
ist, kann die beigefügte Innenantenne ausreichend
sein. Befestigen Sie die Antenne an der Wand und
bringen Sie dabei die beiden Drähte vertikal an.
In Gebieten mit einem schwachen Sendersignal
sollten Sie eine Außenantenne verwenden, um
möglichst viele Sender empfangen zu können.
DAB-Sender werden auf „Band III“ oder
„L-Band“ (oder beiden) übertragen. Welche
Übertragungsfrequenz in Ihrem Gebiet verwendet
wird erfahren Sie entweder von Ihrem Händler
oder auf www.WorldDAB.org. In Band IIIÜbertragungsgebieten sollten Sie eine YagiAntenne mit mehreren Elementen verwenden,
wenn Sie weit von der Sendestation entfernt
sind bzw. eine gerichtete Antenne oder eine
Dipolantenne, wenn Sie sich in der Nähe mehrerer
Sendestationen be nden. (In Großbritannien,
einem Band III-Bereich, sollte diese Antenne
mit vertikalen Elementen erstellt werden, da die
Übertragungen vertikal polarisiert sind.) Wenn
die DAB-Dienste in Ihrem Gebiet im L-Band
übertragen werden, sollten Sie sich von Ihrem
Händler beraten lassen, welche Antenne am
besten geeignet ist.
Sowohl die Dachantenne als auch die Drahtantenne sollten mit einem F-Stecker an der UKWAntennenbuchse an der Geräterückseite angeschlossen werden.
UKW/MW
Für den Empfang von VHF-Radiosignalen ist eine UKW-Antenne erforderlich und für MW-Signalen
eine MW-Antenne.
UKW-Antenne
Im Lieferumfang ist zwar eine UKW-Bandantenne als Zubehör enthalten, für einen optimalen UKWRadioempfang empfehlen wir jedoch eine auf dem Dach oder Dachboden montierte Antenne. In
manchen Gegenden ist evtl. Kabelradio verfügbar oder es ist eine Gemeinschaftsantenne installiert
(z. B. in einem Mehrfamilienhaus). In der Wohnung sollte in diesen Fällen eine Buchse mit der
Bezeichnung „UKW“ („FM“) oder „VHF“ (nicht die mit der Bezeichnung „TV“) installiert sein, die
Sie mit dem Anschluss „FM“ von Solo verbinden sollten.
Wenn Sie das mitgelieferte Bandkabel verwenden möchten, befestigen Sie es so hoch wie möglich
an einer Wand. Die T-Elemente sollten horizontal angebracht werden. Testen Sie verschiedene
Wände des Raums, um herauszu nden, wo Sie den besten Empfang haben, und verwenden Sie
Reißnägel oder Klebeband, um die Antenne T-förmig anzubringen. Achten Sie dabei darauf, dass die
Reißnägel nicht mit dem Antennendraht in Berührung kommen.
MW-Antenne
Eine MW-Rahmenantenne ist im Lieferumfang enthalten. Schließen Sie diese Antenne an den
Anschlüssen „AM“ und „GND“ auf der Geräterückseite an. Es ist dabei egal, welche Leitung Sie
wo anschließen. Stellen Sie die Antenne in einiger Entfernung vom Solo-System, Fernsehgeräten,
Computern oder anderen Geräten auf, die „Funkrauschen“ erzeugen. Drehen Sie die Antenne, bis
Sie den besten Empfang erhalten.
In Gebieten mit schwachem Empfang oder in Gebäuden mit Stahlbeton können Sie einen drei bis
fünf Meter langen Draht verwenden, um den Empfang zu verbessern. Bringen Sie diesen Draht
so hoch wie möglich an der Außenseite des Gebäudes an und schließen Sie ein Ende des Drahts
zusammen mit der MW-Antenne an der Antennenbuchse „AM“ an.
Montage der UKW-Rahmenantenne
Antennenweiche
2. Führen Sie die Lasche in den Schlitz am
Fuß des Ständers ein, bis es klickt.
3. Verbinden Sie die Kabel mit dem
AM- Anschluss auf der Geräterückseite.
Drehen Sie die Antenne, bis Sie den besten
Empfang haben.
1. Entfernen Sie den Kabelbinder und
wickeln Sie das Kabel ab. Klappen Sie den
Kunststoffständer durch den Rahmen nach
vorne.
Solo iss4.id2 26/4/05, 8:09 pm7
Page 36

D8
Musik-
wiedergabe
CD-Wiedergabe
Schnellstart – so geben Sie CDs wieder:
So geben Sie CDs wieder:
1. Drücken Sie </1 auf der Gerätevorderseite bzw. 1 auf
der Fernbedienung, um das CD-Fach zu öffnen.
2. Legen Sie die CD ein. Drücken Sie 1 bzw. 4
(Wiedergabe), um das Fach zu schließen.
3. Warten Sie, bis die CD gelesen wurde. Wenn Sie zum
Schließen die Wiedergabetaste gedrückt haben, wird die
Wiedergabe automatisch gestartet. Drücken Sie sonst
4/;
(Fernbedienung: A, um die Wiedergabe zu starten.
Wichtige Bedienelemente an
der Gerätevorderseite
Power
Drücken Sie den
Netzschalter (POWER), um
das Solo-System ein bzw.
in den Stand-by-Modus zu
schalten.
Be ndet sich das Gerät im
Stand-by-Modus, leuchtet
die LED neben dem
Schalter rot und im Display
wird die Uhrzeit angezeigt.
Drücken Sie POWER, um
das Gerät einzuschalten. Die LED leuchtet dann
blau.
Beachten Sie, dass sich der Hauptnetzschalter
auf der Geräterückseite be ndet. Leuchtet
die Betriebsleuchte gar nicht, lesen Sie die
Anweisungen unter „Betriebsbereitschaft“ auf
Seite 4.
Lautstärke und Stumm
Mit diesen Tasten können Sie die Ausgabe
stummschalten bzw. die Lautstärke erhöhen und
verringern. Ist Solo stummgeschaltet, können Sie
durch erneutes Drücken MUTE oder durch Drücken
einer der Lautstärketasten die Stummschaltung
aufheben.
Die aktuelle Lautstärke wird oben rechts im
Display angezeigt.
Source –/+
Mit diesen Tasten wählen Sie die Audioquelle.
Wenn Sie z. B. UKW-Radio hören möchten,
drücken Sie SOURCE+, bis „FM” in der linken
oberen Ecke des Display angezeigt wird.
Diese Tasten werden auch zum Bedienen des
Solo-Menüs verwendet. Weitere Informationen
nden Sie unter „Kon gurieren des Geräts“ auf
Seite 11.
Source selection Wiedergabemodus
Current volume
Titelnummer, Liedtext, Wiedergabezeit usw.
Wiedergabezustand
Überspringen/Durchsuchen von Titeln
Drücken Sie auf der Gerätevorderseite oder
Fernbedienung die Taste 0 bzw. /, um zum
vorherigen bzw. nächsten Titel der CD zu
springen.
Beim Vorwärtspringen wird die Wiedergabe
am Anfang des nächsten Titels (falls
vorhanden) gestartet. Wenn Sie die Taste 0 in
den ersten drei Sekunden eines Titels drücken,
springt die Wiedergabe zum vorherigen
Titel (falls vorhanden), ansonsten wird die
Wiedergabe vom Anfang des aktuellen Titels
gestartet. Es ist daher in den meisten Fällen
normal, dass Sie die Taste 0 zweimal drücken
müssen, um zum Anfang des vorherigen Titels
zu springen.
Die Tasten 0 und / werden auch zum
Ausführen des Suchlaufs verwendet. Halten
Sie die Taste 0 bzw. / gedrückt, um einen
Suchlauf in die entsprechende Richtung
auszuführen.
Besondere Wiedergabemodi
Drücken Sie MODE auf der Fernbedienung, um
durch die verschiedenen Modi für wiederholte/
zufällige CD-Wiedergabe zu wechseln.
Folgende Optionen stehen zur Verfügung:
1. Repeat disc (CD wiederholen): Die Titel der
CD werden nacheinander wiedergegeben. Nach
dem Ende des letzten Titels wird die Wiedergabe
vom ersten Titel der CD fortgesetzt.
2. Repeat track (Titel wiederholen): Die
Wiedergabe des aktuellen Titels wird
wiederholt, bis der Modus deaktiviert wird.
3. Shuf e (Zufall): Die Titel der CD werden in
zufälliger Reihenfolge wiedergegeben.
4. Repeat shuf e (Wiederholen+Zufall): Eine
Kombination von „Repeat disc“ und „Shuf e“.
Bei jedem Neustart der Wiedergabe wird die
Reihenfolge der Titel zufällig bestimmt.
Sie können die Modi für zufällige/wiederholte
Wiedergabe abbrechen, indem Sie wiederholt
MODE drücken, bis der Wiedergabemodus nicht
mehr angezeigt wird.
Beachten Sie, dass die Modi für zufällige/
wiederholte Wiedergabe während der
programmierten Wiedergabe (siehe nächste
Spalte) nicht verfügbar sind.
Programmieren der
Wiedergabereihenfolge
Sie können die Reihenfolge, in der die
Titel einer CD wiedergegeben werden,
programmieren. Verwenden Sie dazu das SoloKon gurationsmenü, das auf Seite 11 ausführlich
beschrieben wird. Eine Kurzanweisung folgt:
1. Drücken Sie MENU, um das
Kon gurationsmenü zu öffnen.
2. Drücken Sie C (SOURCE– auf der
Gerätevorderseite), bis in der obersten Zeile
des Display „Prog“ angezeigt wird.
3. Drücken Sie OK, um den Programmiermodus
zu aktivieren, und markieren Sie den nächsten
Titel, der in die Wiedergabeliste aufgenommen
werden soll, mit der Taste – bzw. + (0 bzw. /
auf der Gerätevorderseite). Drücken Sie „OK“,
um den Titel hinzuzufügen. Wiederholen Sie
diesen Vorgang, bis alle gewünschten Titel in
die Wiedergabeliste aufgenommen wurden.
4. Drücken Sie MENU, um den Programmier-
modus zu beenden. Drücken Sie MENU erneut,
um das Kon gurationsmenü zu schließen.
Sie können eine Programmierung löschen,
indem Sie die Taste < auf der Fernbedienung
zweimal drücken.
Anzeigemodi
Es stehen vier verschiedene Anzeigemodi für
die CD-Wiedergabe zur Verfügung. Drücken Sie
zum Ändern des Modus die Taste INFO auf der
Gerätevorderseite bzw. der Fernbedienung.
1. Aktuelle Titelzeit: Die „übliche“ Anzeige
für die CD-Wiedergabe (Titelnummer und
Wiedergabezeit).
2. Verbleibende Titelzeit: Dieser Modus
zeigt die aktuelle Titelnummer sowie die
verbleibende Wiedergabezeit an.
3. CD text: Falls verfügbar, wird der CD-Text
angezeigt (z. B. Titelname oder Interpret). Ist kein
CD-Text verfügbar, ist die Anzeige mit der von
„Current track time“ identisch.
4. Große Zeichen: In diesem Modus werden
die Zeichen in doppelter Größe angezeigt (nur
Titelnummer und Lautstärke).
CD-Wiedergabe (Zusammenfassung)
4
(Wiedergabe): Drücken Sie diese Taste, um
die Wiedergabe einer CD zu starten.
<
(Stopp): Drücken Sie diese Taste, um die
Wiedergabe einer CD zu beenden.
;
(Pause): Drücken Sie diese Taste, um die
Wiedergabe einer CD anzuhalten. Drücken
Sie die Taste erneut (oder Wiedergabe), um
die Wiedergabe fortzusetzen.
0
(Überspringen/Suchen rückwärts): Drücken
Sie diese Taste kurz, um zum Anfang des
aktuellen Titels bzw. zum vorherigen Titel zu
springen. Halten Sie die Taste gedrückt, um
einen Suchlauf (rückwärts) durchzuführen.
/
(Überspringen/suchen vorwärts): Drücken
Sie diese Taste kurz, um zum Ende des
aktuellen Titels bzw. zum nächsten Titel zu
springen. Halten Sie die Taste gedrückt, um
einen Suchlauf (vorwärts) durchzuführen.
1
(Öffnen/Schließen): Drücken Sie diese Taste,
um das CD-Fach zu öffnen. Drücken Sie die
Taste erneut, um es wieder zu schließen.
Direkter Titelzugriff
Sie können einen Titel einer CD direkt aufrufen,
indem Sie die entsprechende Zifferntaste auf der
Fernbedienung drücken.
Drücken Sie zum Aufrufen von Titel 1–9 die
Nummer des gewünschten Titels. Wenn Sie
einen Titel höher als 9 auswählen möchten,
halten Sie die erste Ziffer gedrückt (z. B. 1), bis sie
unten links im Display angezeigt wird („1–“), und
drücken Sie dann die zweite Ziffer.
Solo iss4.id2 26/4/05, 8:10 pm8
Page 37

D9
Deutsch
Umschalten auf Radio
Das Gerät verfügt entweder über ein DAB/UKW- oder ein MW/UKW-Empfangsmodul, abhängig davon,
wo Sie es erworben haben.
Solo verfügt über folgende Funktionen:
< bis zu 30 Sendervoreinstellungen
< volle RDS-Informationen für UKW (falls übertragen), Programmdaten für DAB
< Anzeigen für UKW-Signalstärke und DAB-Datenrate
Umschalten auf Radio
Drücken Sie SOURCE+ bzw. SOURCE–, bis der gewünschte Radiomodus (DAB/FM/AM) angezeigt wird.
Sie können auch die Taste DAB/FM/AM bzw. FM auf der Fernbedienung drücken, um den Modus direkt
aufzurufen.
Quellenauswahl Sendername
Programmieren von Sendervoreinstellungen
Sie können Ihre Lieblingssender in einer der Voreinstellungen speichern und
ihn später schnell aufrufen, ohne ihn erneut einstellen zu müssen. Solo stellt
30 Voreinstellungen zur Verfügung, die zwischen DAB, FM und AM (je nach
Modell) aufgeteilt werden.
Suchen Sie den Radiosender, der gespeichert werden soll. Sie können einen
Sender in den Voreinstellungen 1–9 speichern, indem Sie die Taste mit der
entsprechende Zahl auf der Fernbedienung gedrückt halten, bis „Preset
Saved“ (Voreinstellung gespeichert) auf dem Display angezeigt wird.
Wenn Sie eine Voreinstellungen zwischen 10 und 30 aufrufen möchten,
drücken Sie MENU, um das Solo-Kongurationsmenü aufzurufen (ausführliche
Beschreibung auf Seite 11), und suchen Sie den Menüpunkt „Store
Preset“ (Voreinstellung speichern). Drücken Sie die Taste – bzw. + auf der
Fernbedienung (bzw. 0 auf / der Gerätevorderseite), um die gewünschte
Voreinstellung auszuwählen. Ist eine Voreinstellung bereits belegt,
wird der Name bzw. die Sendefrequenz des Senders auf der untersten
Zeile des Displays angezeigt. Leere Voreinstellungen sind mit „Empty“
gekennzeichnet. Wenn die gewünschte Sendernummer angezeigt wird,
drücken Sie OK, um die Voreinstellung zu speichern. Beachten Sie, dass beim
Speichern eines Radiosenders in einer Voreinstellung, die bereits für einen
Sender vergeben ist, die alte durch die neue Sendervoreinstellung gelöscht
wird.
Die Sender bleiben auch dann gespeichert, wenn Solo vom Netz getrennt wird.
Sendersuche
Wenn Sie bei der Wiedergabe von Radio MODE
drücken, wird zwischen den beiden TuningModi („Preset“ und „Tune“) umgeschaltet. Der
Name des ausgewählten Modus wird kurz im
Display angezeigt.
Im Modus „Preset“ können Sie durch Drücken
von > oder ? auf der Fernbedienung
(0 oder / auf der Gerätevorderseite) die
vorherige/nächste Sendervoreinstellung
(falls angegeben) auswählen. Beachten
Sie, dass diese Tasten im Preset-Modus
nicht genutzt werden können, wenn keine
Voreinstellungen deniert sind.
Im Modus „Tune“ wird die MW/UKW-Frequenz
gewechselt bzw. der nächsten DABRadiosender aus der Senderliste gewählt.
UKW/MW
Wenn Sie einen Suchlauf nach neuen Sendern
durchführen möchten, vergewissern Sie sich,
dass Solo sich im Tuner-Modus (siehe oben)
bendet.
< Manueller Sendersuchlauf: Drücken
Sie B und C (0 oder / auf der
Gerätevorderseite), um die gewünschte
Frequenz auszuwählen. Damit können
Sie eine bestimmte Frequenz einstellen.
Außerdem können Sie auf diese Weise
einen Sender einstellen, der für den
automatischen Suchlauf zu schwach ist.
< Automatischer Sendersuchlauf: Halten
Sie B oder C auf der Fernbedienung
(0 oder / auf der Gerätevorderseite)
mindestens eine Sekunde gedrückt, um
den automatischen Sendersuchlauf zu
starten. Solo sucht einen Radiosender
mit ausreichender Sendeleistung und hält
dann an. Drücken Sie eine der Tasten
erneut, um den nächsten Sender zu
suchen. Der automatische Sendersuchlauf
funktioniert für UKW und MW.
DAB
Die Auswahl der Sender unter DAB
unterscheidet sich von der Auswahl unter
UKW oder MW. Sie müssen nicht wissen, auf
welcher Frequenz der gewünschte Sender
übertragen wird, das wird vom Gerät erledigt.
Wählen Sie „DAB“ als Quelle und drücken Sie
MENU. Schalten Sie durch die Menüoptionen
(siehe Seite 11), bis „DAB Setup“ angezeigt
wird. Dieser Menüeintrag enthält zwei
Optionen: „Scan“ und „Erase settings“. Wenn
Sie „Scan“ wählen, sucht Solo nach neuen
DAB-Sendern. Werden Sender gefunden,
werden sie automatisch in die Liste der
verfügbaren Sender aufgenommen. Drücken
Sie MENU erneut, um das Menü zu verlassen.
Drücken Sie zum Auswählen eines DABRadiosenders die Taste B oder C auf
der Fernbedienung, bis der Name des
gewünschten Senders angezeigt wird.
Nach etwa zwei Sekunden wird der Sender
automatisch gewählt.
Aktuelle Lautstärke
Sendedetails oder andere Informationen
Preset-Modus-Anzeige
Auswählen von Sendervoreinstellungen
Solo muss sich im Preset-Modus benden, bevor voreingestellte Sender
ausgewählt werden können (siehe oben).
Sie können durch die voreingestellten Sender blättern, indem Sie B oder
C
auf der Fernbedienung (0 oder / auf der Gerätevorderseite) drücken.
Außerdem können Sie Voreinstellungen auch direkt über den Nummernblock
der Fernbedienung auswählen. Weitere Informationen zu dieser Funktion
nden Sie auf Seite 10.
Anzeigemodi
Es stehen vier verschiedene Anzeigemodi für
die Radiowiedergabe zur Verfügung. Drücken
Sie zum Ändern des Modus die Taste INFO auf
der Gerätevorderseite bzw. der Fernbedienung.
1. Sendungsart (DAB/FM): Eine
Kurzbeschreibung des gesendeten Programms.
2. Sendefrequenz (FM/AM): Der Sendername
(falls verfügbar) und die Sendefrequenz.
3. Dynamische Beschreibung (DAB)/ RDS
(FM): Text mit 128 Zeichen, der Informationen
zum Programm enthält (z. B. Telefonnummern,
URLs usw.).
4. Datenrate (DAB): Dieser Modus zeigt die
Datenrate des Senders (in kBit/s) und den
Sendemodus an. Eine höhere Datenrate
gibt eine bessere Audioqualität an, der
Maximalwert beträgt 256 kBit/s.
5. Signalqualität: Ein Balkendiagramm, das die
Qualität des empfangenen Signals anzeigt.
Solo iss4.id2 26/4/05, 8:10 pm9
Page 38

D10
Einlegen der Batterien in
die Fernbedienung
Fern-
bedienung
Die Tasten der Fernbedienung
2
(Betrieb): Schaltet das Solo-System ein bzw. in den Stand-by-Modus.
Titel-/Preset-Auswahl (0–9): Drücken Sie die Nummer des gewünschten Titels bzw. Preset. Wenn
Sie einen Titel bzw. ein Preset höher als 9 auswählen möchten, halten Sie die erste Ziffer gedrückt
(z. B. 1), bis sie unten links im Display angezeigt wird („1-”), und drücken Sie dann die zweite Ziffer.
>
und
?
: Bei der Radiowiedergabe können Sie mit diesen Tasten die Sendefrequenz bzw. die
Sendervoreinstellung ändern.
INFO: Ändert den Anzeigemodus für CD oder Radio.
MODE: Für manche Quellen können Sie den Wiedergabemodus wechseln.
CD – Drücken Sie MODE, um durch die verschiedenen Modi für wiederholte/zufällige CD-Wiedergabe
zu wechseln.
DAB/FM/AM – Drücken Sie MODE, um zwischen den Tuner- und Preset-Modus umzuschalten. Wenn
Sie im Tuner-Modus > oder ? drücken, wird die ausgewählte Frequenz (UKW/MW) oder der
ausgewählte Sender (DAB) gewechselt, im Preset-Modus dagegen wird die Sendervoreinstellung
gewechselt.
DISP: Ändert die Helligkeit des Displays auf der Gerätevorderseite. Sie können verschiedene
Helligkeitseinstellungen oder auch ein vollständiges Ausschalten des Displays wählen.
Quellenauswahl: Drücken Sie die entsprechende Taste, um die gewünschte Audioquelle zu wählen.
Pfeiltasten und OK: Bei der Musikwiedergabe funktionieren die Tasten
B
und C wie die oben
beschriebenen Tasten > und ?, wobei die Tasten – und + zum Regeln der Lautstärke verwendet
werden. Mit diesen Tasten sowie der Taste OK können Sie das Solo-Kon gurationsmenü bedienen
(siehe Seite 11 und 12).
Mute: Drücken Sie diese Taste einmal, um die Lautsprecher- und Vorverstärkerausgänge von
Solo stummzuschalten. Drücken Sie die Taste erneut (bzw. eine der Lautstärketasten), um die
Stummschaltung aufzuheben.
MENU: Drücken Sie diese Taste, um das Kon gurationsmenü von Solo aufzurufen. Eine ausführliche
Beschreibung nden Sie auf den Seiten 11 und 12. Drücken Sie MENU erneut, um das Menü zu
beenden.
Befehle zur CD-Wiedergabe
4
(Wiedergabe): Drücken Sie diese Taste, um die Wiedergabe einer CD zu starten.
<
(Stopp): Drücken Sie diese Taste, um die Wiedergabe einer CD zu beenden.
;
(Pause): Drücken Sie diese Taste, um die Wiedergabe einer CD anzuhalten. Drücken Sie die Taste
erneut (oder Wiedergabe), um die Wiedergabe fortzusetzen.
0
(Überspringen/Suchen rückwärts): Drücken Sie diese Taste kurz, um zum Anfang des aktuellen
Titels bzw. zum vorherigen Titel zu springen. Halten Sie die Taste gedrückt, um einen Suchlauf
(rückwärts) durchzuführen.
/
(Überspringen/suchen vorwärts): Drücken Sie diese Taste kurz, um zum Ende des aktuellen Titels
bzw. zum nächsten Titel zu springen. Halten Sie die Taste gedrückt, um einen Suchlauf (vorwärts)
durchzuführen.
1
(Öffnen/Schließen): Drücken Sie diese Taste, um das CD-Fach zu öffnen. Drücken Sie die Taste
erneut, um es wieder zu schließen.
1. Öffnen Sie das Batteriefach auf der
Rückseite der Fernbedienung.
2. Legen Sie die beiden AAABatterien ein. Beachten Sie dabei
die Hinweissymbole zur Polung im
Batteriefach.
3. Schließen Sie das Batteriefach wieder.
Die Fernbedienung
Hinweise zum Gebrauch der Fernbedienung:
< Zwischen der Fernbedienung und dem
Sensor von Solo dürfen sich keine
Hindernisse be nden. Die Fernbedienung
hat eine Reichweite von ca. sieben
Metern. Auf der Geräterückseite be ndet
sich ein Anschluss für die Fernbedienung,
den Sie verwenden können, wenn der
Empfangssensor verdeckt ist. Weitere
Informationen erhalten Sie bei Ihrem
Fachhändler.
< Bei starker Sonneneinstrahlung oder
Neonbeleuchtung auf den Sensor von
Solo kann der Betrieb der Fernbedienung
unzuverlässig werden.
< Ersetzen Sie die Batterien, wenn Sie
ein Nachlassen der Reichweite der
Fernbedienung erkennen.
Solo iss4.id2 26/4/05, 8:11 pm10
Page 39

D11
Deutsch
Kongurieren des Geräts
Sie können verschiedene Einstellungen individuell vornehmen
sowie eine Reihe von Funktionen an Ihr HiFi-System
anpassen. Die folgende Abbildung hilft bei der Suche nach
den verfügbaren Einstellungen.
Anpassen der Höreinstellungen
In normalem Betrieb werden im Display die aktuelle
Lautstärke, die gewählte Audioquelle und zusätzliche
Informationen zur Quelle (z. B. die Wiedergabezeit einer CD)
angezeigt. Drücken Sie zum Anpassen der Höreinstellungen
MENU an der Gerätevorderseite bzw. auf der Fernbedienung.
Verwenden Sie die Tasten, um eine bestimmte Einstellung
auszuwählen und anzupassen.
Balance [Balance]
Mit dieser Einstellung erhöhen Sie die Lautstärke eines
Kanals (links oder rechts) in Relation zum anderen. Normalerweise brauchen Sie an dieser Einstellung keine Anpassung
vorzunehmen, aber wenn Sie gewohnheitsmäßig näher an
einem Lautsprecher sitzen als am anderen, können Sie durch
Ändern der Balance das Stereobild an Ihre Hörposition anpassen.
Tiefen [Bass]
Mit dieser Einstellung ändern Sie die relative Lautstärke
der tieferen Frequenzen in einem Musiktitel. Wenn Sie der Meinung sind, die Musik wäre nicht „warm“
genug, erhöhen Sie die Tiefen, wenn die Musik zu „dumpf“ ist, nehmen Sie Tiefen heraus. Sie auch
„Tiefenkorrektur“.
Höhen [Treble]
Mit dieser Einstellung ändern Sie die relative Lautstärke der höheren Frequenzen in einem Musiktitel.
Wenn Sie der Meinung sind, dass Perkussionselemente in der Musik verloren gehen, erhöhen Sie diesen
Wert. Wenn die hohen Frequenztöne zu dominant sind, verringern Sie diesen Wert.
Beachten Sie, dass bei angeschlossenen Kopfhörern die Regler für Tiefen und Höhen deaktiviert sind.
Tiefenkorrektur [Bass correction]
Im Normalfall sollten Sie diese Einstellung nicht benötigen (lassen Sie den Minimalwert stehen).
Tiefenkorrektur kann verwendet werden, wenn Lautsprecher angeschlossen sind, die einen
eingeschränkten Frequenzbereich haben und deshalb sehr tiefe Töne nicht wiedergeben können.
Durch Erhöhen dieses Werts werden die tiefen Frequenzen progressiv abgeschwächt, da sie nicht vom
Lautsprecher wiedergegeben werden können, während die Lautstärke etwas höherer Frequenzen
erhöht wird. Dies bedeutet, dass der gesamte „Tiefenwert“, den die Lautsprecher ausgeben, dem vollen
Frequenzbereich eines („großen“) Lautsprechers entspricht.
Sie können die Anlage durch Verwendung dieser Einstellung zwar nicht beschädigen, es wird jedoch
empfohlen, dass Sie verschiedene Tiefen- und Höheneinstellungen testen, bis Sie eine gut klingende
Kombination gefunden haben.
Sleep Timer
Mit diesem Zeitgeber können Sie einen Zeitraum festlegen, nach dem Solo automatisch in den Stand-byModus schaltet. Sie können diesen Zeitraum in 5-Minuten-Schritten bis zu maximal 2 Stunden festlegen.
CD-Programm
Um die Wiedergabereihenfolge einer CD zu programmieren,
drücken Sie OK, wenn dieser Menüpunkt angezeigt
wird. Die Wiedergabereihenfolge der CD wird dann wie
angegeben in der Anzeige der CD-Programmierung (siehe
rechts) eingegeben. Wenn Sie die Eingabe des Programms
abgeschlossen haben, drücken Sie MENU, um den
Programmiermodus zu beenden. Drücken Sie erneut MENU,
um das Kongurationsmenü von Solo zu beenden.
Erweiterte
Funktionen
Erklärung der Symbole auf dieser Seite:
Symbol:
Taste am
Gerät:
Taste auf
Fernbedienung:
OK
Zustand beim Einschalten
Links
Rechts
Nur bei Quelle
„FM“
Nur bei Quelle
„DAB“
–Voreinstellung
Einstellungen löschen
+Voreinstellung
Nach verfügbaren Sendern suchen
Voreinstellung bestätigen
Nur bei Quelle „DAB“,
„FM“ oder „AM“
–dB +dB
–dB +dB
–dB +dB
OK
OK
OK
Nur bei Quelle
„CD“
OK
–Voreinstellung +Voreinstellung
Voreinstellung bestätigen
+–
CD-Programmierung
34
Hervorheben des Titels, der
zum Programm hinzugefügt
werden soll
OK
Hinzufügen des Titels zum
Programm
CLR
Löschen des letzten
Programmeintrags
STOP
Zweimaliges Drücken der Taste
STOP auf der Fernbedienung,
um das gesamte Programm zu
löschen
Solo iss4.id2 26/4/05, 8:11 pm11
Page 40

D12
Einrichten der Uhr- und Alarmzeit
Drücken Sie MENU, wenn sich Solo im Stand-by-Modus bendet, um die Uhr- und Alarmzeit einzurichten.
Wählen Sie mit der Pfeiltaste nach rechts bzw. links der Fernbedienung den zu ändernden Eintrag aus
und ändern Sie den Wert mit der Pfeiltaste nach oben bzw. unten. Beispiel: Drücken Sie MENU, um das
Uhr-/Alarm-Menü aufzurufen. Jetzt können Sie mit den Tasten nach oben bzw. unten zwischen dem
Einstellen der Uhr- oder einer Alarmzeit wechseln.
Sie können im bis zu vier verschiedene Alarmzeiten einrichten.
Stoppen oder Anhalten eines Alarms
Um einen ausgelösten Alarm auszuschalten, drücken Sie den Netzschalter an der Gerätevorderseite
oder auf der Fernbedienung. Außerdem können Sie auch OK drücken, um den Pausiermodus („snooze“)
aufzurufen. Der Alarm wird dadurch nach 10 Minuten erneut ausgelöst. Drücken Sie den Netzschalter,
um den Pausiermodus abzubrechen.
FM Mode
Dieser Menüeintrag wird nur angezeigt, wenn „FM“ als Audioquelle gewählt ist.
In Gebieten mit schwachen Sendersignalen kann es vorteilhaft sein, die Ausgabe des UKW-Tuner auf
Mono einzustellen, da bei Mono schon geringe Signalstärken akzeptable Ergebnisse erzielen. Ist die
Signalstärke in Ihrem Gebiet gut, können Sie die Einstellung „Stereo“ beibehalten.
DAB Setup
Dieser Menüeintrag wird nur angezeigt, wenn „DAB“ als Audioquelle gewählt ist.
Dieser Menüpunkt enthält zwei Optionen: „Scan“ und „Erase settings“. Wenn Sie „Scan“ wählen,
sucht Solo nach neuen DAB-Sendern. Werden Sender gefunden, werden sie automatisch in die Liste der
verfügbaren Sender aufgenommen.
Beim Suchen nach neuen Sendern werden alte, nicht mehr aktive Sender nicht gelöscht. Es kann also
sein, dass die Liste enthält, die gar nicht mehr empfangen werden können. Wählen Sie in diesem Fall
die Option „Erase settings“ und führen danach einen neuen Suchvorgang durch. Nach Abschluss des
Suchvorgangs benden sich nur aktuelle Sender in der Liste.
Set Preset
Dieser Menüeintrag wird nur angezeigt, wenn „DAB“, „FM“ oder „AM“ als Audioquelle gewählt ist.
Weitere Informationen nden Sie unter „Programmieren von Sendervoreinstellungen“ auf Seite 7.
Anpassen der Lautstärke von Zone 2
Halten Sie MENU auf der Gerätevorderseite gedrückt, bis „Z2 Vol“ angezeigt wird, und verringern bzw.
erhöhen Sie mit dem Lautstärkeregler die Lautstärke von Zone 2. Drücken Sie erneut MENU, um den
Modus zu beenden.
Solo iss4.id2 26/4/05, 8:12 pm12
Page 41

D13
Deutsch
Technische
Daten
Vorverstärker
Eingänge
Max. Eingangspegel 2,5Vrms
Eingangsimpedanz 47kΩ
Störabstand 105dB
Koaxialausgänge
Max. Ausgangspegel 2,5Vrms
Ausgangsimpedanz
500Ω
Optischer Ausgang (TOSLINK)
Sample-Rate
44,1 kHz (bei CD-Wiedergabe),
48 kHz (bei DAB-Empfang),
sonst stummgeschaltet
Verstärker
Dauerleistung pro Kanal, 80kHz Maßbandbreite
Beide Kanäle, 4Ω, 1kHz 75Wrms, 0,013% THD+n
Klirrfaktor, 4Ω, beide Führungen 80% Leistung, 1kHz
0,011%, THD+1
CD-Wiedergabe
D/A-Wandler Wolfson 24-Bit Multilevel Delta-Sigma DAC
Frequenzumfang (±0.5dB) 20Hz–20kHz
DAB-Empfänger (falls installiert)
D/A-Wandler AKM 96 kHz 24-Bit Delta-Sigma DAC
Frequenz-Abstimmungsumfang 174–240MHz (Band III)
1452–1490MHz (L-band)
Empndlichkeit (typisch)
-98dBm (VHF-Messung gemäß EN50248)
Eingangsimpedanz
50Ω
Max. Audiodatenrate 256 kBit/s MPEG Layer II, Schutzebene 3
Max. gespeicherte Dienste 128
UKW-Empfänger
Frequenz-Abstimmungsumfang 87,5–108MHz
Empndlichkeit (typisch) 2µV
Störabstand (bei 200 mV) 58dB
Verzerrung (Klirrfaktor bei 200 mV) 0,5%
MW-Empfänger (falls installiert)
Frequenz-Abstimmungsumfang 522–1611kHz
Störabstand (bei 200 mV) 40dB
Verzerrung (Klirrfaktor bei 30% Modulation) 1,5%
Allgemeines
Versorgungsspannung
100, 115 oder 230 V Wechselstrom,
landesabhängig
Leistungsaufnahme VA-Stand-by 3.2VA;
VA-Betrieb 50VA (typisch), 400VA (max.)
Abmessungen (BxTxH) B430mm x T350mm x H79mm
Nettogewicht 7,75 kg
Gewicht inkl. Verpackung 10,5 kg
Mitgeliefertes Zubehör
Netzkabel
Dipol-Drahtantenne (Band III)
Fernbedienung mit zwei AAA-Batterien
Bedienungsanleitung und Registrierungskarte
Störungen (Funkinterferenzen)
Solo ist ein Audiogerät, das Mikroprozessoren und andere digitale Elektronikbauteile enthält. Es
entspricht höchsten Anforderungen hinsichtlich der elektromagnetischen Verträglichkeit.
Sollte das Gerät Interferenzstörungen beim Radio- oder Fernsehempfang verursachen (was Sie durch Einund Ausschalten des Gerätes feststellen können), gehen Sie folgendermaßen vor:
< Richten Sie die Empfangsantenne des Empfängers neu aus, oder verlegen Sie das Antennenkabel
so weit entfernt wie möglich vom betroffenen Gerät und seiner Verkabelung.
< Stellen Sie den Empfänger an einer anderen Stelle auf.
< Schließen Sie den Empfänger an einer anderen Stromquelle als das betroffene Gerät an.
Wenn das Problem weiterhin besteht, wenden Sie sich an Ihren Arcam-Händler.
Solo iss4.id2 26/4/05, 8:12 pm13
Page 42

D14
Produkt-
garantie
Weltweite Garantie
Sie sind berechtigt, das Gerät während der ersten zwei Jahre nach Kaufdatum bei einem autorisierten
Arcam-Fachhändler kostenlos reparieren zu lassen, unter der Voraussetzung, dass es ursprünglich bei
einem Arcam-Händler erworben wurde. Der Hersteller übernimmt keine Verantwortung für Schäden,
die durch Unfall, Missbrauch, Verschleiß, Vernachlässigung oder unautorisierte Veränderungen bzw.
Reparaturen entstehen. Außerdem wird keinerlei Verantwortung für Schäden oder Verlust des Gerätes
während des Transports zum oder vom Garantienehmer übernommen.
Die Garantie umfasst Folgendes:
Teile- und Arbeitsstundenkosten bis zu zwei Jahre nach dem Kaufdatum. Nach Ablauf von zwei Jahren
müssen Sie die vollen Kosten für Ersatzteile und Arbeitsstunden tragen. Versandkosten werden nicht
übernommen.
Inanspruchnahme der Garantie
Das Gerät sollte in der Originalverpackung an den Händler zurückgegeben werden, bei dem es erworben
wurde. Ist dies nicht möglich, können Sie es auch direkt an den Arcam-Vertreter in Ihrem Land schicken.
Der Versand sollte frei Haus durch einen angesehenen Kurier erfolgen – nicht mit der Post. Da keine
Verantwortung für Schäden oder Verlust während des Transports zum Händler übernommen wird, sollten
Sie das Gerät entsprechend versichern.
Weitere Informationen erhalten Sie vom Arcam-Kundendienst:
Arcam Customer Support Department
Pembroke Avenue, Waterbeach, CAMBRIDGE, CB5 9QR, England.
oder www.arcam.co.uk.
Probleme?
Kann Ihr Arcam-Händler Fragen zu diesem oder einem anderen Arcam-Produkt nicht beantworten,
wenden Sie sich bitte an den Arcam-Kundendienst, und wir versuchen uns Möglichstes, Ihnen zu helfen.
Solo iss4.id2 26/4/05, 8:12 pm14
Page 43

N1
Nederlands
Handbook
Manuel
Handbuch
Handleiding
Manual
Solo iss4.id2 26/4/05, 8:18 pm1
Page 44

N2
Belangrijke
veiligheidsvoorschriften
Dit product is ontworpen en vervaardigd om
aan strenge kwaliteits- en veiligheidsnormen te
voldoen. Bij de installatie en bediening moet u
echter op de volgende voorzorgsmaatregelen
letten:
1. Neem waarschuwingen en aanwijzingen in acht
U dient alle veiligheidsvoorschriften en
gebruiksaanwijzingen te lezen alvorens dit
apparaat te gebruiken. Bewaar deze handleiding
ter referentie en houdt u aan alle waarschuwingen
in de handleiding of op het apparaat.
2. Water en vocht
De aanwezigheid van elektriciteit in de buurt van
water kan gevaarlijk zijn. Gebruik het apparaat niet
in de buurt van water – bijvoorbeeld naast een
bad, wastafel, gootsteen, in een vochtige kelder of
bij een zwembad.
3. Vreemde voorwerpen en vloeistoffen
Zorg dat er geen voorwerpen via openingen in
de behuizing naar binnen vallen en dat er geen
vloeistof in gemorst wordt. Met vloeistof gevulde
voorwerpen zoals vazen mogen niet op de
apparatuur gezet worden.
4. Ventilatie
Plaats de apparatuur niet op een bed, bank,
vloerkleed of ander zacht oppervlak, of in een
gesloten boekenkast of wandkast, aangezien dit
de ventilatie kan belemmeren. Het is raadzaam
een minimumafstand van 50 mm rondom en
boven het apparaat te bewaren om voldoende
ventilatie te geven.
5. Hitte
Zet het apparaat niet in de buurt van open vuur
of apparatuur die hitte uitstraalt, zoals radiatoren,
kachels of andere apparaten (inclusief andere
versterkers).
6. Klimaat
Het apparaat is ontwikkeld voor gebruik in
gematigde klimaten.
7. Rekken en stellingen
Gebruik alleen rekken en stellingen die aanbevolen
zijn voor gebruik met geluidsapparatuur. Als de
apparatuur op een draagbaar rek staat, dient het
heel voorzichtig verplaatst te worden zodat de
combinatie niet omvalt.
8. Reiniging
Ontkoppel de eenheid van het lichtnet voordat
reiniging plaatsvindt.
De kast hoeft normaal alleen met een zachte,
vochtige lintvrije doek afgeveegd te worden.
Gebruik geen verfverdunners of andere chemische
oplosmiddelen om de apparatuur te reinigen.
Wij raden het gebruik van meubelwas (vast of in
een spuitbus) af, aangezien deze onuitwisbare
witte plekken kan achterlaten als de eenheid
daarna met een vochtige doek afgenomen wordt.
9. Stroomvoorziening
Sluit het apparaat alleen op een stroomvoorziening
aan die in de gebruiksaanwijzingen of op het
apparaat vermeld wordt.
Dit is een klasse 1-apparaat dat geaard moet
worden.
De primaire methode om Solo van het lichtnet te
isoleren, is de schakelaar aan de achterkant van
Solo te gebruiken. Solo moet zo geïnstalleerd zijn
dat hij ontkoppeld kan worden.
10. Netsnoerbescherming
Netsnoeren dienen zo gerouteerd te worden dat
er niet overheen gelopen wordt, en ze niet in de
verdrukking komen door voorwerpen die erop of
ertegenaan gezet worden. Hierbij moet vooral
gelet worden op snoeren en stekkers, en hun
uitgangspunt op het apparaat.
11. Aarding
Zorg dat het aardingsmiddel van het apparaat niet
tenietgedaan wordt.
12. Hoogspanningskabels
Installeer buitenantennes weg van
hoogspanningskabels.
13. Wanneer niet in gebruik
Als de eenheid een standby-functie heeft, blijft
er in deze modus een kleine hoeveelheid stroom
naar de apparatuur gaan. Haal het netsnoer van
het apparaat uit het stopcontact als het apparaat
lange tijd niet gebruikt wordt.
14. Abnormale geur
Als het apparaat een abnormale geur of rook
afgeeft, zet het dan onmiddellijk uit en haal de
stekker van de eenheid uit de wandcontactdoos.
Neem onmiddellijk contact op met uw dealer.
15. Onderhoud
Voer zelf geen onderhoud aan het apparaat uit
buiten wat er in deze handleiding beschreven
wordt. U dient overig onderhoud aan deskundig
onderhoudspersoneel over te laten.
16. Schade die reparatie vereist
Het apparaat moet in de volgende gevallen
door bevoegd onderhoudspersoneel nagekeken
worden:
A. Het netsnoer of de stekker is beschadigd.
B. Er zijn voorwerpen in het apparaat gevallen
of er is vloeistof in gemorst.
C. Het apparaat werd aan regen blootgesteld.
D. Het apparaat lijkt niet normaal te
functioneren of het prestatievermogen is
aanzienlijk veranderd.
E. Het apparaat is gevallen of de kast is
beschadigd.
17. Luidsprekeraansluitingen
Eventuele luidsprekers dienen met een klasse
2-snoer op Solo aangesloten te worden (d.w.z.
ze mogen niet geaard worden). Wanneer u deze
voorzorgsmaatregel negeert, kan Solo beschadigd
raken.
Veiligheidsnaleving
Dit product is ontworpen om aan de IEC 60065standaard voor internationale elektrische veiligheid
te voldoen.
RISQUE DE CHOC ELECTRIQUE
NE PAS OUVRIR
ATTENTION
CAUTION
RISK OF ELECTRIC
SHOCK DO NOT OPEN
WAARSCHUWING: Verwijder de behuizing (of achterkant) niet, om het risico van een elektrische schok te vermijden. In het apparaat zitten
geen onderdelen die door de gebruiker onderhouden kunnen worden. Laat het onderhoud over aan bevoegd onderhoudspersoneel.
WAARSCHUWING: Stel dit apparaat niet bloot aan regen of vocht om het risico van brand of elektrische schok te vermijden.
De driehoek met de bliksemschicht is bedoeld om de gebruiker erop attent te maken dat er in de kast van het product een ongeïsoleerd
‘gevaarlijk voltage’ is dat krachtig genoeg is om personen een elektrische schok toe te brengen.
De driehoek met het uitroepteken is bedoeld om de gebruiker attent te maken op belangrijke gebruiksaanwijzingen en onderhoudsinstructies
in de documentatie bij dit product.
WAARSCHUWING: In Canada en de VS moet u ervoor zorgen dat de brede pen van de stekker in de brede opening van het
stopcontact gaat en dat de stekker goed in het stopcontact zit om het risico op een elektrische schok te vermijden.
veiligheids-
richtlijnen
Solo iss4.id2 26/4/05, 8:18 pm2
Page 45

N3
Nederlands
… en hartelijk dank voor uw aankoop van het Arcam Solo-muzieksysteem.
Arcam produceert al bijna 30 jaar hoogwaardige audiocomponenten. Door de
jaren heen hebben we een schat aan kennis opgebouwd over het ontwerp en de
constructie van audiocomponenten, zodat we de beste geluidsprestaties voor de
prijs kunnen leveren. Het ontwerp van Solo is een ontleding van deze kennis in een
gebruiksvriendelijk pakket dat bedoeld is voor jarenlang luistergenot, terwijl u het
apparaat binnen enkele minuten kunt bedienen.
Deze handleiding is bedoeld om u gedetailleerde informatie over het gebruik van
het Solo-muzieksysteem geven. Allereerst krijgt u advies over installatie, vervolgens
wordt beschreven hoe u het product gebruikt en tot slot vindt u er extra informatie
over de meer geavanceerde functies. Gebruik de inhoudsopgave rechts om de
gewenste sectie te vinden.
Wij hopen dat uw Solo-muzieksysteem u jarenlang probleemloos van dienst zal
zijn. Mocht het apparaat onverhoopt een fout vertonen, of wilt u gewoon verdere
informatie over Arcam-producten, dan staat ons netwerk van dealers klaar om u te
helpen. Ga naar de Arcam-website www.arcam.co.uk voor meer informatie.
Het Solo-ontwikkelingsteam
welkom…
veiligheids-richtlijnen .............................................N2
welkom….................................................................N3
aansluitingen maken ..............................................N4
muziekmaken ..........................................................N8
afstands-bediening...............................................N10
geavanceerde functies.......................................... N11
technische specicaties ........................................N13
product-garantie ...................................................N14
Veiligheid
De veiligheidsrichtlijnen staan op pagina 2 van
deze handleiding.
De meeste van deze voorschriften zijn normale
voorzorgsmaatregelen, maar voor uw eigen
veiligheid, en om beschadiging van de eenheid
te voorkomen, raden wij u aan ze door te lezen.
Dit product heeft een geaarde aansluiting
nodig.
Inhoud
Solo iss4.id2 26/4/05, 8:18 pm3
Page 46

N4
FMRS232
CD OUT
AV
IN
SERIAL NO.
GAME TVTAPE OUT TAPE INZONE 2 PRE OUT
GND
AM
230V
~
50 – 60HZ
400VA
MAX
PROGRAM
SPEAKER
OUTPUT
12V
REMOTE
IN
OUT
IN
L
R
R
L
TRIGGER
LOCAL
ZONE 2
Stroom
Solo wordt geleverd met een netstekker die al aan het snoer
bevestigd is. Controleer of de meegeleverde stekker in uw
contactdoos past – mocht u een nieuw netsnoer nodig hebben,
neem dan contact op met uw Arcam-dealer.
Duw het IEC-stekkeruiteinde van het stroomsnoer in het aansluitpunt
op de achterkant van Solo, en zorg ervoor dat de stekker er stevig
in zit. Steek de stekker aan het andere uiteinde van het snoer in het
stopcontact.
Solo heeft een stroomschakelaar aan de achterkant van het product,
naast het aansluitpunt voor het netsnoer. Zorg ervoor dat deze
ingeschakeld is om Solo te kunnen gebruiken.
Solo is voorzien van een transformator die ontworpen is
om de netspanning te kunnen accepteren van de regio waar
het product geleverd is. Als het voltage van uw lichtnet niet
aan deze speci catie voldoet (zoals op het achterpaneel
aangegeven), als u de eenheid naar een regio met een andere
netspanning wilt meenemen, of als de netstekker verkeerd is,
raadpleeg dan uw Arcam-dealer.
Dit product moet geaard zijn.
aansluitingen
maken
Radioantenne
In Europa en Canada is Solo meestal voorzien van een
gecombineerde FM/DAB-ontvangermodule (digitale radio); in
de VS en het Verre Oosten wordt er gewoonlijk een AM/FMontvangermodule meegeleverd. Teneinde een van deze modules te
kunnen gebruiken, dient u een antenne op de eenheid aan te sluiten;
er wordt een geschikte antenne als accessoire meegeleverd.
De FM/DAB-antenneconnector is een F-typeconnector (schroef).
De antenne moet op deze ingang aangesloten worden door de pen
in het gaatje in het midden van de connector te duwen, en daarna
de sleeve aan de buitenkant te schroeven. De AM-antenne dient
aangesloten te worden volgens de beschrijving op pagina 7.
Wilt u de meegeleverde T-vormige draadantenne gebruiken, dan
bevestigt u deze zo hoog mogelijk aan de muur met de elementen
in een verticale positie. Probeer elke bruikbare muur van de kamer
om te zien welke de beste ontvangst geeft. Gebruik punaises
of plakband om de antenne stevig aan de muur te hangen, maar
zorg ervoor dat de punaises niet in contact komen met de interne
bedrading van de antenne.
Voor optimale ontvangst is het raadzaam een (externe) antenne op
het dak te monteren (zie pagina 7).
Luidsprekers
Solo is ontworpen om één paar luidsprekers met een impedantie
tussen 4 en 8 ohm aan te sturen, en is voorzien van luidsprekeraansluitpunten waarop spades of blanke kabels aangesloten
kunnen worden.
U sluit de linkerluidspreker aan door de aansluitpunten met een ‘L’
op de achterkant van Solo los te schroeven, de luidsprekerbedrading
(of spade) erin te steken en de aansluitpunten weer vast te
schroeven. Zorg ervoor dat het rode (positieve/+) aansluitpunt van
de luidspreker op het rode aansluitpunt van Solo aangesloten is,
en het zwarte (negatieve/–) aansluitpunt van de luidspreker op het
zwarte aansluitpunt van Solo. Herhaal bovenstaande stappen om de
rechterluidspreker op de aansluitpunten met een ‘R’ aan te sluiten.
Het is belangrijk dat er geen losse draden van de kabels van deze
aansluitingen in aanraking komen met andere kabels of de behuizing
van het product, anders kan er een kortsluiting ontstaan en schade
veroorzaakt worden aan Solo.
De luidsprekeraansluitingen niet te vast aandraaien en geen
sleutel, tang enzovoort gebruiken, aangezien dit schade aan de
aansluitingen kan veroorzaken die niet door de garantie gedekt
wordt.
Zie pagina 6 voor tips over luidsprekerplaatsing.
Verbindingskabels
Het is raadzaam hoogwaardige afgeschermde
kabels te gebruiken, omdat kabels van inferieure
kwaliteit de algehele kwaliteit van uw systeem
aantasten. Gebruik alleen kabels die voor die
speci eke toepassing zijn ontworpen, aangezien
andere kabels andere impedantiekarakteristiek
en hebben, waardoor uw systeem slechter zal
presteren (gebruik bijvoorbeeld geen videokabels
om audiosignalen over te dragen). Alle kabels
dienen zo kort mogelijk te zijn.
Het is raadzaam om er bij het aansluiten van uw
apparatuur voor te zorgen dat de kabels voor
netvoeding en uw audiokabels zo ver mogelijk
uit elkaar liggen. Als u dit niet doet, kan dit
ongewenste ruis in de audiosignalen veroorzaken.
Algemene richtlijnen
De eenheid plaatsen
< Plaats Solo op een vlakke, stevige
ondergrond. Zet hem niet in direct zonlicht,
nabij een hittebron of op een vochtige plaats.
< Plaats de eenheid niet boven op een
eindversterker of andere hittebron.
< Zet Solo niet in een gesloten ruimte
(bijvoorbeeld een boeken- of wandkast) tenzij
er gezorgd is voor goede ventilatie. Solo
wordt tijdens normale werking warm.
< Plaats geen andere onderdelen of
voorwerpen op Solo, omdat dit de
luchtstroom rond de koelplaat kan blokkeren
waardoor de Solo oververhit kan raken. (De
eenheid die op Solo geplaatst is, zou in dat
geval ook heet worden.)
< Zorg ervoor dat de ontvanger voor de
afstandsbediening in het midden van het
display op het voorpaneel niet geblokkeerd
wordt, omdat dit de werking van de
afstandsbediening kan belemmeren.
Als plaatsing in het gezichtsveld niet
mogelijk is, kunt u een herhaler voor de
afstandsbediening gebruiken in combinatie
met de connector op het achterpaneel.
< Plaats uw platenspeler niet boven op
deze eenheid. Platenspelers zijn zeer
gevoelig voor de ruis die door netvoeding
gegenereerd wordt. Staat een platenspeler
te dichtbij, dan hoort u deze ruis als gebrom
op de achtergrond.
Solo iss4.id2 26/4/05, 8:18 pm4
Page 47

N5
Nederlands
RS232-bediening
Solo is voorzien van een seriële RS232-connector
waarmee afstandsbediening vanaf een pc of
gelijksoortig apparaat mogelijk is. Bij normaal
gebruik zal deze connector waarschijnlijk niet
gebruikt worden. Wilt u echter met deze afstandsbedieningsmethode experimenteren, dan gaat u
naar de Arcam-website voor volledige informatie
over het afstandsbedieningsprotocol.
Een koptelefoon gebruiken
Op het voorpaneel van
Solo ziet u een ingang
waarop u een koptelefoon
kunt aansluiten. Wilt u
een koptelefoon met
Solo gebruiken, dan
steekt u de koptelefoon
in de ingang links op het
voorpaneel. Wanneer
er een koptelefoon
wordt aangesloten,
wordt de uitvoer naar
de hoofdluidsprekers
en de voorversterker
automatisch gedempt
(Zone 2-uitvoer blijft actief).
Deze ingang is geschikt voor koptelefoons
met een impedantie tussen 8Ω en 2kΩ, die
met een 3,5mm-stereostekker uitgerust zijn.
De koptelefooningang is altijd actief, behalve
wanneer Solo gedempt is.
FMRS232
CD OUT
AV
IN
SERIAL NO
.
GAME TV
TAPE OUT TAPE INZONE 2 PRE OUT
GND
AM
L
R
Geluidsuitgangen
TAPE OUT: Deze uitgang wordt voor de volumeregeling genomen, d.w.z.
de bron waarnaar wordt geluisterd, wordt direct naar deze uitgang
geleid. U kunt deze uitgang desgewenst op een taperecorder aansluiten
(of een ander opnameapparaat). Sluit deze uitgang nooit op een
eindversterker aan.
Deze uitgang is gedempt wanneer de bron op tape is ingesteld om
feedback-lussen te voorkomen.
PRE OUT: Wilt u de geluidskwaliteit nog verder verbeteren of hebt u meer
nodig dan het 50W/kanaal dat Solo biedt, dan kunt u een externe
eindversterker of subwoofer aansluiten. Verbind deze aansluitingen
met de ingangen van uw subwoofer of eindversterker. Als u een
eindversterker gebruikt, sluit u vervolgens uw luidsprekers op de
luidsprekeruitgangen van de versterker aan.
Geluidsingangen
Solo biedt vier audio-ingangen en een tape lus, waardoor er andere
audiobronnen (gameconsoles, tv’s, dvd-spelers enzovoort) aangesloten
kunnen worden. Drie ingangen bevinden zich samen met de tapelus op
het achterpaneel, en één ingang zit op het voorpaneel van Solo. De labels
boven de ingangen geven aan waarvoor ze gebruikt kunnen worden, maar
de vier ingangen hebben allemaal dezelfde kenmerken (het zijn allemaal
lijnniveau-ingangen), en alle geschikte apparaten kunnen op alle ingangen
aangesloten worden. (De naam van de ingang die op het display aan de
voorkant wordt weergegeven, kan echter niet gewijzigd worden.)
Gebruik een stereo-phonokabel met een geschikte lengte om een apparaat
op een ingang op het achterpaneel van Solo aan te sluiten; voor een
aansluiting op het voorpaneel moet de kabel eindigen in een 3,5 mm
stekker. Sluit de audio-uitgang van het apparaat op een van de Soloingangen aan. Zorg er daarbij voor dat de stekkers er stevig inzitten. We
raden u aan waar mogelijk hoogwaardige verbindingskabels te gebruiken
voor een optimale geluidskwaliteit.
AV
IN
GAME TV
GND
AM
L
R
Tape lus
Een tape lus maakt het mogelijk een extern tapedeck
op Solo aan te sluiten.
TAPE OUT – Sluit deze uitgangen aan op de ingangen
van uw tapedeck (meestal aangeduid met
RECORD).
TAPE IN – Sluit de uitgangen van uw tapedeck (meestal
aangeduid met PLAY) op deze ingangen aan.
De TAPE OUT-uitvoer wordt gedempt wanneer ‘Tape’ als
muziekbron geselecteerd wordt.
Een platenspeler aansluiten
Solo heeft geen phonovoorversterker. Als u een platenspeler op Solo aan
wilt sluiten, hebt u een externe voorversterker nodig. Neem contact op
met uw leverancier voor meer informatie en aanbevelingen over de beste
oplossing voor u.
FMRS232
AV
IN
GAME TV
TAPE OUT TAPE INZONE 2 PRE OUT
GND
AM
L
R
ZONE 2 OUT: Dit is de uitgang die gebruikt moet worden voor een
tweekamersysteem. Deze uitgang moet op de versterker in de tweede
kamer aangesloten worden. Het niveau van de uitvoer wordt bepaald
door de volumeregeling voor de tweede kamer.
CD OUT: Hiermee wordt de digitale uitvoer van de CD- en DAB-delen (indien
aanwezig) van Solo overgedragen, en kunnen digitale opnames gemaakt
worden met behulp van compatibele opnameapparaten (zoals MiniDisc).
Wanneer er een CD wordt afgespeeld, draagt deze uitgang een signaal
met een samplefrequentie van 44,1 kHz over, bij DAB-radio is de
samplefrequentie van het signaal 48 kHz.
Deze aansluitingen dienen gebruikt te worden voor
installaties in meerdere kamers. Meestal hebt u
deze aansluitingen helemaal niet nodig. Als u er
echter wel gebruik van wilt maken, dient u het
document ‘Solo bediening vanop afstand’ van
onze web-site (www.arcam.co.uk) te downloaden.
Dit document geeft u advies over het gebruik van
deze verbindingen.
12V TRIGGER – Deze uitgang geeft een 12V-
signaal telkens wanneer de eenheid
aangezet wordt (d.w.z. niet uit of in standby). Dit signaal kan gebruikt worden om
eindversterkers (of andere compatibele
apparatuur) die op Solo zijn aangesloten,
automatisch aan te zetten, omdat ze
ingeschakeld zullen worden wanneer Solo
ingeschakeld wordt.
IN LOCAL – Hiermee kan Solo de signalen van
de afstandsbediening ontvangen, als de
afstandssensor bedekt is (of anderszins
‘onzichtbaar’ voor de afstandsbediening).
Er wordt een externe sensor gebruikt om
de signalen van de afstandsbediening op te
vangen, die vervolgens aan Solo (via deze
ingang) worden doorgegeven met behulp
van een geschikte kabel.
FMRS232
CD OUT
AV
IN
SERIAL NO
.
GAME TV
TAPE OUT TAPE INZONE 2 PRE OUT
GND
AM
PROGRAM
SPEAKER
OUTPUT
12V
REMOTE
IN
OUT
IN
L
R
R
L
TRIGGER
LOCAL
ZONE 2
IN ZONE 2 – Gebruik deze connector als u een
tweekamersysteem met een afstandssensor
gebruikt. De externe sensor wordt gebruikt
om de signalen van de afstandsbediening op
te vangen, die vervolgens aan Solo (via deze
ingang) worden doorgegeven met behulp
van een geschikte kabel.
OUT – Via deze uitgang worden alle signalen
overgedragen van de afstandsbedieningontvanger op het voorpaneel, plus
opdrachten die via de twee
bovengenoemde externe
sensoringangen (‘In Local’ en
‘In Zone 2’) worden ontvangen.
Zo kunnen opdrachten van de
afstandsbediening naar andere
apparatuur geleid worden
(mogelijk op andere lokaties).
Solo kan bijvoorbeeld dvdspeleropdrachten ontvangen
en deze naar een dvd-speler op
een externe lokatie leiden via
deze uitgangsconnector.
De 12V-trigger en ingangen/uitgangen voor afstandsbediening
Solo iss4.id2 26/4/05, 8:19 pm5
Page 48

N6
Luidsprekerinstallatie
Het volgende advies moet gezien worden als algemene
richtlijnen voor luidsprekerinstallatie. Raadpleeg de
documentatie bij uw luidsprekers voor gedetailleerdere
informatie over plaatsing en installatie.
Plaatsing
Over het algemeen dienen luidsprekers op onbuigzame staanders
geplaatst te worden op ongeveer 15–40 cm van de achtermuur en
ten minste 60 cm van zijmuren. Zet luidsprekers nooit op de grond
(tenzij het om vloermodellen gaat), of in hoeken.
Het uiteindelijke geluid is afhankelijk van de akoestiek in de
luisterruimte, en het is zeker de moeite waard te experimenteren
met de positie van de luidsprekers. We raden u aan als
Luisteren in een tweede kamer
Solo biedt twee onafhankelijke volumeregelingen,
waardoor u dezelfde uitvoer in twee verschillende
kamers van uw huis kunt beluisteren. U hebt hiervoor het
volgende nodig:
< een eindversterker (zoals de Arcam P80) en luidsprekers;
< geschikte verbindingskabels, zoals de hierboven beschreven kabels;
< een ontvanger voor de afstandsbediening (optioneel), verkrijgbaar bij uw Arcam-
dealer;
< een tweede Solo-afstandsbediening (optioneel), verkrijgbaar bij uw Arcam-
dealer.
Zo maakt u de verbindingen:
1. Zorg ervoor dat alle apparatuur uitgeschakeld is en ontkoppel de eenheid van het
lichtnet.
2. Sluit de Solo-uitgangen Zone 2 met behulp van de verbindingskabels op de
audio-ingangen van de eindversterker aan.
3. Sluit de luidsprekers op de luidsprekeruitgangen van de eindversterker aan. U
doet dit volgens de instructies in het paneel op pagina 4, ‘Luidsprekers’.
4. Sluit de afstandsontvanger uit de tweede kamer aan op de connector In Zone 2
op het achterpaneel van Solo.
5. Sluit de apparatuur opnieuw op het lichtnet aan en schakel de stroom in. U moet
nu de uitvoer van Solo via de eindversterker kunnen horen, en het volume met
De tweede kamer is altijd gedempt
wanneer Solo ingeschakeld wordt; deze
demping moet, indien vereist, ‘nadrukkelijk’
opgeheven worden. Dit is om onverwachte
uitvoer in deze ruimte te voorkomen.
uitgangspositie de luidsprekers 2–3 meter uit elkaar
te zetten met de achterkant 15 centimeter van de
achtermuur.
Luidsprekerstaanders
Hoe steviger een luidspreker op zijn plaats gehouden
wordt, hoe beter het geluid zal zijn. We raden u aan
onbuigzame metalen staanders met een hoogte van
40–60 cm te gebruiken. Met goed gedempte types die
niet ‘naklinken’ wanneer u er met een potlood tegenaan
tikt (vanwege hun constructie of omdat ze gevuld zijn
met droog zilverzand), zult u de beste prestaties van uw
luidsprekers verkrijgen. Zorg ervoor dat de staanders
en/of luidsprekers niet wankelen.
>60cm
15
–
40cm
40 – 60cm
2 – 3m
Solo iss4.id2 26/4/05, 8:20 pm6
Page 49

N7
Nederlands
VHF/FM
DAB
Radioantenne
Uw Solo biedt een uitstekende radio-ontvangst,
maar alleen als er een goed transmissiesignaal
ontvangen wordt.
Solo is ofwel met een DAB/FM of een AM/FM
ontvangermodule uitgerust, afhankelijk van
waar u het apparaat kocht. Ongeacht welke
radiomodule uw Solo heeft, dient er waar mogelijk
een dakantenne gebruikt te worden om de beste
ontvangst te verkrijgen.
Welk antennetype u moet gebruiken,
hangt af van uw luistervoorkeuren en de
plaatselijke omstandigheden. Luistert
u bijvoorbeeld uitsluitend naar FMuitzendingen, en is het FM-signaal sterk
in uw gebied, dan kan een eenvoudige
omnidirectionele antenne op zolder of op
het dak voldoende zijn. Wanneer u naar
DAB wilt luisteren in een gebied met een
zwak signaal, is een dakantenne met grote
versterking vereist.
Voor de beste ontvangst van zowel DAB- als
FM-signalen kan een antenne-combiner
vereist zijn (zie het tegenoverstaande
diagram). Hiermee worden de signalen
die van twee antennes ontvangen worden
(één voor DAB, één voor FM), in één kabel
gecombineerd die vervolgens op Solo moet
worden aangesloten. Als er geen antennecombiner gebruikt wordt, is het mogelijk
dat de ene antenne die voor zowel DABals FM-ontvangst gekozen is, in bepaalde
regio’s geen optimale ontvangst geeft.
Voor het beste advies raden we u aan
contact op te nemen met uw plaatselijke
Arcam-dealer of expert voor antenneinstallatie.
DAB
Als het transmissiesignaal in uw gebied sterk
is, hebt u waarschijnlijk alleen de meegeleverde
binnenantenne nodig (bevestig deze aan de muur
met beide draden volledig verticaal uitgestrekt). In
gebieden met een zwak signaal is het raadzaam
een externe antenne te gebruiken om het grootst
mogelijke aantal services te ontvangen.
DAB-transmissies kunnen in ‘Band III’ of ‘L-band’
(of beide) zijn. Teneinde de transmissiefrequentie
in uw gebied te bepalen, neemt u contact op met
uw dealer of raadpleegt u www.WorldDAB.org.
In gebieden waar op Band III uitgezonden wordt,
gebruikt u een Yagi-antenne met meerdere
elementen als u zich ver van de zender bevindt, of
een omnidirectionele of gevouwen dipoolantenne
als u zich dicht bij meerdere zenders bevindt (in
het UK, een Band III-regio, dienen de elementen
van de antenne verticaal bevestigd te worden,
omdat de uitzendingen verticaal gepolariseerd
zijn). Als de DAB-services in uw gebied op de Lband worden uitgezonden, raadpleegt u uw dealer
voor de beste antenne.
Of u nu besluit een externe antenne te installeren
of de meegeleverde lintkabel te gebruiken, hij
moet op de (schroef-)connector van het F-type,
gelabeld ‘FM’, op het achterpaneel van de eenheid
aangesloten worden.
FM/AM
U hebt een FM-antenne nodig om VHF-radiosignalen en een AM-antenne om AM-/middengolfradiosignalen te kunnen ontvangen.
FM-antenne
Hoewel er een FM-lintantenne als accessoire bij Solo wordt geleverd, is het raadzaam voor optimale
FM-radio-ontvangst een antenne op het dak of op zolder te monteren. In sommige gebieden is
er misschien kabelradio beschikbaar, of in een atgebouw kan er een centraal antennesysteem
geïnstalleerd zijn. In beide gevallen zouden er in uw woning aansluitpunten met de aanduidingen
FM of VHF moeten zijn (gebruik niet de aansluitpunten met de aanduiding TV), die op de FMconnector op het achterpaneel van Solo aangesloten dienen te worden.
Als u de meegeleverde FM-lintantenne wilt gebruiken, monteer deze dan zo hoog mogelijk aan
een muur met de T-elementen horizontaal. Probeer elke bruikbare muur in de kamer om te zien
waar u de beste ontvangst krijgt, en gebruik punaises of plakband om de antenne in een T-vorm te
bevestigen (de punaises mogen niet in contact komen met de interne bedrading van de antenne).
AM-antenne
Een AM-lusantenne wordt meegeleverd als accessoire bij Solo. Deze moet aan de AM-antenneingangen op het achterpaneel van Solo bevestigd worden, met het ene uiteinde aangesloten
op ‘AM’ en het andere op ‘Ground’ [Aarde]. Het maakt niet uit welk uiteinde op welke ingang
aangesloten wordt. Zorg ervoor dat de antenne zich zo ver mogelijk van Solo zelf, tv’s, computers
en andere bronnen van RF-ruis bevindt. Roteer de antenne om uit te vinden welke stand de beste
ontvangst geeft.
In gebieden met zwakke ontvangst of wanneer Solo binnen staalskeletconstructies (zoals een
atgebouw) gebruikt wordt, kunt u een 3- tot 5-meter lange kabel gebruiken om de ontvangst te
versterken. Monteer deze, indien mogelijk, hoog buiten het gebouw en sluit het ene uiteinde van
deze kabel aan op het AM-deel van de AM-antenne-ingang, naast de meegeleverde lusantenne
(ontkoppel de AM-lusantenne niet).
De AM-lusantenne monteren
Antenne-combiner
2. Duw de tab in de open sleuf in de basis
van de stander. Druk totdat de tab vastklikt.
3. Verbind de draden met het AMaansluitpunt op het achterpaneel van Solo.
Draai de stander van de antenne tot u de
beste ontvangst hebt.
1. Maak de kabelbinder los en wikkel de
getwiste draad af. Vouw de plastic stander
naar voren dóór het lusframe.
Solo iss4.id2 26/4/05, 8:20 pm7
Page 50

N8
muziek
maken
Naar een CD luisteren
Snel starten - een cd afspelen:
1. Druk op de </1-knop (laden) op het voorpaneel of op 1
van de afstandsbediening om de CD-lade te openen.
2. Plaats de CD in het midden van de lade, met de op de
CD gedrukte tekst naar boven. Druk op de knop 1 of 4
(afspelen) om de lade te sluiten.
3. Wacht totdat de schijf geladen is. Als u op ‘play’ hebt
gedrukt om de lade te sluiten, begint de schijf automatisch
af te spelen. Anders drukt u op 4/; (afstandsbediening: A) om de schijf af te spelen.
Bronselectie Afspeelmodus Huidig volume
Tracknummer, tekst, afspeeltijd, enzovoort
Indicator voor afspeelstatus
Belangrijke knoppen aan de
voorkant
Power
Druk op de aan/uit-knop
om Solo tussen ‘aan’ en
‘stand-by’ te schakelen.
Wanneer Solo in stand-by
staat, brandt het lampje
naast de Power-knop op
het voorpaneel rood, en
geeft het display van het
voorpaneel de huidige
tijd weer. Wanneer u op
POWER drukt terwijl de
eenheid in stand-by staat, gaat de eenheid aan en
zal het lampje blauw branden.
De hoofdstroomschakelaar van Solo bevindt
zich aan de achterkant van de eenheid. Brandt
het stroomlampje helemaal niet, lees dan de
instructies op pagina 4.
Volume en dempen
Gebruik deze knoppen om het volume te dempen,
verhogen of verlagen. Als u nogmaals op de
dempknop drukt of het volume wijzigt wanneer
Solo gedempt is, wordt de demping opgeheven.
Het huidige volume wordt in de rechterbovenhoek
van het display weergegeven.
Source –/+
Gebruikt voor het wijzigen van de geluidsbron.
Wilt u bijvoorbeeld naar FM-radio luisteren, dan
drukt u herhaaldelijk op SOURCE+ totdat ‘FM’ in
de linkerbovenhoek van het display weergegeven
wordt.
Deze knoppen worden ook gebruikt voor
navigatie door het Solo-menu. Zie de sectie
Productcon guratie (pagina 11) voor meer
informatie.
Tracks overslaan/scannen
Druk kort op de knoppen 0 en / op de
voorkant of de afstandsbediening om naar
de vorige of volgende track van een cd te
springen.
Wanneer u vooruitspringt, start het afspelen
vanaf het begin van de volgende track op de
schijf (indien aanwezig); springt u achteruit
en houdt u de knop 0 tijdens de eerste drie
seconden van een track ingedrukt, dan springt
u naar het begin van de vorige track (indien
aanwezig), drukt u later in de track op deze
knop dan wordt de track opnieuw vanaf het
begin afgespeeld. Vanaf de meeste posities
moet u daarom tweemaal op 0 drukken om
naar het begin van de vorige track te springen.
De knoppen 0 en / worden ook gebruikt om
te scannen. Wilt u binnen een track voor- of
achteruit scannen, dan houdt u de knop 0 of
/
ingedrukt. Pas wanneer u de knop weer
loslaat, wordt het scannen stopgezet.
Speciale afspeelmodi
Druk op MODE van de afstandsbediening om
tussen de modi repeat/shuf e [herhalen/
willekeurig] te schakelen voor het afspelen van
cd’s. De volgende opties zijn beschikbaar:
1. Repeat disc [Schijf herhalen]: De tracks
op de schijf worden op volgorde afgespeeld.
Aan het einde van de laatste track wordt het
afspelen weer vanaf de eerste track hervat.
2. Repeat track [Track herhalen]: De huidige
track wordt steeds opnieuw afgespeeld, totdat
dit geannuleerd wordt.
3. Shuf e [Willekeurig]: De tracks op de schijf
worden in willekeurige volgorde afgespeeld.
4. Repeat shuf e [Willekeurig herhalen]:
Deze optie combineert ‘repeat disc’ en
‘shuf e’. Telkens wanneer het afspelen
opnieuw wordt gestart, worden de tracks in
een andere volgorde afgespeeld.
Wilt u een van de shuf e/repeat-modi annuleren,
dan drukt u herhaaldelijk op MODE tot de
afspeelmodus uit het display verwijderd wordt.
De modi repeat/shuf e zijn niet beschikbaar
tijdens geprogrammeerd afspelen (hieronder
beschreven).
De afspeelvolgorde programmeren
De volgorde waarin tracks op een cd afgespeeld
worden, kan geprogrammeerd worden. U kunt
dit doen via het Solo-con guratiemenu, dat
op pagina 11 volledig beschreven wordt. Hier
worden beknopte instructies gegeven.
1. Druk op MENU om het con guratiemenu te
openen.
2. Druk op C (SOURCE– [Bron] op de
voorkant), totdat ‘Prog’ in de bovenste regel
van het display verschijnt.
3. Druk op OK om naar de programmeermodus
te gaan en gebruik vervolgens de knoppen
– en + (0 en / op voorkant) om de markering
te verplaatsen naar de volgende track die aan
de afspeellijst moet worden toegevoegd. Druk
op OK om de track toe te voegen. Herhaal
deze handeling tot alle gewenste tracks aan de
afspeellijst zijn toegevoegd.
4. Druk op MENU om de programmeermodus
af te sluiten. Druk nogmaals op MENU om het
con guratiemenu te sluiten.
Druk tweemaal op < van de afstandsbediening om
een programma te wissen of de schijf vrij te geven.
Weergavemodi
Solo heeft vier verschillende weergavemodi
voor het beluisteren van een cd. De modus
kan gewijzigd worden door op de knop INFO
aan de voorkant of op de afstandsbediening te
drukken.
1. Huidige trackduur: Dit is het ‘conventionele’
display voor een cd-speler en toont het
tracknummer met de tracktijd.
2. Resterende trackduur: Dit geeft het huidige
tracknummer weer met de resterende tracktijd.
3. CD text: In deze modus wordt, indien
beschikbaar, tekst van de schijf (cd-tekst)
weergegeven, zoals tracknaam of artiest. Is er
geen cd-tekst beschikbaar, dan is deze modus
hetzelfde als voor huidige trackduur.
4. Large-character display: In deze modus is
de weergave twee keer zo groot en worden
alleen het huidige tracknummer en het volume
weergegeven.
Overzicht van opdrachten voor het
afspelen van cd’s
4
(Afspelen) – druk op deze knop om het
afspelen van een CD te starten.
<
(Stoppen) – druk op deze knop om het
afspelen van een CD te stoppen.
;
(Pauzeren) – druk op deze knop om het
afspelen van een CD te pauzeren. Druk
nogmaals op deze knop (of druk op
‘afspelen’) om het afspelen te hervatten.
/
(Overslaan/Vooruit scannen) – druk op
deze knop om vooruit te springen naar het
begin van de volgende track. Houd de knop
ingedrukt om voorwaarts te scannen.
0
(Overslaan/Achteruit scannen) – druk op
deze knop om achteruit te springen naar het
begin van de huidige/vorige track. Houd de
knop ingedrukt om achterwaarts te scannen.
1
(Openen/sluiten) – druk hierop om de CD-
lade te openen; druk er nogmaals op om
hem te sluiten.
Directe toegang tot tracks
Via de numerieke toetsen op de afstandsbediening
kunt u direct toegang krijgen tot tracks op de
schijf.
Voor tracks 1–9 drukt u op het nummer van de
track die u wilt beluisteren. Wilt u een hoger
tracknummer dan 9 selecteren, dan houdt u het
eerste cijfer van de track ingedrukt (bijv. 1) tot
het linksonder in het display verschijnt (‘1–’).
Vervolgens drukt u op het tweede cijfer.
Solo iss4.id2 26/4/05, 8:20 pm8
Page 51

N9
Nederlands
Naar de radio overschakelen
Afhankelijk van de lokatie waarnaar Solo verscheept zal worden, heeft Solo een DAB/FM- of een AM/FMontvanger.
Solo voorziet:
< tot 30 vooraf ingestelde stations
< volledige RDS-informatie op FM (waar uitgezonden); programmagegevens op DAB
< meters voor FM signaalsterkte en DAB-gegevenssnelheid.
Naar de radio overschakelen
Druk op SOURCE+ of SOURCE– [Bron] tot het radiotype waarnaar u wilt luisteren (DAB/FM/AM), op de
voorkant weergegeven wordt. U kunt ook op de knop DAB/FM/AM van de afstandsbediening drukken voor
directe toegang.
Bronselectie Stationsnaam
Voorinstellingen programmeren
U kunt uw favoriete radiostation in een van de voorinstellingen opslaan,
zodat u het station voortaan direct kunt oproepen zonder opnieuw te moeten
afstemmen. Op de Solo kunnen 30 radiostations vooraf ingesteld worden, die
verdeeld worden tussen DAB, FM en AM (indien aanwezig).
Om een voorinstelling op te slaan, dient u eerst het radiostation dat u wenst
op te slaan af te stemmen. Om het station onder de voorinstellingen 1 tot 9 te
bewaren, dient u de overeenkomstige cijferknop op de afstandsbediening in
te drukken, tot het bericht ‘Preset Saved’ verschijnt.
De voorinstellingen 10–30 worden op een andere manier opgeroepen. Druk
op ‘menu’ om naar het Solo-conguratiemenu te gaan (volledig beschreven
op pagina 11). Navigeer vervolgens door het menu totdat ‘Store Preset’
[Voorinstelling opslaan] weergegeven wordt. Met behulp van de knoppen
– en + op de afstandsbediening (0 of / op de voorkant) kunt u nu het vooraf
ingestelde nummer selecteren dat u voor het station wilt gebruiken. Als een
voorinstelling al gebruikt wordt, verschijnt de naam of uitzendfrequentie van
het station dat erin bewaard wordt, op de onderste regel van het display; lege
voorinstellingen worden met ‘Empty’ [Leeg] aangeduid. Indien het gewenste
voorinstellings-nummer is bereikt, druk OK om de voorinstelling op te slaan.
Indien u een radiostation bewaart onder een voorinstelling die reeds in gebruik
is, wordt het oorspronklijke radiostation vervangen door het nieuwe station.
Uw voorinstellingen worden bewaard ookal is Solo uitgeschakeld.
Naar stations zoeken
Drukt u op de knop MODE wanneer de radio als
muziekbron geselecteerd is, dan kunt u tussen
de twee afstemmodi van Solo schakelen:
‘Preset’ [voorinstellingsmodus] of ‘Tune’
[afstemmmodus]. De geselecteerde modus
verschijnt dan even in het display.
Door de knoppen > of ? van de afstandsbediening in te drukken (0 of / op het
voorpaneel), wordt bij de voorinstellingsmodus
het vorige of volgende vooringestelde
station (indien deze zijn gedeneerd)
geselecteerd. N.B.: deze knoppen hebben, in
voorinstellings (preset) modus, geen effect
indien er geen voorinstellingen werden
gedeneerd.
Wanneer u daarentegen in de afstemmodus
op deze knoppen drukt, wordt de AM/FMafstemfrequentie gewijzigd of het volgende
DAB-radiostation in de lijst geselecteerd.
FM/AM
Om naar nieuwe stations te zoeken, dient Solo
in afstemmingsmodus ingesteld te zijn, zoals
hierboven werd beschreven.
< Handmatig afstemmen. Gebruik de
knoppen B of C (0 of / op het
voorpaneel) om de gewenste frequentie
te selecteren. Hiermee kunt u op een
specieke frequentie afstemmen. Dit
is ook nuttig als u een station probeert
te selecteren dat te zwak is voor
automatisch afstemmen.
< Automatisch afstemmen. Door
de knoppen B of C van de
afstandsbediening (0 of / op het
voorpaneel) langer dan één seconde
in te drukken, wordt de automatische
afstemming opgestart. Solo zoekt naar
een radiostationsignaal dat sterk genoeg
is, en stopt daar. Druk weer op een van
de knoppen om naar het volgende station
te gaan. Automatisch afstemmen is
beschikbaar voor zowel FM als AM.
DAB
Het afstemmen op stations is bij DAB anders
dan bij conventionele FM- of AM-afstemming,
omdat u de uitzendfrequentie van het station
niet hoeft te weten; Solo regelt dit voor u.
Selecteer DAB als de bron en druk dan op
de MENU-knop. Schakel door de menuopties
(zie pagina 11) tot ‘DAB Setup’ weergegeven
wordt. Deze menuopdracht biedt twee opties:
Scan [Scannen] en Erase settings [Instellingen
wissen]. Wanneer u ‘Scan’ selecteert, zoekt
Solo naar nieuwe DAB-stations. Als er stations
worden gevonden, worden ze automatisch aan
de lijst met beschikbare stations toegevoegd.
Druk nogmaals op MENU om het af te sluiten.
Om een DAB radiostation te selecteren,
druk de knoppen B of C van de
afstandsbediening, tot de naam van het
gewenste station wordt weergegeven. Na een
vertraging van zo’n twee seconden wordt er
automatisch op het station afgestemd.
Huidig volume
Uitzendgegevens of andere informatie
Voorinstellingsmodus indicator
Voorinstellingen selecteren
Solo moet in de voorinstelling (preset) modus zijn ingesteld, voor dat u de
voorinstellingen kan selecteren (zie hierboven).
Om de voorinstellingen te doorlopen, maakt u gebruik van de knoppen
B
of C van de afstands-bediening (0 of / op het voorpaneel). Anderzijds
kan u de voorinstellingen selecteren door gebruik te maken van de
numerieke knoppen op de afstandsbediening. Zie pagina 10 voor verdere
informatie met betrekking tot deze laaste methode.
Weergavemodi
Solo heeft verschillende weergavemodi voor het
luisteren naar de radio. De modus kan gewijzigd
worden door op de knop INFO aan de voorkant
of op de afstandsbediening te drukken.
1. Programmatype (DAB/FM): een korte
beschrijving van het type programma dat
uitgezonden wordt.
2. Uitzendfrequentie (FM/AM): de
stationsnaam (indien beschikbaar) en
uitzendfrequentie.
3. Dynamisch label (DAB)/ RDS (FM): 128
tekens tekst die door omroepen gebruikt
worden om programma-informatie (zoals
telefoonnummers en webadressen) te
verstrekken.
4. Gegevenssnelheid (DAB): In deze modus
worden de gegevenssnelheid van het station
(in kbits/s) en de uitzendmodus weergegeven.
Een hogere gegevenssnelheid duidt op een
betere geluidskwaliteit. De maximumsnelheid
is 256 kbits/s.
5. Signaalkwaliteit: een staafgraek die aangeeft
wat de kwaliteit van het ontvangen signaal is.
Solo iss4.id2 26/4/05, 8:20 pm9
Page 52

N10
Batterijen in de
afstandsbediening plaatsen
afstands-
bediening
Knoppen van de afstandsbediening
2
(Stroom) – Hiermee schakelt u Solo tussen stand-by en aan.
Track-/voorinstellingsselectie (0–9) – Druk het nummer in van de track of voorinstelling waarnaar
u wilt luisteren. U selecteert een track/voorinstelling na 9 door het eerste cijfer van de track (bijv. 1)
ingedrukt te houden tot het cijfer linksonder in het display weergegeven wordt (‘1–’). Vervolgens
drukt u het tweede cijfer in.
>
en
?
– U kunt deze knoppen gebruiken wanneer u naar de radio luistert om de afgestemde
frequentie of het vooraf ingestelde radiostation te wijzigen.
INFO – Hiermee verandert u de displaymodus voor CD of radio.
MODE – U kunt voor sommige bronnen de luistermodus wijzigen.
CD – Om de herhaal/shuf e modi voor weergave van de CD te doorlopen, drukt u de MODE knop.
DAB/FM/AM – Druk op MODE om tussen de modi ‘tune’ [afstemmen] en ‘preset’ [voorinstelling] te
schakelen. In afstemmodus wordt de afgestemde frequentie (FM/AM) of het geselecteerde station
(DAB) gewijzigd door > of ? te drukken. Bij voorinstellingsmodus wordt het vooringestelde station
gewijzigd.
DISP – Hiermee kunt u de helderheid van het display op het voorpaneel aanpassen. U kunt kiezen uit
verschillende helderheids-niveaus, inclusief het uitschakelen van het display.
Bronselectie – Druk op de toepasselijke knop om de gewenste audiobron te selecteren.
Cursortoetsen en OK – Wanneer u naar muziek luistert, werken de toetsen
B
en C op dezelfde
manier als de hierboven beschreven toetsen > en ?, en worden de toetsen – en + gebruikt om het
volume te wijzigen. Deze toetsen kunnen ook samen met de OK-knop gebruikt worden voor navigatie
door het Solo-con guratiemenu (beschreven op pagina’s 11 en 12).
Dempen – Druk eenmaal op deze knop om de luidspreker- en voorversterkeruitgangen van Solo te
dempen. Druk nogmaals op deze knop (of wijzig het volume) om het dempen op te heffen.
MENU – Druk op de MENU-knop om naar het con guratiemenu van Solo te gaan. Dit menu wordt op
pagina 11 en 12 uitgebreid beschreven. Druk nogmaals op de MENU-knop om het menu te verlaten.
Opdrachten voor afspelen CD
4
(Afspelen) – druk op deze knop om het afspelen van een CD te starten.
<
(Stoppen) – druk op deze knop om het afspelen van een CD te stoppen.
;
(Pauzeren) – druk op deze knop om het afspelen van een CD te pauzeren. Druk nogmaals op deze
knop (of druk op ‘afspelen’) om het afspelen te hervatten.
0
(Overslaan/Achteruit scannen) – druk op deze knop om achteruit te springen naar het begin van de
huidige/vorige track. Houd de knop ingedrukt om achterwaarts te scannen.
/
(Overslaan/Vooruit scannen) – druk op deze knop om vooruit te springen naar het begin van de
volgende track. Houd de knop ingedrukt om voorwaarts te scannen.
1
(Openen/sluiten) – druk hierop om de CD-lade te openen; druk er nogmaals op om hem te sluiten.
1. Open het batterijcompartiment door
het knopje op het achterpaneel van de
afstandsbediening in te drukken.
2. Plaats twee AAA-batterijen in het
batterijcompartiment volgens de
polariteitindicatie in het compartiment zelf.
3. Druk het batterijdeksel weer terug op zijn
plaats.
De afstandsbediening
gebruiken
Houd het volgende in gedachten wanneer u de
afstandsbediening gebruikt:
< Zorg ervoor dat er zich geen obstakels
bevinden tussen de afstandsbediening
en de afstandssensor van Solo. De
afstandsbediening heeft een bereik
van ongeveer zeven meter. (Als de
afstandssensor geblokkeerd wordt, kunt
u de ingang voor de afstandsbediening
op het achterpaneel gebruiken. Neem
contact op met uw leverancier voor meer
informatie.)
< De werking van de afstandsbediening
kan onbetrouwbaar worden als er fel
zonlicht of uorescerend licht op de
afstandssensor van Solo schijnt.
< Vervang de batterijen wanneer u
merkt dat het werkingsbereik van de
afstandsbediening kleiner is geworden.
Solo iss4.id2 26/4/05, 8:21 pm10
Page 53

N11
Nederlands
Productconguratie
Met Solo kunt u luisterinstellingen aan uw smaak en
verschillende functies aan uw systeem aanpassen. Het
onderstaande diagram geeft u een overzicht van de
beschikbare instellingen.
Luisterinstellingen regelen
Bij normaal gebruik toont het display informatie over het huidige
volume, de bron waarnaar u luistert en relevante broninformatie
(zoals de afspeeltijd op een CD). Druk op MENU op het
voorpaneel of op de afstandsbediening om de luisterinstellingen
aan te passen. Gebruik de knoppen zoals aangegeven om een
specieke instelling te selecteren en veranderen.
Balance [Balans]
Hiermee kunt u het volume van één kanaal (links of rechts) ten
opzichte van het andere kanaal verhogen. Meestal hoeft u deze
instelling niet aan te passen, maar als u doorgaans dichter bij
de ene dan bij de andere luidspreker zit, kunt u het stereobeeld
voor uw luisterpositie herstellen door de balans te veranderen.
Bass [Lage tonen]
Hiermee kunt u het relatieve volume van de lagere
frequentiecomponenten in uw muziek wijzigen. Als u
vindt dat uw muziek niet ‘warm’ genoeg klinkt, verhoogt u
deze instelling. Klinkt uw muziek ‘te hol’, dan kan het helpen deze instelling te verlagen. Zie ook ‘Bass
correction’ hieronder.
Treble [Hoge tonen]
Hiermee kunt u het relatieve volume van de hogere frequentiecomponenten in uw muziek wijzigen. Als u
bijvoorbeeld vindt dat er percussie-elementen in de muziek verloren gaan, kan het helpen deze instelling
te verhogen. Overheersen de hoge frequentiegeluiden, dan verlaagt u deze instelling.
N.B.: de controles voor hoge/lage tonen zijn non actief indien u een koptelefoon gebruikt.
Bass correction [Bascorrectie]
Deze instelling hoeft normaal niet gebruikt te worden (minimuminstelling handhaven).
Deze instelling wordt gebruikt als Solo op (kleine) luidsprekers met een beperkt frequentiebereik is
aangesloten, waarmee geluiden met een zeer lage frequentie niet gereproduceerd kunnen worden.
Wanneer deze instelling wordt verhoogd, worden geluiden met een zeer lage frequentie progressief
verzwakt (aangezien deze niet door de luidsprekers gereproduceerd kunnen worden), terwijl het volume
van geluiden met een iets hogere frequentie wordt versterkt. De algehele ‘hoeveelheid’ bas die door de
luidsprekers geproduceerd wordt, klinkt hetzelfde als bij een volledige frequentie (grote) luidspreker.
U kunt deze instelling echter gebruiken zonder uw systeem te beschadigen, zodat we u aanraden met
deze instelling, én de bas- en treble-instellingen, te experimenteren tot u de gewenste combinatie vindt.
Sleep timer
Met deze timer kunt u een luisterperiode speciceren, waarna Solo automatisch overgaat naar stand-by.
De periode kan met tussenpauzen van 5 minuten worden ingesteld, tot 120 minuten (2 uur).
CD programma
Indien u de afspeelvolgorde van uw CD wenst te
programmeren, druk dan OK als dit menu item wordt
weergegeven. De CD afspeelvolgorde wordt dan zoals in het
“CD programmering” paneel (zie rechts), ingevoerd. Indien u
klaar bent met het invoeren van het programma, druk dan MENU
om de “programma” modus te verlaten. Druk voor een tweede
keer op MENU om het Solo conguratiemenu af te sluiten.
FM Mode [FM-modus]
Deze menuopdracht verschijnt alleen wanneer de
geselecteerde bron FM is.
In sommige gebieden met een zwak signaal kan het helpen om
mono-uitvoer voor de FM-tuner af te dwingen, omdat mono een
veel lagere signaalsterkte nodig heeft om acceptabele resultaten te produceren. Als de signaalsterkte in uw
gebied goed is, behoudt u de instelling ‘stereo’.
geavanceerde
functies
Verklaring voor de gebruikte symbolen
op deze pagina’s:
Symbool: Knop op
voorpaneel:
Knop op
afstandsbediening
OK
Status ‘Ingeschakeld’
Alleen als
bron FM is
Alleen als
bron DAB is
–Voorinstelling
Instellingen wissen
+Voorinstelling
Scannen naar beschikbare stations
Voorinstelling bevestigen
Alleen als bron DAB,
FM of AM is
Links
Rechts
–dB +dB
–dB +dB
–dB +dB
OK
OK
OK
Alleen als
bron CD is
OK
Voreinstellung bestätigen
–Voorinstelling +Voorinstelling
+–
CD programmering:
34
Markeer de track die u aan het
programma wenst toe te voegen
OK
Voeg de track aan het
programma toe
CLR
Verwijder de laatste programma
toevoeging
STOP
Druk twee maal op de STOP-
knop van de afstandsbediening
om het volledige programma
te wissen.
Solo iss4.id2 26/4/05, 8:21 pm11
Page 54

N12
De klok en wekker instellen
Druk op MENU wanneer Solo in stand-by staat om de klok of wekkers in te stellen.
Selecteer de optie die u wilt wijzigen met de knoppen links/rechts op de afstandsbediening, en wijzig
vervolgens de waarde met de knoppen omhoog/omlaag. Hebt u bijvoorbeeld het instellingenmenu voor
klok/wekker opgeroepen via MENU, dan kunt u met de knoppen omhoog/omlaag tussen het instellen van
de klok en een van de wekkers schakelen.
Met Solo kunt u tot vier verschillende wekkers instellen.
Een alarm stoppen of pauzeren
Om een alarm te stoppen, druk op de POWER-knop op het voorpaneel of op de afstandsbediening.
Anderzijds kan u ook op OK drukken om de ‘snooze’-modus te activeren; het alarm zal na 10-minuten
opnieuw afgaan. Om de snooze-modus te annuleren, drukt u de POWER-knop.
DAB Setup
Deze menuopdracht verschijnt alleen wanneer de geselecteerde bron DAB is.
Deze menuopdracht biedt twee opties: Scan [Scannen] en Erase settings [Instellingen wissen]. Wanneer
u ‘Scan’ selecteert, zoekt Solo naar nieuwe DAB-stations. Als er stations worden gevonden, worden ze
automatisch aan de lijst met beschikbare stations toegevoegd.
Oude stations waarop niet langer wordt uitgezonden, worden niet gewist wanneer u naar nieuwe
stations scant. Na verloop van tijd, of als u van lokatie verandert, kan dit betekenen dat er een aantal
stations in uw lijst staan, die niet meer ontvangen kunnen worden. Selecteer in dit geval ‘Erase settings’
en voer een nieuwe scan uit. Wanneer deze scan voltooid is, bevat uw lijst alleen stations die momenteel
in uw gebied beschikbaar zijn.
Set Preset [Voorinstelling congureren]
Deze menuopdracht verschijnt alleen wanneer de geselecteerde bron DAB, FM of AM is. Zie de sectie
‘Programmeren van voorinstellingen’ op pagina 7 voor meer informatie.
Aanpassen Zone 2 volume
Druk (op het voorpaneel) de MENU-knop in, en hou deze ingedrukt tot ‘Z2 Vol’ wordt weergegeven.
Gebruik dan de volume controle om het Zone 2 volume te verlagen/verhogen. Druk opnieuw op MENU om
het proces te beëindigen.
Solo iss4.id2 26/4/05, 8:21 pm12
Page 55

N13
Nederlands
technische
specicaties
Voorversterker
Ingangen
Maximum ingangsniveau 2.5Vrms
Ingangsimpedantie
47kΩ
Signaal-/ruisverhouding 105dB
Coaxiale uitgangen
Maximumuitgangsniveau 2,5Vrms
Uitgangsimpedantie
500Ω
Optische uitgang (TOSLINK)
Samplefrequentie
44,1k Hz (bij afspelen CD),
48 kHz (met DAB-ontvanger),
anders gedempt.
Versterker
Constante stroomafgifte per kanaal, 80kHz metings bandbreedte
Beide kanalen, 4Ω, 1kHz
75Wrms, 0,013% THD+ruisverhouding
Vervorming, 4Ω, beidekanalen, 80% vermogen,
1kHz
0,011% THD+ruisverhouding
Afspelen CD
DAC Wolfson 24-bits multiniveau Delta-Sigma DAC
Frequentiebereik (±0.5dB) 20Hz–20kHz
DAB-ontvanger (waar aangebracht)
DAC AKM 96 kHz 24-bits Delta-Sigma DAC
RF-afstembereik 174–240MHz (Band III)
1452–1490MHz (L-band)
Gevoeligheid (typisch) –98dBm (VHF meting tot EN50248)
Ingangsimpedantie
50Ω
Gegevenssnelheid van audio (maximum) 256 kbits/s MPEG layer II, beveiligingsniveau 3
Aantal opgeslagen services (maximum) 128
FM-ontvanger
RF-afstembereik 87,5–108MHz
Gevoeligheid (typisch) 2µV
Signaal/ruisverhouding (bij 200 mV) 58dB
Vervorming (THD bij 200mV) 0,5%
AM-ontvanger (waar aangebracht)
RF-afstembereik 522–1611kHz
Signaal/ruisverhouding (bij 200 mV) 40dB
Vervorming (THD bij 30% modulatie) 1,5%
Algemeen
Toevoerspanning
100 V, 115 V of 230 V AC,
afhankelijk van leveringsgebied
Stroomverbruik stand-by 3.2VA;
operationeel 50VA (typisch), 400VA (maximum)
Afmetingen (BxDxH) B430mm x D350mm x H79mm
Gewicht (netto) 7,75kg
Gewicht (verpakt) 10,5kg
Meegeleverde accessoires
Netsnoer
Dipool draadantenne (Band III)
Afstandsbediening en twee AAA-batterijen
Handleiding en registratiekaart
Radiostoring
Solo is een geluidsapparaat dat microprocessors en andere digitale elektronica bevat. Het is volgens zeer
hoge standaarden van elektromagnetische compatibiliteit ontworpen.
Als Solo de ontvangst van radio of televisie stoort, wat kan worden vastgesteld door Solo aan en uit te
zetten, dient u de volgende maatregelen te nemen:
< Oriënteer de ontvangende antenne opnieuw of leid de antennekabel van de ontvanger in kwestie zo
ver mogelijk van Solo en zijn bekabeling weg.
< Verplaats de ontvanger ten opzichte van Solo.
< Sluit de ontvanger en Solo op verschillende stopcontacten aan.
Als het probleem hiermee niet verholpen wordt, neemt u contact op met uw Arcam-dealer.
Solo iss4.id2 26/4/05, 8:22 pm13
Page 56

N14
product-
garantie
Universele garantie
Deze garantie geeft u het recht om de eenheid gratis te laten repareren, tijdens de eerste twee jaar
na aankoop, bij elke erkende Arcam-distributeur, mits de eenheid oorspronkelijk bij een geautoriseerde
Arcam-dealer of -distributeur aangekocht werd. De fabrikant kan geen verantwoordelijkheid aanvaarden
voor fouten die ontstaan door ongelukken, verkeerd gebruik, misbruik, slijtage, onachtzaamheid of door
ongeoorloofde aanpassingen en/of reparaties, en kan ook geen verantwoordelijkheid aanvaarden voor
schade of verlies, ontstaan tijdens vervoer van of naar de persoon die onder de garantie claimt.
De garantie dekt:
Onderdelen en arbeidsloon voor twee jaar vanaf de datum van aankoop. Na twee jaar moet u zowel voor
onderdelen als arbeidsloon betalen. In geen enkel geval worden transportkosten door de garantie
gedekt.
Claims onder garantie
Deze apparatuur dient in de oorspronkelijke verpakking terugbezorgt te worden aan de dealer bij wie ze
aangekocht werd, of anders rechtstreeks aan de Arcam-distributeur in het land waar u woont.
De eenheid dient, vracht betaald, via een gerenommeerde expediteur verstuurd te worden – niet per
post. Tijdens vervoer naar de dealer of distributeur kan er geen verantwoordelijkheid voor de eenheid
aanvaard worden, en klanten wordt daarom aangeraden de eenheid tegen verlies of schade tijdens
vervoer te verzekeren.
Voor meer informatie kunt u contact opnemen met Arcam:
Arcam Customer Support Department,
Pembroke Avenue, Waterbeach, CAMBRIDGE, CB5 9QR, Engeland.
of www.arcam.co.uk.
Problemen?
Als uw Arcam-dealer uw vragen betreffende dit of een ander Arcam-product niet kan beantwoorden,
neemt u contact op met de Arcam-klantendienst op het bovenstaande adres, en wij zullen ons best doen
om u te helpen.
Solo iss4.id2 26/4/05, 8:22 pm14
Page 57

P1
Português
Handbook
Manuel
Handbuch
Handleiding
Manual
Solo iss4.id2 26/4/05, 8:22 pm1
Page 58

P2
Instruções importantes de
segurança
Este produto foi concebido e produzido em
conformidade com rigorosos padrões de
qualidade e segurança. No entanto, deverá tomar
em consideração as seguintes indicações e
precauções de instalação e funcionamento.
1. Respeite todos os avisos e instruções
Deverá ler todas as indicações de segurança
e funcionamento antes de ligar o dispositivo.
Guarde este manual para referência futura e
respeite todos os avisos contidos no manual ou no
dispositivo.
2. Água e humidade
A presença de electricidade perto de água pode
ser perigosa. Não utilize esta unidade em locais
próximos de fontes de água – por exemplo,
perto de uma banheira, de um lavatório ou de
um lava-loiça, de uma piscina ou noutros locais
semelhantes.
3. Entrada de objectos ou líquidos
Certique-se de que não entram quaisquer
objectos ou líquidos para o interior da unidade
através das aberturas de ventilação. Objectos
com líquidos, tais como vasos, não devem ser
colocados sobre o dispositivo.
4. Ventilação
Não instale a unidade sobre uma cama, sofá,
tapete ou outra superfície semelhante ou numa
estante ou armário, dado que poderá impedir a sua
ventilação. Recomendamos uma distância mínima
de 50mm à volta e por cima do dispositivo, de
forma a assegurar a ventilação adequada.
5. Exposição ao calor
Não utilize este dispositivo em locais próximos de
fontes de calor, tais como chama nua, radiadores,
fogões ou outros aparelhos (incluindo outros
amplicadores) que produzam calor.
6. Ambiente de funcionamento
O dispositivo foi concebido para utilização em
climas temperados.
7. Racks e suportes
Utilize apenas racks ou suportes recomendados
para utilização de equipamento áudio. Se o
dispositivo tiver sido instalado num suporte ou
num móvel de transporte, deverá ser deslocado
com o máximo cuidado, para evitar a sua queda.
8. Limpeza
Desligue a cha do dispositivo antes de proceder
à sua limpeza.
O dispositivo normalmente apenas necessita de
limpeza com um pano macio, que liberte pelo,
humedecido com água. Não utilize diluentes ou
outros solventes químicos para a sua limpeza.
Não aconselhamos a utilização de pulverizadores
de limpeza ou lustro de móveis, dado que
podem causar marcas brancas permanentes se o
dispositivo for subsequentemente limpo com um
pano humedecido.
9. Fontes de Alimentação
Ligue o dispositivo apenas a uma fonte de
alimentação do tipo descrito no Manual ou
conforme indicado no dispositivo.
Este é um dispositivo de Classe 1 e tem que estar
ligado à terra.
O método principal de isolamento do Solo da rede
eléctrica é através do interruptor no painel traseiro
do Solo. O Solo tem que ser instalado de forma a
que seja possa ser desligado.
10. Protecção do cabo de alimentação
Os cabos de alimentação deverão ser
posicionados de forma a que não sejam pisados
ou entalados, devendo ser prestada particular
atenção ao local em onde são ligados ao
dispositivo.
11. Ligação à terra
Assegure-se que a ligação do dispositivo à terra
não é adulterada.
12. Rede de alta tensão
Posicione qualquer antena exterior afastada de
linhas de alta tensão.
13. Quando não está a ser utilizado
Se o dispositivo incorporar uma função de
stand-by (espera), existe sempre uma pequena
quantidade de energia que continua a ser
fornecida ao equipamento neste modo. Desligue
o cabo de alimentação do dispositivo da tomada
se o dispositivo não for utilizado durante um longo
período de tempo.
14. Cheiro anormal
Se for detectado um cheiro anormal ou
fumo provenientes do dispositivo, desligue
imediatamente o dispositivo e retire a cha
do cabo de alimentação da tomada. Contacte
imediatamente o seu retalhista.
15. Assistência técnica
Não deverá efectuar quaisquer intervenções no
dispositivo além das descritas neste Manual.
Todas as outras intervenções de assistência
técnica deverão ser efectuadas por técnicos
qualicados.
16. Danos que exijam assistência técnica
Deverá dirigir-se a um técnico de assistência
qualicado para que este possa reparar a unidade
quando ocorrer alguma das seguintes situações:
A. o cabo ou cha de alimentação AC tiver sido
danicado, ou
B. caso tenha deixado cair objectos para dentro
do dispositivo ou tenha entornado líquidos
sobre o mesmo, ou
C. caso o dispositivo tenha sido exposto a
chuva, ou
D. caso o dispositivo aparente não funcionar
normalmente ou apresente uma alteração
signicativa no seu desempenho, ou
E. caso o dispositivo tenha caído ao chão ou a
caixa exterior tenha sido danicada.
17. Ligações dos altifalantes
Os altifalantes têm que ser ligados ao Solo através
de cabo de Classe 2 (i.e., não deve ser efectuada
nenhuma ligação à terra). A não observância desta
precaução poderá resultar em danos ao Solo.
Norma de segurança
Este produto foi concebido em conformidade com
as normas internacionais de segurança eléctrica
IEC 60065.
RISQUE DE CHOC ELECTRIQUE
NE PAS OUVRIR
ATTENTION
CAUTION
RISK OF ELECTRIC
SHOCK DO NOT OPEN
CAVISO: Para reduzir o risco de choque eléctrico, não retire as coberturas. Não existem no interior da unidade quaisquer componentes
que possam ser reparados pelo utilizador. O serviço de manutenção (assistência) deverá ser efectuado por pessoal qualificado.
AVISO – Para reduzir o risco de incêndio ou choque eléctrico, não exponha o dispositivo à chuva ou à humidade.
O símbolo do relâmpago com extremidade em forma de seta, dentro de um triângulo equilátero, tem por função alertar o utilizador
relativamente à existência de “voltagem perigosa” sem isolamento no interior da caixa de protecção do produto, que poderá ter uma
potência suficiente para constituir um risco de choque eléctrico para as pessoas.
O ponto de exclamação dentro de um triângulo equilátero tem por função alertar o utilizador relativamente à existência de instruções de
funcionamento e manutenção (assistência) importantes, constantes da literatura que é fornecida juntamente com o dispositivo.
AVISO: No Canadá e Estados Unidos, para evitar choques eléctricos, a insira a ficha correctamente na tomada..
instruções de
segurança
Solo iss4.id2 26/4/05, 8:22 pm2
Page 59

P3
Português
… e obrigado por ter escolhido o sistema áudio Arcam Solo.
A Arcam produz componentes áudio de elevada qualidade há quase trinta
anos. Durante esse período de tempo acumulámos uma grande quantidade de
conhecimentos de concepção e construção de componentes áudio, de forma
a proporcionar o melhor desempenho sonoro na sua gama. O design do Solo
representa a conjugação destes conhecimentos num dispositivo de fácil utilização,
que se destina a proporcionar anos de prazer áudio, tendo apenas que investir
alguns minutos a conhecer o seu modo de funcionamento.
Este Manual tem como objectivo proporcionar um guia detalhado da utilização
do sistema Solo. Começa por aconselhar quanto à sua instalação descrevendo,
de seguida, a sua forma de utilização e termina com informação complementar
sobre as características mais avançadas. Utilize o índice (à direita) para consultar as
secções que desejar.
Esperamos que o seu sistema áudio Solo lhe proporcione anos de funcionamento
ininterrupto. No caso improvável de uma avaria, ou se simplesmente desejar mais
informação sobre os produtos Arcam, a nossa rede de retalhista encontra-se à sua
inteira disposição. Poderá encontrar informação complementar no site da Arcam,
www.arcam.co.uk.
Equipa de desenvolvimento do Solo
bem vindo…
Segurança
As indicações de segurança são descriminadas
na página 2 deste Manual.
Muitas destas indicações são precauções
comuns mas, para sua própria segurança e
para se assegurar que não provocará danos ao
dispositivo, recomendamos a sua leitura.
Este produto necessita de uma ligação à terra.
Conteúdo
instruções de segurança ........................................ P2
bem vindo…............................................................ P3
instruções de instalação......................................... P4
música...................................................................... P8
controlo remoto.................................................... P10
características avançadas......................................P11
especicações técnicas ........................................ P13
garantia.................................................................. P14
Solo iss4.id2 26/4/05, 8:22 pm3
Page 60

P4
Cabos de ligação
Recomendamos a utilização de cabos blindados de
elevada qualidade, dado que a utilização de cabos
de qualidade inferior provoca uma deterioração na
qualidade global do seu sistema. Utilize apenas
cabos concebidos para o m especí co a que
se destinam, dado que outros tipos de cabos
dispõem de características de diferentes de
impedância que irão provocar a deterioração do
desempenho do seu sistema (por exemplo, não
utilize cabo de vídeo para o transporte de sinais de
áudio). Todos os cabos devem ser mantidos tão
curto quanto possível.
Quando ligar o seu equipamento, constitui boa
prática assegurar que o cabo de alimentação CA
é colocado tão longe quanto possível dos cabos
de áudio. Caso contrário, poderá resultar em ruído
não desejado nos sinais de áudio.
instruções de
instalação
Indicações gerais
Posicionamento do dispositivo
< Coloque o Solo numa superfície plana e
estável, evitando a luz solar directa e fontes
de calor ou humidade.
< Não coloque o Solo em cima de um
ampli cador áudio ou sobre outra fonte de
calor.
< Não coloque o Solo num local fechado como,
por exemplo, uma estante ou um armário
fechado, quando não seja possível assegurar
a ventilação adequada. O Solo foi concebido
para aquecer durante o seu funcionamento
normal.
< Não coloque qualquer outro componente ou
objecto em cima do Solo, dado que estes
poderão obstruir o uxo ar do dissipador de
calor, provocando o sobreaquecimento do
Solo. (O objecto ou dispositivo posicionado
em cima do Solo também sobreaquecerá.)
< Certi que-se que o receptor do controlo
remoto, localizado no centro do painel
frontal, se encontra desobstruído, de outra
forma poderá prejudicar o funcionamento
do controlo remoto. Se não for prática uma
linha de visão desobstruída do receptor
do controlo remoto, pode ser utilizado um
repetidor de controlo remoto através da
ligação no painel traseiro (ver abaixo).
< Não coloque o leitor de cassetes em cima
deste dispositivo. Os leitores/gravadores
de cassetes são muito sensíveis ao ruído
produzido pelas fontes de alimentação,
provocando um ‘zumbido’ de fundo se o
leitor/gravador de cassetes for colocado
demasiado perto.
FMRS232
CD OUT
AV
IN
SERIAL NO.
GAME TVTAPE OUT TAPE INZONE 2 PRE OUT
GND
AM
230V
~
50 – 60HZ
400VA
MAX
PROGRAM
SPEAKER
OUTPUT
12V
REMOTE
IN
OUT
IN
L
R
R
L
TRIGGER
LOCAL
ZONE 2
Power (Alimentação)
O Solo é fornecido com uma cha instalada no cabo de alimentação.
Certi que-se que a cha fornecida é a apropriada para as tomadas
que dispõe – caso necessite de um novo cabo de alimentação
contacte o seu retalhista Arcam.
Coloque a cha IEC (tipo computador) do cabo de alimentação na
tomada localizada no painel traseiro do Solo, assegurando-se que se
encontra rmemente encaixada. Encaixe a cha do outro extremo do
cabo na tomada de alimentação e, se necessário, ligue a tomada.
O Solo encontra-se equipado com um interruptor no painel traseiro,
junto à tomada . Para utilizar o Solo, assegure-se que este interruptor
está ligado.
O Solo encontra-se equipado com um transformador concebido
para a tensão de alimentação da rede na região em que o
dispositivo será utilizado. Se a tensão de alimentação da rede
eléctrica não corresponder a esta especi cação (apresentada
no painel traseiro), se desejar utilizar o dispositivo numa região
com uma tensão de rede diferente ou se a cha de alimentação
fornecida for incorrecta, por favor contacte o seu retalhista
Arcam.
Este produto tem que ser ligado à terra.
Antena de rádio
Na Europa e Canadá o Solo é normalmente equipado com um
módulo combinado de recepção FM/DAB (rádio digital); nos EUA
e Extremo Oriente é normalmente equipado com um módulo de
recepção AM/FM. Para poder utilizar qualquer um destes módulos,
terá que ligar uma antena ao dispositivo – é fornecida como
acessório uma antena apropriada.
O terminal de ligação da antena FM/DAB é um terminal tipo F
(parafuso). A antena deverá ser ligada a esta entrada, colocando a
patilha dentro do orifício da cha e aparafusando o revestimento ao
seu exterior. A antena de AM deverá ser ligada conforme descrito na
página 7.
Se utilizar a antena em ‘T’ fornecida com o Solo, posicione-a tão alto
quanto possível numa parede, com os elementos na vertical. Se
possível, experimente a aplicação em paredes diferentes, de forma a
determinar qual proporciona a melhor qualidade de recepção. Utilize
pionés ou ta adesiva para xar a antena à parede, mas assegure-se
que os pionés não entram em contacto com o condutor interno da
antena.
Para uma recepção óptima, recomenda-se a utilização de uma
antena (ver página 7).
Altifalantes
Solo foi concebido para accionar dois altifalantes de 4 a 8 ohms e
encontra-se equipado para terminais tipo forquilha ou condutores
descarnados.
Para ligar o altifalante esquerdo, desaperte o casquilho de aperto do
painel traseiro do Solo identi cado com a letra L, insira o condutor
descarnado (ou terminal) do altifalante e volte a apertar o casquilho.
Assegure-se que o terminal vermelho (positivo/+) do altifalante se
encontra ligado ao terminal vermelho do Solo e que o terminal preto
(negativo/–) do altifalante se encontra ligado ao terminal preto do
Solo. Repita os passos descritos acima para efectuar a ligação do
altifalante direito aos terminais identi cados com a letra R.
É de extrema importância certi car-se que não existem os
condutores soltos nestes terminais, que possam entrar em contacto
com um terminal adjacente ou com o chassis do dispositivo. A não
observância desta indicação poderá resultar num curto-circuito e em
danos ao Solo.
Não aperte excessivamente os terminais dos altifalantes, nem
utilize uma chave, alicate, etc., dado que estes poderão causar
danos nos terminais, que não serão cobertos pela garantia.
Consulte a página 6 para indicações sobre o posicionamento dos
altifalantes.
Solo iss4.id2 26/4/05, 8:22 pm4
Page 61

P5
Português
FMRS232
AV
IN
GAME TV
TAPE OUT TAPE INZONE 2 PRE OUT
GND
AM
L
R
Controlo RS232
O Solo encontra-se equipado com uma ligação
série RS232 que permite o controlo remoto a partir
de uma PC ou de um dispositivo semelhante.
Em utilização normal é pouco provável que esta
ligação seja utilizada. No entanto, se desejar
utilizar este método de controlo remoto, poderá
encontrar informação detalhada sobre o protocolo
de controlo remoto no site da Arcam.
Audição com auscultadores
O painel frontal do Solo
dispõe de uma cha
que permite a ligação
de auscultadores. Para
utilizar os auscultadores
com o Solo, ligue os
auscultadores à cha
do lado esquerdo do
painel frontal. Quando
os auscultadores se
encontram ligados à cha
dos auscultadores, a saída
principal dos altifalantes e
a saída do pré-ampli cador
são automaticamente
silenciadas (a saída para a Zona 2 permanece
activa).
Esta cha aceita auscultadores com uma
impedância entre 8Ω e 2kΩ, equipados com
uma cha de estéreo de 3,5mm. A cha dos
auscultadores está permanentemente activa,
excepto quando o Solo é silenciado (mute).
FMRS232
CD OUT
AV
IN
SERIAL NO
.
GAME TV
TAPE OUT TAPE INZONE 2 PRE OUT
GND
AM
L
R
Saídas áudio
TAPE OUT (saída): Esta saída é proporcionada antes do controlo de volume,
i.e., a fonte em audição é direccionada directamente para esta saída.
Se desejar, esta saída poderá ser ligada a um gravador de cassetes (ou
outro dispositivo de gravação). Esta saída não deverá ser ligada a
um ampli cador de potência sob nenhuma circunstância. Atenção:
a saída Tape Out é silenciada quando Tape (leitor de cassetes) for
seleccionado como fonte de sinal, para evitar a realimentação do sinal.
PRE OUT (saídas áudio do pré-ampli cador): Para melhorar adicionalmente
a qualidade do som ou, se necessitar de mais que os 50W por canal
disponibilizados pelo Solo, podem ser ligados um ampli cador de
potência ou subwoofer. Para efectuar a ligação a um subwoofer,
será necessário uma cha adaptadora de 2-phono para phono, que
deverá ser utilizada para ligar as saídas áudio do pré-ampli cador à
entrada do subwoofer. Para efectuar a ligação a um ampli cador de
Entradas áudio
O Solo disponibiliza quatro entradas áudio e monitorização de leitor/
gravador de cassetes, possibilitando a ligação de outras fontes de áudio
(consola de jogos, TV, leitor de DVD, etc.). Três destas entradas e a
monitorização do leitor/gravador de cassetes estão colocadas no painel
traseiro, a outra no painel dianteiro do Solo. O texto que identi ca as
entradas representa uma sugestão de utilização, mas as quatro entradas
dispõem todas das mesmas características (são todas entradas de nível
de linha), podendo ser ligado a qualquer entrada, qualquer dispositivo
apropriado . (No entanto, o nome da entrada posicionada no painel frontal
não pode ser alterado.)
Para efectuar a ligação de um dispositivo a uma entrada no painel traseiro
do Solo, utilize um cabo phono estéreo com o comprimento adequado;
para efectuar a ligação no painel frontal, o cabo tem que dispor de uma
cha macho estéreo de 3,5mm. Ligue a saída do dispositivo a uma das
entradas do Solo, assegurando-se que as chas se encontram rmemente
inseridas nas tomadas. Aconselhamos que, sempre que possível, utilize
cabos de ligação de qualidade elevada, de forma a assegurar a melhor
qualidade de som possível.
AV
IN
GAME TV
GND
AM
L
R
Tape loop (Leitor/gravador de cassetes)
A monitorização de leitor/gravador de cassetes é
disponibilizada para permitir a ligação de um leitor/
gravador de cassetes externo ao Solo.
TAPE OUT (saída) – Ligue estas saídas às chas de
entrada do leitor/gravador de cassetes (normalmente
designadas RECORD).
TAPE IN (entrada) – Ligue as saídas do leitor/gravador de
cassetes (normalmente designadas PLAY) a estas
entradas.
Atenção: a saída TAPE OUT é silenciada quando Tape (leitor de cassetes) for
seleccionado como fonte de sinal.
Ligação de um gira-discos
O Solo não dispõe de um pré-ampli cador phono (gira discos) instalado.
Se desejar ligar um gira-discos ao Solo, então necessitará de um préampli cador. Por favor contacte o seu retalhista para informação adicional e
recomendações acerca da melhor opção para o seu sistema.
potência, ligue estas saídas às chas de entrada do seu ampli cador de
potência ligando, de seguida, os seus altifalantes aos seus terminais de
altifalante.
ZONA 2 OUT (saídas áudio do pré-ampli cador): Esta saída é utilizada para
um sistema numa segunda sala. Deverá ser ligada ao ampli cador na
segunda sala. O volume de som varia em conformidade com o controlo
de volume da segunda sala.
CD OUT (saídas áudio do pré-ampli cador): Esta saída transporta o sinal
digital da plataforma CD e DAB (quando instalado) do Solo e pode ser
utilizada para efectuar gravações digitais, utilizando dispositivos de
compatíveis de gravação (tal como o MiniDisc). Quando um CD está a
ser reproduzido, esta plataforma transporta um sinal com um sample
rate (frequência de amostragem) de 44,1kHz; com o rádio DAB, o
sample rate do sinal é 48kHz.
Estas ligações destinam-se a instalações
multi-sala. Normalmente, não há necessidade
de efectuar quaisquer ligações a estas chas.
No entanto, se desejar utilizar alguma destas
características, por favor efectue o download do
documento ‘Solo Remote Control’ do nosso site
(www.arcam.co.uk), que inclui indicações sobre a
forma de efectuar estas ligações.
12V TRIGGER (Trigger de 12V) – Esta saída
proporciona um sinal de 12V sempre que o
dispositivo é ligado (i.e., não está desligado
ou em stand-by). Este sinal pode ser utilizado
para alimentar ampli cadores de potência
ligados ao Solo (ou outro equipamento
compatível) de forma automática, dado que
serão ligados quando o Solo é activado.
IN LOCAL (Entrada Local) – Permite a recepção
dos sinais do controlo remoto pelo Solo
se o sensor se encontrar obstruído (ou
não estiver ‘em linha de visão’ do controlo
remoto). É utilizado um sensor externo para
recepção dos sinais de controlo remoto, que
são, de seguida, direccionados para o Solo
(nesta entrada) através do cabo apropriado.
FMRS232
CD OUT
AV
IN
SERIAL NO
.
GAME TV
TAPE OUT TAPE INZONE 2 PRE OUT
GND
AM
PROGRAM
SPEAKER
OUTPUT
12V
REMOTE
IN
OUT
IN
L
R
R
L
TRIGGER
LOCAL
ZONE 2
IN ZONE 2 (Entrada Zona 2) – Use esta cha se
tiver uma segunda sala que disponha de
um sensor remoto. O sensor externo é
utilizado para recepção dos sinais de controlo
remoto, que são, de seguida, direccionados
para o Solo (nesta entrada) através do cabo
apropriado.
OUT (Saída) – Esta saída transporta todos os
sinais do receptor do controlo remoto
do painel frontal, em complemento aos
comandos recebidos através
dos dois sensores externos
anteriormente descritos
(‘Entrada Local’ e ‘Entrada
Zona 2’). Pode ser utilizado
para direccionar os comandos
do controlo remoto para outro
equipamento (possivelmente
em locais diferentes). Por
exemplo, os comandos para
o leitor de DVD podem ser
recebidos através do Solo e, de
seguida, direccionados para o
leitor de DVD num local remoto
através desta ligação de saída.
Entradas/saídas de controlo remoto e trigger de 12V
Solo iss4.id2 26/4/05, 8:24 pm5
Page 62

P6
Instalação dos altifalantes
As instruções aqui fornecidas constituem indicações gerais
para a instalação de altifalantes. Consulte a documentação
fornecida com os seus altifalantes para informação mais
detalhada sobre o seu posicionamento e instalação.
Posicionamento
Em termos gerais, os altifalantes devem ser colocados em
suportes rígidos, a cerca de 15–40cm da parede traseira e, pelo
menos, a 60cm de qualquer parede lateral. Os altifalantes nunca
deverão ser colocados no chão (excepto os altifalantes de chão),
ou nos cantos.
A qualidade nal de som dependerá das características acústicas
da sala e os ensaios de posicionamento dos altifalantes traduzemse em grandes benefícios. Como ponto de partida, sugerimos que
Audição noutra sala
O Solo proporciona dois controlos de volume
independentes, permitindo a audição da mesma saída em
duas divisões diferentes da sua casa. Para tal, irá necessitar do seguinte equipamento:
< um ampli cador de potência (tal como o Arcam P80) e altifalantes;
< cabos apropriados de interligação, tais como os anteriormente descritos;
< um receptor de controlo remoto (opcional), disponível no seu retalhista Arcam;
< um segundo controlo remoto (opcional), disponível no seu retalhista Arcam;
Deverá efectuar as ligações da seguinte forma:
1. Assegure-se de que todo o equipamento se encontra desligado e retire a cha
da tomada de alimentação.
2. Ligue as saídas do Solo, identi cadas como ‘Zona 2’, às entradas áudio do
ampli cador, utilizando os cabos de ligação.
3. Ligue os altifalantes aos terminais dos altifalantes do ampli cador. Os altifalantes
deverão ser ligados conforme descrito na página 4, ‘Altifalantes’.
4. Ligue o receptor remoto da segunda sala à cha identi cada como
‘Entrada Zone 2’, no painel traseiro do Solo.
5. Volte a ligar o dispositivo à tomada de alimentação e ligue-o. Deverá ouvir a
saída do Solo através do ampli cador e controlar o volume utilizando o controlo
remoto.
Atenção: a segunda sala é sempre silenciada
(mute) quando o solo é ligado – tem que ser
‘explicitamente’ activada quando necessário.
Esta característica permite evitar a saída
inesperada de som no local remoto.
posicione os altifalantes a 2–3m de distância entre eles,
com os painéis traseiros a 15cm da parede traseira.
Suportes de altifalantes
Quanto mais rme for a xação do altifalante, melhor
será o som produzido. Recomendamos a utilização de
suportes metálicos rígidos entre 40 e 60 cm de altura.
Os suportes com o amortecimento acústico apropriado
que não produz qualquer reverberação ao bater com
um lápis (devido ao tipo de construção ou porque foram
cheios com areia seca) maximizam as prestações
dos altifalantes. Assegure-se que os suportes e/ou os
altifalantes não “abanam”.
>60cm
15
–
40cm
40 – 60cm
2 – 3m
Solo iss4.id2 26/4/05, 8:24 pm6
Page 63

P7
Português
VHF/FM
DAB
Antena de rádio
O seu Solo tem uma capacidade soberba de
recepção de rádio, mas apenas se receber uma
transmissão com sinal de boa qualidade.
O Solo encontra-se equipado com um módulo
receptor DAB/FM ou AM/FM, dependendo de
onde tiver adquirido o dispositivo. No entanto,
independentemente do módulo de rádio instalado
no seu Solo, deverá ser utilizada uma antena
exterior sempre que possível, para garantir a
melhor recepção possível.
O tipo de antena a utilizar depende
da preferência do utilizador e das
condições locais. Por exemplo, se ouvir
principalmente transmissões de FM e
a intensidade do sinal FM for elevada
na sua área, poderá ser su ciente uma
antena omnidireccional montada no sótão
ou telhado. Para ouvir DAB numa zona
com intensidade reduzida de sinal será
necessário utilizar uma antena de telhado,
de ganho elevado.
Para a melhor recepção de sinais de DAB e
FM, poderá ser necessário um misturador
(conforme apresentado no diagrama). Esta
combina os sinais recebidos pelas duas
antenas (uma de DAB e a outra de FM)
num cabo que, de seguida, é ligado ao
Solo. Se não for utilizado um misturador,
a antena única de recepção de DAB e
FM poderá não proporcionar o melhor
desempenho possível em determinadas
áreas geográ cas.
Para informação mais detalhada sobre este
assunto, recomendamos que contacte o
seu retalhista Arcam ou um especialista de
instalação de antenas.
DAB
Se a intensidade do sinal de transmissão for
su cientemente elevada na área onde irá utilizar
o Solo, a antena interior poderá ser su ciente
(deverá ser colocada numa parede, com ambos
os condutores esticados na vertical). Em área com
intensidade reduzida de sinal é recomendada a
utilização de uma antena externa, para recepção
da maior quantidade de serviços possível. As
transmissões DAB podem ser efectuadas
em ‘Banda III’ ou ‘Banda L’ (ou ambas). Para
determinar a frequência de transmissão na
área onde o Solo será utilizado, contacte o seu
retalhista ou consulte www.WorldDAB.org. Em
áreas de transmissão Banda III, utilize uma antena
Yagi multi-elementos se o transmissor estiver a
uma distância considerável, ou utilize uma antena
omnidireccional ou de dipolo dobrado, se estiver
próximo de mais de um transmissor (no Reino
Unido, uma região de Banda III, esta deverá ser
montada com os elementos na vertical, dado que
as transmissões são polarizadas na vertical). Se os
serviços DAB na sua área forem transmitidos em
Banda L, deverá consultar o seu retalhista quanto
à antena mais adequada.
Quer decida instalar uma antena exterior, ou opte
por utilizar o cabo de ta fornecido, esta deverá
ser ligada à cha tipo “F” (parafuso), identi cada
como ‘FM’, no painel traseiro do dispositivo.
FM/AM
É necessária uma antena de FM para a recepção de sinais de rádio VHF e uma antena AM para a
recepção de sinais de rádio AM/onda média.
Antena FM
Embora a antena de FM em cabo de ta seja fornecida como um acessório para o Solo, aconselhase a utilização de uma antena montada no telhado ou sótão, para uma recepção de FM de maior
qualidade. Em determinadas regiões poderá ser disponibilizado rádio por cabo ou, em apartamentos,
pode ter sido instalado um sistema de distribuição do sinal das antenas. Em qualquer um destes
casos, em sua casa deverá dispor de chas identi cadas com FM ou VHF (não utilize as chas
identi cadas com TV), que deverão ser ligadas à cha ‘FM’, instalada no painel traseiro do Solo.
Se desejar utilizar a antena FM em cabo de ta, deverá aplicá-la tão alto quanto possível na parede,
com os elementos do ‘T’ posicionados na horizontal. Experimente a sua aplicação em paredes
diferentes da sala, de forma a determinar qual proporciona a melhor qualidade de recepção, mas
assegure-se que os pionés não entram em contacto com o condutor interno da antena.
Antena AM
É fornecida uma antena AM, como acessório do Solo. Esta antena deverá ser ligada às entradas AM
no painel traseiro do Solo, sendo um dos condutores ligado ao terminal ‘AM’ e o outro ao terminal
‘Ground’ (terra), não sendo relevante a orientação de ligação dos condutores. Assegure-se que a
antena é posicionada afastada do próprio Solo, de televisões, computadores e de outras fontes
‘ruído’ RF. Proceda à orientação da antena para determinar qual a posição que proporciona melhor
recepção.
Em áreas de intensidade de sinal reduzida, ou quando o Solo for utilizado dentro de um edifício com
estrutura de aço, poderá ser utilizado um condutor com 3 a 5 metros de comprimentos, para reforço
da qualidade de recepção. Este deverá ser aplicado num local elevado, no exterior do edifício (se
possível) e ligado ao terminal ‘AM’ da entrada de antena AM, em complemento à antena fornecida
(não desligue a antena AM fornecida).
Montagem da antena AM
misturador
2. Empurre a patilha para dentro da
abertura, na base do suporte. Empurre até
ouvir um clique.
3. Ligue os condutores à ficha AM no painel
traseiro do Solo. Rode base da antena até
conseguir obter a melhor recepção.
1. Retire o arame e desenrole o condutor
torcido. Dobre a base plástica para a frente,
através da estrutura..
Solo iss4.id2 26/4/05, 8:25 pm7
Page 64

P8
Comandos importantes no
painel frontal
Power (Alimentação)
Prima o botão power para
ligar e desligar o Solo,
passa de ‘on’ (ligado) a
‘stand-by’ (em espera) e
vice-versa.
Quando o Solo se encontra
em stand-by, a luz junto
ao botão POWER no
painel frontal encontra-se
acesa vermelha e o visor
apresenta as horas. Ao
premir o botão quando o dispositivo se encontra
em stand-by, liga o dispositivo e a luz passa a azul.
Atenção: o interruptor principal de alimentação do
Solo encontra-se no painel traseiro da unidade.
Se a luz power não estiver acesa, consulte as
indicações na página 4 “Power”.
Volume e Mute
Utilize estes comandos para silenciar (mute),
aumentar ou diminuir o volume. Se o Solo for
silenciado, ao premir o botão MUTE novamente
ou alterar o volume, a função será cancelada. O
volume actual é apresentado no canto superior
direito do visor.
Source –/+ (Fonte)
Utilizado para alterar a fonte de áudio. Se desejar
ouvir rádio FM, por exemplo, prima SOURCE
repetidamente até ‘FM’ aparecer no canto
superior esquerdo do visor.
Estes botões são igualmente utilizados para
navegação no menu do Solo. Consulte a secção
‘Con guração do produto’ (página 11) para
informação completar.
música
Fonte Modo de reprodução
Volume actual
Número da faixa, texto associado,
duração da música, etc.
Indicador de estado de reprodução
Localizar/pesquisar faixas (skip/scan)
Prima por breves instantes os botões 0 ou /
no painel frontal ou no controlo remoto para
passar para a faixa anterior ou seguinte de um
CD.
Ao premir localizar para a frente, a reprodução
será iniciada no princípio da faixa seguinte (se
existir); ao premir localizar para trás, premindo
o botão 0 durante os primeiros 3 segundos
de uma faixa, irá regressar ao início da faixa
anterior (se existir), após os primeiros 3
segundos a reprodução iniciar-se-á no princípio
da faixa actual. Assim, na maioria dos casos,
será normal ter que premir 0 duas vezes para
localizar o início da faixa anterior.
Os botões 0 e / são igualmente utilizados
para pesquisar. Para pesquisar para trás ou a
frente numa faixa, prima e mantenha premido
o botão 0 ou / – a pesquisa continuará até o
botão ser libertado.
Modos especiais de reprodução
Prima MODE no controlo remoto para alternar
entre os modos repetir/aleatório, de reprodução
de CD. As opções são as seguintes:
1. Repetir disco: as faixas contidas no disco
são reproduzidas pela ordem normal. Após a
reprodução da última faixa, esta é reiniciada a
partir da primeira faixa do disco;
2. Repetir faixa: a reprodução da faixa actual é
repetida até o comando ser cancelado;
3. Aleatória: as faixas contidas no disco são
reproduzidas numa ordem aleatória;
4. Repetir aleatória: esta função combina
‘repetir disco’ e ‘aleatória’. Cada vez que a
reprodução é reiniciada, a ordem das faixas é
alterada.
Para cancelar qualquer um dos modos aleatório/
repetir, prima MODE várias vezes até que o modo
de reprodução seja apagado do visor.
Atenção: os modos repetir/aleatório não se
encontram disponíveis durante a reprodução
de uma ordem de faixas programada (descrita
na caixa à direita).
Programação da ordem de reprodução
A ordem de reprodução das faixas de um CD
pode ser programada. Esta função constitui
parte integrante do menu de con guração do
Solo, que é descrito em detalhe na página 11;
é aqui apresentada uma breve descrição.
1. Prima MENU para abrir o menu de
con guração;
2. Prima 6 (SOURCE – no painel frontal), até a
linha superior apresentar ‘Prog’;
3. Prima OK para entrar no modo de programa
e, de seguida, utilize os botões – e + (painel
frontal: 0 e /) para realçar a próxima faixa a
adicionar à lista. Prima OK para adicionar a faixa
seleccionada. Repita esta operação até todas
as faixas desejadas terem sido adicionadas à
lista.
4. Para sair do modo de programa, prima
MENU. Prima MENU novamente para fechar o
menu de con guração.
Para apagar qualquer programa, prima < duas
vezes no controlo remoto ou retire o CD.
Modos de visor
O Solo proporciona quatro modos diferentes de
visor durante a reprodução de um CD. O modo
pode ser alterado premindo o botão INFO no
painel frontal ou no controlo remoto.
1. Tempo de reprodução de faixa: esta é a
informação ‘convencional’ de um leitor de CD,
apresentando o número de faixa e o seu tempo
de reprodução.
2. Tempo restante de reprodução de faixa:
apresenta o número de faixa em reprodução
em conjunto com o tempo restante na faixa.
3. Texto CD: se disponível, o texto do disco
(CD text) será apresentado neste modo (nome
da faixa ou artista, por exemplo). Se o texto
CD não estiver disponível, este modo é igual
‘tempo de reprodução’.
4. Visor com caracteres de grandes dimensões:
este modo proporciona um visor com caracteres
de altura dupla, apresentando apenas o número
de faixa em reprodução e o volume.
Sumário dos comandos de reprodução
de CD
4
(Play – reprodução) – prima este botão para
iniciar a reprodução de um CD.
<
(Stop – parar) – prima este botão para
interromper a reprodução de um CD.
;
(Pause – pausa) – prima este botão para
pausar a reprodução de um CD. Prima
novamente (ou prima play) para reiniciar a
reprodução do CD.
/
(Localizar/pesquisar para a frente) – prima e
liberte este botão para avançar para o início
da faixa seguinte. Prima e liberte este botão
para pesquisar para a frente.
0
(Localizar/pesquisar para trás) – prima e
liberte este botão para voltar ao início da
faixa actual/anterior. Prima e liberte este
botão para pesquisar para trás.
1
(Abrir/Fechar) – prima para abrir a gaveta do
CD; prima novamente para fechar.
Acesso directo à faixa
O acesso directo a uma faixa do CD pode ser
conseguido utilizando os botões numéricos no
controlo remoto.
Para as faixas 1 a 9, prima o número
correspondente à faixa que deseja reproduzir. Para
seleccionar uma faixa/memória superior a 9, prima
e mantenha premido o primeiro dígito da faixa (por
ex. 1) até esse número ser apresentado no canto
inferior esquerdo do visor (‘1–’), de seguida, prima
o segundo dígito.
Reprodução de CDs
Guia rápido – reprodução de CD:
1. Prima o botão </1 (parar/abrir) no painel frontal ou
1
no controlo remoto, para abrir a gaveta do CD.
2. Coloque o CD no centro da gaveta, assegurando-se que
a face do CD com a etiqueta se encontra virada para
cima. Prima o botão 1 ou 4 (play) para fechar a gaveta.
3. Aguarde até a gaveta fechar. Se premiu play para fechar
a gaveta, será automaticamente iniciada a reprodução
do disco, se não, prima 4/; (controlo remoto: A) para
iniciar a reprodução.
Solo iss4.id2 26/4/05, 8:25 pm8
Page 65

P9
Português
Modos de visor
O Solo proporciona modos diferentes de visor
durante a audição de rádio. O modo pode ser
alterado (ciclado) premindo o botão INFO no
painel frontal ou no controlo remoto.
1. Tipo de programa (DAB/FM): uma descrição
breve sobre o tipo de programa transmitido.
2. Frequência de transmissão (FM/AM): o
nome da estação (se disponível) e a frequência
de transmissão.
3. Etiqueta dinâmica (DAB)/ RDS (FM): 128
caracteres de texto utilizados pelas estações
para disponibilizar informações relacionadas
com o programa (por ex., números de telefone,
endereços da Internet, etc.).
4. Velocidade de transmissão (DAB): este
modo apresenta a velocidade de transmissão
da estação (em kbits/s) e o modo de
transmissão. Uma velocidade de transmissão
mais elevada indica uma qualidade áudio
superior, sendo o máximo 256kbits/s.
5. Qualidade do sinal: um gráco de barras
apresenta a qualidade de recepção do sinal.
Rádio
O Solo encontra-se equipado com um receptor de DAB/FM ou AM/FM, dependendo do local onde é
vendido.
O Solo proporciona:
< memorização de até 30 estações;
< informação completa RDS em FM (quando transmitida); informação associada aos programas em
DAB;
< indicador da intensidade do sinal FM e da velocidade de transmissão DAB.
Seleccionar o rádio
Prima SOURCE + ou SOURCE – até o modo de rádio desejado (DAB/FM/AM) ser apresentado no visor. Em
alternativa, prima o botão DAB/FM/AM no controlo remoto, para acesso directo.
Fonte Nome da estação
Memorização de estações de rádio
Pode memorizar as suas estações de rádio preferidas numa das memórias
‘presets’ de rádio, proporcionando acesso rápido à estação sempre que
desejar sem ter que sintonizar novamente. O Solo proporciona 30 memórias
de estações de rádio, partilhadas entre DAB, FM e AM (conforme instalação).
Para memorizar uma estação, sintonize primeiro a estação que deseja
memorizar. Para memorizar a estação numa das memórias 1 a 9, prima e
mantenha premido o botão com o número desejado no controlo remoto até a
mensagem ‘preset saved’ (estação memorizada) ser apresentada.
Uma outra forma de memorização, que proporciona acesso às memórias
10 a 30, é proporcionada premindo o botão MENU, para entrar no menu de
conguração do Solo (descrito de forma detalhada na página 11), navegando,
de seguida, pelo menu até ser visualizado Memorizar Estação – ‘Store
Preset’. Neste menu, a utilizando os botões – e + do controlo remoto (0 ou /
no painel frontal) permite a selecção da posição de memória que deseja
utilizar para a estação de rádio (se a posição de memória já se encontrar em
utilização, é apresentado o nome da estação ou a frequência de transmissão
na linha inferior no visor; as posições de memória disponíveis são visualizadas
como ‘Empty’ – vazia). Quando visualizar a posição de memória desejada,
prima OK para memorizar a estação nessa posição. Atenção: se memorizar
uma estação de rádio numa posição de memória ocupada, a estação nessa
posição de memória será apagada e substituída pela nova estação.
As estações memorizadas são mantidas quando o Solo é desligado na
tomada de alimentação eléctrica.
Procura de estações
Premindo o botão MODE quando o rádio é
seleccionado como fonte alterna entre os dois
modos de sintonização do Solo – ‘Memória’
ou ‘Sintonizar’. O modo seleccionado é
apresentado por breves instantes no visor.
Quando se encontrar no modo de memória,
premindo os botões > ou ? no controlo
remoto (0 ou / no painel frontal) selecciona
a estação memorizada anterior/seguinte (se
estiver denidas). Atenção: premir estes
botões não terá qualquer efeito no modo de
memória, se não tiverem sido predenidas
quaisquer memórias.
Em contraste, no modo de sintonizador, ao
premir estes botões altera a frequência de
sintonização AM/FM ou selecciona a próxima
estação de rádio DAB da lista de estações.
FM/AM
Para procurar novas estações, assegure-se que
o Solo se encontra no modo ‘Tune’, conforme
anteriormente descrito.
< Sintonização manual. Utilize os botões
B
e C (0 ou / no painel frontal) para
seleccionar a frequência desejada. Este
modo pode ser utilizado para sintonizar
uma frequência especíca. É igualmente
útil se desejar sintonizar uma estação
cuja intensidade de sinal seja demasiado
reduzida para sintonização automática.
< Sintonização automática. Ao premir
os botões B ou C (0 ou / no painel
frontal) por mais de um segundo, é
activada a sintonização automática. O
Solo procura uma estação de rádio com
intensidade de sinal suciente e pára.
Para prosseguir para a estação seguinte,
prima um dos botões novamente. A
sintonização automática está disponível
tanto em FM como em AM.
Volume actual
Detalhes de transmissão, ou outra informação
Selecção das estações memorizadas
O Solo tem que se encontrar em modo de ‘preset’ – memória – antes de
poder seleccionar qualquer estação memorizada (consultar descrição).
Para procurar uma estação memorizada, utilize os botões B ou C no
controlo remoto (0 ou / no painel frontal). Em alternativa, as posições de
memória podem ser seleccionadas directamente através do teclado numérico
no controlo remoto. Consulte a página 10 para informação mais detalhada
sobre esta opção.
Indicador do modo predenido
DAB
A sintonização de estações em DAB é diferente
da sintonização convencional FM ou AM, não
é necessário conhecer a frequência da estação
– esta tarefa é desempenhada pelo Solo.
Seleccione DAB como a fonte, premindo, de
seguida, o botão MENU. Percorra as opções do
menu (consulte página 11) até ser apresentado
‘DAB Setup’. Existem duas opções nesta
secção do menu – ‘Scan’ (procurar) e ‘Erase
settings’ (apagar denições). Ao seleccionar
‘Scan’ o Solo começa a procurar novas
estações DAB. Se for encontrada alguma,
então será automaticamente adicionada à lista
de estações disponíveis. Prima MENU uma
segunda vez para sair do menu.
Para seleccionar uma estação de rádio DAB,
prima os botões B ou C no controlo
remoto até o nome da estação de deseja
escutar ser apresentado. A estação será
automaticamente seleccionada após um
período de cerca de dois segundos.
Solo iss4.id2 26/4/05, 8:25 pm9
Page 66

P10
Colocação das pilhas no
controlo remoto
controlo
remoto
Botões do controlo remoto
2
(Alimentação) – Liga e desliga o Solo, passa de ‘on’ (ligado) a ‘stand-by’ (em espera) e vice-versa.
Selecção de faixa/memória (0–9) – Prima o número da faixa ou da posição de memória que
deseja ouvir. Para seleccionar uma faixa/memória superior a 9, prima e mantenha premido o primeiro
dígito da faixa (por ex. 1) até o número ser apresentado no canto inferior esquerdo do visor (‘1–’), de
seguida, prima o segundo dígito.
>
e ? – São utilizados para alterar a frequência de sintonização ou a estação memorizada, quando
estiver a ouvir rádio.
INFO – Altera a informação apresentada no visor na reprodução de CD ou rádio.
MODE – Algumas fontes permitem alterações ao modo de audição.
CD – Prima o botão MODE para alternar entre os vários modos – repetir/aleatório – de reprodução
de CDs.
DAB/FM/AM – Prima o botão MODE para alternar entre os modos ‘sintonizar’ e ‘memória’. Em
modo de sintonização, premindo > ou ? altera a frequência de sintonização (FM/AM) ou a estação
seleccionada (DAB); em modo de memória, a estação é alterada. Consulte a página seguinte para
informação mais detalhada.
DISP – Altera a intensidade do brilho do visor no painel frontal. Pode optar entre diversos níveis de
intensidade, incluindo desligar o visor.
Selecção de fonte áudio – Prima o botão da fonte de áudio que deseja ouvir.
Teclas cursor e OK – Quando estiver a ouvir música, os botões
B
e C funcionam da mesma
forma que os botões > e ? descritos acima, sendo os botões – e + utilizados para alterar o volume.
Em conjunto com o botão OK, estes botões são igualmente utilizados para navegação no menu de
con guração do Solo, descrito nas páginas 11 e 12.
Silenciar – Prima uma vez para silenciar os altifalantes e as saídas pré-ampli cadas do Solo. Prima
novamente (ou altere o volume) para cancelar esta função.
MENU – Ao premir o botão MENU entra no menu de con guração do Solo. Este é descrito de forma
detalhada nas páginas 11e 12. Prima o botão MENU novamente para sair do menu.
Comandos de reprodução de CD
4
(Reprodução) – prima este botão para iniciar a reprodução de um CD.
<
(Parar) – prima este botão para interromper a reprodução de um CD.
;
(Pausa) – prima este botão para pausar a reprodução de um CD. Prima novamente (ou prima play)
para reiniciar a reprodução do CD.
/
(Localizar/pesquisar para trás) – prima e liberte este botão para voltar ao início da faixa actual/
anterior. Prima e liberte este botão para pesquisar para trás.
0
(Localizar/pesquisar para a frente) – prima e liberte este botão para avançar para o início da faixa
seguinte. Prima e liberte este botão para pesquisar para a frente.
1
(Abrir/Fechar) – prima para abrir a gaveta do CD; prima novamente para fechar.
1. Para abrir o compartimento das pilhas
prima o botão traseiro do controlo remoto.
2. Coloque duas pilhas ‘AAA’ no
compartimento das pilhas, de acordo com
as indicações de polaridade apresentadas
no próprio compartimento.
3. Empurre a tampa do compartimento para
a sua posição de fechada.
Utilização do controlo
remoto
Tenha presente o seguinte quando utilizar o
controlo remoto:
< Assegure-se de que não existem
obstáculos entre o controlo remoto e
o sensor remoto no Solo. O controlo
remoto tem um raio de alcance de
cerca de sete metros. (Se o receptor do
controlo remoto se encontra obstruído,
encontra-se disponível a cha de entrada
do controlo remoto no painel traseiro.
Contacte o seu retalhista Arcam para
mais informações.)
< O funcionamento do controlo remoto
pode tornar-se irregular se o sensor
remoto do Solo for sujeito a luz solar
intensa ou luz uorescente.
< Substitua as pilhas quando veri car uma
redução no raio de alcance do controlo
remoto.remote control.
Solo iss4.id2 26/4/05, 8:26 pm10
Page 67

P11
Português
Conguração do produto
O Solo permite ao utilizador ajustar as denições áudio de
acordo com as suas preferências pessoais e adaptar várias
denições ao seu sistema especíco. Utilize o diagrama
abaixo como auxiliar à denição das congurações disponíveis.
Ajuste das denições áudio
Em utilização normal, o visor apresenta informação sobre
o volume, a fonte de áudio e qualquer outra informação
relevante (tal como o tempo de reprodução de um CD).
Para ajustar a denições áudio, prima MENU no painel frontal
ou no controlo remoto. Utilize os botões conforme indicado
para ajustar um parâmetro em particular.
Balance (Balanço)
Esta denição permite aumentar o volume de um canal
(esquerdo ou direito) em relação ao outro canal. Normalmente
não deverá ser necessário alterar esta denição mas, se
habitualmente se sentar mais próximo de um altifalante
especíco, ao alterar o balanço poderá ajudar a restabelecer a
imagem estéreo para a sua posição de audição.
Bass (Graves)
Esta denição permite alterar o volume relativo das
frequências baixas da sua música. Se sentir que a
reprodução de música do seu sistema não é sucientemente
‘envolvente’, aumente este parâmetro; se a música apresentar
sons ‘graves’ em excesso, a redução deste parâmetro poderá permitir obter maior qualidade sonora.
Consultar igualmente ‘Correcção de Graves’, abaixo. Atenção: este controlo é desactivado quando os
auscultadores são ligados.
Treble (Agudos)
Esta denição permite alterar o volume relativo das frequências elevadas da sua música. Se sentir que os
componentes de percussão na música (por exemplo) são demasiado ténues, o aumento deste parâmetro
poderá permitir melhor qualidade sonora. Se os sons nesta frequência se revelarem demasiado
dominantes, diminua este parâmetro.
Atenção: os controlos de graves e agudos são desactivados quando os auscultadores são ligados.
Bass correction (Correcção de graves)
Esta denição normalmente não necessita de ser utilizada (deixar no mínimo).
A correcção de graves pode ser utilizada se o Solo for ligado a altifalantes de gama reduzida de
frequências (‘Pequenos’), que não têm a capacidade de reproduzir frequências muito baixas. Ao aumentar
este parâmetro os sons de frequências muito baixas são progressivamente atenuados (dado que não
podem ser reproduzidos pelo altifalante), enquanto que o volume dos sons de frequências ligeiramente
mais elevadas é aumentado. O que signica que a ‘quantidade’ global de graves produzida pelo altifalante
produz o mesmo som que um altifalante de gama completa de frequências (‘Grande’).
Não é possível danicar nenhum componente do seu sistema ao utilizar esta denição, desta forma,
sugerimos que experimente variar os parâmetros, em combinação com o controlo de graves e agudos,
até encontrar as denições da sua preferência.
Sleep timer (Temporizador de desactivação)
Este temporizador permite que o utilizador seleccione um período de tempo, após o qual o Solo passará
automaticamente à condição de stand-by (em espera). Este
período de tempo pode ser programado em intervalos de 5
minutos, até 120 minutos (2 horas).
CD programme (Programação de CD)
Se desejar programar a ordem de reprodução de um CD, prima
OK
quando esta opção for visualizada. A ordem de reprodução
do CD é, de seguida, inserida conforme descrito na caixa “CD
programming”, apresentada à direita. Quando tiver terminado
a introdução do programa, prima
MENU
para sair do “modo de
programação”. Prima o botão
MENU
novamente para sair do
menu de conguração do Solo.
características
avançadas
Legenda dos símbolos utilizados neste manual:
Símbolo:
Painel
frontal:
Controlo
remoto:
OK
Apagar
definições
Condição 'Ligado'
Esquerda Direita
–dB +dB
–dB +dB
–dB +dB
Apenas se a fonte
áudio for FM
Apenas se a fonte
áudio for DAB
OK
+Preset
(memorização)
Procurar estações disponíveis
OK
Confirmar memorização
Apenas se a fonte áudio
for DAB, FM ou AM
OK
Apenas se a fonte
áudio for CD
+
+Preset
(memorização)
Confirmar memorização
OK
–
–Preset
(memorização)
–Preset
(memorização)
Programação de CD:
34
Realçar a faixa a adicionar
OK
Adicionar faixa ao programa
CLR
Apagar última entrada
STOP
Prima STOP duas vezes
(apenas controlo remoto) para
apagar o programa.
Solo iss4.id2 26/4/05, 8:27 pm11
Page 68

P12
Ajuste do relógio e alarme
Com o Solo em stand-by (espera), prima MENU para acertar o relógio ou os alarmes.
Utilize os botões para a esquerda ou direita no controlo remoto para seleccionar, de seguida, utilize
os botões para cima e baixo, para acertar. Por exemplo, após premir MENU para entrar no menu de
denições do relógio/alarme, ao premir para cima ou para baixo poderá alternar entre acertar o relógio e
denir um dos alarmes.
O Solo permite a denir até quatro alarmes diferentes.
Interromper ou pausar um alarme
Para interromper um alarme, prima o botão power no painel frontal ou no controlo remoto. Em alternativa,
prima OK para entrar no modo ‘snooze’; o alarme tocará novamente após um intervalo de 10 minutos.
Para cancelar o modo snooze, prima o botão POWER.
FM Mode (Modo FM)
Esta opção de menu é visualizada quando a fonte de áudio seleccionada for FM.
Em áreas com intensidade de sinal reduzida, poderá ser benéco forçar o sintonizador de FM a reproduzir
em mono, dado que em mono é necessária uma intensidade de sinal muito inferior para uma qualidade
sonora aceitável. Se a intensidade de sinal na sua área for elevada, mantenha este parâmetro em ‘stereo’.
Denições DAB
Esta opção de menu é visualizada quando a fonte de áudio seleccionada for DAB.
Existem duas opções nesta secção do menu – ‘Scan’ (procurar) e ‘Erase settings’ (apagar denições). Ao
seleccionar ‘Scan’ o Solo começa a procurar novas estações DAB. Se for encontrada alguma, então será
automaticamente adicionada à lista de estações disponíveis.
Ao procurar novas estações, não são apagadas as estações anteriores que já não efectuam
transmissões – com o passar do tempo, ou se mudar de local onde normalmente utiliza o Solo, este facto
poderá resultar em estações memorizadas que já não se encontram disponíveis para audição. Nesta
situação, seleccione ‘Erase settings’ (Apagar denições) e efectue uma nova pesquisa; quando a
pesquisa tiver sido completada, apenas serão apresentadas as estações disponível na sua área.
Set Preset (Memorizar estações)
Esta opção de menu é visualizada quando a fonte de áudio seleccionada for DAB, FM
ou AM.
Consulte a secção ‘Memorização de estações de rádio’, na página 7, para
informação mais detalhada.
Ajuste do volume da Zona 2
Prima e mantenha premido o botão MENU no painel frontal
até ser apresentado ‘Z2 Vol’ no visor, de seguida, utilize
o controlo de volume para diminuir/aumentar volume
da Zona 2. Prima novamente MENU para sair.
Solo iss4.id2 26/4/05, 8:27 pm12
Page 69

P13
Português
especicações
técnicas
Pré-amplicador
Entradas
Nível máximo de entrada 2.5Vrms
IImpedância de entrada 47kΩ
Relação sinal/ruído 105dB
Saídas coaxiais
Nível máximo de saída 2.5Vrms
Impedância de saída 500Ω
Saída óptica (TOSLINK)
Sample rate (frequência de amostragem) 44,1kHz (reprodução de CD),
48kHz (receptor DAB),
ou desactivada.
Amplicador
Potência contínua de saída, por canal, 80kHz largura de banda de medição
Ambos os canais, 4Ω, 1kHz 75Wrms, 0,013% THD+n
Distorção, ambos os canais 4Ω,
80% power, 1kHz
0,011% THD+n
Reprodução de CD
DAC DAC Delta-Sigma – Wolfson multi-nível de 24-bits
Resposta de frequência (±0.5dB) 20Hz–20kHz
Receptor DAB (quando instalado)
DAC Delta-Sigma AKM 96kHz de 24-bits
Frequência de sintonização RF 174–240MHz (Banda III),
1452–1490MHz (Banda L)
Sensibilidade (típica) –98dBm (VHF medida em conformidade com
EN50248)
Impedância de entrada 50Ω
Velocidade de processamento de dado áudio
(máxima)
256kbits/s MPEG camada II, nível de protecção 3
Quantidade de serviço memorizados (máxima) 128
Receptor de FM
Frequência de sintonização RF 87.5–108MHz
Sensibilidade (típica) 2µV
Relação sinal/ruído (a 200mV) 58dB
Distorção (THD a 200mV) 0.5%
Receptor AM (quando instalado)
Frequência de sintonização RF 522–1611kHz
Relação sinal/ruído (a 200mV) 40dB
Distorção (THD a 30% de modulação) 1.5%
Geral
Tensão de alimentação 100V, 115V ou 230V AC, dependendo da região
onde será utilizado
Consumo Stand-by (em espera) 3,2VA;
Em funcionamento 50VA (típico), 400VA (máximo)
Dimensões (L x P x A) L430mm x P350mm x A79mm
Peso (dispositivo) 7.75kg
Peso (com embalagem) 10.5kg
Acessórios fornecidos Cabo de alimentação
Antena de dipolo em o (Banda III)
Dispositivo de controlo remoto e duas pilhas AAA
Manual de instruções e cartão de registo
Interferência de radiofrequências
O Solo é um dispositivo áudio que contém microprocessadores e outros componentes de
electrónica digital. Foi concebido em conformidade com padrões muito elevados de compatibilidade
electromagnética.
Se o Solo provocar interferências na recepção de rádio ou televisão (que podem ser determinadas ligando
e desligando o Solo), deverão ser tomadas as seguintes medidas:
< Reposicione a antena receptora ou coloque o cabo da antena do receptor afectado tão longe quanto
possível do Solo e dos seus cabos.
< Reposicione o receptor em relação ao Solo.
< Ligue o receptor e o Solo a tomadas diferentes.
Se o problema persistir, por favor contacte o seu retalhista Arcam.
Solo iss4.id2 26/4/05, 8:28 pm13
Page 70

P14
garantia
Garantia Mundial
Esta garantia proporciona-lhe a reparação sem custos do dispositivo, durante os dois anos após a sua
aquisição, em qualquer distribuidor autorizado Arcam, desde que tenha sido originalmente adquirido
num retalhista ou distribuidor Arcam. O fabricante não aceita qualquer responsabilidade por defeitos que
resultem de acidentes, má utilização, utilização abusiva, desgaste normal, negligência ou reparações/
anações não autorizadas, nem por danos ou perdas ocorridos no transporte de/para o indivíduo que
efectuou a reclamação de garantia.
A garantia cobre os seguintes itens:
Custos de peças e mão-de-obra durante dois anos, a partir da data de aquisição. Decorridos os dois anos,
o proprietário terá que suportar os custos de peças e mão-de-obra. A garantia não cobre quaisquer
custos de transporte.
Reclamações em garantia
Este equipamento deverá ser acondicionado na embalagem original e devolvido ao retalhista onde foi
adquirido ou, se tal não for possível, deverá ser enviado directamente para o distribuidor Arcam do país
de residência.
Deverá ser enviado (pré-pago) através de uma empresa reconhecida de transporte de mercadorias – não
pelo correio. Não será aceite qualquer responsabilidade pela unidade enquanto se encontrar em trânsito
para o retalhista ou distribuidor, sendo o cliente aconselhado segurar a unidade contra danos e perdas em
trânsito.
Para informação mais detalhada contacte a Arcam:
Arcam Customer Support Department,
Pembroke Avenue,
Waterbeach,
CAMBRIDGE, CB5 9QR, England.
ou www.arcam.co.uk.
Problemas?
Se o seu retalhista Arcam não conseguir satisfazer qualquer solicitação ou esclarecimento relativos a
este ou qualquer outro produto Arcam, por favor contacte o Arcam Customer Support na morada acima
indicada e envidaremos os nossos melhores esforços para esclarecer as questões apresentadas.
Solo iss4.id2 26/4/05, 8:28 pm14
Page 71

Solo iss4.id2 26/4/05, 8:28 pm15
Page 72

SH152
Issue 4
Pembroke Avenue, Waterbeac h, CAMBRIDGE CB5 9QR, England
Solo iss4.id2 27/4/05, 9:05 am16
 Loading...