

Page 1
Handbook Sound bar
Manuel Barre de son
Handbuch Sound-Bar
Handleiding Geluidsbalk
Manual Barra de Sonido
Руководство звуковой панели
Manuale Sound bar
手册条形音箱
Page 2

Page 3
Handbook Sound bar
English
Page 4

welcome...
contents
English
… and thank you for purchasing the Arcam Solo bar.
Arcam has been producing specialist audio equipment of remarkable quality
for over three decades and the new Solo bar is the latest in a long line of
award winning Hi-Fi and home cinema products.
We hope that the care and eort we have put into building this product will
be amply demonstrated in its superior performance and reliability, ensuring
that you enjoy many years of ownership.
is handbook is a guide to installing and using the Solo bar. Use the
contents list on the next page to guide you to the section of interest.
We hope that your Solo bar will give you years of trouble-free operation. In
the unlikely event of any fault, or if you simply require further information
about Arcam products, our network of dealers will be happy to help
you. Further information can also be found on the Arcam website at
www.arcam.co.uk.
e Solo bar development team.
important safety instructions E-4
overview E-5
Buttons and display E-5
Connections E-6
quick start E-7
What’s in the box? E-7
Placing the unit E-7
Connecting devices E-7
Connecting a TV E-7
Connecting digital devices via HDMI E-8
Connecting analogue devices E-9
Connecting audio devices via digital input E-9
Connecting a subwoofer E-9
Plug in and turn on E-10
Connecting a Solo sub E-10
Connecting Bluetooth® devices E-11
Using headphones E-11
remote control E-12
Using the remote control E-12
remote control app E-13
Download instructions E-13
Pairing your mobile device E-14
operation E-15
Switching on E-15
Selecting a source E-15
Volume control E-15
Selecting an audio mode E-16
Sound from your TV E-16
Sound from Bluetooth® devices E-16
IR repeater E-16
CEC control via HDMI E-16
Auto setup E-17
system setup E-18
System setup menu E-18
Speaker/EQ setup menu E-19
HDMI setup menu E-20
rmware update E-21
Download an update le E-21
Performing the update E-21
specications E-22
troubleshooting E-23
xing instructions E-24
You will need E-24
Fixing procedure E-24
product guarantee E-25
Copyright E-25
Worldwide guarantee E-25
Claims under guarantee E-25
On-line registration E-25
Problems? E-25
technology licensing E-26
E-3E-2
Page 5
important safety
instructions
overview
English
1. Read these instructions
All the safety and operating instructions
should be read before this product is
operated.
2. Keep these instructions
e safety and operating instructions
should be retained for future reference.
3. Heed all warnings
All warnings on the appliance and in
the operating instructions should be
adhered to.
4. Follow all instructions
All operating and use instructions should
be followed.
5. Do not use this apparatus near water
e appliance should not be used near
water or moisture – for example, in a wet
basement or near a swimming pool.
6. Clean only with dry cloth.
7. Do not block any ventilation openings.
Install in accordance with the
manufacturer’s instructions.
8. Do not install near any heat sources such
as radiators, heat registers, stoves, or
other apparatus (including ampliers)
that produce heat.
9. Do not defeat the safety purpose of
the polarized or grounding-type plug.
A polarized plug has two blades with
one wider than the other. A grounding
type plug has two blades and a third
grounding prong. e wide blade or the
third prong are provided for your safety.
If the provided plug does not t into
your outlet, consult an electrician for
replacement of the obsolete outlet.
10. Protect the power cord from being
walked on or pinched particularly at
plugs, convenience receptacles, and the
point where they exit from the apparatus.
11. Only use attachments/accessories
specied by the manufacturer.
12. Use only with the cart, stand, tripod,
bracket, or table specied by the
manufacturer, or sold with the
apparatus. When a cart is used, use
caution when moving the cart/apparatus
combination to avoid injury from
tip-over.
13. Unplug this apparatus during lightning
storms or when unused for long periods
of time.
14. Refer all servicing to qualied service
personnel. Servicing is required when
the apparatus has been damaged in any
way, such as power-supply cord or plug
is damaged, liquid has been spilled or
objects have fallen into the apparatus,
the apparatus has been exposed to rain
or moisture, does not operate normally,
or has been dropped.
15. Please keep the unit in a well-ventilated
environment.
WARNING: To reduce the risk of fire or electric shock,
do not expose this apparatus to rain, moisture,
dripping or splashing. Objects filled with liquids,
such as vases should not be placed on the apparatus.
WARNING: The mains plug or appliance coupler is
used as a disconnect device, the disconnect device
shall remain readily operable.
This lightning flash with arrowhead symbol within
an equilateral triangle is intended to alert the
user to the presence of non-insulated ‘dangerous
voltage’ within the product’s enclosure that may
be of sufficient magnitude to constitute a risk of
electric shock.
Warning: To reduce the risk of electric shock,
do not remove cover (or back) as there are no
user-serviceable parts inside. Refer servicing to
qualified personnel.
The exclamation point within an equilateral triangle
is intended to alert the user to the presence of
important operating and maintenance instructions
in the literature accompanying the appliance.
This equipment is a Class II or double insulated
electrical appliance. It has been designed in
such a way that it does not require a safety
connection to electrical earth.
Correct disposal of
this product
This product contains electrical
or electronic materials. The
presence of these materials may,
if not disposed of properly, have
potential adverse effects on the
environment and human health.
Presence of this label on the product means it
should not be disposed of as unsorted waste and
must be collected separately. As a consumer, you
are responsible for ensuring that this product is
disposed of properly.
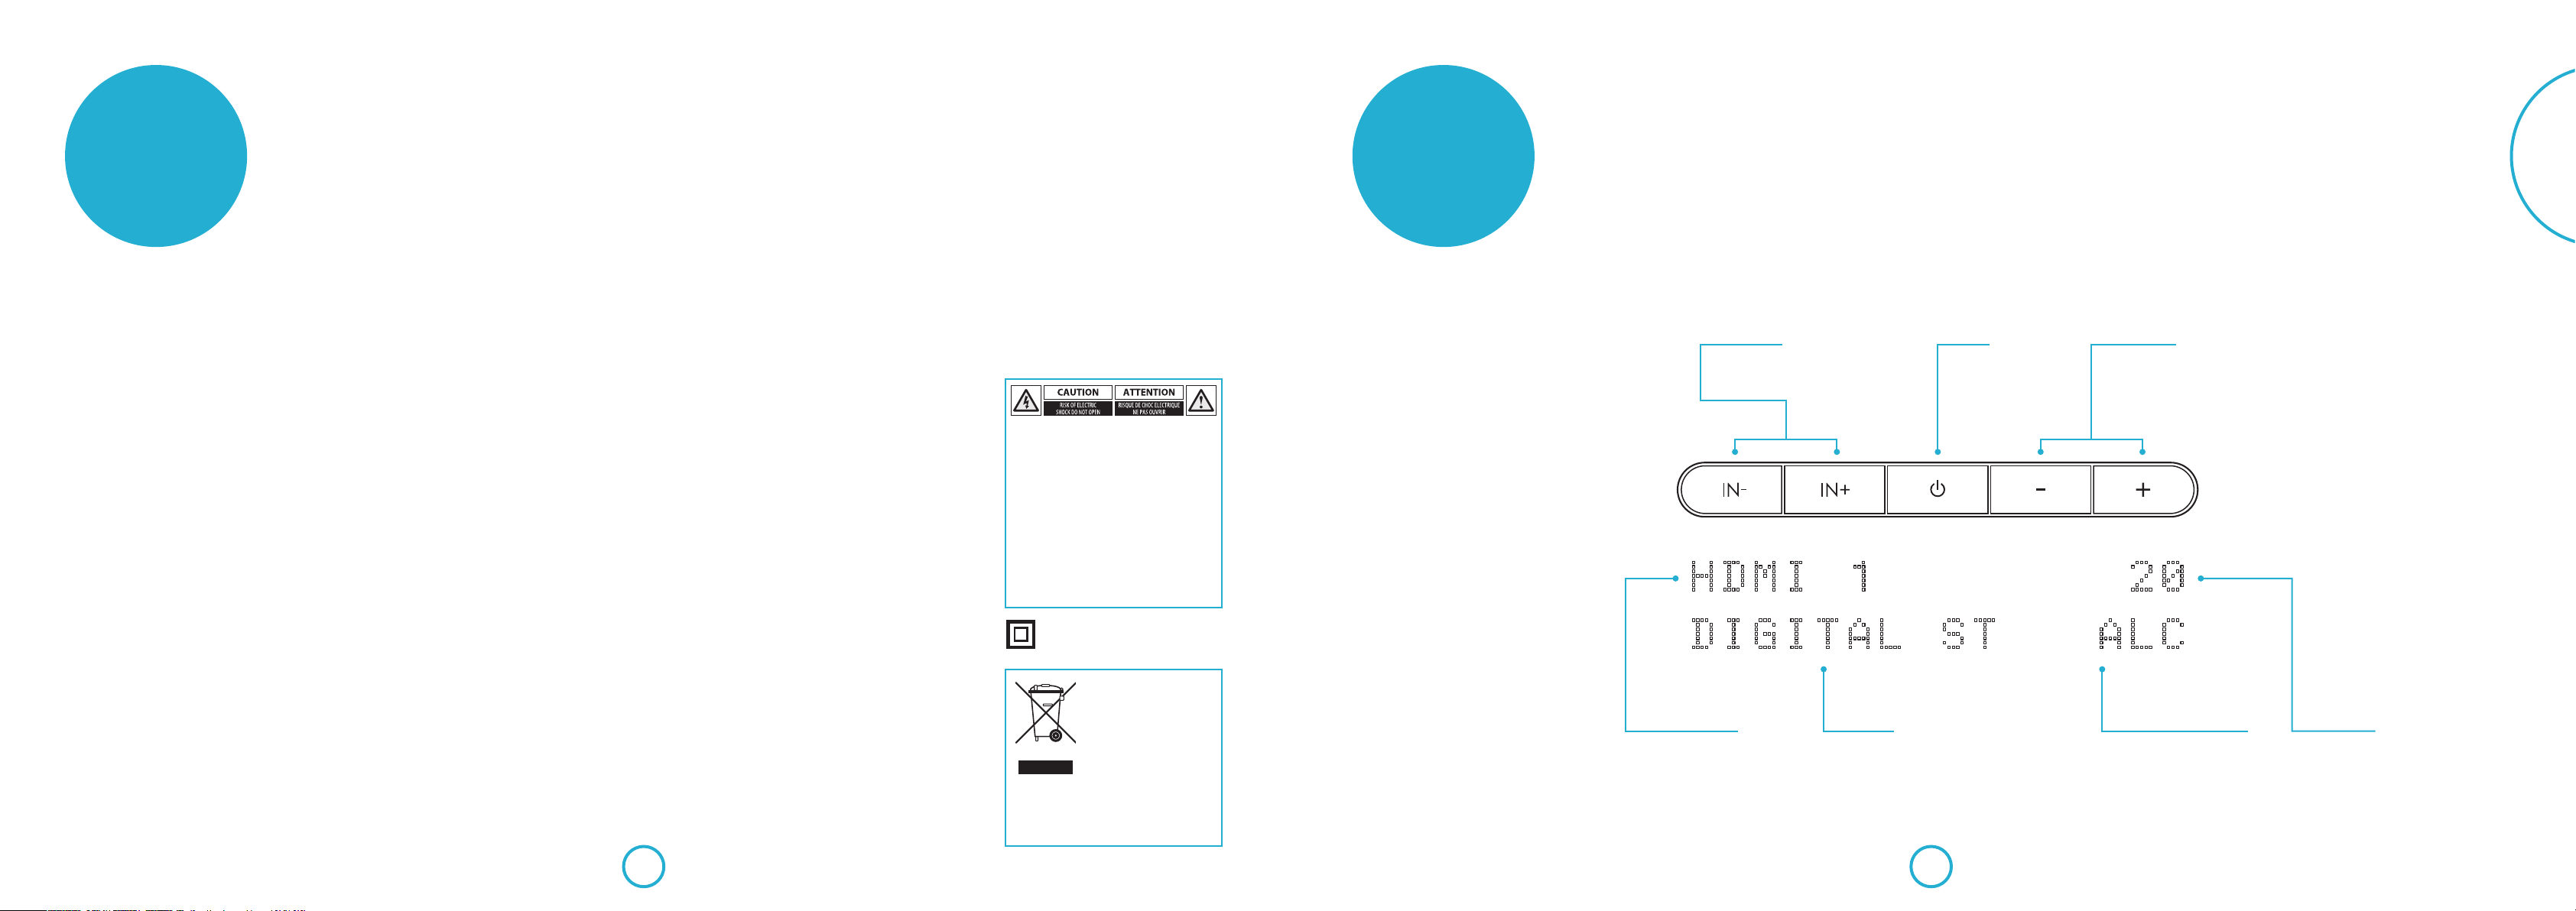
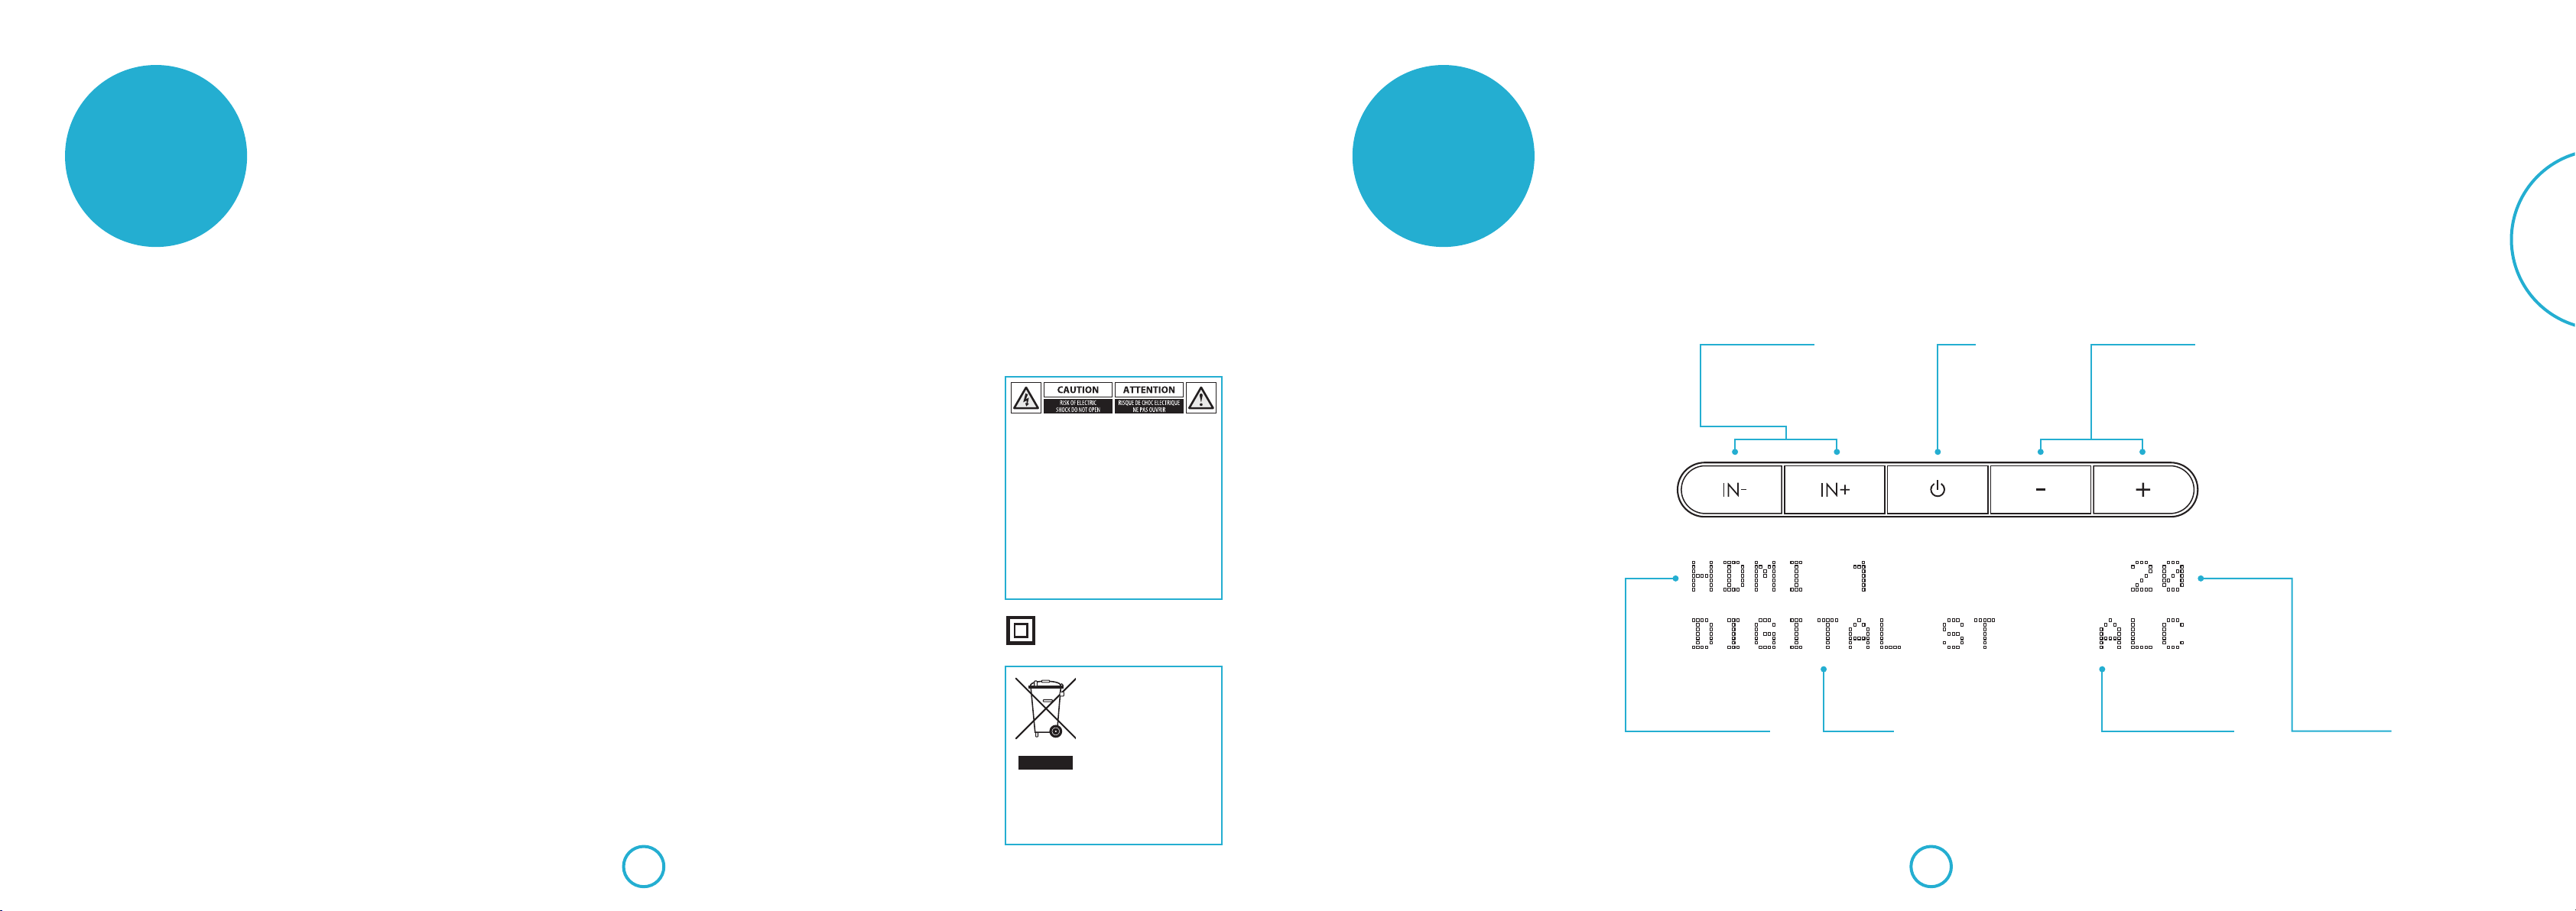
Buttons and display
Input selection
IN- backwards through input sources.
IN+ forwards through input sources.
The display indicates selected source.
Selected input source
Note: changes to menu
level during setup,
see page18 for more
information.
Audio mode
Note: changes to menu
option during setup,
see page18 for more
information.
Standby
Switches the Solo bar in
and out of standby.
Volume control
- decreases sound output.
+ increases sound output.
Volume shown on display.
Automatic Loudness Control
Use the remote control to turn
ALC on and off.
Volume setting
Note: changes to value
for selected menu option
during setup, see page18
for more information.
E-5E-4
Page 6

quick start
English
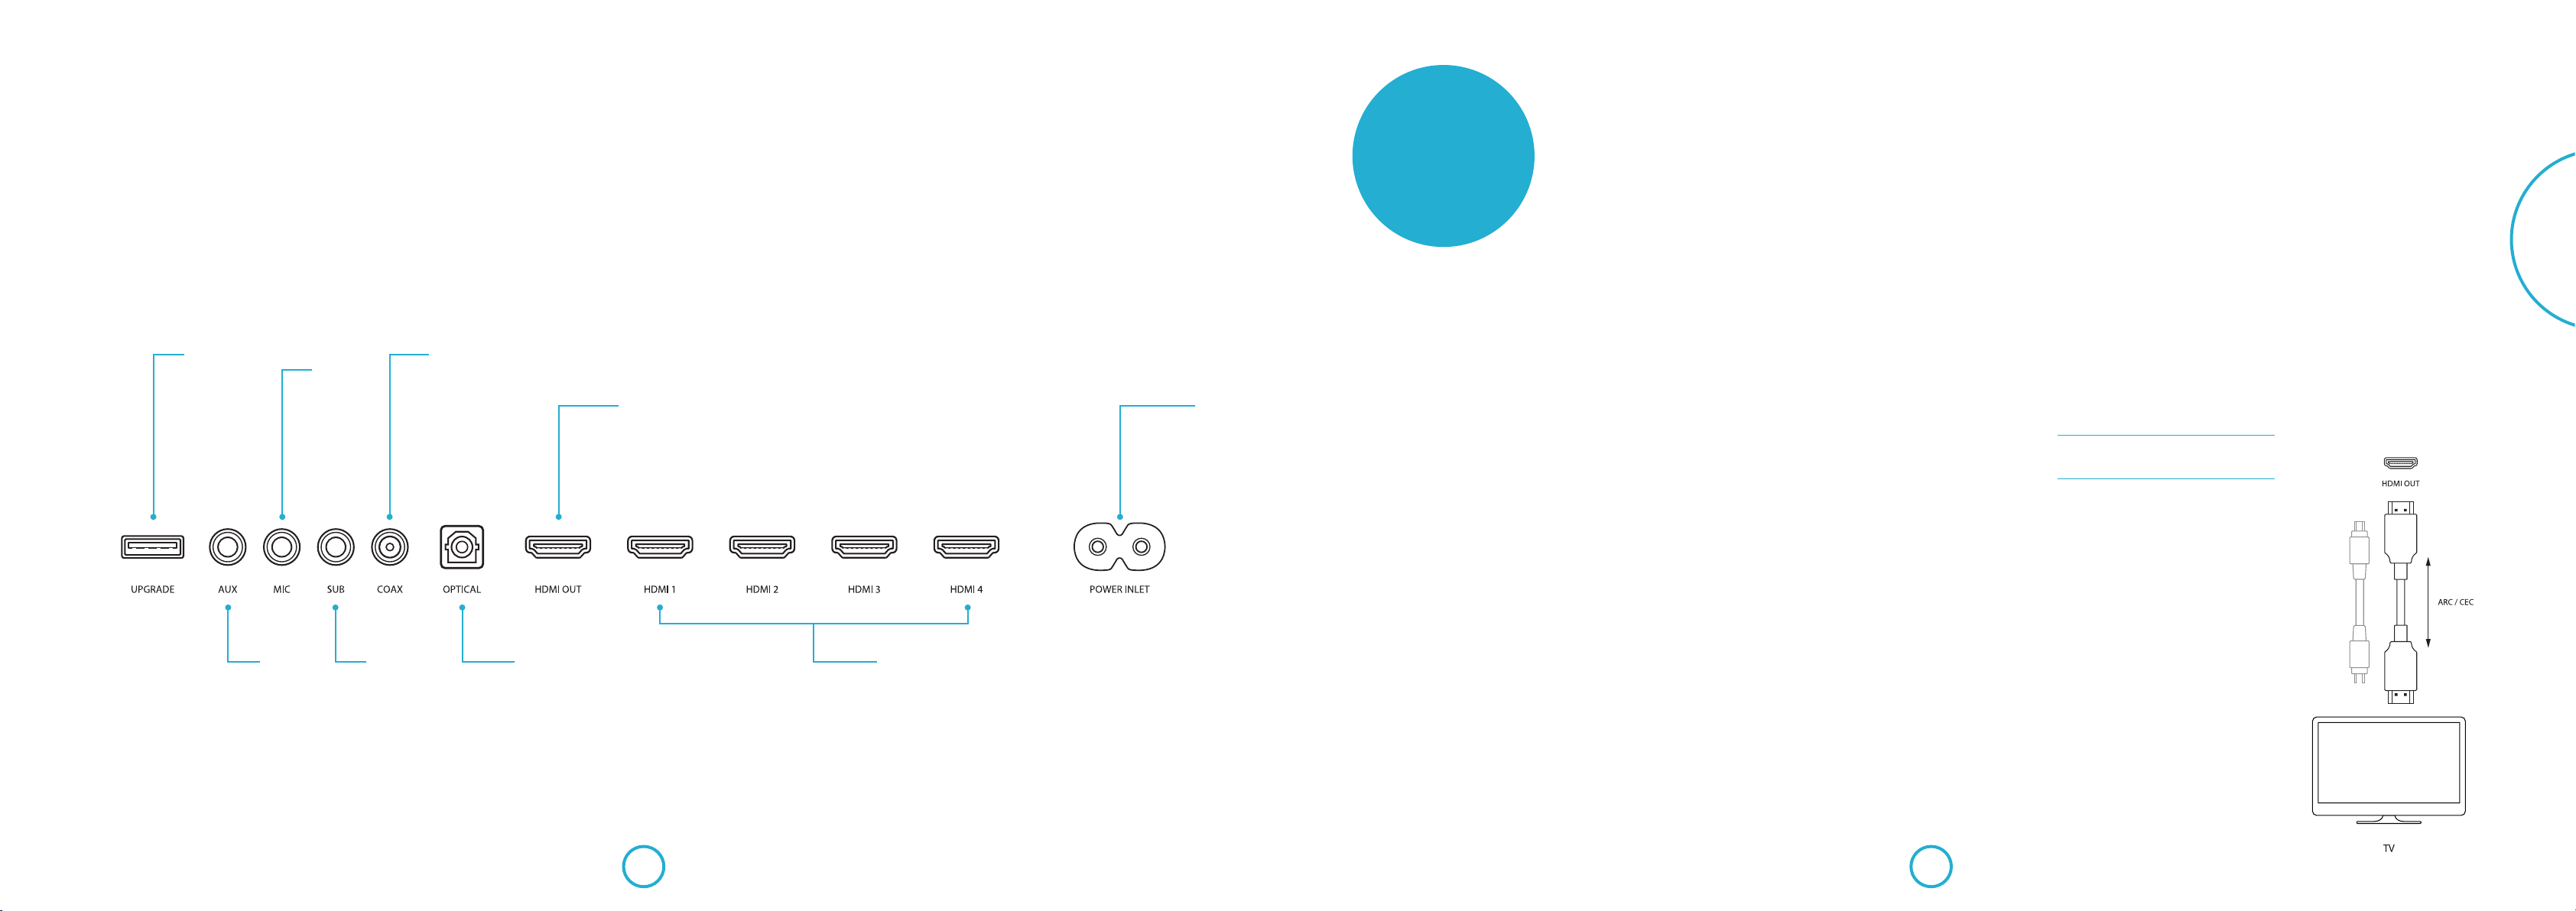
Connections
USB
Used for service and
firmware updates only
See page21 for
information about
firmware updates.
AUX
3.5mm stereo
mini-jack, used
to connect an
analogue audio
source.
MIC
3.5mm mini jack,
used to connect mic
supplied during auto
speaker setup.
See page17 for more
information.
SUB
RCA LFE output,
used to connect a
subwoofer.
See page10 for
information about
connecting a Solo sub
via a wireless link.
COAX
RCA socket, used
to connect a digital
audio source.
OPTICAL
TOSLINK socket, used
to connect a digital
audio source.
HDMI OUT
Used to connect a
TV and as the Audio
Return Channel (ARC).
See page7 for more
information.
HDMI 1 – 4
Used to connect up
to four digital devices
providing 1080p and
3D pass through.
POWER INLET
Used to connect to
mains power supply.
What’s in the box?
< Solo bar soundbar
< Power cord
< Remote control
< Batteries (2 x AAA)
< Microphone
< Wall mount bracket
< User manual
< Registration card
Placing the unit
e Solo bar is an incredibly versatile
product. Place it on a table top, cabinet
or shelf, making sure that it sits level and
securely. Position it below a TV set, either
free standing on a at level surface or
mounted to a wall.
For the best listening experience, we
recommend wall mounting . Use the
custom-designed wall bracket supplied.
See page24 for xing and mounting
instructions.
Position the Solo bar away from direct
sunlight and sources of heat or damp.
Connecting devices
Once the Solo bar is positioned correctly,
connect it to your devices as shown in the
following illustrations.
Make sure that none of the cables are kinked
or stretched.
WARNING: Do not connect your Solo bar to the
mains until you have connected all of your audio
and video devices.
Connecting a TV
Connect your TV to HDMI OUT using an
HDMI cable. If your TV supports ARC, the
audio can be played through the Solo bar
for better sound performance – see page20
for setup information. If your TV does not
support ARC, connect an audio cable to
OPTICAL or COAX input on the Solo bar.
Audio cable
if not ARC
E-7E-6
Page 7

English
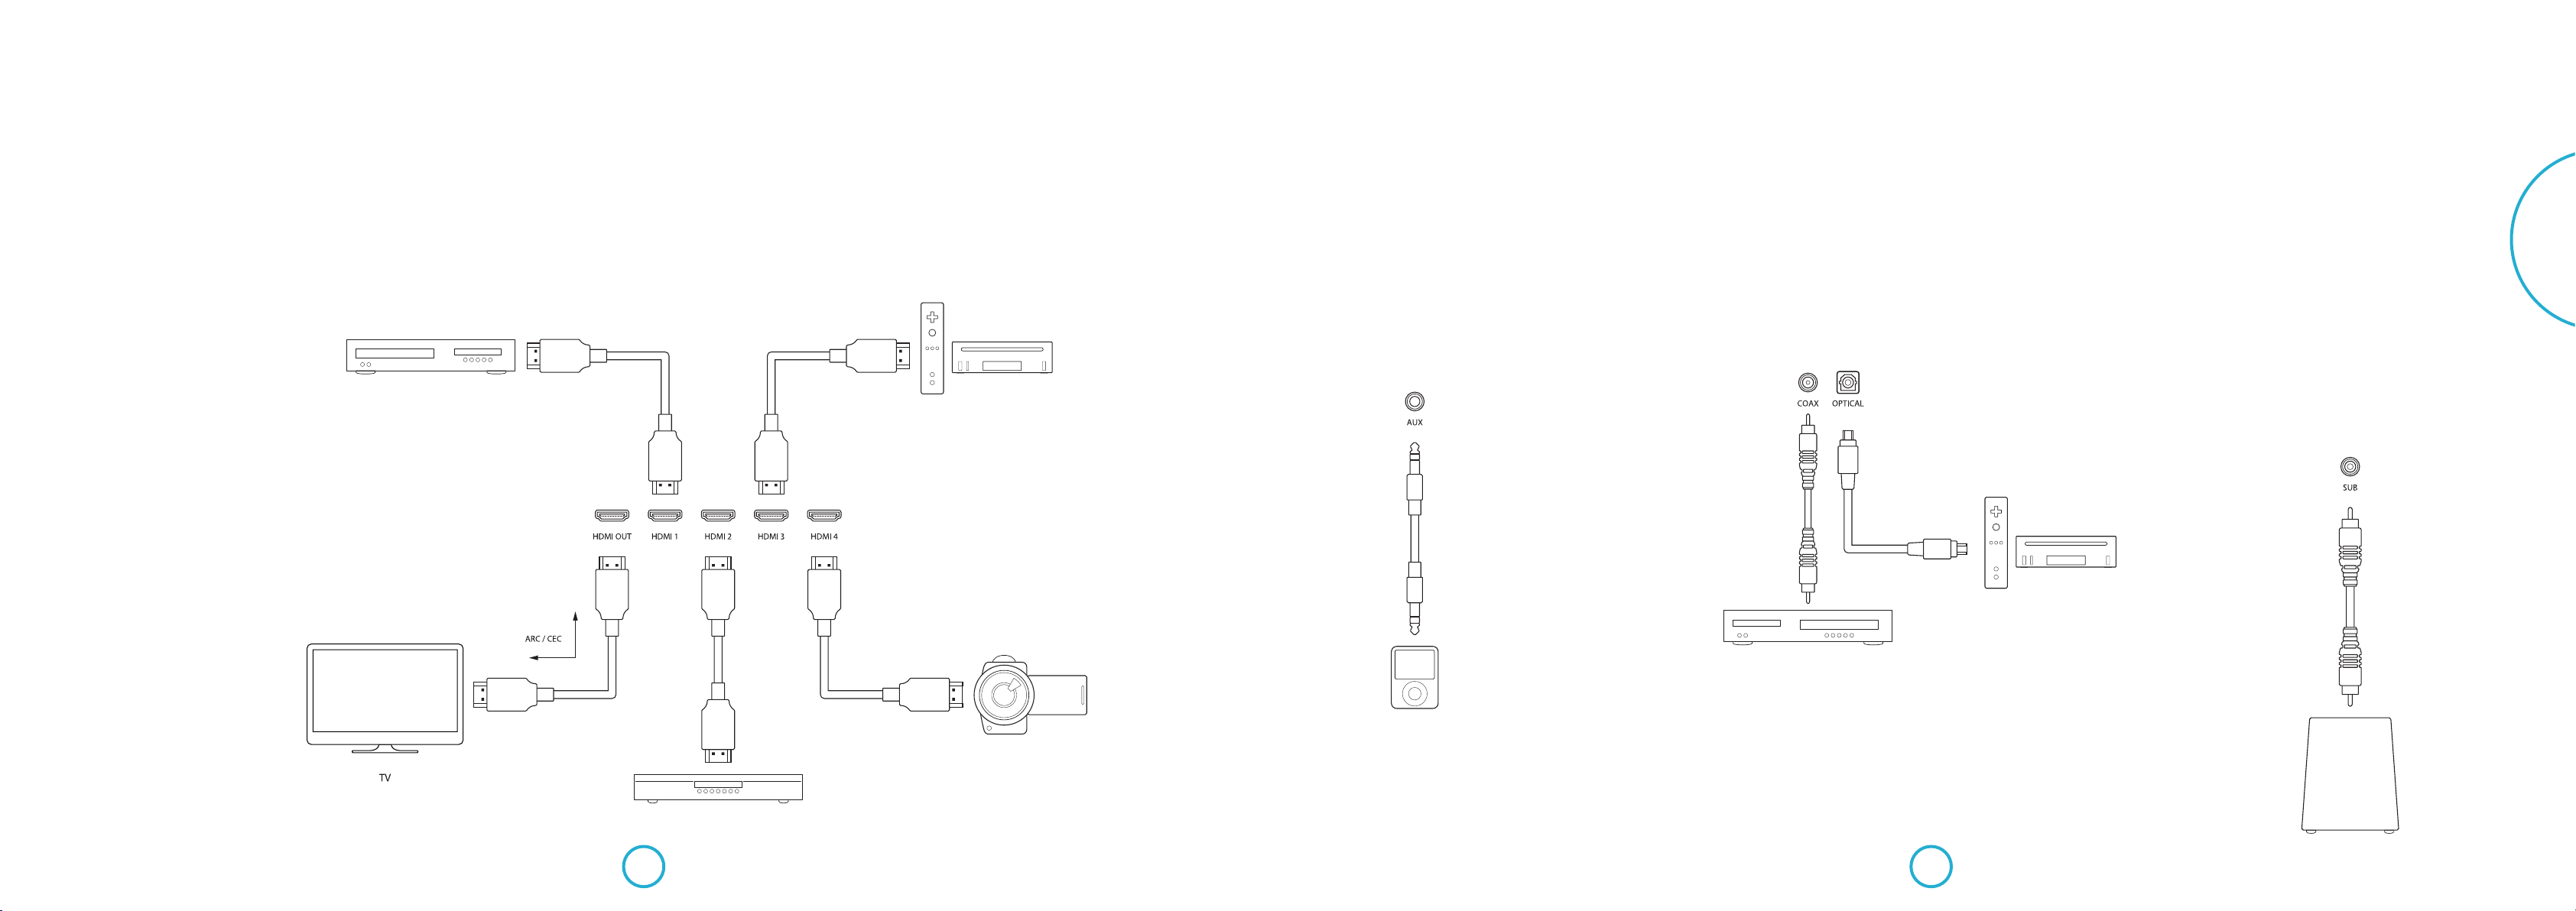
Connecting digital devices via HDMI Connecting analogue devices
Many digital devices including set-top
boxes, Blu-ray players, DVD players, games
consoles and camcorders can be connected
using an HDMI connection.
Note that when using this method of
connection, the image will be displayed
by your TV and the sound will be played
through the Solo bar. No other audio
connections are needed.
Blu-ray dics player Games console
Connect any analogue audio device to the Solo
bar’s AUX input using a 3.5mm mini-jack lead.
MP3 player
Connecting audio devices via digital input
Audio devices can also be connected to the Solo bar using the Coaxial
and Optical inputs.
Games console
CD player
Connecting a subwoofer
e Solo bar comes with a built-in
subwoofer output (see page19 for setup).
Use a subwoofer lead with an RCA LFE jack
to connect your equipment to the Solo bar.
Note: If you have an Arcam Solo sub, please
see the next page.
Set-top box
Camcorder
Subwoofer
E-9E-8
Page 8
English
WIRELESS
Plug in and turn on
e Solo bar is supplied with a moulded
mains plug already tted to the cable. Check
that the plug supplied ts your supply. If
your mains supply voltage or mains plug is
dierent, please contact your Arcam dealer
immediately.
First, connect the mains cable to the power
socket on the back of the Solo bar, making
sure that it is pushed in rmly. Now push
the plug into your mains socket and switch
the socket on. e unit is now in standby,
indicated by a red LED on the front panel.
If the unit is le unused for an extended
period of time it will go into standby to
reduce power consumption.
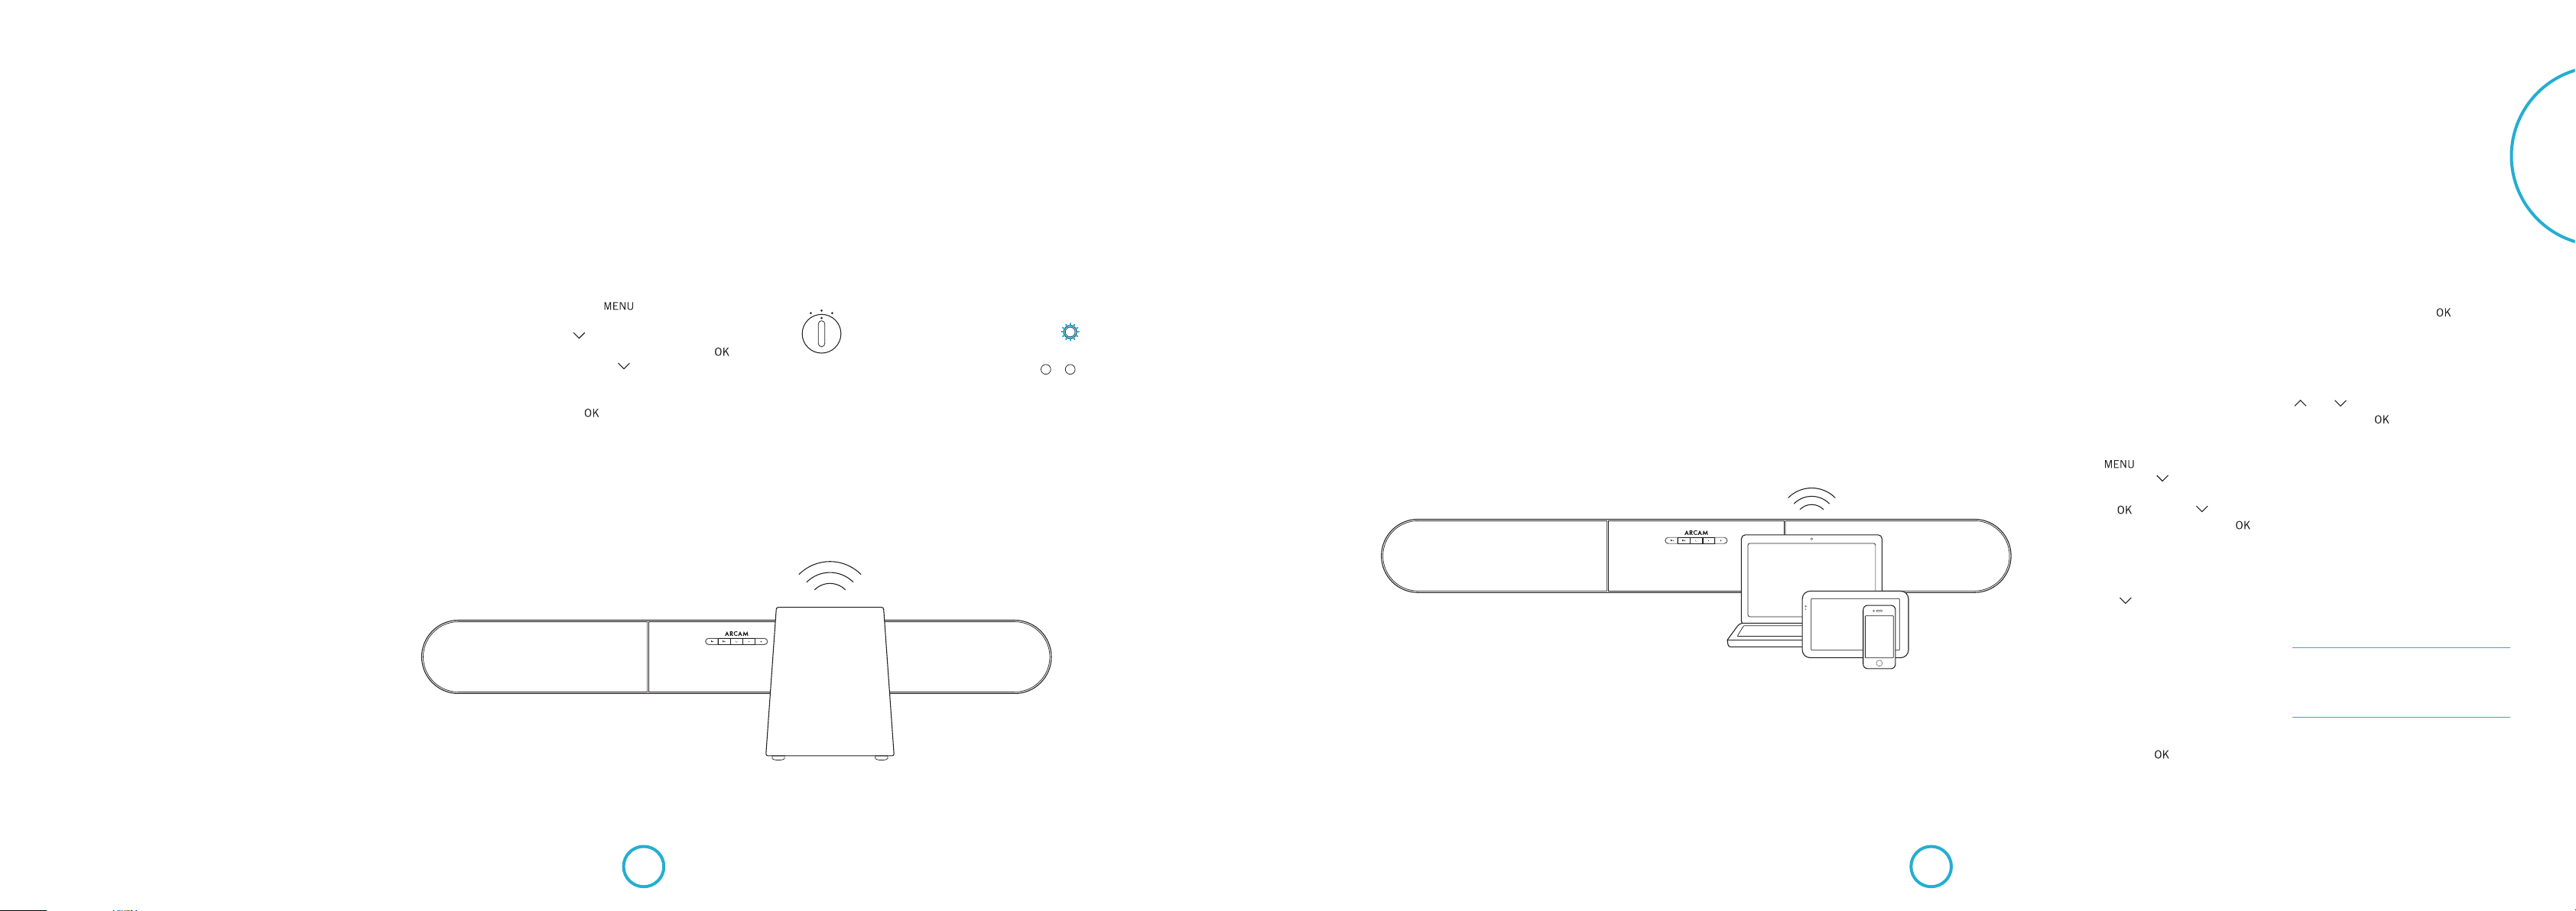
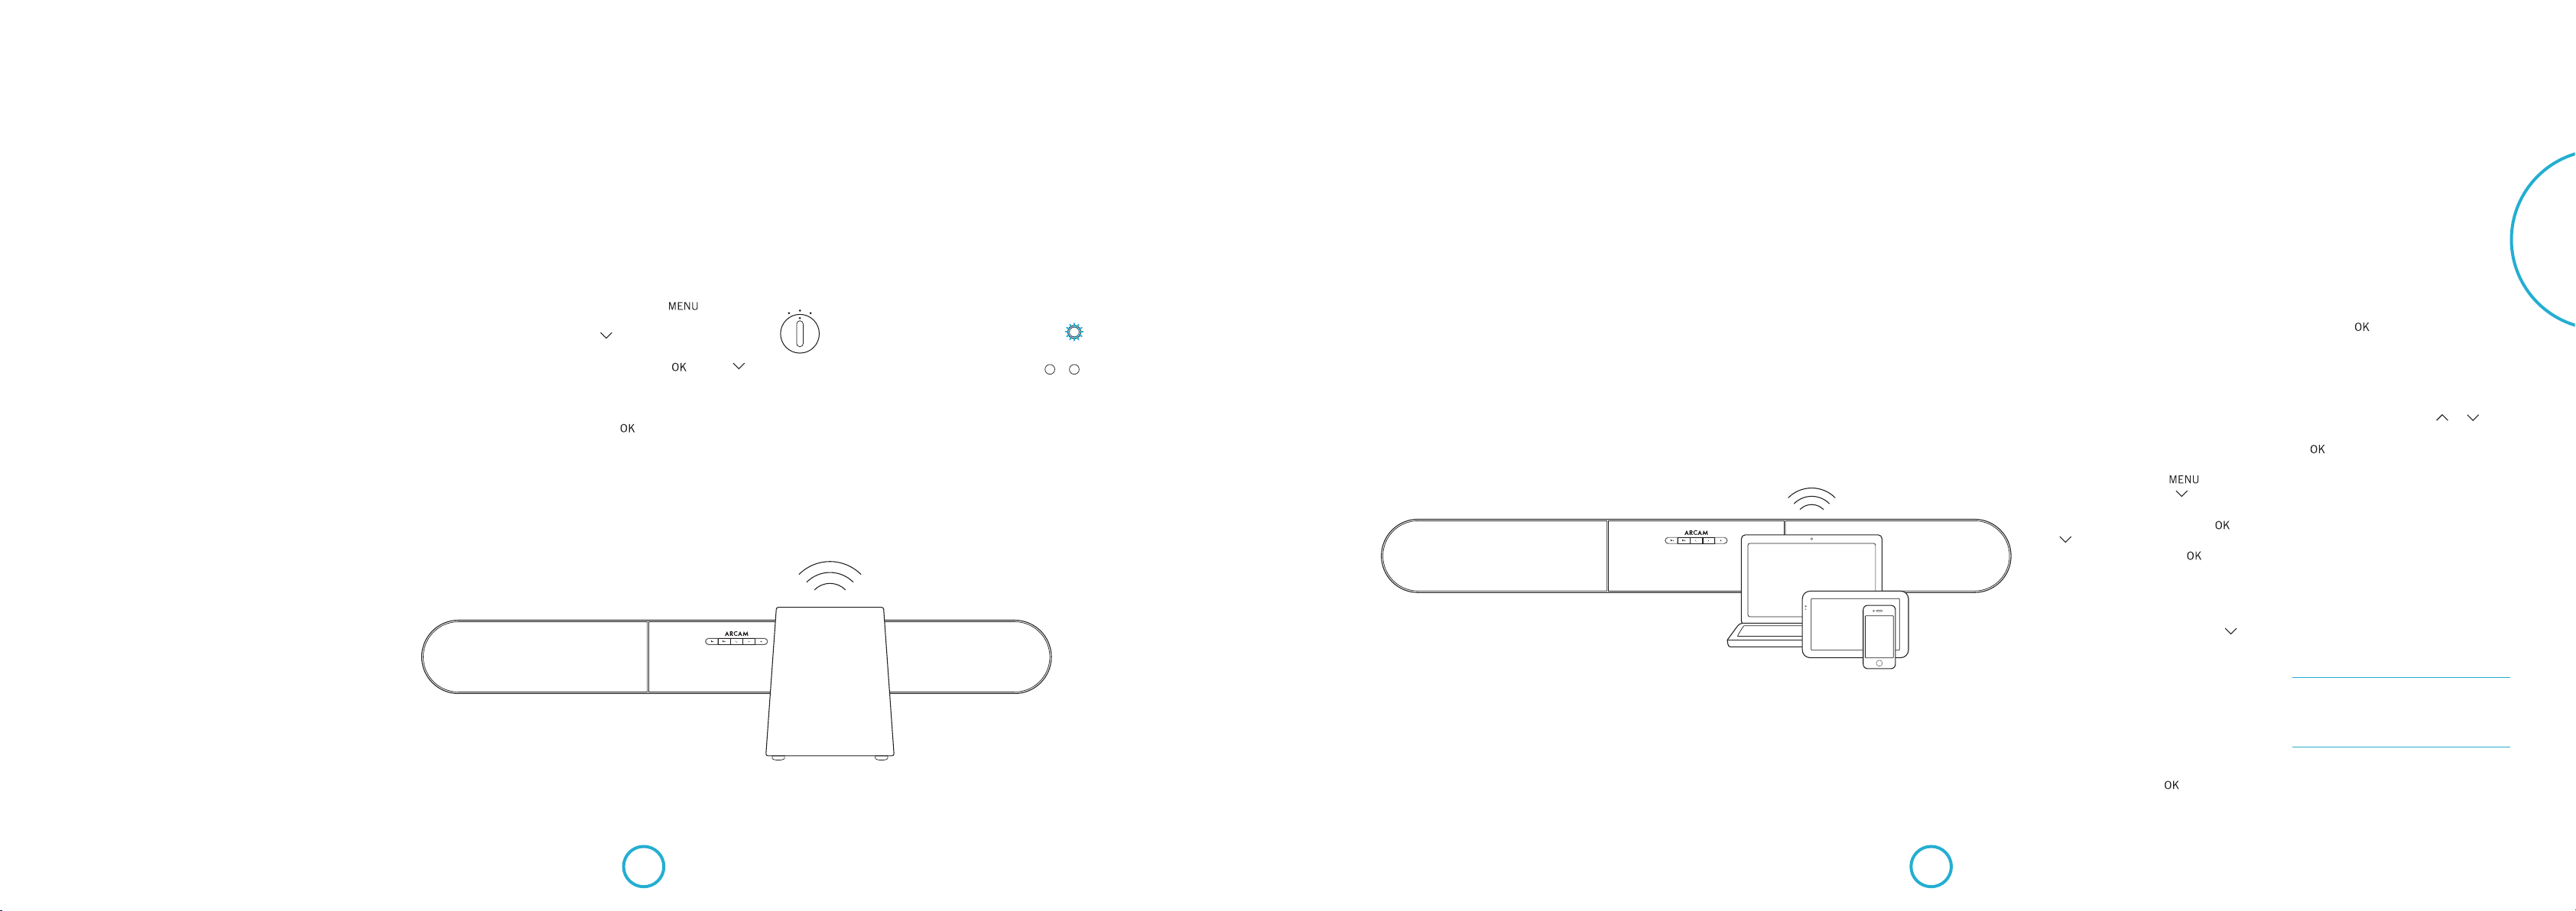
Connecting a Solo sub
Being part of the Arcam Solo range means
your Solo sub can communicate wirelessly
with the Solo bar.
Make sure the Solo sub is turned on at its
power switch.
1. Press the button on the remote
control unit of the Solo bar followed
by until Speaker/EQ Setup appears
on the front display panel. Press
followed by again, until Sub Pairing
appears.
2. Press to start the pairing procedure.
e display will change to In Progress.
3. Position the INPUT selector on the rear
of the Solo sub to WIRELESS.
LINE
LFE
INPUT
4. Press and hold the WIRELESS button
on the rear of the Solo sub for about ve
seconds. e WIRELESS LED will start
ashing blue, signalling that the Solo
sub is in sync mode and searching for a
source to connect with.
WIRELESS
PAIRING
PWR WIRELESS
5. If the pairing procedure was successful, the
WIRELESS LED will glow a constant blue
and the Solo bar will display Linked.
6. Once the pairing procedure is nished, the
Solo sub will always reconnect whenever it
is powered on or receives an audio signal.
Connecting Bluetooth® devices Using headphones
e Solo bar has built in Bluetooth wireless
technology for seamless integration with any
Bluetooth enabled device.
Pairing with Bluetooth devices
Follow the advice provided in the operation
instructions for your Bluetooth device. Select
Arcam Solo bar from the list of Bluetooth devices
to complete the pairing. Once the pairing procedure
is nished, it does not need to be performed again.
Bluetooth® devices
e Solo bar comes with a Bluetooth
transmitter so that it can connect to a set of
Bluetooth headphones.
Note: Transmitting via Bluetooth is different
to receiving. Up to four devices can be paired
but only one device can be connected at a
time on a first-come-first-served basis.
Connecting Bluetooth headphones
Press the button on the remote
control followed by until Speaker/
EQ Setup appears on the front display
panel. Press followed by again,
until Headphone Out appears. Press to
selectit.
By default, the Bluetooth transmitter is
turned o so Disable is shown on the display
panel. Press to change the display to
Enabled. e Bluetooth transmitter is now
on and the Device Search menu option is
activated.
Now follow the advice supplied with your
Bluetooth headphones to put them in
pairing mode.
If no devices are found, press again to
start another search. You might want to
make sure there are no obstacles in the way.
When the search is nished, available
devices will be displayed in a list. Use the
and buttons to select the correct
device and press to nish the pairing
procedure. e Solo bar will display a
message to indicate that the connection has
been successfully completed.
Using your headphones
Make sure both the Solo bar and your
headphones are turned on. Select an audio
source and enjoy listening to sound through
your headphones.
Note: If your headphones are turned off,
audio is automatically played using the Solo
bar speakers.
WARNING: Turning the Bluetooth transmitter on
temporarily disables the Bluetooth input. This
means you will not be able to stream sound from
a Bluetooth device to the Solo bar and listen via
headphones at the same time.
Solo sub
Note: Sync mode lasts for about 30seconds.
If no source is detected during this time, the
Solo bar will stop searching and the process
will need to be repeated.
Make sure that Device Search is still
displayed and press . e Solo bar will
search for available devices for one minute.
E-11E-10
Page 9
remote control
The Solo bar can be set up and controlled using either the remote control
unit supplied or the Solo bar remote control app.
remote control
app
English
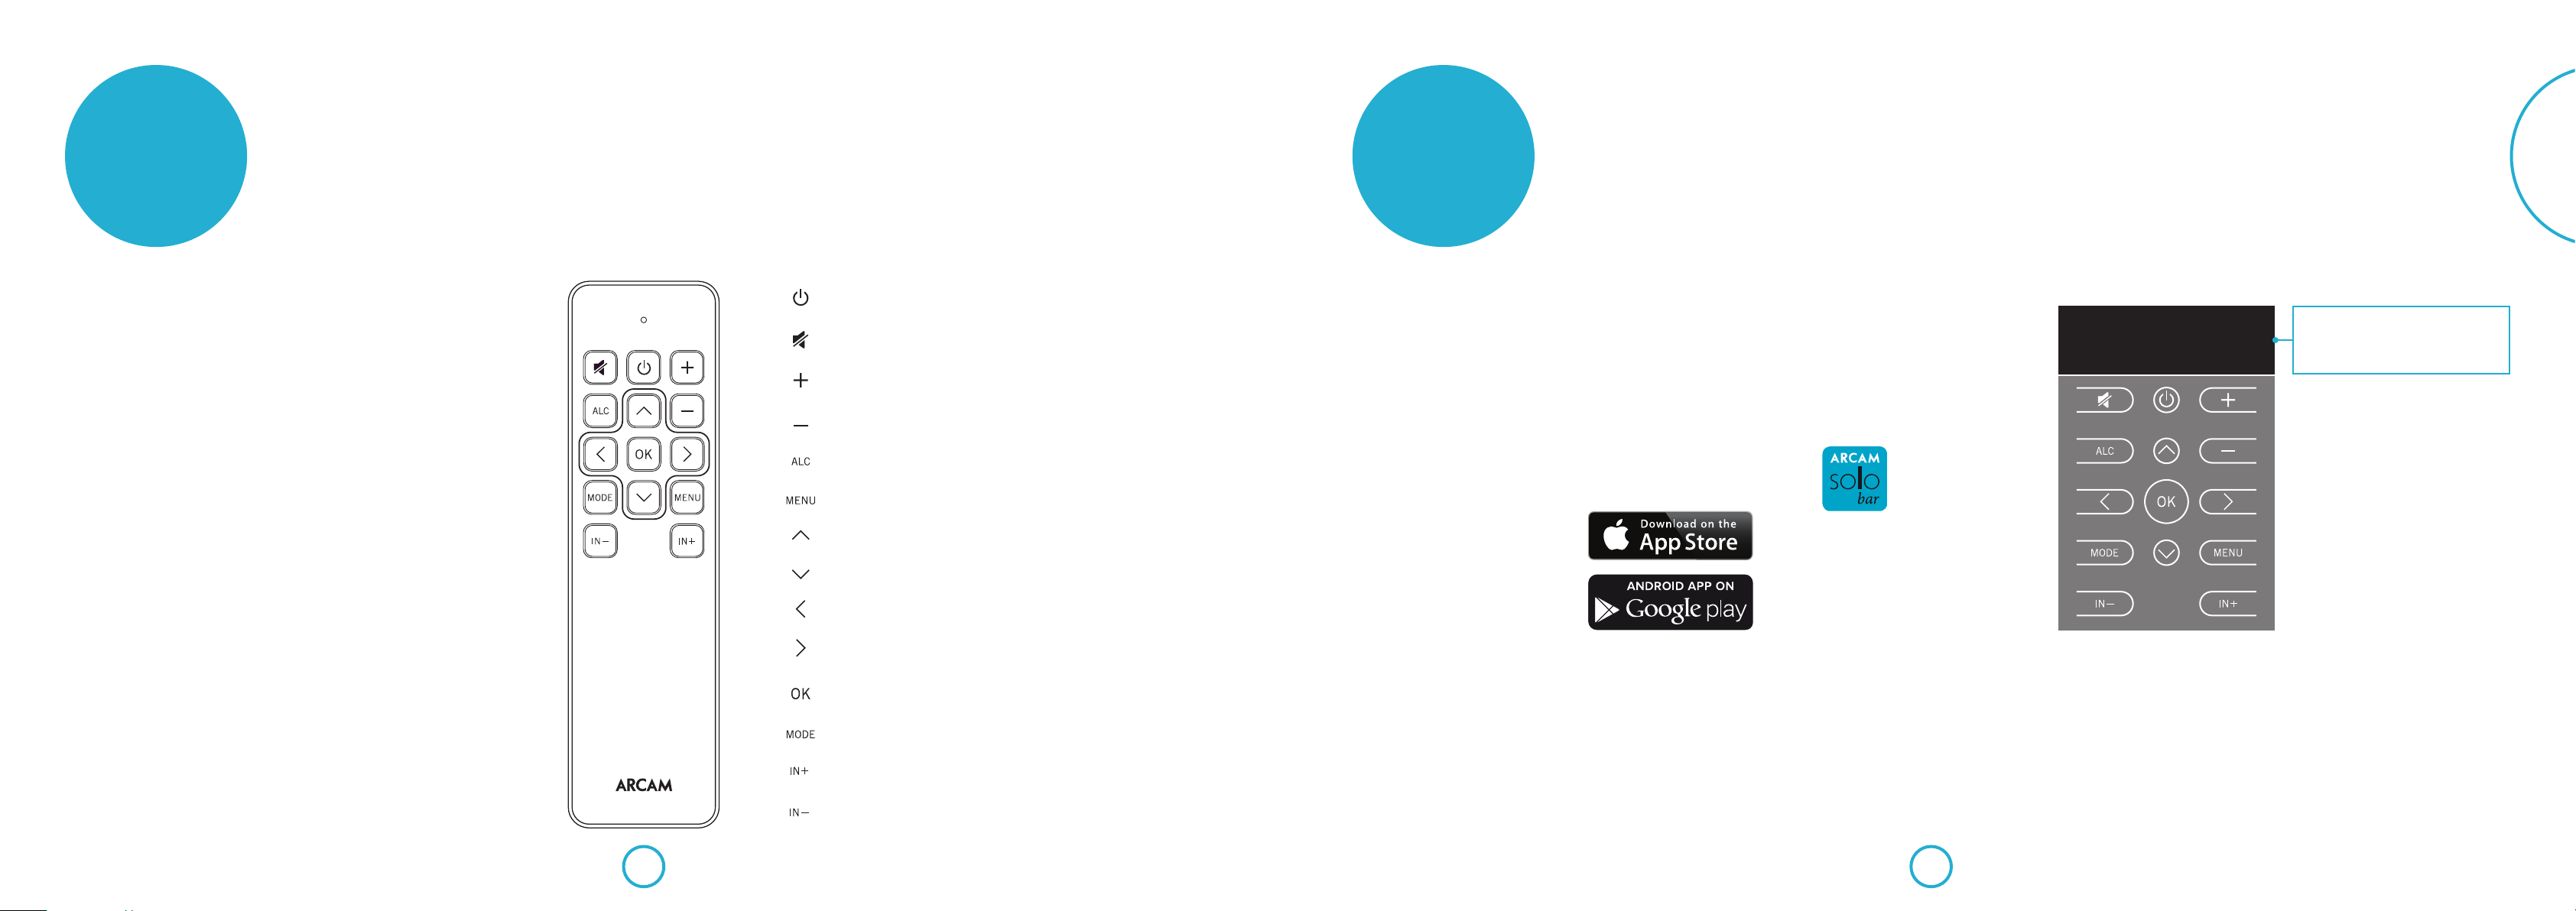
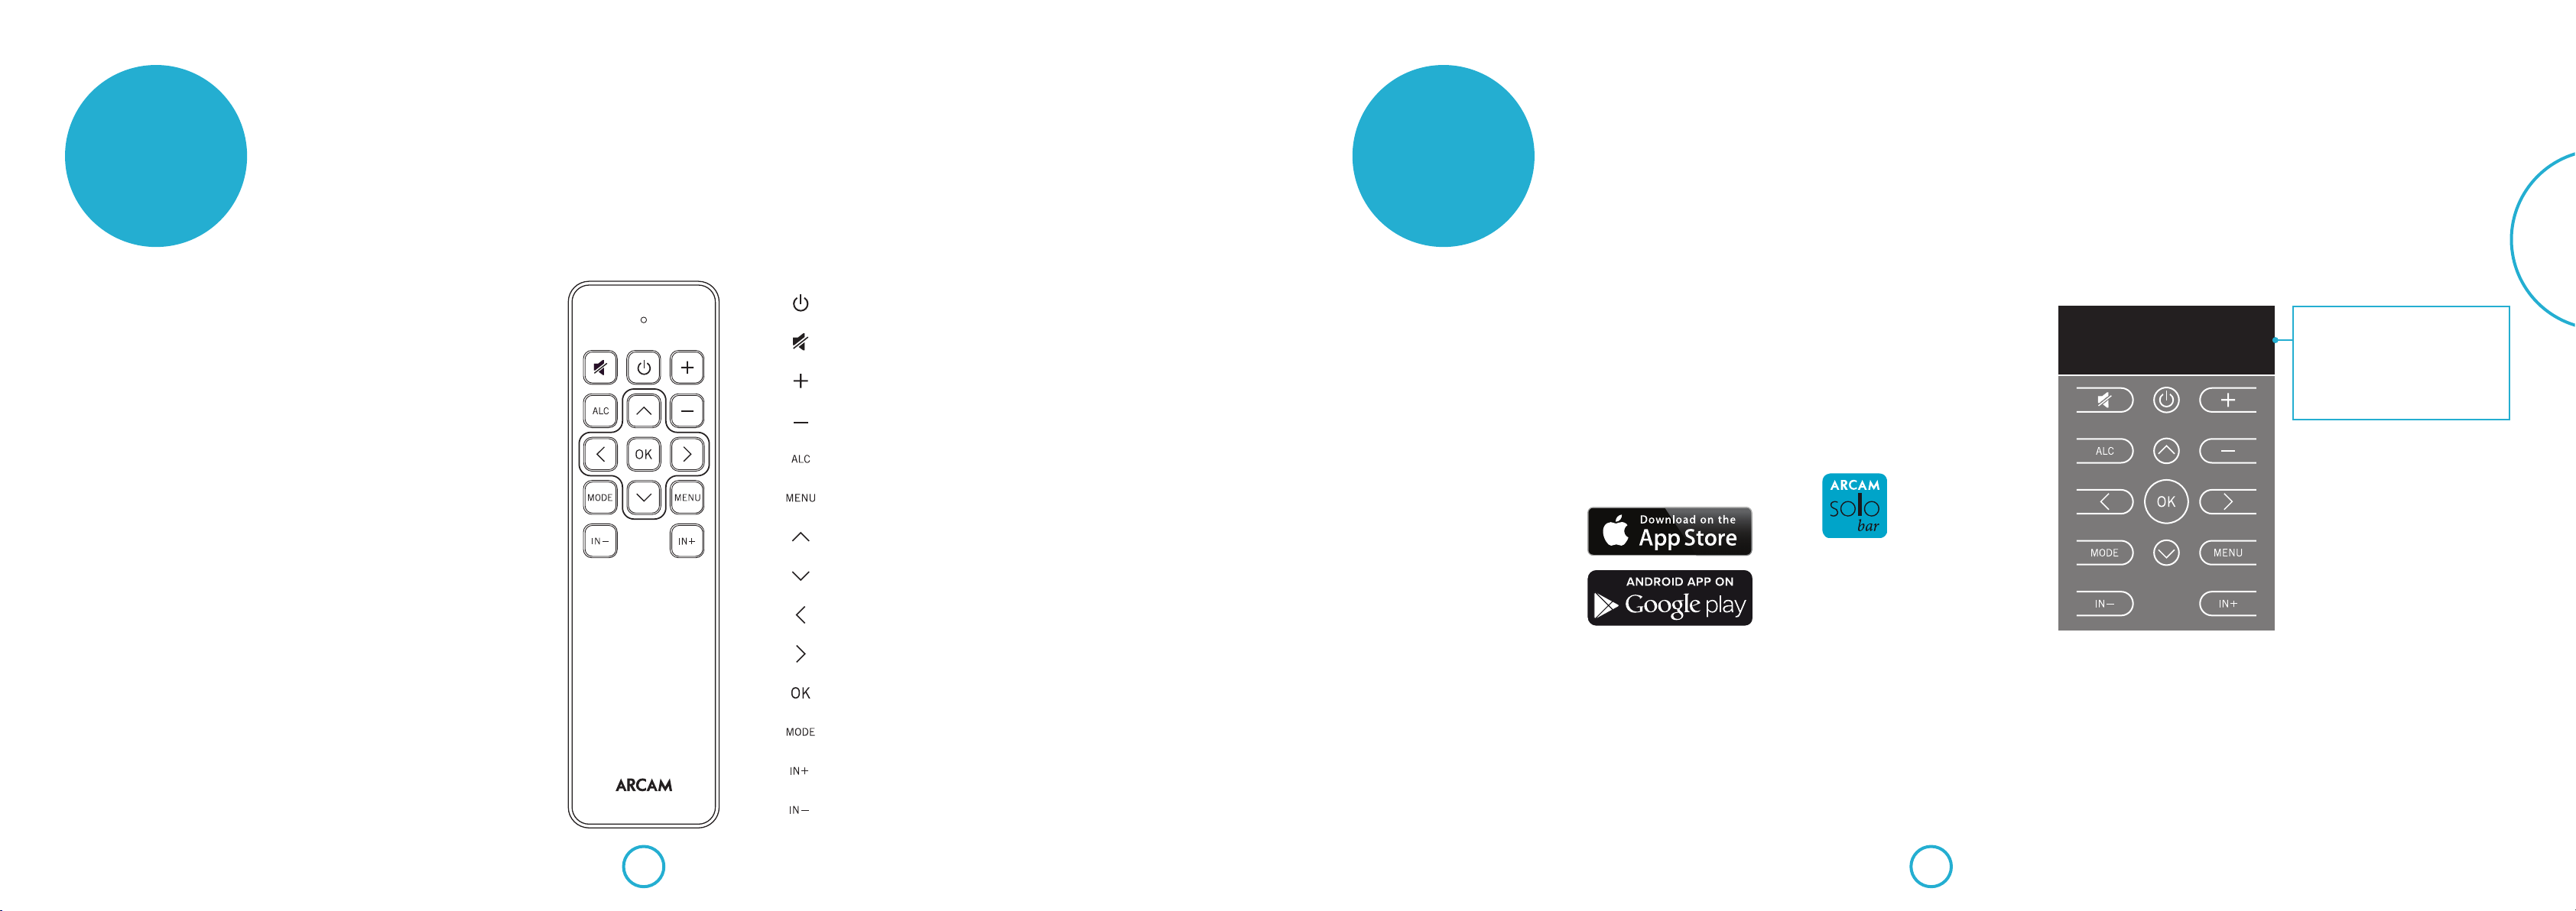
Using the remote control
e remote control unit is programmed for
use with the Solo bar.
Before use, make sure the two AAA batteries
supplied are correctly installed.
1. With the remote face-down, press down
on the non-slip indentations of the
battery compartment cover and slide
the cover o.
2. Insert the two ‘AAA’ batteries supplied.
Take care to insert the batteries in the
right direction by following the ‘+’ and
‘–’ marks.
3. Slide the battery compartment cover
back and lock it in place with a click.
To ensure reliable operation, the remote
requires a clear line of sight to the Solo bar
front panel display.
Switches the Solo bar between stand-by and on.
Press once to mute the Solo bar. Press again (or adjust the volume) to unmute.
Increase volume.
Decrease volume.
Automatic Loudness Control - switches between on and off.
Press to enter the set-up menu (see pages 18 - 20). Press again to exit the menu.
Navigate upwards through menu settings.
Navigate downwards through menu settings.
Navigate back through menu levels.
Navigate right through menu levels.
Press to select menu setting.
e Arcam Solo bar remote control
app enables you to use an Apple iOS or
Android™ device to control the Solo bar via
Bluetooth.
Use the app to congure menu settings and
control playback in exactly the same way as
the remote control unit supplied.
Minimum OS requirements for the app:
iOS6, Android 4.0
Download instructions
Download the app from either the App
StoreSM or Google Play™.
Follow the download prompts displayed on
your device.
Once installed, tap the app icon to launch
the application.
HDMI 1 20
DIGITAL ST
App mirrors the display of the Solo bar
Display shows input source, volume and
audio format during normal operation or
menu options when configuring set up.
Switches through stereo, movie and concert audio output modes.
Input source selector - switches forwards through connected sources.
Input source selector - switches backwards through connected sources.
E-13E-12
Page 10

operation
English
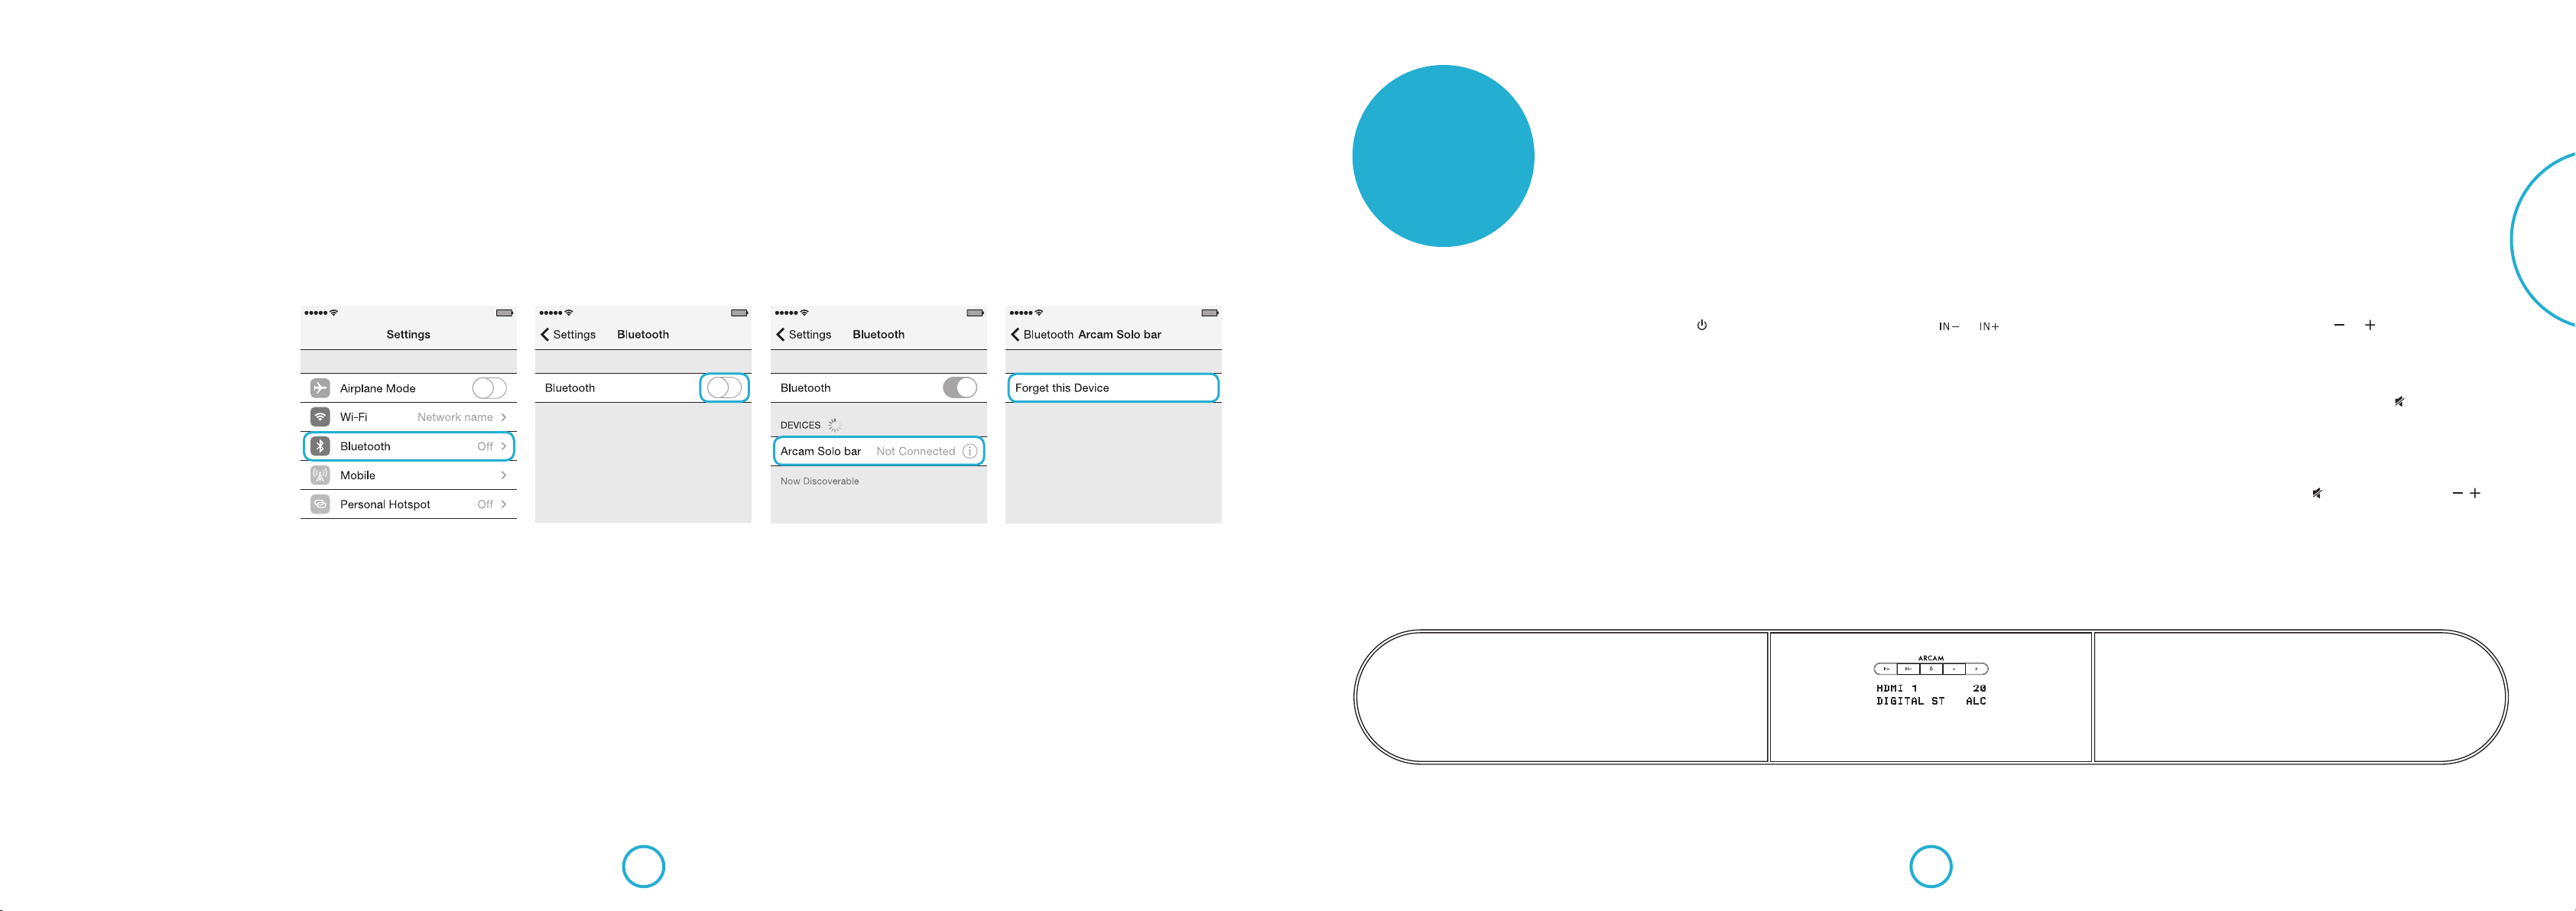
Pairing your mobile device
e app requires your device to be paired
with the Solo bar via Bluetooth.
Make sure your device has Bluetooth turned
on. For iOS devices follow these steps:
For Android devices, follow the instructions
supplied with your device.
Open Settings then tap Bluetooth. Slide Bluetooth switch to on position. Wait for Arcam Solo bar to appear under
DEVICES and then tap to Connect.
Should you need to unpair your device, tap
the information icon next to Connected
and then tap Forget this Device.
Note: A maximum of four Bluetooth source
devices can be paired to the Solo bar with
each device being available on a first-comefirst-served basis. Occasionally, if more than
one person wants use the Solo bar you may
need to unpair a device.
Switching on
To wake the Solo bar from standby, press the
button on the front panel or the remote.
ARCAM Solo bar appears briey on the
front panel display followed by the currently
selected input source, volume setting and
audio mode.
Note: If the unit is to be left unused for an
extended period, disconnect it from the
mains supply to save power.
Selecting a source
To select a particular source, press the
or buttons on the front panel or remote
until that source is shown on the front panel
display. e following sources are available:
HDMI 1
HDMI 2
HDMI 3
HDMI 4
OPTICAL
COAX
AUX
BLUETOOTH
Note: If supported, some HDMI devices may
identify themselves by their device name.
If your TV is connected using ARC and
you have followed the setup procedure on
page16 the display panel will show the
following message when watching TV.
TV/ARC
Audio Return Channel (ARC) is a feature
built into the latest version of HDMI which
allows your TV to send audio back down to
the HDMI cable to the soundbar.
Note: This is displayed automatically when
an ARC enabled TV is connected.
Volume control
Adjust the volume by pressing the or
buttons on the front panel or remote.
Muting output
e sound output of the Solo bar can be
silenced by pressing on the remote
control. If the unit is muted, the volume
setting changes to MUTE on the front
display panel.
To cancel mute, press for a second time
or / to change the volume.
E-15E-14
Page 11
English
Selecting an audio mode
e Solo bar has three pre-congured audio
modes – STEREO, MOVIE and CONCERT.
Press the button on the remote to
switch through and make a selection.
Note: Stereo is the default mode and means
audio is played as it was recorded.
Sound from your TV
If your TV is connected to the Solo bar
using ARC, select the appropriate source on
your TV and enjoy superb sound from the
Solo bar using your TVs remote to control
volume.
When used in this way, the Solo bar front
display panel automatically shows TV/ARC.
Sound from Bluetooth®
devices
To enjoy listening to music wirelessly from
any Bluetooth device, rst make sure your
device is paired with the Solo bar - see
page11 for more information.
Once your device is paired, simply follow
the instructions provided with your device.
IR repeater
When the Solo bar is positioned in front
of a TV it may (depending on the model)
obscure the remote control sensor on the
TV so that operation is no longer possible.
If this happens, use the IR repeater function
on the Solo bar to relay the signals through
to your TV. Note: This will work even when
the Solo bar is on standby.
See page18 for setup information.
CEC control via HDMI
Consumer Electronics Control (CEC) is a
feature that allows you to connect up to 15
CEC-enabled devices to your Solo bar via
HDMI and control them simultaneously
using a single remote control unit.
By default, CEC is enabled. See page20 for
setup information.
Typical examples of system control using
CEC include:
< Simultaneous power on or standby of
every connected device.
< Volume control.
< Input source selection.
Auto setup
ere is a proprietary automatic setup
function built into the Solo bar which
attempts to set the essential speaker settings
for your system (including a subwoofer if
present). It also calculates room equalisation
(Room EQ) lter values to remove some of
the worst eects of resonant frequencies in
the listening room.
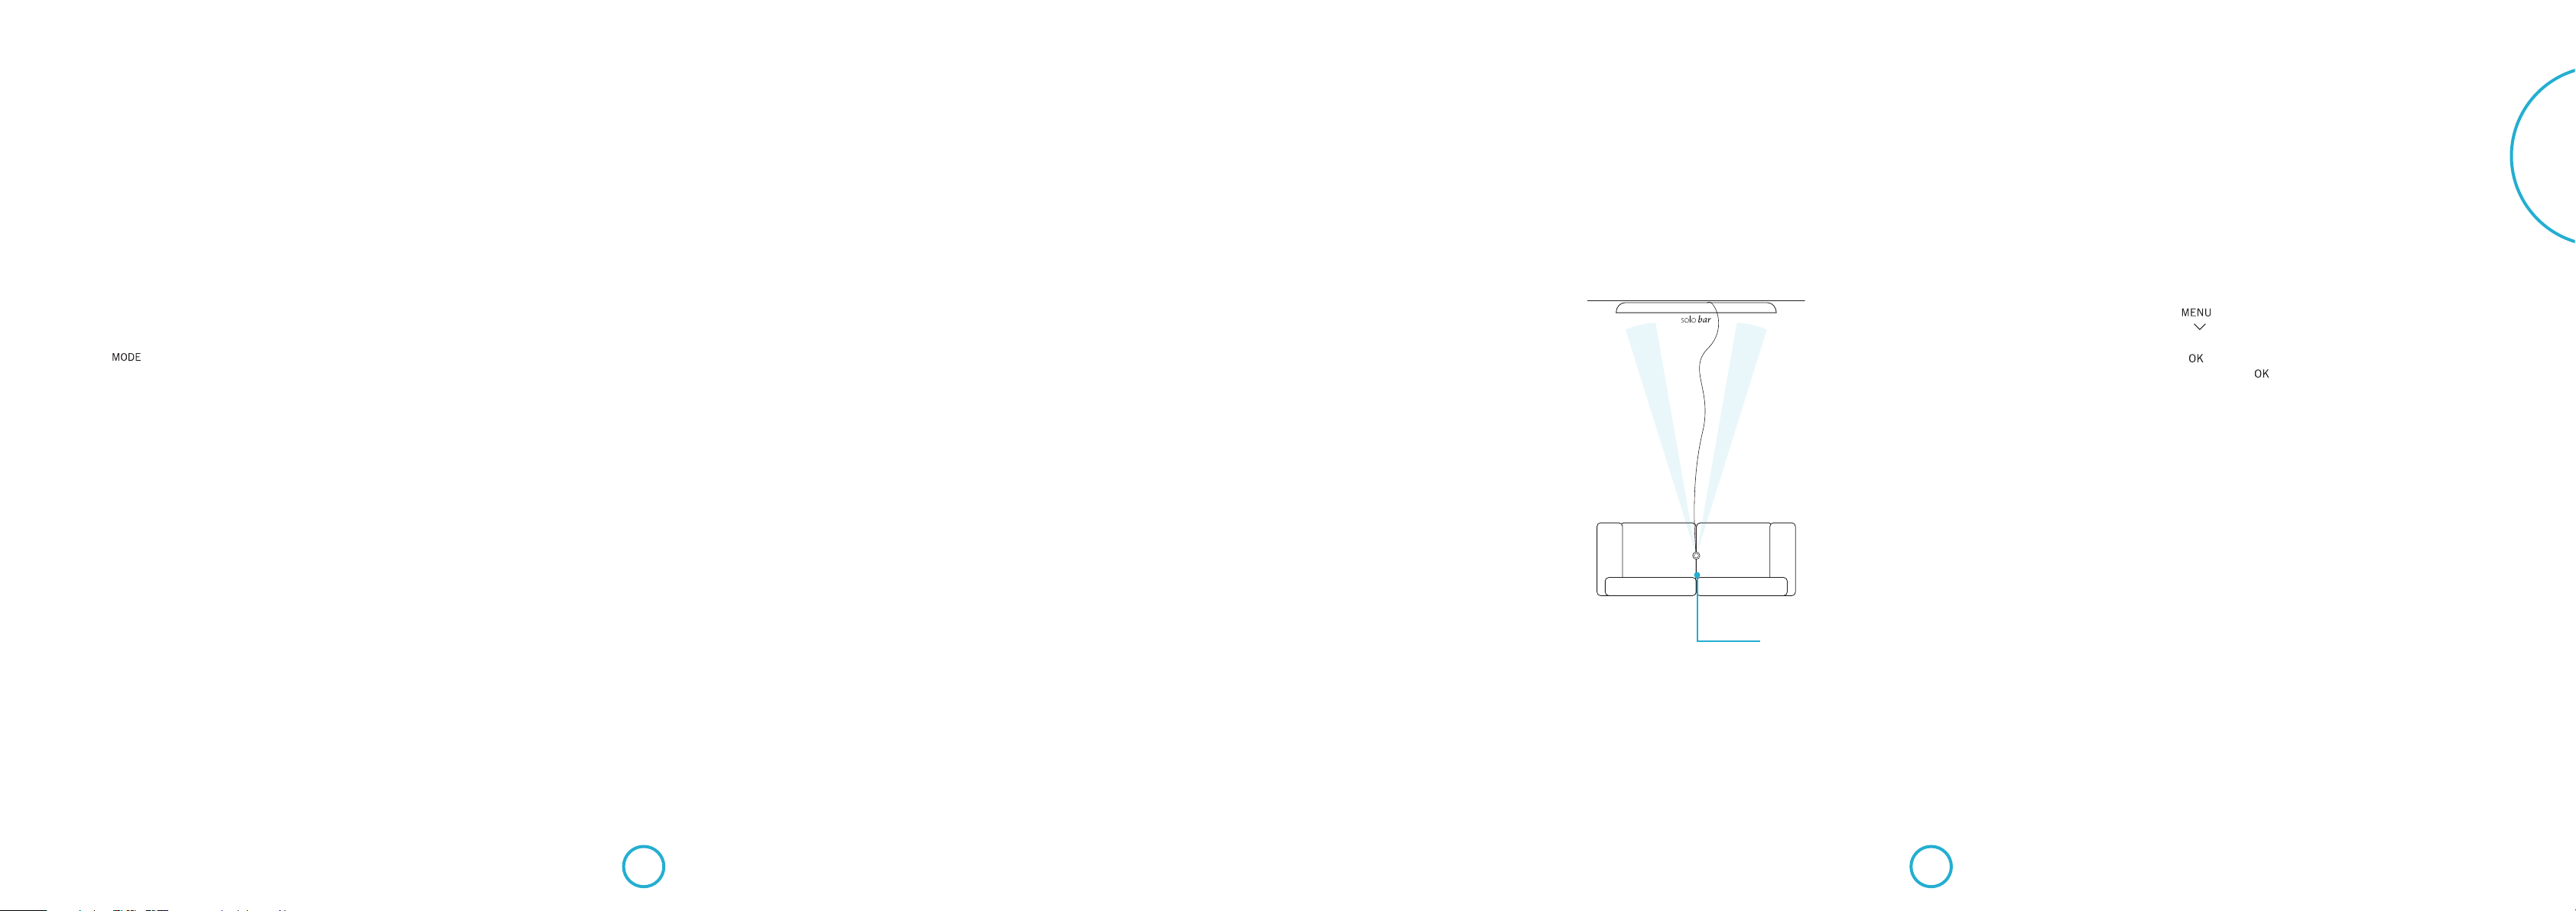
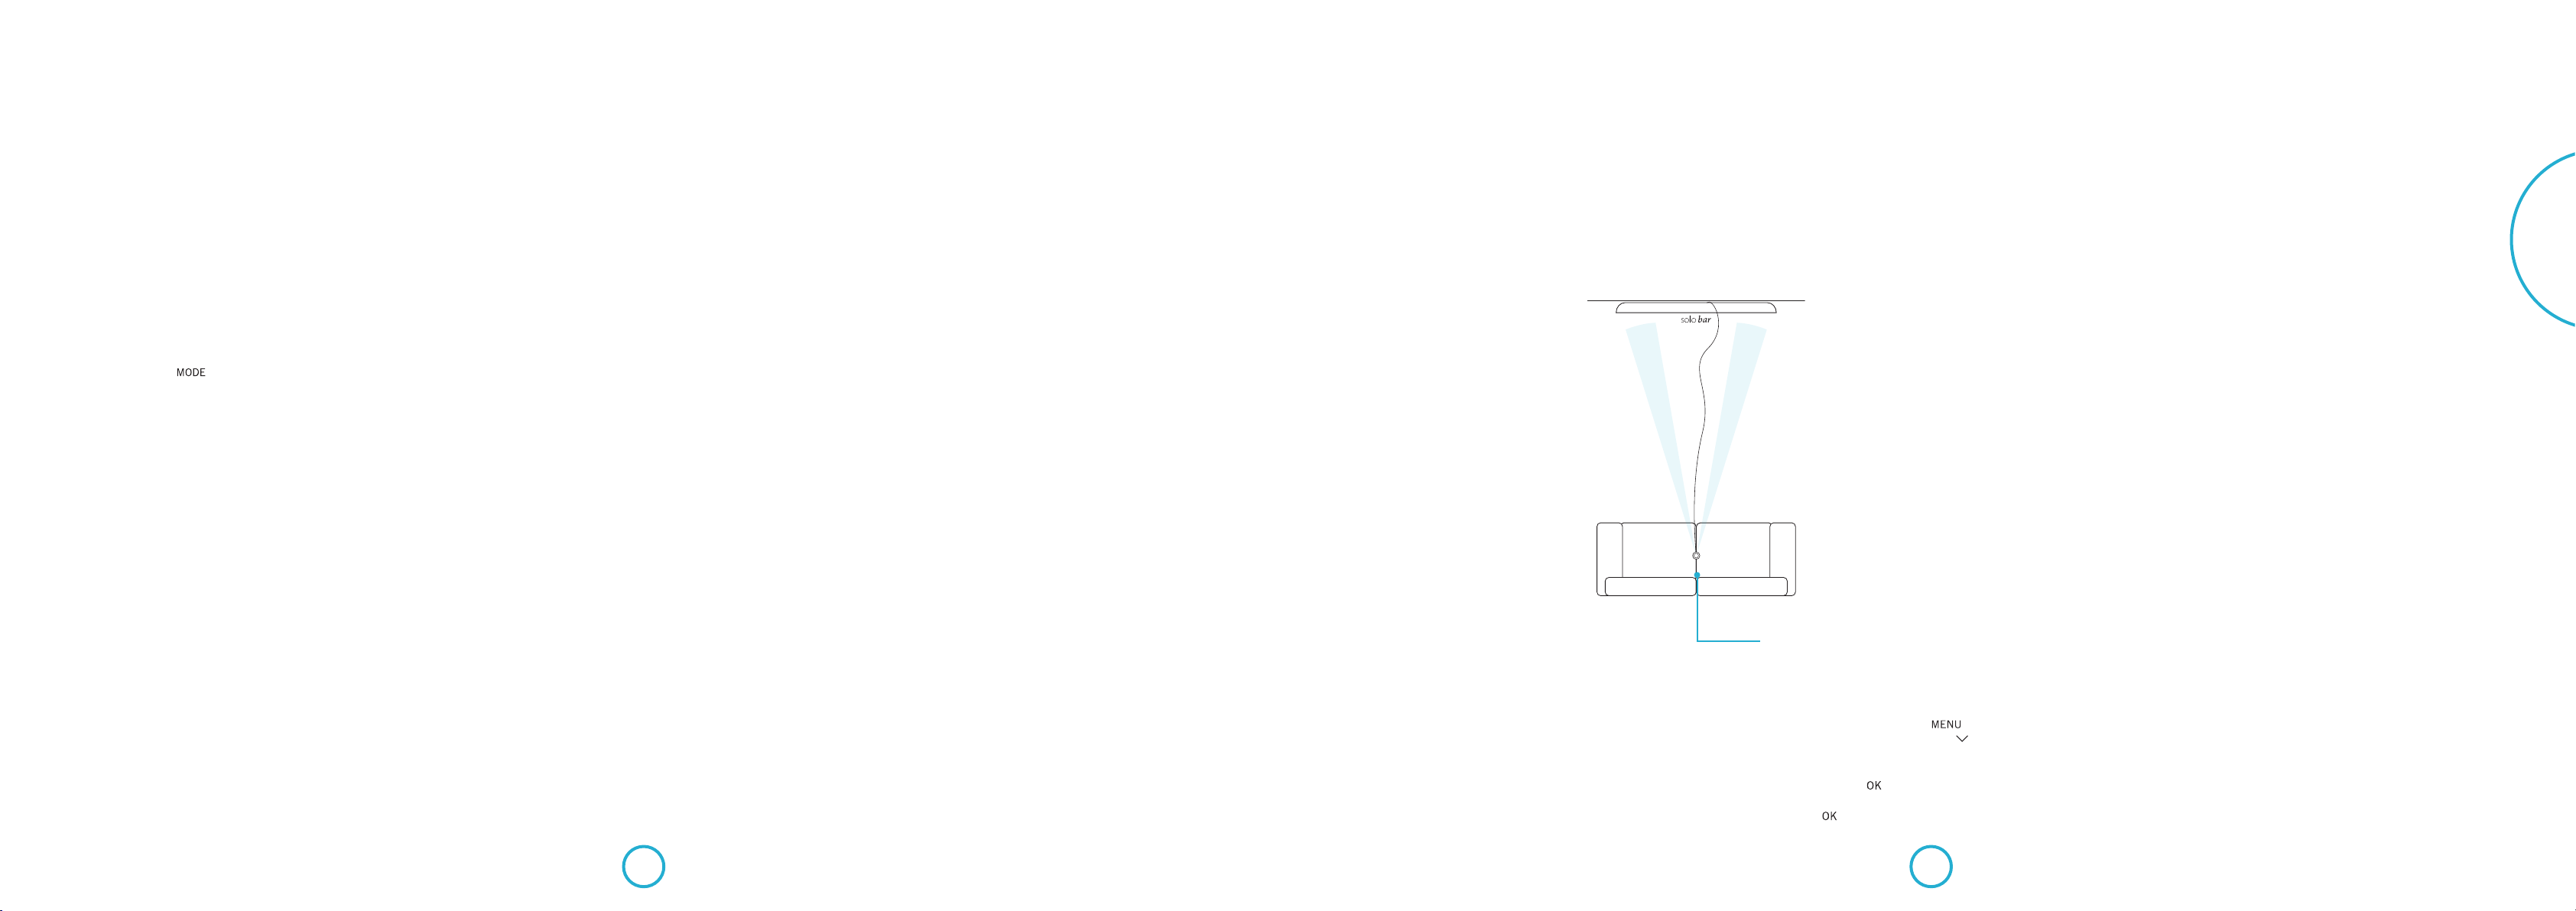
Using the calibration microphone supplied,
insert the jack into the MIC socket on the
rear panel and place the microphone at the
main listening position.
is microphone picks up the special
calibration tones generated by the speakers
(and subwoofer) when Auto Setup is run.
e Solo bar then analyses the signal and
computes:
< speaker level,
< crossover frequency to the subwoofer,
< problem resonant frequencies in the
room which need control by ltering.
Microphone
Place at head height in
listening position with
mic pointing upwards.
To help the system be as accurate as
possible, follow these guidance rules:
< Minimise any background sounds in
the listening room and nearby rooms.
< Close all windows and doors in the
listening room.
< Turn o all fans including air-
conditioning systems.
< If holding the microphone in the hand,
keep your hand and ngers still to avoid
generating any ‘handling noise’.
< Position the microphone pointing
upwards at roughly head height in the
normal listening position with a direct
unobstructed view of the speakers. It is
not necessary to point the microphone
directly at the speakers.
< If your system includes an active
subwoofer, start by setting its output
level/gain control to a value halfway
between minimum and maximum.
To run Auto Setup, press on the
remote control followed by until
Speaker/EQ Setup is displayed on the Solo
bar front panel. Now press and notive
the display changes to Auto Setup. Press
again to start the procedure.
e process will generate test tones from the
speakers and typically takes less than two
minutes. e test tone generator will cycle
round each speaker twice. Between each
cycle, Analysing will be displayed briey.
Aer the second cycle the display will show
Calculating followed shortly by Complete.
Should any errors occur during auto setup,
follow the instructions provided on the
display panel.
Auto Setup is normally quite accurate but
occasionally false results can be generated.
Problems may be as a result of:
< external sounds or rumbling/handling
noises picked up by the microphone
< sound reections o hard surfaces (e.g.
windows or walls) close to the listening
position,
< very strong acoustic resonances within
the room,
< obstacles (such as a sofa) between
speakers and the microphone.
<
Using a subwoofer
If your system includes an active subwoofer
you may need to re-run Auto Setup with the
subwoofer output level/gain control set to a
medium value.
Auto Setup will attempt to select a crossover
frequency that allows the smoothest low
frequency transition from the main speakers
to the subwoofer. However if this does not
produce pleasing results we recommend
manually trying other crossover frequencies
to nd something more to your preference.
When Auto Setup is run it also calculates
Room EQ values to remove some of the
worst eects of resonant frequencies in the
listening room.
By default, Room EQ is disabled. You should
enable Room EQ on inputs you think
benet from this feature, as required, by
listening to typical source material through
each input.
While room equalisation can help to reduce
problems with listening room acoustics,
it is usually far better to try to solve these
problems with the room directly. To enable
Room EQ see page19 in system setup.
E-17E-16
Page 12
system setup
English
Use the remote control and follow these steps to ensure
your Solo bar is set up for maximum enjoyment.
System setup menu
Default settings are shown in Blue.
System Setup Lipsync Delay 0 to 200ms Delays may be introduced into the video signal by video
Display Level
App Control
IR Repeater
System Info Press OK to view the system software version.
Factory Defaults
Dim g Bright g Off
Enable g Disable
Enable g Disable
Press OK to reset the Solo bar to factory defualts. Note: Paired or connected devices will be lost.
Press to go back a level or to exit setup.
processing which causes a mismatch between the audio and
video timing. You will notice this by speech sound being out
of synch with lip movements. To compensate for this, you can
adjust the lip sync delay. Use the and buttons to adjust
synchronisation between sound and vision. Press to go
back a level or to exit setup.
The LED display levels can be adjusted to suit your
requirements. Use the and buttons to switch between
settings. When set to Off, the display illuminates briefly
whenever it receives a command. Press to go back a level or
to exit setup.
Enables the Solo bar to be woken from standby using the
optional remote control app. Use the and buttons to
switch app control on or off. Press to go back a level or
to exit setup.
Use the and buttons to switch IR repeater on or off.
See page16 for more information. Press to go back a level or
to exit setup.
Speaker/EQ setup menu
Default settings are shown in Blue.
Speaker/EQ Setup Auto Setup Auto setup configures your Solo bar for optimum listening experience Press OK to start setup
procedure. See page17 for more information.
Room EQ
Sub Pairing
Subwoofer Level 0 to -12dB
Headphone out
Enable g Disable
Press to start pairing procedure. See page10 for more information.
BT Transmitter
Enable g Disable
Device search
Use the and buttons to switch EQ on or off.
Note: Only available after Auto setup has been completed.
Press to go back a level or to exit setup.
Use the and buttons to select a subwoofer level.
Note: Only available after Sub Pairing has been completed.
Press to go back a level or to exit setup.
Use the and buttons to switch Bluetooth® transmitter
on or off. Press to go back a level or to exit setup.
Note: Only available if headphone out is enabled.
Press to start searching for headphones. Use and
buttons to select headphone from list. Press to go back a
level or to exit setup.
E-19E-18
Page 13
rmware update
English
HDMI setup menu
Default settings are shown in Blue.
HDMI Setup HDMI Audio Out
CEC / ARC
Disable g Passthrough
Enable g Disable
Use the and buttons to switch HDMI Passthrough on
and off. HDMI passthrough passes the video and audio signal
from any HD source to your Solo bar via an HDMI cable.
The Solo bar splits the signal, playing the audio from the HD
source through its own speakers and sending the unaltered
video signal to a TV using an HDMI OUT cable. Press to
go back a level or to exit setup.
Use the and buttons to switch CEC/ARC on or off.
See page16 for more information. Press to go back a level or
to exit setup.
Download an update file
To perform a rmware update, you’ll need
to download an update le from the Arcam
web site.
Check the availablity of rmware updates by
typing www.arcam.co.uk into your browser
and navigating to the Solo bar page.
Note: Make sure you download the file to the
root of your USB, do not put it inside a folder
or the update will fail.
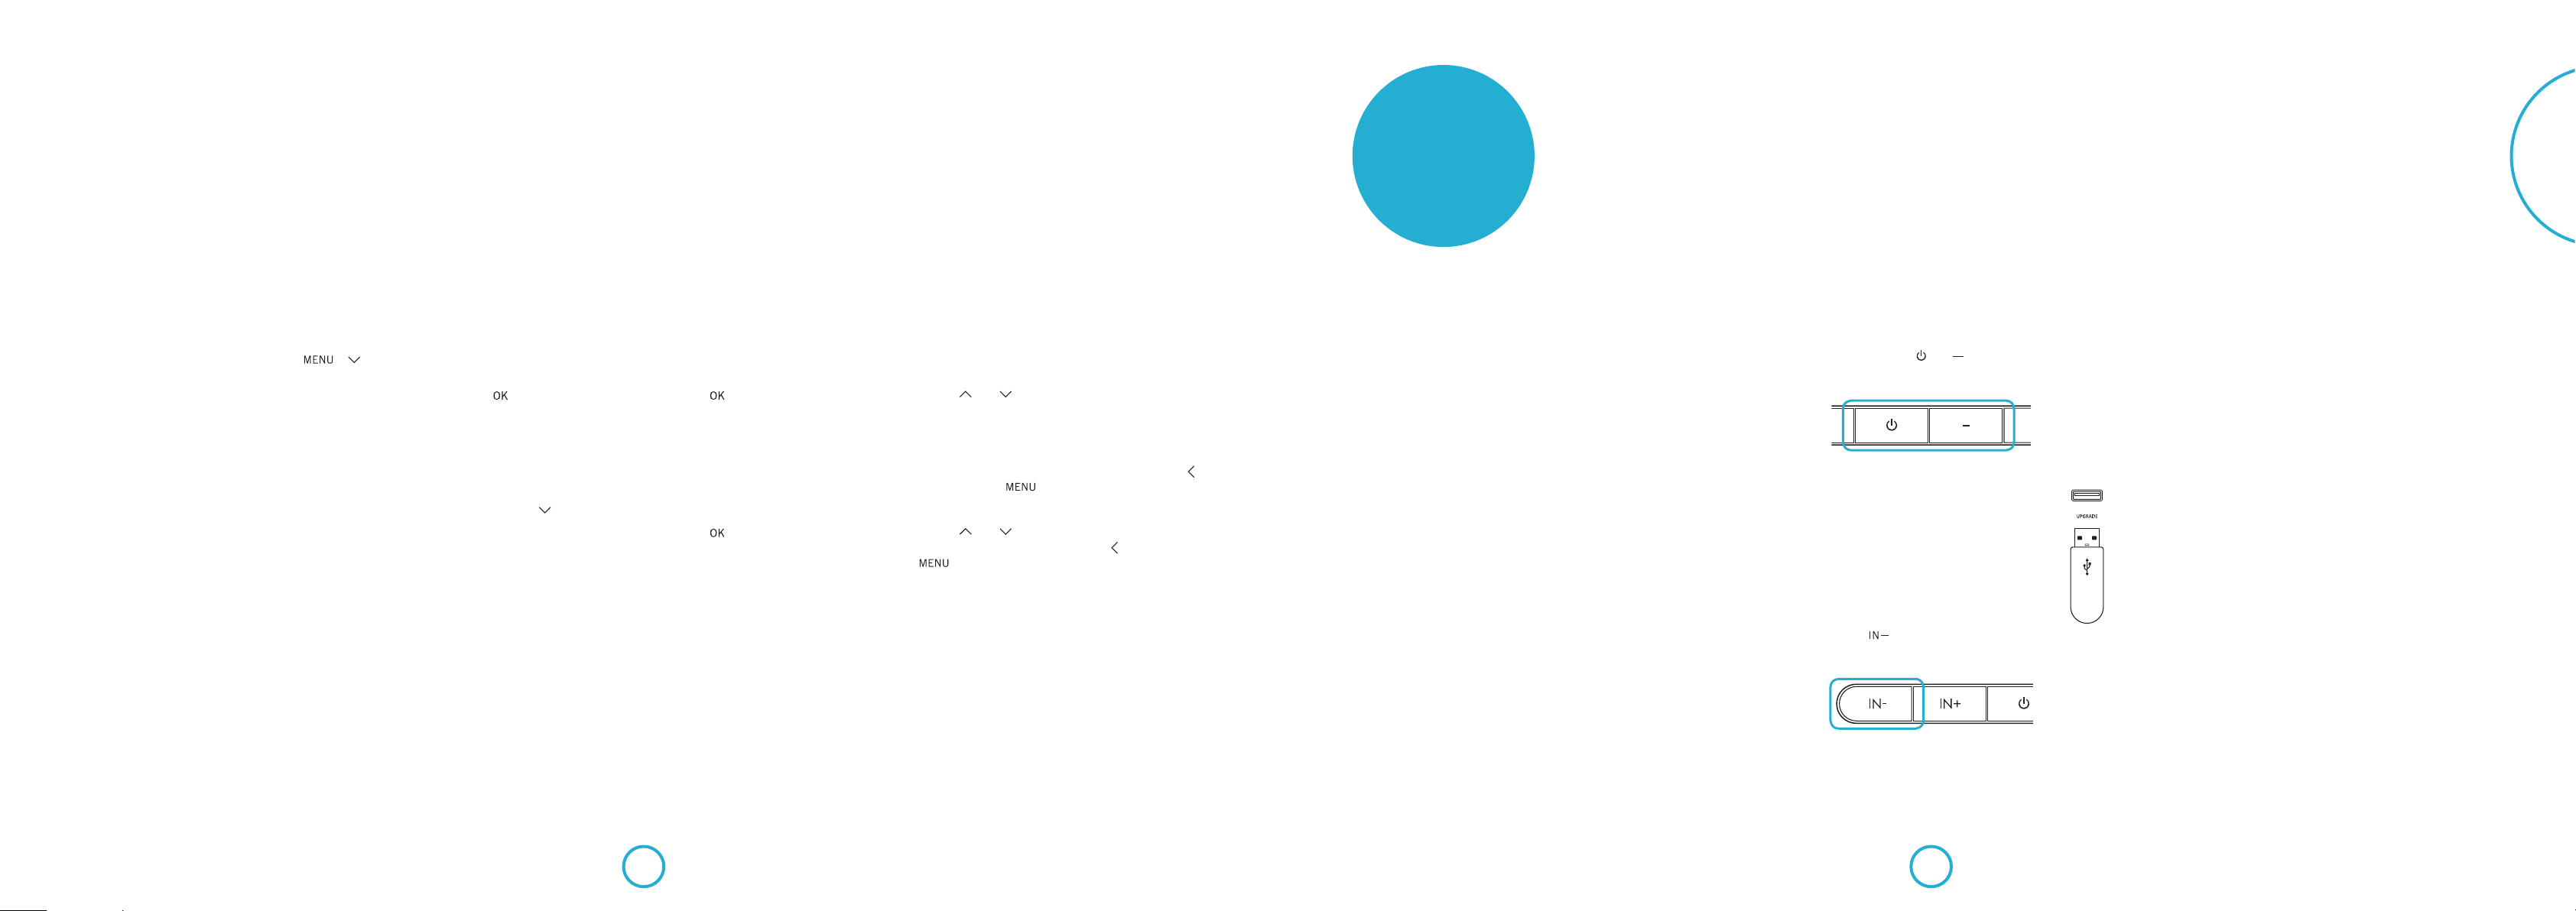
Performing the update
Make sure the soundbar is turned on at the
plug and in standby mode.
Press and hold the and buttons
simultaneously for about ve seconds.
e Solo bar will turn on and display the
following information:
ARCAM SB M:V024
B:40526 D:30304
Note: M = Main software version,
B=Bluetooth software version and
D = DSP software version.
Press the button to go to the soware
update screen.
e display will change to:
System Update
Insert USB...
Note: Pressing IN- again will cycle between
this and the software version screen.
Insert the USB drive containing the update
le into the UPGRADE socket on the rear
panel of the Solo bar.
e rmware update will
start automatically once
the USB drive has been
detected and the display
will change accordingly:
System Update
Updating...
If 30 seconds have elapsed before the USB
was inserted, the display will timeout and
change to:
System Update
USB Not Detected
If the update was successful, the display will
show the following information for about
three seconds, aer which the Solo bar will
turn itself o.
System Update
Complete
If the update was not successful, the display
will show the following information for
about three seconds, aer which the
Solo bar will turn itself o and the whole
procedure will need to be performed again.
System Update
Error
is message will be displayed for about
three seconds, aer which the Solo bar will
turn itself o and the entire procedure will
need to be repeated.
E-21E-20
Page 14
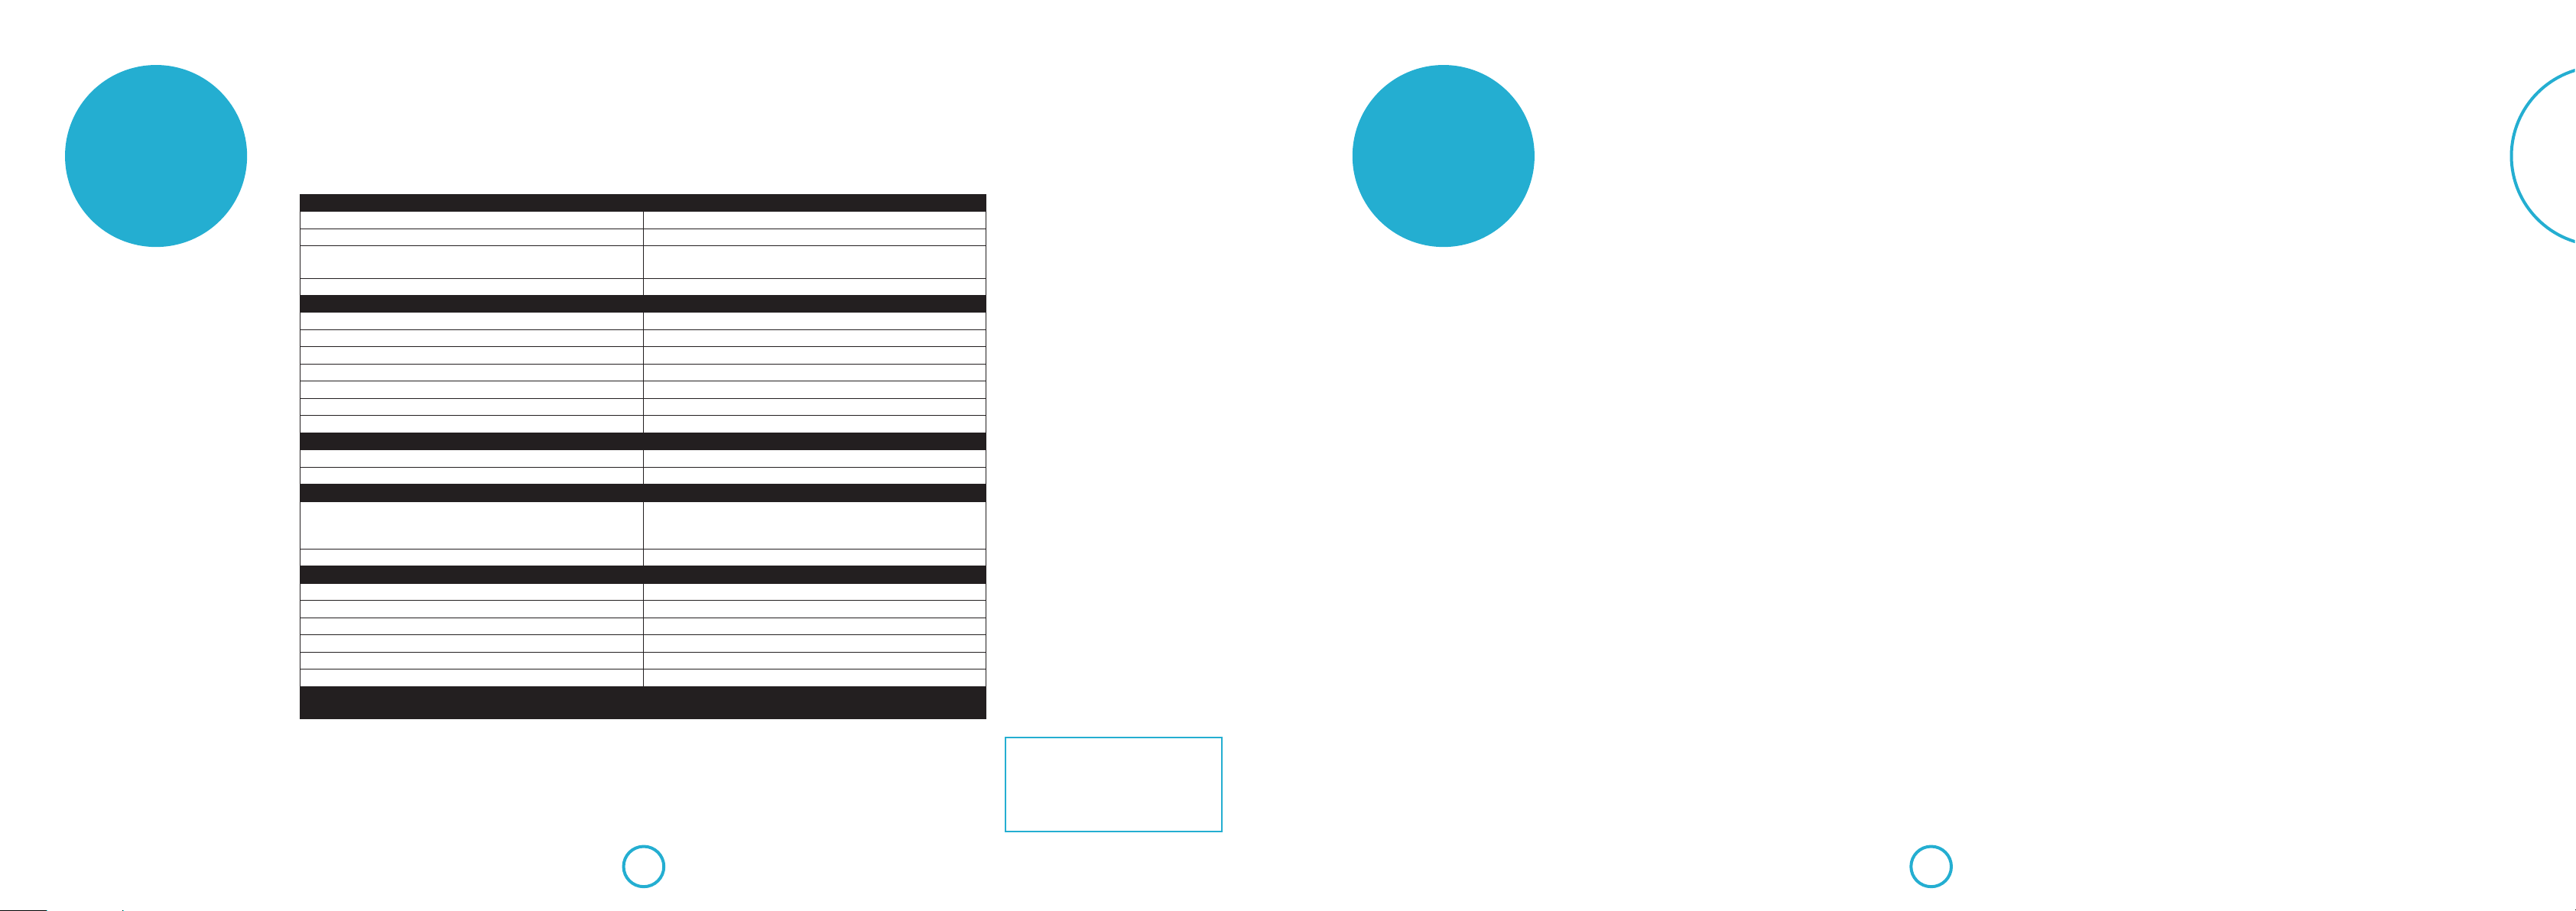
specications
General
Weight (Packed) 10kg
Dimensions (H x W x D) 130mm x 1100mm x 110mm
Power consumption Operating mode: 150W (max)
Standby mode: <0.5W
Power requirements 100 – 240V, 50/60Hz
Inputs/Outputs
HDMI In Type A receptacle x 4
HDMI Out Type A receptacle, with ARC/CEC support
Digital In (Optical) S/PDIF Optical receptacle
Digital In (Coaxial) RCA jack
Auxiliary In 3.5mm stereo jack
Bluetooth Audio Ver. 3.0, Compliant with A2DP standard
Subwoofer Out RCA LFE jack
Wireless Subwoofer Output
Frequency 2.4GHz
Transmission range Approx. 20m (without interference)
Amplifier
Rated power output:
Woofer (0.5% THD)
Tweeter (0.5% THD)
Nominal Amplifier Output Level (20Hz-20kHz) 100 W
Speakers
Woofer 1 2 x 4in Cone
Woofer 2 2 x 4in Cone
Tweeter 2 x 1in Cone
Woofer frequency response 170Hz – 20kHz ± 3dB
Tweeter frequency response 3.8kHz – 14kHz ± 3dB
Rated impedance 6Ω
E&OE
NOTE: All specification values are typical unless otherwise stated.
40W per channel
10W per channel
Continual improvement policy
Arcam has a policy of continual
improvement for its products. is
means that designs and specications
are subject to change without notice.
troubleshooting
Here are some simple checks you can do if
you are experiencing problems with your
Solo bar.
Power
< Check that the power cord is plugged in
and connected properly.
< Make sure the power and mains
switches are turned on.
Remote control
< Check the batteries are inserted
correctly.
< Batteries may need replacing.
< Are you too far away from the unit or is
there an obstruction?
Sound
< Make sure the cables are connected
properl y.
< Check that the right input source is
selected.
< If the sound is noisy or distorted during
playback from a Bluetooth device, try
turning the volume down on the device
and up on the Solo bar.
Picture
< If there is no picture or it is displaying
badly, check the HDMI cables are
connected properly.
< Check that the right input source is
selected.
Bluetooth
< Check your Bluetooth device is paired
correctly.
< Is your Bluetooth device too far away
from the unit?
FCC Notice
is product contains FCC ID: VNH-IKCSRBC05/QEC-GWNO
is equiment has been tested and found to
comply with the limits for a Class B digital
device, pursuant to Part 15 of the FCC
Rules. ese limits are designed to provide
reasonable protection against harmful
inteference in a residential installation.
is equipment generates, uses and can
radiate radio energy and, if not installed and
used in accordance with the instructions,
may cause harmful interference to radio
communications. However, there is no
guarantee that interference will not occur in
a praticular installation. If this equipment
does cause harmful interference to radio
or television reception, which can be
determined by turning the equipment o
and on, the user is encouraged to correct the
interference by one or more of the following
measures:
< Reorient or relocate the receiveng
antenna.
< Increase the separation between the
equipment and the receiver.
< Connect the equipment to an outlet on
a circuit dierent from that to which
the reciver is connected.
< Consult the dealer or an experienced
radio/TV technician for help.
English
is device complies with part 15 of the
FCC Rules. Operation is subject to the
following two conditions:
(a) is device may not cause harmful
interference, and
(b) is device must accept any interference
recieved, including interference that may
cause undesired operation.
(FCC Part 15.21) Caution: changes or
modications not expressly approved by
the party responsible for compliance could
void the user’s authority to operate the
equipment.
Canada ICES-003 statement
is product contains IC
10581A-IKCSRBC05/10581A-GWK5NO
is product complies with RSS-210 of
industry Canada.
Operation is subject to the following two
conditions:
(1) this product may not cause harmful
interence, and (2) this product must
accpet any inteference received, including
interference that may cause undesired
operation.
is Class B digital apparatus complies with
Canadia ICES-003.
E-23E-22
Page 15
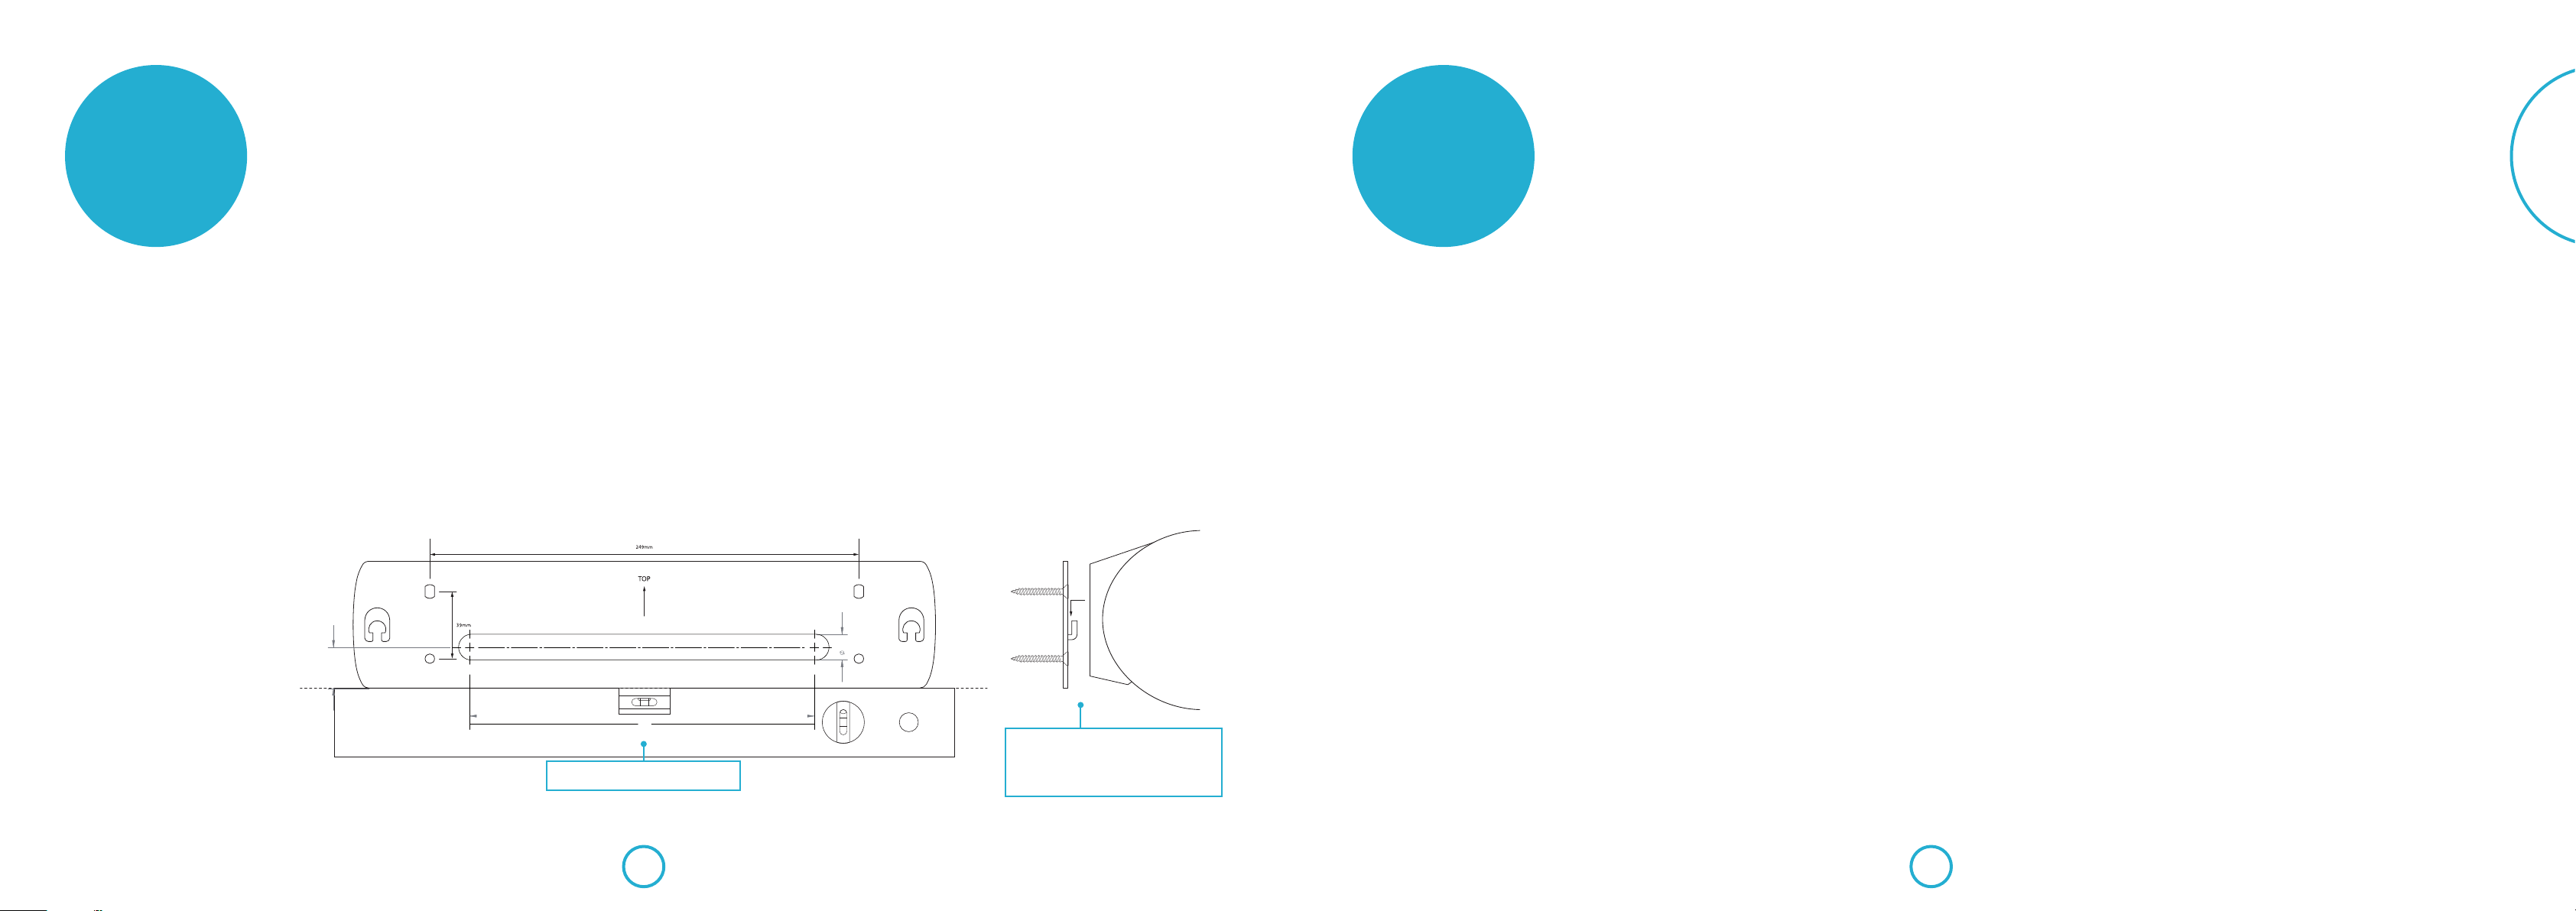
xing
instructions
Use the custom-designed wall mount accessory to
attach the Solo bar safely and securely to a wall.
product
guarantee
English
You will need
< Power drill
< Drill bit, wall plugs and xings suitable
for the type of wall you are xing to.
< Screw driver
< Spirit level
< Pencil
< Tape measure
24.0
Fixing procedure
1. Make sure the wall bracket is horizontal
by placing a spirit level underneath it.
2. Mark the holes with a pencil, taking
care to trace the outlines accurately.
3. Carefully drill four holes, using a drill
bit and plugs suitable for the type of
wall you are xing to.
200.0
Make sure the wall mount is horizontal.
4. Attach the wall mount to the wall using
four robust screws (the screw should
have a minimum diameter of 5.5mm),
making sure they t the wall plugs
correctly and are done up tight and
ev enl y.
5. Finally, attach the Solo bar to the wall
mount by carefully guiding it onto the
two protruding supports. It should sit
rmly and securely against the wall.
15.0
Caution: Do not mount the unit on
plywood or any so surface walls. If you
are uncertain of the wall quality, consult
a professional for advice.
Make sure the screws are tight and flush
before guiding the Solo bar down onto the
two protruding supports. It should sit
securely against the wall.
Copyright
June 2014, © 2014 A&R Cambridge Ltd.
A & R Cambridge Limited (Arcam)
reserves the right to make changes to the
specications of the products detailed in
this document at any time without notice
or obligation to notify any person of such
changes.
All third-party trademarks are
acknowledged and observed. Mention of
third-party products does not constitute an
endorsement or a recommendation.
Arcam takes every precaution to ensure that
all information contained in this publication
is factually correct but accepts no liability
for any error or omission.
Worldwide guarantee
Arcam warrants that the products
described in this guide shall conform to
their published specication in all material
respects for a period of two years from the
date of purchase. is entitles you to have
the unit repaired free of charge, provided
that it was purchased from an authorised
Arcam dealer.
e Arcam dealer is responsible for all
aer-sales service. e manufacturer can
take no responsibility for defects arising
from accident, misuse, abuse, wear and tear,
neglect or through unauthorised adjustment
and/or repair, neither can they accept
responsibility for damage or loss occurring
during transit to or from the person
claiming under the guarantee.
The warranty covers:
Parts and labour costs for two years from
the purchase date. Aer two years you must
pay for both parts and labour costs. e
warranty does not cover transportation
costs at any time.
Claims under guarantee
is equipment should be packed in the
original packaging and returned to the
dealer from whom it was purchased.
It should be sent carriage prepaid by a
reputable carrier – not by post.
No responsibility can be accepted for
the unit whilst in transit to the dealer or
distributor and customers are therefore
advised to insure the unit against loss or
damage whilst in transit.
On-line registration
You can register your product on-line at
www.arcam.co.uk.
Problems?
If your Arcam dealer is unable to answer
any query regarding this or any other Arcam
product please contact Arcam Customer
Support at the address below and we will do
our best to help you.
Arcam Customer Support Department,
Unit15, Pembroke Avenue,
Waterbeach, CAMBRIDGE,
CB25 9QP, England or via
www.arcam.co.uk.
E-25E-24
Page 16

technology
®
licensing
Manufactured under license from Dolby
Laboratories. Dolby and the double-D
symbol are trademarks of Dolby
Laboratories.
e terms HDMI and HDMI HighDenition Multimedia Interface, and the
HDMI Logo are trademarks or registered
trademarks of HDMI Licensing LLC in the
United States and other countries.
For DTS patents, see http://patents.dts.
com. Manufactured under license from
DTS Licensing Limited. DTS, DTS-HD, the
Symbol, & DTS and the Symbol together are
registered trademarks, and DTS-HD Master
Audio is a trademark of DTS, Inc. © DTS,
Inc. All Rights Reserved.
© 2013 CSR plc and its group companies.
e aptX® mark and the aptX logo are
trade marks of CSR plc or one of its group
companies and may be registered in one or
more jurisdictions.
e Bluetooth® word mark and logos are
registered trademarks owned by Bluetooth
SIG, Inc. and any use of such marks by
Arcam is under license. Other trademarks
and trade names are those of their respective
owners.
“Made for iPod,” “Made for iPhone,” and
“Made for iPad” mean that an electronic
accessory has been designed to connect
specically to iPod, iPhone, or iPad,
respectively, and has been certied by the
developer to meet Apple performance
standards. Apple is not responsible for the
operation of this device or its compliance
with safety and regulatory standards. Please
note that the use of this accessory with
iPod, iPhone, or iPad may aect wireless
performance.
Bluetooth technology works with iPhone
5s, iPhone 5c, iPhone 5, iPhone 4s, iPhone
4, iPhone 3GS, iPad Air, iPad (3rd and 4th
generation), iPad 2, iPad mini with Retina
display, iPad mini, and iPod touch (4th and
5th generation).
iOS, iTunes, iPad, iPhone and iPod are
trademarks of Apple Inc., registered in the
U.S. and other countries. App StoreSM is a
service mark of Apple Inc.
Made for:
• iPhone 5s
• iPhone 5c
• iPhone 5
• iPhone 4s
• iPhone 4
• iPhone 3GS
• iPad Air
• iPad mini with Retina display
• iPad (4th generation)
• iPad mini
• iPad (3rd generation)
• iPad 2
• iPod touch (5th generation)
• iPod touch (4th generation)
Google Play™ is a trademark of Google Inc.
Android™ is a trademark of Google Inc.
E-26
Page 17
Manuel Barre de son
Français
Page 18

bienvenue...
... et merci d'avoir choisi la Arcam Solo bar.
Depuis plus de trois décennies, Arcam fabrique des équipements audio
spécialisés de remarquable qualité et la nouvelle Solo bar est la dernière
manifestation d'une longue lignée d'appareils hi- et d'ensembles home
cinéma primés.
Nous espérons que la performance et la abilité supérieures de ce produit
seront non seulement une ample démonstration de l'attention et de l'eort
que nous avons mis à le concevoir, mais aussi une garantie que vous en
aurez l'usage de nombreuses années.
Ce manuel est un guide d'installation et d'utilisation de la Solo bar.
Reportez-vous à la table des matières page suivante pour rechercher les
rubriques qui vous intéressent plus particulièrement.
Nous vous souhaitons des années de plaisir acoustique avec votre Solo bar.
Dans l'éventualité, peu probable, où une panne surviendrait, ou si vous
recherchez simplement des informations supplémentaires sur les produits
Arcam, les représentants de notre réseau de revendeurs se feront un plaisir
de vous aider. D'autres informations sont disponibles sur notre site web
d'Arcam à l'adresse www.arcam.co.uk.
L'équipe de développement de la Solo bar.
Table des
matières
conseils de sécurité F-4
aperçu F-5
Touches et achage F-5
Connexions F-6
démarrage rapide F-7
Que contient la boite ? F-7
Mise en place de l'appareil F-7
Branchement des appareils F-7
Branchement d'un téléviseur F-7
Branchement d'appareils numériques via HDMI F-8
Branchement d'appareils analogiques F-9
Branchement d'appareils audio à l'aide de l'entrée numérique F-9
Branchement d'un caisson de basses F-9
Branchez et allumez F-10
Branchement d'un Solo sub F-10
Connexion d'appareils Bluetooth® F-11
Utilisation d'écouteurs F-11
télécommande F-12
Utilisation de la télécommande F-12
application de télécommande F-13
Téléchargement des instructions F-13
Jumelage de votre appareil mobile F-14
fonctionnement F-15
Mise en marche F-15
Sélection d'une source F-15
Contrôle du volume F-15
Sélection d'un mode audio F-16
Son en provenance du téléviseur F-16
Son en provenance d'appareil Bluetooth® F-16
Répéteur IR F-16
Contrôle CEC transmis par HDMI F-16
Conguration automatique F-17
Français
conguration dusystème F-18
Menu de la conguration du système F-18
Menu de la conguration du haut-parleur et de l'égaliseur F-19
Menu de la conguration HDMI F-20
mise à jour du rmware F-21
Téléchargement d'un chier de mise à jour F-21
Réalisation de la mise à jour F-21
spécications F-22
Dépannage F-23
instructions pourla xation F-24
Vous aurez besoin de F-24
Procédure de xation F-24
garantie du produit F-25
Copyright F-25
Garantie internationale F-25
Réclamations sous garantie F-25
Enregistrement en ligne F-25
Des problèmes ? F-25
licences de technologie F-26
F-3F-2
Page 19
conseils de
sécurité
aperçu
1. Lisez ces instructions
Lisez toutes les instructions de sécurité et
d'utilisation avant de faire fonctionner
l'appareil.
2. Conservez ces instructions
Conservez les instructions de sécurité et
d'utilisation pour future référence.
3. Respectez toutes les mises en garde
Faites attention à toutes les mises en
garde sur l'appareil et à celles du guide
d'utilisation.
4. Suivez l'ensemble des instructions
Suivez toutes les instructions concernant
l'utilisation.
5. N'utilisez pas cet appareil près d'une
source d'eau
N'utilisez pas cet appareil à proximité
d'eau ou d'humidité – par exemple, dans
un sous-sol mouillé ou près d'une piscine.
6. Nettoyez uniquement avec un chion sec.
7. Ne bloquez pas les ouvertures d'aération.
Procédez à l'installation conformément
aux recommandations du fabricant.
8. N'installez pas l'appareil près de sources
de chaleur, comme des radiateurs, des
grilles de chauage, des fours ou autres
appareils (y compris des amplicateurs)
produisant de la chaleur.
9. Ne détournez pas la protection de la
prise polarisée ou de terre. Une prise
polarisée dispose de deux lames, dont
l'une plus large que l'autre. Une prise
de terre dispose de deux lames et d'une
troisième broche de mise à la terre. La
lame la plus large ou la troisième broche
correspond à un dispositif de protection.
Si la che fournie ne correspond pas à
votre installation électrique, veuillezvous adresser à un électricien pour faire
remplacer la prise obsolète.
10. Installez le câble électrique de telle sorte
qu'il ne puisse pas être piétiné ou écrasé,
notamment au niveau des ches, des
prises et des points de sortie de l'appareil.
11. Utilisez uniquement des câbles/
accessoires conformes aux
recommandations du fabricant.
12. Utilisez uniquement un meuble à
roulettes, un support, un trépied, des
xations ou une table recommandé(e)
par le fabricant ou livré(e) avec
l'appareil. En cas d'utilisation d'un
meuble à roulettes, déplacez le meuble et
l'appareil avec précaution pour éviter de
le renverser, ce qui pourrait entraîner des
blessures.
13. Débranchez l'appareil en cas d'orage ou
lorsque vous ne l'utiliserez pas sur une
période prolongée.
14. Faites usage de cet appareil dans un
environnement bien ventilé.Conez les
réparations à un technicien qualié. Il est
nécessaire de faire réparer l’appareil s’il a
été endommagé d’une manière ou d’une
autre, par exemple si le l électrique ou
la prise est abimé(e), si du liquide a été
renversé ou des objets ont pénétré dans
l’appareil, si l’appareil a été exposé à la
pluie ou à l’humidité, s’il ne fonctionne
pas normalement, ou s’il est tombé.
15. Faites usage de cet appareil dans un
environnement bien ventilé.
MISE EN GARDE: Afin de réduire les risques d'incendie
ou de décharge électrique, n'exposez pas cet appareil à
la pluie, à l'humidité, aux fuites ou aux éclaboussures.
Des objets remplis de liquides ne doivent pas être placés
au-dessus de l'appareil.
MISE EN GARDE: La prise électrique ou le coupleur est
utilisé comme dispositif de débranchement qui doit
toujours être prêt à fonctionner.
Cet éclair accompagné du symbole fléché à l'intérieur
d'un triangle équilatéral est censé alerter l'utilisateur
de la présence d'une «tension dangereuse» non isolée
à l'intérieur de l'enceinte du produit de magnitude
suffisante pour être capable de constituer un risque de
décharge électrique.
Mise en garde: Pour réduire le risque de décharge
électrique, n'enlevez pas le capot (ou l'arrière)
puisque l'appareil ne contient aucun composant
susceptible d'être réparé par l'utilisateur. Confiez les
réparations à un technicien qualifié.
Le point d'exclamation dans un triangle équilatéral
permet d'avertir l'utilisateur de la présence de consignes
importantes concernant le fonctionnement et l'entretien
dans la documentation livrée avec l'appareil.
Cet équipement est une Classe II ou un appareil
électrique à double isolation. Il a été conçu de telle
manière qu'il ne nécessite pas de branchement de
sécurité à une prise de terre.
Mise au rebus
adéquate de cet
appareil
Ce produit contient des pièces
électriques ou électroniques.
La présence de ces matériels
peut, s'ils ne sont pas disposés
de façon adéquate, avoir la
possibilité d'effets indésirables
sur l'environnement et la santé
La présence de cette étiquette sur le produit signifie
qu'il ne doit pas être disposé en tant que déchet non
trié mais doit être collecté séparément. En tant que
consommateur, vous avez la responsabilité de vous
assurer de l'élimination correcte de ce produit.
humaine.
Touches et affichage
Sélection d'une entrée
IN- fait défiler vers l'arrière
les sources d'entrée.
IN+ fait défiler vers l'avant
les sources d'entrée.
L'affichage indique la source
sélectionnée.
Source d'entrée sélectionnée
Remarque: passe à un
niveau de menu lors de la
configuration, reportezvous à la page 18 pour plus
d'information.
Mode audio
Remarque: passe à une
option de menu lors de la
configuration, reportezvous à la page 18 pour
plus d'information.
Veille
Permet d'activer et de
désactiver le mode
veille de la Solo bar.
Contrôle du volume
- diminue le volume de sortie.
+ augmente le volume de sortie.
Le niveau du volume est affiché à l'écran.
Contrôle automatique du
niveau sonore (ALC)
Utilisez la télécommande pour
activer ou désactiver l'ALC.
Français
Réglage du volume
Remarque: passe à la
valeur de l'option de menu
sélectionnée lors de la
configuration, reportezvous à la page 18 pour plus
d'information.
F-5F-4
Page 20
Connexions
USB
Destiné uniquement
aux mises à jour
du firmware et
aux opérations de
maintenance
Reportez-vous à
la page 21 pour
les informations
concernant les mises à
jour du firmware.
MIC
Mini-jack 3,5mm
pour le branchement
du micro inclus
au moment de
la configuration
automatique du
haut-parleur.
Reportez-vous à la
page 17 pour plus
d'informations.
COAX
Prise RCA pour
le branchement
d'une source audio
numérique.
HDMI OUT
Pour le branchement
d'un téléviseur;
assure aussi le retour
audio (ARC).
Reportez-vous à la
page 7 pour plus
d'informations.
POWER INLET
Pour le branchement
sur le secteur.
démarrage
rapide
Que contient la boite ?
< Barre de son Solo
< Le cordon d'alimentation
< Télécommande
< Piles (2 x AAA)
< Microphone
< Support mural
< Le manuel de l'utilisateur
< La carte d'enregistrement
Mise en place de l'appareil
La Solo bar est un produit extrêmement
polyvalent. Placez-la sur une table, un
meuble ou une étagère, en vous assurant
qu'elle soit posée bien à plat sans risque de
basculer. Installez-la sous un téléviseur, soit
telle quelle sur une surface horizontale soit
montée au mur.
Pour une meilleure expérience d'écoute,
nous recommandons le montage mural.
À cet eet, utilisez le support mural
spécialement conçu qui a été fourni.
Reportez-vous à la page 24 relativement à sa
xation et au montage de la barre de son.
Installez la Solo bar à l'abri d'une exposition
directe à la lumière du soleil et des sources
de chaleur ou d'humidité.
Branchement des
appareils
Une fois que la Solo bar est correctement
installée, branchez-la à vos appareils comme
illustré ci-après.
Assurez-vous qu'aucun câble ne vrille ni ne
soit distendu.
MISE EN GARDE : Ne branchez pas votre Solo bar
sur le secteur tant que vous n'aurez pas branché
tous vos appareils audio et vidéo.
Branchement d'un
téléviseur
Branchez votre téléviseur sur HDMI OUT
à l'aide d'un câble HDMI. Si votre téléviseur
est compatible ARC (retour audio), l'audio
peut s'écouter à l'aide de la Solo bar pour
une meilleure sonorité – reportez-vous
à la page 20 pour les informations de
conguration. Si votre téléviseur n'est pas
compatible ARC, branchez un câble audio
sur l'entrée OPTICAL ou COAX de la barre
de son.
Câble
audio en
l'absence
d'ARC
Français
AUX
Mini-jack stéréo
3,5mm pour le
branchement
d'une source audio
analogique.
SUB
Sortie RCA LFE pour
le branchement d'un
caisson de basses.
Reportez-vous à la
page 10 pour plus
d'informations sur la
connexion sans fil d'un
Solo sub.
OPTICAL
Prise TOSLINK pour
le branchement
d'une source audio
numérique.
HDMI 1 – 4
Pour le branchement
d'un maximum de
quatre appareils
numériques pour un
affichage en 1080p et
flux 3D.
F-7F-6
Page 21
Branchement d'appareils numériques via HDMI Branchement d'appareils
De nombreux appareils numériques, y
compris les décodeurs, les lecteurs Blu-ray,
les lecteurs DVD, les consoles de jeux et
les caméscopes peuvent être raccordés via
HDMI.
Prenez note qu'avec cette méthode de
branchement, l'image sera achée par votre
téléviseur, mais le son proviendra de votre
Solo bar. Aucun autre branchement audio
n'est nécessaire.
Lecteur Blu-ray Consoles de jeux
analogiques
Branchez tout type d'appareil audio analogique
à l'entrée AUX de la Solo bar en utilisant un l à
mini-jack 3,5mm.
Branchement d'appareils audio à l'aide de
l'entrée numérique
Les appareils audio peuvent aussi être connectés à la Solo bar par le
biais des entrées coaxiales et optiques.
Consoles de jeux
Lecteur CD
Français
Branchement d'un caisson
de basses
La Solo bar est livrée avec une sortie de
caisson de basses intégrée (reportez-vous à
la page 19 pour la conguration). Utilisez un
l pour caisson de basses pourvu d'une prise
RCA LFE pour brancher votre équipement
à la Solo bar.
Remarque: Si vous possédez un Arcam Solo
sub, rendez-vous à la page suivante.
Décodeur
Lecteur MP3
Caméscope
Caisson des basses
F-9F-8
Page 22
Branchez et allumez
WIRELESS
La Solo bar est livrée avec une che secteur
moulée déjà mise sur le cordon. Vériez
que la che fournie s'adapte à la prise
secteur. Si la tension ou les prises de votre
circuit électrique sont diérentes, contactez
immédiatement votre revendeur Arcam.
Branchez d'abord le cordon sur la prise
secteur à l'arrière de la Solo bar, en vous
assurant qu'elle y est correctement insérée.
Puis insérez la che du cordon dans la prise
murale et mettez sous tension. L'appareil
est alors en mode veille indiqué par la LED
rouge sur le panneau avant.
Si l’appareil n’est pas utilisé pendant une
longue période de temps, il se met en veille
pour réduire la consommation d’énergie
Branchement d'un Solo
sub
Faisant partie de la gamme d'Arcam Solo, le
caisson Solo peut communiquer sans l avec
la Solo bar.
Assurez-vous que le Solo sub est allumé.
1. Appuyez sur la touche du boitier
de la télécommande de la barre Solo
puis sur jusqu'à ce que le panneau
d'achage à l'avant montre Speaker/
EQ Setup. Appuyez sur puis sur
de nouveau, jusqu'à ce que Sub Pairing
s'ache.
2. Appuyez sur pour commencer la
procédure de jumelage. L'écran ache
alors In Progress.
3. Positionnez le sélecteur INPUT situé à
l’arrière du Solo sub sur WIRELESS.
LINE
LFE
INPUT
4. Maintenez appuyé la touche WIRELESS
située à l’arrière du Solo sub pendant
cinq secondes environ. Le LED bleu
WIRELESS commencera à clignoter
pour indiquer que le Solo sub est
en mode de synchronisation et à la
recherche d’une source à laquelle se
connecter.
WIRELESS
PAIRING
PWR WIRELESS
5. Si la procédure de jumelage réussie, la LED
WIRELESS brillera d’un bleu constant et la
Solo bar achera Linked.
6. Une fois que la procédure de jumelage
est terminée, le Solo sub se reconnectera
toujours à chaque fois qu'il sera allumé ou
recevra u signal audio.
Connexion d'appareils Bluetooth® Utilisation d'écouteurs
La Solo bar dispose d'une technologie sans l Bluetooth
intégrée permettant une intégration uide avec tous les
appareils disposant de Bluetooth activé.
Jumelage avec des appareils Bluetooth
Suivez les instructions fournies par le guide d'utilisation
de votre appareil Bluetooth. Sélectionnez Arcam Solo
bar dans la liste des appareils Bluetooth pour compléter
le jumelage. Une fois que le jumelage est terminé, il n'a
plus besoin d'être eectué à nouveau.
Appareils Bluetooth®
La Solo bar dispose d'un transmetteur
Bluetooth lui permettant de se connecter à
des écouteurs Bluetooth.
Remarque: La transmission via Bluetooth
diffère de la réception. Jusqu'à quatre
appareils peuvent êtres jumelés, mais un seul
peut être connecté à la fois selon le principe
premier arrivé-premier servi.
Connexion des écouteurs Bluetooth
Appuyez sur la touche de la
télécommande puis sur jusqu'à ce que
le panneau d'achage à l'avant montre
Speaker/EQ Setup. Appuyez sur puis sur
de nouveau, jusqu'à ce que Headphone
Out s'ache. Appuyez sur pour le
sélectionner.
Le transmetteur Bluetooth est désactivé
par défaut, donc Disable est montré sur le
panneau d'achage. Appuyez sur pour
acher Enabled. Le transmetteur Bluetooth
fonctionne maintenant et l'option de menu
Device Search est activée.
Suivez maintenant les instructions fournies
pour vos écouteurs Bluetooth pour les
mettre en mode de jumelage.
Français
Si aucun appareil n'est trouvé, appuyez de
nouveau sur pour démarrer une autre
recherche. Veuillez-vous assurer qu'aucun
obstacle ne bloque le signal.
Quand la recherche est terminée, les
appareils disponibles seront achés dans
une liste. Utilisez les touches et pour
sélectionner l'appareil approprié et appuyez
sur pour terminer la procédure de
jumelage. La Solo bar achera un message
pour indiquer que la connexion s'est faite
avec succès.
Utilisation de vos écouteurs
Assurez qu'à la fois votre Solo bar et vos
écouteurs sont allumés. Sélectionnez une
source audio et protez de la sonorité
délivrée par vos écouteurs.
Remarque: Si vos écouteurs sont éteints,
l'audio passera automatiquement par les
hauts parleurs de la Solo bar.
MISE EN GARDE : L'activation du transmetteur
Bluetooth désactive temporairement l'entrée
Bluetooth. Cela signifie que vous ne pourrez pas
diffuser d'un appareil Bluetooth vers la Solo bar
et en même temps profiter des écouteurs.
Solo sub
Remarque: Le mode de synchronisation
dure 30 secondes environ. Si aucune source
n'est détectée dans cet intervalle, la barre
Solo arrête la recherche et le processus
devra être répété.
Assurez-vous que Device Search est toujours
aché et appuyez sur . La Solo bar
cherchera tous les appareils disponibles
pendant une minute.
F-11F-10
Page 23
télécommande
La Solo bar peut être congurée et contrôlée soit à l'aide du boîtier de
télécommande fourni soit avec l'application de télécommande de la Solo bar.
Utilisation de la
télécommande
Le boîtier de la télécommande est
programmé pour être utilisé avec la Solo
bar.
Avant de vous en servir, assurez-vous que
les piles AAA fournies sont correctement
installées.
1. Quand la télécommande est retournée,
poussez les indentations antidérapantes
du couvercle du compartiment des piles
vers le bas et faites le coulisser pour
l'enlever.
2. Insérez les deux piles «AAA» fournies.
Assurez-vous d'insérer les piles dans le
bon sens en vous servant des repères
visuels «+» et «–».
3. Faites glisser en position le couvercle du
compartiment à piles pour le fermer et
le verrouiller en position avec un clic.
Permet d'activer et de désactiver le mode veille de la Solo bar.
Appuyez une fois pour mettre la Solo bar en sourdine. Appuyez une fois de
plus (ou ajustez le volume) pour enlever la sourdine.
Augmenter le volume.
Diminuer le volume.
Contrôle automatique du niveau sonore - s'active ou se désactive.
Appuyez pour entrer dans le menu de configuration (reportez-vous aux pages
de 18 à 20). Appuyez-encore une fois pour sortir du menu.
Parcourt les paramètres du menu vers le haut.
Parcourt les paramètres du menu vers le bas.
Remonte de niveaux dans le menu.
Descend de niveaux dans le menu.
application de
télécommande
L'application de télécommande de la
Arcam Solo bar vous permet de vous servir
d'appareils avec Apple iOS ou Android™
pour contrôler la Solo bar via Bluetooth.
Servez-vous de l'application pour congurer
les paramètres du menu et contrôler la
lecture comme vous le feriez avec le boîtier
de la télécommande.
Version de système d'exploitation minimum
requise pour l'application: iOS 6, Android 4.0
Téléchargement des
instructions
Téléchargez l'application soit d'App StoreSM
soit de Google Play™.
Suivez les instructions de téléchargement
qui s'ache à l'écran de votre appareil.
Une fois l'installation terminée, touchez
l'icône de l'application pour la lancer.
HDMI 1 20
DIGITAL ST
Français
L'application mimique l'affichage de la
Solo bar
L'écran affiche la source d'entrée, le
volume et le format audio pendant le
fonctionnement normal ou les potions
du menu lors de la configuration des
paramètres.
Pour que la télécommande fonctionne de
façon able, elle nécessite une ligne de visée
claire vers le panneau d'achage de la Solo
bar.
Appuyez pour sélectionner le paramètre du menu.
Bascule entre les modes de sortie audio stéréo, film et concert.
Sélecteur de la source d'entrée - descend le long de la liste des sources
connectées.
Sélecteur de la source d'entrée - remonte le long de la liste des sources
connectées.
F-13F-12
Page 24
Jumelage de votre
appareil mobile
L'application nécessite que votre appareil
soit jumelé avec la Solo bar via Bluetooth.
Assurez-vous que le Bluetooth de votre
appareil est activé. Pour les appareils avec
iOS, suivez ces étapes:
Pour les appareils avec Android, suivez les
instructions fournies avec votre appareil.
Ouvrez Settings et touchez Bluetooth. Faites glisser l'interrupteur du Bluetooth
sur la position on.
Attendez que Arcam Solo bar apparaisse
au-dessous de DEVICES puis touchez pour
vous Connecter.
Dans le cas où vous voudriez enlever un
appareil, touchez l'icône d'information près
de Connecté puis Enlever cet appareil.
fonctionnement
Mise en marche
Pour sortir la Solo bar du mode veille,
appuyez sur la touche placée sur le
panneau avant ou sur la télécommande.
ARCAM Solo bar apparaît brièvement sur
le panneau d'achage suivi de la source
d'entrée sélectionnée, du réglage du volume
et du mode audio.
Remarque: Si l'appareil est inutilisé sur une
longue période, débranchez-le du secteur
pour économiser de l'énergie.
Sélection d'une source
Pour sélectionner une source particulière,
appuyez sur les touches ou sur
le panneau avant ou sur la télécommande
jusqu'à ce que la source s'ache sur le
panneau d'achage. Les sources suivantes
sont disponibles:
HDMI 1
HDMI 2
HDMI 3
HDMI 4
OPTICAL
COAX
AUX
BLUETOOTH
Remarque: S'ils supportent cette
fonctionnalité, certains appareils HDMI
s'identifieront avec leur nom d'usine.
Si votre téléviseur est branché en utilisant
la fonction ARC et que vous avez suivi la
procédure de conguration détaillée à la
page 16, le panneau d'achage montrera le
message suivant lorsque vous regardez la
télévision.
TV/ARC
Le retour audio (ARC : Audio Return
Channel) est une fonctionnalité inhérente à
la dernière version de HDMI qui permet à
votre téléviseur de transmettre de l'audio au
travers du câble vers la barre de son.
Remarque: L'affichage en est automatique
quand un téléviseur compatible avec ARC
est branché.
Français
Contrôle du volume
Ajustez le volume en appuyant sur les
touches ou sur le panneau avant ou
sur la télécommande.
Mettre la sortie en sourdine
Le son de la Solo bar peut être coupé en
appuyant sur l'icône de la télécommande.
Si l'appareil est mis en sourdine, le réglage
du volume passe à MUTE sur le panneau
d'achage.
Pour annuler la mise en sourdine, appuyer
sur une deuxième fois ou sur / pour
changer le volume.
Remarque: Un maximum de quatre
appareils Bluetooth peut être jumelé à la
Solo bar, chacun étant disponible selon le
principe premier arrivé-premier servi. De
temps à autre, si plus d'une personne désire
utiliser la Solo bar, vous pourriez avoir
besoin d'enlever un appareil.
F-15F-14
Page 25
Sélection d'un mode audio
La Solo bar dispose de trois modes audio
précongurés - STEREO, MOVIE et
CONCERT.
Appuyez sur la touche de la
télécommande et faites votre sélection.
Remarque: Le mode par défaut est stéréo,
cela signifie que l'audio est joué comme il a
été enregistré.
Son en provenance du
téléviseur
Si votre téléviseur est connecté à la Solo bar
en utilisant la fonction ARC, sélectionnez
la source appropriée sur votre téléviseur
et protez du son superbe émis par la
Solo bar en réglant le volume à l'aide de la
télécommande du téléviseur.
Quand elle est utilisée de cette façon,
l'écran d'achage de la Solo bar montre
automatiquement TV/ARC.
Son en provenance
d'appareil Bluetooth®
Pour avoir le plaisir d'écouter de la musique
sans l à partir de n'importe quel appareil
Bluetooth, vous devez d'abord vous
assurez que celui-ci est jumelé avec la Solo
bar-reportez-vous à la page 11 pour plus
d'information.
Une fois que votre appareil est jumelé, il
vous sut juste de suivre les instructions
fournies avec votre appareil.
Répéteur IR
Placée devant un téléviseur, la Solo bar
pourrait en bloquer (suivant le modèle)
le capteur de télécommande et rendre
impossible la transmission de commandes.
Dans ce type de situation, utilisez la
fonction de répéteur IR de la Solo bar pour
relayer les signaux vers votre téléviseur.
Remarque: Cela fonctionnera même quand
votre Solo bar sera en mode veille.
Reportez-vous à la page 18 les informations
de conguration.
Contrôle CEC transmis par
HDMI
Le contrôle «inter-éléments» (CEC:
Consumer Electronics Control) est une
fonctionnalité qui vous permet de brancher
via HDMI jusqu'à 15 appareils compatibles
et de les contrôler simultanément avec un
seul boîtier de télécommande.
CEC est activé par défaut. Reportez-vous à
la page 20 les informations de conguration.
Des exemples typiques de systèmes
contrôlés par CEC incluent:
< La mise en marche ou la mise en veille
simultanée de chaque appareil branché.
< Le contrôle de volume.
< La sélection de la source d'entrée.
Configuration
automatique
Une fonction propriétaire de conguration
automatique intégrée à la Solo bar tentera
de congurer les paramètres de haut-parleur
essentiels pour votre système (y compris
ceux d'un éventuel caisson de basse). Elle
calcule également les valeurs du ltre
d'égalisation de la pièce (Room EQ) pour
supprimer les pires eets des fréquences de
résonnance dans la pièce d'écoute.
Insérez la che du microphone de
calibration fourni dans la prise MIC située
sur le panneau arrière et placez-le dans la
zone d'écoute principale.
Le microphone capte les tonalités de
calibration spécialement émises par les
hauts parleurs (et le caisson de basse) quand
la conguration automatique s'exécute. La
Solo bar analyse le signal et calcule:
< le niveau d'enceinte,
< la fréquence de croisement du caisson
de basse,
< tout problème de fréquences de
résonnance dans la pièce nécessitant un
contrôle par ltrage.
Microphone
Pointez le microphone
vers le haut à hauteur
de la tête en étant dans
la position d'écoute.
Pour faire en sorte que le système soit aussi
précis que possible, suivez ces principes
directeurs:
< Minimisez les bruits de fond dans la
pièce d'écoute et celles avoisinantes.
< Fermer toutes les fenêtres et portes dans
la pièce d'écoute.
< Éteindre tous les ventilateurs, y compris
les systèmes de climatisation.
< Si vous avez le microphone dans la
main, ne bougez ni vos mains, ni vos
doigts pour éviter de créer des «bruits
de manipulation».
< Pointez le microphone vers le haut
à hauteur de la tête en étant dans la
position d'écoute normale en ayant
une vue directe, sans obstacles, des
hauts parleurs. Il n'est pas nécessaire de
pointer le microphone en direction des
hauts parleurs.
< Si votre système contient un caisson
de basses actif, réglez d'abord la
commande de son niveau de sortie - ou
gain - à mi-chemin entre le minimum
et le maximum.
Pour lancer la conguration automatique,
appuyez sur la touche de la
télécommande suivie de la jusqu'à ce
que Speaker/EQ Setup apparaisse sur le
panneau d'achage de la Solo bar. Appuyez
alors sur et remarquez quand l'écran
affiche Auto Setup. Appuyez de nouveau sur
pour commencer la procédure.
Au cours processus, qui dure généralement
moins de deux minutes, les hauts parleurs
émettent des tonalités de test. Le générateur
de tonalités de test passera sur chaque
enceinte deux fois. Entre chaque cycle,
Analysing s'achera brièvement. Après le
deuxième cycle, l'écran achera Calculating
puis toute de suite après Complete.
Si des erreurs se produisent pendant la
conguration automatique, suivez les
instructions qui apparaissent sur le panneau
d'achage.
La conguration automatique est
normalement très précise, mais elle peut
générer de temps à autre des résultats faux.
Les problèmes peuvent provenir de:
< sons externes ou bruits de grondement /
de manipulation détectés par le micro
< réverbérations sonores sur des surfaces
dures (par exemple, fenêtres ou murs)
près de la position d'écoute,
< résonances acoustiques très prononcées
dans la pièce,
< obstacles (un canapé par exemple) entre
les enceintes et le micro.
<
Français
Utilisation d'un caisson de grave
Si votre système un caisson de basses
actif, il se peut que vous ayez à relancer
la conguration automatique avec la
commande de son niveau de sortie - ou gain
- réglée sur une valeur moyenne.
La conguration automatique essaiera de
sélectionner une fréquence de croisement
permettant la transition de basses
fréquences la plus uide possible, entre les
hauts parleurs principaux et le caisson de
basses. Si cela ne produit pas un résultat
susamment satisfaisant, nous vous
conseillons d'essayer d'autres fréquences
de transition pour trouver celles qui vous
correspondent le mieux.
Quand la conguration automatique
s'exécute, elle calcule également les valeurs
du ltre d'égalisation de la pièce (Room
EQ) pour supprimer les pires eets des
fréquences de résonnance dans la pièce
d'écoute.
Room EQ est désactivé par défaut. Vous
devriez activer Room EQ sur les entrées qui,
selon vous, pourraient en bénécier quand
vous écoutez des sons spéciques à la source
sur chaque entrée.
L'égalisation de la pièce permet de réduire
les problèmes d'acoustique dans la pièce
d'écoute. Il est cependant plus ecace
d'essayer de régler l'origine même de ces
problèmes. Pour activer Room EQ, reportezvous à la page 19 dans conguration du
système.
F-17F-16
Page 26

conguration
dusystème
Servez-vous de la télécommande et suivez ces étapes pour assurer
que la Solo bar est congurée pour le maximum d'agrément.
Menu de la configuration du système
Les paramètres par défaut sont achés en bleu.
System Setup Lipsync Delay 0 ~ 200ms Il est possible d'introduire des retards sur le signal vidéo par traitement
Display Level
App Control
IR Repeater
System Info Appuyez sur OK pour afficher la version du logiciel système.
Dim g Bright g Off
Enable g Disable
Enable g Disable
vidéo qui entraine une mauvaise coordination de l'audio et de la vidéo.
Vous la remarquerez quand le son de la voix n'est pas synchronisé avec les
mouvements de lèvres. Pour compenser ce décalage, vous pouvez régler
le décalage lip sync. Servez-vous des touches et pour ajuster la
synchronisation entre le son et l'image. Appuyez sur pour remonter d'un
niveau ou pour sortir de la configuration.
Les niveaux d'éclairage du LED peuvent être ajustés pour s'adapter à vos
besoins. Servez-vous des touches et pour passer d'un paramètre à
l'autre. Quand le réglage de l'écran est sur Off, celui-ci s'illumine brièvement
à chaque fois qu'une commande est reçue. Appuyez sur pour remonter
d'un niveau ou pour sortir de la configuration.
Permet que la Solo bar puisse sortir de la mise en veille en se servant de
l'application de télécommande optionnelle. Servez-vous des touches et
pour permettre ou empêcher l'envoi de commandes avec l'application.
Appuyez sur pour remonter d'un niveau ou pour sortir de la
configuration.
Servez-vous des touches et pour activer ou désactiver le répéteur IR.
Reportez-vous à la page 16 pour plus d'informations. Appuyez sur pour
remonter d'un niveau ou pour sortir de la configuration.
Menu de la configuration du haut-parleur et de l'égaliseur
Les paramètres par défaut sont achés en bleu.
Speaker/EQ Setup Auto Setup La configuration automatique (Auto setup) configure votre Solo bar en vue d'une expérience d'écoute optimale.
Appuyez sur OK pour commencer la procédure de configuration. Reportez-vous à la page 17 pour plus
Room EQ
Sub Pairing
Subwoofer Level 0 ~ -12dB
Headphone out
d'informations.
Enable g Disable
Appuyez sur pour commencer la procédure de jumelage. Reportez-vous à la page 10 pour plus d'informations.
BT Transmitter
Enable g Disable
Device search
Servez-vous des touches et pour activer ou désactiver l'égaliseur.
Remarque: Disponible uniquement à la fin de la configuration automatique. Appuyez
sur pour remonter d'un niveau ou pour sortir de la configuration.
Servez-vous des touches et pour sélectionnez le niveau du caisson des basses.
Remarque: Disponible uniquement à la fin du jumelage du caisson. Appuyez sur
pour remonter d'un niveau ou pour sortir de la configuration.
Utilisez les touches et pour activer ou désactiver le transmetteur Bluetooth®.
Appuyez sur pour remonter d'un niveau ou pour sortir de la configuration.
Remarque: Disponible uniquement si Headphone out est activé.
Appuyez sur pour commencer la recherche des écouteurs. Servez-vous des
touches et pour sélectionner les écouteurs dans la liste. Appuyez sur pour
remonter d'un niveau ou pour sortir de la configuration.
Français
Factory Defaults
Appuyez sur OK pour réinitialiser la Solo bar aux paramètres d'usine. Remarque: Les appareils jumelés
ou connectés seront perdus. Appuyez sur pour remonter d'un niveau ou pour sortir de la
configuration.
F-19F-18
Page 27
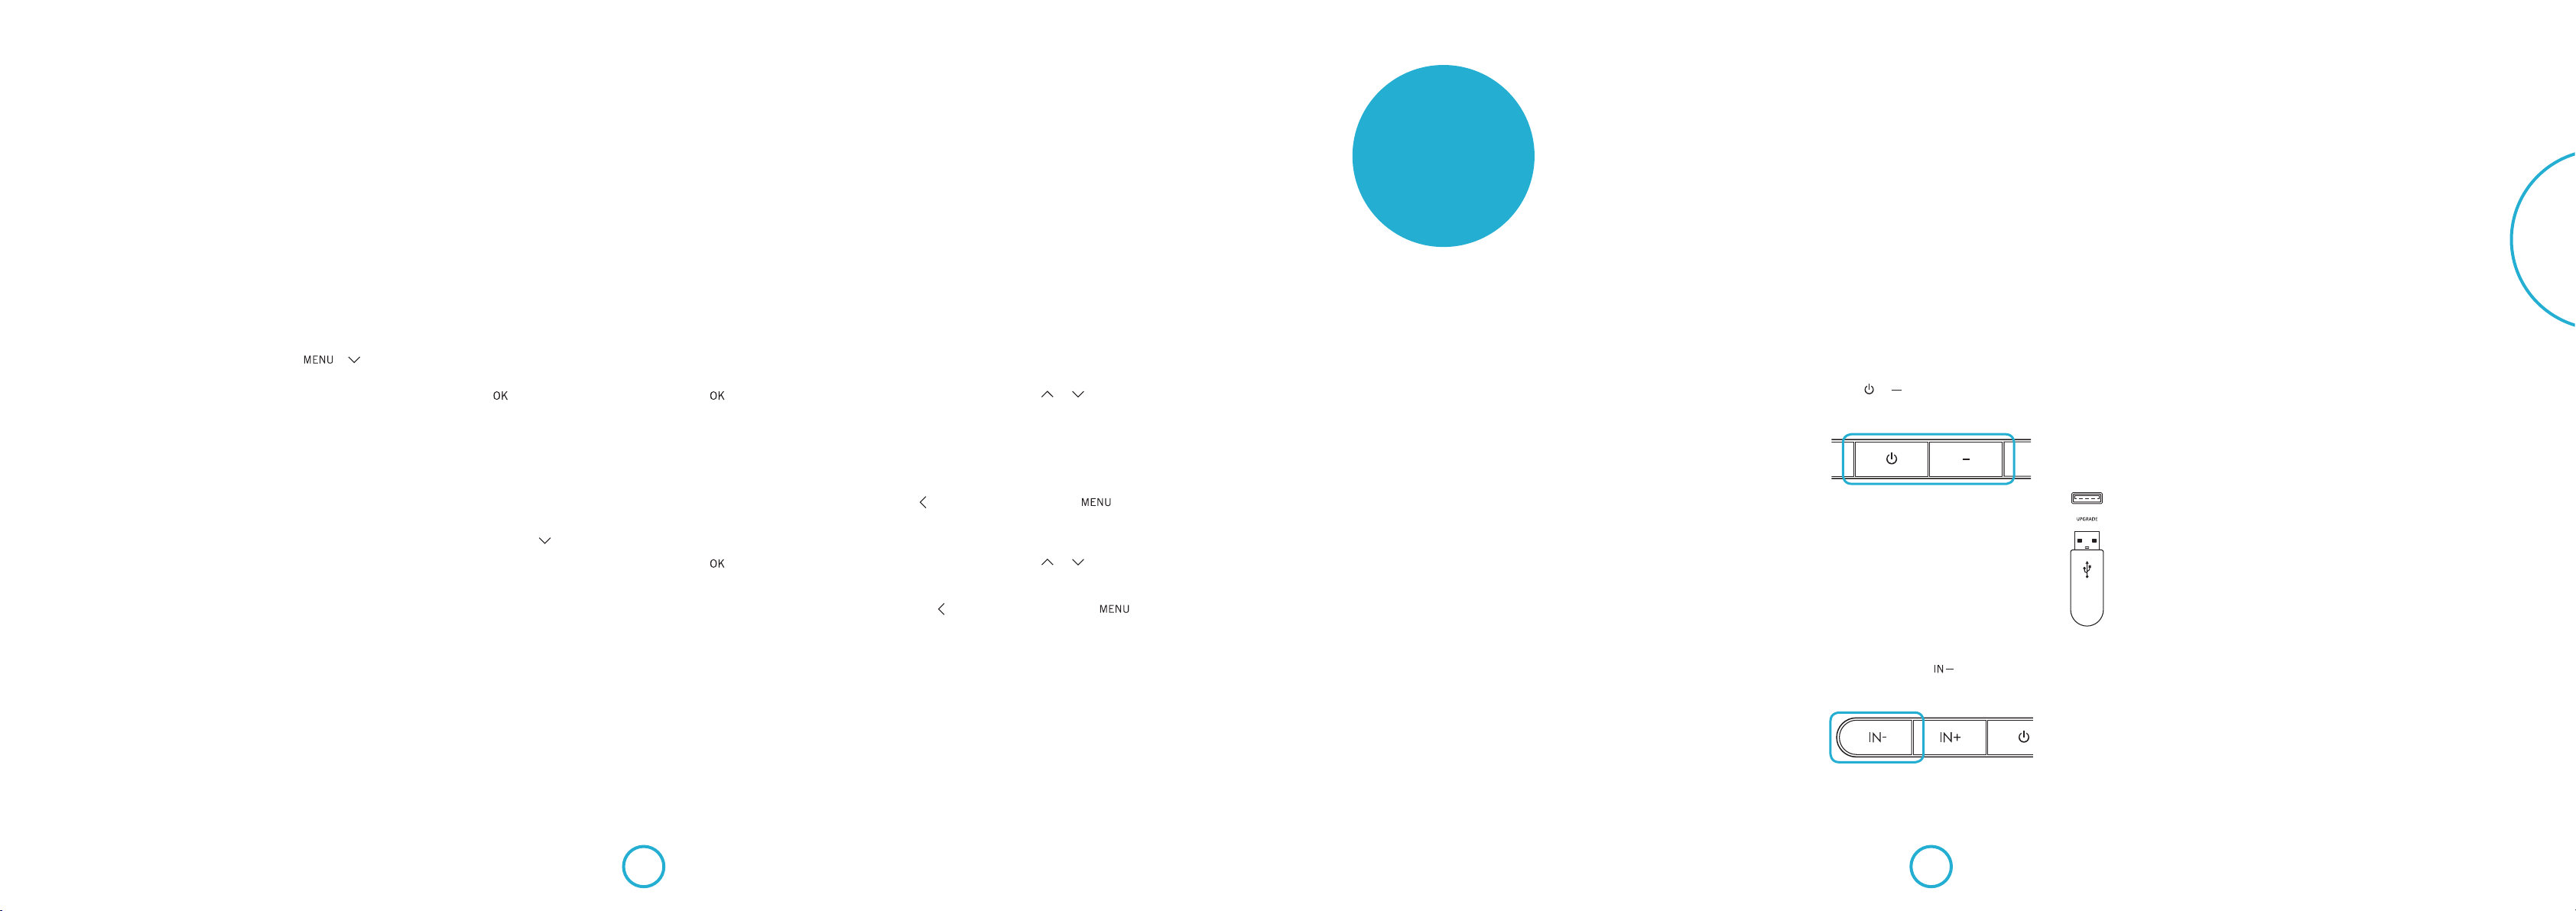
Menu de la configuration HDMI
Les paramètres par défaut sont achés en bleu.
HDMI Setup HDMI Audio Out
CEC / ARC
Disable g Passthrough
Enable g Disable
Servez-vous des touches et pour activer ou désactiver
HDMI Passthrough. HDMI Passthrough transmet les signaux
vidéo et audio de n'importe quelle source HD vers votre
Solo bar au travers d'un câble HDMI. La Solo bar sépare le
signal, joue l'audio en provenance de la source HD avec ses
propres hauts parleurs et retransmet le signal vidéo inchangé
au téléviseur au travers du câble HDMI OUT. Appuyez sur
pour remonter d'un niveau ou pour sortir de la
configuration.
Servez-vous des touches et pour activer ou désactiver
CEC/ARC.
Reportez-vous à la page 16 pour plus d'informations. Appuyez
sur pour remonter d'un niveau ou pour sortir de la
configuration.
mise à jour du
rmware
Téléchargement d'un
fichier de mise à jour
Pour eectuer une mise à jour du rmware,
vous aurez besoin de télécharger un chier
de mise à jour du site web d'Arcam.
Vériez si des mises à jour sont disponibles
en tapant www.arcam.co.uk dans votre
navigateur et en vous rendant sur la page de
la Solo bar.
Remarque: Assurez-vous de télécharger
le fichier sur la racine de votre clé USB et
non dans un répertoire sinon la mise à jour
échouera.
Réalisation de la mise à
jour
Assurez-vous que la barre de son est
branchée et en mode veille.
Maintenez simultanément appuyées les
touches et pendant cinq secondes
environ.
La Solo bar s'allumera et achera
l'information suivante:
ARCAM SB M:V024
B:40526 D:30304
Remarque: M = Version du logiciel principal,
B = Version du logiciel Bluetooth et
D=version du logiciel DSP.
L'écran ache alors:
System Update
Insert USB...
Remarque: Appuyer de nouveau sur IN-
remettra l'écran avec les versions de logiciel.
Insérez la clé USB contenant le chier de
mise à jour dans le port UPGRADE située
sur le panneau arrière de la Solo bar.
La mise à jour du
rmware commencera
automatiquement aussitôt
que la clé USB aura été
détectée et l'achage
changera en conséquence:
System Update
Updating...
Français
Si la mise à jour réussit, l'écran achera
l'information suivante pendant trois
secondes environ, après quoi la Solo bar
s'éteindra.
System Update
Complete
Si la mise à jour échoue, l'écran achera
l'information suivante pendant trois
secondes environ, après quoi la Solo bar
s'éteindra et toute la procédure devra de
nouveau être eectuée.
System Update
Error
Appuyez sur la touche pour vous
rendre à l'écran de mise à jour du logiciel.
F-21F-20
Si 30 secondes s'écoulent avant que la clé
ne soit insérée, l'achage disparaîtra pour
acher à la place:
System Update
USB Not Detected
Le message s'achera pendant trois
secondes environ, après quoi la Solo bar
s'éteindra et l'entière procédure devra être
répétée.
Page 28
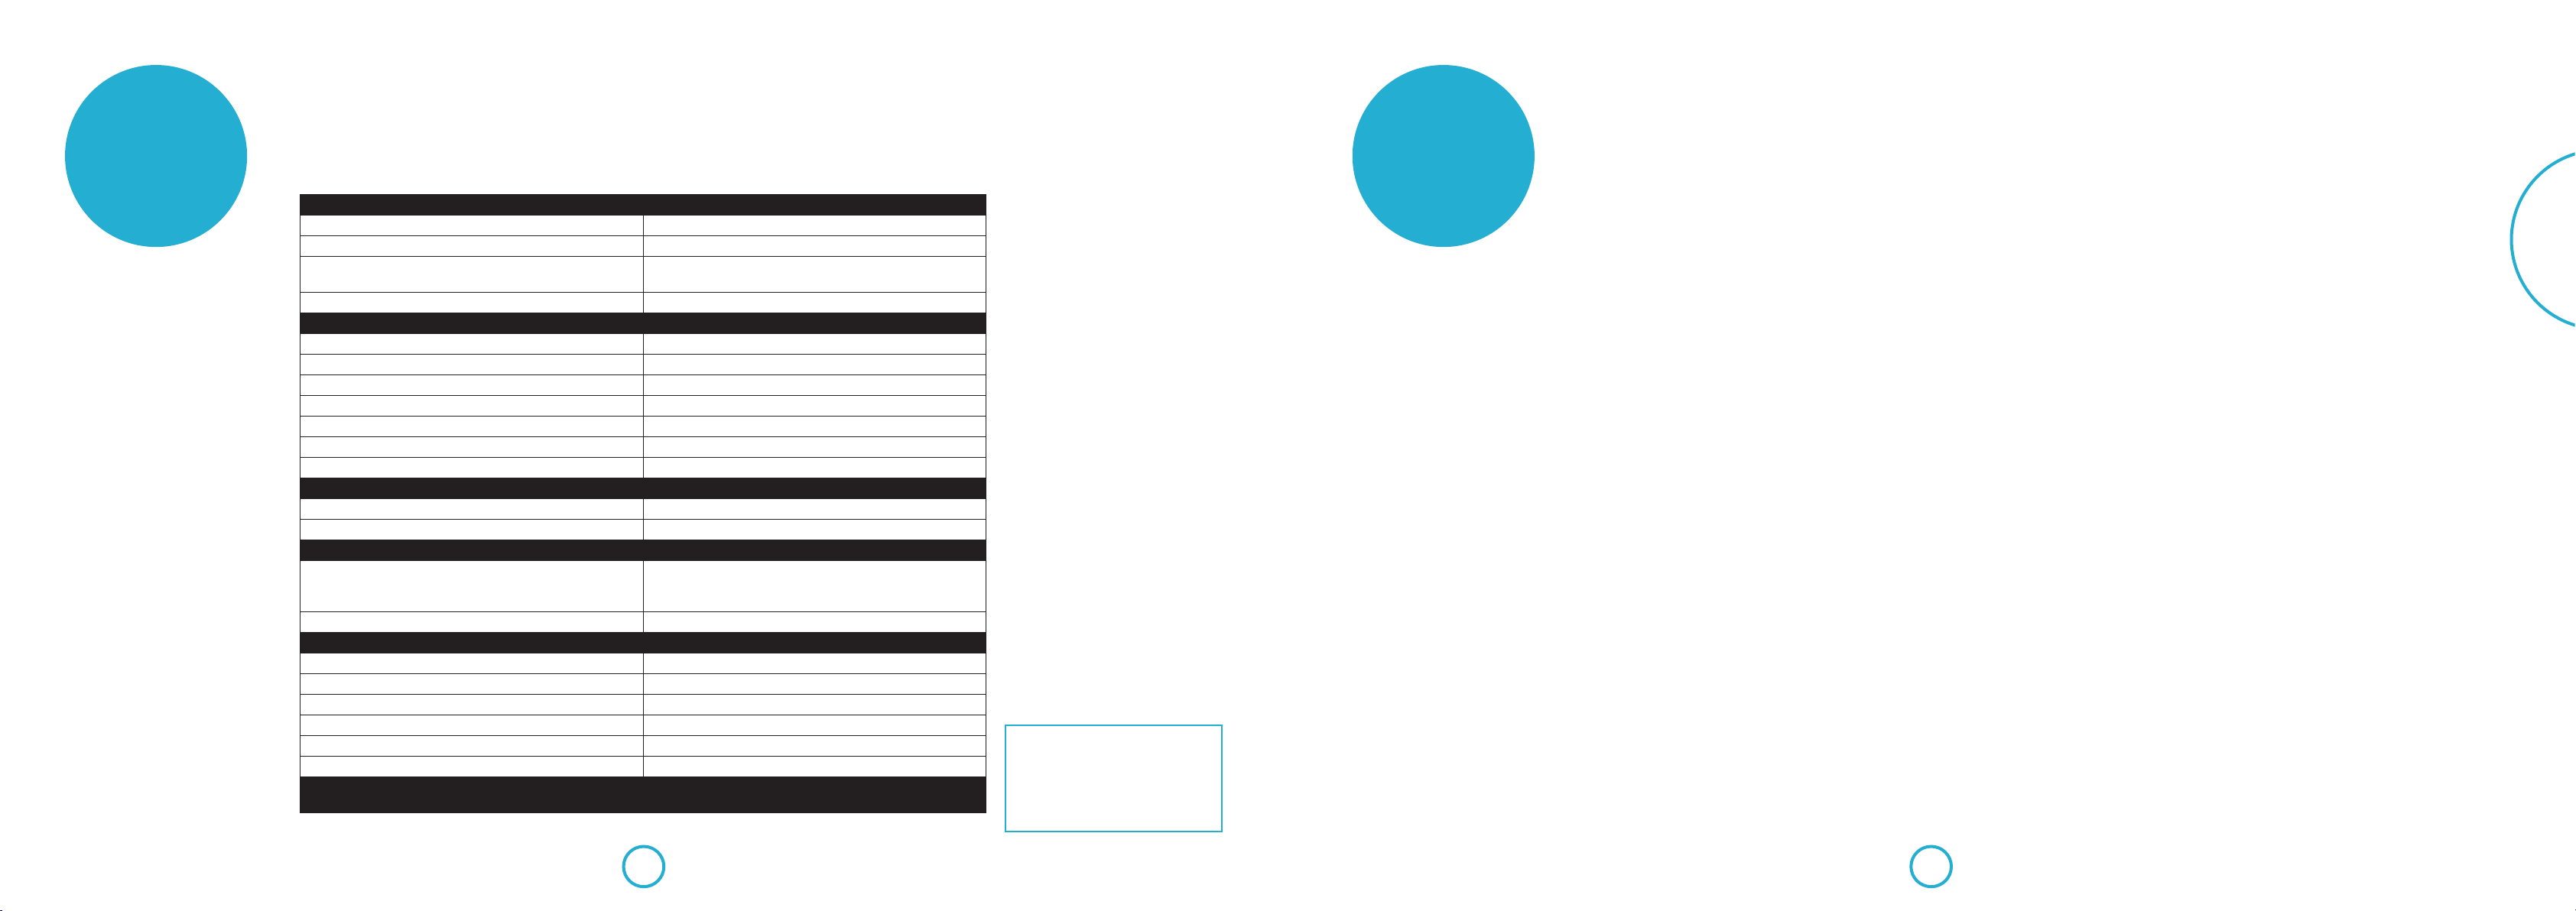
spécications
Généralités
Poids (emballé) 10kg
Dimensions (H x L x P) 130mm x 1100mm x 110mm
Consommation électrique Mode de fonctionnement: 150W (max.)
Mode veille: < 0,5W
Alimentation requise 100 à 240V, 50/60Hz
Entrées / Sorties
Entrée HDMI 4 prises de type A
Sortie HDMI Prise de type A avec prise en charge d'ARC/CEC
Entrée numérique (optique) Prise optique S/PDIF
Entrée numérique (coaxiale) Prise RCA
Entrée auxiliaire Prise stéréo 3,5mm
Audio Bluetooth Ver. 3.0, compatible avec la norme A2DP
Sortie du caisson de basses Prise RCA LFE
Sortie sans fil du caisson de basses
Fréquence 2,4GHz
Couverture de la transmission Approx. 20m (sans interférence)
Amplificateur
Puissance nominale:
Caisson des basses (0,5% THD)
Caisson des aigus (0,5% THD)
Puissance nominale de l'amplificateur (20Hz à 20kHz) 100 W
Hauts parleurs
Caisson des basses 1 Cône 2 x 4 pouces
Caisson des basses 2 Cône 2 x 4 pouces
Caisson des aigus Cône 2 x 1 pouces
Réponse en fréquence du caisson des basses 170Hz à 20kHz ± 3dB
Réponse en fréquence du caisson des aigus 3.8kHz à 14kHz ± 3dB
Impédance nominale 6Ω
E&OE
Remarque: Toutes les valeurs techniques sont typiques sauf mention contraire.
40W par canal
10W par canal
Politique d'amélioration
continue
Arcam améliore continuellement
ses produits. Les conceptions et les
spécications peuvent donc faire l'objet
de modications sans préavis.
Dépannage
Voici quelques-unes des vérications
simples que vous pouvez eectuer si vous
avez des problèmes avec votre Solo bar.
Alimentation
< Vériez que le cordon d'alimentation
est correctement branché des deux
côtés.
< Assurez-vous que l'interrupteur du
secteur est enclenché et que l'appareil
est allumé.
Télécommande
< Vériez que les piles sont correctement
mises.
< Il se peut que les piles aient besoin
d'être remplacées.
< Êtes-vous trop loin de l'appareil, ou y
a-t-il un obstacle?
Son
< Assurez-vous que les câbles sont
correctement branchés.
< Vériez que la bonne source d'entrée est
sélectionnée.
< S'il y a trop de bruits ou de distorsion
dans le son lors de la lecture à partir
d'un appareil Bluetooth essayez d'en
diminuer le volume et d'augmenter le
volume sur la Solo bar.
Image
< L'image est absente ou s'ache mal,
vériez que les câbles HDMI sont
correctement branchés.
< Vériez que la bonne source d'entrée est
sélectionnée.
Bluetooth
< Vériez que votre appareil Bluetooth est
correctement branché.
< Est-ce que votre appareil Bluetooth est
trop loin de la barre?
Avis de la FCC
Ce produit contient l’ID FCC : VNH-IKCSRBC05/QEC-GWNO
Cet appareil a été testé et déclaré conforme
aux limites d’un appareil numérique de
classe A conformément au paragraphe 15
de la réglementation de la FCC. Ces limites
sont conçues pour fournir une protection
raisonnable contre les interférences nuisibles
dans les installations résidentielles. Cet
appareil génère, utilise et peut émettre de
l’énergie radiofréquence et, s’il n’est pas
installé et utilisé selon le guide d’utilisation,
peut causer des interférences nuisibles
aectant les communications radio.
Cependant, rien ne garantit que telle ou
telle installation ne sera pas aectée par des
interférences. Si cet équipement cause des
interférences préjudiciables à la réception
radio ou la réception d’un téléviseur (ce
qui peut être constaté en éteignant puis
en allumant l’appareil), nous conseillons à
l’utilisateur de prendre une ou plusieurs des
mesures suivantes pour tenter de corriger le
problème :
< Réorienter ou déplacer l’antenne
réceptrice.
< Augmenter la distance séparant
l’équipement et le récepteur.
< Brancher l’équipement dans une prise
de courant d’un circuit diérent de celui
sur lequel le récepteur est branché.
< Consultez votre revendeur ou un
technicien radio/télévision qualié.
Français
Cet appareil est conforme à la section
15 du règlement de la FCC. L’utilisation
de cet équipement est soumise aux deux
conditions suivantes :
(a) Cet appareil ne peut causer
d’interférences nuisibles,
(b) il doit accepter toute interférence reçue,
y compris les interférences risquant
d’engendrer un fonctionnement
indésirable.
(Section 15.21 des règles FCC)
Avertissement : tout changement/
modication non expressément approuvé
par la partie responsable de la conformité
pourrait annuler l’autorisation accordée à
l’utilisateur d’utiliser cet appareil.
Déclaration NMB-003 (Norme sur le
matériel brouilleur) du Canada
Ce produit contient IC
10581A-IKCSRBC05/10581A-GWK5NO
Ce dispositif satisfait aux exigences
d’Industrie Canada, prescrites dans le
document CNR-210.
L’utilisation de cet équipement est soumise
aux deux conditions suivantes :
(1) l’équipement concerné ne doit pas causer
d’interférences dangereuses, et (2) il doit
accepter toute interférence reçue, y compris
les interférences risquant d’engendrer un
fonctionnement indésirable.
Cet appareil numérique de la classe B est
conforme la norme NMB-003 (Norme sur le
matériel brouilleur) du Canada.
F-23F-22
Page 29
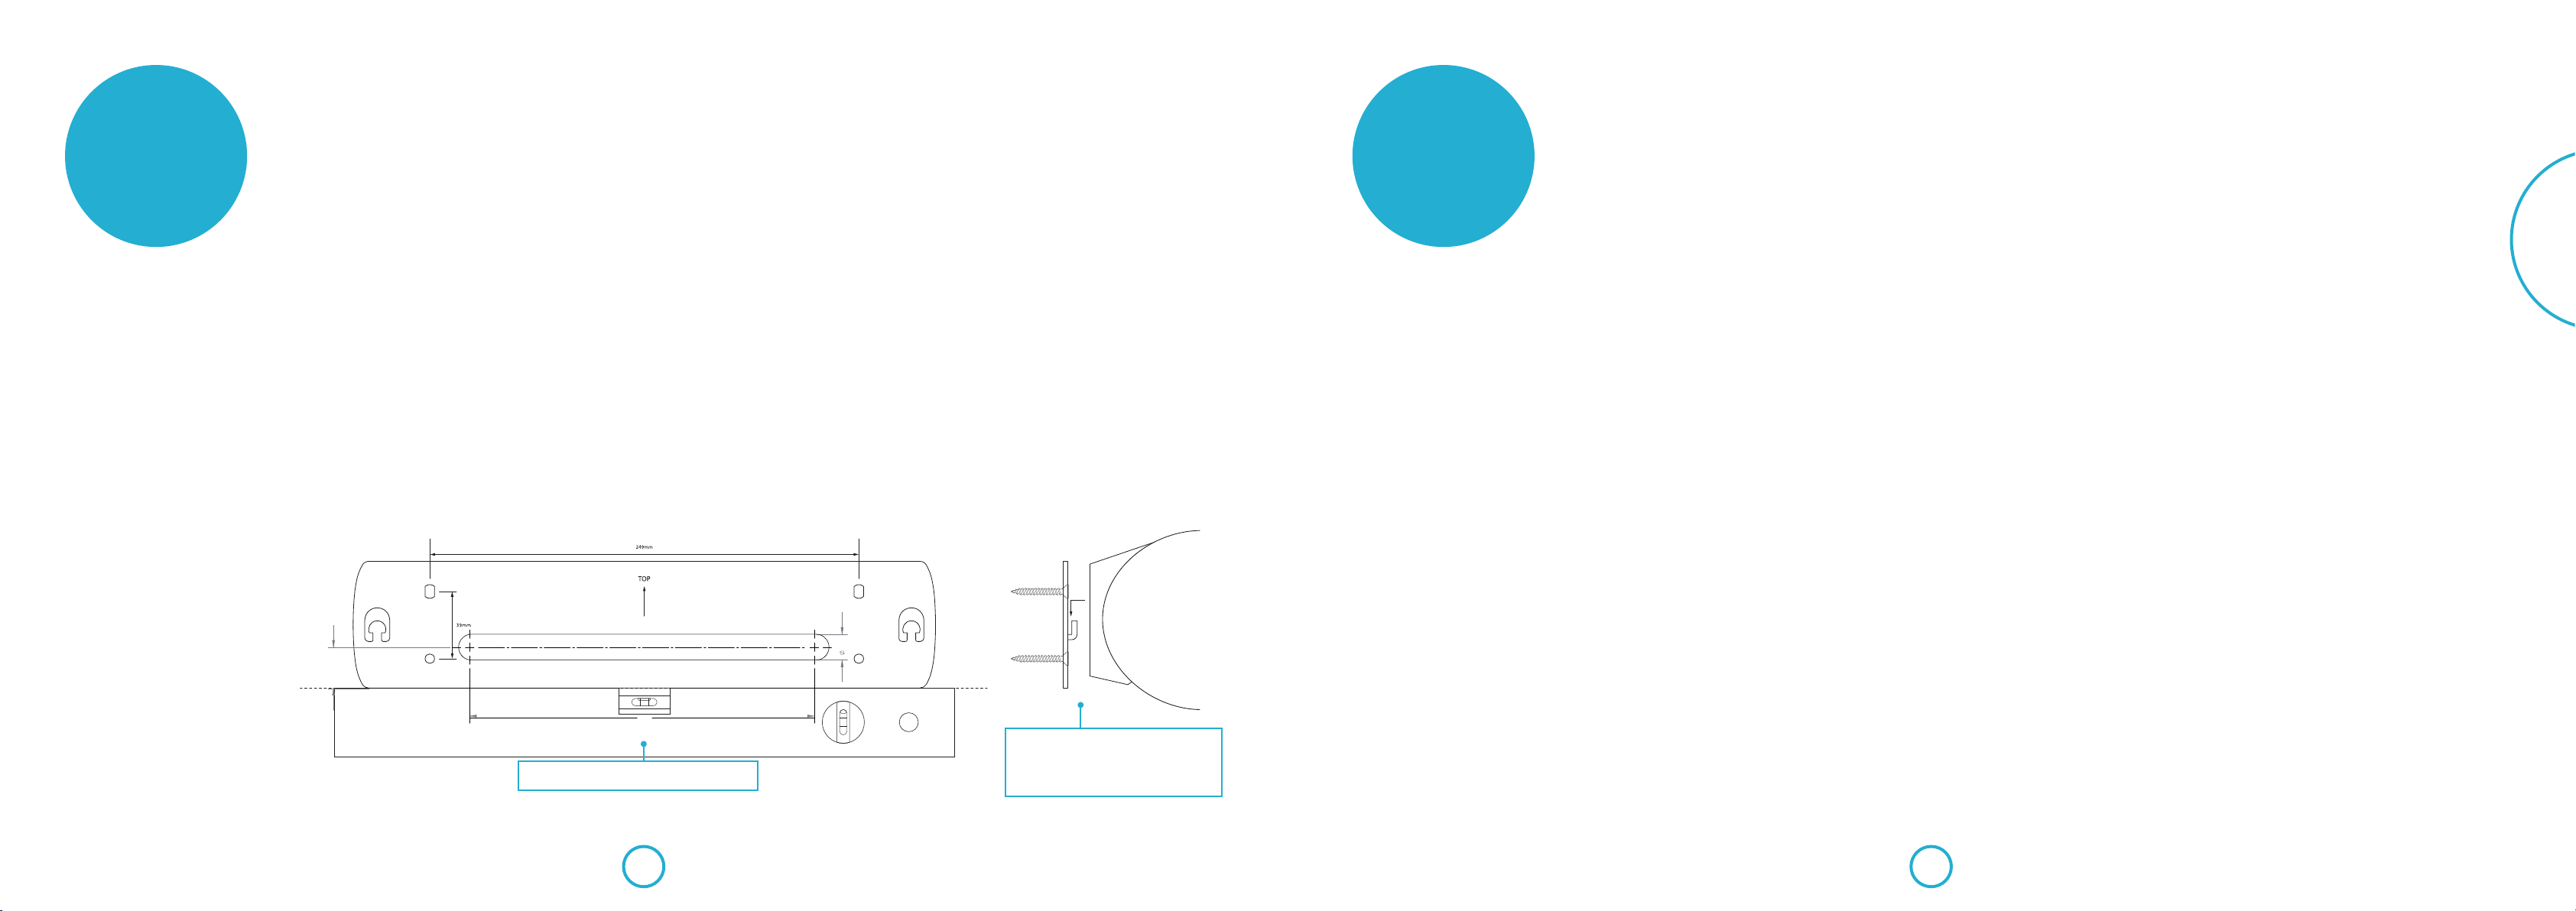
instructions
pourla xation
Servez-vous du support mural spécialement conçu pour
xer la Solo bar au mur solidement et en toute sécurité.
Vous aurez besoin de
< Une perceuse
< Une mèche, des chevilles et des
xations qui conviennent au type de
mur sur lequel vous xez la barre.
< Un tournevis
< Un niveau à bulle
< Un crayon
< Un mètre ruban
Procédure de fixation
1. Assurez-vous que le support mural est
horizontal en plaçant le niveau à bulle
au-dessous.
2. Marquer l'emplacement des trous avec
un crayon, en prenant soin de tracer les
contours correctement.
3. En faisant attention, percez quatre
trous, en vous servant de la mèche,
des chevilles et des xations qui
conviennent au type de mur sur lequel
vous xez la barre.
4. Fixez le support au mur en utilisant
de solides vis (les vis devraient avoir
un diamètre minimum de 5,5mm),
en vous assurant qu'elle s'adapte
parfaitement aux chevilles et qu'elles
sont serrées et au même niveau.
5. Fixez enn la Solo bar au support
en y insérant les crochets saillants.
Elle devrait s'appuyer fermement et
solidement contre le mur.
Attention ! N’installez pas l’appareil sur
un mur en contreplaqué ou non solide.
Consultez un professionnel si vous
n’êtes pas sûr de la solidité du mur.
garantie du
produit
Copyright
Juin 2014, © 2014 A&R Cambridge Ltd.
A & R Cambridge Limited (Arcam) se
réserve le droit d'apporter des modications
aux spécications des produits décrits dans
ce document à tout moment sans préavis et
sans obligation de notier qui que ce soit de
ces changements.
Toutes les marques commerciales de tiers
sont reconnues et indiquées. La mention
des produits de tiers ne constitue ni une
approbation, ni une recommandation.
Arcam prend toutes les précautions
nécessaires pour s'assurer que les
informations contenues dans cette
publication sont exactes mais n'accepte
aucune responsabilité en cas d'erreur ou
d'omission.
Garantie internationale
Arcam garantit que les produits décrits
dans ce guide seront conformes avec leurs
spécications publiées dans tous les aspects
signicatifs pour une période de deux ans
après la date de l'achat. Cela vous donne
droit à voir l'appareil réparé sans frais,
pourvu que l'appareil a été acheté auprès
d'un détaillant agréé d'Arcam.
Le revendeur Arcam est responsable de
l'ensemble du service après-ventes. Le
fabricant ne peut être tenu responsable de
défauts provoqués par un accident, une
mauvaise utilisation, une utilisation abusive,
une usure normale, de la négligence ou des
réglages et/ou réparations non autorisés,
et n'accepte pas non plus la responsabilité
des dommages et pertes encourus durant
le transport vers ou à partir de la personne
réclamant les réparations sous garantie.
Réclamations sous
garantie
Cet équipement doit être renvoyé dans
son emballage d'origine au revendeur
auprès duquel il avait été acheté. Il doit
être expédié par l'intermédiaire d'un
transporteur réputé – pas par la poste.
Aucune responsabilité ne peut être acceptée
durant le transit de l'appareil vers le
revendeur ou le distributeur et il est donc
conseillé aux clients d'assurer l'appareil
contre toute perte ou dommage durant le
transport.
Enregistrement en ligne
Vous pouvez enregistrer votre produit en
ligne à www.arcam.co.uk.
Français
Des problèmes ?
Si votre détaillant Arcam n'est pas en
mesure de répondre à vos questions
en ce qui concerne ce produit ou tout
autre produit Arcam, veuillez contacter
l'assistance à la clientèle d'Arcam à l'adresse
suivante et nous ferons de notre mieux pour
vous aider.
Arcam Customer Support Department,
Unit15, Pembroke Avenue,
Waterbeach, CAMBRIDGE,
CB25 9QP, Angleterre ou sur le siteWeb
www.arcam.co.uk.
15.0
24.0
200.0
Assurez-vous que les vis sont serrées et bien
enfoncées avant de fixer la Solo bar sur les
Assurez-vous que le support mural est horizontal.
crochets saillants. Elle devrait s'appuyer
solidement contre le mur.
Les frais de pièces et main d'œuvre pendant
deux ans à compter de la date d'achat.
Au bout de deux ans, il vous faut payer
les frais de pièces et de main d'œuvre. La
garantie ne couvre en aucun cas les frais
de transport.
F-25F-24
Cette garantie couvre:
Page 30

licences de
®
technologie
Fabriqué sous licence des laboratoires
Dolby. Dolby et le symbole du double
D sont des marques commerciales des
laboratoires Dolby.
Les termes HDMI and HDMI HighDenition Multimedia Interface ainsi que le
logo HDMI sont des marques commerciales
ou des marques déposées de HDMI
Licensing LLC aux États-Unis et dans les
autres pays.
Pour les brevets DTS, consultez le site
http://patents.dts.com. Fabriqué sous licence
de DTS Licensing Limited. DTS, DTS-HD,
le symbole DTS ainsi que DTS associé au
symbole DTS sont des marques déposées
de DTS, Inc.; DTS-HD Master Audio et les
logos DTS sont des marques commerciales
de DTS, Inc. © DTS, Inc. Tous droits
réservés.
© 2013 CSR plc et les sociétés de son
groupe.
La marque aptX® et le logo aptX sont des
marques commerciales de CSR plc ou de
l'une des sociétés de son groupe et peuvent
avoir été enregistrés dans une ou plusieurs
juridictions.
La marque mondiale Bluetooth® et les logos
sont des marques déposées appartenant à
Bluetooth SIG, Inc. et tout usage des dites
marques par Arcam est sous licence. Les
autres marques et noms commerciaux
mentionnés sont la propriété de leur
détenteur respectif.
«Made for iPod», «Made for iPhone» et
«Made for iPad» signient qu'un accessoire
électronique a été conçu pour se connecter
spéciquement à un iPod, un iPhone ou un
iPad respectivement, et qu'il a été certié
conforme aux normes de performance
Apple par le développeur. Apple ne saurait
être tenu responsable du fonctionnement de
cet appareil, ni de sa conformité aux normes
de sécurité réglementaires. Attention,
l'utilisation de cet accessoire avec un iPod,
un iPhone ou un iPad peut aecter la
performance sans l.
La technologie Bluetooth fonctionne avec
iPhone 5s, iPhone 5c, iPhone 5, iPhone 4s,
iPhone 4, iPhone 3GS, iPad Air, iPad (3e et
4e génération), iPad 2, iPad mini avec écran
Retina, iPad mini, et iPod touch (4e et 5e
génération).
iOS, iTunes, iPad, iPhone et iPod sont
des marques commerciales d'Apple Inc.,
enregistrées aux États-Unis et dans d'autres
pays. App StoreSM est une marque de service
d'Apple Inc.
Conçu pour:
• iPhone 5s
• iPhone 5c
• iPhone 5
• iPhone 4s
• iPhone 4
• iPhone 3GS
• iPad Air
• iPad mini avec écran Retina
• iPad (4e génération)
• iPad mini
• iPad (3e génération)
• iPad 2
• iPod touch (5e génération)
• iPod touch (4e génération)
Google Play™ est une marque commerciale
de Google Inc.
Android™ est une marque commerciale de
Google Inc.
F-26
Page 31

Handbuch Sound-Bar
Deutsch
Page 32

Willkommen...
Inhalt
… vielen Dank, dass Sie sich für den Kauf des Arcam Solo bar entschieden
haben.
Arcam stellt seit mehr als 30 Jahren hochwertige Audiokomponenten
her. Der neue Solo bar ist die jüngste in einer langen Tradition von
ausgezeichneten Hi-Fi- und Heimkino-Geräten.
Wir hoen, dass die Sorgfalt und Mühen bei der Herstellung dieses Produkts
wird eindrucksvoll mit seiner überlegenen Leistung und Zuverlässigkeit
demonstriert werden, um sicherzustellen, dass Ihr Produkt Ihnen über viele
Jahre hinweg Freude bereitet.
Dieses Handbuch bietet eine detaillierte Anleitung zur Installation und zur
Bedienung des Solo bar. Das Inhaltsverzeichnis auf dieser Seite zeigt Ihnen,
welche Abschnitte von besonderem Interesse für Sie sind.
Wir hoen, dass Ihnen Ihr Solo-Bar viele Jahre lang Freude bereiten
wird. Im unwahrscheinlichen Fall eines Produktfehlers oder wenn Sie
einfach weitere Informationen zu den Produkten von Arcam wünschen,
wenden Sie sich bitte an unsere Händler, welche Ihnen gerne weiterhelfen
werden. Weitere Informationen nden Sie auf der Arcam-Website unter
www.arcam.co.uk.
Ihr Solo Bar Entwicklungsteam.
Sicherheitshinweise D-4
Übersicht D-5
Tasten und Display D-5
Anschlüsse D-6
Kurzanleitung D-7
Verpackungsinhalt D-7
Aufstellen des Geräts D-7
Anschließen von Geräten D-7
Anschließen eines Fernsehers D-7
Anschluss von digitalen Geräten über HDMI D-8
Anschluss von analogen Geräten D-9
Anschluss von Audiogeräten über digitalen Eingang D-9
Anschluss eines Subwoofers D-9
Einstecken und einschalten D-10
Anschließen eines Solo sub D-10
Anschluss von Bluetooth®-Geräten D-11
Gebrauch von Kopfhörern D-11
Fernbedienung D-12
Gebrauch der Fernbedienung D-12
Fernbedienungs-App D-13
Anweisungen zum Download D-13
Koppeln Ihres mobilen Geräts D-14
Bedienung D-15
Einschalten D-15
Quellenwahl D-15
Lautstärkeregelung D-15
Auswahl eines Audiomodus D-16
Ton von Ihrem Fernseher D-16
Ton von Bluetooth®-Geräten D-16
IR-Repeater D-16
CEC-Steuerung via HDMI D-16
Automatische Einrichtung D-17
Systemeinstellung D-18
Systemeinstellungsmenü D-18
Lautsprecher-/EQ-Einstellungsmenü D-19
HDMI-Einrichtungsmenü D-20
Firmware-Aktualisierung D-21
Herunterladen einer Aktualisierungsdatei D-21
Ausführen der Aktualisierung D-21
Technische Daten D-22
Fehlerbehebung D-23
Montageanweisungen D-24
Sie benötigen D-24
Montagevorgang D-24
Produktgarantie D-25
Copyright D-25
Weltweite Garantie D-25
Inanspruchnahme der Garantie D-25
Online Registrierung D-25
Probleme? D-25
Technologielizenzen D-26
Deutsch
D-3D-2
Page 33

Sicherheitshin-
weise
Übersicht
1. Diese Anweisungen lesen
Vor Betrieb des Geräts sollten Sie alle
Sicherheits- und Bedienungsanleitungen
lesen.
2. Die Anweisungen auewahren
Die Sicherheits- und
Bedienungsanleitungen müssen für
zukünigen Bezug auewahrt werden.
3. Alle Warnungen beachten
Alle Warnungen auf dem Gerät und
in der Bedienungsanleitung müssen
beachtet werden.
4. Alle Anweisungen befolgen
Alle Bedienungs- und
Verwendungsanweisungen müssen
befolgt werden.
5. Dieses Gerät nicht in der Nähe von
Wasser verwenden
Dieses Gerät nicht in der Nähe von
Wasser oder Nässe verwenden – z. B. in
einem nassen Keller oder in der Nähe
eines Schwimmbeckens.
6. Nur mit einem trockenen Tuch reinigen.
7. Decken Sie keine Belüungsönungen
ab. In Übereinstimmung mit den
Anweisungen des Herstellers installieren.
8. Das Gerät muss fern von Wärmequellen
wie Radiatoren, Heizkörpern, Öfen und
anderen wärmeerzeugenden Geräten
(einschließlich Verstärkern) aufgestellt
werden.
9. Nicht die Sicherheiten des polarisierten
oder geerdeten Steckers außer Kra
setzen. Ein polarisierter Stecker hat zwei
Stie, wobei der eine breiter ist als der
andere. Ein geerdeter Stecker hat zwei
Stie und einen dritten Erdungssti.
Der breitere Sti oder der dritte
Erdungssti sind für Ihre Sicherheit
gedacht. Wenn der mitgelieferter Stecker
nicht in Ihre Steckdose passt, bitten Sie
einen Elektriker die veraltete Steckdose
auszuwechseln.
10. Schützen Sie das Netzkabel, dass
möglichst nicht darauf getreten und dass
es nicht eingeklemmt wird. Besondere
Vorsicht sollte man bei Netzsteckern,
Steckdosen und an der Ausgangsstelle im
Gerät walten lassen.
11. Nur Befestigungs- und Zubehörteile
verwenden, die vom Hersteller empfohlen
werden.
12. Stets nur auf einen vom Hersteller
empfohlenen oder zusammen mit dem
Gerät verkauen Wagen, Ständer,
Dreifuß, Gestell oder Tisch benutzen. Bei
Verwendung eines Wagens, die Geräte/
Wagen-Kombination vorsichtig bewegen,
um Verletzungen durch Umstürzen zu
vermeiden.
13. Ziehen Sie während eines Gewitters
und bei längerer Nichtbenutzung den
Netzstecker des Geräts.
14. Wenden Sie sich mit allen
Wartungsarbeiten stets an einen
autorisierten Kundendienst-Mitarbeiter.
Reparaturen sind erforderlich, wenn das
Gerät in irgendeiner Weise beschädigt
wurde, z.B. das Netzkabel oder der
Stecker, wenn Flüssigkeiten oder
Gegenstände in das Gerät eingedrungen
sind, das Gerät Regen oder Feuchtigkeit
ausgesetzt wurde, es nicht richtig
funktioniert oder fallen gelassen wurde.
15. Bitte bewahren Sie das Gerät an einem
gut belüeten Ort auf.
WARNUNG: Um eine Gefährdung durch Feuer oder
Stromschlag auszuschließen, das Gerät vor Regen,
tropfenden oder spritzenden Flüssigkeiten schützen.
Auf dem Gerät dürfen keine mit Flüssigkeit gefüllten
Objekte, wie z. B. Vasen, abgestellt werden.
WARNUNG: Der Netzstecker/die
Gerätesteckvorrichtung dient zur Unterbrechung der
Stromversorgung und muss weiterhin betriebsbereit
bleiben.
Das Blitzsymbol in einem Dreieck weist den Anwender
auf eine nicht isolierte „gefährliche Spannungsquelle“ im
Gehäuse des Geräts hin, die stark genug sein kann, um
einen Stromschlag auszulösen.
Warnung: Um das Risiko eines Elektroschocks
zu minimieren, öffnen Sie nicht die Abdeckung
(oder Rückseite). Es befinden sich keine durch den
Anwender zu wartenden Teile im Inneren. Wenden Sie
sich stets an qualifiziertes Personal.
Das Ausrufezeichen in einem gleichseitigen Dreieck weist
den Anwender auf wichtige Anweisungen zum Betrieb
und zur Instandhaltung in der mit dem Gerät gelieferten
Literatur hin.
Bei diesem Gerät handelt es sich um ein doppelt
isoliertes elektrisches Gerät der Schutzklasse
II. Es wurde so konzipiert, dass es keine Erdung
benötigt.
Sachgemäße Entsorgung
des Produkts
Dieses Produkt enthält elektrische
oder elektronische Bestandteile. Diese
Bestandteile können, wenn nicht
ordnungsgemäß entsorgt, potenzielle
Nebenwirkungen auf die Umwelt und
die menschliche Gesundheit haben.
Dieses Etikett auf dem Produkt weist darauf hin, dass
es nicht zusammen mit unsortierten Abfällen entsorgt,
sondern getrennt gesammelt werden muss. Als
Konsument sind Sie dafür verantwortlich, sicherzustellen,
dass dieses Produkt ordnungsgemäß entsorgt wird.
Tasten und Display
Wahl des Eingangssignals
IN-: Rückwärts durch die Eingangsquellen.
IN+: Vorwärts durch die Eingangsquellen.
Das Display zeigt die gewählte Quelle an.
Ausgewählte Eingangsquelle
Hinweis: Ändert während der
Einrichtung die Menüebene,
weitere Informationen finden Sie
auf Seite 18.
Audiomodus
Hinweis: Ändert während
der Einrichtung die
Menüoption, weitere
Informationen finden Sie
auf Seite 18.
Standby
Versetzt den Solo bar in den
Standby-Modus oder holt
ihn aus diesem.
Lautstärkeregelung
-: Verringert die Lautstärke.
+: Erhöht die Lautstärke.
Die Lautstärke wird auf dem Display angezeigt.
Automatische LoudnessSteuerung (ALC)
Schalten Sie die ALC mit der
Fernbedienung ein oder aus.
Deutsch
Lautstärke-Einstellung
Hinweis: Ändert während
der Einrichtung den
Wert der gewählten
Menüoption, weitere
Informationen finden Sie
auf Seite 18.
D-5D-4
Page 34

Kurzanleitung
Anschlüsse
USB
Nur für die Wartung
und FirmwareAktualisierungen
verwendet
Informationen
zu FirmwareAktualisierungen
finden Sie auf Seite 21.
AUX
3,5 mm
Stereo-MiniKlinkenbuchse
für den Anschluss
analoger
Audioquellen.
MIC
3,5 mm MiniKlinkenbuchse
zum Anschluss des
im Lieferumfang
enthaltenen
Mikrofons während
der automatischen
LautsprecherEinrichtung.
Weitere Informationen
finden Sie auf Seite 17.
SUB
RCA LFE-Ausgang
zum Anschluss eines
Subwoofers.
Auf Seite 10 finden Sie
Informationen zum
Anschluss eines SoloSub über eine drahtlose
Verbindung.
COAX
RCA-Buchse
zum Anschluss
von digitalen
Audioquellen.
OPTICAL
TOSLINK-Buchse
zum Anschluss
von digitalen
Audioquellen.
HDMI OUT
Für den Anschluss
eines Fernsehers und
als Audio-Rückkanal
(ARC).
Weitere Informationen
finden Sie auf Seite 7.
HDMI 1 – 4
Zum Anschluss von
bis zu vier digitalen
Geräten mit 1080pund 3D-Pass through.
POWER INLET
Zum Anschluss
an eine Steckdose
verwendet.
Verpackungsinhalt
< Solo bar Soundbar
< Netzkabel
< Fernbedienung
< Batterien (2 x AAA)
< Mikrofon
< Wand-Montagewinkel
< Bedienungsanleitung
< Registrierungskarte
Aufstellen des Geräts
Der Solo bar ist ein unglaublich vielseitiges
Produkt. Stellen Sie ihn auf einen Tisch,
Schrank oder ein Regal, und achten Sie
darauf, dass er waagerecht und sicher
aufgestellt wurde. Stellen Sie ihn unten
einen Fernseher, entweder freistehend auf
einer achen und waagerechten Fläche oder
an einer Wand montiert.
Für ein optimales Klangerlebnis empfehlen
wir die Wandmontage. Verwenden
Sie die individuelle Wandhalterung,
die im Lieferumfang enthalten ist. Die
Befestigungs- und Montageanleitung nden
Sie auf Seite 24.
Setzen Sie den Solo bar keiner direkten
Sonneneinstrahlung, Wärmequellen oder
Feuchtigkeit aus.
Anschließen von Geräten
Nachdem der Solo bar ordnungsgemäß
aufgestellt wurde, schließen Sie ihn an Ihre
Geräte an, siehe folgende Abbildungen.
Achten Sie darauf, dass keine Kabel geknickt
oder gedehnt werden.
WARNUNG: Schließen Sie nicht den Solo bar
nicht an eine Steckdose, bevor Sie nicht alle Ihre
Audio- und Videogeräte angeschlossen haben.
Anschließen eines Fernsehers
Schließen Sie Ihren Fernseher mit einem
HDMI-Kabel an HDMI OUT an. Wenn Ihr
Fernseher die ARC-Funktion unterstützt,
kann Audio für eine bessere Tonqualität
über den Solo bar wiedergegeben werdenauf Seite 20 nden Sie Informationen
zur Einrichtung. Wenn Ihr Fernseher die
ARC-Funktion nicht unterstützt, schließen
Sie ein Audiokabel an den OPTICAL- oder
COAX-Eingang der Solo bar an.
Audiokabel,
wenn
ARC nicht
unterstützt
wird
Deutsch
D-7D-6
Page 35

Anschluss von digitalen Geräten über HDMI Anschluss von analogen Geräten
Viele digitale Geräte, einschließlich
Settop-Boxen, Blu-ray-Player, DVD-Player,
Spielkonsolen und Camcorder, können über
HDMI angeschlossen werden.
Beachten Sie, dass bei Verwendung dieser
Anschlussmethode das Bild auf Ihrem
Fernseher angezeigt, der Ton aber über den
Solo bar wiedergegeben wird. Es sind keine
anderen Audioverbindungen erforderlich.
Blu-ray Disk-Player Spielkonsole
Schließen Sie mit einem 3,5 mm MiniKlinkenkabelein beliebiges analoges Audiogerät
anden AUX-Eingang der Solo bar an.
MP3-Player
Anschluss von Audiogeräten über digitalen Eingang
Audiogeräte können auch über den koaxialen
oder optischen Eingang an den Solo bar
angeschlossen werden.
Spielkonsole
CD-Player
Anschluss eines Subwoofers
Der Solo bar verfügt über einen integrierten
Subwoofer-Ausgang (die Einrichtung nden
Sie auf Seite 19). Schließen Sie Ihren Subwoofer
mit einem Subwoofer-Kabel mit einem RCA
LFE-Stecker an den Solo bar an.
Hinweis: Wenn Sie einen Arcam Solo-Subwoofer
besitzen, siehe nächste Seite.
Deutsch
Settop-Box
Camcorder
Subwoofer
D-9D-8
Page 36

Einstecken und einschalten
Der Solo bar wird mit einem Netzkabel
mit vergossenem Netzstecker geliefert.
Achten Sie darauf, dass der im Lieferumfang
enthaltene Stecker in Ihre Steckdose passt.
Falls Ihre Netzanschlussspannung oder das
Netzkabel nicht übereinstimmen, wenden
Sie sich sofort an Ihren Arcam-Händler.
Stecken Sie zuerst den Gerätestecker des
Netzkabels in die Netzbuchse auf der
Rückseite des Solo bar und achten Sie
darauf, dass dieser fest sitzt. Stecken Sie
jetzt den Netzstecker in eine Steckdose
und schalten Sie diese ggf. ein. Das Gerät
bendet nun im Standby-Modus, der durch
eine rote LED auf der Gerätefront angezeigt
wird.
Wenn das Gerät längere Zeit nicht
verwendet wird, wechselt es in den
Standby-Modus, um den Energiebedarf zu
verringern.
Anschließen eines Solo sub
Als Komponente der Arcam SoloProduktpalette kann Ihr Solo sub drahtlos
mit dem Solo bar kommunizieren.
Achten Sie darauf, dass der Solo sub mit
seinem Netzschalter eingeschaltet wurde.
1. Drücken Sie die Taste auf der
Fernbedienung des Solo bar gefolgt
von , bis Speaker/EQ Setup auf dem
Display auf der Gerätefront angezeigt
wird. Drücken Sie erneut gefolgt
von , bis Sub Pairing angezeigt wird.
2. Starten Sie mit den
Kopplungsvorgang. Das Display
wechselt zu In Progress.
3. Stellen Sie den Wahlschalter INPUT
auf der Rückseite des Solo sub auf
WIRELESS.
WIRELESS
LINE
LFE
INPUT
4. Halten Sie die Taste WIRELESS auf der
Rückseite des Solo sub für etwa fünf
Sekunden gedrückt. Die WIRELESSLED beginnt blau zu blinken und zeigt
damit an, dass der Solo sub sich im
Synchronisations-Modus bendet und
auf der Suche nach einer Quelle ist, mit
der sich verbinden kann.
Solo sub
WIRELESS
PAIRING
PWR WIRELESS
5. Wenn der Kopplungsvorgang erfolgreich
war, leuchtet die WIRELESS-LED leuchtet
ständig blau, und der Solo bar zeigt Linked
an.
6. Sobald der Kopplungsvorgang
abgeschlossen ist, verbindet sich der Solo
sub immer wieder mit der Quelle, wenn
er eingeschaltet wird oder wenn er ein
Audiosignal empfängt.
Hinweis: Der Synchronisations-Modus
dauert ca. 30 Sekunden. Wenn während
dieser Zeit keine Quelle erkannt wird,
beendet der Solo bar die Suche und der
Vorgang muss wiederholt werden.
Anschluss von Bluetooth®-Geräten Gebrauch von Kopfhörern
Der Solo bar verfügt über integrierte, drahtlose
Bluetooth-Technologie für nahtlose Integration mit
jedem Bluetooth-fähigen Gerät.
Kopplung mit Bluetooth-Geräten
Befolgen Sie die Hinweise in der Bedienungsanleitung
Ihres Bluetooth-Geräts. Wählen Sie zum Abschluss der
Kopplung Arcam Solo bar aus der Liste der BluetoothGeräte. Nachdem der Kopplungsvorgang abgeschlossen
ist, muss er nicht erneut durchgeführt werden.
Bluetooth®-Geräte
Der Solo bar ist mit einem Bluetooth-Sender
ausgestattet, so dass er sich mit einem
Bluetooth-Kopörer verbinden kann.
Hinweis: Die Übertragung via Bluetooth
unterscheidet sich vom Empfang. Bis zu vier
Geräte können gekoppelt werden, aber es
kann gleichzeitig nur ein Gerät der Reihe
nach verbunden werden.
Verbindung mit BluetoothKopfhörern
Drücken Sie die Taste auf der
Fernbedienung gefolgt von , bis
Speaker/EQ Setup auf dem Display auf der
Gerätefront angezeigt wird. Drücken Sie
erneut gefolgt von , bis Headphone
Out angezeigt wird. Drücken Sie zum
Auswählen.
Standardmäßig ist der Bluetooth-Sender
ausgeschaltet, so dass Disable auf dem
Display angezeigt wird. Drücken Sie
zum Wechseln der Anzeige zu Enabled.
Der Bluetooth-Sender ist jetzt eingeschaltet
und die Menüoption Device Search wurde
aktiviert.
Befolgen Sie nun die Hinweise in
der Bedienungsanleitung Ihrer
Bluetooth-Kopörer, wie diese in den
Kopplungsmodus versetzt werden.
Achten Sie darauf, dass Device Search
immer noch angezeigt wird und drücken Sie
dann . Der Solo bar sucht für eine Minute
nach verfügbaren Geräten.
Wenn keine Geräte gefunden wurden,
drücken Sie erneut die Taste um
einen weiten Suchvorgang zu starten.
Vergewissern Sie sich, dass sich keine
Hindernisse zwischen den Geräten
benden.
Wenn die Suche beendet ist, werden die
verfügbaren Geräte in einer Liste angezeigt.
Wählen Sie mit den Tasten und
das richtige Gerät und beenden Sie den
Kopplungsvorgang mit . Der Solo bar
zeigt eine Meldung an, dass die Verbindung
erfolgreich hergestellt wurde.
Gebrauch der Kopfhörer
Achten Sie darauf, dass sowohl der Solo
bar und die Kopörer eingeschaltet sind.
Wählen Sie eine Audioquelle und genießen
Sie Ton über die Kopörer.
Hinweis: Wenn Ihr Kopfhörer ausgeschaltet
ist, wird der Ton automatisch über die
Lautsprecher der Solo bar wiedergegeben.
WARNUNG: Das vorübergehende Einschalten
des Bluetooth-Senders deaktiviert den
Bluetooth-Empfang. Dies bedeutet, Sie Audio
nicht von einem Bluetooth-Gerät zum Solo bar
zu streamen und gleichzeitig über Kopfhörer
wiedergeben können.
Deutsch
D-11D-10
Page 37

Fernbedienung
Fernbedienungs-
App
Der Solo bar kann entweder unter Verwendung der mitgelieferte Fernbedienung
oder der Solo bar Fernbedienungs-App eingerichtet werden.
Gebrauch der
Fernbedienung
Die Fernbedienung ist für den Gebrauch mit
dem Solo bar programmiert.
Stellen Sie vor dem Gebrauch sicher, dass
die zwei mitgelieferten AAA-Batterien
ordnungsgemäß eingelegt wurden.
1. Halten Sie die Vorderseite der
Fernbedienung nach unten, drücken Sie
auf die rutschfesten Vertiefungen der
Batteriefachabdeckung und schieben
Sie die Abdeckung herunter.
2. Legen Sie die zwei mitgelieferten
„AAA“-Batterien entsprechend
den Markierungen „+“ und „–“ im
Batteriefach ein.
3. Schieben Sie den Deckel wieder auf
das Batteriefach und lassen Sie ihn mit
einem Klick einrasten.
Für einen zuverlässigen Betrieb muss die
Fernbedienung eine freie Sichtlinie zum
Frontdisplay der Solo bar haben.
Schaltet den Solo bar zwischen Standby- und eingeschaltetem Modus um.
Einmal drücken schaltet den Solo bar stumm. Erneutes drücken
(oderEinstellen der Lautstärke) hebt die Stummschaltung auf.
Lautstärke erhöhen.
Lautstärke verringern.
Automatische Lautstärkekontrolle - Wechselt zwischen Ein und Aus.
Drücken Sie die Taste, um das Einstellungsmenü aufzurufen
(sieheSeiten18-20). Erneut drücken, um das Menü zu verlassen.
Geht aufwärts durch die Menü-Einstellungen.
Geht abwärts durch die Menü-Einstellungen.
Geht durch die Menü-Ebenen zurück.
Geht durch die Menü-Ebenen nach rechts.
Zur Auswahl der Menü-Einstellung drücken.
Mit der Fernbedienungs-App des Arcam
Solo bar können Sie ein Apple iOS- oder
Android™-Gerät zur Steuerung der Solo bar
via Bluetooth verwenden.
Verwenden Sie die App zum Kongurieren
der Menü-Einstellungen und zum Steuern
der Wiedergabe auf genau die gleiche Weise
wie mit der mitgelieferten Fernbedienung.
Minimale Anforderungen an das
Betriebssystem für die App: iOS 6,
Android4.0
Anweisungen zum
Download
Laden Sie die App entweder vom App StoreSM
oder von Google Play™ herunter.
Befolgen Sie auf Ihrem Gerät die Hinweise
zum Herunterladen.
Tippen Sie nach der Installation einfach auf
das Symbol der App, um die Anwendung
zu starten.
HDMI 1 20
DIGITAL ST
Die App gibt das Display des Solo bar
wieder
Das Display zeigt während des normalen
Betriebs die Eingangsquelle, Lautstärke und
das Audioformat oder die Menüoptionen
während der Konfiguration der
Einrichtungan.
Deutsch
Wechselt zwischen den Audio-Ausgangsmodi Stereo, Film und Konzert.
Eingangsquellenauswahl - Geht vorwärts durch die angeschlossenen Quellen.
Eingangsquellenauswahl - Geht rückwärts durch die angeschlossenen Quellen.
D-13D-12
Page 38

Bedienung
Koppeln Ihres mobilen
Geräts
Die App erfordert, dass das Gerät mit der
Solo bar via Bluetooth gekoppelt wurde.
Achten Sie darauf, dass auf Ihrem Gerät
Bluetooth eingeschaltet wurde. Führen Sie
bei iOS-Geräten folgende Schritte durch:
Befolgen Sie bei Android-Geräten die
Anweisungen, die im Lieferumfang Ihres
Geräts enthalten sind.
Önen Sie Einstellungen und tippen Sie
dann auf Bluetooth.
Schieben Sie den Bluetooth-Schalter in die
eingeschaltete Position.
Warten Sie, bis Arcam Solo bar unter
GERÄTE angezeigt wird und tippen Sie
dann auf Verbinden.
Sollten Sie Ihr Geräts trennen müssen,
tippen Sie auf das Informationssymbol
neben Verbunden und tippen Sie dann auf
Dieses Gerät vergessen.
Hinweis: Maximal vier Bluetooth-Geräte
können mit dem Solo bar gekoppelt werden,
aber es kann jedes Gerät nur der Reihe nach
gekoppelt werden. Falls gelegentlich mehr
als eine Person den Solo bar benutzen will,
müssen Sie möglicherweise die Kopplung
eines Geräts aufheben.
Einschalten
Drücken Sie zum Aufwecken der Solo
bar aus dem Standby-Modus die Taste
auf dem Bedienfeld oder auf der
Fernbedienung.
Auf dem Frontdisplay wird kurz ARCAM
Solo bar angezeigt, gefolgt von der
aktuell ausgewählten Eingangsquelle,
der Lautstärke-Einstellung und dem
Audiomodus.
Hinweis: Wenn das Gerät längere Zeit nicht
benutzt wird, trennen Sie es von Stromnetz,
um Energie zu sparen.
Quellenwahl
Drücken Sie zur Auswahl einer bestimmten
Quelle mehrmals die Taste oder
auf der Gerätefront oder auf der
Fernbedienung, bis diese Quelle auf dem
Frontdisplay angezeigt wird. Folgenden
Quellen sind vorhanden:
HDMI 1
HDMI 2
HDMI 3
HDMI 4
OPTICAL
COAX
AUX
BLUETOOTH
Hinweis: Falls unterstützt, geben sich einige
HDMI-Geräte mit ihrem Gerätenamen zu
erkennen.
Wenn Ihr Fernseher via ARC angeschlossen
wurde und Sie den Einrichtungsvorgang
auf Seite 16 befolgt haben, zeigt das
Frontdisplay beim Fernsehen folgende
Meldung an.
TV/ARC
Audio-Rückkanal (ARC) ist eine Funktion,
die in die neueste HDMI-Version integriert
wurde, damit Ihr Fernseher den Ton wieder
über das HDMI-Kabel an den Soundbar
zurücksenden kann.
Hinweis: Dies wird automatisch angezeigt,
wenn ein ARC-fähiger Fernseher
angeschlossen ist.
Lautstärkeregelung
Stellen Sie die Lautstärke durch Drücken der
Tasten oder auf der Gerätefront oder
auf der Fernbedienung ein.
Ton stumm schalten
Die Tonausgabe der Solo bar kann mit der
Taste auf der Fernbedienung stumm
geschaltet werden. Wenn das Gerät stumm
geschaltet wurde, wechselt die LautstärkeEinstellung auf dem Frontdisplay auf
MUTE.
Um die Stummschaltung wieder
aufzuheben, drücken Sie ein zweites Mal
oder die Taste oder zum Ändern der
Lautstärke.
Deutsch
D-15D-14
Page 39

Auswahl eines
Audiomodus
Der Solo bar besitzt drei vorkongurierte
Audiomodi - STEREO, MOVIE und
CONCERT.
Drücken Sie zum Wechseln des Modus die
Taste auf der Fernbedienung und
treen Sie eine Auswahl.
Hinweis: Stereo ist die Standardeinstellung
und das bedeutet, dass Audio so
wiedergeben wird, wie es aufgenommen
wurde.
Ton von Ihrem Fernseher
Falls Ihr Fernseher mit ARC mit dem
Solo bar verbunden wurde, wählen Sie die
entsprechende Quelle an Ihrem Fernseher
aus und genießen Sie den hervorragenden
Klang von der Solo bar und stellen Sie die
Lautstärke mit der TV-Fernbedienung ein.
Bei dieser Anwendung zeigt das
Frontdisplay des Solo bar automatisch TV/
ARC an.
Ton von Bluetooth®Geräten
Um Musik drahtlos von einem BluetoothGerät wiederzugeben, achten Sie zunächst
darauf, dass Ihr Gerät mit der Solo bar
gekoppelt ist - weitere Informationen nden
Sie auf Seite 11.
Sobald Ihr Gerät gekoppelt wurde, folgen
Sie einfach den Anweisungen, die im
Lieferumfang Ihres Geräts enthalten sind.
IR-Repeater
Wenn der Solo bar vor einem Fernseher
aufgestellt wird, kann er (je nach Modell)
den Sensor für die Fernbedienung am
Fernseher verdecken, so dass dieser nicht
mehr funktioniert.
Falls dies der Fall ist, verwenden Sie die
IR-Repeater-Funktion des Solo bar, welche
die Signale an Ihren Fernseher weiterleitet.
Hinweis: Das funktioniert auch, wenn sich
der Solo bar im Standby-Modus bendet.
Weitere Informationen nden Sie auf
Seite18.
CEC-Steuerung via HDMI
Die Funktion Consumer Electronics
Control (CEC) ermöglicht den Anschluss
von bis zu 15 CEC-fähigen Geräten via
HDMI an Ihren Solo bar und Sie können
diese gleichzeitig mit nur einer einzigen
Fernbedienung steuern.
Standardmäßig ist CEC aktiviert. Weitere
Informationen nden Sie auf Seite 20.
Typische Beispiele für die Anlagensteuerung
mit CEC:
< Gleichzeitiges Einschalten oder auf
Standby schalten jedes angeschlossenen
Geräts.
< Lautstärkeregelung.
< Auswahl der Eingangsquelle.
Automatische Einrichtung
In Ihren Solo bar wurde eine rmeneigene
automatische Einstellungsfunktion
integriert, die versucht, alle grundlegenden
Lautsprecher-Einstellungen für Ihre Anlage
einzustellen (einschließlich Subwoofer, falls
vorhanden). Sie berechnet außerdem die
Filterwerte für den Raumabgleich (Room
EQ), um einige der schlimmsten Eekte von
Resonanzfrequenzen zu vermeiden.
Verwenden Sie dazu das mitgelieferte
Kalibrierungs-Mikrofon. Stecken Sie den
Stecker in die Buchse MIC auf der Rückseite
und positionieren Sie das Mikrofon an der
Hörposition.
Dieses Mikrofon nimmt spezielle
Kalibrierungstöne auf, die während
der automatischen Einrichtung von
den Lautsprechern (und Subwoofern)
erzeugt werdend. Der Solo bar analysiert
anschließend dieses Signal und errechnet:
< Das Lautsprecher-Level,
< Die Übernahmefrequenz für den
Subwoof er,
< Problematische Resonanzfrequenzen in
dem Raum, die durch Filter gesteuert
werden müssen.
Mikrofon
An der Hörposition
in Ohrhöhe mit nach
oben gerichtetem
Mikrofon positionieren.
Um dem System zu helfen, so genau wie
möglich zu arbeiten, befolgen Sie diese
Richtlinien:
< Minimieren Sie Hintergrundgeräusche
im Hörraum und in Nebenräumen.
< Schließen Sie alle Fenster und Türen in
dem Hörraum.
< Schalten Sie alle Ventilatoren inkl.
Klimaanlagen ab.
< Wenn Sie das Mikrophon in der Hand
halten, halten Sie Ihre Hand und Finger
ruhig um „Bewegungsgeräusche“ zu
vermeiden.
< Positionieren Sie das Mikrophon nach
oben gerichtet auf ungefährer Ohrhöhe
an der normalen Hörposition mit
direkter, ununterbrochener Sichtlinie
zu den Lautsprechern. Es ist nicht
notwendig, dass das Mikrophon direkt
auf die Lautsprecher ausgerichtet wird.
< Wenn Ihre Anlage über einen aktiven
Subwoofer verfügt, stellen Sie anfangs
den Regler für die Ausgangsleistung/
Gain Control auf Mittelstellung.
Drücken Sie zum Aufrufen der
automatische Einrichtung die Taste
auf der Fernbedienung gefolgt von ,
bis auf dem Frontdisplay des Solo bar
Speaker/EQ Setup angezeigt wird. Drücken
Sie nun und die Anzeige wechselt zu
Auto Setup. Starten Sie den Vorgang wieder
mit .
Der Vorgang erzeugt Testtöne aus den
Lautsprechern und braucht normalerweise
weniger als 2 Minuten. Der TesttonGenerator geht für jeden einzelnen
Lautsprecher zweimal reihum. Zwischen
den einzelnen Zyklen wird kurz Analysing
angezeigt. Nach dem zweiten Zyklus zeigt
das Display Calculating und kurz danach
Complete an.
Sollten während der automatischen
Einrichtung Fehler aureten, folgen Sie den
Anweisungen auf dem Frontdisplay.
Die automatische Einrichtung ist in
der Regel sehr genau, dennoch können
gelegentlich falsche Ergebnisse generiert
werden. Probleme können resultieren aus:
< Externen Geräuschen oder Poltern/
Bewegungsgeräusche, die vom
Mikrofon wahrgenommen werden,
< Schallreexionen harter Oberächen
(z.B. Fenster oder Wände) nahe der
Hörposition,
< sehr starken akustischen Resonanzen
innerhalb des Raums,
< Hindernissen (wie z. B. ein Sofa)
zwischen den Lautsprechern und dem
Mikrofon.
<
Gebrauch eines Subwoofers
Wenn Ihre Anlage über einen aktiven
Subwoofer verfügt, kann es sein, dass Sie
die automatische Einrichtung mit einer
am Subwoofer auf einen mittleren Wert
eingestellten Ausgangsleistung/Gain Control
wiederholen müssen.
Die automatische Einrichtung bemüht
sich die Übergangsfrequenz so zu
wählen, dass der Übergang der tiefen
Frequenzen zum Hauptlautsprecher
möglichst ießend erfolgt. Wenn diese
Prozedur dennoch kein zufriedenstellendes
Ergebnis erzielt, empfehlen wir andere
Übernahmefrequenzen auszuprobieren,
um ein Ergebnis zu erzielen, dass Ihren
Wünschen näher kommt.
Wenn die automatische Einrichtung
läu, erfolgt auch eine Berechnung der
Raum-EQ-Werte, um die schlimmsten
Raumresonanzfrequenzen im Hörraum
auszugleichen.
Der Raum-EQ ist standardmäßig
deaktiviert. Sie sollten den Raum-EQ für
Eingänge aktivieren, von denen Sie denken
dass diese davon protieren können, wenn
Sie eine typische Wiedergabe der Quelle an
dem entsprechenden Eingang hören.
Auch wenn der Raumabgleich helfen kann
Probleme mit der Akustik des Hörraums zu
reduzieren, ist es für gewöhnlich wesentlich
besser die Probleme in dem Raum direkt zu
lösen. Zum Aktivieren des Raum-EQ siehe
Seite 19 unter Systemeinstellung.
Deutsch
D-17D-16
Page 40

Systemeinstel-
lung
Führen Sie die folgenden Schritte mit der Fernbedienung aus, um
sicherzustellen, dass Ihr Solo bar für maximales Hörvergnügen eingerichtet ist.
Systemeinstellungsmenü
Standardeinstellungen werden in Blau dargestellt.
System Setup Lipsync Delay 0 ~ 200ms Es können Verzögerungen im Videosignal einsetzen, hervorgerufen
Display Level
App Control
IR Repeater
System Info Drücken Sie auf OK, um die System-Software-Version zu sehen.
Factory Defaults
durch Videoverarbeitung, welche eine falsche Zuordnung zwischen
Audio- und Video-Timing verursacht. Sie können dies feststellen, wenn
der Ton nicht synchron mit den Lippenbewegungen ist. Um dies zu
kompensieren, können Sie das Lipsync Delay einstellen. Passen Sie mit
den Tasten und die Synchronisation zwischen Ton und Bild an.
Gehen Sie mit eine Ebene zurück oder beenden Sie die Einstellung
mit .
Dim g Bright g Off
Enable g Disable
Enable g Disable
Setzen Sie den Solo bar mit einem Tastendruck auf OK auf die Werkseinstellungen zurück. Hinweis:
Gekoppelte oder angeschlossene Geräte gehen verloren. Gehen Sie mit eine Ebene zurück oder
beenden Sie die Einstellung mit .
Die LED-Anzeigehelligkeit kann auf Ihre Bedürfnisse eingestellt
werden. Wechseln Sie mit den Tasten und zwischen den
Einstellungen. Bei der Einstellung auf Off leuchtet das Display kurz auf,
wenn es einen Befehl empfängt. Gehen Sie mit eine Ebene zurück
oder beenden Sie die Einstellung mit .
Aktiviert den Solo bar, damit er mit der optionalen FernbedienungsApp aus dem Standby-Modus aufgeweckt werden kann. Schalten Sie mit
den Tasten und die App-Steuerung ein oder aus. Gehen Sie mit
eine Ebene zurück oder beenden Sie die Einstellung mit .
Schalten Sie mit den Tasten und den IR-Repeater ein oder aus.
Weitere Informationen finden Sie auf Seite 16. Gehen Sie mit eine
Ebene zurück oder beenden Sie die Einstellung mit .
Lautsprecher-/EQ-Einstellungsmenü
Standardeinstellungen werden in Blau dargestellt.
Speaker/EQ Setup Auto Setup Die automatische Einrichtung konfiguriert Ihren Solo bar für den optimalen Musikgenuss. Drücken Sie OK,
Room EQ
Sub Pairing
Subwoofer Level 0 ~ -12dB
Headphone out
um den Einstellungsvorgang zu starten. Weitere Informationen finden Sie auf Seite 17.
Enable g Disable
Starten Sie mit den Kopplungsvorgang. Weitere Informationen finden Sie auf Seite 10.
BT Transmitter
Enable g Disable
Device search
Schalten Sie mit den Tasten und den EQ ein oder aus
Hinweis: Ist erst dann verfügbar, wenn die automatische Lautsprecher-Einrichtung
abgeschlossen ist. Gehen Sie mit eine Ebene zurück oder beenden Sie die
Einstellung mit .
Wählen Sie mit den Tasten und einen Subwoofer-Pegel.
Hinweis: Ist erst dann verfügbar, wenn die Kopplung der Subwoofer abgeschlossen ist.
Gehen Sie mit eine Ebene zurück oder beenden Sie die Einstellung mit .
Schalten Sie mit den Tasten und denBluetooth®-Sender ein oder aus. Gehen Sie
mit eine Ebene zurück oder beenden Sie die Einstellung mit .
Hinweis: Ist erst dann verfügbar, wenn der Kopfhörerausgang aktiviert wurde.
Starten Sie die Suche nach Kopörern mit . Wählen Sie mit den Tasten und
einen Kopörer aus der Liste aus. Gehen Sie mit eine Ebene zurück oder beenden
Sie die Einstellung mit .
.
Deutsch
D-19D-18
Page 41

Firmware-
Aktualisierung
HDMI-Einrichtungsmenü
Standardeinstellungen werden in Blau dargestellt.
HDMI Setup HDMI Audio Out
CEC / ARC
Disable g Passthrough
Enable g Disable
Schalten Sie mit den Tasten und HDMI-Passthrough ein
oder aus. HDMI-Passthrough leitet das Video- und Audiosignal von
jeder HD-Quelle über ein HDMI-Kabel zu Ihrem Solo bar weiter.
Der Solo bar teilt das Signal auf und gibt das Audiosignal der HDQuelle über seine eigenen Lautsprecher wieder. Das unveränderte
Videosignal wird mit einem HDMI-OUT-Kabel an einen Fernseher
gesendet. Gehen Sie mit eine Ebene zurück oder beenden Sie die
Einstellung mit .
Schalten Sie mit den Tasten und CEC/ARC ein oder aus
Weitere Informationen finden Sie auf Seite 16. Gehen Sie mit eine
Ebene zurück oder beenden Sie die Einstellung mit .
.
Herunterladen einer
Aktualisierungsdatei
Zur Durchführung einer FirmwareAktualisierung müssen Sie von der ArcomWebsite eine Datei herunterladen.
Überprüfen Sie die Verfügbarkeit von
Firmware-Aktualisierungen durch die
Eingabe von www.arcam.co.uk in Ihrem
Browser und gehen Sie zur Solo bar-Seite.
Hinweis: Achten Sie darauf, dass Sie die
Datei in das Stammverzeichnis Ihres USBLaufwerks herunterladen. Speichern Sie sie
nicht in einem Verzeichnis ab, andernfalls
schlägt die Aktualisierung fehl.
Ausführen der
Aktualisierung
Achten Sie darauf, dass der Soundbar
an eine Steckdose angeschlossen und
eingeschaltet ist, sowie sich im StandbyModus bendet.
Halten Sie gleichzeitig die Tasten und
für ca. 5 Sekunden gedrückt.
Der Solo bar schaltet sich ein und zeigt
folgende Informationen an:
ARCAM SB M:V024
B:40526 D:30304
Hinweis: M = Version der Hauptsoftware,
B= Version der Bluetooth-Software und
D=Version der DSP-Software.
Rufen Sie mit der Taste den SowareAktualisierungsbildschirm auf.
Das Display wechselt zu:
System Update
Insert USB...
Hinweis: Erneutes Drücken von IN- wechselt
zyklisch zwischen diesem und dem
Softwareversion-Bildschirm.
Schließen Sie das USB-Laufwerk mit der
Aktualisierungsdatei an den UPGRADEPort auf der Rückseite des Solo bar an.
Die FirmwareAktualisierung startet
automatisch, sobald das
USB-Laufwerk erkannt
wurde und das Display
wechselt entsprechend zu:
System Update
Updating...
Wenn das USB-Laufwerk nach 30 Sekunden
nicht angeschlossen wurde, wird der
Timeout aktiviert und das Display wechselt
zu:
Diese Meldung wird ca. drei Sekunden lang
angezeigt. Danach schaltet sich der Solo bar
automatisch aus und der gesamte Vorgang
muss wiederholt werden.
Wenn die Aktualisierung erfolgreich
durchgeführt wurde, zeigt das Display
folgende Informationen etwa drei Sekunden
lang an. Danach schaltet sich der Solo bar
selbst aus.
System Update
Complete
Wenn die Aktualisierung nicht erfolgreich
durchgeführt wurde, zeigt das Display
folgende Informationen etwa drei Sekunden
lang an. Danach schaltet sich der Solo bar
selbst aus und der gesamte Vorgang muss
wiederholt werden.
System Update
Error
Deutsch
System Update
USB Not Detected
D-21D-20
Page 42

Technische
Daten
Allgemein
Gewicht (verpackt) 10 kg
Abmessungen (H x B x T) 130 mm x 1100 mm x 110 mm
Leistungsaufnahme Betriebsmodus: 150 W (max.)
Standby-Modus: < 0,5 W
Stromversorgungsanforderungen 100 bis 240 V, 50/60 Hz.
Ein-/Ausgänge
HDMI-Eingang 4 x Typ A Buchse
HDMI-Ausgang Typ A Buchse, mit ARC/CEC-Unterstützung
Digitaleingang (optisch) Optische S/PDIF-Buchse
Digitaleingang (koaxial) RCA-Buchse
Auxiliary-Eingang 3,5 mm Audio-Klinkenbuchse
Bluetooth-Audio Ver. 3.0, kompatibel mit A2DP-Standard
Subwoofer-Ausgang RCA LFE-Buchse
Drahtloser Subwoofer-Ausgang
Frequenz 2,4 GHz
Übertragungsbereich Ca. 20 m (ohne Störungen)
Verstärker
Nennausgangsleistung:
Tieftöner (0,5 % THD)
Hochtöner (0,5 % THD)
Nominale Verstärker Ausgangsleistung (20 Hz-20 kHz) 100 W
Lautsprecher
Tieftöner 1 2 x 10 cm (4") Membran
Tieftöner 2 2 x 10 cm (4") Membran
Hochtöner 2 x 2,5 cm (1") Membran
Tieftöner-Frequenzbereich 170 Hz - 20 kHz ± 3 dB
Hochtöner-Frequenzbereich 3.8 kHz - 14 kHz ± 3 dB
Nennimpedanz 6 Ω
Fehler und Auslassungen vorbehalten
HINWEIS: Alle angegebenen Werte sind typisch, sofern nicht anders angegeben.
40 W pro Kanal
10 W pro Kanal
Ständige Verbesserungen
Arcam bemüht sich um ständige
Produktverbesserung. Das Design und
die technischen Daten können sich
deshalb ohne weitere Ankündigung
ändern.
Fehlerbehebung
Hier sind ein paar einfache Maßnahmen,
falls Sie Probleme mit Ihrem Solo bar haben.
Stromversorgung
< Prüfen Sie, ob der Netzstecker
ordnungsgemäß in eine Steckdose
eingesteckt ist.
< Achten Sie darauf, dass das der
Netzschalter und die Sicherung
eingeschaltet sind.
Fernbedienung
< Überprüfen Sie, ob die Batterien
korrekt eingesetzt wurden.
< Die Batterien müssen möglicherweise
ersetzt werden.
< Sind Sie zu weit entfernt vom Gerät
entfernt oder gibt es ein Hindernis
zwischen Gerät und Fernbedienung?
Ton
< Achten Sie darauf, dass die Kabel richtig
angeschlossen sind.
< Überprüfen Sie, ob die richtige
Eingangsquelle ausgewählt wurde.
< Wenn während der Wiedergabe
von einem Bluetooth-Gerät der Ton
verrauscht oder verzerrt ist, verringern
Sie die Lautstärke am Gerät und am
Solo bar.
Bild
< Wenn kein Bild angezeigt wird oder
die Bildqualität schlecht ist, prüfen Sie
auf ordnungsgemäßen Anschluss der
HDMI-Kabel.
< Überprüfen Sie, ob die richtige
Eingangsquelle ausgewählt wurde.
Bluetooth
< Überprüfen Sie, ob Ihr Bluetooth-Gerät
ordnungsgemäß gekoppelt wurde.
< Ist Ihr Bluetooth-Gerät zu weit vom
Gerät entfernt?
Deutsch
D-23D-22
Page 43

Montageanwei-
sungen
Produktgarantie
Verwenden Sie die individuelle Wandhalterung zur sicheren
und stabilen Befestigung des Solo bar an einer Wand.
Sie benötigen
< Elektrische Bohrmaschine
< Bohrer, Dübel und
Befestigungselemente für die Montage
entsprechend zum Wandtyp.
< Schraubendreher
< Wasserwaage
< Bleisti
< Maßband
24.0
Montagevorgang
1. Achten Sie darauf, dass die
Wandhalterung ist waagerecht ist,
indem Sie eine Wasserwaage darunter
halten.
2. Markieren Sie die Löcher mit einem
Bleisti und achten Sie dabei darauf, die
Konturen genau zu nachzuzeichnen.
3. Bohren Sie vorsichtig vier Löcher mit
einem Bohrer und stecken Sie für den
Wandtyp geeignete Dübel ein.
200.0
Achten Sie darauf, dass die
Wandhalterung waagerecht ist.
4. Montieren Sie die Wandhalterung
mit vier stabilen Schrauben an der
Wand (die Schrauben sollten einen
Durchmesser von mindestens 5,5 mm
haben). Achten Sie darauf, dass die
Dübel ordnungsgemäß und fest sowie
gleichmäßig eingesteckt wurden.
5. Setzen Sie schließlich den Solo
bar auf die Wandhalterung, indem
sie ihn vorsichtig auf die beiden
hervorstehenden Haken führen. Er
sollte fest und sicher an der Wand
sitzen.
15.0
Vorsicht: Montieren Sie das Gerät nicht
an Wänden aus Sperrholz oder anderen
Materialien mit weichen Oberächen.
Wenn Sie sich bezüglich der
Wandqualität unsicher sind, wenden Sie
sich bezüglich einer Beratung ein einen
Fachmann.
Achten Sie darauf, dass die Schrauben fest
und bündig angezogen sind, bevor den
Solo bar auf die beiden hervorstehenden
Haken nach unten führen. Er sollte sicher an
der Wand sitzen.
Copyright
Juni 2014, © 2014 A&R Cambridge Ltd.
A & R Cambridge Limited (Arcam)
behält sich das Recht vor, jederzeit
Änderungen an den Spezikationen der
in diesem Dokument beschriebenen
Produkte vorzunehmen, ohne vorherige
Ankündigung oder Verpichtung zur
Bekanntgabe solcher Änderungen.
Alle Marken von Drittanbietern sind
kenntlich gemacht und werden beachtet.
Die Erwähnung der Produkte von
Drittanbietern stellt keine Befürwortung
oder Empfehlung dar.
Arcam unternimmt alle erdenklichen
Anstrengungen, um sicherzustellen, dass
alle in dieser Publikation enthaltenen
Angaben sachlich richtig sind, aber es wird
keine Haung für etwaige Fehler oder
Auslassungen übernommen.
Weltweite Garantie
Arcam gewährleistet, dass die in dieser
Anleitung beschriebenen Produkte
ihrer veröentlichten Spezikation in
allen wesentlichen Punkten für einen
Zeitraum von zwei Jahren ab Kaufdatum
entsprechen. Sie sind berechtigt, das Gerät
kostenlos reparieren zu lassen, unter der
Voraussetzung, dass es ursprünglich bei
einem Arcam-Händler erworben wurde.
Der Arcam-Fachhändler führt den
Kundenservice nach Vertragsschluss
durch. Der Hersteller übernimmt
keine Verantwortung für Schäden, die
durch Unfall, Missbrauch, Verschleiß,
Vernachlässigung oder unzulässige
Veränderungen bzw. Reparaturen entstehen.
Außerdem wird keinerlei Verantwortung
für Schäden oder Verlust des Gerätes
während des Transports zum oder vom
Garantienehmer übernommen.
Die Garantie deckt Folgendes ab:
Ersatzteile und Arbeitsleistung für zwei
Jahre ab Kaufdatum. Nach Ablauf von
zwei Jahren müssen Sie die vollen Kosten
für Ersatzteile und Arbeitsaufwand
tragen. Versandkosten werden nicht
übernommen.
Inanspruchnahme der
Garantie
Das Gerät sollte in der Originalverpackung
an den Händler zurückgegeben werden, bei
dem es erworben wurde. Der Versand muss
frei Haus durch einen angesehenen Kurier
erfolgen - nicht mit der Post.
Da keine Verantwortung für Schäden
oder Verlust während des Transports zum
Händler oder Distributor übernommen
wird, sollten Sie das Gerät entsprechend
versichern.
Online Registrierung
Sie können Ihr Produkt online auf
www.arcam.co.uk registrieren.
Probleme?
Kann Ihr Arcam-Händler Fragen zu
diesem oder einem anderen ArcamProdukt nicht beantworten, wenden Sie
sich an den Arcam-Kundendienst unter der
folgenden Adresse, und wir versuchen uns
Möglichstes, Ihnen zu helfen.
Arcam Customer Support Department,
Unit15, Pembroke Avenue,
Waterbeach, CAMBRIDGE,
CB25 9QP, England oder via
www.arcam.co.uk.
Deutsch
D-25D-24
Page 44

Technologieli-
®
zenzen
Hergestellt unter Lizenz von Dolby
Laboratories. Dolby und das Doppel-DSymbol sind Warenzeichen der Dolby
Laboratories.
Die Begrie HDMI, High-Definition
Multimedia Interface und das HDMI-Logo
sind Markenzeichen oder eingetragene
Markenzeichen der HDMI Licensing LLC in
den USA und anderen Ländern.
Für DTS-Patente siehe http://patents.dts.
com. Hergestellt unter der Lizenz der DTS
Licensing Limited. DTS, DTS-HD, das
Symbol sowie DTS zusammen mit dem
Symbol sind eingetragene Warenzeichen
und DTS-HD Master Audio ist ein
Warenzeichen von DTS, Inc. © DTS, Inc.
Alle Rechte vorbehalten.
© 2013 CSR plc und ihre
Tochtergesellschaen.
Das aptX®-Zeichen und das aptX-Logo
sind Marken der CSR plc oder einer ihrer
Tochtergesellschaen und können in
einer oder mehreren Rechtsordnungen
eingetragen sein.
Der Name Bluetooth® und die zugehörigen
Logos sind eingetragene Warenzeichen
und Eigentum der Bluetooth SIG, Inc.
und Arcam benutzt sie unter Lizenz.
Andere Marken- und Produktnamen sind
Warenzeichen der jeweiligen Eigentümer.
„Made for iPod“, „Made for iPhone“
und „Made for iPad“ bedeutet, dass
elektronisches Zubehör entworfen wurde,
welches speziell mit dem iPod, iPhone
oder iPad verwendet wird und zertiziert
ist, Apple Leistungsstandards zu erfüllen.
Apple ist für den Betrieb des Geräts oder
dessen Übereinstimmung mit Sicherheitsober regulatorischen Standards nicht
verantwortlich. Bitte beachten Sie, dass die
Benutzung dieses Zubehörs mit dem iPod,
iPhone oder iPad die drahtlose Leistung
beeinträchtigen kann.
Die Bluetooth-Technologie funktioniert mit
iPhone 5s, iPhone 5c, iPhone 5, iPhone 4s,
iPhone 4, iPhone 3GS, iPad Air, iPad (3.und
4. Generation), iPad 2, iPad mini mit
Retina-Display, iPad mini und iPod touch
(4. und 5. Generation).
iOS, iTunes, iPad, iPhone und iPod sind
Marken von Apple Inc., eingetragen in den
USA und in anderen Ländern. App StoreSM
ist ein Dienstleistungszeichen von Apple
Inc.
Hergestellt für:
• iPhone 5s
• iPhone 5c
• iPhone 5
• iPhone 4s
• iPhone 4
• iPhone 3GS
• iPad Air
• Ipad mini mit Retina-Display
• iPad (4. Generation)
• iPad mini
• iPad (3. Generation)
• iPad 2
• iPod touch (5. Generation)
• iPod touch (4. Generation)
Google Play™ ist ein Markenzeichen von
Google Inc.
Android™ ist ein Markenzeichen von Google
Inc.
D-26
Page 45

Handleiding Geluidsbalk
Nederlands
Page 46

welkom...
Inhoudsopgave
… en hartelijk bedankt voor het aanschaen van deze Arcam Solo bar.
Arcam produceert al langer dan drie decennia gespecialiseerde
audioapparatuur van bijzonder hoge kwaliteit en de nieuwe Solo bar is
de meest recente aanvulling op een lange serie prijswinnende Hi-Fi en
thuisbioscoopproducten.
Wij hopen dat al onze zorgen en inspanningen tijdens de ontwikkeling van
dit product u duidelijk de superieure prestaties en betrouwbaarheid ervan
zullen demonstreren, zodat u er jarenlang van zult genieten.
Deze handleiding zal u helpen de Solo bar correct te installeren en
gebruiken. Gebruik de inhoudsopgave op de volgende pagina om de
gewenste sectie te vinden.
Wij hopen dat u jarenlang probleemloos van uw Solo bar zult genieten. In
het onwaarschijnlijke geval dat het systeem defect raakt of indien u meer
informatie wilt ontvangen over producten van Arcam, dan zijn de dealers
van ons netwerk u graag van dienst. U kunt ook meer informatie vinden op
de Arcam website www.arcam.co.uk.
Het Solo bar ontwikkelingsteam.
veiligheidsrichtlijnen N-4
overzicht N-5
Toetsen en display N-5
Aansluitingen N-6
snel van start N-7
Leveringsomvang N-7
Het plaatsen van het toestel N-7
Apparatuur aansluiten N-7
Aansluiting op een TV N-7
Digitale apparatuur aansluiten via HDMI N-8
Analoge apparatuur aansluiten N-9
Audioapparatuur aansluiten via digitale ingang N-9
Een subwoofer aansluiten N-9
Aansluiten en inschakelen N-10
Een Solo sub aansluiten N-10
Bluetooth® apparatuur verbinden N-11
Hoofdtelefoon gebruiken N-11
afstandsbediening N-12
De afstandsbediening gebruiken N-12
afstandsbediening app N-13
Downloadinstructies N-13
Uw mobiele apparaat paren N-14
bediening N-15
Inschakelen N-15
Een bron kiezen N-15
Volumeregelaar N-15
Een audiomodus selecteren N-16
Geluid vanuit uw TV N-16
Geluid vanuit Bluetooth® apparatuur N-16
IR versterker N-16
CEC-bediening via HDMI N-16
Auto-instelling N-17
systeeminstelling N-18
Systeeminstellingsmenu N-18
Luidspreker/EQ-instellingsmenu N-19
HDMI-instellingsmenu N-20
rmware-update N-21
Een updatebestand downloaden N-21
De update uitvoeren N-21
specicaties N-22
problemen oplossen N-23
bevestiginginstructies N-24
U hebt hiervoor nodig N-24
Bevestigingprocedure N-24
productgarantie N-25
Auteursrecht N-25
Wereldwijde garantie N-25
Claims onder garantie N-25
Online registratie N-25
Problemen? N-25
technologielicentie N-26
Nederlands
N-3N-2
Page 47

veiligheidsricht-
lijnen
overzicht
1. Lees deze instructies
Alle veiligheid- en gebruiksinstructies
moeten worden gelezen doordat u dit
product in gebruik neemt.
2. Bewaar deze instructies
Alle veiligheid- en gebruiksinstructies
dienen te worden bewaard als eventueel
naslagwerk.
3. Besteed aandacht aan alle
waarschuwingen
Alle waarschuwingen op het apparaat en
in de gebruiksaanwijzingen moeten in
acht worden genomen.
4. Volg alle instructies op
Alle bediening- en gebruiksaanwijzingen
dienen te worden gevolgd.
5. Gebruik dit toestel niet in de buurt van
water
Het apparaat dient niet te worden
gebruikt in de buurt van water of vocht –
bijvoorbeeld in een natte kelder of nabij
een zwembad.
6. Reinig het apparaat alleen met een droge
doek.
7. Blokkeer geen ventilatieopeningen.
Installeer volgens de instructies van de
fabrikant.
8. Installeer niet in de buurt van
warmtebronnen zoals radiatoren,
kachels, ovens of andere apparaten
(inclusief versterkers) die warmte
produceren.
9. Omzeil nooit de veiligheidsvoorziening
van de gepolariseerde of geaarde stekker.
Een gepolariseerde stekker hee twee
bladen, waarvan er een breder is dan
de andere. Een geaarde stekker hee
twee bladen en een derde pen voor de
aarding. Het brede blad of de derde pen
is bedoeld voor uw veiligheid. Mocht de
geleverde stekker niet in uw stopcontact
passen, raadpleeg dan een elektricien
voor het vervangen van het verouderde
stopcontact.
10. Bescherm het netsnoer zodat er niet
over gelopen kan worden of bekneld kan
raken, vooral bij stekkers, stopcontacten
en het punt waar ze het apparaat
verlaten.
11. Gebruik alleen aansluitstukken/
accessoires aanbevolen door de fabrikant.
12. Gebruik uitsluitend een wagentje,
standaard, statief, beugel of tafel door de
fabrikant aanbevolen of bij het apparaat
verkocht. Wanneer u een wagentje
gebruikt, wees dan voorzichtig bij het
verplaatsen van de combinatie wagen/
toestel en voorkom letsel door omvallen.
13. Haal de stekker van dit toestel uit het
stopcontact tijdens bliksem of wanneer
het toestel gedurende lange perioden niet
gebruikt wordt.
14. Laat al het onderhoud uitvoeren door
gekwaliceerd onderhoudspersoneel.
Onderhoud is nodig wanneer het
apparaat op enige wijze beschadigd
is, zoals het netsnoer of de stekker is
beschadigd, er vloeistof in het apparaat
is gemorst of voorwerpen in zijn
terechtgekomen, het apparaat aan regen
of vocht is blootgesteld, niet normaal
werkt of is gevallen.
15. Plaats het apparaat a.u.b. in een goed
geventileerde ruimte.
WAARSCHUWING: Stel dit apparaat niet bloot aan
regen, vocht, druppels of spetters, om het risico op
brand of elektrische schokken te voorkomen. Plaats
geen met vloeistof gevulde voorwerpen, zoals een
vaas, op het apparaat.
WAARSCHUWING: De netstekker of de
apparaatkoppeling wordt gebruikt om de voeding
volledig los te koppelen en moet altijd bereikbaar en
gereed worden gehouden.
Dit bliksemschichtsymbooltje binnenin een gelijkzijdige
driehoek is bestemd de gebruiker te wijzen op de
aanwezigheid van ongeïsoleerde ‘gevaarlijke spanning’
binnenin de productbehuizing die krachtig genoeg kan
zijn om een risico op elektrische schokken te vormen.
Waarschuwing: Verwijder nooit de behuizing (of
achterzijde) om het risico op elektrische schokken te
voorkomen, er zijn geen interne onderdelen die de
gebruiker zelf kan repareren. Laat reparaties over aan
gekwalificeerd personeel.
De gelijkzijdige driehoek met een uitroepteken
waarschuwt de gebruiker dat in de handleiding van
het toestel belangrijke aanwijzingen voor gebruik en
onderhoud zijn opgenomen.
Dit toestel is een Klasse II of dubbel geïsoleerd
elektrisch toestel. Het is op een zodanige wijze
ontworpen dat het geen veilige aansluiting met
elektrische aarding nodig heeft.
Een juiste verwijdering
van dit product
Dit product bevat elektrische
en elektronische materialen. De
aanwezigheid van deze materialen
kan, indien incorrect afgevoerd,
mogelijk schadelijke effecten
hebben op het milieu en de
volksgezondheid.
De aanwezigheid van dit label op het product betekent
dat deze niet als ongescheiden afval mag worden
afgevoerd, maar echter gescheiden moet worden
ingezameld. U bent als consument verantwoordelijk
voor de correcte verwijdering van dit product.
Toetsen en display
Ingangsselectie
IN- ingangsbronnen in teruglopende
volgorde selecteren.
IN+ ingangsbronnen in oplopende
volgorde selecteren.
De display toont de geselecteerde bron.
Geselecteerde ingangsbron
Opmerking: verandert
in menustructuur tijdens
instelling, zie pagina 18 voor
meer informatie.
Audiomodus
Opmerking: verandert
in menuoptie tijdens
instelling, zie pagina 18
voor meer informatie.
N-5N-4
Stand-by
Schakelt de Solo bar in
en uit stand-by.
Volumeregelaar
- verlaagt geluidsuitgang.
+ verhoogt geluidsuitgang.
De display toont het volume.
Automatische Volumecontrole
Gebruik de afstandsbediening om
de ALC in en uit te schakelen.
Nederlands
Volume-instelling
Opmerking: verandert
in waarde voor de
geselecteerde menuoptie
tijdens instelling, zie
pagina 18 voor meer
informatie.
Page 48

snel van start
Aansluitingen
USB
Alleen gebruikt voor
service en firmwareupdates
Zie pagina 21 voor
informatie over
firmware-updates.
MIC
3,5mm
miniaansluiting,
gebruikt voor
aansluiting van
de meegeleverde
microfoon tijdens
automatische
luidsprekerinstelling.
Zie pagina 17 voor
meer informatie.
AUX
3,5mm stereo
miniaansluiting,
gebruikt voor
aansluiting van
een analoge
audiobron.
COAX
RCA-aansluiting,
gebruikt voor
aansluiting op een
digitale audiobron.
SUB
RCA LFE-uitgang,
gebruikt voor
aansluiting van een
subwoofer.
Zie pagina 10 voor
informatie over
aansluiting van een
Solo sub via een
draadloze.
OPTICAL
TOSLINK-aansluiting,
gebruikt voor
aansluiting van een
digitale audiobron.
HDMI OUT
Gebruikt voor
aansluiting op een TV
en tevens als Audio
Retourkanaal (ARC).
Zie pagina 7 voor meer
informatie.
HDMI 1 – 4
Gebruikt voor
aansluiting van
tot op vier digitale
apparaten voor 1080p
en 3D pass-through.
POWER INLET
Gebruikt voor
aansluiting op het
stopcontact.
Leveringsomvang
< Solo geluidsbalk
< Voedingskabel
< Afstandsbediening
< Batterijen (2 x AAA)
< Microfoon
< Steun voor muurmontage
< Gebruikshandleiding
< Registratiekaart
Het plaatsen van het toestel
De Solo bar is een uiterst veelzijdig product.
Plaats het op een tafelblad, in een kabinet
of op een boekenplank, en controleer of
het apparaat waterpas en stevig staat. Plaats
het onder een TV, vrijstaand op een vlak
oppervlak of op een muur gemonteerd.
Wij raden muurmontage aan voor de
beste luisterervaring. Gebruik hiervoor
de speciaal ontwikkelde, meegeleverde
muurbeugel. Zie pagina 24 voor
bevestiging- en montage-instructies.
Plaats de Solo bar uit de buurt van direct
zonlicht en hitte- of vochtbronnen.
Apparatuur aansluiten
Nadat de Solo bar eenmaal correct is
geplaatst, kunt u er uw apparatuur op
aansluiten zoals te zien in de volgende
aeeldingen.
Zorg ervoor dat geen van de kabels
verbogen of uitgetrokken zijn.
WAARSCHUWING: Sluit uw Solo bar pas aan
op het stopcontact nadat al uw audio- en
videoapparaten zijn aangesloten.
Aansluiting op een TV
Sluit uw TV aan op de HDMI OUT
d.m.v. een HDMI-kabel. Als uw TV
ARC ondersteunt, kan audio worden
afgespeeld via de Solo bar voor betere
geluidprestaties – zie pagina 20 voor meer
instellinginformatie. Als uw TV ARC
niet ondersteunt, kunt u een audiokabel
aansluiten op de ingang OPTICAL of COAX
op de Solo bar.
Audiokabel
indien geen
ARC
Nederlands
N-7N-6
Page 49

Digitale apparatuur aansluiten via HDMI Analoge apparatuur aansluiten
Veel digitale apparatuur, waaronder settop boxen, Blu-ray spelers, DVD-spelers,
spelconsoles en camcorders, kan worden
aangesloten via een HDMI-verbinding.
Vergeet niet dat wanneer u deze
aansluitmethode gebruikt, het beeld
door uw TV zal worden weergegeven
terwijl het geluid wordt afgespeeld via de
Solo bar. Er zijn in dit geval geen andere
audioverbindingen nodig.
Blu-ray diskspeler Spelconsole
Sluit een willekeurig analoog audioapparaat
aan op de AUX-ingang van de Solo bar via
een3,5mmministekker.
MP3-speler
Audioapparatuur aansluiten via digitale ingang
Audioapparatuur kan ook worden aangesloten op de Solo bar
d.m.v. de Coaxiale en Optische ingangen.
Spelconsole
CD-speler
Een subwoofer aansluiten
De Solo bar komt met een ingebouwde
subwooferuitgang (zie pagina 19 voor
instelling). Gebruik een subwooferkabel met
een RCA LFE-stekker om uw uitrusting op
de Solo bar aan te sluiten.
Opmerking: Lees a.u.b. de volgende pagina
als u een Arcam Solo sub gebruikt.
Nederlands
Set-top box
Camcorder
Subwoofer
N-9N-8
Page 50

WIRELESS
Aansluiten en inschakelen
De Solo bar komt geleverd met een gegoten
netstekker die al bevestigd is aan de kabel.
Controleer of deze stekker goed in uw
stopcontact past. Neem onmiddellijk
contact op met uw Arcam-dealer als de
voedingsspanning of netstekker bij u
afwijkt.
Sluit eerst de netkabel aan op de
voedingsingang op de achterzijde van de
Solo bar en controleer of deze er stevig in
zit. Steek nu de stekker in het stopcontact en
schakel de voedingsingang in. Het apparaat
staat nu op stand-by, zoals aangegeven door
een rode LED op het voorpaneel.
Als het apparaat voor langere tijd ongebruikt
blij, zal deze op stand-by schakelen om het
stroomverbruik te verlagen
Een Solo sub aansluiten
Omdat uw Solo sub deel uitmaakt van
het Arcam Solo productaanbod, kan deze
draadloos communiceren met de Solo bar.
Zorg ervoor de Solo sub in te schakelen via
de aan/uitschakelaar ervan.
1. Druk op de toets op de
afstandsbediening van de Solo bar,
gevolgd door totdat Speaker/EQ
Setup op de display op het voorpaneel
verschijnt. Druk op gevolgd door
nogmaals totdat Sub Pairing
verschijnt.
2. Druk op om de paringprocedure te
starten. De display zal veranderen in In
Progress.
3. Stel de schakelaar INPUT op de
achterzijde van de Solo sub in op
WIRELESS.
LINE
LFE
INPUT
4. Houd de toets WIRELESS op de
achterzijde van de Solo sub voor ca. vijf
seconden ingedrukt. De WIRELESSLED zal blauw beginnen te knipperen
om aan te geven dat de Solo sub op
synchronisatiemodus is ingesteld en
momenteel zoekt naar een bron om
verbinding mee te maken.
Solo sub
WIRELESS
PAIRING
PWR WIRELESS
5. De WIRELESS LED zal na een geslaagde
paring constant blauw blijven branden,
terwijl de Solo bar Linked zal aangeven.
6. Nadat de paringprocedure eenmaal
is voltooid, zal de Solo sub altijd
opnieuw verbinding proberen te maken
wanneer deze wordt ingeschakeld of een
audiosignaal ontvangt.
Opmerking: De synchronisatiemodus
duurt ca. 30 seconden. Als er gedurende
deze tijd geen bron wordt waargenomen,
zal de Solo balk het zoeken stoppen en
dient u het proces te herhalen.
Bluetooth® apparatuur verbinden Hoofdtelefoon gebruiken
De Solo bar is voorzien van ingebouwde draadloze
Bluetooth technologie voor naadloze integratie met elk
ander apparaat dat Bluetooth ondersteunt.
Paring met Bluetooth apparatuur
Volg de instructies in de gebruiksaanwijzingen van uw
Bluetooth apparaat. Selecteer Arcam Solo bar in de lijst
met Bluetooth apparatuur om de paring af te ronden.
Nadat de paringprocedure eenmaal is voltooid, hoe u
dit niet nog een keer uit te voeren.
Bluetooth® apparatuur
De Solo bar komt met een Bluetooth zender,
zodat deze verbinding kan maken met een
Bluetooth hoofdtelefoon.
Opmerking: Zenden via Bluetooth verschilt
van ontvangen. U kunt tot op vier apparaten
paren, maar er kan slechts telkens met één
apparaat verbinding worden gemaakt,
waarbij prioriteit wordt gegeven aan het
eerste gevonden apparaat.
Een Bluetooth hoofdtelefoon
verbinden
Druk op de toets op de
afstandsbediening gevolgd door
totdat Speaker/EQ Setup op de display
van het voorpaneel verschijnt. Druk op
en vervolgens nogmaals op totdat
Headphone Out verschijnt. Druk op om
te selecteren.
De Bluetooth zender is standaard
uitgeschakeld, waardoor Disable op de
display wordt aangegeven. Druk op om
de display te veranderen in Enabled. De
Bluetooth zender is nu ingeschakeld en de
menuoptie Device Search is geactiveerd.
Volg nu de instructies meegeleverd met
uw Bluetooth hoofdtelefoon om deze op
paringmodus in te stellen.
Controleer of Device Search nog steeds
wordt weergegeven en druk op . De
Solo bar zal gedurende één minuut naar
beschikbare apparatuur zoeken.
Als er geen apparaten zijn gevonden, kunt
u nogmaals op drukken om een nieuwe
scan te starten. U kunt eventueel controleren
dat er geen obstakels in de weg staan.
Wanneer de scan is voltooid, zullen alle
beschikbare apparaten in een lijst worden
weergegeven. Gebruik de toetsen en
om het correcte apparaat te selecteren
en druk op om het paringproces af te
ronden. De Solo bar zal een melding tonen
om u te informeren dat de verbinding is
geslaagd.
Uw hoofdtelefoon gebruiken
Zorg ervoor dat beide de Solo bar en uw
hoofdtelefoon zijn ingeschakeld. Selecteer
een audiobron en geniet van het geluid
afgespeeld via uw hoofdtelefoon.
Opmerking: Zodra uw hoofdtelefoon
uitschakelt, wordt de audio automatisch
afgespeeld via de luidsprekers van de Solo
bar.
WAARSCHUWING: Door de Bluetooth zender in
te schakelen, wordt de Bluetooth ingang tijdelijk
uitgeschakeld. Dit betekent dat u niet gelijkertijd
muziek vanuit een Bluetooth apparaat naar de
Solo bar kunt streamen en via de hoofdtelefoon
kunt luisteren.
Nederlands
N-11N-10
Page 51

afstandsbedie-
ning
afstandsbedie-
ning app
De Solo bar kan worden ingesteld en bediend door of de meegeleverde
afstandsbediening te gebruiken of via de afstandsbediening app van de Solo bar.
De afstandsbediening
gebruiken
De afstandsbediening is geprogrammeerd
voor gebruik met de Solo bar.
Controleer voorafgaand aan gebruik of de
twee meegeleverde type AAA batterijen
correct zijn geïnstalleerd.
1. Houd de afstandsbediening
ondersteboven, druk op de
antislipinkepingen van het klepje van de
batterijhouder en schuif het klepje er af.
2. Plaats de twee meegeleverde ‘AAA’batterijen. Zorg ervoor de batterijen in
de juiste richting in te steken volgens de
‘+’ en ‘–’ markeringen.
3. Schuif het klepje van het batterijvak
terug en vergrendel het met een klik.
Zorg ervoor dat er geen obstakels zijn
tussen de afstandsbediening en de display
op het voorpaneel van de Solo bar, om een
betrouwbare werking te garanderen.
Wisselt de Solo bar tussen stand-by en ingeschakelde modus.
Eenmaal indrukken om de Solo bar te dempen. Nogmaals indrukken
(ofhetvolume aanpassen) om het geluid te herstellen.
Volume verhogen.
Volume verlagen.
Automatische Luidheidcontrole – wisselt tussen in en uit.
Indrukken om het instellingsmenu te openen (zie pagina’s 18 - 20). Nogmaals
indrukken om het menu te verlaten.
Omhoog navigeren door de menu-instellingen.
Omlaag navigeren door de menu-instellingen.
Naar links navigeren door de menuniveaus.
Naar rechts navigeren door de menuniveaus.
Indrukken om een menu-instelling te selecteren.
U kunt dankzij de afstandsbediening app
van uw Arcam Solo bar een Apple iOS of
Android™ apparaat gebruiken om de Solo
bar via Bluetooth te bedienen.
Gebruik de app om menu-instellingen te
congureren en het afspelen te bedienen om
precies dezelfde wijze als de meegeleverde
afstandsbediening.
Minimum OS-vereisten voor de app: iOS6,
Android 4.0
Downloadinstructies
Download de app vanuit of de App StoreSM of
Google Play™.
Volg de downloadinstructies weergegeven
op uw apparaat.
Druk na de installatie op het applicatieicoontje om de applicatie te starten.
HDMI 1 20
DIGITAL ST
De app spiegelt de display van de Solo bar
De display toont de ingangsbron, het
volume en het audioformaat in normale
gebruiksmodus of het toont menuopties
wanneer u de instellingen configureert.
Nederlands
Wisselt de uitgangmodus van de audio tussen stereo, film en concert.
Ingangsbronschakelaar – doorloopt de aangesloten bronnen in oplopende
volgorde.
Ingangsbronschakelaar – doorloopt de aangesloten bronnen in aflopende
volgorde.
N-13N-12
Page 52

bediening
Uw mobiele apparaat
paren
Voor deze app, moet uw apparaat met de
Solo bar zijn gepaard via Bluetooth.
Zorg ervoor dat de functie Bluetooth op uw
apparaat is ingeschakeld. Volg deze stappen
voor iOS apparatuur:
Volg voor Android apparatuur de instructies
meegeleverd met uw apparaat.
Open Instellingen, druk vervolgens op
Bluetooth.
Schuif de schakelaar Bluetooth naar positie
“a an”.
Wacht totdat Arcam Solo bar verschijnt
onder APPARATEN en druk vervolgens op
Verbinden.
Als u de paring met uw apparaat wilt
verbreken, kunt u op het informatieicoontje naast Verbonden drukken en
vervolgens op Dit Apparaat Vergeten
drukken.
Opmerking: U kunt een maximum van vier
Bluetooth bronapparaten met de Solo bar
paren, waarbij altijd het eerste gevonden
apparaat beschikbaar is. Er maken mogelijk
meerdere personen gebruik van de Solo bar
en u dient in dit geval misschien de paring
met een apparaat te verbreken.
Inschakelen
Druk op de toets op het voorpaneel of op
de afstandsbediening om de Solo bar vanuit
stand-by in te schakelen.
De display op het voorpaneel zal kort
ARCAM Solo bar weergeven, gevolgd door
de momenteel geselecteerde ingangsbron, de
volume-instelling en de audiomodus.
Opmerking: Als u het apparaat voor langere
tijd niet gebruikt, haal dan a.u.b. de stekker
uit het stopcontact om energie te besparen.
Een bron kiezen
U kunt de gewenste bron selecteren door op
de toets of op het voorpaneel of
op de afstandsbediening te drukken, totdat
deze bron op de display van het voorpaneel
wordt weergegeven. De volgende bronnen
zijn beschikbaar:
HDMI 1
HDMI 2
HDMI 3
HDMI 4
OPTICAL
COAX
AUX
BLUETOOTH
Opmerking: Wanneer deze functie wordt
ondersteund, identificeren bepaalde HDMI
apparaten zichzelf mogelijk met hun
apparaatnaam.
Als uw TV is verbonden met gebruik van
ARC en u hebt de instellingprocedure
op pagina 16 gevolgd, zal de display de
volgende melding weergeven wanneer u
TV kijkt.
TV/ARC
Audio Retourkanaal (ARC) is een functie
ingebouwd in de nieuwste versie van
HDMI, waardoor uw TV audio terug kan
sturen naar de HDMI kabel en dus naar de
geluidsbalk.
Opmerking: Dit wordt automatisch
weergegeven wanneer een TV is verbonden
met geactiveerde ARC.
Volumeregelaar
Pas het volume aan door op de toets
of op het voorpaneel of op de
afstandsbediening te drukken.
De uitgang dempen
U kunt de geluidsuitgang van de Solo bar
dempen door op op de afstandsbediening
te drukken. Zolang het apparaat is gedempt,
verandert de volume-instelling in MUTE op
de display van het voorpaneel.
U kunt de dempfunctie annuleren door nog
een keer op te drukken of op / om
het volume aan te passen.
Nederlands
N-15N-14
Page 53

Een audiomodus
selecteren
De Solo bar wordt geleverd met drie
standaard ingestelde audiomodi – STEREO,
MOVIE en CONCERT.
Druk op de toets op de
afstandsbediening om deze modi te
doorlopen en een selectie te maken.
Opmerking: De standaard modus is Stereo
en dit betekent dat audio wordt afgespeeld
zoals het was opgenomen.
Geluid vanuit uw TV
Als uw TV is aangesloten op de Solo bar
met gebruik van ARC, selecteer a.u.b. de
correcte bron op uw TV en geniet van
superieur geluid vanuit de Solo bar, gebruik
hierbij de afstandsbediening van de TV om
het volume te regelen.
Wanneer in deze modus gebruikt, zal de
display op het voorpaneel van de Solo bar
automatisch TV/ARC weergeven.
Geluid vanuit Bluetooth®
apparatuur
Om draadloos van muziek te genieten
vanuit een willekeurig Bluetooth apparaat,
dient u dit apparaat eerst met de Solo bar te
paren – zie pagina 11 voor meer informatie.
Zodra uw apparaat eenmaal is gepaard,
hoe u slechts de instructies te volgen
meegeleverd met dat apparaat.
IR versterker
Wanneer u de Solo bar voor een TV plaatst,
kan deze (aankelijk van het model)
de afstandsbedieningsensor op de TV
blokkeren, waardoor bediening niet langer
mogelijk is.
Gebruik in dit geval de IR versterkerfunctie
op de Solo bar om de signalen door te
sturen naar uw TV. Opmerking: Dit werkt
zelfs met de Solo bar op stand-by ingesteld.
Zie pagina18 voor instellinginformatie.
CEC-bediening via HDMI
Consument Elektronica Controle (CEC) is
een functie waarmee u tot op 15 CECondersteunende apparaten via HDMI op uw
Solo bar kunt aansluiten en deze met slechts
een enkele afstandsbediening gelijktijdig
kunt bedienen.
CEC is standaard ingeschakeld. Zie
pagina20 voor instellinginformatie.
Typische voorbeelden van systeembediening
met CEC zijn o.a.:
< Elk aangesloten apparaat gelijktijdig
inschakelen of op stand-by schakelen.
< Volumeregeling.
< Ingangsbronnen selecteren.
Auto-instelling
De Solo bar is voorzien van een
gepatenteerde, automatische
instellingsfunctie die probeert de essentiële
luidsprekerinstellingen voor uw systeem
in te stellen (inclusief een subwoofer
indien aanwezig). De functie berekent de
lterwaarden voor de vervormingcorrectie
van de ruimte (room EQ) om de ergste
eecten van resonantiefrequenties in de
luisterkamer te verwijderen.
Steek de stekker van de meegeleverde
ijkingmicrofoon in de MIC-aansluiting op
het achterpaneel en plaats de microfoon op
de meest gebruikelijke luisterpositie.
Deze microfoon zal de speciale ijkingtonen
oppikken die door de luidsprekers (en
subwoofer) worden gegenereerd wanneer
u de Auto-instelling start. De Solo bar
analyseert vervolgens dit signaal en berekent
het volgende:
< het luidsprekerniveau,
< cross-overfrequentie naar de subwoofer,
< problematische resonantiefrequenties
in de ruimte die moeten worden
weggelterd.
Microfoon
Op hoofdhoogte in
luisterpositie plaatsen
met de microfoon
omhoog gericht.
Ga als volgt te werk om het systeem te
helpen zo nauwkeurig mogelijk te zijn:
< Minimaliseer alle achtergrondgeluiden
in de luisterruimte en naastliggende
kamers.
< Sluit de ramen en deuren van de
luisterkamer.
< Schakel ventilatoren en airconditioners
uit.
< Als u de microfoon in de hand houdt,
dient u uw hand en vingers stil te
houden zodat u daarmee geen geluid
maakt.
< Plaats de microfoon omhoog gericht
op ongeveer de hoogte van uw hoofd
wanneer in de normale luisterpositie
met direct op de luidsprekers zonder
enige obstakels. Het is niet nodig de
microfoon direct op de luidsprekers te
richten.
< Als uw systeem een actieve subwoofer
bevat, begin dan met het uitgangsniveau
en versterkingsregeling daarvan
halverwege ingesteld tussen minimum
en maximum.
Start de Auto-instelling door op op
de afstandsbediening te drukken gevolgd
door totdat Speaker/EQ Setup op
het voorpaneel van de Solo bar wordt
weergegeven. Druk nu op en de display
dient te veranderen in Auto Setup. Druk nog
een keer op om de procedure te starten.
Het proces zal de testtonen vanuit
de luidsprekers genereren en duurt
gewoonlijk korter dan twee minuten. De
testgeluidgenerator doorloopt tweemaal
elke luidspreker. Tussen elke cyclus zal kort
Analysing worden weergegeven. De display
zal na de tweede cyclus Calculating en snel
daarna Complete weergeven.
Mochten er tijdens de auto-instelling enige
storingen optreden, volg dan a.u.b. de
instructies op de display.
De Auto-instelling is gewoonlijk vrij
nauwkeurig, maar er kunnen soms valse
resultaten worden gegenereerd. Problemen
kunnen het gevolg zijn van:
< externe of rommelende
geluiden/‘hanteergeluiden’ die door de
microfoon worden opgepakt
< geluidsweerkaatsing op harde
oppervlakken (bijv. ramen of muren)
in de directe nabijheid van de
luisterpositie,
< erg sterke akoestische resonantie in de
ruimte,
< obstakels (bijv. een leunstoel) tussen de
luidspreker en de microfoon.
<
Een subwoofer gebruiken
Als uw systeem een actieve subwoofer bevat,
dient u de Auto-instelling mogelijk opnieuw
uit te voeren met het uitgangsniveau en
de versterkingregeling van de subwoofer
ingesteld op een gemiddelde waarde.
De Auto-instelling zal proberen een crossoverfrequentie te selecteren waarop de
soepelste overdracht van lage frequenties
vanuit de hoofdluidsprekers naar de
subwoofer mogelijk is. Als dit geen positieve
resultaten oplevert, raden we u aan om met
de hand andere cross-overfrequenties uit te
proberen tot u een resultaat vindt dat beter
aan uw wensen voldoet.
Wanneer de Auto-instelling wordt
uitgevoerd, worden ook de Ruimte
EQ-waarden berekend om de ergste
eecten van resonantiefrequenties in de
luisterruimte te elimineren.
Kamer EQ is standaard uitgeschakeld.
Udient Ruimte EQ in te schakelen op de
ingangen waarvoor u denkt dat deze functie
nuttig is, door naar typisch bronmateriaal te
luisteren via elke ingang.
De vereeningcorrectie in de ruimte kan u
helpen problemen in de akoestiek van de
luisterkamer te beperken. Dit is doorgaans
beter dan dat u probeert deze problemen
direct in de kamer te verhelpen. Zie pagina
19 in systeeminstelling om Ruimte EQ in te
schakelen.
Nederlands
N-17N-16
Page 54

systeeminstelling
Gebruik de afstandsbediening en volg deze
stappen om uw Solo bar optimaal in te stellen.
Systeeminstellingsmenu
Standaard instelling worden weergegeven in Blauw.
System Setup Lipsync Delay 0 ~ 200ms De beeldverwerking die een misaanpassing tussen de timing
Display Level
App Control
IR Repeater
System Info Druk op OK om de systeemsoftware versie te bekijken
Factory Defaults
van het geluid en het beeld veroorzaakt kan het videosignaal
vertragen. U zult dit opmerken doordat het spraakgeluid
niet gesynchroniseerd klinkt met lipbewegingen. Dit kunt u
compenseren door de vertraging van de lipsynchronisatie aan
te passen. Gebruik de en toetsen om de synchronisatie
tussen geluid en beeld aan te passen. Druk op om een stap
terug te gaan of op om de instellingen te verlaten.
Dim g Bright g Off
Enable g Disable
Enable g Disable
Druk op OK om de Solo bar terug te stellen op de standaard fabriekswaarden. Opmerking:
Gepaarde of verbonden apparaten zullen verloren raken. Druk op om een stap terug te gaan of
op om de instellingen te verlaten.
De niveaus van de LED-display kunnen naar wens worden
aangepast. Gebruik de en toetsen om van instelling te
wisselen. Wanneer ingesteld op Uit, zal de display kort oplichten
telkens dat deze een commando ontvangt. Druk op om een
stap terug te gaan of op om de instellingen te verlaten.
Schakelt inbedrijfstelling van de Solo bar vanuit stand-by in
d.m.v. de optionele afstandsbediening app. Gebruik de en
toetsen om de app-bediening in of uit te schakelen. Druk op
om een stap terug te gaan of op om de instellingen te
verlaten.
Gebruik de en toetsen om de IR versterker in of uit te
schakelen. Zie pagina 16 voor meer informatie. Druk op om
een stap terug te gaan of op om de instellingen te verlaten.
Luidspreker/EQ-instellingsmenu
Standaard instelling worden weergegeven in Blauw.
Speaker/EQ Setup Auto Setup De Automatische instelling configureert uw Solo bar voor optimaal luisterplezier. Druk op OK om de
instellingprocedure te starten. Zie pagina 17 voor meer informatie.
Room EQ
Sub Pairing
Subwoofer Level 0 ~ -12dB
Headphone out
Enable g Disable
Druk op om de paringprocedure te starten. Zie pagina 10 voor meer informatie.
BT Transmitter
Enable g Disable
Device search
Gebruik de en toetsen om de EQ in of uit te schakelen.
Opmerking: Alleen beschikbaar nadat de Automatische instelling is voltooid. Druk
op om een stap terug te gaan of op om de instellingen te verlaten.
Gebruik de en toetsen om een subwooferniveau te selecteren.
Opmerking: Alleen beschikbaar nadat de Sub Paring is voltooid. Druk op om
een stap terug te gaan of op om de instellingen te verlaten.
Gebruik de en om de Bluetooth® zender in of uit te schakelen. Druk op
om een stap terug te gaan of op om de instellingen te verlaten.
Opmerking: Alleen beschikbaar als de hoofdtelefoonuitgang is ingeschakeld.
Druk op om het zoeken naar een hoofdtelefoon te starten. Gebruik de en
toetsen om de hoofdtelefoon in de lijst te selecteren. Druk op om een stap
terug te gaan of op om de instellingen te verlaten.
Nederlands
N-19N-18
Page 55

rmware-update
HDMI-instellingsmenu
Standaard instelling worden weergegeven in Blauw.
HDMI Setup HDMI Audio Out
CEC / ARC
Disable g Passthrough
Enable g Disable
Gebruik de en toetsen om de HDMI-doorvoer in en uit
te schakelen. HDMI-doorvoer stuurt het video- en audiosignaal
vanuit elke willekeurige HD-bron naar uw Solo bar via een
HDMI-kabel. De Solo bar splitst het signaal, speelt audio
vanuit de HD-bron af door zijn eigen luidsprekers en stuurt het
ongemodificeerde videosignaal naar een TV via een “HDMI
UIT”-kabel. Druk op om een stap terug te gaan of op
om de instellingen te verlaten.
Gebruik de en toetsen om CEC/ARC in of uit te
schakelen.
Zie pagina 16 voor meer informatie. Druk op om een stap terug
te gaan of op om de instellingen te verlaten.
Een updatebestand
downloaden
Om een rmware-update uit te voeren,
dient u een updatebestand via de Arcam
website te downloaden.
Controleer of er rmware-updates
beschikbaar zijn door www.arcam.co.uk in
uw browser te typen en naar de pagina “Solo
bar” te navigeren.
Opmerking: Zorg ervoor het bestand
naar de hoofdfolder van uw USB-stick te
downloaden, sla het bestand niet op binnen
een folder, anders zal de update mislukken.
De update uitvoeren
Zorg ervoor dat de geluidsbalk is
ingeschakeld bij de stekker en op stand-by
is ingesteld.
Houd de en toetsen voor ca. vijf
seconden gelijkertijd ingedrukt.
De Solo bar zal inschakelen en de display
toont de volgende informatie:
ARCAM SB M:V024
B:40526 D:30304
Opmerking: M = Hoofdsoftwareversie,
B=Bluetooth softwareversie en
D=DSP-softwareversie.
Druk op de toets om het sowareupdatescherm te openen.
De display zal veranderen in:
System Update
Insert USB...
Opmerking: Druk nog een keer op IN- om
te wisselen tussen dit scherm en het scherm
met de softwareversie.
Steek de USB-drive met het opgeslagen
bestand in de aansluiting UPGRADE op het
achterpaneel van de Solo bar.
De rmware-update zal
automatisch worden
gestart zodra de USB-drive
is herkend en de display
zal dienovereenkomstig
veranderen:
System Update
Updating...
Als 30 seconden zijn verstreken voordat
de USB was aangesloten, zal de display
verlopen en veranderen in:
System Update
USB Not Detected
Deze melding zal voor ca. drie seconden
worden weergegeven, vervolgens zal de
Solo bar uitschakelen en dient u de gehele
procedure te herhalen.
De display zal na een geslaagde update de
volgende informatie voor ca. drie seconden
weergeven en de Solo bar zal zichzelf
vervolgens uitschakelen.
Nederlands
System Update
Complete
Als de update niet was geslaagd, zal de
display de volgende informatie voor ca.
drie seconden weergeven. De Solo bar zal
zichzelf hierna automatisch uitschakelen en
u dient de gehele procedure opnieuw uit te
voeren.
System Update
Error
N-21N-20
Page 56

specicaties
Algemeen
Gewicht (verpakt) 10kg
Afmetingen (H x B x D) 130mm x 1100mm x 110mm
Stroomverbruik Bedrijfsmodus: 150W (max)
Stand-bymodus: <0,5W
Voedingsvereisten 100 – 240V, 50/60Hz
Ingangen/Uitgangen
HDMI In Type A ingang x 4
HDMI Uit Type A ingang, met ondersteuning van ARC/CEC
Digitaal In (Optisch) Optische S/PDIF-ingang
Digitaal In (Coaxiaal) RCA-ingang
Aux In 3,5mm stereoaansluiting
Bluetooth Audio Ver. 3.0, Compliant met A2DP-standaard
Subwoofer Uit RCA LFE-aansluiting
Draadloze Subwooferuitgang
Frequentie 2,4GHz
Overdrachtbereik Ca. 20m (zonder interferentie)
Versterker
Nominaal uitgangsvermogen:
Woofer (0,5% THD)
Tweeter (0,5% THD)
Nominaal Uitgangsniveau van Versterker (20Hz-20kHz) 100W
Luidsprekers
Woofer 1 2 x 4 in Conus
Woofer 2 2 x 4 in Conus
Tweeter 2 x 1 in Conus
Woofer frequentierespons 170Hz – 20kHz ± 3dB
Tweeter frequentierespons 3.8kHz – 14kHz ± 3dB
Nominale impedantie 6Ω
E&OE
Opmerking: De waarden van alle specificaties zijn kenmerkend, tenzij anders vermeld.
40W per kanaal
10W per kanaal
Beleid van constante verbetering
Het beleid van Arcam is gericht
op constante verbetering van de
producten. Dit betekent dat ontwerpen
en specicaties onderhevig zijn aan
veranderingen zonder voorafgaande
kennisgeving.
problemen
oplossen
Hier volgen enkele eenvoudige controles
die u kunt uitvoeren als u problemen
ondervindt met uw Solo bar.
Voeding
< Controleer of de voedingskabel correct
is aangesloten.
< Controleer of de voeding- en
netschakelaars zijn ingeschakeld.
Afstandsbediening
< Controleer of de batterijen correct zijn
geïnstalleerd.
< De batterijen zijn mogelijk aan
vervanging toe.
< Bent u te ver verwijderd van het
apparaat of zijn er obstructies
aanwezig?
Geluid
< Controleer of de kabels correct zijn
aangesloten.
< Controleer of de juiste ingangsbron is
geselecteerd.
< Als het geluid ruist of vervormd is
tijdens het afspelen vanuit een Bluetooth
apparaat, kunt u proberen het volume
om het apparaat te verlagen en op de
Solo bar te verhogen.
Beeld
< Als er geen of een slecht weergegeven
beeld is, controleer a.u.b. of de HDMI-
kabels correct zijn aangesloten.
< Controleer of de juiste ingangsbron is
geselecteerd.
Bluetooth
< Controleer of uw Bluetooth apparaat
correct is gepaard.
< Is uw Bluetooth apparaat te ver
verwijderd van het apparaat?
Nederlands
N-23N-22
Page 57

bevestigingin-
structies
productgarantie
Gebruik de speciaal ontworpen muurmontagebeugel om de
Solo bar veilig en stevig op een muur te bevestigen.
U hebt hiervoor nodig
< Elektrische boormachine
< Boorkop, muurpluggen en
bevestigingen geschikt voor het
type muur waar u het apparaat wilt
bevestigen.
< Schroevendraaier
< Wat er pas
< Potlood
< Rolmaat
24.0
Bevestigingprocedure
1. Controleer of de muurbeugel
horizontaal zit door er een waterpas
onder te houden.
2. Markeer de gaten met een potlood,
teken hierbij nauwkeurig de uitlijning af.
3. Boor voorzichtig vier gaten met een
boorkop en pluggen geschikt voor het
type muur waar u het apparaat op wilt
bevestigen.
200.0
Zorg ervoor dat de muurmontage horizontaal zit.
4. Bevestig de muurbeugel op de muur
m.b.v. vier stevige schroeven (de
schroeven moeten een minimale
diameter hebben van 5,5mm), controleer
of deze goed in de muurpluggen passen
en stevig en gelijkmatig vast zitten.
5. Bevestig uiteindelijk de Solo bar op de
muurmontage door deze voorzichtig
op de twee uitspringende steunen te
schuiven. Het geheel dient stevig en
veilig tegen de muur te zitten.
15.0
Opgelet: Monteer dit product niet op
triplexplaten of muren met zachte
oppervlaktes. Als u twijfelt over de
muurkwaliteit, vraag dan a.u.b. een
expert om hulp.
Zorg ervoor dat de schroeven stevig en
verzonken vast zitten, voordat u de Solo bar
op de twee uitspringende steunen schuift.
Het geheel dient stevig tegen de muur te
zitten.
Auteursrecht
Juni 2014, © 2014 A&R Cambridge Ltd.
A & R Cambridge Limited (Arcam) behoudt
het recht voor de specicaties van de
producten beschreven in deze documentatie
op elk gewenst moment te wijzigen,
zonder kennisgeving of de verplichting een
willekeurige persoon over deze wijzigingen
te informeren.
Alle handelsmerken van derden zijn erkend
en geobserveerd. Het gebruik van de namen
van producten van derden duidt niet op een
goedkeuring of aanbeveling.
Arcam tre alle voorzorgsmaatregelen om
te garanderen dat alle informatie in deze
publicatie feitelijk correct is, maar kan niet
aansprakelijk worden gesteld voor enige
fouten of onvolledigheid.
Wereldwijde garantie
Arcam garandeert dat de producten
beschreven in deze handleiding zullen
voldoen aan de beschreven specicaties in
alle materiaalrespecten voor een periode
van twee jaar vanaf de aankoopdatum. Dit
gee u het recht het apparaat kosteloos te
laten repareren, vooropgesteld dat deze was
aangescha bij een geautoriseerde Arcam
dealer.
De Arcam-dealer is verantwoordelijk voor
alle service na verkoop. De fabrikant kan
geen verantwoordelijkheid aanvaarden voor
gebreken als gevolg van ongeval, verkeerd
gebruik, misbruik, slijtage, verwaarlozing
of door ongeoorloofde aanpassing en/of
reparatie, noch kan zij verantwoordelijkheid
aanvaarden voor schade of verlies ontstaan
tijdens het transport van of naar de persoon
die krachtens de garantie claimt.
De garantie dekt:
Onderdelen en arbeidskosten voor twee
jaar vanaf de aankoopdatum. Na twee jaar
moet u voor zowel de onderdelen als de
arbeidskosten betalen. De garantie dekt
geen transportkosten op elk moment.
Claims onder garantie
Deze apparatuur moet worden verpakt in
de originele verpakking en naar de dealer
worden geretourneerd van wie het werd
gekocht. Het moet franco vervoer via
een gerenommeerde vervoerder worden
toegezonden – niet per post.
Er kan tijdens transport naar de dealer of
distributeur geen verantwoordelijkheid voor
de eenheid worden aanvaard en klanten
worden daarom geadviseerd om de eenheid
te verzekeren tegen verlies of beschadiging
tijdens transport.
Online registratie
Online registratie U kunt uw product online
registreren op www.arcam.co.uk.
Problemen?
Als uw Arcam dealer uw vragen over dit of
een willekeurig ander Arcam product niet
kan beantwoorden, neem dan a.u.b. contact
op met Arcam Klantendienst op het adres
hieronder en wij staan u graag te hulp.
Arcam Customer Support Department,
Unit15, Pembroke Avenue,
Waterbeach, CAMBRIDGE,
CB25 9QP, Engeland of via
www.arcam.co.uk.
Nederlands
N-25N-24
Page 58

technologieli-
®
centie
Gefabriceerd onder licentie van Dolby
Laboratories. Dolby en het symbool met de
dubbele D zijn handelsmerken van Dolby
Laboratories.
De termen HDMI en HDMI HighDenition Multimedia Interface, en
het HDMI-logo zijn handelsmerken of
geregistreerde handelsmerken van HDMI
Licensing LLC in de Verenigde Staten en
andere landen.
Zie voor DTS patenten a.u.b. http://patents.
dts.com. Gefabriceerd onder licentie van
DTS Licensing Limited. DTS, DTS-HD, het
Symbool, & DTS en het Symbool samen
zijn geregistreerde handelsmerken, en
DTS-HD Master Audio is een geregistreerd
handelsmerk van DTS, Inc. © DTS, Inc. Alle
Rechten Voorbehouden.
© 2013 CSR plc en haar groepsbedrijven.
De aptX® markering en het aptX-logo zijn
handelsmerken van CSR plc of van een
van haar groepsbedrijven en kunnen zijn
geregistreerd in één of meer jurisdicties.
De Bluetooth® woordmarkering en logo’s
zijn geregistreerde handelsmerken in
het bezit van Bluetooth SIG, Inc. en elk
gebruik van deze markeringen door Arcam
is onder licentie. Andere handelsmerken
en handelsnamen zijn het bezit van hun
betreende eigenaren.
“Made for iPod”, “Made for iPhone”,
en “Made for iPad” betekenen dat een
elektronisch accessoire ontworpen is voor
specieke verbinding met, respectievelijk,
iPod, iPhone of iPad, en gecerticeerd is
door de ontwikkelaar voor compliantie met
Apple prestatiestandaarden. Apple is niet
verantwoordelijk voor de functionering van
dit toestel of de overeenstemming ervan met
de wettelijke en veiligheidsvoorschrien.
Vergeet a.u.b. niet dat het gebruik van dit
accessoire met iPod, iPhone of iPad de
draadloze prestaties kan aantasten.
Bluetooth technologie werkt met iPhone 5s,
iPhone 5c, iPhone 5, iPhone 4s, iPhone4,
iPhone 3GS, iPad Air, iPad (3e en 4e
generatie), iPad 2, iPad mini met Retina
display, iPad mini en iPod touch (4e en 5e
generatie).
iOS, iTunes, iPad, iPhone en iPod zijn
handelsmerken van Apple Inc., geregistreerd
in de V.S. en andere landen. App StoreSM is
een servicemarkering van Apple Inc.
Gemaakt voor:
• iPhone 5s
• iPhone 5c
• iPhone 5
• iPhone 4s
• iPhone 4
• iPhone 3GS
• iPad Air
• iPad mini met Retina display
• iPad (4e generatie)
• iPad mini
• iPad (3e generatie)
• iPad 2
• iPod touch (5e generatie)
• iPod touch (4e generatie)
Google Play™ is een handelsmerk van
Google Inc.
Android™ is een handelsmerk van Google
Inc.
N-26
Page 59

Manual Barra de Sonido
Español
Page 60

bienvenido...
contenido
… y gracias por comprar la Arcam Solo bar.
Arcam ha estado produciendo equipo de audio especializado de calidad
extraordinaria durante más de tres décadas y la nueva Solo bar es el último
de una larga lista de productos galardonados de alta delidad y cines en
casa.
Esperamos que el cuidado y esfuerzo que hemos puesto en la fabricación
de este producto se verán ampliamente demostrados en su desempeño y
abilidad superiores, lo que garantiza que usted disfrutará muchos años de
posesión.
Este manual es una guía para la instalación y el uso de la Solo bar. Use la
lista de contenido en la página siguiente para consultar la sección de interés.
Esperamos que su Solo bar le proporcione años de operación sin problemas.
En el caso poco probable de darse algún fallo, o simplemente si requiere más
información sobre los productos Arcam, nuestra red de distribuidores estará
encantada de ayudarle. También se puede encontrar información adicional
en el sitio Web de Arcam ww.arcam.co.uk.
El equipo de desarrollo de la Solo bar.
pautas de seguridad ES-4
vista general ES-5
Botones y pantalla ES-5
Conexiones ES-6
inicio rápido ES-7
¿Qué hay en la caja? ES-7
Colocación de la unidad ES-7
Conexión de dispositivos ES-7
Conexión de aparatos de TV ES-7
Conexión de dispositivos digitales vía HDMI ES-8
Conexión de dispositivos analógicos ES-9
Conexión de dispositivos de audio vía la entrada digital ES-9
Conexión de un subwoofer ES-9
Conexión y encendido ES-10
Conexión de un Solo sub ES-10
Conexión de dispositivos Bluetooth® ES-11
Uso de audífonos ES-11
mando a distancia ES-12
Utilización del mando a distancia ES-12
app de mando a distancia ES-13
Instrucciones para descarga ES-13
Conexión de su dispositivo móvil ES-14
operación ES-15
Encendido ES-15
Selección de una fuente ES-15
Control de volumen ES-15
Selección de un modo de audio ES-16
Sonido desde su TV ES-16
Sonido desde dispositivos Bluetooth® ES-16
Repetidor IR ES-16
Control CEC vía HDMI ES-16
Conguración automática ES-17
conguración del sistema ES-18
Menú de conguración del sistema ES-18
Menú de conguración Speaker/EQ ES-19
Menú de conguración HDMI ES-20
actualización de rmware ES-21
Descarga de archivo de actualización ES-21
Ejecución de la actualización ES-21
especicaciones ES-22
solución de problemas ES-23
instrucciones desujeción ES-24
Usted necesitará ES-24
Procedimiento de sujeción ES-24
garantía del producto ES-25
Derechos reservados ES-25
Garantía mundial ES-25
Reclamaciones bajo la garantía ES-25
Registro en línea ES-25
¿Problemas? ES-25
concesión de licencias tecnológicas ES-26
Español
ES-3ES-2
Page 61

pautas de
seguridad
vista general
1. Lea estas instrucciones
Lea todas las instrucciones de seguridad
y operación antes de operar este
producto.
2. Conserve estas instrucciones
Conserve las instrucciones de seguridad
y operación para referencia futura.
3. Preste atención a todas las
advertencias
Observe todas las precauciones en
el aparato y en las instrucciones de
operación.
4. Siga todas las instrucciones
Siga todas las instrucciones de operación
y uso.
5. No utilice este aparato cerca del agua
No use el aparato cerca del agua o
humedad – por ejemplo, en un sótano
húmedo o cerca de una alberca.
6. Límpielo sólo con un paño seco.
7. No obstruya ninguna abertura de
ventilación. Instálelo de acuerdo con las
instrucciones del fabricante.
8. Coloque la unidad lejos de fuentes de
calor tales como radiadores, rejillas de
salida de calefacción, estufas y otros
aparatos (incluyendo amplicadores) que
produzcan calor.
9. No anule las medidas de seguridad del
enchufe con toma de tierra o polarizado.
Un enchufe polarizado tiene dos clavijas,
una más ancha que la otra. Un enchufe
con toma de tierra tiene dos clavijas y
una tercera para la conexión a tierra.
La hoja ancha o la tercera clavija tienen
por objeto mantener su seguridad. Si
el enchufe suministrado no encaja en
su toma de corriente, consulte a un
electricista para realizar la sustitución de
la toma de corriente por una adecuada.
10. Proteja el cable de alimentación para que
no se le pise ni dañe, principalmente en
los enchufes, en las tomas de corriente, y
en los puntos de salida del equipo.
11. Utilice sólo los accesorios y conexiones
especicados por el fabricante.
12. Colóquelo sólo sobre los carritos,
plataformas, trípodes, soportes o
mesas, especicados por el fabricante,
o vendidos con el aparato. Cuando
se utilice un carrito, tenga cuidado al
mover el conjunto de carrito y aparato
para evitar lesiones en caso de vuelco.
13. Desconecte el equipo durante las
tormentas eléctricas o cuando vaya a
estar mucho tiempo sin utilizarse.
14. Para todo tipo de mantenimiento
consulte al personal de servicio técnico
cualicado. El servicio técnico es
necesario cuando el equipo haya sido
dañado de cualquier forma, como por
ejemplo: cuando se dañe el cable de
alimentación, se derrame líquido o
caigan objetos sobre el equipo, éste se
haya expuesto a la lluvia o la humedad,
no funcione con normalidad, o se haya
caído.
15. Mantenga la unidad en un ambiente
bien ventilado.
ADVERTENCIA: No exponga este aparato a la lluvia,
humedad, goteos o salpicaduras a fin de reducir el
riesgo de incendio o descargas eléctricas. No coloque
objetos llenos con líquidos, tales como floreros,
sobre el aparato.
ADVERTENCIA: El enchufe de alimentación o
conector del aparato se usa como un dispositivo de
desconexión, el dispositivo de desconexión deberá
permanecer fácilmente operable.
Este símbolo de rayo con punta de flecha dentro de un
triángulo equilátero está destinado a alertar al usuario
sobre la presencia de ‘voltaje peligroso’ sin aislamiento
dentro de la carcasa del producto que puede ser de
magnitud suficiente para constituir un peligro de
descarga eléctrica.
Advertencia: Para reducir el riesgo de descargas
eléctricas, no retire la cubierta (o tapa posterior)
ya que dentro del equipo no hay partes a las que
el usuario pueda dar servicio. Consulte al personal
calificado para servicio y mantenimiento.
El punto de exclamación dentro de un triángulo
equilátero sirve para alertar al usuario de la presencia
de instrucciones importantes de operación y
mantenimiento en la literatura que acompaña al aparato.
Este equipo es un aparato Clase II o de aislamiento
eléctrico doble. Ha sido diseñado de modo que
no necesita una conexión de seguridad con toma
de tierra.
Forma correcta de
deshacerse de este
producto
Este producto contiene materiales
eléctricos y electrónicos. La
presencia de estos materiales puede,
si no se desechan adecuadamente,
tener efectos adversos potenciales
sobre el medio ambiente y la salud
La presencia de esta etiqueta en el producto implica que
no deberá ser desechado como residuos sin clasificar y
debe ser recolectado por separado. Como consumidor,
usted es responsable de garantizar que este sea
desechado adecuadamente.
humana.
Botones y pantalla
Selección de entrada
IN- se desplaza hacia atrás a través de las
fuentes de entrada.
IN+ se desplaza hacia adelante a través
de las fuentes de entrada.
La pantalla indica la fuente seleccionada.
Fuente de entrada seleccionada
Nota: para cambios al nivel de menú
durante la configuración, véase la
página18 para más información.
Modo de audio
Nota: para cambios a
las opciones del menú
durante la configuración,
véase la página18 para
más información.
ES-5ES-4
Standby
Enciende o apaga el
standby de la Solo bar.
Control de volumen
- disminuye la salida de audio.
+ aumenta la salida de audio.
Volumen mostrado en la pantalla.
Control automático de
volumen (ALC)
Use el control remoto
para activar o desactivar
el ALC.
Español
Ajuste de volumen
Nota: para cambios al
valor para la opción
seleccionada del menú
durante la configuración,
véase la página18 para
más información.
Page 62

inicio rápido
Conexiones
USB
Usada exclusivamente
para servicio y
actualizaciones de
firmware
Véase la página21
para información sobre
las actualizaciones de
firmware.
AUX
Conector mini
estéreo de 3.5mm,
entrada usada
para conectar una
fuente de audio
analógica.
MIC
Conector mini de
3.5mm, entrada
usada para conectar
el micrófono
suministrado durante
la configuración
automática de
altavoces.
Vea la página 17 para
más información.
SUB
Salida RCA LFE, usada
para conectar un
subwoofer.
Véase la página10
para información sobre
cómo conectar un
subwoofer Solo sub vía
el enlace inalámbrico.
COAX
Entrada RCA, usada
para conectar una
fuente de audio
digital.
OPTICAL
Entrada TOSLINK,
usada para conectar
una fuente de audio
digital.
HDMI OUT
Usada para conectar
una TV y como el
Canal de regreso de
audio (ARC).
Vea la página 7 para
más información.
HDMI 1 – 4
Usadas para conectar
hasta cuatro
dispositivos digitales
que ofrecen paso de
señal 1080p y 3D.
POWER INLET
Usada para
conectarse a la fuente
de alimentación
principal.
¿Qué hay en la caja?
< Barra de sonido Solo bar
< Cable de alimentación
< Mando a distancia
< Baterías (2 x AAA)
< Micrófono
< Soporte para montaje en pared
< Manual del usuario
< Tarjeta de registro
Colocación de la unidad
La Solo bar es un producto increíblemente
versátil. Colóquela sobre una mesa, gabinete
o estante, asegurándose de que quede
nivelada y rme. Colóquela debajo de la TV,
ya sea como unidad independiente sobre
una supercie plana o montada en una
pared.
Le recomendamos el montaje en la pared
para la mejor experiencia acústica. Use
el soporte para pared diseñado a medida
suministrado. Véase la página24 para las
instrucciones de sujeción y montaje.
Coloque la Solo bar alejada de la luz solar
directa y de fuentes de calor o humedad.
Conexión de dispositivos
Una vez que la Solo bar esté colocada
correctamente, conéctela a sus dispositivos
como se muestra en las ilustraciones
siguientes.
Asegúrese que ninguno de los cables esté
retorcido o demasiado estirado.
ADVERTENCIA: No conecte su Solo bar a la
alimentación hasta que haya conectado todos
sus dispositivos de audio y video.
Conexión de aparatos de TV
Conecte su TV a la terminal HDMI OUT
usando un cable HDMI. Si su TV soporta
ARC, el audio puede ser reproducido
a través de la Solo bar para el mejor
desempeño de sonido – véase la página20
para información sobre la conguración. Si
su TV no soporta ARC, conecte un cable de
audio a la terminal de entrada OPTICAL o
COAX en la Solo bar.
Cable de
audio si no
soporta
ARC
Español
ES-7ES-6
Page 63

Conexión de dispositivos digitales vía HDMI Conexión de dispositivos
Muchos dispositivos digitales, entre ellos
decodicadores de TV, reproductores Bluray, reproductores DVD, consolas de juegos
y videocámaras, se pueden conectar usando
una conexión HDMI.
Note que cuando se usa este método de
conexión, la imagen será mostrada por
su TV y el sonido será reproducido a
través de la Solo bar. No se requieren otras
conexiones de audio.
Reproductor de discos Blu-ray Consola de juegos
Videocámara
analógicos
Conecte cualquier dispositivo de audio analógico a
la entrada AUX de la Solo bar usando un cable con
conector mini de 3.5mm.
Reproductor MP3
Conexión de dispositivos de audio
vía la entrada digital
Los dispositivos de audio también pueden conectarse a la
Solo bar usando las entradas Coaxial y Óptica.
Reproductor de CD
Conexión de un subwoofer
La Solo bar viene con una salida integrada
para subwoofer (véase la página 19 para la
conguración). Use un cable para subwoofer
con un conector RCA LFE para conectar su
equipo a la Solo bar.
Nota: Si cuenta con un Arcam Solo sub,
consulte la página siguiente.
Español
Consola de juegos
Decodificador de TV
Subwoofer
ES-9ES-8
Page 64

Conexión y encendido
La Solo bar se suministra con un enchufe de
alimentación moldeado con cable incluido.
Verique que el enchufe suministrado sea
compatible con su toma de alimentación.
Si su voltaje de alimentación o enchufe
de alimentación es diferente, contacte
inmediatamente con su distribuidor de
Arcam.
Primero, conecte el cable de alimentación
en el enchufe de alimentación en la parte
posterior de la Solo bar, asegurándose que se
haya insertado rmemente. Ahora inserte el
conector dentro del enchufe de alimentación
y encienda el enchufe. La unidad ahora
se encuentra en standby, lo que se indica
mediante un LED rojo en el panel frontal.
Si la unidad se deja de usar durante un
periodo de tiempo extenso, entrará en
espera para reducir el consumo de potencia.
Conexión de un Solo sub
Como forma parte de la gama de productos
Arcam Solo su subwoofer se puede
comunicar de manera inalámbrica con la
Solo bar.
Asegúrese que el Solo sub esté encendido en
su interruptor de encendido.
1. Presione el botón en la unidad
de mando a distancia de la Solo bar
seguido por hasta que Speaker/
EQ Setup aparezca en la pantalla del
panel frontal. Presione seguido por
una vez más, hasta que Sub Pairing
aparezca.
2. Presione para iniciar el
procedimiento de conexión. La pantalla
cambiará a In Progress.
3. Coloque el selector INPUT en la parte
posterior del Solo sub en la posición
WIRELESS.
WIRELESS
LINE
LFE
INPUT
4. Presione y mantenga presionado el
botón WIRELESS en la parte posterior
del Solo sub durante alrededor de cinco
segundos. El LED WIRELESS empezará
a parpadear con un color azul, lo que
indica que el Solo sub está en modo de
sincronización y en busca de una fuente
para conectarse.
Solo sub
WIRELESS
PAIRING
PWR WIRELESS
5. Si el procedimiento de conexión tiene éxito,
el LED WIRELESS se iluminará con un
color azul constante y la Solo bar mostrará
Linked.
6. Una vez que termina el procedimiento de
conexión, el Solo sub siempre se reconectará
si está encendido o cuando reciba una señal
de audio.
Nota: El modo de sincronización dura
alrededor de 30segundos. Si no se detecta
ninguna fuente durante este tiempo, la
Solo bar dejará de buscar y el proceso
necesitará ser repetido.
Conexión de dispositivos Bluetooth® Uso de audífonos
La Solo bar cuenta con tecnología inalámbrica Bluetooth
para una integración sin problemas con cualquier
dispositivo habilitado para Bluetooth.
Conexión con dispositivos Bluetooth
Siga la información suministrada en las instrucciones
de operación de su dispositivo Bluetooth. Seleccione
la Arcam Solo bar de la lista de dispositivos
Bluetooth para completar la conexión. Una vez que
el procedimiento de conexión ha terminado, no es
necesario que lo vuelva a ejecutar.
Dispositivos Bluetooth®
La Solo bar viene con un transmisor
Bluetooth para que se pueda conectar a un
juego de audífonos Bluetooth.
Nota: La transmisión vía Bluetooth es
diferente a la recepción. Se pueden conectar
hasta cuatro dispositivos pero solo un
dispositivo puede ser conectado a la vez
según el orden de conexión.
Conexión de audífonos Bluetooth
Presione el botón en el mando a
distancia seguido por hasta que Speaker/
EQ Setup aparezca en el panel delantero
de la pantalla. Presione seguido por
una vez más, hasta que Headphone Out
aparezca. Presione para seleccionarlo.
Por defecto, el transmisor Bluetooth está
apagado así que en el panel de la pantalla se
muestra Disable. Presione para cambiar
la pantalla a Enabled. Ahora el transmisor
Bluetooth está encendido y se activa la
opción del menú Device Search.
Ahora siga la información suministrada con
sus audífonos Bluetooth para ponerlos en
modo de conexión.
Asegúrese que Device Search todavía
aparezca en la pantalla y presione . La
Solo bar buscará los dispositivos disponibles
durante un minuto.
Si no se encuentran dispositivos, presione
una vez más para iniciar otra búsqueda.
Puede que tenga que asegurarse que no haya
obstáculos en el camino.
Cuando la búsqueda haya terminado,
se mostrará una lista de dispositivos
disponibles. Use los botones y
para seleccionar el dispositivo correcto y
presione para terminar el procedimiento
de conexión. La Solo bar desplegará un
mensaje para indicar que la conexión se
completó con éxito.
Utilización de sus audífonos
Asegúrese que la Solo bar y sus audífonos
estén encendidos. Seleccione una fuente
de audio y disfrute escuchando el sonido a
través de sus audífonos.
Nota: Si sus audífonos están apagados,
el audio se reproduce automáticamente
usando los altavoces de la Solo bar.
ADVERTENCIA: Al encender el transmisor
Bluetooth se deshabilita temporalmente la
entrada Bluetooth. Esto significa que no podrá
transmitir sonido desde un dispositivo Bluetooth
a la Solo bar y escuchar vía los audífonos al
mismo tiempo.
Español
ES-11ES-10
Page 65

mando a
distancia
app de mando a
distancia
La Solo bar puede ser congurada y controlada usando la unidad de mando
a distancia suministrada o la app de mando a distancia de la Solo bar.
Utilización del mando a
distancia
La unidad de mando a distancia está
programada para ser usada con la Solo bar.
Antes de usarlo, asegúrese de que las dos
baterías AAA suministradas estén instaladas
correctamente.
1. Con el mando posicionado hacia
abajo, presione en las hendiduras
antideslizantes de la tapa del
compartimiento de baterías y deslice la
tapa hacia afuera.
2. Coloque las dos baterías ‘AAA’
suministradas. Cuide que las baterías
sean colocadas en la dirección correcta
siguiendo las marcas ‘+’ y ‘–’.
3. Vuelva a colocar la tapa deslizándola
hasta que se quede en su sitio con un
‘clic’.
Para garantizar una operación conable,
el mando requiere una línea de visión sin
obstáculos hacia la pantalla en el panel
frontal de la Solo bar.
Alterna a la Solo bar entre el modo stand-by y encendido.
Presione una vez para silenciar la Solo bar. Presione otra vez (o ajuste el
volumen) para salir del modo silencio.
Aumenta el volumen.
Disminuye el volumen.
Control automático de volumen (ALC) – alterna entre encendido y apagado.
Presione para entrar al menú de configuración (véase las páginas 18 a 20).
Presione una vez más para salir del menú.
Navega hacia arriba a través de las opciones del menú.
Navega hacia abajo a través de las opciones del menú.
Navega hacia atrás a través de los niveles del menú.
Navega hacia adelante a través de los niveles del menú.
Presione para seleccionar la opción del menú.
Alterna entre los modos de salida de audio estéreo, película y concierto.
La app del mando a distancia de la Arcam
Solo bar le permite utilizar un dispositivo
Apple iOS o Android™ para controlar la
Solobar vía Bluetooth.
Utilice la app para congurar las opciones
del menú y controlar la reproducción
exactamente de la misma manera que con
elmando a distancia suministrado.
Requisitos mínimos de sistema operativo
parala app: iOS6, Android 4.0
Instrucciones para
descarga
Descargue la app desde la App StoreSM o
Google Play™.
Siga los avisos de descarga mostrados en su
dispositivo.
Una vez instalada, toque el icono de la app e
inicie la aplicación.
HDMI 1 20
DIGITAL ST
La app es idéntica a la pantalla de la Solo
bar
La pantalla muestra la fuente de entrada,
el volumen y el formato de audio durante
la operación normal u opciones del menú
cuando se configuran los ajustes.
Español
Selector de fuente de entrada – alterna hacia adelante entre las fuentes
conectadas.
Selector de fuente de entrada – alterna hacia atrás entre las fuentes conectadas.
ES-13ES-12
Page 66

operación
Conexión de su
dispositivo móvil
La app requiere que su dispositivo se
conecte con la Solo bar vía Bluetooth.
Asegúrese de que su dispositivo tenga
encendido Bluetooth. Para dispositivos
iOS siga estos pasos:
Para dispositivos Android, siga las
instrucciones suministradas junto con su
dispositivo.
Abra Ajustes luego toque en Bluetooth. Deslice el interruptor Bluetooth a la
posición encendido.
Espere a que la Arcam Solo bar aparezca
en DISPOSITIVOS y luego toque para
Conectar.
Si necesitara desconectar su dispositivo,
toque el icono de información al lado de
Conectado y luego toque Olvidar este
dispositivo.
Nota: Se pueden conectar máximo cuatro
dispositivos fuente Bluetooth a la Solo bar
estando cada dispositivo disponible según
el orden de conexión. Algunas veces, si más
de una persona desea usar la Solo bar puede
que necesite desconectar un dispositivo.
Encendido
Para reactivar la Solo bar desde el modo
standby, presione el botón en el panel
frontal o el mando a distancia.
ARCAM Solo bar aparece por un instante
en la pantalla del panel frontal seguido por
la fuente de entrada seleccionada actual, el
ajuste de volumen y el modo de audio.
Nota: Si la unidad no se va a usar por un
periodo prolongado de tiempo, desconéctela
de la fuente de alimentación para ahorrar
energía.
Selección de una fuente
Para seleccionar una fuente en particular,
presione los botones o en el
panel frontal o el mando a distancia hasta
que la fuente aparezca en la pantalla del
panel frontal. Las siguientes fuentes están
disponibles:
HDMI 1
HDMI 2
HDMI 3
HDMI 4
OPTICAL
COAX
AUX
BLUETOOTH
Nota: Si están soportados, algunos
dispositivos HDMI pueden identificarse por sí
mismos mediante su nombre de dispositivo.
Si su TV está conectada usando ARC y
usted siguió el procedimiento de ajuste en la
página16, el panel de la pantalla mostrará el
siguiente mensaje cuando esté viendo TV.
TV/ARC
Canal de retorno audio (ARC) es una
característica incluida en la última versión
de HDMI la cual permite a su TV enviar
audio de vuelta al cable HDMI hacia la
barra de sonido.
Nota: Esto se muestra automáticamente
cuando se conecta una TV habilitada para
ARC.
Control de volumen
Ajuste el volumen al presionar los botones
o en el panel frontal o el mando a
distancia.
Silenciar el audio
La salida de audio de la Solo bar puede ser
silenciada al presionar en el mando a
distancia. Si la unidad está silenciada, el
ajuste de volumen cambia a MUTE en el
panel de la pantalla frontal.
Para cancelar el modo de silencio, presione
por segunda vez o / para ajustar el
volumen.
Español
ES-15ES-14
Page 67

Selección de un modo de
audio
La Solo bar cuenta con tres modos de audio
pre-congurados – STEREO, MOVIE y
CONCERT.
Presione el botón en el mando a
distancia para alternar las opciones y hacer
una selección.
Nota: Stereo es el modo por defecto y
significa que el audio es reproducido tal y
como se grabó.
Sonido desde su TV
Si su TV está conectada a la Solo bar usando
ARC, seleccione la fuente apropiada en su
TV y disfrute de un sonido excelente desde
la Solo bar usando el mando a distancia de
su TV para controlar el volumen.
Si se usa de este modo, el panel de la
pantalla frontal de la Solo bar muestra
automáticamente TV/ARC.
Sonido desde dispositivos
Bluetooth®
Para disfrutar escuchar música de forma
inalámbrica desde cualquier dispositivo
Bluetooth, primero asegúrese que su
dispositivo esté conectado con la Solo bar –
véase la página11 para más información.
Una vez que su dispositivo esté conectado,
simplemente siga las instrucciones
suministradas con su dispositivo.
Repetidor IR
Si la Solo bar está posicionada enfrente
de una TV esto puede (dependiendo del
modelo) bloquear la señal del sensor del
mando a distancia en la TV por lo que su
operación ya no es posible.
Si esto sucede, use la función repetidor IR
en la Solo bar para retransmitir las señales
a través de su TV. Nota: Esto funcionará
incluso si la Solo bar está en modo standby.
Véase la página18 para la información de
conguración.
Control CEC vía HDMI
Control de electrónica de consumo (CEC)
es una característica que le permite conectar
hasta 15 dispositivos habilitados para CEC
a su Solo bar vía HDMI y controlarlos
simultáneamente usando una sola unidad de
mando a distancia.
Por defecto, CEC está habilitado. Véase
la página20 para la información de
conguración.
Ejemplos típicos de control de sistemas que
usan CEC incluyen:
< Encendido o standby simultáneo
de cada uno de los dispositivos
conectados.
< Control de volumen.
< Selección de fuente de entrada.
Configuración automática
Existe una función de conguración
automática exclusiva incluida en la Solo
bar que intenta congurar los ajustes
esenciales de los altavoces de su sistema
(que incluye un subwoofer si está presente).
También calcula los valores de ltro de la
ecualización de habitación (Room EQ) para
quitar algunos de los peores efectos de las
frecuencias resonantes en la habitación de
escucha.
Usando el micrófono para calibración
suministrado, inserte el conector en el
enchufe MIC en el panel posterior y coloque
el micrófono en la posición principal de
escucha.
Este micrófono recibe los tonos de
calibración especiales generados por los
altavoces (y el subwoofer) si se ejecuta la
Conguración automática. La Solo bar
analiza entonces la señal y calcula:
< el nivel de altavoces,
< la frecuencia de corte hacia el
subw oofer,
< las frecuencias resonantes
problemáticas en la habitación que
necesitan ser controladas por ltro.
Micrófono
Colóquelo a la altura
de la cabeza en
posición de escucha
con el micrófono
apuntando hacia
arriba.
Para ayudar a que el sistema sea lo más
exacto posible, siga las siguientes directrices:
< Minimice cualquier ruido de fondo en
la habitación de escucha y habitaciones
cercanas.
< Cierre todas las ventanas y puertas en la
habitación de escucha.
< Apague todos los ventiladores, incluso
los sistemas de aire acondicionado.
< Si sostiene el micrófono en la mano,
mantenga su mano y dedos quietos
y evite generar cualquier ‘ruido por
manipulación’.
< Coloque el micrófono apuntando hacia
arriba apenas a la altura de la cabeza en
una posición de escucha normal con
una vista directa sin obstrucciones de
los altavoces. No es necesario apuntar el
micrófono directamente a los altavoces.
< Si su sistema incluye un subwoofer
activo, empiece por ajustar su nivel
de salida /control de ganancia a un
valor intermedio entre el mínimo y el
máximo.
Para ejecutar la Conguración automática,
presione en el mando a distancia
seguido de hasta que Speaker/EQ Setup
aparezca en el panel frontal de la Solo bar.
Ahora presione y note que la pantalla
cambia a Auto Setup. Presione una vez
más para iniciar el procedimiento.
El proceso generará tonos de prueba desde
los altavoces y esto por lo general toma
menos de dos minutos. El generador de
tonos de prueba alternará cada altavoz dos
veces. Entre cada ciclo, Analysing aparecerá
brevemente en la pantalla. Después
del segundo ciclo la pantalla mostrará
Calculating seguido al poco tiempo por
Complete.
Si se presentara algún error durante
la conguración automática, siga las
instrucciones que se muestran en el panel de
la pantalla.
Conguración automática normalmente
es bastante exacta pero, a veces, se pueden
generar resultados erróneos. Los problemas
pueden derivar de:
< sonidos externos o ruidos retumbantes/
ruidos de manipulación recogidos por
el micrófonos
< reexiones de sonido en supercies
duras (por ejemplo, ventanas o paredes)
cerca de la posición de escucha,
< resonancias acústicas muy fuertes
dentro de la habitación,
< obstáculos (tales como un sofá) entre
los altavoces y el micrófono.
<
Uso de un subwoofer
Si su sistema incluye un subwoofer activo
puede que necesite volver a ejecutar la
Conguración automática con el nivel de
salida/control de ganancia ajustado a un
valor medio.
Conguración automática intentará
seleccionar una frecuencia de corte que
permita la transición de baja frecuencia
más suave de los altavoces principales al
subwoofer. No obstante, si esto no produce
resultados satisfactorios, le recomendamos
probar otras frecuencias de corte en forma
manual a n de encontrar algo más acorde a
sus preferencias.
Cuando se ejecuta la Conguración
automática esta también calcula los valores
Room EQ para eliminar algunos de los
peores efectos de frecuencias de resonancia
en la habitación de escucha.
Por defecto, Room EQ está deshabilitado.
Usted podrá habilitar el Room EQ en
entradas que crea que se beneciaran con
esta característica, según se requiera, al
escuchar material fuente típico a través de
cada entrada.
Si bien la ecualización de habitación
puede ayudar a reducir problemas con la
acústica de la misma, en general, es mucho
mejor intentar resolver estos problemas
con la habitación directamente. Para
habilitar Room EQ véase la página19 en la
conguración del sistema.
Español
ES-17ES-16
Page 68

conguración
del sistema
Use el mando a distancia y siga estos pasos para garantizar
que su Solo bar esté congurada para el placer máximo.
Menú de configuración del sistema
Los ajustes por defecto se muestran en color Azul.
System Setup Lipsync Delay 0 ~ 200ms Se pueden producir retardos en la señal de video debido
Display Level
App Control
IR Repeater
System Info Pulse OK para ver la versión del software del sistema.
Factory Defaults
a procesamiento de video que causa un desajuste entre la
sincronización del audio y del video. Usted notará esto en el sonido
del habla que está fuera de sincronización con los movimientos
de labios. Para compensar esto, puede ajustar el retardo de
sincronización de labios. Use los botones y para ajustar la
sincronización entre el sonido y la visión. Presione para regresar
un nivel o para salir de la configuración.
Dim g Bright g Off
Enable g Disable
Enable g Disable
Presione OK para restablecer la Solo bar a los valores de fábrica. Nota: Los dispositivos conectados se
perderán. Presione para regresar un nivel o para salir de la configuración.
Los niveles de la pantalla LED se pueden ajustar para adaptarse a sus
requisitos. Use los botones y para alternar entre las opciones.
Si se ajusta a Off, la pantalla se ilumina levemente siempre que reciba
un comando. Presione para regresar un nivel o para salir de
la configuración.
Habilita a la Solo bar para salir del modo standby usando la app de
mando a distancia opcional. Use los botones y para para
encender o apagar el control de la app. Presione para regresar un
nivel o para salir de la configuración.
Use los botones y para encender o apagar el repetidor IR. Vea
la página 16 para más información. Presione para regresar un nivel
o para salir de la configuración.
Menú de configuración Speaker/EQ
Los ajustes por defecto se muestran en color Azul.
Speaker/EQ Setup Auto Setup La configuración automática configura su Solo bar para una experiencia auditiva óptima. Presione OK para
iniciar el procedimiento de configuración. Vea la página 17 para más información.
Room EQ
Sub Pairing
Subwoofer Level 0 ~ -12dB
Headphone out
Enable g Disable
Presione para iniciar el procedimiento de conexión. Vea la página 10 para más información.
BT Transmitter
Enable g Disable
Device search
Use los botones y para encender o apagar el EQ.
Nota: Solo disponible después de completar la Configuración automática.
Presione para regresar un nivel o para salir de la configuración.
Use los botones y para seleccionar un nivel de subwoofer.
Nota: Solo disponible después de completar la Conexión de subwoofer. Presione
para regresar un nivel o para salir de la configuración.
Use los botones y para encender o apagar el transmisor Bluetooth®.
Presione para regresar un nivel o para salir de la configuración.
Nota: Solo disponible si la salida de audífonos está habilitada.
Presione para iniciar la búsqueda de audífonos. Use los botones y
para seleccionar audífonos de la lista. Presione para regresar un nivel o
para salir de la configuración.
Español
ES-19ES-18
Page 69

actualización de
rmware
Menú de configuración HDMI
Los ajustes por defecto se muestran en color Azul.
HDMI Setup HDMI Audio Out
CEC / ARC
Disable g Passthrough
Enable g Disable
Use los botones y para encender y apagar el paso HDMI. El
paso HDMI pasa la señal de video y audio desde cualquier fuente
HD a su Solo bar vía un cable HDMI. La Solo bar separa la señal,
reproduciendo el audio desde la fuente de HD a través de sus propios
altavoces y enviando la señal inalterada de video a una TV usando un
cable HDMI OUT. Presione para regresar un nivel o para salir
de la configuración.
Use los botones y para encender o apagar la función CEC/ARC.
Vea la página 16 para más información. Presione para regresar un
nivel o para salir de la configuración.
Descarga de archivo de
actualización
Para realizar la actualización de rmware,
usted necesitará descargar un archivo de
actualización desde el sitio web de Arcam.
Verique la disponibilidad de
actualizaciones de rmware al escribir
www.arcam.co.uk en su navegador y
acceder a la página de la Solo bar.
Nota: Asegúrese de que descargue el archivo
al directorio raíz de su USB, no lo coloque
dentro de una carpeta o la actualización
fallará.
Ejecución de la
actualización
Asegúrese de que la barra de sonido esté
encendida, en el conector y en modo de
standby.
Presione y mantenga presionados los
botones y simultáneamente durante
alrededor de cinco segundos.
La Solo bar se encenderá y mostrará la
siguiente información:
ARCAM SB M:V024
B:40526 D:30304
Nota: M = Versión software principal,
B= Versión de software de Bluetooth y
D=Versión de software DSP.
Presione el botón para ir a la pantalla
de actualización de soware.
La pantalla cambiará a:
System Update
Insert USB...
Nota: Al presionar IN- una vez más se
alternará entre esta y la pantalla de versión
de software.
Inserte la unidad USB que contenga el
archivo de actualización en la entrada
UPGRADE en el panel posterior de la Solo
bar.
La actualización de
rmware iniciará
automáticamente una
vez que la unidad USB
haya sido detectada y la
pantalla cambiará según
corresponda:
System Update
Updating...
Si han transcurrido 30 segundos antes de
que se haya insertado la USB, la pantalla se
cerrará y cambiará a:
Este mensaje se mostrará durante alrededor
de tres segundos, después del cual la
Solo bar se apagará y la totalidad del
procedimiento tendrá que repetirse.
Si la actualización tuvo éxito, la pantalla
mostrará la siguiente información durante
alrededor de tres segundos, después del cual
la Solo bar se apagará.
System Update
Complete
Si la actualización no tuvo éxito, la pantalla
mostrará la siguiente información durante
alrededor de tres segundos, después del
cual la Solo bar se apagará y la totalidad
del procedimiento tendrá que realizarse de
nuevo.
System Update
Error
Español
System Update
USB Not Detected
ES-21ES-20
Page 70

especicaciones
General
Peso (empacado) 10kg
Dimensiones (Alto x Ancho x Fondo) 130mm x 1100mm x 110mm
Consumo de potencia Modo operativo: 150W (máx.)
Modo standby: <0.5W
Requisitos de energía 100 – 240V, 50/60Hz
Entradas/Salidas
Entrada HDMI Receptáculo Tipo A x 4
Salida HDMI Receptáculo Tipo A, con soporte para ARC/CEC
Entrada digital (óptica) Receptáculo S/PDIF óptico
Entrada digital (coaxial) Entrada RCA
Entrada auxiliar Entrada estéreo de 3.5mm
Audio Bluetooth Ver. 3.0, Cumple con la norma A2DP
Salida para subwoofer Entrada RCA LFE
Salida inalámbrica para subwoofer
Frecuencia 2.4GHz
Rango de transmisión Apróx. 20m (sin interferencia)
Amplificador
Salida nominal de potencia:
Woofer (0.5% THD)
Tweeter (0.5% THD)
Nivel de salida nominal del amplificador (20Hz-20kHz) 100W
Altavoces
Woofer 1 Cono de 2 x 4 pulgadas
Woofer 2 Cono de 2 x 4 pulgadas
Tweeter Cono de 2 x 1 pulgadas
Respuesta de frecuencia del woofer 170Hz – 20kHz ± 3dB
Respuesta de frecuencia del tweeter 3.8kHz – 14kHz ± 3dB
Impedancia nominal 6Ω
E&OE
NOTA: Todos los valores especificados son típicos a menos que se indique otra cosa.
40W por canal
10W por canal
Política de mejora continua
Arcam tiene una política de
mejora continua de sus productos.
Esto signica que los diseños y
especicaciones están sujetos a cambios
sin previo aviso.
solución de
problemas
A continuación le presentamos algunas
comprobaciones simples que puede hacer si
experimenta problemas con su Solo bar.
Alimentación
< Compruebe que el cable de
alimentación esté enchufado y
conectado adecuadamente.
< Asegúrese de que los interruptores
de encendido y alimentación estén
encendidos.
Mando a distancia
< Compruebe que las baterías estén
colocadas correctamente.
< Puede que necesite cambiar las baterías.
< ¿Se encuentra demasiado lejos de la
unidad o existe alguna obstrucción?
Sonido
< Asegúrese que los cables estén
conectados adecuadamente.
< Compruebe que esté seleccionada la
fuente de entrada correcta.
< Si el sonido es ruidoso o distorsionado
durante la reproducción de un
dispositivo Bluetooth, intente bajar el
volumen en el dispositivo y subirlo en
la Solo bar.
Imagen
< Si no hay imagen o no se muestra bien,
compruebe que los cables HDMI estén
conectados adecuadamente.
< Compruebe que esté seleccionada la
fuente de entrada correcta.
Bluetooth
< Compruebe que su dispositivo
Bluetooth esté conectado correctamente.
< ¿Está su dispositivo Bluetooth
demasiado lejos de la unidad?
Español
ES-23ES-22
Page 71

instrucciones
desujeción
garantía del
producto
Use el accesorio para montaje en pared diseñado a la medida
para jar la Solo bar de forma segura y rme a la pared.
Usted necesitará
< Taladro eléctrico
< Broca, taquetes y accesorios adecuados
para el tipo de pared a la que está
sujetando la unidad.
< Destornillador
< Nivel
< Lápiz
< Flexómetro
24.0
Procedimiento de sujeción
1. Asegúrese que el soporte esté horizontal
al colocar el nivel debajo del mismo.
2. Marque los agujeros con un lápiz,
teniendo cuidado de trazar los
contornos con exactitud.
3. Taladre cuidadosamente cuatro
agujeros, usando una broca y taquetes
adecuados para el tipo de pared a la que
esté sujetando la unidad.
200.0
Asegúrese que el montaje de pared esté horizontal.
4. Fije el soporte a la pared usando cuatro
tornillos resistentes (el tornillo deberá
tener un diámetro mínimo de 5.5mm),
asegurándose de que entren en los
taquetes correctamente y que estén bien
apretados y derechos.
5. Finalmente, je la Solo bar al soporte
guiándola cuidadosamente sobre los
dos soportes que sobresalen. Deberá
asentarse de manera rme y segura
contra la pared.
15.0
Precaución: No monte la unidad en
contrachapado o cualquier pared de
supercie suave. Si no está seguro de
la calidad de la pared, consulte a un
profesional para que le asesore.
Asegúrese de que los tornillos estén
apretados y a ras antes de guiar la Solo bar
sobre los dos soportes que sobresalen.
Deberá estar asentada de forma segura
contra la pared.
Derechos reservados
Junio 2014, © 2014 A&R Cambridge Ltd.
A & R Cambridge Limited (Arcam) se
reserva el derecho de hacer cambios a las
especicaciones de los productos detallados
en este documento en cualquier momento y
sin aviso previo u obligación de noticar a
persona alguna sobre dichos cambios.
Se reconocen y observan todas las marcas
registradas de terceros. La mención de
productos de terceros no constituye un
respaldo o una recomendación.
Arcam toma todas las precauciones
necesarias para garantizar que toda la
información contenida en esta publicación
sea realmente correcta pero no asume
ninguna responsabilidad por errores u
omisiones.
Garantía mundial
Arcam garantiza que los productos
descritos en esta guía deberán cumplir sus
especicaciones publicadas en todos los
aspectos materiales durante un periodo de
dos años a partir de la fecha de compra.
Esto le da derecho a que la unidad sea
reparada sin cargo, siempre y cuando haya
sido comprada con un distribuidor Arcam
autorizado.
El distribuidor de Arcam es responsable de
todo el servicio post-venta. El fabricante
no se hace responsable de los defectos
derivados de ningún accidente, uso
inadecuado, abuso, desgaste, ajuste y/o
reparación negligente o no autorizado, ni
puede aceptar la responsabilidad por daños
o pérdidas durante el transporte hasta o
desde la persona reclamante bajo la garantía.
La garantía cubre:
Costos de piezas y mano de obra durante
dos años a partir de la fecha de compra.
Transcurridos los dos años usted correrá
con los costoss de piezas y de mano de
obra. La garantía no cubre los costoss de
transporte en ningún momento.
Reclamaciones bajo la
garantía
Este equipo deberá estar empaquetado
en su embalaje original y ser devuelto al
distribuidor al cual fue comprado. Debe ser
enviado en un transporte ya pagado, por un
transportista reconocido – no por correo.
No se acepta responsabilidad sobre la
unidad mientras se está transportando
al distribuidor o clientes y por eso
aconsejamos asegurar la unidad contra
pérdida o daños durante el transporte.
Registro en línea
Puede registrar su producto en línea en
www.arcam.co.uk.
¿Problemas?
Si su distribuidor Arcam no está disponible
para responder a sus dudas respecto a
este u otros productos Arcam póngase en
contacto con el Departamento de asistencia
técnica de Arcam en la dirección indicada
más adelante y haremos todo lo posible por
brindarle nuestra ayuda.
Arcam Customer Support Department,
Unit15, Pembroke Avenue,
Waterbeach, CAMBRIDGE,
CB25 9QP, Inglaterra o vía
www.arcam.co.uk.
Español
ES-25ES-24
Page 72

concesión
®
de licencias
tecnológicas
Fabricado bajo licencia de Dolby
Laboratories. Dolby y el símbolo doble
D son marcas comerciales de Dolby
Laboratories.
Los términos HDMI y HDMI HighDenition Multimedia Interface, y el
logotipo de HDMI son marcas registradas
de HDMI Licensing LLC en los Estados
Unidos y otros países.
Para patentes DTS, consulte la dirección
http://patents.dts.com. Fabricado bajo
licencia de DTS Licensing Limited. DTS,
DTS-HD, el símbolo, y DTS y el símbolo
juntos son marcas registradas, y DTS-HD
Master Audio es una marca registrada de
DTS, Inc. © DTS, Inc. Todos los derechos
reservados.
© 2013 CSR plc y su grupo de compañías.
La marca aptX® y el logotipo de aptX son
marcas registradas de CSR plc o de una
de compañías del grupo y puede estar
registrada en una o más jurisdicciones.
La marca denominativa y los logotipos de
Bluetooth® son marcas registradas propiedad
de Bluetooth SIG, Inc. y cualquier uso de
dichas marcas por parte de Arcam es bajo
licencia. Otras marcas registradas y nombres
comerciales son los de sus propietarios
respectivos.
“Made for iPod”, “Made for iPhone”,
y “Made for iPad” signican que un
accesorio electrónico ha sido diseñado para
conectarse especícamente a un dispositivo
iPod, iPhone, o iPad, respectivamente, y
ha sido certicado por el desarrollador
para cumplir las normas de desempeño
de Apple. Apple no se responsabiliza del
funcionamiento de este dispositivo o de su
cumplimiento de las normas de regulación y
seguridad. Note que el uso de este accesorio
con dispositivos iPod, iPhone, o iPad puede
afectar el desempeño inalámbrico.
La tecnología Bluetooth funciona con
dispositivos iPhone 5s, iPhone 5c, iPhone 5,
iPhone 4s, iPhone 4, iPhone 3GS, iPad Air,
iPad (3ª y 4ª generación), iPad 2, iPad mini
con pantalla de Retina, iPad mini, y iPod
touch (4ª y 5ª generación).
iOS, iTunes, iPad, iPhone y iPod son marcas
registradas de Apple Inc., registradas en los
Estados Unidos y otros países. App StoreSM es
un servicio de la marca Apple Inc.
Hecho para:
• iPhone 5s
• iPhone 5c
• iPhone 5
• iPhone 4s
• iPhone 4
• iPhone 3GS
• iPad Air
• iPad mini con pantalla de Retina
• iPad (4ª generación)
• iPad mini
• iPad (3ª generación)
• iPad 2
• iPod touch (5ª generación)
• iPod touch (4ª generación)
Google Play™ es una marca registrada de
Google Inc.
Android™ es una marca registrada de
Google Inc.
ES-26
Page 73

Руководство звуковой панели
Русский
Page 74

Добро пожаловать...
Содержание
… и спасибо, что приобрели звуковую панель Arcam Solo bar.
Компания Arcam уже на протяжении более тридцати лет
специализируется на выпуске высококачественного звукового
оборудования. Звуковая панель Solo bar является новейшей
разработкой из длинного перечня удостоившихся награды звуковых
устройств класса Hi-Fi и продуктов для домашних кинотеатров.
Мы надеемся, что приложенное нами усердие и внимание, с
которым мы создали настоящий продукт, станут залогом
высокой производительности и надежности работы устройства,
которое будет дарить радость владельцу в течение долгих лет
эксплуатации.
В настоящем руководстве приведены инструкции по установке
и эксплуатации звуковой панели Solo bar. Вы можете найти
интересующий вас раздел, воспользовавшись оглавлением,
расположенным на следующей странице.
Мы надеемся, что звуковая панель Solo bar будет безотказно
служить вам долгие годы. В случае непредвиденных обстоятельств,
сбоев или просто при необходимости получения информации о
продуктах Arcam, наша сеть дилеров будет рада помочь вам. Более
подробную информацию вы можете найти на нашем Интернетсайте www.arcam.co.uk.
Команда разработчиков звуковой панели Solo bar.
правила техники безопасности R-4
обзор R-5
Кнопки и дисплей R-5
Соединения R-6
краткое руководство R-7
Содержимое упаковки: R-7
Установка ресивера R-7
Подключение других устройств R-7
Подключение к телевизору R-7
Подключение цифровых устройств через HDMI-выход R-8
Подключение аналоговых устройств R-9
Подключение аудиоустройств через цифровой вход R-9
Подключение сабвуфера R-9
Подключение к сети и включение R-10
Подключение сабвуфера Solo sub R-10
Подключение устройств Bluetooth® R-11
Использование наушников R-11
Пульт дистанционного управления R-12
Использование пульта дистанционного управления R-12
приложение
для дистанционного управления R-13
Указания по загрузке R-13
Синхронизация вашего мобильного устройства R-14
эксплуатация R-15
Включение R-15
Выбор источника сигнала R-15
Регулирование громкости R-15
Выбор звукового режима R-16
Воспроизведение звукового сигнала, поступающего с телевизора R-16
Звуковой сигнал, поступающий с устройств Bluetooth® R-16
Повторитель ИК-сигнала R-16
Управления потребительской электроникой (CEC) через HDMI R-16
Автонастройка R-17
настройка системы R-18
Меню настройки системы R-18
Меню опций настройки громкоговорителя/функции EQ R-19
Меню настройки HDMI R-20
Обновление ПО R-21
Загрузить файл обновления R-21
Выполнение обновления R-21
Спецификации R-22
Поиск неисправностей R-23
инструкции по установке R-24
Вам понадобится R-24
Процедура выполнения монтажа R-24
гарантия изделия R-25
Авторские права R-25
Всемирная гарантия R-25
Претензии по гарантии R-25
Регистрация онлайн R-25
Проблемы? R-25
выдача лицензий на технологию R-26
Русский
R-3R-2
Page 75

правила
техники
безопасности
обзор
1. Прочтите данные инструкции
Прежде чем приступить к
эксплуатации настоящего
продукта необходимо изучить
соответствующие инструкции
по технике безопасности и
эксплуатации.
2. Сохраните эти инструкции
Инструкции по технике
безопасности и эксплуатации
устройства необходимо сохранить
для дальнейшего использования.
3. Внимательно отнеситесь ко всем
предупреждениям
Необходимо строго выполнять
все указания, содержащиеся в
руководстве по эксплуатации, и
предупреждения.
4. Следуйте всем инструкциям
Необходимо выполнять все
инструкции по эксплуатации
устройства.
5. Не используйте данное устройство
вблизи воды
Запрещается эксплуатировать
сабвуфер около воды или в сырых
помещениях, например, в сырых
подвалах и около бассейнов.
6. Протирайте только сухой тканью.
7. Не закрывайте никакие
вентиляционные отверстия.
Проводите установку в
соответствии с инструкциями
производителя.
8. Не устанавливайте вблизи какиелибо источники тепла, такие как
радиаторы, обогреватели, печи или
другие приборы, выделяющие тепло
(включая усилители звука).
9. Не удаляйте функциональные
элементы безопасности
поляризованной или заземленной
электровилки. Поляризованная
вилка имеет два контакта, один
из которых шире другого. Вилка с
заземлением имеет два контакта
и третий заземляющий контакт.
Широкий контакт или контакт
заземления предназначены для вашей
безопасности. Если комплектная
вилка не подходит к вашей розетке,
проконсультируйтесь с электриком
для ее замены.
10. Защитите шнур питания таким
образом, чтобы на него нельзя было
наступить или передавить, особенно
в местах рядом с вилкой, розеткой и
местом его выхода из устройства.
11. Используйте только приспособления/
аксессуары, указанные
производителем.
12. Пользуйтесь только тележками,
стойками, штативами,
креплениями или подставками,
рекомендованными изготовителем
или входящими в комплект
устройства. При использовании
тележки соблюдайте осторожность
при совместном перемещении
тележки с ресивером во
избежание травм при возможном
опрокидывании.
13. Отключайте ресивер от сети во
время грозы или когда долго им не
пользуетесь.
14. Для проведения любого ремонта
обращайтесь к квалифицированному
персоналу. Ремонт необходим,
если устройство было повреждено
каким-либо образом, например,
был испорчен шнур питания
или вилка, на устройство была
пролита жидкость или падали
предметы, устройство подвергалось
воздействию дождя или влаги, оно
некорректно функционирует или его
роняли.
15. Храните устройство в хорошо
вентилируемых помещениях.
ВНИМАНИЕ! Для снижения риска возникновения
пожара или поражения электрическим током не
допускайте попадания на устройство дождевых
капель, брызг и водяной пыли. Не ставьте на сабвуфер
сосуды с водой, например, вазы.
ВНИМАНИЕ! Штепсельная вилка и штекер силового
шнура служат в качестве устройств отключения
сабвуфера от сети, поэтому они должны быть в
исправном состоянии.
Значок молнии внутри равностороннего треугольника
предупреждает пользователя о наличии опасного
напряжения внутри корпуса устройства, которое может
привести к поражению пользователя электрическим
током.
Внимание! Для снижения риска поражения
электрическим током не снимайте с сабвуфера
заднюю защитную крышку, поскольку внутри
корпуса устройства находятся компоненты
устройства, которые не предназначены для
обслуживания пользователем. При необходимости
выполнения осмотра или ремонта оборудования
обратитесь за помощью к квалифицированному
специалисту.
Восклицательный знак внутри равностороннего
треугольника предназначен для предупреждения
потребителя о наличии важных инструкций по
эксплуатации и техническому обслуживанию в
руководствах, которые входят в комплект ресивера.
Это оборудование относится к классу II или
к электрическим устройствам с двойной
изоляцией. Оно разработано таким образом,
чтобы не требовалось безопасное подключение
с заземлением.
Утилизация этого
устройства
В состав данного устройства входят
электрические и электронные
компоненты. При нарушении
требований к утилизации
устройства такие компоненты
могут оказать неблагоприятное
воздействие на окружающую среду
Наличие этого ярлыка на продукте означает, что
устройство не относится к ТБО, поэтому сбор и
утилизация электрических устройств необходимо
выполнять отдельно от ТБО. Потребитель обязан
обеспечить надлежащую утилизацию данного
продукта.
и здоровье человека.
Кнопки и дисплей
Выбор входа
IN- переход к источникам сигнала
нижнего уровня.
IN+ переход к источникам сигнала
верхнего уровня.
На дисплее отображается
выбранный источник сигнала.
Выбранный источник сигнала
Примечание: переход по уровням
меню во время настройки
устройства (для получения
более подробной информации
смотрите стр. 18).
Аудиорежим
Примечание: изменение
опций меню во время
настройки устройства
(для получения более
подробной информации
смотрите стр. 18).
Режим ожидания
Служит для включения
и выключения режима
ожидания звуковой
панели Solo bar.
Регулирование громкости
«-» - уменьшение громкости звука.
«+» - увеличение громкости.
Значение громкости звука
выводится на дисплей.
Автоматическое управление
громкостью звука (ALC)
Для включения/выключения
функции автоматического
управления громкостью звука
(ALC) воспользуйтесь ПДУ.
Русский
Уровень громкости звука
Примечание: изменение
значения выбранной опции
меню во время настройки
устройства (для получения
более подробной информации
смотрите стр. 18).
R-5R-4
Page 76

краткое
руководство
Соединения
USB
Служит только для
обновления сервисов
и программного
обеспечения
Информация
об обновлении
программного
обеспечения приведена
на стр.21.
AUX
Выход стандарта
«мини-джек»
3,5мм стерео
служит для
подключения
аналоговых
аудиоустройств.
MIC
Разъем «миниджек» 3,5 мм служит
для подключения
микрофона,
входящего
в комплект
поставки, во время
автоматической
настройки
громкоговорителя.
Дополнительную
информации см. на
стр.17.
SUB
Выход RCA LFE
служит для
подключения
сабвуфера.
Для беспроводного
подключения
звуковой панели
Solo sub изучите
инструкции на
стр.110.
COAX
RCA-выход служит
для подключения
цифровых
аудиоустройств.
OPTICAL
Оптический выход
TOSLINK служит
для подключения
цифровых
аудиоустройств.
HDMI OUT
Служит для подключения
телевизора и в качестве
реверсивного звукового
канала (ARC).
Дополнительную
информации см. на стр.7.
HDMI 1 – 4
Служит для
подключения до
четырех цифровых
устройств для
воспроизведения
форматов 1080 p
и 3D.
POWER INLET
Служит для
подключения к
питающей сети.
Содержимое упаковки:
< Звуковая панель Solo bar
< Сетевой шнур
< Пульт дистанционного управления
< Батарейки (2 x AAA)
< Микрофон
< Кронштейн для установки на стену
< Руководство пользователя
< Регистрационная карта
Установка ресивера
Звуковая панель Solo bar является
универсальным устройством. Звуковую
панель можно разместить на столе,
шкафчике или полке, предварительно
убедившись, что опорная поверхность
ровная и устройство надежно
закреплено. Звуковую панель можно
разместите под телевизором, установив
ее на ровную горизонтальную
поверхность или прикрепив к стене.
Для обеспечения лучшего качества
звучания рекомендуем устанавливать
устройство на стену. Воспользуйтесь
специальным кронштейном, входящим
в комплект поставки. Инструкции по
установке и крепежу приведены на
странице 24.
Звуковую панель Solo bar необходимо
устанавливать вдали от источников
теплоты, влаги и прямых солнечных
лучей.
Подключение других
устройств
Правильно установив звуковую панель
Solo bar, подключите ее к вашим
устройствам согласно следующим
инструкциям.
Убедитесь, что соединительные кабели
не перекручены и не перетянуты.
ВНИМАНИЕ! Звуковую панель Solo bar можно
включить в сеть только после подключения
ее к аудио- и видеоаппаратуре.
Подключение к телевизору
Подключите звуковую панель к
телевизору через выход HDMI OUT
с помощью HDMI-кабеля. Если
телевизор поддерживает функцию ARC,
для обеспечения лучшего качества
звучания звуковой сигнал можно
воспроизводить через звуковую панель
Solo bar. Инструкции по настройке
устройства приведены на странице20.
Если телевизор не поддерживает
функцию ARC, подключите его к
Solo bar с помощью звукового кабеля
через оптический (OPTICAL) или
коаксиальный (COAX) входы звуковой
панели.
Если функция
ARC не
поддерживается,
воспользуйтесь
звуковым
кабелем
Русский
Телевизор
R-7R-6
Page 77

Подключение цифровых устройств через HDMI-выход Подключение аналоговых
Через HDMI-разъем к звуковой
панели можно подключать различные
цифровые устройства: декодеры каналов
кабельного телевидения, проигрыватели
Blu-ray, DVD-проигрыватели, игровые
приставки и видеокамеры.
Обратите внимание, что при таком
подключении на экране телевизора
будет отображаться соответствующий
значок, при этом звуковой сигнал будет
воспроизводиться через звуковую панель
Solo bar. Другие звуковые соединения не
требуются.
Проигрыватель
дисков Blu-ray
Игровая приставка
устройств
Любое аналоговое аудиоустройство можно
подключить к звуковой панели Solo bar через
звуковой кабель, поместив разъем стандарта «миниджек» 3,5 мм в AUX-вход звуковой панели.
Подключение аудиоустройств
через цифровой вход
Аудиоустройства также можно подключить к
звуковой панели Solo bar с помощью коаксиальных
(Coaxial) или (Optical) оптических входов.
Подключение сабвуфера
Solo bar имеет встроенный выход для
подключения сабвуфера (смотрите
инструкции по установке на странице19). Для
подключения сабвуфера к звуковой панели
Solo bar воспользуйтесь соответствующим
соединительным кабелем с разъемом RCA LFE.
Примечание: Если у вас имеется сабвуфер Solo
sub Arcam, изучите сведения, приведенные на
следующей странице.
Телевизор
Декодер каналов кабельного телевидения
Камкордер
Игровая приставка
Русский
Плеер компакт-дисков
MP3-плейер
Сабвуфер
R-9R-8
Page 78

WIRELESS
Подключение к сети и
включение
Звуковая панель Solo bar оснащена
сетевым шнуром с встроенной литой
штепсельной вилкой. Убедитесь, что
штепсельная вилка по форме подходит к
сетевой розетке. Если напряжение вашей
сети электропитания или необходимый
тип вилки отличаются, немедленно
свяжитесь с дилером компании Arcam.
Вначале поместите штекер
сетевого шнура в разъем питания,
расположенный сзади Solo bar так, чтобы
он плотно сел на штатное место. Затем
поместите штепсельную вилку в сетевую
розетку. Устройство находится в режиме
ожидания, на что указывает красный
световой индикатор на передней панели
устройства.
Если устройство не используется
длительное время, оно перейдет
в режим ожидания для снижения
энергопотребления
Подключение сабвуфера
Solo sub
Solo sub относится к линейке продукции
Solo производства Arcam, поэтому может
сообщаться с Solo bar беспроводным
способом.
Убедитесь, что сетевой выключатель Solo
sub включен.
1. Нажмите кнопку на ПДУ
Solo bar, затем - , пока на дисплее
Solo bar не отобразится Speaker/EQ
Setup. Нажмите кнопку затем -
, пока на дисплее устройства не
отобразится Sub Pairing.
2. Нажмите для запуска
синхронизации. На дисплее
отобразится In Progress.
3. Переместите селектор ввода INPUT,
расположенный сзади Solo sub в
положение WIRELESS.
LINE
LFE
INPUT
4. Нажмите и удерживайте кнопку
WIRELESS, расположенную сзади
Solo sub в течение пяти секунд.
WIRELESS LED, мигающий синим
светом, сигнализирует о том, что
сабвуфер Solo sub синхронизирован
со звуковой панелью и выполняет
поиск источника сигнала для
подключения к нему.
Solo sub
WIRELESS
PAIRING
PWR WIRELESS
5. Если синхронизация устройств
выполнена успешно, WIRELESS
LED загорится постоянным синим
светом, а на дисплее Solo bar появится
уведомление Linked.
6. Единожды синхронизировав сабвуфер
Solo sub со звуковой панелью, каждый
раз при включении Solo sub в сеть
или получении сабвуфером звукового
сигнала, он будет автоматически
подключаться к устройству.
Примечание: Устройство остается
синхронизированным в течение
30секунд. Если в течение этого
времени не будет обнаружено никаких
источников сигнала, Solo bar прекратит
поиск и процесс синхронизации
необходимо будет повторить.
Подключение устройств Bluetooth® Использование наушников
Solo bar имеет встроенный беспроводной модуль
Bluetooth, обеспечивающий надежное подключение
к другим, включенным в сеть Bluetooth-устройствам.
Синхронизация с Bluetooth-устройствами
Следуйте указаниям, приведенным в инструкциях
по эксплуатации вашего Bluetooth-устройства Для
выполнения синхронизации выберите Arcam
Solo bar из списка Bluetooth-устройств. После
завершения синхронизации, ее не нужно выполнять
заново.
Устройства Bluetooth®
Звуковая панель Solo bar оборудована
Bluetooth -передатчиком, благодаря
которому устройство можно подключить
к Bluetooth-наушникам.
Примечание: Процесс передачи
отличается от процесса получения
сигнала через Bluetooth. Звуковую панель
можно синхронизировать с четырьмя
устройствами, но подключаться к
ним можно только по отдельности в
порядке очереди.
Подключение Bluetoothнаушников
Нажмите кнопку на ПДУ, затем
- , пока на дисплее устройства не
отобразится Speaker/EQ Setup. Нажмите
кнопку , затем - пока на дисплее
устройства не отобразится, Headphone
Out. Нажмите , чтобы выбрать эту
опцию.
По умолчанию Bluetooth-передатчик
выключен, поэтому на дисплее будет
отображаться уведомление Disable.
Нажмите кнопку - на дисплее
появится уведомление Enabled. Bluetoothпередатчик включен; опция меню Device
Search активирована.
Синхронизируйте Bluetooth- наушники
с устройством согласно инструкциям по
эксплуатации наушников.
Убедившись, что Device Search
отображается на дисплее, нажмите . В
течение минуты Solo bar выполнит поиск
доступных устройств.
Если устройства не обнаружены,
нажмите для повторного
выполнения поиска. Убедитесь, что
между устройствами нет посторонних
предметов, препятствующих
выполнению поиска.
После завершения поиска, список
доступных устройств выводится на
дисплей. Выбрав с помощью кнопок
и нужное устройство, нажмите
для завершения синхронизации. При
успешном выполнении подключения
на дисплее Solo bar отобразится
соответствующее уведомление.
Использование наушников
Убедитесь, что Solo bar и наушники
включены. Выберите аудиоисточник
и наслаждайтесь прослушиванием
аудиозаписей через наушники.
Примечание: При выключении
наушников аудиозапись будет
автоматически воспроизводиться
через громкоговорители Solo bar.
ВНИМАНИЕ! При включении Bluetoothпередатчика временно отключается прием
входящего сигнала с других Bluetoothустройств. Это значит, что невозможно
одновременно передавать звуковой
сигнал с Bluetooth-устройства к Solo bar и
прослушивать аудиозаписи через Bluetoothнаушники.
Русский
R-11R-10
Page 79

Пульт
дистанционного
управления
Управлять и настраивать звуковую панель Solo bar можно с
помощью ПДУ или специального программного приложения.
приложение
для
дистанционного
управления
Использование пульта
дистанционного
управления
ПДУ запрограммирован для управления
звуковой панелью Solo bar.
Прежде чем приступить к эксплуатации,
проверьте правильность установки в
ПДУ двух комплектных батареек AAA.
1. Расположив ПДУ лицевой стороной
вниз, надавите на крышку в месте
расположения противоскользящих
ребер и движением вниз снимите
крышку.
2. Вставьте две комплектные батарейки
ААА. Аккуратно поместите
батарейки в батарейный отсек,
соблюдая полярность, обозначенную
значкам и «+» и «–».
3. Установите крышку батарейного
отсека на место и задвиньте ее до
щелчка.
Для нормальной работы пульта
необходимо удалить посторонние
предметы, находящиеся перед дисплеем
Solo bar.
Служит для включения и выключения режима ожидания Solo bar.
Нажмите однократно для выключения звука Solo bar. Нажмите повторно
(либо нажмите кнопку регулировки громкости) для включения звука.
Увеличение громкости звука.
Уменьшение громкости звука.
Автоматическое управление громкость звука (ALC) - включение и
выключение звука.
Нажмите для входа в меню настроек (смотрите стр. 18 - 20). Нажмите
повторно для выхода из меню.
Перемещение вверх по списку параметров настройки меню.
Перемещение вниз по списку параметров настройки меню.
Переход к предыдущим уровням меню.
Переход к следующим уровням меню.
Нажмите для выбора параметров меню настройки.
Переключение между различными режимами звукового
воспроизведения: стерео, кино, концерт.
Выбор источника сигнала - переход к следующему из подключенных
источников сигнала.
Выбор источника сигнала - переход к предыдущему из подключенных
источников сигнала.
Приложение для дистанционного
управления Arcam Solo bar позволяет
применять устройства Apple iOS или
Android™ для управления звуковой
панелью Solo bar через Bluetooth.
Приложение служит для
конфигурирования параметров настроек
меню и управления воспроизведением
аналогично ПДУ, входящему в комплект
поставки.
Минимальные требования к
операционной системе: iOS6, Android 4.0
Указания по загрузке
Загрузите приложение с App StoreSM или
Google Play™.
Следуйте указания по загрузке, которые
выводятся на дисплей устройства.
После установки щелкните по
соответствующей иконке для запуска
приложения.
HDMI 1 20
DIGITAL ST
Оболочка программного приложения
эмитирует дисплей Solo bar
В нормальном режиме работы устройства
на дисплей индицируются источники
сигнала, уровень громкости звука и
аудиоформат, во время конфигурации
настроек - опции меню.
Русский
R-13R-12
Page 80

эксплуатация
Синхронизация вашего
мобильного устройства
Для использования приложения
необходимо предварительно
синхронизировать ваше устройство с
Solo bar через Bluetooth.
Убедитесь, что на вашем устройстве
включен Bluetooth. Если мобильное
устройство работает на базе
операционной системы iOS необходимо
выполнить следующие шаги:
Если мобильное устройство работает
на базе операционной системы Android,
выполните указания, приведенные в
руководстве по эксплуатации вашего
устройства:
Откройте меню параметров настройки и
щелкните Bluetooth.
Переместите выключатель Bluetooth
-устройства в положение «включено».
Дождитесь, пока в списке устройств
УСТРОЙСТВ не отобразится Arcam Solo
bar, а затем щелкните подключиться.
Для рассинхронизации устройства,
щелкните по информационной иконке
напротив уведомления подключено, а
затем - «Забыть данное устройство».
Примечание: Звуковую панель можно
синхронизировать с четырьмя
устройствами, но подключаться к
ним можно только по отдельности
в порядке очереди. Необходимость
рассинхронизации устройства
возникает, как правило, в тех случаях,
когда устройством пользуются
несколько человек.
Включение
Для выключения режима ожидания
нажмите кнопку на передней
панели или ПДУ. На дисплее Solo bar
кратковременно отобразится ARCAM
Solo bar, затем на дисплее будет выведено
названием текущего источника сигнала,
громкость звука и аудиорежим.
Примечание: Если вы не будете
пользоваться устройством в течение
длительного времени, отключите его
от сети для экономии электроэнергии.
Выбор источника сигнала
Для выбора нужного источника сигнала,
нажимайте кнопку или на
передней панели устройства или на
пульте дистанционного управления,
пока нужный источник сигнала не
отобразится на дисплее. Доступны
следующие источники сигнала:
HDMI 1
HDMI 2
HDMI 3
HDMI 4
OPTICAL
COAX
AUX
BLUETOOTH
Примечание: Некоторые HDMIустройства могут идентифицировать
себя по своему имени, если эта функция
поддерживается ими.
Если телевизор подключен через
реверсивный звуковой канал (ARC) и вы
выполнили инструкции по настройке,
приведенные на странице 16, то при
включении телевизора на дисплее
отобразится следующее уведомление.
TV/ARC
Реверсивный звуковой канал (ARC)
- функция, встроенная в HDMIустройства последнего поколения,
которая позволяет по HDMI-кабелю
передавать звуковой сигнал от
телевизора к звуковой панели.
Примечание: Это уведомление
отображается на дисплее
автоматически при включении
телевизора, поддерживающего функцию
ARC.
Регулирование громкости
Отрегулируйте громкость звука,
воспользовавшись кнопками или
, расположенными на передней панели
устройства или ПДУ.
Отключение выхода
Звук Solo bar можно отключить
нажатием кнопки на ПДУ. При
выключении (при смене настроек) звука,
на дисплее отображается MUTE.
Беззвучный режим отключают
повторным нажатием кнопки
или нажатием кнопки регулировки
громкости звука / .
Русский
R-15R-14
Page 81

Выбор звукового
режима
Solo bar имеет три преднастроенных
звуковых режима - STEREO, MOVIE и
CONCERT.
Нажмите кнопку на ПДУ для
переключения и выбора нужного
режима.
Примечание: Стерео режим
установлен по умолчанию - звукозапись
воспроизводится в формате, в котором
она была записана.
Воспроизведение
звукового сигнала,
поступающего с
телевизора
Если телевизор подключен к Solo bar
через реверсивный звуковой канал
(ARC), выберите соответствующий
источник сигнала с телевизора и
наслаждайтесь великолепным звуком,
воспроизводимым Solo bar; громкость
звука можно регулировать с помощью
ПДУ телевизора.
При этом на дисплей Solo bar
автоматически выведется уведомление
TV/ARC.
Звуковой сигнал,
поступающий с
устройств Bluetooth®
Для прослушивания композиций,
переданных беспроводным способом
через любое Bluetooth -устройство,
необходимо предварительно убедиться,
что такое устройство синхронизировано
с Solo bar (для получения более
подробной информации смотрите
стр.11).
Синхронизировав ваше устройство,
следуйте указаниям, содержащимся в
руководстве по его эксплуатации.
Повторитель ИК-сигнала
Если Solo bar установлена перед
телевизором, она, в зависимости от
модели, может создавать помехи для
сенсора ПДУ, расположенного на
телевизоре.
В этом случае на Solo bar можно
включить повторитель ИК-сигнала для
передачи телевизору управляющего
сигнала, поступающего с ПДУ.
Примечание: Функция работает даже
в том случае, если звуковая панель
находится в режиме ожидания.
Сведения по настройке приведены на
странице 18.
Управления
потребительской
электроникой (CEC)
через HDMI
Управление потребительской
электроникой (CEC) - функция, которая
позволяет подключать через HDMI до
15 устройств с включенной функцией
CEC и управлять ими с одного пульта
дистанционного управления.
Функция CEC включена по умолчанию.
Сведения по настройке приведены на
странице 20.
Типичные примеры управления
системой с помощью функции CEC
включают:
< Включение или выключение режима
ожидания одновременно на всех
подключенных устройствах.
< Управление громкостью звука.
< Выбор источника сигнала.
Автонастройка
Solo bar оснащена встроенной
автоматической функцией
индивидуальной настройки, которая
позволяет выполнить настройку
основных громкоговорителей всей
системы, включая сабвуфер (если
имеется). Она также позволяет
рассчитать значения фильтра
эквализации помещения для удаления
негативных эффектов резонансных
частот в помещении для прослушивания.
Чтобы воспользоваться калибровочным
микрофоном, входящим в комплект
поставки, поместите штекер в разъем
MIC (микрофон), расположенный сзади
звуковой панели, и установите микрофон
в положение для прослушивания шумов.
Данный микрофон улавливает
специальные калибровочные сигналы,
издаваемые громкоговорителями и
сабвуфером, во время выполнения
автонастройки оборудования. Затем Solo
bar анализирует полученные сигналы и
рассчитывает:
< уровне динамика,
< частоту разделения диапазонов
сабвуфера,
< неисправных резонансных частотах
в комнате, к которым следует
применить фильтрацию.
Микрофон
Установите в
положение для
прослушивания на
уровне головы, при
этом микрофон
должен быть
направлен вверх.
Для максимального повышения
точности системы, необходимо
выполнить инструкции, содержащиеся в
настоящем руководстве:
< Минимизировать фоновые звуки в
помещении для прослушивания и
соседних помещениях.
< Закрыть все окна и двери в комнате
прослушивания.
< Отключить все вентиляторы,
включая системы
кондиционирования воздуха.
< Если вы держите микрофон в руках,
во избежание создания посторонних
шумов, старайтесь не шевелить
рукой или пальцами.
< Установите микрофон на уровне
головы в положение для обычного
прослушивания, направив его
вверх так, чтобы между ним и
громкоговорителями не было
посторонних объектов. Нет
необходимости направлять
микрофон непосредственно на
громкоговорители.
< Если к системе подключен активный
сабвуфер, вначале необходимо
настроить выходную мощность
сабвуфера/задать среднее (между
максимальным и минимальным)
значение звуковой мощности.
Для запуска автонастройки нажмите
на ПДУ кнопку , затем - , пока
на дисплее Solo bar не отобразится
Speaker/EQ Setup. Теперь нажмите и
убедитесь, что на дисплее отображается
Auto Setup. Повторно нажмите для
начала выполнения операции.
Во время настройки, которая
обычно занимает менее двух минут,
громкоговоритель генерирует
испытательные сигналы. Генератор
тестовых тонов протестирует
каждый динамик два раза. Между
тестировочными циклами на дисплей
кратковременно выводится уведомление
Analysing. После окончания второго
цикла тестирования громкоговорителей
на дисплей выводится уведомление
Calculating расчет, а затем
кратковременно - Complete.
При возникновении каких-либо ошибок
во время выполнения автонастройки,
выполните указания, выведенные на
дисплей устройства.
Автонастройка обычно выполняется
достаточно точно, но иногда система
может генерировать ошибочные
результаты. Проблемы могут возникнуть
в результате следующих причин:
< внешние звуки или скрежет/
посторонние шумы с микрофона
< отражение звука от твердых
поверхностей (например, окон или
стен), расположенных близко к точке
прослушивания,
< сильный акустический резонанс в
комнате,
< препятствия (например, кровать)
между динамиками и микрофоном.
<
Использование сабвуфера
При подключении к системе
включенного сабвуфера, может
возникнуть необходимость повторного
выполнения автонастройки уровня
выходной мощности/среднего (между
максимальным и минимальным)
значения звуковой мощность.
Во время автонастройки система
подберет переходную частоту, обеспечив
гладкий низкочастотный переход
от основных громкоговорителей к
сабвуферу. Однако, если это не дает
удовлетворительных результатов,
рекомендуется вручную указать
другую частоту разделения для поиска
оптимального значения.
Функция автонастройки позволяет
также рассчитать значение эквализации
помещения (EQ) для устранения
негативного эффекта резонансных
частот.
По умолчанию функция EQ выключена.
Если необходимо, включите функцию EQ
для тех входов устройства, для которых
сочтете это необходимым, путем
прослушивания стандартного материала
через каждый вход.
Хотя функция "эквалайзер помещения"
помогает снизить проблемы с
акустикой в комнате, лучше устранить
эти проблемы непосредственно. Для
включения функции EQ изучите
инструкции по настройке системы на
странице 19.
Русский
R-17R-16
Page 82

настройка
системы
С помощью ПДУ выполните следующие настройки Solo bar, которые позволят
в полной мере получить удовольствие от прослушивания звукозаписей.
Меню настройки системы
Параметры настройки по умолчанию выделены
System Setup Lipsync Delay 0 ~ 200ms Могут быть задержки по причине обработки видеосигнала, что
Display Level
App Control
IR Repeater
System Info
синим цветом
.
является причиной несоответствия звука и изображения. Об этом
свидетельствует несовпадение движения губ и озвучивания. Вы
можете компенсировать этот эффект, настроив функцию задержки
для синхронизации губ. Для синхронизации аудио- и видеодорожек
воспользуйтесь кнопками и . Нажмите для возврата к
предыдущему уровню или для выхода из меню настроек.
Dim g Bright g Off
Enable g Disable
Enable g Disable
Нажмите OK, чтобы посмотреть версию программного обеспечения системы.
Уровень яркости светодиодного дисплея можно отрегулировать
по своему вкусу. Для переключения параметров настройки
воспользуйтесь кнопками и . При получении соответствующей
команды выключенный дисплей включится автоматически. Нажмите
для возврата к предыдущему уровню или для выхода из меню
настроек.
Позволяет отключить режим ожидания Solo bar, воспользовавшись
опциональным приложением для дистанционного управления
устройством. Кнопки и служат для включения/выключения
приложения дистанционного управления. Нажмите для возврата к
предыдущему уровню или для выхода из меню настроек.
Кнопки и служат для включения/выключения ИКповторителя. Дополнительную информации см. на стр.16. Нажмите
для возврата к предыдущему уровню или для выхода из меню
настроек.
Меню опций настройки громкоговорителя/функции EQ
Параметры настройки по умолчанию выделены
Speaker/EQ Setup Auto Setup Автонастройка позволяет сконфигурировать Solo bar для оптимального прослушивания. Нажмите OK для
Room EQ
Sub Pairing
Subwoofer Level 0 ~ -12dB
Headphone out
синим цветом
.
запуска процедуры настройки. Дополнительную информации см. на стр.17.
Enable g Disable
Нажмите для запуска синхронизации. Дополнительную информации см. на стр.10.
BT Transmitter
Enable g Disable
Device search
Кнопки и служат для включения/выключения функции EQ.
Примечание: Доступно только после завершения автонастройки. Нажмите для
возврата к предыдущему уровню или для выхода из меню настроек.
Кнопки
и
Примечание: Доступно только после выполнения синхронизации сабвуфера.
Нажмите для возврата к предыдущему уровню или для выхода из меню
настроек.
Кнопки и и служат для включения/выключения передатчика Bluetooth®.
Нажмите для возврата к предыдущему уровню или для выхода из меню
настроек.
Примечание: Доступно при включении усилителя звука наушников.
Нажмите для запуска поиска наушников. Воспользуйтесь кнопками , для
выбора наушников из списка. Нажмите для возврата к предыдущему уровню или
для выхода из меню настроек.
служат для установки уровня мощности сабвуфера.
Русский
Factory Defaults
Нажмите кнопку OK для восстановления заводских настроек Solo bar. Примечание: Это приведет
к рассинхронизации и потере подключения к другим устройствам. Нажмите для возврата к
предыдущему уровню или для выхода из меню настроек.
R-19R-18
Page 83

Обновление ПО
Меню настройки HDMI
Параметры настройки по умолчанию выделены
HDMI Setup HDMI Audio Out
CEC / ARC
синим цветом
Загрузить файл
.
Disable g Passthrough
Enable g Disable
Воспользуйтесь кнопками и для включения/выключения
функции HDMI-передачи. Функция HDMI-передачи служит для
передачи аудио- и видеосигнала из любого HD-источника к Solo bar
через HDMI-кабель. Solo bar разделяет сигнал: аудиосигнал из HDисточника передается к собственным громкоговорителям звуковой
панели, а видеосигнал без изменений передается в телевизор через
кабель HDMI OUT. Нажмите для возврата к предыдущему
уровню или для выхода из меню настроек.
Кнопки и служат для включения/выключения СЕС/ARC.
Дополнительную информации см. на стр.16. Нажмите для
возврата к предыдущему уровню или для выхода из меню
настроек.
обновления
Для обновления ПО необходимо
загрузить файл обновления с веб-сайта
Arcam.
Проверить обновления ПО можно на
страницу Solo bar на веб-сайте
www.arcam.co.uk.
Примечание: Загрузите файл на
запоминающее USB-устройство, не
помещайте его в какую-либо папку,
иначе обновление не будет выполнено.
Выполнение обновления
Убедитесь, что звуковая панель
подключена к сети и находится в режиме
ожидания.
Нажмите и удерживайте одновременно
кнопки и в течение пяти секунд.
Solo bar включится - на дисплее появится
следующая информация:
ARCAM SB M:V024
B:40526 D:30304
Примечание: M = основная версия ПО,
B= версия ПО Bluetooth-устройства и
D=версия ПО DSP.
Нажмите для открытия экрана
обновления ПО.
На дисплее отобразится следующее
уведомление:
System Update
Insert USB...
Примечание: Повторным нажатием
IN- можно переключаться между данным
экраном и экраном с указанием версии
программного обеспечения.
Вставьте USB-накопитель с файлом
обновления ПО в порт для обновления
ПО (UPGRADE), расположенный сзади
Solo bar.
Обновление
программного
обеспечения начнется
автоматически сразу
после обнаружения
USB-накопителя, при
этом на дисплее появится
следующее уведомление:
System Update
Updating...
Если в течение 30 секунд USBнакопитель не поместить в
соответствующий порт, на дисплее
появится следующее уведомление:
System Update
USB Not Detected
Настоящее уведомление будет
отображаться на дисплее в течение трех
секунд, затем Solo bar выключится и
процедуру обновления необходимо будет
повторить заново.
Если обновление выполнено успешно,
на дисплее в течение трех секунд
отображается следующая информация,
затем Solo bar автоматически
выключается.
Русский
System Update
Complete
Если обновление не выполнено,
на дисплее в течение трех секунд
будет отображаться нижеуказанное
уведомление, затем Solo bar выключится
и процедуру обновления необходимо
будет повторить заново.
System Update
Error
R-21R-20
Page 84

Спецификации
Общие сведения
Масса (брутто) 10 кг
Габаритные размеры (В x Ш x Д) 130 мм x 1100 мм x 110 мм
Энергопотребление В рабочем режиме: 150 Вт (макс.)
В режиме ожидания: <0,5 Вт
Требования к источнику питания 100 - 240 В, 50/60 Гц
Входы/Выходы
HDMI-вход Колодка гнездовая, тип A x 4
HDMI-выход Колодка гнездовая, тип А с поддержкой функции ARC/CEC
Цифровой вход (оптический) Колодка гнездовая, оптическая S/PDIF
Цифровой вход (коаксиальный) Разъем типа тюльпан RCA
Вспомогательный вход разъем 3,5 мм, стерео
Bluetooth Audio Верс. 3.0, отвечает стандарту A2DP
Выход сабвуфера Разъем RCA LFE
Выходная частота сабвуфера при беспроводном подключении
Частота 2,4 Гц
Диапазон передачи Приблизительно 20 м (при отсутствии препятствий)
Усилитель
Номинальная выходная мощность:
Сабвуфер (полный коэффициент гармонических искажений 0,5%)
Высокочастотный динамик (полный коэффициент
гармонических искажений - 0,5%)
Номинальное значение уровня частоты выходного сигнала
(20Гц-20 кГц)
Громкоговорители
Сабвуфер 1 Конус 2 x 4 дюйма
Сабвуфер 2 Конус 2 x 4 дюйма
Высокочастотный динамик Конус 2 x 1 дюйма
Частотная характеристика сабвуфера 170 Гц - 20 кГц ± 3 дБ
Частотная характеристика высокочастотного динамика 3.8 кГц - 14 кГц ± 3 дБ
Номинальное полное сопротивление 6 Ом
E&OE
Примечание: Все значения спецификации типичны если не указано иное.
40 Вт на канал
10 Вт на канал
100 Вт
Политика непрерывного
совершенствования
Arcam ведет политику непрерывного
совершенствования для всех своих
продуктов. Это означает, что дизайн
и спецификации могут меняться без
какого либо уведомления.
Поиск
неисправностей
Ниже приведены простые проверочные
операции, которые необходимо
выполнить при возникновении сбоев в
работе Solo bar.
питание
< Проверьте правильность
подключение сетевого шнура.
< Убедитесь, что сетевой выключатель
включен и устройство подключено
к сети.
Пульт дистанционного
управления
< Проверьте правильность установки
батареек.
< Возможно, необходимо заменить
батарейки.
< Возможно, вы находитесь слишком
далеко от устройства или между
ПДУ и устройством имеется
препятствие.
Звук
< Убедитесь в правильности
подключения кабелей.
< Проверьте правильность выбора
источника входного сигнала.
< При возникновении посторонних
шумов или искажении звука во
время воспроизведения аудиозаписи
с Bluetooth - устройства, попробуйте
уменьшить громкость звука на
передающем устройстве и увеличьте
громкость звука на Solo bar.
Изображение
< При отсутствии или плохом
воспроизведении видеосигнала,
проверьте подключение HDMI-
кабелей.
< Проверьте правильность выбора
источника входного сигнала.
Bluetooth-устройство
< Проверьте правильность
синхронизации вашего Bluetooth-
устройства.
< Возможно, ваше Bluetooth устройство
расположено слишком далеко от
звуковой панели.
Русский
R-23R-22
Page 85

инструкции по
установке
гарантия
изделия
Для обеспечения надежности крепления Solo bar к стене
воспользуйтесь специальными кронштейнами.
Вам понадобится
< Электродрель
< Сверло, деревянные заглушки и
крепеж для выполнения монтажа с
учетом характеристик стены.
< Отвертка
< Спиртовой уровень
< Карандаш
< Рулетка
24.0
Процедура выполнения
монтажа
1. Поместив спиртовой уровень
под кронштейном для того, что
убедиться, что он установлен
горизонтально.
2. Четко и аккуратно отметьте
карандашом места под монтажные
отверстия.
200.0
Убедитесь, что кронштейн для крепления
звуковой панели к стене находится в
горизонтальном положении.
3. С помощью перьевого пера
аккуратно просверлите четыре
монтажных отверстия и забейте в
них деревянные заглушки.
4. Прикрепите кронштейн к стене
с помощью мощных шурупов
(минимальный диаметр шурупов
должен составлять не менее 5,5мм);
предварительно убедитесь, что
шурупы подходят по размеру
к заглушкам; туго без рывков
завинтите шурупы.
15.0
5. Прикрепите Solo bar к стене,
аккуратно поместив его в два
выступающие из кронштейна вперед
держателя. Звуковая панель должна
плотно сесть на штатное место.
Осторожно: Запрещается крепить
устройство к стенам, выполненным
из фанеры или другого мягкого
материала. Если вы сомневаетесь
в пригодности стен для установки
устройства, обратитесь за
консультацией к специалисту.
Прежде чем поместить Solo bar в
держатели, убедитесь, что крепежные
шурупы держателей плотно затянуты и
заглушены. Она должно плотно сесть в
держатели.
Авторские права
июнь 2014 г., © 2014 A&R Cambridge Ltd.
A & R Cambridge Limited (Arcam)
оставляет за собой право в любое
время без уведомления или принятия
на себя обязательств по уведомлению
каких-либо лиц вносить изменения в
технические характеристики продукции,
описанной в настоящем документе.
Компания поддерживание и признает
права третьих лиц на принадлежащие им
торговые марки. Упоминание продукции,
принадлежащей третьим лицам, не
является одобрением или указанием к ее
применению.
Arcam принимает все возможные
меры, чтобы сведения, содержащиеся
в настоящем издании, были
достоверными, вместе с тем, компания
не несет никакой ответственности за
содержащиеся в документе ошибки или
пропуски.
Всемирная гарантия
Arcam гарантирует, что продукция,
описанная в настоящем руководстве,
будет по всем материальным аспектам
отвечать техническому описанию,
содержащемуся в руководстве, в течение
двух лет с момента покупки продукции.
Это дает вам право бесплатно
отремонтировать устройство, при
условии, что оно было приобретено у
уполномоченного дилера Arcam.
Дилер Arcam несет ответственность
за все послепродажное обслуживание
устройства. Производитель не
несет никакой ответственности за
дефекты, возникшие вследствие
несчастного случая, неправильного
обращения, износа, или вследствие
несанкционированных настроек и / или
ремонта, не несет ответственность за
ущерб или убытки, происходящие во
время транспортировки к или от лица,
проходящего по гарантии.
Гарантия покрывает:
Затраты на запчасти и трудовые затраты
на протяжении двух лет с даты покупки.
По окончании двух лет, вы оплачиваете
стоимость запчастей и трудовые затраты
самостоятельно. Гарантия не покрывает
затраты на транспортировку товара.
Претензии по гарантии
Оборудования должно быть упаковано
в оригинальную упаковку и возвращено
дилеру, у которого было приобретено
оборудование. Продукция должна
быть отправлена курьерской службой с
оплатой доставки - не почтой.
Компания не несет ответственности
за состояние оборудования на пути
к дилеру или дистрибьютору, и
рекомендует застраховать устройство
от потери и повреждения на время
пребывания в пути.
Регистрация онлайн
Вы можете зарегистрировать
ваш продукт онлайн на сайте
www.arcam.co.uk.
Проблемы?
Если дилер Arcam не может ответить
на какие-либо вопросы в отношении
данного или другого продукта Arcam,
обратитесь в отдел технической
поддержки компании Arcam,
расположенный по нижеуказанному
адресу, мы сделаем все возможное, чтобы
помочь вам.
Arcam Customer Support Department,
Unit15, Pembroke Avenue,
Waterbeach, CAMBRIDGE,
CB25 9QP, Англия или через веб-сайт
www.arcam.co.uk.
Русский
R-25R-24
Page 86

выдача
®
лицензий на
технологию
Изготовлено по лицензии Dolby
Laboratories. Символы «Dolby»
и знак двойного «D» являются
зарегистрированными торговыми
марками Dolby Laboratories.
Названия HDMI, мультимедийные
интерфейсы высокой четкости HDMI
и логотип HDMI являются торговыми
марками HDMI Licensing LLC в США и
других странах мира.
Патенты на DTS представлены на вебсайте http://patents.dts.com. Произведено
по лицензии DTS Licensing Limited.
DTS, DTS-HD, Symbol & DTS и Symbol
являются зарегистрированными
торговыми марками; DTS-HD Master
Audio - торговая марка DTS, Inc. © DTS,
Inc. Все права защищены.
© 2013 CSR plc и ее группа компаний.
Торговая марка aptX® и логотип aptX
logo являются торговыми марками
CSR plc или одной из ее компаний,
зарегистрированными в одной или
нескольких странах мира.
Bluetooth® - торговая марка и логотип,
зарегистрированные торговые марки,
принадлежащие Bluetooth SIG, Inc. Arcam
пользуется этими торговыми марками
по лицензии. Другие торговые марки и
названия принадлежат соответствующим
владельцам.
Надписи «Made for iPod», «Made for
iPhone» и «Made for iPad» означают,
что вспомогательное электронное
устройство разработано специально
для iPod, iPhone или iPad и прошли
сертификацию разработчика в
соответствии со стандартом Apple.
Apple не несет ответственности за
работу этого устройства или его
соответствие стандартам безопасности
и регулятивным нормам. Обращаем
ваше внимание, что использование
настоящего устройства с iPod, iPhone
или iPad может отрицательно сказаться
на производительности беспроводных
устройств.
Bluetooth-устройства работаю с iPhone
5s, iPhone 5c, iPhone 5, iPhone 4s, iPhone
4, iPhone 3GS, iPad Air, iPad (3-го и
4-го поколения), iPad 2, iPad mini с
сетчаточным дисплеем, iPad mini и iPod
touch (4-го и 5-го поколения).
iOS, iTunes, iPad, iPhone и iPod - торговые
марки Apple Inc., зарегистрированные в
США и других странах мира. App StoreSM знак обслуживания Apple Inc.
Изготовлено для:
• iPhone 5s
• iPhone 5c
• iPhone 5
• iPhone 4s
• iPhone 4
• iPhone 3GS
• iPad Air
• iPad mini с сетчаточным дисплеем
• iPad (4-е поколение)
• iPad mini
• iPad (3-е поколение)
• iPad 2
• iPod touch (5-е поколение)
• iPod touch (4-е поколение)
Google Play™ - торговая марка Google Inc.
Android™ - торговая марка Google Inc.
R-26
Page 87

Manuale Sound bar
Italiano
Page 88

Benvenuti...
Indice
... e grazie per l'acquisto della Arcam Solo bar.
Arcam produce dispositivi audio professionali di grande qualità da oltre
trent’anni e la nuova Solo bar per diusione audio rappresenta l’ultimo
arrivato di una lunga serie di prodotti pluri-premiati nell'ambito dei
dispositivi Hi-Fi e dell'home cinema.
Ci auguriamo che tutta la passione e lo sforzo messi nella costruzione di
questo prodotto, si riettano ampiamente nelle prestazioni ed adabilità
superiori, che esso dimostrerà in molti anni di soddisfacente utilizzo.
Questo manuale è una guida per l'installazione e l'utilizzo della Solo bar.
Attraverso l’indice dei contenuti che trovate nella pagina successiva, potrete
individuare con facilità la sezione di interesse.
Ci auguriamo che la Solo bar vi ora tanti anni di funzionamento senza
problemi. Nel caso improbabile di un guasto, o se semplicemente desiderate
ulteriori informazioni sui prodotti Arcam, la nostra rete di rivenditori sarà
lieta di aiutarvi. Ulteriori informazioni si possono trovare anche sul sito
Arcam www.arcam.co.uk.
Il team di sviluppo della Solo bar.
Linee guida per la sicurezza IT-4
Panoramica IT-5
Pulsanti e schermo IT-5
Connettori IT-6
avvio rapido IT-7
Contenuto della confezione IT-7
Posizionamento dell'unità IT-7
Connessione di dispositivi IT-7
Connessione a un televisore IT-7
Connessione di dispositivi digitali via HDMI IT-8
Connessione di dispositivi analogici IT-9
Connessione di dispositivi audio tramite ingresso digitale IT-9
Connessione di un subwoofer IT-9
Connessione spina e accensione IT-10
Connessione di un Solo sub IT-10
Connessione dispositivi Bluetooth® IT-11
Uso delle cue IT-11
Telecomando IT-12
Uso del telecomando IT-12
app telecomando IT-13
Istruzioni di download IT-13
Associazione del dispositivo mobile IT-14
Uso IT-15
Accensione IT-15
Selezione di una sorgente IT-15
Controllo del volume IT-15
Scelta modalità audio IT-16
Audio dalla propria TV IT-16
Audio da dispositivi Bluetooth® IT-16
Ripetitore IR IT-16
Controllo CEC tramite HDMI IT-16
Congurazione automatica IT-17
congurazione di sistema IT-18
Menù di congurazione del sistema IT-18
Menù di regolazione Altoparlanti/EQ IT-19
Menù di congurazione HDMI IT-20
aggiornamento rmware IT-21
Scaricare un le di aggiornamento IT-21
Esecuzione dell'aggiornamento IT-21
Speciche IT-22
Risoluzione dei problemi IT-23
istruzioni di montaggio IT-24
Occorrente IT-24
Procedura di montaggio IT-24
Garanzia sul prodotto IT-25
Diritti d'autore IT-25
Garanzia in tutto il mondo IT-25
Richieste in garanzia IT-25
Registrazione on-line IT-25
Problemi? IT-25
Licenze delle tecnologie IT-26
Italiano
IT-3IT-2
Page 89

Linee guida per
la sicurezza
Panoramica
1. Leggere queste istruzioni
Tutte le istruzioni operative e di
sicurezza vanno lette prima di usare il
presente prodotto.
2. Conservare queste istruzioni
Tutte le istruzioni operative e di
sicurezza vanno conservate per future
consultazioni.
3. Osservare tutte le avvertenze
Tutte le avvertenze relative al dispositivo
e quelle riportate nelle istruzioni
operative vanno rispettate.
4. Seguire tutte le istruzioni
Tutte le istruzioni relative al
funzionamento e all'uso del dispositivo
devono essere seguite.
5. Non utilizzare questo apparecchio
vicino all'acqua
Il dispositivo non deve essere usato
in vicinanza dell'acqua o di fonti di
umidità, ad esempio in una cantina
umida o in prossimità di una piscina.
6. Pulire solo con un panno asciutto.
7. Non ostruire le aperture di ventilazione.
Installare secondo le istruzioni del
produttore.
8. Non installare vicino a fonti di calore
come radiatori, caloriferi, stufe o altri
apparecchi (compresi amplicatori) che
producono calore.
9. Non annullare gli scopi di sicurezza
della spina polarizzata o con messa a
terra. Una spina polarizzata presenta
due lame, una più grande dell'altra. Una
spina con messa a terra ha due lame e
un terzo polo di terra. La lama larga o
il terzo polo sono presenti per la vostra
sicurezza. Se la spina fornita non è
adatta alla propria presa, consultate un
elettricista per la sostituzione della presa
obsoleta.
10. Evitare che il cavo di alimentazione
venga calpestato o tirato, in particolare
presso le spine, le prese e al punto di
uscita dall'apparecchio.
11. Usare solo dispositivi opzionali/accessori
specicati dal produttore.
12. Usare solo con carrello, supporto,
cavalletto, sostegno o tavola specicati
dal produttore o venduti con
l'apparecchio. Se si usa un carrello,
prestare attenzione muovendo la
combinazione di carrello/apparecchio per
evitare lesioni dovute a ribaltamento.
13. Scollegare questo apparecchio durante
temporali o se resta inutilizzato per
lunghi periodi di tempo.
14. Per l'assistenza tecnica rivolgersi a
personale qualicato. L'assistenza si
rende necessaria quando l'apparecchio è
stato danneggiato in qualsiasi modo, per
esempio se il cavo di alimentazione o la
spina sono danneggiati, è stato versato
del liquido o degli oggetti sono caduti sul
dispositivo, o ancora se l'apparecchio è
stato esposto a pioggia o umidità, non
funziona normalmente, o è caduto.
15. Tenere l’unità in un ambiente ben
ventilato.
AVVERTENZA: Per ridurre il rischio di incendi o scosse
elettriche, non esporre questo apparecchio a pioggia,
umidità, gocciolamento o schizzi d'acqua. Nessun oggetto
contenente liquidi, come vasi, deve essere collocato
sull'apparecchio.
AVVERTENZA: La spina dell’alimentazioneo
dell’accoppiatore sono utilizzati come mezzo di
scollegamento, pertanto devono rimanere sempre
facilmente accessibili.
Il simbolo del lampo con punta di freccia, all'interno di
un triangolo equilatero, avverte l'utente della presenza di
'voltaggio pericoloso' non isolato all'interno del prodotto,
che può essere di entità tale da costituire un rischio di
scarica elettrica per le persone.
AVVERTENZA: Per ridurre il rischio di esporsi a
scosse elettriche, evitare di rimuovere la copertura
(o il retro) dell'apparecchio, che non contiene al suo
interno parti riparabili dagli utenti. Per l'assistenza
tecnica rivolgersi a personale qualificato.
Il punto esclamativo all'interno di un triangolo equilatero
avverte l'utente della presenza di istruzioni importanti di
manutenzione nella documentazione che accompagna
il prodotto.
Questa apparecchiatura è di Classe II ovvero è
un apparecchio elettrico a doppio isolamento. È
stato progettato in modo tale che non richieda un
collegamento a terra di sicurezza elettrica.
Smaltimento corretto
di questo prodotto
Il prodotto contiene materiale
elettrico o elettronico. La presenza
di questi materiali può, in caso di
loro mancato smaltimento, avere
effetti potenzialmente negativi
sull'ambiente e la salute dell'uomo.
La presenza di questo marchio indica che il prodotto
non dovrebbe essere smaltito con i rifiuti indifferenziati,
ma deve essere soggetto a raccolta differenziata. In
qualità di consumatore, l'utente è responsabile del
corretto smaltimento di questo prodotto.
Pulsanti e schermo
Scelta fonti di ingresso
IN- per spostarsi all'indietro
tra le fonti di ingresso.
IN+ per spostarsi in avanti
tra le fonti di ingresso.
Lo schermo evidenzia la
fonte selezionata.
Fonte di ingresso selezionata
Nota: per ulteriori informazioni
sulle modifiche al livello del menù
in fase di impostazione, fare
riferimento a pagina 18.
Modalità audio
Nota: per ulteriori
informazioni sulle
modifiche alle opzioni
dei menù in fase di
impostazione, fare
riferimento a pagina 18.
Standby
Questo tasto consente
di attivare o disattivare
la modalità di standby
per la Solo bar.
Controllo del volume
- riduce il volume dell'uscita audio.
+ aumenta il volume dell'uscita audio.
Il volume è indicato sullo schermo.
Controllo Loudness Automatico
Usare il telecomando per attivare o
disattivare la modalità ALC.
Italiano
Regolazione volume
Nota: per ulteriori
informazioni sulle
modifiche ai valori delle
opzioni menù scelte in
fase di impostazione, fare
riferimento a pagina 18.
IT-5IT-4
Page 90

avvio rapido
Connettori
USB
Usato solo per servizi
e aggiornamenti
firmware
Consultare pagina21
per informazioni
relative agli
aggiornamenti
firmware.
AUX
Ingresso per
spinotto mini
stereo da 3,5mm,
usato per la
connessione di una
sorgente audio
analogica.
MIC
Ingresso per spinotto
mini da 3,5 mm, usato
per il collegamento
del microfono in
dotazione durante
la configurazione
automatica degli
altoparlanti.
Vedere pagina 17 per
ulteriori informazioni.
SUB
Uscita RCA LFE, usata
per collegare un
subwoofer.
Consultare pagina10
per informazioni
sulla connessione di
un Solo sub tramite
collegamento wireless.
COAX
Presa RCA, usata per
il collegamento di
sorgenti audio digitali.
OPTICAL
Presa TOSLINK, usata
per il collegamento di
sorgenti audio digitali.
HDMI OUT
Usata per la
connessione di un
televisore o come
Canale di Ritorno
Audio (ARC).
Vedere pagina 7 per
ulteriori informazioni.
HDMI 1 – 4
Porte usate per
connettere fino a
quattro dispositivi
digitali, per fornire
un pass-through a
sistemi 3D da 1080p.
POWER INLET
Usato per la
connessione
all'alimentazione
elettrica.
Contenuto della
confezione
< Soundbar Solo bar
< Cavo di alimentazione
< Telecomando
< 2 batterie (AAA)
< Microfono
< Sostegno per installazione a muro
< Manuale d'uso
< Scheda di registrazione
Posizionamento dell'unità
La Solo bar di diusione audio è un
prodotto incredibilmente versatile. Può
essere collocata su tavoli, armadietti o
scaali, assicurandosi che si trovi sempre in
piano e in un posto stabile. Può poi essere
posizionata sotto un televisore, liberamente
appoggiata su una supercie piana
orizzontale, oppure installata alla parete.
Per una migliore esperienza di ascolto,
suggeriamo l'installazione a muro. In tal
caso servirsi dell'apposito sostegno di
installazione in dotazione. Fare riferimento
a pagina 24 per le istruzioni di ssaggio e
installazione.
Evitare di esporre la Solo bar alla luce solare
diretta e a fonti di calore o umidità.
Connessione di dispositivi
Una volta che la Solo bar è stata
correttamente installata, è possibile
collegarla a dispositivi esterni, come
indicato nelle gure seguenti.
Assicurarsi che nessun cavo del sistema sia
attorcigliato o eccessivamente teso.
AVVERTENZA: Non collegare la Solo bar
all'alimentazione elettrica prima di aver
completato la connessione di tutti i dispositivi
esterni audio e video.
Connessione a un televisore
Collegare il televisore all'uscita HDMI
usando un cavo HDMI. Se il televisore
supporta il sistema ARC, la riproduzione
audio può avvenire tramite la Solo bar
per garantire una migliore qualità sonora
(consultare pagina 20 per informazioni sulla
relativa congurazione). Se il televisore non
supporta ARC, collegare un cavo audio agli
ingressi OPTICAL o COAX della Solo bar.
Cavo audio
se non c'è
l'ARC
Italiano
IT-7IT-6
Page 91

Connessione di dispositivi digitali via HDMI Connessione di dispositivi
Numerosi dispositivi digitali possono essere
collegati facendo uso di una connessione
HDMI, quali decoder, lettori Blu-ray e
DVD, console di gioco, videocamere.
Usando questo metodo di connessione, le
immagini sono visualizzate sulla TV, mentre
l'audio è riprodotto dalla Solo bar. Non sono
necessarie altre connessioni audio.
Lettore dischi Blu-ray Console di gioco
Videocamera
analogici
Qualsiasi dispositivo audio analogico può essere
connesso alla Solo bar tramite l'ingresso AUX,
usando un cavo con spinotto-mini da 3,5 mm.
Lettore MP3
Connessione di dispositivi audio tramite
ingresso digitale
È possibile collegare dispositivi audio alla Solo bar anche usando gli
ingressi Coassiale e Ottico.
Lettore CD
Connessione di un
subwoofer
La Solo bar è dotata di un'uscita per
subwoofer incorporata (vedere pagina
19per la relativa congurazione). Usare un
cavo per subwoofer dotato di spinotto RCA
LFE per collegare il dispositivo alla Solo bar.
Nota: Se si dispone di un Arcam Solo sub,
fare riferimento alla pagina seguente.
Console di gioco
Italiano
Decoder
Subwoofer
IT-9IT-8
Page 92

WIRELESS
Connessione spina e
accensione
La Solo bar è dotata di una spina di
alimentazione stampata, montata sul
cavo integrato. Vericare che la spina in
dotazione sia adatta al vostro alimentatore.
Se il vostro alimentatore di rete o la spina è
diversa, si prega di contattare il rivenditore
Arcam immediatamente.
Per prima cosa, collegare il cavo elettrico
alla presa di alimentazione sul retro della
Solo bar, facendo in modo che essa sia
inserita saldamente. Inserire il cavo nella
presa di corrente e accendere la presa.
L'unità è ora in modalità standby, indicata
dall'accensione di una spia LED rossa sul
pannello anteriore.
Se il dispositivo non viene utilizzato per un
periodo prolungato di tempo, entrerà in
modalità standby per ridurre il consumo di
corrente.
Connessione di un Solo
sub
Quando si trova nel raggio operativo
dell'unità Arcam Solo, il Solo sub resta in
connessione wireless con la Solo bar.
Assicurarsi che l'interruttore del Solo sub
sia acceso.
1. Premere il tasto sul telecomando
della Solo bar, seguito da , nché
non appare l'indicazione Speaker/
EQ Setup sullo schermo del pannello
frontale. Premere , seguito ancora da
, nché non appare l'indicazione Sub
Pairing.
2. Premere per avviare la procedura
di associazione. Lo schermo passerà
all'indicazione In Progress.
3. Posizionare il selettore di INPUT sul
retro del Solo sub sulla voce WIRELESS.
LINE
LFE
INPUT
4. Premere e tenere premuto il tasto
WIRELESS sul retro del Solo sub per
circa cinque secondi. La spia LED
WIRELESS inizierà a lampeggiare in
blu, per segnalare che il Solo sub è in
modalità di sincronizzazione e alla
ricerca di una fonte cui connettersi.
Solo sub
WIRELESS
PAIRING
PWR WIRELESS
5. Se la procedura di associazione ha avuto
successo, la spia LED WIRELESS diventa blu
e la Solo bar mostra l’indicazione Linked.
6. Al termine della procedura di associazione,
il Solo sub sarà sempre riconnesso a quella
fonte all'accensione o quando riceve un
segnale audio.
Nota: La modalità di Sincronizzazione dura
circa 30 secondi. Se nessuna sorgente viene
individuata in questo periodo, la Solo bar
interromperà la ricerca e il processo dovrà
essere ripetuto.
Connessione dispositivi Bluetooth® Uso delle cuffie
La Solo bar è dotata di tecnologia wireless Bluetooth
incorporata per un'agevole connessione con tutti i
dispositivi con Bluetooth attivo.
Associazione di dispositivi Bluetooth
Fare riferimento alle istruzioni operative del proprio
dispositivo Bluetooth. Scegliere la Arcam Solo bar
dall'elenco dei dispositivi Bluetooth per completare
il processo di associazione. Una volta completata, la
procedura di associazione dei dispositivi non necessita
più di essere ripetuta.
Dispositivi Bluetooth®
La Solo bar è dotata di un trasmettitore
Bluetooth che ne rende possibile la
connessione a cue Bluetooth.
Nota: La trasmissione e la ricezione via
Bluetooth sono due operazioni distinte. È
possibile associare fino a quattro dispositivi,
ma se ne può connettere uno solo alla volta,
con il primo arrivato ad essere servito.
Connessione di cue Bluetooth
Premere il tasto sul telecomando,
seguito da nché non appare
l'indicazione Speaker/EQ Setup sullo
schermo del pannello frontale. Premere
, seguito ancora da , nché non appare
l'indicazione Headphone Out. Premere
per selezionarla.
Per impostazione predenita, il
trasmettitore Bluetooth è disattivato, in
modo che l'indicazione Disable è mostrata
sullo schermo. Premere per modicare
l'indicazione sullo schermo e far apparire
Enabled. Il trasmettitore Bluetooth è ora
acceso e la voce di menù Device Search è
attiva.
Ora seguire le indicazioni fornite con
le vostre cue Bluetooth per attivare la
modalità associazione del dispositivo.
Assicurarsi che l'indicazione Device Search
sia ancora presente sullo schermo e premere
. La Solo bar cercherà i dispositivi
disponibili per un minuto.
Se nessun dispositivo viene trovato, premere
di nuovo per avviare un'altra ricerca.
Assicurarsi che non ci siano oggetti sul
cammino che ostacolano l'individuazione
dei dispositivi.
A ricerca completa, i dispositivi disponibili
sono mostrati in un elenco. Usare i tasti
e per scegliere il dispositivo richiesto e
premere per terminare la procedura di
accoppiamento. La Solo bar mostrerà un
messaggio indicante che la connessione è
stata completata con successo.
Uso delle cue
Accertarsi che la Solo bar e le cue siano
entrambe accese. Scegliendo una sorgente
audio, potrete godervi la musica tramite le
cue.
Nota: Se le cuffie sono spente, l'audio
sarà automaticamente diffuso tramite gli
altoparlanti della Solo bar.
AVVERTENZA: L'accensione del trasmettitore
Bluetooth disabilita temporaneamente l'ingresso
Bluetooth. Questo significa che non è possibile
trasmettere l'audio di un dispositivo Bluetooth
alla Solo bar e ascoltare musica con le cuffie allo
stesso tempo.
Italiano
IT-11IT-10
Page 93

Telecomando
app
telecomando
La Solo bar può essere congurata e controllata sia usando il
telecomando in dotazione che la app telecomando per l'unità Solo.
Uso del telecomando
L’unità telecomando in dotazione è destinata
all'uso con la Solo bar.
Prima dell'uso, accertarsi che le due batterie
AAA incluse siano state correttamente
inserite.
1. Tenendo il telecomando a faccia in giù,
spingere verso il basso la rientranza
anti-scivolo sul coperchio del vano
batterie ed aprirlo.
2. Inserite le due batterie ‘AAA’ incluse.
Assicurarsi di inserire le batterie
nella giusta direzione, seguendo le
indicazioni per i segni ‘+’ e ‘–’.
3. Richiudete il coperchio del vano
batterie facendolo scivolare in posizione
nché non sentite un click.
Per garantirne il corretto funzionamento,
è necessario che vi sia una chiara linea di
visibilità tra il telecomando e lo schermo sul
pannello anteriore della Solo bar.
Questo tasto consente di far passare la Solo bar dalla modalità di standby a
quella attiva.
Premere una volta questo tasto per disattivare l'audio della Solo bar. Premerlo
di nuovo (o regolare il livello del volume) per riattivare l'audio.
Incremento volume.
Decremento volume.
Attivazione/disattivazione della modalità Controllo Loudness Automatico.
Premere questo tasto per accedere al menù di configurazione (vedere pagine
18 - 20). Premerlo di nuovo per uscire dal menù.
Navigazione verso l'alto tra le impostazioni del menù.
Navigazione verso il basso tra le impostazioni del menù.
Navigazione all'indietro tra i livelli del menù.
Navigazione in avanti tra i livelli del menù.
Premere questo stato per scegliere l'impostazione di menù selezionata.
La app di telecomando della Arcam Solo
bar consente di usare un dispositivo Apple
iOS o Android™ per controllare la Solo bar
tramite Bluetooth.
Usando tale app, è possibile congurare
le impostazioni di menù e controllare
la riproduzione dell'unità come col
telecomando in dotazione.
Requisiti minimi di sistema operativo per
l'uso della app: iOS6, Android 4.0
Istruzioni di download
La app può essere scaricata o dall'App StoreSM
o da Google Play™.
Seguire le istruzioni di download che
appaiono sul dispositivo.
Dopo l'installazione, toccare l'icona dell'app
per avviare l'applicazione.
HDMI 1 20
DIGITAL ST
La app riproduce lo schermo della
Solobar
Vi sono indicati la sorgente di ingresso, il
livello di volume e il formato audio in fase di
funzionamento normale, o le voci del menù
in fase di configurazione.
Italiano
Consente di scegliere tra le modalità di uscita audio: stereo, cinema o concerto.
Selettore della fonte di ingresso - per spostarsi in avanti tra le sorgenti
connesse.
Selettore della fonte di ingresso - per spostarsi all'indietro tra le sorgenti
connesse.
IT-13IT-12
Page 94

Uso
Associazione del
dispositivo mobile
L'uso della app richiede l'associazione del
dispositivo mobile alla Solo bar tramite
Bluetooth.
Assicurarsi che il Bluetooth del dispositivo
sia attivo. Per dispositivi iOS applicare le
istruzioni seguenti:
Per dispositivi Android, seguire le istruzioni
fornite col dispositivo.
Aprire le Impostazioni, quindi toccare la
voce Bluetooth.
Far scorrere l'interruttore Bluetooth in
posizione di accensione.
Attendere che la scritta Arcam Solo bar
appaia sotto la voce DEVICES e toccarla
per eettuare la Connessione.
Se dovesse essere necessario rimuovere il
dispositivo, toccare l'icona informazioni
accanto alla voce Connected e toccare la
voce Ignora questo dispositivo.
Nota: Fino a quattro dispositivi sorgente
possono essere associati via Bluetooth alla
Solo bar, in base al criterio che il primo
dispositivo arrivato è quello servito. Se più
di una persona può utilizzare la Solo bar,
può rendersi occasionalmente necessario
rimuovere un dispositivo associato.
Accensione
Per attivare la Solo bar dalla modalità
standby, premere il tasto sul pannello
anteriore o sul telecomando.
La scritta ARCAM Solo bar appare per
un momento sullo schermo del pannello
anteriore, seguita dall'indicazione della
sorgente audio attualmente in uso, del livello
di volume e della modalità audio.
Nota: Se l'unità deve restare inutilizzata per
un lungo periodo, è opportuno scollegarla
dall'alimentazione elettrica per risparmiare
corrente.
Selezione di una sorgente
Per scegliere una specica sorgente, premere
i tasti o sul pannello anteriore o
sul telecomando, nché la fonte richiesta
non appare sullo schermo del pannello
anteriore. Sono disponibili le seguenti
sorgenti:
HDMI 1
HDMI 2
HDMI 3
HDMI 4
OPTICAL
COAX
AUX
BLUETOOTH
Nota: Se l'opzione è supportata, alcuni
dispositivi HDMI potranno essere identificati
col proprio nome di dispositivo.
Se il televisore è connesso tramite il canale
ARC, usando la procedura di congurazione
descritta a pagina 16, lo schermo del
pannello mostrerà il messaggio seguente
mentre si guarda la TV.
TV/ARC
La modalità Canale di Ritorno Audio
(ARC) è una funzione compresa nell'ultima
versione della specifica HDMI, che consente
alla TV di inviare il proprio audio alla
soundbar tramite il cavo HDMI.
Nota: Questo messaggio appare
automaticamente in caso di connessione di
televisori dotati di ARC.
Controllo del volume
Per regolare il volume, premere i tasti o
sul pannello anteriore o sul telecomando.
Impostare l’uscita su mute
L'uscita audio della Solo bar può essere
disattivata premendo sul telecomando.
Se l'audio dell'unità è disattivato, il livello di
volume mostrato sullo schermo del pannello
anteriore indica MUTE.
Per annullare la disattivazione audio,
premere di nuovo o modicare il livello
di volume tramite / .
Italiano
IT-15IT-14
Page 95

Scelta modalità audio
La Solo bar ha tre modalità audio
pre-congurate - STEREO, MOVIE e
CONCERT.
Premere il tasto sul telecomando per
passare alle varie modalità e scegliere quella
richiesta.
Nota: La modalità stereo è quella predefinita
e indica che l'audio sarà riprodotto come è
stato registrato.
Audio dalla propria TV
Se il televisore è collegato alla Solo bar
tramite ARC, scegliere l'opportuna sorgente
audio dalla TV per godersi una superba
diusione sonora grazie alla Solo bar,
servendosi del telecomando della TV per la
regolazione del volume.
Se usato in questa modalità, lo schermo
del pannello frontale della Solo bar mostra
automaticamente l'indicazione TV/ARC.
Audio da dispositivi
Bluetooth®
Per ascoltare liberamente la musica preferita
da qualunque dispositivo con connessione
wireless Bluetooth, dapprima assicurarsi di
aver associato il dispositivo alla Solo bar vedere pagina 11 per ulteriori informazioni.
Una volta completata l'associazione, seguire
le istruzioni fornite col proprio dispositivo.
Ripetitore IR
Quando la Solo bar è collocata di fronte
al televisore, può accadere (in base anche
al modello) che essa oscuri il sensore
di ricezione del telecomando sulla TV,
impedendone il funzionamento.
Se questo si verica, è possibile usare la
funzionalità di ripetitore IR della Solo bar,
per inoltrare i segnali al televisore. Nota:
Questa funzione è disponibile anche quando
la Solo bar è in modalità standby.
Consultare pagina 18 per informazioni di
congurazione.
Controllo CEC tramite
HDMI
Il Consumer Electronics Control (CEC) è
una funzione che consente di connettere
no a 15 dispositivi dotati di capacità
CEC alla Solo bar, tramite HDMI, con la
possibilità di controllarli simultaneamente,
tramite un singolo telecomando.
Per impostazione predenita, la funzione
CEC è attiva. Consultare pagina 20 per
informazioni di congurazione.
Tipiche operazioni di controllo del sistema,
usando la funzione CEC, sono:
< Accensione o messa in standby
simultanea di tutti i dispositivi connessi.
< Controllo del volume.
< Scelta fonti di ingresso.
Configurazione
automatica
La Solo bar è dotata di una funzione di
congurazione automatica proprietaria, per
cui l'unità tenta di denire le impostazioni
essenziali degli altoparlanti del sistema
(compresi i subwoofer eventualmente
presenti). Calcola anche i valori di ltro
equalizzazione della stanza (Room EQ) per
rimuovere alcuni degli eetti peggiori delle
frequenze risonanti nella sala d'ascolto.
Usare il microfono di taratura in dotazione,
inserirne lo spinotto nella presa MIC sul
pannello posteriore e collocare il microfono
nella posizione di ascolto principale.
Questo microfono è in grado di ricevere
gli speciali toni di taratura emessi dagli
altoparlanti (incluso il subwoofer), mentre la
procedura di congurazione automatica è in
corso. La Solo bar quindi analizza il segnale
e calcola:
< livello dell'altoparlante,
< la frequenza di crossover del subwoofer,
< frequenze problematiche di risonanza
nella stanza che hanno bisogno di
controllo tramite ltro.
Microfono
Collocare il microfono
rivolto verso l'alto
all'altezza della testa in
posizione di ascolto.
Per rendere il sistema più accurato possibile
nel compiere tali valutazioni, attenersi alle
seguenti regole:
< Ridurre al minimo i rumori di fondo
nella stanza di ascolto e in quelle
adiacenti.
< Chiudere tutte le nestre e le porte della
sala di ascolto.
< Spegnere tutte le ventole, compresi i
sistemi di condizionamento d'aria.
< Se il microfono è tenuto in mano
durante la taratura, tenere la mano e
le dita ferme per evitare di produrre
rumori dovuti all'impugnatura.
< Tenere il microfono rivolto verso
l'alto all'incirca all'altezza della testa
nella normale posizione di ascolto,
mantenendo una visuale diretta e
non ostruita degli altoparlanti. Non
è necessario puntare il microfono
direttamente verso gli altoparlanti.
< Se il sistema comprende un subwoofer
attivo, impostare il suo livello di uscita/
controllo di guadagno ad un valore
medio tra il minimo e il massimo.
Per attivare la procedura di Impostazione
Automatica, premere il tasto sul
telecomando, seguito da , nché non
appare l'indicazione Speaker/EQ Setup sul
pannello frontale della Solo bar. Quindi
premere e notare che l'indicazione sullo
schermo diventa Auto Setup. Premere
ancora per avviare la procedura.
La procedura produrrà i toni di prova
generati dagli altoparlanti e tipicamente
richiede meno di due minuti. Il generatore
di toni di prova si alterna su ogni
altoparlante due volte. Ad ogni ciclo, la
scritta Analysing apparirà per un momento.
Dopo il secondo ciclo lo schermo mostrerà
la scritta Calculating seguita subito dopo da
Complete.
Se si verica qualche errore nella procedura
di congurazione automatica, seguire
le istruzioni indicate sul pannello dello
schermo.
La procedura di congurazione automatica
è di solito piuttosto accurata, ma può
talvolta produrre risultati erronei. I
problemi possono essere a causa di:
< suoni esterni o rombi/rumori dovuti al
movimento raccolti dal microfono
< riessioni del suono su superci dure
(ad esempio nestre o pareti) vicino alla
posizione di ascolto,
< risonanze acustiche molto forti
all'interno della stanza,
< ostacoli (ad esempio un divano) tra
diusori e il microfono.
<
Utilizzo di un subwoofer
Se il sistema comprende un subwoofer
attivo, può rendersi necessario riavviare la
procedura di congurazione automatica,
impostando il livello di uscita/controllo
di guadagno del subwoofer ad un valore
medio.
La congurazione automatica tenterà
di scegliere una frequenza di crossover
che consenta di ridurre al minimo gli
eetti della transizione di frequenza
dagli altoparlanti principali al subwoofer.
Tuttavia, se ciò non produce risultati
soddisfacenti si consiglia di cercare
manualmente altre frequenze di crossover
per trovare qualcosa di più vicino alla vostra
preferenza.
La procedura di congurazione automatica
calcola anche i valori di Room EQ, per
rimuovere i peggiori eetti dovuti alle
frequenze di risonanza nella stanza di
ascolto.
Per impostazione predenita, la funzione
di Room EQ è disattivata. La funzione di
Room EQ deve essere attivata per fonti di
ingresso che si ritiene possano beneciarne,
in base all'ascolto di campioni tipici di
quella sorgente, provati per ogni ingresso.
Mentre l'equalizzazione ambientale può
contribuire a ridurre i problemi di acustica
della stanza di ascolto, di solito è molto
meglio cercare di risolvere questi problemi
direttamente nella stanza. Per attivare la
funzione Room EQ, consultare pagina 19 in
merito alle congurazioni di sistema.
Italiano
IT-17IT-16
Page 96

congurazione
di sistema
Usando il telecomando e queste istruzioni otterrete un'impostazione
della Solo bar che ne garantisce le migliori prestazioni.
Menù di configurazione del sistema
Le impostazioni predenite sono indicate in Blu.
System Setup Lipsync Delay 0 ~ 200ms Ritardi possono essere introdotti nel segnale video attraverso l'elaborazione
Display Level
App Control
IR Repeater
System Info
Factory Defaults
video che causa una mancata corrispondenza nella temporizzazione tra
audio e video. Questo problema sarà indicato dal fatto che il suono delle
parole non è sincronizzato al movimento delle labbra. Per rimediare a
questo, è possibile regolare il ritardo nella sincronizzazione del movimento
labiale. Usare i tasti e per regolare la sincronizzazione tra audio e
video. Premere per tornare indietro di un livello o premere per
uscire dalla configurazione.
Dim g Bright g Off
Enable g Disable
Enable g Disable
Premere OK per visualizzare la versione del software di sistema.
Premere OK per reinizializzare la Solo bar alle impostazioni di fabbrica. Nota: I dispositivi associati o
connessi andranno perduti. Premere per tornare indietro di un livello o premere per uscire dalla
configurazione.
Il livello di visualizzazione dei LED può essere regolato in base alle proprie
esigenze. Usare i tasti e per spostarsi tra le varie impostazioni.
Quando tale opzione è disattiva, lo schermo si illumina brevemente quando
riceve un comando. Premere per tornare indietro di un livello o premere
per uscire dalla configurazione.
Questa opzione rende possibile riattivare la Solo bar dalla modalità standby,
usando la app telecomando opzionale. Usare i tasti e per attivare o
disattivare il controllo tramite app. Premere per tornare indietro di un
livello o premere per uscire dalla configurazione.
Usare i tasti e per attivare o meno il ripetitore IR. Vedere pagina 16
per ulteriori informazioni. Premere per tornare indietro di un livello o
premere per uscire dalla configurazione.
Menù di regolazione Altoparlanti/EQ
Le impostazioni predenite sono indicate in Blu.
Speaker/EQ Setup Auto Setup La configurazione automatica predispone la Solo bar alla migliore esperienza di ascolto possibile. Premere OK
per avviare la procedura di configurazione. Vedere pagina 17 per ulteriori informazioni.
Room EQ
Sub Pairing
Subwoofer Level 0 ~ -12dB
Headphone out
Enable g Disable
Premere per avviare la procedura di associazione. Vedere pagina 10 per ulteriori informazioni.
BT Transmitter
Enable g Disable
Device search
Usare i tasti e per attivare o meno l'opzione EQ.
Nota: Opzione disponibile solo dopo aver completato la configurazione automatica.
Premere per tornare indietro di un livello o premere per uscire dalla
configurazione.
Usare i tasti e per scegliere un livello di subwoofer.
Nota: Disponibile solo dopo che l'associazione del subwoofer è completa. Premere
per tornare indietro di un livello o premere per uscire dalla configurazione.
Usare i tasti e per attivare il trasmettitore Bluetooth® o disattivarlo. Premere
per tornare indietro di un livello o premere per uscire dalla configurazione.
Nota: Opzione disponibile solo se l'uscita per le cuffie è attiva.
Premere per avviare la ricerca delle cue. Usare i tasti e per selezionare la
cua dall'elenco. Premere per tornare indietro di un livello o premere per
uscire dalla configurazione.
Italiano
IT-19IT-18
Page 97

aggiornamento
rmware
Menù di configurazione HDMI
Le impostazioni predenite sono indicate in Blu.
HDMI Setup HDMI Audio Out
CEC / ARC
Disable g Passthrough
Enable g Disable
Usare i tasti e per attivare o meno l'opzione
Passthrough HDMI. L'opzione HDMI passthrough consente
la trasmissione del segnale video e audio proveniente da una
qualunque fonte HD alla Solo bar tramite un cavo HDMI. La
Solo bar è in grado di separare i segnali, riproducendo l'audio
proveniente dalla sorgente HD tramite i propri altoparlanti e
inviando il segnale video inalterato al televisore, tramite un
cavo di uscita HDMI. Premere per tornare indietro di un
livello o premere per uscire dalla configurazione.
Usare i tasti e per attivare o disattivare l'opzione CEC/
ARC.
Vedere pagina 16 per ulteriori informazioni. Premere per
tornare indietro di un livello o premere per uscire dalla
configurazione.
Scaricare un file di
aggiornamento
Per eseguire un aggiornamento rmware,
sarà necessario scaricare un le di
aggiornamento dal sito web della Arcam.
Per controllare la presenza di
aggiornamentirmware, inserire l'indirizzo
www.arcam.co.uk nel proprio browser e da
lì navigare alla pagina della Solo bar.
Nota: Assicurarsi di scaricare il file nella
radice del proprio lettore USB, e non
salvarlo all'interno di un'altra cartella o
l'aggiornamento fallirà.
Esecuzione
dell'aggiornamento
Assicurarsi che la soundbar sia collegata alla
corrente, accesa e in modalità standby.
Premere e tenere premuti
contemporaneamente i tasti e per
circa cinque secondi.
La Solo bar si riattiva e mostra
l'informazione seguente:
ARCAM SB M:V024
B:40526 D:30304
Nota: M = Versione software principale,
B=Versione software Bluetooth e
D=Versione software DSP.
Premere il tasto per andare alla
schermata di aggiornamento soware.
Lo schermo mostrerà:
System Update
Insert USB...
Nota: Premendo ancora il tasto IN- lo
schermo si alternerà tra questo e la pagina di
versione del software.
Inserire il drive USB contenente il le di
aggiornamento nella presa di UPGRADE
nel pannello posteriore della Solo bar.
L'aggiornamento rmware
si avvia automaticamente,
dopo l'individuazione del
drive USB e l'indicazione
sullo schermo si modica
di conseguenza:
System Update
Updating...
Se passano 30 secondi senza che il lettore
USB venga inserito, lo schermo visualizzerà
un messaggio di timeout:
Se l'aggiornamento va a buon ne, lo
schermo mostra l'informazione seguente
per circa tre secondi, dopo di che la barra si
spegne automaticamente.
System Update
Complete
Se l'aggiornamento non va a buon ne, lo
schermo mostra l'informazione seguente
per circa tre secondi, dopo di che la barra
si spegne automaticamente e l'intera
procedura va eseguita di nuovo.
System Update
Error
Italiano
System Update
USB Not Detected
Il messaggio sarà mostrato per circa tre
secondi, dopo di che la barra si spegne
automaticamente e la procedura va ripetuta
di nuovo.
IT-21IT-20
Page 98

Speciche
Generale
Peso (confezione) 10 kg
Dimensioni (A x L x P) 130mm x 1100mm x 110mm
Consumo di corrente Modalità di funzionamento: 150 W (max)
Modalità standby: <0,5 W
Consumo di energia 100 - 240 V, 50/60 Hz
Ingressi/Uscite
Ingresso HDMI Presa di tipo A x 4
Uscita HDMI Presa di tipo A, con supporto ARC/CEC
Ingresso digitale (ottico) Presa ottica S/PDIF
Ingresso digitale (coassiale) Spinotto RCA
Ingresso Ausiliario Spinotto stereo da 3,5 mm
Audio Bluetooth Ver. 3.0, Conforme allo standard A2DP
Uscita Subwoofer Spinotto RCA LFE
Uscita Subwoofer Wireless
Frequenza 2,4 GHz
Raggio di trasmissione Circa 20 m (senza interferenze)
Amplificatore
Potenza nominale:
Woofer (0,5% THD)
Tweeter (0,5% THD)
Livello nominale di uscita amplificatore (20 Hz-20 kHz) 100 W
Altoparlanti
Woofer 1 2 x 4in Cono
Woofer 2 2 x 4in Cono
Tweeter 2 x 1in Cono
Risposta di frequenza woofer 170Hz - 20kHz ± 3 dB
Risposta di frequenza tweeter 3.8kHz - 14kHz ± 3 dB
Impedenza nominale 6 Ω
E&OE
NOTA: Tutti i valori delle specifiche sono tipici se non diversamente specificato.
40 W per canale
10W per canale
Politica di miglioramento
continuo
Arcam ha una politica di continuo
miglioramento dei propri prodotti. Ciò
signica che i progetti e le speciche
sono soggette a modiche senza
preavviso.
Risoluzione dei
problemi
Di seguito alcuni semplici controlli da
applicare se si incontrano problemi nell'uso
della Solo bar.
Alimentazione
< Controllare che il cavo di alimentazione
sia opportunamente inserito e connesso.
< Assicurarsi che gli interruttori dell'unità
e della presa siano accesi.
Telecomando
< Controllare il corretto inserimento delle
batterie.
< Vericare se le batterie devono essere
sostituite.
< Siete troppo distanti dall'unità o ci sono
ostacoli sul cammino?
Suono
< Vericare la corretta connessione dei
cavi.
< Controllare la sorgente di ingresso
selezionata.
< In caso di audio disturbato o distorto
durante la riproduzione da un
dispositivo Bluetooth, abbassare il
volume sul dispositivo e aumentare
quello della Solo bar.
Immagini
< In caso di immagini assenti o
disturbate, controllare la corretta
connessione dei cavi HDMI.
< Controllare la sorgente di ingresso
selezionata.
Bluetooth
< Vericare che il dispositivo Bluetooth
sia stato correttamente associato alla
barra.
< Il dispositivo Bluetooth è troppo
lontano dall'unità?
Italiano
IT-23IT-22
Page 99

istruzioni di
montaggio
Garanzia sul
prodotto
Usare l'accessorio per il montaggio a parete in dotazione
per ssare al muro la Solo bar in modo fermo e sicuro.
Occorrente
< Trapano elettrico
< Punta del trapano, tasselli e attacchi da
parete, adatti al tipo di muro su cui si
lavora.
< Cacciavite
< Livella
< Matita
< Metro a nastro
24.0
Procedura di montaggio
1. Assicurarsi che la staa da parete sia in
posizione orizzontale, collocando una
livella sotto la staa.
2. Evidenziare le posizioni dei fori a
matita, facendo attenzione a tracciare
accuratamente i contorni.
3. Praticare delicatamente col trapano
quattro fori, impiegando punta del
trapano e tasselli adatti al tipo di parete
su cui si lavora.
200.0
Controllare che il sostegno a muro sia orizzontale.
4. Fissare alla parete il sostegno a muro,
usando quattro viti robuste (le viti
devono avere un diametro minimo
di 5,5 mm), avendo cura di ssare
accuratamente le viti ai tasselli a muro,
in modo che essi siano stretti bene e
uniformemente.
5. Inne applicare la Solo bar al sostegno a
muro, facendola scorrere delicatamente
sui due supporti sporgenti. Assicurarsi
che alla ne la barra sia agganciata in
maniera ferma e sicura alla parete.
15.0
Cautela: Non montare l’unità su
compensato o altre pareti con supercie
morbida. In caso di dubbi sul tipo di
parete, consultare un professionista.
Assicurarsi che le viti siano ben strette e a
filo prima di inserire la Solo bar sui due
supporti sporgenti. Assicurarsi che la barra
sia agganciata in maniera sicura alla parete.
Diritti d'autore
Giugno 2014, © 2014 A&R Cambridge Ltd.
A & R Cambridge Limited (Arcam) si
riserva il diritto di apportare modiche alle
speciche dei prodotti indicate nel presente
documento in qualsiasi momento, senza
alcun preavviso o obbligo di notica di tali
modiche ad alcun soggetto.
Tutti i marchi registrati di parti terze sono
stati riconosciuti e rispettati. Il riferimento
a prodotti di terze parti non costituisce
promozione o raccomandazione di tali
prodotti.
La Arcam prende ogni precauzione per
garantire la massima accuratezza delle
informazioni contenute nella presente
pubblicazione, ma non si assume alcuna
responsabilità per eventuali errori o
omissioni.
Garanzia in tutto il mondo
La Arcam garantisce per un periodo
di due anni a partire dalla data di
acquisto, la conformità dei suoi prodotti
a quanto descritto nella presente guida
in tutti gli aspetti materiali. Questo
dà diritto a far riparare l'apparecchio
gratuitamente, a condizione che esso sia
stato originariamente acquistato presso un
rivenditore autorizzato Arcam.
Il concessionario Arcam è responsabile
di tutti i servizi postvendita. Il produttore
non si assume alcuna responsabilità per
difetti derivanti da incidenti, uso improprio,
abuso, usura, negligenza o da modiche
e/o riparazioni non autorizzate. Inoltre, il
produttore non accetta alcuna responsabilità
per danni o perdite che si verichino
durante il trasporto da o verso la persona
che invoca la garanzia.
La garanzia copre:
Parti e costo del lavoro per due anni dalla
data di acquisto. Dopo due anni devono
essere pagate sia le parti che il costo del
lavoro. La garanzia non copre mai i costi
di trasporto.
Richieste in garanzia
Questo apparecchio deve essere imballato
nella confezione originale e restituito
al rivenditore presso il quale è stato
acquistato. Dovrebbe essere inviato tramite
spedizione prepagata con un vettore
adabile e non per posta.
Nessuna responsabilità può essere accettata
per l'unità mentre è in transito verso il
rivenditore o il distributore e i clienti sono
pertanto invitati ad assicurare l'unità contro
perdita o danno durante il trasporto.
Registrazione on-line
È possibile registrare il prodotto on-line
all'indirizzo www.arcam.co.uk.
Problemi?
Se il rivenditore Arcam non è in grado
di rispondere a una domanda per quanto
riguarda questo o qualsiasi altro prodotto
Arcam, si prega di contattare il supporto
clienti all'indirizzo Arcam qui sotto e noi
faremo del nostro meglio per aiutarvi.
Arcam Customer Support Department,
Unit15, Pembroke Avenue,
Waterbeach, CAMBRIDGE,
CB25 9QP, Inghilterra o tramite
www.arcam.co.uk.
Italiano
IT-25IT-24
Page 100

Licenze delle
®
tecnologie
Prodotto su licenza di Dolby Laboratories.
Dolby e il simbolo della doppia D sono
marchi di Dolby Laboratories.
I termini HDMI e HDMI High Denition
Multimedia Interface, nonché il logo HDMI,
sono marchi o marchi registrati della HDMI
Licensing LLC negli Stati Uniti e negli altri
paesi.
Per i brevetti DTS, consultare il sito http://
patents.dts.com. Prodotto sotto licenza della
DTS Licensing Limited. DTS, DTS-HD, il
Simbolo, & DTS e il Simbolo insieme, sono
marchi registrati, mentre DTS-HD Master
Audio è un marchio registrato della DTS,
Inc. © DTS, Inc. Tutti i diritti sono riservati.
© 2013 CSR plc e le compagnie del suo
gruppo.
Il marchio aptX® e il logo aptX sono marchi
della CSR plc o di una delle compagnie del
suo gruppo e possono essere registrati in
una o più giurisdizioni.
Il marchio denominativo e il logo Bluetooth®
sono marchi registrati di proprietà della
Bluetooth SIG, Inc. e ogni uso di tali marchi
fatto dalla Arcam avviene sotto licenza. Altri
marchi e nomi commerciali sono quelli dei
rispettivi proprietari.
Le diciture "Made for iPod", "Made for
iPhone" e "Made for iPad" indicano che un
dispositivo elettronico è stato progettato
espressamente per essere connesso a iPod,
iPhone o iPad rispettivamente e sono
certicati dagli sviluppatori nel rispetto delle
prestazioni standard Apple. Apple non è
responsabile per il funzionamento di questo
dispositivo o per la sua conformità alle
norme di sicurezza e di regolamentazione.
Notare che l'uso di questo accessorio con
iPod, iPhone o iPad può inuenzarne le
prestazioni wireless.
La tecnologia Bluetooth funziona con
iPhone 5s, iPhone 5c, iPhone 5, iPhone 4s,
iPhone 4, iPhone 3GS, iPad Air, iPad (terza
e quarta generazione), iPad 2, iPad mini
con Retina display, iPad mini e iPod touch
(quarta e quinta generazione).
iOS, iTunes, iPad, iPhone e iPod sono
marchi della Apple Inc., registrati negli USA
e in altri paesi. App StoreSM è un marchio di
servizio della Apple Inc.
Progettato per:
• iPhone 5s
• iPhone 5c
• iPhone 5
• iPhone 4s
• iPhone 4
• iPhone 3GS
• iPad Air
• iPad mini con Retina display
• iPad (quarta generazione)
• iPad mini
• iPad (terza generazione)
• iPad 2
• iPod touch (quinta generazione)
• iPod touch (quarta generazione)
Google Play™ è un marchio di Google Inc.
Android™ è un marchio di Google Inc.
IT-26
 Loading...