

Page 1
Connections and Quickstart Guide
Connexions et Guide de démarrage rapide
Schnellstartanleitung
Aansluitingen en snelstartgids
Conexiones y Guía de Inicio Rápido
Краткое руководство по подключению и использованию
Connessione e Guida introduttiva
连接和快速入门指南
Page 2

Page 3

Connections and Quickstart Guide
English
Page 4

Important Safety Instructions
1. Read these instructions
2. Keep these instructions
3. Heed all warnings
4. Follow all instructions
5. Do not use this apparatus near water
6. Clean only with dry cloth
7. Do not block any ventilation openings. Install in accordance with the manufacturer’s instructions
8. Do not install near any heat sources such as radiators, heat registers, stoves, or other apparatus (including
ampliers) that produce heat
9. Do not defeat the safety purpose of the polarized or grounding-type plug. A polarized plug has two
blades with one wider than the other. A grounding type plug has two blades and a third grounding
prong. The wide blade or the third prong are provided for your safety. If the provided plug does not t
into your outlet, consult an electrician for replacement of the obsolete outlet
10. Protect the power cord from being walked on or pinched particularly at plugs, convenience receptacles,
and the point where they exit from the apparatus
11. Only use attachments/accessories specied by the manufacturer
12. Use only with the cart, stand, tripod, bracket, or table specied by the manufacturer, or sold with the
apparatus. When a cart is used, use caution when moving the cart/apparatus combination to avoid injury
from tip-over
13. Unplug this apparatus during lightning storms or when unused for long periods of time
14. Refer all servicing to qualied service personnel. Servicing is required when the apparatus has been
damaged in any way, such as power-supply cord or plug is damaged, liquid has been spilled or objects
have fallen into the apparatus, the apparatus has been exposed to rain or moisture, does not operate
normally, or has been dropped
15. The apparatus shall not be exposed to dripping or splashing and that objects lled with liquid, such as
vases, shall not be placed on apparatus
16. The apparatus should be connected to a mains socket outlet with a protective earthing connection
Page 5

Welcome…
…and thank you for purchasing the Arcam rPhono MM/MC phono stage.
Arcam has been producing high-quality audio components for over thirty-ve years. During that time we have
amassed a wealth of knowledge on both the design and construction of audio components in order to give the
best sound performance for the price.
This handbook provides guidance for connecting and using your rPhono.
We hope that your rPhono will give you years of trouble-free operation. In the unlikely event of any fault, or if you
simply require further information about Arcam products, our network of dealers will be happy to help you. Further
information can be found on the Arcam website at www.arcam.co.uk.
English
The rPhono development team
E-1
Page 6
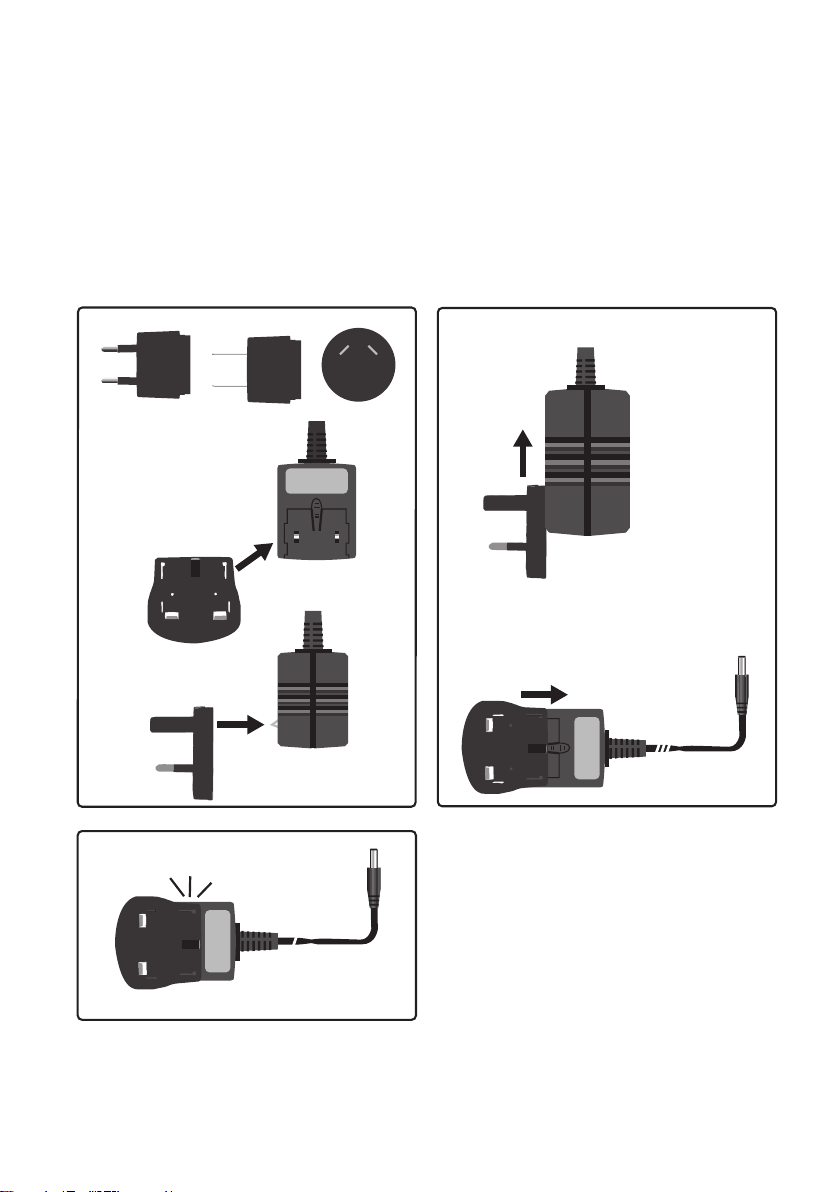
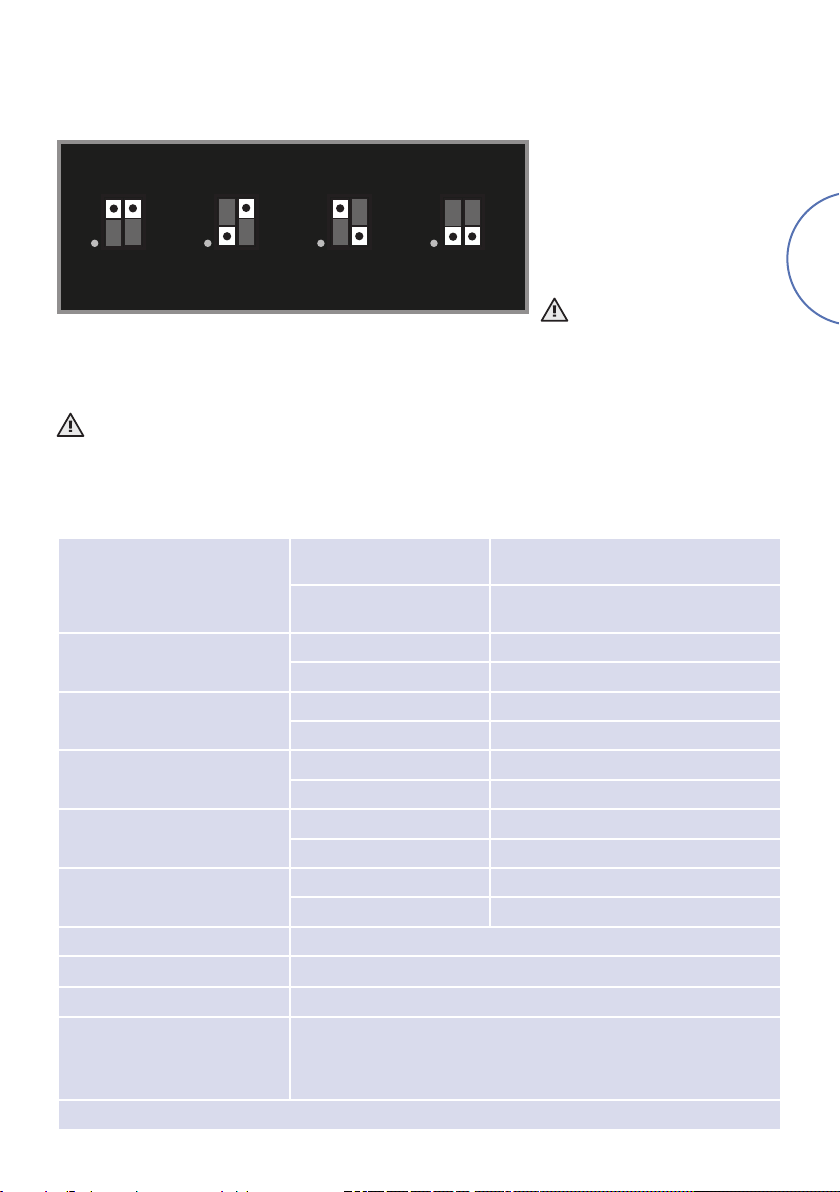
Power Supply Setup
1
EU
UK
3
Click!
US
AU
2
E-2
Page 7
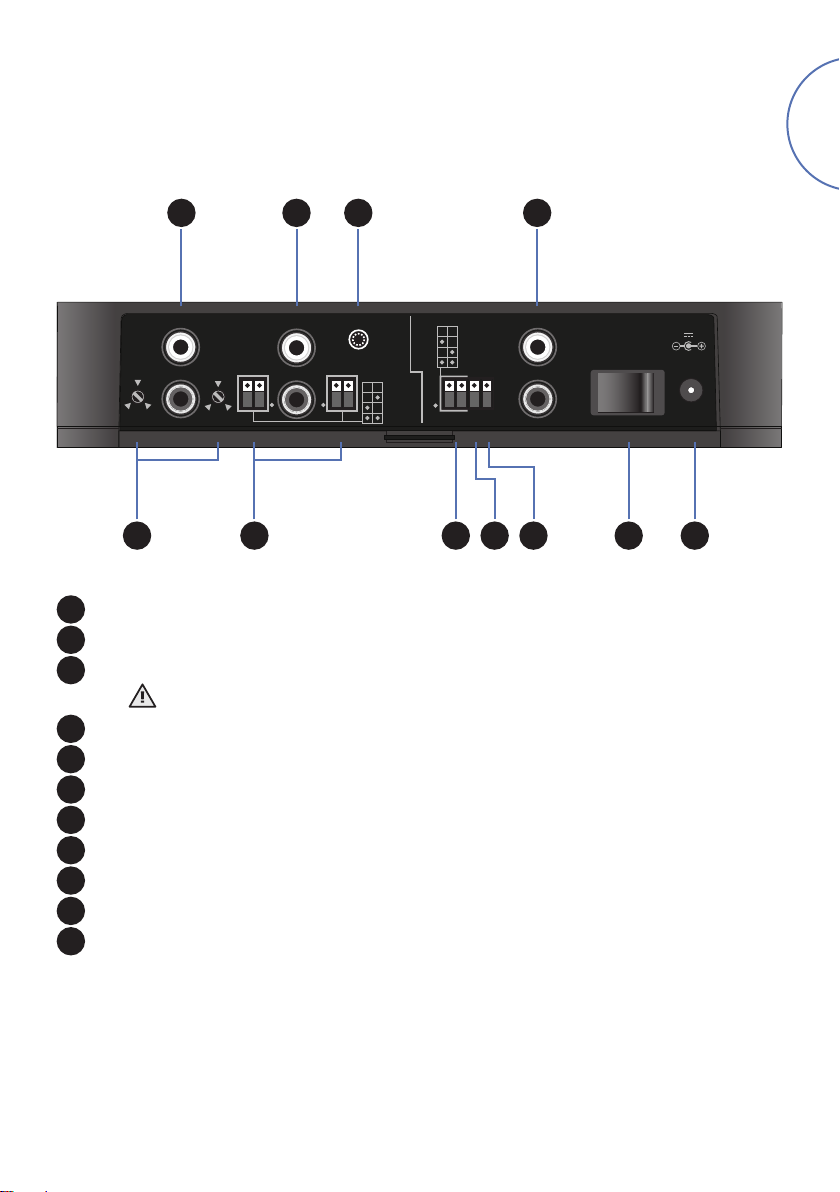
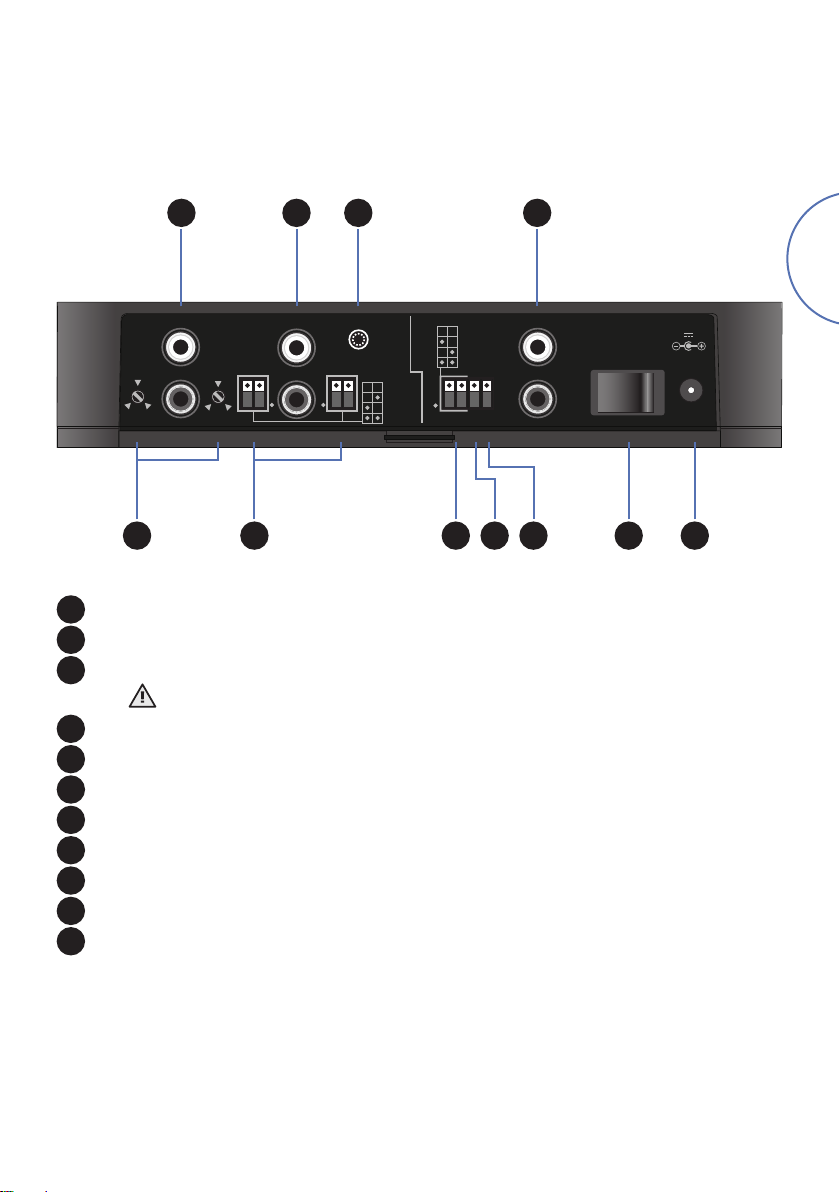
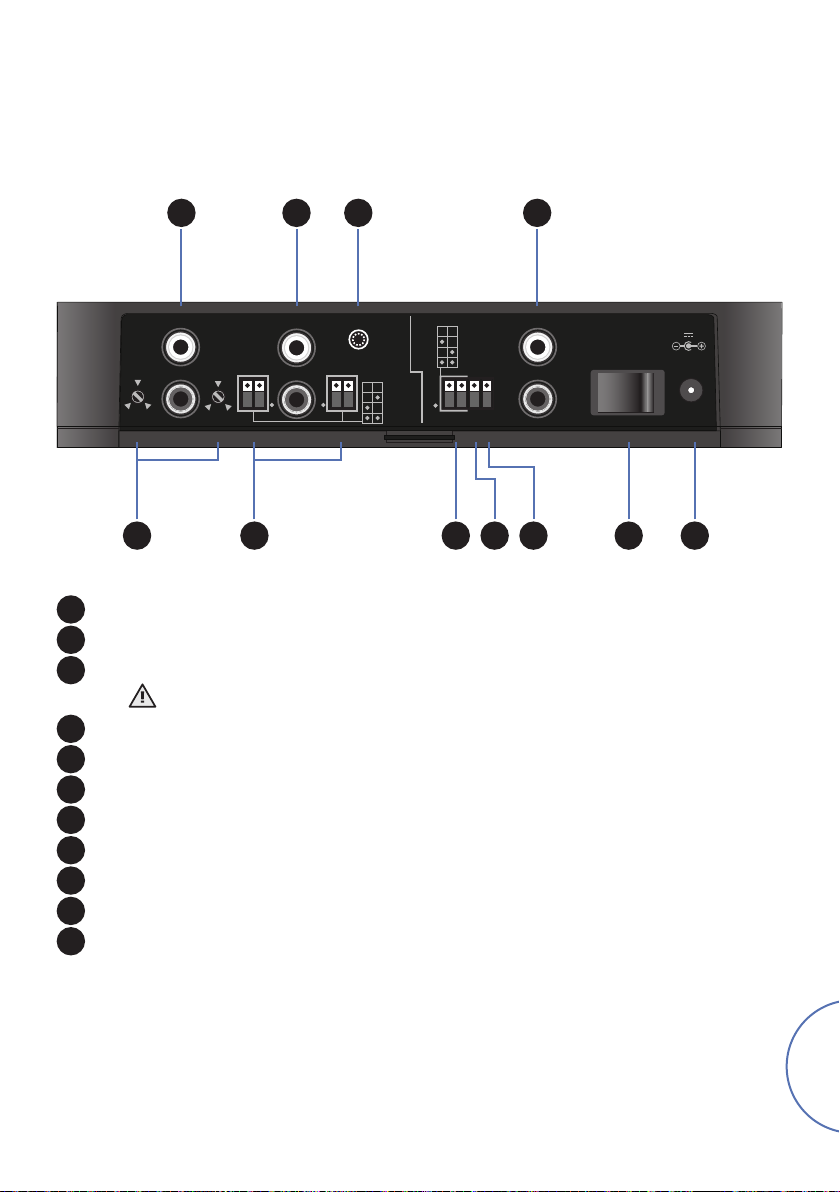
Connectors and Controls
English
1
MC
L
LOAD R
50-550Ω
R
LOAD L
50-550Ω
5 6
Phono input (MC)
1
Phono input (MM)
2
Phono ground connection
3
R
2 3
L
CAP
LOAD
120pF
220pF
340pF
440pF
GAIN
30dB
40dB
50dB
52dB
7 8 9
MM
RUMBLE OFF
ON
MC
Note that this terminal must not be used as a safety earth
rPhono output
4
Left and right input loading resistance (MC only)
5
Left and right input loading capacitance
6
rPhono gain
7
Rumble filter
8
Phono cartridge type selector
9
Power switch
10
Power input connector
11
4
OUTPUTMM
POWER
L
R
12V 2.0A
0
1
10 11
E-3
Page 8
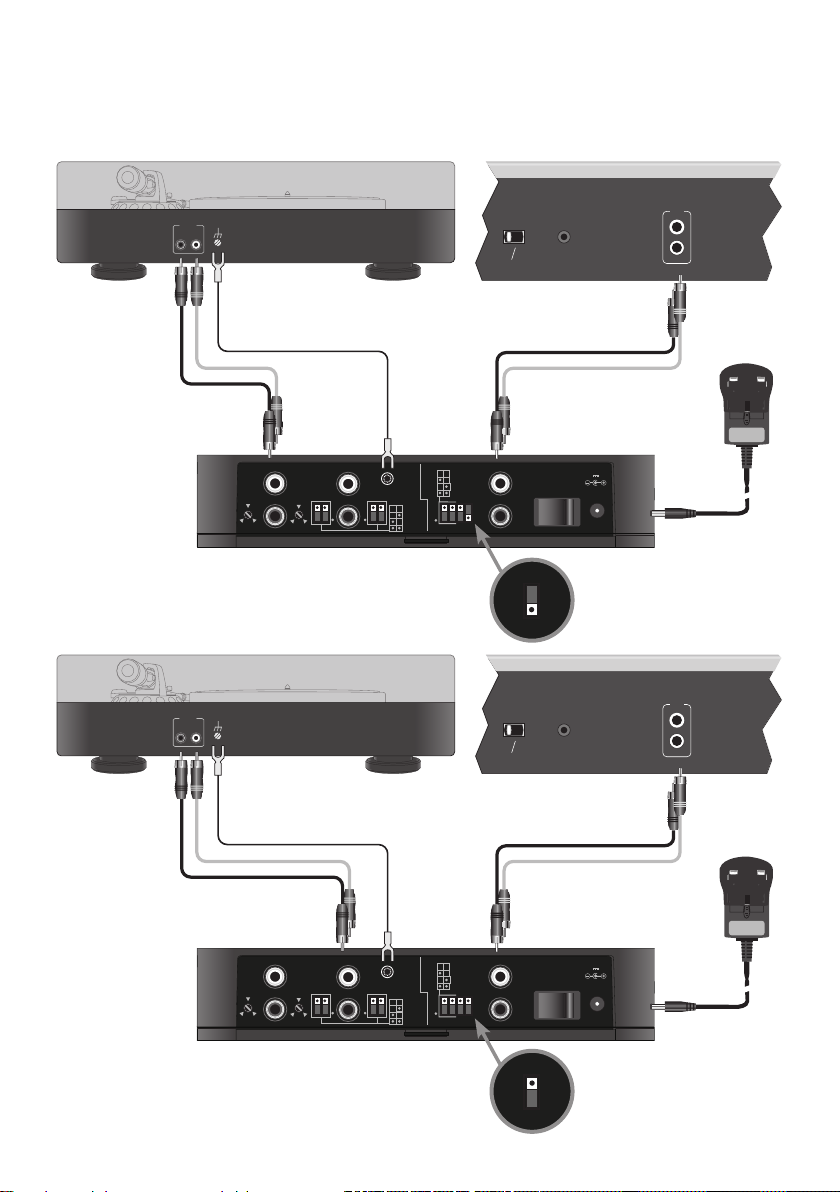
Connections
MMMC
MMMC
MMMC
Moving coil Input
GNDOUT
R L
50-550Ω
LOAD R
MC
L
R
rPhono
Moving magnet Input
50-550Ω
LOAD L
PRE
VOLTAGE SELECT
110 -120V
~60Hz
220 - 240V
~50Hz
REMOTE
IN
IN
L
R
Integrated AmplifierTurntable
Power Supply
GAIN
MM
RUMBLE OFF
ON
MC
OUTPUTMM
POWER
L
R
12V 2.0A
0
1
30dB
40dB
50dB
52dB
R
CAP
L
LOAD
120pF
220pF
340pF
440pF
E-4
rPhono
R L
PRE
GNDOUT
VOLTAGE SELECT
110 -120V
~60Hz
220 - 240V
~50Hz
REMOTE
IN
IN
L
R
Integrated AmplifierTurntable
Power Supply
GAIN
MM
RUMBLE OFF
ON
MC
OUTPUTMM
POWER
L
R
12V 2.0A
0
1
50-550Ω
LOAD R
MC
L
R
LOAD L
R
50-550Ω
30dB
40dB
50dB
52dB
CAP
L
LOAD
120pF
220pF
340pF
440pF
Page 9
Operation
Power
Turn the rPhono on by pressing the power switch located at the rear of the unit.
Always make sure the rPhono is switched off before changing inputs or making any adjustments.
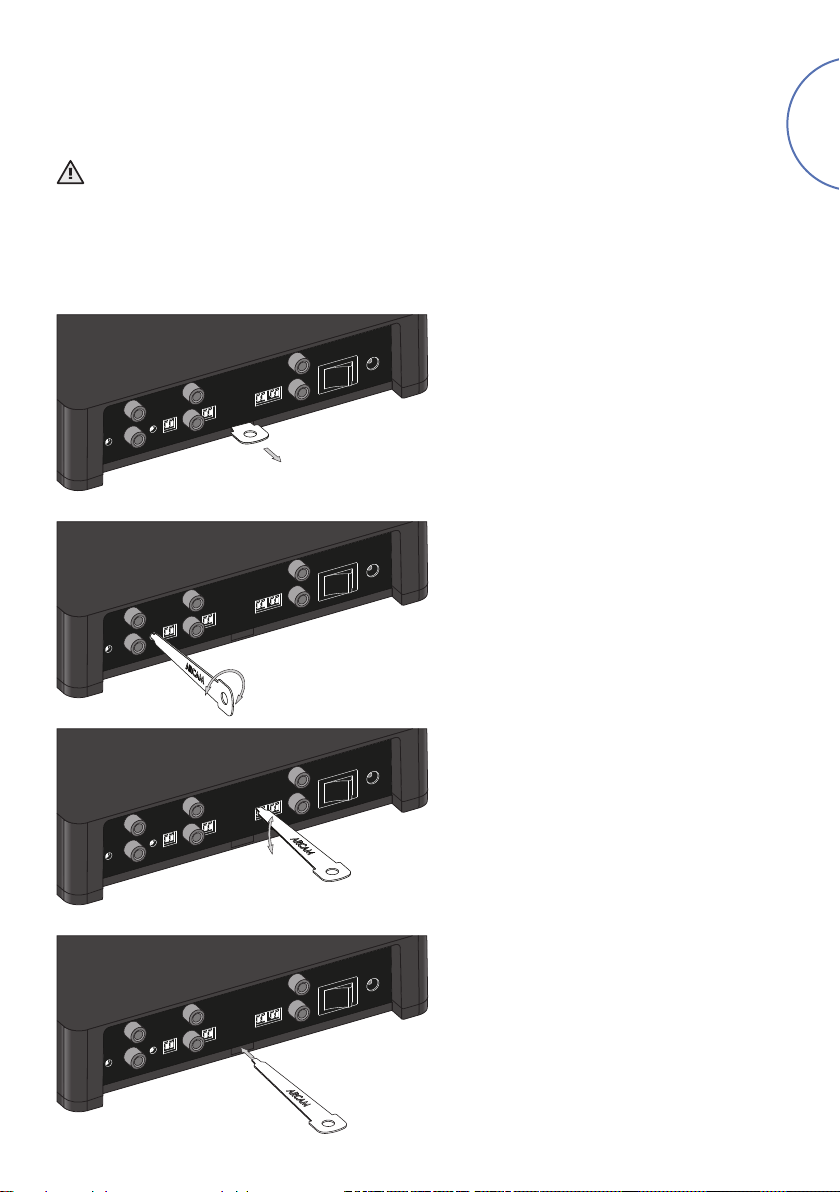
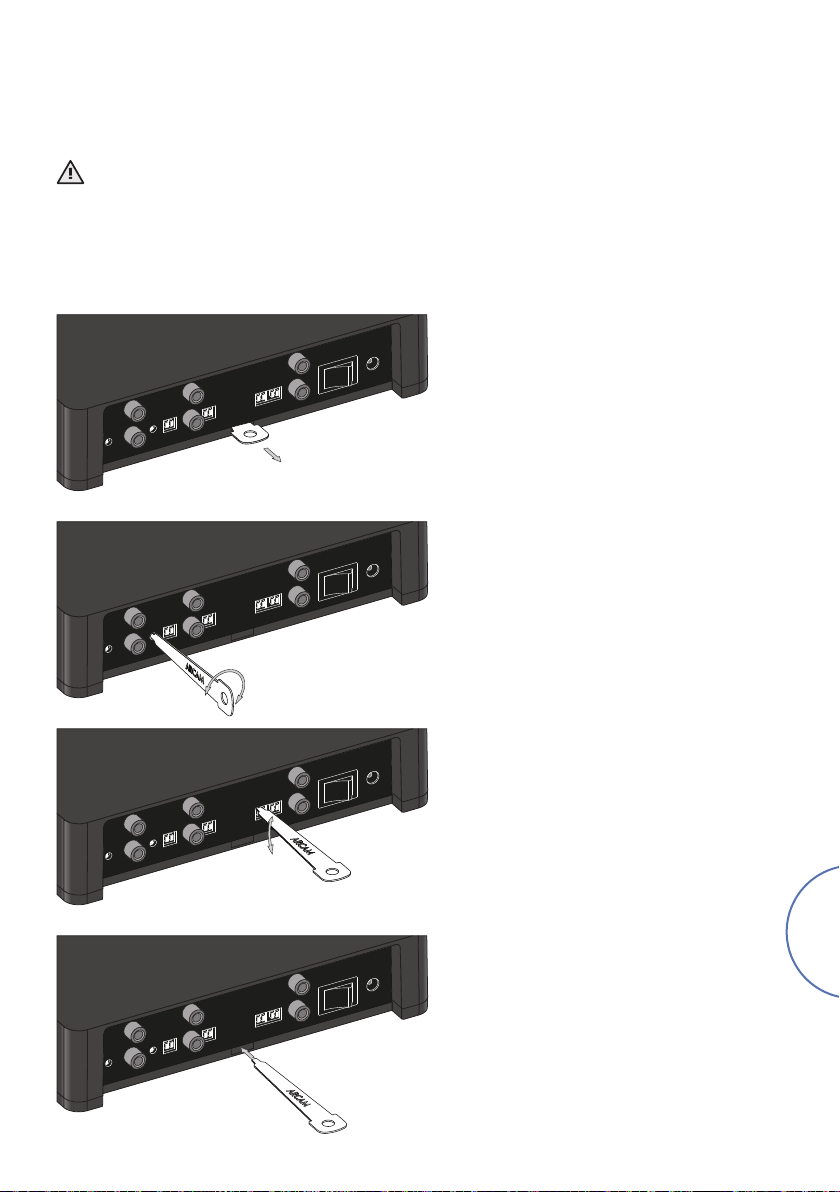
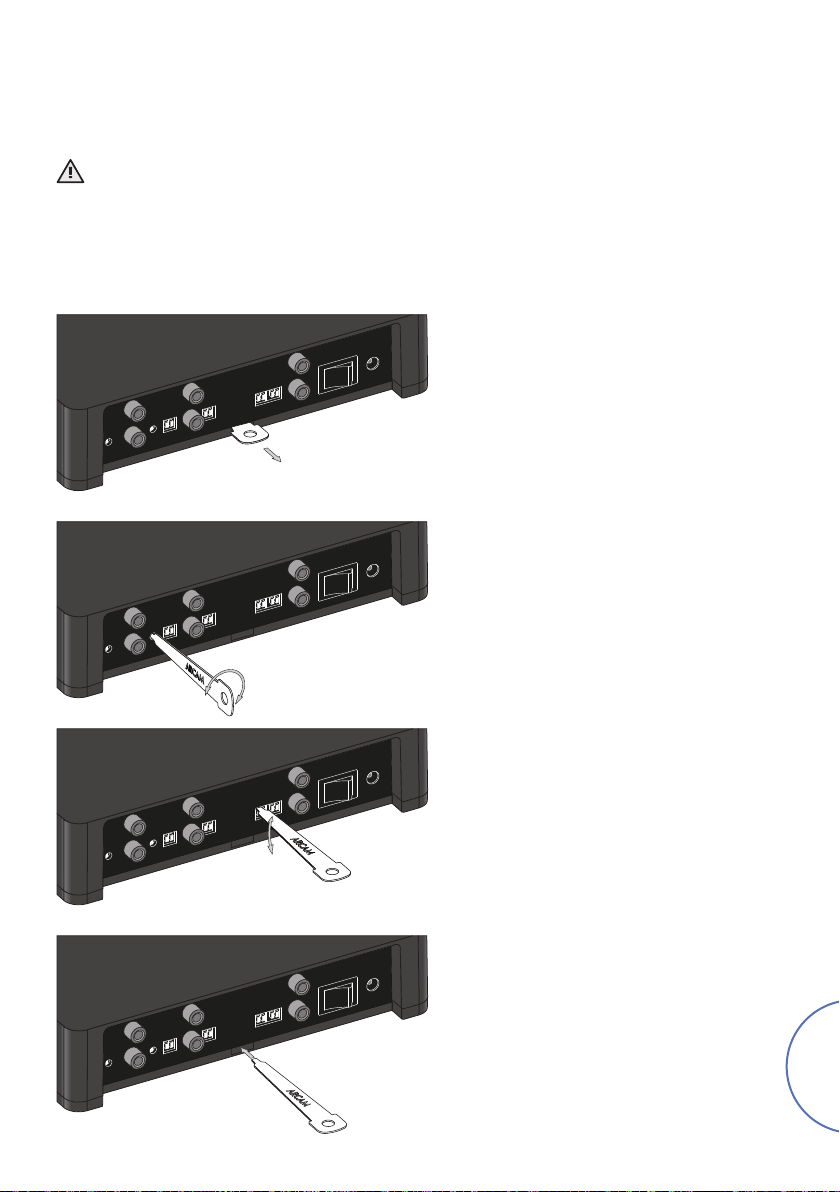
Adjusting the rear panel controls
The rPhono features a variety of controls located at the rear of the unit. For convenience, the rPhono is supplied
with a custom tool, which is designed to facilitate their adjustments.
Remove the tool from the rear of the rPhono
Adjust the trim pots by turning them left or right
English
Adjust the switches by moving them up or down
Return the tool to its holder
E-5
Page 10

Cartridge type selector
The rPhono features separate inputs for either a moving coil
(MC) or a moving magnet (MM) cartridge. Depending on your
type of cartridge, connect the turntable output to either the
MC or MM input of the rPhono and make sure that the rPhono
input is correctly selected using the MM/MC switch.
MC MM
MOVING
COIL
MC MM
MOVING
MAGNET
If required, connect the separate ground of your turntable to
the ground terminal of the rPhono, as shown on page E-4.
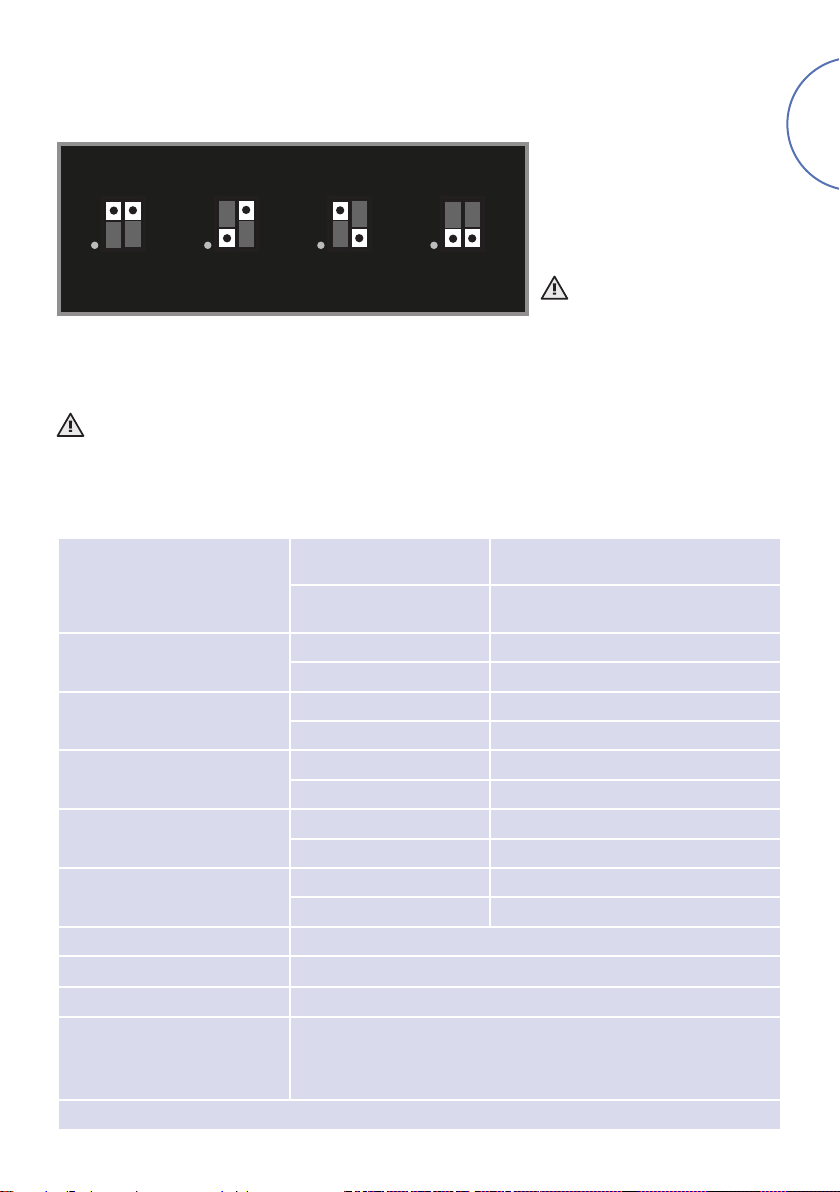
Input loading resistance (MC only)
The MC input resistive loading can be adjusted between 50 and 550Ω to best match
the specifications of your cartridge.
300Ω
175Ω
425Ω
NOTE: The left and right channel should be adjusted to the same value.
50Ω
550Ω
Input loading capacitance
120pF 220pF 340pF 440pF
Rumble lter
This filter eliminates very low frequency "rumble", typically caused by
record imperfections (e.g. pressing irregularities or warped records), which
can affect the rPhono performance.
ON RUMBLE OFF
DISABLED ENABLED
ON RUMBLE OFF
The input loading capacitance can be
set to 120, 220, 340 or 440pF to best
match the specifications of your
cartridge.
NOTE: The left and right channel
should be adjusted to the same value.
E-6
Page 11
rPhono gain
An MM input gain of 30, 40, 50 or
52dB can be selected to best match
your turntable and amplifier setup.
NOTE: The MC input has a fixed gain
of 30dB in addition to the values
30dB 40dB 50dB 52dB
selected above.
Setting the gain to an incorrect
value may result in a distorted
audio output
Output
Connect the rPhono output to the appropriate line input of your preamplifier or integrated amplifier.
Do not connect the rPhono output to the dedicated PHONO input available on some integrated amplifiers,
unless the amplifier is capable of reducing its input gain to normal line level (as it is the case with the Arcam
A19, A29, A39 and A49 integrated amplifiers).
Technical Specications
English
Rumble filter OFF
Frequency response
Rumble filter ON
Total Harmonic Distortion + Noise
(at 1kHz, 5V Out)
System gain
Input impedance
Equivalent input noise
(A-weighted, 40dB MM gain)
Output level
Power requirements (max) 12V DC, 2.0A
Dimensions (WxHxD) 194 x 44 x 124mm
Net weight 1.1kg
Supplied accessories
E&OE. All specification values are typical unless otherwise stated
MC input, 30dB gain 0.005%
MM input, 30dB gain 0.0015%
MC input 60, 70, 80 or 82dB
MM input 30, 40, 50 or 52dB
MC input 50 - 550Ω + 1nF
MM input 47kΩ + 120, 220, 340 or 440pF
MC input 0.06µV RMS
MM input 0.5µV RMS
Nominal 0.5V RMS
Maximum 6V RMS
Power supply with interchangeable plugs
Stereo phono–phono cable
DIP switch and pot trim tool
User manual and registration card
20Hz-50kHz ± 0.2dB
-3dB at 7Hz
45Hz-50kHz ± 0.2dB
-3dB at 20Hz, -13dB at 10Hz
E-7
Page 12

Worldwide Guarantee
This entitles you to have the unit repaired free of charge for two years after purchase, provided that it was
originally purchased from an authorised Arcam dealer. The manufacturer can take no responsibility for defects
arising from accident, misuse, abuse, wear and tear, neglect or through unauthorized adjustment and/or repair,
neither can they accept responsibility for damage or loss occurring during transit to or from the person claiming
under the guarantee.
The warranty covers:
Parts and labour costs for two years from the purchase date. After two years you must pay for both parts and
labour costs. The warranty does not cover transportation costs at any time.
Claims under guarantee
This equipment should be packed in the original packing and returned to the dealer from whom it was
purchased, or failing this, directly to the Arcam distributor in the country where the product was purchased.
It should be sent carriage prepaid by a reputable carrier – not by post. No responsibility can be accepted for the
unit whilst in transit to the dealer or distributor and customers are therefore advised to insure the unit against loss
or damage whilst in transit.
For further details contact Arcam at support@arcam.co.uk.
Problems?
If your Arcam dealer is unable to answer any query regarding this or any other Arcam product please contact
Arcam Customer Support at the above address and we will do our best to help you.
E-8
Correct disposal of this product
This marking indicates that this product should not be disposed with other household waste
throughout the EU.
To prevent possible harm to the environment or human health from uncontrolled waste disposal
and to conserve material resources, this product should be recycled responsibly.
To dispose of your product, please use your local return and collection systems or contact the
retailer where the product was purchased.
Page 13

Connexions et Guide de démarrage rapide
Français
Page 14

Page 15

Bienvenue…
…et merci d’avoir acheté l’étage phono MM/MC Arcam rPhono.
Arcam produit des composants audio de haute qualité depuis plus de trente-cinq ans. Pendant ce temps, nous
avons accumulé de vastes connaissances autant sur la conception que sur la construction des composants audio
an d’obtenir la meilleure performance audio pour le prix.
Ce manuel fournit des instructions pour connecter et utiliser votre rPhono.
Nous espérons que votre rPhono vous assurera des années de fonctionnement sans le moindre problème.
Dans l’éventualité, peu probable, où une panne surviendrait, ou si vous recherchez simplement des informations
supplémentaires sur les produits Arcam, les représentants de notre réseau de revendeurs se feront un plaisir de
vous aider. D’autres informations sont disponibles sur notre site web d’Arcam à l’adresse www.arcam.co.uk.
L’équipe de développement rPhono
Français
F-1
Page 16

Installation de l’alimentation
1
UE
GB
3
Clic !
US
AU
2
F-2
Page 17
Connecteurs et contrôles
1
MC
L
LOAD R
50-550Ω
R
LOAD L
50-550Ω
5 6
Entrée phono (MC)
1
Entrée phono (MM)
2
Connexion à la terre du phono
3
R
2 3
L
CAP
LOAD
120pF
220pF
340pF
440pF
GAIN
30dB
40dB
50dB
52dB
7 8 9
OUTPUTMM
MM
RUMBLE OFF
ON
MC
4
POWER
L
R
12V 2.0A
0
1
10 11
Remarque : cette borne ne doit pas être utilisée comme une mise à la terre de sécurité.
Sortie rPhono
4
Impédance des entrées gauche et droite (MC uniquement)
5
Capacité de charge des entrées gauche et à droite
6
Gain de la rPhono
7
Filtre passe-bas
8
Sélecteur de type de cartouche de lecture
9
Bouton de l’alimentation
10
Connecteur d’entrée de l’alimentation
11
Français
F-3
Page 18

Connexions
MMMC
MMMC
MMMC
Entrée à bobine mobile
GNDOUT
R L
50-550Ω
LOAD R
MC
L
R
50-550Ω
rPhono
Entrée à aimant mobile
LOAD L
PRE
VOLTAGE SELECT
110 -120V
~60Hz
220 - 240V
~50Hz
REMOTE
IN
IN
L
R
Amplificateur intégréPlatine
Alimentation
GAIN
MM
RUMBLE OFF
ON
MC
OUTPUTMM
POWER
L
R
12V 2.0A
0
1
30dB
40dB
50dB
52dB
R
CAP
L
LOAD
120pF
220pF
340pF
440pF
F-4
rPhono
R L
PRE
GNDOUT
VOLTAGE SELECT
110 -120V
~60Hz
220 - 240V
~50Hz
REMOTE
IN
IN
L
R
Amplificateur intégréPlatine
Alimentation
GAIN
MM
RUMBLE OFF
ON
MC
OUTPUTMM
POWER
L
R
12V 2.0A
0
1
50-550Ω
LOAD R
MC
L
R
LOAD L
R
50-550Ω
30dB
40dB
50dB
52dB
CAP
L
LOAD
120pF
220pF
340pF
440pF
Page 19

Guide d’utilisation
Alimentation
Allumez le rPhono en appuyant sur l’interrupteur situé à l’arrière.
Assurez-vous toujours que le rPhono est éteint avant de changer d’entrées ou d’effectuer des réglages.
Réglage des commandes du panneau arrière
Le rPhono comporte une variété de commandes situées à l’arrière. Pour plus de commodité, le rPhono est livré
avec un outil personnalisé conçu pour faciliter leurs réglages.
Retirez l’outil de la partie arrière du rPhono
Réglez les potentiomètres en les tournant vers la
gauche ou la droite
Français
Réglez les commutateurs en les déplaçant vers le
haut ou vers le bas
Remettez l’outil dans son emplacement
F-5
Page 20
Sélecteur de type de cartouche
Le rPhono comporte des entrées séparées pour une cartouche
soit à bobine mobile (MC) soit à aimant mobile (MM). En
fonction du type de cartouche, branchez la sortie de la platine
à l’entrée MC ou MM du rPhono et assurez-vous qu’elle est
correctement sélectionnée à l’aide du commutateur MM/MC.
MC MM
MOVING
COIL
MC MM
MOVING
MAGNET
Si nécessaire, connectez la masse séparée de votre platine à la
borne de terre du rPhono, comme illustré à la page F-4.
Impédance d’entrée (MC uniquement)
La charge résistive de l’entrée MC peut .être réglée entre 50 et 550 Ω pour
correspondre au mieux aux caractéristiques de votre cartouche.
300Ω
175Ω
425Ω
REMARQUE : Les canaux gauche et droit doivent être réglés à la même valeur.
50Ω
550Ω
Capacité de charge des entrées
120pF 220pF 340pF 440pF
Filtre passe-bas
Ce filtre élimine le « grondement » à très basse fréquence, généralement
causé par les imperfections des disques (comme les irrégularités dues à
la presse ou les disques déformés), qui peut affecter les performances du
rPhono.
ON RUMBLE OFF
DISABLED ENABLED
ON RUMBLE OFF
La capacité de charge des entrées peut
être réglée sur 120, 220, 340 ou 440 pF
pour correspondre au mieux aux
caractéristiques de votre cartouche.
REMARQUE : Les canaux gauche et
droit doivent être réglés à la même
valeur.
F-6
Page 21
Gain de la rPhono
Un gain d’entrée MM de 30, 40, 50 ou
52 dB peut être sélectionné pour
correspondre au mieux à la
configuration de votre platine et de
votre amplificateur.
REMARQUE: L’entrée MC a un gain
30dB 40dB 50dB 52dB
fixe de 30 dB, en plus des valeurs
indiquées ci-dessus.
Régler le gain à une valeur
incorrecte peut entraîner une
sortie audio déformée
Sortie
Branchez la sortie du rPhono à l’entrée de ligne appropriée de votre préamplificateur ou de votre amplificateur intégré.
Ne branchez pas la sortie du rPhono à l’entrée PHONO dédiée disponible sur certains amplificateurs intégrés,
à moins que l’amplificateur ne soit capable de réduire son gain d’entrée au niveau de ligne normal (comme
c’est le cas avec les amplificateurs intégrés Arcam A19, A29, A39 et A49).
Spécications Techniques
Français
Filtre passe-bas inactif
Réponse en fréquence
Filtre passe-bas actif
Distorsion harmonique totale +
bruit (à 1 kHz, 5 V en sortie)
Gain du système
Impédance d’entrée
Bruit d’entrée équivalent
(Pondéré A, gain MM de 40 dB)
Niveau de sortie
Besoins en alimentation (max.) 12 V CC, 2,0 A
Dimensions (l x h x d) 194 x 44 x 124 mm
Poids net 1,1kg
Accessoires fournis
E&OE. Toutes les valeurs techniques sont typiques sauf mention contraire
Entrée MC, gain de 30 dB 0,005%
Entrée MM, gain de 30 dB 0,0015%
Entrée MC 60, 70, 80 ou 82 dB
Entrée MM 30, 40, 50 ou 52 dB
Entrée MC 50 - 550 Ω + 1 nF
Entrée MM 47 kΩ + 120, 220, 340 ou 440 pF
Entrée MC 0,06 µV RMS
Entrée MM 0,5 µV RMS
Nominal 0,5V RMS
Maximum 6V RMS
Alimentation avec prises interchangeables
Câble phono-phono stéréo
Outil pour potentiomètre et commutateur DIP
Mode d’emploi et carte d’enregistrement
20 Hz-50 kHz ± 0,2 dB
-3 dB at 7 Hz
45 Hz-50 kHz ± 0,2 dB
-3 dB à 20 Hz, -13 dB à 10 Hz
F-7
Page 22

Garantie internationale
Cette garantie vous donne droit à des réparations gratuites de l’appareil pendant deux ans à compter de la date
d’achat, si l’achat a été fait auprès d’un revendeur Arcam agréé. Le fabricant ne peut être tenu responsable de
défauts provoqués par un accident, une mauvaise utilisation, une utilisation abusive, une usure normale, de
la négligence ou des réglages et/ou réparations non autorisés, et n’accepte pas non plus la responsabilité des
dommages et pertes encourus durant le transport vers ou à partir de la personne réclamant les réparations sous
garantie.
Cette garantie couvre:
Les frais de pièces et main d’œuvre pendant deux ans à compter de la date d’achat. Au bout de deux ans, il vous
faut payer les frais de pièces et de main d’œuvre. La garantie ne couvre en aucun cas les frais de transport.
Réclamations sous garantie
Cet équipement doit être emballé dans l’emballage d’origine et retourné au revendeur auprès duquel il a été
acheté, ou à défaut, directement auprès du distributeur Arcam dans le pays où le produit a été acheté.
Il doit être expédié par l’intermédiaire d’un transporteur réputé – pas par la poste. Aucune responsabilité ne peut
être acceptée durant le transit de l’appareil vers le revendeur ou le distributeur et il est donc conseillé aux clients
d’assurer l’appareil contre toute perte ou tout dommage durant le transport.
Pour en savoir plus, veuillez contacter Arcam à l’adresse support@arcam.co.uk.
Des problèmes?
Si votre revendeur Arcam n’est pas en mesure de répondre à vos questions sur cet appareil ou tout autre appareil
Arcam, veuillez vous adresser au service après-vente d’Arcam à l’adresse ci-dessus. Nous ferons de notre mieux
pour vous aider.
F-8
Mise au rebut adéquate de cet appareil
Les plaques signalétiques indiquent que cet appareil ne doit pas être jeté avec le reste des
déchets ménagers, et ce dans toute l’Union européenne.
Pour protéger l’environnement et la santé en évitant une mise au rebut des déchets non contrôlée
et pour conserver les ressources de matériaux, cet appareil doit être recyclé de manière responsable.
Si vous devez jeter votre appareil, veuillez le faire conformément aux systèmes de renvoi et de
collecte locaux, ou contactez le revendeur ayant vendu cet appareil.
Page 23

Schnellstartanleitung
Deutsch
Page 24

Page 25

Willkommen…
…und vielen Dank für den Kauf der Arcam rPhono MM/MC Phonostufe.
Arcam stellt seit mehr als 35 Jahren hochwertige Audiokomponenten her. Während dieser Zeit haben wir viel
Wissen und Erfahrung über das Design und den Bau von Audiokomponenten gesammelt, auf deren Grundlage
wir Ihnen beste Soundleistung zu einem guten Preis bieten können.
Dieses Handbuch enthält Hinweise für den Anschluss und die Verwendung Ihres rPhono.
Wir hoen, dass Ihnen Ihr rPhono viele Jahre lang Freude bereiten wird. Im unwahrscheinlichen Fall eines
Produktfehlers bzw. wenn Sie Interesse an zusätzlichen Informationen über Arcam Produkte haben, steht Ihnen
unser Händlernetz gerne zur Verfügung. Weitere Informationen nden Sie auch auf der Website von Arcam unter
www.arcam.co.uk.
Das rPhono Entwicklungsteam
Deutsch
D-1
Page 26

Einrichten des Netzadapters
1
EU
GB
3
Klick!
US
AU
2
D-2
Page 27

Anschlüsse und Bedienelemente
1
MC
L
LOAD R
50-550Ω
R
LOAD L
50-550Ω
5 6
Phono-Eingang (MC)
1
Phono-Eingang (MM)
2
Phono-Erdungsanschluss
3
R
2 3
L
CAP
LOAD
120pF
220pF
340pF
440pF
GAIN
30dB
40dB
50dB
52dB
7 8 9
OUTPUTMM
MM
RUMBLE OFF
ON
MC
4
POWER
L
R
12V 2.0A
0
1
10 11
Bitte beachten Sie, dass dieser Anschluss nicht als Schutzerde verwendet werden darf
rPhono-Ausgang
4
Linker und rechter Eingangslastwiderstand (nur MC)
5
Linke und rechte Eingangslastkapazität
6
rPhono Verstärkung
7
Rumpelfilter
8
Phono-Tonabnehmertyp-Auswahl
9
Ein-/Ausschalter
10
Stromeingangsbuchse
11
Deutsch
D-3
Page 28

Anschlüsse
MMMC
MMMC
MMMC
Drehspuleneingang
GNDOUT
R L
50-550Ω
LOAD R
MC
L
LOAD L
R
50-550Ω
rPhono
Moving Magnet-Eingang
PRE
VOLTAGE SELECT
110 -120V
~60Hz
220 - 240V
~50Hz
REMOTE
IN
IN
L
R
Integrierter VerstärkerPlattenteller
Stromver-
sorgung
GAIN
MM
RUMBLE OFF
ON
MC
OUTPUTMM
POWER
L
R
12V 2.0A
0
1
30dB
40dB
50dB
52dB
R
CAP
L
LOAD
120pF
220pF
340pF
440pF
D-4
rPhono
R L
PRE
GNDOUT
VOLTAGE SELECT
110 -120V
~60Hz
220 - 240V
~50Hz
REMOTE
IN
IN
L
R
Integrierter VerstärkerPlattenteller
Stromver-
sorgung
GAIN
MM
RUMBLE OFF
ON
MC
OUTPUTMM
POWER
L
R
12V 2.0A
0
1
50-550Ω
LOAD R
MC
L
R
LOAD L
R
50-550Ω
30dB
40dB
50dB
52dB
CAP
L
LOAD
120pF
220pF
340pF
440pF
Page 29

Betrieb
Netzanschluss
Schalten Sie die rPhono durch Drücken des Power auf der Rückseite des Gerätes ein.
Es ist darauf zu achten, dass die rPhono ausgeschaltet ist, bevor Eingänge geändert oder andere
Anpassungen vorgenommen werden..
Anpassung der Bedienelemente auf der Rückseite
Die rPhono bietet eine Vielzahl von Bedienelementen, die sich auf der Rückseite des Gerätes befinden. Die rPhono
ist mit einem Spezialwerkzeug ausgestattet, mit dem diese Anpassungen bequem vorgenommen werden können.
Entfernen Sie das Werkzeug von der Rückseite der
rPhono
Stellen Sie die Trimmer durch Drehen nach links oder
rechts ein
Die Schalter können durch die Verstellung nach oben
oder unten angepasst werden.
Deutsch
Stecken Sie das Werkzeug zurück in die Halterung
D-5
Page 30

Auswahl des Tonabnehmertyps
Die rPhono bietet separate Eingänge für Tonabnehmer des Typs
Moving Coil (MC) oder Moving Magnet (MM). Verbinden Sie
den Plattenspieler-Ausgang je nach Typ des Tonabnehmers
entweder mit dem MC- oder MM-Eingang der rPhono und
stellen Sie sicher, dass der Eingang der rPhono mithilfe des
MM/MC-Schalters korrekt ausgewählt ist.
MC MM
MOVING
COIL
MC MM
MOVING
MAGNET
Verbinden Sie bei Bedarf die separate Erde des Plattenspielers
mit dem Erdungsanschluss der rPhono, wie auf Seite D-4
gezeigt.
Eingangslastwiderstand (nur MC)
Die ohmsche Belastung des MC-Eingangs kann zwischen 50 und 550 Ω angepasst
werden, um den technischen Angaben Ihres Tonabnehmers zu entsprechen.
300Ω
175Ω
425Ω
HINWEIS: Der linke und rechte Kanal sollte auf den gleichen Wert eingestellt werden.
50Ω
550Ω
Eingangslastkapazität
120pF 220pF 340pF 440pF
Rumpellter
Dieser Filter beseitigt das niederfrequente „Rumpeln“, das in der Regel
durch Unvollkommenheiten der Schallplatte (z. B. Unregelmäßigkeiten
beim Pressen oder verzogene Schallplatten) verursacht wird und die
Leistung der rPhono beeinträchtigen kann.
ON RUMBLE OFF
DISABLED ENABLED
ON RUMBLE OFF
Die Eingangslastkapazität kann auf
120, 220, 340 oder 440 pF eingestellt
werden, um den technischen
Angaben Ihres Tonabnehmers zu
entsprechen.
HINWEIS: Der linke und rechte
Kanal sollte auf den gleichen Wert
eingestellt werden.
D-6
Page 31

rPhono Verstärkung
Um die beste Abstimmung mit der
Einrichtung Ihres Plattenspielers und
Verstärkers zu erreichen, kann eine
MM-Eingangsverstärkung von 30, 40,
50 oder 52 dB ausgewählt werden.
HINWEIS: Zusätzlich zu den oben
30dB 40dB 50dB 52dB
ausgewählten Werten besitzt der
MC-Eingang eine feste Verstärkung
von 30 dB.
Wenn eine Verstärkung mit
einem falschen Wert eingestellt
wird, kann dies zu einer verzerrten
Audioausgabe führen.
Ausgang
Schließen Sie den Ausgang der rPhono an den entsprechenden Line-Eingang Ihres Vorverstärkers oder integrierten
Verstärkers an.
Schließen Sie den Ausgang der rPhono nicht an den dedizierten PHONO-Eingang an, der bei einigen integrierten
Verstärkern verfügbar ist, es sei denn der Verstärker kann seine Eingangsverstärkung auf den nominalen
Line-Pegel reduzieren (dies ist z. B. der Fall bei den integrierten Verstärkern A19, A29, A39 und A49 von Arcam).
Technische Daten
Deutsch
Rumpelfilter AUS
Frequenzgang
Rumpelfilter AN
Gesamte harmonische Verzerrung +
Rauschen (bei 1 kHz, 5 V Ausgang)
Systemverstärkung
Eingangsimpedanz
Gleichwertiges Eingangsrauschen
(A-gewichtet, 40 dB MM-Verstärkung)
Ausgangspegel
Anforderungen an die
Stromversorgung (max.)
Abmessungen (B x H x T) 194 x 44 x 124mm
Nettogewicht 1,1kg
Mitgeliefertes Zubehör
Fehler und Auslassungen vorbehalten Alle Spezifikationen sind typische Werte falls nicht abweichend angegeben.
MC-Eingang, 30 dB Verstärkung 0,005%
MM-Eingang, 30 dB Verstärkung 0,0015%
MC-Eingang 60, 70, 80 oder 82 dB
MM-Eingang 30, 40, 50 oder 52 dB
MC-Eingang 50 - 550 Ω + 1 nF
MM-Eingang 47 kΩ + 120, 220, 340 oder 440 pF
MC-Eingang 0,06 µV RMS
MM-Eingang 0,5 µV RMS
Nennwert 0,5V RMS
Maximum 6V RMS
12V DC, 2,0A
Netzadapter mit austauschbaren Steckern
Stereo Cinch-Kabel
DIP-Schalter und Trimm-Werkzeug
Benutzerhandbuch und Registrierungskarte
20 Hz - 50 kHz ± 0,2 dB
-3 dB bei 7 Hz
45 Hz - 50 kHz ± 0,2 dB
-3 dB bei 20 Hz, -13 dB bei 10 Hz
D-7
Page 32

Weltweite Garantie
Sie sind berechtigt, das Gerät zwei Jahre nach Kaufdatum bei einem autorisierten Arcam-Fachhändler kostenlos
reparieren zu lassen, unter der Voraussetzung, dass es ursprünglich bei einem Arcam-Händler erworben
wurde. Der Hersteller übernimmt keine Verantwortung für Schäden, die durch Unfall, Missbrauch, Verschleiß,
Vernachlässigung oder unzulässige Veränderungen bzw. Reparaturen entstehen. Außerdem wird keinerlei
Verantwortung für Schäden oder Verlust des Gerätes während des Transports zum oder vom Garantienehmer
übernommen.
Die Garantie umfasst Folgendes:
Teile- und Arbeitsstundenkosten bis zu zwei Jahre nach dem Kaufdatum. Nach Ablauf von zwei Jahren müssen
Sie die vollen Kosten für Ersatzteile und Arbeitsstunden tragen. Versandkosten werden nicht übernommen.
Inanspruchnahme der Garantie
Das Gerät sollte in der Originalverpackung an den Händler zurückgegeben werden, bei dem es erworben wurde.
Sie können es auch direkt an den Arcam-Händler in dem Land schicken, in dem das Produkt gekauft wurde.
Der Versand muss frei Haus durch einen angesehenen Kurier erfolgen – nicht mit der Post. Da keine
Verantwortung für Schäden oder Verlust während des Transports zum Händler oder Distributor übernommen
wird, sollten Sie das Gerät entsprechend versichern.
Weitere Informationen erhalten Sie von Arcam unter support@arcam.co.uk.
Probleme?
Kann Ihr Arcam-Händler Fragen zu diesem oder einem anderen Arcam-Produkt nicht beantworten, wenden Sie
sich an den Arcam-Kundendienst, und wir versuchen unser Möglichstes, um Ihnen zu helfen.
D-8
Sachgemäße Entsorgung des Produkts
Diese Kennzeichnung zeigt an, dass das Produkt in der gesamten EU nicht mit anderem
Haushaltsmüll entsorgt werden darf.
Zur Vermeidung möglicher Umwelt- oder Gesundheitsschäden durch unkontrollierte Entsorgung
und zur Materialerhaltung sollte dieses Produkt verantwortungsvoll entsorgt werden.
Zur Entsorgung Ihres Produkts verwenden Sie bitte Ihre örtlichen Entsorgungssysteme oder
kontaktieren Sie den Händler, bei dem Sie das Produkt erstanden haben.
Page 33

Aansluitingen en snelstartgids
Nederlands
Page 34

Page 35

Welkom…
…en hartelijk dank voor de aanschaf van de Arcam rPhono MM/MC-phonotrap.
Arcam produceert al meer dan vijfendertig jaar audiocomponenten van hoge kwaliteit. Gedurende die tijd hebben
we een schat aan kennis over zowel het ontwerp en de bouw van audiocomponenten vergaard om de beste
geluidsprestaties voor de prijs te kunnen bieden.
Dit handboek geeft aanwijzingen voor het aansluiten en het gebruik van uw rPhono.
We hopen dat uw rPhono u jarenlang probleemloos gebruik zal geven. In het onwaarschijnlijke geval dat het
systeem defect raakt of indien u meer informatie wilt ontvangen over producten van Arcam, dan zijn de dealers
van ons netwerk u graag van dienst. Meer informatie is te vonden op de Arcam website op www.arcam.co.uk.
Het rPhono-ontwikkelingsteam
Nederlands
N-1
Page 36

Instellingen voedingsspanning
1
EU
VK
3
Klik!
VS
AU
2
N-2
Page 37

Aansluitingen en bedieningsknoppen
1
MC
L
LOAD R
R
50-550Ω
50-550Ω
5 6
Phono-ingang (MC)
1
Phono-ingang (MM)
2
Phono-aarding
3
LOAD L
R
2 3
L
CAP
LOAD
120pF
220pF
340pF
440pF
GAIN
30dB
40dB
50dB
52dB
7 8 9
OUTPUTMM
MM
RUMBLE OFF
ON
MC
4
L
R
Merk op dat deze klem niet als veiligheidsaarde mag worden gebruikt
rPhono-uitgang
4
Laadweerstand linker en rechter ingang (alleen MC)
5
Laadcapacitantie linker en rechter ingang
6
rPhono-versterking
7
Rumble-filter
8
Keuzeknop Phono-cartridgetype
9
Aan/Uit-schakelaar
10
Voedingsaansluiting
11
POWER
12V 2.0A
0
1
10 11
Nederlands
N-3
Page 38

Aansluitingen
MMMC
MMMC
MMMC
Ingang voor bewegende spoel
GNDOUT
R L
50-550Ω
LOAD R
MC
L
R
LOAD L
R
50-550Ω
CAP
L
LOAD
rPhono
Ingang voor bewegende magneet
PRE
VOLTAGE SELECT
110 -120V
~60Hz
220 - 240V
~50Hz
REMOTE
IN
IN
L
R
Geïntegreerde versterkerDraaitafel
Voedings-
spanning
GAIN
MM
RUMBLE OFF
ON
MC
OUTPUTMM
POWER
L
R
12V 2.0A
0
1
30dB
40dB
50dB
52dB
120pF
220pF
340pF
440pF
N-4
rPhono
R L
PRE
GNDOUT
VOLTAGE SELECT
110 -120V
~60Hz
220 - 240V
~50Hz
REMOTE
IN
IN
L
R
Geïntegreerde versterkerDraaitafel
Voedings-
spanning
GAIN
MM
RUMBLE OFF
ON
MC
OUTPUTMM
POWER
L
R
12V 2.0A
0
1
50-550Ω
LOAD R
MC
L
R
LOAD L
R
50-550Ω
30dB
40dB
50dB
52dB
CAP
L
LOAD
120pF
220pF
340pF
440pF
Page 39

Gebruik
Voeding
Zet de rPhono aan door op de stroomschakelaar aan de achterkant van het apparaat te drukken.
Zorg er altijd voor dat de rPhono is uitgeschakeld voordat u ingangen wijzigt of aanpassingen maakt.
De bedieningsorganen op het achterpaneel verstellen
De rPhono beschikt over diverse bedieningsorganen aan de achterzijde van het apparaat. De rPhono is gemakshalve
voorzien van een aangepast hulpmiddel dat is ontworpen om hun aanpassingen te vergemakkelijken.
Verwijder het hulpmiddel uit de achterzijde van de
rPhono.
Pas de potmeters aan door ze naar links of rechts te
draaien.
Nederlands
Verstel de schakelaars door ze omhoog of omlaag te
verzetten.
Plaats het hulpmiddel terug in de houder.
N-5
Page 40

Keuzeknop cartridgetype
De rPhono beschikt over aparte ingangen voor zowel een
cartridge voor een bewegende spoel (MC) of een bewegende
magneet (MM). Sluit, afhankelijk van uw type cartridge, de
uitgang van de draaitafel aan op de MC- of MM-ingang van de
rPhono en zorg ervoor dat de rPhono-ingang juist geselecteerd
is met de MM/MC-schakelaar.
MC MM
MOVING
COIL
MC MM
MOVING
MAGNET
Sluit, indien nodig, de afzonderlijke aarding van uw draaitafel
aan op de aardaansluiting van de rPhono, zoals aangegeven op
pagina N-4.
Laadweerstand invoer (alleen MC)
De resistieve lading van de MC-ingang kan worden aangepast van 50 tot 550Ω om
het best te passen bij de specificaties van uw cartridge.
300Ω
175Ω
50Ω
425Ω
550Ω
Opmerking: Het linker en rechter kanaal dienen te worden ingesteld op dezelfde
waarde.
Laadcapaciteit invoer
De laadcapaciteit van de invoer kan
worden ingesteld op 120, 220, 340 of
440pF om het best te passen bij de
specificaties van uw cartridge.
120pF 220pF 340pF 440pF
Rumble-lter
Deze filter elimineert "rumble” van zeer lage frequentie, meestal
veroorzaakt door oneffenheden in de plaat (zoals onregelmatigheden
in de persing of kromgetrokken platen), wat invloed kan hebben op de
prestaties van rPhono.
ON RUMBLE OFF
DISABLED ENABLED
N-6
ON RUMBLE OFF
Opmerking: Het linker en rechter
kanaal dienen te worden ingesteld
op dezelfde waarde.
Page 41

rPhono-versterking
Er kan een MM-ingangsversterking van
30, 40, 50 of 52dB geselecteerd worden
die het best past bij de instelling van de
draaitafel en de versterker.
Opmerking: De MC-invoer heeft een
vast versterking van 30dB naast de
30dB 40dB 50dB 52dB
hierboven geselecteerde waarden.
De versterking instellen op een
onjuiste waarde kan leiden tot
een vervormde audio-uitvoer.
Uitvoer
Sluit de rPhono-uitvoer aan op de juiste lijninvoer van uw voorversterker of geïntegreerde versterker.
Sluit de rPhono-uitvoer niet aan op het toegewijde PHONO-ingang die sommige geïntegreerde versterkers
hebben, tenzij de versterker de ingangsversterking naar een normaal lijnniveau kan verminderen (zoals geldt
voor de Arcam A19, A29, A39 en A49 geïntegreerde versterkers).
Technische Specicaties
Rumble filer UIT
Frequentiebereik
Rumble filter AAN
Totale harmonische vervorming +
Ruis (bij 1kHz, 5V-uit)
Systeemversterking
Ingangsimpedantie
Gelijkwaardige invoerruis
(A-gewogen, 40dB
MM-versterking)
Uitvoerniveau
Stroomvoorziening (max) 12 V DC, 2,0 A
Afmetingen (BxHxD) 194 x 44 x 124mm
Netto gewicht 1,1kg
Meegeleverde accessoires
E&OE. De waarden van alle specificaties zijn kenmerkend, tenzij anders vermeld
MC-invoer, 30dB versterking 0,005%
MM-invoer, 30dB versterking 0,0015%
MC-invoer 60, 70, 80 of 82dB
MM-invoer 30, 40, 50 of 52dB
MC-invoer 50 - 550Ω + 1nF
MM-invoer 47kΩ + 120, 220, 340 of 440pF
MC-invoer 0,06µV RMS
MM-invoer 0,5µV RMS
Nominaal 0,5V RMS
Maximaal 6V RMS
Voeding met verwisselbare stekkers
Stereo phono-phono-kabel
DIP-schakelaar en potmeterhulpmiddel
Gebruikershandleiding en registratiebewijs
20Hz-50kHz ± 0,2dB
-3dB bij 7Hz
45Hz-50kHz ± 0,2dB
-3dB bij 20Hz, -13dB bij 10Hz
Nederlands
N-7
Page 42

Wereldwijde garantie
Dit verleent u het recht het apparaat kosteloos te laten repareren voor een periode van twee jaar vanaf de
aankoopdatum, vooropgesteld dat het origineel was aangeschaft van een geautoriseerde Arcam dealer.
De fabrikant kan niet aansprakelijk worden gesteld voor gebreken als gevolg van ongeval, verkeerd gebruik,
misbruik, slijtage, verwaarlozing of door ongeoorloofde aanpassing en/of reparatie, noch kan de fabrikant
aansprakelijk worden gesteld voor schade of verlies ontstaan tijdens het transport van of naar de persoon die
een garantieclaim indient.
De garantie dekt:
Onderdelen en arbeidskosten voor twee jaar vanaf de aankoopdatum. Na twee jaar moet u voor zowel de
onderdelen als de arbeidskosten betalen. De garantie dekt op geen enkel moment transportkosten.
Garantieclaims
Deze apparatuur moet worden verpakt in de originele verpakking en teruggestuurd naar de leverancier bij wie
deze werd aangeschaft of rechtstreeks naar de Arcam-distributeur in het land waar het product werd aangeschaft.
Het moet franco vervoer via een gerenommeerde vervoerder worden toegezonden – niet per post. Er kan tijdens
transport naar de dealer of distributeur geen verantwoordelijkheid voor het apparaat worden aanvaard en klanten
worden daarom geadviseerd om het apparaat te verzekeren tegen verlies of beschadiging tijdens transport.
Neem voor meer informatie contact op met Arcam via support@arcam.co.uk.
Problemen?
Als uw Arcam-dealer geen enkele vraag met betrekking tot dit of enig ander Arcam-product kan beantwoorden,
neem contact op met Arcam Customer Support op het hierboven vermelde adres en we zullen ons best doen
om u te helpen.
N-8
Dit product correct afvoeren
Deze markering geeft aan dat dit product nergens in de Europese Unie met ander huishoudelijk
afval mag worden afgevoerd.
Om mogelijke schade aan het milieu of de volksgezondheid door ongecontroleerde
afvalverwijdering te voorkomen en grondstoffen te behouden, dient dit product op
verantwoorde wijze gerecycled te worden.
Om uw apparaat te verwijderen, maak gebruik van uw plaatselijke inlever- en inzamelsystemen
of neem contact op met de winkelier waar het product was aangeschaft.
Page 43

Conexiones y Guía de Inicio Rápido
Español
Page 44

Page 45

Bienvenido…
…y gracias por comprar el Arcam rPhono MM/MC etapa de audio.
Arcam ha estado produciendo componentes de alta calidad durante más de treinta y cinco años. Durante
ese tiempo hemos acumulado una riqueza de conocimientos tanto en el diseño como en la construcción de
componentes de audio a n de ofrecer el mejor desempeño de sonido por el precio.
Este manual ofrece una guía para la conexión y uso de su rPhono.
Esperamos que su rPhono le proporcione años de operación sin problemas. En el caso poco probable de
darse algún fallo, o simplemente si requiere más información sobre los productos Arcam, nuestra red de
distribuidores estará encantada de ayudarle. Se puede encontrar más información en el sitio web de Arcam
enwww.arcam.co.uk.
El equipo de desarrollo rPhono
Español
ES-1
Page 46

Ajuste de la fuente de alimentación
1
UE
3
¡Clic!
EE.UU.
RU
AU
2
ES-2
Page 47

Conectores y controles
1
MC
L
LOAD R
50-550Ω
R
LOAD L
50-550Ω
5 6
Entrada audio (MC)
1
Entrada audio (MM)
2
Conexión de audio a tierra
3
R
2 3
L
CAP
LOAD
120pF
220pF
340pF
440pF
GAIN
30dB
40dB
50dB
52dB
7 8 9
OUTPUTMM
MM
RUMBLE OFF
ON
MC
4
POWER
L
R
12V 2.0A
0
1
10 11
Tenga en cuenta que este terminal no debe utilizarse como toma a tierra de seguridad.
Salida rPhono
4
Entrada izquierda y derecha resistencia de carga (exclusivo MC)
5
Entrada izquierda y derecha capacitancia de carga
6
Ganancia rPhono
7
Filtro de corte de graves
8
Selector de tipo de cartucho de audio
9
Interruptor de encendido
10
Conector de entrada de alimentación
11
Español
ES-3
Page 48

Conexiones
MMMC
MMMC
MMMC
Entrada de bobina móvil
GNDOUT
R L
50-550Ω
LOAD R
MC
L
LOAD L
R
50-550Ω
rPhono
Entrada de bobina móvil
PRE
VOLTAGE SELECT
110 -120V
~60Hz
220 - 240V
~50Hz
REMOTE
IN
IN
L
R
Amplificador integradoTornamesa
Fuente de
alimentación
GAIN
MM
RUMBLE OFF
ON
MC
OUTPUTMM
POWER
L
R
12V 2.0A
0
1
30dB
40dB
50dB
52dB
R
CAP
L
LOAD
120pF
220pF
340pF
440pF
ES-4
rPhono
R L
PRE
GNDOUT
VOLTAGE SELECT
110 -120V
~60Hz
220 - 240V
~50Hz
REMOTE
IN
IN
L
R
Amplificador integradoTornamesa
Fuente de
alimentación
GAIN
MM
RUMBLE OFF
ON
MC
OUTPUTMM
POWER
L
R
12V 2.0A
0
1
50-550Ω
LOAD R
MC
L
R
LOAD L
R
50-550Ω
30dB
40dB
50dB
52dB
CAP
L
LOAD
120pF
220pF
340pF
440pF
Page 49

Funcionamiento
Alimentación
Encienda el rPhono al presionar el interruptor power ubicado en la parte posterior de la unidad.
Siempre asegúrese de que el rPhono esté apagado antes de cambiar entradas o hacer cualquier ajuste.
Ajuste de los controles del panel posterior
El rPhono ofrece diversos controles ubicados en la parte posterior de la unidad. Por comodidad, el rPhono incluye
una herramienta a la medida que está diseñada para facilitar sus ajustes.
Retire la herramienta de la parte posterior del rPhono
Ajuste los potenciómetros al girarlos a la izquierda
o derecha
Ajuste los interruptores al moverlos hacia arriba
o abajo
Regrese la herramienta a su contenedor
Español
ES-5
Page 50

Selector de tipo de cartucho
El rPhono ofrece entradas separadas para un cartucho de
bobina móvil (MC) o imán móvil (MM). Dependiendo de su tipo
de cartucho, conecte la salida de la tornamesa a la entrada MC
o MM del rPhono y asegúrese de que la entrada del rPhono
esté seleccionada correctamente usando el interruptor MM/MC.
MC MM
MOVING
COIL
MC MM
MOVING
MAGNET
Si es necesario, conecte la tierra separada de su tornamesa
a la terminal a tierra del rPhono, como se muestra en la
página ES-4.
Resistencia de carga de entrada (exclusivo MC)
La carga resistiva de entrada MC puede ser ajustada entre 50 y 550 Ω para adaptarse
mejor a las especificaciones de su cartucho.
300Ω
175Ω
425Ω
NO TA: El canal izquierdo y derecho deberá ajustarse al mismo valor.
50Ω
550Ω
Capacitancia de carga de entrada
120pF 220pF 340pF 440pF
Filtro de corte de graves
Este filtro elimina el "ruido" de muy baja frecuencia, que habitualmente es
provocado por imperfecciones de grabación (p. ej., irregularidades de
prensado o acetatos deformados), lo cual puede afectar el desempeño del
rPhono.
ON RUMBLE OFF
DISABLED ENABLED
ON RUMBLE OFF
La capacitancia de carga de entrada
puede ser ajustada a 120, 220, 340 o
440 pF para adaptarse mejor a las
especificaciones de su cartucho.
NO TA: El canal izquierdo y derecho
deberá ajustarse al mismo valor.
ES-6
Page 51

Ganancia rPhono
Se puede seleccionar una ganancia
de entrada MM de 30, 40, 50 o 52 dB
para adaptarse mejor a su tornamesa
y ajuste de amplificador.
NOTA: La entrada MC tiene una
ganancia fija de 30 dB además de los
30dB 40dB 50dB 52dB
valores seleccionados arriba.
Si se ajusta la ganancia a un valor
incorrecto esto puede generar
una salida de audio distorsionada
Salida
Conecte la salida del rPhono a una entrada de línea apropiada de su preamplificador o amplificador integrado.
No conecte la salida del rPhono a la entrada PHONO dedicada disponible en algunos amplificadores
integrados, a menos que el amplificador sea capaz de reducir su ganancia de entrada al nivel de línea normal
(como es el caso de los amplificadores integrados Arcam A19, A29, A39 y A49).
Especicaciones Técnicas
Filtro de corte de graves APAGADO
Respuesta de frecuencia
Filtro de corte de graves ENCENDIDO
Distorsión armónica total + ruido
(a 1 kHz, 5 V salida)
Ganancia de sistema
Impedancia de entrada
Ruido equivalente de entrada
(A ponderada, 40 dB de ganancia MM)
Nivel de salida
Requisitos de potencia (máx.) 12 V CC, 2,0 A
Dimensiones (An x Al x Pr) 194 x 44 x 124mm
Peso neto 1,1kg
Accesorios incluidos
E&OE Todos los valores especificados son típicos a menos que se indique otra cosa.
Entrada MC, ganancia de 30 dB 0,005%
Entrada MM, ganancia de 30 dB 0,0015%
Entrada MC 60, 70, 80 o 82 dB
Entrada MM 30, 40, 50 o 52 dB
Entrada MC 50 - 550 Ω + 1 nF
Entrada MM 47 kΩ + 120, 220, 340 o 440 pF
Entrada MC 0.06 µV RMS
Entrada MM 0.5 µV RMS
Nominal 0.5V RMS
Máximo 6V RMS
Fuente de alimentación con enchufes intercambiables
Cable audio-audio estéreo
Herramienta para interruptor DIP y potenciómetro
Manual del usuario y tarjeta de registro
20 Hz-50 kHz ± 0.2 dB
-3 dB a 7 Hz
45 Hz-50 kHz ± 0.2 dB
-3 dB a 20 Hz, -13 dB a 10 Hz
Español
ES-7
Page 52

Garantía Mundial
Esto le asegura la reparación de la unidad de forma gratuita durante dos años después de la compra, siempre y
cuando haya sido adquirido con un distribuidor autorizado Arcam. El fabricante no se hace responsable de los
defectos derivados de ningún accidente, uso inadecuado, abuso, desgaste, ajuste y/o reparación negligente o
no autorizado, ni puede aceptar la responsabilidad por daños o pérdidas durante el transporte hasta o desde la
persona reclamante en el marco de la garantía.
La garantía cubre:
Costos de piezas y mano de obra durante dos años a partir de la fecha de compra. Transcurridos los dos años
usted correrá con los costos de piezas y de mano de obra. La garantía no cubre los costos de transporte en
ningún momento.
Reclamaciones en el marco de la garantía
Este equipo deberá ser embalado en el empaque original y devuelto al vendedor con el cual se adquirió, o si
esto no es posible, directamente con el distribuidor Arcam en el país donde el producto se adquirió.
Debe ser enviado en un transporte ya pagado, por un transportista reconocido – no por correo. No se acepta
responsabilidad sobre la unidad mientras se está transportando al distribuidor o clientes y por eso aconsejamos
asegurar la unidad contra pérdida o daños durante el transporte.
Para más detalles contacte a Arcam en support@arcam.co.uk.
¿Problemas?
Si su distribuidor de Arcam es incapaz de responderle a alguna duda respecto a este o a otro producto Arcam,
contacte al Servicio de Atención al Cliente de Arcam, en la dirección anterior y haremos todo lo posible por
ayudarle.
ES-8
Forma correcta de deshacerse de este producto
Esta marca indica que este producto no debe disponerse con otros desperdicios domésticos
en ningún lugar de los EE.UU.
Para evitar posibles daños al medio ambiente o a la salud humana debido a la eliminación no
controlada de desechos y para conservar los recursos materiales, este producto debe reciclarse
de manera responsable.
Para eliminar su producto, utilice sus sistemas locales de devolución y recolección o contacte
al distribuidor al que le compró el producto.
Page 53

Краткое руководство по п
одключению и использованию
Русский
Page 54

Page 55

Добро пожаловать…
…и спасибо, что приобрели фонокорректор rPhono MM/MC торговой марки Arcam.
Arcam производит высококачественную аудиотехнику уже более тридцати пяти лет. Знания,
накопленные нами за этот период в области проектирования и конструирования аудиотехники,
реализованы в аудиоустройствах с высочайшим качеством звучания, которые можно приобрести
по разумной цене.
В данном руководстве приведены указания по подключению и использованию вашего rPhono.
Надеемся, что rPhono будет надежно служить вам долгие годы. В случае непредвиденных
обстоятельств, сбоев или при необходимости получения информации о продуктах Arcam наши
дилеры будут рады помочь вам. Более подробную информацию можно найти на веб-сайте Arcam
www.arcam.co.uk.
Команда разработчиков rPhono
Русский
R-1
Page 56

Подключение к источнику электропитания
1
Великобритания
3
ЕС
Щелчок!
США
2
АВСТРАЛИЯ
R-2
Page 57

Соединители и средства управления
1
MC
L
LOAD R
50-550Ω
R
LOAD L
50-550Ω
5 6
Фоно вход (MC)
1
Фоно вход (MМ)
2
Заземляющее фоно соединение
3
R
2 3
L
CAP
LOAD
120pF
220pF
340pF
440pF
GAIN
30dB
40dB
50dB
52dB
7 8 9
OUTPUTMM
MM
RUMBLE OFF
ON
MC
4
POWER
L
R
12V 2.0A
0
1
10 11
Обратите внимание, что данная клемма не должна использоваться в качестве защитного
заземления
Выход rPhono
4
Левое и правое входные нагрузочные сопротивления (только MC)
5
Левое и правое входные нагрузочные емкости
6
Коэффициент усиления rPhono
7
Шумовой фильтр
8
Выбор типа головки звукоснимателя
9
Выключатель питания
10
Входной силовой соединитель
11
Русский
R-3
Page 58

Соединения
MMMC
MMMC
MMMC
Вход подвижного катушечного звукоснимателя
GNDOUT
R L
50-550Ω
LOAD R
MC
L
R
LOAD L
R
50-550Ω
L
rPhono
Вход подвижного магнитного
звукоснимателя
30dB
40dB
50dB
52dB
CAP
LOAD
120pF
220pF
340pF
440pF
VOLTAGE SELECT
220 - 240V
110 -120V
~60Hz
REMOTE
~50Hz
IN
Встроенный усилительПроигрыватель
GAIN
OUTPUTMM
POWER
L
MM
RUMBLE OFF
R
0
ON
MC
1
12V 2.0A
PRE
IN
L
R
Источник
электропитания
R-4
rPhono
R L
PRE
GNDOUT
VOLTAGE SELECT
110 -120V
~60Hz
220 - 240V
~50Hz
REMOTE
IN
IN
L
R
Встроенный усилительПроигрыватель
Источник
электропитания
GAIN
MM
RUMBLE OFF
ON
MC
OUTPUTMM
POWER
L
R
12V 2.0A
0
1
50-550Ω
LOAD R
MC
L
R
LOAD L
R
50-550Ω
30dB
40dB
50dB
52dB
CAP
L
LOAD
120pF
220pF
340pF
440pF
Page 59

Работа
Электропитание
Включите rPhono в сеть, нажав кнопку сети на задней панели устройства.
Прежде чем выполнить регулировку или сменить источник входного сигнала, удостоверьтесь,
что rPhono отключен от сети.
Отладка элементов управления на задней панели устройства
На задней панели rPhono имеется множество различных элементов управления. Для удобства регулировки
rPhono укомплектован специальным пользовательским инструментом.
Выньте инструмент из держателя сзади rPhono
Отрегулируйте потенциометры, поворачивая
регулятор влево или вправо
Выполните настройку с помощью выключателей,
перемещая их вверх или вниз
Верните инструмент в держатель
Русский
R-5
Page 60

Селектор головки звукоснимателя
rPhono имеет отдельные выходы для подвижных катушечных
(MC) или магнитных (MM) звукоснимателей. В зависимости
от типа звукоснимателя подключите выход проигрывателя
к входу MC или MM устройства rPhono и удостоверьтесь в
правильности выбора входа rPhono (с помощью
переключателя MM/MC).
MC MM
MOVING
COIL
MC MM
MOVING
MAGNET
Если необходимо, подключите индивидуальный заземлитель
проигрывателя к клемме заземляющей шины rPhono, как
показано на page R-4.
Входное нагрузочное сопротивление (только для MC)
Для обеспечения соответствия техническим характеристикам звукоснимателя
диапазон регулировки входного нагрузочного сопротивления MC составляет
50–550 Ом.
ПРИМЕЧАНИЕ: Для левого и правого каналов необходимо установить одно
и то же значение.
175Ω
50Ω
300Ω
425Ω
550Ω
Входная нагрузочная емкость
Для обеспечения лучшего
соответствия техническим
характеристикам звукоснимателя
можно устанавливать следующие
значения входной нагрузочной
емкости: 120, 220, 340 или 440 пкФ.
120pF 220pF 340pF 440pF
ПРИМЕЧАНИЕ: Для левого и
правого каналов необходимо
установить одно и то же значение.
Шумовой фильтр
ON RUMBLE OFF
DISABLED ENABLED
R-6
ON RUMBLE OFF
Этот фильтр устраняет низкочастотные шумы, вызванные искажениями
звукозаписи (например, при сжатии или деформации звукозаписи),
которые могут влиять на работу rPhono.
Page 61

Коэффициент усиления rPhono
Для обеспечения соответствия
установкам усилителя и
проигрывателя коэффициент усиления
входа MM по выбору устанавливается
на 30, 40, 50 или 52 дБ.
ПРИМЕЧАНИЕ: В дополнение
30dB 40dB 50dB 52dB
к вышеназванным значениям
вход MC имеет фиксированный
коэффициент усиления 30 дБ.
Ошибка при установке
коэффициента усиления
может привести к искажению
выходного аудиосигнала
Выход
Подключите выход rPhono к соответствующему линейному входу предусилителя или встроенного усилителя.
Не подключайте выход rPhono к выделенному входу ФОНО встроенного усилителя, если он не
способен уменьшать коэффициент усиления до нормального линейного уровня (как, например,
в случае с встроенными усилителями Arcam A19, A29, A39 и A49).
Технические характеристики
Шумовой фильтр
Частотная характеристика
Полный коэффициент
гармонических искажений + шум
(при 1 кГц, 5 В на выходе)
Системный коэффициент усиления
Входное полное сопротивление
Эквивалентный шум на входе
(взвешенный по кривой A,
коэффициент усиления MM - 40 дБ)
Выходной уровень
Требования по электропитанию
(макс.)
Габариты (Ш x В x Г ) 194 x 44 x 124 мм
Масса нетто 1,1 кг
Аксессуары в комплекте
Исключая ошибки и пропуски. Если не указано иное, для всех технических характеристик приведены
типовые значения
ОТКЛЮЧЕН
Шумовой фильтр ВКЛЮЧЕН
Вход MC, коэффициент
усиления 30 дБ
Вход MМ, коэффициент
усиления 30 дБ
Вход MC 60, 70, 80 или 82 дБ
Вход MМ 30, 40, 50 или 52 дБ
Вход MC 50–550 Ом + 1 нФ
Вход MМ 47 кОм + 120, 220, 340 или 440 пкФ
Вход MC 0,06 мкВ, ср. квадр.
Вход MМ 0,5 мкВ, ср. квадр.
Номинальное 0,5 мкВ, ср. квадр.
Максимальное 6 мкВ, ср. квадр.
12 В пост. тока; 2,0 A
Электропитание с помощью универсальных переходников
Стерео фоно–фоно кабель
DIP-выключатель и потенциометр
Руководство пользователя и регистрационная карта
20 Гц–50 кГц ± 0,2 дБ
-3 дБ при 7 Гц
45 Гц-50 кГц ± 0,2 дБ
-3 дБ при 20 Гц, -13 дБ при 10 Гц
0,005 %
0,0015%
Русский
R-7
Page 62

Гарантия по всему миру
Это дает вам право отремонтировать аппарат бесплатно в течение первых двух лет после покупки, при
условии, что он был первоначально приобретен у официального дилера Arcam. Производитель не несет
ответственность за дефекты, возникшие вследствие несчастного случая, неправильного обращения, износа,
несанкционированных настроек и/или ремонта, а также за повреждения или утерю изделия во время
доставки или обратной транспортировки от лица, предъявляющего гарантийные претензии.
Гарантия распространяется на нижеследующее.
Запчасти и сборку в течение двух лет с даты покупки. По окончании двух лет запчасти и услуги по их замене
оплачиваются владельцем изделия. Гарантия не покрывает затраты, связанные с транспортировкой
товара.
Претензии по гарантии
Данное устройство должно быть упаковано в оригинальную упаковку и возвращено дилеру, у которого
оно приобреталось, или (при несоблюдении данных требований) непосредственно дистрибьютору Arcam
в стране приобретения продукта.
Изделие должно быть отправлено курьерской службой с оплатой доставки – не почтой. Компания не
несет ответственности за оборудование, отправленное дилеру или дистрибьютору, и рекомендует своим
заказчикам застраховать устройство от потери и повреждения во время транспортировки.
Для получения более подробной информации свяжитесь с компанией Arcam по электронной почте
support@arcam.co.uk.
Проблемы?
Если дилер компании Arcam не может ответить на вопрос, касающийся этого или любого другого продукта,
свяжитесь с нашей службой поддержки по указанному выше адресу, и мы сделаем все возможное, чтобы
помочь вам.
R-8
Утилизация этого устройства
Эта маркировка означает, что данное изделие нельзя утилизировать вместе с бытовыми
отходами на всей территории Европейского союза.
Данное устройство подлежит утилизации в соответствии с утвержденным регламентом, что
позволяет предотвратить загрязнение окружающей среды и причинение вреда здоровью
человека, а также сохранить материальные ресурсы.
Для утилизации устройства, воспользуйтесь местной системой сбора и утилизации отходов
или обратитесь к поставщику устройства.
Page 63

Connessione e Guida introduttiva
Italiano
Page 64

Page 65

Benvenuti…
… e grazie per aver acquistato lo stadio phono Arcam rPhono MM/MC.
Arcam produce componenti audio di alta qualità da oltre trentacinque anni. Durante questo periodo abbiamo
consolidato la nostra vasta conoscenza sia del design sia della costruzione di componenti audio, per garantire
lamigliore resa sonora in rapporto al prezzo.
Questa guida fornisce le istruzioni per collegare e usare l'unità rPhono.
Ci auguriamo che rPhono le ora anni di funzionamento senza problemi. Nel caso improbabile di un guasto,
oanche solo per ricevere ulteriori informazioni sui prodotti Arcam, la nostra rete di rivenditori sarà lieta di orire
supporto agli utenti. Ulteriori informazioni sono disponibili sul sito Arcam www.arcam.co.uk.
Il team di sviluppo rPhono
Italiano
IT-1
Page 66

Installazione dell’alimentatore
1
UE
GB
3
Clic!
USA
AU
2
IT-2
Page 67

Connettori e comandi
1
MC
L
LOAD R
50-550Ω
R
LOAD L
50-550Ω
5 6
Ingresso Phono (MC)
1
Ingresso Phono (MM)
2
Connessione di terra Phono
3
R
2 3
L
CAP
LOAD
120pF
220pF
340pF
440pF
GAIN
30dB
40dB
50dB
52dB
7 8 9
OUTPUTMM
MM
RUMBLE OFF
ON
MC
4
POWER
L
R
0
1
10 11
Questo terminale non deve essere utilizzato come messa a terra di sicurezza.
Uscita rPhono
4
Resistenza di caricamento ingressi sinistro e destro (solo MC)
5
Capacità di caricamento ingressi sinistro e destro
6
Guadagno rPhono
7
Filtro disturbi
8
Selettore tipo testina Phono
9
Interruttore corrente
10
Connettore di ingresso alimentazione
11
12V 2.0A
Italiano
IT-3
Page 68

Connessioni
MMMC
MMMC
MMMC
Ingresso bobina mobile
GNDOUT
R L
50-550Ω
LOAD R
MC
L
LOAD L
R
50-550Ω
rPhono
Ingresso magnete mobile
PRE
VOLTAGE SELECT
110 -120V
~60Hz
220 - 240V
~50Hz
REMOTE
IN
IN
L
R
Amplificatore integratoGiradischi
Alimentatore
elettrico
GAIN
MM
RUMBLE OFF
ON
MC
OUTPUTMM
POWER
L
R
12V 2.0A
0
1
30dB
40dB
50dB
52dB
R
CAP
L
LOAD
120pF
220pF
340pF
440pF
IT-4
rPhono
R L
PRE
GNDOUT
VOLTAGE SELECT
110 -120V
~60Hz
220 - 240V
~50Hz
REMOTE
IN
IN
L
R
Amplificatore integratoGiradischi
Alimentatore
elettrico
GAIN
MM
RUMBLE OFF
ON
MC
OUTPUTMM
POWER
L
R
12V 2.0A
0
1
50-550Ω
LOAD R
MC
L
R
LOAD L
R
50-550Ω
30dB
40dB
50dB
52dB
CAP
L
LOAD
120pF
220pF
340pF
440pF
Page 69
Funzionamento
Alimentazione
Accendere l'unità rPhono premendo l'interruttore situato sul retro.
Assicurarsi che l'unità rPhono sia sempre spenta prima di modificare gli ingressi o fare altre regolazioni.
Regolazione comandi pannello posteriore
L'unità rPhono è dotata di numerosi comandi situati sul retro. Per comodità, l'unità rPhono è dotata di un attrezzo
personalizzato, progettato per la regolazione di tali controlli.
Rimuovere l'attrezzo dal retro dell'unità rPhono
Sistemare i potenziometri di regolazione ruotandoli a
sinistra o a destra
Regolare gli interruttori spostandoli su e giù
Rimettere l'attrezzo nel suo vano
Italiano
IT-5
Page 70

Selettore tipo puntina
L'unità rPhono dispone di ingressi separati per puntine a bobina
mobile (MC) e puntine a magnete mobile (MM). In base al tipo
di puntina, collegare l'uscita del giradischi all'ingresso MC o MM
dell'unità rPhono, assicurandosi di selezionare il giusto ingresso,
tramite l'interruttore MM/MC.
MC MM
MOVING
COIL
MC MM
MOVING
MAGNET
Se necessario, collegare la messa a terra separata del giradischi
al terminale di terra dell'unità rPhono, come mostrato in
pagina IT-4.
Resistenza di caricamento ingresso (solo MC)
Il caricamento resistivo dell'ingresso MC può essere regolato tra 50 e 550Ω per
rispondere al meglio alle specifiche della puntina.
300Ω
175Ω
425Ω
NO TA: I canali sinistro e destro devono essere regolati allo stesso valore.
50Ω
550Ω
Capacità di caricamento ingresso
120pF 220pF 340pF 440pF
Filtro disturbi
Questo filtro elimina disturbi a frequenze molto basse, tipicamente dovuti
a imperfezioni di registrazione (quali irregolarità nei solchi o deformazioni
di incisione), che potrebbero influenzare negativamente le prestazione
dell'unità rPhono.
ON RUMBLE OFF
DISABLED ENABLED
ON RUMBLE OFF
La capacità di caricamento degli
ingressi può essere regolato ai valori
120, 220, 340 o 440pF per rispondere
al meglio alle specifiche della
puntina.
NO TA: I canali sinistro e destro
devono essere regolati allo stesso
valore.
IT-6
Page 71

Guadagno rPhono
Il guadagno di ingresso MM può
essere regolato a 30, 40, 50 o 52 dB per
rispondere al meglio alle impostazioni
di giradischi e amplificatore.
NOTA: L'ingresso MC ha un
30dB 40dB 50dB 52dB
guadagno fisso di 30 dB oltre ai
valori selezionabili visti prima.
L'impostazione del guadagno
a valori sbagliati può causare
distorsioni all'uscita audio
Uscita
Collegare l'uscita rPhono al giusto ingresso del preamplificatore o amplificatore integrato del proprio sistema.
Non collegare l'uscita dell'unità rPhono all'ingresso PHONO dedicato, disponibile su alcuni amplificatori
integrati, a meno che l'amplificatore non sia capace di ridurre il proprio guadagno di ingresso al normale
livello di linea (come nel caso dei modelli di amplificatore integrato Arcam A19, A29, A39 e A49).
Speciche Tecniche
Filtro disturbi disattivo
Risposta in frequenza
Filtro disturbi attivo
Distorsione armonica totale +
Rumore (a 1 kHz, 5V Out)
Guadagno di sistema
Impedenza in ingresso
Rumore di ingresso equivalente
(A-weight, guadagno MM 40 dB)
Livello di uscita
Consumo di energia (max) 12 V CC, 2,0 A
Dimensioni (L x A x P) 194 x 44 x 124mm
Peso netto 1,1kg
Accessori in dotazione
E&OE Tutti i valori delle specifiche sono tipici se non diversamente indicato
Ingresso MC, guadagno 30 dB 0,005%
Ingresso MM, guadagno 30 dB 0,0015%
Ingresso MC 60, 70, 80 o 82 dB
Ingresso MM 30, 40, 50 o 52 dB
Ingresso MC 50 - 550 Ω + 1nF
Ingresso MM 47kΩ + 120, 220, 340 o 440pF
Ingresso MC 0,06 µV RMS
Ingresso MM 0,5 µV RMS
Nominale 0,5V RMS
Massimo 6V RMS
Alimentatore con spine intercambiabili
Cavo stereo fono–fono
Interruttore DIP e attrezzo potenziometro regolazione
Manuale utente e scheda di registrazione
20 Hz-50 kHz ± 0,2 dB
-3 dB a 7 Hz
45 Hz-50 kHz ± 0,2 dB
-3 dB a 20 Hz, -13 dB a 10 Hz
Italiano
IT-7
Page 72

Garanzia in tutto il mondo
Questa garanzia dà diritto all'utente di far riparare l’unità gratuitamente per i due anni successivi all’acquisto,
sempre che sia stata acquistata originariamente presso un distributore autorizzato Arcam. Il produttore non
si assume alcuna responsabilità per difetti derivanti da incidenti, uso improprio, abuso, usura, negligenza o da
modifiche e/o riparazioni non autorizzate. Inoltre, il produttore non accetta alcuna responsabilità per danni o
perdite che si verifichino durante il trasporto da o verso la persona che invoca la garanzia.
La garanzia copre:
Parti e costo del lavoro per due anni dalla data di acquisto. Dopo due anni devono essere pagate sia le parti che
il costo del lavoro. La garanzia non copre mai i costi di trasporto.
Richieste in garanzia
Questo strumento dovrebbe essere restituito nella confezione originale al distributore presso cui è stato
acquistato, o se non fosse possibile, direttamente al distributore Arcam del paese in cui il prodotto è stato
acquistato.
Dovrebbe essere inviato tramite spedizione prepagata con un vettore affidabile e non per posta. Nessuna
responsabilità può essere accettata per l'unità mentre è in transito verso il rivenditore o il distributore e i clienti
sono pertanto invitati ad assicurare l'unità contro smarrimenti o danni durante il trasporto.
Per ulteriori dettagli contattare Arcam all'indirizzo support@arcam.co.uk.
Problemi?
Se il rivenditore Arcam non è in grado di rispondere a una domanda per quanto riguarda questo o qualsiasi altro
prodotto Arcam, si prega di contattare il supporto clienti all'indirizzo Arcam di cui sopra e noi faremo del nostro
meglio per aiutarvi.
IT-8
Smaltimento corretto di questo prodotto
Questo marchio indica che il prodotto non dovrebbe essere smaltito con altri rifiuti domestici
all'interno dell'UE.
Per evitare eventuali danni all'ambiente o alla salute umana causati da smaltimento errato dei
rifiuti e per risparmiare le risorse materiali, il prodotto deve essere riciclato in modo responsabile.
Per smaltire il prodotto, utilizzare i sistemi locali di restituzione e raccolta o contattare il
rivenditore presso il quale il prodotto è stato acquistato.
Page 73

连接和快速入门指南
简体中文
Page 74

Page 75

欢迎…
……
感谢您购买
Arcam
致力于生产优质音频组件已经长达三十五年。在此过程中,我们在设计和制造最高性价比音频组件
方面积累了丰富的经验。
Arcam rPhono MM/MC
唱头放大器。
本手册提供连接和使用
我们希望
想要了解有关
问
Arcam
rPhono
能够长期让您省心省力。如果您的产品发生任何故障(这种情况很罕见),或者您只是
Arcam
网站:
www.arcam.co.uk
rPhono
的指引。
产品的更多信息,我们的经销商网络将很乐意为您效劳。如欲了解更多信息,请访
。
rPhono 研发团队
SC-1
简体中文
Page 76

电源安装
1
欧盟
英国
3
咔嗒!
美国
澳大
利亚
2
SC-2
Page 77
连接器和控制
LOAD R
50-550Ω
1
MC
L
R
LOAD L
50-550Ω
R
2 3
L
CAP
LOAD
120pF
220pF
340pF
440pF
30dB
40dB
50dB
52dB
5 6
唱机输入 (MC)
1
唱机输入 (MM)
2
唱机接地连接
3
请注意,此端子不得用作安全接地端子
rPhono 输出
4
左、右输入负载电阻(仅限 MC)
5
左、右输入负载电容
6
rPhono 增益
7
低频杂音滤波器
8
唱机唱头类型选择器
9
电源开关
10
电源输入接口
11
GAIN
MM
RUMBLE OFF
ON
MC
7 8 9
4
OUTPUTMM
POWER
L
R
12V 2.0A
0
1
10 11
SC-3
简体中文
Page 78

连接
MMMC
MMMC
MMMC
动圈式输入
rPhono
动磁式输入
R L
PRE
GNDOUT
VOLTAGE SELECT
110 -120V
~60Hz
220 - 240V
~50Hz
REMOTE
IN
IN
L
R
集成放大器唱机转盘
电源
GAIN
MM
RUMBLE OFF
ON
MC
OUTPUTMM
POWER
L
R
12V 2.0A
0
1
50-550Ω
LOAD R
MC
L
R
LOAD L
R
50-550Ω
30dB
40dB
50dB
52dB
CAP
L
LOAD
120pF
220pF
340pF
440pF
SC-4
rPhono
R L
PRE
GNDOUT
VOLTAGE SELECT
110 -120V
~60Hz
220 - 240V
~50Hz
REMOTE
IN
IN
L
R
集成放大器唱机转盘
电源
GAIN
MM
RUMBLE OFF
ON
MC
OUTPUTMM
POWER
L
R
12V 2.0A
0
1
50-550Ω
LOAD R
MC
L
R
LOAD L
R
50-550Ω
30dB
40dB
50dB
52dB
CAP
L
LOAD
120pF
220pF
340pF
440pF
Page 79
操作
电源
按下位于设备背面的 POWER 开关打开 rPhono。
在更改输入或进行任何调整之前,请务必确保 rPhono 已关机。
调整后面板控制
rPhono 设备的背面具有各种控制。为方便起见,rPhono 配有便于进行调整的定制工具。
从 rPhono 背面取出工具
通过向左或向右扭动调整微调电位器
通过向上或向下移动调整开关
将工具放回工具盒
简体中文
SC-5
Page 80

唱头类型选择器
MC MM
MOVING
COIL
MC MM
MOVING
MAGNET
输入负载电阻(仅限 MC)
MC 输入电阻性负载可在 50 - 550Ω 之间进行调整,以便与唱头规格实现最佳
匹配。
300Ω
175Ω
425Ω
注:左、右通道应调整为相同值。
rPhono 具有独立的输入,用于动圈式(MC)或动磁式 (MM) 唱
头。根据唱头类型,将唱机转盘输出连接到 rPhono 的 MC
或 MM 输入,并确保使用 MM/MC 开关对 rPhono 输入进行
了正确选择。
如果需要,可将唱机转盘的独立接地连接到 rPhono 的接地
端子,如第 SC-4 页所示。
50Ω
550Ω
输入负载电容
120pF 220pF 340pF 440pF
低频杂音滤波器
该滤波器可消除极低频率的杂音,这些杂音通常由唱片瑕疵所导致
(如压制不平整或唱片翘曲),从而影响 rPhono 的性能。
ON RUMBLE OFF
DISABLED ENABLED
ON RUMBLE OFF
输入负载电容可设置为 120、220、
340 或 440pF,以便与唱头规格实
现最佳匹配。
注:左、右通道应调整为相同值。
SC-6
Page 81

rPhono 增益
可选择 30、40、50 或 52dB 的 MM
输入增益,以便与唱机转盘和放大
器设置实现最佳匹配。
注:除了以上可供选择的值之外,
MC 输入具有 30db 的固定增益。
30dB 40dB 50dB 52dB
将增益设置为不正确的值,
可能会导致音频输出失真
输出
将 rPhono 输出连接到前置放大器或集成放大器相应的线路输入。
切勿将 rPhono 输出连接到某些集成放大器的专用 PHONO 输入,除非放大器能够将其输入增益降低
到正常线路电平(就像 Arcam A19、A29、A39 和 A49 集成放大器那样)。
技术规格
低频杂音滤波器 OFF(关闭)
频率响应
低频杂音滤波器 ON(开启)
总谐波失真 + 噪声
(1kHz,5V 输出)
系统增益
输入阻抗
等效输入噪声
(A 计权,MM 增益为 40dB)
输出电平
电源要求(最大) 12V 直流电源,2.0A
尺寸(宽×高×深) 194 x 44 x 124mm
净重 1.1kg
随附件
E&OE 除非另有说明,否则所有规格值均为典型值。
MC 输入,30dB 增益 0.005%
MM 输入,30dB 增益 0.0015%
MC 输入 60、70、80 或 82dB
MM 输入 30、40、50 或 52dB
MC 输入 50 - 550Ω + 1nF
MM 输入 47kΩ + 120、220、340 或 440pF
MC 输入 0.06µV RMS(均方根值)
MM 输入 0.5µV RMS(均方根值)
标称 0.5V RMS
最大 6V RMS
配可互换插头的电源
立体声唱机互连线缆
DIP 开关和电位器微调工具
用户手册和注册卡
20Hz-50kHz ± 0.2dB
7Hz 下为 -3dB
45Hz-50kHz ± 0.2dB
20Hz 下为 -3dB,10Hz 下为 -13dB
简体中文
SC-7
Page 82

全球联保
在购买本设备后的两年内,您享有免费保修权,但前提是您的设备是从授权的 Arcam 经销商那里原装
购买的。对于由于意外、误用、滥用、磨损、疏忽、未经授权的调校和/或维修而导致的缺陷,制造商
可以不承担任何责任,此外,对于在运输期间发生的损坏或丢失,制造商可以不履行保修义务。
保修范围:
2 年期(从购买日期开始算起)部件与人工费用。2 年后,您必须支付部件和人工费用。无论何时,保修
都不包括运输费用。
保修免责声明
应该使用原有包装将本设备退回到销售本设备的经销商;否则,应将设备直接退回到购买本产品所在国
家的Arcam分销商。
应该在预付运费的情况下通过快递公司发货 — 请勿邮寄。如果设备在发往经销商或分销商的途中出现
问题,我们不承担责任;因此,客户需确保设备在运输途中不会发生丢失或损坏。
如欲了解更多详细信息,请联系 Arcam,电子邮箱:support@arcam.co.uk 。
问题解决
如果您的 Arcam 经销商无法解答有关本设备或其他任何 Arcam 产品的咨询,请通过上述地址联系 Arcam
客户支持部,我们将尽力为您提供帮助。
SC-8
请正确处置本产品
此标记指示在整个欧盟范围内,不应该将本产品当作普通的家庭废弃物进行处置。
为防止非受控的废弃物处置方式对环境或人类健康造成危害以及为了节省物料资源,应该
以负责任的态度回收本产品。
要处置您的产品,请利用本地的回收系统,或者与销售本产品的零售商联系。
Page 83

Page 84

SH291 Issue 2
www.arcam.co.uk
THE WEST WING, STIRLING HOUSE
WATERBEACH, CAMBRIDGE, CB25 9PB, ENGLAND
+44 (0) 1223 203200
 Loading...