

Page 1
ce rt if ie d
kleer
iPod Speaker System
Page 2
Important Safety Instructions
is product is designed and manufactured to meet
strict quality and safety standards. However, you should
be aware of the following installation and operation
precautions.
is symbol precedes
important operating or
servicing information.
Important Safety Instructions
1. Follow all warnings and instructions
You must read all the safety and operating instructions
before operating this equipment. Retain this handbook
for future reference and adhere to all warnings in the
handbook or on the equipment.
2. Water and moisture
e presence of electricity near water can be dangerous.
To prevent water dripping or splashing into the
equipment, do not use near water – for example near a
bathtub, kitchen sink or swimming pool, etc.
3. Object or liquid entry
Take care that objects do not fall and liquids are not
spilled into the enclosure through any openings. Liquidlled objects such as vases should not be placed on the
equipment.
4. Placing the equipment
Only use a rack or shelf that is stable and strong enough to
support the weight of this equipment.
5. Ventilation
Do not block any ventilation openings in the equipment.
Do not place the equipment on a bed, sofa, rug or similar
so surface, or in an enclosed bookcase or cabinet, since
ventilation may be impeded.
6. Heat
Locate the equipment away from naked ames or heatproducing appliances such as radiators, stoves or other
appliances that produce heat.
7. Climate
e equipment has been designed for use in moderate
climates and in domestic situations.
8. Cleaning
Unplug the unit from the mains supply before cleaning.
e case should normally only require a wipe with a dry,
so, lint-free cloth. Do not use chemical solvents for
cleaning.
We do not advise the use of furniture cleaning sprays or
polishes as they can cause permanent white marks.
9. Power sources
Only connect the equipment to a power supply of the type
described in the operating instructions or as marked on
the equipment.
Safety InformationSafety Information
e primary method of isolating the equipment from the
mains supply is to remove the mains plug. e equipment
must be installed in a manner that makes disconnection
possible.
10. Power-cord protection
Power supply cords should be routed so that they are not
likely to be walked on or pinched by items placed upon or
against them. Pay particular attention to the point where
they exit from the equipment.
11. Non-use periods
We recommend that the power cord of the equipment is
unplugged from the power outlet during lightning storms
or if the equipment is not being used for an extended
period of time
E-2
Page 3
Important Safety Instructions
Important Safety Instructions
12. Abnormal smell
If an abnormal smell or smoke is detected from the
equipment, turn the power o immediately and unplug
the equipment from the wall outlet. Contact your dealer
and do not reconnect the equipment.
13. Servicing
You should not attempt to service the equipment. Contact
your dealer to arrange servicing.
14. Damage requiring service
e equipment should be serviced by qualied service
personnel when:
A. the power-supply cord or the plug has been damaged,
or
B. objects have fallen, or liquid has spilled into the
equipment, or
C. the equipment has been exposed to rain or moisture,
or
D. the equipment does not appear to operate normally
or exhibits a marked change in performance, or
E. the equipment has been dropped or the enclosure
damaged.
Correct disposal of this product
is marking indicates that this product should
not be disposed with other household waste
throughout the EU.
To prevent possible harm to the environment or
human health from uncontrolled waste disposal
and to conserve material resources, this product
should be recycled responsibly.
To dispose of your product, please use your local
return and collection systems or contact the
retailer where the product was purchased.
Safety and Standards Compliance
is equipment has been designed to meet the IEC/EN
60065 international electrical safety standard. is device
complies with Part 15 of the FCC Rules. Operation
is subject to the following two conditions: (1) is
device may not cause harmful interference, and (2) this
device must accept any interference received, including
interference that may cause undesired operation.
klee r
ce r t i f i ed
“Made for iPod,” and “Made for iPhone” mean that
an electronic accessory has been designed to connect
specically to iPod or iPhone respectively, and
has been certied by the developer to meet Apple
performance standards. Apple is not responsible for
the operation of this device or its compliance with
safety and regulatory standards.
iPhone, iPad and iPod are trademarks of Apple Inc.,
registered in the U.S. and other countries.
E-3
Page 4
Welcome
ank you for purchasing the rCube and
Contents
Safety Information ................................................E-2
Welcome ..................................................................E-4
What’s in the Box? .......................................................E-5
Contents
Available Accessories .................................................E-5
Product Overview .......................................................E-6
Rear Panel .......................................................................E-7
Connections Overview .............................................E-8
Top Panel ........................................................................E-9
Remote .........................................................................E-10
Carrying and Placing the rCube .........................E-12
Operate ..................................................................E-13
Playing from an iPod or iPhone ..........................E-13
Playing from a Line-Level Source ......................E-14
Playing from a Headphone Jack ........................E-15
Using Video Outputs ...............................................E-16
rCube goes where you go ....................................E-17
Options ..................................................................E-18
Setting up the rWave .............................................E-18
Playing from the rWave ........................................E-19
Options ..................................................................E-20
Setting up the rWand .............................................E-20
Playing from the rWand .........................................E-21
Setting up rCube-to-rCube transmission .......E-22
Upgrading the Firmware .......................................E-23
Troubleshooting .................................................E-24
Specications ...................................................... E-25
Warranty ...............................................................E-26
welcome to the Arcam family. Arcam has
been producing specialist audio products
of remarkable quality for discerning Hi-Fi
enthusiasts for over three decades. Your rCube
has the heritage of a long line of award winning
Hi-Fi components.
e rCube is unique among iPod® speakers.
It is designed to be small in size but big in
sound. Side ring full range drivers create a
spacious sound from a small unit. e rCube
can stream music wirelessly, too. With its
integral battery and using an optional wireless
transmitter, the rCube can wirelessly receive
music from your PC or iPod, enabling you to
bring music anywhere you like in the home.
e rCube is intuitive and easy to use. is
handbook gives you all the instructions you
will need to get the most from your ‘Cube’.
It will help you set up your rCube, connect
it and position it to get the best sound. is
handbook also shows you how to play music
from your iPod, from an external source and
from another rCube or a PC wirelessly.
We hope you will enjoy your rCube. If you
require further information about Arcam
products, our network of dealers will be
happy to help you. Further information
can also be found on the Arcam website at
www.arcam.co.uk.
E-4
Page 5

What’s in the Box?
QuickTour
rCube
Arcam rWave USB transmitter
for wireless audio streaming
from your PC or Mac
AC Adapter
(supplied with the
apppropriate power lead)
Available Accessories
Arcam rWand iPod® transmitter
for wireless audio streaming
from your iPod, iPhone® or iPad®
Other accessories may become available in future
— please contact your Arcam dealer for the latest information.
E-5
Arcam rTube Component video breakout
cable for connecting to high quality
component video enabled displays
Remote
(supplied with
battery)
Page 6

Product Overview
View from Back
QuickTour
IO
Rear Panel Connectors
e rear panel contains the overall power switch and
connectors for connecting power as well as CD players and
TVs etc. See page E-7.
View from Top
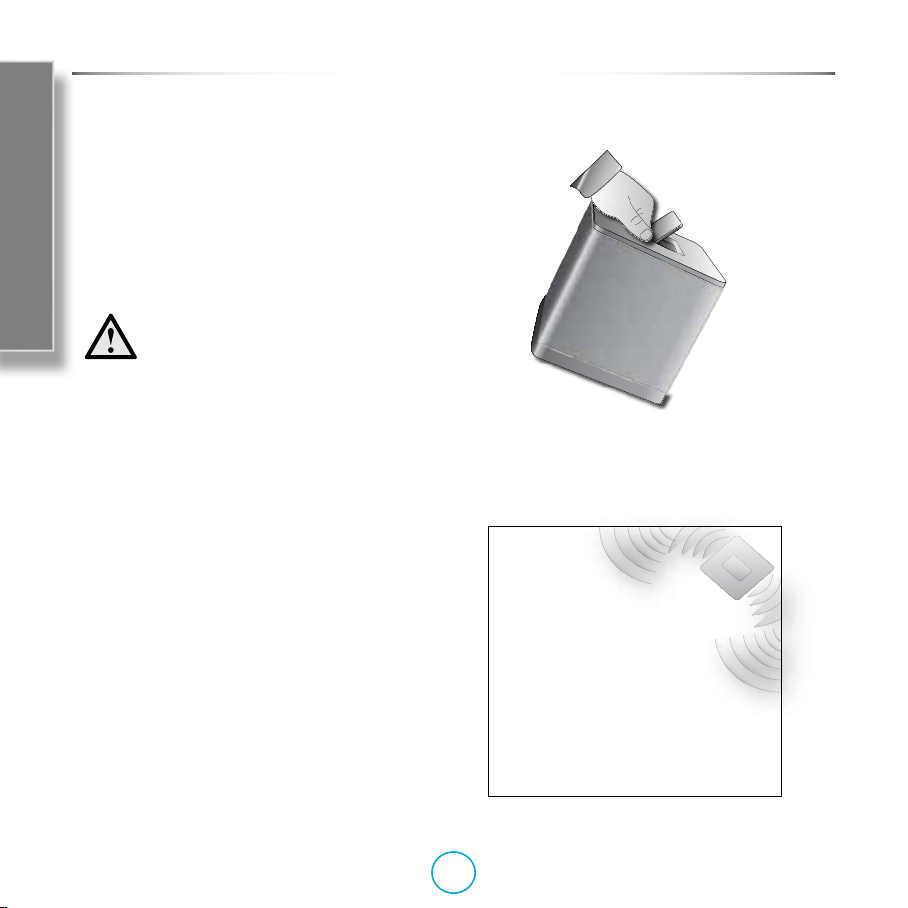
iPod Dock and Handle (with dust cover)
e iPod dock and integrated handle is protected by a dust
cover. Press on the rear of the cover to rotate it and reveal
the dock and handle. Note the unit must not be carried with
the handle while an iPod is in the dock.
Top Panel Controls
is row of buttons provides control over input selection,
wireless reception, standby mode, mute and volume. See
page E-9.
E-6
Page 7

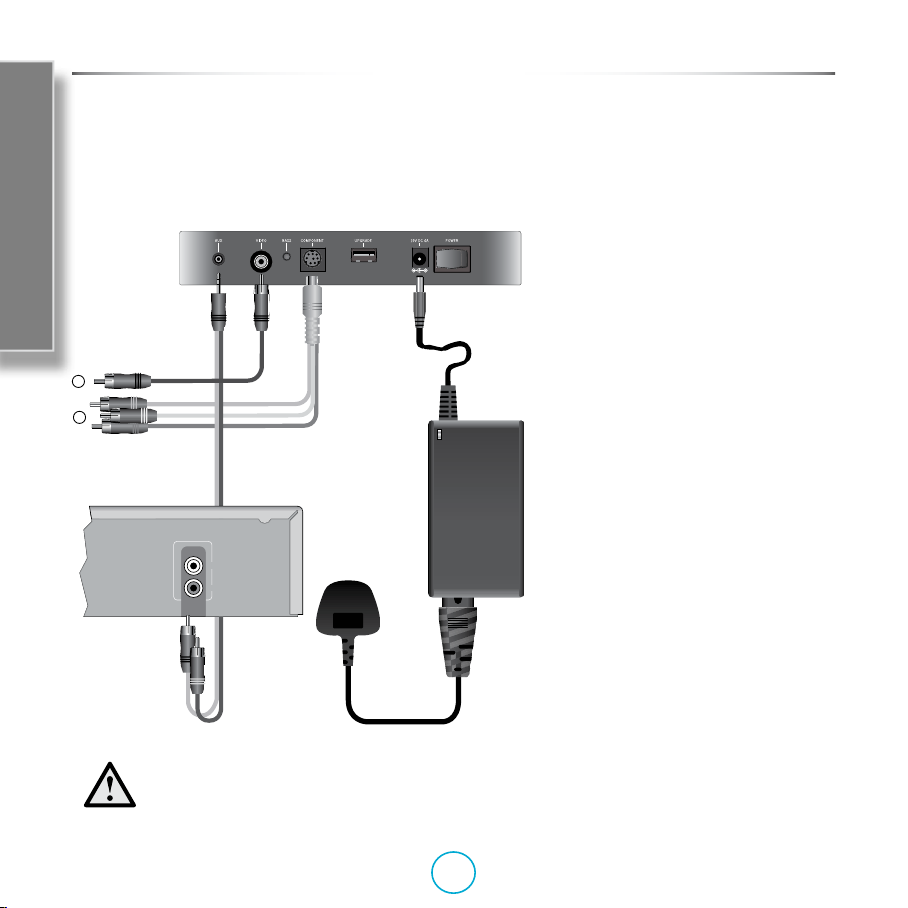
Rear Panel
Rear Panel
e rear panel contains the master power switch and
sockets for power and connecting the rCube to other
devices (see Connections Overview on page E-8 for
details).
Video and audio connections
e rCube has a variety of ways to connect to external video displays
and analogue and digital audio sources. See the ‘Connection
Overview’ section of this manual or look for your specic connection
in the ‘Playing from a ....’ in the Table of Contents for details.
BASS button
e rCube applies a sophisticated psychoacoustic bass enhancement
carefully designed to enable the rCube to produce tight, powerful bass
despite its compact size. When pressed in, the BASS button provides
an extra bass boost in conjunction with other sound adjustments to
give a punchier, enhanced sound.
AUX-in
Composite
VIDEO
BASS
Y, Pb, Pr
VIDEO
UPGRADE
DC IN
External analogue input via 3.5mm
connector.
Composite video output from
supported iPods
When pressed in,
enhances bass output.
Component video output from
supported iPods
USB connector for upgrading
rmware
DC Voltage supply input from power
module.
IO
USB upgrade
e rCube has a USB connector on the
back of the unit for future upgrade via
a USB memory stick. You should not
upgrade your unit unless advised to do so.
If you need to upgrade your unit please
visit www.arcam.co.uk for instructions
and the latest rmware.
e rear panel USB connector
is for future rCube upgrades
only. e rCube does not play
music les from this USB
port nor does it interface with
computers via this port.
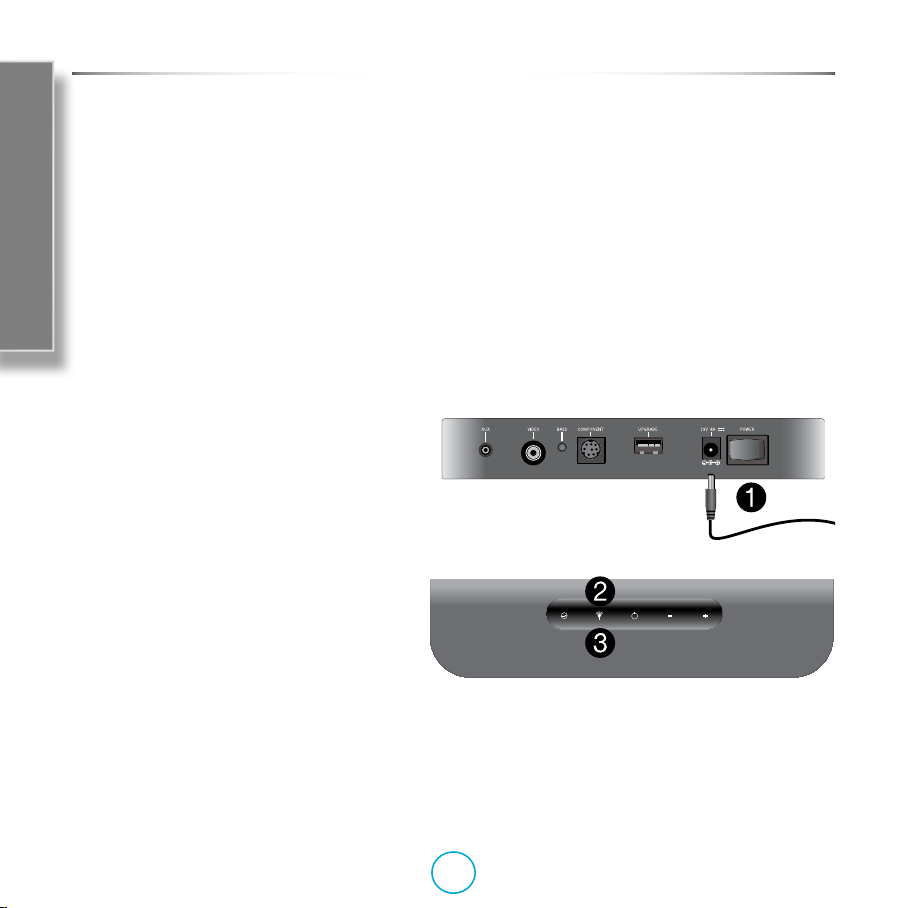
Power Switch
Before using the rCube it must be
connected to the mains supply using the
supplied AC adaptor (unless the integral
battery is charged). Once plugged in, the
power switch on the rear panel will switch
the rCube from o to standby mode. In
standby, the rCube responds to front panel
or remote control commands but also uses
a small amount of power. If you are using
battery power you should switch the unit
completely o using the rear-panel power
switch when not in use.
QuickTour
IO
POWER
Main on/o switch for entire unit.
E-7
Page 8
QuickTour
.
L
Cube
A
TV
B
CD OUT
SERIAL NO .
External Source
Only use the AC adaptor that was originally
supplied with your rCube. Other adaptors
may damage the rCube.
Connections Overview
Power
Your rCube can be powered from the mains
or from the integral rechargeable battery.
IO
CD OUT
L
R
R
Power
Connect the power supply to power the unit
from the mains and/or to charge the battery.
Connecting to external sources
ere are two types of sources that can be
connected to the rCube’s AUX-in input: linelevel analogue (e.g. from a hi- CD player
or a TV) and headphone jack analogue (e.g.
MP3 player). For more details on a specic
connection please see the ‘Playing from a
...’ in the Table of Contents to locate your
scenario.
Connecting to a TV (iPod video playback)
Video-enabled iPods can be connected to
a television with either composite video
A or component video B connectors
(see gure). To connect to a display with
component video (3 wires) use the optional
break out cable. For a list of currently
compatible iPod products that output video
see http://support.apple.com/kb/HT1454.
Please note that Apple devices do not output
any menu graphics or any application
graphics to a connected display — the video
out is used only for playback of video les.
E-8
Page 9
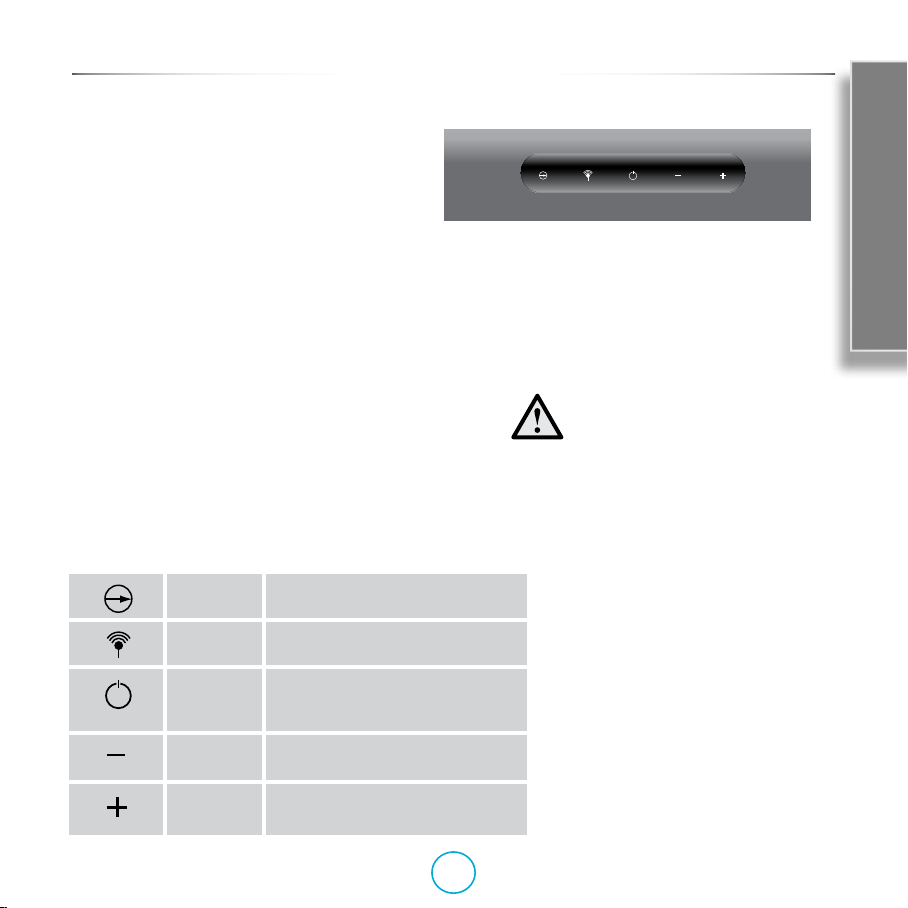
e Top Panel contains touch-sensitive buttons for
Top Panel
standby, selecting sources, and changing the volume. Each
button has an LED above it which illuminates to indicate
each button press.
Power and Standby
At the centre of the top-panel is the standby button.
When the rear-panel rocker switch is on, the 2 button
on the top-panel (or on the remote) toggles between fully
on (blue front LED, or purple when using battery power) and standby
mode (red LED).
Source Selection
You can switch between listening to the iPod dock or AUX rear
panel sources by pressing the SOURCE button (see table below). To
select a wireless source instead, press the WIRELESS button. is
will de-select any AUX or iPod source and start playing from
the optional USB or iPod Transmitter. When a wireless source is
selected, the wireless indicator will glow continuously.
Indicator LEDs
e top panel LEDs illuminate to indicate source selection and volume
adjustment. When using the remote control, the power LED ashes to
conrm reception of remote commands.
QuickTour
In order to use the wireless transmitter
you must rst set it up. See the section
“Setting up the rWave Optional USB
transmitter” on page E-18 or “Setting up the
rWand Optional iPod transmitter” on
page E-20
SOURCE
WIRELESS
STANDBY
VOLUME
DOWN
VOLUME
UP
Chooses local source to play: AUX-in
(red illumination) or iPod (green).
Chooses available wireless sources to
play: searching (red) or locked (green).
Turn rCube from standby (red LED)
to on (blue/purple) or place unit into
standby.
Reduces volume. Press and hold to
smoothly reduce the volume.
Increase volume. Press and hold to
smoothly increase volume.
E-9
Changing the Volume and Muting
A short press of - or + will increase or
decrease the rCube’s volume a small
amount or you can press and hold
the button to ramp the volume up or
down. Pressing both volume buttons
simultaneously will instantly mute all
sound coming from the device. Both
volume LEDs (- & +) are illuminated
when the rCube is muted. Press any
volume button to release the Mute
function.
Page 10
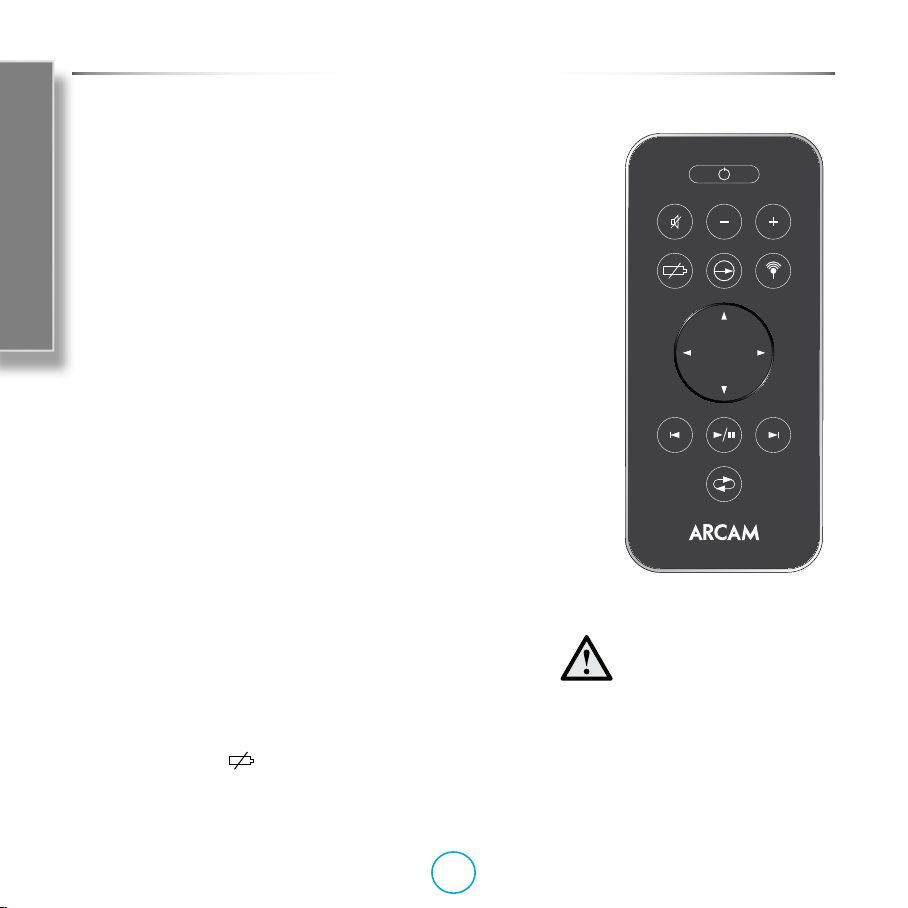
Remote
Remote
e Remote contains buttons like those found on the Top Panel
for standby, selecting sources and changing the rCube volume.
In addition it can also be used to navigate through menus and
tracks on the iPod and change the iPod play mode (to ‘shue’ for
example).
Power and Standby
QuickTour
e remote standby button 2 works in conjunction with the
rear panel power rocker switch. When the rear panel switch is
in the on position pressing the remote power button will toggle
the unit between fully on (blue LED (mains power) or purple
LED (battery power) on the front of the unit) and standby mode
(red LED on the front of the unit). e remote standby button
duplicates the unit’s top panel standby button.
Changing the Volume and Muting
e remote volume buttons duplicate the top panel volume
and buttons. A short press of + or - will increase or decrease
the rCube’s volume a small amount (there are 52 volume steps)
or you can press and hold these buttons to ramp the volume
up or down. e top panel volume + and - LEDs will ash to
conrm volume adjustment. Pressing the mute button will put
the unit into ‘Mute’. When muted, both volume LEDs (- & +) are
illuminated and no sound will come from the device. Press Mute
again to release the Mute function and allow it to play.
iPod Charging
e rCube, like the ARCAM irDock, has user control over iPod
charging for longer battery life and better sound quality. By
default, the rCube always charges iPods when mains or battery
power is available and the rCube is switched on. iPod charging
is not available in Standby mode. You can manually prevent
charging by pressing the
the charge indicator will disappear from the iPod screen and iPod
charging will cease until the button is pressed again, the iPod is
re-inserted or until the rCube is switched back on.
button. When this button is pressed,
e remote must be pointed
toward the front of the rCube in
order to work.
E-10
Page 11
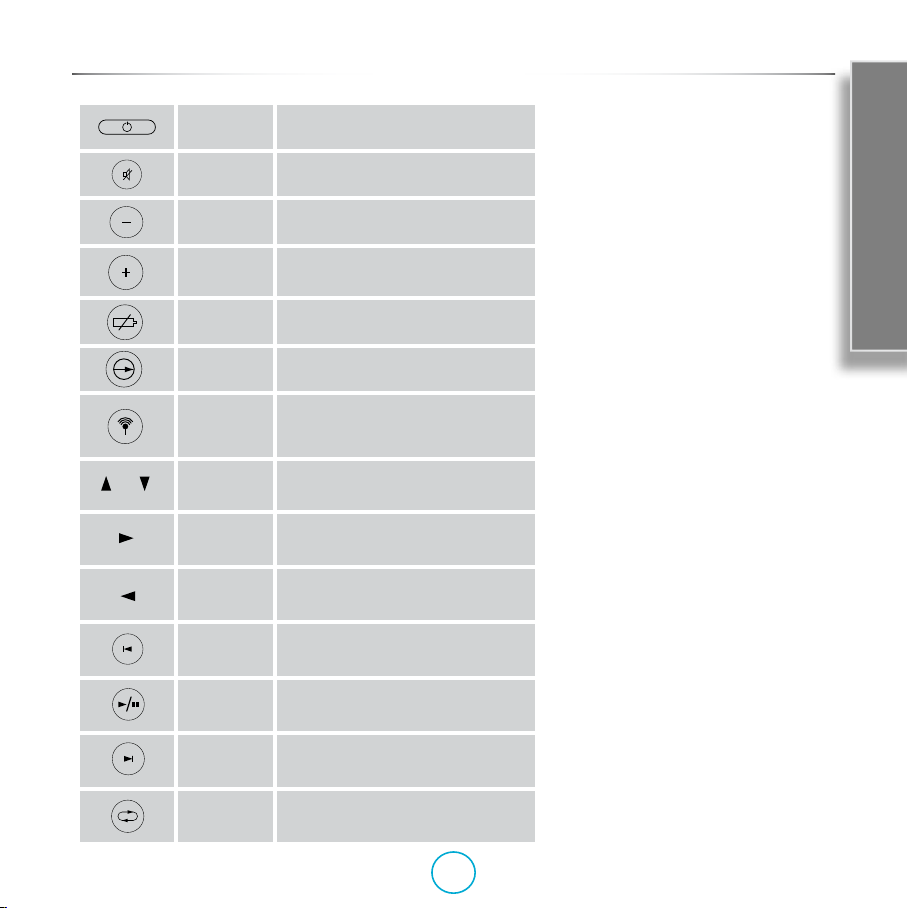
STANDBY
MUTE
VOLUME
DOWN
VOLUME
UP
CHARGE
IPOD
SOURCE
SELECT
WIRELESS
SCROLL
SELECT
MENU
REW/SKIP
PLAY/
PAUSE
FWD/SKIP
PLAY
MODE
Remote
Turn rCube on from standby or place
unit into standby from on.
Mute the rCube volume.
Reduces volume. Press and hold to
smoothly reduce the volume.
Increases volume. Press and hold to
smoothly increase volume.
Turns iPod charging on and o. Turn
o charging to prolong battery life.
Toggles between iPod and external
sources.
Selects a wireless source. Press to
select the next available wireless source
associated with the rCube.
Scroll up and down to choose from
listed iPod page items.
Select current item move to sub-page.
Navigate back on page level.
Press and hold to fast forward or single
press to skip to the next track.
Press to toggle between play and pause
modes.
Press and hold to review or single
press to skip to the previous track.
Rotates through the popular play
modes on the iPod.
iPod control
NOTE: these functions are only available
for docked iPods and iPhones. ey are
not available when an iPod is connected
wirelessly.
Navigating iPod Menus
You can navigate through the menus of
a docked iPod by using the 4 navigation
buttons. Pressing B or C scrolls up
or down through listed page items
to highlight a selection. e E arrow
functions as ‘select’ and will moves to the
sub-page of any selected menu item. e
D button functions as a menu or back
button. Pressing D causes the iPod to go
up one page level to the previous page.
Playing, Using Rew/Fwd and Changing
iPod Tracks
ere are three iPod track navigation
buttons on the remote. e 4/; button
toggles between play and pause. If an
iPod is docked but not playing and its
display is dark, pressing 4/; will also
activate the iPod. Press and hold 9 or :
to continuously rewind or fast forward;
single presses will skip to the previous or
next track respectively.
Play Mode (Repeat and Shue
iPod playback mode is controlled by the
‘Play Mode’. button. Single presses rotate
through the 5 possible play modes: (a)
single track repeat, (b) playlist or folder
repeat, (c) playlist or folder repeat plus
shue, (d) no repeat but with playlist or
folder shue instead, (e) no repeat and
no shue, plays the playlist or folder once
(default).
QuickTour
E-11
Page 12
Carrying and Placing the rCube
Right
Channel
Left
Channel
23425
Carrying your rCube
e rCube is designed to be easy to carry around the house;
the hidden handle under the dust cover comfortably ts a
hand. To li your rCube, rst make sure there is no iPod
in the docking station and that the AC mains adaptor is
disconnected. With your palm facing toward the rear of
the unit push down on the back of the dust cover and grip
underneath the lid. As you li, your rCube will tilt. Be gentle
QuickTour
when liing or setting down your rCube.
Remove any iPod before carrying the rCube.
You should not carry the rCube with an iPod
in the dock. You can carry the rCube while it is
playing wirelessly whilst on battery power.
Choosing where to put your rCube
e rCube sounds great almost anywhere. Side mounted
front angled drivers allow the rCube to produce high-quality
sound over 270 degrees.
Do put the rCube in a corner!
While good just about anywhere, the rCube is designed to
sound great when placed in the corner of a room. In this
position the side-ring drivers reect sound o walls to
produce a more spacious sound. Try placing your rCube in a
corner angled at 45 degrees and pointing toward the centre
of the room. We think you will be surprised how the sound
lls the space. We recommend that the BASS button is not
pressed in when using corner placement or placing near a
wall, since the corner/wall acoustics naturally enhance bass.
Select the bass boost (BASS button pressed in) when placing
the rCube away from a corner or wall, or if the music style
benets from extra bass.
Don’t put the rCube in a conned space
e side ring drivers work best when they are not
obstructed (e.g. on a kitchen counter). Do not place the
rCube on a bookshelf with books on either side as this will
block the sound.
E-12
Page 13
Playing from an iPod or iPhone
Power up
1
Plug one end of the laptop-style power supply
into the AC mains wall supply and the other
into the DC power input jack on the rear panel
Operate
of the rCube. Switch the rCube on by pressing
its power rocker switch on the rear panel. e
front LED will glow red (standby mode). Press
the standby button on the top panel or on the
remote. e power LED will change from red to
blue and the rCube is now on.
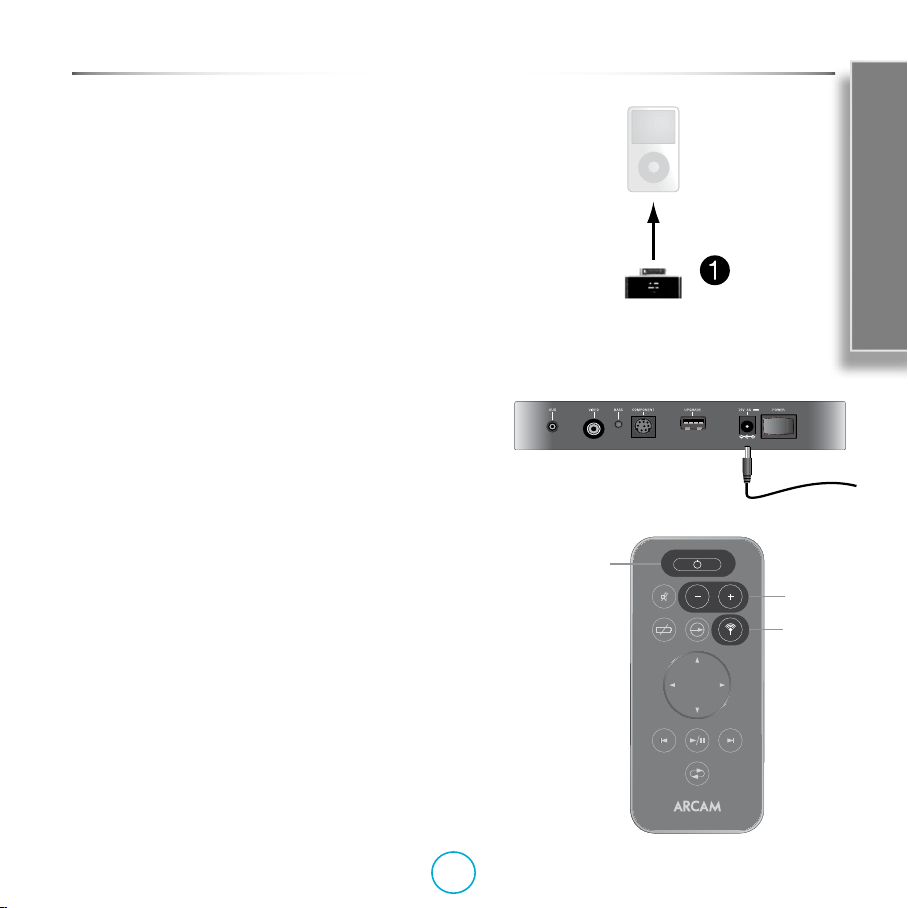
Dock the iPod
2
Open the dust cover to reveal the universal
docking well. Gently insert your iPod or iPhone
onto the connector.
When docking or removing, insert the
iPod gently and at the same angle as
the connector. Do not twist or pull the
iPod while it is in contact with the dock
connector! is can damage the connector.
Select iPod as the source
3
When the iPod is docked, the rCube will automatically select iPod
as the source and the source button will glow green. If the iPod is in
the dock but not the current source, press the source button on the
remote control or on the top panel until the source LED glows green.
Choose track and play
4
Use your iPod controls or rCube remote to select a track and begin
audio playback.
Adjust volume
5
Use the + and - volume buttons on the remote or on the top panel to
adjust the volume to desired level.
NOTE: e Apple iPad is too large for the docking connector, but can be
connected wirelessly using a transmitter accessory. See page E-20.
MENU
, .
;4
IO
1
Operate
2
E-13
Page 14
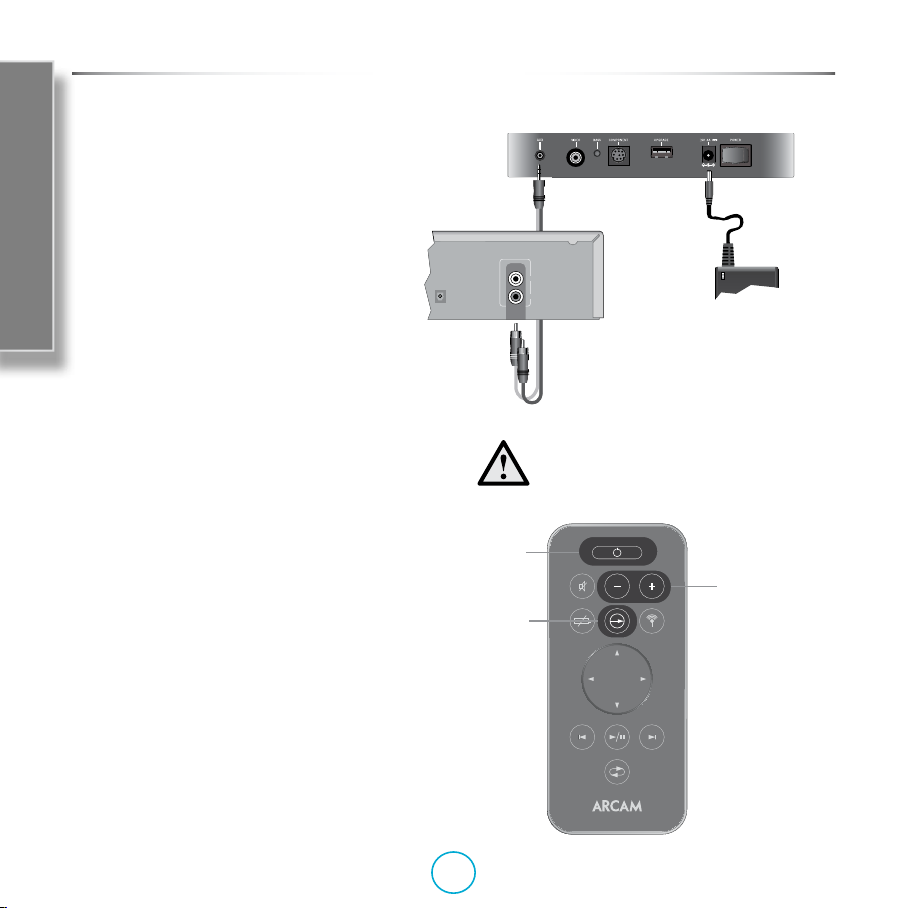
Playing from a Line-Level Source
CD OUT
SERIAL NO .
L
Connect the line level source to AUX-in
1
Line level sources (e.g. a CD player or
preamplier output) typically have RCA phono
connectors (pictured at right) and they do not
usually have any volume control. To connect
Operate
a line level source you will need a cable that
has dual (le and right) RCA phono male
connectors on one end and 3.5mm stereo
mini-jack on the other. If there is a volume
control on the source set it to 90%. Make this
connection with the unit switched o.
Power up
2
Plug one end of the power supply into the AC
mains wall supply and the other into the DC power input
jack on the rear panel of the rCube. Switch the rCube on
by pressing its power rocker switch on the rear panel, the
front LED will glow red (standby mode). Press the standby
button on the top panel or on the remote. e power LED
will change from red to blue and the rCube is now on.
Select AUX-in as the source
3
Press the ‘Source Select’ button on the remote control or
press the source button on the top panel until the source
LED turns red. Red indicates AUX is chosen as the source.
Make sure the external source is playing
4
Use the controls on the line-level source to start playback
and verify the device is playing.
CD OUT
Digital
SERIAL NO .
..
1
1
CD OUT
L
R
R
Note: some devices output line level from
a 3.5mm stereo mini jack. If you have one
of these you will need a stereo male to male
3.5mm cable instead of the one shown.
Line-Level
Source
2
IO
2
Adjust volume
5
Use the + and - volume buttons on the remote or on the
top panel to adjust the volume to desired level.
E-14
Page 15

Playing from a Headphone Jack
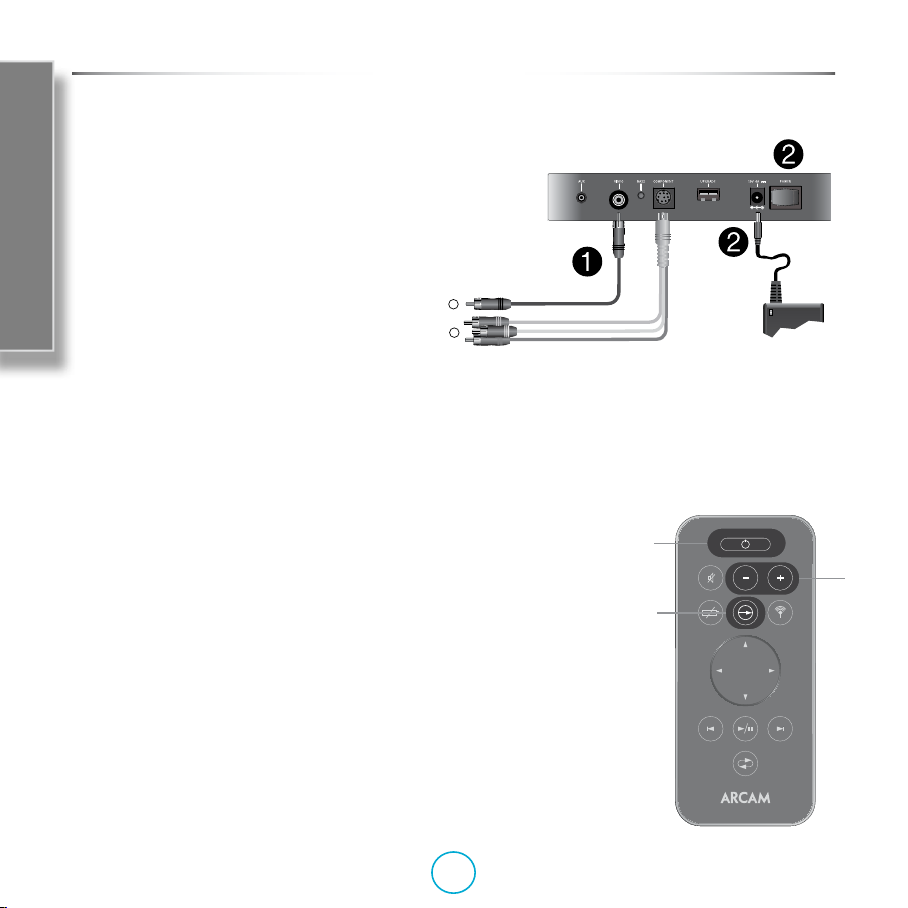
Connect the headphone jack to AUX-in
1
Almost all audio equipment has a headphone
jack. is is an easy way to connect to the
rCube. Early iPods, other MP3 players, TVs
and laptops can be connected this way via a
double-ended 3.5mm mini-stereo cable. Usually
headphone outputs produce a higher maximum
voltage than line level outputs so set the source
to 75% volume.
Power up
2
Plug the power supply into the AC mains wall
supply and the DC power input jack on the
rear panel of the rCube. Switch on the rCube
by pressing power switch on the rear panel, and
press the standby button on the top panel or on
the remote. e blue power LED should light.
Select AUX-in as the source
3
Press the ‘Source Select’ button on the remote
control or press the source button on the top panel until the source LED
turns red. Red indicates AUX is chosen as the source.
Make sure the external source is playing
4
Use the controls on the source device to start playback. Remember to set
the volume to 75% on the headphone source device, signals that are too
high can produce distortion. You can verify the device is playing properly
by using a pair of headphones.
1
87
;4
Headphone
Source
IO
21
2
Operate
Adjust volume
5
Use the + and - volume buttons on the remote or on the top panel to
adjust the volume to desired level.
E-15
Page 16
Using Video Outputs
In addition to playing audio the rCube can output
video from supported iPods. When a video-enabled
iPod is docked and playing, video is routed to both
the composite (option A) and Y, Pb, Pr (option B)
video outputs on the rear panel. The output you use
is entirely up to you and what your display supports.
Note that some iPods may need to have their settings
changed to enable video — please contact Apple for
Operate
iPod support. Please note that Apple devices do not
output any menu graphics or any application graphics
to a connected display — the video out is used only for
playback of video les.
Connect the video display to the rCube
1
Composite video and Y, Pb, Pr (also called ‘component’) video are common
video formats. To connect your iPod to a composite video display you will need
a video cable with RCA phono connectors on either side (option A). For Y, Pb,
Pr video use the optional breakout cable (option B). Y, Pb, Pr video provides the
best picture quality. To purchase this component video cable please contact your
Arcam dealer.
Power up
2
Plug the power supply into the AC mains wall supply and the DC power input
jack on the rear panel of the rCube. Switch on the rCube by pressing power switch
on the rear panel, and press the standby button on the top panel or on the remote.
e blue power LED should light.
Select iPod as the source and play a video
3
Press the ‘Source Select’ button on the remote control or press the source button
on the top panel until the source button turns green. Green indicates iPod is
chosen as the source. Start the iPod video playback.
Make sure your display’s source is correctly set
4
Use the controls on the display device to select the video input your rCube is
connected to as the current video source.
Adjust volume
5
Use the + and - volume buttons on the remote or on the top panel to adjust the
volume to desired level.
TV
A
B
E-16
rCube
IO
Page 17
rCube goes where you go
Lithium Ion power means it goes where you go
Your rCube has an integral high-capacity Lithium-Ion
(Li-ion) rechargable battery — it goes where you go. Into
the garden and around the home. e front power LED
glows purple to indicate that the rCube is running on
battery power.
Charging the battery
e rCube automatically charges the battery and has
built in charge methods to make the battery last as long
as possible. To nd out how much battery power is
remaining, connect the power supply, put the rCube into
standby and press the
e rCube top panel button LEDs indicate the level of
charge remaining:
- 4 illuminated LEDs indicate 100% remaining;
- 3 illuminated LEDs indicate 75% remaining;
- 2 illuminated LEDs indicate 50% remaining;
- 1 illuminated LED indicates 25% remaining.
Storage
If you need to store the rCube, you should ensure the rear
power switch is in the off position.
button on the remote control.
Operate
E-17
Page 18
Setting up the rWave Optional USB transmitter
The Arcam rWave wireless USB transmitter lets you play
music anywhere in the home from les on your PC.
You can purchase the optional Arcam rWave USB wireless
transmitter for your rCube to broadcast your computer music
anywhere around the house. To purchase the rWave please visit
your local ARCAM dealer or visit www.arcam.co.uk. Before
Options
using the rWave for the rst time, you must associate it with
a particular rCube receiver.
You only need to perform this setup once. Aer an
association is established it is remembered, even if the
units are powered o.
Install the rWave USB transmitter
1
into your PC or laptop
Plug the USB disk drive-style rWave transmitter into
a free USB port in your computer. e computer will
recognize the device as a sound device and set it as
your default output device.
Set the rWave to search for a rCube
2
Press the ‘associate’ button on the rWave USB
transmitter. e rWave LED will ash rapidly
indicating it is searching for an association. For
the next 30 seconds the rWave will associate with
any rCube also searching for an association
(see step 4).
1
3
IO
Turn on the rCube
3
Plug in and switch the rCube to on by pressing the rear
panel rocker switch to the on position and pressing the
top panel standby button, so hat the power LED is blue.
Set the rCube to search for a transmitter
4
Press the wireless button to select the wireless input.
Release the button briey, then press and hold.
e wireless LED will ash red as it searches for a
transmission. When the wireless LED on the rCube
glows continuous green, the association has been made.
e rWave remains in association mode for 30 seconds in
case any more cubes are being set up. Do not remove the
rWave from the PC during this time. When association
is nished, the LED on the rWave will ash briey every
ve seconds. You will now be able to hear the wireless
source.
E-18
Page 19
Playing from the rWave Optional USB Transmitter
IO
The Arcam rWave wireless USB transmitter lets you play
music anywhere in the home from les on your PC.
NOTE: You will need to associate each cube with a wireless
transmitter before that cube can receive audio.
Remote
Install the rWave USB transmitter
1
into your PC or laptop.
Plug the USB disk drive-style rWave transmitter
into a free USB port in your computer. e
computer will recognize the device as a sound device.
You may need to enable audio output to the rWave (“Arcam
Wireless DAC”) in your system settings — some operating
systems do this automatically. You can check to see if the rWave is
broadcasting by looking at its LED, which will ash briey every ve
seconds when transmitting.
Power up
2
Plug the power supply into the AC mains wall supply and the DC power
input jack on the rear panel of the rCube. Switch on the rCube by pressing
power switch on the rear panel, and press the top panel standby button.
e blue power LED should light.
Operate
1
2
Select the rWave as wireless source
3
To select the rWave transmitter, press the ‘Wireless’ button on the rCube
remote control or on the top panel. If a source is available the light will
turn green and the source will begin to play. Note: if a second wireless
source is also transmitting you may have to press the ‘Wireless’ button
twice to select the correct transmitter.
Play tunes on the computer
4
Go to iTunes or your favourite soware music player and choose and play
a song. N.B. Always insert the USB transmitter before starting iTunes.
Adjust volume
5
Use the + and - volume buttons on the remote or on the top panel to
adjust the volume to desired level.
E-19
Page 20
Setting up the rWand Optional iPod transmitter
, .
;4
23425
The Arcam rWand wireless Apple-compatible transmitter means
you can play music anywhere in the home from your Apple iPod,
iPhone or iPad.
You can purchase an Arcam rWand wireless transmitter for your
rCube to broadcast your iPod’s music wirelessly around the house.
To purchase the rWand please visit your local ARCAM dealer or visit
www.arcam.co.uk. Before using the rWand for the rst time, you must
Options
associate it with a particular rCube receiver.
You only need to perform this setup once. Aer an association
is established it is remembered, even if the units are powered
o.
Insert the rWand iPod transmitter into your iPod, iPhone
1
or iPad.
Plug the rWand into the docking connector at the
bottom of your Apple player.
Set the rWand to search for a rCube
2
Press the ‘associate’ button on the rWand
transmitter within 3 seconds of inserting it.
Hold the button until the transmitter LED
ashes rapidly (5 times per second) indicating it
is searching for an association. For the next 30
seconds the rWand will associate with any rCube
also searching for an association (see step 4).
MENU
, .
;4
3
IO
Turn on the rCube
3
Plug in and switch the rCube to on by pressing the
rear panel rocker switch to the on position and
pressing the top panel standby button, so that the
power LED is blue.
Set the rCube to search for a transmitter
4
Press the wireless button to select the wireless
input. Release the button briey, then press and
hold. e wireless LED will ash red as it searches for
a transmission. When the wireless LED on the rCube
glows continuous green, the association has been made.
e rWand remains in association mode for 30 seconds
in case any more cubes are being set up. Do not remove
the rWand from the iPod during this time. When
association is nished, the LED on the rWand will ash
briey every ve seconds. You will now be able to hear
music played from the iPod.
E-20
Page 21
Playing from the rWand Optional iPod Transmitter
IO
NOTE: You need to associate each cube with a wireless transmitter before that
cube can receive the transmitter’s audio.
Remote
Install the rWand iPod transmitter into your iPod, iPhone or iPad.
1
Plug the rWand transmitter into the docking connector at the bottom
of your Apple player. You can check to see if the rWand is broadcasting
by looking at its LED, which will ash briey every ve seconds when
transmitting.
Power up
2
Plug the power supply into the AC mains wall supply and the DC power
input jack on the rear panel of the rCube. Switch on the rCube by pressing
power switch on the rear panel, and press the top panel standby button.
e blue power LED should light.
Select the rWand as wireless source
3
To select the rWand iPod transmitter, press the ‘Wireless’ button
on the remote control or on the top panel. If a source is available the light
will turn green and the source will begin to play. Note: if a second wireless
source is also transmitting you may have to press the ‘Wireless’ button
twice to select the correct transmitter.
Play tunes on the iPod/iPhone/iPad
4
NOTE: Some Apple devices require you to select the iPod music player
application.
Adjust volume
5
Use the + and - volume buttons on the remote or on the top panel to adjust
the volume to desired level. e rCube volume can also be adjusted using
the iPod’s volume control.
, .
MENU
;4
Operate
2
E-21
Page 22
Setting up rCube-to-rCube transmission
With two rCubes, one rCube can receive wireless
transmissions from the other.
Any music played on the transmitting rCube, from an iPod or
an external source, will be sent wirelessly to the second rCube.
Before transmitting for the rst time, you must associate the
transmitting rCube with the receiving rCube.
Operate
Aer an association is established it is remembered, even
if the units are powered o. Note: Association must be
performed twice if you want each cube to be able to transmit
to the other - you will need to repeat the steps below with the
cubes switched around. Once this is done, you’ll be able to set
either cube to receive whatever the other is playing.
Power on all rCubes
1
Connect power, turn on at the rear panel and
power on using the top panel standby buttons, so
that the power LED glows blue.
Set the transmitter rCube to search for
2
receiver rCubes
Press and release the source select button to select
the source (iPod or AUX) that you want to
transmit. Press and hold the wireless button
until the wireless LED ashes red. For the next
30 seconds this transmitter rCube will associate
with any rCube searching for an association
(see step 3).
Wireless Range
An rCube can normally receive from a
transmitter situated in the same house.
Range may be reduced depending on
building materials and interference from
other wireless sources such as cordless
telephones and WiFi routers. If you
experience problems with the wireless
signal, try moving either the receiving
rCube or the transmitter to a dierent
location. Wireless operation cannot be
guaranteed in hostile RF environments.
IO
Set the receiver rCube(s) to search for a
3
transmitter
Press the wireless button to select the wireless input.
Release the button briey, then press and hold.
e wireless LED will ash red as it searches for a
transmission. When the wireless LED on the rCube
glows continuous green, the association has been made.
e transmitting rCube will continue
to search for receiver rCubes for 30
seconds. Do not interrupt this process –
wait until the wireless LED glows green
before powering o the transmitter
rCube.
E-22
Page 23

Upgrading the Firmware
IO
e rCube has the ability to have its soware
upgraded by the user. is allows additional
features to be added and allows compatibility
with yet to be released iPods and iPhones.
You should only upgrade the
rmware if directed by Arcam or
your dealer
To upgrade the rCube you will need a USB ash
drive and a PC or laptop computer that can
connected to the internet.
Download the rmware le to your
1
memory stick.
Visit www.arcam.co.uk to download the
latest firmware and place the file on your
USB flash drive.
There must not be any other files present
on the drive.
With the rCube o, insert
2
the USB ash drive.
First make sure the rCube is
fully powered o (using the rear
panel switch) and then insert
the memory stick with the
downloaded le into the USB
style upgrade port on the rear
panel of the unit.
Power on the rCube into standby mode
3
Turn the rCube on by pressing the power
rocker switch on the
rear panel. Press and
hold the standby
button until the power
LED ashes red. e
power LED will ash red rapidly while the unit is
upgrading. When the LED will stops ashing and
glows continuously, the rCube is updated.
Remove the memory stick
4
It is now safe to remove the memory stick.
If the rCube is put into upgrade
mode accidentally, turn o the power.
When the power is turned back on,
the rCube will operate normally.
Operate
E-23
Page 24
Problem Check that...
ere are no lights lit on the
unit
e power light is ashing red < the rCube is in upgrade mode. Insert a USB ash drive with upgrade le to
My rCube is on and an iPod is
docked, it appears to be playing
but I can’t hear any sound
Troubleshooting
e unit responds erratically or
not at all to the remote control
Hum when playing the ‘AUXin’ Analogue input
The iPod is playing a video and
I have connected a display to
one of the video outputs but my
images are not displayed.
The sound is thin and lacking
in bass.
The sound is boomy with too
much bass
< the rCube rear panel power switch is in the ‘on’ position.
update or turn the power o and back on to reset to normal.
< the source is set to play from iPod by pressing the ‘iPod’ button on the remote or
the source button on the top panel until the source LED lights green (indicting
iPod source chosen).
< both volume LEDs are not lit. If they are, this indicates that sound is muted. Press
the ‘MUTE’ button on the remote or a volume control button to unmute the
sound.
< the rCube is powered on, if it is in standby mode press the P button on the
remote to turn it on.
< there are fresh batteries in the remote.
< there is a ‘line of sight’ (no obstruction) between the remote and the rCube’s front
panel IR receiving point.
< all cables are making good connection. If necessary withdraw the cable from he
connector and plug it fully in again (turn the power o before doing this).
< the connections inside the source cable connector are not broken or badly
soldered.
< if the hum originates only when one particular source component connected,
check that the source is properly grounded. Check that any aerial cable is ground
isolated. Contact an installation contractor for assistance.
< all cables are making good connection. If necessary withdraw the cable from he
connector and plug it fully in again (turn the power o before doing this).
< the display source is set to display the input the cable is plugged into.
< the Bass button on the rear panel is not pressed in.
Press this button in to add extra bass.
< the rCube is too far from a wall.
Move the rCube closer to a wall or a corner for more bass output.
< the Bass button on the rear panel is pressed in.
Set this button to the 'out' position to reduce the bass output.
< the rCube is too close to a wall or corner.
Move the rCube away from a wall or a corner for less bass output.
E-24
Page 25

Specications
Continuous power output (20Hz—20kHz at 0.5% THD), per channel
Woofer channels, 4Ω, 100Hz—3.7kHz 35W/Ch
Tweeter channels, 6Ω, at 1kHz 10W/Ch
Harmonic distortion, 80% power, 1kHz 0.1%
Inputs
Line inputs:
Nominal sensitivity 250mV—1.5V
Input impedance 22kΩ
Signal/noise ratio (CCIR, 45W) 90dB
Amplier output
Nominal output level 90W
Output impedance <50Ω
Speakers
Output Level ~94dB SPL/Vrms
Output impedance 100Ω
General
Mains voltage 110—120V or 220—240V
Power consumption (maximum) 90W
Dimensions W x D x H (including feet) 200 x 200 x 200mm
Weight (net) 5 kg
Weight (packed) 6.2 kg
Supplied accessories Power Supply
Mains Lead
Remote Control with CR2025 Battery
E&OE
NOTE: All specication values are typical unless otherwise stated.
Remote
E-25
Page 26

Warranty
Worldwide Guarantee
is entitles you to have the unit repaired free of charge, during the rst two years aer purchase, provided that
it was originally purchased from an authorised Arcam dealer. e Arcam dealer is responsible for all aer-sales
Remote
service. e manufacturer can take no responsibility for defects arising from accident, misuse, abuse, wear and tear,
neglect or through unauthorised adjustment and/or repair, neither can they accept responsibility for damage or loss
occurring during transit to or from the person claiming under the guarantee.
The warranty covers:
Parts and labour costs for two years from the purchase date. Aer two years you must pay for both parts and labour
costs. e warranty does not cover transportation costs at any time.
Claims under guarantee
is equipment should be packed in the original packing and returned to the dealer from whom it was purchased.
It should be sent carriage prepaid by a reputable carrier – not by post. No responsibility can be accepted for the unit
whilst in transit to the dealer or distributor and customers are therefore advised to insure the unit against loss or
damage whilst in transit.
For further details contact Arcam at:
Arcam Customer Support Department,
Pembroke Avenue, Waterbeach, CAMBRIDGE, CB25 9QR, England
or via www.arcam.co.uk.
Problems?
If your Arcam dealer is unable to answer any query regarding this or any other Arcam product please contact Arcam
Customer Support at the above address and we will do our best to help you.
On-line registration
You can register your product on-line at www.arcam.co.uk.
E-26
Page 27

Page 28

Page 29

Système de haut-parleur iPod
Page 30

Instructions de sécurité importantes
Cet appareil a été conçu et fabriqué conformément aux
normes de qualité et de sécurité les plus strictes. Vous
devez cependant observer les précautions qui suivent lors
de son installation et de son utilisation.
Ce symbole précède des
informations importantes
d’exploitation ou d’entretien.
1. Respect des avertissements et consignes
Il est impératif de lire l’ensemble des consignes de sécurité
Instructions de sécurité importantes
et d’utilisation avant de mettre cet appareil en marche.
Conservez ce manuel pour vous y référer par la suite et
respectez scrupuleusement les avertissements gurant
dans ce manuel ou sur l’appareil lui-même.
2. Eau et humidité
L’installation d’un appareil électrique à proximité d’une
source d’eau présente de sérieux risques. Pour ne pas
exposer l’appareil au ruissellement ou à la projection d’eau,
évitez de l’utiliser près de l’eau, par exemple près d’une
baignoire, évier de cuisine ou piscine, etc.
3. Chute d’objets ou inltration de liquides
Veillez à ne pas laisser tomber d’objets ni couler de
liquides à travers les ouvertures de l’appareil et ne placez
pas sur l’appareil d’objet contenant du liquide, tel qu’un
vase par exemple.
4. Emplacement de l’appareil
Évitez de placer l’appareil sur un lit, un canapé, un tapis ou
une surface similaire instable ou dans une bibliothèque ou
un meuble fermé. Ceci risquerait de nuire à la ventilation
du système.
5. Ventilation
Ne bloquez aucune fente d’aération de l’équipement. Ne
posez pas l’appareil sur un lit, un canapé, un tapis ou une
autre surface non rigide. Ne l’installez pas non plus dans
un endroit fermé tel qu’un placard ou une bibliothèque
fermée, cela entraverait en eet la bonne ventilation de
l’appareil.
6. Chaleur
Maintenez l’appareil éloigné de toute amme nue
ou d’appareils produisant de la chaleur, comme des
radiateurs, des fours ou autres.
7. Conditions climatiques
L’appareil est conçu pour fonctionner sous climat tempéré.
8. Nettoyage
Mettez l’appareil hors-tension avant de le nettoyer.
Pour l’entretien du boîtier, utilisez uniquement un chion
doux, humide et non pelucheux. N’utilisez pas de diluant
pour peinture ni de solvant chimique.
L’emploi d’aérosols ou de produits de nettoyage pour
meubles est déconseillé, car le passage d’un chion
humide risquerait de laisser des traces blanches et
indélébiles.
9. Alimentation secteur
Branchez l’appareil uniquement sur une alimentation
secteur du type mentionné dans le manuel d’utilisation ou
indiqué sur l’appareil lui-même.
Le principal moyen d’isoler l’appareil du circuit électrique
est de débrancher l’appareil. L’appareil doit être installé de
façon à pouvoir le débrancer si nécessaire.
10. Protection des câbles d’alimentation secteur
Veillez à ce que les câbles d’alimentation ne se trouvent
pas dans un lieu de passage ou bloqués par d’autres objets.
Cette règle s’applique plus particulièrement aux prises
et câbles d’alimentation et à leurs points de sortie de
l’appareil.
F-2
Page 31

Instructions de sécurité importantes
Instructions de sécurité importantes
11. Périodes de non utilisation
Nous recommandons que le cordon d’alimentation de
l’appareil soit débranché de la prise secteur pendant les
orages ou si l’équipement n’est pas utilisé pendant une
longue période de temps
12. Odeur suspecte
Arrêtez et débranchez immédiatement l’appareil en cas
d’émission de fumée ou d’odeur anormale. Contactez
immédiatement votre revendeur et ne rebranchez pas
l’appareil.
13. Service
N’essayez jamais d’eectuer d’autres opérations que celles
mentionnées dans ce manuel. Toute autre intervention
doit être eectuée par un personnel qualié.
14. Entretien par des techniciens qualiés
L’appareil doit être entretenu par du personnel qualié
lorsque :
A. la prise ou le câble d’alimentation a été endommagé,
B. des objets sont tombés ou du liquide a coulé dans
l’appareil,
Traitement responsable des déchets
Ce symbole indique que ce produit ne doit pas être
éliminé avec d’autres déchets ménagers, ceci dans
aucun des pays de l’Union européenne.
En recyclant ce produit de façon responsable,
vous contribuez à prévenir tout eet nocif sur
l’environnement ou la santé humaine consécutif à
une élimination de déchets non contrôlée, ainsi qu’à
préserver les resources naturelles.
veuillez utiliser l’un de vos centres locaux de récuperation et de
recyclage ou contactez le revendeur auprès duquel vous avez acheté le
produit.
Si vous souhaitez mettre ce produit au rebut,
C. L’appareil a été exposé à la pluie ou l’humidité, ou
D. l’appareil présente des dysfonctionnements,
E. l’appareil est tombé ou le boîtier a été endommagé.
Conformité aux normes et sécurité
Cet appareil a été conçu de manière à satisfaire à la
norme internationale de sécurité électrique IEC/EN
60065. Cet appareil est conforme à la section 15 des
règles de la FCC. Son utilisation est sujette aux deux
conditions suivantes : (1) Cet appareil ne doit pas causer
d’interférence nuisible, et (2) cet appareil doit accepter
toute interférence, y compris des interférences pouvant
causer un fonctionnement inapproprié.
klee r
ce r t i f i ed
“Made for iPod” et “Made for iPhone” signie
que l’accessoire électronique a été conçu
spécialement pour fonctionner avec iPod ou iPhone,
respectivement, et a été certié par le concepteur
pour satisfaire les normes de performance Apple.
Apple ne peut être tenu responsable de l’utilisation
de cet accessoire et de sa conformité aux normes de
sécurité.
iPhone, iPad et iPod sont des marques commerciales
d’Apple Inc., déposées aux Etats-Unis et dans d’autres
pays.
F-3
Page 32

Bienvenue
Contents
Instructions de sécurité importantes ......F-2
Bienvenue ......................................................F-4
Accessoires disponibles ............................................F-5
Contenu du coret .....................................................F-5
Bienvenue
Présentation du produit ...........................................F-6
Panneau arrière ............................................................F-7
Présentation des connexions .................................F-8
Panneau de dessus .....................................................F-9
Télécommande .........................................................F-10
Transport et placement de rCube. ....................F-12
Utilisation ....................................................F-13
Lecture à partir d’un iPod ou iPhone ...............F-13
Lecture d’une source de niveau ligne ..............F-14
Lecture à partir d’une prise casque ..................F-15
Utilisation des sorties vidéo .................................F-16
rCube va là où vous allez .......................................F-17
Options ........................................................F-18
Conguration de l’émetteur USB en option . F-18
Lecture à partir d’un émetteur
USB sans l en option ............................................F-19
Conguration de l’émetteur iPod en option F-20
Lecture à partir d’un émetteur
iPod sans l en option ...........................................F-21
Conguration de transmission
rCube-à-rCube ..........................................................F-22
Mise à niveau du micrologiciel ..........................F-23
Dépannage .................................................F-24
Spécications.............................................F-25
Garantie ......................................................F-26
Merci d’avoir acheté rCube et bienvenue dans
la famille Arcam. Arcam a été le spécialiste de
production de produits audio de qualité remarquable
pour les passionnés de la haute-délité depuis plus de
trois décennies. Votre rCube bénécie de l’héritage
d’une longue lignée de composants haute-délité
primés.
rCube est unique parmi les haut-parleurs iPod®.
rCube était conçu pour être petit en taille mais grand
par le son. Les transducteurs à rayonnement latéral
créent un son spacieux de tous les côtés à partir
d’un petit appareil. rCube peut également streamer
de la musique sans l. Avec sa batterie intégrée et
l’utilisation d’un émetteur sans l en option, rCube
peut recevoir sans l de la musique depuis votre PC
ou votre iPod, vous permettant ainsi d’amener la
musique où vous voulez dans la maison.
rCube est intuitif et simple d’utilisation. Ce guide
vous donne toutes les instructions dont vous aurez
besoin pour proter au maximum de votre ‘Cube’.
Il vous aidera à congurer, connecter et choisir un
emplacement pour votre rCube an d’obtenir le
meilleur son. Ce manuel va également vous montrer
comment lire sans l de la musique de votre iPod, à
partir d’une source externe ou d’un autre rCube ou
d’un PC.
Nous espérons que votre rCube vous plaira. Si
vous désirez de plus amples renseignements sur les
produits Arcam, notre réseau de concessionnaires
sera heureux de vous aider. D’autres informations
sont disponibles sur notre site web d’Arcam à
www.arcam.co.uk.
l’adresse
F-4
Page 33

Contenu du coret
Tour rapide
rCube
Arcam rWave
Emetteur USB pour le streaming
audio sans l depuis votre PC
Adaptateur secteur
(Fourni avec che pour l’UE, le
Royaume-Uni ou les Etats-Unis)
Télécommande
Accessoires disponibles
émetteur iPod® pour le streaming
audio sans l en continu à partir de
votre iPod, iPhone® ou iPad®
D’autres accessoires peuvent être disponibles prochainement
- contactez votre revendeur Arcam pour obtenir les dernières informations.
Arcam rWand
F-5
câble composant vidéo séparable
pour la connexion de composants
vidéo haute qualité
(piles fournies)
Page 34

Présentation du produit
Vue de derrière
Tour rapide
IO
Connecteurs du panneau arrière
Le panneau arrière comporte l’interrupteur d’alimentation
générale et des connecteurs pour le raccordement électrique
ainsi que des lecteurs CD, téléviseurs, etc. Voir page F-7.
Vue de dessus
station d’accueil iPod et poignée (avec housse de
protection)
La station d’accueil iPod avec une poignée intégrée protégée
par une housse de protection. Appuyez à l’arrière de la
housse pour la faire pivoter et révéler la station d’accueil et
la poignée. Notez que l’appareil ne doit pas être transporté
par la poignée lorsqu’un iPod est dans la station d’accueil.
Commandes du Panneau de dessus
Cette rangée de touches permet de contrôler la sélection
d’entrée, la réception sans l, le mode veille, le volume et la
coupure du son. Voir page F-9.
F-6
Page 35

Panneau arrière
Panneau arrière
Le panneau arrière comporte l’interrupteur d’alimentation
principale, des prises d’alimentation et de connexion du rCube
à d’autres appareils (pour plus de détails, reportez-vous à
Présentation des connexions à la page E-8).
Connexions vidéo et audio
rCube se connecte de plusieurs façons à des écrans vidéo externes et
des sources audio analogiques et numériques. Pour plus de détails,
reportez-vous à la section “Présentation des connexions” de ce manuel ou
recherchez votre connexion particulière dans “Lecture à partir de ....” dans
la table des matières.
Bouton BASS
Le rCube est composé d’un améliorateur psychoacoustique de
basses sophistiqué conçu pour permettre au rCube de délivrer des
basses fortes malgré sa taille compacte. Une fois enfoncé, le bouton
BASS donne des basses profondes en conjonction avec les autres
Entrée analogique externe via un
connecteur 3,5 mm.
Sortie vidéo composite à partir d’iPod
supportés
Une fois enfoncé,
Améliore les basses.
Sortie vidéo composante à partir
d’iPod supportés
Connecteur USB pour la mise à
niveau du micrologiciel
Entrée de tension d’alimentation CC à
partir du module d’alimentation.
Interrupteur marche / arrêt principal
de l’appareil.
IO
AUX-in
Composite
VIDEO
BASS
Y, Pb, Pr
VIDEO
UPGRADE
DC IN
POWER
IO
ajustements sonores, gagnant ainsi en
puissance et améliorant le son.
USB de mise à niveau
rCube dispose d’un connecteur USB à
l’arrière de l’appareil pour prendre en charge
les mises à niveau via une clé USB. Vous ne
devez pas mettre à niveau votre appareil à
moins qu’on vous le demande. Si vous devez
mettre à niveau votre appareil, visitez www.
arcam.co.uk pour obtenir les instructions et
le dernier micrologiciel.
Le connecteur USB du panneau arrière
ne sert qu’à des mises à niveau
ultérieures de rCube. rCube ne
lit pas les chiers de musique à
partir de ce port USB et ne l’utilise pas pour
communiquer avec des ordinateurs.
Interrupteur d’alimentation
Avant d’utiliser rCube, ce dernier doit être
branché au réseau d’alimentation en utilisant
l’adaptateur secteur fourni (sauf si la batterie
intégrée est chargée). Une fois branché,
l’interrupteur d’alimentation du panneau
arrière fera basculer rCube de l’état éteint au
mode veille. En mode veille, rCube répond
aux commandes du panneau avant ou de la
télécommande, mais utilise également une
petite quantité d’énergie. Si vous utilisez la
batterie, vous devez arrêter complètement
l’appareil lorsqu’il n’est pas utilisé à l’aide de
l’interrupteur d’alimentation du panneau
arrière.
Tour rapide
F-7
Page 36

.
L
Tour rapide
TV
rCube
A
B
CD OUT
SERIAL NO .
Sources
externes
Présentation des connexions
IO
CD OUT
L
R
R
Alimentation
N’utilisez que l’adaptateur secteur qui a été initialement
fourni avec votre rCube. Les autres adaptateurs peuvent
endommager rCube.
Alimentation
Votre rCube peut être alimenté par secteur
ou par la batterie rechargeable intégrée.
Branchez l’adaptateur secteur pour alimenter
l’appareil et / ou pour charger la batterie.
Raccordement à des sources
externes
Deux types de sources peuvent être connectés
à l’entrée AUX-in de rCube : analogique de
niveau ligne (ex. un lecteur CD hi- ou un
téléviseur) et prise pour casque analogique
(ex. lecteur MP3). Pour plus de détails sur
une connexion particulière, reportez-vous à
la section “Lecture à partir de ...” dans la table
des matières pour rechercher votre scénario.
Raccordement à un téléviseur (lecture
vidéo iPod)
Les iPod compatibles Vidéo peuvent être
connectés à un téléviseur via vidéo composite
A ou les connecteurs vidéo composante
B (voir gure). Pour connecter un écran
avec vidéo composante (3 ls) utilisez le
câble séparable en option. Pour obtenir une
liste des produits actuellement compatibles
à iPod qui reproduisent de la vidéo voir
http://support.apple.com/kb/HT1454.
Notez que les appareils Apple ne générèrent
pas de menus ou applications graphiques
vers un écran connecté, la sortie vidéo n’est
utilisée que pour la lecture de chiers vidéo.
F-8
Page 37

Le panneau de dessus contient des touches tactiles pour
Panneau de dessus
veille, sélection des sources, et changement de volume.
Chaque touche possède une LED qui s’allume lorsque la
touche est appuyée.
Marche et veille
La touche veille se trouve au centre du panneau de dessus.
Lorsque le commutateur à bascule du panneau arrière
est activé, la touche 2 du panneau de dessus (ou de la
télécommande) permet de basculer entre le mode marche (LED avant
bleue ou violet lorsqu’on utilise la batterie) et le mode veille (LED
rouge).
Sélection d’une source
En appuyant sur la touche SOURCE, vous basculez entre l’écoute
d’iPod ou à une source connectée à la prise AUX du panneau arrière
(voir tableau ci-dessous). Appuyez sur la touche WIRELESS pour
sélectionner une source sans l. Ceci désélectionne toute source
AUX ou iPod et démarre la lecture à partir de l’émetteur USB ou iPod
en option. Quand une source sans l est sélectionnée, l’indicateur sans
l s’allume en permanence.
Voyants LED
Les voyants LED du panneau de dessus s’allument pour indiquer
SOURCE
WIRELESS
STANDBY
VOLUME
DOWN
VOLUME
UP
Choisit la source locale à lire : AUX-in
(éclairage rouge) ou iPod (en vert).
Choisit les sources sans l disponibles
à lire : recherche (rouge) ou verrouillé
(en vert).
Fait passer rCube du mode veille (LED
rouge) à allumé (bleu / violet) ou met
l’appareil en mode veille.
Baisse le volume. Maintenez appuyée
pour réduire le volume rapidement .
Augmente le volume Maintenez
appuyée pour augmenter le volume
rapidement .
F-9
Tour rapide
Pour pouvoir utiliser l’émetteur
sans l, vous devez d’abord le
congurer. Reportez-vous à la section
«Conguration de l’émetteur USB en
option» auf Seite F-18 ou «Conguration
de l’émetteur iPod en option» auf Seite
F-20.
la sélection de source et le réglage
du volume. Lorsque vous utilisez la
télécommande, le voyant d’alimentation
clignote pour conrmer la réception du
signal de la télécommande.
Réglage du volume et coupure du son
Une brève pression sur - ou + diminue ou
augmente un peu le volume de rCube, en
maintenant la touche enfoncée, le volume
sera rapidement diminué ou augmenté.
En appuyant simultanément sur les deux
touches de volume, le son venant de
l’appareil sera coupé instantanément. Les
deux LED volume (- & +) sont allumées
lorsque le son de rCube est coupé.
Appuyez sur une touche de volume quelle
conque pour rétablir le son.
Page 38

Télécommande
Télécommande
La télécommande contient des touches comme celles qu’on trouve sur
le panneau de dessus telles que veille, sélection d’une source et réglage
du volume de rCube. En plus, elle peut également être utilisée pour
naviguer dans les menus et les titres de l’iPod et de changer le mode de
lecture iPod (pour “aléatoire”, par exemple).
Marche et veille
Tour rapide
La touche 2 veille de la télécommande fonctionne en combinaison avec
l’interrupteur à bascule du panneau arrière. Lorsque l’interrupteur du
panneau arrière est en position On (marche), en appuyant sur la touche
d’alimentation de la télécommande permet de basculer l’appareil entre
marche (LED bleue (alimentation secteur) ou LED violet (alimentation
sur batterie) sur l’avant de l’appareil) et veille (LED rouge allumée
sur l’avant de l’appareil). La touche veille de la télécommande est la
duplication de la touche veille du panneau de dessus de l’appareil.
Réglage du volume et coupure du son
Les touches volume de la télécommande sont la duplication des touches
volume du panneau de dessus de l’appareil. Une brève pression sur + ou
- augmente ou diminue un peu le volume de rCube, (il y a 52 niveau de
volume) en maintenant la touche enfoncée, le volume sera rapidement
diminué ou augmenté. Les LED volume + et - du panneau de dessus de
l’appareil se mettent à clignoter pour conrmer le réglage du volume. En
appuyant sur la touche Mute, le son de l’appareil sera coupé. Lorsque le
son est coupé, les deux LED volume (- & +) sont allumés et aucun son
ne sort de l’appareil. Appuyez de nouveau sur Mute pour rétablir le son.
Charger l’iPod
rCube, comme les irDock d’ARCAM, donne le contrôle de charge des
iPod pour garantir une plus grande autonomie et une meilleure qualité
sonore. Par défaut, rCube charge toujours les iPod quand le secteur ou la
batterie est disponible et que rCube est allumé. Vous pouvez empêcher
la charge manuellement en appuyant sur cette touche . Quand cette
touche est appuyée, l’indicateur de charge disparaît de l’écran iPod et la
charge de l’iPod est suspendue jusqu’à ce que la touche soit de nouveau
appuyée, l’iPod réinséré ou rCube remis en marche.
Pour qu’elle marche, la
télécommande doit être dirigée
vers l’avant de rCube.
F-10
Page 39

STANDBY
MUTE
VOLUME
DOWN
VOLUME
UP
CHARGE
IPOD
SOURCE
SELECT
WIRELESS
SCROLL
SELECT
MENU
REW/SKIP
PLAY/
PAUSE
FWD/SKIP
PLAY
MODE
Télécommande
Met rCube en veille à partir d’un état de
veille ou met l’appareil en veille à partir de
cet instant.
Coupe le son de rCube.
Baisse le volume. Maintenez appuyée pour
réduire le volume rapidement.
Augmente le volume. Maintenez appuyée
pour augmenter le volume rapidement.
Active ou désactive la charge de l’iPod.
Désactive la charge pour prolonger la durée
de vie de la batterie.
Bascule entre iPod et des sources externes.
Sélectionne une source sans l. Appuyez
pour sélectionner la source sans l suivante
disponible associée à rCube.
Fait déler vers le haut ou le bas pour choisir
parmi les éléments de la page iPod.
La sélection de l’élément actuel fait passer à
la sous-page.
Retourne à la page précédente.
Maintenez enfoncée la touche pour eectuer
une avance rapide ou une pression simple
pour passer à la piste suivante.
Appuyez pour basculer entre les modes
lecture et pause.
Maintenez enfoncée la touche pour eectuer
un retour rapide ou une pression simple
pour passer à la piste précédente.
Bascule entre les diérents modes de lecture
populaire de l’iPod.
Commandes de l’iPod
REMARQUE : ces fonctions ne sont
disponibles que pour les iPod et iPhone
connectés via la station. Elles ne sont pas
disponibles quand un iPod est connecté sans
l.
Navigation des menus iPod
Vous pouvez naviguer dans les menus d’un
iPod connecté en utilisant les 4 touches
de navigation. En appuyant sur B ou C
vous faites déler vers le haut ou vers le
bas les éléments d’une page pour mettre
en surbrillance une sélection. La èche E
fonctionne comme ‘sélectionner’ et fait passer
à la sous-page de l’élément sélectionné du
menu. La touche D fonctionne comme une
touche menu ou retour. En appuyant sur D,
l’iPod remonte à la page précédente.
Lecture, utilisation de Rew / Fwd et
changement de piste iPod
La télécommande comporte trois touches
de navigation de pistes iPod. La touche 4/;
permet de basculer entre lecture et pause. Si
un iPod est connecté, mais n’est pas en cours
de lecture et son écran est éteint, en appuyant
sur 4/; l’iPod sera activé. Maintenez enfoncée
la touche 9 ou : pour eectuer un retour
ou une avance rapide ; une pression simple
fait passer à la piste précédente ou suivante
respectivement.
Mode de lecture (Répétition et Aléatoire
Le mode de lecture iPod est contrôlé par la
touche ‘Play Mode’. Des pressions simples
font basculer entre les 5 modes possibles de
lecture: (a) répétition d’une seule piste, (b)
répétition de liste de lecture ou dossier, (c)
répétition de lecture aléatoire liste de lecture
ou dossier, (d) pas de répétition, mais lecture
aléatoire liste de lecture ou dossier, (e) pas de
répétition et pas d’aléatoire, lecture liste de
lecture ou dossier une fois (par défaut).
Tour rapide
F-11
Page 40

Canal
droit
Canal
gauche
23425
Transport et placement de rCube
Transport de rCube
rCube est conçu pour être facile à transporter dans la maison; la poignée
cachée sous la housse de protection peut être confortablement tenue par
une main. Avant de soulever votre rCube, vériez tout d’abord qu’il n’y a
pas d’iPod dans la station d’accueil et que l’adaptateur secteur est débranché.
Avec la paume dirigée vers l’arrière de l’appareil poussez vers le bas sur
l’arrière de la housse de protection et saisissez le couvercle. En même temps
Tour rapide
que vous le soulevez, votre rCube va s’incliner. Soyez attentif en soulevant ou
en posant votre rCube.
Retirez tous les iPod avant de transporter rCube. Vous ne
devez pas transporter rCube avec un iPod dans la station
d’accueil. Vous pouvez transporter rCube en cours de
lecture sans l et alimenté sur batterie.
Choisir l’endroit où placer votre rCube
rCube sonne bien presque partout. Les moteurs des haut-parleurs installés à
l’avant de façon angulaire permettent à rCube de reproduire un son de haute
qualité à plus de 270 degrés.
Placez le rCube dans un coin !
Bien qu’il soit excellent n’importe où, le rCube est conçu pour
sonner encore mieux lorsqu’il est placé dans le coin d’une pièce.
Dans cette position, les haut-parleurs situés sur les côtés se servent
de la réexion du son par les murs pour délivrer une image sonore
plus large. Essayez de placer votre rCube dans un angle de 45
degrés et de l’orienter vers le centre de la pièce. Nous pensons que
vous allez être surpris d’entendre comment la musique remplie
l’espace. Nous recommandons de ne pas activer le bouton BASS
lorsqu’il est ainsi placé puisque le coin et les murs augmentent
naturellement les basses. Sélectionnez la fonction bass (bouton
Bass enfoncé) si le rCube est placé loin d’un mur, ou si le style de
musique écouté à besoin d’un supplément de graves.
Ne mettez pas rCube dans un espace conné
Les transducteurs à rayonnement latéral fonctionnent mieux quand
ils ne sont pas obstrués (par exemple sur un comptoir de cuisine).
Ne placez pas rCube sur une étagère avec des livres de chaque côté
car cela bloquerait le son.
F-12
Page 41

Lecture à partir d’un iPod ou iPhone
Mise sous tension
1
Branchez une extrémité de l’adaptateur
d’alimentation dans une prise secteur et l’autre dans
la prise d’entrée d’alimentation CC du panneau
arrière de rCube. Allumez rCube en appuyant sur
l’interrupteur à bascule du panneau arrière. La LED
avant s’allume en rouge (mode veille). Appuyez
sur la touche veille du panneau de dessus ou de la
télécommande. Le voyant d’alimentation passe du
rouge au bleu indiquant que rCube est en marche.
Connecter iPod
2
Ouvrez la housse de protection pour révéler
l’adaptateur universel. Introduisez attentivement votre
iPod ou votre iPhone dans le connecteur.
Lorsque vous connectez ou retirez l’iPod, insérez
ce dernier doucement et sous le même angle que
le connecteur. Ne tordez pas et ne tirez pas l’iPod
pendant qu’il est en contact avec le connecteur de
la station ! Cela peut endommager le connecteur.
Sélectionner l’iPod comme source
3
Lorsque l’iPod est connecté, rCube sélectionne automatiquement l’iPod
comme source et la touche source s’allume en vert. Si l’iPod est dans la
station, mais n’est pas la source courante, appuyez sur la touche Source de
la télécommande ou du panneau de dessus jusqu’à ce que la LED source
s’allume en vert.
Choix et lecture d’une piste
4
Utilisez les touches iPod ou celles de la télécommande rCube pour
sélectionner une piste et commencer la lecture audio.
Régler le volume
5
Utilisez les touches volume + et - de la télécommande ou du panneau de
dessus pour régler le volume au niveau désiré.
REMARQUE : L’iPad d’Apple est trop grand pour le connecteur de la station
d’accueil, mais peut être connecté sans l via un émetteur accessoire. Voir page F-20.
MENU
, .
;4
IO
Utilisation
1
2
F-13
Page 42

CD OUT
SERIAL NO .
L
Lecture d’une source de niveau ligne
Connecter la source de niveau ligne à AUX-in
1
les sources de niveau ligne (par exemple un lecteur CD
ou une sortie de préamplicateur) ont généralement
des connecteurs RCA phono (photo à droite) et n’ont
généralement pas de touches de contrôle de volume.
Utilisation
Pour connecter une source de niveau ligne, vous aurez
besoin d’un câble de double connecteurs (gauche et
droite) RCA phono, mâle d’un côté et 3,5 mm mini-jack
stéréo de l’autre. S’il y a un contrôle de volume sur la
source, il faut le mettre à 90%. Eectuez cette connexion
avec l’appareil éteint.
Mise sous tension
2
Branchez une extrémité de l’adaptateur d’alimentation
dans une prise secteur et l’autre dans la prise d’entrée
d’alimentation CC du panneau arrière de rCube. Allumez
rCube en appuyant sur son commutateur d’alimentation
à bascule situé sur le panneau arrière, la LED avant
s’allume en rouge (mode veille). Appuyez sur la touche
veille du panneau de dessus ou de la télécommande.
Le voyant d’alimentation passe du rouge au bleu indiquant que rCube est en
marche.
Sélectionner AUX-in comme source
3
Appuyez sur la touche ‘Source Select’ de la télécommande ou appuyez sur la
touche Source du panneau de dessus jusqu’à ce que la LED source s’allume en
rouge. Le rouge indique qu’AUX est choisi comme source.
S’assurer que la source externe est en cours de lecture
4
Utilisez les touches de la source de niveau ligne pour démarrer la lecture et
pour vérier que le dispositif est en cours de lecture.
CD OUT
1
CD OUT
L
R
Digital
SERIAL NO .
R
..
Source de
niveau de ligne
1
Remarque : certains dispositifs reproduisent
une sortie de niveau ligne à partir d’un minijack stéréo de 3,5 mm. Si vous avez l’un de ces
types, il vous faut un câble stéréo mâle à mâle
3,5 mm au lieu de celui indiqué.
2
IO
2
Régler le volume
5
Utilisez les touches volume + et - de la télécommande ou du panneau de
dessus pour régler le volume au niveau désiré.
F-14
Page 43

Lecture à partir d’une prise casque
Connecter la source de niveau ligne à AUX-in
1
Pratiquement tous les équipements audio ont
une prise casque. C’est un moyen facile pour se
connecter à rCube. Au début les iPod, les autres
lecteurs MP3, les téléviseurs et les ordinateurs
portables peuvent être connectés de cette manière
par un câble mini-stéréo double-extrémité de 3,5
mm. Généralement les sorties casque produisent
une tension maximum supérieure aux sorties de
niveau ligne, xez alors la source à 75% du volume.
Mise sous tension
2
Branchez une extrémité de l’adaptateur
d’alimentation dans une prise secteur et l’autre dans
la prise d’entrée d’alimentation CC du panneau
arrière de rCube. Allumez rCube en appuyant sur
l’interrupteur d’alimentation du panneau arrière, et
appuyez sur la touche veille du panneau de dessus
ou de la télécommande. Le voyant d’alimentation
doit s’allumer en bleu.
Sélectionner AUX-in comme source
3
Appuyez sur la touche ‘Source Select’ de la télécommande ou appuyez sur la
touche Source du panneau de dessus jusqu’à ce que la LED source s’allume
en rouge. Le rouge indique qu’AUX est choisi comme source.
S’assurer que la source externe est en cours de lecture
4
Utilisez les commandes du dispositif source pour lancer la lecture. N’oubliez
pas de régler le volume à 75% sur le casque du dispositif source, les signaux
qui sont trop élevées peuvent provoquer des distorsions. Vous pouvez
vérier que le dispositif lit correctement en utilisant une paire d’écouteurs.
1
87
;4
Source
casque
IO
21
2
Utilisation
Régler le volume
5
Utilisez les touches volume + et - de la télécommande ou du panneau de
dessus pour régler le volume au niveau désiré.
F-15
Page 44

Utilisation des sorties vidéo
En plus de lire l’audio, rCube peut reproduire de
la vidéo à partir d’iPod supportés. Quand un iPod
compatible vidéo est connecté et en lecture, la vidéo
est acheminée aux sorties vidéo composite (option
A) et Y, Pb, Pr (option B) du panneau arrière. La
sortie que vous utilisez dépend entièrement de vous
et de ce que l’écran peut supporter. Notez que certains
iPod nécessitent qu’on modifie leurs paramètres pour
Utilisation
obtenir de la vidéo ; contactez Apple pour avoir de
l’assistance sur l’iPod. Notez que les appareils Apple ne
générèrent pas de menus ou applications graphiques
vers un écran connecté, la sortie vidéo n’est utilisée que
pour la lecture de chiers vidéo.
Connecter un écran vidéo à rCube
1
La vidéo composite et Y, Pb, Pr (aussi appelé “composant”) sont les formats vidéo courants. Pour connecter votre
iPod à un écran composite vidéo, vous aurez besoin d’un câble vidéo avec des connecteurs RCA phono de chaque
côté (option A). Pour la vidéo Y, Pb, Pr, utilisez le câble séparable en option (option B). La vidéo Y, Pb, Pr offre la
meilleure qualité d’image. Pour acheter ce câble vidéo composante, contactez votre revendeur Arcam.
Mise sous tension
2
Branchez une extrémité de l’adaptateur d’alimentation dans une prise secteur
et l’autre dans la prise d’entrée d’alimentation CC du panneau arrière de rCube.
Allumez rCube en appuyant sur l’interrupteur d’alimentation du panneau arrière,
et appuyez sur la touche veille du panneau de sessus ou de la télécommande. Le
voyant d’alimentation doit s’allumer en bleu.
Sélectionner iPod comme source et lire une vidéo
3
Appuyez sur la touche ‘Source Select’ de la télécommande ou appuyez sur la
touche Source du panneau de dessus jusqu’à ce que la touche source s’allume en
vert. Le vert indique qu’iPod est choisi comme source. Démarrez la lecture vidéo
à partir d’iPod.
Assurez-vous que la source de votre écran est correctement réglée
4
Utilisez les touches du dispositif d’achage pour sélectionner l’entrée vidéo à
laquelle votre rCube est connectée comme source vidéo actuelle.
Régler le volume
5
Utilisez les touches volume + et - de la télécommande ou du panneau de dessus
pour régler le volume au niveau désiré.
TV
rCube
A
B
IO
F-16
Page 45

rCube va là où vous allez
L’alimentation au Lithium Ion signie que vous
pouvez l’utiliser n’importe où vous allez
Votre rCube est équipé d’une batterie rechargeable
lithium-ion (Li-ion) intégrée de haute capacité qui vous
permet de l’utiliser n’importe où vous allez. Dans le jardin
et dans toute la maison. Le voyant d’alimentation s’allume
violet pour indiquer que rCube fonctionne sur batterie.
Charger la batterie
rCube recharge automatiquement la batterie et est doté
de méthodes intégrées pour que la batterie dure aussi
longtemps que possible. Pour connaître la capacité de
batterie restante, branchez l’alimentation, mettez rCube
en veille et appuyez sur la touche
Les LED du panneau de dessus indiquent le niveau de
charge restant :
- 4 LED allumées indiquent 100% restants ;
- 3 LED allumées indiquent 75% restants ;
- 2 LED allumées indiquent 50% restants;
- 1 LED allumée indique 25% restants.
Stockage
Si vous avez besoin de stocker rCube, vous devez vous
assurer que l’interrupteur d’alimentation du panneau
arrière est sur la position Off (arrêt).
de la télécommande.
Utilisation
F-17
Page 46

Conguration de l’émetteur USB en option
Arcam rWave
Un émetteur sans l USB vous permet d’écouter de la
musique partout dans la maison à partir de chiers sur
votre PC.
Vous pouvez acheter un émetteur USB sans l en option
pour votre rCube pour diuser la musique de votre
ordinateur n’importe où dans la maison. Pour acheter
Utiliser
l’émetteur , consulter votre concessionnaire local ou visitez
www.arcam.co.uk. Avant d’utiliser l’émetteur pour la première
fois, vous devez l’associer à un récepteur rCube particulier.
Cette opération de conguration ne se fait qu’une
seule fois. Une fois cette association établie, les unités
s’en souviennent, même si elles sont hors tension.
1
Installer l’émetteur USB à votre PC ou ordinateur
1
portable
Branchez l’émetteur USB de type clé USB dans un port
USB disponible de votre ordinateur. L’ordinateur va
reconnaître le périphérique comme un dispositif audio
et le dénit comme périphérique de sortie par défaut.
Régler l’émetteur pour rechercher un rCube
2
Appuyez sur la touche ‘associate’ sur l’émetteur USB.
La LED de l’émetteur se met à clignoter rapidement
pour indiquer qu’elle est à la recherche d’une
association. Pendant les 30 secondes qui suivent,
l’émetteur sera associé avec un rCube qui lui aussi à la
recherche d’une association
(voir étape 4).
Allumer rCube
3
Branchez et allumez rCube en appuyant sur le
commutateur à bascule du panneau arrière pour le
mettre sur la position On et en appuyant sur a touche
standby du panneau de dessus de sorte que le voyant
d’alimentation devienne bleu.
Régler rCube pour rechercher un émetteur
4
Appuyez sur la touche sans l pour sélectionner l’entrée
3
IO
sans l. Relâchez brièvement puis maintenez enfoncée
la touche. La LED sans l clignote en rouge comme
à la recherche d’une transmission. Lorsque le voyant
sans l de rCube s’allume en vert xe, l’association a été
établie. L’émetteur reste en mode association pendant 30
secondes au cas où d’autres cubes seraient congurés. Ne
retirez pas l’émetteur du PC pendant ce temps. Lorsque
l’association est établie, la LED de l’émetteur clignote
brièvement toutes les cinq secondes. Vous allez pouvoir
entendre la source sans l.
F-18
Page 47

Lecture à partir d’un émetteur USB sans l en option
IO
Arcam rWave
Un émetteur sans l USB vous permet d’écouter
de la musique partout dans la maison à partir de
chiers sur votre PC.
REMARQUE : Vous aurez besoin d’associer chaque
cube avec un émetteur sans l avant que ce dernier
puisse recevoir des signaux audio.
Installer l’émetteur USB à votre PC ou
1
ordinateur portable
Branchez l’émetteur USB de type clé USB
dans un port USB de votre ordinateur.
L’ordinateur reconnaîtra l’appareil comme
étant un dispositif audio. Vous devrez peut-être activer la sortie audio de l’émetteur
USB dans la conguration de votre système, certains systèmes d’exploitation le font
automatiquement. Vous pouvez vérier si l’émetteur diuse en regardant sa LED qui
doit clignoter brièvement toutes les cinq secondes pendant la
transmission.
Mise sous tension
2
Branchez l’adaptateur d’alimentation dans une prise secteur
et dans la prise d’entrée d’alimentation CC du panneau
arrière de rCube. Allumez rCube en appuyant sur l’interrupteur d’alimentation du
panneau arrière, et appuyez sur la touche standby du panneau de dessus. Le voyant
d’alimentation doit s’allumer en bleu.
Sélectionner l’émetteur sans l en tant que source
3
Pour sélectionner l’émetteur ordinateur, appuyez sur la touche ‘Wireless’ de la
télécommande ou du panneau de dessus. Si une source est disponible, la lumière
devient verte et la source commence à lire. Remarque : si une deuxième source sans
l est également en cours de transmission, vous devez appuyer deux fois sur la touche
‘Wireless’ pour sélectionner le bon émetteur USB.
Utilisation
1
2
Lecture de musique sur l’ordinateur
4
Aller sur iTunes ou sur votre logiciel de lecture de musique préféré et choisissez une
chanson à écouter. N.B. Insérez toujours l’émetteur USB avant de démarrer iTunes.
Régler le volume
5
Utilisez les touches volume + et - de la télécommande ou du panneau de dessus pour
régler le volume au niveau désiré.
F-19
Page 48

, .
;4
23425
Conguration de l’émetteur iPod en option
Arcam rWand
Un émetteur sans l compatible Apple signie que vous
pouvez écouter de la musique partout dans la maison à
partir de votre iPod, iPhone ou iPad Apple.
Vous pouvez acheter un émetteur iPod sans l en option pour
votre rCube pour diuser la musique de votre iPod n’importe
où dans la maison. Pour acheter l’émetteur , consulter votre
Utiliser
concessionnaire local ou visitez www.arcam.co.uk. Avant
d’utiliser l’émetteur pour la première fois, vous devez l’associer à
un récepteur rCube particulier.
Cette opération de conguration ne se fait qu’une
seule fois. Une fois cette association établie, les unités
s’en souviennent, même si elles sont hors tension.
Insérer l’émetteur iPod dans votre iPod, iPhone ou
1
iPad.
Branchez l’émetteur sur le connecteur de la station
d’accueil en bas de votre lecteur Apple.
Régler l’émetteur pour rechercher un rCube
2
Appuyez sur le bouton ‘associate’ de l’émetteur dans les
3 secondes de son insertion. Maintenez enfoncé le
bouton jusqu’à ce que l’émetteur clignote rapidement
(5 fois par secondes) pour indiquer qu’il est à
la recherche d’une association. Pendant les 30
secondes qui suivent, l’émetteur sera associé
avec un rCube qui lui aussi à la recherche d’une
association (voir étape 4).
MENU
, .
;4
3
IO
Allumer rCube
3
Branchez et allumez rCube en appuyant sur le
commutateur à bascule du panneau arrière pour le
mettre sur la position On et en appuyant sur a touche
standby du panneau de dessus de sorte que le voyant
d’alimentation devienne bleu.
Régler rCube pour rechercher un émetteur
4
Appuyez sur la touche sans l pour sélectionner l’entrée
sans l. Relâchez brièvement puis maintenez enfoncée
la touche. La LED sans l clignote en rouge comme à la
recherche d’une transmission. Lorsque le voyant sans l
de rCube s’allume en vert xe, l’association a été établie.
L’émetteur reste en mode association pendant
30 secondes au cas où d’autres cubes seraient congurés.
Ne retirez pas l’émetteur de l’iPod pendant ce temps.
Lorsque l’association est établie, la LED de l’émetteur
clignote brièvement toutes les cinq secondes. Il vous sera
possible d’entendre la musique lue à partir de l’iPod.
F-20
Page 49

IO
Lecture à partir d’un émetteur iPod sans l en option
Arcam rWand
REMARQUE : Vous aurez besoin d’associer chaque cube avec un
émetteur sans l avant que ce dernier puisse recevoir les signaux
audio de l’émetteur.
Installer l’émetteur iPod dans votre iPod, iPhone ou iPad.
1
Branchez l’émetteur sur le connecteur de la station d’accueil en
bas de votre lecteur Apple. Vous pouvez vérier si l’émetteur
diuse en regardant sa LED qui doit clignoter brièvement
toutes les cinq secondes pendant la transmission.
Mise sous tension
2
Branchez l’adaptateur d’alimentation dans une prise secteur
et dans la prise d’entrée d’alimentation CC du panneau arrière
de rCube. Allumez rCube en appuyant sur l’interrupteur
d’alimentation du panneau arrière, et appuyez sur la touche
standby du panneau de dessus. Le voyant d’alimentation doit
s’allumer en bleu.
Sélectionner l’émetteur sans l en tant que source
3
Pour sélectionner l’émetteur iPod, appuyez sur la touche
‘Wireless’ de la télécommande ou du panneau de dessus. Si
une source est disponible, la lumière devient verte et la source
commence à lire. Remarque : si une deuxième source sans l est
également en cours de transmission, vous devez appuyer deux
fois sur la touche ‘Wireless’ pour sélectionner le bon émetteur.
Lecture de musique sur iPod/iPhone/iPad
4
REMARQUE : Certains dispositifs Apple vous obligent à
choisir l’application de lecture de musique iPod.
, .
MENU
;4
Utilisation
2
Régler le volume
5
Utilisez les touches volume + et - de la télécommande ou du
panneau de dessus pour régler le volume au niveau désiré. Le
niveau de volume rCube peut également être réglé en utilisant
les touches volume de l’iPod.
F-21
Page 50

Conguration de transmission rCube-à-rCube
Avec deux rCube, un rCube peut recevoir des transmissions
sans l à partir de l’autre.
Toute musique lue sur le rCube d’émission, à partir d’un iPod ou
d’une source externe, sera envoyée sans l à l’autre rCube. Avant
d’émettre pour la première fois, vous devez associer le rCube émetteur
au rCube récepteur.
Utiliser
Une fois cette association établie, les unités s’en souviennent,
même si elles sont hors tension. Remarque : L’association doit être
eectuée deux fois si vous voulez que chaque cube peut émettre
à l’autre - vous aurez besoin de répéter les étapes ci-dessous avec
les cubes sous tension. Une fois cela fait, vous serez en mesure de
dénir le cube récepteur sans tenir compte de ce que l’autre lit.
Allumez tous les rCube
1
Branchez l’alimentation, mettez l’interrupteur du
panneau arrière sur On et allumez en utilisant les
boutons standby du panneau de dessus, de manière
que le voyant d’alimentation s’allume en bleu.
Régler l’émetteur rCube pour rechercher les
2
récepteurs rCube
Appuyez et relâchez le bouton de sélection de
source (source select) pour sélectionner la source
(iPod ou AUX) que vous souhaitez qu’elle émette.
Maintenez enfoncée la touche wireless jusqu’à ce
que la LED sans l clignote en rouge. Pendant les
30 secondes qui suivent, cet émetteur rCube sera
associé avec un rCube qui lui aussi à la recherche
d’une association (voir étape 3).
Portée sans l
Un rCube peut normalement recevoir à partir
d’un émetteur situé dans la même maison.
La portée peut être réduite en fonction des
matériaux de construction et des interférences
provenant d’autres sources sans l telles que
téléphones sans l et routeurs WiFi. Si vous
rencontrez des problèmes avec le signal sans
l, essayez de déplacer soit le rCube récepteur
ou l’émetteur dans autre un endroit. Le
fonctionnement sans l ne peut être garanti
dans les environnements hostiles RF.
IO
Régler le récepteur rCube pour rechercher un
3
émetteur
Appuyez sur la touche sans l pour sélectionner l’entrée
sans l. Relâchez brièvement puis maintenez enfoncée
la touche. La LED sans l clignote en rouge comme à la
recherche d’une transmission. Lorsque le voyant sans l de
rCube s’allume en vert xe, l’association a été établie.
Le rCube émetteur continuera à chercher
des rCube récepteur pendant 30 secondes.
N’interrompez pas ce processus, attendez
que le voyant LED sans l s’allume vert avant
d’éteindre l’émetteur rCube.
F-22
Page 51

IO
Mise à niveau du micrologiciel
rCube a la possibilité d’avoir son logiciel mis
à niveau par l’utilisateur. Cela permet l’ajout
de fonctionnalités supplémentaires et assurer
la compatibilité avec les iPod et les iPhone qui
n’étaient pas encore diusés.
Vous ne devez mettre à niveau
le micrologiciel que lorsqu’il est
demandé par Arcam ou votre
revendeur
Pour mettre à niveau rCube vous aurez besoin
d’une clé ash USB et d’un PC ou un ordinateur
portable qui peut être connecté à Internet.
Téléchargez le chier du micrologiciel
1
sur votre clé ash.
Rendez-vous sur
www.arcam.co.uk pour
télécharger le dernier micrologiciel
et placer le fichier sur votre clé
flash USB.
Il ne doit y avoir aucun autre
fichier sur la clé.
Insérez la clé ash USB
2
dans rCube alors que ce dernier est
hors tension.
Assurez-vous d’abord que
rCube est éteint (en utilisant
l’interrupteur du panneau
arrière), puis insérez la clé ash
contenant le chier téléchargé
dans le port USB de mise à niveau
du panneau arrière de l’appareil.
Mettez rCube en mode veille
3
Allumez rCube en appuyant sur
l’interrupteur à
bascule du panneau
arrière. Maintenez
enfoncée la touche
standby jusqu’à
ce que le voyant d’alimentation clignote en
rouge. Le voyant d’alimentation clignote en
rouge rapidement pendant la mise à niveau de
l’appareil. Lorsque le voyant cesse de clignoter
et s’allume xe, cela indique que rCube est mis
à niveau.
Retirez la clé
4
mémoire.
On peut à présent
retirer la clé mémoire
en toute sécurité.
Si rCube est mis en mode mise à
niveau accidentellement, coupez
l’alimentation. Lorsque rCube
sera rallumé, il fonctionnera
normalement.
Utilisation
F-23
Page 52

Problème Vériez que...
Aucune LED n’est allumée < L’interrupteur d’alimentation du panneau arrière de rCube est dans la position “On”.
Le voyant d’alimentation
clignote en rouge
Mon rCube est allumé et un
iPod est connecté, il semble
lire mais je ne peux entendre
Dépannage
aucun son
L’appareil réagit de manière
erronée ou pas du tout à la
télécommande
bourdonnement lors de la
lecture à partir de l’entrée
analogique “AUX-in”
L’iPod est en lecture vidéo et
j’ai connecté un écran à l’une
des sorties vidéo, mais mes
images ne sont pas affichées.
Le son est petit et manque
de graves.
Le son est boomy avec trop
de basses.
< rCube est en mode mise à niveau. Insérez une clé ash USB contenant le chier
de mise à niveau pour mettre à niveau ou mettez hors tension puis rallumez pour
revenir en mode normal.
< la source est réglée pour lire de l’iPod en appuyant sur la touche “iPod” de la
télécommande ou le bouton source du panneau de dessus jusqu’à ce que la LED
source s’allume en vert (indiquant que iPod est choisi comme source).
< Les deux voyant volume ne sont pas allumés. S’ils le sont, cela indique que le son est
coupé. Appuyez sur la touche “MUTE” de la télécommande ou un bouton de réglage
de volume pour rétablir le son.
< rCube est allumé, s’il est en mode veille, appuyez sur la touche P de la
télécommande pour l’allumer.
< il ya des piles neuves dans la télécommande.
< il ya une “ligne de vue” (sans obstruction) entre la télécommande et le point de
réception du panneau avant IR de rCube.
< tous les câbles sont correctement connectés. Si nécessaire, retirez le câble du
connecteur et branchez-le à nouveau à fond (mettez hors tension avant de le faire).
< les connexions à l’intérieur du connecteur du câble de la source sont brisées ou mal
soudées.
< Si le bourdonnement provient uniquement d’un composant de source particulière
connectée, vériez que la source est correctement mise à la terre. Vériez que tout
câble d’antenne est mis à la terre de façon isolée. Contactez un installateur pour
obtenir de l’aide.
< tous les câbles sont correctement connectés. Si nécessaire, retirer le câble du
connecteur et branchez-le à nouveau à fond (mettez hors tension avant de le faire).
< la source d’achage est congurée pour acher l’entrée auquel le câble est branché.
< le bouton de basses du panneau arrière n’est pas enfoncé. Appuyez dessus pour
ajouter des basses.
< le rCube est trop loin d’un mur. Déplacez le rCube pour le mettre proche d’un mur
ou d’un coin de pièce.
< le bouton de basses du panneau arrière est enfoncé. Dé-enclencher le bouton pour
réduire l’eet des basses.
< le rCube est trop près d’un mur. Déplacez le rCube pour l’éloigner du mur ou
du coin de la pièce.
F-24
Page 53

Spécications
Puissance de sortie continue (20Hz—20kHz at 0,5% THD), par canal
Canaux Woofer, 4Ω, 100Hz—3,7kHz 35W/Ch
Canaux Tweeter, 6Ω, at 1kHz 10W/Ch
Distorsion Harmonique, 80% puissance, 1kHz 0,1%
Entrées
Entrées ligne :
Sensibilité nominale 250mV—1,5V
Impédance d’entrée 22kΩ
Rapport signal sur bruit (CCIR, 45W) 90dB
Sortie amplicateur
Niveau de sortie nominale 90W
Impédance de sortie <50Ω
Haut-parleurs
Niveau de sortie ~94dB SPL/Vrms
Impédance de sortie 100Ω
Généralités
Tension d’alimentation 110—120V ou 220—240V
Consommation d’énergie (maximum) 90W
Dimensions L x l x H (pieds compris) 200 x 200 x 200mm
Poids (net) 5 kg
Poids (emballé) 6,2 kg
Accessoires fournis Alimentation
Secteur
Télécommande avec pile CR2025
Sauf erreurs ou omissions
REMARQUE : Toutes les valeurs des spécications sont typiques, sauf indication contraire.
Speci cations
F-25
Page 54

Garantie
Garantie mondiale
Cette garantie vous autorise à faire réparer gratuitement votre appareil chez un distributeur Arcam agréé durant les
deux premières années suivant l’achat, à condition que l’appareil ait à l’origine été acheté chez un revendeur ou un
Garantie
distributeur Arcam. Le fabricant ne peut engager sa responsabilité en cas de défauts découlant d’un accident, d’une
mauvaise utilisation, d’une utilisation intensive, d’une usure normale, d’une négligence ou d’un réglage ou d’une
réparation non autorisée. Il ne peut en outre engager sa responsabilité pour tout dommage ou toute perte survenant
pendant le transport du matériel sous garantie.
La garantie couvre :
Le coût des pièces et de la main d’oeuvre pendant deux ans à compter de la date d’achat. Après deux ans, ces frais
incombent au client. La garantie ne couvre jamais les frais de transport.
Réclamations au titre de la garantie
Cet équipement doit être emballé dans son emballage original et retourné à votre revendeur, vous pouvez également
le retourner au distributeur Arcam du pays d’achat.
Il doit être envoyé en port prépayé par l’intermédiaire d’un transporteur able – jamais par la poste. Aucune
responsabilité n’est acceptée pendant le transport de l’appareil au titre de la garantie ; aussi, est-il conseillé aux clients
d’assurer l’appareil contre les pertes et les dommages subis en transit.
Pour tout renseignement complémentaire, veuillez contacter le Service client Arcam à l’adresse suivante :
Arcam Customer Support Department,
Pembroke Avenue, Waterbeach, CAMBRIDGE CB25 9QR, Grande Bretagne
www.arcam.co.uk
Des problèmes ?
Si votre revendeur ne peut répondre à votre demande pour ce produit Arcam ou tout autre produit Arcam, veuillez
contacter le Service client d’Arcam, à l’adresse ci-dessus, où nous ferons de notre mieux pour vous aider.
F-26
Page 55

iPod-Lautsprechersystem
Page 56

Wichtige Sicherheitshinweise
Dieses Gerät wurde unter Berücksichtigung strikter Qualitätsund Sicherheitsbestimmungen entworfen und gefertigt. Sie
sollten jedoch bei der Installation und dem Betrieb folgende
Sicherheitshinweise beachten.
Dieses Symbol steht vor wichtigen
Bedienungs- oder Wartungsinformationen.
1. Befolgen Sie alle Warnungen und Anweisungen
Vor der Inbetriebnahme dieses Geräts sollten Sie die
entsprechenden Sicherheits- und Betriebsanleitungen lesen.
Wichtige Sicherheitshinweise
Heben Sie dieses Handbuch gut auf, und beachten Sie die
enthaltenen Warnungen sowie die Hinweise auf dem Gerät.
2. Wasser und Feuchtigkeit
Das Betreiben von elektrischen Geräten in der Nähe von
Wasser kann gefährlich sein. Um das Eindringen von Wasser
in das Gerät zu vermeiden, verwenden Sie es nicht in einer
feuchten Umgebung - z. B. in der Nähe von Badewannen,
Waschbecken, Schwimmbecken usw.
3. Eindringen von Flüssigkeiten oder Fremdkörpern
Achten Sie darauf, dass keine Flüssigkeiten oder Fremdkörper
in das Geräteinnere gelangen. Sie sollten keine mit Flüssigkeit
gefüllten Behälter (z. B. Blumenvasen) auf dem Gerät
abstellen.
4. Aufstellung
Stellen Sie das Gerät nur in einem Regal auf, das stark genug
ist, das Gewicht dieses Geräts aufzunehmen.
5. Wärme
Niemals die Ventilationsönungen des Geräts blockieren.
Stellen Sie das Gerät nicht auf ein Bett, ein Sofa, einen Teppich
oder eine ähnliche weiche Oberäche, in ein geschlossenes
Bücherregal bzw. einen Schrank, da hierdurch die Belüung
beeinträchtigt werden kann.
6. Wärme
Schützen Sie das Gerät vor oenen Flammen oder Wärme
erzeugenden Geräten wie Heizungen oder Herde.
7. Klima
Das Gerät wurde für den Betrieb in gemäßigten Klimazonen
ausgelegt.
8. Reinigung
Ziehen Sie vor dem Reinigen des Geräts den Netzstecker.
In den meisten Fällen reicht es aus, wenn Sie das Gehäuse
mit einem weichen, usenfreien und angefeuchteten Tuch
abwischen. Verwenden Sie keine Verdünner oder andere
chemische Lösungsmittel.
Von der Verwendung von Polituren oder Möbelsprays wird
abgeraten, da diese Substanzen weiße Spuren hinterlassen
können, wenn das Gerät danach mit einem feuchten Tuch
abgewischt wird.
9. Stromversorgung
Verwenden Sie nur eine Stromquelle, die den Hinweisen im
Handbuch oder auf dem Gerät entspricht.
Zum Trennen des Geräts von der Netzstromversorgung
muss der Netzstecker gezogen werden. Das Gerät muss so
aufgestellt werden, dass eine Trennung des Geräts von der
Stromversorgung möglich ist.
10. Schutz des Netzkabels
Netzkabel müssen so verlegt werden, dass sie nicht geknickt
oder gedehnt werden, dass nicht auf sie getreten wird und
dass keine Gegenstände darauf abgestellt werden. Gehen
Sie besonders sorgfältig mit Kabelenden an Steckern und
Gerätebuchsen um.
11. Nichtnutzung
Wir empfehlen, das Netzkabel des Geräts bei Gewitter bzw.,
wenn das Gerät über einen längeren Zeitraum hinweg nicht
verwendet wird, von der Stromversorgung zu trennen.
D-2
Page 57

Wichtige Sicherheitshinweise
Wichtige Sicherheitshinweise
12. Seltsamer Geruch
Sollten Sie einen ungewöhnlichen Geruch bemerken oder
Rauch am Gerät entdecken, schalten Sie es aus und ziehen
Sie den Netzstecker. Wenden Sie sich unverzüglich an Ihren
Fachhändler.
13. Wartung
Versuchen Sie nicht, das Gerät selbst zu reparieren.
Überlassen Sie die Wartung des Geräts einem Fachmann.
14. Zu behebende Schäden
Das Gerät muss von einem Fachmann gewartet werden,
wenn:
A. das Netzkabel oder der Netzstecker beschädigt wurde,
oder
B. Gegenstände in das Gerät gefallen oder Flüssigkeiten
eingedrungen sind, oder
C. Das Gerät Regen oder Feuchtigkeit ausgesetzt war oder
D. das Gerät nicht ordnungsgemäß funktioniert oder einen
erheblichen Leistungsabfall aufweist, oder
E. das Gerät zu Boden gefallen oder das Gehäuse
beschädigt ist.
Sachgemäße Entsorgung des Geräts
Diese Kennzeichnung zeigt an, dass das
Gerät in der gesamten EU nicht mit anderem
Haushaltsabfall entsorgt werden darf.
Zur Vermeidung möglicher Umwelt- oder
Gesundheitsschäden durch unkontrollierte
Entsorgung und zur Einsparung von
natürlichen Ressourcen muss dieses Produkt
verantwortungsvoll entsorgt werden.
Zur Entsorgung Ihres Produkts geben Sie es bitte an Ihrer örtlichen
Sammelstelle für Elektroaltgeräte ab oder wenden Sie sich an den
Händler, bei dem Sie das Gerät erworben haben.
Sicherheits- und Standardbestimmungen
Dieses Gerät entspricht der internationalen Sicherheitsnorm
für Elektrogeräte IEC 60065. Dieses Gerät entspricht Teil
15 der FCC-Regeln. Für den Betrieb müssen die folgenden
beiden Bedingungen eingehalten werden: (1) Das Gerät
darf keine schädlichen Interferenzen erzeugen und (2) das
Gerät muss jede empfangene Interferenz akzeptieren, auch
solche Störungen, die unerwünschte Funktionen verursachen
können.
klee r
ce r t i f i ed
„Made for iPod“ und „Made für iPhone“ bedeuten,
dass ein elektronisches Zusatzgerät entwickelt wurde,
um speziell an ein iPod bzw. iPhone angeschlossen
zu werden und vom Entwickler bestätigt wurde, dass
es den Apple-Leistungsnormen entspricht. Apple ist
für den Betrieb dieses Geräts oder die Einhaltung
von Sicherheits- und gesetzlichen Standards nicht
verantwortlich.
iPhone, iPad und iPod sind eine Marken von Apple
Inc., eingetragen in den USA und in anderen
Ländern.
VORSICHT
STROMSCHLAGGEFAHR
NICHT ÖFFNEN
D-3
Page 58

Willkommen
Inhalt
Wichtige Sicherheitshinweise .................... D-3
Willkommen .................................................D-4
Inhalt
Erhältliches Zubehör .................................................D-5
Lieferumfang ................................................................D-5
Aufbau des Geräts ......................................................D-6
Rückseite ........................................................................D-7
Anschlussübersicht ...................................................D-8
Oberes Bedienfeld .....................................................D-9
Fernbedienung ........................................................D-10
Umsetzen und Aufstellen des rCubes .............D-12
Bedienung ..................................................D-13
Wiedergabe von einem iPod oder iPhone ....D-13
Wiedergabe von einer Linepegel-Quelle ......D-14
Wiedergabe über eine Kopfhörerbuchse ......D-15
Videoausgänge verwenden ................................D-16
Der rCube ist für Sie immer verfügbar ............D-17
Optionen ....................................................D-18
Einen optionalen USB-Sender einrichten ....D-18
Von einem optionalen USB-Sender
wiedergeben ............................................................D-19
Einen optionalen iPod-Sender einrichten ....D-20
Wiedergabe von einem optionalen
iPod-Sender ..............................................................D-21
Einrichten der rCube-zu-rCube-Übertragung D-22
Aktualisieren der Firmware .................................D-23
Störungserkennung ................................ D-24
Spezikationen ........................................ D-25
Garantie ..................................................... D-26
Vielen Dank für den Kauf des rCube und
willkommen in der Arcam-Familie. Arcam stellt
seit mehr als 30 Jahren hochwertige Audioprodukte
für anspruchsvolle Hi-Fi-Enthusiasten her. Ihr
rCube besitzt das Erbe einer langen Tradition von
ausgezeichneten Hi-Fi-Komponenten.
Der rCube ist unter den iPod®-Lautsprechern
einzigartig. Er ist klein, hat aber einen großartigen
Klang. Die seitlich angeordneten Lautsprecher
sorgen für räumlichen Klang aus einem kleinen
Gerät. Der rCube kann Musik auch mittels Funk
übertragen. Mit seiner eingebauten Batterie
und mit dem optionalen USB-Sender kann der
rCube von Ihrem iPod oder PC drahtlos Musik
empfangen, so dass Sie überall in Ihrem Haus
Musik hören können.
Der rCube ist intuitiv und einfach zu bedienen.
Diese Bedienungsanleitung liefert Ihnen alle nötigen
Anweisungen, um das Maximum aus Ihrem „Cube“
herauszuholen. Für besten Klang hil sie Ihnen
beim Einrichten, Anschließen und Aufstellen Ihres
rCube. Diese Bedienungsanleitung zeigt Ihnen,
wie Sie von Ihrem iPod, einer externen Quelle und
einem anderen rCube oder PC über Funk Musik
wiedergeben können.
Wir hoen, dass Sie mit Ihrem rCube Freude haben.
Wenn Sie Interesse an zusätzlichen Informationen
zu Arcam-Produkten haben, steht Ihnen unser
Händlernetz gerne zur Verfügung. Weitere
Informationen nden Sie auch auf der Website von
Arcam unter
www.arcam.co.uk.
Herzliche Grüße,
Das rCube-Entwicklungsteam
D-4
Page 59

Lieferumfang
Einführung
rCube
Arcam rWave
USB-Sender für drahtlose
Audioübertragung von Ihrem PC
Zukünftig kann weiteres Zubehör erhältlich sein
— Bitte wenden Sie sich für die neuesten Informationen an Ihren Arcam-Händler.
AC-Netzadapter
(In der EU u. GB mitgeliefert
oder in den USA Steckerleitungen)
Erhältliches Zubehör
Arcam rWand
iPod®-Sender für drahtlose
Audioübertragung von Ihrem
iPod, iPhone® oder iPad®
D-5
Fernbedienung
(Batterie
mitgeliefert)
Component-Videokabelpeitsche
für den Anschluss an qualitativ
hochwertige Displays, die
Componentvideo-fähig sind.
Page 60

Aufbau des Geräts
Ansicht Rückseite
Einführung
Anschlüsse auf der Geräterückseite
Auf der Rückseite benden sich der Netzschalter und die
Anschlüsse für die Stromversorgung sowie CD-Player und
Fernseher usw. Siehe Seite D-7.
IO
Ansicht Oberseite
iPod Dockingstation und Gri (mit
Staubschutzabdeckung)
Die iPod-Dockingstation und der integrierte Gri werden
durch eine Staubschutzabdeckung geschützt. Drücken Sie
auf die Rückseite der Abdeckung, um sie zu drehen. Die
Dockingstation und der Gri werden freigegeben. Beachten
Sie, dass während sich auf der Dockingstation ein iPod
bendet, das Gerät nicht am Gri getragen werden darf.
Bedienelemente auf der Oberseite
Mit dieser Tastenreihe können Eingang, Funkempfang,
Standby-Modus, Mute (Stummschaltung) und Lautstärke
eingestellt werden. Siehe Seite F-9.
D-6
Page 61

IO
Rückseite
Rückseite
Auf der Rückseite benden sich der Netzschalter und die
Buchsen für die Stromversorgung und den Anschluss des
rCube an andere Geräte (für weitere Einzelheiten siehe
Anschlussübersicht auf Seite D-8).
Video- und Audio-Anschlüsse
Der rCube bietet eine Vielzahl von Möglichkeiten, um externe VideoDisplays und analoge und digitale Audioquellen anzuschließen.
Für weitere Einzelheiten siehe „Anschlussübersicht“ in dieser
Bedienungsanleitung oder schlagen Sie für Ihren speziellen Anschluss
unter „Wiedergabe von einem ....“ im Inhaltsverzeichnis nach.
BASS-Taste
Der rCube verwendet eine ausgeklügelte psychoakustische
Bassverstärkung, die sorgfältig entwickelt wurde, damit der rCube
trotz seiner kompakten Größe volle, kräige Bässe erzeugen kann.
Die gedrückte BASS-Taste bietet in Verbindung mit anderen
AUX-in (AUXEingang)
CompositeVIDEO
BASS
Y, Pb, Pr
VIDEO
UPGRADE
(Aktualisierung)
DC IN (Stromversorgungseingang)
POWER (Ein-/
IO
Ausschalter)
Externer, analoger Eingang mit 3,5
mm Buchse.
Composite-Videoausgang von
unterstützten iPods
Bei gedrückter Taste wird
der Bass verstärkt.
Component-Videoausgang von
unterstützten iPods
USB-Anschluss zum Aktualisieren
der Firmware
DC-Spannungsversorgungseingang
vom Netzadapter.
Schaltet das Gerät vollständig ein
oder aus.
Einführung
Klangeinstellungen eine zusätzliche
Bass-Verstärkung, um einen kräigen,
verbesserte Klang zu liefern.
USB-Aktualisierung
Der rCube besitzt für zukünige
Aktualisierungen via USB-Memorystick
auf der Rückseite einen USB-Anschluss. Sie
sollten Ihr Gerät nicht aktualisieren, außer
Sie werden dazu aufgefordert. Wenn Sie Ihr
Gerät aktualisieren müssen, erhalten Sie auf
www.arcam.co.uk Anweisungen und die
neuste Firmware.
Der USB-Anschluss auf der Rückseite
ist nur für zukünige
Aktualisierungen des rCubes
gedacht. Der rCube gibt über
diesem USB-Port weder Musikdateien
wieder, noch kann kann an diesen Port
ein Computer angeschlossen werden.
Ein-/Ausschalter
Vor der Benutzung des rCubes muss dieser
mit dem mitgelieferten Netzteil an das
Stromnetz angeschlossen werden (außer,
es wurde eine geladene Batterie eingesetzt).
Schalten Sie den rCube nach dem Einstecken
mit dem Ein-/Ausschalter auf der Rückseite
in den Standby-Modus. Im StandbyModus reagiert der rCube auf Befehle vom
Bedienfeld oder der Fernbedienung und
braucht nur wenig Strom. Wenn Sie das
Gerät nicht benutzen, sollten Sie das Gerät
bei Batteriebetrieb mit dem Ein-/Ausschalter
auf der Rückseite vollständig abschalten.
D-7
Page 62

.
L
Einführung
rCube
A
TV
B
CD OUT
SERIAL NO .
Externer Quelle
Verwenden Sie nur das Netzteil, das zum Lieferumfang
Ihres rCubes gehört. Andere Netzteile, können den rCube
beschädigen.
Anschlussübersicht
Stromversorgung
Ihr rCube kann über das Netzteil oder über
die eingebaute, wieder auadbare Batterie
IO
CD OUT
L
R
R
Stromversorgung
mit Strom versorgt werden. Schließen das
Netzteil für die Stromversorgung des Geräts
und/oder zum Laden der Batterie an.
Anschluss externer Quellen
Es gibt zwei Arten von Quellen, die an den
AUX-in-Eingang des Cubes angeschlossen
werden können: Analoge Linesignale (z. B.
von einem Hi-Fi CD-Player oder Fernseher)
und eine analoge Kopörerbuchse (z. B.
MP3-Player). Weitere Einzelheiten über
einen bestimmten Anschluss für Ihr Szenario
nden Sie im Inhaltsverzeichnis unter
„Wiedergabe von einem ...“.
Anschluss an einen Fernseher (iPodVideowiedergabe)
Videofähige iPods können entweder
über die Composite-Video A- oder
über die Component-Video B-Buchsen
angeschlossen werden (siehe Abbildung). Um
ein Anzeigegerät über Component-Video
(3 Kabel) anzuschließen, verwenden Sie
die optionale Kabelpeitsche. Für eine Liste
der aktuell kompatiblen iPod-Produkte,
die Video ausgeben können, siehe unter
http://support.apple.com/kb/HT1454.
Bitte beachten Sie, dass Apple-Geräte keine
Menügraken oder Anwendungsgraken
auf einem angeschlossenen Anzeigegerät
ausgeben - Die Videoausgabe wird nur für
die Wiedergabe von Videodateien verwendet.
D-8
Page 63

Auf dem oberen Bedienfeld benden sich
Oberes Bedienfeld
berührungsempndliche Tasten für Standby,
Quellenauswahl und zum Ändern der Lautstärke.
Jede Taste besitzt oberhalb eine LED, die bei jedem
Tastendruck aueuchtet.
Ein und Standby
In der Mitte des oberen Bedienfelds bendet sich die
Standby-Taste. Wenn der Kippschalter auf der Rückseite
eingeschaltet wurde, schaltet die Taste 2 auf dem oberen Bedienfeld
(oder auf der Fernbedienung) zwischen vollständig eingeschaltet
(LED vorne leuchtet blau oder bei Batteriebetrieb violett auf) und
Standby-Modus (rote LED) um.
Auswahl Wiedergabequelle
Sie können mittels der Taste SOURCE (Quelle) zwischen
Wiedergabe von der iPod-Dockingstation oder AUX-Quellen auf
der Rückseite umschalten (siehe Tabelle unten). Um stattdessen eine
Funk-Quelle auszuwählen, drücken Sie die Taste WIRELESS (Funk).
Dadurch wird jede AUX- oder iPod-Quelle abgewählt und die
Wiedergabe beginnt vom optionalen USB- oder iPod-Sender. Wenn
eine Funk-Quelle ausgewählt wurde, leuchtet die Funk-Anzeige
kontinuierlich auf.
SOURCE (Quelle)
FUNK
STANDBY
VOLUME DOWN
(Lautstärke
verringern)
VOLUME UP
(Lautstärke erhöhen)
Auswahl der lokalen Wiedergabequelle:
AUX-in (leuchtet rot) oder iPod (leuchtet
grün).
Auswahl der verfügbaren FunkWiedergabequellen: Suche (rot) oder
gesperrt (grün).
Schaltet den rCube aus dem StandbyModus (rote LED) ein (blaue/violette
LED) oder in den Standby-Modus.
Verringert die Lautstärke. Zum sanen
Verringern der Lautstärke gedrückt
halten.
Lautstärke erhöhen. Zum sanen
Erhöhen der Lautstärke gedrückt halten.
D-9
Einführung
Vor der Verwendung des Funksenders
müssen Sie ihn zuerst einrichten. Siehe
Abschnitt «Von einem optionalen USBSender wiedergeben» auf Seite D-19 oder
unter «Einen optionalen iPod-Sender
einrichten» auf Seite D-20
Anzeige-LEDs
Die LEDs des oberen Bedienfelds
zeigen die ausgewählte Quelle und
die eingestellte Lautstärke an. Bei
Verwendung der Fernbedienung blinkt
die Power-LED und bestätigt den
Empfang von Fernbedienungsbefehlen.
Ändern der Lautstärke und
Stummschaltung
Ein kurzer Tastendruck auf + oder erhöht oder verringert die Lautstärke des
rCubes um einen Schritt oder halten Sie
die Taste gedrückt, um die Lautstärke
kontinuierlich zu erhöhen oder zu
verringern. Durch gleichzeitiges Drücken
beider Lautstärketasten wird der Ton
sofort stummgeschaltet. Beide LautstärkeLEDs (- u. +) leuchten auf, wenn der
rCube stumm geschaltet wurde. Drücken
Sie eine beliebige Lautstärketaste, um die
Stummschaltungsfunktion aufzuheben.
Page 64

Fernbedienung
Fernbedienung
Die Fernbedienung besitzt identische Tasten für Standby, Quellenauswahl und Ändern
der Lautstärke des Cubes wie die auf dem oberen Bedienfeld. Darüber hinaus kann sie
auch verwendet werden, um auf dem iPod durch die Menüs und Tracks zu navigieren
und den Wiedergabemodus des iPods zu ändern (z.B. auf „zufällig“).
Ein und Standby
Einführung
Die Standby-Taste 2 der Fernbedienung arbeitet mit dem Kippschalter auf der
Rückseite zusammen. Wenn der der Schalter auf der Rückseite eingeschaltet ist, wird
mit der Power-Taste auf der Fernbedienung das Gerät zwischen eingeschaltet (blaue
LED (Netzbetrieb) oder violette LED (Batteriebetrieb)) auf der Vorderseite des Geräts)
und dem Standby-Modus (rote LED auf der Vorderseite des Geräts) umgeschaltet. Die
Standby-Taste der Fernbedienung ist zur Standby-Taste auf dem oberen Bedienfeld des
Geräts identisch.
Ändern der Lautstärke und Stummschaltung
Die Lautstärketasten auf der Fernbedienung sind zu den Lautstärketasten auf dem
oberen Bedienfeld des Geräts identisch. Ein kurzer Tastendruck auf + oder - erhöht oder
verringert die Lautstärke des rCubes um einen Schritt (es gibt 52 Lautstärkeschritte)
oder halten Sie die Taste gedrückt, um die Lautstärke kontinuierlich zu erhöhen oder
zu verringern. Die Lautstärke-LEDs + und - auf dem oberen Bedienfeld blinken als
Bestätigung für die Lautstärkeeinstellung. Durch Drücken der Mute-Taste wird das
Gerät stummgeschaltet. Während der Stummschaltung leuchten beide Lautstärke-LEDs
(- u. +) auf und der Ton des Geräts ist ausgeschaltet. Drücken Sie erneut Mute, um die
Stummschaltungsfunktion zu deaktivieren und den Ton wieder einzuschalten.
iPod auaden
Für eine längere Akkulaufzeit und bessere Klangqualität besitzt der rCube,
wie der ARCAM irDock, die Benutzerkontrolle über das Auaden des iPod.
Wenn Netz- oder Batterieversorgung vorhanden und der rCube eingeschaltet
ist, lädt der rCube standardmäßig immer iPods. Das Laden von iPods ndet
im Standby-Modus nicht statt. Sie können manuell das Auaden verhindern,
indem Sie die Taste drücken. Wenn Sie diese Taste gedrückt wurde,
erlischt die Ladeanzeige auf dem iPod-Display und das Auaden des iPod wird
angehalten, bis die Taste erneut gedrückt, der iPod wieder eingesetzt oder bis der rCube
wieder eingeschaltet wurde.
iPod steuern
HINWEIS: Diese Funktionen sind nur bei angedockten iPods und iPhones verfügbar.
Sie sind nicht verfügbar, wenn ein iPod über Funk verbunden ist.
Die Fernbedienung muss für
eine ordnungsgemäße Funktion
auf die Vorderseite des rCubes
gerichtet werden.
D-10
Page 65

Fernbedienung
STANDBY
MUTE Schaltet den rCube stumm.
VOLUME DOWN
(Lautstärke verringern)
VOLUME UP
(Lautstärke erhöhen)
IPOD AUFLADEN
QUELLE AUSWÄHLEN
FUNK
BLÄTTERN
AUSWÄHLEN
MENÜ Geht zur Seitenebene zurück.
RÜCKLAUF/
SPRINGEN
WIEDERGABE/PAUSE
VORLAUF/SPRINGEN
WIEDERGABEMODUS
Schaltet den rCube aus dem Standbymodus
ein oder in den Standbymodus zurück.
Verringert die Lautstärke. Zum sanen
Verringern der Lautstärke gedrückt halten.
Erhöht die Lautstärke. Zum sanen
Erhöhen der Lautstärke gedrückt halten.
Schaltet das Auaden des iPods ein oder
aus. Ausschalten des Auadens zum
Verlängern der Batterielebensdauer.
Schaltet zwischen iPod und externen
Quellen um.
Wählt eine Funkquelle. Auswahl der
nächsten verfügbaren Funkquelle, die mit
dem rCube verbunden ist.
Auf- und abwärts blättern, um aus
angezeigten iPod-Seitenelementen
auszuwählen.
Wählt das aktuelle Element, um zur
Unterseite zu gehen
Für den schnellen Rücklauf gedrückt halten
oder mit einem einzelnen Tastendruck zum
vorherigen Track springen.
Schaltet zwischen Wiedergabe und Pause
um.
Für den schnellen Vorlauf gedrückt halten
oder mit einem einzelnen Tastendruck zum
nächsten Track springen.
Geht zyklisch durch die beliebten
Wiedergabemodi des iPods.
Durch die iPod-Menüs navigieren
Sie können durch die Menüs eines
angedockten iPods mit den 4
Navigationstasten navigieren. Um eine
Auswahl zu markieren, scrollen Sie durch
die Elemente der Seite mit B oder C
nach oben oder unten. Der E-Pfeil dient
als „Auswahl“ und ru die Unterseite eines
gewählten Menüpunkts auf. Die D-Taste
dient als Menü- oder Zurücktaste. Die Taste
D lässt den iPod eine Seitenebene aufwärts
zur vorherigen Seite gehen.
Wiedergabe, Rew/Fwd (schneller
Rück- oder Vorlauf) verwenden und
Tracks auf dem iPod wechseln
Es sind drei iPod Track-Navigationstasten
auf der Fernbedienung vorhanden. Die
Taste 4/; schaltet zwischen Wiedergabe
und Pause um. Wenn ein iPod angedockt
ist, aber nicht wiedergibt und sein Display
nicht leuchtet, wird der iPod auch durch
Drücken von 4/; aktiviert. Halten Sie 9
oder : für den kontinuierlichen schnellen
Rücklauf oder Vorlauf gedrückt. Mit einem
einzelnen Tastendruck springen Sie jeweils
zum vorherigen oder nächsten Track.
Wiedergabemodus (Wiederholung
und Zufallswiedergabe
Der iPod-Wiedergabemodus wird mittels
der „Play Mode (Wiedergabemodus)“-Taste
gesteuert. Mit einzelnen Tastendrucken
gehen Sie zyklisch durch die 5 möglichen
Wiedergabemodi: (a) Einzelnen Track
wiederholen, (b) Wiedergabeliste
oder Ordner wiederholen, (c)
Wiedergabeliste oder Ordner wiederholen
plus Zufallswiedergabe, (d) Keine
Wiederholung, aber stattdessen zufällige
Wiedergabe einer Wiedergabeliste oder
eines Ordners, (e) Keine Wiederholung
und keine Zufallswiedergabe, gibt die
Wiedergabeliste oder einen Ordner wieder
(Standardeinstellung).
Einführung
D-11
Page 66

Rechter
Kanal
Linker
Kanal
23425
Umsetzen und Aufstellen des rCubes
Umsetzen Ihres rCubes
Die rCube wurde so konzipiert, dass er leicht im Haus umgesetzt werden kann. Der unter
der Schutzabdeckung versteckte Gri passt bequem in eine Hand. Zum Anheben Ihres
rCubes achten Sie darauf, dass sich kein iPod in der Dockingstation bendet und der
AC-Netzadapter nicht angeschlossen ist. Drücken Sie mit Ihrer Handäche in Richtung
zur Rückseite des Geräts auf dem Staubschutz hinten und greifen Sie unter die Abdeckung.
Sobald Sie sie anheben, kippt Ihr rCube. Seien Sie beim Anheben und Absetzen Ihres
Einführung
rCubes vorsichtig.
Entfernen Sie vor dem Umsetzen des rCubes jeden iPod. Sie sollten den rCube nicht
mit einem iPod auf der Dockingstation umsetzen. Wenn sich der rCube
im Batteriebetrieb bendet, können Sie ihn während der Funkwiedergabe
umsetzen.
Aufstellen des rCubes
Der rCube klingt fast überall großartig. Mit seitlich montierten und nach vorne
abgewinkelten Lautsprechern erzeugt der rCube qualitativ hochwertigen Klang in einem
Winkel von über 270 Grad.
Stellen Sie den rCube in einer Ecke auf!
Obwohl der rCube fast überall problemlos aufgestellt
werden kann, klingt er besonders großartig, wenn er in der
Ecke eines Zimmers aufgestellt wurde. In dieser Position wird
der Ton der seitlichen Lautsprecher an den Wänden reektiert,
um mehr Raumklang zu erzeugen.
Stellen Sie Ihren rCube in einem Winkel von 45 Grad in einer
Ecke und in Richtung zur Raummitte auf.
Wir sind sicher, Sie werden überrascht sein, wie sich das Zimmer mit Klang
füllt. Wir raten bei Aufstellung in einer Ecke oder in der Nähe einer Wand nicht die BASSTaste zu drücken, da die Akustik der Ecke/Wand den Bass auf natürliche Weise verstärkt.
Wählen Sie die Bassanhebung (BASS-Taste wurde gedrückt), wenn der rCube nicht in einer
Ecke oder an einer Wand aufgestellt wurde oder die Musikrichtung von zusätzlichem Bass
protiert.
Stellen Sie den Cube nicht in einen geschlossenen Bereich
Die seitlich abstrahlenden Lautsprecher funktionieren am besten, wenn sie nicht behindert
werden (z. B. auf einer Küchenarbeitsplatte). Stellen Sie den rCube nicht auf ein Bücherregal
mit Büchern auf beiden Seiten, da dies den Ton blockiert.
D-12
Page 67

Wiedergabe von einem iPod oder iPhone
Einschalten
1
Stecken Sie den Netzstecker des Netzteils in eine
Steckdose und den Gleichstromstecker in die
DC-Stromversorgungsbuchse auf der Rückseite des
rCubes. Schalten Sie den rCube durch Drücken des
Kippschalters auf der Rückseite ein. Die LED auf der
Vorderseite leuchtet rot auf (Standby-Modus). Drücken
Sie die Standby-Taste auf dem oberen Bedienfeld oder auf
der Fernbedienung. Die Power-LED wechselt von rot zu
blau und der rCube ist jetzt eingeschaltet.
Andocken eines iPods
2
Önen Sie die Staubschutzhaube, um die universelle
Dockingstation freizugeben. Setzen Sie Ihren iPod oder
Ihr iPhone vorsichtig auf den Anschluss.
Setzen Sie den iPod beim Andocken oder Entfernen
vorsichtig im gleichen Winkel auf den Anschluss!
Den iPod nicht drehen oder ziehen, während er auf
dem Docking-Stecker sitzt. Dies kann den Stecker
beschädigen.
Wählen Sie den iPod als Quelle
3
Wenn der iPod angedockt wurde, wird der rCube den iPod automatisch als die
Quelle wählen und die Quelle-Taste leuchtet grün auf. Wenn sich der iPod auf
der Dockingstation bendet, aber nicht die aktuelle Quelle ist, drücken Sie die
Quelle-Taste auf der Fernbedienung oder auf dem oberen Bedienfeld, bis die
Quelle-LED grün aueuchtet.
Auswahl und Wiedergabe eines Tracks
4
Verwenden Sie die Bedienelemente Ihres iPods oder die Fernbedienung des
rCubes, um einen Track auszuwählen und die Audiowiedergabe zu starten
Lautstärke einstellen
5
Stellen Sie de Lautstärke mit den Lautstärketasten + und - auf der
Fernbedienung oder auf dem oberen Bedienfeld auf den gewünschten Pegel.
HINWEIS: Das Apple iPad ist zu groß für den Docking-Anschluss, kann aber über
Funk mit einem Sender verbunden werden. Siehe Seite F-20.
MENU
, .
;4
IO
Bedienung
1
2
D-13
Page 68

CD OUT
SERIAL NO .
L
Wiedergabe von einer Linepegel-Quelle
Schließen Sie die Linepegel-Quelle an AUX-in
1
(AUX-Eingang) an
Linepegel-Quellen (z. B. ein CD-Player oder
Vorverstärker-Ausgang) besitzen in der Regel
Cinchbuchsen (rechtes Bild) und sie haben keine
Lautstärkeregelung. Um eine Linepegel-Quelle
Bedienung
anzuschließen, müssen Sie ein Kabel verwenden,
das an einem Ende zwei Cinch-Stecker (links und
rechts) und am anderen Ende einen 3,5mm Stereo
Mini-Klinkenstecker besitzt. Wenn die Quelle einen
Lautstärkeregler besitzt, stellen Sie ihn auf 90%.
Schließen Sie das ausgeschaltete Gerät an.
Einschalten
2
Stecken Sie den Netzstecker des Netzteils in eine
Steckdose und den Gleichstromstecker in die
DC-Stromversorgungsbuchse auf der Rückseite des
rCubes. Schalten Sie den rCube durch Drücken des
Kippschalters auf der Rückseite ein. Die LED auf der
Vorderseite leuchtet rot auf (Standby-Modus). Drücken
Sie die Standby-Taste auf dem oberen Bedienfeld oder auf
der Fernbedienung. Die Power-LED wechselt von rot zu blau und der rCube
ist jetzt eingeschaltet.
Wählen Sie AUX-in als Quelle
3
Drücken Sie die „Source Select (Quellenauswahl)“-Taste auf der
Fernbedienung oder drücken Sie die Taste SOURCE (Quelle) auf dem oberen
Bedienfeld, bis die Quelle-LED rot aueuchtet. Rot zeigt an, das AUX als
Quelle gewählt wurde.
Stellen Sie sicher, dass die Wiedergabe auf der externen Quelle läuft
4
Verwenden Sie die Bedienelemente an der Line-Quelle, um die Wiedergabe zu
starten und prüfen Sie, ob die Wiedergabe vom Gerät läu.
CD OUT
Digital
1
CD OUT
SERIAL NO .
L
R
R
..
LinepegelQuelle
1
Hinweis: Einige Geräte geben den Linepegel
auf einer 3,5 mm Stereo-Klinkenbuchse aus.
Wenn Sie ein solches Gerät besitzen, müssen
statt des dargestellten Kabels Sie ein 3,5 mm
Stecker-Stecker Stereokabel verwenden.
2
IO
2
Lautstärke einstellen
5
Stellen Sie die Lautstärke mit den Lautstärketasten + und - auf der
Fernbedienung oder auf dem oberen Bedienfeld auf den gewünschten Pegel.
D-14
Page 69

Wiedergabe über eine Kopfhörerbuchse
Verbinden Sie die Kopfhörerbuchse mit AUX-in (AUX-Eingang)
1
Fast alle Audio-Geräte verfügen über eine
Kopörerausgangsbuchse. Dies ist eine
einfache Möglichkeit, den rCube anzuschließen.
Ältere iPods, andere MP3-Player, Fernseher und
Laptops können auf diese Weise über ein
3,5 mm Stecker-Stecker-Stereokabel
angeschlossen werden. In der Regel
liefern Kopörerausgänge eine höhere
Maximalspannung als Linepegel-Ausgänge,
stellen Sie deshalb die Lautstärke auf 75% ein.
Einschalten
2
Stecken Sie den Netzstecker des Netzteils in eine
Steckdose und den Gleichstromstecker in die
DC-Stromversorgungsbuchse auf der Rückseite
des rCubes. Schalten Sie den rCube durch
Drücken des Kippschalters auf der Rückseite
ein. Die LED auf der Vorderseite leuchtet rot auf
(Standby-Modus). Drücken Sie die StandbyTaste auf dem oberen Bedienfeld oder auf der
Fernbedienung. Die Power-LED wechselt von rot zu blau und der rCube ist jetzt
eingeschaltet.
Wählen Sie AUX-in als Quelle
3
Drücken Sie die „Source Select (Quellenauswahl)“-Taste auf der Fernbedienung oder
drücken Sie die SOURCE (Quelle)-Taste auf dem oberen Bedienfeld, bis die
Quelle-LED rot aueuchtet. Rot zeigt an, dass AUX als Quelle gewählt wurde.
Achten Sie darauf, dass die Wiedergabe von der externen Quelle läuft
4
Verwenden Sie die Bedienelemente am Quellgerät, um die Wiedergabe zu starten.
Denken Sie daran, die Lautstärke am Kopörer-Quellgerät auf 75% einzustellen.
Zu hohe Signale können zu Verzerrungen führen. Sie können die ordnungsgemäße
Wiedergabe des Geräts mithilfe eines Kopörers prüfen.
Lautstärke einstellen
5
Stellen Sie die Lautstärke mit den Lautstärketasten + und - auf der Fernbedienung
oder auf dem oberen Bedienfeld auf den gewünschten Pegel.
1
Kopfhörer-Quelle
87
;4
IO
21
2
Bedienung
D-15
Page 70

Videoausgänge verwenden
Neben dem Abspielen von Audio kann der rCube
von unterstützten iPods Videos wiedergeben. Wenn ein
videofähiger iPod angedockt wurde und die Wiedergabe
läuft, wird das Videosignal auf die beiden Composite(OptionA) und Y, Pb, Pr (Option B) Video-Ausgänge
auf der Rückseite weitergeleitet. Der verwendete
Ausgang liegt völlig bei Ihnen und davon ab, welchen Ihr
Anzeigegerät unterstützt. Beachten Sie, dass bei einigen
Bedienung
iPods möglicherweise die Einstellungen geändert werden
müssen, um die Videoausgabe zu ermöglichen - Bitte
wenden Sie sich an die iPod-Unterstützung von Apple.
Bitte beachten Sie, dass Apple-Geräte keine Menügraken
oder Anwendungsgraken auf einem angeschlossenen
Anzeigegerät ausgeben - Die Videoausgabe wird nur für die Wiedergabe von Videodateien verwendet.
Schließen Sie das Videodisplay an den rCube an
1
Composite Video und Y, Pb, Pr (auch „Component“ genannt) Video sind übliche Videoformate. Um Ihren iPod an ein
Composite-Display anzuschließen, benötigen Sie ein Videokabel mit Cinch-Phonosteckern an jedem Ende (Option
A). Für Y, Pb, Pr Video verwenden Sie die optionale Video-Kabelpeitsche (Option B). Y, Pb, Pr Video bietet die beste
Bildqualität. Für den Kauf dieses Component-Videokabels wenden Sie sich bitte an Ihren Arcam-Händler.
Einschalten
2
Stecken Sie den Netzstecker des Netzteils in eine Steckdose und den Gleichstromstecker in die
DC-Stromversorgungsbuchse auf der Rückseite des rCubes. Schalten Sie den rCube
durch Drücken des Ein-/Ausschalters auf dem hinteren Bedienfeld ein und drücken Sie
die Standby-Taste auf dem oberen Bedienfeld oder auf der Fernbedienung. Die blaue
Power-LED sollte aueuchten.
Wählen Sie iPod als Quelle und geben Sie ein Video wieder
3
Drücken Sie die „Source Select (Quellenauswahl)“-Taste auf der Fernbedienung oder
drücken Sie die Quelle-Taste auf dem oberen Bedienfeld, bis die Quelle-LED grün
aueuchtet. Grün zeigt an, das der iPod als Quelle gewählt wurde. Starten Sie die iPodVideowiedergabe
Achten Sie darauf, dass die Quelle Ihres Displays richtig eingestellt wurde.
4
Verwenden Sie die Bedienelemente auf dem Anzeigegerät, um den Videoeingang
auszuwählen, an den Ihr rCube als aktuelle Videoquelle angeschlossen ist.
Stellen Sie die Lautstärke ein
5
Stellen Sie die Lautstärke mit den Lautstärketasten + und - auf der Fernbedienung oder
auf dem oberen Bedienfeld auf den gewünschten Pegel.
TV
rCube
A
B
D-16
IO
Page 71

Der rCube ist für Sie immer verfügbar
Lithium-Ionenenergie ist für Sie immer verfügbar
Ihr rCube besitzt eine eingebaute Lithium-Ionen-(LiIon)-Batterie mit hoher Kapazität - Er ist für Sie immer
verfügbar. Im Garten und rund ums Haus. Die vordere
LED leuchtet violett auf und zeigt damit an, dass der
rCube mit Batteriestrom läu.
Batterie laden
Der rCube lädt die Batterie automatisch und besitzt
interne Lademethoden, um die Batterielebensdauer so
weit wie möglich zu verlängern. Um herauszunden,
wie viel Energie in die Batterie übrig ist, schließen
Sie den Netzadapter an, schalten den rCube in den
Standby-Modus und drücken Sie die Taste
Fernbedienung. Die LEDs auf dem oberen Bedienfeld des
rCubes zeigen die Höhe der Restladung an:
- 4 leuchtende LEDs stehen für 100% Restladung.
- 3 leuchtende LEDs stehen für 75% Restladung.
- 2 leuchtende LEDs stehen für 50% Restladung.
- 1 leuchtende LED steht für 25% Restladung.
Aufbewahrung
Wenn Sie den rCube auewahren möchten, müssen Sie
den Ein-/Ausschalter auf der Rückseite in die Stellung
OFF (Aus) stellen.
auf der
Bedienung
D-17
Page 72

Arcam rWave
Einen optionalen USB-Sender einrichten
Ein USB-Funksender bedeutet, dass Sie Musik von Dateien
auf Ihrem PC überall im Haus wiedergeben können.
Sie können einen optionalen USB-Funksender für Ihren rCube
kaufen, um Ihre Musik vom Computer überall rund ums Haus
zu übertragen. Zum Kauf des Senders wenden Sie bitte an Ihren
lokalen ARCAM-Händler oder besuchen Sie www.arcam.co.uk.
Vor der ersten Benutzung des Senders müssen Sie ihn mit einem
Options
einzelnen rCube-Empfänger verbinden.
Sie müssen diesen Setup nur einmal durchführen.
Nachdem eine Verbindung hergestellt wurde, ist diese
gespeichert, selbst wenn die Geräte ausgeschaltet wurden.
Installieren Sie den USB-Sender an Ihrem PC oder
1
Laptop
Stecken Sie USB-Sender mit dem Aussehen eines
Memorysticks in einen freien USB-Port Ihres
Computers. Der Computer erkennt das Gerät als eine
Soundkarte und legt es als Ihr Standard-Ausgabegerät
fest.
Stellen Sie den Sender für eine Suche nach einem
2
rCube ein
Drücken Sie die „Associate (Verbinden)“-Taste am
USB-Sender. Die Sender-LED blinkt schnell und
zeigt damit an, dass nach einer Verbindung gesucht
wird. Für die nächsten 30 Sekunden wird sich der
Sender auf der Suche nach einer Verbindung mit
jedem rCube verbinden (Siehe Schritt 4).
Schalten Sie den rCube ein
3
Schließen Sie den rCube an eine Steckdose an und schalten
ihn ein, indem Sie den Kippschalter auf der Rückseite in die
Stellung ON (Ein) stellen und die Standby-Taste auf dem
oberen Bedienfeld drücken, so dass die Power-LED blau
aueuchtet.
Stellen Sie den Sender für eine Suche nach einem
4
rCube ein
Drücken Sie die Taste Wireless (Funk), um die Funkeingabe
1
IO
auszuwählen. Lassen Sie die Taste kurz los und halten Sie
sie anschließend gedrückt. Die Funk-LED blinkt rot auf,
während nach einer Übertragung gesucht wird. Wenn am
rCube die Funk-LED kontinuierlich grün aueuchtet, wurde
eine Verbindung hergestellt. Der Sender bleibt 30 Sekunden
im Verbindungsmodus, falls mehrere rCubes eingerichtet
werden müssen. Entfernen Sie währenddessen nicht den
Sender vom PC. Wenn der Verbindungsauau beendet ist,
blinkt die LED am Sender alle fünf Sekunden kurz auf. Sie
können nun die Funk-Quelle wiedergeben.
D-18
Page 73

Arcam rWave
IO
Von einem optionalen USB-Sender wiedergeben
Mit einem USB-Funksender können Sie Musik von Dateien
auf Ihrem PC überall im Haus wiedergeben.
ANMERKUNG: Sie müssen jeden rCube mit einem Funksender
verbinden, bevor dieser rCube Audio empfangen kann.
Installieren Sie den USB-Sender an Ihrem PC
1
oder Laptop.
Stecken Sie USB-Sender mit dem Aussehen eines
Memorysticks in einen freien USB-Port Ihres
Computers. Der Computer erkennt das Gerät als
eine Soundkarte. Möglicherweise müssen Sie in
Ihren Systemeinstellungen die Audioausgabe zum
USB-Sender aktivieren - Einige Betriebssysteme tun dies automatisch. Sie können
überprüfen, ob der Sender überträgt, indem Sie seine LED beobachten, die bei
einer Übertragung alle fünf Sekunden kurz aulinkt.
Einschalten
2
Stecken Sie den Netzstecker des Netzteils in eine Steckdose und
den Gleichstromstecker in die DC-Stromversorgungsbuchse auf
der Rückseite des rCubes. Schalten Sie den rCube durch Drücken
des Ein-/Ausschalters auf der Rückseite ein und drücken Sie die
Standby-Taste auf dem oberen Bedienfeld. Die blaue Power-LED
sollte aueuchten.
Wählen Sie den Sender als Funk-Quelle
3
Drücken Sie zum Auswählen des Computer-Senders die „Wireless (Funk)“-Taste
auf der Fernbedienung oder auf dem oberen Bedienfeld. Wenn eine Quelle
verfügbar ist, leuchtet die LED grün auf und die Quelle wird wiedergegeben.
Hinweis: Wenn eine zweite Funk-Quelle auch sendet, müssen Sie möglicherweise
die „Wireless (Funk)“-Taste zweimal drücken, um den richtigen USB-Sender
auszuwählen.
iTunes auf dem Computer aufrufen
4
Rufen Sie iTunes oder Ihren Lieblings-Musikplayer auf und wählen Sie einen Song
zur Wiedergabe. Stecken Sie stets den USB-Sender ein, bevor Sie iTunes starten.
Stellen Sie die Lautstärke ein
5
Stellen Sie die Lautstärke mit den Lautstärketasten + und - auf der Fernbedienung
oder auf dem oberen Bedienfeld auf den gewünschten Pegel.
Bedienung
1
2
D-19
Page 74

, .
;4
23425
Arcam rWand
Einen optionalen iPod-Sender einrichten
Mit einem apple-kompatiblen USB-Funksender können Sie Musik
von Ihrem Apple iPod oder iPad überall im Haus wiedergeben.
Um Ihre Musik vom iPod überall rund um das Haus drahtlos zu übertragen,
können Sie einen optionalen iPod-Funksender für Ihren rCube erwerben.
Zum Kauf des Senders wenden Sie bitte an Ihren lokalen ARCAM-Händler
oder besuchen Sie www.arcam.co.uk. Vor der ersten Benutzung des Senders
müssen Sie ihn mit einem einzelnen rCube-Empfänger verbinden.
Options
Sie müssen diesen Setup nur einmal durchführen. Nachdem
eine Verbindung hergestellt wurde, ist diese gespeichert, selbst
wenn die Geräte ausgeschaltet wurden.
Stecken Sie den iPod-Sender in Ihr iPod, iPhone oder iPad.
1
Stecken Sie den Sender in den Docking-Anschluss
auf der Unterseite Ihres Apple-Players.
Stellen Sie den Sender für eine Suche nach
2
einem rCube ein
Drücken Sie innerhalb von 3 Sekunden nach
dem Einsetzen die „Associate (Verbinden)“-Taste
am Sender. Halten Sie die Taste gedrückt, bis die
Sender-LED schnell (5 mal pro Sekunde) blinkt
und damit anzeigt, dass nach einer Verbindung
gesucht wird. Für die nächsten 30 Sekunden wird
sich der Sender mit jedem rCube verbinden, der
auch nach einer Verbindung sucht (Siehe Schritt 4).
Schalten Sie den rCube ein
3
Schließen Sie den rCube an eine Steckdose an und schalten
Sie ihn ein, indem Sie den Kippschalter auf der Rückseite
in die Stellung ON (Ein) stellen und die Standby-Taste auf
dem oberen Bedienfeld drücken, so dass die Power-LED blau
aueuchtet.
Stellen Sie den rCube für eine Suche nach einem
4
Sender ein
Drücken Sie die Funk-Taste, um die Funkeingabe
auszuwählen. Lassen Sie die Taste kurz los und halten Sie sie
MENU
, .
;4
3
IO
anschließend gedrückt. Während nach einer Übertragung
gesucht wird, blinkt die Funk-LED rot auf. Wenn die FunkLED am rCube kontinuierlich grün aueuchtet, wurde eine
Verbindung hergestellt. Der Sender bleibt 30 Sekunden
im Verbindungsmodus, falls mehrere rCubes eingerichtet
werden müssen. Entfernen Sie währenddessen nicht den
Sender vom iPod. Wenn der Verbindungsauau beendet ist,
blinkt die LED am Sender alle fünf Sekunden kurz auf. Sie
hören nun die Musik, die auf dem iPod wiedergegeben wird.
D-20
Page 75

IO
Arcam rWand
Wiedergabe von einem optionalen iPod-Sender
HINWEIS: Sie müssen jeden rCube mit einem Funksender verbinden, bevor
dieser rCube Audio von dem Sender empfangen kann.
Stecken Sie den iPod-Sender in Ihr iPod, iPhone oder iPad.
1
Stecken Sie den Sender in den Docking-Anschluss auf der Unterseite Ihres
Apple-Players. Sie können überprüfen, ob der Sender überträgt, indem Sie
seine LED beobachten, die bei einer Übertragung alle fünf Sekunden kurz
aulinkt.
Einschalten
2
Stecken Sie den Netzstecker des Netzteils in eine Steckdose und den
Gleichstromstecker in die DC-Stromversorgungsbuchse auf der Rückseite
des rCubes. Schalten Sie den rCube durch Drücken des Ein-/Ausschalters
auf der Rückseite ein und drücken Sie die Standby-Taste auf dem oberen
Bedienfeld. Die blaue Power-LED sollte aueuchten.
Wählen Sie den Sender als Funk-Quelle
3
Drücken Sie zum Auswählen des iPod-Senders die „Wireless (Funk)“Taste auf der Fernbedienung oder auf dem oberen Bedienfeld. Wenn
eine Quelle verfügbar ist, leuchtet die LED grün auf und die Quelle wird
wiedergegeben. Hinweis: Wenn eine zweite Funk-Quelle auch sendet,
müssen Sie möglicherweise die „Wireless (Funk)“-Taste zweimal drücken,
um den richtigen Sender auszuwählen.
iTunes auf dem iPod/iPhone/iPad aufrufen
4
HINWEIS: Einige Apple-Geräte verlangen, dass Sie den iPod-Musikplayer
wählen.
, .
MENU
;4
Bedienung
2
Stellen Sie die Lautstärke ein
5
Stellen Sie die Lautstärke mit den Lautstärketasten + und - auf der
Fernbedienung oder auf dem oberen Bedienfeld auf den gewünschten
Pegel. Die Lautstärke des rCube kann auch mit der Lautstärkeregelung des
iPods eingestellt werden.
D-21
Page 76

Einrichten der rCube-zu-rCube-Übertragung
Bei zwei rCubes kann ein rCube Funk-Übertragungen von einem
anderen rCube empfangen.
Jeder Musiktitel von einem iPod oder einer externen Quelle, der auf dem
sendenden rCube wiedergegeben wird, wird drahtlos an den zweiten
rCube gesendet. Vor dem ersten Senden müssen Sie den sendenden rCube
mit dem empfangenden rCube verbinden.
Nachdem eine Verbindung hergestellt wurde, ist diese gespeichert, selbst
Bedienung
wenn die Geräte ausgeschaltet wurden. Hinweis: Wenn Sie möchten, dass
jeder rCube in der Lage ist, zum anderen rCube zu übertragen, muss die
Verbindung zweimal durchgeführt werden - Sie müssen die folgenden
Schritte bei den rCubes der Reihe nach wiederholen. Sobald dies erledigt
ist, können Sie mit dem rCube auch das empfangen, was der andere
wiedergibt.
Schalten Sie alle rCubes ein
1
Schließen Sie die Stromversorgung an, schalten Sie
den Kippschalter auf der Rückseite in die Stellung ON
(ein) und schalten Sie auf dem oberen Bedienfeld die
Standby-Taste ein, so dass die blaue LED aueuchtet.
Stellen Sie den Sender-rCube für eine Suche
2
nach Empfänger-rCubes ein
Drücken und lassen Sie die Quellenauswahl-Taste
los, um die Quelle (iPod oder AUX) auszuwählen,
die Sie übertragen möchten. Halten Sie die FunkTaste gedrückt, bis die Funk-LED rot aulinkt. Für
die nächsten 30 Sekunden wird sich dieser SenderrCube mit jedem rCube verbinden, der nach einer
Verbindung sucht (Siehe Schritt 3).
Funkreichweite
Ein rCube kann in der Regel von einem Sender
im gleichen Haus empfangen. Die Reichweite
kann je nach Baumaterial und Störungen durch
andere Funk-Quellen wie schnurlose Telefone
und WLAN-Router verringert werden. Wenn Sie
Probleme mit dem Funksignal haben, versuchen
Sie entweder den empfangenden rCube oder den
Sender umzusetzen. Der Funkbetrieb kann in
funkfeindlichen Umgebungen nicht gewährleistet
werden.
IO
Stellen Sie die Empfänger-rCubes für eine Suche nach einem
3
Sender-rCube ein
Drücken Sie die Funk-Taste, um die Funkeingabe auszuwählen.
Lassen Sie die Taste kurz los und halten Sie sie anschließend
gedrückt. Während nach einer Übertragung gesucht wird,
blinkt die Funk-LED rot auf. Wenn die Funk-LED am rCube
kontinuierlich grün aueuchtet, wurde eine Verbindung
hergestellt.
Der sendende rCube setzt für 30 Sekunden die
Suche nach Empfänger-rCubes fort. Unterbrechen
Sie diesen Vorgang nicht - Warten Sie, bis die FunkLED grün aueuchtet, bevor Sie den Sender-rCube
ausschalten.
D-22
Page 77

IO
Aktualisieren der Firmware
Die Soware des rCubes kann vom Anwender
aktualisiert werden. Dadurch können zusätzliche
Funktionen hinzugefügt und die Kompatibilität mit
zukünigen iPods und iPhones gewährleistet werden.
Sie sollten die Firmware nur aktualisieren,
wenn Sie von Arcam oder Ihrem Händler dazu
aufgefordert wurden
Zur Aktualisierung des rCube benötigen Sie ein USBFlashlaufwerk und einen PC oder Laptop, der mit dem
Internet verbunden ist.
Laden Sie die Firmware-Datei auf Ihren
1
Memorystick herunter.
Besuchen Sie www.arcam.co.uk, um die neueste
Firmware herunterzuladen und speichern Sie die Datei
auf Ihrem USB-Flashlaufwerk.
Auf dem Laufwerk dürfen sich keine
anderen Dateien befinden.
Stecken Sie das USB-
2
Flashlaufwerk in den
ausgeschalteten rCube.
Stellen Sie zunächst sicher, dass
der rCube komplett ausgeschaltet
ist (mittels des Kippschalters auf
der Rückseite) und stecken Sie
anschließend den Memorystick
mit der heruntergeladenen
Datei in den USB-Port auf der
Rückseite des Geräts.
Schalten Sie den rCube in den Standby-Modus
3
Schalten Sie den rCube durch Drücken des
Kippschalters auf der Rückseite ein. Halten Sie die
Standby-Taste gedrückt, bis die Power-LED rot aulinkt.
Während das
Gerät aktualisiert
wird, blinkt die
Power-LED
schnell rot auf.
Wenn die LED auört zu blinken und kontinuierlich
leuchtet, wurde der rCube aktualisiert.
Entfernen Sie den Memorystick
4
Sie können jetzt den Memorystick sicher entfernen.
Wenn der rCube versehentlich in den
Aktualisierungsmodus gesetzt wurde,
schalten Sie das Gerät aus. Wenn
der rCube erneut eingeschaltet wird,
funktioniert er wieder normal.
Bedienung
D-23
Page 78

Problem Prüfen, ob...
Es leuchten keine
Anzeigen am Gerät.
Die Power-LED blinkt
rot auf
Mein rCube ist
eingeschaltet und ein
iPod ist angedockt. Er
scheint wiederzugeben,
es aber ist kein Ton zu
hören.
Störungserkennung
Das Gerät reagiert auf die
Fernbedienung fehlerha
oder überhaupt nicht.
Brummen bei der
Wiedergabe vom „AUXin“-Analogeingang
Der iPod gibt ein Video
wieder und ich habe ein
Anzeigegerät an einen
der Video-Ausgänge
angeschlossen, aber das
Bild wird nicht angezeigt.
Der Ton ist leise und es
fehlt Bass.
Der Ton dröhnt mit zu
viel Bass
< sich der Kipp-Netzschalter auf der Rückseite des rCube in der Stellung „ON (Ein)“ bendet.
< sich der rCube im Aktualisierungsmodus bendet. Stecken Sie ein USB-Flashlaufwerk mit der
Aktualisierungsdatei ein oder schalten Sie das Gerät aus und wieder ein, um das Gerät in den
normalen Zustand zurückzusetzen.
< die Quelle durch Drücken der „iPod“-Taste auf der Fernbedienung oder der Quelle-Taste auf
dem oberen Bedienfeld auf die Wiedergabe vom iPod eingestellt ist, bis die Quelle-LED grün
aueuchtet (Anzeige, dass die Quelle iPod gewählt wurde).
< beide Lautstärke-LEDs nicht leuchten. Wenn ja, wurde der Ton stummgeschaltet. Drücken die
Taste „MUTE (Stummschaltung)“ auf der Fernbedienung oder eine Lautstärkereglertaste, um die
Stummschaltung aufzuheben.
< der rCube eingeschaltet wurde. Wenn er sich im Standby-Modus bendet, drücken Sie die
-Taste auf der Fernbedienung, um das Gerät einzuschalten.
P
< neue Batterien in der Fernbedienung eingesetzt wurden.
< eine „Sichtverbindung“ (kein Hindernis) zwischen der Fernbedienung und dem IR-Sensor auf
dem vorderen Bedienfeld des rCube vorhanden ist.
< alle Kabel eine gute Verbindung haben. Wenn nötig, ziehen Sie den Netzstecker und stecken Sie
ihn erneut vollständig ein (Schalten Sie das Gerät zuvor aus).
< die Anschlüsse innerhalb des Quellkabelsteckers gebrochen sind oder schlecht gelötet wurden.
< das Brummen nur auritt, wenn eine bestimmte Quellkomponente angeschlossen wurde.
Überprüfen Sie, ob die Quelle ordnungsgemäß geerdet ist. Prüfen Sie, ob ein Antennenkabel
keine Masseverbindunghat. Wenden Sie sich für Unterstützung an ein Elektro-Unternehmen.
< alle Kabel eine gute Verbindung haben. Wenn nötig, ziehen Sie den Netzstecker und stecken Sie
ihn erneut vollständig ein (Schalten Sie das Gerät zuvor aus).
< die Anzeigequelle so eingestellt ist, dass der Eingang angezeigt wird, an den das Kabel
angeschlossen ist.
< die Bass-Taste auf der Rückseite nicht gedrückt ist.
Drücken Sie diese Taste, um den Bass zu verstärken.
< der rCube zu weit von einer Wand entfernt ist.
Bewegen Sie den rCube für mehr Basswiedergabe näher an eine Wand oder eine Ecke.
< die Bass-Taste auf der Rückseite gedrückt wurde.
Stellen Sie diese Taste in die nicht-gedrückte Stellung, um den Bass zu verringern.
< der rCube zu nahe an einer Wand oder Ecke aufgestellt wurde.
Bewegen Sie den rCube für weniger Basswiedergabe weg von der Wand oder aus der Ecke.
D-24
Page 79

Spezikationen
Maximale Dauer-Ausgangsleistung (20 Hz—20 kHz bei 0,5% THD), pro Kanal
Woofer-Kanäle, 4Ω, 100 Hz—3,7 kHz 35W/Ch
Tweeterkanäle, 6Ω, bei 1 kHz 10W/Ch
Klirrfaktor, 80% Leistung, 1 kHz 0,1%
Eingänge
Line-Eingänge:
Nennempndlichkeit 250mV bis 1,5V
Eingangsimpedanz 22kΩ
Rauschabstand (CCIR, 45W) 90dB
Verstärkerausgang
Nennausgangpegel 90W
Ausgangsimpedanz <50Ω
Lautsprecher
Ausgangspegel ~94dB SPL/Vrms
Ausgangsimpedanz 100Ω
Allgemein
Netzspannung 110—120V oder 220—240V
Leistungsaufnahme (maximal) 90W
Abmessungen B x T x H (einschließlich Füße) 200 x 200 x 200mm
Gewicht (Netto) 5 kg
Gewicht (mit Verpackung) 6,2 kg
Mitgeliefertes Zubehör Stromversorgung
Netzkabel
Fernbedienung mit CR2025 Batterie
Irrtümer (und Auslassungen) vorbehalten.
HINWEIS: Alle angegebenen Werte sind typisch, sofern nicht anders angegeben.
Spezikationen
D-25
Page 80

Garantie
Gesetzliche Gewährleistung
Arcam-Produkte unterliegen strengen Qualitätskontrollen und technischen Verbesserungen. Falls
unerwartet ein technischer Defekt Ihres Arcam-Produkts vorliegen sollte, stehen Ihnen als Käufer gesetzliche
Gewährleistungsansprüche für einen Zeitraum von zwei Jahren ab Kaufdatum gegenüber dem Händler zu, bei dem das
Gerät gekau wurde. Bitte wenden Sie Sich in diesem Fall an den Verkäufer des Produkts.
Garantie
Hersteller-Garantie für Deutschland
Falls Sie das Produkt bei einem autorisierten Arcam-Fachhändler in Deutschland gekau haben, haben Sie die
Möglichkeit, das Produkt beim zuständigen Vertrieb zu registrieren. Dazu müssen Sie den Kaueleg und die
Garantieanforderungskarte zum deutschen Arcam-Vertrieb einsenden und bekommen dann die Herstellergarantiekarte
zurückgeschickt. Die Garantiezeit beträgt beim Kauf über einen autorisierten Arcam-Fachhändler und nach
Registrierung zwei Jahre für alle Geräte der Solo Neo-Serie und fünf Jahre für alle Geräte der FMJ-Serie. Der Ablauf für
Österreich und die Schweiz kann unterschiedlich sein. Bitte wenden Sie Sich an die entsprechenden Vertriebe.
Der Hersteller oder Vertrieb übernimmt keine Verantwortung für Schäden, die durch Unfall, Missbrauch, Verschleiß,
Vernachlässigung oder unautorisierte Veränderungen bzw. Reparaturen entstehen. Außerdem wird keinerlei
Verantwortung für Schäden oder Verlust des Gerätes während des Transports zum oder vom Garantienehmer
übernommen.
Die Herstellergarantie umfasst Teile- und Arbeitsstundenkosten. Nach Ablauf der Herstellergarantiezeit müssen Sie die
vollen Kosten für Ersatzteile und Arbeitsstunden tragen.
Versandkosten werden nicht übernommen.
Inanspruchnahme der Garantie
Das Gerät sollte in der Originalverpackung an den Händler zurückgegeben werden, bei dem es erworben wurde.
Sie können es auch direkt an den Arcam-Service in Ihrem Land schicken. Der Versand sollte frei Haus durch einen
angesehenen Kurier erfolgen. Da keine Verantwortung für Schäden oder Verlust während des Transports zum Händler
oder zur Service-Werkstatt übernommen wird, sollten Sie das Gerät entsprechend versichern. Weitere Informationen
erhalten Sie von Ihrem Arcam-Vertrieb oder vom
Arcam Customer Support Department
Pembroke Avenue, Waterbeach, CAMBRIDGE, CB25 9QR, England.
oder
www.arcam.co.uk.
Probleme?
Kann Ihr Arcam-Händler Fragen zu diesem oder einem anderen Arcam-Produkt nicht beantworten, wenden Sie sich
bitte an den Arcam-Kundendienst.
D-26
Page 81

iPod-luidsprekersysteem
Page 82

Belangrijke veiligheidsvoorschriften
Dit product is ontworpen en vervaardigd om aan strenge
kwaliteits- en veiligheidsnormen te voldoen. Bij de
installatie en bediening moet u echter op de volgende
voorzorgsmaatregelen letten:
Dit symbool gaat vooraf
aan belangrijke bedienings-
of onderhoudsinformatie.
1. Volg alle waarschuwingen en aanwijzingen op
U dient alle veiligheidsvoorschrien en
gebruiksaanwijzingen te lezen alvorens dit apparaat te
Belangrijke veiligheidsvoorschriften
gebruiken. Bewaar deze handleiding ter referentie en
houdt u aan alle waarschuwingen in de handleiding of op
het apparaat.
2. Water en vocht
De aanwezigheid van elektriciteit in de buurt van water
kan gevaarlijk zijn. Om te voorkomen dat er water in het
apparaat druppelt of spat, dient u het niet te gebruiken
in de buurt van water – bijvoorbeeld in de buurt van een
badkuip, gootsteen of zwembad, enz.
3. Vreemde voorwerpen en vloeistoen
Zorg dat er geen voorwerpen via openingen in de
behuizing naar binnen vallen en dat er geen vloeistof in
gemorst wordt. Met vloeistof gevulde voorwerpen zoals
vazen mogen niet op de apparatuur gezet worden.
4. Rekken en stellingen
Gebruik alleen rekken en stellingen die aanbevolen zijn
voor gebruik met geluidsapparatuur. Als de apparatuur
op een draagbaar rek staat, dient het heel voorzichtig
verplaatst te worden zodat de combinatie niet omvalt.
5. Ventilatie
Blokkeer geen ventilatieopeningen in het apparaat.
Plaats de apparatuur niet op een bed, bank, vloerkleed of
ander zacht oppervlak, of in een gesloten boekenkast of
wandkast, aangezien dit de ventilatie kan belemmeren.
6. Hitte
Het systeem niet op een bed, sofa, tapijt of dergelijk zacht
oppervlak plaatsen of in een dichte boekenkast of andere
kast, aangezien dit de ventilatie verhindert.
7. Klimaat
Het apparaat is ontwikkeld voor gebruik in gematigde
klimaten.
8. Reiniging
Ontkoppel de eenheid van het lichtnet voordat reiniging
plaatsvindt.
De kast hoe normaal alleen met een zachte, vochtige
lintvrije doek afgeveegd te worden. Gebruik geen
verfverdunners of andere chemische oplosmiddelen om
de apparatuur te reinigen.
Wij raden het gebruik van meubelwas (vast of in een
spuitbus) af, aangezien deze onuitwisbare witte plekken
kan achterlaten als de eenheid daarna met een vochtige
doek afgenomen wordt.
9. Voedingsbronnen
Sluit het apparaat uitsluitend aan op een voedingsbron die
in de gebruikershandleiding of op het apparaat is vermeld.
De beste methode om de stroomtoevoer aan het apparaat
te verbreken, is door de schakelaar op de achterkant van
het apparaat te gebruiken. Het apparaat moet zodanig
worden geïnstalleerd dat uitschakeling mogelijk is.
Haal de stekker van het systeem tijdens onweersstorm
uit het stopcontact om mogelijke beschadiging door
blikseminslag of stroomstoten te voorkomen.
10. Netsnoerbescherming
Netsnoeren dienen zo gerouteerd te worden dat er niet
overheen gelopen wordt, en ze niet in de verdrukking
komen door voorwerpen die erop of ertegenaan gezet
worden. Hierbij moet vooral gelet worden op snoeren en
stekkers, en hun uitgangspunt op het apparaat.
11. Perioden van inactiviteit
Wij bevelen aan om de stekker van het apparaat uit het
ProductbeschrijvingWelkomProductbeschrijvingBediening BedieningProductbeschrijvingBedieningBedieningOptiesProbleemoplossingSpeci caties
NL-2
Page 83

Belangrijke veiligheidsvoorschriften
Belangrijke veiligheidsvoorschriften
stopcontact te halen tijdens onweersstormen of wanneer
het apparaat gedurende langere tijd niet wordt gebruikt.
12. Abnormale geur
Als het apparaat een abnormale geur of rook afgee, zet
het dan onmiddellijk uit en haal de stekker van de eenheid
uit de wandcontactdoos. Neem onmiddellijk contact op
met uw dealer.
13. Onderhoud
Voer zelf geen onderhoud aan het apparaat uit buiten wat
er in deze handleiding beschreven wordt. U dient overig
onderhoud aan deskundig onderhoudspersoneel over te
laten.
14. Schade die reparatie vereist
Het apparaat moet in de volgende gevallen door bevoegd
onderhoudspersoneel nagekeken worden:
A. Het netsnoer of de stekker is beschadigd.
B. Er zijn voorwerpen in het apparaat gevallen of er is
vloeistof in gemorst.
C. het apparaat is blootgesteld aan regen of vocht, of
D. Het apparaat lijkt niet normaal te functioneren of het
prestatievermogen is aanzienlijk veranderd.
E. Het apparaat is gevallen of de kast is beschadigd.
Het op de juiste manier wegdoen van dit product:
Dit teken gee aan dat dit product niet met het
huisvuil mag worden weggegooid; dit geldt voor
de gehele EU.
Om eventuele schade door niet gecontroleerde
afvalverwerking aan het milieu of gezondheid
van de mens te voorkomen en om materiële
middelen te behouden, moet dit product op
verantwoordelijke wijze worden gerecycled.
Maak voor het wegdoen van dit product gebruik van uw plaatselijke
teruggave en ophaal systemen of neemt u contact op met de handelaar
waar het product werd gekocht.
Naleving van veiligheid en normen
Deze apparatuur is ontworpen om te voldoen aan de
internationale veiligheidsnorm voor elektrische apparaten
IEC/EN 60065. Dit apparaat is onderhevig aan de
volgende twee voorwaarden: (1) Dit apparaat mag geen
schadelijke storing veroorzaken, en (2) dit apparaat moet
alle ontvangen storing opnemen, ook als dat leidt tot
ongewenste werking.
klee r
ce r t i f i ed
“Gemaakt voor iPod” en “Gemaakt voor iPhone”
betekent dat er een elektronisch accessoire is
ontworpen dat speciek met een iPod of iPhone
verbinding maakt en is goedgekeurd door de
ontwikkelaar . Apple is niet verantwoordelijk voor
de werking van dit apparaat of de naleving van
veiligheidsnormen en wettelijke normen.
iPhone, iPad en iPod zijn handelsmerken van Apple
Inc. die zijn geregistreerd in de V.S. en andere landen.
NL-3
Page 84

Welkom
Dank u voor het kopen van de rCube en welkom in de Arcam-familie. Arcam maakt al meer dan dertig
jaar gespecialiseerde audioproducten van
Contents
Belangrijke veiligheidsvoorschriften ........ N-2
Contents
Welkom .........................................................N-4
Inhoud van de verpakking .....................................N-5
Verkrijgbare accessoires ..........................................N-5
Productoverzicht ........................................................N-6
Achterpaneel................................................................N-7
Aansluitingsoverzicht ...............................................N-8
Bovenpaneel ................................................................N-9
Afstandsbediening .................................................N-10
Dragen en plaatsen van de rCube ....................N-12
Bediening ...................................................N-13
Afspelen vanaf een iPod of iPhone ..................N-13
Een bron afspelen via de lijningang ................N-14
Afspelen vanaf een koptelefoonaansluiting N-15
Gebruik van video-uitgangen ............................N-16
rCube gaat met u mee ..........................................N-17
Opties .......................................................... N-18
Instellen van de optionele USB-zender .........N-18
Afspelen vanaf de optionele USB-zender ....N-19
Instellen van de optionele iPod-zender ........N-20
Afspelen vanaf de optionele iPod-zender ....N-21
Verbinding tussen rCubes instellen .................N-22
De rmware bijwerken..........................................N-23
Probleemoplossing ................................. N-24
Specicaties .............................................. N-25
Garantie ..................................................... N-26
uitzonderlijke kwaliteit voor kritische hilieebbers. Uw rCube is erfgenaam van een
lange reeks bekroonde hi-componenten.
De rCube is uniek in vergelijking tot andere
iPod®luidsprekers. Hij is klein in afmeting,
maar groot in geluid. Zijwaarts gemonteerde
geluidsmodules met volledig bereik zorgen
voor een ruimtelijk geluid uit een klein
apparaat. Met de rCube kan ook draadloos
muziek afgespeeld worden. Met de ingebouwde
accu en een optionele draadloze zender kan
de rCube draadloos muziek ontvangen van
uw PC of iPod, waardoor u overal waar u dat
wenst in huis muziek kunt ontvangen.
De rCube is intuïtief en makkelijk in het
gebruik. Deze handleiding biedt u alle
benodigde aanwijzingen om uw ‘Cube’
maximaal te benutten. De handleiding helpt
u bij het instellen en aansluiten van uw rCube
en vertelt u hoe u hem moet plaatsen om het
beste geluid te krijgen. Ook wordt beschreven
hoe u draadloos muziek kunt afspelen vanaf
uw iPod, een externe bron, een andere rCube
of een PC.
We hopen dat u veel plezier zult hebben van
uw rCube. Indien u meer informatie nodig
hee over producten van Arcam, zal ons
dealernetwerk u graag van dienst zijn. Meer
informatie is ook te vinden op de website van
Arcam: www.arcam.co.uk.
NL-4
Page 85

Inhoud van de verpakking
Productbeschrijving
rCube
Arcam rWave
USB-zender om draadloos audio
te beluisteren vanaf uw PC
Wisselstroomadapter
(geleverd bij stroomkabels voor
EU, VK of VS)
Verkrijgbare accessoires
Arcam rWand
iPod® zender voor draadloos
afspelen vanaf uw iPod,
iPhone® of iPad®
In de toekomst kunnen er andere accessoires beschikbaar komen
— neem contact op met uw Arcam dealer voor de laatste informatie.
NL-5
kabel met aftakkingen voor
componentvideo, voor aansluiting
op hoogwaardige schermen die
componentvideo kunnen afspelen
Afstandsbediening
(geleverd met batterij)
Page 86

Productoverzicht
Achteraanzicht
Aansluitingen op het achterpaneel
Produc tbeschrijving
IO
Op het achterpaneel bevindt zich de hoofdschakelaar en de
aansluitingen voor elektriciteit, CD-spelers, TV’s enz. Zie
pagina NL-7.
Bovenaanzicht
iPoddock en handvat (met stofdeksel)
De iPoddock en het ingebouwde handvat worden
beschermd door een stofdeksel. Druk op de achterkant van
het deksel om het te draaien en de dock en het handvat
zichtbaar te maken. Let op: Het apparaat mag niet gedragen
worden met een iPod in de dock.
Bedieningselementen op het bovenpaneel
Met deze rij knoppen kunnen de volgende zaken bediend
worden: ingangsselectie, draadloze ontvangst, stand-by
modus, geluidsdemping en volume. Zie pagina F-9.
NL-6
Page 87

Achterpaneel
Achterpaneel
Het achterpaneel bevat de hoofdschakelaar en
aansluitingen voor elektriciteit en aansluiting van de
rCube op andere apparaten (zie Aansluitingsoverzicht op
pagina E-8 voor details).
Video- en audioaansluitingen
De rCube kan op verschillende manieren worden aangesloten op
externe videoschermen en analoge of digitale audiobronnen. Zie
het ‘Aansluitingsoverzicht’ in deze handleiding of zoek de bij een
specieke aansluiting behorende informatie op in het gedeelte
‘Afspelen vanaf een ....’ in de inhoudsopgave.
BASS knop
Door een geavanceerde pyschoakoestische versterking van de lage
frequenties biedt de rCube u ondanks zijn bescheiden afmetingen
toch een strakke en krachtige laagweergave. Als u de BASS knop aan
de achterzijde van de rCube indrukt, zorgt een extra versterking van
de lage frequenties (bass boost) samen met andere klankaanpassingen
voor een nog rijkere en krachtigere sound.
Externe analoge ingang via 3,5 mm
aansluiting
Composietvideo-output van
ondersteunde iPods
Het indrukken van deze knop
versterkt de laagweergave.
Componentvideo-ouput van
ondersteunde iPods
USB-aansluiting voor updaten van de
rmware
Ingang voor gelijkspanning uit de
stroomadapter.
Hoofdschakelaar aan/uit voor het
hele apparaat.
IO
AUX-in
Composite
VIDEO
BASS
Y, Pb, Pr
VIDEO
UPGRADE
DC IN
AAN/UIT
Productbeschrijving
IO
USB-update
De rCube is voorzien van een USBaansluiting aan de achterzijde van het
apparaat, voor toekomstige updates met
behulp van een USB-geheugenstick.
U dient het apparaat alleen te updaten
als u dat wordt geadviseerd. Als u uw
apparaat moet updaten, ga dan naar
www.arcam.co.uk voor aanwijzingen en
de nieuwste rmware.
De USB-aansluiting op het
achterpaneel dient alleen voor
toekomstige updates van de
rCube. De rCube kan via deze
USB-poort geen muziek afspelen of met
computers communiceren.
Aan/uit schakelaar
Voordat u de rCube kunt gebruiken
moet deze worden aangesloten op
het elektriciteitsnet door middel van
de wisselstroomadapter (tenzij de
ingebouwde accu is opgeladen). Wanneer
de rCube is aangesloten, kan hij met de
schakelaar op de achterkant van uit naar
stand-by geschakeld worden. In stand-by
reageert de rCube op bediening vanaf het
voorpaneel of de afstandsbediening, maar
verbruikt hij ook een kleine hoeveelheid
stroom. Als u de accu gebruikt, moet u
het apparaat helemaal uitschakelen met de
schakelaar aan de achterkant wanneer u
het niet gebruikt.
NL-7
Page 88

.
L
TV
Produc tbeschrijving
A
B
CD OUT
Externe
bronnen
Aansluitingsoverzicht
Cube
CD OUT
L
R
SERIAL NO .
R
Voeding
Gebruik alleen de oorspronkelijke wisselstroomadapter
die met uw rCube werd meegeleverd. Andere adapters,
met inbegrip van gelijksoortige adapters voor laptops,
kunnen de rCube beschadigen.
IO
NL-8
Voeding
De stroom voor uw rCube kan worden
geleverd via het elektriciteitsnet of via de
ingebouwde oplaadbare accu. Sluit de
stroomadapter aan om de rCube aan te sluiten
op het elektriciteitsnet en/of om de accu te
laden.
Aansluiten op externe bronnen
Er zijn twee soorten bronnen die op de
AUX-in ingang van de rCube kunnen worden
aangesloten: analoge lijnaansluiting (bv. van
een hi-CD-speler of een TV) en analoge
koptelefoonaansluiting (bv. van een MP3speler). Zie voor meer informatie over een
specieke aansluiting ‘Afspelen vanaf ...’ in de
inhoudsopgave. Zoek vervolgens de gewenste
aansluiting.
Aansluiten op een TV (video afspelen op
de iPod)
iPods waarmee video kan worden
afgespeeld, kunnen worden aangesloten
op een televisie met een aansluiting voor
composietvideo A of componentvideo B
(zie aeelding). Gebruik voor het aansluiten
van een scherm met componentvideo
(3 draden) de optionele kabel. Zie
voor een lijst van actuele, compatibele
producten voor videoweergave op de iPod
http://support.apple.com/kb/HT1454.
Denk eraan dat apparaten van Apple geen
menu’s of aan de toepassing gerelateerde
aeeldingen verzenden naar een aangesloten
scherm — de video-uitgang wordt alleen
gebruikt voor het afspelen van videobestanden.
Page 89

Het bovenpaneel bevat aanraakgevoelige knoppen voor
stand-by, bronselectie en volumeverandering. Boven elke
knop zit een led, die gaat branden om aan te geven dat de
knop wordt ingedrukt.
Aan/uit en stand-by
De stand-by knop zit midden op het bovenpaneel.
Wanneer de wipschakelaar op het achterpaneel is
ingeschakeld, wisselt de knop 2 op het bovenpaneel (of
de afstandsbediening) tussen volledig ingeschakeld (blauwe led op
het voorpaneel, of paars bij gebruik van de accu) en stand-bymodus
(rode led).
Bronselectie
U kunt schakelen tussen de iPoddock en de AUX-bronnen op het
achterpaneel door de SOURCE-knop in te drukken (zie onderstaande
tabel). Druk op de knop DRAADLOOS om een draadloze bron
te selecteren. Daardoor worden alle AUX- of iPodbronnen
gedeselecteerd en begint het afspelen via de optionele USB- of
iPodzender. Wanneer er een draadloze bron is geselecteerd, brandt
het lampje voor de draadloze aansluiting continu.
Hiermee kiest u de lokale bron die
BRON
DRAADLOOS
STAND-BY
VOLUME
OMLAAG
VOLUME
OMHOOG
moet worden afgespeeld: AUX-in (rood
verlicht) of iPod (groen).
Hiermee kiest u een draadloze bron
om af te spelen: zoeken (rood) of
vergrendeld (groen).
Om de rCube vanuit stand-by (rode
led) in te schakelen (blauw/paars) of het
apparaat stand-by te zetten.
Volume verlagen. Ingedrukt houden om
het volume geleidelijk te verlagen.
Volume verhogen. Ingedrukt houden
om het volume geleidelijk te verhogen.
Bovenpaneel
Productbeschrijving
Om de draadloze zender te gebruiken
moet u hem eerst instellen. Zie het
gedeelte "Afspelen vanaf de optionele
USB-zender" op pagina NL-19 of "Instellen
van de optionele iPod-zender" op
pagina NL-20.
Led-controlelampjes
De led’s op het bovenpaneel gaan
branden tijdens bronselectie en
volumeverandering. Bij gebruik van de
afstandsbediening knippert de aan/uit
led om ontvangst van de signalen van de
afstandsbediening te bevestigen.
Volumeverandering en
geluidsdemping
Door kort op - of + te drukken verlaagt
of verhoogt u het volume van de rCube
in kleine stappen. U kunt de knop
ook ingedrukt houden om het volume
traploos te verhogen of verlagen. Door
beide volumeknoppen gelijktijdig in te
drukken wordt onmiddellijk alle geluid
uit het apparaat gedempt. Wanneer het
geluid van de rCube is gedempt, branden
beide led’s voor het volume (- en +). Druk
op een willekeurige volumeknop om de
geluiddemping ongedaan te maken.
NL-9
Page 90

Afstandsbediening
Afstandsbediening
De afstandsbediening bevat evenals het bovenpaneel knoppen voor stand-by,
bronselectie en volumeverandering van de rCube. Bovendien kan de
afstandsbediening worden gebruikt om door de menu’s en nummers op de iPod te
navigeren en de afspeelmodus van de iPod te veranderen (bijvoorbeeld in ‘shue”).
Aan/uit en stand-by
De stand-by knop op de afstandsbediening 2 staat in verbinding met de aan/uit-
wipschakelaar op het achterpaneel. Wanneer de schakelaar op het achterpaneel aan
Produc tbeschrijving
staat, schakelt u het apparaat met de aan/uitknop op de afstandsbediening tussen
volledig ingeschakeld (blauwe led (netaansluiting) of paarse led (accuvoeding) op
het voorpaneel van het apparaat) en stand-bymodus (rode led op het voorpaneel
van het apparaat). De stand-byknop op de afstandsbediening werkt hetzelfde als de
stand-byknop op het bovenpaneel van het apparaat.
Volumeverandering en geluidsdemping
De volumeknoppen op de afstandsbediening zijn hetzelfde als die op het
bovenpaneel. Door kort op - of + te drukken verlaagt of verhoogt u het volume van
de rCube in kleine stappen (er zijn 52 volumestappen). U kunt de knoppen ook
ingedrukt houden om het volume traploos te verhogen of verlagen. De + en - led’s
op het bovenpaneel knipperen om aan te geven dat het volume wordt geregeld.
Door de knop voor geluidsdemping in te drukken schakelt u het geluid uit.
Wanneer de geluidsdemping is ingeschakeld, branden beide led’s voor het volume
(- en +) en komt er geen geluid uit het apparaat. Druk nogmaals op de knop
voor geluidsdemping om de geluidsdemping uit te schakelen en weer te kunnen
afspelen.
Opladen van de iPod
Net als de IrDock van ARCAM hee de rCube een gebruikersfunctie voor het
opladen van de iPod, voor een langere levensduur van de accu en een betere
geluidskwaliteit. Standaard laadt de rCube iPods altijd op wanneer er netspanning
of accuspanning beschikbaar is en de rCube ingeschakeld is. In stand-by mode
kunnen iPods niet worden opgeladen. U kunt voorkomen dat de rCube de iPod
oplaadt door op de knop
verdwijnt het controlelampje voor het laden van het scherm van de iPod en stopt
het opladen van de iPod totdat de knop weer wordt ingedrukt, de iPod weer wordt
aangesloten of totdat de rCube weer wordt ingeschakeld.
te drukken. Wanneer deze knop wordt ingedrukt,
De afstandsbediening moet
naar de voorkant van de
rCube gericht zijn voor een
goede werking.
NL-10
Page 91

Afstandsbediening
STAND-BY
DEMPEN Het geluid van de rCube uitschakelen.
VOLUME
OMLAAG
VOLUME
OMHOOG
IPOD LADEN
BRONSELECTIE
DRAADLOOS
SCROLLEN
SELECTEREN
MENU Terug naar de hoofdpagina gaan.
TERUG/VORIGE
AFSPELEN/
PAUZEREN
VOORUIT/
VOLGENDE
AFSPEELMODUS
De rCube inschakelen vanuit
stand-by of in stand-by zetten vanuit
ingeschakelde toestand.
Volume verlagen. Ingedrukt houden
om het volume geleidelijk te verlagen.
Volume verhogen. Ingedrukt houden
om het volume geleidelijk te verhogen.
Schakelt opladen van de iPod in en
uit. Zet de laadfunctie uit om de
levensduur van de accu te verlengen.
Schakelt tussen iPod en externe
bronnen.
Selecteert een draadloze bron.
Indrukken om de volgende draadloze
bron te selecteren die aan de rCube
gekoppeld is.
Naar boven en beneden scrollen om
items in het menu van de iPod te
selecteren.
Huidig item selecteren en naar
bijbehorende pagina gaan
Ingedrukt houden om terug te spoelen,
kort indrukken om naar het vorige
nummer te springen.
Indrukken om tussen afspeel- en
pauzemodus te schakelen.
Ingedrukt houden vooruit te spoelen,
kort indrukken om naar het volgende
nummer te springen.
Schakelen tussen favoriete afspeelmodi
van de iPod.
NL-11
Bediening van de iPod
OPMERKING: deze functies zijn alleen
beschikbaar voor gedockte iPods en
iPhones. Ze zijn niet beschikbaar wanneer
een iPod draadloos is aangesloten.
Navigeren door iPodmenu’s.
Met de 4 navigatieknoppen kunt u door de
menu’s van een gedockte iPod navigeren.
Door op B of C te drukken scrolt u naar
boven of beneden door de items uit een lijst
om een selectie te markeren. De pijl E dient
om te selecteren. Hiermee gaat u naar een
onderliggende pagina van een geselecteerd
menu-item. De knop D dient als menuknop
of terugknop. Door op D te drukken gaat
de iPod naar een bovenliggend menu of
terug naar de vorige pagina.
Afspelen met behulp van terug/vooruit
en nummers wisselen op de iPod
Op de afstandsbediening zitten drie
knoppen om te navigeren tussen de
nummers op de iPod. Met de knop 4/;
schakelt u tussen afspelen en pauzeren.
Als een iPod gedockt is, maar niet bezig is
met afspelen, kunt u de iPod ook activeren
door op 4/; te drukken. Druk op 9 of
: en houd de knop ingedrukt om terugof vooruit te spelen. Door de knop kort
in te drukken springt u naar het vorige,
respectievelijk volgende nummer.
Afspeelmodus (herhalen en willekeurig
afspelen)
De afspeelmodus van de iPod wordt
geregeld via de knop ‘afspeelmodus’. Door
de knop 1 keer in te drukken verandert u
de afspeelmodus. Er zijn 5 afspeelmodi:
(a) enkel nummer herhalen, (b) afspeellijst
of map herhalen, (c) afspeellijst of map
herhalen in willekeurige volgorde, (d)
afspeellijst of map afspelen in willekeurige
volgorde zonder herhalen, (e) niet herhalen
en niet willekeurig afspelen, afspeellijst of
map eenmaal afspelen (standaard).
Productbeschrijving
Page 92

Rechterkanaal
Linkerkanaal
23425
Dragen en plaatsen van de rCube
Uw rCube dragen
De rCube is ontworpen om makkelijk door het huis gedragen te
kunnen worden, het verborgen handvat onder het stofdeksel ligt
makkelijk in de hand. Controleer voordat u uw rCube optilt eerst of
er geen iPod in het docking station aanwezig is en of de stoomadapter
losgekoppeld is. Druk met uw handpalm naar de achterzijde van het
apparaat gericht het stofdeksel naar beneden en grijp de rCube onder
het deksel vast. Als u uw rCube optilt, kantelt deze. Wees voorzichtig
tijdens het optillen of neerzetten van uw rCube.
Produc tbeschrijving
Een plaats voor uw rCube kiezen
De rCube klinkt bijna overal geweldig. Dankzij zijwaarts
gemonteerde, onder een hoek naar voren gerichte geluidsmodules
kan de rCube hoogwaardig geluid afgeven binnen een hoek van 270
graden.
Zet uw rCube in de hoek!
U kunt uw rCube in principe overal neerzetten, maar de klank
komt het best tot zijn recht als u hem in een hoek plaatst. In die
positie wordt het geluid van de naar opzij gerichte luidsprekers via
de muren weerkaatst, wat een ruimtelijker klankbeeld biedt. Het
resultaat is optimaal als de rCube in een hoek van 45° op de muren
staat, dus met de voorzijde op het midden van de kamer gericht. In
die positie bevelen we u aan om de BASS knop niet in te drukken,
omdat de muren en de hoek al voor een natuurlijke versterking
van de laagweergave zorgen. Zet u de rCube niet in een hoek of
speelt u muziek waarbij extra bassen juist gewenst zijn, activeer de
geïntegreerde bass boost dan door deze knop in te drukken.
Zet de rCube niet in een afgesloten ruimte
De zijwaartse geluidsmodules werken het beste wanneer ze niet
worden belemmerd (bv. op een aanrecht). Plaats de rCube niet op een
boekenplank met boeken aan beide zijden, omdat daardoor het geluid
geblokkeerd wordt.
Verwijder iPods voordat u de rCube draagt. Er mag geen
iPod in de dock zitten wanneer u de rCube draagt. U kunt
de rCube dragen als deze draadloos afspeelt op de accu.
NL-12
Page 93

Afspelen vanaf een iPod of iPhone
Aansluiten
1
Steek het ene uiteinde van de stroomadapter
(wisselstroom) in het stopcontact en het andere
uiteinde in de gelijkstroomaansluiting op het
achterpaneel van de rCube. Zet de rCube aan met
behulp van de wipschakelaar op het achterpaneel.
De led aan de voorkant gaat rood branden (stand-by
modus). Druk op de stand-by knop op het
bovenpaneel of de afstandsbediening. De aan/uit led
verandert van rood in blauw en de rCube staat nu aan.
Dock de iPod
2
Open het stofdeksel om de universele aansluiting van
het docking station te tonen. Schuif uw iPod of iPhone
voorzichtig in de connector.
Dock en verwijder de iPod voorzichtig en onder
dezelfde hoek als de connector. Niet aan de iPod
draaien of trekken als deze contact maakt met de
connector van het docking station! Hierdoor kan
de connector beschadigd raken.
Selecteer de iPod als bron
3
Wanneer de iPod gedockt is, selecteert de rCube automatisch de iPod als
bron en gaat de knop ‘bron’ groen branden. Als de iPod in het dock staat,
maar niet geselecteerd is als bron, drukt u net zolang op de knop ‘bron’, op de
afstandsbediening of op het bovenpaneel, totdat de led voor de bron groen gaat
branden.
Kies een nummer en speel het af
4
Gebruik de bediening van de iPod of de knoppen op de afstandsbediening om
een nummer te selecteren en te beginnen met het afspelen van audio.
Regel het volume
5
Gebruik de volumeknoppen + en - op de afstandsbediening of het bovenpaneel
om het volume op het gewenste niveau in te stellen.
OPMERKING: De iPad van Apple is te groot voor de aansluiting van het docking
station, maar kan draadloos worden aangesloten met behulp van een zenderaccessoire. Zie pagina NL-20.
MENU
, .
;4
IO
Bediening
1
2
NL-13
Page 94

CD OUT
SERIAL NO .
L
Een bron afspelen via de lijningang
Sluit de bron met lijnniveau aan op AUX-in
1
Bronnen met lijnniveau (bv. de uitgang van een
CD-speler of voorversterker) hebben gewoonlijk
RCA-fonoconnectoren (rechts afgebeeld) en meestal
geen volumeregeling. Om een bron met lijnniveau
Bediening
aan te sluiten hebt u een kabel nodig met een dubbele
tulpstekker (links en rechts) aan het ene uiteinde en
een 3,5 mm stereo mini-jack aan het andere uiteinde.
Als de bron een volumeregeling hee, stel die dan
in op 90%. Zet het apparaat uit voordat u deze
aansluiting tot stand brengt.
Aansluiten
2
Steek het ene uiteinde van de stroomadapter
(wisselstroom) in het stopcontact en het andere uiteinde
in de gelijkstroomaansluiting op het achterpaneel
van de rCube. Zet de rCube aan met behulp van
de wipschakelaar op het achterpaneel, de led aan
de voorkant gaat rood branden (stand-by modus).
Druk op de stand-by knop op het bovenpaneel of de
afstandsbediening. De aan/uit led verandert van rood in
blauw en de rCube staat nu aan.
Selecteer AUX-in als bron
3
Druk op de knop ‘Bronselectie’ op de afstandsbediening of druk op de knop
‘bron’ op het bovenpaneel totdat de led voor de bron rood gaat branden.
Rood gee aan dat AUX als bron geselecteerd is.
Controleer of de externe bron afspeelt.
4
Gebruik de bedieningselementen op de bron met lijnniveau om te beginnen
met afspelen en controleer of het apparaat ook werkelijk afspeelt.
CD OUT
Digital
1
CD OUT
SERIAL NO .
L
R
R
..
Bron met
lijnniveau
1
Opmerking: sommige apparaten hebben een
3,5mm stereo stereo mini-jack voor uitgang
van lijnniveau. In dat geval hebt u een 3,5
verloopkabel nodig in plaats van de afgebeelde
kabel.
2
IO
2
Regel het volume
5
Gebruik de volumeknoppen + en - op de afstandsbediening of het
bovenpaneel om het volume op het gewenste niveau in te stellen.
NL-14
Page 95

Afspelen vanaf een koptelefoonaansluiting
Sluit de koptelefoonstekker aan op AUX-in
1
Bijna alle audio-apparatuur is voorzien van een
koptelefoonaansluiting. Dit is een eenvoudige
manier om een aansluiting op de rCube tot stand
te brengen. Oudere iPods, andere MP3-spelers,
TV’s en laptops kunnen op deze manier met een
3,5mm mini-stereokabel worden aangesloten.
Koptelefoonuitgangen geven meestal een hoger
voltage af dan lijnniveau-uitgangen. Stel het volume
van de bron daarom af op75%.
Aansluiten
2
Steek het ene uiteinde van de stroomadapter
(wisselstroom) in het stopcontact en het andere
uiteinde in de gelijkstroomaansluiting op het
achterpaneel van de rCube. Zet de rCube aan met
behulp van de aan/uit schakelaar op het achterpaneel
en druk op de stand-by knop op het bovenpaneel of
de afstandsbediening. De blauwe led voor aan/uit
moet gaan branden.
Selecteer AUX-in als bron
3
Druk op de knop ‘Bronselectie’ op de afstandsbediening of druk op de
knop ‘bron’ op het bovenpaneel totdat de led voor de bron rood gaat
branden. Rood gee aan dat AUX als bron geselecteerd is.
Controleer of de externe bron afspeelt.
4
Gebruik de knoppen op het bronapparaat om te beginnen met afspelen.
Vergeet niet om het volume op het bronapparaat van de koptelefoon in
te stellen op 75%. Te sterke signalen kunnen leiden tot vervorming. Met
behulp van een koptelefoon kunt u controleren of het apparaat goed
afspeelt.
1
Koptelefoonbron
87
;4
IO
21
2
Bediening
Regel het volume
5
Gebruik de volumeknoppen + en - op de afstandsbediening of het
bovenpaneel om het volume op het gewenste niveau in te stellen.
NL-15
Page 96

Gebruik van video-uitgangen
Naast audio kan de rCube ook video weergeven vanaf
ondersteunde iPods. Wanneer een iPod met videoondersteuning in het dock staat en afspeelt, wordt de video
naar de composietvideo-uitgang (optie A) en de Y, Pb,
Pr video-uitgangen (optie B) op het achterpaneel geleid.
Welke uitgang u gebruikt hangt volledig af van uw keuze
en de ondersteuning door het scherm. Denk eraan dat de
instellingen van sommige iPods veranderd moeten worden
Bediening
om video weer te geven — neem contact op met Apple
voor ondersteuning van de iPod. Denk eraan dat apparaten
van Apple geen menu’s of aan de toepassing gerelateerde
aeeldingen verzenden naar een aangesloten scherm — de
video-uitgang wordt alleen gebruikt voor het afspelen van
videobestanden.
Sluit het videoscherm aan op de rCube
1
Composietvideo en Y, Pb, Pr video (ook wel componentvideo genoemd) zijn gewone videoformaten. Om uw iPod aan te
sluiten op een composietvideoscherm hebt u een videokabel nodig met tulpstekkers aan elk uiteinde (optie A). Gebruik
voor Y-, Pb- en Pr-video de optionele kabel met aftakkingen (optie B). Y-, Pb- en Pr-video biedt de beste beeldkwaliteit.
Neem voor het kopen van deze kabel voor componentvideo contact op met uw Arcam dealer.
Aansluiten
2
Steek het ene uiteinde van de stroomadapter (wisselstroom) in het stopcontact en het
andere uiteinde in de gelijkstroomaansluiting op het achterpaneel van de rCube. Zet
de rCube aan met behulp van de aan/uit schakelaar op het achterpaneel en druk op
de stand-by knop op het bovenpaneel of de afstandsbediening. De blauwe led voor
aan/uit moet gaan branden.
Selecteer iPod als bron en speel een video af
3
Druk op de knop ‘Bronselectie’ op de afstandsbediening of druk op de knop ‘bron’
op het bovenpaneel totdat de knop ‘bron’ groen wordt. Groen geeft aan dat iPod als
bron geselecteerd is. Begin met het afspelen van de video van de iPod.
Controleer of de bron van uw scherm goed is ingesteld
4
Gebruik de knoppen op het scherm om de video-ingang waarop uw rCube is te
selecteren als de huidige bron voor video. connected to as the current video source.
Stel het volume in
5
Gebruik de volumeknoppen + en - op de afstandsbediening of het bovenpaneel om
het volume op het gewenste niveau in te stellen.
TV
rCube
A
B
IO
NL-16
Page 97

rCube gaat met u mee
Lithium-ion energie betekent dat u overal met het
apparaat naartoe kunt.
Uw rCube is voorzien van een ingebouwde lithium-ion
accu met hoge capaciteit — de rCube kan overal met u
mee naartoe. In de tuin en rond het huis. De aan/uit led
aan de voorkant brandt paars om aan te geven dat de
voeding voor de rCube door de accu wordt geleverd.
De accu opladen
De rCube laadt de accu automatisch op en is voorzien
van geïntegreerde laadmethoden om de accu zo lang
mogelijk te laten meegaan. Om te kijken hoeveel capaciteit
de accu nog hee, kunt u het snoer aansluiten, de rCube
op stand-by zetten en op de
afstandsbediening. De led’s op het bovenpaneel van de
rCube geven aan hoeveel capaciteit de accu nog hee:
- 4 brandende led’s betekent 100% resterend;
- 3 brandende led’s betekent 75% resterend;
- 2 brandende led’s betekent 50% resterend;
- 1 brandende led betekent 25% resterend.
Opslag
Als u de rCube wilt bewaren, zorg er dan voor dat de aan/
uit schakelaar aan de achterkant op uit staat.
knop drukken op de
Bediening
NL-17
Page 98

Instellen van de optionele USB-zender
Met een draadloze USB-zender kunt overal in huis
muziek afspelen van bestanden op uw PC.
U kunt een optionele draadloze USB-zender voor uw rCube
kopen om de muziek van uw computer overal in huis af
te spelen. Ga naar uw plaatselijke ARCAM dealer of naar
www.arcam.co.uk wanneer u de zender wilt kopen.
Opties
Voordat u de zender voor het eerst gebruikt, moet u hem
koppelen aan een bepaalde rCube-ontvanger.
U hoe dit slechts een keer in te stellen. Nadat de
koppeling tot stand is gebracht, blij deze in het
geheugen aanwezig, zelfs als de apparaten uitgezet
worden.
Installeer de USB-zender in uw PC of laptop
1
Steek de USB-stick in een vrije USB-poort van uw
computer. De computer herkent de USB-stick als
een geluidsapparaat en stelt hem in als uw standaard
uitgangsapparaat.
Laat de zender naar een rCube zoeken
2
Druk op de knop ‘koppelen’ (associate) op
de USB-zender. De led van de zender gaat
snel knipperen om aan te geven dat er naar
een verbinding wordt gezocht. Gedurende
de volgende 30 seconden maakt de zender
verbinding met elke rCube die ook een
verbinding zoekt (zie stap 4).
Zet de rCube aan
3
Steek de stekker in het stopcontact en zet de rCube aan
met behulp van de wipschakelaar aan de achterkant;
druk ook de stand-by knop op het bovenpaneel in,
zodat de aan/uit led blauw is.
Laat de rCube naar een zender zoeken
4
Druk op de knop ‘draadloos’ om een draadloze
Arcam rWave
1
3
IO
ingang te selecteren. Laat de knop kort los en druk hem dan
nogmaals in. Houd hem ingedrukt. De led voor draadloos
knippert rood tijdens het zoeken naar een verbinding.
Wanneer de led ‘draadloos’ op de rCube continu groen brandt,
is de koppeling tot stand gebracht. De zender blij gedurende
30 in koppelingsmodus om eventueel nog meer rCubes in te
stellen. Haal de zender tijdens deze periode niet uit de PC.
Wanneer de koppeling tot stand gebracht is, knippert de led
op de zender elke vijf seconden. U kunt nu de bron beluisteren
via de draadloze verbinding.
NL-18
Page 99

Arcam rWave
IO
Afspelen vanaf de optionele USB-zender
Met een draadloze USB-zender kunt overal in huis
muziek afspelen van bestanden op uw PC.
OPMERKING: U moet elke cube aan een draadloze
zender koppelen voordat die cube audio kan ontvangen.
Installeer de USB-zender in uw PC of laptop
1
Steek de USB-stick in een vrije USB-poort van
uw computer. De computer herkent de USBstick als een geluidsapparaat. U moet mogelijk
de audio-uitgang naar de USB-zender in uw
systeeminstellingen activeren — bij sommige
besturingssystemen gebeurt dit automatisch. U
kunt controleren of de zender uitzendt door naar de led te kijken, die iedere vijf
seconden kort oplicht tijdens het zenden.
Aansluiten
2
Steek het ene uiteinde van de stroomadapter (wisselstroom)
in het stopcontact en het andere uiteinde in de
gelijkstroomaansluiting op het achterpaneel van de rCube.
Zet de rCube aan met behulp van de aan/uit schakelaar op het
achterpaneel en druk op de stand-by knop op het bovenpaneel.
De blauwe led voor aan/uit moet gaan branden.
Bediening
1
2
Selecteer de zender als draadloze bron
3
Druk voor het selecteren van de zender op de computer op de knop ‘draadloos’ op
de afstandsbediening of het bovenpaneel. Als er een bron beschikbaar is, wordt het
lampje groen en begint de bron af te spelen. Opmerking: Als er tevens een tweede
bron aan het zenden is moet u mogelijk de knop ‘draadloos’ tweemaal indrukken
om de juiste USB-zender te selecteren.
Muziek afspelen op de computer
4
Ga naar iTunes of uw favoriete muzieksoware en kies een nummer om af te
spelen. N.B. Plaats altijd de USB-zender voordat u iTunes opstart.
Regel het volume
5
Gebruik de volumeknoppen + en - op de afstandsbediening of het bovenpaneel
om het volume op het gewenste niveau in te stellen.
NL-19
Page 100

, .
;4
23425
Arcam rWand
Instellen van de optionele iPod-zender
Met een draadloze zender die compatibel is met Apple
kunt U overal in huis muziek afspelen van bestanden
vanaf uw iPod, iPhone of iPad van Apple.
U kunt een optionele draadloze iPod-zender voor uw rCube
kopen om de muziek van uw iPod overal in huis draadloos
af te spelen. Ga naar uw plaatselijke ARCAM dealer of naar
Opties
www.arcam.co.uk wanneer u de zender wilt kopen. Voordat u
de zender voor het eerst gebruikt, moet u hem koppelen aan een
bepaalde rCube-ontvanger.
U hoe dit slechts een keer in te stellen. Nadat de
koppeling tot stand is gebracht, blij deze in het
geheugen aanwezig, zelfs als de apparaten uitgezet
worden.
MENU
, .
;4
Plaats de iPod-zender in uw iPod, iPhone of iPad
1
Plaats de zender de aansluiting op het docking
station, aan de onderkant van uw Apple-speler.
Laat de zender naar een rCube zoeken
2
Druk binnen 3 seconden nadat u hem hebt aangesloten
op de knop ‘koppelen’ (associate) op de zender. Houd de
knop ingedrukt totdat de led op de zender snel knippert
om aan te geven dat hij verbinding zoekt.
Gedurende de volgende 30 seconden maakt de
zender verbinding met elke rCube die ook een
verbinding zoekt (zie stap 4).
Zet de rCube aan
3
Steek de stekker in het stopcontact en zet de rCube aan
met behulp van de wipschakelaar aan de achterkant; druk
ook de stand-by knop op het bovenpaneel in, zodat de
aan/uit led blauw is.
Laat de rCube naar een zender zoeken
4
Druk op de knop ‘draadloos’ om een draadloze ingang
te selecteren. Laat de knop kort los en druk hem
dan nogmaals in. Houd hem ingedrukt. De led voor
3
IO
draadloos knippert rood tijdens het zoeken naar
een verbinding. Wanneer de led ‘draadloos’ op de
rCube continu groen brandt, is de koppeling tot
stand gebracht. De zender blij gedurende 30 in
koppelingsmodus om eventueel nog meer rCubes in
te stellen. Haal de zender tijdens deze periode niet uit
de iPod. Wanneer de koppeling tot stand gebracht is,
knippert de led op de zender elke vijf seconden. U kunt
nu muziek beluisteren die op de iPod wordt afgespeeld.
NL-20
 Loading...