

Page 1

MS250
Page 2

MS250
2
Safety guidelines
Important safety instructions
This product is designed and manufactured to meet strict
quality and safety standards. However, you should be aware
of the following installation and operation precautions.
1. Take heed of warnings and instructions
It is important that you:
A. read all the safety and operating instructions before
operating this speaker.
B. keep this handbook for future reference.
C. follow all instructions and adhere to all warnings in the
handbook or on the speaker.
2. Water and moisture
Do not use this speaker near water.
The presence of electricity near water can be dangerous
– for example next to a bathtub, washbowl, kitchen sink, in
a wet basement or near a swimming pool, etc.
3. Object or liquid entry
Take care that objects do not fall and liquids are not
spilled, dripped or splashed into the enclosure through any
openings. Liquid-lled objects such as vases should not be
placed on the equipment.
4. Ventilation
Do not block any of the ventilation openings.
Do not place the equipment on a bed, sofa, rug or similar soft
surface, or in an enclosed bookcase or cabinet, since ventilation
may be impeded. We recommend a minimum distance of
50mm around the sides and top of the appliance to provide
adequate ventilation.
5. Heat
Do not install the speaker near any heat producing
equipment such as radiators, stoves or other appliances
(including other ampliers) that produce heat.
6. Climate
The appliance has been designed for use in moderate
climates.
7. Racks and stands
Only use a rack or stand that is recommended for use with
audio equipment. If the equipment is on a portable rack it
should be moved with great care, to avoid overturning the
combination.
8. Power sources
The unit is supplied with a market-suitable electrical plug.
Do not substitute or modify the supplied plug – see your
dealer if a replacement is required.
The mains socket or the connecting lead is used as the
disconnect device. The MS250 must be installed in a manner
that makes disconnection possible.
9. Grounding
The MS250 is Class I construction and must be connected to
a socket outlet with a protective earthing connection. Ensure
that the grounding means of the appliance is not defeated.
10. Power-cord protection
Power supply cords should be routed so that they are
protected against being walked on or pinched, particularly at
plugs and the point where they exit from the unit.
11. Protection from electrical storms
Unplug the unit during lightning storms or when unused for
long periods of time.
12. Abnormal smell
If an abnormal smell or smoke is detected from the
appliance, turn the power off immediately and unplug the
unit from the wall outlet. Contact your dealer immediately.
13. Cleaning
Unplug the unit from the mains supply before cleaning.
The case should normally only require a wipe with a soft,
dry, lint-free cloth. Do not use paint thinners or other
chemical solvents for cleaning.
We do not advise the use of furniture cleaning sprays or
polishes as they can cause indelible white marks if the unit
is subsequently wiped with a damp cloth.
14. Servicing and repair
Refer all servicing to qualied servicing personnel.
Servicing is required when: the speaker has been damaged
in any way, such as:
A. the power-supply cord or the plug has been damaged,
or
B. liquid has been spilled, or objects have fallen into the
enclosure, or
C. the appliance has been exposed to rain or moisture, or
D. the appliance does not appear to operate normally or
exhibits a marked change in performance, or
E. the appliance has been dropped or the enclosure
damaged.
Safety compliance
This product has been designed to meet the IEC 60065
international electrical safety standard.
CAUTION: To reduce the risk of electric shock, do not remove cover (or back). No user serviceable parts inside. Refer servicing
to qualied service personnel.
WARNING: To reduce the risk of re or electric shock, do not expose this apparatus to rain or moisture.
The lightning ash with an arrowhead symbol within an equilateral triangle, is intended to alert the user to the presence of uninsulated
‘dangerous voltage’ within the product’s enclosure that may be of sufcient magnitude to constitute a risk of electric shock to persons.
The exclamation point within an equilateral triangle is intended to alert the user to the presence of important operating and maintenance
(servicing) instructions in the literature accompanying the product.
CAUTION: In Canada and the USA, to prevent electric shock, match the wide blade of the plug to the wide slot in the socket and
insert the plug fully into the socket.
Page 3

English
MS250
3
Safety guidelines .................................................. 2
Important safety instructions ...............................2
Safety compliance ..............................................2
Before you start! ................................................... 4
Using this handbook............................................4
What’s in the box? ..............................................4
Inserting the batteries into the remote control ........4
Conventions used in this document .......................5
Before making connections ..................................5
Installation & connectivity .................................... 6
Positioning the unit .............................................6
Connections on the back panel ............................. 6
General connection advice ...................................7
Connecting to a power supply ..............................7
Front-panel controls ............................................. 8
Using the CR-425 remote control .......................... 9
Operating the MS250 .......................................... 10
The menu system ............................................. 10
Switching on .................................................... 10
Playing CDs ......................................................... 11
Storing a CD on the MS250.................................. 12
Playing stored music ........................................... 14
Internet radio ..................................................... 16
Playlists .............................................................. 17
Creating a playlist ............................................. 17
Listening to a playlist ........................................ 18
Adding tracks to a playlist .................................. 18
Editing a playlist ............................................... 18
Managing your stored music library .................... 18
Creating a CD ...................................................... 20
System and User Settings ................................... 22
The Audio menu ............................................... 22
The Content menu ............................................ 22
The Display menu ............................................. 23
The Network menu ...........................................24
The Region menu ............................................. 24
The System menu............................................. 24
The Time menu ................................................ 25
The Archive music menu .................................... 25
Connecting to a network and the Internet .......... 26
Local Area network congurations ....................... 26
Testing your Internet connection ......................... 27
Advanced network conguration information ........ 27
Advanced features .............................................. 28
Zones .............................................................28
External audio sources ......................................28
Playing music stored on a portable MP3 player or other
USB storage device ........................................... 28
Playing music over the network .......................... 28
Copying music les ........................................... 29
Remote-control codes ......................................... 30
Technical specications ...................................... 31
Guarantee ........................................................... 32
On line registration ............................................. 32
Contents
Welcome, and thank you for buying the Arcam MS250.
The MS250 is designed to act a central repository and
distribution system for all your digital music. It can
distribute high quality music programming to multiple rooms
in your house using both analogue and digital connections.
It can distribute music stored on the MS250, and also music
stored on computers connected to your home ethernet
network.
You can use your MS250 to:
<
Store and catalogue your entire CD collection
<
Play Internet radio stations
<
Play CDs
<
Create CDs from your own music selections (‘playlists’)
<
Access and play music stored on your computer
network
<
Direct music from any source (including two external
sources, such as a DAB tuner or record deck) around
your home.
The MS250 uses very high quality digital-to-analogue
conversion to ensure superb reproduction in the analogue
output chain. Depending on the system settings, the stored
copy of a CD will be identical to the original, with no quality
loss. We hope that you have many hours of enjoyment from
this product, in whichever room you choose to listen.
Page 4

MS250
4
Before you start!
Using this handbook
This handbook has been designed to give you all the information you need to install, connect, set-up and
use your Arcam MS250. The supplied remote control handset is also described.
It may be that your MS250 has been installed and set-up as part of your Hi-Fi installation by a qualied
Arcam dealer. In this case, you may wish to skip the sections of this handbook dealing with installation
and setting up the unit, and move directly to the sections dealing with using the server. Use the contents
list on page 3 to guide you to these sections.
Safety
Safety guidelines are set out on page 2 of this handbook.
Many of these items are common sense precautions, but for your own safety, and to ensure that you do
not damage the unit, we recommend that you read them. This is a class 1 product and requires an earth
connection.
What’s in the box?
Check that the following items are in the box when you receive it:
<
Arcam MS250
<
Arcam CR-425 remote control with 2 ‘AAA’ batteries — the remote control model number is
shown on the front at the bottom of the remote control;
<
Mains power lead appropriate for the mains supply in your area;
<
Product registration card and envelope.
If any of these items are missing or incorrect, please contact your Arcam dealer immediately.
Inserting the batteries into the remote control
The remote control requires 2 ‘AAA’ batteries to operate. To insert the batteries into the remote control,
please follow these instructions:
1. Open the battery compartment cover on the back of the remote control.
2. Insert two AAA batteries into the battery compartment, following the
polarity indications given inside the compartment itself.
3. Close the cover.
Notes on inserting the remote control batteries
<
Incorrect use of batteries can result in hazards such as leakage and
bursting.
<
Do not mix old and new batteries together.
<
Do not use different kinds of battery together—although they may look
similar, different batteries may have different voltages.
<
Ensure that the plus (+) and minus (—) ends of each battery match the
indications in the battery compartment.
<
Remove batteries from equipment that is not going to be used for a
month or more.
<
When disposing of used batteries, please comply with governmental (or
other) regulations that apply in your country or area.
Using the remote control
Please keep in mind the following when using the remote control:
<
Ensure that there are no obstacles between the remote control and the
remote sensor on the MS250. The remote has a range of about seven
meters. (If the remote sensor is obscured, the remote control input jack
on the rear panel is available. Please contact your dealer for further
information.)
<
Remote operation may become unreliable if strong sunlight or uorescent
light is shining on the remote sensor of the MS250.
<
Replace the batteries when you notice a reduction in the operating range
of the remote control.
A. Open the cover of the remote control
battery compartment
B. Insert the batteries into the remote
control
C. Close the cover of the remote control
battery compartment
Page 5

English
MS250
5
Conventions used in this document
Zones
The MS250 supports up to four zones. The term ‘Zones’ refers to the four stereo analogue outputs
supported by this product. Zone 1 corresponds to the room where the MS250 is situated: Zones 2, 3 and
4 are the other three analogue output locations.
Before making connections
Before connecting your equipment it is important to think about the following points, as these will affect
your choice of connections and subsequent use of the system.
Video
Normal, everyday control of the MS250 is by remote handset (or the front panel control buttons) and the
front panel display. However, to access certain features of the MS250, you will need to connect a TV or
monitor. A USB keyboard can also be added to make text entry more convenient.
Your MS250 supports three different video connection types: VGA, S-Video, or Composite video. Choose
a connection that your TV/monitor supports.
Audio inputs
Two stereo line-level inputs are provided on the rear panel to allow routing and recording of analogue
sources, such as a DAB tuner. The audio signal from theses inputs can be routed to any of the Zones.
If you wish to listen to more than two external sources, you may wish to invest in an external switch or
pre-amp to use for input selection.
Note that to connect a record deck to the MS250 you will require a phono pre-amp.
Audio outputs
The MS250 supports analogue, digital (SP/DIF) and networked audio connections.
With the possible exception of networked connections, all of these methods require you to route cables
from the MS250 to an appropriate amplier or receiver in the remote location. Analogue connections
require a stereo phono cable to be routed to an amplier; digital connections require a remote receiver
or D/A converter; and networked connections require a PC or similar network audio receiver.
Think carefully about the type of connection you wish to use for each remote location before starting to
equip a new multi-room installation: we recommend asking your dealer for advice at the planning stage
before installation work is commissioned.
Page 6
MS250
6
Positioning the unit
<
Place the MS250 on a level, rm surface. Ensure that the surface you have chosen is strong
enough to take the weight of the MS250.
<
Avoid placing the unit in direct sunlight or near sources of heat or damp.
<
Do not place the unit on top of an amplier or other source of heat.
<
Ensure adequate ventilation. Do not place the unit in an enclosed space such as a bookcase
or closed cabinet unless there is good provision for ventilation. The MS250 is designed to run
warm during normal operation.
<
Make sure the IR receiver on the front panel is unobstructed, otherwise this will impair the use
of the remote control. If line-of-sight is impractical, an infrared remote repeater can be used
with the rear panel IR connector.
<
Do not place your record deck on top of this unit. Record decks are very sensitive to the noise
generated by mains power supplies which will be heard as ‘hum’ if the record deck is too close.
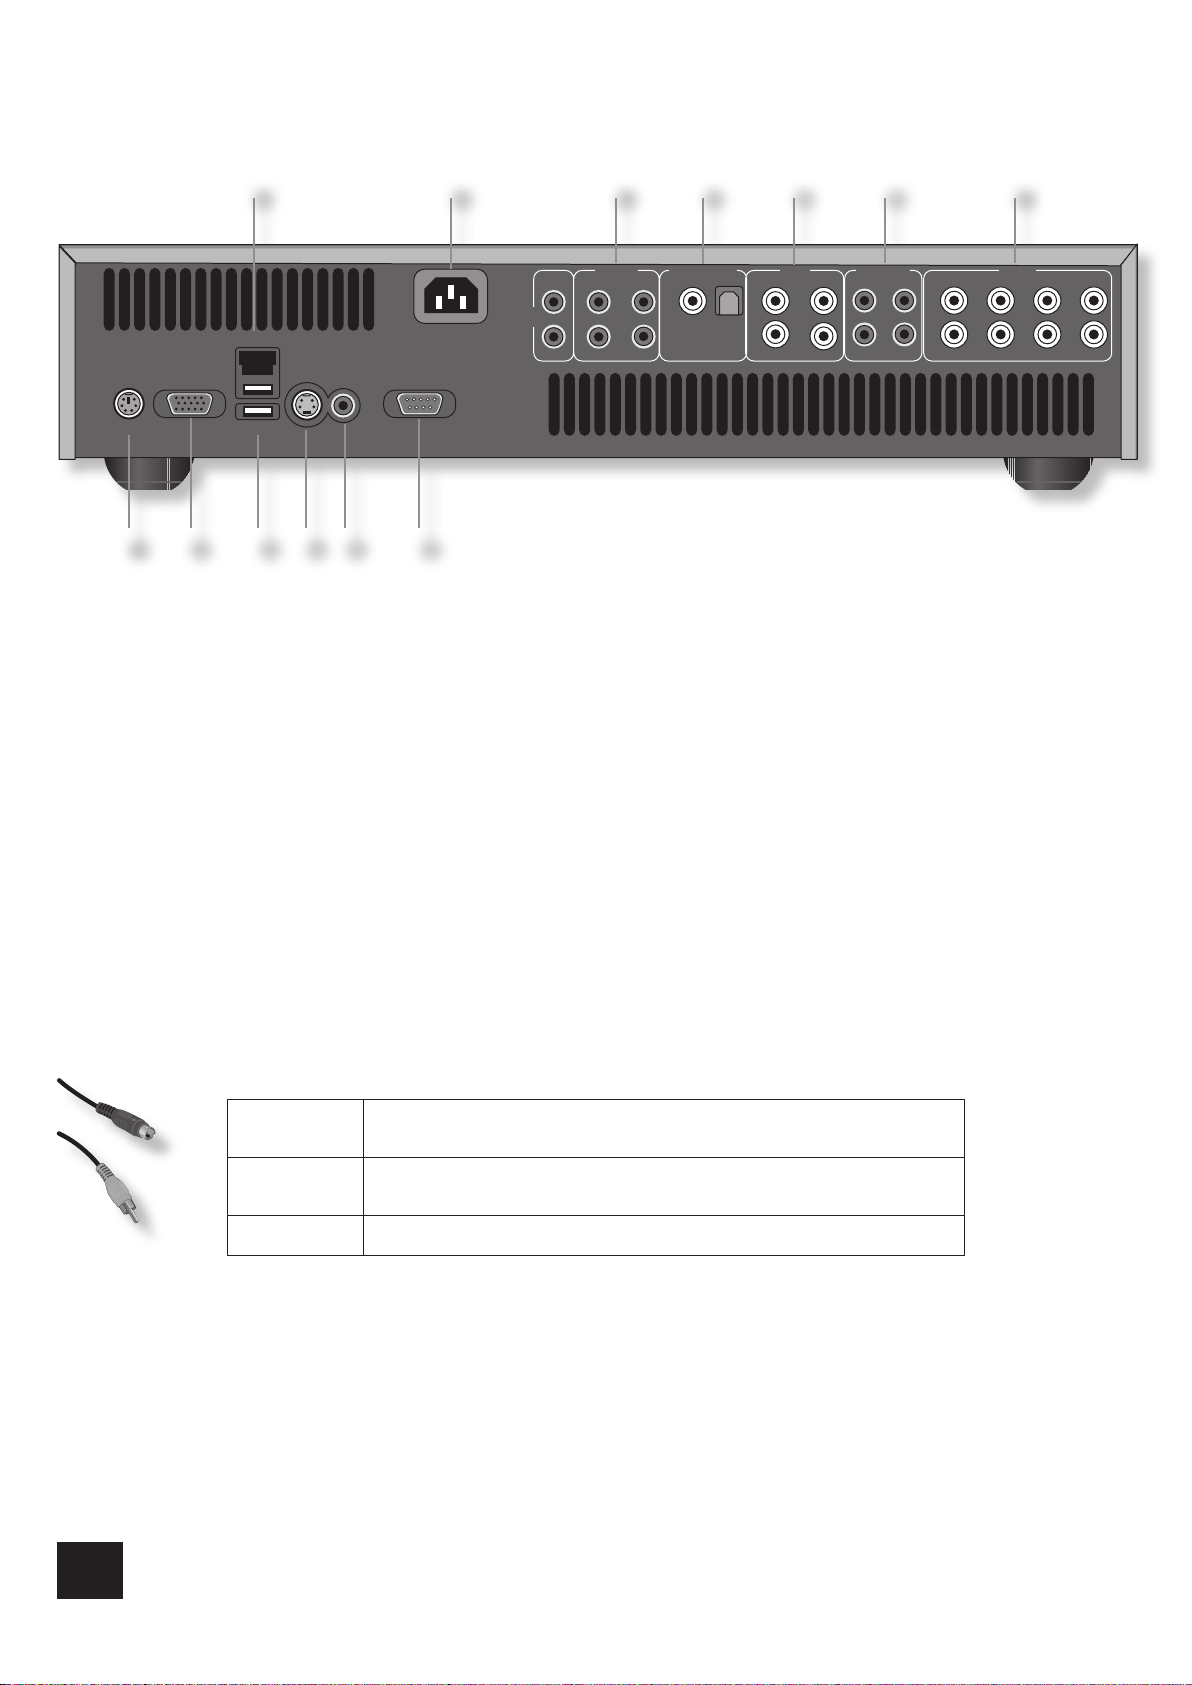
Connections on the back panel
Video output
A video connection may be used to view the menus of the MS250 on a TV or computer monitor. The
MS250 does not have to be connected to a video display for day-to-day use, as all basic functionality
is available via the front-panel. However, to gain access to advanced functionality, for product
conguration, and for improved ease of use, a video display is required.
There are three different video outputs available from the MS250: VGA, S-Video and Composite Video.
Choose one that your display supports, connect it with a suitable cable and, if required, congure the
output to match using the ‘Display’ menu option within Settings > System.
4
S-Video
The S-Video output (also known as S-VHS or Y/C) is commonly supported by
display devices worldwide. Connect the S-VIDEO output of the MS250 to the
S-Video input of the display device using an S-Video cable of an appropriate length.
5
Composite
video
If your display device offers a composite input (sometimes labelled CVBS or just
‘video’), connect this to the COMPOSITE video output of the MS250 using a 75Ω
phono cable suitable for video use.
2
VGA
The VGA connector is used commonly by computer monitors and is becoming
increasing available on other display devices.
Note that you may connect equipment such as AV receivers in the signal path between the MS250 and
the display device, so long that the connected equipment also supports the type of video signal you
intend to use. For instructions on how to connect AV equipment, consult the manual for that equipment.
Digital-audio output
bk
A digital-audio output is provided for use in Zone 1. This output always carries the audio from Zone 1
and cannot be congured for other zones.
If you have an external surround-sound decoder, receiver or D-A converter that you wish to use with the
MS250, then you will need to connect it to the digital-audio output using either a co-axial or optical lead.
If possible, use the co-axial connection as this offers slightly better performance. Connect the co-axial
output of the MS250 to the digital audio co-axial input of the decoder/D-A converter or receiver using a
phono cable designed for digital audio interconnection.
Alternatively, connect the optical output of the MS250 to the optical input of the decoder/D-A converter
or receiver using a TOSLINK optical lead.
Installation & connectivity
ZONE4ZONE3
ZONE2ZONE1ZONE1
115–230VAC
100CVA MAX
ZONE1
COAXOPTICAL
ZONE4ZONE3
ZONE2ZONE1
S-VIDEO
COMPOSITE
VIDEO
RS232
CONTROL
VGA
KEYBOARD
ZONE2
INPUTS
DIGITAL OUTPUTS TRIGGER OUTREMOTE IN
NETWORK
BACKUP
ZONE4ZONE1
L
R
ZONE3ZONE2
OUTPUTS
L
R
AUX 1 AUX 2
IR
OUTPUT
Page 7

English
MS250
7
Analogue-audio outputs
7
Four stereo pairs of phono outputs are provided, one for each Zone. The volume level for each zone
can be independently set. The outputs can each carry audio from different sources (stored music, CD,
Internet radio etc.), including up to two external line-level inputs (a DAB tuner, for example).
The remote-control input
bl
The REMOTE IN input can be used to pass RC5 codes to the MS250 if it is installed in a position (or
system) where infrared cannot be used. If this is required, please contact your dealer for further
information.
Keyboard connector
1
Characters can be entered into an on-screen text eld using the CR-425 remote control. If you have a
large number of track titles to enter by hand, however, you’ll nd that connecting an external keyboard
is much more convenient.
You can connect either a PS/2 or a USB keyboad. If you are using a PS/2 keyboard, connect it to the
KEyBOARD socket before the MS250 is powered on, otherwise it may not be recognised. A USB keyboard
can be connected to one of the USB connectors on the rear panel or the USB connector on the front
panel. You can connect or disconnect a USB keyboard at any time.
Backup connector (USB)
7
Allows you to connect a keyboard or external USB storage device to the MS250. A second USB
connection is provided on the front panel.
Network (Ethernet/USB)
bn
This is a standard Ethernet RJ45 connection allowing you to connect the MS250 to your local area
network (LAN). See the section on ‘Connecting to a network’ for further information. An additional USB
connection below the RJ45 socket is provided for future use.
General connection advice
We recommend the use of high quality screened analogue, digital and video cables, since inferior
quality cables will degrade the overall quality of your system. Use only cables that are designed for the
particular application as other cables will have different impedance characteristics that will degrade
the performance of your system (for example, do not use cabling intended for audio use to carry video
signals). All cables should be kept as short as is practically possible.
Video and digital connections must be made with cables that are designed for this purpose, i.e., coaxial
cable with a 75Ω impedance. Using substandard cables may result in poor picture quality, such as ghost
images and/or grainy picture quality (‘snow’).
Speaker cables should be kept short to ensure efcient power transmission and avoid audible distortion.
It is good practice when connecting your equipment to ensure that the mains power supply cabling is
kept as far away as possible from your audio and video cables, as this will provide the best sound and
picture quality . Failure to do so may result in unwanted noise in the audio and video signals.
Connecting to a power supply
Mains lead
The appliance is normally supplied with a moulded mains plug already tted to the lead. If for any
reason the plug needs to be removed, it must be disposed of immediately and securely, as it is a
potential shock hazard when inserted into the mains socket.
Check that the plug supplied with the unit ts your supply and that your mains supply voltage agrees
with the voltage setting (115V or 230V) indicated on the rear panel of the unit.
If your mains supply voltage or mains plug is different, or you require a new lead, please consult your
Arcam dealer.
Plugging in
Push the plug (IEC line socket) of the power cable supplied with the unit into the socket
bm
in the back
of the unit. Make sure it is pushed in rmly.
Put the plug on the other end of the cable into your power supply socket and switch the socket on.
Page 8
MS250
8
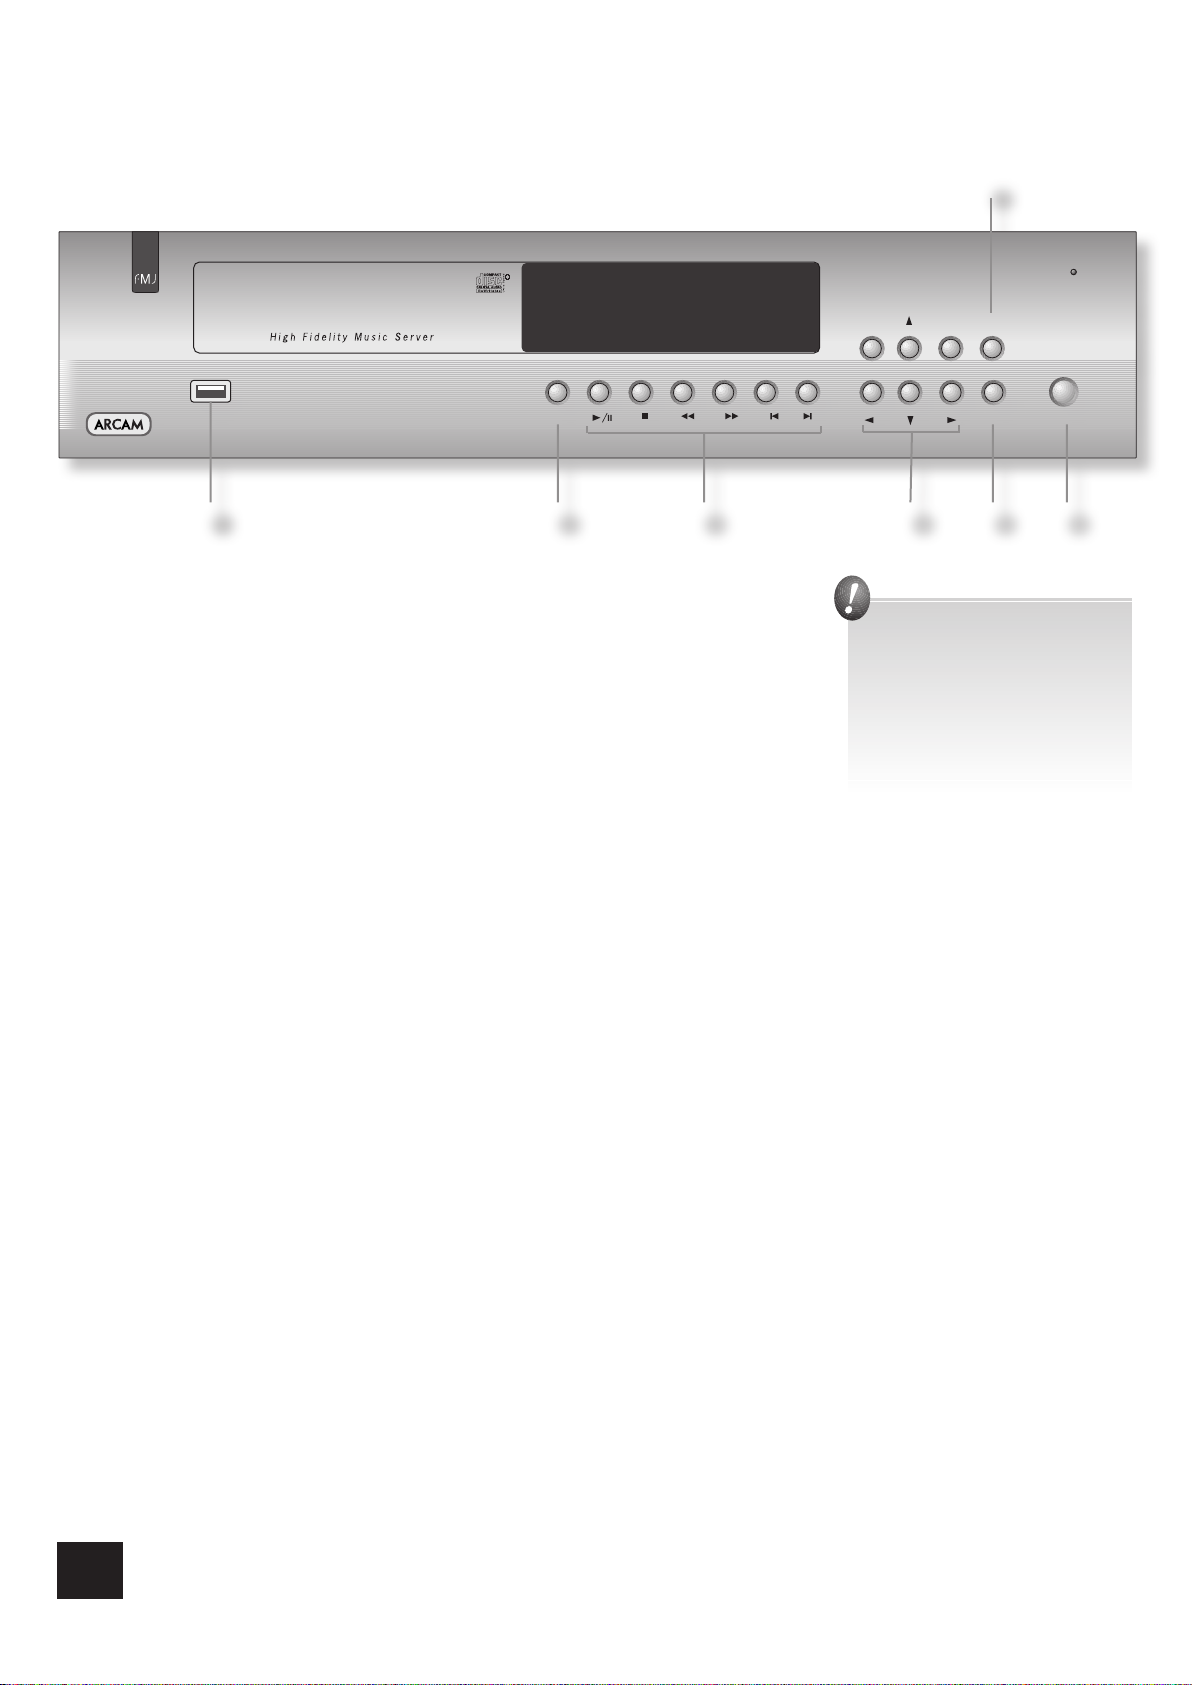
POWER
6
Press this button to switch on the MS250. The power indicator light changes from
red to green. From power-on, the MS250 will take about 30 seconds to initialise; a
start-up message is displayed on the front panel.
When powered-on, press this button for a second time to switch the unit off. The
MS250 takes a few seconds to shut down. To avoid risk of data loss, do not remove
power from the unit during this period.
LOAD
2
To load a CD, press LOAD (or OPEN on the remote control). The CD tray opens to
accept 12cm or 8cm discs. Place the CD in the tray with the label facing uppermost.
Press LOAD again (or press PLAy, or gently push the tray in 5mm) to close the tray.
After a few seconds, if the CD has been found in the on-line database, the track
names appear on the display.
Music control keys
3
These keys can be used to control CDs and stored music.
Play/Pause: Press 4 to play the current music selection. Press again to pause the music. If the music
is paused, pressing Play again will resume the music from the point where it was paused.
Stop: Press < to stop the current music selection. Pressing play after the music has been stopped will
resume playing at the start of the current track.
Search forwards/backwards: Press 8 or 7 on the front-panel or remote control to play fast forward
or backwards. The following speeds for fast playback are available: x2, x4, x8, x16 and x32. Press the
button repeatedly to cycle through the different speeds. To resume normal playback speed, press PLAy.
Fast playback is not available for MP3/WMA tracks.
Skip track: To start a CD with a track other than the rst, press / or 0 to locate the desired track.
To select another track at any time during play, press / or 0.
Menu navigation keys
4
These keys allow navigation of the MS250 menu system – they match the cursor keys on the remotecontrol. Use the up-down-left-right keys to move the menu highlight to the item of interest, then press
OK to open or select the highlighted item.
DISPLAy
5
This key changes the brightness of the display. Press repeatedly to reduce the brightness in steps from
full brightness to off. Press once more to restore to full brightness.
ZONE
7
Press the Zone button to select the zone you wish to view or control. There are four output zones, which
in a typical installation will be routed to different rooms in the house. The zone number is shown on the
display along with the audio settings for that zone. You can route different audio sources to different
zones. For example, you can play a stored CD in one zone and Internet radio in another zone at the
same time.
USB connector
1
The front panel USB connector is in addition to the two USB connectors on the back panel of the MS250.
It allows easier access to the MS250 for playing music or transferring music les from portable music
sources.
POWER
LOAD
OKHOME ZONE
DISPLAY
Front-panel controls
To put the unit into stand-by,
press the power button on the
remote control. The display is
dimmed and shows the time and
date.
Page 9
English
MS250
9
If the remote control receiver
(located on the right of the frontpanel window) is not ‘visible’ to the
remote control hand-set, then the
remote control will not work! Either
locate the unit differently, or take
advantage of the remote control
input on the rear of the player
(consult your dealer for further
information on this option).
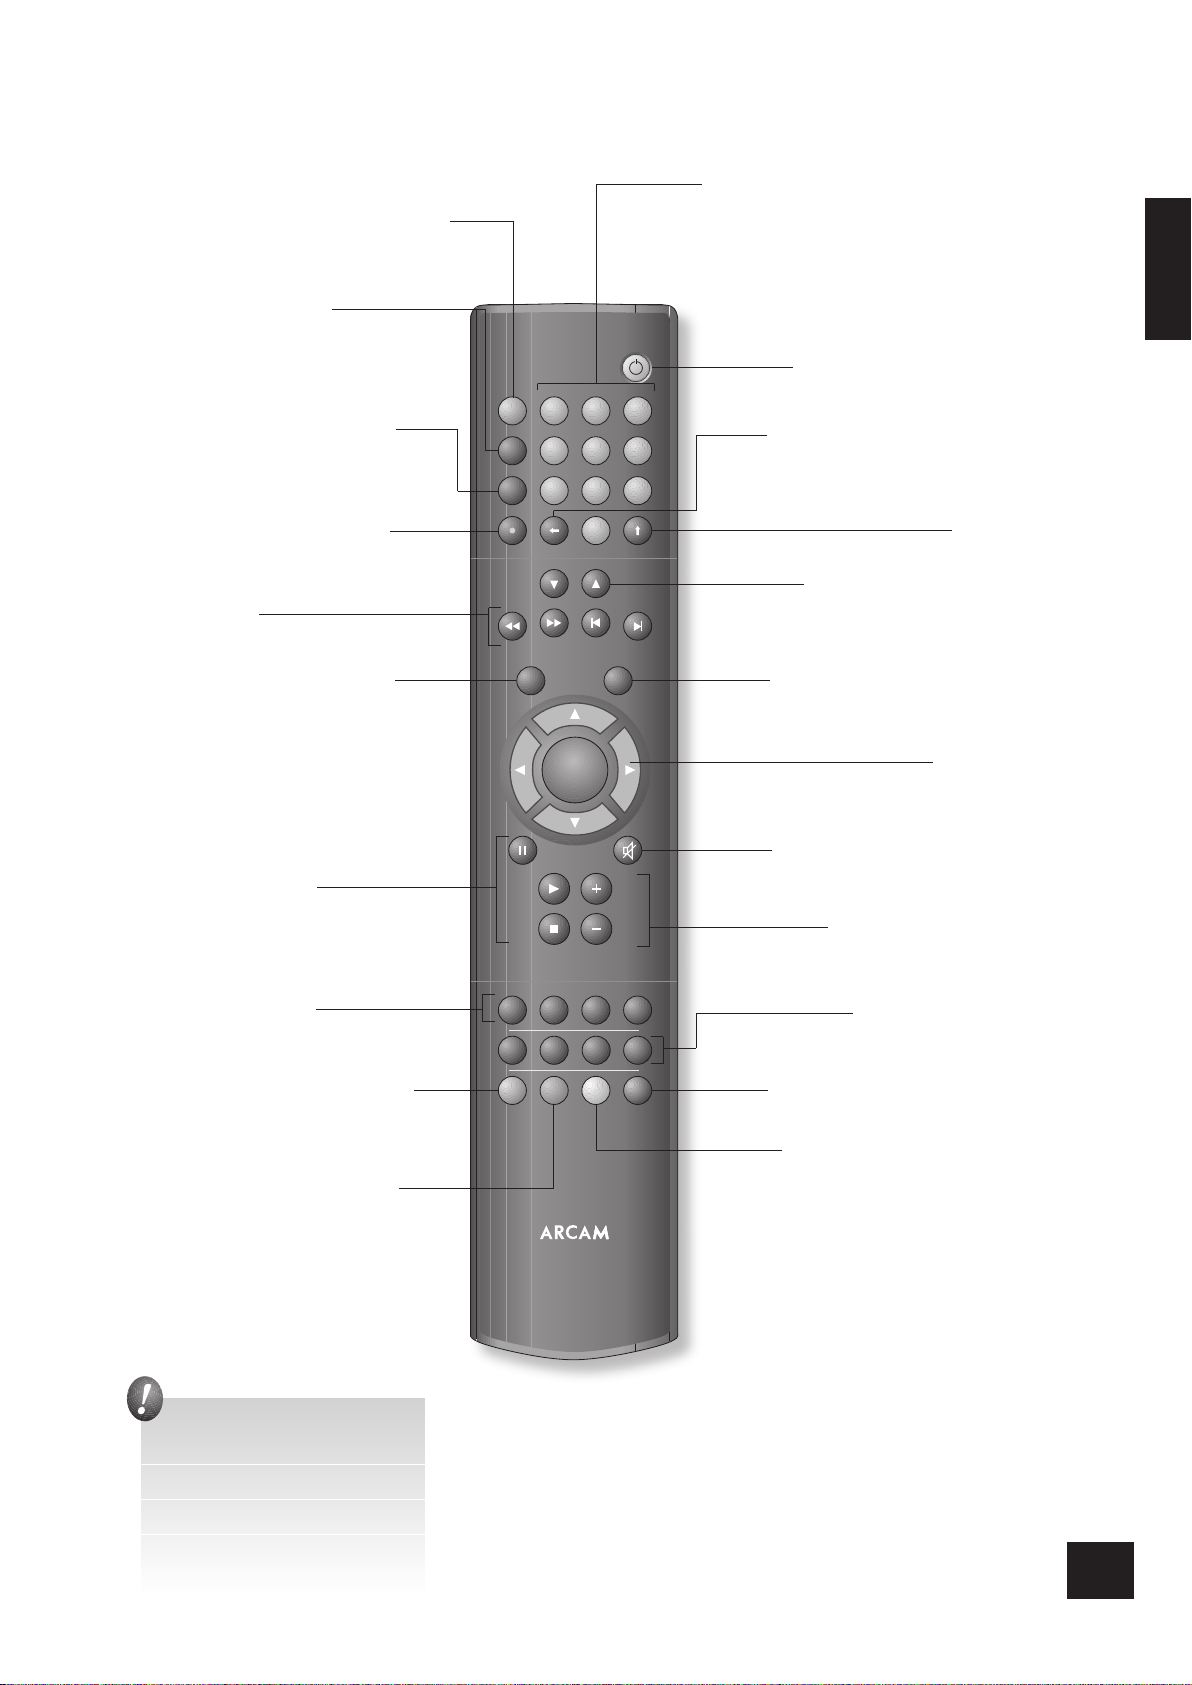
Using the CR-425 remote control
DISP (display)
Cycles the brightness of the front panel display.
There are several brightness levels to choose
from, including switching the display off.
Record
Press this button to begin recording a CD to
hard drive or recording line input..
0–9 keypad
This allows text entry of characters and numbers,
as on a mobile phone.
On genre, artists, album or track lists these also
lter based on the rst character.
Back
Use this key to navigate back to the previous menu page.
The key is also used to delete characters when editing
text entries.
MUTE
Stops sound output of the currently selected zone.
Volume +/–
Adjusts the volume (output level) of the currently
selected zone.
OPEN
Opens and closes the disc tray
Page Up/Down
Scrolls through long lists a page at a time.
Cursor pad and OK button
Use the cursor pad to navigate within a menu page.
Conrm your selection with the OK button.
Playback control
Pause (
;
), Play (4) and Stop (<).
Fast play and Skip track
Play fast (7
8
) and Skip tracks
(0
/
) in both directions.
Source selection
Press these buttons to select the internal
CD player, Internet radio, or the devices
connected to the AUX 1 or AUX 2 inputs.
Standby
Press Standby to toggle the standby state of the MS250.
ZONE
Press ZONE to cycle through a display of what each zone
is currently playing.
SETUP
Press this button to access the
MS250’s ‘Setup’ menu.
HOME
Press this button to access the
MS250’s ‘Home’ menu.
Menu shortcuts
Press these buttons to navigate directly to the
appropriate menu when choosing stored music.
Normal/Caps/Numbers shift
Press to change alphanumeric setting when entering text.
Red
If a CD is in the tray then this closes the tray
and records the CD to hard drive and plays
the CD at the same time.
Blue
Go to ‘Now Playing’ screen
Green
If a CD is in the tray then this closes the tray
and plays the CD without identifying it rst.
yellow
Toggles the on screen display on/off
Page 10
MS250
10
Operating the MS250
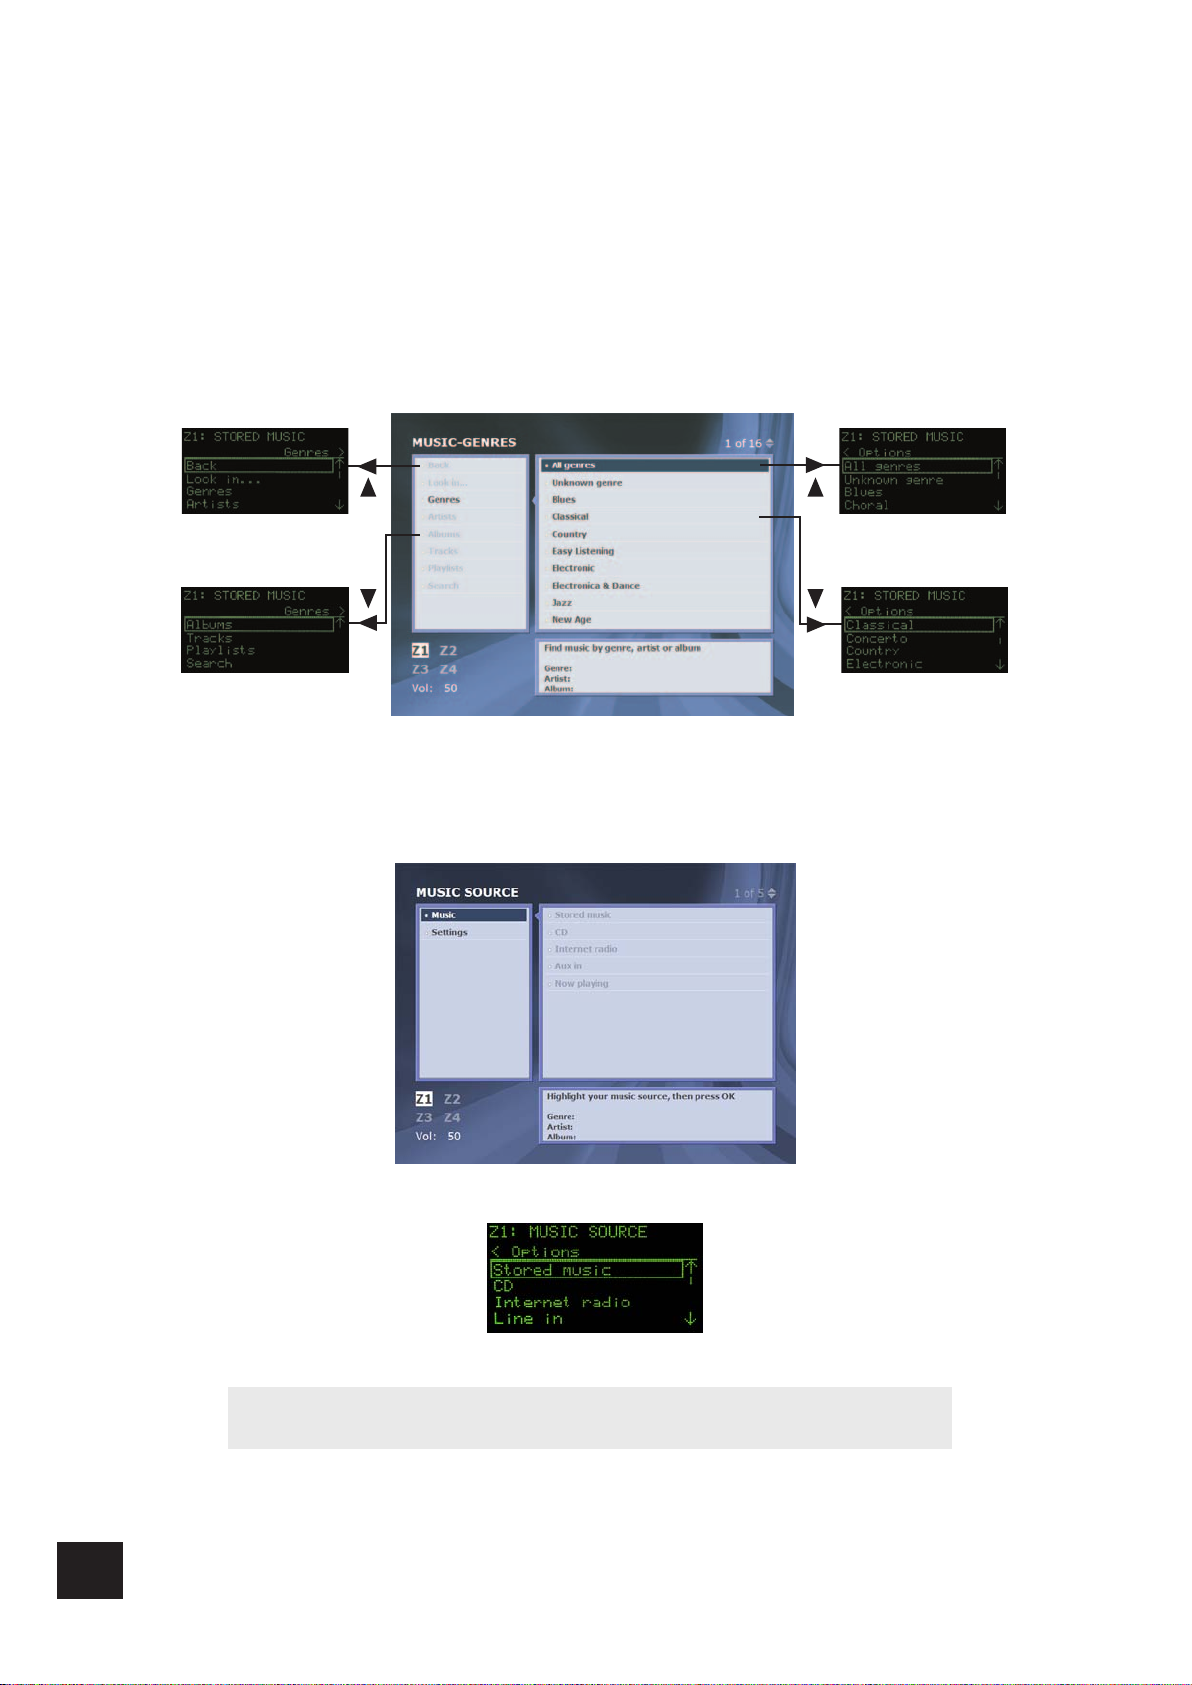
The menu system
The MS250 is controlled using its menu system. This is best viewed on a TV or a computer monitor,
connected as described on page 6. The menu system is also displayed front panel display which is
sufcient for day-to-day control.
Navigation around the menus is performed using either the remote control or the buttons on the front
panel. The remote control includes useful shortcut keys and is easier to use.
The front panel display acts as a ‘window’ on the menu system showing a (necessarily) restricted view of
the whole. Use the up, down, left and right keys to navigate to each corner of the menu displayed. The
picture below shows an example.
The picture below shows how this works.
Switching on
The front panel display shows the power on message. After about 30 seconds, the MUSIC SOURCE
home page appears:
Note: The front panel display is shown here for completeness. For clarity, only the TV/Monitor
display is shown in the rest of this section. Note that most of the features may be operated using the
front panel buttons to navigate, using information shown on the front panel display.
Any time you wish to return to this page, you can do so by simply pressing HOME on the remote or on
the front panel.
Page 11

English
MS250
11
Playing CDs
To play a CD, press LOAD (or OPEN on the remote control) to open the CD tray. Place the CD in the tray
with the label facing uppermost. Press LOAD again (or OPEN again on the remote control) to close the
tray. After a few seconds, the track names appear on the display.
To select particular tracks, use the C and B keys on the remote (or 6 and 5 keys on the front
panel) to move down and up the tracklist.
OK toggles a track from selected (red square before the track number) indicating that the track is to be
played; to unselected (open square before the track number), indicating that the track is to be skipped.
The MS250 plays all selected tracks from the highlighted track to the end of the selection, and then
repeats playing from the rst selected track.
You can instruct the MS250 to play tracks in a random order from the CD by choosing Shufe on from
the left of the menu page.
See pages 8 and 9 (‘Front panel controls’ and ‘Using the CR-425 remote control’) for how to pause, stop,
skip tracks, etc.
To play the whole CD, simply press PLAy on the remote or front panel. The display on the TV/monitor
and on the front panel appear as follows:
The front panel display indicates
the volume level (0-100). This is
the output level of the signal fed to
your amplier. If you amplier has
its own volume control, you should
set the MS250 volume control to
maximum (100) and adjust the
volume level on the amplier as
desired. See ‘User settings’ to
disable volume adjustment using
the remote.
If the MS250 is not connected
to the Internet, or the database
does not contain details for the CD
inserted, the tracks will be listed by
number only.
Page 12

MS250
12
Storing a CD on the MS250
To store the contents of a CD on the MS250, select Store from the left hand window of the CD menu.
The STORE CD menu page is displayed with Disc info. selected:
Editing CD details
This page allows you to enter or modify information for the CD. This is useful if the details for the CD
could not be retrieved by the MS250 or if you wish to modify any of the details shown. Navigate to the
desired info box (e.g. Genre) and press OK to select it. You can now enter the text
required using the number keys on the remote:
<
To make an alphabetic selection using the number keys, press the key once
for the rst letter below the key, twice for the second letter, etc., as on a
mobile phone. Press 3 to delete a character. Press the D and E keys to
move the cursor left and right.
<
To enter uppercase letters, press [up arrow] once. The word ‘Capitals’
appears in brackets on the menu page. Press 5 again to enter digits. Press
5
once more to revert back to entering lower case letters.
<
When you’re happy with your entry , press OK to nish.
You can edit track names for the CD by choosing the Track names option on the
left of the menu page and selecting the track names to edit in the same way.
Choosing storage options
Choose Format from the left of the menu page to display the storage options for the CD.
Navigate to the quality level required and press OK to select it.
Note that the ‘Uncompressed’ option stores an exact bit-for-bit duplicate of the CD on the MS250 hard
disk. This results in the highest possible quality but takes up the most space on the hard disk. You can
store around 450 CDs on the MS250 with this option.
Store CD option
You might like to select the ‘Background compression’ option to carry out data compression as a
background task.
Note: This menu page is not
shown on the front panel display.
You’ll need a TV or monitor to edit
CD details. Attaching a USB or
PS/2 keyboard to the MS250 will
make the task quicker and easier.
Page 13

English
MS250
13
Storing the CD
Choose Store from the left of the menu page. The following screen is displayed:
Select ‘Start’ (storage onto hard disc), ‘Start and Play’, or Cancel.
Press OK to start the storage process. When the MS250 has completed storing the CD, the MUSIC
GENRES home page is displayed.
Page 14

MS250
14
Playing stored music
From the MUSIC GENRES home page, navigate to Stored music and press OK. The following menu
page is displayed:
Music stored on the MS250 is catalogued by genre (Rock, Classical etc.), album title, artist and track
names. The catalogue is heirarchical, working down from genre to tracks, and sorted alphabetically. For
example, to nd a Blues album by B.B. King, you might:
<
Select Genres from the left-hand window of the menu page
<
Select Blues - the Artists option is automatically selected and a list of Blues artists is displayed
<
Select B.B. King from the list of artists - the Albums option is automatically selected and the list
of albums by B.B. King stored on the MS250 is displayed
<
Select the album desired - the track names are displayed.
<
Press Play to commence playing the tracks.
You can also choose music by going directly to album, artist or track lists as follows.
Finding music by artist
To nd a particular artist, choose Artists from the left-hand window of the STORED
MUSIC page and navigate down the list to the artist you’d like to listen to. Press OK
and choose the album you’d like to listen to from the list that appears. Press
4
to
start playing the album from track 1. Alternatively, press OK and select the tracks
you’d like to listen to from the list of tracks that follows.
Finding music by album title
To nd a particular album, choose Albums from the left of the STORED MUSIC
page and navigate down the list to the album you’d like to listen to. Press
4
to start
playing the album from track 1. Alternatively, press OK and select the tracks you’d
like to listen to from the list of tracks that follows.
Finding music by track name
To nd a particular track, choose Tracks from the left of the STORED MUSIC page and navigate down
the list to the track you’d like to listen to. This option lists every track in every album stored on your
MS250 in alphabetical order, so it could be a long list!
Searching for stored music
You can search for tracks, album titles or artists in your stored music using the Search function. You can
enter part of a title to search to save time. For example, you could type ‘glass’ to search for any track
with glass or Glass in the title. The search function is not case-sensitive.
1. Select Search from the left-hand window of the MUSIC-GENRES page.
2. Press OK to select the search text box and enter the track/artist/album name you want to
search for. Press OK again to set the text.
Tip: The remote control includes
shortcut buttons that take you to
directly to the Album, Artist, Track
or Playlist menu pages.
Page 15

English
MS250
15
3. Now choose Artists, Albums or Tracks from the left of the menu page, or by pressing the
relevant key on the remote.
The list of artists, albums or tracks with the words entered in the search box is displayed:
Page 16

MS250
16
Internet radio
From the MUSIC GENRES home page, navigate to Internet radio and press OK. The following menu
page is displayed:
The radio stations are listed hierarchically by genre, location and language, and there is also a complete
alphabetical list of all available stations (‘Stations’).
Note: There is a default list of Internet radio stations installed on the MS250. In addition, every time
you switch on the MS250 it automatically downloads the latest list of available stations from the Arcam
website (given that the unit is connected to the Internet).
Playing an Internet radio station
To play an Internet radio station, simply select it from the list of available stations.
For example, to select a station called J-Wave from a list of all those currently playing Blues music,
select Internet radio, Genres, Blues, All locations, All languages, Play, 4J-Wave.
Page 17

English
MS250
17
Playlists
Playlists are a convenient way to gather together and sort tracks stored on the MS250 in any order you’d
like to listen to them. For example, you might put together a list of tracks from various albums suitable
for a dinner party. You can give your playlists names to make them easy to nd. You can also record the
tracks in a playlist onto a CD (see ‘Creating a CD’).
Creating a playlist
To create a playlist:
1. Choose the rst selection of tracks you’d like to include in your playlist, so that they are listed on
the MUSIC-TRACKS menu page. Any selected tracks are included in your playlist – deselect any
you don’t want.
2. From the left of the menu page choose Add to palylist. The PLAyLIST-ADD menu page is
displayed. Any previously created playlists will appear on the right-hand window of the menu
page:
3. Choose New playlist from the left-hand window of the menu screen.
4. Enter a name for your new playlist and press OK. The PLAyLIST-MENU page appears with the
tracks you’ve added displayed on the right-hand window.
Page 18

MS250
18
Listening to a playlist
Choose Playlists from the MUSIC-PLAyLISTS menu page. The playlists you have created are listed in
alphabetical order. Navigate to the desired playlist and press
4
.
Adding tracks to a playlist
To add tracks to a playlist, you rst need to choose the tracks you’d like to add so they are displayed on
the MUSIC-TRACKS menu page (as you did when creating your playlist). Now choose Add to playlist
and choose the playlist you’d like to add the tracks to. After a brief pause, the new tracks will be added
at the end of the list of tracks in the chosen playlist.
Editing a playlist
You can remove tracks, change the order in which they are played, delete the entire playlist, make a
copy of a playlist and rename a playlist from the PLAyLIST-EDIT menu page.
To navigate to the PLAyLIST-EDIT menu page, select the playlist you’d like to modify and then choose
Edit playlist from the left-hand window of the menu page.
<
To remove a track highlight the track and click OK. The box next to the track turns green. Now
choose Remove from the left of the menu page.
<
To move a track up or down the playlist highlight the track as above and choose Move up
or Move down from the left of the menu page. Continue to click OK until the track has moved
to the desired location.
<
To delete the entire playlist choose Delete playlist from the left of the menu page. The
playlist is deleted and the remaining playlists are displayed. Note that deleting a playlist does not
delete the tracks in the playlist from the albums where they came from.
<
To copy (duplicate) a playlist choose Copy playlist from the left of the menu page. Click OK
and enter the new name for the playlist.
<
To rename a playlist choose Rename from the left of the menu page.
Managing your stored music library
You can edit album or playlist details including the album/playlist title and individual track titles. You can
also add or remove tracks from an album.
<
Choose the album you’d like to work on so that the track names are displayed. Choose Edit
details from the left-hand window of the menu screen to display the MUSIC-EDIT screen:
Page 19

English
MS250
19
<
Choose Disc info or Track names to edit details of the album or playlist (genre, artist, album
title, and track names). If you attempt to enter a name that is too long, a warning message is
briey displayed.
<
To remove tracks from the album, rst select the tracks you’d like to remove on the MUSIC-
TRACKS menu page. Any selected tracks will be removed from the album - deselect any you
want to keep. Now choose Edit tracks and then choose Remove from the left of the MUSIC
LIBRARy menu page.
Deleting an album
Choosing Delete will erase the album from the MS250 hard disk, freeing up the space previously used
by it. This will not delete les on other networked devices e.g. your PC, but they will be removed from
the library.
Page 20

MS250
20
Creating a CD
You can create your own CDs with selections of tracks from an album or playlist. When creating a CD,
you can choose between standard audio CD format that can be played by any CD player, or a Data CD
format that can be played by a computer or on a CD player capable of playing MP3 tracks.
To create a CD, rst navigate to the album or playlist you would like to record onto the CD, and press OK
to display the list of tracks on the MUSIC-TRACKS menu page. Now choose Create CD from the lefthand window of the MUSIC-TRACKS menu page to display the following menu:
Blank CD-Rs vary in their capacity; the number of megabytes (and the equivalent playing time) is
displayed on the box, the case or the disc itself. The CD size option allows you to identify the disc
capacity:
For rewriteable media (CDRW), you need to prepare the disc for a new recording. Select ‘Wipe CDRW’
from the left of the menu page. The following menu is displayed:
A progress bar is completed once you select ‘Start’.
Page 21

English
MS250
21
Select your preferred CD format and insert a blank CD-R into the CD drive, or prepare a CDRW disc,
then choose ‘Create CD’ from the left of the menu page. The following menu screen appears:
Indicator bars show the progress of CD creation, for each track and for the complete CD. Once the CD
has been completed, the display returns to the CD MENU and displays the tracks on the CD you have
just created.
Page 22

MS250
22
System and User Settings
Although you can normally use the MS250 without changing the factory-set options, the Setup
preferences allow you to ne-tune the way your MS250 operates to suit your own requirements.
To display the SETUP menu page, choose Settings from the left-hand window of the MUSIC-SOURCE
home page:
The Audio menu
Choose this option to set the options for controlling how CDs and MP3s are stored and compressed,
default actions on loading a CD, party settings and locking a volume against inadvertant deletion.
The options are:
Store format
This option allows you to set the default CD storage format: from the highest quality (uncompressed)
through ve levels of MP3 compression to the most compact (MP3, 128kb/s compression).
Store options
This option allows you to select or deselect ‘Background compression’, where disc compression is carried
out in the background, when the MS250 is least busy .
CD format
Two options are provided for the CD burn format: Audio CD or Data CD. Data CD format is useful for
storing a large number of compressed MP3 les.
CD action
These options allow you to choose the default action on loading a CD: Show tracks, Play tracks, Store
tracks, or Do nothing (until a command is received from the front panel controls or remote control).
Audio mode
These options are for setting a ‘party setting’: Independent control of zone output, a Party mode playing
to all zones, or conned to Zone 1 only.
Lock volume
This option allows you to Lock or Unlock the mass storage volume to control unauthorised changes.
The Content menu
The Content menu allows you to choose where your MS250 looks for music les. By default, this will
be the hard disk on the MS250 itself, but you can add other devices including network devices that the
MS250 can play les from. This includes some portable MP3 players (those which appear as a disk drive
when connected to a PC).
Page 23

English
MS250
23
The options are:
Rescan
Select this option to rescan a device to allow the MS250 to update the record it has of the music stored
on the device. For example, if you add some music les to your networked PC, you’ll need to rescan the
PC to allow the music player to nd the les so it can play them.
Add location
Select this option and enter the details of a networked device you would like the MS250 to access.
You will need to enter a ‘Friendly name’ for the device (e.g. ‘Bedroom iMac’) along with the IP network
address for the device, a User name and Password. Note that this is not necessary for non-networked
devices (e.g. MP3 players or USB drives) since these will appear in the list automatically when they are
connected.
Remove location
Select this option to prevent the MS250 accessing a device that had previously been connected. If
you remove a non-networked device such as an MP3 player, you can reinstate it by disconnecting and
reconnecting it to the MS250.
Backup database
Although your MS250 is very robust, in exceptional cases, such as following a power failure or electrical
storm, it is possible that the music database might be corrupted. To insure against this possibility it is a
good idea to make a back up of the database occasionally. It is also a good idea to do this before making
major changes to the database, for example before scanning a new networked device with a large
number of music les on it.
Restore database
Choose this option if you want to revert to the most recently backed-up database, for example if you
accidentally removed an album or if it has become corrupt for any reason.
Reset database
Choose this option if all else fails! This will completely clear the database, removing all entries. You will
then need to rescan the hard disk in the MS250 to re-instate the music les stored on it. Any playlists,
however, will be lost.
The Display menu
Choose this option to match the video output style of the MS250 to your display device (TV set or
monitor screen).
The options are:
Theme
This option allows you switch between Normal User, a Normal User with no display of Album Art, and
Advanced User.
TV standard
This option allows you to set the default output as PAL (used mainly in Europe) and NTSC (used mainly
in the U.S.).
Page 24

MS250
24
Brightness
This option sets the default Brightness (on power up) of the front panel, from Off, Dim, Medium or
Bright. The Brightness can be adjusted subsequently from the front panel DISPLAy button or the
remote’s DISP button.
The Network menu
Choose this option to change various network settings. See page 27 for details.
The options are:
Options
This allows you to select or deselect the automatic allocation of IP settings (DHCP). If this option is
deselected, you will have to provide explicit settings for the Ethernet settings (see next option).
Ethernet
This option allows you to enter explicit values for the Ethernet IP settings (the IP address, Subnet mask,
Gateway, Name server, and Unit name (default = ‘Arcam’)). Press OK to edit the text elds.
Apply
Select ‘Apply’ to enact the Ethernet settings set up in the previous two options.
The Region menu
Choose this option to set the default language and keyboard settings.
The options are:
Language
Choose the language for onscreen display from Deutsch, English, Español, Français or Nederlands. The
default setting is English.
Keyboard
Choose the setting for the (optional) attached keyboard.
The System menu
Choose this option to retrieve system information, restore default settings and control updates.
Page 25

English
MS250
25
The options are:
Information
This displays a panel of information about the System, Operating System and software version installed,
the Hard disk size and usage, and other details which may be useful to note if you are reporting a
service issue to Arcam technical personnel.
Restore defaults
This option returns various options to their factory settings.
Update…
This option calls the Arcam website for any software updates that may have become available since the
previous check.
Update radio
This option calls the Arcam website and checks for updates in the list of available Internet radio stations.
PIN
This four-gure PIN restrict access to the user settings so that only authorised users may change them.
The Time menu
Choose this option to modify the system date and time, the screen display and standby periods.
The options are:
Time
This option allows you to set the system Date (entry format is DD/MM/YYYY) and Time (entry format
is HH:MM:SS in 24-hour notation). The system date and time are retained for several days the unit is
unplugged, but may need to be reestablished after a long period without power.
Blank time
This sets the screen blank time in minutes (the default is 5 minutes).
Standby time
This sets the standby time in minutes (the default is 60 minutes).
The Archive music menu
Choose this option to make a security copy of the data on the main disk, to backup to an external disk,
or to restore from a disk after a serious data loss:
The options are:
Archive disk
This option copies the music database from the MS250 to an externally connected hard disk.
Backup
This option save an ‘incremental’ backup to an externallly connected hard disk. A backup operation is
much quicker than making a full archive copy, since only recently changed items need to be copied.
Restore
This option Restores (i.e. copies back to the internal hard disk unit) data from an archived copy of the
database. This facility is useful in circumstances of serious data loss or unintentional deletion of les.
Page 26

MS250
26
Connecting to a network and the Internet
Once you’ve connected the MS250 to your existing audio equipment and checked that it works, you can
connect it to the Internet. This will enable you to make full use of the MS250’s capabilities, such as:
<
Playing Internet radio stations
<
Automatically downloading CD details (track information etc.) from a music database on the
Internet when you insert a CD
<
Playing music from existing music libraries on computers on your network
Local Area network congurations
To get the most out of your MS250, it needs to be installed as part of a local area
network (LAN) including one or more computers, and have access to a broadband
Internet connection.
Note: Some Internet service providers offer broadband packages that restrict
access to the internet to only one device on the network. You may need to
upgrade your package to allow additional devices (such as the MS250) to
access the Internet. Contact your Internet service provider if in doubt.
If you have a computer with broadband Internet access but no local area network
(e.g. a PC and a USB broadband modem) it may be possible to connect the MS250 to
your PC directly, although it is a little more tricky. It also requires that your computer
is running any time the MS250 needs to access the Internet.
Finally, if you currently don’t have broadband Internet access, then it is quite
straightforward to set this up - see below for details.
Connecting the MS250 to an existing Ethernet network with Internet
access.
If you already have an Ethernet Local Area Network (LAN) which provides multiple networked devices
with Internet access via an ADSL or cable modem, connection is very straightforward. To connect your
MS250 to your LAN:
1. Connect a straight-through Ethernet cable from a spare LAN port on the Ethernet Router (or
attached Ethernet Switch) to the Ethernet port on the rear panel of the MS250.
2. Switch on the MS250.
Note: If you have an existing wireless network, you can connect a wireless Ethernet Bridge (e.g.
Netgear – see www.netgear.com; or D-Link products – see www.dlink.com) to the MS250 instead of
the Ethernet cable. An alternative is to use the home mains wiring to establish a ‘wireless’ network
(e.g. Powerline products – see www.powerlinecommunications.net).
In most cases, no further adjustments to the MS250 or the network will be required. Follow the
procedure described in ‘Testing your connection’ below to verify if this is the case.
Connecting the MS250 to a computer with a USB modem.
If you have a broadband Internet connection using an ADSL or cable modem connected to a USB port on
your computer, it is possible to connect the MS250 to the computer and allow it to ‘share’ the Internet
connection. However, this does mean that your computer must be running any time the MS250 needs to
access the Internet (for example when it needs to access the music database or when you wish to listen
to an Internet radio station). For this reason, you may nd it more convenient to simply buy an ADSL or
cable router to replace your USB modem, and proceed as above. You will need to contact your Internet
Service Provider (ISP) to conrm if this is possible, and refer to the instructions provided by your ISP to
congure your new router before proceeding, but this is usually a straightforward process.
If you do wish to ‘share’ the internet connection on your PC with the MS250, you can do this as follows:
1. Using an Ethernet crossover cable (not a straight-through cable), connect the MS250 to the
computer’s ethernet port
MS250
POWER
LOAD
OKHOME ZONE
DISPLAY
MS250
POWER
LOAD
OKHOME ZONE
DISPLAY
Broadband Internet access is
typically provided using an ADSL
or Cable modem. Typical modems
built into computers (often referred
to as ‘dial-up’ or ‘56k’ modems)
are not fast enough to use with the
MS250.
Page 27

English
MS250
27
2. Enable Internet Connection Sharing on your computer
3. Switch on the MS250.
Note: Most recent computers come with a built-in Ethernet connection. If yours doesn’t, however,
you will need to buy an Ethernet Network Interface Card (NIC) and install it.
You can also use a wireless connection between the MS250 and your computer. To do this, you will need
two wireless Ethernet Bridges. These will need to be congued using your PC, then connect one to your
computer, and one to the MS250.
If you don’t have an Ethernet network or an ADSL or cable modem
The easiest way to establish an Ethernet network with Intenet connection for your MS250 is to use an
ADSL or Cable Router connected to your PC. To simplify the wiring, you may prefer to use a wireless
ADSL or Cable Router and a wireless Ethernet Bridge connected to the MS250. Proceed as follows:
1. Subscribe to a broadband service and specify that you would like to use a wireless ADSL or
cable Router. Many ISPs can provide a suitable router when you sign up; if not, you will need to
purchase one of these from a computer store.
2. Connect your computer to the router
3. Congure the router according to the instructions provided with it and the conguration
information provided by your ISP
4. If you are using a wired Ethernet conguration, connect the MS250 to a spare LAN port
on the Ethernet Router using a straight-through Ethernet cable. Refer to the diagram under
‘Connecting the MS250 to an existing Ethernet network with Internet access’
or
If you are using a wireless Ethernet conguration, use your PC to
congure the Wireless Ethernet bridge according to the instructions provided
with it and then connect the Wireless Ethernet bridge to the MS250. Refer to
the diagram above.
5. Switch on the MS250.
Connecting the MS250 to the Internet without a computer.
Although it is usually necessary to use a computer to congure the modem in the
setup described above, once the conguration has been completed you no longer
need the computer to access Internet radio stations or retrieve track names for CDs.
The computer can therefore be disconnected, leaving only a single connection between the ADSL/cable
router and the MS250.
Testing your Internet connection
To check that the MS250 is able to use your broadband Internet connection:
1. Insert an audio CD into the MS250’s CD drive.
2. Check that the MS250 retrieves track names from the Internet.
Note: It may take a few moments to recover the track names from the Internet database. Also,
although track names for most CDs are available, there are a few exceptions. Try another CD before
moving on to ‘Troubleshooting’ below.
Advanced network conguration information
By default, the MS250 is conguret to use DHCP, which means that it will pick up its network settings
automatically from a suitable device (normally the router) on your LAN. However, if your network does
not use or support DHCP, you will need to congure the MS250 with a static IP address. To do this, you’ll
need to know the following settings (either obtain them from your ISP, or congure them to t in with
existing network setup):
1. From the Home page, select 4Settings4Network4Ethernet
2. From the NETWORK-ETHERNET menu screen, enter the following information:
IP Address – this must be a unique address on your LAN (e.g. if your router has the IP address
192.168.1.1, you might set the MS250’s IP address to be 192.168.1.101)
Subnet mask – this must match the subnet mask of other devices on your LAN (and is usually
255.255.255.0)
Name server – this is the IP address of the device that converts domain names into appropriate
IP addresses and vice versa (normally the address of your router)
Gateway – the IP address of the device on your LAN that acts as a gateway to the Internet and
other networks (this is normally your router)
3. Make sure that 4Settings4Network4Options shows that DHCP is disabled.
4. Select “Apply” to set the new network settings (this will take a few moments).
MS250
POWER
LOAD
OKHOME ZONE
DISPLAY
It is not possible to connect a
USB modem directly to the MS250
- the USB ports can only be used
for keyboard/mouse connections or
an external backup disk.
Page 28

MS250
28
Advanced features
Zones
The MS250 has four ‘zoned’ outputs, so you can send different music streams to different zones. For
example, you might play the currently inserted CD to zone 1, an Internet radio stream to zone 2, a
playlist on the MS250’s hard drive to zone 3 and music from one of the two Aux inputs to zone 4. For
example:
<
To play the current CD to zone 1, select Music, CD, Tracks and select the tracks you want to play,
then press the Zone button to select Z1, then press Play.
<
To play an Internet radio stream to zone 2, select the Internet radio station, press the Zone
button to select Z2, then press Play.
External audio sources
The MS250 has two auxiliary audio inputs. You can connect a line-level device (such as to each of these
inputs. Once you have connected an auxiliary audio input device, you can:
<
route the audio to any one of the MS250’s four zones (see ‘Zones’ above)
<
record the audio stream onto the MS250’s hard disk
Routing audio from an external source to a zone
As an example, to route audio from Aux input 2 to Zone 4, select Music Aux in Play, Aux input 2, then
select Play.
To do this from the remote, press the Zone button until Z4 is highlighted, then press the Input 2 button,
then press Play or OK.
Recording audio from an external source to the hard disk
You can record audio from an external source onto the MS250’s hard disk. Audio will always be recorded
uncompressed.
For example, to record audio from Aux input 1 to the hard disk:
1. Cue the device connected to the Aux 1 input so that it is ready to play your chosen music.
2. Select Music, Aux in, Play, Aux input 1.
3. Select Music, Aux in, Record.
[Sending 100% complete]
[Recording (xxx MB, xx% free)]
4. Start the music playing on the external audio device.
4. When you’re done, select Music, Aux in, Stop record.
You’ll see a message telling you the name of the track to which the audio has been saved (you
might want to make a note of this, so it’s easy to nd later):
[pic: “Recorded to Line 1 29-Jul-05 15-05-32.wav”]
Recordings will be stored in the “Recordings” genre.
Working with recorded tracks
Once you have recorded a track from an external source to the hard disk, you can perform any of the
standard operations on it (e.g. play it, rename it or delete it). A sensible rst step is to rename any
recorded tracks.
1. Search for the tracks you’re interested in – select Music, Stored music, Search and press OK.
2. Enter part of the track name (e.g. enter “Line 1” to search for all the tracks recorded from Aux
input 1) then go back and select Tracks on the MUSIC-SEARCH menu screen.
3. From the resulting list, select the tracks you’re interested in.
4. From the menu, perform any of the standard track functions (e.g. Add to playlist, Edit tracks - all
described elsewhere).
Playing music stored on a portable MP3 player or other USB
storage device
To play music stored on an MP3 player or other USB storage device:
1. Connect the device to a USB port on the MS250. The music sever will
automatically scan the device to check for music les already stored on it.
This could take a few minutes.
2. Navigate to the STORED MUSIC menu page and choose Look in from the
left of the menu page
3. Select the device that contains the music you’d like to play.
You can now search for tracks and play them in the usual way.
Note: These comments do not
apply to Apple iPod®s, but do apply
to most MP3 or USB-connected
music players.
Page 29

English
MS250
29
Playing music over the network
The MS250 can play music stored on a PC on your network. To do this:
<
‘Share’ a logical disk on your PC - refer to your computer help documentation to nd out how to
do this.
<
Tell the MS250 to look in this disk for music les - this is done via the Settings menu described
later.
If you have a large number of music les on your computer, it may take some time for the MS250 to
locate them all and register them in its database.
Copying music les
You can copy music les from the MS250 to other devices. These devices could be your PC via the
network, or a portable MP3 player for example. To transfer les to an external device:
<
If you want to transfer the les to a portable MP3 player or other USB storage
device, you must rst connect the device to a USB port on the MS250. The
music sever will automatically scan the device to check for music les already
stored on it. This could take a few minutes.
<
If you want to transfer the les to a disk over the network, make sure it has
been added to the list of available locations using the Add location option
(see Settings).
<
Select the playlist, CD or stored tracks you’d like to transfer
<
Choose ‘Send to..’ from the left of the menu screen and choose the device
you’d like to send the music les to.
<
Choose the audio format for the les you are copying (if this option is
availible) and press OK.
A progress bar is displayed while the les are being transferred.
You can also copy les from an external device by using “send to...” to copy the les to the “hard disk
drive”.
Note: The database only
contains the names and location
of music les, not the music les
themselves. if you have deleted
music les using the ‘Delete’
option, you will not be able to
recover them using the ‘restore
database’ option.
Page 30

MS250
30
Remote-control codes
Power commands
Command Decimal Code
Power toggle 21–12
Power-on 21–123
Power-off 21–124
Playback control commands
Command Decimal Code
Track number ‘n’, (e.g., 1) 21–n (e.g., 21–1)
T rack forward 21–32
T rack back 21–33
Volume up 21–16
Volume down 21–17
Mute 21–13
Fast forward 21–52
Fast rewind 21–50
Page up 21–41
Page down 21–40
Open 21–45
Pause 21–48
Stop 21–54
Play 21–53
Record 21–42
Del 21–112
Caps 21–113
Display control commands
Command Decimal Code
Display 21–71
Advanced control commands
Command Decimal Code
CD 21–67
Radio 21–68
Input 1 21–69
Input 2 21–70
Album 21–72
Artist 21–73
T rack 21–74
List 21–75
Up 21–80
Down 21–81
Left 21–85
Right 21–86
OK 21–87
Setup 21–14
(Red) 21–107
(Green) 21–108
(Yellow) 21–109
(Blue) 21–110
The following table gives the IR-commands accepted by the MS250.
The system code for the MS250 is 21.
Page 31

English
MS250
31
Technical specications
General
Power Requirements 100/115V or 230V AC,
set by voltage selector switch on rear panel
Power consumption < 35 VA
Dimensions 435mm x 80mm x 350mm
Weight net: 5.2kg; packed: 8.0kg
Video outputs
Composite video 1 x gold plated phono. 1V pk-pk in 75Ω
S-Video 1 x 4-pin mini-DIN. Y 1V pk-pk in 75Ω, C 0.3V pk-pk in 75Ω
Audio outputs
Analogue audio outputs Stereo or multi-channel output on gold-plated phono sockets
Output level 2.2V rms at 0dB signal,
4V rms with HDCD discs (left and right channels only)
Frequency response 20Hz to 20kHz (+0.1db, –0.5dB)
THD+N <0.005% for 1kHz 0dB signal,
measured 22Hz–22kHz, unweighted
Signal-to-noise ratio 105dB, measured 20Hz–20kHz, unweighted
Digital audio output (IEC958) PCM/Dolby digital/MPEG/DTS on gold plated phono (coax) and
TOSLINK (optical)
Accessories supplied
CR-425 Remote control
2 x AAA batteries
mains lead
E&EO
NOTE: All specication values are typical unless otherwise stated.
Continual improvement policy
Arcam has a policy of continual improvement for its products. This means that designs and
specications are subject to change without notice.
Page 32

Guarantee
Worldwide Guarantee
This entitles you to have the unit repaired free of charge, during the rst two years after purchase, at
any authorised Arcam distributor provided that it was originally purchased from an authorised Arcam
dealer or distributor. The manufacturer can take no responsibility for defects arising from accident,
misuse, abuse, wear and tear, neglect or through unauthorised adjustment and/or repair, neither can
they accept responsibility for damage or loss occurring during transit to or from the person claiming
under the guarantee.
The warranty covers:
Parts and labour costs for two years from the purchase date. After two years you must pay for both parts
and labour costs. The warranty does not cover transportation costs at any time.
Claims under guarantee
This equipment should be packed in the original packing and returned to the dealer from whom it was
purchased, or failing this, directly to the Arcam distributor in the country of residence.
It should be sent carriage prepaid by a reputable carrier -– NOT by post. No responsibility can be
accepted for the unit whilst in transit to the dealer or distributor and customers are therefore advised to
insure the unit against loss or damage whilst in transit.
For further details contact Arcam at:
Arcam Customer Support Department,
Pembroke Avenue, Waterbeach, CAMBRIDGE, CB5 9QR, England.
Problems?
If your Arcam dealer is unable to answer any query regarding this or any other Arcam product please
contact Arcam Customer Support at the above address and we will do our best to help you.
On line registration
You can register your Arcam product on line at: www.arcam.co.uk
A&R Cambridge Ltd, Pembroke Avenue, Waterbeach, CAMBRIDGE CB25 9QR, England.
SH149
Issue G
 Loading...