

Page 1

Handbook
Manuel
Handbuch
Handleiding
solo
mini
Page 2
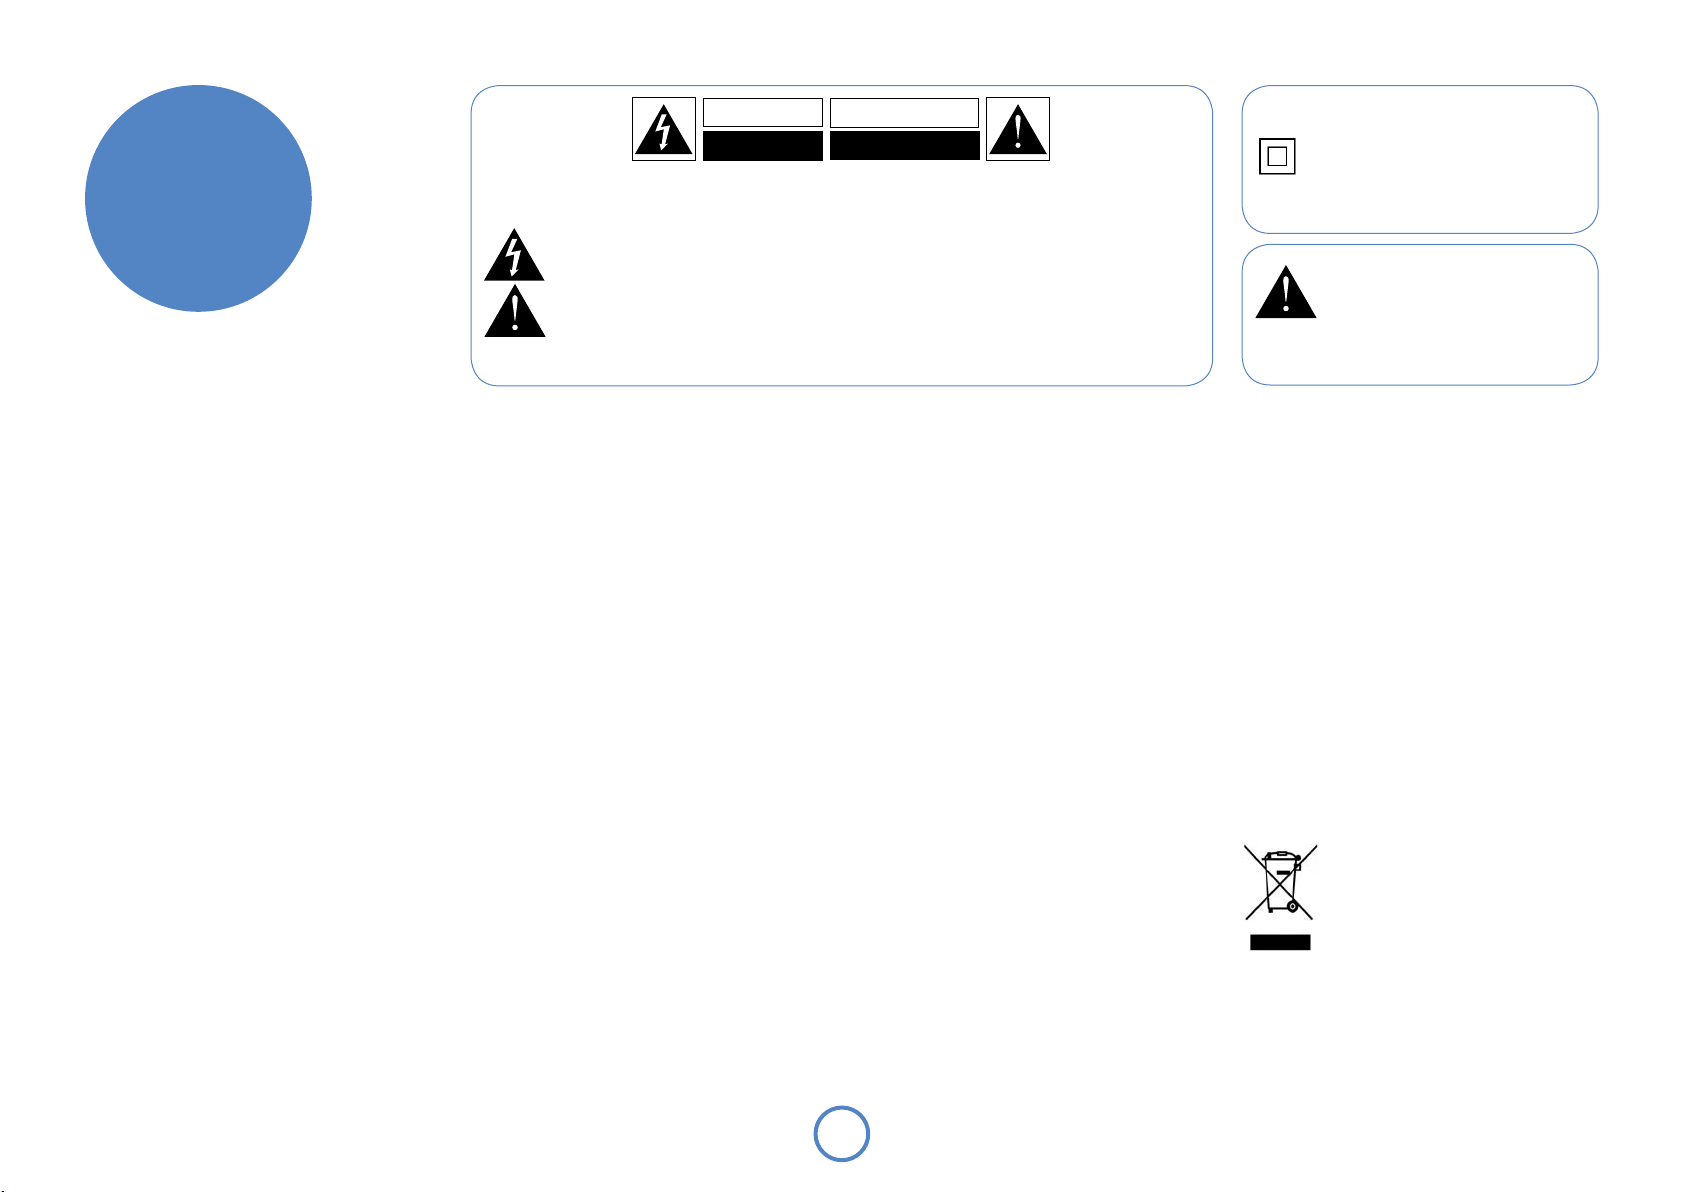
Class II product
This equipment is a Class II or double
insulated electrical appliance. It has been
designed in such a way that it does not
require a safety connection to electrical
earth (‘ground’ in the U.S.).
The screw on the base of the unit
indicated by the warning triangle is a
critical component.
For safety reasons, only replace with
a screw of identical size – or one not
exceeding 8mm in length.
safety
guidelines
CAUTION
RISK OF ELECTRIC
SHOCK DO NOT OPEN
CAUTION: To reduce the risk of electric shock, do not remove cover (or back). No user serviceable parts inside. Refer
servicing to qualified service personnel.
WARNING: To reduce the risk of fire or electric shock, do not expose this apparatus to rain or moisture.
The lightning flash with an arrowhead symbol within an equilateral triangle, is intended to alert the user to the presence of
uninsulated ‘dangerous voltage’ within the product’s enclosure that may be of sufficient magnitude to constitute a risk of electric
shock to persons.
The exclamation point within an equilateral triangle is intended to alert the user to the presence of important operating and
maintenance (servicing) instructions in the literature accompanying the product.
CAUTION: In Canada and the USA, to prevent electric shock, match the wide blade of the plug to the wide slot
in the socket and insert the plug fully into the socket.
ATTENTION
RISQUE DE CHOC ELECTRIQUE
NE PAS OUVRIR
Many of these items are common sense precautions but, for your own safety and to ensure that you do not damage the unit, we recommend that you read them.
Important safety instructions
This product is designed and manufactured to meet
strict quality and safety standards. However, you should
be aware of the following installation and operation
precautions.
1. Take heed of warnings and instructions
You should read all the safety and operating
instructions before operating this equipment. Retain
this handbook for future reference and adhere to all
warnings in the handbook or on the equipment.
2. Water and moisture
The presence of electricity near water can be
dangerous. Do not use the equipment near water – for
example next to a bathtub, washbowl, kitchen sink, in a
wet basement or near a swimming pool, etc.
3. Object or liquid entry
Take care that objects do not fall and liquids are not
spilled into the enclosure through any openings. Liquidlled objects such as vases should not be placed on the
equipment.
4. Placing the equipment
Only use a rack or shelf that is stable and strong
enough to support the weight of this equipment.
5. Ventilation
Do not place the equipment on a bed, sofa, rug or
similar soft surface, or in an enclosed bookcase
or cabinet, since ventilation may be impeded. We
recommend a minimum distance of 50mm around the
sides and top of the equipment to provide adequate
ventilation.
5. Heat
Locate the equipment away from naked ames or heatproducing appliances such as radiators, stoves or other
appliances that produce heat.
6. Climate
The equipment has been designed for use in moderate
climates and in domestic situations.
8. Cleaning
Unplug the unit from the mains supply before cleaning.
The case should normally only require a wipe with a
soft, lint-free cloth. Do not use chemical solvents for
cleaning.
We do not advise the use of furniture cleaning sprays
or polishes as they can cause indelible white marks.
9. Power sources
Only connect the equipment to a power supply of
the type described in the operating instructions or as
marked on the equipment.
The primary method of isolating Solo Mini from the
mains supply is to use the switch on the rear of the
unit. Solo Mini must be installed in a manner that makes
disconnection possible.
10. Power-cord protection
Power supply cords should be routed so that they are
not likely to be wa ked on or pinched by items placed
upon or against them. Pay particular attention to the
point where they exit from the equipment.
11. Power lines
Locate any outdoor antenna/aerial away from power
lines.
12. Non-use periods
If the equipment is not being used for an extended
period, we recommend that you unplug the power cord
of the equipment from the outlet, to save power.
13. Abnormal smell
If an abnormal smell or smoke is detected from the
equipment, turn the power off immediately and unplug
the equipment from the wall outlet. Contact your
dealer and do not reconnect the equipment.
14. Servicing
You should not attempt to service the equipment.
Contact your dealer to arrange servicing.
15. Damage requiring service
The equipment should be serviced by qualied service
personnel when:
A. the power-supply cord or the plug has been
damaged, or
B. objects have fallen, or liquid has spilled into the
equipment, or
C. the equipment has been exposed to rain, or
D. the equipment does not appear to operate
normally or exhibits a marked change in
performance, or
E. the equipment has been dropped or the
enclosure damaged.
Safety compliance
This equipment has been designed to meet the IEC/EN
60065 international electrical safety standard.
This device complies with Part 15 of the FCC Rules.
Operation is subject to the following two conditions:
(1) This device may not cause harmful interference, and
(2) this device must accept any interference received,
including interference that may cause undesired
operation.
WARNING:
Due to the mains switch being located on the rear
panel, the apparatus must be located in an open area
without anything obstructing access to the mains
switch.
Mains plug/appliance coupler is used to disconnect
device and it shall remain readily operable.
Correct Disposal of this product
This marking indicates that this product
should not be disposed with other
household waste throughout the EU.
To prevent possible harm to the
environment or human health from
uncontrolled waste disposal and to
conserve material resources, this product should be
recycled responsibly.
To dispose of your product, please use your local
return and collection systems or contact the retailer
where the product was purchased.
2
Page 3

welcome…
… and thank you for purchasing the Arcam Solo Mini music system.
Arcam has been producing high-quality audio components for nearly thirty
years. During that time we have amassed a wealth of knowledge on both
the design and construction of audio components in order to give the best
sound performance for the price. The design of Solo Mini is a distillation of this
knowledge into a compact and easy-to-use package that is intended to give you
years of listening enjoyment while taking just a few minutes to learn how to use.
This handbook is intended to give you a detailed guide to using the Solo Mini
music system. It starts by giving advice on installation, moves on to describe
how to use the product and nishes with additional information on the more
advanced features. Use the contents list shown on the right to guide you to the
section of interest.
We hope that your Solo Mini music system will give you years of trouble-free
operation. In the unlikely event of any fault, or if you simply require further
information about Arcam products, our network of dealers will be happy
to help you. Further information can be found on the Arcam web-site at
www.arcam.co.uk.
The Solo Mini development team
Contents
Important safety instructions ...............................2
Safety compliance ....................................................2
safety guidelines ............................................. 2
welcome…......................................................... 3
overview ...........................................................4
top panel/ front panel .....................................5
rear panel.........................................................6
positioning .......................................................7
Positioning the unit .................................................7
Power .........................................................................7
Thermal protection ................................................7
Interconnect cables.................................................7
speakers ...........................................................8
Speaker installation .................................................8
Connecting speakers ..............................................8
other inputs ......................................................9
iPod connection .......................................................9
USB connection .......................................................9
radio ................................................................10
Which radio aerial? ..............................................10
playing sounds ................................................12
Playing a CD .......................................................... 12
Listening to radio .................................................12
DAB ......................................................................... 13
AM/FM .................................................................... 13
Playing tracks from a USB memory device ....13
remote control .................................................14
Inserting batteries into the remote control .. 14
Using the remote control ..................................14
system
menu................................................................16
Conguring the listening settings ..................... 16
technical specification .....................................17
product guarantee ..........................................18
Worldwide Guarantee ........................................ 18
Claims under guarantee .....................................18
Problems? ...............................................................18
On-line registration ............................................. 18
English
Continual improvement policy
Arcam has a policy of continual improvement
for its products. This means that designs and
specications are subject to change without notice.
so
3
m
Page 4

overview
Solo Mini represents a new dimension
in experiencing music.
Using the most advanced digital processing chipset
and A/D conversion technology, together with near
silent slot-loading CD transport, Solo Mini brings the
performance normally associated with high-delity
separates to a new audience of style-conscious music
lovers. The resulting sound is simply world class,
and all the more astonishing because of Solo Mini’s
compact size.
Arcam developed the world’s rst DAB radio and
the clarity of reception will bring hours of musical
enjoyment from DAB, FM or AM (market dependent).
Music from iPod
Arcam’s rDock or rLead. Solo Mini takes over the
control and amplication with iPod text appearing on
the front panel display of the unit.
The Solo remote control supplied with Solo Mini is
simple to use and able to control the sound from a
range of sources, from CD, radio, television, iPod/Tape
or a games console.
At last a compact but powerful two-channel
sound system with a level of performance that
will bring your music to life.
®
can be seamlessly integrated using
IN
4
Page 5
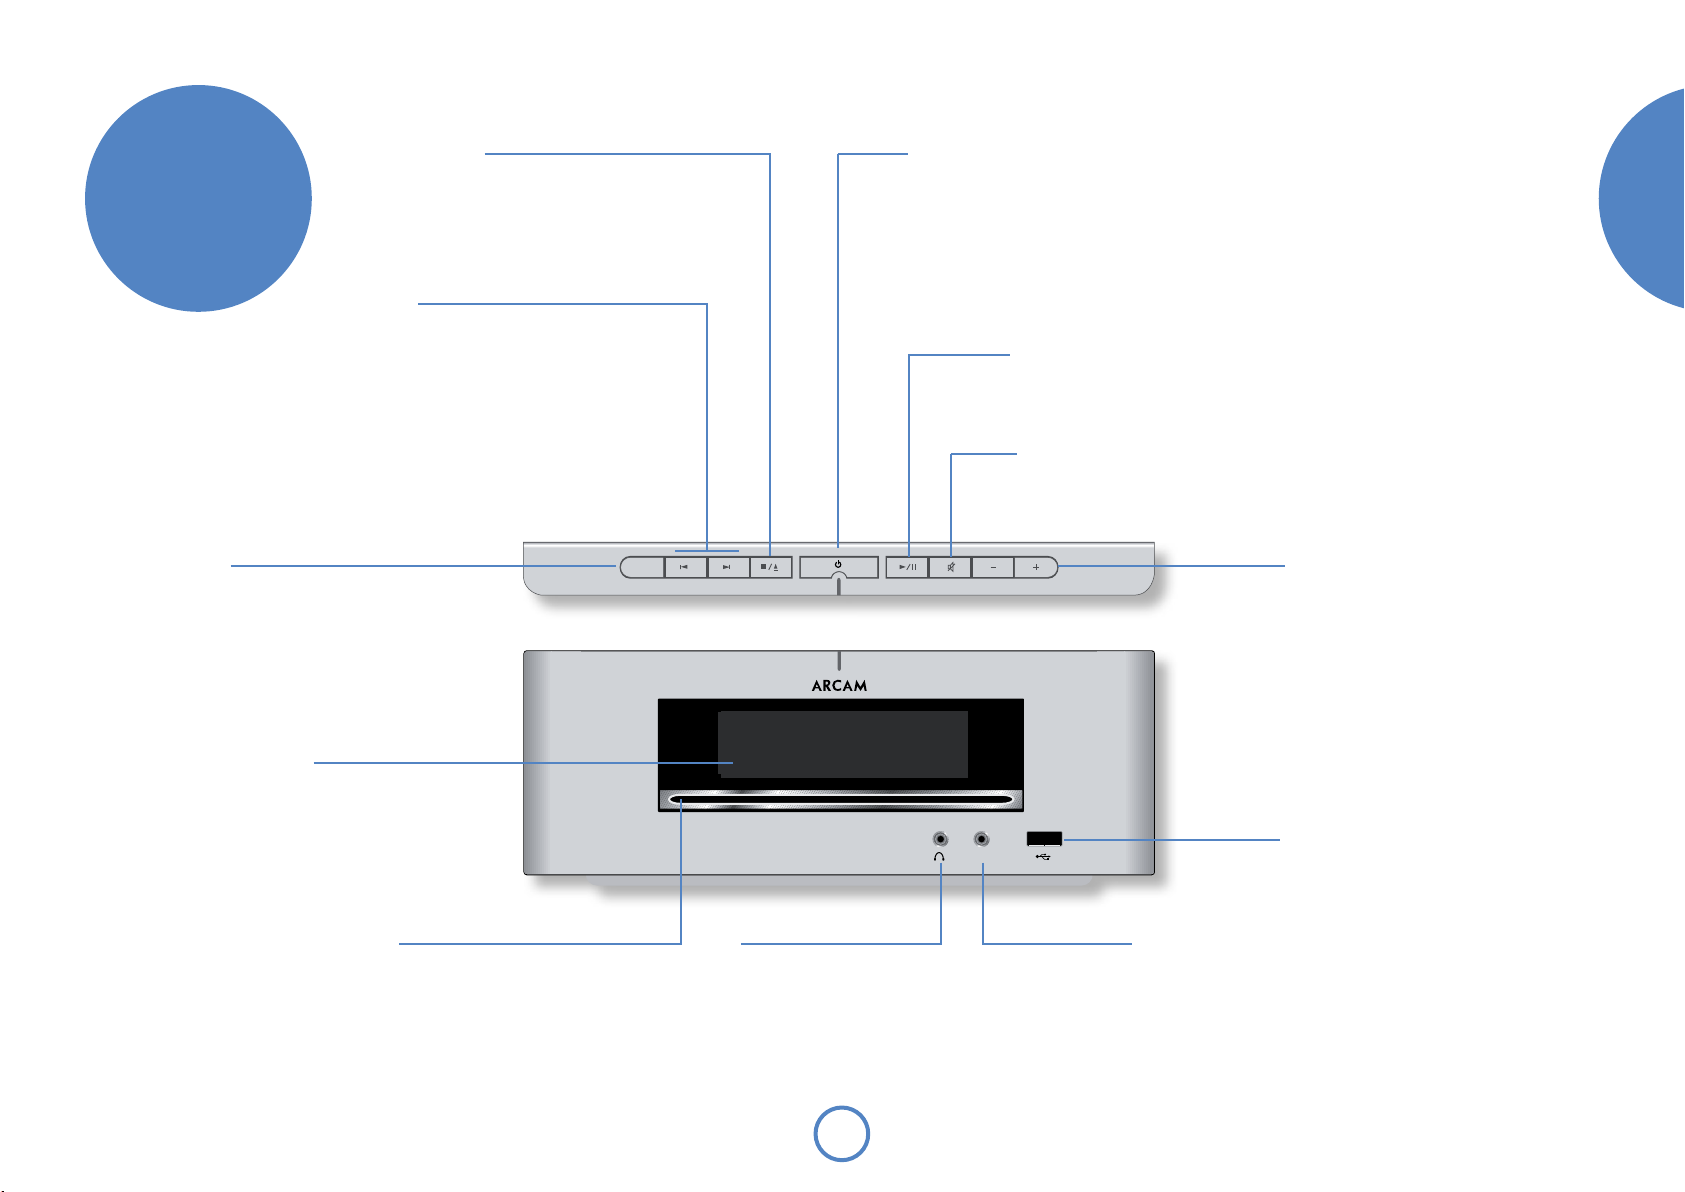
top panel/
front panel
(Stop/Eject)
</1
Press the </1 button once to stop a disc
playing. Press again to eject a stopped disc.
When playing a CD, pressing and holding
also ejects a disc.
</1
Skip back/forward
To skip tracks on a CD, press / or 0. When
skipping back, the rst button press takes
you to the beginning of the current track.
Pressing the button again takes you to the
start of the previous track.
When the source is Radio (DAB, FM or
AM), the buttons cycle through station
presets.
When the System menu is active, the
buttons are also used to step through
option settings (see page 16).
Power
Note that the primary power-switch for Solo Mini is on the rear of the unit. If the
power light is not illuminated at all, check that the unit is receiving mains power and the
rear power switch is ‘On’.
Press the
When Solo Mini is in standby mode, the light next to the power button on the top panel
glows red. Pressing
and the power button light turns blue.
button to switch Solo Mini between ‘On mode’ and ‘Standby mode’.
2
when the unit is in standby mode will cause the unit to switch on
2
Play/Pause
Press the 4/
track, pause a playing track, or resume
playing a paused track.
button to start playing a
;
Mute
Use this button to mute the volume. If Solo Mini is
muted, pressing the MUTE button for a second time
or changing the volume will unmute it.
English
Source
Press the
through the available signal sources.
In Standby mode, pressing the
SOURCE button switches Solo Mini on.
SOURCE button to cycle
Front panel display
This is a vacuum uorescent
display with variable brightness.
CD input slot
Gently insert a CD (label-side up) into
this slot and allow the disc to be drawn
in by motorised rollers. If ‘CD AutoPlay’
is enabled, the CD plays immediately (see
page 16.)
Do not nsert 80 mm mini CDs or any non-
stanDarD sizeD DisCs.
SOURCE
Headphone output
This 3.5mm stereo jack socket
accepts headphones with an
impedance between 32Ω and
600Ω. Sound to the speakers
is muted when headphones
are used.
IN
Line-level input
This is a stereo analogue
input, connected via a stereo
3.5mm jack plug. It is suitable
for audio sources such as
a portable tape player, MP3
player or games console.
Volume –/+
Use these buttons to decrease (–) or
increase (+) the volume. The current
volume setting is shown on the front
panel display.
USB input
The USB socket is suitable for an MP3
player or for playing les contained on
a USB memory device.
solo
mini
5
Page 6
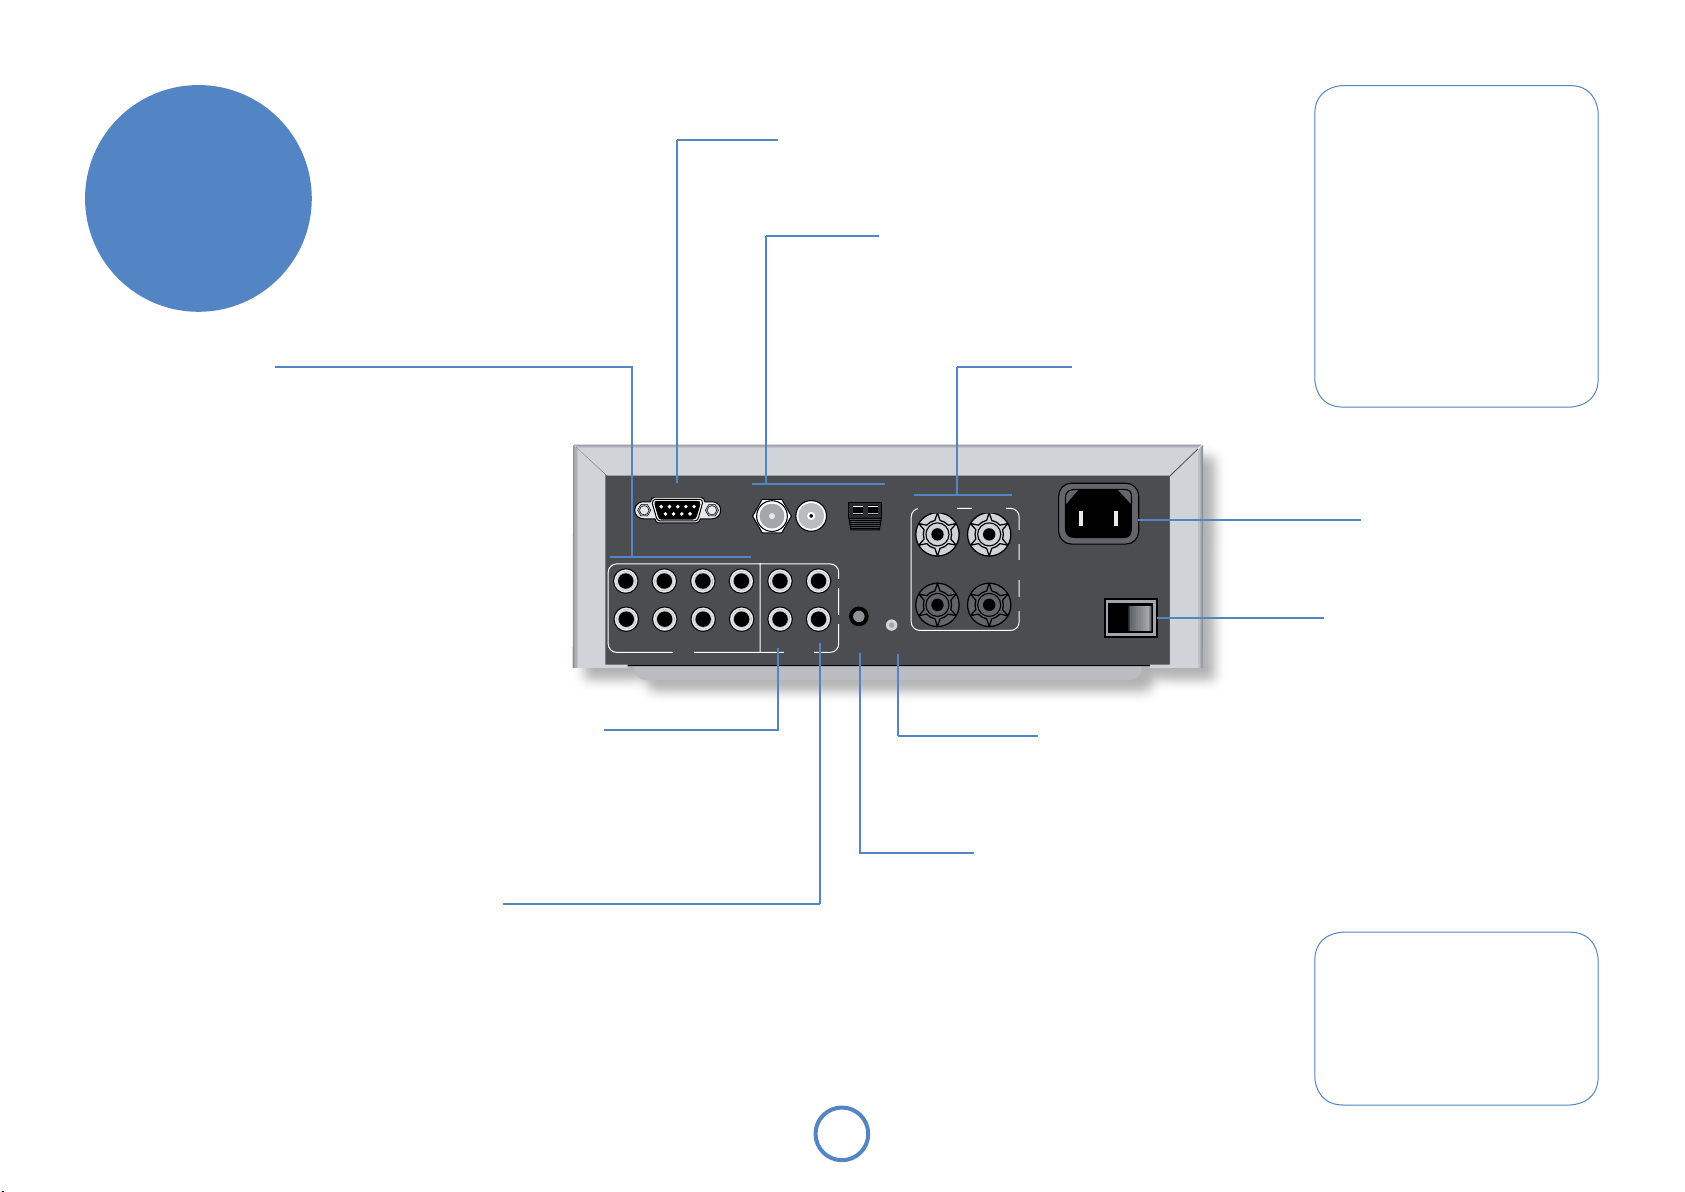
rear panel
Analogue inputs
Solo Mini provides four pairs of analogue
inputs, allowing connection of other stereo
sources (e.g. a games console, AV, iPod/
Tape, or TV). All four inputs have the same
characteristics – the labels below the inputs
give suggested uses.
To connect a device to an input on the
rear of Solo Mini, use a stereo phono cable
of a suitable length. We advise you to use
high-quality interconnect cables wherever
poss ble to ensure the best poss ble sound
quality.
Preamp output
If you require more power than Solo Mini’s 25W per
channel, you can connect an external power amplier.
Connect the
your power amplier, then connect your speakers to
the power amplier’s speaker terminals.
This output may also be used to provide a signal for
a self-powered Low Frequency Effects speaker (a
subwoofer). Arcam’s Logo speaker ideally matches
the design and output characteristics of Solo Mini.
RS232 control
This is used for controlling an iPod (see page 9),
or for control via a remote computer.
Antennae inputs
These inputs can be used with the aerials
provided (DAB, if tted, has a telescopic
aerial, FM a wire aerial, and AM a loop
aerial). In weak signal areas, external aerials
of the correct type may be required for
optimal reception.
RS232 CONTROL
GAME AV iPod/TAPE TV TAPE PRE OUT
IN OUT
Tape output
This is the output to be used
for connecting to an audio
recorder or for a second room
system. It should be connected
by Phono–Phono (RCA)
cables to the amplier in the
second room.
PRE OUT sockets to the input sockets of
Speaker outputs
Connect your Muso speakers
here!
L
R
REMOTE
OUT
AMFMDAB
PROG
RIGHT LEFT
+
SPEAKER
OUTPUT
–
220-240V
50–60Hz
250W MAX
Programmer switch
This is an override switch that allows an
Arcam dealer to install software upgrades.
The user should not access this facility.
Remote output
This output carries all signals from the
front-panel remote-control receiver. This
can be used to route remote-control
commands to other equipment (potentially
in different locations). For example,
amplier commands could be received by
Solo Mini, then routed to a power amplier
in a remote location using this output
connector.
Controlling an iPod
®
Music or podcasts from your iPod can
be fully integrated with your system
using Arcam’s rDock or rLead. These
accessory units use the RS232 CONTROL
and IPOD/TAPE connectors to take over
the control and amplication, with
iPod text appearing on the front panel
display of Solo Mini.
Information on connecting and using
an iPod with the Solo remote is given
in the rDock or rLead quick start
guide supplied with these accessory
units, but see ‘iPod connection’ in the
connectivity section of this manual.
Mains power input
100V, 115V or 230V AC,
depending on shipping region
~
O I
OFF/ON
Mains switch
This is the main Off/On
switch, though it is usual to
place the unit in low-power
‘Standby mode’ when not
in use.
Connecting a record deck
Solo Mini is not tted with a phono
pre-amplier. If you wish to connect
a record deck to Solo Mini, then
you’ll need an external pre-amplier.
Please contact your dealer for further
information and recommendations on
the best option for you.
6
Page 7

positioning
Positioning the unit
< Place Solo Mini on a level, rm surface, avoiding
direct sunlight and sources of heat or damp.
< Do not place Solo Mini on top of a power
amplier or other source of heat.
< Do not place Solo Mini in an enclosed space such
as a bookcase or closed cabinet unless there
is good provision for ventilation. Solo Mini is
designed to run warm during normal operation.
< Do not place any other component or item on
top of Solo Mini as this may obstruct airow
around and through the unit, causing Solo Mini to
overheat.
< Do not obstruct the vents in the top, bottom, or
sides of Solo Mini.
< Make sure the remote-control receiver on the
left-hand side of the display is unobstructed,
otherwise the remote control will not work
reliably.
Power
Solo Mini is supplied with a moulded mains plug already
tted to the lead. Check that the plug supplied ts your
supply – should you require a new mains lead, please
contact your Arcam dealer.
Push the IEC plug end of the power cable into the
socket on the back of Solo Mini, making sure that it is
pushed in rmly. Plug the other end of the cable into
your mains socket and, if necessary, switch the socket
on.
Solo Mini is tted with a power switch on the rear
panel, below the power inlet: make sure that this is
switched on.
Solo Mini is tted with a transformer designed to
accept the mains voltage in the region that the product
was shipped to. If your mains supply voltage does not
match the specication printed on the rear panel, or
you wish to take the unit to a region with a different
mains voltage, or the mains plug is incorrect, please
contact your Arcam dealer.
Thermal protection
Make sure that the unit receives adequate ventilation at
all times (see ‘Positioning the unit’).
If Solo Mini gets too hot, an ‘Over Temperature’
warning is shown on the front panel and the unit shuts
down to protect itself. You can restart Solo Mini after it
has cooled for 15 minutes without power.
Interconnect cables
We recommend the use of high-quality screened cables
that are designed for the particular application. All
cables should be kept as short as is practically poss ble.
To avoid unwanted noise in the audio signals, make sure
that the mains power-supply cabling is kept as far away
as possible from your audio cables.
English
solo
7
mini
Page 8
OFF/O
2 40V
5 0Hz
25 MAX
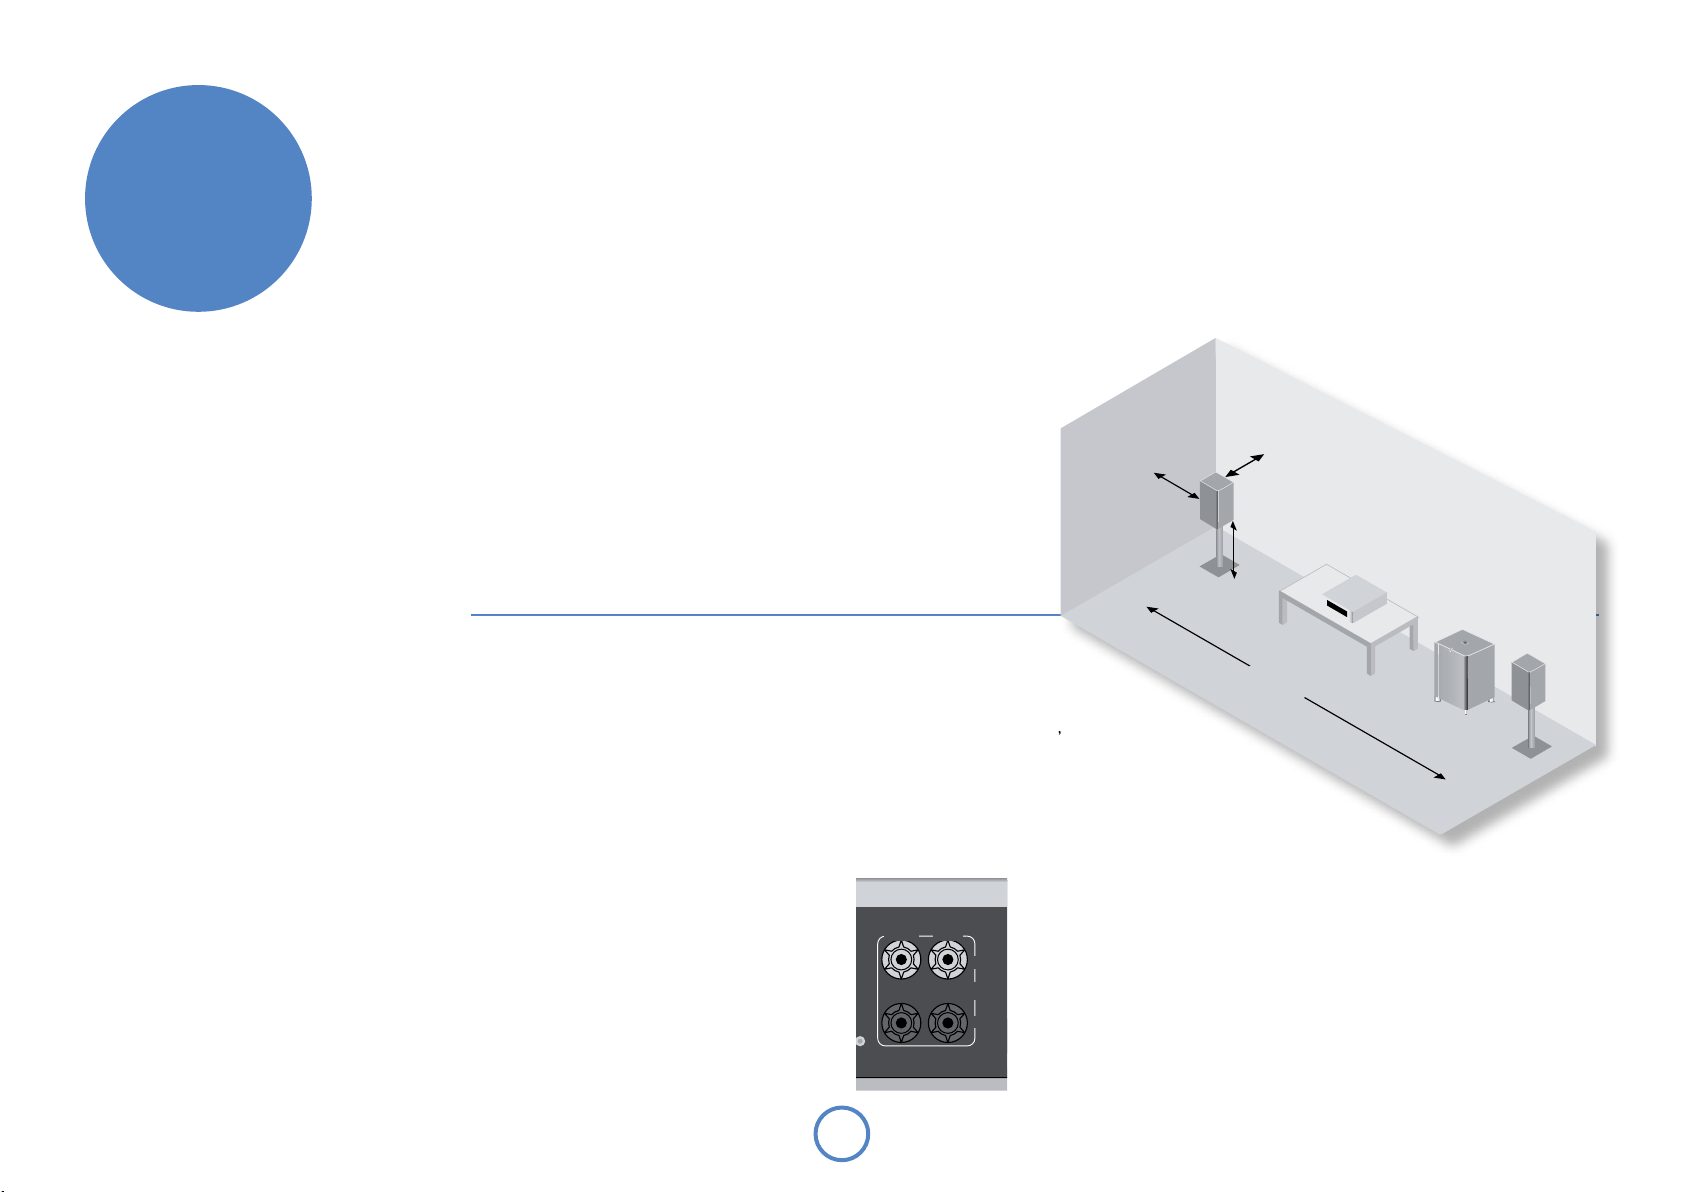
speakers
>60cm
15 –
40cm
40 – 60cm
2 – 3m
Speaker installation
The advice given here is a general guideline for setting
up speakers. Refer to the documentation supplied with
your speakers for more precise positioning and installation
information.
Room acoustics
Your room’s shape and how it is furnished will affect
the sound you hear. For instance, too many bare
surfaces can cause reections that may add harshness
to the sound. Carpets, wall-hangings and curtains can
all help.
If you have a choice of listening rooms, avoid one that
is perfectly square or has one dimension exactly twice
another. Such a room can aggravate resonances that
colour the sound.
The closer you place a speaker to corners and the
intersection of wall and oor or wall and ceiling, the
stronger the bass output, which may over-emphasise
the bass. Moving a speaker just a few inches can
sometimes make a big difference.
Speaker setup
Proper speaker placement is the key to the sound from
your speakers. As a rough guide, speakers should be
placed on rigid stands at about 15cms from the rear
wall and at least 60cms from any side wall. Speakers
should never be placed on the oor (unless they are
oor-standing speakers), or in corners. The speaker
drivers should be about ear-level height when seated.
If poss ble, centre your seating area between the
speakers.
The nal sound will depend on the acoustics of
the listening room and experimenting with speaker
positioning is very worthwhile.
Speaker stands
The more rmly a speaker is held, the better it will
sound. We recommend the use of rigid metal stands of
40–60cms height. Properly damped types that do not
‘ring’ when tapped with a pencil (either by virtue of
construction, or because they are lled with dry silver
sand) will bring out the best in a speaker. Ensure that
the stands and/or speakers do not wobble.
Arcam can supply specially designed oor stands for
Muso (and other bookshelf-sized) speakers. Arcam’s
adjustable wall-xing brackets are a very practical
alternative. Ask your dealer for details.
Connecting speakers
Solo Mini is designed to drive a pair of full-bandwidth
speakers, rated between 4 and 8 ohms. Arcam Muso
speakers ideally complement the performance and
design values of Solo Mini, but other high quality
speaker units will also give good results.
Solo Mini is tted with speaker terminals that can
accept either 4mm banana plugs, spade terminals or
bare wires. To connect the speakers, unscrew the
corresponding terminals on the back of Solo Mini,
insert the speaker wires (or spades) and screw the
terminals back up. Make sure that the red (positive/+)
terminal of the speaker is connected to the red
(positive/+) terminal on the back panel, and the black
(negative/–) terminal of the speaker is connected to the
black (negative/–) terminal on the back panel.
It is important that no stray strands of wire from these
connections are allowed to touch another cable or the
product casing. Failure to ensure this can cause a short
circuit and damage your Solo Mini.
Do not over-tighten the loudspeaker terminals, or use a
wrench, pliers, etc., as this could damage the terminals and
this would not be covered under warranty.
Speaker cables
The speakers should be
connected to the amplier
using good-quality, high-purity,
copper cables. Solid core cables,
or those with surface-only
conductors, are particularly
suitable. Bell wire and very
cheap speaker cables should
be avoided – they are a false
economy and can signicantly
degrade the sound quality.
RIGHT LEFT
+
SPEAKER
OUTPUT
–
OG
8
The cable runs to the two
speakers should be of
roughly equal length and
yet as short as practicable.
Connections to the speaker
terminals should always be
tight, whether using bare
wires or spade connectors,
but do not use tools such as
pliers, wrenches or spanners
to tighten the connectors as
these may cause damage to
the terminals.
Page 9
other inputs
IN OUT
REMOTE
OUT
PROG
SPEAKER
OUTPUT
OFF/ON
RIGHT LEFT
AMFMDAB
RS232 CONTROL
GAME AV iPod/TAPE TV TAPE PRE OUT
L
R
+
220 240V
~
50 60Hz
250W MAX
O I
USB connection
MP3 and WMA les may be played from a ash
memory USB device or an MP3 player connected to
this front panel input.
Press the top panel
the available signal sources and select USB, or press the
remote control FRONT button twice.
Connect the storage device and navigate through the
folders and les with the remote control selection keys
IN
to choose a track, then press
(or 4/; on the top panel) to play the track (see page
13).
SOURCE button to cycle through
on the remote control
4
Solo Mini supplies a nominal 5V at 500mA, but not all
USB devices can be guaranteed to work with the unit
due to the lack of standardisation of USB devices on
the market. USB hard disc drives are not supported by
this connection.
Note that USB devices are physically vulnerable when
connected. Take care not to knock or dislodge the
device from its socket.
English
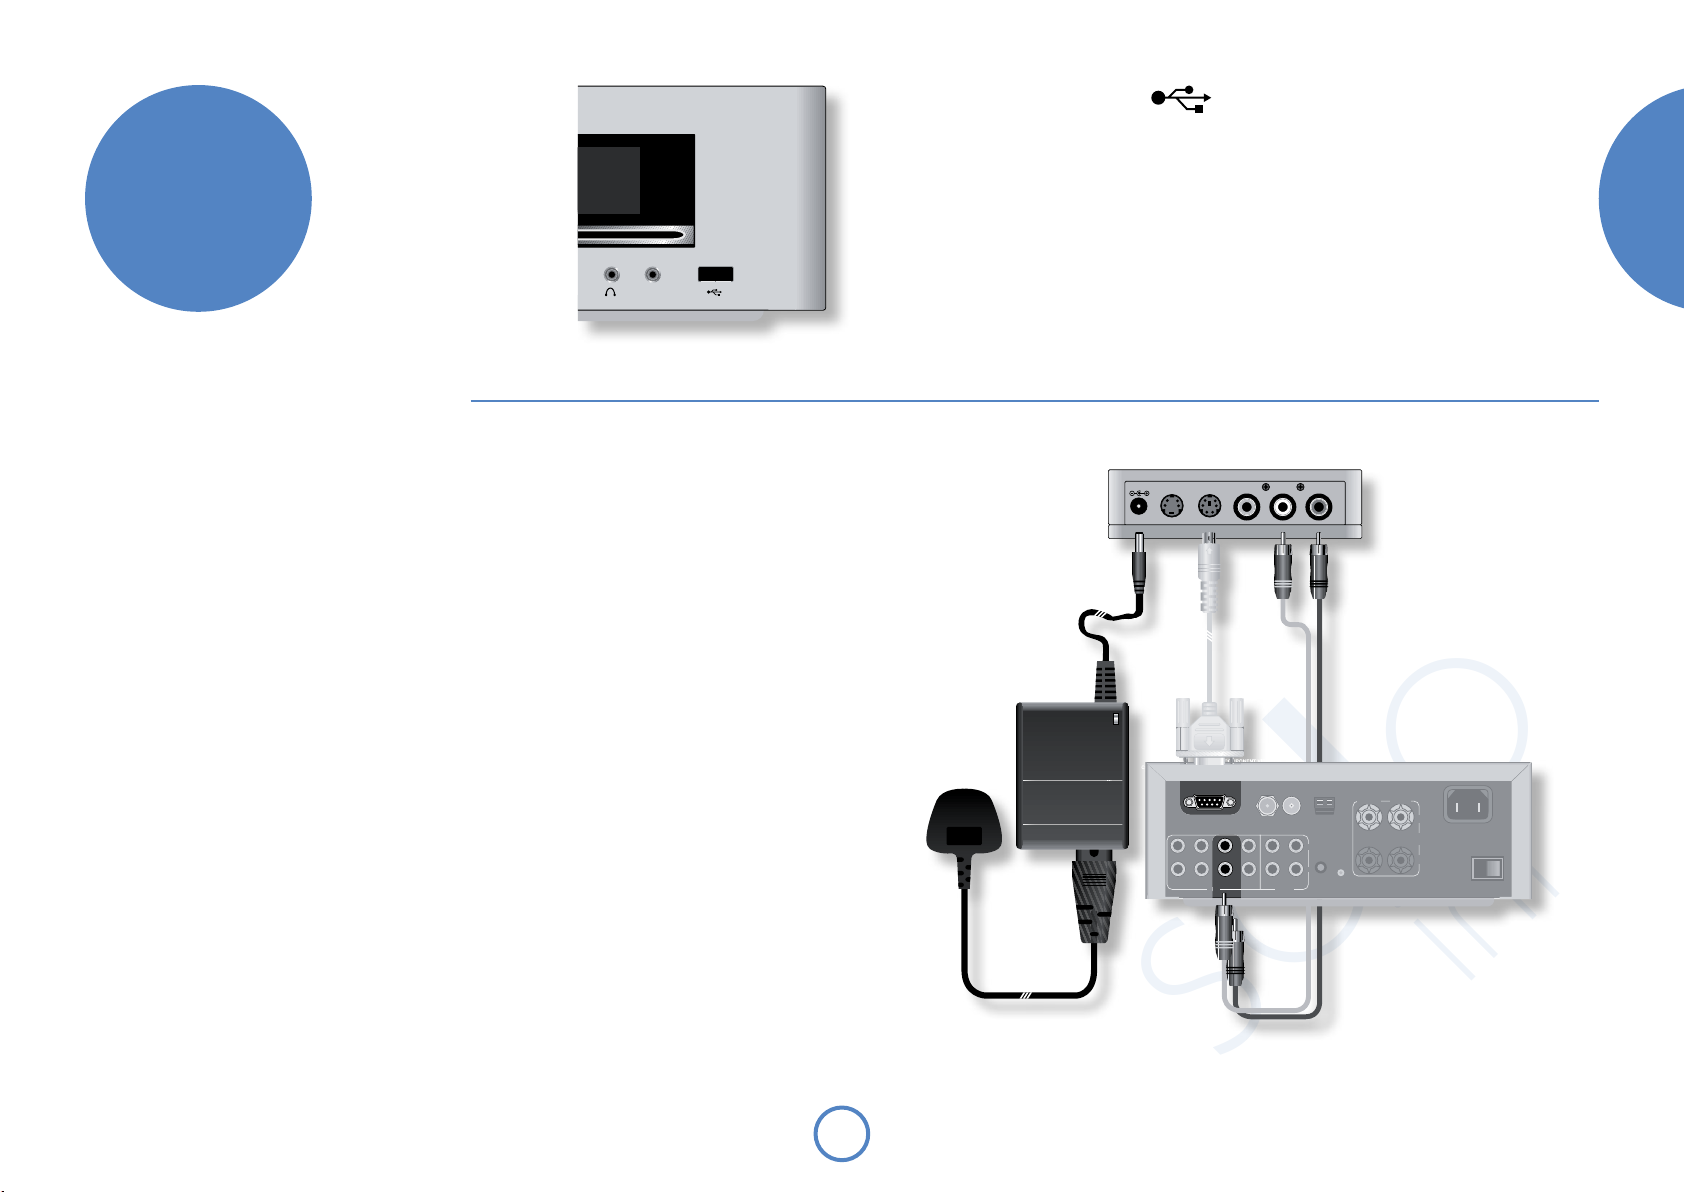
iPod connection
The combination of Solo Mini and Arcam’s rDock (or
rLead) provides a great platform for your iPod.
Connect the rDock as shown, power on the rDock,
slot in your iPod and select iPod as the source.
Navigating through music and podcasts on your iPod is
simple using the Solo remote, with text appearing on
the Solo Mini display.
More information is given in the rDock quick start
guide or (rLead quick start guide) supplied with these
accessory units.
rDock
DC IN S VIDEO CONTROL VD OUT LEFT RIGHT
+15V 0 65A
RS232 CONTROL
GAME AV iPod/TAPE TV TAPE PRE OUT
IN OUT
AMFMDAB
RIGHT LEFT
+
SPEAKER
L
R
REMOTE
PROG
OUT
OUTPUT
220 240V
50 60Hz
250W MAX
~
O I
OFF/ON
Solo Mini
9
solo
mini
Page 10
radio
Which radio aerial?
Your Solo Mini is capable of superb radio reception, but
only if it is receiving a good quality transmission signal.
Solo Mini is tted with an AM/FM receiver module and
an optional DAB receiver, depending on the region
where it was sold. The type of aerial you need depends
on your listening preferences and the local conditions.
Try the aerials supplied with your unit. If you are in a
medium to strong signal area, these should be adequate
for good reception; if not, you should contact your local
Arcam dealer or an aerial installation expert for advice.
Radio interference
Solo Mini is an audio device containing
microprocessors and other digital electronics.
It has been designed to very high standards of
electromagnetic compatibility.
If Solo Mini causes interference to radio or
television reception (which can be determined
by switching Solo Mini off and on), the following
measures should be taken:
< Re-orient the receiving antenna or route the
antenna cable of the affected receiver as far
as possible from Solo Mini and its cabling.
< Relocate the receiver with respect to Solo
Mini.
< Connect the receiver and Solo Mini to
different mains outlets.
If the problem persists, please contact your Arcam
dealer.
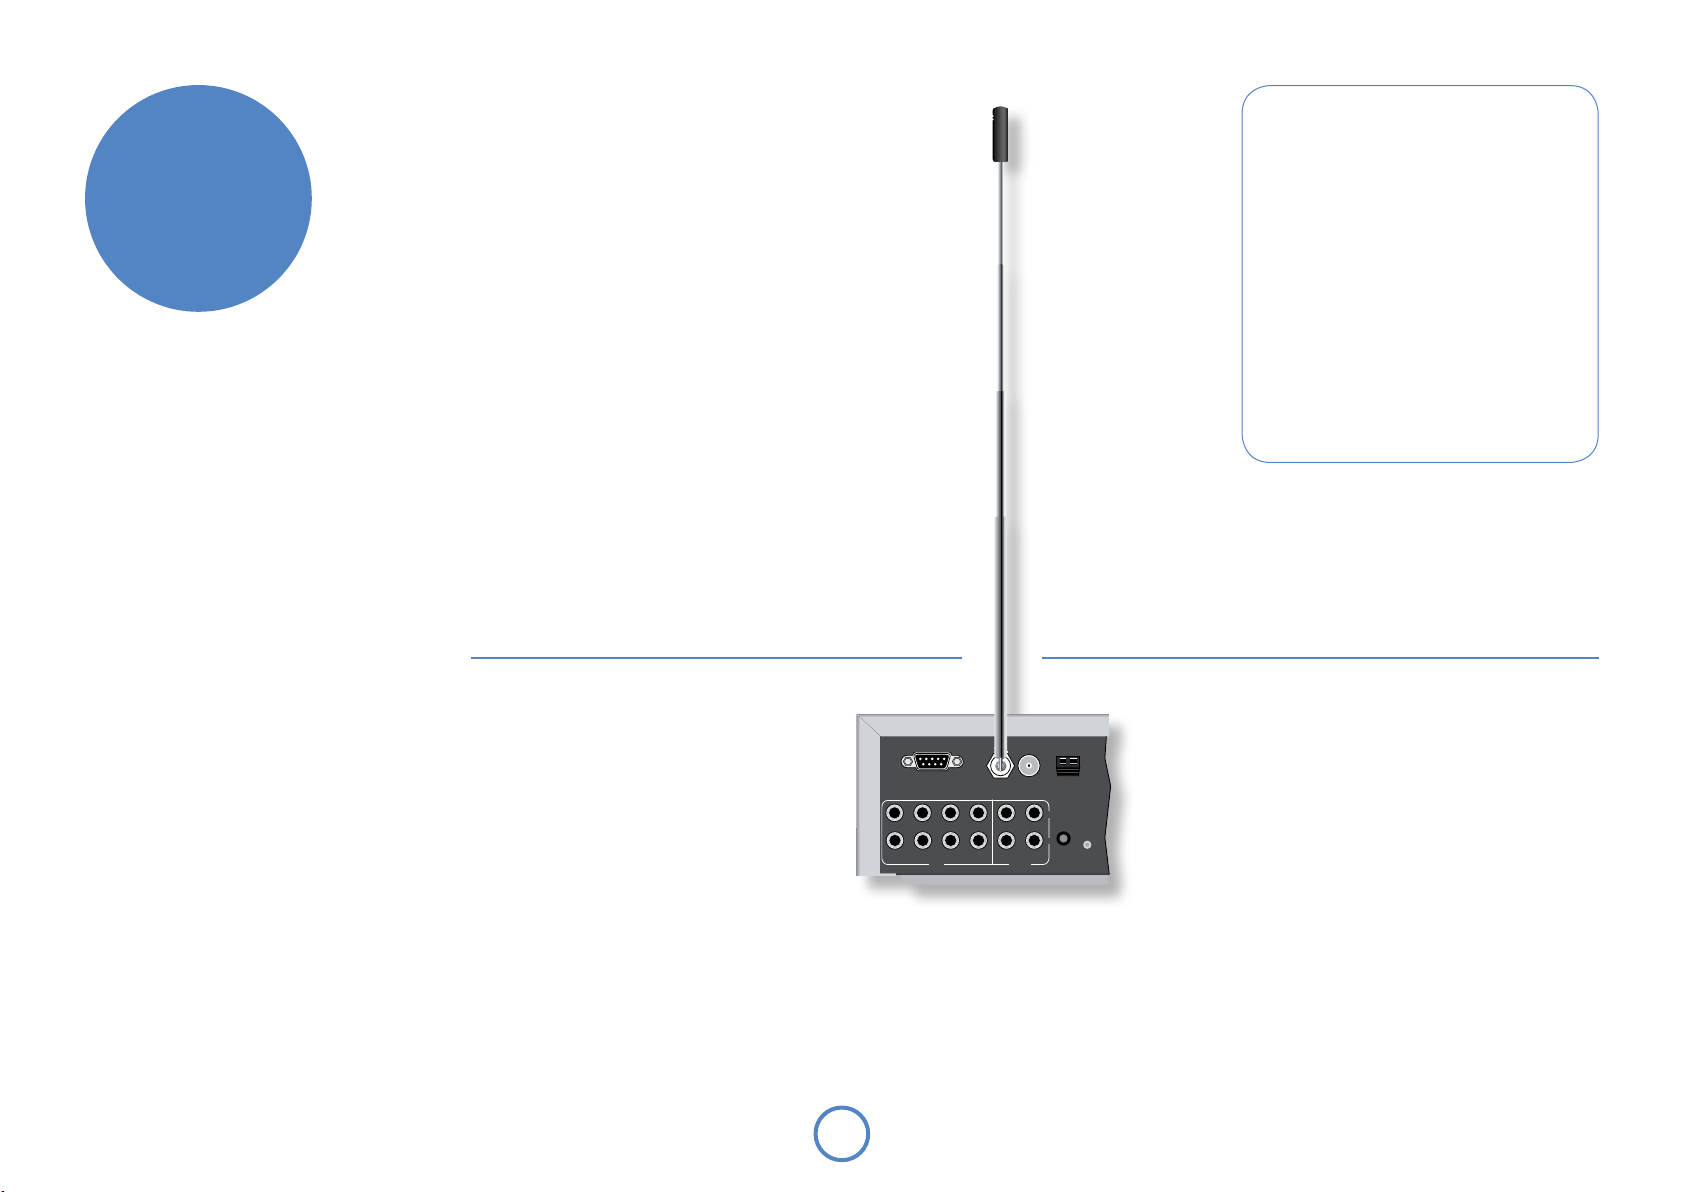
DAB
If the transmission signal is reasonably strong in your
area then the supplied telescopic aerial should be all
you need. When installed and receiving DAB, check the
signal strength by pressing the remote control’s INFO
button until the signal bar graph is displayed.
1. Attach the telescopic aerial to the screw connector
labelled ‘DAB’ on the rear of the unit.
2. With the aerial pointing upwards, fasten the screw
no more than nger-tight (do not use a spanner or
wrench).
3. Adjust the length of the aerial for optimum
reception. A fully extended aerial is likely to be best
for Band III transmissions. You may nd that that a
short extension is best for L-Band transmissions.
RS232 CONTROL
GAME AV iPod/TAPE TV TAPE PRE OUT
10
IN OUT
In weak signal areas, a high-gain, externally-mounted or
AMFM
roof-mounted aerial is desirable in order to receive the
highest number of services.
In Band III transmission areas (such as the UK), use a
L
R
REMOTE
PROG
OUT
multi-element Yagi aerial with the elements mounted
vertically, as the transmissions are vertically polarised.
If you are close to more than one transmitter, use an
omnidirectional or folded dipole aerial.
If the DAB services in your area are transmitted on
L-band, then ask your dealer for advice for the best
aerial to use.
Page 11

FM
An FM aerial is required to receive VHF radio signals.
In strong signal areas, the supplied FM wire aerial can
be used with reasonable results.
Connect the supplied aerial to the centre terminal of
the
FM coaxial connector input on the rear panel of the
unit. Experiment with the position of the aerial to get
the best reception.
In weak signal areas, or for optimal FM radio reception,
a roof- or loft-mounted aerial is advised as this will give
superior reception.
In some areas, cable radio may be available or, in an
apartment building, a distributed aerial system may
be installed. In either of these cases you should have
sockets in your home marked
those marked TV); these should be connected to the FM
coaxial connector on the rear of Solo Mini.
FM or VHF (do not use
DAB
VHF/FM
English
AM
An AM aerial is required to receive AM/medium wave
radio signals, so a simple loop aerial is supplied as an
accessory. Follow the assembly instructions in the
adjacent diagram.
Make sure that the aerial is positioned well away from
Solo Mini itself, TVs, computers and other sources of
RF ‘noise’. Rotate the aerial to discover which position
gives the best reception.
In weak signal areas, or when Solo Mini is in use inside
a steel-framed building (such as an apartment building),
a wire between 3 and 5 metres long can be used to
strengthen reception. Mount this high up outside the
building (if possible) and connect one end of this wire
to the ‘AM’ part of AM aerial input, in addition to the
loop aerial supplied (do not disconnect the AM loop
aerial).
Assembling the AM loop aerial
1. Release the tie-wrap and unwind the
twisted lead. Fold the plastic stand
forward through the loop frame.
11
2. Push the tab into the open slot in the
base of the stand. Press until the tab
clicks home.
o
3. Connect the lead wires to the AM socket
at the rear of Solo Mini (the wires are
not polarised). Rotate the aerial’s stand
until you obtain the best reception.
Page 12

playing
sounds
Playing a CD
With Solo Mini switched on (blue light showing),
gently insert a CD (label-side up) into the disc slot on
the front panel. Allow the disc to be drawn in by the
motorised rollers.
If ‘CD AutoPlay’ is enabled, the CD plays immediately; if
disabled, the CD waits for a command from the remote
or top panel. (‘CD AutoPlay’ is set in the system menu
– see page 16.)
In addition to audio CDs, Solo Mini can play MP3
and WMA audio les on a CD-R or CD-RW.
Basic operation
< Press 4/; (remote: 4) to start playback.
< To directly access a track, press the track number
on the numeric keypad of the remote.
< Press 4/
control to pause playback. To resume playback,
press 4/
< Press the </
the remote control to stop playback.
< To eject a disc, press 1 on the remote control,
or press the </
Skipping tracks
To skip a track forwards or back, press / or 0.
When skipping back, the rst button press takes you to
the beginning of the current track. Pressing the button
again takes you to the start of the previous track.
Repeat and Shufe play
To change the play mode, use the MODE button on the
remote control.
Press
MODE again to cycle through the various repeat
and shufe options.
on the top panel or
;
on the top panel or
;
button on the top panel or
1
button on the top panel.
1
on the remote
;
on the handset.
4
on
<
CD Play modes
CD
Rpt Disc
Rpt Trk
Shuffle
Rpt Shuf
Default play mode.
Disc tracks are played back in sequential
order.
Repeat disc.
All tracks on the CD are played in
order. After the last track has nished,
playback restarts from the rst track.
Repeat track.
Playback of the current track is
repeated until cancelled.
Shufe all.
The tracks on the CD are played in a
random order.
Repeat shufe.
All the tracks on the CD are played in
a random order. After every track on
the CD has been played once, playback
restarts from the rst track.
Listening to radio
Switching on the radio
Press the FM or DAB/AM button on the remote-control
to cycle between tuner inputs.
Alternatively, press
you wish to listen to (DAB, FM or AM) is displayed on
the front panel.
Tune mode and Preset mode
The MODE button toggles between the two ways of
selecting a station: Tune mode and Preset mode.
In Tune mode, you can step through the frequency of
the FM or AM band, either manually or automatically
(see below) using the
remote control. Found DAB stations are cycled through
in sequence in Tune mode.
In Preset mode, you can cycle through stations that
have been saved as presets, either sequentially (using
the
or C buttons on the remote control, or 0 or
B
on the top panel); press OK to conrm in each case.
/
Or you can go straight to a particular preset station by
pressing its number key on the remote.
Setting station presets
Solo Mini provides for 30 FM station presets, 30 AM
station presets and 10 DAB station presets.
To store a preset, rst tune to the radio station you
wish to store. To store the station into one of the
presets 1–9, press and hold the appropriately numbered
button on the remote control until the ‘Saved to Preset
nn’ message is displayed.
An alternative method, giving access to presets 10–30,
is to press
16). Navigate through the menu until ‘Store Preset’ is
displayed. At this point, use the { and } buttons on
the remote control (0 or / on the top panel) to select
the preset number you wish to use for the currently
tuned station. Press OK to conrm and the ‘Saved to
Preset nn’ message is displayed.
Note that saving a radio station into an already
occupied preset will cause it to be overwritten by the
new one.
Your presets are retained when Solo Mini is
disconnected from the power supply.
SOURCE until the radio type that
or C buttons on the
B
MENU to enter the system menu (see page
12
Page 13

DAB
DAB Setup
The rst time you select DAB as the source on a new
Solo Mini, you are prompted to scan for new stations.
Make sure you have an aerial installed, and conrm with
OK. Found stations are added automatically to a list of
available stations when the scan is complete.
You can scan for new stations at any time after the
initial scan. Select DAB as the source, then press the
MENU button. Navigate through the menu options
(see page 16) until ‘DAB Setup’ is displayed. There are
two options under this menu item – ‘Scan’ and ‘Erase
settings’.
Selecting ‘Scan’ adds new DAB stations to the list
of available stations, but stations that are no longer
transmitted are not erased. Over time, or if you change
location, this may lead to you having a number of
stations in your list that cannot actually be received.
In this case, select ‘Erase settings’, then perform a new
scan; when the scan is complete, only stations that are
currently receivable are shown.
AM/FM
Tune mode: Manual tuning
Press the B or C buttons on the remote control
(or 0 or / on the top panel) for less than one second
to select the desired tuning frequency. Manual tuning
is useful for tuning to a known frequency, or if you are
trying to select a station that is too weak to capture by
automatic tuning.
Tune mode: Automatic tuning
Press the B or C buttons on the remote control
(or 0 or / on the top panel) for longer than one
second to engage automatic tuning. Solo Mini searches
for a radio station signal of sufcient strength, then
stops. To skip to the next station, press one of the
buttons again. Automatic tuning is available for both FM
and AM.
Playing tracks from a USB
memory device
Press the FRONT button on the remote control two
times. Alternatively, press the top panel
until ‘USB’ is shown as the source.
Plug the USB memory device holding the audio tracks
into the USB socket on the front panel. Solo Mini can
play MP3 or WMA le formats.
Browsing music
Navigation through the audio tracks held on the device
depends on how the audio les have been organised
into folders and les. We recommend a fairly ‘at’
organisation, to simplify navigation.
Typically, there may be folders for ‘Genre’ (Classical,
Rock, Jazz, etc.), ‘Artists’ or ‘A bums’. Files that are not
stored inside a folder (i.e. ‘loose’ audio les) are treated
as though they were placed in a folder entitled ‘Songs’.
To navigate through folders, use the
on the remote control (or 0 or / on the top panel).
To select a folder to browse, press OK on the remote
control.
Once a folder containing audio les is selected, you
can navigate through the les using the the B or C
buttons on the remote control (or 0 or / on the top
panel). Song titles and Album titles (i.e. enclosing folder
names) are normally displayed.
Playing music
Press 4 on the remote control (or 4/; on the top
panel) to start playing the track.
The display shows the track title (scrolling if necessary)
with the elapsed time and volume setting. You can
toggle the information displayed by pressing the
button.
To skip a track, use the
control or top panel.
or / buttons on the remote
0
B
SOURCE button
or C buttons
INFO
Repeat and Shufe play
To change the play mode, use the MODE button on the
remote control.
Press
MODE again to cycle through the various repeat
and shufe options.
USB RPT ALL
8.Hysteria
In the example above, ‘Repeat all’ play mode is shown.
The USB play modes available are listed in the following
table:
USB Play modes
USB
USB RPT
ALL
USB RPT
FDR
USB RPT
TRK
USB SHF
ALL
USB R F
SHF
Default play mode.
Tracks are played back in sequential
order.
Repeat all.
All tracks on the USB device are played
in order. After the last track has nished,
playback restarts from the rst track on
the device.
Repeat folder.
Tracks in the current folder are played
in order. After the last track in the folder
has nished, playback restarts from the
rst track in the folder.
Repeat track.
Playback of the current track is repeated
until cancelled.
Shufe all.
Tracks on the device are played in
random order.
Repeat folder shufe.
Tracks in the current folder are played in
a random order. After every track in the
folder has been played once, playback
restarts from the rst track.
VOL:35
01:42
USB R A
SHF
Disconnecting a USB device
To disconnect a USB device from Solo Mini, either
put Solo Mini into standby mode, or select a different
source using the remote control (or the SOURCE
button on the top panel). After a short delay to allow
any read operation to conclude, the USB device may be
safely removed from the front panel.
Repeat all shufe.
All the tracks on the USB device are
played in a random order. After every
track on the device has been played
once, playback restarts from the rst
track.
English
13
solo
mini
Page 14

remote
control
Inserting batteries into the
remote control
1. Open the battery compartment by pressing the
button on the back of the remote control.
2. Insert two ‘AAA’ batteries into the battery
compartment, following the polarity indications
given inside the compartment itself.
3. Push the battery cover back into position.
Using the remote control
Please keep in mind the following when using the
remote control:
< Ensure that there are no obstacles between the
remote control and the remote sensor on Solo
Mini. The remote has a range of about seven
meters.
< Remote operation may become unreliable if
strong sunlight or uorescent light is shining on
the remote sensor of Solo Mini.
< Replace the batteries when you notice a
reduction in the operating range of the remote
control.
General Solo Mini commands
Switches Solo between Standby mode
2
and On.
DISP
Cycles the brightness of the front-panel
display.
Source
selection
{
B, C
{
and OK
MENU
Press the appropriate button to select
the audio source you would l ke to hear:
CD, FM, DAB/AM, FRONT, TV, AV, GAME or
TAPE.
Where DAB is tted, press
twice to select AM.
Press
FRONT twice to select USB.
Adjusts the amplier volume.
,
}
The B and C keys are used to
navigate the System menu, { and } to
,
}
adjust the settings, together with the OK
button (see pages 16).
Press once to mute the speaker and
pre-amp outputs of Solo Mini. Press for
@
a second time (or adjust the volume) to
unmute the unit.
MENU
enters the System menu (see page
16). Press the MENU button for a second
time to leave the menu.
DAB/AM
14
Page 15

CD commands (source is CD)
(Play) Start the playback of a CD.
4
(Stop) Stop the playback of a CD.
<
(Pause) Pause the playback of a CD.
;
Press again (or press play) to re-start
playback.
(Skip/Scan forwards) Press and release
/
to skip to the beginning of the next
track. Press and hold the button to scan
forwards.
(Skip/Scan backwards) Press and release
0
to skip back to the start of the current
track. Press and release again to skip to
the start of the previous track. Press and
hold the button to scan backwards.
(Eject) Press to eject a CD.
1
1–9,0
INFO
MODE
B, C
Number keys for track selection – Press
the number of the track that you want
to hear. To select a track greater than 9,
press and hold the rst digit of the track
(e.g. 1) until ‘1–’ is shown, then press the
second digit.
Toggles the track time display from a
count-up to a count-down timer.
Press the MODE button to cycle through
the repeat/shufe modes for CD
playback (Repeat disc, Repeat track,
Shufe and Repeat shufe).
When listening to music, the B
and C keys are used to increase or
decrease the track number played.
Radio commands (source is FM, DAB or
AM)
1–9, 0
>, ?
B, C
INFO
MODE
Number keys for selecting a preset
station. To select a station preset greater
than 9, press and hold the rst digit of
the preset (e.g. 1) until ‘1–’ is shown, then
press the second digit.
In Preset mode, these keys step through
valid station presets.
In Tune mode and with an FM or AM
source, these keys step up or step down
through frequency. Press and hold one
of these keys to search for stations by
scanning up or scanning down through
the frequency band.
For FM sources, displays the RDS station
name and RDS text (if available), signal
strength and frequency.
For DAB sources, cycles between
scrolling text, programme type, bit rate
and signal strength.
Toggles between Preset mode and Tune
mode.
iPod commands (source is iPod)
TAPE, OK Select ‘iPod’ as source, conrm with OK.
B, C
OK or
B, C
INFO
MODE
Navigate through top-level iPod menus:
Artists, Albums, Genres, Songs,
Composers, Audiobooks, Podcasts,
Make Selection and Playlists.
Select a menu item, or play an item if at
the bottom level.
}
Navigates up one level in the menu structure
{
Navigate within a selected item.
Play selected item.
4
Stop playback.
<
Pause playback.
;
Cycles through different information
displays of the item currently playing.
Press the MODE button to cycle through
the iPod play modes:
Repeat Track, Repeat All, Shuffle
Songs, Shuffle Albums and Shuffle
Songs Repeat All.
USB device commands (source is USB)
FRONT,
FRONT
B, C
OK or
B, C
INFO
MODE
Select ‘USB Device’ as source.
Navigate through levels of folders/sound
les on USB Device.
Select a menu item, or play an item if at
the bottom level.
}
Navigates up one level in the menu structure
{
Navigate within a selected iteml.
Play selected item.
4
Stop playback.
<
Pause playback.
;
Skip one item forward, back
/, 0
Cycles through different information
displays of the item currently playing.
Press the MODE button to cycle through
the USB play modes:
Repeat All, Repeat Folder, Repeat
Track, Shuffle All, Repeat Shuffle
Foldr, and Repeat Shuffle All.
English
15
solo
mini
Page 16

system
menu
Balance
Balance allows you to increase the volume of one
channel (left or right) relative to the other. Altering the
balance may help to restore the stereo image for an
off-centre listening position.
Bass
This setting increases or decreases the lower frequency
components of your music.
Treble
This setting changes the relative volume of the higher
frequency components of your music.
Sleep Timer
This timer allows you to specify a listening period, after
which the volume fades into the (silent) standby mode.
CD AutoPlay
(Applies only if source is
This setting controls the handling of a CD inserted
into the front slot. If enabled, the CD plays immediately;
if disabled, the CD waits for a command from the
remote or top panel.
Prog
(Applies only if source is
This feature allows you to programme the playing
order of CD tracks. Scroll left or right to highlight any
of the available tracks and press
playback sequence.
CD.)
CD and a CD is loaded.)
OK to transfer it to the
Configuring the listening settings
Solo Mini allows you to adjust listening settings to suit
your taste, and to customise various system features.
Use the adjacent diagram to navigate through the items
available.
With the unit switched on (blue light showing), press
MENU on the remote control. Now use the
keys on the remote to move down and up the
B
settings available. The { and } keys on the remote
are used to adjust particular settings.
To leave the menu at any time, press
FM Mode
(Applies only if source is
In some weak signal areas, switching the FM tuner to
‘Mono’ can be of benet, as mono requires a much
lower signal strength to produce acceptable results. If
the signal strength in your area is good, leave FM Mode
in ‘Stereo’.
DAB Setup
(Applies only if source is
Selecting ‘Scan’ (conrm with
search for new DAB stations. Found stations are added
automatically to the list of available stations.
Scanning for new stations does not erase stations that
are no longer transmitted – over time, or if you change
location, this may lead to you having stations in your
list that cannot be received. In this case, select ‘Erase
settings’ (conrm with
When the scan is complete, only stations that are
currently available in your area are shown.
Store/Erase Preset
This allows you to store a radio station that you have
tuned in to as a numbered preset (conrm with
The station can then be retrieved by pressing the
preset number on the remote.
In the same way, you can erase a particular numbered
preset (conrm with
iPod Option
(Applies to
This allows you to Enable or Disable control of an iPod
when connected via an Arcam rLead (for rDock, this
feature is automatic).
TAPE input with rLead connected)
FM.)
DAB.)
OK), then perform a new scan.
OK).
MENU again.
OK) causes Solo Mini to
C
and
OK).
16
Erase list of stations
OK
Scan for available stations
Conrm preset
OK
Conrm preset
OK
‘Power on’ mode
MENU
Left
–dB
–dB
OK
–Preset
Only if source is
DAB, FM or AM
–Preset
Right
+dB
+dB
Only if source is CD
Only if source is CD
and CD loaded
Only if source is
FM
Only if source is
DAB
+Preset
+Preset
rLead only
Page 17

technical
specification
Pre-amplifier
Inputs
Maximum input level 2.5Vrms
Input impedance 47k
Signal/noise ratio 105dB
Co-axial outputs
Maximum output level 2.5Vrms
Output impedance 500
Ω
Ω
Amplifier
Continuous power output, per channel, 80kHz measurement bandwidth
Both channels, 8
Distortion, both channels 8
power, 1kHz
Ω, 1kHz 25Wrms, 0.1% THD+n
Ω, 80%
0.036% THD+n
CD playback
DAC Wolfson 24-bit multilevel Delta-Sigma
Frequency response (±0.5dB) 20Hz–20kHz
DAC
DAB receiver (where fitted)
RF tuning range 174–240MHz (Band III)
Number of DAB presets 10
Sensitivity (typical) –98dBm (VHF measurement to EN50248)
Input impedance 50
Audio data rate (maximum) 256kbits/s MPEG layer II, protection level
1452–1490MHz (L-band)
Ω
3
AM receiver
RF tuning range 522–1710kHz, in steps of 9kHz (UK)
530–1710kHz, in steps of 10kHz (USA)
531–1629kHz, in steps of 9kHz (Japan)
Number of AM presets 30
Signal/noise ratio (at 200mV) 40dB
Distortion (THD at 30%
modulation)
1.5%
General
Supply voltage* 100V, 115V or 230V AC,
Power consumption Standby mode 1W
Size (W x D x H) W230mm x D350mm x H90mm
Weight (net) 5.31kg
Weight (packed) 6.7kg
Supplied accessories Mains lead
* In Japan, the supply voltage is 100V, 50–60Hz.
E&OE. All specication values are typical unless otherwise stated.
depending on shipping region
Operational 80W (typical), 250W
(maximum)
Solo remote control handset and two AAA
batteries
Instruction manual and registration card
DAB/FM model: DAB Telescopic aerial, FM
dipole aerial and AM loop aerial,
AM/FM model: FM dipole aerial and AM loop
aerial
English
FM receiver
RF tuning range 87.5–108MHz (Europe and USA)
77.5–108MHz (Japan)
Number of FM presets 30
Sensitivity (typical) 2µV
Signal/noise ratio (at 200mV) 58dB
Distortion (THD at 200mV) 0.5%
17
solo
mini
Page 18

product
guarantee
Worldwide Guarantee
This entitles you to have the unit repaired free of charge, during the rst two years
after purchase, at any authorised Arcam distributor provided that it was originally
purchased from an authorised Arcam dealer or distributor. The manufacturer can take
no responsibility for defects arising from accident, misuse, abuse, wear and tear, neglect
or through unauthorised adjustment and/or repair, neither can they accept responsibility
for damage or loss occurring during transit to or from the person claiming under the
guarantee.
The warranty covers:
Parts and labour costs for two years from the purchase date. After two years you must
pay for both parts and labour costs. The warranty does not cover transportation costs
at any time.
Claims under guarantee
This equipment should be packed in the original packing and returned to the dealer
from whom it was purchased, or failing this, directly to the Arcam distr butor in the
country of residence.
It should be sent carriage prepaid by a reputable carrier – not by post. No responsibility
can be accepted for the unit whilst in transit to the dealer or distributor and customers
are therefore advised to insure the unit against loss or damage whilst in transit.
For further details contact Arcam at:
Arcam Customer Support Department,
Pembroke Avenue, Waterbeach, CAMBRIDGE, CB25 9QR, England
or www.arcam.co.uk.
Problems?
If your Arcam dealer is unable to answer any query regarding this or any other Arcam
product please contact Arcam Customer Support at the above address and we will do
our best to help you.
On-line registration
You can register your product on-line at www.arcam.co.uk.
18
 Loading...