

Page 1
Service Manual
ARCAM
FMJ P7
7-Channel Amplifi er
P7
Issue 1.0
ARCAM
Page 2

Contents List
Section Issue
Technical specifications
! Technical specification -
! Rear panel silk screen -
Amplifier board L924
! Circuit description -
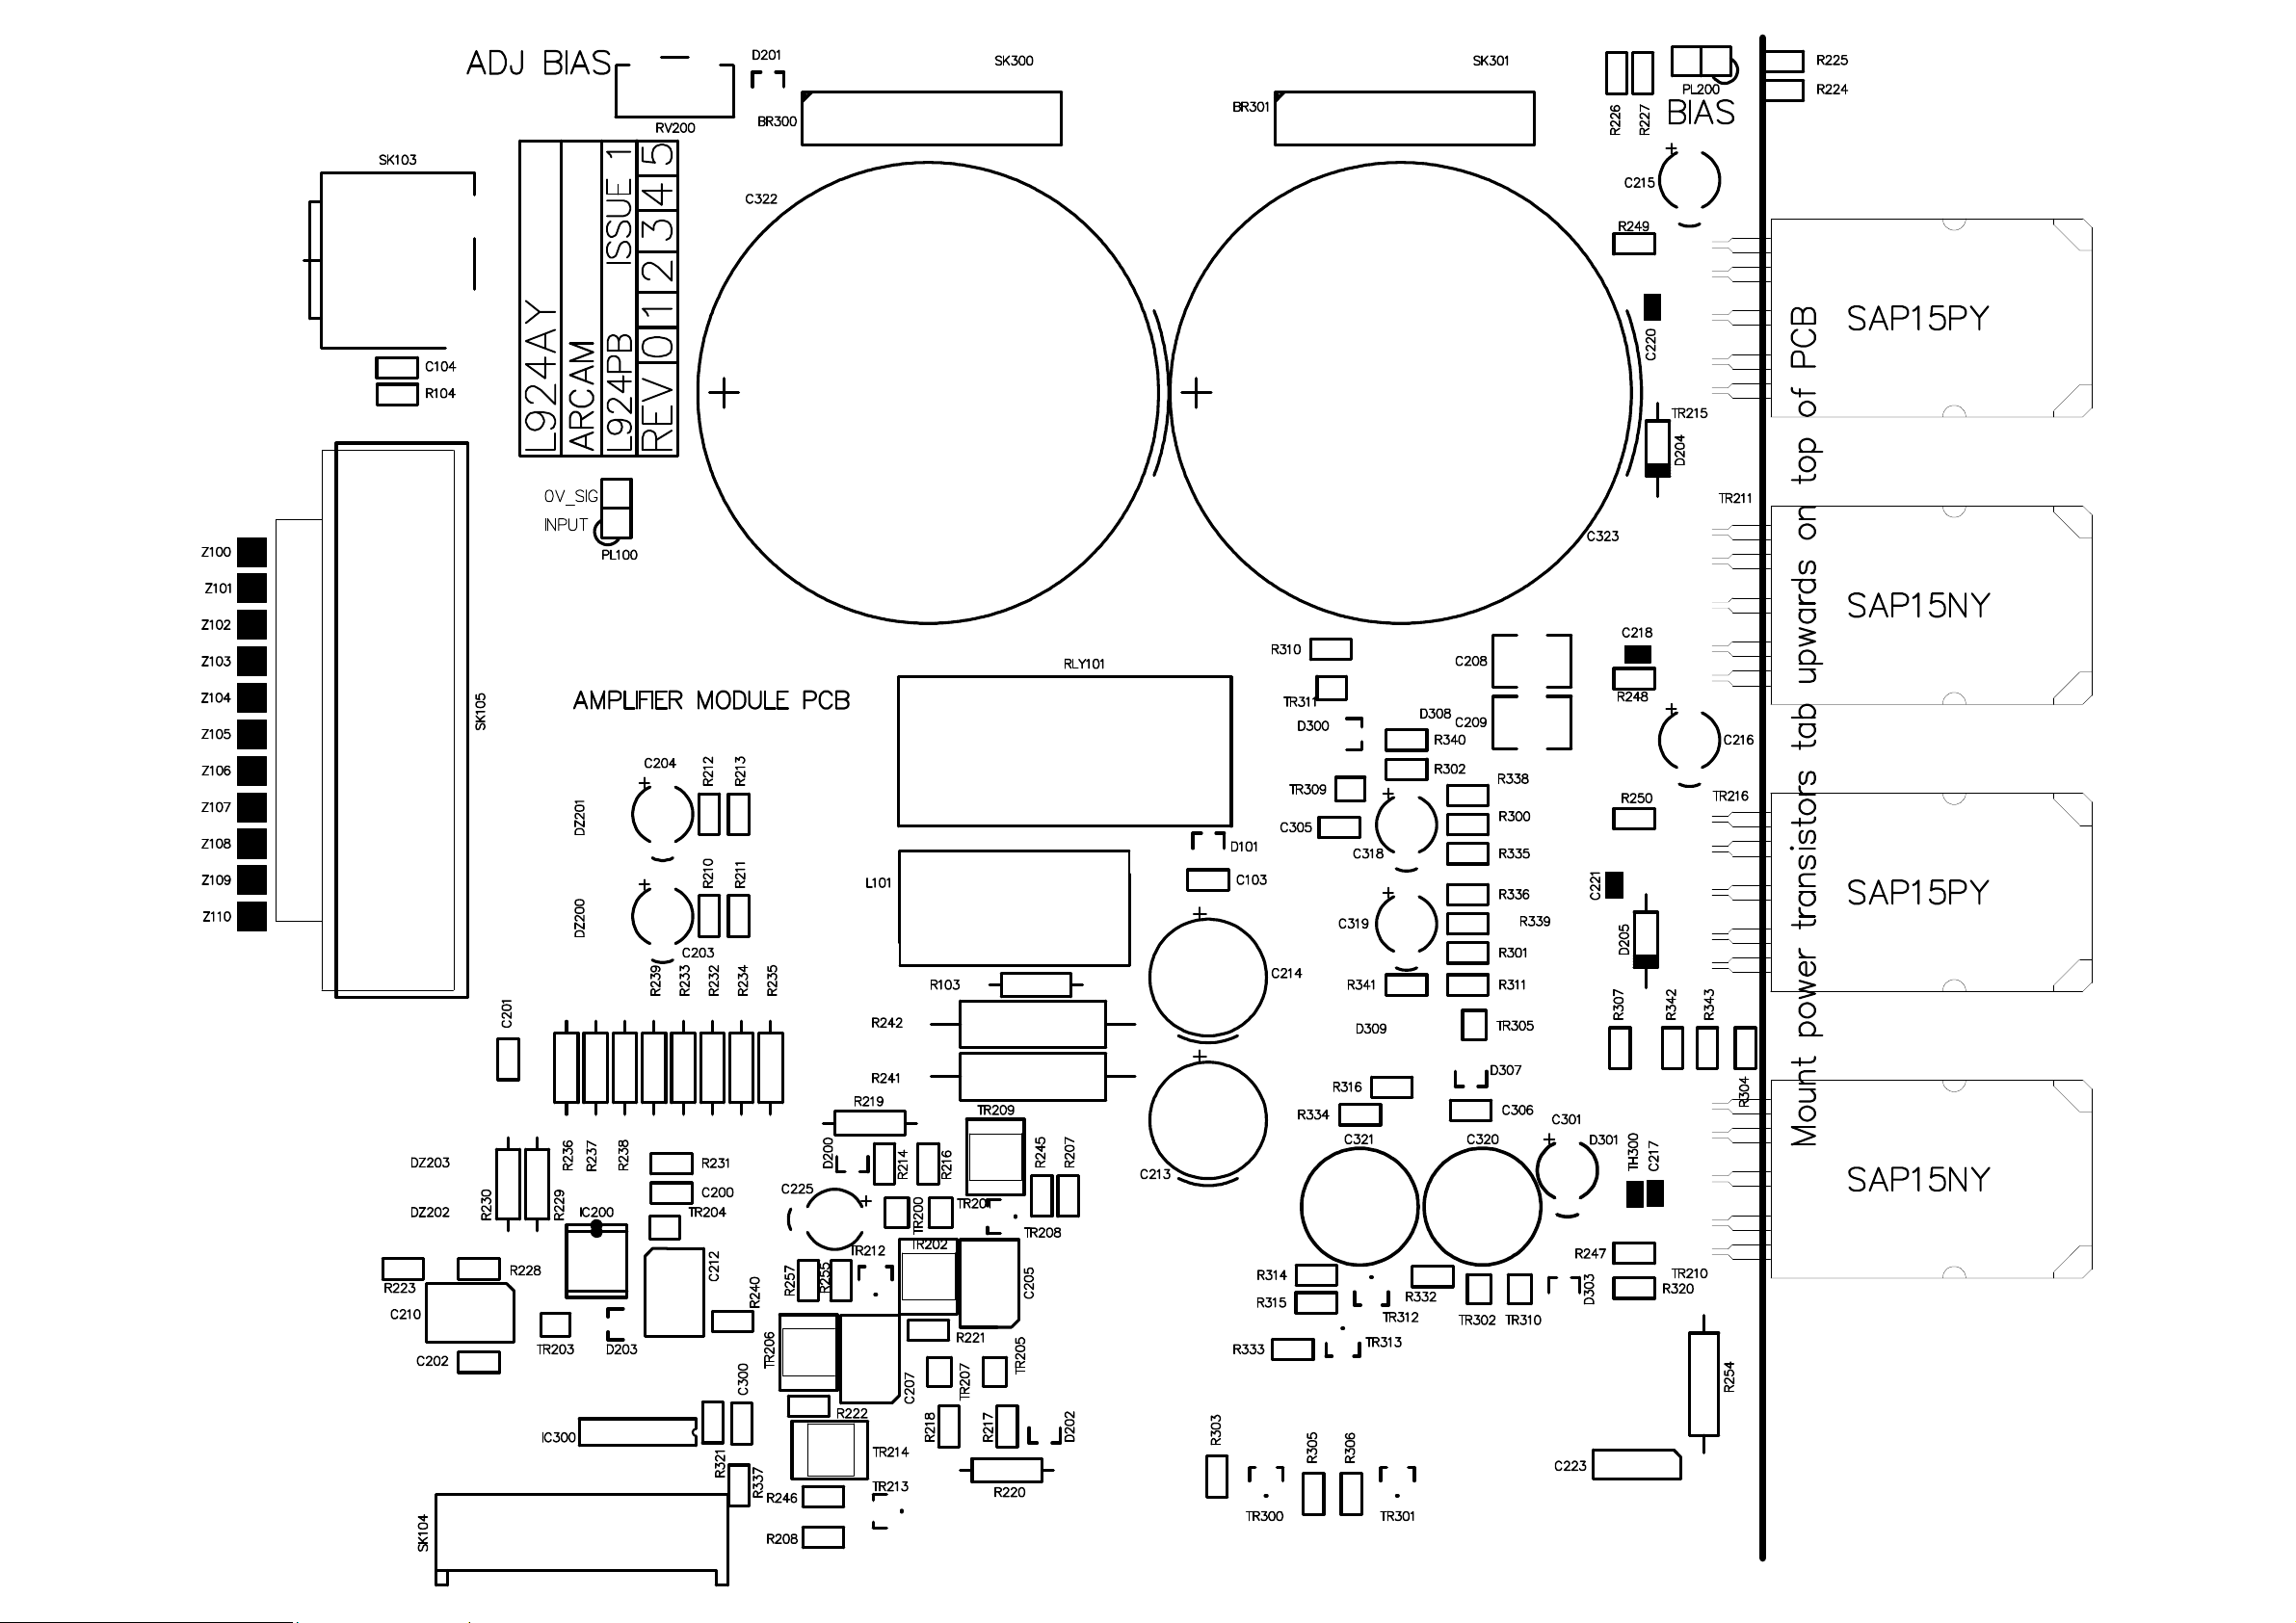
! Component overlay 1.0
! Parts list 1.1
! Circuit diagrams 1.1
Controller board L925
! Circuit description -
! Component overlay 1.0
! Parts list 1.2
! Circuit diagrams 1.2
Transformer specifications
! L911TX 1.0
! L912TX 1.0
! L920TX 1.0
! L921TX 1.0
Mechanical
! General assembly parts list -
! Assembly diagrams
Front panel TX tray - -
Rear panel Chassis -
Page 3

Technical
Specifications
Contents
!
Technical
specifications
!
Rear panel silk screen
Page 4

Technical Specifications
All measurements are with 230V/50Hz mains power
Continuous output power
All channels driven, 20Hz – 20Khz, 8 ohm 150W per channel 1.05kW total
All channels driven, 20Hz – 20kHz, 4 ohm 230W per channel 1.62kW total
One or two channels driven at 1kHz, 8 ohm 160W per channel
One or two channels driven at 1kHz, 4 ohm 250W per channel
One or two channels driven at 1kHz, 3.2 ohm 300W per channel
Peak output current capability 25A per channel
Total harmonic distortion
At any level up to rated power, into 4 or 8 ohms <0.05% (20Hz – 20kHz)
Typically <0.005% at 1kHz
Frequency response +-0.2dB (20Hz – 20 kHz)
-1dB at 1Hz and 100kHz
Residual hum and noise
Referenced to full power -122dB, 20Hz – 20kHz, unweighted
Voltage gain x 28.3 (1V input gives 100W/8 ohm output)
Input impedance 22k ohm in parallel with 470pF
Output impedance 50m Ohm at 20Hz, 1kHz
120m ohm at 20kHz
Power requirements 115V or 230VAC, 50/60Hz, 3kW maximum via heavy duty IEC mains inlet
A soft start system eliminates large inrush currents at switch on
Dimensions W430 x D450 x H180 mm
Weight 31kg (68 Ib) nett
35kg (77 Ib) packed
Page 5
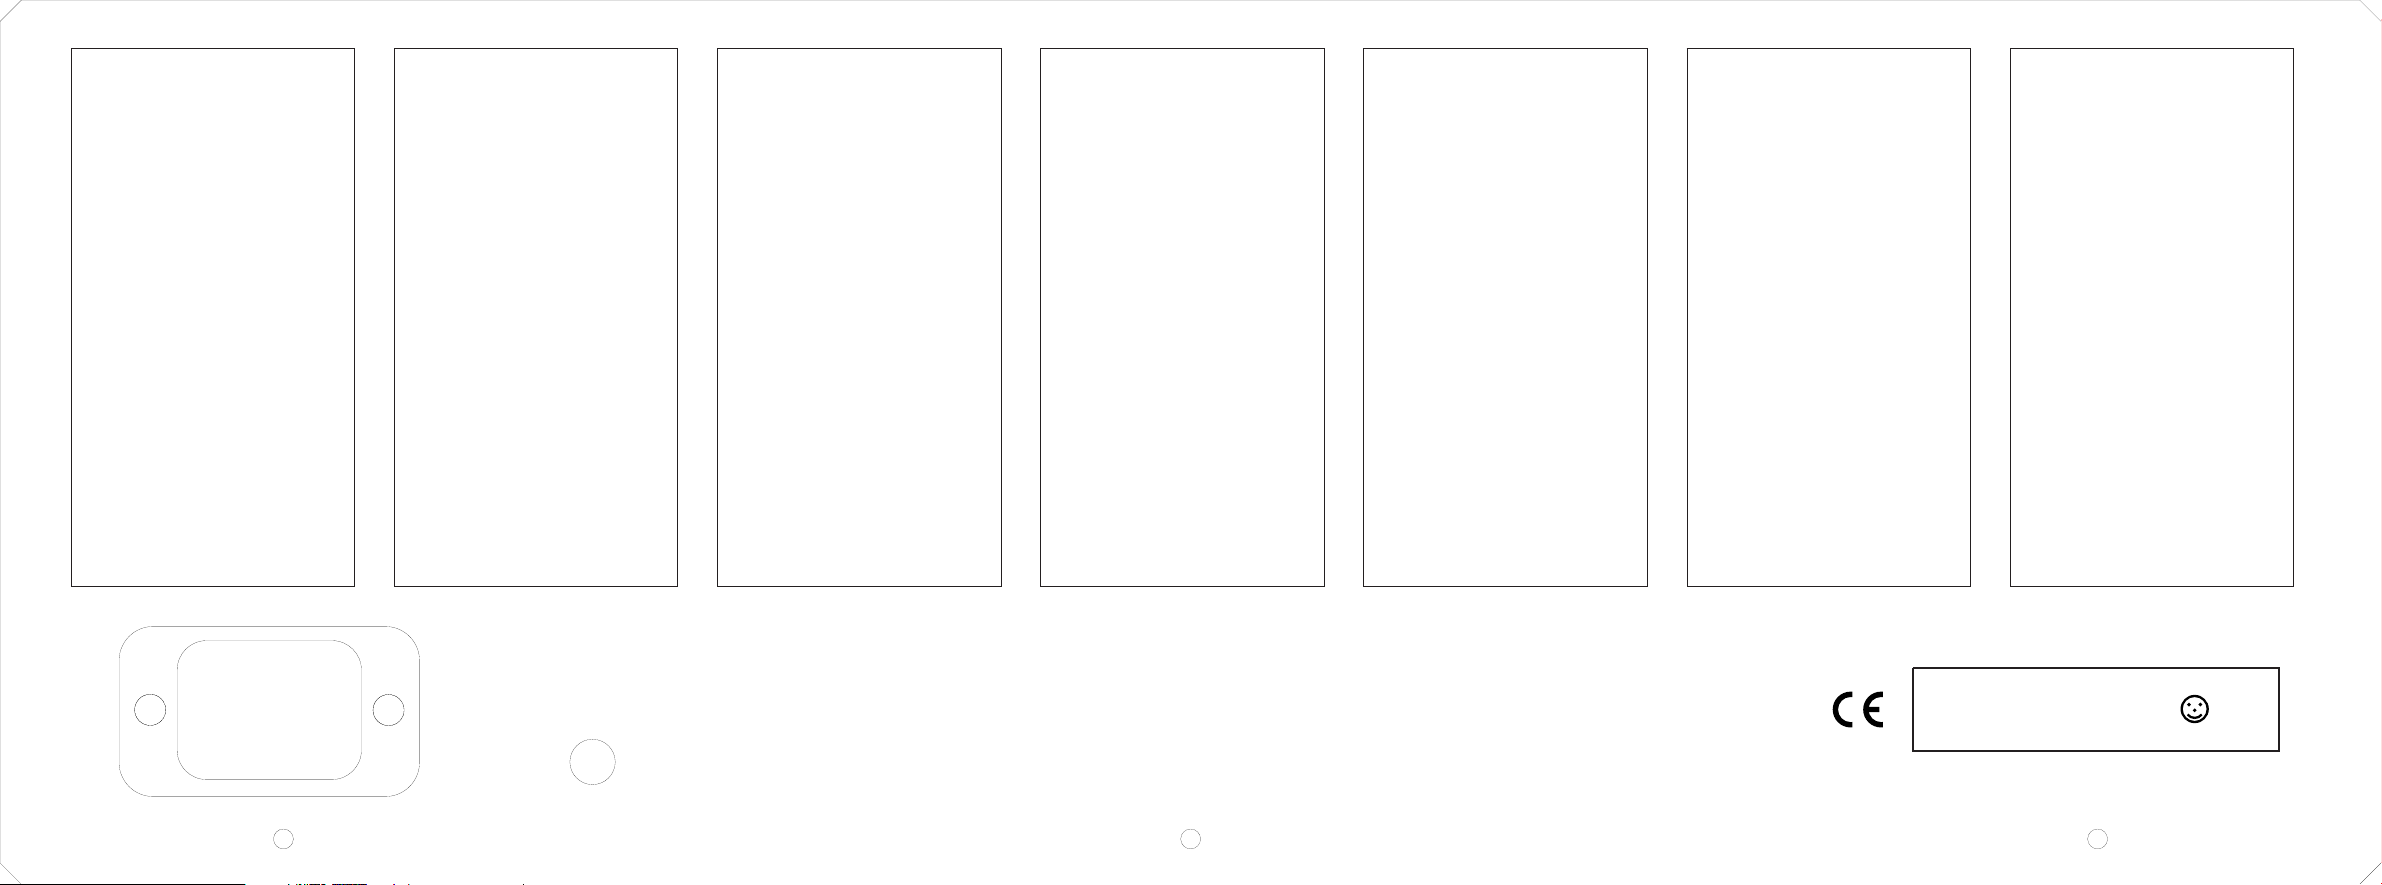
7 RS BACK
POWER INLET
230V
~
50 – 60 Hz
3700 VA
MAX
6 R SURR 5 RIGHT 4 CENTRE 3 LEFT 2 L SURR 1LS BACK
CAUTION – SHOCK HAZARD, DO NOT OPEN.
12V TRIGGER
IN
WARNING: THIS APPLIANCE MUST BE EARTHED.
ACHTUNG – VOR OEFFNEN DES GERAETES NETZSTECKER ZIEHEN.
ATTENTION – RISQUE DE CHOC, NE PAS ENLEVER.
PRECAUCION – PELIGRO DESCARGA, NO ABRIR.
RADIO INTERFERENCE (USA) THIS PRODUCT COMPLIES WITH PA RT 15 OF FCC RULES, OPERATION
IS SUBJECT TO THE FOLLOWING CONDITIONS; (1) THIS DEVICE MAY NOT CAUSE HARMFUL
INTERFERENCE (2) THIS DEVICE MUST ACCEPT ANY INTERFERENCE RECEIVED, INCLUDING
INTERFERENCE THAT MAY CAUSE UNDESIRED OPERATION.
THIS PRODUCT IS CERTIFIED BY THE MANUFACTURER TO COMPLY WITH DHHS RULE 21 CFR
SUBPART J APPLICABLE AT THE DATE OF MANUFACTURE.
DESIGNED & MADE IN THE UK BY:
A & R CAMBRIDGE LTD, WATERBEACH,
CAMBRIDGE, CB5 9PB.
SERIAL No. LABEL
Page 6

Amplifier
Board
L924
Contents
!
Circuit description
!
Component overlay
!
Parts list
!
Circuit diagrams
Page 7

P7 Amplifier Module
Circuit Description
Refer to L924 circuit diagrams
Introduction
L924 is the power amplifier module for the P7 multichannel
amplifi er . There are 7 identical modules in t he P7. The circuit
design is based on the A85 / A32 output stage topology.
The main features of the amplifier module are as follows:
• Preset ‘THX’ gain (29d B closed loop gain). 0dBV input
signal corresponds to 100 watts into 8Ω output power
• Capable of producing 150 watts of sinusoida l output
power into an 8Ω resisti ve loa d (with greater than
250W into 3.2Ω subject to thermal dissipation limits)
• Relay coupled output for silent power on / off and load
protection
• Opto-isolated fault and control lines to the
microprocessor PCB (to avoid hum loops and
instability, to improve EMC performance and crosstalk)
• DC coupled signal path with integrating servo to
remove residual DC errors
• Instantaneous load protection
• Mono block design (each channel is electrically isolated
from all others and has independent power supply
windings on the mains transformer)
• Integrated modular heatsink for good therm al
performance and ease of assembly / servicing
• Low harmonic and in termodulation distort ion
• Flat frequency response
• Fast (and symmetrical) slew rate
• High damping factor
• Unconditionally stable into load s of up to ±90° phase
angle
Sheet 1
The input to the amplifier is connected via SK103. The 2
phono sockets are connect ed in parallel to allo w ‘daisychaining’ of amplifier modules. R104 provides a DC leakage
path to the chassis (i.e. mains power eart h) to prevent small
transform er leakage currents causing the electrical 0V of the
amplifier to rise significantly above mains earth potential.
C104 provides an EMC coupling between the local input
ground and the chassis to reduce common mode RF noise.
Star point SP101 connects the differently named electrical 0V
nets at a single point. This is to ensure the correct wiring
topology of the ground connections on the printed circuit
board. SP101 provides a good common ground reference
point when making voltage measur ements on the PCB. N ote
that 0V_DIG is not connected to SP101, as this is the
microprocessor groun d.
Relay RLY101 connects the output of the amplifier to the
load via socket SK105.
L101 and R103 form part of a ‘Zobel’ network to decouple
the load at hi gh frequencies to ensure amplifier stabili ty into
capacitive loads.
Note that signals 6 through 9 are open collector outputs,
active low, referred to 0V_DIG with no pull-up resistors.
This is beca use they are wire OR’ d on the micropro cessor
PCB (L925), where the pull-up resistors to +5V digital are
located.
The line ‘NFB’ provides for a portion of the negative feedback of the
amplifier to be taken on the load side of RLY101. The components
that allow for this (R236 thru R239) are not presently fitted , meaning
that RLY101 is not in cluded in the feedback loop.
SK104 connects to the microcontroller PCB. Note that all signals on
this connector are electrically isolated f r o m the amplifi er circuit
itself, via either opto isolators or the relay coil of RLY101. The 10pin connector has the following signals:
SK104
Pin Type Name Description
1 GND 0V_DIG Microprocessor ground return
2 PSU +24V_DIG +24 volt digital power supply
3 MUTE Not used
4 I/P OUT_RLY Relay drive for the output relay
5 Not used
6 O/P THERMPR
OT
7 O/P VIPROT Open collector short circuit fault
8 O/P DCPROT Open collector DC fault signal
9 O/P FAULT Open collector overall fault signal
10 Not used
(referred to 0V_DIG only) for
relay coil RLY101
RLY101 (LOW = output relay
ON)
Open collector thermal fault signal
(LOW = FAULT)
signal (LOW = FAULT)
(LOW = FAULT)
(LOW = FAULT)
Sheet 2
Port INPUT connects the input of the amplifier, referred to 0V_SIG,
which is the precis ion signal ground reference .
Zener diodes DZ202 and DZ203 limit the input signal amplitude to
approximat ely 5.3Vpk. This is to prevent damage to the input of opamp IC200, due t o a leaky source signal or el ectrostatic discharge.
R223, R228 and C210 form a passive 1
3dB corner frequency of roughly 330kHz to prevent ultrasonic
signals from entering the circuit and possibly causing damage.
The main amp l ifier circuit is a ‘classic’ curr ent feedback des ign.
IC200A is configured as a non-inverting amplifier with a gain of 2.
Its purpose is to provide current outputs (via its power supply pins)
and a current input (via its output pin). This forms the voltage to
current (transimpedance) conversion and phase splitting necessary to
drive the voltage gain stage. The ‘current feedback’ occurs because
when IC200 drives its 44Ω load to ground, the power supply pin
currents are half-wave rectif ied versions of the drive current of the
amplifier. This causes voltage gain, which is buffered and passed on
to the outputs . The feedback from the output to pin 1 of IC200 acts to
reduce the gain of the amplifier; when this current is roughly equal to
the current required to drive th e input signal into 44Ω, equilibrium is
reached and the closed loop gain is defined. The ou tput stage
provides the vast majority of the current required t o dr ive the 44Ω
signals to ground. The op-amp only provides a very small error
current sufficient to give the required voltage magnifica tion.
Transistors TR204 and TR203 are wired as cascodes (common base
amplifiers). Their purpose is to provide IC200 with ±15V power
supply rails, whilst allowing IC200’s power supply pin currents to
pass through them to the NPN and PNP current mirrors.
The resistor, zener diode and capacitor circuits on the bases of TR204
and TR203 are to provide a controlled ramp up during power on, a
stable power supply voltage and good local HF decoupling.
st
order low pass filter with a –
Page 8

Transistors TR200, TR201 and TR202 form a PNP Wilson
current mirror. Likewise TR205, TR207 and TR206 form an
NPN Wilson current mirror. The outputs of these two current
mirrors are connected together via the bias network around
TR212.
The two current mi rrors combine to provide a very high-gain
current to voltage (tran s resi st ance) gain stage, which provides
all the voltage gain of the amplifier (roughly 80dB at low
frequency).
C205, C207, R221 and R222 provide the loop compensation
for the amplifier. They combine to produce an open-loop pole
at roughly 10kHz and a corresponding open-loop zero around
500kHz. This allows for good time domain performance and
clean square wave reproduction. The amplifier is designed to
be critically damped. There should be no ringing or overshoot
apparent on the output signal when a (small) step function is
applied to the input.
Diodes D200 and D202 act to limit the current through
TR202 and TR206 in the event of a fault condition. When the
input current exceeds 14mA the diodes conduct and the
transresistance stage becomes a constant current source,
killing the open loop gain and preventing damage to the
transistors.
Resistors R219 and R220 decouple the supplies for the
amplifier gain stages from the main power rails. This is to
permit the bootstrap circuit to modulate these supplies,
increasing efficiency. The bootstrap will be described in more
detail later.
TR212 provides a 4.7V bias voltage to allow the following
pre-driver stage to operate in class ‘A’. It also acts as a V
BE
multiplier for TR209 and TR214 to maintain an
approximately constant current as the ambient temperature
inside the box changes.
TR209 and TR214 form a class ‘A’ pre-driver emitter
follower stage to boost the cu r r ent gain and isolat e the
transresistance stage from the outpu t transistors. This is
important to keep the loop gain of the amplifier high and thus
minimise distortion. TR208 and TR213 act as a current limit
(roughly 30mA) to prevent the destruction of TR209 and
TR214 in a fault condition.
R247, R248, R249 and R250 are to loosely decouple the
emitters of TR209 and TR214 from the output stage. This is
very important. The output devices (Sanken power
Darlingtons) have inbuilt temperature com pe ns ating diodes
which control the bias voltage to their bases. Each output
device has a 150Ω resistor so that the inbuilt diodes can
accurately control quiescent V
and hence colle ctor current
BE
as the output power and device temperature varies. Preset
potentiometer RV200 adjusts the quiescent current. NB:
Ensure that the amplifier has fully warmed up before
adjusting the qu iescent current. D201 protects the output
devices from destruction in the event of the preset
potentiometer going open circuit. PL200 allows the test
engineer to measure the bias volta ge (and thus collector
current).
C217, C218, C220 and C221 provide local HF stability
around the output transistors to prevent parasitic oscillation.
D204 and D205 are catch diodes to reduce the effects of
induced back-EMF in the loudspeaker load.
R254 and C223 form part of the ‘Zobel’ network that ensures
the amplifier sees a constant load of roughly 4.7Ω at very
high frequencies. This helps to improve stability and reduce
HF output noise.
C208 and C209 provide local high frequency decoupling for
the output devi ces.
IC200B forms the DC integrating servo. Its purpose is to remove
residual DC errors due to slight device mismatch and component
tolerances. It is configured as an inverting integrator with a time
constant of 0.47 seconds. Any positive DC offset at the output of the
amplifier will cause the output of the op-amp to go negative,
increasing the cur r e nt in the negative supply pin and thus ‘pull ing ’
the output down to ground (and vice versa). D203 protects the
inverting input of IC200B in a fault condit ion.
The bootstrap circuit consists of C213, C214, R241, R242, R219 and
R220. The purpos e of the bootstrap is to a llow the output voltage
swing to modulate the power supply rails of the input and voltage
gain stages. This allows this circuit’s power supply voltage to exceed
the main power rails connected to the output devices, allowing t he
driver stag e to fully drive the output and thus give th e best thermal
efficiency. The ‘bottom’ of R219 sees a peak-to-peak voltage swing
of approximately 15 volts at full output power (i.e. it goes 7.5 volts
above the rai l at the peak of the c ycle). The ‘top’ of R220 should see
the same volta ge swing.
Sheet 3
This sheet contains the protection circuits and interfa ce to the
microprocessor signals.
TR309, TR30 5 and their associ ated components for m the
instantaneous load protection circuit for t he output transistors. They
sense the voltage across the 0.22Ω emitter resistors (hence emitter
current) and the c ollector-emitter voltage, cutting off the base drive to
the output transistors when the collec tor current or device power
dissipation exceeds a pres et limit.
The protect ion circuit is designed to allow large (unrestrict ed)
currents into loa ds of 3Ω and above but limit the current into a short
circuit or very low impedance load. C318, C319, R335 and R336
form a 2.2ms time con st ant, which will allow larger t ransients of
current delivery for a few milliseconds, to ensure that the ampli f ier
has a sufficiently large transient capability to drive ‘difficult’
loudspeaker loads with a music signal.
TR311 also turns on when the protection circuit activates. This
switches on optocoupler IC300B causing a fault signal to be
transmitted to the microcontroller. The microcontroller will then
switch off the output relay to protect th e amplifier.
TR310, TR30 2 and their associ ated components for m the DC offset
detection circuit. A positive DC offset at the output will turn on
TR310. A negative DC offset at the output will turn on TR302, thus
causing TR313 to turn on. In either case optocoupler IC300A is
switched on causing a fault signal to be transmitted to the
microcontroller. The microcontroller will then switch off the output
relay to protec t the loudspeak er voice coils from overhea ting.
Thermistor TH30 0 is connected to the positive supply rail, adjacent to
the collector leg of one of the power output devices. This allows it to
sense the collector temperature of the output device. Its impedance
when cool is low, typically a few hundred ohms. In the event of a
thermal overload (above 110°C), TH300 will go to a high impedance
state. This will turn on TR301, which then turns on TR300, causing
optocoupler IC300D to switch on, sending a fault signal to the
microcontroller. The microcontroller will then switch off the output
relay until such time as the unit has cooled down to an acceptable
level (80°C or so). TR301 is configured with a small amount of
hysterisis (positive feedback) to ensure a clean signal is transmitted to
the microprocessor via IC300D.
Optocoupler IC300C is connected in series with the 3 optocouplers
mentioned ab ove, producing an overall fa ult signal. This is so that the
microcontroller c an determine in which module the fault has
occurred, permitting selective control of the output relay for each
module in the amplifier.
Page 9
Page 10

L924 Amplifier Module Parts List Issue 1.1
Designator Part Description
BR300 3BGBU8D Diode Bridge Rectifier GBU8D Plastic Package 8A 200V
BR301 3BGBU8D Diode Bridge Rectifier GBU8D Plastic Package 8A 200V
C103 2C410 Capacitor SM 1206 X7R Ceramic 50V 10% 100N
C104 2C210 Capacitor SM 1206 NPO Ceramic 50V 5% 1N0
C200 2C410 Capacitor SM 1206 X7R Ceramic 50V 10% 100N
C201 2C410 Capacitor SM 1206 X7R Ceramic 50V 10% 100N
C202 2C410 Capacitor SM 1206 X7R Ceramic 50V 10% 100N
C203 2N710 Capacitor Radial Electrolytic Dia 5mm Pitch 5mm 100UF 25V
C204 2N710 Capacitor Radial Electrolytic Dia 5mm Pitch 5mm 100UF 25V
C205 2D110W2 Capacitor Boxed Polyprop 5mm Pitch 250V 5% 100P
C207 2D110W2 Capacitor Boxed Polyprop 5mm Pitch 250V 5% 100P
C208 2C410A Capacitor SM 1812 X7R Ceramic 500V 10% 100N
C209 2C410A Capacitor SM 1812 X7R Ceramic 500V 10% 100N
C210 2D147W Capacitor Boxed Polyprop 5mm Pitch 100V 5% 470P
C212 2K447 Capacitor Boxed Polyester 5mm Pitch 10% 63V 470N
C213 2N710B Capacitor Radial Electrolytic Dia 10mm Pitch 5mm 100UF 100V
C214 2N710B Capacitor Radial Electrolytic Dia 10mm Pitch 5mm 100UF 100V
C215 2N610 Capacitor Radial Electrolytic Dia 5mm Pitch 5mm 10UF 50V
C216 2N610 Capacitor Radial Electrolytic Dia 5mm Pitch 5mm 10UF 50V
C217 2C047B Capacitor SM 0805 NPO Ceramic 200V 5% 47PF
C218 2C047B Capacitor SM 0805 NPO Ceramic 200V 5% 47PF
C220 2C047B Capacitor SM 0805 NPO Ceramic 200V 5% 47PF
C221 2C047B Capacitor SM 0805 NPO Ceramic 200V 5% 47PF
C223 2K347 Capacitor Boxed Polyester 5mm Pitch 10% 63V 47N
C225 2N610 Capacitor Radial Electrolytic Dia 5mm Pitch 5mm 10UF 50V
C300 2C410 Capacitor SM 1206 X7R Ceramic 50V 10% 100N
C301 2N710 Capacitor Radial Electrolytic Dia 5mm Pitch 5mm 100UF 25V
C305 2C410 Capacitor SM 1206 X7R Ceramic 50V 10% 100N
C306 2C410 Capacitor SM 1206 X7R Ceramic 50V 10% 100N
C318 2N710 Capacitor Radial Electrolytic Dia 5mm Pitch 5mm 100UF 25V
C319 2N710 Capacitor Radial Electrolytic Dia 5mm Pitch 5mm 100UF 25V
C320 2V710 Capacitor Non-Polar Radial Electrolytic 100UF 16V
C321 2V710 Capacitor Non-Polar Radial Electrolytic 100UF 16V
C322 2P910AM Capacitor Radial Electrolytic Dia 40mm PCB Mount 10000uF 71V
C323 2P910AM Capacitor Radial Electrolytic Dia 40mm PCB Mount 10000uF 71V
D101 3AS16W Diode Surface Mount Small Signal BAS16W SOT-23 Package
D200 3AS16W Diode Surface Mount Small Signal BAS16W SOT-23 Package
D201 3AS16W Diode Surface Mount Small Signal BAS16W SOT-23 Package
D202 3AS16W Diode Surface Mount Small Signal BAS16W SOT-23 Package
D203 3AV99W Diode Dual Surface Mount Small Signal BAV99 SOT-23 Package
D204 3B4003 Diode 1N4003 DO-41 Package
D205 3B4003 Diode 1N4003 DO-41 Package
D300 3AS16W Diode Surface Mount Small Signal BAS16W SOT-23 Package
D301 3CW315V Zener Diode 0.25W Surface Mount BZX84C15V SOT-23 Package
D303 3AS16W Diode Surface Mount Small Signal BAS16W SOT-23 Package
D307 3AS16W Diode Surface Mount Small Signal BAS16W SOT-23 Package
D308 3CW322V
D309 3CW322V
DZ200 3CW315V Zener Diode 0.25W Surface Mount BZX84C15V SOT-23 Package
DZ201 3CW315V Zener Diode 0.25W Surface Mount BZX84C15V SOT-23 Package
DZ202 3CW34V7 Zener Diode 0.25W Surface Mount BZX84C4V7 SOT-23 Package
DZ203 3CW34V7 Zener Diode 0.25W Surface Mount BZX84C4V7 SOT-23 Package
IC200 5B072D Opamp TL072CD SO-8 Package
IC300 5T3Q66 Opto Isolator Quad PC3Q66Q
L101 7D002C Inductor AC 2u2 SELF BONDED
PL100 8K6201 CON SINGLE ROW HDR 0.1IN VERTICAL 2WAY
PL200 8K6201 CON SINGLE ROW HDR 0.1IN VERTICAL 2WAY
R103 1H822 Resistor Metal Film 0.25W 1% 2R2
R104 1A110 Resistor 1206 Surface Mount 0.25W 1% 100R
R207 1A110 Resistor 1206 Surface Mount 0.25W 1% 100R
R208 1A110 Resistor 1206 Surface Mount 0.25W 1% 100R
R210 1A327 Resistor 1206 Surface Mount 0.25W 1% 27K
Page 11

L924 Amplifier Module Parts List Issue 1.1
Designator Part Description
R211 1A327 Resistor 1206 Surface Mount 0.25W 1% 27K
R212 1A327 Resistor 1206 Surface Mount 0.25W 1% 27K
R213 1A327 Resistor 1206 Surface Mount 0.25W 1% 27K
R214 1A047 Resistor 1206 Surface Mount 0.25W 1% 47R
R216 1A047 Resistor 1206 Surface Mount 0.25W 1% 47R
R217 1A047 Resistor 1206 Surface Mount 0.25W 1% 47R
R218 1A047 Resistor 1206 Surface Mount 0.25W 1% 47R
R219 1H122 Resistor Metal Film 0.25W 1% 220R
R220 1H122 Resistor Metal Film 0.25W 1% 220R
R221 1A233 Resistor 1206 Surface Mount 0.25W 1% 3K3
R222 1A233 Resistor 1206 Surface Mount 0.25W 1% 3K3
R223 1A210 Resistor 1206 Surface Mount 0.25W 1% 1K0
R224 1A210 Resistor 1206 Surface Mount 0.25W 1% 1K0
R225 1A210 Resistor 1206 Surface Mount 0.25W 1% 1K0
R226 1A210 Resistor 1206 Surface Mount 0.25W 1% 1K0
R227 1A210 Resistor 1206 Surface Mount 0.25W 1% 1K0
R228 1A322 Resistor 1206 Surface Mount 0.25W 1% 22K
R229 1H022 Resistor Metal Film 0.25W 1% 22R
R230 1H022 Resistor Metal Film 0.25W 1% 22R
R231 1A247 Resistor 1206 Surface Mount 0.25W 1% 4K7
R232 1H156 Resistor Metal Film 0.25W 1% 560R
R233 1H156 Resistor Metal Film 0.25W 1% 560R
R234 1H168 Resistor Metal Film 0.25W 1% 680R
R235 1H168 Resistor Metal Film 0.25W 1% 680R
R236 1H239 Resistor Metal Film 0.25W 1% 3K9
R237 1H239 Resistor Metal Film 0.25W 1% 3K9
R238 1H239 Resistor Metal Film 0.25W 1% 3K9
R239 1H239 Resistor Metal Film 0.25W 1% 3K9
R240 1A510 Resistor 1206 Surface Mount 0.25W 1% 1M0
R241 1C210 Resistor Carbon Film 2W 5% 1K0
R242 1C210 Resistor Carbon Film 2W 5% 1K0
R245 1A022 Resistor 1206 Surface Mount 0.25W 1% 22R
R246 1A022 Resistor 1206 Surface Mount 0.25W 1% 22R
R247 1A115 Resistor 1206 Surface Mount 0.25W 1% 150R
R248 1A115 Resistor 1206 Surface Mount 0.25W 1% 150R
R249 1A115 Resistor 1206 Surface Mount 0.25W 1% 150R
R250 1A115 Resistor 1206 Surface Mount 0.25W 1% 150R
R254 1D847 Resistor Carbon Film 0W5 5% 4R7
R255 1A268 Resistor 1206 Surface Mount 0.25W 1% 6K8
R257 1A210 Resistor 1206 Surface Mount 0.25W 1% 1K0
R300 1A110 Resistor 1206 Surface Mount 0.25W 1% 100R
R301 1A110 Resistor 1206 Surface Mount 0.25W 1% 100R
R302 1A110 Resistor 1206 Surface Mount 0.25W 1% 100R
R303 1A322 Resistor 1206 Surface Mount 0.25W 1% 22K
R304 1A127 Resistor 1206 Surface Mount 0.25W 1% 270R
R305 1A310 Resistor 1206 Surface Mount 0.25W 1% 10K
R306 1A310 Resistor 1206 Surface Mount 0.25W 1% 10K
R307 1A339 Resistor 1206 Surface Mount 0.25W 1% 39K
R310 1A110 Resistor 1206 Surface Mount 0.25W 1% 100R
R311 1A110 Resistor 1206 Surface Mount 0.25W 1% 100R
R314 1A110 Resistor 1206 Surface Mount 0.25W 1% 100R
R315 1A110 Resistor 1206 Surface Mount 0.25W 1% 100R
R316 1A322 Resistor 1206 Surface Mount 0.25W 1% 22K
R320 1A322 Resistor 1206 Surface Mount 0.25W 1% 22K
R321 1A322 Resistor 1206 Surface Mount 0.25W 1% 22K
R332 1A322 Resistor 1206 Surface Mount 0.25W 1% 22K
R333 1A322 Resistor 1206 Surface Mount 0.25W 1% 22K
R334 1A247 Resistor 1206 Surface Mount 0.25W 1% 4K7
R335 1A022 Resistor 1206 Surface Mount 0.25W 1% 22R
R336 1A022 Resistor 1206 Surface Mount 0.25W 1% 22R
R337 1A210 Resistor 1206 Surface Mount 0.25W 1% 1K0
R338 1A133 Resistor 1206 Surface Mount 0.25W 1% 330R
Page 12

L924 Amplifier Module Parts List Issue 1.1
Designator Part Description
R339 1A133 Resistor 1206 Surface Mount 0.25W 1% 330R
R340 1A310 Resistor 1206 Surface Mount 0.25W 1% 10K
R341 1A310 Resistor 1206 Surface Mount 0.25W 1% 10K
R342 1A412 Resistor 1206 Surface Mount 0.25W 1% 120K
R343 1A410 Resistor 1206 Surface Mount 0.25W 1% 100K
RLY101 A220 Relay 1P2T 24V
RV200 6F110V Preset Vertical Mount 100R linear
SK103 8D226 Phono socket 2 way vertical gold
SK104 8K2810 CON HORIZ PCB SKT 10WAY
SK105 8D421 Connector 4mm 2 way horizontal
SK300 8K2302 CON MINIFIT HCS V 2WAY
SK301 8K2302 CON MINIFIT HCS V 2WAY
TH300 1T007 Thermistor PTC SM 110 degrees C
TR200 4AFMMT597 Transistor FMMT597 SOT23 Package
TR201 4AFMMT597 Transistor FMMT597 SOT23 Package
TR202 4B1740 Transistor 2SA1740 SOT-89 Package
TR203 4AFMMT597 Transistor FMMT597 SOT23 Package
TR204 4AFMMT497 Transistor FMMT497 SOT23 Package
TR205 4AFMMT497 Transistor FMMT497 SOT23 Package
TR206 4B4548 Transistor 2SC4548 SOT-89
TR207 4AFMMT497 Transistor FMMT497 SOT23 Package
TR208 4AFMMT497 Transistor FMMT497 SOT23 Package
TR209 4B4548 Transistor 2SC4548 SOT-89
TR210 4CSAP15N Transistor SAP15NY
TR211 4CSAP15N Transistor SAP15NY
TR212 4AFMMT497 Transistor FMMT497 SOT23 Package
TR213 4AFMMT597 Transistor FMMT597 SOT23 Package
TR214 4B1740 Transistor 2SA1740 SOT-89 Package
TR215 4CSAP15P Transistor SAP15PY
TR216 4CSAP15P Transistor SAP15PY
TR300 4AFMMT497 Transistor FMMT497 SOT23 Package
TR301 4AFMMT597 Transistor FMMT597 SOT23 Package
TR302 4AFMMT597 Transistor FMMT597 SOT23 Package
TR305 4AFMMT597 Transistor FMMT597 SOT23 Package
TR309 4AFMMT497 Transistor FMMT497 SOT23 Package
TR310 4AFMMT497 Transistor FMMT497 SOT23 Package
TR311 4AFMMT497 Transistor FMMT497 SOT23 Package
TR312 4AFMMT497 Transistor FMMT497 SOT23 Package
TR313 4AFMMT497 Transistor FMMT497 SOT23 Package
Z100 L924PB BLANK PCB 7 CHANNEL AMP MODULE
Z101 E107AY ASSEMBLY OF REAR PANEL MODULE AND SILK SCREEN
Z102 E915HK Finished Heatsink for single channel amp module
Z103 HF4V09B SCREW SELF-TAPPING-SEMS NO.4 X 9MM PAN TORX-SLOT STEEL ZINC-PLATE BLK
Z104 HF4V09B SCREW SELF-TAPPING-SEMS NO.4 X 9MM PAN TORX-SLOT STEEL ZINC-PLATE BLK
Z105 HF4V09B SCREW SELF-TAPPING-SEMS NO.4 X 9MM PAN TORX-SLOT STEEL ZINC-PLATE BLK
Z106 E950MC INSULATOR P7 TRANSISTOR INSULATING PAD
Z107 HB3B12A SCREW TAPTITE HEXAGON WASHER FACE M3X12MM
Z108 HB3B12A SCREW TAPTITE HEXAGON WASHER FACE M3X12MM
Z109 HB3B12A SCREW TAPTITE HEXAGON WASHER FACE M3X12MM
Z110 HB3B12A SCREW TAPTITE HEXAGON WASHER FACE M3X12MM
Page 13

C104
1N0 SM
0V_SIG
R104
100R SM
EMC
Inputs
SK103
PHONO2G
1
TP100
F
N
TP101
PL100
1
2
2WVERTJUMPER
To microprocessor PCB
+24V_DIG
1
2
MUTE
3
OUT RLY
4
5
THERMPROT
6
VIPROT
7
DCPROT
8
9
FAULT
10
VIPROT
DC
THERM
FAULT
BASE1
BASE2
L924C2
L924C2_1.1.sch
INPUT
BASE1
BASE2
NFB
NB: Signals THERMPROT, VIPROT,
DCPROT and FAULT are open
collector outputs, active low,
referenced to 0V_DIG with no pull up
resistors
EMITTER1
EMITTER2
OUTPUT
SK104
10WAY-H-0.1-F
Microprocessor GND
Microprocessor +24V
MUTE not used
Output relay control
Not used
Thermal protection
SOA protection
DC offset protection
Overall fault signal
Not used
L924C3
L924C3_1.1.sch
EMITTER1
EMITTER2
OUTPUT
Amplifier circuit Protection and supplies
TP102
VIPROT
DCPROT
THERMPROT
FAULT
NB: Nets +24V_DIG and 0V_DIG are isolated from amplifier circuit
+24V_DIG
TP103
TP104
TP105
TP106
TP107
TP108
TP109
0V_DIG
RLY G2R-1E-24DC 16A SPDT
OUT RLY
RLY101A
RLY G2R-1E-24DC 16A SPDT
TP110
RLY101B
C103
100N SM
R103
2R2 MF
L101
2U2 AIR CORED
D101
BAS16W SM
Electrical ground star point
0V_HF
0V_PSU
TP111
SK105
0V_SIG
SP101
STAR_8
0V_LS0V_ZOB
Z100
PCB HEATSINK
L924PB
Z101
SUB PANEL
E107AY
Z102
E915HK
Z103
SUB PANEL SUB PANEL SUB PANEL
SCREW SCREW SCREW
HF4V09B
Z106
TRANSISTOR
INSULATOR
E950MC
Z104
HF4V09B
Z107
M3 TAPTITE M3 TAPTITE M3 TAPTITE M3 TAPTITE
HB3B12A
Z105
HF4V09B
Z108
HB3B12A
Z109
HB3B12A
Z110
HB3B12A
NB: Feedback around relay not fitted
4MM 2W HOR
TP112
0V_LS
DRAWING TITLE
A & R Cambridge Ltd.
Pembroke Avenue
Waterbeach
Cambridge CB5 9PB
P7 Amplifier Module
Filename:
L924C1_1.1.sch
Notes:
Contact Engineer:
02_E055 JR 4/3/2002 FIXED DC FAULT AT POWER ON SEQUENCE BY FEEDBACK 1.1
Contact Tel: (01223) 203200Jonny Reckless
ECO No. DESCRIPTION OF CHANGE
INITIALS
Printed:
DATE
7-Mar-2002
1 3Sheet of
DRAWING NO.
L924CT
ISSUE
Page 14

R219
220R MF
+55V
INPUT
DZ202
4V7 350MW SM
DZ203
4V7 350MW SM
0V_SIG
0V_HF
0V_HF
R210
27K SM
+
C203
100U EL
R223
1K0 SM
+
C204
100U EL
R212
27K SM
R211
27K SM
DZ200
15V 350MW SM
Input Filter
R228
22K SM
C201
100N SM
DZ201
15V 350MW SM
R213
27K SM
TR200
FMMT597
0V_SIG
C210
470P PPW
0V_SIG
TR205
FMMT497
C200
100N SM
3
2
C202
100N SM
R214
47R SM
TR204
FMMT497
0V_SIG
TP200
IC200A
TL072CD
84
TP202
1
R229
22R MF
R230
TP201
22R MF
V to I converter
TR203
FMMT597
R217
47R SM
D200
BAS16W SM
PNP current mirror
C212
470N PE
IC200B
TL072CD
7
TP203
R231
4K7 SM
Integrating DC servo
R232
560R MF
R233
560R MF
R236
NF
R237
NF
R238
NF
R239
NF
NPN current mirror
D202
BAS16W SM
TR202
TR PNP 2SA1740
C205
R221
3K3 SM
100P/250V
D203
BAV99W
+
C225
10U EL
NFB
R255
6K8 SM
R257
1K SM
R240
1M0 SM
TR212
FMMT497
6
5
R234
680R MF
R235
680R MF
R236 THRU R239 NOT FITTED
Pre driver bias
C207
R222
3K3 SM
100P/250V
TR206
TR NPN 2SC4548
R216
47R SM
TR201
FMMT597
TR207
FMMT497
R218
47R SM
+
C213
100U EL 100V
R241
1K CF 2W
Bootstrap
R242
1K CF 2W
+
C214
100U EL 100V
TR208
FMMT497
TR213
FMMT597
Pre driver
Pre driver
R207
100R SM
R245
22R SM
R246
22R SM
R208
100R SM
TR209
TR NPN 2SC4548
C217
47P/200V
R247
150R SM
C215
10U EL
R249
150R SM
C220
47P/200V
TR214
TR PNP 2SA1740
RV200
100R PSET
+
Trim output stage Iq
Output stage
TR210
SAP15N
R224
1K0 SM
D201
BAS16W SM
R226
1K0 SM
TR215
SAP15P
Output stage
C218
47P/200V
R248
150R SM
R250
150R SM
C221
47P/200V
+
C216
10U EL
TR211
SAP15N
R225
1K0 SM
Measure Iq
R227
1K0 SM
TR216
SAP15P
TP204
BIAS
PL200
1
2
TP205
D204
1N4003F
D205
1N4003F
C208
100N X7R 1812 500V
BASE1
EMITTER1
OUTPUT
R254
4R7 W2 CF
C223
47N PE
0V_ZOB
EMITTER2
BASE2
0V_HF
C209
100N X7R 1812 500V
R220
220R MF
DRAWING TITLE
A & R Cambridge Ltd.
Pembroke Avenue
Waterbeach
Cambridge CB5 9PB
P7 Amplifier Module
Filename:
L924C2_1.1.sch
Notes:
Contact Engineer:
-55V
02_E055 JR 4/3/2002 FIXED DC FAULT AT POWER ON SEQUENCE BY FEEDBACK 1.1
Contact Tel: (01223) 203200Jonny Reckless
ECO No. DESCRIPTION OF CHANGE
INITIALS
Printed:
DATE
7-Mar-2002
2 3Sheet of
DRAWING NO.
L924CT
ISSUE
Page 15

BASE1
EMITTER1
OUTPUT
EMITTER2
R338
330R SM
R339
330R SM
R300
100R SM
R301
100R SM
+55V
D308
22V 350MW SM
Instant SOA limiting
R340
10K SM
R302
100R SM
+
C318
100U EL
R335
22R SM
R336
22R SM
+
C319
100U EL
R311
100R SM
R341
10K SM
C305
100N SM
C306
100N SM
D300
BAS16W SM
TR309
FMMT497
R316
22K SM
C320
100U NP
TR305
FMMT597
DC offset detection
TP300
C321
100U NP
0V_HF
R334
4K7 SM
IC300A
OPTO-PC3Q66-QUAD-SM
R320
22K SM
D303
BAS16W SM
TR310
FMMT497
TR302
FMMT597
0V_HF
R332
22K SM
0V_DIG
R333
22K SM
R310
100R SM
C300
100N SM
IC300B
OPTO-PC3Q66-QUAD-SM
R321
22K SM
R337
1K SM
TR311
FMMT497
VIPROTDC
0V_DIG
+
C301
100U EL
TH300
PTH 110DEG SM
D301
15V 350MW SM
R342
120K SM
R307
39K SM
0V_HF
Over temperature sensing
R343
100K SM
R304
270R SM
TR301
FMMT597
R305
10K SM
R306
10K SM
IC300C
OPTO-PC3Q66-QUAD-SM
IC300D
OPTO-PC3Q66-QUAD-SM
R303
22K SM
TR300
FMMT497
FAULT
THERM
0V_DIG
BASE2
Instant SOA limiting
D309
22V 350MW SM
-55V
D307
BAS16W SM
TR312
FMMT497
R314
100R SM
TR313
FMMT497
R315
100R SM
AC from transformer
AC from transformer
SK300
MOLEXPWR2WAY_R/A
1
TP304
2
TP305
SK301
MOLEXPWR2WAY_R/A
1
TP306
2
TP307
DRAWING TITLE
A & R Cambridge Ltd.
Pembroke Avenue
Waterbeach
Cambridge CB5 9PB
Power supplies
1
BR300
+
BRGBU8D
3
~
3
~
2
~
-
4
1
+
BR301
BRGBU8D
2
~
-
4
P7 Amplifier Module
Filename:
Notes:
Contact Engineer:
L924C3_1.1.sch
+55V
TP302
+
C322
C AM 71V 10000U
0V_PSU
+
C323
C AM 71V 10000U
TP303
-55V
02_E055 JR 4/3/2002 FIXED DC FAULT AT POWER ON SEQUENCE BY FEEDBACK 1.1
Contact Tel: (01223) 203200Jonny Reckless
ECO No. DESCRIPTION OF CHANGE
INITIALS
Printed:
DATE
7-Mar-2002
3 3Sheet of
DRAWING NO.
L924CT
ISSUE
Page 16

Controller
Board
L925
Contents
!
Circuit description
!
Component overlay
!
Parts list
!
Circuit diagrams
Page 17

P7 Controller Circuit Description
The Amp controller PCB Panel consists of 6 PCBs.
! Controller PC B
! Display PCB
! Connector PCB
! Mains Switch PCB
! 2x Wire Clamp PCBs
Overview
The controller PCB contains the microprocessor and most
of the circuitry for controlling the P7 amplifier. The
display PCB provides the LEDs and resistors for the
simple 7 LED display for the front panel of the unit. The
mains switch PCB provides a means of supporting the
front panel mounted mains switch. The connector PCB fits
on the base of the chassis near the rear panel and provides
a means of connecting the 7 amplifier modules to a
connector which is then linked to the controller PCB. The
connector PCB also provides a means of mounting the rear
panel mounted t rigger input connector and c onnecting its
signals to the mains controller PCB.
The cable cla mp PCBs are used t o hold the transformer
power cables neatly to the side of the chassis base.
The controller PCB
The controller PCB provides the following functionality
! Mains power distribution, switching and soft-start
! Voltage se lection for 115/230V operation.
! +5V (for logic) supplies
! +22V (for rela y and fan) supplies
! Variable speed fan dr ive
! Relay control for soft starts and sequenced power up/
power down for switch on, switch off and fault
conditions.
! Heatsink temperature measurement for fan speed
control
! Transformer Thermal trip monitoring
! Mains supply monitoring for output mu ting
! Soft start resistor monitoring to prevent soft start
resistor overdissipation
! Amplifier module fault status monitoring for module
over-temperature, module DC offset, module VI
limit
! Output muting relays drive ci rcuit
! Amplifier status display drive circuitry via the front
panel mounted LEDs.
! Watch-dog failsafe mechanism which activates in the
case of microprocessor failure
Mains power distribution, switching and
soft-start
The mains input supply is connected directly to the control
PCB via SK100. The mains supply is routed through the
power rela y RLY100 and through the 3 parallel resistors
R100, R101, R102. These form a high power rated 50Ohm resistor th at is used to limit the inrush current into the
2 large pow er toroid s. These to roids a re mounted beneath
the transf ormer tray at th e front of the u nit. The 50-Oh m
series resistor limits the inrush current to 5A and is
allowed to remain in circuit for a few hundred
milliseconds after power on. After the power amplifier
module electro lytic capa citors have ch arged to full su pply
voltage the cu rrent th rough th e resis tor falls t o a low va lue
(which is sensed by the circuitry around IC105 as
described below) and the soft start resistor is then switched
out of circuit by relay RLY101. This arrangement of
power relays ensures that relay RLY101 never switches
high voltages and its contacts remain clean.
Voltage selection for 115/230V operation
The control PCB provides a means of configuring the unit
for 115V or 230V operation. This is achieved by having 2
connectors m arked with th e appropriate volta ge for each of
the units 3 transformers (1 auxiliary transformer which
powers the control PCB and 2 large toroids each of which
powers 3 ½ amplifier modules). The connectors SK101,
SK102 for the aux TX and SK103, SK104 for the Right
hand power toroid and SK105, SK106 for the left hand
power torroid are configured to place the two primary
windings of each transformer in parallel for 115V
operation and in series for 230V operation. The
arrangement of fuses (6 in total which are all fitted)
ensures that each winding has a series fuse when
configured in parallel for 115V operation and 1 of each
pair of fuses is used to fuse the series configured windings
when set for 230V operation. In this way there are 2
parallel fuses for each tran sformer when set for 115V (to
allow twice the current as required). The fuses are time
delay types.
C121 is X rated and provides suppression for rectifier
switching transients for EMC conducted noise compliance.
RC100 is a series RC network to prolong relay life.
+5V supply (for logic)
The auxiliary transformer has 2 secondary windings.
These are rectified by full wave rect ifiers to form the DC
supplies.
The +5V supply is rectifi ed by D101, D102, D105, D106
and smoothed by C102. The supply is then regulated by
the 3 terminal 5V regulator REG100. The supply is
designed to provid e 9.5V DC to th input of the regulat or
when fed with a nominal 230V. This allows 8V at the
input to the regulator (so that it remains within regulation)
when fed from 195V mains supply. The regulator is fitted
with a heatsink. C103 is provided to eliminate input
transients. C107 ensures regulator stability.
+22V supply (for relay and fan)
The +22V supply is formed in a similar manner by D103,
D104, D107, D108 and C101. The supply voltage is
chosen to give 22 V when driven from a mains voltage of
230V. This gives aroun d 24V when t he main s supply is at
its maximum value (265V). This is due to the relays
having a maximum specified input voltage of 24V.
Variable fan speed drive
The fan for the amplifi er is required to be very qu iet. This
is achieved by having the fan speed proportional to
temperature. The temperature is measured by the
microprocessor (as described below) and when the
temperatu re exceeds a progra mmed thresh old then th e fan
is switched on at its lowest speed (approx 7V). As the
temperatu re of t h e unit in c rea s es t h e fa n sp eed is in c rea sed
until it is operating at full speed (12V). This is a chieved by
having the microprocessor output a PWM 5V pk to pk
square wave on line PWM_OUT. The square wave is
filtered by R112, C108 to form a DC level. The amplitude
of the DC level is thus prop ortional to the d uty cycle th at
is under microprocessor con trol. The filtered DC sign al is
then amplified by the simple 4 transistor amplifier formed
around TR100, TR113, TR114 and TR115. The gain of the
amplifier is set by R117, R118 to around 6. This ensures
Page 18

that the PWM_OUT signal duty cycle can move the output
of the amplifier over the required range. C104, C113
provide suppression for EMC and C112 provides amplifier
loop compensation. The supply to the fan is fused by F101
this fuse li mits current in th e event of the fan sta lling. If
the fuse blows the watchdog timer cct immediately
switches off the power relays to ensure failsafe condition.
Relay control
The power relay and soft-start relay (R LY100, RLY101)
respectively are driven by microprocessor signals
MPOWER an d MSOFT_ST*. Tra nsistors TR 108, TR111
buffer the microp rocessor ou tput s. Diodes D1 15 and D119
prevent dama ge to the collectors of t he transistors b y the
inductance of the relay coils at coil switch off.
The power for the relay coils (+22V_SW) is provided
through TR116. This transistor is off (hence relays off)
when the watchdog circuit detects no microprocessor
activity (as described below) or the fan fuse F101 is blown
(as described above).
Heatsink temperature measurement
The microprocessor monitors the temperature of the
heatsink using the circuitry around TR112. Capacitor
C114 is alternately charged through fixed resistor R122
(2K2) and thermistor TH100. The time taken to charge the
capacitor is measured by the microprocessor. The ratio of
the time taken to charge the capacitor through the 2K2
fixed resistor compared with the time taken to charge the
capacitor through the thermistor allows the microprocessor
to calculate the resistance of the thermistor. The software
is then able t o establish th e temperature of t he thermistor
from its resistance.
Three microprocessor lines are involved in this
measurement. TREF, TTE MP, C_DISCH.
A measurement cycle proceeds a s follows.
C_DISCH goes high to discharge C114. After a delay to
ensure C114 is fu lly discharged C_ DISCH then goes Low
and TREF is set as an output and goes hi gh. TTEM P is s et
as an input. This allows C114 to charge through R122.
The time taken for C114 to charge to the input high
threshold of the micro is measured by timing through input
TTEMP.
When the threshold is reached, C_DISCH is again taken
high to discharge the capacitor.
After a delay to ensure C114 is fu lly di scha rged C_ DISCH
then goes Low and TTEMP is set as an output and goes
high. TREF is set as an input. This allows C114 to charge
through TH100. The time taken for C114 to charge to the
input high th reshold of the micro is measured by timing
through input TREF.
When the threshold is reached, C_DISCH is again taken
high to discharge the capacitor.
This cycle is repeated continuously and the ratio of
capacitor cha rge times allows th e ratio of resista nce R122
to resistance TH100 to be measured. The measurement is
immune to varia tion in value of C114, sat uration voltage
of TR112 and average supply voltage on the 5V rail. The
variation of input voltage 1 threshold of the TREF and
TTEMP inputs is not compensated for but in practice this
is usually found to be minimal. The method should give a
measurement accuracy of a few degrees C that is all that is
needed for fan speed control.
Transformer Thermal trip monitoring
The main power transformers have thermal trips built into
them. These are normally closed and go open when the trip
temperature is exceeded. The trips are put in series and
pulled to 5V through R131. In the event of 1 (or both)
transformer trips going open circuit then line
TX_OVTEMP goes h igh and the microprocess or is then
able to power the amplifier down as required.
Mains supply monitoring for output muting
In order to prevent thumps through the loudspeaker when
the amplifier is switched off it is necessary to detect the
removal of the mains supply so that the amplifier modules
can be muted.
This is affected by the circuitry around TR101 and the
microprocessor. The AC supply for the 22V rail is sensed
by R109. At th e positive p eak of the main s supply TR1 01
is turned on and sat u rat es th ereb y di s ch a rgin g C10 9. In t he
event of the AC su pp ly di sap p ea rin g then C109 will n ot be
discharged and will instead charge to 5V through R132.
The time constant R132 . C109 = 47mS sets the time taken
for line PWROK* to go high. So if the mains supply
disappears for around 5 capacitor charge cycles then
PWROK* will n otify t he mic roproc essor wh ich wi ll then
mute the amplif ier outputs.
Soft start resistor monitoring
The soft start resistor is used to limit the inrush current
into the lar ge power t ransf ormers. The res istor is des igned
to be in-circuit only for the duration of the inrush current
at switch on. The resis tor must be s horted out by the rela y
before the amplifier is configured to deliver output current.
Also in the event of a fault (e.g. a short across one of the
amplifier module reservoir capacitors) then the resistor
might be exposed t o a situation which might cause over
dissipation.
This is avoided by having the microprocessor monitor the
voltage across t h e resi s tor so t h at in the even t of a f au lt th e
amplifier can be switched off before da mage to the resist or
occurs.
The voltage across the soft-start resistor is monitored by
the circuitry around IC105. When voltage is present across
the soft-start resistor (only the positive half cycle is
sensed) then the opto-transistor is turned on. This
discharges C100.
The RC time con stant R104, C100 = 22 0mS dictates that
line SSPROT* will be low until a round ¼ of a second after
the voltage across the soft-start resistor has fallen to zero.
Amplifier module fault status monitoring
! Module over-t emperature
! Module DC offset
! Module VI limit
The amplifier modules contain circuitry that senses the
above fault conditions. The fault status is indicated to the
control PCB by means of open collector transistors on
each module that are ON when the fault exists.
The means of connecting the fault lines to the control PCB
requires explanation.
There are 7 amplifier modules, each of which has 3 fault
lines. If these were tracked individually then this would
require 21 lines to th e c ontrol PCB.
In order to reduce the number of lines required then the
connections are cha nged so that the 3 fau lt lin es from ea ch
of the are 7 modules are con nected in paralle l. So tha t e.g.
the VI limit fau lt line i s pulled lo w wh en any one of the 7
modules exhibits a VI limit fault. In order for the
controller to establish which module has the fault (so that
Page 19

it can be indicated on the front panel display) each module
also provides an address line. A fault occurring on a
particular modu le will cause both the fau lt line to be low
and also the address line. In this way the amplifiers can be
monitored by the controller through a total of 10 lines.
The addres s lines are called:
FAULTn* (where n = 1 to 7 as per amplifier module
number)
The fault lines are:
FLT_DC* to indicate a DC offset error
FLT_VI* to indicate VI limit protection
FLT_TEMP* to indicate that the temperature of the output
transis tors has exceeded the 110C trip temperature.
Output muting relays
The muting relays are on the amplifier modules. The
relays allow the amplifier to be disconnected from the
loudspeaker load. This is required for muting switch on
and switch off thumps and in the event of fa ult conditions.
The relays a re dri ven from t he con trol PCB by the s imple
open collec tor tra nsi stor dr ive arr angemen t form ed arou nd
TR102, TR104- TR110. The diodes D111-D118 protect
the transistor collectors against over voltage spikes
occurring when the inductive relay coils are switched off.
The open collector transistors are driven through the
74HC259 type addressable latch. This configuration
allows 24 output lines to be provided from 7
microprocessor lines. The outputs of one of the 259s
(IC103) are used to drive the muting relay transistors. The
remaining pa ckages (IC101, IC1 02) are used to drive th e
display LEDs as described below.
Control of the 259s is as follows. Each has 3 address bits
S0, S1, S2 which a llows one of 8 outp uts to b e selected, a
DATA input which allows a 0 or a 1 to be latched to the
output and a GATE input which transfers the signal on
DATA to the select ed (addressed) ou tput of the package.
The GATE input is also used as a chip select to select
which of the 3 packages is being controlled. This allows
the S and DATA inputs to be connected in parallel on
multiple packages.
Amplifier status display
The amplifier status is indicated via the front panel
mounted LEDs. IC101, IC102 are used to directly drive
the tricolour LEDs which are mounted on the LED PCB.
Each channel has a single Tricolour LED. The LED has a
red and green LED built in and the third colour (yellow) is
produced by having both Red and Green LEDs ON at the
same time.
IC101 is connected to the red LEDs and IC102 is
connected to the green LEDs.
Watch-dog
The watch dog circuit provides a failsafe mechanism
which places the amplifier in a safe (OFF) state in the
event of the microprocessor failing or crashing. The
circuitry monitors the average voltage on the
WATCHDOG line and if it falls outside its required
voltage then it removes the power supply to the relays
which has the eff ect of muting the amplifi er outputs and
removing the power to the power amplifier toroids.
The line WATCHDOG is toggled by the software in the
micro. Every ti me it completes a program loop it toggles
the state of the line. Th is results in a 50% duty cycle signal
that is averaged to 2.5V by the filter R114, C110. The
voltage is then fed to the window comparator formed
around IC104. The network R105, R106 and R107 sets the
upper and low thresh olds at 75% of 5V and 25% of 5V
respectively.
The outputs are open collector and if the filtered
WATCHDOG signal exceeds the upper threshold or falls
below the lower th reshold then the b-e junction of TR103
is pulled low and TR116 is then turned off – which
removes the power to the relays.
The filtered WATCHDOG signal can only move outside
the window if the WATCHDOG line sits high (or low)
continuously. This can only occur if the microprocessor
breaks or the software crashes.
This protection scheme also includes the fan fuse (F101).
If the fan fuse blows t hen TR103 gets no ba se current that
also immediately removes the power supply to the relays.
LED PCB
The LED PCB contains the 7 bicolour LEDs and their
current limiting resistors. The LED PCB also provides a
means of routin g the mains switch wiring to the c on trol
PCB via the LED PCB to control PCB flexfoil cable.
Connector PCB
The connector PCB provides a means of joining the
amplifier modules to the control PCB via the 22way
flexfoil cable. The PCB also includes circuitry for the 12V
trigger circuit.
The trigger circuit is formed around SK201. The 12V
trigger signal is converted to a 5V logic level compatible
signal by R200, D200. C201 and C202 provide EMC
suppression (since the signal is ultimately routed to the
Control PCB which contains a microprocessor). R202
isolates the ground pin of the jack socket from the
amplifier ground. This prevents possible ground loop
problems with other hifi components connected in the
system.
The zener diode clamped signal is limited to 4.7V pk
amplitude. This is fed to the microprocessor via line
TRIG/RC5
Fault conditions
Fault D.C
When a D.C fa ult is created on an amp lifier a ll the LED S
turn red accept the module with the fault that flashes
green.
Fault V.I
When a V.I fault is created all the LEDS turn red accept
the module with the fault which flash red.
Therm fault (amplifier overheating)
When a therm fau lt i s creat ed a ll th e LEDS s tay green an d
the amp module with the fault flashes amber.
Thermal trip (TX overheating)
When a thermal trip is created all the LEDS flash amber,
stating that it is a transformer problem.
Page 20

Page 21

L925 Controller Board Parts List Issue 1.2
Designator Part Description
C100 2N547 Capacitor Radial Electrolytic Dia 5mm Pitch 5mm 4U7 50V
C101 2N833A Capacitor Radial Electrolytic Dia 16mm Pitch 7.5mm 3300UF 35V
C102 2N810 Capacitor Radial Electrolytic Dia 10mm Pitch 5mm 1000UF 25V
C103 2K410 Capacitor Boxed Polyester 5mm Pitch 10% 63V 100N
C104 2K410 Capacitor Boxed Polyester 5mm Pitch 10% 63V 100N
C105 2K410 Capacitor Boxed Polyester 5mm Pitch 10% 63V 100N
C106 2K410 Capacitor Boxed Polyester 5mm Pitch 10% 63V 100N
C107 2N722B Capacitor Radial Electrolytic Dia 10mm Pitch 5mm 220UF 50V
C108 2N610 Capacitor Radial Electrolytic Dia 5mm Pitch 5mm 10UF 50V
C109 2N610 Capacitor Radial Electrolytic Dia 5mm Pitch 5mm 10UF 50V
C110 2N610 Capacitor Radial Electrolytic Dia 5mm Pitch 5mm 10UF 50V
C111 2N610 Capacitor Radial Electrolytic Dia 5mm Pitch 5mm 10UF 50V
C112 2K210 Capacitor Boxed Polyester 5mm Pitch 5% 100V 1NF
C113 2N747 Capacitor Radial Electrolytic Dia 10mm Pitch 5mm 470UF 25V
C114 2N747 Capacitor Radial Electrolytic Dia 10mm Pitch 5mm 470UF 25V
C115 2N610 Capacitor Radial Electrolytic Dia 5mm Pitch 5mm 10UF 50V
C116 2N647 Capacitor Radial Electrolytic Dia 5mm Pitch 5mm 47UF 35V
C117 2A410 Capacitor Ceramic 5mm Pitch 50V 10% 100nF
C118 2A410 Capacitor Ceramic 5mm Pitch 50V 10% 100nF
C119 2A410 Capacitor Ceramic 5mm Pitch 50V 10% 100nF
C120 2A410 Capacitor Ceramic 5mm Pitch 50V 10% 100nF
C121 2D447 Capacitor X2 Boxed Polypropylene 22.5mm Pitch 275V 470NF
C200 2A410 Capacitor Ceramic 5mm Pitch 50V 10% 100nF
C201 2A210 Capacitor Ceramic 5mm Pitch 50V 20% 1nF
C202 2A210 Capacitor Ceramic 5mm Pitch 50V 20% 1nF
D100 3B4003 Diode 1N4003 DO-41 Package
D101 3B4003 Diode 1N4003 DO-41 Package
D102 3B4003 Diode 1N4003 DO-41 Package
D103 3B4003 Diode 1N4003 DO-41 Package
D104 3B4003 Diode 1N4003 DO-41 Package
D105 3B4003 Diode 1N4003 DO-41 Package
D106 3B4003 Diode 1N4003 DO-41 Package
D107 3B4003 Diode 1N4003 DO-41 Package
D108 3B4003 Diode 1N4003 DO-41 Package
D109 3A4148 Diode Small Signal 1N4148 DO-35 Package
D110 3A4148 Diode Small Signal 1N4148 DO-35 Package
D111 3A4148 Diode Small Signal 1N4148 DO-35 Package
D112 3A4148 Diode Small Signal 1N4148 DO-35 Package
D113 3A4148 Diode Small Signal 1N4148 DO-35 Package
D114 3A4148 Diode Small Signal 1N4148 DO-35 Package
D115 3A4148 Diode Small Signal 1N4148 DO-35 Package
D116 3A4148 Diode Small Signal 1N4148 DO-35 Package
D117 3A4148 Diode Small Signal 1N4148 DO-35 Package
D118 3A4148 Diode Small Signal 1N4148 DO-35 Package
D119 3A4148 Diode Small Signal 1N4148 DO-35 Package
D120 3F5711 DIODE SCHOTTKY 1N5711 DO-35 Package
D200 3C04704 Zener Diode 0.5W BZX79C4V7 DO-35 Package
F100 C11316 FUSE BUSSMANN S504 T315mA 20MM
F100-1 8S004 FUSEHOLDER 20MM PCB
F100-2 F022 FUSEHOLDER COVER TO SUIT 8S004
F101 C11316 FUSE BUSSMANN S504 T315mA 20MM
F101-1 8S004 FUSEHOLDER 20MM PCB
F101-2 F022 FUSEHOLDER COVER TO SUIT 8S004
F102 C11316 FUSE BUSSMANN S504 T315mA 20MM
F102-1 8S004 FUSEHOLDER 20MM PCB
F102-2 F022 FUSEHOLDER COVER TO SUIT 8S004
F103 C12406 FUSE BUSSMANN S504 T4A 20MM
F103-1 8S004 FUSEHOLDER 20MM PCB
F103-2 F022 FUSEHOLDER COVER TO SUIT 8S004
F104 C12406 FUSE BUSSMANN S504 T4A 20MM
F104-1 8S004 FUSEHOLDER 20MM PCB
F104-2 F022 FUSEHOLDER COVER TO SUIT 8S004
F105 C12406 FUSE BUSSMANN S504 T4A 20MM
F105-1 8S004 FUSEHOLDER 20MM PCB
Page 22

L925 Controller Board Parts List Issue 1.2
Designator Part Description
F105-2 F022 FUSEHOLDER COVER TO SUIT 8S004
F106 C12406 FUSE BUSSMANN S504 T4A 20MM
F106-1 8S004 FUSEHOLDER 20MM PCB
F106-2 F022 FUSEHOLDER COVER TO SUIT 8S004
HS100 F007 HEATSINK TO-220 23 degC/W CLIP ON
HS101 F007 HEATSINK TO-220 23 degC/W CLIP ON
IC100 L022AY PROGRAMMED PIC16F877 WITH SOFTWARE FOR P7
IC100-1 8S040 IC SKT 40PIN 0.6IN
IC101 5J74259 IC 8 BIT ADDRESSABLE LATCH 74HC259N
IC102 5J74259 IC 8 BIT ADDRESSABLE LATCH 74HC259N
IC103 5J74259 IC 8 BIT ADDRESSABLE LATCH 74HC259N
IC104 5M393A IC COMPARATOR LM393AN DIP-8 PACKAGE
IC105 5T4N35 Opto Isolator 4N35
JP100 8K004 CON JUMPER SOCKET 0.1IN GOLD BLUE
LED300 3D002 LED 5mm Red/Green Tricolour SPR-54MVWT
LED301 3D002 LED 5mm Red/Green Tricolour SPR-54MVWT
LED302 3D002 LED 5mm Red/Green Tricolour SPR-54MVWT
LED303 3D002 LED 5mm Red/Green Tricolour SPR-54MVWT
LED304 3D002 LED 5mm Red/Green Tricolour SPR-54MVWT
LED305 3D002 LED 5mm Red/Green Tricolour SPR-54MVWT
LED306 3D002 LED 5mm Red/Green Tricolour SPR-54MVWT
PB L925PB BLANK PCB CONTROLLER FOR MULTI CHANNEL AMP
PL200 8K2910 CON VERT HEADER 10WAY
PL201 8K2910 CON VERT HEADER 10WAY
PL202 8K2910 CON VERT HEADER 10WAY
PL203 8K2910 CON VERT HEADER 10WAY
PL204 8K2910 CON VERT HEADER 10WAY
PL205 8K2910 CON VERT HEADER 10WAY
PL206 8K2910 CON VERT HEADER 10WAY
R100 1W115A Resistor Axial Wirewound 17W 5% 150R
R101 1W115A Resistor Axial Wirewound 17W 5% 150R
R102 1W115A Resistor Axial Wirewound 17W 5% 150R
R103 1E410 Resistor Carbon Film 1W 5% 100K
R104 1H347 Resistor Metal Film 0.25W 1% 47K
R105 1H347 Resistor Metal Film 0.25W 1% 47K
R106 1H322 Resistor Metal Film 0.25W 1% 22K
R107 1H322 Resistor Metal Film 0.25W 1% 22K
R108 1H310 Resistor Metal Film 0.25W 1% 10K
R109 1H310 Resistor Metal Film 0.25W 1% 10K
R110 1H310 Resistor Metal Film 0.25W 1% 10K
R111 1H222 Resistor Metal Film 0.25W 1% 2K2
R112 1H410 Resistor Metal Film 0.25W 1% 100K
R113 1H410 Resistor Metal Film 0.25W 1% 100K
R114 1H410 Resistor Metal Film 0.25W 1% 100K
R115 1H110 Resistor Metal Film 0.25W 1% 100R
R116 1H110 Resistor Metal Film 0.25W 1% 100R
R117 1H147 Resistor Metal Film 0.25W 1% 470R
R118 1H222 Resistor Metal Film 0.25W 1% 2K2
R119 1H310 Resistor Metal Film 0.25W 1% 10K
R120 1H222 Resistor Metal Film 0.25W 1% 2K2
R121 1H222 Resistor Metal Film 0.25W 1% 2K2
R122 1H222 Resistor Metal Film 0.25W 1% 2K2
R123 1H222 Resistor Metal Film 0.25W 1% 2K2
R124 1H222 Resistor Metal Film 0.25W 1% 2K2
R125 1H222 Resistor Metal Film 0.25W 1% 2K2
R126 1H222 Resistor Metal Film 0.25W 1% 2K2
R127 1H222 Resistor Metal Film 0.25W 1% 2K2
R128 1H222 Resistor Metal Film 0.25W 1% 2K2
R129 1H222 Resistor Metal Film 0.25W 1% 2K2
R130 1H222 Resistor Metal Film 0.25W 1% 2K2
R131 1H247 Resistor Metal Film 0.25W 1% 4K7
R132 1H247 Resistor Metal Film 0.25W 1% 4K7
R133 1H247 Resistor Metal Film 0.25W 1% 4K7
R134 1H247 Resistor Metal Film 0.25W 1% 4K7
Page 23

L925 Controller Board Parts List Issue 1.2
Designator Part Description
R135 1H247 Resistor Metal Film 0.25W 1% 4K7
R136 1H247 Resistor Metal Film 0.25W 1% 4K7
R137 1H410 Resistor Metal Film 0.25W 1% 100K
R200 1H210 Resistor Metal Film 0.25W 1% 1K0
R201 1H222 Resistor Metal Film 0.25W 1% 2K2
R202 1H210 Resistor Metal Film 0.25W 1% 1K0
R300 1H122 Resistor Metal Film 0.25W 1% 220R
R301 1H122 Resistor Metal Film 0.25W 1% 220R
R302 1H122 Resistor Metal Film 0.25W 1% 220R
R303 1H122 Resistor Metal Film 0.25W 1% 220R
R304 1H122 Resistor Metal Film 0.25W 1% 220R
R305 1H122 Resistor Metal Film 0.25W 1% 220R
R306 1H122 Resistor Metal Film 0.25W 1% 220R
R307 1H122 Resistor Metal Film 0.25W 1% 220R
R308 1H122 Resistor Metal Film 0.25W 1% 220R
R309 1H122 Resistor Metal Film 0.25W 1% 220R
R310 1H122 Resistor Metal Film 0.25W 1% 220R
R311 1H122 Resistor Metal Film 0.25W 1% 220R
R312 1H122 Resistor Metal Film 0.25W 1% 220R
R313 1H122 Resistor Metal Film 0.25W 1% 220R
RC100 2K410R RC SUPPRESSOR 100N+100R X2 RATED 250V
REG100 5D7805 IC VOLTAGE REGULATOR +5V L7805CV TO-220 PACKAGE
RELAY100 A220 Relay 1P2T 24V
RELAY101 A220 Relay 1P2T 24V
SK100 8K2308 CON MINIFIT HCS 8WAY
SK101 8K2306 CON MINIFIT HCS 6WAY
SK102 8K2306 CON MINIFIT HCS 6WAY
SK103 8K2306 CON MINIFIT HCS 6WAY
SK104 8K2306 CON MINIFIT HCS 6WAY
SK105 8K2306 CON MINIFIT HCS 6WAY
SK106 8K2306 CON MINIFIT HCS 6WAY
SK107 8K2304 CON MINIFIT HCS 4WAY
SK108 8K6602 CON KK SERIES 0.1in VERTICAL FRICTION LOCK HDR 2WAY
SK109 8K6602 CON KK SERIES 0.1in VERTICAL FRICTION LOCK HDR 2WAY
SK110 8K6602 CON KK SERIES 0.1in VERTICAL FRICTION LOCK HDR 2WAY
SK111 8K8516 CON 1.00MM VERTICAL FFC 16WAY
SK112 8K6306 CON HDR DUAL ROW 0.1IN VERTICAL 6WAY
SK113 8K6306 CON HDR DUAL ROW 0.1IN VERTICAL 6WAY
SK114 8K8022B CON 1.00MM VERTICAL FFC 22WAY FMN SERIES
SK200 8K8022B CON 1.00MM VERTICAL FFC 22WAY FMN SERIES
SK201 8D228 CON MIN JACK 3.5MM SINGLE
SK300 8K8516 CON 1.00MM VERTICAL FFC 16WAY
SK301 8K2402 CON CT SERIES VERTICAL 2WAY
SK302 8K2402 CON CT SERIES VERTICAL 2WAY
SW300 A1007 SW PUSH MAINS
TH100 1T006 THERMISTOR NTC 2K2
TR100 4A547 Transistor BC547B TO92 Package
TR101 4A547 Transistor BC547B TO92 Package
TR102 4A547 Transistor BC547B TO92 Package
TR103 4A547 Transistor BC547B TO92 Package
TR104 4A547 Transistor BC547B TO92 Package
TR105 4A547 Transistor BC547B TO92 Package
TR106 4A547 Transistor BC547B TO92 Package
TR107 4A547 Transistor BC547B TO92 Package
TR108 4A547 Transistor BC547B TO92 Package
TR109 4A547 Transistor BC547B TO92 Package
TR110 4A547 Transistor BC547B TO92 Package
TR111 4A547 Transistor BC547B TO92 Package
TR112 4A547 Transistor BC547B TO92 Package
TR113 4A557 Transistor BC557B TO92 Package
TR114 4A557 Transistor BC557B TO92 Package
TR115 4B5248 Transistor 2SC5248E TO220 Package
TR116 4B180 Transistor BD180 TO126 Package
X100 7W005 CERAMIC RESONATOR 4.00MHz
Page 24

Control PCB
L925CT1_1.2.SCH
Interface PCB
L925CT2_1.2.SCH
Main Switch and LED Display
L925CT3_1.2.sch
DRAWING TITLE
P7 Amp Controller
23425
A & R Cambridge Ltd.
Pembroke Avenue
Waterbeach
Cambridge CB5 9PB
Filename:
Notes:
Contact Engineer:
L925CT0_1.2.Sch
CHANGED R200 VALUE. CORRECTED SK301 & SK302 TO 8K2402
JP100 ADDED ON SK112 PIS 1 & 2 , F102 PART CORRECTED TO 315mA
ECO No. DESCRIPTION OF CHANGE
Contact Tel: (01223) 203252Kevin Lamb
INITIALS
Printed:
DATE
18-Apr-2002
1 4Sheet of
DRAWING NO.
L925CT
1.220/03/02KAL02_E061
1.17/03/02KAL02_E054 CHANGED C121 VALUE. REMOVED SOFT START PROTECTION
1.07/02/02KAL02_E041 PRODUCTION ISSUE PCB CHANGES ONLY
ISSUE
Page 25

15
2
6
3
7
4
8
SK100
TP109
AC_N
THERMAL TRIPS
FROM POWER
TRANSFORMERS
TP133
SK109
TX_THERM2
1
2
IDC2S
TP134
SK110
TX_THERM1
1
2
TP135
IDC2S
DGND_SK127
GND1
TP100
AC_L
C121
470N X2 CLASS
F100
T315MA
TP101
AUX_FUSE1
SK101
MOLEXPWR6
3
2
1
POWER TO AUX TRANSFORMER
TP110
AUX_AC2
TP111
AUX_AC1
1
2
SK107
MOLEXPWR4 D107
3
4
TP112
AUX_AC3
TP113
AUX_AC4
+5VD
R131
4K7 MF
R122
2K2 MF
GND1
6
5
4
+
F102
T315MA
TP102
AUX_FUSE2
D101
1N4003
D102
1N4003
D103
1N4003
D104
1N4003
D109
1N4148
+5VD
GND1
TH100
THERM NTC 2K2
C114
470U EL 25V
RELAY100A
RLY G2R-1E-24DC 16A SPDT
SK102
MOLEXPWR6
3
6
2
5
1
4
230V115V
R109
10K MF
TR101
BC547B
R137
100K MF
+
C115
10U EL
GND1
TREF
TTEMP
TR112
BC547B
D110
1N4148
X100
CST4.00
RESET*
TP103
AUX_TX
D105
1N4003
D106
1N4003
1N4003
D108
1N4003
C_DISCH
R123
2K2 MF
R100
RES 17W 150R
R101
RES 17W 150R
R102
RES 17W 150R
RC100
X2 100N/100R
RELAY101A
RLY G2R-1E-24DC 16A SPDT
+22VD
+
C101
3M3 35V EL
+5VD
R132
4K7 MF
PWROK*
+
C109
10U EL
GND1
D120
1N5711
TP156 TREF
TP157 C_DISCH
TP158 TTEMP
IC101B
IC 74HC259
VDD
GND
FIX100
FIX102
FIXING HOLE 3.5
FIXING HOLE 3.2
R103
100K 2W CF
F103
T4A
TP104
MAIN_FUSE1
SK103
MOLEXPWR6
3
2
1
6
5
4
F104
T4A
TP105
MAIN_FUSE2
SK104
MOLEXPWR6
3
2
1
TP114
MAIN_TX1
NF
6
5
4
230V 230V115V115V
F105
T4A
TP106
MAIN_FUSE3
SK105
MOLEXPWR6
3
2
1
6
5
4
D100
1N4003
NF
F106
T4A
TP107
MAIN_FUSE4
TP115
MAIN_TX2
SK106
MOLEXPWR6
3
2
1
IC105
1
2
3 4
4N35
NF
6
5
4
POWER TO MAIN TRANSFORMERS
HS100
TO220HS30REG
I
Vin
+
C102
1M0 25V
GND1
+5VD
R133
4K7 MF
FLT_TEMP*
GND1
+5VD
16
C117
100N CD
8
GND1
C103
100N PE
+5VD +5VD +5VD
R135
R134
4K7 MF
4K7 MF
FLT_VI*
FLT_DC*
TP136
MCLR
MAINS_SW
TX_OVTEMP
PWROK*
WATCHDOG
FLT_VI*
FLT_DC*
FLT_TEMP*
UC5V
C106
100N PE
IC102B
IC 74HC259
+5VD
16
VDD
C118
100N CD
8
GND
GND1
GND
G
GND1
TREF
TTEMP
PWM_OUT
C_DISCH
Vout
REG100
7805
S1
+5VD
O
+
C107
220U EL 50V
R136
4K7 MF
MAINS_SW
+5VD
SK112
1 2
3 4
5 6
GND1
DIL6 VPLG
IC100
1
MCLR
2
RA0
3
RA1
4
RA2
5
RA3
6
RA4/T0CKI
7
RA5/SS
8
RE0/RD
9
RE1/WR
10
RE2/CS
11
VDD
12
VSS
13
OSC1/CLKIN
14
OSC2/CLKOUT
15
RC0/T1OSI/T1CKI
16
RC1/T1OSO
17
RC2/CCP1
18
RC3/SCK/SCL
19
RD0/PSP0
RD1/PSP120RD2/PSP2
PIC16F877
IC103B
IC 74HC259
16
VDD
8
GND
+5VD
GND1
TP137 uC_+5V
JP100
JUMPER
RD7/PSP7
RD6/PSP6
RD5/PSP5
RD4/PSP4
RC5/SDO
RC4/SDI/SDA
RD3/PSP3
C119
100N CD
RB0/INT
UC5V
FAULT7*
40
RB7
RB6
RB5
RB4
RB3
RB2
RB1
VDD
VSS
RC7
RC6
FAULT6*
39
FAULT5*
38
FAULT4*
37
FAULT3*
36
FAULT2*
35
FAULT1*
34
TRIG/RC5
33
UC5V
32
31
GND1
SSPROT*
30
SEL_RELAY*
29
SEL_GRN*
28
SEL_RED*
27
RX
26
TX
25
MSOFT_ST*
24
MPOWER
23
DATAS0
22
S2
21
S1
S0
PWM_OUT
SK113
DIL6 VPLG+5VD
1 2
3 4
5 6
GND1
IC104C
+5VD
LM393A
84
C120
100N CD
GND1
GND1
+5VD
R110
10K MF
C105
100N PE
TP108
6
MSSPROT
5
GND1
WATCHDOG
+5VD
R104
47K MF
SSPROT*
+
C100
4U7 50V
NF
GND1
+22VD
F101
R114
100K MF
DATA
S0
S1
S2
SEL_RED*
RESET*
DATA
S0
S1
S2
SEL_GRN*
DATA
S0
S1
S2
SEL_RELAY*
T315MA
PWM_OUT
+5VD
R106
22K MF
R105
47K MF
GND1
+
C110
10U EL
IC101A
D13Q0
S01Q2
S12Q3
S23Q4
G14Q6
CLR15Q7
IC 74HC259
IC102A
D13Q0
S01Q2
S12Q3
S23Q4
G14Q6
CLR15Q7
IC 74HC259
IC103A
D13Q0
S01Q2
S12Q3
S23Q4
G14Q6
CLR15Q7
IC 74HC259
R107
22K MF
RED1
4
RED2
5
Q1
RED3
6
RED4
7
RED5
9
RED6
10
Q5
RED7
11
12
GRN1
4
GRN2
5
Q1
GRN3
6
GRN4
7
GRN5
9
GRN6
10
Q5
GRN7
11
12
RELAY1
4
RELAY2
5
Q1
RELAY3
6
RELAY4
7
RELAY5
9
RELAY6
10
Q5
11
RELAY7
12
+
+
C111
10U EL
C116
47U EL 35V
IC104A
3
2
LM393A
IC104B
5
6
LM393A
GND1
TP159 RELAY1
TP160 RELAY2
TP161 RELAY3
TP142 RELAY4
TP162 RELAY5
TP163 RELAY6
TP164 RELAY7
1
7
R112
100K MF
+22VD +22VD_SW
R108
10K MF
R111
2K2 MF
R119
10K MF
TR103
BC547B
D111
1N4148
TP138
RELAY1*
TR102
TR104
BC547B
BC547B
R124
R125
2K2 MF
2K2 MF
RELAY1
RELAY2
+
C108
10U EL
MAINS_SW
+22VD_SW
TR116
BD180 PNP TO-126
D112
1N4148
TP139
RELAY2*
TR105
BC547B
R126
2K2 MF
RELAY3
R115
100R MF
TR100
BC547B
R117
470R MF
R116
100R MF
TR113
BC557B TR114
D113
1N4148
TP140
RELAY3*
GND1
TR106
BC547B
R127
2K2 MF
RELAY4
MPOWER
MSOFT_ST*
D114
1N4148
TP141
RELAY4
BC557B
R113
100K MF
RELAY5
TR107
BC547B
R128
2K2 MF
2K2 MF
R120
2K2 MF
R121
2K2 MF
R118
C112
1N PE
D115
1N4148
TR108
BC547B
GND1
D116
1N4148
TP143
RELAY5*
TR109
BC547B
R129
2K2 MF
RELAY6
GND1
TR115
2SC5248
HS101
TO220HS30TR
C104
100N PE
PCB NET LINK
RELAY100B
RLY G2R-1E-24DC 16A SPDT
+22VD_SW
D117
1N4148
TP144
RELAY6*
TR110
BC547B
R130
2K2 MF
RELAY7
DRAWING TITLE
23425
A & R Cambridge Ltd.
Pembroke Avenue
Waterbeach
Cambridge CB5 9PB
LK1
D119
1N4148
TR111
BC547B
D118
1N4148
TP145
RELAY7*
GND1
P7 Amp Controller
Filename:
Notes:
Contact Engineer:
RELAY101B
RLY G2R-1E-24DC 16A SPDT
GND1
TP146FAULT1
TP147FAULT2
TP148FAULT3
TP149FAULT4
TP150FAULT5
TP151FAULT6
TP152FAULT7
L925CT1_1.2.sch
FIX103
FIXING HOLE 3.5
FIX104
FIXING HOLE 3.5
FIX101
FIXING HOLE 3.2
FIX105
FIXING HOLE 3.5
PB
PCB
L925PB_E
+
C113
470U EL 25V
TP116RED1
TP117RED2
TP118RED3
TP119RED4
TP120RED5
TP121RED6
TP122RED7
Contact Tel: (01223) 203252Kevin Lamb
TP131
SK108
FAN
1
2
IDC2S
TP130
DGND_FAN
SK111
RED1
RED2
RED3
RED4
RED5
RED6
RED7
TP123GRN1
TP124GRN2
TP125GRN3
TP126GRN4
TP127GRN5
TP128GRN6
TP129GRN7
TP153FLT_DC*
TP154FLT_VI*
TP155FLT_TEMP*
+22VD_SW
TRIG/RC5
ECO No. DESCRIPTION OF CHANGE
INITIALS
Printed:
1
2
3
4
5
6
7
8
GRN1
9
GRN2
10
GRN3
11
GRN4
12
GRN5
13
GRN6
14
GRN7
15
16
FFC16V
GND1
TP132
MAINS_SW
SK114
FAULT1*
22
FAULT2*
21
FAULT3*
20
FAULT4*
19
FAULT5*
18
FAULT6*
17
FAULT7*
16
FLT_DC*
15
FLT_VI*
14
FLT_TEMP*
13
12
RELAY1*
11
RELAY2*
10
RELAY3*
9
RELAY4*
8
RELAY5*
7
RELAY6*
6
RELAY7*
5
4
3
2
TP166
1
+22V
FFC22V1MM
TP165
TP167
DGND_SK131
GND1
CHANGED R200 VALUE. CORRECTED SK301 & SK302 TO 8K2402
JP100 ADDED ON SK112 PIS 1 & 2 , F102 PART CORRECTED TO 315mA
DATE
18-Apr-2002
2 4Sheet of
DRAWING NO.
L925CT
1.220/03/02KAL02_E061
1.17/03/02KAL02_E054 CHANGED C121 VALUE. REMOVED SOFT START PROTECTION
1.07/02/02KAL02_E041 PRODUCTION ISSUE PCB CHANGES ONLY
ISSUE
Page 26

SK201
JACK3.5
C201
1N0 CD
CHASSIS CHASSIS
TP202
RC5_TRIG
GND_RC5_TRIG
C202
1N0 CD
TP207
GND2 GND2
R200
1K0 MF
R202
1K0 MF
D200
4V7 400MW
GND2
R201
2K2 MF
SK200
1
2
3
4
5
6
7
8
9
10
11
12
13
14
15
16
17
18
19
20
21
22
FFC22V1MM
TP203
DGND_SK206
GND2
AFAULT1
AFAULT2
AFAULT3
AFAULT4
AFAULT5
AFAULT6
AFAULT7
AFLT_DC*
AFLT_VI*
AFLT_TEMP*
ARELAY1*
ARELAY2*
ARELAY3*
ARELAY4*
ARELAY5*
ARELAY6*
ARELAY7*
TP204 A+22VD
FIX202
FIXING HOLE 3.5
+22VD_SW2
C200
100N CD
GND2
FIX200
FIXING HOLE 3.2
FIX203
FIXING HOLE 3.5
CHASSIS
FIX204
FIXING HOLE 3.5
FIX205
FIXING HOLE 3.5
FIX206
FIXING HOLE 3.5
FIX207
FIXING HOLE 3.5
FIX201
FIXING HOLE 3.2
+22VD_SW2
TP200RELAY1
TP201RELAY2
TP206RELAY3
TP205RELAY4
TP208RELAY5
TP209RELAY6
TP210RELAY7
ARELAY1*
ARELAY2*
ARELAY3*
ARELAY4*
ARELAY5*
ARELAY6*
ARELAY7*
ASIG_PRES*
AFLT_TEMP*
AFLT_VI*
AFLT_DC*
ASIG_PRES*
AFLT_TEMP*
AFLT_VI*
AFLT_DC*
ASIG_PRES*
AFLT_TEMP*
AFLT_VI*
AFLT_DC*
ASIG_PRES*
AFLT_TEMP*
AFLT_VI*
AFLT_DC*
ASIG_PRES*
AFLT_TEMP*
AFLT_VI*
AFLT_DC*
ASIG_PRES*
AFLT_TEMP*
AFLT_VI*
AFLT_DC*
ASIG_PRES*
AFLT_TEMP*
AFLT_VI*
AFLT_DC*
AFAULT1
+22VD_SW2
AFAULT2
+22VD_SW2
AFAULT3
+22VD_SW2
AFAULT4
+22VD_SW2
AFAULT5
+22VD_SW2
AFAULT6
+22VD_SW2
AFAULT7
GND2
GND2
GND2
GND2
GND2
GND2
GND2
PL200
1
2
3
4
5
6
7
8
9
10
CON 10W 0.1 HDR
PL201
1
2
3
4
5
6
7
8
9
10
CON 10W 0.1 HDR
PL202
1
2
3
4
5
6
7
8
9
10
CON 10W 0.1 HDR
PL203
1
2
3
4
5
6
7
8
9
10
CON 10W 0.1 HDR
PL204
1
2
3
4
5
6
7
8
9
10
CON 10W 0.1 HDR
PL205
1
2
3
4
5
6
7
8
9
10
CON 10W 0.1 HDR
PL206
1
2
3
4
5
6
7
8
9
10
CON 10W 0.1 HDR
DRAWING TITLE
23425
A & R Cambridge Ltd.
Pembroke Avenue
Waterbeach
Cambridge CB5 9PB
P7 Amp Controller
Filename:
L925CT2_1.2.Sch
Notes:
Contact Engineer:
CHANGED R200 VALUE. CORRECTED SK301 & SK302 TO 8K2402
JP100 ADDED ON SK112 PIS 1 & 2 , F102 PART CORRECTED TO 315mA
INITIALS
Printed:
DATE
18-Apr-2002
3 4Sheet of
DRAWING NO.
L925CT
Contact Tel: (01223) 203252Kevin Lamb
ECO No. DESCRIPTION OF CHANGE
ISSUE
1.220/03/02KAL02_E061
1.17/03/02KAL02_E054 CHANGED C121 VALUE. REMOVED SOFT START PROTECTION
1.07/02/02KAL02_E041 PRODUCTION ISSUE PCB CHANGES ONLY
Page 27

SK301
1
2
8K2402
SW300A
MAINS_SW A1007
SW300B
MAINS_SW A1007
SK300
16
15
14
13
12
11
10
9
8
7
6
5
4
3
2
1
FFC16V
BRED1
BGRN1
MAINS_SW1
BRED1
BRED2
BRED3
BRED4
BRED5
BRED6
BRED7
BGRN1
BGRN2
BGRN3
BGRN4
BGRN5
BGRN6
BGRN7
MAINS_SW1
TP315
DGND_SK302
GND3
BRED1
BRED2
BRED3
BRED4
BRED5
BRED6
BRED7
BGRN1
BGRN2
BGRN3
BGRN4
BGRN5
BGRN6
BGRN7
R300
220R MF
R
GND3
LED300
LED RED/GRN
R301
220R MF
G
FIX302
FIXING HOLE 3.5
FIX300
FIXING HOLE 3.2
TP300RED1
TP301RED2
TP302RED3
TP303RED4
TP304RED5
TP305RED6
TP306RED7
TP307GRN1
TP308GRN2
TP309GRN3
TP310GRN4
TP311GRN5
TP312GRN6
TP313GRN7
TP314DMAIN_SW
R302
220R MF
R
LED301
LED RED/GRN
BRED2
BGRN2
R303
220R MF
GND3
FIX303
FIXING HOLE 3.5
FIX301
FIXING HOLE 3.2
BRED3
BGRN3
R304
220R MF
G
R
LED302
LED RED/GRN
GND3
R305
220R MF
G
R306
220R MF
R
BRED4
GND3
LED303
LED RED/GRN
BGRN4
R307
220R MF
G
R308
220R MF
R
BRED5
GND3
LED304
LED RED/GRN
BGRN5
R309
220R MF
G
R310
220R MF
R
BRED6
GND3
LED305
LED RED/GRN
BGRN6
R311
220R MF
G
R312
220R MF
R
BRED7
BGRN7
R313
220R MF
G
GND3 GND3
LED306
LED RED/GRN
1
2
SK302
8K2402
MAINS_SW1
DRAWING TITLE
P7 Amp Controller
23425
A & R Cambridge Ltd.
Pembroke Avenue
Waterbeach
Cambridge CB5 9PB
Filename:
Notes:
Contact Engineer:
L925CT3_1.2.Sch
CHANGED R200 VALUE. CORRECTED SK301 & SK302 TO 8K2402
JP100 ADDED ON SK112 PIS 1 & 2 , F102 PART CORRECTED TO 315mA
ECO No. DESCRIPTION OF CHANGE
Contact Tel: (01223) 203252Kevin Lamb
INITIALS
Printed:
DATE
18-Apr-2002
4 4Sheet of
DRAWING NO.
L925CT
1.220/03/02KAL02_E061
1.17/03/02KAL02_E054 CHANGED C121 VALUE. REMOVED SOFT START PROTECTION
1.07/02/02KAL02_E041 PRODUCTION ISSUE PCB CHANGES ONLY
ISSUE
Page 28

Transformer
Specifications
Contents
!
L911TX
Power amp 115/230VAC
!
L912TX
Aux 115/230VAC
!
L920TX
Power amp 100VAC
!
L921TX
Aux 100VAC
Page 29

87654321
windings connect to 2 way molex connector 39-01-3028. Use MOLEX pin
Transformer Specification For 115/230V P7 transformer
Arcam Part Number L911TX
Material Safety Specification
1. Winding Wire to be Grade 2 (130C rating) to BS 60317-4 1995
2. Mylar Polyester Insulator 130C Rated
D
C
3. Potting Compound PC3502 E135297(M)
Mechanical Specification
1. Middle of transformer to be potted (as shown).
2. Primary windings connect to 6 way MOLEX connector 39-01-2065.
Secondary
44476-3112.
MOLEX connectors have pin numbers indicated on them.
3. Primary wires are enclosed in a common sleeve. Each secondary
winding is individually sleeved.
Use PVC sleeving.
4. All wire lengths in mm. Lengths are +5.0, -0
5. Please adhere rubber insulating pad to bottom of transformer as shown.
Electrical Specification
1. Transformer to have dual 115V primaries to allow parallel operation for
115V input and series operation with 230V input.
2. Transformer input voltage range
115V -18% +14% (97.5V to 132.5V)
230V -18% +14% (195V to 265V)
3. Transformer to have 7 secondary windings as show in the adjacent
drawing.
4. Loaded DC voltages specified at 230V AC in (with transformer primaries
in series)
5. Each secondary winding to have a full wave (4diode) bridge to produce a
single DC rail.
(AS shown in diagram)
Output Capacitance to be 10000uF per rail.
VOUTmin = 52V dc @ Io = 2A (with 230V AC in) See dwg
This figure to be the minimum voltage on the reservoir capacitor as shown
in the diagram
5 1
46 2
12
3
Pin outs of Molex connectors
As viewed looking down at the end
the wires enter the connector
Connector Latch
2 way6 way
PRIMARY WIRES
LEADS EXIT FROM BOTTOM
145mm dia max
Rubber insulating pad
SECONDARY WIRES
LEADS EXIT FROM BOTTOM
POTTING COMPOUND
M12 Threaded Brass Insert
INSERT TO ALLOW 30mm DEPTH OF THREAD
1
2
3
4
5
6
95max
PRIMARY
6 WAY CONN PIN 1
115V ac
6 WAY CONN PIN 3
6 WAY CONN PIN 4
115V ac
6 WAY CONN PIN 6
BROWN
WHITE
BLACK
BLUE
SECONDARY
RED
OR
RED
OR
RED
OR
RED
OR
RED
OR
RED
OR
RED
OR
100C THERMAL TRIP
NORMALLY CLOSED
RESETTABLE
SCREEN WIRE GRN/YELL
1
2
1
2
1
2
1
2
1
2
1
2
1
2
1
2
2WAY 10-11-2023 molex
M4 CRIMP EYELET
D
C
B
Voltage on Reservoir Capacitor
6 way MOLEX 39-01-2065
52V
10mS
VOUT min
UL94- V0
2WAY 10-11-2023 molex
TEST CIRCUIT (PER OUTPUT)
+VOUT
AC IN
+
10000uF
A
1 2 3 4 5 6 7 8
-VOUT
2A load
A & R Cambridge Ltd.
Pembroke Avenue
Denny Industrial Centre
Waterbeach
Cambridge CB5 9PB
Filename
J:\Development_Projects\P7_Amp\Transformer Design\L911TX_1.ddb - Documents\L911TX_1.sch
23425
PRIMARIES
THERMAL TRIP
SCREEN WIRE
M4 CRIMP EYELET
200mm
280mm
280mm
DRAWING TITLE
POWER TRANSFORMER FOR P7 115/230V
Circuit Diagram
Notes:
ECO No. DESCRIPTION OF CHANGE
INITIALS
SECONDARY 1
DATE
Date Printed
6-Mar-2002
2 way MOLEX 39-01-3028
FOR LENGTH OF SECONDARIES
SEE TABLE BELOW
SECONDARY 7
2 way MOLEX 39-01-3028
SECONDARY LENGTH
1
2
3
4
5
6
7
Lead Out Changes to suit new wiring arrangement in amplifier
Lead Out Changes
Drawn by:
KAL
1 1Sheet of
520
560
550
570
570
610
650
DRAWING NO.
ISSUE
L911TX
B
A
105-03-2002KAL
D4-12-2001KAL Mechanical Changes
Page 30

4321
windings connect to 4 way molex connector 39-01-3048. Use MOLEX pin 44476-3112.
(this will ensure that VOUT2 is 8V at 195V AC in)
Transformer Specification For 115/230V P7 Auxilliary Transformer
Arcam Part Number L912TX
PRIMARY SECONDARY
6 WAY CONN PIN 3
D
BROWN
RED
4 WAY CONN PIN 3
115V ac
6 WAY CONN PIN 1
6 WAY CONN PIN 6
WHITE
BLACK
ORANGE
YELLOW 4 WAY CONN PIN 2
4 WAY CONN PIN 4
115V ac
6 WAY CONN PIN 4
BLUE
PURPLE
4 WAY CONN PIN 1
TEST CIRCUIT (PER OUTPUT)
TEST CIRCUIT
1N4003 1N4003
1N4003 1N4003
+
3300uF
VOUT 1
500mA load
Amthyst Part Number AD3595T
Material Safety Specification
D
1. Winding Wire to be Grade 2 (130C rating) to BS 60317-4 1995
2. Mylar Polyester Insulator 130C Rated
3. Potting Compound PC3502 E135297(M)
Mechanical Specification
1. Middle of transformer to be potted. Potting to be drilled out with an 6mm DIA Hole
and then the bottom surface counterbored to a depth of 12mm with a 12mm dia drill
as shown. Actual part which the counterbore is designed to clear extends up to 10mm from
transformer mounting surface into counterbore.
C
B
Vout1 = 22V
Vout2 = 9.5V
60 max
CENTRE TO BE POTTED AND DRILLED
OUT TO 6mm DIA
35mm
Voltage on Reservoir Capacitor
10mS
90mm
PRIMARIES
SECONDARIES
110mm
12mm
40 max
DRAWING TITLE
AUX TOROIDAL TRANSFORMER FOR P7 AMP 115/230V
1N4003 1N4003
1N4003 1N4003
6 way MOLEX 39-01-2065
UL94-V0
4 way MOLEX 39-01-3048
VOUT 2
+
1000uF
5346
12
Pin outs of Molex connectors
As viewed looking down at the end
the wires enter the connector
GND
150mA load
GND
3
4
1
2
4 way6 way
2. Primary windings connect to 6 way MOLEX 39-01-2065. Secondary
MOLEX connectors have pin numbers indicated on them.
3. Use 24 AWG wire with colours as shown. Primary wires are enclosed in a common
sleeve. Secondary wires are enclosed in a common screen. Use PVC sleeving.
4. All wire lengths in mm. Lengths are +5.0, -0
5. Please adhere rubber insulating pad to bottom of transformer as shown.
Electrical Specification
1. Transformer to have dual 115V primaries to allow parrallel operation for
115V input and series operation with 230V input.
2. Transformer input voltage range
115V -18% +14% (97.5V to 132.5V)
230V -18% +14% (195V to 265V)
3. Transformer to have two secondary windings as show in the adjacent drawing.
4. Loaded DC voltages specified at 230V AC in (with transformer primaries in series)
DC supplies to be generated by configuring the seconday windings with a full wave bridge
(see diagram).
Output Capacitance to be 3300uF. 22V dc
Output Capacitance to be 1000uF. 9.5V dc
VOUT1 = 22.0V dc @ Io = 250mA (With 230V AC in)
V0UT2 = 9.5V dc @ Io = 150mA (With 230V AC in)
C
B
A
COUNTERBORE DIA 12mm
COUNTERBORE DEPTH 12mm
23425
A & R Cambridge Ltd.
Pembroke Avenue
Denny Industrial Centre
Rubber insulating pad
1 2 3 4
Waterbeach
Cambridge CB5 9PB
Circuit Diagram
Notes:
ECO No. DESCRIPTION OF CHANGE
Filename
J:\Development_Projects\P7_Amp\Transformer Design\L912tx_1.ddb - Documents\L912TX_1.Sch
INITIALS
05/03/2002KAL Changed counterbore details and numerous corrections.
04/12/2001KAL Changed Lead Lengths
DATE
Date Printed
6-Mar-2002
Drawn by:
KAL
1 1Sheet of
DRAWING NO.
A
1
F
ISSUE
L912TX
Page 31

87654321
windings connect to 2 way molex connector 39-01-3028. Use MOLEX pin
Transformer Specification For 100V P7 Amplifier
Arcam Part Number L920TX
Material Safety Specification
1. Winding Wire to be Grade 2 (130C rating) to BS 60317-4 1995
2. Mylar Polyester Insulator 130C Rated
D
C
3. Potting Compound PC3502 E135297(M)
Mechanical Specification
1. Middle of transformer to be potted (as shown).
2. Primary windings connect to 6 way MOLEX connector 39-01-2065.
Secondary
44476-3112.
MOLEX connectors have pin numbers indicated on them.
3. Primary wires are enclosed in a common sleeve. Each secondary
winding is individually sleeved.
Use PVC sleeving.
4. All wire lengths in mm. Lengths are +5.0, -0
5. Please adhere rubber insulating pad to bottom of transformer as shown.
Electrical Specification
1. Transformer to have dual 100V primaries to allow parallel operation for
100V input
2. Transformer input voltage range
100V -18% +14% (82V to 114V)
3. Transformer to have 7 secondary windings as show in the adjacent
drawing.
4. Loaded DC voltages specified at 100V AC in (with transformer primaries
in parallel)
5. Each secondary winding to have a full wave (4diode) bridge to produce a
single DC rail.
(AS shown in diagram)
Output Capacitance to be 10000uF per rail.
VOUTmin = 52V dc @ Io = 2A (with 100V AC in) See dwg
This figure to be the minimum voltage on the reservoir capacitor as shown
in the diagram
5 1
46 2
12
3
Pin outs of Molex connectors
As viewed looking down at the end
the wires enter the connector
Connector Latch
2 way6 way
PRIMARY WIRES
LEADS EXIT FROM BOTTOM
145mm dia max
Rubber insulating pad
SECONDARY WIRES
LEADS EXIT FROM BOTTOM
POTTING COMPOUND
M12 Threaded Brass Insert
INSERT TO ALLOW 30mm DEPTH OF THREAD
1
2
3
4
5
6
95max
PRIMARY
6 WAY CONN PIN 1
100V ac
6 WAY CONN PIN 3
6 WAY CONN PIN 4
100V ac
6 WAY CONN PIN 6
BROWN
WHITE
BLACK
BLUE
SECONDARY
RED
OR
RED
OR
RED
OR
RED
OR
RED
OR
RED
OR
RED
OR
100C THERMAL TRIP
NORMALLY CLOSED
RESETTABLE
SCREEN WIRE GRN/YELL
1
2
1
2
1
2
1
2
1
2
1
2
1
2
1
2
2WAY 10-11-2023 molex
M4 CRIMP EYELET
D
C
B
Voltage on Reservoir Capacitor
6 way MOLEX 39-01-2065
52V
10mS
VOUT min
UL94- V0
2WAY 10-11-2023 molex
TEST CIRCUIT (PER OUTPUT)
+VOUT
AC IN
+
10000uF
A
1 2 3 4 5 6 7 8
-VOUT
2A load
A & R Cambridge Ltd.
Pembroke Avenue
Denny Industrial Centre
Waterbeach
Cambridge CB5 9PB
Filename
J:\Development_Projects\P7_Amp\Transformer Design\L920TX_1.ddb - Documents\L920TX_1.sch
23425
PRIMARIES
THERMAL TRIP
SCREEN WIRE
M4 CRIMP EYELET
200mm
280mm
280mm
DRAWING TITLE
POWER TRANSFORMER FOR P7 100V (JAPAN)
Circuit Diagram
Notes:
ECO No. DESCRIPTION OF CHANGE
INITIALS
SECONDARY 1
DATE
Date Printed
6-Mar-2002
FOR LENGTH OF SECONDARIES
SEE TABLE BELOW
SECONDARY 7
SECONDARY LENGTH
1
2
3
4
5
6
7
Drawn by:
KAL
2 way MOLEX 39-01-3028
520
560
550
570
570
610
650
1 1Sheet of
DRAWING NO.
2 way MOLEX 39-01-3028
ISSUE
L920TX
B
A
105-03-2002KAL Based on spec of 115/230V part (L911TX)
Page 32

4321
windings connect to 4 way molex connector 39-01-3048. Use MOLEX pin 44476-3112.
Transformer Specification For 100V (JAPAN) P7 Auxilliary Transformer
Arcam Part Number L921TX
PRIMARY SECONDARY
6 WAY CONN PIN 3
D
BROWN
RED
4 WAY CONN PIN 3
100V ac
6 WAY CONN PIN 1
6 WAY CONN PIN 6
WHITE
BLACK
ORANGE
YELLOW 4 WAY CONN PIN 2
4 WAY CONN PIN 4
100V ac
6 WAY CONN PIN 4
BLUE
PURPLE
4 WAY CONN PIN 1
TEST CIRCUIT
1N4003 1N4003
1N4003 1N4003
+
3300uF
VOUT 1
500mA load
Material Safety Specification
1. Winding Wire to be Grade 2 (130C rating) to BS 60317-4 1995
D
2. Mylar Polyester Insulator 130C Rated
3. Potting Compound PC3502 E135297(M)
Mechanical Specification
1. Middle of transformer to be potted. Potting to be drilled out with an 6mm DIA Hole
and then the bottom surface counterbored to a depth of 12mm with a 12mm dia drill
as shown. Actual part which the counterbore is designed to clear extends up to 10mm from
transformer mounting surface into counterbore.
TEST CIRCUIT (PER OUTPUT)
2. Primary windings connect to 6 way MOLEX 39-01-2065. Secondary
Voltage on Reservoir Capacitor
VOUT 2
GND
MOLEX connectors have pin numbers indicated on them.
C
B
Vout1 = 22V
Vout2 = 9.5V
60 max
CENTRE TO BE POTTED AND DRILLED
OUT TO 6mm DIA
35mm
12mm
40 max
10mS
90mm
PRIMARIES
SECONDARIES
110mm
1N4003 1N4003
1N4003 1N4003
6 way MOLEX 39-01-2065
UL94-V0
4 way MOLEX 39-01-3048
DRAWING TITLE
AUX TOROIDAL TRANSFORMER P7 100V (JAPAN)
+
1000uF
5346
12
Pin outs of Molex connectors
As viewed looking down at the end
the wires enter the connector
150mA load
GND
3
4
1
2
4 way6 way
3. Use 24 AWG wire with colours as shown. Primary wires are enclosed in a common
sleeve. Secondary wires are enclosed in a common screen. Use PVC sleeving.
4. All wire lengths in mm. Lengths are +5.0, -0
5. Please adhere rubber insulating pad to bottom of transformer as shown.
Electrical Specification
1. Transformer to have dual 100V primaries to allow parallel operation for
100V input.
2. Transformer input voltage range
100V -18% +14% (82V to 114V)
3. Transformer to have two secondary windings as show in the adjacent drawing.
4. Loaded DC voltages specified at 100V AC in (with transformer primaries in parallel)
DC supplies to be generated by configuring the seconday windings with a full wave bridge
(see diagram).
Output Capacitance to be 3300uF. 22V dc
Output Capacitance to be 1000uF. 9.5V dc
VOUT1 = 22.0V dc @ Io = 250mA (With 100V AC in)
V0UT2 = 9.5V dc @ Io = 150mA (With 100V AC in)
(this will ensure that VOUT2 is 8V at 82V AC in)
C
B
A
COUNTERBORE DIA 12mm
COUNTERBORE DEPTH 12mm
23425
A & R Cambridge Ltd.
Pembroke Avenue
Denny Industrial Centre
Rubber insulating pad
1 2 3 4
Waterbeach
Cambridge CB5 9PB
Circuit Diagram
Notes:
ECO No. DESCRIPTION OF CHANGE
Filename
J:\Development_Projects\P7_Amp\Transformer Design\L921tx_1.ddb - Documents\L921TX_1.Sch
INITIALS
05/03/2002KAL Based on spec of 115/230V part (L912TX)
DATE
Date Printed
6-Mar-2002
Drawn by:
KAL
1 1Sheet of
DRAWING NO.
A
1
ISSUE
L921TX
Page 33

Mechanical
Assembly
Contents
!
General assembly
parts list
!
Assembly diagrams
Front panel
TX tray
Rear panel
Chassis
Page 34

ITEM 240V 115V 100V SILVER BLACK DESCRIPTION WHERE USED QTY
E065AY E065AYB FASCIA ASSEMBLY FITS TO FRONT OF CHASSIS 1
E844CP E844CPB COVER 1
E934MC E934MCB POWER BUTTON FITS ONTO POWER SWITCH 1
HA4V06S SCREW MACHINE M4x6mm PAN TORX
HA4V06B SCREW MACHINE M4x6mm PAN TORX
E801SL E802SL VOLTAGE LABEL ON REAR PANEL OVER 230V TEXT 1
SL024 SL092 VOLTAGE LABEL ON CARTON LABEL OVER 230V TEXT 1
8A018 SCHURTER IEC C20 16A INLET SCREWS TO REAR PANEL 1
E064AY REAR PANEL ASSEMBLY FITS ONTO BACK OF CHASSIS 1
E088AY FAN ASSY. FITS ONTO FAN MOUNTING BRACKET 1
E106AY TRANSFORMER TRAY ASSEMBLY 1
E799RS MAINS IEC LEAD 1
E817CH CHASSIS 1
E879SL PRODUCT CONFIGURATION CONTROL LABEL ON O/S SIDE OF CHASSIS 1
E888PM BLANKING PLUG FOR 4MM BINDING POST 4MM BINDING POSTS 14
E909PK PAIR OF P7 PACKING CAPS (TOP/BOTTOM) 1
E910PK CARDBOARD PARTITION FOR MAINS LEAD 1
E911PK CARTON 1
E920PK POLY SHEET 1300x1000mm 350 GAUGE TO PACKAGE UNIT 1
E926MC POWER SWITCH BRACKET MOUNTS SWITCH TO FASCIA 1
E932MC BUSH (POWER BUTTON) FITS INTO COUNTERBORE IN FASCIA 1
E935MC FOOT FITS TO UNDERSIDE OF CHASSIS 4
E937SL CARTON LABEL P7 1
E949MC FAN MOUNTING BRACKET FITS TO CHASSIS 1
F044 CABLE TIE 100MM X 2.5MM T18R THROUGH ‘HOOKS’ ON CHASSIS BASE TO SECURE
F164 FOAM TOP OF FASCIA ASSY. 400MM
F211 EASY SLIDE BUMPON FOOT STICKS TO RECESS IN FOOT 4
F221 SYMMETRIC LOW LOAD ISODAMP ISOLATION
H040 M3x14mm MALE-FEMALE SPACER FITS DISPLAY PCB TO FASCIA 4
HA12K30B SCREW MACHINE M12x30mm HEX STEEL ZINC
HA3V06A SCREW MACHINE M3x6mm PAN TORX STEEL
HA3V10A SCREW MACHINE M3x10mm PAN T0RX-SLOT
HA3V10B SCREW MACHINE M3x10mm PAN TORX-SLOT
HA4D40A SCREW MACHINE M4x40mm PAN POZI STEEL
P7 General Assembly Parts List – issue 4
STAINLESS-STEEL NICKEL-PLATED
STAINLESS-STEEL BLACK
GROMMET
PLATED BLACK
ZINC-PLATE CLEAR
STEEL ZINC-PLATE CLEAR
STEEL ZINC-PLATE BLACK
COVER TO CHASSIS 8
TRANSFORMER CABLES
FAN MOUNTING BRACKET 4
POWER TX BOLT 2
28
FOOT FIXING 8
IEC INLET TO REAR PANEL. MODULE REAR PANEL
TO REAR PANEL
FAN MOUNTING SCREWS 4
7
16
Page 35

ITEM 240V 115V 100V SILVER BLACK DESCRIPTION WHERE USED QTY
HA4D06A SCREW MACHINE M4x6mm PAN POZI STEEL
HA5L12B SCREW MACHINE M5x12mm HEX STEEL ZINC-
HA5L30B SCREW MACHINE M5x30mm HEX STEEL ZINC-
HA5W10B SCREW MACHINE M5x10mm BUTTON HEX-
HA6L60B SCREW MACHINE M6x60mm CAP HEX-SOCKET
HC8A13A SCREW SELF-TAPPING NO8x13mm PAN SUPA
HF4V09B SCREW SELF-TAPPING-SEMS NO4x9mm PAN
HJ4A00F M4 HEX NUT NYLOC FAN MOUNTING 4
HJ5A00A NUT FULL M5 STEEL ZINC-PLATE CLEAR MODULE TO TRAY 14
HL12AB WASHER PLAIN M12 STEEL ZINC-PLATE BLACK POWER TX TO TRAY 2
HL4SB WASHER INT-SHAKEPROOF M4 STEEL ZINC-
HL5EB WASHER PLAIN M5 STEEL ZINC-PLATE BLACK AUX TX TO TRAY. MODULE TO TRAY 15
WASHER M3 FIBRE ADHESIVE BACKED - O/D
L911TX L911TX L920TX POWER TRANSFORMER FITS UNDER TRANSFORMER TRAY 2
L912TX L912TX L921TX SECONDARY TRANSFORMER FITS ONTO TRANSFORMER TRAY 1
L924AY AMP MODULE ASSEMBLY 7
L925AY CONTROL PCB ASSEMBLY 1
L934CA IEC INLET TO CONTROL PCB CABLE 1
L936CA CONTROL PCB TO CONNECTOR PCB FLEXFOIL 1
L937CA SWITCH PCB TO LED PCB 2 WIRE
L938CA CONTROL PCB TO LED PCB FLEXFOIL 1
P3020 GRIP-SEAL POLYTHENE BAG 254X356 CLEAR 180
SH000 REGISTRATION CARD IN POLY BAG P3020 1
SH000A ENVELOPE IN POLY BAG P3020 1
SH100 P7 HANDBOOK (MULTI-LANGUAGE) IN POLY BAG P3020 1
SM631 SELLOTAPE PACKING 1
P7 General Assembly Parts List – issue 4
ZINC-PLATE CLEAR
NICKEL-PLATED
PLATE BLACK
PLATE BLACK
SOCKET STEEL ZINC-PLATE BLACK
STEEL ZINC-PLATE BLACK
STEEL ZINC-PLATE CLEAR
TORX-SLOT STEEL ZINC-PLATE BLACK
PLATE BLACK
8mm, I/D 3.6mm, THK 0.9mm
INTERCONNECT
GAUGE
FAN BRACKET (3) CHASSIS SAFETY EARTH (1) AND
TRANSFORMER EARTH SCREEN WIRE (1)
MODULE TO TRAY 14
AUX TX TO TRAY 1
TRAY TO CHASSIS 8
MODULE TO CHASSIS 7
FRONT PANEL TO CHASSIS 6
REAR TO CHASSIS. COVER TO REAR 10
CHASSIS SAFETY EARTH (1) TRANSFORMER EARTH
SCREEN WIRE (1)
DISPLAY PCB MOUNTING & POWER SWITCH
BRACKET AS REQUIRED.
1
FOR REGISTRATI ON CARD, ENVELOPE AND
HANDBOOK
5
2
1
Australia Israel South Africa Switzerland Philippines USA/Canada Thailand Japan Europe UK Korea H.Kong/Mal Argentina Description
8A019 8A020 8A021 8A022 8A019 8A023 8A023 8A023 8A024 8A025 8A024 8A024 8A019 High current IEC mains lead
Page 36

Page 37

Page 38

Page 39

Page 40

ARCAM
All parts can be ordered via spares@arcam.co.uk
Pembroke Ave, Waterbeach, Cambridge, CB5 9PB, ENGLAND
TEL: +44(0) 1223 203 203 FAX: +44(0) 1223 863 384
 Loading...