

Page 1

ARCAM
DELTA 290 AMPLIFIER
HANDBOOK
Page 2

TECHNICAL SPECIFICATION
Output power (20Hz-20kHz at 0.5%THD)
Harmonic Distortion, 60W, 8Q at IkHz
Tone controls (typical variation)
L/R Crosstalk
INPUTS
Line inputs:
Noise (CCIR) ref. rated power
Input impedance
Overload margin
Phono board (if fitted):
Noise (CCIR) ref rated power
Input impedance
Overload margin
OUTPUTS
Preamplifier Output
Nominal output level
Maximum output level
Output impedance
Tape/ AUX outputs:
Output impedance
Headphones:
Maximum output level into 600Q
Output impedance
75W, both channels into 8Q
90W, single channel into 8Q
MOW, single channel into 4Q
0.02% typical
± 3dB at lOOHz and lOkHz
-70dB at IkHz
Sensitivity 175mV —
99dB typical
lOkfl
>40dB
Sensitivity 2.6mV MM, 260/zV MC
79dB MM, 73dB MC
47k Q MM, 300Q MC
35dB
800mV
8V
loon
lOOQ
8V
lOOQ
Power consumption
Dimensions W/D/Hmm.
Weight
Supplied accessories
E & O E.
550VA
430x315x92
6.3kg nett.
7.5kg packed
Mains lead
CR 25 Handi-Remote
Page 3
Page 4

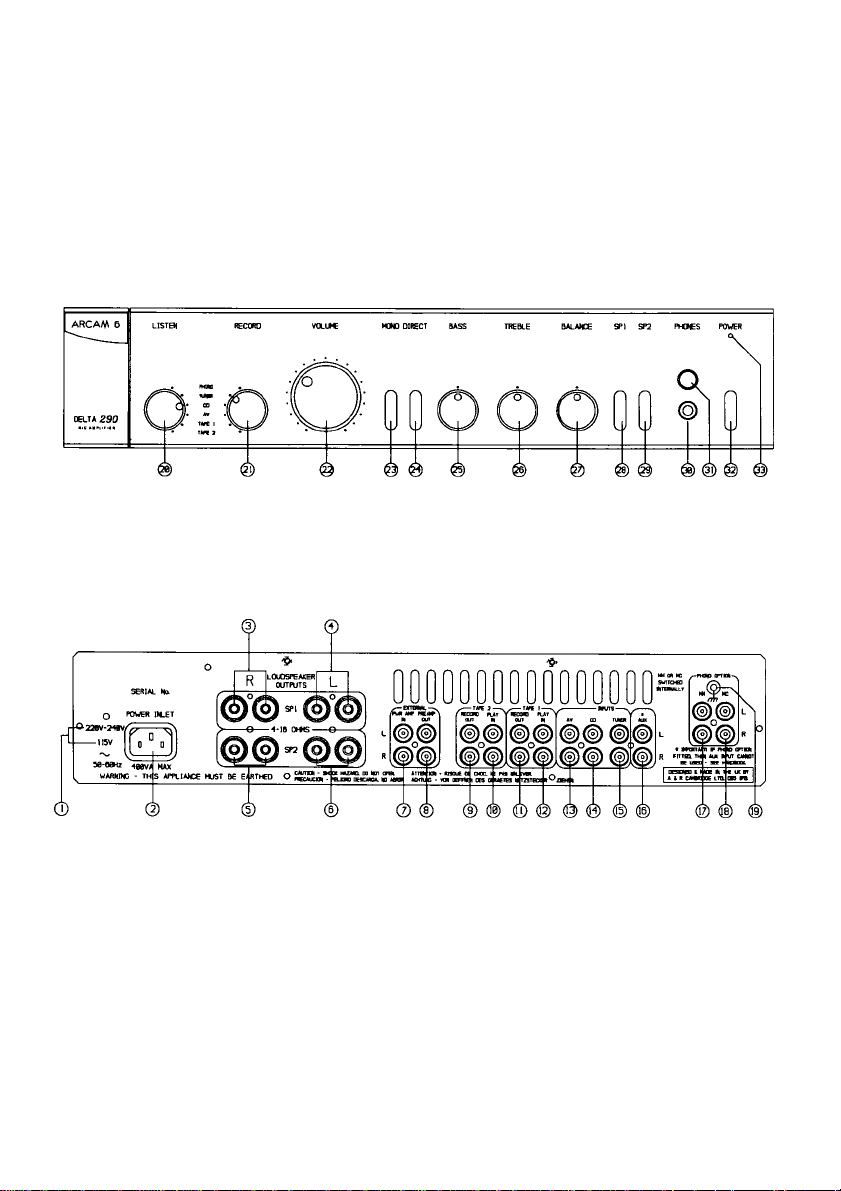
INSTALLATION
LOUDSPEAKER CONNECTIONS
Check that your mains supply voltage
©
agrees with the voltage setting indicated
on the rear panel of the unit.
If your mains supply voltage is different,
consult your Arcam dealer.
MAINS SAFETY
This product is normally supplied with a
moulded mains plug already fitted to the
lead. If for any reason the plug needs to
be removed, it must be disposed of
immediately and securely, as it is a
potential shock hazard when inserted into
a mains socket.
If the plug is removed then the remaining
lead must be rewired as follows:
The blue wire must be connected to the
terminal which is coloured blue or
marked with the letter N.
The brown wire must be connected to
the temiinal which is coloured brown or
marked with the letter L.
The green and yellow wire must be
connected to the terminal which is
coloured green and yellow, or marked
with the letter E or the safety earth
symbol.
When replacing the fuse in the supplied
moulded mains plug, the integral fuse
holder/cover must always be refitted.
Warning: This apparatus must be
earthed.
MAINS SUPPLY CONNECTIONS
Insert the lEC line socket of the mains
lead fully into the power inlet on the rear
panel. Connect the other end to your
mains supply.
Insert the red plugs into the red sockets
and the other plugs into the black
sockets. If your speaker cable has bare
ends, the positive conductor can usually
be identified by a ridge or coloured
marking.
Ensure that no stray strands are allowed
to touch another cable or the amplifier's
casing. This can cause a short circuit and
damage your amplifier!
Connect terminals ®
@,©
speaker and terminals
speaker.
To drive a second pair of speakers,
connect terminals ® to the right speaker
and terminals ® to the left speaker.
Both pairs of speakers may be driven
simultaneously provided each pair is rated
between 8 and 16 ohms.
© to your left
CONNECTING YOUR SOURCE
COMPONENTS
For the following connections, insert the
red phono plugs into the sockets labelled
'R' and the other phono plugs into the
sockets labelled 'L'.
PWR AMP IN - To use your Delta 290
®
as a power amplifier, connect the output
of your pre-amplifier to PWR AMP IN.
Set the internal selector switch to EXT
INPUT position.
PREAMP OUT - To use your Delta
290 as a pre-amplifier, connect
PREAMP OUT to your power
amplifier's input.
Please note: the PREAMP OUT
sockets are permanently active.
to your right
Page 5

TAPE 2 RECORD OUT - Connect to
your tape deck's input (RECORD).
TAPE 2 PLAY IN - Connect to your
tape deck's output (PLAY).
© TAPE 1 RECORD OUT - Connect to
your tape deck's input (RECORD).
TAPE 1 PLAY IN - Connect to your
tape deck's output (PLAY).
A/V - Suitable for connecting an
Audio/Visual product such as a VCR,
Laserdisc player or Nicam tuner.
0
CD - For connecting your CD player or
DAC.
TUNER - For connecting your radio
tuner.
AUX - For connecting any unit with a
line level output, eg. tape deck, tuner etc.
Please note; AUX must not be used if
the phono module is fitted. When the
phono module is fitted, AUX becomes
an output carrying the equalised phono
signal at line level.
PHONO OPTION - Please note: The
phono input is a separate plug-in module
which your Arcam dealer or distributor
can supply and fit.
This module is compatible with most
high output moving coil and moving
magnet cartridges (MM) and low output
moving coil cartridges (MC).
MM or MC is selected via an internal
switch. Your cartridge type should be
specified when the module is fitted.
MM - For connecting a turntable fitted
with a high output moving coil or a
moving magnet (MM) cartridge.
MC - For connecting a turntable fitted
with a low output moving coil (MC)
cartridge.
GROUND TERMINAL - For
connecting your turntable's earth lead (if
fitted).
OPERATION
LISTEN SELECTOR - Selects the input
you wish to listen to. This function can
also be operated by remote control. (See
Remote Control Functions).
RECORD SELECTOR - Selects the
input you wish to record. This operates
independently of the LISTEN function.
VOLUME - Adjusts the volume level of
the loudspeakers and headphones.
This can also be operated by remote
control (See Remote Control functions).
MONO - Selects monaural output. In
normal use leave the switch out for stereo
output. '
DIRECT - Bypasses bass, treble and
balance controls. This affects all inputs,
and will generally give a small
improvement in sound quality.
BASS - Rotate clockwise to boost the
bass response and anti-clockwise to cut
the bass response. For a flat response
leave in the central 'click' position.
Page 6

TREBLE - Rotate clockwise to boost
the treble response and anti-clockwise to
cut the treble response. For a flat
response leave in the central 'click'
position.
Switch the amplifier off and wait for at
least 5 minutes before switching on again.
If the LED continues to glow amber,
switch the unit off and contact your
Arcani dealer.
BALANCE - Rotate clockwise or anti
clockwise to move the position of the
stereo image. This may be necessary if it
is not possible to sit centrally between the
speakers. In normal use leave in the
central 'click' position.
SPl - Selects or defeats the main pair of
speakers. If you wish to listen on
headphones only, use SPl and SP2 (if
necessary) to mute the speakers.
SP2 - Selects or defeats the secondary
pair of speakers.
HEADPHONES SOCKETS - Accepts
headphones rated between 8 ohms and
2kohms fitted with a 6.3mm stereo jack
plug. If your headphones are fitted with
a different plug contact your dealer for a
suitable adaptor.
REMOTE RECEIVER - Ensure the
remote receiver is not obscured or
commands from the remote control
handset will not be received.
POWER - Switches the unit on and off.
POWER LED - The LED above the
POWER switch will initially glow
amber. After a few seconds, it will glow
green. When the LED glows amber, the
speakers are disconnected and an internal
protection circuit is activated. If this
LED glows amber during nonnal use it
may be due to the amplifier overheating.
Check the amplifier is properly
ventilated.
BI-WIRING - When using only one
pair of loudspeakers in the system, it is
possible to use both SPl and SP2 outputs
to bi-wire your speakers. This is
particularly useful if you have two
separate pairs of speaker cables.
Connect the SPl outputs to the speakers'
high frequency drive units (tweeters) and
the SP2 outputs to the speakers' low
frequency drive units (woofers). Ensure
both SPl and SP2 selection switches are
in the "on" position.
In order to bi-wire when two pairs of
speakers are used in the system, join the
treble and bass cables for each speaker
together at the amplifier end and
temiinate with one pair of speaker plugs.
Connect to either SPl or SP2. This will
leave one pair of tenninals free for your
second pair of speakers.
REMOTE MODE - The Delta 290 is
fitted with an internal Remote Mode
selector switch, which is factory-set to
NORMAL. In NORMAL mode, the
Arcani 'Handi-Remote' or CR200
System Remote will synchronise the
operation of any Arcam CD player or
transport, cassette deck or remote control
tuner with the LISTEN selector on the
Delta 290, all at the touch of a single
button.
For example, using the remote in CD
mode, press PLAY, and the CD player
will start the disc and the LISTEN
function selects CD.
Page 7

If this facility is not required, the internal
selector switch should be set to
UNIQUE. The LISTEN selector switch
can still be operated by either remote
control handset.
REMOTE CONTROL FUNCTIONS
■ Your Delta 290 amplifier is supplied with
the Arcam CR25 "HandiRemote" infra
red remote control handset, which has
buttons to allow the simple operation of
other products. It is supplied with 2AA
batteries - ensure these are inserted
correctly.
■ The remote allows you to operate the
Delta 290 plus some basic functions of an
Arcam or Philips based CD player, a
remote controlled tuner (such as the
Arcam Delta 280*), the Arcam Delta
Black Box 500 DACC and an Arcam
amplifier with remote control facility (the
Alpha 6, Delta 110/11 OS pre amplifiers
and the Xeta One Home Cinema
amplifier).
The Delta 290 can also be operated by the
CR200 System Remote handset, available from
your Arcam dealer as an optional extra. This
handset will also operate Arcam CD players
(except the Alpha One), the Delta 100 cassette
deck, the Delta 280 FM tuner and the Delta 150
NICAM stereo TV tuner.
SAFETY STANDARD
■ Thise product has been designed to mee "
the lEC 65 international electrical safety
standard.
* Note: versions of the Delta 280 FM tuner
manufactured before September 1994
will not respond to the programme
up/down buttons on the "Handi
Remote".
The functions available on the Delta 290 are:
■ INPUT SELECTORS: Selects the input
you wish to listen to.
■ VOLUME - and +: Increases or
decreases the volume level.
MUTE: Mutes the output by turning
the volume knob fully anti-clockwise.
To restore the volume press VOLUME
 Loading...