

Page 1
www.arcappliances.com.au
Page 2

Dear Customer
Congratulations on purchasing your new product from Home Appliances.
To register your Parts and Labour Warranty, some conditions apply, please refer to your warranty
card for more details and contact our Aftersales Support team on:
1800 444 357
Our Customer Care Centre is there to ensure you get the most out of your appliance. Should you
want to learn more about your product and how to use it to its best potential or tips on cleaning,
please feel free to call us on the above number.
It is important that you read through the following instruction manual thoroughly to become
familiar with the installation and operation of this appliance and ensure optimum performance.
We also carry a complete range of spare parts for all Home Appliance products. For all your spare
parts enquiries please contact our Aftersales Support team on
1800 444 357
Again, thank you for choosing an appliance brought to you by Home Appliances and we look
forward to being of service to you.
IMPORTANT
to complete the information on the following page
. To assist in handling any enquiries in the future about your appliance we
and Select 1
and Select 2
urge you
Kind regards,
The Management
Home Appliances
1
Page 3
For future reference we suggest that you staple a copy of your purchase receipt here and
complete the below so the information is always available.
Model number
Description
Serial number (Note down prior to installation)
Date of Purchase (DD-MM-YYYY)
Place of Purchase
Invoice and / or receipt number
Date of Installation (DD-MM-YYYY)
Installers details
AOI5
60cm built-in oven
Store name:
Address:
Telephone No.
Company Name:
Licence No.
Installers Name:
Address:
Telephone No.
2
Page 4

CONTENTS
WARNINGS 4
SAFETY
FITTING OVEN INTO THE KITCHEN CABINETS 6
DECLARATION OF COMPLIANCE 6
SAFETY TIPS 6
PRODUCT DESCRIPTION 7
HOW TO USE THE OVEN 7
ACCESSORIES 8
SHELF PLACEMENT 8
SECURING THE OVEN TO THE CABINET 8
DIMENSIONS FOR OVEN AND INSTALLATION 9
COOLING FAN 9
ELECTRICAL CONNECTION OF OVEN 10
BULB REPLACEMENT 10
CLEANING AND MAINTENANCE 10
REMOVING THE OVEN DOOR FOR CLEANING 11
REMOVING THE INNER GLASS DOOR FOR CLEANING 11
TROUBLESHOOTING 12
DISPOSAL OF THIS APPLIANCE 14
HINTS 5
Function Selection 7
Manual Operation (No Timer) 7
Timer Operation 7
Temperature Setting 7
Function description 7
3
Page 5

WARNINGS
•
When the oven is first switched on, it may give off an unpleasant
smell. This is due to the bonding agents used for the insulating
panels and elements within the oven. This is completely normal, if
it does occur, you merely have wait for the smell to clear before
putting food into the oven.
•
The appliance is not intended for use by persons (including
children) with reduced physical, sensory or mental
capabilities, or lack of experience and knowledge, unless they
have been given supervised or instruction concerning use of the
appliance by a responsible person for their safely.
•
Young children should be supervised to ensure that they do
not play with the appliance.
•
During use the appliance becomes hot. Care should be taken to
avoid touching heating elements inside the oven.
•
WARNING: Ensure the appliance is switched off before
replacing the lamp to avoid the possibility of electric shock.
•
WARNING: Accessible parts will become hot when in use. To
avoid burns and scalds, young children should be kept away.
•
Do not use a steam cleaner to clean this appliance
•
Do not use harsh abrasive cleaners or sharp metal scrapers to
clean the oven glass door since they can scratch the surface,
which may result in shattering of the glass
•
If the electrical supply is restricted, means of all-pole
disconnection must be accessible and incorporated in the fixed
wiring in accordance with the wiring rules.
4
Page 6

SAFETY HINTS
• Do not use the oven unless you are wearing something on your
feet. Do not touch the oven with wet or damp hands or feet.
• Oven door should not be opened often during the cooking period.
• The appliance must be installed by an authorized technician and
put into use. The manufacturer is not responsible for any damage
that might be caused by defective placement, and installation by
unauthorized personnel.
• When the door of the oven is open do not leave anything on it, you
may unbalance your appliance or break the door.
• Some parts of appliance may retain heat for a long time. It may
take a long time for parts of the oven to cool down especially those
parts heated directly. Take care even after the oven has been
turned off.
• If you will not use the appliance for a long time, such a going on
holidays, it is advised to disconnect the appliance.
• If the supply cord is damaged, it must be replaced by the
manufacturer, its service agent or similarly
order to avoid a hazard.
qualified persons in
• Excess spillages should be removed as soon as possible. Cleaning
whilst the oven is warm, not hot, will make cleaning a little easier.
• Steam cleaners are not to be used for cleaning the appliance.
5
Page 7

FITTING THE OVEN INTO THE KITCHEN CABINETS
Fit the oven into the space provided in the kitchen unit; it may be fitted
underneath a bench top or into a tower cupboard. Fix the oven in position by
screwing into place, using the two fixing holes in the frame. To locate the fixing
holes, open the oven door and look inside. To allow adequate ventilation,
the measurements and distances adhered to when fixing the oven.
If the oven is to work properly, the kitchen housing must be suitable. The
panels of the kitchen unit that are next to the oven must be made of a heat
resistant material. Ensure that the glues of units that are made of veneered
wood can with stand temperatures of at least 120oC
cannot withstand such temperatures will melt and deform the unit, once
the oven has been installed in the kitchen cabinets, electrical parts must
be completely insulated. This is a legal safety requirement. All guards must
be firmly fixed into place so that it is impossible to remove them without
using special tools. Remove the back of the kitchen unit to ensure an
adequate current of air circulates around the oven.
. Plastics or glues that
DECLARATION OF COMPLIANCE
When you have unpacked the oven, make sure that it has not been damaged
in any way. If you have any doubts at all, do not use it: contact a authorised
qualified person. Keep packing materials such as plastic bags, polystyrene, or
nails out of the reach of children because these are dangerous to children.
SAFETY TIPS
• Opening the oven door - always hold the handle in the centre, trying to
open from the left or right side will make opening more difficult.
• Hot surfaces - remember that during use the oven gets hot, use caution
when using the oven.
• Removing dishes & shelves - Use of oven gloves or similar is
recommended when removing dishes, pans or shelves from the oven.
6
Page 8

PRODUCT DESCRIPTION
Function Knob Timer knob
Temperature Knob
HOW TO USE THE OVEN
• Function Selection - Turn the knob to the desired function for the type of cooking
desired, refer to the table below for description of what each function can be used for.
The oven will not start cooking until the Timer is set to Manual Operation or a set for
Timer Operation (duration cooking time required) and desired Temperature selected.
For some types of cooking the oven should be pre-heated.
• Manual Operation (No Timer) - Turn timer knob to " " "
Close supervision may be necessary during grilling as spatters could cause a fire or
during toasting as food could be burnt
• Timer Operation - Set the desired cooking time by turning the timer knob to the
required time as per guide indicated in the recipe chosen. Afte
time has been reached, the unit will "Dong" and then stop. NOTE: For cooking times
under 60 minutes, the timer must be turned past this point first time and then turned
back to the time required, for example, 22 minutes for baking muffins.
• Temperature Setting - To set the temperature turn the knob clockwise to the desired
temperature. Not all temperatures are noted around the knob and you will have to set in
between marked positions for your desired temperature required.
NOTE: If the unit is not in use, always set the knobs to "0".
Symbol Function description
Oven Lamp: This enables the user to observe the progress of cooking without opening the
door.
Defrost: The circulation of air at room temperature enables quicker thawing of frozen food,
(without the use of any heat). It's a gentle but quick way to speed up the defrosting time and
thawing of ready-made dishes and cream filled produce etc.
Fan Forced: Combination of the fan and rear heating element provides more even heat
penetration, saving up to 15-30% energy. Dishes are lightly browned on the outside and still
moist on the inside. NOTE: This function is suitable for grilling or roasting big pieces of meat
at a higher temperature.
Top Heat: Heat comes only from the upper part of the oven. Ideal for browning foods and
gentle grilling.
" to use the oven manually.
r the duration cooking
Fan Grilling: This cooking method is normal grilling, utilizing the inner part only of
the top heating element, which directs heat downwards onto the food and fan to circulate the
heat through out the oven
7
Page 9

ACCESSORIES
NOTE: The number of accessories included depends on the particular appliance purchased.
Wire chrome shelves : For grill dishes, cake pan with items for
roasting and grilling. The shelves are fitted with stops to ensure the
users safety and a rear bar to stop dishes from falling off the back of
the shelf.
Universal pan: For cooking large quantities of food such as moist
cakes, pastries, frozen food etc. Also useful for collecting fat spills
and meat juices.
Side racks: Located on the left and right sides inside the oven these
racks are used to fit either the Wire chrome shelves or Universal
pan. The side racks are removable for easier cleaning of the oven
cavity
NOTE: Number of shelf positions vary from model to model and the image to right may not
represent what your oven is fitted with.
SHELF PLACEMENT
WARNING: To ensure the oven shelves
imperative
racks. They must be fitted in the dedicated
securley in place for use. This will ensure that during careful removal
of the shelf or tray, hot food
that the shelves are correctly
items will not slide off.
operate
placed between
rails, to ensure they are
safely, it is
the side
SECURING THE OVEN TO THE CABINET
1. Fit oven into the cabinet recess.
2. Open the oven door.
3. Secure the oven to the kitchen cabinet with two distance holders "A"
which fit the holes in the oven frame and fit the two wood screws "B".
8
Page 10

DIMENSIONS FOR OVEN AND INSTALLATION
560mm
560mm
595mm
570mm
575mm
595mm
min.
INSTALLATION NOTES:
• If fitted with plug and lead the location of the power point cannot be mounted directly behind the
the oven as this will impede the oven sitting correctly into the cabinet.
• When mounted under bench and there is a bench above the oven, air flow ventilation is
important to help keep the cabinets and oven electronics from getting to hot. Please note three
ways that this can be achieved and illustrated above with the matching letters.
o A - This represents the cabinet rear panel being removed. With the panel removed, it can
draw some air from under the base panel and behind the adjacent cabinets
o B -- This represents the use of plinth supports at the bottom on either side in lieu of the
cabinet base panel to support the oven in place and improves the air flow.
o C-IIf base panel is in place it is recommended to cut an opening under the oven to draw
air through and around the oven. Minimum size cutout should measure 400mm x 400mm.
One of these methods MUST BE incorporated otherwise warranty may be voided.
B
600mm
A
600mm
C
COOLING FAN
• To improve the efficiency of keeping the cabinet and oven electronics from getting to hot,
the oven is fitted with a cooling fan located in top of the oven. Ambient air from outside the
oven is drawn in by means of this cooling fan and the hot air is expelled from a series of
vent holes located at the top of the oven cavity just above the door.
NOTE: Even after the oven has been turned off the cooling fan will continue to run for a period
of time to keep doing it's job. There is no need to be concerned as this normal and uses very
little energy.
Oven vent holes
9
Page 11
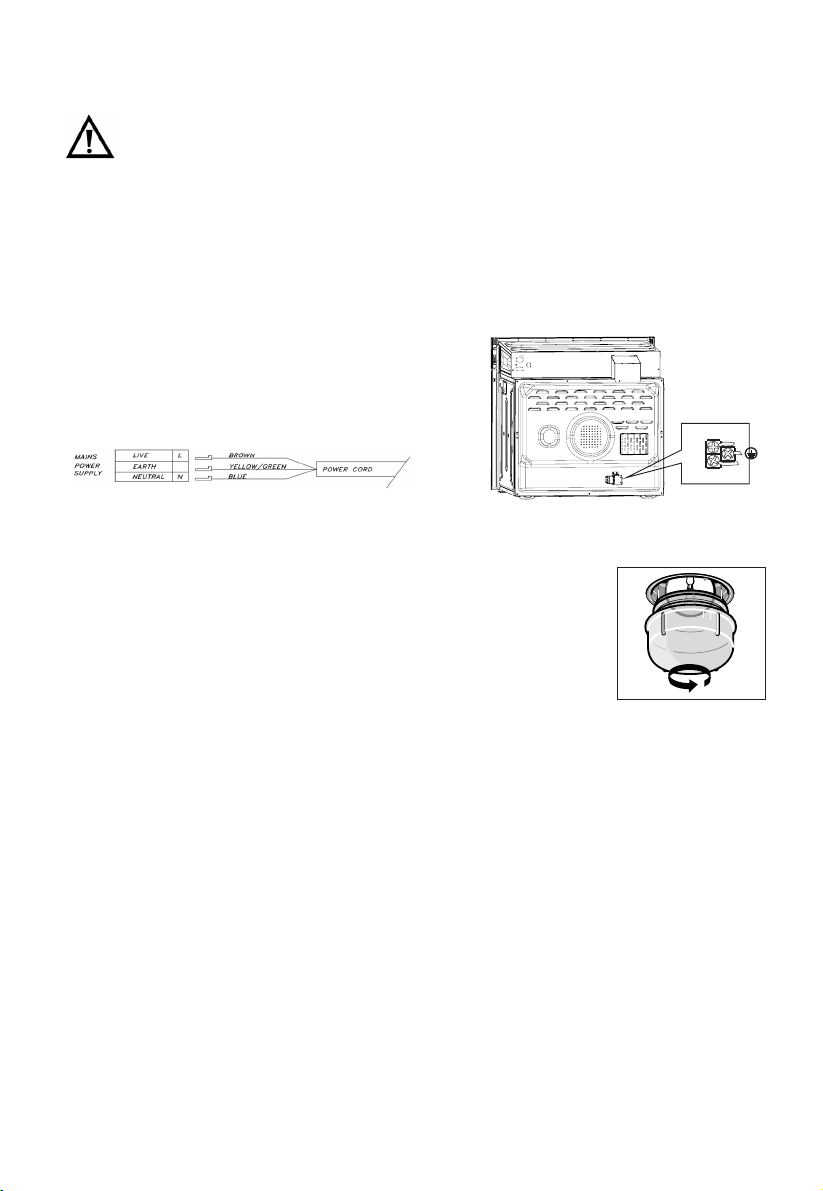
ELECTRICAL CONNECTION OF OVEN
The installation must be carried out by a suitably qualified person, in
accordance with the current versions of the following.
o AS/NZS 3000: 2007 Wiring Regulations
o 2010 Electrical Safety Regulations
Before connecting the appliance, make sure that the supply voltage marked on the
rating plate corresponds with your mains supply voltage.
If the electrical supply is restricted, means of all-pole disconnection must be accessible and
incorporated in the fixed wiring in accordance with the wiring rules.
WARNING: THIS APPLIANCE MUST BE EARTHED.
Model number AOI5
Voltage
Frequency
Total power
200~240 Volt
50/60Hz
2100 watt
N
L
BULB REPLACEMENT
The bulb in the light is a special bulb, and has high
temperature resistance (240V~25W).
For replacement, proceed as follows:
1. Disconnect power from the mains outlet or switch off the circuit
breaker of the unit's mains outlet.
2. Unscrew the glass cover and replace the bulb with a new one of the
same type.
3. Screw the glass cover back in place.
CLEANING AND MAINTENANCE
NOTE: The parts of the unit which come into contact with food have to be cleaned regularly.
- Before any maintenance and cleaning, disconnect the power. Set all controls in the OFF position.
- Wait until the inside of the unit is not hot but only slightly warm, this makes cleaning easier.
- Clean the surface of the unit with a damp cloth, soft brush or fine sponge and then wipe dry
- In case of heavy soiling, use hot water with non-abrasive cleaning product
- For cleaning the glass of the oven door,do not use abrasive cleaners or sharp metal scrapers, these
can scratch the surface or lead to the glass being damaged.
- Never leave acidic substances (lemon juice, vinegar) on stainless steel or enamel parts.
- Removable or large spills should be done as soon as they occur to make cleaning easier later.
- Do not use a high pressure cleaner for cleaning the unit. The baking pans may be washed in mild
detergent.
10
Page 12

REMOVING THE OVEN DOOR FOR CLEANING
To facilitate the cleaning of the inside of the oven and the outer frame of the oven, the door
can be removed as follows:-
The hinges (A) have two movable latches on them (B).
If you raise both of the
the hinges (A) are released from the oven housing.
You should grip the sides of the door at the centre and
then incline it slightly towards the oven cavity and
then pull the door gently away from the oven cavity.
IMPORTANT: You should make sure that the door is
supported at all times and that you place the
door on some padded material whilst cleaning it.
The oven door and door glass should only be cleaned using a damp cloth and a small
amount of detergent. The cloth MUST NOT have come into contact with any form of
cleaning product or chemical previously.
To refit the door you should slide the hinges back into their slots and open the door fully.
IMPORTANT: The movable latches (B) must be closed back into their original positions before
closing the door.
Take care not to dislodge the hinge locking system when removing the
door, as the hinge mechanism has a strong spring.
Do not immerse the door in water at any time.
movable latches (B), then
11
Page 13

REMOVING THE INNER GLASS DOOR FOR CLEANING
NOTE: Do not use any abrasive
of the glass panel becomes scratched, this could lead to a dangerous failure.
To facilitate cleaning, the inner door glass can be lifted out. Refer to illustrations below.
Grip the top and the bottom of the inner door glass panel.
Gently pull the bottom of the inner door glass panel upwards.
The securing clips at the bottom of the glass
free to remove.
IMPORTANT: Do not raise the panel more than 35° as it can damage the securing clips
NOTE: If the top securing clips do no
upwards, then pull the top of the glass panel upwards until the top also pops out.
After cleaning, insert the glass panel correctly back into the door in the reverse order.
Ensure the securing clips slot back into place and the glass panel locks into place
securely.
cleaner that could cause damage. Remember that if the surface
panel will pop out and the glass panel will be
t also pop out when pulling the bottom of the glass panel
IMPORTANT: Remember where the panel of glass is removed from so you can reassemble the
door correctly. Do not mix the glasses up or rearrange the order.
WARNING: Placing the glass pieces back in the door incorrectly could cause damage and
possibly door exploding.
12
Page 14

TROUBLESHOOTING
Here are a few suggestions if experiencing issue with your oven, if these do not help please call
out After Sales team on 1800 444 357 for further assistance.
The oven is not coming on
There appears to be no power to
the oven and grill
The grill function works but the
main oven does not.
The grill and top oven element is
not working, or cuts out for long
periods of time during use.
My food is not
My food is not cooking evenly
cooking properly
Make sure the timer has been set to manual
operation or a cooking time selected.
Check that you have selected a cooking function
and a cooking temperature
Check that the appliance has been connected to the
electrical mains supply correctly
Check that the mains fuses are in working order
Check that you have selected the correct cooking function.
Allow the
cool check whether the appliance is again working
properly.
Ensure that
and the correct cooking function for the food that
you are cooking. It may be appropriate to adjust your
cooking temperature by plus or minus 10°C, to achieve
the best cooking results.
Check that the oven has been installed correctly and is
level.
Check that the correct temperatures and shelf
positions are being used.
oven to cool for approximately 2 hours. Once
you are selecting the correct temperature
The oven light is not working
I am getting condensation in my
oven.
Refer to the “Replacing the oven bulb” section.
Steam and
cooking any food with high water content, such as frozen
food, chicken etc.
You may get condensation in the oven cavity and
forming between the oven door glasses. This is not
necessarily a sign that the oven is not working correctly.
Do not leave food in the oven to cool after it has been
cooked and the oven has been switched off.
Use a covered container, where practical, when
cooking to reduce the amount of condensation that
forms.
condensation is a natural by-product of
13
Page 15

TROUBLESHOOTING - Continued
IMPORTANT: If your appliance appears not
to be operating
correctly, then you should disconnect it from your mains
supply and then contact the our After Sales Team on 1800 444 357.
DO NOT ATTEMPT TO REPAIR THE APPLIANCE YOURSELF.
Please note that if
a service technician is asked to attend whilst the product is
under guarantee and finds that the problem is not the result of an appliance fault, then you
may be liable for the cost of the call out charge.
The appliance must be accessible for the service technician to perform
any necessary repair. If your appliance is installed in such a way that a
service technician is concerned that damage will be caused to the appliance or
your kitchen, then they will not complete a repair.
This includes situations where appliances have been tiled in, sealed in
with sealant, have wooden obstructions placed in front of the appliance, like
plinths. Or any installation other than the one specified by Home Appliances has
been completed.
IMPORTANT: The manufacturer operates a policy of continuous improvement and
reserves the right to adjust and modify its products without prior notification.
DISPOSAL OF THIS APPLIANCE
This appliance is marked according to the European directive 2002/96/EC on Waste Electrical and
Electronic Equipment (WEEE)
By ensuring this product is disposed correctly, you will help prevent potential negative
consequences for the environment and human health,which could otherwise be caused by
inappropriate waste handling of this product.
The symbol on the product indicates that this product may not be treated as household waste.
Instead it shall be handed over to the applicable collection point for the recycling of electrical and
electronic equipment.
Disposal must be carried out in accordance with local environmental regulations for waste
disposal.
For more detailed information about treatment, recovery and recycling of this product, please
contact your local city office, your household waste disposal service or the shop where you
purchased the product
14
Page 16

 Loading...