


 ®
®
products with a watertight reputation
DIGITAL MEDIA LOCKER™
AQ-DM-4UBT
OWNERS MANUAL
DIGITAL MEDIA LOCKER™
for Bluetooth, USB, iPod, iPhone & MP3 devices
4UBT-DM-AQ
PLEASE READ THIS INSTRUCTION MANUAL BEFORE INSTALLATION
AND OPERATION
GETTING STARTED
 CONTENTS
•AQ-DM-4UBT Digital Media Locker™
•2-Way RF Wireless Remote Control (AQ-RFDM-4U)
•USB to 30-pin iPod™ Cable
•3.5mm to 3.5mm Jack Cable
•Wiring Harness (AQ-UNH-2)
•Six (6) Stainless Steel Mounting Screws
•One (1) CR-2430 Battery
•Mounting Template
•Owners Manual
 installation
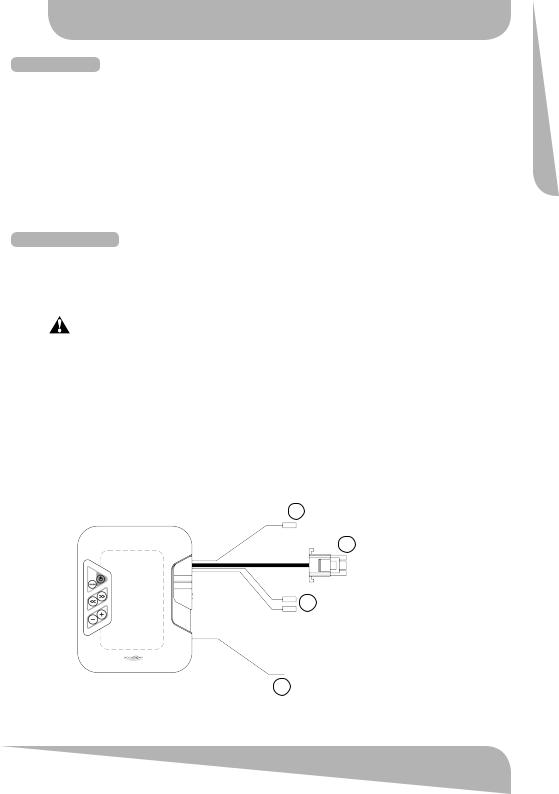
1. 12-pin Watertight Harness
The 12-pin harness supplies power and ground connections to the Digital Media Locker and four (4) speaker channel output connections from the Digital Media Locker.
Do not cut or modify the 12-pin harness on the Locker side or warranty will be void.
2. FM Radio Antenna Jack
Connect antenna (AQ-ANT-1 sold separetely) to female antenna receptacle. For best FM performance make sure the antenna is extended to the highest achievable position.
3. Auxiliary Outputs
Allows external amplifiers to be connected to power additional speakers.
4. 12V DC External Trigger
Allows for an external light or relay to be triggered (350mA max load).
2 FM Radio Antenna Jack
1 12-pin Watertight Harness
3 RCA Auxiliary Output
4 External 12V DC Trigger
4UBT-DM-AQ
www.aquaticav.com |
2 |

GETTING STARTED
 12-pin harness connection
The AQ-DM-4UBT includes the universal harness AQ-UNH-2 in order to connect the dock to power and speakers.
All open wire connections should be soldered and protected against water and dust for best long term performance.
2 Ohm
(White/strip)
2 Ohm
2 Ohm
2 Ohm
No lower than a 2 Ohm load should be used or damage may occur to the Digital Media Locker.
Make sure the polarity of speakers are connected correctly.
 mounting the unit
1.Mounting templates are included. Aquatic
AV recommends using the ‘measure twice, cut once’ method.
2.Once the mounting hole is complete, make sure the outside surface is clean and clear of debris. The Digital Media Locker has an external water/dust proof gasket, but this
requires a clean surface for best performance.
3.The Digital Media Locker has six (6) front screws. Drive the screws using a screw driver
During final mounting apply equal pressure to all points for the best water/dust outer seal performance.
4.Review all outside surfaces of the Digital Media Locker to ensure proper water/dust seal This is important for long term environmental protection performance for your digital media device.
180mm
140mm |
100mm |
76mm
91mm
4UBT-DM-AQ
151mm
www.aquaticav.com |
3 |
GETTING STARTED
 remote battery install
Remove the RF Wireless Remote control from the Digital Media Locker. Unscrew the waterproof cap on the back of the remote control. Place the CR-2430 battery in the RF Remote control and replace the water/dust proof cap.
 power on
Press the on/off button. Standby will be indicated by a red LED, and ON by a blue LED.
For applications that require zero current draw, and where battery drain may occur, the power button must be turned OFF. When the power button is in the OFF position the red LED will not be lit.
For applications where a 12V battery is not used, such as in a Spa, the power button can be left ON and the remote control can then be used to power on/off accordingly.
 remote synchronizing
1.Turn the Digital Media Locker to standby with the power button inside the door. The LED should be illuminated red.
2.Press the red  (POWER) button on the remote.
3. |
Press and hold the |
(MODE) button until the LCD reads PAIR. |
4. |
Continue to press the |
MODE button during step 5 below. |
5.Press the power button once on the Digital Media Locker to pair, the LED should turn from red to blue.
6.The remote’s LCD should read WELCOME or show a mode position such as RADIO, IPOD, or AUX IN.
For any additional remote controls, you will also need to activate/synchronize those remote controls by following the steps above.
If the pairing process is not effective, switch the locker off using the on/off button located inside the door of the dock. Unplug the 12-pin Harness on the back of the Digital Media Locker for 3 minutes. Reattach the Harness and repeat steps 1-6 above.
If the LCD displays “NO LINK” in either mode, this means the remote is out of reception range. Move the remote closer to the Locker and try again.
If you lose your remote control and buy another new remote control, please follow the above to start pairing before normal usage.
4UBT-DM-AQ
www.aquaticav.com |
4 |
LOCATION OF CONTROLS
 DIGItal media locker
4UBT-DM-AQ
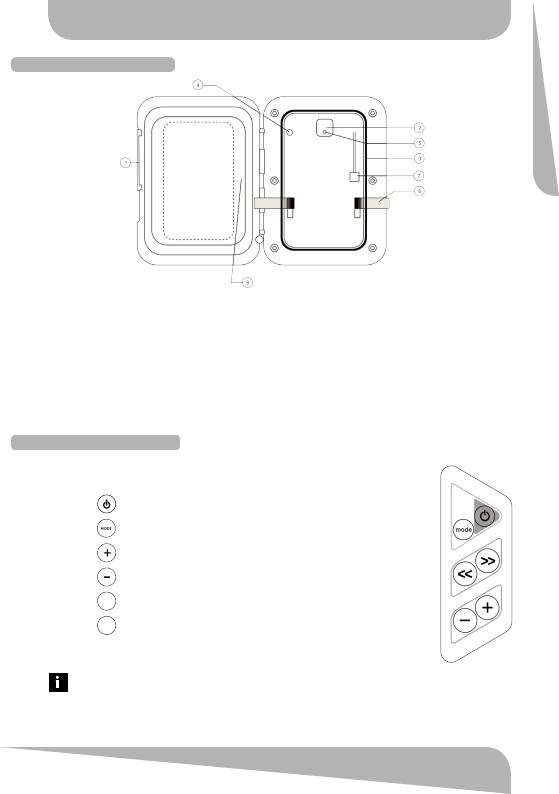
1.Digital Media Locker Open/Close Latch & Protective Door
2.Power ON/OFF Button
3.Water/Dust Protection Inner Gasket
4.3.5mm Aux Input for MP3 Devices
5.Power ON/OFF LED
6.Security Strap for digital media devices
7.USB Connector
8.Door Control Keypad
 DOOR CONTROL Keypad
Buttons |
|
Music Mode |
FM Radio Mode |
|
|
|
|
|
|
Power |
|
|
Press once: Toggle from Operation mode to Standby mode or vice-versa. |
|
|
|
|
|
|
Mode |
|
|
Press once: Change the source. |
Press once: Change the source. |
|
|
Press and hold: Pair |
Press and hold: Pair |
|
|
|
|
||
Volume |
|
|
Press once: Volume up |
Press once: Volume up |
Up |
|
|
Press and hold: Fast volume up |
Press and hold: Fast volume up |
Volume |
|
|
Press once: Volume down |
Press once: Volume down |
Down |
|
|
Press and hold: Fast volume down |
Press and hold: Fast volume down |
Fast |
|
<< |
Press once: Previous track |
Press once: Seek down |
Rewind |
|
|
Press and hold: Fast rewind |
Press and hold: Toggle manual scanning |
Fast |
|
<< |
Press once: Next track |
Press once: Seek up |
Forward |
|
Press and hold: Fast forward |
Press and hold: Toggle to manual scanning |
|
The keypad on the door has a set of keys fewer than those on the remote but has exactly the same functions correspondingly. This keypad allows you to operate the dock even under no remote condition.
www.aquaticav.com |
5 |
 Loading...