

Page 1

iPhone
User Guide
For iOS 5.0 Software
Page 2

Contents
9 Chapter 1: iPhone at a Glance
9 iPhone overview
9 Accessories
10 Buttons
12 Status icons
14 Chapter 2: Getting Started
14 Viewing this user guide on iPhone
14 What you need
15 Installing the SIM card
15 Setup and activation
15 Connecting to the Internet
16 Connecting iPhone to your computer
16 Setting up mail and other accounts
16 Managing content on your iOS devices
17 iCloud
18 Syncing with iTunes
19 Chapter 3: Basics
19 Using apps
22 Customizing the Home screen
24 Typing
27 Printing
28 Searching
29 Voice Control
30 Notications
31 Twitter
32 Apple Earphones with Remote and Mic
33 AirPlay
33 Bluetooth devices
34 Battery
36 Security features
37 Cleaning iPhone
37 Restarting or resetting iPhone
38 Chapter 4: Siri
38 Using Siri
40 If Siri doesn’t hear you correctly
40 Dictation
41 Chapter 5: Phone
41 Phone calls
45 FaceTime
2
Page 3

46 Visual voicemail
47 Contacts
48 Favorites
48 Call forwarding, call waiting, and caller ID
49 Ringtones, Ring/Silent switch, and vibrate
49 International calls
50 Setting options for Phone
51 Chapter 6: Mail
51 Checking and reading email
52 Working with multiple accounts
52 Sending mail
53 Using links and detected data
53 Viewing attachments
53 Printing messages and attachments
54 Organizing mail
54 Searching mail
54 Mail accounts and settings
57 Chapter 7: Safari
57 Viewing webpages
58 Links
58 Reading List
58 Reader
58 Entering text and lling out forms
59 Searching
59 Bookmarks and history
59 Printing webpages, PDFs, and other documents
59 Web clips
60 Chapter 8: Music
60 Adding music and audio
60 Playing songs and other audio
61 Additional audio controls
62 Podcast and audiobook controls
62 Using Siri or Voice Control with Music
63 Browsing album artwork in Cover Flow
63 Viewing tracks on an album
63 Searching audio content
64 iTunes Match
64 Genius
65 Playlists
65 Home Sharing
66 Chapter 9: Messages
66 Sending and receiving messages
67 Sending messages to a group
67 Sending photos, videos, and more
68 Editing conversations
68 Searching messages
Contents
3
Page 4

69 Chapter 10: Calendar
69 About Calendar
69 Viewing your calendars
70 Adding events
70 Responding to invitations
70 Searching calendars
71 Subscribing to calendars
71 Importing calendar events from Mail
71 Calendar accounts and settings
72 Chapter 11: Photos
72 Viewing photos and videos
73 Viewing slideshows
73 Organizing photos and videos
73 Sharing photos and videos
74 Printing photos
75 Chapter 12: Camera
75 About Camera
76 Taking photos and videos
76 HDR photos
77 Viewing, sharing, and printing
77 Editing photos
77 Trimming videos
78 Uploading photos and videos to your computer
78 Photo Stream
79 Chapter 13: YouTube
79 About YouTube
79 Browsing and searching for videos
80 Playing videos
80 Watching YouTube on a TV
80 Keeping track of videos you like
81 Sharing videos, comments, and ratings
81 Getting information about a video
81 Sending videos to YouTube
82 Chapter 14: Stocks
82 Viewing stock quotes
83 Getting more information
84 Chapter 15: Maps
84 Finding locations
85 Getting directions
86 Getting and sharing info about a location
86 Showing trac conditions
87 Satellite view and street view
88 Chapter 16: Weather
88 Getting weather information
4
Contents
Page 5

89 Chapter 17: Notes
89 About Notes
89 Writing notes
90 Reading and editing notes
90 Searching notes
90 Printing or emailing notes
91 Chapter 18: Clock
91 About Clock
91 Setting world clocks
92 Setting alarms
92 Using the stopwatch
92 Setting a timer
93 Chapter 19: Reminders
93 About Reminders
94 Setting a reminder
94 Managing reminders in List view
95 Managing reminders in Date view
95 About location reminders
95 Managing completed reminders
95 Searching reminders
96 Chapter 20: Game Center
96 About Game Center
97 Signing in to Game Center
97 Purchasing and downloading games
97 Playing games
97 Playing with friends
98 Game Center settings
99 Chapter 21: iTunes Store
99 About the iTunes Store
99 Finding music, videos, and more
100 Purchasing music, audiobooks, and tones
100 Purchasing or renting videos
100 Following artists and friends
101 Streaming or downloading podcasts
101 Checking download status
102 Changing the browse buttons
102 Viewing account information
102 Verifying downloads
103 Chapter 22: Newsstand
103 About Newsstand
103 Reading the latest issues
104 Chapter 23: App Store
104 About the App Store
105 Finding and downloading apps
105 Deleting apps
106 Store settings
Contents
5
Page 6

107 Chapter 24: Contacts
107 About Contacts
107 Syncing contacts
108 Searching contacts
108 Adding and editing contacts
109 Unied contacts
109 Contacts accounts and settings
110 Chapter 25: Videos
110 About Videos
110 Playing videos
111 Searching for videos
111 Watching rented movies
111 Watching videos on a TV
112 Deleting videos from iPhone
112 Using Home Sharing
113 Setting a sleep timer
113 Converting videos for iPhone
114 Chapter 26: Calculator
114 Using the calculator
114 Scientic calculator
115 Chapter 27: Compass
115 About Compass
115 Calibrating the compass
116 Finding the direction
116 Using Compass with Maps
117 Chapter 28: Voice Memos
117 About Voice Memos
118 Recording
118 Listening to a recording
119 Managing and sharing recordings
119 Sharing voice memos with your computer
120 Chapter 29: Nike + iPod
120 About Nike + iPod
120 Activating Nike + iPod
120 Linking a sensor
121 Working out with Nike + iPod
121 Calibrating Nike + iPod
121 Sending workout data to Nikeplus.com
122 Chapter 30: iBooks
122 About iBooks
122 Using the iBookstore
122 Syncing books and PDFs
123 Reading books
124 Reading PDFs
124 Changing a book’s appearance
125 Searching books and PDFs
6
Contents
Page 7

125 Looking up the denition of a word
125 Having a book read to you
125 Printing or emailing a PDF
126 Organizing the bookshelf
126 Syncing bookmarks and notes
127 Chapter 31: Accessibility
127 Universal Access features
128 VoiceOver
137 Routing the audio of incoming calls
137 Siri
138 Triple-Click Home
138 Zoom
138 Large Text
139 White on Black
139 Speak Selection
139 Speak Auto-text
139 Mono Audio
139 Hearing aid compatibility
140 Custom Vibrations
140 LED Flash for Alerts
140 AssistiveTouch
141 Universal Access in Mac OS X
141 TTY support
141 Minimum font size for mail messages
141 Assignable ringtones
141 Visual voicemail
141 Widescreen keyboards
142 Large phone keypad
142 Voice Control
142 Closed captioning
143 Chapter 32: Settings
143 Airplane mode
143 Wi-Fi
144 Notications
145 Location Services
145 VPN
145 Personal Hotspot
146 Carrier
146 Sounds and the Ring/Silent switch
147 Brightness
147 Wallpaper
147 General
152 Settings for apps
153 Appendix A: International Keyboards
153 Adding and removing keyboards
153 Switching keyboards
153 Chinese
155 Japanese
155 Typing Emoji characters
Contents
7
Page 8

155 Using the candidate list
155 Using shortcuts
156 Vietnamese
157 Appendix B: Support and Other Information
157 iPhone Support site
157 Restarting or resetting iPhone
157 Backing up iPhone
159 Updating and restoring iPhone software
159 File sharing
160 Safety, software, and service information
160 Using iPhone in an enterprise environment
160 Using iPhone with other carriers
161 Disposal and recycling information
162 Apple and the environment
162 iPhone operating temperature
8
Contents
Page 9

iPhone at a Glance
Headsetjack
Receiver
Ring/Silent
switch
Top
microphone
Volume
buttons
Apple Retina
display
Speaker
Homebutton
Front camera
Main camera
LED flash
SIMcardtray
Dock
connector
On/Off
button
Bottom
microphone
App icons
Statusbar
iPhone
Dock Connector to USB Cable
Apple Earphones
with Remote and Mic
SIM eject tool
USB power adapter
iPhone overview
1
Your iPhone and the Home screen may look dierent, depending on the model of iPhone you
have and whether you’ve customized your Home screen.
Accessories
The following accessories are included with iPhone:
9
Page 10
Item What you can do with it
On/Off button
Apple Earphones with Remote
and Mic
Dock Connector to USB Cable Use this cable to connect iPhone to your computer to sync and charge. The
USB power adapter Connect the power adapter to iPhone using the included cable, then plug it
SIM eject tool (not included in
all areas)
Listen to music and videos, and make phone calls. See “Apple Earphones
with Remote and Mic
cable can be used with the optional dock or plugged directly into iPhone.
into a standard power outlet to charge iPhone.
Eject the SIM card tray.
” on page 32.
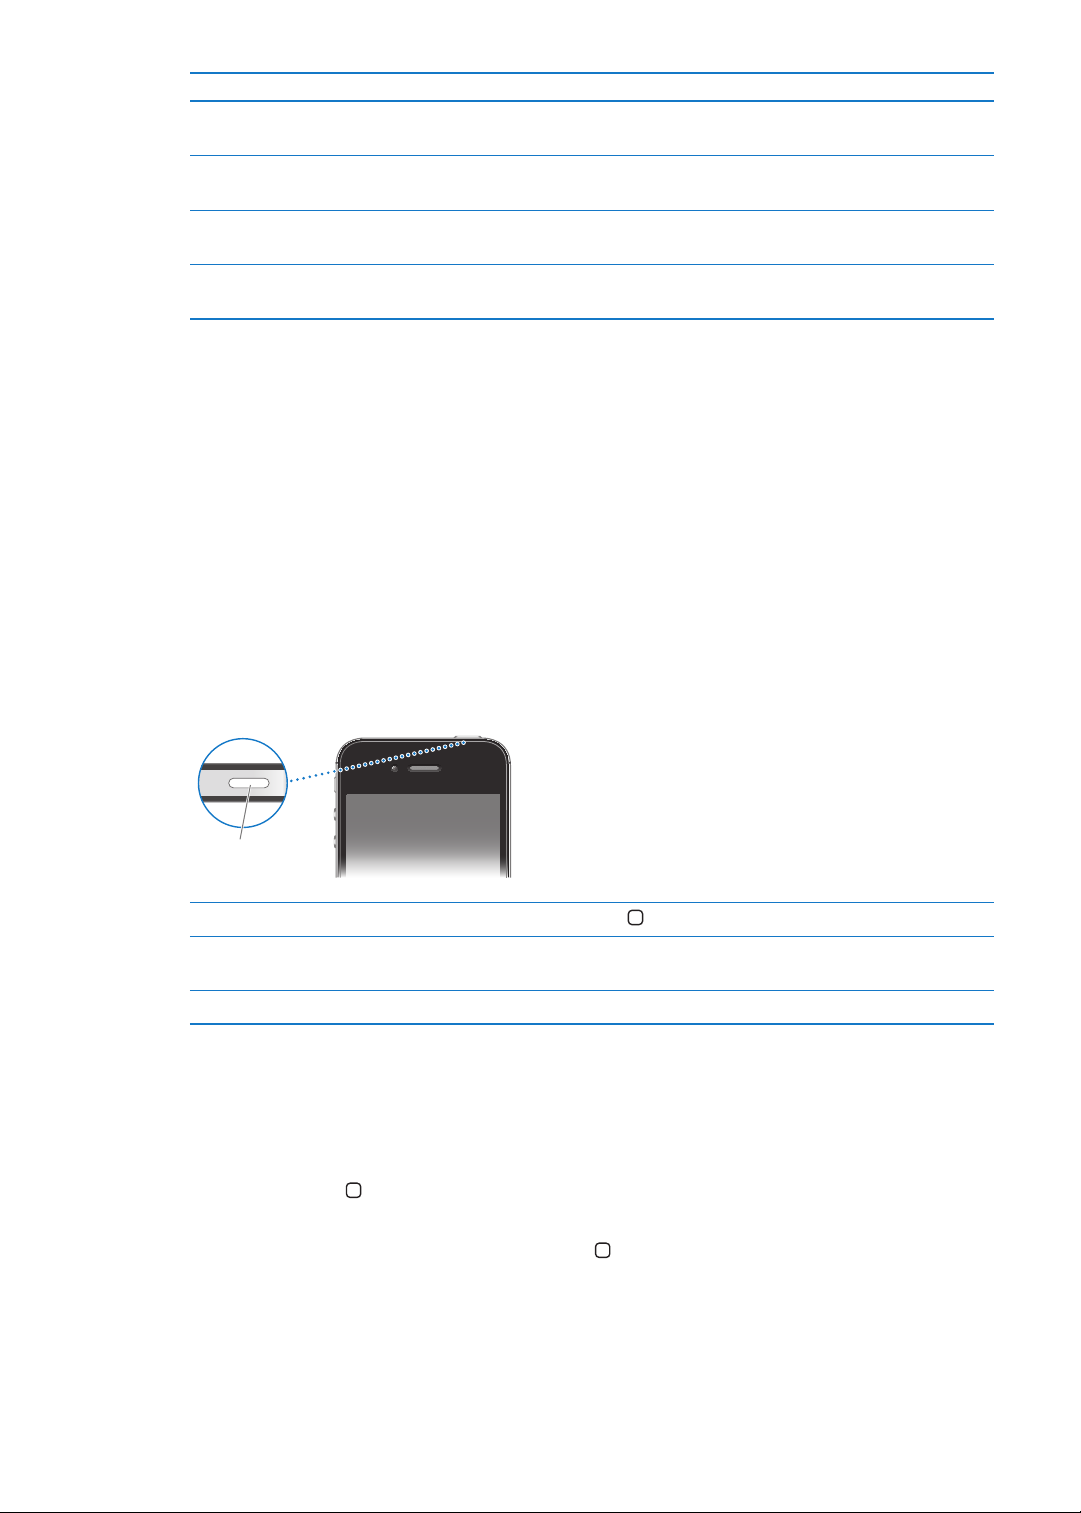
Buttons
On/O button
When you’re not using iPhone, you can lock it to turn o the display and save the battery.
Lock iPhone: Press the On/O button.
When iPhone is locked, nothing happens if you touch the screen. iPhone can still receive calls,
text messages, and other updates. You can also:
Listen to music Â
Adjust the volume using the buttons on the side of iPhone (or on the iPhone earphones) while Â
you’re on a phone call or listening to music
Use the center button on iPhone earphones to answer or end a call, or to control audio Â
playback (see “Playing songs and other audio” on page 60)
Unlock iPhone Press the Home button or the On/O button, then drag the slider.
Turn iPhone o Press and hold the On/O button for a few seconds until the red slider
appears, then drag the slider.
Turn iPhone on Press and hold the On/O button until the Apple logo appears.
By default, if you don’t touch the screen for a minute, iPhone locks automatically. To turn auto-lock
o, or to change how long before iPhone locks, see “Auto-Lock” on page 150. To require a passcode
to unlock iPhone, see “Passcode Lock” on page 150.
Home button
The Home button lets you get back to the Home screen at any time. It also provides other
convenient shortcuts.
Go to the Home screen: Press the Home button .
At the Home screen, just a tap opens an app. See “Opening and switching apps” on page 19 .
10
Chapter 1 iPhone at a Glance
Page 11
Display the multitasking bar
Volume
up
Volume
down
Ring
Silent
to see recently used apps
Display audio playback controls When iPhone is locked: Double-click the Home button . See “Playing songs
Start Siri (iPhone 4S) or
Voice Control
With iPhone unlocked, double-click the Home button .
and other audio
When using another app: Double-click the Home button
app switcher from left to right.
Press and hold the Home button
“Voice Control
” on page 60.
. See Chapter 4, “ Siri,” on page 38 and
” on page 29.
, then ick the
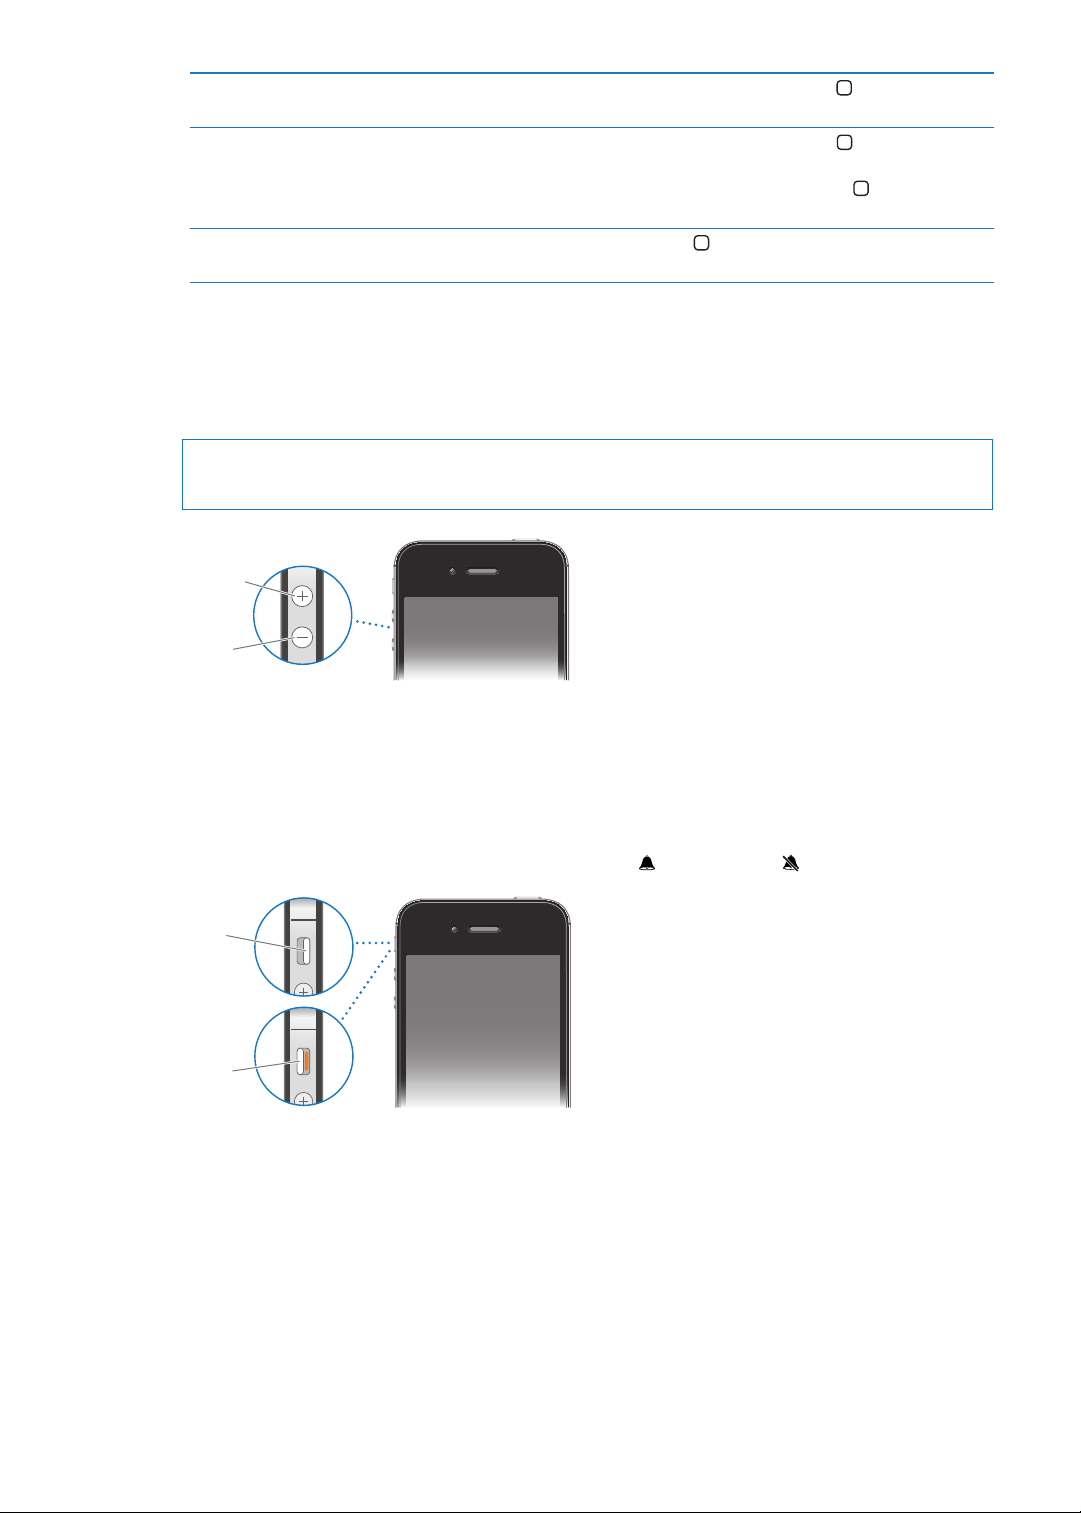
Volume buttons
When you’re on the phone or listening to songs, movies, or other media, the buttons on the side
of iPhone adjust the audio volume. Otherwise, the buttons control the volume for the ringer,
alerts, and other sound eects.
WARNING: For important information about avoiding hearing loss, see the Important Product
Information Guide at www.apple.com/support/manuals/iphone.
To limit the volume for music and videos, go to Settings > Music.
You can also use the volume up button to take a picture or record a video. See “Taking photos and
videos” on page 76.
Ring/Silent switch
Flip the Ring/Silent switch to put iPhone in ring mode or silent mode .
In ring mode, iPhone plays all sounds. In silent mode, iPhone doesn’t ring or play alerts and other
sound eects.
Important: Clock alarms, audio apps such as Music, and many games still play sounds through the
built-in speaker when iPhone is in silent mode.
For information about changing sound and vibrate settings, see “Sounds and the Ring/Silent
switch” on page 14 6.
Chapter 1 iPhone at a Glance
11
Page 12

Status icons
The icons in the status bar at the top of the screen give information about iPhone:
Status icon What it means
Cell signal* Shows whether you’re in range of the cellular network and
can make and receive calls. The more bars, the stronger
the signal. If there’s no signal, the bars are replaced with
“No service.”
Airplane mode Shows that airplane mode is on—you cannot use the
phone, access the Internet, or use Bluetooth® devices.
Non-wireless features are available. See “Airplane
mode
” on page 143.
UMTS/EV-DO Shows that your carrier’s 3G UMTS (GSM) or EV-DO
(CDMA) network is available, and iPhone can connect to
the Internet over that network. See “Network
EDGE Shows that your carrier’s EDGE (GSM) network is available,
and iPhone can connect to the Internet over that network.
See “Network
GPRS/1xRTT Shows that your carrier’s GPRS (GSM) or 1xRTT (CDMA)
network is available, and iPhone can connect to the
Internet over that network. See “Network
Wi-Fi* Shows that iPhone is connected to the Internet over
a Wi-Fi network. The more bars, the stronger the
connection. See “Wi-Fi
Personal Hotspot Shows that iPhone is connected to another iPhone
providing a Personal Hotspot. See “Personal Hotspot
page 145.
Syncing Shows that iPhone is syncing with iTunes.
Network activity Shows network activity. Some third-party apps may also
use the icon to show an active process.
Call Forwarding Shows that Call Forwarding is set up on iPhone. See “Call
forwarding
VPN Shows that you’re connected to a network using VPN.
See “Network
Lock Shows that iPhone is locked. See “On/O button” on
page 10 .
TTY Shows that iPhone is set to work with a TTY machine.
See “TTY support
Play Shows that a song, audiobook, or podcast is playing.
See “Playing songs and other audio
Portrait orientation lock Shows that the iPhone screen is locked in portrait
orientation. See “Viewing in portrait or landscape
orientation
Alarm Shows that an alarm is set. See “Setting alarms” on
page 92.
Location Services Shows that an item is using Location Services.
See “Location Services
” on page 148.
” on page 143.
” on page 48.
” on page 148.
” on page 141.
” on page 60.
” on page 21.
” on page 145.
” on page 148.
” on page 148.
” on
12
Chapter 1 iPhone at a Glance
Page 13

Status icon What it means
Bluetooth* Blue or white icon: Bluetooth is on and a device, such as
a headset or car kit, is connected.
on, but no device is connected. See “Bluetooth devices
page 33.
Bluetooth battery Shows the battery level of a supported paired Bluetooth
device.
Battery Shows battery level or charging status. See “Battery” on
page 34.
* The use of certain accessories with iPhone may aect wireless performance.
Gray icon: Bluetooth is
” on
Chapter 1 iPhone at a Glance
13
Page 14

Getting Started
2
·
WARNING: To avoid injury, read all operating instructions in this guide and safety information
in the iPhone Important Product Information Guide at www.apple.com/support/manuals/iphone
before using iPhone.
Viewing this user guide on iPhone
The iPhone User Guide can be viewed on iPhone in Safari, and in the free iBooks app.
View the user guide in Safari: Tap , then tap the iPhone User Guide bookmark.
To add an icon for the guide to the Home screen, tap , then tap “Add to Home Screen.” To view
it in a dierent language, tap “Change Language” on the main contents page.
View the user guide in iBooks: If you haven’t installed iBooks, open App Store, then search for
and install “iBooks.” Open iBooks and tap Store. Search for “iPhone User,” then select and download
the guide.
For more information about iBooks, see Chapter 30, “iBooks,” on page 12 2 .
What you need
To use iPhone, you need:
A wireless service plan with a carrier that provides iPhone service in your area Â
An Apple ID (for some features), which can be created during setup Â
A Mac or a PC with a USB 2.0 port and one of the following operating systems: Â
Mac OS X v10.5.8 or later Â
Windows 7, Windows Vista, or Windows XP Home or Professional (SP3) Â
An Internet connection for your computer (broadband is recommended) Â
iTunes 10.5 or later (for some features), available at  www.itunes.com/download
14
Page 15
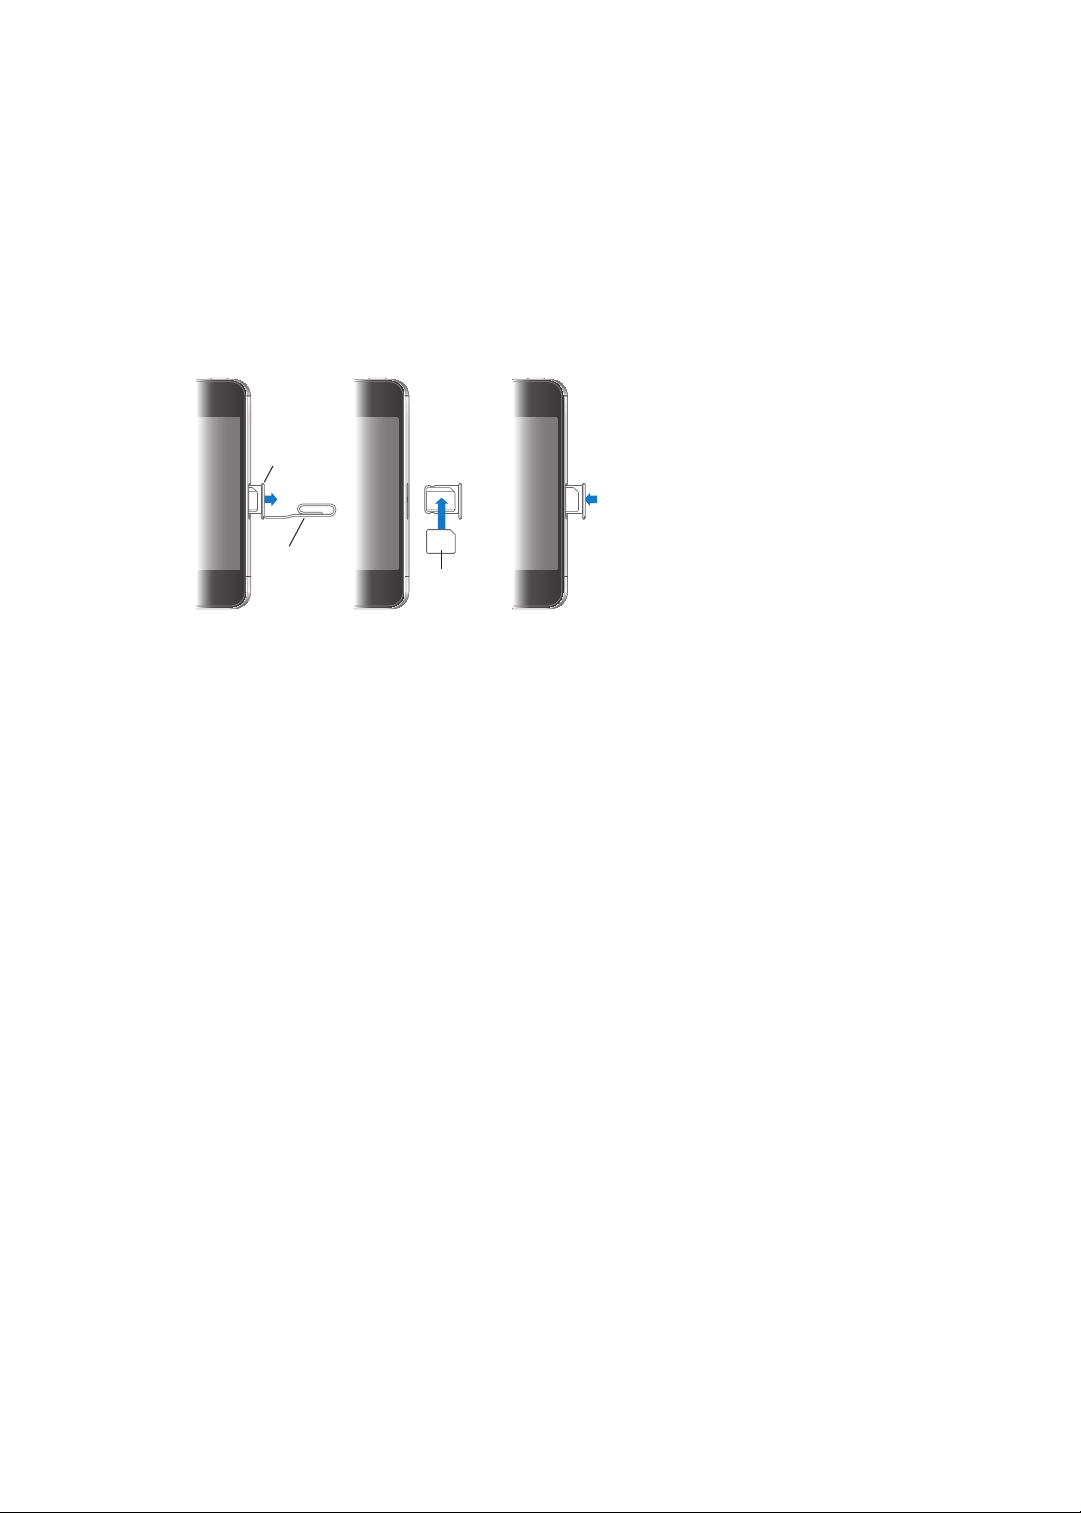
Installing the SIM card
Micro SIM
card
Micro SIM
card tray
Paper clip
or SIM
eject tool
If you were given a SIM card to install, install it before setting up iPhone.
Important: A SIM card is required to use cellular services when connecting to GSM networks and
some CDMA networks. An iPhone 4S that has been activated on a CDMA wireless network may
also use a SIM card for connecting to a GSM network, primarily for international roaming. Your
iPhone is subject to your wireless service provider’s policies, which may include restrictions on
switching service providers and roaming, even after conclusion of any required minimum service
contract. Contact your wireless service provider for more details. Availability of cellular capabilities
depends on the wireless network.
Installing the SIM Card in iPhone 4S
Install the SIM card: Insert the end of a small paper clip or SIM eject tool into the hole on the
SIM card tray. Pull out the SIM card tray and place the SIM card in the tray as shown. With the tray
aligned and the SIM card on top, carefully replace the tray.
Setup and activation
To set up and activate iPhone, turn on iPhone and follow the Setup Assistant. The Setup Assistant
steps you through the setup process, including connecting to a Wi-Fi network, signing in with or
creating a free Apple ID, setting up iCloud, turning on recommended features such as Location
Services and Find My iPhone, and activating iPhone with your carrier. You can also restore from an
iCloud or iTunes backup during setup.
Activation can be done over a Wi-Fi network or over your carrier’s cellular network (not available
in all areas). If neither are available, you need to connect iPhone to your computer. See the
following section. If you don’t have a SIM card installed (for GSM networks), iPhone must be
connected to a Wi-Fi network, or to your computer with iTunes open, in order to complete
activation. In areas where you have a choice of carriers, the SIM card must be installed to
complete the initial activation.
Connecting to the Internet
iPhone connects to the Internet whenever necessary, using a Wi-Fi connection (if available) or
your carrier’s cellular network. For information about connecting to a Wi-Fi network, see “Wi-Fi” on
page 143.
Note: If a Wi-Fi connection to the Internet isn’t available, certain iPhone features and services
may transfer data over your carrier’s cellular network, which may result in additional fees. Contact
your carrier for information about your cellular data plan rates. To manage cellular data usage, see
“Network” on page 148.
Chapter 2 Getting Started
15
Page 16

Connecting iPhone to your computer
If you don’t have Wi-Fi or cellular access, you may need to connect iPhone to your computer in
order to complete activation. Connecting iPhone to your computer also lets you sync information,
music, and other content with iTunes. See “Syncing with iTunes” on page 18 .
Connect iPhone to your computer: Use the Dock Connector to USB Cable provided with iPhone.
Setting up mail and other accounts
iPhone works with iCloud, Microsoft Exchange, and many of the most popular Internet-based mail,
contacts, and calendar service providers. If you don’t already have a mail account, you can set up a
free iCloud account when you rst set up iPhone, or later in Settings > iCloud.
Set up an account: Go to Settings > Mail, Contacts, Calendars.
For information about iCloud, see “iCloud” on page 17.
You can add contacts using an LDAP or CardDAV account if your company or organization
supports it. See “Syncing contacts” on page 107.
You can add a CalDAV calendar account, and you can subscribe to iCal (.ics) calendars or import
them from Mail. See page 71.
Managing content on your iOS devices
You can transfer information and les between your iOS devices and computers using either
iCloud or iTunes.
 iCloud stores your photos, apps, contacts, calendars, and more, and wirelessly pushes them
to your devices. When something changes on one of your devices, your other devices are
automatically updated. See “iCloud,” below.
 iTunes syncs music, video, photos, and more between your computer and iPhone. Changes you
make on one device are copied to the other when you sync. You can also use iTunes to copy
a le to iPhone for use with an app, or to copy a document you’ve created on iPhone to your
computer. See “Syncing with iTunes” on page 18 .
You can use iCloud or iTunes, or both, depending on your needs. For example, you can use iCloud
Photo Stream to automatically get photos you take on iPhone to your other devices, and use
iTunes to sync photo albums from your computer to iPhone.
Note: You should not sync items on the Info pane of iTunes (such as contacts, calendars, and
notes) and also use iCloud to keep that information up to date on your devices. If you do both,
duplicated data may result.
16
Chapter 2 Getting Started
Page 17

iCloud
iCloud stores your photos, apps, contacts, calendars, and more, and wirelessly pushes it to your
iOS devices and computers, automatically keeping everything up to date.
iCloud features include:
Automatic Downloads—Music, apps, and books that you purchase appear on your devices Â
automatically.
Previous Purchases—View previous iTunes Store, App Store, and iBooksstore purchases and Â
download them again if needed.
Photo Stream—When you take a photo on one iOS device, automatically get it on your other Â
devices. See“Photo Stream” on page 78 .
Documents & Data—Store and keep document up to date on your devices for apps that Â
support Documents in the iCloud.
Find My iPhone—Locate your iPhone on a map, display a message, play a sound, lock the Â
screen, or remotely wipe the data. See “Find My iPhone” on page 36.
You can also back up iPhone to iCloud. See “Backing up iPhone” on page 15 7.
With iCloud, you get a free email account and 5 GB of storage for your mail, documents, and
backup. Your purchased music, apps, TV shows, and books, as well as your Photo Stream, don’t
count against your free space.
Note: iCloud is not available in all areas, and iCloud features may vary by area.
Sign in or create an iCloud account: In Settings, tap iCloud.
If you have a MobileMe subscription, you can migrate it to iCloud at me.com/move.
Choose info to store in iCloud Go to Settings > iCloud.
Turn Automatic Downloads on
or o
View and download previous
iTunes Store purchases
View and download previous
App Store purchases
View and download previous
iBooksstore purchases
Turn Photo Stream on or o Go to Settings > iCloud.
Find your iPhone Visit www.icloud.com.
Purchase additional iCloud storage Go to Settings > iCloud > Storage & Backup, then tap Manage Storage. For
Go to Settings > Store.
Go to iTunes, then tap Purchased.
Go to App Store, tap Updates, then tap Purchased.
Go to iBooks, tap Store, then tap Purchased.
Important: On your iPhone, Find My iPhone must be turned on in
Settings > iCloud in order for Find My iPhone features to be available.
information about purchasing iCloud storage, see help.apple.com/icloud.
For more information about iCloud, go to www.apple.com/icloud. For support information, go to
www.apple.com/support/icloud.
Chapter 2 Getting Started
17
Page 18

Syncing with iTunes
Syncing with iTunes copies information from your computer to iPhone, and vice versa. You can
sync by connecting iPhone to your computer using the Dock Connector to USB Cable, or you
can set up iTunes to sync wirelessly using Wi-Fi. You can set iTunes to sync music, photos, video,
podcasts, apps, and more. For information about syncing iPhone with a computer, open iTunes,
then select iTunes Help from the Help menu.
Set up wireless iTunes syncing: Connect iPhone to your computer using the Dock Connector to
USB Cable. In iTunes, turn on “Sync over Wi-Fi connection” in the device’s Summary pane.
When Wi-Fi syncing is turned on, iPhone syncs automatically every day. iPhone must be
connected to a power source, both iPhone and your computer must be on the same wireless
network, and iTunes must be open on your computer. For more information, see “iTunes Wi-Fi
Sync” on page 149.
Tips for syncing with iTunes
If you’re using iCloud to store your contacts, calendars, bookmarks, and notes, don’t also sync Â
them to your device using iTunes.
Purchases you make on iPhone in the iTunes Store or the App Store are synced back to your Â
iTunes library. You can also purchase or download content and apps from the iTunes Store on
your computer, and then sync them to iPhone.
In the device’s Summary pane, you can set iTunes to automatically sync your device when it’s Â
attached to your computer. To temporarily override this setting, hold down Command and
Option (Mac) or Shift and Control (PC) until you see your iPhone appear in the sidebar.
In the device’s Summary pane, select “Encrypt  iPhone backup” if you want to encrypt the
information stored on your computer when iTunes makes a backup. Encrypted backups are
indicated by a lock icon , and a password is required to restore the backup. If you don’t select
this option, passwords (such as those for mail accounts) aren’t included in the backup and will
have to be reentered if you use the backup to restore the device.
In the device’s Info pane, when you sync mail accounts, only the settings are transferred from Â
your computer to iPhone. Changes you make to an email account on iPhone don’t aect the
account on your computer.
In the device’s Info pane, click Advanced to select options to let you  replace the information on
iPhone with the information from your computer during the next sync.
If you listen to part of a podcast or audiobook, your place in the story is included if you sync the Â
content with iTunes. If you started listening to the story on iPhone, you can pick up where you
left o using iTunes on your computer—or vice versa.
In the device’s Photo pane, you can sync photos and videos from a folder on your computer. Â
18
Chapter 2 Getting Started
Page 19
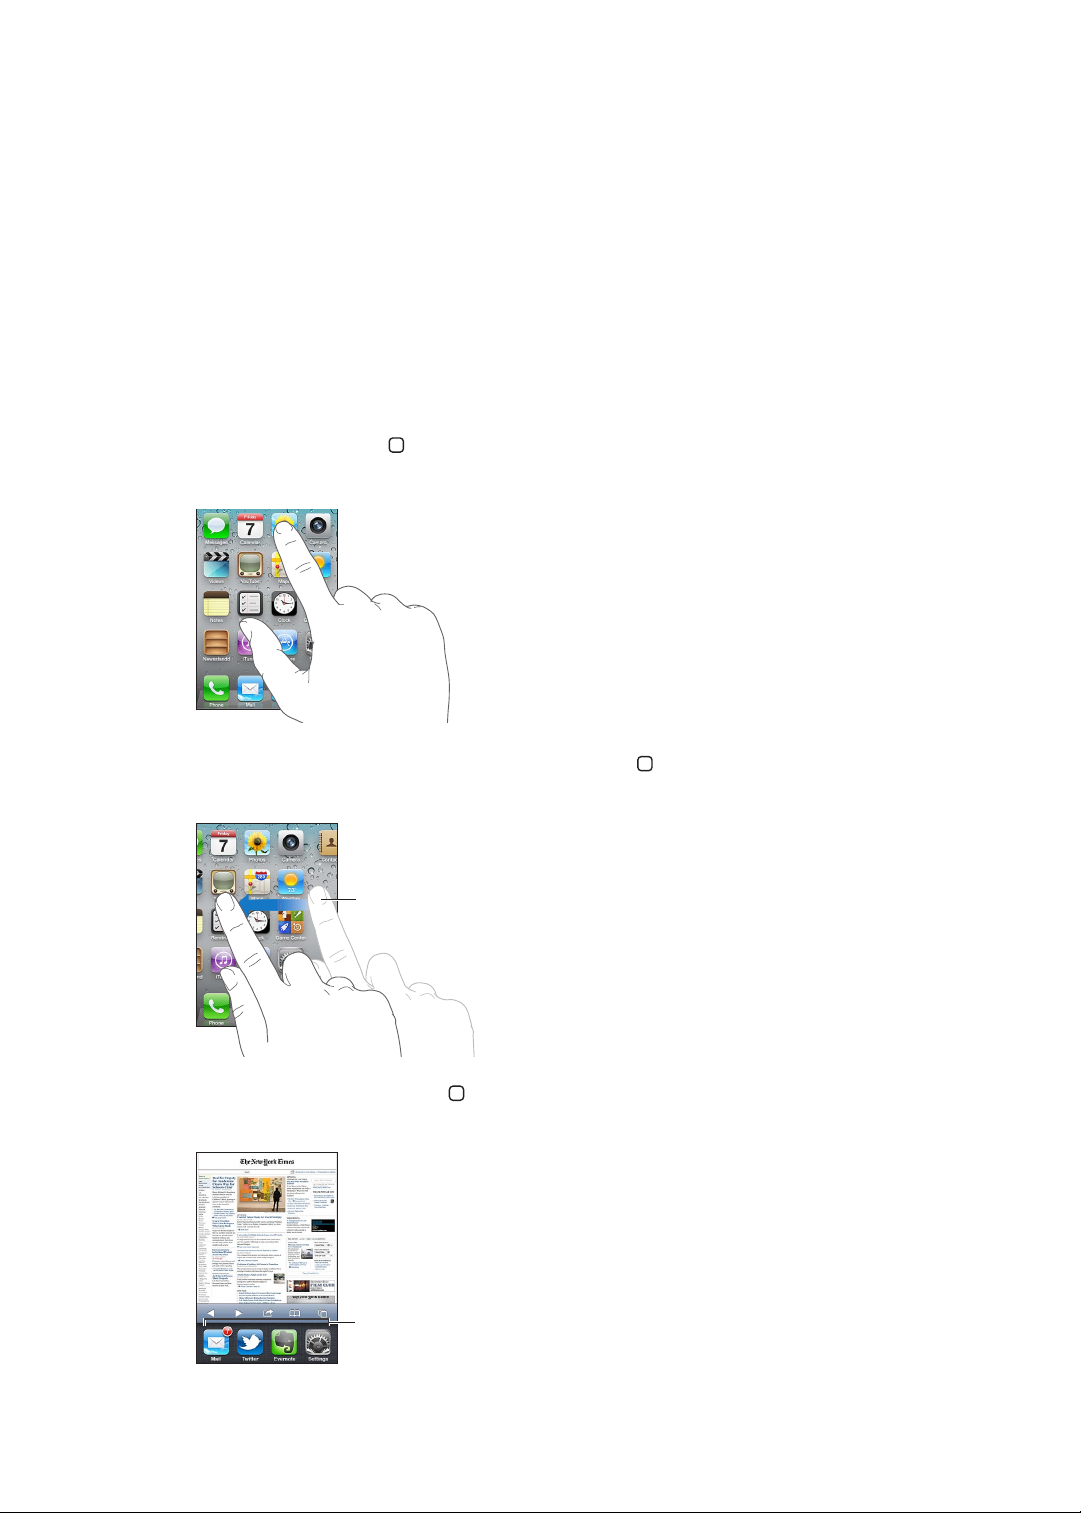
Basics
Flick left or right to switch
to another Home screen.
Recently used apps
Using apps
The high-resolution Multi-Touch screen and simple nger gestures make it easy to use
iPhone apps.
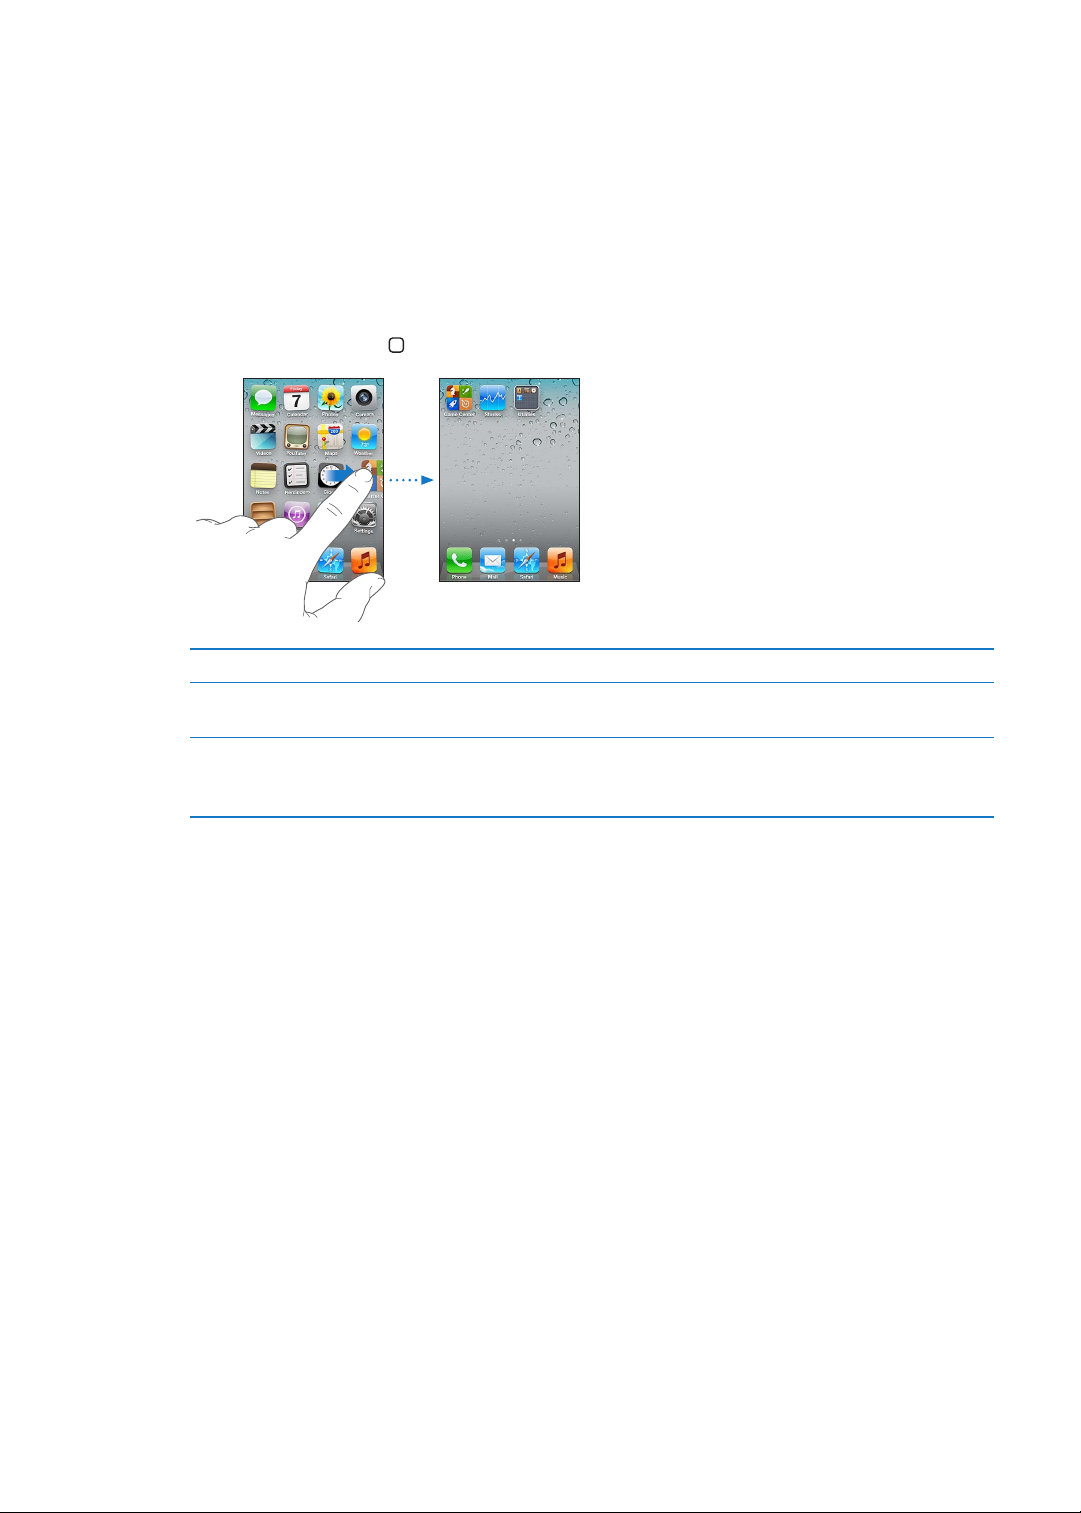
Opening and switching apps
Press the Home button to go to the Home screen and see your apps.
Open an app: Tap it.
3
To return to the Home screen, press the Home button again. Flick left or right to see another
Home screen.
Double-click the Home button to reveal the multitasking bar, which shows your most recently
used apps. Tap an app to reopen it, or ick to see more apps.
19
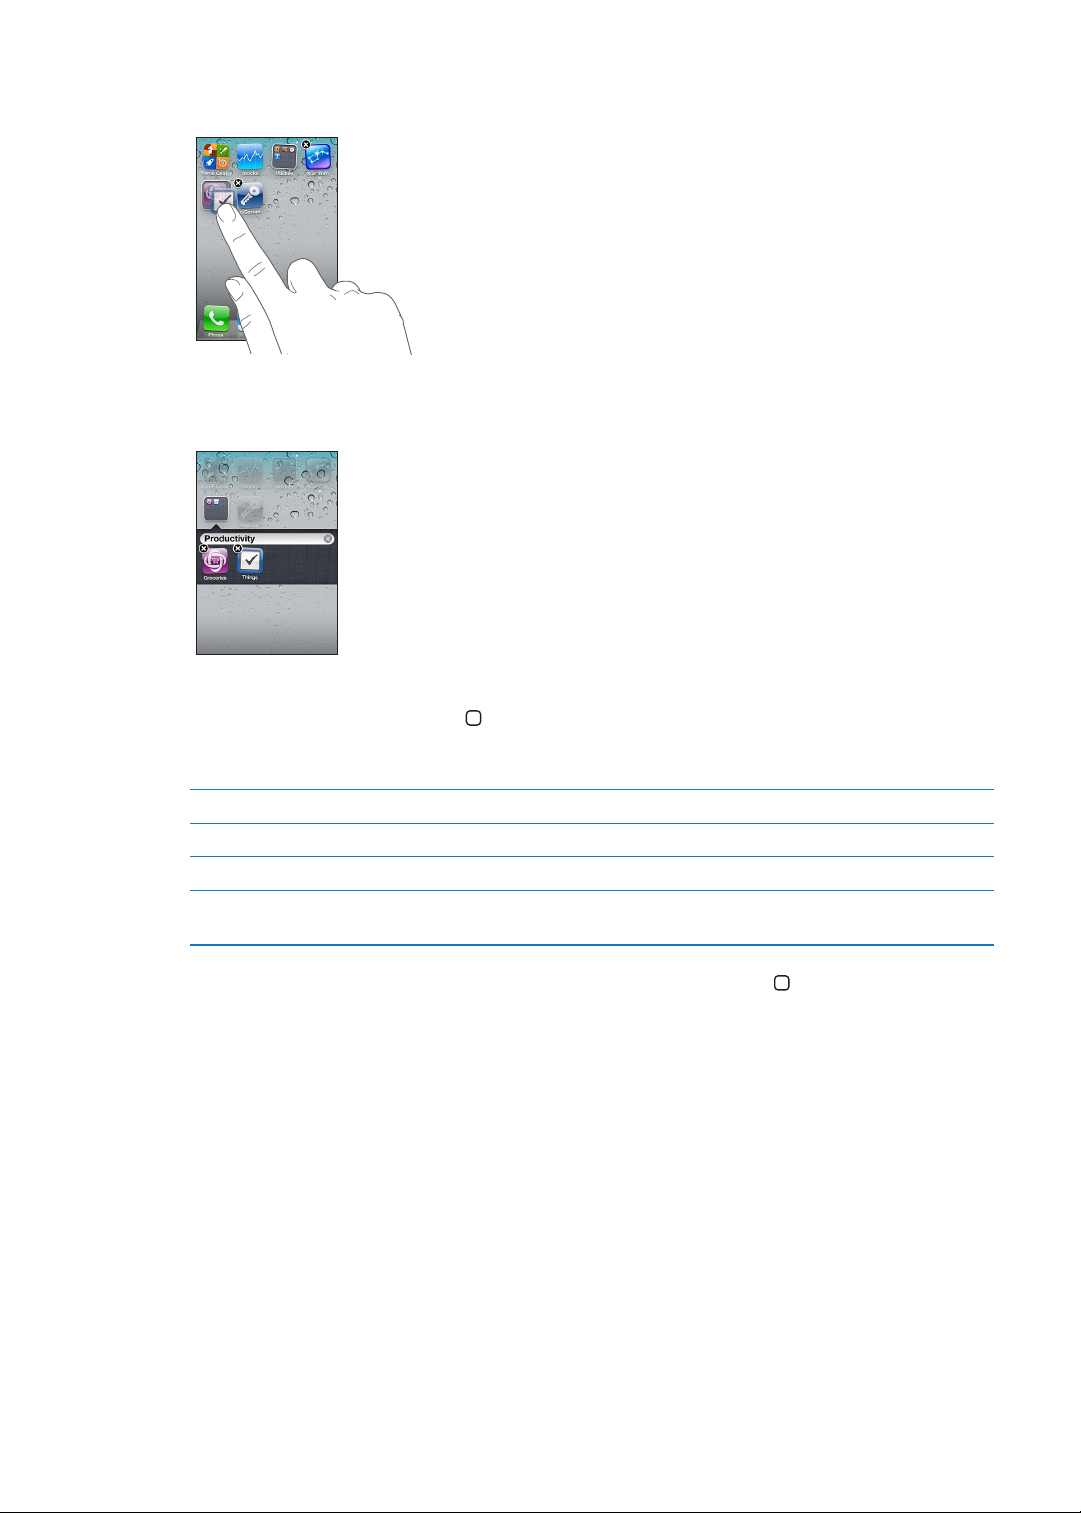
Page 20
Remove an app from the
Drag your finger along
the index to scroll quickly.
Tap a letter to jump to
a section.
multitasking bar
Touch and hold the app icon until it begins to jiggle, then tap
Removing an app from the multitasking also forces it to quit.
.
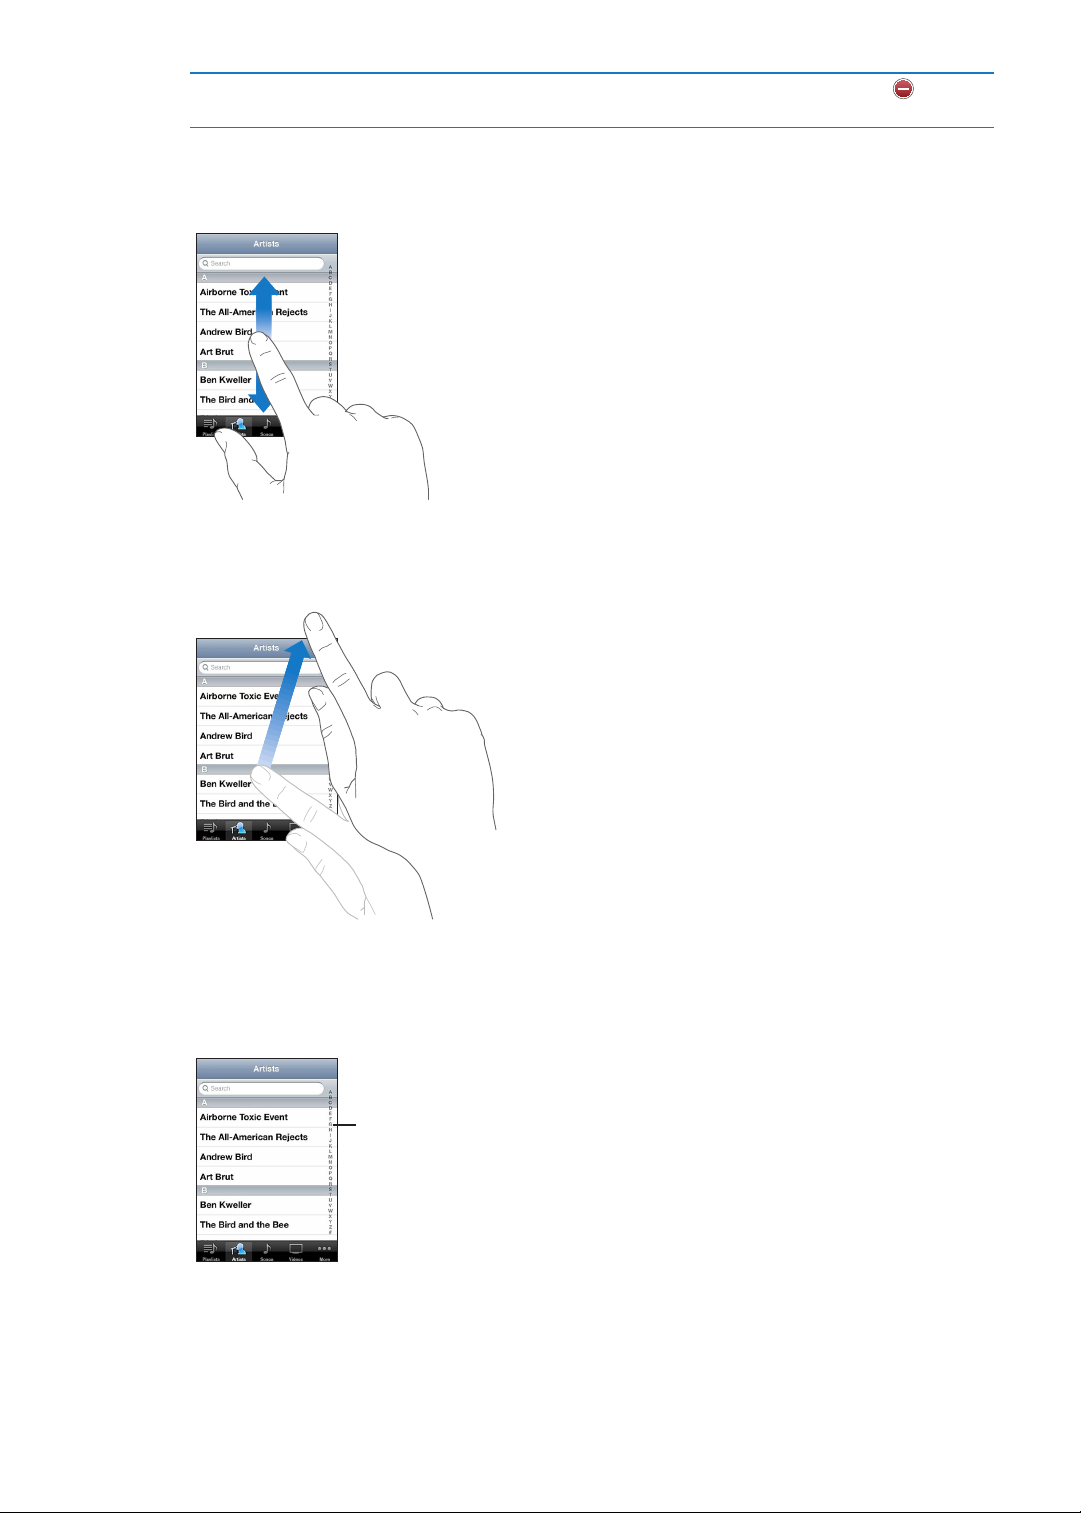
Scrolling
Drag up or down to scroll. On some screens such as webpages, you can also scroll side to side.
Dragging your nger to scroll won’t choose or activate anything on the screen.
Flick to scroll quickly.
20
You can wait for the scrolling to come to a stop, or touch the screen to stop it immediately.
Touching the screen to stop scrolling won’t choose or activate anything.
To quickly scroll to the top of a page, tap the status bar at the top of the screen.
Tap an item in a list to choose it. Depending on the list, tapping an item can do dierent things—
for example, it may open a new list, play a song, open an email, or show someone’s contact
information so you can call that person.
Chapter 3 Basics
Page 21

Zooming in or out
When viewing photos, webpages, email, or maps, you can zoom in and out. Pinch your ngers
together or apart. For photos and webpages, you can double-tap (tap twice quickly) to zoom
in, then double-tap again to zoom out. For maps, double-tap to zoom in and tap once with two
ngers to zoom out.
Zoom is also an accessibility feature that lets you magnify the screen with any app you’re using,
to help you see what’s on the display. See “Zoom” on page 13 8 .
Viewing in portrait or landscape orientation
Many iPhone apps let you view the screen in either portrait or landscape orientation. Rotate
iPhone and the display rotates too, adjusting automatically to t the new screen orientation.
You may prefer landscape orientation for viewing webpages in Safari, or when entering text,
for example. Webpages scale to the wider screen in landscape orientation, making the text and
images larger. The onscreen keyboard is also larger.
Movies viewed in Videos and YouTube appear only in landscape orientation. Street views in Maps
also appear only in landscape orientation.
Lock the screen in portrait orientation: Double-click the Home button , ick the bottom of the
screen from left to right, then tap .
The portrait orientation lock icon appears in the status bar when the screen orientation
is locked.
Chapter 3 Basics
21
Page 22
Customizing the Home screen
Rearranging apps
You can customize the layout of app icons on the Home screen—including the apps in the Dock
along the bottom of the screen. If you want, arrange them over multiple Home screens. You can
also organize apps by collecting them in folders.
Rearrange icons:
1 Touch and hold any app on the Home screen until it begins to jiggle.
2 Arrange the apps by dragging them.
3 Press the Home button to save your arrangement.
Move an icon to another screen While arranging apps, drag an app to the side of the screen.
Create additional Home screens While arranging apps, ick to the rightmost Home screen, then drag an app
to the right edge of the screen. You can create up to 11 Home screens.
Reset your Home screen to the
default layout
Go to Settings > General > Reset, then tap Reset Home Screen Layout.
Resetting the Home screen removes any folders you’ve created and applies
the default wallpaper to your Home screen.
You can add icons on the Home screen to open your favorite webpages. See “Web clips” on
page 59.
When iPhone is physically connected to your computer (with the Dock Connector to USB Cable),
you can customize your Home screens using iTunes. In iTunes, select iPhone in the Devices list,
then click Apps at the top of the screen.
Organizing with folders
Folders let you organize apps on the Home screen. You can put up to 12 apps in a folder. iPhone
names a folder automatically when you create it, based on the category of the apps you use
to create the folder. You can change the name anytime you want. Like apps, folders can be
rearranged by dragging them on the Home screens, or to the Dock.
22
Chapter 3 Basics
Page 23
Create a folder: Touch an app until the Home screen apps begin to jiggle, then drag the app onto
another app.
iPhone creates a new folder that includes the two apps, and shows the folder’s name. You can tap
the name eld and enter a dierent name.
Tap a folder to open it, then you can tap to open an app inside. To close a folder, tap outside the
folder, or press the Home button .
While arranging apps:
Add an app to a folder Drag the app onto the folder.
Remove an app from a folder Tap to open the folder, then drag the app out of the folder.
Delete a folder Move all apps out of the folder. The folder is deleted automatically.
Rename a folder Tap to open the folder, then tap the name at the top and use the keyboard
to enter a new name.
When you nish organizing your Home screen, press the Home button to save your changes.
Adding wallpaper
You can set an image or photo as wallpaper for the Lock screen. You can also set wallpaper for
your Home screen. You can choose an image that came with iPhone, a photo from your Camera
Roll or other album on iPhone.
Set wallpaper:
1 In Settings, choose Wallpaper, tap the image of the Lock and Home screens, then tap Wallpaper or
an album.
2 Tap to choose an image or photo. If you choose a photo, drag to position it and pinch to zoom in
or out, until it looks the way you want.
3 Tap Set, then choose whether you want to use the photo as wallpaper for your Lock Screen, Home
screen, or both.
Chapter 3 Basics
23
Page 24

Typing
To type an alternate character,
touch and hold a key, then slide
to choose one of the options.
The onscreen keyboard appears anytime you need to type.
Entering text
Use the keyboard to enter text. The keyboard corrects misspellings, predicts what you’re typing,
and learns as you use it. Depending on the app you’re using, the intelligent keyboard may suggest
corrections as you type, to help prevent mistyped words.
Type text: Tap a text eld to bring up the keyboard, then tap on the keyboard.
As you type, each letter appears above your thumb or nger. If you touch the wrong key, you can
slide your nger to the correct key. The letter isn’t entered until you release your nger from the key.
Delete the previous character Tap .
Type uppercase Tap the Shift key before tapping a letter. Or touch and hold the Shift key,
then slide to a letter.
Quickly type a period and space Double-tap the space bar. To turn this feature on or o, go to Settings >
General > Keyboard.
Turn caps lock on Double-tap the Shift key
You can turn this feature on or o in Settings > General > Keyboard.
Enter numbers, punctuation,
or symbols
Set options for typing Go to Settings > General > Keyboard.
Tap the Number key
punctuation and symbols.
. Tap the Shift key again to turn caps lock o.
. Tap the Symbol key to see additional
Dictation
On iPhone 4S, you can dictate text instead of typing it on the onscreen keyboard. For
example, you can dictate a message in Mail or a note in Notes. Siri must be turned on in
Settings > General > Siri.
Dictate text: From the onscreen keyboard, tap , then dictate. When you nish, tap Done.
To add to the message, tap again.
24
Chapter 3 Basics
Page 25
Enter a comma, period, or other
Suggested
word
punctuation mark
Say the punctuation mark.
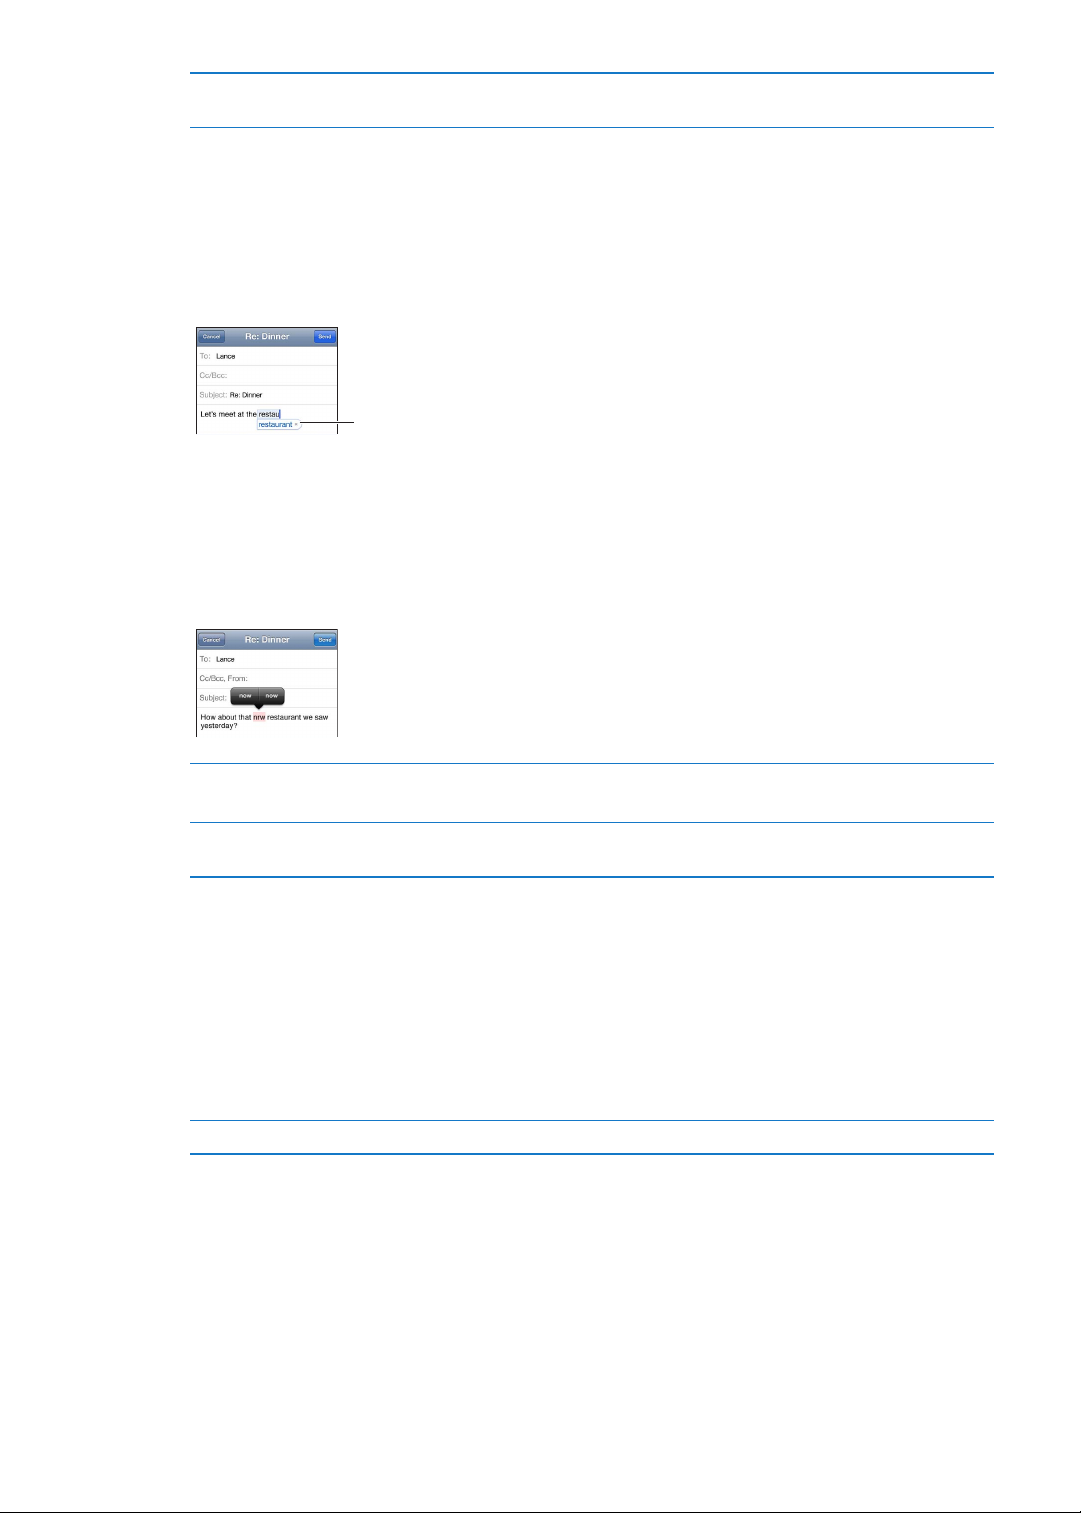
Auto-correction and spell checking
For many languages, iPhone automatically corrects misspellings or makes suggestions as
you type. When iPhone suggests a word, you can accept the suggestion without interrupting
your typing.
Note: For a list of supported languages, see www.apple.com/iphone/specs.html.
Accept the suggestion: Type a space, punctuation mark, or return character.
Reject a suggestion: Tap the “x”.
Each time you reject a suggestion for the same word, iPhone becomes more likely to accept
the word.
iPhone may also underline words you’ve already typed that might be misspelled.
Replace a misspelled word Tap the word, then tap one of the alternate spellings.
If the word you want doesn’t appear, correct the word by retyping it.
Turn auto-correction or spell
checking on or o
Go to Settings > General > Keyboard.
Shortcuts and your personal dictionary
Shortcuts lets you type just a few characters in place of a longer word or phrase. The expanded
text appears whenever you type the shortcut. For example, the shortcut “omw” is expanded to
“On my way!”
Create a shortcut: Go to Settings > General > Keyboard, then tap Add New Shortcut.
Add a word or phrase to your personal dictionary so that iPhone doesn’t try to correct or
replace it: Create the shortcut, but leave the Shortcut eld blank.
Edit a shortcut Go to Settings > Keyboard and tap the shortcut.
Editing text
The touchscreen makes it easy to make changes to text you’ve entered. An onscreen magnifying
glass helps you position the insertion point precisely where you need it. Grab points on selected
text let you quickly select more or less text. You can also cut, copy, and paste text and photos
within apps, or across multiple apps.
Chapter 3 Basics
25
Page 26

Position the insertion point: Touch and hold to bring up the magnifying glass, then drag to
position the insertion point.
Select text: Tap the insertion point to display the selection buttons.
You can also double-tap to select a word. In read-only documents, such as webpages, or email
messages you’ve received, touch and hold to select a word. Drag the grab points to select more
or less text.
Cut or copy text Select text, then tap Cut or Copy.
Paste text Tap the insertion point and tap Paste. The last text that you cut or copied is
inserted. Or select text and tap Paste to replace the text.
Undo the last edit Shake iPhone and tap Undo.
Make text bold, italic, or underlined When available, tap
Get the denition of a word When available, tap , then tap Dene.
Get alternative words When available, tap Suggest, then tap one of the words.
, then tap B/I/U.
Keyboard layouts
You can use Settings to set the keyboard layouts for software and hardware keyboards. The
available layouts depend on the keyboard language.
Select a keyboard layout: Go to Settings > General > Keyboard > International Keyboards,
then select a keyboard.
For each language, you can make separate selections for both the onscreen software and
any external hardware keyboards. The software keyboard layout determines the layout of the
keyboard on the iPhone screen. The hardware keyboard layout determines the layout of an Apple
Wireless Keyboard connected to iPhone.
26
Chapter 3 Basics
Page 27
Using an Apple Wireless Keyboard
You can use an Apple Wireless Keyboard (available separately) for typing on iPhone. The Apple
Wireless Keyboard connects via Bluetooth. See “Pairing a Bluetooth device with iPhone” on
page 33.
Once the keyboard is paired with iPhone, it connects whenever the keyboard is within range (up
to 30 feet). You can tell that the keyboard is connected if the onscreen keyboard doesn’t appear
when you tap in a text eld. To save the battery, turn o or unpair the keyboard when not in use.
Printing
AirPrint
AirPrint lets you print wirelessly to AirPrint-enabled printers. You can print from:
Mail—email messages and attachments that can be viewed in Quick Look Â
Photos and Camera—photos Â
Safari—webpages, PDFs, and other attachments that can be viewed in Quick Look Â
iBooks—PDFs Â
Maps—view of map showing on the screen Â
Notes—currently displayed note Â
Other apps available from the App Store may also support AirPrint.
An AirPrint-enabled printer doesn’t need setup—just connect it to the same Wi-Fi network as
iPhone. For more information, go to support.apple.com/kb/HT4356.
Printing a document
AirPrint uses your Wi-Fi network to send print jobs wirelessly to your printer. (iPhone and the
printer must be on the same Wi-Fi network.)
Print a document:
1 Tap , , or (depending on the app you’re using), then tap Print.
2 Tap Select Printer to select a printer.
3 Set printer options such as number of copies and double-sided output (if the printer supports it).
Some apps also let you set a range of pages to print.
4 Tap Print.
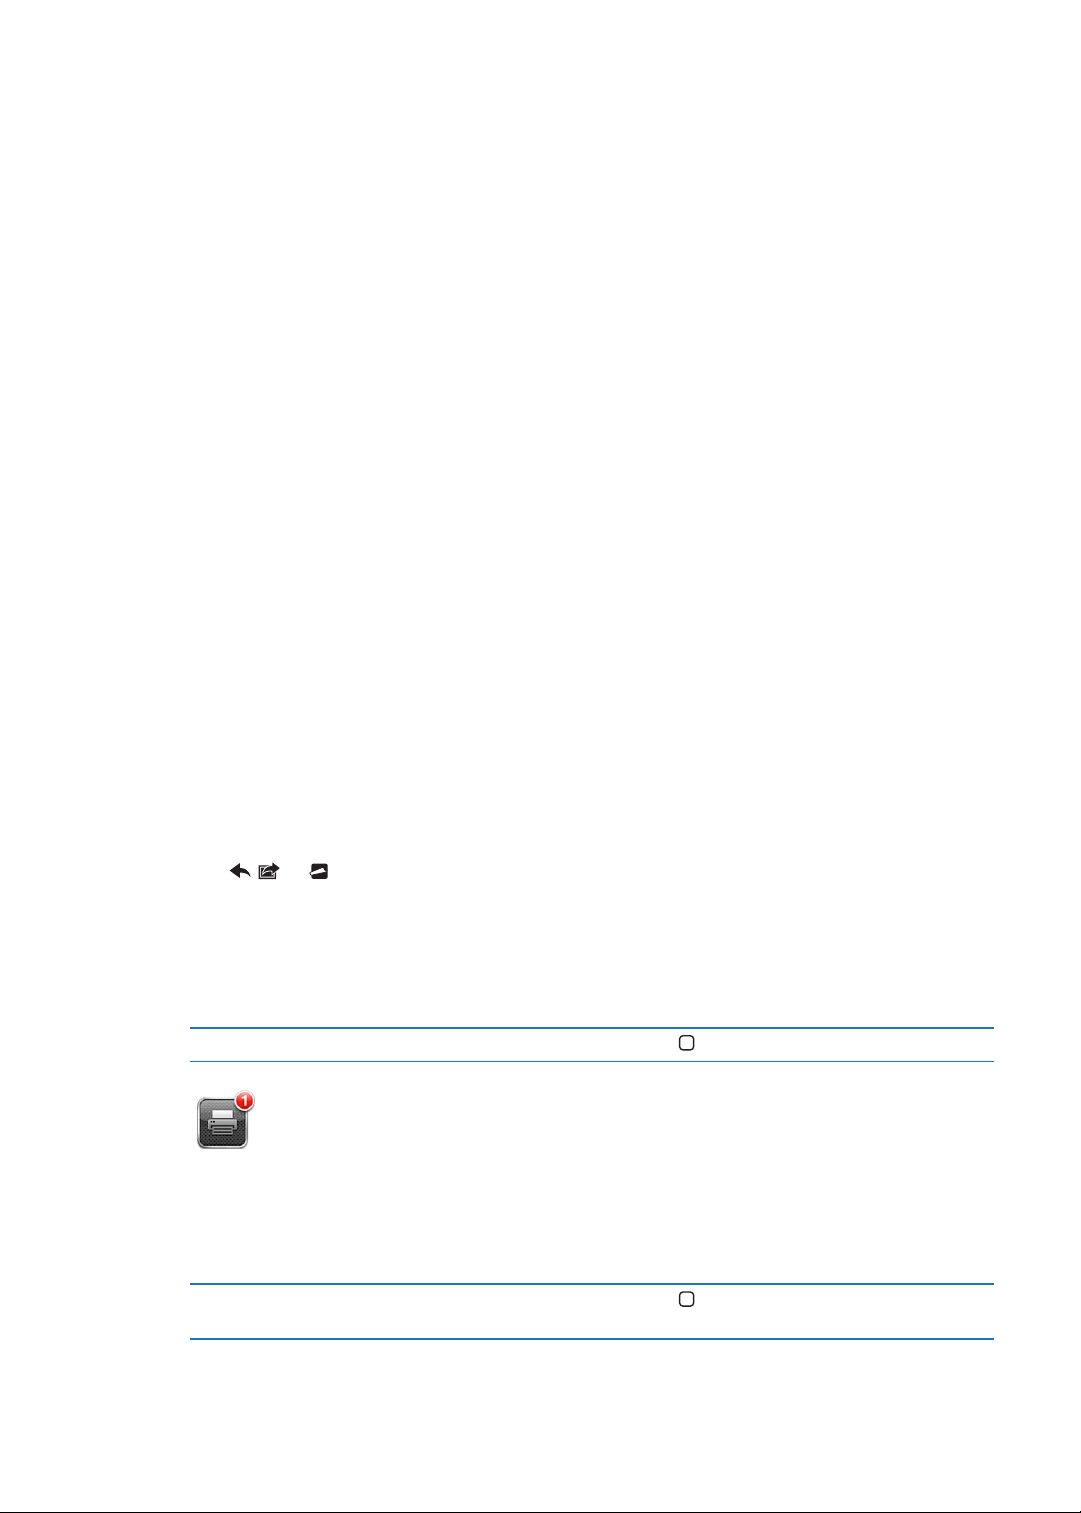
See the status of a print job Double-click the Home button , then tap Print Center.
The Print Center app appears as the most recent app when a document is printing. A badge on
the app app shows how many documents are queued for printing.
If you’re printing more than one document, select a print job to see its status summary.
Cancel a print job Double-click the Home button , tap Print Center, select the print job (if
you’re printing more than one document), then tap Cancel Printing.
Chapter 3 Basics
27
Page 28
Searching
You can search many apps on iPhone, including Contacts, Mail, Calendar, Music, Messages, Notes,
and Reminders. You can search an individual app, or all apps at once.
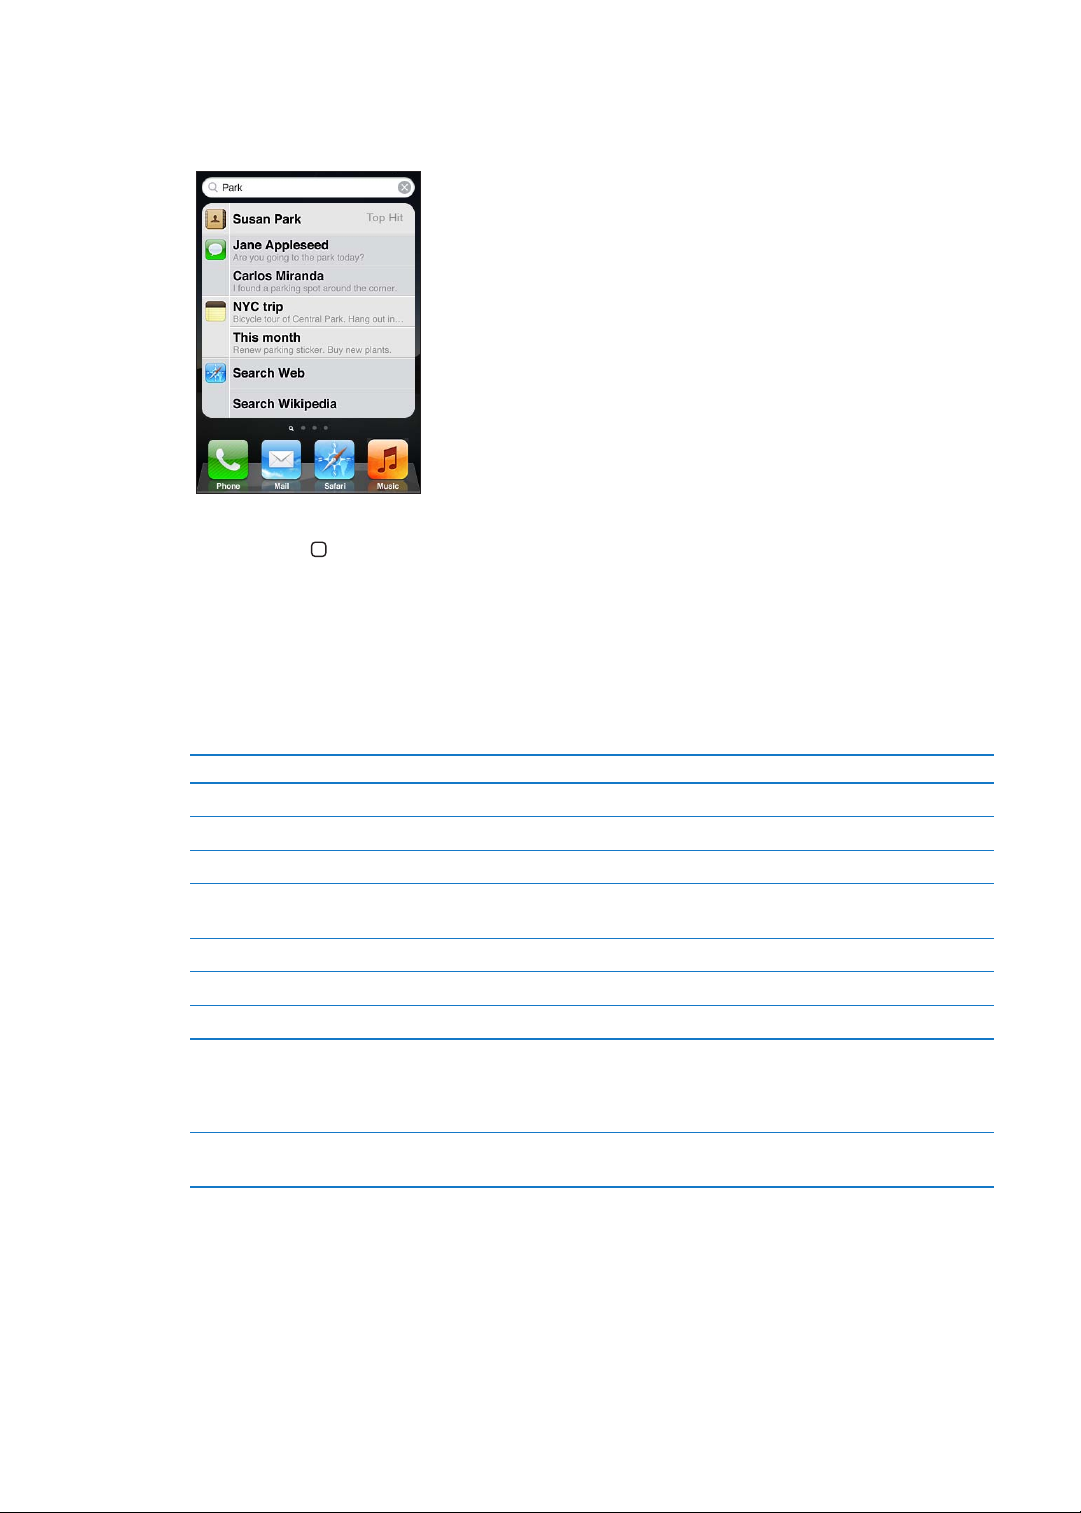
Search iPhone: Go to the Search screen. (From the rst Home screen, ick right or press the
Home button .) Enter text in the Search eld.
Search results appear as you type. Tap an item in the list to open it. Tap Search to dismiss the
keyboard and see more results.
Icons next to the search results show which app the results are from.
iPhone may display a top hit for you, based on your previous searches. Safari search results include
options to search the web or to search Wikipedia.
App What’s searched
Contacts First, last, and company names
Mail To, From, and Subject elds and the messages of all accounts
Calendar Event titles, invitees, locations, and notes
Music Music (names of songs, artists, and albums) and the titles of podcasts,
videos, and audiobooks
Messages Names and text of messages
Notes Text of notes
Reminders Titles
Search also searches the names of the native and installed apps on iPhone, so if you have a lot of
apps, you may want to use Search to locate and open apps.
Open apps from Search Enter the app name, then tap to open the app directly from the search
results.
Use the Spotlight Search setting to specify which contents are searched and the order the results
are presented in. See “Spotlight Search” on page 149.
28
Chapter 3 Basics
Page 29
Voice Control
Voice Control lets you make phone calls and control music playback using voice commands.
On iPhone 4S, you can also use Siri to control iPhone by voice. See Chapter 4, “ Siri,” on page 38.
Note: Voice Control may not be available in all languages. Voice Control is not available on
iPhone 4S when Siri is turned on.
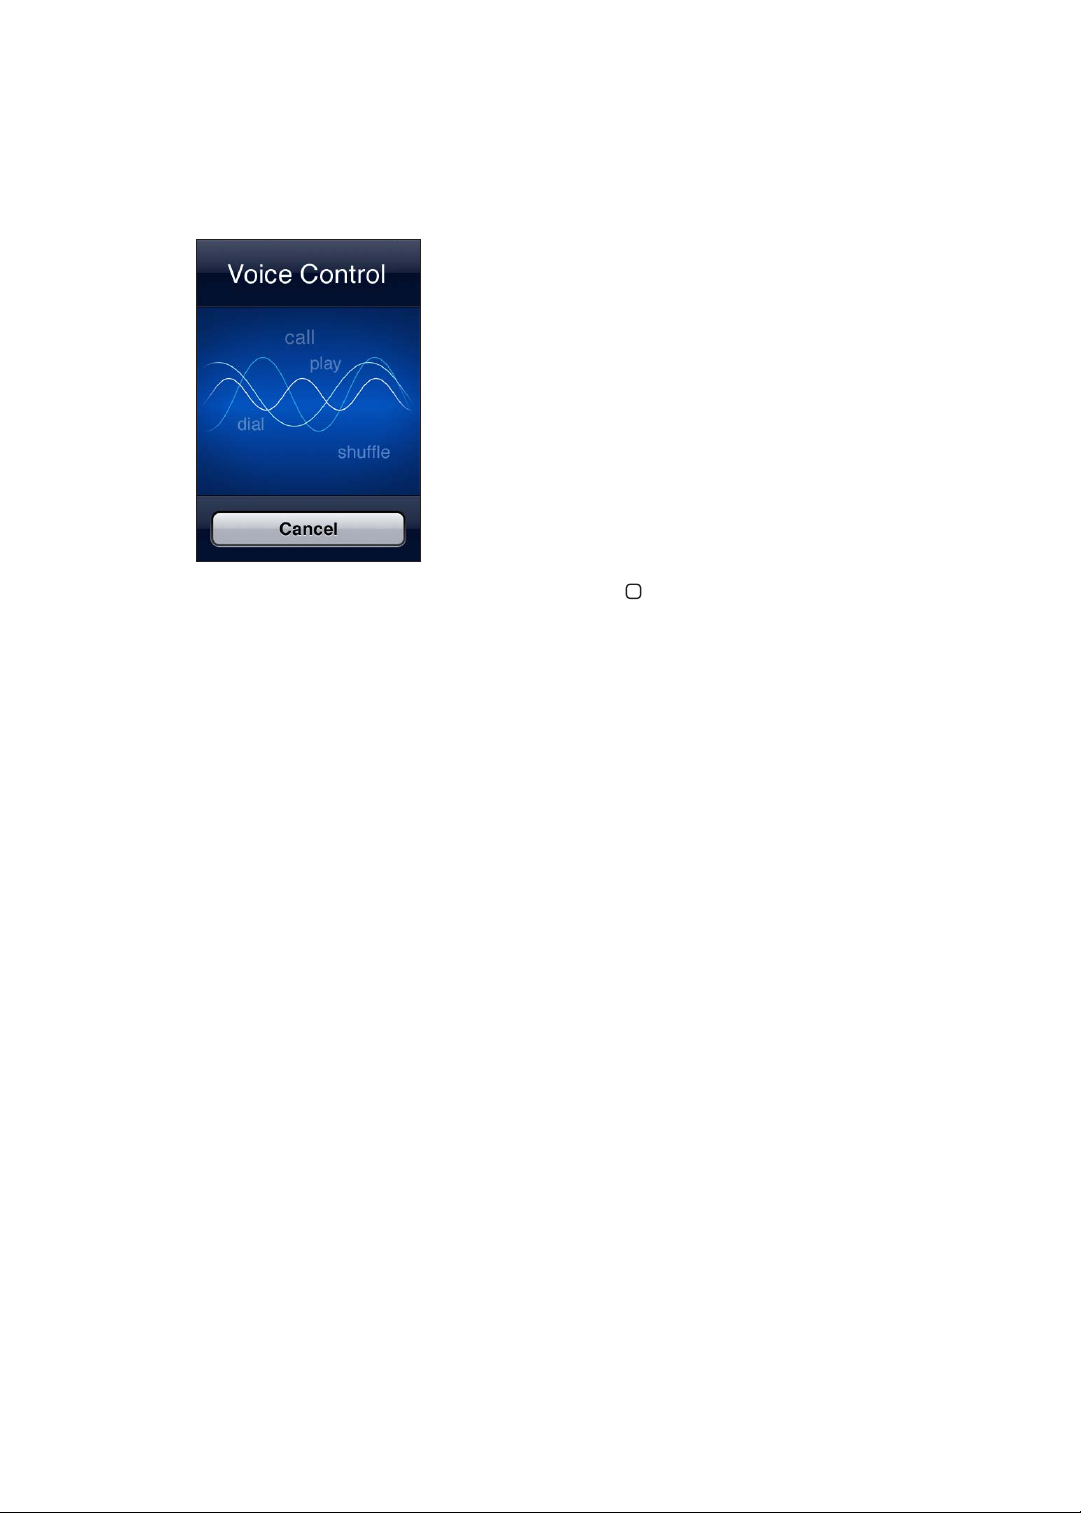
Use Voice Control: Press and hold the Home button until the Voice Control screen appears and
you hear a beep. You can also press and hold the center button on the iPhone earphones.
For best results:
Speak into the iPhone microphone as if you were making a phone call. You can also use the Â
microphone on your Bluetooth headset or compatible Bluetooth car kit.
Speak clearly and naturally. Â
Say only iPhone commands and names, and numbers. Pause slightly between commands. Â
Use full names. Â
For more about using Voice Control, including information about using Voice Control in dierent
languages, go to support.apple.com/kb/HT3597.
Voice Control normally expects you to speak voice commands in the language that’s set for
iPhone (go to Settings > General > International > Language). Voice Control settings let you
change the language for speaking voice commands. Some languages are available in dierent
dialects or accents.
Change the language or country: Go to Settings > General > International > Voice Control and
tap the language or country.
Voice Control for the Music app is always on, but for better security you can prevent voice dialing
when iPhone is locked.
Prevent voice dialing when iPhone is locked: Go to Settings > General > Passcode Lock and turn
Voice Dial o. Unlock iPhone to use voice dialing.
See “Voice dialing” on page 42 and “Using Siri or Voice Control with Music” on page 62.
Chapter 3 Basics
29
Page 30
Notications
Notication Center displays all your alerts in one place, including alerts about:
Missed phone calls and voice messages Â
New email Â
New text messages Â
Reminders Â
Calendar events Â
Friend requests (Game Center) Â
Weather Â
Stocks Â
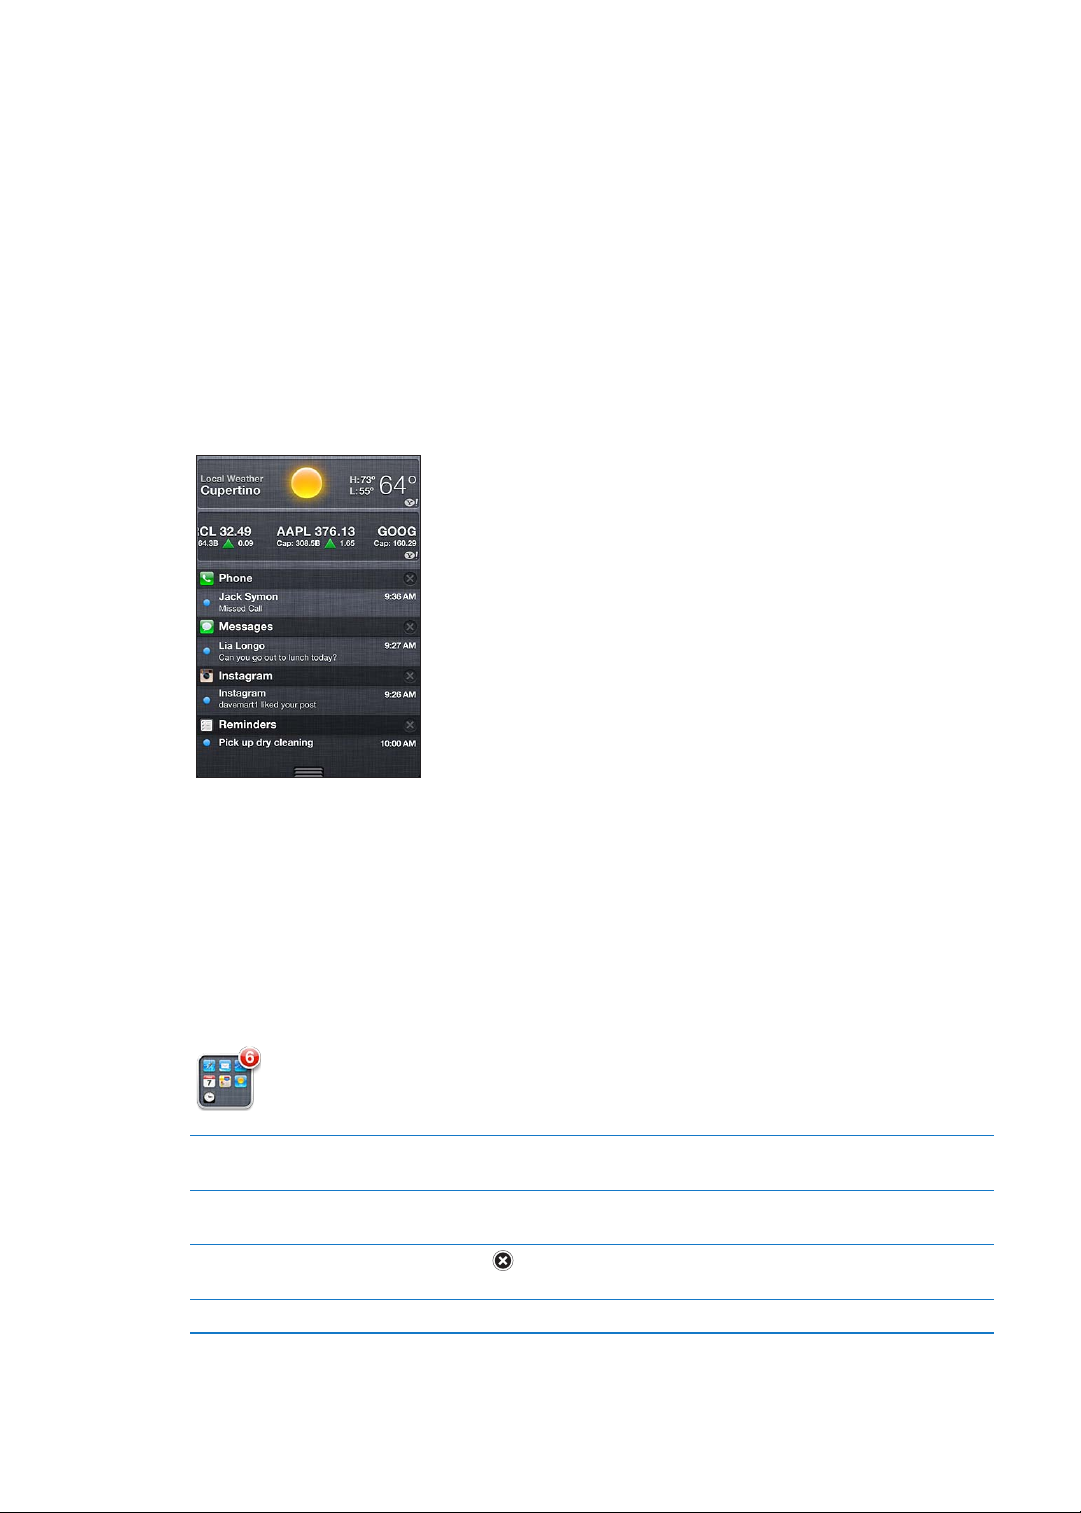
Show Notication Center: Drag down from the top of the screen. Scroll the list to see
additional alerts.
Alerts also appear on the lock screen, or briey at the top of the screen when you’re using iPhone.
You can see all current alerts in Notication Center.
Many apps, such as Phone, Messages, Mail, and the App Store, can display an alert badge on their
Home screen icon with a number (to indicate incoming items) or an exclamation mark (to indicate
a problem). If these apps are contained in a folder, the badge appears on the folder. A badge with
a number shows the total number of items you haven’t attended to, such as incoming phone calls,
email messages, text messages, and updated apps to download. A badge with an exclamation
mark indicates a problem with an app.
Respond to an alert in
Notication Center
Respond to an alert on the
lock screen
Remove alerts from
Notication Center
Set options for notications Go to Settings > Notications.
Tap the alert.
Swipe the icon displayed in the alert to the right.
, then tap Clear.
Tap
30
Chapter 3 Basics
Page 31

In Camera or Photos,
tap the Action button
to tweet a photo.
Tweet a photo.
Sign in to your Twitter account (or create a new account) in Settings to enable Tweets with
attachments from the following apps:
Camera or Photos—with a photo Â
Safari—with a webpage Â
Maps—with a location Â
YouTube—with a video Â
Sign in to or create a Twitter account: Go to Settings > Twitter. Then enter the user name and
password for an existing account, or tap Create New Account.
Tweet a photo, video, or webpage View the item, tap , then tap Tweet. If isn’t showing, tap the screen.
To include your location, tap Add Location. Location Services must be on in
Settings > Location Services.
Tweet a location in Maps Tap the location pin, tap
Add your current location to
a Tweet
Add Twitter user names and
photos to your contacts
Turn Twitter on or o for Photos
or Safari
Tap . Location Services must be turned on in Settings > Location Services.
Go to Settings > Twitter, then tap Update Contacts.
Go to Settings > Twitter.
, tap Share Location, then tap Tweet.
When you write a Tweet, the number in the lower-right corner of the Tweet screen shows the
number of characters remaining that you can enter. Attachments use some of a Tweet’s 140
characters.
You can also install and use the Twitter app to post a Tweet, view your timeline, search for
trending topics, and more.
Install the Twitter app: Go to Settings > Twitter, then tap Install.
To learn how to use the Twitter app, open the app, tap the More button (…), tap Accounts &
Settings, tap Settings, then tap Manual.
Chapter 3 Basics
31
Page 32

Apple Earphones with Remote and Mic
Center button
The Apple Earphones with Remote and Mic included with iPhone feature a microphone, volume
buttons, and an integrated button that allows you to answer and end calls easily, and control
audio and video playback.
Plug in the earphones to listen to music or make a phone call. Press the center button to control
music playback and answer or end calls, even when iPhone is locked.
Pause a song or video Press the center button. Press again to resume playback.
Skip to the next song Press the center button twice quickly.
Return to previous song Press the center button three times quickly.
Fast-forward Press the center button twice quickly and hold.
Rewind Press the center button three times quickly and hold.
Adjust the volume Press the + or – button.
Answer an incoming call Press the center button.
End the current call Press the center button.
Decline an incoming call Press and hold the center button for about two seconds, then let go.
Two low beeps conrm you declined the call.
Switch to an incoming or on-hold
call and put the current call on hold
Switch to an incoming or on-hold
call and end the current call
Use Siri or Voice Control
Press the center button. Press again to switch back to the rst call.
Press and hold the center button for about two seconds, then let go.
Two low beeps conrm you ended the rst call.
Press and hold the center button. See Chapter 4, “ Siri,” on page 38 or “Voice
Control
” on page 29.
32
If you get a call while the earphones are plugged in, you can hear the ringtone through both the
iPhone speaker and the earphones.
Chapter 3 Basics
Page 33

AirPlay
You can stream music, photos, and video wirelessly to your HDTV using AirPlay and Apple TV.
You can also use AirPlay to stream audio to an Airport Express base station. Other AirPlay-enabled
receivers are available from third-parties. Visit the online Apple Store for details.
Stream content to an AirPlay-enabled device: Start the video, slideshow, or music, then tap
and choose the AirPlay device. Once streaming starts, you can exit the app that’s playing
the content.
iPhone and the AirPlay-enabled device must be on the same Wi-Fi network.
Get quick access to the AirPlay
control
Switch output from AirPlay back
to iPhone
When the screen is on, double-click the Home button
left end of the multitasking bar.
and choose iPhone.
Tap
and scroll to the
On iPhone 4S, you can mirror the iPhone screen on a TV with Apple TV. Everything on the iPhone
screen appears on the TV.
Mirror the iPhone screen on a TV: Tap at the left end of the multitasking bar, choose an
Apple TV, and tap the Mirroring button that appears.
A blue bar appears at the top of the iPhone 4S screen when AirPlay mirroring is turned on.
You can also mirror the iPhone screen on a TV using a cable. See “Watching videos on a TV” on
page 111.
Bluetooth devices
You can use iPhone with the Apple Wireless Keyboard and other Bluetooth devices, such as
Bluetooth headsets, car kits, and stereo headphones. Third-party Bluetooth headphones may
support volume and playback controls. See the documentation that came with your Bluetooth
device. For supported Bluetooth proles, go to support.apple.com/kb/HT3647.
Pairing a Bluetooth device with iPhone
WARNING: For important information about avoiding hearing loss and about driving safely, see
the Important Product Information Guide at www.apple.com/support/manuals/iphone.
Before you can use a Bluetooth device with iPhone, you must rst pair them.
Pair a Bluetooth headset, car kit, or other device with iPhone:
1 Follow the instructions that came with the device to make it discoverable or to set it to search for
other Bluetooth devices.
2 Go to Settings > General > Bluetooth and turn Bluetooth on.
3 Choose the device on iPhone, and enter its passkey or PIN number. See the instructions about the
passkey or PIN that came with the device.
After you pair a Bluetooth device to work with iPhone, you must make a connection to have
iPhone use the device for your calls. See the documentation that came with the device.
When iPhone is connected to a Bluetooth headset or car kit, outgoing calls are routed through
the device. Incoming calls are routed through the device if you answer using the device, and
through iPhone if you answer using iPhone.
Chapter 3 Basics
33
Page 34

Pair an Apple Wireless Keyboard with iPhone:
Charging Charged
1 Go to Settings > General > Bluetooth and turn Bluetooth on.
2 Press the power button on the Apple Wireless Keyboard to turn it on.
3 On iPhone, select the keyboard listed under Devices.
4 Type the passkey on the keyboard as instructed, then press Return.
Note: You can pair only one Apple Wireless Keyboard with iPhone at a time. To pair a dierent
keyboard, you must rst unpair the current one.
For more information, see “Using an Apple Wireless Keyboard” on page 27.
Bluetooth status
The Bluetooth icon appears in the iPhone status bar at the top of the screen:
 or : Bluetooth is on and a device is connected to iPhone. ( The color depends on the current
color of the status bar.)
 : Bluetooth is on but no device is connected. If you’ve paired a device with iPhone, it may be
out of range or turned o.
 No Bluetooth icon: Bluetooth is turned o.
Unpairing a Bluetooth device from iPhone
You can unpair a Bluetooth device if you don’t want to use it with iPhone any more.
Unpair a Bluetooth device:
1 Go to Settings > General > Bluetooth and turn Bluetooth on.
2 Tap next to the device name, then tap “Forget this Device.”
Battery
iPhone has an internal rechargeable battery.
Charging the battery
WARNING: For important safety information about charging iPhone, see the Important Product
Information Guide at www.apple.com/support/manuals/iphone.
The battery icon in the upper-right corner shows the battery level or charging status. You can also
display the percentage of the battery charge. Go to Settings > General > Usage and turn on the
setting under Battery Usage.
Charge the battery: Connect iPhone to a power outlet using the included Dock Connector to
USB Cable and USB power adapter.
34
Chapter 3 Basics
Page 35

Note: Connecting iPhone to a power outlet can start an iCloud backup or wireless iTunes syncing.
or
See “Backing up iPhone” on page 15 7 and “Syncing with iTunes” on page 18 .
Charge the battery and sync iPhone: Connect iPhone to your computer using the included Dock
Connector to USB Cable. Or connect iPhone to your computer using the included cable and the
Dock, available separately.
Unless your keyboard has a high-powered USB 2.0 port, you must connect iPhone to a USB 2.0
port on your computer.
Important: The iPhone battery may drain instead of charge if iPhone is connected to a computer
that’s turned o or is in sleep or standby mode.
If you charge the battery while syncing or using iPhone, it may take longer to charge.
Important: If iPhone is very low on power, it may display one of the following images, indicating
that iPhone needs to charge for up to ten minutes before you can use it. If iPhone is extremely
low on power, the display may be blank for up to two minutes before one of the low-battery
images appears.
Maximizing battery life
iPhone uses lithium-ion batteries. To learn more about how to maximize the battery life of iPhone,
go to www.apple.com/batteries.
Replacing the battery
Rechargeable batteries have a limited number of charge cycles and may eventually need to
be replaced. The iPhone battery isn’t user replaceable; it can be replaced only by an authorized
service provider. For more information, go to www.apple.com/batteries/replacements.html.
Chapter 3 Basics
35
Page 36

Security features
Security features help protect the information on iPhone from being accessed by others.
Passcodes and data protection
You can set a passcode that you must enter each time you turn on or wake up iPhone.
Set a passcode: Go to Settings > General > Passcode Lock and enter a 4-digit passcode, then
enter the passcode again to verify it. iPhone then requires you to enter the passcode to unlock it
or to display the passcode lock settings.
Setting a passcode turns on data protection. Data protection uses your passcode as the key for
encrypting mail messages and their attachments stored on iPhone. (Data protection may also
be used by some apps available in the App Store.) A notice at the bottom of the Passcode Lock
screen in Settings shows whether data protection is enabled.
To increase iPhone security, turn o Simple Passcode and use a longer passcode with a
combination of numbers, letters, punctuation, and special characters. See “Passcode Lock” on
page 150.
Important: On an iPhone 3GS that didn’t ship with iOS 4 or later, you must also restore iOS
software to enable data protection. See “Updating and restoring iPhone software” on page 15 9 .
Prevent voice dialing when iPhone is locked: Go to Settings > General > Passcode Lock and turn
Voice Dial o. Unlock iPhone to use voice dialing.
Find My iPhone
Find My iPhone helps you locate and secure your iPhone using the free Find My iPhone app on
another iPhone, iPad, or iPod touch, or using a Mac or PC web browser signed in to icloud.com
or me.com.
Find My iPhone includes:
 Locate on a map: View the approximate location of your iPhone on a full-screen map.
 Send a Message or Play a Sound: Lets you compose a message that will appear on your
iPhone screen, or play a sound at full volume for two minutes, even if the Ring/Silent switch is
set to silent.
 Remote Passcode Lock: Lets you remotely lock your iPhone and create a 4-digit passcode,
if you haven’t set one previously.
 Remote Wipe: Lets you protect your privacy by erasing all media and data on iPhone, restoring
it to factory settings.
Important: Before you can use its features, Find My iPhone must be turned on in either iCloud or
MobileMe settings on your iPhone. Find My iPhone can be turned on only in one account.
Turn on Find My iPhone using
iCloud
Turn on Find My iPhone using
MobileMe
Go to Settings > iCloud and turn on Find My iPhone.
Go to Settings > Mail, Contacts, Calendars, tap your MobileMe account,
then turn on Find My iPhone.
See “iCloud” on page 17 or “Setting up mail and other accounts” on page 16 .
36
Chapter 3 Basics
Page 37

Cleaning iPhone
Clean iPhone immediately if it comes in contact with any contaminants that may cause stains,
such as ink, dyes, makeup, dirt, food, oils, or lotions. To clean iPhone, disconnect all cables and
turn o iPhone (press and hold the On/O button, then slide the onscreen slider). Then use a soft,
slightly damp, lint-free cloth. Avoid getting moisture in openings. Don’t use window cleaners,
household cleaners, compressed air, aerosol sprays, solvents, alcohol, ammonia, or abrasives to
clean iPhone. The front cover of iPhone 3GS and the front and back covers of iPhone 4S and
iPhone 4 are made of glass and have an oleophobic coating. To clean these surfaces, simply
wipe with a soft, lint-free cloth. The ability of this coating to repel oil will diminish over time with
normal usage, and rubbing the screen with an abrasive material will further diminish its eect and
may scratch the glass.
For more information about handling iPhone, see the iPhone Important Product Information Guide
at www.apple.com/support/manuals/iphone.
Restarting or resetting iPhone
If something isn’t working right, try restarting iPhone, force quitting an app, or resetting iPhone.
Restart iPhone: Press and hold the On/O button until the red slider appears. Slide your nger
across the slider to turn o iPhone. To turn iPhone back on, press and hold the On/O button until
the Apple logo appears.
If you can’t turn o iPhone or if the problem continues, you may need to reset iPhone. A reset
should be done only if turning iPhone o and on doesn’t resolve the problem.
Force an app to close: Press and hold the On/O button for a few seconds until a red slider
appears, then press and hold the Home button until the app quits.
You can also force an app to quit by removing it from the multitasking bar. See “Opening and
switching apps” on page 19 .
Reset iPhone: Press and hold both the On/O button and the Home button for at least ten
seconds, until the Apple logo appears.
For more troubleshooting suggestions, see Appendix B, “ Support and Other Information,” on
page 15 7.
Chapter 3 Basics
37
Page 38

Siri
What Siri heard you say
Tap to speak to Siri.
Siri’s response
Related info—tap to
open the app.
4
Using Siri
Siri helps you get things done. All you have to do is ask. You can ask Siri to make a call, nd a
business and get directions, schedule reminders and meetings, search the web, dictate text, and
much more.
Note: Siri is available only on iPhone 4S and requires Internet access. Siri may not be available in
all languages or in all areas, and features may vary by area. Cellular data charges may apply.
Use Siri: Press and hold the Home button . After the tone, ask a question or tell Siri what to do.
With iPhone earphones or a supported Bluetooth headset, press and hold the center (or
comparable) button.
You can also bring iPhone to your ear while the screen is on.
Siri can help with the following apps and services:
Phone Make a phone or FaceTime call.
Example: “Call Jason.” or “FaceTime Joe.”
Music Control music playback.
Example: “Play The Light of the Sun.”
Messages Read and send text messages.
Example: “Tell Susan I’ll be right there.”
Calendar Create and view events.
Example: “Set up a meeting at 9.”
38
Page 39

Reminders Create, search, and update reminders.
Example: “Remind me to call mom.”
Maps Find locations, get directions, and contact businesses.
Example: “How do I get home?”
Mail Send and search email.
Example: “Email Lisa about the trip.”
Weather Get current weather and forecasts.
Example: “What’s the weather for today?”
Stocks Get stock info.
Example: “What is Apple’s stock price?”
Clock Get the date and time for major cities, set alarms, and start the timer.
Example: “Wake me up tomorrow at 7 a.m.”
Contacts Get and use information about your contacts.
Example: “What’s Michael’s address?”
Notes Create, search, or add to notes.
Example: “Note that I spent $12 on lunch.”
Safari Search the web.
Example: “Search the web for Bora Bora.”
WolframAlpha Answer questions about facts, data, statistics, and mathematical
calculations.
Example: “How many calories in a bagel?”
Find My Friends (available
separately from the App Store)
Locate friends.
Example: “Find Bob.”
For more examples, ask Siri, “What can you do?” or tap when Siri opens.
Siri knows which app you’re using, so you can refer to what’s on your screen. For example, when
reading a message in Mail, you can say “Reply, I like it” or “Call him.” Siri also understands dierent
ways of saying the same thing. For example, you could say “Send a message to Susan saying I’ll be
right there” or “Tell Susan I’ll by right there.”
When Siri displays information on the screen (for example, a calendar appointment), you can
usually tap the displayed info to open the related app for details and further action.
Siri uses information in Contacts to know when you’re referring to your friends and associates.
Make sure you have contacts for the people you want Siri to know about. Include nicknames
and addresses, so that you can say things like “Find restaurants near Bob’s house.” If you refer
to someone by a single name, Siri looks for a match in Favorites (in Phone) or Conversations (in
Messages). Otherwise, Siri asks for clarication, if needed.
On your personal card in Contacts, enter names of Related People (such as mother, brother, or
manager) to enable Siri to respond to requests such as “Call mom.” Enter your home address and
work address, so you can say things like “How do I get home?” and “Remind me to call Bob when I
get to work.” To let Siri know which card is yours, go to Settings > General > Siri > My Info.
Chapter 4 Siri
39
Page 40

Cancel a request Say “cancel,” tap , or press the Home button .
Stop a phone call you started
with Siri
Set options for Siri Go to Settings > General > Siri. See “Siri
Restrict Siri completely or restrict
explicit language
Before Phone opens, press the Home button . If Phone is already open,
tap End.
” on page 148.
Go to Settings > General > Restrictions.
If Siri doesn’t hear you correctly
On the Siri screen, Siri shows what it heard you say and displays a response. If Siri doesn’t hear you
exactly right, you can make corrections.
Correct what Siri hears you say On the Siri screen, tap the bubble showing what Siri heard you say. Edit
your request by typing, or tap
Correct a word underlined in blue Tap the word, then tap one of the alternatives presented, type the
correction, or tap
Correct Siri by voice Tap to speak to Siri again, and restate or clarify your request. For example,
“I meant Boston.”
Correct a mail or text message When asked if you want to send the message, you can say things like:
 “Change it to: Call me tomorrow.”
 “Add: See you there question mark.”
 “No, send it to Bob.”
 “No.” (to keep the message without sending it)
 “Cancel.”
If the message is correct, you can say something like “Yes, send it.”
to dictate.
to dictate. Tap Done when you nish.
Dictation
When Siri is turned on, you can also dictate text. See “Dictation” on page 24.
40
Chapter 4 Siri
Page 41

Phone
Number of
missed calls
Call a favorite with a single tap.
View your recent incoming and outgoing
calls to return a call or get more info.
Call, email, or text someone
in your contacts list.
Dial manually.
View a list of
your voicemail
messages.
Number of
unheard messages
5
Phone calls
Making a call
Making a call on iPhone is as simple as tapping a name or number in your contacts, using Siri
to say “call bob” (iPhone 4S), tapping one of your favorites, or tapping a recent call to return it.
Buttons at the bottom of the Phone screen give you quick access to your favorites, recent calls,
your contacts, and a numeric keypad for dialing manually.
WARNING: For important information about driving safely, see the Important Product Information
Guide at www.apple.com/support/manuals/iphone.
Return a missed call Do one of the following:
 Phone: Tap Recents, then tap the name or number.
 Locked screen: Swipe the icon displayed in the alert to the right.
 Notication Center: Tap the missed call.
41
Page 42

Dialing manually
You can use the keypad to dial a phone number manually.
Dial a number: Tap Keypad, enter the number, then tap Call.
Paste a number to the keypad Tap the screen above the keyboard, then tap Paste.
Enter a soft (2-second) pause Touch the “*” key until a comma appears.
Enter a hard pause (to pause
dialing until you tap the Dial
button)
Redial the last number Tap Keypad, tap Call, then tap Call again.
Touch the “#” key until a semicolon appears.
Voice dialing
You can use Siri (iPhone 4S) or Voice Control to call someone in your contacts, or to dial a specic
number. See Chapter 4, “Siri,” on page 38 and “Voice Control” on page 29.
Make a phone call by voice: Activate Siri or Voice Control, say “call” or “dial,” then say the name
or number.
Siri: If the screen isn’t on, press the On/O or Home button , then hold iPhone to your ear.
Voice Control or Siri: Press and hold the Home button until you hear the tone. You can also press
and hold the center button on the iPhone earphones.
For example:
Call John Appleseed Â
Call John Appleseed at home Â
Call John Appleseed, mobile Â
For best results, speak the full name of the person you’re calling. When voice dialing a number,
speak each digit separately—for example, say “four one ve, ve ve ve, one two one two.”
Note: For the “800” area code in the U.S., you can say “eight hundred.”
Receiving calls
When you receive a call, tap Answer. If iPhone is locked, drag the slider. You can also press the
center button on your iPhone earphones.
Silence a call Press the On/O button or either volume button. You can still answer the
call after silencing it, until it goes to voicemail.
Decline a call and send it directly
to voicemail
Block calls and maintain Wi-Fi
access to the Internet
If iPhone is turned o or in Airplane Mode, incoming calls go directly to voicemail.
Do one of the following:
 Press the On/O button twice quickly.
 Press and hold the center button on the iPhone earphones for about
two seconds. Two low beeps conrm that the call was declined.
 Tap Decline (if iPhone is awake when a call comes in).
Go to Settings and turn on Airplane Mode, then tap Wi-Fi to turn it on.
42
Chapter 5 Phone
Page 43

While on a call
Mute your line.
iPhone 4 or later: Touch and
hold to put your call on hold.
Dial a number or
enter numbers.
Use the
speakerphone
or a Bluetooth
device.
Get contact info.
iPhone 4 or later:
Make a FaceTime call.
iPhone 3GS (Hold button):
Put a call on hold.
Make another
call.
When you’re on a call, the screen shows call options.
The call options may vary, depending on which iPhone you’re using.
Use another app during a call Press the Home button , then tap an app icon. To return to the call,
tap the green bar at the top of the screen.
End a call Tap End Call. Or press the center button on your iPhone earphones.
Second calls
During a call, you can make or receive another call. If you receive a second call, iPhone beeps and
shows the caller’s information and a list of options.
Note: Making and receiving a second call may be an optional service in some areas. Contact your
carrier for more information.
Respond to a second incoming call:
 To ignore the call and send it to voicemail: Tap Ignore.
 To hold the rst call and answer the new one: Tap Hold Call + Answer.
 To end the rst call and answer the new one: When using a GSM network, tap End Call + Answer.
With a CDMA network, tap End Call and when the second call rings back, tap Answer, or drag
the slider if the phone is locked.
If you’re on a FaceTime video call, you can either end the video call and answer the incoming call,
or decline the incoming call.
Make a second call Tap Add Call. The rst call is put on hold.
Switch between calls Tap Swap. The active call is put on hold.
Merge calls Tap Merge Calls.
With CDMA, you can’t switch between calls if the second call was outgoing,
but you can merge the calls. If you end the second call or the merged call,
both calls are terminated.
With CDMA, you can’t merge calls if the second call was incoming.
Chapter 5 Phone
43
Page 44

Conference calls
With GSM, you can set up a conference call to talk with up to ve people at a time, depending on
your carrier.
Note: Conference calling may be an optional service in some areas. Contact your carrier for
information.
Create a conference call:
1 Make a call.
2 Tap Add Call and make another call. The rst call is put on hold.
3 Tap Merge Calls. The calls are merged on one line and everyone can hear each other.
4 Repeat steps two and three to add additional calls.
Drop one call Tap Conference and tap next to a call. Then tap End Call.
Talk privately with a call Tap Conference, then tap Private next to a call. Tap Merge Calls to resume
the conference call.
Add an incoming call Tap Hold Call + Answer, then tap Merge Calls.
If your service includes conference calling, iPhone always has a second line available in addition to
the conference call.
Note: You can’t make a FaceTime video call when you’re on a conference call.
Using a Bluetooth device for calls
You can make and receive calls using a Bluetooth device paired with iPhone. See “Pairing a
Bluetooth device with iPhone” on page 33.
For information about using a Bluetooth device, see the documentation that came with the device.
Bypass your Bluetooth device:
Answer a call by tapping the iPhone screen. Â
During a call, tap Audio and choose iPhone or Speaker Phone. Â
Turn o Bluetooth in Settings > General > Bluetooth. Â
Turn o the Bluetooth device, or move out of range. You must be within about 30 feet of a Â
Bluetooth device for it to be connected to iPhone.
Emergency calls
If iPhone is locked with a passcode, you may still be able to make an emergency call.
Make an emergency call when iPhone is locked: On the Enter Passcode screen, tap Emergency
Call, then enter the emergency number and tap the green button.
In the U.S., location information (if available) is provided to emergency service providers when
you dial 911.
With CDMA, when an emergency call ends, iPhone enters Emergency call mode to allow a call back
from emergency services. While in this mode, data transmission and text messages are blocked.
Exit emergency call mode (CDMA): Do one of the following:
Tap the back button. Â
Press the On/O button or the Home button  .
Use the keypad to dial a non-emergency number. Â
44
Emergency call mode ends automatically after a few minutes, as determined by your carrier.
Chapter 5 Phone
Page 45

Important: You should not rely on wireless devices for essential communications, such as medical
Switch cameras.
Drag your image
to any corner.
Mute (you can hear and see;
the caller can see but not hear).
emergencies. Use of iPhone to call emergency services may not work in all areas or all operating
conditions. Emergency numbers and services vary by area, and sometimes an emergency call
cannot be placed due to network availability or environmental interference. Some cellular
networks may not accept an emergency call from iPhone if iPhone is not activated, if iPhone is not
compatible with or congured to operate on a particular cellular network, or (when applicable) if
iPhone does not have a SIM or if the SIM is PIN-locked. If you’re on a FaceTime video call, you must
end that call before you can call an emergency number.
FaceTime
FaceTime video calls (iPhone 4 or later) let you see as well as hear the person you’re talking to. You
can make a video call to someone with a Mac or iOS device that supports FaceTime. No setup is
needed, but you must have a Wi-Fi connection to the Internet. By default, FaceTime uses the front
camera so the person you call can see your face; switch to the rear camera to share what you see
around you.
Note: FaceTime may not be available in all areas.
Make a FaceTime call: In Contacts, choose a name, tap FaceTime, then tap the phone number
or email address the person uses for FaceTime.
To call someone who has an iPhone 4 or later, you can start by making a voice call, then tap
FaceTime.
When the voice call is established, the other person’s image appears on your screen. An inset
shows what the other person sees. Rotate iPhone to use FaceTime in landscape orientation.
If your Wi-Fi network is unavailable (for example, if you’re out of range), you get an option to redial
the number for a voice call.
Note: When you make a FaceTime video call, your phone number is displayed even if caller ID is
blocked or turned o.
Chapter 5 Phone
45
Page 46

Make a FaceTime call using Siri
Number of missed calls and
unheard voicemail messages.
or Voice Control
Block FaceTime calls Go to Settings > FaceTime and turn o FaceTime. You can also disable
Use your Apple ID or an email
address for FaceTime
Press and hold the Home button until you hear the tone. With Siri (iPhone
4S), you can also just hold iPhone to your ear (the screen must be one). Say
“FaceTime,” followed by the name of the person to call.
FaceTime in Restrictions. See “Restrictions
Go to Settings > FaceTime, then tap “Use your Apple ID for FaceTime” or
Add An Email. See “FaceTime
” on page 45.
” on page 150.
Visual voicemail
Setting up voicemail
On iPhone, visual voicemail lets you see a list of your messages and choose which ones to listen to
or delete, without having to listen to instructions or prior messages.
Note: Visual voicemail may not be available in all areas, or may be an optional service. Contact
your carrier for more information. If visual voicemail isn’t available, tap Voicemail and follow the
voice prompts to retrieve your messages.
The rst time you tap Voicemail, iPhone prompts you to create a voicemail password and record
your voicemail greeting.
Change your greeting: Tap Voicemail, tap Greeting, then tap Custom. Tap Record and say your
greeting. When you nish, top Stop.
To review, tap Play. To rerecord, tap Record again. Tap Save when you’re satised.
Use your carrier’s default greeting Tap Voicemail, tap Greeting, then tap Default.
Set an alert sound for new
voicemail
Change the voicemail password Go to Settings > Phone > Change Voicemail Password.
Go to Settings > Sounds, then turn New Voicemail on. The alert sounds
once for each new voicemail.
If the Ring/Silent switch is o, iPhone won’t sound alerts.
46
Chapter 5 Phone
Page 47

Checking voicemail
Drag the playhead to skip
to any point in a message.
Unheard
messages
Play/Pause
Contact info
Scrubber bar
Speakerphone (Audio,
when a Bluetooth device
is connected. Tap to
choose audio output.)
Return the call.
When you tap Phone, iPhone shows the number of missed calls and unheard voicemail messages.
Tap Voicemail to see a list of your messages.
Listen to a voicemail message: Tap Voicemail, then tap a message.
If you’ve already heard the message, tap the message again to replay it. Use and to pause and
resume playback.
Once you listen to a message, it’s saved until your carrier erases it.
Check voicemail from another
phone
Dial your own number or your carrier’s remote access number.
Deleting messages
Delete a message: Swipe or tap the message, then tap Delete.
Note: In some areas, deleted visual voicemail messages may be permanently erased by your
carrier.
Listen to a deleted message Tap Deleted Messages (at the end of the list), then tap the message.
Undelete a message Tap Deleted Messages (at the end of the list), then tap the message and
tap Undelete.
Delete messages permanently Tap Deleted Messages (at the end of the list), then tap Clear All.
Contacts
From a contact’s Info screen, a quick tap lets you make a phone call, create an email message, nd
their location, and more. See “Searching contacts” on page 108.
Chapter 5 Phone
47
Page 48

Favorites
Favorites gives you quick access to your frequently used phone numbers.
Add a contact’s phone number to your favorites list: Tap Contacts, then choose a contact. Tap
“Add to Favorites.” Choose a phone number or email address (for FaceTime calls). On iPhone 4 or
later, choose whether to save as a voice or FaceTime call.
To call a favorite, tap Favorites and choose a contact. If appears next to a name, iPhone makes
a FaceTime call.
Add a contact to favorites from the
recents list
Delete a contact from your
favorites
Reorder your favorites list Tap Favorites and tap Edit. Then drag
Tap Recents and tap
Favorites.”
Tap Favorites and tap Edit. Then tap
tap Remove.
the list.
next to the contact’s name, then tap “Add to
next to a contact or number and
next to a contact to a new place in
Call forwarding, call waiting, and caller ID
Call forwarding
You can set iPhone to forward incoming phone calls to a another number.
Note: FaceTime calls are not forwarded.
Turn on call forwarding (GSM): Go to Settings > Phone > Call Forwarding and turn on Call
Forwarding. On the “Forward to” screen, enter the number you’re forwarding calls to.
Turn on call forwarding (CDMA): Enter *72, followed by the number you’re forwarding calls to,
then tap Call.
To turn o call forwarding (CDMA), enter *73, then tap Call.
With GSM, the Call Forwarding icon (
You must be in range of the cellular network when you set iPhone to forward calls, or calls won’t
be forwarded.
) appears in the status bar when call forwarding is on.
48
Call waiting
Call waiting gives you the option to take an incoming call when you’re already on the phone.
You can:
Ignore the incoming call
Â
Put the current call on hold and answer the incoming one Â
End the current call and answer the incoming one Â
If you’re on a call and call waiting is turned o, incoming calls go directly to voicemail. See “Second
calls” on page 43.
Turn on call waiting (GSM): Go to Settings > Phone > Call Waiting.
With CDMA, call waiting is on by default, but can be disabled for a single call.
Disable call waiting for a call (CDMA): Enter *70, then dial the number.
Chapter 5 Phone
Page 49

Caller ID
Caller ID displays your name or phone number to the person you call—if the recipient’s
equipment has that capability and you haven’t turned o or blocked the feature.
Note: For FaceTime calls, your phone number is displayed even if caller ID is turned o or blocked.
Turn caller ID on or o (GSM): Go to Settings > Phone > Show My Caller ID.
With CDMA, caller ID is on by default, but can be disabled for a single call.
Block caller ID for a call (CDMA): Enter *67, then dial the number.
Ringtones, Ring/Silent switch, and vibrate
iPhone comes with ringtones that sound for incoming calls, Clock alarms, and the Clock timer.
You can also purchase ringtones from songs in iTunes. Use the switch Ring/Silent switch to turn
the ringer on or o, and Sound settings to set the vibrate options. By default, iPhone vibrates
whether it’s in ring mode or silent mode.
Set the default ringtone: Go to Settings > Sounds > Ringtone.
Turn the ringer on or o: Flip the switch on the side of iPhone. See “Ring/Silent switch” on
page 11.
Important: Clock alarms still sound even if you set the Ring/Silent switch to silent.
Set iPhone to vibrate: Go to Settings > Sounds. Separate controls let you set vibrate for both ring
mode and silent mode.
Assign a dierent ringtone for
a contact
Purchase a ringtone from the
iTunes Store
In Contacts, choose a contact, tap edit, then tap Ringtone and choose
a ringtone.
See “Purchasing music, audiobooks, and tones
” on page 100.
For more information, see “Sounds and the Ring/Silent switch” on page 146 .
International calls
Making international calls from your home area
For information about making international calls from your home area, including rates and other
charges that may apply, contact your carrier or go to your carrier’s website.
Using iPhone abroad
When traveling abroad, you may be able to use iPhone to make calls, send and receive text
messages, and use apps that access the Internet, depending on available networks.
Enable international roaming: Contact your carrier for information about availability and fees.
Important: Voice, text message, and data roaming charges may apply. To avoid charges for phone
calls and data delivered via the cellular network (including visual voicemail) when roaming
outside your carrier’s network, turn o Voice Roaming and Data Roaming.
If you have an iPhone 4S that’s been activated to work on a CDMA network, you may be able
to roam on GSM networks if the phone has a SIM card installed. See “Installing the SIM card” on
page 15 . When roaming on a GSM network, iPhone has access to GSM network features. Charges
may apply. Contact your carrier for more information.
Chapter 5 Phone
49
Page 50

Turn o Voice Roaming on a
CDMA network
Turn o Data Roaming Go to Settings > General > Network.
Set iPhone to add the correct
prex when dialing from
another country
Set the carrier to use Go to Settings > Carrier. This option is available only when you’re traveling
Get voicemail when visual
voicemail isn’t available
Turn o cellular data Go to Settings > General > Network.
Turn o cellular services Go to Settings, tap Airplane Mode to turn it on, then tap Wi-Fi and turn
Go to Settings > General > Network.
Turning Voice Roaming o disables phones calls when you’re outside of
your carrier’s network.
Turning Data Roaming o disables data transmission over the cellular
network. Apps that depend on Internet access are disabled unless iPhone
has access to the Internet via a Wi-Fi connection. Visual voicemail delivery is
suspended when roaming unless your carrier does not charge for it.
Go to Settings > Phone, then turn on International Assist (not available in
all areas). This lets you use contacts and favorites to make U.S. calls, without
having to add a prex or country code.
outside your carrier’s network, and with carriers that have roaming
agreements with your service provider. For more information, see
“Carrier
” on page 14 6 .
Dial your own number (with CDMA, dial your number followed by #), or
touch and hold “1” on the numeric keypad.
Wi-Fi on.
Incoming phone calls are sent to voicemail. To make and receive calls again
and get your voicemail messages, turn airplane mode o.
Setting options for Phone
In Settings, go to Phone to:
See the phone number for your iPhone Â
Turn call forwarding, call waiting, and caller ID on or o (GSM) Â
Turn TTY on or o Â
Change your voicemail password (GSM) Â
Turn international assist on or o—when calling from abroad, international assist lets you call Â
contacts and favorites in the U.S. without having to add a prex or country code (GSM)
Lock your SIM to require a PIN when you turn iPhone on (required by some carriers) Â
In Settings, go to FaceTime to:
Turn FaceTime on or o Â
Use your Apple ID for FaceTime Â
Add an email address for FaceTime Â
To set ringtones, vibration options, and the sound for new voicemail, go to Settings > Sounds. See
also “Sounds and the Ring/Silent switch” on page 14 6 .
50
Chapter 5 Phone
Page 51

Mail
Unread messages
Number of
messages in
thread
6
Mail works with iCloud, Microsoft Exchange, and many of the most popular mail systems—
including Yahoo!, Google, Hotmail, and AOL—as well as other industry-standard POP3 and IMAP
mail systems. You can send and receive photos, videos, and graphics, and view PDFs and other
attachments. You can also print messages, and attachments that open in Quick Look.
Checking and reading email
In Mail, the Mailboxes screen gives you quick access to all your inboxes and other mailboxes.
When you open a mailbox, Mail retrieves and displays the most recent messages. You can set the
number of messages retrieved in your Mail settings. See “Mail accounts and settings” on page 54.
Organize messages by thread Go to Settings > Mail, Contacts, Calendars, then turn Organize By Thread
on or o.
If you organize messages by thread, related messages appear as a single
entry in the mailbox. See “Mail accounts and settings
Check for new messages Choose a mailbox, or tap
Load additional messages Scroll to the bottom of the list of messages and tap Load More Messages.
Zoom in on part of a message Double-tap the area to zoom in on. Double-tap again to zoom out. Or pinch
apart or together to zoom in or out.
at any time.
” on page 54.
51
Page 52

Resize any column of text to t
the screen
See all the recipients of a message Tap Details. Tap a name or email address to see the recipient’s contact
Add an email recipient to your
contacts list
Flag or mark a message as unread Open the message and, if necessary, tap Details. Then tap Mark.
Open a meeting invitation Tap the invitation. See “Responding to invitations
Double-tap the text.
information, then tap a phone number or email address to contact
the person.
Tap the message and, if necessary, tap Details to see the recipients. Then
tap a name or email address and tap Create New Contact or “Add to
Existing Contact.”
To mark multiple messages as unread, see “Organizing mail
” on page 70.
” on page 54.
Working with multiple accounts
If you set up more than one account, the Accounts section of the Mailboxes screen lets you access
your accounts. You can also tap All Inboxes to see all of your incoming messages in a single list.
For information about setting up additional mail accounts, see “Mail accounts and settings” on
page 54.
When writing a new message, tap the From eld to select the account from which to send
the message.
Sending mail
You can send an email message to anyone who has an email address.
Compose a message: Tap
Add a recipient from Contacts Type a name or email address in the To eld, or tap .
Rearrange recipients To move a recipient from one eld to another, such as from To to Cc, drag
the recipient’s name to the new location.
Make text bold, italic,
or underlined
Send a photo or video in an
email message
Save a draft of a message to
complete later
Reply to a message Tap , then tap Reply. Files or images attached to the initial message
Quote a portion of the
message you’re replying to
or forwarding
Forward a message Open a message and tap , then tap Forward.
Share contact information In Contacts, choose a contact, tap Share Contact at the bottom of the
Tap the insertion point to display the selection buttons, then tap Select.
Drag the points to select the text that you want to style. Tap
B/I/U. Tap Bold, Underline, or Italic to apply the style.
In Photos, choose a photo or video, tap
Video. You can also copy and paste photos and videos.
To send multiple photos or videos, tap
album. Tap to select the photos and videos, tap Share, then tap Email.
Tap Cancel, then tap Save. The message is saved in the Drafts mailbox.
Touch and hold
aren’t sent back. To include the attachments, forward the message instead
of replying.
Touch and hold to select text. Drag the grab points to select the text you
want to include in your reply, then tap
To change the indentation of quoted text, touch and hold to select text,
then tap
Info screen.
to quickly access it.
. Tap Quote Level, then tap Increase or Decrease.
, then tap Email Photo or Email
while viewing thumbnails in an
.
, then tap
52
Chapter 6 Mail
Page 53

Using links and detected data
iPhone detects web links, phone numbers, email addresses, dates, and other types of information
that you can use to open a webpage, create a preaddressed email message, create or add
information to a contact, or perform some other useful action. Detected data appears as blue
underlined text.
Tap the data to use its default action, or touch and hold to see other actions. For example, for an
address, you can show its location in Maps or add it to Contacts.
Viewing attachments
iPhone displays image attachments in many commonly used formats (JPEG, GIF, and TIFF) inline
with the text in email messages. iPhone can play many types of audio attachments, such as MP3,
AAC, WAV, and AIFF. You can download and view les (such as PDF, webpage, text, Pages, Keynote,
Numbers, and Microsoft Word, Excel, and PowerPoint documents) that are attached to messages
you receive.
View an attached le: Tap the attachment to open it in Quick Look. (You may need to wait while
the le downloads before viewing it.)
Open an attached le Touch and hold the attachment, then choose an app to open it. If none of
your apps support the le and it isn’t one that Quick Look supports, you can
see the name of the le but you can’t open it.
Save an attached photo or video Touch and hold the photo or video, then tap Save Image or Video. The item
is saved to your Camera Roll album in the Photos app.
Quick Look supports the following document types:
.doc, .docx Microsoft Word
.htm, .html webpage
.key Keynote
.numbers Numbers
.pages Pages
.pdf Preview, Adobe Acrobat
.ppt, .pptx Microsoft PowerPoint
.rtf Rich Text Format
.txt text
.vcf contact information
.xls, .xlsx Microsoft Excel
Printing messages and attachments
You can print email messages, and attachments that can be viewed in Quick Look.
Print an email message: Tap , then tap Print.
Print an inline image Touch and hold the image, then tap Save Image. Then open Photos and
print the image from your Camera Roll album.
Print an attachment Tap the attachment to view it in Quick Look, then tap
and tap Print.
For more information about printing and printer options, see “Printing” on page 27.
Chapter 6 Mail
53
Page 54

Organizing mail
You can organize messages in any mailbox, folder, or search results window. You can delete or mark
messages as read. You can also move messages from one mailbox or folder to another in the same
account or between dierent accounts. You can add, delete, or rename mailboxes and folders.
Delete a message: Open the message and tap .
You can also delete a message directly from the mailbox message list by swiping left or right over
the message title, then tapping Delete.
Some mail accounts support archiving messages instead of deleting them. When you archive
a message, it moves from your Inbox to All Mail. Turn archiving on or o in Settings > Mail,
Contacts, Calendars.
Recover a message Deleted messages are moved to the Trash mailbox.
To change how long a message stays in Trash before being permanently
deleted, go to Settings > Mail, Contacts, Calendars. Then tap Advanced.
Delete or move multiple messages While viewing a list of messages, tap Edit, select the messages you want to
delete, then tap Move or Delete.
Move a message to another
mailbox or folder
Add a mailbox Go to the mailboxes list, tap Edit, then tap New Mailbox.
Delete or rename a mailbox Go to the mailboxes list, tap Edit, then tap a mailbox. Enter a new name or
Flag and mark multiple messages
as read
While viewing a message, tap
location for the mailbox. Tap Delete Mailbox to delete it and all its contents.
While viewing a list of messages, tap Edit, select the messages you want,
then tap Mark. Choose either Flag or Mark as Read.
, then choose a mailbox or folder.
Searching mail
You can search the To, From, Subject and body text of email messages. Mail searches the
downloaded messages in the current mailbox. For iCloud, Exchange, and some IMAP mail
accounts, you can also search messages on the server.
Search email messages: Open a mailbox, scroll to the top, and enter text in the Search eld. Tap
From, To, Subject, or All to choose which elds you want to search. If your mail account supports it,
messages on the server are also searched.
Mail messages can also be included in searches from the Home screen. See “Searching
” on page 28.
Mail accounts and settings
Accounts
For Mail and mail accounts, go to Settings > Mail, Contacts, Calendars. You can set up:
Microsoft Exchange Â
iCloud Â
MobileMe Â
Google Â
Yahoo! Â
AOL Â
Microsoft Hotmail Â
Other POP and IMAP mail systems Â
54
Chapter 6 Mail
Page 55

Settings may vary, based on the type of account you’re setting up. Your service provider or system
administrator can provide the information you need to enter.
Change an account’s settings: Go to Settings > Mail, Contacts, Calendars, choose an account,
then make the changes you want.
Changes you make to an account’s settings on iPhone aren’t synced to your computer, so you
can congure your accounts to work with iPhone without aecting the account settings on
your computer.
Stop using an account Go to Settings > Mail, Contacts, Calendars, choose an account, then turn an
account service (such as Mail, Calendars, or Notes) o.
If an account service is o, iPhone doesn’t display or sync information with
that account service until you turn it back on. This is a good way to stop
receiving work email while on vacation, for example.
Store drafts, sent messages, and
deleted messages iPhone
Set how long before messages are
removed permanently from Mail
Adjust mail server settings Go to Settings > Mail, Contacts, Calendars, then choose an account. Ask
Adjust SSL and password settings Go to Settings > Mail, Contacts, Calendars, choose an account, then tap
Turn Archive Messages on or o Go to Settings > Mail, Contacts, Calendars, choose your account, then turn
Delete an account Go to Settings > Mail, Contacts, Calendars, choose an account, then scroll
Send signed and encrypted
messages
Set Push settings Go to Settings > Mail, Contacts, Calendars > Fetch New Data. Push delivers
Set other options for Mail For settings that apply to all of your accounts, go to Settings > Mail,
Go to Settings > Mail, Contacts, Calendars, choose an account, then
tap Advanced. Choose the location for Draft Mailbox, Sent Mailbox, or
Deleted Mailbox.
Go to Settings > Mail, Contacts, Calendars, choose an account, then tap
Advanced. Tap Remove, then choose a time: Never, or after one day, one
week, or one month.
your network administrator or Internet service provider for the correct
settings.
Advanced. Ask your network administrator or Internet service provider for
the correct settings.
Archive Messages on or o. See “Organizing mail
down and tap Delete Account.
All email and the contacts, calendar, and bookmark information synced
with the account are removed from iPhone.
Go to Settings > Mail, Contacts, Calendars, choose an account, then
tap Advanced. Turn on S/MIME, then select certicates for signing and
encrypting outgoing messages.
To install certicates, obtain a conguration prole from your system
administrator, download the certicates from the issuer’s website using
Safari, or receive them in Mail attachments.
new information when iPhone is connected to a Wi-Fi network. You might
want to turn Push o to suspend delivery of email and other information, or
to conserve battery life. When Push is o, use the Fetch New Data setting to
determine how often data is requested. For optimal battery life, don’t fetch
too often.
Contacts, Calendars.
” on page 54.
Chapter 6 Mail
55
Page 56

Mail settings
Mail settings, except where noted, apply to all your accounts on iPhone.
Set options for mail: Go to Settings > Mail, Contacts, Calendars.
To change the tones played when mail is sent or received, go to Settings > Sounds.
Fetch New Data
This setting lets you turn Push on or o for iCloud, Microsoft Exchange, Yahoo!, and any other
push accounts on iPhone. Push accounts deliver new information to iPhone whenever new
information appears on the server (some delays may occur) and there’s an Internet connection.
You might want to turn Push o to suspend delivery of email and other information, or to
conserve battery life.
When Push is o, and with accounts that don’t support push, data can still be fetched—that
is, iPhone can check with the server to see if new information is available. Use the Fetch New
Data setting to determine how often data is requested. For optimal battery life, don’t fetch too
often. Setting Push to OFF (or setting Fetch to Manually on the Fetch New Data screen) overrides
individual account settings.
Set Push settings: Go to Settings > Mail, Contacts, Calendars > Fetch New Data.
56
Chapter 6 Mail
Page 57

Safari
Search the web and
the current page.
Flick through open
webpages or open a
new page.
Double-tap an item or
pinch to zoom in or out.
Enter a web address (URL).
Add a bookmark, add to the Reading List,
add an icon to the Home screen, or share
or print the page.
Tap the status bar to quickly scroll to the top.
View your bookmarks or Reading List.
Viewing webpages
7
View a webpage: Tap the address eld (in the title bar) to bring up the keyboard. Type the web
address, then tap Go.
If the address eld isn’t visible, tap the status bar to quickly scroll to the top.
You can view webpages in portrait or landscape orientation.
Erase the text in the address eld Tap .
Scroll a webpage Drag up, down, or sideways.
Scroll within a frame on a webpage Scroll with two ngers inside the frame.
Open a new page Tap
Go to another page Tap , ick left or right, then tap the page.
Stop a webpage from loading Tap .
Reload a webpage Tap in the address eld.
, then tap New Page. You can have up to eight pages open at a time.
A number inside indicates the number of open pages.
57
Page 58

Close a page Tap , then tap by the page.
Protect private information and
block some websites from tracking
your behavior
Set options for Safari Go to Settings > Safari.
Go to Settings > Safari and turn on Private Browsing.
Links
Follow a link on a webpage: Tap the link.
See a link’s destination address Touch and hold the link.
Detected data—such as phone numbers and email addresses—may also appear as links in
webpages. Touch and hold a link to see the available options. See “Using links and detected
data” on page 53.
Reading List
Reading List lets you collect links to webpages to read later.
Add a link to the current page to your Reading List: Tap , then tap “Add to Reading List.”
Add a link to your Reading List: Touch and hold the link, then choose “Add to Reading List.”
View your Reading List Tap , then tap Reading List.
Use iCloud to keep your Reading
List up to date on your iOS devices
and computers
Go to Settings > iCloud, then turn on Documents & Data. See “iCloud
page 17.
” on
Reader
Reader displays web articles without ads or clutter so you can read without distrctions. On a
webpage with an article, you can use Reader to view just the article in a continuous window.
View an article in Reader: Tap the Reader button, if it appears in the address eld.
Adjust font size Tap .
Bookmark, add to Reading List
or Home Screen, share, or print
the article
Return to normal view Tap Done.
Tap
.
Entering text and lling out forms
Enter text: Tap a text eld to bring up the keyboard.
Move to another text eld Tap the text eld, or tap Next or Previous.
Submit a form Tap Go or Search, or the link on the page to submit the form, if available.
58
To enable AutoFill to help ll out forms, go to Settings > Safari > AutoFill.
Chapter 7 Safari
Page 59

Searching
The search eld in the upper-right corner lets you search the web, and the current page or PDF.
Search the web, and the current page or searchable PDF: Enter text in the search eld.
 To search the web: Tap one of the suggestions that appear, or tap Search.
 To nd the search text on the current page or PDF: Scroll to the bottom of the screen, then tap
the entry below On This Page.
The rst instance is highlighted. To nd later occurrences, tap .
Change the search engine Go to Settings > Safari > Search Engine.
Bookmarks and history
Bookmark a webpage: Open the page, tap , then tap Add Bookmark.
When you save a bookmark, you can edit its title. By default, bookmarks are saved at the top level
of Bookmarks. Tap Bookmarks to choose another folder.
View previous web pages (history): Tap , then tap History. To clear the history, tap Clear.
Open a bookmarked webpage Tap .
Edit a bookmark or bookmark
folder
Use iCloud to keep bookmarks up
to date on your iOS devices and
computers
Sync bookmarks with the web
browser on your computer
Tap , choose the folder that has the bookmark or folder you want to edit,
then tap Edit.
Go to Settings > iCloud, then turn on Bookmarks. See “iCloud
See “Syncing with iTunes
” on page 18 .
” on page 17.
Printing webpages, PDFs, and other documents
Print a webpage, PDF, or Quick Look document: Tap , then tap Print.
For more information, see “Printing” on page 27.
Web clips
You can create web clips, which appear as icons on the Home screen.
Add a web clip: Open the webpage and tap . Then tap “Add to Home Screen.”
When you open a web clip, Safari automatically zooms to the part of the webpage showing when
you saved the web clip. Unless the webpage has a custom icon, that image is also used for the
web clip icon on the Home screen.
Web clips aren’t synced by MobileMe or iTunes, but they’re backed up by iTunes.
Chapter 7 Safari
59
Page 60

Music
Next/Fast-forward
Play/Pause
Track list
Back
VolumePrevious/
Rewind
AirPlay
8
Adding music and audio
To get music and other audio content onto iPhone:
Purchase and download content from the iTunes Store on iPhone. See Chapter  21, “ iTunes
Store,” on page 99. (You can also go to the iTunes Store from Music by tapping the Store button
when browsing.)
Use Automatic Download to automatically download new music purchased on your other iOS Â
devices and computers. See “iCloud” on page 17.
Sync with iTunes on your computer. You can sync all of your media, or you can select specic Â
songs and other items. See “Syncing with iTunes” on page 18 .
You can also use iTunes Match to access your music library in iCloud. See “iTunes Match” on
page 64.
Playing songs and other audio
WARNING: For important information about avoiding hearing loss, see the Important Product
Information Guide at www.apple.com/support/manuals/iphone.
The buttons along the bottom of the screen let you browse content on iPhone by playlists, artists,
songs, and other categories.
60
Page 61

Play a song or other item: Tap the item.
Repeat Ping like
Scrubber bar
Shuffle
Genius
Ping post
Playhead
Use the onscreen controls to control playback. You can also use the buttons on the earphones.
See “Apple Earphones with Remote and Mic” on page 32.
Customize the browse buttons Tap More, tap Edit, then drag an icon over the button you want to replace.
Get more podcast episodes Tap Podcasts (tap More rst, if Podcasts isn’t visible) then tap a podcast to
see available episodes.
Shake to shue Shake iPhone to turn shue on and change songs. Shake again to change
to another song.
To turn Shake to Shue on or o, go to Settings > Music.
Play music on AirPlay speakers or
Apple TV
Display a song’s lyrics Tap the album artwork when playing a song. (Lyrics appear if you’ve added
Set options for Music Go to Settings > Music.
Tap . See “AirPlay” on page 33.
them to the song using the song’s Info window in iTunes.)
You can display the audio playback controls from another app by double-clicking the Home
button , then icking from left to right along the bottom of the screen.
The controls operate the currently playing app, or—if the music is paused—the most recent
app that played. The icon for the app appears on the right. Tap it to open the app. Flick right
again to display a volume control and the AirPlay button (when in range of an Apple TV or
AirPlay speakers).
Double-clicking the Home button also displays audio playback controls when the screen
is locked.
Additional audio controls
To display additional controls, tap the album artwork on the Now Playing screen. You can see
elapsed time, remaining time, and the song number. The song’s lyrics also appear, if you’ve added
them to the song in iTunes.
Chapter 8 Music
61
Page 62

Repeat songs Tap .
Scrubber bar
Playhead
Playback
speed
30-second repeatEmail
= repeat all songs in the album or list
= repeat the current song only
= no repeat
Shue songs Tap . Tap again to play songs in order
= shue songs
= play songs in order
Skip to any point in a song Drag the playhead along the scrubber bar. Slide your nger down to slow
down the scrub rate.
Make a Genius playlist Tap
Use Ping See “Following artists and friends
. See “Genius” on page 64.
” on page 100.
Podcast and audiobook controls
Podcast and audiobook controls and information appear on the Now Playing screen when you
begin playback.
Set the playback speed Tap . Tap again to change the speed.
= Play at double speed.
= Play at half speed.
= Play at normal speed.
Skip to any point along the
timeline
Show or hide the controls Tap the center of the screen.
Hide podcast info Go to Settings > Music.
Drag the playhead along the scrubber bar. Slide your nger down to slow
down the scrub rate.
Using Siri or Voice Control with Music
You can use Siri (iPhone 4S) or Voice Control to control music playback on iPhone. See
Chapter 4, “ Siri,” on page 38 and “Voice Control” on page 29.
Control music playback Say “play” or “play music.” To pause, say “pause” or “pause music.” You can
also say “next song” or “previous song.”
Play an album, artist, or playlist Say “play,” then say “album,” “artist,” or “playlist” and the name.
Shue the current playlist Say “shue.”
Find out more about the currently
playing song
Use Genius to play similar songs Say “Genius,” “play more like this,” or “play more songs like this.”
Cancel Voice Control Say “cancel” or “stop.”
Say “what’s playing,” “what song is this,” “who sings this song,” or “who is this
song by.”
62
Chapter 8 Music
Page 63

Browsing album artwork in Cover Flow
Rating bar
Return to the Now
Playing screen.
Album tracks
When you browse music, rotate iPhone to see your iTunes content in Cover Flow and browse your
music by album artwork.
Browse album artwork: Drag left or right.
See the tracks on an album Tap the album artwork or . Drag up or down to scroll; tap a track to play it.
Return to the artwork Tap the title bar. Or tap again.
Viewing tracks on an album
See all the tracks on the album that contains the current song: On the Now Playing screen,
tap . Tap a track to play it. Tap the thumbnail to return to the Now Playing screen.
In track list view, you can assign ratings to songs. You can use ratings when creating smart
playlists in iTunes.
Searching audio content
You can search the titles, artists, albums, and composers of songs, podcasts, and other audio
content on iPhone.
Search music: Enter text in the search eld at the top of a song list, playlist, artist list, or other
view of your Music content.
You can also search audio content from the Home screen. See “Searching” on page 28.
Chapter 8 Music
63
Page 64

iTunes Match
iTunes Match stores your music library in iCloud—even songs imported from CDs—and lets
you enjoy your collection on your iPhone and other iOS devices and computers. iTunes Match is
available as a paid subscription.
Note: iTune Match is available starting in the U.S.
Subscribe to iTunes Match: In iTunes on your computer, choose Store > Turn On iTunes Match,
then click the Subscribe button.
Once you subscribe, iTunes adds your music and playlists to your iCloud library. Any of your songs
that match music already in the iTunes Store are automatically available in your iCloud library. Any
remaining songs are uploaded. You can download and play matched songs at iTunes Plus quality
(256 kbps DRM-free AAC), even if your original was of lower quality. For more information, see
www.apple.com/icloud/features.
Turn on iTunes Match Go to Settings > Music. Your iCloud library appears automatically in Music.
Any songs already on your device will be removed once you turn on iTunes
Match. Turning on iTunes Match also disables Genius Mixes and Genius
Playlists on your iPhone.
Genius
A Genius playlist is a collection of songs from your library that go great together. You can create
Genius playlists in iTunes and sync them to iPhone. You can also create and save Genius playlists
directly on iPhone.
A Genius Mix is a selection of songs of the same kind of music, recreated from your library each
time you listen to the mix.
To use Genius on iPhone, rst turn on Genius in iTunes, then sync iPhone with iTunes. Genius
Mixes are synced automatically, unless you manually manage your music and choose which mixes
you want to sync in iTunes. Genius is a free service, but it requires an Apple ID.
When you sync a Genius Mix, iTunes may select and sync songs from your library that you haven’t
specically chosen to sync.
Browse Genius Mixes: Tap Genius (tap More rst, if Genius isn’t visible). Flick left or right to access
your other mixes. To play a mix, tap .
Make a Genius playlist: View Playlists, then tap Genius Playlist and choose a song in the list.
To make a Genius playlist from the Now Playing screen, tap to display the controls, then tap .
Save a Genius playlist In the playlist, tap Save. The playlist is saved in Playlists with the title of the
song you picked.
Refresh a Genius playlist In the playlist, tap Refresh.
Make a Genius playlist using a
dierent song
Delete a saved Genius playlist Tap the Genius playlist, then tap Delete.
Tap Genius Playlist, then tap New and pick a song.
Genius playlists created on iPhone are copied to your computer when you sync with iTunes.
64
Note: Once a Genius playlist is synced to iTunes, you can’t delete it directly from iPhone. Use
iTunes to edit the playlist name, stop syncing, or delete the playlist.
Chapter 8 Music
Page 65

Playlists
You can create and edit your own playlists on iPhone, or edit playlists synced from iTunes on your
computer.
Create a playlist: View Playlists, then tap “Add Playlist” near the top of the list. Enter a title, tap
to select songs and videos you want to include, then tap Done.
When you make a playlist and then sync iPhone to your computer, the playlist is synced to your
iTunes library.
Edit a playlist: View Playlists and select the playlist to edit. Tap Edit, then:
 To add more songs: Tap .
 To delete a song: Tap . Deleting a song from a playlist doesn’t delete it from iPhone.
 To move a song higher or lower in the list: Drag .
Your edits are copied to the playlist in your iTunes library then next time you sync iPhone with
your computer.
Delete a playlist In Playlists, tap the playlist you want to delete, then tap Delete.
Clear a playlist In Playlists, tap the playlist you want to clear, then tap Clear.
Delete a song from iPhone In Songs, swipe the song, then tap Delete.
The song is deleted from iPhone, but not from your iTunes library on your
Mac or PC.
Home Sharing
Home Sharing lets you play music, movies, and TV shows on iPhone from the iTunes library
on your Mac or PC. iPhone and your computer must be on the same Wi-Fi network. On your
computer, iTunes must be open, with Home Sharing turned on and logged in using the same
Apple ID as Home Sharing on iPhone.
Note: Home Sharing requires iTunes 10.2 or later, available at www.itunes.com/download. Bonus
content, such as digital booklets and iTunes Extras, can’t be shared.
Play music from your iTunes library on iPhone:
1 In iTunes on your computer, choose Advanced > Turn On Home Sharing.
2 Log in, then click Create Home Share.
3 On iPhone, go to Settings > Music, then log in to Home Sharing using the same Apple ID
and password.
4 In Music, tap More, then tap Shared and choose your computer’s library.
Return to content on iPhone Tap Shared and choose My iPhone.
Chapter 8 Music
65
Page 66

Messages
Tap the attach media
button to include a
photo or video.
Tap to enter text.
9
Sending and receiving messages
WARNING: For important information about driving safely, see the Important Product Information
Guide at www.apple.com/support/manuals/iphone.
Messages supports text messages with other SMS and MMS devices, and with other iOS devices
using iMessage. With MMS and iMessage, you can also include photos, videos, and other info.
Use iMessage to send messages over Wi-Fi or cellular data connections to other iOS 5 users.
You can see when the other person is typing, and let others be notied when you’ve read their
messages. Because iMessages are displayed on all of your iOS 5 devices logged in to the same
account, you can start a conversation on one of your devices, then continue it on another device.
iMessages are also encrypted.
Note: SMS and MMS require a cellular connection, and may not be available in all areas. Cellular
data charges or additional fees may apply.
Send a text message: Tap , then tap and choose a contact, search your contacts by entering
a name, or enter a phone number or email address manually. Enter the message, then tap Send.
Note: An alert badge appears if a message can’t be sent. Tap the alert in a conversation to try
sending the message again.
Conversations are saved in the Messages list. A blue dot indicates unread messages. Tap a
conversation to view or continue it. In an iMessage conversation, your outgoing messages appear
in blue.
66
Page 67

Use Emoji characters Go to Settings > General > Keyboard > International Keyboards > Add New
Keyboard, then tap Emoji to make that keyboard available. To enter Emoji
characters when typing a message, tap
See “Switching keyboards” on page 153 .
Resume a previous conversation Tap the conversation in the Messages list, then enter a message and tap Send.
Display earlier messages in the
conversation
Receive iMessages using another
email address
Follow a link in a message Tap the link. A link may open a webpage in Safari, or dial a phone number,
Forward a conversation Select a conversation, then tap Edit. Select parts to include, then tap Forward.
Add someone to your contacts list Tap a phone number in the Messages list, then tap “Add to Contacts.”
Notify others when you’ve read
their messages, and set other
options for Messages
Manage notications for messages See “Notications
Set the alert sound for incoming
text messages
Scroll to the top (tap the status bar) and tap Load Earlier Messages.
Go to Settings > Messages > Receive At > Add Another Email.
for example.
Go to Settings > Messages.
” on page 14 4 .
See “Sounds and the Ring/Silent switch
to bring up the Emoji keyboard.
” on page 14 6 .
Sending messages to a group
Group messaging lets you send a message to multiple recipients. Group messaging works with
iMessage and MMS (not available in all areas).
Send messages to a group: Tap , then enter multiple recipients.
Note: With MMS, group messaging must also be turned on in Settings > Messages, and replies are
sent only to you—they aren’t copied to the other people in the group.
Sending photos, videos, and more
With iMessage or MMS, you can send photos, videos, locations, contact info, and voice memos.
Send a photo or video: Tap .
The size limit of attachments is determined by your service provider. iPhone may compress photo
and video attachments, if necessary.
Send a location In Maps, tap for a location, tap Share Location (bottom of screen), then
tap Message.
Send contact info In Contacts, choose a contact, tap Share Contact (bottom of screen), then
tap Message.
Send a voice memo In Voice Memos, tap
Save a photo or video you receive
to your Camera Roll album
Copy a photo or video Touch and hold the attachment, then tap Copy.
Save contact information
you receive
Tap the photo or video, then tap .
Tap the contact bubble, then tap Create New Contact or “Add to Existing
Contact.”
, tap the voice memo, tap Share, then tap Message.
Chapter 9 Messages
67
Page 68

Editing conversations
If you want to keep just part of a conversation, you can delete the parts you don’t want. You can
also delete entire conversations from the Messages list.
Edit a conversation: Tap Edit, select the parts to delete, then tap Delete.
Clear all text and attachments,
without deleting the conversation
Delete a conversation Swipe the conversation, then tap Delete.
Tap Edit, then tap Clear All.
Searching messages
You can search the content of conversations in the Messages list.
Search a conversation: Tap the top of the screen to display the search eld, then enter the text
you’re looking for.
You can also search conversations from the Home screen. See “Searching
” on page 28.
68
Chapter 9 Messages
Page 69

Calendar
Add an event.
Days with dots have
scheduled events.
Go to today.
Switch views.
Respond to a
calendar invitation.
Events for the
selected day
10
About Calendar
Calendar makes it easy to stay on schedule. You can view individual calendars, or several calendars
at once. You can view your events by day, by month, or in a list. You can search the titles, invitees,
locations, and notes of events. If you enter birthdays for your contacts, you can view those
birthdays in Calendar.
You can also make, edit, or cancel events on iPhone, and sync them back to your computer. You
can subscribe to Google, Yahoo!, or iCal calendars. If you have a Microsoft Exchange or iCloud
account, you can receive and respond to meeting invitations.
Viewing your calendars
You can view calendars individually, or as a combined calendar. This makes it easy to manage
work and family calendars at the same time.
Change views: Tap List, Day, or Month. To view by week, rotate iPhone sideways.
In Day view, swipe left or right to move between dates.
69
Page 70

View the Birthday calendar Tap Calendars, then tap Birthdays to include birthdays from your Contacts
with your events.
See the details of an event Tap the event. You can tap information about the event to get more details.
If an address for the location is specied, for example, tap it to open Maps.
Edit or delete a calendar Tap Calendars, then tap Edit.
Select calendars to view Tap Calendars, then tap to select the calendars you want to view. The
events for all selected calendars appear in a single calendar on iPhone.
Adding events
You can create and update calendar events directly on iPhone.
Add an event: Tap and enter event information, then tap Done.
You can also touch and hold an empty spot on a calendar to create a new event. Drag the grab
points to adjust the event’s duration.
Set an alert Tap Alert, then set an alert from 5 minutes to two days before the event.
Set a default alert for events Go to Settings > Mail, Contacts, Calendars > Default Alert Times
Update an event Tap Edit and change event information.
To quickly adjust an event’s time or duration, touch and hold the event
to select it, then drag it to a new time or use the grab points to change
its duration.
Delete an event Tap the event, tap Edit, then scroll down and tap Delete Event.
Invite others to an event Tap Invitees to select people from Contacts. This requires an iCloud, a
Microsoft Exchange, or CalDAV account.
Responding to invitations
If you have an iCloud, Microsoft Exchange account, or a supported CalDAV account, you can
receive and respond to meeting invitations from people in your organization. When you receive
an invitation, the meeting appears in your calendar with a dotted line around it. appears in the
lower-right corner of the screen.
Respond to an invitation: Tap an invitation in the calendar. Or tap to display the Event screen,
and then tap an invitation.
See information about the
organizer
See other invitees Tap Invitees. Tap a name to see that person’s contact information.
Add comments in reply Tap Add Comments. Your comments are visible to the organizer, but not
Set your availability Tap Availability and select “busy” or “free.”
Tap “invitation from.”
to other attendees. Comments may not be available, depending on the
calendar service you’re using.
Searching calendars
In List view, you can search the Titles, Invitees, Locations, and Notes elds of the events in your
calendars. Calendar searches just the events for the calendars you’re currently viewing.
Search for events: Tap List, then enter text in the search eld.
Calendar events can also be included in searches from the Home screen. See “Searching” on page 28.
70
Chapter 10 Calendar
Page 71

Subscribing to calendars
You can subscribe to calendars that use the iCalendar (.ics) format. Many calendar-based services
support calendar subscriptions, including iCloud, Yahoo!, Google, and the Mac OS X iCal application.
Subscribed calendars are read-only. You can read events from subscribed calendars on iPhone,
but you can’t edit events or create new ones.
Subscribe to a calendar: Go to Settings > Mail, Contacts, Calendars, then tap Add Account.
Tap Other, then tap Add Subscribed Calendar.
You can also subscribe to an iCal (or other .ics) calendar published on the web, by tapping a link
to the calendar.
Importing calendar events from Mail
You can add events to a calendar by importing a calendar le from an email message. You can
import any standard .ics calendar le.
Import events from a calendar le: In Mail, open the message and tap the calendar le.
Calendar accounts and settings
There are several settings in Settings > Mail, Contacts, Calendars that aect Calendar and your
calendar accounts.
Calendar accounts are also used to sync to-do items for Reminders.
Add a CalDAV account: Go to Settings > Mail, Contacts, Calendars, tap Add an Account, then tap
Other. Under Calendars, tap Add CalDAV Account.
These options apply to all of your calendars:
Set the calendar alert tones Go to Settings > Sounds > Calendar Alerts.
Sync past events Go to Settings > Mail, Contacts, Calendars > Sync, then choose time period.
Future events are always synced.
Set alerts to sound when you
receive a meeting invitation
Turn on Calendar time zone
support
Set a default calendar Go to Settings > Mail, Contacts, Calendars > Default Calendar.
Use iCloud to keep Calendar
up-to-date on your iOS devices
and computers
Go to Settings > Mail, Contacts, Calendars and turn on New Invitation Alerts.
Go to Settings > Mail, Contacts, Calendars > Time Zone Support.
Go to Settings > iCloud, then turn on Calendar. See “iCloud
” on page 17.
Important: When Time Zone Support is on, Calendar displays event dates and times in the time
zone of the city you selected. When Time Zone Support is o, Calendar displays events in the time
zone of your current location as determined by the network time. Some carriers don’t support
network time in all areas. When you travel, iPhone may not display events or sound alerts at the
correct local time. To manually set the correct time, see “Date & Time” on page 151.
Chapter 10 Calendar
71
Page 72

Photos
Edit the photo.
Delete the photo.
Tap the screen to
display the controls.
Share the photo, assign it to a contact,
use it as wallpaper, or print it.
Play a slideshow.
Stream photos using AirPlay.
Viewing photos and videos
Photos lets you view photos and videos on iPhone, in your:
Camera Roll album—shots you took with the built-in camera, or save from an email, text Â
message, or webpage
Photo Stream album—photos streamed from iCloud Â
Photo Library and other albums synced from your computer Â
11
View photos and videos: Tap an album, then tap a thumbnail to see the photo or video in
full screen.
Albums you sync with iPhoto 8.0 (iLife ’09) or later, or Aperture v3.0.2 or later, can be viewed by
events or by faces. You can also view photos by location, if they were taken with a camera that
supports geotagging.
Show or hide the controls Tap the full-screen photo or video.
See the next or previous photo
or video
Zoom in or out Double-tap or pinch.
Pan a photo Drag the photo.
72
Flick left or right.
Page 73

Play a video Tap in the center of the screen.
View a video in full screen, or t
to screen
Stream a video to an HDTV See “AirPlay
Edit photos or trim videos See “Editing photos” or “Trimming videos
Double-tap the video.
” on page 33.
” on page 77.
Viewing slideshows
View a slideshow: Tap an album to open it, then tap a photo and tap . Select slideshow options,
then tap Start Slideshow.
Stream a slideshow to an HDTV See “AirPrint” on page 27.
Stop a slideshow Tap the screen.
Set additional options Go to Settings > Photos.
Organizing photos and videos
You can create, rename, and delete albums on iPhone to help you organize your photos and videos.
Create a album: When viewing albums, tap Edit, then tap Add. Select photos to add to the new
album, then tap Done.
Note: Albums created on iPhone aren’t synced back to your computer.
Rename an album Tap Edit, then select an album.
Rearrange albums Tap Edit, then drag
Delete an album Tap Edit, then tap .
up or down.
Sharing photos and videos
Send a photo or video in an email, text message (iMessage or MMS), or Tweet: Choose a photo
or video, then tap . If you don’t see , tap the screen to show the controls.
Note: To post a Tweet, you must be logged in to your Twitter account. Go to Settings > Twitter.
The size limit of attachments is determined by your service provider. iPhone may compress photo
and video attachments, if necessary.
Send multiple photos or videos While viewing thumbnails, tap , select the photos or videos, then
tap Share.
Copy a photo or video Touch and hold the photo or video, then tap Copy.
Copy multiple photos or videos Tap
Paste a photo or video in an email
or text (iMessage or MMS) message
in the upper-right corner of the screen. Select the photos and
videos, then tap Copy.
Touch and hold where you want to place the photo or video, then
tap Paste.
Chapter 11 Photos
73
Page 74

Save a photo or video from an
email message
Save a photo or video from a text
message
Save a photo from a webpage Touch and hold the photo, then tap Save Image.
Share a video on YouTube While viewing a video, tap
Tap to download the item if necessary, tap the photo or touch and hold the
video, then tap Save.
Tap the image in the conversation, tap
, then tap “Send to YouTube.”
, than tap Save.
Photos and videos that you receive, or that you save from a webpage, are saved to your Camera
Roll album.
Printing photos
Print a photo: Tap , then tap Print.
Print multiple photos: While viewing a photo album, tap . Select the photos you want to print,
then tap Print.
For more information, see “Printing” on page 27.
74
Chapter 11 Photos
Page 75

Camera
Tap a person
or object to
focus and set
exposure.
Switch
between the
main camera
and front
camera.
Take a photo.
Camera/Video switch
View the photos and videos you’ve taken.
Set LED flash mode.
Turn on the grid or HDR.
12
About Camera
The built-in camera lets you take both still photos and videos. iPhone 4S and iPhone 4 include a
front camera for FaceTime and self-portraits (in addition to the main camera on the back), and an
LED ash.
If Location Services is turned on, photos and videos are tagged with location data that can be
used by some apps and photo-sharing websites. See “Location Services” on page 145.
Note: If Location Services is turned o when you open Camera, you may be asked to turn it on.
You can use Camera without Location Services.
75
Page 76

Taking photos and videos
You can quickly open Camera when the screen is locked by double-clicking the Home button,
then tapping .
Take a photo: Make sure the Camera/Video switch is set to , then aim iPhone and tap .
You can also take a photo by pressing the volume up button.
Record a video: Slide the Camera/Video switch to , then tap to start or stop recording,
or press the volume up button.
When you take a photo or start a video recording, iPhone makes a shutter sound. You can control
the volume with the volume buttons or the Ring/Silent switch.
Note: In some areas, the shutter sound isn’t silenced by the Ring/Silent switch.
A rectangle shows where the camera is focused and setting the exposure. When you’re
photographing people, iPhone uses face detection (iPhone 4S) to automatically focus on the most
prominent face and balance exposure across up to 10 faces.
Zoom in or out Pinch the screen (main camera, in camera mode only).
Turn on the grid Tap Options.
Set focus and exposure Tap the person or object on the screen. (Face detection is turned o for
the shot.)
Lock the focus and exposure Touch and hold the screen until the rectangle pulses. AE/AF Lock appears
on the screen, and the focus and exposure remain locked until you tap the
screen again.
Take a screenshot Press and release the On/O button and the Home button
time. The screenshot is added to your Camera Roll album.
at the same
76
HDR photos
HDR (iPhone 4 or later) blends the best parts of three separate exposures into a single “high
dynamic range” photo. For best results, iPhone and the subject should be stationary.
Turn on HDR: Tap Option, then set HDR. When HDR is on, the ash is turned o.
To keep the both the normal and HDR versions, go to Settings > Photos. When both versions are
kept,
album with the controls visible).
Chapter 12 Camera
appears in the upper-left corner of the HDR photo (when viewed in your Camera Roll
Page 77

Viewing, sharing, and printing
Rotate
Auto enhance
Removered-eye
Crop
The photos and videos you take with Camera are saved in your Camera Roll album.
View your Camera Roll album: Flick left-to-right, or tap the thumbnail image in the lower-left
corner of the screen. You can also view your Camera Roll album in the Photos app.
To take more photos or videos, tap .
If you have iCloud Photo Stream turned on in Settings > iCloud, new photos also appear in your
Photo Stream album and are streamed to your other iOS devices and computers. See “iCloud” on
page 17.
For more information about viewing and sharing photos and videos, see “Sharing photos and
videos” on page 73 and “Uploading photos and videos to your computer” on page 78.
Show or hide the controls while
viewing a full-screen photo or
video
Email or text a photo or video Tap
Tweet a photo View the photo in full screen, tap , then tap Tweet. You must be logged
Print a photo Tap
Delete a photo or video Tap
Tap the screen.
.
in to your Twitter account. Go to Settings > Twitter.
To include your location, tap Add Location.
. See “Printing” on page 27.
.
Editing photos
You can rotate, enhance, remove red-eye, and crop photos. Enhancing improves a photo’s overall
darkness or lightness, color saturation, and other qualities.
Edit a photo: While viewing a photo in full screen, tap Edit, then choose a tool.
With the red-eye tool, tap each eye to correct it. To crop, drag the corners of the grid, drag the
photo to reposition it, then tap Crop. You can also tap Constrain when cropping, to set a specic
ratio.
Trimming videos
You can trim the frames from the beginning and end of a video that you just recorded, or from
any other video in your Camera Roll album. You can replace the original video, or save the
trimmed version as a new video clip.
Trim a video: While viewing a video, tap the screen to display the controls. Drag either end of the
frame viewer at the top of the video, then tap Trim.
Important: If you choose Trim Original, the trimmed frames are permanently deleted from the
original video. If you choose “Save as New Clip,” a new trimmed video clip is saved in your Camera
Roll album and the original video is unaected.
Chapter 12 Camera
77
Page 78

Uploading photos and videos to your computer
You can upload the photos and videos you take with Camera to photo applications on your
computer, such as iPhoto on a Mac.
Upload photos and videos to your computer: Connect iPhone to your computer using the Dock
Connector to USB Cable.
 Mac: Select the photos and videos you want, then click the Import or Download button in
iPhoto or other supported photo application on your computer.
 PC: Follow the instructions that came with your photo application.
If you delete the photos and videos from iPhone when you upload them to your computer,
they’re removed from your Camera Roll album. You can use the Photos settings pane in iTunes to
sync photos and videos to the Photos app on iPhone (videos can be synced only with a Mac). See
“Syncing with iTunes” on page 18 .
Photo Stream
Photo Stream—a feature of iCloud—automatically sends copies of photos that you take on
iPhone to your other iOS devices and computers set up with iCloud and have Photo Stream
turned on. Photos taken with your other devices using Photo Stream automatically appear on
iPhone, in the Photo Stream album in Photos. See “iCloud” on page 17.
Turn on Photo Stream: Go to Settings > iCloud > Photo Stream.
Photos are sent when you leave the Camera app, once iPhone is connected to the Internet via
Wi-Fi. Photos sent from iPhone include all photos added to your Camera Roll album, including
photos downloaded from email and text messages, images saved from web pages, and
screenshots. Photo Stream can share up to 1000 of your most recent photos across your iOS
devices and computers.
78
Chapter 12 Camera
Page 79

YouTube
See related videos, or
save or share this video.
See additional browse
buttons, or rearrange
the buttons.
Tapavideotoplayit.
Tapabrowsebuttontoseealistofvideos.
13
About YouTube
YouTube lets you watch short videos submitted by people from around the world. Some YouTube
features require a YouTube account. To set up an account, go to www.youtube.com.
Note: YouTube may not be available in all languages or areas.
Browsing and searching for videos
Browse videos: Tap any browse button at the bottom of the screen, or tap More to see additional
browse buttons. If you’re watching a video, tap Done to see the browse buttons.
Change the browse buttons Tap More, then tap Edit. Drag a button to the bottom of the screen, over
Browse related videos Tap
Search for a video Tap Search at the bottom of the screen, then tap the search eld.
See more videos submitted by
the same account
the button you want to replace. Drag a button left or right to move it. When
you’re nished, tap Done.
next to any video in a list.
next to the current video on the video information screen, then tap
Tap
More Videos.
79
Page 80

Playing videos
Tap the video
to show or
hide the
controls.
Watch on a
TV with
Apple TV.
Drag to skip
forward or back.
Download progress
Add the video to your
YouTube Favorites.
Dragtoadjust
thevolume.
Watch a video: Tap any video as you browse. Playback starts when enough of the video is
downloaded to iPhone. The shaded portion of the scrubber bar shows download progress.
Pause or resume playback Tap or . You can also press the center button on the iPhone earphones.
Start again from the beginning Tap while the video is playing. If you’ve watched less than ve seconds
of the video, you’ll skip instead to the previous video in the list.
Scan forward or back Touch and hold
Skip to any point Drag the playhead along the scrubber bar.
Skip to the next or previous video
in a list
Switch between ll screen and
t screen
Stop watching a video Tap Done.
to skip to the next video. Tap twice to skip to the previous video.
Tap
If you’ve watched less than ve seconds of the video, tap only once.
Double-tap the video. You can also tap
screen, or tap to make it t the screen.
or .
to make the video ll the
80
Watching YouTube on a TV
You can wach YouTube videos, including videos in HD format (iPhone 4), on a TV by connecting
iPhone to your TV or AV receiver using an Apple Component AV Cable, Apple Composite AV Cable,
Apple VGA Adapter, or Apple Digital AV Adapter (iPhone 4), or wirelessly by using AirPlay and
Apple TV. See “Watching videos on a TV” on page 111.
Keeping track of videos you like
Add a video to your list of favorites or to a playlist: Tap next to a video to see buttons for
adding the video to a list.
Add a video to Favorites Tap “Add to Favorites.” If you’re watching the video, tap .
Add a video to a playlist Tap “Add to Playlist” on the video information screen, then tap an existing
playlist or tap
Delete a favorite Tap Favorites, tap Edit, and then tap next to the video.
Delete a video from a playlist Tap Playlists, tap the playlist, tap Edit, then tap .
Delete a playlist Tap Playlists, tap a playlist, tap Edit, then tap .
Subscribe to an account Tap next to the current video (above the Related Videos list). Then tap
Unsubscribe from an account Tap Subscriptions (tap More rst if you don’t see it), tap an account in the
Chapter 13 YouTube
More Videos, scroll to the bottom of the list, and tap “Subscribe to account.”
list, then tap Unsubscribe.
to create a new playlist.
Page 81

Sharing videos, comments, and ratings
Show the controls for sharing, commenting, and rating: Tap next to the video.
Email a link to a video Tap next to a video and tap Share Video. Or, if you’re watching the video,
just tap .
Rate or comment on a video On the More Info screen, tap “Rate, Comment, or Flag,” then choose “Rate or
Comment.”
Send a video to YouTube Open the Photos app, select the video, then Tap
.
Getting information about a video
View a description and viewer comments: Tap next to the video in a list, then tap again
when it appears at the top of the screen.
Sending videos to YouTube
If you have a YouTube account, you can send videos directly to YouTube. See “Sharing photos and
videos” on page 73.
Chapter 13 YouTube
81
Page 82

Stocks
14
Viewing stock quotes
Stocks lets you see the latest available quotes for your selected stocks, funds, and indexes.
Quotes may be delayed up to 20 minutes or more, depending upon the reporting service.
Add a stock, fund, or index to the stock reader: Tap , then tap . Enter a symbol, company
name, fund name, or index, then tap Search.
Show the change in value of a stock, fund, or index over time: Tap the stock, fund, or index in
your list, then tap 1d, 1w, 1m, 3m, 6m, 1y, or 2y.
When you view a chart in landscape orientation, you can touch the chart to display the value for a
specic point in time.
82
Use two ngers to see the change in value over a specic period of time.
You can also view your stock ticker in Notication Center. See “Notications” on page 30.
Page 83

Delete a stock Tap and tap next to a stock, then tap Delete.
Change the order of the list Tap . Then drag next to a stock or index to a new place in the list.
Switch the view to percentage
change, price change, or market
capitalization
Use iCloud to keep your stock list
up to date on your iOS devices
Tap any of the values along the right side of the screen. Tap again to switch
to another view.
Go to Setting > iCloud > Document & Data, then turn on Documents &
Data (it’s on by default). See “iCloud
” on page 17.
Getting more information
See the summary, chart, or news page for a stock, fund, or index: Select the stock, fund, or
index in your list, then ick the pages underneath the stock reader to view the summary, chart,
or news page.
On the news page, you can scroll up or down to read headlines, or tap a headline to view the
article in Safari.
See more stock information at Yahoo.com: Select the stock, fund, or index in your list, then tap .
Chapter 14 Stocks
83
Page 84

Maps
Display the location of a business
or person in your contacts list.
Set options, such as
showing traffic or
satellite view.
More information
Double-tap to zoom in;
tap with two fingers to
zoom out. Or, pinch to
zoom in or out.
Current location
Enter a
search.
Show your
current
location.
Get directions by
car, public transit,
or walking.
15
Finding locations
WARNING: For important information about driving and navigating safely, see the Important
Product Information Guide at www.apple.com/support/manuals/iphone.
84
Find a location: Tap the search eld to bring up the keyboard. Type an address or other
information, then tap Search.
You can search for information such as:
Intersection (“8th and market”) Â
Area (“greenwich village”) Â
Landmark (“guggenheim”) Â
Zip code Â
Business (“movies,” “restaurants san francisco ca,” “apple inc new york”) Â
You can also tap to nd the location of a contact.
Page 85

See the name or description of
a location
See a list of the businesses found
in a search
Find your current location Tap
Show which way you’re facing Tap
Mark a location Touch and hold the map until the drop pin appears.
Tap the pin.
, then tap List.
Tap
Tap a business to see its location.
.
Your current location is shown by a blue marker. If your location can’t be
determined precisely, a blue circle appears around the marker. The smaller
the circle, the greater the precision.
again.
The icon changes to map rotates to show your heading.
Important: Maps, directions, and location-based apps depend on data services. These data services
are subject to change and may not be available in all areas, resulting in maps, directions, or locationbased information that may be unavailable, inaccurate, or incomplete. Compare the information
provided on iPhone to your surroundings, and defer to posted signs to resolve any discrepancies.
If Location Services is turned o when you open Maps, you may be asked to turn it on. You can
use Maps without Location Services. See “Location Services” on page 145.
Getting directions
Get directions:
1 Tap Directions.
2 Enter starting and ending locations.
Tap in either eld to choose a location in Bookmarks (including your current location or the
dropped pin), a recent location, or a contact. If isn’t visible, tap to delete the contents of
the eld.
3 Tap Route, then select directions for driving ( ), public transit ( ), or walking ( ).
4 Do one of the following:
 To view directions one step at a time, tap Start, then tap to see the next leg of the trip.
 To view all the directions in a list, tap , then tap List.
Tap any item in the list to see a map showing that leg of the trip. Tap Route Overview to return
to the overview screen.
5 If multiple routes appear, choose the one you want to use.
Chapter 15 Maps
85
Page 86

If you’re taking public transit, tap to set your departure or arrival time, and to choose a
Get
directions.
Visit the
website.
Tap to show
contact info.
Make a
call.
schedule for the trip. Tap the icon at a stop to see the departure time for that bus or train, and to
get a link to the transit provider’s website or contact info.
Get directions from a location on
the map
Bookmark a location Tap "Add to Bookmarks.”
Tap the pin, tap
, then tap Directions To Here or Directions From Here.
Getting and sharing info about a location
Get or share info about a location: Tap the pin, then tap .
Add a business to your contacts Tap “Add to Contacts.”
Tweet, text, or email your location Tap Share Location.
Note: To post a Tweet, you must be logged in to your Twitter account. Go to
Settings > Twitter.
Showing trac conditions
You can show trac conditions for major streets and highways on the map.
Show or hide trac conditions: Tap , then tap Show Trac or Hide Trac.
Streets and highways are color-coded to indicate the ow of trac:
Gray—no data is available Â
Green—posted speed limit Â
Yellow—slower than the posted speed limit Â
Red—stop and go Â
Note: Trac conditions aren’t available in all areas.
86
Chapter 15 Maps
Page 87

Satellite view and street view
Tap to return to map view
See a satellite view or hybrid view: Tap , then select the view you want.
See the Google Street View of a location: Tap . Flick left or right to pan through the 360°
panoramic view (the inset shows your current view). Tap an arrow to move down the street. To
return to map view, tap the map inset in the lower-right corner.
Note: Street view may not be available in all areas.
Chapter 15 Maps
87
Page 88

Weather
Current conditions
Add or delete cities.
Current temperature
Six-day forecast
Seehourlyforecast.
Numberofcitiesstored
16
Getting weather information
Tap Weather on the Home screen to get the current temperature and six-day forecast for one or
more cities around the world.
88
If the weather board is light blue, it’s daytime in that city. If the board is dark purple, it’s nighttime.
Add a city: Tap , then tap . Enter a city or zip code, then tap Search.
Switch to another city Flick left or right.
Reorder cities Tap
Delete a city Tap and tap , then tap Delete.
Display the temperature in
Fahrenheit or Celsius
Use iCloud to push your list of
cities to your other iOS devices
See information about a city
at Yahoo.com
, then drag up or down.
Tap , then tap °F or °C.
Go to Setting > iCloud > Document & Data, then turn on Documents &
Data (it’s on by default). See “iCloud
.
Tap
” on page 17.
Page 89

Notes
Tap the note to edit it.
Delete the note.
Email or print the note.
Add a new note.
View the list of notes.
Viewthepreviousornextnote.
17
About Notes
Type notes on iPhone, and iCloud makes them available on your other iOS devices and computers.
You can also read and create notes in other accounts, such as Gmail or Yahoo.
Writing notes
Add a note: Tap , then type your note and tap Done.
Use iCloud to keep your notes
up to date on your devices and
computers
Create a note in a specic account Tap Accounts and select the account, before you tap
Set the default account for
new notes
Go to Settings > iCloud and turn on Notes (it’s on by default). See
“iCloud
” on page 17.
If you tap while viewing All Notes, the note is created in the default
account you select in Settings > Notes.
to create the note.
89
Page 90

Reading and editing notes
Notes are listed with the most recent at the top. If you use more than one iOS device or computer
with your iCloud account, notes from all devices are listed. If you share notes with an application
on your computer or with other online accounts such as Yahoo or Gmail, those notes are
organized by account.
Read a note: Tap the note in the list. To see the next or previous note, tap or .
Change the font Go to Settings > Notes.
See notes in a specic account Tap Accounts and choose the account.
See notes in all accounts Tap Accounts and choose All Notes.
Edit a note Tap anywhere on the note to bring up the keyboard.
Delete a note While looking at the list of notes, swipe left or right across the note.
While reading a note, tap
.
Searching notes
You can search the text of all your notes.
Search for notes: While viewing a list of notes, ick down to scroll to the top of the list and reveal
the search eld, then tap in the eld and type what you’re looking for.
You can also search for notes from the iPhone Home screen. See “Searching” on page 28.
Printing or emailing notes
To email a note, iPhone must be set up for email. See “Setting up mail and other accounts” on
page 16.
Print or email a note: While reading the note, tap .
90
Chapter 17 Notes
Page 91

Clock
Add a clock.
View clocks, set an
alarm, time an event,
or set a timer.
Delete clocks or change their order.
About Clock
You can use Clock to check the time anywhere in the world, set an alarm, time an event,
or set a timer.
18
Setting world clocks
You can add clocks to show the time in other major cities and time zones around the world.
Add a clock: Tap , then type the name of a city. If you don’t see the city you’re looking for,
try a major city in the same time zone.
Rearrange clocks Tap Edit, then drag .
Delete a clock Tap Edit, then tap .
91
Page 92

Setting alarms
You can set multiple alarms. Set each alarm to repeat on days you specify, or to sound only once.
Set an alarm: Tap Alarm and tap .
Change settings for an alarm Tap Edit, then tap .
Delete an alarm Tap Edit, then tap .
If at least one alarm is set and turned on, appears in the iPhone status bar at the top of the
screen. If an alarm is set to sound only once, it turns o automatically after it sounds. You can turn
it on again to reenable it.
Important: Some carriers don’t support network time in all locations. If you’re traveling, iPhone
alerts may not sound at the correct local time. See “Date & Time” on page 151.
Using the stopwatch
Time an event: Tap Stopwatch, then tap Start.
Stopwatch keeps timing if you switch to another app.
Setting a timer
You can set a timer that keeps running even while you use other apps.
Set a timer: Tap Timer, ick to set the duration, and tap Start.
Choose the alert sound Tap When Timer Ends.
Set a sleep timer for iPhone Set the duration, tap When Timer Ends, and choose Sleep iPhone.
iPhone stops playing music or video when the timer ends.
92
Chapter 18 Clock
Page 93

Reminders
Change views.
Mark as completed.
Add a reminder.
Viewandeditlists.
19
About Reminders
Reminders lets you organize your life with lists—complete with due dates and locations. You
can be reminded of an item on a specic day and date, or when you’re approaching or leaving a
location, such as your home or oce. Reminders works with your calendar accounts, so changes
you make update automatically on your other iOS devices and computers.
Switch between List view and Date view: At the top of the screen, tap List or Date.
93
Page 94

Setting a reminder
You can set a reminder for a date and time, for a location, or for both.
Add a reminder: In Reminders, tap , then enter a description and tap Done.
After you add a reminder, you can ne-tune its settings.
Set a location for a reminder Tap the reminder, then tap Remind Me. Turn on “At a Location” and select
When I Leave or When I Arrive, or both.
To change the location to somewhere other than where you are, tap Current
Location, then tap Choose Address and pick a location from Contacts.
See “About location reminders
Set a due date for a reminder Tap the reminder, then tap Remind Me. Turn on “On a Day,” then set the
date and time you want to be reminded. Reminders that are due and
uncompleted are displayed in Notication Center.
Add notes to a reminder Tap the reminder, then tap Show More. Tap Notes.
Move a reminder to another list Tap the reminder, then tap Show More. Tap List and choose a new list.
To create or edit lists, see “Managing reminders in List view
Delete a reminder Tap the reminder, tap Show More, then tap Delete.
Edit a reminder Tap the reminder, then tap its name.
Mark a reminder as completed Tap the box next to the item, so that a checkmark appears.
Completed items are shown in the Completed list. See “Managing
completed reminders
Set the tone played for reminders Go to Settings > Sound.
Use iCloud to keep Reminders
up-to-date on your iOS devices
and computers
Go to Settings > iCloud, then turn on Reminders. See “iCloud
” on page 95.
” on page 95.
” on page 94.
” on page 17.
Managing reminders in List view
Organizing reminders into lists makes it easy to keep your work, personal, and other to-dos
separate from each other. Reminders comes with one list for active reminders, plus a built-in list of
Completed items. You can add other lists of your own.
Create a list: At the top of the screen, tap List, then tap . Tap Edit.
Quickly switch between lists Swipe left or right across the screen.
You can also jump to a specic list. Tap
View completed items Swipe left across the screen until you reach the completed list.
To change the order of lists In List view, tap
You can’t move a list to a dierent account, and you can’t change the order
of reminders in a list.
Delete a list In List view, tap
When you delete a list, all items in the list are also deleted.
Change the name of a list In List view, tap
type a new name. Tap Done.
Set a default list for new reminders Go to Settings > Mail, Contacts, Calendars, then under the Reminders
heading, tap Default List.
, then tap Edit. Drag next to a list to change the order.
, then tap Edit. Tap for each list you want to delete.
, then tap Edit. Tap the name you want to change, then
You can also create a reminder by speaking. See Chapter 4, “ Siri,” on page 38.
, then tap a list name.
94
Chapter 19 Reminders
Page 95

Managing reminders in Date view
You use Date view to manage reminders that have a due date.
View reminders for a date: At the top of the screen, tap Date to view today’s reminders, as well as
uncompleted items from previous days.
View a recent date Drag the time slider, located under the list, to a new day.
View a specic day Tap
, then select a date to view.
About location reminders
Location reminders are available only on iPhone 4 and iPhone 4S, and may not be available in all
areas. Also, you cannot set locations for reminders in Microsoft Exchange accounts.
You can set a location reminder to have Reminders alert you when you approach the location,
and again when you’re no longer near the area. For best results, specify a location that’s well
dened—such as an address instead of city—and remember that the accuracy can vary. iPhone
checks its location less frequently depending on your model of iPhone and whether it’s locked,
so there may be a delay before the reminder is triggered.
When you create a reminder, you can use your current location or a location from your contacts
list. Add locations that you’ll use with Reminders, such as the grocery store or school, to Contacts.
You should also add personal locations, such as your home and work addresses, to your contact
card in Contacts. Reminders shows the locations from your contact card. For information about
setting your contact card in Contacts, see “Contacts accounts and settings” on page 109.
Managing completed reminders
Reminders keeps track of the items you mark as complete. You can see them in List or Date view,
or you can use the Completed list.
View completed items: Tap the List button at the top of the screen, then swipe from left to right
until the Completed list appears.
View the number of completed
items
Mark a completed item as not
completed
Sync previous reminders Go to Settings > Mail, Contacts, Calendars, and, under Reminders, tap Sync.
In List view or Date view, scroll to the top of the reminder list, then pull
down on the list until Completed appears. Tap Completed to view all of the
completed items.
Tap to remove the checkmark. The item automatically moves back to its
original list.
This setting applies to all of your reminder accounts. For best performance,
don’t sync more previous items than you need.
Searching reminders
You can quickly nd pending or completed reminders. Reminders are searched by name.
Search Reminders in Date view: Tap , then tap Search Reminders and enter a search phrase.
Search Reminders in List view: Tap , then tap Search Reminders and enter a search phrase.
You can also search Reminders from the Home screen. See “Spotlight Search” on page 149. And
you can ask Siri to nd reminders by title. See Chapter 4, “ Siri,” on page 38.
Chapter 19 Reminders
95
Page 96

Game Center
See who’s the best.
Respond to friend
requests.
See a list of game goals.
Play the game.
Find someone to
play against.
Choose a game to play.
Invitefriendstoplay.
Declareyourstatus,change
yourphoto,orsignout.
20
About Game Center
Discover new games and share your game experiences with friends around the world in Game
Center. Invite friends to play, or use auto-match to nd other worthy opponents. Earn bonus
points by achieving specic accomplishments in a game, see what your friends have achieved,
and check leaderboards to see who the best players are.
Note: Game Center may not be available in all areas, and game availability may vary.
To use Game Center, you need an Internet connection and an Apple ID. If you don’t have an
Apple ID, you can create a new one in Game Center, as described below.
96
Page 97

Signing in to Game Center
Sign in: Open Game Center. If you see your nickname and photo at the top of the screen, you’re
already signed in. If not, enter your Apple ID and password, then tap Sign In. Or, tap Create New
Account to create a new Apple ID.
Add a photo Tap the photo next to your name.
Declare your status Tap Me, tap the status bar, and then enter your status.
View your account settings Tap Me, tap the account banner, then choose View Account.
Sign out Tap Me, tap the Account banner, then tap Sign Out. You don’t need to sign
out each time you quit Game Center.
Purchasing and downloading games
Games for the Game Center are available from the App Store.
Purchase and download a game: Tap Games, then tap a recommended game or tap Find Game
Center Games.
Purchase a game your friend has Tap Friends, then tap the name of your friend. Tap a game in your friend’s
list of games, then tap the price of the game below it’s name at the top of
the screen.
Playing games
Play a game: Tap Games, choose a game, then tap Play.
See a list of top scorers Tap Games, then choose the game and tap Leaderboard.
See the achievements you can
try for
Return to Game Center after
playing
Tap Games, choose a game, then tap Achievements.
Press the Home button, then tap Game Center on the Home screen.
Playing with friends
Game Center can put you in contact with players around the world. You add friends to Game
Center by making a request, or by accepting a request from another player.
Invite friends to a multiplayer game: Tap Friends, choose a friend, choose a game, and tap Play. If
the game allows or requires additional players, choose additional players to invite, then tap Next.
Send your invitation, then wait for the others to accept. When everyone is ready, start the game.
If a friend isn’t available or doesn’t respond to your invitation, you can tap Auto-Match to have
Game Center nd another player for you, or tap Invite Friend to try inviting some other friend.
Send a friend request Tap Friends or Requests, tap +, then enter your friend’s email address or
Game Center nickname. Tap
friends in one request, type Return after each address.
Respond to a friend request Tap Requests, tap the request, then tap Accept or Ignore. To report a
problem with the request, ick up and tap “Report a Problem.”
See the games a friend plays and
check your friend’s scores
Tap Friends, tap your friend’s name, then tap Games or Points.
to browse your contacts. To add several
Chapter 20 Game Center
97
Page 98

Search for someone in your list
of friends
Prevent game invitations from
others
Keep your email address private Turn o Find Me By Email in your Game Center account settings. See “Game
Disable all multiplayer activity Go to Settings > General > Restrictions > Game Center and turn o
Disallow friend requests Go to Settings > General > Restrictions > Game Center and turn o
See a list of a friend’s friends Tap Friends, tap the friend’s name, then tap Friends just below their picture.
Remove a friend Tap Friends, tap a name, then tap Unfriend.
Report oensive or inappropriate
behavior
Tap the status bar to scroll to the top of the screen, then tap the search
eld and start typing.
Turn o Game Invites in your Game Center account settings. See “Game
Center settings
Center settings
Multiplayer Games.
Adding Friends.
Tap Friends, tap the person’s name, then tap “Report a Problem.”
” on page 98.
” on page 98.
Game Center settings
Some Game Center settings are associated with the Apple ID you use to sign in. Others are
in the Settings app on iPhone.
Change Game Center settings for your Apple ID: Sign in with your Apple ID, tap Me, tap the
Account banner, then choose View Account.
Specify which notications you want for Game Center: Go to Settings > Notications >
Game Center. If Game Center doesn’t appear, turn on Notications.
Change restrictions aecting Game Center: Go to Settings > General > Restrictions >
Game Center.
98
Chapter 20 Game Center
Page 99

iTunes Store
Choose a category.
Download
purchases again.
21
About the iTunes Store
Use the iTunes Store to add content to your iPhone. You can browse and purchase music, TV
shows, audiobooks, alert tones, and ringtones. You can also buy or rent movies, or download and
play podcasts or iTunes U collections. You need an Apple ID to purchased content. See “Store
settings” on page 106.
Note: The iTunes Store may not be available in all areas, and iTunes Store content may vary by
area. Features are subject to change.
To access the iTunes Store, iPhone must have an Internet connection. See “Network” on page 148.
Finding music, videos, and more
Browse content: Tap one of the content types, such as Music or Videos. Or tap More to browse
other content.
Search for content Tap Search (tap More rst, if Search isn’t visible), tap the search eld and
Buy, review, or tell a friend about
an item
Explore artist and friend
recommendations
enter one or more words, then tap Search.
Tap an item in a list to see more details on its Info screen.
Tap Ping (tap More rst, if Ping isn’t visible) to nd out what’s new from
your favorite artists or see what music your friends are recommending.
For information, see “Following artists and friends
” on page 100.
99
Page 100

Purchasing music, audiobooks, and tones
When you nd a song, album, alert tone, ringtone, or audiobook you like in the iTunes Store, you
can purchase and download it. You can preview an item before you purchase it, to make sure it’s
what you want.
Preview a song, ringtone, or audiobook: Tap the item and follow the onscreen instructions.
Redeem a gift card or code Tap Music (tap More rst, if Music isn’t visible), then tap Redeem at
the bottom of the screen and follow the onscreen instructions. When
you’re signed in, your remaining store credit appears with your Apple ID
information at the bottom of most iTunes Store screens.
Complete an album While viewing any album, tap the discounted price for the remaining songs
below Complete My Album (not available in all areas). To see oers to
complete other albums, tap Music, then tap Complete My Album Oers.
Download a previous purchase Tap Purchased.
You can also download an item while browsing. Just tap Download where
you usually see the price.
Automatically download purchases
made on other iOS devices and
computers
Go to Settings > Store, then turn on the kinds of purchases you want to
automatically download.
Purchasing or renting videos
The iTunes Store (may not be available in all areas) lets you purchase and download movies,
TV shows, and music videos. Some movies can also be rented for a limited time. Video content
may be available in standard-denition (SD, or 480p) format, high-denition (HD, or 720p) format,
or both.
Purchase or rent a video: Tap Buy or Rent.
Once you purchase an item, it begins downloading and appears on the Downloads screen. See
“Checking download status” on page 101.
Preview a video Tap Preview.
View the preview on a TV with
AirPlay and Apple TV
When the preview starts, tap and choose Apple TV. See “AirPlay” on
page 33.
Note: If you purchase HD video on iPhone 3GS, the video is downloaded in SD format.
Following artists and friends
Use Ping to connect with the world’s most passionate music fans. Follow favorite artists to learn
about new releases and upcoming concerts and tours, get an insider’s perspective through their
photos and videos, and learn about their musical inuences. Read friends’ comments about the
music they’re listening to, and see what they’re buying and which concerts they plan to attend.
Express your musical likes and post comments for your own followers as well.
To create and explore musical connections, you rst create a prole.
Create your Ping prole: Open the iTunes application on your Mac or PC, click Ping, and follow
the onscreen instructions.
Tap Ping (if Ping isn’t visible, tap More rst), then explore Ping. You can do the following:
10 0
Chapter 21 iTunes Store
 Loading...