

Page 1
iPhone 5 Power Button Replacement
Remove the power button from your iPhone 5.
Written By: Andrew Optimus Goldheart
iPhone 5 Power Button Replacement
Draft: 2019-11-15Guide ID: 10703 -
This document was generated on 2021-03-25 02:15:23 PM (MST).
© iFixit — CC BY-NC-SA www.iFixit.com Page 1 of 29
Page 2

INTRODUCTION
Use this guide to remove the power button from your iPhone 5.
[video: https://www.youtube.com/watch?v=0x-0nh-sjEI]
TOOLS:
SIM Card Eject Tool (1)
SIM Card Eject Tool (1)
or paperclip
Phillips #000 Screwdriver (1)
iFixit Opening Tools (1)
Suction Handle (1)
Spudger (1)
P2 Pentalobe Screwdriver iPhone (1)
Anti-Static Project Tray (1)
Standoff Screwdriver for iPhones (1)
PARTS:
iPhone 5 Power and Lock Button (1)
iPhone 5 Power Button Replacement
Draft: 2019-11-15Guide ID: 10703 -
This document was generated on 2021-03-25 02:15:23 PM (MST).
© iFixit — CC BY-NC-SA www.iFixit.com Page 2 of 29
Page 3
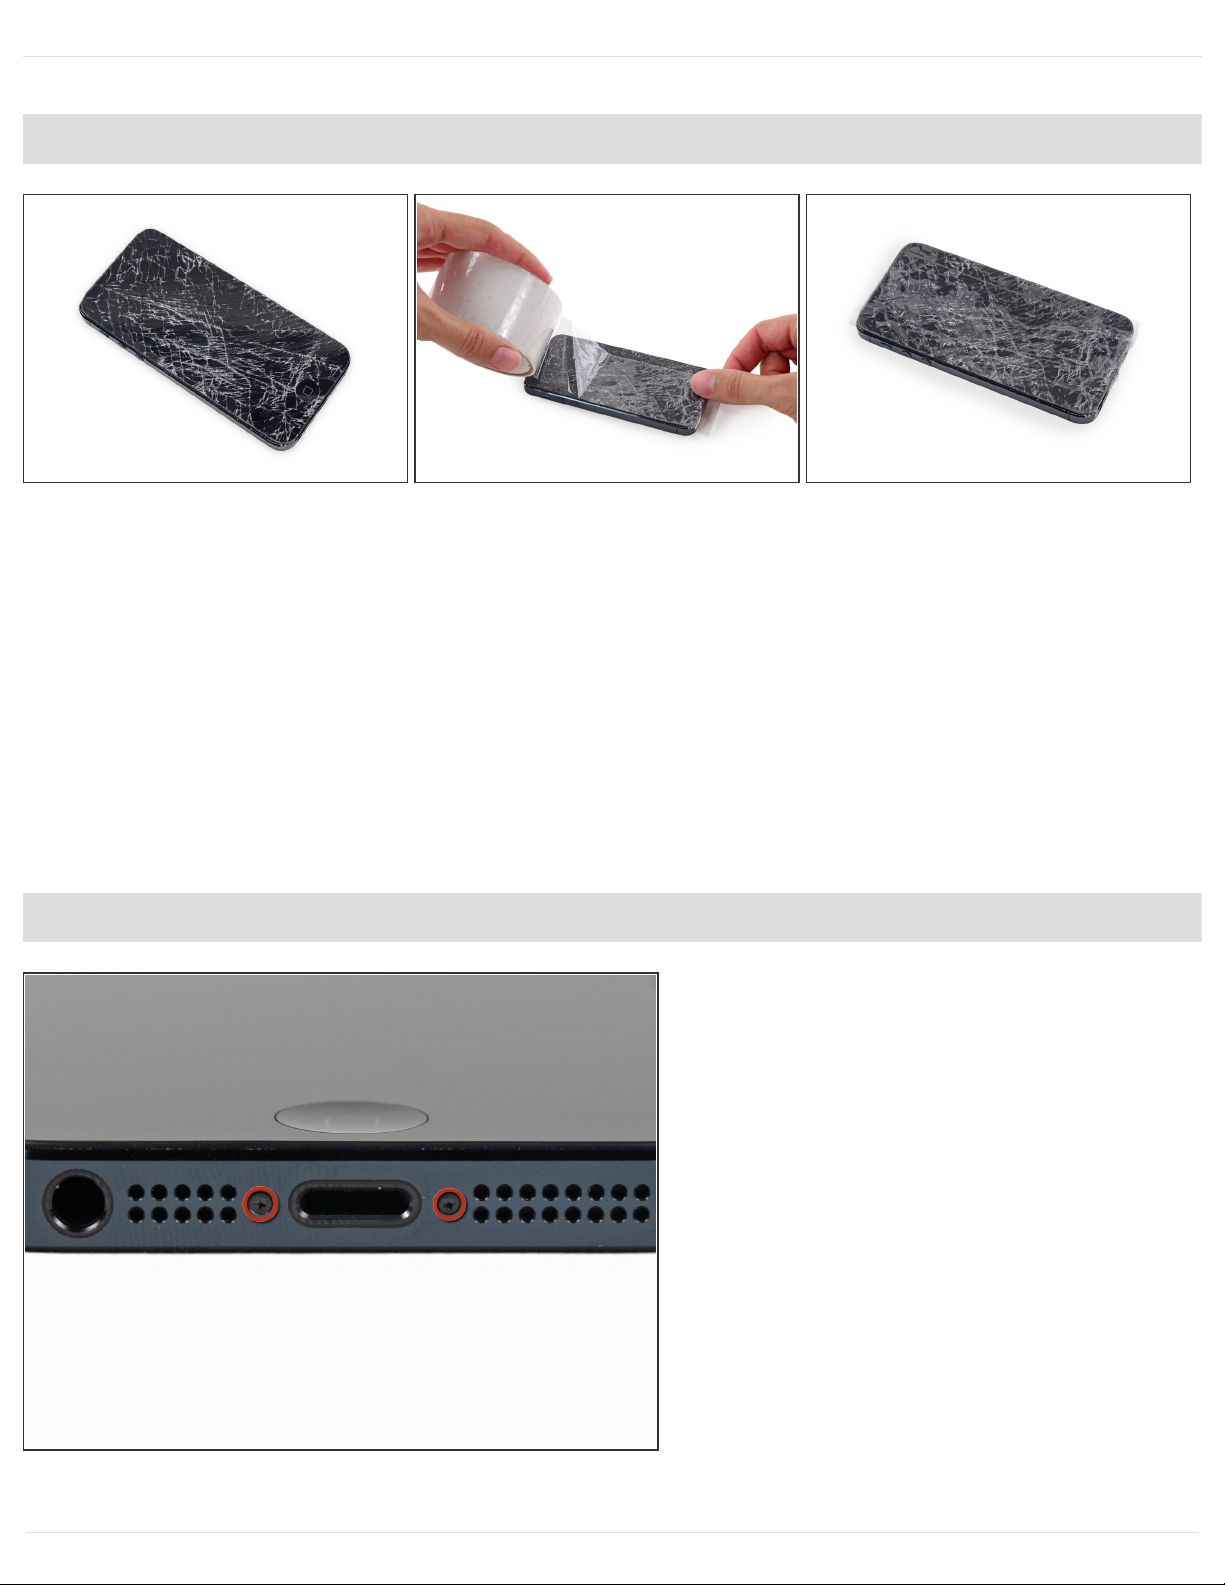
Step 1 — Taping the display glass
If your display glass is cracked, keep further breakage contained and prevent bodily harm during
your repair by taping the glass.
Lay overlapping strips of clear packing tape over the iPhone's display until the whole face is
covered.
This will keep glass shards contained and provide structural integrity when prying and lifting the
display.
Wear safety glasses to protect your eyes from any glass shaken free during the repair.
Step 2 — Remove the Pentalobe screws
Before you proceed, discharge your
iPhone battery below 25%. A
charged lithium-ion battery can
catch fire and/or explode if
accidentally punctured.
Power off your iPhone before
beginning disassembly.
Remove the two 3.6 mm Pentalobe
screws next to the Lightning
connector.
iPhone 5 Power Button Replacement
Draft: 2019-11-15Guide ID: 10703 -
This document was generated on 2021-03-25 02:15:23 PM (MST).
© iFixit — CC BY-NC-SA www.iFixit.com Page 3 of 29
Page 4

Step 3 — How to prevent display separation
In the following steps you will be pulling the display up out of the phone body. The display is
composed of a glass screen and a plastic bezel with metal clips.
Regardless of the tool you use, you need to be sure you pull up the entire display.
If the glass begins to separate from the plastic, as shown in the first image, slide a plastic opening
tool between the plastic frame and the metal phone body to pry the metal clips out of the case.
If you are reassembling a phone with a separated display bezel, you may want to place a thin strip
of adhesive between the plastic bezel and the glass to keep the phone closed.
iPhone 5 Power Button Replacement
Draft: 2019-11-15Guide ID: 10703 -
This document was generated on 2021-03-25 02:15:23 PM (MST).
© iFixit — CC BY-NC-SA www.iFixit.com Page 4 of 29
Page 5
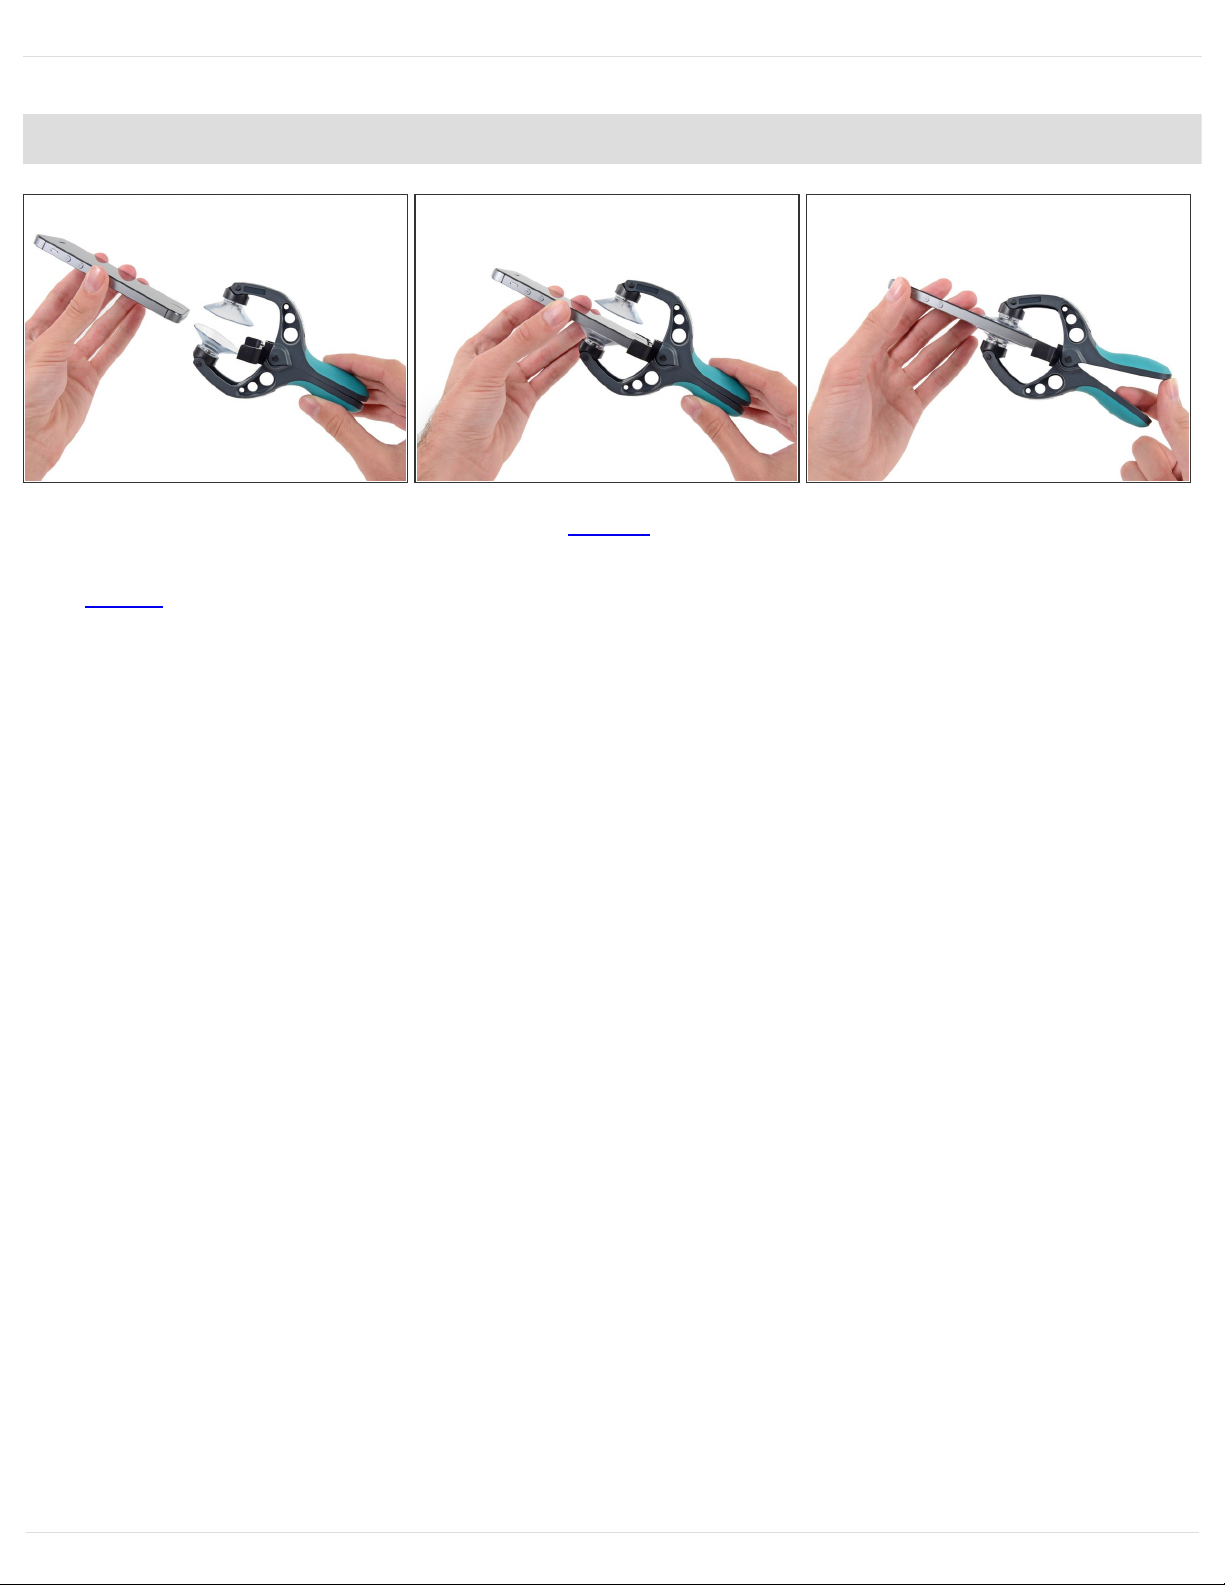
Step 4 — Starting the iSclack Opening Procedure
The next two steps demonstrate using the iSclack, a great tool for safely opening the iPhone 5 that
we recommend for anyone doing more than one repair. If you aren't using the iSclack, skip to
Step 6.
Close the handle on the iSclack, opening the suction-cup jaws.
Place the bottom of your iPhone in between the suction cups, against the plastic depth gauge.
The top suction cup should rest just above the home button.
Open the handles to close the jaws of the iSclack. Center the suction cups and press them firmly
onto the top and bottom of the iPhone.
iPhone 5 Power Button Replacement
Draft: 2019-11-15Guide ID: 10703 -
This document was generated on 2021-03-25 02:15:23 PM (MST).
© iFixit — CC BY-NC-SA www.iFixit.com Page 5 of 29
Page 6
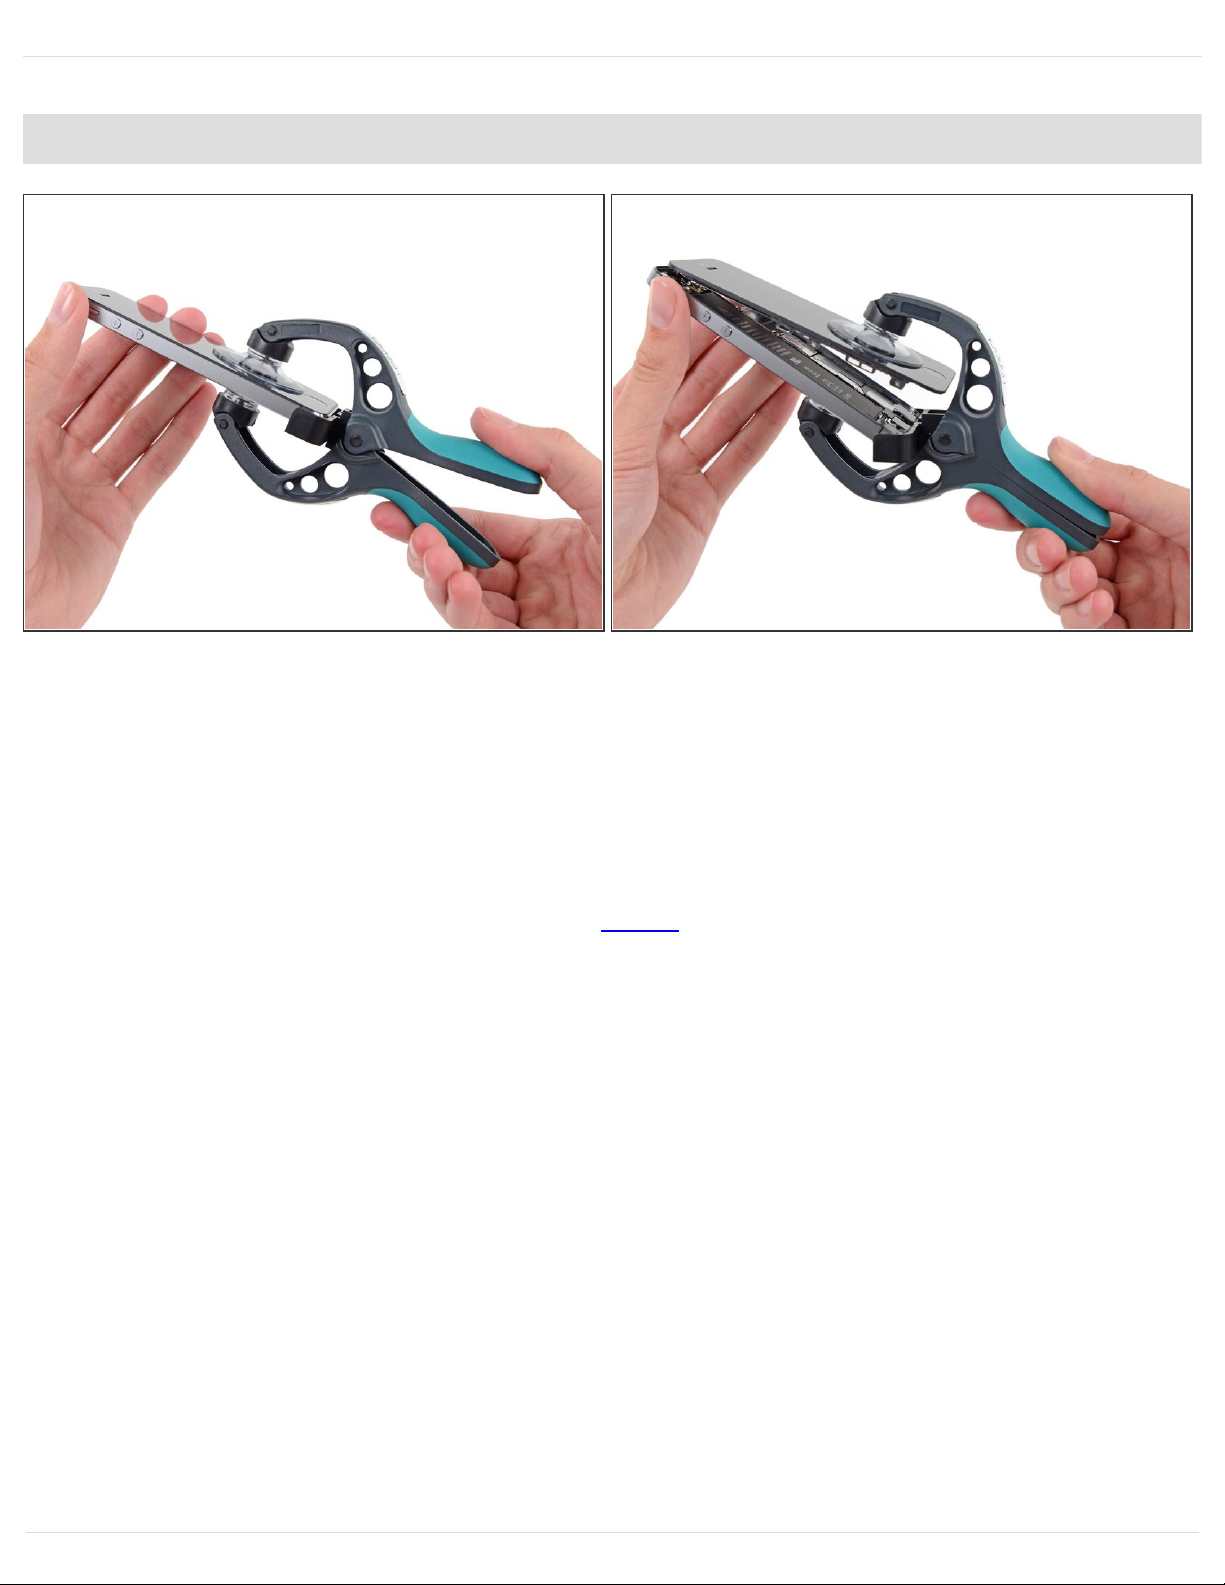
Step 5 — Finishing the iSclack Opening Procedure
Hold onto your iPhone securely and close the handle of the iSclack to separate the suction cups,
pulling the front panel up from the rear case.
The iSclack is designed to safely open your iPhone just enough to separate the pieces, but not
enough to damage any cables.
Peel the two suction cups off your iPhone.
Skip the next three steps and continue on Step 9.
iPhone 5 Power Button Replacement
Draft: 2019-11-15Guide ID: 10703 -
This document was generated on 2021-03-25 02:15:23 PM (MST).
© iFixit — CC BY-NC-SA www.iFixit.com Page 6 of 29
Page 7

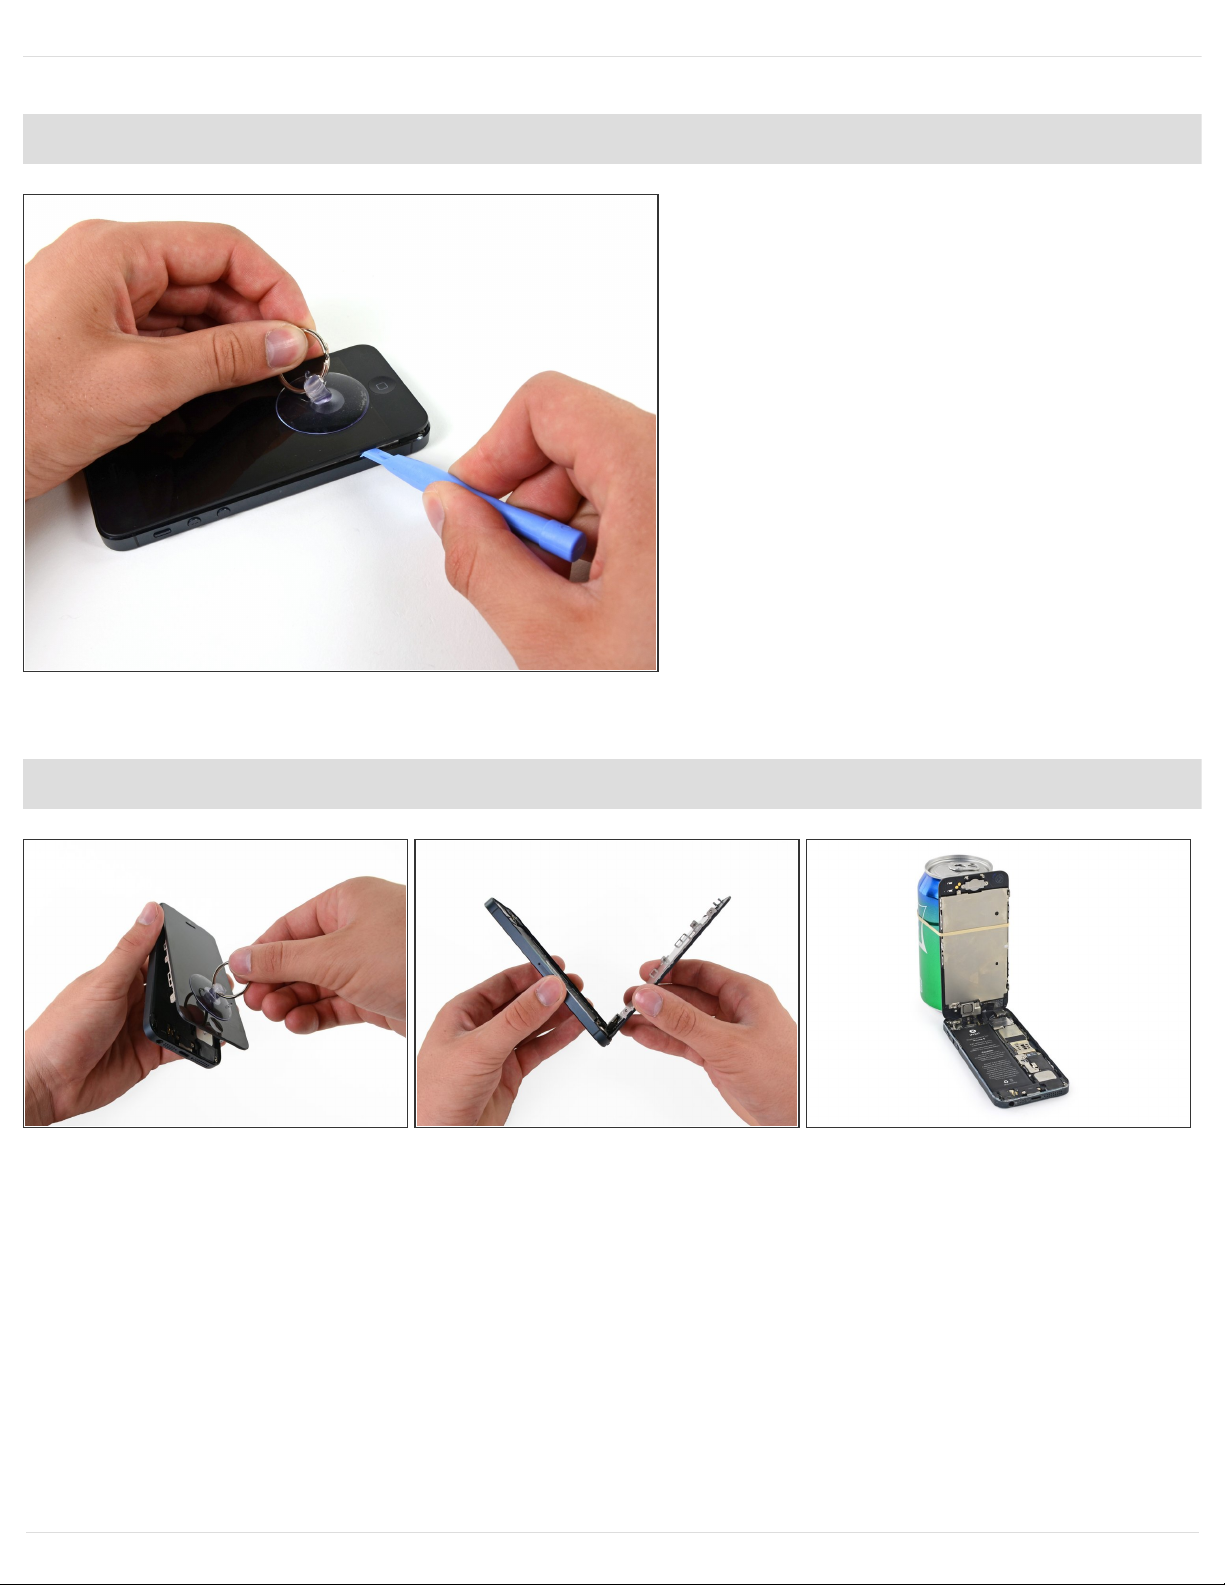
Step 6 — Manual Opening Procedure
Press a suction cup onto the screen,
just above the home button.
Be sure the cup is completely on the
screen to get a tight seal.
If you're opening an iPhone with
cracked glass, neatly lay a couple
strips of packing tape across the
front and squeeze out as many
bubbles as you can. This will give
the suction cup a surface to grab,
and minimize the spread of broken
glass.
iPhone 5 Power Button Replacement
Draft: 2019-11-15Guide ID: 10703 -
This document was generated on 2021-03-25 02:15:23 PM (MST).
© iFixit — CC BY-NC-SA www.iFixit.com Page 7 of 29
Page 8

Step 7 — Start lifting the front panel assembly
Make sure the suction cup is firmly
attached to the front panel
assembly.
While holding the iPhone down with
one hand, pull up on the suction cup
to slightly separate the front panel
assembly from the rear case.
Take your time and apply firm,
constant force. The screen is a
much tighter fit than most devices.
With a plastic opening tool, begin to
gently pry the rear case down, away
from the screen, while you pull up
with the suction cup.
There are several clips attaching the
front panel assembly to the rear
case, so you may need to use a
combination of the suction cup and
plastic opening tool to free the front
panel assembly.
iPhone 5 Power Button Replacement
Draft: 2019-11-15Guide ID: 10703 -
This document was generated on 2021-03-25 02:15:23 PM (MST).
© iFixit — CC BY-NC-SA www.iFixit.com Page 8 of 29
Page 9
Step 8 — Detaching the front panel side clips
Continue to pry up around the sides
of the front panel assembly,
detaching the clips along the left and
right side.
Step 9 — Opening up the phone
Do not try to completely remove the front panel assembly from the rear case, as there are several
ribbon cables still attached at the top of the iPhone.
Once the clips have been released on the bottom and sides of the front panel assembly, pull the
bottom of the assembly away from the rear case.
Open the display to about a 90º angle, and lean it against something to keep it propped up while
you're working on the phone.
Add a rubber band to keep the display securely in place while you work. This prevents undue
strain on the display cables.
iPhone 5 Power Button Replacement
Draft: 2019-11-15Guide ID: 10703 -
This document was generated on 2021-03-25 02:15:23 PM (MST).
© iFixit — CC BY-NC-SA www.iFixit.com Page 9 of 29
Page 10

Step 10 — Removing the battery connector bracket screws
Remove the following two screws
securing the metal battery connector
bracket to the logic board:
One 1.8 mm Phillips screw
One 1.6 mm Phillips screw
Step 11 — Removing the battery connector bracket
Remove the metal battery connector
bracket from the iPhone.
iPhone 5 Power Button Replacement
Draft: 2019-11-15Guide ID: 10703 -
This document was generated on 2021-03-25 02:15:23 PM (MST).
© iFixit — CC BY-NC-SA www.iFixit.com Page 10 of 29
Page 11

Step 12 — Disconnecting the battery connector
Use a plastic opening tool to gently
pry the battery connector up from its
socket on the logic board.
Be careful not to dislodge the small
surface-mounted components
surrounding the socket.
Be very careful to only pry up on the
battery connector itself and not the
socket on the logic board. If you pry
up on the logic board socket or the
board itself, you may destroy the
socket or damage nearby
components on the board.
Step 13 — Removing the front panel assembly cable bracket screws
Remove the following screws
securing the front panel assembly
cable bracket to the logic board:
Two 1.2 mm Phillips screws
One 1.6 mm Phillips screw
This screw tends to not be
attracted to a magnetized
screwdriver. Take care not to
lose it when removing, and
make sure it gets back into the
right place—a magnetized
screw may interfere with the
compass.
iPhone 5 Power Button Replacement
Draft: 2019-11-15Guide ID: 10703 -
This document was generated on 2021-03-25 02:15:23 PM (MST).
© iFixit — CC BY-NC-SA www.iFixit.com Page 11 of 29
Page 12

Step 14 — Removing the front panel assembly cable bracket
Lift the display cable bracket toward the battery to unhook it, and remove it from the iPhone.
During reassembly, clip the left-hand hooks under the logic board and lower the bracket towards
the outside of the phone.
iPhone 5 Power Button Replacement
Draft: 2019-11-15Guide ID: 10703 -
This document was generated on 2021-03-25 02:15:23 PM (MST).
© iFixit — CC BY-NC-SA www.iFixit.com Page 12 of 29
Page 13

Step 15 — Disconnecting the front panel assembly cables
Make sure the battery is disconnected before you disconnect or reconnect the cables in this step.
Use a plastic opening tool or a fingernail to disconnect the three front panel assembly cables:
Front-facing camera and sensor cable
LCD cable
Digitizer cable
When reassembling your phone, the LCD cable may pop off the connector. This can cause
white lines, or nothing at all to appear when powering your phone back on. If that happens,
simply reconnect the cable and power cycle your phone. The best way to power cycle your
phone is to disconnect and reconnect the battery .
iPhone 5 Power Button Replacement
Draft: 2019-11-15Guide ID: 10703 -
This document was generated on 2021-03-25 02:15:23 PM (MST).
© iFixit — CC BY-NC-SA www.iFixit.com Page 13 of 29
Page 14

Step 16 — Separating front panel assembly and rear case
Remove the front panel assembly
from the rear case.
Step 17 — Lifting the battery
Use the exposed clear plastic pull
tab to peel the battery off the
adhesive securing it to the iPhone.
If you are having trouble peeling the
battery up or if the tab breaks, apply
a few drops of high concentration
(over 90%) isopropyl alcohol under
the edge of the battery.
Wait about one minute for the
alcohol solution to weaken the
adhesive. Use an opening tool to
gently lift the battery by its edge.
iPhone 5 Power Button Replacement
Draft: 2019-11-15Guide ID: 10703 -
This document was generated on 2021-03-25 02:15:23 PM (MST).
© iFixit — CC BY-NC-SA www.iFixit.com Page 14 of 29
Page 15

Don't try to forcefully lever the
battery out. If needed, apply a few
more drops of alcohol to further
iPhone 5 Power Button Replacement
Draft: 2019-11-15Guide ID: 10703 -
This document was generated on 2021-03-25 02:15:23 PM (MST).
© iFixit — CC BY-NC-SA www.iFixit.com Page 15 of 29
Page 16

weaken the adhesive. Never
deform or puncture the battery
with your pry tool.
If there's any alcohol solution
remaining in the phone, carefully
wipe it off or allow it to air dry
before installing your new battery.
If you still have trouble peeling the
battery up, use an iOpener or hair
dryer to heat the rear case of the
iPhone and soften the adhesive.
Overheating the iPhone may
ignite the battery.
Step 18 — Prying up the battery
Use the plastic opening tool to gently pry the battery up, only at the outside edge of the phone.
Prying anywhere else, especially near the logic board, may result in damage to the logic board.
If the battery doesn't pry easily out of the case, apply a few more drops of isopropyl alcohol.
Pry gently and evenly to avoid deforming the battery. A bent battery can be a fire hazard.
Do not pry at the top portion of the battery, you risk severing the volume control cables.
iPhone 5 Power Button Replacement
Draft: 2019-11-15Guide ID: 10703 -
This document was generated on 2021-03-25 02:15:23 PM (MST).
© iFixit — CC BY-NC-SA www.iFixit.com Page 16 of 29
Page 17

Step 19 — Removing the battery
Remove the battery.
If your replacement battery came in
a plastic sleeve, remove it before
installation by pulling it away from
the the ribbon cable.
Before you adhere the replacement
battery, temporarily reconnect the
battery connector to the
motherboard socket. This ensures
that the battery is properly aligned in
its recess.
Adhere the battery, disconnect it,
and continue reassembling your
device.
During reassembly, make sure the
battery is seated firmly against the
rear case. This will prevent any
damage to other components when
reinstalling the front panel assembly.
Perform a hard reset after
reassembly. This can prevent
several issues and simplify
troubleshooting.
iPhone 5 Power Button Replacement
Draft: 2019-11-15Guide ID: 10703 -
This document was generated on 2021-03-25 02:15:23 PM (MST).
© iFixit — CC BY-NC-SA www.iFixit.com Page 17 of 29
Page 18

Step 20 — Logic Board Assembly
Use the tip of a spudger to pry the
cellular data antenna cable
connector up from its socket on the
logic board, just above the speaker
enclosure.
Step 21
Remove the following two screws
securing the top logic board bracket
to the rear case:
One 1.5 mm Phillips screw
One 2.3 mm Phillips screw
iPhone 5 Power Button Replacement
Draft: 2019-11-15Guide ID: 10703 -
This document was generated on 2021-03-25 02:15:23 PM (MST).
© iFixit — CC BY-NC-SA www.iFixit.com Page 18 of 29
Page 19

Step 22
Remove the bracket from the top of the logic board.
Be sure not to break off the tiny grounding tab that sticks up off of the bracket next to the rear
facing camera.
On newer models, the bracket may be attached to the camera housing and will not come
completely out.
iPhone 5 Power Button Replacement
Draft: 2019-11-15Guide ID: 10703 -
This document was generated on 2021-03-25 02:15:23 PM (MST).
© iFixit — CC BY-NC-SA www.iFixit.com Page 19 of 29
Page 20

Step 23
Use the flat end of a spudger to disconnect the following three cables from the logic board:
Upper interconnect cable
Button assembly cable
Lower interconnect cable
Step 24
Remove the two 1.3 mm Phillips
screws from the inner top of the rear
case.
iPhone 5 Power Button Replacement
Draft: 2019-11-15Guide ID: 10703 -
This document was generated on 2021-03-25 02:15:23 PM (MST).
© iFixit — CC BY-NC-SA www.iFixit.com Page 20 of 29
Page 21

Step 25
Remove the single 1.2 mm Phillips
screw remaining in the mid-section
logic board bracket.
Step 26
Remove the mid-section bracket from the logic board.
iPhone 5 Power Button Replacement
Draft: 2019-11-15Guide ID: 10703 -
This document was generated on 2021-03-25 02:15:23 PM (MST).
© iFixit — CC BY-NC-SA www.iFixit.com Page 21 of 29
Page 22

Step 27
Use a spudger to pry the Lightning connector cable connector up from its socket on the logic
board.
Gently peel the cable back and out of the way of the logic board.
Step 28
Depress the SIM card release on the right side of the iPhone with a SIM card eject tool or a bent
paperclip to eject the SIM card tray.
Alternatively, you can press the SIM card eject lever from the inside with the flat end of a
spudger.
Remove the SIM card tray from the iPhone.
iPhone 5 Power Button Replacement
Draft: 2019-11-15Guide ID: 10703 -
This document was generated on 2021-03-25 02:15:23 PM (MST).
© iFixit — CC BY-NC-SA www.iFixit.com Page 22 of 29
Page 23

Step 29
Remove the following screws
securing the logic board to the rear
case:
Two 2.3 mm Phillips screws
Two 2.7 mm standoff screws
Standoff screws are best
removed using a standoff
screwdriver or bit.
In a pinch, a small flathead
screwdriver will do the job—but
use extra caution to ensure it
doesn't slip and damage
surrounding components.
One non-magnetic 2.7 mm
standoff screw
Be sure to put this screw back
in its original position at the top
of the logic board. A
magnetized screw may
interfere with the digital
compass.
iPhone 5 Power Button Replacement
Draft: 2019-11-15Guide ID: 10703 -
This document was generated on 2021-03-25 02:15:23 PM (MST).
© iFixit — CC BY-NC-SA www.iFixit.com Page 23 of 29
Page 24

Step 30
Rotate the logic board assembly toward the battery side of the rear case.
Do not attempt to completely remove the logic board assembly from the rear case, yet; there is still
one cable connected to the underside of the logic board.
The flash surround is adhered to the flash unit and the rear case. If it stays on the rear case
remove with tweezers and mount it back on the flash unit.
Note: when reassembling your device, be sure that the lower interconnect cable is not tucked
underneath the logic board.
iPhone 5 Power Button Replacement
Draft: 2019-11-15Guide ID: 10703 -
This document was generated on 2021-03-25 02:15:23 PM (MST).
© iFixit — CC BY-NC-SA www.iFixit.com Page 24 of 29
Page 25

Step 31
Use the tip of a spudger to pry the Wi-Fi antenna cable connector up from its socket on the
underside of the logic board.
Step 32
Remove the logic board assembly
from the rear case.
While your logic board is out of your
phone, keep it on a grounded anti-
static mat to prevent any damage to
the circuitry.
iPhone 5 Power Button Replacement
Draft: 2019-11-15Guide ID: 10703 -
This document was generated on 2021-03-25 02:15:23 PM (MST).
© iFixit — CC BY-NC-SA www.iFixit.com Page 25 of 29
Page 26

Step 33 — Power Button
Use the tip of a spudger to remove the rubber bumper from below the power button.
iPhone 5 Power Button Replacement
Draft: 2019-11-15Guide ID: 10703 -
This document was generated on 2021-03-25 02:15:23 PM (MST).
© iFixit — CC BY-NC-SA www.iFixit.com Page 26 of 29
Page 27

Step 34
Remove the following screws from the metal bracket between the rear facing flash and camera
windows:
One 2.9 mm standoff screw
Standoff screws are best removed with a standoff screwdriver or standoff driver bit. A small
flathead screwdriver can also do the job—but use extra caution to ensure it doesn't slip and
damage surrounding components.
One 1.6 mm Phillips screw
One 1.9 mm Phillips screw
iPhone 5 Power Button Replacement
Draft: 2019-11-15Guide ID: 10703 -
This document was generated on 2021-03-25 02:15:23 PM (MST).
© iFixit — CC BY-NC-SA www.iFixit.com Page 27 of 29
Page 28

Step 35
Remove the metal bracket between
the rear facing flash and camera
windows.
Step 36
Use the tip of a spudger to flip the metal bracket holding the power switch away from the top of the
rear case.
iPhone 5 Power Button Replacement
Draft: 2019-11-15Guide ID: 10703 -
This document was generated on 2021-03-25 02:15:23 PM (MST).
© iFixit — CC BY-NC-SA www.iFixit.com Page 28 of 29
Page 29

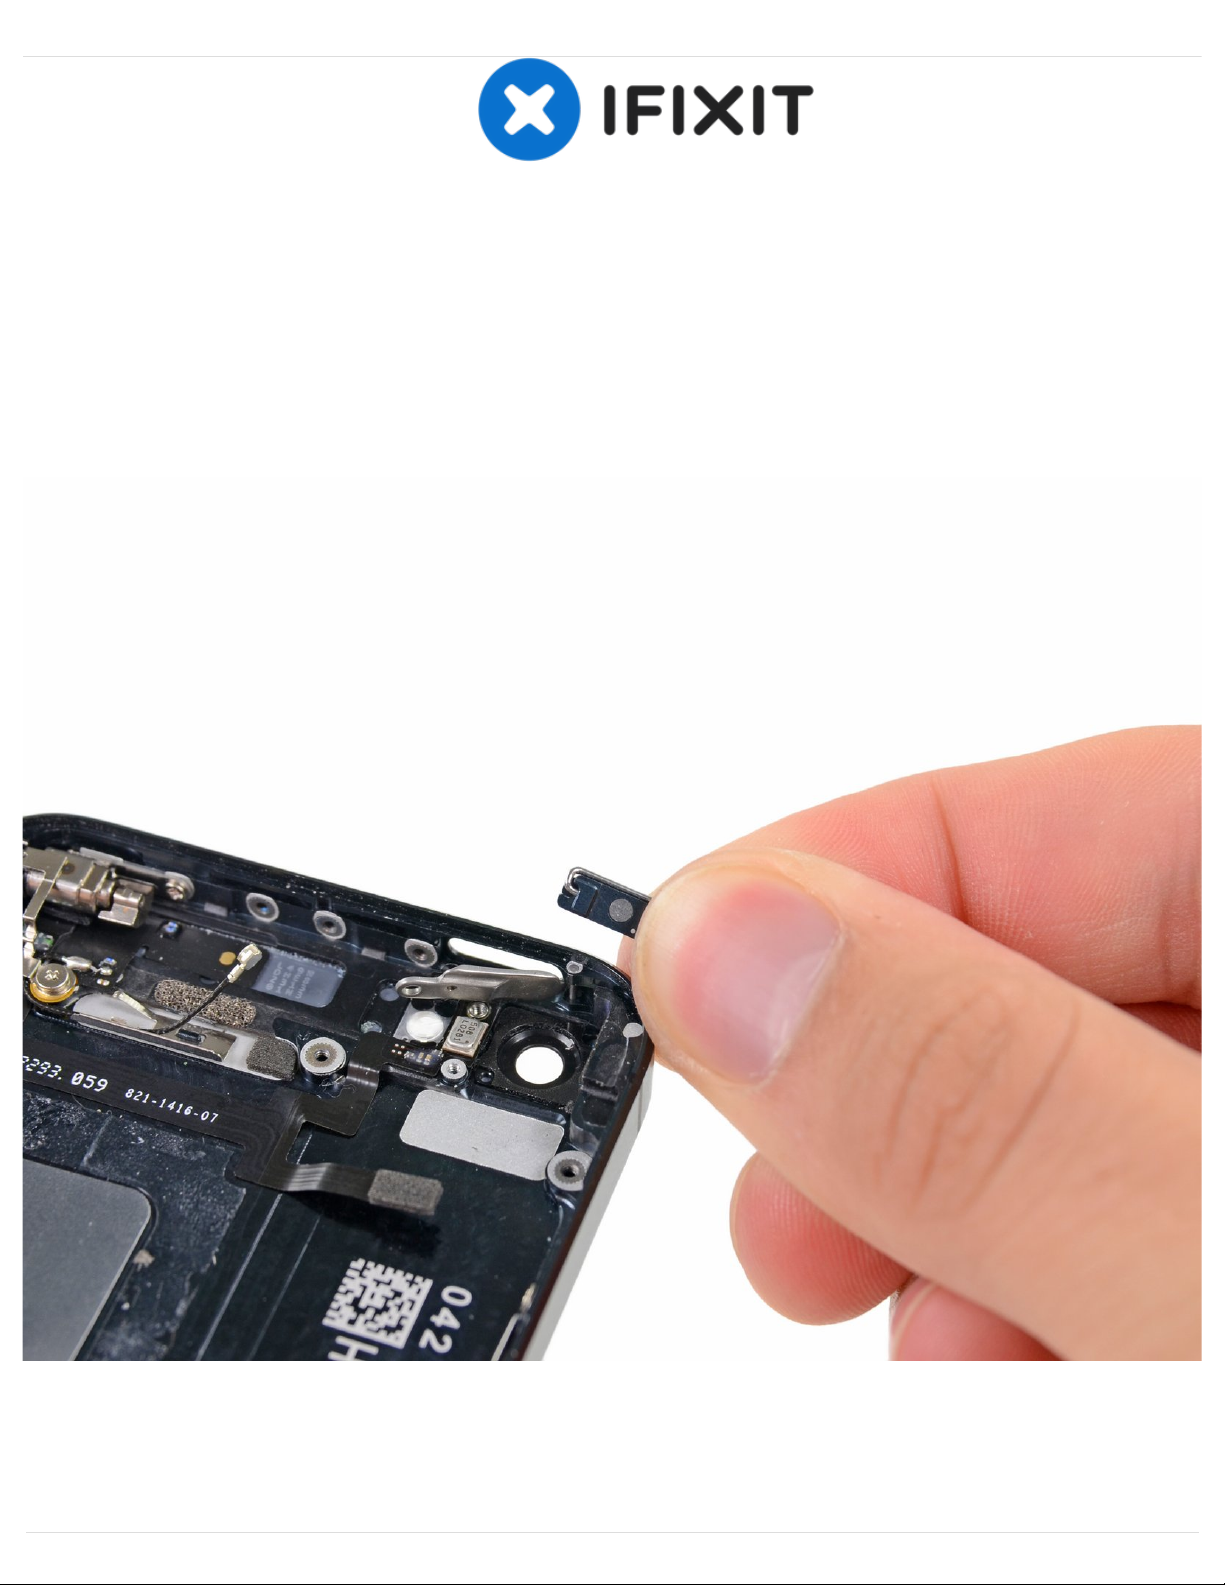
To reassemble your device, follow these instructions in reverse order.
Step 37
Press the power button into the rear case from the outside of the phone with the tip of a spudger.
Remove the power button.
When installing the power button, make sure the hinged metal loop on the back is flipped up, as
shown—not down.
iPhone 5 Power Button Replacement
Draft: 2019-11-15Guide ID: 10703 -
This document was generated on 2021-03-25 02:15:23 PM (MST).
© iFixit — CC BY-NC-SA www.iFixit.com Page 29 of 29
 Loading...