

Page 1

EmergeCard
Remote Access User Guide
Run Your Servers Smarter
Page 2

EmergeCard Remote Access User Guide
© 2001 Apex Inc. All rights reserved.
July 2001
Printed in the United States of America
Apex Part Number 053-0191-00
The information contained in this guide is subject to change without notice.
Apex Inc. shall not be liable for technical or editorial errors or omissions contained herein; nor is it liable
for incidental or consequential damages resulting from the furnishing, performance, or use of this
material.
Product names mentioned herein may be trademarks and/or registered trademarks of their respective
companies. Emerge, Viewpoint, Viewpoint 64, OutLook, and OSCAR are trademarks of Apex Inc.
Apex Inc.
9911 Willows Road NE
Redmond, WA 98052
USA
Telephone 800 861-5858
Fax 425 861-5757
E-mail sales@apex.com
support@apex.com
Web Site http://www.apex.com
Page 3

Contents
1. Overview 1
EmergeCard Remote Access Overview........................................................................... 1
Package Contents...................................................................................................... 2
Key Features ............................................................................................................3
2. Installation 4
System Requirements ................................................................................................4
Installation Checklist.................................................................................................. 5
Planning Your Emerge System Options .......................................................................... 6
Installing your EmergeCard .........................................................................................8
Connecting to an OutLook Switch or a Server................................................................. 9
Connecting to a Multi-user OutLook Switch .................................................................. 11
Connecting to a Viewpoint User Pod............................................................................ 13
Connecting to a Viewpoint User Pod and System Pod..................................................... 15
3. Configuration 17
Configuring Your EmergeCard.................................................................................... 17
Install and Configure the Emerge Software .................................................................. 18
Setting up the Target Systems........................................................................ 18
4. Operation 19
Using the Emerge Application .................................................................................... 19
Launching the Emerge Application .............................................................................. 20
Using the Switch Configuration Wizard ........................................................................ 21
Beginning a Host Session.......................................................................................... 27
Emerge Application Tool Bar...................................................................................... 28
Target System Tool and Status Bars ........................................................................... 29
Menu Items in the Emerge Window............................................................................. 30
Resolution Table...................................................................................................... 32
Optimizing Your Connection Performance..................................................................... 33
Emerge Card Remote Access User Guide Contents •••• i
Page 4

Screen Update Rate....................................................................................... 33
Changed-Segment Grid.................................................................................. 34
Using Function Keys................................................................................................. 35
Setting Alternate Function Key Mapping............................................................ 36
Configuring Mouse Pointers ....................................................................................... 37
Synchronizing Mouse Movement...................................................................... 37
Optimizing Mouse Performance ....................................................................... 38
Improving the Video Display...................................................................................... 39
Setting Your Switch Port Scan Rate............................................................................. 41
Adjusting the Target Window Properties ...................................................................... 42
Maintaining Log Files................................................................................................ 43
Adjusting Log File Options .............................................................................. 43
Viewing Emerge Versions.......................................................................................... 44
5. Troubleshooting 45
Appendices 46
Getting Help ........................................................................................................... 46
Communications Regulation Information...................................................................... 47
Limited Warranty..................................................................................................... 48
Emerge Card Remote Access User Guide Contents •••• ii
Page 5
1. Overview
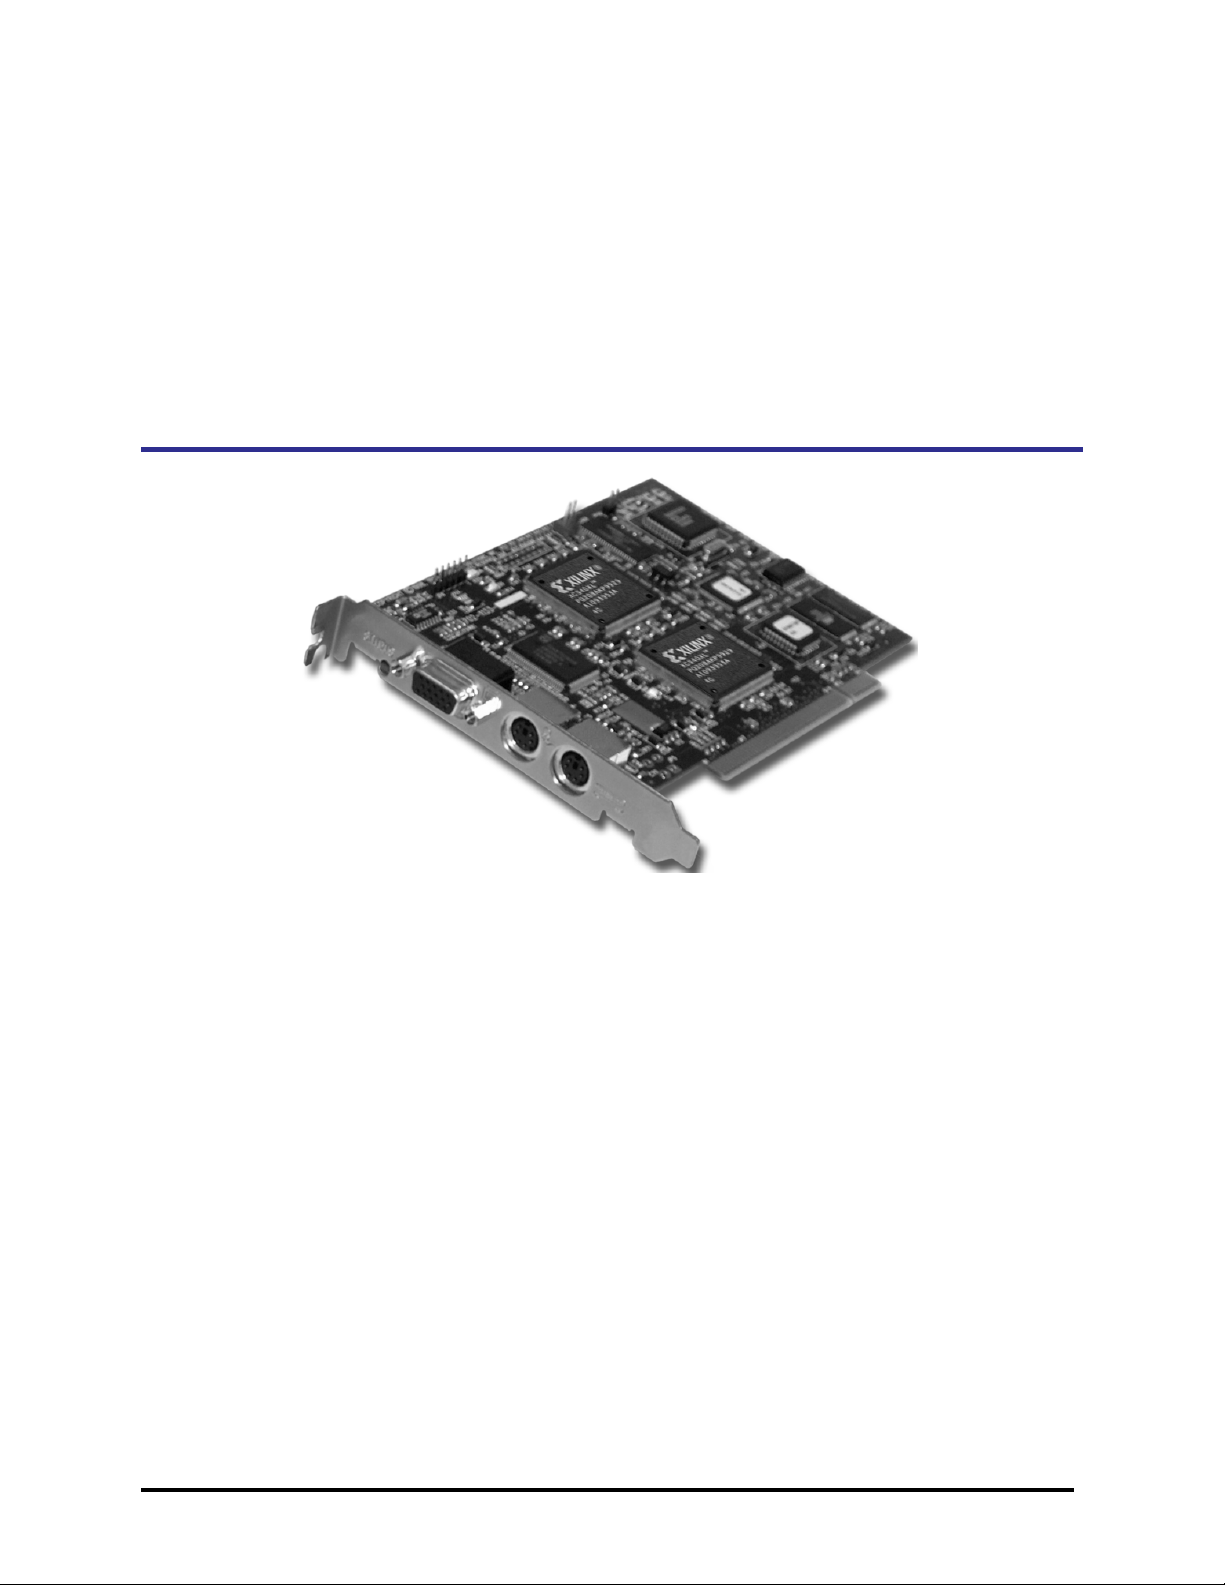
EmergeCard Remote Access Overview
The EmergeCard is the fastest and most reliable way to remotely control and manage your entire
server population
The EmergeCard provides you with the first digital, customizable, universal access solution available
today. Emerge allows any number of network administrators to remotely access any number of
systems from any location.
Across the building, campus or globe your servers are never more than a few keystrokes away.
Unlike other remote control solutions, the EmergeCard, when used in conjunction with an Apex
console switch, maintains the server connection even on system restart. Emerge takes up no target
system resources and no remote control software is necessary on the target system.
The Emerge technology is a PCI card that can be installed inside most Windows NT based servers. It
captures and digitizes the video and PS/2 data from the attached target server or switch and
transmits it over any connection to a remote system. Digital Emerge technology provides the remote
user with full GUI (Graphical User Interface) control of the attached system.
no matter where you are, and no matter where your servers are!
—
Emerge Card Remote Access User Guide Overview •••• 1
Page 6

Package Contents
EmergeCard
CD containing the EmergeCard Remote Access User Guide and the Emerge software
EmergeCard Install Card
Save Your Emerge Packaging
Apex ships the Emerge system in packaging designed to protect its components during shipping and
handling. Save the carton and packing materials until your equipment is fully installed and
operational.
If anything is missing or was damaged during shipment, contact Apex Customer Support. If you need
to return the product, you will need a return materials authorization (RMA) number from Customer
Support. Apex cannot accept any returned materials without an RMA number.
How to Reach Apex Customer Support
E-mail support@apex.com
Telephone 800.861.5858
Mon-Fri, 6 am to 6 pm Pacific Time
Emerge Card Remote Access User Guide Overview •••• 2
Page 7

Key Features
Feature Description
OSCAR Compatible On-Screen Configuration and Activity Reporting. Compatible
with OSCAR-enabled switches such as OutLook and Viewpoint,
which provide access to all of the commands and functions of
Apex’s console switches. For Apex products that do not include
an on-screen display, EmergeCard will allow ‘soft switching’
(keyboard access).
Many Possible Configurations Direct to a critical server, Viewpoint or an OutLook switch in a
variety of configurations.
Compatible Operating Systems Emerge supports the following operating platforms on the
target system: Windows 3.1; Windows 95, 98, 2000; Windows
NT; and MS-DOS.
Full Network Security Available through operating system and remote software.
Multiple levels of access can be defined for each user.
Flash Memory Download capable.
Supported Remote Control Software LapLink Gold, PCAnywhere 9.2, Terminal Server.
Compatibility Compatible with major computer and peripheral devices,
including: industry-standard PS/2 mouse and keyboard,
computers requiring serial pointing devices (through the Apex
serial to PS/2 converter), and Apex products.
Console View Options View one or more server consoles on the remote monitor.
Supported Resolutions Supports standard high resolution VGA up to 1024 x 768 @75
Hz refresh rate.
Resolution Detection Auto-sense resolution detection.
Video Control Options Align server display (horizontal and vertical positioning).
Adjust video characteristics to optimize performance.
Programmable Function Keys Emerge application allows user-definable function keys.
Constant Connection Continuously view the screen status and video of the target
system, even during cold reboot.
Full Apex Service Free technical support.
Free software upgrades.
One-year warranty.
Emerge Card Remote Access User Guide Overview •••• 3
Page 8

2. Installation
System Requirements
The following are the recommended systems for your EmergeCard.
Recommended systems:
• Compaq 1850R
• Compaq Prosignia Series
• Compaq Proliant Series
• Dell Power Edge 6300
• Dell Dimension Series
• HP NetServer Series
• IBM NetFinity Series
Recommended system parameters:
• Pentium III 450MHz
• 128MB RAM
• NT Server 4.0 with Service Pack 4
• NT network connection
• 10MB available disk space
Emerge Card Re mote Access User Guide Installation •••• 4
Page 9

Installation Checklist
Follow the steps outlined in the checklist below to install your Emerge remote computer system.
1 Check the contents of the package
2 Plan the Emerge system options
Connection options
Location options
Remote access options
Tiering options
Cabling lengths
Video resolution support options
3 Install your EmergeCard
4 Connect the Emerge system into your system in one of the following configurations:
Directly to a critical server
To a single or multi-user Apex OutLook switch
To a Viewpoint user pod
To a Viewpoint user pod and system pod
5 Power up your Emerge system and prepare to install your Emerge software
Emerge Card Re mote Access User Guide Installation •••• 5
Page 10

Planning Your Emerge System Options
Before you setup your new Emerge system, take a few minutes to plan your layout. A quick review of
your options will facilitate a quick, trouble-free installation.
System connection options
You may connect your Emerge system to a single critical server or integrate it with other Apex
console switches. The following list illustrates the types of connections you might be considering:
• Connect directly to a critical server
• Connect to a single or multi-user OutLook switch
• Connect to a Viewpoint user pod
• Connect to a Viewpoint user pod and system pod
• Connect to a Viewpoint user pod and core
System location options
The Emerge system can be used in desktop or rack-mounted systems.
Remote access options
Users connect to the Emerge system using either a direct network connection or a high-speed (64
Kbps or higher) modem connection. All video, keyboard, and mouse signals originate with the remote
computer through an established connection (phone line, ISDN, LAN, or serial) to the Emerge. The
Emerge then passes the signals to the Apex switch, which transmits the signals to the target system.
Tiering options
The Emerge is a remote access device. Unlike the OutLook switch, it cannot be tiered to itself. It can
connect to a primary or secondary OutLook switch in a multi-switch or tiered configuration.
Note
When deciding on the layout for your Emerge system, planning the environment is critical. Operating outside of acceptable
temperature or humidity ranges can result in diminished system operation or damage to your system.
Cable lengths
A target system is connected to the Emerge by means of keyboard, mouse, and high-quality video
cables. Use a high-quality video cable to obtain the best possible video image. Using lower quality
cables may result in poor video quality.
12 ft Maximum cable length for video, keyboard, mouse cable from Emerge to the target system.
Note
Cable length affects video quality as well as keyboard and mouse data timing. The maximum cable length is determined in part by
the computer and peripherals used. Not all systems will give satisfactory results at the maximum length.
Hotplug cable sequence
When hotplugging cables, always plug in the keyboard last or your mouse may not initialize properly.
Emerge Card Re mote Access User Guide Installation •••• 6
Page 11

Video resolution support options
The Emerge supports standard high-resolution VGA video up to 1024 x 768 @75 Hz refresh rate.
• 640 x 480 @60 Hz
• 640 x 480 @72 Hz
• 640 x 480 @75 Hz
• 640 x 480 @85 Hz
• 800 x 600 @56 Hz
• 800 x 600 @60 Hz
• 800 x 600 @72 Hz
• 800 x 600 @75 Hz
• 800 x 600 @85 Hz
• 1024 x 768 @60 Hz
• 1024 x 768 @70 Hz
• 1024 x 768 @75 Hz
• 720 x 400 @ 70 Hz
Note
Interlaced resolutions are not supported.
Emerge Card Re mote Access User Guide Installation •••• 7
Page 12

Installing your EmergeCard
The exact installation procedure you will follow to install your EmergeCard will depend on the
computer system brand you are using. The following instructions give you the essential steps to
accomplish your installation successfully.
To install your EmergeCard
1 Ensure that the system into which you will be installing your EmergeCard is powered off and
unplugged.
2 Remove the cover of your system.
3 Locate an open PCI slot.
4 Remove the EmergeCard from its protective bag and insert it into the open PCI slot.
5 Secure the EmergeCard with a standard PCI card screw.
6 Replace the system’s cover.
Now you are ready to connect your Emerge into your system. Review the following pages that
illustrate the various ways that you might integrate your new Emerge.
Emerge Card Re mote Access User Guide Installation •••• 8
Page 13
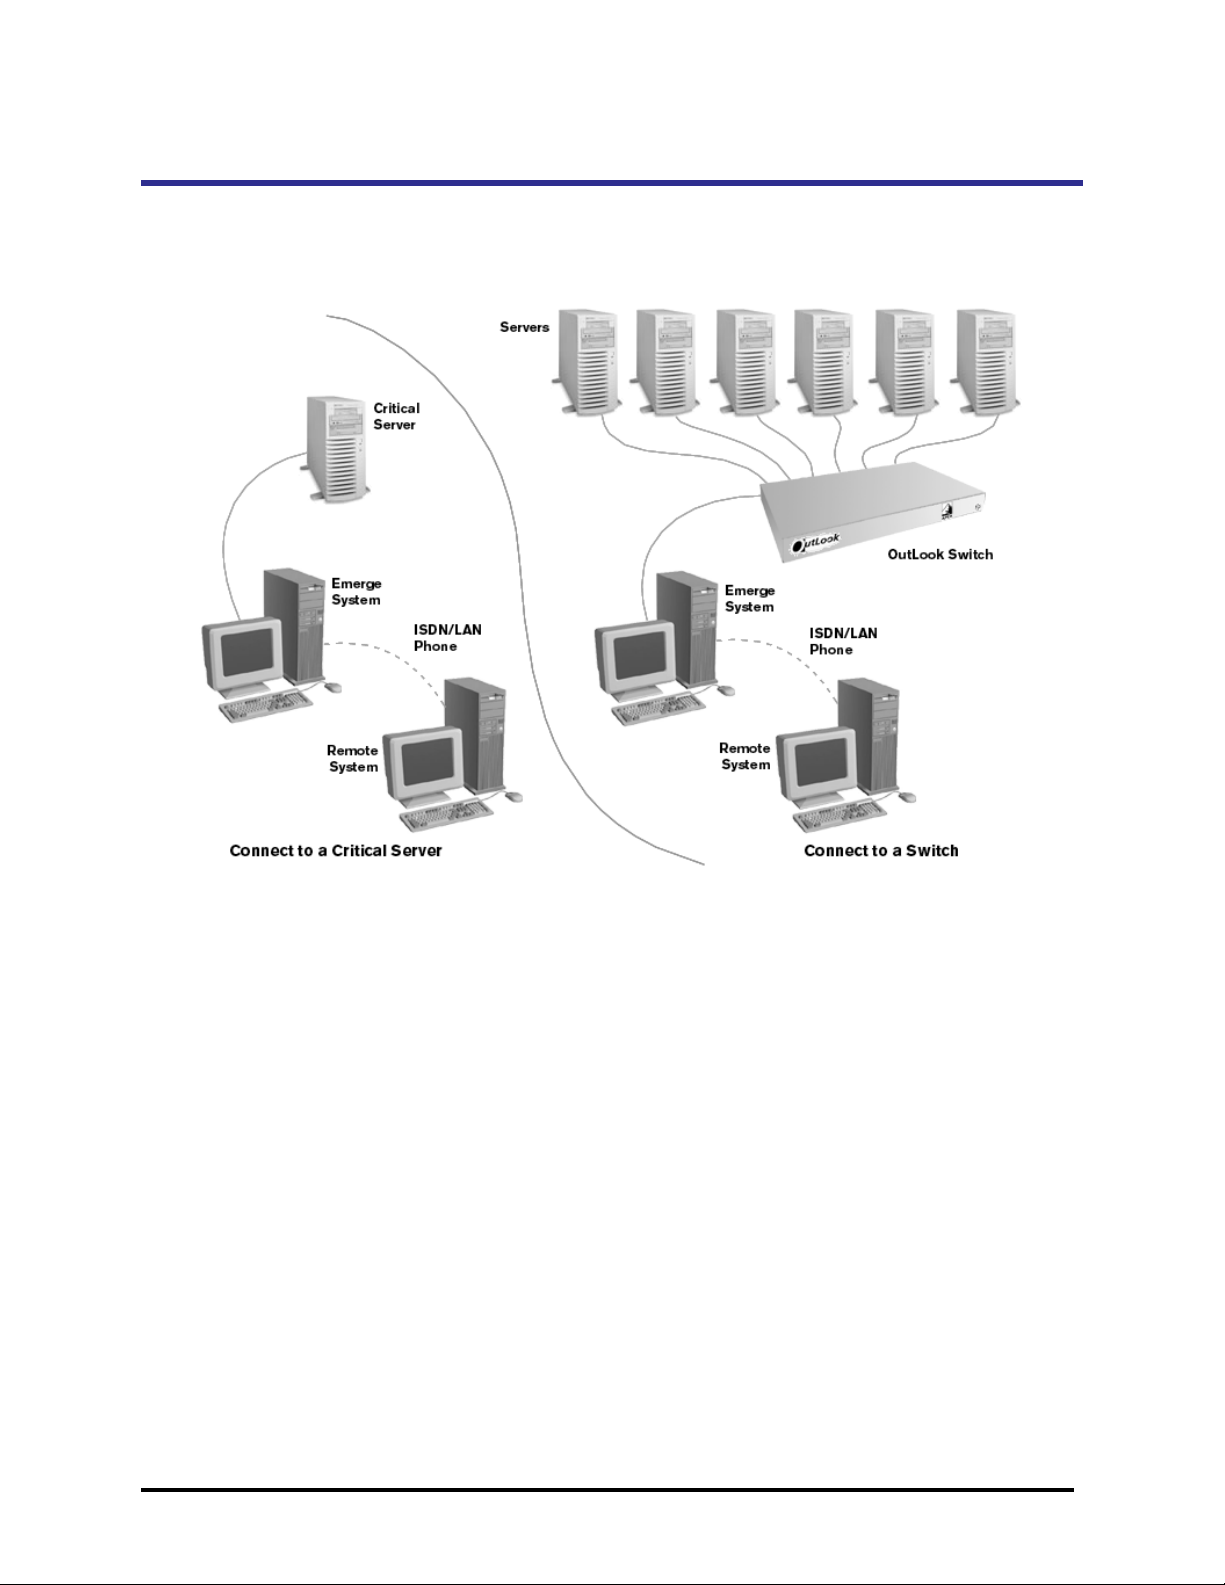
Connecting to an OutLook Switch or a Server
The Emerge can be attached directly to an OutLook switch or to a server to allow the remote user to
gain access to servers or remotely access commands and functionality of remote switches.
Connect directly to a server
The Emerge can be connected directly the keyboard, monitor, and mouse ports of a server or other
single computer.
Connect to a switch console port
The Emerge can be connected to the console port of an OutLook switch as if it were a user. All (4, 8,
or 16) system ports are available for servers. Monitor installation is optional. Connect a monitor if
you want to perform setup or maintenance locally at the Emerge system.
Connect to a switch system port
The Emerge can be connected to one of the computer ports of an OutLook switch as if it were a
computer. All four (or two) user consoles are available for users. This configuration does not require a
keyboard and mouse to be attached to the Emerge system. Onsite users can perform maintenance.
Emerge Card Re mote Access User Guide Installation •••• 9
Page 14

To connect to a switch console port or server
1 Make sure the Emerge system is turned off and unplugged.
2 Place the unit in the desired location. The maximum length of cable between the Emerge system
and a computer or switch should be no more than 12 feet.
3 Connect the video, mouse, and keyboard cable set to their respective jacks on the back panel of
the Emerge system.
4 Connect the other end of the video, mouse, and keyboard interconnecting cables to their
respective jacks on the target system (the server or the console port on the OutLook switch).
5 Connect the local mouse and keyboard to the jacks marked with their respective symbols on the
back panel of the Emerge.
6 Plug in your remote access connection to the modem or network connection port.
7 Plug the power cord into its socket on the back panel of the Emerge system.
Note
You will need a monitor, keyboard, and mouse attached to the Emerge to configure the Emerge system in Windows NT. Setting up
the system in Windows NT must be done at the Emerge system. After setup is compl eted, then the monitor is opti onal. Keyboard
and mouse attachment is required if you are connecting to the user console.
Emerge Card Re mote Access User Guide Installation •••• 10
Page 15

Connecting to a Multi-user OutLook Switch
The Emerge can be connected to an OutLook multi-user switch in two different ways: either to a user
console or system port.
Connect to a switch console port
Emerge can be connected to one of the user console ports of the OutLook switch. Monitor installation
is optional if you want to perform setup or maintenance locally at the Emerge system.
Note
Console settings need to be at preemptive (rather than cooperative) at the KVM switch.
Connect to a system port
Emerge can be connected to one of the computer ports of the OutLook switch as if it were a
computer. All four (or two) console ports are available for users. This configuration does not require a
keyboard and mouse to be attached to the Emerge system. Onsite users can perform maintenance.
Emerge Card Re mote Access User Guide Installation •••• 11
Page 16

To connect to an OutLook multi-user switch
1 Make sure the Emerge system is turned off and unplugged.
2 Place the unit in the desired location.
3 Connect the video, mouse, and keyboard interconnecting cables to their respective jacks on the
back panel of the EmergeCard.
4 Connect the other end of the mouse, monitor, and keyboard interconnecting cables to their
respective jacks in one of the console ports on the back panel of the OutLook switch.
5 Connect the local mouse and keyboard to the jacks marked with their respective symbols on the
back panel of the Emerge system.
6 Plug in your remote access connection to the modem or network connection port.
7 Plug the power cord into its socket on the back panel of the Emerge system.
Emerge Card Re mote Access User Guide Installation •••• 12
Page 17
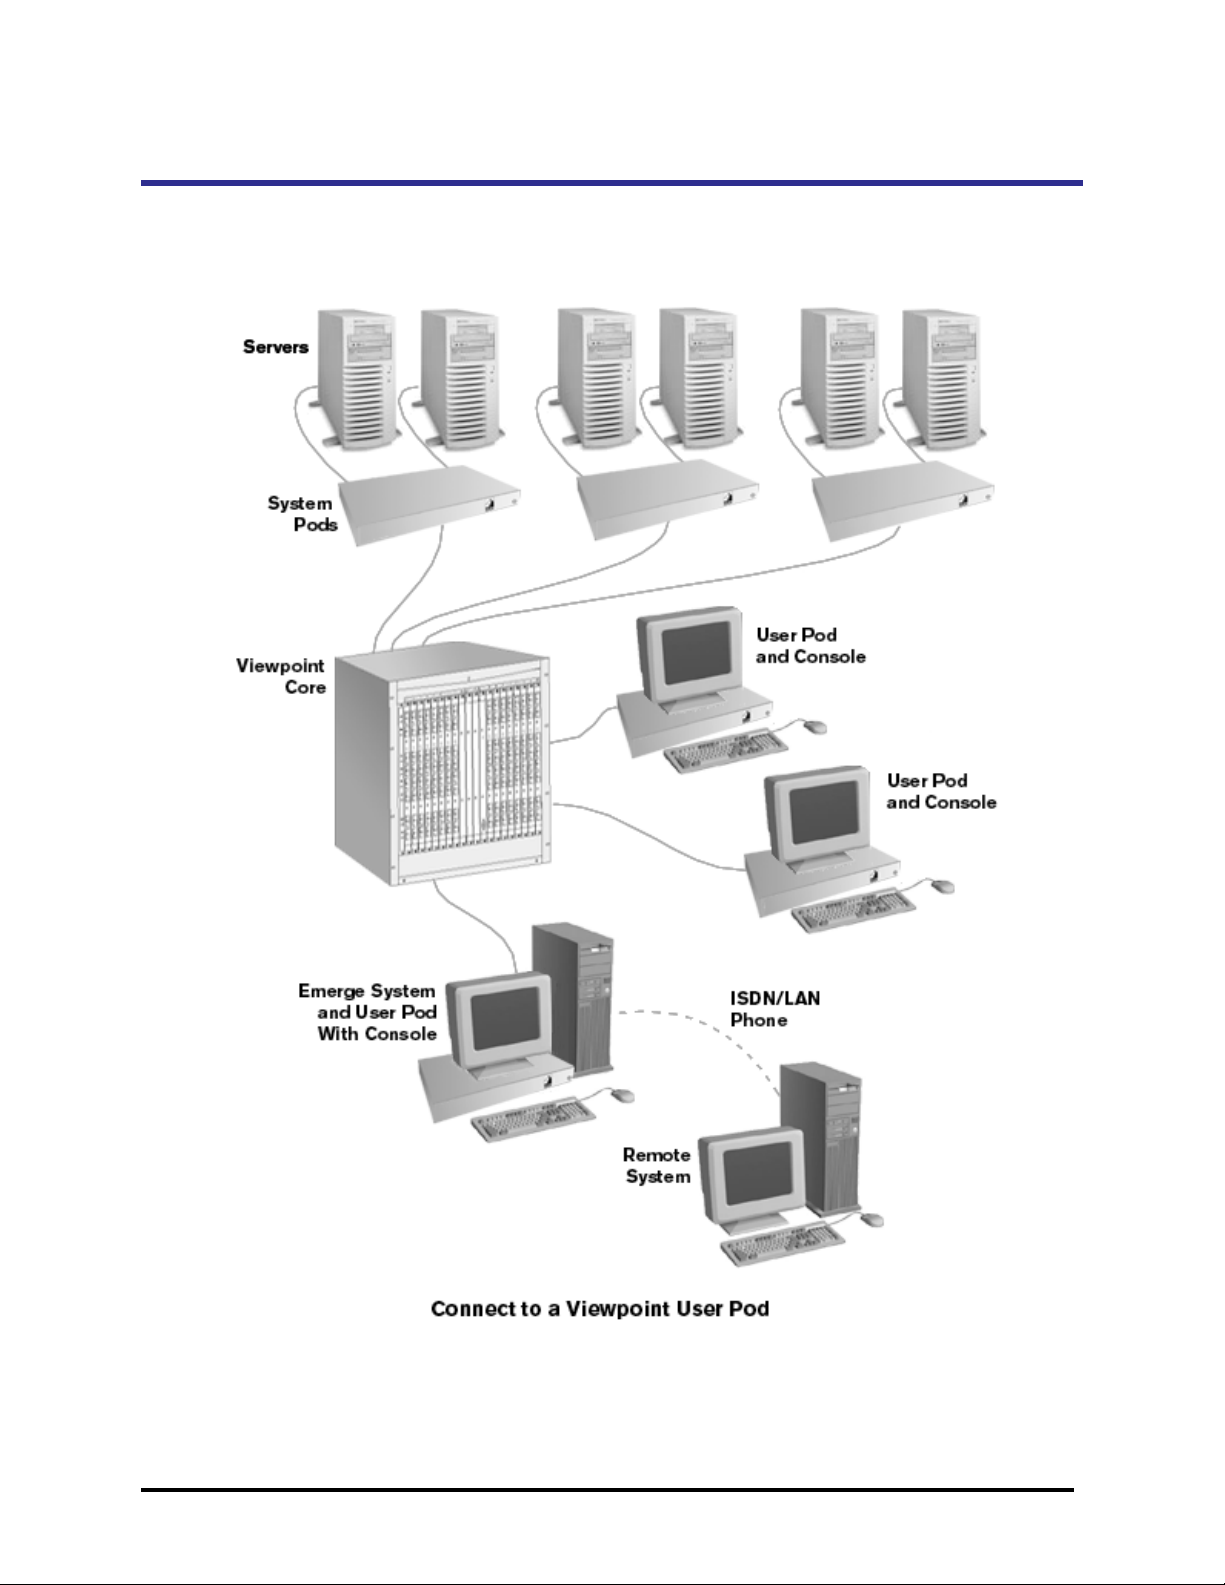
Connecting to a Viewpoint User Pod
Attaching the Emerge to a user pod allows a remote user to utilize the OSCAR menus to access
commands and functionality of the Viewpoint switch. Connect a monitor if you want to perform setup
or maintenance locally at the Emerge system, and if you want to access target computers.
Emerge Card Re mote Access User Guide Installation •••• 13
Page 18

To connect to a user pod
1 Make sure the Emerge system is turned off and unplugged.
2 Place the Emerge system in the desired location. The maximum cable length between the Emerge
and the target system should be no longer than 12 feet.
3 Connect the mouse, video, and keyboard interconnecting cables to their respective jacks on the
back panel of the EmergeCard.
4 Connect the other end of the mouse, video, and keyboard interconnecting cables to their
respective jacks on the user pod.
5 Connect the local mouse and keyboard to the jacks marked with their respective symbols on back
panel of Emerge.
6 Plug in your remote access connection to the modem or network connection port.
7 Plug the power cord into its socket on the back panel of the Emerge system.
Emerge Card Re mote Access User Guide Installation •••• 14
Page 19

Connecting to a Viewpoint User Pod and System Pod
Attaching the Emerge to a system pod and user pod allows a remote user to utilize the OSCAR menus
to access the commands and functionality of the Viewpoint switch and perform maintenance on the
Emerge system. No keyboard and mouse are needed at the Emerge system because the system pod,
instead of the local keyboard and mouse, starts Emerge properly. All other user pods can perform
maintenance on the Emerge system.
Emerge Card Re mote Access User Guide Installation •••• 15
Page 20

To connect to a user pod and system pod
1 Make sure the Emerge system is turned off and unplugged.
2 Place the unit in the desired location, no longer than 12 feet from a user pod.
3 Connect the mouse, video, and keyboard interconnecting cables to their respective jacks on the
back panel of the EmergeCard.
4 Connect the other end of the mouse, video, and keyboard interconnecting cables to their
respective jacks on the user pod.
5 Connect the mouse, video, and keyboard cables of the system pod to their respective local KVM
jacks on the back panel of the Emerge.
6 Plug in your remote access connection to the modem or network connection port.
7 Plug the power cord into its socket on the back panel of the Emerge system.
Emerge Card Re mote Access User Guide Installation •••• 16
Page 21

3. Configuration
Configuring Your EmergeCard
After installing your EmergeCard, follow the steps listed below in the Configuration Checklist before
operating your new system.
Configuration checklist
1 Install and configure the Emerge software
2 Install and configure the remote communication software
Install and configure your remote communication software on the Emerge system
Install and configure your remote communication software on the remote computer
3 Access the Emerge
Ensure network/modem connections are in place
Establish remote control session with the Emerge from the remote computer
Emerge Card Re mote Access User Guide Configuration •••• 17
Page 22

Install and Configure the Emerge Software
Once your new EmergeCard is installed you will need to install your Emerge software.
To install and configure your Emerge software
1 Insert the Emerge CD into the System’s CD-ROM drive.
2 Open up the folder "Update.xxx."
3 Run Updatexxx.exe.
4 Restart the system.
5 Follow the Setup Wizard instructions to complete setup of your EmergeCard.
Note
Running other applications along with the Emerge may affect operation and performance.
Setting up the Target Systems
Prior to operation with the Emerge, set up your target system(s) to ensure optimum results:
Set your target system mouse movement
• Set standard PS/2 mouse drivers to SLOW.
• Set Intellimouse mouse driver speed to the center position, set Acceleration to NONE and
deactivate the mouse snap.
Set your target display
Select a supported resolution for each of the servers to be accessed by Emerge. Emerge supports
standard high-resolution VGA video up to 1024 x 768 @ 75Hz refresh rate. Setting your servers at
unsupported resolutions may produce undesirable results. Reduce your target system resolution and
color depth to improve performance by decreasing the amount of image data passed along to the
Emerge.
Emerge Card Re mote Access User Guide Configuration •••• 18
Page 23

4. Operation
Using the Emerge Application
This chapter describes how to operate your Emerge software. The following checklist will help you in
operating and customizing your Emerge environment. Reference the following pages for details on
each topic.
Application operation checklist
1 Launch the Emerge application from your desktop (if it doesn't automatically start up.)
2 Use the Switch Configuration Wizard to configure Emerge to recognize the switch (or
switches) to which the unit is connected.
3 Start a session to a target system.
4 Customize your Emerge application which might include any of the following:
•
Check Target Resolution
•
Adjust Screen Update and Port Scan Rate
•
Check or Change Function Key Mapping
•
Synchronize or Configure Mouse Movement
•
Adjust Video Display
•
Set Log File Options
Emerge Card Re mote Access User Guide Operation •••• 19
Page 24

Launching the Emerge Application
To gain access from the remote computer through Emerge to the target system
1 Double-click the Emerge icon to open the Emerge application.
If this is the first time you are running the Emerge, you will use the Switch Configuration
Wizard to configure Emerge to recognize the connected switch (or switches). (See “Using the
Switch Configuration Wizard.”)
2 Use the Emerge window to specify settings or make connections to the connected target systems.
The Emerge window displays current system information for the target system, including its
resolution and activity. You should see that the video is specified as active. (See “Emerge
Application Window.”)
3 From the File menu, select Start Session.
4 You can now launch applications, read files, and change system settings on the target system. If
you are connected to an Apex switch, you will be able to utilize OSCAR menus to access the
commands and functions of the switch.
Note
Emerge has assigned various tasks to function keys. If you use one or more functions key in other applications, you may want to
reassign or remove the Emerge function key settings. Review the table “Default Settings for Emerge Function Keys” in Chapter 4,
Operations, to learn how Emerge function keys are configured.
Emerge Card Re mote Access User Guide Operation •••• 20
Page 25

Using the Switch Configuration Wizard
To use the Switch Configuration Wizard
1 Double-click the Emerge icon on the desktop of the Administrator Remote Control console to open
Emerge.
2 If this is the first time you have launched Emerge or if no windows were open the last time
Emerge was closed, the Switch Configuration Wizard dialog box appears.
3 If a console switch is attached to your Emerge system, select Yes and click Next to display a list
of switch options.
Select Yes if you are attached to a switch and want integrated control.
-or-
Select Yes, but I want to use the same window for all ports if you are connected to a switch
but want to maintain manual controls. (If you select this, proceed to step 15.)
-or-
Select No if you are connected to a server rather than a switch. (If you select this, proceed to
step 17.)
Emerge Card Re mote Access User Guide Operation •••• 21
Page 26

4 Select the type of switch being used. Click Next.
-or-
Select (Other) if you are using an Apex compatible switch and select the associated switch model.
Click Next.
5 A dialog box appears asking if additional switches are tiered from this switch. Select Yes or No.
Click Next.
Emerge Card Re mote Access User Guide Operation •••• 22
Page 27

6 Yes brings up a dialog box asking which ports the tiered switches are attached to. Select All or
Ports. (If you select Ports, proceed to Step 10.) Click Next.
7 If you select All, you are asked if all the switches are the same type. Select Yes or No and click
Next. (If you selected No, proceed to step 15.)
Emerge Card Re mote Access User Guide Operation •••• 23
Page 28
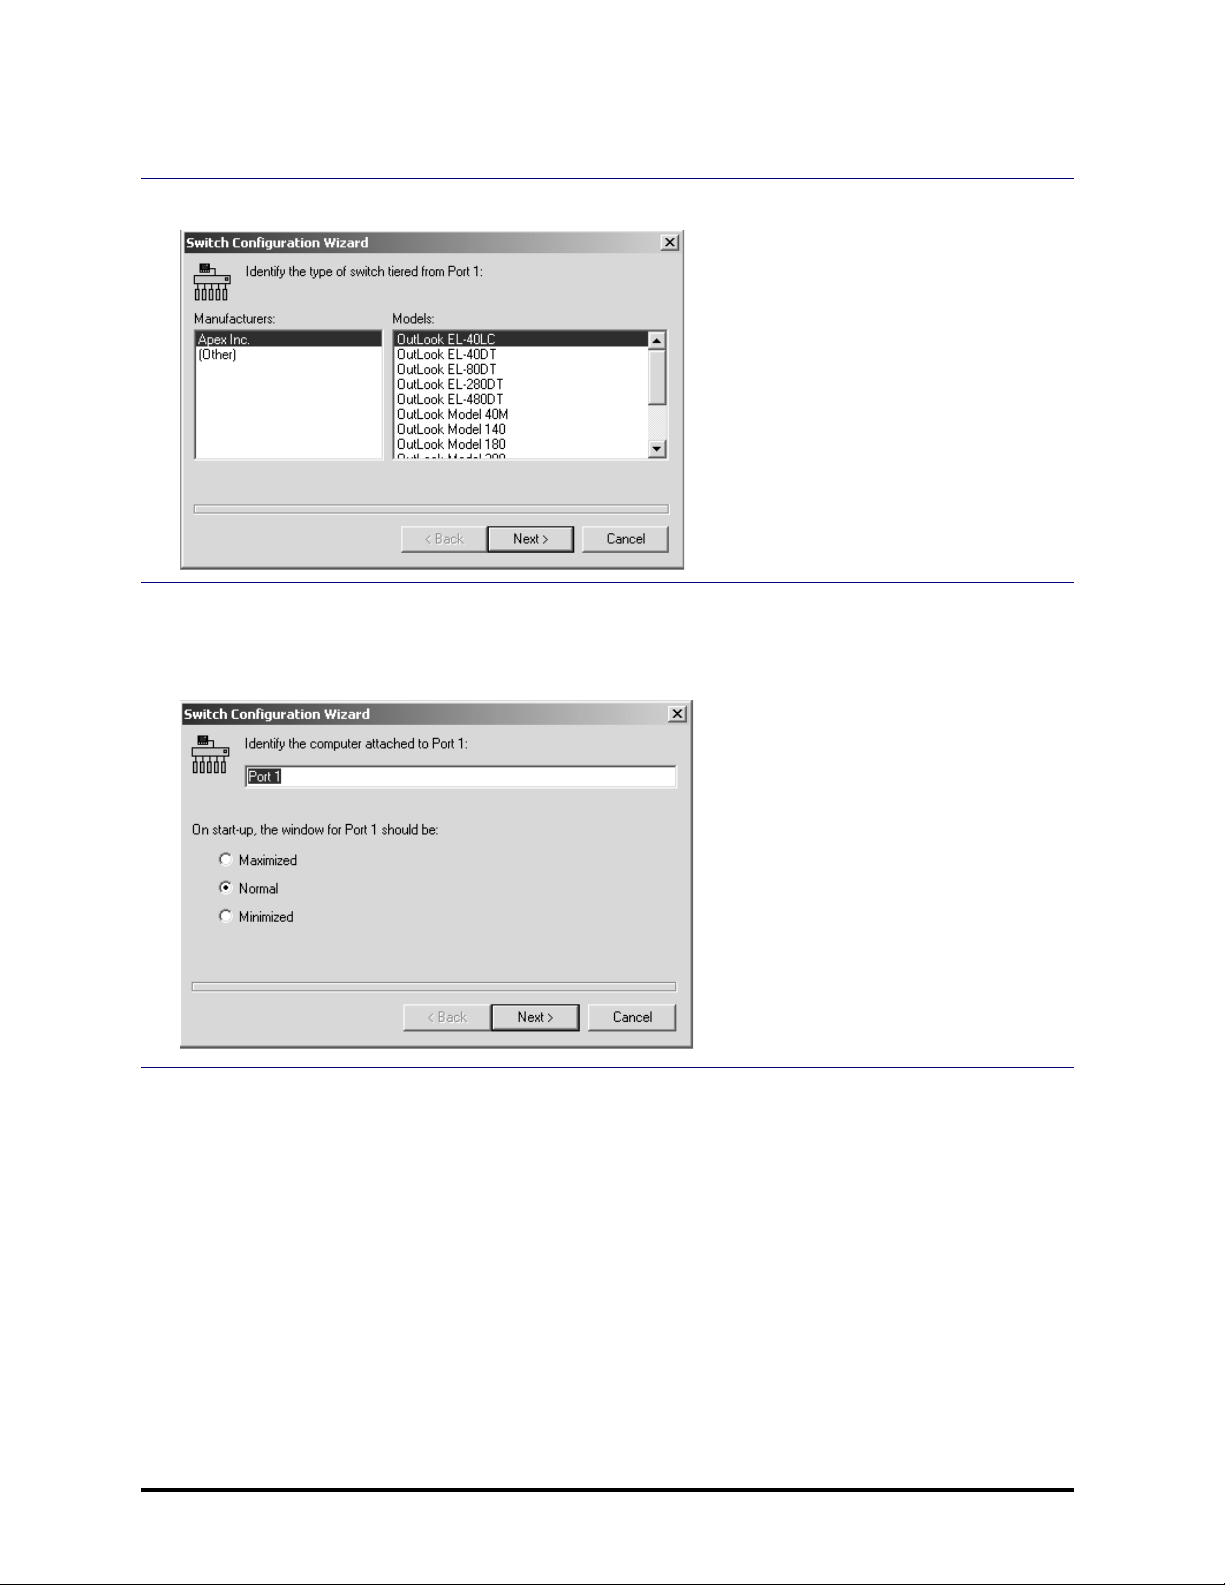
8 Selecting Yes brings up a dialog box that asks you to identify the tiered switch type.
9 Select the tiered switch and click Next. A dialog box appears where you enter the name you want
associated with each Port. Select how you want the window for each Port to appear on Start up
and click Next to access the next Port. When you have entered all the Port names, click Finish to
complete configuration and begin a session.
Emerge Card Re mote Access User Guide Operation •••• 24
Page 29

10 If you select Ports, a dialog box appears asking you to enter the port numbers and/or port
ranges, separate port numbers and/or ranges with commas.
11 Selecting Next brings up a dialog box asking if all tiered Switches are the same type. Select Yes
or No.
12 Selecting No and clicking Next brings up a dialog box asking you to identify the type of switch
being used.
13 Enter the name of the computer attached to Port 1 and select how you want the window to
appear on Start up (Maximized, Normal, Minimized, or Hidden).
14 Click Next to enter the names of the computers attached to Ports 2, 3, etc. When you have
entered all the names of the computers attached to the ports, click Finish to begin a session.
Emerge Card Re mote Access User Guide Operation •••• 25
Page 30

15 If you select Yes, but I want to use the same window for all ports when you first encounter
the Switch Configuration Wizard dialog box and click Next, a dialog box appears asking you
to enter a title for the Target System Window.
16 Enter the title you want for the Target System Window and select whether the window should be
maximized or normal on Start up. Click Finish to complete the Switch Configuration and begin a
session.
17 If you select No when you first encounter the Switch Configuration Wizard dialog box and
click Next, this same dialog box appears asking you to enter a title for the Target System
Window. (See item 13 above.)
18 Enter the title you want to use for the Target System Window and select whether the window
should be maximized or normal on Start up. Click Finish to complete the switch configuration
and begin a session.
Note
When you begin a session, the individual screens for selected computers or ports will cascade on the Emerge screen. To change the
arrangements of the windows, click Window>Title to tile the windows.
Emerge Card Re mote Access User Guide Operation •••• 26
Page 31

Beginning a Host Session
Once you have configured your Emerge to recognize the attached switches, you can begin a host
session by double-clicking the Emerge icon on the desktop to launch Emerge.
To Begin a Host Session
1 Double-click the Emerge icon on the desktop to launch the application.
2 Click File>Start Session or press the Start/Stop Session function key F5 or click the Start
Session icon on the Session toolbar.
3 The Desktop for the target system appears. When Emerge first opens, you will see information on
the current system(s) connected to Emerge. To gain access to this window later, press F5.
Emerge Application Window
1 Menu Bar (See "Menu Items in the Emerge Window
2 Tool Bar (See "Emerge Application Tool Bar
3 Target System Toolbar (See "Target System Tool and Status Bars" on page 29 for details)
4 Target System Status Bar (See "Target System Tool and Status Bars" on page 29 for details)
Emerge Card Re mote Access User Guide Operation •••• 27
" on page 28 for details)
" on page 30 for details)
Page 32

Emerge Application Tool Bar
The following toolbar appears at the top of your Emerge application window.
This Icon Represents This
1 New Target Window Opens the New Target System dialog box to initiate
another session window or the Switch Wizard.
2 Log File Options Contains logging options per session, including the type of
events logged and the location of the log files. Used for
troubleshooting.
3 Exit Quit the Emerge application.
4 Resolution Table Lists supported video resolutions and associated values.
Current resolution is highlighted.
5 Screen Update Rates Allows user to adjust the screen update rate based on the
bandwidth of the connection.
6 Configure Function Keys Configures the alternate key mapping and function key
settings to nondefault values.
7 Mouse Pointers Focuses synchronization of the mouse pointer of the target
system and the remote computer to the upper left corner
of the image display. Use if having problems with mouse
synchronization. (Default setting synchronizes mouse
pointers wherever EmergeCard crosshairs are located.)
8 Emerge Help Launches online help.
9 Emerge Help Topics Provides a list of help topics.
10 Current Function Key Settings Displays the current function key mapping that has been
set up.
11 About Emerge Displays version information.
Emerge Card Re mote Access User Guide Operation •••• 28
Page 33

Target System Tool and Status Bars
The following target system window will appear for each of the port windows you have open.
This Icon Represents This
1 Port Name/Number Port name/number of target system is displayed.
2 Start Session Starts a session with the active target system.
3 Stop Session Stops a session with the active target system.
4 Adjust Target Video Display Automatically adjusts video alignment.
5 Send Ctrl+Alt+Del Sends these keystrokes to the target system when in the
Emerge application.
6 Send Ctrl+Esc Sends these keystrokes to the target system when in the
Emerge application.
7 Current Target Resolution Current target system resolution is displayed.
8 Target System Session Status Session status with target system is displayed.
Emerge Card Re mote Access User Guide Operation •••• 29
Page 34

Menu Items in the Emerge Window
This Key Represents This Which Does This
FILE
Start/Stop Session Starts or stops a session with the active target system.
New Target Window Opens the New Target System dialog box to initiate
another session window or the Switch Wizard.
Log File Options Contains logging options per session, including the type of
events logged and the location of the log files. Used for
troubleshooting.
Update Firmware Contains three options for updating firmware to the latest
versions: microprocessor, PCI FPGA, or DSP FPGA.
CONFIGURE
Resolution Table Lists supported video resolutions and associated values.
Current resolution is highlighted.
Screen Update Rate Allows user to adjust the screen update rate based on the
bandwidth of the connection.
Function Keys Configures the alternate key mapping and function key
settings to nondefault values.
Mouse Pointers Focuses synchronization of the mouse pointer of the target
system and the remote computer to the upper left corner
of the image display. Use if having problems with mouse
synchronization. (Default setting synchronizes mouse
pointers wherever EmergeCard crosshairs are located.)
Adjust Video Automatically adjusts video alignment.
Reset keyboard/Mouse Resets the keyboard and mouse to re-establish functions if
lost.
VIEW
Toolbar Select or deselect to enable or disable the toolbar.
Status Bar Select or deselect to enable or disable the status bar.
Switch Port Scan Allows you to automatically scan from port to port. You can
set the scan time in the “Screen Update Rate” Menu item.
Changed-segment grid Identifies where on the screen there is activity.
Full Screen Overwrites the target window so it displays over the entire
EmergeCard desktop.
Properties Allows you to change the name, port and tiering status for
whichever port is in focus.
Refresh Repaints the screen of the port that is currently in focus.
Emerge Card Re mote Access User Guide Operation •••• 30
Page 35

This Key Represents This Which Does This
WINDOW
New Target Window Allows you to select a different target system.
Cascade Allows you to cascade multiple sessions on the screen.
Tile Horizontally/Ve rtically Allows you to tile multiple sessions on the screen.
Order by Port Number Allows you to arrange individual target windows by Port
number when tiling or cascading. When "Order by Port
Number" is disabled, target windows are ordered by last
input focus.
Arrange Minimized Windows Arranges minimized target system windows at the bottom
of the main Emerge window.
HELP
Contents Provides a list of help topics.
Help Topics Launches online help.
Function Key Help Displays the current function key mapping that has been
set up.
About Emerge Displays version information.
Emerge Card Re mote Access User Guide Operation •••• 31
Page 36

Resolution Table
The Resolution Table lists the supported video resolutions and associated values. Your current
resolution is the selected value.
Emerge Card Re mote Access User Guide Operation •••• 32
Page 37

Optimizing Your Connection Performance
Screen Update Rate
The Screen Update Rate allows you to set the video update rate between 2 seconds and 200
milliseconds to adjust to the type of connection you are using to access your target system.
If you are accessing your target system over a slower link or if you have a great deal of screen
activity, you may be able to increase performance by slowing the Screen Update Rate. When this
option is set to 2 seconds, the Emerge sends video updates to the remote system less frequently so
the bandwidth will be available for communications.
If you are working over a LAN connection, you may want to set this to 200 milliseconds to allow for
more frequent video refresh while still retaining appropriate communication rates.
Note
To optimize performance, you may also want to reduce the number of colors being used for the video image on the target system.
For example, a video image that uses 16 million colors will have more color changes than a video image with 256 colors. More col or
choices will cause the pixel matrix to update more frequently and consume bandwidth that could otherwise be used for keyboard
and mouse communication.
Emerge Card Re mote Access User Guide Operation •••• 33
Page 38

Changed-Segment Grid
The Changed-Segment Grid identifies the presence and location of any screen activity. This feature is
important for helping you to improve the performance of your connection. If the phase is out of
adjustment, you may have screen activity that you aren’t aware of that will impact your performance
over a slower connection.
No Screen Activity Screen Activity Identified
To optimize screen activity
1 Select the Changed-Segment Grid from under the View menu.
2 With a static screen image, stop any mouse movement and check the Changed Segment grid.
White boxes indicate no screen activity. If you have black boxes, Emerge is recognizing screen
activity.
3 If there should be no screen activity, open the Adjust Video dialog box under the Configure
menu.
4 With the Changed Segment grid visible, adjust the Phase slider or Color Offsets sliders until
the grid contains the fewest black boxes.
Emerge Card Re mote Access User Guide Operation •••• 34
Page 39
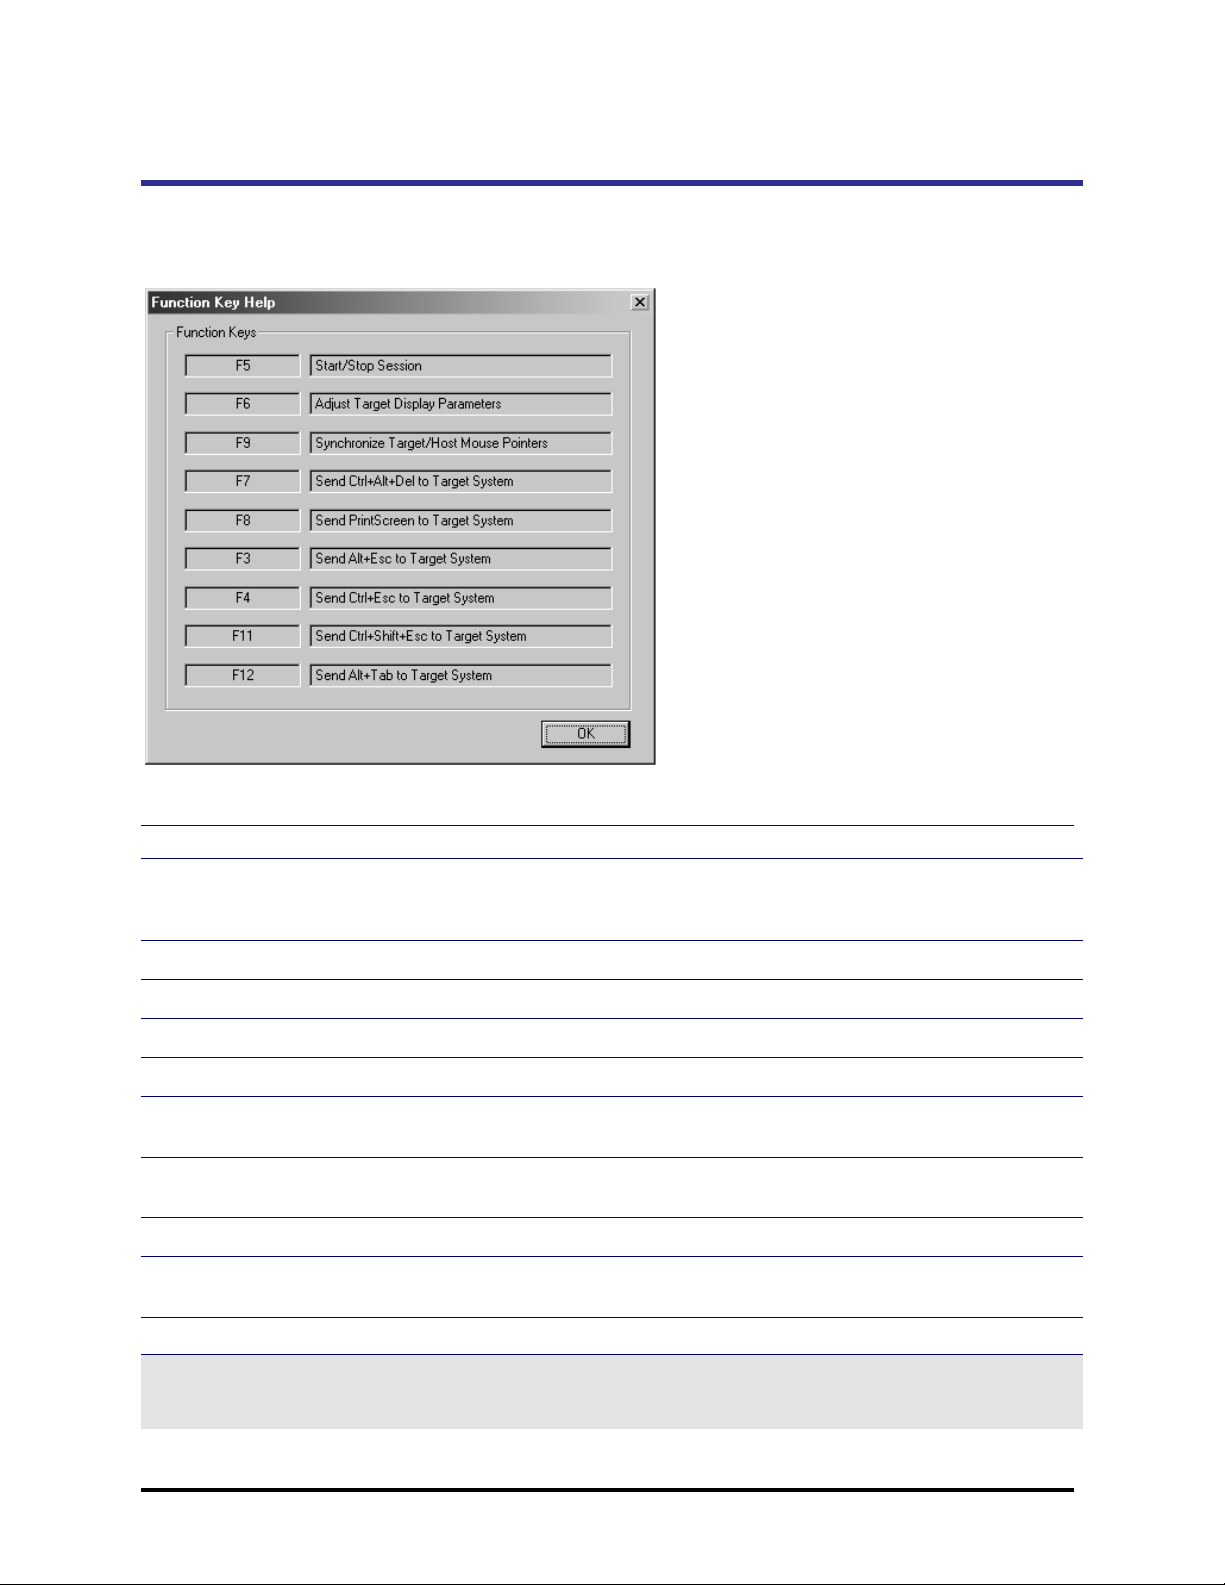
Using Function Keys
Emerge comes configured with helpful function keys that allow you to select menu items quickly.
Click the Function Key Help icon on the Tool bar or look under the Help menu item to find the
Function Key that has been configured for the keystrokes you want to send.
Default Settings for Emerge Function Keys
This Key Represents This Which Does This
F1 Help Menu Opens Emerge Help. If you are in an active target window,
<F1> opens Windows Help. If you want Emerge Help
instead, simply stop the current session.
F2 OSCAR Advanced Menus Displays OSCAR Menu screen if attached to an Apex switch.
F3 ALT+ESCAPE Sends these keystrokes to the target system.
F4 CTRL+ESCAPE Sends these keystrokes to the target system.
F5 Start/Stop Session Starts or stops a session with the target system.
F6 Adjustments menu Adjusts video alignment and color through an on-screen
display dialog box.
F7 CTRL+ALT+DELETE Sends these keystrokes to the target system when in the
Emerge application.
F8 PRINT SCREEN Sends this keystroke to the target system.
F9 Synchronize Mouse Pointers Synchronizes the mouse pointer of the target system with
the mouse pointer of the user computer.
F12 ALT+TAB Sends these keystrokes to the target system.
Note
If you want to establish a session with an Apex OSCAR-compatible switch, open OSCAR menus by using the function key F8 or
press PRINT SCREEN.
Emerge Card Re mote Access User Guide Operation •••• 35
Page 40
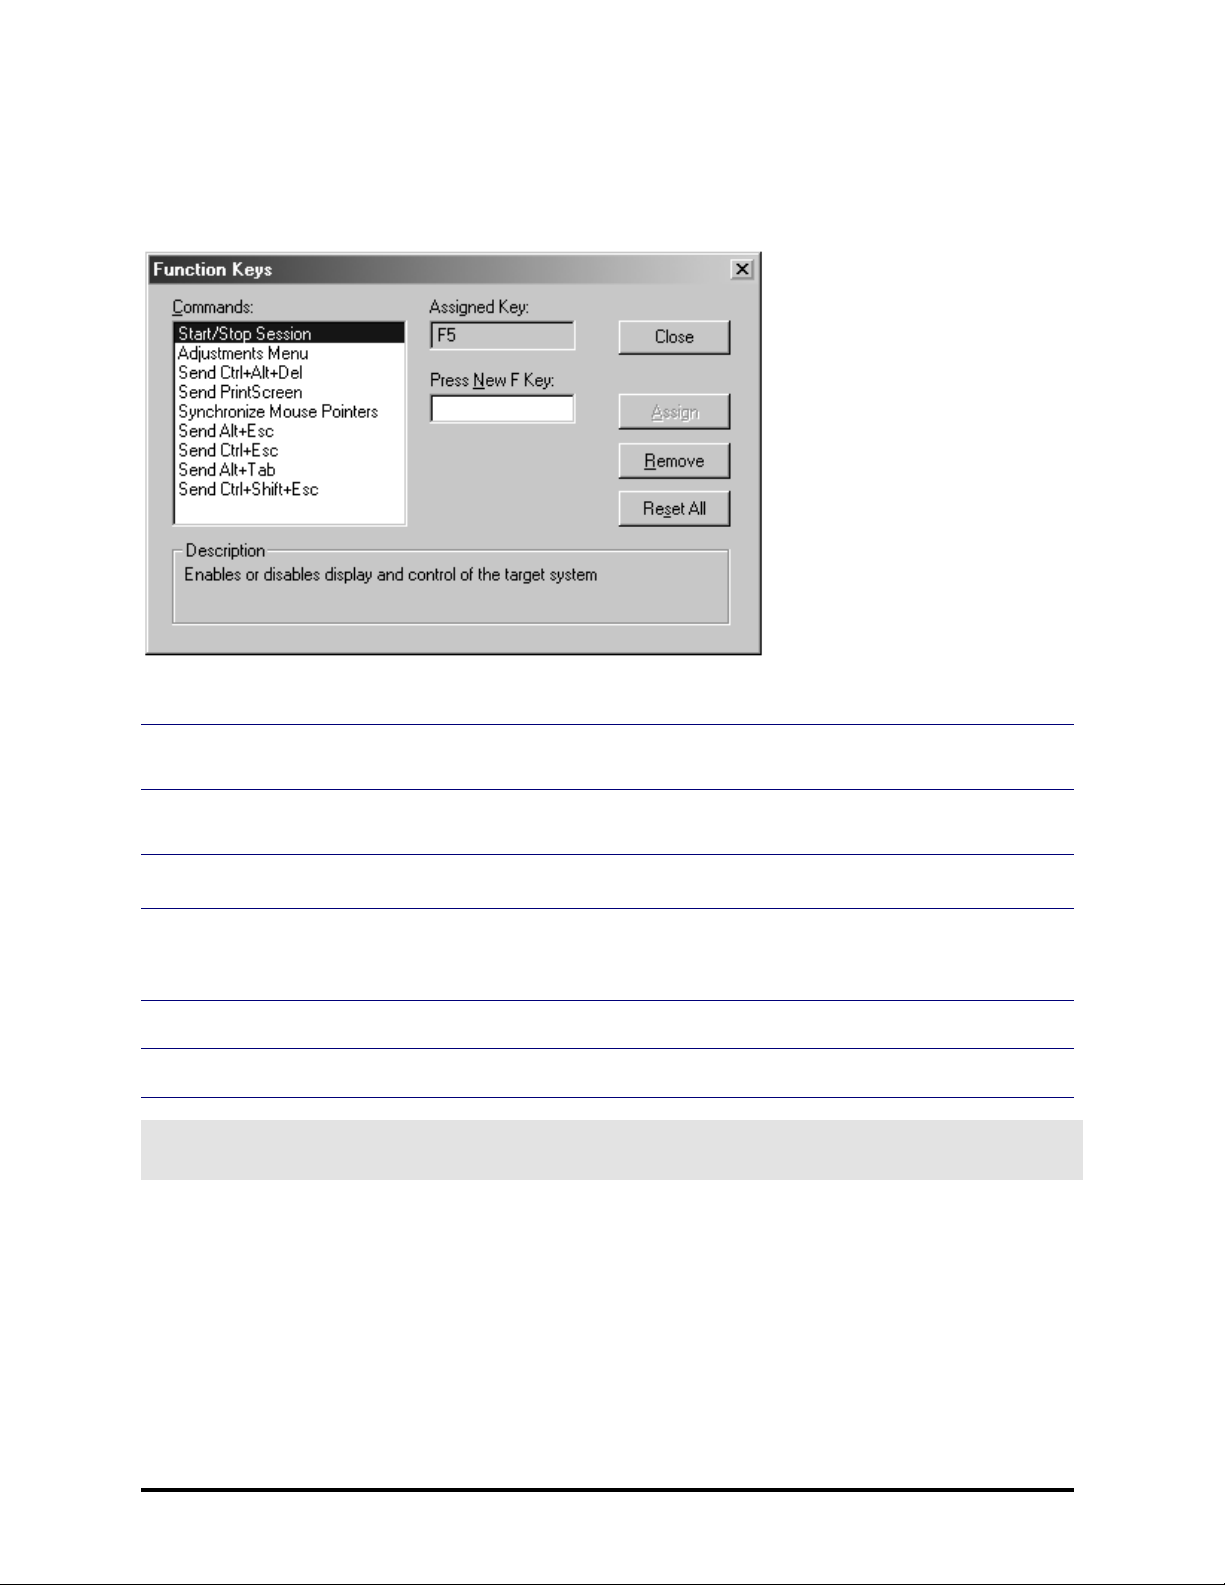
Setting Alternate Function Key Mapping
You can change the current function key configurations or remove Emerge assignments entirely to
match your existing system usage.
To set alternative key mapping and function keys
1 From Configure, select Function Keys. The Function Keys dialog box appears, allowing you to
view the current key functions.
2 Select a function from the Commands list and you will see the current assigned key with a
description of that function.
3 Type in a new F key assignment in the New F key box if you wish to set an alternate F key for
that function.
To remove an Emerge Function Key assignment
1 Select a function key from the Commands list.
2 Select Remove to free up that function key for use by another application.
Note
Certain keystrokes are reserved, for example <F1> is reserved for Windows. Do not use <F2> if you are connected to an Apex
switch because <F2> is used to gain access to OSCAR Advanced Menus screen.
Emerge Card Re mote Access User Guide Operation •••• 36
Page 41

Configuring Mouse Pointers
Emerge offers you the ability to configure your mouse pointers for unique operating environments.
Synchronize at Upper-Left Corner
This option focuses the synchronization of the mouse pointer of the target system and the remote
computer to the upper left corner of the image display. Use this option if you are having problems
with standard mouse synchronization. (The default setting synchronizes mouse pointers wherever
Emerge crosshairs are located.)
Hide Emerge Pointer
If you are accessing your target system on the Emerge through a very fast LAN connection, you may
want to turn off the Emerge crosshairs.
Hide Pointer in Full-Screen DOS Mode
If you operate in full-screen DOS mode, you may want to hide the Emerge crosshair pointer by
clicking the Hide Pointer in Full-Screen DOS Mode option.
Synchronizing Mouse Movement
You may need to periodically synchronize the mouse movement of both your remote and target
system. You will see a circular target that represents the mouse location on your remote system,
while the target system’s mouse location is represented by the pointer tool.
To synchronize mouse movements
Press F9 to bring the mouse of the target system into alignment with the mouse on the remote
computer.
–or–
Move the mouse outside the Emerge application window and then move it back into the window. This
action forces the target mouse to align with the position of the mouse for the remote computer.
Emerge Card Re mote Access User Guide Operation •••• 37
Page 42

Optimizing Mouse Performance
Apex recommends that all servers controlled by the Emerge system be adjusted as follows prior to
installation.
To adjust Standard PS/2 mouse drivers
Access via Control Panel>Mouse>Motion tab>Pointer Speed
The mouse motion rate needs to be set all the way to SLOW. The EmergeCard device then can use a
calculation matrix to move the mouse at the target server the appropriate distance and speed to
match the remote client.
To adjust Intellimouse drivers
Access via Control Panel>Mouse>Pointer Options>Pointer Speed
The Pointer Speed needs to be set at the center (or fifth) position. Advanced – Pointer Acceleration
needs to be turned off and any mouse snap features need to be deactivated.
Emerge Card Re mote Access User Guide Operation •••• 38
Page 43

Improving the Video Display
The Emerge gathers system information from the target system through observation. Because it has
an unobtrusive presence, it cannot obtain specific system information. When it obtains the video
image from the target system, it digitizes the analog signal. Because its video output is based on
information gathered through observation and the sampling of color bits, you may need to make
slight adjustments to improve video display.
Other factors that affect video display are slight variations in signal levels and timing, which may
cause grainy colors, dithering, ghosting, or misalignment. Such factors should be corrected as they
can affect the performance of your system.
Connection to a switch introduces a delay in the transmission of the video signal for each tier of
computers. You can optimize the video by making adjustments in the Adjustments menu.
This Adjustment Has This Effect
Screen Alignment Adjusts the displayed image of the target system either horizontally or vertically.
Automatic allows the Emerge system to align the target window for you.
Manual allows you to make adjustments yourself.
If your background is black, you will need to manually adjust because the
Automatic configuration looks for the first nonblack pixel to align the screen. If
your background is black, the automatic screen adjustment will incorrectly align
your screen.
Phase Sharpens the displayed image from the target computer. Select a value from 0-
31. Changes in settings are immediately reflected on the monitor.
Color Offsets Changes the color of the displayed image from the target computer to correct
untrue colors or to correct snow on solid colors. Display colorful windows on the
monitor for graphical reference when selecting values.
Emerge Card Re mote Access User Guide Operation •••• 39
Page 44
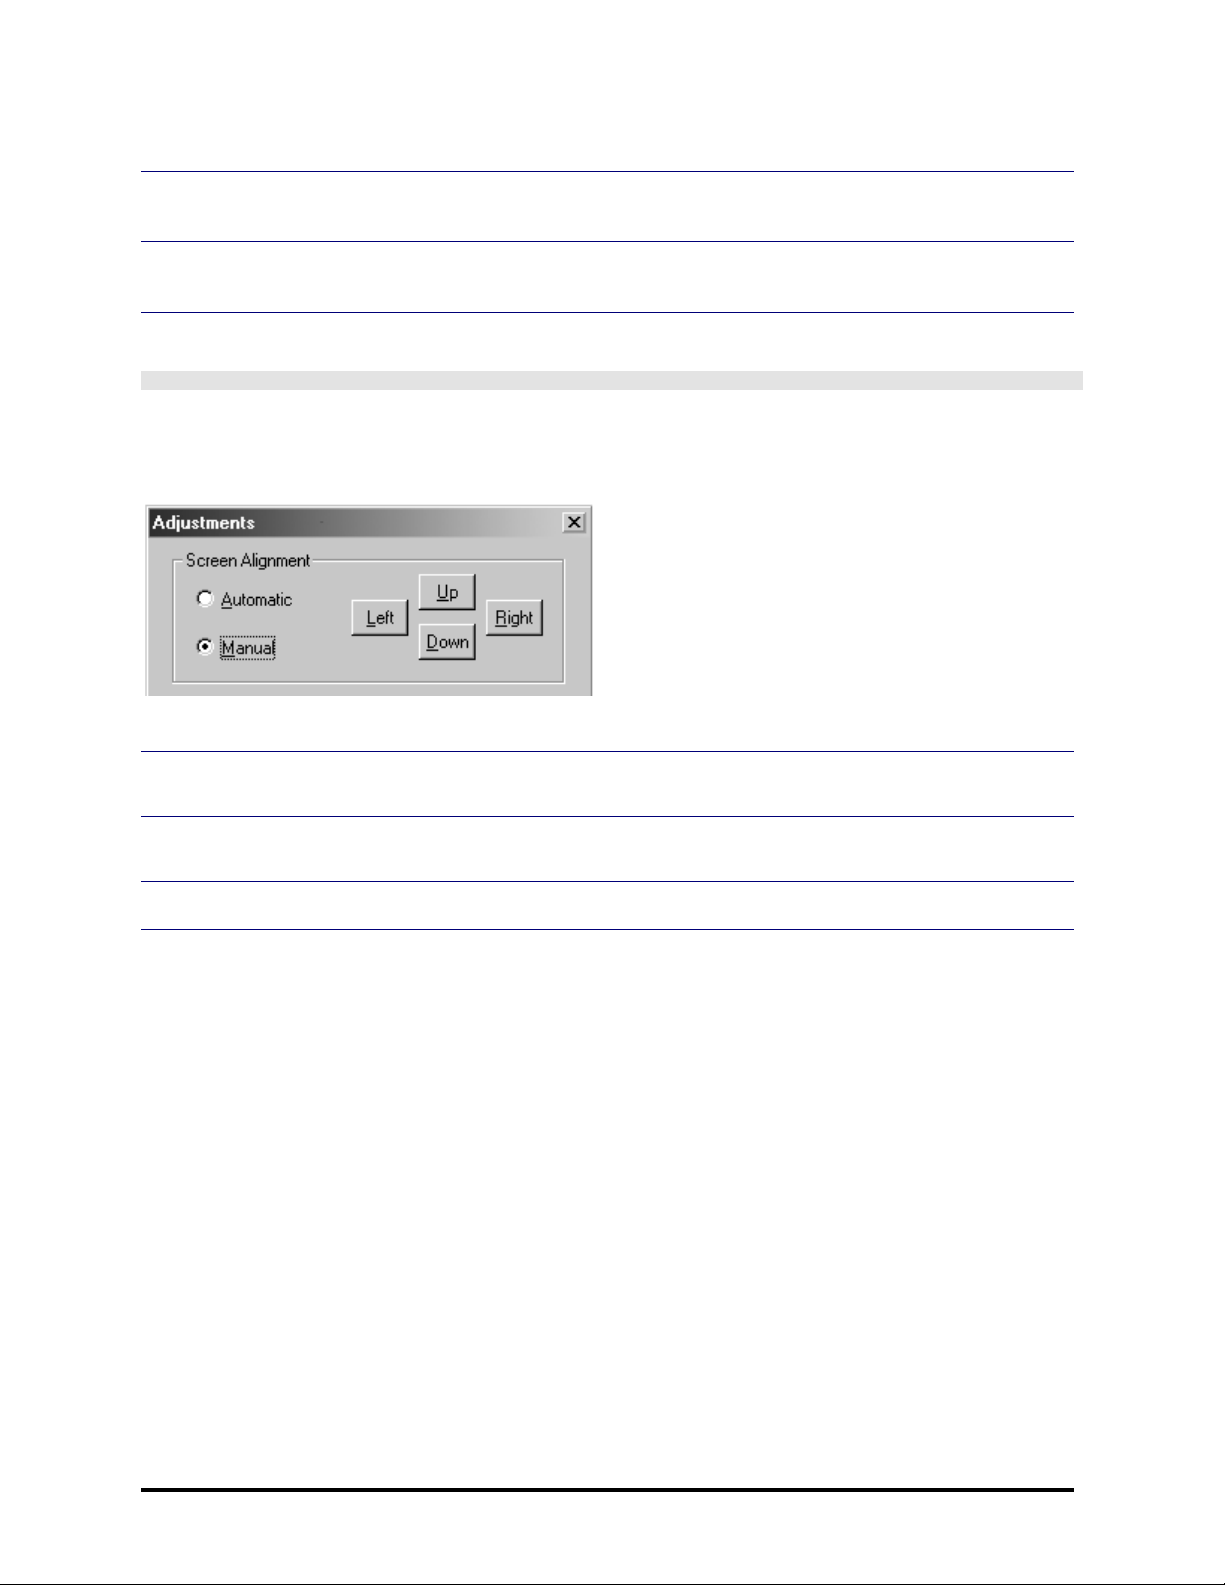
To adjust the displayed video image of the target system
1 Click the Video icon on the toolbar for the console switch screen to open the Adjustments dialog
box or Press F6, the Adjust Settings function key, to bring up the Emerge Adjustments menu.
2 Select Automatic and the Emerge system will make changes to the screen to attempt to align
the target window in the Emerge window.
Note
If your background is black, you will need to manually adjust because the Automatic configuration looks for the first nonblack pixel
to align the screen. If your background is black, the automatic screen adjustment will incorrectly align your screen.
Select Manual to adjust your settings manually. The Manual selection allows you to click on the alignment boxes to move the
screen left, right, up, or down.
3 Adjust Phase by moving the slide bar left (to decrease) or right (to increase) the sharpness of the
image.
4 Adjust Color Offsets by moving the slide bars associated with the colors to increase or decrease
tones.
5 Click OK to save the settings or Cancel to return to the Default settings.
Emerge Card Re mote Access User Guide Operation •••• 40
Page 45
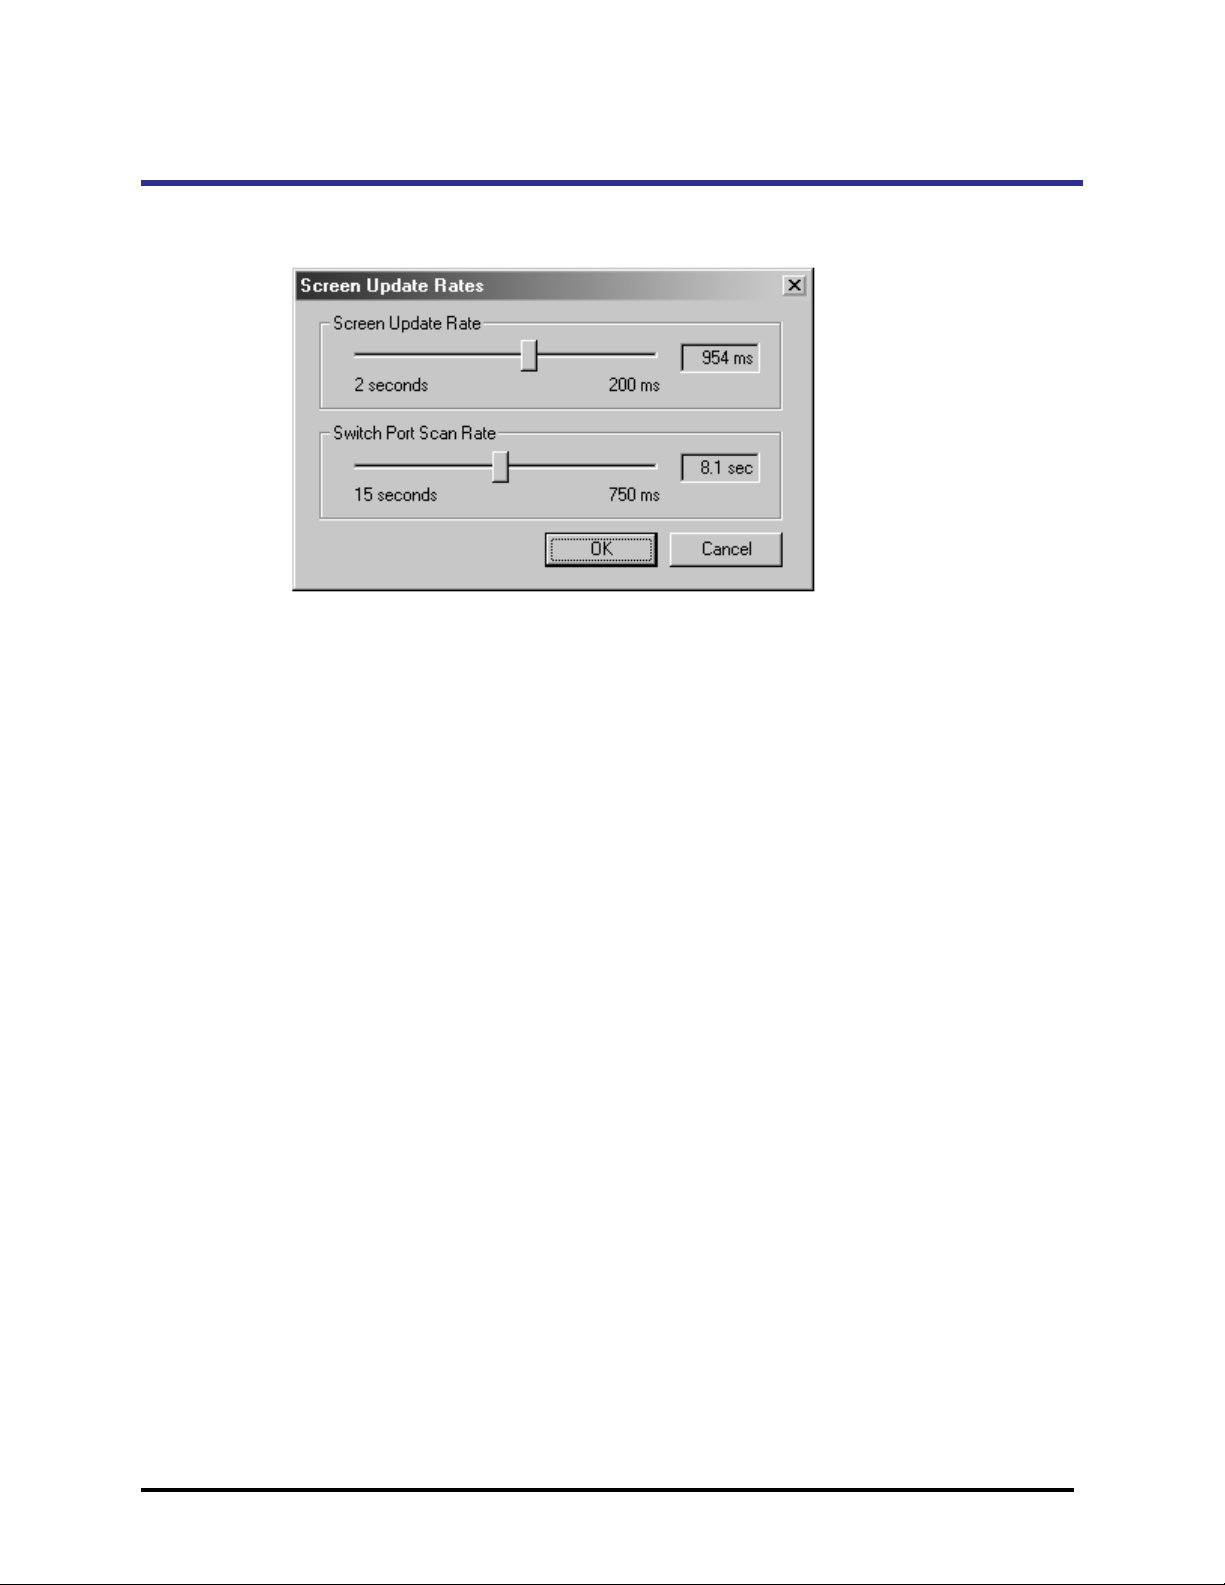
Setting Your Switch Port Scan Rate
If you have set Emerge to automatically scan from port to port, you can set how long it stays at each
port by setting the slider on the Switch Port Scan Rate.
Emerge Card Re mote Access User Guide Operation •••• 41
Page 46
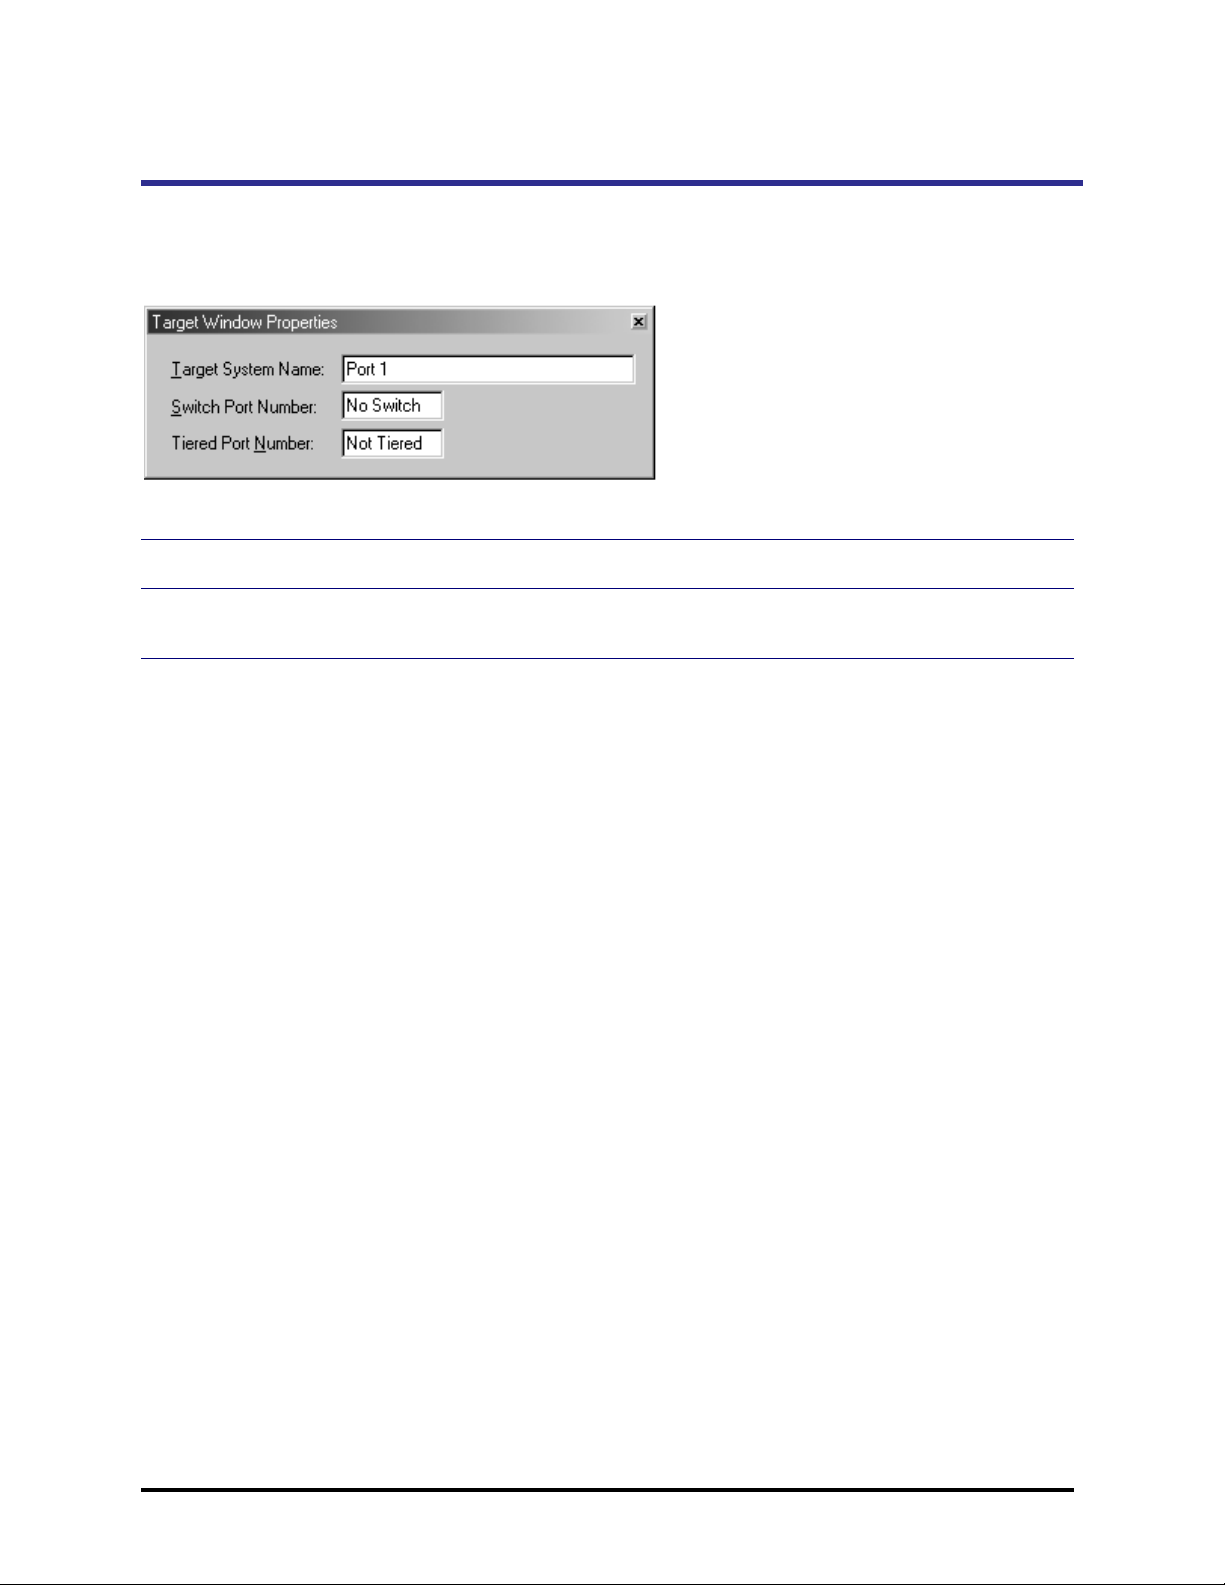
Adjusting the Target Window Properties
The Properties dialog box allows you to control various attributes of your target system including the
Name, Switch Port number, and Tiered Port number.
To change Target Window Properties
1 Open the Target Window Properties dialog box under the View menu item.
2 Type in the Name, Switch Port or Tiered Port number in the appropriate box. Select Enter to
implement the changes.
Emerge Card Re mote Access User Guide Operation •••• 42
Page 47
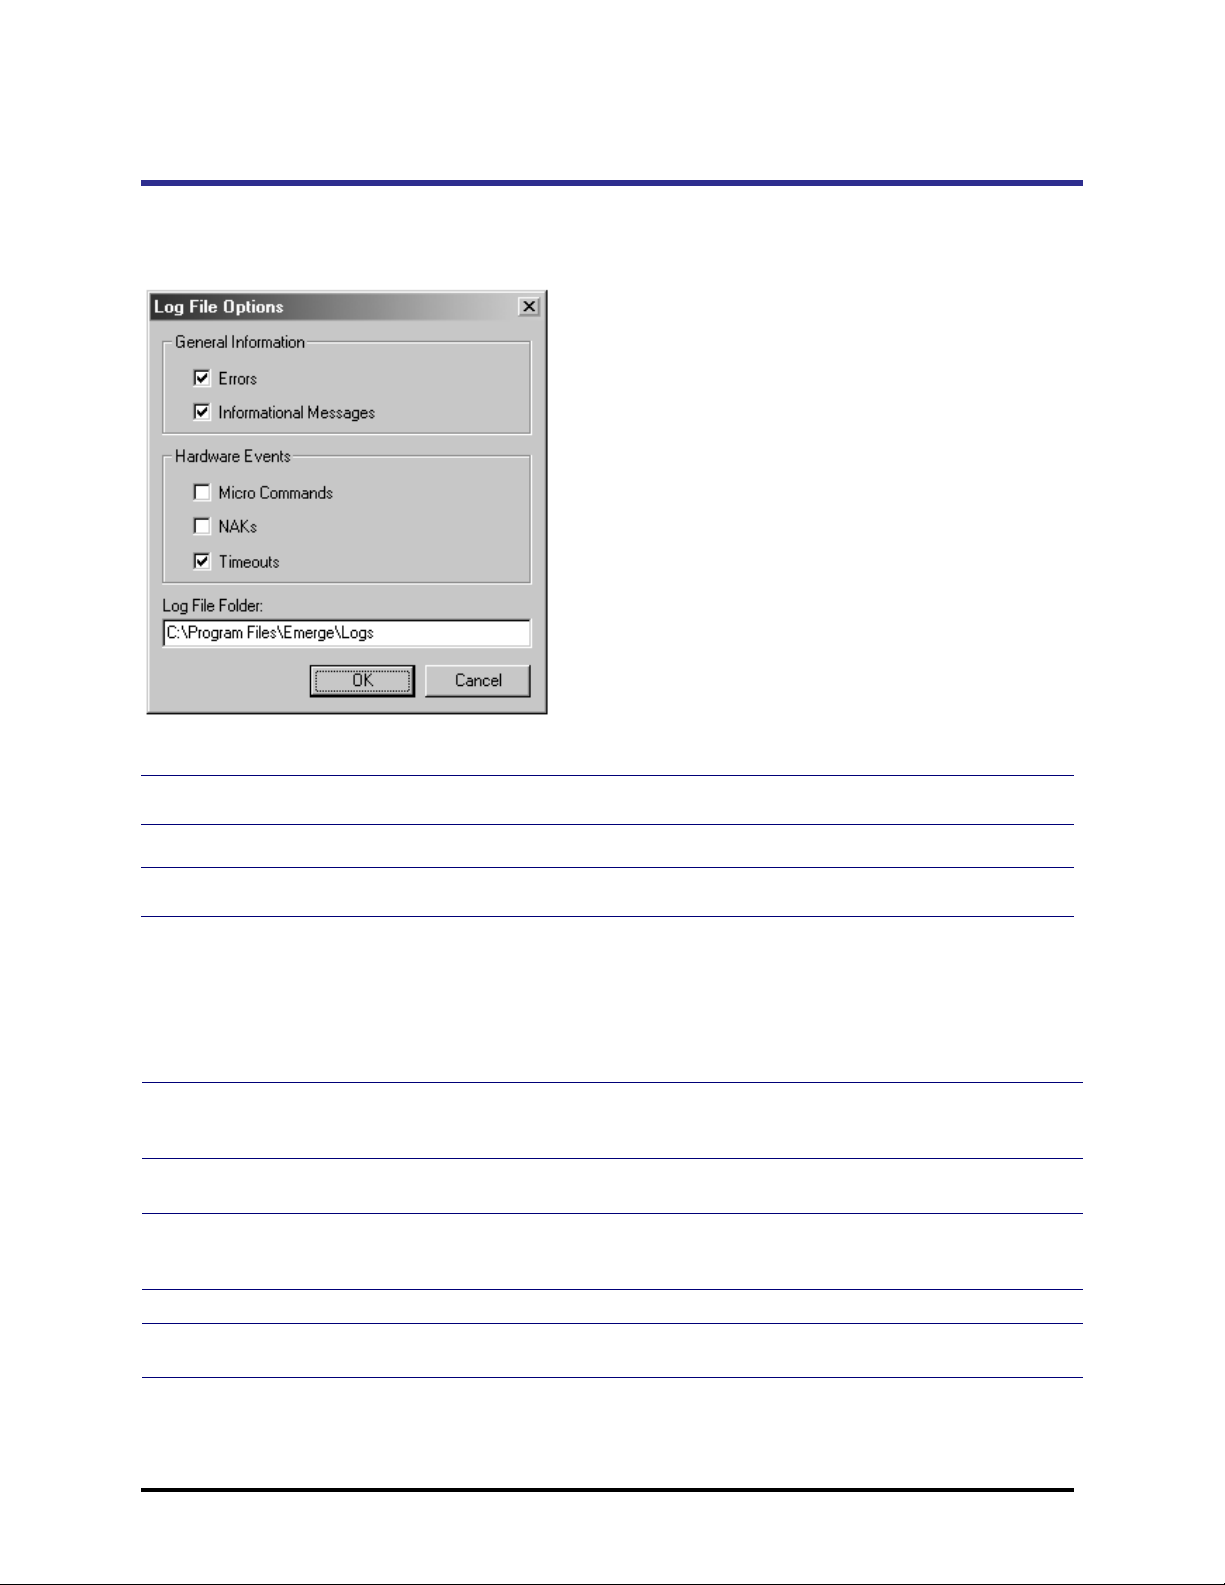
Maintaining Log Files
The Emerge system maintains an application log file that can be reviewed by Apex Customer Support
for servicing problems. The log file settings can be modified to record specific types of information,
although maintaining the default settings will help Customer Support assess operation problems.
To modify log file settings
1 Click File>Log File Options in the Emerge window.
2 Check the log options that you want to have recorded.
3 Click OK to save changes.
Adjusting Log File Options
The following chart describes each of the options that you can have recorded in your log files.
Errors Records any errors processed by the Emerge and the time the error occurred.
Leave this option enabled at all times.
Information Messages Provides additional error information, such as start-up/stop times, version
numbers and other actions that help Customer Support identify the cause of
an error.
Micro Commands Details the device communications between the Emerge application and the
EmergeCard hardware.
NAKs Details device communication between the Emerge application and the
EmergeCard hardware when the hardware cannot process a command issued
by the application.
Timeouts Details information on specific timeouts that have occurred.
Log File Folder Allows the user to change the location of the log file. By default, the log file is
located in the Log subdirectory of the Emerge.
Emerge Card Re mote Access User Guide Operation •••• 43
Page 48

Viewing Emerge Versions
You can access a window displaying the current versions of the Emerge application and components
that you are running.
To verify the current version of the Emerge
1 Click Help>About Apex Emerge or select the Emerge icon on the Emerge application tool bar.
2 View all the version numbers to verify the current application and component information for your
EmergeCard.
Emerge Card Re mote Access User Guide Operation •••• 44
Page 49

5. Troubleshooting
Symptom Probable Cause Recommended Solution
Emerge host mouse
loses synchronization
with target mouse
Method that mouse movements are
processed and transferred
Speed/acceleration settings
incorrect on target system
Press Align Mouse Pointers hotkey
<F9>.
Set mouse settings to recommended
values on target system. See section
Synchronizing Mouse Movement
Operation chapter.
in the
Mouse displays erratic
behavior
Slow video
transmission
Video dithered (pixels
in a solid region
flicker) or snowy,
ghosting, or untrue
colors
Video image jitters
Processing with target computer left
mouse in indeterminate state
Large video images at high
resolution
Problems digitizing analog video
from target computer into an 8-bit
format (3-bits red, 3-bits green, 2bits blue)
Poor quality cables or long cables
Problems with video horizontal
synchronization signal
Other factors to consider: the target
system’s video card and tiering of
switches that introduces a delay to
the horizontal synchronization
signal for each tier.
Reset the mouse by using the menu
item Configure> Reset Keyboard and
Mouse.
Choose a lower video resolution. In the
LapLink software, select Optimize for
low speed connection.
Press Emerge Adjustments function key
<F6> and select Video Phase to sharpen
the image.
-or-
Adjust Red, Green, or Blue Offset to
correct color.
Use short (7 feet or less) highresolution cables.
If using Viewpoint or SwitchBack with
Cat 5 cabling, adjust cable
compensation.
If using Viewpoint or SwitchBack with
Cat 5 cabling, adjust cable
compensation.
Press Emerge Adjustments function key
<F6> and adjust Video Phase.
Problems in video
feedback
Interlaced resolution Interlaced resolutions not supported.
Change to a supported video resolution.
Emerge Card Re mote Access User Guide Troubleshooting •••• 45
Page 50

Appendices
Getting Help
Where to Go for Assistance
Visit our Web site for the latest technical information and to download updates. www.apex.com
Contact your distributor or reseller
E-mail Apex Customer Support: support@apex.com
Phone Apex Customer Support: 800 861-5858
Monday through Friday between 6 am and 6 pm Pacific Time
What Information to Provide to Apex Customer Support
Unit model number and serial number
Make and model of keyboard and mouse attached to the unit. These numbers are on the underside of
each unit.
Make and model of computers used
Name and version of operating systems used
Note
If anything is missing or was damaged during shipment, contact the Apex Customer Support group. If you need to return any
product, you will need a return materials authorization (RMA) number from Customer Support. Apex Inc. will not accept any
returned materials without first issuing a RMA number. Please call Customer Support for details.
Note
Apex Inc. packages and ships your product in a manner designed to protect the system during shipping and handling. We
recommend that you save the carton and packing materials until after your equipment is fully installed and operational.
Emerge Card Remote Access User Guide Apendixes •••• 46
Page 51

Communications Regulation Information
ENGLISH
Federal Communications Notice (Class A Equipment)
This equipment has been tested and found to comply with the limits for a Class A digital device,
pursuant to Part 15 of the FCC rules. These limits are designed to provide reasonable interference
when the equipment is operated in a commercial environment.
Radio Interference
This equipment generates, uses, and can radiate radio frequency energy and, if not installed and
used in accordance with the instructions, may cause harmful interference to radio communications.
Operation of this equipment in a residential area is likely to cause harmful interference, in which case
the user will be required to correct the interference at personal expense.
DOC Class A Compliance
This digital apparatus does not exceed the Class A limits for radio noise emissions from digital
apparatus as set out in the interference-causing equipment standard entitled “Digital Apparatus,”
ICES-003 of the Department of Communications.
FRANÇAIS
Observation des normes—Classe A
Cet appariel numérique respecte les limites de bruits radioélectriques applicables aux appariels
numérique de Classe A prescrites dans la norme sur le matériel brouilleur: “Appariels Numérique,”
NMB-003 édictée par le ministre des Communications.
DEUTSCH
BZT Hinweis
Hiermit wird bescheinigt, daß dieses Gerät in Übereinstimmung mit den Bestimmugen der BMPTAmtsblVfg 243/1991 funk-entstört ist. Der vorschriftsmäßige Betrieb mancher Gerät (z.B.
Meßsender) kann allerdings gewissen Einschränkungen unterliegen. Beachten Sie deshalb die
Hinweise in der Bedienungsanleitung.
Dem Bundesamt für Zulassungen in der Telekommunikation wurde das Inverkehrbringen dieses
Geräts angezeigt und die Berechtigung zur Überprüfung der Serie auf die Einhaltung der
Bestimmugen eingeräumt.
Emerge Card Remote Access User Guide Apendixes •••• 47
Page 52

Limited Warranty
Apex Inc. warrants that the Emerge remote access card (Product) will be free from defects in
materials and workmanship under normal use and service for a period of one year from the date of
receipt. Any implied warranty on the switch is limited to one year.
Customer Remedies
Apex’s entire liability and your exclusive remedy shall be, at Apex’s option, either (a) return of the
price paid or (b) repair or replacement of the Product that does not meet Apex’s Limited Warranty
and which is returned to Apex with a copy of your receipt. THIS LIMITED WARRANTY IS VOID IF
FAILURE OF THE PRODUCT HAS RESULTED FROM ACCIDENT, ABUSE, OR MISAPPLICATION. Any
replacement Product will be warranted for the remainder of the original warranty period or six
months, whichever is longer.
No Other Warranties
Apex Inc. disclaims all other warranties, either expressed or implied, including but not limited to
implied warranties of merchantability and fitness for a particular purpose, with respect to the Product
and the accompanying product manual and written materials. This Limited Warranty gives you
specific rights, and you may have other rights which vary from state to state.
No Liability for Consequential Damages
In no event shall Apex be liable for any other damages whatsoever (including, without limitation,
damages for loss of business profits, business interruption, loss of business information, or other
pecuniary loss) arising out of the use of or inability to use the Product, even if Apex has been advised
of the possibility of such damages. In any case, Apex’s entire liability under any provision of this
agreement shall be limited to the amount actually paid by you for the Product.
Emerge Card Remote Access User Guide Apendixes •••• 48
 Loading...