

Page 1
DT150
Digital TV Converter Box
User's Manual
®
simply remarkable™
Caja Convertidora
de TV Digital
Manual del Usuario
Ver.1.2 07/08
Page 2
Important Safety Information
- TO PREVENT FIRE OR SHOCK HAZARD, DO NOT USE THIS PLUG WITH AN EXTENSION CORD, RECEPTACLE OR
OTHER OUTLET UNLESS THE BLADES CAN BE FULLY INSERTED TO PREVENT BLADE EXPOSURE.
- TO PREVENT FIRE OR SHOCK HAZARD, DO NOT EXPOSE THIS APPLIANCE TO RAIN OR MOISTURE.
The lightning flash with arrowhead
symbol, within an equilateral
triangle, is intended to alert the user
to the presence of uninsulated
"dangerous voltage" within the
product's enclosure that may be of
sufficient magnitude to constitute a
risk of electric shock to persons.
The exclamation point within an
equilateral triangle is intended
to alert the user to the presence
of important operating and
maintenance (servicing)
instructions in the literature
accompanying the appliance.
WARNING : TO REDUCE THE RISK
OF ELECTRIC SHOCK, DO NOT
REMOVE COVER (OR BACK). NO
USER SERVICEABLE/PARTS
INSIDE REFER SERVICING TO
QUALIFIED SERVICE PERSONNEL.
WARNING
CHANGES OR MODIFICATIONS TO THIS UNIT NOT EXPRESSLY APPROVED BY THE PARTY RESPONSIBLE FOR COMPLIANCE COULD VOID THE USER’S AUTHORITY TO OPERATE THE EQUIPMENT.
NOTE: THIS EQUIPMENT HAS BEEN TESTED AND FOUND TO COMPLY WITH THE LIMITS FOR A CLASS B DIGITAL
DEVICE, PURSUANT TO PART 15 OF THE FCC RULES. THESE LIMITS ARE DESIGNED TO PROVIDE REASONABLE
PROTECTION AGAINST HARMFUL INTERFERENCE IN A RESIDENTIAL INSTALLATION. THIS EQUIPMENT GENERATES
USES AND CAN RADIATE RADIO FREQUENCY ENERGY AND, IF NOT INSTALLED AND USED IN ACCORDANCE WITH THE
INSTRUCTIONS, MAY CAUSE HARMFUL INTERFERENCE TO RADIO COMMUNICATIONS.
HOWEVER, THERE IS NO GUARANTEE THAT INTERFERENCE WILL NOT OCCUR IN A PARTICULAR INSTALLATION. IF
THIS EQUIPMENT DOES CAUSE HARMFUL INTERFERENCE TO RADIO OR TELEVISION RECEPTION, WHICH CAN BE
DETERMINED BY TURNING THE EQUIPMENT OFF AND ON, THE USER IS ENCOURAGED TO TRY TO CORRECT THE
INTERFERENCE BY ONE OR MORE OF THE FOLLOWING MEASURES:
• REORIENT OR RELOCATE THE RECEIVING ANTENNA.
• INCREASE THE SEPARATION BETWEEN THE EQUIPMENT AND RECEIVER.
• CONNECT THE EQUIPMENT INTO AN OUTLET ON A CIRCUIT DIFFERENT FROM THAT TO WHICH THE RECEIVER IS
NEEDED.
• CONSULT THE DEALER OR AN EXPERIENCED RADIO/TV TECHNICIAN FOR HELP.
EN
1
Page 3
Digital Television Transition Notice: This device contains a digital
television tuner, so it should receive digital over the air TV programming,
with a suitable antenna, after the end of full-power analog TV broadcasting in the United States on February 17, 2009. After February 17, 2009, a
television receiver with only an analog broadcast tuner will require a
converter box to receive full power over-the-air broadcasts with an
antenna because of the Nation’s transition to digital broadcasting.
Analog-only TVs should continue to work as before to receive low power,
Class A or translator television stations and with cable and satellite TV
services, gaming consoles, VCRs, DVD players, and similar products.
When a converter box is used with an older television receiver, a signal
splitter might be necessary to continue to receive low-power analog
broadcasts via an antenna. Information about the DTV transition is available from www.DTV.gov or 1-888-CALL-FCC, and from
www.dtv2009.gov or 1-888-DTV-2009 for information about subsidized
coupons for digital-to-analog converter boxes.
Important Safety Information
Read these instructions.
Keep these instructions.
Heed all warnings.
Follow all instructions.
Do not use this apparatus near water.
Clean only with dry cloth.
Do not block any ventilation openings. Install in accordance with the
manufacturer’s instructions.
Do not install near any heat sources such as radiators, heat registers, stoves
or other apparatus (including amplifiers) that produce heat.
Do not defeat the safety purpose of the polarized or grounding-type plug. A
polarized plug has two blades with one wider than the other. A grounding type
plug has two blades and a third grounding prong. The wide blade or the third
prong are provided for your safety. If the provided plug does not fit into your
outlet, consult an electrician for replacement of the obsolete outlets.
Protect the power cord from being waked on or pinched particularly at plugs,
convenience receptacles, and the pint where they exit from the apparatus.
1.
2.
3.
4.
5.
6.
7.
8.
9.
10.
EN
2
Page 4
Important Safety Information
Only use attachments/accessories specified by the manufacturer.
Use only with the cart, stand, tripod,
bracket, or table specified by the
manufacturer, or sold with the apparatus.
When a cart is used, use caution when
moving the cart/apparatus combination
to avoid injury from tip-over.
Unplug this apparatus during lightning storms or when unused for long
periods of time.
Refer all servicing to qualified service personnel. Servicing is required when
the apparatus has been damaged in any way, such as power supply cord or
plug is damaged, liquid has been spilled or objects have fallen into the
apparatus, the apparatus has been exposed to rain or moisture, does not
operate normally, or has been dropped.
Apparatus shall not be exposed to dripping or splashing and no objects filled
with liquids, such as vases, shall be placed on the apparatus.
The main electrical plug is designed to be easily connected or disconnected
from the power outlet for safe operation.
11.
12.
13.
14.
15.
16.
EN
3
Page 5
Thank You for purchasing the DT150 digital TV converter box. It has
been designed to bring you many years of viewing enjoyment from digital
TV broadcasts when connected to a television that does not incorporate a
digital tuner. Enjoy crystal clear quality that is free of ghosting and snowy
interference.
The DT150 digital TV converter
box includes the following:
- Remote Control
- 2 AAA Batteries
3.4
Special Note:
Digital TV broadcasts require an adequate signal strength from your
antenna to provide the best possible viewing experience. Should a
TV broadcast be disrupted by choppy reception or picture stutter,
readjust your antenna or consider a high quality rooftop antenna for
best results.
Introduction
What’s In The Box?
- AV Cables
- RF Cable
- Owner’s Manual
Unit Dimensions:
Net Weight:
Aspect Ratio:
Tuner Type/ Range:
Resolution:
11” x 8.5” x 1.8”
3 lbs.
16:9 / 4:3
ATSC/ RF CH 2-69
Down converts to 480i
Video Outputs:
Composite (1); S Video (1), RF Out
with Audio
Video Inputs:
RF (1); Smart Antenna (optional)
Audio Outputs:
L/R Audio
Energy Standards: <1 Watt While in Sleep Mode
Specifications
*Antennaweb.org provides personalized information for choosing
antenna type and orientation for your particular location.
EN
4
Page 6
Table of Contents
G
etting Started
Important Safety Information ................................................
Introduction / What’s In The Box? / Specifications ............
Table of Contents .....................................................................
I
nitial Setup Before Use
V
iewing TV Broadcasts
G
eneral Information
Remote Control Battery Installation....................................
Remote Control Functions..................................................
Front / Rear Panel Overview.................................................
Connection to TV.............................................................
Connection to Stereo..........................................................
Quick Start Guide................................................................
Remote Control Overview
To Mute Sound / Number Buttons / CCD / Menu / Exit........................
Remote Control Overview
Arrow Buttons / Channel / Volume / Recall / Display / Guide ...............
Remote Control Overview
Favorite Channels / Signal / Add & Delete Favorite Channels / MTS...
Zoom Functions ...............................................................
Main Menu
Auto Program / Auto Scan of Digital Channels / Manual Channel
Set / Set Password Code.......................................................................
Main Menu
Parental Controls / Closed Caption / Language / Sleep Timer............
Main Menu
Smart Antenna/ Time Zone/ TV Aspect Ratio/ Reset Default Settings.......
Display Menus
Guide/ Signal/ Volume ...........................................................................
Troubleshooting Guide.....................................................
Limited Warranty................................................................
Legal Notice........................................................................
1-3
4
5
6
7
8
9,10
11
12
13
14
17
18
21
22
23
15
16
19
20
EN
5
Page 7
Remove the battery compartment cover.
Load two fresh “AAA” batteries into the battery compartment.
Make sure the batteries are inserted properly, matching polarity
by referring to the symbols “+ -” marked in the battery compartment.
Close the battery compartment cover.
• When replacing batteries, replace both of them. Do not mix new and
used batteries together as battery life will be shortened.
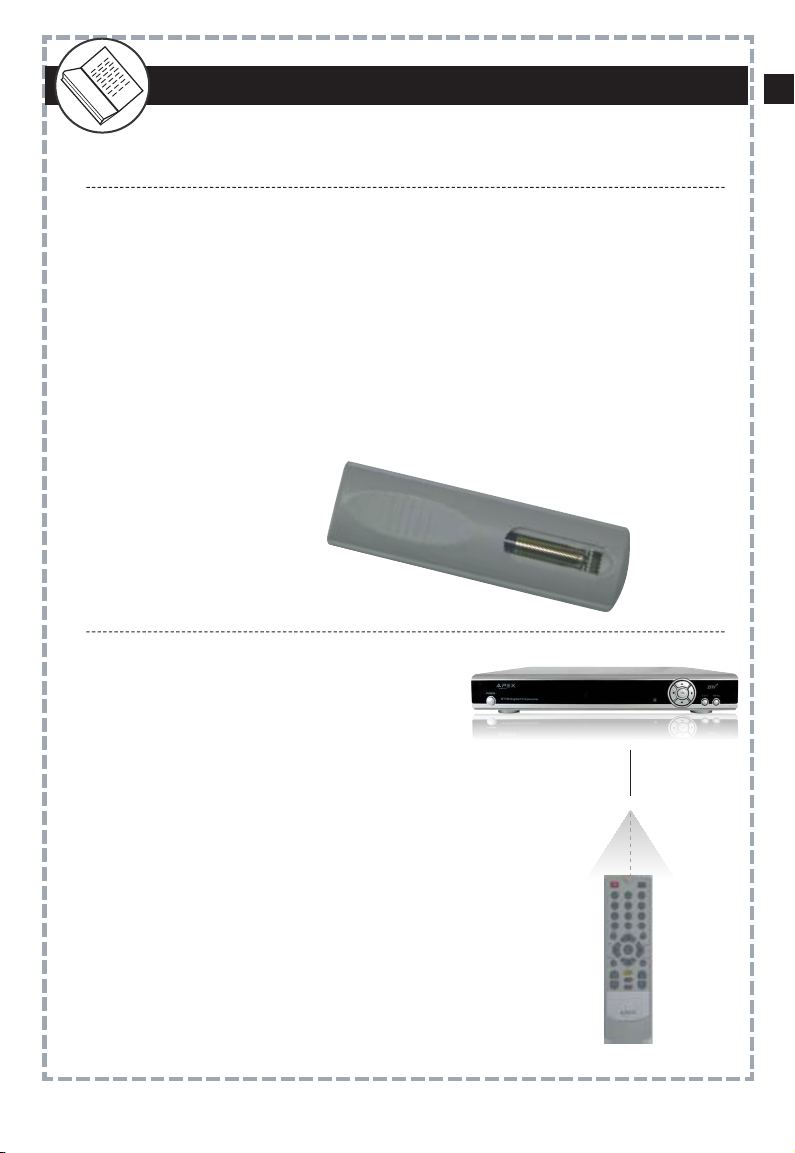
Remote Control Battery Installation
Remote Control Operation Range
Remote Sensor
Point the remote control unit no more than
20 feet from the remote sensor and within
30º from the front of the unit.
• The operating distance may vary depending on
the brightness in the room.
Note:
• Do not point bright lights towards the remote control
signal sensor.
• Do not place objects between the remote control
unit and the remote signal sensor.
• Do not use the remote control unit while operating
other units at the same time.
30º
3
2
1
Remote Control Battery Installation
EN
6
Page 8

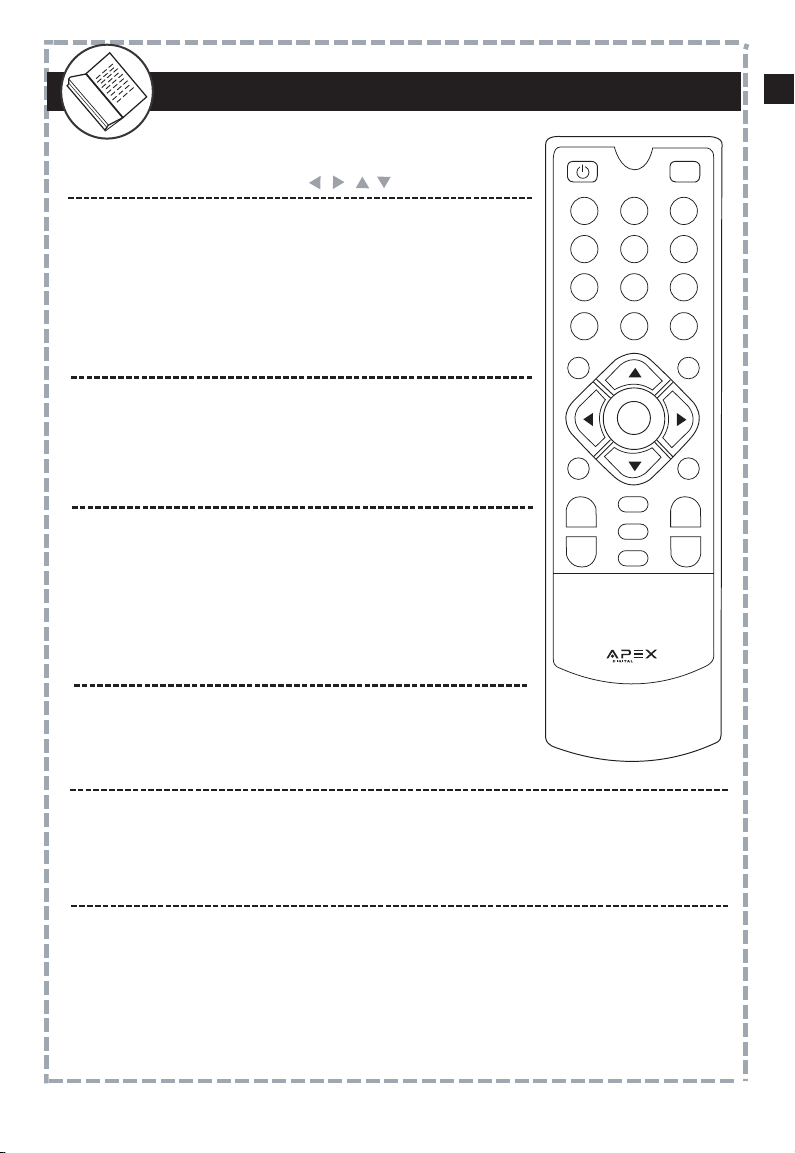
Remote Control Functions
1
13
14
15
2
3
4
5
7
10
11
12
15
12
9
6
3
Zoom button
(PG. 16)
Exit button
(PG. 13)
Add/Delete Favorites CH
(PG. 15)
Favorite Channel (up)
(PG. 15)
Menu button
(PG. 13)
8
2
14
11
5
Guide button
(PGS. 14, 20)
Closed Caption button
(PGS. 13, 18)
Recall button
(PG. 14)
Favorite Channel (down)
(PG. 15)
Number buttons
(PG. 13)
Power button
(PG. 13)
Mute button
(PG. 13)
Display button
(PG. 14)
Signal Strength
(PGS. 15, 20)
MTS button
(PG. 15)
/OK/Vol/Ch
(PGS. 14, 17-20)
13
10
7
16
4
1
16
6
8
9
13
MUTE
CH +
CH -
GUIDE
SIGNAL
FAV +
FAV - MTS
ZOOM
FAV
EXIT
MENU
VOL -
RECALL
DISPLAY
VOL +
1
2 3
4
5 6
7
0
OK
- CCD
8
9
®
EN
7
Page 9
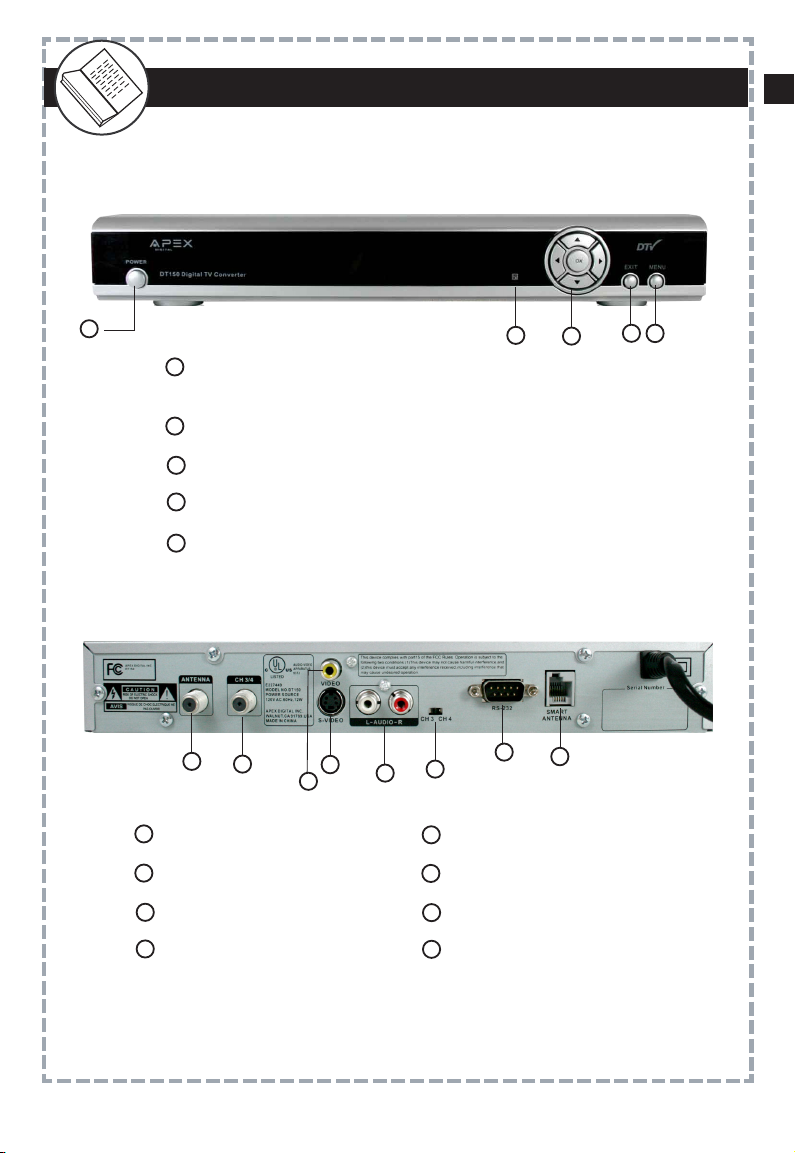
Front & Rear Panel Overview
1
2
3
4
5
1
2
DT150 (front view)
4
3
5
Navigation (Left, Right, Up, Down, OK)
Power ON / OFF
(Yellow light illuminates when power is on)
IR Receiver
Exit Menu
Main Menu Display
DT150 (rear view)
1
2
4
3
5
Composite Video Output
Antenna (RF Input)
Channel 3/4 (RF Output)
S-Video Output
Audio (L/R) Output
5
6
7
8
1
2
4
3
6
8
7
(
Diagnostic/Service use only)
Channel 3/4 Switch
Smart Antenna Connector
(For use with optional Smart Antenna)
EN
8
Page 10
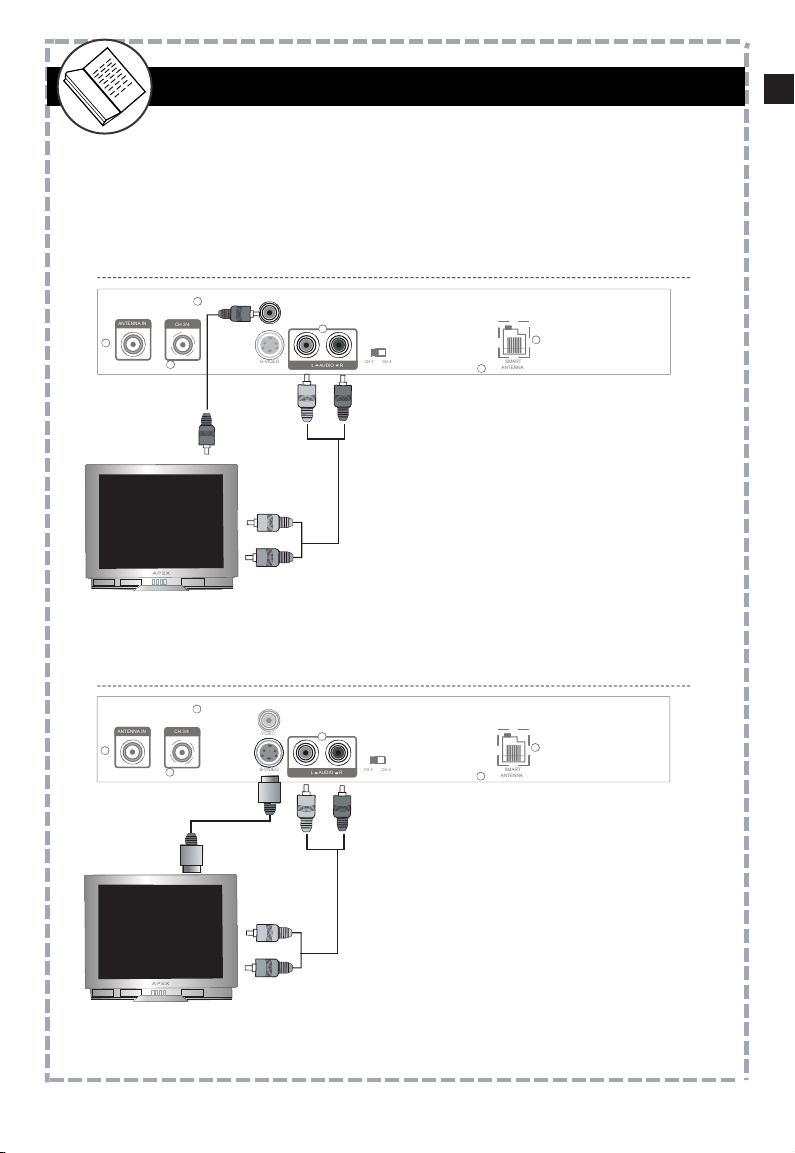
Connection to TV
Composite (using supplied AV cables)
S Video
The DT150 is ready for use after connections are made to your TV using
one of these video installation methods.
Connect the supplied video (yellow) and
audio (red & white) cables.
To view, cycle through your television inputs
(Video 1, 2, etc) to select the source that the
DT150 is connected to.
For better quality, connect with an optional
S-Video cable (if your TV has this input). Do
not connect the yellow video cable when
installing the S-Video cable.
To view, cycle through your television inputs
(Video 1, 2, etc) to select the source that the
DT150 is connected to.
Rear panel subject to modification
Rear panel subject to modification
(using supplied audio cables, S Video is optional)
yellow
To TV Video Input
VIDEO
ANTENNA IN
CH 3/4
S-VIDEO
L
AUDIO R
CH 3 CH 4
SMART
ANTENNA
To TV Audio L/R Input
white red
VIDEO
ANTENNA IN
CH 3/4
S-VIDEO
L
AUDIO R
CH 3 CH 4
SMART
ANTENNA
To TV Audio L/R Input
white red
To S-Video Input on TV
S-VIDEO
EN
9
Page 11
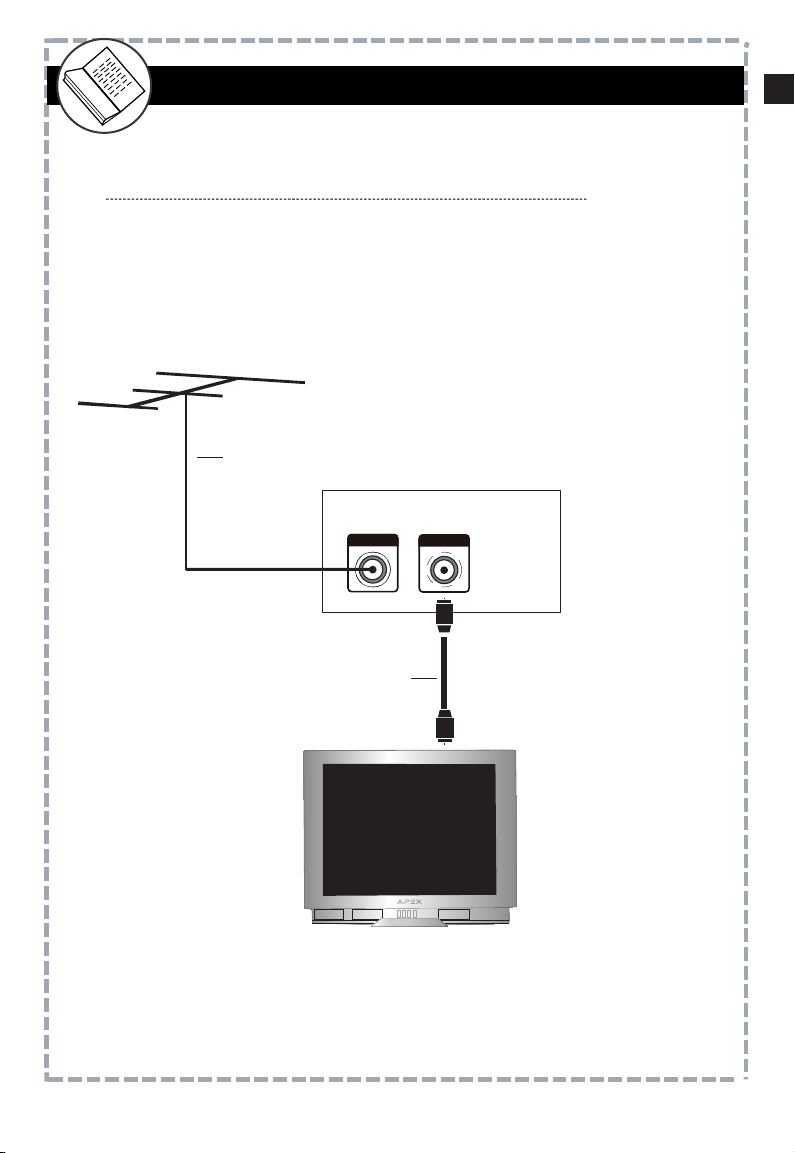
Standard Install - RF Input / Output
Connect antenna wire to RF ANTENNA IN on the rear of the
DT150. Connect the supplied coax cable wire from the CH 3/4
terminal (RF Out) to RF ANTENNA INPUT on the rear of
your TV.
To view, tune Ch 3 or 4 on your TV, choose the channel that
does not have an active or strong signal. Slide the CH 3/4
switch located on the rear of the DT150.
Connection to TV
(Back of Digital Converter Box)
RF Coaxial cable
to your TV
Over-the-air Antenna
ANTENNA
CH 3/4
EN
10
Page 12
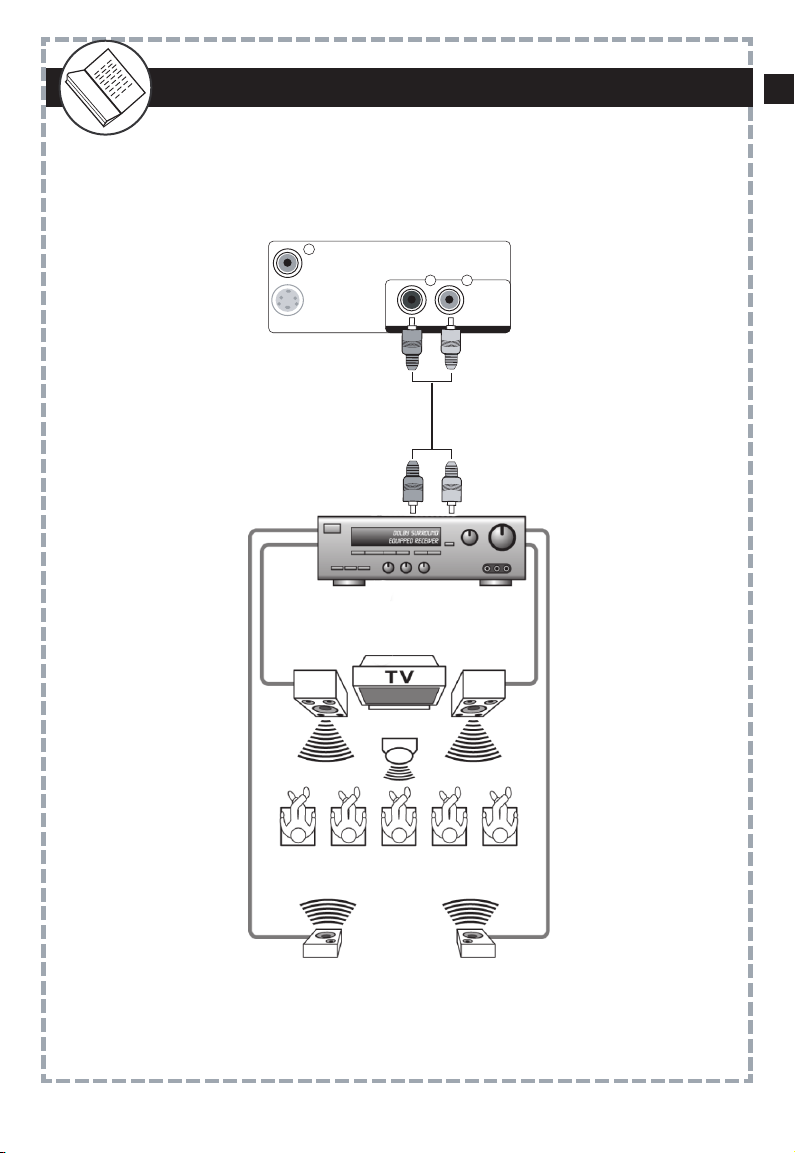
Connection to Stereo
L
R
S-VIDEO
VIDEO
AUDIO OUTPUT
AUDIO OUTPUT
Front Left
Speaker
Front Right
Speaker
Center Channel
Surround Right
Speaker
Surround Left
Speaker
Dolby Surround
Connection Example
To Dolby Surround
Equipped Receiver
(L + R Audio Input)
white red
You may connect the unit to your stereo system using the following
method:
Rear panel subject to modification
EN
11
Page 13

Zoom Functions
Zoom effect on a 4:3 TV Display
Due to the nature of digital broadcasts, the normal image displayed on
your television may appear as a “windowbox” or “letterboxed” image. This
is a normal condition based on signal transmission and programming.
Press the ZOOM button on the remote control to minimize or eliminate
the black bars on your TV display, if desired.
Normal
Zoom
Zoom effect on a 16:9 TV Display (SD Broadcasts Only)
Normal
Zoom
Normal
Zoom
Fill
When viewing TV broadcasts on a widescreen television you will find that
SD programing does not fill the display entirely. Press ZOOM on the remote
control until the display area is filled and black bars are minimized.
A windowbox image is typical when viewing DT broadcasts that are
not widescreen presentations. Press Zoom to eliminate the black bars.
A letterbox image is typical when viewing DT broadcasts that are
presented in widescreen format. Press Zoom to eliminate the black bars.
Note: ZOOM option can vary depending on the broadcaster.
Quick Start Guide
Once all connections are made, follow this quick guide to start viewing
digital channels immediately. It is recommended that you read the
entire manual to familiarize yourself with all of the functions available
to you.
Initial Setup Menu
Menu
Time Zone
TV Aspect Ratio
Auto Scan Channels
When using the converter box for the first time you’ll need to scan for all
available digital channels broadcasting in your local area. Using the
arrow, highlight Auto Program. Press OK to confirm.
When the converter box is used the first time, an Initial Setup Menu will
display.
Select the preferred language when viewing on screen menus.
Use the arrow buttons to select English > Spanish > French.
Auto Program Menu
Auto Scan
Progress (%) 26
Scanning
Initial Setup Menu
Menu Language
Time Zone
TV Aspect Ratio
Auto Program
To Move To Select To Exit
OK EXIT
English
Pacific
4:3
Set the time zone where you reside. Using the highlight Time Zone, then
press to select Pacific > Alaska> Hawaii > Eastern > Central > Mountain
Set the aspect ratio (or shape) of your television display. Using the arrow
button, highlight TV Aspect Ratio, then press to select 4:3 (conventional
TV Shape) or 16:9 (newer widescreen TV shape).
Note: Auto Program search for digital channels in your local area may take several
minutes to complete.
EN
12
Page 14

Remote Control Overview
Number Buttons
Press to directly access a desired television channel.
For example: to access channel 4-2, press
4 > “-” > 2.
The following overview will detail the functions available when using the
remote control.
Press button to turn the converter box ON or OFF. When powered
on, a green LED will illuminate on the front panel.
1
2
Menu
Exit
Press to exit the menu display. The menu will automatically disappear after
30 seconds if there is no adjustment activity.
Press to gain access to the main menu where you
may set up your personal preferences for the
converter box.
Press to highlight a subcategory. See pages 17-19 for details.
1
2
1
CCD
Press to display Closed Caption text (Determined by Broadcaster):
OFF > CC1 > CC2 > CC3 > CC4 or OFF > CS1 >
CS2 > CS3 > CS4 > CS5 > CS6. See page 18 for
more CCD details.
1
To Mute Sound
To momentarily cut off sound to the speakers, press
the MUTE button.
1
To restore sound, press once again.
2
MUTE
CH +
CH -
GUIDE
SIGNAL
FAV +
FAV - MTS
ZOOM
FAV
EXIT
MENU
VOL -
RECALL
DISPLAY
VOL +
1
2 3
4
5 6
7
0
OK
- CCD
8 9
®
EN
13
Page 15
Remote Control Overview
Arrow Buttons / OK
Channel + -
Volume + -
Press Channel + to scan up to the next channel.
Press Vol + to gradually increase volume.
1
2
Recall
Display
Press to return to the previously viewed channel.
Press to view information about the currently viewed program.
1
2
1
Press Vol - to gradually decrease volume.
2
Guide
Press to display an on screen guide of program information that
is available up to 3 days in advance (Determined by Brocaster).
See page 20.
Note: If CCD is activated, the on screen closed caption text will
disappear as long as the guide is displayed.
1
1
1
Press Channel - to scan down to the next channel.
Press OK to confirm your selection.
Note: Make sure your television volume is sufficient.
For best results, adjust set top box volume to
the maximum (100) level. See page 20.
Press OK / arrow buttons to navigate through
guides and favorite channels or to highlight
submenu options.
MUTE
CH +
CH -
GUIDE
SIGNAL
FAV +
FAV - MTS
ZOOM
FAV
EXIT
MENU
VOL -
RECALL
DISPLAY
VOL +
1
2 3
4
5 6
7
0
OK
- CCD
8 9
®
EN
14
Page 16

Remote Control Overview
Signal
Fav (Add/ Delete Favorite Channels)
Press to add the currently viewed channel to
your Favorite’s List.
MTS
1
Press to select a 2nd audio channel providing alternative dialogue
(if available).
Fav + / Fav - (Favorite Channels)
Press to scan downward and view
channels you’ve added into your Favorite’s List.
1
2
Press to view the signal meter that indicates
the strength of the transmission originating from
the broadcaster. Press again to exit. See page
19.
2
Press to scan upward and view
channels you’ve added into your Favorite’s List.
1
Press again to delete the currently viewed
channel from your Favorite’s List.
Add This Channel to your Favorite’s List
Delete This Channel From Your Favorite’s List
SIGNAL
FAV
FAV
MTS
FAV +
FAV -
MUTE
CH +
CH -
GUIDE
SIGNAL
FAV +
FAV - MTS
ZOOM
FAV
EXIT
MENU
VOL -
RECALL
DISPLAY
VOL +
1
2 3
4
5 6
7
0
OK
- CCD
8 9
®
EN
15
Page 17

Zoom Functions
Zoom effect on a 4:3 TV Display
Due to the nature of digital broadcasts, the normal image displayed on
your television may appear as a “windowbox” or “letterboxed” image. This
is a normal condition based on signal transmission and programming.
Press the ZOOM button on the remote control to minimize or eliminate
the black bars on your TV display, if desired.
Normal
Zoom
Zoom effect on a 16:9 TV Display (SD Broadcasts Only)
Normal
Zoom
Normal
Zoom
Fill
When viewing TV broadcasts on a widescreen television you will find that
SD programing does not fill the display entirely. Press ZOOM on the remote
control until the display area is filled and black bars are minimized.
A windowbox image is typical when viewing DT broadcasts that are
not widescreen presentations. Press Zoom to eliminate the black bars.
A letterbox image is typical when viewing DT broadcasts that are
presented in widescreen format. Press Zoom to eliminate the black bars.
Note: ZOOM option can vary depending on the broadcaster.
EN
16
Page 18

1
2
Main Menu
Set Password Code
Auto Scan Digital Channels
Manual Channel Set (Add / Delete Channels)
Auto Program
Press MENU on the remote control to display the Main Menu.
It is strongly recommended to set up your personal preferences in
accordance with the menu options. It is presumed your television
antenna is installed. A rooftop antenna is strongly recommended.
The unit will scan and search for all digital
channels that can be received.
To add or delete digital channels that were
found during auto scan.
Note: You can add or delete channels from your Favorite’s
List from this menu. Highlight a channel, then press FAV.
Using arrow buttons, highlight
“Manual Channel Set”. A menu of available
channels will display.
Press to select a channel to be viewable
or not viewable. Press OK to confirm the
change.
For access to Parental Controls, enter your
4 digit password. Factory default code:
0000
The Main Menu display is for accessing
and setting up preferences for the DT150.
When Auto Program is highlighted, press
OK to begin the auto scan program search.
Note: Auto Program search for digital channels
in your local area may take several minutes
to complete.
Main Menu
Auto Program
Manual Channel Set
Password
Parental Controls
Closed Captions
Language
Sleep Timer
Smart Antenna
Time Zone
TV Aspect Ratio
Reset Default Settings
To Move To Select To Exit
OK EXIT
English
4 Hours
Pacific
4:3
Manual Channel Set Menu
To Move To Select To Exit
OK EXIT
Ch 2-1
Ch 4-1
Ch 4-2
Ch 4-4
Ch 5-1
Ch 5-5
Ch 7-1
Ch 7-2
Ch 7-3
Ch 9-1
KCBS-DT
NBC-4LA
WX-PLUS
RawNews
KTLA-DT
TheTube
KABC-DT
KABC-SD
KABC-WN
KCAL-DT
Viewable
Viewable
Not Viewable
Viewable
Viewable
Viewable
Viewable
Viewable
Viewable
Viewable
Fav
Fav
Fav
Auto Program Menu
Auto Scan
Progress (%)
Scanning
25
Enter Old Password
ANTENNA IN
TV OUT
S-VIDEO
L
AUDIO R
CH 3
CH 3/4 &
Analog Pass-Through
CH 4
SMART
ANTENNA
Note: TV reception is dependent on local
terrain, distance from the local area
antenna tower and strength of your antenna.
ANTENNA IN
TV OUT
VIDEO
SMART
ANTENNA
EN
17
Page 19

VIDEO
Connection to TV
yellow
To TV Video Input
ANTENNA IN
TV OUT
S-VIDEO
L
AUDIO R
CH 3
CH 3/4 &
Analog Pass-Through
CH 4
SMART
ANTENNA
Composite (using supplied AV cables)
S Video
Connect the supplied video (yellow) and
audio (red & white) cables.
To view, cycle through your television inputs
(Video 1, 2, etc) to select the source that the
DT250 is connected to.
For better quality, connect with an optional
S-Video cable (if your TV has this input).
Do not connect the yellow video cable when
installing the S-Video cable.
To view, cycle through your television inputs
(Video 1, 2, etc) to select the source that the
DT250 is connected to.
(using supplied audio cables)
To TV Audio R, L Input
white red
L
AUDIO R
CH 3
CH 3/4 &
Analog Pass-Through
CH 4
S-VIDEO
ANTENNA IN
TV OUT
VIDEO
SMART
ANTENNA
To TV Audio R, L Input
white red
To S-Video Input on TV
Main Menu
Sleep Timer
Closed Caption
Language
Parental Control of MPAA Ratings
After your password code is accepted, the
Parental Control < Menu will display.
Press arrow buttons to select
the TV rating best suited to your family’s
preference.
Using arrow buttons, highlight
“Language” then press OK to select a
preferred on screen display text:
English > Spanish > French.
2
Using arrow buttons, highlight
“Closed Caption” then press OK to
display a menu of customizable options.
Press to highlight and select CCD
display option preferences. Press
OK to confirm.
3
Press Exit
4
Press CCD on the remote to display
captions
Press Exit
Press MENU on the remote control to
display the Main Menu.
Press MENU on the remote control to
display the Main Menu.
Press MENU on the remote control to
display the Main Menu.
Using arrow buttons, highlight
“Sleep Timer”, then press to select
how many hours before the unit should
turn off (Standby mode) 1hr > 2hrs >
4hrs > off (factory default is set at 4hrs).
2
1
1
Press Exit
2
Parental Control Menu
MPAA
To Move To Select To Exit
OK EXIT
NONE
G
PG
PG-13
R
NC-17
X
NONE
TV-Y
TV-Y7
TV-G
TV-PG
TV-14
TV-MA
ALL FV L S V D
Closed Caption
Style
Size
Font
Text Color
Text Opacity
Background Color
Background Opacity
Edge Effect
Edge Color
To Move To Select To Exit
OK EXIT
DETERMINED BY BROADCASTER
Automatic
Automatic
Automatic
Automatic
Automatic
Automatic
Automatic
Automatic
Automatic
Main Menu
Auto Program
Manual Channel Set
Password
Parental Controls
Closed Captions
Language
Sleep Timer
Smart Antenna
Time Zone
TV Aspect Ratio
Reset Default Settings
To Move To Select To Exit
OK EXIT
English
4 Hours
Main Menu
Auto Program
Manual Channel Set
Password
Parental Controls
Closed Captions
Language
Sleep Timer
Smart Antenna
Time Zone
TV Aspect Ratio
Reset Default Settings
To Move To Select To Exit
OK EXIT
English
4 Hours
Pacific
4:3
Pacific
4:3
18
EN
Page 20

Main Menu
Smart Antenna (Optional)
Time Zone
TV Aspect Ratio
1
Using arrow buttons, highlight
“Smart Antenna” to display the Smart
Antenna menu, then press OK.
Press MENU on the remote control to
display the Main menu.
Press MENU on the remote control to
display the Main menu.
Press Exit
Press MENU on the remote control to
display the Main menu.
Note: A Smart antenna must be connected
(CEA-909 Mode A) to display the
Smart Antenna Menu.
1
2
Press Exit
2
Using arrow buttons, highlight
“Time Zone”. Press arrow button
to select your local time zone. See page
12.
1
Using arrow buttons, highlight “TV
Aspect Ratio”. Use arrow button to
select the TV display shape connected
to this unit (4:3 or 16:9). See page 12.
Main Menu
Auto Program
Manual Channel Set
Password
Parental Controls
Closed Captions
Language
Sleep Timer
Smart Antenna
Time Zone
TV Aspect Ratio
Reset Default Settings
To Move To Select To Exit
OK EXIT
English
4 Hours
Pacific
4:3
Main Menu
Auto Program
Manual Channel Set
Password
Parental Controls
Closed Captions
Language
Sleep Timer
Smart Antenna
Time Zone
TV Aspect Ratio
Reset Default Settings
To Move To Select To Exit
OK EXIT
English
4 Hours
Pacific
4:3
Main Menu
Auto Program
Manual Channel Set
Password
Parental Controls
Closed Captions
Language
Sleep Timer
Smart Antenna
Time Zone
TV Aspect Ratio
Reset Default Settings
To Move To Select To Exit
OK EXIT
English
4 Hours
Pacific
4:3
Smart Antenna Menu
Change antenna position
Automatic Re-adjust position
Save new position
To Move To Select To Exit
OK EXIT
1
Reset Default Settings
Main Menu
Auto Program
Manual Channel Set
Password
Parental Controls
Closed Captions
Language
Sleep Timer
Smart Antenna
Time Zone
TV Aspect Ratio
Reset Default Settnigs
To Move To Select To Exit
OK EXIT
English
4 Hours
Pacific
4:3
Press MENU on the remote control to
display the Main menu.
1
Using arrow buttons, highlight
“Reset Default Settings”. Press OK
to reset all settings back to original
factory status.
19
EN
Page 21

Remote Control Functions
1
13
14
15
2
3
4
5
7
10
11
12
15
12
9
6
3
Zoom button
(PG. 16)
Exit button
(PG. 13)
Add/Delete Favorites CH
(PG. 15)
Favorite Channel (up)
(PG. 15)
Menu button
(PG. 13)
8
2
14
11
5
Guide button
(PGS. 14, 20)
Closed Caption button
(PGS. 13, 18)
Recall button
(PG. 14)
Favorite Channel (down)
(PG. 15)
Number buttons
(PG. 13)
Power button
(PG. 13)
Mute button
(PG. 13)
Display button
(PG. 14)
Signal Strength
(PGS. 15, 20)
MTS button
(PG. 15)
/OK/Vol/Ch
(PGS. 14, 17-20)
13
10
7
16
4
1
16
6
8
9
13
MUTE
CH +
CH -
GUIDE
SIGNAL
FAV +
FAV - MTS
ZOOM
FAV
EXIT
MENU
VOL -
RECALL
DISPLAY
VOL +
1
2 3
4
5 6
7
0
OK
- CCD
8
9
®
Display Menus
Signal
Guide
1
Press to display a guide of program information (if available).
Press to display future programming information (if available).
1
Press SIGNAL to view a linear signal meter that indicates the
strength of the digital transmission originating from the broadcaster.
2
THETUBE Music Vide. . .
THETUBE Music Vide. . .
THETUBE Music Vide. . .
12:00PM - 12:30PM
12:00PM - 1:00PM
Music Videos 24/7 (TV-G)
1:00PM - 1:30PM
Signal Level 57
Weak Good Excellent
Volume
1
It is recommended to adjust volume to the maximum level (100) for best
audio results.
Press Volume + to increase volume.
2
Press Volume - to decrease volume.
Volume 100
EN
20
Page 22

etting Started
eneral Information
Troubleshooting Guide
Cannot receive certain channels
through the antenna.
Video noise or choppy picture
TV blocked at certain channels
No sound
Black box on screen
No power
No picture
• Use the automatic scanning function to add the
channels not included in memory.
• Signal from the TV station may be weak.
• Reposition antenna
• Check connected video and audio cables are completely
inserted
• Reposition antenna
•
Use the automatic scanning method to add the channels
not included into the memory.
•
Check parental control settings.
• Check connected audio cables are completely inserted.
• Correct audio source from your amplifier.
• Mute function may be enabled, press Mute on remote.
•
The “Text” option is enabled and no text is available.
• Turn off CCD on the remote control.
• Batteries in the remote control may need replacing.
• Remove then re-attach AC plug to wall outlet after 30 s.
• Digital TV channel signal may be weak, try another
channel
• Re-connect the antenna or cable wiring.
• Make sure the video devices are turned on.
• Make sure Auto Scan Channels is completed.
Symptom Possible Solutions
Check for a possible solution to a symptom before contacting a customer
service representative. We recommend visiting our website at:
www.apexdigitalinc.com for additional updates.
*Antennaweb.org provides personalized information for choosing antenna
type and orientation for your particular.
EN
21
Page 23

Limited Warranty
DT150 Digital TV Converter Box
1YEAR PARTS / 90 DAY LABOR LIMITED WARRANTY
WHO IS COVERED?
WHAT IS COVERED
Warranty repair from the original date of purchase: 1 year replacement of parts; 90 day
limited labor warranty coverage.
If you don’t have proof of purchase, your unit will
be considered out of warranty and charged at a flat labor rate.
WHAT IS EXCLUDED?
Your warranty does not cover:
- Labor charges for installation or setup of the product, adjustment of customer controls
on the product and installation or repair of antenna systems outside of the product.
- Product repair and/or part replacement because of misuse, accident, unauthorized
repair or other cause not within the control of Apex Digital, Inc.
- A product that requires modification or adaptation to enable it to operate in any country
other than the country for which it was designed, manufactured, approved and / or
authorized, or repair of products damaged by these modifications.
- Incidental or consequential damages resulting from the product. (Some states do not
allow the incidental or consequential damages, so the above exclusion may not apply to
you. This includes but is not limited to, precorded material, whether copyrighted or not.)
-Shipment and service to a NON-AUTHORIZED repair facility.
ORDERING ACCESSORIES:
You may purchase accessories by visiting www.shop-apex.com or call (866) 930-1236
anytime.
WHERE IS SERVICE AVAILABLE?
If you previously registered your product(s) online at www.apexdigitalinc.com go to
Support Services, then My Account to email your request. You may also call us at
(866) 427-3946 Monday-Friday, 6am-6pm PST.
REGISTERING YOUR PRODUCT ONLINE:
To register your product go to www.apexdigitalinc.com. Click on Support Services, then
Product Registration. Validate your warranty, gain access to customer support representatives, product news, email notifications and access to special offers.
This warranty gives you specific legal rights. You may have other rights which vary from state/province to state/province.
Limited One (1) Year Parts Warranty - Apex Digital warrants the parts in this product against defects
in material or workmanship for a period of one (1) year from the date of original retail purchase.
During this period, Apex Digital will replace a defective part with a new or refurbished part without
charge to you. Limited Ninety (90) Days Labor Warranty - Apex Digital warrants it will be responsible for labor charges for repair or replacement of parts on this product for a period of ninety days
from the date of original retail purchase. Keep the original box and packaging in case your unit
requires service. You
are responsible for the shipping costs to Apex Digital. E-mail or call
Customer Support for detailed instruction on where to ship your product for repair.
A return
authorization number is required before acceptance by Apex Digital. This
required number must be
clearly written on the package or the delivery may be refused by warehouse personnel
22
EN
Page 24

Legal Notice
FCC Part 15
This device complies with Part 15 of the FCC Rules. Operation of this
product is subject to the following two\conditions: (1) this device may not
cause harmful interference, and (2) this device must accept any
interferencereceived, including interference that may cause undesired
operation.
This equipment has been tested and found to comply within the limits for a
class B digital device, pursuant to Part 15 of the FCC Rules. These limits
are designed to provide reasonable protection against harmful interference
in a residential installation. This equipment generates, uses, and can
radiate radio frequency energy and, if not installed and used in accordance
with the instructions, may cause harmful interference to radio
communications. However, there is no guarantee that interference will not
occur in a particularinstallation. If this equipment does cause harmful
interference to radio or television reception, which can be determined by
turning the equipment off and on, the user is encouraged to try to correct
the interference by one or more of the following measures:
• Reorient or relocate the receiving antenna.
• Increase the separation between the equipment and
receiver.
• Connect the equipment into an outlet on a circuit
different from that to which the receiver is connected.
• Consult the dealer or an experienced technician for
help.
FCC warning
Changes or modifications not expressly approved by the party responsible
for compliance with the FCC Rules could void the user’s authority to
operate this equipment.
EN
23
Page 25

DT150
Digital TV Converter Box
User's Manual
®
simply remarkable™
Caja Convertidora
de TV Digital
Manual del Usuario
Page 26

Información importante de seguridad
ADVERTENCIA
- PARA EVITAR INCENDIOS O DESCARGAS ELÉCTRICAS, NO UTILICE ESTE ENCHUFE CON
CABLES DE EXTENSIÓN, TOMAS ELÉCTRICAS U OTROS TOMACORRIENTES SALVO QUE LAS
CLAVIJAS PUEDAN INTRODUCIRSE COMPLETAMENTE PARA IMPEDIR SU EXPOSICIÓN.
- PARA EVITAR INCENDIOS O DESCARGAS ELÉCTRICAS, NO EXPONGA ESTE DISPOSITIVO A LA
LLUVIA NI A LA HUMEDAD.
El símbolo de rayo con punta de flecha
dentro de un triángulo equilátero
advierte la presencia de “voltaje
peligroso” sin aislamiento dentro de la
carcasa del producto que puede tener
una magnitud suficiente para implicar
un riesgo de descarga eléctrica para
las personas.
El signo de exclamación dentro
de un triángulo equilátero
advierte la presencia de
instrucciones de funcionamiento
y mantenimiento (reparación) en
la documentación que
acompaña al dispositivo.
ADVERTENCIA: PARA REDUCIR EL
RIESGO DE DESCARGA ELÉCTRICA,
NO QUITE LA CUBIERTA (NI LA PARTE
TRASERA). EN EL INTERIOR, NO HAY
PIEZAS QUE EL USUARIO PUEDA
REPARAR. CONSULTE CON EL
SERVICIO DE REPARACIONES PARA
OBTENER INFORMACIÓN ACERCA DE
PERSONAL CALIFICADO
P R E C A U C I Ó N
RIESGO DE DESCARGA
ELÉCTRICA, NO ABRA
- LOS CAMBIOS O LAS MODIFICACIONES EN ESTA UNIDAD QUE NO ESTÉN
EXPRESAMENTE APROBADOS POR LA PARTE RESPONSABLE DEL CUMPLIMIENTO
DE LAS NORMAS PODRÍAN ANULAR LA AUTORIZACIÓN DEL USUARIO PARA
OPERAR EL EQUIPO.
NOTA: ESTE EQUIPO FUE PROBADO Y SE COMPROBÓ QUE CUMPLE CON LOS
LÍMITES PARA UN DISPOSITIVO DIGITAL CLASE B, DE ACUERDO CON LA PARTE 15
DE LAS NORMAS DE LA FCC (COMISIÓN FEDERAL DE COMUNICACIONES). ESTOS
LÍMITES ESTÁN DISEÑADOS PARA OFRECER UNA PROTECCIÓN RAZONABLE
CONTRA LA INTERFERENCIA PERJUDICIAL EN UNA INSTALACIÓN RESIDENCIAL.
ESTE EQUIPO GENERA, UTILIZA Y PUEDE IRRADIAR ENERGÍA DE
RADIOFRECUENCIA Y, SI NO SE INSTALA Y SE UTILIZA DE ACUERDO CON LAS
INSTRUCCIONES, PUEDE PRODUCIR INTERFERENCIA PERJUDICIAL EN LAS
COMUNICACIONES RADIALES.
SIN EMBARGO, NO SE GARANTIZA QUE NO HAYA INTERFERENCIA EN UNA
INSTALACIÓN EN PARTICULAR. SI ESTE EQUIPO SÍ PRODUCE UNA
INTERFERENCIA PERJUDICIAL EN LA RECEPCIÓN TELEVISIVA O RADIAL, LO CUAL
SE PUEDE DETERMINAR AL ENCENDER Y APAGAR EL EQUIPO, SE RECOMIENDA
AL USUARIO QUE INTENTE CORREGIR LA INTERFERENCIA MEDIANTE UNA O MÁS
DE LAS SIGUIENTES MEDIDAS:
- REORIENTE O REUBIQUE LA ANTENA RECEPTORA.
- AUMENTE LA DISTANCIA ENTRE EL EQUIPO Y EL RECEPTOR.
- CONECTE EL EQUIPO A UN TOMACORRIENTE EN UN CIRCUITO DIFERENTE DEL
QUE ESTÁ CONECTADO EL RECEPTOR.
- CONSULTE AL DISTRIBUIDOR O A UN TÉCNICO DE RADIO/TELEVISIÓN
EXPERIMENTADO PARA QUE LE BRINDE ASISTENCIA.
Información importante de seguridad
Información importante de seguridad
ES
1
Page 27

Lea estas instrucciones.
Conserve estas instrucciones.
Tome en cuenta todas las advertencias.
Siga todas las instrucciones.
No use este aparato cerca del agua.
Limpie solamente con un paño seco.
No bloquee ninguna de las aperturas de ventilación. Instale de acuerdo con
las instrucciones del fabricante.
No instale cerca de fuentes de calor tales como radiadores, registros de
calor, estufas, u otros aparatos (incluyendo amplificadores) que produzcan
calor.
No elimine el propósito de seguridad de la clavija polarizada o del tipo a tierra.
Una clavija polarizada tiene dos cuchillas, una mas ancha que la otra. Una
clavija del tipo a tierra. Una clavija del tipo a tierra tienes dos cuchillas y una
tercera punta para conexión a tierra. La cuchilla ancha o la tercera punta son
suministradas para su seguridad. Si la clvija suministrada no se adapta dentro
de su toma de corriente, consulte a un electricista para que reemplace la
toma de corriente obsoleta.
Proteja el cable de corriente de pisotones o machucones particularmente en
las clavijas, receptáculos de conveniencia, y en punto donde salen del
aparato.
1.
2.
3.
4.
5.
6.
7.
8.
9.
10.
11.
12.
13.
14.
15.
16.
Información sobre el modo digital: Este aparato tiene un sintonizador de televisión digital, por lo que, con
una antena adecuada, empezará a recibir la señal por aire en formato digital, con motivo a que Estados
Unidos dejará de emitir señales análogas a partir del 17 de febrero de 2009. Después de esta fecha, si
tiene un receptor de televisión análogo, deberá adquirir un convertidor para recibir la señal televisiva por
aire con una antena, debido a que el país hará la transición a la televisión digital. Los televisores
análogos no deberían tener problemas con la recepción de servicios de televisión Clase A, de baja
potencia o de estaciones repetidoras, ni con las señales por cable y satelital, consolas de juegos,
aparatos de video (VCR), reproductores de DVD y productos similares. Cuando el convertidor se utiliza
con un receptor de televisión más viejo, es posible que necesite un divisor de señales para continuar
recibiendo las transmisiones análogas de baja potencia a través de una antena. Para obtener más
información sobre la transición a la televisión digital, visite www.DTV.gov o llame al 1-888-CALL-FCC.
Ingrese en www.dtv2009.gov o llame al 1-888-DTV-2009 para recibir información relacionada con los
cupones subvencionados para convertidores análogo-digitales
Información importante de seguridad
Información importante de seguridad
2
ES
Page 28

Use solamente accesorios/aditamentos especificados por el fabricante.
Use solamente con el carro, soporte, trípode, consola, o mesa especificados
por el fabricante, o vendidos con el aparato. Cuando se utiliza un carro, tenga
precaución al mover la combinación de carro/aparato para evita lesión
ocasionada por volcadura.
Desconecte este aparato durante tormentas eléctricas o cuando no sea
utilizado por largos periodos de tiempo.
Refiera todo el servicio es requerido cuando el aparato ha sido dañado de
alguna forma, tal como daño a la clavija o al cable de corriente, cuando se ha
derramado liquido o han caído objetos dentro del aparato, el aparato ha sido
expuesto a lluvia o humedad, no funciones normalmente, o ha sido tirado.
El aparato no debe quedar expuesto a goteos o salpicaduras de líquidos, y,
por lo tanto, no se deben colocar sobre el aparato objetos que contengan
líquidos, como por ejemplo vasos.
El cable electrico principal fue diseñado para enchufar y desenchufar
facilmente de la toma de corriente para seguridad de funcionamiento.
11.
12.
13.
14.
15.
16.
Información importante de seguridad
ES
3
Page 29

3.4
Introducción
Qué incluye el convertidor?
Dimensiones del aparato:
Peso Neto:
Formato de imagen:
Tipo/alcance del sintonizador:
Resolución
11” x 8.5” x 1.8”
3 lbs.
16:9 / 4:3
ATSC/ RF CH 2-69
Conversión descendente hasta 480i
Salidas de video:
Compuesta (1); S Video (1), salida RF
con audio
Entradas de video:
RF (1); Antena inteligente (opcional)
Salidas de audio:
L/R Audio
Valores de energía: <1 vatio en la opción En espera
Especificaciones
4
Gracias por la compra del convertidor de televisión digital, que le permitirá disfrutar, durante
muchos años, del entretenimiento digital al conectarlo a un aparato de televisión que no tiene
incorporado un sintonizador digital. Deléitese con la nitidez sin imágenes dobles ni interferencia en forma de lluvia.
Nota especial:
Las transmisiones de la televisión digital requieren una intensidad de señal adecuada desde
su antena para brindar la mejor imagen posible. Si la recepción de la transmisión televisiva es
entrecortada o la imagen parpadea, reajuste su antena o considere la posibilidad de adquirir
una antena para techo de alta calidad para obtener mejores resultados.
*El sitio Antennaweb.org proporciona información personalizada para elegir el tipo de antena y
la dirección para su localidad en particular.
El convertidor de televisión digital
DT150 incluye lo siguiente:
- control remoto
- 2 pilas AAA
- cables AV
- cable RF
- manual del usuario
ES
Page 30

Tabla de Contenido
Primeros pasos
Información importante de seguridad ................................
Introducción / Especificaciones
Tabla de Contenido ...................................................................
Instalación inicial antes del uso
Transmisiones televisivas
Información general
Instalación de las pilas del control remoto.........................
Funciones del control remoto.............................................
Descripción general del panel delantero y trasero..............
Conexión al televisor.......................................................
Conexión a estéreo.............................................................
Guía de inicio rápido............................................................
Descripción general del control remoto
Para modo silencioso/Botones numéricos/CCD/Menú/Salir................
Descripción general del control remoto
Botones de flecha/Canal/Volumen/Volver/Visualización/Guía ............
Descripción general del control remoto
Canales favoritos/Señal/Agregar y borrar canales favoritos/MTS........
Funciones del zoom ........................................................
Menú principalpal
Programación automática/Escaneo automático de canales
digitales/Canales manuales Establecer/Establecer contraseña...........
Menú principal
Controles parentales/Subtitulado electrónico/Idioma/Temporizador de apagado................
Menú principal
Menú principal Antena inteligente/Zona horaria/Formato de imagen/
Reinicio de las propiedades predeterminadas
........................................................
Visualización de menús
Guía/Señal/Volumen ...........................................................................
Guía para la solución de problemas................................
Garantía limitada................................................................
Aviso Legal.........................................................................
1-3
4
5
6
7
8
9,10
11
12
13
14
17
18
21
22
23
15
16
19
20
5
..............................................
ES
Page 31

Instalación de las pilas del control remoto
Alcance del control remoto
Remote Sensor
• La distancia de alcance puede variar según
la luminosidad que haya en la habilitación.
30º
6
Instalación de las pilas del control remoto
6
1. Quite la tapa del compartimiento de las pilas.
2. Coloque dos pilas "AAA".
Asegúrese de haberlas colocado correctamente y de que coincida la polaridad
tomando como referencia los símbolos "+ -" que aparecen en el compartimiento.
3. Cierre la tapa del compartimiento de las pilas.
• Siempre reemplace ambas pilas. No mezcle las pilas nuevas con las usadas
porque les acortará su vida útil.
Apunte con el control remoto al
sensor remoto a una distancia de no
más de 20 pies y dentro de los 30º
de la parte frontal del aparato.
Nota:
• No apunte luces brillantes hacia el sensor de
señales del control remoto.
• No coloque objetos entre el control remoto y el
sensor remoto de señales.
• No utilice el control remoto al mismo tiempo
que opera otros aparatos.
ES
Page 32

Funciones del control remoto
1
13
14
15
2
3
4
5
7
10
11
12
15
12
9
6
3
Botón Zoom
(PG. 16)
Botón Salir
(PG. 13)
Agregar y borrar canales
favoritos
(PG. 15)
Canal favorito
(ascendente)
(PG. 15)
Botón Menú
(PG. 13)
8
2
14
11
5
Botón Guía
(PGS. 14, 20)
Botón de subtitulado
electrónico
(PGS. 13, 18)
Botón Volver
(PG. 14)
Canal favorito
(descendente)
(PG. 15)
Botones numéricos
(PG. 13)
Botón de encendido
(PG. 13)
Botón Silencio
(PG. 13)
Botón Visualizar
(PG. 14)
Intensidad de señal
(PGS. 15, 20)
Botón MTS
(PG. 15)
/OK/Vol/Ch
(PGS. 14, 17-20)
13
10
7
16
4
1
16
6
8
9
13
MUTE
CH +
CH -
GUIDE
SIGNAL
FAV +
FAV - MTS
ZOOM
FAV
EXIT
MENU
VOL -
RECALL
DISPLAY
VOL +
1
2 3
4
5 6
7
0
OK
- CCD
8
9
®
7
ES
Page 33

Descripción general del panel delantero y trasero
DT150 (vista del frente)
Encendido/En espera
(Luz amarillo: encendido)
Sensor del control remoto
DT150 (vista posterior)
1
2
4
3
5
Interruptor de canales 3 y 4
Entrada de antena
(entrada RF)
Salida TV
(salida RF)
Salida de video compuesta
Salida de S-Video
5
6
7 8 1
2
3
4
6
7
8
Salida de audio (L/R)
Conector de antena inteligente
(Opcional)
8
1
2
3
4
5
1
2
4
3
5
Navegación (ido, derecho, encima de, abajo, OK)
Salga el menú
Exhibición del menú principal
(Uso de diagnóstico
del servicio solamente)
ES
Page 34

Conexión al televisor
Compuesta (mediante los cables AV proporcionados)
S Video (utilizando los cables de audio proporcionados)
Conecte los cables proporcionados de audio
(rojo y blanco) y de video (amarillo).
Para ver, pruebe con todas las entradas de su
televisión (video 1, 2, etc.) para seleccionar la
fuente a la que se conecta el DT150.
Para una mejor calidad, conecte con un cable
S-Video opcional (si su TV tiene esta entrada).
No conecte el cable de video amarillo
cuando utilice el cable S-Video.
Para ver, pruebe con todas las entradas de su
televisión (video 1, 2, etc.) para seleccionar la
fuente a la que se conecta el DT150.
Conexión al televisor
yellow
A la entrada de TV video
VIDEO
ANTENNA IN
CH 3/4
S-VIDEO
L
AUDIO R
CH 3 CH 4
SMART
ANTENNA
To TV Audio R, L Input
white red
VIDEO
ANTENNA IN
CH 3/4
S-VIDEO
L
AUDIO R
CH 3 CH 4
SMART
ANTENNA
To TV Audio R, L Input
white red
To S-Video Input on TV
S-VIDEO
ES
9
Page 35

Conexión al televisor
Instalación estándar. Salida y entrada de RF
Cable coaxial de
RF a su TV
Antena en el aire
ANTENNA IN TV OUT
Conecte el cable de la antena a la ENTRADA DE
ANTENA RF en la parte trasera del DT150. Conecte
el cable coaxial complementario desde el terminal CH
3/4 (Salida de RF) a la SALIDA DE LA ANTENA DE
RF en la parte trasera de su TV
Para ver, sintonice el Ch 3 o 4 en su TV, elija el canal
que no tiene una señal fuerte o activa. Deslice el
interruptor CH 3/4 ubicado en la parte trasera del
DT150.
ES
10
Page 36

Conexión a estéreo
Parlante envolvente Parlante envolvente
Parlante envolvente Parlante envolvente
Center Channel
Ejemplo de conexión de
sonido envolvente Dolby
Al receptor equipado con
sonido envolvente Dolby
(Salida de audio L + R)
whitered
Puede conectar el aparato a su sistema estéreo utilizando
el siguiente método:
Panel trasero sujeto a modificaciones
11
ES
Page 37

Configure la zona horaria según el lugar donde viva. Utilice la para
seleccionar Zona horaria, luego presione para seleccionar Pacífico >
Alaska> Hawai > del este > central > montaña
Seleccione el idioma en el que desea ver los menús en la pantalla. Utilice
los botones de flecha para seleccionar inglés > español > francés.
Guía de inicio rápido
Menú de configuración inicial
Menú
Zona horaria
Formato de imagen
Escaneo automático de canales
Cuando el convertidor se utiliza por primera vez, aparecerá un menú de
configuración inicial.
Auto Program Menu
Auto Scan
Progress (%) 26
Scanning
Initial Setup Menu
Menu Language
Time Zone
TV Aspect Ratio
Auto Program
To Move To Select To Exit
OK EXIT
English
Pacific
4:3
Una vez realizadas todas las conexiones, siga esta guía para comenzar a ver canales digitales de inmediato. Se recomienda que lea todo
el manual para familiarizarse con cada una de las funciones que
puede utilizar.
Configure el formato de imagen para la visualización en su televisor. Use el
botón de la flecha , seleccione el formato de imagen, luego presione
para seleccionar 4:3 (formato usual de TV) o 16:9 (formato nuevo para
pantalla ancha).
Cuando utiliza el convertidor por primera vez, será necesario que
escanee todos los canales digitales disponibles que transmiten en su
zona local. Mediante la flecha , seleccione Auto Program. Presione OK
para confirmar.
Nota: La busqueda de canales digitales en su area puede llevar varios minutos.
ES
12
Page 38

Presione para ver los subtítulos electrónicos (determinado por la
estación televisiva)
OFF > CC1 > CC2 > CC3 > CC4 o
OFF > CS1 > CS2 > CS3 > CS4 > CS5 > CS6. Para
obtener más detalles sobre CCD, vea la página 18.
12
Descripción general del control remoto
Botones numéricos
1
2
Salir
1
2
1
CCD
1
Para detener el sonido
1
2
MUTE
CH +
CH -
GUIDE
SIGNAL
FAV +
FAV - MTS
ZOOM
FAV
EXIT
MENU
VOL -
RECALL
DISPLAY
VOL +
1
2 3
4
5 6
7
0
OK
- CCD
8 9
®
13
Las siguientes características detallarán las funciones disponibles cuando
utiliza el control remoto.
Presione el botón de encendido ( ) y apagado del convertidor. Cuando se
encienda, un LED verde se iluminará en el panel delantero.
Para interrumpir momentáneamente el sonido de los
parlantes, presiones el botón MUTE (silencio).
Para restituir el sonido, presiónelo una vez más..
Presione directamente para acceder al canal de
televisión deseado.
Por ejemplo: para acceder al canal 4-2, presione 4 >
"-" > 2.
Presione para acceder al menú principal donde puede
configurar sus preferencias personales para el
convertidor.
Presione para seleccionar una subcategoría. Para
obtener detalles, consulte las páginas 17 a 19.
Presione el botón Exit para salir del menú. El menú desaparecerá
automáticamente después de transcurridos 30 segundos de inactividad.
Menú
ES
Page 39

12
Descripción general del control remoto
14
Botones de flecha / OK
Canal + -
Volume + -
1
2
Volver
Visualización
1
2
1
2
Guía
1
1
1
Presione OK y los botones de flecha para navegar
por las guías y los canales favoritos, o para
seleccionar opciones de los submenús.
Presione OK para confirmar su selección
Presione Vol + para aumentar gradualmente el
volumen.
Presione el botón Recall para volver al canal visto
anteriormente.
Presione el botón Display para ver información sobre el programa que
está viendo actualmente.
Presione el botón Guide para visualizar en pantalla la guía de información de programación que se encuentra disponible hasta 3 días
antes (determinado por la estación televisiva). Vea la página 20.
Nota: Si CCD está activado, el texto del subtitulado electrónico en pantalla desaparecerá durante el tiempo que se visualice la guía.
Presione Vol - para reducir gradualmente el
volumen.
Presione CH + para ir al siguiente canal en
orden ascendente.
Presione CH - para ir al siguiente canal en
orden descendente.
Nota: Asegúrese de que el volumen de su televisor sea
suficiente. Para obtener mejores resultados, ajuste el
volumen del aparato al máximo (100). Vea la página 20.
MUTE
CH +
CH -
GUIDE
SIGNAL
FAV +
FAV - MTS
ZOOM
FAV
EXIT
MENU
VOL -
RECALL
DISPLAY
VOL +
1
2 3
4
5 6
7
0
OK
- CCD
8 9
®
ES
Page 40

Descripción general del control remoto
Señal
Fav (Agregar y borrar canales favoritos)
MTS
1
Presione el botón para seleccionar un segundo canal de audio y
proporcionar un diálogo alternativo (si está disponible).
Fav + / Fav - (Canales Favoritos)
1
2
2
1
Add This Channel To Your Favorite’s List
Delete This Channel From Your Favorite’s List
Presione FAV+ para buscar en orden ascendente y ver los canales que ha agregado a su
Lista de favoritos.
Presione FAV- para buscar en orden descendente y ver los canales que ha agregado a su
Lista de favoritos.
Presione el botón FAV para agregar el canal
que está viendo en ese momento a su Lista de
favoritos.
Presione el mismo botón otra vez para borrar el
canal que está viendo en ese momento de su
Lista de favoritos.
Presione el botón
SIGNAL para ver el medidor de
señal que indica la intensidad de la transmisión
originada desde la estación televisiva. Presiónelo
nuevamente para salir. Vea la página 19.
MUTE
CH +
CH -
GUIDE
SIGNAL
FAV +
FAV - MTS
ZOOM
FAV
EXIT
MENU
VOL -
RECALL
DISPLAY
VOL +
1
2 3
4
5 6
7
0
OK
- CCD
8 9
®
MTS
ES
15
Page 41

Funciones del Zoom
Effecto de enfoque (ZOOM) en una pantalla con formato de imagen 4:3.
Normal
Zoom
Efecto del zoom en una pantalla con formato
de imagen 16:9
(sólo transmisión digital estándar, ED)
Normal
Zoom
Debido a las transmisiones digitales, la imagen normal que aparece en su
televisor puede tener un "formato de ventana" o un "formato de buzón". Ésta
es una condición normal que depende de la señal de transmisión y programación. Presione el botón ZOOM para minimizar o eliminar las barras
negras en la pantalla de su TV, si así lo desea.
Nota: Las opciones de ZOOM varian dependiendo en la estacion transmisora.
Las imágenes con formato ventana son habituales cuando mira transmisiones televisivas digitales que no son para pantalla ancha. Presione el
botón Zoom para eliminar las barras negras.
Las imágenes con formato buzón son habituales cuando mira transmisiones
televisivas digitales que son para pantalla ancha. Presione el botón Zoom
para eliminar las barras negras.
Cuando mira programas televisivos en un televisor panorámico, descubrirá
que la programación ED no llena completamente la pantalla. Presione el
botón ZOOM hasta que la zona de visualización se llene y se minimicen las
barras negras.
Normal
Zoom
Relleno
ES
16
Page 42

12
Menú principal
17
Auto Program
Escaneo de canales digitales
Determinar los canales manualmente (Agregar y borrar canales)
Establecer contraseña
Presione el botón MENU para visualizar el menú principal. Se
recomienda encarecidamente que instale sus preferencias personales
según las opciones del menú. Se supone que su antena de televisión
está instalada. Es preferible tener una antena de techo.
La visualización del menú principal sirve
para acceder y establecer las preferencias
para el DT150.
Cuando selecciona Auto Program, presione
OK para comenzar la búsqueda automática
de programas.
Nota: Con esta opción, la búsqueda de
canales digitales en su área puede
llevar varios minutos.
El aparato escaneará y buscará todos los
canales que pueda recibir.
Nota: La recepción de la señal de televisión depende de
la geografía local, la distancia de la torre de la antena
en la zona local y la potencia de su antena.
Para agregar o borrar canales digitales que se
encontraron durante el escaneo automático.
Con los botones de flecha , seleccione
"Manual Channel Set" (determinar los canales
manualmente). Se visualizará un menú de
canales disponibles.
Presione para seleccionar un canal.
Presione OK para confirmar el cambio.
Para acceder a los controles parentales,
ingrese su contraseña de 4 dígitos. Código
predeterminado de fábrica: 0000
Manual Channel Set Menu
To Move To Select To Exit
OK EXIT
Ch 2-1
Ch 4-1
Ch 4-2
Ch 4-4
Ch 5-1
Ch 5-5
Ch 7-1
Ch 7-2
Ch 7-3
Ch 9-1
KCBS-DT
NBC-4LA
WX-PLUS
RawNews
KTLA-DT
TheTube
KABC-DT
KABC-SD
KABC-WN
KCAL-DT
Viewable
Viewable
Not Viewable
Viewable
Viewable
Viewable
Viewable
Viewable
Viewable
Viewable
Fav
Fav
Fav
Auto Program Menu
Auto Scan
Progress (%)
Scanning
25
Main Menu
Auto Program
Manual Channel Set
Password
Parental Controls
Closed Captions
Language
Sleep Timer
Smart Antenna
Time Zone
TV Aspect Ratio
Reset Default Settings
To Move To Select To Exit
OK EXIT
English
4 Hours
Pacific
4:3
Enter Old Password
Nota: Puede agregar o borrar canales de su Lista de
favoritos de este menú. Seleccione un canal, luego
presione FAV
ES
Page 43

12
Menú principal
18
Control parental de clasificaciones de la
Asociación Cinematográfica Estadounidense, MPAA
Subtitulado electrónico
Idioma
Temporizador de apagado
Después de que su contraseña es aceptada,
se despliega el Menú de control paternal.
Presione los botones de flecha para
escoger la clasificación televisiva que mejor
se adapte a las preferencias de su familia
Presione el botón MENU para visualizar el menú
principal.
1. Con los botones de flecha , seleccione "Closed
Caption" (subtitulado electrónico) y presione OK para
visualizar un menú de opciones que se pueden
personalizar.
2. Presione para resaltar y seleccionar las
preferencias de las opciones de visualización de
CCD. Presione OK para confirmar.
3. Presione Exit.
4. Presione CCD en el control remoto para visualizar
los subtítulos.
Presione el botón MENU para visualizar el menú
principal.
1. Use los botones de flecha para seleccionar
"Language" (idioma) luego, presione OK para elegir el
idioma de visualización en pantalla preferido:
inglés > español > francés.
2. Presione Exit.
Presione el botón MENU para visualizar el menú
principal.
1. Con los botones de flecha , seleccione "Sleep
Timer" (temporizador de apagado), luego presione
para seleccionar el tiempo de apagado del aparato
(modo en espera) 1 h > 2 h > 4 h > off (la configuración de fábrica está establecida en 4 h).
2. Presione Exit.
Closed Caption
Style
Size
Font
Text Color
Text Opacity
Background Color
Background Opacity
Edge Effect
Edge Color
To Move To Select To Exit
OK EXIT
DETERMINED BY BROADCASTER
Automatic
Automatic
Automatic
Automatic
Automatic
Automatic
Automatic
Automatic
Automatic
Main Menu
Auto Program
Manual Channel Set
Password
Parental Controls
Closed Captions
Language
Sleep Timer
Smart Antenna
Time Zone
TV Aspect Ratio
Reset Default Settings
To Move To Select To Exit
OK EXIT
English
4 Hours
Pacific
4:3
Parental Control Menu
MPAA
To Move To Select To Exit
OK EXIT
NONE
G
PG
PG-13
R
NC-17
X
NONE
TV-Y
TV-Y7
TV-G
TV-PG
TV-14
TV-MA
ALL FV L S V D
Main Menu
Auto Program
Manual Channel Set
Password
Parental Controls
Closed Captions
Language
Sleep Timer
Smart Antenna
Time Zone
TV Aspect Ratio
Reset Default Settings
To Move To Select To Exit
OK EXIT
English
4 Hours
Pacific
4:3
ES
Page 44

12
Menú principal
19
Antena inteligente (Opcional)
Zona horaria
Formato de imagen del televisor
Restablecimiento de la configuración inicial
Presione el botón MENU para visualizar el
menú principal.
1. Mediante los botones de flecha ,
destaque la opción "Smart Antenna" (antena
inteligente) para visualizar el menú Smart
Antenna, luego presione OK.
Presione el botón MENU para visualizar el
menú principal.
1. Con los botones de flecha , seleccione
"Time Zone" (zona horaria). Presione el
botón de flecha para seleccionar su zona
horaria local. Vea la página 12.
2. Presione Exit.
.
Presione el botón MENU para visualizar el menú
principal.
1 Con los botones de flecha , seleccione "TV
Aspect Ratio" (formato de imagen del televisor).
Utilice el botón de flecha para seleccionar el
formato de imagen del televisor conectado a este
aparato (4:3 o 16:9). Vea la página 12.
2 Presione Exit.
Presione el botón MENU para visualizar el menú
principal.
1. Con los botones de flecha , seleccione
"Reset Default Settings" (restablecer la configuración inicial). Presione OK para restablecer todas
las configuraciones al estado original de fábrica.
Main Menu
Auto Program
Manual Channel Set
Password
Parental Controls
Closed Captions
Language
Sleep Timer
Smart Antenna
Time Zone
TV Aspect Ratio
Reset Default Settings
To Move To Select To Exit
OK EXIT
English
4 Hours
Pacific
4:3
Main Menu
Auto Program
Manual Channel Set
Password
Parental Controls
Closed Captions
Language
Sleep Timer
Smart Antenna
Time Zone
TV Aspect Ratio
Reset Default Settings
To Move To Select To Exit
OK EXIT
English
4 Hours
Pacific
4:3
Main Menu
Auto Program
Manual Channel Set
Password
Parental Controls
Closed Captions
Language
Sleep Timer
Smart Antenna
Time Zone
TV Aspect Ratio
Reset Default Settnigs
To Move To Select To Exit
OK EXIT
English
4 Hours
Pacific
4:3
Smart Antenna Menu
Change antenna position
Automatic Re-adjust position
Save new position
To Move To Select To Exit
OK EXIT
1
Main Menu
Auto Program
Manual Channel Set
Password
Parental Controls
Closed Captions
Language
Sleep Timer
Smart Antenna
Time Zone
TV Aspect Ratio
Reset Default Settings
To Move To Select To Exit
OK EXIT
English
4 Hours
Pacific
4:3
Nota: Para visualizar el menú de antena
inteligente (CEA-909 Modo A), ésta debe
estar conectada.
ES
Page 45

12
Menú principal
20
Guía
Señal
Volumen
1. Presione para visualizar una guía de información de programas (si está
disponible).
2. Presione para visualizar información futura de programación (si está
disponible).
1. Presione el botón SIGNAL (señal) para ver el medidor de señal que
indica la intensidad de la transmisión digital originada desde la estación
televisiva.
1. Presione Vol + para aumentar el volumen.
2. Presione Vol - para bajar el volumen.
Se recomienda ajustar el volumen al nivel máximo (100) para obtener
mejores resultados de audio.
Signal Level 57
Weak Good Excellent
THETUBE Music Vide. . .
THETUBE Music Vide. . .
THETUBE Music Vide. . .
12:00PM - 12:30PM
12:00PM - 1:00PM
Music Videos 24/7 (TV-G)
1:00PM - 1:30PM
Volume 100
ES
Page 46

12
Guía para la solución de problemas
21
Si detecta un problema, consulte las posibles soluciones antes de comunicarse con el representante de servicio de atención al cliente. Le recomendamos que visite nuestro sitio web www.apexdigitalinc.com para obtener
actualizaciones.
*El sitio Antennaweb.org proporciona información personalizada para elegir
el tipo de antena y la dirección para su localidad en particular.
Síntoma Posible solución
No recibo la señal de algunos
canales a través de la antena
• Utilice la función de escaneo automático para
agregar los canales que no están incluidos en la
memoria
• La señal del canal de TV puede ser débil
• Cambie la posición de la antena
No hay sonido
• Verifique que los cables de audio están completamente
insertados
• Ajuste la fuente de audio de su amplificador • Es posible
que el modo silencioso esté silencioso, presione Mute en
el control remoto
Video ruidoso o imagen cortada
• Verifique que los cables de audio estén completamente
insertados
• Cambie la posición de la antena
Ciertos canales están bloqueados
• Utilice la función de escaneo automático para agregar los
canales que no están incluidos en la memoria
• Revise la configuración del control parental
No hay imagen
• La señal del canal de TV digital puede ser débil,
intente con otro canal
• Vuelva a conectar la antena o los cables
• Asegúrese de que los aparatos de video estén
encendidos
• Asegúrese de que el escaneo automático de canales
se haya completado
Cuadro negro en la pantalla
• La opción "Text" (texto) está seleccionada, pero no
hay texto
• Desactive la función CCD del control remoto.
Sin energía
• Las pilas del control remoto pueden estar agotadas
• Desconecte el enchufe del tomacorriente, espere 30
segundos y vuelva a colocarlo
ES
Page 47

12
Garantía limitada
22
APEX DIGITAL, INC.
GARANTÍA DE COMPONENTES DE
1 AÑO Y DE MANO DE
OBRA DE 90 DÍAS
BENEFICIARIO
Para recibir el servicio de garantía, necesita el comprobante de compra, como el recibo
original de venta, donde aparece la fecha original de compra en un comercio autorizado por
Apex Digital, Inc. de Norteamérica. Conserve la caja y el empaque original en caso de que
deba enviar su unidad al servicio técnico. Usted debe hacerse cargo de los costos de
envío a Apex Digital. Envíe un correo electrónico o llame a Servicio al Consumidor para
recibir instrucciones detalladas sobre el envío de su producto para reparación. Se exige el
número de autorización para devolución antes de la aceptación de Apex Digital. El
número debe estar escrito claramente en el paquete o será rechazado por el personal de
devoluciones.
COBERTURA
Garantía de reparación desde la fecha original de compra: cobertura de garantía limitada de
recambio de componentes por 1 año y de mano de obra por 90 días. Si no posee el
comprobante de compra, su unidad no tendrá garantía y se cobrará una tarifa fij a de
mano de obra.
FUERA DE COBERTURA
La garantía no cubre:
1. Cargos de mano de obra por instalación o configuración del producto, ajuste de
controles personalizados al producto e instalación o reparación de sistemas de antena
separados del producto;
2. Reparación del producto o recambio de componentes por uso incorrecto,
accidentes, reparación no autorizada u otra causa que esté fuera de la supervisión de
Apex Digital, Inc.;
3. Un producto que necesite modificación o adaptación para permitir su
funcionamiento en otro país que no sea para el que fue diseñado, fabricado, admitido o
autorizado, o reparación de productos dañados por realizar estas modificaciones;
4. Daños accidentales o directos relacionados con el producto. (Algunos estados no autorizan
los daños accidentales o directos, por lo tanto, es posible que la exclusión no corresponda
a su caso en particular. Esto incluye, entre otros, material previamente grabado, ya sea
propiedad registrada o no);
Envío y servicio a un centro de reparación NO AUTORIZADO.
REGISTRE SU PRODUCTO EN LÍNEA
Para registrar su producto, ingrese a www.apexdigitalinc.com, haga clic en “Support
Services” y luego, en “Product Registration”. Valide su garantía, obtenga acceso a los
representantes de servicio al cliente, novedades de productos, notificaciones por correo
electrónico y ofertas especiales.
¿DÓNDE ESTÁ DISPONIBLE EL SERVICIO?
Si ya registró sus productos en línea en www.apexdigitalinc.com, ingrese a “Support
Services" y luego, en "My Account" para enviar su solicitud por correo electrónico.
También puede llamarnos al (866) 427-3946, de lunes a viernes, de 6 a. m. a 6 p. m.,
hora estrandar del pacífico.
PEDIDO DE ACCESORIOS
Para comprar accesorios, visite www.shop-apex.com o llame al (866) 930-1236 en
cualquier horario.
Esta garantía le otorga derechos legales específicos. Es pos ible que tenga otros derechos que varíen según el estado o provincia
Caja Convertidora de TV Digital DT150
ES
Page 48

12
23
Aviso legal
Parte 15 de la FCC
Este dispositivo cumple con la Parte 15 de las normas de la Comisión
federal de comunicaciones (FCC). El funcionamiento de este producto se
encuentra sujeto a las siguientes dos condiciones: (1) este dispositivo no
debe causar interferencia perjudicial y (2) debe aceptar cualquier
interferencia que reciba, incluida la interferencia que pueda causar un
funcionamiento no deseado.
Se ha comprobado que este equipo cumple con los límites de un
dispositivo digital de clase B, conforme a la Parte 15 de las normas de la
FCC. Estos límites están calculados para brindar protección prudencial
contra interferencia perjudicial en una instalación residencial. Este equipo
genera, utiliza y puede transmitir energía de radiofrecuencia y, si no se
instala y utiliza de acuerdo con las instrucciones, puede causar
interferencia perjudicial a las radiocomunicaciones. Sin embargo, no se
garantiza que no ocurra interferencia en una instalación en particular. En
caso de que cause interferencia perjudicial a la recepción de radio o
televisión, que se puede determinar al apagar y encender el equipo, se
recomienda al usuario que intente corregir mediante uno o más de los
siguientes métodos:
1. Vuelva a orientar o coloque la antena receptora en otro
sitio.
2. Separe un poco más el equipo del receptor.
3. Conecte el equipo a un tomacorriente de un
circuito diferente al que está conectado el receptor.
4. Para obtener ayuda, consulte a un
representante o técnico experimentado.
Advertencia de la FCC
Los cambios o modificaciones que no estén expresamente aprobados por
la persona responsable del cumplimiento de las normas de la FCC
podrían anular la autoridad del usuario para manejar este equipo.
ES
 Loading...