

Page 1

Wire Harness for the
Battery Management
System
AP9924
AP9926
AP9927
Installation
Page 2

Contents
Preliminary Information. . . . . . . . . . . . . . . . . . . . . . . . . . . . . . . 1
Overview . . . . . . . . . . . . . . . . . . . . . . . . . . . . . . . . . . . . . 1
Silcon versus non-Silcon installation . . . . . . . . . . . . . . . . . . . 1
Inventory . . . . . . . . . . . . . . . . . . . . . . . . . . . . . . . . . . . . . 2
Safety Information. . . . . . . . . . . . . . . . . . . . . . . . . . . . . . . . . . . 3
Pre-installation Procedures. . . . . . . . . . . . . . . . . . . . . . . . . . . . . 4
Lockout/Tagout the UPS . . . . . . . . . . . . . . . . . . . . . . . . . . . 4
Determine battery numbers . . . . . . . . . . . . . . . . . . . . . . . . 4
Determine fuse bus and midpoint bus connections (Silcon only) 4
Install the Wire Harnesses . . . . . . . . . . . . . . . . . . . . . . . . . . . . . 6
How to install the tab washers on non-embedded terminals . . . 6
How to install tab washers on embedded battery terminals . . . 7
Prepare the harness wires . . . . . . . . . . . . . . . . . . . . . . . . . . 8
Install the battery and power fuses . . . . . . . . . . . . . . . . . . . 8
Connect the battery wires . . . . . . . . . . . . . . . . . . . . . . . . . . 9
Additional Silcon Connection Procedures . . . . . . . . . . . . . . . . . 10
Attach harness to the fuse bus and midpoint bus (Silcon only) 10
Install the 3/4 A and 5 A fuses (Silcon only) . . . . . . . . . . . . . 10
Secure the Wire Harness . . . . . . . . . . . . . . . . . . . . . . . . . . . . . 11
Secure the battery wires . . . . . . . . . . . . . . . . . . . . . . . . . . 11
Connect to the Battery Management System . . . . . . . . . . . . . . 12
Install the Battery Management System . . . . . . . . . . . . . . . . 12
String connection . . . . . . . . . . . . . . . . . . . . . . . . . . . . . . 12
Battery Connector Pinouts. . . . . . . . . . . . . . . . . . . . . . . . . . . . 13
Battery Diagrams. . . . . . . . . . . . . . . . . . . . . . . . . . . . . . . . . . . 14
Warranty and Service . . . . . . . . . . . . . . . . . . . . . . . . . . . . . . . 15
Limited warranty . . . . . . . . . . . . . . . . . . . . . . . . . . . . . . . 15
Warranty limitations . . . . . . . . . . . . . . . . . . . . . . . . . . . . 15
Obtaining service . . . . . . . . . . . . . . . . . . . . . . . . . . . . . . 15
Life-Support Policy. . . . . . . . . . . . . . . . . . . . . . . . . . . . . . . . . . 16
General policy . . . . . . . . . . . . . . . . . . . . . . . . . . . . . . . . . 16
Examples of life-support devices . . . . . . . . . . . . . . . . . . . . 16
Wire Harness: Installation i
Page 3

Preliminary Information
Overview
Silcon versus non-Silcon installation
The Battery Management System for high voltage applications connects
to one of the following:
• A single APC Silcon UPS with pairs of strings.
• A single non-APC UPS with single strings.
The system provides battery management for nominal 2 V, 6 V, 8 V, or
12 V lead-acid batteries; or 1.2 V nickel-cadmium batteries. A system is
comprised of at least one AP9921X master unit and up to five
AP9921XS expansion units. Each unit supports up to 64 batteries.
For more information on the features and capabilities of the
Battery Management System, see the initial sections of the
User’s Guide, which is available on the Utility CD supplied
See also
Note
This manual covers the installation of two types of systems:
• An installation for an APC Silcon battery cabinet
• An installation using 5-, 50-, or 100-foot wire harnesses, to be cut
with the Battery Management System.
Do not turn on the power to the unit until the wire harnesses
are connected and the DIP switches are configured.
at installation to match your battery configuration
The majority of the procedures in this manual are used for both system
installations. Disregard Silcon-specific instructions (i.e., midpoint and
fuse bus connections) if you are installing a generic harness to fit your
battery cabinet or rack that is not for an APC Silcon UPS.
Wire Harness: Installation 1
Page 4

Preliminary Information
Inventory
Item Quantity
Wire harness 1
Ring terminal assemblies 3
3/4 A fuse (0W2237) 2
5 A fuse ( 0W2015) 38
Tab w a s he r s 38
®
Male Faston
connectors 5
Female Faston connectors 37
4-inch wire tie
for 5-foot harness
for 50-foot harness
for 100-foot harness
20
80
80
8-inch wire tie
for 5-foot harness
for 50-foot harness
for 100-foot harness
20
40
80
2 Wire Harness: Installation
Page 5

Safety Information
Electrical
Hazard
Warning
When installing the Battery Management System:
• Cover the batteries with an insulating blanket before installing the
harnesses.
• Wear safety glasses, rubber gloves, and rubber boots.
• Use double-insulated tools.
• Do not short-circuit the battery terminals; a short circuit could cause
the batteries to explode.
• Do not lay tools or metal parts on top of the batteries or near the
cable lugs.
• Remove watches, rings, and other metal objects.
• Use only cables supplied by APC unless otherwise indicated.
• For the UPS and switch gear, use Lockout/Tagout safety procedures
(which remove access to a device and physically label the device as
intentionally out of service) before working on the batteries.
Risk of electric shock: battery cabinets contain
potentially lethal voltages! Batteries are energized even
when AC power has been disconnected.
Only qualified personnel, trained in battery operation
and safety, may install the harnesses. Keep unauthorized
personnel away from the batteries.
Wire Harness: Installation 3
Page 6
Pre-installation Procedures
Lockout/Tagout the UPS
Determine battery numbers
Determine fuse bus and midpoint bus connections (Silcon only)
Before installing the wire harnesses, use lockout and tagout safety
procedures for the UPS or any attached equipment, such as high-voltage
power supplies. If possible, disconnect the main output lead from the
battery string to the load.
Voltage is present in the battery cabinet even after
disconnecting it from the main load. Use caution when
Electrical
Hazard
Before installing the harness wires, designate a battery number to each
battery in your system. Using a volt meter to check polarity, determine
the most positive battery in your string (Battery 1), and count to the most
negative (last) battery in your string.
Locate the 1/2-fuse bus connectors and 1/2-midpoint bus connectors on
the inside roof of the cabinet.
working with the batteries.
Fuse Bus
Midpoint Bus
• The positive fuse bus connectors and midpoint bus connectors are
on the right side of the cabinet.
• The negative fuse bus connectors and midpoint bus connectors are
on the left side of the cabinet.
4 Wire Harness: Installation
Page 7

Pre-installation Procedures
Determine what connections you need to make:
1. If you are installing harnesses in one cabinet, connect the
following:
• one positive 1/2-fuse bus (+ 1/2) connector
• two positive 1/2-midpoint (+ 1/2) connectors
• one negative 1/2-fuse bus (- 1/2) connector
2. If you are installing harnesses in two cabinets, connect the
following:
Cabinet A:
• one positive 1/2-fuse bus (+ 1/2) connector
• two positive 1/2-midpoint (+ 1/2) connectors
Cabinet B:
• two negative 1/2-fuse bus (- 1/2) connectors
• one negative 1/2-midpoint (- 1/2) connector
Wire Harness: Installation 5
Page 8

Install the Wire Harnesses
Before you attach the wire harnesses to the batteries, install a tab washer
on the positive terminal of each battery to be managed. How you install
the tab washer depends on whether the terminal bolt is embedded in the
battery.
How to install the tab
washers on nonembedded terminals
Do not disturb existing battery connections. Place the tab
washers and nuts on top of the bolt thread extensions of the
existing battery connections. You must provide your own
Note
nuts for tab washer installation.
1. Install a tab washer onto the positive terminal of each battery to be
managed.
mph0157a
For Battery 1 and the last battery of String A, you must
install additional tab washers to connect the Battery
Management System unit power wires (String A wires 34
Note
and 35). For each unit on the system, attach one
additional tab washer. For example, a four-unit system
would require five tab washers stacked on top of each
other and offset on the positive terminal of both Battery 1
and the last battery of String A. This would include one
tab washer to manage the battery and four tab washers to
connect each unit’s power wire.
2. Secure each set of washers in place with a nut.
3. Coat the tab washers and nuts with approved antioxidant grease.
If you experience problems connecting wires to the terminals
on the batteries, contact APC Customer Support at a number
Note
6 Wire Harness: Installation
on the back cover of this manual.
Page 9

How to install tab washers on embedded battery terminals
Install the Wire Harnesses
Verify that the string is an open circuit before working
Electrical
Hazard
with the batteries.
1. Remove the bolt from a battery.
mph026 9a
2. Place the ring terminal on the existing battery connection, directly
under the hex-head of the bolt.
mph0270a
3. Replace the bolt in the battery, and adjust its torque according to
the battery manufacturer’s specifications.
4. Coat the tab washer and nut with approved antioxidant grease.
For Battery 1 and the last battery of String A, you must
install additional tab washers to connect the Battery
Management System unit power wires (String A wires 34
Note
and 35). For each unit on the system, attach one
additional tab washer. For example, a four-unit system
would require five tab washers stacked on top of each
other and offset on the positive terminal of both Battery 1
and the last battery of String A. This would include one
tab washer to manage the battery and four tab washers to
connect each unit’s power wire.
If you experience problems connecting to the terminals on the
batteries, contact APC Customer Support at a number on the
Note
back cover of this manual.
Wire Harness: Installation 7
Page 10

Install the Wire Harnesses
Prepare the harness wires
Install the battery and power fuses
To prepare the harness wires:
1. Measure the length of each wire so that it will reach from the
positive terminal on its battery to the battery connector on the rear
of the Battery Management System, adding a ‘service loop’ that
will permit one repair of the wire without having to replace it.
2. For an APC Silcon unit, measure wires to connect to the fuse bus
and midpoint bus located on the inside roof of the battery cabinet.
See “Determine fuse bus and midpoint bus connections
(Silcon only)” on page 4.
3. Cut the wires to the lengths measured in step 1 and step 2, and
reattach the wire labels to the wire ends.
4. For an APC Silcon unit, attach the male Faston connectors to the
fuse bus and midpoint bus wire ends, and crimp them securely in
place.
5. Attach the female Faston connectors to the battery wire ends, and
crimp them securely in place.
Attach a 5 A fuse (0W2015) to the following wire connectors:
• Strings A–33A
• Strings 1B–33B, if applicable
• String 35A (negative power wire)
Attach a 3/4 A fuse (0W2237) to String 34A (positive power wire).
mph0261a
8 Wire Harness: Installation
Page 11

Install the Wire Harnesses
Connect the battery wires
Slide the receptor end of each fuse over the tab portion on the washers
that you installed on the positive terminals of each battery.
Each wire is labeled with a number indicating its correct
battery connection. For example, the battery labeled 1A
Note
would connect to Battery1 of String A, and so on.
mp h0111 a
For additional guidance on battery-wire connections, see the
battery connector pinout on page 13 and the battery diagram
on page 14.
Wire Harness: Installation 9
Page 12

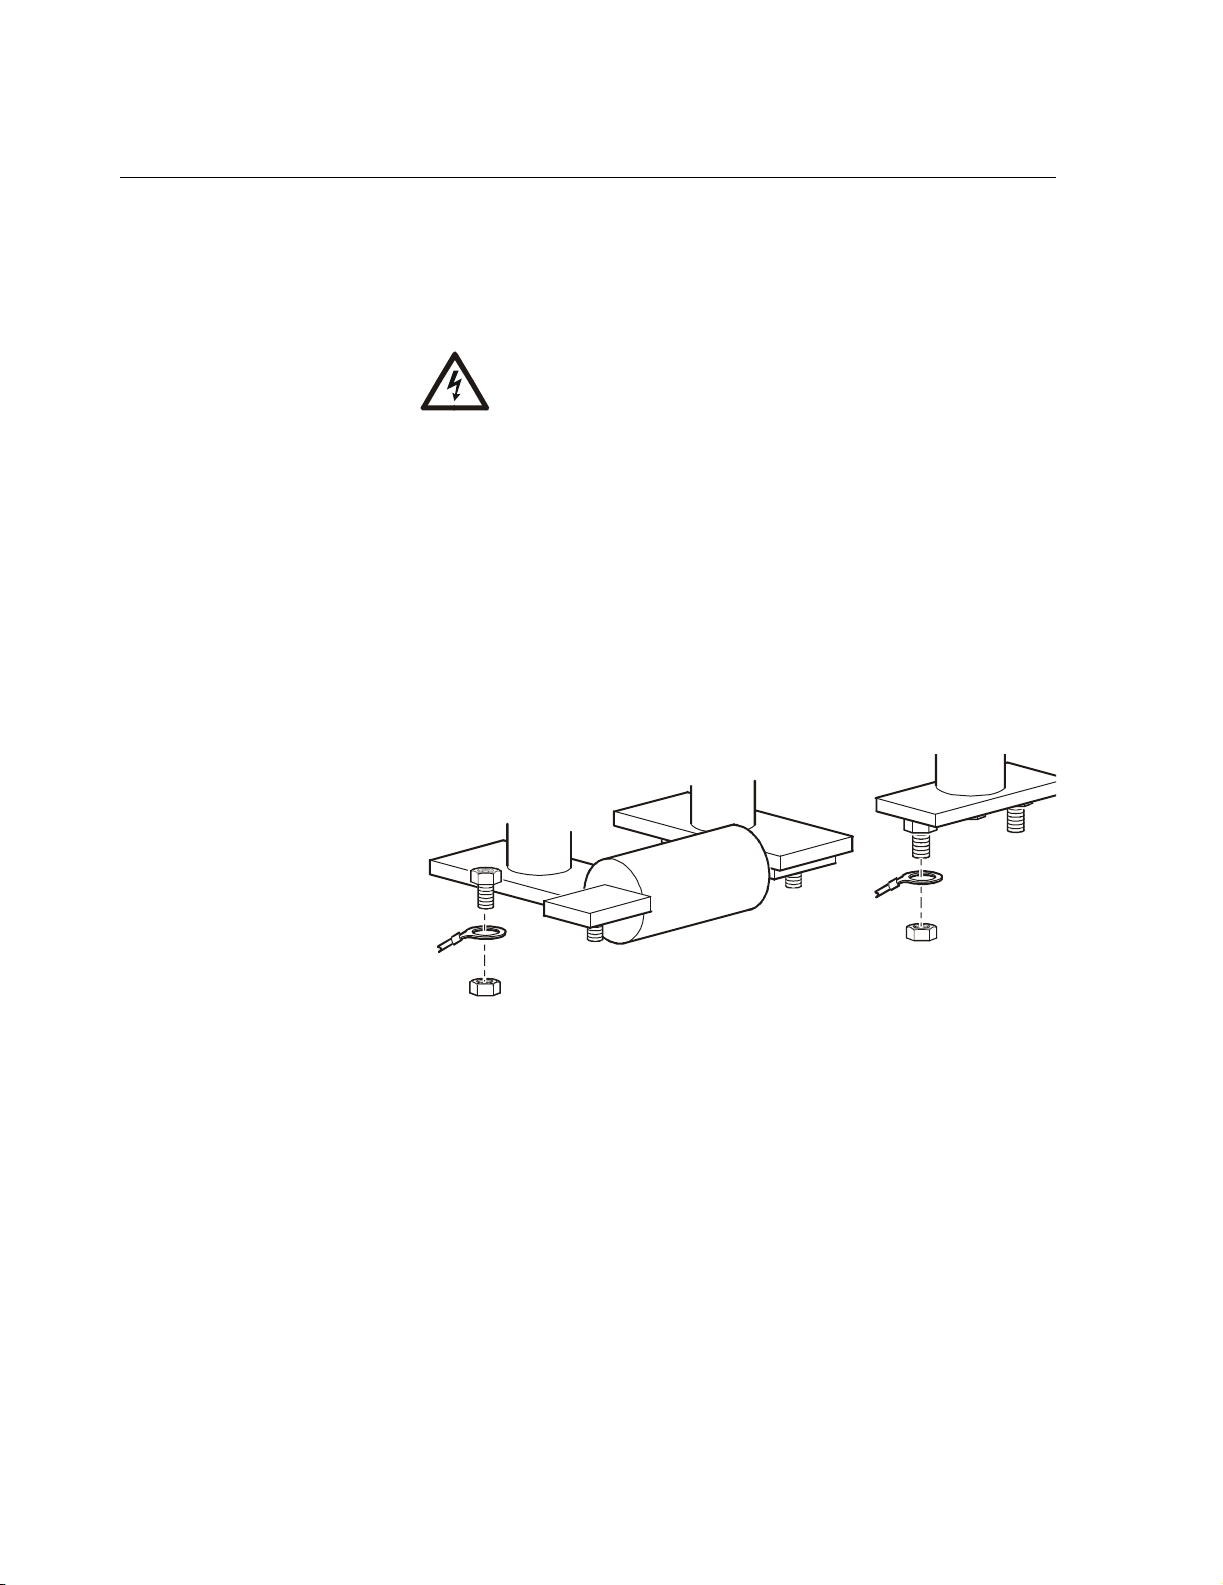
Additional Silcon Connection Procedures
Attach harness to the fuse bus and midpoint bus (Silcon only)
Install the 3/4 A and 5 A fuses (Silcon only)
Install the ring terminals onto the appropriate bolts on the fuse bus and
midpoint bus:
1. Remove the nut from the bolt.
2. Slide the ring terminal onto the bolt.
3. Replace and tighten the nut.
See “Determine fuse bus and midpoint bus connections
(Silcon only)” on page 4 for the connections to make.
To install the fuses onto the fuse bus and midpoint bus wires:
One-cabinet system:
1. Install the 3/4 A fuse (0W2237) between the ring terminal
assembly and the positive 1/2-string fuse bus wire.
2. Install 5 A fuses (0W2015) between the ring terminal assemblies
and all other fuse bus and midpoint bus connections.
Two-cabinet system:
1. Install a 3/4 A fuse (0W2237) on the positive 1/2-string fuse bus
wire on the positive string harness (0W1492).
2. Install a 5 A fuse (0W2015) on the negative 1/2-string midpoint
bus wire on the negative string harness (0W1491).
3. Install 5 A fuses (0W2015) between the ring terminal assemblies
and all other fuse bus and midpoint bus connections.
Fuse Bus
Midpoint Bus
mph0107a
10 Wire Harness: Installation
Page 13

Secure the Wire Harness
Secure the harness to the rack or cabinet to prevent damage
to the wires or personal injury by people tripping on them.
Warning
Secure the battery wires
After the battery wires are connected, secure the harness wires.
1. Using the 4-inch wire ties, attach the battery wires to the battery
straps.
Attaching the wires too tightly could damage their
insulation.
Caution
mph0113a
2. Using the 8-inch wire ties, secure the harness to the enclosure to
prevent wire damage.
mph 0114a
Wire Harness: Installation 11
Page 14

Connect to the Battery Management System
Install the Battery Management System
String connection
Install the Battery Management System in a battery cabinet, in a rack or
enclosure, or on top of the battery cabinet. The system must be installed
in a location that is safe, convenient, and accessible for connection
procedures.
For instructions and safety information on installing the
Battery Management System (AP9921X and AP9921XS),
See also
After attaching the wire harnesses to the batteries and securing the
harnesses to the cabinets or racks, connect the battery strings to the
Battery Management System.
Note
see the Battery Management System Installation and Quick
Start manual (990-1649A), included with your Battery
Management System. You can also obtain the manual and
other documentation for currently available models of the
Battery Management System at www.apc.com by searching
for the product's part number (e.g., AP9921X).
Verify that the ON/OFF button is in the OFF position on
each Battery Management System before plugging in
connectors.
1. Plug the connector for String A into the right rear of the Battery
Management System in the port marked Battery/Power Input A.
2. If applicable, plug the connector for String B into the left rear of
the Battery Management System in the port marked Battery
Input B.
12 Wire Harness: Installation
Page 15

Battery Connector Pinouts
Battery Connector A Battery Connector B
Wire # Battery number and polarity Wire # Battery number and polarity
1 Battery 1 + 1 Battery 33 +
2 Battery 1 - and Battery 2 + 2 Battery 33 - and Battery 34 +
3 Battery 2 - and Battery 3 + 3 Battery 34 - and Battery 35 +
4 Battery 3 - and Battery 4 + 4 Battery 35 - and Battery 36 +
5 Battery 4 - and Battery 5 + 5 Battery 36 - and Battery 37 +
6 Battery 5 - and Battery 6 + 6 Battery 37 - and Battery 38 +
7 Battery 6 - and Battery 7 + 7 Battery 38 - and Battery 39 +
8 Battery 7 - and Battery 8 + 8 Battery 39 - and Battery 40 +
9 Battery 8 - and Battery 9 + 9 Battery 40 - and Battery 41 +
10 Battery 9 - and Battery 10 + 10 Battery 41 - and Battery 42 +
11 Battery 10 - and Battery 11 + 11 Battery 42 - and Battery 43 +
12 Battery 11 - and Battery 12 + 12 Battery 43 - and Battery 44 +
13 Battery 12 - and Battery 13 + 13 Battery 44 - and Battery 45 +
14 Battery 13 - and Battery 14 + 14 Battery 45 - and Battery 46 +
15 Battery 14 - and Battery 15 + 15 Battery 46 - and Battery 47 +
16 Battery 15 - and Battery 16 + 16 Battery 47 - and Battery 48 +
17 Battery 16 - and Battery 17 + 17 Battery 48 - and Battery 49 +
18 Battery 17 - and Battery 18 + 18 Battery 49 - and Battery 50 +
19 Battery 18 - and Battery 19 + 19 Battery 50 - and Battery 51 +
20 Battery 19 - and Battery 20 + 20 Battery 51 - and Battery 52 +
21 Battery 20 - and Battery 21 + 21 Battery 52 - and Battery 53 +
22 Battery 21 - and Battery 22 + 22 Battery 53 - and Battery 54 +
23 Battery 22 - and Battery 23 + 23 Battery 54 - and Battery 55 +
24 Battery 23 - and Battery 24 + 24 Battery 55 - and Battery 56 +
25 Battery 24 - and Battery 25 + 25 Battery 56 - and Battery 57 +
26 Battery 25 - and Battery 26 + 26 Battery 57 - and Battery 58 +
27 Battery 26 - and Battery 27 + 27 Battery 58 - and Battery 59 +
28 Battery 27 - and Battery 28 + 28 Battery 59 - and Battery 60 +
29 Battery 28 - and Battery 29 + 29 Battery 60 - and Battery 61 +
30 Battery 29 - and Battery 30 + 30 Battery 61 - and Battery 62 +
31 Battery 30 - and Battery 31 + 31 Battery 62 - and Battery 63 +
32 Battery 31 - and Battery 32 + 32 Battery 63 - and Battery 64 +
33 Battery 32 - 33 Battery 64 -
34 105–560 VDC power from (+)
of first battery in first string.
35 105–560 VDC power from (-)
of last battery in first string.
36 NC 36 NC
34 NC – Do not use.
35 NC – Do not use.
Wire Harness: Installation 13
Page 16

Battery Diagrams
The following is an example battery diagram for two strings of 32
batteries or one string of 64 batteries.
An example for one string of 32 batteries would include Connector A
only.
Power
Power
Not used
CONNECTOR A
1
2
3
4
5
6
7
8
9
10
11
12
13
14
15
16
17
18
19
20
21
22
23
24
25
26
27
28
29
30
31
32
33
+
34
35
36
+
1
+
2
3
4
5
6
7
8
9
10
11
12
13
14
15
16
17
18
19
20
21
22
23
24
25
26
27
28
29
30
31
32
Power Switch
(Inside each unit)
To next unit
CONNECTOR B
+
1
2
3
4
5
6
7
8
9
10
11
12
13
14
15
16
17
18
19
20
21
22
23
24
25
26
27
28
29
30
31
32
33
34
35
36
1 (33)
+
2 (34)
3 (35)
4 (36)
5 (37)
6 (38)
7 (39)
8 (40)
9 (41)
10 (42)
11 (43)
12 (44)
13 (45)
14 (46)
15 (47)
16 (48)
17 (49)
18 (50)
19 (51)
20 (52)
21 (53)
22 (54)
23 (55)
24 (56)
25 (57)
26 (58)
27 (59)
28 (60)
29 (61)
30 (62)
31 (63)
32 (64)
Not used
Not used
Not used
14 Wire Harness: Installation
Page 17

Warranty and Service
Limited warranty
Warranty limitations
APC warrants the wire harness to be free from defects in materials and
workmanship for a period of two years from the date of purchase. Its
obligation under this warranty is limited to repairing or replacing, at its
own sole option, any such defective products. This warranty does not
apply to equipment that has been damaged by accident, negligence, or
misapplication or has been altered or modified in any way. This
warranty applies only to the original purchaser.
Except as provided herein, APC makes no warranties, express or
implied, including warranties of merchantability and fitness for a
particular purpose. Some jurisdictions do not permit limitation or
exclusion of implied warranties; therefore, the aforesaid limitation(s) or
exclusion(s) may not apply to the purchaser.
Except as provided above, in no event will APC be liable for direct,
indirect, special, incidental, or consequential damages arising out of
the use of this product, even if advised of the possibility of such
damage.
Specifically, APC is not liable for any costs, such as lost profits or
revenue, loss of equipment, loss of use of equipment, loss of software,
loss of data, costs of substitutes, claims by third parties, or otherwise.
This warranty gives you specific legal rights and you may also have
other rights, which vary according to jurisdiction.
Obtaining service
To obtain support for problems with your wire harness:
0
1. Note the serial number and date of purchase. You can locate the
serial number on the box label.
2. Contact Customer Support at a phone number on the back cover of
this manual. A technician will try to help you solve the problem by
phone.
3. If you must return the product, the technician will give you a return
material authorization (RMA) number. If the warranty expired, you
will be charged for repair or replacement.
4. Pack the unit carefully. The warranty does not cover damage
sustained in transit. Enclose a letter with your name, address, RMA
number and daytime phone number; a copy of the sales receipt;
and a check as payment, if applicable.
5. Mark the RMA number clearly on the outside of the shipping
carton.
6. Ship by insured, prepaid carrier to the address provided by the
Customer Support technician.
Wire Harness: Installation 15
Page 18

Life-Support Policy
General policy
Examples of life-support devices
American Power Conversion (APC) does not recommend the use of any
of its products in the following situations:
• In life-support applications where failure or malfunction of the
APC product can be reasonably expected to cause failure of the life-
support device or to affect significantly its safety or effectiveness.
• In direct patient care.
APC will not knowingly sell its products for use in such applications
unless it receives in writing assurances satisfactory to
risks of injury or damage have been minimized, (b) the customer
assumes all such risks, and (c) the liability of American Power
Conversion is adequately protected under the circumstances.
The term life-support device includes but is not limited to neonatal
oxygen analyzers, nerve stimulators (whether used for anesthesia, pain
relief, or other purposes), autotransfusion devices, blood pumps,
defibrillators, arrhythmia detectors and alarms, pacemakers,
hemodialysis systems, peritoneal dialysis systems, neonatal ventilator
incubators, ventilators (for adults and infants), anesthesia ventilators,
infusion pumps, and any other devices designated as “critical” by the
U.S. FDA.
APC that (a) the
Hospital-grade wiring devices and leakage current protection may be
ordered as options on many
units with these modifications are certified or listed as hospital-grade by
APC or any other organization. Therefore these units do not meet the
requirements for use in direct patient care.
APC UPS systems. APC does not claim that
16 Wire Harness: Installation
Page 19

aRadio Frequency Interference
Changes or modifications to this unit not expressly approved
by the party responsible for compliance could void the user’s
Warning
authority to operate this equipment.
USA—FCC This equipment has been tested and found to comply with the limits for a
Class A digital device, pursuant to part 15 of the FCC Rules. These limits are
designed to provide reasonable protection against harmful interference when
the equipment is operated in a commercial environment. This equipment
generates, uses, and can radiate radio frequency energy and, if not installed
and used in accordance with this user manual, may cause harmful
interference to radio communications. Operation of this equipment in a
residential area is likely to cause harmful interference. The user will bear sole
responsibility for correcting such interference.
Canada—ICES This Class A digital apparatus complies with Canadian ICES-003.
Cet appareil numérique de la classe A est conforme à la norme NMB-003 du
Canada.
Japan—VCCI This is a Class A product based on the standard of the Voluntary Control
Council for Interference by Information Technology Equipment (VCCI). If
this equipment is used in a domestic environment, radio disturbance may
occur, in which case, the user may be required to take corrective actions.
この装置は、情報処理装置等電波障害自主規制協議会(VCCI)の基
準に基づくクラス A 情報技術装置です。この装置を家庭環境で使用
すると、電波妨害を引き起こすことがあります。この場合には、使
用者が適切な対策を講ずるように要求されることがあります。
Page 20

APC Worldwide Customer Support
Customer support for this or any other APC product is available at no charge in any of the following ways:
• Visit the APC Web site to access documents in the APC Knowledge Base and to submit customer
support requests.
– www.apc.com (Corporate Headquarters)
Connect to localized APC Web sites for specific countries, each of which provides customer
support information.
– www.apc.com/support/
Global support searching APC Knowledge Base and using e-support.
• Contact an APC Customer Support center by telephone or e-mail.
– Regional centers:
Silcon Customer Support (1)(877)287-7835 (toll free)
APC headquarters U.S., Canada (1)(800)800-4272 (toll free)
Latin America (1)(401)789-5735 (USA)
Europe, Middle East, Africa (353)(91) 702000 (Ireland)
Japan (0) 35434-2021
Australia, New Zealand, South Pacific area (61) (2) 9955 9366 (Australia)
– Local, country-specific centers: go to www.apc.com/support/contact for contact information.
Contact the
information on how to obtain local customer support.
APC representative or other distributor from whom you purchased your APC product for
Entire contents © 2005 American Power Conversion. All rights reserved. Reproduction in
whole or in part without permission is prohibited. APC, the APC logo, InfraStruXure, and
Silcon are trademarks of American Power Conversion Corporation and may be registered in
some jurisdictions. All other trademarks, product names, and corporate names are the
property of their respective owners and are used for informational purposes only.
990-1813B 04/2005
*990-1813B*
 Loading...