

DE
DE Lithium Powerpack 18.000mAh mit Starthilfe
Art.-Nr. 16477
GB FR NL I
EAL GmbH
Otto-Hausmann-Ring 107
42115 Wuppertal
Deutschland
Telefon: +49 (0)202 42 92 83 0 Telefax: +49 (0)202 42 92 83 160
Internet: www.eal-vertrieb.com E-Mail: info@eal-vertrieb.com

Inhalt Seite
1. Bestimmungsgemäßer Gebrauch 2
2. Lieferumfang 3
3. Spezikationen 3
4. Sicherheitshinweise 3
5. Symbolerklärung 4
6. Bedienungsanleitung 4
6.1 Übersicht 4
6.2 Laden des Powerpacks 5
6.2.1 Laden des Powerpack mit dem Steckerladegerät 5
6.2.2 Laden des Powerpacks mit dem Kfz-Ladekabel 5
6.2.3 Prüfen des Ladezustandes 5
6.3 Starthilfe für 12 V Fahrzeuge 5
6.4 Laden von USB-Geräten 6
6.5 Laden von 19 V-Notebooks 7
6.6 Verwenden des 12 V-Ausgangs 7
6.7 Benutzung der LED-Leuchte / Signalleuchte 7
7. Wartung und Pege 7
7.1 Reinigung 7
7.2 Aufbewahrung 7
7.3 Wartung 7
8. Hinweise zum Umweltschutz 8
9. Kontaktinformationen 9
WARNUNG
Lesen Sie die Bedienungsanleitung vor Inbetriebnahme sorgfältig durch und beachten
Sie alle Sicherheitshinweise! Nichtbeachtung kann zu Personenschäden, Schäden
am Gerät oder Ihrem Eigentum führen! Bewahren Sie die Originalverpackung, den
Kaufbeleg sowie diese Anleitung zum späteren Nachschlagen auf! Bei der Weitergabe
des Produkts geben Sie auch diese Anleitung weiter. Prüfen Sie vor Inbetriebnahme den
Inhalt der Verpackung auf Unversehrtheit und Vollständigkeit!
1. Bestimmungsgemäßer Gebrauch
Das Lithium Powerpack dient zum Auaden der Akkus von Mobiltelefonen, Smartphones, Tabletcomputern, MP3Playern und ähnlichen Geräten, die über ein USB-Kabel aufgeladen werden können. An dem 12 V DC Ausgang und
dem 19 V DC können entsprechende Geräte, z. B. Notebooks angeschlossen und aufgeladen werden. Zusätzlich gibt
es noch die Möglichkeit zur Starthilfe für 12 V Kraftfahrzeuge mit maximal 2,0 l Benzinmotor oder 1,6 l Dieselmotor.
Dieses Gerät ist nicht dafür bestimmt, durch Kinder und Personen mit eingeschränkten geistigen Fähigkeiten oder
ohne erforderliches Fachwissen benutzt zu werden. Kinder sind von dem Gerät fernzuhalten.
Das Gerät ist nicht für den gewerblichen Einsatz bestimmt.
Zum bestimmungsgemäßem Gebrauch gehört auch die Beachtung aller Informationen in dieser Anleitung,
2

insbesondere die Beachtung der Sicherheitshinweise. Jede andere Verwendung gilt als nicht bestimmungsgemäß
und kann zu Sach- oder Personenschäden führen. Die EAL GmbH übernimmt keine Haftung für Schäden, die durch
nicht bestimmungsgemäßen Gebrauch entstehen.
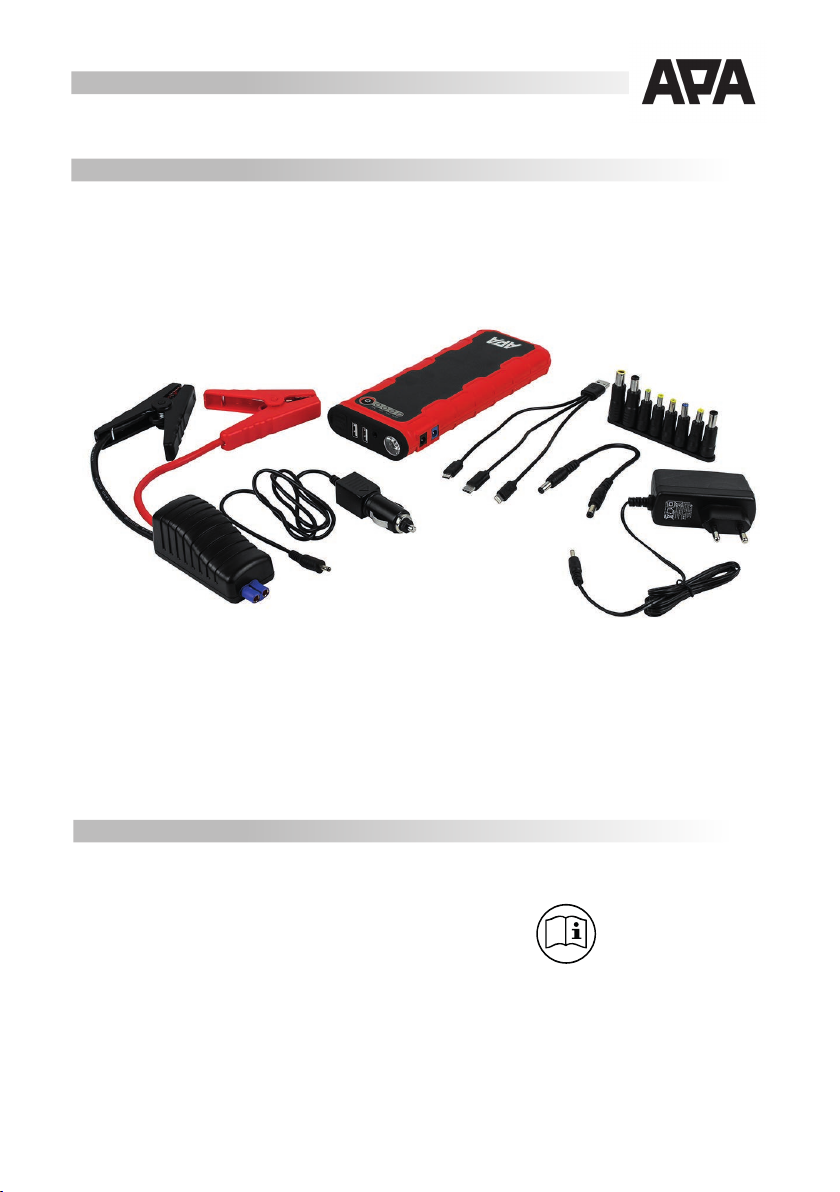
2. Lieferumfang
1 x Power Pack 1 x USB-3in1-Kabel 1 x Steckerladegerät
1 x Starthilfekabel 1 x 12 V Kfz-Ladekabel 1 x Bedienungsanleitung
1 x 12/19 V Adapterkabel 8 x Hohlsteckeradapter 1 x Tasche
3. Spezikationen
Größe (L x B x H): 22,4 x 8,7 x 2,9 [cm] Gewicht: 0,610 kg (Power Pack)
Akkukapazität: 18000 mAh, (66,6 Wh) Akkutyp: Lithium-Ionen
Ausgang: USB 5 V DC 1 A, USB 5 DC V 2 A
EC5 Starthilfe 12 V DC, 300 A (Spitze 600 A)
12 V DC 10 A, 19 V DC 3,5 A
Eingang: 15 V, 1 A (Steckerladegerät)
Ladedauer: ca. 6 Stunden
Temperaturbereich: -20 °C bis +60 °C
USB 3in1-Kabel für: Micro USB B, Micro USB C, Lightning
4. Sicherheitshinweise
• Das Warndreieck kennzeichnet alle für die Sicherheit wichtigen Anweisungen. Befolgen Sie
diese immer, anderenfalls könnten Sie sich verletzen oder das Gerät könnte beschädigt werden.
• Kinder dürfen nicht mit dem Gerät spielen.
• Reinigung und Benutzerwartung dürfen nicht von Kindern ohne Beaufsichtigung durchgeführt
werden.
• Lassen Sie das Verpackungsmaterial nicht achtlos liegen. Dieses kann für Kinder zu einem gefährlichen
Spielzeug werden!
• Benutzen Sie dieses Produkt nur für die dafür vorgesehene Verwendung!
• Manipulieren oder zerlegen Sie das Gerät nicht!
• Verwenden Sie zu Ihrer eigenen Sicherheit ausschließlich Zubehör oder Ersatzteile, die in der
Anleitung angegeben sind, oder deren Verwendung durch den Hersteller empfohlen wird!
• Lesen Sie vor dem Versuch einer Starthilfe im Handbuch Ihres Fahrzeugs nach, wie ein
Starthilfevorgang durchzuführen ist.
• Tragen Sie beim Umgang mit Blei-Akkus stets eine Schutzbrille und Schutzkleidung.
• Blei-Akkus enthalten aggressive ätzende Säuren. Vermeiden Sie Haut- und Augenkontakt mit
Flüssigkeiten aus dem Blei-Akku! Zerlegen Sie Blei-Akkus niemals! Waschen Sie betroene Hautpartien
gründlich mit Wasser und Seife ab. Ist Säure ins Auge gelangt, spülen Sie dieses sofort für mindestens
10 Minuten unter ießendem, klarem, lauwarmem Wasser aus! Suchen Sie danach sofort einen Arzt
auf!
• Ist Säure auf Ihre Kleidung gelangt, so waschen Sie diese sofort mit viel Wasser und Seife aus!
3
• Tragen Sie niemals Ringe, Halsketten, Uhren o.ä. beim Umgang mit Akkus oder Ladegeräten. Durch das
Kurzschließen der Akkukontakte besteht Verbrennungs- und Explosionsgefahr!
• Das Powerpack ist nur vorgesehen für Starthilfe eines Kraftfahrzeugs mit eigenem Akku.
Das Powerpack kann den Fahrzeug-Akku nicht ersetzten.
• Bewahren Sie das Powerpack immer mit abgezogenem Starthilfekabel auf, damit es nicht zu
Kurzschlüssen zwischen den Polzangen kommen kann.
• Versuchen Sie nicht, den Akku des Powerpacks auszubauen und zu ersetzen. Sollte die Lebensdauer des
Akkus einmal beendet sein, entsorgen Sie das gesamte Powerpack gemäß den örtlichen Richtlinien.
• Laden Sie den Akku des Powerpacks nicht mit einem beschädigten Ladegerät auf.
• Lassen Sie das Powerpack während des Ladevorgangs nicht unbeaufsichtigt.
• Benutzen Sie nur das mitgelieferte Zubehör zum Auaden des Powerpacks.
• Versuchen Sie niemals eine Starthilfe bei eingefrorener Batterie durchzuführen, es besteht
Explosionsgefahr.
Bewahren Sie diese Anleitung auf und geben Sie sie an andere Benutzer weiter.
entspricht den
EG-Richtlinien
gekennzeichnetes Elektroprodukt darf nicht in den Hausmüll
geworfen werden
Geräte mit diesem Zeichen
dürfen nur im Haus (trockene
Umgebung) betrieben werden
6. Bedienungsanleitung
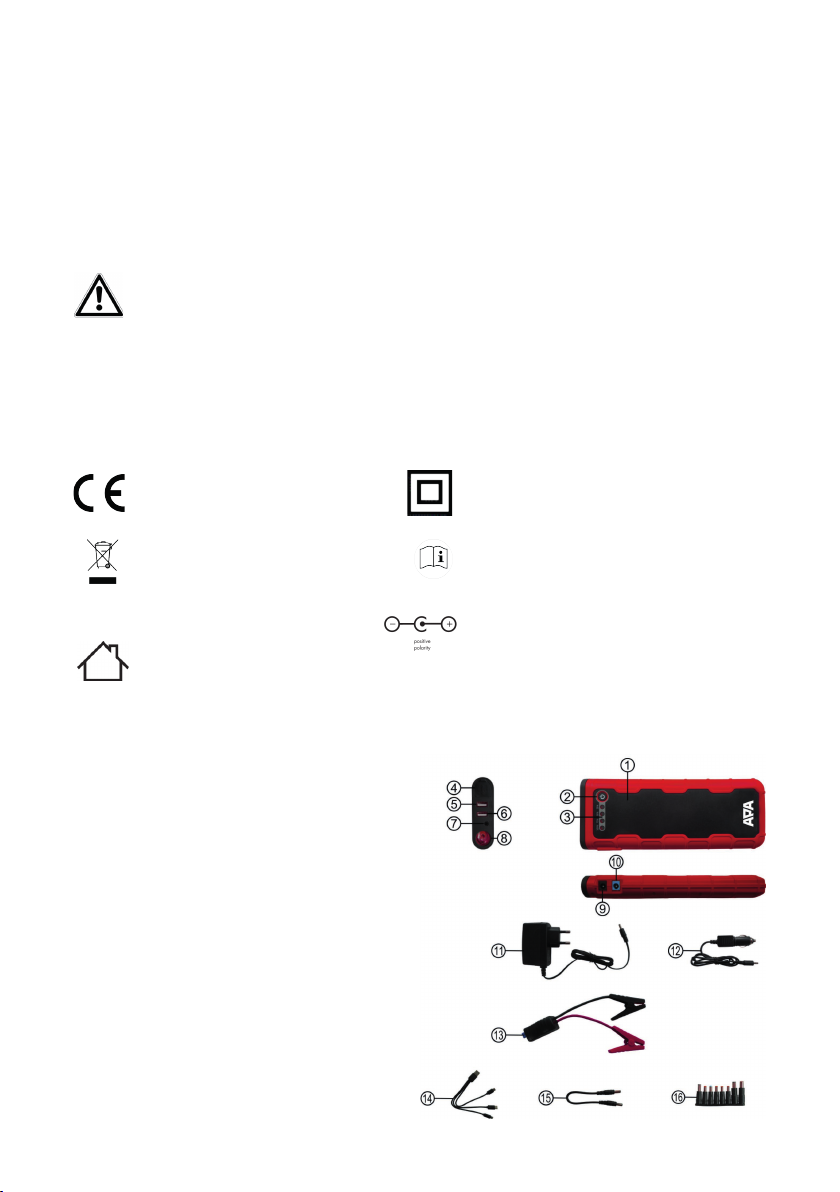
6.1 Übersicht
1 Powerpack 2 Schalter
3 Ladezustandsanzeige 4 Starthilfeanschluss
5 USB-Anschluss 1 A 6 USB-Anschluss 2 A
7 Ladebuchse 8 LED-Leuchte
9 19 V DC Anschlussbuchse 10 2 V DC Anschlussbuchse
11 Steckerladegerät 12 Kfz-Ladekabel
Schutzisoliertes Gehäuse
(Schutzklasse II).
Gebrauchsanleitung lesen
Polarität des Ladesteckers
4

6.2 Laden des Powerpacks
6.2.1 Laden des Powerpacks mit dem Steckerladegerät
Stecken Sie den Ladestecker des Steckerladegerätes (Position 11 in der Übersicht) in die Ladebuchse (Position 7
in der Übersicht) des Powerpacks. Danach stecken Sie das Steckerladegerät in eine 230 V Netzsteckdose. Sollte
es einmal vorkommen, dass Sie das Powerpack auaden müssen, ohne es beaufsichtigen zu können, stellen Sie
es während des Ladevorgangs auf eine feuerfeste Unterlage (Stein, Fliesen oder Metallplatte). Entfernen Sie alle
brennbaren Gegenstände im Umkreis von einem Meter.
Während des Ladevorgangs blinken die Kontrollleuchten der Ladezustandsanzeige (Position 3 in der Übersicht)
nacheinander auf, die Zahl der dauernd leuchtenden Kontrollleuchten zeigt den Ladezustand des Power Packs an.
Ist der Ladevorgang abgeschlossen, verlöschen alle Kontrollleuchten.
6.2.2 Laden des Powerpacks mit dem Kfz-Ladekabel
Stecken Sie den Ladestecker des Kfz-Ladekabels (Position 12 in der Übersicht) in die Ladebuchse (Position 7 in
der Übersicht) des Power Packs. Danach stecken Sie den Zigarettenanzünderstecker in die 12 V – Steckdose Ihres
Fahrzeugs.
ACHTUNG: Laden Sie das Powerpack mit dem Kfz-Ladekabel nur während der Fahrt, oder
wenn der Motor läuft, sonst besteht die Gefahr, dass die Starterbatterie Ihres Fahrzeugs
entladen wird.
Während des Ladevorgangs blinken die Kontrollleuchten der Ladezustandsanzeige (Position 3 in der Übersicht)
nacheinander auf, die Zahl der dauernd leuchtenden Kontrollleuchten zeigt den Ladezustand des Power Packs an.
Ist der Ladevorgang abgeschlossen, verlöschen alle Kontrollleuchten.
6.2.3 Prüfen des Ladezustands
Entfernen Sie das Ladekabel aus der Ladebuchse. Drücken Sie den Schalter (Position 2 in der Übersicht) des Geräts,
um den Ladezustand zu prüfen. Den Ladezustand können Sie an den leuchtenden Kontrollleuchten ablesen.
Kontrollleuchten 1 1+2 1+2+3 1+2+3+4
Ladezustand 25 % 50 % 75 % 100 %
1.Stellen Sie sicher, dass mindestens drei Kontrollleuchten (mind. 75 %
Batteriekapazität) der Ladezustandsanzeige dauernd leuchten und dass
die Batteriepole nicht verschmutzt oder oxidiert sind. Verbinden Sie das
Powerpack und das Starthilfekabel (Position 13 in der Übersicht), indem
Sie den Stecker der Startbox des Starthilfekabels in den Starthilfeanschluss
(Position 4 in der Übersicht) des Powerpacks stecken, siehe Bild 2. Stellen
Sie dabei sicher, dass der Stecker fest und sicher eingesteckt ist.
Bild 2: Starthilfekabel anschließen
5

2.Verbinden Sie zuerst die rote Polzange des Starthilfekabels mit dem Pluspol und danach die schwarze Polzange
mit dem Minuspol der Fahrzeugbatterie. Die Polzangen müssen einen festen und sicheren Kontakt zu den
Batteriepolen haben.
3.Achten Sie auf die Kontrollleuchten der Startbox und den Warnton,
siehe Bild 3.
Grüne Kontrollleuchte „correct“ Dauerleuchten:
Das Powerpack ist korrekt angeschlossen, Sie können Ihr Fahrzeug starten.
Bild 3: Startbox Kontrollleuchten
Grüne Kontrollleuchte „correct“ Blinken:
Die Fahrzeugbatterie hat einen niedrigen Ladezustand. Drücken Sie die „BOOST“-Taste und warten Sie bis die grüne
Kontrollleuchte dauerhaft leuchtet. Starten Sie Ihr Fahrzeug innerhalb der nächsten 30 Sekunden.
Rote Kontrollleuchte „reverse“ leuchtet und es ertönt ein Warnton:
Das Starthilfekabel ist falsch angeschlossen. Die Polzangen sind vertauscht an den Batteriepolen befestigt.
Schließen Sie das Starthilfekabel korrekt an und warten Sie bis die grüne Kontrollleuchte dauerhaft leuchtet.
Starten Sie Ihr Fahrzeug innerhalb der nächsten 30 Sekunden.
Keine Kontrollleuchte leuchtet und es ertönt kein Warnton:
Die Fahrzeugbatterie ist tiefentladen oder defekt. Kontrollieren Sie das Starthilfekabel auf korrekten Anschluss.
Drücken Sie die „BOOST“-Taste und warten Sie bis die grüne Kontrollleuchte dauerhaft leuchtet. Starten Sie Ihr
Fahrzeug innerhalb der nächsten 30 Sekunden.
Im Winter kann es bei Fahrzeugen mit Dieselmotor erforderlich sein,
diesen Vorgang in der Vorglühphase mehrfach zu wiederholen.
4. Starten Sie den Motor Ihres Fahrzeugs. Lassen Sie den Anlasser nicht länger als 6 Sekunden arbeiten. Sollte der
Startversuch nicht erfolgreich gewesen sein, warten Sie mindestens drei Minuten, bis Sie den nächsten Versuch
starten. Unternehmen Sie nach dem dritten, fehlgeschlagenen Startversuch keinen weiteren, sondern überprüfen
Sie Ihr Fahrzeug auf Fehler.
5. Entfernen Sie das Starthilfekabel von der Fahrzeugbatterie.
6.4 Laden von USB-Geräten
Wählen Sie den passenden Anschluss am USB 3in1 Adapterkabel (Position 14 in der Übersicht) für Ihr USB-Gerät aus
und schließen Sie es an. Schließen Sie den USB-Stecker an den für Ihr Gerät geeigneten USB-Ausgang (Position 5
oder 6 in der Übersicht) des Power Packs an. Drücken Sie den Schalter (Position 2 in der Übersicht) des Powerpacks,
um den Ladevorgang zu starten.
Nachdem der Ladevorgang abschlossen ist, gehen die LEDs für den Ladezustand (Position 3 in der Übersicht) aus.
Ziehen Sie zuerst das Ladekabel vom Powerpack ab, dann entfernen Sie das Ladekabel von Ihrem USB-Gerät.
6

6.5 Laden von 19 V-Notebooks
Um ein 19 V-Notebook zu betreiben oder aufzuladen, wählen Sie zuerst einen für Ihr Notebook passenden Adapter
aus dem Adapterset (Position 16 in der Übersicht) aus. Verbinden Sie diesen Adapter mit dem Adapterkabel
(Position 15 in der Übersicht). Stecken Sie den Adapter in den Ladeanschluss Ihres Notebooks. Verbinden Sie das
andere Ende des Adapterkabels mit dem 19 V Ausgang (Position 9 in der Übersicht) des Powerpacks. Starten Sie
den Ladevorgang durch Drücken des Schalters (Position 2 in der Übersicht). Nachdem der Ladevorgang abschlossen
ist, gehen die LEDs für den Ladezustand (Position 3 in der Übersicht) aus. Ziehen Sie zuerst das Adapterkabel vom
Powerpack ab und dann entfernen Sie es von Ihrem Notebook.
6.6 Verwenden des 12 V-Ausgangs
Achtung: Die 12 V-Anschlussbuchse besitzt dieselbe Bauart wie die 19 V-Anschlussbuchse.
Stellen Sie sicher, dass diese nicht verwechselt werden.
Um andere 12 V-Geräte (Kühlboxen, mobile Fernsehgeräte etc.) zu betreiben, wählen Sie zuerst einen für Ihr
Gerät passenden Adapter aus dem Adapterset (Position 16 in der Übersicht) aus. Verbinden Sie diesen Adapter mit
dem Adapterkabel (Position 15 in der Übersicht). Stecken Sie den Adapter in Anschlussbuchse Ihres 12 V-Geräts.
Verbinden Sie das andere Ende des Adapterkabels mit dem 12 V Ausgang (Position 10 in der Übersicht) des
Powerpacks. Nach dem Gebrauch ziehen Sie das Adapterkabel vom Powerpack ab. Die LEDs für den Ladezustand
(Position 3 in der Übersicht) gehen danach automatisch aus. Entfernen Sie das Adapterkabel von Ihren 12 V-Gerät.
6.7 Benutzung der LED-Leuchte / Signalleuchte
Um das Dauerlicht der LED-Leuchte einzuschalten, halten Sie den Schalter (Position 1 in der Übersicht) des
Powerpacks für ca. 3 Sekunden gedrückt. Danach können Sie durch erneutes Drücken des Schalters die folgenden
Lichtfunktionen hintereinander einschalten: Blinken, SOS, aus.
7. Wartung und Pege
7.1 Reinigung
Reinigen Sie das Lithium Powerpack nur mit einem weichen Tuch und benutzen Sie keine scharfen Reinigungsoder Lösemittel. Lassen Sie niemals Flüssigkeiten in das Innere des Gehäuses gelangen.
7.2 Aufbewahrung
Bei Nichtbenutzung bewahren Sie das Lithium Powerpack an einem trockenen Ort auf. Setzen Sie das Powerpack
weder Feuchtigkeit, Öl, Staub, Schmutz, hohen Temperaturen, starker Vibration noch mechanischer Belastung
aus. Bewahren Sie das Powerpack immer mit abgezogenem Starthilfekabel auf, damit es nicht zu Kurzschlüssen
zwischen den Polzangen kommen kann.
7.3 Wartung
Laden Sie bei Nichtbenutzung das Powerpack alle drei Monate auf.
7

8. Hinweise zum Umweltschutz
Entsorgen Sie Elektrogeräte nicht mit dem Hausmüll! Elektro- und Elektronik-Altgeräte müssen
getrennt gesammelt und einer umweltgerechten Wiederverwertung zugeführt werden. Über
Entsorgungsmöglichkeiten für Elektro- und Elektronik-Altgeräte informieren Sie sich bei Ihrer Gemeindeoder Stadtverwaltung. Die Materialien sind recycelbar. Durch Recycling, stoiche Verwertung oder andere
Formen der Wiederverwendung von Altgeräten leisten Sie einen wichtigen Beitrag zum Schutz unserer
Umwelt!
9. Kontaktinformationen
EAL GmbH
Otto-Hausmann-Ring 107
42115 Wuppertal
Deutschland
Telefon: +49 (0)202 42 92 83 0 Telefax: +49 (0)202 42 92 83 160
Internet: www.eal-vertrieb.com E-Mail: info@eal-vertrieb.com
Item number 16477
Lithium Power Pack 18.000mAh with Jump Lead
Contents
1. Proper use of the product 9
2. Scope of delivery 9
3. Specications 9
5.Explanation of symbols 10
4. Safety precautions 10
6.Operating manual 11
6.1 Overview 11
6.2 Charging the power pack 11
6.2.1 Charging the power pack with the plug-in charger 11
6.2.2 Charging the power pack with the motor vehicle charging cable 11
6.2.3 Checking the charging status 12
6.3 Jump-starting 12 V vehicles 12
6.4 Charging USB devices 13
6.5 Charging 19 V Notebooks 13
6.6 Using the 12 V outlet 13
6.7 Using the LED lights / signal lights 13
7. Maintenance and care 13
7.1 Cleaning 13
7.2 Storage 13
7.3 Maintenance 13
8. Notes regarding environmental protection 14
9. Contact information 14

WARNING: Please read the operating instructions carefully prior to use and observe
all safety instructions! Not observing such may lead to personal injury, damage to
the device or to your property! Store the original packaging, the receipt and these
instructions so that they may be consulted at a later date! When passing the product on,
please also include these operating instructions. Please check the contents of package
for integrity and completeness prior to use!
1. Proper use of the product
The lithium power pack is for charging the batteries of mobile telephones, smartphones, tablets, MP3 players and
other such devices which can be charged using a USB cable. Associated devices such as Notebooks can be connected
to the 12 V DC output and the 19 V DC, and charged. In addition, the jump lead can also be used for 12 V motor
vehicles with a maximum 2.0 l fuel motor, or a 1.6 l diesel motor.
This device is not designed to be used by children or persons with limited mental abilities or without experience
and/or lack of required specialist knowledge. Keep children away from the device.
The device is not designated for commercial use.
Use according to the intended purpose also includes the observance of all information in these operating
instructions, particularly the observance of the safety notes. Any other utilisation is considered to be contrary to the
intended purpose and may lead to material damage or personal injuries. EAL GmbH assumes no liability for damage
resulting from improper use.
2. Scope of delivery
1 x power pack 1 x USB 3-in-1 cable
1 x jump lead 1 x 12/19 V adaptor cable
1 x plug-in charger 8 x coaxial connector adaptors
1 x 12 V motor vehicle charging cable 1 x bag
1 x operating instructions
3. Specications
Size (L x W x H) : 22.4 x 8.7 = 2.9 [cm]
Weight: 0.610 kg (power pack)
Rechargeable battery capacity: 18,000 mAh, (66.6 Wh)
Battery: Lithium ion
Output: USB 5 V DC 1 A, USB 5 DC V 2 A
EC5 jump lead 12 V DC, 300 A (peak 600 A)
12 V DC 10 A, 19 V DC 3,5 A
Input: 15 V, 1 A (plug-in charger)
Charging time: approx. 6 hours
Temperature range: -20 °C to +60 °C
USB 3-in-1 cable for: Micro USB B, Micro USB C, Lightning
9
4. Safety precautions
• The warning sign indicates all instructions which are important for safety. Always follow these,
otherwise you could injure yourself or damage the device.
• Children may not play with the device.
• Cleaning and user maintenance may not be carried out by children without supervision.
• Do not treat packaging material carelessly. This may become a dangerous plaything for a child!
• Only use this product for its designated purpose!
• Do not manipulate or disassemble the device!
• For your own safety, only use accessories and spare parts that are stated in these instructions, or
that are recommended by the manufacturer!
• Before trying to jump-start a motor vehicle, read the manual for your vehicle to nd out how to
jump-start it.
• When using lead batteries, always wear protective goggles and clothing.
• Lead batteries contain aggressive, corrosive acids. Prevent skin and eyes from coming into contact
with the lead battery uids! Never dismantle lead batteries! Wash aected skin thoroughly using soap
and water. If acid has entered an eye, rinse immediately for at least 10 minutes under clean, running,
lukewarm water! Then immediately consult a doctor!
• If your clothing has acid on it, rinse immediately with plenty of soap and water!
• Never wear rings, necklaces, watches or similar when handling batteries or chargers.
The short-circuiting of the battery contacts brings a risk of burns and explosion!
• The power pack is only designed as a starting aid for a vehicle that has a battery of its own.
The power pack cannot replace the vehicle battery.
• Always store the power pack with the jump lead unplugged, to prevent bypasses between the
cable clamps.
• Do not attempt to remove and replace the battery pack of the power pack. If the battery comes to
the end of its useful life, dispose of the entire battery in accordance with local policy.
• Never charge the power pack using a damaged charger.
• Do not leave the power pack unattended during charging.
• Only used the supplied accessories to charge the power pack.
• Never attempt to jump-start a vehicle when the battery is frozen, as this brings a risk of explosion.
Store these instructions carefully and, if necessary, pass them on to other users.
5.Explanation of symbols
Complies with
EC directives
Labelled electrical products
may not be disposed of in the
household waste
Devices with this symbol may only be
operated indoors (dry environment)
10
Insulated housing (protection class II)
Read the operating instructions
Polarity of the plug connector

6.Operating manual
6.1 Overview
1 Power pack 2 Switch
3 Charging status display 4 Jump lead connection
5 1 A USB connection 6 2 A USB connection
7 Charging socket 8 LED light
9 19 V DC connection socket 10 12 V DC connection socket
11 Plug-in charger 12 Motor vehicle charging cable
13 Jump lead 14 USB 3-in-1 cable
15 Adaptor cable 16 Adaptor set
6.2 Charging the power pack
6.2.1 Charging the power pack with the plug-in charger
Plug the coaxial connector of the plug-in charger (Position 11 in the overview) into the charging socket of the
power pack (Position 7 in the overview). Next, plug the charger into a 230 V power socket. If you have to charge
the power pack but are unable to supervise it, place it on a reproof surface during charging (stone, tile or metal
plate). Remove all ammable objects within a 1 m radius.
During charging, the control lights on the charging status display (Position 3 in the overview) will ash one after
another; the number of control lights which stay lit shows the charging status of the power pack. If charging is
complete, all control lights will go out.
6.2.2 Charging the power pack with the motor vehicle charging cable
Plug the coaxial connector of the motor vehicle charging cable (Position 12 in the overview) into the charging
socket of the power pack (Position 7 in the overview). Now connect the cigarette lighter plug to the 12 V socket of
your vehicle.
ATTENTION: Only charge the power pack with the motor vehicle charging cable when
driving or when the motor is running, otherwise there is a risk that the starter battery
of your vehicle may be discharged.
During charging, the control lights on the charging status display (Position 3 in the overview) will ash one after
another; the number of control lights which stay lit shows the charging status of the power pack. If charging is
complete, all control lights will go out.
11

6.2.3 Checking the charging status
Remove the charging cable from the charging socket. Push the switch of the device (Position 2 in the overview) to
check the charging status. You can read the charging status from the control lights which light up.
Control lights 1 1+2 1+2+3 1+2+3+4
Charging status 25 % 50 % 75 % 100 %
6.3 Jump-starting 12 V vehicles
1. Make sure that at least three control lights are on in the charging display
(at least 75% battery capacity), and that the battery has not been soiled
or oxidised. Connect the power pack and the jump lead (Position 13 in the
overview). See Figure 2 for where to plug in the start box plug for the jump
lead cable in the jump lead connection (Position 4 in the overview). Make
sure that the plug is plugged in rmly and securely.
2. First, connect the red cable clamp of the jump lead to the plus pole of
Figure 2: Connecting the jump lead
the car battery, and then connect the black cable clamp to the minus pole.
The cable clamps must have rm and secure contact with the battery poles.
3. Pay attention to the control lights on the start box and the warning signal
- see Figure 3.
Green ‚correct‘ control light stays lit:
The power pack is connected correctly, and you can start your vehicle.
Figure 3: Start box control lights
Green ‚correct‘ control light ashes:
The car battery has a low charging status. Press the ‚BOOST‘ button and wait
until the green control light stays lit. Start your vehicle within the next 30 seconds.
Red ‚reverse‘ control light lights up and you hear a warning signal:
The jump lead is connected incorrectly. The cable clamps are connected to the wrong poles of the battery. Connect
the jump lead correctly and wait for the green control light to stay lit. Start your vehicle within the next 30 seconds.
No control lights light up, and no warning signal sounds:
The vehicle battery is deep discharged or defective. Make sure the jump lead is connected to the right point. Press
the ‚BOOST‘ button and wait until the green control light stays lit. Start your vehicle within the next 30 seconds.
In winter, this procedure may need to be repeated several times for vehicles with diesel motors during
the preheating stage.
4. Start the motor of your vehicle. Do not operate the starter for longer than 6 seconds. If the start attempt is not
successful, wait for at least three minutes before starting the next attempt. After the third failed attempt, do not
attempt again. Instead, check your vehicle for faults.
5. Remove the jump lead from the battery.
12

6.4 Charging USB devices
Select the right connection on the USB 3-in-1 adaptor cable (Position 14 in the overview) for your USB device, and
connect it. Connect the USB plug to the USB output on the power pack which suits your device (Position 5 or 6 in
the overview). Push the switch of the power pack (Position 2 in the overview) to start charging.
After charging has nished, the LEDs for the charging status (Position 3 in the overview) will go out. Pull the
charging cable from the power pack rst, then remove the charging cable from your USB device.
6.5 Charging 19 V Notebooks
To operate or charge a 19 V Notebook, select the right adaptor for your Notebook from the adaptor set (Position 16
in the overview). Connect this adaptor with the adaptor cable (Position 15 in the Overview). Plug the adaptor into
the charging outlet of your Notebook. Connect the other end of the adaptor cable with the 19 V outlet (Position
9 in the overview) of the power pack. Start charging by pushing the switch of the power pack (Position 2 in the
overview). After charging has nished, the LEDs for the charging status (Position 3 in the overview) will go out.
Pull the adaptor cable out of the power pack rst, and then remove it from your Notebook.
6.6 Using the 12 V outlet
Warning: The 12 V connection socket has the same design as the 19 V.
Make sure you do not get them mixed up.
To operate other 12 V devices (cooling boxes, mobile TVs etc.), rst select the right adaptor for your device from
the adaptor set (Position 16 in the overview). Connect this adaptor with the adaptor cable (Position 15 in the
Overview). Plug the adaptor into the connection socket of your 12 V device. Connect the other end of the adaptor
cable with the 12 V outlet (Position 10 in the overview) of the power pack. Pull the adaptor cable out of the
power pack after use. The LEDs for the charging status (Position 3 in the overview) will then automatically go out.
Remove the adaptor cable from your 12 V device.
6.7 Using the LED lights / signal lights
To turn the continuous LED light on, keep the switch (Position 1 in the overview) of the power pack pressed down
for approx. 3 seconds. You can then switch on the following light functions one after the other, by repeatedly
pressing the switch: ashing, SOS, o.
7. Maintenance and care
7.1 Cleaning
Only clean the lithium power pack with a soft cloth and do not use any aggressive cleaning agents or solvents.
Never allow liquids to ingress into the housing.
7.2 Storage
When not in use, store the lithium power pack in a dry place. Do not expose the power pack to moisture, oil, dust,
dirt, high temperatures, strong vibrations, or mechanical load. Always store the power pack with the jump lead
unplugged, to prevent bypasses between the cable clamps.
7.3 Maintenance
Charge the power pack every three months when not in use.
13

8. Notes regarding environmental protection
Do not dispose of electrical devices with the household waste! Electrical and electronic scrap must be
collected separately and disposed of in an environmentally responsible manner for recycling. Please contact
your community or city administration regarding disposal options for electrical and electronic scrap.
The materials are recyclable. You make an important contribution to protecting our environment by recycling, material utilisation or other forms of reusing waste equipment!
9. Contact information
EAL GmbH
Otto-Hausmann-Ring 107
42115 Wuppertal
Germany
Telephone: +49 (0)202 42 92 83 0 Fax: +49 (0)202 42 92 83 160
Internet: www.eal-vertrieb.com Email: info@eal-vertrieb.com
N° d‘art. 16477
Powerpack au lithium 18 000 mAh avec aide au démarrage
Sommaire
1.Utilisation conforme- 15
2. Matériel fourni- 15
3. Spécications- 15
4. Consignes de sécurité- 16
5. Explication des symboles- 17
6. Notice d‘utilisation- 17
6.1 Vue d‘ensemble 17
6.2 Chargement du Powerpack 17
6.2.1 Chargement du Powerpack à l‘aide du chargeur à che 17
6.2.2 Chargement du Powerpack à l‘aide du câble de chargement automobile 18
6.2.3 Contrôle de l‘état de chargement 18
6.3 Aide au démarrage pour véhicules 12 V 18
6.4 Chargement d‘appareils USB 19
6.5 Chargement de Notebooks 19 V 19
6.6 Utilisation de la sortie 12 V 20
6.7 Utilisation de la lampe à LED / lampe de signalisation 20
7. Maintenance et entretien 20
7.1 Nettoyage 20
7.2 Rangement et conservation 20
7.3 Entretien 20
8. Remarques relatives à la protection de l‘environnement 20
9. Données de contact 21
14

AVERTISSEMENT
Lisez attentivement la notice d‘utilisation avant la mise en service et respectez toutes
les consignes de sécurité ! Tout non-respect peut entraîner des dommages corporels,
endommager l‘appareil ou vos biens ! Conservez l‘emballage d‘origine, le justicatif
d‘achat et la présente notice pour vous y référer ultérieurement ! Si vous revendez
ou remettez l‘appareil à des tiers, veuillez également leur remettre cette notice
d‘utilisation. Avant la mise en service, veuillez contrôler le contenu de l‘emballage pour
exclure des dommages et vérier si toutes les pièces sont présentes !
1.Utilisation conforme
The lithium power pack is for charging the batteries of mobile telephones, smartphones, tablets, MP3 players and
other such devices which can be charged using a USB cable. Associated devices such as Notebooks can be connected
to the 12 V DC output and the 19 V DC, and charged. In addition, the jump lead can also be used for 12 V motor
vehicles with a maximum 2.0 l fuel motor, or a 1.6 l diesel motor.
This device is not designed to be used by children or persons with limited mental abilities or without experience
and/or lack of required specialist knowledge. Keep children away from the device.
The device is not designated for commercial use.
Use according to the intended purpose also includes the observance of all information in these operating
instructions, particularly the observance of the safety notes. Any other utilisation is considered to be contrary to the
intended purpose and may lead to material damage or personal injuries. EAL GmbH assumes no liability for damage
resulting from improper use.
2. Matériel fourni
1 x Powerpack 1 x câble USB 3 en 1
1 x câble d‘aide au démarrage 1 x câble d‘adaptateur 12/19 V
1 x chargeur à che 8 x adaptateur à che creuse
1 x câble de chargement automobile 12 V 1 x sacoche
1 x notice d‘utilisation
3. Spécications
Dimensions (L x l x h) : 22,4 x 8,7 x 2,9 [cm]
Poids : 0,610 kg (Powerpack)
Capacité de la batterie : 18 000 mAh, (66,6 Wh)
Type de batterie : lithium-ion
Sortie : USB 5 V CC 1 A, USB 5 CC V 2 A
aide au démarrage EC5 12 V CC, 300 A (crête 600 A)
12 V CC 10 A, 19 V CC 3,5 A
Entrée : 15 V, 1 A (chargeur à che)
Temps de charge : 6 heures environ
Plage de température : -20 °C à +60 °C
Câble USB 3 en 1 pour : Micro USB B, Micro USB C, Lightning
15

4. Consignes de sécurité
• Le triangle de signalisation indique toutes les instructions relatives à la sécurité. Respectez-les à tout
moment car vous risqueriez sinon de vous blesser ou l‘appareil risquerait d‘être endommagé.
• Les enfants ne doivent pas jouer avec l‘appareil.
• Les tâches de nettoyage et d‘entretien à eectuer chez soi ne doivent pas être exécutées par des
enfants qui ne sont pas sous surveillance.
• Ne laissez pas traîner le matériel d‘emballage. Il pourrait devenir un jouet dangereux pour les enfants !
• N‘utilisez cet appareil qu‘aux ns pour lesquelles il a été prévu !
• Ne pas manipuler ni démonter l‘appareil !
• Pour votre propre sécurité, utilisez exclusivement les accessoires ou pièces de rechange qui sont indi
qué(e)s dans la notice d‘utilisation ou dont l‘utilisation est conseillée par le fabricant !
• Avant toute tentative d‘aide au démarrage, informez-vous de la procédure correcte en consultant le
manuel de votre véhicule.
• Portez toujours des lunettes de protection et des vêtements de protection lorsque vous manipulez une
batterie au plomb.
• Les batteries au plomb contiennent des acides corrosifs. Évitez tout contact de la peau et des yeux avec
les liquides de la batterie au plomb ! Ne démontez jamais les batteries au plomb ! Lavez soigneu
sement les zones de la peau concernées à l‘eau et au savon. Si l‘acide est entré au contact d‘un œil,
rincez-le immédiatement pendant au moins 10 minutes sous de l‘eau claire courante tiède ! Consultez
ensuite immédiatement un médecin !
• Si les vêtements sont entrés en contact avec de l‘acide, lavez-les immédiatement avec beaucoup d‘eau
et du savon !
• Ne portez jamais de bagues, de colliers, de montres, etc. lorsque vous manipulez des batteries ou
des chargeurs. Un court-circuit au niveau des contacts de la batterie entraîne un risque de brûlure et
d‘explosion !
• Le Powerpack est uniquement prévu pour l‘aide au démarrage d‘automobiles équipés de leur propre
batterie. Le Powerpack ne remplace pas la batterie du véhicule.
• Ne rangez jamais le Powerpack sans avoir débranché le câble d‘aide au démarrage ; vous évitez ainsi
des courts-circuits entre les pinces crocodiles.
• N‘essayez pas de démonter ou de remplacer la batterie du Powerpack. Lorsque la batterie ne foncti
onne plus, éliminez le Powerpack complet en respectant les prescriptions locales.
• Ne rechargez pas la batterie du Powerpack avec un chargeur endommagé.
• Ne laissez pas le Powerpack sans surveillance lors de l‘opération de chargement.
• Utilisez uniquement les accessoires fournis pour recharger le Powerpack.
• N‘essayez jamais d‘eectuer une aide au démarrage lorsque la batterie est gelée car cela présente un
risque d‘explosion.
Rangez cette notice d‘utilisation en lieu sûr et remettez-la à tout utilisateur tiers.
16

5. Explication des symboles
Correspond aux
directives de la CE
Un produit électrique/électronique
marqué avec ce symbole ne doit pas
être jeté dans les ordures ménagères.
Les appareils portant ce symbole ne
peuvent être utilisés qu‘à l‘intérieur
(environnement sec)
6. Notice d‘utilisation
6.1 Vue d‘ensemble
1 Powerpack 2 Interrupteur
3 Indicateur d‘état de charge 4 Connecteur d‘aide au démarrage
5 Port USB 1 A 6 Port USB 2 A
7 Connecteur de chargement 8 Lampe à LED
9 Connecteur de 19 V CC 10 Connecteur de 12 V CC
11 Chargeur à che 12 Câble de chargement automobile
13 Câble d‘aide au démarrage 14 Câble USB 3 en 1
15 Câble d‘adaptateur 16 Kit d‘adaptateurs
Boîtier avec isolation
(classe de protection II).
Lire la notice
d‘utilisation
Polarité du connecteur de chargement
Figure 1 : Vue d’ensemble
6.2 Chargement du Powerpack
6.2.1 Chargement du Powerpack à l‘aide du chargeur à che
Insérez la che du chargeur (position 11 sur la vue d‘ensemble) dans le connecteur de chargement du Powerpack
(position 7 sur la vue d‘ensemble). Ensuite, branchez le chargeur à che sur une prise secteur de 230 V. Si vous devez exceptionnellement laisser le Powerpack sans surveillance lors de l‘opération de chargement, placez-le sur un
support ininammable (en pierre, sur un carrelage ou sur une plaque métallique). Enlevez tout objet combustible
se situant dans un rayon d‘un mètre.
Les lampes de contrôle clignotent successivement lors de l‘opération de chargement (position 3 sur la vue d‘ensemble) ; le nombre de lampes continuellement éclairées indique l‘état de chargement du Powerpack. Dès que
l‘opération de chargement est terminée, toutes les lampes de contrôle s‘éteignent.
17

6.2.2 Chargement du Powerpack à l‘aide du câble de chargement automobile
Branchez la che du câble de chargement automobile (position 12 sur la vue d‘ensemble) sur le connecteur de
chargement du Powerpack (position 7 sur la vue d‘ensemble). Ensuite, branchez la che allume-cigares dans la
prise 12 V de votre véhicule.
ATTENTION : Ne rechargez le Powerpack à l‘aide du câble de chargement automobile que pendant que
vous roulez ou lorsque le moteur est en marche pour éviter de décharger la batterie du démarreur de
votre véhicule.
Les lampes de contrôle s‘allument successivement lors de l‘opération de chargement (position 3 sur la vue
d‘ensemble) ; le nombre de lampes éclairées en permanence indique l‘état de chargement du Powerpack. Dès que
l‘opération de chargement est terminée, toutes les lampes de contrôle s‘éteignent.
6.2.3 Contrôle de l‘état de chargement
Débranchez le câble de chargement de la prise. Appuyez sur l‘interrupteur (position 2 sur la vue d‘ensemble) de
l‘appareil an de contrôler l‘état de chargement. L‘état de chargement est indiqué par les lampes de contrôle
éclairées.
Lampes de contrôle 1 1+2 1+2+3 1+2+3+4
État de chargement 25 % 50 % 75 % 100 %
6.3 Aide au démarrage pour véhicules 12 V
1. Assurez-vous qu‘au moins une lampe de contrôle de l‘achage
d‘état de chargement est éclairée (minimum de 75 % de capacité
de charge de la batterie) et que les pôles de la batterie ne sont pas
souillés ou oxydés. Reliez le Powerpack et le câble d‘aide au démarrage
(position 13 sur la vue d‘ensemble) en enchant la che de la boîte de
démarrage du câble d‘aide au démarrage dans le connecteur d‘aide au
démarrage (position 4 sur la vue d‘ensemble) du Powerpack, voir g. 2.
Ce faisant, vériez le branchement sûr et correct de la che.
Figure 2 : Raccordement du câble
d‘aide au démarrage
2. Fixez d‘abord la pince crocodile rouge du câble d‘aide au démarrage
sur le pôle Plus et ensuite la pince crocodile noire sur le pôle Moins de
la batterie du véhicule. Les pinces crocodiles doivent avoir un contact
sûr et ferme sur les pôles de la batterie.
3. Observez les lampes de contrôle de la boîte de démarrage et l‘alarme
acoustique, voir g. 3..
Lampe de contrôle verte „correct“ éclairée en permanence :
Le Powerpack est correctement raccordé et vous pouvez démarrer votre
véhicule.
18
Figure 3 : Lampes de contrôle de
la boîte de démarrage

La lampe de contrôle verte „correct“ clignote :
L‘état de chargement de la batterie du véhicule est faible. Appuyez sur la touche „BOOST“ et patientez jusqu‘à ce
que la lampe de contrôle verte soit éclairée en permanence. Démarrez votre véhicule au cours des 30 secondes
suivantes.
La lampe de contrôle rouge „reverse“ s‘allume et un signal acoustique retentit :
Le câble d‘aide au démarrage n‘est pas correctement raccordé. Les pinces crocodiles sur les pôles de la batterie ont
été permutées. Fixez le câble d‘aide au démarrage correctement et patientez jusqu‘à ce que la lampe de contrôle
verte soit éclairée en permanence. Démarrez votre véhicule au cours des 30 secondes suivantes.
Aucune lampe de contrôle ne s‘allume et aucun signal acoustique ne retentit :
Décharge profonde de la batterie du véhicule ou cette dernière est défectueuse. Assurez-vous que le câble d‘aide
au démarrage est correctement raccordé. Appuyez sur la touche „BOOST“ et patientez jusqu‘à ce que la lampe de
contrôle verte soit éclairée en permanence. Démarrez votre véhicule au cours des 30 secondes suivantes.
En hiver, les véhicules avec moteur diesel peuvent exiger une répétition multiple de cette opération lors
de la phase de préchauage.
4. Démarrez le moteur de votre véhicule. Ne laissez pas travailler le démarreur pendant plus de 6 secondes. Si la
tentative de démarrage n‘a pas réussi, patientez au moins pendant trois minutes avant d‘eectuer une nouvelle
tentative. Si vous avez tenté un démarrage trois fois sans y parvenir, cessez ces tentatives et contrôlez si votre
véhicule est présente des défectuosités.
5.Retirez le câble d‘aide au démarrage de la batterie du véhicule.
6.4 Chargement d‘appareils USB
Choisissez le connecteur adéquat du câble d‘adaptateur USB 3 en 1 (position 14 sur la vue d‘ensemble) et raccordez
votre appareil USB. Branchez la che USB sur la sortie USB adéquate (position 5 ou 6 sur la vue d‘ensemble) du
Powerpack. Appuyez sur l‘interrupteur (position 2 sur la vue d‘ensemble) du Powerpack et contrôlez l‘état de
chargement.
Une fois l‘opération de chargement terminée, les LED d‘état de chargement (position 3 sur la vue d‘ensemble)
s‘éteignent. Débranchez d‘abord le câble de chargement du Powerpack et débranchez ensuite le câble de
chargement de votre appareil USB.
6.5 Chargement de Notebooks 19 V
An d‘utiliser ou de charger un Notebook 19 V, sélectionnez d‘abord l‘adaptateur adéquat du kit d‘adaptateurs
(position 16 sur la vue d‘ensemble). Fixez cet adaptateur sur le câble d‘adaptateur (position 15 sur la vue
d‘ensemble). Enchez l‘adaptateur dans la prise de chargement de votre Notebook. Branchez l‘autre extrémité du
câble d‘adaptateur sur la sortie 19 V (position 9 sur la vue d‘ensemble) du Powerpack. Démarrez l‘opération de
chargement en appuyant sur l‘interrupteur (position 2 sur la vue d‘ensemble). Une fois l‘opération de chargement
terminée, les LED d‘état de chargement (position 3 sur la vue d‘ensemble) s‘éteignent. Retirez d‘abord l‘extrémité
du câble d‘adaptateur du Powerpack et ensuite celle du Notebook.
19

6.6 Utilisation de la sortie 12 V
Attention : La construction de la prise de raccordement 12 V est identique à celle de la prise de raccordement 19 V.
Assurez-vous qu‘elles ne soient pas permutées.
An d‘utiliser ou de charger un autre appareil 12 V (glacières, téléviseurs mobiles, etc.), choisissez d‘abord
l‘adaptateur adéquat dans le kit d‘adaptateurs (position 16 sur la vue d‘ensemble). Fixez cet adaptateur sur le
câble d‘adaptateur (position 15 sur la vue d‘ensemble). Enchez l‘adaptateur dans la prise de chargement de
votre appareil 12 V. Branchez l‘autre extrémité du câble d‘adaptateur sur la sortie 12 V (position 10 sur la vue
d‘ensemble) du Powerpack. Après l‘utilisation, débranchez le câble d‘adaptateur du Powerpack. Les LED pour
l‘état de chargement (position 3 sur la vue d‘ensemble) s‘éteignent alors automatiquement. Débranchez le câble
d‘adaptateur de votre appareil 12 V.
6.7 Utilisation de la lampe à LED / lampe de signalisation
An d‘allumer en permanence la lampe à LED, maintenez l‘interrupteur (position 1 sur la vue d‘ensemble) du
Powerpack enfoncé pendant 3 secondes environ. Ensuite, vous pouvez activer successivement les fonctions de
chargement suivantes en pressant encore une fois l‘interupteur : clignotement, SOS, arrêt.
7. Maintenance et entretien
7.1 Nettoyage
Nettoyez le Powerpack au lithium exclusivement avec un chion doux et sans nettoyants agressifs ni solvants. Ne
laissez jamais de liquides entrer à l‘intérieur du boîtier.
7.2 Rangement et conservation
Lorsque le Powerpack au lithium n‘est pas utilisé, rangez-le à un emplacement sec. Protégez le Powerpack de
l‘humidité, de l‘huile, de la poussière, de la boue, des températures élevées, des fortes vibrations et des surcharges
mécaniques. Ne rangez jamais le Powerpack sans avoir débranché le câble d‘aide au démarrage ; vous évitez ainsi
des courts-circuits entre les pinces crocodiles.
7.3 Entretien
En cas de non-utilisation, rechargez le Powerpack tous les trois mois.
8. Remarques relatives à la protection de l‘environnement
Ne jetez pas les appareils électriques dans les ordures ménagères ! Les appareils électriques et électroniques usagés
doivent être collectés séparément et être remis aux services de recyclage. Renseignez-vous quant aux
possibilités d‘élimination d‘appareils électriques et électroniques usagés auprès de votre administration
communale ou municipale
Les matériaux sont recyclables. Par le recyclage, la récupération des matières ou d’autres formes de
réutilisation d’appareils usagés, vous contribuez activement à la protection de notre environnement !
9. Données de contact
EAL GmbH
Otto-Hausmann-Ring 107 42115 Wuppertal Allemagne
Téléphone : +49 (0)202 42 92 83 0 Fax : +49 (0)202 42 92 83 160
Internet: www.eal-vertrieb.com Courriel : info@eal-vertrieb.com
20

Art.nr. 16477
Lithium Powerpack 18.000 mAh met starthulp
Inhoud
1.Reglementair gebruik 21
2. Leveringsomvang 22
3. Specicaties 22
4. Veiligheidsinstructies 23
5. Uitleg bij de symbolen 24
6. Gebruiksaanwijzing 24
6.1 Overzicht 24
6.2 De powerpack opladen 24
6.2.1 De powerpack met behulp van de oplader opladen 24
6.2.2 De powerpack met behulp van de auto-oplaadkabel opladen 25
6.2.3 Controle van de laadtoestand 25
6.3 Starthulp voor 12 V - voertuigen 25
6.4 USB-apparaten opladen 26
6.5 19 V-notebooks opladen 26
6.6 Gebruik van de 12 V-uitgang 26
6.7 Gebruik van de LED-lamp/waarschuwingslamp 27
7. Onderhoud en verzorging 27
7.1 Reiniging 27
7.2 Opslag 27
7.3 Onderhoud 27
8. Informatie over de bescherming van het milieu 27
9. Contactinformatie 27
WAARSCHUWING
Lees voorafgaand aan de ingebruikname de gebruiksaanwijzing aandachtig door
en neem alle veiligheidsvoorschriften in acht! Het niet-naleven hiervan kan letsel,
schade aan het product of aan uw eigendom veroorzaken! Bewaar de oorspronkelijke
verpakking, het aankoopbewijs en deze gebruiksaanwijzing om later te kunnen
raadplegen! Geef bij het doorgeven van het product eveneens deze handleiding door.
Controleer voor de ingebruikname eerst de inhoud van de verpakking op beschadigingen
en volledigheid!
1.Reglementair gebruik
De lithium-powerpack is bedoeld voor het opladen van de accu van mobiele telefoons, smartphones, tablets, MP3spelers en dergelijke, die via een USB-kabel kunnen worden opgeladen. Op de uitgang van 12 V DC en die van 19
V DC kunnen de betreende apparaten, bijv. notebooks aangesloten en opgeladen worden. Bovendien beschikt
het over de mogelijkheid om als starthulp voor 12 V-personenauto‘s met een benzinemotor van maximaal 2,0 l of
dieselmotor van 1,6 l te fungeren.
Dit apparaat mag niet worden gebruikt door kinderen, personen met beperkte geestelijke vermogens of personen
21

zonder ervaring en/of gebrek aan kennis. Kinderen moeten uit de buurt van het apparaat worden gehouden.
Het apparaat is niet bedoeld voor bedrijfsmatig gebruik.
Tot het reglementair gebruik behoort ook het in acht nemen van alle informatie in deze handleiding, vooral van
de veiligheidsvoorschriften. Elk ander gebruik geldt als oneigenlijk en kan materiële schade of persoonlijk letsel
veroorzaken. EAL GmbH is niet aansprakelijk voor schade als gevolg van oneigenlijk gebruik.
2. Leveringsomvang
1 x Powerpack 1 x USB 3-in-1 kabel
1 x startkabel 1 x 12/19 V adapterkabel
1 x oplader 8 x holle-stekkeradapter
1 x 12 V auto-oplaadkabel 1 x tas
1 x gebruiksaanwijzing
3. Specicaties
Afmetingen (L x B x H): 22,4 x 8,7 x 2,9 [cm]
Gewicht: 0,610 kg (powerpack)
Accucapaciteit: 18.000 mAh, (66,6 Wh)
Soort accu: lithium-ionen
Uitgang: USB 5 V DC 1 A, USB 5 DC V 2 A
EC5 starthulp 12 V DC, 300 A (piek 600 A)
12 V DC 10 A, 19 V DC 3,5 A
Ingang: 15 V, 1 A (oplader)
Oplaadduur ca. 6 uur
Temperatuurbereik: -20°C tot +60°C
USB 3-in-1 kabel voor: Micro USB B, Micro USB C, Lightning
4. Veiligheidsinstructies
• De waarschuwingsdriehoek geldt als aanduiding van alle voor de veiligheid belangrijke
aanwijzingen. Neem deze te allen tijde in acht, anders kan lichamelijk letsel of schade aan het
apparaat worden veroorzaakt.
• Kinderen mogen niet met het apparaat spelen.
• Reiniging en onderhoud mag niet zonder toezicht door kinderen worden uitgevoerd.
• Laat het verpakkingsmateriaal niet achteloos rondslingeren. Dit kan voor kinderen gevaarlijk
speelgoed worden!
• Gebruik dit product uitsluitend voor het beoogde doel!
• Manipuleer of demonteer het apparaat niet!
• Gebruik voor uw eigen veiligheid uitsluitend toebehoren of reserveonderdelen die in de
gebruiksaanwijzing staan vermeld of waarvan het gebruik door de fabrikant wordt aanbevolen!
• Lees voor het gebruik van een starthulp eerst in het handboek van uw auto na hoe de procedure met
een starthulp moet worden uitgevoerd.
• Draag in de omgang met loodaccu‘s altijd een veiligheidsbril en beschermende kleding.
22

• Loodaccu‘s bevatten agressieve, bijtende zuren. Zorg dat vloeistoen uit loodaccu‘s niet met
de huid of ogen in contact kunnen komen! Loodaccu‘s in geen geval uit elkaar halen! Was de
blootgestelde huid grondig met water en zeep. Als u zuur in de ogen krijgt, spoel het
onmiddellijk uit gedurende minimaal 10 minuten onder stromend, helder, lauw water!
Consulteer vervolgens onmiddellijk een arts!
• Als er zuur op uw kleding komt, spoel het uit met veel water en zeep!
• Draag nooit ringen, kettingen, horloges etc. bij het hanteren van accu‘s en opladers. Door
kortsluiting van de accucontacten bestaat gevaar voor brandwonden of een explosie!
• De powerpack is uitsluitend bedoeld als starthulp voor motorvoertuigen met een eigen accu. De
powerpack is geen vervanging voor de accu in het voertuig.
• Berg de powerpack altijd op met een uitgetrokken startkabel, zodat er geen kortsluiting tussen
de poolklemmen kan ontstaan.
• Probeer nooit de accu van de powerpack te demonteren en te vervangen. Wanneer een einde
aan de levensduur van de accu is gekomen, voer dan de gehele powerpack volgens de richtlijnen
ter plaatse als afval af.
• Laad de accu van de powerpack nooit op met een beschadigde oplader.
• Laat de powerpack tijdens het opladen nooit onbeheerd achter.
• Gebruik uitsluitend de bijgeleverde accessoires voor het opladen van de powerpack.
• Probeer nooit een starthulp uit te voeren bij een bevroren accu, deze kan daarbij ontploen.
Bewaar deze gebruiksaanwijzing goed en geef deze door aan andere gebruikers.
5. Uitleg bij de symbolen
Komt overeen met de
EG-richtlijnen
Een elektrisch product met deze
markering mag niet als afval via het
huisvuil worden afgevoerd
Apparaten met dit teken mogen uitsluitend binnenshuis (droge omgeving)
worden gebruikt
Behuizing met randaarde
(beveiligingsklasse II).
Gebruiksaanwijzing lezen
Polariteit van de oplaadstekker
23

6.Gebruiksaanwijzing
6.1 Overzicht
1 Powerpack
2 Schakelaar
3 Laadtoestandsindicator
4 Starthulpaansluiting
5 USB-aansluiting 1 A
6 USB-aansluiting 2 A
7 Laadbus
8 LED-lamp
9 19 V DC-aansluitbus
10 12 V DC-aansluitbus
11 Oplader
12 Auto-oplaadkabel
13 Startkabel
14 USB 3-in-1 kabel
15 Adapterkabel
16 Adapterset
6.2 De powerpack opladen
6.2.1 De powerpack met behulp van de oplader opladen
Steek de stekker van de oplader (positie 11 in het overzicht) in de laadbus van de powerpack (positie 7 in het
overzicht). Daarna de stekker van de oplader in een stopcontact (230 V) steken. Mocht het onverhoopt voorkomen
dat u de powerpack tijdens het opladen niet in de gaten kunt houden, zet deze dan tijdens het opladen op een
vuurvaste ondergrond (steen, tegels of een metalen plaat). Verwijder alle brandbare voorwerpen in een straal van
een meter rondom de powerpack.
Afbeelding 1: Overzicht
Tijdens het opladen knipperen de controlelampjes van de laadtoestandsindicator (positie 3 in het overzicht)
afwisselend, terwijl het aantal lampjes dat gaat branden de laadtoestand van de powerpack aangeeft. Zodra het
opladen is afgesloten, gaan alle controlelampjes uit.
6.2.2 De powerpack met behulp van de auto-oplaadkabel opladen
Steek de stekker van de auto-oplaadkabel (positie 12 in het overzicht) in de laadbus (positie 7 in het overzicht) van
de powerpack. Steek daarna de sigarettenaansteker in de 12 V–aansluiting in de auto.
LET OP: Laad de powerpack alleen met behulp de auto-oplaadkabel op tijdens het rijden of
wanneer de motor draait, want anders bestaat het risico dat de accu van uw auto leeg raakt.
Tijdens het opladen knipperen de controlelampjes van de laadtoestandsindicator (positie 3 in het overzicht)
afwisselend, terwijl het aantal lampjes dat gaat branden de laadtoestand van de powerpack aangeeft. Zodra het
opladen is afgesloten, gaan alle controlelampjes uit.
24

6.2.3 Controle van de laadtoestand
Verwijder de oplaadkabel uit de laadbus. Druk op de schakelaar (positie 2 in het overzicht) van het apparaat, om
de laadtoestand te controleren. U kunt de laadtoestand aan de hand van het aantal brandende controlelampjes
aezen.
Spie di controllo 1 1+2 1+2+3 1+2+3+4
Livello di carica 25 % 50 % 75 % 100 %
6.3 Avviamento d‘emergenza per veicoli a 12 V
1. Controleer of tenminste 3 controlelampjes (accucapaciteit van
min. 75%) van de laadtoestandsindicator permanent branden en de
polen van de accu niet vuil of geoxideerd zijn. Verbind de powerpack
en de startkabel (positie 13 in het overzicht), door de stekker van de
startbox van de oplaadkabel in de starthulpaansluiting (positie 4 in
het overzicht) van de powerpack te steken, zie afbeelding 2. Zorg er
daarbij voor dat de stekker stevig en veilig is ingestoken.
2. Verbind eerst de rode poolklem van de startkabel met de pluspool
en daarna de zwarte poolklem met de minpool van de accu in de
auto. De poolklemmen moeten een stevig en veilig contact met de
accupolen hebben.
3. Let op de controlelampjes van de startbox en de waarschuwingstoon,
zie afbeelding 3.
Groen controlelampje „correct“ brandt permanent:
De powerpack is correct aangesloten, u kunt de auto starten.
Afbeelding 2: Startkabel aansluiten
Afbeelding 3: Startbox
controlelampjes
Groen controlelampje „correct“ knippert:
De accu van de auto heeft een lage laadtoestand. Druk op de „BOOST“-knop en wacht tot het groene controlelampje
permanent brandt. Start uw auto binnen de volgende 30 seconden.
Het rode controlelampje „reverse“ brandt en er klinkt een waarschuwingstoon:
De startkabel is verkeerd aangesloten. De poolklemmen op de accupolen zijn verkeerd om bevestigd. Sluit
de startkabel correct aan en wacht tot het groene controlelampje permanent brandt. Start uw auto binnen de
volgende 30 seconden.
Er brandt geen enkel controlelampje en er klinkt een waarschuwingstoon:
De accu van de auto is diepontladen of defect. Controleer of de startkabel correct is aangesloten. Druk op de
„BOOST“-knop en wacht tot het groene controlelampje permanent brandt. Start uw auto binnen de volgende 30
seconden.
25

In de winter kan het bij auto’s met een dieselmotor nodig zijn op de procedure meermaals in de
voorgloeifase te herhalen.
4. Start de motor van uw auto. Laat de startmotor niet langer dan 6 seconden draaien. Als de auto na de eerste
poging niet direct start, wacht dan tenminste 3 minuten voordat u het opnieuw probeert. Probeer het na drie
mislukte startpogingen niet nogmaals, maar controleer eerst uw auto op eventuele storingen.
5. Verwijder de startkabel van de accu van de auto.
6.4 USB-apparaten opladen:
Kies de passende aansluiting van de USB 3-in-1 adapterkabel (positie 14 in het overzicht) voor uw USB-apparaat
en sluit deze aan. Sluit de USB-stekker aan op de voor uw apparaat geschikte de USB-uitgang (positie 5 of 6 in het
overzicht) van de powerpack. Druk op de schakelaar (positie 2 in het overzicht) van de powerpack, om het opladen
te starten.
Nadat het opladen is voltooid, gaan de LED‘s voor de laadtoestand (positie 3 in het overzicht) uit. Trek eerst de
oplaadkabel van de powerpack eruit en verwijder dan pas de oplaadkabel uit het USB-apparaat.
6.5 19 V-notebooks opladen
Om een 19 V-notebook te bedienen en op te laden kiest u eerst een bij uw notebook passende adapter uit de
adapterset (positie 16 in het overzicht). Verbind deze adapter met de adapterkabel (positie 15 in het overzicht).
Steek de adapter dan in de laadaansluiting van uw notebook. Sluit het andere uiteinde van de adapterkabel aan op
de 19 V-uitgang (positie 9 in het overzicht) van de powerpack. Druk op schakelaar (positie 2 in het overzicht) om het
opladen te starten. Nadat het opladen is voltooid, gaan de LED‘s voor de laadtoestand (positie 3 in het overzicht) uit.
Trek eerst de adapterkabel van de powerpack los en verwijder deze dan pas uit uw notebook.
6.6 Gebruik van de 12 V-uitgang
Let op: De 12 V-aansluitbus heeft dezelfde constructie als de 19 V-aansluitbus. Zorg ervoor dat deze niet
met elkaar verwisseld worden.
Om een ander apparaat van 12 V (koelbox, mobiele TV-toestellen e.d.) te kunnen gebruiken, kiest u eerst een bij uw
apparaat passende adapter uit de adapterset (positie 16 in het overzicht). Verbind deze adapter met de adapterkabel
(positie 15 in het overzicht). Steek de adapter in de aansluitbus van uw 12 V-apparaat. Sluit het andere uiteinde
van de adapterkabel aan op de 12 V-uitgang (positie 10 in het overzicht) van de powerpack. Trek na gebruik altijd
eerst de adapterkabel van de powerpack los. De LED’s voor de laadtoestand (positie 3 in het overzicht) gaan dan
automatisch uit. Verwijder de adapterkabel van uw 12 V-apparaat.
6.7 Gebruik van de LED-lamp/waarschuwingslamp
Om de LED-lamp permanent in te schakelen, houdt u de schakelaar (positie 1 in het overzicht) van de powerpack
gedurende ca. 3 seconden ingedrukt. Daarna kunt u, door nogmaals op de schakelaar te drukken, achtereenvolgens
de onderstaande lichtfuncties inschakelen: knipperen, SOS, uit.
26
© EAL GmbH, 16480, 03 2018

7 Onderhoud en verzorging
7.1 Reiniging
Reinig de powerpack alleen met een zachte doek en gebruik geen bijtende reinigings- of oplosmiddelen. Laat nooit
vloeistoen in de behuizing terechtkomen.
7.2 Opslag
Bewaar de powerpack op een droge plaats, wanneer u hem niet gebruikt. De powerpack in geen geval blootstellen
aan vocht, olie, stof, vuil, hoge temperaturen, krachtige vibraties of mechanische belasting. Berg de powerpack
altijd op met een uitgetrokken startkabel, zodat er geen kortsluiting tussen de poolklemmen kan ontstaan.
7.3 Onderhoud
Laad de powerpack om de drie maanden op, wanneer u hem niet gebruikt.
8. Informatie over de bescherming van het milieu
Gooi elektrische apparaten niet weg met het gewone huishoudelijke afval! Afgedankte elektrische en elektronische
apparaten moeten gescheiden worden ingezameld en op milieuvriendelijke wijze worden gerecycled. U kunt
informatie inwinnen bij uw gemeente- of stadsbestuur over de afvoermogelijkheden voor afgedankte elektrischeen elektronische apparaten.
De materialen kunnen worden gerecycled. Door recycling of andere vormen van hergebruik van oude apparaten
levert u een belangrijke bijdrage aan de bescherming van ons milieu!
9. Contactinformatie
EAL GmbH
Otto-Hausmann-Ring 107
D-42115 Wuppertal
Duitsland
Telefoon: +49 (0)202 42 92 83 0
Telefax: +49 (0)202 42 92 83 160
Internet: www.eal-vertrieb.com
E-mail: info@eal-vertrieb.com
27

Cod. art. 16477
Lithium Powerpack 18.000mAh con avviamento d‘emergenza
Indice
1.Uso conforme 29
2. Volume di consegna 29
3. Speciche 29
4. Avvertenze di sicurezza 30
5. Spiegazione dei simboli 31
6.Istruzioni per l‘uso 31
6.1 Panoramica 31
6.2 Ricarica del Powerpack 31
6.2.1 Ricarica del Powerpack con il caricatore a spina 31
6.2.2 Ricarica del Powerpack con il cavo di ricarica per auto 32
6.2.3 Controllo del livello di carica 32
6.3 Avviamento d‘emergenza per veicoli a 12 V 32
6.4 Ricarica dei dispositivi USB 33
6.5 Ricarica dei notebook da 19 V 33
6.6 Utilizzo dell‘uscita 12 V 33
6.7 Utilizzo della spia LED / spia di segnalazione 34
7. Manutenzione e pulizia 34
7.1 Pulizia 34
7.2 Conservazione 34
7.3 Manutenzione 34
8. Avvertenze sulla tutela ambientale 34
9. Come contattarci 34
AVVERTENZA
Leggere attentamente le istruzioni per l‘uso prima della messa in funzione e osservare
tutte le avvertenze di sicurezza! La mancata osservanza di queste istruzioni può
provocare lesioni personali, danni al prodotto o alla vostra proprietà! Conservare la
confezione originale, la prova d‘acquisto e queste istruzioni come riferimento futuro!
In caso di cessione del prodotto, consegnare anche le presenti istruzioni. Vericare
l‘integrità e la completezza del contenuto della confezione prima di utilizzare il
prodotto!
28

1.Uso conforme
Il Lithium Powerpack serve per la ricarica delle batterie ricaricabili di telefoni cellulari, smartphone, computer/tablet,
lettori MP3 e dispositivi simili, che possono essere ricaricati con un cavo USB. All‘uscita 12 V DC e 19 V DC si possono
collegare e ricaricare i relativi dispositivi, ad es. i notebook. Inoltre, può fungere da avviamento d‘emergenza per i
veicoli a 12 V con motore a benzina da massimo 2,0 l o con motore a diesel da massimo 1,6 l.
Questo dispositivo non è destinato all‘uso da parte di bambini e persone con capacità mentali limitate o che non siano
in possesso delle necessarie conoscenze. Tenere il dispositivo lontano dalla portata dei bambini.
Questo dispositivo non è destinato all‘impiego industriale.
Dell’uso appropriato fa parte anche il rispetto di tutte le informazioni fornite in queste istruzioni, soprattutto delle
avvertenze sulla sicurezza. Ogni altro utilizzo viene considerato improprio e può
2. Volume di consegna
1 x Powerpack 1 x cavo USB 3in1
1 x cavo per avviamento emergenza 1 x cavo adattatore 12/19 V
1 x caricatore a spina 8 x adattatore connettore cavo
1 x cavo di ricarica auto 12 V 1 x borsa
1 x manuale d’uso
3. Speciche
Dimensioni (Lun x Lar x Alt): 22,4 x 8,7 x 2,9 [cm]
Peso: 0,610 kg (Power Pack)
Capacità della batteria: 18000 mAh (66,6 Wh)
Tipo di batteria: agli ioni di litio
Uscita: USB 5 V DC 1 A, USB 5 DC V 2 A
avviamento d‘emergenza EC5 12 V DC, 300 A (picco 600 A)
12 V DC 10 A, 19 V DC 3,5 A
Ingresso: 15 V, 1 A (caricatore a spina)
Durata ricarica: ca. 6 ore
Campo di temperatura: da -20 °C a +60 °C
Cavo USB 3in1 per: Micro USB B, Micro USB C, Lightning
29

4. Avvertenze di sicurezza
• Il triangolo di segnalazione identica tutte le istruzioni importanti per la sicurezza. Rispettare sempre
queste istruzioni, per evitare il pericolo di lesioni personali o danni al dispositivo.
• I bambini non devono giocare con l‘apparecchio.
• Non adare pulizia e manutenzione ai bambini se non sorvegliati.
• Non lasciare il materiale d‘imballaggio in giro con noncuranza. Questo può diventare un giocattolo
pericoloso per i bambini!
• Utilizzare questo prodotto solo per lo scopo previsto!
• Non manomettere né smontare il prodotto!
• Per la propria sicurezza, utilizzare solo gli accessori e i pezzi di ricambio indicati nelle istruzioni o
consigliati dal produttore!
• Prima di eettuare un avviamento d‘emergenza, consultare il manuale del proprio veicolo in merito
alla procedura per l‘avviamento d‘emergenza.
• Mentre si utilizzano le batterie al piombo, indossare sempre occhiali di protezione e indumenti
protettivi.
• Le batterie ricaricabili al piombo contengono acidi corrosivi aggressivi. Evitare il contatto della pelle e
degli occhi con i liquidi che fuoriescono dalla batteria ricaricabile al piombo! Non smontare mai
le batterie ricaricabili al piombo! Lavare a fondo con acqua e sapone le parti della pelle interessate.
Se l‘acido penetra in un occhio, sciacquare l‘occhio immediatamente per almeno 10 minuti sotto
acqua
corrente pulita e tiepida! Dopodiché contattare subito un medico!
• Se l‘acido viene a contatto con i propri indumenti, lavarli immediatamente e abbondantemente con
acqua e sapone!
• Mentre si utilizzano batterie o caricabatterie, non indossare mai anelli, collane, orologi o sim. Il
cortocircuito dei contatti della batteria comporta il rischio di ustioni e di esplosione!
• Il Powerpack serve solo per l‘avviamento d‘emergenza di un autoveicolo dotato di batteria propria. Il
Powerpack non può sostituire la batteria del veicolo.
• Conservare sempre il Powerpack con il cavo per l‘avviamento d‘emergenza staccato, in modo che non
si crei un cortocircuito tra i morsetti.
• Non tentare di smontare e di sostituire la batteria ricaricabile del Powerpack. Al termine della durata
utile della batteria, smaltire l‘intero Powerpack in conformità con le direttive locali.
• Non ricaricare la batteria del Powerpack tramite un caricabatteria danneggiato.
• Non lasciare incustodito il Powerpack durante il processo di ricarica.
• Per la ricarica del Powerpack, utilizzare esclusivamente gli accessori forniti in dotazione.
• Non eettuare mai l‘avviamento d‘emergenza con una batteria congelata, altrimenti si rischia di
provocare esplosioni.
Conservare accuratamente le presenti istruzioni d’uso e consegnarle anche agli altri utilizzatori.
30

5. Spiegazione dei simboli
Conforme alle direttive CE Alloggiamento protettivo isolato
(classe di protezione II)
I dispositivi elettrici contrassegnati
con questo simbolo non vanno gettati
nei riuti domestici
I dispositivi contrassegnati con questo
simbolo sono destinati all‘uso domestico (in ambienti asciutti)
6.Istruzioni per l‘uso
6.1 Panoramica
1 Powerpack
2 Interruttore
3 Indicatore del livello di carica
4 Porta per avviamento d‘emergenza
5 Porta USB 1 A
6 Porta USB 2 A
7 Presa di ricarica
8 Spia LED
9 Presa di collegamento 19 V DC
10 Presa di collegamento 12 V DC
11 Caricatore a spina
12 Cavo di ricarica per auto
13 Cavo per avviamento emergenza
14 Cavo USB 3in1
15 Cavo adattatore
16 Set adattatori
Leggere le istruzioni d‘uso
Polarità della spina di ricarica
Figura 1: Panoramica
6.2 Ricarica del Powerpack
6.2.1 Ricarica del Powerpack con il caricatore a spina
Inserire la spina di ricarica del caricatore a spina (pos. 11 dello schema) nella presa di ricarica del Powerpack (pos.
7 dello schema). Quindi collegare il caricabatterie a una presa di alimentazione a 230 V. Nel caso in cui si dovesse
ricaricare il Powerpack senza poterlo sorvegliare, posizionarlo per la ricarica su una base resistente al calore (pietra, piastrelle o piastra metallica). Allontanare tutti gli oggetti inammabili nel raggio di un metro.
Durante la fase di ricarica, le spie di controllo dell‘indicatore del livello di carica (pos. 3 dello schema) lampeggiano
una dopo l‘altra: il numero delle spie permanentemente accese indica il livello di carica del Powerpack. Una volta
terminato il processo di ricarica, tutte le spie si spengono.
31

6.2.2 Ricarica del Powerpack con il cavo di ricarica per auto
Inserire la spina del cavo di ricarica per auto (pos. 12 dello schema) nella presa di ricarica del Powerpack (pos. 7
dello schema). Inserire ora il connettore per accendisigari a 12 V nella presa a 12 V del veicolo.
ATTENZIONE: caricare il Powerpack con il cavo di ricarica per auto soltanto durante il viaggio o comunque con il motore acceso, altrimenti la batteria d‘avviamento del veicolo rischia di scaricarsi.
Durante la fase di ricarica, le spie di controllo dell‘indicatore del livello di carica (pos. 3 dello schema) lampeggiano
una dopo l‘altra: il numero delle spie permanentemente accese indica il livello di carica del Powerpack. Una volta
terminato il processo di ricarica, tutte le spie si spengono.
6.2.3 Controllo del livello di carica
Scollegare il cavo di ricarica dalla presa. Premere l‘interruttore (pos. 2 dello schema) del dispositivo per controllare
il livello di carica. Il livello di carica si ricava dalle spie di controllo accese.
Spie di controllo 1 1+2 1+2+3 1+2+3+4
Livello di carica 25 % 50 % 75 % 100 %
6.3 Avviamento d‘emergenza per veicoli a 12 V
1. Assicurarsi che almeno tre spie di controllo (min. il 75 % della
capacità della batteria) dell‘indicatore del livello di carica siano accese
permanentemente e che i poli della batteria non siano sporchi o
ossidati. Collegare il Powerpack e il cavo per l‘avviamento d‘emergenza
(pos. 13 dello schema) inserendo il connettore della scatola
d‘avviamento del cavo nella relativa porta (pos. 4 dello schema) del
Powerpack, vedi gura 2. Assicurarsi che il connettore sia inserito
saldamente e correttamente.
Figura 2: Collegamento cavo
per avviamento emergenza
2. Collegare prima il polo rosso del cavo per l‘avviamento d‘emergenza
al polo positivo e poi il morsetto nero al polo negativo della batteria
del veicolo. I morsetti devono avere un contatto stabile e sicuro con i
poli della batteria.
3. Fare attenzione alle spie di controllo della scatola d‘avviamento e al
segnale acustico, vedi gura 3.
Spia verde „correct“ accesa ssa:
Il Powerpack è collegato correttamente, si può avviare il veicolo.
Spia verde „correct“ lampeggiante:
La batteria del veicolo ha un livello di carica basso. Premere sul pulsante „BOOST“ e attendere no a quando la spia
verde non è accesa ssa. Avviare il veicolo entro i prossimi 30 secondi.
32
Figura 3: Spie di controllo
scatola d‘avviamento

Si accende la spia rossa „reverse“ e viene emesso un segnale acustico:
Il cavo per l‘avviamento d‘emergenza è collegato in modo errato. I morsetti collegati ai poli della batteria sono
scambiati. Collegare il cavo correttamente e attendere no a quando la spia verde non è accesa ssa. Avviare il
veicolo entro i prossimi 30 secondi.
Non è accesa alcuna spia e non viene emesso alcun segnale acustico:
La batteria del veicolo è completamente scarica o guasta. Controllare se il cavo per l‘avviamento d‘emergenza è
collegato correttamente. Premere sul pulsante „BOOST“ e attendere no a quando la spia verde non è accesa ssa.
Avviare il veicolo entro i prossimi 30 secondi.
In inverno, sui veicoli con motore diesel può rendersi necessario ripetere questa procedura diverse volte nella fase
di preriscaldamento.
4. Avviare il motore del veicolo. Lasciar funzionare l‘avviatore per non più di 6 secondi. Se il tentativo di avviamento non va a buon ne, attendere almeno tre minuti prima di riprovare. Dopo il terzo tentativo fallito, non
riprovare ma controllare eventuali malfunzionamenti del veicolo.
5. Scollegare il cavo per l‘avviamento d‘emergenza dalla batteria del veicolo.
6.4 Ricarica dei dispositivi USB
Scegliere il connettore adatto del cavo adattatore USB 3in1 (pos. 14 dello schema) per il proprio dispositivo USB
e collegarlo. Collegare il connettore USB all‘uscita USB adatta al proprio dispositivo (pos. 5 o 6 dello schema) del
Powerpack. Premere l‘interruttore (pos. 2 dello schema) del Powerpack per avviare il processo di ricarica.
Una volta terminato il processo di ricarica, i LED del livello di carica (pos. 3 dello schema) si spengono. Scollegare
prima il cavo di ricarica dal Powerpack, quindi rimuovere il cavo di ricarica dal dispositivo USB.
6.5 Ricarica dei notebook da 19 V
Per alimentare o ricaricare un notebook da 19 V, scegliere prima dal set adattatori (pos. 16 dello schema) un adattatore adeguato al proprio notebook. Collegare l‘adattatore scelto con il cavo adattatore (pos. 15 dello schema).
Inserire l‘adattatore nella porta di ricarica del notebook. Collegare l‘altra estremità del cavo adattatore all‘uscita
19 V (pos. 9 dello schema) del Powerpack. Avviare il processo di ricarica premendo sull‘interruttore (pos. 2 dello
schema). Una volta terminato il processo di ricarica, i LED del livello di carica (pos. 3 dello schema) si spengono.
Scollegare prima il cavo adattatore dal Powerpack, quindi rimuoverlo dal notebook.
6.6 Utilizzo dell‘uscita 12 V
Attenzione: la presa di collegamento 12 V si presenta allo stesso modo della presa di collegamento 19 V. Assicurarsi di non scambiarle.
Per alimentare altri dispositivi da 12 V (frigobox, televisori portatili ecc.), scegliere prima dal set adattatori (pos.
16 dello schema) un adattatore adeguato al proprio dispositivo. Collegare l‘adattatore scelto con il cavo adattatore
(pos. 15 dello schema). Inserire l‘adattatore nella presa di collegamento del dispositivo da 12 V. Collegare l‘altra
estremità del cavo adattatore all‘uscita 12 V (pos. 10 dello schema) del Powerpack. Al termine dell‘utilizzo, scollegare il cavo adattatore dal Powerpack. Dopodiché, i LED del livello di carica (pos. 3 dello schema) si spengono
automaticamente. Rimuovere il cavo adattatore dal dispositivo da 12 V.
33

6.7 Utilizzo della spia LED / spia di segnalazione
Per accendere la spia LED, tenere premuto l‘interruttore (pos. 1 dello schema) del Powerpack per circa 3 secondi.
Premendo di nuovo l‘interruttore, si attivano in sequenza le seguenti funzioni luce: lampeggio, SOS, O.
7. Manutenzione e pulizia
7.1 Pulizia
Pulire il Lithium Powerpack esclusivamente con un panno morbido e non utilizzare detergenti né solventi aggressivi. Evitare sempre che i liquidi penetrino all‘interno dell‘alloggiamento.
7.2 Conservazione
Se non viene utilizzato, conservare il Lithium Powerpack in un luogo asciutto. Non esporre il Powerpack a umidità,
olio, polvere, sporcizia, temperature elevate, forti vibrazioni o sollecitazioni meccaniche. Conservare sempre il Powerpack con il cavo per l‘avviamento d‘emergenza staccato, in modo che non si crei un cortocircuito tra i morsetti.
7.3 Manutenzione
Se non si utilizza il Powerpack, ricaricarlo ogni tre mesi.
8. Avvertenze sulla tutela ambientale
Non smaltire gli apparecchi elettrici insieme ai riuti domestici! I dispositivi elettrici ed elettronici devono essere
separati e destinati al riciclaggio. Per le possibilità di smaltimento delle apparecchiature elettriche ed elettroniche,
informarsi presso il proprio comune
I materiali sono riciclabili. Con il riciclo, il recupero del materiale e altre forme di riutilizzo di prodotti usati si
fornisce un contributo importante per la protezione dell‘ambiente!
9. Come contattarci
EAL GmbH
Otto-Hausmann-Ring 107
42115 Wuppertal
Germania
Telefono: +49 (0)202 42 92 83 0
Fax: +49 (0)202 42 92 83 160
Internet: www.eal-vertrieb.com
E-mail: info@eal-vertrieb.com
34
 Loading...