

Page 1
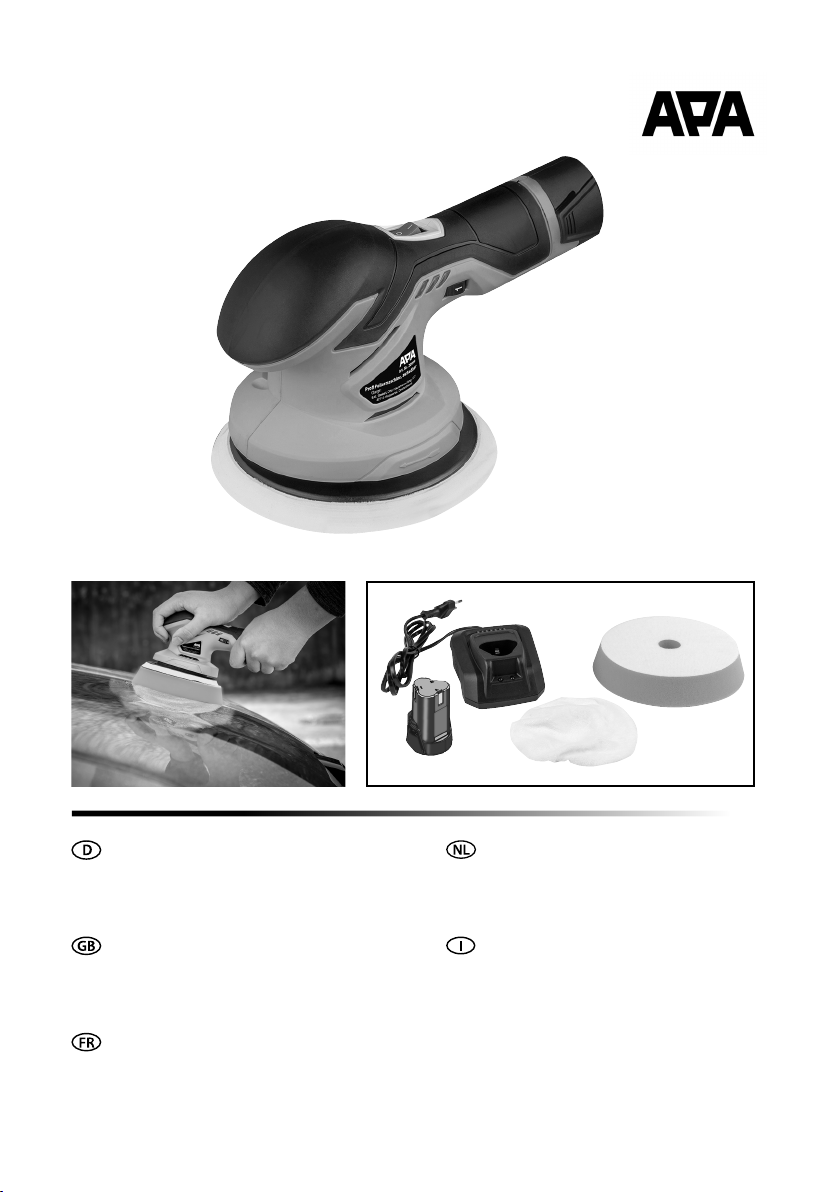
Art.-Nr.: 20999
Pro Poliermaschine, auadbar
Bedienungsanleitung . . . . . . . . . . . . . . . . . . . . . 3
Art.nr. 20999
Professionele oplaadbare polijstmachine
Gebruiksaanwijzing . . . . . . . . . . . . . . . . . . . . 18
Article number 20999
Rechargeable professional polishing machine
Operating instructions . . . . . . . . . . . . . . . . . . . . . 8
Réf. 20999
Polisseuse rechargeable professionnelle
Manuel de l‘opérateur . . . . . . . . . . . . . . . . . . . . 13
Cod. art. 20999
Lucidatrice professionale ricaricabile
Istruzioni per l‘uso . . . . . . . . . . . . . . . . . . . . . 23
Page 2

2
Page 3

PROFI POLIERMASCHINE, AUFLADBAR
INHALT
1. BESTIMMUNGSGEMÄSSER GEBRAUCH __________________________________________3
2. LIEFERUMFANG ________________________________________________________3
3. SPEZIFIKATIONEN _______________________________________________________3
4. SICHERHEITSHINWEISE ___________________________________________________4
5. SYMBOLERKLÄRUNG _____________________________________________________ 5
6. BEDIENUNGSANLEITUNG __________________________________________________5
6.1 ÜBERSICHT ___________________________________________________________ 5
6.2 VOR DER INBETRIEBNAHME ________________________________________________5
6.2.1 LADEN DES AKKUS ______________________________________________________5
6.2.2 MONTAGE DER POLIERSCHEIBE ______________________________________________6
6.2.3 MONTAGE DER POLIERHAUBE _______________________________________________6
6.3 POLIEREN ___________________________________________________________6
6.3.1 AUFTRAGEN DES POLIERMITTELS _____________________________________________6
6.3.2 AUFTRAGEN DES POLIERMITTELS AUF DEN LACK ____________________________________7
6.3.3 POLIEREN DES LACKS ____________________________________________________7
7. WARTUNG UND PFLEGE ___________________________________________________7
8. HINWEISE ZUM UMWELTSCHUTZ _____________________________________________7
9. KONTAKTINFORMATIONEN _________________________________________________7
WARNUNG
Lesen Sie die Bedienungsanleitung
vor Inbetriebnahme sorgfältig
durch und beachten Sie alle Sicherheitshinweise! Nichtbeachtung
kann zu Personenschäden, Schäden
am Gerät oder Ihrem Eigentum
führen! Bewahren Sie die Originalverpackung, den Kaufbeleg sowie diese Anleitung zum späteren
Nachschlagen auf! Bei der Weitergabe des Produkts geben Sie auch
diese Anleitung weiter. Prüfen Sie
vor Inbetriebnahme den Inhalt der
Verpackung auf Unversehrtheit und
Vollständigkeit!
1. BESTIMMUNGSGEMÄSSER GEBRAUCH
Die auadbare Poliermaschine ist ausschließlich zum
Wachsen und Polieren von Lacken auf Autos, Booten,
Wohnwagen oder Wohnmobilen bestimmt.
Dieses Gerät ist nicht dafür bestimmt, durch Kinder
und Personen mit eingeschränkten geistigen Fähigkeiten oder ohne erforderliches Fachwissen benutzt
zu werden. Kinder sind von dem Gerät fernzuhalten.
Das Gerät ist nicht für den gewerblichen Einsatz
bestimmt.
Zum bestimmungsgemäßem Gebrauch gehört auch
die Beachtung aller Informationen in dieser Anleitung,
insbesondere die Beachtung der Sicherheitshinweise.
Jede andere Verwendung gilt als nicht bestimmungsgemäß und kann zu Sach- oder Personenschäden
führen. Die EAL GmbH übernimmt keine Haftung für
Schäden, die durch nicht bestimmungsgemäßen Gebrauch entstehen.
2. LIEFERUMFANG
1 x Poliermaschine
1 x Ladegerät
1 x Lithium-Akku
1 x Schaumstopolierscheibe
1 x Polierhaube
1 x Gebrauchsanleitung
3. SPEZIFIKATIONEN
Poliermaschine:
Dimensionen (L x B x H): 238 x 150 x 130 [mm]
Gewicht (Inkl. Akku): ca. 1,000 kg
Spannungsversorgung Motor: 12 V DC
Stromaufnahme: max. 5 A
Leistung: 60 W
Drehzahl: 2500 - 5000 1/min
Stützteller: Ø 150 mm
3
Page 4
Akku:
Spannung: 12 V
Akkukapazität: 2 Ah 24 Wh
Ladegerät:
Eingangsspannung: 230 V AC, 50 Hz
Ausgangsspannung: 12 V DC
Ladestrom: 2,4 A Leistung: 50 W
4. SICHERHEITSHINWEISE
• Das Warndreieck kennzeichnet
alle für die Sicherheit wichtigen
Anweisungen. Befolgen Sie diese
immer, anderenfalls könnten Sie
sich verletzen oder das Gerät könnte
beschädigt werden.
• Kinder dürfen nicht mit dem Gerät
spielen.
• Reinigung und Benutzerwartung
dürfen nicht von Kindern ohne
Beaufsichtigung durchgeführt
werden.
• Lassen Sie das Verpackungsmaterial
nicht achtlos liegen. Dieses kann
für Kinder zu einem gefährlichen
Spielzeug werden!
• Benutzen Sie dieses Produkt nur für
die dafür vorgesehene Verwendung!
• Manipulieren oder zerlegen Sie das
Gerät nicht!
• Verwenden Sie zu Ihrer eigenen
Sicherheit ausschließlich Zubehör
oder Ersatzteile, die in der Anleitung
angegeben sind, oder deren
Verwendung durch den Hersteller
empfohlen wird!
• Entfernen Sie den Akku aus der
Poliermaschine, bevor Sie Montageoder Reinigungsarbeiten an dem Gerät
durchführen.
• Stellen Sie sicher, dass sich der Schalter
in der Stellung „0“ bendet, bevor Sie
den Akku einsetzen. So vermeiden
Sie ein unkontrolliertes Anlaufen der
Maschine.
• Verwenden Sie das Gerät nicht, wenn
es beschädigt ist.
• Überlasten Sie das Gerät nicht.
• Entfernen Sie den Akku aus dem
Gerät, wenn es nicht gebraucht wird.
Schützen Sie die Kontakte des Akkus
vor Kurzschluss.
• Tragen Sie geeignete Kleidung.
Tragen Sie keine weite Kleidung oder
Schmuck. Halten Sie Haare, Kleidung
und Handschuhe fern von sich
bewegenden Teilen. Lockere Kleidung,
Schmuck oder lange Haare können
von sich bewegenden Teilen erfasst
werden.
• Tragen Sie eine Schutzbrille.
• Das Tragen persönlicher Schutzausrüstung wie Staubmaske, rutschfeste
Sicherheitsschuhe, oder Schutzhelm,
je nach Art und Einsatz der Poliermaschine, verringert das Risiko von
Verletzungen.
• Schalten Sie die Poliermaschine erst
ein, wenn sie auf der zu bearbeitenden
Oberäche auiegt.
• Wenn Sie Polierhauben verwenden,
lassen Sie keine losen Teile der
Polierhaube, insbesondere Befestigungsschnüre, zu. Verstauen oder
kürzen Sie die Befestigungs-schnüre.
Lose, sich mitdrehende Teile können
Ihre Finger erfassen oder sich in z. B.
Türgrien verfangen.
• Arbeiten Sie besonders vorsichtig
im Bereich von Ecken und scharfen
Kanten. Das rotierende Werkzeug
kann abprallen oder sich verklemmen.
Dies verursacht einen Kontrollverlust
und kann zu Verletzungen führen.
• Beachten Sie die Vorschriften
des Herstellers des verwendeten
Poliermittels.
• Halten Sie die Poliermaschine von
Regen oder Nässe fern.
• Reinigen Sie das Gerät nach jedem
Gebrauch.
• Beachten Sie auch die Sicherheitshinweise in den einzelnen Abschnitten
der Gebrauchsanleitung.
4
Page 5
5. SYMBOLERKLÄRUNG
Entspricht den EG-Richtlinien
Gebrauchsanleitung lesen
Augenschutz benutzen
Gekennzeichnetes Elektroprodukt
darf nicht in den Hausmüll geworfen
werden
Kennzeichnung nach § 17 BattG:
Der Endverbraucher ist gesetzlich
verpichtet, Batterien zwecks
fachgerechter Entsorgung an den
Händler oder eine entsprechenden
Rücknahmestelle zurückzugeben.
Geräte mit diesem Zeichen dürfen
nur im Haus (trockene Umgebung)
betrieben werden
Schutzisoliertes Gehäuse
(Schutzklasse II).
6. BEDIENUNGSANLEITUNG
6.1 ÜBERSICHT
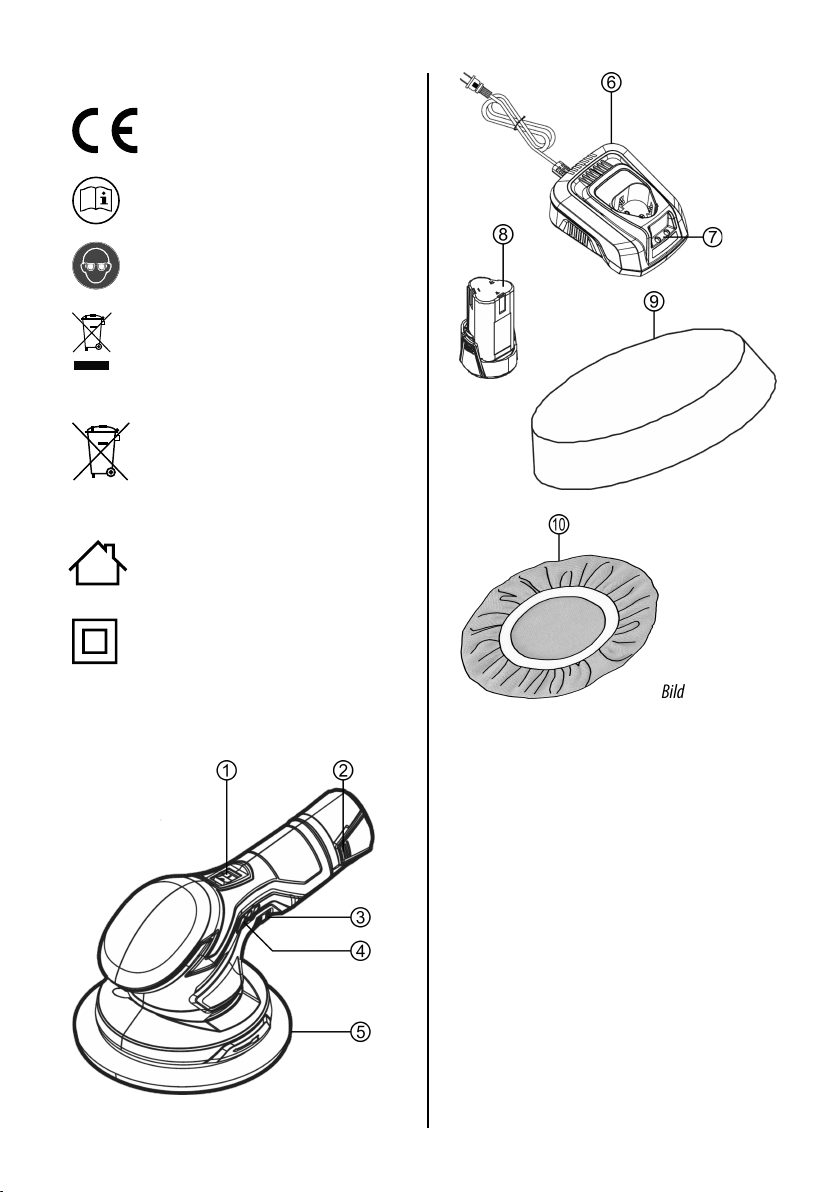
Bild 1: Übersicht 1
1 - EIN-AUS-Schalter
2 - Akku-Verriegelung
3 - Drehzahlregler
4 - Ladezustandsanzeiger
5 - Stützteller
6 - Ladegerät
7 - Ladekontrollleuchten
8 - Akku
9 - Polierscheibe
10 - Polierhaube
6.2 VOR DER INBETRIEBNAHME
6.2.1 LADEN DES AKKUS
Der Akku (Position 8 in der Übersicht) muss
zum Laden aus dem Gerät heraus genommen
werden. Drücken Sie dazu die Entriegelungstasten
5
Page 6

(Position 2 in der Übersicht) und ziehen Sie den
Akku aus der Poliermaschine heraus. Setzen Sie
den Akku in das Ladegerät ein. Stecken Sie das
Ladegerät in eine Steckdose. Die Ladekontrollleuchte
(Position 7 in der Übersicht) leuchtet während des
Ladevorgangs rot. Ist der Akku vollgeladen leuchtet
die Ladekontrollleuchte grün. Nachdem Ladevorgang
ziehen Sie das Ladegerät aus der Steckdose.
Um den Ladezustand des Akkus zu kontrollieren,
stellen Sie zuerst den Drehzahlregler (Position
3 in der Übersicht) auf die kleineste Stufe und
bringen Sie den EIN-AUS-Schalter (Position 1 in der
Übersicht) in die Stellung „0“. Setzen Sie den Akku
in die Poliermaschine ein. Stellen Sie sicher, dass der
Stützteller (Position 5 in der Übersicht) freigängig
ist. Schalten Sie die Poliermaschine mit dem
EIN-AUS-Schalter ein. Der Ladezustandsanzeiger
(Position 4 in der Übersicht) zeigt Ihnen die
Akkuladung an:
grün gelb rot betriebsbereit
gelb rot nur noch kurze Betriebszeit
verfügbar
rot Akku muss geladen werden
6.2.2 MONTAGE DER POLIERSCHEIBE
Stellen Sie sicher, dass der Akku aus
der Poliermaschine entnommen ist,
bevor Sie die Polierscheibe aufsetzen
oder entfernen. Durch unbeabsichtigtes
Einschalten des Geräts kann es zu
Verletzungen oder Schäden am Gerät
oder Fahrzeug kommen.
Setzen Sie die Polierscheibe (Position 9 in der
Übersicht) auf den Stützteller (Position 5 in der
Übersicht), Bild 2.
6.2.3 MONTAGE DER POLIERHAUBE
Ziehen Sie die Polierhaube (Position 10 in der
Übersicht) über die Polierscheibe (Position 9 in der
Übersicht). Achten Sie darauf, dass der Polierscheibe
und die Polierhaube frei von Verunreinigungen sind.
Richten Sie die Polierhaube zentriert auf der
Polierscheibe aus. Verstauen oder kürzen Sie die
eventuell vorhandenen Befestigungsschnüre.
Lose, sich mitdrehende Teile können
Ihre Finger erfassen oder sich in z.
B. Türgrien verfangen. Lose, sich
mitdrehende Teile können Ihre Finger
erfassen oder sich in z. B. Türgrien
verfangen.
Benutzen Sie immer nur saubere und
unbeschädigte Polierhauben und
Polierscheiben. Verschmutzungen
oder Einschlüsse können den Lack
beschädigen.
6.3 POLIEREN
Reinigen Sie die zu bearbeitende
Oberäche sorgfältig. Die Oberäche
muss zum Polieren vollkommen
trocken sein. Verwenden Sie nur für
Poliermaschinen geeignete Produkte
zum Polieren oder Wachsen. Beachten
sie die Gebrauchsanweisungen der
eingesetzten Pegemittel. Stark
verwitterte Lacke benötigen eventuell
eine besondere Vorbehandlung. Fragen
Sie dazu im Fachhandel nach.
6.3.1 AUFTRAGEN DES POLIERMITTELS
Tragen Sie das Pegemittel gleichmäßig bis zum
Rand der Polierscheibe/-haube auf. Es muss eine
durchgehend, dünne Beschichtung entstehen.
Zuviel aufgetragenes Pegemittel
verbessert das Ergebnis nicht, sondern
erschwert nur das Entfernen.
Bild 2: Montage Polierscheibe
6
Zu langes Polieren auf derselben Stelle
kann den Lack beschädigen.
Polieren Sie das Fahrzeug nicht in der
prallen Sonne oder bei sehr hohen
Temperaturen.
Page 7
6.3.2 AUFTRAGEN DES POLIERMITTELS AUF
DEN LACK
Tragen Sie das Pegemittel nur auf Lackächen auf,
niemals auf Kunststoteile oder Gummidichtungen.
Tupfen Sie das Pegemittel mit der Polierhaube an
mehreren Stellen der zu bearbeitenden Fläche auf.
Stellen Sie die Drehzahl mit dem Drehzahlregler
(Position 3 in der Übersicht) auf die kleinste Stufe.
Halten Sie das Gerät mit beiden Händen fest.
Setzten Sie das Gerät mit der Polierhaube auf die zu
bearbeitende Fläche auf. Schalten Sie das Gerät mit
dem EIN/AUS-Schalters (Position 1 in der Übersicht)
ein. Führen Sie das Gerät gleichmäßig über den Lack.
Üben Sie keinen Druck auf das Gerät aus. Die Arbeit
wird durch die Rotation verrichtet, nicht durch den
Druck auf den Lack.
Behandeln Sie zuerst die großen, ebenen Flächen wie
Motorhaube, Dach und Koerraumdeckel. Danach die
Kleineren wie Türen und Kotügel. Für Stellen, die mit
der Poliermaschine nicht erreichbar sind, entfernen
Sie die Polierhaube und bearbeiten diese Stellen von
Hand.
6.3.3 POLIEREN DES LACKS
Polieren Sie nur lackierte Oberächen.
Aufkleber und Folien könne nicht poliert
werden. Bei dem Versuch werden diese
beschädigt oder zerstört und können den
Lack beschädigen.
7. WARTUNG UND PFLEGE
Reinigen Sie die Poliermaschine nach jedem
Gebrauch. Achten Sie besonders auf saubere
Lüftungsschlitze. Benutzen Sie dazu ein trockenes,
weiches Tuch. Verwenden Sie keine scharfen Reiniger
oder Lösungsmittel. Lassen Sie keine Flüssigkeiten in
das Innere des Geräts gelangen. Sie können das Gerät
auch mit Druckluft mit niedrigem Druck abblasen.
Die Polierscheibe/-haube waschen Sie mit warmem
Wasser von Hand aus. Lassen Sie die Polierscheibe/haube an der Luft trocknen.
Bewahren Sie die Poliermaschine ohne Polierhaube
auf. Legen Sie die Poliermaschine so, dass sich der
Stützteller nicht verformen kann. Legen Sie keine
anderen Gegenstände auf dem Stützteller ab.
8. HINWEISE ZUM UMWELTSCHUTZ
Entsorgen Sie Elektrogeräte nicht
mit dem Hausmüll! Elektro- und
Elektronik-Altgeräte müssen getrennt
gesammelt und einer umweltgerechten
Wiederverwertung zugeführt werden.
Über Entsorgungsmöglichkeiten für
Elektro- und Elektronik-Altgeräte
informieren Sie sich bei Ihrer Gemeindeoder Stadtverwaltung.
Nachdem Sie das Pegemittel gleichmäßig
aufgetragen und eingearbeitet haben, muss es
entfernt und die Lackäche poliert werden. Je
nach Hersteller oder Typ muss das aufgetragene
Poliermittel vollständig angetrocknet sein. Entfernen
Sie nun das Pegemittel vollständig durch Polieren
von den Lackächen, in genau der Reihenfolge, in
der Sie es aufgetragen haben. Stellen Sie die für Ihr
Pegemittel geeignete Drehzahl ein.
Stellen Sie die Drehzahl nach jedem
Abschalten auf die kleinste Stufe zurück.
So vermeiden Sie Unfälle beim nächsten
Einschalten.
Kennzeichnung nach § 17 BattG:
Der Endverbraucher ist gesetzlich
verpichtet, Batterien zwecks
fachgerechter Entsorgung an den
Händler oder eine entsprechenden
Rücknahmestelle zurückzugeben.
9. KONTAKTINFORMATIONEN
EAL GmbH
Otto-Hausmann-Ring 107
42115 Wuppertal, Deutschland
+49 (0)202 42 92 83 0
+49 (0) 202 42 92 83 – 160
[email protected]
www.eal-vertrieb.com
7
Page 8
RECHARGEABLE PROFESSIONAL POLISHING MACHINE
CONTENTS
1. PROPER USE OF THE PRODUCT _______________________________________________ 8
2. SCOPE OF DELIVERY _____________________________________________________8
3. SPECIFICATIONS ________________________________________________________ 8
4. SAFETY PRECAUTIONS ____________________________________________________ 9
5. EXPLANATION OF SYMBOLS ________________________________________________ 9
6. OPERATING INSTRUCTIONS ________________________________________________ 10
6.1 OVERVIEW __________________________________________________________ 10
6.2 PRIOR TO STARTING UP __________________________________________________ 10
6.2.1 PRIOR TO STARTING UP __________________________________________________ 10
6.2.2 INSTALLING THE POLISHING PLATE ___________________________________________ 11
6.2.3 INSTALLING THE POLISHING HOOD ___________________________________________ 11
6.3 POLISHING __________________________________________________________ 11
6.3.1 APPLYING POLISH _____________________________________________________ 11
6.3.2 APPLYING THE POLISHING MEDIUM TO THE PAINTWORK ______________________________ 11
6.3.3 POLISHING THE PAINTWORK _______________________________________________ 12
7. MAINTENANCE AND CARE _________________________________________________ 12
8. NOTES REGARDING ENVIRONMENTAL PROTECTION _________________________________ 12
9. CONTACT INFORMATION __________________________________________________ 12
WARNING
Please read the operating instruc-
tions carefully prior to use, and
observe all safety notices!
Not observing such may lead to
personal injury, damage to the device or to your property!
Store the original packaging, the
receipt and these instructions so
that they may be consulted at a
later date! When passing on the
product, please include these operating instructions as well.
Please check the contents of
package for integrity and
completeness prior to use!
1. PROPER USE OF THE PRODUCT
The rechargeable polishing machine is designed only
for waxing and polishing the paintwork of cars, boats,
caravans and mobile homes.
This device is not designed to be used by children
or persons with limited mental abilities or without
experience and/or lack of required specialist
knowledge. Keep children away from the device.
The device is not designated for commercial use.
Utilisation according to the intended purpose also
includes the observance of all information in these
operating instructions, particularly the observance of
the safety instructions. Any other utilisation is considered to be contrary to the intended purpose and
may lead to material damage or personal injuries.
EAL GmbH assumes no liability for damage resulting
from improper use
2. SCOPE OF DELIVERY
1 x Polishing machine
1 x Charger
1 x Rechargeable lithium battery
1 x Foam polishing plate
1 x Polishing cover
1 x User instructions
3. SPECIFICATIONS
Polishing machine:
Dimensions (L x W x H): 238 x 150 x 130 [mm]
Weight (incl. batter y): approx. 1.000 kg
Motor power supply: 12 V DC
Current consumption: max. 5 A
Power rating: 60 W
Speed: 2500 - 5000 rpm
Support plate: Ø 150 mm
8
Page 9
Battery:
Voltage: 12 V
Battery capacity: 2 Ah 24 Wh
Charger:
Input voltage: 230 V AC, 50 Hz
Output voltage: 12 V DC
Charging current: 2.4 A Power: 50 W
4. SAFETY PRECAUTIONS
• The warning triangle indicates all
instructions which are important for
safety. Always follow these otherwise
you could injure yourself or damage
the device.
• Children may not play with the device.
• Cleaning and user maintenance may
not be carried out by children without
supervision.
• Do not treat packaging material
carelessly. This may become a
dangerous plaything for a child!
• Only use this product for its designated
purpose!
• Do not manipulate or disassemble the
device!
• For your own safety, only use
accessories and spare parts that are
stated in these instructions or that are
recommended by the manufacturer!
• Remove the battery from the
polishing machine before carrying out
installation or cleaning work on the
device.
• Make sure that the switch is in the ‘0’
position before using the battery. This
will prevent the machine from starting
accidentally.
• Do not use the device if it is damaged.
• Do not overload the device.
• Remove the battery from the device
when not in use. Protect the battery
contact points from short circuiting.
• Wear suitable clothing. Do not wear
loose clothing or jewellery. Keep
hair, clothing and gloves well away
from moving parts. Loose clothing,
jewellery or long hair may be caught
by moving parts.
• Wear goggles.
• Wearing personal protective
equipment such as a dust mask,
non-slip safety shoes, or hard hat,
according to the type of polishing
machine and the usage, will reduce
the risk of injuries.
• Only switch the polishing machine on
when it is placed on the surface to be
treated.
• If using the polishing hood, do not
allow parts of the polishing hood to
come loose, especially the xing cords.
Hide or shorten the xing cords. Loose,
rotating parts may catch your ngers
or, for example, get caught in door
handles.
• Work very carefully around corners
and sharp edges. The rotating tool
may bounce o or get trapped. This
will lead to a loss of control and may
result in injuries.
• Follow the manufacturer’s instruc tions
for the polish you are using.
• Do not expose the polishing machine
to rain or wet conditions.
• Clean the device after each use.
• Also observe the safety precautions
in the individual sections of the
operating instructions.
5. EXPLANATION OF SYMBOLS
Complies with EC directives
Read the operating instructions
Wear eye protection
Labelled electrical products may not be
disposed of in the household waste
9
Page 10
Labelled as per Section 17 of the German
Batteries Act (BattG): The end consumer
is obliged to send to the dealer for proper disposal or to hand in at an appropriate collection point.
Devices with this symbol may only be
operated indoors (dry environment)
Insulated housing (protection class II).
6. OPERATING INSTRUCTIONS
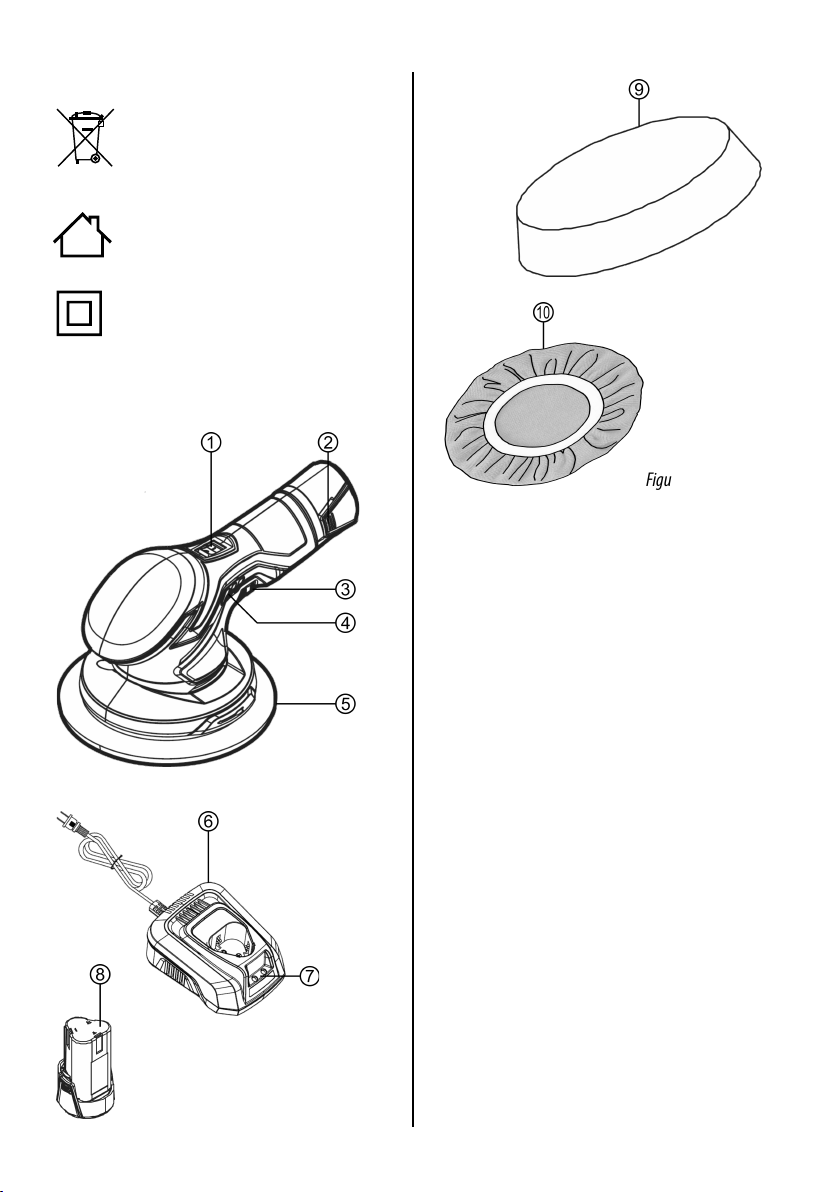
6.1 OVERVIEW
Figure 1: Overview
1 - ON/OFF switch
2 - Battery locking mechanism
3 - Speed controller
4 - Charging status display
5 - Support plate
6 - Charger
7 - Charging indicator lights
8 - Rechargeable battery
9 - Polishing plate
10 - Polishing hood
6.2 PRIOR TO STARTING UP
6.2.1 PRIOR TO STARTING UP
The rechargeable battery (number 8 in the overview)
must be removed from the device for charging. To
do this, press the release button (number 2 in the
overview) and remove the battery from the polishing
machine. Insert the battery into the charger. Plug
the charger into a socket. The charging indicator
light (number 7 in the overview) will light up red
during the charging process. When the battery is fully
charged, the charging indicator light lights up green.
After charging, unplug the charger from the socket.
To check the charging status of the battery, rst set
the speed control (number 3 in the overview) to the
lowest level and set the ON/OFF switch (number 1 in
10
Page 11
the overview) to the ‘0’ position. Insert the battery
into the polishing machine. Make sure that the
support plate (number 5 in the overview) is clear.
Switch the polishing machine o using the ON/OFF
switch. The charging status display (position 4 in the
overview) displays the charging status of the battery
for you:
green yellow red ready for operation
yellow red only available for a short period
red battery must be charged
6.2.2 INSTALLING THE POLISHING PLATE
Make sure that the battery has been
removed from the polishing machine
before you attach or remove the polishing
plate. Unintentional activation of the
device may result in injuries or damages
to the device or vehicle.
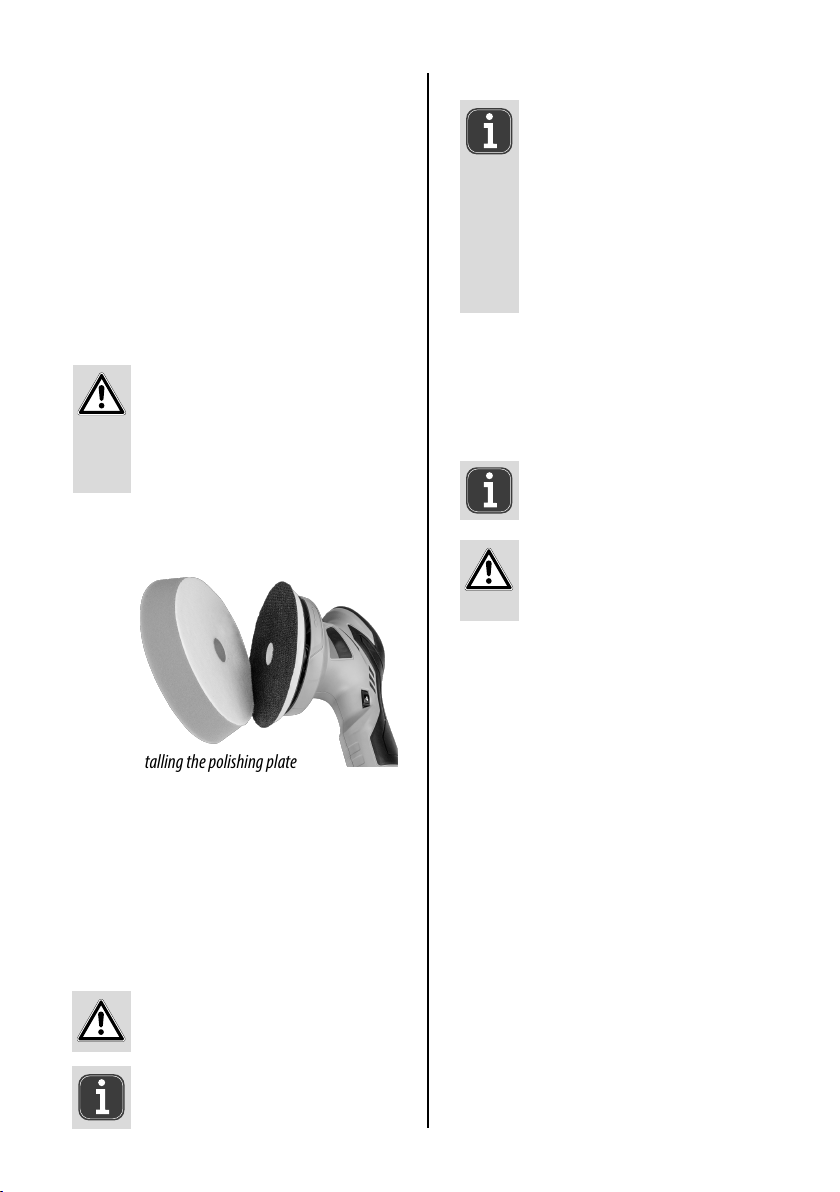
Place the polishing place (number 9 in the overview)
on the support plate (number 5 in the overview),
image 2.
6.3 POLISHING
Carefully clean the surface you wish to
polish. The surface must be completely
dry before polishing. Only use polishing
and waxing products designed for use
with polishing machines. Observe the
instructions for the care products being
used. Heavily weathered paintwork
may require special pre-treatment. For
information, inquire at the specialist
dealership.
6.3.1 APPLYING POLISH
Apply the care product evenly up to the edges of the
polishing plate/hood. A continuous, thin coating
must be ensured.
Applying excess care product will not
improve the results, it will just make it
more dicult to remove.
Polishing too long on the same spot may
damage the paintwork.
Do not polish the vehicle in full sunlight
or in very high temperatures.
Image 2: Installing the polishing plate
6.2.3 INSTALLING THE POLISHING HOOD
Pull the polishing hood (number 10 in the overview)
over the polishing plate (number 9 in the overview).
Make sure that the polishing plate and hood are free
from dirt.
Align the polishing hood centrally on the polishing
plate. Hide or shorten any xing cords.
Loose, rotating parts may catch your
ngers or, for example, get caught in
door handles.
Only use clean and undamaged polishing
hoods and plates. Contamination or
cracks may damage the paintwork.
6.3.2 APPLYING THE POLISHING MEDIUM TO
THE PAINTWORK
Apply the product only to painted surfaces, never
to plastic parts or rubber seals. Using the polishing
hood, dab the care product onto various spots on
the surface to be polished. Set the revolutions to the
lowest level, using the speed control (number 3 in the
overview). Hold the device rmly with both hands.
Rest the device with polishing hood on the surface to
be processed. Switch the device on using the ON/OFF
switch (number 1 in the overview). Pass the device
evenly over the paintwork. Do not put pressure on the
device. The work is carried out by the rotation process,
not the pressure on the paintwork.
First treat the large, at surfaces such as bonnet, root
and boot lid. Then move on to smaller areas, such as
doors and wings. For areas that cannot be reached
using the polishing machine, remove the polishing
hood and polish by hand.
11
Page 12
6.3.3 POLISHING THE PAINTWORK
Only polish painted areas. Labels and
lm cannot be polished. If you attempt
to polish them, they will be damaged
or destroyed, and may damage the
paintwork.
After you have applied and worked in the care
product, it must be removed and the paintwork must
be polished. Depending on manufacturer/type, the
applied polishing agent must be completely dry. Now
completely remove the care product by polishing the
paintwork with the terrycloth hood in the same order
in which you applied the polish. Set the appropriate
revolutions for your care product.
Set the revolutions back to the lowest
level every time you switch the device o.
This prevents accidents when switching
back on again.
7. MAINTENANCE AND CARE
Clean the polishing machine after each use. Pay
particular attention to ensure the ventilations slots
are clean. To do this, use a dry, soft cloth. Do not use
aggressive cleaning agents or solvents. Never allow
liquids to get into the device. You can use compressed
air at a low-pressure to blow-out the device.
The polishing plate/hood can be washed by hand in
warm water. Leave the polishing plate/hood to air
dr y.
Store the polishing machine without the hood.
Position the polishing machine in such a way that
the support plate is not distorted. Do not place other
objects on the support plate.
8. NOTES REGARDING ENVIRONMENTAL
PROTECTION
Do not dispose of electrical devices
with the household waste! Electrical
and electronic scrap must be collected
separately and disposed of in an
environmentally responsible manner
for recycling. Please contact your
community or city administration
regarding disposal options for electrical
and electronic scrap.
Labelled as per Section 17 of the German
Batteries Act (BattG): The end consumer
is obliged to send to the dealer for proper
disposal or to hand in at an appropriate
collection point.
9. CONTACT INFORMATION
EAL GmbH
Otto-Hausmann-Ring 107
42115 Wuppertal, Germany
+49 (0)202 42 92 83 0
+49 (0) 202 42 92 83 – 160
[email protected]
www.eal-vertrieb.com
12
Page 13
POLISSEUSE RECHARGEABLE PROFESSIONNELLE
SOMMAIRE
1. UTILISATION CONFORME _________________________________________________ 13
2. MATÉRIEL FOURNI _____________________________________________________ 13
3. SPÉCIFICATIONS _______________________________________________________ 13
4. CONSIGNES DE SÉCURITÉ _________________________________________________ 14
5. EXPLICATION DES SYMBOLES _______________________________________________ 15
6. NOTICE D‘UTILISATION ___________________________________________________ 15
6.1 VUE D‘ENSEMBLE ______________________________________________________ 15
6.2 AVANT LA PREMIÈRE MISE EN SERVICE _________________________________________ 15
6.2.1 CHARGEMENT DE LA BATTERIE ______________________________________________ 15
6.2.2 MONTAGE DU PLATEAU DE POLISSAGE _________________________________________ 16
6.2.3 MISE EN PLACE DU BONNET DE POLISSAGE ______________________________________ 16
6.3 POLISSAGE __________________________________________________________ 16
6.3.1 APPLICATION DE L’AGENT DE POLISSAGE ________________________________________ 16
6.3.2 APPLICATION DE L’AGENT DE POLISSAGE SUR LA LAQUE ______________________________ 17
6.3.3 POLISSAGE DE LA LAQUE _________________________________________________ 17
7. MAINTENANCE ET ENTRETIEN ______________________________________________ 17
8. REMARQUES RELATIVES À LA PROTECTION DE L‘ENVIRONNEMENT ________________________ 17
9. DONNÉES DE CONTACT ___________________________________________________ 17
AVERTISSEMENT
Lisez attentivement la notice
d‘utilisation avant la mise en service
et respectez toutes les consignes de
sécurité !
Tout non-respect de ces consignes peut entraîner des dommages
corporels, endommager l‘appareil
ou vos biens !
Conservez l‘emballage d‘origine,
le justicatif d‘achat et la présente notice pour vous y référer
ultérieurement ! Si vous revendez
ou remettez l‘appareil à des tiers,
veuillez également leur remettre
cette notice d‘utilisation.
Avant la mise en service, veuillez
contrôler le contenu de l‘emballage
quant à l‘absence de dommages
et vérier si toutes les pièces sont
présentes !
1. UTILISATION CONFORME
La polisseuse rechargeable est conçue exclusivement
pour cirer et polir les laques de voitures, bateaux,
camping-cars ou caravanes.
Cet appareil n‘est pas destiné à être utilisé par des
enfants ou des personnes aux capacités mentales
limitées ou ne disposant pas de l‘expérience ou des
connaissances nécessaires. Les enfants doivent rester
à distance de cet appareil.
L‘appareil n‘est pas destiné à une utilisation industrielle ou commerciale.
L‘utilisation conforme aux prescriptions implique
également le respect de toutes les informations
contenues dans cette notice d‘utilisation, en
particulier le respect des consignes de sécurité.
Toute autre utilisation est considérée comme non
conforme et peut entraîner des dommages matériels ou
corporels. La société EAL GmbH décline toute
responsabilité en cas de dommages découlant d’une
utilisation non conforme à l’emploi prévu.
2. MATÉRIEL FOURNI
1 x Polisseuse
1 x Chargeur
1 x Batterie lithium
1 x Plateau de polissage en mousse
1 x Bonnet de polissage
1 x Mode d’emploi
3. SPÉCIFICATIONS
Polisseuse :
Dimensions (L x l x H) : 238 x 150 x 130 [mm]
Poids (batterie comprise) : env. 1 kg
Bloc d’alimentation moteur : 12 V DC
Consommation : max. 5 A
Puissance : 60 W
Vitesse : 2500 - 5000 1/min
Disque d’appui : Ø 150 mm
13
Page 14
Batterie :
Tension : 12 V
Capacité : 2 Ah 24 Wh
Chargeur :
Tension d’entrée : 230 V AC, 50 Hz
Tension de sortie : 12 V DC
Courant de charge : 2,4 A Puissance : 50 W
4. CONSIGNES DE SÉCURITÉ
• Le triangle d’avertissement indique
toutes les instructions relatives à la
sécurité. Respectez-les à tout moment
car vous risqueriez sinon de vous
blesser ou l‘appareil risquerait d‘être
endommagé.
• Les enfants ne doivent pas jouer avec
l‘appareil.
• Les tâches de nettoyage et d‘entretien
à eectuer chez soi ne doivent pas être
exécutées par des enfants qui ne sont
pas sous surveillance.
• Ne laissez pas traîner le matériel
d‘emballage. Il pourrait devenir un
jouet dangereux pour les enfants !
• N‘utilisez cet appareil qu‘aux ns pour
lesquelles il a été prévu !
• Ne pas manipuler ni démonter
l‘appareil !
• Pour votre propre sécurité, utilisez
exclusivement les accessoires ou
pièces de rechange qui sont indiqué(e)
s dans la notice d‘utilisation ou dont
l‘utilisation est conseillée par le
fabricant !
• Retirez la batterie de la polisseuse
avant de monter un accessoire sur
l’appareil ou de le nettoyer.
• Assurez-vous que l’interrupteur se
trouve en position « 0 » avant d’insérer
la batterie. Cela permet d’éviter que
la machine ne fonctionne de façon
incontrôlable.
• N‘utilisez pas l’appareil s’il est
endommagé.
• Ne surchargez pas l’appareil.
• Retirez la batterie de l’appareil lorsque
vous ne l’utilisez pas. Protégez les
contacts de la batterie contre les
courts-circuits.
• Portez des vêtements adaptés. Ne
portez pas d’autres vêtements ou de
bijoux. Gardez les cheveux, vêtements
et gants à distance des pièces mobiles.
Les vêtements amples, les bijoux et
les cheveux longs peuvent se prendre
dans les pièces mobiles.
• Portez des lunettes de protection.
• Le port d’un équipement de protection
individuelle, comme un masque antipoussière, des chaussures de sécurité
anti-dérapantes ou un casque de
protection en fonction du type et de
l’utilisation de la polisseuse, diminue
le risque de blessures.
• N’allumez la polisseuse que lorsque
celle-ci se trouve sur la surface à polir.
• Lorsque vous utilisez des bonnets de
polissage, ne laissez aucune partie
du bonnet de polissage détachée,
en particulier les celles de xation.
Rangez ou raccourcissez les celles
de xation. Les parties mobiles
détachées peuvent happer vos doigts
ou se prendre dans les poignées de
portes.
• Soyez particulièrement prudent
lorsque vous travaillez dans des
coins ou sur des bords tranchants.
L‘outil rotatif peut rebondir ou rester
accrocher. Cela provoque une perte
de contrôle et peut entraîner des
blessures.
• Respectez les instructions du fabricant
de l’agent de polissage que vous
utilisez.
• Gardez la polisseuse à l’abri de la pluie
ou de l’humidité.
• Nettoyez l’appareil après chaque
utilisation.
• Respectez également les consignes de
sécurité contenues dans chacun des
paragraphes du mode d’emploi.
14
Page 15
5. EXPLICATION DES SYMBOLES
Correspond aux directives de la CE
Lire le mode d‘emploi
Porter des lunettes de protection
L‘appareil électrique marqué ne peut
pas être jeté aux ordures ménagères
Marquage selon le § 17 de la loi
allemande sur les batteries (BattG) :
l‘utilisateur nal est obligé par la loi
de remettre les batteries usagées au
revendeur ou à un service de
collecte pour qu‘elles soient éliminées
conformément aux dispositions.
Les appareils portant ce symbole ne
peuvent être utilisés qu‘à l‘intérieur
(environnement sec)
Boîtier avec isolation
(classe de protection II).
6. NOTICE D‘UTILISATION
6.1 VUE D‘ENSEMBLE
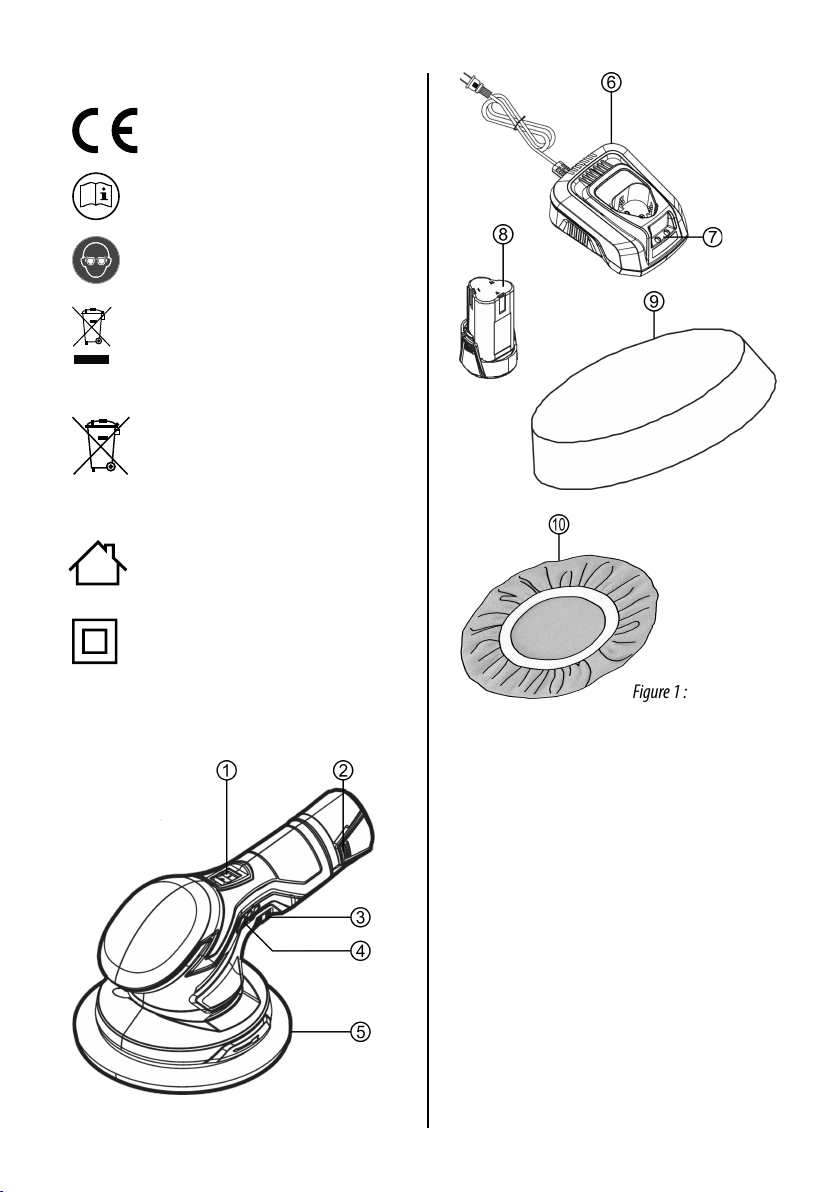
Figure 1 : Vue d’ensemble
1 - Interrupteur Marche/Arrêt
2 - Verrouillage batterie
3 - Régulateur de vitesse
4 - Indicateur d’état de charge
5 - Disque d’appui
6 - Chargeur
7 - Témoin de contrôle de charge
8 - Batterie
9 - Plateau de polissage
10 - Bonnet de polissage
6.2 AVANT LA PREMIÈRE MISE EN SERVICE
6.2.1 CHARGEMENT DE LA BATTERIE
La batterie (position 8 dans la vue d’ensemble)
doit être retirée de l’appareil pour être rechargée.
Pour cela, appuyez sur le bouton de déverrouillage
15
Page 16
(position 2 dans la vue d’ensemble) et retirez la
batterie de la polisseuse. Insérez la batterie dans
le chargeur. Branchez le chargeur à une prise. Le
témoin de contrôle de charge (position 7 dans la vue
d‘ensemble) s’allume en rouge lors du processus de
charge. Lorsque la batterie est entièrement rechargée,
le témoin de contrôle de charge s‘allume en vert. Une
fois le processus de charge terminé, débranchez le
chargeur de la prise.
Pour contrôler l’état de charge de la batterie, mettez
d’abord le régulateur de vitesse (position 3 dans la
vue d’ensemble) au niveau le plus faible et mettez
l’interrupteur MARCHE/ARRÊT (position 1 dans la vue
d’ensemble) en positon « 0 ». Insérez la batterie dans
la polisseuse. Assurez-vous que le disque d’appui
(position 5 dans la vue d’ensemble) tourne librement.
Allumez la polisseuse avec l’interrupteur MARCHE/
ARRÊT. L’indicateur d’état de charge (position 4 dans
la vue d’ensemble) vous indique la progression de la
charge de la batterie :
vert jaune rouge opérationnel
jaune rouge durée de fonctionnement
disponible faible
rouge la batterie doit être rechargée
6.2.2 MONTAGE DU PLATEAU DE POLISSAGE
Assurez-vous que la batterie se trouve
hors de polisseuse avant de mettre ou de
retirer le plateau de polissage. Une mise
en marche inopinée de l’appareil peut
provoquer des blessures ou endommager
l’appareil ou le véhicule.
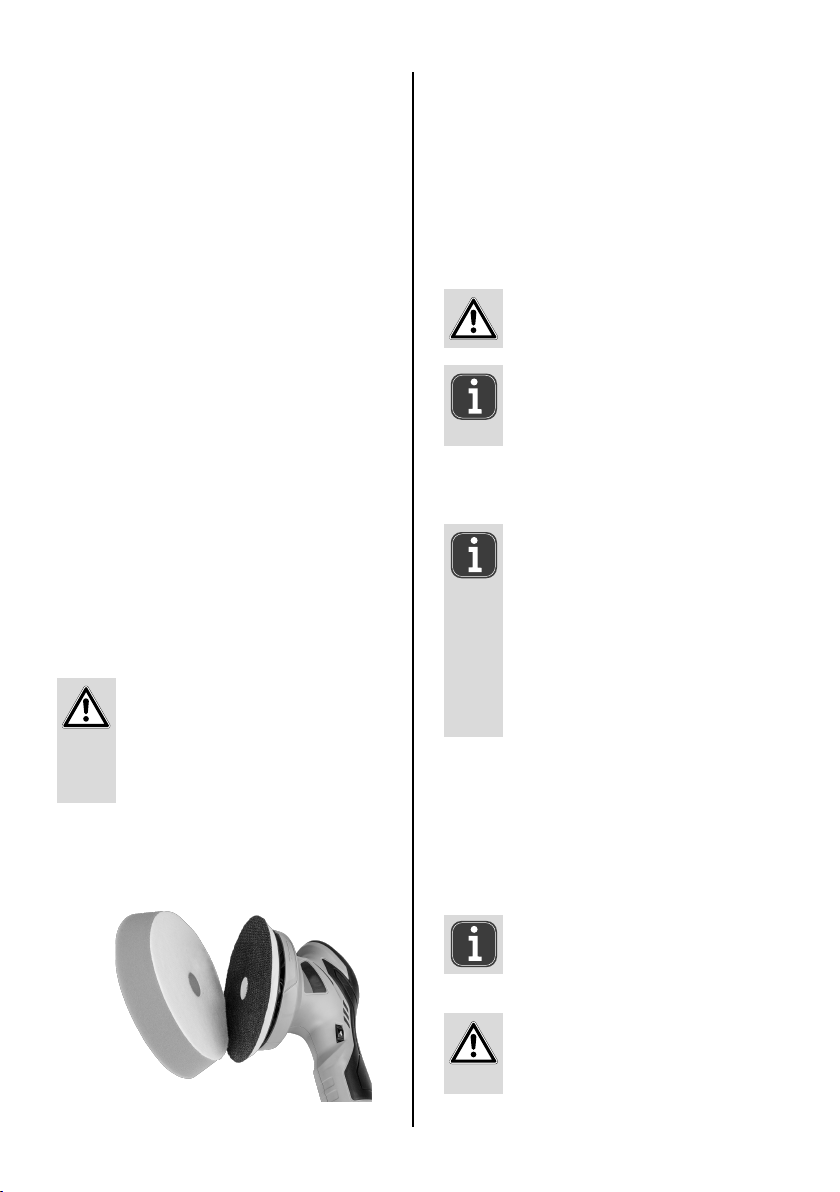
Posez le bonnet de polissage (position 9 dans la vue
d’ensemble) sur le disque d’appui (position 5 dans la
vue d’ensemble), Fig. 2.
Fig. 2 : Montage du plateau de polissage
6.2.3 MISE EN PLACE DU BONNET DE POLISSAGE
Posez le bonnet de polissage (position 10 dans la vue
d’ensemble) sur le plateau de polissage (position 9
dans la vue d’ensemble). Veillez à ce que le plateau
de polissage et le bonnet de polissage soient exempts
de salissures.
Placez le bonnet de polissage au milieu du plateau
de polissage. Rangez ou raccourcissez les celles de
xation.
Les parties mobiles détachées peuvent
happer vos doigts ou se prendre dans les
poignées de portes.
Utilisez toujours uniquement des
bonnets de polissage propres et intactes.
Les salissures ou les morceaux bloqués
peuvent endommager la laque.
6.3 POLISSAGE
Nettoyez la surface à traiter avec
précaution. La surface doit être
complètement sèche pour être polie.
N’utilisez que des produits adaptés à
la polisseuse pour polir ou pour cirer.
Respectez les instructions des produits
d’entretien utilisés. Les laques fortement
érodées peuvent éventuellement
nécessiter un pré-traitement spécial.
Demandez conseil à un spécialiste.
6.3.1 APPLICATION DE L’AGENT DE POLISSAGE
Appliquez le produit d’entretien uniformément
jusqu’au bord du plateau/bonnet de polissage.
Le bonnet doit être recouvert par une ne couche
continue.
Le fait d’appliquer trop de produit
d’entretien n’améliore pas le résultat. Au
contraire, il complique l’élimination des
salissures.
Polir trop longtemps au même endroit
peut endommager la laque.
Ne polissez pas votre véhicule en plein
soleil ou à très hautes températures.
16
Page 17
6.3.2 APPLICATION DE L’AGENT DE POLISSAGE
SUR LA LAQUE
Appliquez le produit d’entretien sur les surfaces
laquées, jamais sur les parties en plastique ou sur les
joints en caoutchouc. Appliquez de petites touches
de produit d’entretien avec le bonnet de polissage
à plusieurs endroits de la surface à traiter. Réglez la
vitesse au niveau le plus faible à l’aide du régulateur
de vitesse (position 3 dans la vue d’ensemble).
Maintenez l’appareil à deux mains. Posez l’appareil
avec le bonnet de polissage sur la surface à traiter.
Allumez l’appareil avec l‘interrupteur MARCHE/ARRÊT
(position 1 dans la vue d’ensemble). Guidez l’appareil
uniformément sur la laque. N’appliquez pas de
pression sur l’appareil. Le travail se fait par la rotation,
pas par la pression appliquée sur la laque.
Traitez d’abord les grandes surfaces larges, telles que
le capot, le toit et le core. Passez ensuite aux plus
petites, comme les portières et les ailes. Pour les
endroits qui ne sont pas accessibles avec la polisseuse,
retirez le bonnet et traitez ces endroits à la main.
6.3.3 POLISSAGE DE LA LAQUE
Ne polissez que des surfaces laquées.
Les autocollants et les lms ne peuvent
pas être polis. Si vous essayez, cela les
abimera ou les détruira et risquerait
d’endommager la laque.
Après avoir appliqué uniformément le produit
d‘entretien, vous devez l’enlever et polir la laque.
Selon le fabricant ou le type, l’agent de polissage
appliqué doit être complètement sec. Enlevez
maintenant complètement le produit d’entretien
de la surface laquée en la polissant dans l’ordre par
lequel vous avez appliqué le produit. Réglez la vitesse
appropriée au produit d’entretien.
aucun produit de nettoyage ou de solvant agressif.
Ne laissez jamais de liquides entrer à l‘intérieur
de l’appareil. Vous pouvez également enlever la
poussière de l’appareil en souant dessus avec de
l’air comprimé basse pression.
Le plateau/bonnet de polissage doit être nettoyé à la
main avec de l’eau tiède. Laissez le plateau/bonnet
de polissage sécher à l’air.
Rangez la polisseuse sans bonnet de polissage.
Placez la polisseuse de manière à ce que le disque
d’appui ne puisse pas se déformer. Ne placez aucun
objet sur le disque d’appui.
8. REMARQUES RELATIVES À LA PROTECTION
DE L‘ENVIRONNEMENT
Ne jetez pas les appareils électriques
dans les ordures ménagères ! Les
appareils électriques et électroniques
usagés doivent être collectés séparément
et remis aux services de recyclage.
Renseignez-vous quant aux possibilités
d‘élimination d‘appareils électriques et
électroniques usagés auprès de votre
administration communale, municipale
ou cantonale.
Marquage selon le § 17 de la loi
allemande sur les batteries (BattG) :
l‘utilisateur nal est obligé par la loi
de remettre les batteries usagées au
revendeur ou à un service de collecte
pour qu‘il soit éliminé conformément
aux dispositions.
Réglez la vitesse au plus faible niveau
après chaque arrêt. Vous éviterez ainsi un
accident à la prochaine mise en marche.
7. MAINTENANCE ET ENTRETIEN
Nettoyez la polisseuse après chaque utilisation. Faites
particulièrement attention aux fentes d’aération.
Pour cela, utilisez un chion sec et doux. N‘utilisez
9. DONNÉES DE CONTACT
EAL GmbH
Otto-Hausmann-Ring 107
42115 Wuppertal, Allemagne
+49 (0)202 42 92 83 0
+49 (0) 202 42 92 83 – 160
[email protected]
www.eal-vertrieb.com
17
Page 18
PROFESSIONELE OPLAADBARE POLIJSTMACHINE
INHOUD
1. EGLEMENTAIR GEBRUIK __________________________________________________ 18
2. LEVERINGSOMVANG ____________________________________________________ 18
3. SPECIFICATIES ________________________________________________________ 18
4. EILIGHEIDSINSTRUCTIES _________________________________________________ 19
5. UITLEG BIJ DE SYMBOLEN _________________________________________________ 20
6. EBRUIKSAANWIJZING ___________________________________________________ 20
6.1 OVERZICHT __________________________________________________________ 20
6.2 VOORAFGAAND AAN DE INBEDRIJFSTELLING _____________________________________ 20
6.2.1 ACCU LADEN _________________________________________________________ 20
6.2.2 DE POLIJSTSCHIJF MONTEREN ______________________________________________ 21
6.2.3 DE POLIJSTVACHT MONTEREN ______________________________________________ 21
6.3 POLIJSTEN __________________________________________________________ 21
6.3.1 HET POLIJSTMIDDEL AANBRENGEN ___________________________________________ 21
6.3.2 HET POLIJSTMIDDEL OP DE LAK AANBRENGEN ____________________________________ 22
6.3.3 DE LAK POLIJSTEN _____________________________________________________ 22
7. NDERHOUD EN VERZORGING _______________________________________________ 22
8. INFORMATIE OVER DE BESCHERMING VAN HET MILIEU _______________________________ 22
9. CONTACTGEGEVENS ____________________________________________________ 22
WAARSCHUWING
Lees voorafgaand aan de ingeb-
ruikname de gebruiksaanwijzing
aandachtig door en neem alle
veiligheidsvoorschriften in acht!
Het niet-naleven hiervan kan letsel,
schade aan het product of aan uw
eigendom veroorzaken!
Bewaar de oorspronkelijke
verpakking, het aankoopbewijs en
de gebruiksaanwijzing om deze
later te kunnen raadplegen! Geef bij
het doorgeven van het product ook
deze gebruiksaanwijzing door.
Controleer de inhoud van de
verpakking voor de ingebruikname
eerst op beschadigingen en volledigheid!
1. REGLEMENTAIR GEBRUIK
De oplaadbare polijstmachine is uitsluitend bedoeld
voor het in de was zetten en polijsten van lakken op
auto‘s, boten, caravans of campers.
Dit product mag niet worden gebruikt door kinderen,
mensen met een verstandelijke beperking of mensen
die niet over de vereiste ervaring/kennis beschikken.
Houd kinderen uit de buurt van het apparaat.
Het apparaat is niet bedoeld voor bedrijfsmatig
gebruik.
Tot het reglementair gebruik behoort ook het in acht
nemen van alle informatie in deze gebruiksaanwijzing, in het bijzonder van de veiligheidsvoorschriften.
Elk ander gebruik geldt als niet-reglementair en kan
materiële schade of persoonlijk letsel veroorzaken.
EAL GmbH is niet aansprakelijk voor schade als gevolg van niet-reglementair gebruik.
2. LEVERINGSOMVANG
1 x Polijstmachine
1 x Oplader
1 x Lithium-accu
1 x Schuimrubber polijstschijf
1 x Polijstvacht
1 x Gebruiksaanwijzing
3. SPECIFICATIES
Polijstmachine:
Afmetingen (L x B x H): 238 x 150 x 130 [mm]
Gewicht (incl. accu): ca. 1.000 kg
Spanning motor: 12 V DC
Stroomverbruik: max. 5 A
Vermogen: 60 W
Toerental: 2500 - 5000 1/min
Steunschijf: Ø 150 mm
18
Page 19
Accu:
Spanning: 12 V
Accucapaciteit: 2 Ah 24 Wh
Oplader:
Ingangsspanning: 230 V AC, 50 Hz
Uitgangsspanning: 12 V DC
Laadstroom: 2,4 A Vermogen: 50 W
4. VEILIGHEIDSINSTRUCTIES
• De gevarendriehoek markeert
alle voor de veiligheid belangrijke
aanwijzingen. Neem deze te allen
tijde in acht, anders kan lichamelijk
letsel of schade aan het apparaat het
gevolg zijn.
• Kinderen mogen niet met het apparaat
spelen.
• Reiniging en onderhoud mogen niet
zonder toezicht door kinderen worden
uitgevoerd.
• Laat het verpakkingsmateriaal niet
achteloos rondslingeren. Dit kan
voor kinderen gevaarlijk speelgoed
worden!
• Gebruik dit product uitsluitend voor
het beoogde doel!
• Verander of demonteer het apparaat
niet!
• Gebruik voor uw eigen veiligheid
uitsluitend toebehoren of
reserveonderdelen die in de
gebruiksaanwijzing staan vermeld of
waarvan het gebruik door de fabrikant
wordt aanbevolen!
• Verwijder de accu uit de
polijstmachine voordat u montageof reinigingswerkzaamheden aan het
apparaat uitvoert.
• Zorg ervoor dat de schakelaar in de
stand „0“ staat voordat u de accu
plaatst. Zo voorkomt u onbedoeld
starten van de machine.
• Gebruik het apparaat niet als het
beschadigd is.
• Overbelast het apparaat niet.
• Verwijder de accu uit het apparaat
wanneer het buiten gebruik is.
Bescherm de accucontacten tegen
kortsluiting.
• Draag geschikte kleding. Draag geen
wijde kleding of sieraden. Houd het
haar, kleding en handschoenen uit
de buurt van bewegende delen. Losse
kleding, sieraden of lang haar kunnen
worden gegrepen door bewegende
onderdelen.
• Draag een veiligheidsbril.
• Het dragen van persoonlijke
beschermingsmiddelen
zoals stofmasker, slipvaste
veiligheidsschoenen of een
veiligheidshelm, afhankelijk
van hoe u de polijstmachine
gebruikt, vermindert het risico
op verwondingen.Schakel de
polijstmachine pas in als deze op het
te bewerken oppervlak ligt.
• Laat geen losse onderdelen
van de polijstspons, met name
bevestigingssnoeren, slingeren als u
de polijstmachine gebruikt. Berg de
bevestigingssnoeren op of kort deze
in. Losse, meedraaiende delen kunnen
uw vingers grijpen of vast komen te
zitten in bijv. portiergrepen.
• Werk uiterst voorzichtig in de buurt
van hoeken en scherpe randen. Het
roterende gereedschap kan stuiteren
of vastgeklemd raken. Dit veroorzaakt
verlies van controle en kan leiden tot
letsel.
• Neem de voorschriften van de
fabrikant van het polijstmiddel in
acht.
• Stel het apparaat niet bloot aan regen
of vocht.
• Reinig het apparaat na elk gebruik.
• Neem ook de veiligheidsinstructies
in de afzonderlijke paragrafen van de
gebruiksaanwijzing in acht.
19
Page 20
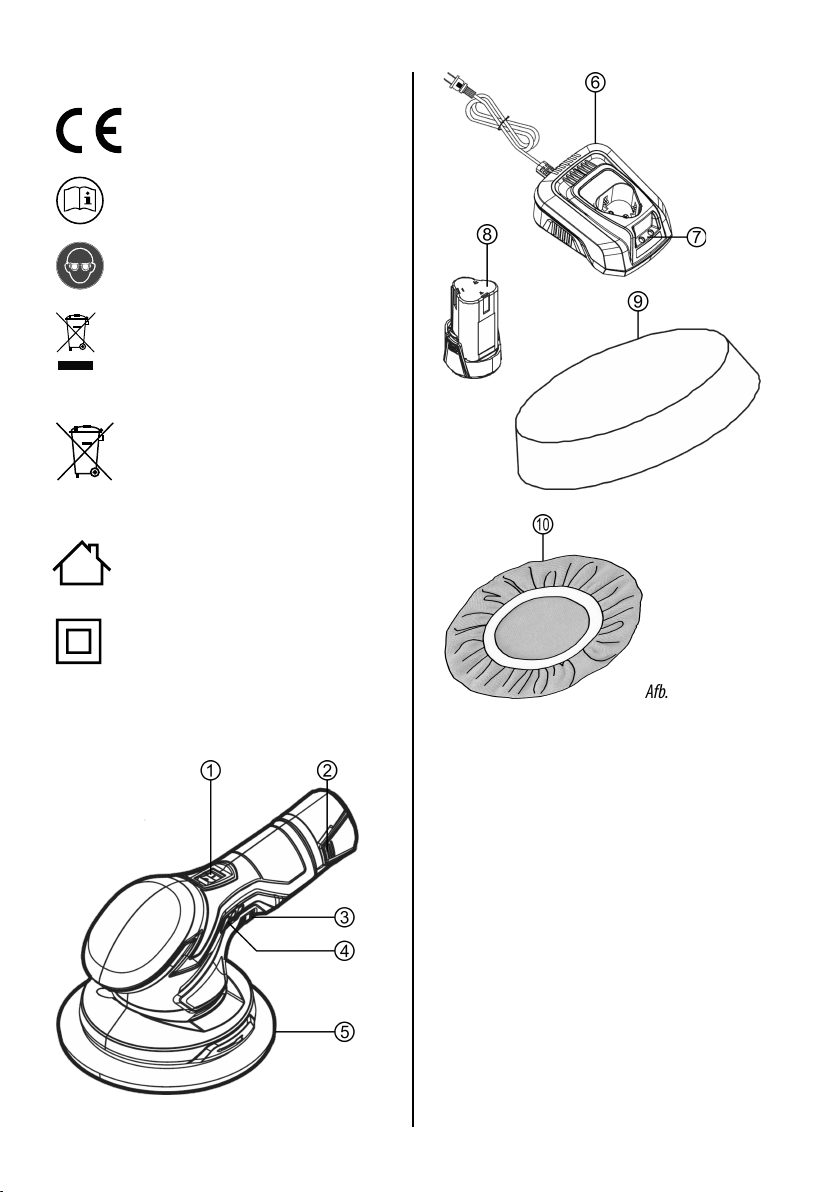
5. UITLEG BIJ DE SYMBOLEN
Voldoet aan de EG-richtlijnen
Gebruiksaanwijzing lezen
Gebruik oogbescherming
Een elektrisch product met dit symbool
mag niet bij het huisvuil worden
gegooid
Aanduiding volgens § 17 BattG: de
eindgebruiker is wettelijk verplicht om
batterijen terug te brengen naar de
leverancier of naar een verzamelpunt
waar een correcte verwijdering kan
plaatsvinden.
Apparaten met dit teken mogen
uitsluitend binnenshuis (droge
omgeving) worden gebruikt
Dubbelgeïsoleerde behuizing
(beschermingsklasse II).
6. GEBRUIKSAANWIJZING
6.1 OVERZICHT
20
Afb. 1: Overzicht
1 - Aan-/uitschakelaar
2 - Accuvergrendeling
3 - Toerentalregelaar
4 - Laadindicator
5 - Steunschijf
6 - Oplader
7 - Laadcontrolelampjes
8 - Accu
9 - Polijstschijf
10 - Polijstvacht
6.2 VOORAFGAAND AAN DE
INBEDRIJFSTELLING
6.2.1 ACCU LADEN
De accu (positie 8 in het overzicht) moet voor het
opladen uit het apparaat worden verwijderd. Druk
hiertoe op de ontgrendelingsknoppen (positie 2 in
Page 21
het overzicht) en trek de accu uit de polijstmachine.
Plaats de accu in de oplader. Steek de oplader in
een stopcontact. Het laadcontrolelample (positie 7
in het overzicht) brandt rood tijdens het laadproces.
Wanneer de accu volledig is opgeladen, wordt het
laadcontrolelample groen. Na het laden trekt u de
oplader uit het stopcontact.
Om de laadtoestand van de accu te controleren,
zet u eerst de toerentalregelaar (positie 3 in het
overzicht) op de laagste stand en zet u de aan-/
uitschakelaar (positie 1 in het overzicht) in de stand
„0“. Plaats de accu in de polijstmachine. Zorg ervoor
dat de steunschijf (positie 5 in het overzicht) vrij
kan bewegen. Schakel de polijstmachine in met de
aan-/uitschakelaar. De laadindicator (positie 4 in het
overzicht) geeft de acculading weer:
groen geel rood gereed voor gebruik
geel rood nog slechts korte bedrijfstijd
beschikbaar
rood accu moet worden opgeladen
6.2.2 DE POLIJSTSCHIJF MONTEREN
Zorg ervoor dat de accu uit de
polijstmachine is verwijderd voordat
u de polijstschijf plaatst of verwijdert.
Onbedoeld inschakelen van het apparaat
kan leiden tot letsel of schade aan het
apparaat of voertuig.
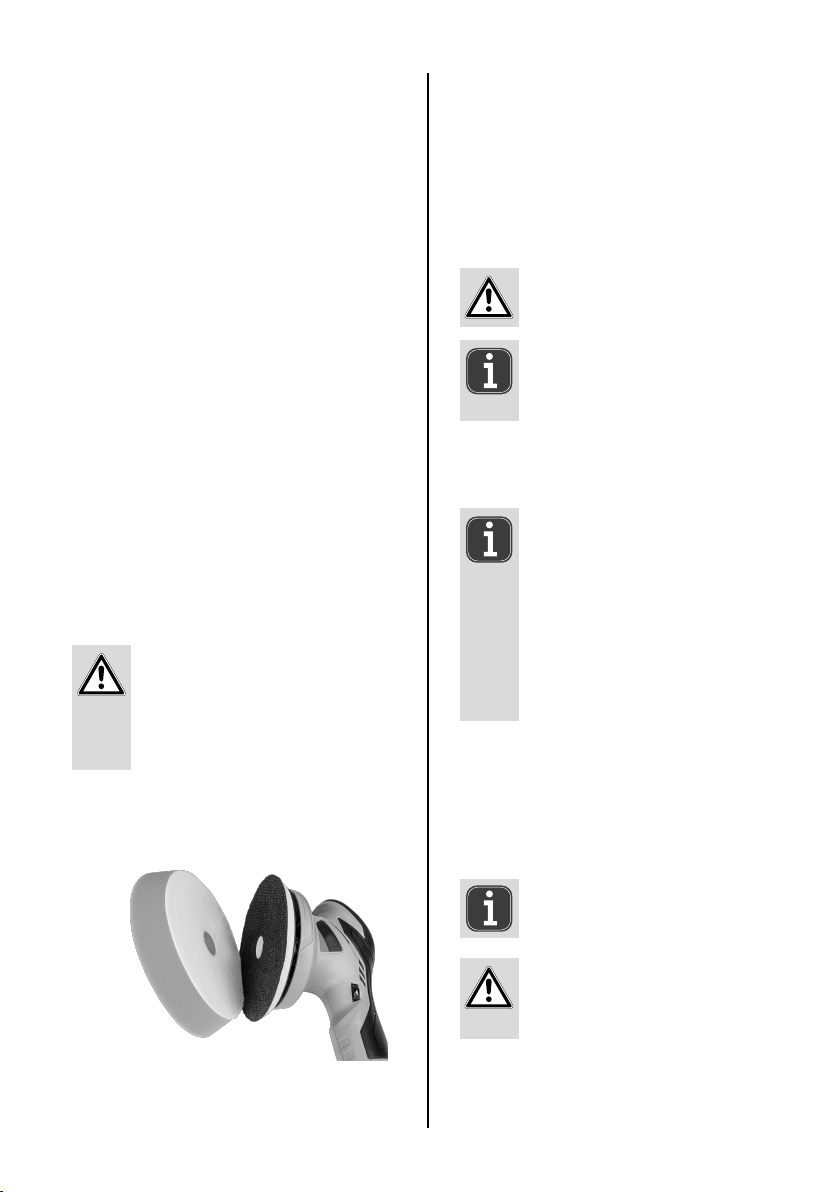
Plaats de polijstschijf (positie 9 in het overzicht) op de
steunschijf (positie 5 in het overzicht), afb. 2.
6.2.3 DE POLIJSTVACHT MONTEREN
Trek de polijstvacht (positie 10 in het overzicht)
over de polijstschijf (positie 9 in het overzicht). Zorg
ervoor dat de polijstschijf en de polijstvacht vrij zijn
van verontreinigingen.
Plaats de polijstvacht midden op de polijstschijf.
Eventueel aanwezige bevestigingskoorden opbergen
of inkorten.
Losse, meedraaiende delen kunnen uw
vingers grijpen of vast komen te zitten in
bijv. portiergrepen.
Gebruik altijd schone en onbeschadigde
polijstvachten en polijstschijven. Vuil
of vastzittende deeltjes kunnen de lak
beschadigen.
6.3 POLIJSTEN
Reinig het te behandelen oppervlak
zorgvuldig. Het oppervlak moet volledig
droog zijn voor het polijsten. Gebruik
alleen polijst- of wasproducten die
geschikt zijn voor polijstmachines. Neem
de gebruiksaanwijzing voor de gebruikte
verzorgingsmiddelen in acht. Voor
zwaar verweerde lak kan een speciale
voorbehandeling nodig zijn. Vraag
hiernaar bij uw vakhandel.
6.3.1 HET POLIJSTMIDDEL AANBRENGEN
Breng het verzorgingsmiddel gelijkmatig aan tot aan
de rand van de polijstschijf/-vacht. Het moet een
continue, dunne laag zijn.
Teveel aangebracht verzorgingsmiddel
verbetert het resultaat niet, maar maakt
alleen de verwijdering ervan lastig.
Afb. 2: Montage polijstschijf
Te lang polijsten op dezelfde plaats kan
de lak beschadigen.
Polijst het voertuig niet in fel zonlicht of
bij zeer hoge temperaturen.
21
Page 22
6.3.2 HET POLIJSTMIDDEL OP DE LAK
AANBRENGEN
Breng het verzorgingsmiddel alleen aan op gelakte
oppervlakken, nooit op kunststof onderdelen of
rubberen afdichtingen. Dep het verzorgingsmiddel
met de polijstvacht op verschillende plaatsen op
het te bewerken oppervlak. Zet het toerental met
behulp van de toerentalregelaar (positie 3 in het
overzicht) op de laagste stand. Houd het apparaat
met beide handen vast. Plaats het apparaat met de
polijstvacht op het te bewerken oppervlak. Schakel
het apparaat in met de aan-/uitschakelaar (positie 1
in het overzicht). Geleid het apparaat gelijkmatig over
de lak. Oefen geen druk uit op het apparaat. Het werk
wordt gedaan door de rotatie, niet door de druk op
de lak.
Behandel eerst de grote, vlakke oppervlakken zoals
de motorkap, het dak en de achterklep. Daarna zijn
de kleinere vlakken aan de beurt zoals deuren en
spatborden. Voor plekken die niet toegankelijk zijn
met de polijstmachine verwijdert u de polijstvacht en
bewerkt u deze plekken met de hand.
6.3.3 DE LAK POLIJSTEN
Polijst uitsluitend gelakte oppervlakken.
Stickers en folies kunnen niet worden
gepolijst. Als u dit probeert, worden ze
beschadigd of vernietigd en kan de lak
beschadigd raken.
Nadat u het verzorgingsmiddel gelijkmatig hebt
aangebracht en laten inwerken, moet het worden
verwijderd en moet het gelakte oppervlak worden
gepolijst. Afhankelijk van het fabricaat of type moet
het aangebrachte polijstmiddel volledig uitgedroogd
zijn. Verwijder nu het verzorgingsmiddel volledig door
de gelakte oppervlakken te polijsten in exact dezelfde
volgorde waarin u het hebt aangebracht. Stel het voor
uw verzorgingsmiddel geschikte toerental in.
Zet het toerental na elke uitschakeling
terug naar het laagste niveau. Zo
voorkomt u ongelukken als u het apparaat
opnieuw inschakelt.
7. ONDERHOUD EN VERZORGING
Reinig de polijstmachine na elk gebruik. Zorg daarbij
dat vooral de luchtspleten schoon zijn. Gebruik
daarvoor een vochtige, zachte doek. Gebruik geen
scherpe reinigings- of oplosmiddelen. Laat nooit
vloeistoen in de behuizing van het apparaat
binnendringen. U kunt het apparaat ook uitblazen
met perslucht bij lage druk.
De polijstschijf/-vacht wast u handmatig met warm
water. Laat de polijstschijf/-vacht drogen in de lucht.
Bewaar de polijstmachine zonder gemonteerde
polijstvacht. Leg de polijstmachine zodanig neer dat
de steunschijf niet vervormd kan raken. Plaats geen
andere voorwerpen op de steunschijf.
8. INFORMATIE OVER DE BESCHERMING VAN
HET MILIEU
Gooi elektrische apparaten niet weg
met het gewone huishoudelijke afval!
Afgedankte elektrische en elektronische
apparaten moeten gescheiden worden
ingezameld en op milieuvriendelijke
wijze worden gerecycled. Meer
informatie over het afvoeren van
elektrische en elektronische apparaten
kunt u opvragen bij de gemeente of het
stadsbestuur.
Aanduiding volgens § 17 BattG: de
eindgebruiker is wettelijk verplicht om
batterijen terug te brengen naar de
leverancier of naar een verzamelpunt
waar een correcte verwijdering kan
plaatsvinden.
9. CONTACTGEGEVENS
EAL GmbH
Otto-Hausmann-Ring 107
42115 Wuppertal, Duitsland
+49 (0)202 42 92 83 0
+49 (0) 202 42 92 83 – 160
[email protected]
www.eal-vertrieb.com
22
Page 23
LUCIDATRICE PROFESSIONALE RICARICABILE
INDICE
1. USO CONFORME _______________________________________________________ 23
2. FORNITURA _________________________________________________________ 23
3. SPECIFICHE__________________________________________________________ 23
4. AVVERTENZE DI SICUREZZA ________________________________________________ 24
5. SPIEGAZIONE DEI SIMBOLI ________________________________________________ 25
6. ISTRUZIONI PER L‘USO ___________________________________________________ 25
6.1 SCHEMA GENERALE ____________________________________________________ 25
6.2 PRIMA DELLA MESSA IN FUNZIONE ___________________________________________ 25
6.2.1 RICARICA DELLA BATTERIA ________________________________________________ 25
6.2.2 MONTAGGIO DEL DISCO PER LUCIDARE _________________________________________ 26
6.2.3 MONTAGGIO DELLA CALOTTA DI LUCIDATURA _____________________________________ 26
6.3 LUCIDATURA _________________________________________________________ 26
6.3.1 APPLICAZIONE DEL MATERIALE LUCIDANTE ______________________________________ 26
6.3.2 APPLICAZIONE DEL MATERIALE LUCIDANTE SULLA VERNICE ____________________________ 27
6.3.3 LUCIDATURA DELLA VERNICE _______________________________________________ 27
7. MANUTENZIONE E PULIZIA ________________________________________________ 27
8. INDICAZIONI SULLA TUTELA AMBIENTALE _______________________________________ 27
9. COME CONTATTARCI ____________________________________________________ 27
AVVERTENZA
Leggere attentamente le istruzioni
per l‘uso prima della messa in funzione e osservare tutte le avvertenze
di sicurezza!
La mancata osservanza di queste
istruzioni può provocare lesioni
personali, danni al prodotto o alla
vostra proprietà!
Conservare la confezione originale,
la prova d‘acquisto e queste istruzioni come riferimento futuro! In caso
di cessione del prodotto, consegnare
anche le presenti istruzioni.
Vericare l‘integrità e la completezza del contenuto della confezione
prima della messa in funzione!
1. USO CONFORME
La lucidatrice ricaricabile è destinata esclusivamente
alla ceratura e alla lucidatura delle vernici di automobili, barche, roulotte o camper.
Questo dispositivo non è destinato all‘uso da parte
di bambini e persone con capacità mentali limitate
o che non siano in possesso delle necessarie conoscenze. Tenere il dispositivo lontano dalla portata dei
bambini.
Questo dispositivo non è destinato all‘impiego industriale.
Dell’uso appropriato fa parte anche il rispetto di tutte
le informazioni fornite in queste istruzioni, soprattutto delle avvertenze sulla sicurezza. Ogni altro utilizzo viene considerato improprio e può causare danni
a persone o cose. EAL GmbH non risponde dei danni
derivanti da un uso improprio.
2. FORNITURA
1 x Lucidatrice
1 x Caricabatteria
1 x Batteria al litio
1 x Disco per lucidare in spugna
1 x Calotta di lucidatura
1 x Manuale d’uso
3. SPECIFICHE
Lucidatrice:
Dimensioni (L x P x H): 238 x 150 x 130 [mm]
Peso (incl. batteria): ca. 1,000 kg
Tensione alimentazione motore: 12 V DC
Corrente assorbita: max. 5 A
Potenza: 60 W
Velocità di rotazione: 2500 - 5000 giri/min
Platorello: Ø 150 mm
23
Page 24
Batteria ricaricabile:
Tensione: 12 V
Capacità della batteria: 2 Ah 24 Wh
Caricabatteria:
Tensione in ingresso: 230 V AC, 50 Hz
Tensione in uscita: 12 V DC
Corrente di carica: 2,4 A Potenza: 50 W
4. AVVERTENZE DI SICUREZZA
• Il triangolo di segnalazione identica
tutte le istruzioni importanti per la
sicurezza. Rispettare sempre queste
istruzioni, per evitare il pericolo di
lesioni personali o danni al dispositivo.
• I bambini non devono giocare con
l‘apparecchio.
• Non adare pulizia e manutenzione ai
bambini se non sorvegliati.
• Non lasciare il materiale d‘imballaggio
in giro con noncuranza. Potrebbe
infatti diventare un pericoloso
giocattolo per i bambini!
• Utilizzare questo prodotto solo per
l‘impiego previsto!
• Non manomettere né smontare il
prodotto!
• Per la propria sicurezza, utilizzare
solo gli accessori e i pezzi di ricambio
indicati nelle istruzioni o il cui impiego
sia consigliato dal produttore!
• Prima di eettuare qualsiasi lavoro di
montaggio o la pulizia sul dispositivo,
rimuovere la batteria dalla lucidatrice.
• Accertarsi che l‘interruttore sia
in posizione „0“ prima di inserire
la batteria. In questo modo si
evita che il dispositivo si accenda
incontrollatamente.
• Non usare l‘apparecchio se è
danneggiato.
• Non sovraccaricare mai l‘apparecchio.
• Rimuovere la batteria dall‘apparecchio
quando non è in uso. Proteggere i
contatti della batteria dal cortocircuito.
• Indossare indumenti adeguati. Non
indossare capi di abbigliamento
troppo ampi né gioielli. Tenere i
capelli, i vestiti e i guanti lontano dalle
parti in movimento. I vestiti larghi,
i gioielli o i capelli lunghi possono
impigliarsi nelle parti in movimento.
• Indossare occhiali protettivi.
• Indossando dispositivi di protezione
individuale, quali mascherina
antipolvere, scarpe antinfortunistiche
o casco protettivo, a seconda del tipo
d‘impiego della lucidatrice, si riduce il
rischio di lesioni.
• Accendere la lucidatrice soltanto
quando è appoggiata sulla supercie
da lavorare.
• Se si utilizzano calotte di lucidatura,
non lasciare libere parti della calotta,
in particolare i cordini di ssaggio.
Sistemare o accorciare il cordino di
ssaggio. Le parti sciolte e rotanti
possono catturare le dita o rimanere
incastrate ad es. nelle maniglie delle
portiere.
• Lavorare con estrema cautela in
vicinanza di angoli e spigoli vivi.
L’utensile rotante potrebbe rimbalzare
o incepparsi. Questo provocherebbe
una perdita di controllo e lesioni.
• Osservare le indicazioni del produttore
del materiale lucidante utilizzato.
• Proteggere la lucidatrice dalla pioggia
o dall‘acqua.
• Pulire l‘apparecchio dopo ogni
impiego.
• Osservare anche le istruzioni di
sicurezza contenute nelle singole
sezioni del manuale d’uso.
24
Page 25
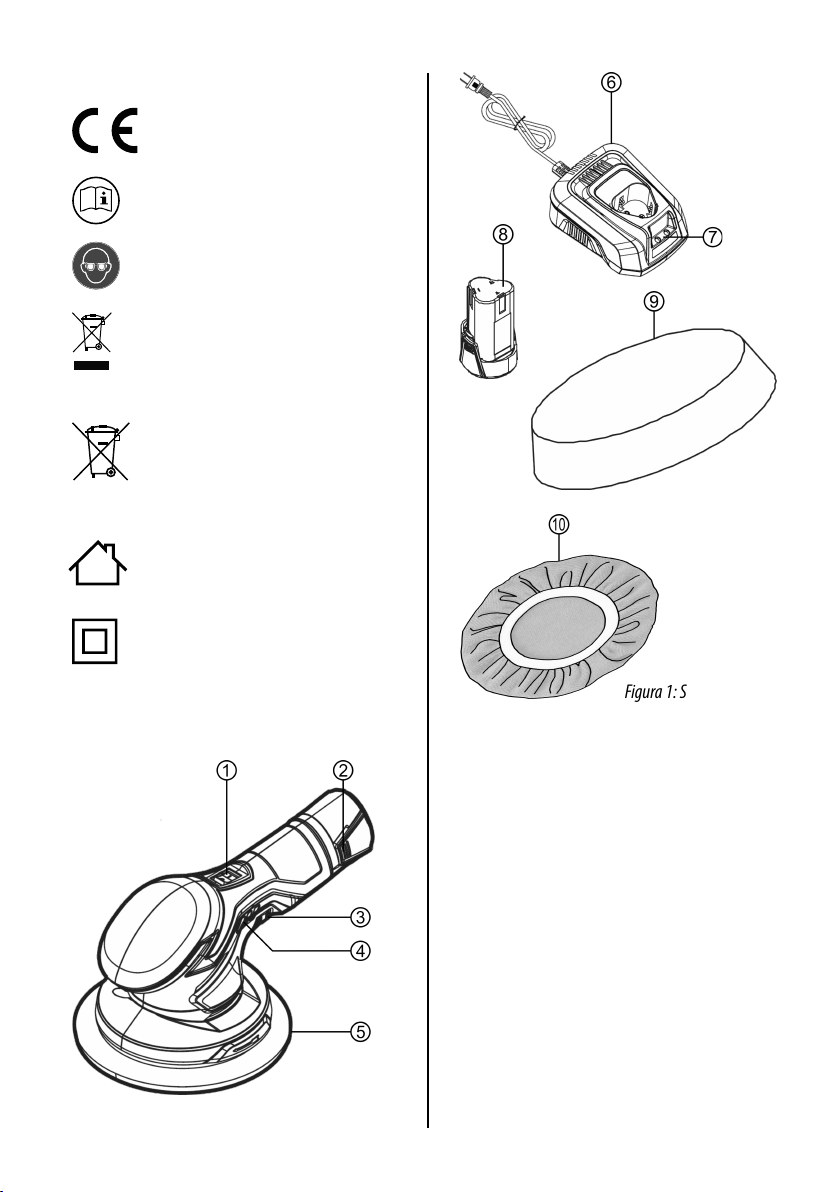
5. SPIEGAZIONE DEI SIMBOLI
Conforme alle direttive CE
Leggere le istruzioni d‘uso
Indossare occhiali protettivi
I dispositivi elettrici contrassegnati con
questo simbolo non vanno gettati nei
riuti domestici
Contrassegno secondo il § 17 BattG
(legge sulle batterie): il consumatore
nale è obbligato per legge a smaltirle
correttamente restituendole al rivenditore o a un apposito centro di raccolta.
I dispositivi contrassegnati con questo
simbolo sono destinati all‘uso domestico
(in ambienti asciutti)
Alloggiamento protettivo isolato (classe
di protezione II).
6. ISTRUZIONI PER L‘USO
6.1 SCHEMA GENERALE
Figura 1: Schema generale
1 - Interruttore ON/OFF
2 - Bloccaggio batteria
3 - Regolatore di velocità
4 - Indicatore di carica
5 - Platorello
6 - Caricabatteria
7 - Spie di controllo ricarica
8 - Batteria
9 - Disco per lucidare
10 - Calotta di lucidatura
6.2 PRIMA DELLA MESSA IN FUNZIONE
6.2.1 RICARICA DELLA BATTERIA
Per ricaricare la batteria (pos. 8 dello schema),
occorre estrarla dall‘apparecchio. Per fare ciò,
premere i pulsanti di sblocco (pos. 2 dello schema)
25
Page 26
ed estrarre la batteria dalla levigatrice. Inserire la
batteria nel caricabatteria. Collegare il caricabatteria a
una presa di corrente. La spia di controllo (pos. 7 dello
schema) si accende a luce rossa durante la ricarica.
Una volta che la batteria è completamente ricaricata,
la spia di controllo si accende a luce verde. Al termine
del processo di ricarica, scollegare il caricabatteria
dalla presa elettrica.
Per controllare il livello di caric a della batteria, portare
prima il regolatore di velocità (pos. 3 dello schema) al
livello più basso e portare l‘interruttore ON/OFF (pos.
1 dello schema) in posizione „0“. Inserire la batteria
nella lucidatrice. Assicurarsi che il platorello (pos. 5
dello schema) sia libero di muoversi. Accendere la
lucidatrice con l‘interruttore ON/OFF. L‘indicatore di
carica (pos. 4 dello schema) indica il livello di carica
della batteria:
verde giallo rosso pronto all‘uso
giallo rosso breve durata di funzionamento
disponibile
rosso occorre ricaricare la batteria
6.2.2 MONTAGGIO DEL DISCO PER LUCIDARE
Assicurarsi che la batteria sia stata
rimossa dalla lucidatrice prima di
applicare o rimuovere il disco per
lucidare. L‘accensione accidentale del
dispositivo potrebbe provocare lesioni o
danni al dispositivo stesso o al veicolo.
6.2.3 MONTAGGIO DELLA CALOTTA DI LUCIDATURA
Applicare la calotta di lucidatura (pos. 10 dello
schema) sul disco per lucidare (pos. 9 dello schema).
Assicurarsi che il disco e la calotta non siano sporchi.
Disporre la calotta al centro del disco. Sistemare
o accorciare i cordini di ssaggio eventualmente
presenti.
Le parti sciolte e rotanti possono
catturare le dita o rimanere incastrate ad
es. nelle maniglie delle portiere.
Utilizzare sempre calotte e dischi puliti e
non danneggiati. Lo sporco ed eventuali
inclusioni potrebbero danneggiare la
vernice.
6.3 LUCIDATURA
Pulire accuratamente la supercie
da lavorare. La supercie da lucidare
deve essere completamente asciutta.
Utilizzare prodotti per lucidatura o
ceratura adatti solo per lucidatrici.
Osservare le istruzioni per l‘uso
dei prodotti utilizzati. Le vernici
fortemente alterate possono richiedere
un trattamento preliminare speciale.
Chiedere informazioni in merito al
proprio commerciante di ducia.
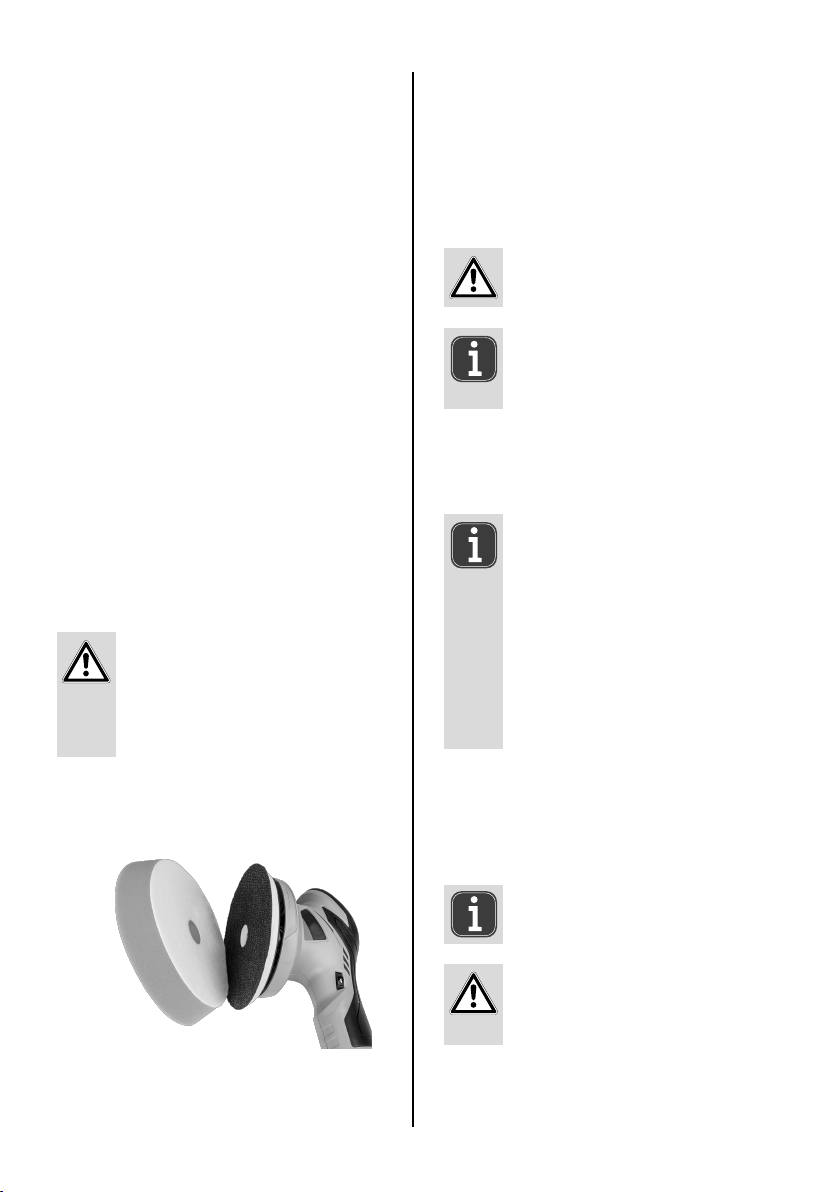
Applicare il disco per lucidare (pos. 9 dello schema)
sul platorello (pos. 5 dello schema), gura 2.
Figura 2: Montaggio disco per lucidare
26
6.3.1 APPLICAZIONE DEL MATERIALE LUCIDANTE
Applicare accuratamente il materiale lucidante in
modo uniforme no all‘orlo della calotta / del disco.
Si deve ottenere uno strato continuo e sottile.
Applicando troppo prodotto non si
migliora il risultato, ma se ne rende
dicile la rimozione.
Lucidando troppo a lungo nello stesso
punto si può danneggiare la vernice.
Non lucidare il veicolo in pieno sole né a
temperature molto elevate.
Page 27
6.3.2 APPLICAZIONE DEL MATERIALE
LUCIDANTE SULLA VERNICE
Applicare il prodotto solo sulle superci verniciate,
mai su parti in plastica o su guarnizioni in gomma.
Tamponare il prodotto con la calotta di lucidatura in
diversi punti della supercie da lavorare. Impostare
la velocità di rotazione tramite l‘apposito regolatore
(pos. 3 dello schema) sul livello più basso. Tenere
l‘apparecchio saldamente con entrambe le mani.
Appoggiare il dispositivo con la calotta di lucidatura
sulla supercie da lavorare. Accendere il dispositivo
tramite l‘interruttore ON/OFF (pos. 1 dello schema).
Fare scorre il dispositivo uniformemente sopra la
vernice. Non esercitare pressione sul dispositivo. Il
lavoro viene fatto dalla rotazione, non dalla pressione
sulla vernice.
Trattare prima le superci più ampie e piane, come
cofano motore, tetto e coperchio del bagagliaio. Poi le
superci più piccole, come le portiere e i parafanghi.
Per i punti non raggiungibili con la levigatrice,
rimuovere la calotta di lucidatura e lavorare questi
punti a mano.
6.3.3 LUCIDATURA DELLA VERNICE
Lucidare soltanto le superci verniciate.
Non lucidare adesivi e pellicole. Se si tenta
di farlo, vengono danneggiati o distrutti e
possono rovinare la vernice.
Dopo aver applicato e distribuito uniformemente
il prodotto è necessario rimuoverlo e lucidare la
supercie verniciata. Il materiale lucidante applicato
deve essere completamente asciutto a seconda
del produttore o del modello. Rimuovere adesso
completamente il prodotto lucidando le superci
verniciate nell‘ordine esatto in cui è stato applicato il
prodotto. Impostare la velocità di rotazione adatta per
il prodotto impiegato.
Dopo ogni spegnimento riportare la
velocità di rotazione sul livello più basso.
In tal modo si evitano incidenti alla
successiva accensione.
7. MANUTENZIONE E PULIZIA
Pulire la lucidatrice dopo ogni impiego. Accertarsi
soprattutto che le fessure di ventilazione siano pulite.
Utilizzare a tale scopo un panno umido e morbido.
Non utilizzare detergenti aggressivi o solventi.
Evitare sempre che i liquidi penetrino all‘interno del
dispositivo. È possibile anche pulire il dispositivo con
aria compressa a bassa pressione.
La calotta di lucidatura / il disco per lucidare si lava a
mano con acqua calda. Mettere la calotta / il disco ad
asciugare all‘aria.
Conservare la lucidatrice senza calotta di lucidatura.
Appoggiare la levigatrice in modo che il platorello
non possa deformarsi. Non posizionare altri oggetti
sul platorello.
8. INDICAZIONI SULLA TUTELA AMBIENTALE
Non smaltire gli apparecchi elettrici
insieme ai riuti domestici! I dispositivi
elettrici ed elettronici devono essere
separati e destinati al riciclaggio.
Per le possibilità di smaltimento
delle apparecchiature elettriche ed
elettroniche, informarsi presso il proprio
comune.
Contrassegno secondo il § 17 BattG
(legge sulle batterie): il consumatore
nale è obbligato per legge a smaltirle
correttamente restituendole al
rivenditore o a un apposito centro di
raccolta.
9. COME CONTATTARCI
EAL GmbH
Otto-Hausmann-Ring 107
42115 Wuppertal, Germania
+49 (0)202 42 92 83 0
+49 (0) 202 42 92 83 – 160
[email protected]
www.eal-vertrieb.com
27
Page 28

EAL GmbH
Otto-Hausmann-Ring 107
42115 Wuppertal
+49 (0)202 42 92 83 0
+49 (0) 202 42 92 83 – 160
[email protected]
www.eal-vertrieb.com
Deutschland
© EAL GmbH, 20999 04.2020
28
 Loading...