

AR3030
&RQFHUWR
User's Manual
© Simon Collings, G4SGI 1994
Software Published and Distributed by:
AOR (UK) LTD
4E East Mill
Bridgefoot
Belper
Derbyshire DE56 2UA
Tel: 01773 880788 Fax: 01773 880780
info@aoruk.com www.aoruk.com

CONTENTS
_____________________________________________________________________
CONTENTS
INTRODUCTION ...........................................................................................3
MINIMUM SYSTEM REQUIREMENTS....................................................4
INSTALLING THE PROGRAM...................................................................5
Copy Protection
To Install...
GETTING STARTED.....................................................................................10
RS-232 connection
Starting the Program
The Front Panel Window
Front Panel functions
Step Tuning
Tuning Step Size
User Step Size
AGC Speed
Low Tone
Attenuator
Normal/Narrow Filter Selection
Obtaining Help
MEMORY MENU FUNCTIONS ..................................................................16
New Bank
Load Bank
Memory Window functions
Storing a memory channel
Recalling a memory channel
Editing a channel
Sorting the memory bank
Clearing a memory channel
Selecting a scan number
Save Bank
Save Bank As
Close Bank
Delete Bank File
Print Bank
Send to RX...
Get from RX...
Copy Bank to Clipboard
Copy Bank from Clipboard
Exit
............................................................................................................................23
SCANNING MENU OPTIONS......................................................................24
Begin Scan
Scan Dwell
Spectrum Analysis
SETUP MENU OPTIONS ..............................................................................27
........................................................................................................5
................................................................................................................6
...................................................................................................10
...............................................................................................10
........................................................................................11
..............................................................................................12
..................................................................................................12
...........................................................................................13
...............................................................................................13
...................................................................................................13
......................................................................................................13
.....................................................................................................13
.................................................................14
.........................................................................................................14
..................................................................................................................17
................................................................................................................17
....................................................................................18
..........................................................................18
.......................................................................19
.........................................................................................19
............................................................................19
........................................................................20
..............................................................................20
.................................................................................................................20
............................................................................................................20
................................................................................................................21
.......................................................................................................21
................................................................................................................21
.............................................................................................................22
..........................................................................................................22
.........................................................................................22
....................................................................................23
................................................................................................................24
................................................................................................................25
...................................................................................................25
_____________________________________________________________________
AR3030
&RQFHUWRUser’s Manual 1

CONTENTS
_____________________________________________________________________
Communications ......................................................................................................27
Get/Send Delay.........................................................................................................27
WINDOWS MENU OPTIONS ......................................................................29
Arrange Icons...........................................................................................................29
MEMORY DATA IN
WINDOWS
TM
CLIPBOARD
...................................30
MOVING COPY PROTECTION..................................................................31
_____________________________________________________________________
AR3030
&RQFHUWRUser’s Manual 2

INTRODUCTION
_____________________________________________________________________
INTRODUCTION
Welcome to
WindowsTM and the AOR
an RS-232 serial port to tune the receiver and has many exciting features:
Microsoft® WindowsTM program.
)
On-line context sensitive help. The full WindowsTM hypertext help
)
Unlimited number of disk based memory banks. Each memory
)
Copy data to/from clipboard. You can exchange memory data with
)
Front Panel Window. A simple to use window provides you with the
)
Spectrum Analysis Display. A spectrum analyser window is provided
)
AR3030
AR3030
WindowsTM program (not a DOS program running in a window) which
has a standard "look and feel" and is easy to use.
system is used to provide you with the information you need wherever
you are in
have a "help" push button which calls up information for that dialog.
You can also highlight individual menu options using the arrow keys
and obtain help on them by pressing <F1>.
bank contains 100 memory channels which can be sent to the radio
(download) and you can get banks from it (upload). Up to 10 can be
viewed on-screen at once, an unlimited number can be stored on disk
(subject to free disk space).
WindowsTM Clipboard for bulk editing and export to a data base (not
supplied) or other WindowsTM applications.
ease of “keypad frequency entry” from your mouse. An S-meter
display echoes the meter on the receiver and shows you the current
signal strength.
which allows you to display signals over a wide frequency range. Once
complete you can use the mouse to control a cursor and tune the radio
to signals on the display.
AR3030
&RQFHUWR, the control program for Microsoft®
HF communications receiver. This program uses
AR3030
&RQFHUWR . In addition to the help menu, all dialogs
&RQFHUWR is a genuine
_____________________________________________________________________
AR3030
&RQFHUWRUser’s Manual 3

MINIMUM SYSTEM REQUIREMENTS
_____________________________________________________________________
MINIMUM SYSTEM REQUIREMENTS
25 MHz 80386 IBM PC compatible or above
)
4 Mbytes of memory or more
)
)
Microsoft® mouse
at least two RS-232 serial ports (one for mouse)
)
1 MByte of free disk space
)
)
Microsoft® WindowsTM 3.1 (or higher) or Microsoft® Windows for
Workgroups 3.1 (or higher) running in enhanced mode
Printer (optional)
)
An AOR
)
required (unlike other receivers), but you will need a serial cable (details
given in Section 7 Computer Control (RS-232C) of the
2SHUDWLQJ0DQXDO ).
AR3030
HF communications receiver. No RS-232 interface is
AR3030
_____________________________________________________________________
AR3030
&RQFHUWRUser’s Manual 4

INSTALLING THE PROGRAM
_____________________________________________________________________
INSTALLING THE PROGRAM
It is assumed that you are familiar with the way WindowsTM works, so there
are few details included about using WindowsTM itself. If you need more information,
you should consult your WindowsTM User's Guide or run the Windows
is available from program manager (under the Help|Windows Tutorial menu
option).
You should install and use
enhanced mode. If you already have WindowsTM in enhanced mode (this is the
default), you can proceed. If not, consult your WindowsTM User's Guide to find out
how to configure WindowsTM for enhanced mode.
You must have Microsoft® WindowsTM running in enhanced mode for
AR3030
&RQFHUWR to run.
AR3030
&RQFHUWR using Microsoft® WindowsTM in
TM
tutorial that
Copy Protection
AR3030
other cumbersome devices, however, there are a few simple points that you may
need to refer to. Please read this section carefully.
your hard disk when you install the program. The program will only work on the disk
you installed it to. There is no dongle or key-disk, so once installed the program runs
completely normally and you will not be inconvenienced (unlike other schemes).
Specific points to remember:
1. The distribution disk contains a single token. You cannot transfer the program to
another machine without moving the token back onto the original distribution disk
then re-installing. The token can easily be moved with the program that is provided.
Contact your distributor if you need additional copies of the software.
2. You should keep you original disk in a safe place away from strong magnetic fields,
high humidity or other environmental conditions that could damage it. You will not
be able to re-install the software or move it to another machine without the original
distribution disk.
3. Two hidden files are copied to a hidden subdirectory of the
directory (CONCERTO.CCC and CCONTROL.SYS) when you install the software.
_____________________________________________________________________
AR3030
&RQFHUWR is copy protected. The protection does not use a dongle or
&RQFHUWR is copy protected using a system which places a “token” on
AR3030
AR3030
&RQFHUWRUser’s Manual 5
&RQFHUWR

INSTALLING THE PROGRAM
_____________________________________________________________________
These contain configuration information for the copy protection scheme and are
normal DOS format files. DO NOT DELETE THESE FILES UNDER ANY
CIRCUMSTANCES. If these files are deleted,
4. If you are using a backup utility, make sure that the two hidden files are not backed
up. When restored, the copy protection scheme may not be able to validate the
installation and
these files because they have the hidden, system and read-only attributes set. The two
copy protection files also do not have the archive bit set, so you should be able to
exclude them from backups by setting up your backup software to ignore files without
an archive bit. Remember, it is not the backup but the restore that can cause
problems.
5. The /d+ option of the PC-Kwik disk cache software from Multisoft Corporation is
not compatible with the copy protection scheme and should be temporarily disabled
when installing
copy protection scheme in the same way because of non-standard methods of
accessing the floppy disk drive. Again, it should be temporarily disabled, but both
caches may be used at other times.
6. The copy protection scheme is compatible with disk drives compressed with
SuperStor, Stacker and DoubleSpace. However, you should temporarily remove the
token from the hard disk when installing one of these compression utilities because
the protection will appear invalid when the drives are compressed. The disk
compression utilities warn you of this in their manuals.
7. The copy protection scheme is known to be compatible with the following disk
defragmenters: Central Point’s Compress, Digital Research’s Diskopt, Stac’s Sdefrag
and Microsoft’s Defrag.
See the section of this manual entitled MOVING COPY PROTECTION for
instructions on using the utility for moving the copy protection token.
AR3030
AR3030
&RQFHUWR will not run. Most backup utilities do not touch
&RQFHUWR or moving the token. HyperCache also affects the
AR3030
&RQFHUWR will not run.
To Install...
To install
<ENTER> at the DOS prompt) and bring the program manager window to the top so
that you can see it clearly.
There are two simple ways to install
distribution disk into drive A then...
Either...
_____________________________________________________________________
AR3030
&RQFHUWR, start Windows
AR3030
TM
(usually by typing "WIN
&RQFHUWR. First insert the
AR3030
&RQFHUWRUser’s Manual 6
INSTALLING THE PROGRAM
_____________________________________________________________________
Click on the File menu of program manger and select the Run... option. Type
"A:\INSTALL.EXE<ENTER>" into the dialog.
Or...
Use file manager to list the files on drive A and double-click on the line with
"INSTALL.EXE" on it.
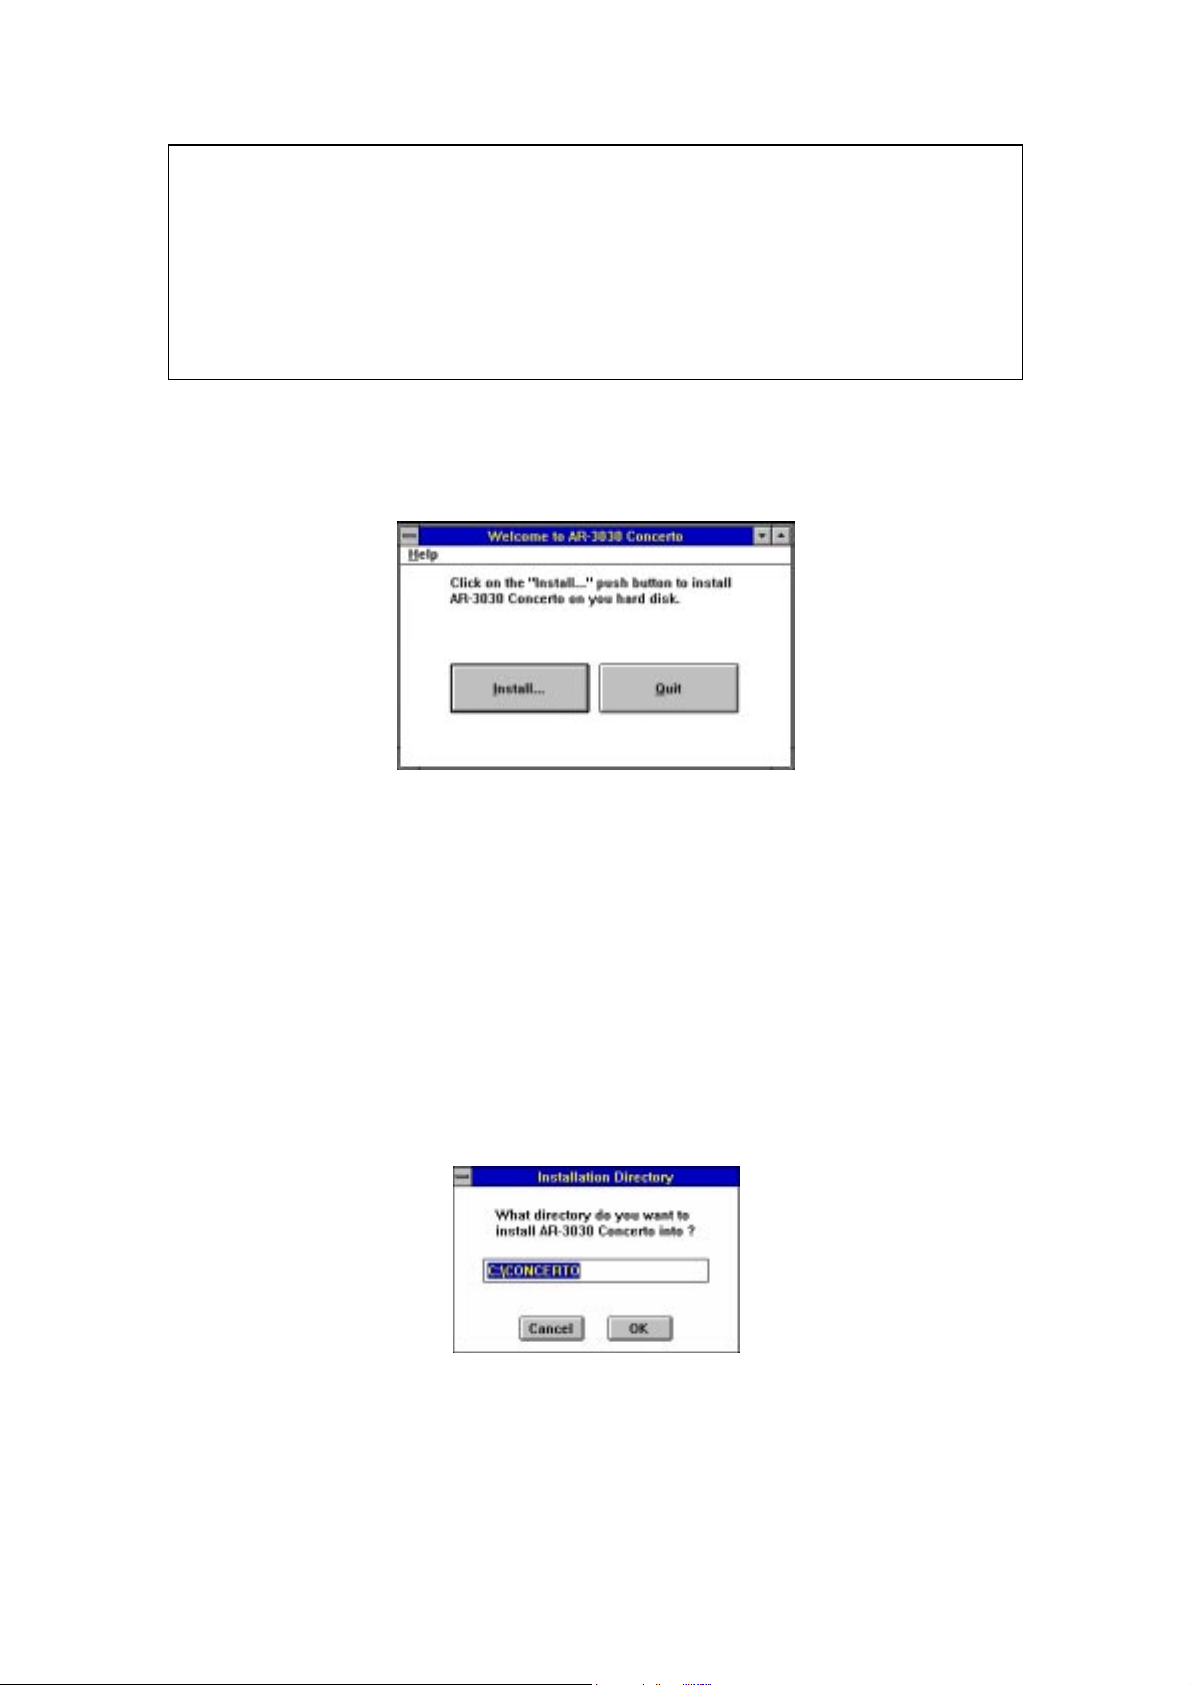
Either method can be used, but you should obtain the window shown below on
your screen:
Two push buttons are provided inside the window. You can abort the
installation by clicking on the "Quit" push button (or by pressing <Q>).
Alternatively, to copy the program files onto your hard disk, click on the
"Install..." push button (or press <I>). If you want to obtain help on the
installation program, you can click on the Help menu option in the top right hand
corner of the window.
If you are proceeding with the installation, you will now be asked to type in
the name of a directory on your hard disk for the program files (you will need
approximately 1 MByte of space). The default directory name is "C:\CONCERTO",
but you can change it by typing in an alternative into the dialog that is displayed.
The dialog looks like that shown above. If you want to keep the default
directory for the
to change it, you can type in an alternative name and then click on OK (if the directory
does not already exist, it will be created).
_____________________________________________________________________
AR3030
&RQFHUWR files, just click on the OK push button. If you want
AR3030
&RQFHUWRUser’s Manual 7

INSTALLING THE PROGRAM
_____________________________________________________________________
Once you have selected a directory for the
copied onto your system in a few minutes. The copy protection token is also
transferred to your hard disk.
NOTE: The installation program does not alter your WindowsTM ".INI"
initial settings files; it uses its own. The file is called "CONCERTO.INI" and is
located in the
The installation program creates a new group in program manager and adds
the
AR3030
to use the package and looks like:
AR3030
&RQFHUWR icons to it. The program group contains all the items you need
&RQFHUWR directory.
AR3030
&RQFHUWR files, they are
Where each icon is as follows:
The main
An invitation to send us your comments
Some useful guidance on RS-232 interfacing
The "
AR3030
READ.ME
&RQFHUWR program
" file. Double-click on this for the latest information.
Utility to move the copy protection token between hard disk and
floppy.
At the end of the installation process the new program group will be
displayed in program manager. You can re-size the
or minimise it if you wish.
_____________________________________________________________________
AR3030
AR3030
&RQFHUWR group window
&RQFHUWRUser’s Manual 8

INSTALLING THE PROGRAM
_____________________________________________________________________
When the installation procedure is finished you are ready to connect your radio
and start using the software.
_____________________________________________________________________
AR3030
&RQFHUWRUser’s Manual 9

GETTING STARTED
_____________________________________________________________________
GETTING STARTED
RS-232
You must connect your radio to an RS-232 port of your computer before you
can operate the software. A screened cable with a minimum of 3 conductors is
required for connecting the PC to the receiver.
If screened cable is not used then digital noise may radiate from the
conductors of the cable and cause interference to reception. All cable
connections should be high quality for durability.
Full details of the connection required (including the pin configuration) is
given in Section 7 Computer Control (RS-232C) of the
0DQXDO. No level shifting interface is required (unlike other manufacturer’s
receivers), you just connect a serial port of your computer directly to the radio.
connection
AR3030
2SHUDWLQJ
Starting the program
Before proceeding, please read the "
information or changes not covered by this manual. This is accessible from the
AR3030
FIRST!" icon.
&RQFHUWR program group; you just need to double-click on the "READ ME
READ.ME
" file for last minute
To setup
already running), switch on your radio but DO NOT CONNECT YOUR RADIO
TO YOUR COMPUTER YET. You need to choose a serial port and baud rate for
RS-232 communications between your computer and the
&RQFHUWR. Begin by setting up for operation at 4800 baud (you may find it convenient
to use 9600 baud later).
To setup the software:
To select the baud rate and serial port used by &RQFHUWR, open the
&RQFHUWR group using program manager and double-click on the main program icon
_____________________________________________________________________
AR3030
&RQFHUWR for your system, first run WindowsTM (if it is not
AR3030
AR3030
&RQFHUWRUser’s Manual 10
BEFORE using
AR3030

GETTING STARTED
_____________________________________________________________________
(which looks like an
RADIO TO BE CONNECTED.
The program will then launch and display a copyright notice before opening
it's main window if all is well. Select the Setup|Communications menu option
and choose the RS-232 options you require from the dialog that is displayed (see
below):
Make sure that the settings match your requirements (adjust as necessary), then
click on the OK push button. In the dialog above,
for serial port COM2 at 4800 baud.
the "CONCERTO.INI" initial setting file which is maintained automatically by the
program. Exit from the program then restart it to make sure that these setting take
effect properly.
To setup the radio:
With the radio switched ON, type in 4, 8, 0, 0, ENT or 9, 6, 0, 0, ENT into the
AR3030
for &RQFHUWR; it will be effective until you exit from the program or switch the radio
OFF. You will need to setup the radio in this way EVERY TIME you use the
software because the
work.
Now that you have setup the software and radio, you can use the program.
Double-click on the
AR3030
’s keypad (not &RQFHUWR’s). You should use the same baud rate you selected
AR3030
&RQFHUWR will store these settings, for each time the program is run, in
AR3030
AR3030
radio) to run the program. YOU DO NOT NEED THE
AR3030
must be in “REMOTE” mode for RS-232 control to
&RQFHUWR icon in Program Manager to begin.
&RQFHUWR has been setup
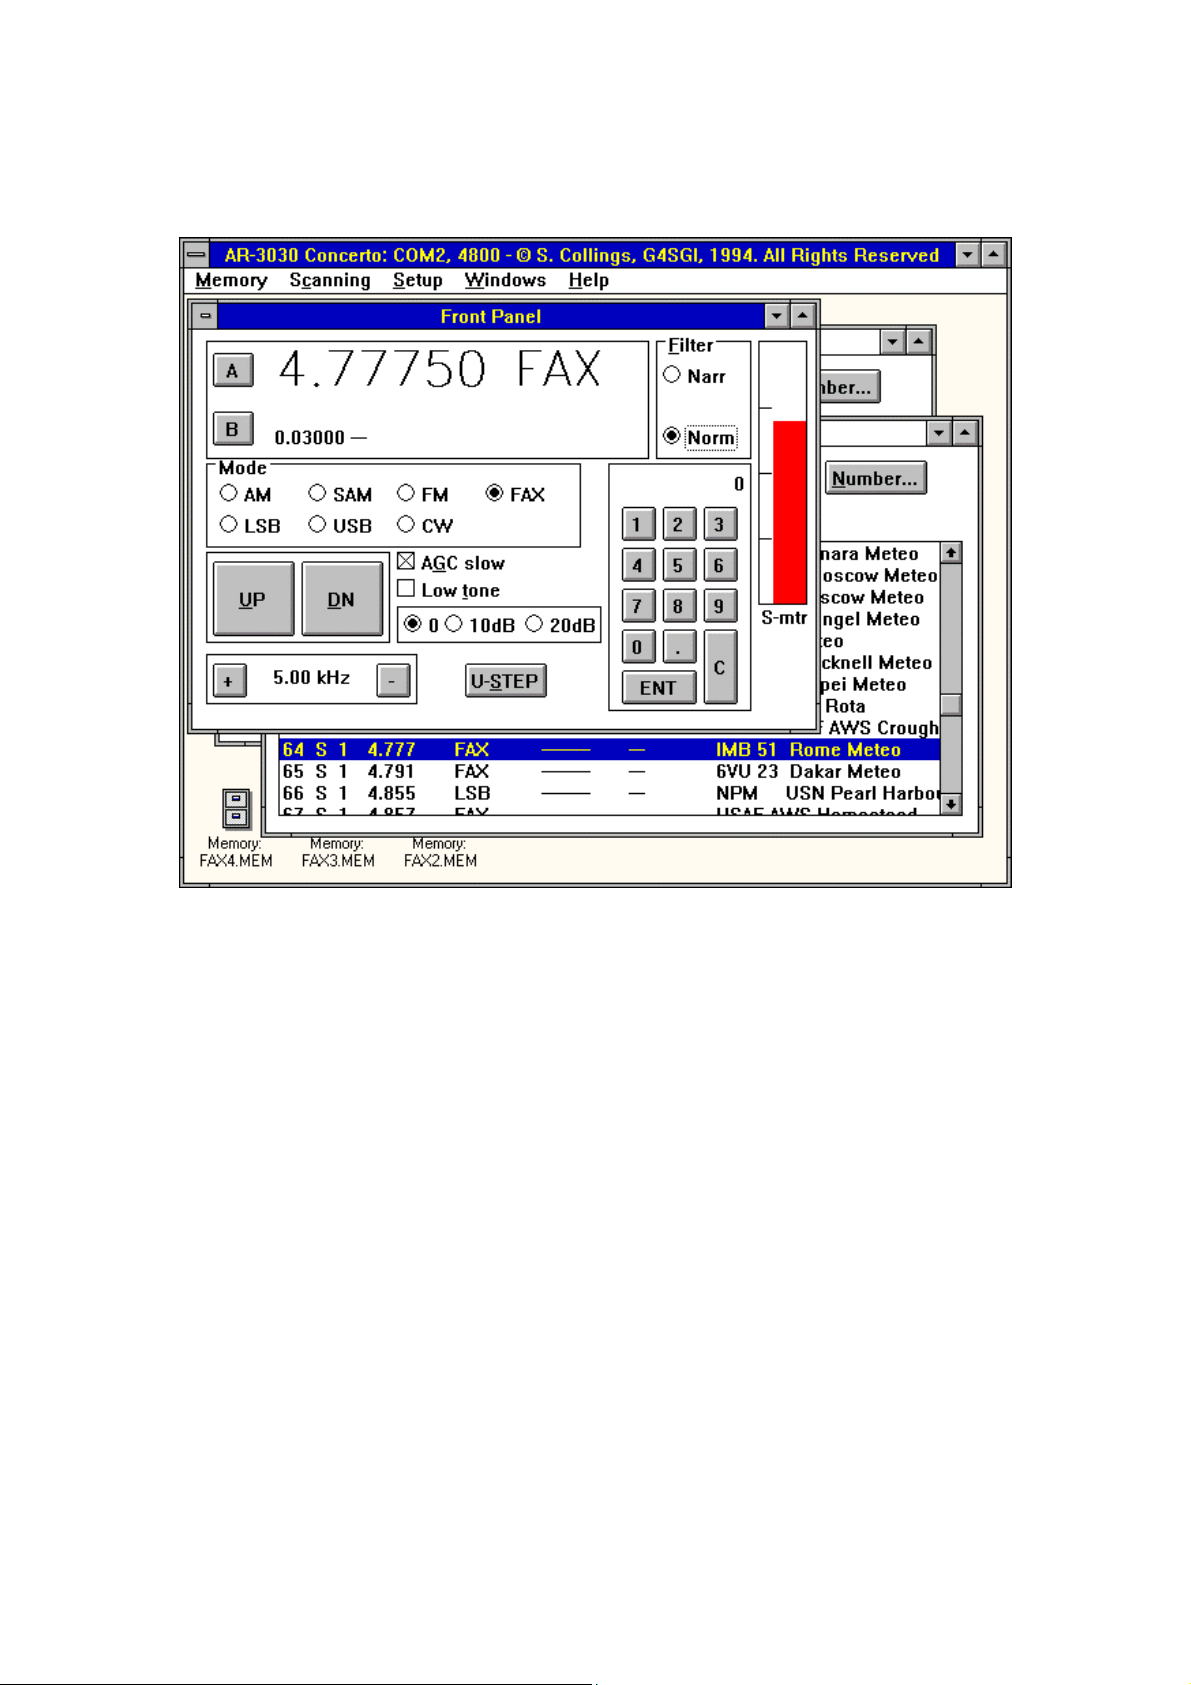
The Front Panel Window
Once you have &RQFHUWR running and properly configured, you can check that
your radio and computer are working correctly using the front panel window. This
_____________________________________________________________________
AR3030
&RQFHUWRUser’s Manual 11

GETTING STARTED
_____________________________________________________________________
contains a dual VFO display and controls for tuning the radio. The front panel
window looks like:
There are two VFOs (stored by
S-meter display. Various controls are provided by the front panel window for
operating your
you click on a control. Try selecting a new mode by clicking on one of the buttons
shown inside the box below the frequency display (eg click on USB to select upper
sideband).
To tune the radio to a specific frequency, click the numeric push buttons on the
keypad in the bottom right corner of the window (C clears and ENT is enter). The
mode can be selected using the group of eight buttons located in the box below the
frequency display (just click on the mode you want so that there is a dot inside the
circle).
AR3030
remotely. RS-232 commands are sent to the radio whenever
AR3030
&RQFHUWR , not by the radio) and an
Example: To tune to 0.198 MHz AM
Click on 0, ., 1, 9, 8, ENT and select the correct mode by clicking on the AM
mode button with your mouse
If the front panel window is focused (highlighted) it will also respond to
keyboard commands.
Example: To tune to 21.745 MHz
Press <2>, <1>, <.>, <7>, <4>, <5>, <ENTER>. You can select the
mode using your mouse or the function keys: <F1>=AM, <F2>=SAM, <F3>=FM,
<F4>=FAX, <F5>=LSB, <F6>=USB, <F7>=CW
Front Panel functions
Step Tuning
_____________________________________________________________________
AR3030
&RQFHUWRUser’s Manual 12

GETTING STARTED
_____________________________________________________________________
You can tune up or down in steps using the UP and DN push buttons,
alternatively press the <U> or <D> keys. The current step size is
shown in the box in the bottom left hand corner of the window.
Tuning Step Size
To alter the tuning step size, click on the + and - push buttons or press
the <+> and <-> keys.
User Step Size
If none of the step sizes already provided are suitable, you can enter
your own using the U-Step push button (press the <S> key).
Type in the step size you want (in kHz) and click on OK.
Example: To enter a user step size of 6.25 kHz
Type "6.25 <ENTER>" and click on OK.
AGC Speed
To adjust the AGC speed, click on the AGC Slow check box or toggle
the speed by pressing the <G> key.
Low Tone
Low tone can be selected using this check box or toggled using the
<T> key.
Attenuator
You can select the level of RF attenuation using the three buttons
marked 0dB, 10dB or 20dB. Alternatively, you can cycle through the
three settings using the <#> key.
_____________________________________________________________________
AR3030
&RQFHUWRUser’s Manual 13

GETTING STARTED
_____________________________________________________________________
Normal/Narrow Filter Selection
To select the normal or narrow IF filter, click on the buttons in the top
right corner of the window. You can toggle between them using the
<F> key.
Obtaining Help
There is extensive help information available at all times throughout
&RQFHUWR. There is a help push button in most dialogs which gives you full context
sensitive help, or you can get help from the menu along the top of the
&RQFHUWR window.
NOTE: Specific help on using WindowsTM Help can be obtained by selecting
the Help|Using Help menu option from within
Once you are running WindowsTM Help, you can read instructions for each
feature of the program as you go along. A full list of the main features of
&RQFHUWR is available from the Help menu of the program. All you need to do is
select the option you need from the menu and read the contents of the help window
that appears.
The topics that are available from the Help menu are shown below:
AR3030
&RQFHUWR.
AR3030
AR3030
AR3030
The index contains a complete list of all the main help topics that are
available. You can obtain help on any of the topics listed by selecting them with the
mouse. Alternatively, you can list and search for information on topics using the
search facility of WindowsTM Help (by clicking on the Search push button once
WindowsTM Help is running).
You can also obtain information about individual
functions by highlighting them with the arrow keys and pressing <F1>.
_____________________________________________________________________
AR3030
AR3030
&RQFHUWRUser’s Manual 14
&RQFHUWR menu

GETTING STARTED
_____________________________________________________________________
Example: To find help on the Memory|Close Bank option
First select the Memory menu, then press <Up> and <Dn> to highlight the Close
bank option of the Memory menu...
...now press <F1> to obtain help on Memory|Close bank.
_____________________________________________________________________
AR3030
&RQFHUWRUser’s Manual 15

MEMORY MENU OPTIONS
_____________________________________________________________________
MEMORY MENU OPTIONS
Memory data is organised by
Each bank is stored on disk in a file and is displayed on-screen inside a window. Up
to ten banks can be loaded into the program at once; there is no limit to the number of
memory bank files that can be saved on disk (disk space permitting).
You can create a new (blank) bank using the Memory|New menu option.
To do this, click your mouse on the Memory menu (in the top left hand corner of the
AR3030
&RQFHUWR window). You should see the following Memory menu options:
AR3030
&RQFHUWR into banks of 100 channels.
Some of the menu items are "greyed" out if you do not have a memory bank
open (or if none are highlighted). This happens throughout
options are not available. When you have no banks open, only options that allow you
to create or load a memory bank are enabled because (for example) it does not make
sense to print a memory bank if there are none to print.
NOTE: Most Memory menu options only operate on focused (highlighted)
memory bank windows (eg when you select print,
focused memory bank window).
AR3030
AR3030
&RQFHUWR will print the
&RQFHUWR when
_____________________________________________________________________
AR3030
&RQFHUWRUser’s Manual 16

MEMORY MENU OPTIONS
_____________________________________________________________________
New Bank
To create a new (blank) memory bank, click on the New Bank menu
option. You will see a memory bank window appear on screen inside the main
AR3030
&RQFHUWR window. The whole program window will look similar to:
The lines inside the window indicate blank data. When you start adding
channel to the memory bank, memory channel data will be listed neatly inside the
memory window in the form of a table.
Load Bank
Choose this Memory menu option if you have a memory bank file on disk
which you want to load into
The following picture shows a memory bank window that has been loaded
into the program. Note that the name of the memory bank file is displayed in the
window's title bar. You can also see a row of six push buttons along the top of the
memory bank window. These provide you with the facilities you need to manipulate
memory channels in the window.
NOTE: Most of these push buttons only operate on a single memory channel
highlighted using the mouse. To highlight a channel, click on the required
channel then use the push button function.
AR3030
&RQFHUWR.
_____________________________________________________________________
AR3030
&RQFHUWRUser’s Manual 17

MEMORY MENU OPTIONS
_____________________________________________________________________
Store... Store the current VFO in the highlighted channel
Recall Transfer the highlighted memory channel to the VFO
Edit... Edit the highlighted memory channel data
Sort... Sort the entire list of memory data
Clear Blank the highlighted memory channel
Number... Give a channel a scan number
Memory Window functions
Storing a memory channel
First select a memory channel inside the memory bank window. Now
click on the Store... push button to open the following dialog:
The frequency, mode and other settings of the current VFOs are copied
automatically into the dialog, you just need to type in an optional
comment and click on the OK push button.
_____________________________________________________________________
AR3030
&RQFHUWRUser’s Manual 18

MEMORY MENU OPTIONS
_____________________________________________________________________
Recalling a memory channel
Select a memory channel (as above) and click on the Recall push
button to transfer the memory data to the VFO.
An alternative way to recall a memory channel is to double-click on the
line where it is listed in the memory bank window.
Editing a channel
Select a memory channel in the normal way (by single-clicking on the
required channel inside the memory bank window). Now click on the
Edit... push button to alter the data in the memory channel using
the following dialog:
All the data in the selected memory channel is copied into the dialog so
that you can edit it. Click on the OK push button to update the channel.
Sorting the memory bank
Use this push button to sort the memory channels listed in the memory
bank. You can choose between the frequency in VFO A, mode in VFO
A or by scan number. The following dialog allows you to do this:
_____________________________________________________________________
AR3030
&RQFHUWRUser’s Manual 19

MEMORY MENU OPTIONS
_____________________________________________________________________
Clearing a memory channel
You cannot recover memory data after it has been cleared!
You can clear a selected memory channel (blank it) using this push
button.
Selecting a scan number
When you scan memory channels, you can select only those channels
that have the same scan number (eg only channels having the scan
number 2 will be included in the scan). There are ten scan numbers so
that each memory bank lets you scan up to ten sets of channels
(labelled 0 - 9). You can select the scan number using the following
dialog:
Use the drop down list box to select the scan number you want. If you
select blank, the memory channel is not included in any scans.
Save Bank
You can save the focused (highlighted) memory bank to disk using this
option. However, if you have altered a memory bank and try to exit from
&RQFHUWR , you will be asked if you want to save the data first.
AR3030
Save Bank As
Use this memory menu option to save the focused (highlighted) memory
bank under a different name to that displayed on it's title bar.
NOTE: The file extension for the memory bank file must be ".MEM"!
A WindowsTM standard dialog is used to let you type in the new filename.
_____________________________________________________________________
AR3030
&RQFHUWRUser’s Manual 20

MEMORY MENU OPTIONS
_____________________________________________________________________
You can type in the name of the file you want in the File Name field of
the dialog.
Close Bank
This option closes the focused (highlighted) memory bank window. You
will need to use the Load Bank option to re-load the memory bank if you want to
continue to use the data.
Delete Bank File
You cannot recover memory bank data once it has been deleted from disk!
This option allows you to close the focused (highlighted) memory bank and
delete it's file from your hard disk.
Print Bank
Use this option to print a listing of the memory channels in the focused
(highlighted) memory bank.
A WindowsTM standard dialog is used to control printing:
_____________________________________________________________________
AR3030
&RQFHUWRUser’s Manual 21

MEMORY MENU OPTIONS
_____________________________________________________________________
Send to RX...
Existing data in the radio will be overwritten by this option!
This option sends memory data from the focused memory bank to your
radio. A simple progress dialog shows you how much of the memory data has been
sent so far.
All memory channels in the
This makes sure that unused memory channels are cleared.
THE TIMING OF RS-232 COMMANDS USED FOR TRANSFERRING
MEMORY DATA TO/FROM THE RADIO IS CRITICAL. IT IS VITAL
THAT NO OTHER PROGRAMS YOU MAY BE RUNNING INTERFERE
WITH THE TRANSFER OR DATA MAY BE LOST.
THE BEST WAY TO AVOID OTHER PROGRAMS INTERFERING WITH
DATA TRANSFER IS TO STOP THEM AND RUN
FOREGROUND.
You can adjust the timing delay used for memory transfers to/from the radio
using the dialog obtained from the Setup|Get/Send Delay... menu option
(see the Setup section of this manual).
AR3030
are erased before the data is sent.
AR3030
&RQFHUWR IN THE
Get from RX...
This menu option gets memory data from the
blank memory bank (created especially). The same caution concerning RS-232
timings while sending data to the radio also applies.
AR3030
and places it in a
Copy Bank to Clipboard
Data from the currently focused memory bank can be copied as text to
WindowsTM Clipboard where it can be transferred to other applications. Using this
option, it is possible to modify memory data in bulk using a text editor (eg WindowsTM
Notepad) then copy it back into Clipboard so that it can be transferred back to
AR3030
_____________________________________________________________________
&RQFHUWR .
AR3030
&RQFHUWRUser’s Manual 22

MEMORY MENU OPTIONS
_____________________________________________________________________
NOTE: Read the section called MEMORY DATA IN WINDOWSTM
CLIPBOARD for a description of the text format used when copying to/from
Clipboard.
Copy Bank from Clipboard
This memory menu option allows you to copy data back from WindowsTM
Clipboard into the currently focused memory bank. This facility complements
copying to Clipboard.
Any occupied memory channels in the focused memory bank will be
overwritten if they are also occupied in the Clipboard data. Create a new (blank)
memory bank using the Memory|New menu option to copy memory bank data
without overwriting any existing memory channels.
NOTE: Read the section called MEMORY DATA IN WINDOWSTM
CLIPBOARD for a description of the text format used when copying to/from
Clipboard.
Exit
This option allows you to exit from
double-click on the system menu bar of the main program window.
AR3030
&RQFHUWR, you can also
_____________________________________________________________________
AR3030
&RQFHUWRUser’s Manual 23

SCANNING MENU OPTIONS
_____________________________________________________________________
SCANNING MENU OPTIONS
The Scanning menu options allow you to scan memory channels and to
create a spectrum analysis display by scanning continuously between two frequency
limits. The options provided are:
Begin Scan
This menu option allows you to begin a memory scan using channels from
the current focused (highlighted) memory bank. You select the scan number using
one of the “number” sub-menu options.
When scanning, the main menu along the top of the
window changes so that scanning options are displayed. You will see a display like:
AR3030
&RQFHUWR
As each channel is scanned, the highlight bar moves onto it so that you
know what the station is on the channel. You can pause or stop the memory scan
using the menu options on the main window. You can adjust the amount of time
spent on each channel using the scan dwell menu option which is also available from
the Scanning menu (see below for details).
_____________________________________________________________________
AR3030
&RQFHUWRUser’s Manual 24

SCANNING MENU OPTIONS
_____________________________________________________________________
Scan Dwell
You can adjust the amount of time spent on each channel while scanning
using the following dialog to adjust the dwell time. The value is milliseconds in the
box next to the scroll bar.
Spectrum Analysis
You can obtain a graphical display of signals in a portion of the radio
spectrum using this Scanning menu option. A spectrum analysis window is opened
when you select Scanning|Spectrum Analysis. Click on the Setup push
button to obtain the following dialog:
Type in the centre frequency you require, select a step size and mode, then
click on OK to start scanning to produce a spectrum display. The range of the
spectrum analysis is determined by the step size you choose (there are always 400
steps).
NOTE: Open the radio's squelch fully (by rotating the squelch control fully
anti-clockwise) for best results.
The signal level detected at each step is displayed in the form of a graph as
the radio scans. The range of frequencies is determined by the centre frequency and
step size you chose.
You can click on the display to measure frequencies precisely while
scanning is in progress, or you can tune the radio using the cursor once you have
stopped scanning. The following push buttons are provided:
Abort Exit from spectrum analysis and restore the VFO
_____________________________________________________________________
AR3030
&RQFHUWRUser’s Manual 25

SCANNING MENU OPTIONS
_____________________________________________________________________
Exit Exit from spectrum analysis and copy the last scanned
frequency to the VFO
Setup... Alter the spectrum analysis' parameters
Print... Print the spectrum display
Pause... Pause scanning
Stop Stop scanning but keep the spectrum analysis window
_____________________________________________________________________
AR3030
&RQFHUWRUser’s Manual 26

SETUP MENU OPTIONS
_____________________________________________________________________
SETUP MENU OPTIONS
The Setup menu options allow you to configure
it runs correctly with your hardware. The two options that are provided are:
Communications
The communications options relate to the
your computer and have already been described in the GETTING STARTED section.
RS-232
Get/Send Delay
When
slowed down so that the radio can process commands properly.
uses WindowsTM timers to moderate the flow of commands between your computer
and radio. The following dialog, which allows you to alter the delay used for sending
and getting memory data, is opened when you select Setup|Delays...:
RS-232
communications take place with your radio, they must be
AR3030
serial port settings for
&RQFHUWR so that
AR3030
&RQFHUWR
The delay is the period of time between RS-232 commands used to transfer
data between the radio and computer and gives the radio time to process
requests or store data before new commands arrive.
You probably do not need to alter the default value that is provided. If you
have problems with frequencies being missed or data being corrupted during memory
transfer operations, try altering the delay setting.
You should try very small changes at first, usually by increasing the delays.
_____________________________________________________________________
AR3030
&RQFHUWRUser’s Manual 27

SETUP MENU OPTIONS
_____________________________________________________________________
The setting of this delay can be very sensitive. If you do need to change
it, you may need to experiment very carefully with a number of settings. Slowly
alter the control in very small steps until the problem goes away.
If you want to restore the current default value before closing the dialog,
click on the Default push button.
_____________________________________________________________________
AR3030
&RQFHUWRUser’s Manual 28

WINDOWS MENU OPTIONS
_____________________________________________________________________
WINDOWS MENU OPTIONS
This menu option lets you arrange the windows you have open within
AR3030
because a list of the windows you have open is included:
In the picture above, there are two windows open: the front panel and a
memory bank.
The 9 mark indicates which window is currently focused (highlighted). If
you want to bring a window to the top of the display, you just need to click it's name
in the list to move the 9 mark. This is useful for uncovering a window that has
become obscured so it can be seen again.
&RQFHUWR and helps you tidy up icons. The Windows menu options vary
Arrange Icons
You can minimise some of the windows used by
reducing them to an icon. This helps if you have several windows open at once.
If you want to tidy up these icons and arrange them into a neat row along
the bottom of the main window, use select the Arrange Icons menu option.
AR3030
&RQFHUWR by
_____________________________________________________________________
AR3030
&RQFHUWRUser’s Manual 29

MEMORY DATA IN WINDOWS CLIPBOARD
_____________________________________________________________________
MEMORY DATA IN
WINDOWS
TM
CLIPBOARD
Data from a memory bank window can be copied to, or from, WindowsTM
Clipboard as text. This allows you to edit a memory bank in bulk using a text editor
(such as WindowsTM Notepad).
A memory bank contains lines of text describing all 100 memory channels
inside a memory window (with a new line character, <CR>, at the end); each line
contains the following fields:
Channel, Attenuator, AGC, Filter, Tone, Scan no., Frequency A, Mode A, Frequency B,
Mode B, Comment
Where each field is defined as follows:
Channel: A two-digit number representing the memory channel number
(00-99)
Attenuator: 0=none, 1=10dB, 2=20dB
AGC Speed: 0=fast, 1=slow
Filter: 0=wide, 1=narrow
Tone: 0=high, 1=low
Scan no.: A digit in the range 0 - 9
Freq A: The frequency of VFO A in MHz
Mode A: One of the following: "AM", "SAM", "USB", "LSB", "CW",
"FM" or "FAX"
Freq B: The frequency of VFO B in MHz
Mode B: The mode of VFO B (options as for VFO A)
Comment: A comment associated with the memory channel
You must ensure that the data in Clipboard conforms to the format shown
above after you have edited it with
back. You will be given an error message if
correctly.
Example
00,1,0,1,1,0,0.198, AM,---------,---,BBC Radio 4
01,0,0,0,0,1,2.182,USB,---------,---,Marine
02,0,0,1,0,1,4.722,USB,11.200,USB,Royal Air Force Volmet
03,0,1,0,0,1,4.782,FAX,2.618,FAX,Bracknell Meteo
04,0,0,0,1,1,5.649,USB,---------,---,Shanwick
05,0,0,0,0,2,5.955, AM,9.650, AM,Radio Netherlands
_____________________________________________________________________
Windows
TM
Notepad
AR3030
AR3030
and you are copying it
&RQFHUWR cannot interpret it
&RQFHUWRUser’s Manual 30

MOVING COPY PROTECTION
_____________________________________________________________________
MOVING COPY PROTECTION
A simple utility has been provided so you can move the copy protection
“token” that is installed by the software back onto the distribution floppy disk or
between hard disks.
You may need to move the copy protection token back onto you original
distribution disk in the following circumstances:
When installing disk compression software.
)
When upgrading
)
When moving the program to a new computer.
)
When returning the original disk to your AOR distributor (for updates
)
etc.)
To transfer the token onto the distribution floppy disk, run the Copy Protection
Move utility by double-clicking on its icon in the
AR3030
&RQFHUWR.
AR3030
&RQFHUWR group:
When you have done this, the following window is displayed:
To transfer the token onto the distribution floppy disk, click on the Move to
master floppy... push button. If the token is already on the floppy disk, you
can transfer it to hard disk using the Move from master floppy... push
button. You can use this utility to have copies of the program on several computers at
once, however the program will only work on the machine that has the copy
protection token on it. You will not be able to copy the distribution disk itself.
This AOR software product comes with a single license. Contact your AOR
dealer to obtain additional copies of the software.
_____________________________________________________________________
AR3030
&RQFHUWRUser’s Manual 31
 Loading...