

Page 1

Copyright
© Copyright 2003 . All rights reserved. No part of this publication may be reproduced, transmitted,
transcribed, stored in a retrieval system, or translated into any language or computer language, in
any form or by any means, electronic, mechanical, magnetic, optical, chemical, manual or
otherwise, without the prior written permission of our company. All brand and product names are
trademarks and/or registered trademarks of their respective holders.
Disclaimer
We make no representations or warranties, either expressed or implied, with respect to the
contents hereof and specifically disclaims any warranties, merchantability or fitness for any
particular purpose. Any software described in this manual is sold or licensed “as is”. Should the
programs prove defective following their purchase, the buyer (and not our company., its
distributor, or its dealer) assumes the entire cost of all necessary servicing, repair, and any
incidental or consequential damages resulting from any defect in the software. Further, we
reserve the right to revise this publication and to make changes from time to time in the contents
hereof without obligation to notify any person of such revision or changes.
Federal Communications Commission (FCC) Statement
This equipment has been tested and found to comply with the limits for a class B device, pursuant
to part 15 of the FCC rules. These limits are designed to provide reasonable protection against
harmful interference in residential installation. This equipment generates, uses, and can radiate
radio frequency energy and, if not installed and used in accordance with the instructions may
cause harmful interference to radio communications. However, there is no guarantee that
interference will not occur in a particular installation. If this equipment does cause harmful
interference to radio or television reception, which can be determined by turning equipment off
and on, the user is encouraged to try to correct the interference by one or more of the following
measures:
y Reorient or relocate the receiving antenna.
y Increase the separation between the equipment and receiver.
y Connect the equipment into an outlet on a circuit different from that to which the
receiver is connected.
y Consult the dealer or an experienced radio / TV technician help.
FCC Warning
Changes or modification not expressly approved by the party responsible for compliance could
void the user’s authority to operate the equipment.
CLASS 1 LASER PRODUCT
APPAREIL A LASER DE CLASSE 1
LASER KLASSE 1
LOUKAN 1 LASERLAITE
PRODUIT LASER
CATEGORIE 1
Page 2

Table of Contents
1. Use Precautions................................................................1
1.1. Warning for Safety..........................................................................1
1.2. Warning as to Use..........................................................................5
2. Introduction.......................................................................6
2.1. Overview ........................................................................................6
2.2. Features .........................................................................................7
2.3. Format Compatibility.......................................................................8
2.4. Type of Writing ...............................................................................9
Disc-At-Once........................................................................................... 9
Track-At-Once......................................................................................... 9
Session-At-Once .....................................................................................9
Multi-session ...........................................................................................9
Packet Write............................................................................................ 9
3. Hardware Installation .....................................................10
3.1. System Requirements ..................................................................10
3.2. Hardware Instruction ....................................................................11
3.2.1 Front Panel (1) ............................................................................. 11
3.2.2 Front Panel (2) ............................................................................. 11
3.3. Installing the DVD+RW/+R drive ..................................................16
Required Tools ......................................................................................16
Installation Procedure ...........................................................................16
3.4. Supported CD-R, CD-RW and DVD+RW/+R Discs......................21
Supported Discs.................................................................................... 21
The handling of CD-R, CD-RW and DVD+RW/+R Discs...................... 21
4. Software Installation.......................................................22
4.1. Before You Start...........................................................................22
4.2. Installing Software ........................................................................22
5. Technical Support ..........................................................23
5.1. Troubleshooting............................................................................23
Appendix A. Glossary ...................................................................26
Appendix B. Frequently Asked Question (FAQ) ........................29
Page 3

Appendix C. Specification ............................................................31
Page 4
Use Precautions English
1. Use Precautions
These precautions explain how to use the device correctly and safely, thereby
preventing injury to yourself or to others. This section relates to your personal safety,
and also helps you minimize the risk of damaging the device. Please read carefully
before proceeding.
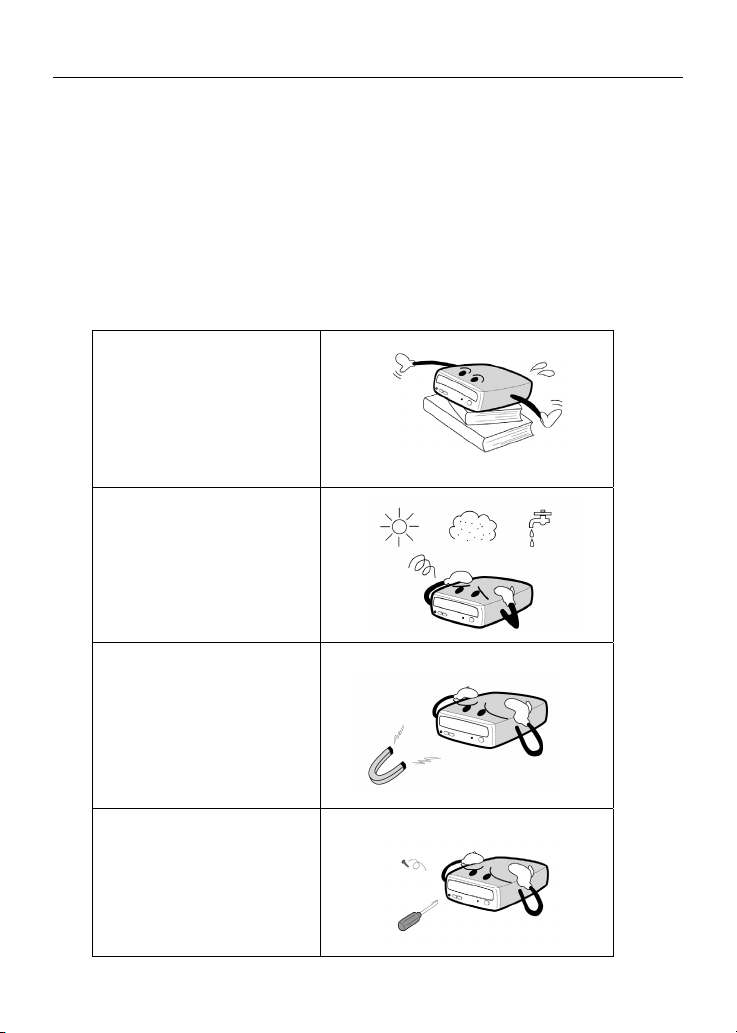
1.1. Warning for Safety
When you use this DVD+RW/+R, please pay heed to the following
At the time of installation:
As suggested in your
specifications please do not
install in an unstable
position or in one that
vibrates.
Do not install in high humidity,
direct sunlight, or damp
conditions.
Do not use near magnetic
fields, or place near a television
or a radio signal as the
performance of the device may
be affected.
Do not open to try to repair
as the laser may be harmful.
-- E-1 --
Page 5

Use Precautions English
y Read these instructions carefully. Save these instructions for future reference.
y Follow all warnings and instructions marked on the product.
y Do not use this product near water.
y This product should be operated from the type of power indicated on the
marking label. If you are not sure of the type of power available, consult your
dealer or local power company.
y This product is equipped with a 3-wire grounding-type plug, a plug having a
third (grounding) pin. This plug will only fit into a grounding-type power outlet.
This is a safety feature. If you are unable to insert the plug into the outlet,
contact your electrician to replace your obsolete outlet. Do not defeat the
purpose of the grounding-type plug.
y Never push objects of any kind into this product through cabinet slots as they
may touch dangerous voltage points or short out parts that could result in a fire
or electric shock. Never spill liquid of any kind on the product.
y Do not attempt to service this product yourself, as opening or removing covers
may expose you to dangerous voltage points or other risks. Refer all servicing
to qualified service personnel.
y Do not move from a cool environment to a warm one, as this will abruptly
change the temperature of the device
y When moving the device, remove any disc from the device because any harm
caused to the disc may result in data loss.
y Prevent liquids or metals from entering the device. If this situation should occur
please contact your reseller for advice.
y Do not use any evaporating solvents to clean the device. If a spray solvent
does happen to spray on the device please use a cloth to wipe it clean, or use a
neutral cleaner to dilute the solvent and wipe the device clean.
y When the device is reading/writing please do not interrupt power supply.
y Do not place damaged discs inside the device. In the winter do not use discs
brought in from outside immediately but wait until they have reached room
temperature.
y Unplug this product from the wall outlet and refer servicing to qualified service
personnel under the following conditions:
a. When the power cord or plug is damaged or frayed
b. If liquid has been spilled into the product
c. If the product has been exposed to rain or water
d. If the product does not operate normally when the operating
instructions are followed. Adjust only those controls that are
covered by the operating instructions since improper adjustment of
other controls may result in damage and will often require
extensive work by a qualified technician to restore the product to
-- E-2 --
Page 6
Use Precautions English
normal condition.
e. If the product has been dropped or the cabinet has been damaged
f. If the product exhibits a distinct change in performance, indicating
a need for service.
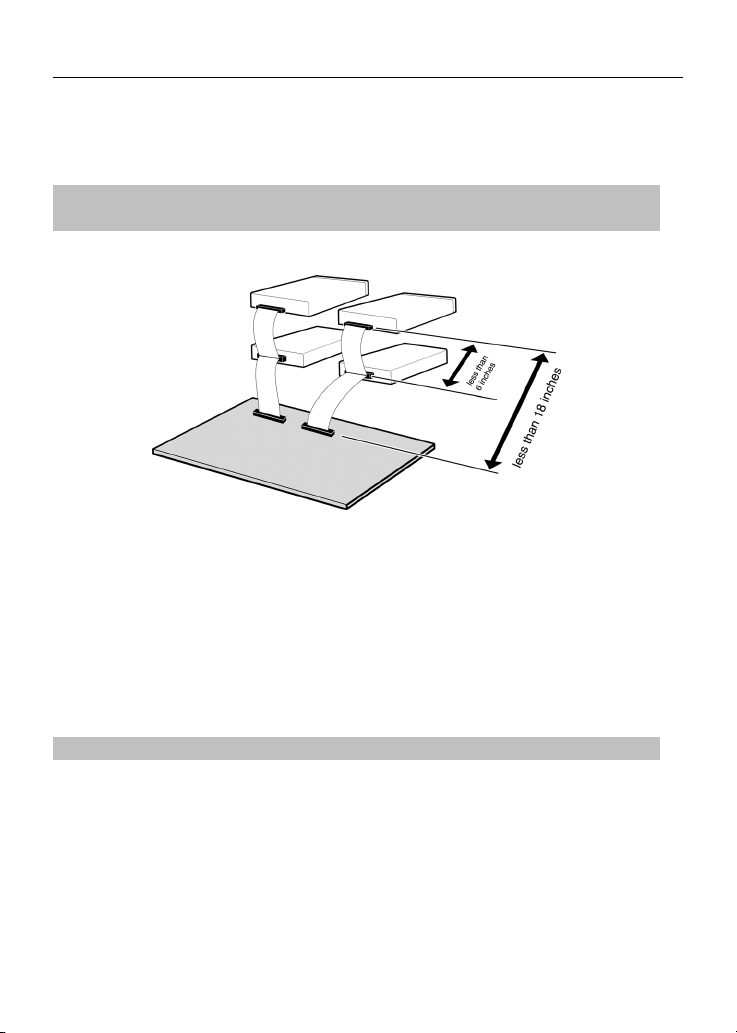
When installing the IDE device please pay attention to these
following details:
y Keep the IDE cable within 6 inches in length (15 cm).
y Before connecting the IDE cable, please make sure the power supply is off.
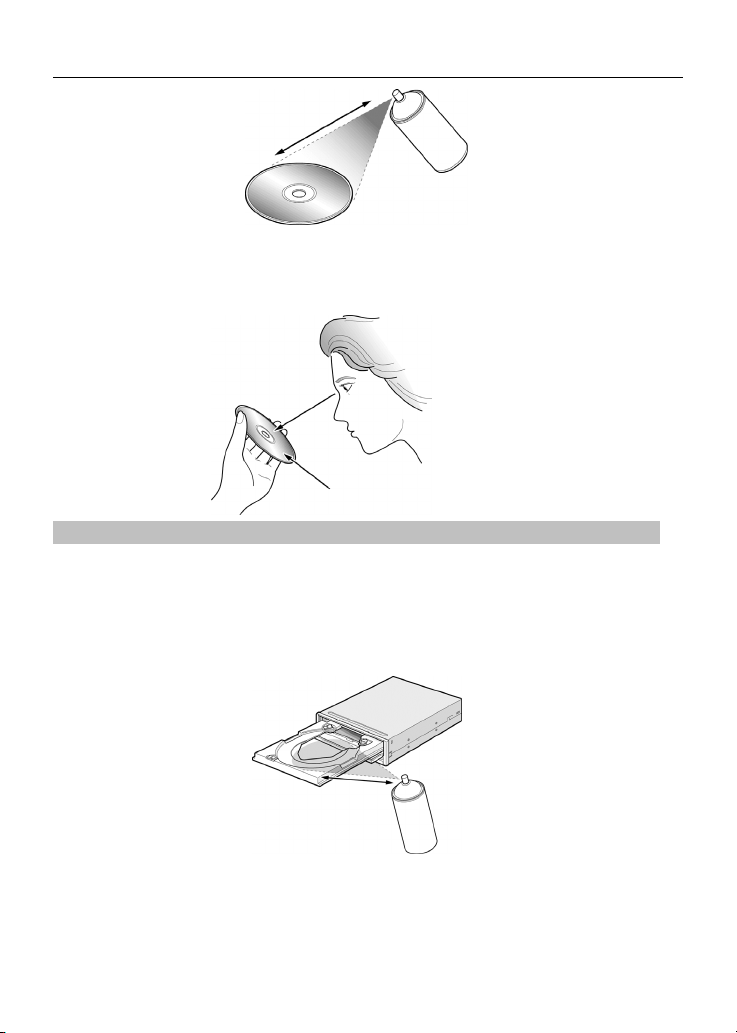
When cleaning CD / DVD disc, please note:
y Press the eject button to remove the disc
y Use compressed air to rid dust from the disc (spray with compressed air for
about five seconds)
-- E-3 --
Page 7
Use Precautions English
y When checking for dust, please make sure that your hands do not touch the
surface of the disc.
Other points to pay attention to:
When moving the drive, please make sure that the disc has already been ejected.
y If you have not used the drive for some time, there will be dust collected on the
cover and in the tray. Before using the drive spray with compressed air to clean
it of dust.
y Before connecting all cables and wires, please make sure the power supply is
off otherwise this may cause a short circuit.
-- E-4 --
Page 8

Use Precautions English
1.2. Warning as to Use
This DVD+RW/+R drive together with software is a product for utilizing DVD+RW/+R
recording media with rewriting, erasing and readout capabilities, as an external
computer memory device. Except in the case where copying of
CD-ROMs/DVD-ROMs or the like is especially recognized under the copyrights laws
as being for the purpose of individual use by the customer or the like, or in the case
where the customer has obtained permission to make copies from the right holder,
reproduction of CD-ROMs/DVD-ROMs and copyright laws. Take notice that
unauthorized copying may be subject to claims for damages and to penalties.
INVISIBLE / VISIBLE RADIATION
DANGER
WHEN OPEN. AVOID EXPOSURE TO
BEAM.
-- E-5 --
Page 9

Introduction English
2. Introduction
2.1. Overview
Thank you for purchasing our DVD+RW/+R drive. In this manual, we will explain how to
install your DVD+RW/+R drive correctly. Please read this manual carefully before using
the drive.
High Speed
This DVD+RW/+R drive offers unprecedented performance to handle today’s
demands by reading DVD’s at up to 8x speed and writing DVD+RW discs at super 4x
speed. This product writes a 4.7 GB disc in about 20 minutes. Beside, this product
writes CD-R or CD-RW discs at fast 24x / 10x speed. To read CD’s up to 40x speed.
Just Link
Just Link is a new technology developed independently by Ricoh that automatically
prevents buffer under-run errors by predicting them before they happen. This
DVD+RW/+R features Just Link technology to enable stable writing in the following
situations where buffer under-run errors may otherwise occur in a conventional drive.
y With high-speed writing,
y When some other operation is being performed on the computer during writing,
y When writing DVD+RW/+R/CD-R/CD-RW discs from a DVD-ROM/CD-ROM
drive,
y When writing directly via network.
High Reliability
An improved anti-heat design and the OPC design boost recording reliability.
Optimum Power Control continually monitors signal levels during recording and
adjusts laser power to compensate for a dirty disc. This feature ensures a flat signal,
significantly enhancing reliability.
High Compatibility
This product supports all major CD / DVD formats, offering full backward-compatibility
through the huge installed base of CD-ROM/DVD-ROM drives and media. What’s
more, reordered DVD+RW/+R media can be played in a DVD player with multi-read
feature, maintaining future compatibility.
-- E-6 --
Page 10

Introduction English
2.2. Features
y E-IDE interface meets requirements of ATAPI Version 2.6
y Completely sealed door construction provides high reliability
y JustLink has made auto-avoidance against buffer under run errors possible
y Can read not only CD-R, CD-RW and DVD+RW discs, but also video CDs,
music CDs, photo CDs, and CD-Text
y Can read CD data at 40x speed (6.0MB/sec data transfer rate), write data at
24x speed (CD-R, 3.6MB/sec data transfer rate.), re-write data at 10x speed
(High Speed CD-RW, 1.5MB/sec data transfer rate) *1, and write data at 4x
speed (DVD+RW/+R, 5.52MB/sec data transfer rate).
y Excellent media compatibility: The firmware of DVD+RW/+R drive has tuned up
to the 99% compatibility.
y Support random write UDF in DVD+RW
y Legacy DVD-ROM and DVD Player can play DVD+RW/+R disc
y An improved anti-heat design means that no cooling fan is needed.
y Compliant with Orange Book Part II (CD-R) and Part III, Volume 2 V1.0
(CD-RW)
y Supports random UDF for easy writing to CD-R/RW discs
y Emergency disk unload
y Back panel included analog audio output and digital audio output
*1 The speed at which to write on the current standard CD-RW disks is 4x recording
(at a data transfer rate of 600KB/second).
-- E-7 --
Page 11
Hardware Installaiton English
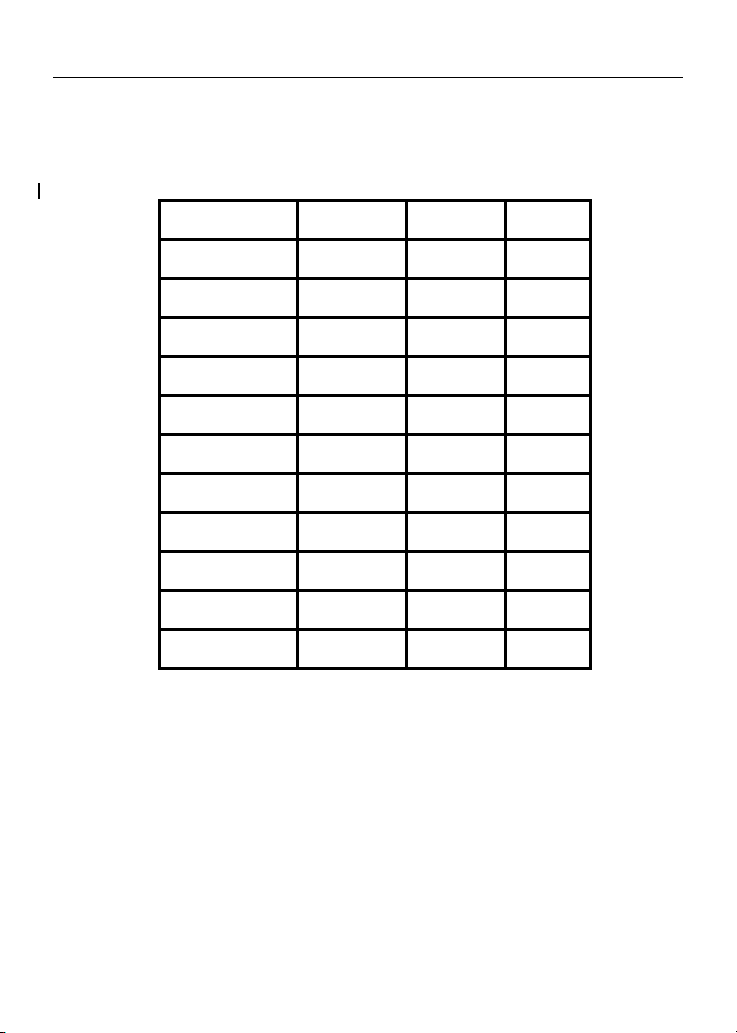
2.3. Format Compatibility
This DVD+RW/+R drive is compatible with the following formats:
”Read” means Data Transfer; “Play” means Audio Play back.
FORMAT Write Read Play*1
CD-DA
CD-ROM
CD-Extra
CD-ROM XA
Photo CD*2
CD-I*2
CD-G
CD-Text
DVD+RW/+R
DVD-ROM*3
DVD-Video
*1 Play means audio play back. Read means data transfer.
*2 CD-I, Photo-CD requires special reader/player. Photo-CD writing
requires Kodak license.
*3 Theoretically allows if disc being read is compatible with DVD-ROM
Not recommended and unwarranted by us be recorded onto a disk, it is
called “Disc-At-Once”.
9
9
9
9
9
9
9
9
9
9
9
9
9
9
9
9
9
9
9
9
9
-- E-8 --
Page 12

Hardware Installaiton English
2.4. Type of Writing
Disc-At-Once
When only a single recording session (lead in/data/lead out) is to be recorded onto a
disk, it is called “Disc-At-Once”.
When using Disc-At-Once, no additional data can be recorded onto the disc, even if
there is available capacity.
The advantage of this method recording is that it enables creation of discs that can be
played back on almost any CD player or CD-ROM drive, because there are no links
inserted between the data tracks.
Track-At-Once
When many sessions are to be recorded onto a disc, it is called “Track-At-Once”. If
there is space available on the disc, additional data can be recorded onto it.
The advantages of this method include being able to record additional sessions onto
a disc, and using a CD-ROM of backup data. (Refer to “Multi-session”.)
Session-At-Once
A "Session-at-Once" recording almost corresponds to a "Disc-at-Once recording", i.e.
all data ("Lead-in", data area and "Lead-out" are written in one go.
The only difference is that the CD is not "finished", i.e. after a "Session-at-Once"
recording you still have the possibility to write a further "Session" on the CD at a later
date.
Multi-session
The recording of lead-in/data/lead-out is referred to as one session. The
Disc-At-Once method is also referred to as “Single Session”, because the disc is only
recorded once. A disc that has had multiple additional session recorded onto it using
the Track-At-Once method is called “Multi-session”.
Packet Write
The Packet Write recording method was developed. It differs from Track-At-Once or
Disc-At-Once in that data is recorded in small fixed sectors of 64k bytes, known as
packets.
The advantages of this method are elimination in overhead per session and the
elimination of buffer under run errors. This method, however, cannot be utilized for
audio data. A number of formats, such as UDF and CD-R FS, can be used when
recording using the Packet Write method.
-- E-9 --
Page 13

Hardware Installaiton English
3. Hardware Installation
The installation of this product is fast and easy. Please follow these instructions
described below:
3.1. System Requirements
A PC system with the following features is highly recommended for ensuring a stable
DVD+RW/+R performance.
System
requirements
Interface Compatible with Enhanced IDE, and Blank Primary
Hard disc Average saving time is 19ms or lower, max data transfer
Voltage +12V or +5V voltage switches
*CD-RW discs: perhaps are unable to be read in the CD-ROM. If this situation
comes about it is likely that your CD-ROM is not compatible with multi-read please
change to a Multi-read compatible CD-ROM or use your DVD+RW/+R.
*All Multi-read CD-ROM devices have the following features
(1) CD-ROM is able to read data created by optical heads
(2) CD-ROM will support the UDF specification (Packet Writing)
CPU We suggest using a Pentium !!! 850MHz
Memory 128MB or above
Operating
systems
Slave, Secondary Master, and Secondary Slave
speed is 33.3MB/sec; disc space 500MB or over
or above (JustLink in use)
Windows 98, Windows 2000, XP
Windows Me, NT WS4.0 SP5 or above
-- E-10 --
Page 14

Hardware Installaiton English
3.2. Hardware Instruction
3.2.1 Front Panel (1)
1. Disc Tray
2. Indicator
3. Eject Button
4. Emergency Eject Hole
3.2.2 Front Panel (2)
-- E-11 --
Page 15

Hardware Installaiton English
1. Disc Tray
2. Earphone Plug
3. Volume Control Dial
4. Indicator
5. Emergency Eject Hole
6. Eject Button
7. Play/Skip Button
Don’t use force to pull out or push in the disc tray. This might cause
damage to the loading section of the drive.
Name Features
Disc Tray This tray is for loading the CD disc. It will
Earphone Plug Please connect your earphones or small
Volume Control Dial This controls the sound for the earphones but
Indicator When a disc has been ejected or is being
Emergency Eject Hole When the power supply has been interrupted or
accept 120mm and 80mm discs. Please place
the disc in the exact center of the tray
speakers to the earphone plug
has no control over the output of the sound
card volume
saved the display light will shine. When a disc
is being burnt, or a disc cannot be saved the
display light will go out. When a disc is unable
to be read, or the device is being repaired the
display light will flash.
it is impossible to eject a disc please use a pin
to press the emergency eject hole so that the
tray will eject the disc.
Eject Button Pressing this controls the insertion and ejection
of the tray.
Play/Skip Button This button has two functions. If the drive is
idle, pressing this button will start playing an
audio disc (if one is currently loaded in the
drive) from the first track. While in the PLAY
mode. Pressing this button lets you skip to the
next track on the disc.
-- E-12 --
Page 16

Hardware Installaiton English
Emergency Eject Hole
This function is only for emergency case. Do not use this
function in usual case to prevent from mechanical damage.
-- E-13 --
Page 17

Hardware Installaiton English
Rear Panel
1. Audio Output Connector
2. Device Configuration Jumper
3. IDE Connector
4. Power Connector
Name Features
Audio Output
Connector
Device
Configuration
Jumper
E-IDE Connector Use a two-headed 40pin IDE CD Recorder
Power Connector Connect DC 5V/12V to the power connector
Be careful not to reverse the power connector when attaching it. A
reversed connection may cause damage to the equipment (not
covered by the warranty)
Is able to be connected to a sound card audio
input and can use a sound card to listen to a CD
music
Used when selecting the device configuration of
E-IDE. Don’t use jumpers to change anything
besides the device configuration. Configuration
changes become valid after power is turned off,
then on again. The device configuration jumper
will be set to Master as factory default setting
connector and an IDE connector head. Before
connecting please switch off the power supply
Connecting or disconnecting E-IDE connectors while power is on
may result in a short circuit, causing damage to the equipment.
When connecting or disconnecting connectors, make sure to turn off
the power beforehand.
-- E-14 --
Page 18

Hardware Installaiton English
There is another very important thing to take care of before the installation of the
DVD+RW/+R drive is setting the master/slave jumpers. Please examine the panel
at the rear of the machine in order to set the master/slave jumpers.
SLAVE
MASTER
USE CSEL
Please do not use USE
CSEL setting
-- E-15 --
Page 19

Hardware Installaiton English
Before plugging in the jumpers please make sure you have switched
off the power supply of both the DVD+RW/+R and the computer.
Please make sure the jumpers are inserted as displayed in the
diagram otherwise you may cause irreparable damage to your
DVD+RW/+R device
Note: Installing jumper pins besides the ones for device configuration
settings may be the cause of damage or abnormal drive operation.
3.3. Installing the DVD+RW/+R drive
Power off your computer and all peripheral devices. Unplug the computer’s power
cord from wall outlet or from the power strip.
Required Tools
y A medium-size screwdriver
y A long-nosed pliers
y Your computer system or motherboard manual (to locate your computer
system’s IDE controller).
Installation Procedure
The discharge of static electricity can damage electronic circuitry. You can
avoid static discharge by touching a grounded metal object, like your
computer case, before and during installation of hardware inside your
computer.
-- E-16 --
Page 20

Hardware Installaiton English
1. Remove the housing or casing of your computer. Be careful of any sharp edges,
which might be hidden inside your computer.
2. If there is not any other CD-ROM drive installed in your system.
We recommend installing the DVD+RW/+R in the Secondary IDE port. It is
unnecessary to adjust any other jumpers on the DVD+RW/+R. Proceed to step 4
for further installation.
3. If a CD-ROM drive is already installed in your system.
We recommend that you install the CD-ROM on the Secondary IDE
channel as the master device (MA), and the DVD+RW/+R on the
Secondary IDE channel as the slave device (SL). Please follow the steps
below to fulfill this arrangement.
y First make sure that your Secondary IDE cable has two ports available for two
y IDE devices. If not, ask your main board vendor or purchase one from computer
hardware stores.
y If the CD-ROM drive was installed in the Primary IDE channel, disconnect it
from the Primary IDE cable.
y Adjust the Device Configuration Jumper of the CD-ROM drive to “Master” (MA)
position.
y Adjust the Device Configuration Jumper of the DVD+RW/+R to “Slave” (SL)
position.
-- E-17 --
Page 21

Hardware Installaiton English
4. First remove the 5.25-inch panel. Further detail of how to remove this can be
found in your computer manual.
5. Place the DVD+RW/+R into the slot. Do not force it in any further than need be
due to the connector cables.
6. Use four
provided screws (size: M3x0.5x4mm) to secure the drive into the half-height bay.
The screws electronically ground the drive.
This DVD+RW/+R drive must be horizontally installed and operated.
-- E-18 --
Page 22

Hardware Installaiton English
7. Locate your computer’s power supply and find an unused power cable connector.
If you do not have an available power connector, you’ll need to purchase a
Y-power cable splitter that expands one power connector into two. You may
purchase it from your local vendor.
8. From your main board, find out the 40-pin Secondary IDE interface cable. Then
connect them to your DVD+RW/+R. And attach the audio cable if necessary. If
you had another CD-ROM drive with audio cable attached, it is not necessary to
attach audio cable for your DVD+RW/+R.
Sound Card
Motherboard
-- E-19 --
Page 23

Hardware Installaiton English
9. Put your computer cover back on. Be careful of any sharp edges, which might be
hidden inside your computer.
10. Plug in your computer power cord, and turn on the computer.
-- E-20 --
Page 24

Hardware Installaiton English
3.4. Supported CD-R, CD-RW and DVD+RW/+R Discs
Supported Discs
This drive can write to discs that carry the following logos:
CD-R discs
This DVD+RW/+R drive can write to these discs at 4x, 8x,12x,
16x, 24x speed. These discs can be played back in a CD-ROM
drive or a CD player.
CD-RW discs
This DVD+RW/+R drive can write/re-write at 2x or 4x speed on
those discs that support 4x speed. These discs can be
read/played on a CD-ROM that supports “Multi-Read”.
High Speed CD-RW discs
This DVD+RW/+R drive can write/re-write these discs at 4x, 8x,
or 10x speed. These discs can be read/played by a CD-RW drive
that bears the High Speed CD-RW logo.
DVD+RW discs
This DVD+RW/+R drive can writing/re-writing DVD+RW disc at
high speed. These discs can be read/played by DVD-ROM drive
or DVD player that bears the DVD+RW logo.
DVD+R discs
This DVD+RW/+R drive can writing/re-writing DVD+R disc at high
speed. These discs can be read/played by DVD-ROM drive or
DVD player that bears the DVD+R logo.
The handling of CD-R, CD-RW and DVD+RW/+R Discs
Please read the following regarding the handling of CD-R, CD-RW and DVD+RW/+R
discs.
y Do not expose the discs to excessive heat such as in direct sunlight or near a
heater. Also avoid keeping them in a humid place.
y Do not touch disc surfaces. When handling a disc, hold it by its edges.
y Remove dust and dirt from disc surfaces. Use air-based dust removers. The
surfaces may be scratched if wiped with a dry cloth.
y Do not stick labels on disc surfaces.
y Do not write on disc surfaces except where indicated.
y Do not clean discs with chemicals or detergents.
y Do not bend or drop discs
-- E-21 --
Page 25

Software Installation English
4. Software Installation
4.1. Before You Start
Please understand that CD & DVD recording are non-interruptible process. Therefore,
a stable recording environment is a must. If you have a HDD set up only for CD or
DVD recording purpose, the recording process shall be smooth.
However, if an extra HDD is not available, you might prefer carrying out the following
steps to optimize your Windows2000/XP/ME/98SE/98(or NT4.0) CD recording
arrangement:
y Close all resident programs that include Anti-Virus, Screen Saver, System
Agent, Power Management, etc. Turn off Auto Insert Notification. Further,
maximizing and minimizing windows are not recommended either. If not, any
operation of these applications will intrude the CD/DVD recording process and
damage your disk.
y Defragment your HDD before any CD/DVD recording. This is particularly
important
y When you write files to CD/DVD+RW from HDD. Defragmentation of HDD
reallocates all
y The files so that these relevant files are placed in the nearby clusters. This
saves time and risks when CD/DVD burning software is trying to search for the
files you want to record on CD or DVD.
4.2. Installing Software
For information on installing procedures and how to use the authoring software,
please refer to the manual that came with it. If you want to use another type of
authoring software not bundled with this product, please refer to each manual on how
to install and operate. Please note that some authoring software or version of
authoring software does not support this product.
-- E-22 --
Page 26

Technical Support English
5. Technical Support
5.1. Troubleshooting
Write problems
Symptom Possible Causes Solutions
No drive recognition
Cannot write
Cannot add writing on
DVD+RW
Cannot write at highest
speed
Bad connection between IDE
cable and your DVD+RW/+R
drive.
Conflicts with other IDE
devices.
Using other writing software
which not supports your
DVD+RW/+R drive.
Using other writing software
which not supports your
DVD+RW/+R drive.
Disc inserted upside down. Reinsert the disc with label side up.
No power. Check if the power cord is securely connected to
IDE cable isn’t connected
properly
Install more than one
CD/DVD writing software
simultaneously.
Wrote with another writing
software
Short of DVD+RW capacity Capacity of CD-R/RW media is limited to 650MB
CD-R/RW media not
compatible with the highest
speed.
Defective CD-R/RW or
DVD+RW/+R media.
Using other writing software
not bundled with your
DVD+RW.
Source Drive not support
highest speed on the fly.
Ensure that cables or IDE connectors are not
damaged, bent or dented. Check especially the
pins.
Ensure the Master/Slave device setting of
DVD+RW/+R is not conflict with the other IDE
device connected to the same IDE port.
Use the writing software provided with this
DVD+RW/+R drive. When using other software,
ensure your DVD+RW/+R drive is supported by
contacting the software supplier.
Use the writing software provided with this
DVD+RW/+R drive. When using other software,
ensure your DVD+RW/+R drive is supported by
contacting the software supplier.
the connector.
Ensure the cable of IDE connectors are not
damaged, bent or dented. Check especially the
pins.
Remove other writing software. Just keep one
software on your hard disk.
If different writing software is used comparing to
the previous writing, errors may occur. Use
always the same writing software.
(74 min-type) and DVD+RW/+R media limited to
4.7GB including lead-in, lead-out and TOC data.
Use a new CD-R/RW or DVD+RW/+R media if
the capacity is insufficient for the additional data.
Use the highest speed compatible discs or writ
with lower speed.
CD-R/RW or DVD+RW/+R media may be dirty,
scratched or damaged. Rewrite on another
CD-R/RW or DVD+RW/+R media.
Use the writing software provided with this
DVD+RW drive. When using other software,
ensure your DVD+RW drive is supported by
contacting the software supplier.
Copy all files to harddisk, then write from
harddisk to CD-R or DVD+RW. Otherwise, pls
slow down writing speed.
-- E-23 --
Page 27

Technical Support English
Source Disc is bad-quality Make image files then burn image file onto the
CD-R/RW or DVD+RW disc.
DMA function disable Ensure to enable DMA function on both source
and target drives.
-- E-24 --
Page 28

Troubleshooting English
Read problems
Symptom Possible Causes Solutions
No drive recognition
No operation
Cannot read photo CD
discs
Cannot read CD-I
discs
Read error occurs
reading
Cannot eject tray
Can read only the first
session of a
multisession disc
Cannot read the
former session of the
CD-R/RW or
DVD+RW/+R disc
which has been written
at least twice
IDE cable and the
DVD+RW/+R drive not
connected properly.
Conflicts with other IDE
devices.
Power is not switched on. Check if the LED of your DVD+RW/+R drive is lit.
No power Check if the power cord is connected securely to
IDE cable isn’t connected
properly.
Bad photo CD disc. Try to play another photo CD disc and see if it
Need special application
software
Need special application
software
Defective CD-ROM disc Deep scratches, fingerprints or other
Music CD inserted. Because audio compact discs do not have
Disc inserted upside down. Remove the disc from tray and reinsert it with the
Eccentric disc loaded. Replace it by another one. Excessive noise when
Seal attached on the surface. Detach the seal very carefully. Don’t make any
Eject locked by software. When you are working under Windows 9x/NT
CD/DVD set incorrectly into
tray.
“Close session” was not
selected at the previous
writing
“Load Contents” or “Import
Session” was NOT clicked on
the software.
Ensure both connectors of IDE cable is properly
connected to the IDE ports on the main board
and DVD+RW/+R.
Ensure the Master/Slave device setting of
DVD+RW/+R is not conflict with the other IDE
device connected to the same IDE port.
If not, there is no power.
the connector.
Ensure the IDE cable and connectors are not
damaged, bent or dented. Check especially the
pins.
reads fine. If it works, you should replace the
defective disc.
Check if install “Kodak Photo CD Access Plus
Software”.
Check if install application software such as
“Cyberlink Powerplayer”
contaminates on the discs surface can disable
the drive from reading data. Always keep it clean.
computer data, typing computer commands while
an audio CD is in your drive will result in an error
message.
label side up.
scratches.
4.0, check if locked on the DVD+RW/+R
properly.
Insert emergency eject stick into the emergency
eject hole and eject the tray. Use a pair of
tweezers or pliers if it won’t eject with emergency
eject stick.
Additional session cannot be read because the
previous session was not closed. Rewrite on
other CD-R/RW or DVD+RW/+R media.
If recorded without checked “Load Contents” or
“Import Session”, it is impossible to read. But
when using utility software such as “Session
Selection” from Adaptec, the former session can
be read.
-- E-25 --
Page 29

Troubleshooting English
Appendix A. Glossary
CD-DA
Compact Disc - Digital Audio. The typical music CD is written with this CD format. At this time, up
to 74 minutes of music can be written on a CD. The corresponding standard is the Red Book.
CD-I
Compact Disc - Interactive. This format allows the storage of different types of data such as
images, music or video on a CD. The process is defined in the Green Book.
CD-R
Compact Disc - Recordable. A technology for CD-R (recordable) media. Also refer to CD-WO,
Compact Disc - Write Once, limited to just one writing.
CD-ROM
Compact Disc - Read Only Memory. This is described in the Yellow Book. Differing types of data
that can be read by a computer such as programs, text, image data or sound may be stored with
this CD format.
CD-ROM - Mode 1 and Mode 2
A supplement to the CD-ROM format which provides an additional error recognition and
correction function. Mode 1 is especially used for computer data and employs a code for error
correction. Mode 2 is used with CD-ROM/ XA and CD-I with audio data and contains an error
recognition code only.
CD-ROM/ XA
CD-ROM/ Extended Architecture. This CD format makes it possible to store computer data and
audio or video data on one track. The different types of data are linked to each other (Interleaving)
so that synchronization problems can be reduced.
CD-RW
Compact Disc - ReWritable. A technology for CD-RW (rewritable) media. It is not limited to just
one writing, but may be erased and re-written as often as desired.
CD-WO
CD - Write Once. As the name implies, it is a CD that may only be written on once. Also refer to
CD-R.
DVD+RW
Compact Disc – ReWritable. A technology for DVD+RW (rewritable) media. It is not limited to just
one writing, but may be erased and re-written as often as desired.
DVD+R
A technology for DVD+R (limited to just one writing.)
Disc At Once
Disc At Once is a method for recording of data onto a CD. With this method, the entire CD is
written in a single process. The CD-recorder first writes a Lead-In, then the data block, and finally
a Lead-Out. In contrast to Track At Once, linking blocks are not used between the individual
tracks with Disc At Once.
-- E-26 --
Page 30

Troubleshooting English
Enhanced Music CD, CD + and CD Extra
An expansion of Audio or Mixed-Mode CD consists of two sessions. The first session
corresponds to CD-DA, while the second session consists of computer data. The process is
specified in the Blue Book.
Finalization
Finalization is the permanent closing of the writing procedure on a CD. After that, it cannot be
written to, regardless of whether it was produced as a single-session or a multi-session CD.
Green Book
A book of CD Interactive (CD-I) standards published by Philips and Sony in 1986
High Sierra
The forerunner of today’s ISO Standard 9660. It was published in 1986. With the passage of time
it has lost its significance.
Hybrid Type CD
A CD-ROM disc storing "two different platforms of softwares" for Windows and Macintosh etc.
Image
The term “image” describes all edited data that will later be located on a CD. The creation of an
image file is known as premastering.
ISO 9660
ISO Standard 9660 describes the construction of a CD-ROM, so that it may be read and
processed by different types of operating systems.
Joliet
This supplement to the standards comes from Microsoft and is supported by Windows 95 and
Windows NT. The CDs that are created under this standard are in conformity with ISO 9660,
which allows long file names based on Unicode in additional directory structures.
Mixed Mode-CD
Music and computer data are stored on one CD with this type of CD. The computer data are
generally located on track 1 and audio data are located in the ensuing tracks.
Multi-Session-CD
A CD which is written in several sequential sessions is known as a multi-session CD.
On-The-Fly
A process for burning data onto a CD-R. There are two different methods of doing this. With the
classical and older method, all of the data which are to be recorded onto the CD are first stored in
a buffer in a large file known as an image file. From there, they are copied or burned onto the
CD-R. In contrast to this, the method known as On-The-Fly transfers the data directly from their
original memory locations on a hard drive onto the CD-R.
Orange Book
The Orange Book is a physical format of recordable CD announced in 1989 by Philips and Sony.
The Orange Book describes CD-MO in part-I and CD-R in part-II. Later on part-II was updated. In
1994, version-II was announced for the CD-ROM and its double speed type. In 1996, the
standards for phase change optical disc, rewritable CD (CD-RW) was added as part-III.
Photo-CD
A CD format and system devised by Eastman Kodak to record digitized photograph data.
-- E-27 --
Page 31

Troubleshooting English
Rainbow Books
The collection of standards which define the different types of CDs. Through these standards, it
has been achieved that CDs can be read and processed by as many devices and operating
systems of the different manufacturers as possible.
Red Book
A book setting the standards for the Compact Disc physical format and audio recording methods,
published by Philips and Sony in 1981.
Session
An inter-related writing procedure is defined as a session. A session consists of the Lead In area,
the data area, and the Lead Out area. A CD can be written with several sessions. This is then
called a multi-session CD, in contrast to a single-session CD which only contains one session. A
silver CD generally consists of one session.
TOC
Contents of the Lead-in, this contains the addresses of all the tracks on the CD.
Track
In an Audio-CD, one track corresponds to one piece of music. With a CD-ROM, one track
contains computer data and it may have any number of files and folders.
UDF
UDF is short for Universal Disc Format, another file layout standard for CDROM. The UDF format
can use in CD-R, CD-RW, and DVD by Packet writing method, which would not cause "Buffer
Under-Run" and can be compatible with ISO9660.The advantage of UDF is provided similar
function like hard disk.
Video CD
A CD-ROM storing MPEG-1-compressed moving pictures, still pictures, audio sounds etc.
Video DVD
A DVD-ROM storing MPEG-2-compressed moving pictures, still pictures, audio sounds etc.
Yellow Book
A book of CD-ROM standards published by Philips and Sony in 1985.
-- E-28 --
Page 32

Troubleshooting English
Appendix B. Frequently Asked Question (FAQ)
The following FAQ’s are the most common problems you may find during installation or regular
use. Please review these FAQ’s to have your problem solved. In case you do not find any items
that answer your problem, please contact your dealer or technical support.
Q: Computer won’t boot up after installation.
Please proceed the following procedures to get your computer back to work:
y Turn off and unplug your computer first. Check each connector along both IDE cables.
(Bent pins, orientations or bad contacts.)
y Check if the power cable attached correctly to each drive.
y If an IDE cable is connected with DVD+RW/+R and other device, check the jumper settings
of both devices and make sure the “MA” (master) and “SL” (slave) settings are different
from each other.
Q: The DVD+RW/+R doesn’t show up in My Computer or Explorer.
The following steps will assist you to get your drive to work as a DVD-ROM:
y If you cannot find DVD+RW/+R in Explorer, restart your computer, or shut it down and then
turn it on again.
y Is the DVD+RW/+R receiving power properly? You can test it by pressing eject button to
see if the tray opens and closes.
y Is the IDE cable connected properly? Be careful to turn off and unplug your computer
system before checking this item. Check the connection by your opening computer system
to see if the IDE connector well inserted and the colored stripe on the side of the IDE cable
lines up with PIN-1 of each connector.
y Select "enable both IDE channels" to enable the IDE channels. Then reboot your PC.
Q: The DVD+RW/+R has problem in reading CD/DVD disc, or Error message when
double-clicking on the DVD+RW/+R icon.
There are several ways to solve this problem as follows:
y The CD/DVD disc in the tray may be loaded upside-down, or a little off-center. Try
re-loading the CD/DVD disc with its label side up.
y After loading a CD/DVD disc, it will take a moment to let the DVD+RW/+R read the disc
information. When the indicator on the front panel stops flashing and stays green, it is
ready for access.
y If the disc you just loaded is a blank disc, try it later after copying some information to the
disk.
-- E-29 --
Page 33

Troubleshooting English
Q: Unable to see a second session reading from a CD-ROM/DVD-ROM drive.
Eject the CD/DVD and re-load it.
y
y Refresh the screen. Select the My Computer icon in Windows Explorer and press F5.
y Make sure if your CD-ROM/DVD-ROM drive reads CD-RW/DVD+RW/+R discs.
CD-RW/DVD+RW/+R discs can only be used in CD-R/RW, DVD+RW or newer MultiRead
CD-ROM/DVD-ROM.
y For Windows 3.x users: Windows 3.x cannot read multi-session CD disc that is created by
package writing software. If some other programs create the CD disc, please verify you are
using version 2.23 of the MSCDEX.EXE file. First, restart your PC and when you see
“Starting MS-DOS…” appear on your monitor, press F8. Each line in your CONFIG.SYS
and AUTOEXEC.BAT files will load one at a time. Press “Y” until you see a line containing
“MSCDEX.EXE”, then press “Y” and you will see the version number displayed on monitor.
The number shall be 2.23 or greater. In case you cannot find this file, you can download it
from Microsoft's FTP site: ftp://ftp.microsoft.com/Softlib/MSFILES/MSCD223.EXE
is a self-extracted ZIP file, please run it to retrieve MSCDEX.EXE file.
. This file
y See if the CD-ROM, CD-R/RW, DVD-ROM or other DVD+RW/+R drives can read the CD/
DVD+RW/+R discs properly. If so, then the problem is probably with the
CD-ROM/DVD-ROM drive. Contact the manufacturer of the drive for updated drivers or
patch files.
Q: Applications cannot locate the DVD in DVD+RW/+R drive.
Some programs only locate the first logical drive letter assigned to a DVD-ROM or a
y
DVD+RW/+R drive. For example, if your DVD-ROM drive is assigned drive D: and
DVD+RW/+R is assigned drive E:, the program locates drive D: only and will not locate
drive E:. Thus you need to reassign drive letters to both your DVD-ROM and DVD+RW/+R
drives in case you need to run the program in DVD+RW/+R.
y Windows ME/98: right-click My Computer icon. Click Properties item, open Device
Manager and double-click CD-ROM drive, then click Setting tab. Under Reserved drive
letters, select the drive letter after the existing letter (for both start and end drive letter) and
click OK. Then double-click DVD+RW/+R icon, then click Setting tab. Under Reserved
drive letters, select the drive letter before current one and click OK.
y Windows NT: click on Start | Programs | Administrative Tolls (common). Choose Disk
Administrator. Right-click on the drive letter you would like to change. Select Assign Drive
Letter and change the drive letter accordingly.
The above are only GENERAL rules that do not necessarily apply to any combination of
DVD+RW/+R drives, HDD and motherboards. A few trials on different configurations before
recording are recommended. Also, try out different DVD+RW/+R media before you proceed to
make volumes duplication as you may figure out which brand of CD-R/DVD+RW/+R media
originates smoother recording and easier access. As long as you find the best CD/DVD recording
way, stick to it.
-- E-30 --
Page 34

Specification English
Appendix C. Specification
Model type Internal type
Interface ATAPI
Applicable media CD-ROM, CD-R, CD-RW, DVD-ROM, DVD+R, DVD+RW
Data buffer memory 2MB
Data transfer speed 33.3MB/sec (maximum)
CD Write / Read speed Read CD-R Write CD-RW Write
DVD-ROM Read speed 8X: 11.08MB/sec (Max)
DVD+RW/+R Write speed 4X: 5.52MB/sec 2.4X: 3.31MB/sec
Average access time CD 120msec DVD 140ms (typical)
Mounting directions Horizontal (eject button right)
Applicable formats Format <Write> <Read> <Play>
Loading method Tray Loading (Auto Loading / auto eject)
Power requirement DC12V , DC5V
Power consumption 16W (Maximum)
Weight Less than 1.2Kg
Dimensions 149.0×196.7×42.0mm (W X L X H)
40X CAV 〇 - -
32X CAV 〇 - -
24X ZCLV - 〇 -
20X CAV 〇 - -
16X ZCLV 〇 - -
12X CLV - 〇 -
10X CLV - - 〇
8X CLV 〇 〇 -
4X CLV 〇 〇 〇
2X CLV - - -
CD-DA 〇 〇 〇
CD-ROM 〇 〇 -
CD-Extra 〇 〇 〇
CD-ROM XA 〇 〇 -
CD-I 〇 〇 -
Photo CD 〇 〇 -
CD-Text 〇 〇 -
CD-G - 〇 -
DVD+RW/+R 〇 〇
DVD-ROM - 〇 -
DVD-Video - - 〇
-- E-31 --
 Loading...