

Page 1

AOpen CRW9420 / CRW9624
User’s Manual
2
Page 2

Copyright
Copyright 1998 by this company. All rights reserved. No part of this public ation
may be reproduced, transmitted, transcribed, stored in a retrieval system, or
translated into any language or computer language, in any form or by any means,
electronic, mechanical, magnetic, optical, chemical, manual or otherwise, without the
prior written permission of this company.
Disclaimer
This company makes no representations or warranties, either expressed or implied,
with respect to the contents hereof and specifically disclaims any warranties,
merchantability or fitness f or any particul ar purpose. A ny software described in t his
manual is sold or licensed "as is". Should the programs prove defective following
their purchase, the buyer (and not this company, its distributor, or its dealer)
assumes the entire cost of all necessary servicing, repair, and any incidental or
consequential damages resulting from any defect in the software. Further, this
company reserves the right to revise this publication and to mak e c hanges from t ime
to time in the contents hereof without obligation to notify any person of such revision
or changes.
More help for latest information:
AOpen Inc. http://www.aopen.com.tw
AOpen America Inc. http://www.aopenusa.com
AOpen Computer B.U.
All brand and product names are trademarks and/or registered trademarks
of their respective holders.
http://www.aopen.nl
3
Page 3

OUTLINE
1. Overview
The Multimedia Printer Series Drive (the CD-R/RW Drive) can do much
more than read and write the usual CD-R discs. When you load it with a
rewritable CD-RW disc, you can record, read, and edit any kind of data,
because these discs allow you to rewrite information that has already been
recorded.
High Speed
!
AOpen's CRW9420 / CRW9624 CD/ReWriter drive offers unprecedented
performance to handle today’s demands by reading CD's at up to 20X /
24X speed and writing CD-R or CD-RW discs at super 4X / 6X speed.
CRW9420 / CRW9624 writes a 650 MB disc in about 18 / 12 minutes.
High Versatility
!
The CRW9420 / CRW9624 is an ideal all-in-one solution for reading CD's,
copying audio/software CD's, creating photo/audio/video CD's, or acting as
a storage drive for archiving or backup. The drive (retail pack only) comes
complete with everything you need to make CD's right away, including
bundled software and blank CDs. With this software, you can create your
own CDs.
High Reliability
!
An improved anti-heat design and the OPC design boost recording
reliability. Optimum Power Control continually monitors signal levels during
4
Page 4

recording and adjusts laser power to compensate for a dirty disc. This
feature ensures a flat signal, significantly enhancing reliability.
High Compatibility
!
The CRW9420 / CRW9624 supports all major CD formats, offering the user
full backward-compatibility through the huge installed base of CD/ROM
drives and media. What’s more, reordered CD/RW media can be played in
a DVD player with multi-read feature, maintaining future compatibility.
2. Features
CRW9420 writes CD-R and CD-RW discs at 4X speed (600KB/sec
!
data transfer rate).
CRW9624 writes CD-R discs at 6X (900KB/sec) and CD-RW at 4X
!
speed.
Reads at up to 20X (3.0MB/sec) / 24X (3.6MB/sec) speed.
!
Firmware upgradable.
!
Tray model simple to use.
!
Industry standard E-IDE (ATAPI) interface.
!
Mounts both vertically and horizontally.
!
OPC* technology boosts recording reliability.
!
New improved anti-heat design.
!
2 MBs data buffer memory provided.
!
Supports packet write for easy writing to CD-R and CD-RW discs.
!
* Continuously monitors the signal level during recording and adjusts the laser power to
compensate when the disc is dirty, insuring a flat signal.
5
Page 5
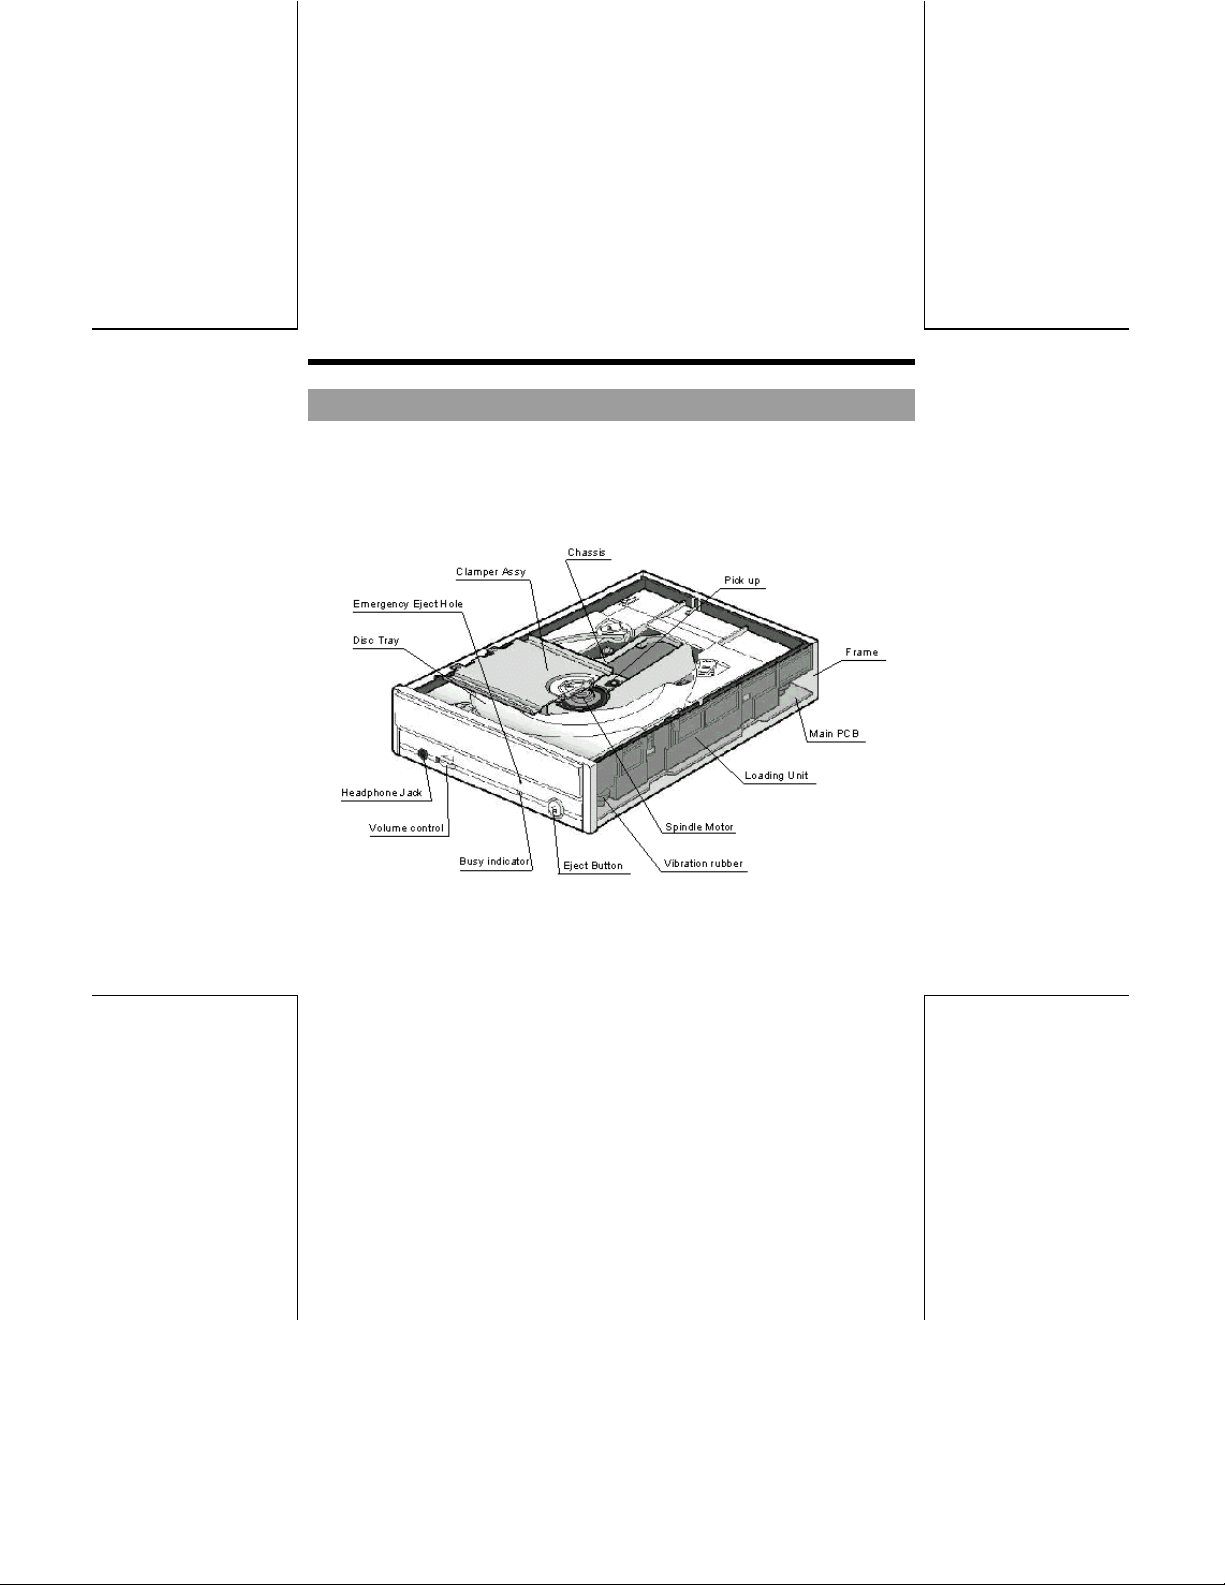
CONSTRUCTION AND INSTALLATION
1. Basic Construction
The Compact Disc Recorder/ Rewriter Driver’s configuration, Function
Block Diagram and Connector are shown below;
Fig. 1 Compact Disc Rewritable Drive configuration
6
Page 6
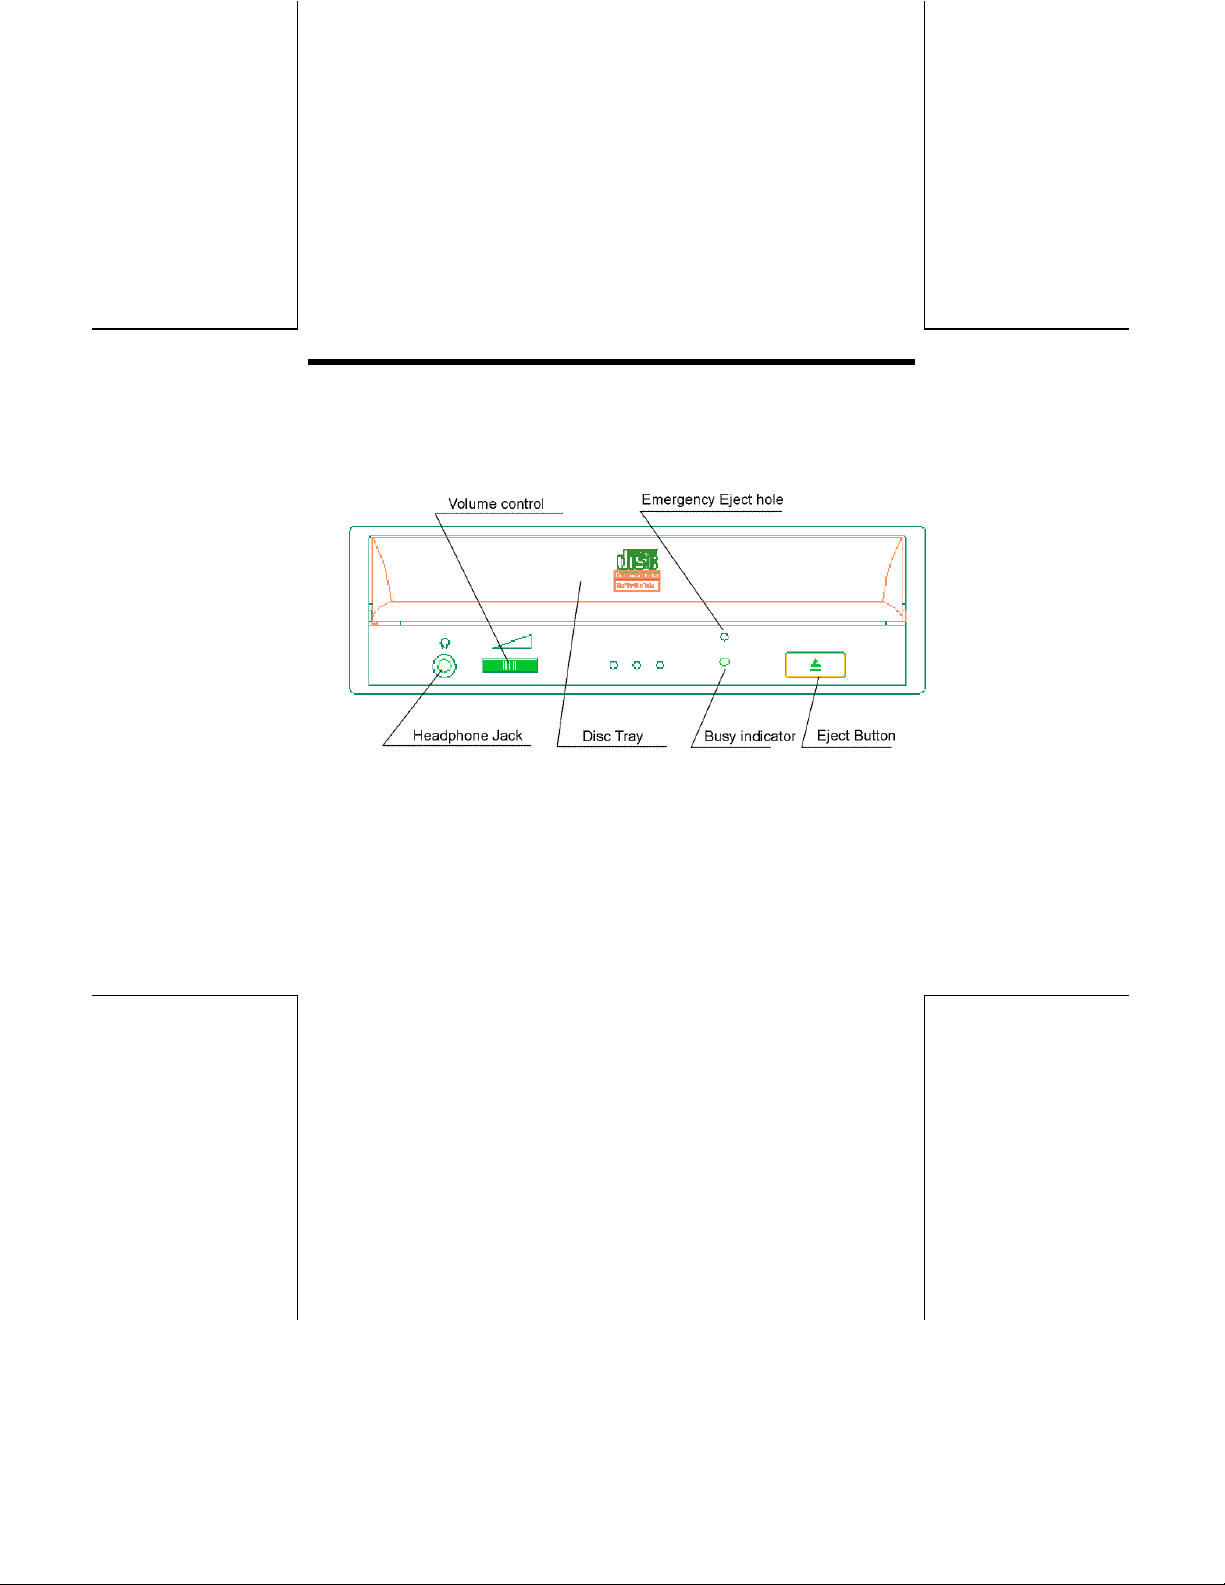
2. Connector
The Connectors are located as shown below. The function of each parts
are also described below.
Fig. 2 Front
7
Page 7
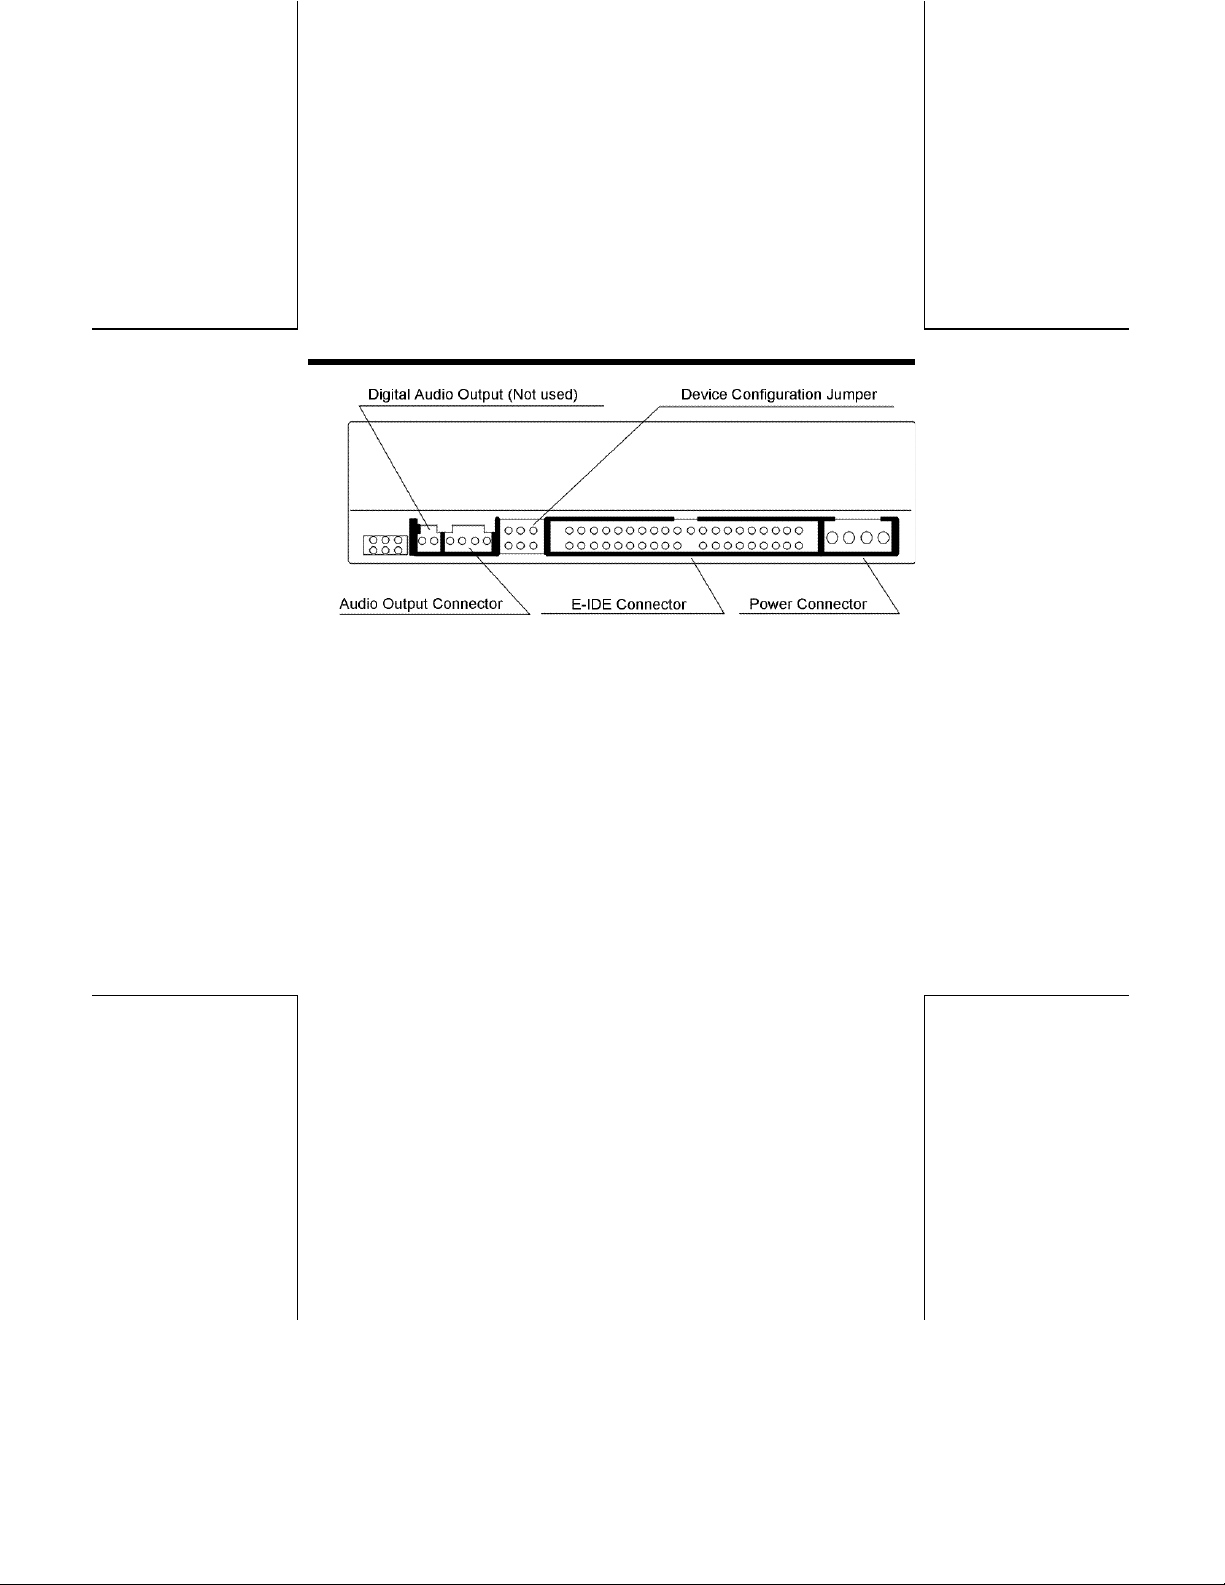
Fig. 3 Back
8
Page 8

2.1 Disc Tray
This is the tray for the disc. Place the disc on the ejected disc tray, then
lightly push the tray (or push the eject button) and the CD will be loaded.
Caution: Don' t use force to pull out or push in the disc tray.
This might cause damage to the loading section of the drive.
2.2 Eject Button
This is the button used to eject or bring in the disc tray.
2.3 Busy Indicator
When the disc tray or disc is being accessed, the light shines or flashes
orange.
Even when a disc is loaded or a disc is not being accessed, the light go
out.
When an illegal disc is loaded or some hardware trouble occurs, the
indicator blinks.
2.4 Headphone Jack
This jack is for connecting headphones or mini-speakers.
2.5 Volume Control
This is used to adjust the output volume of the headphone jack. It can't be
used to adjust the output volume for the audio output connectors on the
rear panel.
9
Page 9

2.6 Emergency Eject hole
When the drive can not eject the Disc Tray because of power failure,
pushing the Emergency Eject hole of the Front Panel by the thin pole make
drive be able to eject the Disc Tray.
Caution: This function is only for emergency case. Do not use
this function in usual case to prevent from mechanical
damage.
2.7 Power Connector
Used to connect to the host computer' s power supply (DC 5V/12V)
Caution: Be careful not to reverse the poser connector when
attaching it. A reversed connection may cause damage to the
equipment (not covered by the warranty).
2.8 E-IDE Connector
Use a 40 pin double-end flat E-IDE cable to connect to the E-IDE interface.
Caution: Connecting or disconnecting connectors while power
is on may result in a short circuit, causing damage to the
equipment. When connecting or disconnecting connectors,
make sure to turn off the power beforehand.
2.9 Audio Output Connector
Used to connect to the sound card. (Analog signal.)
10
Page 10

2.10 Digital Audio Output (Not used)
Used to connect to the sound card. (Digital signal.) It is not used with this
drive.
2.11 Device Configuration Jumper
Used when selecting the Device Configuration of E-IDE. Don’t use jumpers
to change anything besides the Device Configuration, but keep the drive as
initially set (“Master” position). Configuration changes become valid after
power is turned off, then on again.
Caution: Installing jumper pins besides the ones for Device
Configuration settings may be the cause of damage or
abnormal drive operation.
Fig. 4 Device Configuration Jumper
The Device Configuration Jumper will be set to Master as factory setting.
3. Installatio n
The Connectors are located as shown below. The function of each parts
are also described below.
11
Page 11

Installation Conditions:
Mounting direction
Installation Angle 15 degree or less
Compatibility: Because Compact Disc do not perform error correction and
defect alternation at writing, written data may have error. We
recommend to verify the written disc if you are writing
important data.
Horizontal / Vertical (Eject Button
must be upside.)
Fig. 5 Installation Conditions
12
Page 12

4. Cautions During Installation
Dismantling the drive to attempt repairs or for other reasons is
!
dangerous because the laser may radiate outside the unit. Do not
disassemble the drive.
Install the drive in accordance with the specifications. Be careful to
!
avoid locations likely to cause vibration or shock.
Avoid locations where there is high humidity, much dust, or poor
!
ventilation.
Avoid locations in direct sunlight, with severe changes in humidity, or
!
places where there are extremely high or low temperatures.
Don' t use the drive near radio or television receivers. It may interfere
!
with their reception.
5. Cautions During Use
Don’t suddenly move the drive from a cold place to a warm one, or
!
suddenly raise
causing abnormal operation.
Make sure to remove the disc before moving the drive. The disc may
!
be damaged, causing data loss.
Be careful to prevent foreign objects such as liquids or metal from
!
entering the drive. Should by chance a foreign object enter the drive,
please consult the dealer where the drive was purchased.
Don' t use benzene or thinner to clean dirt from the drive. Don't allow
!
chemicals such as insecticides to contact the drive. Use a soft cloth to
the room temperature. Condensation may occur,
13
Page 13

wipe the drive, or moisten a cloth with neutral detergent diluted with
water and use it to clean particularly dirty areas.
Don' t cutoff the electric power while the drive is operating.
!
Make sure IDE cable is shorter than 457.2mm.
!
Make sure the system is powered off before connecting IDE cable.
!
Never insert a damaged disc into the drive.
!
In wintertime, don' t use a disc soon after bringing in from outdoors.
!
Use it only after it has reached room temperature.
6. Cautions Concerning Disc Cleaning
Remove the disc by pressing the eject button.
!
Use compressed air to clear dust from the drive. (Spray the
!
compressed air for about 5 seconds).
Check to see if there is dirt on the surface of the disc. Be careful not to
!
touch the disc with the fingers when doing this.
7. Other Cautions
When moving the equipment, make sure that the disc has been
!
removed from the drive.
When not using the drive for a long period, dust may adhere to the
!
disc tray. Before using the drive again, use dry air cleaner to remove
the dust from the tray.
When connecting connectors, make sure that the power is OFF. If the
!
power is ON, there is a possibility of short circuit.
14
Page 14

8. How to Use the Discs
When using CD-ROM discs, CD-R discs or CD-RW discs, don' t attach
!
any stickers or labels to the discs. Using discs with them attached not
only causes read and write errors, but data on the disc may be lost
due to damage to the disc itself.
Load the disc
!
1. Press the eject button.
2. place the disc on the disc tray.
* Place the 120 mm CD in the large round depression. The face with the
label on it should be up. Never place both discs in the tray at the same
time.
* Be careful not to touch the recording surface of the disc.
3. Press the eject button to load the disc or push the central part of the disc
tray gently.
9. Emergency Eject
This unit is equipped with a mechanism for manually ejecting the Disc Tray
in an emergency, such as when the loading mechanism has failed or power
has been lost. To eject the Disc Tray manually, perform the following
procedure.
Don’t use this feature except in an emergency. This feature is a last
measure to be used only in an emergency. Using it excessively will cause
malfunction.
Turn the system power to OFF.
!
15
Page 15

Push a pin * straight into the emergency eject hole located to the right
!
of the eject button to eject the Disc Tray.
* Diameter: 1.5 to 1.9 mm
Length: 80 to 100 mm
16
Page 16

SPECIFICATIONS
1. Functionality
1.1 Recording
Data should be recorded on the optical disc in response to host computer
command.
1. Drive receives necessary information such as logical block address,
number of block and data to be recorded from the host computer.
2. Recording to pre-recorded area can not be executed. (CD-R disc)
3. Overwriting to pre-recorded area can not be executed. (CD-RW disc)
1.2 Reading
Data on optical disc should be read in response to the host computer
command.
Audio playing (CD-DA) can be executed when receiving the Audio playing
command from the host computer.
1.3 Load/Eject of Disc
1. Load
Place the disc on the disc tray. Load the disc by pushing the eject
button or by lightly pushing in the disc tray.
2. Eject
Operator can eject the Disc Tray (Disc) by pushing this button.
17
Page 17

1.4 Spindle Motor Start/Stop
This controller of the drive senses the disc to be set on the turn-table
connected with the spindle motor and then starts to rotate the spindle
motor, in response to the host computer command.
1.5 Seek Motor
The controller of the drive starts to move the optical pick up carriage, in
response to the host computer command.
1.6 Eject Button
Operator can eject the Disc Tray (Disc) by pushing this button.
1.7 Busy indicator
When the disc tray or disc is being accessed, the light shines or flashes
orange.
Even when a disc is loaded or a disc is not being accessed, the light go
out.
When a illegal disc is loaded or some hardware trouble occurs, the
indicator blinks.
2. Basic Specification
Type: Tray Type
Supported Function (Write/Read/Play)
18
Page 18

1
CD-DA
CD-ROM
CD-Extra
CD-ROM XA
Photo CD *
CD-I *
2
2
CD-ROM + CD-DA
Video-CD
Write Read Play*
"" "
""
"" "
"" "
""
""
"" "
"" "
*1 Play means Audio play back. Read means Data Transfer.
*2 CD-I, Photo-CD requires special reader/player. Photo-CD writing
requires Kodak license.
Writing Mode: Track at Once
Disk at Once
Multisession
Packet Write
Read Error Rate: 10
Write Error Rate: 10
-12
Bits or less
-10
Bits or less
19
Page 19
Recording Capacity:
CD-R disc 700/650/550Mbyte (Type 80 / Type 74 / Type 63)
CD-RW disc 650Mbyte (Type 74)
Controller:
Host ATAPI (E-IDE)
Data Transfer speed CRW9420 Max.16.7 Mbytes/sec. (PIO4, DMA2)
CRW9624 Max. 8Mbytes/sec. (PIO3, DMA2)
Buffer Memory 2Mbytes
3. Audio Specification
Audio output:
Line Output Level 0.57
4. Performance Specification
Rotation Speed: Write 1x, 2x, 4x, 6x* (*CRW9624 only)
Read Max. 20x/24X (CAV)
Write/Read Speed (Ave.):
24x:3.60 MB/sec. (Mode1, Mode2 Form1)*
20x:4.08 MB/sec. (Mode2, Form2)*
20
1
1
Page 20
20x:3.00 MB/sec. (Mode1, Mode2 Form1)*
20x:3.40 MB/sec. (Mode2, Form2)*
6x:900 KB/sec. (Mode1, Mode2 Form1)*
6x:1.02 MB/sec. (Mode2, Form2)*
1
1
1
1
4x:600 KB/sec. (Mode1, Mode2 Form1)
4x:681 KB/sec. (Mode2, Form2)
2x:300 KB/sec. (Mode1, Mode2 Form1)
2x:342 KB/sec. (Mode2, Form2)
1x:150 KB/sec. (Mode1, Mode2 Form1)
1x:171 KB/sec. (Mode2, Form2)
1x:172 KB/sec. (CD-DA)
*1 Reading Only
Access Time: 120msec. or less
Power Consumption: 12 W or less (Normal Operating)
6 W or less (Stand by)
Acoustic Noise:
Idle 40 dB or less (Sound Power Level)
Operating 55 dB or less (Sound Power Level)
Non-Operating 49 dB or less (Sound Pressure Level)
21
Page 21

5. Condition for use and Safety standard
5.1 Power Supply
5V Power Supply: Voltage DC5V
5.2 Environment Conditions
Temperature:
Operating
Non-Operating
Humidity:
Operating 5~90% (No Condensation)
Non-Operating 5~95% (No Condensation)(Power OFF,
Vibration:
Operating 0.035mm p-p (10~45 Hz)
Non-Operating 1 x 9.8 m/s2 (1.0 G)(5~300 Hz)
5~40C (Without Fan)
-30~65C (Power OFF, Without disc)
Without disc)
0.025mm p-p (45~65 Hz)
0.2 x 9.8 m/s2 (0.2 G)(65~150 Hz)
(Power OFF, Without disc)
22
Page 22
Shock:
Operating 2 x 9.8 m/s2 (2.0 G) or less (6msec.
Half Sine)
Non-Operating
40 x 9.8 m/s
2
(40 G) or less (11msec.
Half Sine)
(Power OFF, Without disc)
Altitude:
Operating -305~3,048 m
Dust: Class 3,000,000 or less (Typ.)
Illuminance: 3,000 Lux or less
6. Reliability and Usable Life
MTBF: 100000 hours
MTTR: 30 min.
Equipment Life: 5 Years
MSBF: 20,000 times or more (Drive)
Error Rate:
Unrecoverable Errors Once per 1012 bits or less
23
Page 23
7. Safety Standards
Application Standard: UL, cUL, CE, CDRH
Ratio Interference: Vcci-II, FCC-Class B, EN55022-Class B
8. Storage Conditions
8.1 Storage Conditions
Temperature:
Humidity: 5 ~ 95% (No condensation)
Temperature Gradient: 20%/Hour (Max.)
Humidity Gradient: 10%/Hour (Max.)
Vibration 1.0 x 9.8m/s2 (1.0G) or less (5300Hz)
Shock: 40 x 9.8m/s2 (40.0G) or less (11msec.
Drop: 60.0 cm JIS Z0202
Altitude: -305 ~ 15,240m
Illuminance: 3,000 Lux or less
Preservation Term: year or less
-30 ~ 65C (Max.)
Halfsine)
24
Page 24
8.2 Transportation Condition
Container: Cardboard Packing Case
Means of Transportation: Mixed loading possible
Stacking Layers: 6 or less
Attached Articles: Caution
25
 Loading...